Hummus is one of my all-time favorite appetizers and snacks. I could eat it every single day. Sure, you can buy hummus at the store, but homemade hummus is SO much better and SO easy to make. I am going to teach you my tips and tricks for making the BE…
Hummus is one of my all-time favorite appetizers and snacks. I could eat it every single day. Sure, you can buy hummus at the store, but homemade hummus is SO much better and SO easy to make. I am going to teach you my tips and tricks for making the BEST hummus ever. I love…
I love a good salty snack. Some of my favorites include chips and salsa, chips and guacamole, soft pretzels, and pita chips with hummus. Store bought pita chips are fine, but homemade pita chips are the BEST! If you haven’t made them at home, you…
I love a good salty snack. Some of my favorites include chips and salsa, chips and guacamole, soft pretzels, and pita chips with hummus. Store bought pita chips are fine, but homemade pita chips are the BEST! If you haven’t made them at home, you are missing out. You only need three ingredients and they…
We love making taquitos for an easy weeknight meal or for easy entertaining. They are a favorite for game days! We love Chicken Taquitos, Black Bean Cheese Taquitos, and these Beef Taquitos. If you like our ground beef tacos, I have a feeling you will …
We love making taquitos for an easy weeknight meal or for easy entertaining. They are a favorite for game days! We love Chicken Taquitos, Black Bean Cheese Taquitos, and these Beef Taquitos. If you like our ground beef tacos, I have a feeling you will love these Beef Taquitos too! They are similar, but taquitos…
Everyone loves this pumpkin dip recipe that tastes just like pumpkin pie! All you need is 5 minutes to whip up this fall favorite.
Of all of the pumpkin-spiced recipes floating around this time of year, this one is arguably one of the quickest, easiest paths to the flavors of fall. Try this pumpkin dip recipe! It tastes just like pumpkin pie and you can whip it up in just 5 minutes in a food processor or blender. Scoop up a fluffy dollop with an apple slice and you’ll immediately want to devour the entire bowl. Our friends and family go crazy over this one, so here are all our secrets!
Ingredients in pumpkin pie dip
This pumpkin pie dip tastes like pumpkin pie filling: in fact, we almost like it even better! It’s pure and full-flavored, with just the right balance of cinnamon and pumpkin pie spices. We’ve made it often for friends and family, and everyone goes crazy for it. It’s ideal for a fall dinner post-apple picking or pumpkin patch visit, Halloween parties, and Thanksgiving gatherings. All you need are 6 ingredients:
Cream cheese
Pumpkin puree
Powdered sugar
Cinnamon
Pumpkin pie spice
Vanilla extract
Tips for making pumpkin dip
This pumpkin dip recipe takes just a few minutes to whip up! All you need is a food processor, though you can also use other tools to get the job done. Here are a few tips for making this simple dip recipe:
Use a food processor or stand mixer. The best tool for the job is a large food processor. You can also try it in a stand mixer or with an electric hand mixer.
Soften the cream cheese first. You can let it sit at room temperature for 30 minutes to soften, but we often don’t have the time for this. Here’s a trick: simply microwave it for 5 seconds. Just don’t do it any longer because you don’t want the cream cheese to melt!
Blend and serve immediately. Some pumpkin dip recipes require refrigeration but why wait? Take one bite of this creamy, fluffy dip and you’ll want to devour it immediately.
Storage info
This pumpkin dip dip recipe can be eaten immediately, or you can make it in advance and store it before eating. This recipe lasts 5 days refrigerated. It becomes more solid in texture when cold, so allow it to stand at room temperature for a few minutes before serving for best results.
Ways to serve pumpkin dip
What to serve with pumpkin pie dip? Our favorite is apple slices, but there are lots of other ways to serve it. The best options are fall-favorite fruits, pretzels and cookies. It’s perfect for any fall gathering as an appetizer, snack, or even dessert! It’s especially great for kids. Here are a few ideas for dipping:
Apple slices
Pear slices
Pretzels
Ginger cookies
Vanilla cookies
Graham crackers
More pumpkin recipes
This pumpkin pie dip recipe is one of our favorite pumpkin recipes, but here are a few more we love to make:
Everyone loves this pumpkin dip recipe that tastes just like pumpkin pie! All you need is 5 minutes to whip up this fall favorite.
Ingredients
8 ounce package cream cheese, softened
¾ cup pumpkin puree
3/4 cup powdered sugar
1 tablespoon cinnamon
2 teaspoons pumpkin pie spice
1 teaspoon vanilla extract
Instructions
To soften the cream cheese, plate it on a plate and microwave for 5 seconds on High power. (Alternatively, allow the block of cream cheese to sit at room temperature for 30 minutes.)
Place the cream cheese, pumpkin puree, powdered sugar, cinnamon, pumpkin pie spice, and vanilla extract in a food processor (or a stand mixer fitted with paddle attachment or electric hand mixer). Blend until fully combined, stopping and scraping with a spatula as needed.
Serve immediately or refrigerate until serving. Stores refrigerated for up to 1 week.
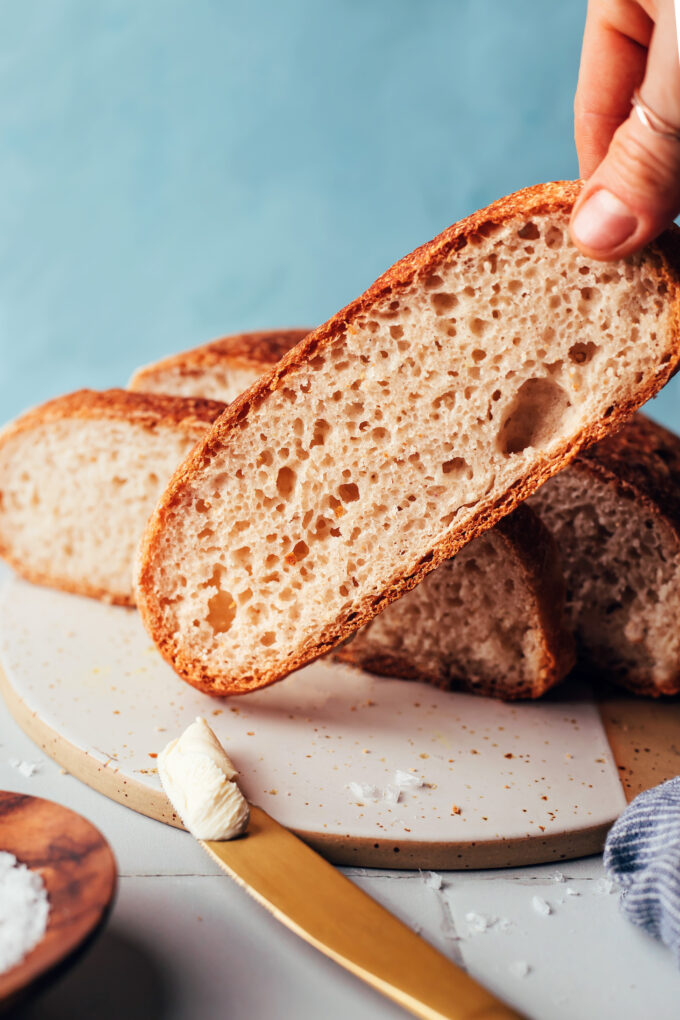
Hold the phone. We’ve dreamed of this bread all of our gluten-free days and it has finally arrived. Introducing the most fluffy, chewy, perfectly textured, crusty, artisan-style gluten-free bread you could ever imagine. We’re in LOVE! Simple flours, mi…
Hold the phone. We’ve dreamed of this bread all of our gluten-free days and it has finally arrived. Introducing the most fluffy, chewy, perfectly textured, crusty, artisan-style gluten-free bread you could ever imagine. We’re in LOVE! Simple flours, minimal active prep, truly life-changing.
All that stands between you and this vegan + gluten-free loaf are 7 ingredients and a little bit of time. It’s the perfect weekend activity, and there’s nothing better than starting the work week with a fresh loaf of bread!
This sun dried tomato pesto is a tasty dip or spread! Made with just 6 ingredients, it’s an easy recipe that’s bursting with flavor.
Need a dip idea that doubles as a sandwich spread? This sun dried tomato pesto is bursting with so much zippy flavor, you’ll want to put it on everything! Dip it with with toasted or grilled bread or crackers, and it’s a burst of savory, sweet, tangy, and herby all at once. All you need are a handful of ingredients to whip up a batch. Store it in the fridge and it’s one of those essential recipes that keep on giving: use it as a sandwich spread, pasta sauce, and more!
Ingredients in sun dried tomato pesto
Sun dried tomato pesto is always a major hit in our household when we make a batch, so we’re extra excited to share it with you. We could not stop dragging our bread slices through the lovely red puree. The flavor is a pop of bright acidity, contrasted with the rich savory undertones of the sun dried tomatoes. Make it for friends and they won’t be able to tear themselves away from the bowl! Here’s what you’ll need for this recipe:
Pine nuts
Sun dried tomatoes packed in oil, drained
Garlic
Parmesan cheese
Fresh parsley
Olive oil
Salt
Pine nuts are essential (plus, a substitute)
Pine nuts are the star in traditional Italian basil pesto: they have a unique sweet undertone that is essential to the overall flavor. If you can find them, they’re fantastic in sun dried tomato pesto, too. The way the nut blends with the chewy tomatoes is heavenly.
However, pine nuts can be very expensive here in the US. Want a pine nut substitute? Try cashews, which have a slightly sweet flavor as well. Walnuts also work, though they have more of a bitter aftertaste.
Tips for making sun dried tomato pesto
This sun dried tomato pesto recipe is simply a matter of blending a few ingredients together. It’s quick and simple and takes only a few minutes to whiz together. Here are a few notes:
Toast the nuts first. Toasting pine nuts brings out their nutty flavor in a way that’s impossible to detect without applying heat. It brings out the flavor like adding a pinch of salt does to savory recipes.
The best tool for the job? A food processor. Use a large food processor to whiz the ingredients together in a flash.
Or, use a mortar and pestle. Don’t have a food processor? You can also use an old school mortar and pestle to grind this pesto into a paste.
Storage info
This sun dried tomato pesto recipe lasts up to 2 weeks stored in the refrigerator. While you can freeze it for up to 3 months, the texture, consistency and flavor are all better prior to freezing. So if you can, eat it while it’s fresh!
Ways to use sun dried tomato pesto
Speaking of…what are the best ways to eat sun dried tomato pesto? We like it best as a dip with grilled bread. However, it’s also tasty as a sandwich spread or even as a pasta sauce! Here are a few ideas:
In a small dry skillet, toast the nuts over medium high heat, stirring constantly, for about 2 to 3 minutes. Remove the nuts to a bowl and allow them to cool slightly.
In food processor**, add the garlic and process for a few seconds until chopped. Add the drained sundried tomatoes, pine nuts, Parmesan cheese, parsley, olive oil, and kosher salt. Process until ground into a paste, about 30 seconds.
Once combined, tastes. Blend in a bit more olive oil if desired, to achieve a looser texture. Stores for 2 weeks in the refrigerator (or freeze for up to 3 months, but the texture is best when refrigerated).
Notes
*You can substitute cashews for a similar flavor, though we like it best with pine nuts.
**Alternatively, you can also use a mortar and pestle.
Meatballs are a favorite meal at our house. They are easy to make and also perfect for meal prepping. A few of our favorite meatball recipes include: classic spaghetti and meatballs, chicken meatballs, Greek meatballs, and teriyaki chicken meatballs. W…
Meatballs are a favorite meal at our house. They are easy to make and also perfect for meal prepping. A few of our favorite meatball recipes include: classic spaghetti and meatballs, chicken meatballs, Greek meatballs, and teriyaki chicken meatballs. We also love making Pesto Meatballs, especially during the summer months when we have a lot…
A cheese board doesn’t need to be some grand act of self-expression. While we adore original, thoughtfully curated partnerships of cheeses, crackers, pickles, and meats, that sort of culinary production can require more effort than we can muster on a h…
A cheese board doesn’t need to be some grand act of self-expression. While we adore original, thoughtfully curated partnerships of cheeses, crackers, pickles, and meats, that sort of culinary production can require more effort than we can muster on a hot summer evening. But the beauty of a cheese board is that it can be defined in many ways—something you painstakingly assemble for a crowd, or a serving instrument that you can use for an easy, snackable meal.
So where to begin? When we’re short on patience and/or creativity, we turn to our archives for grazing inspiration. With comprehensive ingredient lists and step-by-step building instructions, the following recipes are the culinary equivalent of IKEA furniture manuals. That’s a compliment, of course: These blueprints are detailed, easy to follow, and best built with a bottle of wine within reach.
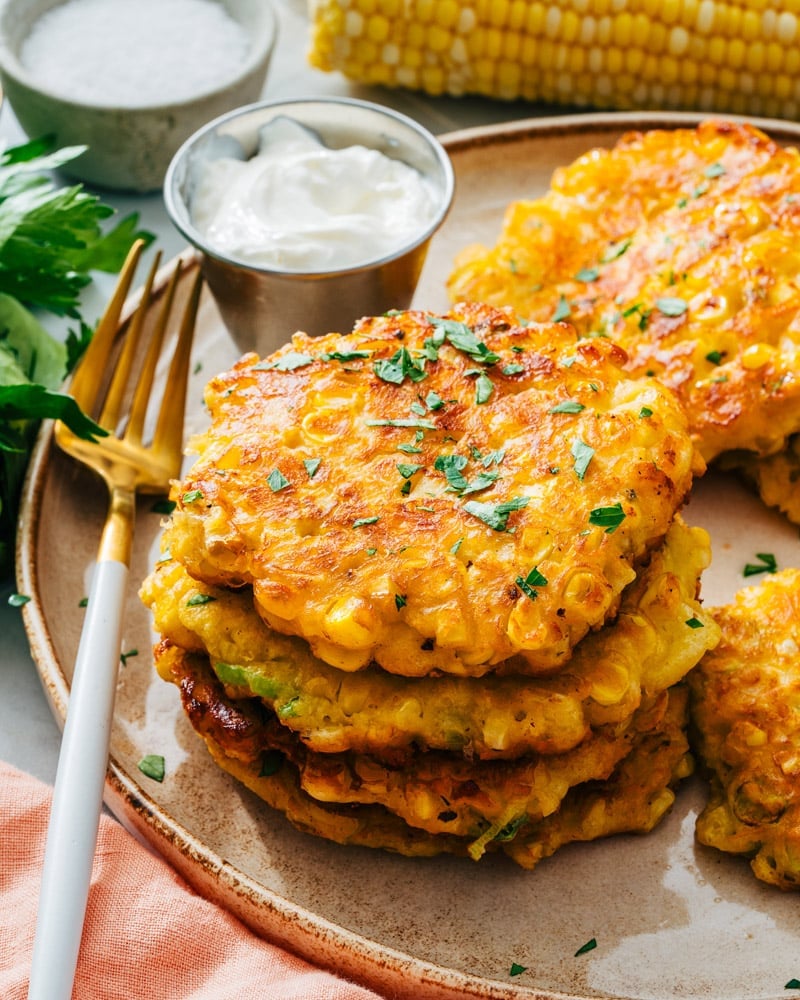
This corn fritters recipe is quick and simple! Pan fry the batter into golden, savory patties and serve with a creamy dipping sauce.
Anything fritter always captures our imagination, since they’re essentially fried dough balls (who could resist?). So with corn season underway, it’s only natural that we’d end up here. Try this irresistible and easy corn fritters recipe! They come out crisp-edged and golden, with a savory sweet batter of cornmeal and spices and big sweet pops from the corn kernels. Dip them into a creamy sauce and there’s nothing better! They’re great as an appetizer, though we also love them warm from the stovetop as a simple dinner with some summery salads.
Ingredients in corn fritters
A fritter is a food where vegetables, fruit, meat, or seafood are coated in batter and fried. Fritters are eaten all over the world, but corn fritters were most likely invented in the American South, where they are a popular food today.
There are lots of tasty dessert fritters (like apple or cherry), but we prefer frying up savory ones like these zucchini fritters. This corn fritters recipe is similar but even simpler, with a batter that uses both all-purpose flour and cornmeal to give it a nuanced corn flavor. Here are the ingredients in this corn fritters recipe:
Fresh corn (or canned)
Green onion
Eggs
Milk
All-purpose flour
Cornmeal
Sugar
Baking powder
Garlic powder
Kosher salt
Oil, for frying
Fresh corn vs canned
The best way to make corn fritters is using fresh, in-season corn on the cob. The sweet, juicy flavor is irreplaceable. Of course, it’s only available certain months of the year, so a close second is canned corn! It has added sugar and salt and a more mellow flavor (it’s partially cooked, so the texture is different as well).
We prefer canned corn instead of frozen corn for this recipe, and it’s also superior to out-of-season corn on the cob packed in plastic. You can use either if you’d like, but know the flavor is not nearly as good. If you do, make sure to boil them first so that the texture is softer.
Tips for frying corn fritters
This corn fritters recipe is pan fried instead of deep fried. Deep frying submerges a fritter in oil, and with this method you can make them into ball shapes. (You can certainly use this method for the recipe if you like!) Pan frying uses less oil and cooks each side of the fritter, so the pancake shape is needed to get everything cooked to golden brown. Here are a few tips for cooking corn fritters:
Add just enough oil to cover the bottom of the pan. The corn fritters are pretty thin, so you can get away with a moderate amount of oil.
The timing depends on the heat of the oil. All stoves and pans are different, so the timing varies. Cook until just golden on each side. It will likely take about 2 to 3 minutes, but you can judge by eye versus setting a timer.
Add more oil for the second batch, and keep in mind the pan will be hotter. The fritters will cook differently for the next batch since the pan is already very hot. Add a drizzle more oil as needed.
Remove the fritters to a baking rack. This helps them cool without getting soggy on the bottom.
Sprinkle with extra salt before serving. We like a sprinkle of flaky sea salt to really make the flavors pop!
Storage and make-ahead info
One thing to know about corn fritters: they’re best hot from the pan! You’ll want to eat them as close to cooking as possible. However if you’d like, you can store leftovers refrigerated for 1 to 2 days. They do become more soggy when stored, so reheat them in a pan with a drizzle of oil before serving.
Want to make them ahead? You can prep some of the batter ingredients in advance, but cook them the day of. Cut the corn from the cob and store it in a sealed container in the refrigerator, then mix up the dry ingredients and store them separately at room temperature. The day of making, whisk together the batter and fry the fritters.
Sauce ideas for corn fritters
How to serve corn fritters? They taste great as is, but you can dunk them into a creamy sauce for a next level experience. Here are a few top ideas for dipping:
Sour cream
Garlic aioli, a punchy, pungent creamy sauce
Remouladesauce, a French sauce made with mayo, capers and spices
In a medium bowl, whisk the eggs and milk. When then whisk in the flour, cornmeal, sugar, baking powder, garlic powder and kosher salt until a thick batter forms. Fold in the corn kernels using a spatula.
Heat a large non-stick skillet over medium heat. Add enough oil to cover the bottom. Add the fritters by dropping from ¼ cup measure, then spreading them out to be thin with the back of the measuring cup. Fry the fritters in batches that fit the skillet, about 2 to 3 minutes per side until golden. Add more olive oil when necessary. Make sure the heat is not too high or the fritters will become browned on the outside but stay gooey in the middle.
Remove and place on a a baking rack to cool slightly (so they don’t become soggy on the bottom). Immediately sprinkle with a bit of flaky sea salt (or more kosher salt) to allow the flavor to pop and if desired, garnish with parsley and serve with sour cream, aioli or another dipping sauce. Finish cooking the remaining batches of the fritters. Serve immediately. The fritters are best the day they are made, but you can store leftovers refrigerated for 1 to 2 days if desired and reheat them in a pan with a drizzle of oil before serving.
Notes
*Boil the corn if it’s not the freshest, in season sweet corn, or if you prefer to eat cooked corn versus fresh. It’s perfectly safe to eat fresh corn without cooking it! Or substitute canned corn (we don’t recommend frozen corn here).
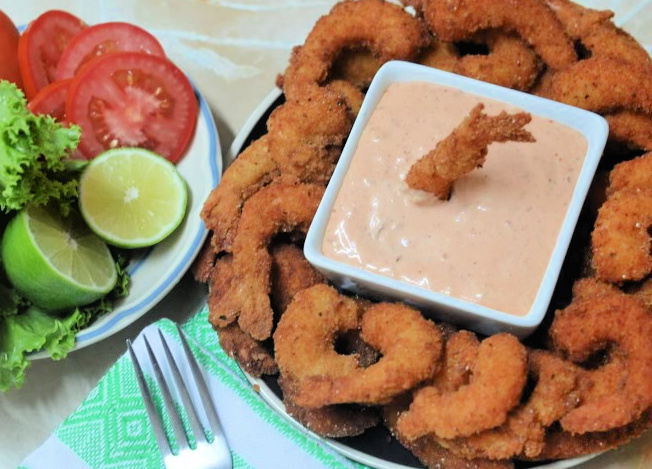
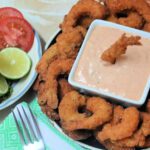
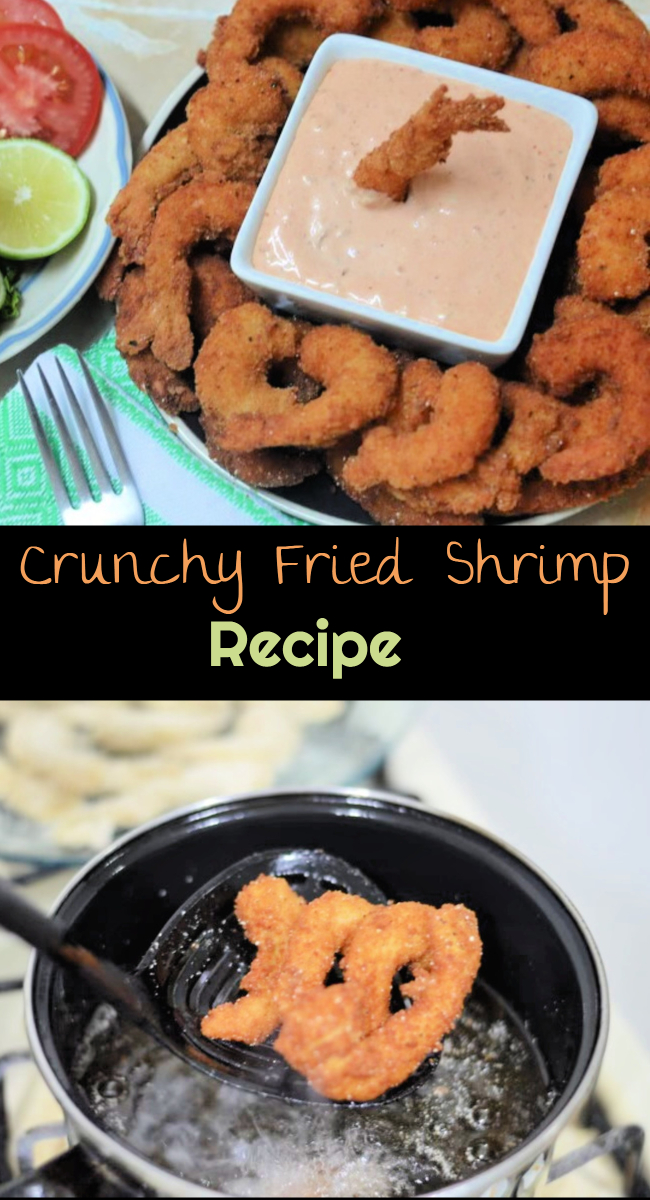
Inside: Learn how to make the most delicious and easy homemade crunch fried shrimp recipe. It is no secret that I love seafood. I grew up on the eastern coast of …
Inside: Learn how to make the most delicious and easy homemade crunch fried shrimp recipe.
It is no secret that I love seafood. I grew up on the eastern coast of Mexico where it is easy to find fresh seafood in many different varieties. One of my favorites of course is shrimp!
Shrimp is such a versatile protein, and I love to make it in different ways, including with a garlic sauce, a la diabla, and in ceviche! While I have gotten my kids to really like shrimp in different ways, and it has grown on my husband too, the most popular way to make it at my house is as crispy crunchy fried shrimp.
The combination of fresh shrimp with seasonings like black pepper, garlic powder, onion powder, and more, which is then fried to golden brown perfection is amazing! This crispy shrimp recipe can be used as a main dish accompanied by french fries, or as a side dish.
This crispy fried shrimp recipe is also one of our favorites to make on game day when we have a crowd over to watch our favorite teams. It is also perfect for other special occasions like birthdays. I always like to serve it with a good dipping sauce as well, which you can make yourself or buy at the store. Just regular hot sauce makes for a great dipping sauce as well if you want to add a little bit of heat.
This recipe is perfect for seafood lovers and people that don’t love seafood and makes for an easy dinner any day of the week.
How Do You Make Crunchy Fried Shrimp?
This is such an easy recipe to make and won’t take you long at all. The good thing is that you can use whatever kind of shrimp you have on hand. I personal like to use larger shrimp, like jumbo shrimp or extra-large shrimp, but you can use smaller ones as well if that is what you have. My preference is to use wild caught shrimp, but again, that is up to your personal preference.
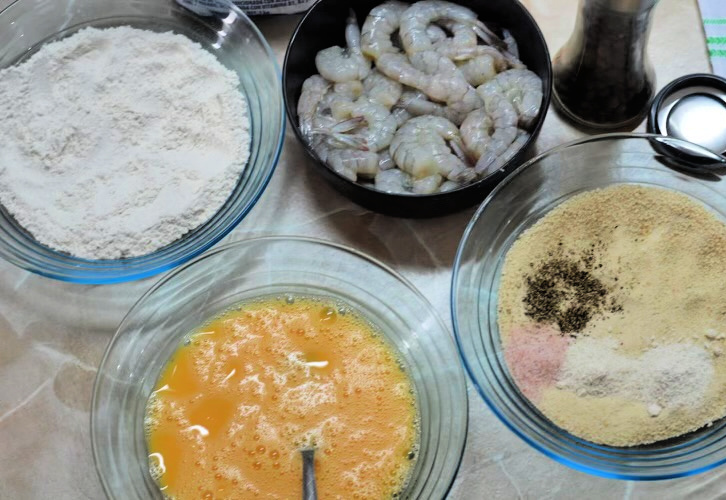
To make this recipe, you will start by gathering the following simple ingredients:
1 pound of raw shrimp
1 cup of flour
1 1/2 cups of bread crumbs (you can use pank bread crumbs if you prefer)
3 eggs
1 teaspoon of garlic powder
1 teaspoon of onion powder
Black pepper
Salt to taste
Oil for frying (vegetable oil, canola oil, or avocado oil all work well)
To make this recipe, you will want to clean and devein the shrimp, season with a little bit of salt and set aside in a medium bowl.
Next, add the flour to another bowl and put it next to the bowl with the Shrimp. Add the eggs to a third bowl with the black pepper, and beat to form the egg mixture. Finally, in a fourth bowl, add the rest of the dry ingredients and combine.
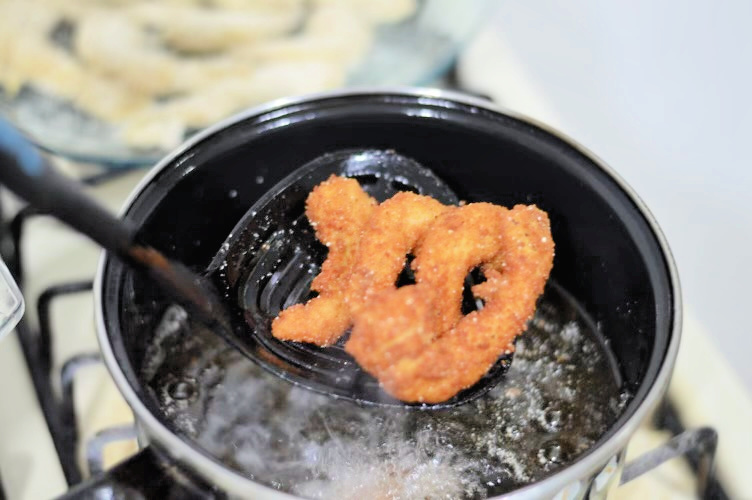
At this point, you will want to heat enough oil in a large pot over medium-high heat to fry the shrimp. You need hot oil for this recipe to make sure you have a very crispy texture. You can use a deep fryer as well if you have one and that may make it easier.
When the oil is hot, coat the shrimp in the flour, and then dredge it in the egg wash, before coating with the breadcrumb mixture. Immediately place shrimp in the hot oil and let the shrimp cook for approximately 2-3 minutes, flipping over half way through if needed to ensure an even cook.
You will want to monitor the temperature of the oil so it doesn’t get too hot, but so that it is still hot enough to fry the shrimp. Once cooked through, place each fried shrimp on a plate lined with paper towels to get rid of the excess grease. You can also put the paper towels under a wire rack and place the shrimp on that to let the grease drain and to allow the shrimp to cool down more quickly.
In no time at all, you will have a plate full of delicious crunchy shrimp to share with your friends and family. You can now serve it with cocktail sauce, tartar sauce, a sour cream based sauce, and also with lemon wedges. This recipe has never failed to please my family and friends and I hope you enjoy it as well. You can store leftover fried shrimp in an airtight container, but it is always best when recently cooked.
Let me know in the comments below how this turns out!
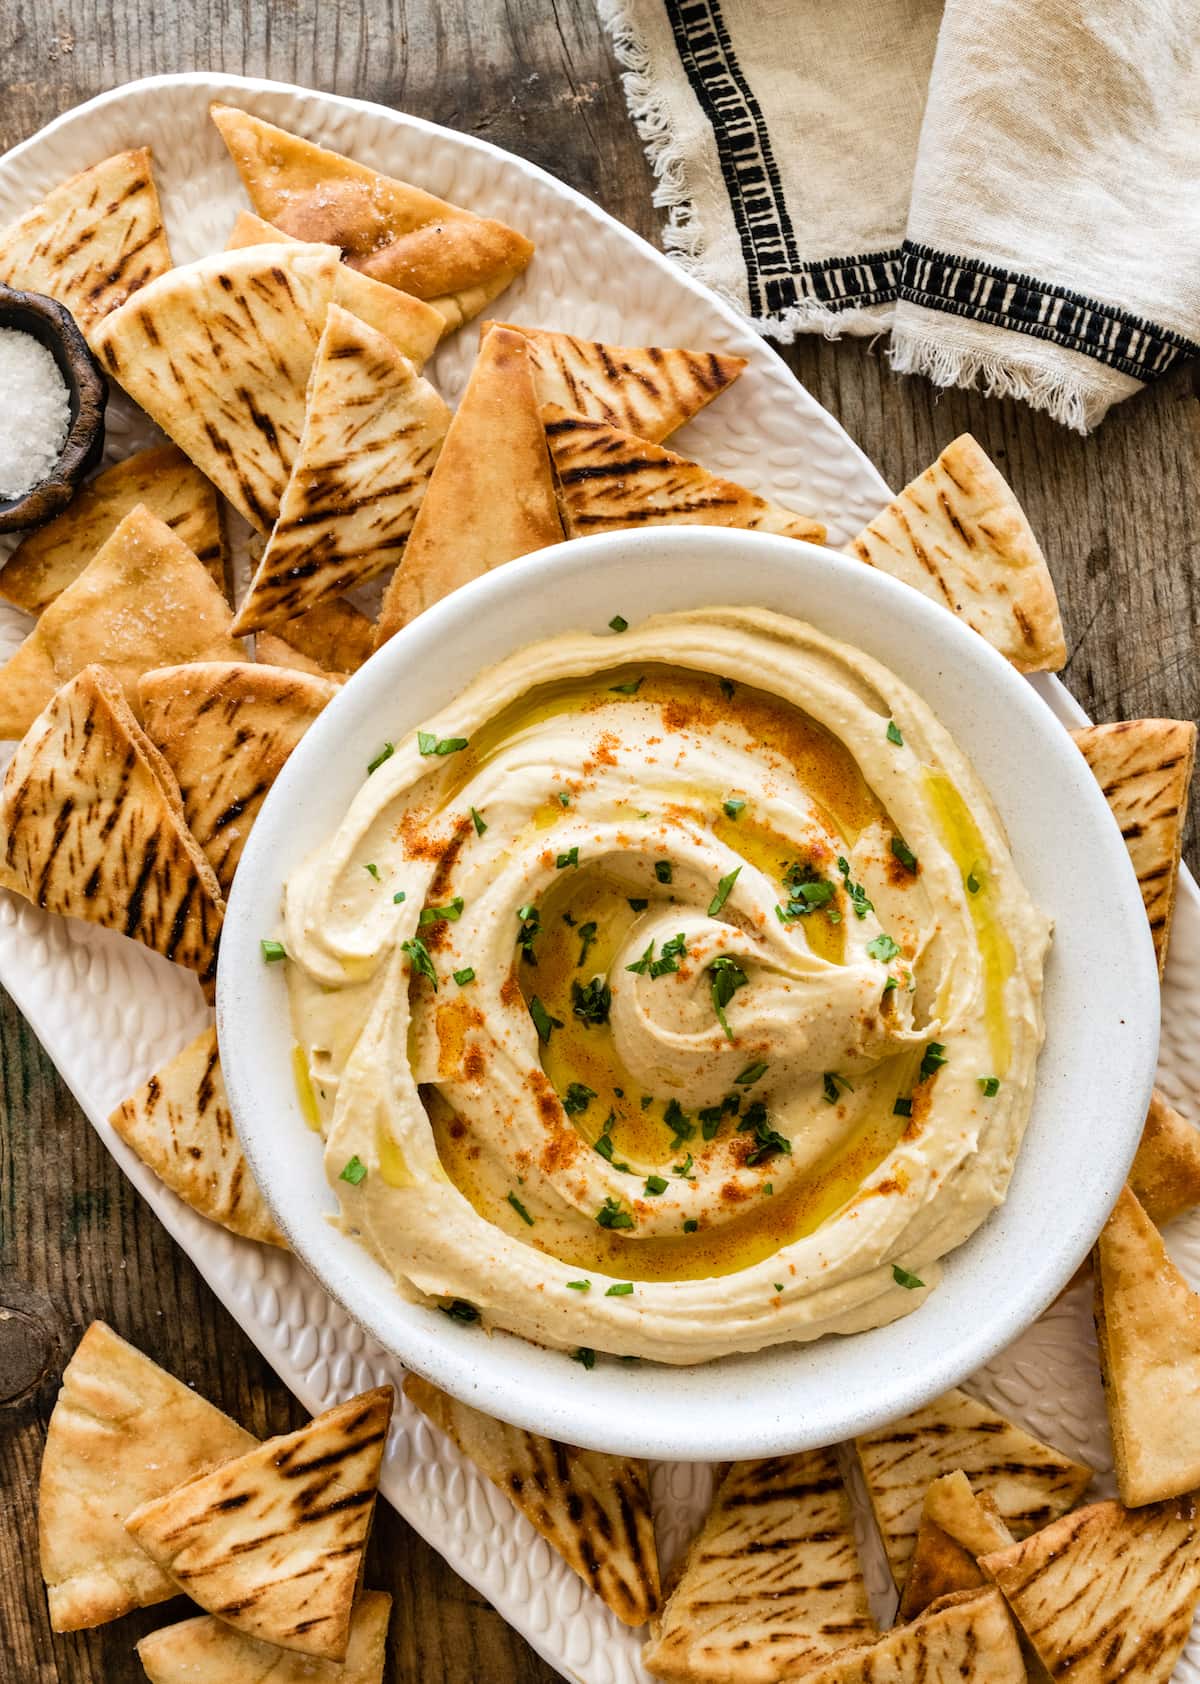 Hummus is one of my all-time favorite appetizers and snacks. I could eat it every single day. Sure, you can buy hummus at the store, but homemade hummus is SO much better and SO easy to make. I am going to teach you my tips and tricks for making the BEST hummus ever. I love…
 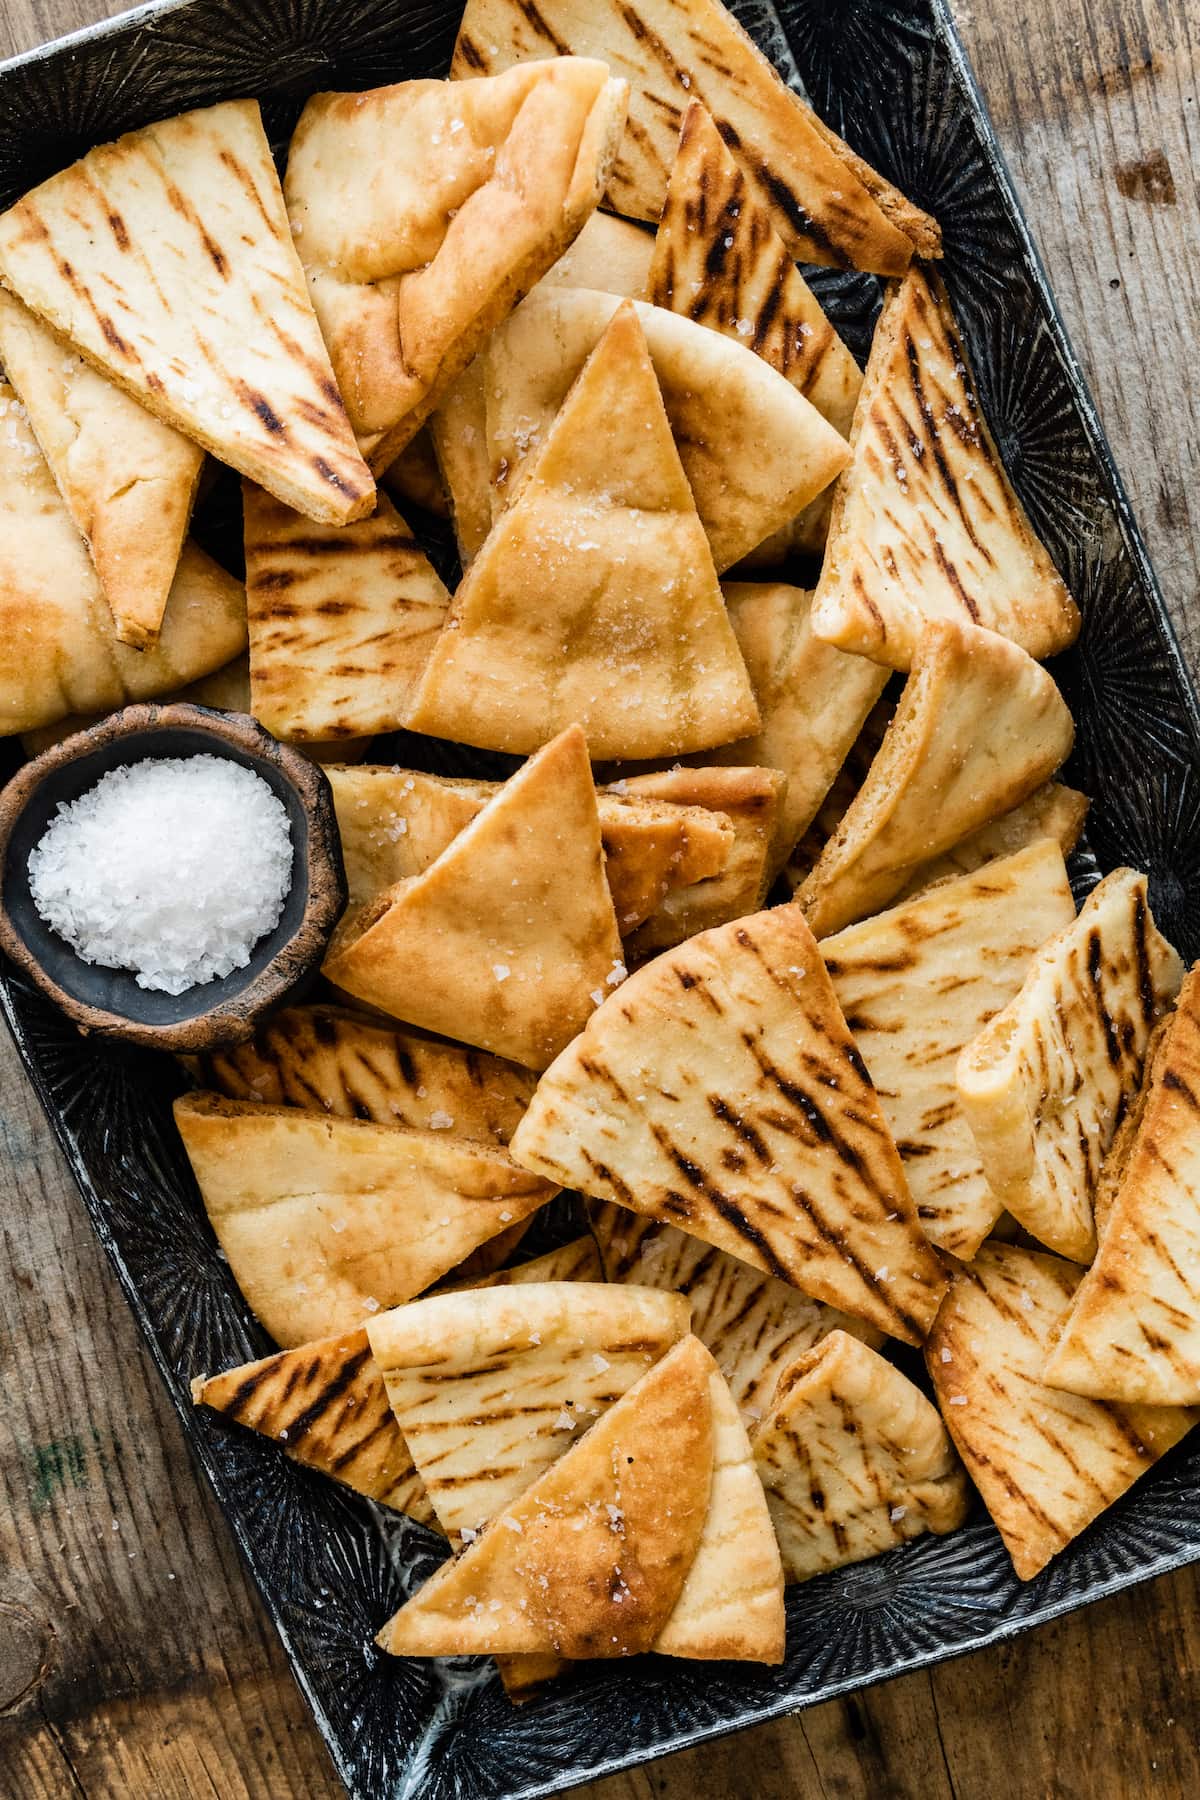 I love a good salty snack. Some of my favorites include chips and salsa, chips and guacamole, soft pretzels, and pita chips with hummus. Store bought pita chips are fine, but homemade pita chips are the BEST! If you haven’t made them at home, you are missing out. You only need three ingredients and they…
 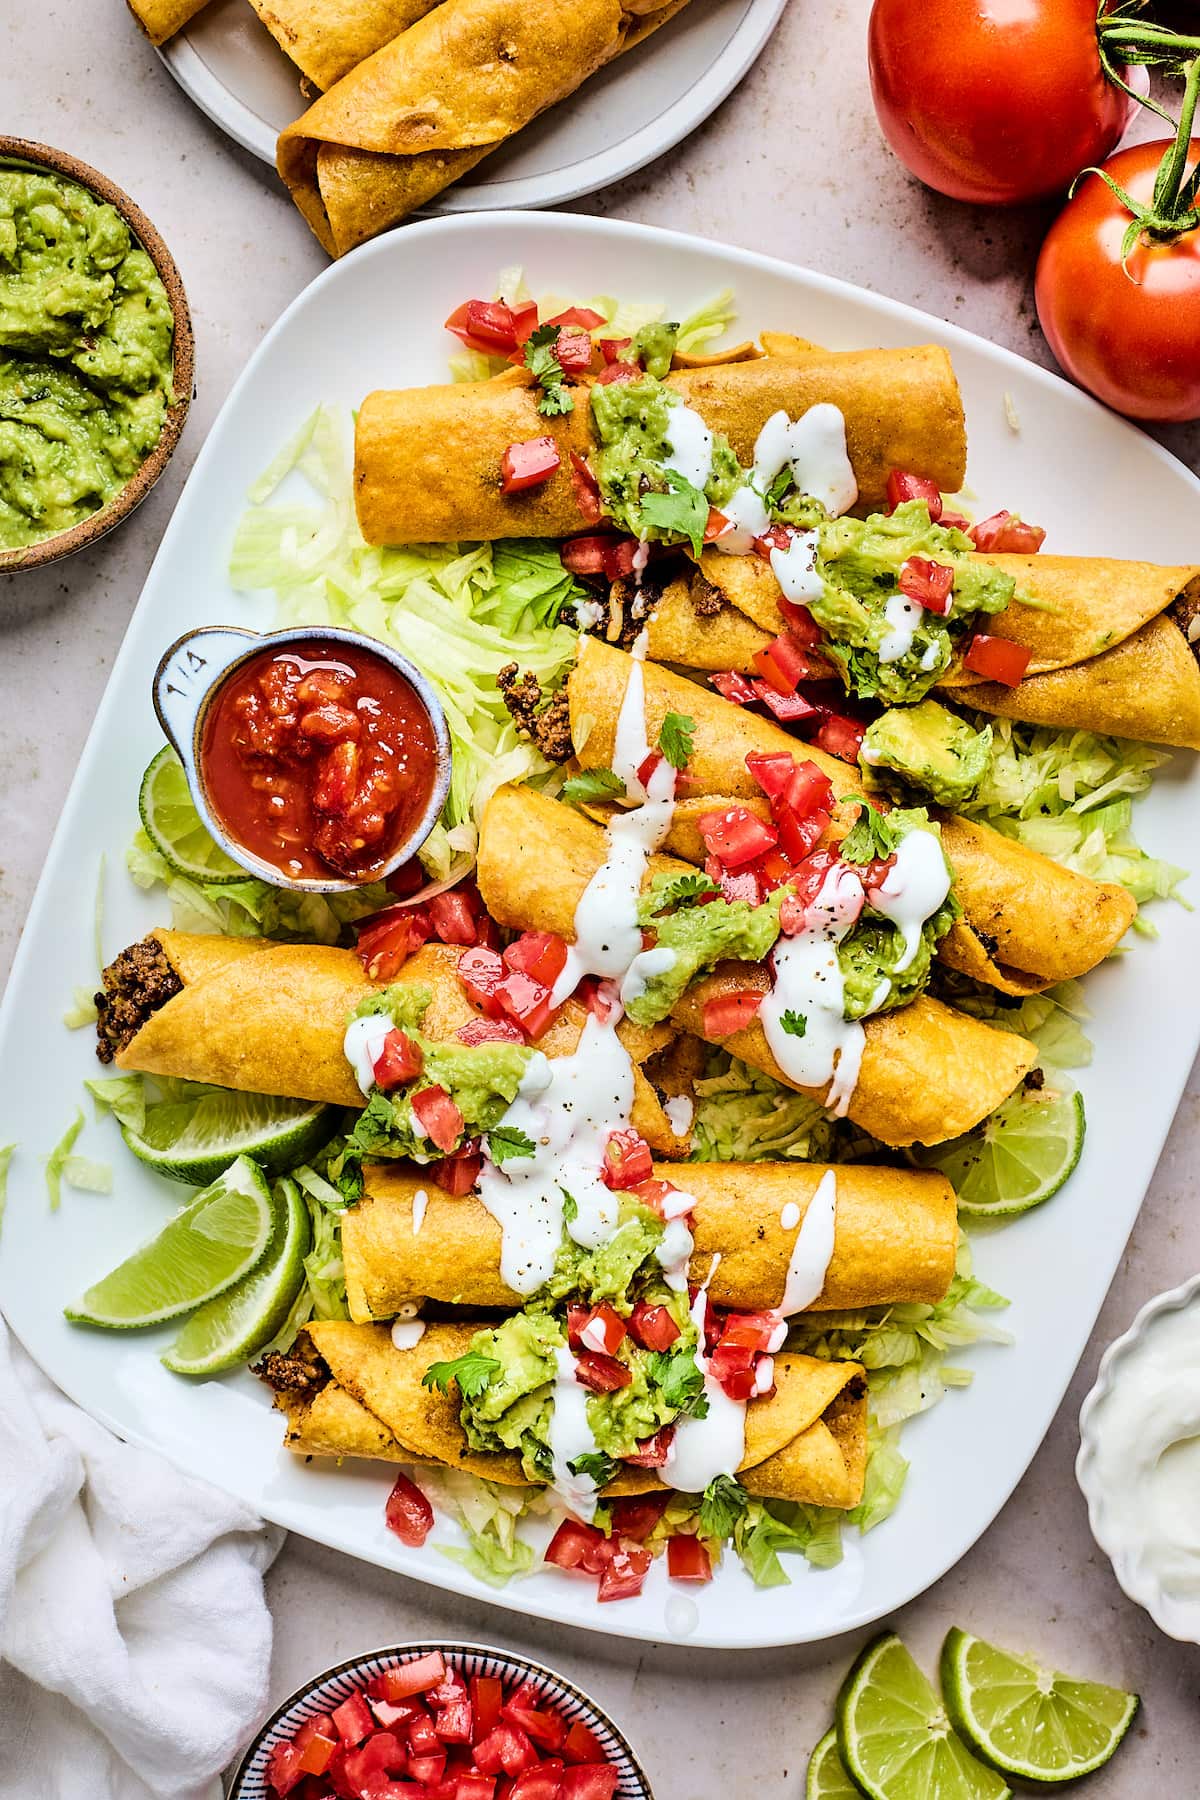 We love making taquitos for an easy weeknight meal or for easy entertaining. They are a favorite for game days! We love Chicken Taquitos, Black Bean Cheese Taquitos, and these Beef Taquitos. If you like our ground beef tacos, I have a feeling you will love these Beef Taquitos too! They are similar, but taquitos…


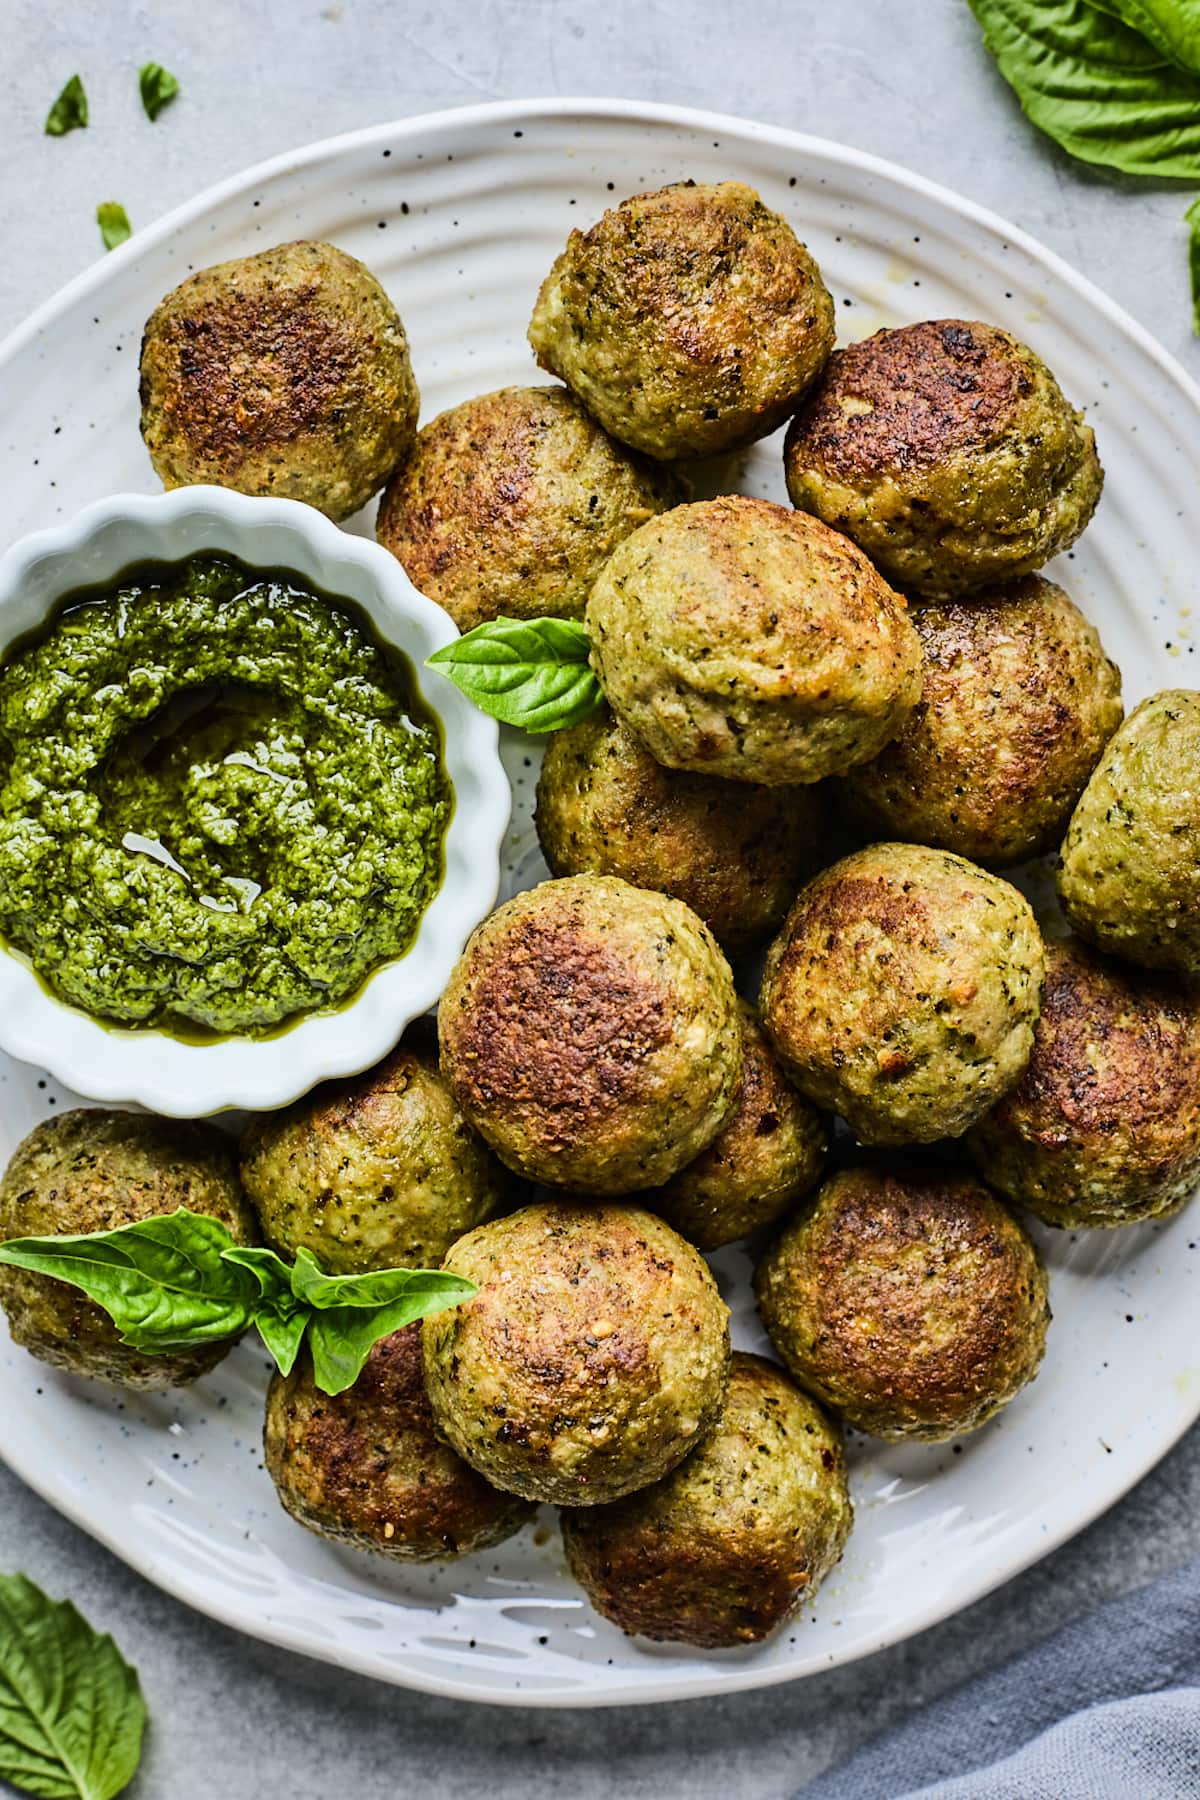 Meatballs are a favorite meal at our house. They are easy to make and also perfect for meal prepping. A few of our favorite meatball recipes include: classic spaghetti and meatballs, chicken meatballs, Greek meatballs, and teriyaki chicken meatballs. We also love making Pesto Meatballs, especially during the summer months when we have a lot…