Wraps make a fun, easy, healthy, and delicious meal. Our Chicken Caesar Wraps are very popular and so are these Turkey Wraps! We love making wraps because they are very versatile. You can add whatever ingredients and sauces you like, just like a sandwi…
Wraps make a fun, easy, healthy, and delicious meal. Our Chicken Caesar Wraps are very popular and so are these Turkey Wraps! We love making wraps because they are very versatile. You can add whatever ingredients and sauces you like, just like a sandwich. But wraps really are more fun. Everything gets wrapped up into…
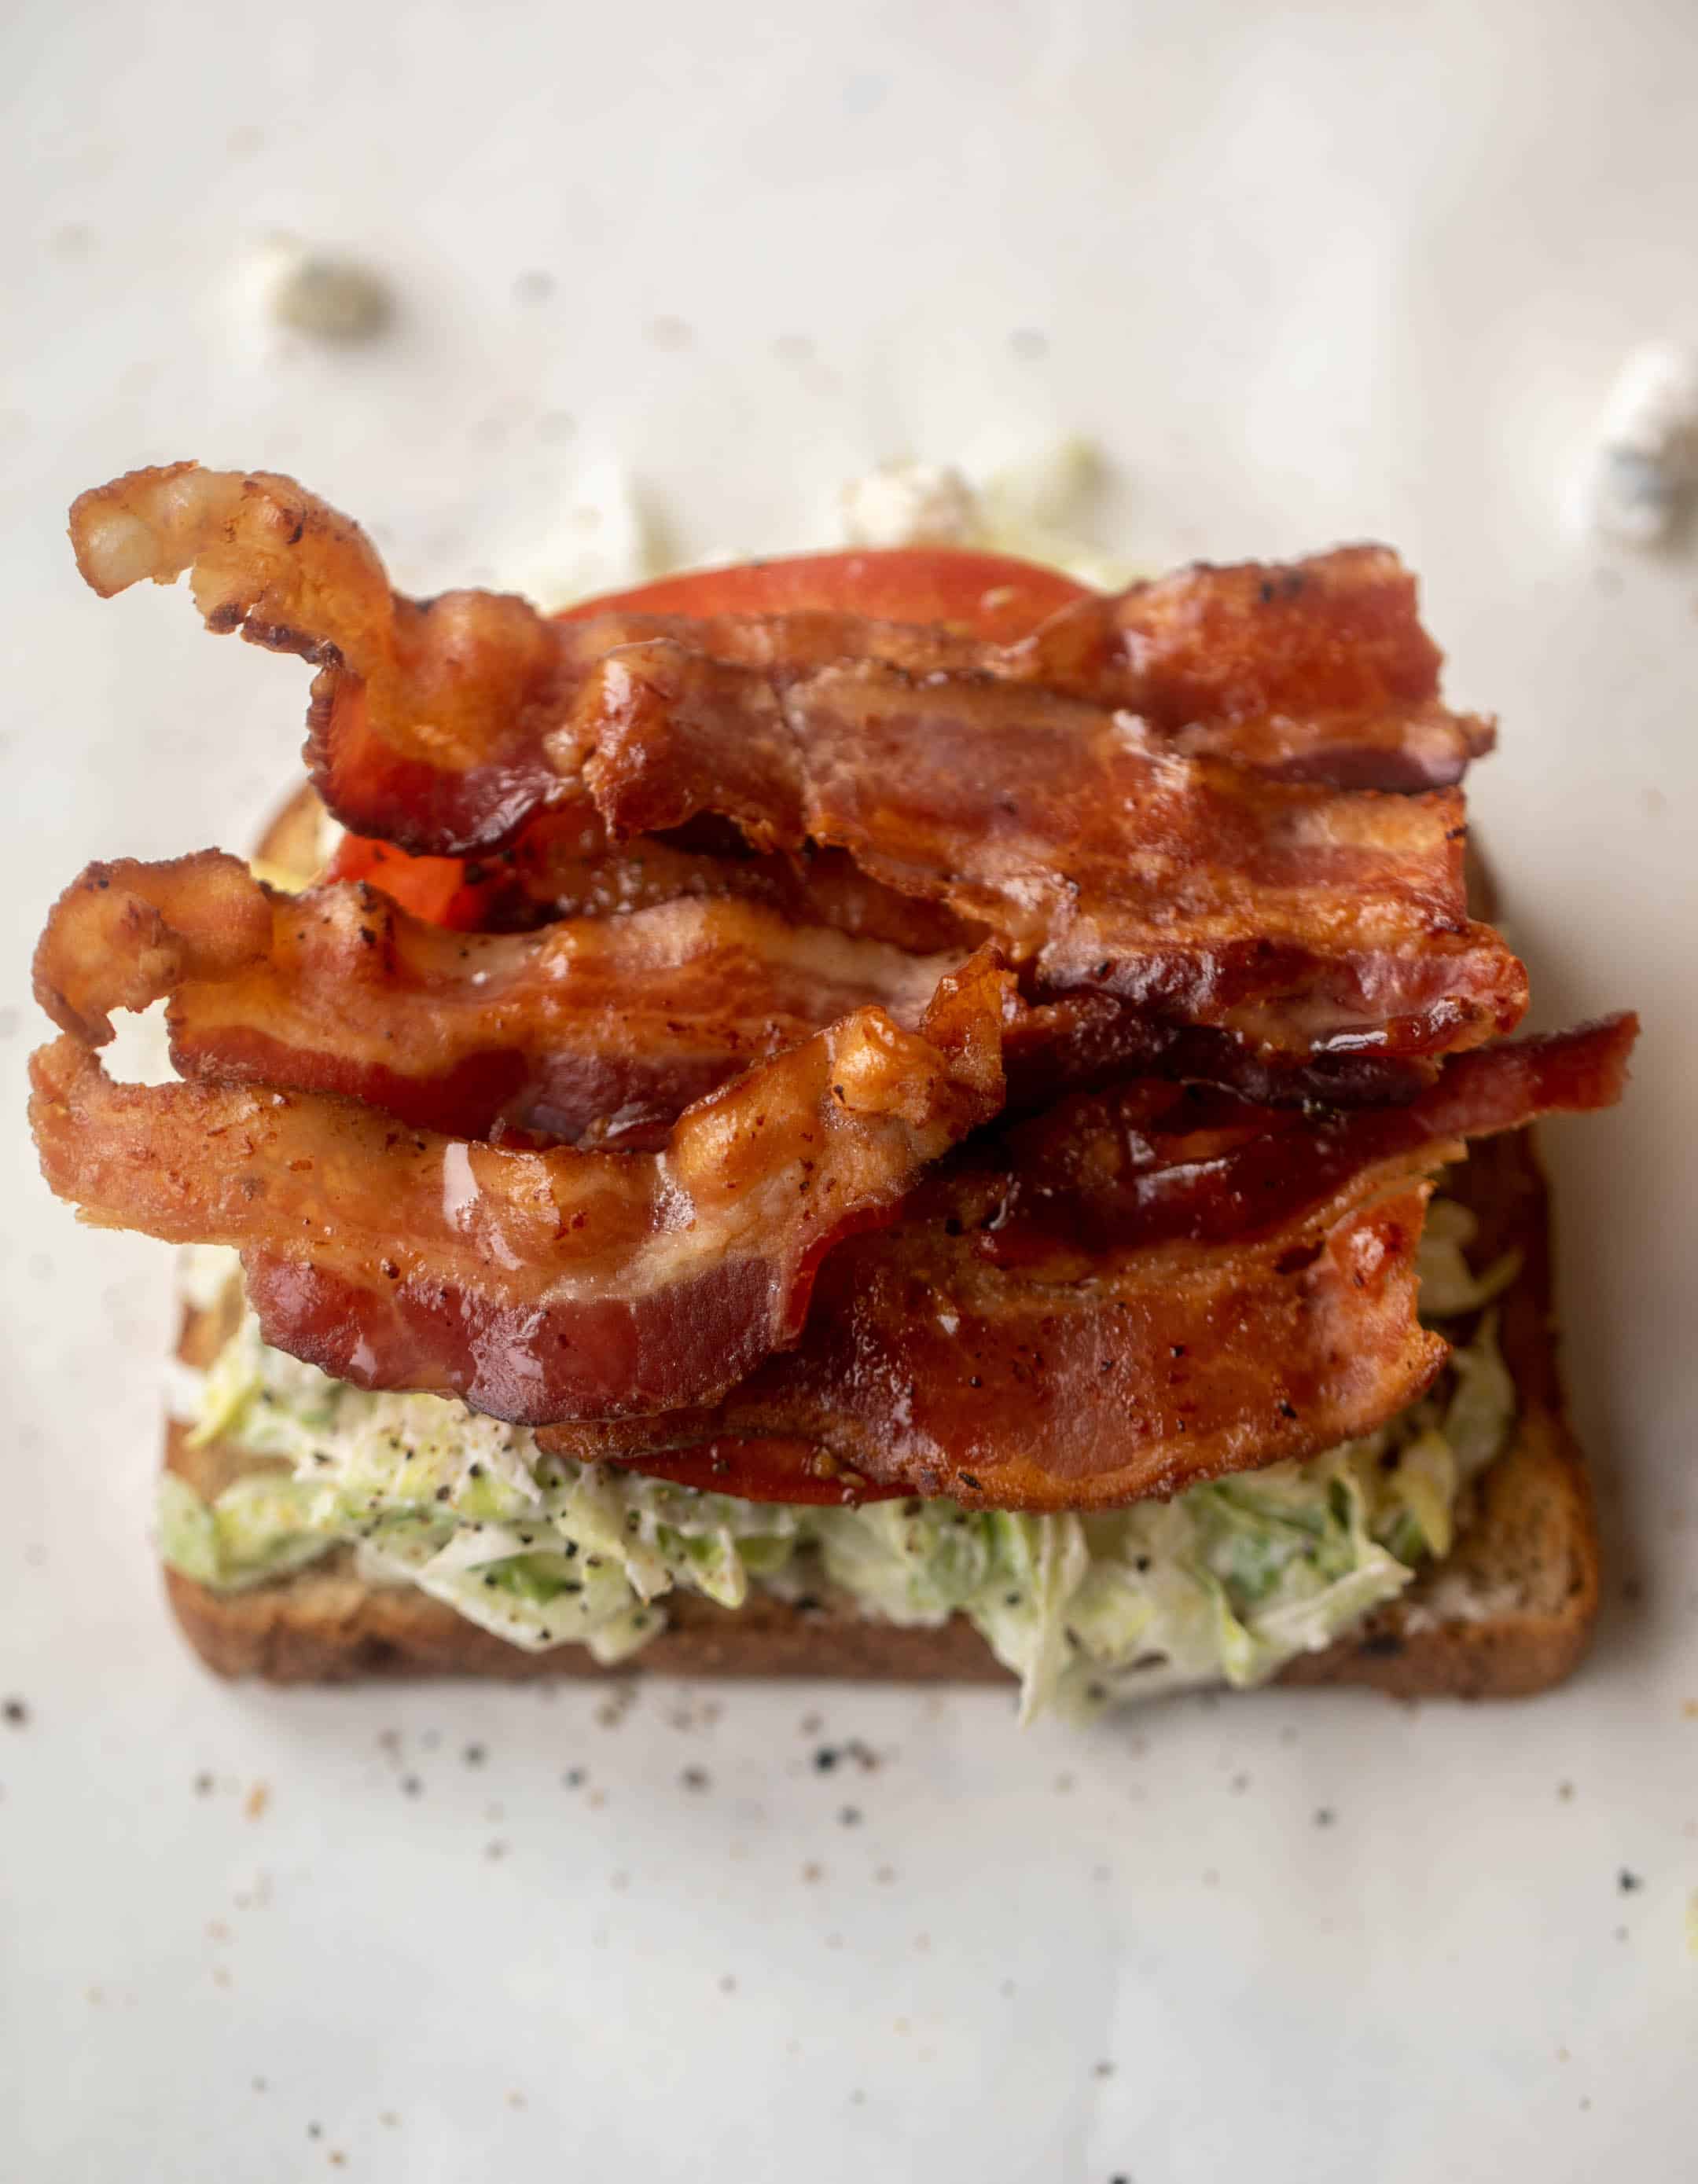
The perfect summer sandwich – a blue cheese BLT! Marinated tomatoes with blue cheese dressing, piles of shredded lettuce and crispy bacon served on toast. So delicious and flavorful! Blue cheese is about to make our BLT better!! If you’re a blue cheese lover like I am, you will adore this sandwich. Marinated tomatoes, crispy, […]
The perfect summer sandwich – a blue cheese BLT! Marinated tomatoes with blue cheese dressing, piles of shredded lettuce and crispy bacon served on toast. So delicious and flavorful!
Blue cheese is about to make our BLT better!!
If you’re a blue cheese lover like I am, you will adore this sandwich. Marinated tomatoes, crispy, crunchy bacon, shredded lettuce piled high with homemade blue cheese dressing on toast. The best summer sandwich!
One of my favorite BLTs in the whole world is from Lake Street Market in Boyne City. It’s so delicious – not only because it has avocado and perfectly crisp bacon, but because the lettuce is shredded. It makes the sandwich so much better, in my opinion.
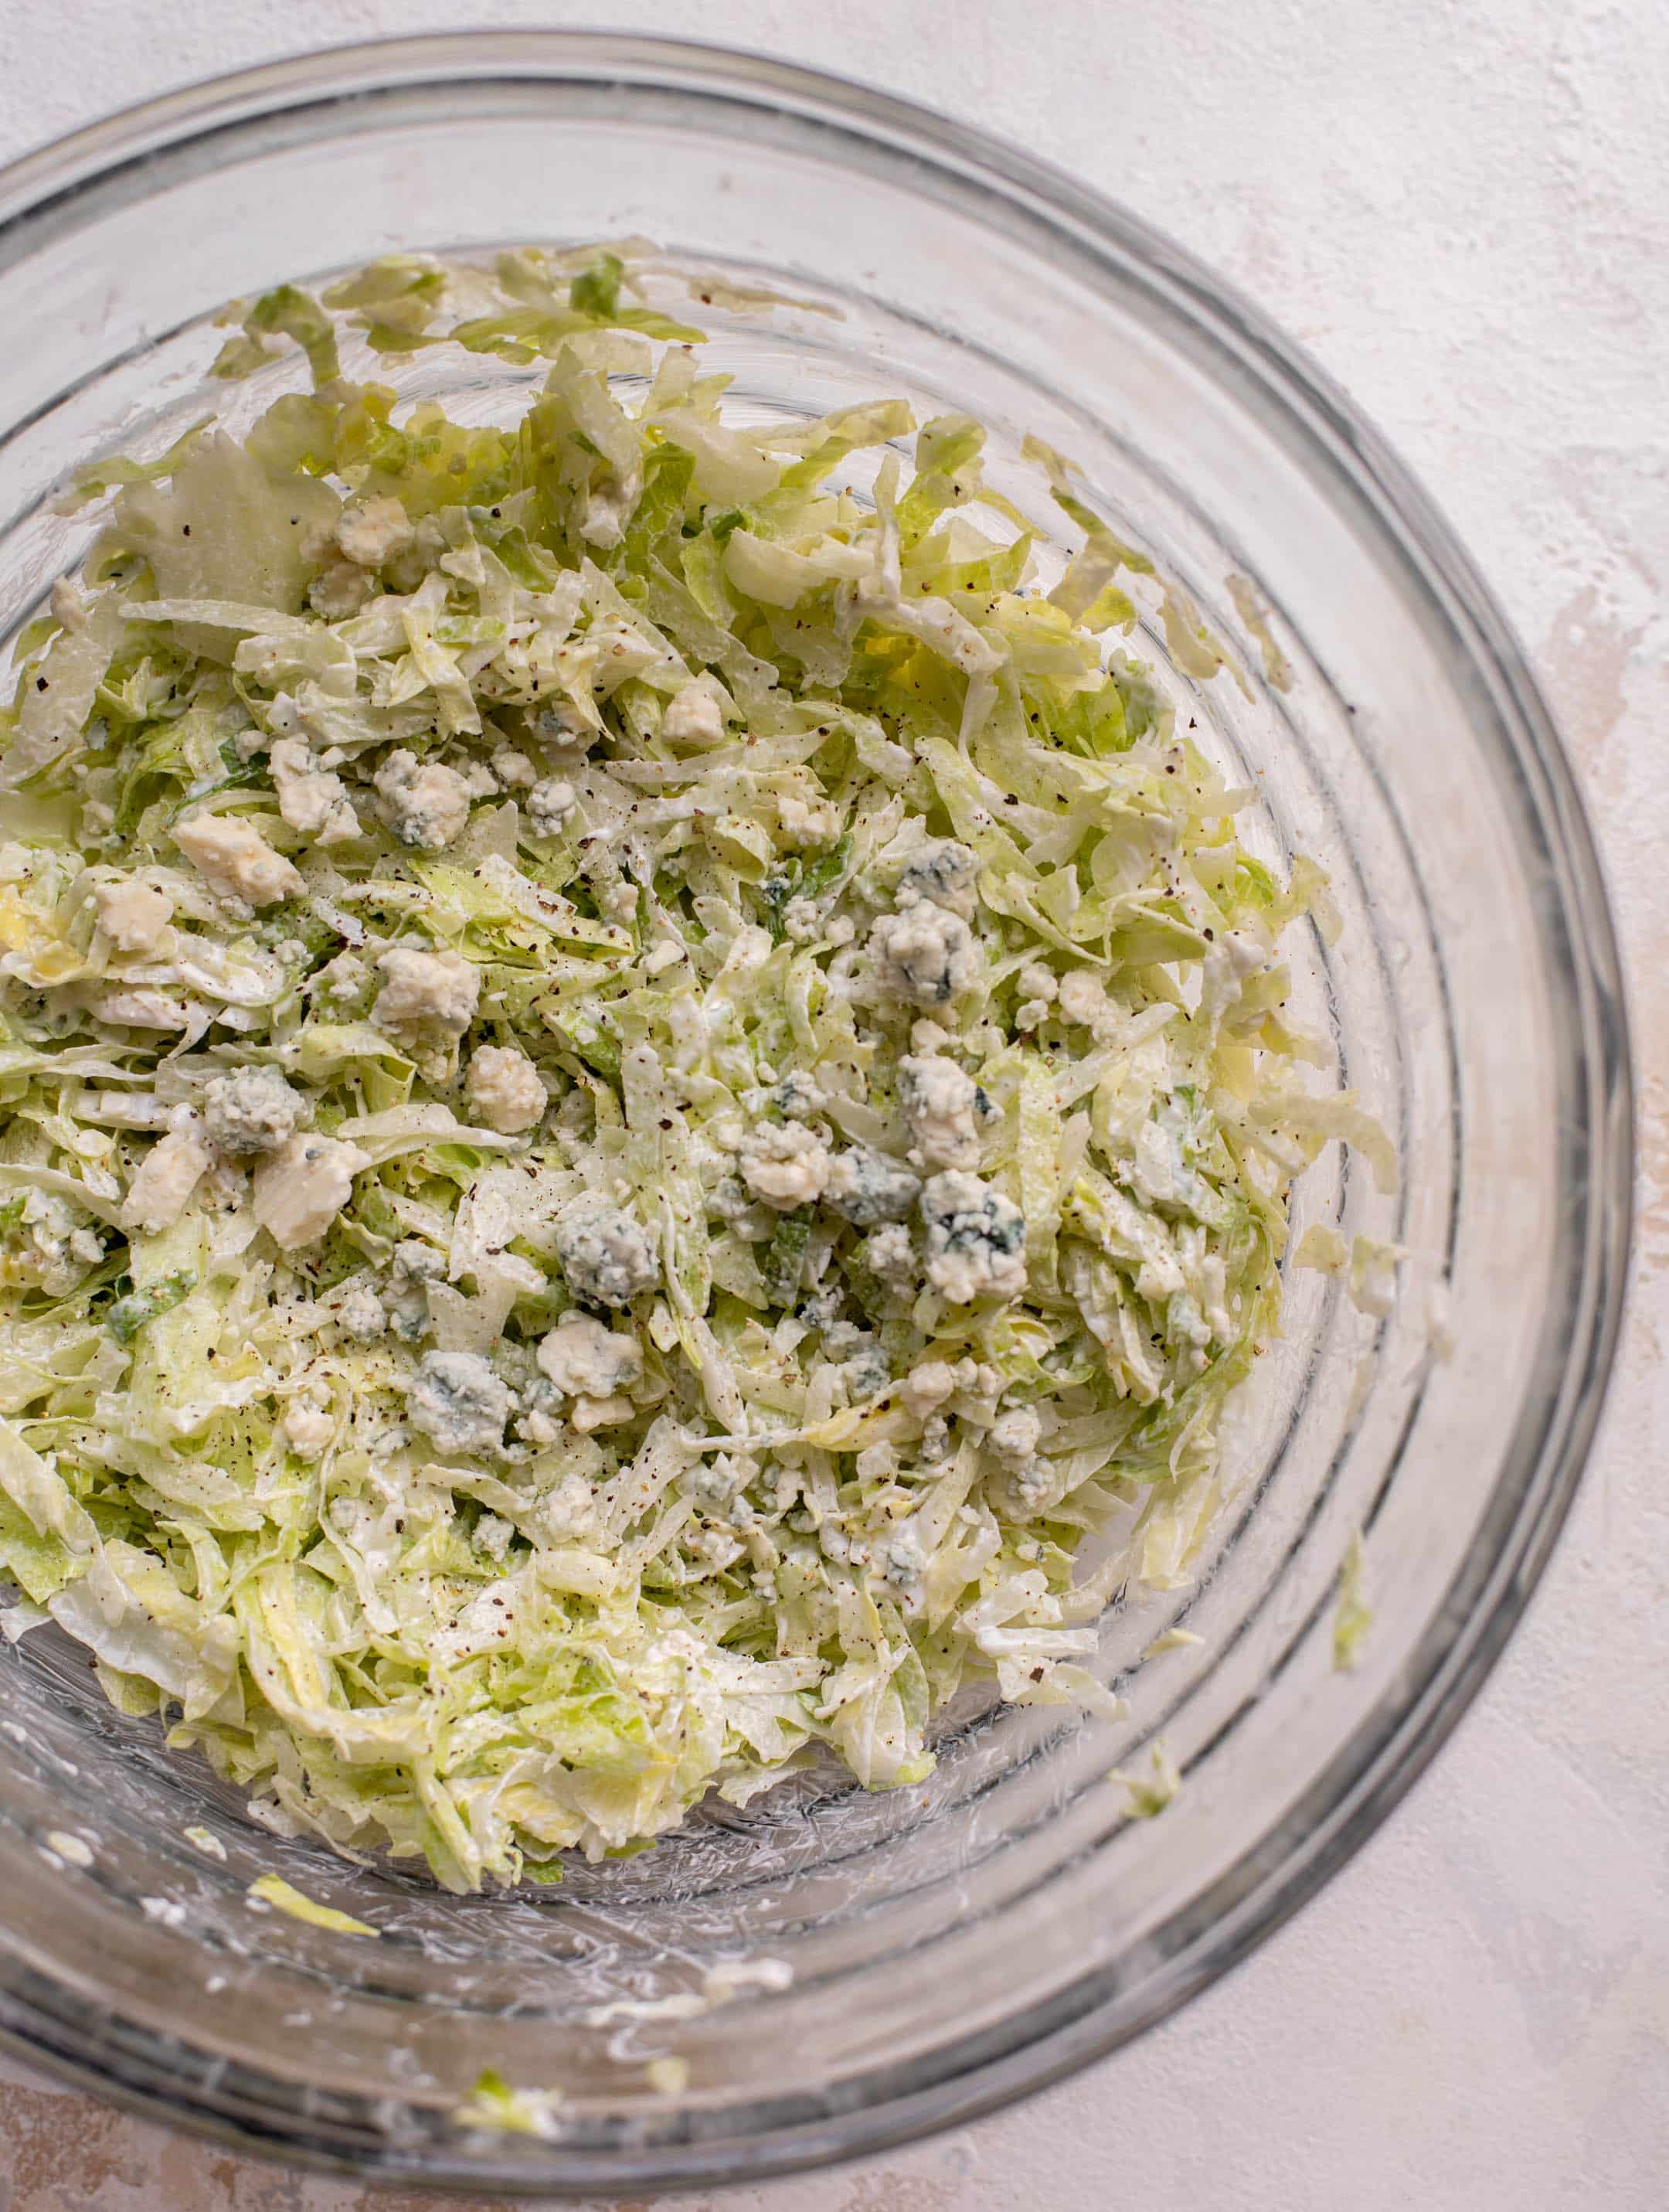
So I take that up a notch and make a blue cheese dressing, which goes on the BLT and also gets somewhat mixed into the shredded lettuce.
Oh
My
Word.
The combination is incredible. So much texture, so crunchy, no huge pieces of lettuce falling out – it really is divine.
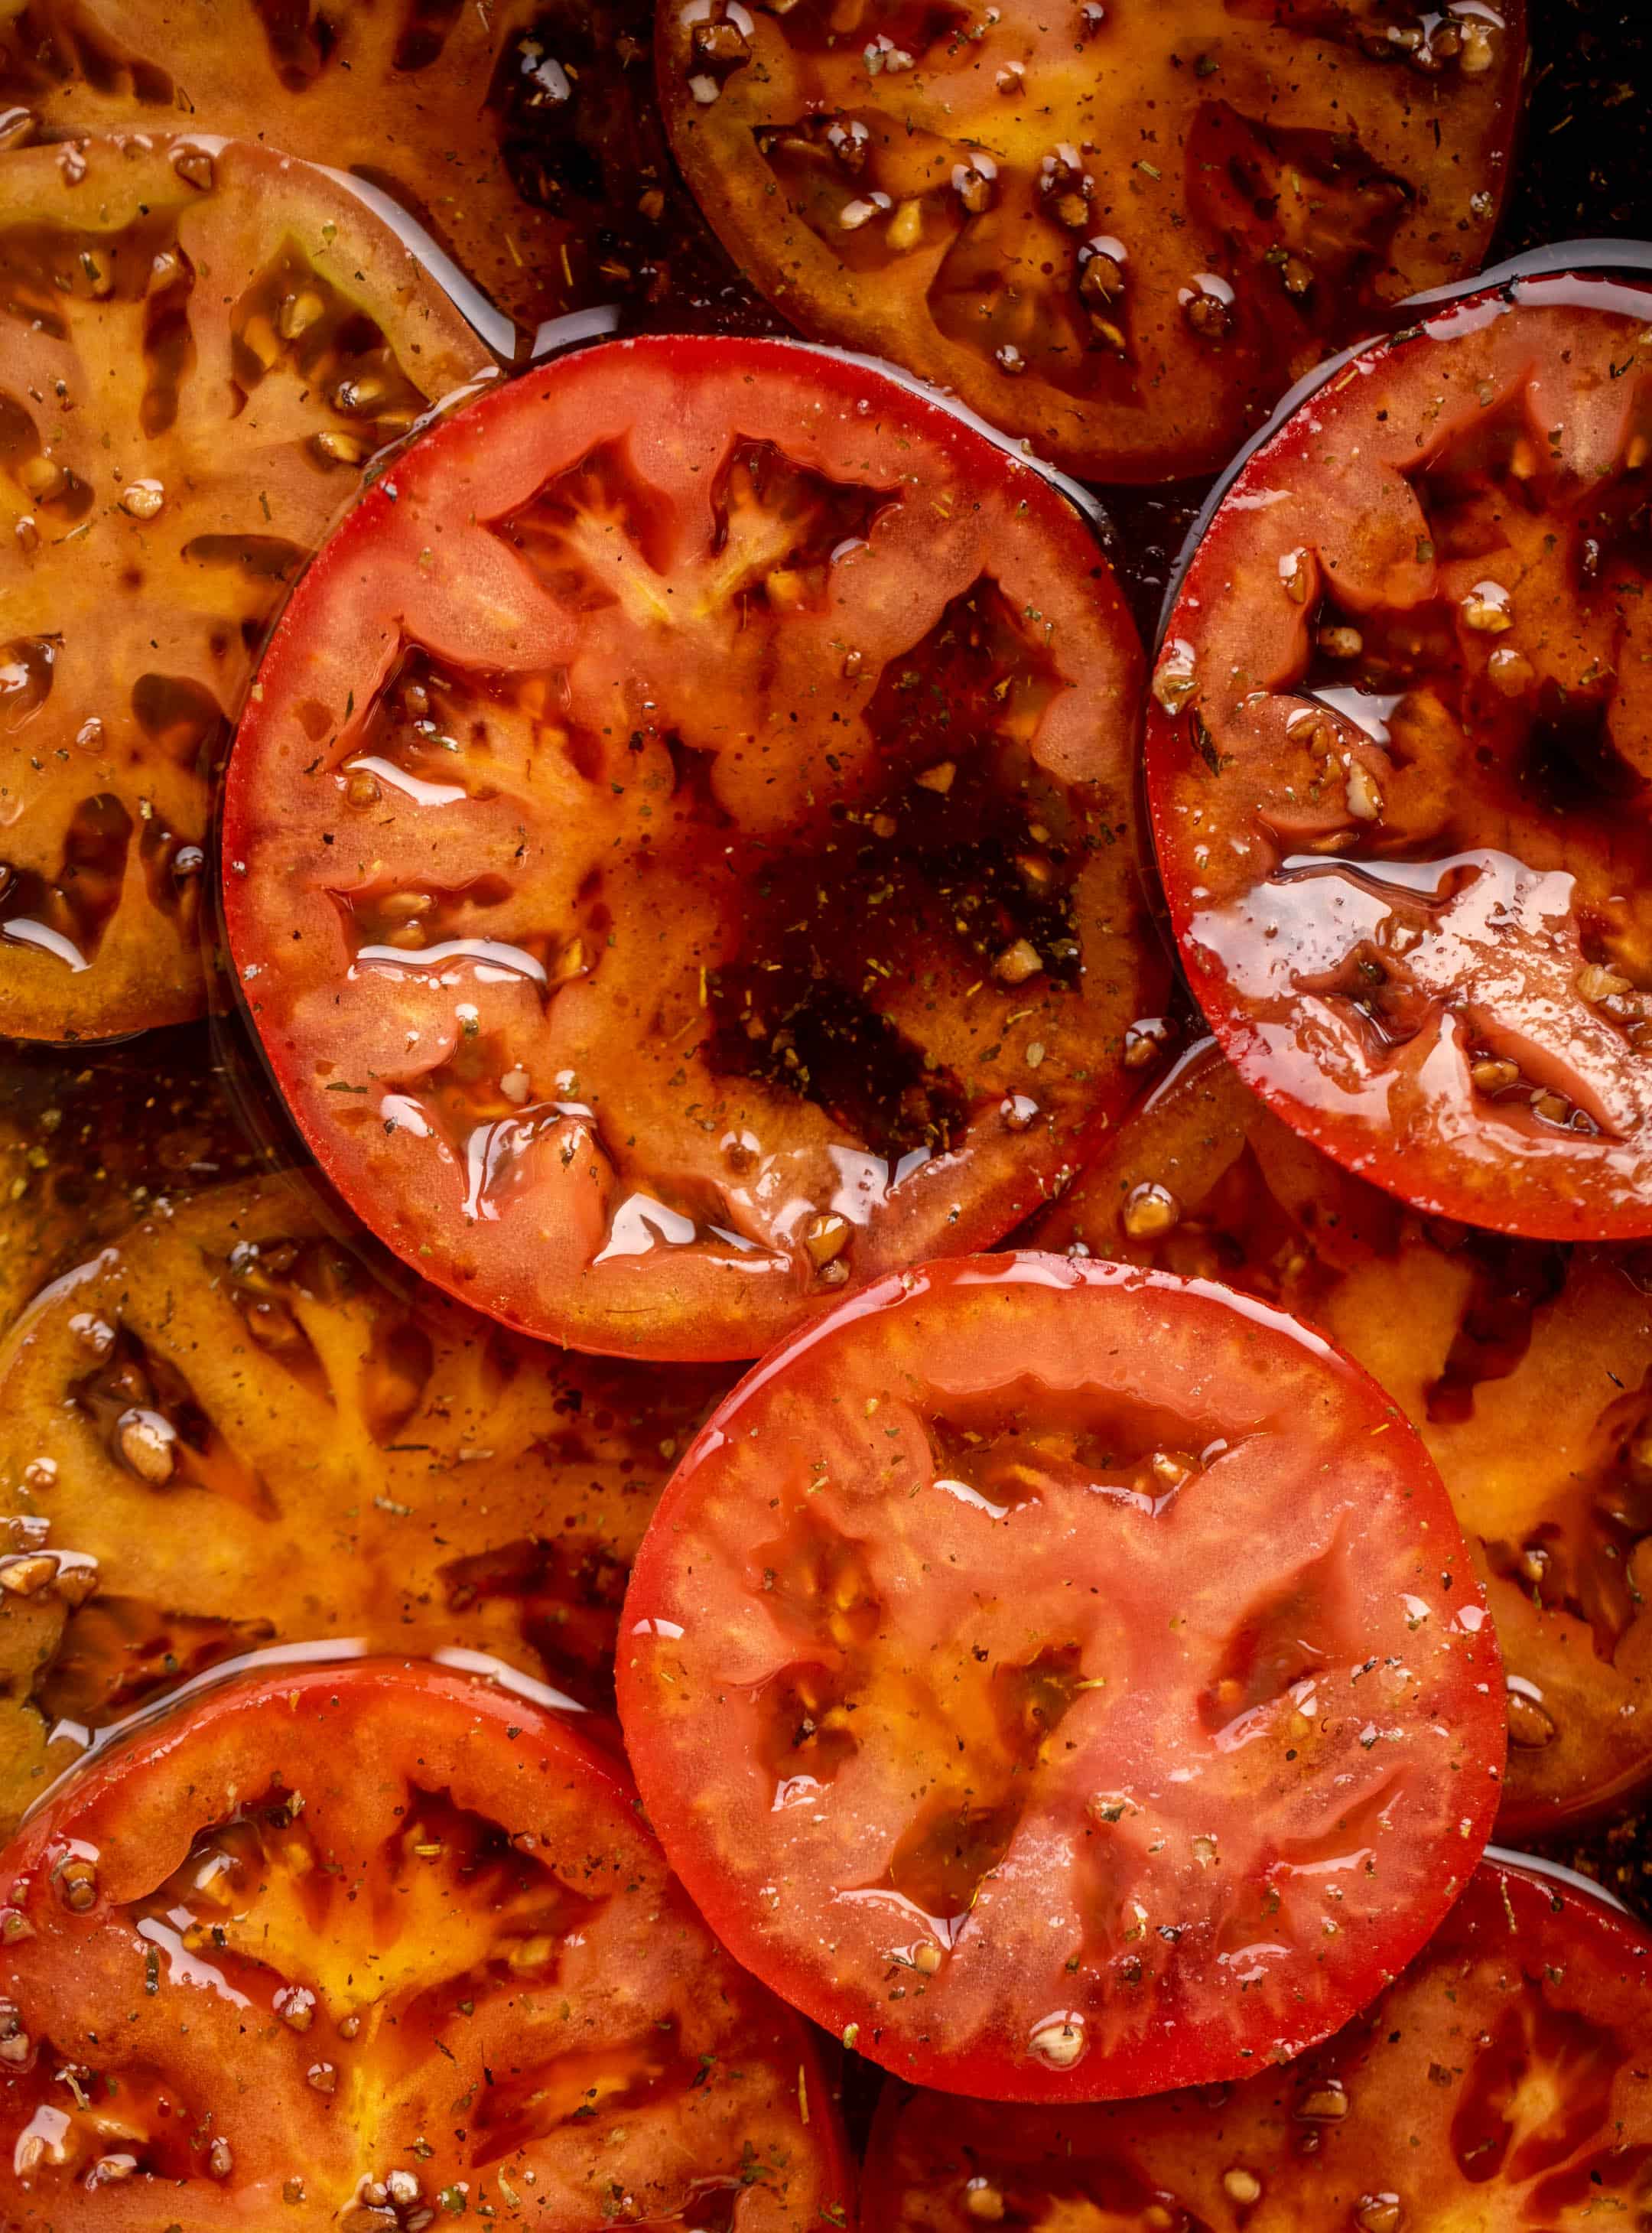
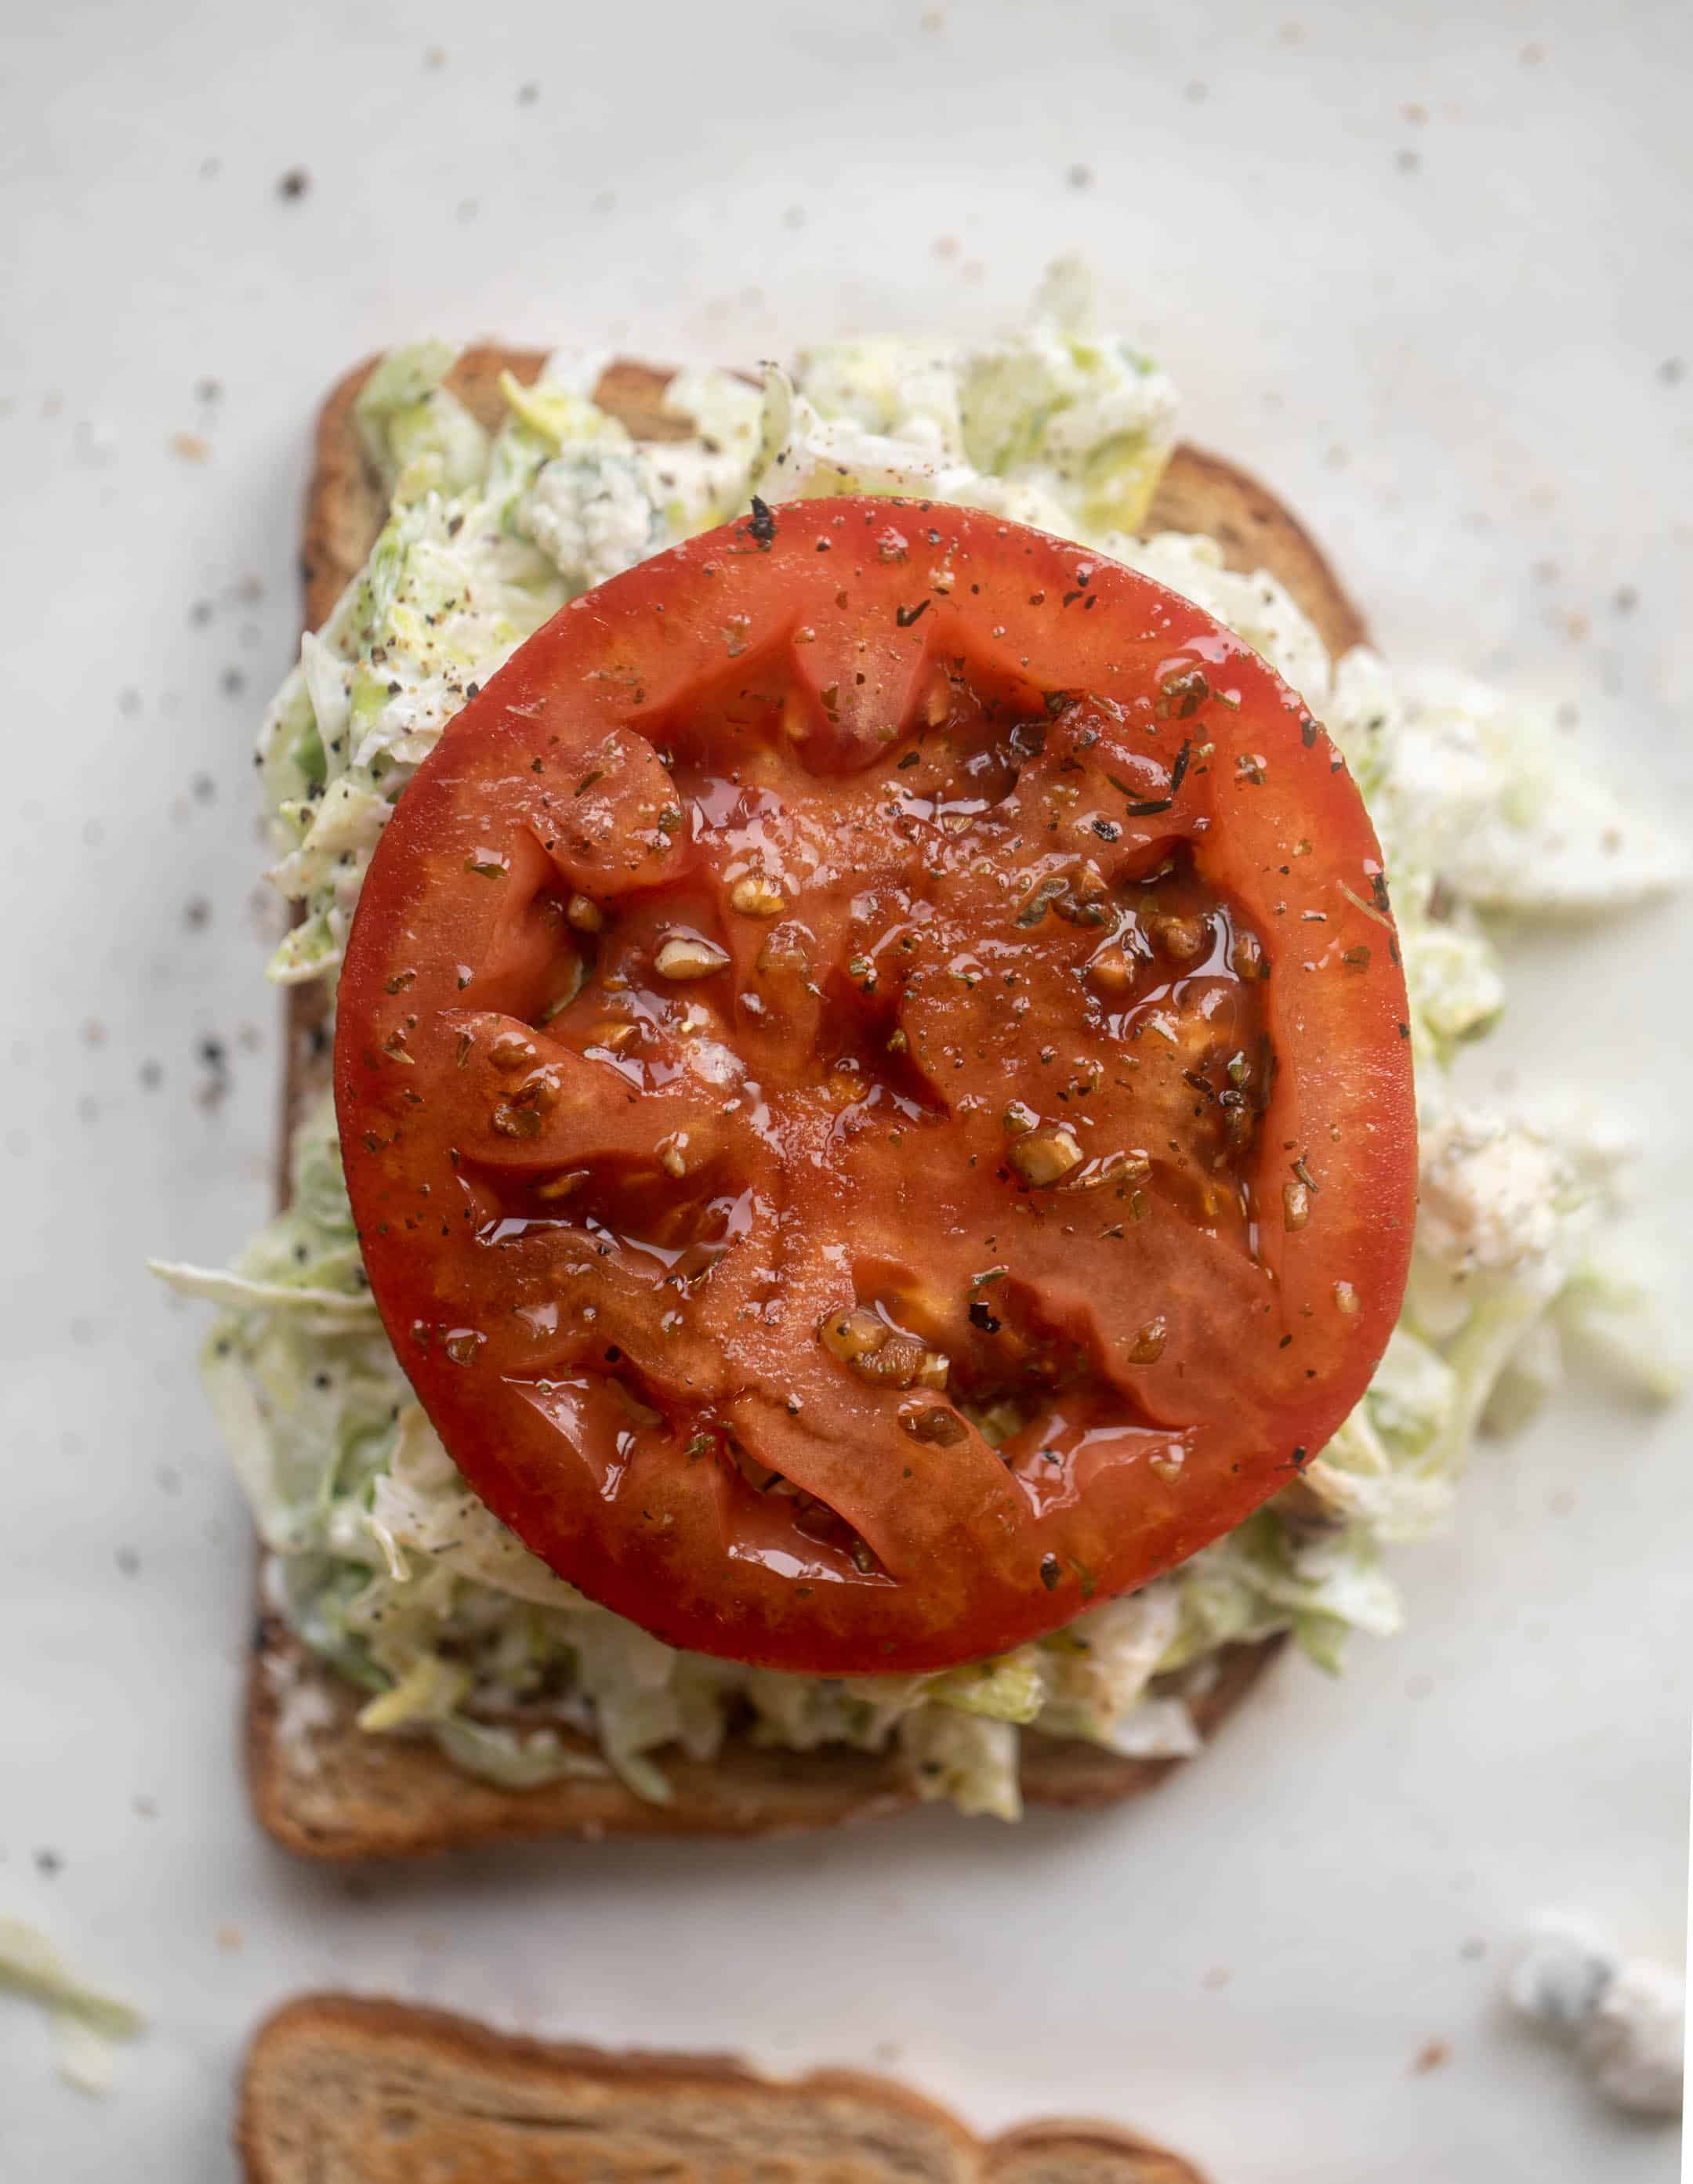
I start by marinating the tomatoes. You can do this for a few hours or even just a few minutes. Marinating them is key because the flavor will be unmatched.
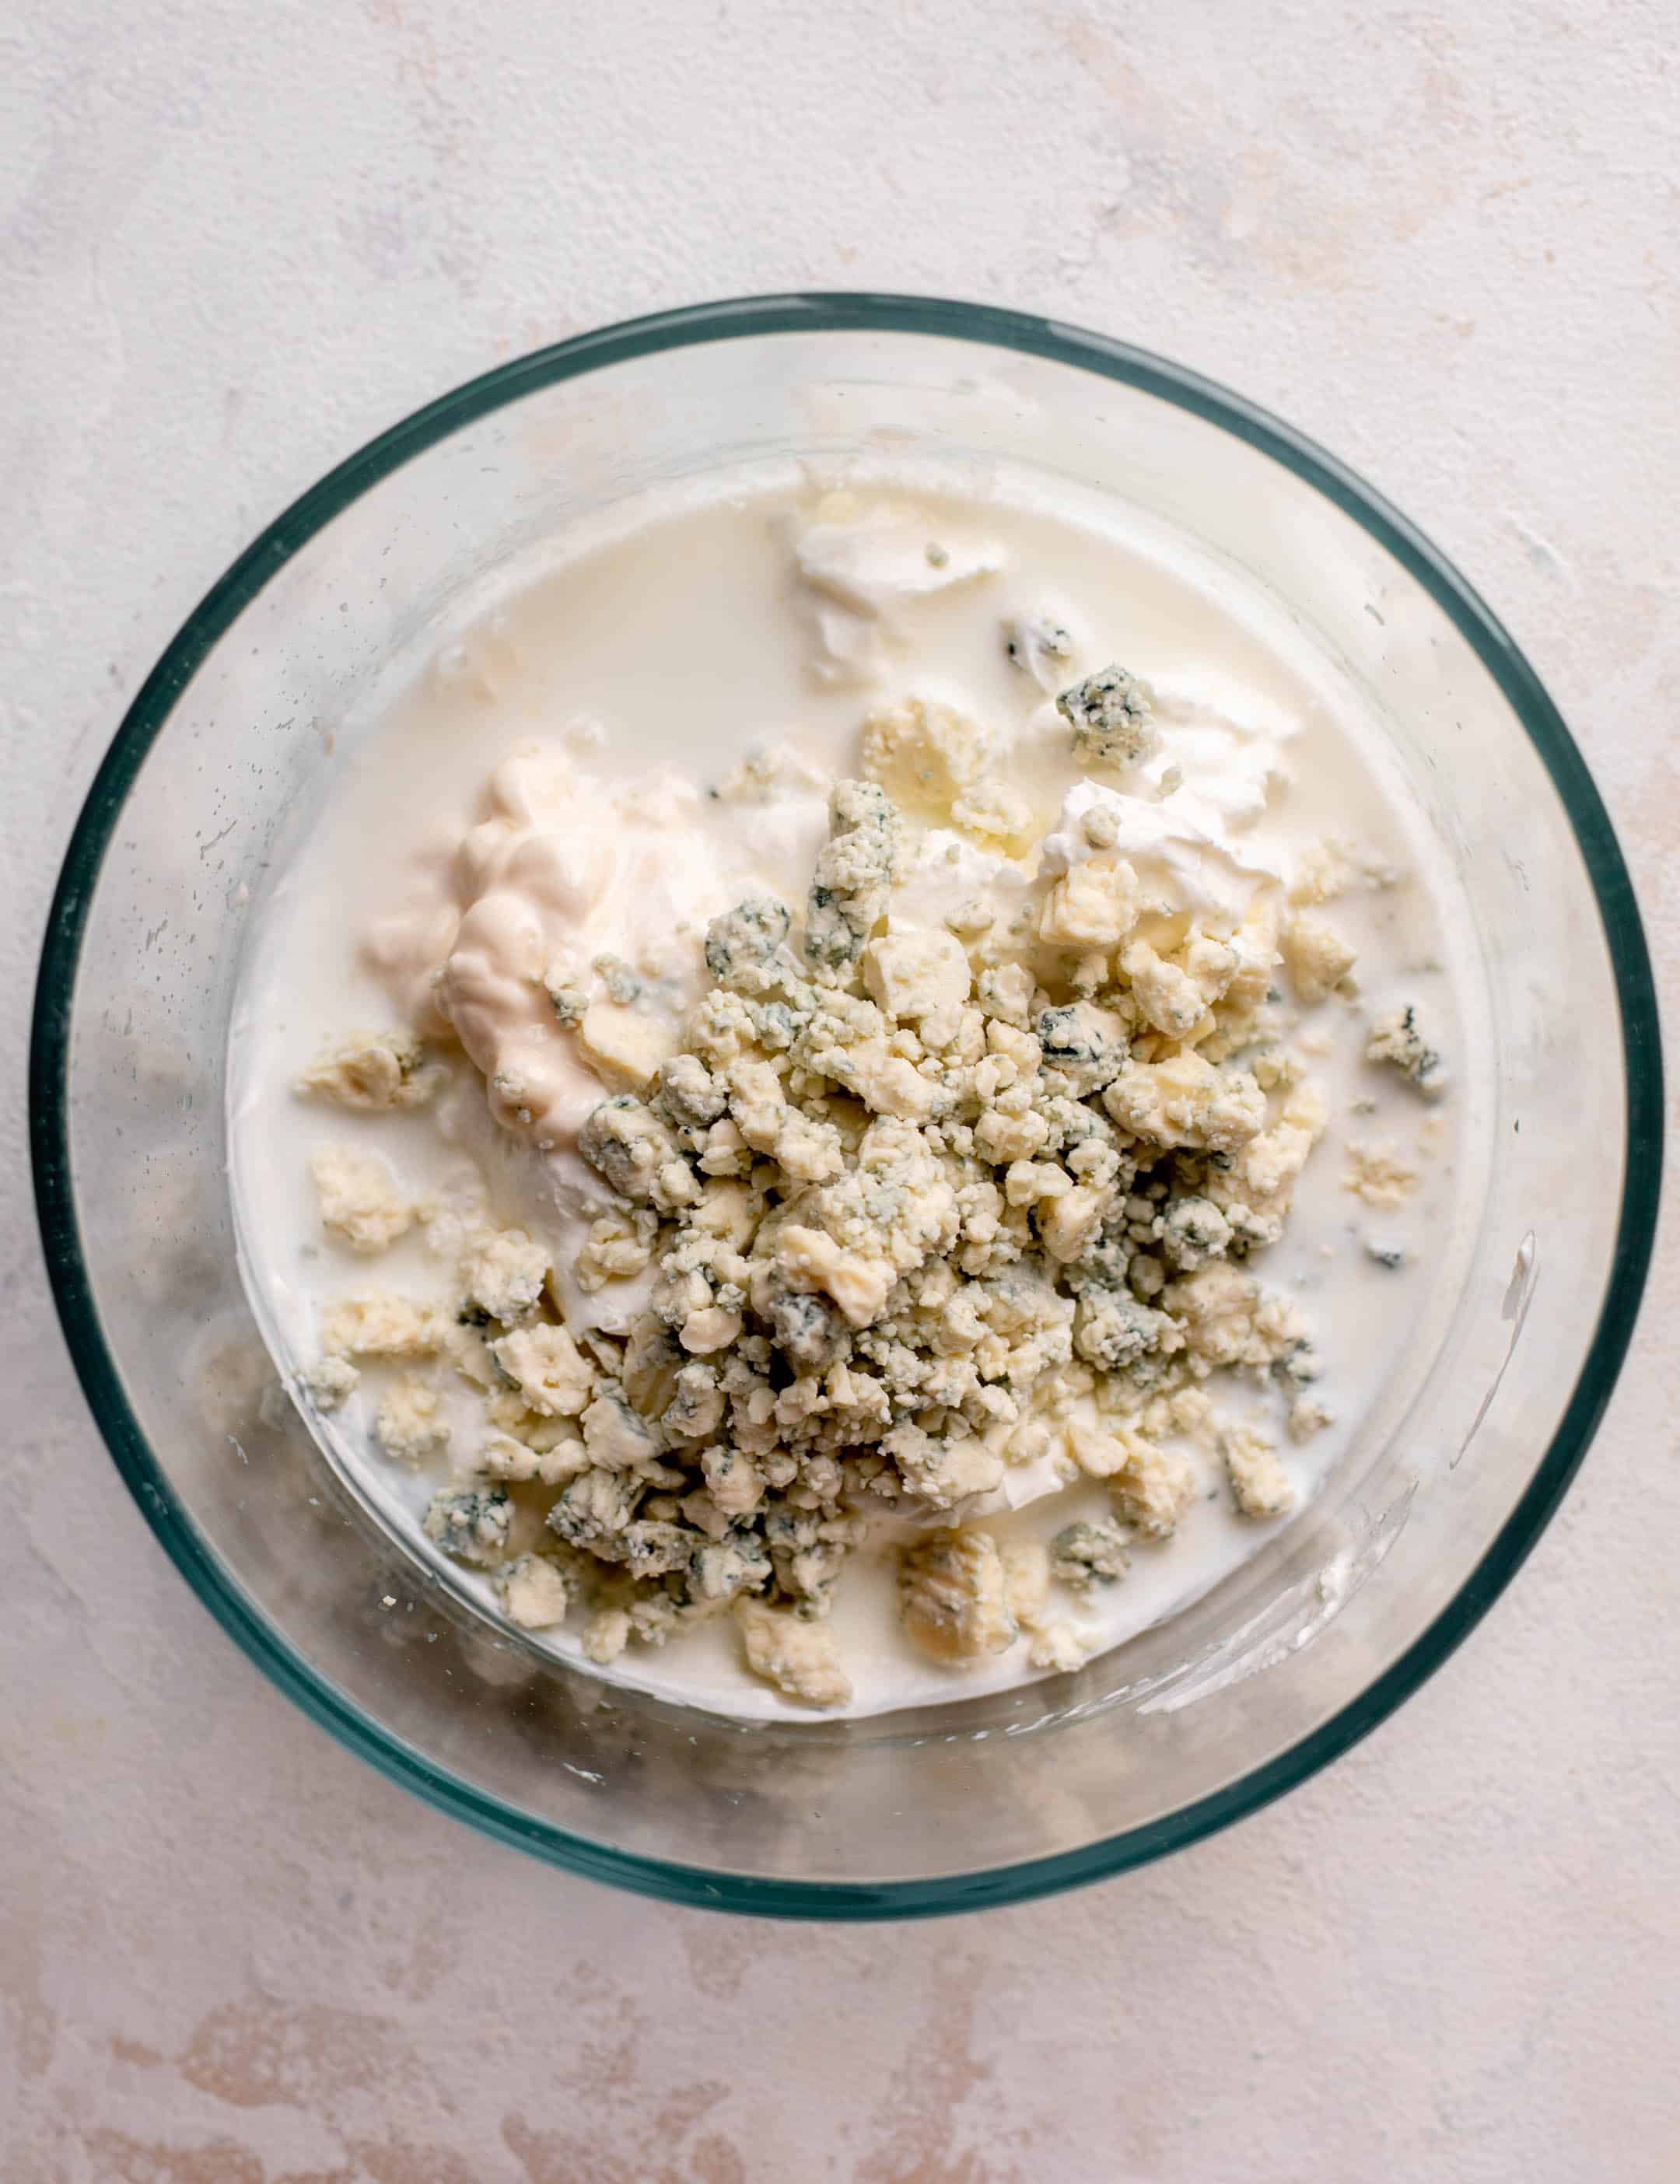
While the tomatoes marinate, I make the blue cheese dressing. It’s a quickie dressing with crumbled blue cheese folded in. I love to use this on everything. It’s great on burgers, as a veggie dip, even for chips.
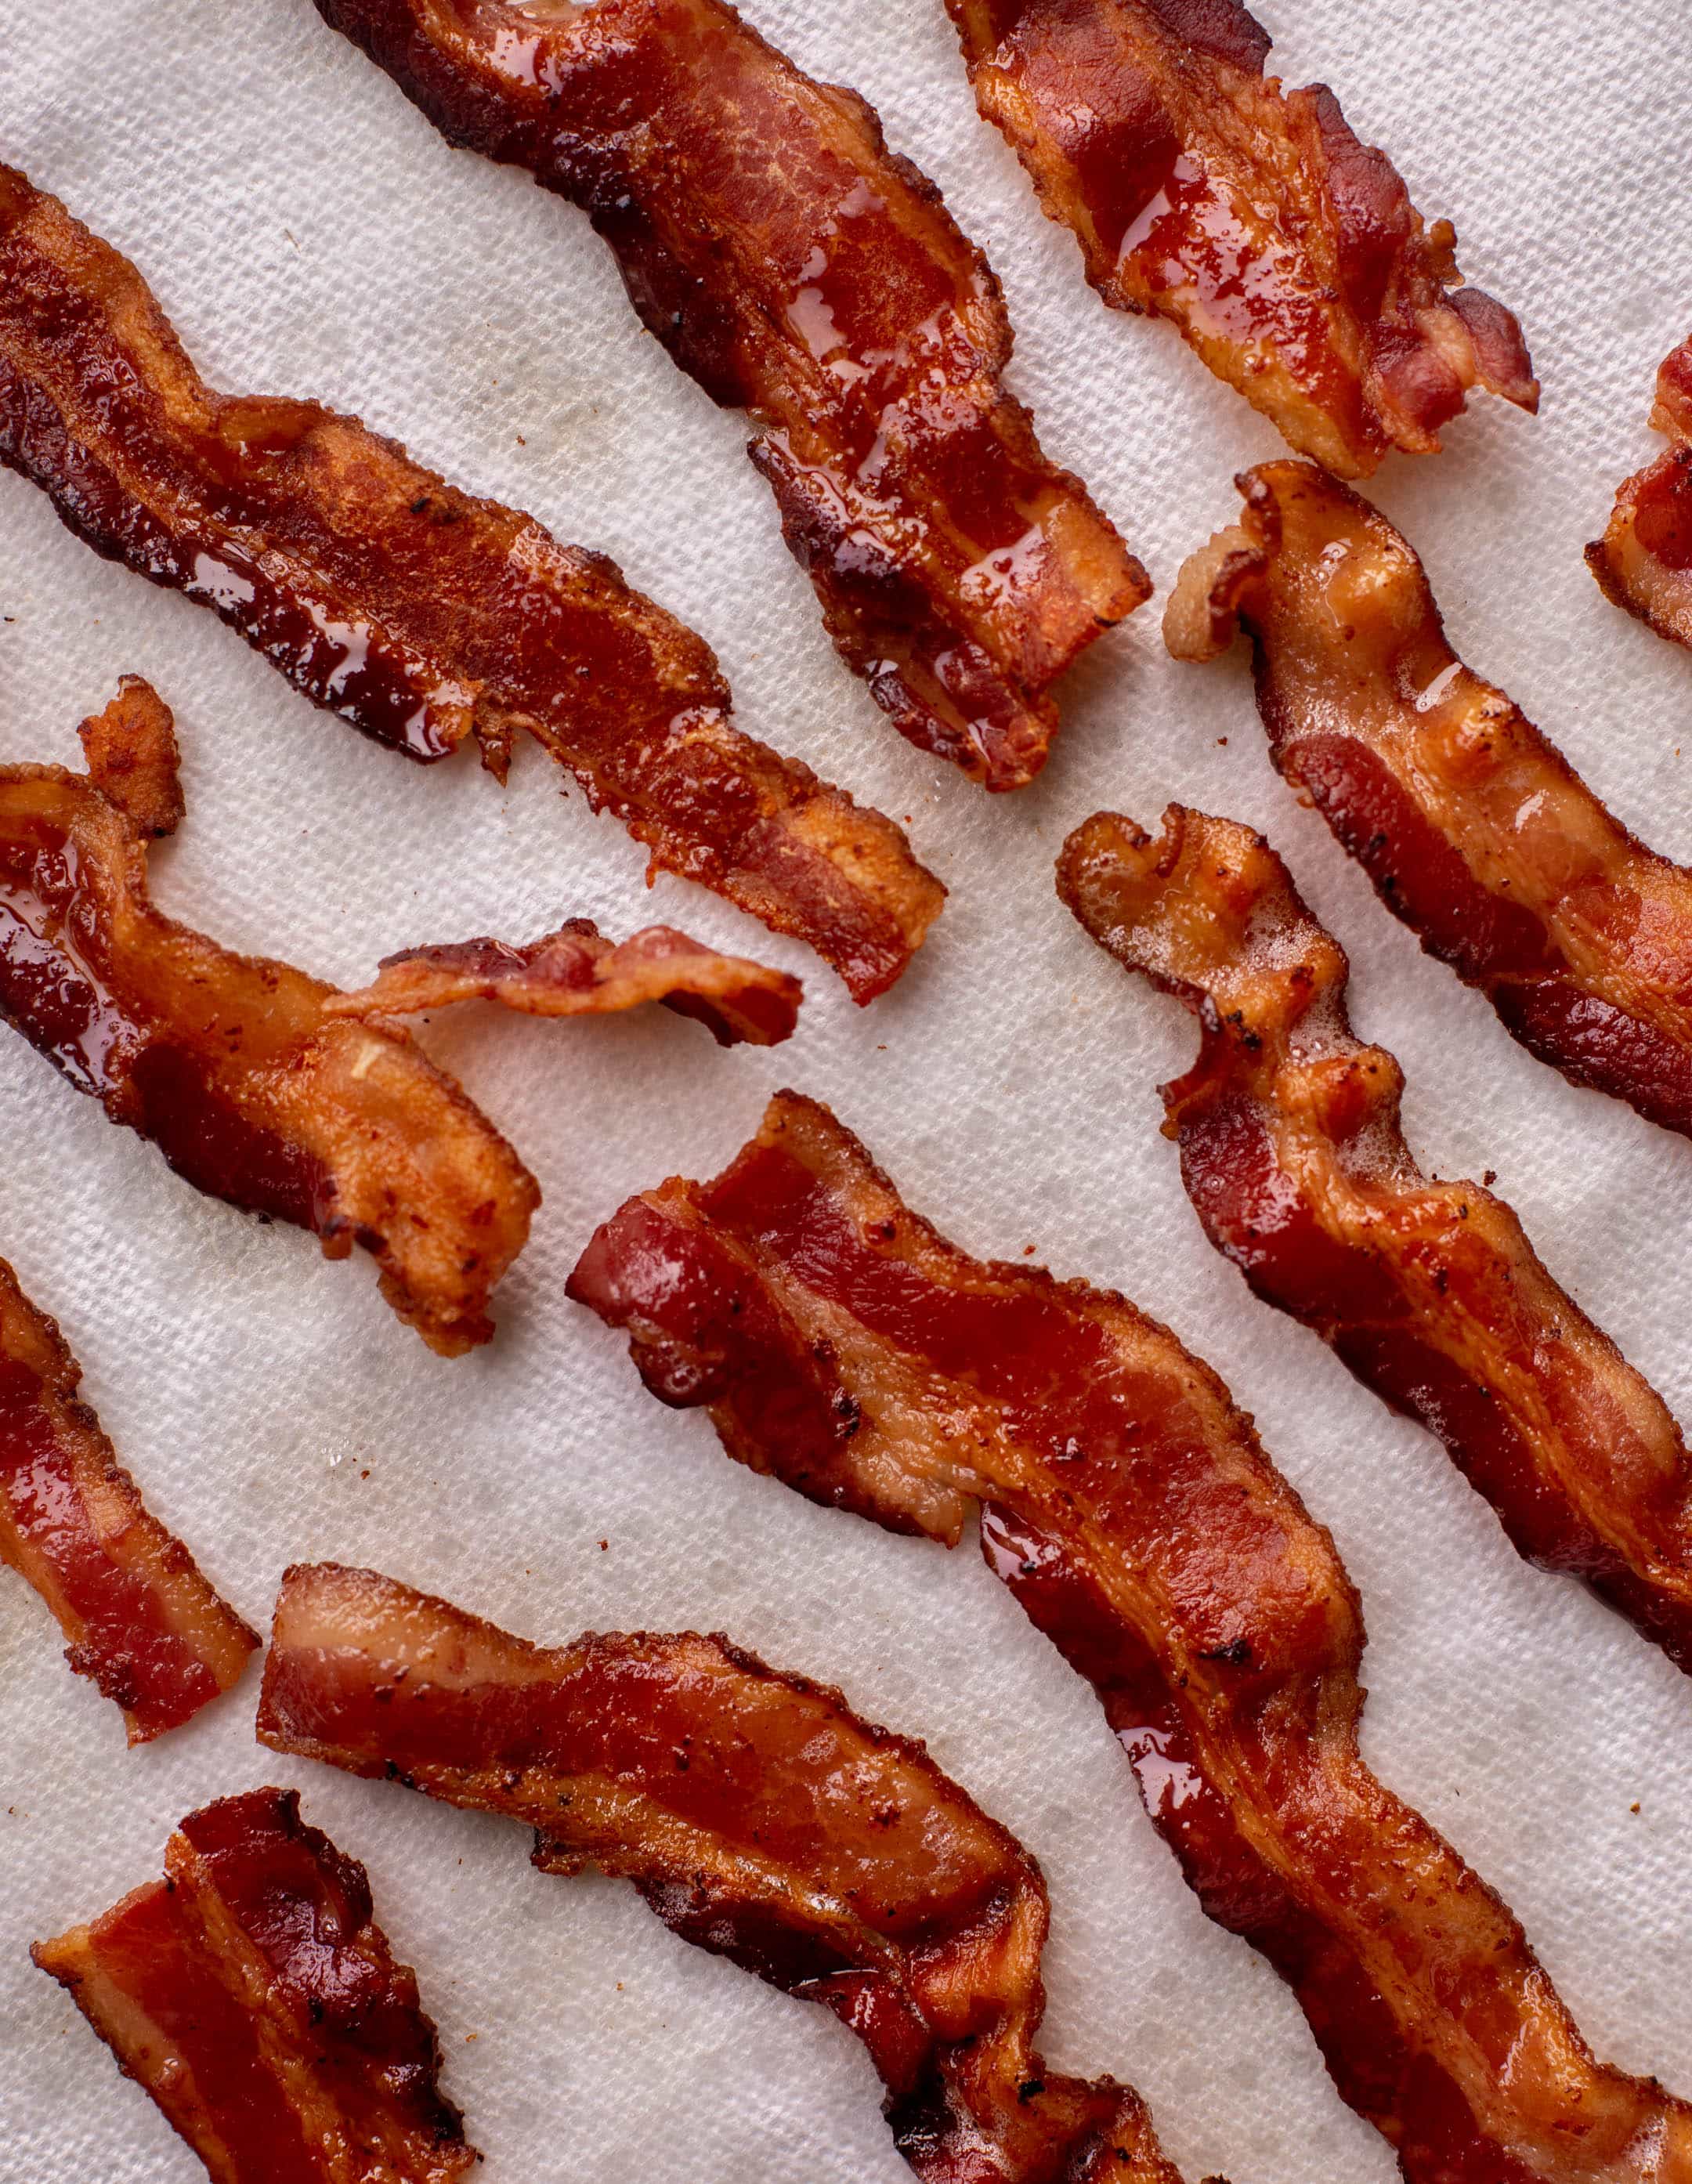
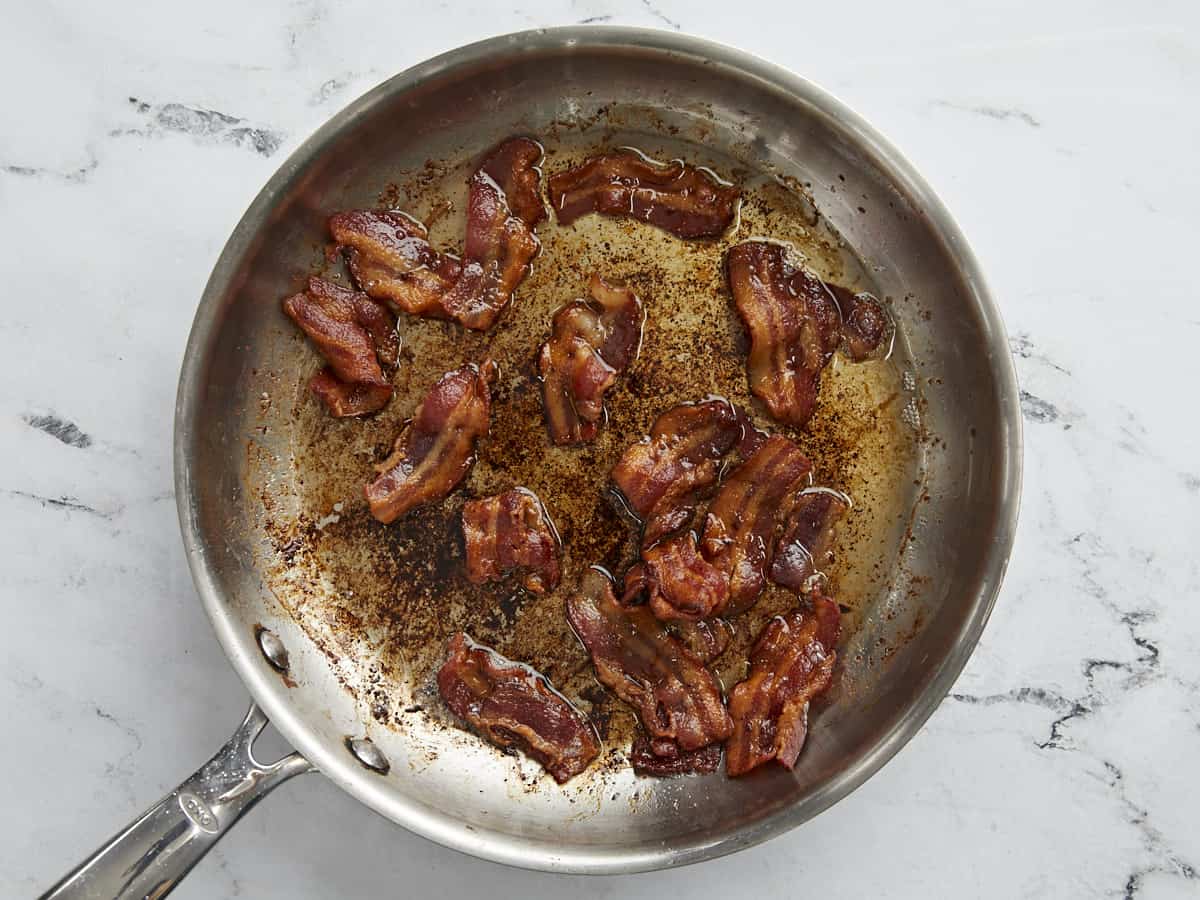
Oh, I fry up the bacon too! Just an essential part of the BLT…
I divide the blue cheese dressing in half, then I toss all the shredded lettuce into one of the halves. Toss, toss, toss.
Then it’s time to combine.
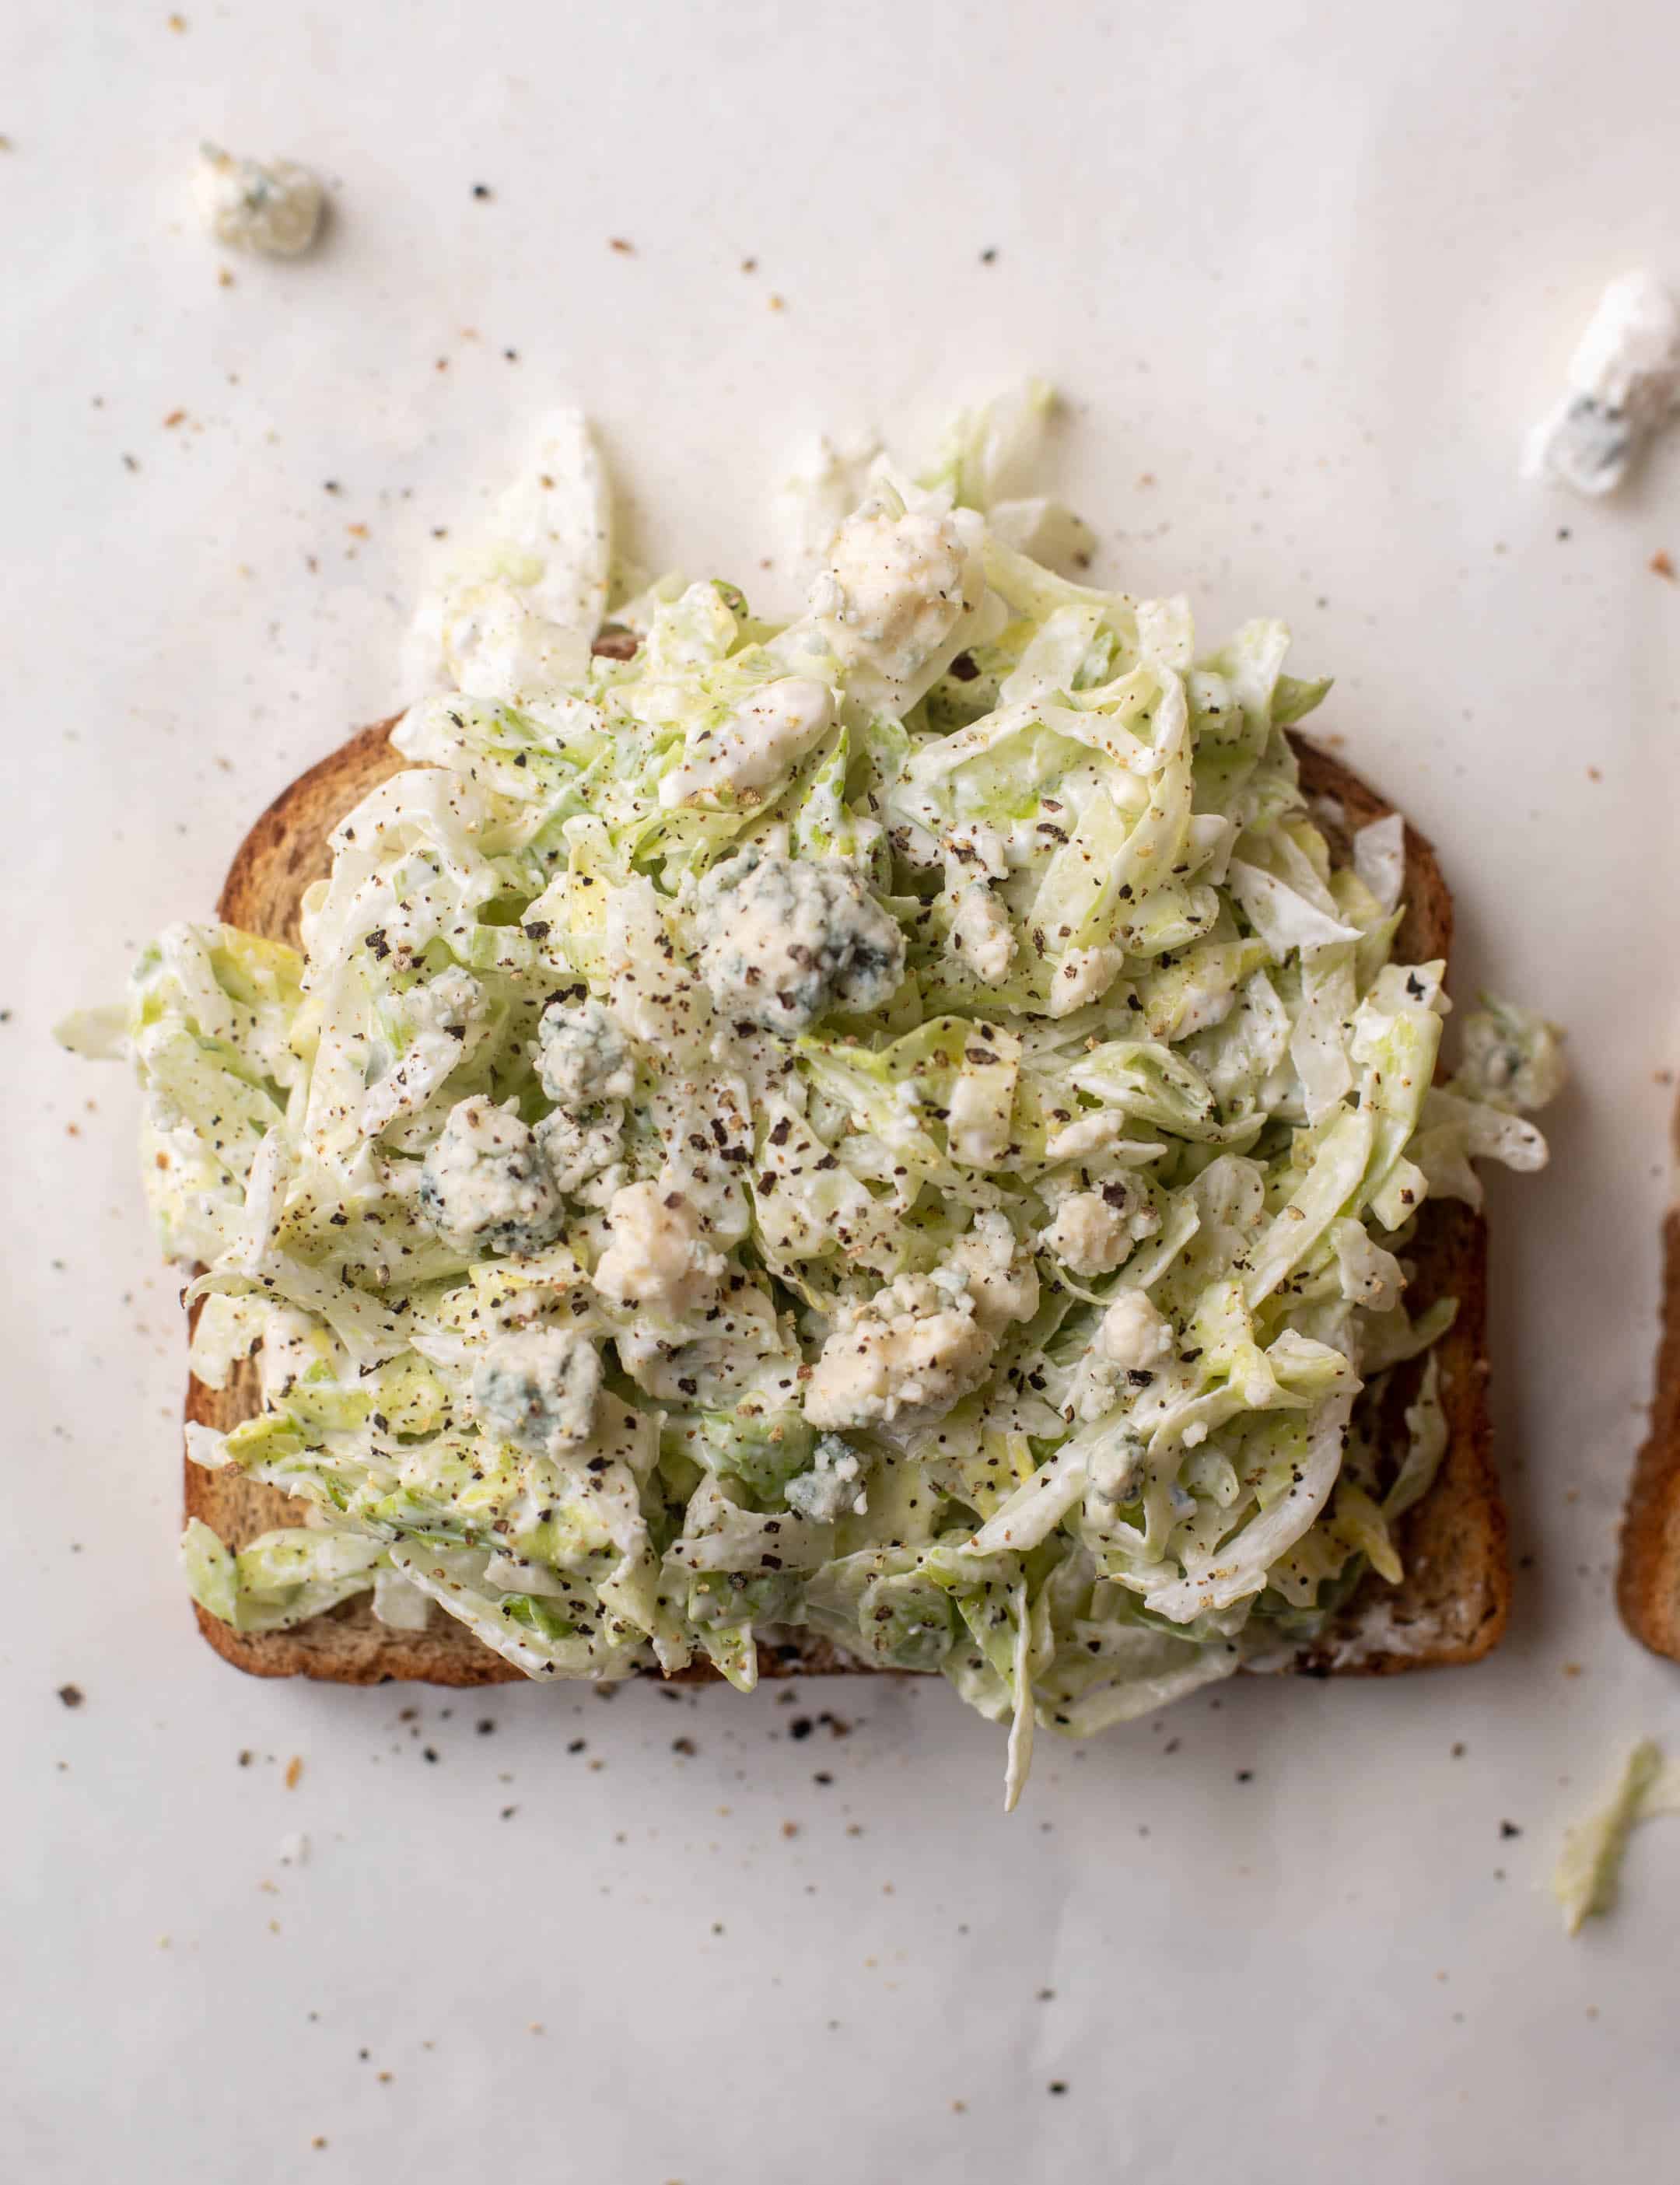
I love to use any toast for this (and, well, everything) and get it nice and golden. I use the remaining blue cheese dressing as a sauce. So, I spread some of the blue cheese on the toast, top it with a ton of the blue cheese shredded lettuce – like, pile it on. It’s crisp and refreshing and you can add so much more here since it’s shredded. Then, the tomatoes, bacon and so on.
This might be the perfect sandwich?
It’s crunchy, creamy, crispy, tangy, savory – everything you want the best summer lunch to be! (more…)
We’ve all had cold pizza for breakfast at some point in our lives (…right?), but intentionally making pizza for breakfast is a whole other ballgame. Breakfast foods taste surprisingly good in pizza form (especially eggs!) and there are so many other fun ingredients you can add to the mix. So if you’re pizza-obsessed like me, or just want to change up your weekend breakfast or brunch routine, you’ve got to make a breakfast pizza. It’s also perfect for brinner (breakfast for dinner)!
What’s on a Breakfast Pizza
There are no real rules when it comes to pizza. But in order to confidently call this a breakfast pizza, it’s got to have some classic breakfast ingredients, like bacon and eggs. The rest is totally open to interpretation! Use any crust you’d like (classic pizza crust, thin crust, a tortilla, crescent rolls, etc.), use red pizza sauce, white sauce, or go sauceless, use any type of cheese you like, and go wild with the leftovers in your fridge for even more toppings!
What Else Can I add?
I’ve kept the breakfast pizza below pretty simple, but pizzas are always a great opportunity to use up your leftovers. Here are some alternative or additional topping ideas for your breakfast pizza:
Bell pepper
Onion
Ham
Spinach
Tomato
Feta
Breakfast sausage
Hashbrowns
Mushrooms
Basically, anything that you can put in an omelet, you’d can put on a breakfast pizza!
Egg Options
I love a good liquid gold runny egg yolk, but if that’s not your thing, scrambled eggs work great on breakfast pizzas, too. Just make sure to only cook the eggs about halfway, until they’re still quite glossy because they will finish cooking while on top of the pizza in the oven. If you fully cook the eggs before adding them to the pizza, they’ll end up dry and rubbery after the pizza cooks.
Make it More Budget-Friendly
If you’re working on a super tight budget, here are a few ways you can make sure to keep the cost of your breakfast pizza LOW:
Make your own dough: the ingredients for pizza dough are as simple as they come, so making it from scratch is always going to be the cheapest option. We’ve got several pizza dough recipes on our website, including classic pizza dough, thin crust, and no-yeast pizza dough. You can even par-bake a tortilla for an ultra-thin and crispy crust!
Use less cheese and more eggs: Cheese is the most expensive ingredient on our breakfast pizza, but if you double the amount of eggs to cover more surface of the pizza you can cut back on the cheese by half and still have a delicious pizza!
Cut back on the meat: The bacon was the second most expensive ingredient in our breakfast pizza, but you could easily cut the amount of meat in half and supplement with some extra veggies! Using a lower-cost meat, like deli ham or sausage is another great option.
Cook the bacon in a skillet over medium heat until brown and crispy. Drain the cooked bacon on a paper towel lined plate.
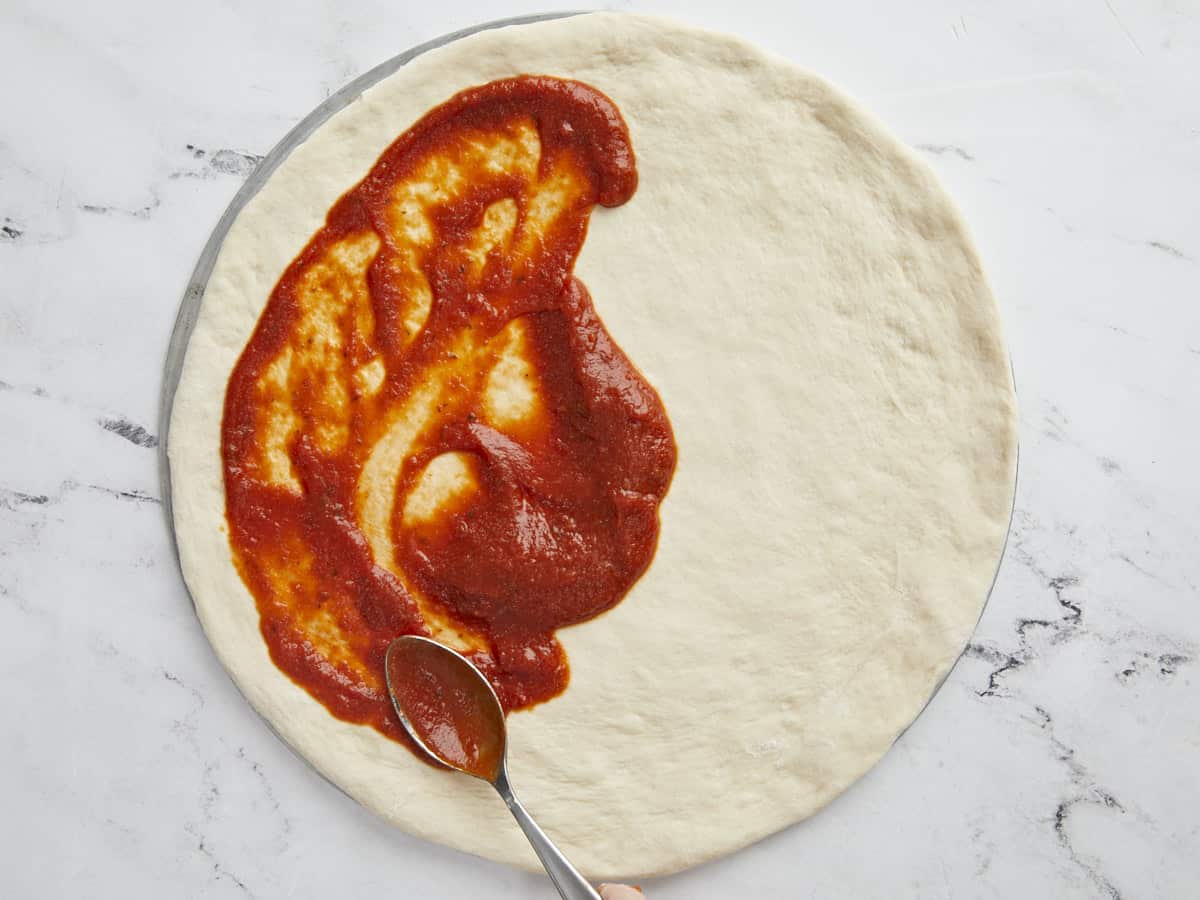
Preheat the oven to 450ºF. Stretch the pizza dough out over a pizz pan, then spread the pizza sauce evenly over the surface (leave about ½ inch of bare crust around the outer edge).
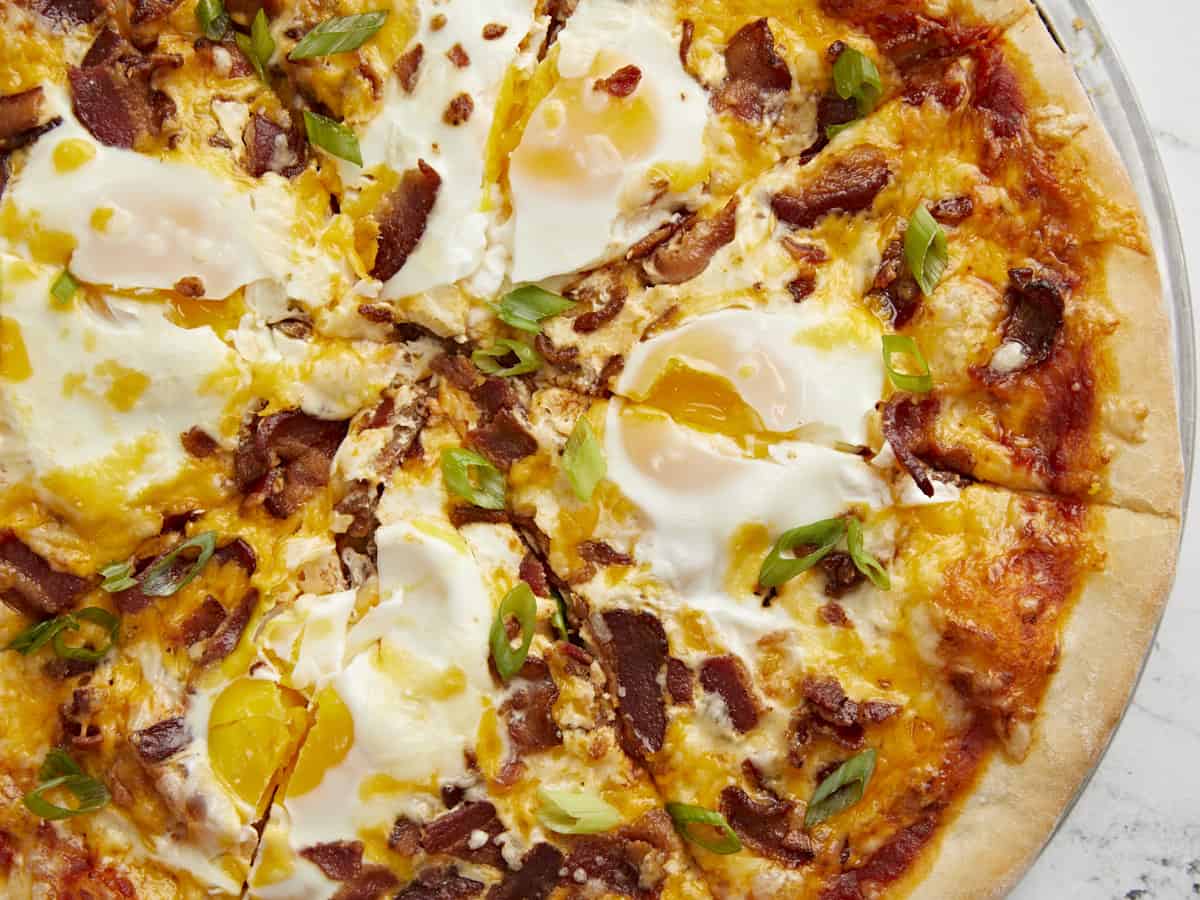
Sprinkle the shredded cheese evenly over the sauce. Crack four eggs onto the pizza, spaced out evenly over the surface, the crumble the bacon on top.
Bake the pizza for 12-15 minutes in the preheated oven or until the crust is golden brown, the cheese is melted, and the eggs are cooked to your liking (solid whites, firm or liquid yolks).
Top the baked pizza with green onion, slice into 8 pieces, then serve!
First, cook 8 oz. bacon in a skillet over medium heat until brown and crispy. Drain the bacon on a paper towel-lined plate. (You can use breakfast sausage in place of bacon, if preferred).
Preheat the oven to 450ºF. Stretch a large pizza dough out over a pizza pan, then spread about ½ cup of pizza sauce over the surface of the dough (use more or less sauce to your liking).
Sprinkle about 2 cups of shredded cheese over the surface of the pizza (we used a mix of cheddar and mozzarella because we’re using up leftovers!). I like to save a handful of the cheese to add on top of the eggs. Crack four eggs onto the pizza, spaced out evenly over the surface.
Crumble the bacon over the surface of the pizza, then sprinkle any remaining cheese on top.
Make sure the oven is fully preheated to 450ºF, then bake the pizza for 12-15 minutes, or just until the egg whites are set, the yolks are still soft, and the dough is golden brown around the edges.
Top the pizza with sliced green onions, cut into eight pieces, then enjoy!
My harabeoji had many secrets, and one of them was tucked inside his BLT.
He kept many things hidden—grief, remorse, worry—in an abyss of stubborn silence. He left Korea for San Diego in 1978 after enduring more than half a century of instability and …
My harabeoji had many secrets, and one of them was tucked inside his BLT.
He kept many things hidden—grief, remorse, worry—in an abyss of stubborn silence. He left Korea for San Diego in 1978 after enduring more than half a century of instability and loss. It was then, at 67, that he started anew, not to retire to manicured golf courses and poolside card games like other sexagenarians, but to work in a corner deli. He had been a widower, briefly, and now, in his new city, he was a newlywed with a new business.
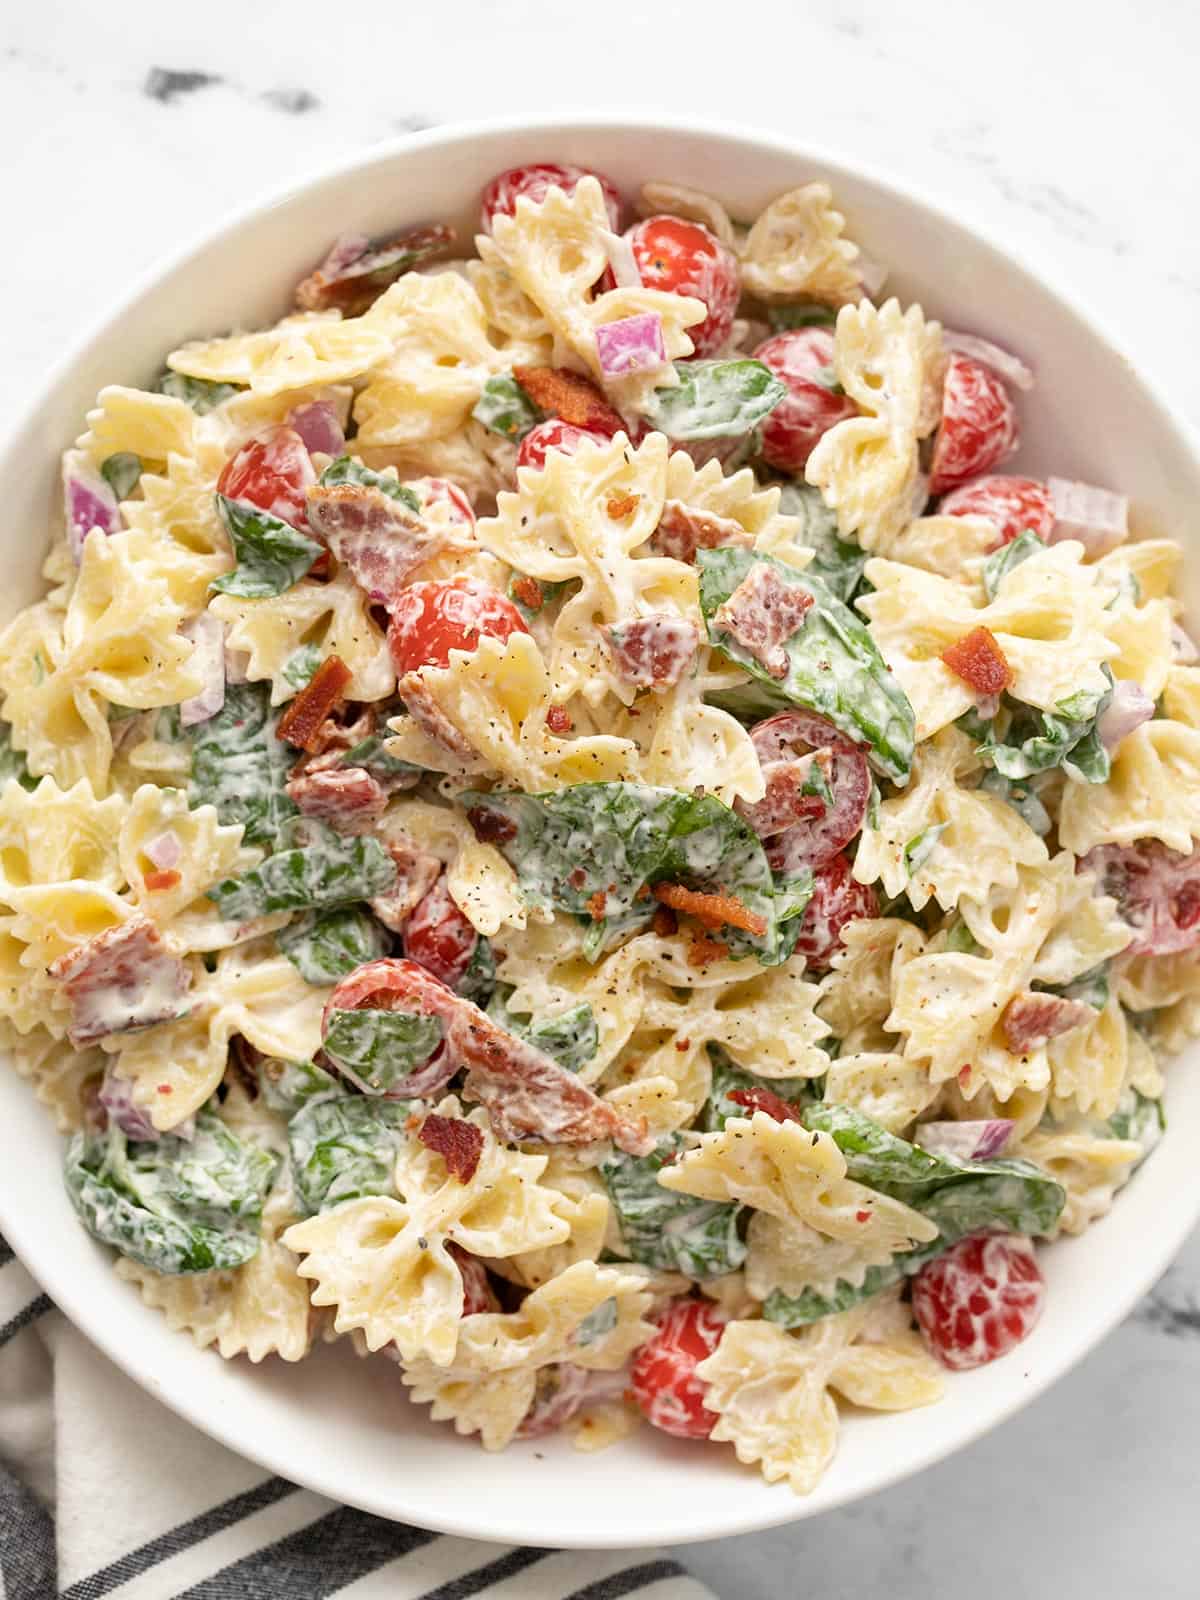
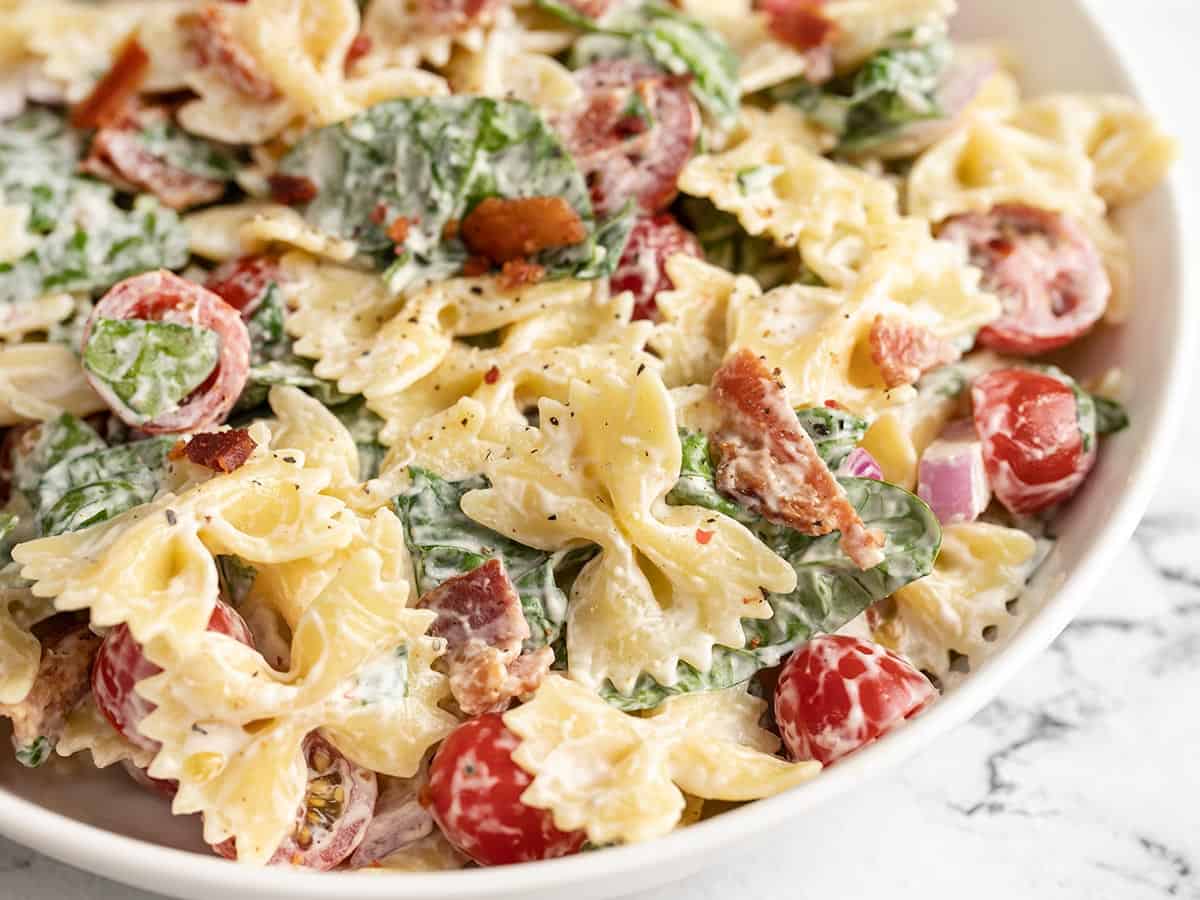
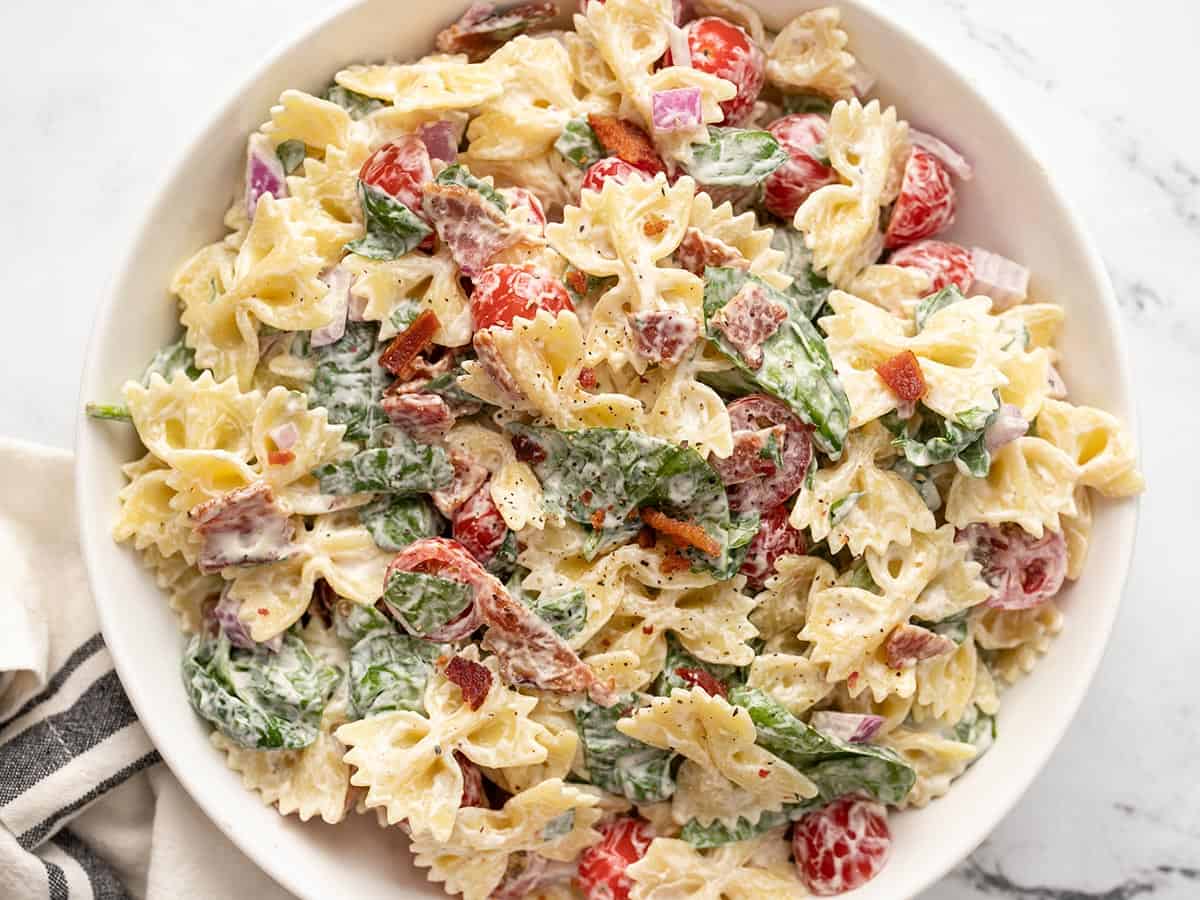
One of my favorite things about summer is a big ol’ juicy BLT sandwich. But until those gorgeous summer tomatoes come in, I’ll be enjoying that BLT flavor in salad form. This BLT Pasta Salad gives me all that creamy, tomatoey, balcony flavor I love but in a cold and refreshing pasta salad form. Plus, it’s great for all your summer BBQs, picnics, and potlucks. So if you haven’t tried this classic summer pasta salad, put it on your list!
What’s In BLT Pasta Salad?
Okay, just in case you’ve never experienced the beautiful simplicity of a BLT sandwich, let’s start there. “BLT” stands for “bacon lettuce tomato”. A BLT sandwich is just crispy bacon, fresh lettuce, and sliced tomatoes between two slices of bread, slathered with mayonnaise. It’s simple and perfect.
For BLT Pasta Salad we keep the core flavors the same, but we flesh it out just a bit. I think lettuce is a bit too delicate for pasta salad, so I used fresh spinach instead (I think it holds up better and has better color and texture for a pasta salad). To give the dressing a little more flavor than just plain mayo, we add a little ranch dressing, lemon juice for zing, and some salt and pepper. And then finally, I added a little diced red onion to round out the flavor and texture of the salad. It’s still super simple and totally delish!
What Kind of Pasta to Use
You can use any short pasta shape for this recipe, like rotini, small shells, macaroni, orecchiette, cavatappi, or farfalle (bowtie). I went for bowtie because I thought the shape was super cute in this salad!
How Long Does it Last?
This BLT Pasta Salad benefits from a little time in the fridge (you’ll want it to sit for 10-15 minutes for the best flavor), but it will eventually dry out, so you’ll want to make it the same day if you’re serving it to guests. I ate the leftovers for two days after I originally made the salad and while it was still amazing the next day, it did get a little dry by day two. So for best results, make this salad the same day you plan to serve it and try to eat up those leftovers within a day or so!
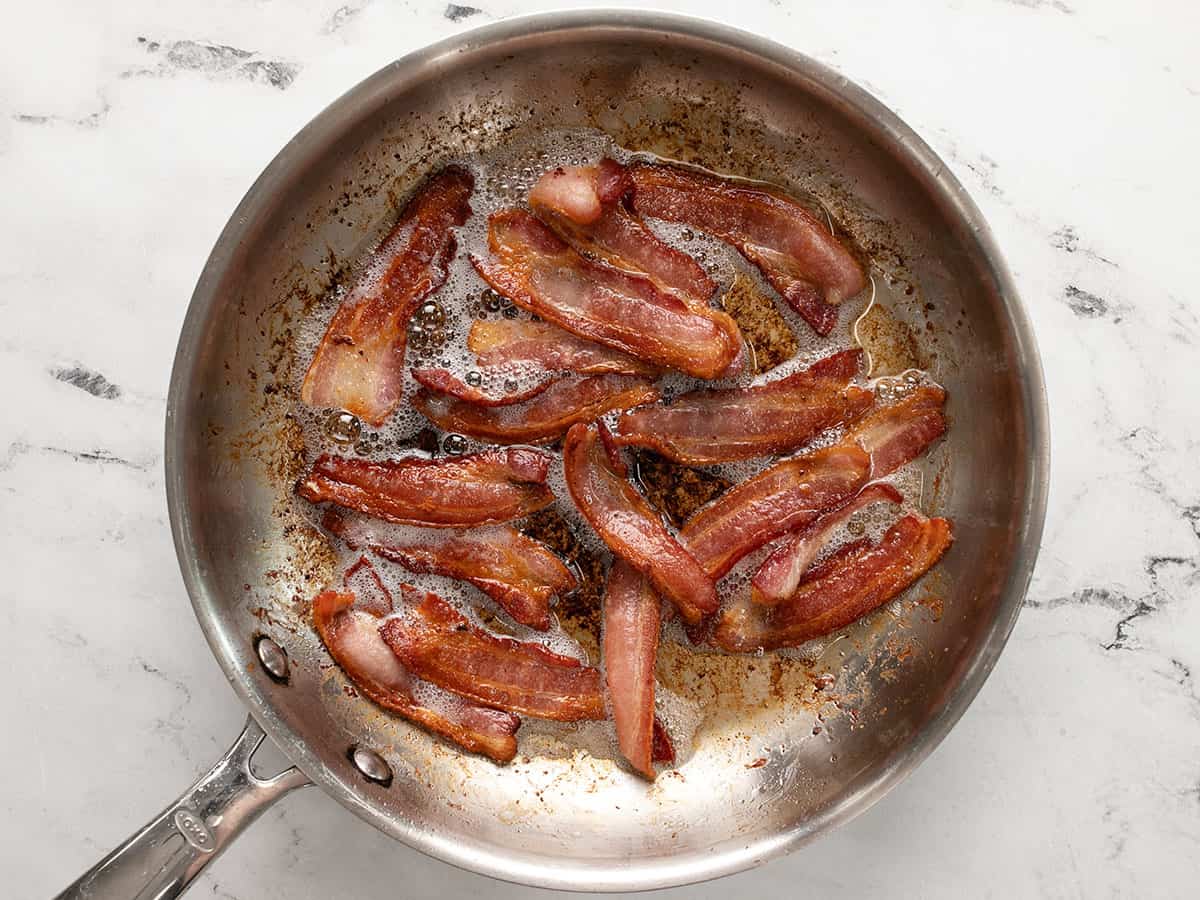
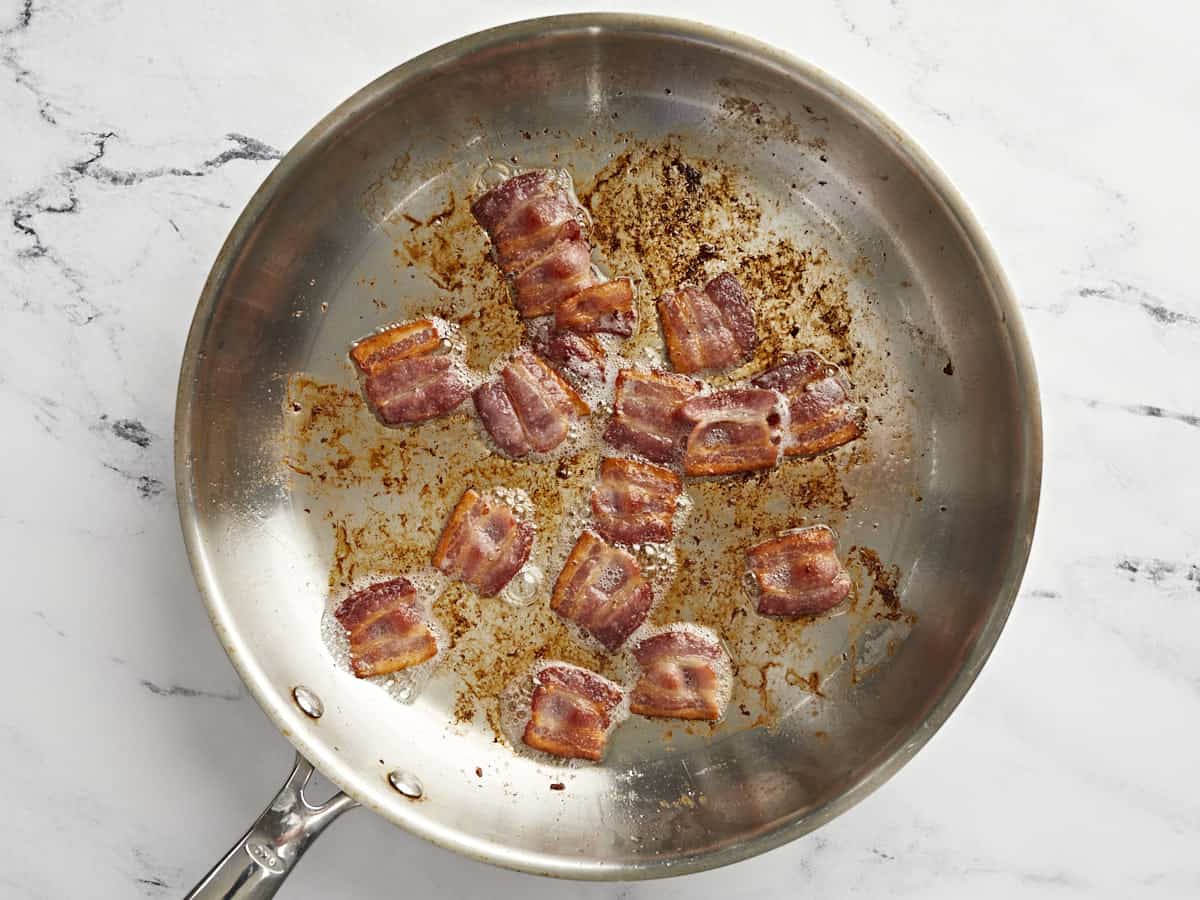
Cook the bacon in a large skillet over medium heat until brown and crispy. Transfer the cooked bacon to a paper towel-lined plate to drain and cool. Once cooled, chop or crumble the bacon into smaller pieces.
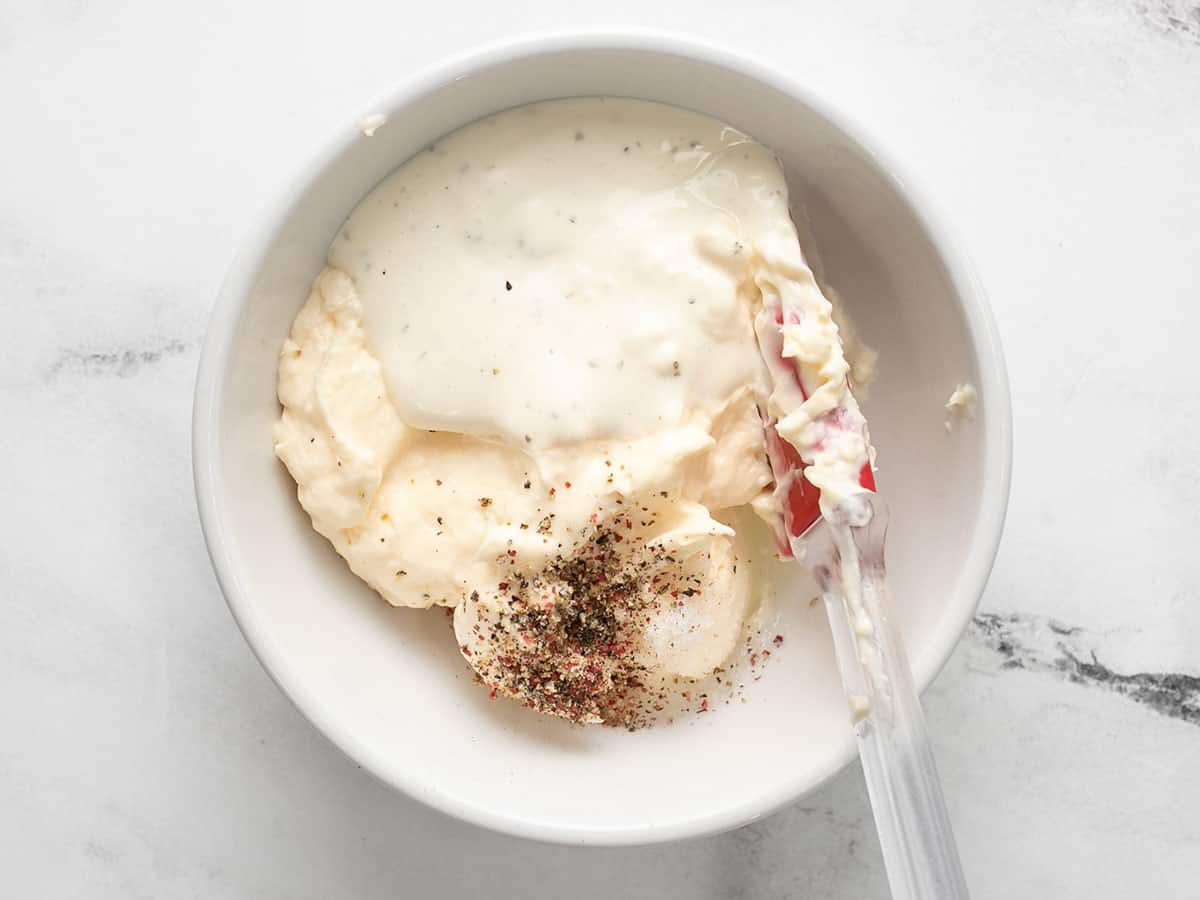
While the bacon is cooking, prepare the dressing. Stir together the mayonnaise, ranch dressing, lemon juice, salt, and pepper. Set the dressing aside.
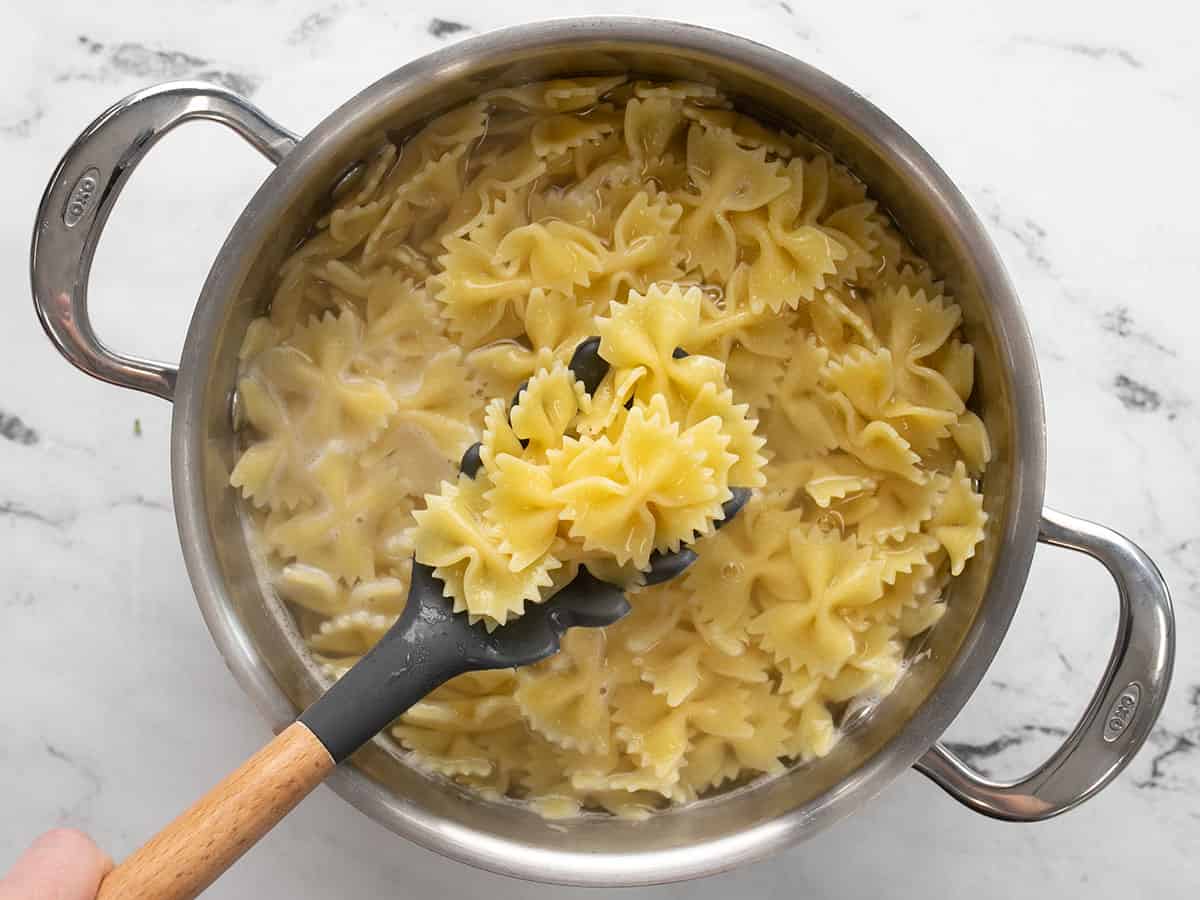
Bring a large pot of salted water to a boil for the pasta. Once boiling, add the pasta and cook until tender (7-8 minutes). Drain the pasta in a colander, rinse it briefly with cool water to cool it down, then let it drain very well.
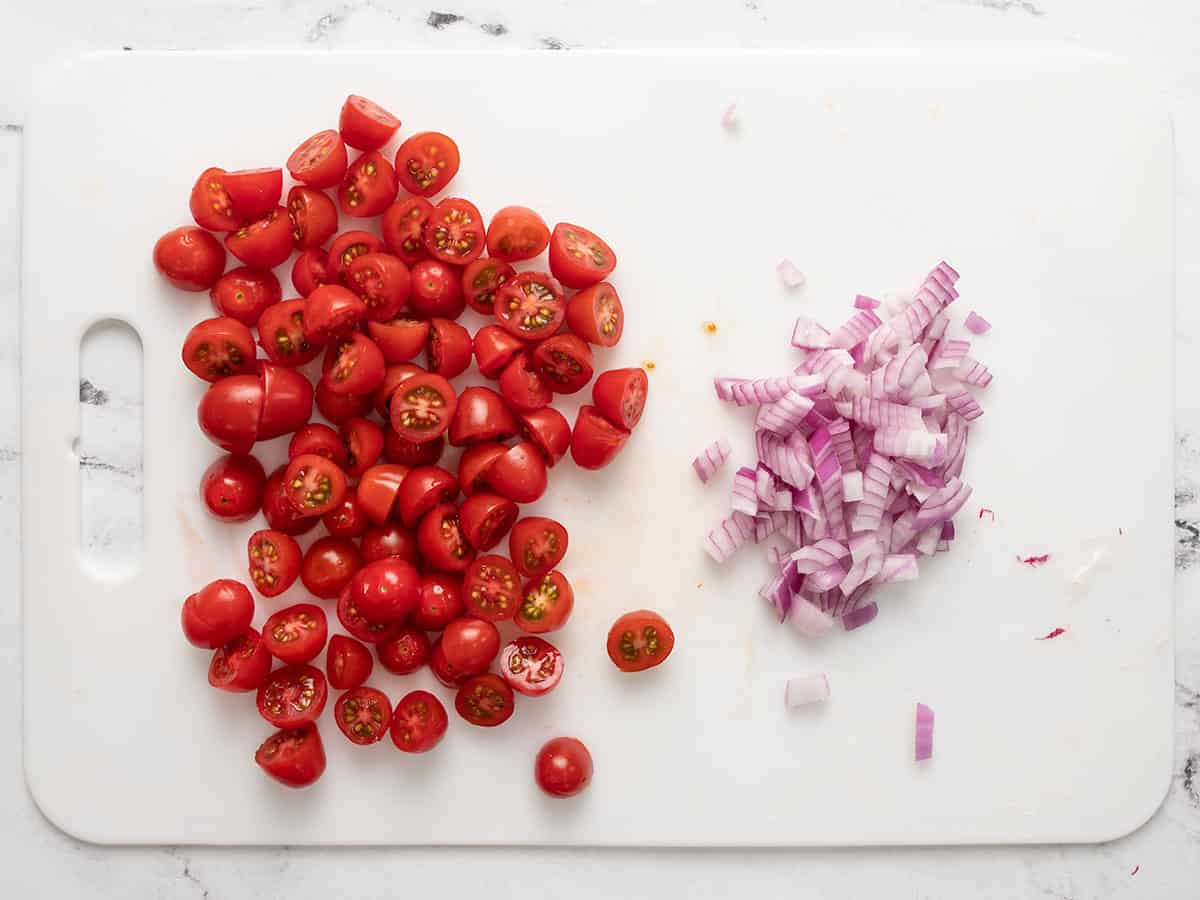
While the pasta is cooking and draining, prepare the vegetables. Slice the grape tomatoes in half, finely dice the red onion, and roughly chop the spinach.
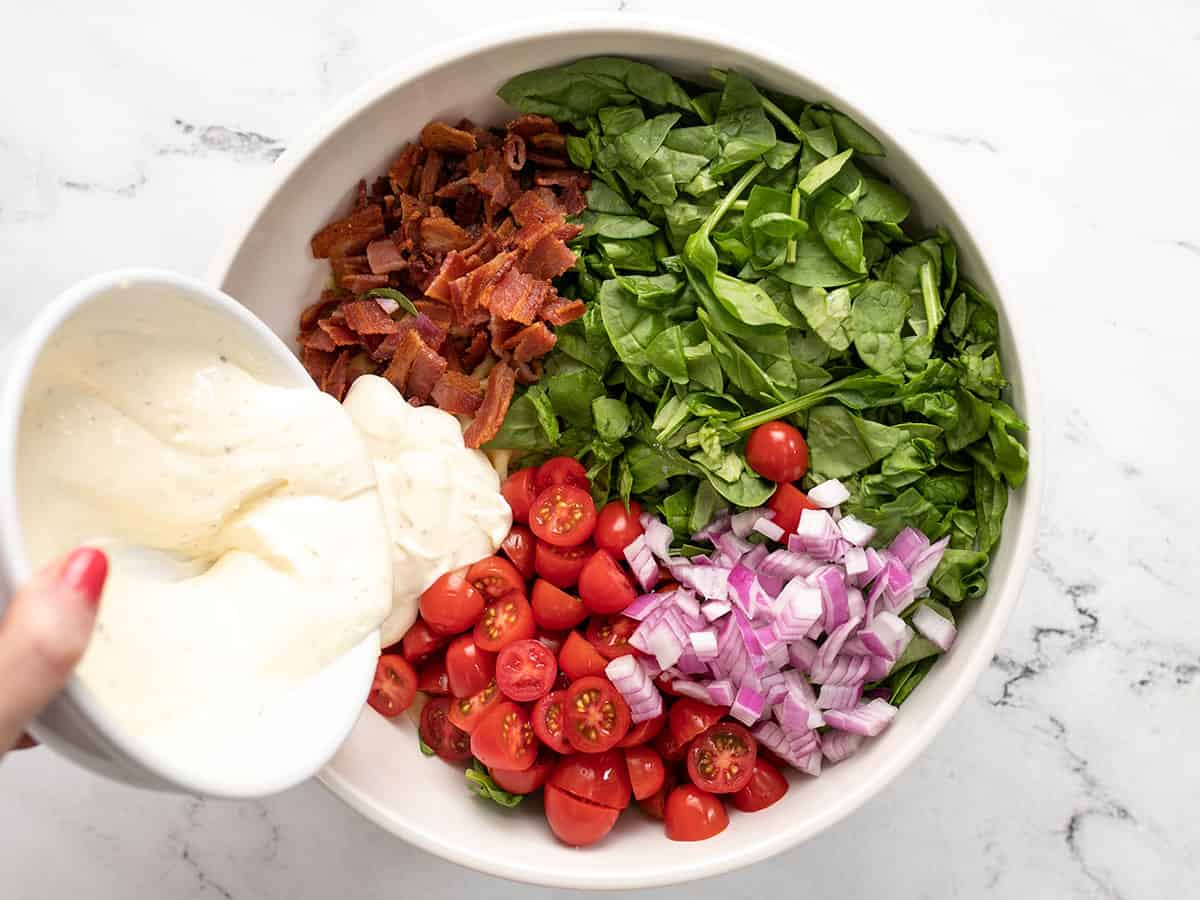
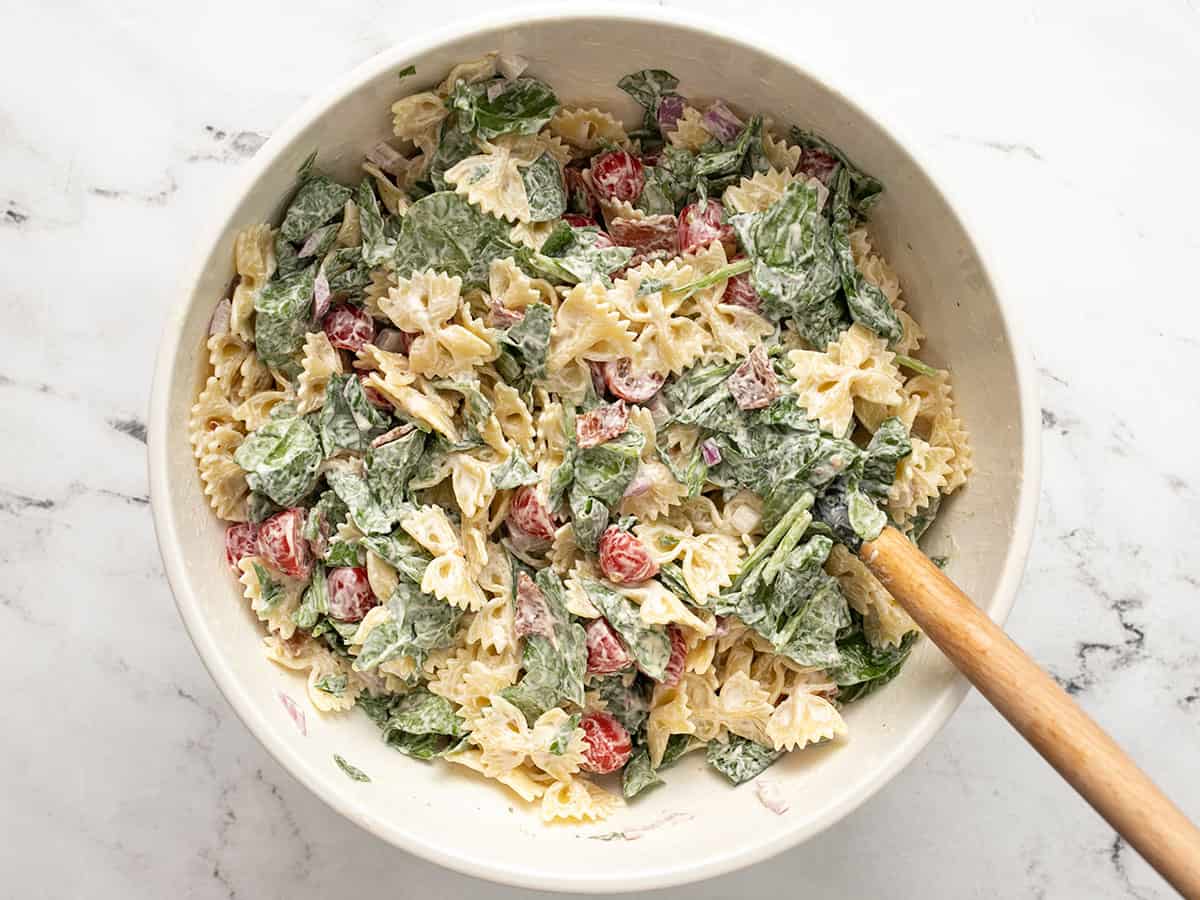
Once the pasta is cooled and drained, add it to a large bowl along with the spinach, tomatoes, onions, and dressing. Stir everything together until evenly combined and coated in dressing. Let the pasta sit for 10-15 minutes for the flavors to blend, then stir once more and serve.
Begin by cooking 8oz. of bacon in a skillet over medium heat until it is brown and crispy. Remove the bacon from the skillet and drain on a paper towel-lined plate. Once cooled, chop or crumble the bacon into smaller pieces.
While the bacon is cooking, make the salad dressing. Combine ¾ cup mayonnaise, ¼ cup ranch dressing, 2 Tbsp lemon juice, ½ tsp salt, and ¼ tsp freshly cracked pepper. Set the dressing aside.
Add a tablespoon of salt to a large pot of water and bring it to a boil over high heat. Once boiling, add 12oz. bowtie pasta and continue to boil until the pasta is tender (7-8 minutes). drain the pasta in a colander. Give it a quick rinse with cool water to cool it off, then let it drain very well.
While the pasta is cooking and draining, slice one pint of grape tomatoes in half and finely dice ¼ of a red onion (about ⅓ cup diced).
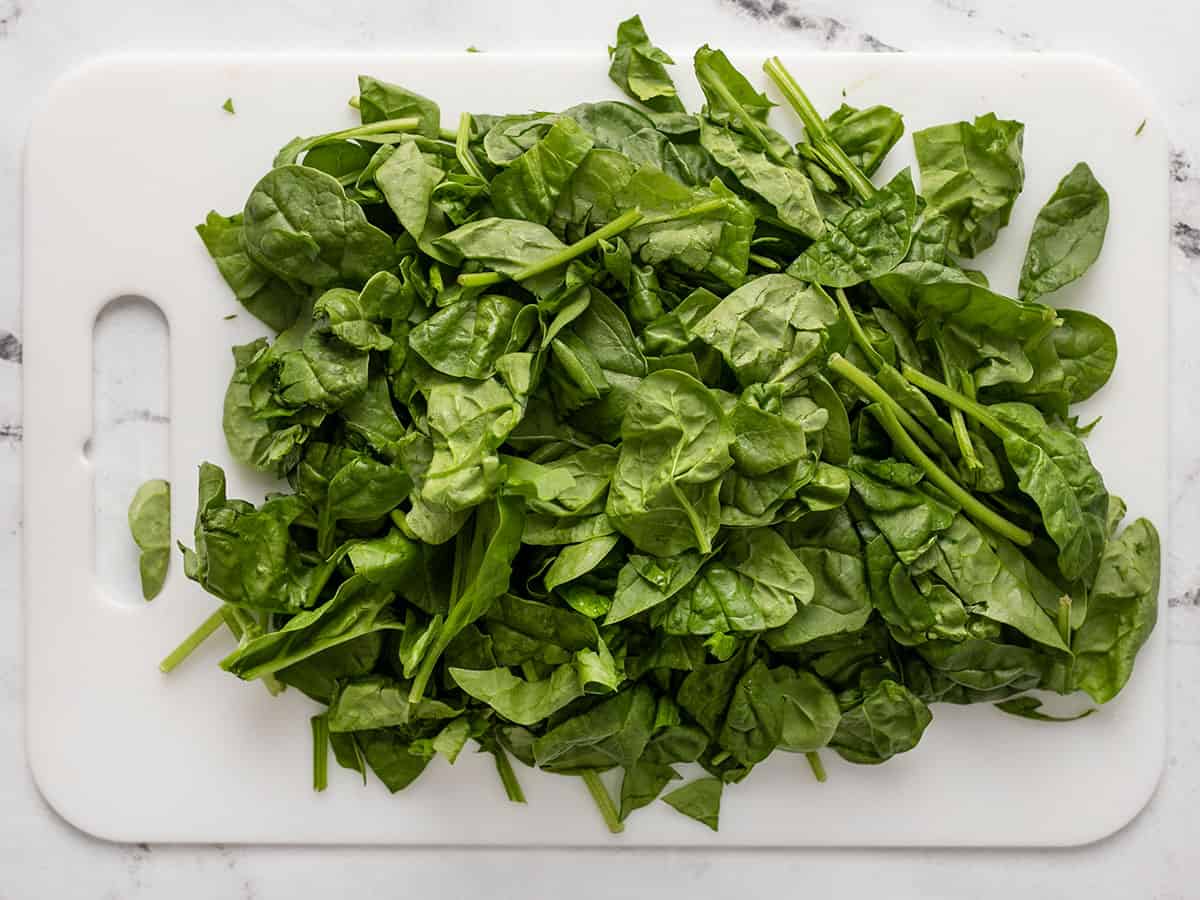
Roughly chop 2 packed cups of fresh spinach into bite-sized pieces.
Once the pasta is cooled and well drained, transfer it to a large bowl and add the spinach, tomatoes, onions, and dressing.
Stir until everything is evenly combined and coated in dressing. Let the salad sit for about 10 minutes for the flavors to blend a little more, then give it one more stir before serving.
Okay, okay, okay, while I love a good rich and creamy southern-style potato salad, sometimes I want something different. I love German potato salad it’s a little bit lighter on the palate with its tangy mayo-free vinaigrette dressing, and still has plenty of body and flavor, thanks to BACON. It makes a great side dish for grilled bratwurst, kielbasa, or anything you might be serving at your back yard summer BBQ!
What is German Potato Salad
German potato salad is a simple yet elegant dish featuring thickly sliced potatoes, bacon, onions, fresh herbs, and a tangy mustard vinaigrette dressing. The fat from the bacon is used to sauté the onions and acts as the fat in the vinaigrette, so everything has that wonderfully smoky bacon flavor. You can serve German potato salad hot or cold.
What Type of Potatoes are Best for Potato Salad?
Not all potatoes are equal. Russet potatoes, for instance, break down easily and are well-suited for things like mashed potatoes. Red potatoes hold up slightly better than russets, but a waxy potato like Yukon Gold will hold their shape even better. Personally, I love the color contrast of the red skins, so I went with red potatoes.
How Long Does German Potato Salad Last in the Refrigerator
You can keep this salad refrigerated for about four days. The dressing will absorb into the potatoes as it chills, so it may become slightly more dry as the days go on. You can either save some extra dressing to add just before serving, or make an extra batch to add later.
What to Serve with German Potato Salad
German potato salad can be served hot or cold and makes a great addition to any potluck or BBQ spread. This week I served mine with my Glazed Pork Chops. It also goes great with sausage, like Bratwurst or Kielbasa! Just like creamy American potato salads, German potato salad also makes a great side dish for lunch items, like sandwiches.
Wash the potatoes well, then add them to a large pot with enough water to cover the potatoes. Add 1 tsp salt to the water to season the potatoes as they cook. Place a lid on the pot, turn the heat on to high, and bring the pot to a boil. Continue to boil the potatoes until they can easily be pierced with a fork (12-15 minutes).
Meanwhile, add the bacon to a large skillet and cook over medium heat until the bacon is brown and crispy. Remove the cooked bacon from the skillet and leave the bacon fat in the skillet to cook the onions and make the dressing.
Add the diced onion to the skillet and continue to cook over medium heat in the bacon fat until the onions are soft and translucent.
Once the onions are soft, turn the heat down to low and add the mustard, sugar, pepper, ½ tsp salt, and the apple cider vinegar. Whisk the ingredients together until a light sauce forms, then turn the heat off.
When the potatoes are finished cooking, drain them in a colander and allow them to cool for a few minutes, or just until they're cool enough to handle. Once slightly cool, slice the potatoes into ¼-inch thick half-rounds.
While the potatoes are cooling, roughly chop the cooked bacon and the fresh parsley.
Add the sliced potatoes, bacon, and parsley to the skillet with the onions and dressing. Toss everything until evenly combined and coated in dressing. Give the potato salad a taste and adjust the salt or other seasonings to your liking. Serve warm or refrigerate until ready to eat.
How to Make German Potato Salad – Step by Step Photos
Wash 2 lbs. of small red potatoes well. Place them in a large pot and add enough water to cover them by one inch. Add about 1 tsp of salt to the water to make sure the potatoes are well seasoned. Place a lid on the pot and turn the heat on to high. Bring the pot to a boil, then continue to boil the potatoes until they are tender enough to be easily pierced with a fork (12-15 minutes, depending on the size).
While the potatoes are boiling, cook 4 oz. of bacon in a skillet over medium heat until the bacon is brown and crispy. Remove the cooked bacon from the skillet. Leave the bacon fat in the skillet as it will be used to cook the onions and make the dressing.
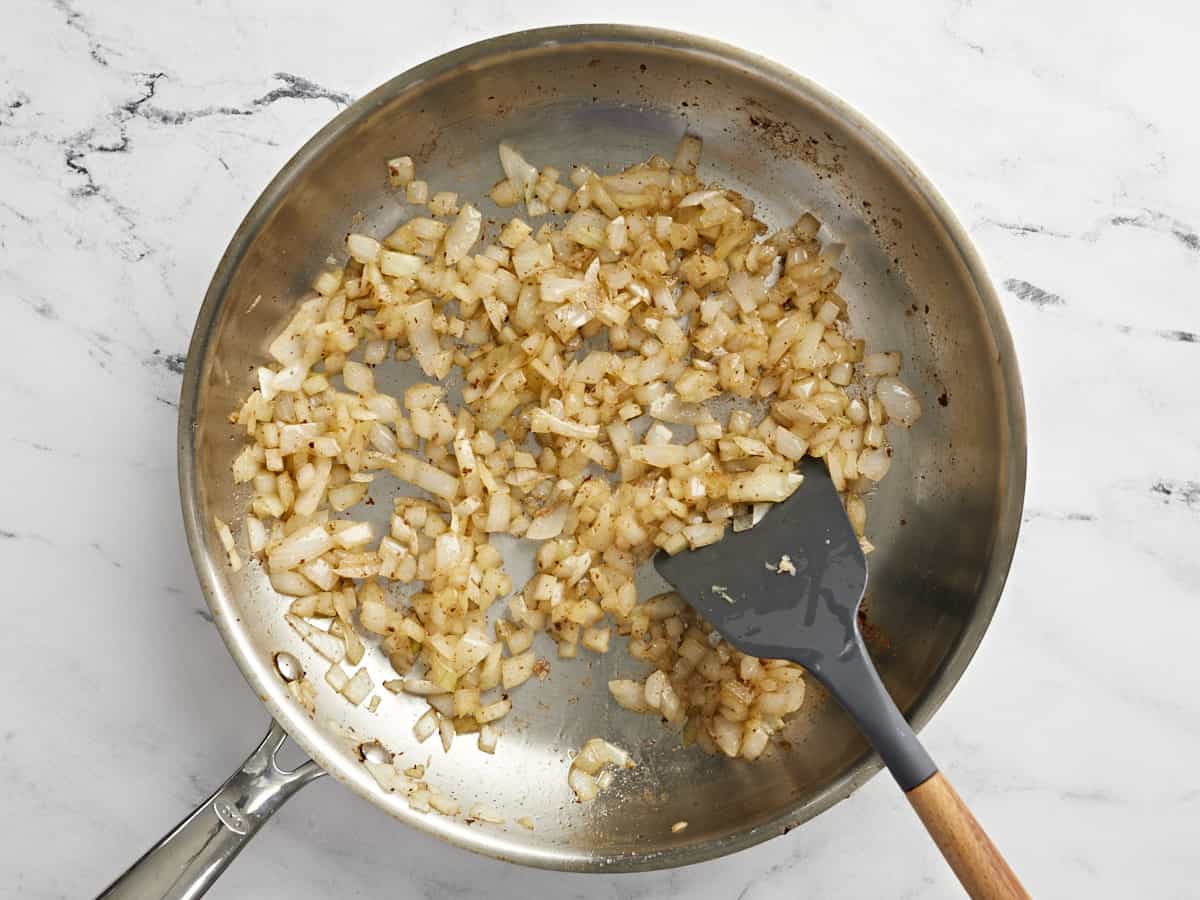
Add one diced yellow onion to the skillet with the bacon fat. Continue to cook over medium heat until the onions are soft and translucent. The moisture from the onions should dissolve all the browned bits of flavor stuck to the bottom of the skillet from the bacon.
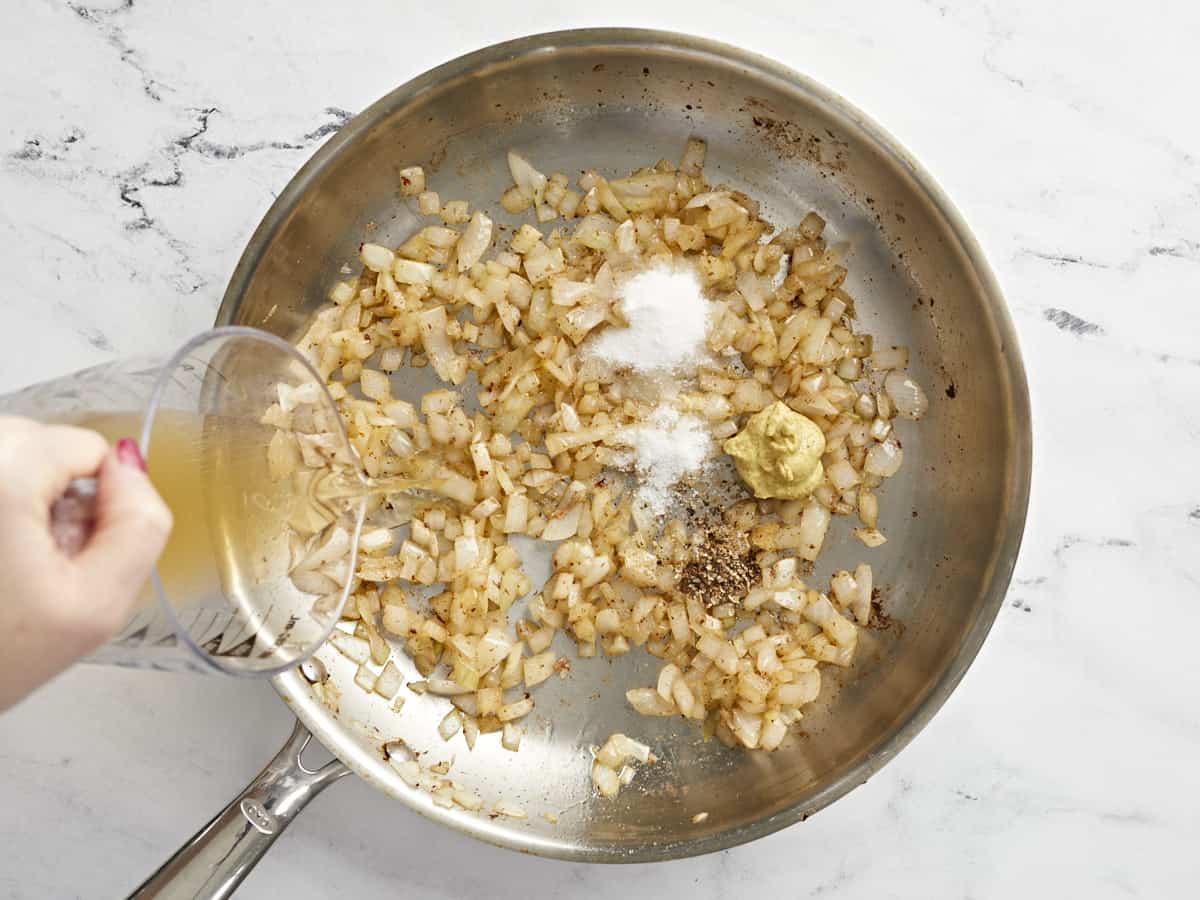
Once the onions are soft, reduce the heat in the skillet to low and add 1 Tbsp grainy mustard, 2 tsp sugar, ½ tsp salt, ¼ tsp freshly cracked pepper, and ⅓ cup apple cider vinegar.
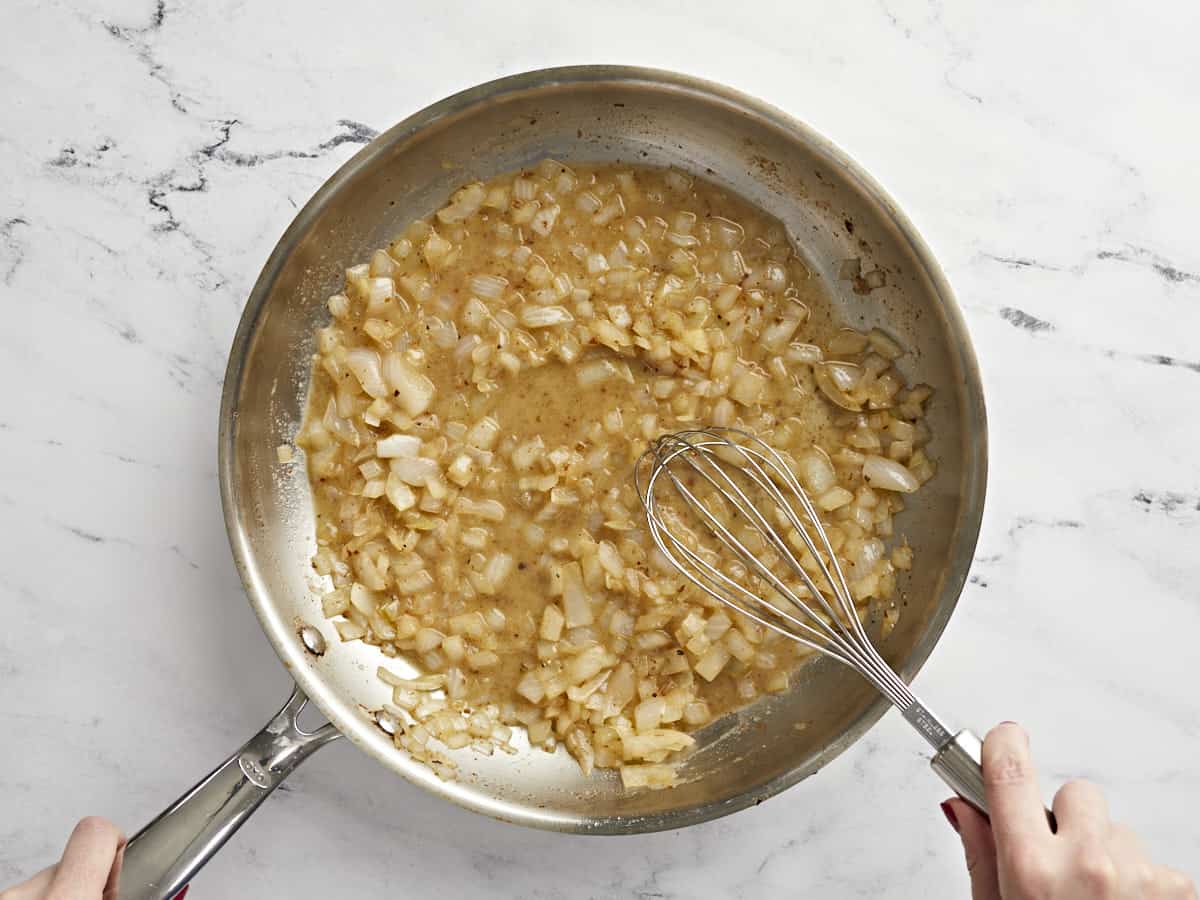
Whisk the ingredients in the skillet until they form a light sauce, then turn the heat off.
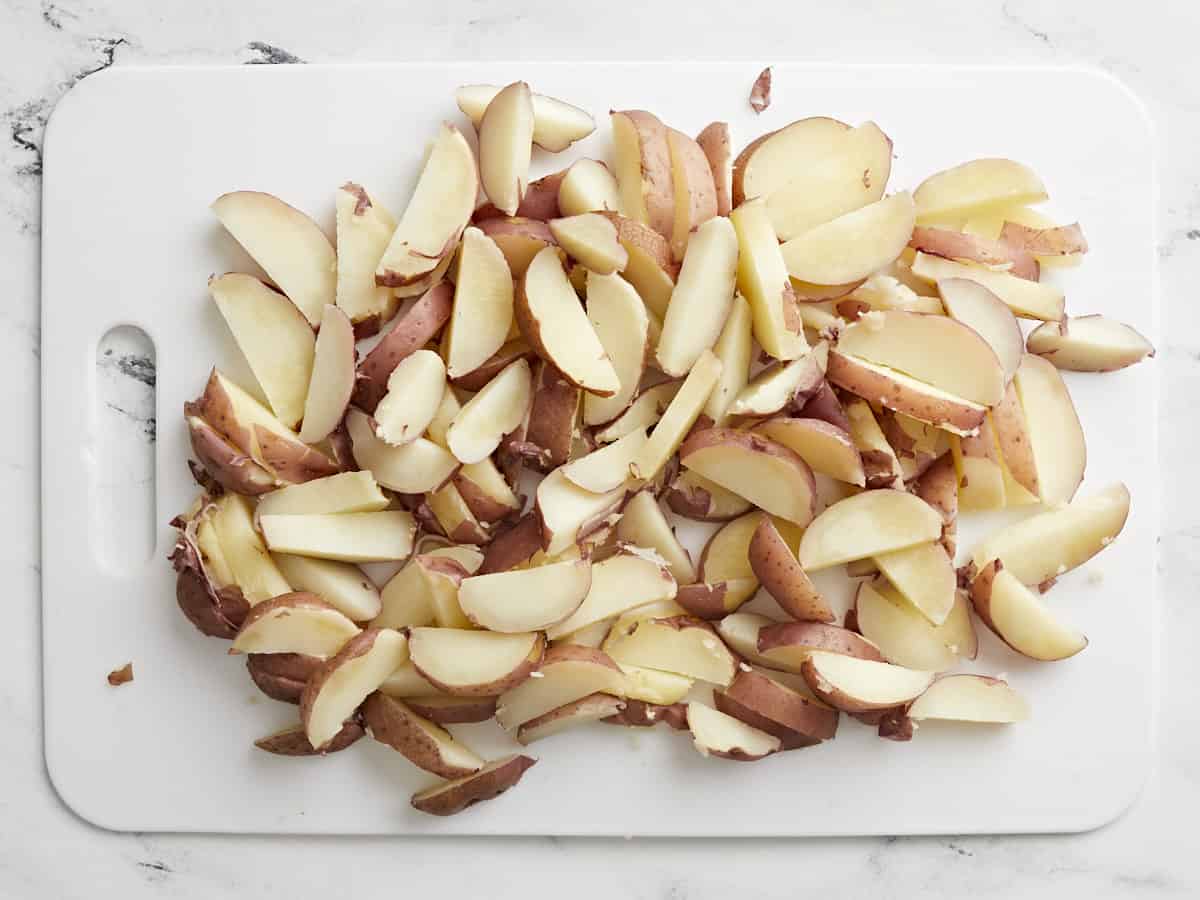
Once the potatoes are tender, drain them in a colander and let them cool for just a few minutes or until they are cool enough to handle. Slice the potatoes into 1/4-inch thick half-moons.
Roughly chop the cooked bacon and ¼ cup of fresh parsley. Add the sliced potatoes, bacon, and parsley to the skillet with the dressing.
Toss the ingredients together until everything is evenly coated in dressing and parsley. Give the potato salad a taste and adjust the salt or other ingredients to your liking.
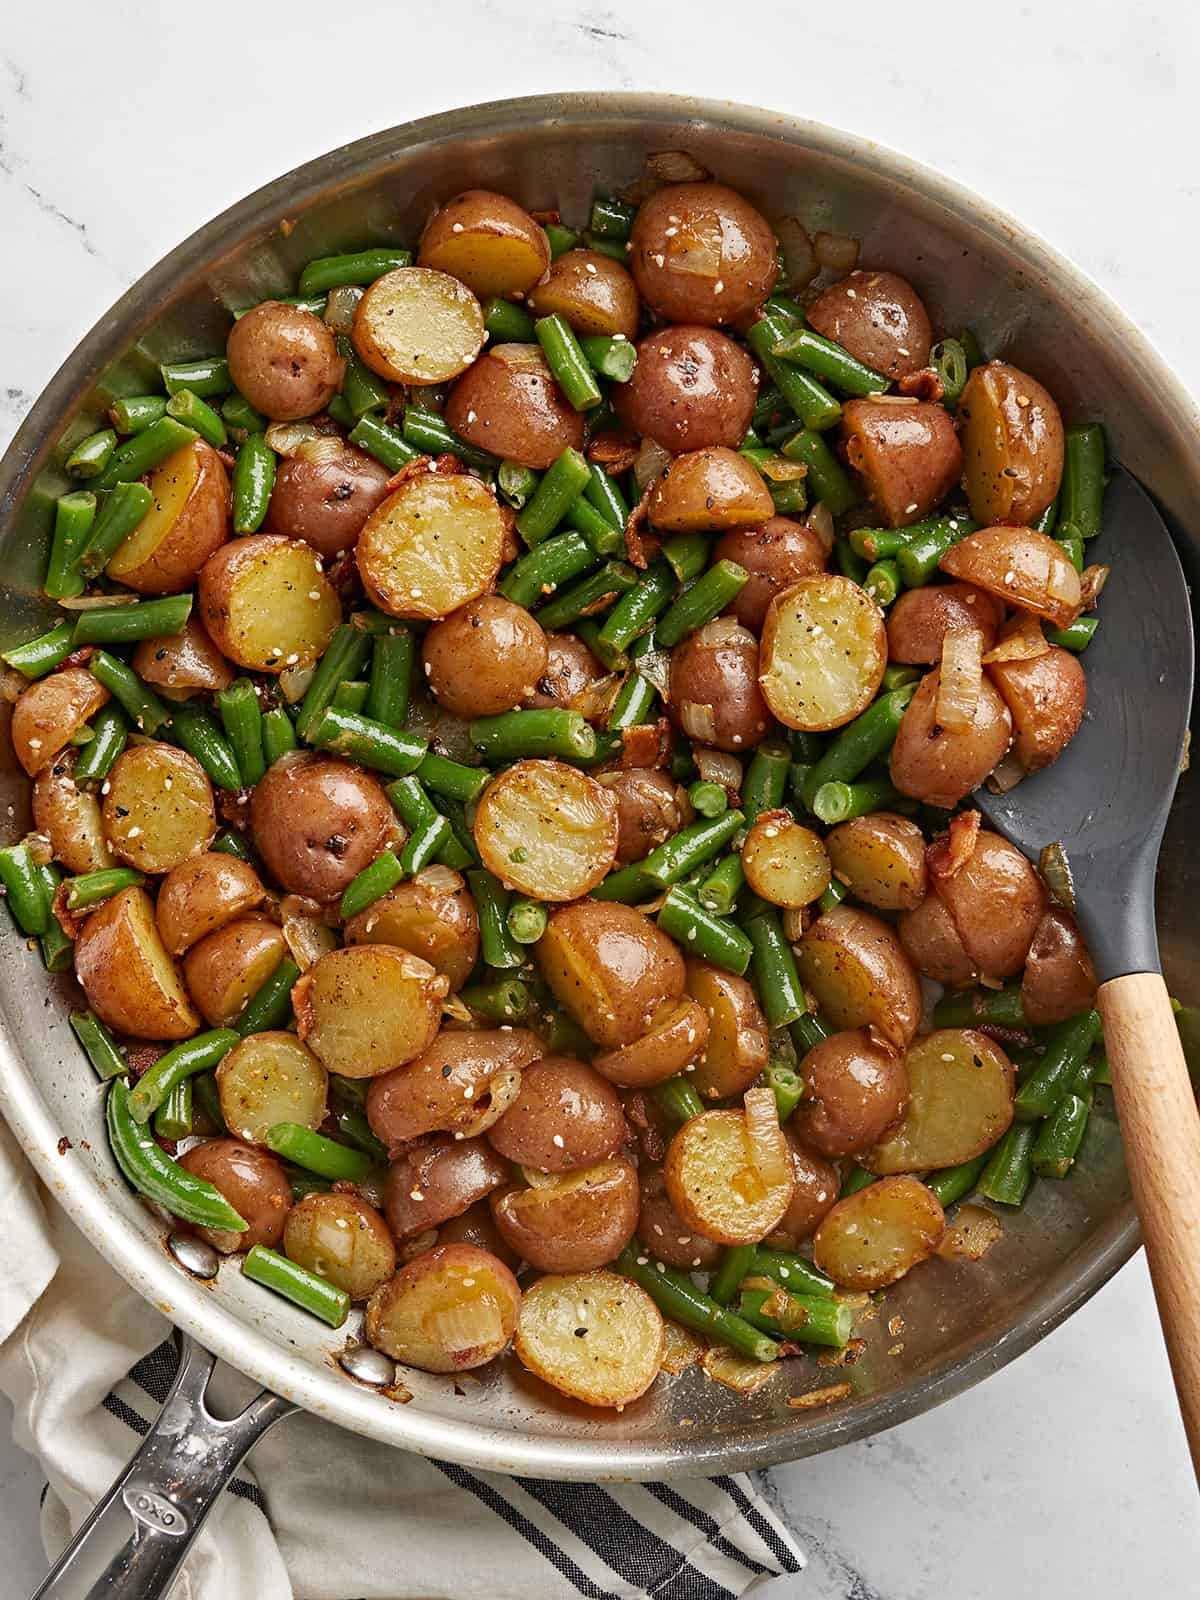
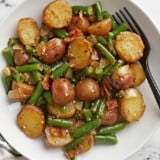
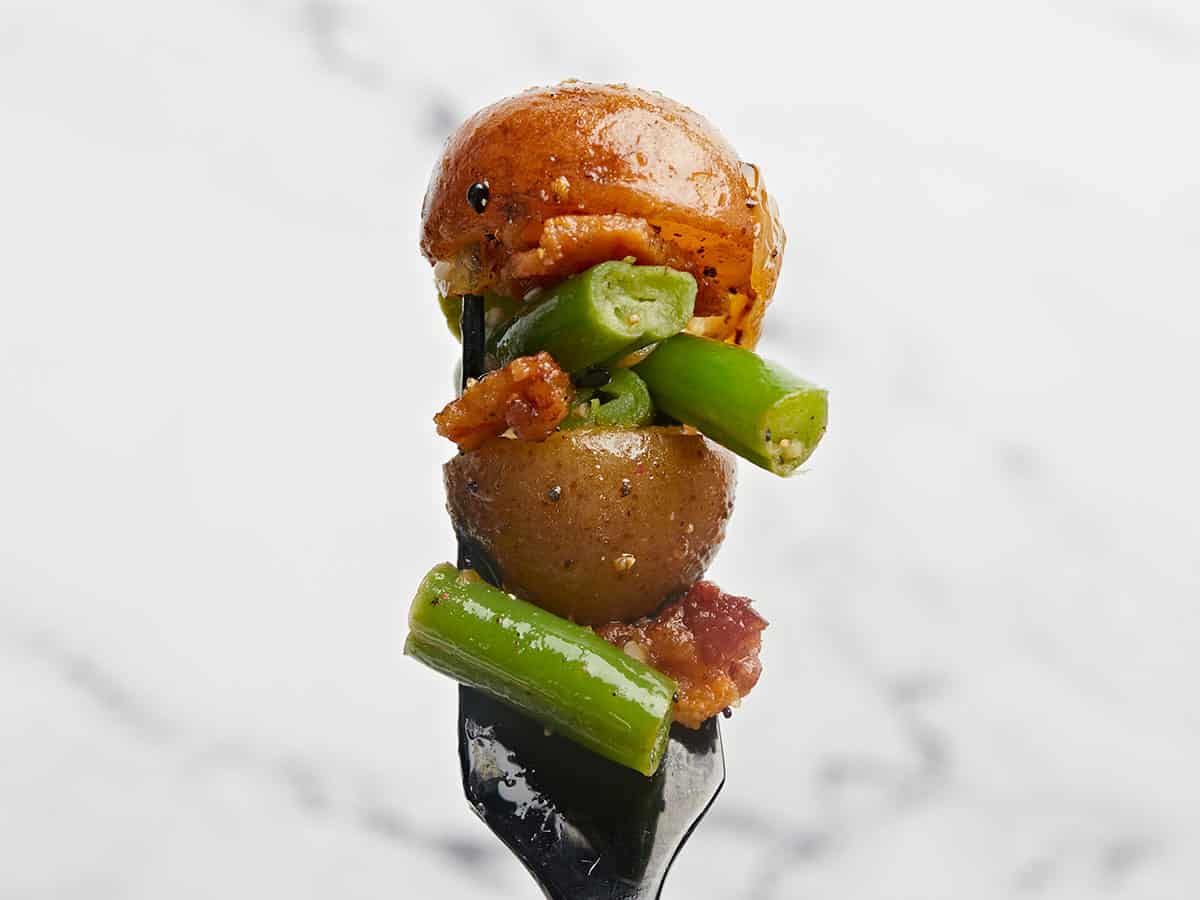
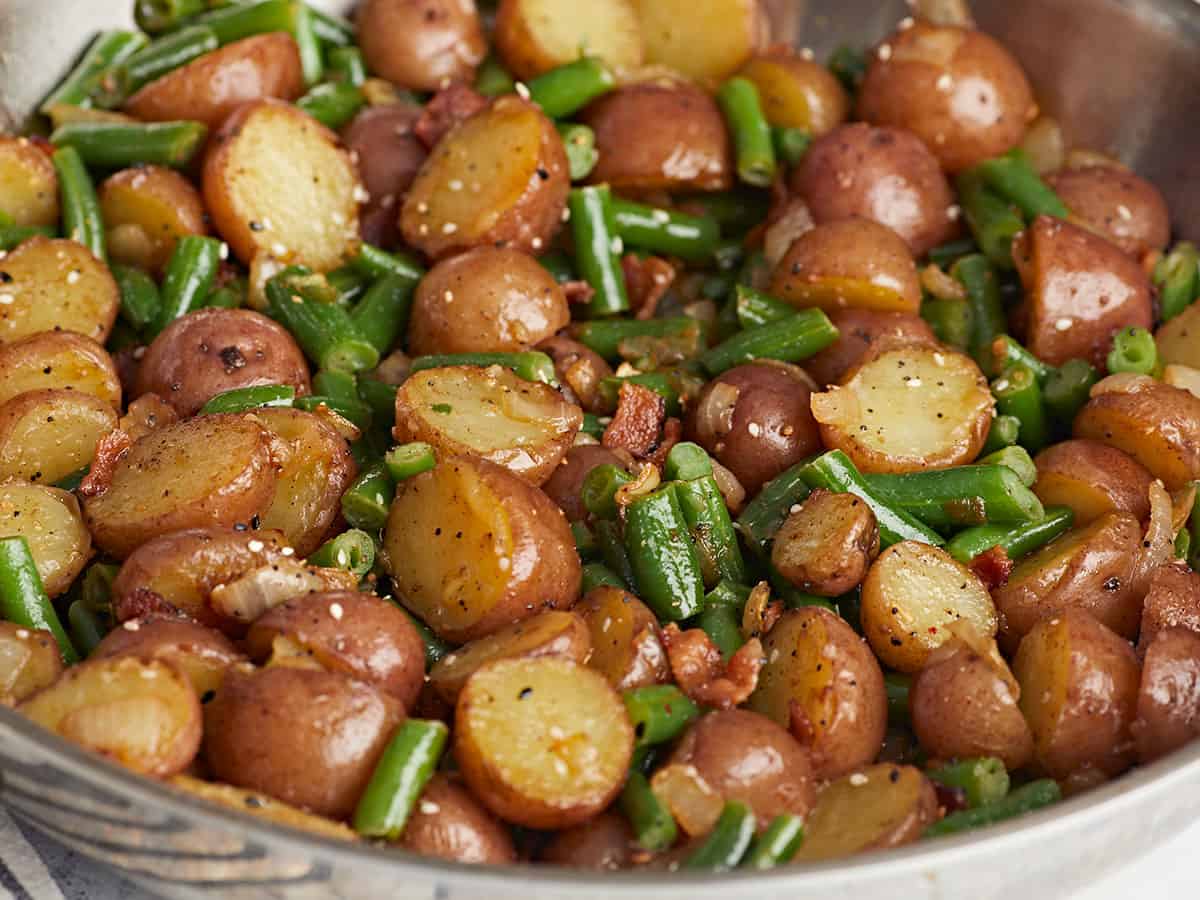
This easy and delicious potato and green bean skillet is the perfect weeknight meal made with simple ingredients like potatoes, green beans, onions, and bacon.
Easy skillet meals are such a life savor on busy weeknights and if that skillet has bacon and potatoes then COUNT ME IN! This simple potato and green bean skillet can be served as a side, or, if you’re like me, you can just eat a big bowl of it for dinner on its own. The caramelized onions, smoky bacon, and tender potatoes are more than enough to keep me satisfied! As usual, I’ve got some ideas for customizations and add-ins for you below so you can make it your own.
What kind of Potatoes to use
I used baby potatoes in my skillet because they’re cute. No, just kidding. Well, kind of. Baby potatoes work well for this recipe because they cook quickly, don’t requite much chopping, and they have a great skin to flesh ratio which gives the skillet great color and texture. If baby potatoes are out of your price range, I would reach for either red potatoes or Yukon gold and chop them into 1-inch pieces before boiling.
Frozen Green Beans for the win
You probably know by now how much I love the convenience of frozen vegetables and how much they can help to reduce waste. For those reasons, I used frozen green beans in this quick skillet meal, but you can definitely use fresh green beans if you have them or if they’re in season. You’ll just want to cook them a little longer in the skillet (until they’re crisp-tender). Frozen green beans are already partially cooked, so they make this skillet that much faster and easier.
What else can I add?
This potato and green bean skillet is ripe for modifications. Here are some swaps or extra ingredients you can add to your skillet to make it your own:
This easy and delicious potato and green bean skillet is the perfect weeknight meal made with simple ingredients like potatoes, green beans, onions, and bacon.
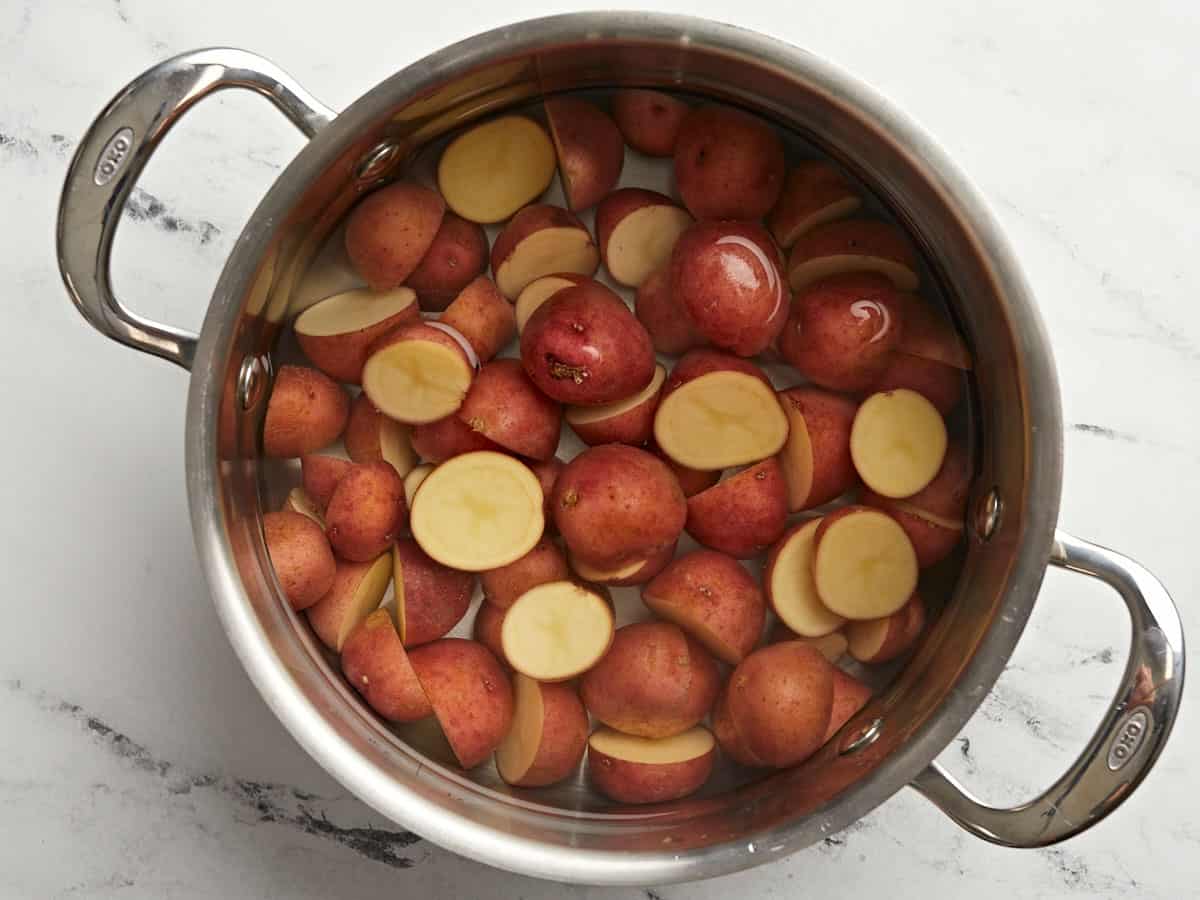
Slice the potatoes in half and place them in a large pot. Cover with water and add 1 tsp salt. Cover the pot and bring the water to a boil over high heat. Once boiling, reduce the heat to medium-high and allow the potatoes to continue boiling until the are fork-tender (about 7-8 minutes). Drain the potatoes in a colander.
While the potatoes are boiling, cook the bacon in a large skillet over medium heat until it is brown and crispy. Remove the bacon from the skillet. For the most flavor, leave all of the bacon fat in the skillet, or drain off the excess making sure to leave at least 2 Tbsp of the fat in the skillet.
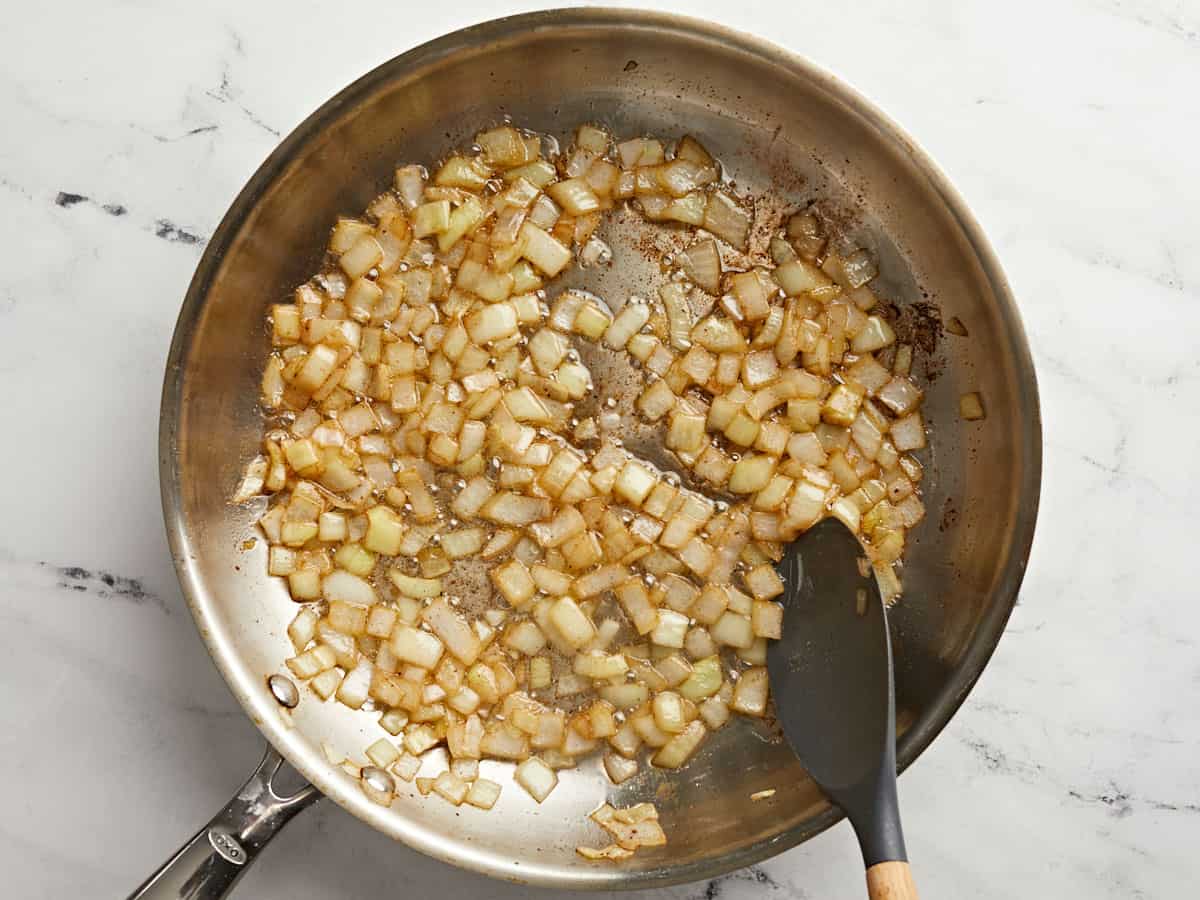
While the bacon is cooking, dice the onion. After removing the bacon from the skillet, add the diced onion and continue to cook over medium heat until the onion is soft and slightly browned.
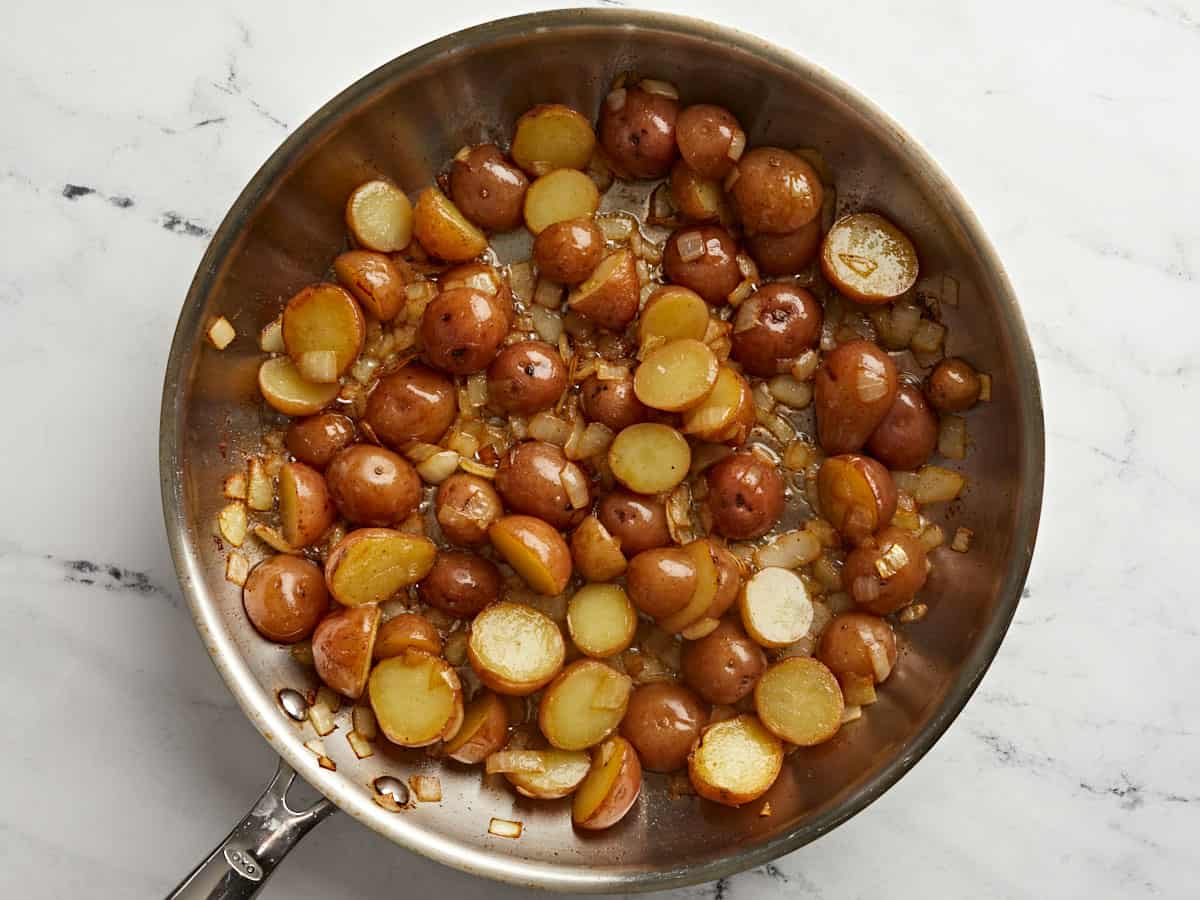
Add the drained potatoes to the skillet with the onions. Give them a brief stir to coat them in fat, then let them continue to cook, stirring only once every few minutes, to allow the bottoms to brown.
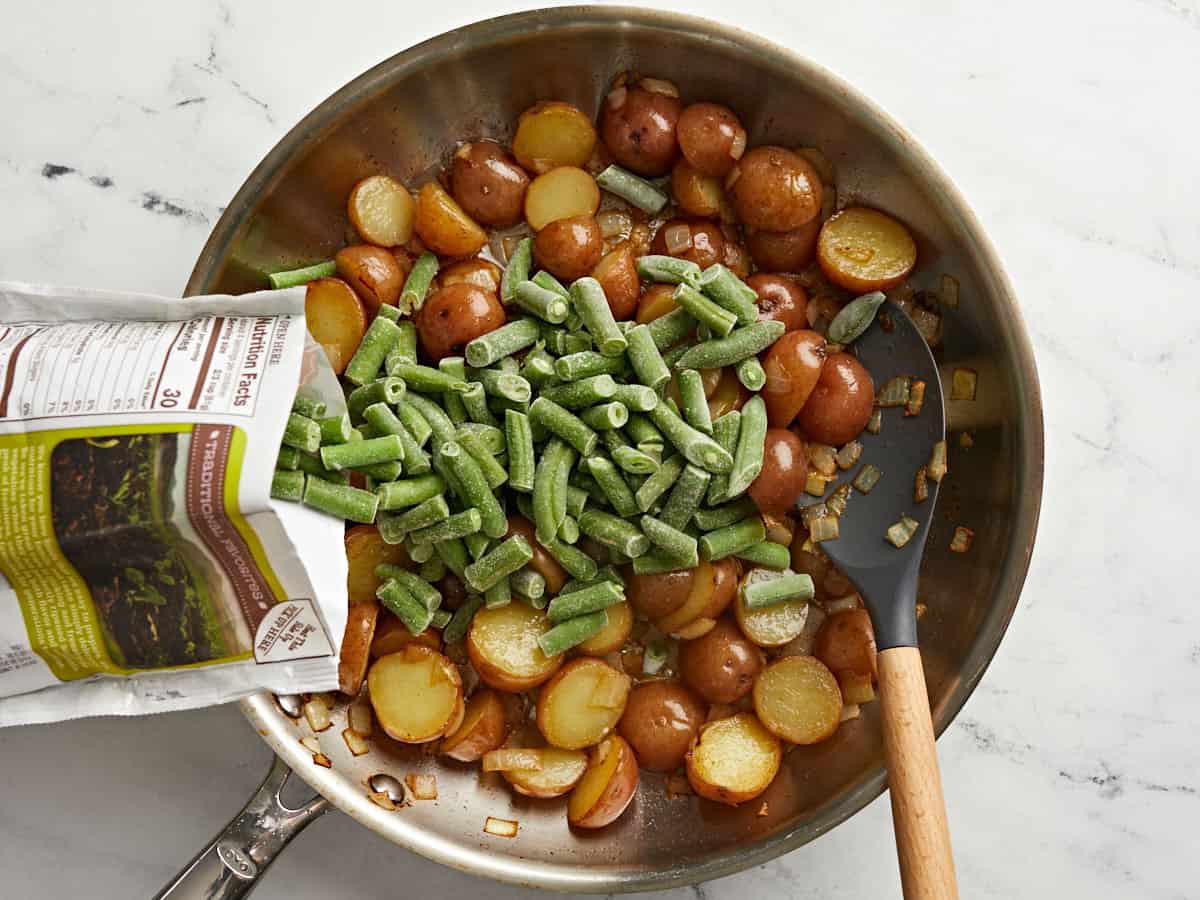
Once the potatoes have some brown color on them, add the frozen green beans (no need to thaw). Continue to cook and stir until the green beans are heated through.
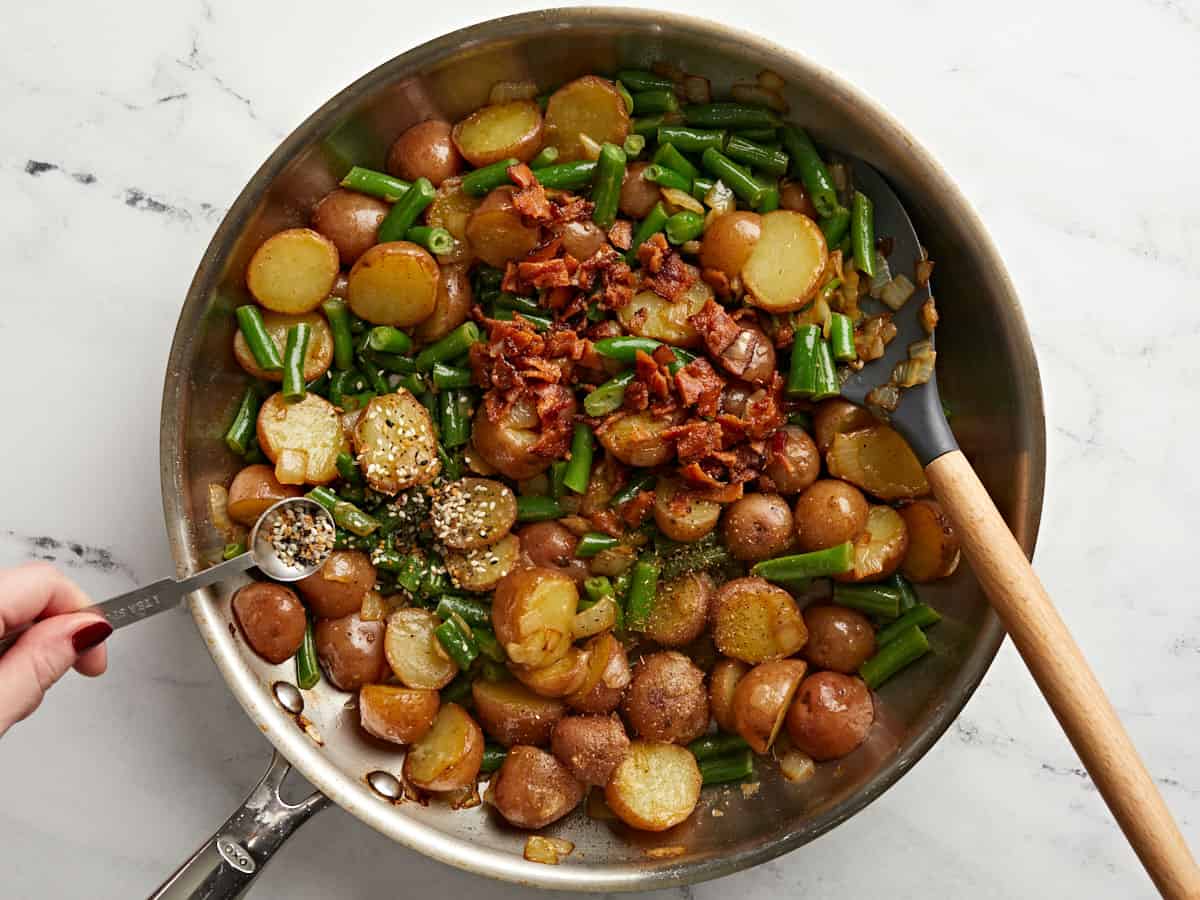
Chop the cooked bacon and add it back to the skillet along with the everything bagel seasoning. Stir to combine, taste, and add salt, pepper, or more bagel seasoning to your liking. Serve hot!
How to Make Potato and Green Bean Skillet – Step by Step Photos
Slice 1.5 lbs. of baby potatoes in half. Place them in a pot and cover with water. Add 1 tsp of salt to the water. Place a lid on the pot and bring it up to a boil over high heat. Once it reaches a boil, turn down the heat to medium-high and allow the potatoes to boil until fork tender, about 7-8 minutes. Drain the potatoes in a colander.
Cook 4 oz. bacon in a large skillet over medium heat until it’s brown and crispy. Remove the cooked bacon from the skillet. For the most flavor, leave all of the bacon fat in the skillet, or drain off most of the fat making sure to leave at least 2 Tbsp of the fat in the skillet.
While the bacon is cooking, dice one yellow onion. Add it to the skillet after removing the bacon and continue to cook over medium heat until the onions are soft and slightly browned.
Add the drained potatoes back to the skillet. Stir briefly to coat them in fat, then let them cook over medium heat only stirring once every few minutes to allow them to brown on the bottom.
Once the potatoes have some browning on the edges, add one 12oz. bag of frozen cut green beans. Stir to combine and continue to cook over medium heat just until the green beans are heated through.
Chop the cooked bacon, then add it back to the skillet along with about 1 tsp of everything bagel seasoning. Stir everything to combine, taste, and add salt, pepper, or more everything bagel seasoning to your liking. Serve hot!
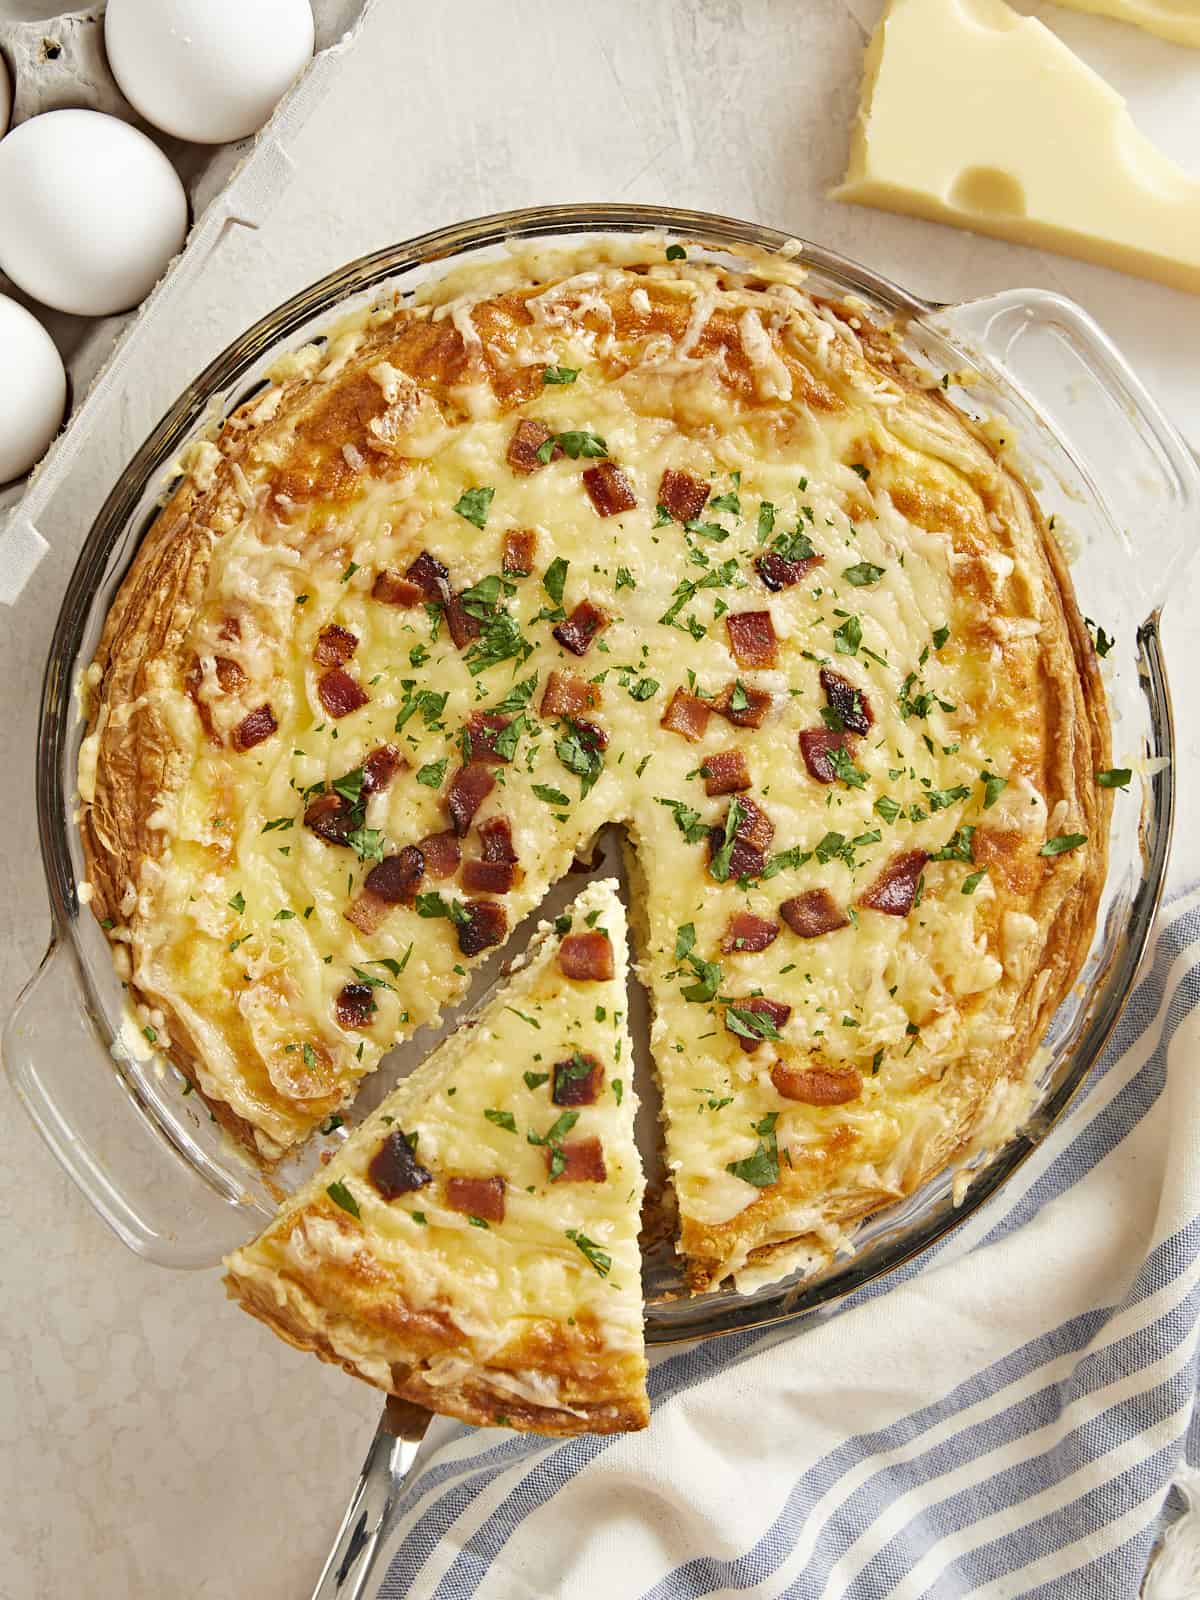
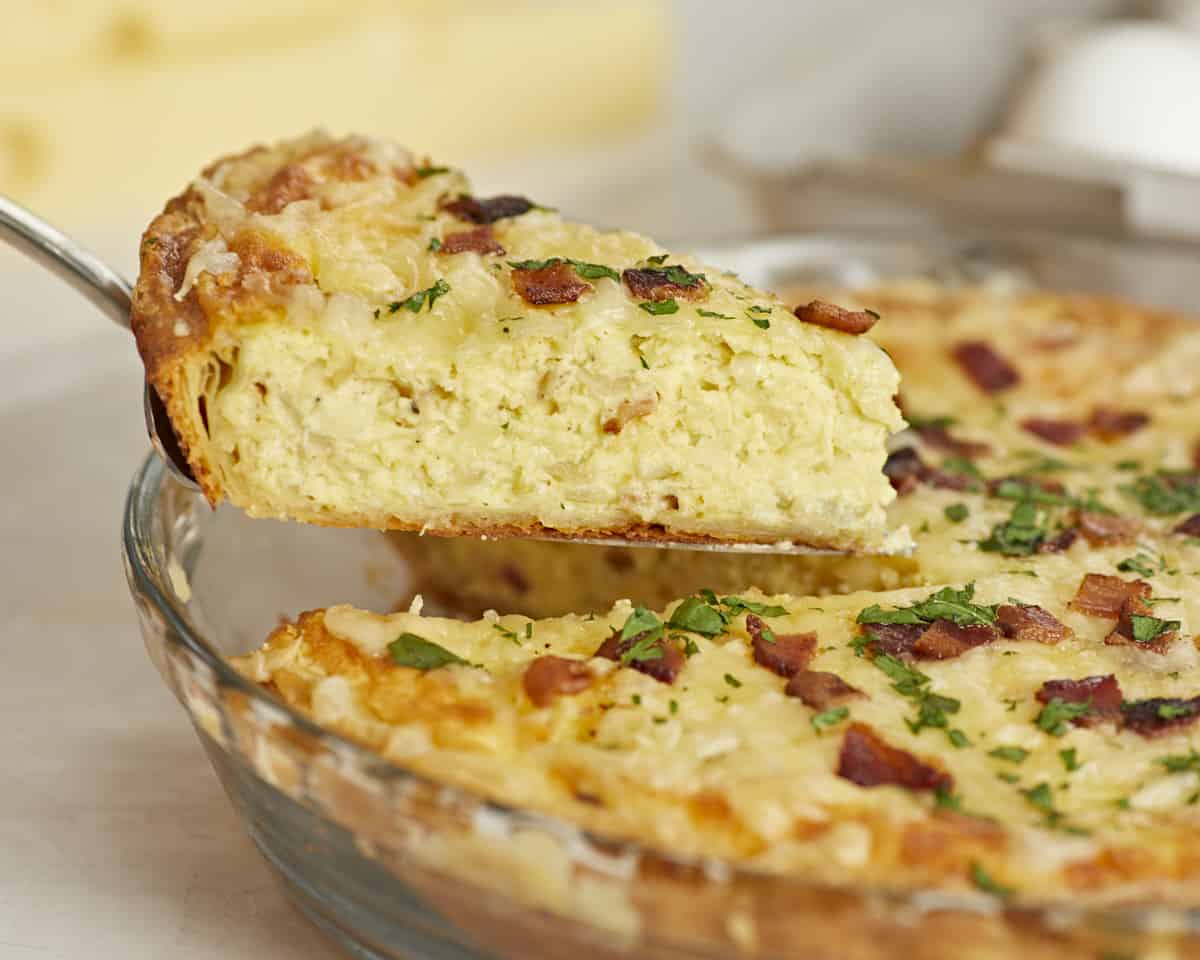
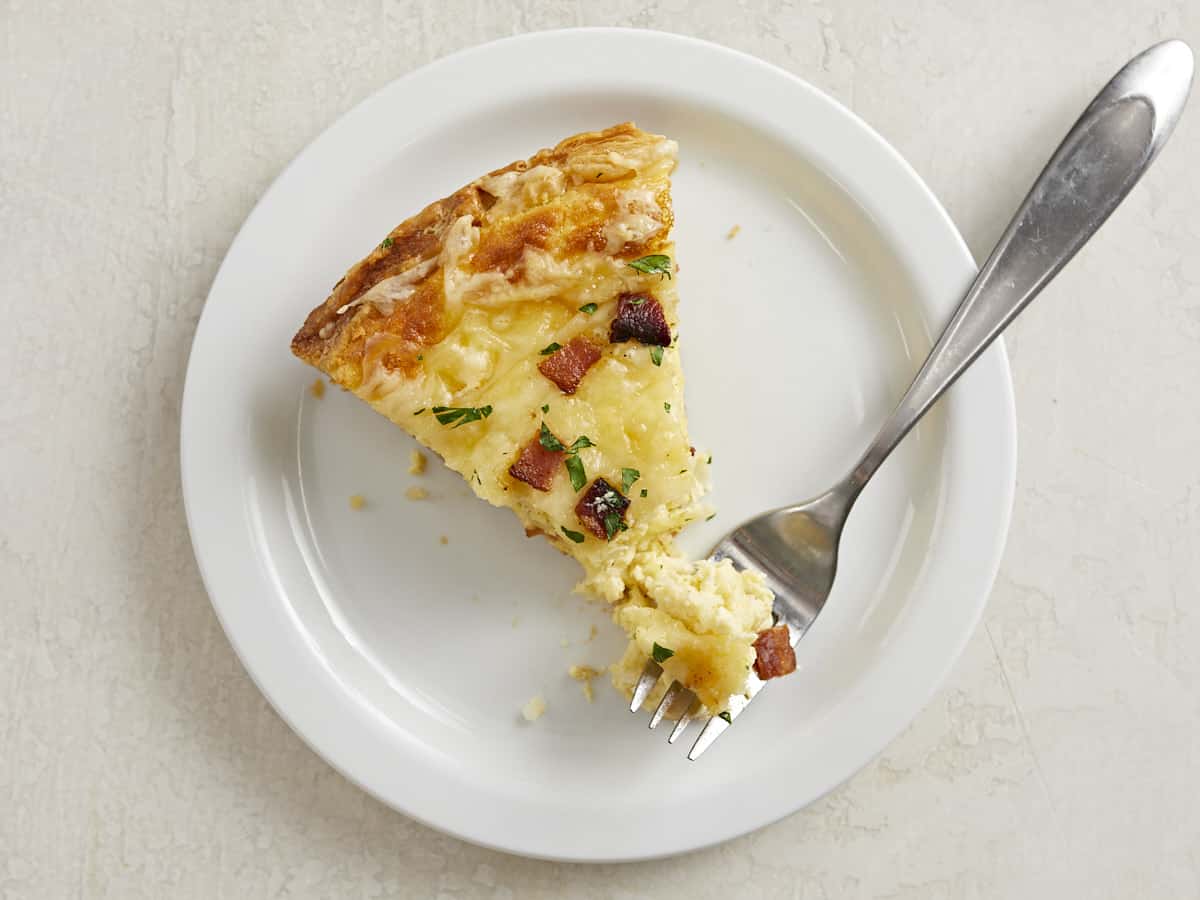
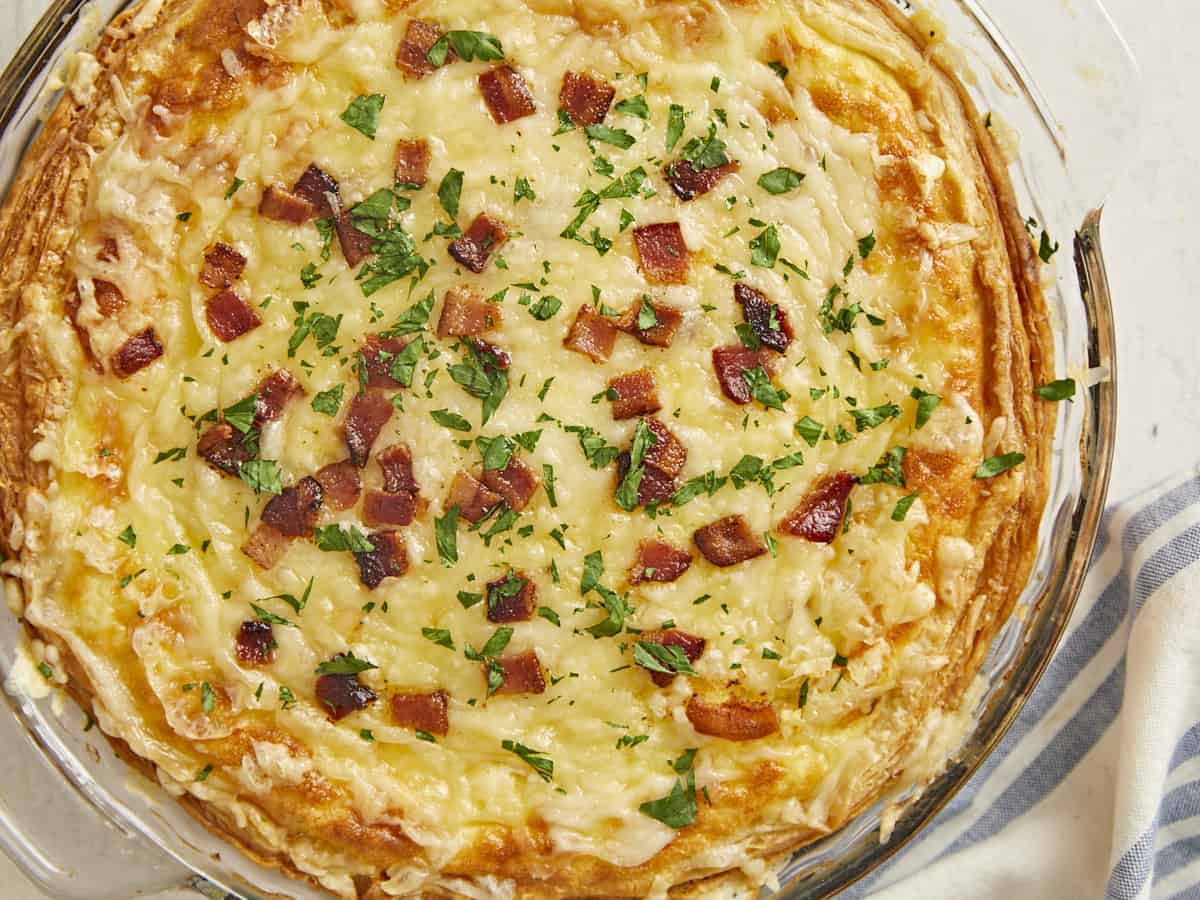
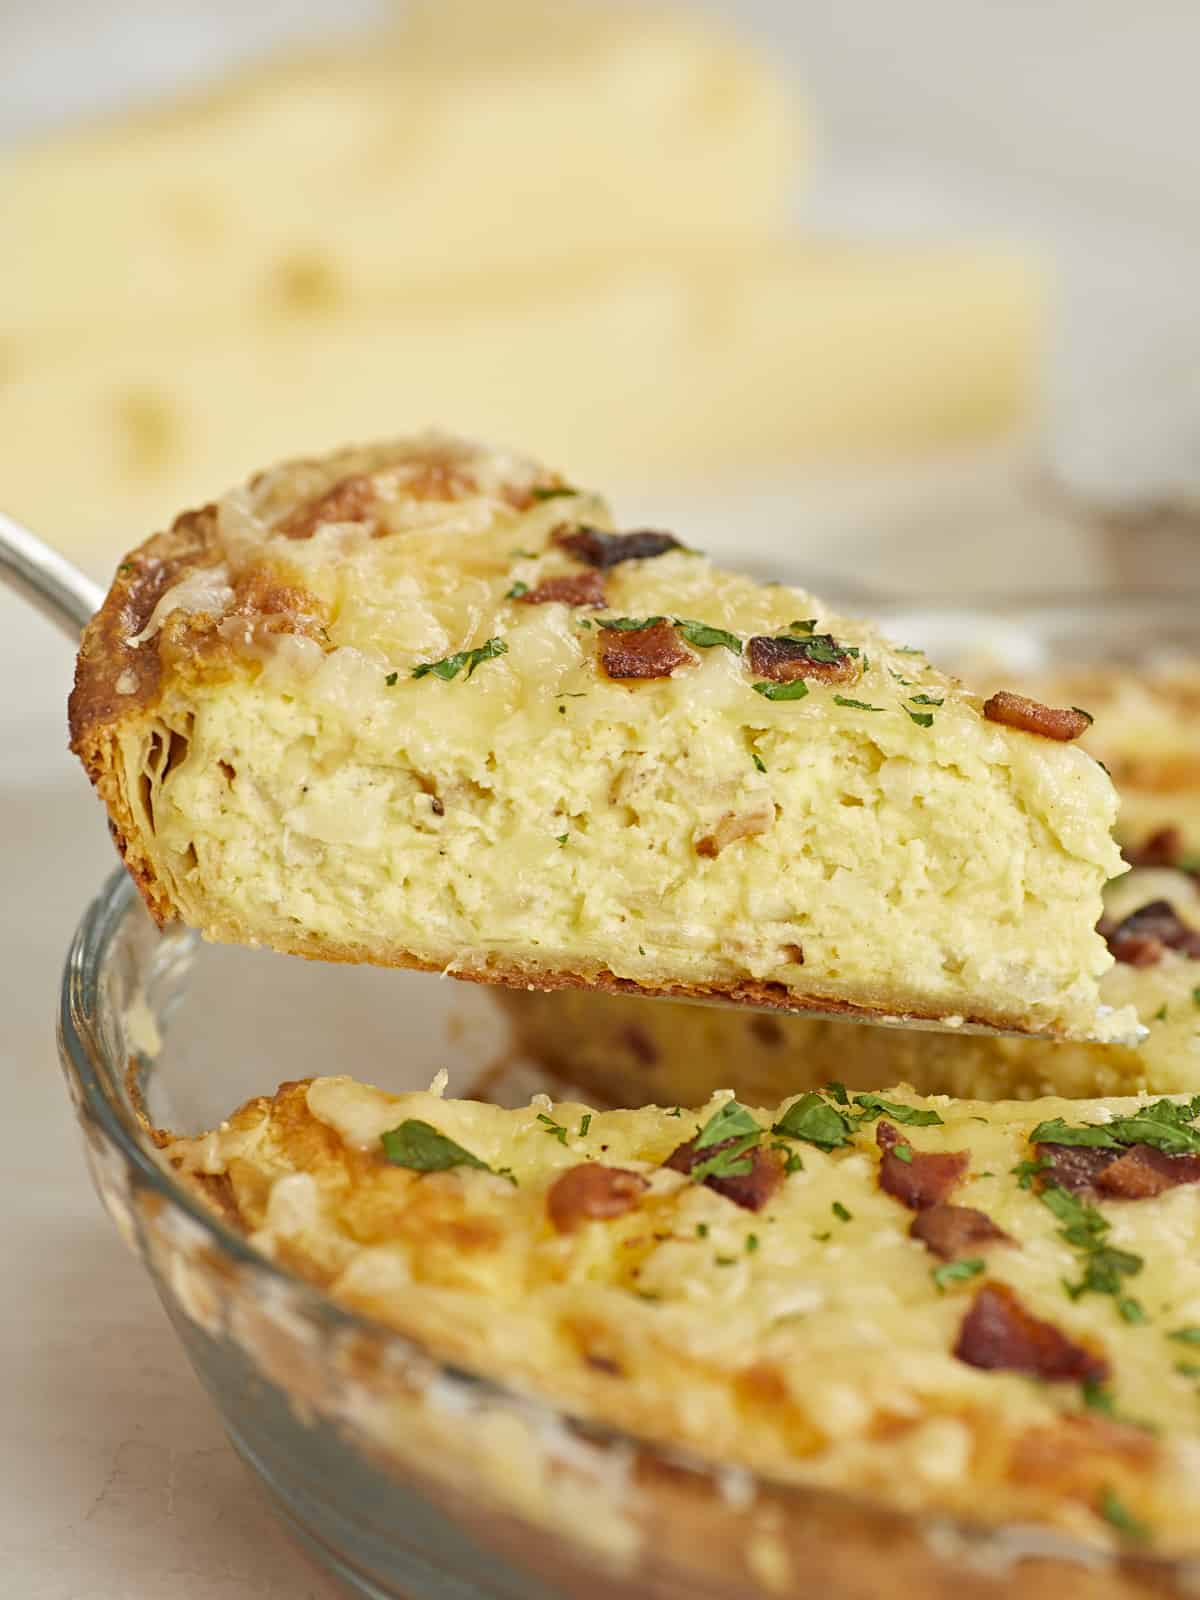
You’re going to love this silky, savory, and ridiculously Easy Quiche Lorraine! The puff pastry crust makes it absolutely effortless! Chock full of bacon and swiss cheese, this creamy custard baked in a pastry crust can be served hot or cold for breakfast, lunch, or brunch. Serve it with a side dish to make it a filling dinner. I love that you can prepare it a day ahead and that it takes almost no time to assemble. Just cook the bacon and aromatics, mix the custard ingredients, and go!
What is Quiche Lorraine?
Quiche Lorraine is what my kid calls an egg pie. It’s a custard set in a pastry crust that gets its name from the Lorraine region in France. Traditionally it’s made with eggs, cream, bacon, and swiss cheese. But feel free to use the ingredients you have. It’s your kitchen!
What You’ll Need
The best part of making this Quiche Lorraine recipe is its versatility. If you’re not intent on keeping things traditional, you can substitute almost all ingredients to better fit your preferences.
Eggs – these create the custard necessary to bind all of the ingredients together. You can substitute eggs with a vegan egg alternative, like Just Egg.
Cream Cheese, Heavy Cream, and Milk– the fat in the cream cheese, heavy cream, and milk helps create a silky custard texture. You can substitute the heavy cream with all milk and two tablespoons of butter. Use plant-based cream cheese, heavy cream, and milk alternatives if you don’t do dairy.
Bacon– adds a big hit of smoky, salty savoriness. You can substitute it with ham, pancetta, salami, or your favorite meatless bacon alternative. If you don’t do pork, use diced roasted chicken or turkey.
Swiss Cheese – is the traditional choice for Quiche Lorraine, but use whatever cheese you have handy. Gouda, provolone, cheddar, and mozzarella are all excellent substitutions.
Puff Pastry – is the vehicle that holds the filling. Par-baking the puff pastry helps keep it from getting soggy as the liquid custard bakes. Pie crust is the traditional choice for quiche, and makes a great substitute for puff pastry. Of course, you can always make my Easy 3-Ingredient Pie Crust.
Onion and Garlic – these aromatics help flavor the custard. You can substitute them with leeks, green onions, or shallots. You can also replace the onion with one teaspoon of onion powder or one tablespoon of dried onion flakes and the garlic with one-eighth of a teaspoon of garlic powder. Add them to the custard when you add the nutmeg to prevent scorching.
Nutmeg– just a pinch helps enhance the creamy flavor of the custard. If you don’t have nutmeg, skip it.
What To Serve With Quiche Lorraine
You can take Quiche Lorraine from a light breakfast or lunch to a full-on dinner by pairing it with a soup, salad, or a veggie-based side dish. Try some of these Budget Bytes favorites!
Allow your quiche to cool completely before storing it in the fridge. If leaving it in the pie pan, cover leftovers with plastic wrap or aluminum foil and refrigerate for up to four days. You can also slice what’s left of the quiche and store the slices in an airtight container. To freeze leftovers, portion and wrap the pieces in aluminum foil, then place them in a freezer-safe container. They will remain fresh for up to a month.
How To Reheat Leftovers
Bring refrigerated slices to room temperature while you preheat your oven to 350°F. Thaw frozen slices overnight in the fridge. Then, cover the crust with aluminum foil or a pie shield and reheat for fifteen minutes or until steaming. In a pinch, you can reheat leftovers in your microwave, but be warned, the texture will become slightly rubbery.
2Tbspchopped fresh Italian parsley for garnish (optional)$0.06
Instructions
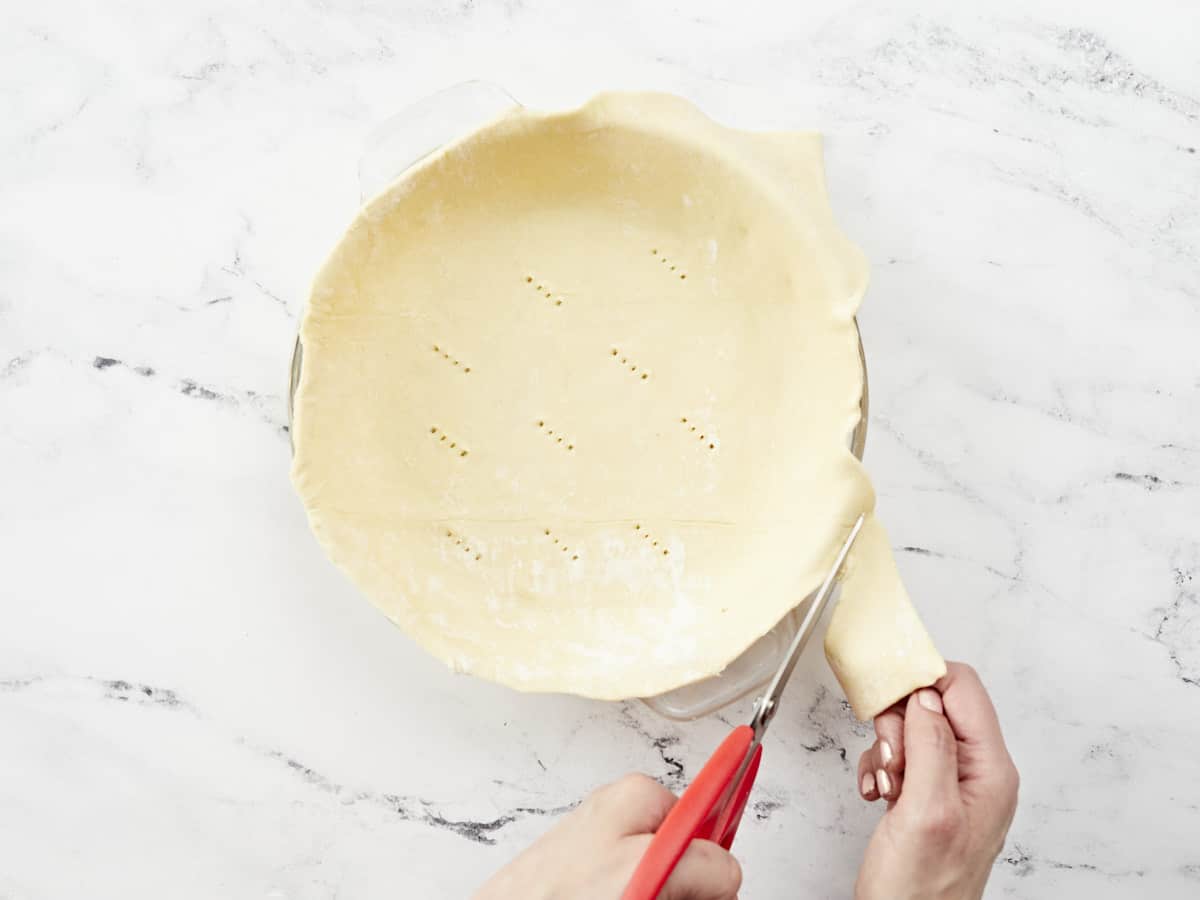
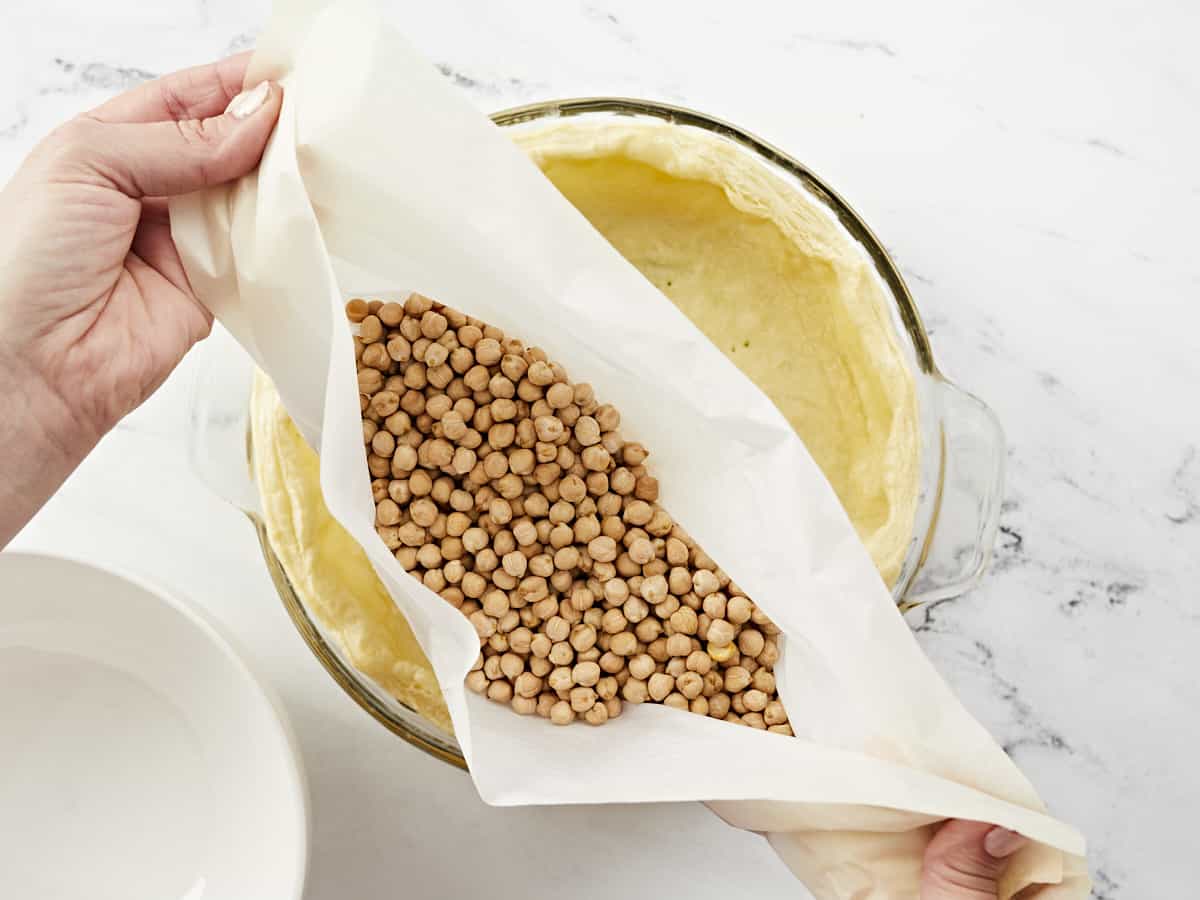
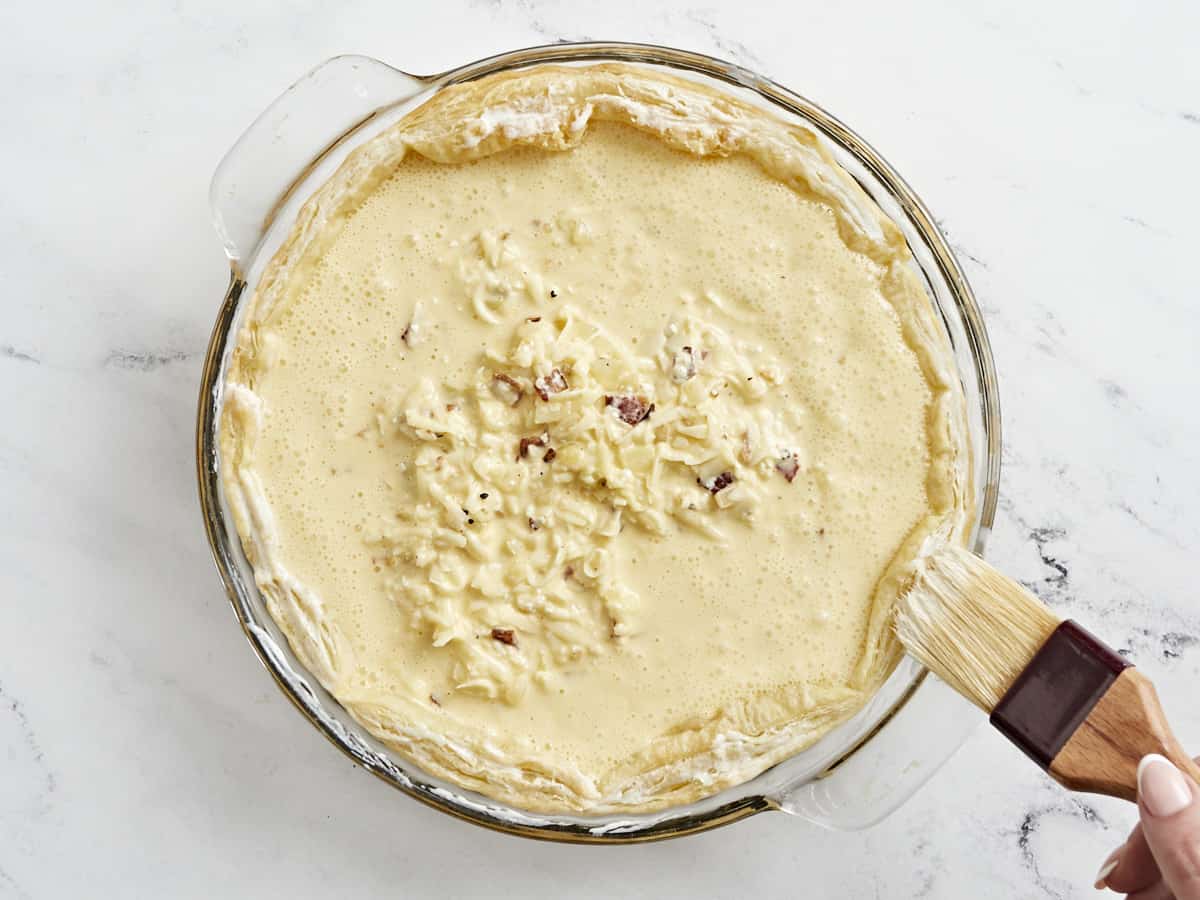
Set a rack in the middle of your oven and preheat it to 425°F. Next, roll the puff pastry into an 11-inch square and transfer it to a 9-inch diameter pie plate. Then puncture the bottom of the puff pastry a few times with a fork and trim the edges.
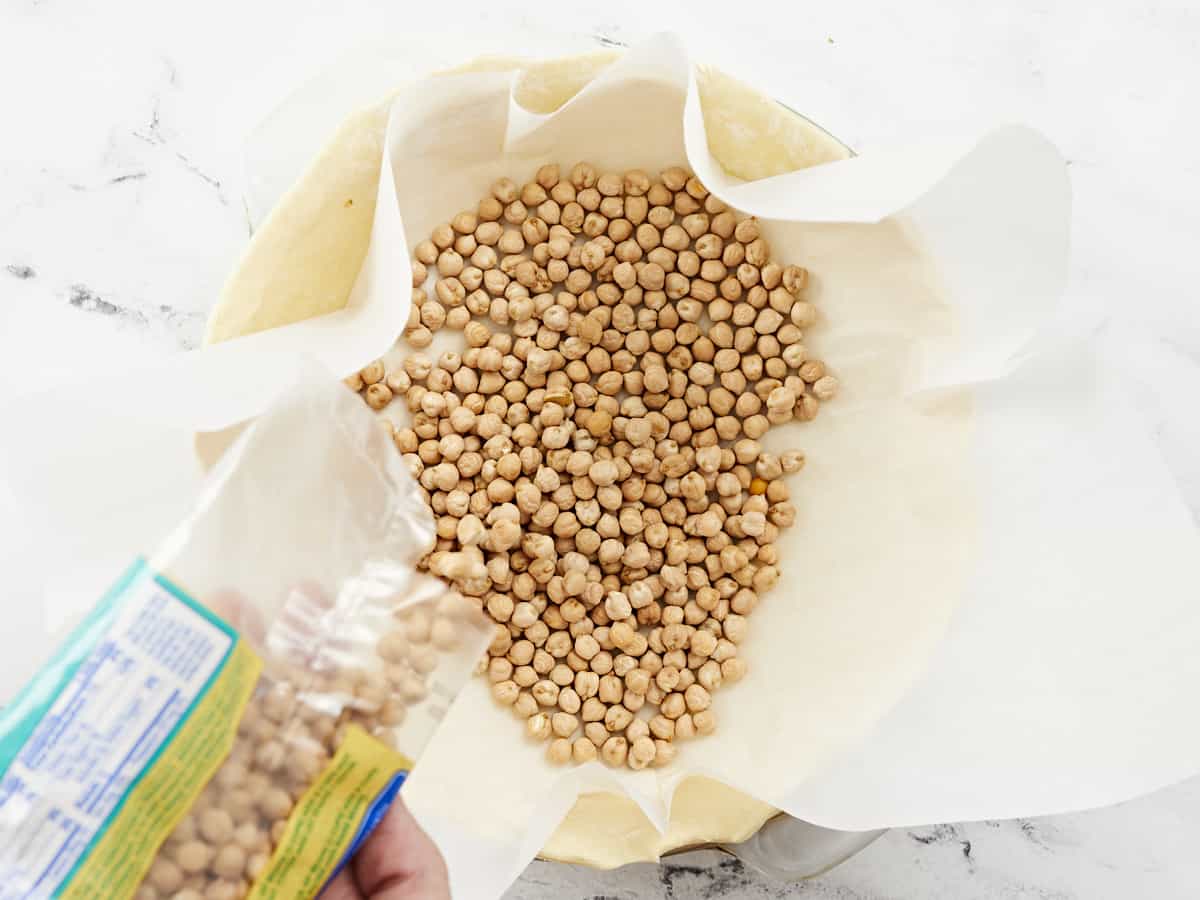
Cover the puff pastry with a sheet of parchment paper and add a pound of dry beans or pie weights. Then, cover the edges of the pastry with a pie shield or ring made of aluminum foil to prevent them from burning. Bake for fifteen minutes.
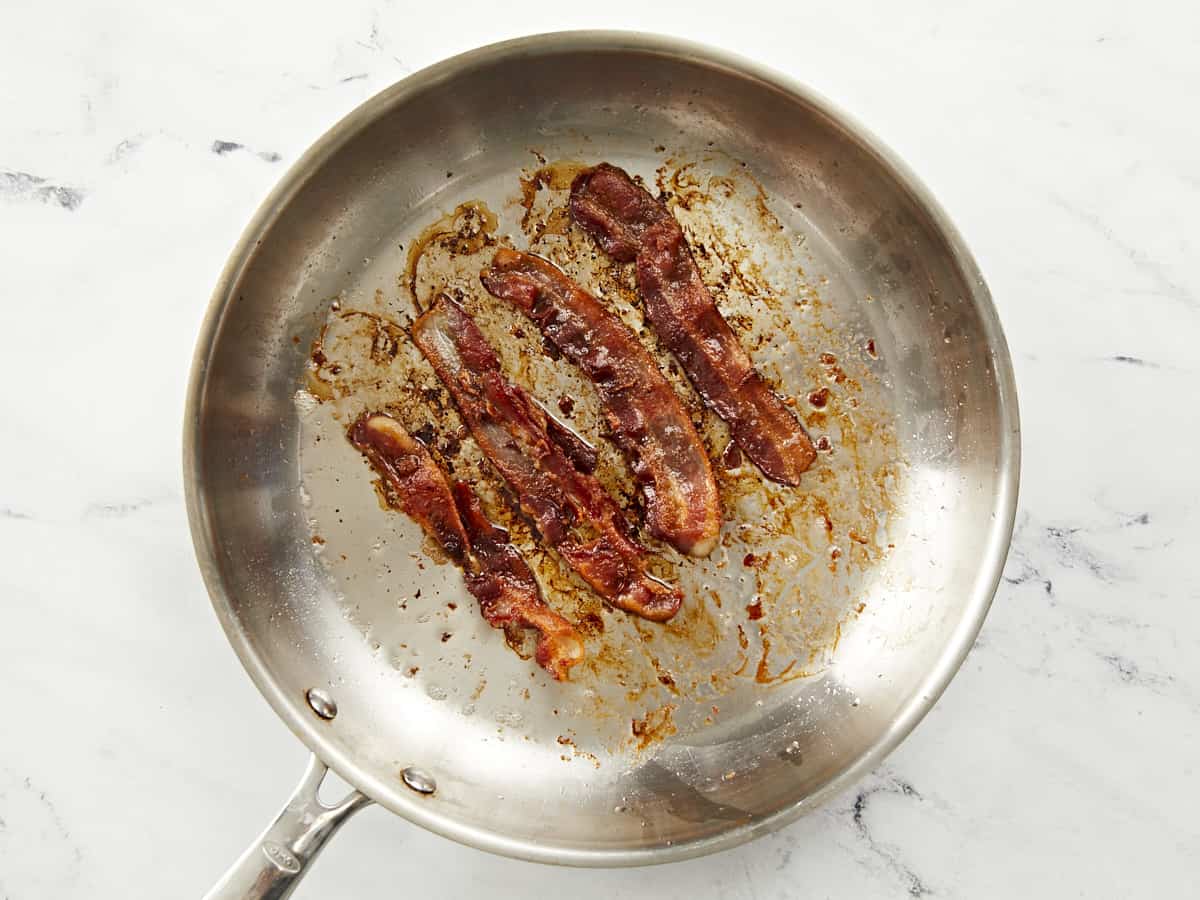
While the puff pastry par-bakes set a heavy-bottomed skillet over medium heat. Add the bacon strips and cook until crispy. Next, chop the bacon into bits. Set aside the chopped bacon and reserve the drippings.
Remove the puff pastry from the oven. Carefully remove the pie shield. Then carefully remove the parchment paper with the beans or pie weights.*
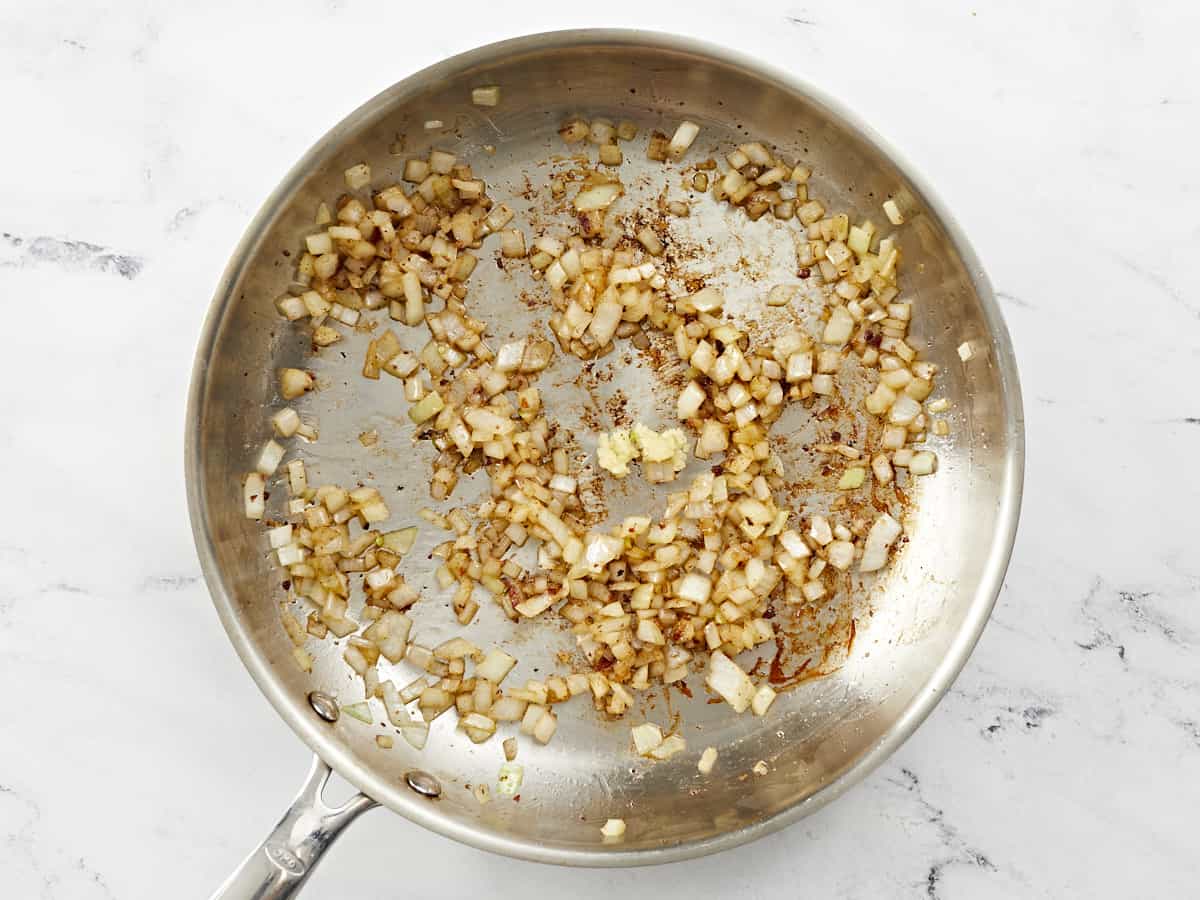
Cook the onion in the bacon drippings until translucent (about 2 minutes). Next, add the garlic clove and cook until fragrant (about 1 minute).
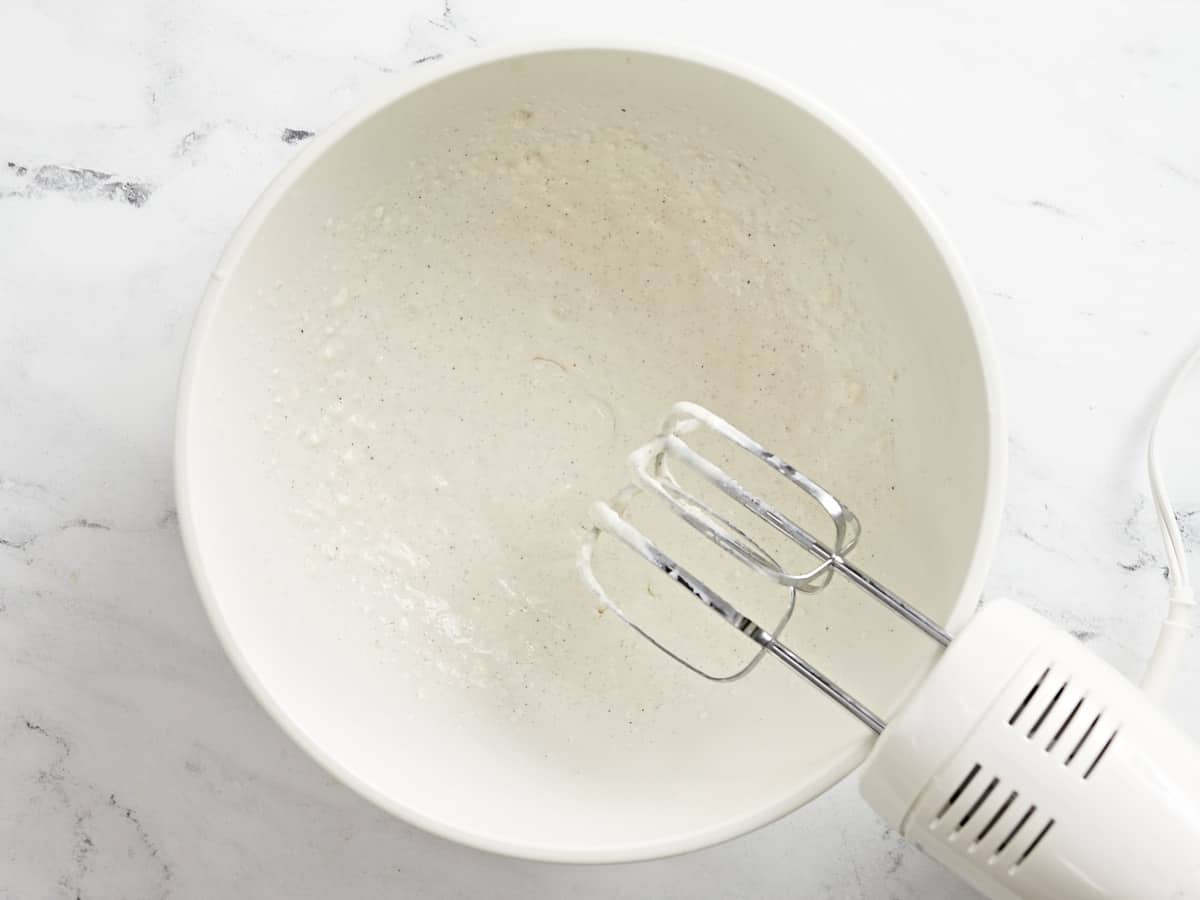
In a large bowl, beat the cream cheese, heavy cream, and milk until smooth.
Add the eggs, nutmeg, salt, and freshly ground pepper. Finally, set aside 2 tablespoons of chopped bacon for garnish and add the rest to the filling.
Pour the filling into the prebaked crust. Brush the crust with 1 teaspoon of heavy cream.
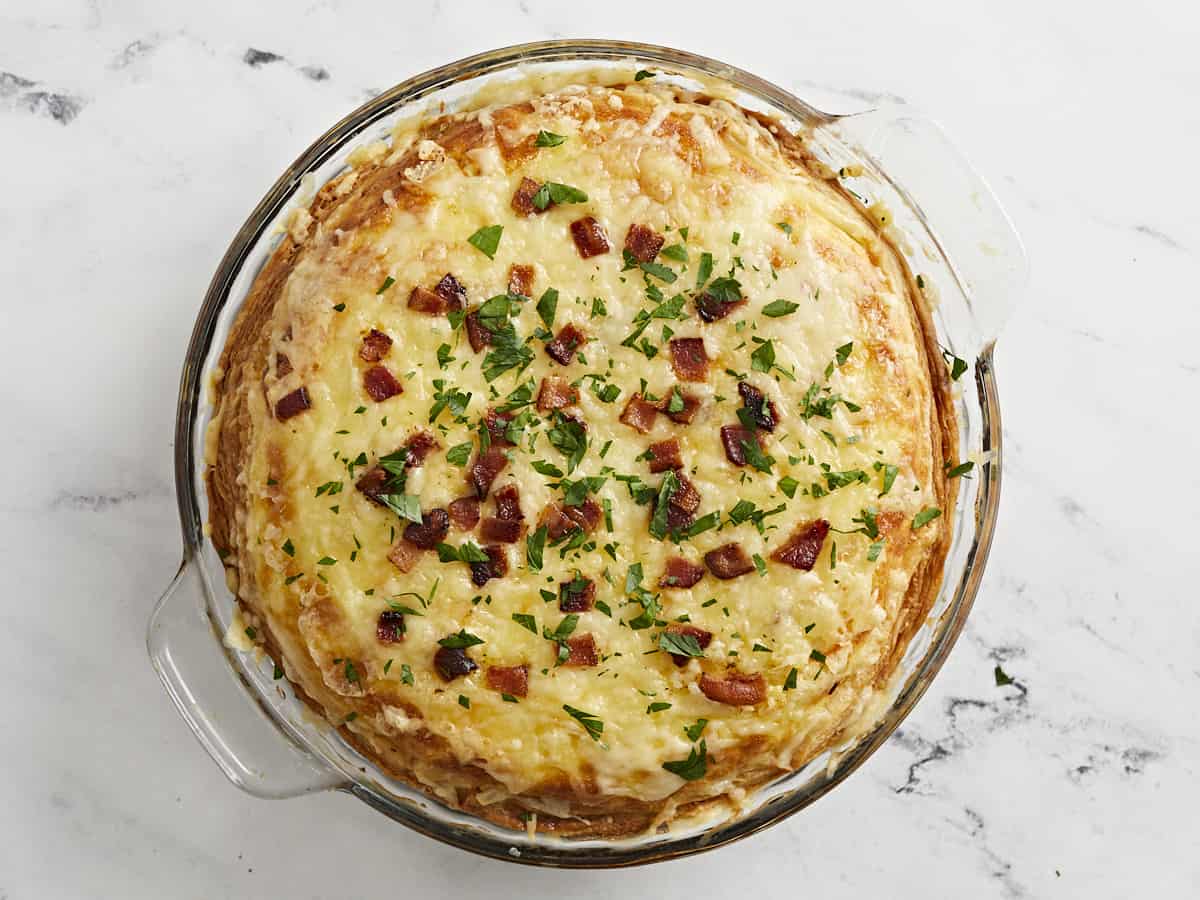
Cover the edges of the quiche with a pie shield or aluminum foil ring. Bake until the crust is golden brown and the filling sets, about 25 minutes. Remove the pie shield and cool the quiche for 10 minutes before serving. Finally, garnish with remaining bacon bits and chopped Italian parsley.*
*Dry beans can be cooled, stored in an air-tight container, and reserved for future use as pie weights.*You will know the quiche has set when you insert a toothpick in the center and it comes out clean.
Set a rack in the middle of your oven and preheat it to 425°F. Next, roll 1 sheet of puff pastry into an 11-inch square. Transfer the puff pastry to a 9-inch diameter pie plate. Trim the edges.
Cover the puff pastry with a sheet of parchment paper and add a pound of dry beans or pie weights. Next, cover the edges of the pastry with a pie shield or ring made of aluminum foil to prevent them from burning. Bake for fifteen minutes.
While the puff pastry par-bakes set a heavy-bottomed skillet over medium heat. Add the 4 strips of bacon and cook until crispy. Next, chop the bacon into bits. Set aside the chopped bacon and reserve the drippings.
Remove the puff pastry from the oven and carefully remove the pie shield and the parchment paper with the dry beans/pie weights. The beans can be cooled, stored in an airtight container, and reused for future preparations.
Next, cook 1 diced yellow onion in the bacon drippings until translucent (about 2 minutes). Then, add 1 minced garlic clove and cook until fragrant (about 1 minute).
In a large bowl, beat 4 ounces of cream cheese, 1/4 cup of heavy cream, and 1/4 cup of milk until smooth.
Add the 5 eggs, ¼ teaspoon of nutmeg, ½ teaspoon of salt, and ¼ teaspoon of freshly ground pepper. Next, set aside 2 tablespoons of bacon for garnish and add the rest of the chopped bacon into the filling.
Finally, pour the filling into the prebaked crust. Then, brush the edges of the crust with 1 teaspoon of heavy cream.Cover the edges of the quiche with a pie shield or aluminum foil ring. Then bake until the crust is golden brown and the filling sets, about 25 minutes. You will know the filling has set when you insert a toothpick in the middle and it comes out clean. Cool for 10 minutes before serving. Finally, garnish with remaining bacon bits and chopped Italian parsley.
Spaghetti Carbonara is a classic Roman pasta dish that is easy to make and 100% indulgent. You only need 6-ingredients and 20 minutes, making it the perfect recipe for busy weeknights or easy entertaining. The ingredients are simple and we always have …
Spaghetti Carbonara is a classic Roman pasta dish that is easy to make and 100% indulgent. You only need 6-ingredients and 20 minutes, making it the perfect recipe for busy weeknights or easy entertaining. The ingredients are simple and we always have them on hand. Spaghetti (or your pasta of choice), bacon, eggs, Pecorino Romano…
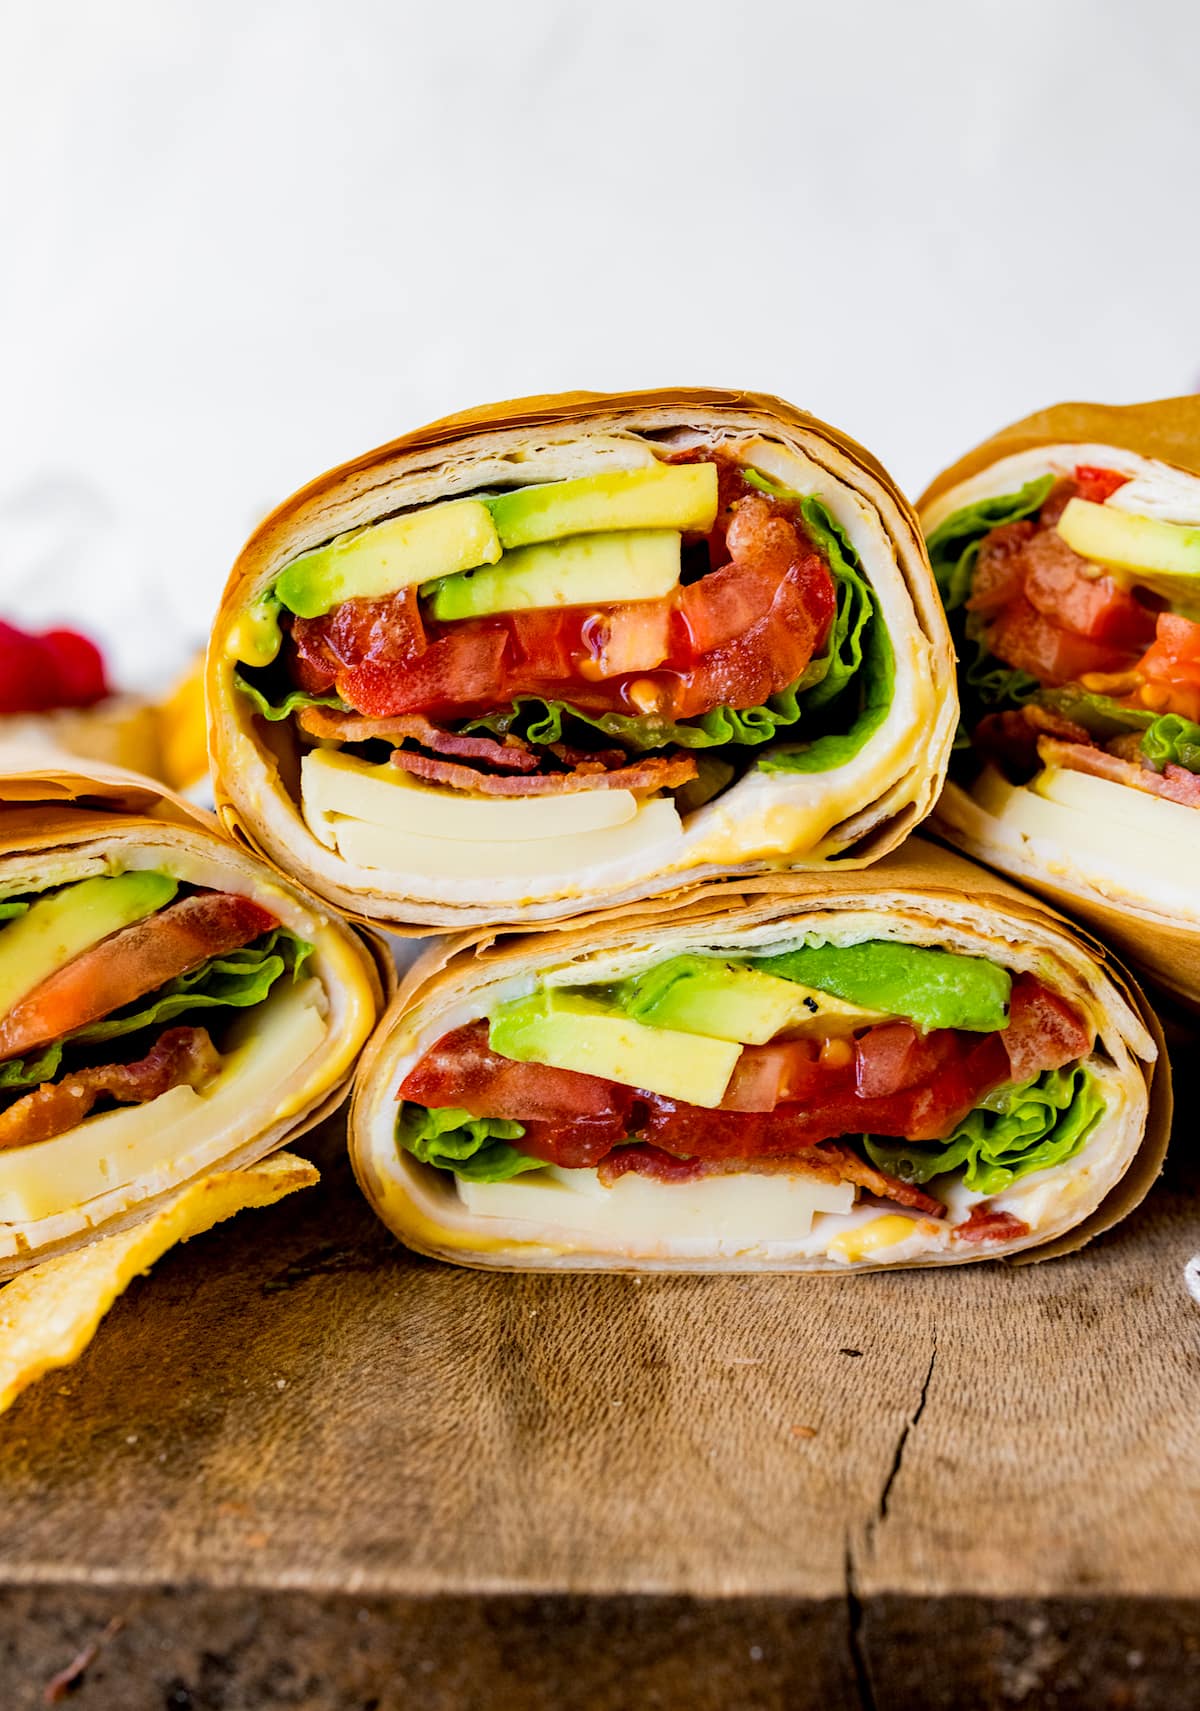 Wraps make a fun, easy, healthy, and delicious meal. Our Chicken Caesar Wraps are very popular and so are these Turkey Wraps! We love making wraps because they are very versatile. You can add whatever ingredients and sauces you like, just like a sandwich. But wraps really are more fun. Everything gets wrapped up into…
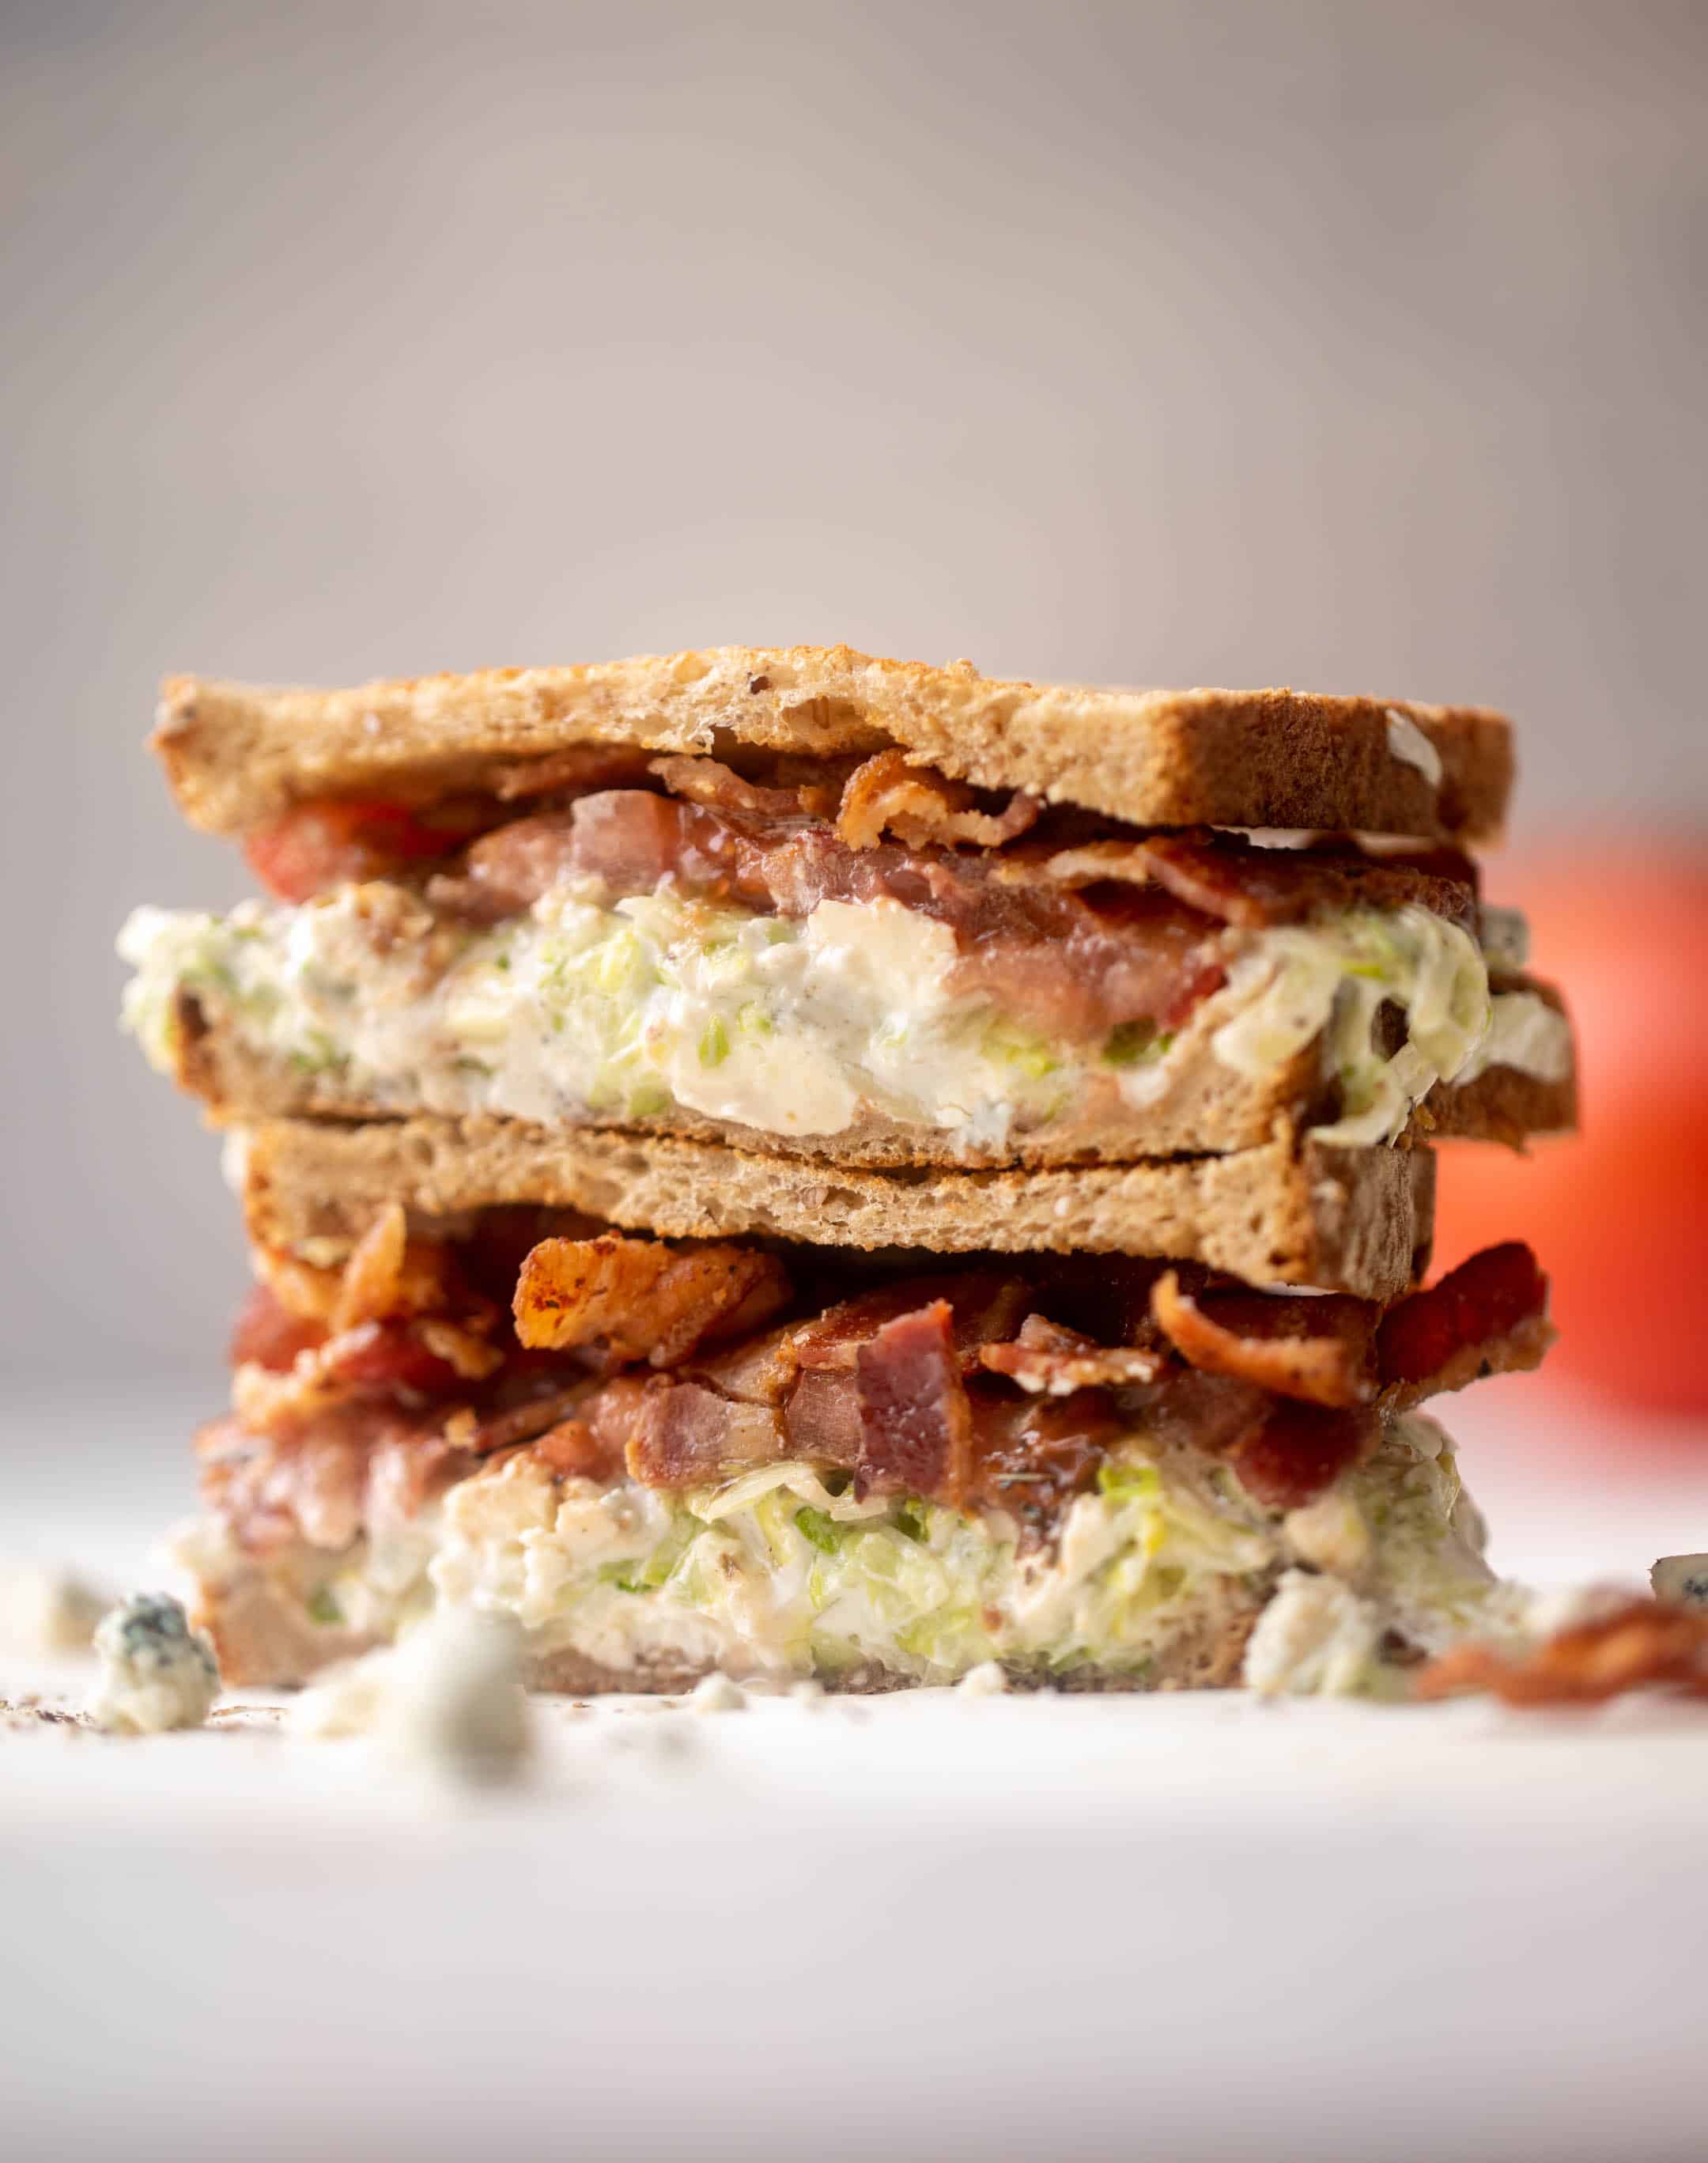


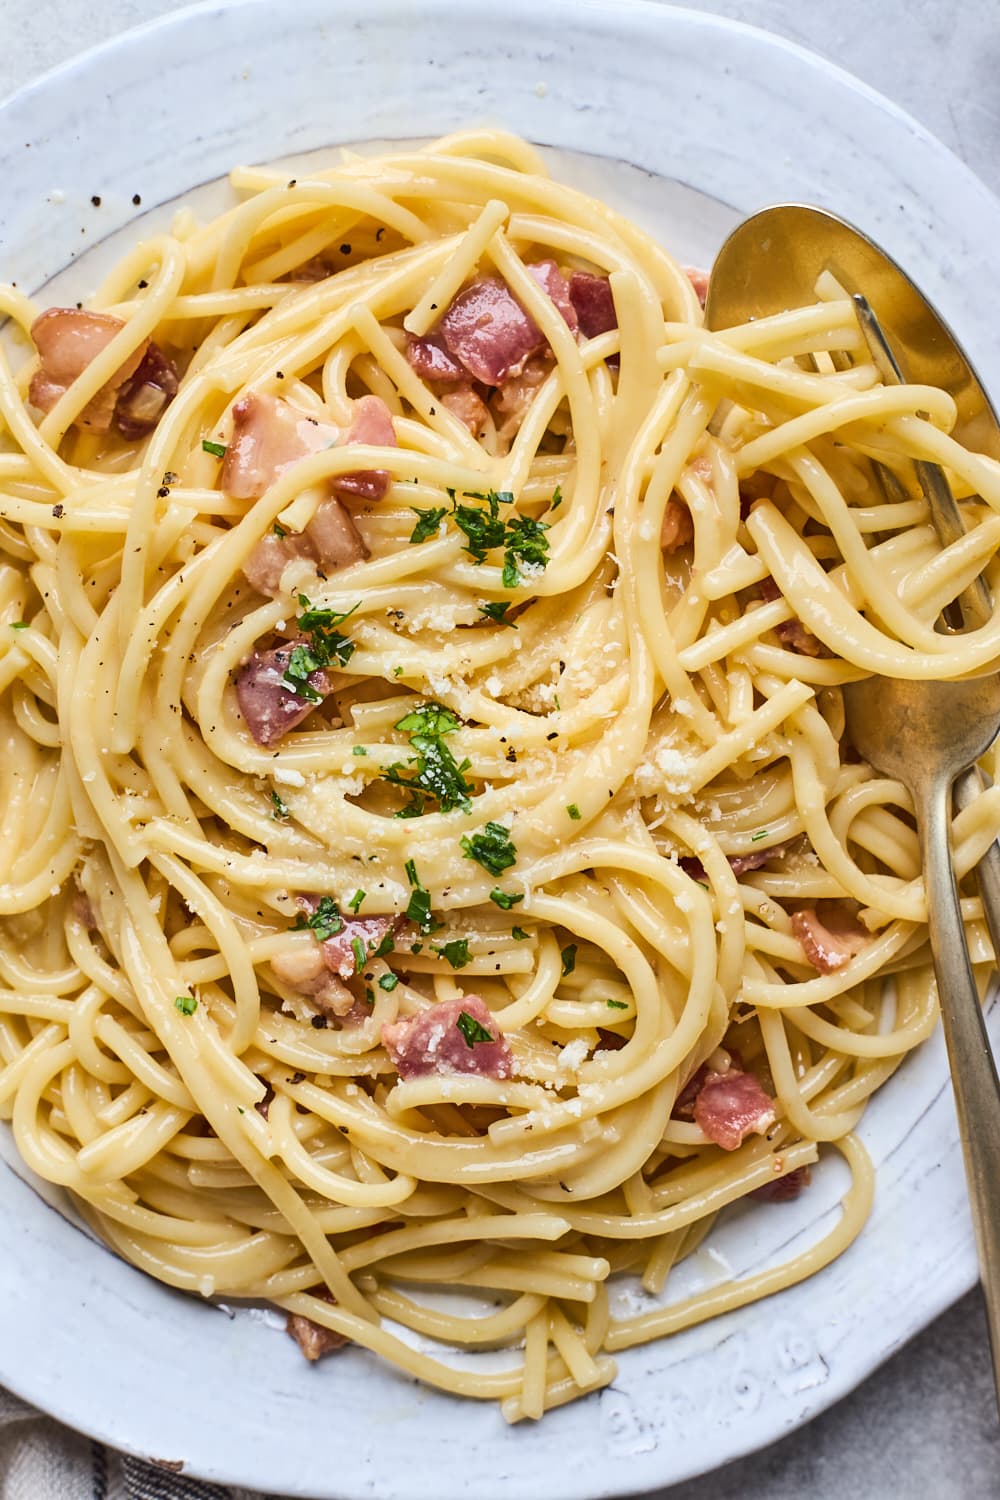 Spaghetti Carbonara is a classic Roman pasta dish that is easy to make and 100% indulgent. You only need 6-ingredients and 20 minutes, making it the perfect recipe for busy weeknights or easy entertaining. The ingredients are simple and we always have them on hand. Spaghetti (or your pasta of choice), bacon, eggs, Pecorino Romano…