This healthy Slow Cooker Chicken and Lentil Soup is an easy slow cooker dump recipe. There’s no need to sauté anything, and it tastes delicious! Slow Cooker Lentil Soup Making chicken and lentil soup in a slow cooker is a comforting and healthy meal th…
This healthy Slow Cooker Chicken and Lentil Soup is an easy slow cooker dump recipe. There’s no need to sauté anything, and it tastes delicious! Slow Cooker Lentil Soup Making chicken and lentil soup in a slow cooker is a comforting and healthy meal that’s high in fiber and protein. This lentil soup recipe gets […]
Craving something bright and flavorful? This lemon chicken orzo soup is packed with tender chicken, fluffy orzo pasta, and a zesty lemon broth for a comforting meal.
Here’s a meal that’s the equivalent of sunshine in a bowl: lemon chicken orzo soup! Zingy citrus always lifts our spirits, and this one is almost guaranteed to make your day brighter. We’ve packed this new soup recipe with tender shredded chicken and fluffy orzo, all in a zesty lemon broth seasoned with garlic, oregano and dill. Shower it with fresh dill or parsley and it’s the perfect easy dinner (that keeps on giving with leftovers!).
Ingredients in lemon chicken orzo soup
Lemon chicken orzo soup comes together in 45 minutes, so you can make it on a weeknight or meal prep it for eating throughout the week. The chicken breast cooks in the broth, then you’ll remove it and shred it while cooking the orzo in the broth. Here are the ingredients you’ll need to make this simple soup:
Olive oil
Butter
Vegetables: Onion, carrots, celery, garlic
Chicken broth
Boneless skinless chicken breasts
Spices: oregano, dill, garlic powder, salt and pepper
Fresh lemon, juice and zest (a Microplane grater is easiest for zesting a lemon)
Orzo pasta
Fresh parsley or dill, to garnish
How to shred chicken
The best way we’ve found to shred chicken is to pull it into strips using your fingers. That’s right, no fancy tools required: simply use your hands to pull it into shreds! We tried the two-forks method and the stand mixer method, and the good old fashioned way won. It makes the best shreds and takes no time at all.
This lemon orzo chicken soup cooks the chicken by simmering it in the soup broth before shredding it. To make shredded chicken on its own for tacos, enchiladas, sandwiches, and more, go to How to Make Shredded Chicken.
Tips for making lemon chicken orzo soup
Lemon chicken orzo soup is a great easy dinner recipe: it’s simple to make and works well to meal prep. Here are a few tips for the process:
Use a food thermometer to assess whether the chicken is done. Simmer the soup until it’s cooked through and the temperature is 165°F when measured with a food thermometer.
Shred the chicken while the orzo cooks, 8 to 9 minutes. You’ll remove the chicken from the simmering pot, then let it rest 5 minutes before shredding it with your fingers. Use this time to cook the orzo pasta in the soup broth. Cooking time for orzo can vary, but it’s typically 8 to 10 minutes.
Garnish with fresh dill or parsley. The fresh herbs make the soup! We like fresh dill best, because of its delicate citrusy flavor. But parsley works well and is cheaper.
Buy organic chicken if possible
When shopping for shredded chicken, keep this in mind: the best chicken to buy is organic. Buying organic makes sure that it is the highest quality meat that was raised sustainably. It is also free of chemicals and additives so it’s the healthiest option for eating, and overall: it just tastes better!
Per the USDA, organic chicken must be raised in living conditions that accommodate their natural behaviors (like grazing on pasture), fed 100% organic feed and forage, and not given antibiotics or hormones.
Storage and make ahead info
Store leftovers refrigerated for up to 3 days; the orzo absorbs liquid over time, so may need to add another splash of water and pinch of salt when reheating. For meal prep, you can make the entire soup in advance and then reheat by adding water and a bit more salt. (If desired, you could also prep up to Step 3, then before serving add the orzo in Step 4 and cook.)
Sides for lemon chicken orzo soup
How to make it a meal? Pair a salad recipe or bread with this chicken orzo soup for an easy meal in any season. Whip up the salad while the soup is simmering. We love it with a crisp green salad like our simple arugula salad, and for an even more stunning dinner you could accessorize a radicchio salad or endive salad.
Craving something bright and flavorful? This lemon chicken orzo soup is packed with tender chicken, fluffy orzo pasta, and a zesty lemon broth for a comforting meal.
Ingredients
2 tablespoons olive oil
2 tablespoons salted butter
1 yellow onion, diced
2 cups peeled and sliced carrots (4 large or 6 medium)
In a large pot, heat the olive oil and butter over medium heat. Add the onions, carrots and celery and cook, stirring occasionally, until onions are tender, about 6 to 7 minutes. Add the garlic and sauté for 1 minute.
Stir in the broth, water, whole chicken breasts, oregano, dill, garlic powder, and 1 ½ teaspoons kosher salt. Bring to a boil, then reduce to a simmer. Simmer until the chicken is cooked through, about 15 to 20 minutes, until the chicken reads 165°F when measured with a food thermometer.
Remove the chicken breasts to a cutting board, then discard the skin and bone and allow to rest 5 minutes. Shred the chicken while the orzo is cooking (in the next step), by using your fingers to pull it into small pieces.
Meanwhile, add the orzo to the pot with the lemon zest and lemon juice. Cook until the orzo is tender, about 8 to 9 minutes.
Once the orzo is tender, turn off the heat and stir in the chicken. Taste and add up to ½ teaspoon kosher salt if desired and fresh ground black pepper. Serve warm, with fresh chopped parsley or dill. Store leftovers refrigerated for up to 3 days; the orzo absorbs liquid over time, so may need to add another splash of water and pinch of salt when reheating.*
Notes
*For meal prep, you can make the entire soup in advance and then reheat by adding water and a bit more salt. (If desired, you could also prep up to Step 3, then before serving add the orzo in Step 4 and cook.)
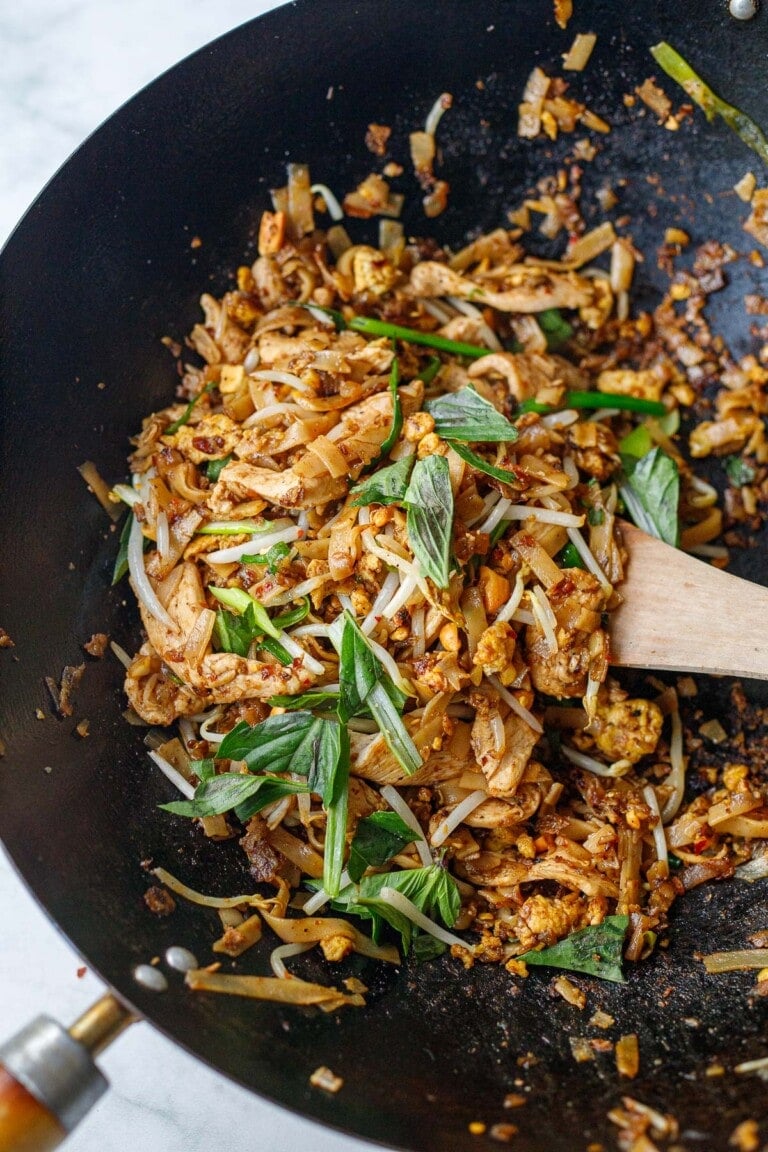
Here are our best, easy Thai Recipes bursting with authentic Thai flavor! These better-than takeout meals are easily made at home and will soon become your new favorites!
Here are our best, easy Thai Recipes bursting with authentic Thai flavor! These better-than takeout meals are easily made at home and will soon become your new favorites!
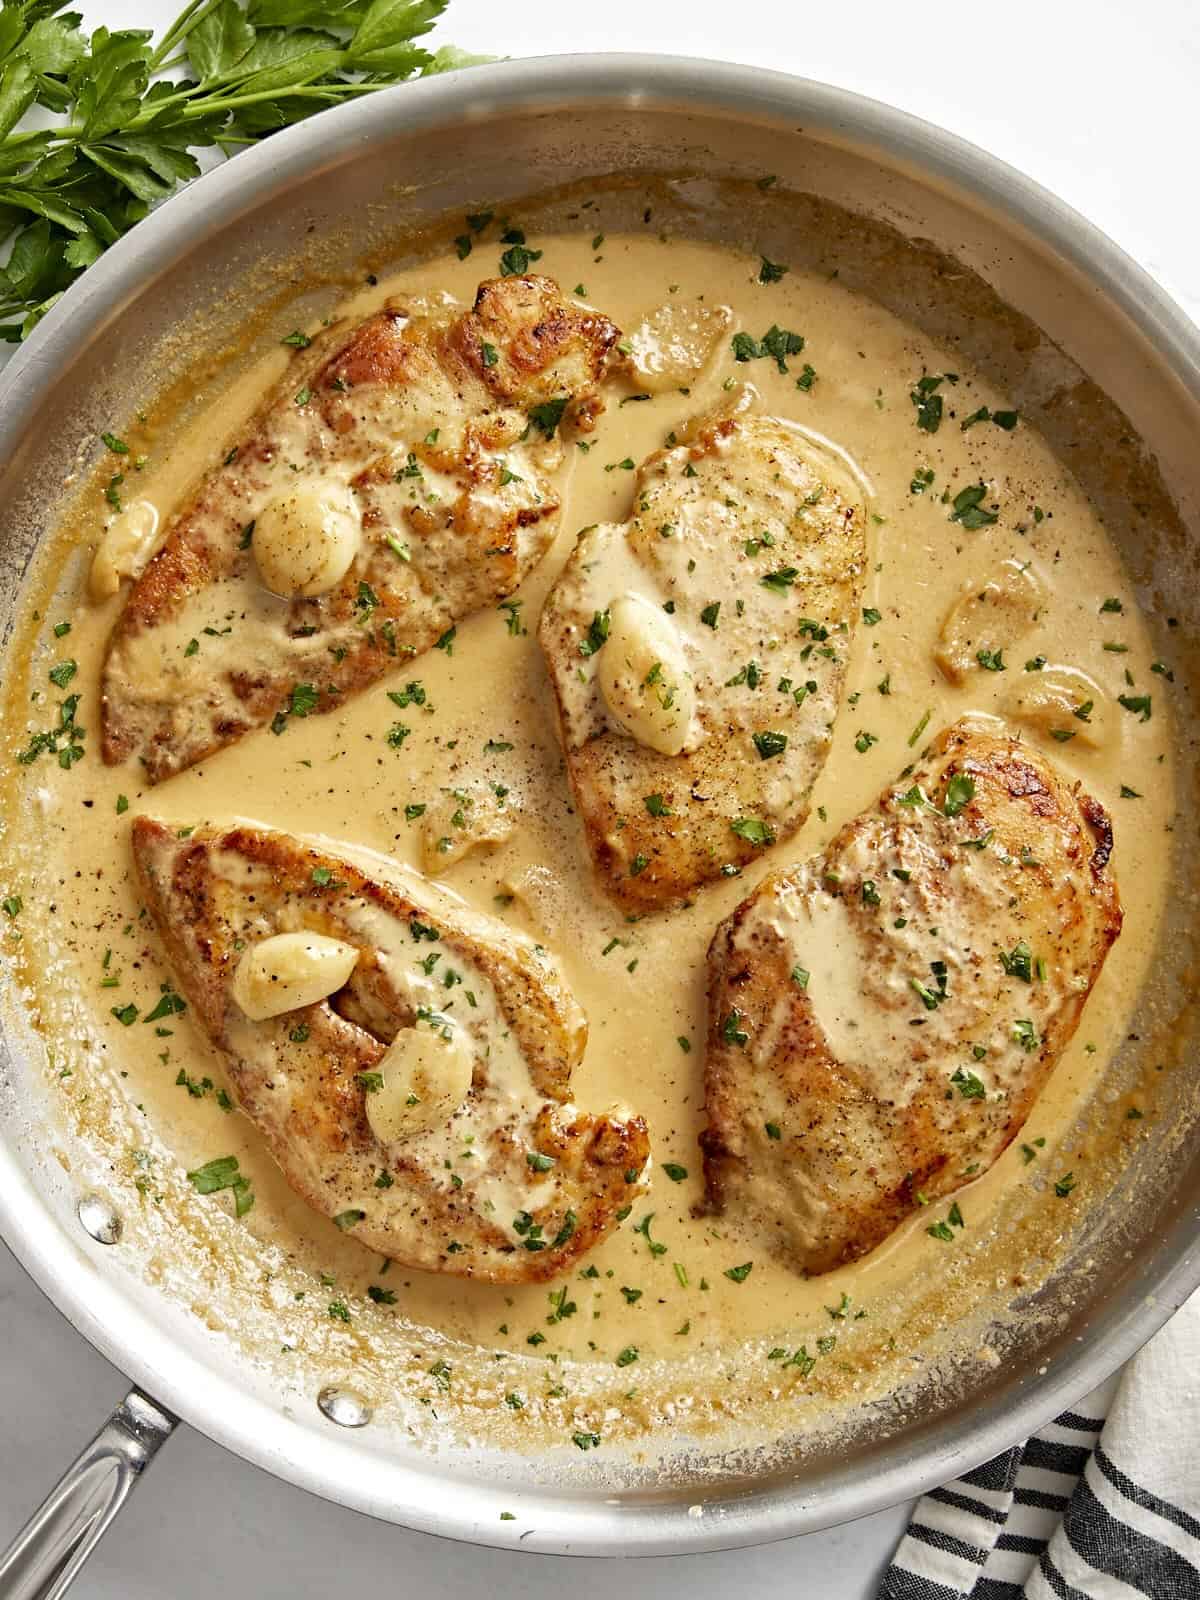
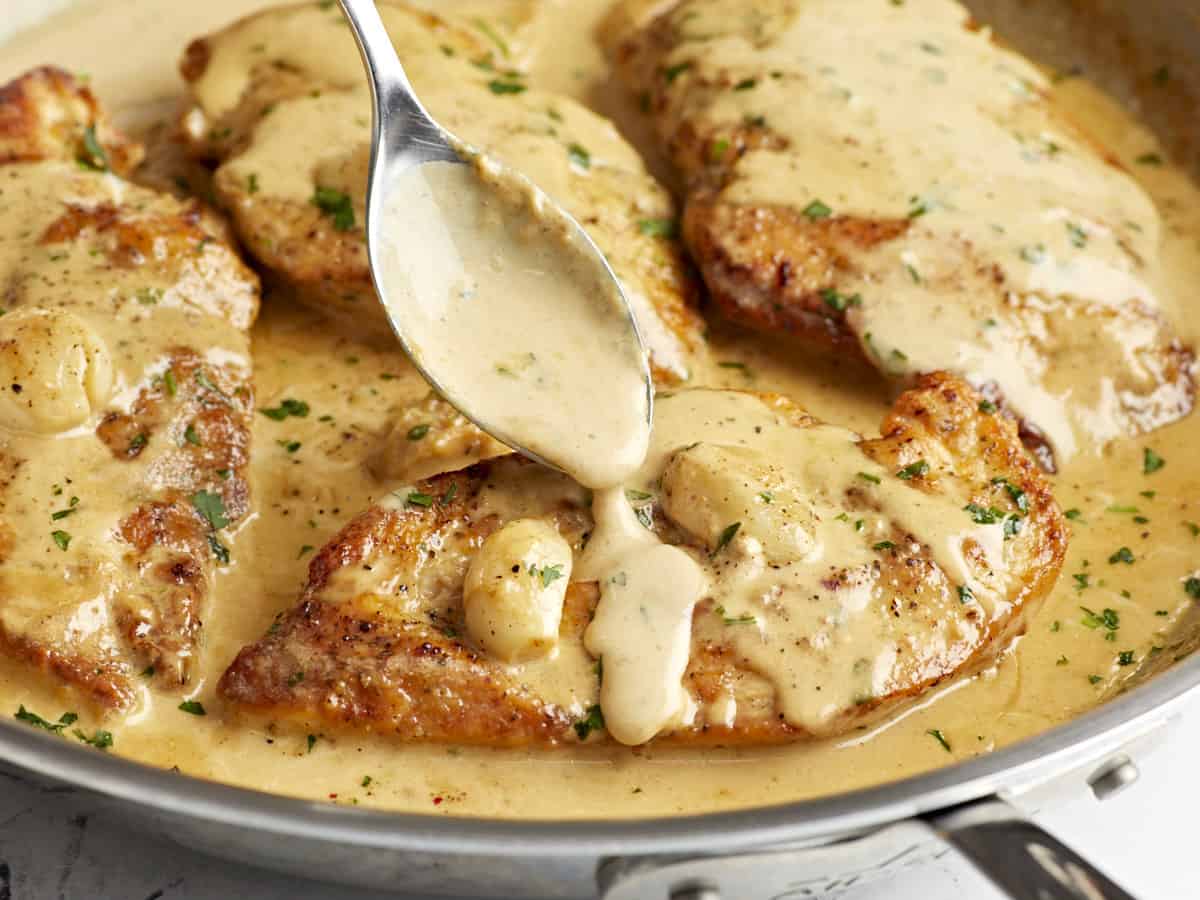
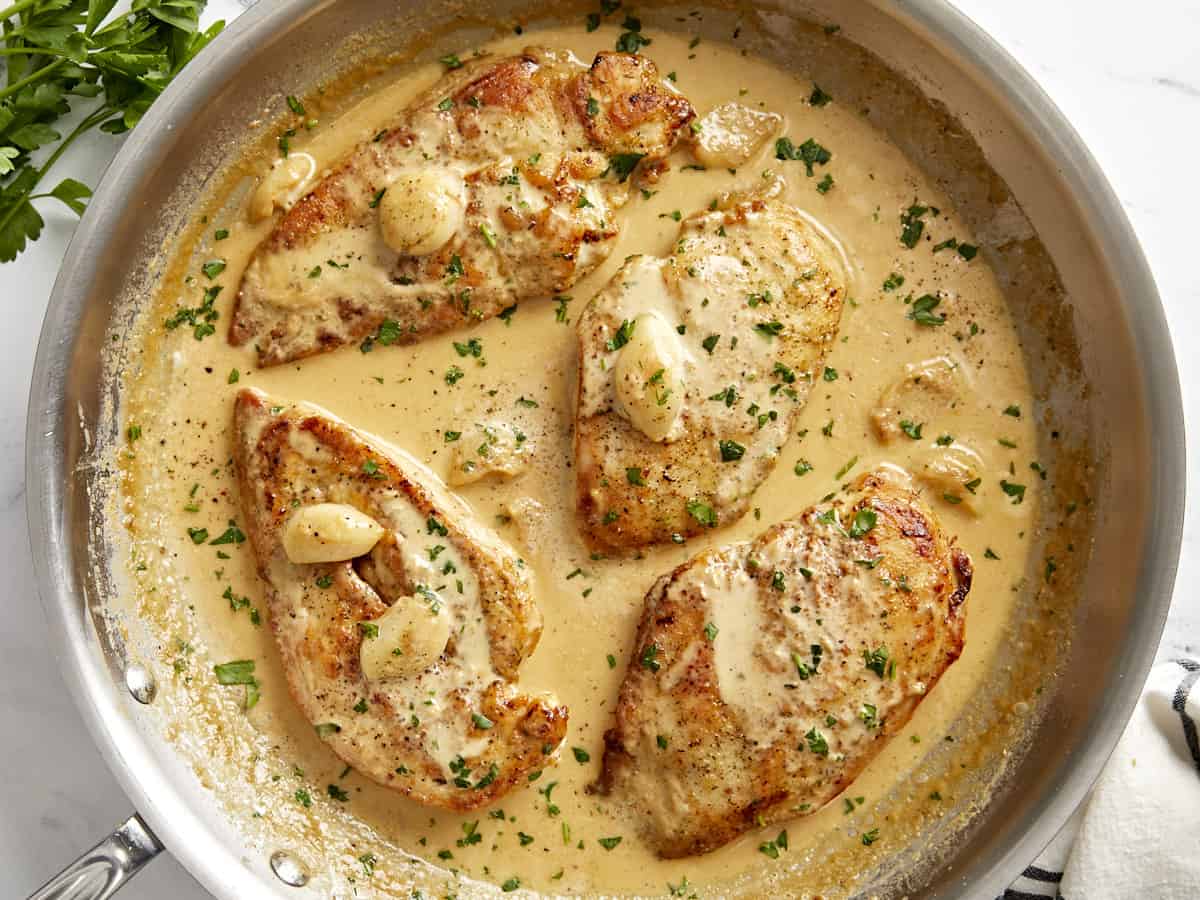
Every now and then you come across one of those recipes that just leaves you speechless. Well, today I’m introducing you to one of those recipes. This Creamy Garlic Chicken is so delicious, so flavorful, and so easy to make for a quick weeknight meal! It starts with tender, pan-seared chicken breasts that are then covered with a creamy, garlic-infused sauce. The moment my family tried this recipe, they instantly loved it! It honestly took everyone’s breath away. If you love simple recipes that are packed with flavor and made with a luscious cream sauce, then make sure to add this one to your weekly rotation!
Ingredients For Creamy Garlic Chicken
Here’s everything you need to make this creamy garlic chicken recipe:
Chicken: If you’ve seen a couple of my recipes, then by now you probably know I love using chicken breasts. So I opted for two boneless, skinless chicken breasts that I cut in half. But you can certainly use boneless, skinless chicken thighs instead.
All-purpose flour: A little bit of flour adds a light breading to the chicken breasts and the perfect compliment to the creamy garlic sauce.
Garlic: Garlic is the star of the show for this dish, so we’re using lots of it. One whole head of garlic to be exact. The garlic cooks down and infuses the sauce without overpowering the dish.
Olive Oil and Butter: Both are used to cook the chicken breasts and a little more butter is used to sauté the garlic cloves.
Chicken Broth and Heavy Cream: The rich garlic sauce is made with a combination of chicken broth and heavy cream. Both of them simmer together, along with the garlic cloves, until a creamy, flavorful sauce is formed.
Seasoning: The chicken breasts are seasoned with a little salt, pepper and Italian seasoning; and the sauce is seasoned with garlic powder plus a little salt & pepper to taste.
Can you eat the garlic cloves?
You may be curious if you can eat the whole garlic cloves with your chicken. The answer is YES! Sautéing the garlic cloves in the butter, then simmering them in the sauce, removes any overpowering, strong garlic taste and leaves a very subtle, delicious flavor. I love to spoon the garlic over the chicken along with the creamy sauce right before serving.
Recipe Tips!
After all the garlic cloves are peeled, I like to carefully smash them with the side of a large chef’s knife by pressing down on the side of the knife with the heel of my hand. Smashing the cloves releases more of their flavorful oils and gives the sauce a stronger garlic flavor.
Make sure you stir the garlic cloves frequently when sautéing them in the skillet with the butter. You don’t want the garlic to burn. As soon as it starts to turn a light brown color, add in the liquids and stir.
What To Serve With Creamy Garlic Chicken?
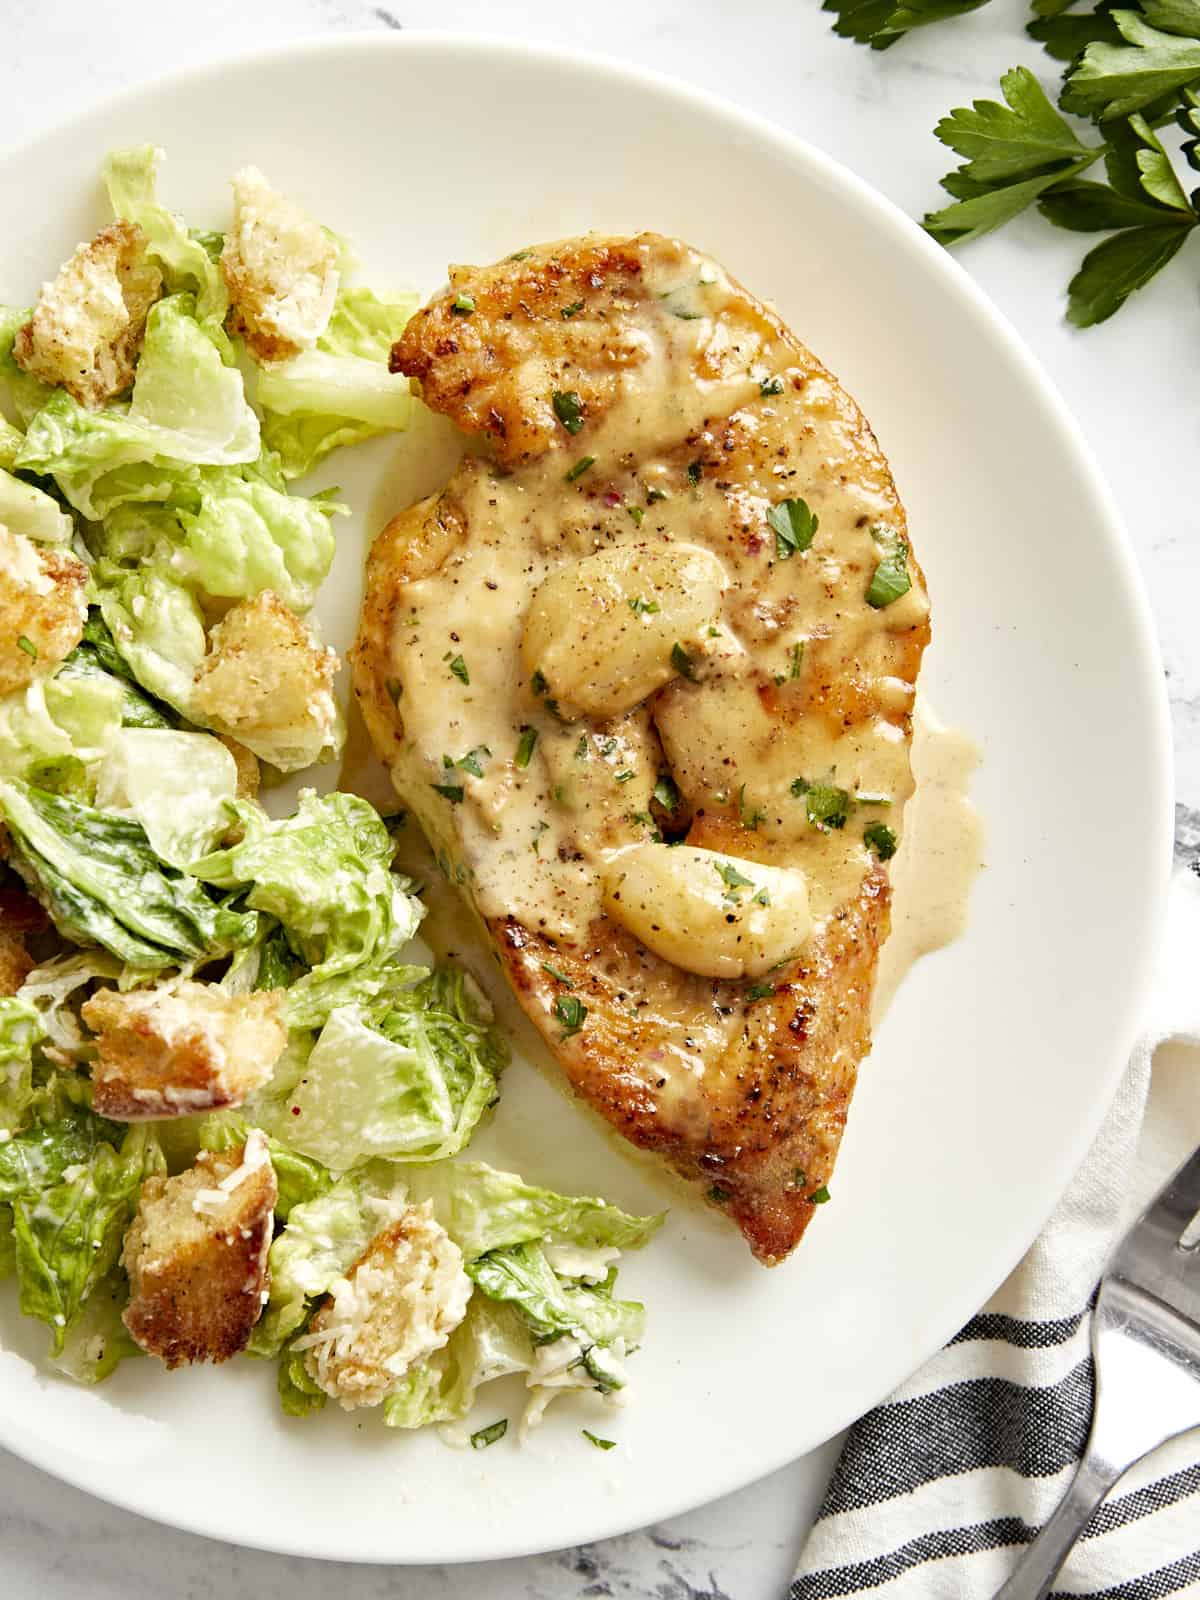
Creamy sauce recipes like this creamy garlic chicken are perfect to serve with Mashed Potatoes, so the potatoes can soak up all of that extra sauce. You can also serve the chicken and sauce over a bed of pasta or rice, or serve it with a simple side salad or in our case a Caesar salad. You really can’t go wrong with any side that you choose!
Using a sharp knife, carefully fillet each chicken breast into two thinner cutlets (or use thin-cut chicken breasts).
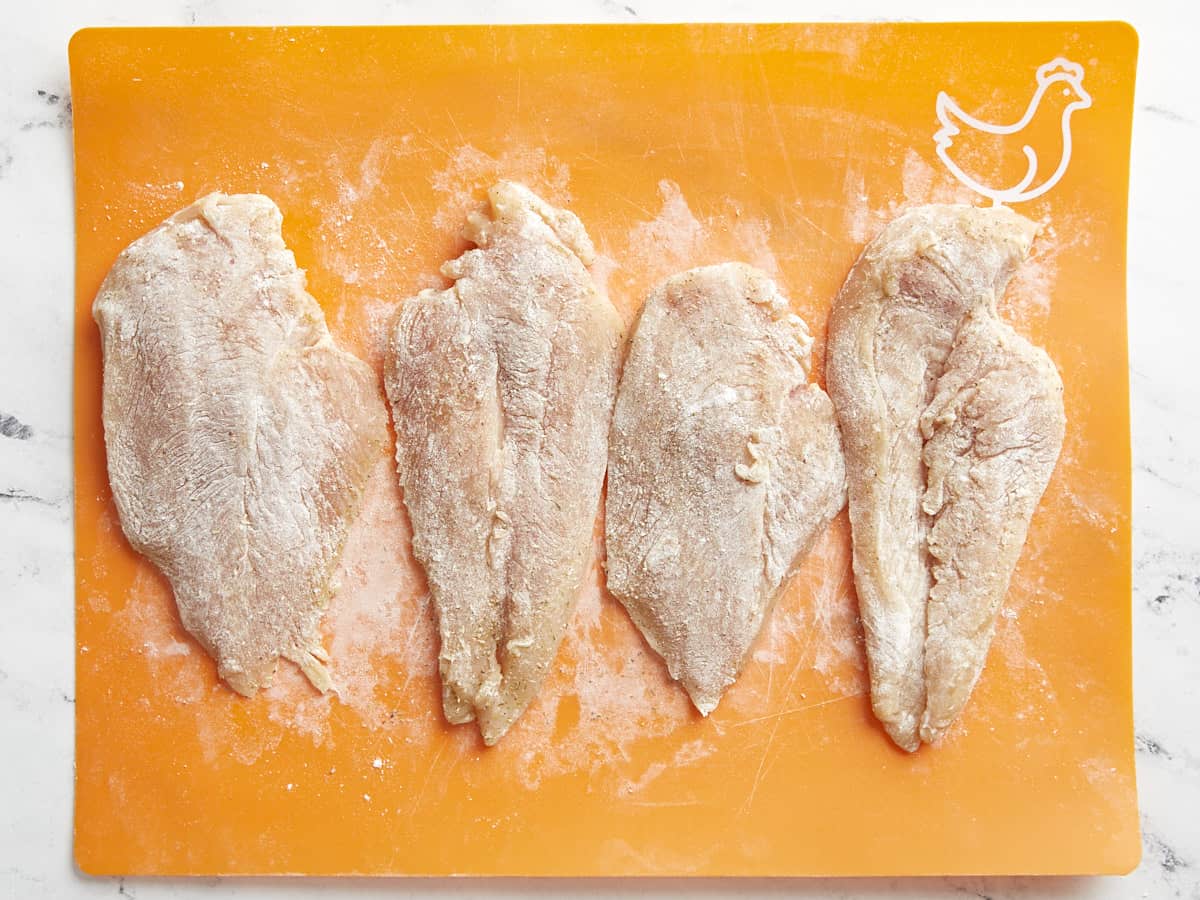
Season each breast with Italian seasoning, salt, and black pepper. Then sprinkle the flour over both sides of the chicken breasts and rub it in until the chicken is evenly coated.
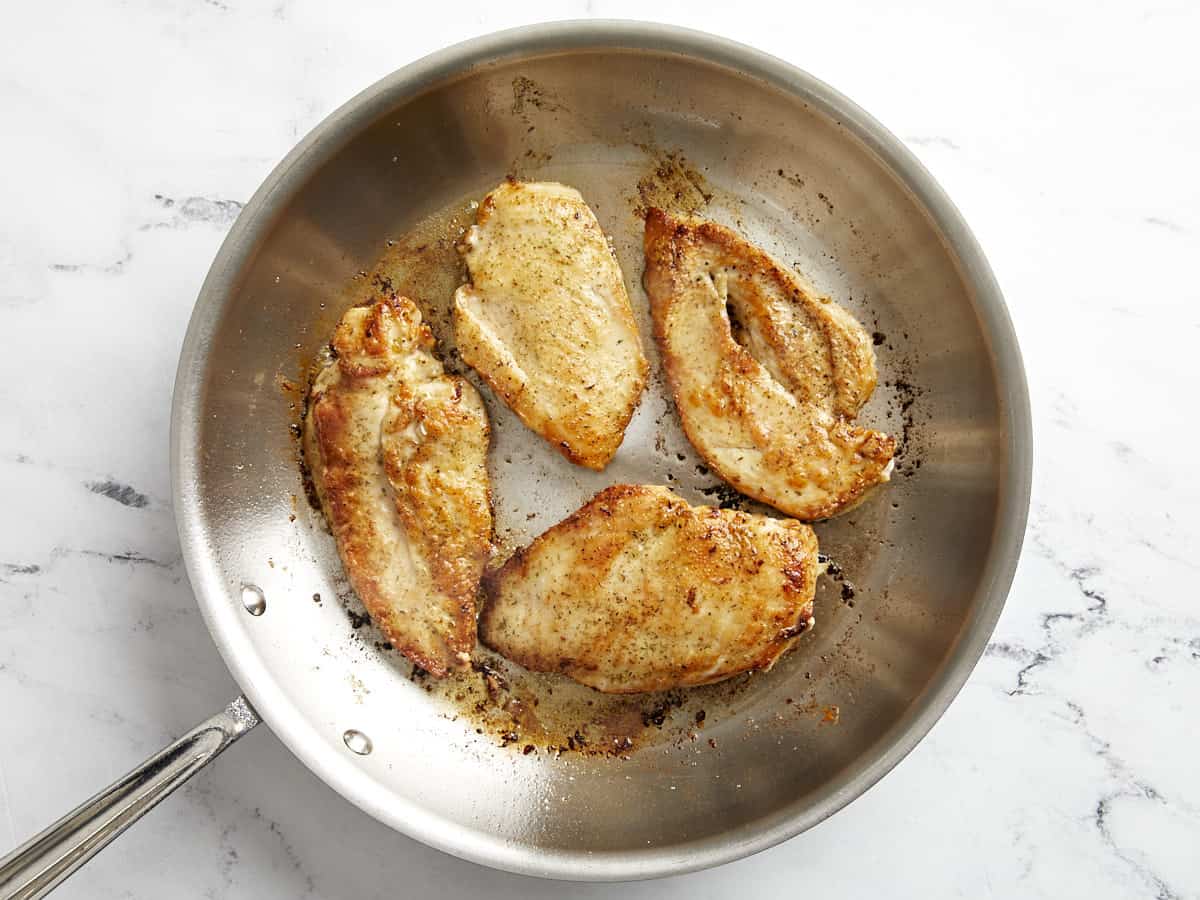
Heat a large skillet over medium heat and add the olive oil and 1 Tbsp of butter. Once the skillet is hot, add the chicken and cook on each side until golden brown and cooked through (about 4 minutes per side). Remove the cooked chicken to a clean plate and cover to keep warm.
While the chicken is cooking, peel the garlic cloves and then carefully smash them with the side of a large chef's knife by pressing down on the side of the knife with the heel of your hand.
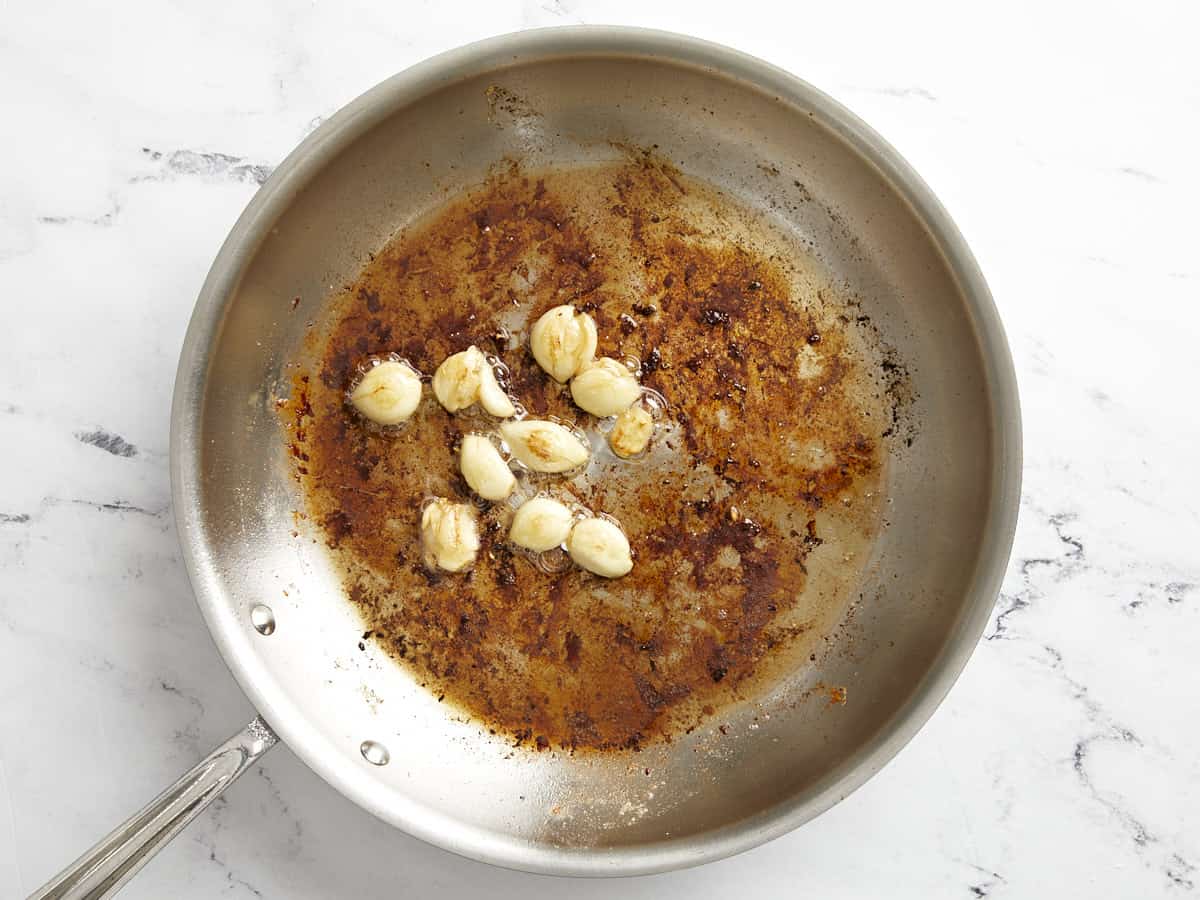
Once the chicken is removed, to the same skillet add the remaining 1 Tbsp of butter, then add the garlic cloves. Turn the heat down to medium-low and sauté the garlic for 3 minutes or until lightly browned and fragrant. Make sure to stir the garlic frequently to prevent it from burning.
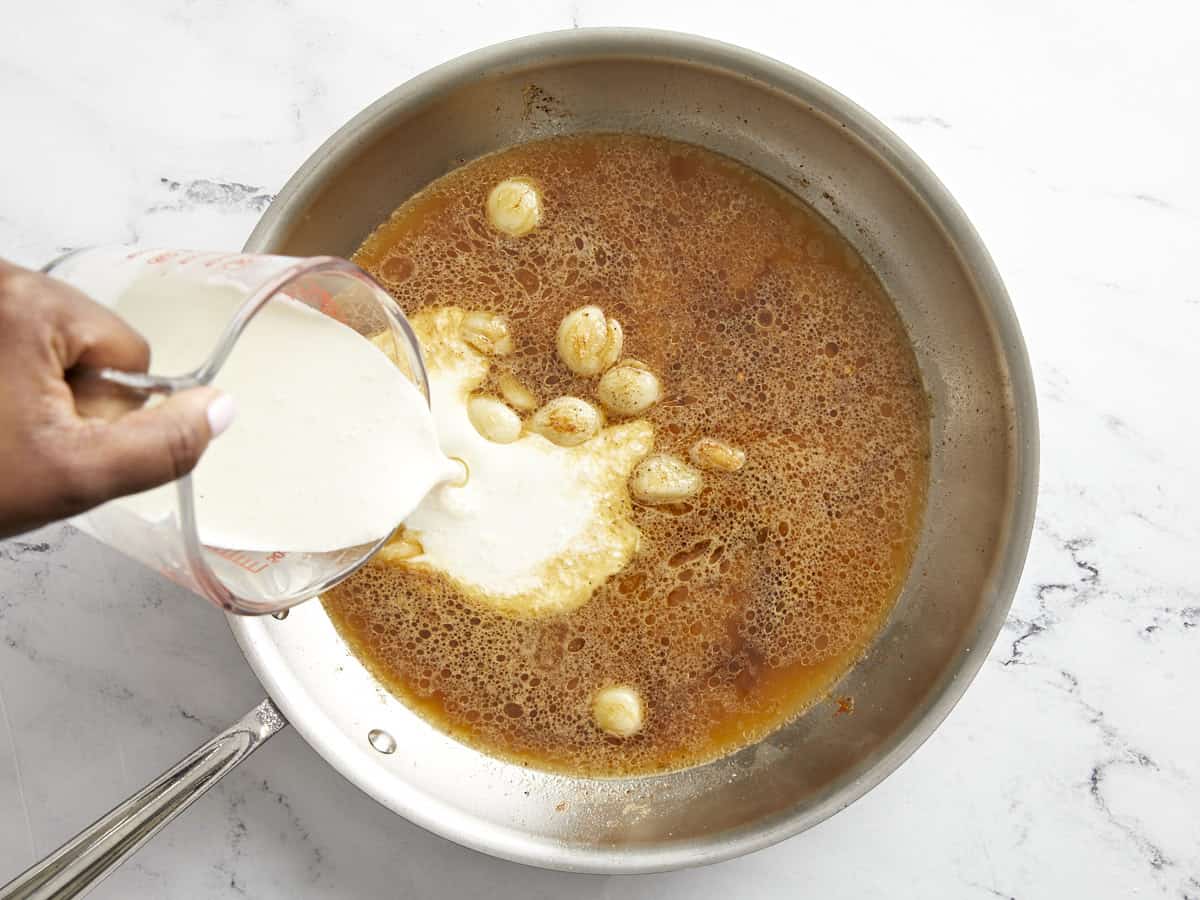
Next pour the chicken broth and heavy cream into the skillet, then add the garlic powder. Stir and scrape up any brown bits from the bottom of the skillet. Allow the sauce to simmer in the skillet for 8-10 minutes, or until it has reduced and thickened by about 50%. Taste the sauce at this point and add salt and pepper if needed (I added about ⅛ tsp of salt and ⅛ tsp of black pepper).
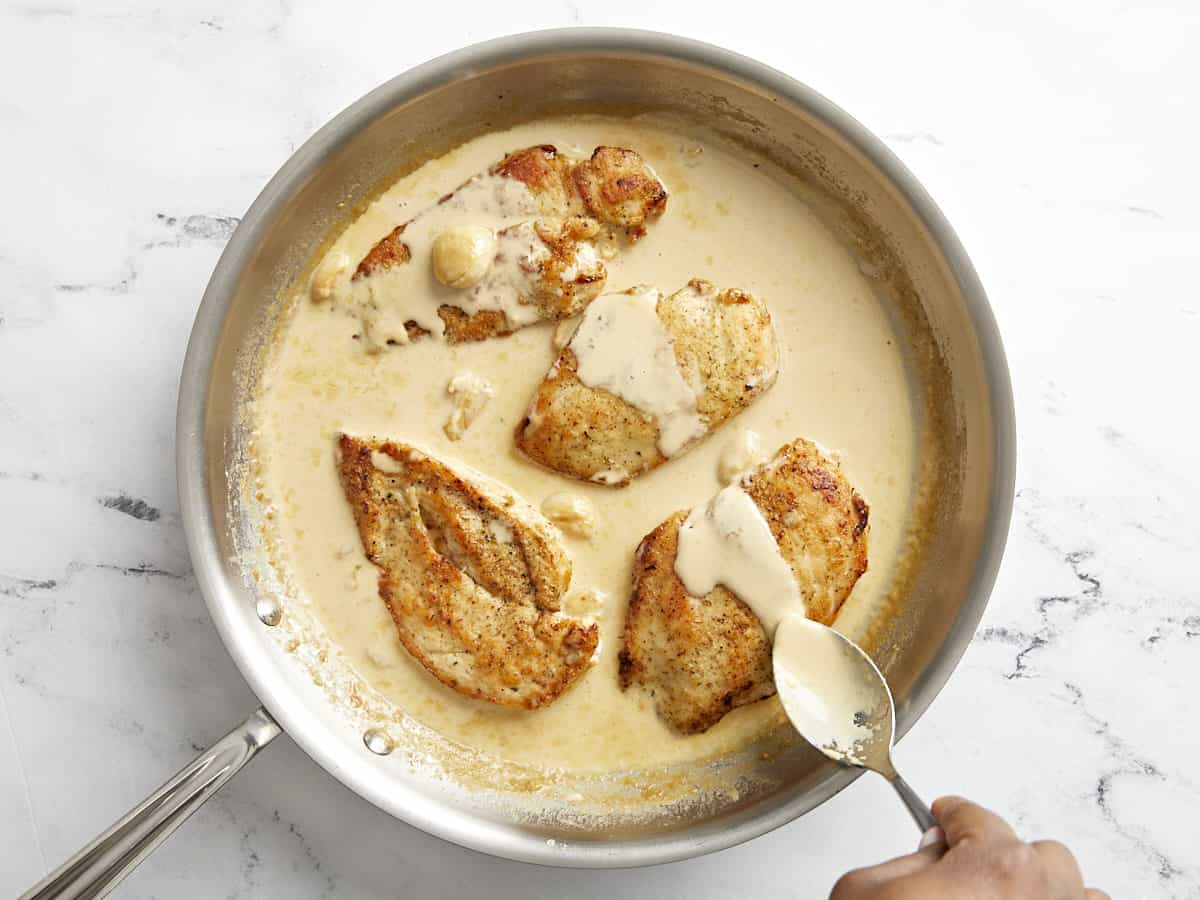
Finally, return the cooked chicken breasts to the skillet and spoon the creamy sauce over top. Allow the chicken to heat through. Serve with fresh chopped parsley (optional), and enjoy!
How to Make Creamy Garlic Chicken – Step by Step Photos
Using a sharp knife, carefully fillet 2 chicken breast into two thinner cutlets (or use thin-cut chicken breasts). Season each breast with 1/2 tsp Italian seasoning, 1/2 tsp salt, and 1/4 tsp freshly cracked black pepper. Then sprinkle 1/4 cup all-purpose flour over both sides of the chicken breasts and rub it in until the chicken is evenly coated.
Heat a large skillet over medium heat and add 2 Tbsp olive oil and 1 Tbsp of butter. Once the skillet is hot, add the chicken and cook on each side until golden brown and cooked through (about 4 minutes per side). Remove the cooked chicken to a clean plate and cover to keep warm.
While the chicken is cooking, peel the garlic cloves from 1 whole head of garlic. Then carefully smash them with the side of a large chef’s knife by pressing down on the side of the knife with the heel of your hand.
Once the chicken is removed, to the same skillet add the remaining 1 Tbsp of butter, then add the garlic cloves. Turn the heat down to medium-low and sauté the garlic for 3 minutes or until lightly browned and fragrant. Make sure to stir the garlic frequently to prevent it from burning.
Next pour 1 cup chicken broth and 3/4 cup heavy cream into the skillet, then add 1/2 tsp garlic powder. Stir and scrape up any brown bits from the bottom of the skillet. Allow the sauce to simmer in the skillet for 8-10 minutes, or until it has reduced and thickened by about 50%.
Taste the sauce at this point and add salt and pepper if needed (I added about ⅛ tsp of salt and ⅛ tsp of black pepper). Return the cooked chicken breasts to the skillet and spoon the creamy sauce over top. Allow the chicken to heat through.
Serve with fresh chopped parsley (optional) and enjoy this creamy, flavorful sauce with mashed potatoes, pasta, or any of your favorite sides.
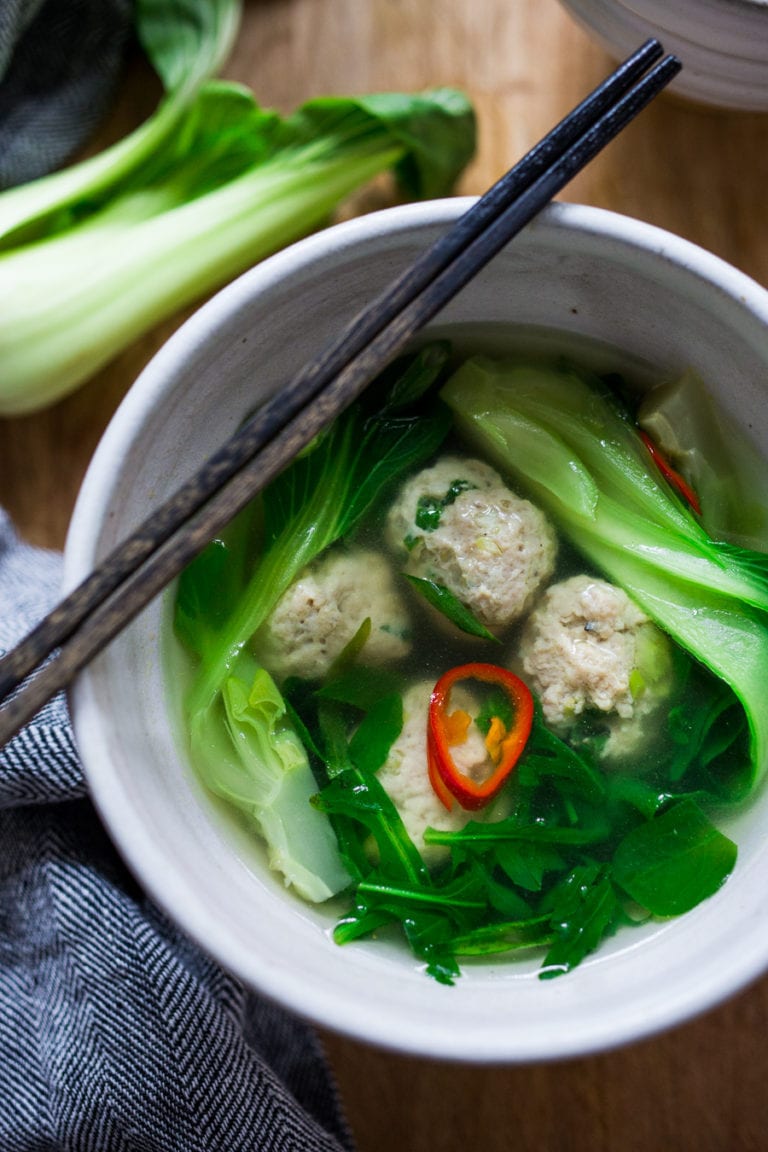
This Asian Chicken Meatball Soup recipe is so nourishing and delicious! Loaded up with healthy bok choy, it’s easily made in 30 minutes. Paleo, low-carb, low-calorie and gluten-free.
This Asian Chicken Meatball Soup recipe is so nourishing and delicious! Loaded up with healthy bok choy, it's easily made in 30 minutes. Paleo, low-carb, low-calorie and gluten-free.
Easy Cranberry Chicken Salad on Apple Slices make a sweet, crunchy, protein-packed lunch! Cranberry Chicken Salad on Apple Slices If you love my chicken salad you’re going to love this healthy Cranberry Chicken Salad on Apple Slices! It’s a refreshing …
Easy Cranberry Chicken Salad on Apple Slices make a sweet, crunchy, protein-packed lunch! Cranberry Chicken Salad on Apple Slices If you love my chicken salad you’re going to love this healthy Cranberry Chicken Salad on Apple Slices! It’s a refreshing take on lunch that’s as nutritious as it is delicious. Made with chicken breast from […]
This one pot chicken and rice is the perfect easy dinner that’s bursting with flavor! Tender chicken thighs and fluffy rice simmer in a cozy broth, with a burst of freshness from the zesty parsley and lemon gremolata topping.
The word “one pot wonder” comes to mind with this recipe (though is that term is a bit retro?). Whatever the case, this glorious one pot chicken and rice meal really is the easy dinner you need in your life. It’s cozy and comforting, from the garlic and herb scented rice to the tender chicken thighs. The zingy parsley lemon gremolata makes the ideal fresh counterpoint to the cozy grains. We’ve made this one pot meal dozens of times for friends and family, and it’s a hit every time (even with unadventurous eaters).
What you need for this chicken and rice recipe
There’s something about a one pot meal that’s filling, cozy, and pleases everyone. This one is your best bet for chicken eaters, since it’s full of big flavors and minimal effort. The cook time is about 30 minutes, and you can likely do most of the prep in 15 minutes. This recipe features economical chicken thighs, which make it a cost-effective dinner as well. Here’s what you’ll need:
Boneless skinless chicken thighs
Garlic powder, onion powder, and dried dill
Salt and pepper
Olive oil
Garlic
White or yellow onion
White rice
Chicken broth
Parsley
Lemon zest
Chicken thighs are ultra flavorful
Many chefs and experts say that chicken thighs are the best cut of chicken, and we agree! A chicken breast can be delicious when butterflied and cooked properly (like in chicken piccata), but chicken thighs can be even more flavorful. They’re fattier than chicken breasts, which gives them a more intense, rich flavor than the white meat. There are two ways to buy chicken thighs: boneless and bone-in.
This recipe is for boneless, skinless chicken thighs. This type of thigh cooks quicker and is easier to eat. We like it for skillet dinners and pan frying because it makes for a fast dinner that’s easy for our entire family to eat (versus pulling meat off the bones, which can be tricky for the kids).
Bone-in, skin-on thighs are tasty, but we prefer using them in other recipes. Bone-in thighs flavors inside the bone spread out onto the meat, leaving you with a meatier, richer flavor. They will take longer too cook in this recipe and we have not tested the timing. We prefer using bone-in, skin-on thighs for our fan favorite Baked Chicken Thighs recipe, where they come out with deliciously crispy skin.
Why to add gremolata
This chicken and rice recipe is tasty as is, but it’s even better topped with the fresh garnish: gremolata! Gremolata is an Italian condiment that adds a burst of freshness and brightness to dishes. Traditionally, it’s a combination of finely chopped fresh parsley, grated lemon zest, and minced garlic, to create a flavor profile that is both herbaceous and citrusy.
Gremolata is typically served as a finishing touch, sprinkled over cooked fish, meat, vegetables, or even pasta for an instant flavor upgrade. Keep in mind that it’s dry in texture, not oil-based like a chimichurri or pistou.
Buy organic chicken if possible
When shopping for this chicken and rice recipe, keep in mind: the best chicken to buy is organic. This makes sure that it is the highest quality meat that was raised sustainably. It is also free of chemicals and additives so it’s the healthiest option for eating.
Per the USDA, organic chicken must be raised in living conditions that accommodate their natural behaviors (like grazing on pasture), fed 100% organic feed and forage, and not given antibiotics or hormones.
Simple ways to make chicken and rice a meal
This chicken and rice skillet is simple to whip up, and even better: you’ve got one side dish covered! Add a green veggie and it’s a meal. Here are a few ways we like to serve it that are easy to make on the side:
Peas, like these lemony peas that take 5 minutes to make
This chicken and rice recipe is the best easy dinner idea for chicken lovers! Our entire family gobbles it up, and we tested it on my in laws who are big fans. Even our unadventurous eaters loved the gremolata. Here are a few more top chicken dinners to try:
This one-pot chicken and rice is the perfect easy dinner that’s bursting with flavor! Tender chicken thighs and fluffy rice simmer in a cozy broth, with a burst of freshness from the zesty parsley and lemon gremolata topping.
Dry the chicken thighs and season with the kosher salt, garlic powder, onion powder and lots of fresh ground pepper. In a large skillet, heat the olive oil over medium high heat. Add the chicken and cook 3 to 4 minutes per side, until golden brown. Remove the chicken to a plate, leaving the juices in the pan.
Reduce the heat to medium low and add the garlic and onion. Cook for 5 minutes, until the onions are very tender, stirring occasionally. Stir in the broth, rice, dill and kosher salt, scraping the bottom of the pan to pick up all of the seasoning from the chicken. Bring to a boil, then reduce to a simmer and top with the browned chicken thighs. Cover with a lid and cook at a low simmer for 15 to 18 minutes until rice is tender and all of the liquid is absorbed.
Meanwhile, in a medium bowl mix together the ingredients for the gremolata.
Remove the heat and let stand covered for 5 minutes. Uncover and fluff the rice with a fork, then top with the gremolata and serve warm.
Category:Main dish
Method:Stovetop
Cuisine:Chicken
Diet:Gluten Free
Keywords: Chicken and rice recipe, chicken and rice
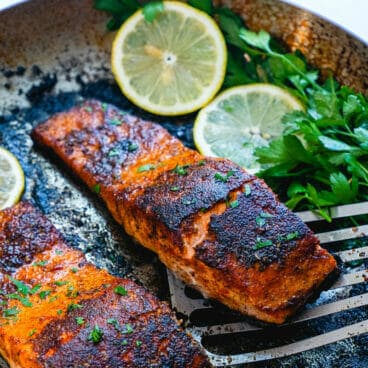
Experience the bold flavors and juicy perfection of blackened chicken! This simple recipe comes together in minutes for a flavor-packed dinner idea. It’s great as is or served on sandwiches, salads, tacos, and more!
Here’s a trick every home cook should know: how to make blackened chicken! This culinary magic transforms ordinary chicken breasts into flavor powerhouses with a smoky depth and a hint of heat. This recipe lets you to create a restaurant-worthy dish in the comfort of your own home, which works on its own with rice, on a sandwich, or cut into strips to top a salad or for tacos. It’s endlessly versatile, making it one of our top chicken recipes to make at home.
What is blackening?
Blackening is a style of cooking meat or fish in a cast iron skillet with a special blend of Cajun-style spices until the outside is crispy and blackened. This technique was popularized by celebrity Cajun chef Paul Prudhomme of Louisiana. He created a recipe for blackened redfish in a 1980’s cookbook that became an instant hit. Since then, blackening has become a popular technique used with different meat and fish, commonly chicken, salmon and shrimp.
Basic steps for blackened chicken
Blackened chicken takes about 15 minutes to make, making it a fantastic quick and easy dinner idea. The clean up does take a few minutes, but it’s worth it! Here are the basic steps for the process (or jump to the recipe below)
Butterfly the chicken by slicing the breasts in half. Chicken cutlets are the quickest and tastiest way to cook a chicken breast.
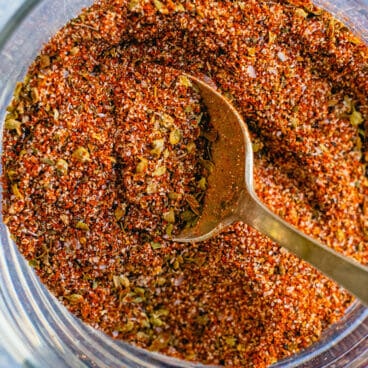
Pat the chicken dry and add blackened seasoning. This recipe uses a simplified version of our classic blackened seasoning for quick and easy prep.
Sear the chicken for 4 to 5 minutes per side. A stainless steel or cast iron pan get the best sear on the meat: avoid using a non-stick pan. Cook on medium high heat until it’s cooked through and at 165°F when measured with a food thermometer.
Tips for butterflying the chicken
This blackened chicken recipe uses chicken cutlets, or butterflied chicken breasts, because it makes for the juiciest, most well-seasoned piece of meat. Chicken breasts are often very thick, making them tricky to cook evenly. Slicing the chicken breast in half horizontally (butterflying it) makes thinner pieces that cook quicker and more evenly, are easier to eat, and are better seasoned. You can buy a chicken breast already butterflied, which is marked on the package as butterflied or “cutlets”. If you buy regular chicken breasts, you can butterfly them yourself:
Place your hand over the top of the chicken breast. Use a sharp knife to carefully slice the breast horizontally, leaving the edge intact so it can open up like a book.
Unfold the chicken breast, then cut along the fold to separate the two halves (each half is a cutlet).
Ways to serve blackened chicken
Blackened chicken works well with a few side dishes, but it is also ultra versatile! Add it to salads, tacos, sandwiches and more for endless variations. Here are a few ways we like to serve it:
After making blackened chicken, you’ll notice that the pan has a lovely blackened char as well. Don’t worry, it’s a;; part of the fun! Here are a few things to note about cleaning your pan:
Clean it right after eating. You can eat your food first, of course! But don’t leave it for hours or overnight or the black crust will solidify, making it much tougher to clean.
“Deglaze” the pan with water. Deglazing the pan is a cooking technique where you add wine or another liquid to loosen the browned bits from the bottom of the pan. You can use it for cleaning too! Simply place water in the pan and heat it on a burner over medium heat. When the blackened bits start to loosen, scrape them off gently with a wooden spoon or silicon spatula.
Use a non-toxic kitchen cleaner. If you have bits that are really stuck, we like to use a cleaner like Bon Ami.
More blackened recipes
Blackening works as a cooking technique for many different proteins, from fish to shellfish. Here are a few more blackened recipes to try:
Experience the bold flavors and juicy perfection of blackened chicken! This simple recipe comes together in minutes for a flavor-packed dinner idea. It’s great as is or served on sandwiches, salads, tacos, and more!
Ingredients
2 boneless skinless chicken breasts (1 to 1 1/2 pound, organic if possible), butterflied or cutlets
Pat the chicken dry with a paper towel. If it is not already butterflied or in cutlets, slice it in half horizontally to make 4 pieces.
Season the chicken with salt, using 1 teaspoon for 1 pound chicken and up to 1 ½ teaspoons for 1 ½ pounds.
In a small bowl, mix together the smoked paprika, oregano, garlic powder, onion powder, cumin, black pepper, celery seed, and cayenne. Sprinkle the chicken on both sides with the seasoning mix.
Add the olive oil to a large stainless steel or cast iron skillet* and heat over medium heat. Add the chicken and cook until browned and the seasoning is starting to blacken, about 4 to 5 minutes per side. When the internal temperature is 165°F or the center is no longer pink, remove to a plate and rest for 3 minutes before serving. (See the section above on how to clean your pan after blackening.)
Notes
*You’ll get the best sear from a stainless steel or cast iron skillet; avoid non-stick surfaces.
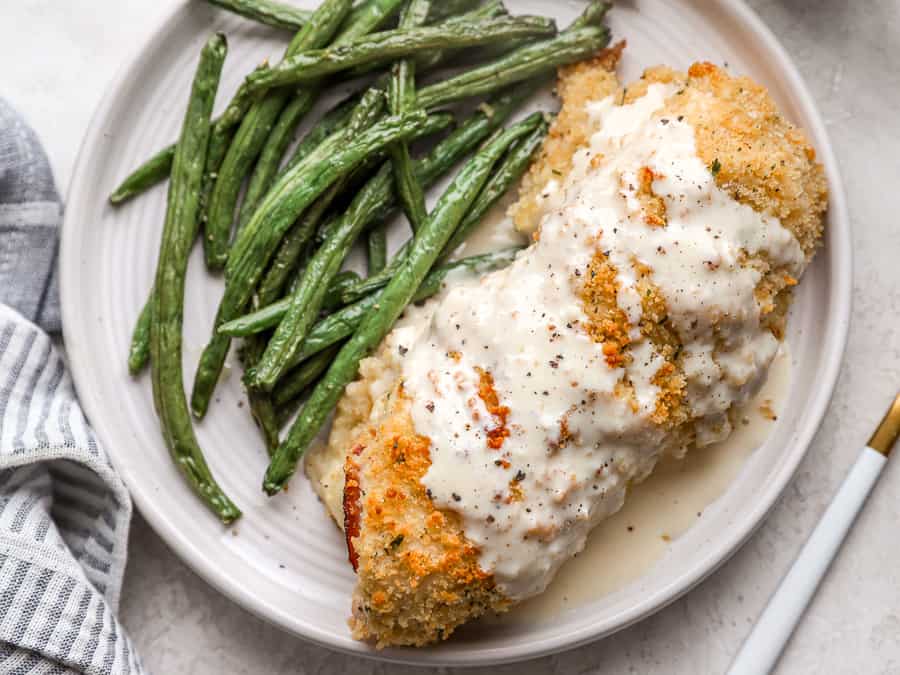
Chicken Cordon Bleu is one of those recipes that feels super fancy but doesn’t actually take a ton of effort. It can be pricey if ordering at a restaurant, but we have developed a budget conscious recipe that can be made at home. With some simple technique and a little bit of patience, you can make this savory, cheesy, saucy dinner recipe in under an hour!
What is Chicken Cordon Bleu?
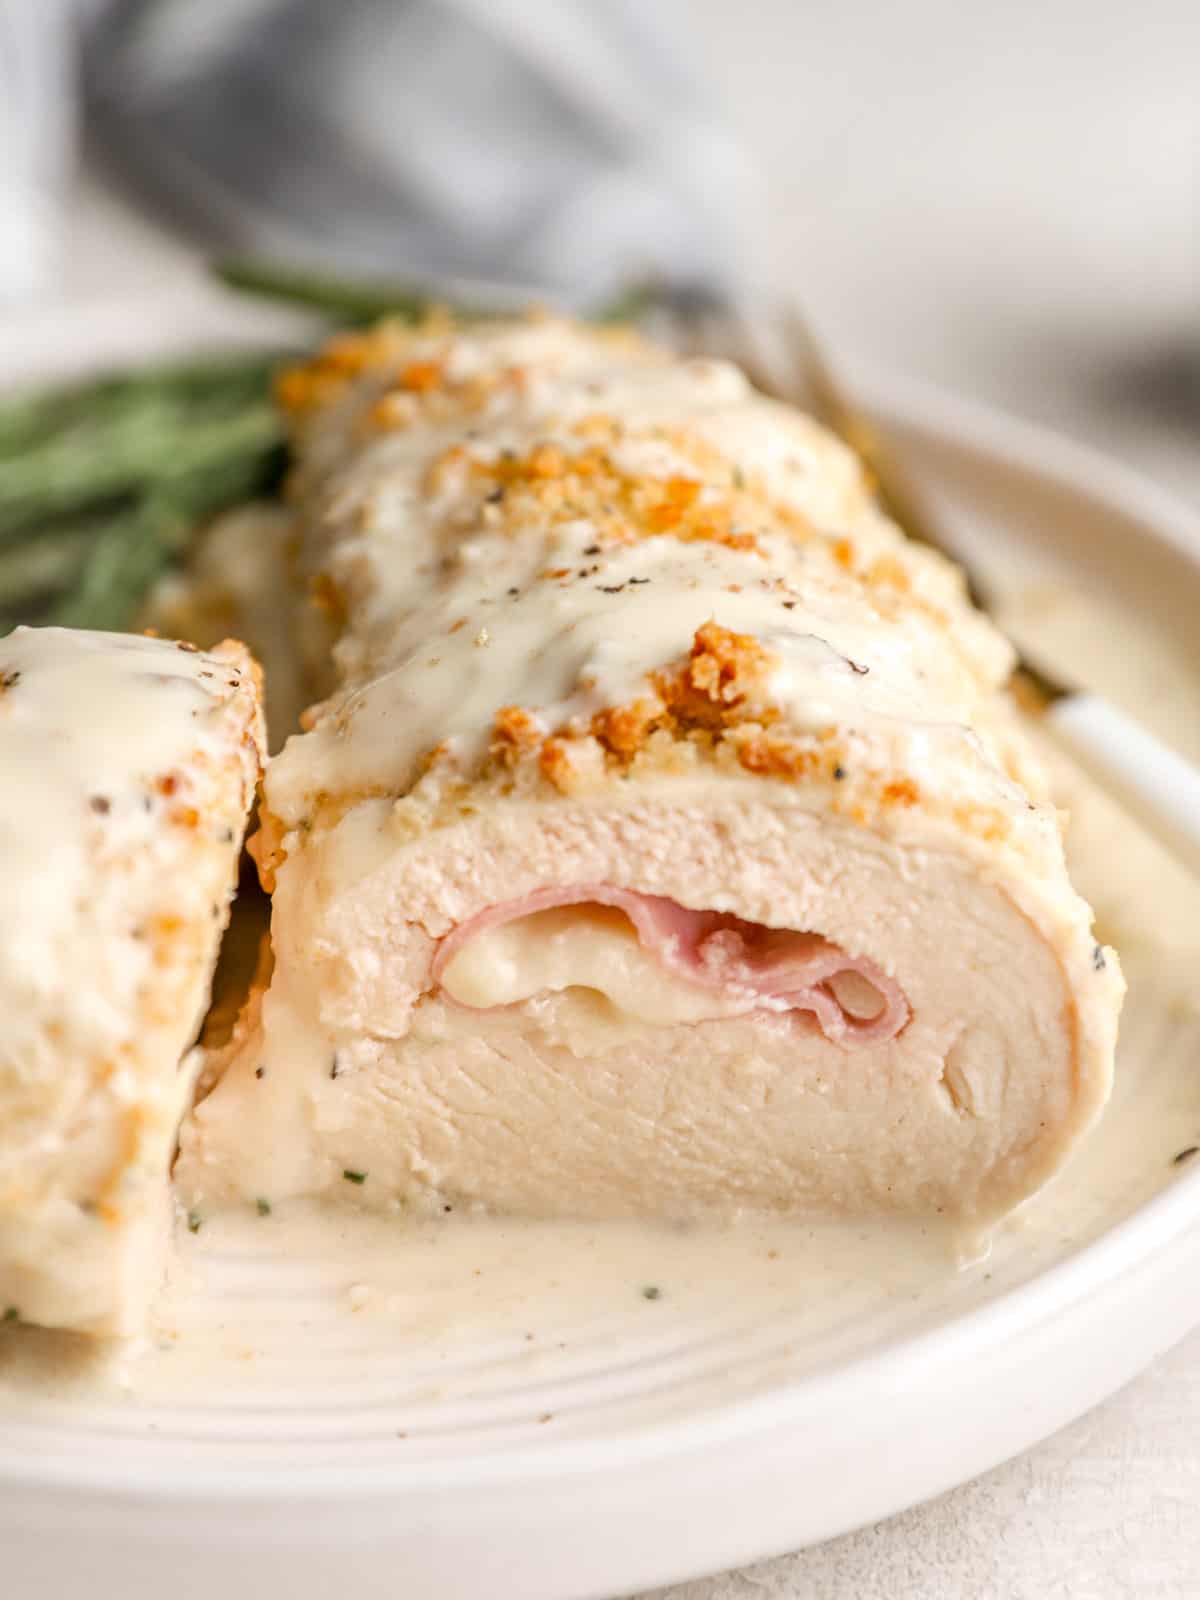
Chicken cordon bleu is made by butterflying a chicken breast and stuffing it with slices of creamy, melty Swiss cheese and salty deli ham. The whole thing gets rolled up, dipped in breadcrumbs, and doused in a creamy sauce for the ultimate decadent dinner. While it can be expensive when ordering out, our version is more cost effective but equally as delicious.
Ingredients For Chicken Cordon Bleu
Boneless Skinless Chicken Breasts: You’ll need 4 large chicken breasts for this recipe so there’s plenty of room to stuff them. Look for ones that are about 7-8 ounces each.
Ham: Any flavor of deli ham works well.
Swiss Cheese: You can also use provolone or cheddar.
Panko Breadcrumbs: Create a crunchy coating on the chicken. Regular or Italian-seasoned breadcrumbs are also a good choice.
Seasonings: Italian seasoning, onion powder, garlic powder, salt, and freshly cracked black pepper season the chicken. Salt also enhances the flavor of the sauce.
Butter: Unsalted butter helps the seasonings and breadcrumbs stick to the chicken, and it also forms the base of the sauce.
All-Purpose Flour: A bit of flour helps to thicken the sauce.
Milk: Milk adds richness and moisture to the sauce. Any kind works, including non-dairy.
Dijon Mustard: A touch of mustard adds just a bit of warmth to the sauce.
Worcestershire Sauce: This umami sauce adds incredible depth of flavor.
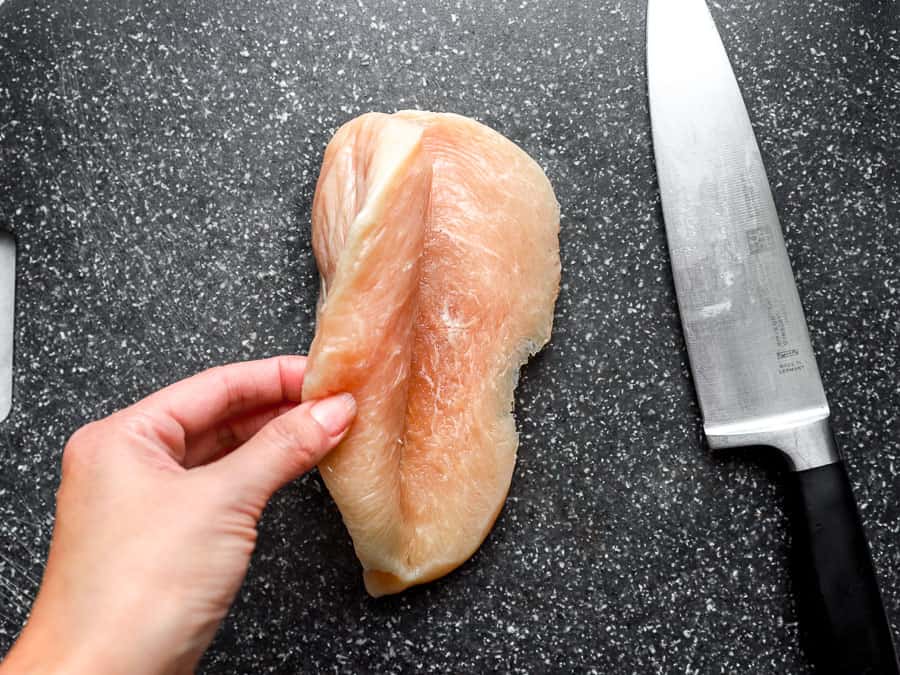
How to Butterfly a Chicken Breast
Place the chicken breast flat on a cutting board and hold your knife horizontally to the cutting board.
Place one hand on the chicken breast to keep it steady, then insert your knife into the center of the chicken breast and begin to cut horizontally until you have almost reached the other side.
Once cooked and cooled, store chicken cordon bleu in an air-tight container in the refrigerator for up to 3 days. If you plan to freeze this dish, I recommend doing so before baking it for the crispiest results. It will keep well for up to 3 months. Simply thaw overnight in the refrigerator, then bake as directed.
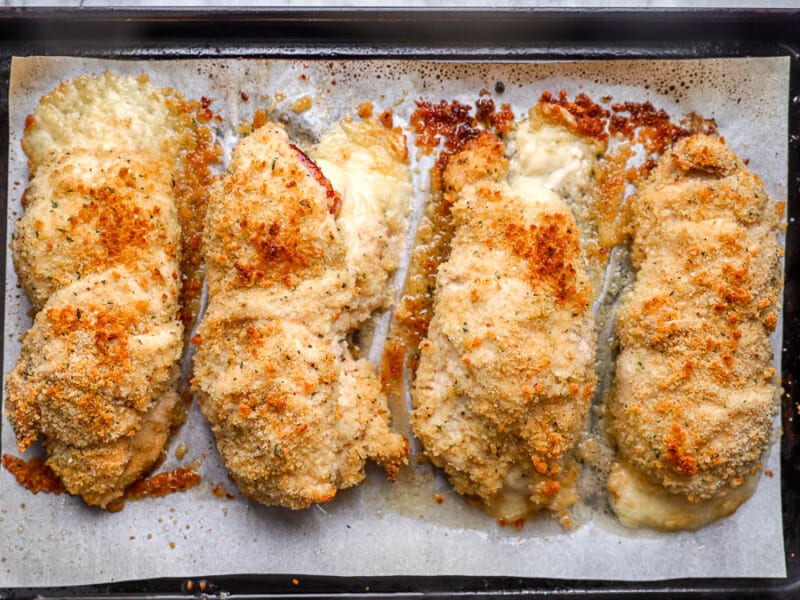
Butterfly each chicken breast by slicing horizontally through the middle of the breast, taking care to not cut all the way through. Open the chicken breast up like a book.
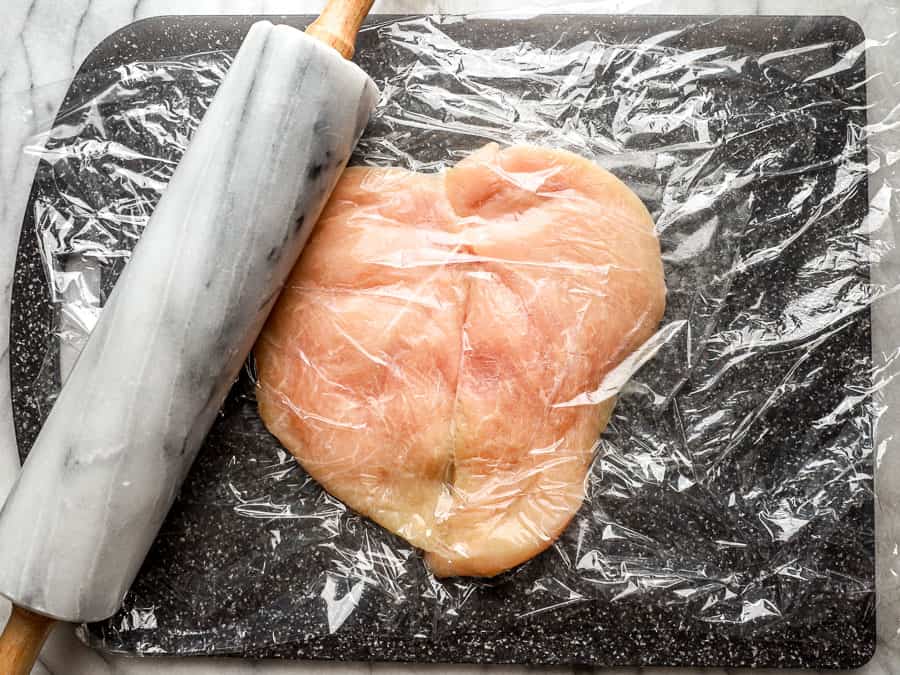
Lay the breast flat between 2 pieces of plastic wrap. Use a meat mallet or rolling pin to pound the chicken breasts into a thin, even layer.
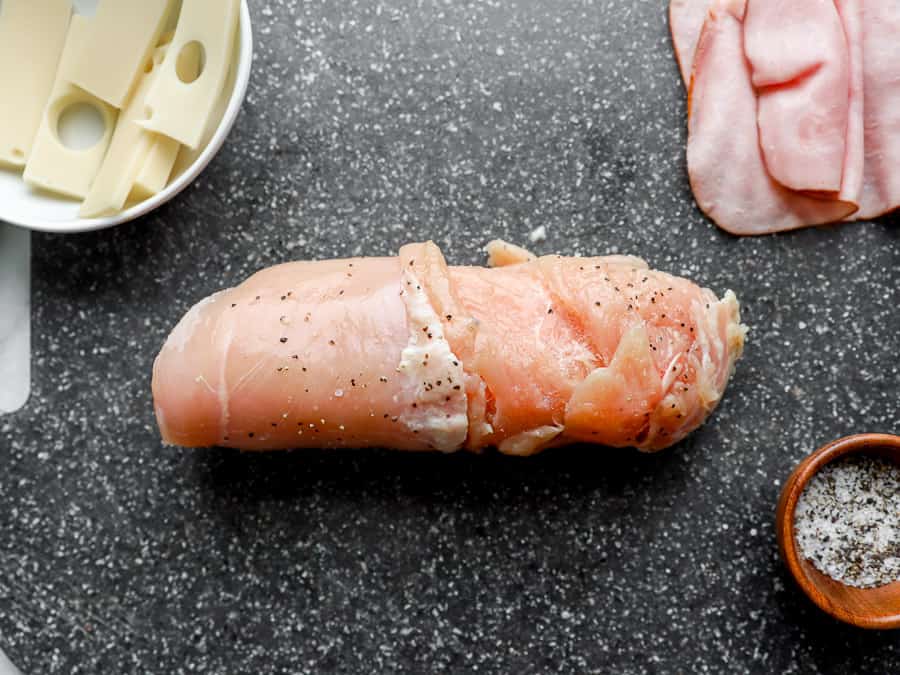
Sprinkle the chicken breasts with salt and pepper. Place a slice of ham and slice of Swiss cheese on each chicken breast.
Gently roll up the chicken breast.
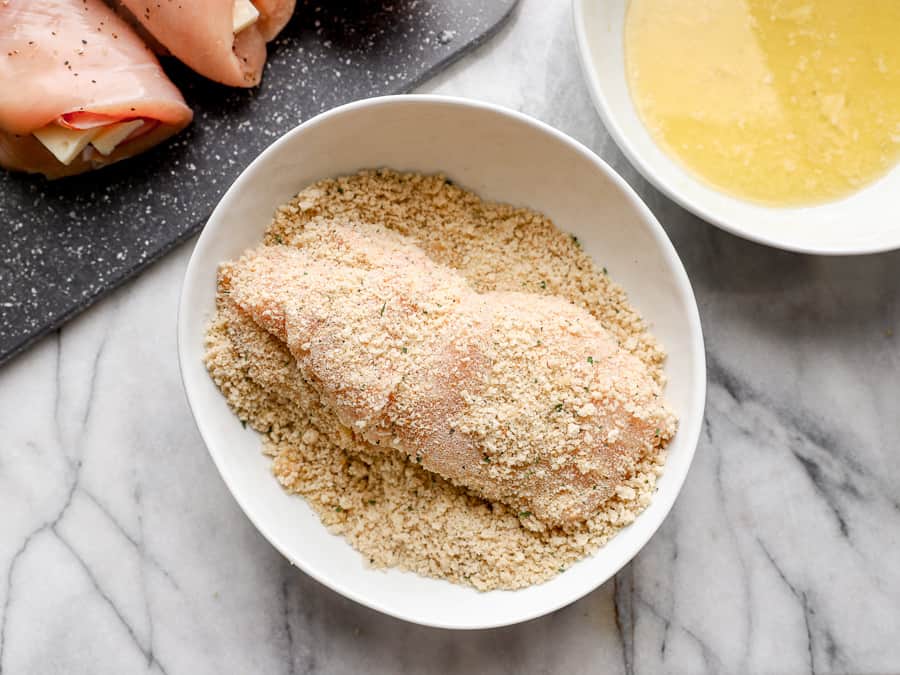
In a shallow bowl, combine the breadcrumbs, Italian seasoning, onion powder, garlic, powder, salt, and pepper. Set up a breading station with 2 shallow bowls; one of melted butter and one for the breading.
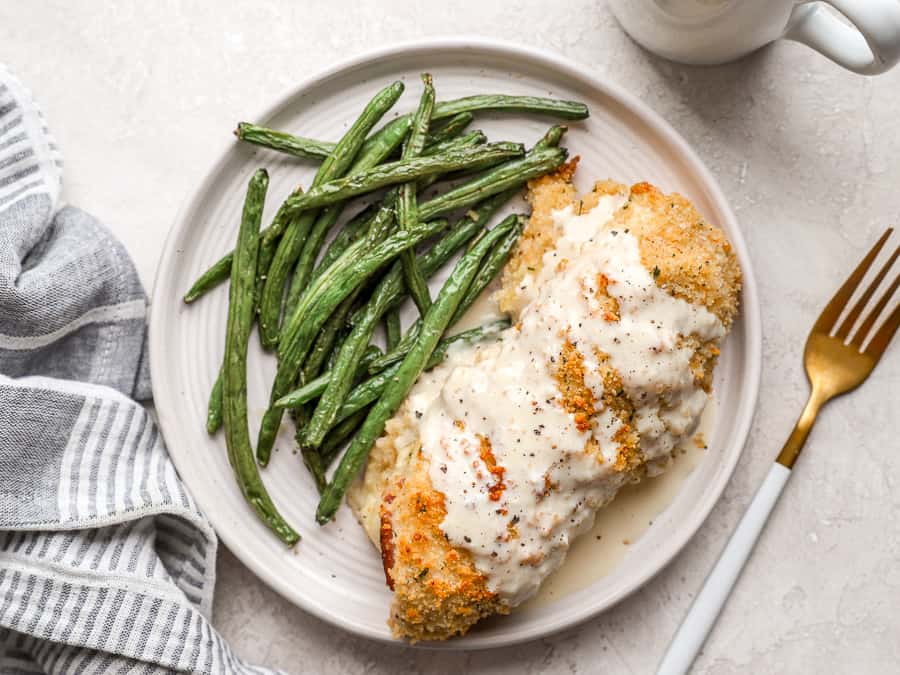
Dip the chicken rolls in the melted butter, and roll in the breadcrumbs until completely coated. Transfer to a parchment linked baking sheet.
Bake the chicken for 35-40 minutes or until it reaches an internal temperature of 165°F.
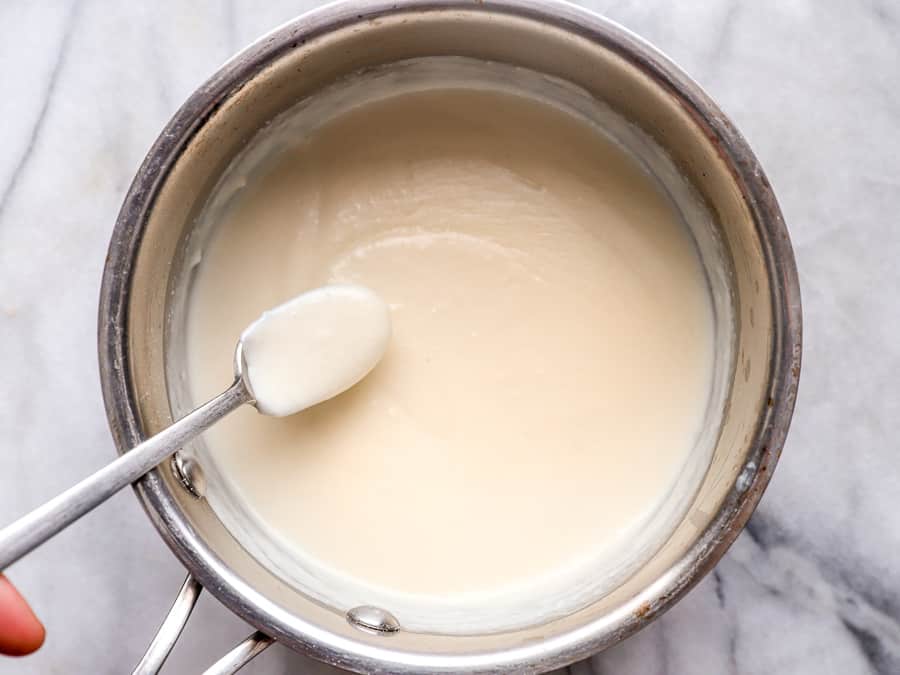
To make the sauce, melt the butter in a saucepan over medium heat. Stir in the flour. Then, slowly pour in the milk while whisking to incorporate.
Add in the Dijon mustard and Worcestershire sauce. Season with salt. Spoon the sauce over the chicken.
how to make Chicken Cordon Bleu – step by step photos
Preheat the oven to 350°F. Butterfly each of 4 chicken breasts by slicing horizontally through the middle of the breast, taking care to not cut all the way through. Open the chicken breast up like a book.
Lay the breast flat between 2 pieces of plastic wrap. Use a meat mallet or rolling pin to pound the chicken breasts into a thin, even layer.
Sprinkle the chicken breasts with salt and pepper. Place a slice of ham and 1 ounce of Swiss cheese on each chicken breast.
Gently roll up the chicken breast.
In a shallow bowl, combine 1 1/2 cups Panko breadcrumbs, 1/2 tsp Italian seasoning, 1/2 tsp onion powder, 1/2 tsp garlic powder, 1 tsp salt, and 1/4 tsp pepper. Set up a breading station with a shallow bowl of 1/2 cup melted butter and the breading. Dip the chicken rolls in the melted butter, and roll in the breadcrumbs until completely coated. Transfer to a greased casserole dish.
Bake the chicken for 35-40 minutes or until it reaches an internal temperature of 165°F.
To make the sauce, melt 1/4 cup butter in a saucepan over medium heat. Stir in the 2 Tbsp flour. Then, slowly pour in 3/4 cup milk while whisking to incorporate.
Add in 1/2 Tbsp Dijon mustard and 1 tsp Worcestershire sauce. Season with 1/2 tsp salt. Spoon the sauce over the chicken.
This crispy, cheesy, salty, and creamy chicken cordon bleu is the ultimate comfort food!