Tostones, or fried green plantains, are the tasty, crispy, salty snack of your dreams! Though they might look intimidating, they’re easy to make. PS They’re more delicious than french fries! (In my humble Puerto Rican opinion, which is OBVIOUSLY super biased.) Made from thick slices of twice-fried green plantain, this delicious Latin American side dish is a great snack and a total must-have side dish whenever you’re serving island food.
What Are Tostones?
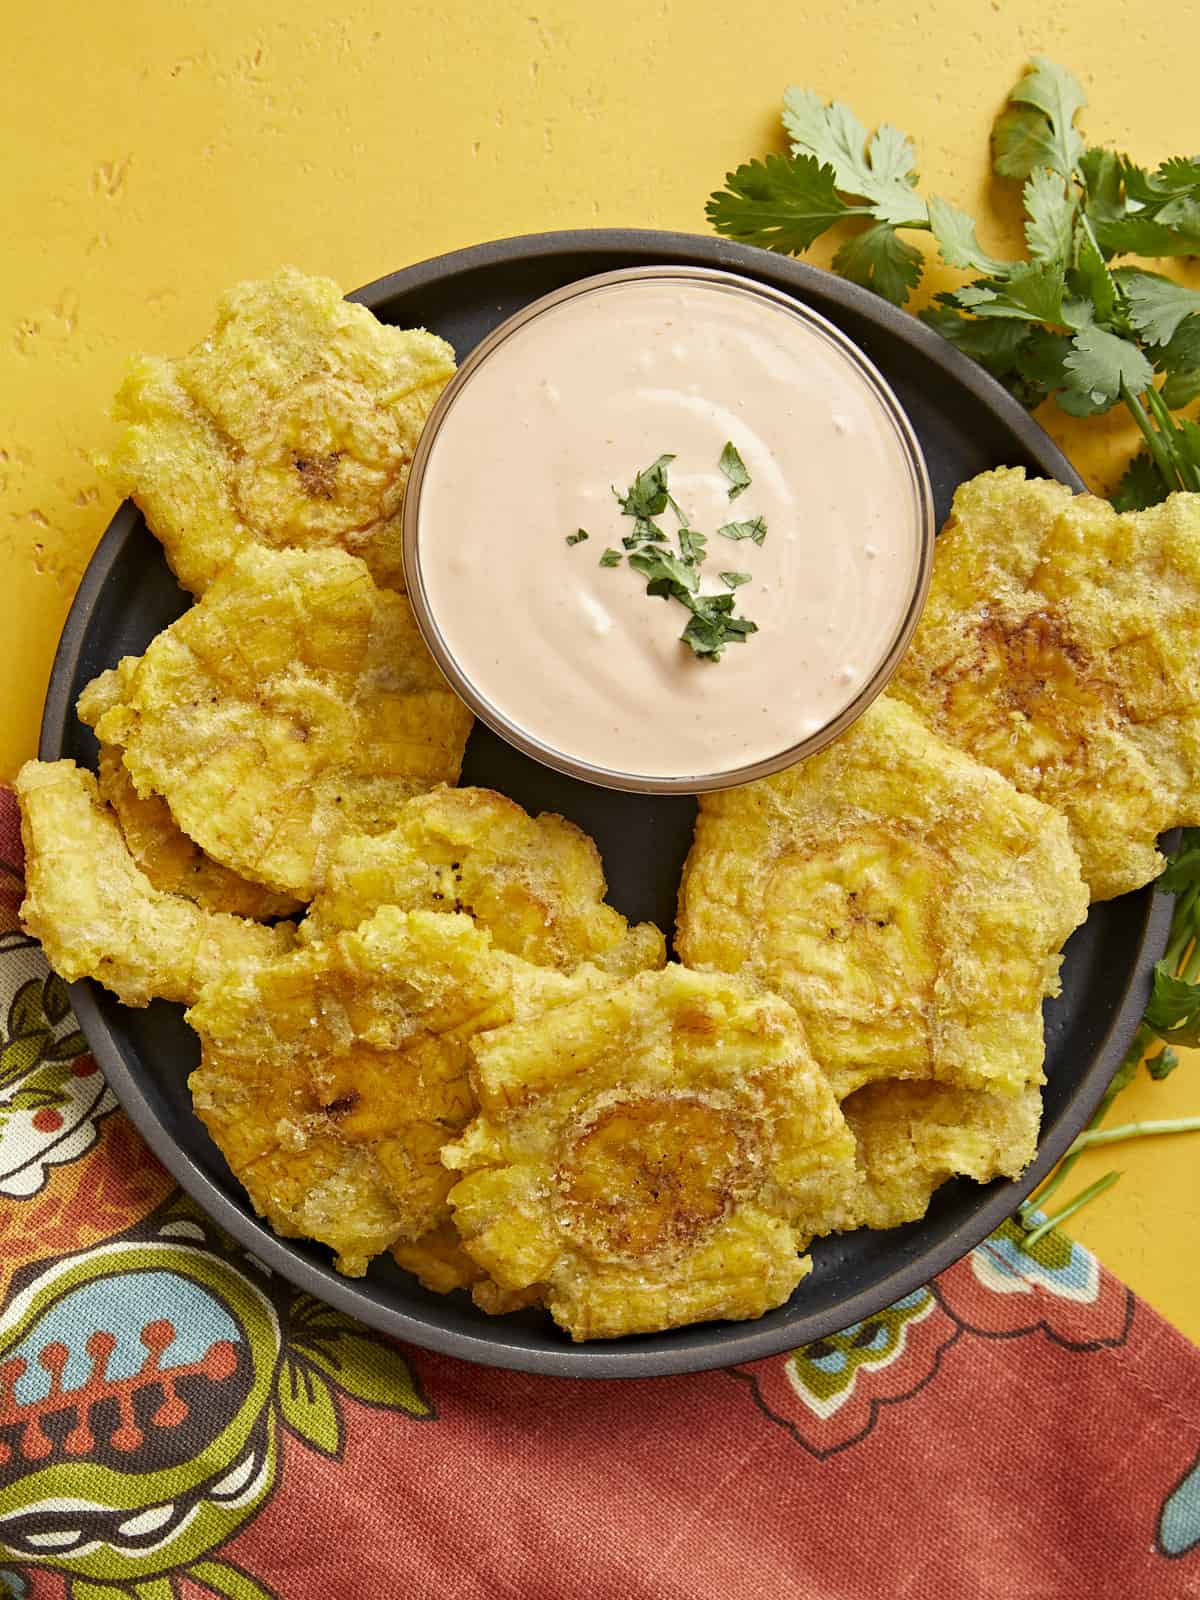
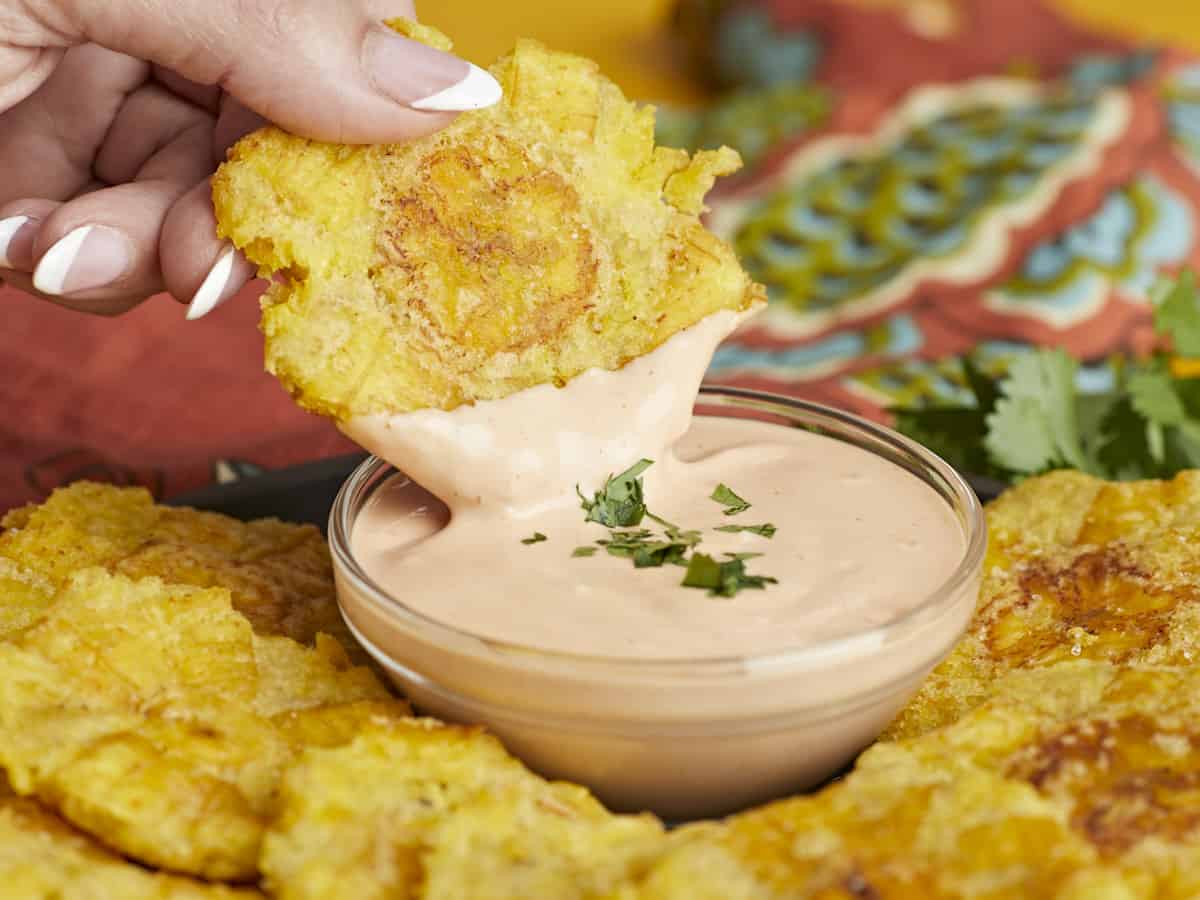
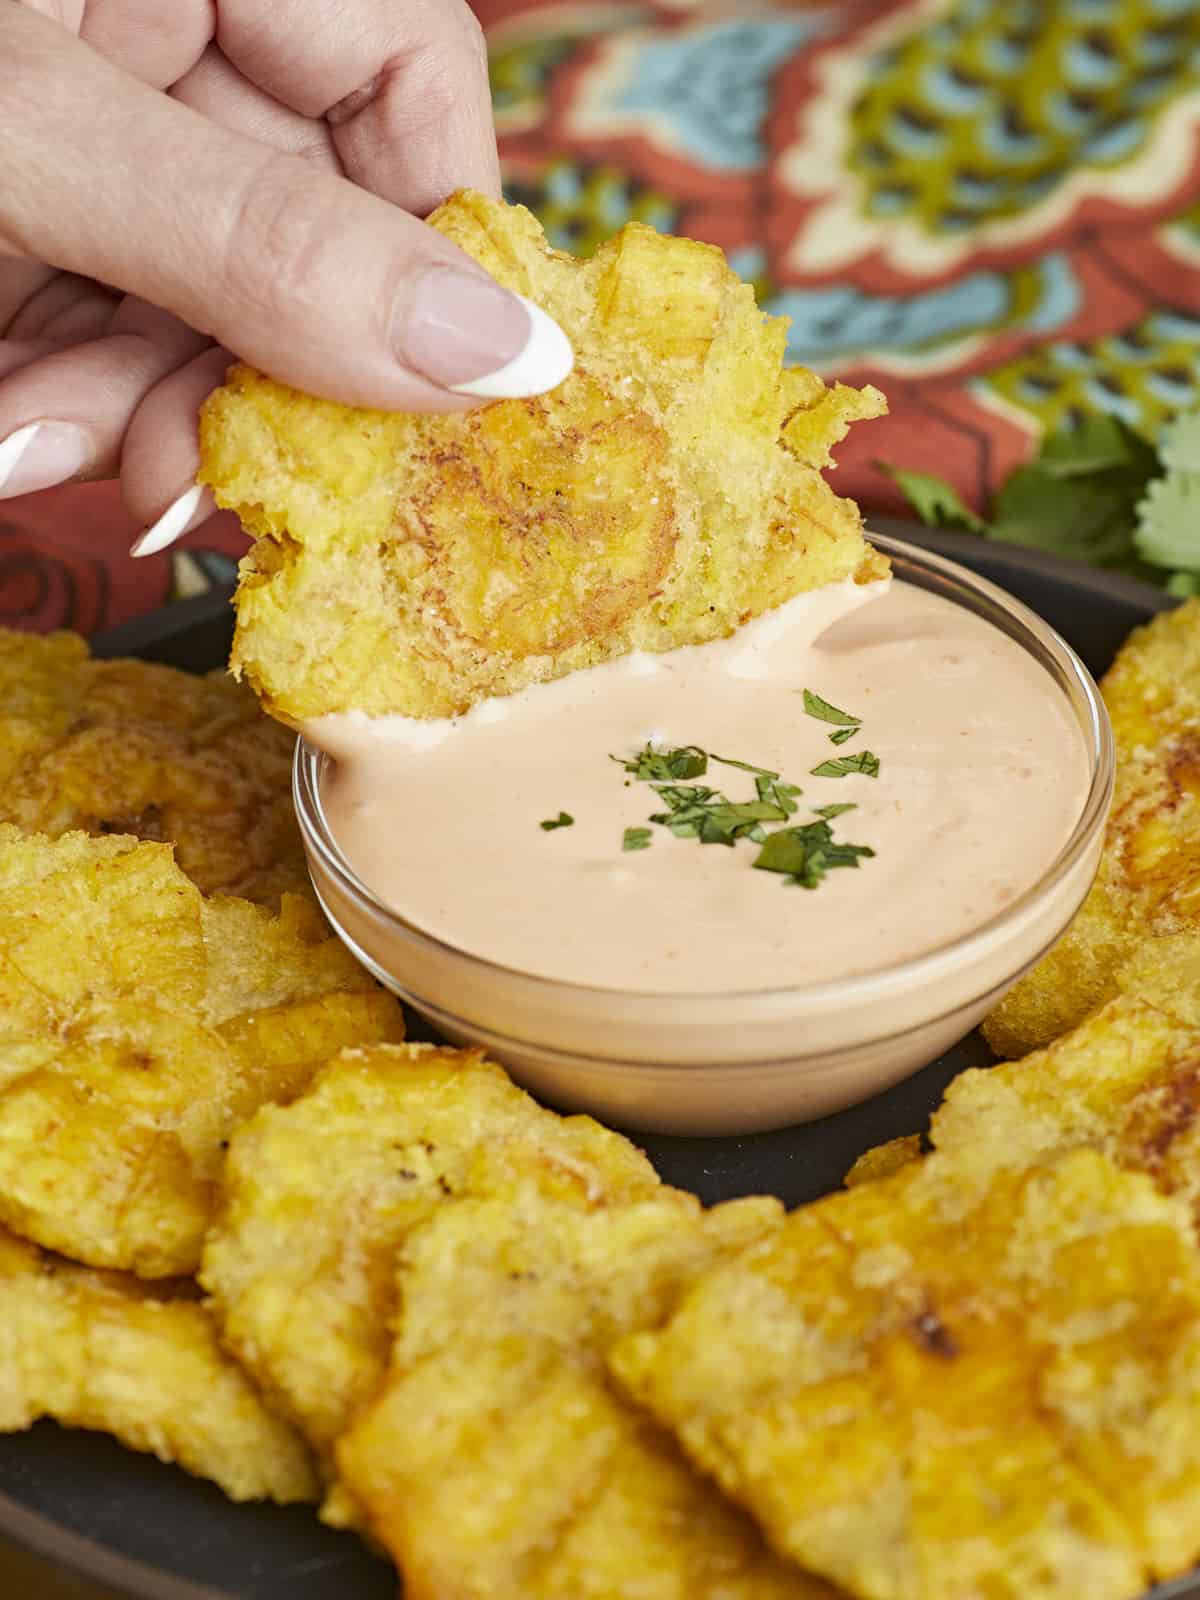
Tostones are delicious, crispy, thick slices of fried green plantain, usually served as a snack or side dish with a dipping sauce. The name “tostones” comes from the Spanish word “tostar,” which means “to toast.” This is because the plantains are “toasted” twice (i.e., fried twice) during cooking. Think of them as Puerto Rican french fries. Though, of course, they’re popular in most Latin cuisines, not just my little island. They can be served as a snack or a side dish and are lovely with a dipping sauce.
Ingredients For Tostones
The first time you make tostones, you might be slightly intimidated by the process. But don’t worry; as you’ll see, it’s actually quite simple. Here’s what you’ll need to make the best tostones:
- Green Plantains: are the star of the show. Look for plantains that are firm to the touch and have unblemished dark pea-green skin with no yellowing. If the plantains are ripe, they’ll be too soft and won’t hold their shape when you fry them. Be warned- green plantains have sap that will stain anything it touches. If you don’t want dark stains on your hands, wear gloves. It’s also a good idea to wear an apron.
- Cooking Oil: any type will do, but you’ll need plenty of it. Tostones are best deep fried, which means filling your medium-sized pot with at least 4 cups of oil. To cut costs, reach for a smaller pot to fry in. Though you’ll have to fry in smaller batches, you’ll need less oil.
- Vinegar: like potatoes, plantains oxidize and turn gray when they are exposed to air. Vinegar helps to stop the plantains from browning, but anything acidic will do. Lime juice is an excellent (though more expensive) substitution.
- Garlic Powder: is used in the water bath for the tostones to add flavor. If you don’t have garlic powder, garlic salt is a great substitution. You can also smash a few cloves of fresh garlic and let them work their magic.

What Can I Serve With Tostones?
Serve tostones with your favorite dipping sauce. Traditionally, they are served with Puerto Rican Mayo Ketchup sauce, a blend that can be as simple as 1 part ketchup to 2 parts mayo. But I also love them with Guacamole, Lime Crema, and even Comeback Sauce.
While fantastic on their own, Tostones are incredible when served as a side dish with Puerto Rican Rice and Beans, Arroz Con Pollo (Puerto Rican Chicken and Rice), Pollo Guisado (Puerto Rican Chicken Stew), Chuletas Guisadas (Puerto Rican Stewed Pork Chops), Pinchos de Pollo (Puerto Rican Chicken Skewers) or Arroz Con Salchichas, (Puerto Rican Rice With Sausage).
Making Tostones Ahead Of Time
Tostones are best served still piping hot from the frying pan, so they don’t store well after their final fry. However, they prep beautifully. To prep tostones, fry them once and mash them. Then cool them and store them in an airtight container layered with parchment paper. Tostones will stay fresh in the fridge for up to 3 days and in the freezer for up to 3 months. Finally, thaw them, give them a quick dunk in salt water, and fry them again.
What Do I Do With Leftover Oil?
Cool the oil to room temperature and then strain it into a resealable air-tight container. You can store it for another day of fabulous Tostones making or use it for other recipes that require cooking oil. Try making our Coconut Chicken Strips With Sweet Chili Sauce, Turkey Meatballs, Sweet Potato Corn Cakes, or Chilaquiles.

Tostones
Equipment
Ingredients
- 4 cups cooking oil $2.79
- 2 green plantain $1.38
- 1/4 tsp garlic powder $0.03
- 1 Tbsp vinegar $0.03
- 1/8 tsp salt $0.01
Instructions
- Fill a medium heavy-bottomed pot with cooking oil and place it over medium heat. Trim off both ends of the green plantain, then make three lengthwise cuts through the skin, each about two inches apart. Peel the skin off the plantains.
- Slice the plantains into 1 1/2-inch thick rounds.
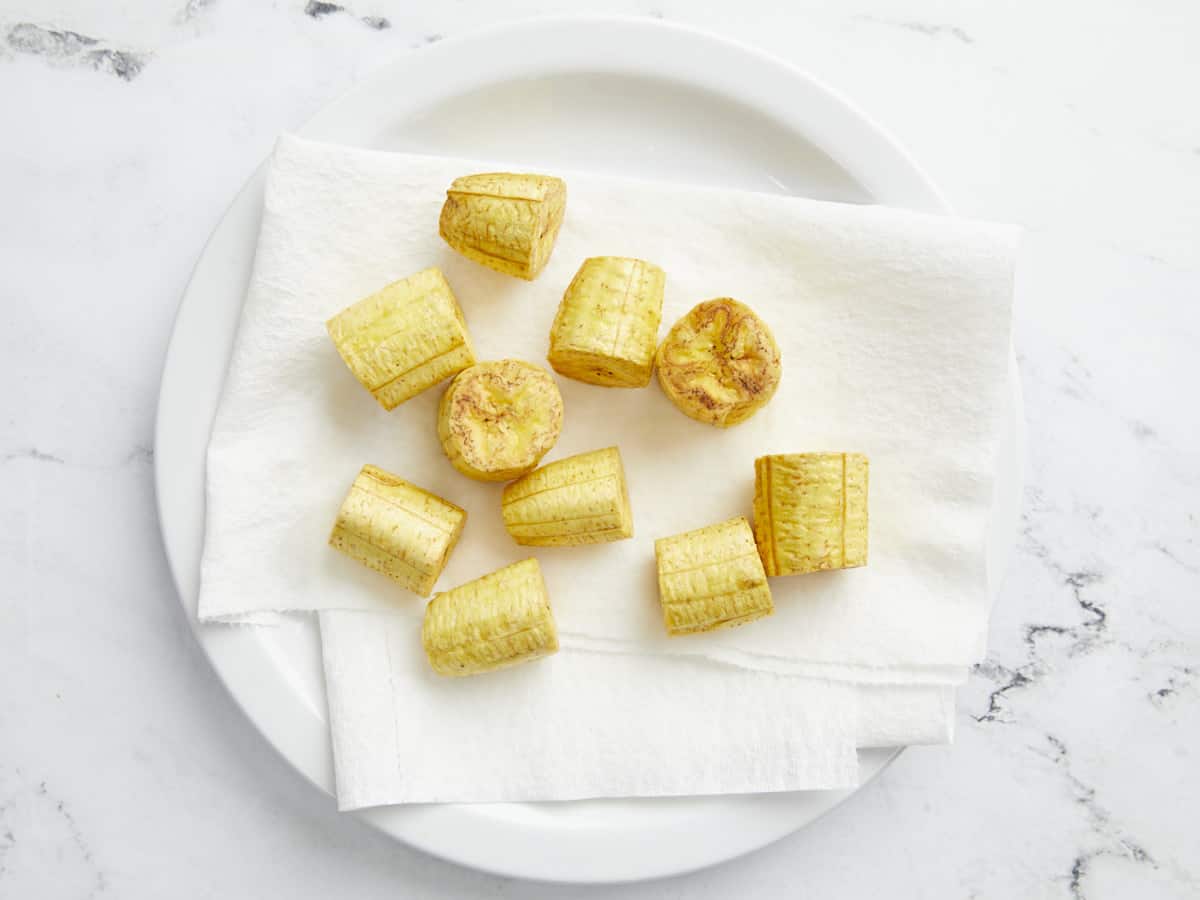
- When the oil is at 350°F, add the sliced plantains, working in batches to not crowd the pot. When the plantain slices change in color from bone white to a golden yellow (about 3 to 4 minutes) remove them from the pot and drain them on a paper towel-lined plate.
- Add about 4 inches of water to a bowl large enough to hold the plantains. Add the garlic powder and the vinegar to the water and mix. Soak the fried plantains for 1 minute and dry them on the paper towel-lined plate.
- Add two sheets of parchment to your work surface and ready a heavy skillet. Place one slice of fried plantain on one sheet of parchment, then top it with the second piece of parchment. Use the heavy skillet to smash the plantain flat, about 1/4 inch thick. Set aside and repeat with the remaining slices.
- Turn the heat up on the oil. When the oil has reached 375°F, fry the plantains again, working in batches so the pot isn't crowded. Fry the tostones until golden and crispy, about 3 minutes. Drain on the paper towel-lined plate and sprinkle with 1/8 teaspoon salt immediately. Serve with your favorite dipping sauce and enjoy!
See how we calculate recipe costs here.
Nutrition
How to Make X – Step by Step Photos
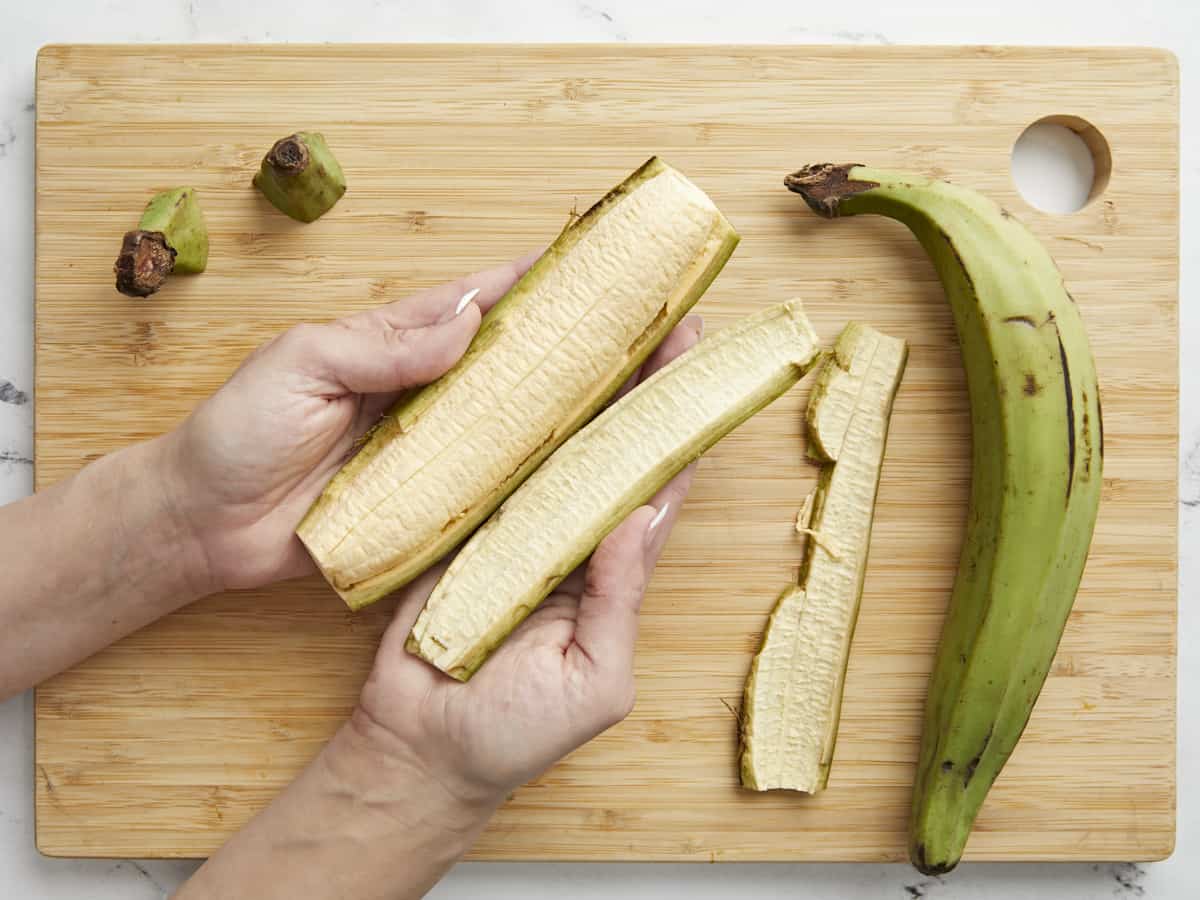
Fill a medium heavy-bottomed pot with 4 cups of oil and place it over medium heat. Trim off the ends of 2 green plantains, then make three lengthwise cuts through the skin, each about two inches apart. Make them deep enough to cut through the 1/4 inch thick skin, but not so deep you cut the flesh. The skin doesn’t peel down like a banana. Instead, peel from the side, pushing the skin away from the flesh, using a spoon or butter knife to help start the process.
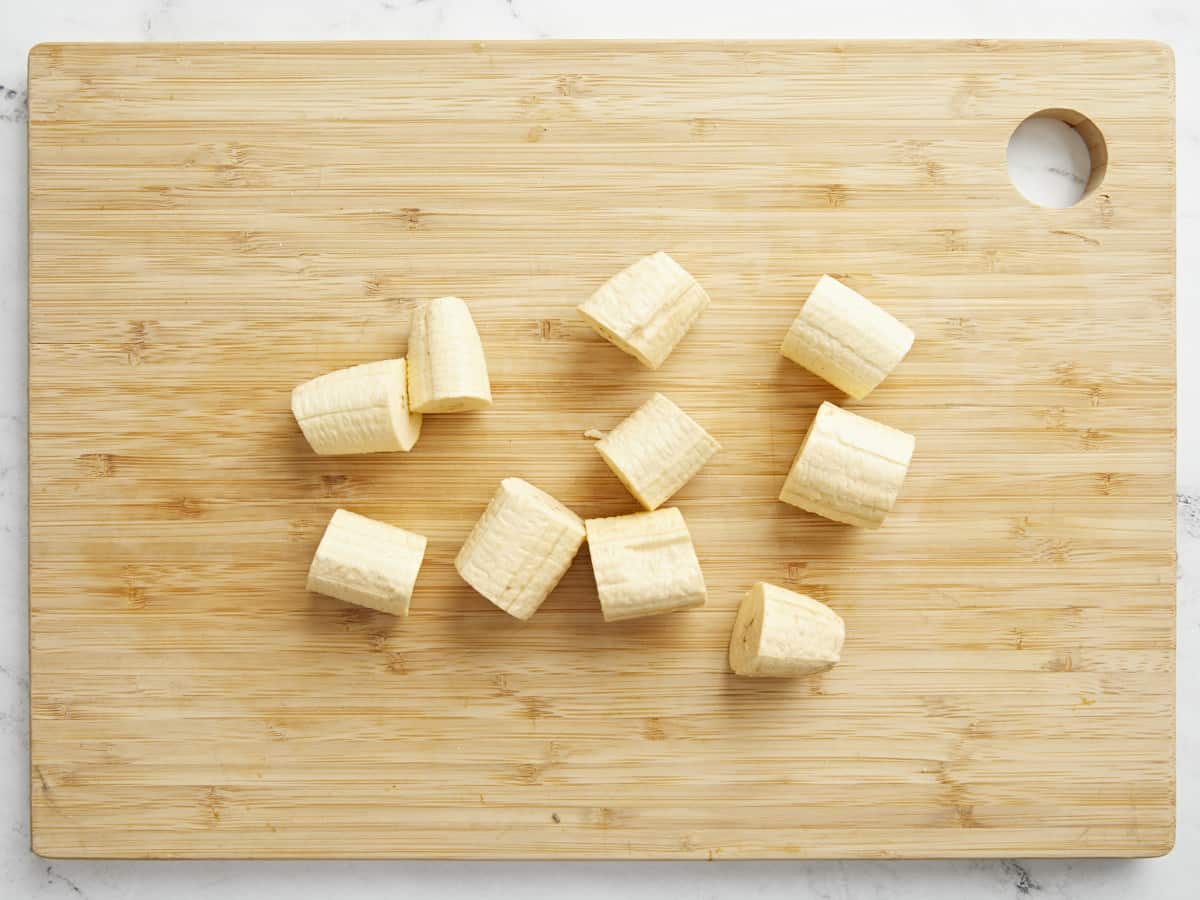
Discard the skin and slice the plantains into 1 1/2-inch thick rounds.
When the oil is at 350°F, add the sliced plantains, working in batches to not crowd the pot. If you do not own a fry thermometer, the oil is ready when a small piece of plantain sizzles softly when it hits the oil. Turn the plantain slices occasionally to ensure they fry evenly. When the plantain slices change in color from bone white to a golden yellow (about 3 to 4 minutes) remove them from the pot and drain them on a paper towel-lined plate.

Add about 4 inches of water to a bowl large enough to hold the plantains. Add 1/4 teaspoon garlic powder and 1/4 teaspoon vinegar to the water and mix. Soak the fried plantains for 1 minute and dry them on the paper towel-lined plate. (For my traditionalists, you can also dip the plantains for 10 to 15 seconds after they have been smashed, but I find the tostones can get water-logged doing it that way, causing the oil to bubble furiously and the tostones to break apart during the second fry. You do you!)
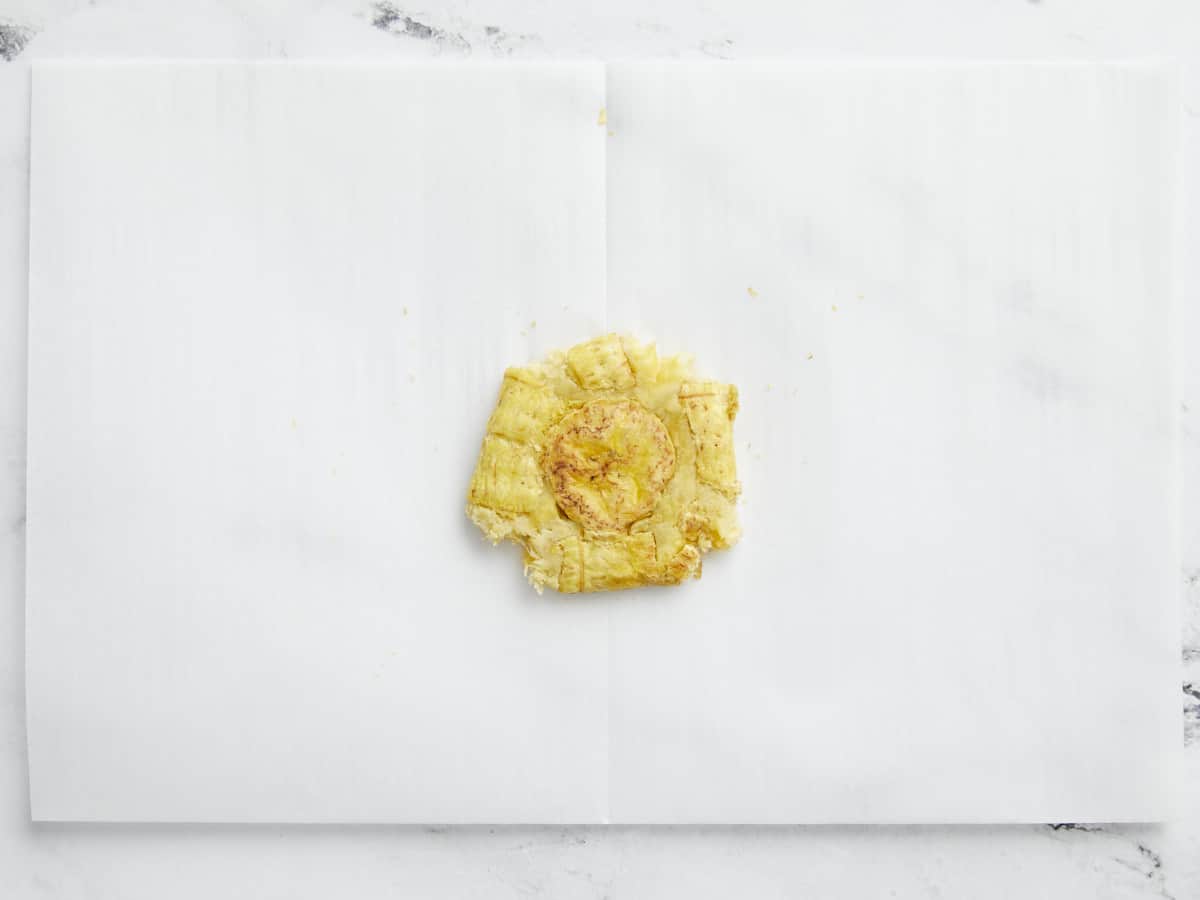
Add two sheets of parchment to your work surface and ready a heavy skillet. Place one slice of fried plantain on one sheet of parchment and top it with the second piece of parchment. Use the heavy skillet to smash the plantain flat, about 1/4 inch thick. Set aside and repeat with the remaining slices.
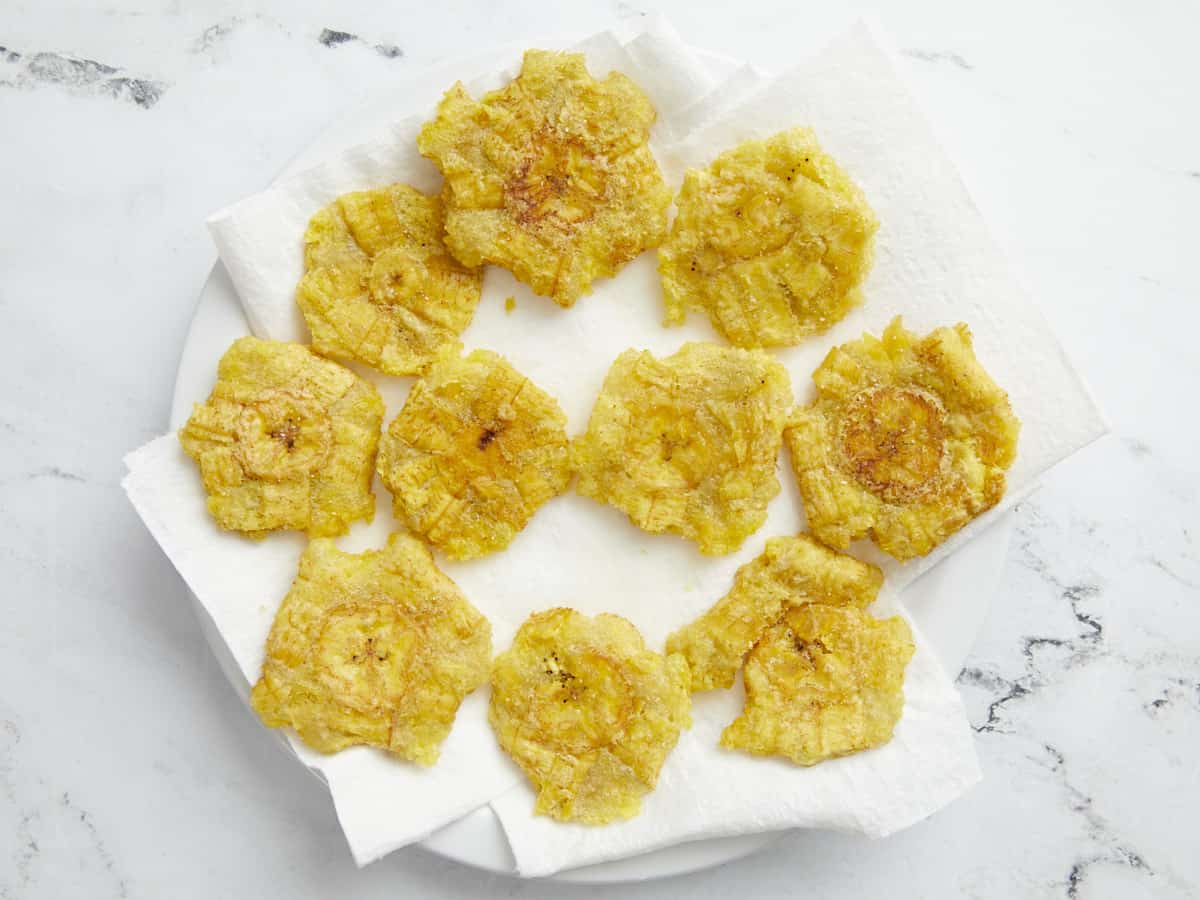
Turn up the heat on the oil. When the oil has reached 375°F, carefully place the tostones in the frying oil, working in batches so the pot isn’t crowded. If you don’t own a thermometer, the oil is ready when a small piece of plantain bubbles furiously when it hits the oil. Fry the tostones until golden and crispy, about 3 minutes. Drain on the paper towel-lined plate and sprinkle with 1/8 teaspoon salt immediately. Serve with your favorite dipping sauce, and enjoy!
More Puerto Rican Vegetarian Recipes


The post Tostones (Fried Green Plantain) appeared first on Budget Bytes.