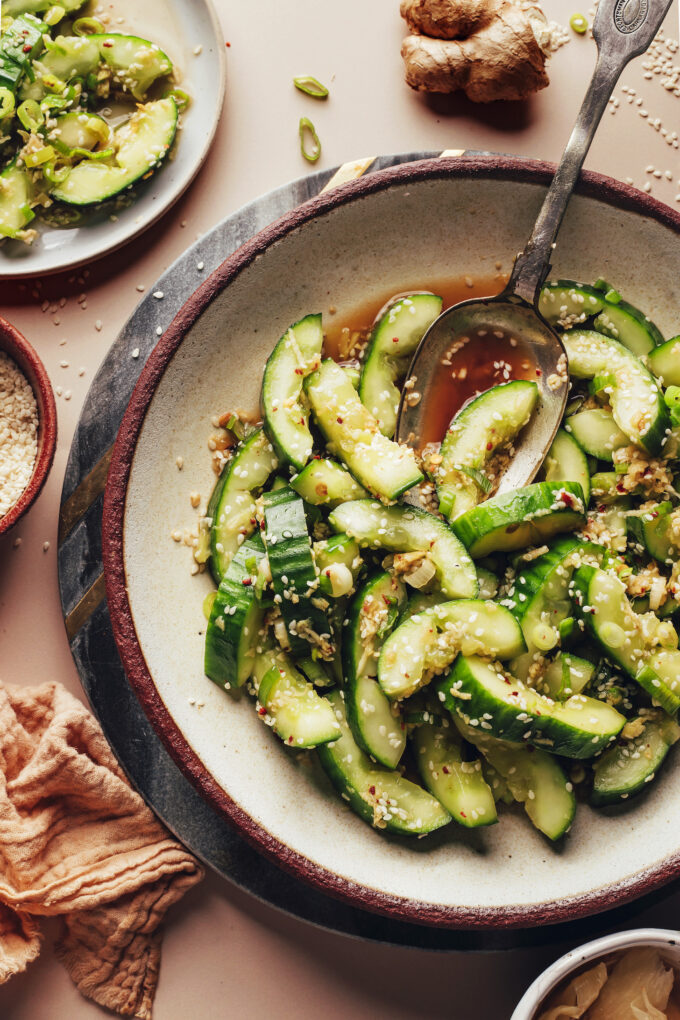
Is it just us or does it seem like cucumbers repel any dressing you add to them? Not so fast! After some research and testing, we learned that smashing cucumbers helps the flavors stick around. Smashed cucumber salad to the rescue!
This Asian-inspired …
Is it just us or does it seem like cucumbers repel any dressing you add to them? Not so fast! After some research and testing, we learned that smashing cucumbers helps the flavors stick around. Smashed cucumber salad to the rescue!
This Asian-inspired take is super fresh, crunchy, savory, a little spicy, and full of ginger and sesame flavor. Plus, so EASY — just 10 ingredients, 1 bowl, and 10 minutes required.
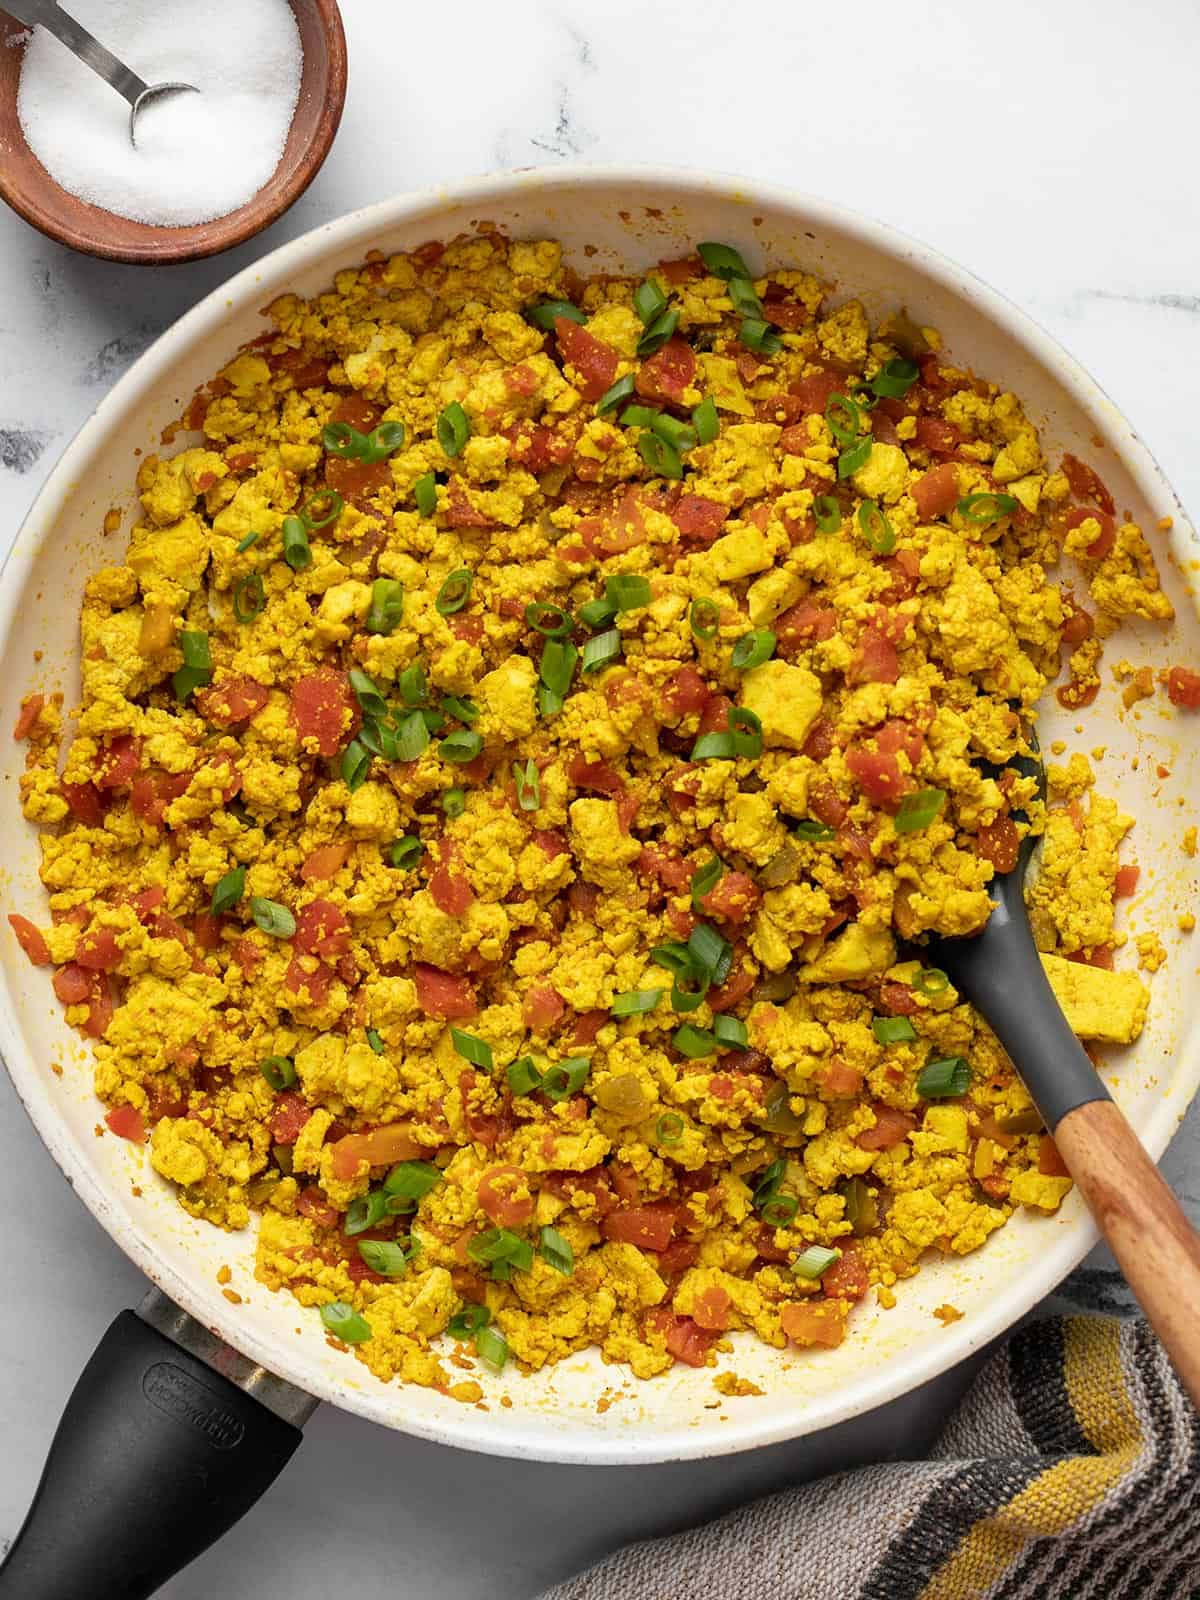
Sometimes recipes surprise me. The concept for this southwest tofu scramble had been in the back of my head for a while, but I kept putting it off because, to be honest, it didn’t sound very exciting. But then I finally tried it this weekend I was pretty blown away by how good it tasted despite being incredible fast to make. And then when I realized how many different ways you could serve it, this tofu scramble instantly became a new favorite. 🙌
What is a Tofu Scramble?
If you’re a tofu newbie, a tofu scramble is simply crumbled tofu that looks a bit like scrambled eggs (but vegan!) and has whatever flavorful add-ins you like. The best part about this scramble is that you don’t have to press the tofu like you do with many other tofu recipes, so the overall process is super fast from start to finish. Today we went with a simple southwest flavor profile for the seasonings and add-ins, but you can switch it up to include whatever you want!
For this tofu scramble you’ll need these ingredients:
Firm or extra-firm tofu: firm tofu is soft enough to crumble, but strong enough to hold that scrambled egg-like shape.
Spices: tofu has almost no flavor on its own, so we added a hefty dose of spices to flavor up the skillet. We also used a little turmeric to give the tofu a bright yellow color, similar to that of scrambled eggs (that’s optional).
Diced tomatoes with green chiles: the diced tomatoes with green chiles add both heat and acidity to the dish which really make the flavors pop! If you can’t find diced tomatoes with green chiles (like Rotel), you can use one can of plain diced tomatoes (drained) and one small can of diced green chiles.
Green onion: a little fresh green onion on top adds a final punch of freshness to the scramble that really rounds out the flavor. Definitely don’t skip the green onion at the end because it takes the dish to the next level!
What Else Can I Add?
This easy tofu scramble is just begging to be customized with whatever leftovers you might have in your fridge. Try adding some jalapeño, fresh or pickled onion, maybe some black beans, diced bell pepper or zucchini, or even avocado. The sky’s the limit!
How to Serve Tofu Scramble
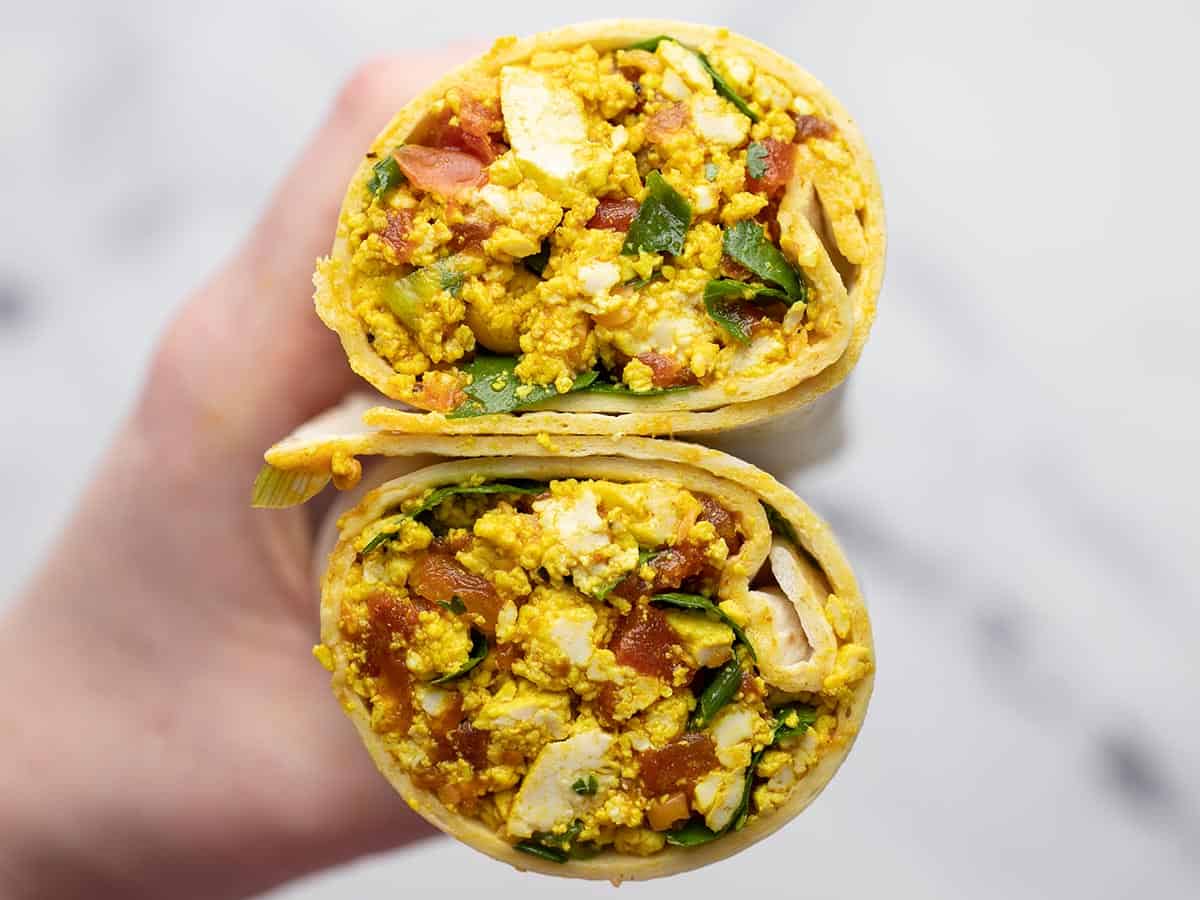
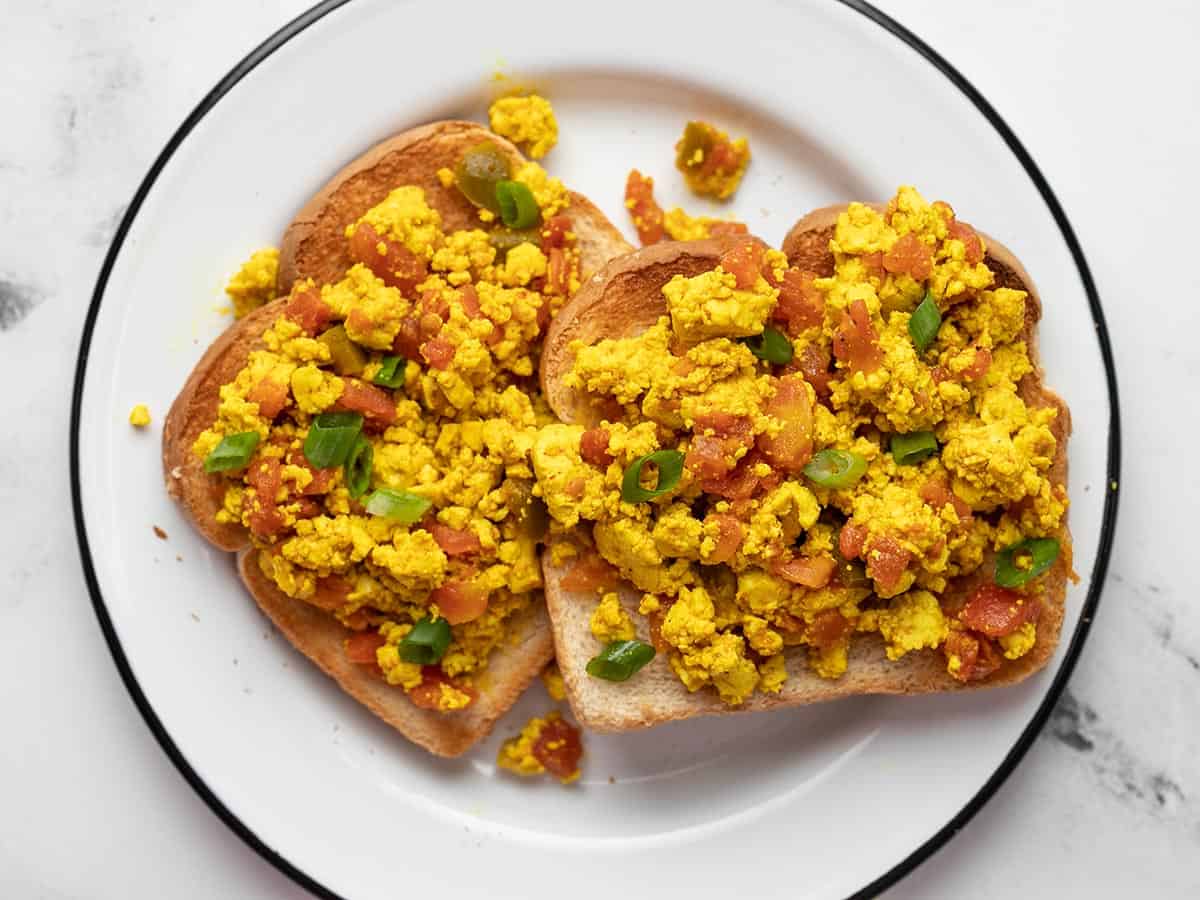
My favorite thing about this tofu scramble is all the different ways you can serve it. You can serve it on a plate with traditional breakfast sides (as you would scrambled eggs), serve it over toast, roll it up into a tortilla with cheese for a breakfast burrito, or serve it over tortilla chips like nachos! The nachos were my absolute favorite. I couldn’t stop eating them after the photo shoot. 😆
Storing Leftovers
The leftovers of this tofu scramble hold up pretty well, so if you’re cooking just for yourself you’ll definitely have a little leftover for you next meal or two! Just pop the tofu scramble into a resealable food storage container and refrigerate until ready to eat. You can reheat it quickly in the microwave,
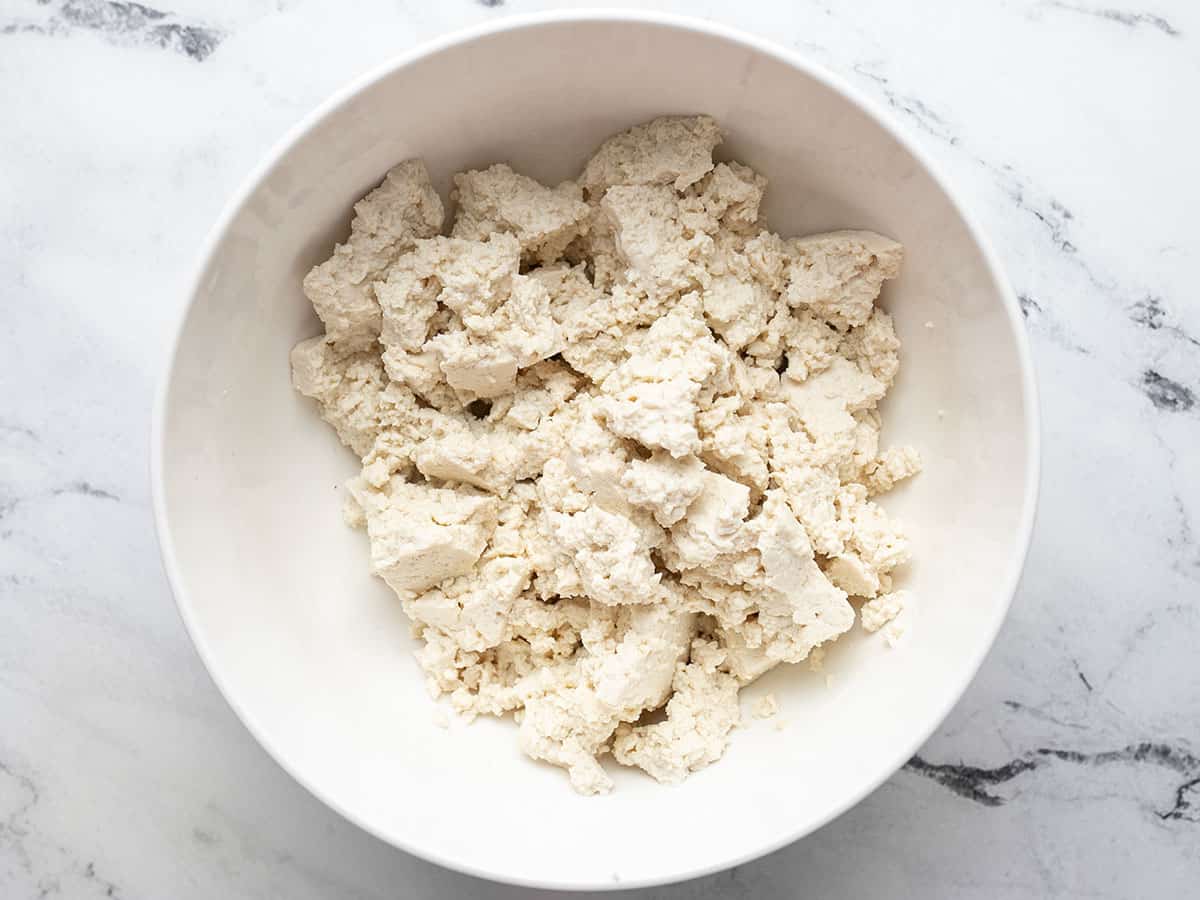
Remove the tofu from the package and drain the excess liquid (no need to press the tofu). Place the tofu in a bowl and use your hands to break it into crumbles.
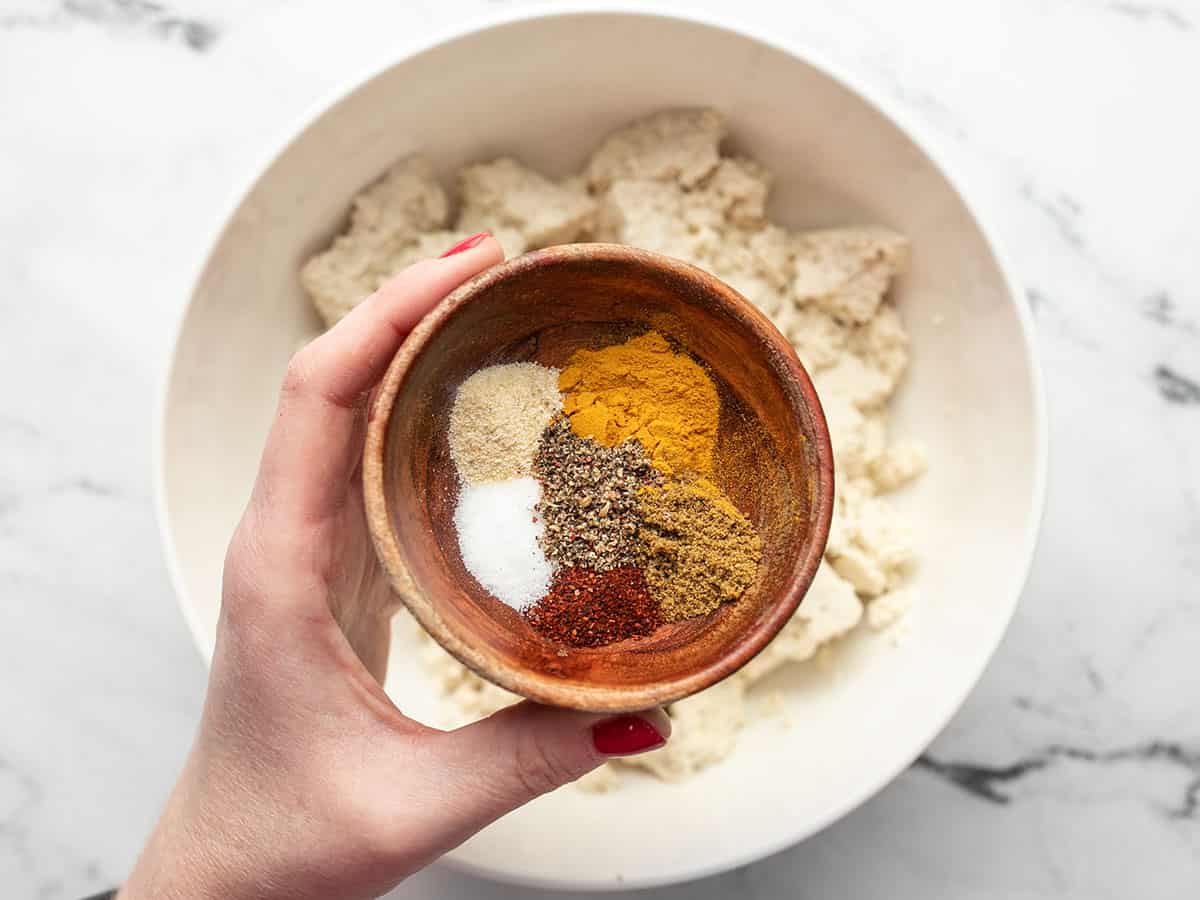
In a small bowl, combine the turmeric, cumin, chili powder, garlic powder, salt, and pepper.
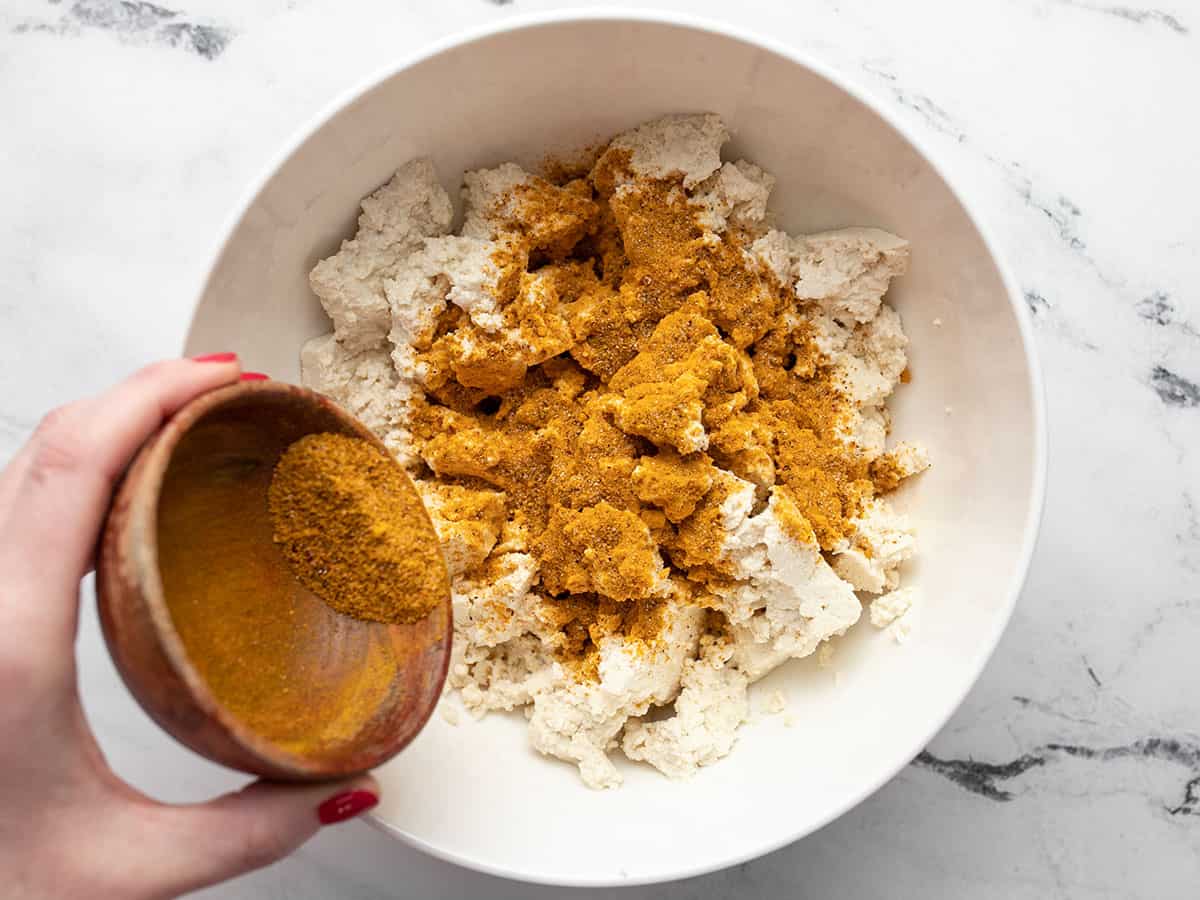
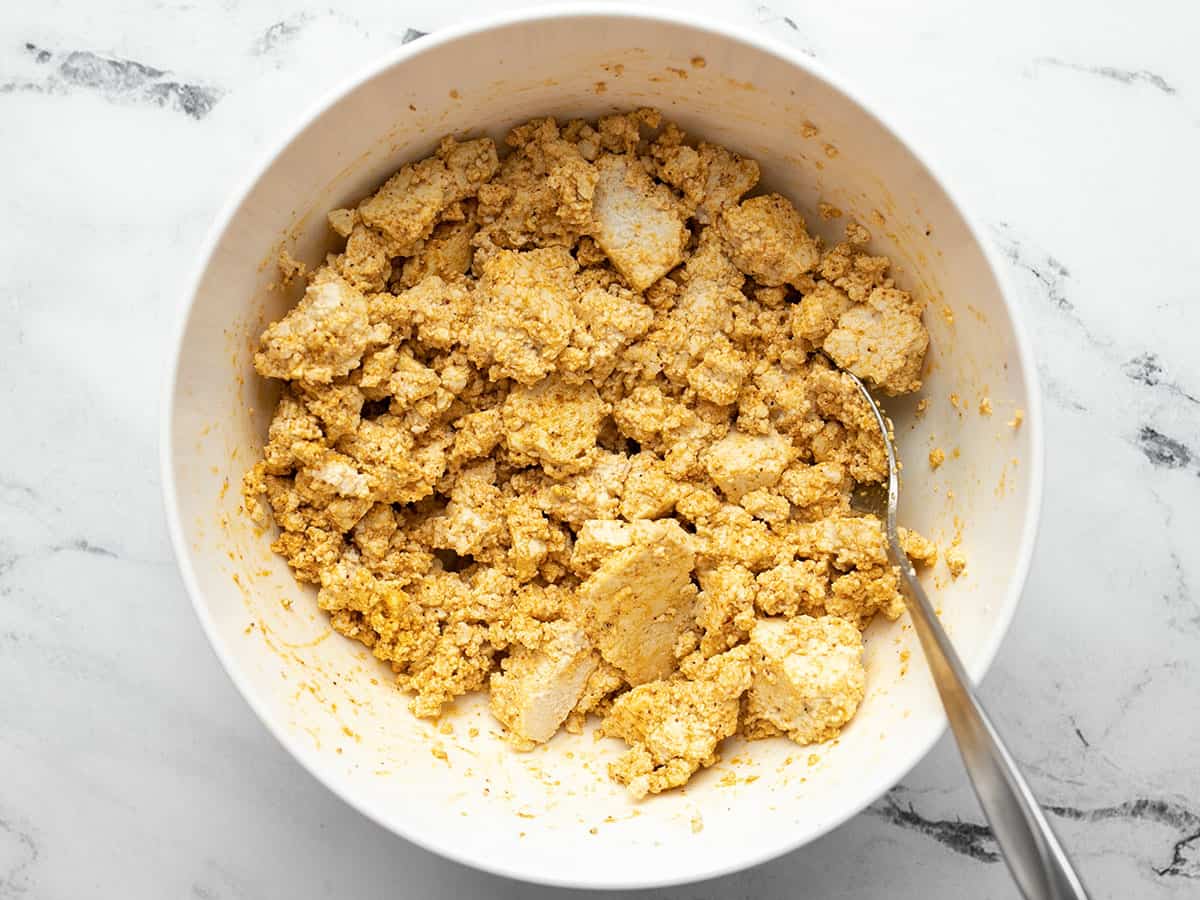
Sprinkle the spice mix over the crumbled tofu and then gently stir until the tofu is evenly coated in spices.
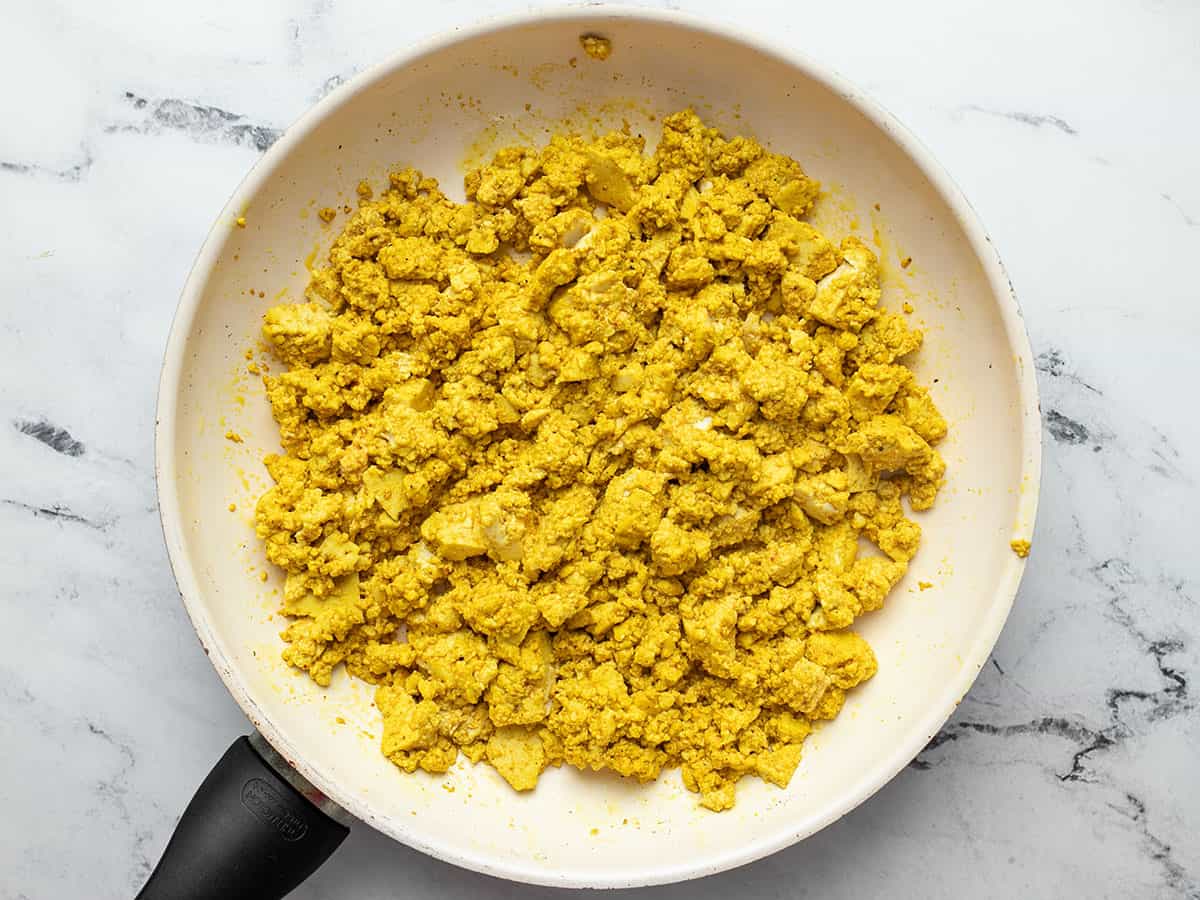
Heat a large non-stick skillet over medium heat. Add the cooking oil to the skillet, swirl to coat the surface, then add the tofu.
Cook the tofu for about five minutes, stirring occasionally, or until heated through. The color of the turmeric will brighten as it cooks.
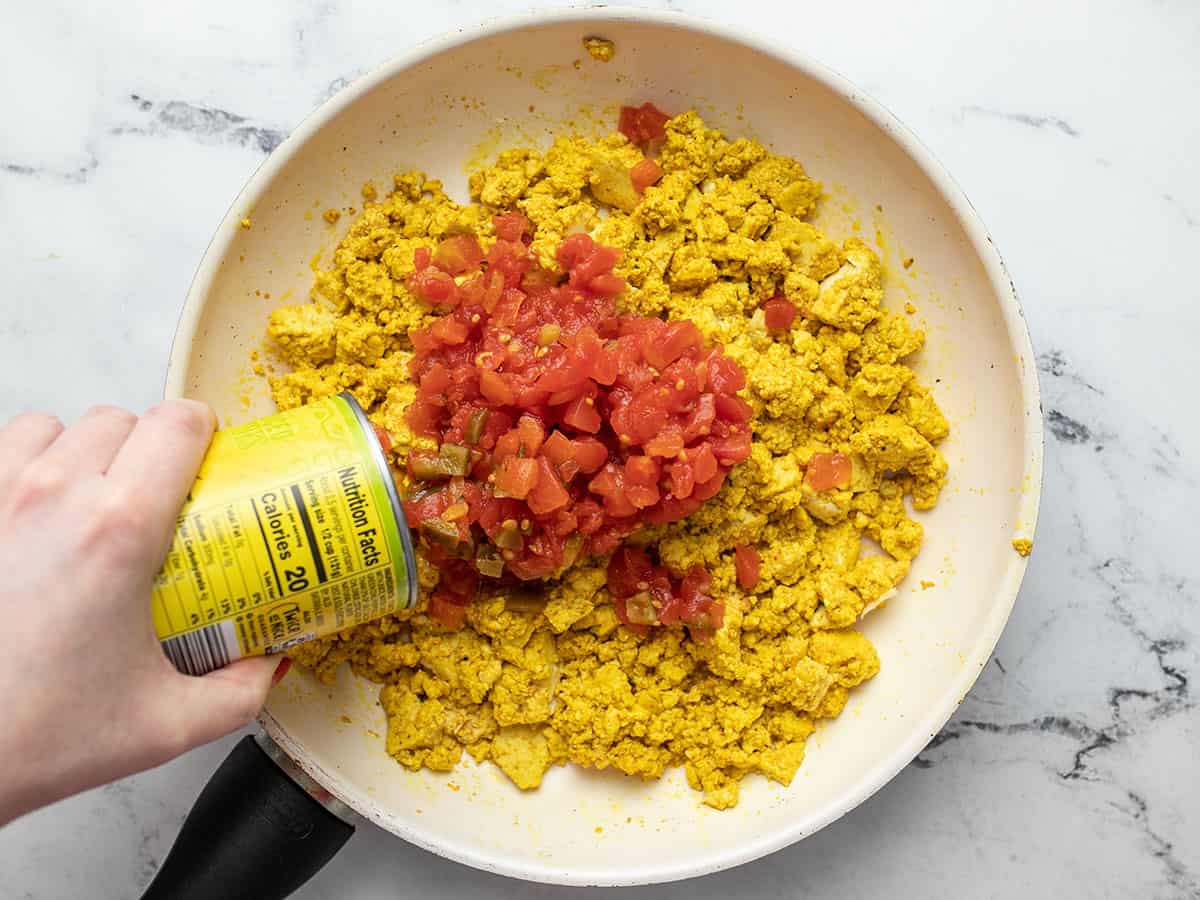
Drain the canned tomatoes well, then add them to the skillet. Stir to combine, then cook another five minutes or until heated through.
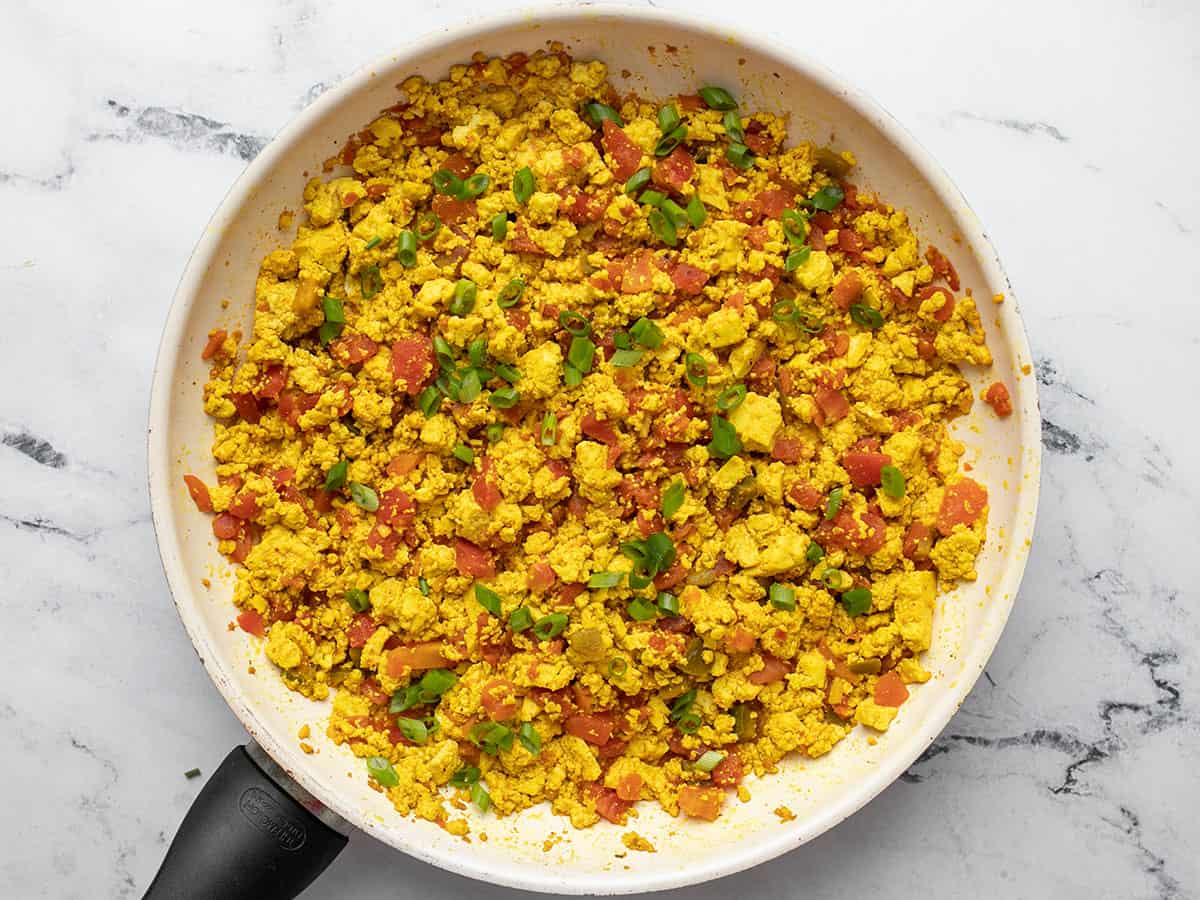
Taste the tofu and adjust the seasonings to your liking. Sprinkle the sliced green onions over top, then serve.
How to Make Southwest Tofu Scramble – Step by Step Photos
Drain one 14oz. package of firm or extra-firm tofu, then place it in a bowl and break it apart into crumbles with your hands. There is no need to press the tofu first.
In a small bowl, combine 1 tsp turmeric (optional for color), ½ tsp cumin, ¼ tsp chili powder, ¼ tsp garlic powder, ½ tsp salt, and ¼ tsp freshly cracked pepper. Stir until the spices are evenly combined.
Sprinkle the seasoning over the crumbled tofu.
Gently stir the tofu until it is evenly coated with seasoning. The color of the turmeric will not be very bright at this point, but the color will pop once heat is applied.
Heat one tablespoon of cooking oil in a non-stick skillet over medium heat. Once hot, add the tofu. Cook over medium heat, stirring occasionally, for about five minutes or until heated through.
Drain one 10oz. can of diced tomatoes with green chiles, then add it to the skillet with the tofu.
Stir and cook the tomatoes and tofu until heated through and any excess liquid has evaporated. Top with sliced fresh green onions and serve!
My favorite way to eat this tofu scramble is on tortilla chips with a little shredded cheese on top. 😋
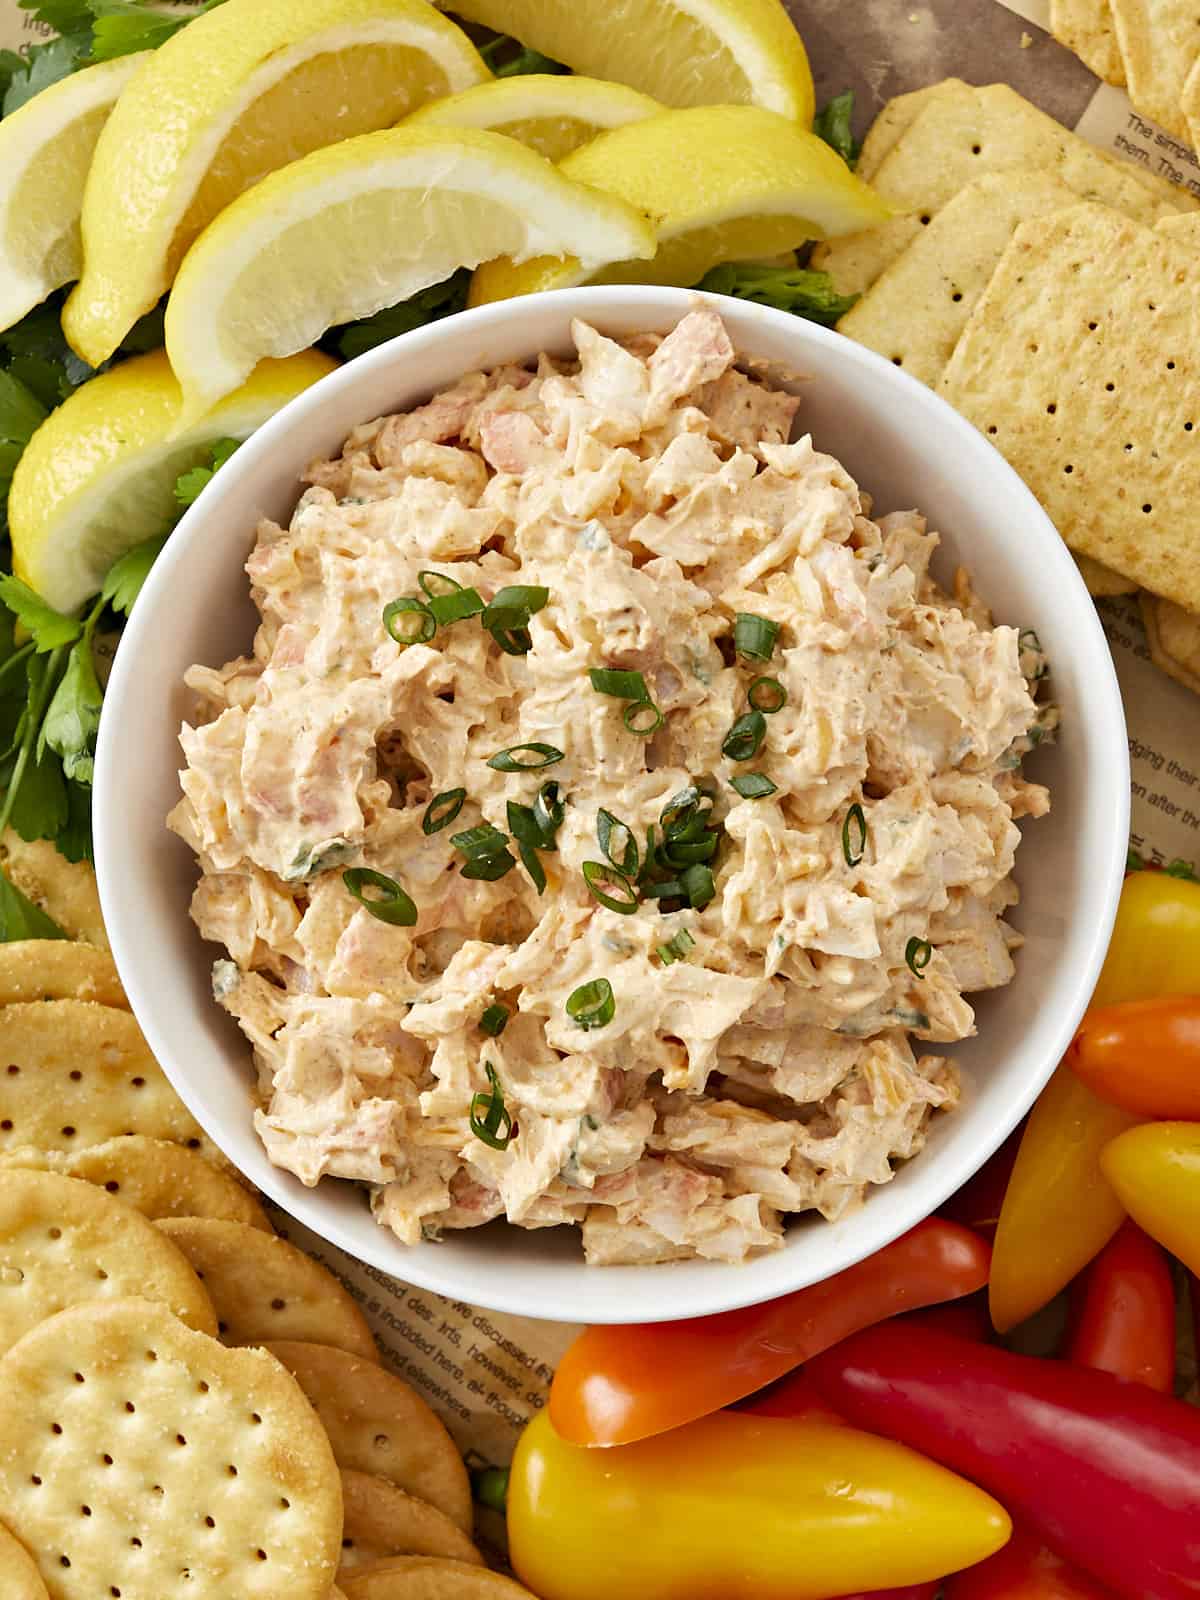
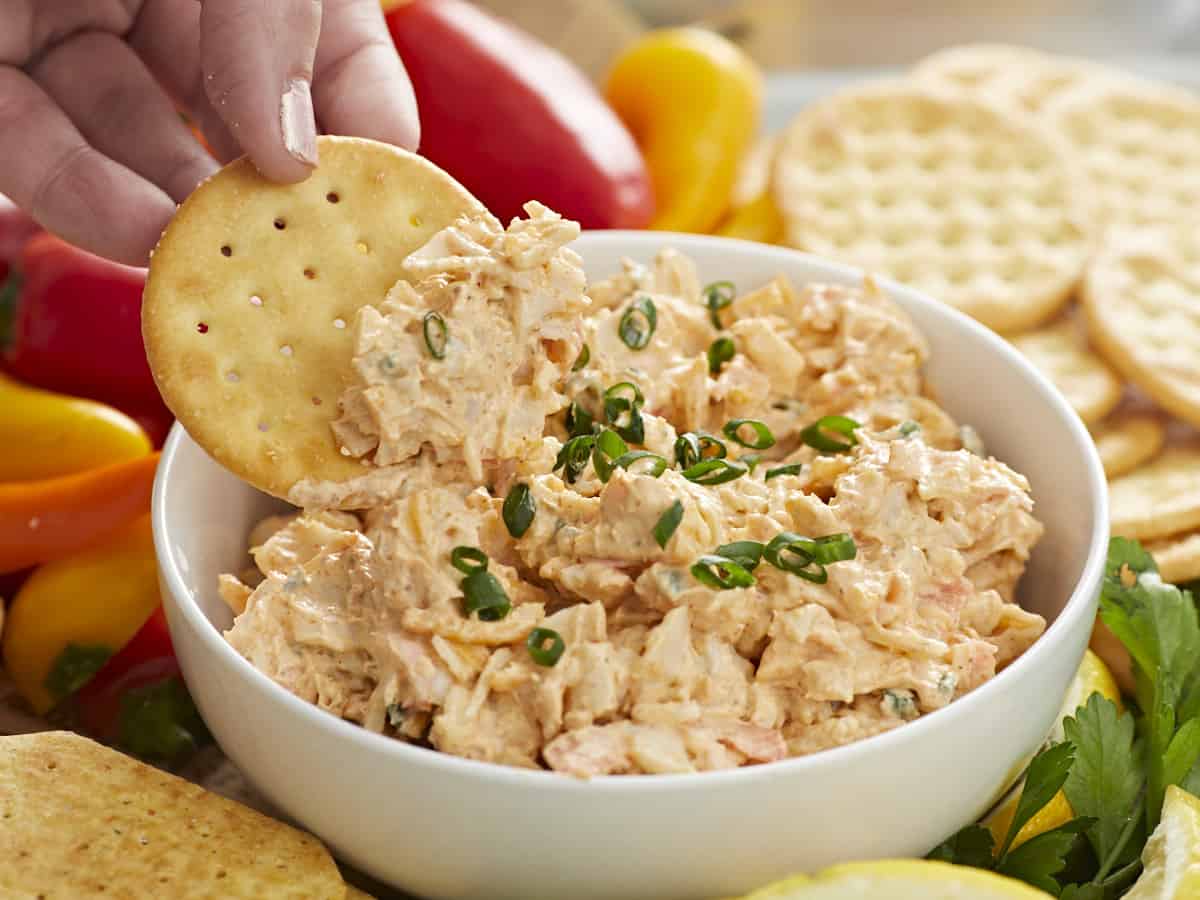
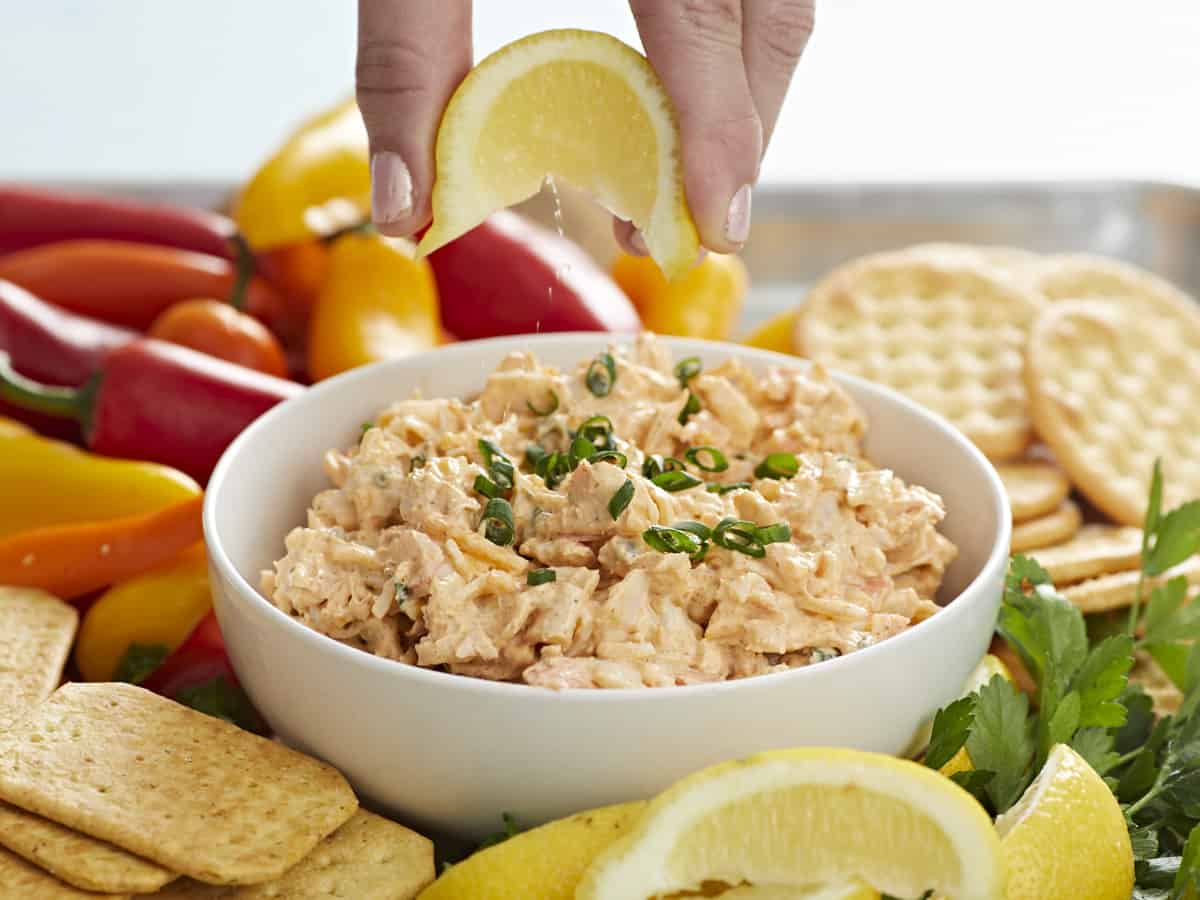
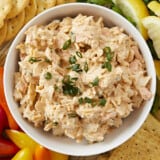
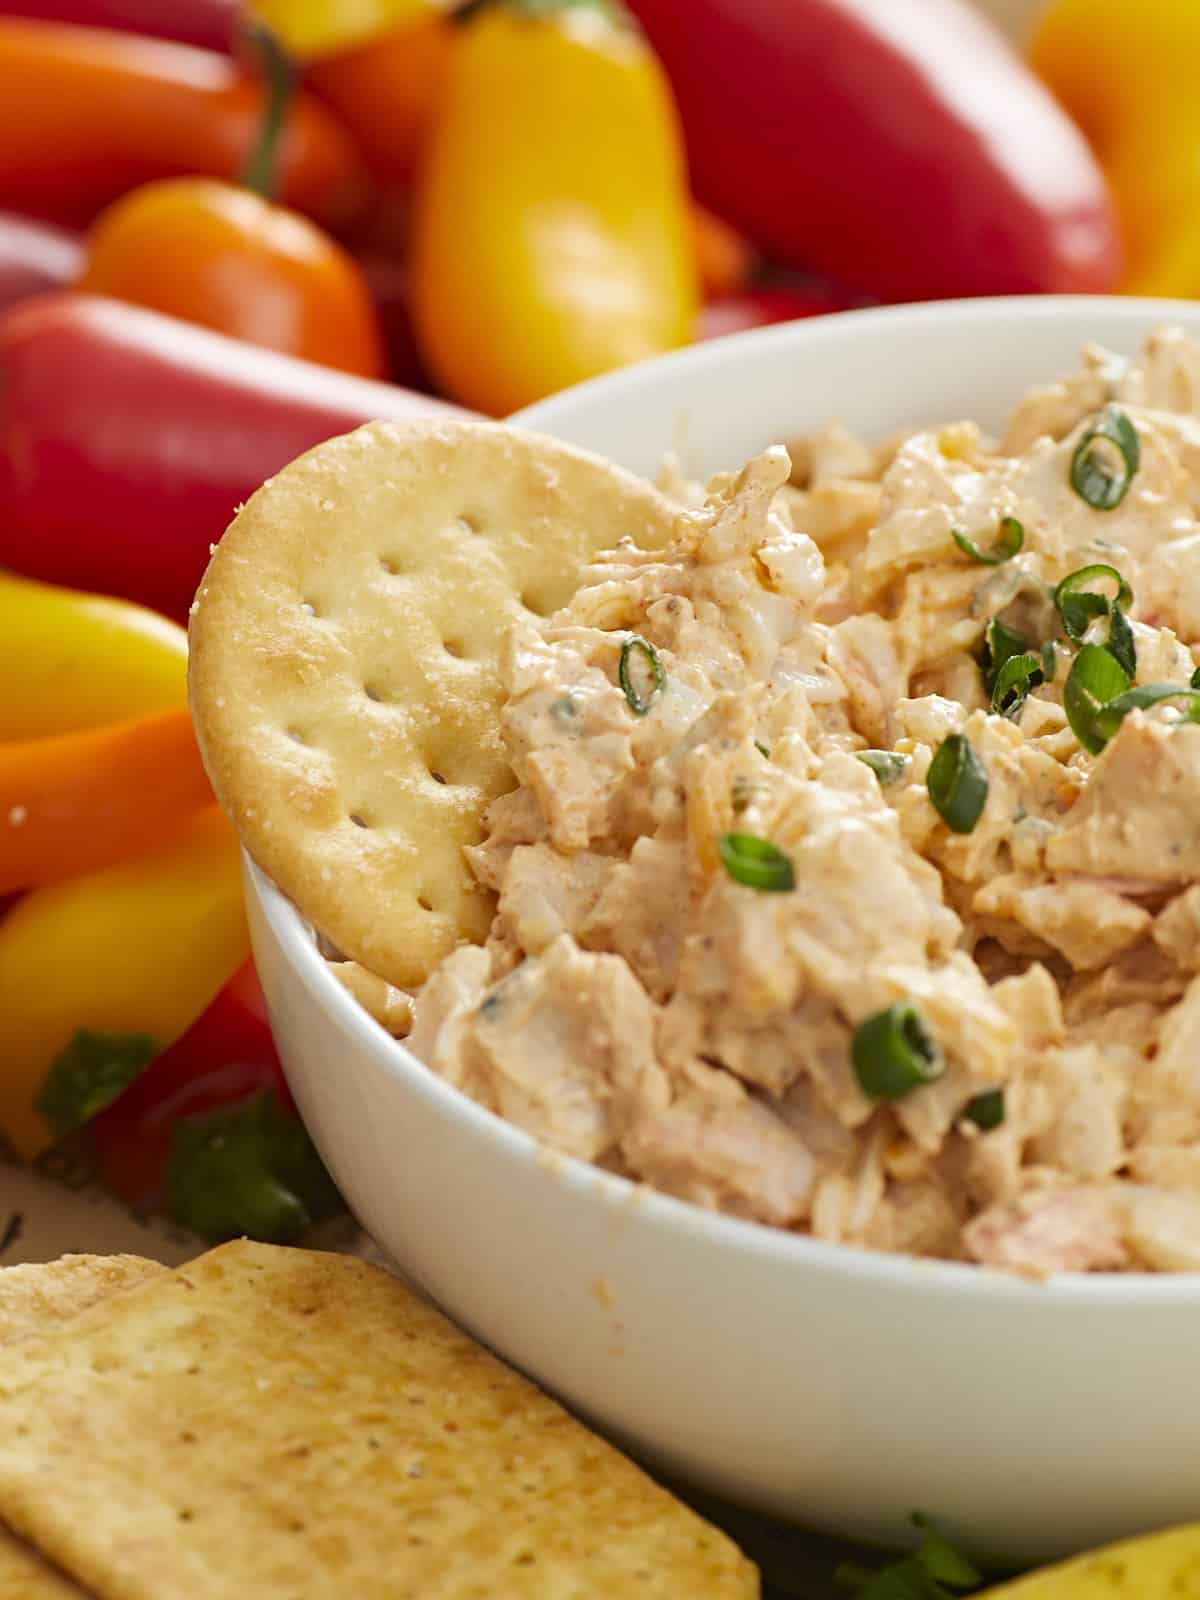
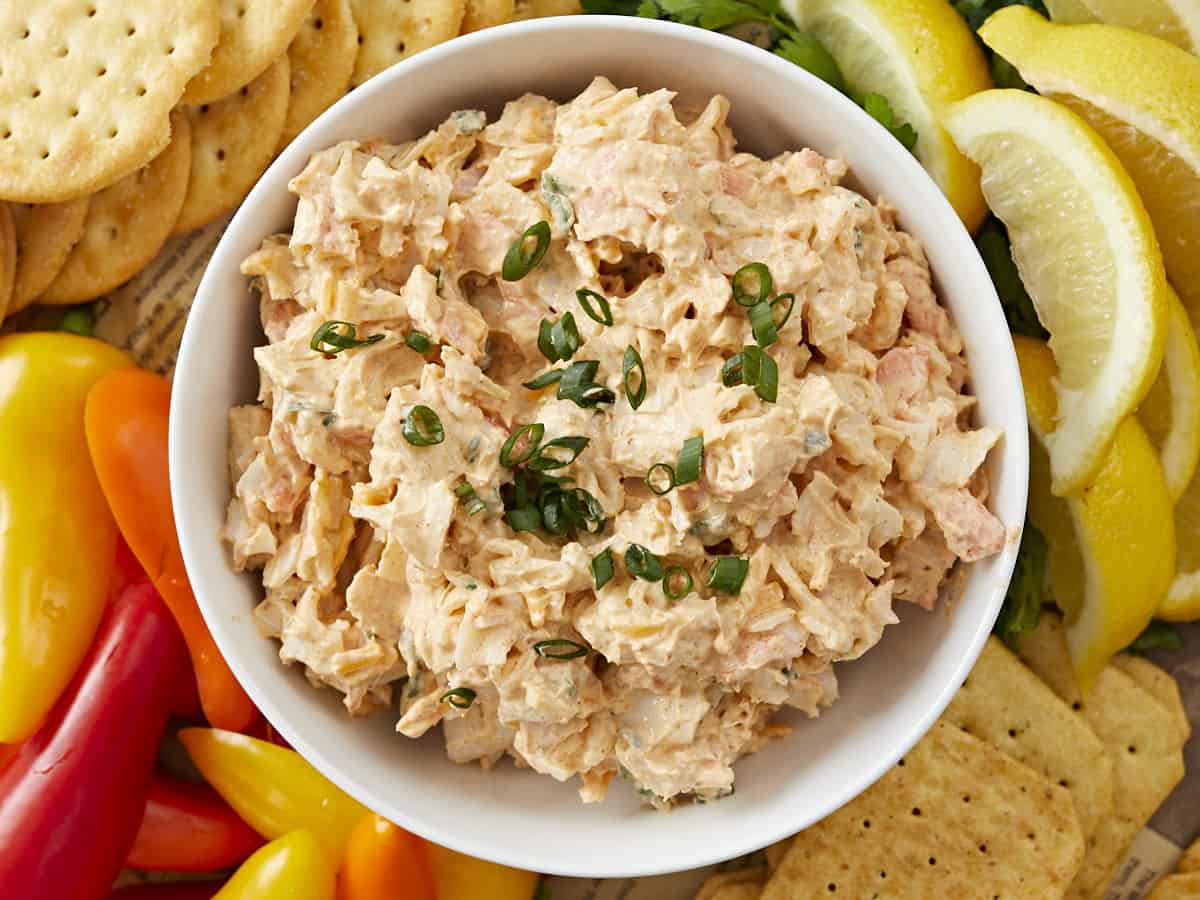
This creamy, spicy crab dip is so good you’ll be pushing a cracker into the corners of your serving dish to scoop up the last schmear. At least that’s what Beth and I did when we annihilated it in the Budget Bytes Kitchen (In the name of research, of course, 😂 ). It’s so easy that it comes together in three steps. And you can serve it hot or cold! Get ready for your new favorite thing to bring to the party.
What You’ll Need
This crab dip comes together in ten minutes. You should chill it before serving to thicken the cream cheese base, but you don’t have to if you’re low on time. Just serve it in a container set over ice. You can also bake it for a few minutes if you prefer to serve it hot.
Crab Meat – the real stuff is expensive, so we used imitation crab meat, and the results were divine. Choose your own adventure, but my money’s on the fish forgery. If you use real crab, drain it well, or your dip will end up runny.
Cream Cheese – acts like a binder and helps keep everything together. It also thickens the consistency of your dip.
Sour cream – adds an undeniable tang and smooth mouth feel.
Cheddar Cheese – the shreds will add texture and a sharp, earthy flavor.
Old Bay Seasoning – this blend of celery salt, red and black pepper, mustard powder, cayenne, and paprika adds a citrusy heat that doesn’t overpower the sweetness of the crab meat. You can substitute it with Cajun seasoning or Crab Boil seasoning.
Garlic Powder – raw garlic has a robust flavor that takes over a crab dip. Instead, use garlic powder which has mellow, roasted notes.
Hot Sauce – adds a smoky heat. Use as much (or as little) as your heart desires. You can substitute hot sauce with red pepper flakes or cayenne.
Lemon Juice – you need this hit of acid to break through the fattiness of the cream cheese and sour cream. If you don’t have lemon, use any white vinegar.
Scallions -add a soft onion flavor, texture, and freshness. You can also garnish with chopped Italian parsley or finely chopped raw onion. Soak raw onion in cold water for a minute to decrease its sharpness.
Crackers, Toasted Bread, Chips, Raw Veggies – lean into plain or lightly flavored crackers, so they don’t overpower the crab. Toasted bread and chips should be sturdy so they don’t break when dipped. Sweet peppers, celery sticks, and carrots sticks are all easy and economical choices.
Do I Serve Crab Dip Hot or Cold?
You can do both! If you want to prepare a hot version, sprinkle an additional 1/4 cup of shredded cheddar over the top and then warm in a 350°F oven until the cheese has melted and the crab dip is bubbly—about fifteen minutes. To serve cold, chill it in the fridge for at least a half hour. If you’re low on time, place the crab dip container over a bed of ice and serve right away.
What Goes With Crab Dip?
Crackers, toasted bread, chips, and raw vegetables are the traditional items served with crab dip. But you can also use it as a spread on toast or chicken. Drizzle it on fried eggs or french fries. Try to stick with milder flavors that won’t overpower the sweetness of the crab.
How To Store Leftovers
Place leftovers in an air-tight container with plastic film or wax paper directly over the surface of the dip. Refrigerate for up to five days and freeze for up to 3 months. Thaw frozen crab dip in the refrigerator overnight. Reheat thawed crab dip that you’d like to serve hot in a 350°F oven.
This creamy, spicy crab dip is so good you'll be pushing a cracker into the corners of your serving dish to scoop up the last schmear! It comes together in three easy steps and you can serve it hot or cold.
*Use 1/4 cup more shredded cheddar to melt on top of the dip if you are serving it hot*If you are serving the crab dip hot, top it with an additional 1/4 cup of shredded cheddar cheese and warm it in a 350°F oven until the cheese has melted and the crab dip is bubbly, about fifteen minutes.
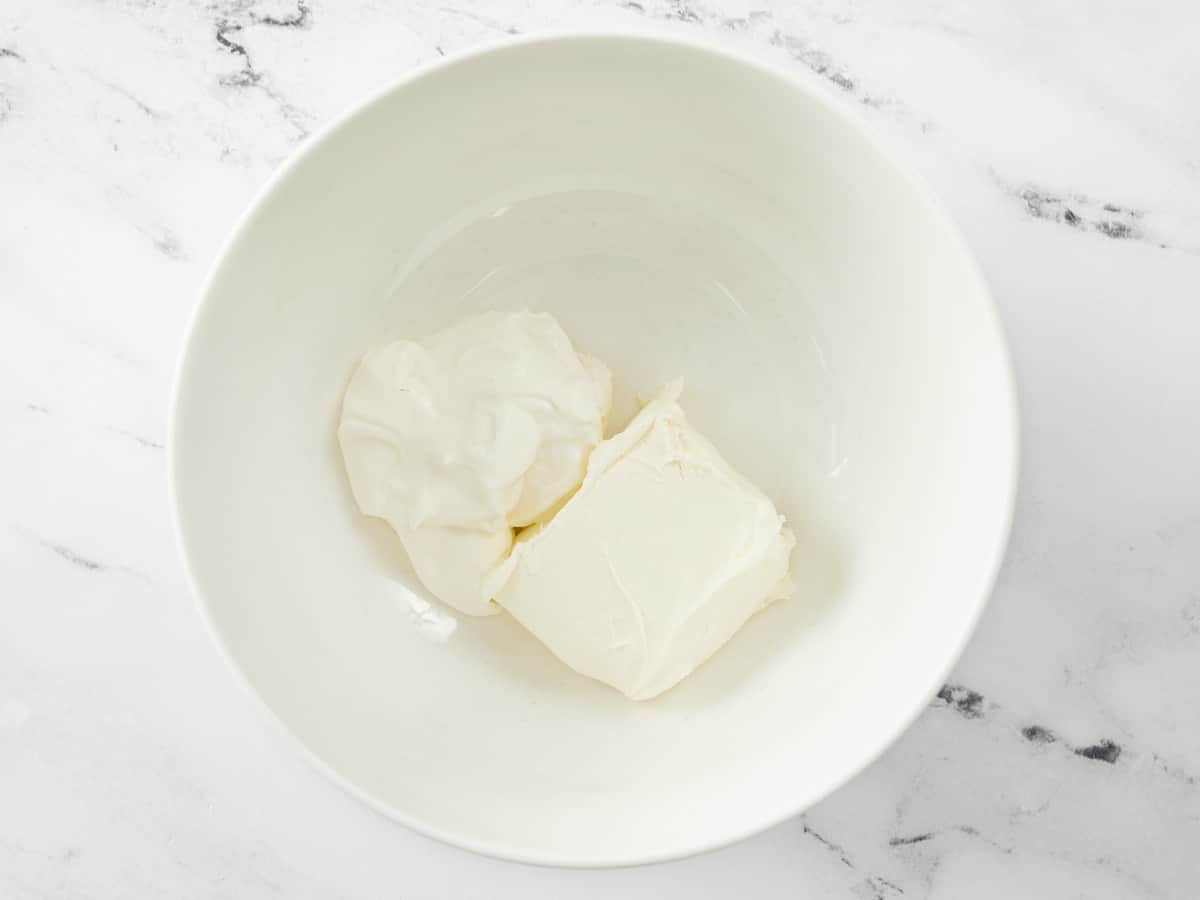
In a medium bowl, mix the 4 ounces of cream cheese and 1/4 cup of sour cream until smooth.
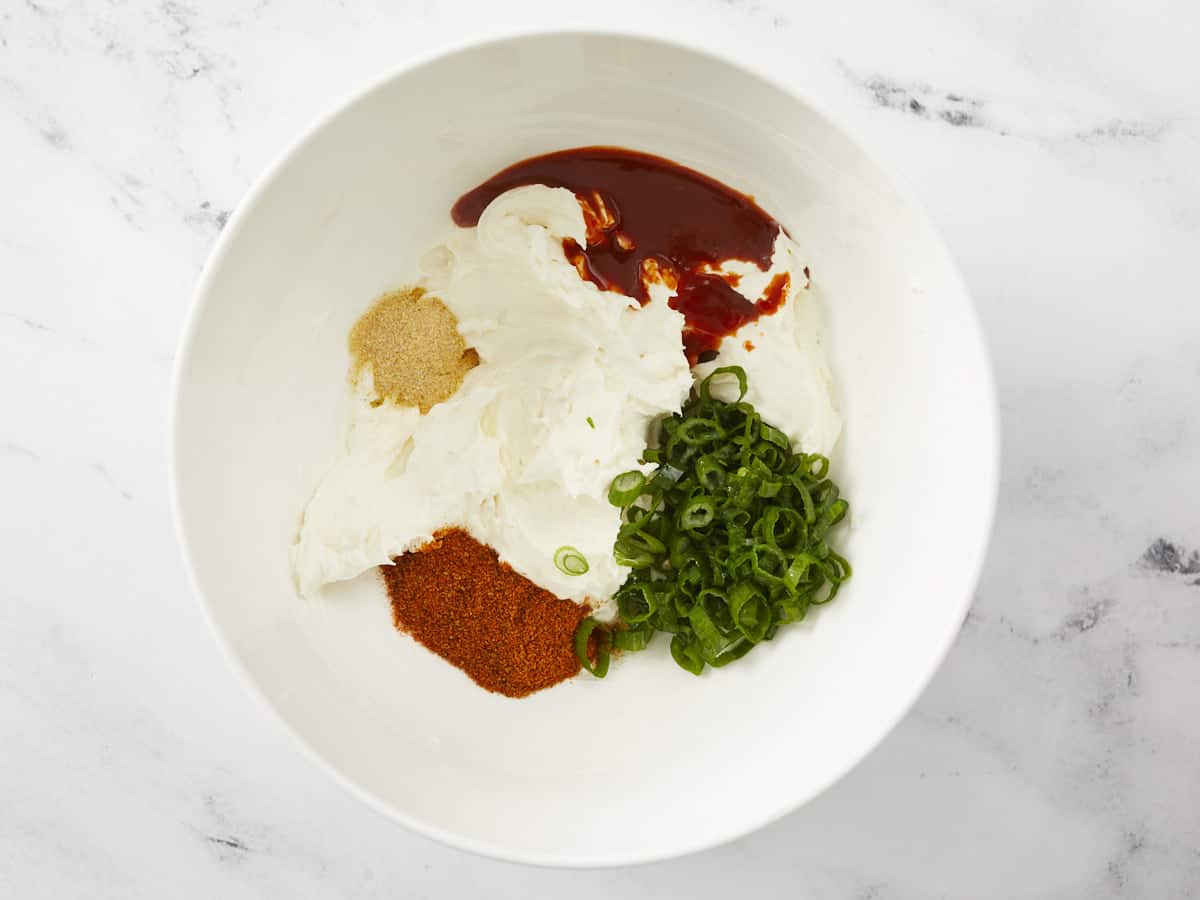
Mix in 1 1/2 teaspoons of Old Bay Seasoning, 1 1/2 teaspoons of fresh lemon juice, 2 teaspoons of hot sauce, 1/2 teaspoon of garlic powder, and 2 green onions sliced in 1/8th inch rounds (about 2 tablespoons).
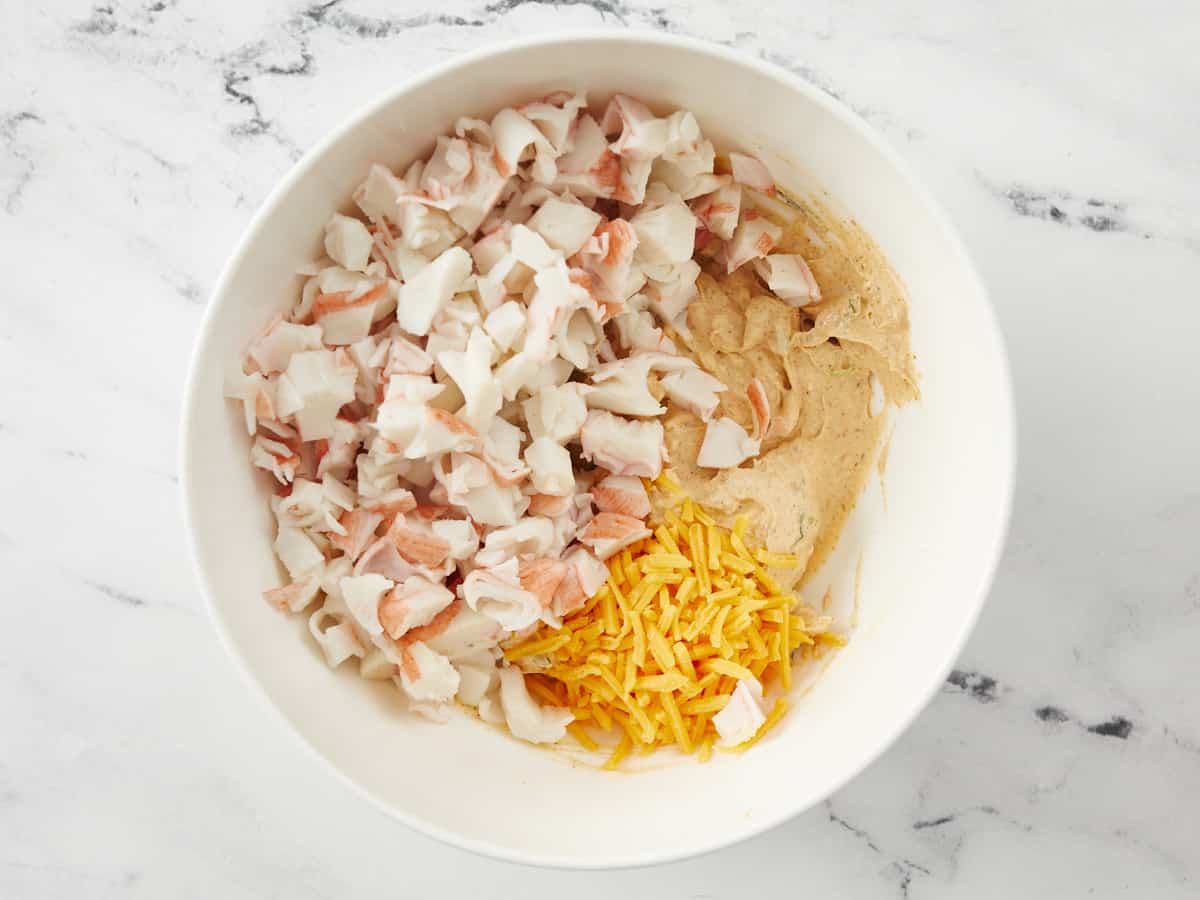
Mix in 8 ounces of imitation crab and 1/4 cup of shredded cheddar cheese.
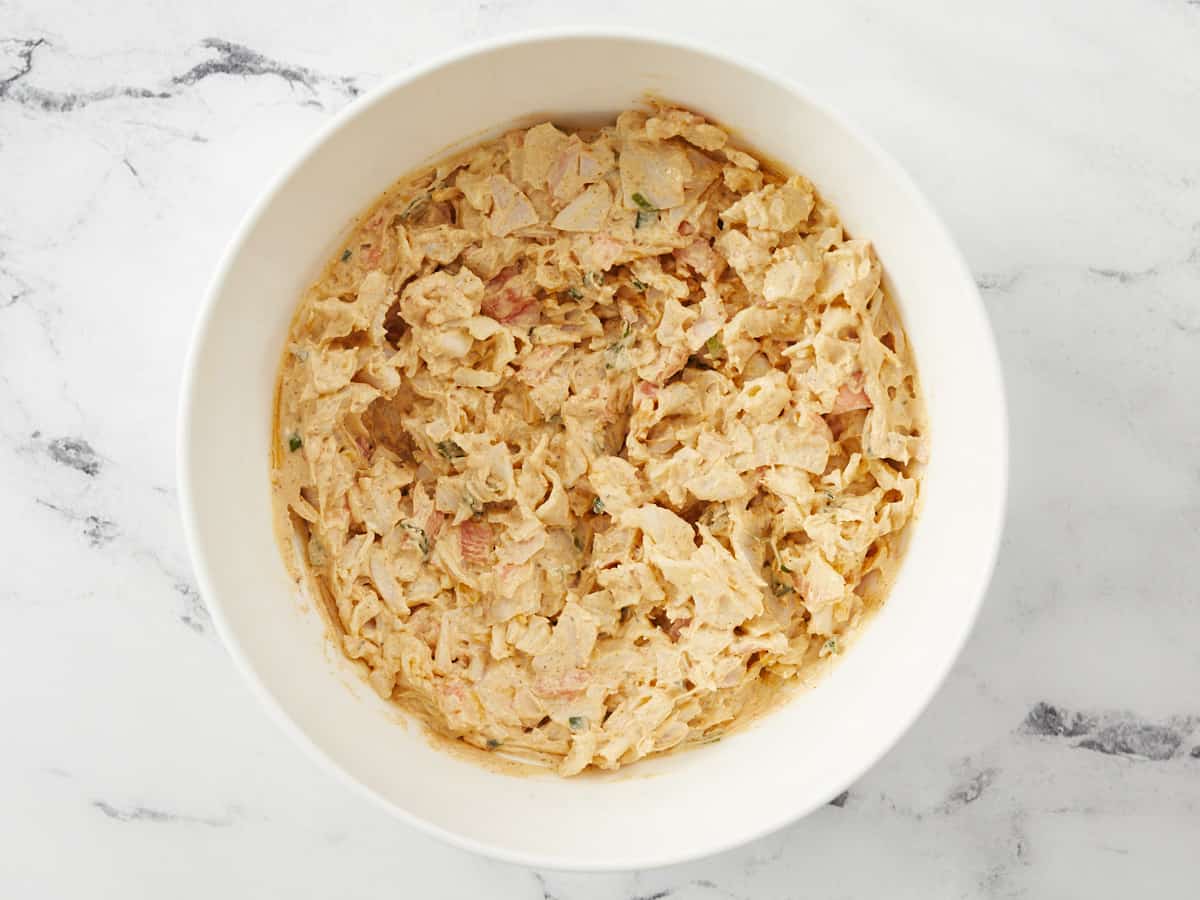
Refrigerate for at least 30 minutes and serve with crackers, bread, chips, or raw veggies. If you’re running low on time, place the serving dish over a bed of ice and serve right away. Get ready for this incredible crab dip to steal the show!
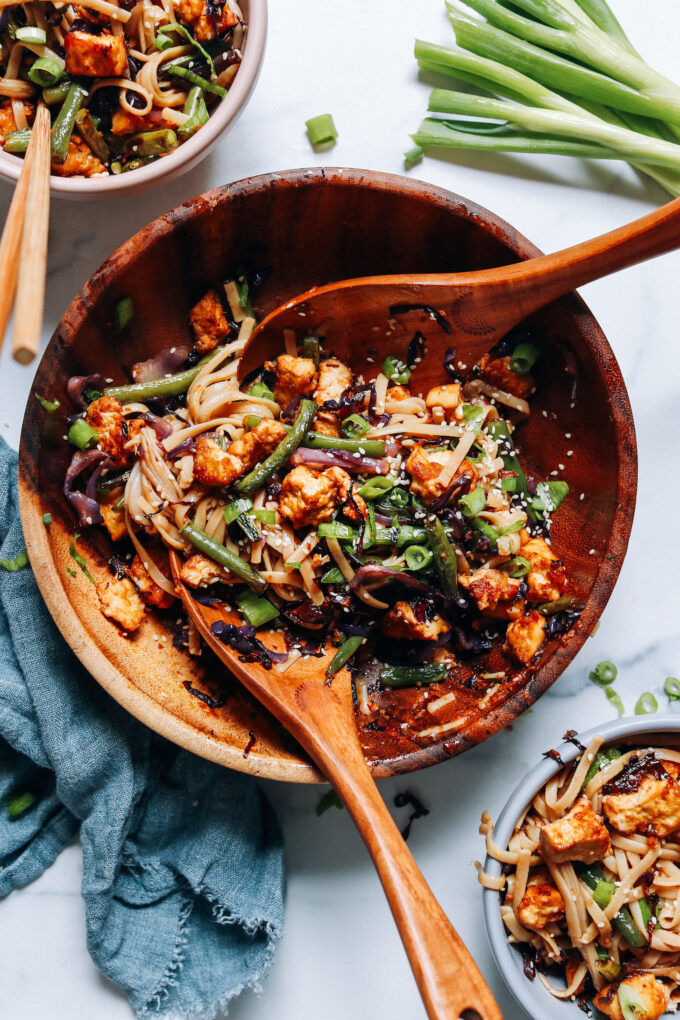
All the flavor and comfort of your favorite noodle stir-fry takeout, but easier than deciding where to order? You bet! This EASY, weeknight-friendly meal is a breeze thanks to one of our favorite kitchen essentials: the sheet pan.
Flavorful seasoned to…
All the flavor and comfort of your favorite noodle stir-fry takeout, but easier than deciding where to order? You bet! This EASY, weeknight-friendly meal is a breeze thanks to one of our favorite kitchen essentials: the sheet pan.
Flavorful seasoned tofu and crispy roasted veggies combine with saucy, gingery sesame noodles for a nourishing, 10-ingredient party in a bowl! Consider dinner planned. Let us show you how it’s done!
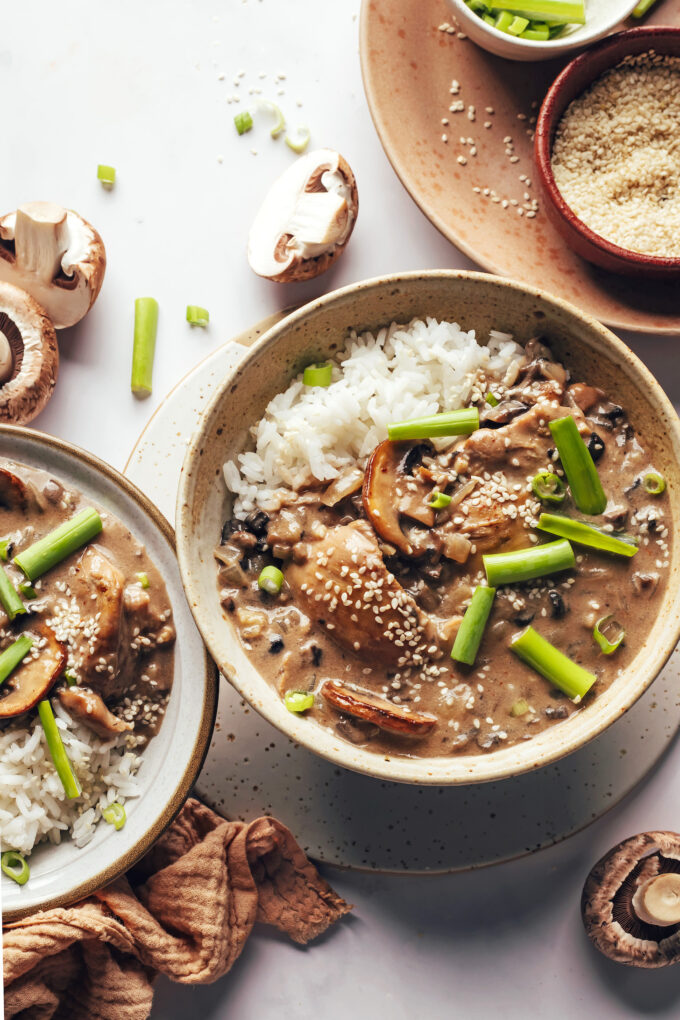
Savory, saucy, and satisfying! What’s not to love?! This Creamy Mushroom Chicken is inspired by a Samoan dish and doesn’t skimp on comfort or richness.
It’s a flavorful, 1-pot meal that’s elegant enough for hosting but easy enough for weeknight dinners…
Savory, saucy, and satisfying! What’s not to love?! This Creamy Mushroom Chicken is inspired by a Samoan dish and doesn’t skimp on comfort or richness.
It’s a flavorful, 1-pot meal that’s elegant enough for hosting but easy enough for weeknight dinners. Serve with veggies and rice (or coconut rice!) and it’s meal prep perfection. Let us show you how it’s done!
This easy, 1-pot recipe begins with sautéing onion, mushrooms, garlic, and ginger for a flavorful base.
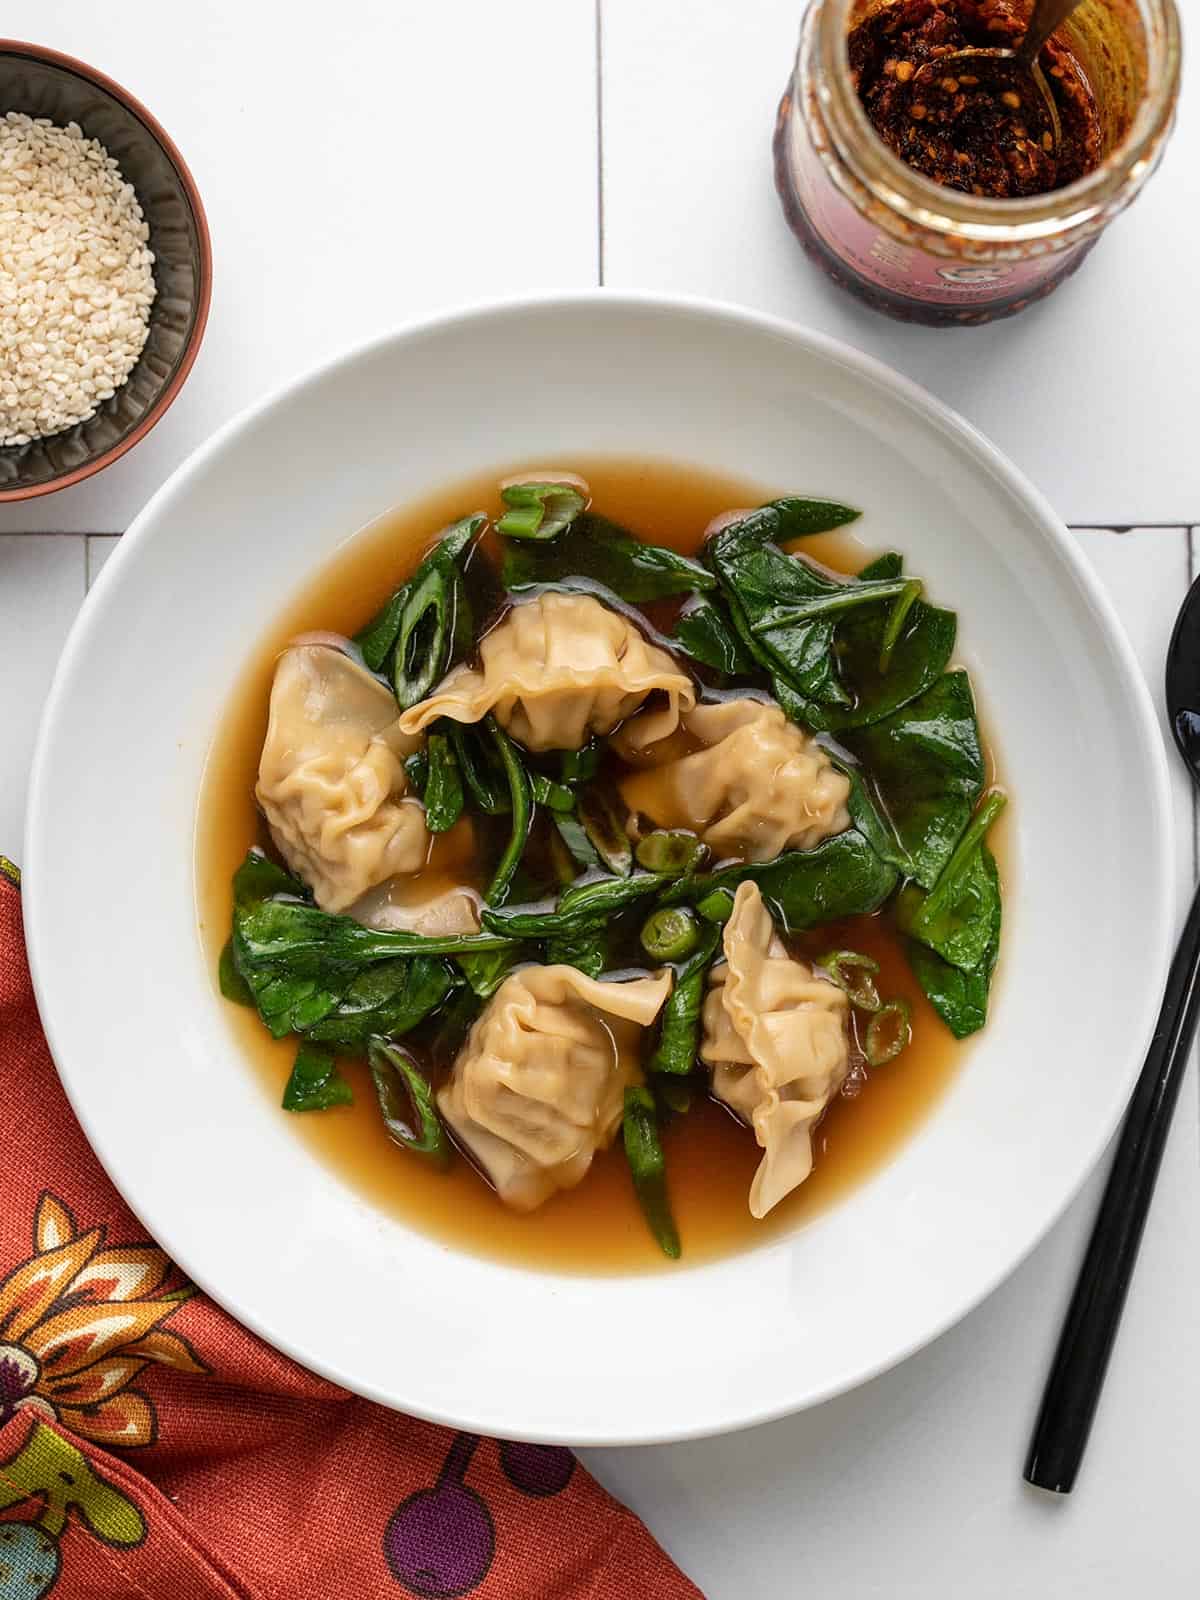
Easy Dumpling Soup is one of my absolute favorite things to throw together if I want a quick-and-simple homemade lunch or an effortless dinner that’s still wholesome, comforting, and budget-friendly. I’ve designed this recipe to be as versatile as possible, dressing up mostly store-bought ingredients, in order to scratch that “itch” for whatever takeout favorite I’m craving when ordering out isn’t on the menu.
What is dumpling soup?
Our version of dumpling soup is a quick, semi-homemade soup inspired by dumpling soups found in Chinese, Korean and Japanese cuisines. The soup features a savory clear broth, delicate meat-filled dumplings, fresh greens, and an array of condiments to sprinkle on top. Here’s what you need for this Easy Dumpling Soup:
Frozen dumplings — You can find Asian-style dumplings in the freezer section, usually filled with pork, vegetables, shrimp, or a combination of those ingredients.
Broth — We fortified our vegetable broth with soy sauce and toasted sesame oil!
A handful of fresh greens — like sliced green onions, fresh spinach, or baby bok choy
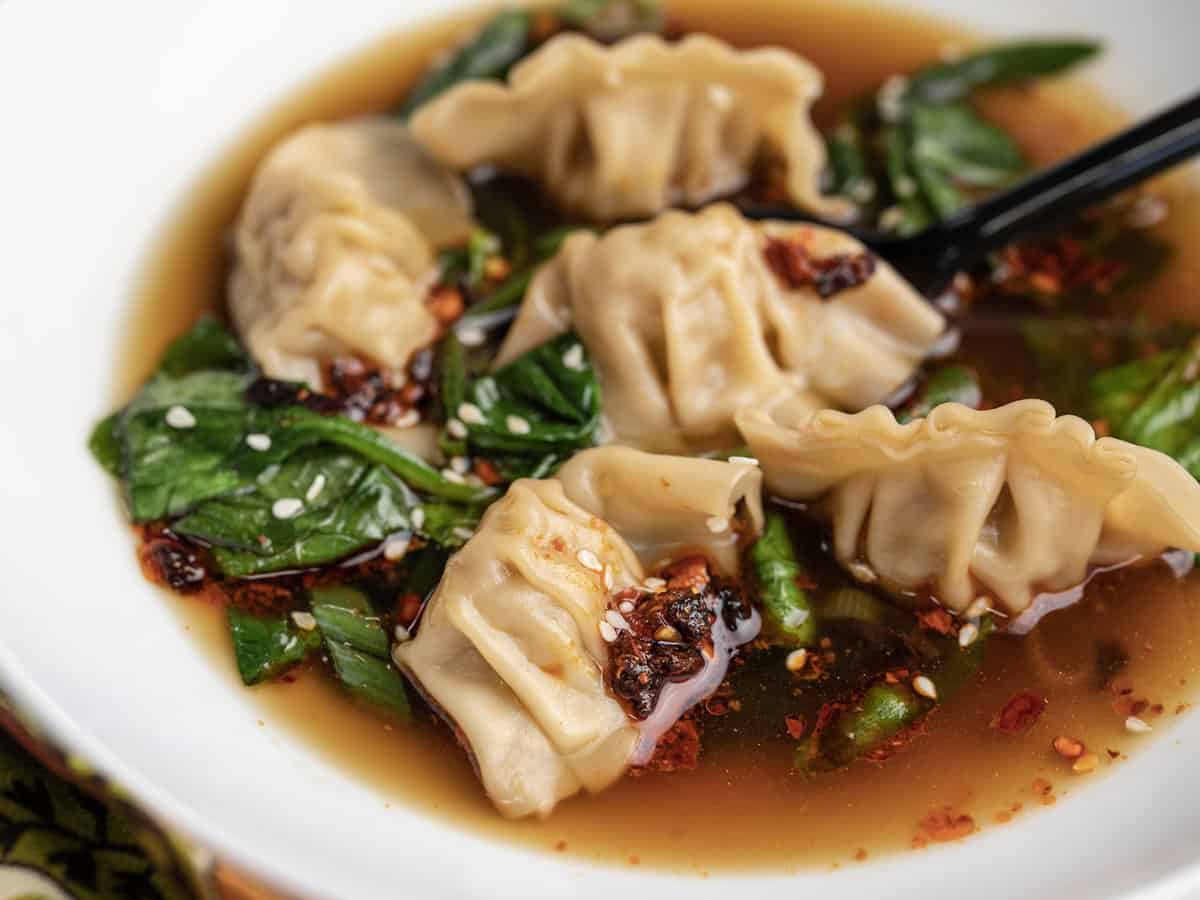
Condiments — Use anything your heart desires! Try chili crisp, sesame seeds, black vinegar, cilantro, and more!
Is this an authentic recipe?
No, this is not an authentic dumpling soup, but we highly encourage you to read more about the wide variety and rich culture surrounding dumplings. Also, check out these recipes for authentic Chinese potstickers and Xiaolongbao (soup dumplings), Korean mandu, and Japanese gyoza.
What kind of dumplings to buy
Most grocery stores offer a variety of frozen dumplings options of different sizes, shapes, and fillings (usually pork, vegetable, shrimp, or a combination of those flavors)—and any type of frozen dumpling will work for this recipe. If you’re operating on an extra-tight budget, visiting an Asian grocery store is a great place to find a wider selection, larger quantities, and even lower prices.
How to know the dumplings are fully cooked:
Frozen dumplings are usually on the smaller side, so they cook quickly when added to boiling broth. However, since our suggested cook time is only based on the handful of brands we’ve tried (and there are so many others!), I highly recommend consulting the package directions on your dumplings to ensure you are cooking them long enough—as well as checking the suggested serving size to make sure you are preparing enough for two people.
Are the leftovers ANY good?
I would not recommend saving these leftovers. As it sits, the dumplings will keep soaking up the broth until they bloat and then fall apart. Instead, just make the amount you think you will eat, which is why I’ve developed the recipe for two servings rather than four. Since it comes together so quickly, it wouldn’t be the end of the world if you decided to make it twice in one night!
Take your Dumpling Soup to the next level
Some great flavor and topping additions for this soup are:
Cubed tofu, cooked chicken, or another prepared protein
Mushrooms, or other fresh or frozen vegetables
Half of a hard-boiled egg
Fish sauce
Kimchi
Cilantro
Mirin
Rice Vinegar or Lime Juice
Miso paste
A prepared sauce like Scheuzan chili oil, chili garlic sauce, sriracha, teriyaki sauce, or a prepared “dumpling sauce”
Sesame seeds, crushed nori, or a store-bought Furikake blend
My go-to Topping combinations
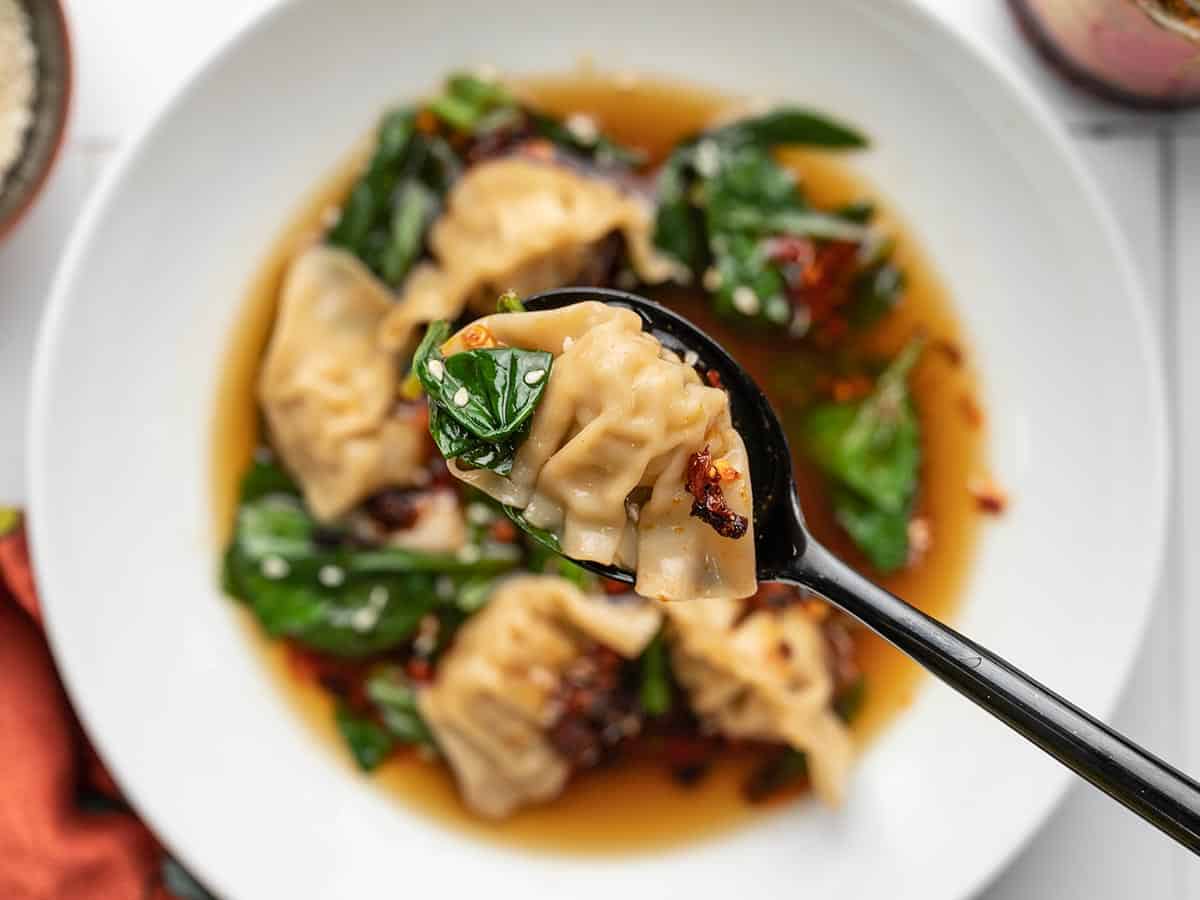
Plan to add any extra condiments and toppings directly to each serving bowl, so each person can mix and match them to suit their tastes. My go-to topping combinations are (per bowl):
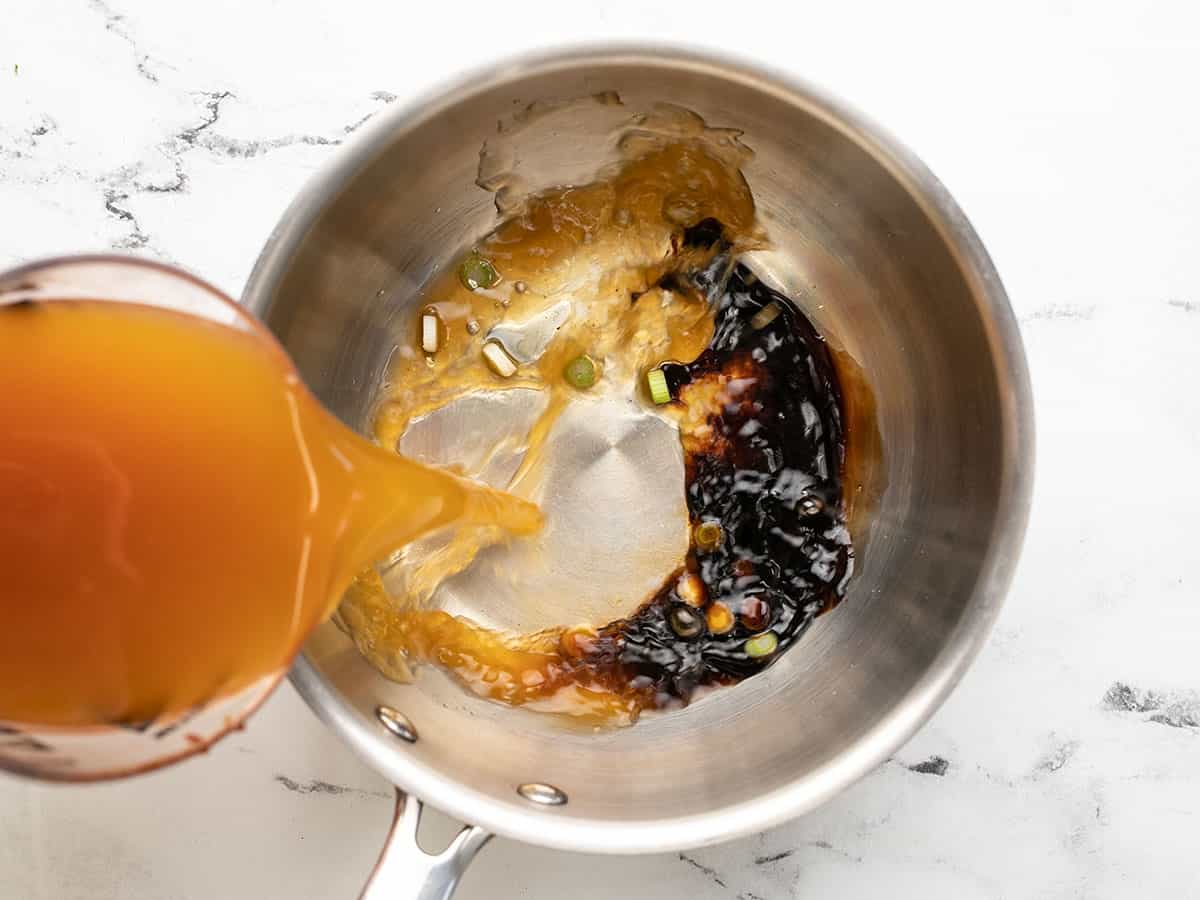
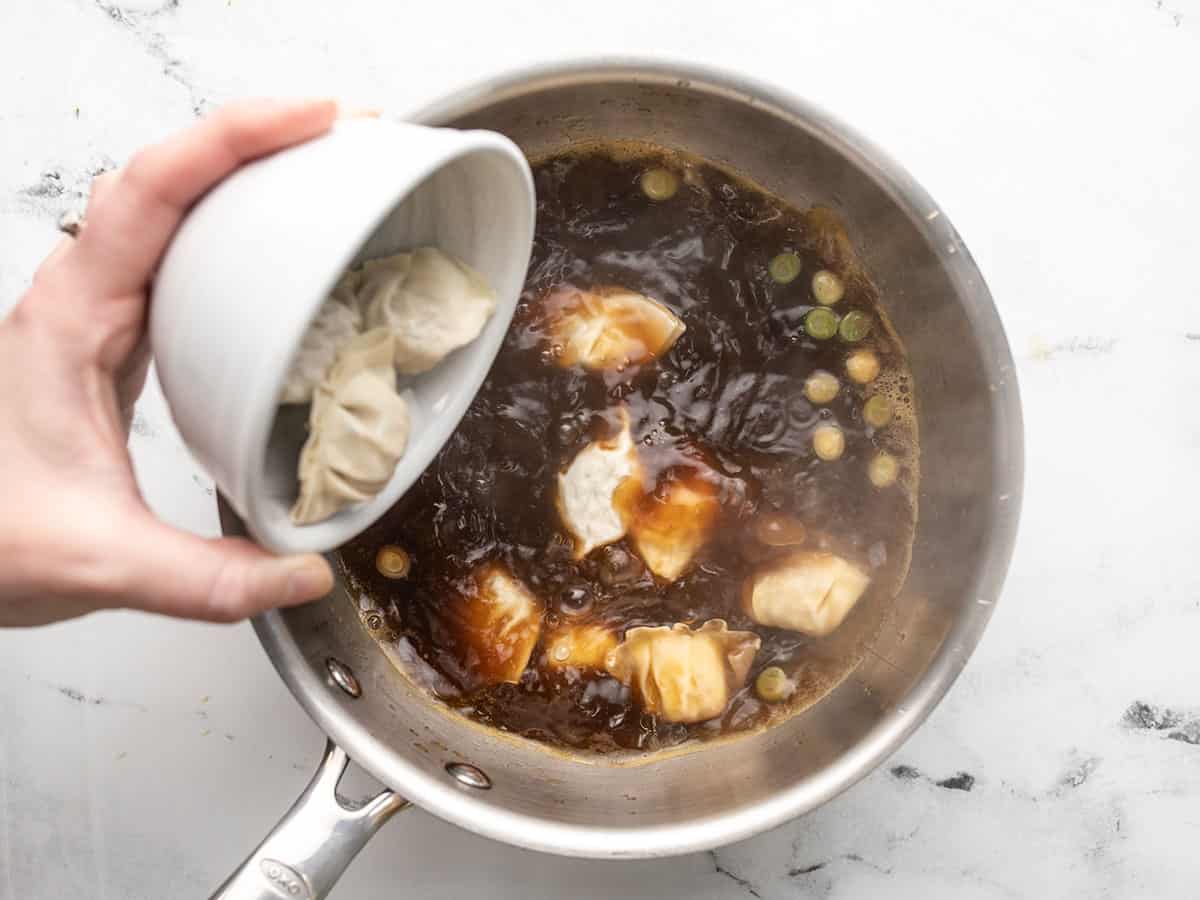
Combine the vegetable broth, soy sauce, toasted sesame oil, and the white parts of a sliced green onion in a medium-sized pot. (If using, also add the fish sauce, pre-cooked proteins or tofu, and any fresh or frozen vegetables that need time to soften.)
Bring the broth up to a boil on medium-high heat. Once boiling, add the dumplings.
Cover the pot and allow the soup to come back up to a boil. Boil the dumplings for about 2 minutes or until they are cooked through. (Consult package directions.)
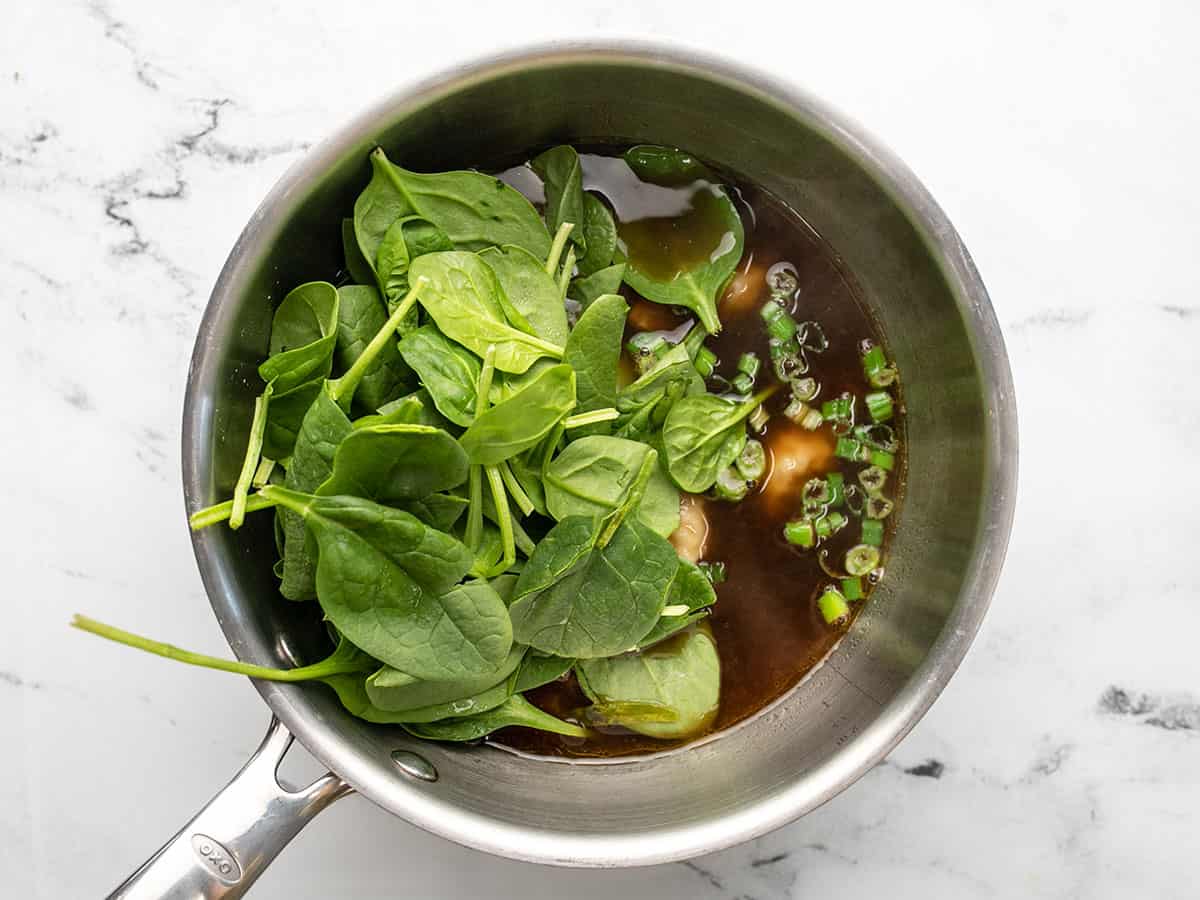
Turn off the heat and stir in the green parts of the sliced green onion and a handful of spinach.
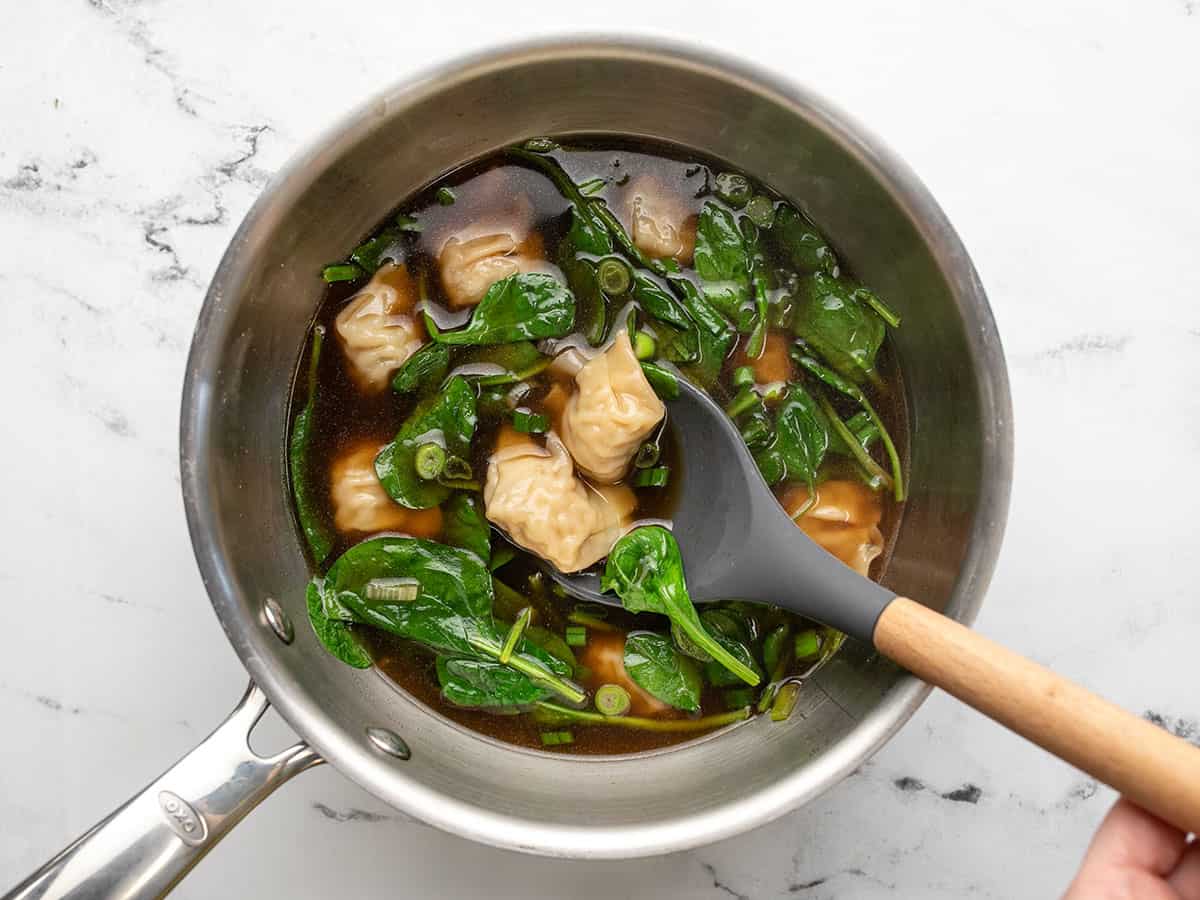
Split the soup into 2 serving bowls and top with any desired condiments.
*You can use any flavor (pork, vegetable, chicken, etc.), but I prefer ones with pork and vegetables.**We use Better Than Bouillon mixed to make all of our broths. If substituted with a low-sodium broth, the final dish may need more salt. ***or baby bok choy
How to Make easy dumpling soup – Step by Step Photos
In a medium-sized pot, combine 2 cups of vegetable broth, 1 Tablespoon of soy sauce, 1 teaspoon of toasted sesame oil, and the white parts of a thinly sliced green onion (set the green parts aside for garnish), and cook over medium-high heat. You should also add the fish sauce now, if using — as well as any other extra ingredients that require some cooking time, like leftover cooked proteins from the fridge, tofu, mushrooms, or any other fresh or frozen vegetables that need time to soften.
Bring the broth up to a boil on medium-high heat. Once boiling, add 10 frozen dumplings. Cover and allow the soup to come back up to a boil. Boil the dumplings for about 2 minutes or until they are cooked through. (Check out the suggested cooking time on your dumpling packaging to insure this will be enough time to cook them all the way through — at the same time, also check the nutrition label to make sure you add the correct amount for two servings.)
Turn off the heat and stir in 1/2 cup of fresh spinach and the reserved green onion slices.
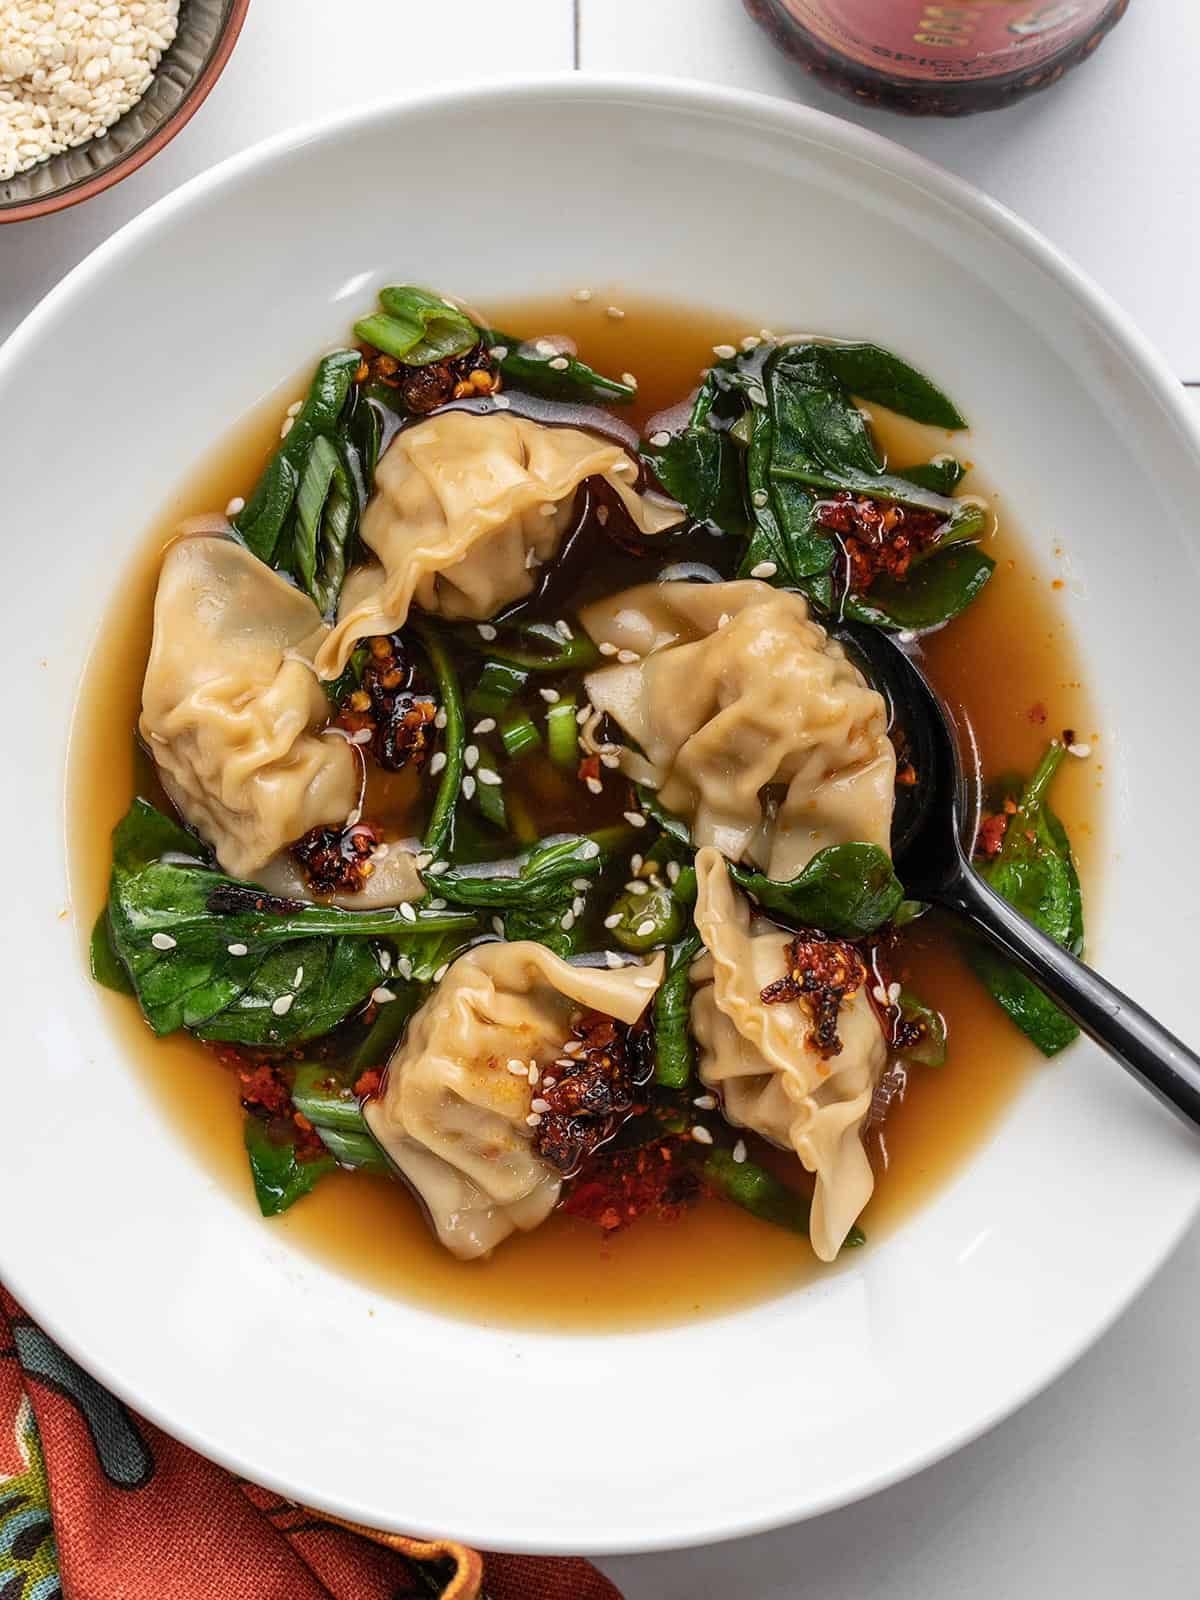
Split the soup into two serving bowls and top each bowl with your desired garnishes. We chose to sprinkle ours with a few sesame seeds and a heaping spoonful of Sichuan Chili Crisp!
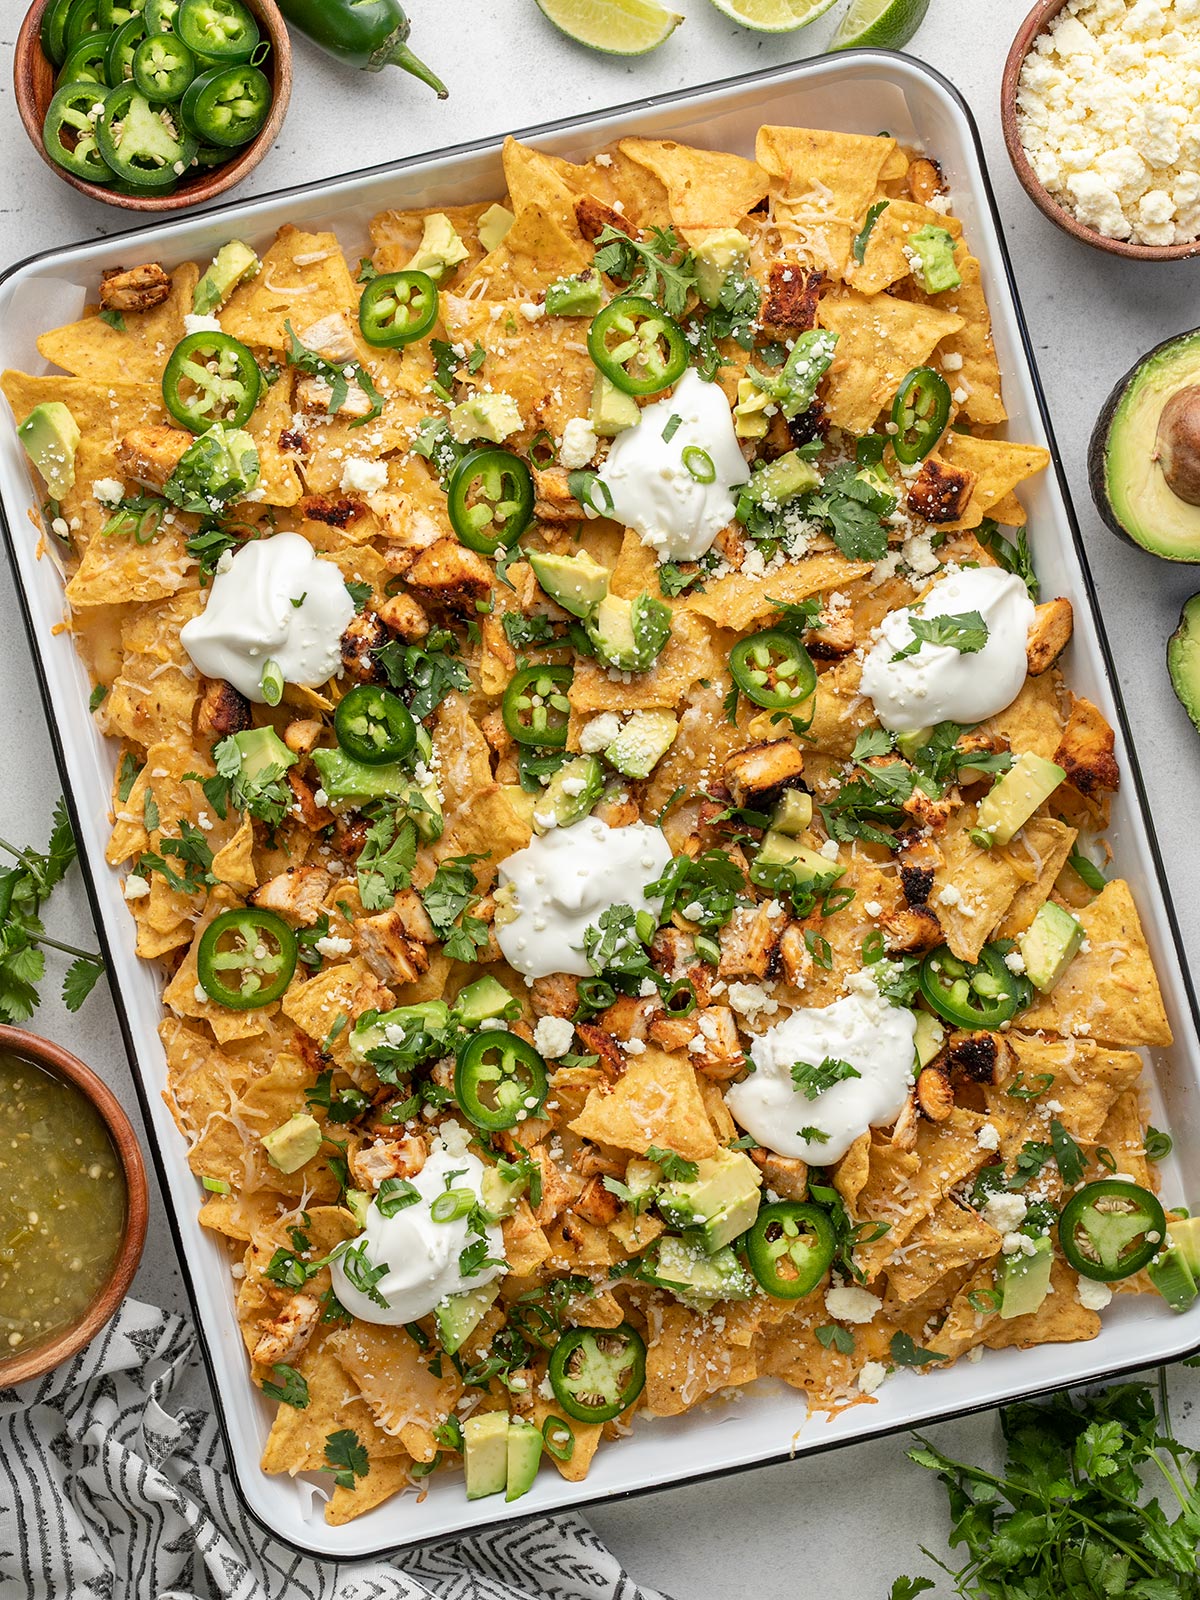
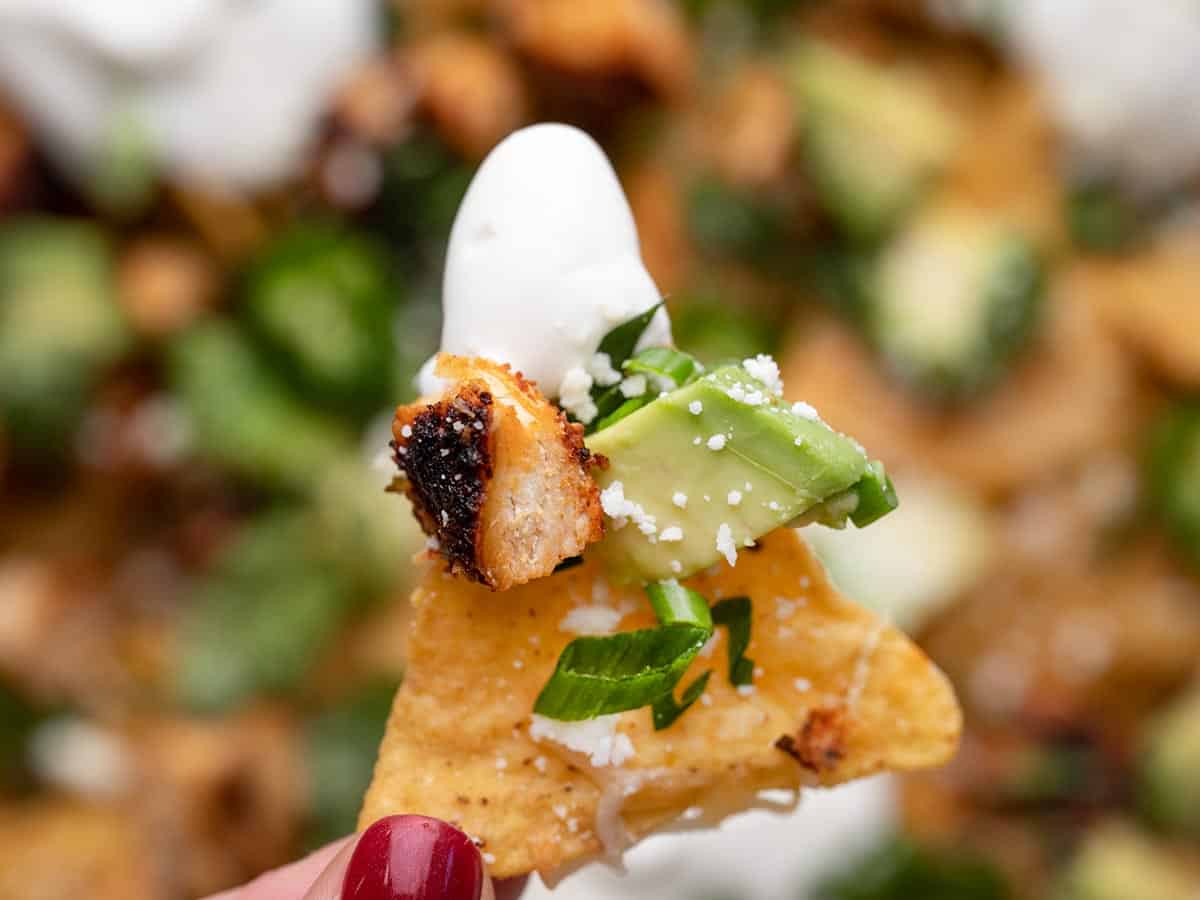
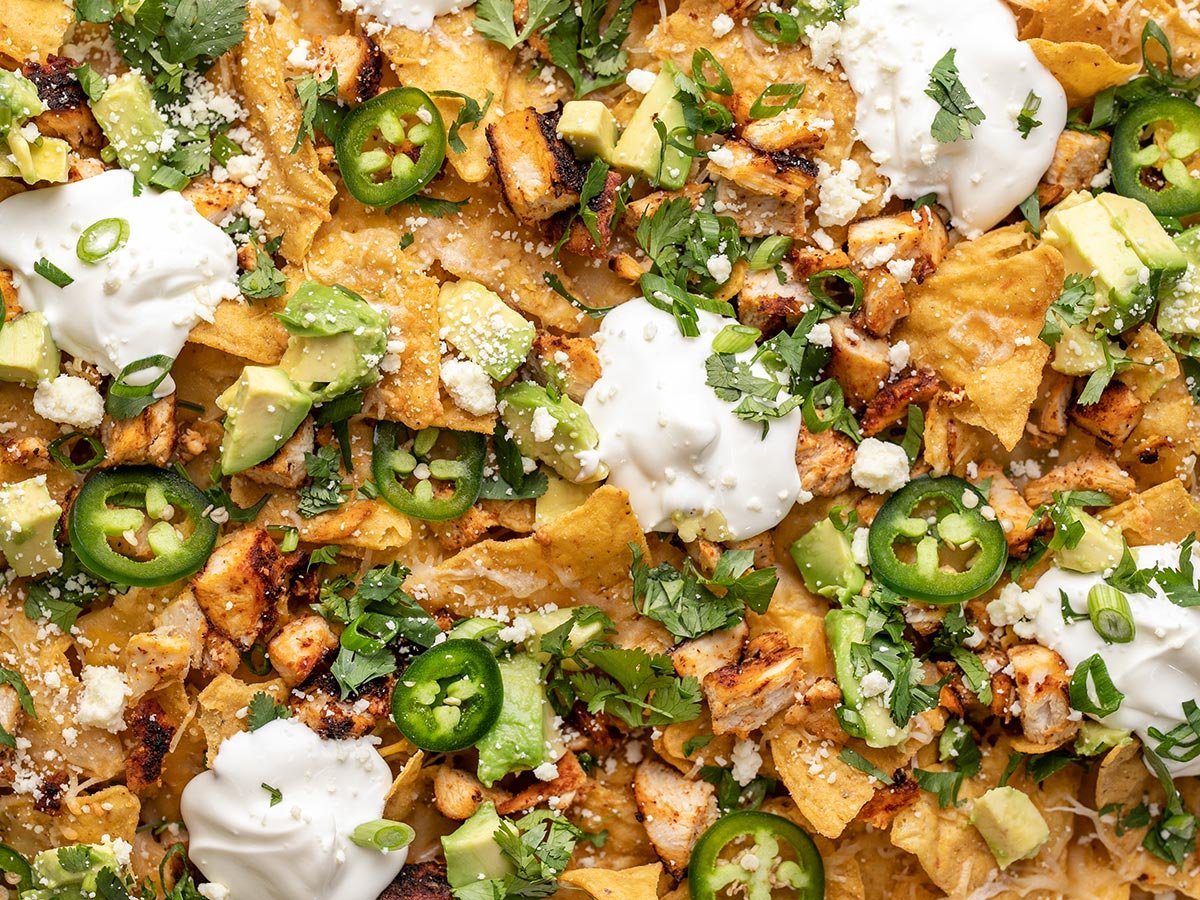
Sometimes you just need the crunchy, salty, cheesy goodness of chicken nachos. Am I right??? What’s not to love about crispy corn chips loaded with succulent chicken breast and dripping with tangy melted cheese and sour cream? They’re even better with earthy cilantro, creamy avocado, and the gentle heat from fresh jalapeno. Sigh. This is THE BEST chicken nacho recipe! It’s a perfect marriage of texture and umami bombs.
What Should I Put On My Nachos?
I’m going ’88 Bobby Brown here and saying that when it comes to ingredients for nachos, it’s your prerogative. (If you’re not familiar with My Prerogative, please enjoy three minutes of 80’s perfection.) This recipe uses chicken, fresh jalapeño, cilantro, green onions, and avocado. Some other excellent choices are:
Veggies: Diced Bell Pepper, Diced Tomatoes, Black Beans, Corn Kernels
Not all cheeses melt well. So if you’re looking for an ooey-gooey cheese pull, opt for any combination of cheeses listed below. And if you can, shred your own. The additives in pre-shredded cheeses can prevent them from softening when heated.
Cheddar
Monterey Jack
Pepper Jack
Mozzarella
Queso Asadero
Queso de Oaxaca
Queso Quesadilla
Queso Chihuahua
All that being said, I still love a sprinkle of Queso Fresco all over my nachos. It doesn’t melt, but it is sooo YUMMY.
What Sauces Go On Nachos?
You can use a simple salsa with nachos or go for something a little more complex. Drizzle it on top of your nachos or serve it on the side in a wide-mouth bowl for easy dunking. I chose a tangy Salsa Verde for this recipe, but a spicy Salsa Roja is just as good. You can also use any of these easy Budget Bytes recipes:
Choose a sturdy corn chip. Thicker chips can hold the weight of all of your toppings. A thin chip will break faster than a drama queen on The Bachelor.
Line Your Sheet Pan. Use parchment or aluminum to make clean-up a breeze. Otherwise, you’ll be spending your night scrubbing burnt cheese.
Layer your nachos. Put toppings on the first layer and then repeat. That way, you lessen the chance of getting a naked chip, i.e., the biggest nacho foul ever.
Pre-cook your meat. Nachos should only be in the oven long enough to melt the cheese, which isn’t long enough to cook raw meat. Cook chicken ahead of time or opt for pre-cooked rotisserie chicken.
Chop toppings into small dice. You want to get a bite with all of your carefully selected flavors. That will only happen with small chunks of meat and veggies.
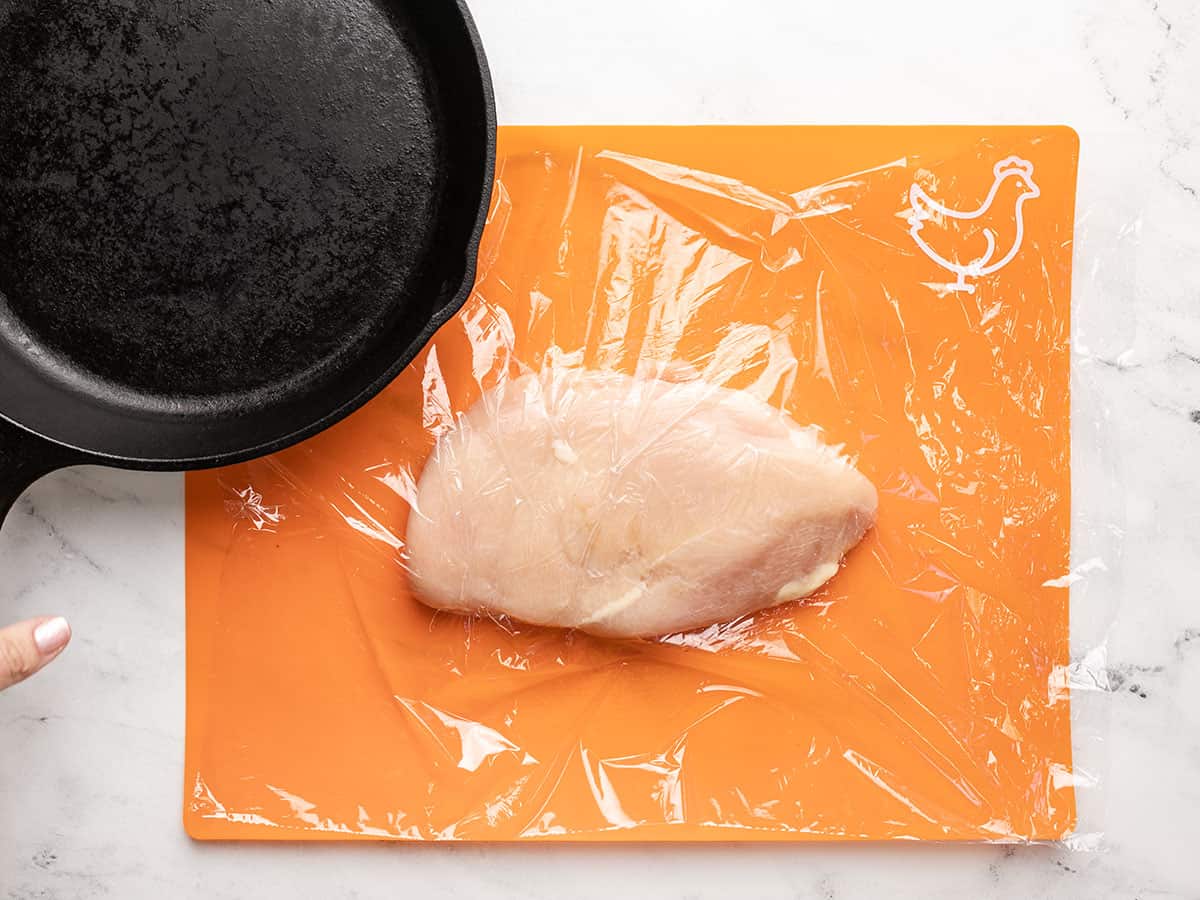
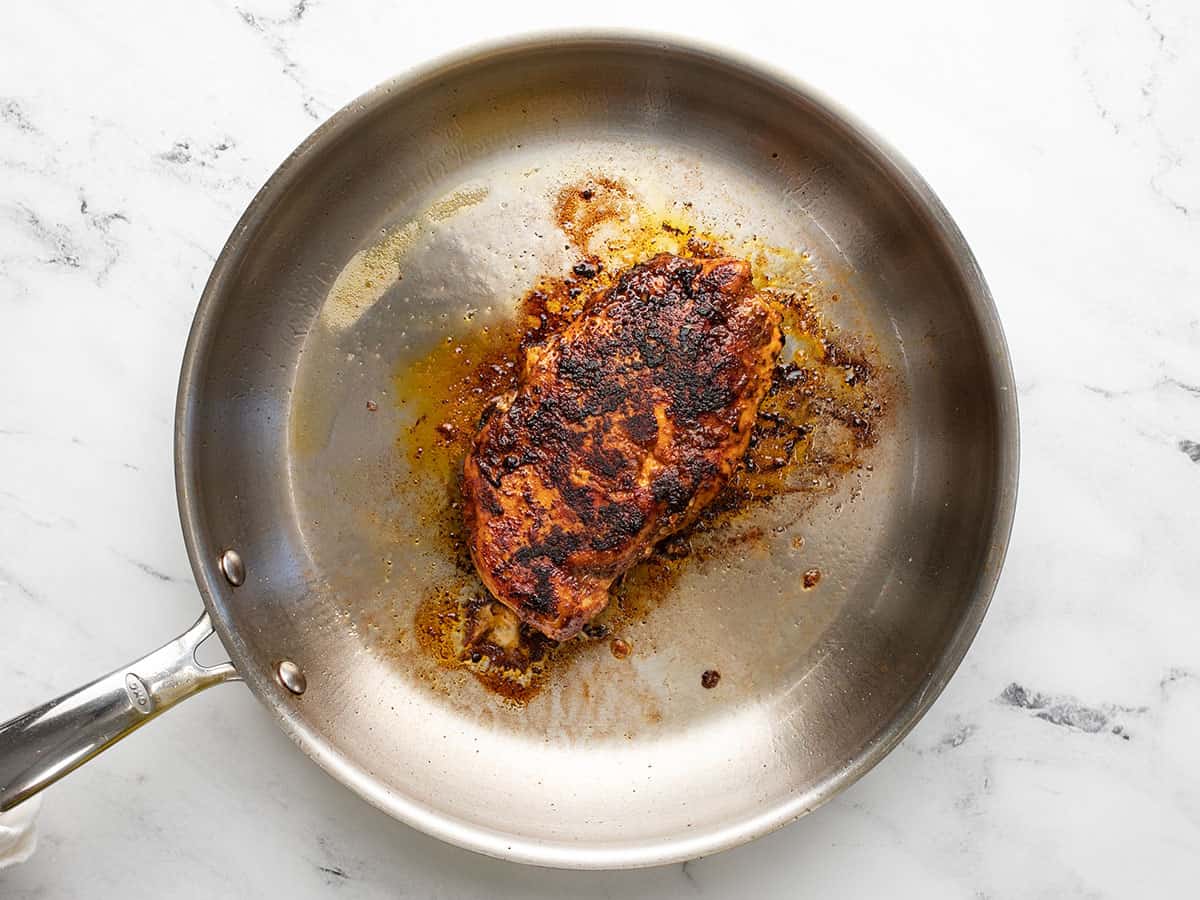
Add a rack to the center of your oven and preheat it to 400°F. Pound the chicken breast an inch thick with a heavy skillet. Sprinkle liberally on both sides with taco seasoning.
Add cooking oil to a heavy-bottomed skillet set over medium-high heat. Sear the chicken breast for 5 minutes, then flip it and cook for a few minutes more, or until a thermometer reads 165°F.
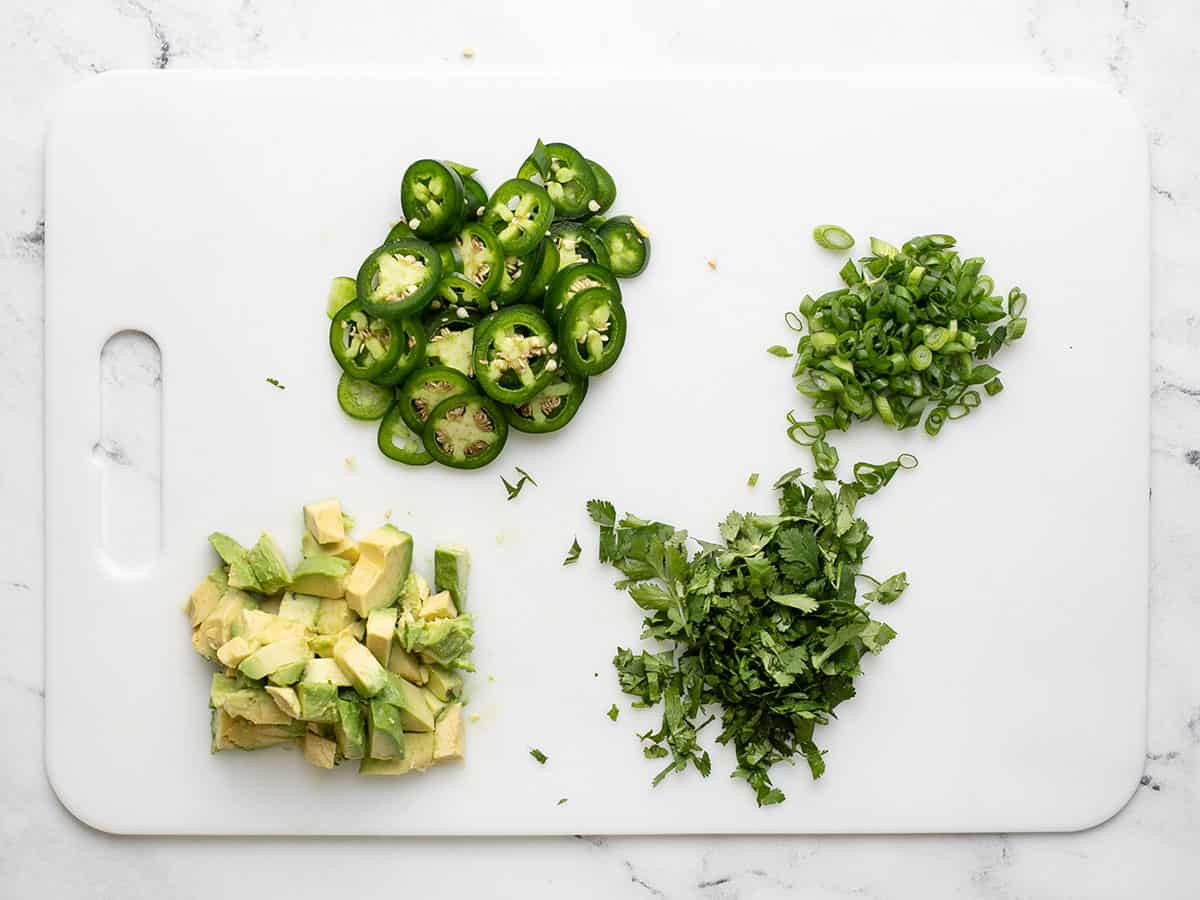
Slice the jalapeño and two green onions. Chop the cilantro. Dice the avocado and drizzle lime juice over it to keep it from browning.
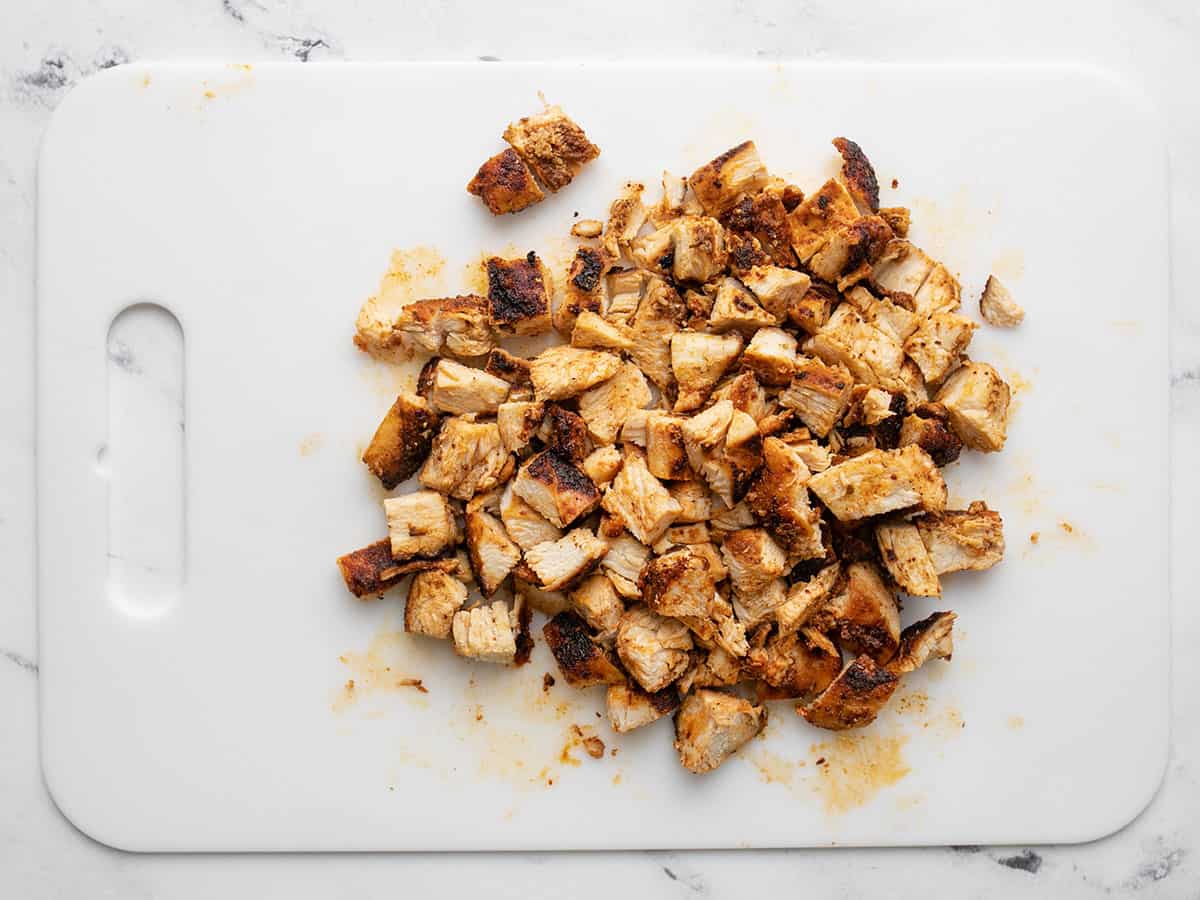
When your chicken has reached an internal temperature of 165°F, remove it from the pan and let it rest for five minutes. Chop it into 1/2-inch pieces.
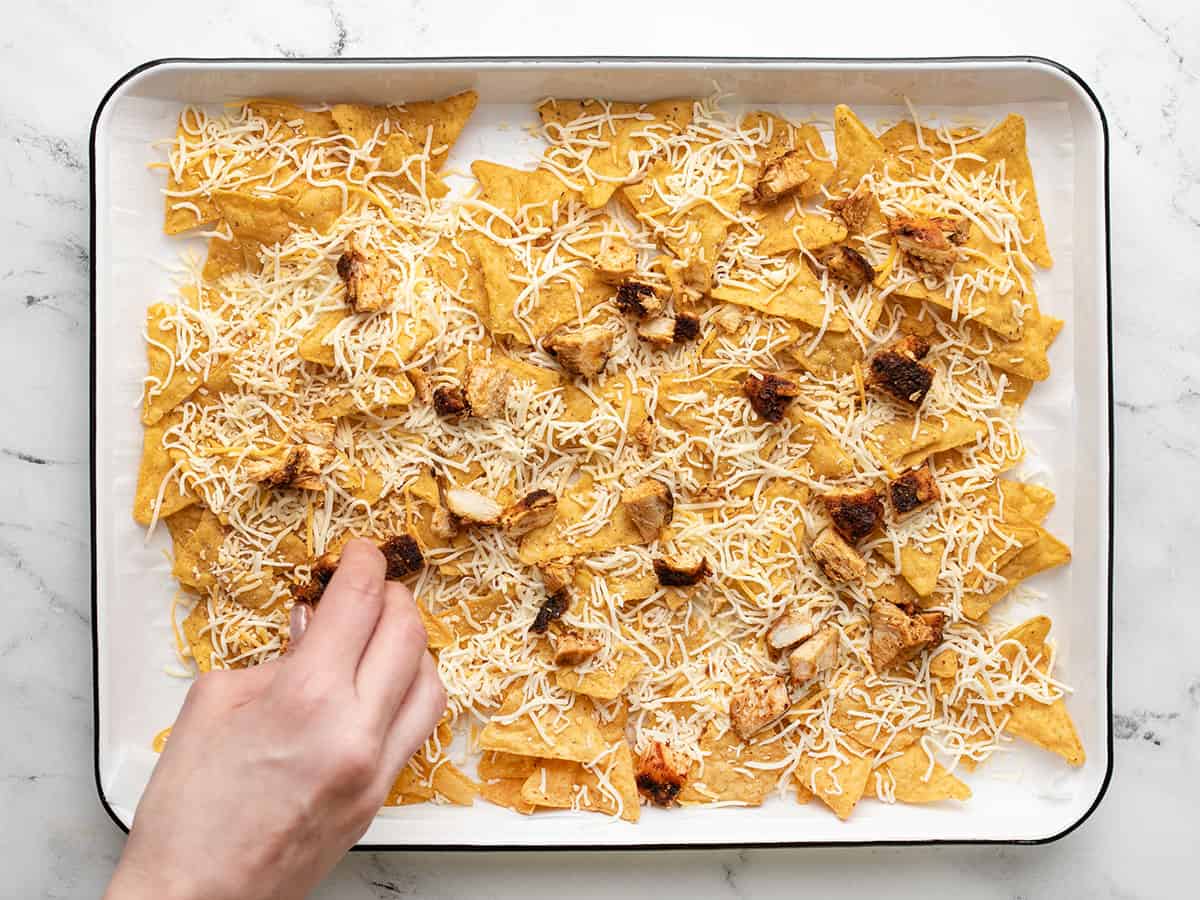
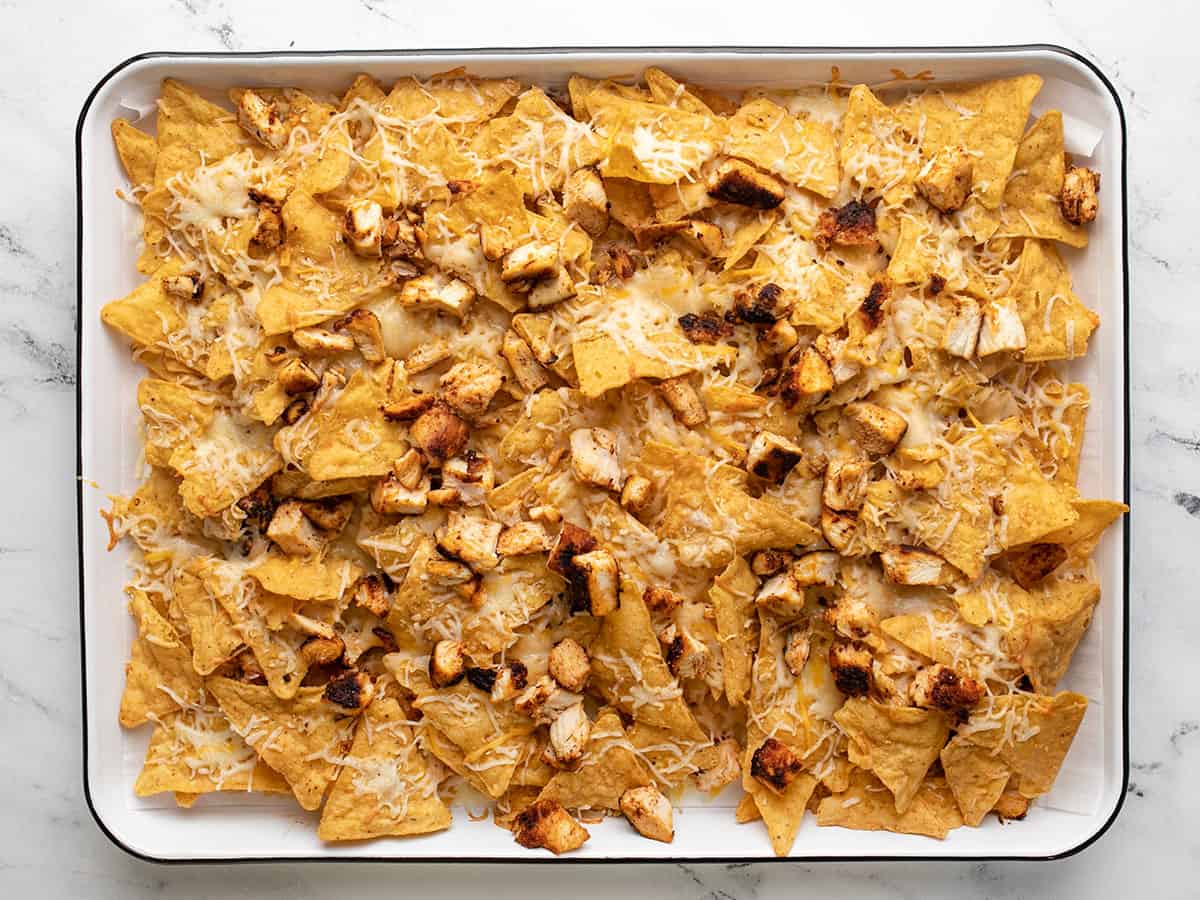
Line a sheet pan with parchment paper. Add half a bag of corn chips to the pan. Top with half of the shredded cheese and half of the chopped chicken.
Repeat the layering process with the remaining chips, cheese, and chicken. Bake at 400°F until the cheese melts, about 7 to 10 minutes.
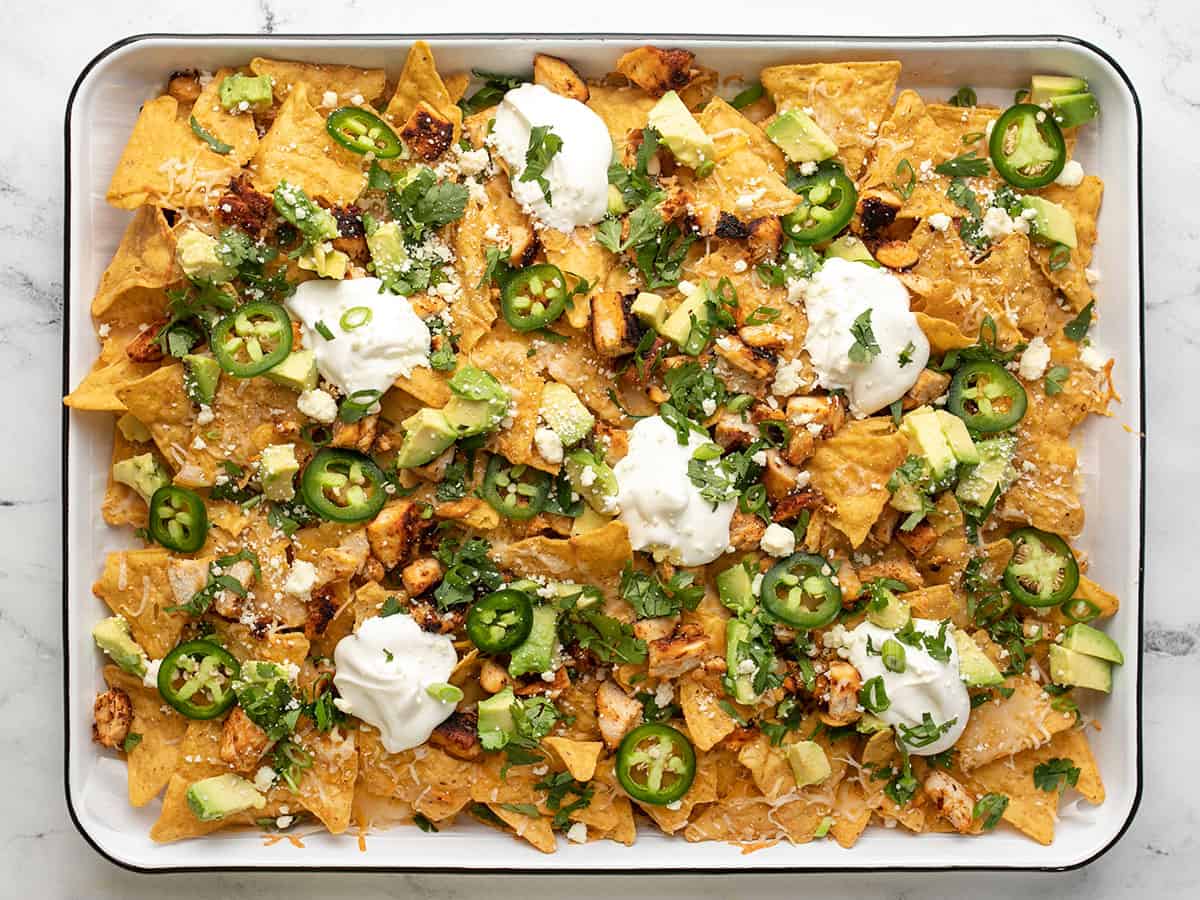
Sprinkle the nachos with the avocado, jalapeño, green onion, lime zest, and chopped cilantro. Finish with dollops of sour cream and sprinkle with crumbled queso fresco.
Add a rack to the center of your oven and preheat it to 400°F. To ensure your chicken cooks evenly, cover it with a sheet of plastic wrap, and pound it an inch thick with a heavy skillet. Season your breast liberally with 3 teaspoons of taco seasoning.
Place a heavy-bottomed skillet over medium-high heat. Add a tablespoon of oil. Once the oil is shimmering hot, add the breast. Cook for 5 minutes without moving it to create a thick sear. Then flip it and cook for a few minutes more, or until a thermometer reads 165°F.
Chop your fresh ingredients: slice one jalapeño, two green onions, a 1/2 cup of cilantro, and dice an avocado. As soon as you dice the avocado, drizzle it with the lime juice to prevent it from turning brown.
When your chicken has reached an internal temperature of 165°F, remove it from the pan and let it rest for five minutes before chopping it into 1/2-inch pieces.
Line a sheet pan with parchment paper. Then, add half a bag of corn chips to the pan. Next, top with 1 cup of shredded cheese. (If you prefer cheesier nachos, double the amount asked for in the recipe.) Sprinkle the chips with half of the chopped chicken breast.
Next, repeat the layering process with the remaining chips, cheese, and chicken. Bake at 400°F until the cheese melts, about 7 to 10 minutes.
Sprinkle the nachos with the diced avocado, sliced jalapeño, 2 sliced green onions, lime zest, and 1/2 cup of chopped cilantro. Finish with dollops of the 1/2 cup of sour cream and sprinkle with 2 tablespoons of crumbled queso fresco. Finally, serve the whole sheet pan of nachos like a party platter and snack on! Ugh. I’m jealous. I want to have these again right now!