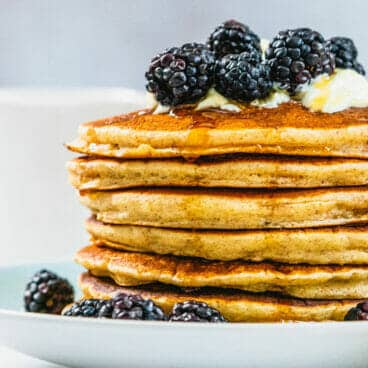
These healthy banana oatmeal pancakes are flourless and made in a blender for quick and easy breakfasts! Enjoy fluffy, satisfying pancakes packed with wholesome oats and natural sweetness.

Want a deliciously healthy breakfast idea that sticks with you all morning? Enter banana oatmeal pancakes! These tasty flapjacks blend up in minutes for a quick and satisfying breakfast. And get this: they’re flourless, made with the magic of Old Fashioned oats and a blender! They are so satisfying, no one will know they’re not “normal” pancakes. Every time we make them, we literally cannot stop eating them (our kids make them disappear in seconds). They’re basically like eating oatmeal and a banana, in pancake form!
Why make these banana oatmeal pancakes?
This banana oatmeal pancakes recipe is a combination between our fan favorite healthy banana muffins recipe and our oatmeal pancakes. Many pancake recipes made with all purpose flour leave us with a sugar crash and hungry an hour later. But these banana oatmeal pancakes are hearty, wholesome and one of our favorite ways to start the morning! What’s great about them?
- They’re made mainly of oats: no flour. This makes them 100% whole grain and naturally gluten free pancakes. You’ll find they stick with you: they’re filling and make your stomach feel full, not ready for a sugar crash! It’s basically like eating a bowl of oatmeal.
- They’re so easy to make! All you need is a blender and these pancakes come together in a breeze.
- They’ve got amazing flavor. Take one bite, and you’ll be a believer. We promise!

They’re easy to make: in a blender!
How to make pancakes easy? Simply whiz up everything in a blender and you’re ready to go! For some reason, using a blender seems easier than whisking everything together: maybe because there’s a little less mess? Then cook them up the same as a standard pancake.
The batter for these banana oatmeal pancakes is a slightly more delicate than a standard pancake since these oatmeal blender pancakes have no gluten. But they don’t require a lot of extra babying! It should feel essentially the same as a normal pancake when they’re on the griddle.
Variations on these banana oatmeal pancakes
Here are a few variations on these banana oatmeal pancakes:
- Dairy free: Use almond milk instead of standard milk, and neutral oil instead of butter. Try vegan yogurt for the yogurt, or you can just add the same amount of non-dairy milk.
- Vegan / plant based: Honestly, we’d recommend our Vegan Pancakes instead. But you can try using flax eggs in place of the egg! To learn more, go to How to make a flax egg.

How to step up these banana oatmeal pancakes
We love serving these banana oatmeal pancakes with just a drizzle of maple syrup! Of course it’s essential to be light-handed on toppings for a healthy pancake recipe, or it kind of negates the purpose of being healthier in the first place, right? Here are a few fun ways to dress up your gluten free banana oatmeal pancakes, with a healthy spin:
- Add fresh or frozen blueberries. Place them right onto the pancakes after you’ve poured them onto the griddle (don’t put them into the batter). They add the perfect tang!
- Serve with fancy syrup, like this homemade blueberry syrup.
- Serve with homemade jam, like our chai cherry jam, rhubarb jam (or compote), or cranberry jam.
- Sprinkle with toasted nuts, like toasted almonds, toasted pecans or toasted walnuts.
Love banana flavor? Our Healthy Banana Muffins or Healthy Banana Bread use the same method! Or browse our favorite banana recipes.

More great pancakes recipes
Want more pancakes recipes? We’ve got ’em! Try our original oatmeal pancakes and more:
- Try the original Best-Ever Oatmeal Pancakes
- Grab Vegan Banana Pancakes
- Opt for fluffy Greek Yogurt Pancakes or Sour Cream Pancakes
- Go for rich and tasty Peanut Butter Pancakes
- Test another flavor, Apple Cinnamon Pancakes


This banana oatmeal pancakes recipe is…
Vegetarian, gluten free, and dairy free. For vegan and plant-based, substitute a flax egg for the eggs or go to Vegan Banana Pancakes.
Print
Banana Oatmeal Pancakes (Flourless!)
-
 Prep Time: 10 minutes
 -
Cook Time: 10 minutes
-
Total Time: 20 minutes
-
 Yield: About 9 large or 12 small pancakes
Description
These deliciously easy banana oatmeal pancakes are made in a blender using oats and bananas: no flour! They’re delicious with a healthy spin. NOTE: Recipe updated 5/26/2021 to address reader comments.
Ingredients
- 2 cups Old Fashioned rolled oats
- ¼ cup plain or vanilla yogurt (Greek or whole milk work)
- 2 large eggs
- ½ cup milk of choice
- 2 tablespoons salted butter, melted (or grapeseed or olive oil)
- 2 tablespoons brown sugar (or maple syrup)
- 1 tablespoon vanilla extract
- 1 tablespoon baking powder
- ½ teaspoon kosher salt
- ¾ cup mashed very ripe bananas (about 2 medium)
Instructions
- Place the oats, Greek yogurt, eggs, milk, melted butter, brown sugar, vanilla, baking powder and kosher salt in a blender. Blend on high until a smooth batter forms.
- Mash the bananas, then stir them into the blender with a spatula.
- Lightly grease a skillet with butter and wipe off extra grease with a paper towel. Heat the skillet over low heat. Add a few more tablespoons milk to the batter until it is still thick but can pour out of the blender. Pour the batter into small circles. Cook the pancakes until the bubbles pop on the top and the bottoms are golden: low and slow is the key! Then flip them and cook until golden on the other side.
- Add another tablespoon or two of milk to the remaining batter and stir so that it is pourable. Cook the remaining batter, adjusting the heat as necessary (the skillet can get very hot on the second batch). Place the cooked pancakes under an inverted bowl to keep them warm. Serve immediately with maple syrup.
 Category: Brunch
 Method: Stovetop
 Cuisine: American
Keywords: Banana Oatmeal Pancakes