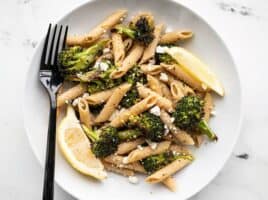
I am OBSESSED with zucchini. I love the green vegetable and I LOVE creating zucchini recipes. Have you seen my collection of zucchini recipes? There are sweet and savory recipes, something for everyone. I love all of these zucchini recipes and try to m…
I am OBSESSED with zucchini. I love the green vegetable and I LOVE creating zucchini recipes. Have you seen my collection of zucchini recipes? There are sweet and savory recipes, something for everyone. I love all of these zucchini recipes and try to make them every summer when the garden zucchini is out of control.…
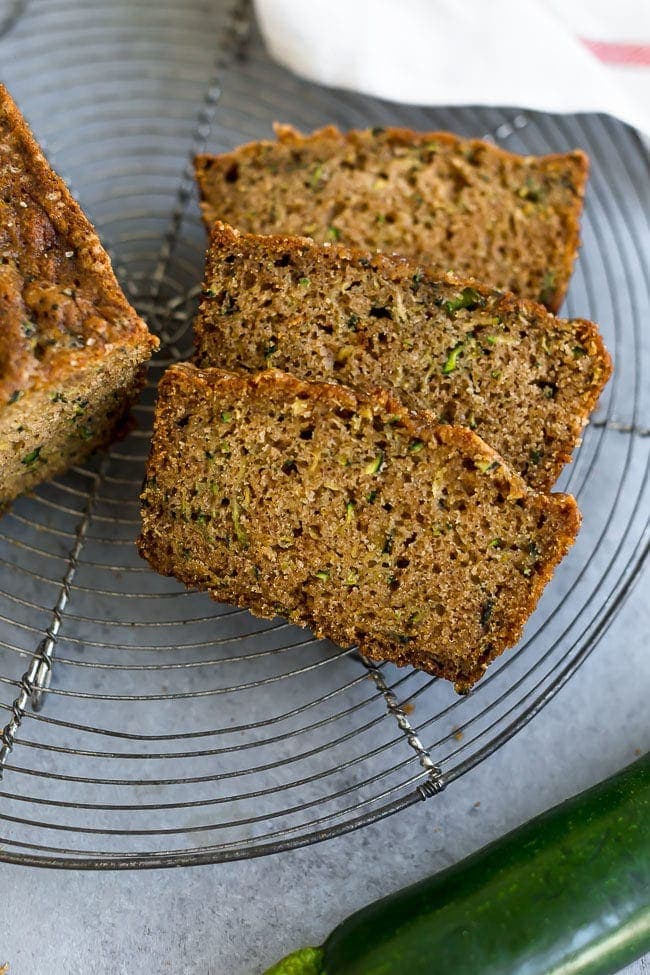
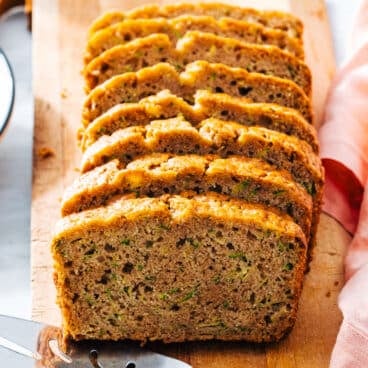
This chocolate zucchini bread recipe really is the best: moist, rich, and chocolaty, generously sprinkled with chips. A family favorite!
There are tasty recipes and then there are family favorites, and this one will make you a legend in your circles: Chocolate Zucchini Bread! It’s beautifully moist, dark chocolaty and sprinkled with a generous helping of chips, making pools of melty chocolate if it’s warm and satisfying chunks when it’s cooled. We’re picky when it comes to chocolate breads and this one is truly sublime. It’s got just the right rich flavor and works as a snack or a dessert: top it with whipped cream for a true delight! Here are all our secrets.
Ingredients in chocolate zucchini bread
This chocolate zucchini bread recipe will wow your friends and family: at least it did for us! We recently visited family in Alaska and enjoyed it at a cookout with a sea view. Afterwards everyone asked for the recipe, solidifying it as “the chocolate zucchini bread.” There are a few things that are essential to the big flavor: Dutch process cocoa powder makes the best deep chocolaty flavor, and a mixture of butter and oil makes the best moist, even crumb. Here are the ingredients you’ll need:
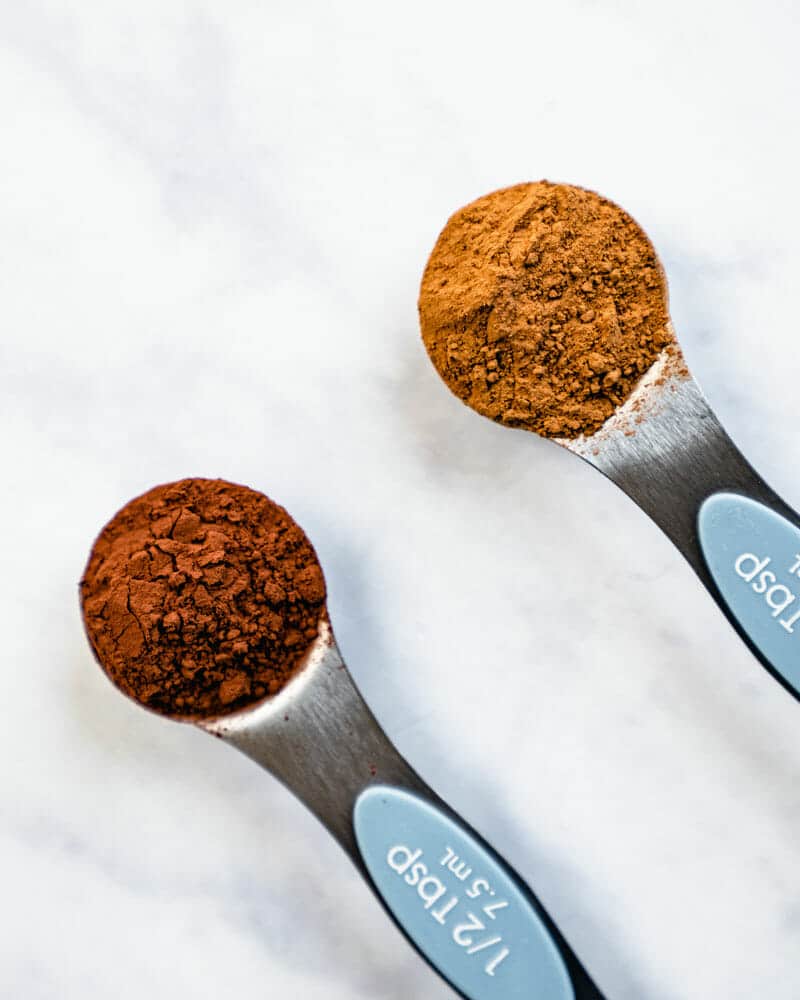
Dutch process (dark) cocoa powder really is essential for the flavor in this recipe! This special type of cocoa powder is treated with an alkali to make it pH neutral, which gives it a darker color and milder flavor. This makes the flavor ultra chocolaty, with deep rich notes versus lighter fruity notes that you’ll get with regular cocoa powder.
Chocolate zucchini bread is simple to whip up, but there are a few keys to success here. When we made it in Alaska my sister used a ceramic pan, which ended up with a drier result than when using an aluminum pan. Here are a few notes to keep in mind:
Use an aluminum baking pan for best results. Ceramic and glass pans don’t cook as evenly and can result in a drier, cakier bread. Use aluminum if you can! We recommend a 9-inch loaf pan, but you can use an 8-inch pan too: just increase the bake time slightly.
Don’t overmix! This is extremely important with a quick bread. Overmixing the batter can cause holes in the texture of the crumb. Mix until the batter is combined and there are no dry spots remaining.
Don’t overbake. Overbaking makes for a dry bread. Pull the bread just when a toothpick comes out clean, about 60 to 65 minutes. The internal temperature should be between 200°F and 205°F.
A few special notes on cooling
Topping chocolate zucchini bread with chocolate chips makes for a nice look. However, there is a drawback: the chips take quite a while to cool and re-solidify. You’ll want to allow 2 to 3 hours for the bread to cool in the pan, and even then sometimes the chips aren’t fully solidified. This is important because when you remove the bread from the pan, the warm chips can get very messy.
If you’d like, you can omit the chocolate chips from the top. This allows you to remove it from the pan sooner and you can eat it warm! Otherwise, cool it in the pan for 2 to 3 hours before attempting to remove it. Don’t want to wait? Turn it into chocolate zucchini muffins instead!
Variation: make it into muffins!
Want a variation on this recipe? Turn it into muffins! They bake in only 20 minutes and take only about an hour to cool. To make chocolate zucchini bread muffins, simply do the following:
Add 1 tablespoon milk to the batter.
Divide the batter into 2 muffin cups and top with the remaining chocolate chips.
Bake for 20 to 26 minutes at 375°F.
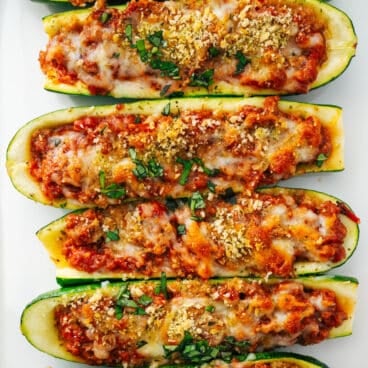
More zucchini bread and muffins
There are so many ways to mix up zucchini bread! This chocolate zucchini bread is our absolute favorite, but a close second is lemon zucchini bread: it’s zingy and bright! It’s the exact opposite of this bread but nearly as satisfying. Here are a few more zucchini recipes:
½ cup Dutch-process (aka dark) cocoa powder (no substitutes!*)
2 cups large grated zucchini (about 12 ounces or 2 medium zucchini), packed
1 cup semi sweet chocolate chips
Instructions
Preheat the oven to 350°F. Butter a 9×5-inch aluminum loaf pan.
Melt the butter, then whisk in the oil, brown sugar, granulated sugar, eggs, vanilla, baking powder, baking soda, and salt.
Use a spatula to mix in the flour, cocoa powder and zucchini until a thick smooth batter forms, mixing just until there are no longer streaks of dry ingredients. Fold in ¾ cup chocolate chips, mixing gently a few times.
Pour the batter into the loaf pan. Top with the remaining ¼ cup chocolate chips*.
Bake 60 to 65 minutes until the top is set (a toothpick inserted should have only a few clinging crumbs, but it’s hard to tell with the chocolate chips since they can melt onto the toothpick!). Cool in the pan until room temperature and the chocolate chips start to firm up, about 2 to 3 hours. Then run a knife around the edge and invert the loaf onto a cooling rack. Serve warm or at room temperature. The bread keeps 3 days at room temperature wrapped in aluminum foil or up to 1 week refrigerated tightly wrapped. You can also freeze for up to 3 months.
**If you’d like, you can omit the chocolate chips from the top. This allows you to remove the bread from the pan sooner and you can eat it warm! Otherwise, cool it in the pan for 2 to 3 hours before attempting to remove it. This is important because when you remove the bread from the pan, the warm chips can get very messy.
This zucchini fritters recipe comes out crispy and golden: a great way to use this green vegetable! Dip or slather with sauce and enjoy.
Got zucchini? Here’s a great recipe for using up this tasty summer vegetable: Zucchini Fritters! These savory pancakes are seasoned with herbs and Parmesan cheese, then fried up in a skillet until golden brown. Eat them salty and warm, dunked in a creamy dipping sauce like tzatziki or remoulade. They make the best fun appetizer or a tasty simple dinner, paired with a few summer salads. They disappeared in a flash over here!
Ingredients in zucchini fritters
A fritter is a food where vegetables, fruit, meat, or seafood are dipped into batter and fried. Fritters are eaten in cuisines around the world, and they can be sweet or savory. Zucchini fritters are commonly eaten in the summer when zucchini is abundant. You can deep fry them, but we’ve found it’s easiest to pan fry them in a bit of olive oil. They come out salty and golden brown! Here’s what you’ll need:
Zucchini
Egg
Garlic
Flour
Parmesan cheese
Dried dill, onion powder, salt, and pepper
Baking powder
Olive oil, for frying
The trick to zucchini fritters
Here’s the thing about zucchini: it’s full of water (in fact, zucchini is 94% water). Add too much water to a fritter, and it comes out gloppy and soggy! So you’ll need to use a trick for zucchini fritters:
Shred the zucchini, add salt, and wait 10 minutes. The salt helps to pull moisture from the zucchini. It also helps to season the shreds, making for better flavor.
Then, squeeze all moisture from the zucchini. First ring it out using your hands, then finish it up by squeezing with a paper towel or clean dish towel.
Tips for frying
If you’ve never fried fritters before, it does take a little practice! Just like making pancakes, the first fritter might not turn out perfectly: and that’s expected. Here are a few tips for this recipe to get your zucchini fritters crisped and golden brown:
Add just enough oil to cover the bottom of the pan. The zucchini fritters are pretty thin, so you can get away with a moderate amount of oil.
The timing depends on the heat of the oil. All stoves and pans are different, so the timing varies. Cook until just golden on each side. It will likely take about 2 to 3 minutes, but you can judge by eye versus setting a timer.
Replenish the oil for the second batch, and keep in mind the pan will be hotter. The fritters will cook differently for the next batch since the pan is already very hot. Add a drizzle more oil as needed.
Remove the fritters to a paper-towel lined plate and taste. If you’d like, you can sprinkle with a little extra salt before serving.
Sauces for zucchini fritters
Zucchini fritters are great as is, but they’re even tastier when dipped or slathered in a creamy dipping sauce. There are lots of options here! Our favorite is tzatziki, that creamy Greek yogurt cucumber sauce. But there are many more ideas! Here are a few:
Tzatziki: This Greek yogurt cucumber sauce is perfect for dipping
Remoulade: Remoulade is mayonnaise-based, so it’s a little richer and has a developed flavor
Avocado Sauce: Creamy and zingy, it stars ripe avocado, Greek yogurt and cilantro
Sour Cream Sauce: A sour cream base makes this sauce irresistibly rich and creamy
And that’s it! Let us know what you think of these zucchini fritters in the comments below. Here are a few more zucchini recipes for using this tasty summer vegetable:
Grate the zucchini using the large holes on a grater. Place it in a bowl and sprinkle with ½ teaspoon kosher salt. Allow it to stand at room temperature for 10 minutes while you prep the other ingredients. Then squeeze out all the moisture with your hands in batches, and use a paper towel or clean dish towel to squeeze out all extra moisture.
In a small bowl, whisk the egg, then add the grated garlic. In a large bowl, whisk the all-purpose flour, grate Parmesan cheese, dried dill, onion powder, baking powder, and remaining ½ teaspoon plus 1 large pinch kosher salt. Add the zucchini and egg mixture and gently mix with a spatula until a sticky dough comes together.
Heat a large non-stick skillet over medium heat. Add enough olive oil to coat the bottom of the skillet by about 1/8-inch (about 2 tablespoons to start). Add the patties by dropping them from ¼ cup measure, then spreading them slightly thinner with the back of the measuring cup. Fry the patties in batches that fit the skillet, about 2 to 3 minutes per side until golden. Add a drizzle more olive oil when necessary. Make sure the heat is not too high or the fritters will become browned on the outside but stay gooey in the middle.
Remove each fritter and place it on a plate lined with a paper towel to drain excess oil. Eat immediately; the fritters taste best the day they are made. Leftovers store refrigerated up to 2 days; reheat in a skillet.
During the hot summer months I make A LOT of salads. Pasta salad, fruit salad, quinoa salad, potato salad, lentil salad, chickpea salad, and many more. I love using summer’s freshest produce in my salads. This Grilled Corn & Zucchini Salad is…
During the hot summer months I make A LOT of salads. Pasta salad, fruit salad, quinoa salad, potato salad, lentil salad, chickpea salad, and many more. I love using summer’s freshest produce in my salads. This Grilled Corn & Zucchini Salad is one of my favorites because it uses fresh sweet corn and summer’s most…
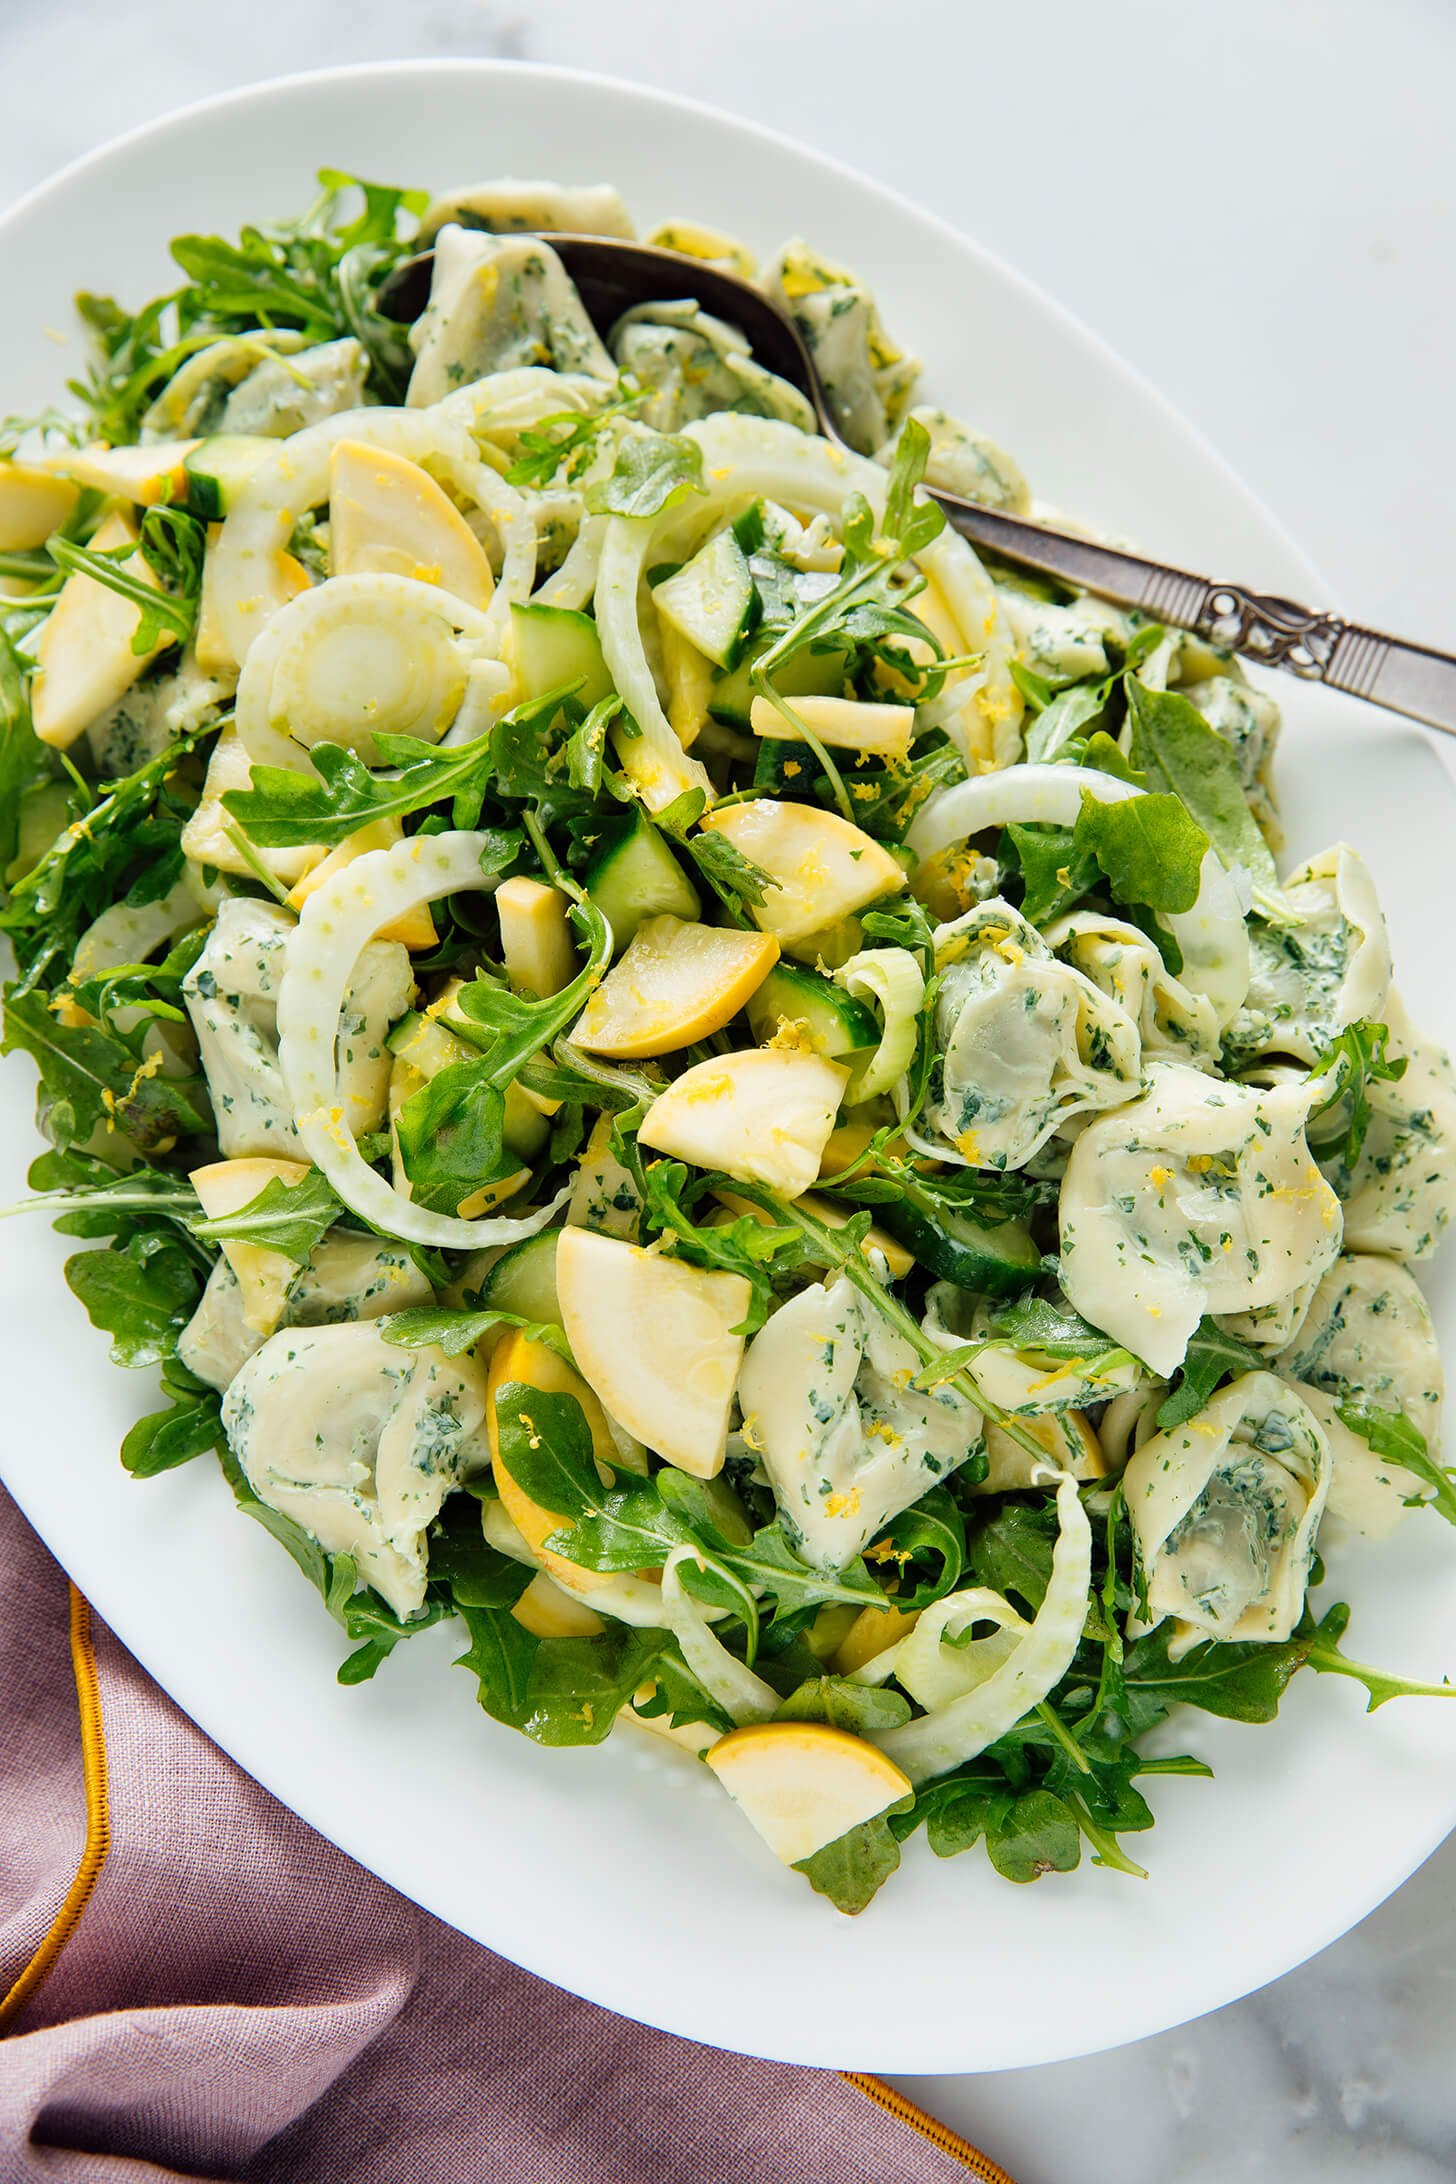
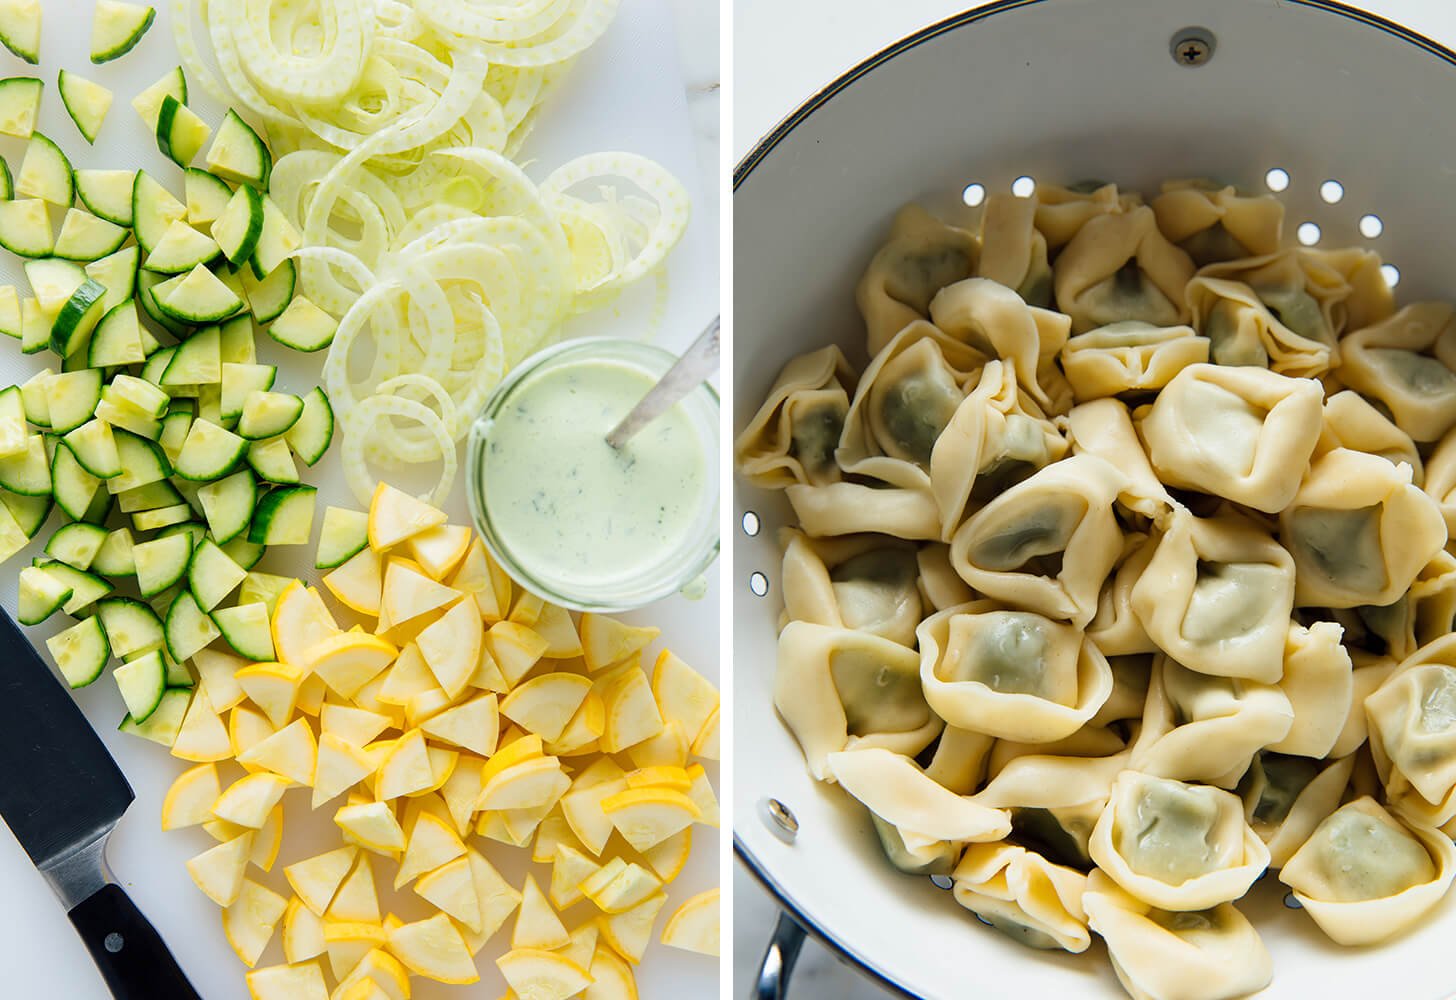
Add this fresh tortellini salad recipe to your weekend menu, stat! It features cheesy spinach tortellini tossed in my all-time favorite green goddess dressing, layered with lemony…
Add this fresh tortellini salad recipe to your weekend menu, stat! It features cheesy spinach tortellini tossed in my all-time favorite green goddess dressing, layered with lemony fresh greens and seasoned spring or summer vegetables.
This pasta dish manages to be light yet hearty at the same time, which is a real feat. It’s quick to make, but looks impressive. It’s versatile, too—you’ll see quite a few vegetable options below. Choose raw vegetables for the simplest preparation, as I did for these photos, or incorporate some quickly blanched vegetables, like asparagus, to expand your options.
My healthy homemade green goddess dressing comes together quickly in the blender or food processor. I suggest doubling the ingredients so you can serve the extra as a veggie dip or refrigerate it for upcoming green salads. It’s really delightful to have on hand.
Choose spinach tortellini over basic cheese tortellini to incorporate even more greens. I hope you’ll give this recipe a try. This vegetarian pasta salad is a real crowd pleaser!
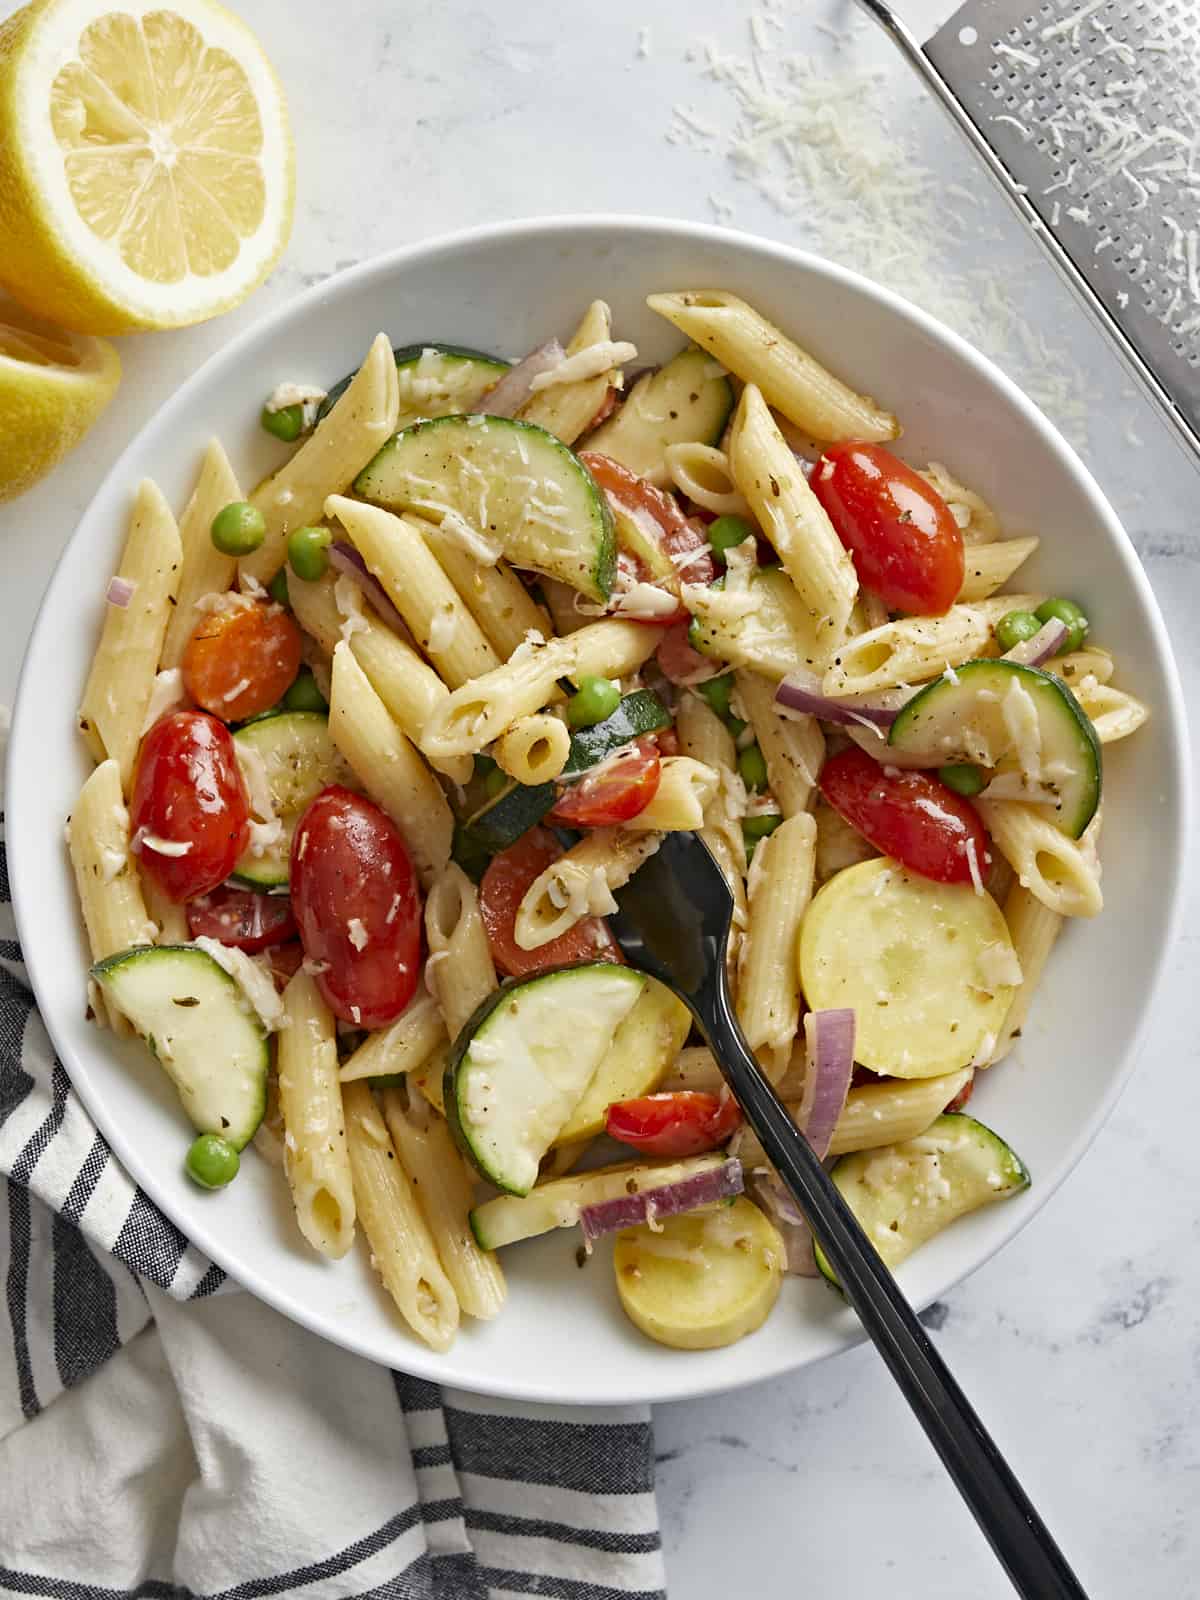
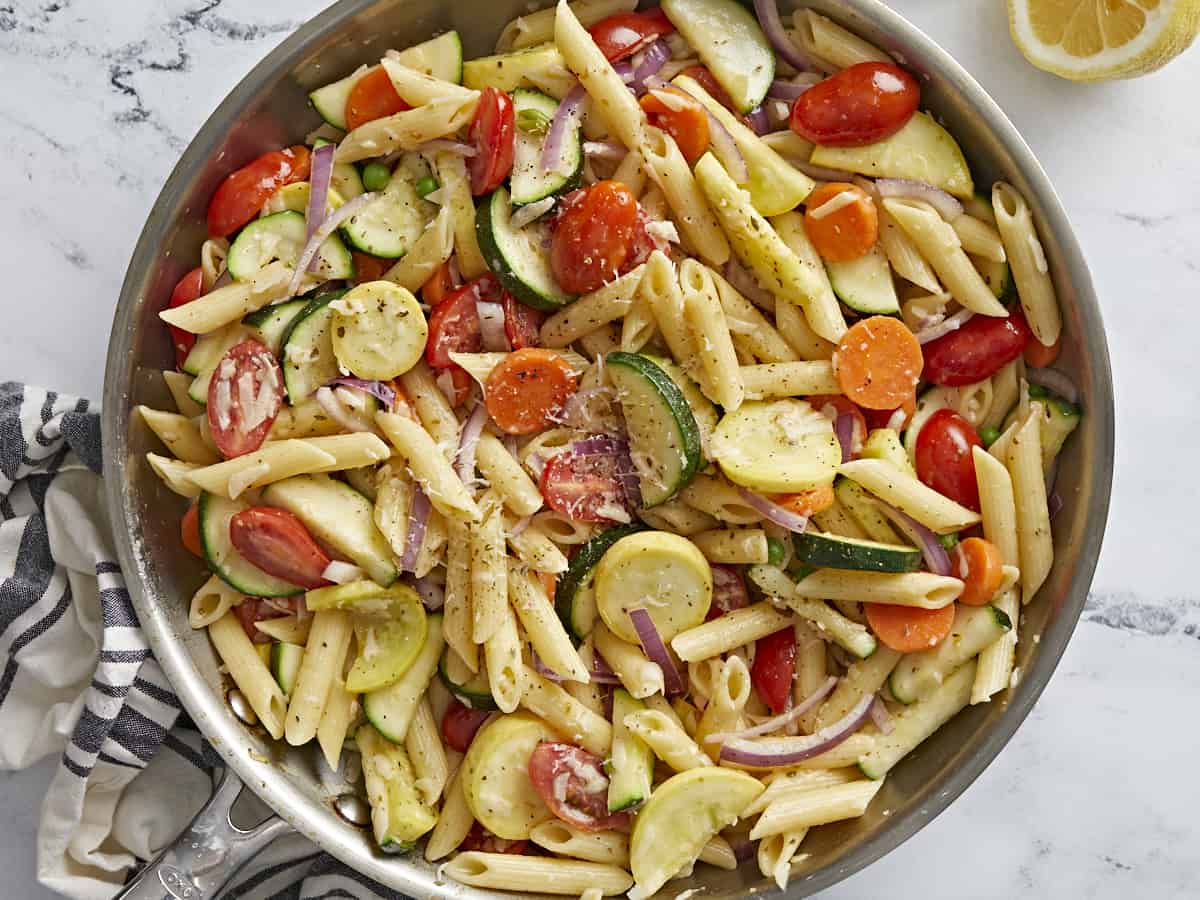
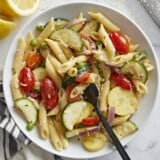
For me nothing says Spring quite like a big serving of Pasta Primavera! This dish is full of fresh seasonal vegetables tossed with pasta in a light lemon and butter sauce. Now I know I’m not the only one who struggles getting their daily veggies, which is why I love this recipe. It incorporates lots of colorful vegetables, is simple to toss together and the leftovers are just as good the next day!
Pasta Primavera
Although the name Primavera stands for “Spring” in Italian, Pasta Primavera is actually a popular American dish that was first introduced in the 1970s. It includes lots of fresh Spring and Summer vegetables that are sauteed and tossed with pasta in a light cream sauce. In this recipe we opted for a fresh lemon and butter sauce.
Ingredients for Pasta Primavera
Pasta Primavera is such a simple and fresh recipe, you’ll only need a few ingredients to make this impressive dish. Here are the ingredients you’ll need to make Pasta Primavera:
Pasta –Choose your favorite medium-sized pasta like penne, rotini or bow-tie pasta.
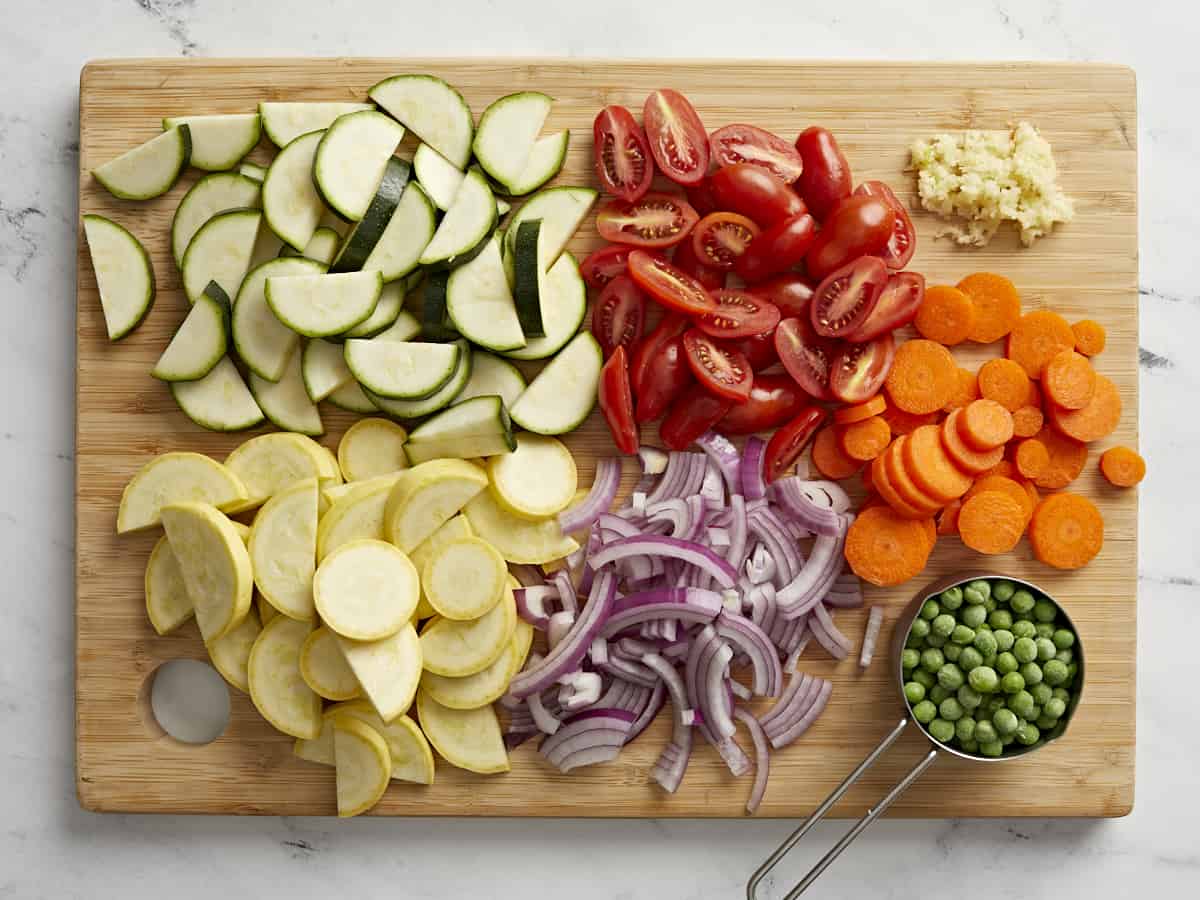
Lots of Veggies – The variety of fresh vegetables is what gives this pasta recipe lots of color, flavor and texture. Here we use a combination of Zucchini, Yellow Squash, Carrots, Grape Tomatoes, Red Onion and Peas.
Fresh Lemon Juice – The fresh lemon juice helps bring out the flavor of the vegetables.
Extra Virgin Olive Oil & Butter – Olive oil to saute the vegetables and a little bit of butter to help make the light sauce.
Salt, Pepper & Dried Oregano – A simple seasoning combination.
Parmesan Cheese – A little bit of fresh parmesan cheese added at the end helps finish the sauce.
Can I Use Different Vegetables?
Absolutely! Pasta Primavera is extremely versatile. You could mix and match with other vegetables like broccoli, mushrooms, asparagus, green beans or any fresh vegetables that are in season that will cook in relatively the same amount of time. This is also a great recipe to use up any leftover veggies that may be hanging out in your fridge to help reduce food waste in your kitchen.
What to Serve with Pasta Primavera
This Pasta Primavera is certainly hearty enough to eat on its own as a main dish, but you can also serve it with some of our favorites like:
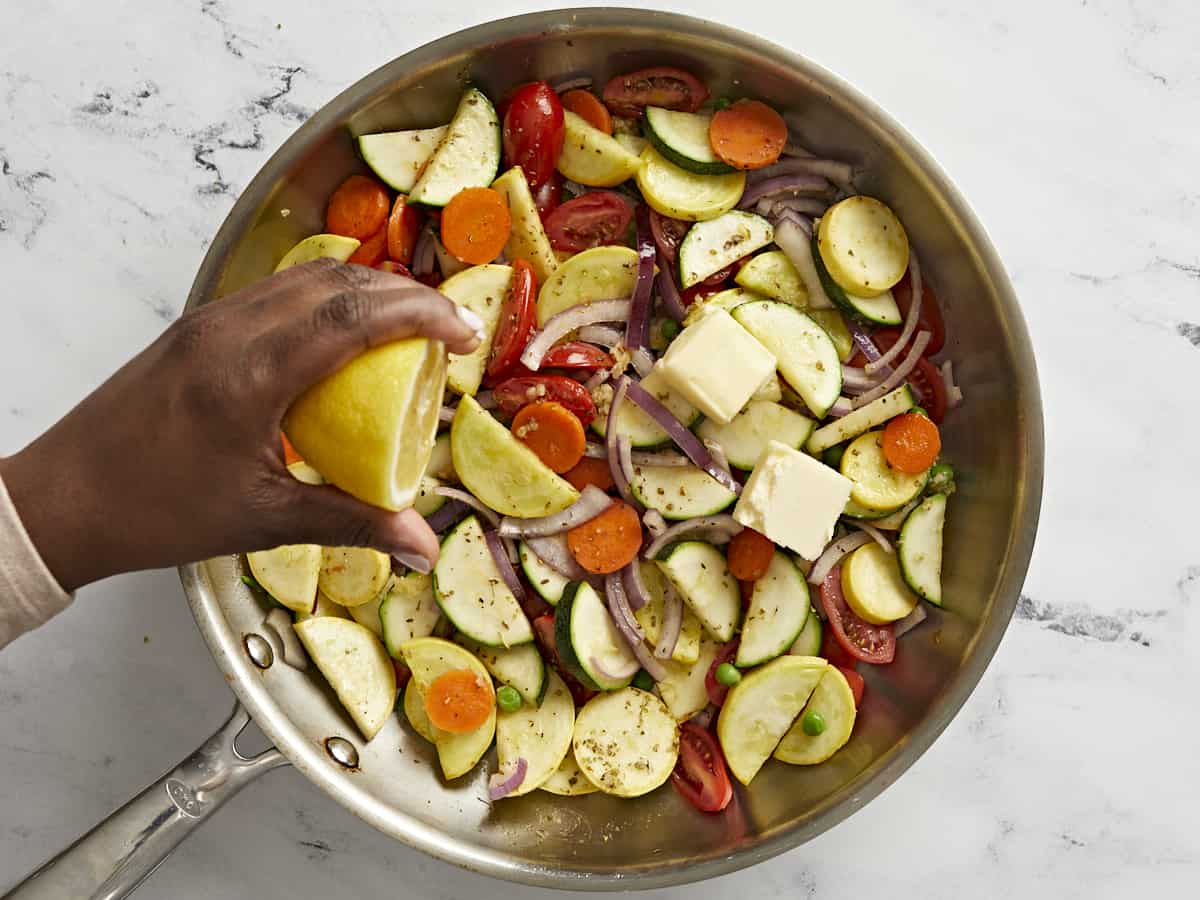
Start by prepping your vegetables. Wash the vegetables, then cut and slice each vegetable into equal size pieces. Cut the zucchini and yellow squash into half moons, slice the carrots into thin rounds, cut the grape tomatoes in half and slice the red onion into strips.
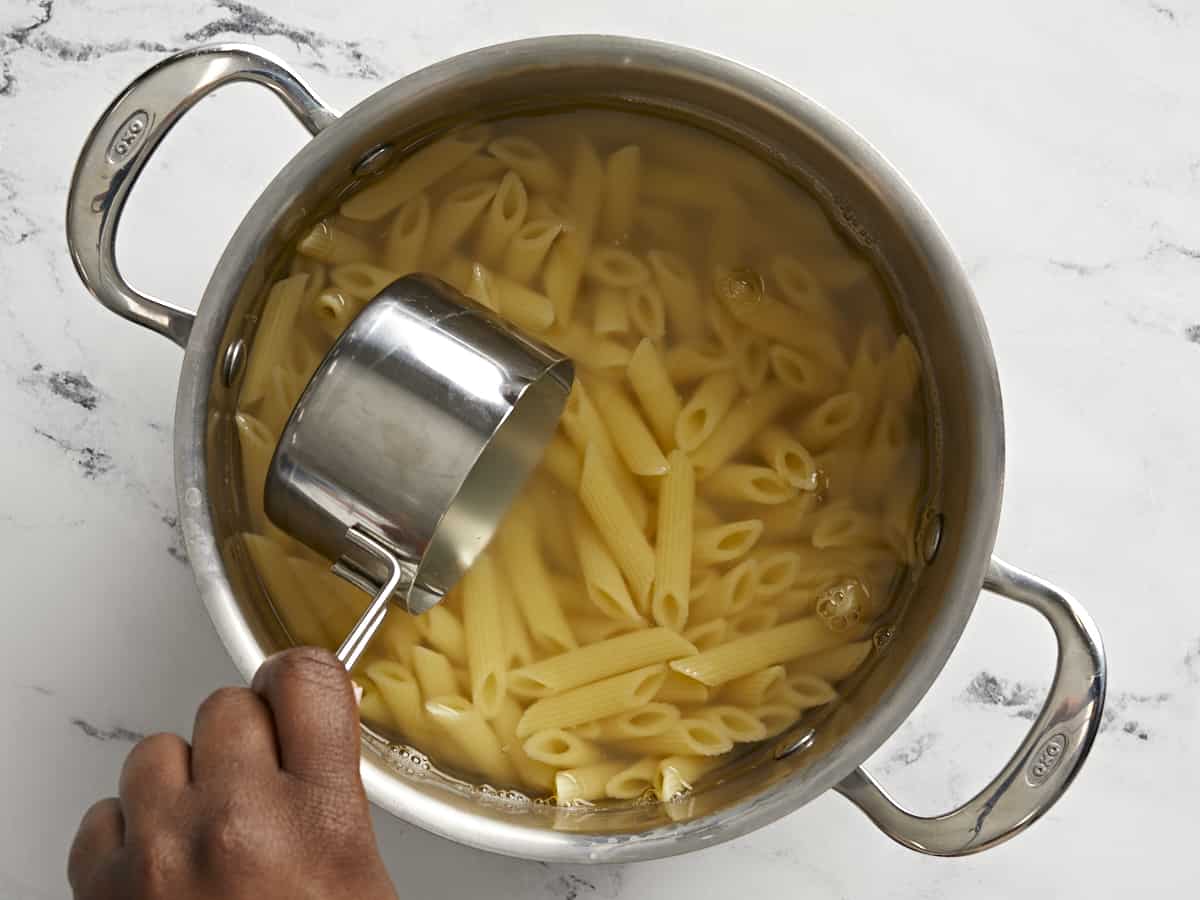
Next bring a large pot of salted water to a boil. Cook the pasta according to the package instructions, or until al dente. Reserve some of the starchy pasta water before draining the pasta in a colander.
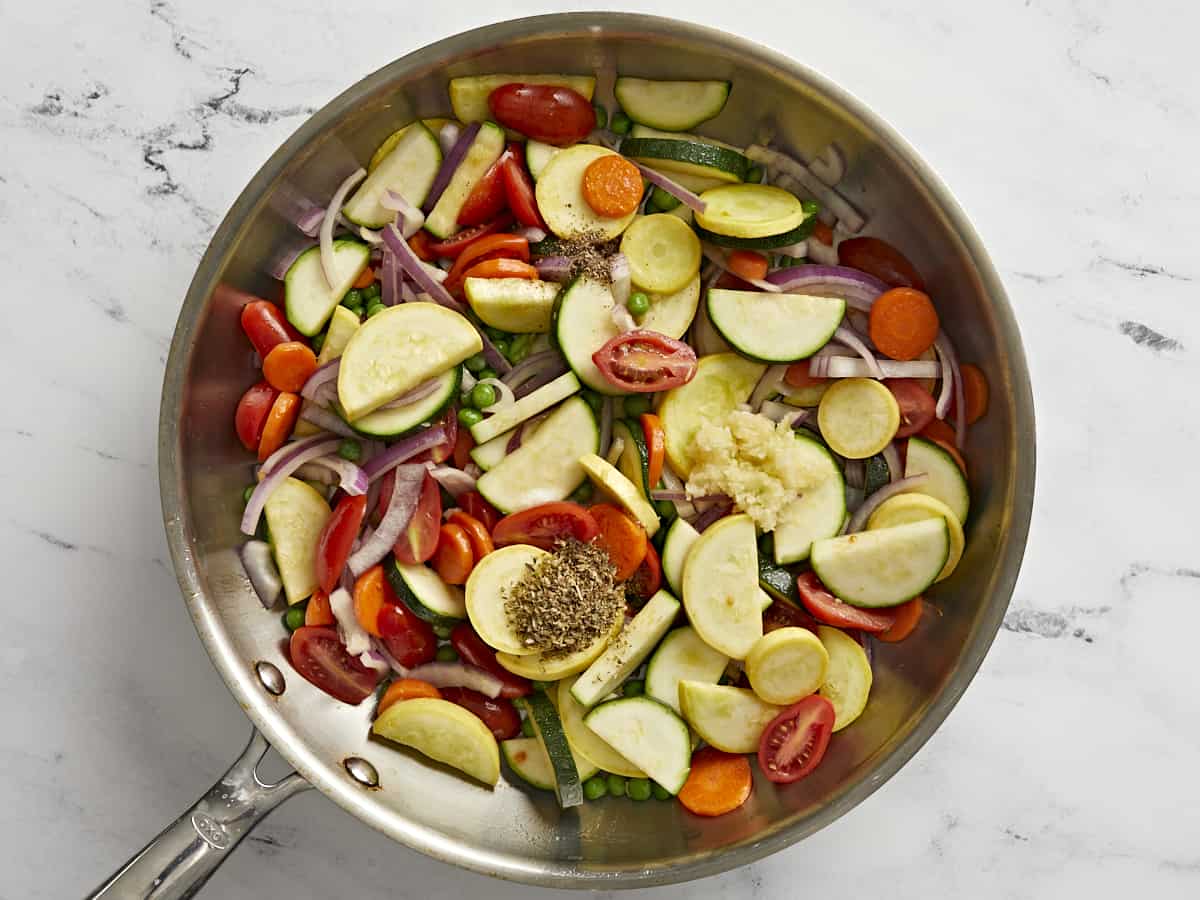
While the pasta is boiling, saute the vegetables. In a large deep skillet add olive oil and saute carrots and onion over medium heat for 1-2 minutes. Next add zucchini and yellow squash and saute for an additional 1-2 minutes.
Next add the minced garlic, grape tomatoes and frozen peas. Season the vegetables with salt, pepper and dried oregano. Saute for an additional 1-2 minutes, then turn the heat off.
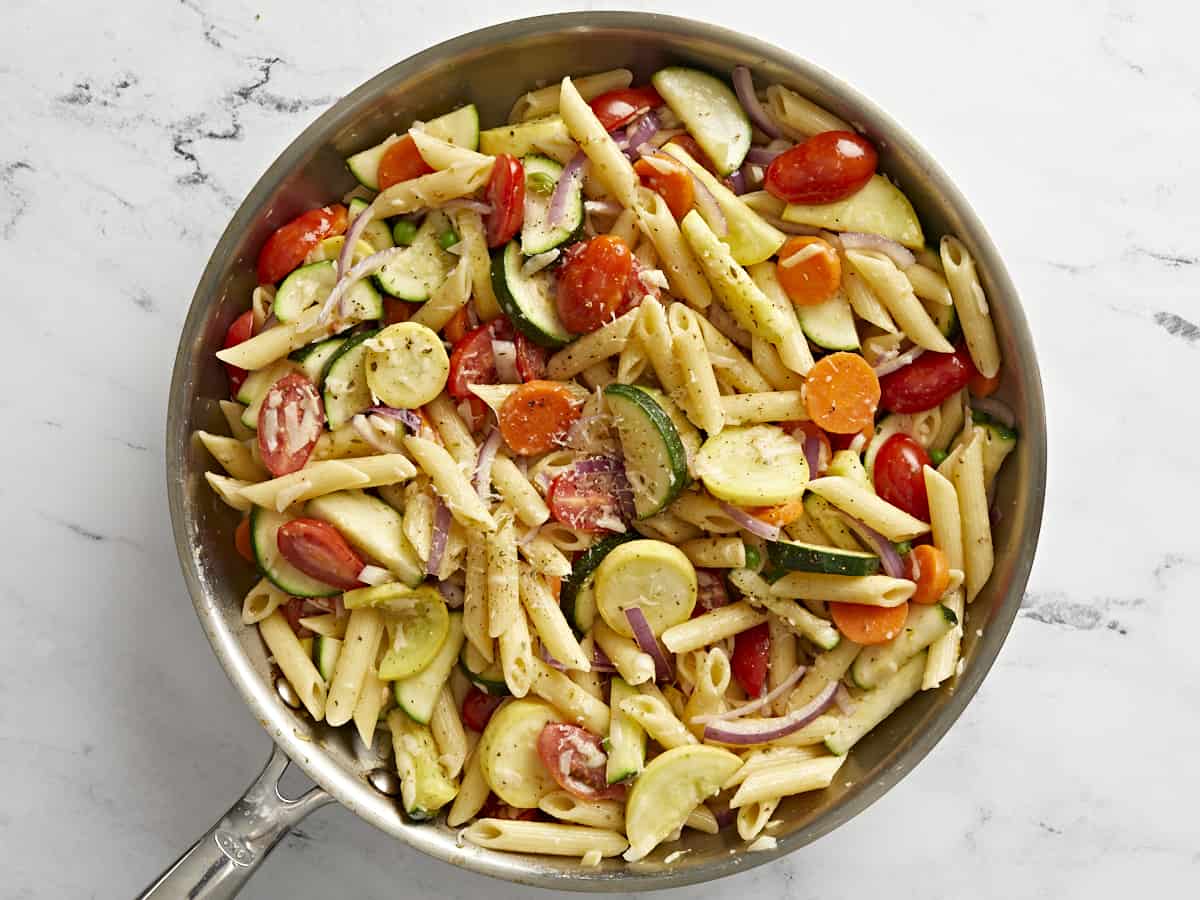
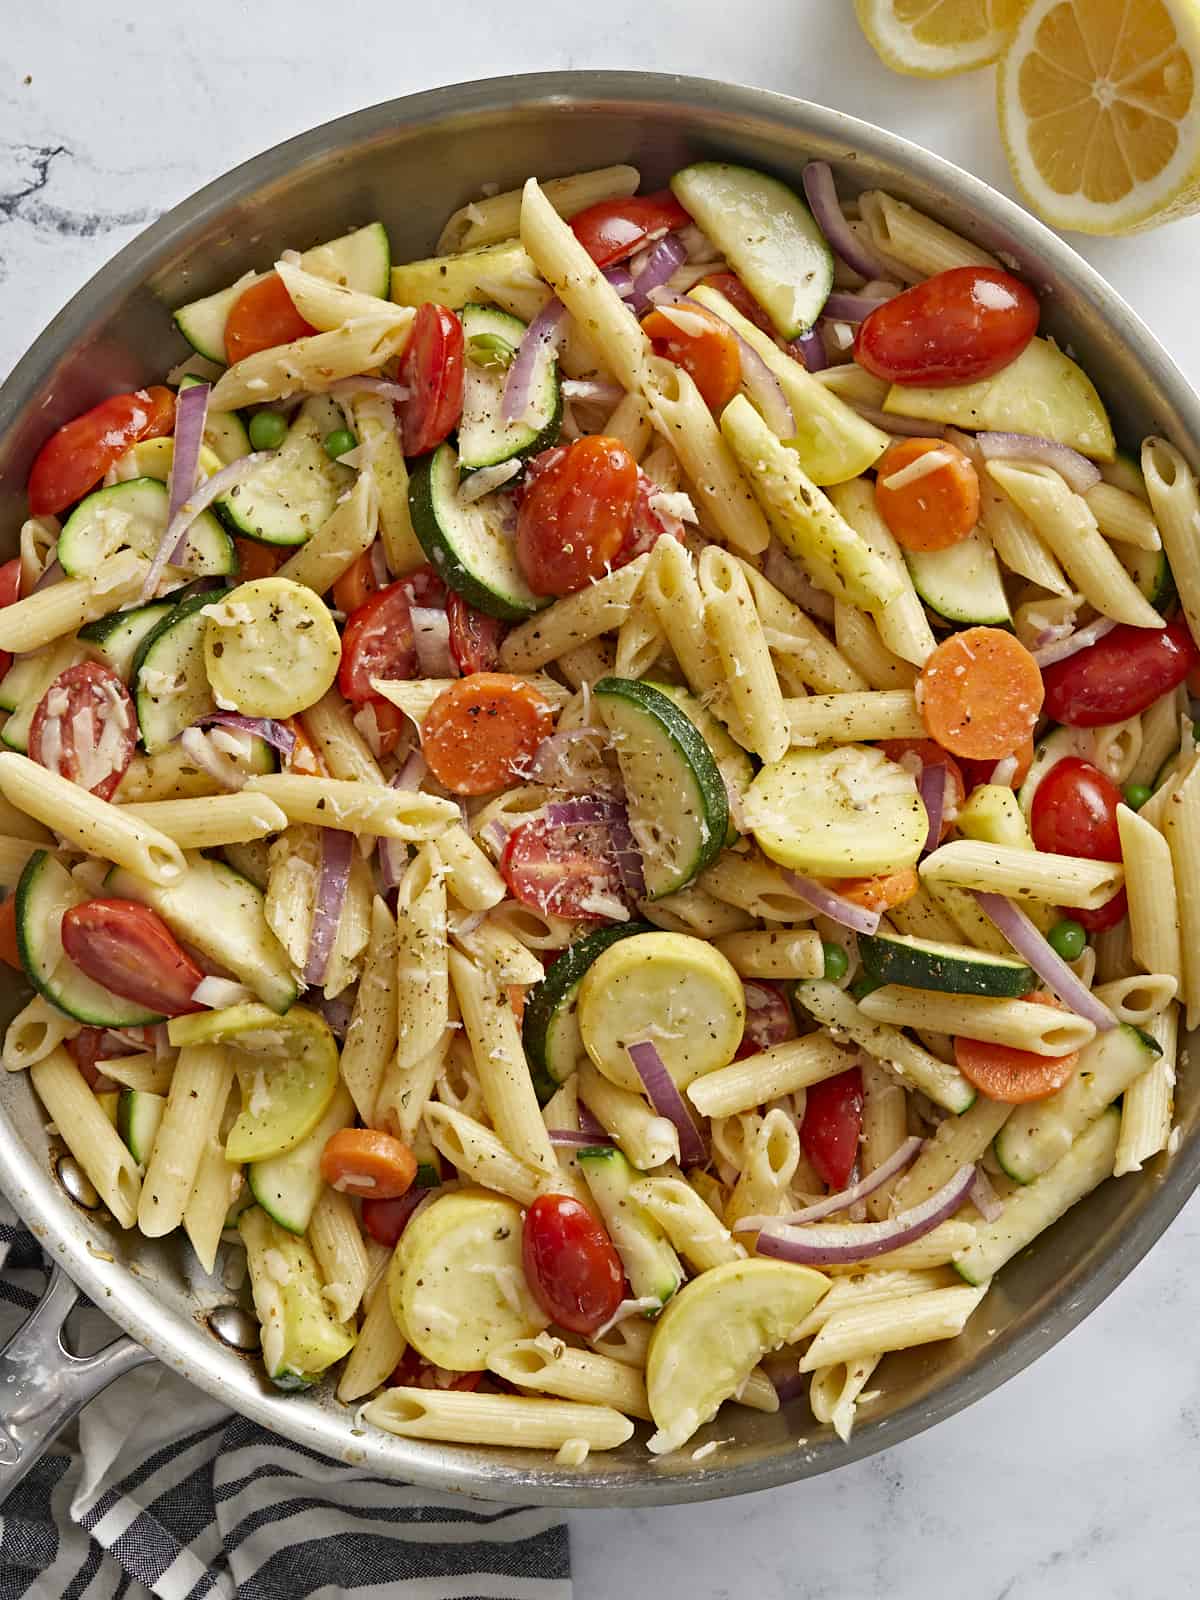
Add the butter to the skillet along with the fresh squeezed lemon juice and stir well to combine. Either add the cooked and drained pasta to the skillet, or transfer the pasta and vegetables to a large bowl. Add grated parmesan cheese and some of the reserved pasta water. Stir the vegetables with the pasta until well combined. Serve with fresh chopped parsley (optional garnish) and enjoy!
Start by prepping your vegetables. Wash the vegetables thoroughly then cut and slice each vegetable into equal size pieces. Cut the one zucchini and one yellow squash into half moons, slice one carrot into thin rounds, thinly slice half of a red onion, cut one cup of grape tomatoes in half, and mince three cloves of garlic.
Next bring a large pot of salted water to a boil. Cook pasta according to the package instructions to al dente. Reserve ½ cup of pasta water before draining the pasta in a colander. Transfer drained pasta to a large bowl.
While the pasta is boiling, start sautéeing the vegetables. In a large deep skillet add olive oil. Sauté carrots and onion over medium heat for 2 minutes. Next add zucchini and yellow squash and sauté for an additional 2 minutes. Now add the minced garlic, grape tomatoes and frozen peas. Season the vegetables with 1 tsp salt (or to taste), 1/2 tsp pepper and 1 tsp dried oregano. Sauté for an additional 1-2 minutes then turn your heat off.
Add 2 Tbsp butter to the skillet along with about 2 Tbsp fresh squeezed lemon juice. Stir the vegetables well to combine.
Either add the cooked and drained penne to the skillet and stir to combine with the vegetables or transfer both the pasta and vegetables to a large bowl. Add 1/2 cup grated or shredded parmesan cheese and about ¼ cup of the reserved pasta water. Stir until well combined. Add more of the reserved pasta water if needed to create a light sauce.
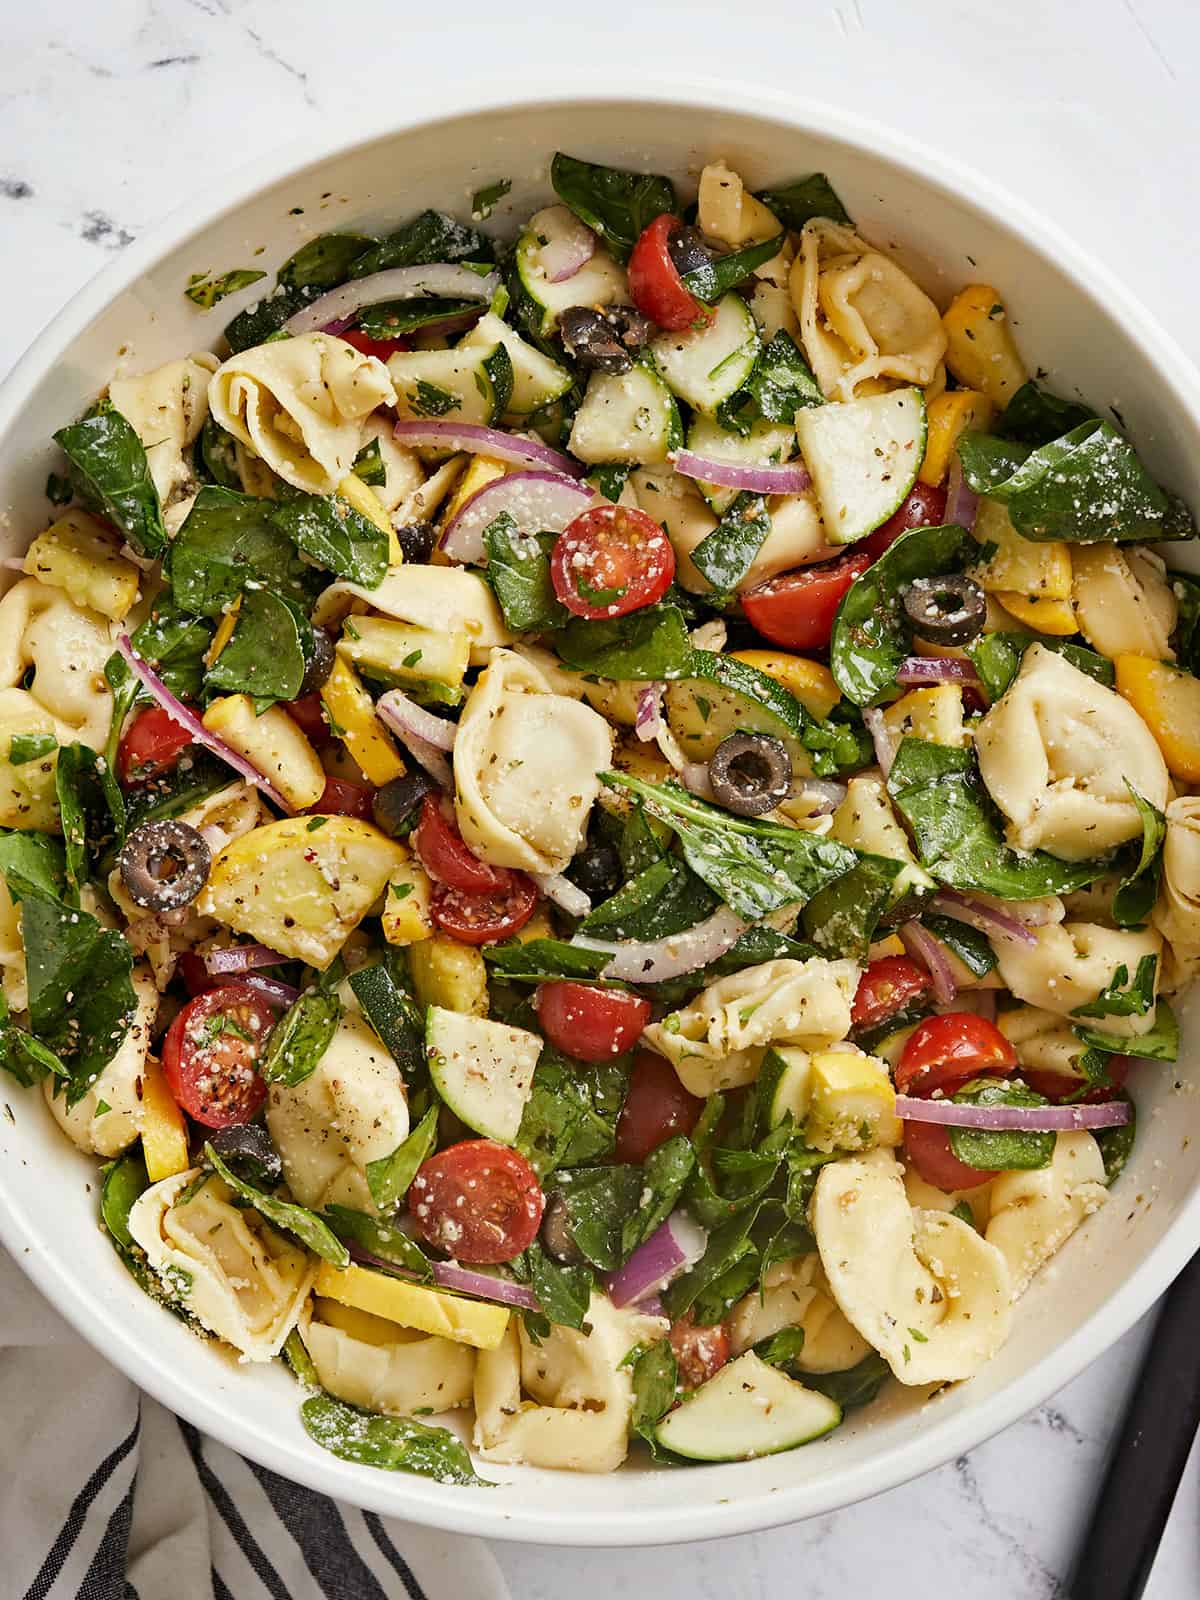
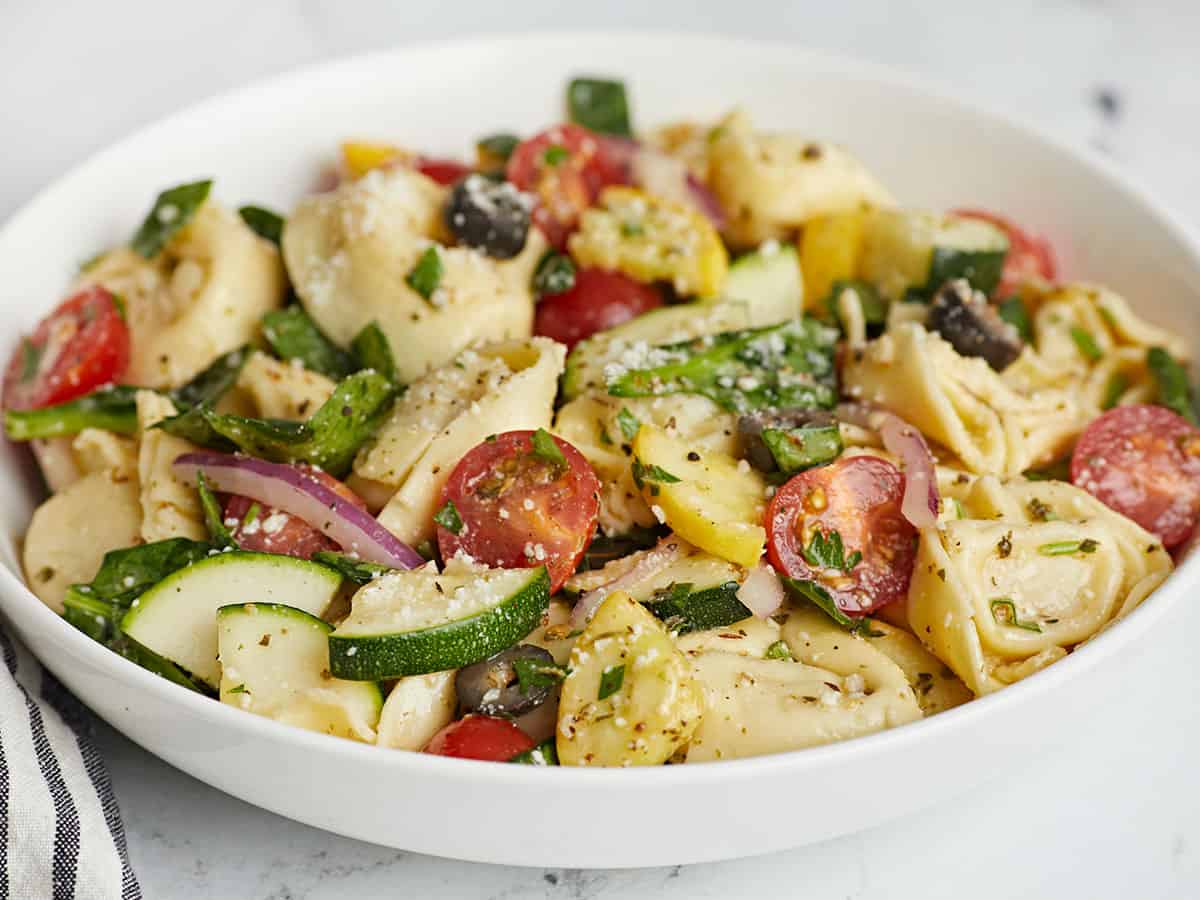
This fresh, vibrant, and utterly delicious Tortellini Salad feeds a crowd on a dime. My favorite part? It only takes a few minutes to put together. Plus, you can make it ahead of time and store it in the fridge for up to 3 days. Win! Win! Win! It’s perfect for picnics, potlucks, or a light lunch at home. Get ready to put this Tortellini Salad recipe on repeat!
What is Tortellini Salad?
Tortellini is a type of pasta stuffed with meat, vegetables, or cheese, then shaped into a small ring. To make the salad, the cooked and cooled tortellini is mixed with summer vegetables, herbs, greens, and a vinaigrette. Sometimes chopped cured meats or pickled peppers are added. For me, the pure joy of it is that it comes together in three steps, it’s super filling, and it’s a perfect choice for when you have an army to feed but don’t want to spend a lot of time in the kitchen.
Ingredients for Tortellini Salad
The pasta is the star here, and though you can use any kind of tortellini, we chose cheese tortellini to keep the flavor profile simple. Here’s what you need to make Tortellini Salad:
Tortellini– any kind will do. If you can’t access this ingredient, substitute it with rotini, farfalle, penne, orecchiette, or gnocchi. (And call it Pasta Salad!)
Cherry tomatoes – these bring a pop of color and a touch of sweetness and acidity to the party. If you’re not a fan of tomatoes, try using red bell peppers instead.
Red onion– sharp, assertive, and spicy, this ingredient is a great way to break up the fattiness of the tortellini. You can substitute with green onion, white onion, or yellow onion.
Summer vegetables like squash and zucchini– these fresh veggies add more texture than flavor and also help bulk up your salad. Substitute with cucumber or carrots.
Black olives– add a touch of brininess. Substitute with green olives or capers.
Baby spinachandItalian Pasley– add herbaceous peppery notes. Substitute the spinach with kale or arugula. If you’re not a fan of parsley, use basil.
Parmesan cheese – helps round out the flavors and adds a touch of nuttiness.
Italian Dressing– pulls everything together and adds zing. Substitute with any lightly flavored vinaigrette.
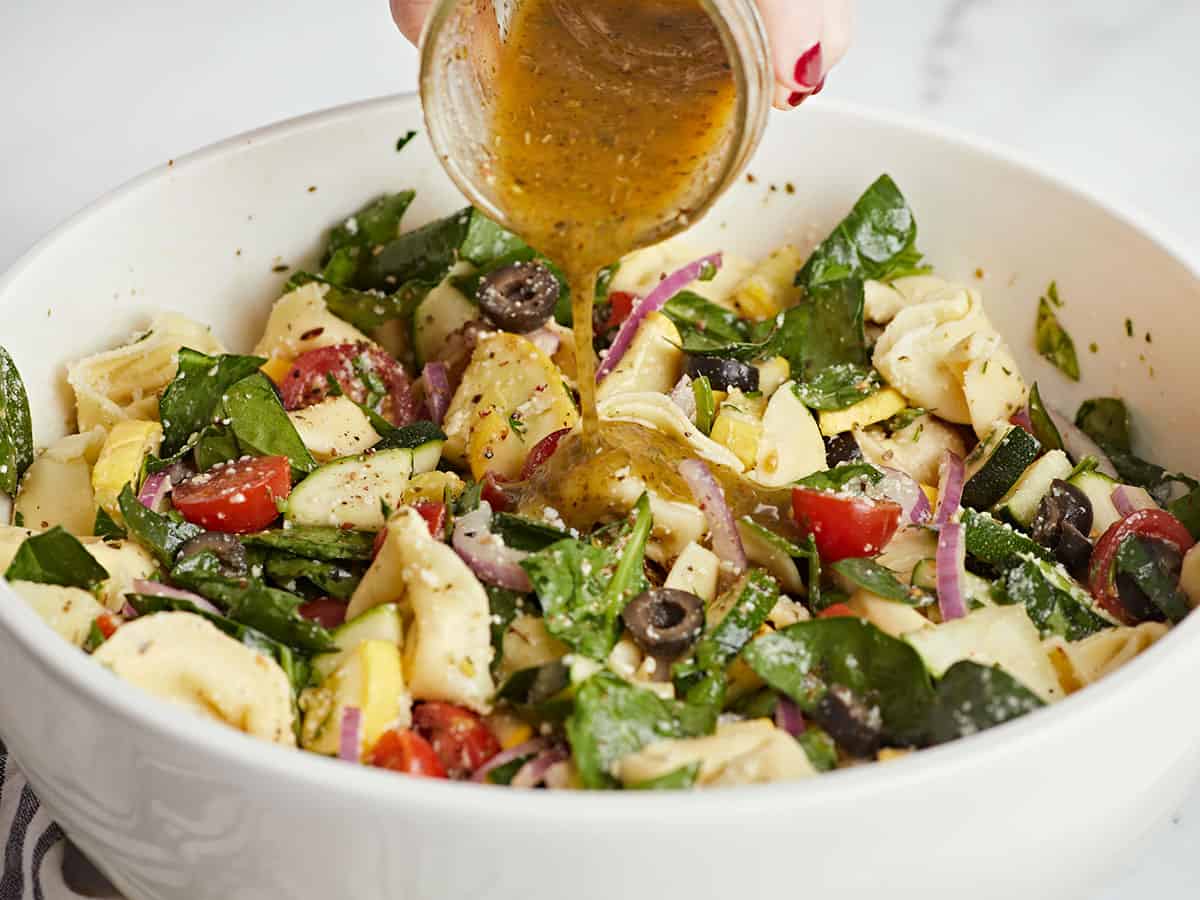
Tips For Making The Best Tortellini Salad
You can use store-bought Italian dressing for convenience, but for a more flavorful salad, use our recipe for Italian Dressing.
Bulk up the salad with more low-cost, in-season veg to transform a pound of tortellini into 16 servings instead of 12. Use any fresh veg, greens, and fresh summer herbs you have on hand. Just cut everything in similar sizes.
Add a little acidity and heat with pickled cherry peppers or banana peppers.
For a heartier salad, add chopped grilled chicken or shrimp. Or try adding chopped salami.
Tortellini salad keeps up to 3 days in the fridge. Just make sure to store leftovers in an airtight container. If you want to make the salad ahead of time, I recommend making the tortellini, chopping and salting the squash and zucchini, and prepping the rest of the ingredients. Add the tortellini to a large container and top with the veg and then the greens. Mix with Parmesan and dressing when you’re ready to serve.
First, cook the tortellini according to the package directions. Then drain well and cool in a very large bowl in the fridge.
While the tortellini is cooking, slice the summer squash and the zucchini into 1/4-inch rounds and then quarter the rounds. Add them to a large bowl and sprinkle with salt and mix.
Slice the cherry tomatoes in half. Slice the red onion in 1/4 inch half moons and soak it in cold water to dull its sharp flavor. Chop the parsley, and if the baby spinach leaves are large, chop them as well.
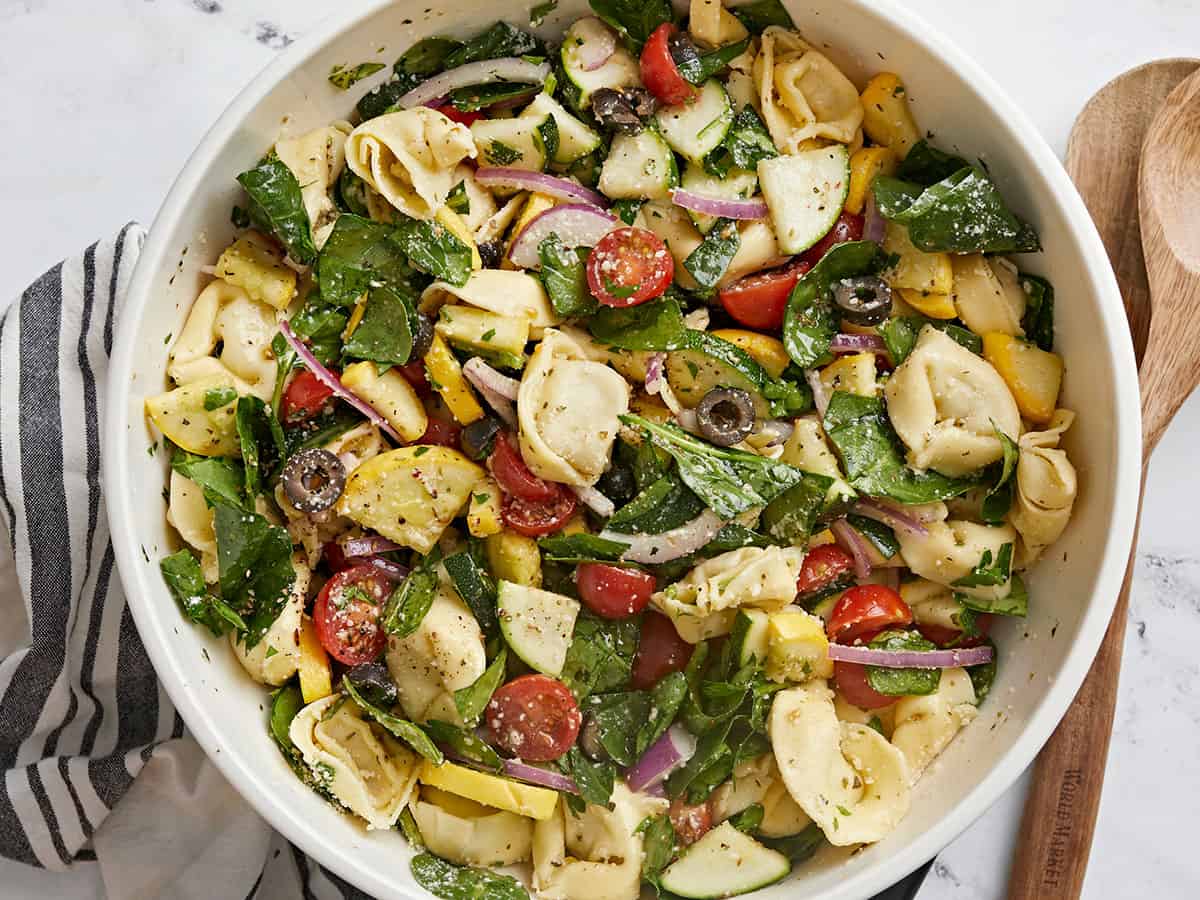
Once the tortellini has cooled, top it with the cherry tomatoes, red onion, baby spinach, and sliced black olives. Then drizzle with 1/2 cup of Italian dressing.
Next, top the salad with chopped Italian parsley and Parmesan cheese. Then drizzle with the final 1/4 cup of Italian dressing. Finally, mix, and serve! Wasn't that easy?
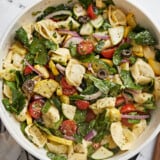
How to Make Tortellini Salad – Step By Step Photos
First, cook one pound of tortellini according to the package directions. Then drain well and cool in a very large bowl in the fridge.
While the tortellini is cooking, slice the summer squash and the zucchini into 1/4-inch rounds and then quarter the rounds. Add them to a large bowl and sprinkle with salt and mix.
Slice the cherry tomatoes in half. Slice the red onion in 1/4 inch half moons and soak it in cold water to dull its sharp flavor. Chop the parsley, and if the baby spinach leaves are large, chop them as well.
Once the tortellini has cooled, you’re ready to assemble. First, top the tortellini with 1 pint of halved cherry tomatoes, 1/2 sliced red onion, 2 cups fresh baby spinach, and 1/2 cup sliced black olives. Then drizzle with 1/2 cup of Italian dressing.
Next, top the salad with 1/2 cup of chopped Italian parsley and 1/4 cup of Parmesan cheese. Then drizzle with the final 1/4 cup of Italian dressing. Finally, mix, and serve! Wasn’t that easy? Now go feed your army and enjoy your time with them instead of spending it in your kitchen!
This grilled vegetable Napoleon is a showstopper with vibrant, char-grilled layers of veggies like eggplant, zucchini, bell pepper, portobello mushroom, and more. If you want a visually stunning and flavorful side dish, look no further. Served with aro…
This grilled vegetable Napoleon is a showstopper with vibrant, char-grilled layers of veggies like eggplant, zucchini, bell pepper, portobello mushroom, and more. If you want a visually stunning and flavorful side dish, look no further. Served with aromatic basil pesto, it is stunning and flavorful. If you are looking for other easy vegan eggplant recipes,...
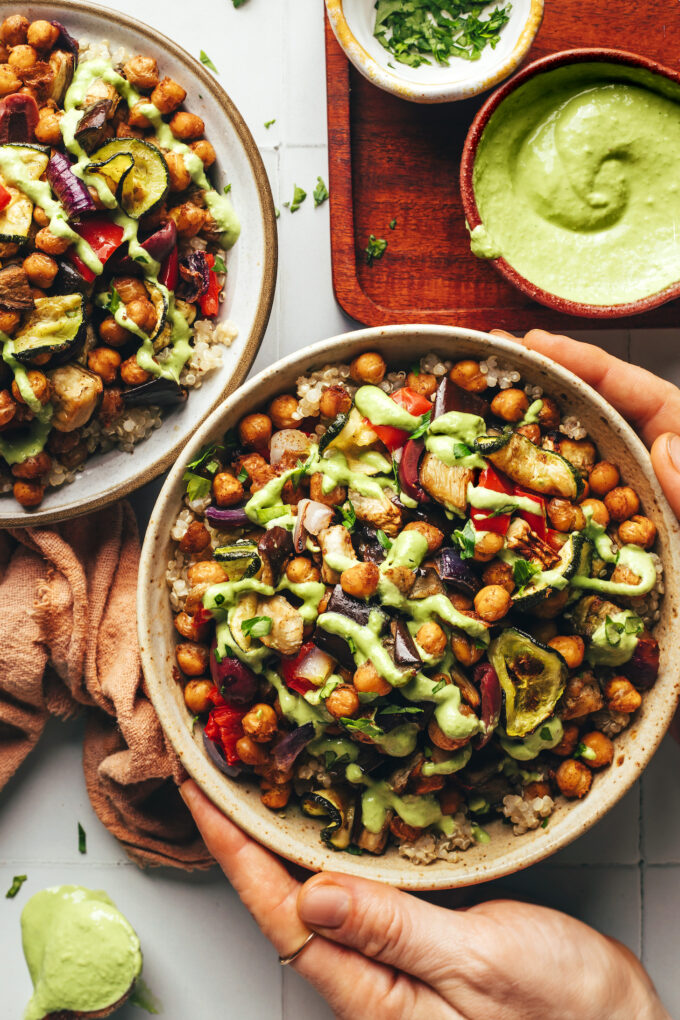
A nourishing, flavorful bowl that comes together fast with minimal cleanup? That’s our kind of meal! These Mediterranean-inspired veggie bowls combine spicy roasted chickpeas, vibrant roasted veggies, and optional grains with an herby green tahini sauc…
A nourishing, flavorful bowl that comes together fast with minimal cleanup? That’s our kind of meal! These Mediterranean-inspired veggie bowls combine spicy roasted chickpeas, vibrant roasted veggies, and optional grains with an herby green tahini sauce. Prepare to fall in love!
Plant-based, gluten-free, and just 10 ingredients required. Let’s make this thing!
First up on the nourish bowl agenda: chickpeas! We toss them with olive oil to help them crisp up, cumin for smokiness, cinnamon for sweetness, and a touch of cayenne for heat.
Morning glory muffins are sweet, moist, and ideal for busy mornings! Pair them with a mug of your favorite coffee for the perfect on-the-go breakfast. Are you a muffin kind of person? I totally am, but most of the time, I prefer muffin tops. Yep, I’m the girl at Starbucks ordering one of their giant …
Morning glory muffins are sweet, moist, and ideal for busy mornings! Pair them with a mug of your favorite coffee for the perfect on-the-go breakfast.
Are you a muffin kind of person? I totally am, but most of the time, I prefer muffin tops.
Yep, I’m the girl at Starbucks ordering one of their giant blueberry muffins and tossing the entire bottom of the muffin into the trash. It’s wasteful, I know.
I’ve tried to pawn the muffin bottoms off on Elle by over-exaggerating their level of deliciousness, but the girl knows what’s up; she’s not having it.
Then there are the muffins at our local grocery store that are to die for good! Okay, that’s a minor exaggeration, but you feel me, right?
Their pistachio muffins are LOADED with chopped pistachios and topped with a ridiculous amount of sparkling sugar. But guess what, once that crunchy sugar and perfectly golden top are gone, I’m out.
My husband does the same thing, only with chocolate glazed donuts. He slices them in half like a bagel so he can simply enjoy all that chocolate frosting goodness with a wee little bit of donut. I’m typically intercepting him on the way to the trash like, ummm, gimme that. Because carbs.
There are a few muffins that I’ll enjoy in their entirety and one of them happens to be these morning glory muffins.
 I am OBSESSED with zucchini. I love the green vegetable and I LOVE creating zucchini recipes. Have you seen my collection of zucchini recipes? There are sweet and savory recipes, something for everyone. I love all of these zucchini recipes and try to make them every summer when the garden zucchini is out of control.…


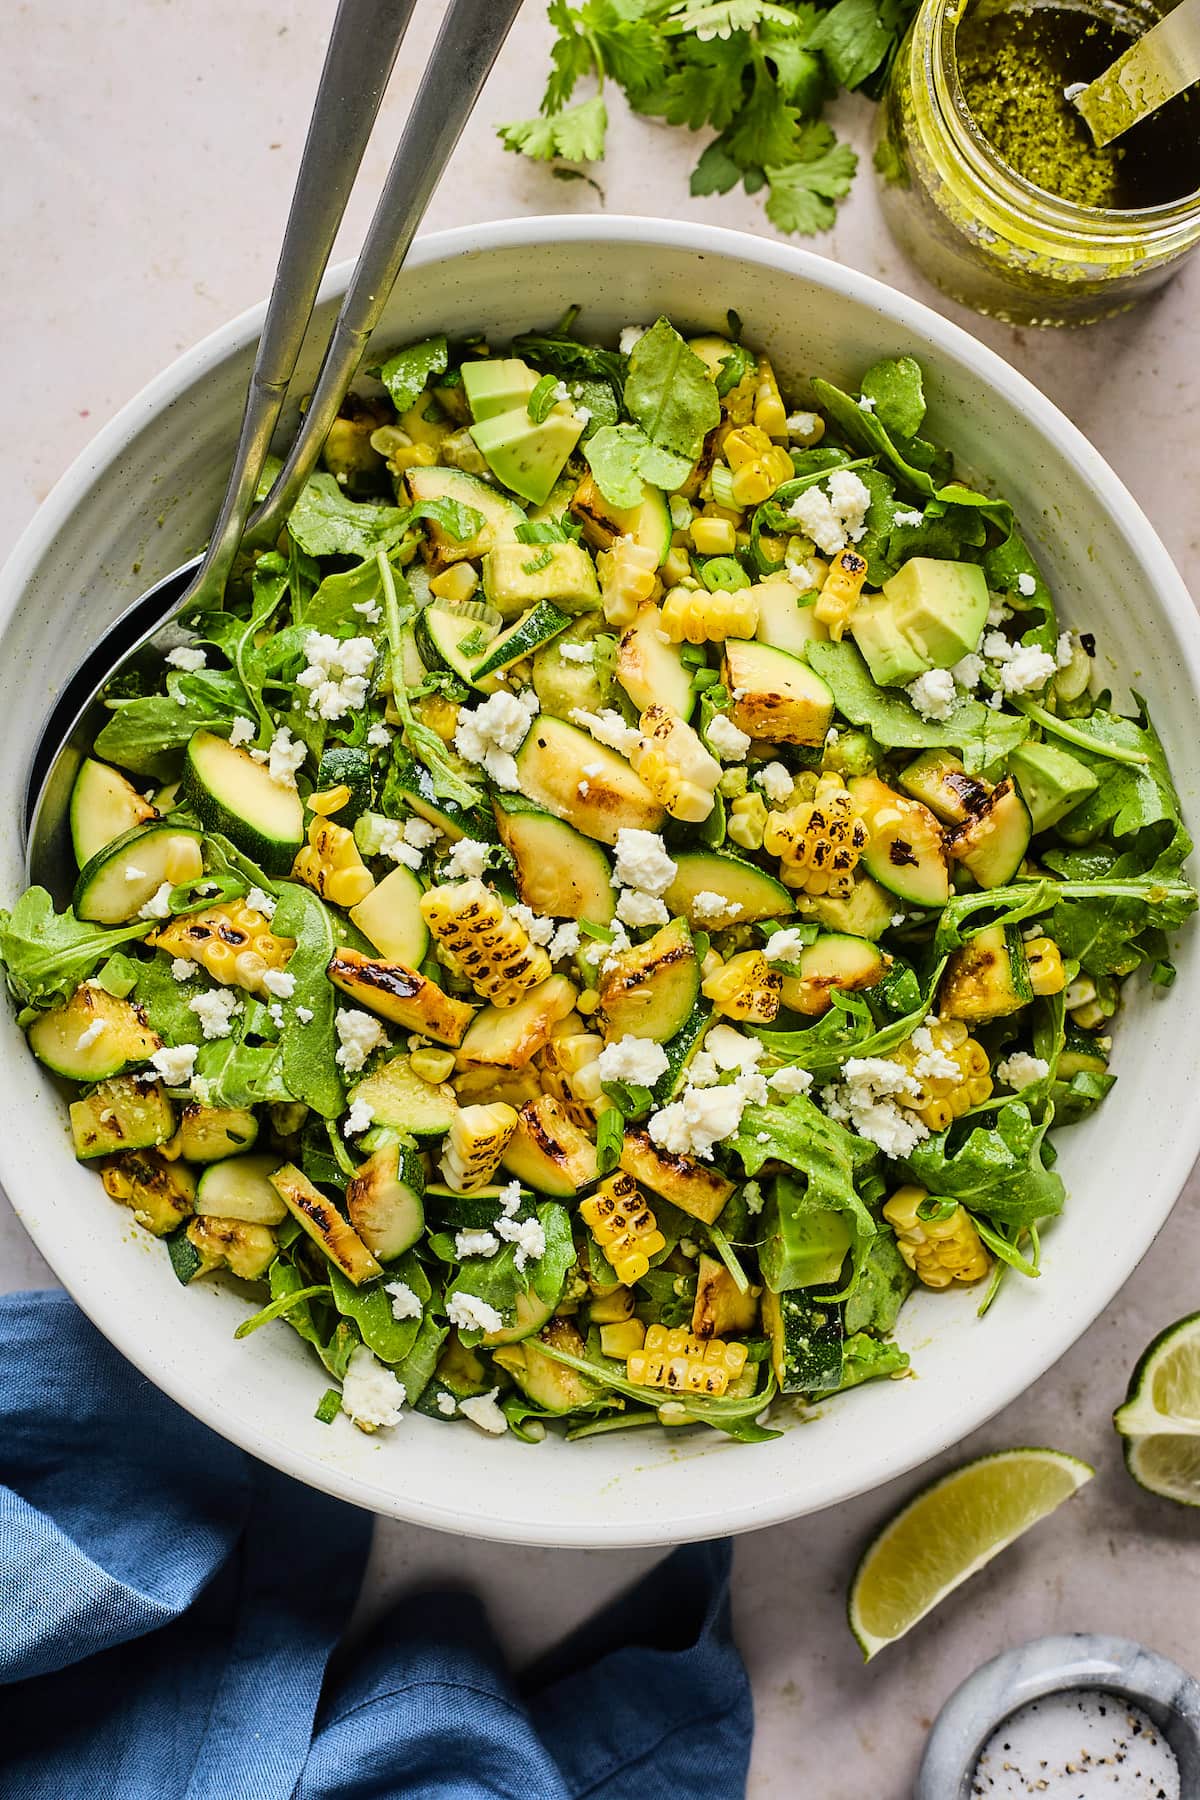 During the hot summer months I make A LOT of salads. Pasta salad, fruit salad, quinoa salad, potato salad, lentil salad, chickpea salad, and many more. I love using summer’s freshest produce in my salads. This Grilled Corn & Zucchini Salad is one of my favorites because it uses fresh sweet corn and summer’s most…