Spinach Artichoke Dip

This creamy and flavorful Spinach Artichoke Dip is made with three types of cheese and is the perfect appetizer for any party or gathering.

The post Spinach Artichoke Dip appeared first on Budget Bytes.

This Spinach Artichoke Dip recipe is epic. It’s super easy to make and the perfect dish to bring to Friendsgiving, football parties, or any gathering. It has three types of cheese, a creamy homemade sauce, and just a little bitty splash of hotness to tingle your taste buds. This spinach artichoke dip is so good that it’ll make you want to eat your appetizer for dinner. …And I won’t judge you if you do. ;)

Spinach Artichoke Dip in a skillet with a chip dipping into the side.

Ingredients for Spinach Artichoke Dip

This recipe is super easy to make and it doesn’t require too many ingredients. Here’s what you’ll need to make this spinach artichoke dip recipe:

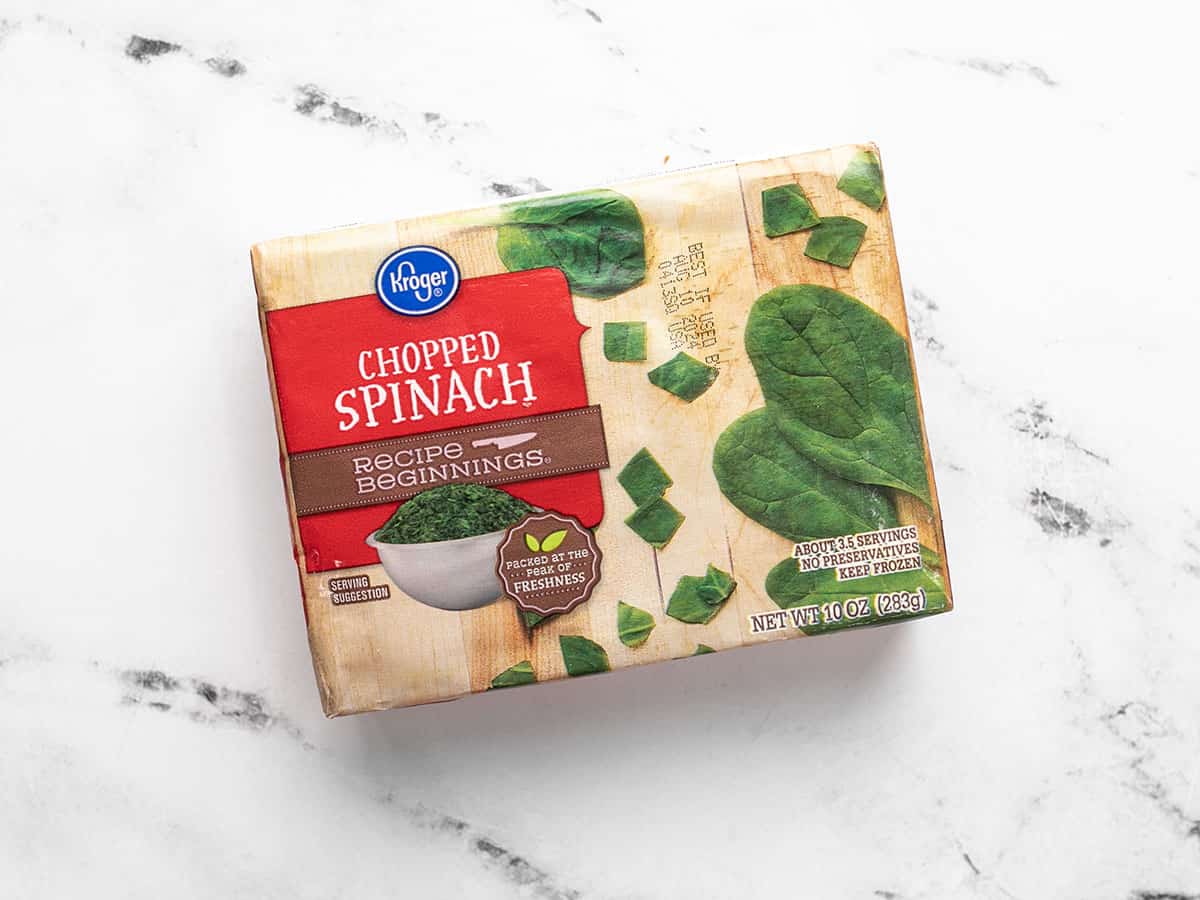
  • Spinach: We used frozen chopped spinach because it’s convenient and inexpensive. Just make sure you fully thaw and squeeze the spinach dry before using. You can use fresh spinach, but you’ll need to cook it down first to remove most of the water. You’ll need about 2 cups once cooked and squeezed.
  • Artichoke Hearts: Canned artichoke hearts are convenient, but you can also use frozen artichoke hearts, if available.
  • Cheese: This super-rich dip has a mix of three cheeses: mozzarella, Parmesan, and cream cheese.
  • Mayonnaise, Sour Cream, and Butter: These three ingredients come together to create the super-rich and creamy sauce that drenches the spinach and artichokes.
  • Seasoning: The seasoning for this dip is pretty simple, just some fresh garlic, hot sauce for tang and heat, plus a pinch of red pepper for another kick. It’s simple, but amazing!

What to Serve with Spinach Artichoke Dip

Because spinach artichoke dip is kind of heavy (understatement) you will want to serve it with something strong and crusty for dipping. My favorite is slices of toasted baguette, but strong crackers and tortilla chips are other great options.

You can also use spinach artichoke dip as part of a meal. Try using it to fill a quesadilla, making it into a grilled cheese sandwich or “melt”, or stirring it into some pasta!

Spinach Artichoke Dip Variations

This is a classic spinach artichoke dip recipe, but you can add or substitute ingredients to make it your own. Here are some ideas for different variations of this spinach artichoke dip recipe:

  • Double Spinach: Use twice the amount of spinach for an extra dose of vegetables.
  • Spicy Spinach Artichoke Dip: make it extra spicy by adding a lot more hot sauce, for a flavor that’s half-way between buffalo dip and spinach dip!
  • Make it Lighter: Substitute the sour cream with non-fat yogurt and Neufchatel cheese for the cream cheese to make a slightly lighter spinach artichoke dip.
  • Skip the Artichokes: If you’re not a fan of artichokes, double up on the spinach and skip the artichokes for a creamy spinach dip.
  • Add Chicken: Make the dip more hearty by stirring in diced cooked chicken breast.

How to Store Leftovers

This spinach and artichoke dip will last about four days in your refrigerator. Reheat leftovers in the microwave until hot, or cover and heat in a 350ºF oven until heated through (the total time needed will depend on the amount of dip being reheated).

Close up overhead view of a skillet full of spinach artichoke dip with tortilla chips dipped into it.
Print

Spinach Artichoke Dip

This creamy and flavorful Spinach Artichoke Dip recipe is made with three types of cheese and is the perfect appetizer for any party or gathering.
Course Appetizer, Dip
Cuisine American
Total Cost $9.73 recipe / $1.62 serving
Prep Time 15 minutes
Cook Time 45 minutes
Total Time 1 hour
Servings 6 1/2 cup each
Calories 457kcal

Ingredients

  • 10 oz. frozen chopped spinach, thawed $1.79
  • 1 14oz. can quartered artichoke hearts $2.99
  • 1.5 cups shredded mozzarella, divided $1.87
  • 1/4 cup grated Parmesan $0.38
  • 1 pinch crushed red pepper $0.02
  • 2 Tbsp butter $0.26
  • 2 cloves garlic, minced $0.16
  • 8 oz. cream cheese $1.25
  • 1/2 cup sour cream $0.63
  • 1/4 cup mayonnaise $0.33
  • 2 dashes hot sauce $0.05

Instructions

  • Preheat the oven to 375ºF. Make sure the spinach is fully thawed, then squeeze out as much of the excess water as possible. Once squeezed, break the spinach up so there are no large clumps. Place the squeeze dried spinach in a large bowl.
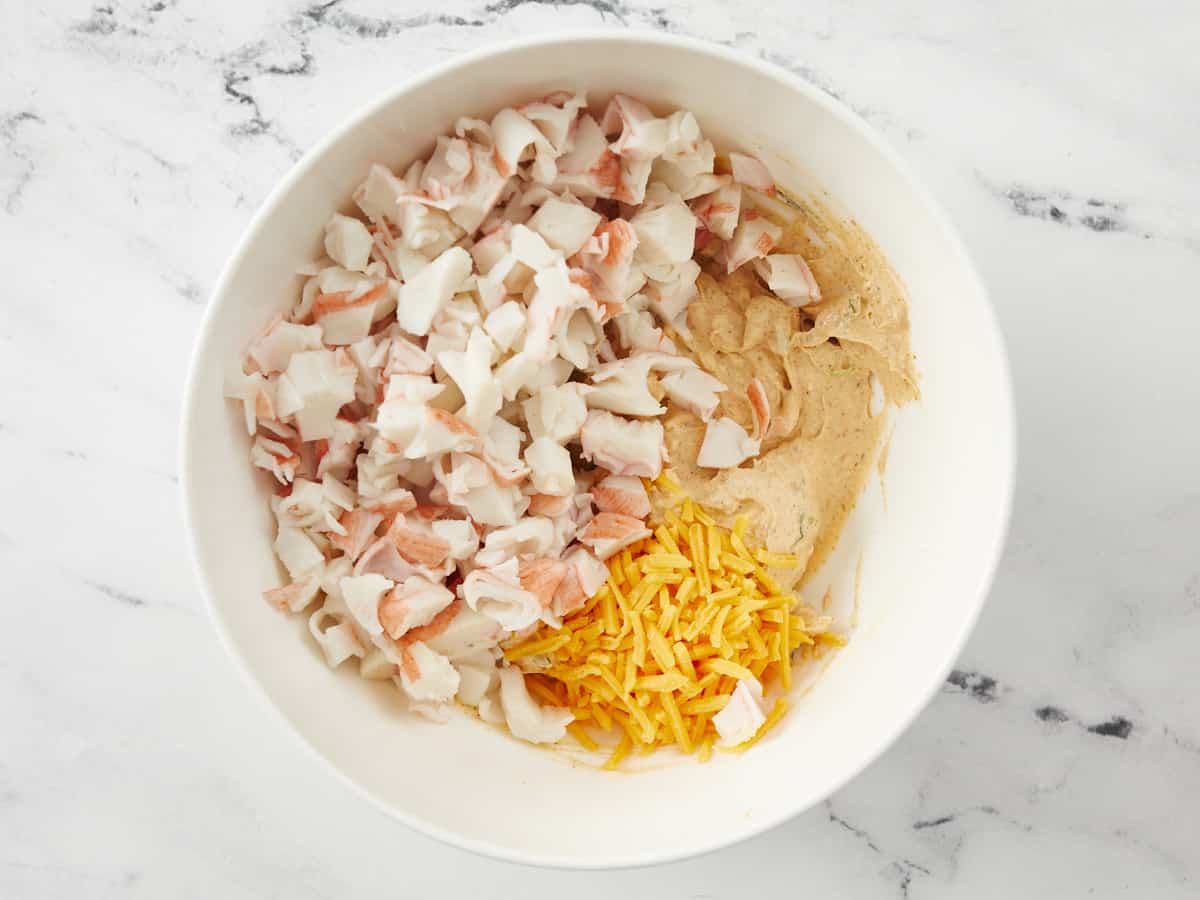
  • Drain and roughly chop the artichoke hearts. Place the artichoke hearts in the bowl with the spinach, 1 cup of the mozzarella, grated Parmesan, and crushed red pepper. Stir these ingredients together to combine, then set them aside.
  • Add the butter and minced garlic to a small sauce pot. Sauté the garlic in the butter over medium-low heat for about two minutes, or just until the garlic becomes very fragrant.
  • Cut the cream cheese into chunks and add it to the sauce pot along with the sour cream and mayonnaise. Heat and whisk these ingredients together for about five minutes, or until they melt together into a smooth sauce. Finally, stir in a couple dashes of hot sauce.
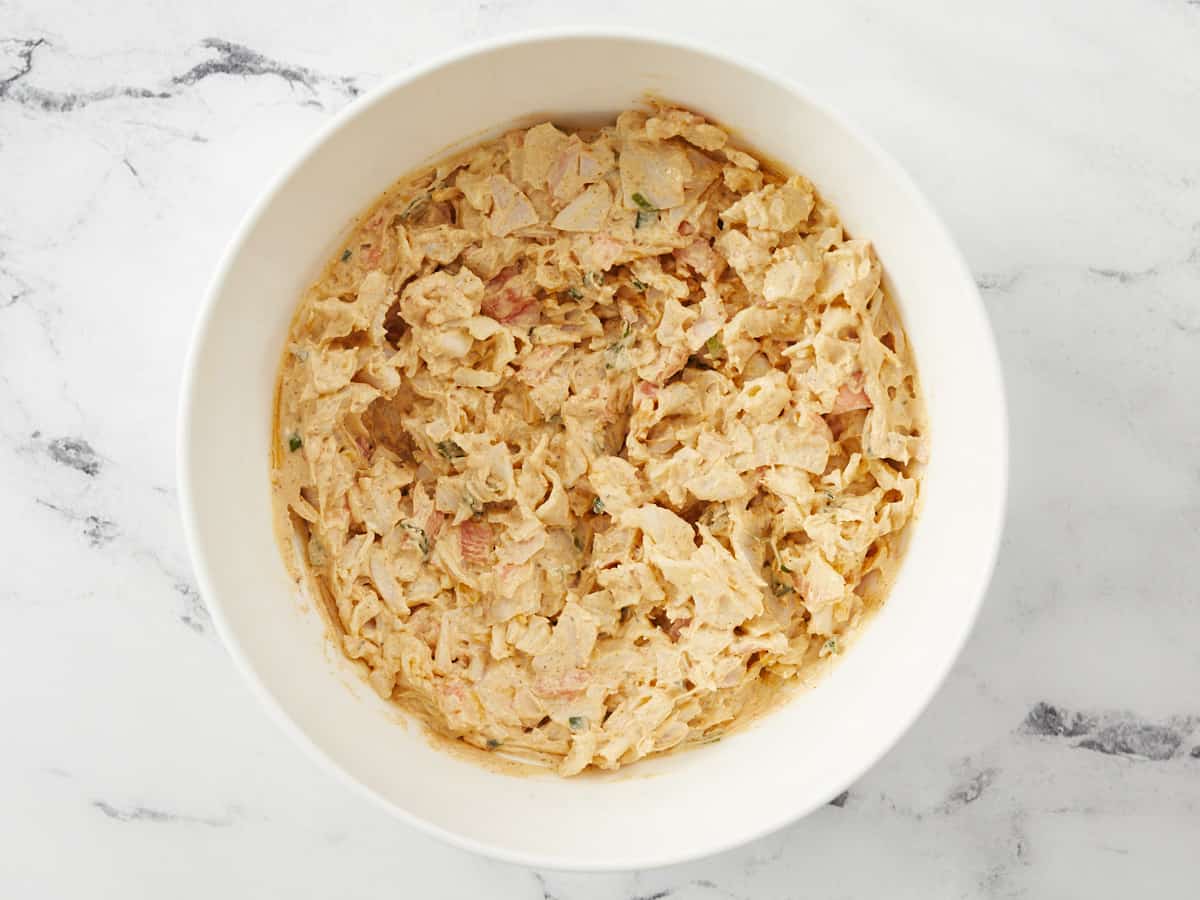
  • Pour the creamy garlic sauce over the spinach artichoke mixture, then stir until everything is evenly combined and coated in sauce. Transfer the mixture to a 2-quart casserole dish, then top with the remaining ½ cup shredded mozzarella.
  • Bake the dip for about 30 minutes, or until it is bubbling around the edges and the cheese on top is turning golden brown. Serve while hot.

See how we calculate recipe costs here.

Nutrition

Serving: 1Serving | Calories: 457kcal | Carbohydrates: 10g | Protein: 13g | Fat: 41g | Sodium: 750mg | Fiber: 3g
Close up side view of a tortilla chip dipping into the pan of spinach artichoke dip.

How to Make Spinach Artichoke Dip

Frozen spinach in the package.

Preheat the oven to 375ºF. Start with one 10 oz. package of frozen chopped spinach, fully thawed. Squeeze as much of the excess liquid out of the thawed spinach as possible. Make sure to use “chopped” spinach so you don’t get long stringy pieces in the dip.

Chopped artichoke hearts on a cutting board.

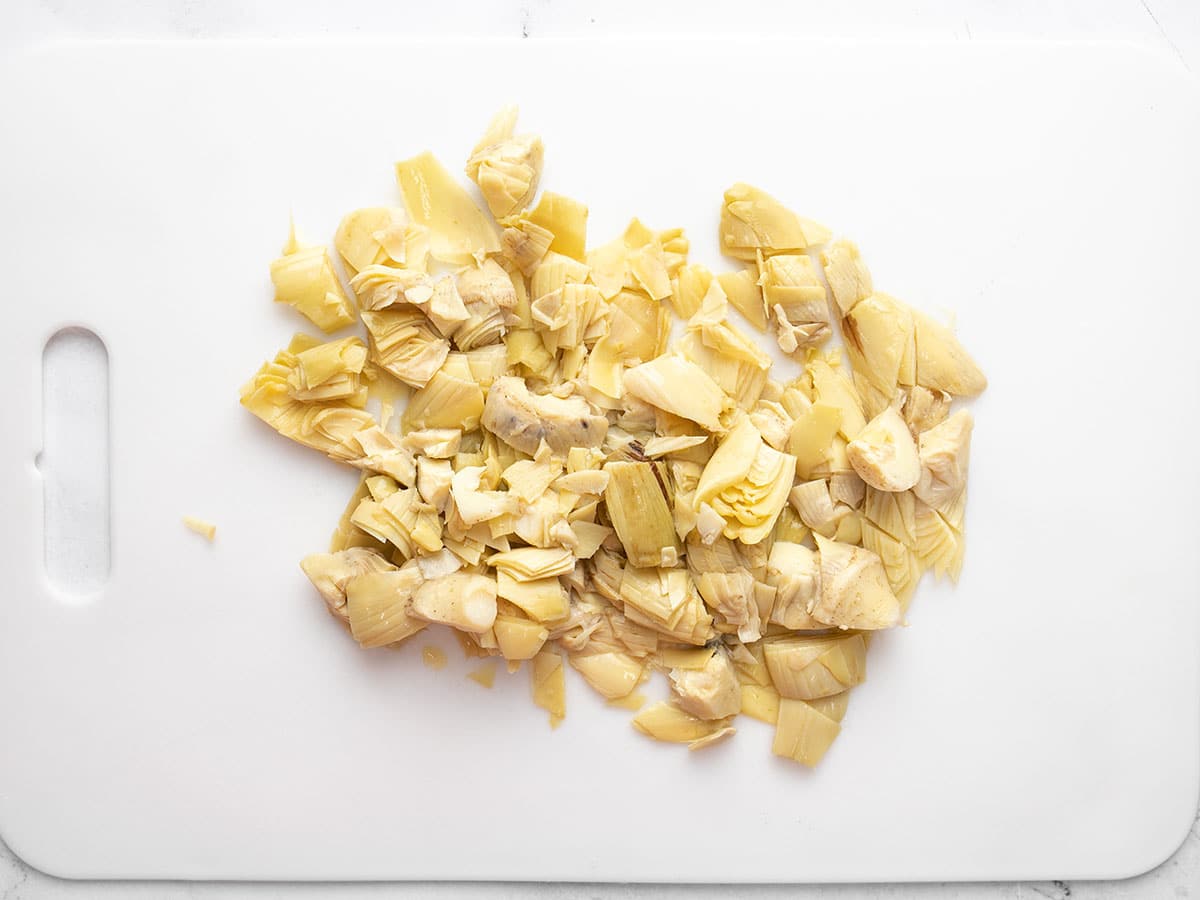
Drain and chop one 14oz. can of artichoke hearts.

Spinach, artichoke hearts, mozzarella and red pepper in a bowl.

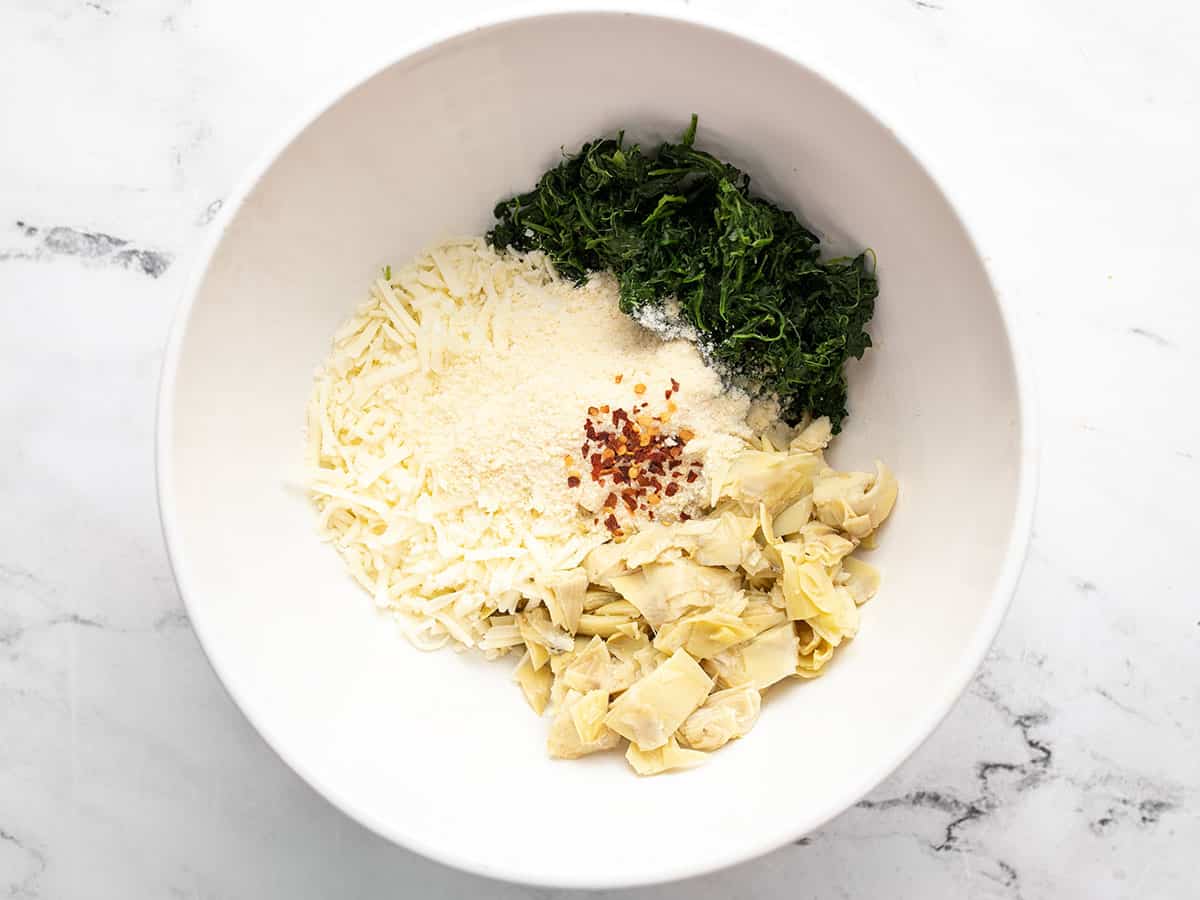
Add the spinach, artichoke hearts, 1 cup of shredded mozzarella, 1/4 cup grated Parmesan, and a pinch of red pepper flakes to a large bowl. Stir them together until they are combined.

Melted butter and garlic in a saucepot.

Add 2 Tbsp butter and 2 cloves of garlic (minced) to a small sauce pot. Sauté the garlic in the butter over medium-low heat for about two minutes, or just until the garlic becomes very fragrant.

Cream cheese, sour cream, and mayonnaise added to the sauce pot.

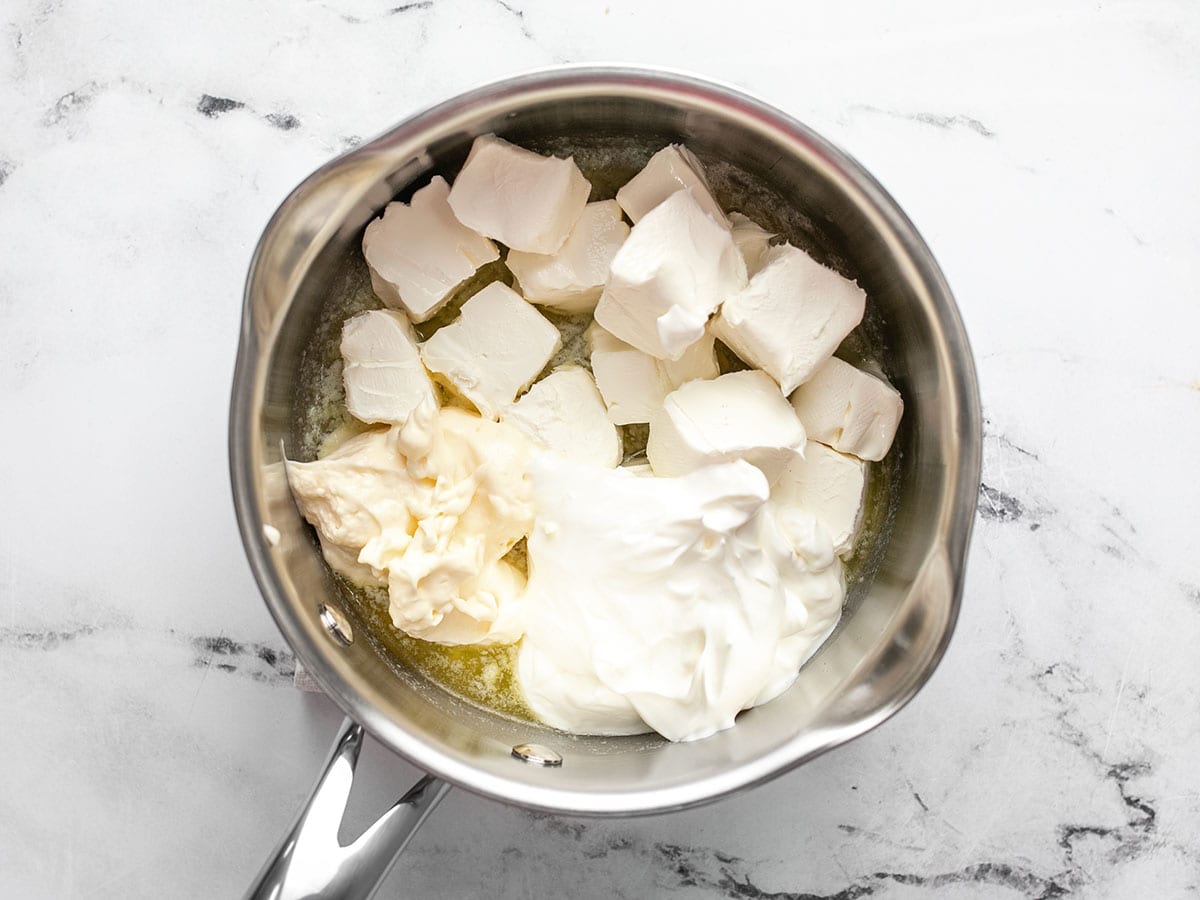
Cut an 8 oz. block of cream cheese into chunks and add it to the sauce pot along with 1/2 cup sour cream and 1/4 cup mayonnaise. Heat and whisk these ingredients together until they melt into a smooth sauce (about 5 minutes).

Hot sauce being added to the saucepot.

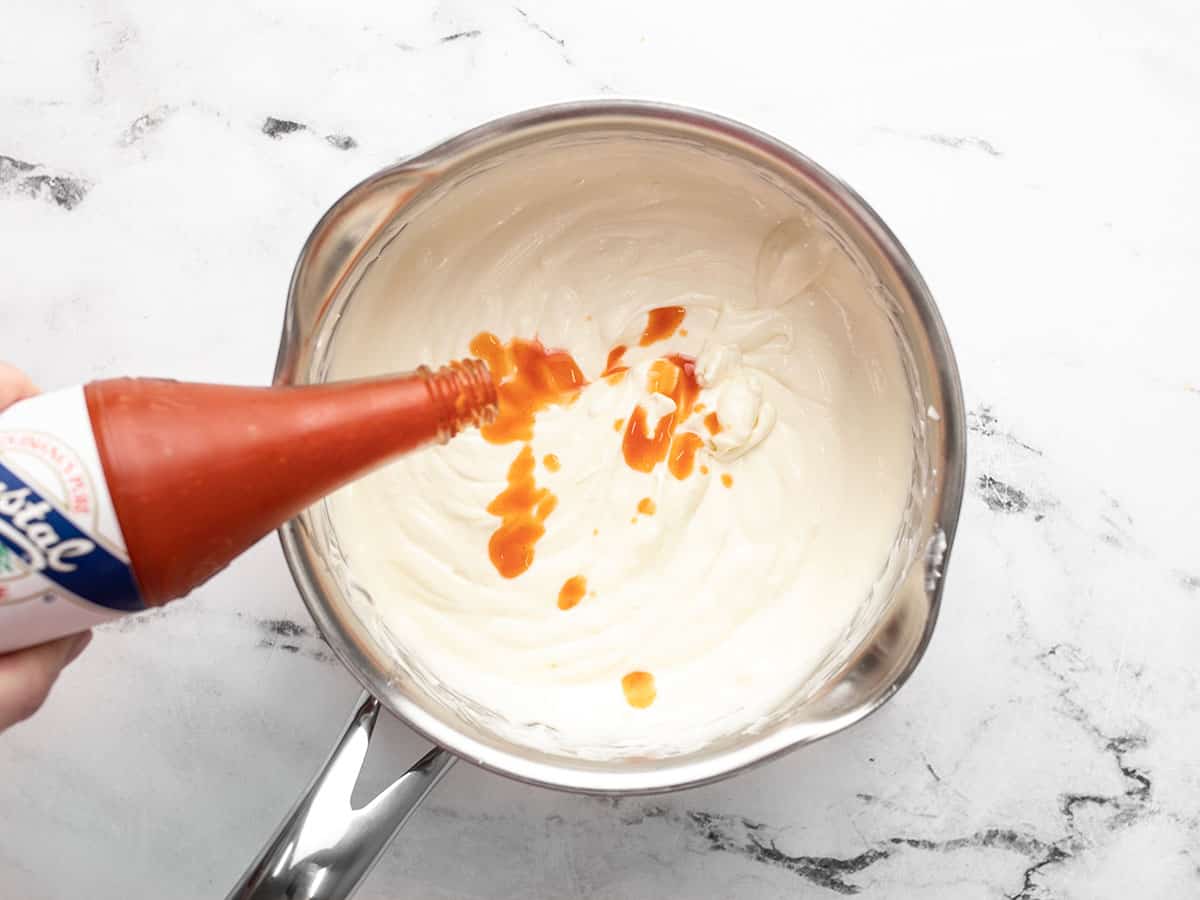
Add a couple of dashes of hot sauce to the creamy garlic sauce. This isn’t enough to actually make it spicy, it just adds a little tang.

Creamy sauce added to bowl with spinach.

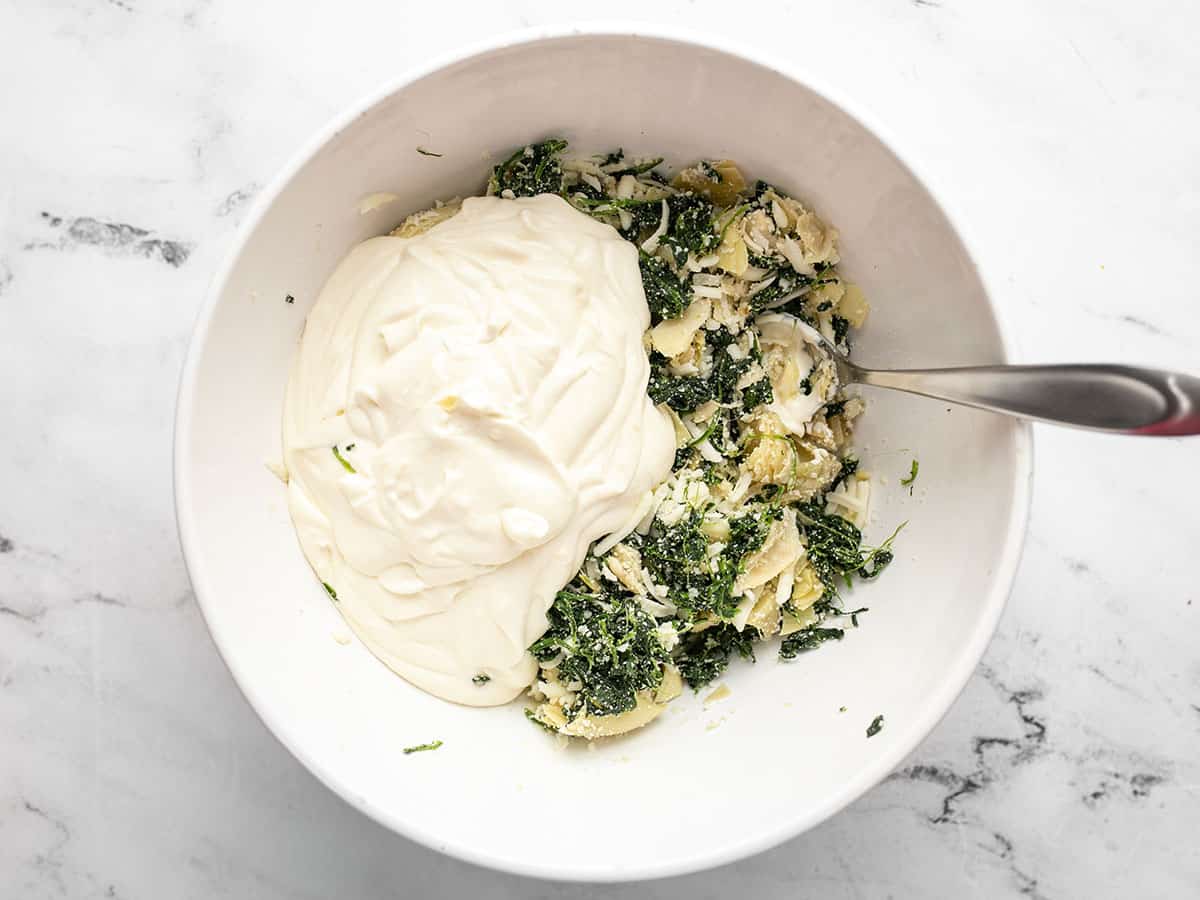
Add the creamy sauce to the spinach and artichoke mixture and stir until everything is very well combined.

Spinach artichoke dip added to a skillet, mozzarella being sprinkled over top.

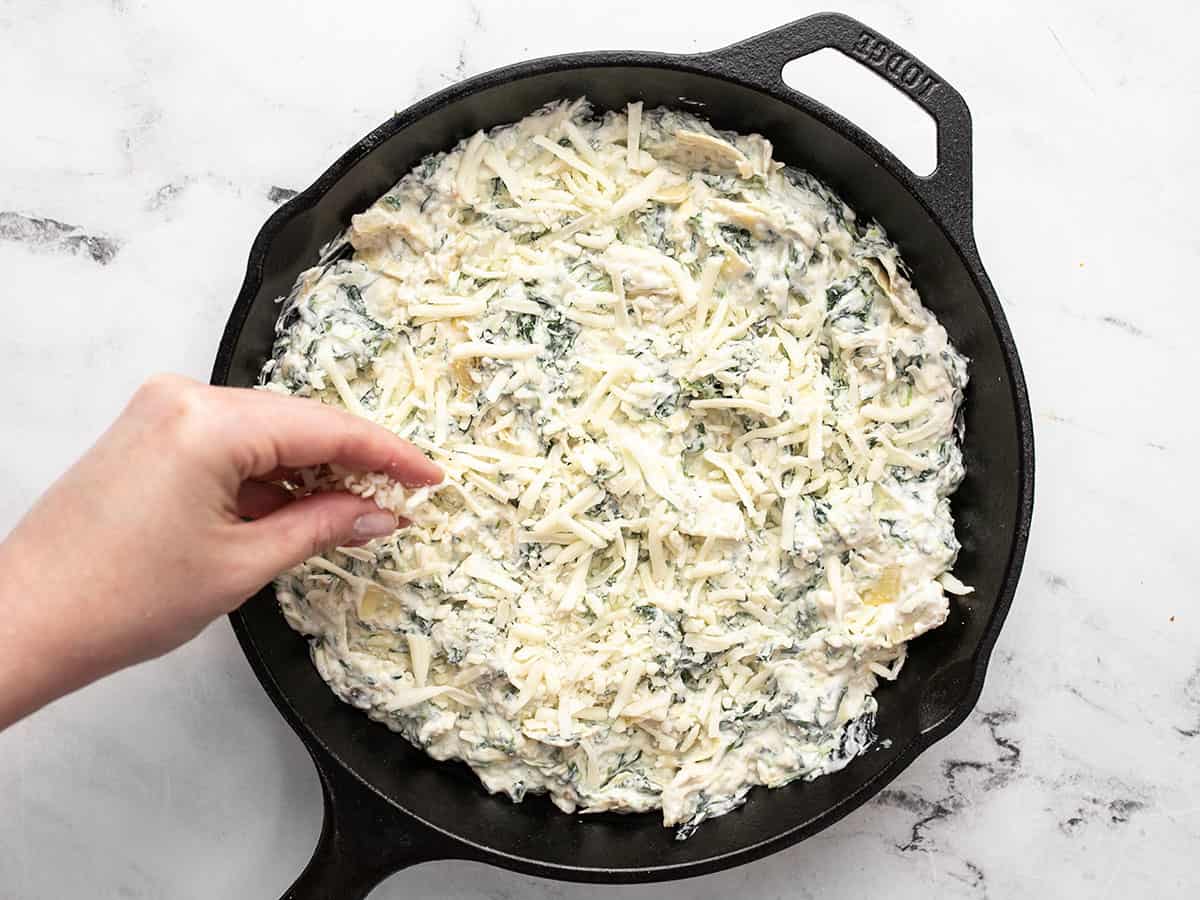
Spread the Spinach Artichoke Dip into a 2-quart skillet or casserole dish. Sprinkle the remaining ½ cup shredded mozzarella over top.

Baked spinach artichoke dip in the skillet.

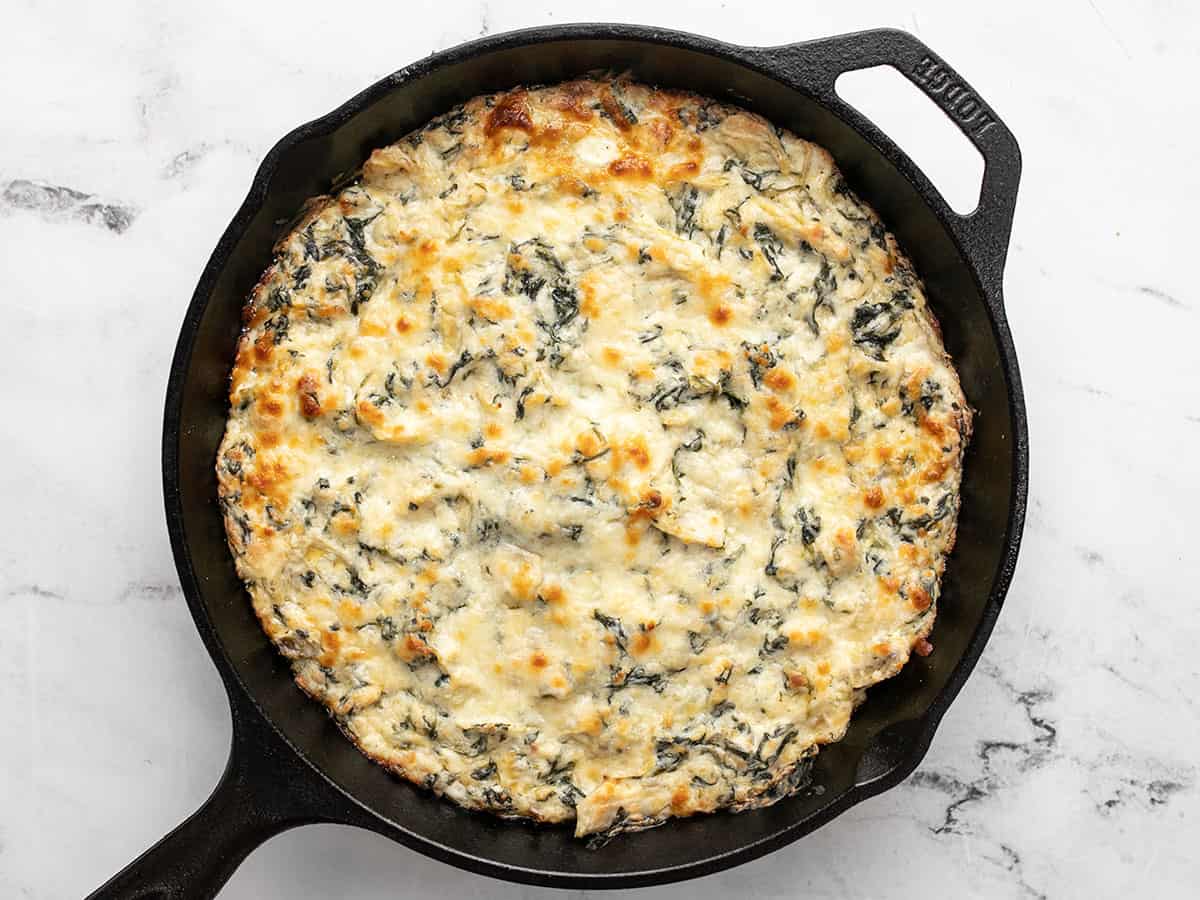
Bake in the preheated 375ºF oven for about 35 minutes or until it’s bubbly around the edges and turning golden brown on top.

Close up of spinach artichoke dip on a tortilla chip.

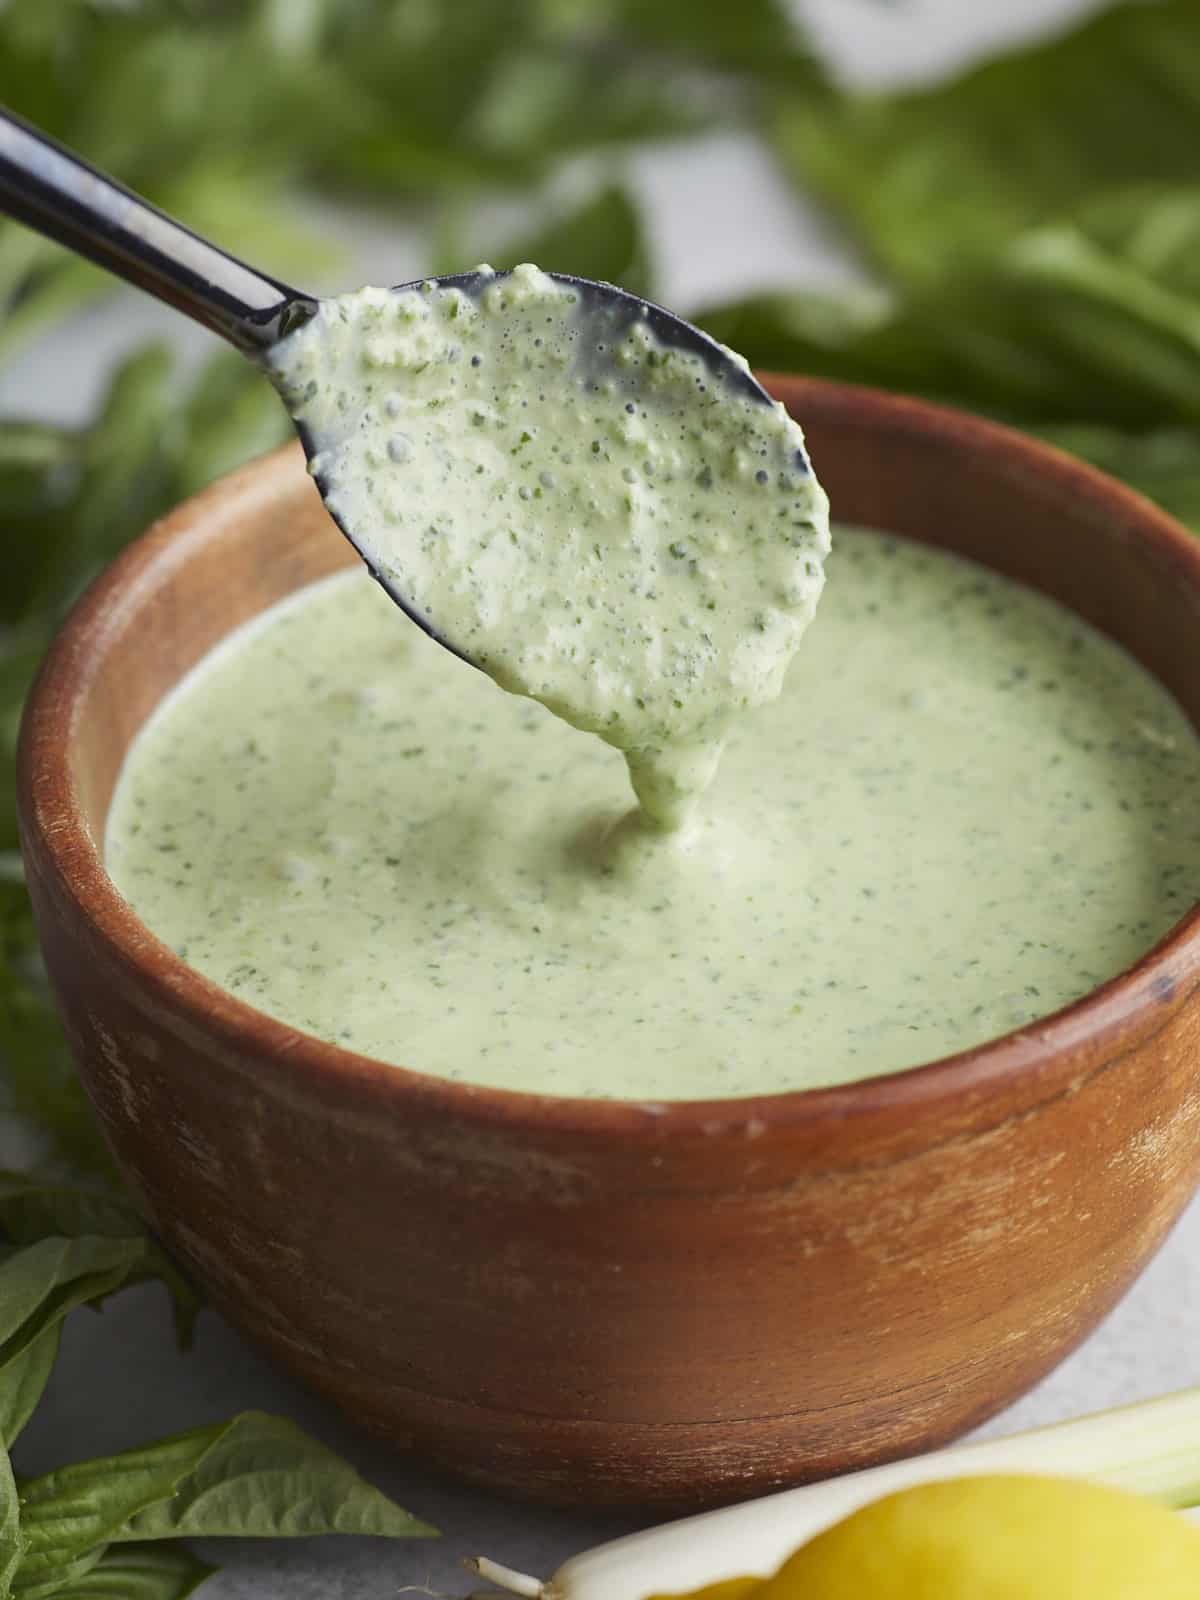
Take a closer look at that creamy, cheesy, spinach-y goodness! 🤤

Close up side view of a skillet full of spinach artichoke dip with a tortilla chip.

This photo shoot took ALL of my willpower. ALL OF IT.

The post Spinach Artichoke Dip appeared first on Budget Bytes.

Corn Pudding

This homemade corn pudding recipe is made with sweet corn, cornmeal, cheddar cheese, eggs, and dairy to make a rich and cozy corn casserole.

The post Corn Pudding appeared first on Budget Bytes.

Corn pudding is a staple at southern Thanksgiving tables, but honestly, it’s a great side dish any time of year! This rich corn casserole is made with sweet corn, cornmeal, eggs, cream, and cheddar, and then baked to perfection. And even though our corn pudding recipe is made 100% from scratch (no boxed cornbread mix or canned creamed corn), it’s still incredibly easy and it will definitely leave you wanting seconds. ;)

Close up overhead view of corn pudding in the casserole dish with a wooden spoon scooping some out.

What is Corn Pudding?

Corn pudding is essentially a corn casserole made with sweet corn, cornmeal, and cheddar cheese baked into a custard made with eggs, cream (or half and half), sour cream, and seasoning. The texture is a bit like stuffing or dressing, in that it is soft, moist, and scoopable. While the ingredients may look similar to cornbread, corn pudding is far more rich and moist.

Ingredients for Corn Pudding

Here are the ingredients you’ll need for this corn pudding recipe:

  • Corn: We used frozen sweet corn for convenience, but if you happen to have an abundance of inexpensive fresh corn, you can boil it or roast it, slice it off the cob, and then add it to the casserole.
  • Half and Half: This creamy mixture is the base for the custard. If you don’t have half and half you can use a 50/50 mix of whole milk and heavy cream, or just whole milk, although that won’t be quite as rich as the half and half.
  • Eggs: Eggs combine with the half and half to create the rich custard. They firm up when baked, giving the pudding its scoopable texture.
  • Cornmeal: Cornmeal gives body and structure to the pudding, so it’s not just a milk custard, but half-way between a custard and a cornbread in texture. Use yellow cornmeal for the best color.
  • Sour Cream: Sour cream adds moisture, richness, and even more flavor to the corn pudding.
  • Cheddar Cheese: Cheese gives the pudding depth of flavor and makes it extra rich!
  • Sugar: A little bit of sweetness contrasts the savory pudding in all the right ways!
  • Seasoning: The pudding is seasoned simply with a little salt, pepper, and a dash of cayenne pepper for sparkle. It’s not enough cayenne to make it spicy, just to give the pudding some personality!

What to Serve with Corn Pudding

Corn pudding is a classic side dish served on Thanksgiving, but it’s also great the rest of the year paired with dishes like Pulled Pork, Baked Beans, or BBQ chicken. It’s a classic American comfort food that goes with any stick-to-your-ribs meal!

How to Store Leftovers

Leftover corn pudding can be stored in the refrigerator for 3-4 days (if you don’t eat it all first!). Or, once chilled in the refrigerator, you can divide it into single-serving portions and freeze for up to three months. Allow frozen corn pudding to thaw completely in the refrigerator first before reheating in the microwave. Just be careful not to overhead the corn pudding as it can cause it to get a little watery.

Side view of corn pudding in the casserole dish with some scooped out.
Overhead view of corn pudding being scooped out of the casserole dish.
Print

Corn Pudding

This homemade corn pudding recipe is made with sweet corn, cornmeal, cheddar cheese, eggs, and dairy to make a rich and cozy corn casserole.
Course Dinner, Side Dish
Cuisine American
Total Cost $6.36 recipe / $0.80 serving
Prep Time 15 minutes
Cook Time 50 minutes
Total Time 1 hour 5 minutes
Servings 8 (about ¾ cup each)
Calories 347kcal

Ingredients

  • 4 cups frozen sweet corn (thawed), divided $1.67
  • 1 cup half and half* $0.75
  • 3 large eggs $0.32
  • 1/2 cup yellow cornmeal $0.24
  • 1/2 cup sour cream $0.63
  • 1/4 cup sugar $0.09
  • 2 tsp salt $0.10
  • 1/2 tsp cayenne pepper $0.05
  • 1/4 tsp freshly cracked black pepper $0.02
  • 2 cups shredded cheddar cheese, divided $2.49

Instructions

  • Preheat the oven to 350ºF. Place 2 cups of the thawed sweet corn in a blender with the half and half, then blend until mostly smooth.
  • Add the blended corn to a large bowl with the remaining 2 cups of corn, the eggs, cornmeal, sour cream, sugar, salt, cayenne pepper, and black pepper. Whisk the ingredients together until evenly combined.
  • Fold 1 cup of the shredded cheddar cheese into the pudding mixture.
  • Pour the pudding into a greased 2 quart casserole dish, then top with the remaining 1 cup of shredded cheddar.
  • Bake the pudding for 50 minutes, or until the outer edges are golden and the center jiggles just a little when you shake the dish. Let the corn pudding cool for about 10 minutes before serving.

See how we calculate recipe costs here.

Notes

* You can use a 50/50 mix of whole milk and heavy cream, or all whole milk (although this will not be quite as rich).

Nutrition

Serving: 0.75cup | Calories: 347kcal | Carbohydrates: 33g | Protein: 14g | Fat: 19g | Sodium: 817mg | Fiber: 3g

How to Make Corn Pudding

Corn in a blender with half and half being poured in.

Preheat the oven to 350ºF. Add 2 cups of thawed frozen corn to a blender with 1 cup half and half. Blend the mixture until mostly smooth. Reserve the remaining 2 cups of thawed corn for the next step.

Other corn pudding ingredients added to the bowl with thawed corn.

Add the blended corn and half and half to a large bowl with the remaining 2 cups of corn, 3 large eggs, ½ cup yellow cornmeal, ¼ cup sugar, ½ cup sour cream, 2 tsp salt, ½ tsp cayenne pepper, and ¼ tsp black pepper. Whisk these ingredients together until evenly combined.

Cheddar cheese being folded into the corn pudding batter.

Fold 1 cup shredded cheddar cheese into the corn pudding batter.

Cheddar cheese being sprinkled over top of the corn pudding in the casserole dish.

Pour the corn pudding mixture into a greased 2 quart casserole dish, then top with another 1 cup of shredded cheddar cheese.

Baked corn pudding in the casserole dish.

Bake the corn pudding in the preheated 350ºF oven for 50 minutes or until the outer edges are golden and the center only slightly jiggles when you shake the casserole dish. Allow the casserole to cool for 10 minutes after removing from the oven, then serve.

Overhead view of corn pudding being scooped out of the casserole dish with ingredients on the sides.

The post Corn Pudding appeared first on Budget Bytes.

Twice Baked Potatoes

Twice baked potatoes are the ultimate comfort food featuring fluffy mashed potatoes, bacon, cheddar cheese, and more delicious toppings.

The post Twice Baked Potatoes appeared first on Budget Bytes.

I thought I loved loaded baked potatoes, until I tried Twice Baked Potatoes. Two words…Next Level! Who knew a deconstructed loaded baked potato, mixed perfectly with all your favorite toppings, then restuffed into crispy potato skins would taste so good? Yes, it’s an extra step but it’s sooo worth it! Beth and I made these twice baked potatoes three times and each time we debated on who would get to take the leftovers home. Listen, I’m just saying if you’ve ever been hesitant on whether the extra step to make “twice” baked potatoes was worth it…trust us it’s worth it!!

Plated twice baked potatoes with shredded cheese, sliced green onions, and sour cream on the side.

What are Twice Baked Potatoes?

Unlike regular baked potatoes, twice baked potatoes are indeed baked twice in the oven. They’re first baked whole until the insides are fluffy and tender. The creamy potato flesh is then scooped out and mixed with all your favorite mix-ins like butter, sour cream, bacon, and cheese. Now the fun part, the hollowed potato skins are restuffed with the perfectly combined potato mixture and baked a second time in the oven.

Picture a loaded baked potato except each bite has the perfect amount of toppings. It’s actually genius and I’m kinda upset that I wasn’t making these years ago!

Ingredients for Twice Baked Potatoes

Of course the potato is the key ingredient, so you’ll want to use a large sturdy potato like Russet Potatoes for this recipe. But the mix-ins that you choose is what really makes these twice baked potatoes stand out! Here’s what we used:

  • Butter
  • Sour Cream
  • Crispy Bacon
  • Green Onions
  • Milk
  • Cheddar Cheese
  • a little Salt & Pepper

But hey, no pressure. Feel free to use whatever toppings you have on hand. You can also switch things up and use one of the combinations listed in our traditional Baked Potatoes blog post.

Storage & Reheating

You can easily store twice baked potatoes in an airtight container in the fridge for 3-4 days. They reheat well in the microwave, but if you have some extra time you can certainly reheat them in a preheated 350°F oven until warmed through.

To freeze twice baked potatoes just wrap them tightly in plastic, then place in an air-tight freezer container, and they can keep for about 3 months. Reheat in the microwave (defrost function first), or let thaw in the refrigerator overnight before heating.

Side front view of plated twice baked potatoes.
Close up overhead view of twice baked potatoes staked beside each other.
Print

Twice Baked Potatoes

Twice baked potatoes are the ultimate comfort food featuring fluffy mashed potatoes, bacon, cheddar cheese, and more delicious toppings.
Course Dinner, Lunch
Cuisine American
Total Cost $7.80 recipe / $0.98 serving
Prep Time 20 minutes
Cook Time 1 hour 10 minutes
Total Time 1 hour 30 minutes
Servings 8
Calories 316kcal

Ingredients

  • 4 russet potatoes (1/2 lb. each) $3.18
  • 1 Tbsp olive oil $0.11
  • 4 oz bacon $1.37
  • 4 Tbsp butter $0.52
  • 1/2 cup sour cream $0.62
  • 1/4 cup milk $0.08
  • 1/2 tsp salt + a pinch to season the potato skins $0.05
  • 1/4 tsp freshly cracked black pepper $0.02
  • 3 green onions, sliced $0.36
  • 1 1/4 cup shredded cheddar cheese, divided $1.49

Instructions

  • Preheat the oven to 400°F. Wash and dry the potatoes well, then use a fork to prick each potato several times.
  • Place the potatoes on a parchment lined baking sheet. Drizzle the olive oil over the potatoes, then use your hands or a silicone brush to brush the oil over each potato until it is fully coated. Season the potatoes with a pinch of salt.
  • Bake in the preheated oven for 50-60 minutes, or until the potatoes can be pierced easily with a fork. Total baking time will depend on the size of your potatoes.
  • While the potatoes are baking, cook the bacon in a skillet over medium heat until brown and crispy. Remove the cooked bacon from the skillet and allow it to drain on a paper-towel lined plate. Once cool enough to handle, rough chop the bacon into smaller pieces.
  • Once the potatoes are done baking, remove them from the oven and allow them to cool slightly. When the potatoes are cool enough to handle, slice them in half lengthwise. Carefully scoop out the potato flesh, leaving a thin rim of potato (about ¼ inch rim) around the edges to help the skin hold its shape.
  • Place the scooped out potato flesh in a large bowl and add the butter, sour cream, milk, salt, and pepper. Use a potato masher or hand mixer to blend the potatoes until light and fluffy.
  • Add the chopped bacon, half of the sliced green onions, and 1/2 cup of the shredded cheddar cheese to the mashed potatoes, then fold to combine.
  • Fill the potato skins with about 1/3 cup of the potato mixture, then sprinkle the remaining cheddar cheese over the top of each potato.
  • Bake the potatoes in the oven a second time, just until heated through and the cheddar cheese is melted on top, about 20 minutes. Top with the remaining green onions and enjoy!

See how we calculate recipe costs here.

Nutrition

Serving: 1potato half | Calories: 316kcal | Carbohydrates: 21g | Protein: 9g | Fat: 22g | Sodium: 413mg | Fiber: 2g
two plated twice baked potatoes with a dollop of sour cream on top.

How to Make Twice Baked POtatoes – Step by Step Photos

4 russet potatoes being pierced with a fork.

Preheat the oven to 400°F. Wash and dry 4 russet potatoes well, then use a fork to prick each potato several times.

4 russet being brushed with olive oil

Place the potatoes on a parchment-lined baking sheet. Drizzle 1 Tbsp of olive oil over the potatoes, then use your hands or a silicone brush to brush the oil over each potato until it is fully coated. Season the potatoes with a pinch of salt and bake in the preheated oven for 50-60 minutes, or until the potatoes can be pierced easily with a fork. The total baking time will depend on the size of your potatoes.

Bacon being cooked in a skillet until brown

While the potatoes are baking, cook 4 oz. of bacon in a skillet over medium heat until brown and crispy. Remove the cooked bacon from the skillet and allow it to drain on a paper-towel-lined plate. Once cool enough to handle, rough chop the bacon into smaller pieces.

Cooked potatoes cut in half and flesh being scooped out.

When the potatoes are cool enough to handle, slice them in half lengthwise. Carefully scoop out the potato flesh, leaving a thin rim of potato (about ¼ inch rim) around the edges to help the skin hold its shape. Be extra careful when scooping the potato flesh so you don’t break through the skin, but make sure to scoop out enough of the flesh to combine with the rest of the ingredients.

Potato flesh, butter, sour cream, milk, salt and pepper in a large bowl

Place the scooped out potato flesh in a large bowl and add 4 Tbsp butter, 1/2 cup sour cream, 1/4 cup milk, 1/2 tsp salt, and 1/4 tsp cracked black pepper. Use a potato masher or hand mixer to blend the potatoes until light and fluffy.

Chopped bacon, shredded cheddar cheese, and sliced green onion added to mashed potatoes.

Add the chopped bacon, 1/2 cup of shredded cheddar cheese, and half of the sliced green onions to the mashed potatoes, then fold to combine.

Potato skins filled with mashed potato mixture and topped with more shredded cheddar cheese.

Fill the potato skins with about 1/3 cup of the potato mixture, then sprinkle the remaining 3/4 cup of cheddar cheese over the top of each potato.

Finished twiced baked potatoes with green onions garnished on top.

Bake the potatoes in the oven just until heated through and the cheddar cheese is melted on top, about 20 minutes.

Plated twice baked potatoes with small serving bowls of green onions, shredded cheese, and sour cream on the side.

Top with the remaining green onions then get ready to enjoy some of the best twice baked potatoes you’ve ever tasted! ;)

Close up overhead photo of twice baked potatoes

The post Twice Baked Potatoes appeared first on Budget Bytes.

Green Goddess Dressing

This creamy, herbaceous Green Goddess Dressing is perfect for hearty summer salads or as a tangy dip for fresh or roasted summer vegetables.

The post Green Goddess Dressing appeared first on Budget Bytes.

This creamy, herbaceous, and super velvety Green Goddess Dressing had everyone at the studio eating it straight out of the bowl! So versatile and easy to make, you can pair it with a simple side salad, mix it into a slaw, or serve it as a dip with a platter of snowpeas and baby carrots. PS It’s a touch more expensive than most homemade dressings, but it’s perfect if you have an herb garden or an abundance of herbs you need to do something with. Plus you know exactly what’s in it. (I can’t identify half of the ingredients in a name-brand Green Goddess dressing because so many are chemical preservatives.)

Overhead shot of Green Goddess Dressing in a wood bowl garnished with herbs.

What Is Green Goddess Dressing?

Bright and herbaceous, the original Green Goddess Dressing was created in 1923 in San Francisco as an homage to an actor in the play The Green Goddess. There are many variations of Green Goddess, but the basic ingredients remain the same. The original recipe used multiple fresh herbs, anchovies, lemon juice, and mayonnaise. My recipe keeps with tradition by mixing herbs but simplifies the original recipe significantly to keep it budget-friendly.

Ingredients for Green Goddess Dressing

This is such a lovely summer dressing for any salad, but pairs exceptionally well with a hearty slaw. It is also a great way to use up any fresh herbs that you have on hand, so feel free to play with this ingredient list. Just make sure to use tender herbs, and leave woodier herbs (like Rosemary) for different preparations. Here’s what you’ll need to make delicious Green Goddess Dressing:

  • Italian Parsley, Basil, and Fennel Fronds: are the green in our Green Goddess. The fennel fronds add a black licorice note and can be substituted with tarragon. Feel free to add other fresh herbs you want to use up, like mint or dill. The key to success with this Green Goddess dressing recipe is to use fresh herbs, so if you only have dried, try making a different dressing.
  • Sour Cream: Adds tangy creaminess to the dressing. If you don’t have sour cream, try Greek yogurt or mayonnaise. We also have an excellent tutorial for How To Make Sour Cream.
  • Green Onions: add a mild onion flavor and can be substituted with chives or, in a pinch, white onion or shallot. If you don’t like onions, just omit them.
  • Garlic: is used for pungency, though there’s not enough in the dressing to give it a garlicky top note. Feel free to add more than what my recipe calls for to adjust to your taste. If you’re not a garlic fan, just leave it out.
  • Lemon: the juice and zest lend citrus notes and help pull everything together. If you don’t have lemon, substitute it with additional vinegar, or try using a lime.
  • Apple Cider Vinegar: adds a soft fruity acidity. You can use any other mild vinegar like rice wine or white wine. Deeply colored vinegars like balsamic and red wine, will muddy the color of the dressing, but if it’s all you have, they will still taste great.

What PairS With Green Goddess Dressing?

This velvety, tart dressing has grassy notes from all of the herbs it’s made with and pairs beautifully with any hearty salad, especially the Green Goddess Salad it was created for. Use it to dress a Simple Side Salad, or use it as substitute for the dressing in Easy Creamy Cole Slaw. This Green Goddess Salad Dressing recipe is also great as a dip for Vegetable Snack Packs and Roasted Summer Vegetables.

How To Store Green Goddess Dressing

Add any leftover dressing to an airtight container and refrigerate for up to a week. While some people do freeze their Green Goddess Dressing, it will dull the color and the flavor and you will have to blend it again, as the components tend to separate as they thaw. I prefer to refrigerate it.

Overhead shot of Green Goddess Dressing in a wood bowl garnished with herbs.
Side shot of Green Goddess Dressing in a wood bowl with a black spoon drizzling some in.
Print

Green Goddess Dressing

This creamy, herbaceous Green Goddess Dressing is perfect for hearty summer salads or as a tangy dip for fresh or roasted summer vegetables.
Course Dressing, Salad
Cuisine American
Total Cost ($6.73 recipe / $0.42 serving)
Prep Time 5 minutes
Total Time 5 minutes
Servings 16 2 Tbsp servings
Calories 34kcal

Ingredients

  • 1 cup basil leaves $2.99
  • 1/2 cup Italian parsley leaves $0.24
  • 1/4 cup fennel fronds* $0.77
  • 4 green onions, roots removed $0.45
  • 2 cloves garlic, minced $0.16
  • 1 lemon, juiced and zested $0.79
  • 1 cup sour cream $1.25
  • 1 Tbsp apple cider vinegar $0.06
  • 1/8 tsp salt, or more to taste $0.01
  • 1 pinch fresh ground black pepper, or more to taste $0.01

Instructions

  • Rough chop the basil leaves, Italian parsley leaves, fennel fronds, and green onions. Mince garlic. Zest and juice the lemon. Measure out the sour cream and the apple cider vinegar.
  • Add the sour cream to a blender. Top with the basil leaves, Italian parsley leaves, fennel fronds, green onions, garlic, lemon juice and zest, apple cider vinegar, salt, and black pepper. Puree until smooth. If necessary, add more salt and pepper to taste. Drizzle over your favorite salad and enjoy!

See how we calculate recipe costs here.

Notes

*Fennel fronds are the wispy, licorice flavored leaves on a fennel bulb. If you cannot source them, try using tarragon instead.

Nutrition

Serving: 1serving | Calories: 34kcal | Carbohydrates: 2g | Protein: 1g | Fat: 3g | Sodium: 25mg | Fiber: 0.4g

How to Make Green Goddess Salad Dressing – Step by Step Photos

Overhead shot of Green Goddess Dressing ingredients on a wood cutting board.

Rough chop 1 cup basil leaves, 1/2 cup Italian parsley leaves, 1/4 cup fennel fronds, and 4 green onions. Mince 2 cloves garlic. Zest and juice 1 lemon.

Overhead shot of Green Goddess Dressing in a blender.

Add 1 cup of sour cream to a blender. Top with basil leaves, Italian parsley leaves, fresh fennel fronds, green onions, garlic, the juice and zest of 1 lemon, 1 tablespoon of apple cider vinegar, 1/8th teaspoon salt, and 1 pinch of black pepper. Puree until smooth. If necessary, add more salt and pepper to taste. Drizzle over your favorite summer salad or use as a dip for summer veggies!

Side shot of Green Goddess Dressing in a wood bowl with a black spoon drizzling some in.

More Easy Salad Dressings

The post Green Goddess Dressing appeared first on Budget Bytes.

Lemon Meringue Butter Cake

This moist and fluffy butter cake is bursting with bright lemon flavor, topped with a crispy toasted meringue that practically melts in your mouth. Talk about one unique dessert! So you’ve heard of lemon meringue pie… but what about lemon meringue cake? It’s the delicious dessert mashup you never knew you wanted, combining a tender […]

The post Lemon Meringue Butter Cake first appeared on Love and Olive Oil.

This moist and fluffy butter cake is bursting with bright lemon flavor, topped with a crispy toasted meringue that practically melts in your mouth. Talk about one unique dessert!

So you’ve heard of lemon meringue pie… but what about lemon meringue cake? It’s the delicious dessert mashup you never knew you wanted, combining a tender lemon butter cake with swirls of crispy meringue.

Cut squares of Lemon Meringue Butter Cake on a marble background with white knife and stack of plates in the background.

Baking is as much about texture as it is flavor, and one of my favorite tricks to elevate baked goods is to introduce a textural contrast, in this case via a crispy meringue topping.

I’d actually brainstormed and tested a lemon meringue blondie a few years back, which proved frustratingly problematic (the blondie wouldn’t fully bake with the meringue topping, I still have no idea why).

So when I decided to attempt a cake with a similar meringue topping, I pulled out my first test cake from the oven fully expecting an underbaked disaster.

Disaster it was not.

I was pleasantly surprised, as I fully expected this one to give me a lot more trouble (though I still tested it a few times, tweaking the flavors and the proportion of cake to meringue [my first cake was like 4 inches tall, no exaggeration]).

In the end, the butter cake base bakes perfectly in the time it takes for the meringue to get golden brown and crispy, and the result is ever so satisfying, both tastefully and texturally.

(more…)

Banana Pound Cake

Get ready to go bananas over this banana pound cake! It’s perfectly moist, rich and buttery, and ready in under an hour. Yum! If you’re anything like me, you’re always on the lookout for new dessert recipes that are both delicious and easy to make. And…

Get ready to go bananas over this banana pound cake! It’s perfectly moist, rich and buttery, and ready in under an hour. Yum! If you're anything like me, you're always on the lookout for new dessert recipes that are both delicious and easy to make. And if you're a fan of bananas, you're going to...

Read More

This article was written and published by Oh My Veggies. It may not be reproduce or republished without permission of the author. The original article can be found here: Banana Pound Cake.

Banana Pound Cake

This article is from Delicious Everyday.
Get ready to go bananas over this banana pound cake! It’s perfectly moist, rich and buttery, and ready in under an hour. Yum! If you’re anything like me, you’re always on the lookout for new dessert recip…

This article is from Delicious Everyday.

Get ready to go bananas over this banana pound cake! It’s perfectly moist, rich and buttery, and ready in under an hour. Yum! If you're anything like me, you're always on the lookout for new dessert recipes that are both delicious and easy to make. And if you're a fan of bananas, you're going to...

Read On →

This content is copyrighted protected by DeliciousEveryday.com.

©2017 Delicious Everyday.

All content in this feed (including photographs and text) are copyrighted to Delicious Everyday and may not be republished in part or full without written permission and appropriate credit. Please contact me for republication or syndication rights.

If you suspect copyright infringement please contact me.

Chocolate Orange Streusel Muffins

Chocolate and orange together in one mouthwatering muffin! Studded with dark chocolate chunks and piled high with a crunchy chocolate streusel topping, these muffins are, simply put, showstoppers. These orange-scented muffins are studded with dark chocolate chunks and topped with a sweet and salty cocoa streusel that bakes up delightfully crisp and crunchy, providing the […]

The post Chocolate Orange Streusel Muffins first appeared on Love and Olive Oil.

Chocolate and orange together in one mouthwatering muffin! Studded with dark chocolate chunks and piled high with a crunchy chocolate streusel topping, these muffins are, simply put, showstoppers.

These orange-scented muffins are studded with dark chocolate chunks and topped with a sweet and salty cocoa streusel that bakes up delightfully crisp and crunchy, providing the perfect textural contrast to the lusciously soft and moist interior.

Chocolate Orange Streusel Muffins in natural newsprint tulip wrappers, on a square marble trivet with mandarin oranges on the side.

Ever wonder about the evolution of a recipe?

In this case, I actually set out to make craquelin-topped muffins, where I placed a disc of craquelin on top of the unbaked muffin batter, hoping it’d rise and crackle like a cream puff.

My first test came out surprisingly well (I was shocked, actually), but subsequent batches were not quite so aesthetically pleasing. Ultimately I nixed the idea (brilliant as it may be) just because the results were so inconsistent.

But I loved the taste and texture of the crispy craquelin on top of the softer muffin base—the rich chocolate flavor and punch of salt was the perfect contrast to the tender orange muffin. I didn’t want to lose that, so I decided to replace the craquelin with a chocolate streusel topping instead to achieve the same textural contrast but hopefully with more consistent results.

I quickly realized that a chocolate streusel is nearly identical to the components of chocolate craquelin—flour, brown sugar, cocoa powder, butter and salt—just with slightly more flour and crumbled instead of rolled into disks. So really, I didn’t have to sacrifice anything in the end!

Row of Chocolate Orange Muffins with chocolate streusel on top, on a gray background, baked in newsprint tulip wrappers.

I tested chocolate streusels with both melted and cold butter, and ultimately decided on the cold butter version as I found it to be crunchier and less prone to sinking than the melted version. It comes together somewhat like a pie dough, although you want to keep working it and rubbing the butter into the flour and sugar mixture until it comes together into a dry dough; you won’t have visible chunks of butter like with pie dough.

The crunchy muffin tops are arguably the best part of any muffin, doubly so for this version with its crunchy, salty chocolate streusel topping. That said, you can skip the streusel if you really want to; instead, sprinkle the tops with granulated sugar and add few chunks of chocolate to finish them off.

(more…)

Orange Olive Oil Cake

This article is from Delicious Everyday.
Orange olive oil cake is a type of cake that is made with olive oil and fresh orange juice and zest. It’s a simple yet elegant cake that is perfect for a variety of occasions, from dinner parties to afternoon t…

This article is from Delicious Everyday.

Orange olive oil cake is a type of cake that is made with olive oil and fresh orange juice and zest. It's a simple yet elegant cake that is perfect for a variety of occasions, from dinner parties to afternoon tea.  If you have not tried this orange juice and olive oil cake add it...

Read On →

This content is copyrighted protected by DeliciousEveryday.com.

©2017 Delicious Everyday.

All content in this feed (including photographs and text) are copyrighted to Delicious Everyday and may not be republished in part or full without written permission and appropriate credit. Please contact me for republication or syndication rights.

If you suspect copyright infringement please contact me.

Crab Dip

This creamy, spicy crab dip is so good you’ll be pushing a cracker into the corners of your serving dish to scoop up the last schmear.

The post Crab Dip appeared first on Budget Bytes.

This creamy, spicy crab dip is so good you’ll be pushing a cracker into the corners of your serving dish to scoop up the last schmear. At least that’s what Beth and I did when we annihilated it in the Budget Bytes Kitchen (In the name of research, of course, 😂 ). It’s so easy that it comes together in three steps. And you can serve it hot or cold! Get ready for your new favorite thing to bring to the party.

Overhead shot of crab dip in a white bowl surrounded by veggies.

What You’ll Need

This crab dip comes together in ten minutes. You should chill it before serving to thicken the cream cheese base, but you don’t have to if you’re low on time. Just serve it in a container set over ice. You can also bake it for a few minutes if you prefer to serve it hot.

Crab Meat – the real stuff is expensive, so we used imitation crab meat, and the results were divine. Choose your own adventure, but my money’s on the fish forgery. If you use real crab, drain it well, or your dip will end up runny.

Cream Cheese – acts like a binder and helps keep everything together. It also thickens the consistency of your dip.

Sour cream – adds an undeniable tang and smooth mouth feel.

Cheddar Cheese – the shreds will add texture and a sharp, earthy flavor.

Old Bay Seasoning – this blend of celery salt, red and black pepper, mustard powder, cayenne, and paprika adds a citrusy heat that doesn’t overpower the sweetness of the crab meat. You can substitute it with Cajun seasoning or Crab Boil seasoning.

Garlic Powder – raw garlic has a robust flavor that takes over a crab dip. Instead, use garlic powder which has mellow, roasted notes.

Hot Sauce – adds a smoky heat. Use as much (or as little) as your heart desires. You can substitute hot sauce with red pepper flakes or cayenne.

Lemon Juice – you need this hit of acid to break through the fattiness of the cream cheese and sour cream. If you don’t have lemon, use any white vinegar.

Scallions -add a soft onion flavor, texture, and freshness. You can also garnish with chopped Italian parsley or finely chopped raw onion. Soak raw onion in cold water for a minute to decrease its sharpness.

Crackers, Toasted Bread, Chips, Raw Veggies – lean into plain or lightly flavored crackers, so they don’t overpower the crab. Toasted bread and chips should be sturdy so they don’t break when dipped. Sweet peppers, celery sticks, and carrots sticks are all easy and economical choices.

Hand dipping cracker in crab dip.

Do I Serve Crab Dip Hot or Cold?

You can do both! If you want to prepare a hot version, sprinkle an additional 1/4 cup of shredded cheddar over the top and then warm in a 350°F oven until the cheese has melted and the crab dip is bubbly—about fifteen minutes. To serve cold, chill it in the fridge for at least a half hour. If you’re low on time, place the crab dip container over a bed of ice and serve right away.

What Goes With Crab Dip?

Crackers, toasted bread, chips, and raw vegetables are the traditional items served with crab dip. But you can also use it as a spread on toast or chicken. Drizzle it on fried eggs or french fries. Try to stick with milder flavors that won’t overpower the sweetness of the crab.

How To Store Leftovers

Place leftovers in an air-tight container with plastic film or wax paper directly over the surface of the dip. Refrigerate for up to five days and freeze for up to 3 months. Thaw frozen crab dip in the refrigerator overnight. Reheat thawed crab dip that you’d like to serve hot in a 350°F oven.

Hand squeezing lime on crab dip.
Overhead shot of crab dip.
Print

Crab Dip

This creamy, spicy crab dip is so good you'll be pushing a cracker into the corners of your serving dish to scoop up the last schmear! It comes together in three easy steps and you can serve it hot or cold.
Course Appetizer
Cuisine American
Total Cost ($5.07 recipe / $0.63 serving)
Prep Time 10 minutes
Servings 8 1/4 cup servings
Calories 109kcal

Ingredients

  • 4 oz cream cheese, softened $1.10
  • 1/4 cup sour cream $0.31
  • 1 tsp Old Bay Seasoning $0.16
  • 1 1/2 tsp lemon juice, freshly squeezed $0.39
  • 2 tsp hot sauce $0.04
  • 1/2 tsp garlic powder $0.04
  • 2 green onions, sliced in 1/8th inch rounds $0.22
  • 8 oz imitation crab, chopped $2.50
  • 1/4 cup sharp cheddar cheese* , shredded $0.31

Instructions

  • In a medium bowl, mix the cream cheese and sour cream until smooth.
  • Mix in Old Bay Seasoning, lemon juice, hot sauce, garlic powder, and green onions.
  • Mix in crab meat and cheddar cheese.
  • Refrigerate for at least 30 minutes and serve.*

See how we calculate recipe costs here.

Notes

*Use 1/4 cup more shredded cheddar to melt on top of the dip if you are serving it hot
*If you are serving the crab dip hot, top it with an additional 1/4 cup of shredded cheddar cheese and warm it in a 350°F oven until the cheese has melted and the crab dip is bubbly, about fifteen minutes.

Nutrition

Serving: 0.25cup | Calories: 109kcal | Carbohydrates: 7g | Protein: 4g | Fat: 8g | Sodium: 256mg | Fiber: 0.4g
Cracker in a bowl of crab dip.

How to Make Crab Dip – Step by Step Photos

Overhead shot of cream cheese and sourcream.

In a medium bowl, mix the 4 ounces of cream cheese and 1/4 cup of sour cream until smooth.

Overhead shot of spices in a bowl.

Mix in 1 1/2 teaspoons of Old Bay Seasoning, 1 1/2 teaspoons of fresh lemon juice, 2 teaspoons of hot sauce, 1/2 teaspoon of garlic powder, and 2 green onions sliced in 1/8th inch rounds (about 2 tablespoons).

Overhead shot of crab and cheese in a white bowl.

Mix in 8 ounces of imitation crab and 1/4 cup of shredded cheddar cheese.

Overhead shot of finished crab dip.

Refrigerate for at least 30 minutes and serve with crackers, bread, chips, or raw veggies. If you’re running low on time, place the serving dish over a bed of ice and serve right away. Get ready for this incredible crab dip to steal the show!

Overhead shot of crab dip.

More Easy Dips

caption

The post Crab Dip appeared first on Budget Bytes.