Pistachio Poke Cake
Turn a boxed cake mix and instant pudding mix into something that tastes homemade with this easy pistachio poke cake…
The post Pistachio Poke Cake appeared first on My Baking Addiction.
Turn a boxed cake mix and instant pudding mix into something that tastes homemade with this easy pistachio poke cake…
The post Pistachio Poke Cake appeared first on My Baking Addiction.
 Another day, another Kauai-inspired recipe! But this time, it’s our go-to cocktail while we’re on the island. Fresh, slightly smoky,…
From Seattle to Boston, discover the best restaurants along I-90 for every craving, with can't-miss local favorites, roadside gems, and iconic dining stops.
Level up your dip game next time you host an event with this delicious smoked salmon dip. All you need are three ingredients and a little bit of time.
With a creamy no-churn vanilla ice cream and tender chocolate cookies, our leveled-up homemade old-school ice cream sandwiches are the perfect nostalgic treat.
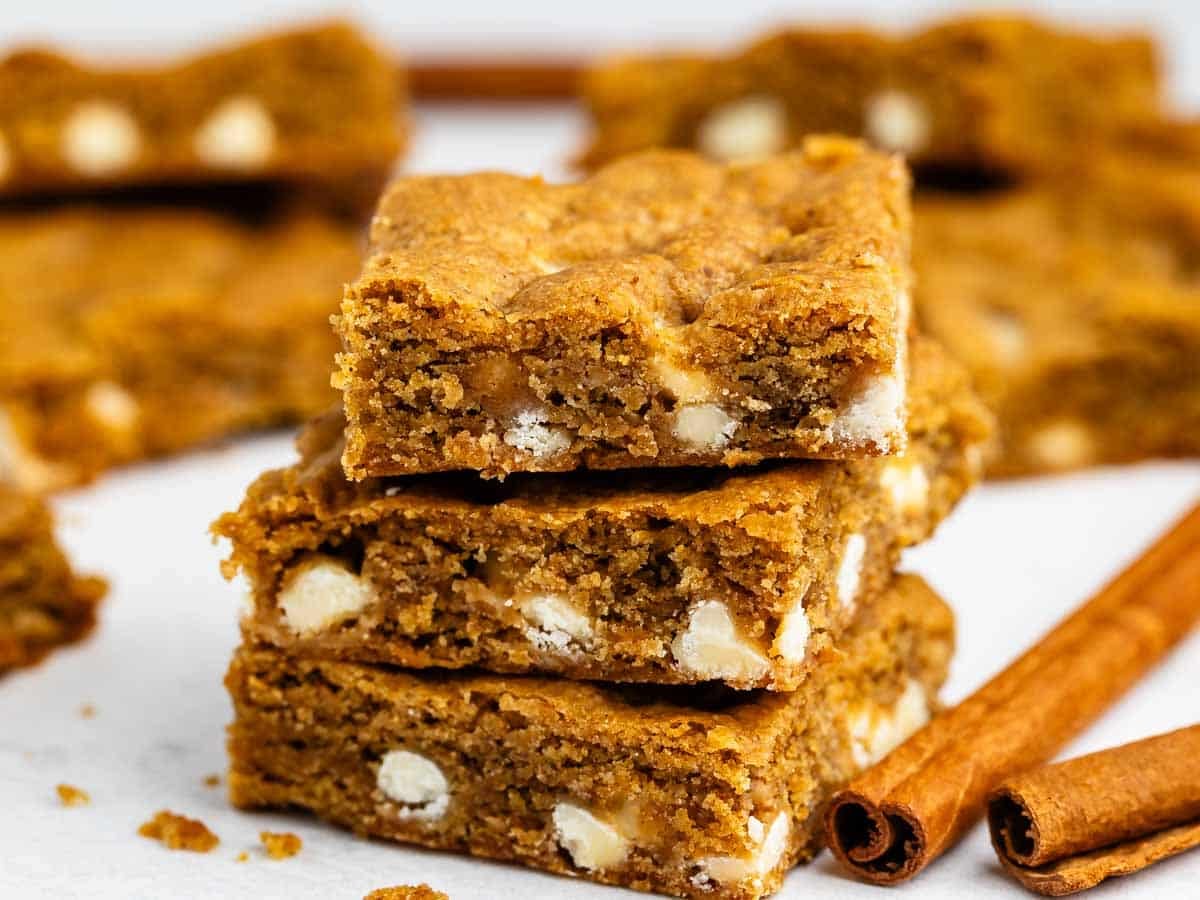 Pumpkin Blondies are a cross between brownies and pumpkin cookies: soft, chewy, and fudgy with tons of pumpkin and pumpkin spice flavor. These are the ultimate fall cookie bar recipe! I created this Pumpkin Blondie recipe from my regular all-purpose blondie recipe, the one I’ve made hundreds of times. By adjusting the amount of brown…
The post Pumpkin Desserts appeared first on Princess Pinky Girl.
Pumpkin desserts are what I bake the most once October hits. Think creamy pumpkin pies and cheesecakes, soft spiced bars under cream cheese frosting, and cookies with that warm cinnamon a…
Of all the vast and varied condiments available to American shoppers, this is the one people reach for more than any other. Can you guess what it is?
Creamy Corn and Zucchini Orzo is Summer Comfort Food Every summer I find myself looking for new ways to use all of the zucchini and sweet corn that seem to magically multiply in my kitchen. While I love tossing them into salads or grilling them, this c…
Chef Marcus Samuelsson tells Chowhound about the biggest grilling mistake limiting your outdoor menu and how to fix it with vegetables, no matter the season.
French supermarkets are spoiled for choice when it comes to butters, with these three butters in particular being worthy of envy. Here's what you should know.
Everyone loves a good piece of bacon, but you might love your next slice a little more if you add a few drops of this to the pan next time you make some.
If you're looking for ways to perk up your salmon fillets, skip the standard teriyaki in favor of this aromatic Japanese sauce. Your taste buds will thank you.
Sweet Liege-style waffles surrounded by classic toppings like Nutella, cookie butter, fresh berries, bananas, chocolate, and whipped cream make this Belgian Waffle Dessert Board a fun, interactive dessert everyone will love. Café Charm at Home Bring the charm of a Belgian waffle café right to your table with this easy dessert board! Let your guests…
The post Belgian Waffle Dessert Board appeared first on The BakerMama.
Turn an inexpensive pack of instant ramen into a cozy, flavor-packed meal with a clever shortcut that uses a common canned ingredient you may already own.
To uncover some of the best craft, light beers available today, we checked in with several bartenders from across the country to learn their favorites.
America's best-selling soda is no recent sales phenomenon. It has been a favorite since its release in 1886, and a marketing juggernaut for about that long.
Give your bratwurst a boost by pairing the sausages with this mustard that gets its sweetness from a classic breakfast ingredient. Here's how.
Culver's creamy frozen custard is one of the biggest draws to this iconic Wisconsin fast food chain. Here's where Culver's frozen custard comes from.
Want to eat like the pioneers did? Take a cue from the typical Oregon Trail breakfast routine in your own kitchen. Their go-to was a dish we all know well.
These pumpkin pie cookies combine a chewy brown sugar base with a real pumpkin pie filling in every bite. Perfect for easy fall baking!
Chia seeds are showing up a lot in recipes, touted for their fiber content and other benefits. Here's what happens to your body if you eat them every day.
If your canned baked beans taste a little bland, this simple pantry addition can add savory flavor and create a more exciting meal in minutes.
These Sweet and Spicy BBQ Meatballs are coated in a sticky honey BBQ glaze with just the right kick of heat, making every bite delicious!
The post Sweet and Spicy BBQ Meatballs appeared first on JCP Eats.

Chicken Broccoli Rice Casserole is one of my favorite weeknight dinners. I use shredded rotisserie chicken and already-cooked rice, so…
The post Chicken Broccoli Rice Casserole appeared first on Southern Food and Fun.