Beef and Broccoli can be so hit and miss, right? Sometimes it’s transcendent, other times it’s gloopy and chewy. I’ve figured out the secrets! If you’re a Chinese food lover, make this easy homemade Beef and Broccoli recipe for a healthy dinner that’s faster (and cheaper) than takeout. A few Asian pantry staples are all you need to make this stir fry that is seriously SO GOOD. Healthy (check) one-pan meal (check) done in less than an hour (check!) Make it with 20 minute Rice or Cauliflower Rice!
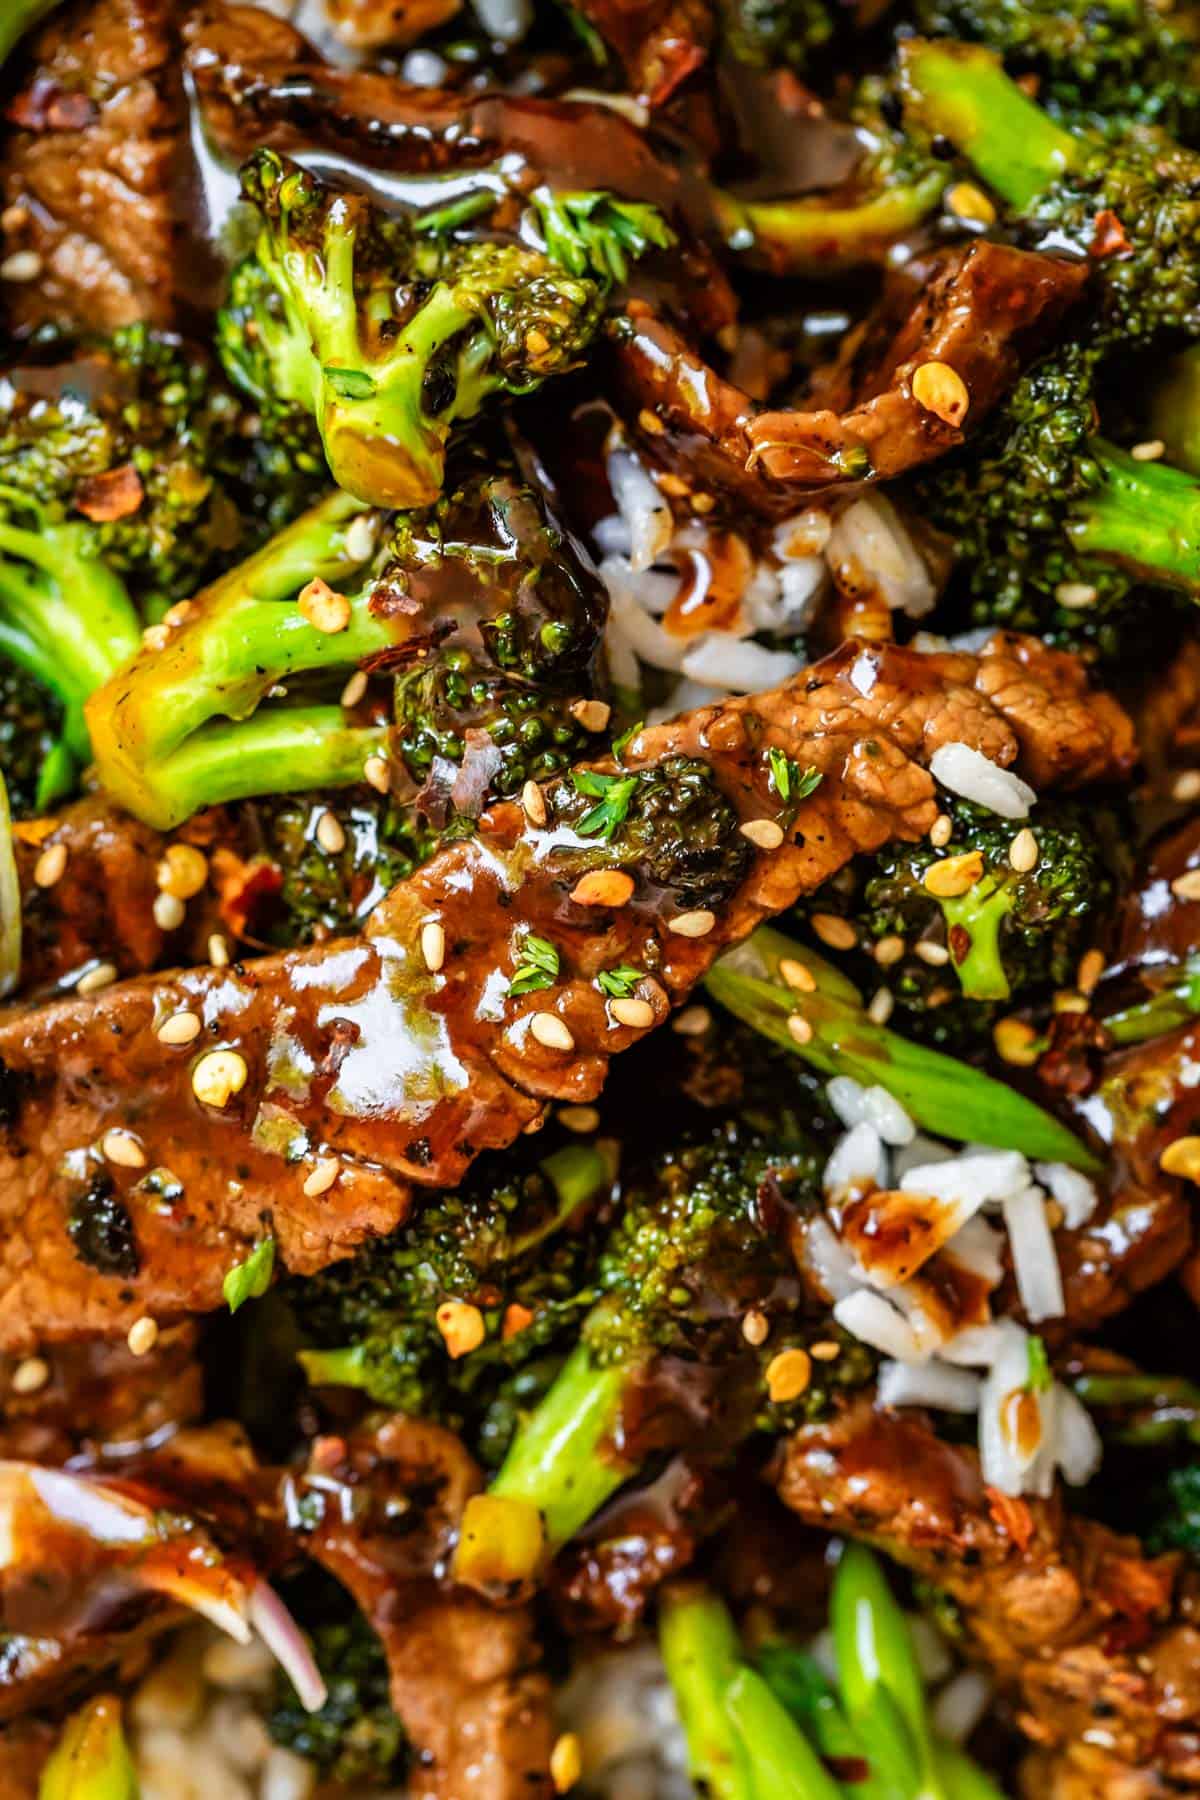
Table of Contents
I went out of state to visit my brother last weekend, who just bought a meth house. Kidding! Kind of. He was halfway through the purchase when he randomly (or maybe inspired!) thought to pay extra for a meth inspection and it came back positive. Gah!!
It’s all cleaned out now. The previous owners took care of decontamination (a tenant was the culprit.) The house was condemned by the state right away after the test came back. I was worried they would raze it to the ground! I’m so glad they were able to get it scrubbed, because the house is so cool!
It was built in 1923, and is sooo beautiful. One hundred year old houses have such a vibe, but they are a lot of work. We spent the weekend deep cleaning his kitchen cupboards and rummaging local antique shops for furniture that will fit the energy of a 1920s bungalow.
It was such a nice change of pace! It’s always so much more fun to clean someone else’s house than to clean your own, you know?? Why is that? If I had half that amount of energy for organizing my own house, we would be eating off the floor over here.
But alas, my 4 children conspire against me daily. Just yesterday I found a baggie of goldfish smashed all over the carpet upstairs, exactly 30 seconds before I had to be in a zoom meeting. You better believe I just left that nonsense right there. Hi, welcome to my house, would you like to clean it? Because I REFUSE.
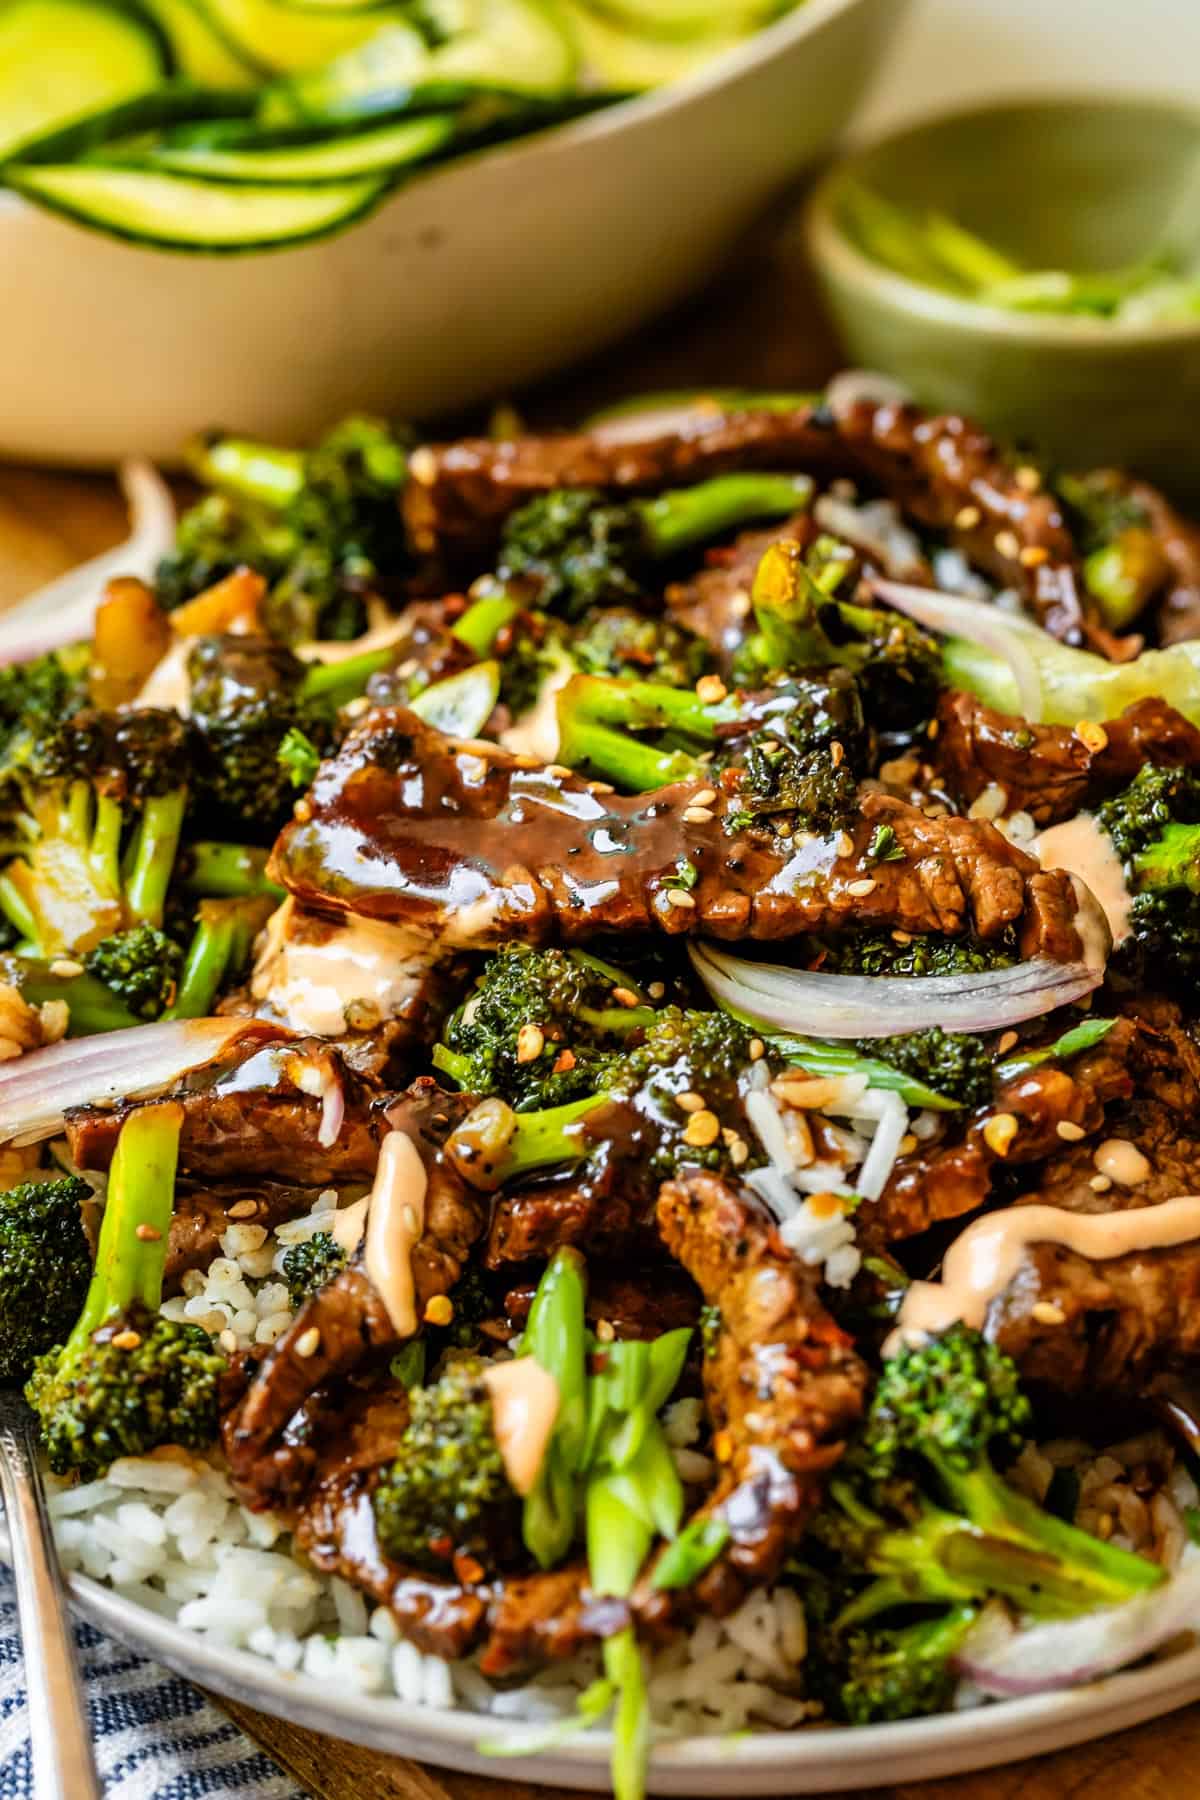
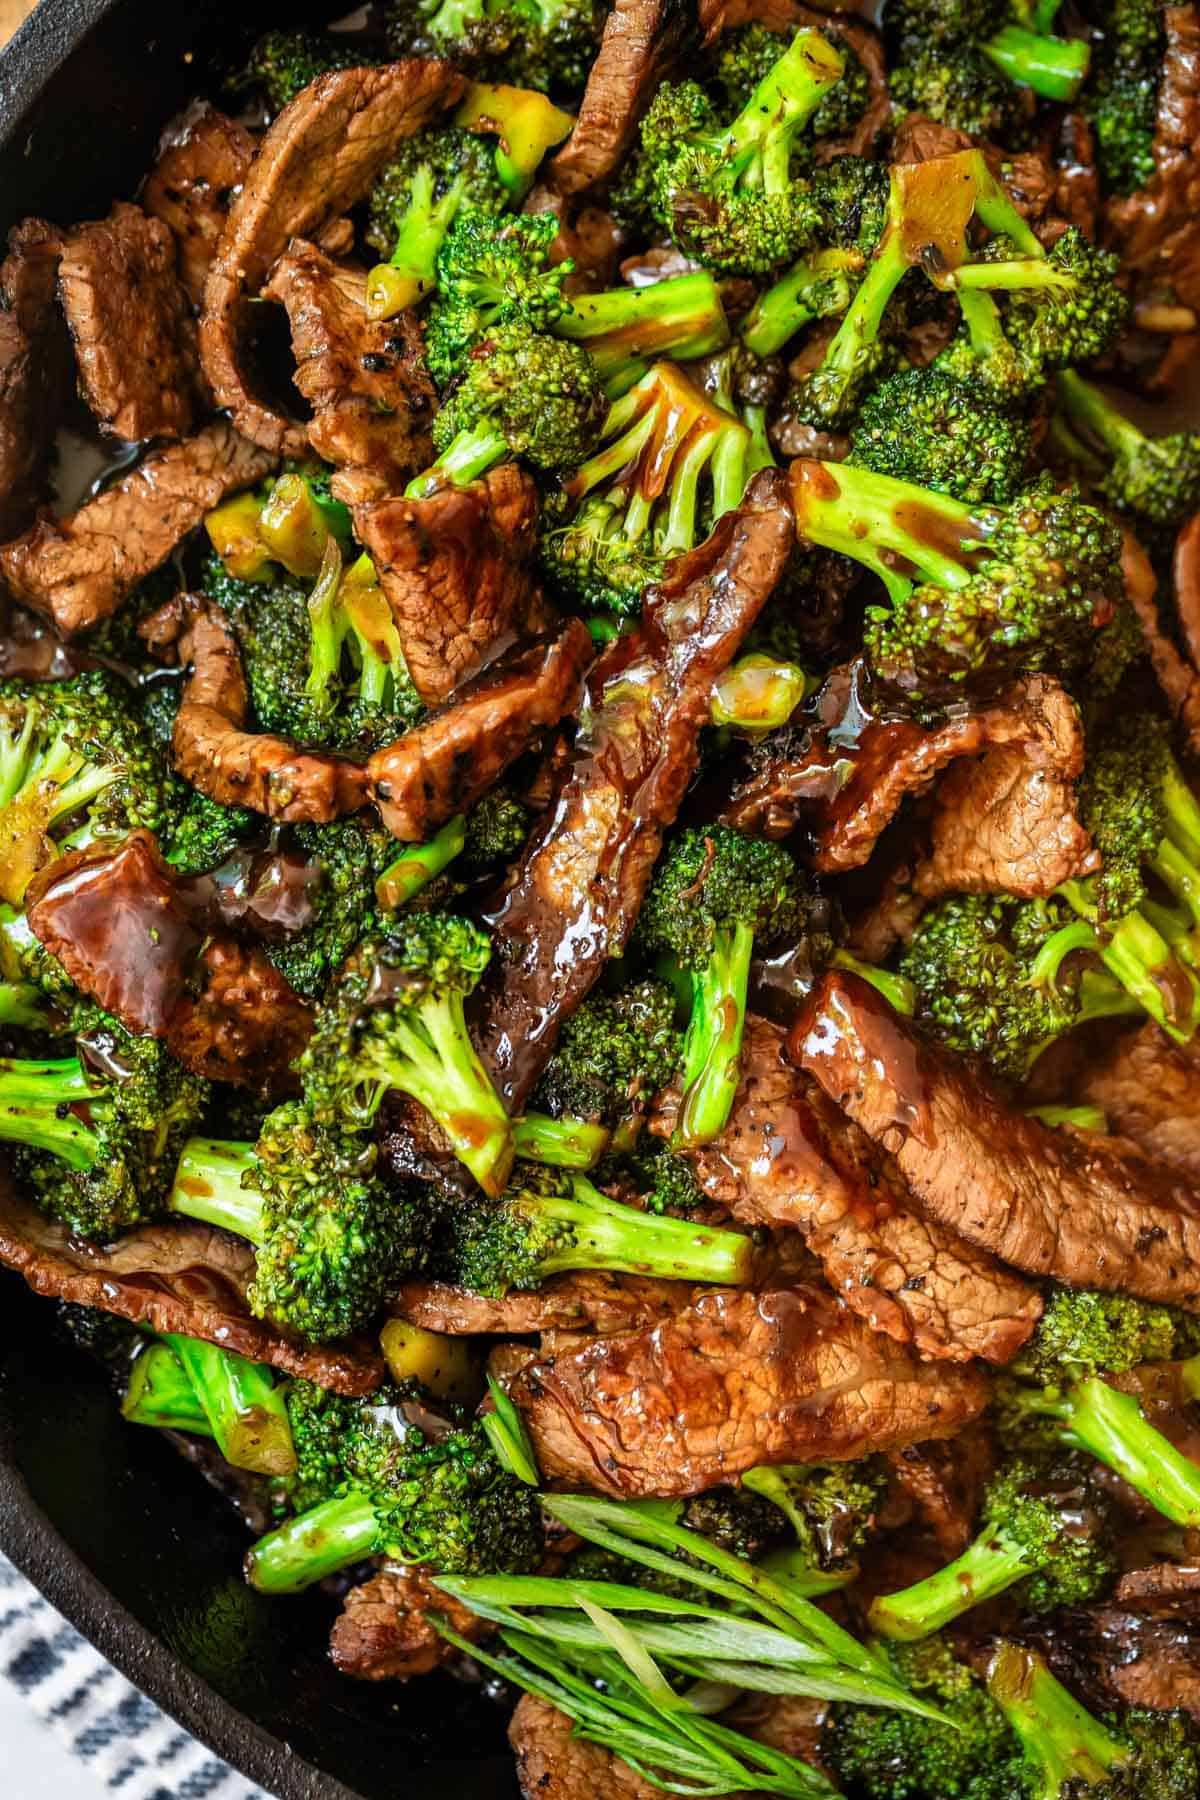
Beef and broccoli stir fry
I’m so excited to tell you about today’s recipe for Beef and Broccoli, and how it blows away any takeout Chinese I’ve ever had.
Honestly guys, I’ve never been a huge Beef and Broccoli fan. I love beef, and I love broccoli, so what’s my deal?? Turns out it’s the sauce I wasn’t in love with, which can sometimes be overwhelmingly sweet, cloyingly thick, or overly…fishy?
My BFF Sarah helps me with recipe development, and she discovered in testing that it’s the high amount of Oyster Sauce I find a little overwhelming when it comes to some recipes for Beef and Broccoli.
Oyster sauce is pretty magical stuff, and an absolutely essential ingredient for classic Beef and Broccoli. It adds amazing umami flavor, so I didn’t want to leave it out. I love this article all about Oyster Sauce, and reading about how it was made accidentally back in 1888 when someone left Oyster soup on to cook for too long 😂 .
It’s a very concentrated sauce that really amps up the flavor of Beef and Broccoli, I just wanted it to be less of a highlight and more of an accent, if that makes sense. Sarah adjusted the final recipe to have a little less Oyster sauce, and I was absolutely astonished by how much I loved it the next time I made it. The final dish is well balanced; not too sweet, not too salty, but just a perfect blend of rich flavors that is so uniquely Chinese, you will feel like you’re sitting in the restaurant. (Where are my fortune cookies??)
Beef and broccoli recipe ingredients
Is your pantry stocked for Asian cooking? If not, you will need to visit the Asian aisle at your grocery store, but won’t need to make a special trip to an international store. This is an overview, the recipe is at the bottom of the post!
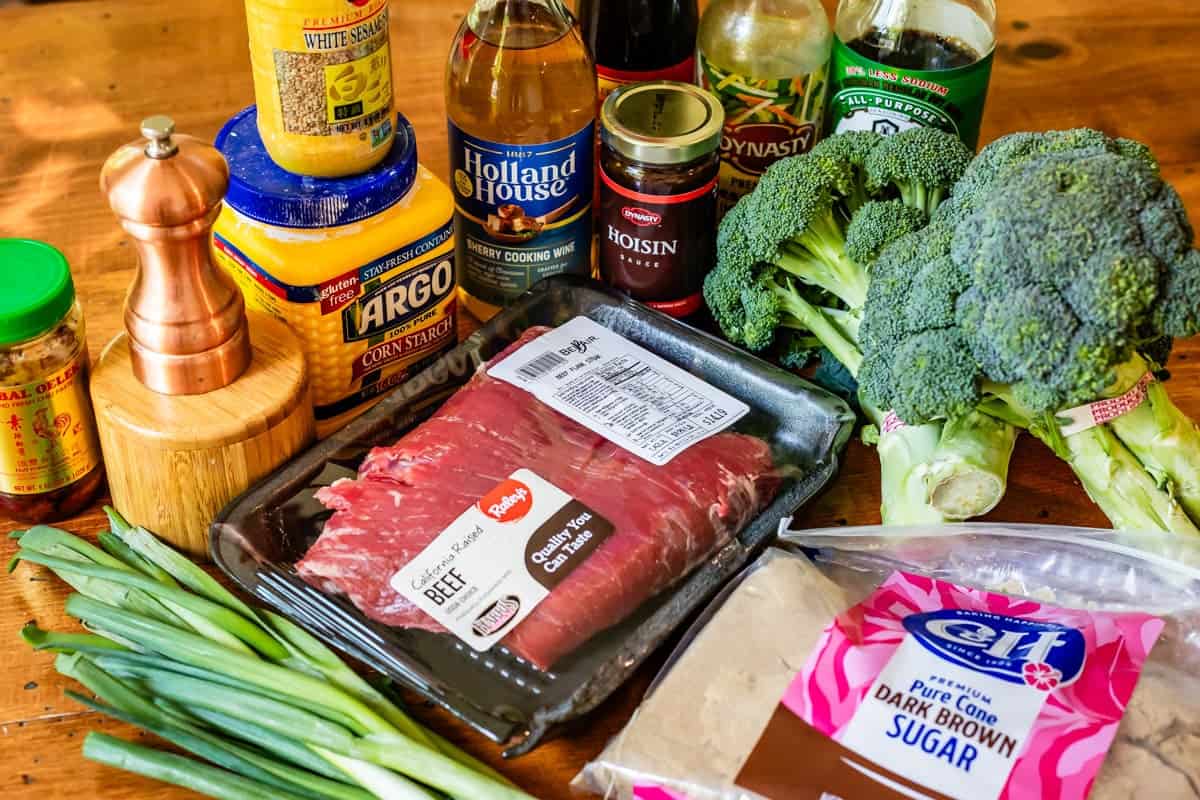
- 1 pound beef (flank steak, skirt steak, flat iron steak, or ribeye if you’re really treating yourself!)
- fresh broccoli
- Shaoxing wine (or sherry cooking wine)
- low-sodium soy sauce
- oil
- oyster sauce
- hoisin sauce
- chili paste (like sambal oelek)
- brown sugar
- sesame oil
- cornstarch
- rice, for serving
How to make beef and broccoli
First things first: pop your beef in the freezer for a few minutes so it gets partially frozen on the edges. This makes it 1000x easier to slice it as thin as we need it for this recipe.
Then we are breaking the cardinal rule of meat butchering: we’re going to slice this baby WITH THE GRAIN. Just once, like this.
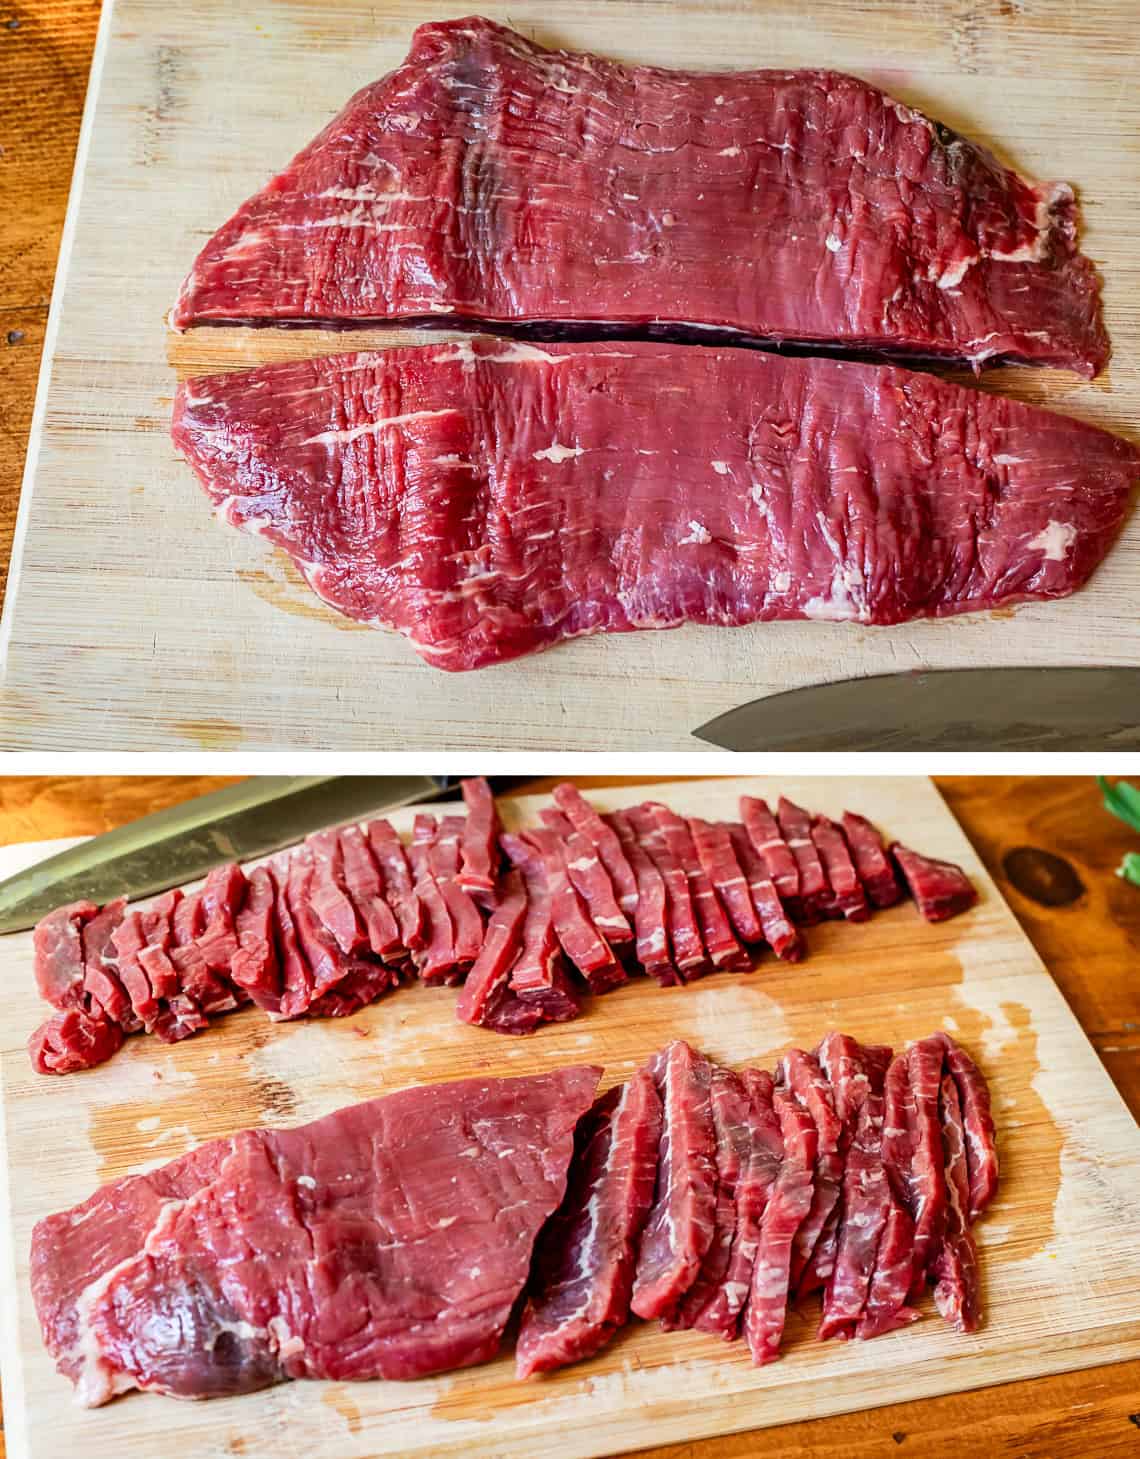
THEN we slice against the grain. The first long cut was so that we don’t have like 10 inch long strips of beef. Cutting against the grain means that your knife is perpendicular to where the lines of the meat are running. Can you see it in the photo above?
Meat is made up of long strands, and cutting against the grain means that our KNIFE is doing a lot of the cutting work, instead of relying only on our poor omnivorous teeth. Cutting a fantastic piece of meat very poorly will result in meat that has a chewy, tough texture no matter how much it cost, or how well you cooked it.
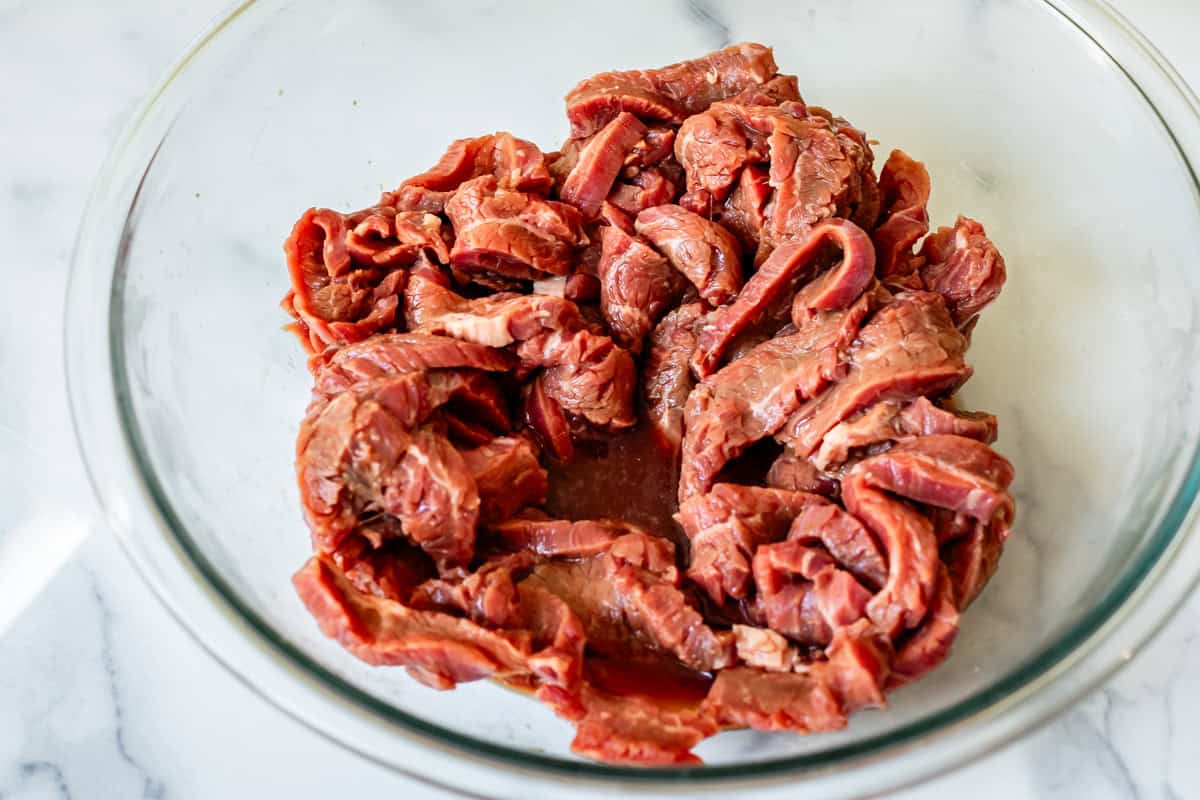
Toss your beef into the marinade for a few minutes. This marinade is so stupid easy, it’s just 3 ingredients: cornstarch, low sodium soy sauce, and Shaoxing wine. I had never heard of this wine before! It’s a classic ingredient in Chinese cooking. I had a heck of a time finding it! You can buy it online here, or an international market is probably your best bet. Shaoxing wine is of course traditional and brings the most authentic flavor, but I subbed Sherry cooking wine, and thought it tasted amazing.
Also, have you heard about cornstarch marinades in Chinese cooking? It’s a technique called “velveting” because the cornstarch reacts with the meat and basically acts as a meat tenderizer. It makes the beef so, so tender and perfect.

Take a hot minute to chop up your broccoli, before things get real over on the stove. If at this point you decide “I want more vegetables!” you could totally slice up some mushrooms, carrots, or peppers to cook along with the broccoli. It’s your thing, do what you wanna do.
Don’t forget the rice. Start the rice now, before we cook the beef, so it has time to steam. Did you catch my last post all about how I make rice for my family? It’s so easy. I usually make white rice for the kids and Cauliflower Rice (or Asian Cauliflower Rice) for me and Eric, because we like to eat low-carb dinners most nights. I often buy the pre-riced frozen cauliflower, because it’s so easy, just heat it up in a pan with some oil and salt.
Now it’s time to sear!
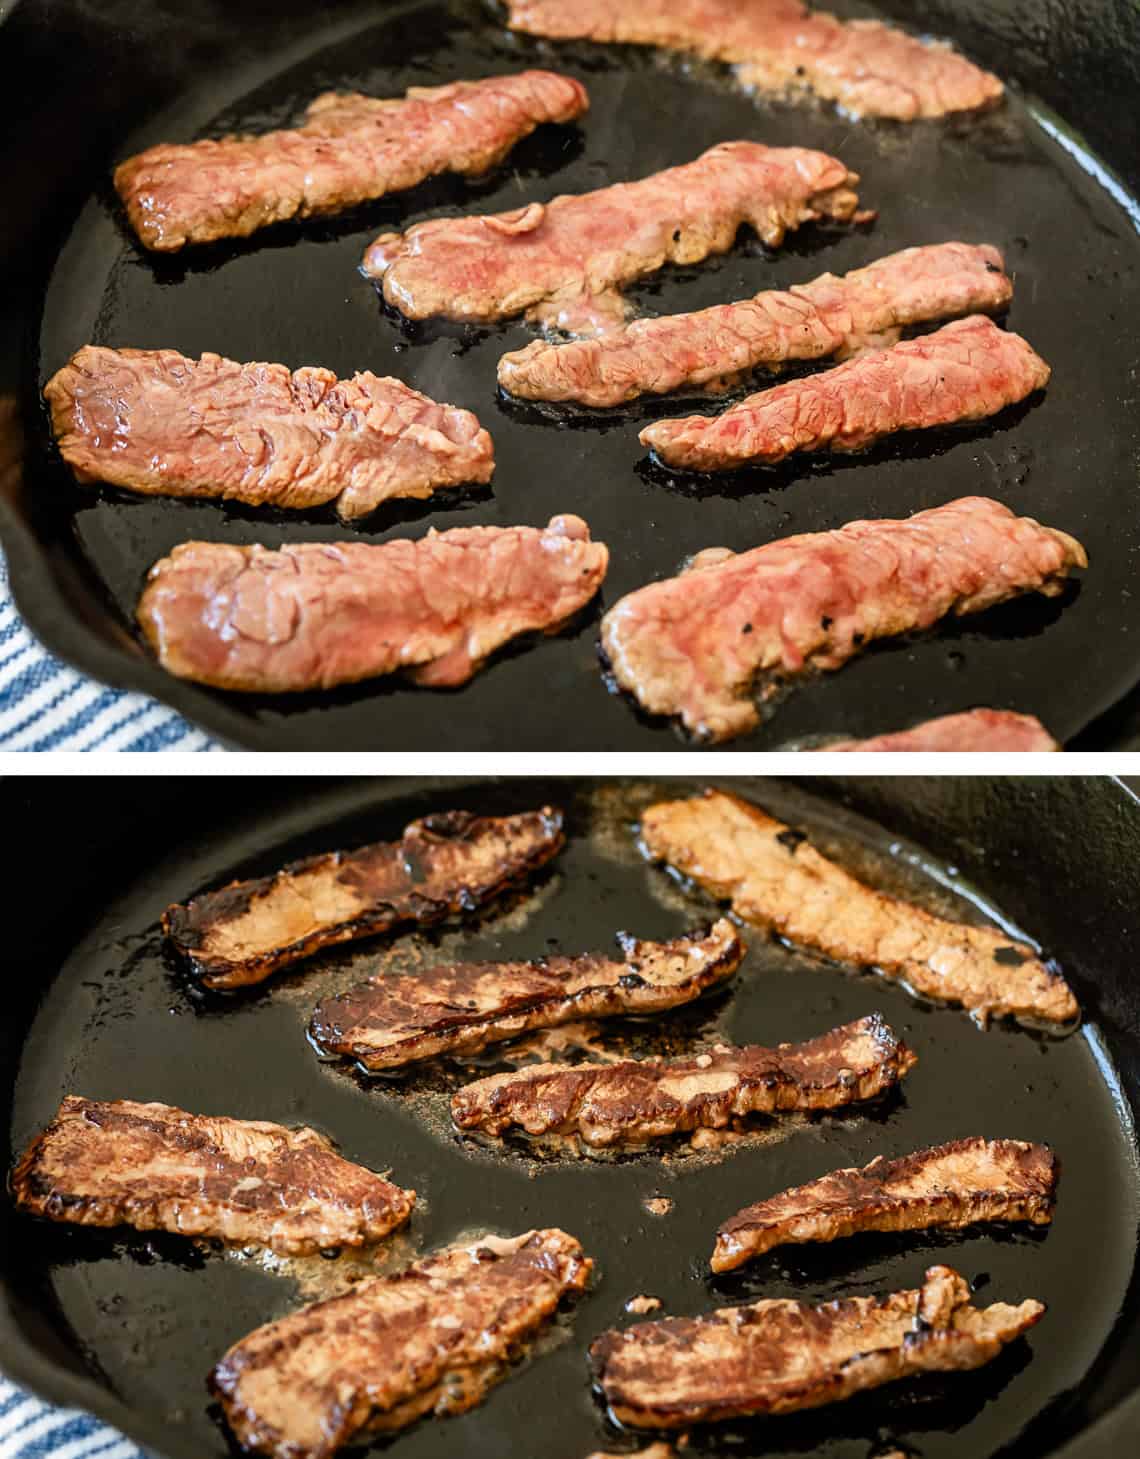
I love to sear my beef in half veggie oil, half sesame oil. Sesame oil is strong but I love love love the flavor. You can skip it and use regular oil if you like.
Whichever way you sear it, just make sure you are leaving enough space in the pan! The meat strips should not be touching each other. If you crowd them all in at once, it will cook but it will not get brown, and you miss out on tons of flavor. It’s so tragic. Don’t do it. Sear in batches and be patient.
You don’t even have to be that patient, this meat is so thin that it cooks in about 1 minute for each side! Remove it all to a plate and make way for some broccoli.
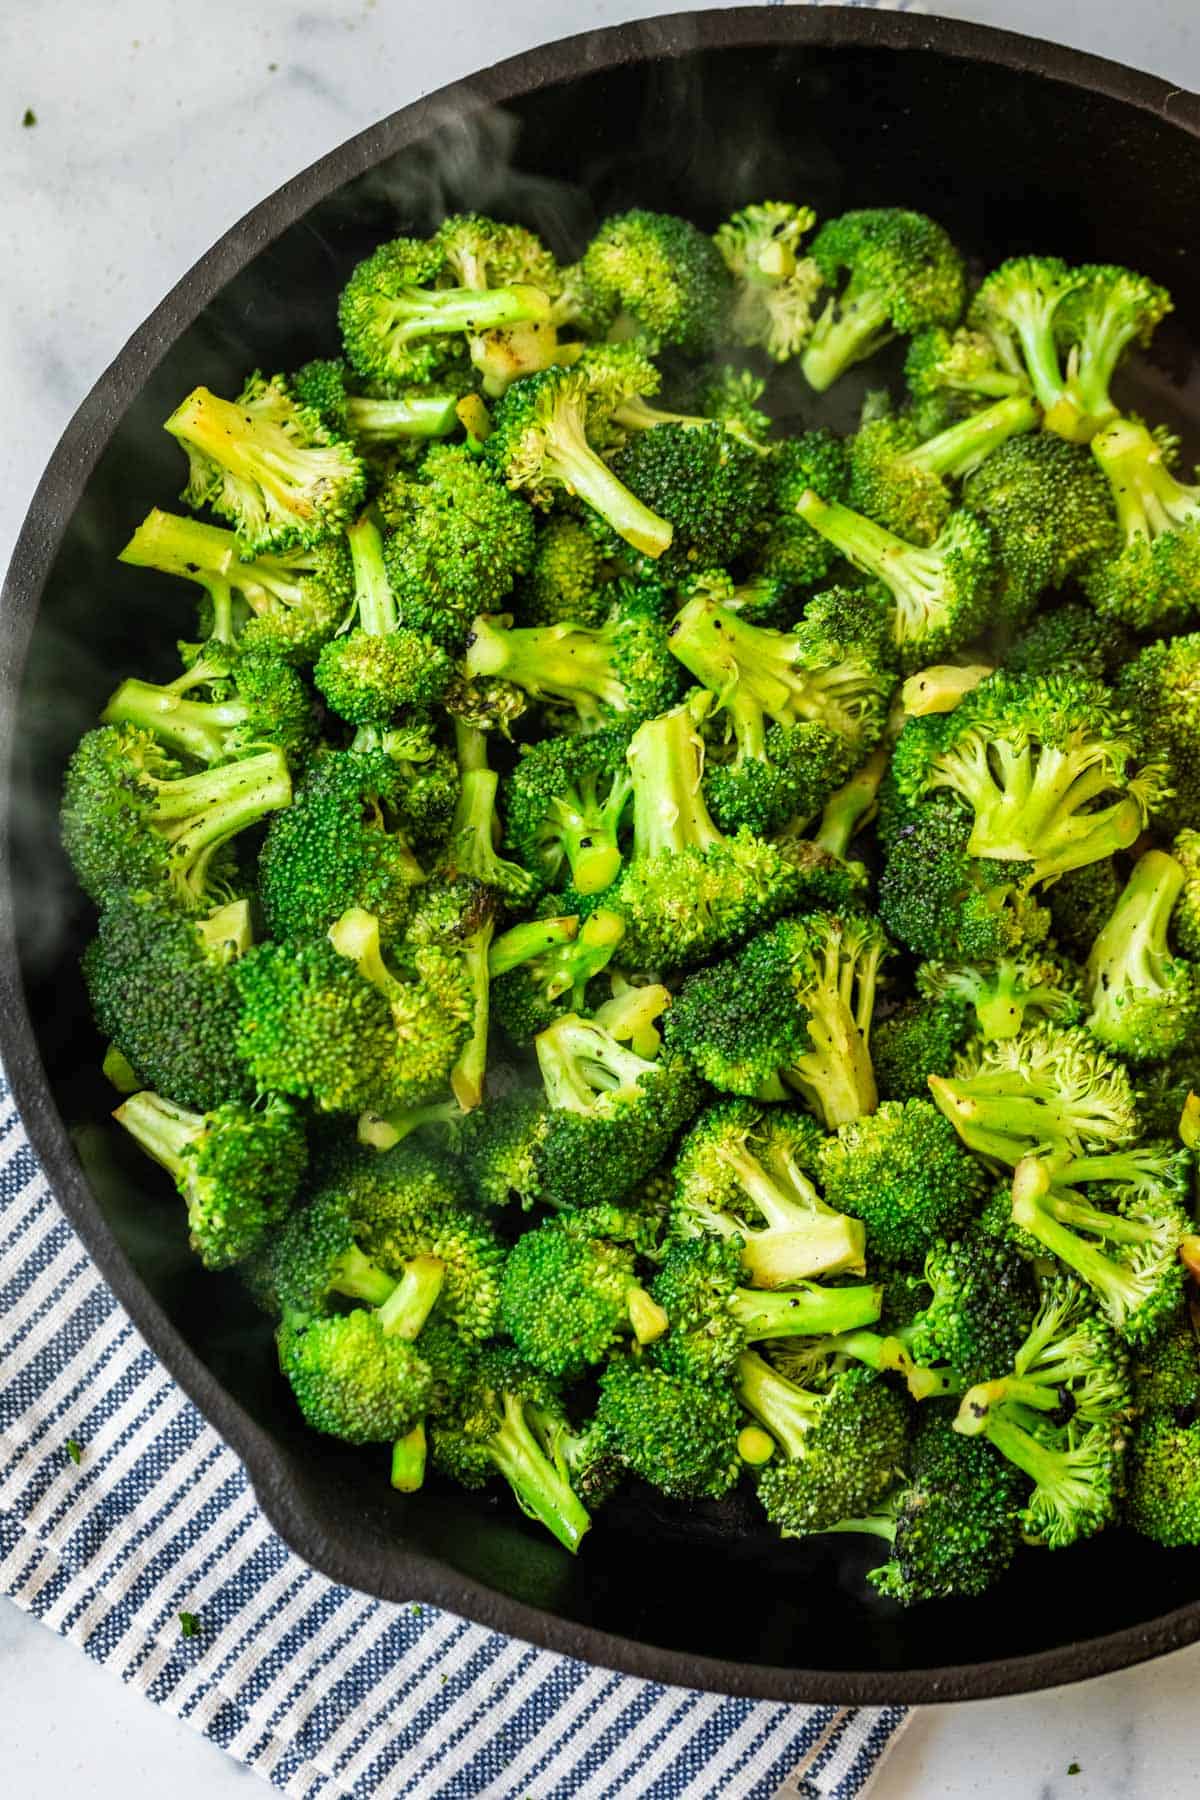
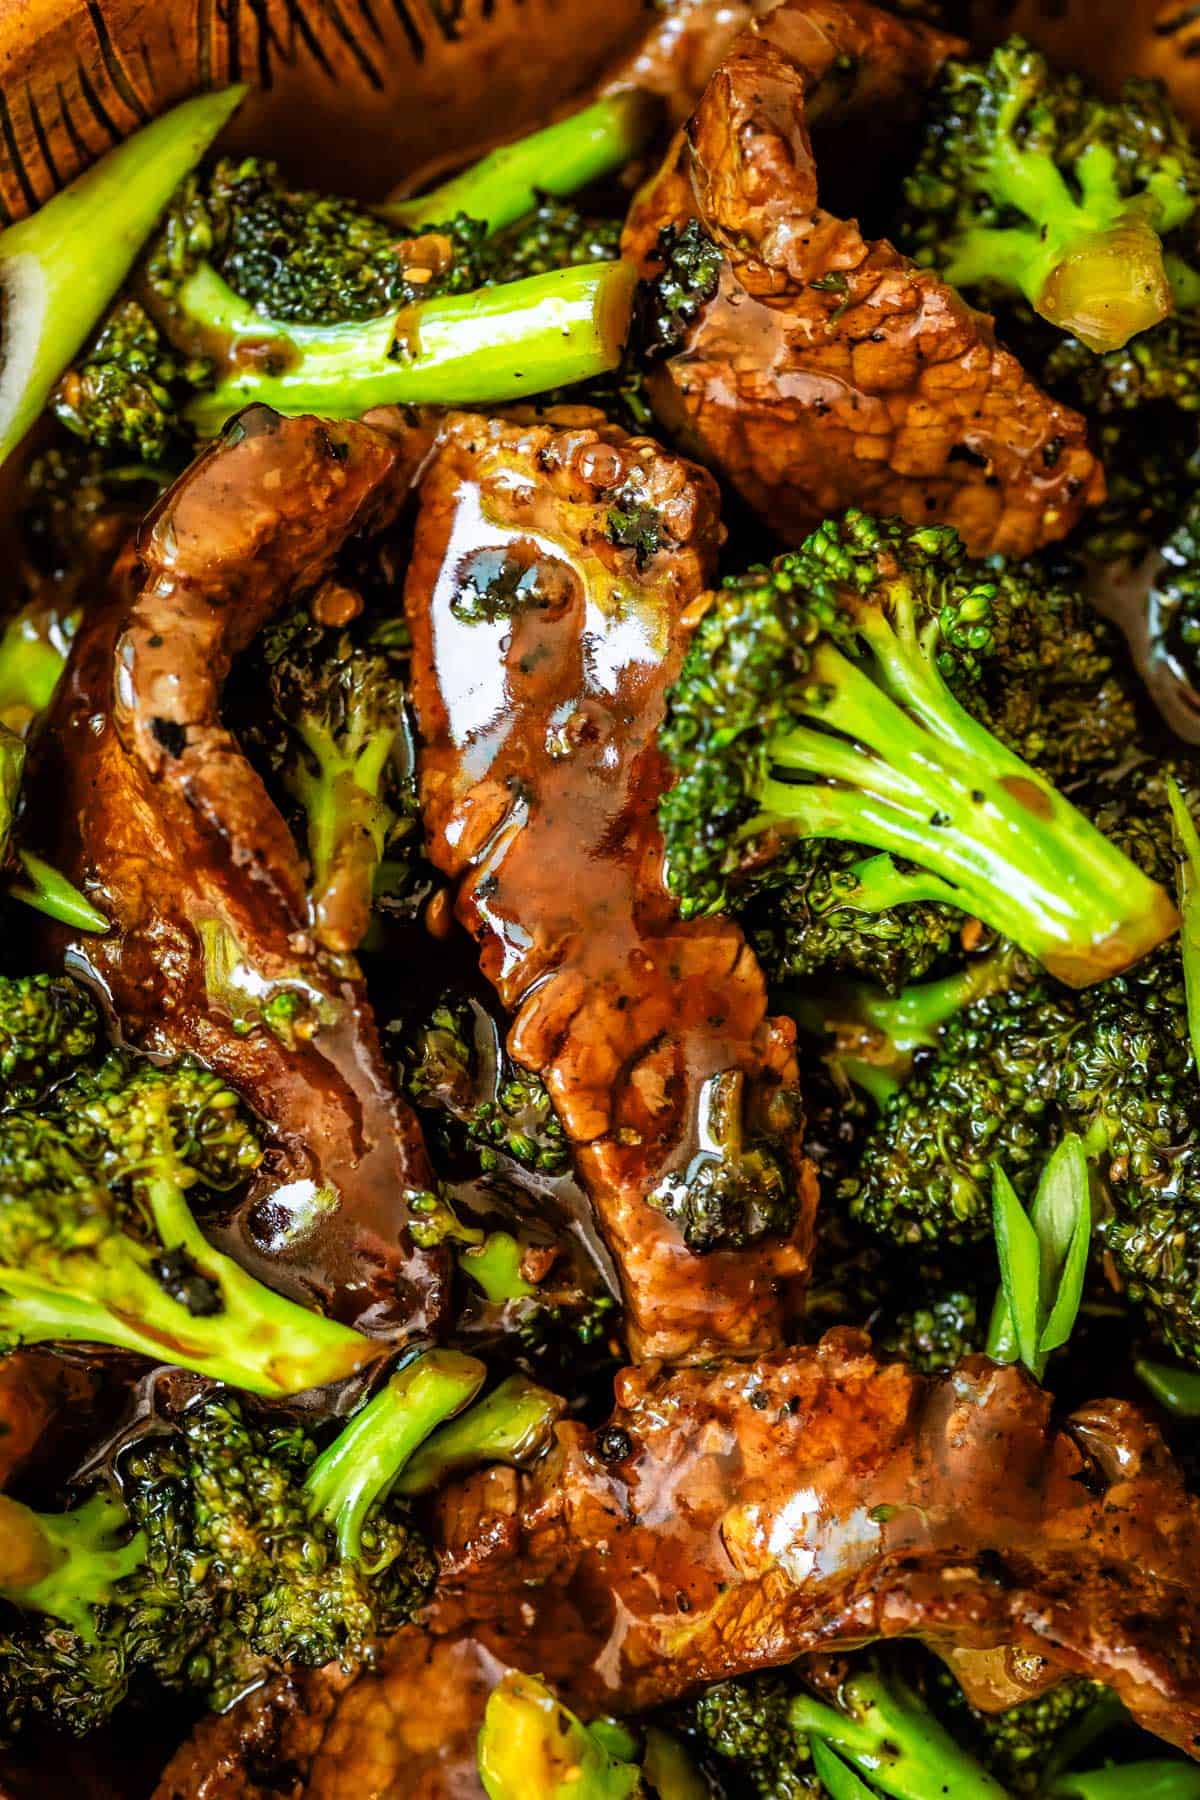
I also saute my broccoli in half sesame oil, half veggie oil. It’s so good! The other tip for doing the broccoli is to stir the pan constantly, and add water 1 tablespoon at a time. The pan is so hot by this point that the broccoli may start to scorch before it’s cooked all the way through. If you add water, a little bit at a time, it will sizzle and evaporate right away, creating steam that helps cook the broccoli. Keep going 2-3 minutes until you see the florets change color to a darker green. We want crisp-tender, not mushy!
Here are all the ingredients for the final sauce. It’s oyster sauce, hoisin sauce, chili garlic paste, brown sugar, sesame oil, cornstarch, and salt and black pepper It’s sooo good.
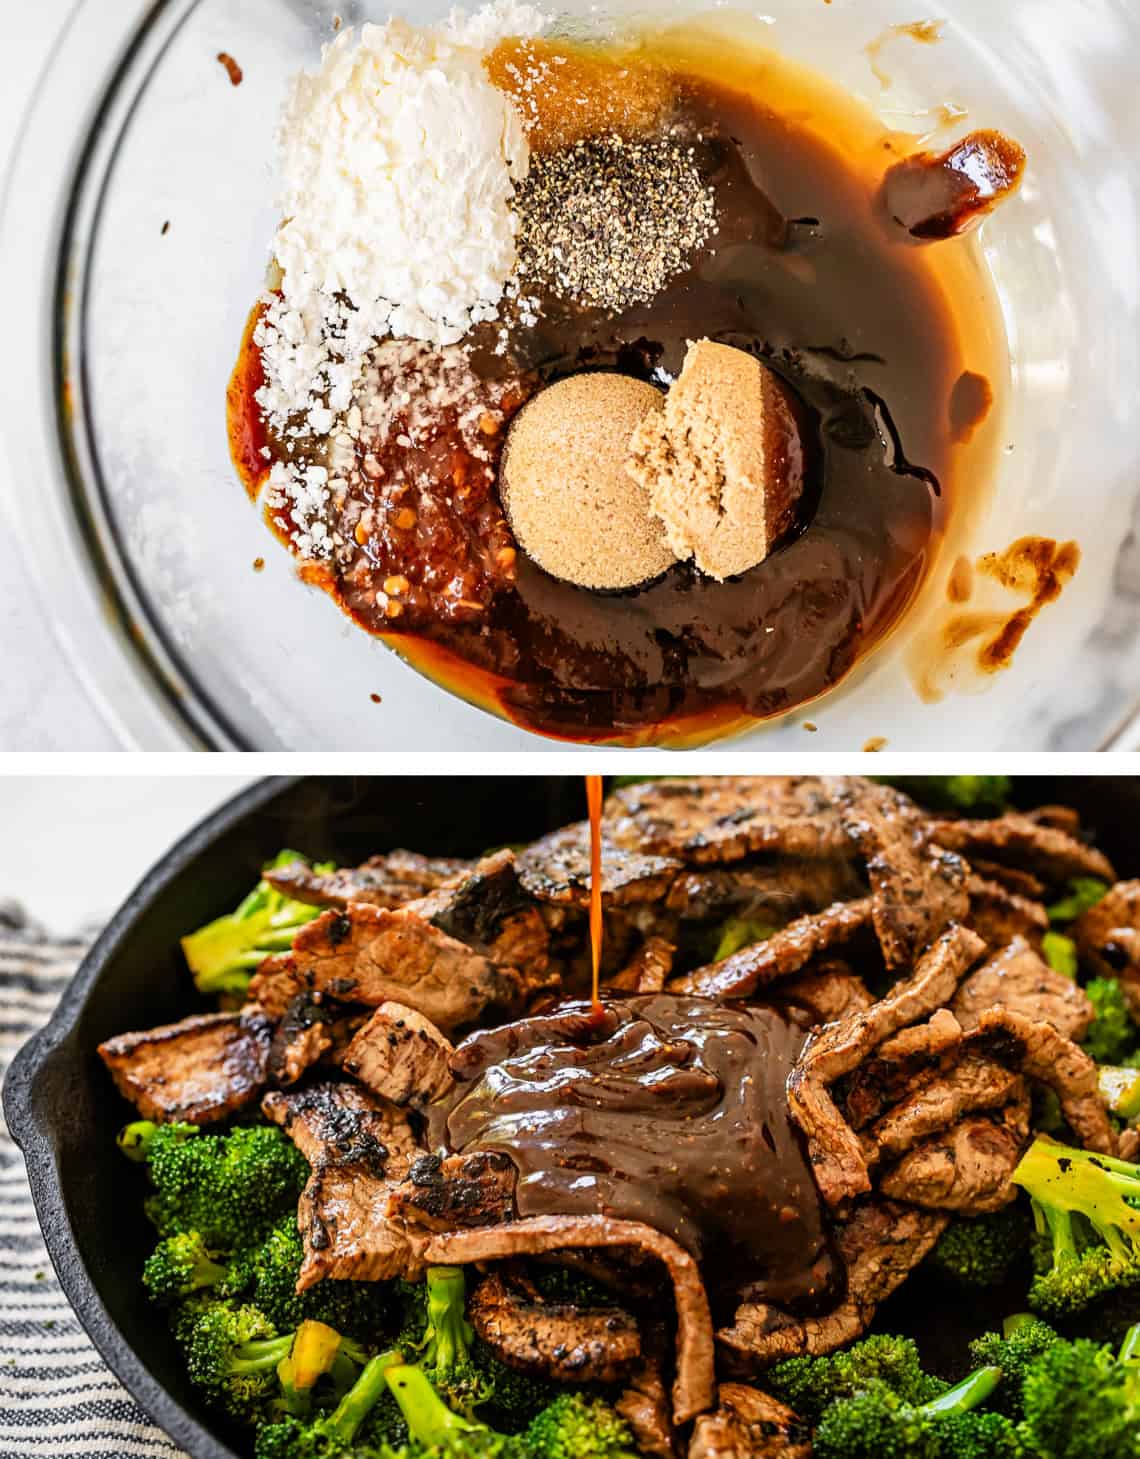
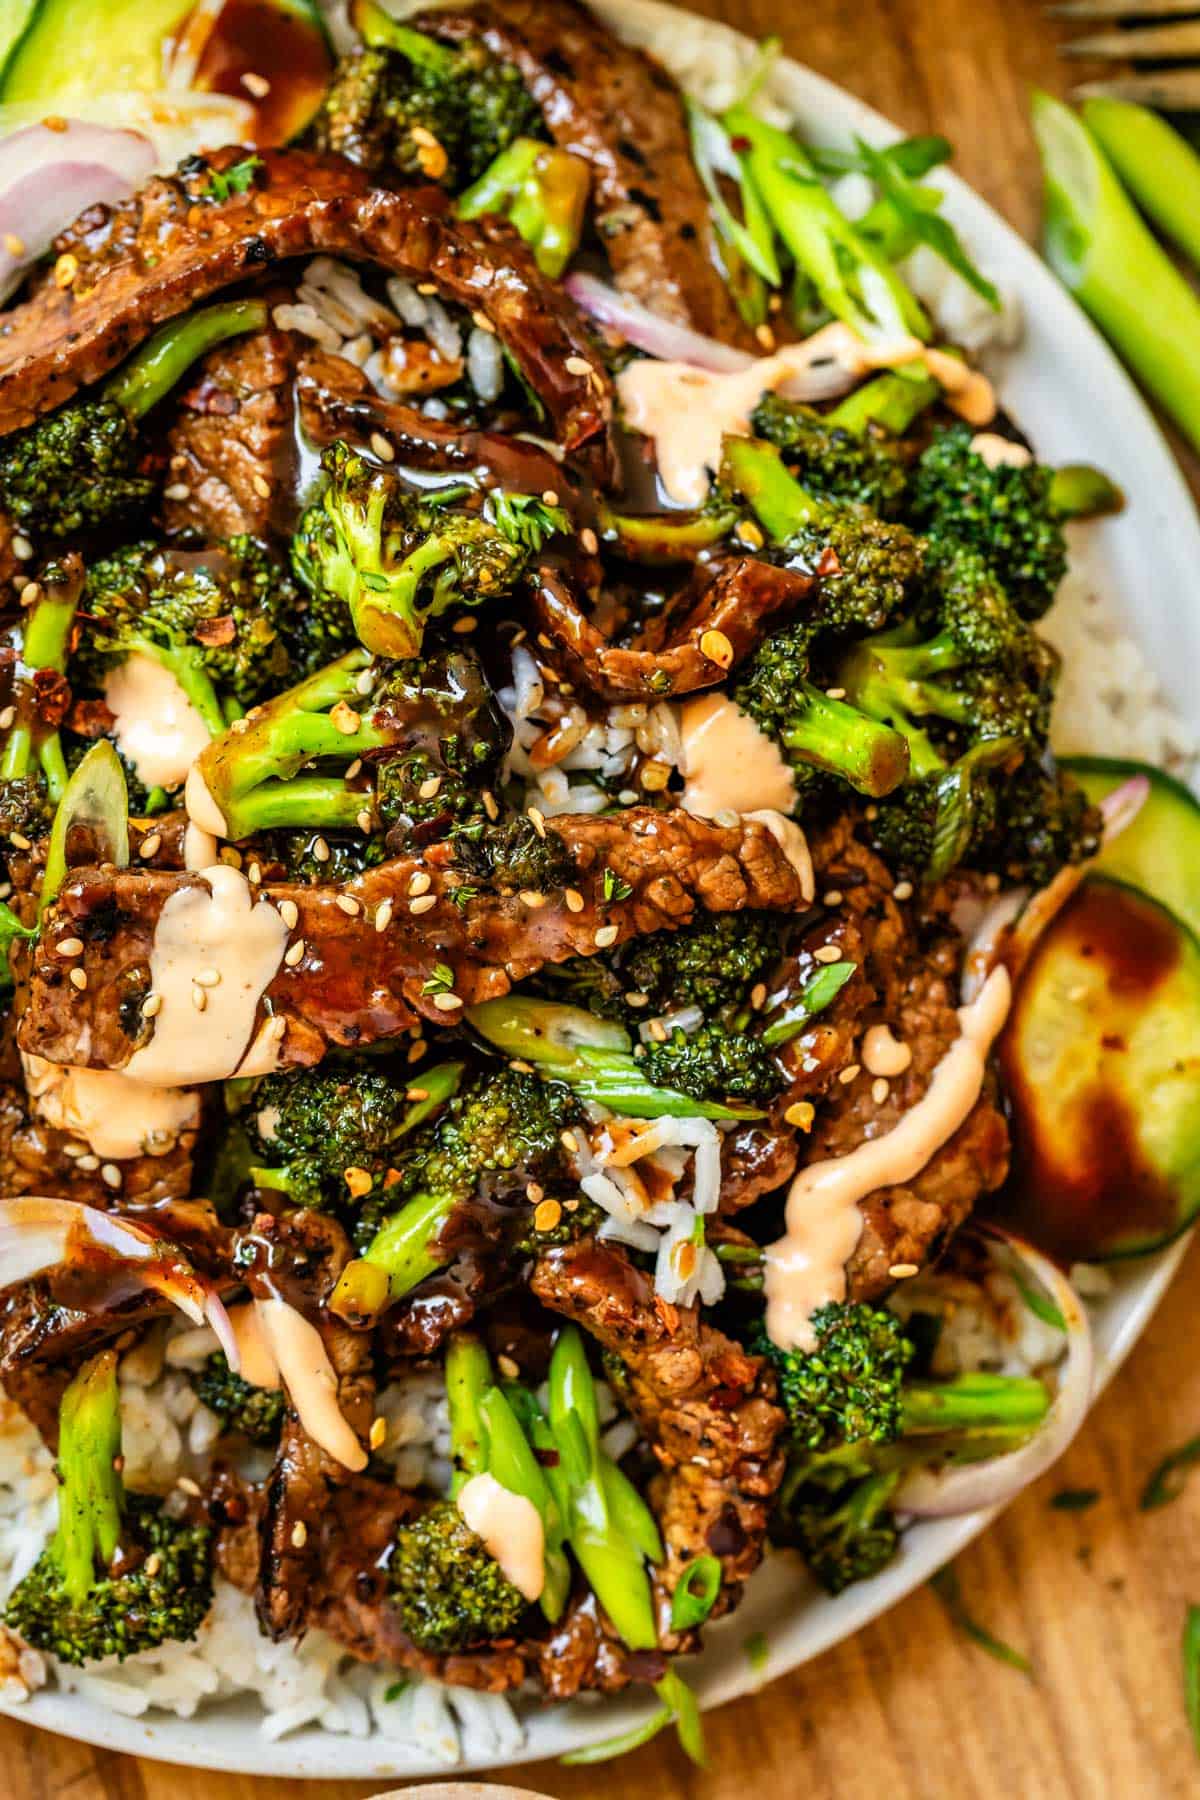
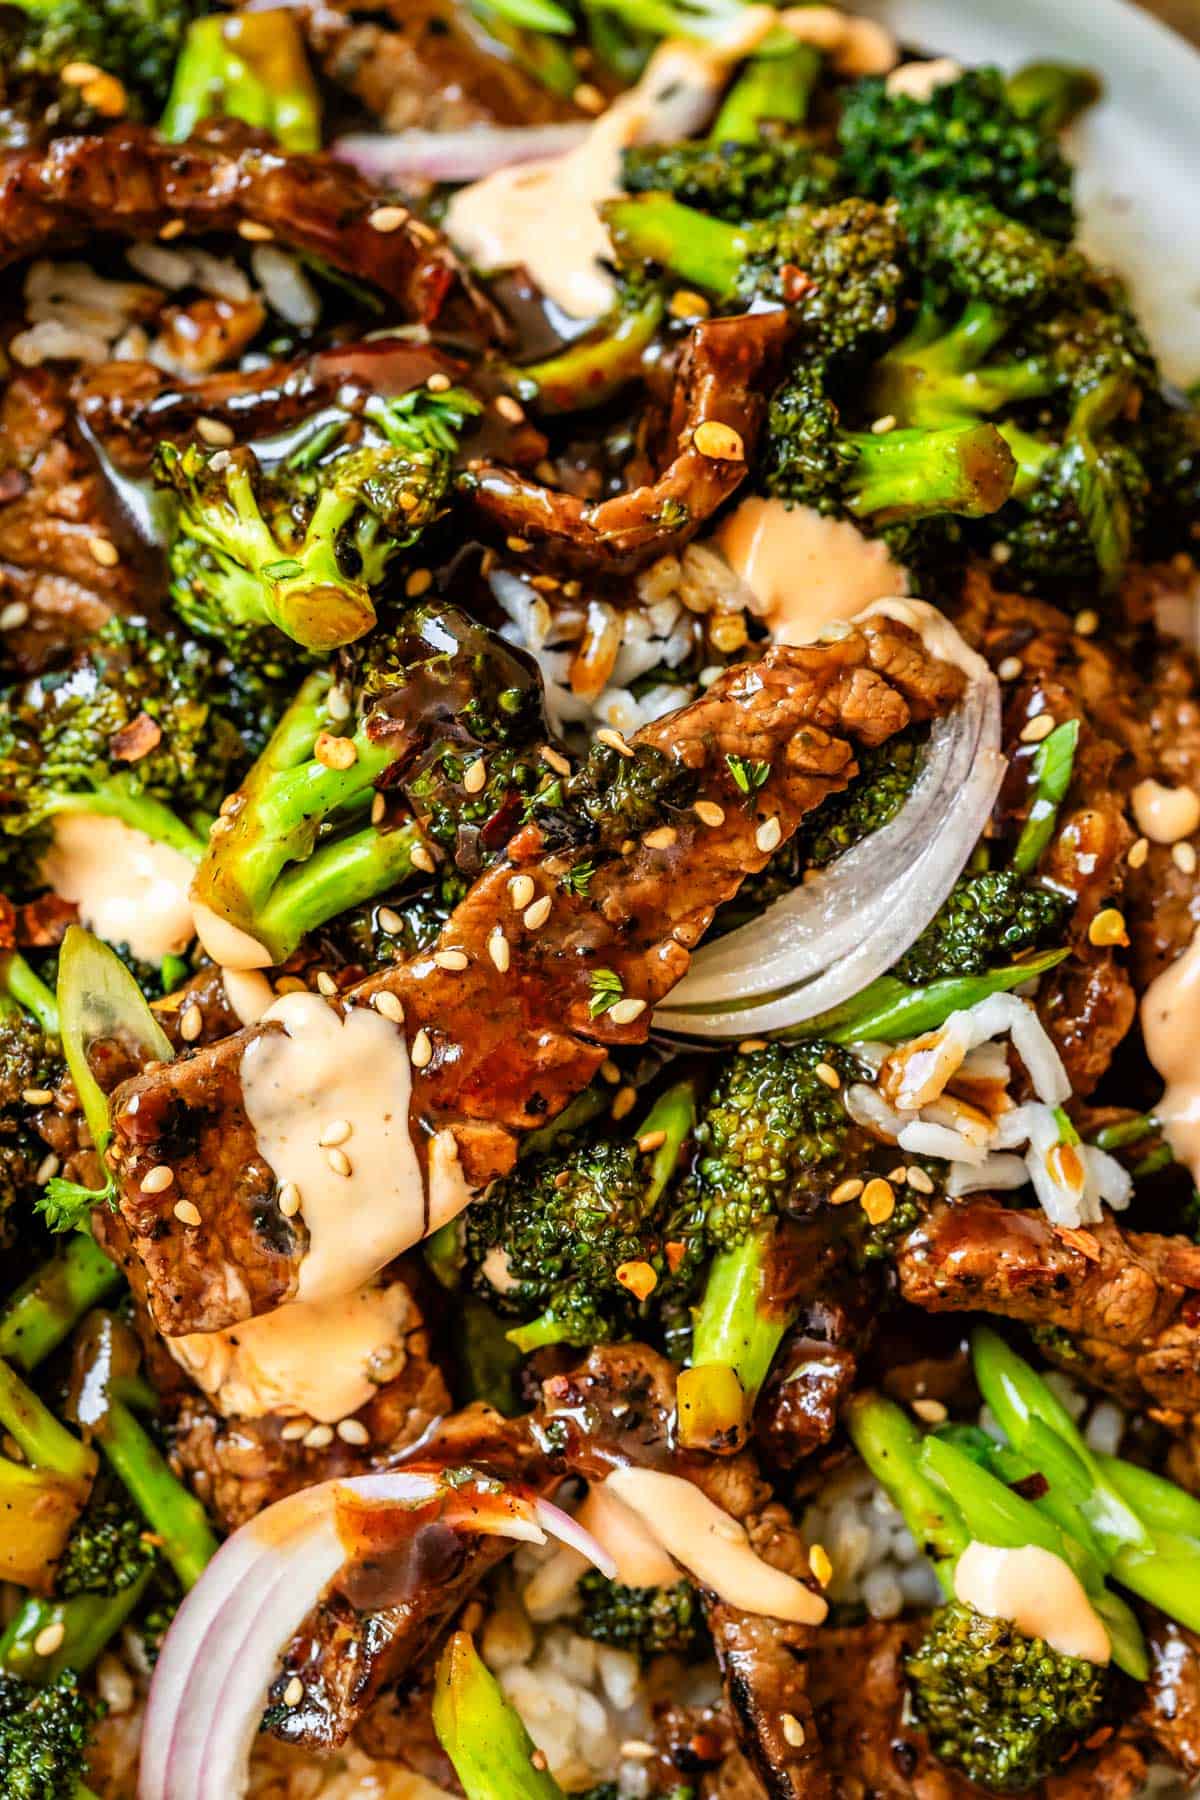
Add the meat back to the pan, douse the whole thing in sauce, stir it up, let’s goooooo

Don’t forget all the goods! Green onions, sesame seeds, Asian Marinated Cucumber Salad, and some sriracha mayo to round it all out. I’m tellin you guys.
What to serve with beef broccoli stir fry
Beef and broccoli is such a classic takeout pick. I love serving it with White Rice or Cauliflower Rice and calling dinner done. But I also love doing sides or making it a “fakeout” night (get it? fake takeout, cause you’re making it at home) and doing more of my Chinese restaurant favorites. Here are some ideas:
- Asian Cauliflower “Rice” >> I can eat this stuff by the shovelful. Not rice, but totally delicious!
- Copycat PF Chang’s Lettuce Wrap Recipe >> knock everyone’s socks off with this amazing appetizer
- Sheet Pan Chicken Fried Rice >> throw this in the oven while you’re using the stovetop
- Asian Seared Chicken with Stir Fried Green Beans >> more low carb Asian goodness!
- Easy Sesame Noodles with Spring Veggies >> I could drink this sesame peanut sauce, no joke
- Marinated Asian Cucumber Salad >> cool, refreshing, and the perfect side
- Thai Mango Sweet Sticky Rice from Joyous Apron
- Banana Lumpia from Ono Hawaiian Recipes
How to store beef and broccoli
If eating leftover Chinese food straight from the container in the fridge is your thing (raises hand), this recipe is perfect for meal prep. Store it in sectioned containers with rice and you’re done. Make sure your tupperwares are airtight so your lunch doesn’t dry out. It’ll last for 4-5 days in the fridge. Reheat in the microwave for about a minute, depending on your portion size and microwave strength.
Sometimes leftover rice can be dry, but if you heat it up in the microwave along with the beef and broccoli, the moisture from your main dish will help freshen up the rice. You can also sprinkle a teaspoon or so of water on the rice and it helps a ton. Read more about reheating rice here.
Can you freeze beef and broccoli?
I’m going to say hard pass this time, guys. I don’t recommend freezing your leftovers. The texture of the broccoli is going to be pretty weird after defrosting, so just don’t go there. The reason we love Beef Broccoli is because of the crispy-tenderness of the whole situation. Don’t mess with it.
Beef and broccoli frequently asked questions
Beef and broccoli sauce is made from Shaoxing wine, oyster sauce, soy sauce, and cornstarch. Sometimes ginger, garlic, hoisin sauce, and chili garlic sauce are added. If you know you love one of these ingredients you can add a little more (or, if it’s not your favorite, a little less.)
Flank steak is my favorite. Sometimes the best cut of meat is the one you already have, though, or what you can afford. If you’re at the store, decide how fancy you want to go. Ribeye makes an incredible beef and broccoli. All that beautiful marbling means the meat is super melt in your mouth and tender. Cheaper options (but still excellent ones) are flank steak, skirt steak, or flat iron steak. I tried London Broil but didn’t love it for this recipe. Another good choice, although a leaner one, is sirloin.
Cornstarch is the perfect thickener for beef and broccoli sauce. Just a couple teaspoons added transforms the sauce to have a phenomenal creamy texture!
To tenderize the beef we’re using a traditional Chinese method called “velveting.” Meat is marinated in an easy cornstarch slurry for 20 minutes or so, and the cornstarch makes it so incredibly tender.
Heck yes! All that protein AND the veggies, in one pan?? Yes please. I’d definitely call this a healthy dinner, especially served with Cauliflower Rice, but even with regular white rice it’s still a pretty healthy option!
Easy beef recipes
Steak might be a special occasion dinner, but cheaper cuts of beef can make a weeknight meal feel just as fancy without the fancy price. Here are some of my favorites meals using high-protein, juicy beef!
- Chinese Beef and Broccoli Soup >> too cold outside for anything but soup? make this version!
- Easy Curry Beef Recipe >> it’s just waiting for you to scoop it up with some pillowy naan
- Crockpot Beef Barley Soup >> a family favorite recipe of ours, for cold winter days
- Old Fashioned Beef Stroganoff Recipe >> this is so comforting and nostalgic!
- Traditional Carne Guisada Tacos >> slow cook your way to saucy taco happiness
- Instant Pot or Crock Pot Gyro Beef >> I love doing Greek night this way!
- Old Fashioned Swiss Steak from My Homemade Roots
- Pepper Steak from Laura in the Kitchen
Facebook | Pinterest | Instagram
Beef and Broccoli
Ingredients
- 1 pound flank steak* (or flat iron, skirt, sirloin, or ribeye steak)
- 1 pound broccoli florets 2 heads broccoli
For the marinade:
- 1 and 1/2 tablespoons cornstarch for the marinade
- 4 and 1/2 tablespoons low-sodium soy sauce**
- 1/2 cup + 1 tablespoon Shaoxing cooking wine*** or substitute sherry wine
For the sauce:
- 3 tablespoons brown sugar
- 1 tablespoon cornstarch
- 3 tablespoons oyster sauce****
- 1/3 cup hoisin sauce
- 2 teaspoons sesame oil
- 1 and 1/2 teaspoons Sambal Oelek chili garlic sauce or more to taste
- 3/4 teaspoon black pepper freshly ground
- 3/4 teaspoon kosher salt or sea salt
For searing
- vegetable oil
- sesame oil
For serving:
- batch white rice
- 1 bunch green onions
- 2 tablespoons sesame seeds for garnish
- crushed red pepper flakes for garnish
- 1 batch Asian Marinated Cucumbers optional
Instructions
- Freeze your beef: Put your beef in the freezer so it's easier to slice. 30 minutes is just about perfect.
- Prep your broccoli. Separate the florets from stems. I like using just the florets, but feel free to cut the stems into small pieces and use them too. You need about a pound of broccoli once it's chopped, about 2 medium heads.
- Prepare the marinade: Add 1 and 1/2 tablespoons cornstarch, 4 and 1/2 tablespoons soy sauce, and 1/2 cup + 1 tablespoon Shaoxing wine* to a medium bowl.
- Slice the beef: We want thin strips or beef that are cut against the grain. If you are using a flank steak or other long cut of beef, make one long vertical cut WITH the grain before you start slicing, so that the strips are not like 8 inches long. See photos. Slice the beef against the grain very thin, no more than 1/4 inch for each piece. Each piece should be about 4 inches long. Add the beef strips to the marinade, stir, and set a timer for 20 minutes.
- Prepare the sauce: While the beef is marinating, prep the sauce in another small bowl. Whisk together 3 tablespoons brown sugar, 1 tablespoon cornstarch, 3 tablespoons oyster sauce, 1/3 cup Hoisin sauce, 2 teaspoons sesame oil, 1 and 1/2 teaspoons chili garlic sauce, 3/4 teaspoon black pepper, and 3/4 teaspoon kosher salt. (Use less salt if all you have is table salt.)
- Rice: If you plan to serve this with rice, start making it now so it can simmer and steam while you sear the beef. Here's How to make Rice.
- Stir fry the beef: Heat a cast iron skillet (or the largest heaviest skillet or wok you have) over medium high heat. Add 1 tablespoon vegetable oil and 1 tablespoon sesame oil oil and swirl it around to coat the bottom.
- Lift the slices of marinated beef one at a time, letting the marinade drip off. Add the beef to the pan in a single layer, with 1-2 inches of space in between each strip of beef. (We will be cooking this in several batches) Be very careful not to drop the pieces, this oil is hot and you don't want to splatter yourself.
- Let the strips cook for 60-90 seconds, until they are browning on the bottom. Use tongs to flip each piece individually. As soon as the second side is browned, remove the beef to a plate. The slices are thin, so they only need a minute or so on each side, and remember, this is steak, so it doesn't exactly need to be well done.
- Continue to sear the rest of the beef. Add more vegetable and sesame oil as necessary in between batches. If you add too much beef at once, there will be too much liquid being released from the beef. This prevents the browning process. The beef needs space to allow that liquid to evaporate; the liquid evaporating is the only way the beef gets in contact with the oil, which is what does the browning. Science!
- Stir fry the broccoli: Once all the beef is seared and removed, add 1 tablespoons vegetable oil and 1 tablespoon sesame oil to the skillet, still set over medium high heat. Add the chopped broccoli florets all at once. Stir with a wooden spoon until you see the florets change color to a darker green, about 2 minutes. We want crisp-tender broccoli, not mushy, so keep an eye on it and don't overdo it.
- Add water to the broccoli, 1 tablespoon at a time once you notice that the bottom of the pan is drying out. The water will evaporate right away and this will help the broccoli to steam. I usually add several tablespoons of water, at least 3-5. Don't let the liquid pool. It should be hot enough that it evaporates immediately.
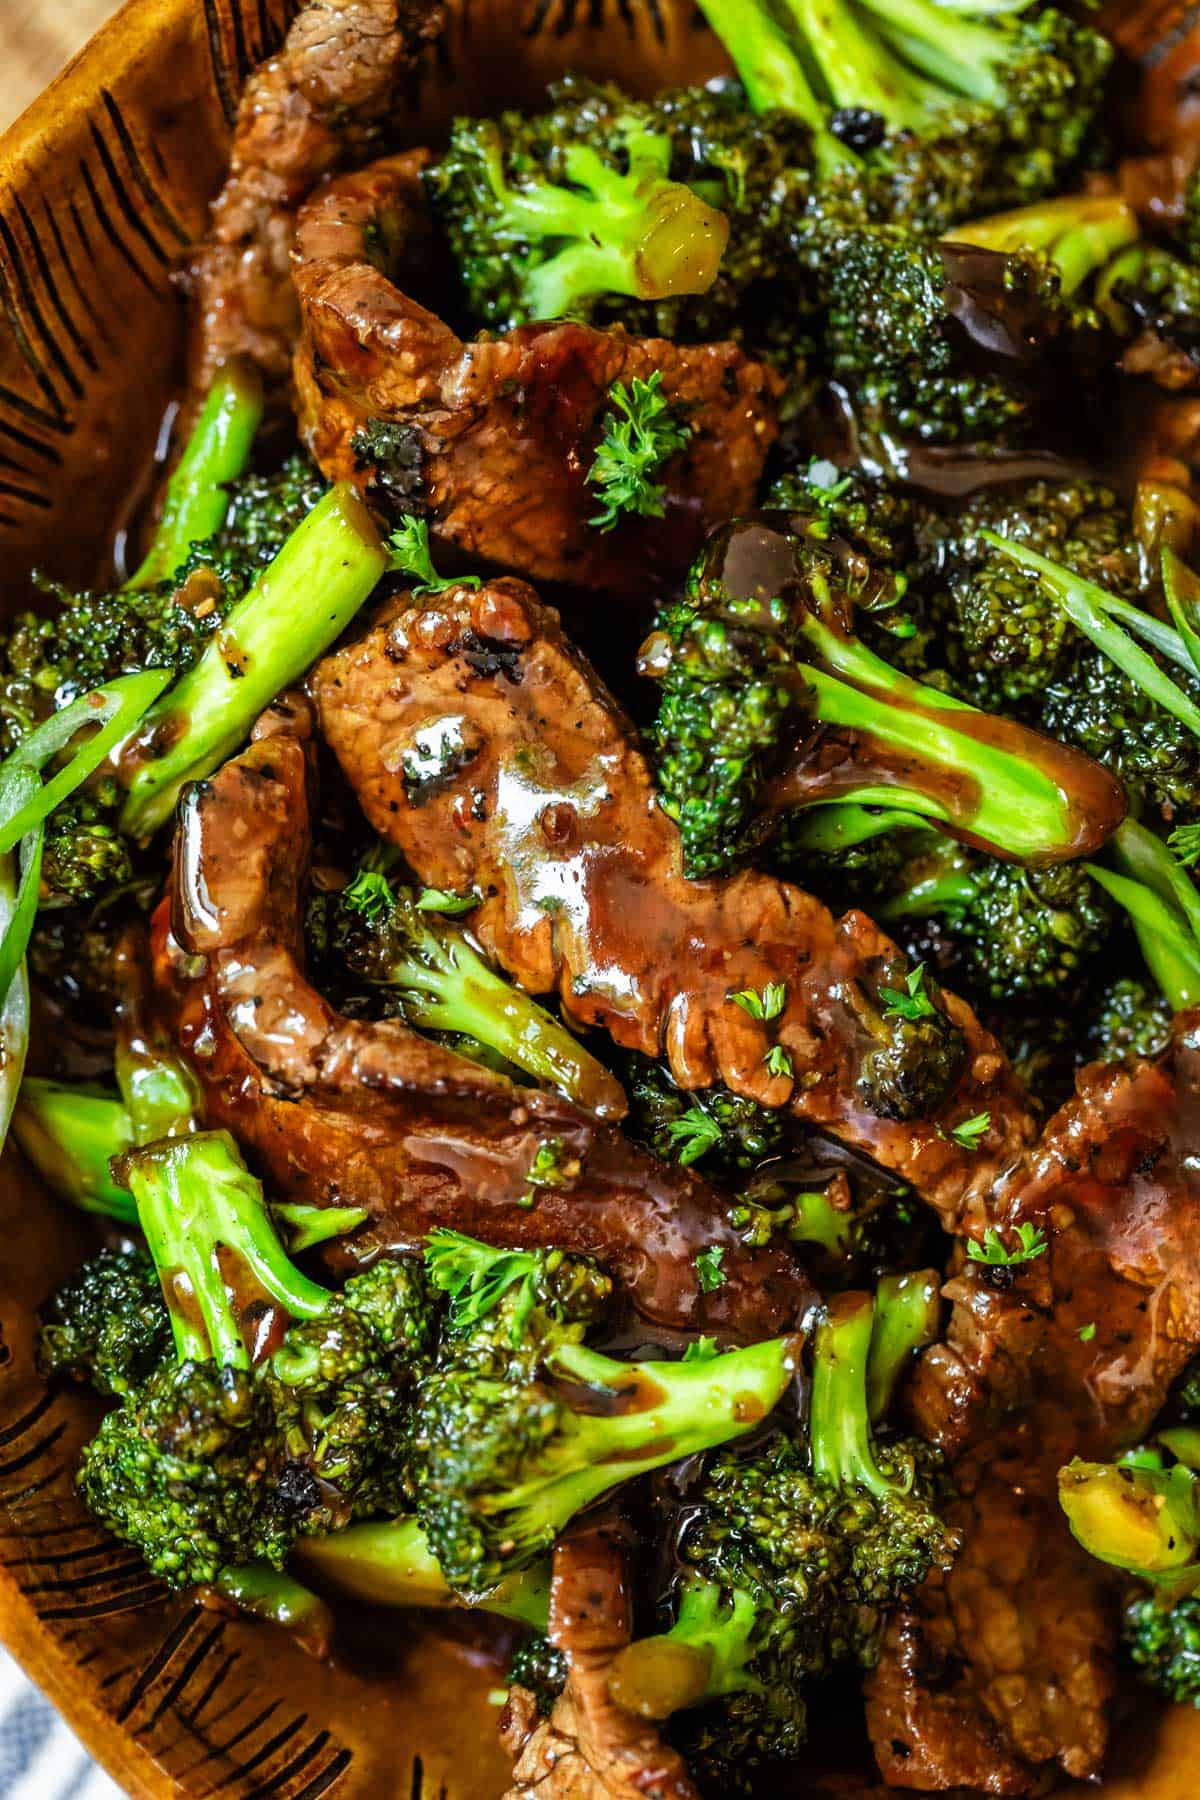
- Finish the dish: As soon as the broccoli is cooked (and, let me say it again, NOT MUSHY) add the beef back to the skillet, followed by all sauce. Scrape it all in there. It will immediately begin to bubble. Give everything a quick stir so the beef and broccoli is coated with the sauce, then turn off the burner and remove the pan from the heat so the cooking process stops.
- Serve hot with the rice. Garnish with sliced green onions and toasted sesame seeds. Serve with a garnish of Asian Marinated Cucumbers, it's so good! You can also serve this with Sriracha mayo (1/2 cup mayo stirred with 1 tablespoon sriracha, or to taste.)
- If you really want to go all out, crisp up some frozen egg rolls in the oven while you're cooking the beef and broccoli, buy some fortune cookies, and it's a whole takeout feast.
- Storage: Store leftovers in the fridge for up to 5 days. Don't freeze!


 From The Food Charlatan. Zuppa Toscana is a rich and creamy, soul-satisfying soup made with Italian sausage, potatoes, and hearty kale. It’s a copycat recipe of the famous soup at Olive Garden. I could eat this stuff for days! #zuppatoscana #soup #easy #recipe #olivegarden #onepot #zuppa #toscana #copycat #copy #sausage #potatoes #creamy #cream #halloween #fallsoup #fall #hearty #kale #italiansausage #betterthan")
 From The Food Charlatan. Zuppa Toscana is a rich and creamy, soul-satisfying soup made with Italian sausage, potatoes, and hearty kale. It’s a copycat recipe of the famous soup at Olive Garden. I could eat this stuff for days! #zuppatoscana #soup #easy #recipe #olivegarden #onepot #zuppa #toscana #copycat #copy #sausage #potatoes #creamy #cream #halloween #fallsoup #fall #hearty #kale #italiansausage #betterthan")
 From The Food Charlatan. Zuppa Toscana is a rich and creamy, soul-satisfying soup made with Italian sausage, potatoes, and hearty kale. It’s a copycat recipe of the famous soup at Olive Garden. I could eat this stuff for days! #zuppatoscana #soup #easy #recipe #olivegarden #onepot #zuppa #toscana #copycat #copy #sausage #potatoes #creamy #cream #halloween #fallsoup #fall #hearty #kale #italiansausage #betterthan")
 From The Food Charlatan. Zuppa Toscana is a rich and creamy, soul-satisfying soup made with Italian sausage, potatoes, and hearty kale. It’s a copycat recipe of the famous soup at Olive Garden. I could eat this stuff for days! #zuppatoscana #soup #easy #recipe #olivegarden #onepot #zuppa #toscana #copycat #copy #sausage #potatoes #creamy #cream #halloween #fallsoup #fall #hearty #kale #italiansausage #betterthan")
 From The Food Charlatan. Zuppa Toscana is a rich and creamy, soul-satisfying soup made with Italian sausage, potatoes, and hearty kale. It’s a copycat recipe of the famous soup at Olive Garden. I could eat this stuff for days! #zuppatoscana #soup #easy #recipe #olivegarden #onepot #zuppa #toscana #copycat #copy #sausage #potatoes #creamy #cream #halloween #fallsoup #fall #hearty #kale #italiansausage #betterthan")
 From The Food Charlatan. Zuppa Toscana is a rich and creamy, soul-satisfying soup made with Italian sausage, potatoes, and hearty kale. It’s a copycat recipe of the famous soup at Olive Garden. I could eat this stuff for days! #zuppatoscana #soup #easy #recipe #olivegarden #onepot #zuppa #toscana #copycat #copy #sausage #potatoes #creamy #cream #halloween #fallsoup #fall #hearty #kale #italiansausage #betterthan")
 From The Food Charlatan. Zuppa Toscana is a rich and creamy, soul-satisfying soup made with Italian sausage, potatoes, and hearty kale. It’s a copycat recipe of the famous soup at Olive Garden. I could eat this stuff for days! #zuppatoscana #soup #easy #recipe #olivegarden #onepot #zuppa #toscana #copycat #copy #sausage #potatoes #creamy #cream #halloween #fallsoup #fall #hearty #kale #italiansausage #betterthan")
 From The Food Charlatan. Zuppa Toscana is a rich and creamy, soul-satisfying soup made with Italian sausage, potatoes, and hearty kale. It’s a copycat recipe of the famous soup at Olive Garden. I could eat this stuff for days! #zuppatoscana #soup #easy #recipe #olivegarden #onepot #zuppa #toscana #copycat #copy #sausage #potatoes #creamy #cream #halloween #fallsoup #fall #hearty #kale #italiansausage #betterthan")
 From The Food Charlatan. Zuppa Toscana is a rich and creamy, soul-satisfying soup made with Italian sausage, potatoes, and hearty kale. It’s a copycat recipe of the famous soup at Olive Garden. I could eat this stuff for days! #zuppatoscana #soup #easy #recipe #olivegarden #onepot #zuppa #toscana #copycat #copy #sausage #potatoes #creamy #cream #halloween #fallsoup #fall #hearty #kale #italiansausage #betterthan")
 From The Food Charlatan. Zuppa Toscana is a rich and creamy, soul-satisfying soup made with Italian sausage, potatoes, and hearty kale. It’s a copycat recipe of the famous soup at Olive Garden. I could eat this stuff for days! #zuppatoscana #soup #easy #recipe #olivegarden #onepot #zuppa #toscana #copycat #copy #sausage #potatoes #creamy #cream #halloween #fallsoup #fall #hearty #kale #italiansausage #betterthan")
 From The Food Charlatan. Zuppa Toscana is a rich and creamy, soul-satisfying soup made with Italian sausage, potatoes, and hearty kale. It’s a copycat recipe of the famous soup at Olive Garden. I could eat this stuff for days! #zuppatoscana #soup #easy #recipe #olivegarden #onepot #zuppa #toscana #copycat #copy #sausage #potatoes #creamy #cream #halloween #fallsoup #fall #hearty #kale #italiansausage #betterthan")

 from The Food Charlatan. Have you ever had traditional Red Beans and Rice? It's a southern staple! I tried Popeye's Red Beans and Rice for the first time a while back, but these beans are even better. They are so creamy and flavorful, with the perfect smoky Cajun spice! #redbeansandrice #riceandbeans #beans #rice #ham #hambone #smokey #traditional #southern #cajun #neworleans #popeyes #recipe #easy #stovetop #authentic #withham #Louisiana #best #creamy")

 from The Food Charlatan. Have you ever had traditional Red Beans and Rice? It's a southern staple! I tried Popeye's Red Beans and Rice for the first time a while back, but these beans are even better. They are so creamy and flavorful, with the perfect smoky Cajun spice! #redbeansandrice #riceandbeans #beans #rice #ham #hambone #smokey #traditional #southern #cajun #neworleans #popeyes #recipe #easy #stovetop #authentic #withham #Louisiana #best #creamy")
 from The Food Charlatan. Have you ever had traditional Red Beans and Rice? It's a southern staple! I tried Popeye's Red Beans and Rice for the first time a while back, but these beans are even better. They are so creamy and flavorful, with the perfect smoky Cajun spice! #redbeansandrice #riceandbeans #beans #rice #ham #hambone #smokey #traditional #southern #cajun #neworleans #popeyes #recipe #easy #stovetop #authentic #withham #Louisiana #best #creamy")
 from The Food Charlatan. Have you ever had traditional Red Beans and Rice? It's a southern staple! I tried Popeye's Red Beans and Rice for the first time a while back, but these beans are even better. They are so creamy and flavorful, with the perfect smoky Cajun spice! #redbeansandrice #riceandbeans #beans #rice #ham #hambone #smokey #traditional #southern #cajun #neworleans #popeyes #recipe #easy #stovetop #authentic #withham #Louisiana #best #creamy")
 from The Food Charlatan. Have you ever had traditional Red Beans and Rice? It's a southern staple! I tried Popeye's Red Beans and Rice for the first time a while back, but these beans are even better. They are so creamy and flavorful, with the perfect smoky Cajun spice! #redbeansandrice #riceandbeans #beans #rice #ham #hambone #smokey #traditional #southern #cajun #neworleans #popeyes #recipe #easy #stovetop #authentic #withham #Louisiana #best #creamy")
 from The Food Charlatan. Have you ever had traditional Red Beans and Rice? It's a southern staple! I tried Popeye's Red Beans and Rice for the first time a while back, but these beans are even better. They are so creamy and flavorful, with the perfect smoky Cajun spice! #redbeansandrice #riceandbeans #beans #rice #ham #hambone #smokey #traditional #southern #cajun #neworleans #popeyes #recipe #easy #stovetop #authentic #withham #Louisiana #best #creamy")
 from The Food Charlatan. Have you ever had traditional Red Beans and Rice? It's a southern staple! I tried Popeye's Red Beans and Rice for the first time a while back, but these beans are even better. They are so creamy and flavorful, with the perfect smoky Cajun spice! #redbeansandrice #riceandbeans #beans #rice #ham #hambone #smokey #traditional #southern #cajun #neworleans #popeyes #recipe #easy #stovetop #authentic #withham #Louisiana #best #creamy")
 from The Food Charlatan. Have you ever had traditional Red Beans and Rice? It's a southern staple! I tried Popeye's Red Beans and Rice for the first time a while back, but these beans are even better. They are so creamy and flavorful, with the perfect smoky Cajun spice! #redbeansandrice #riceandbeans #beans #rice #ham #hambone #smokey #traditional #southern #cajun #neworleans #popeyes #recipe #easy #stovetop #authentic #withham #Louisiana #best #creamy")