Grilled Cajun Chicken
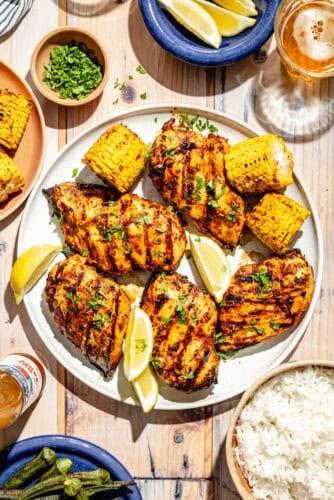 Bold, smoky, and packed with flavor, this Grilled Cajun Chicken is the kind of recipe that earns a permanent spot…
Bold, smoky, and packed with flavor, this Grilled Cajun Chicken is the kind of recipe that earns a permanent spot…
This Boneless Chicken Curry with Coconut Milk is my take on a timeless favorite, with succulent chicken in a silky sauce that’s fragrant with curry, balanced in spice, and brightened with fresh toppings that add color, texture, and depth. I’ve spent years fine-tuning this recipe to make sure it’s easy to prepare with everyday ingredients,…
The post Boneless Chicken Curry Recipe with Coconut Milk appeared first on A Well Seasoned Kitchen.
This Easy Lemon Chicken Piccata with Mushrooms isn’t your average chicken piccata. My recipe keeps the classic lemon-caper magic in the sauce, but adds golden sautéed mushrooms for earthy richness and a splash of soy sauce for subtle umami. The result is a silky, bright sauce with surprising depth, that’s quick enough for a weeknight…
The post Easy Lemon Chicken Piccata with Mushrooms appeared first on A Well Seasoned Kitchen.
When it comes to baked BBQ chicken, simplicity is key – but flavor matters most. This version has both. With just 4 ingredients and taking under 30 minutes from start to finish, this BBQ Chicken Breast Recipe is a quick, foolproof way to get tender, juicy chicken on the table. What sets it apart? Our…
The post Easy Recipe For BBQ Chicken Breasts Baked in the Oven appeared first on A Well Seasoned Kitchen.
Arroz con Pollo is an easy one-pot meal that delivers tender, moist chicken and flavorful rice in every bite. It’s my mom’s recipe – the version my brother and I grew up loving – and it never fails. While Arroz con Pollo varies across Latin cultures, this one calls for turmeric, plus roasted chilies, pimiento-stuffed…
The post How to Make Arroz con Pollo (Latin Chicken and Rice) appeared first on A Well Seasoned Kitchen.
If you’re looking for an easy yet elegant way to prepare chicken, this Feta Chicken with Greek Yogurt Marinade is a winner. The yogurt-based marinade ensures the chicken stays tender and moist, while a creamy feta cheese and yogurt topping adds a deliciously bright, tangy finish. With just a handful of ingredients, each one playing…
The post Feta Chicken Recipe with Greek Yogurt Marinade appeared first on A Well Seasoned Kitchen.
Craving a comforting, flavorful dinner that’s both healthy and easy to prepare? Look no further than this Layered Chicken Enchilada Casserole with Green Chile Sauce. Say goodbye to the fuss of rolling individual enchiladas! This layered dish boasts vibrant Southwestern flavors and a creamy texture, with no cream, sour cream, or canned soups. It’s the…
The post Layered Chicken Enchilada Casserole with Green Chile Sauce appeared first on A Well Seasoned Kitchen.
In this “how to” post, I share the secrets of butterflying and halving a boneless chicken breast like a pro. Through both a video and a detailed step-by-step guide with photos, you’ll see how easy it is to perfect this basic culinary technique. What Does It Mean to Butterfly a Chicken Breast? To butterfly a…
The post How to Split A Chicken Breast (Butterfly and Halve) appeared first on A Well Seasoned Kitchen.
Chicken Ala King is another easy recipe that can be made in only 15 minutes. While it may not be a French dish, its roots trace back to 1890 in New Brighton Beach Hotel, and you can see the influence of French cuisine on it. The use of wine and butter as key ingredients is a hallmark of French …
The post Chicken Ala King appeared first on mytastywall.
This Crispy Baked Panko Chicken has it all! Made with readily available ingredients, it’s crispy on the outside and tender inside, with no oily mess from frying – plus uber amounts of flavor from multiple layers of Mexican seasonings (think salsa verde, chili powder, cumin, garlic). And if that isn’t enough, this one-dish dinner is…
The post Crispy Baked Panko Chicken with Mexican Seasoning appeared first on A Well Seasoned Kitchen.
Add a burst of deep, bold flavor to your classic chicken salad with our delicious Curry Chicken Salad with Pasta. Tender chunks of chicken, short pasta, crunchy celery, green onion, tart green apple, toasted almonds, and sweet raisins are perfectly complemented by an earthy, peppery, warm curry dressing. Whether you’re looking for a new family…
The post Curry Chicken Salad Recipe with Pasta appeared first on A Well Seasoned Kitchen.
This Grilled Chicken with Tomatoes and Goat Cheese recipe bursts with freshness and is ready in just 45 minutes. Perfectly grilled chicken is topped with vibrant juicy tomatoes bathed in a creamy, tangy goat cheese sauce; the result is a colorful, light, and satisfying dish. With just six ingredients, you can effortlessly create a dish…
The post Grilled Chicken with Tomatoes and Goat Cheese appeared first on A Well Seasoned Kitchen.
 These Chili Crisp Chicken Bowls were an Instagram creation that needed a place on the blog! Spicy, fresh, and all…
The post Chili Crisp Chicken Bowls appeared first on The Defined Dish.
 This Tie-Dye Chicken is an absolute hit around my family table and I know it will be around yours! All…
The post Tie-Dye Chicken appeared first on The Defined Dish.
When the mood strikes for a fast meal with a ton of flavor try these Spiced Curry Chicken Kabobs with Coconut Turmeric Rice. It’s an on the table in under 30 minutes meal loaded with exotic seasonings for weeknight fun! True story, it’…