Miso Marinated Fish

If you’ve ever had the famous miso-marinated black cod from NOBU, you know how deliciously tender and flavorful it is. The best part? You can recreate this iconic dish at home with just a few simple ingredients. This Miso Marinated Fish is easy enough for a weeknight dinner but impressive enough to serve at a…

The post Miso Marinated Fish appeared first on Weelicious.

If you’ve ever had the famous miso-marinated black cod from NOBU, you know how deliciously tender and flavorful it is. The best part? You can recreate this iconic dish at home with just a few simple ingredients. This Miso Marinated Fish is easy enough for a weeknight dinner but impressive enough to serve at a dinner party!

Miso Marinated Fish served with brown rice.

Why I Love This Recipe

When I was living in NYC as a model, I loved splurging at NOBU, a renowned Japanese restaurant by world-famous chef Nobu Matsuhisa. The menu is packed with incredible dishes, but the miso marinated black cod is by far the standout! Fortunately, you don’t have to go to the restaurant to enjoy it—you can easily make this dish at home for a fraction of the cost!

  • Simple to Make: This miso marinated fish recipe only requires 4 ingredients. Just whisk the marinade, let the fish soak in the flavor, and broil until golden perfection.
  • Flavorful: The combination of miso, agave, and mirin gives the fish a rich, umami-packed glaze that is irresistible.
  • Versatile: While black cod is my go-to, you can swap it with other oily fish like salmon or even try this recipe with scallops. Black cod is high in omega-3 fatty acids and has a mild flavor which is perfect for kids.
  • Healthy: Loaded with omega-3s and light on prep time, this is a nutritious dish you’ll feel good about eating. The original recipe uses lots of sugar, which I didn’t think was the healthiest idea, so I substitute agave with fantastic results!

The Ingredients

Miso Marinated Fish Ingredients.
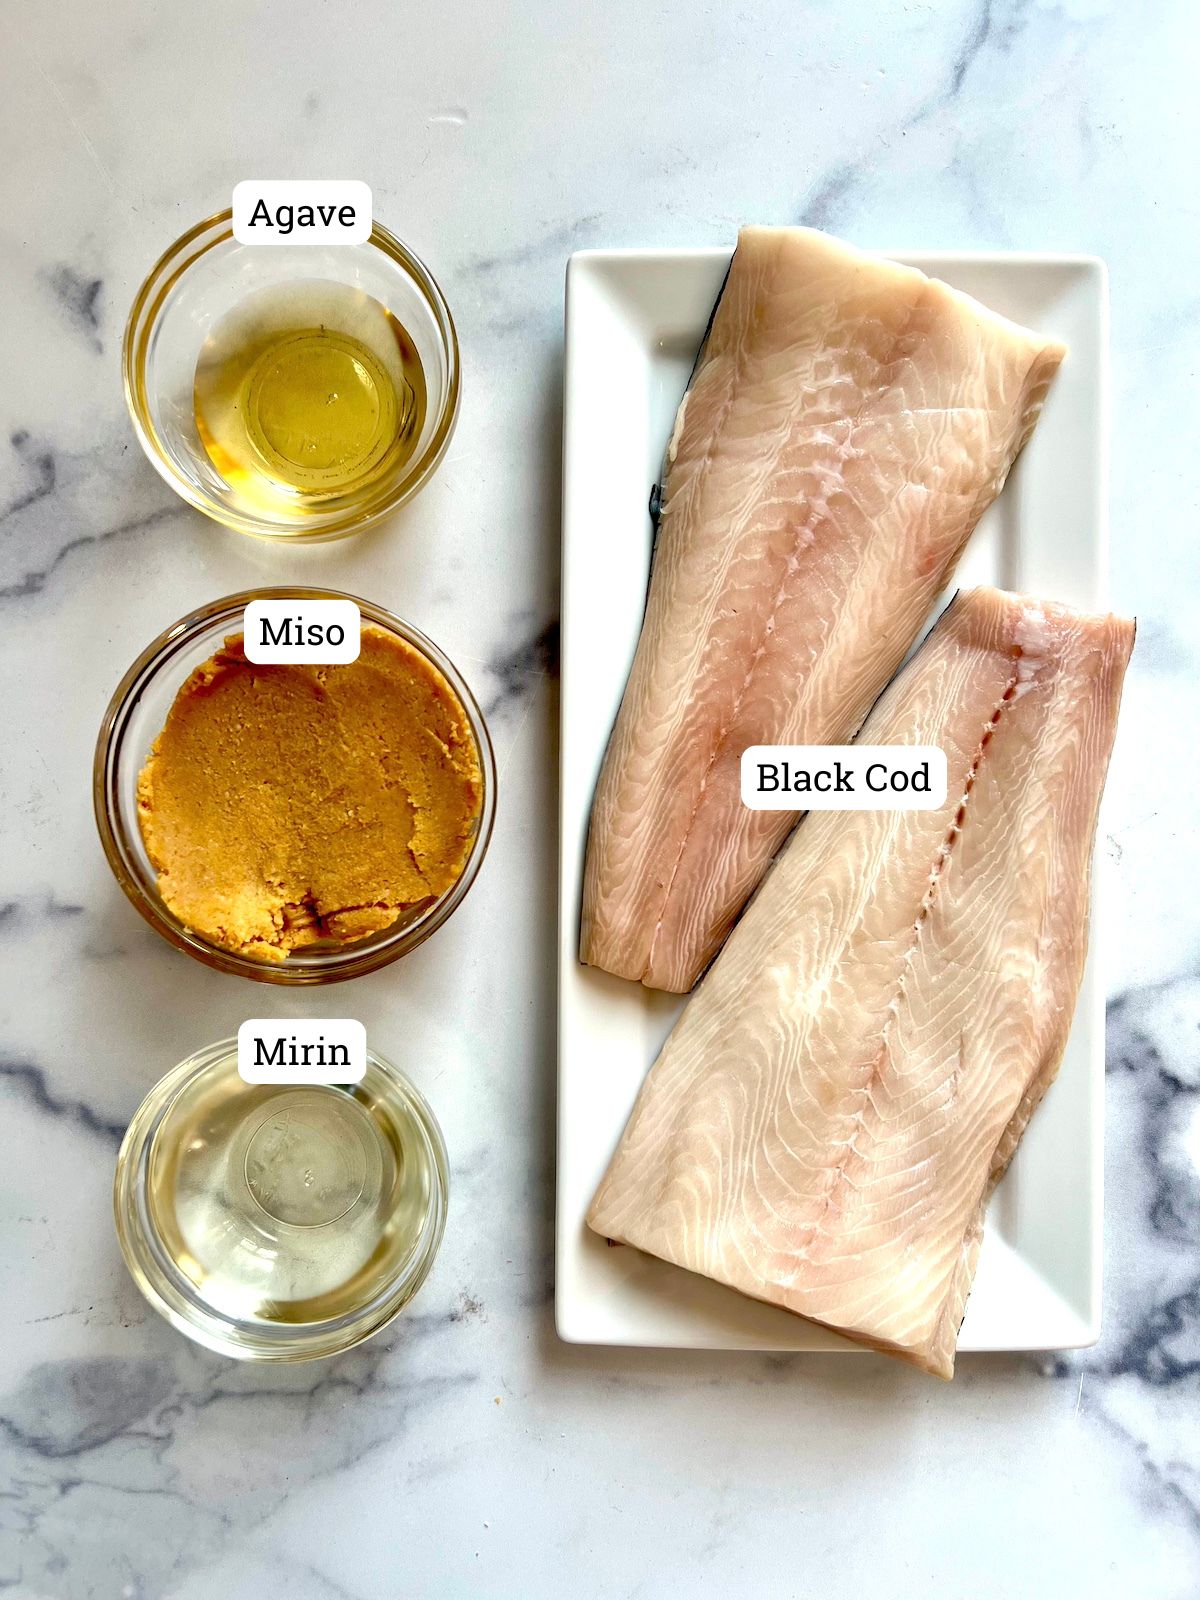
  • Yellow or white miso: This fermented paste is the star of the marinade, adding depth of flavor.
  • Agave: This adds a touch of sweetness to the marinade. You can substitute sugar for a slightly different sweetness.
  • Mirin: This is a sweet Japanese rice wine that balances out the salty miso.
  • Black Cod: Black cod is mild in flavor and high in omega-3 fatty acids. You can use any oily fish for the best results.

How to Make Miso Marinated Fish

Miso, agave and mirin combined in baking dish.

Step 1: Place the miso, agave and mirin in a bowl and whisk to combine.

Black cod in baking dish with marinade.

Step 2: Pour over the fish, cover, refrigerate and marinate for at least 30 minutes (can be marinated up to 3 days).

Marinated black cod on foil lined sheet tray.

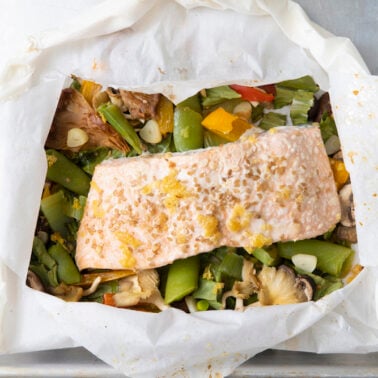
Step 3: Preheat oven broiler to high. Remove fish from marinade and place skin side down on a foil lined cookie sheet.

Cooked miso marinated black cod on sheet tray.

Step 4: Broil fish 6 inches from the heat source for 8-10 minutes or until golden and bubbly.

Tips and Tricks

  • Marinate Longer for More Flavor: If you have the time, let the fish marinate for up to 3 days. The longer the fish soaks in the miso glaze, the deeper the flavor.
  • Use a Hot Broiler: You want the fish to cook quickly under the broiler, so make sure it’s fully preheated. This gives the fish a golden, slightly caramelized exterior while keeping the inside moist and tender.
  • Swap Agave for Sugar: Don’t have agave? You can substitute it with 3 tablespoons of sugar without losing that perfect balance of sweet and savory.
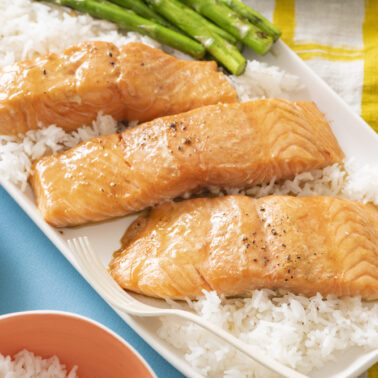
  • Serving Suggestions: Pair your miso-marinated fish with steamed or brown rice and Crispy Broccoli, or for a lighter option, a fresh cucumber salad.

Frequently Asked Questions

What kind of fish works best for miso marinated fish?

Black cod is the classic choice, but salmon works beautifully too. You could also try scallops. You want to stick to oily fish for the best texture and flavor.

Can I meal prep miso marinated fish?

Absolutely! The fish can marinate for up to 3 days, making it a great make-ahead option for busy weeknights or special dinners.

For taking a piece of miso marinated fish.

More Easy Fish Recipes

A fancy meal at a nice restaurant is always a treat, but there’s no reason why you can’t have the world’s best dishes at home. Try this one out and let me know what you think by leaving a comment and rating below!

Want more WeeliciousSubscribe to my newsletter and follow me on InstagramFacebook, and TikTok for all the newest recipes!

Print

Miso Marinated Fish

Miso Marinated Fish is an easy, elegant entree that is perfect for every occasion. It's a great weeknight meal for you family but feels fancy enough to serve at a dinner party for friends.
Course Main Dish
Cuisine Asian
Prep Time 35 minutes
Cook Time 10 minutes
Total Time 45 minutes
Servings 4
Calories 380kcal

Ingredients

  • 1/2 cup yellow or white miso
  • 2 tablespoons agave or 3 tablespoons sugar
  • 1/2 cup mirin
  • 1 1/2 pounds (4 filets) black cod or salmon (you need to use an oily fish)

Instructions

  • Place the miso, agave and mirin in a bowl and whisk to combine.
  • Pour over the fish, cover, refrigerate and marinate for at least 30 minutes (can be marinated up to 3 days).
  • Preheat oven broiler to high.
  • Remove fish from marinade and place skin side down on a foil lined cookie sheet.
  • Broil fish 6 inches from the heat source for 8-10 minutes or until golden and bubbly.

Notes

  • Marinate Longer for More Flavor: If you have the time, let the fish marinate for up to 3 days. The longer the fish soaks in the miso glaze, the deeper the flavor.
  • Use a Hot Broiler: You want the fish to cook quickly under the broiler, so make sure it’s fully preheated. This gives the fish a golden, slightly caramelized exterior while keeping the inside moist and tender.

Nutrition

Calories: 380kcal | Carbohydrates: 19g | Protein: 38g | Fat: 13g | Cholesterol: 95mg | Sodium: 1360mg | Fiber: 2g | Sugar: 10g

The post Miso Marinated Fish appeared first on Weelicious.

Banana Wheat Germ Muffins

These nutritious Banana Wheat Germ Muffins are super healthy, delicious and a great way to use your overripe bananas. Wheat germ adds great taste and is so good for you too! Why You’ll Love This Recipe The Ingredients Variations and Substitutions How to Make Banana Wheat Germ Muffins Step 1: Preheat oven to 350 degrees. Combine flour, wheat…

The post Banana Wheat Germ Muffins appeared first on Weelicious.

These nutritious Banana Wheat Germ Muffins are super healthy, delicious and a great way to use your overripe bananas. Wheat germ adds great taste and is so good for you too!

Banana Wheat Germ Muffins on pink and purple plates.

Why You’ll Love This Recipe

  • Simple to make with everyday ingredients.
  • Packed with fiber and nutrients from wheat germ.
  • Naturally sweetened with ripe bananas and honey instead of tons of sugar. I have tons of recipes using ripe bananas you could try!
  • Moist, tender, and perfect for breakfast or a snack.
  • Ready in under 30 minutes!

The Ingredients

Banana Wheat Germ Muffins Ingredients.
  • All-purpose flour: The base for a fluffy muffin.
  • Wheat germ: Adds texture and nutritional benefits.
  • Baking Soda & Baking Powder: Work together to help the muffins rise.
  • Very ripe bananas: Since there’s very little additional sweetener in these muffins, using very ripe, naturally sweet bananas is imperative. The spottier, the better!
  • Honey: We use honey (or agave) instead of granulated sugar in this recipe to naturally sweeten the muffins.
  • Vegetable oil: Keeps the muffins tender.
  • Vanilla extract: Adds a rich depth of flavor.
  • Large egg: Binds the ingredients together.

Variations and Substitutions

  • Add-Ins: Try adding some dark chocolate chips, dried fruit or chopped nuts for extra flavor and texture.
  • Sweetener: Feel free to use maple syrup instead of honey or agave to sweeten the muffins.
  • Wheat Germ: If you don’t have wheat germ, feel free to substitute it with oat bran or whole wheat flour.

How to Make Banana Wheat Germ Muffins

Banana Wheat Germ Muffins dry ingredients combined in mixing bowl.

Step 1: Preheat oven to 350 degrees. Combine flour, wheat germ, baking powder, baking soda, salt in a bowl.

Banana wheat germ muffin wet ingredients combined in mixing bowl.

Step 2: In a standing mixer or with a hand mixer, combine the 3 bananas, honey or agave, oil, vanilla and egg. Beat until combined and bananas are mashed.

Banana wheat germ muffin batter in mixing bowl.

Step 3: Gently mix in the dry ingredients in 3 stages until just combined. Do not over-mix.

Wheat germ muffin batter in muffin tin.

Step 4: Grease or line muffin cups or mini loaf pans and fill 3/4 full with the mixture.

Wheat germ muffin batter in muffin tin. Each muffin topped with a slice of banana.

Step 5: Place the slices of banana on top of each filled muffin cup or decoratively over the loaf pan.

Baked banana wheat germ muffins in muffin tin.

Step 6: Bake 15 minutes for mini muffin cups, 20 for regular muffin cups or 25 minutes for mini loaf pans or until a toothpick comes out clean.

Make-Ahead and Storage

Muffins are so great to make each week to have on hand. We always have a batch on the counter or in the freezer. These banana wheat germ muffins are great to make ahead for a quick breakfast or healthy snack. Store them in an airtight container at room temperature for up to three days or freeze them for longer storage. Just warm them up when you’re ready to enjoy! I’m also loving Flourless Pumpkin Chocolate MuffinsSpinach Cake Muffins, and Carrot Pineapple Muffins right now!

Tips and Tricks

  • Use very ripe bananas for maximum sweetness and flavor.
  • Don’t over-mix the batter to keep the muffins light and fluffy.
Banana wheat germ muffins stacked on top of each other.

More Healthy Muffin Recipes

Next time you have a craving for a delicious banana muffin, try these! They’re packed with nutrients, easy to make and so delicious. Let me know what you think of this recipe by leaving a comment and rating below!

Want more WeeliciousSubscribe to my newsletter and follow me on InstagramFacebook, and TikTok for all the newest recipes!

Banana Wheat Germ Muffins on pink and purple plates.
Print

Banana Wheat Germ Muffins

Banana Wheat Germ Muffins are super healthy, delicious and a great way to use your overripe bananas. Wheat germ adds great taste and is so good for you!
Course Breakfast, Snack
Cuisine American
Prep Time 5 minutes
Cook Time 20 minutes
Total Time 25 minutes
Servings 12
Calories 190kcal

Equipment

Ingredients

Instructions

  • Preheat oven to 350°F.
  • Combine flour, wheat germ, baking powder, baking soda, salt in a bowl.
  • In a standing mixer or with a hand mixer, combine the 3 bananas, agave, oil, vanilla and egg. Beat until combined and bananas are mashed.
  • Gently mix in the dry ingredients in 3 stages until just combined. Do not over-mix.
  • Grease or line muffin cups or mini loaf pans and fill 3/4 full with the mixture.
  • Place the slices of banana on top of each filled muffin cup or decoratively over the loaf pan.
  • Bake 15 minutes for mini muffin cups, 20 for regular muffin cups or 25 minutes for mini loaf pans or until a toothpick comes out clean.
  • Cool and serve.

Notes

  • Use very ripe bananas for maximum sweetness and flavor.
  • Don’t over-mix the batter to keep the muffins light and fluffy.
  • Storage: Store in an airtight container at room temperature for up to three days or freeze for longer storage.

Nutrition

Calories: 190kcal | Carbohydrates: 33g | Protein: 4g | Fat: 5g | Cholesterol: 15mg | Sodium: 280mg | Fiber: 3g | Sugar: 16g

The post Banana Wheat Germ Muffins appeared first on Weelicious.

Chocolate Tofu Pudding

This Chocolate Tofu Pudding is so easy to prepare and no one will know that it’s actually quite healthy. Made with silken tofu and cocoa powder, it’s a delicious vegan dessert that everyone can love! Why I Love This Recipe The Ingredients Substitutions and Variations One of the best things about this Chocolate Tofu Pudding is how…

The post Chocolate Tofu Pudding appeared first on Weelicious.

This Chocolate Tofu Pudding is so easy to prepare and no one will know that it’s actually quite healthy. Made with silken tofu and cocoa powder, it’s a delicious vegan dessert that everyone can love!

Chocolate Tofu Pudding in clear glasses topped with raspberries.

Why I Love This Recipe

  • Healthy and Satisfying: Made with protein-packed silken tofu and antioxidant-rich cocoa powder, this vegan chocolate pudding recipe lets you enjoy a sweet treat that’s low in fat and not laden with sugar like many desserts.
  • Incredibly Easy: With just a handful of ingredients and a food processor, you can whip up this delightful dessert in minutes. It’s perfect for those sudden chocolate cravings!
  • Creative Use for Tofu: Tofu is one of those amazingly versatile foods that you can use in so many different ways. It’s flavor is neutral, allowing it to take on and absorb the flavors of whatever you make. It’s delicious in this recipe or others like Sweet Gingery Tofu and Mapo Tofu
  • Kid-Friendly: This Chocolate Tofu Pudding is so silky and tasty, I guarantee your kids will never notice that it’s not the Jell-O kind from the box.
  • Dietary Preference Friendly: Whether you’re vegan, gluten-free, dairy-free or just looking for a delicious easy dessert, this recipe caters to all preferences!

The Ingredients

  • Soft Silken Tofu: Silken tofu creates the creamy, luscious base for this pudding and is also high in protein. I like House Foods soft silken tofu or Mori-Nu firm silken tofu if you need ideas.
  • Pure Cocoa Powder: Cocoa powder gives this pudding its deep, intense chocolatey taste.
  • Agave Nectar: Agave nectar naturally sweetens the pudding while keeping it vegan. You could use any of your favorite liquid sweeteners like maple syrup or honey if you wanted. 
  • Vanilla Extract: Vanilla extract enhances the chocolate flavor and adds a lovely aroma.

Substitutions and Variations

One of the best things about this Chocolate Tofu Pudding is how adaptable it is. Here are some ideas to customize it according to your preferences:

  • Sweeteners: Swap agave nectar with maple syrup or honey (if not strictly vegan).
  • Cocoa Powder: For a richer flavor, use dark cocoa powder or experiment with raw cacao powder for added health benefits.
  • Tofu Type: If you prefer a thicker consistency, use firm silken tofu instead of soft. Avoid using regular firm tofu as it won’t blend as smoothly.
  • Nut Butters: Add a tablespoon of almond butter or peanut butter for a nutty twist and extra creaminess.
  • Spices: Sprinkle in a pinch of cinnamon or nutmeg for some warmth.
  • Extracts: Experiment with different extracts like almond or peppermint to create new flavor profiles.
  • Toppings: Top your chocolate tofu pudding with fresh fruits, nuts, dairy-free coconut whipped cream, dark chocolate shavings or chocolate chips to take it to the next level!

How to Make Healthy Chocolate Tofu Pudding

Chocolate Tofu Pudding ingredients in a food processor bowl.

Step 1: Place all the ingredients in a food processor and blend to combine.

Chocolate Tofu Pudding combined in food processor.

Step 2: Scrape down the sides of the food processor and blend again to make sure everything is incorporated.

Chocolate tofu pudding topped with raspeberries.

Step 3: Enjoy it immediately for a softer texture or let it sit in the refrigerator for at least an hour to set and chill.

Tips and Tricks

  • Choose the Right Tofu: We tested this recipe 6 times with different brands of tofus and decided that most brands of silken (or soft) tofu in your grocery store refrigerator section or “Mori-Nu silken firm un-refrigerated tofu” (sold at most health food stores) are the best options. Both tofus produced super smooth pudding results!
  • Adjust Cocoa Powder: You can use more or less cocoa than the amount calls for in the recipe, but 1/3 cup seemed to produce a perfectly chocolatey pudding that wasn’t too light or too rich.
  • Adjust Sweetness Gradually: Start with the recommended amount of sweetener and adjust gradually to suit your taste. Remember, you can always add more but can’t take it out once added.
  • Blend Thoroughly: Ensure all ingredients are well-blended to avoid any lumps. Scraping down the sides of the food processor helps in achieving a uniform consistency.
  • Make Ahead: This pudding is perfect for making ahead of time, in fact, sometimes letting it sit in the refrigerator for a few hours allows the flavors to marry better!

Storage Instructions

Store any leftovers in an airtight container in the refrigerator for up to 3 days. Give it a quick stir before serving again.

FAQs

Can I use regular tofu instead of silken tofu for tofu pudding?

It’s best to use silken tofu for this recipe as it blends smoothly and gives the pudding its creamy texture. Regular tofu won’t provide the same silky consistency.

Is Chocolate Tofu Pudding vegan and gluten-free?

Absolutely! All the ingredients used in this recipe are plant-based and naturally gluten-free, making it suitable for both vegan and gluten-free diets. Just ensure that all your ingredients, especially the cocoa powder and vanilla extract, are certified gluten-free if you have severe sensitivities.

How long does chocolate tofu pudding last in the refrigerator?

You can store the Chocolate Tofu Pudding in an airtight container in the refrigerator for up to 3 days. The texture remains smooth and the flavor stays delicious. Remember to give it a quick stir before serving after storing.

Can I freeze chocolate tofu pudding?

Freezing the pudding is not recommended as it can alter the smooth texture, making it grainy once thawed. It’s best enjoyed fresh or refrigerated!

What can I use instead of a food processor?

If you don’t have a food processor, a high-speed blender works just as well. Ensure to blend until all ingredients are thoroughly combined and the mixture is smooth. You may need to stop and scrape down the sides a few times to achieve the desired consistency.

Chocolate Tofu Pudding in clear serving class topped with raspberries.

More Healthy & Chocolatey Desserts

This recipe takes classic chocolate pudding to the next level and makes it into a guilt-free treat both you and your kids can get excited about! Let me know what you think of this recipe by leaving a comment and rating below!

Want more WeeliciousSubscribe to my newsletter and follow me on InstagramFacebook, and TikTok for all the newest recipes!

Print

Chocolate Tofu Pudding

This Chocolate Tofu Pudding is so easy to prepare and no one will know that it's actually healthy!
Course Dessert
Cuisine American
Prep Time 5 minutes
Total Time 5 minutes
Servings 4
Calories 110kcal

Ingredients

  • 14 oz soft silken tofu (I like House Foods soft silken or Mori-Nu firm silken)
  • 1/3 cup unsweetened cocoa powder
  • 1/4 cup agave nectar, maple syrup or honey (feel free to use a little more if you want it sweeter)
  • 2 teaspoons vanilla extract

Instructions

  • Place all the ingredients in a food processor and blend to combine.
  • Scrape down the sides of the food processor and blend again to make sure everything is incorporated.
  • Enjoy it immediately for a softer texture or let it sit in the refrigerator for at least an hour to set and chill.

Video

Notes

  • Choose the Right Tofu: We tested this recipe 6 times with different brands of tofus and decided that most brands of silken (or soft) tofu in your grocery store will produce silky smooth pudding. Avoid using regular firm tofu as it won’t blend as smoothly.
  • Adjust Cocoa Powder: You can use more or less cocoa than the amount calls for in the recipe, but 1/3 cup seemed to produce a perfectly chocolatey pudding that wasn’t too light or too rich for us.
  • Adjust Sweetness Gradually: Start with the recommended amount of sweetener and adjust gradually to suit your taste. Remember, you can always add more but can’t take it out once added.
  • Blend Thoroughly: Ensure all ingredients are well-blended to avoid any lumps. Scraping down the sides of the food processor helps in achieving a uniform consistency.
  • Make Ahead: This pudding is perfect for making ahead of time, in fact, sometimes letting it sit in the refrigerator for a few hours allows the flavors to marry better!

Nutrition

Calories: 110kcal | Carbohydrates: 18g | Protein: 5g | Fat: 3g | Sodium: 5mg | Fiber: 3g | Sugar: 15g

The post Chocolate Tofu Pudding appeared first on Weelicious.

Easy Apricot Sorbet (No-Churn!)

Once upon a time, in the dark streets of San Francisco, a life-changing ice cream cone was enjoyed thanks to Garden Creamery. This apricot sorbet is inspired by that fateful night, and the result is the perfect way to use up an abundance of ripe summer…

Easy Apricot Sorbet (No-Churn!)

Once upon a time, in the dark streets of San Francisco, a life-changing ice cream cone was enjoyed thanks to Garden Creamery. This apricot sorbet is inspired by that fateful night, and the result is the perfect way to use up an abundance of ripe summer apricots. It’s tart, subtly sweet, and SO refreshing! 

Just 4 ingredients and simple methods (no ice cream maker) required. It’s sorbet time!

Easy Apricot Sorbet (No-Churn!) from Minimalist Baker →

Spicy Passion Fruit Mocktail (AKA “Mockarita”)

Step aside margaritas, the mockarita has ARRIVED! This passion fruit mocktail has all the tart, sweet, refreshing goodness of a traditional margarita thanks to passion fruit, lime, and agave. And, spicy charred jalapeños add booze-like complexity and h…

Spicy Passion Fruit Mocktail (AKA “Mockarita”)

Step aside margaritas, the mockarita has ARRIVED! This passion fruit mocktail has all the tart, sweet, refreshing goodness of a traditional margarita thanks to passion fruit, lime, and agave. And, spicy charred jalapeños add booze-like complexity and heat without the alcohol. Yep, it’s seriously good! 

AND…it gets better! Just 4 ingredients and 25 minutes required, friends.

Spicy Passion Fruit Mocktail (AKA “Mockarita”) from Minimalist Baker →

Avocado Smoothie

This avocado smoothie is my latest obsession. Avocado is packed with healthy fats and the secret to an ultra-rich, dessert-like smoothie!

The post Avocado Smoothie appeared first on Budget Bytes.

Did you know you can freeze avocados? This information was life-changing when I opened my former restaurant, AVO, in Nashville back in 2015; we used frozen avocado in our signature drink, the Avocado Margarita and let me tell you, freezing ripe avocados saved us a bunch of dough! Now, I buy ripe avocados any time they’re on sale, slice them up, and toss them in the freezer for later. This avocado smoothie is the perfect way to use up frozen avocado. I know avocado in a drink might sound crazy, but trust me, it’s the secret to an ultra-rich, dessert-like smoothie. It’s packed with healthy fats and imparts that same creamy texture that avocados (and guacamole) are known for! This is your new favorite green smoothie.

close up of an avocado smoothie in a green glass.

What Is An Avocado Smoothie?

Citrus and avocado are a classic combination. In this smoothie, I add a creamy, ripe banana and a little extra sweetness from agave nectar, making it an instant winner! Super creamy, bright, and fun, this avocado smoothie is the perfect treat with lots of healthy ingredients involved.

Ingredients

Here’s what you’ll need to make an avocado smoothie:

  • Frozen Avocado: Makes this smoothie lusciously creamy and adds heart-healthy fats, fiber, and omega-3s.
  • Agave: This syrup adds a touch of sweetness to this smoothie to balance out the acidic flavors. Agave is a neutral flavored sweetener unlike maple and honey (which are delicious!) but can sometimes take over flavor-wise.
  • Frozen Banana: Adds flavor, subtle sweetness and creaminess.
  • OJ: Balances the fattiness of the avocado, adding a bright flavor.
  • Lime Juice: Adds a touch of extra acidity to balance out the sweet and creamy flavors.

What Else Can I Add?

This smoothie is a great base to add extra greens or fruit to!

  • I love to add spinach or kale.
  • Frozen blueberries or pineapple make great fruity additions!
  • For a protein boost, add a scoop of peanut butter or vanilla protein powder!
two hands clinking avocado smoothies together.
an avocado smoothie in a clear glass.
Print

Avocado Smoothie

This avocado smoothie is my latest obsession. Avocado is packed with healthy fats and is the secret to an ultra-rich, dessert-like smoothie!
Course Breakfast, Drinks
Cuisine American
Prep Time 5 minutes
Total Time 5 minutes
Servings 1 drink (about 1.5 cups)
Calories 297kcal

Equipment

Ingredients

  • 1/2 cup frozen avocado $1.61
  • 1 Tbsp agave $0.14
  • 1/2 frozen ripe banana $0.41
  • 1/2 cup OJ $0.60
  • 1 Tbsp lime juice $0.04

Instructions

  • Blend ingredients together until smooth. Serve ice cold!

See how we calculate recipe costs here.

Nutrition

Serving: 1smoothie | Calories: 297kcal | Carbohydrates: 50g | Protein: 3g | Fat: 12g | Sodium: 8mg | Fiber: 7g
a hand holding an avocado smoothie in a clear glass with a straw.

how to make An Avocado Smoothie – step by step photos

pouring orange juice over ingredients for avocado smoothie in a blender.

Blend 1/2 cup frozen avocado, 1 Tbsp agave syrup, 1/2 of a frozen ripe banana, 1/2 cup OJ, and 1 Tbsp lime juice together until smooth. Serve ice cold!

blending an avocado smoothie.

This creamy and refreshing avocado smoothie is the best way to start your morning or rescue you mid-day!

The post Avocado Smoothie appeared first on Budget Bytes.

Frozen Passion Fruit Mezcalita

We love a margarita, but a mezcalita? Do tell. A mezcalita has the familiar sweet and tart elements of a margarita, but with the added smoky complexity of mezcal. This frozen version is SO refreshing and bursting with passion fruit for a fun and fruity…

Frozen Passion Fruit Mezcalita

We love a margarita, but a mezcalita? Do tell. A mezcalita has the familiar sweet and tart elements of a margarita, but with the added smoky complexity of mezcal. This frozen version is SO refreshing and bursting with passion fruit for a fun and fruity twist. 

Bonus? It’s (ridiculously) quick and easy with just 4 ingredients and 5 minutes required. Let us show you how it’s done! 

Frozen Passion Fruit Mezcalita from Minimalist Baker →