Texas Margarita
A Texas margarita adds fresh orange juice to the classic tequila and lime! Here’s my 5-minute recipe, plus a pitcher…
A Texas margarita adds fresh orange juice to the classic tequila and lime! Here’s my 5-minute recipe, plus a pitcher…
This flavor-packed fajita sauce recipe works for beans, chicken, steak or shrimp! It’s quick to put together with a handful…
I was in Paris* last week — no, I cannot believe I get to utter sentences like that so casually, either, pinch me — and it was really, truly, and surprisingly spring. The magnolia trees at the Jardin du Palais Royal supplied us wit…
This slow cooker fiesta chicken soup is bold, comforting, and packed with Tex-Mex flavor—an easy, protein-rich meal for busy nights.
Texas caviar is a fresh and zesty mix of beans and veggies. It’s perfect for parties, picnics, and summer cookouts,…
We adore these hot honey chipotle chicken tacos! The chicken is the perfect blend of sweet and spicy, served on warm tortillas and topped with a refreshing avocado salsa. The combo is delicious! There’s always time for tacos! ‘ These hot honey chipotle chicken tacos make it into our weekly menu at least once a […]
The post Hot Honey Chipotle Chicken Tacos. appeared first on How Sweet Eats.
This grilled taco chicken with frito slaw will become your new favorite dinner! Spiced taco seasoned chicken is grilled to perfection and served over crunchy, refreshing slaw with chili cheese fritos. Tastes amazing! And it’s fun to serve too. Time to make frito slaw your thing! This grilled taco chicken with frito slaw is my […]
The post Grilled Taco Chicken with Frito Slaw. appeared first on How Sweet Eats.
This Black Bean Soup recipe is easy to make, full of flavor, and ready in 45 minutes with canned beans. What makes it special is the way Southwestern ingredients like cumin, coriander, and jalapeño peppers enhance the beans’ naturally rich, earthy taste without overpowering it. The result is a soup that’s both vibrant and well-balanced,…
The post The Best Easy Black Bean Soup Recipe appeared first on A Well Seasoned Kitchen.
These grilled steak tacos with chimichurri are light, fresh and delicious! Topped with sweet corn, pickled onions and feta cheese, they are fabulous and satisfying dinner! Everybody loves a taco. These grilled steak tacos are a huge crowd pleaser. Serve them with sweet corn, chimichurri, pickled onions and some crumbly feta cheese. They are light […]
The post Grilled Steak Tacos with Chimichurri. appeared first on How Sweet Eats.
 A healthier take on the classic southern casserole, this Skillet King Ranch Casserole features rotisserie chicken, veggies, green chiles two…
The post Skillet King Ranch Casserole appeared first on The Defined Dish.
Soft tortillas are filled with spicy chicken and cheese and topped with a creamy rich white sauce in our white chicken enchiladas recipe.
These air fryer taquitos are the ultimate weeknight dinner! With just five ingredients and 15 minutes from start to finish,…
These crispy baked cheeseburger quesadillas are a huge favorite in our house. Crispy flour tortillas filled with cheddar cheeseburger beef, topped with lettuce, tomato, pickles onions and the best burger sauce ever. Here’s an embarrassingly easy meal for you today! These baked cheeseburger quesadillas are so highly requested in our house. The cripiest tortillas, cheeseburger […]
The post Crispy Baked Cheeseburger Quesadillas. appeared first on How Sweet Eats.
These crispy cheesy chicken tacos are dreamy! Made with seasoned chicken thighs, the tortillas are coated in melty, crispy cheese and topped with a quick pico de gallo. Easy, delicious an such a great weeknight meal. I’m unlocking the secret to one of our favorite meals. These chicken tacos are going to become a staple […]
The post Crispy Cheesy Chicken Tacos. appeared first on How Sweet Eats.
These beer battered fish tacos are crispy, light and delicious. Served on warm tortillas with refreshing mango slaw, they are drizzled with chipotle crema. Light, delicious, satisfying and easy to make! And chipotle crema! These beer battered fish tacos are the ultimate dream: light and airy crunchy exterior with a buttery, flaky interior of white […]
The post Crispy Fish Tacos with Mango Slaw. appeared first on How Sweet Eats.
This vegetarian enchilada casserole is a delicious and filling vegetarian dinner idea! It’s simpler to make than rolling enchiladas and…
These cauliflower enchiladas are so satisfying and delicious! Chipotle roasted cauliflower is mixed with sharp cheddar for a melty filling and stuffed in a flour tortilla. Baked with sauce until warm and cheese, these are divine! I made you dinner! These chipotle cheddar cauliflower enchiladas are a delicious weeknight favorite. They are so filling and […]
The post Chipotle Cheddar Cauliflower Enchiladas. appeared first on How Sweet Eats.
This chicken tortilla soup recipe is packed with savory spiced broth, tender chicken, and crispy tortilla strips—all ready in under…
Craving a comforting, flavorful dinner that’s both healthy and easy to prepare? Look no further than this Layered Chicken Enchilada Casserole with Green Chile Sauce. Say goodbye to the fuss of rolling individual enchiladas! This layered dish boasts vibrant Southwestern flavors and a creamy texture, with no cream, sour cream, or canned soups. It’s the…
The post Layered Chicken Enchilada Casserole with Green Chile Sauce appeared first on A Well Seasoned Kitchen.
This cheesy beef enchilada bake is a cozy, comforting weeknight meal. Homemade enchilada sauce, ground beef, corn, green chiles, tortillas and cheese make this extra delicious. Leftovers are great too! This is the ultimate weeknight meal. This beef enchilada bake is so delicious, completely with homemade enchilada sauce, green chiles, corn, tortillas and monterey jack […]
The post Weeknight Cheesy Enchilada Bake. appeared first on How Sweet Eats.
This Crispy Baked Panko Chicken has it all! Made with readily available ingredients, it’s crispy on the outside and tender inside, with no oily mess from frying – plus uber amounts of flavor from multiple layers of Mexican seasonings (think salsa verde, chili powder, cumin, garlic). And if that isn’t enough, this one-dish dinner is…
The post Crispy Baked Panko Chicken with Mexican Seasoning appeared first on A Well Seasoned Kitchen.
This blooming quesadilla ring recipe is a fun Mexican-inspired dish filled with chicken and cheese arranged around a tasty sauce.
We love to make pizza quesadillas as an easy weeknight meal. Marinara sauce, pizza seasonings, shredded chicken and cheese is covered with tortillas and baked until crispy. Top with sauce, cheese and pepperoni – boom! So easy and delicious. We might be the biggest pizza lovers on the planet. I can easily pizza-fy anything. So […]
The post Crispy Baked Pizza Chicken Quesadillas. appeared first on How Sweet Eats.
If you’re a taco lover, these crispy summer carnitas tacos are for you. Crispy pulled pork in a warm tortilla, topped with refreshing, crisp sweet corn salsa and an herby jalapeño crema drizzled on top. So delicious and flavorful! Who loves tacos!! I’m very much raising both hands for these crispy carnitas summer tacos right […]
The post Crispy Carnitas with Summer Corn Salsa. appeared first on How Sweet Eats.
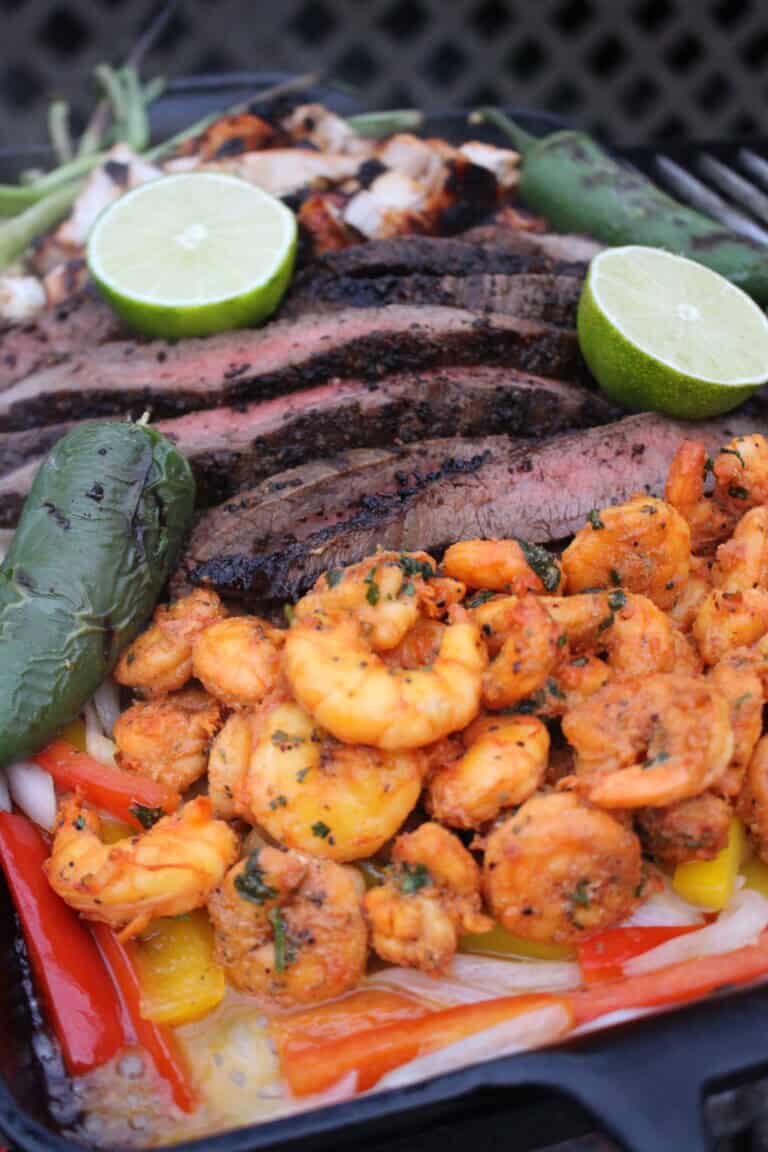
OK, I know what your first question is: why are they called Texas fajitas? Answer: I have no idea. But…
The post Texas Fajitas appeared first on Over The Fire Cooking.