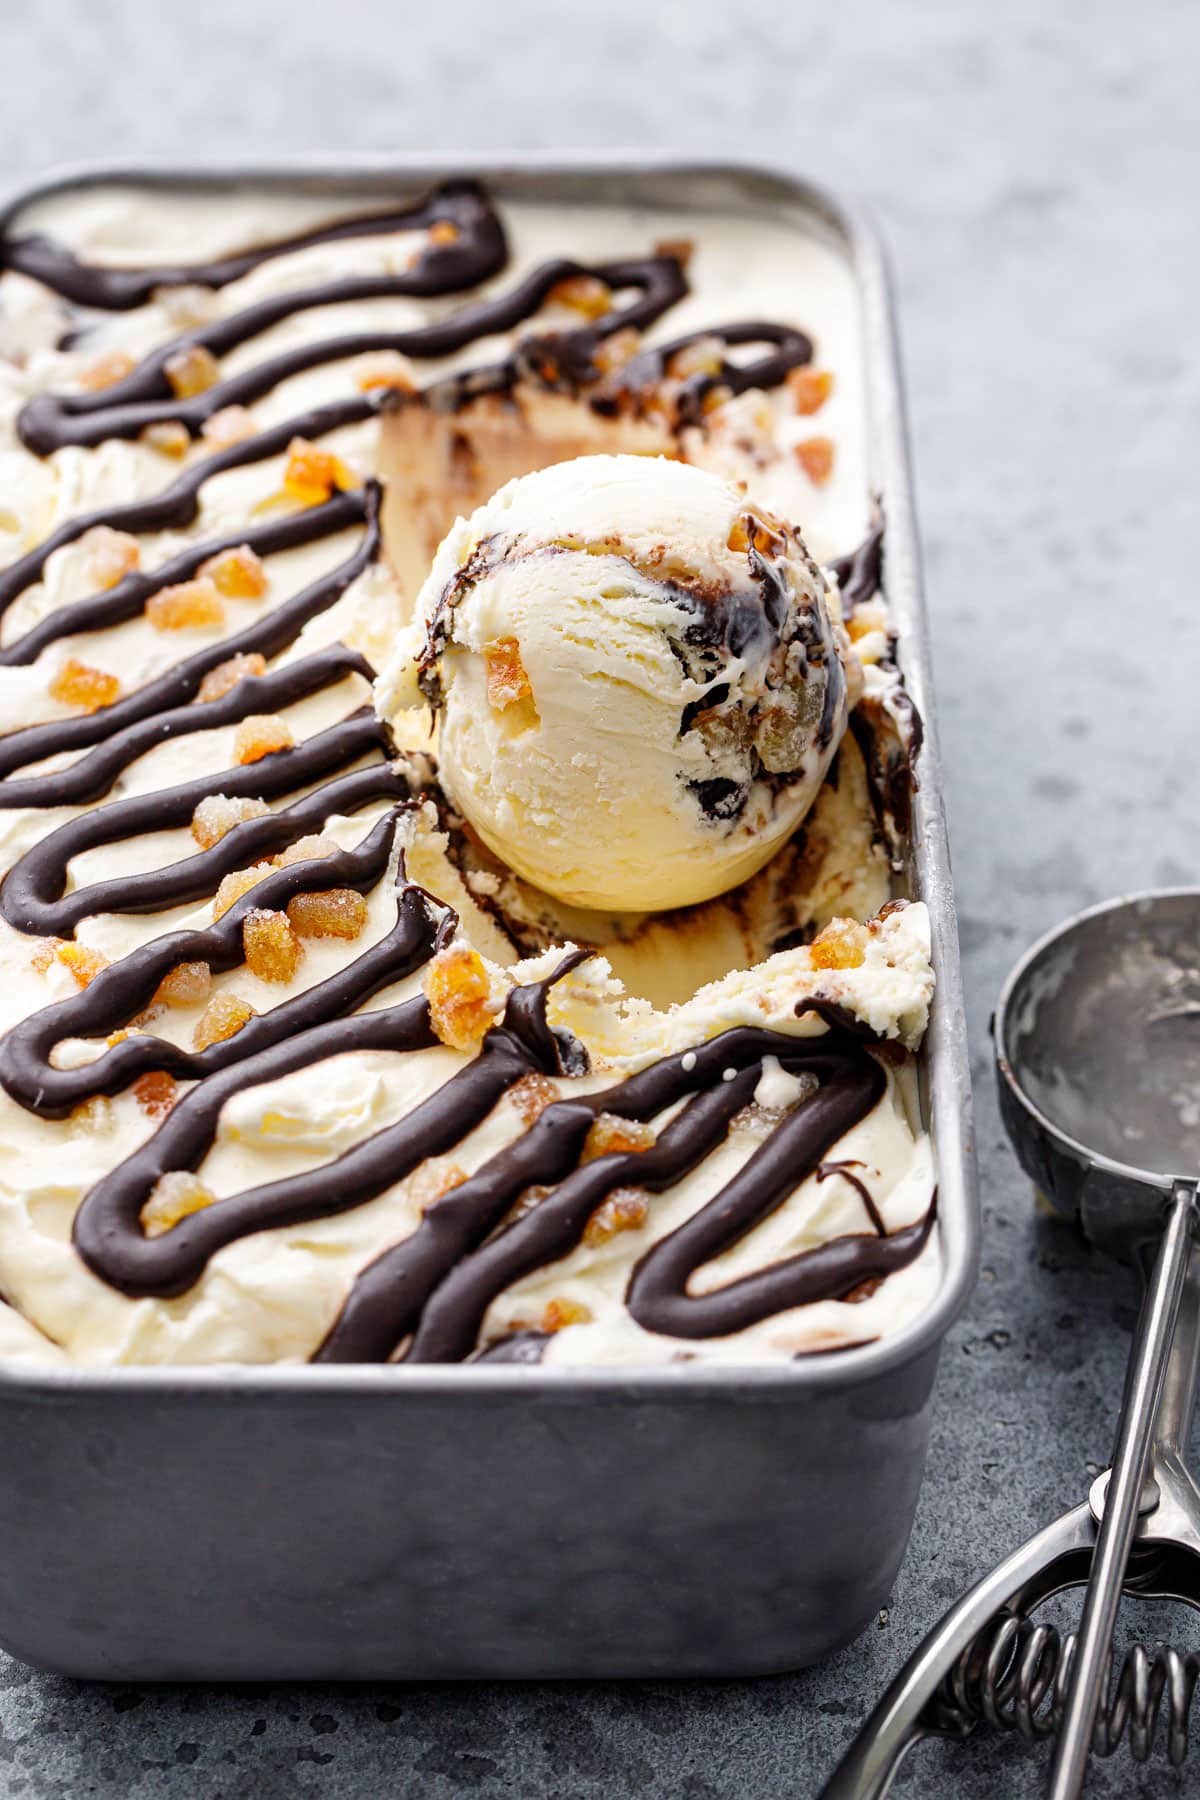
This sweet and creamy custard-based ice cream is flavored with candied orange syrup and features a swirl of rich and chewy chocolate fudge and bits of candied orange peel studded throughout. Inspired by a particularly memorable cone of gelato from our travels, Crema del Doge is a flavor fit for a king: sweet cream with […]
This sweet and creamy custard-based ice cream is flavored with candied orange syrup and features a swirl of rich and chewy chocolate fudge and bits of candied orange peel studded throughout.
Inspired by a particularly memorable cone of gelato from our travels, Crema del Doge is a flavor fit for a king: sweet cream with a hint of orange, with swirls of dark chocolate fudge and bits of bright candied orange peel mixed right in.
Sometimes, a single delicious bite from a trip is so memorable that you’re still thinking about it 7 years later.
This is one of those bites.
Ok, so we had quite a few memorable bites on our trip to Venice back in 2017, including a decadent pistachio cream and the always satisfying straciatella, but it was a mind-blowing scoop of chocolate-and-orange deliciousness dubbed Crema del Doge that embedded itself in my mind and refused to leave.
Crema del Doge is the signature flavor of Gelateria il Doge in Venice, Italy. (The Doge was the highest ranking leader in Venice from about the 7th to 18th centuries… so this gelato is fit for royalty, wouldn’t you agree?) If you ever find yourself in the Floating City, I highly recommend seeking out this particular gelateria as you won’t be disappointed (SuSo is the other one that’s an absolute must).
This particular flavor flavor features a sweet cream gelato base with a swirl of chocolate fudge and bits of candied orange peel, making for a lovely chocolate and orange combination that’s darn near perfection. It was one of those moments where I knew, shortly after taking that first lick, that this was a flavor I needed to recreate at home.
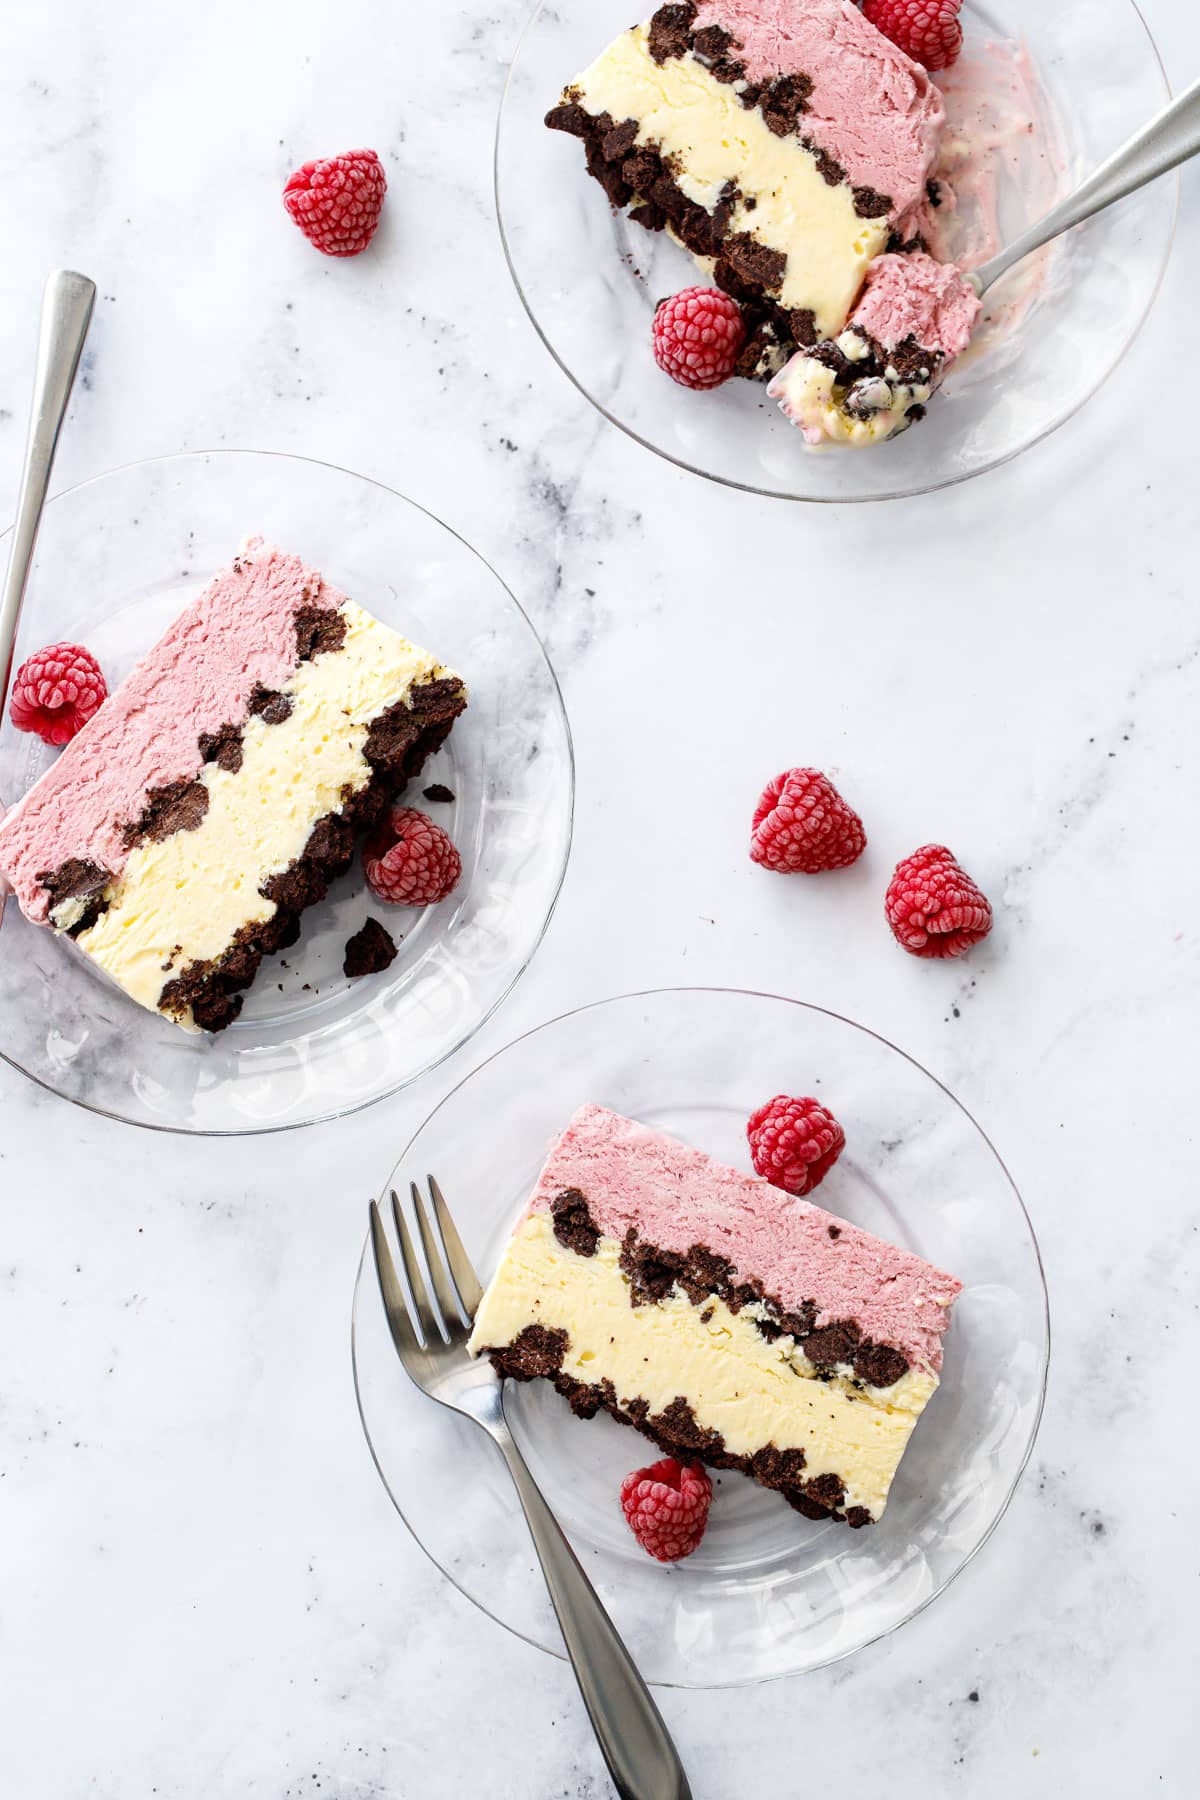
With creamy, ultra-flavorful layers of tropical passionfruit and bold raspberry semifreddo and a dark chocolate crumb for a bit of sweet and salty crunch, this no-churn frozen dessert is truly next-level. A semifreddo is an Italian frozen dessert (literally translating to half frozen) that, texturally, falls somewhere between an ice cream and a frozen mousse. […]
With creamy, ultra-flavorful layers of tropical passionfruit and bold raspberry semifreddo and a dark chocolate crumb for a bit of sweet and salty crunch, this no-churn frozen dessert is truly next-level.
A semifreddo is an Italian frozen dessert (literally translating to half frozen) that, texturally, falls somewhere between an ice cream and a frozen mousse. It is a great option if you’re craving a frozen treat but don’t have an ice cream maker.
This recipe was created in partnership with Amoretti (use coupon code LOVEANDOLIVEOILFREESHIP for free shipping on your order!) All opinions expressed here are my own.
Spoiler alert: this is not Neapolitan! At first glance you may think you’re seeing the classic strawberry-vanilla-chocolate combo, but don’t be fooled, this sweet frozen treat is anything but ordinary, a next-level-Neapolitan if you will, featuring the trifecta of raspberry, passionfruit, and chocolate flavors.
The texture is lighter than ice cream thanks to the folded-in whipped cream, giving the consistency of a luscious frozen mousse that softens into a velvety smooth texture on your tongue. And thanks to the custard base, it has all the creaminess that you love in ice cream without the extra effort of churning.
The beauty of a molded frozen dessert like this is its layering ability, a benefit that poor ice cream certainly can’t claim. Here I’ve stacked layers of bright passionfruit and bold raspberry with Milk Bar-style chocolate crumbs in between and on top for the prefect foil of salty to sweet, crunchy to creamy.
This 3-ingredient strawberry mousse is light, fluffy, and bursting with berry flavor! Made with just strawberries, whipped cream, and a touch of sweetness, it’s the perfect easy dessert for any occasion.
Here at A Couple Cooks we’ve been on a kick of creating 3 ingredient recipes, because who doesn’t love simplicity? (We’re even authors of a cookbook of simple recipes.) Here’s our latest simple dessert idea: this strawberry mousse recipe! A combination of ripe berries, heavy cream, and a touch of sweetener takes just minutes to whip up and makes a pile of fluffy, berry-scented goodness. We saw this concept on social media and created our own spin using maple syrup, an immersion blender, and a whisk. If you’re like us, add a handful of crushed pretzels for that nostalgic sweet and salty hit!
All you need are 3 ingredients for this strawberry mousse
There’s a certain satisfaction to making something with only 3 ingredients, right? This sweet treat is perfect for whipping up in a few minutes for dinner guests or with a kid in your life. You’ll need a small blender (or blender, keep reading for why), a whisk, and this handful of ingredients to make this lusciously fluffy berry mousse. Here are the ingredients you’ll need:
Strawberries: Try to find the ripest, reddest berries you can. Bonus points for local berries! Keep in mind that out of season berries can be tart and tasteless, so making this in the winter months it’s not as tasty (though you can add more sugar to compensate).
Pure maple syrup, honey or sugar: We like this dessert best sweetened with maple syrup, particularly the type marked “Grade A: Dark Color and Robust Flavor” in the US. We find it has the best flavor and avoid any syrups marked amber. Honey works well as a sweetener as well, as does granulated sugar.
Heavy cream: This ingredient is what makes the magic! There are no substitutes for heavy cream here, since the dairy fat is what makes the fluffy texture.
A delicious shortcut for mousse
We will admit this strawberry mousse is not “technically” a traditional mousse like this chocolate mousse, which is cooked on the stovetop and thickened with eggs. Think of it as a delicious shortcut! Because of that, the texture is more light and fluffy than a standard mousse. You can refrigerate the mousse after whipping it up, which helps to make more of a “set” texture.
You can adjust the sweetness to taste
We like making this strawberry mousse recipe with 2 tablespoons sweetener, which makes for a lightly sweet mousse. But if you’re used to very sweet desserts or are cooking for a crowd that is, use 3 tablespoons sweetener for a sweet-tasting strawberry mousse. You also may want to use sugar as your sweetener, as it brings a more direct sweetness compared to the nuanced flavor of maple syrup or honey.
Don’t have a small blender? No problem
This recipe uses a small or immersion blender because the overall quantity of berries is so small, it doesn’t blend well in a standard size of blender. (If you’ve tried it, you know!)
A food processor should also work for this recipe. Or, double the recipe and make it in a standard blender so the quantity is large enough to blend. Then just use half the strawberry puree for the mousse and use the rest in other ways (see these ideas!).
Another way to serve it: as strawberry mousse pie!
This strawberry mousse is delicious served up in little jars with crushed pretzels or graham crackers. Or if you like, you can make double the recipe and pour it into a pretzel crust or graham cracker crust! Make sure to refrigerate it for a few hours before serving to set the mousse to a thicker texture.
Diet considerations, and a trick for vegan
This strawberry mousse recipe is vegetarian and gluten-free. We have not tested a vegan variation, but we’d suggest trying this vegan heavy whipping cream by Nora Cooks and gently folding in the strawberry puree. Let us know if you try it!
More strawberry recipes we love
Embrace the season with more of our favorite strawberry recipes! We hope you love this recipe and let us know what you think in the comments below.
This 3-ingredient strawberry mousse is light, fluffy, and bursting with berry flavor! Made with just strawberries, whipped cream, and a touch of sweetness, it’s the perfect easy dessert for any occasion.
Ingredients
1 cup diced strawberries (about 8 ounces)
2 tablespoons* maple syrup (or honey or sugar)
1 cup heavy cream
Instructions
Clean and chop the strawberries. Using a small blender or immersion blender,** blend the berries with the maple syrup. Add the cream and pulse 2 to 3 times until combined.
Pour the cream mixture into a bowl. Whip with a whisk for 2 minutes until thickened and fluffy.
Serve immediately or refrigerate until serving. Serve with crushed pretzels or graham crackers if desired.
Notes
*2 tablespoons maple syrup makes for a lightly sweet mousse. Use 3 tablespoons if you prefer a sweet mousse.
**A food processor should also work. Doubling the recipe works in a standard blender since the quantity is large enough to blend. If you don’t have a small blender, you can blend double the berries in a large blender and use half the puree for the mousse.
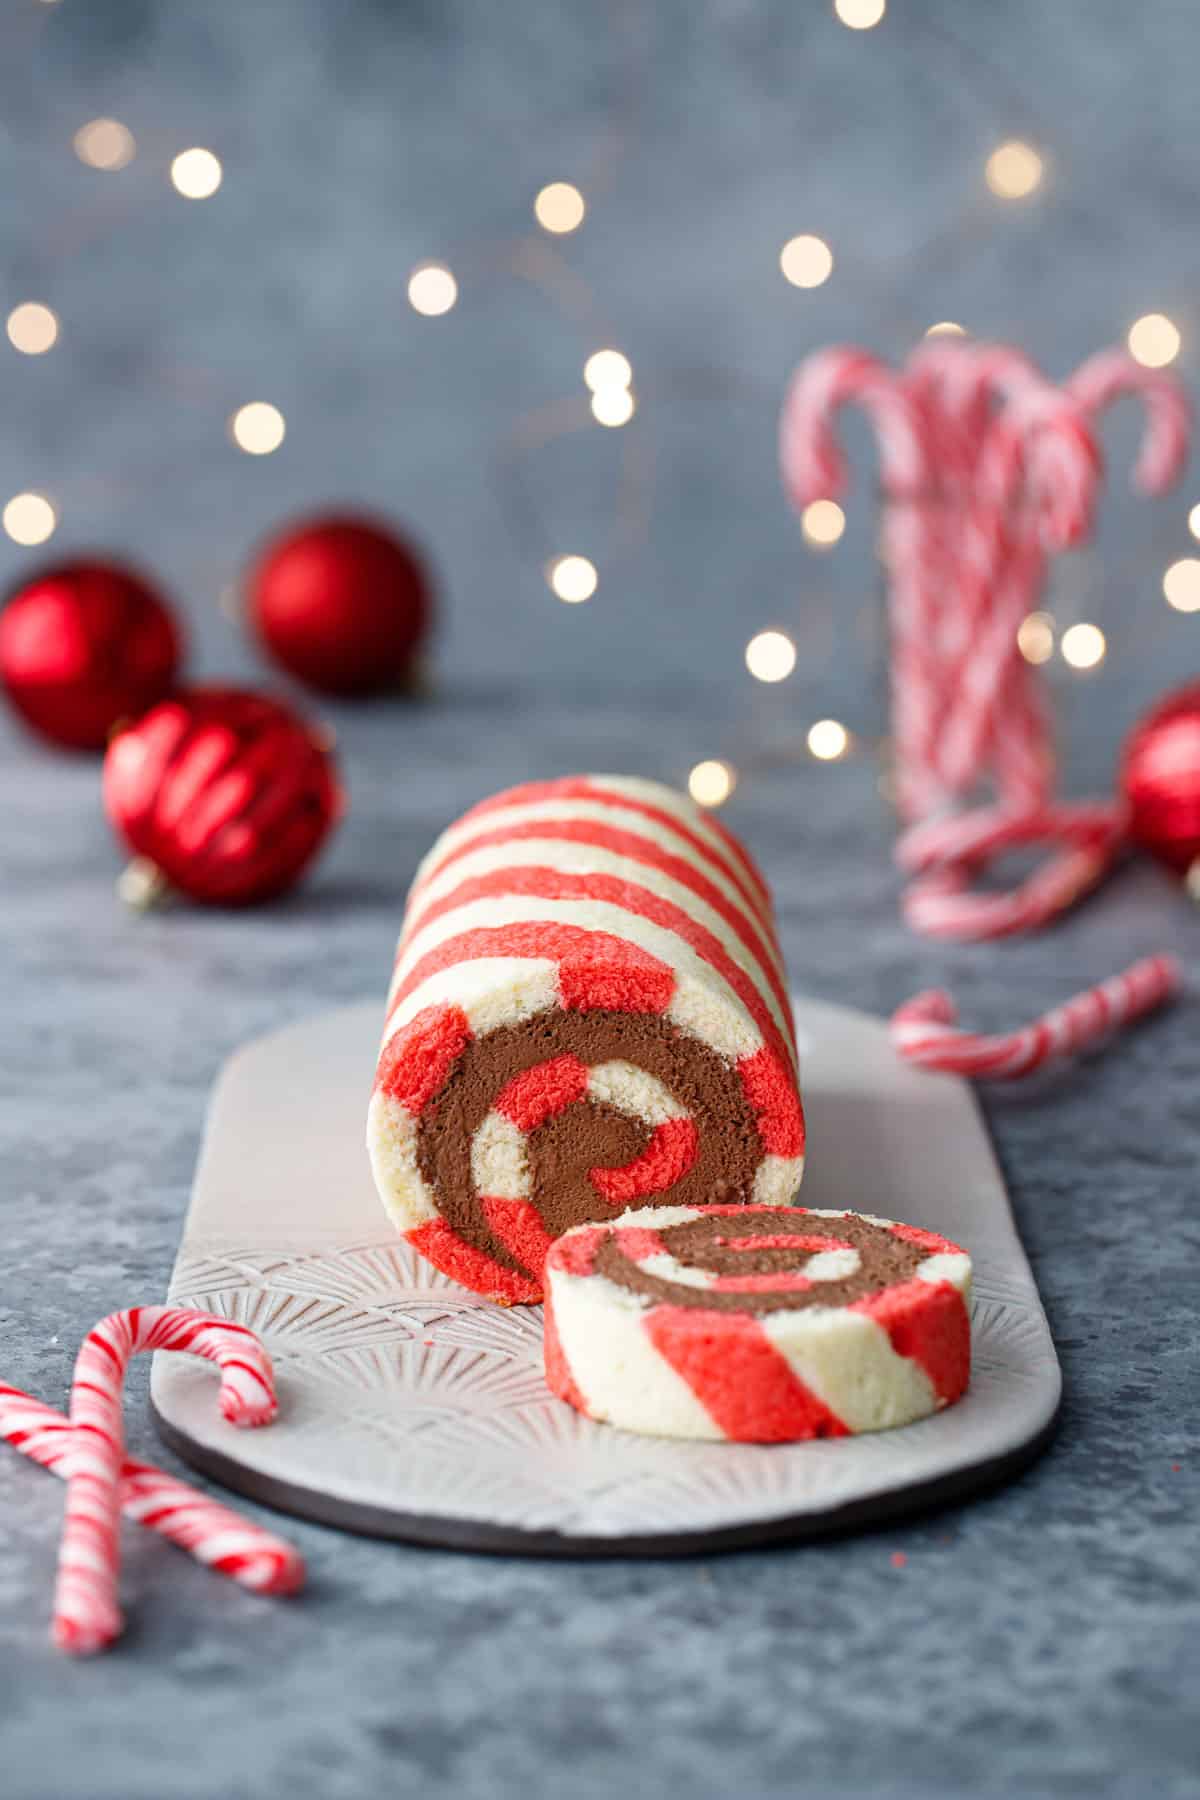
Here’s a perfect addition to your Christmas table: a light and fluffy chiffon cake roll made with red and white striped batter, and filled with a spiral of chocolate peppermint whipped cream for a festive cake that’s dressed to impress. This peppermint roll cake looks and tastes like a giant candy cane (if candy canes […]
Here’s a perfect addition to your Christmas table: a light and fluffy chiffon cake roll made with red and white striped batter, and filled with a spiral of chocolate peppermint whipped cream for a festive cake that’s dressed to impress.
This peppermint roll cake looks and tastes like a giant candy cane (if candy canes were soft and fluffy and filled with chocolate peppermint whipped cream). While patterned cake rolls can be challenging to bake, the work can be split up into a few days (making them a perfect make-ahead dessert!)
Plus, I’ve included lots of tips and tricks and how-to photos in this post to help you succeed in making this impressive looking dessert for your holiday celebration!
This recipe was created in partnership with Amoretti (use coupon code LOVEANDOLIVEOILFREESHIP for free shipping on your order!) All opinions expressed here are my own.
A festive holiday cake roll is quickly becoming a household tradition around here. My own version of the yule log, if you will (this one not quite as obviously log-like as my chocolate chestnut cake roll which has a literal wood grain design baked right in).
I love Japanese-style cake rolls like this because they aren’t overly sweet (not to mention they’re just gosh darn cute). If you are the kind of person who finds most buttercream-frosted cakes far too sweet, chances are you’ll love this style of cake!
The cake itself is lightly sweetened and pillowy soft, with a hint of vanilla and peppermint in the cake itself, and then filled with a chocolate peppermint whipped cream filling with an ultra rich chocolate flavor while still remaining incredibly light (I think it tastes like a decadent peppermint hot chocolate that’s been whipped to a cloud-like fluff).
Let’s talk about our feelings for a second. Excuse me, I meant fillings, not feelings, because let’s face it, that spiral of whipped chocolate goodness is really the star of the flavor train here, packed with chocolate and a lovely peppermint flavor courtesy of Amoretti’s Peppermint Extract.
For chocolate lovers, you’ll be chuffed to know that it’s not just a whipped cream with some cocoa powder added. No, I’ve used dark chocolate in addition to Dutch process cocoa powder, for a rich and chocolately cream filling that falls somewhere between a whipped ganache and a whipped cream in terms of texture (it’s denser and silkier than plain whipped cream, but lighter and airier than a mousse or whipped ganache).
Impress everyone with this creamy Tuscan Salmon! It might just be the best salmon recipe ever, made in just 30 minutes.
There are salmon recipes and then there’s this creamy Tuscan salmon. It might result in a few marriage proposals, which is why we also like to call it “Marry Me Salmon!” The tender fish is bathed in a luscious cream sauce with garlic, sun dried tomatoes, spinach, and capers, making each bite bright, salty, and luxurious. It tastes restaurant-style, but it’s easy to whip up at home in just 30 minutes. Honestly, it might be the best salmon recipe we’ve made!
Ingredients in this Tuscan salmon recipe
We’re not exaggerating when we say this is one of the best salmon recipes we’ve made. Multiple friends and family have tried it and can’t stop raving, then immediately ask for the recipe! This is the one we pull out to impress at dinner parties and for entertaining. Each ingredient here packs a flavor punch, so no substitutions. Here’s what you’ll need:
Protein: Salmon fillets, skin on and 1 to 1 ½ inches thick
Pantry: Olive oil, garlic powder, salt, pepper
Dairy: Salted butter, milk, heavy cream, Parmesan cheese
The most important thing for a great salmon recipeis a buying high quality fillets of salmon. Lower quality salmon can taste very fishy and have a mushy texture. It can also have a lot of white stuff (called albumin) when it’s cooked. While it’s not harmful, it doesn’t look appetizing! Here’s what to know when shopping for salmon:
1 to 1 1/2-inch thick fillets are good for this recipe; you might find it labeled center cut at the store. Thicker fillets can take longer to cook and are slightly harder to pan fry since they can become blackened before they’re cooked on the inside.
Look for wild caught salmon. Fish that is wild caught in your country is usually a sustainable choice. (There are also quality options in well-regulated farms; see Seafood Watch Consumer Guide.)
Buy fresh salmon. Salmon that’s fresh from the fish counter usually has the best flavor. Frozen can work, but try to find highest-quality frozen salmon. Avoid big economy-sized bags, which have thinner fillets that can taste fishy.
Avoiding the white stuff
Ever noticed the white stuff that oozes to the top of some salmon recipes when cooking it? It is coagulated protein that seeps to the surface called albumin. The amount of albumin varies depending on the fish. We’ve bought certain varieties of salmon that have little to no albumin when cooked, but others that consistently have it ooze out.
There’s one thing we’ve found that helps: brining the salmon. In a side by side test, we found it helped to reduce the albumin in two similar fillets. (Keep in mind it did not reduce all of the albumin, so to fully reduce it you have to find a grocery store or other source for salmon that reliably has no white stuff.) Here’s what to do:
In a large shallow dish, whisk together 4 cups room temperature water and 3 tablespoons kosher salt until dissolved.
Place the salmon in the water and wait for 15 minutes.
Making Tuscan salmon for a crowd
This Tuscan salmon recipe is perfect for impressing guests, whether it’s for a dinner party or a holiday like Christmas or Valentine’s Day. It’s pan seared, so you can cook as many fillets as fit in a large skillet. If you want to increase the serving size for this recipe for serving a crowd, you can do it two ways:
Pan sear the salmon in batches. Sear a double version of the salmon in batches.
Bake the salmon. Use the method in this Baked Salmon recipe, but season with the quantities of garlic powder, salt and pepper in the recipe below. For a crispy top similar to pan searing, broil for 2 minutes at the end of the bake time.
Make a large amount of the sauce in a skillet, then pour it into each fillet. Re-warm the salmon if necessary, then top with the creamy sauce right before serving.
Leftover storage
This Tuscan salmon recipe stores well, if you do end up having leftovers! (We rarely do.) Store in a sealed container for up to 3 days, refrigerated. Re-warm in a skillet over medium heat until warmed through. If the sauce becomes dried out, add a splash of milk or cream or a pat of butter.
More salmon recipes
Salmon is always a hit around here! Here are a few more salmon recipes to enjoy:
Allow the salmon to come to room temperature for 15 minutes (or brine it*). Pat the salmon dry with a clean towel. Rub it generously with olive oil and sprinkle it with 1 teaspoon of the kosher salt, the garlic powder, and a few grinds of black pepper.
Heat a large skillet over medium high heat and add the olive oil. Add the salmon skin side up and cook for 3 to 5 minutes until cooked about halfway to the center of the thickest part of the salmon.
Reduce to medium heat and flip the salmon (a fish spatula makes easy work of it). Tilt the pan down slightly and quickly spoon the pan juices over the top of the fish a few times. Cook for 4 to 5 minutes, continuously spooning the butter over the salmon. Cook until just tender and pink at the center (the internal temperature should be between 125 to 130°F in the center when removed).
Remove the salmon to a plate and set aside. Drain the pan of any liquid and quickly wipe it out with a paper towel.
Place the pan over low heat and melt the butter. Then add the garlic and sun-dried tomatoes and cook for 30 seconds to 1 minute until the garlic is lightly browned and fragrant. Add the capers, cream, milk, and remaining ¼ teaspoon kosher salt. Simmer for 2 minutes, stirring occasionally and scraping the brown bits off the bottom of the pan. Add the spinach and cook until wilted, about 1 minute, then return the salmon to the pan and warm it for 2 minutes, spooning the sauce over the salmon.
Serve topped with the sauce and grated Parmesan cheese.
Notes
*To help reduce the white stuff (albumin) that can ooze from salmon when it’s cooked, we recommend brining the salmon to bring it to room temperature. In a large shallow dish, whisk together 4 cups room temperature water and 3 tablespoons kosher salt until dissolved. Place the salmon in the water and wait for 15 minutes.
This lemon garlic chicken recipe is creamy, dreamy and the perfect dish to impress anyone! You’ll want to lick your plate clean.
If there’s one recipe that’s a sure hit in our house, it’s creamy chicken. And this one is an absolute family favorite: try this creamy lemon garlic chicken! The chicken is coated in spices and pan fried until tender and juicy, then topped with a quick pan sauce made with lemon, garlic and a little cream. It wows everyone, whether you’re cooking to impress or just whipping up a weeknight meal. (This one is on repeat in our house!)
What you need for lemon garlic chicken
This creamy lemon garlic chicken recipe is simple to put together in a skillet. The basic idea is to take chicken cutlets, season them and pan fry them for a few minutes, then make a simple creamy sauce with lemon and garlic.
Protein: Boneless skinless chicken cutlets or breasts
Spices: Oregano, onion powder, garlic powder, salt and pepper
Pantry: Olive oil, garlic
Dairy: Butter, milk, heavy cream
Fresh ingredients: Lemon, parsley (for garnish)
Equipment: Large skillet
Time: 25 minutes
A note on serving size
This recipe makes 4 modest servings, so if you’ve got very hungry eaters or more people to food, consider making 1.5 times or double the recipe. If so, use a very large skillet and pan-fry the chicken in batches.
How to butterfly chicken
For this lemon garlic chicken, you’ll want to buy chicken breasts that are already butterflied into cutlets or butterfly it yourself. Why? Chicken breasts are often very thick, making them tricky to cook evenly. Slicing the chicken breast in half horizontally (butterflying it) makes thinner pieces that cook more evenly, are easier to eat, and are better seasoned.
You can buy a chicken breast already butterflied, which is marked on the package as butterflied or “cutlets”. If you buy regular chicken breasts, you can butterfly them yourself! Here’s what to do:
Place your hand over the top of the chicken breast.
Use a sharp knife to carefully slice the breast horizontally, leaving the edge intact so it can open up like a book (or butterfly!).
Unfold the chicken breast like a book, then for cutlets, cut along the fold to separate the two halves (each half is a cutlet). To make evenly thick chicken, you can cover the chicken with plastic wrap and lightly pound the chicken with a mallet or heavy pan to make it even (we did not do that for this recipe).
Buy organic chicken if possible
The best chicken to buy is organic chicken. Per the USDA, organic chicken is raise in living conditions accommodating their natural behaviors (like the ability to graze on pasture), fed 100% organic feed and forage, and not administered antibiotics or hormones.
Buying organic chicken makes sure that it is the highest quality meat that was raised sustainably, and it is also free of chemicals and additives! It’s both the healthiest and tastiest option for eating.
Sides to make it a meal
This lemon garlic chicken makes a fast and easy dinner, paired with some easy side dish recipes! Here are some tasty side dishes that are simple to whip up alongside this chicken:
Let us know in the comments below what you think of this chicken recipe. Our kids love it, and it always impresses at a dinner party! Here are a few more easy chicken recipes you’ll love:
Zest of 1/2 lemon plus 1 tablespoon fresh lemon juice, plus lemon slices for garnish
Fresh parsley, finely chopped, for garnish
Instructions
Pat the chicken dry with a paper towel. If using breasts, slice them in half horizontally (if you bought cutlets, skip this step). Sprinkle the chicken on both sides with the salt, pepper, garlic powder, onion powder, and oregano.
Add the olive oil to a large skillet and heat over medium heat. Add the chicken and cook for 3 to 5 minutes per side, until browned on both sides. When the internal temperature is 165°F, or the center is no longer pink, remove to a plate.
Melt the butter in the same pan over medium low heat. Add the garlic and cook for 30 seconds to 1 minute until the garlic is lightly browned and fragrant. Add the cream, milk, lemon zest, and lemon juice and simmer for 2 to 3 minutes, stirring and scraping, until thickened slightly. Return the chicken to the pan and warm each side for 1 minute. Serve immediately, with sauce spooned over. If desired, garnish with finely chopped fresh parsley and lemon slices.
Notes
*This recipe makes 4 modest servings, so if you’ve got very hungry eaters or more people to food, consider making 1.5 times or double the recipe. If so, use a very large skillet and pan-fry the chicken in batches.
No dry, bland scones here: these cream scones are tender and fluffy and ultra flavorful! This particular version has dark chocolate chunks and freeze-dried raspberries mixed in, but the base recipe is ultra flexible to accommodate whatever flavors you happen to be craving! Compared to their butter-based counterparts, cream scones are a cinch to whip […]
No dry, bland scones here: these cream scones are tender and fluffy and ultra flavorful! This particular version has dark chocolate chunks and freeze-dried raspberries mixed in, but the base recipe is ultra flexible to accommodate whatever flavors you happen to be craving!
Compared to their butter-based counterparts, cream scones are a cinch to whip up with little more than flour, sugar, cream and a fork—no finicky cold butter, pastry blenders or stand mixers needed!
Trust me when I say these are not the dry, crumbly things you probably think of when you hear the word “scone”. Instead, these cream scones are tender and fluffy and chock-full of punchy freeze-dried raspberries and rich, dark chocolate.
I’d argue that cream scones are an entirely different beast, made with heavy cream rather than butter and/or buttermilk.
The high-hydration dough results in a super light and fluffy scone that’s worlds away from the dry, chalky pucks that often pass for scones (it’s sad, really). Trust me, you’ll be shocked at how not-dry these are. They’re almost more muffin-like than anything.
This sun dried tomato pasta is creamy, cozy, and a crowd-pleasing dinner idea! This recipe is simple to make with maximum wow-factor.
You know those recipes where people rave and only you know the secret that it’s actually easy to make? That’s the case with this Creamy Sun Dried Tomato Pasta! There’s major wow-factor but this pasta comes together in under 30 minutes. Earthy, fruity sundried tomatoes lend a meaty quality to this vegetarian pasta, which is bathed in a Parmesan cream sauce. We couldn’t stop raving about each bite!
Ingredients in sun dried tomato pasta
This sun dried tomato pasta comes together in about 30 minutes, with only one ingredient to chop. That’s right, all you need to do is mince garlic! Otherwise, it’s a matter of simmering up a simple sundried tomato cream sauce and boiling a pot of pasta. Here’s what you’ll need:
This sundried tomato pasta recipe works with any type of pasta noodle, but we like it best with short cut pasta. Short cut pasta makes it easy to get perfect distribution of sundried tomatoes, spinach, and bites of chewy pasta. However, you’re welcome to make it with long noodles too! Here are a few varieties we’d recommend:
The most important part of this sun dried tomato pasta recipe? Cook your pasta to al dente. Al dente means “to the bite” in Italian, and signifies to cook until it’s tender with a small white speck inside when you bite into a piece. There’s nothing worse than soft, rubbery pasta. Here are a few tips for the perfect al dente pasta:
Boil the pasta a few minutes less than indicated on the package instructions. Often package instructions make for overcooked pasta.
Start taste testing early. Start taste testing and stop cooking when the pasta is just tender but you can still see a small white speck inside.
Tips for making sun dried tomato pasta
Besides cooking your pasta to al dente, here are a few things to note about this sundried tomato pasta:
If the pasta finishes before the sauce, drain and stir with a drizzle of olive oil. This prevents the pasta from sticking to the pan.
You’ll add flour as a thickener after simmering the sauce. A standard cheese or cream sauce starts with a roux, a mixture of flour and butter that thickens cheese sauces. This sauce is a little different: it does contain flour as a thickener, but you’ll add it at the end of simmering.
For a gluten-free version, use cornstarch and GF pasta. There are lots of great brands of gluten-free pasta these days, made from gluten-free flour or legumes like chickpeas.
Protein adders
This sundried tomato pasta is a delicious vegetarian pasta that’s filling and satisfying! However, if you want to add protein it’s very easy to add the following:
Sundried tomato pasta tastes the best the day it is made. But unlike many pasta recipes, this one tastes great as leftovers! Store leftovers for up to 3 days refrigerated. You can reheat them in a skillet on the stove, adding a splash of milk to keep the sauce creamy. Or you can simply eat it cold (it’s still good!).
Start a large pot of generously salted water to a boil. Add the pasta and boil until al dente (check a few minutes before the package instructions indicate). When cooked, drain the pasta. If it finishes before the sauce, toss with a drizzle of olive oil to prevent sticking.
Meanwhile, heat a large saute pan or saucepan over medium low heat. Melt the butter, then add the garlic and thyme and cook for 30 seconds to 1 minute until the garlic is lightly browned and fragrant. Add the milk, heavy cream and Parmesan cheese and cook for 2 to 3 minutes until the cheese has melted and it thickens slightly. Add the sun dried tomatoes, spinach, and salt and cook 2 to 3 minutes more, until the spinach is wilted.
In a small bowl, mix the flour with 2 tablespoons water. Pour it into the pan with the sauce, then stir until it thickens. Cook 2 minutes more.
Add the drained pasta and stir to combine. Stir in a few grinds of fresh ground black pepper if desired. Serve immediately. Leftovers last refrigerated for up to 3 days.
Category:Main dish
Method:Stovetop
Cuisine:Vegetarian
Diet:Vegetarian
Keywords: Sun dried tomato pasta, sundried tomato pasta, creamy sun dried tomato pasta
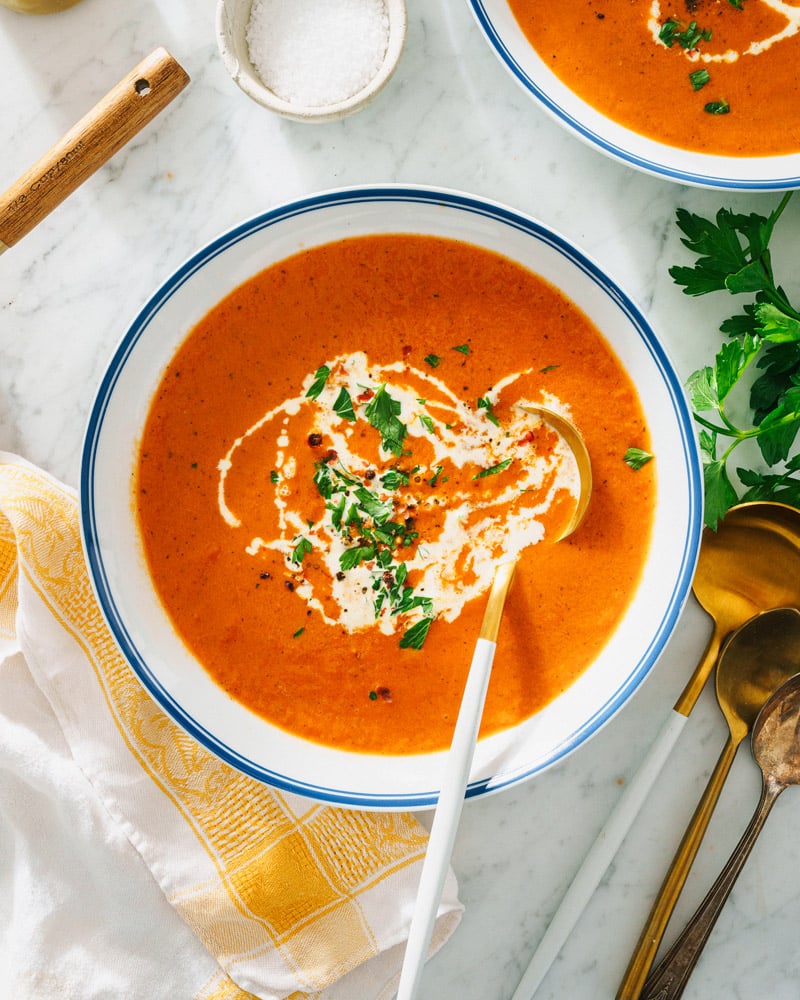
This tomato bisque recipe is tangy and creamy! This classic soup makes a tasty lunch paired with bread or grilled cheese.
Here’s a cozy, creamy soup that works in nearly any season: try Tomato Bisque! This vibrant puree melds bright tomatoes, garlic and aromatic vegetables with a touch of creamy for a rich, silky body. It’s pure and simple, perfect with a hunk of crusty artisan bread or a grilled cheese sandwich. Here’s how to make a simple tomato bisque!
Ingredients in tomato bisque
A bisque is a creamy pureed soup that’s French in origin. A traditional bisque uses ground seafood shells as a thickener, like ground lobster or shrimp shells, and heavy cream to add richness. There are also vegetable-based bisques that are blended and thickened with cream, like butternut squash, red pepper or tomato.
While it sounds fancy, a tomato bisque is simple to make: it’s essentially a French-style creamy tomato soup. Here are the ingredients you’ll need:
Butter or olive oil
Yellow onion
Carrot
Celery
Garlic
White wine vinegar (or white wine)
Fire roasted diced tomatoes (or San Marzano or best quality tomatoes)
Vegetable or chicken broth
Sugar and salt
Heavy cream
Use fire roasted or best quality tomatoes
The key to this tomato bisque recipe? The quality of the tomatoes. Low quality canned tomatoes have a bitter, flat flavor that can’t be compensated with extra seasoning. If you can find fire roasted tomatoes, they have a pure, developed flavor with less simmering time. Here are a few notes on finding best quality tomatoes:
Fire roasted tomatoes are a type of canned tomato that’s cooked over an open flame before canning. It makes the flavor beautifully sweet out of the can, instead of acidic like many canned tomato varieties.
Where to get them? This type of tomatoes are becoming pretty easy to find in grocery stores in the US; they’re sold by several brands (Muir Glen is a favorite of ours). Look in the canned tomatoes section.
What if you can’t find them? Substitute the best quality canned tomatoes you can find and increase the simmer time by 10 minutes. Add 1 teaspoon of sugar if the flavor still seems bitter.
Tips for tomato bisque
This tomato bisque recipe is simple to make: you’ll sauté the vegetables, add tomatoes and broth and simmer, then puree the soup and add cream. Here are a few pointers:
Sauté the vegetables until tender. It’s important to make sure the vegetables are tender before adding the tomatoes so they’re not crunchy in the final soup.
A standard blender works best (vs a stick blender). We used to love the convenience of an immersion blender (aka stick blender), but it doesn’t get the soup nearly as creamy of a texture.
Don’t skimp on the cream. The cream brings a rich, thicker texture and a luxurious mouthfeel. It’s absolutely essential!
Ways to serve it
Pureed soups like tomato bisque are delicious: but they’re not a meal in themselves! You’ll need to add some protein to make a filling meal. Here are a few ideas:
In a medium pot, heat the butter or olive oil over medium heat. Add the onion, carrot and celery and sauté for about 6 to 8 minutes, until the onions are tender and translucent. Add the garlic and cook for 30 seconds until fragrant. Add the white wine vinegar and cook until evaporated.
Add the tomatoes, vegetable broth and salt and bring to a steady simmer. Simmer for 15 minutes. Carefully transfer to a blender using a ladle, then blend until creamy (or an immersion blender). Stir in the cream.
Serve immediately, garnished with a drizzle of olive oil or cream and chopped or thinly sliced basil. Leftovers store refrigerated for up to 4 days or frozen for 3 months.
Notes
*If you can’t find fire roasted tomatoes, use the best quality tomatoes you can find (San Marzanos are also a flavorful variety). Simmer for an additional 10 minutes, then taste and add a teaspoon or so of sugar if the flavor tastes bitter.
**If you have it on hand, substitute ¼ cup white wine and cook until all of the wine evaporates.
This creamed corn recipe has the best flavor from scratch! The creamy sweet pops of kernels pair with just about anything.
It’s corn season here in Indiana, and we just picked up the best juicy yellow cobs from the farmer’s market. Time to make all the corn recipes, and this time we’re experimenting with an old classic: Creamed Corn. Made at home from scratch, it’s nothing like what comes from a can. The rich and creamy sauce comes together with cream, milk, and a little Parmesan, and pairs with just about any main. Bookmark this homemade creamed corn recipe: we think it will become a keeper!
Ingredients in this creamed corn recipe
The traditional method for making a creamed corn recipe didn’t use cream at all! This dish is Native American in origin and used corn milk, the liquid that emerges when corn is scraped from the cob. It went on to become a popular dish in the American South and Midwest.
Most modern versions of creamed corn use heavy cream and milk to make the creaminess. But scraping the corn from the cob adds a massive boost of flavor: so we recommend it! The ingredients for this creamed corn recipe are:
Fresh corn (or canned corn)
Heavy cream
Butter
Parmesan cheese (optional)
Milk
All-purpose flour
Sugar
Garlic
Salt
Use fresh corn for best flavor
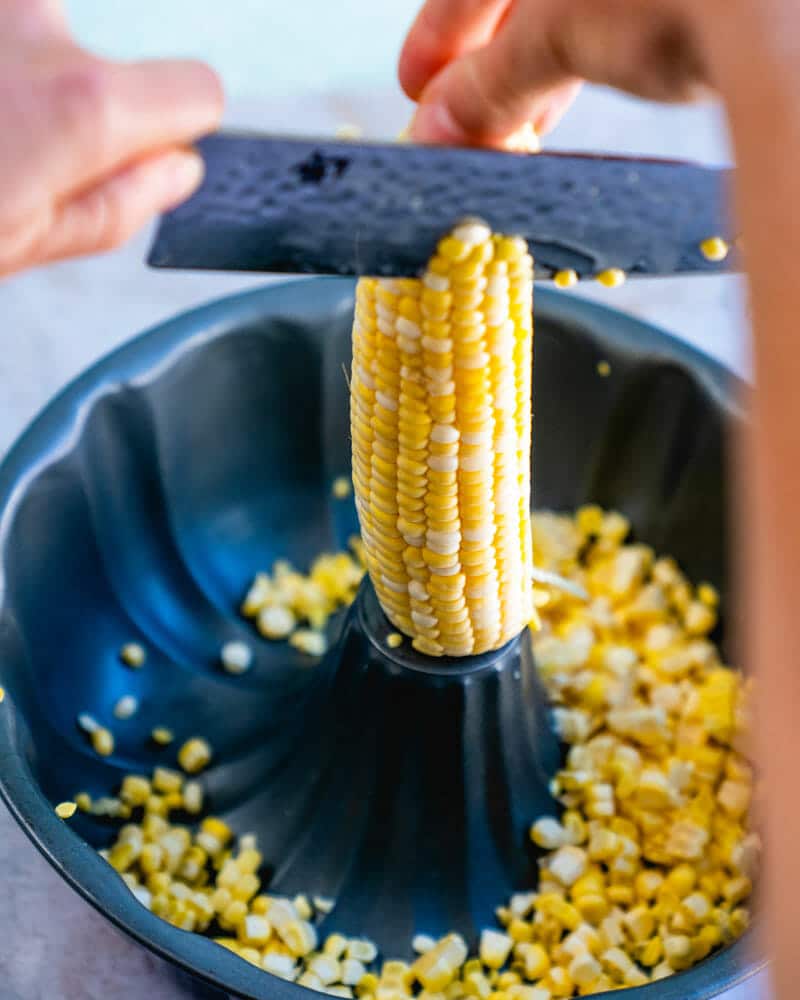
For the best creamed corn recipe, use fresh, in season corn on the cob! Of course this is only available certain months of the year, but the flavor difference is notable. The sweet, juicy flavor of fresh sweet corn is unbeatable! Then you can also add corn milk to this recipe by scrapping the cobs, which heightens its sweet flavor even more.
For a substitute, you can use canned corn instead! It has added sugar and salt, so keep that in mind for the final flavoring (you likely won’t have to add more salt to this recipe). You can also use frozen corn, but we find it doesn’t have quite the same flavor. You may need to add more salt and sugar to taste.
Releasing the corn milk
This creamed corn recipe is best when you use fresh corn and add corn milk: the liquid that is released when you scrape corn cobs! Here’s how to do it:
Use the back of a knife to scrape down the cob to release small bits of corn and the corn milk. See this video for instructions!
Collect the bits of corn and milk with the corn kernels, adding it when instructed in the recipe. This adds even more flavor and creaminess to the dish!
How to make creamed corn
Homemade creamed corn is simple to make and cooks up in under 10 minutes! Here are the basic steps (see the recipe below for quantities):
In a large skillet over medium heat, add the corn kernels (with corn milk), cream, milk, salt, sugar, and garlic powder. Heat over medium heat and simmer for 6 to 7 minutes until the corn is bright yellow and cooked through.
Stir together 2 tablespoons milk with the flour in a separate bow;. Add the flour mixture and the butter to the corn and simmer until thickened, about 90 seconds. Taste and add a bit more salt if desired.
If using, stir in the Parmesan cheese, or transfer to a small casserole dish, sprinkle the top with Parmesan and broil until melted. Top with paprika and parsley and serve.
Ways to serve creamed corn
This creamed corn recipe pairs well with many types of main dishes! Because it’s pretty rich with the cream, we save it for special occasions when we’re cooking for friends or family. It works as an easy side dish that’s perfect in the summer or anytime. Here are a few great ways to serve it:
For fresh corn, cut it from the cob. Then use the back of a knife to scrape down the cob to release small bits of corn and the corn milk (liquid that is released from the cob; see this video). This adds even more flavor and creaminess to the dish.
In a large skillet over medium heat, add the corn (with corn milk), cream, milk, salt, sugar, and garlic powder. Heat over medium heat and simmer for 6 to 7 minutes until the corn is bright yellow and cooked through.
Meanwhile in a small bowl, stir together 2 tablespoons milk with the flour. Add the flour mixture and the butter to the corn and simmer until thickened, about 90 seconds. Taste and add a bit more salt if desired.
If using, stir in the Parmesan cheese, or transfer to a small casserole dish, sprinkle the top with Parmesan and broil until melted.
Top with paprika and parsley and serve.
Notes
*The flavor in creamed corn is absolutely best with in season, fresh corn! You can also make it with canned corn. It’s not as good with frozen corn, but it can work in a pinch: you may need to add additional salt or sugar to taste.