Avocado Toast

A classic avocado toast recipe with 3 easy variations. Perfect for a quick breakfast, lunch or midday snack!

The post Avocado Toast appeared first on Budget Bytes.

Avocado toast was all the rage just a few years ago, but I have good news…this easy 5-10 minute meal never goes out of style. It only requires a few simple ingredients, but you can always spice things up with extra toppings to make it a super filling meal. Today I’m sharing my favorite basic avocado toast recipe along with helpful tips and 3 easy recipe variations. It’s quick and easy which makes it perfect to whip up for breakfast, lunch or a midday snack. And for those of you who are avocado toast experts, like my colleague Jess, then I’m sure you have a few favorite combinations as well. Wanna share? Let’s meet in the comments!😉

Overhead view of avocado toast made 4 different ways.

Ingredients For Avocado Toast

You only need a few simple ingredients to make a classic avocado toast. Here’s what I used:

  • Avocado: Avocado is one of the main ingredients, so you’ll want to choose it wisely. Look for avocados that have a slight give when squeezed, but are not mushy.
  • Bread: You’ll want to choose a good quality, sturdy bread. I like using sourdough or whole grain bread.
  • Garlic: Rubbing a little bit of fresh garlic over toasted bread while it’s still warm adds incredible flavor.
  • Lemon: A small squeeze of fresh lemon juice adds a pop of brightness and keeps the avocado from browning.
  • Salt & Pepper: Don’t skip the salt! Just a pinch of salt and pepper enhances the flavor of the avocado toast.
  • Red pepper flakes (optional): This is optional but it adds a kick and a little bit of extra heat to the avocado toast.

Tips For Making The Best Avocado Toast

  1. Choose your bread wisely: Use a good quality, sturdy bread for the base of your avocado toast like sourdough, multigrain or whole grain bread. Toasted, sturdy bread holds the mashed avocado and any extra toppings a lot better than white sandwich bread.
  2. Picking the perfect avocado: When picking your avocado, look for blackish, dark-green skin, which indicates the avocado has ripened. Also give the avocado a gentle press with your finger, the flesh should give slightly under pressure. If it’s mushy, its time has passed.
  3. Don’t skip the extras! Yes, rubbing your toast with a fresh garlic clove may seem like an unnecessary step, but it adds SO much flavor and compliments this simple meal perfectly. Also the small squeeze of lemon juice gives just the right about of brightness and the pinch of salt makes all the flavors pop!

Topping Ideas

There are lots of fun ways to enjoy your avocado toast! In addition to the recipe variations listed in the step-by-step photos below, here are a few more ingredients and topping ideas for you to try:

Overhead view of avocado toast made 4 different ways with parsley, avocado, and a napkin on the side.
Print

Avocado Toast

A classic avocado toast recipe with 3 easy variations. Perfect for a quick breakfast, lunch or midday snack!
Course Breakfast, Lunch, Snack
Cuisine American
Total Cost $2.61 recipe / $1.30 serving
Prep Time 10 minutes
Total Time 10 minutes
Servings 2 slices
Calories 338kcal

Ingredients

  • 2 slices sturdy bread $1.00
  • 1 clove of garlic, peeled $0.08
  • 1 medium avocado $1.33
  • 1 tsp fresh lemon juice $0.14
  • 1/8 tsp salt $0.02
  • 1/8 tsp freshly cracked black pepper $0.02
  • pinch of red pepper flakes $0.02

Instructions

  • Cut 2 slices of sturdy bread. Toast the bread in a toaster or in a skillet on the stovetop until golden brown.
  • Rub the peeled garlic clove over the top of the warm toasted bread, making sure to fully cover the entire surface area.
  • Next, halve the avocado and remove the pit. Scoop out the avocado flesh from both halves and place it in a bowl. Add a small squeeze of fresh lemon juice (about 1 tsp), salt and pepper to the bowl and mash the avocado with a fork. I recommend leaving it just a little chunky.
  • Divide the avocado mixture and spread it on top of each slice of toast. Top with a pinch of red pepper flakes and a pinch of sea salt (optional).

See how we calculate recipe costs here.

Nutrition

Serving: 1slice | Calories: 338kcal | Carbohydrates: 43g | Protein: 9g | Fat: 16g | Sodium: 539mg | Fiber: 8g
Overhead view of 2 pieces of plain avocado toast on a white plate.

How to Make Avocado Toast – Step by Step Photos

Overhead view of sourdough bread sliced on a cutting board.

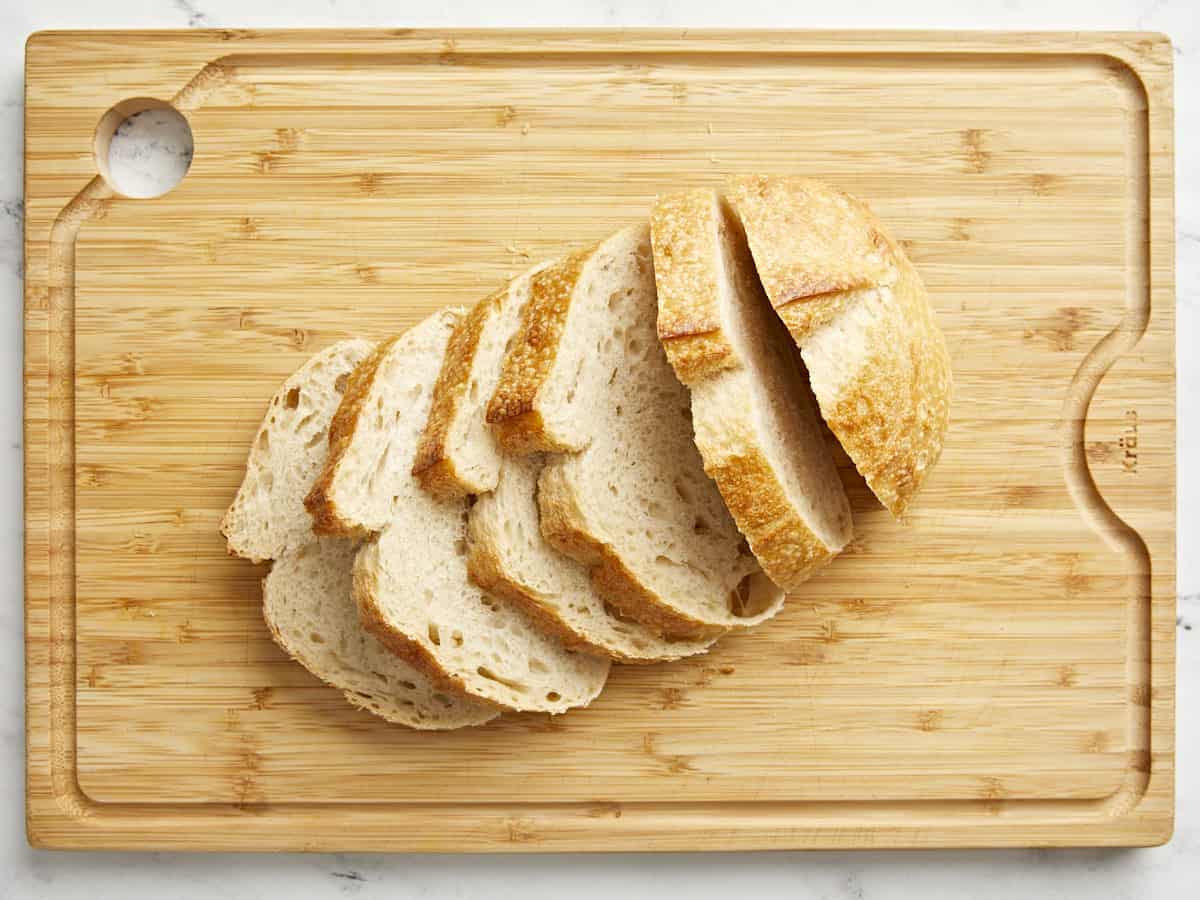
Cut 2 slices of sturdy bread. Toast the bread in a toaster or on the stovetop until golden brown.

Toasted sourdough bread with a garlic clove being rubbed over the top.

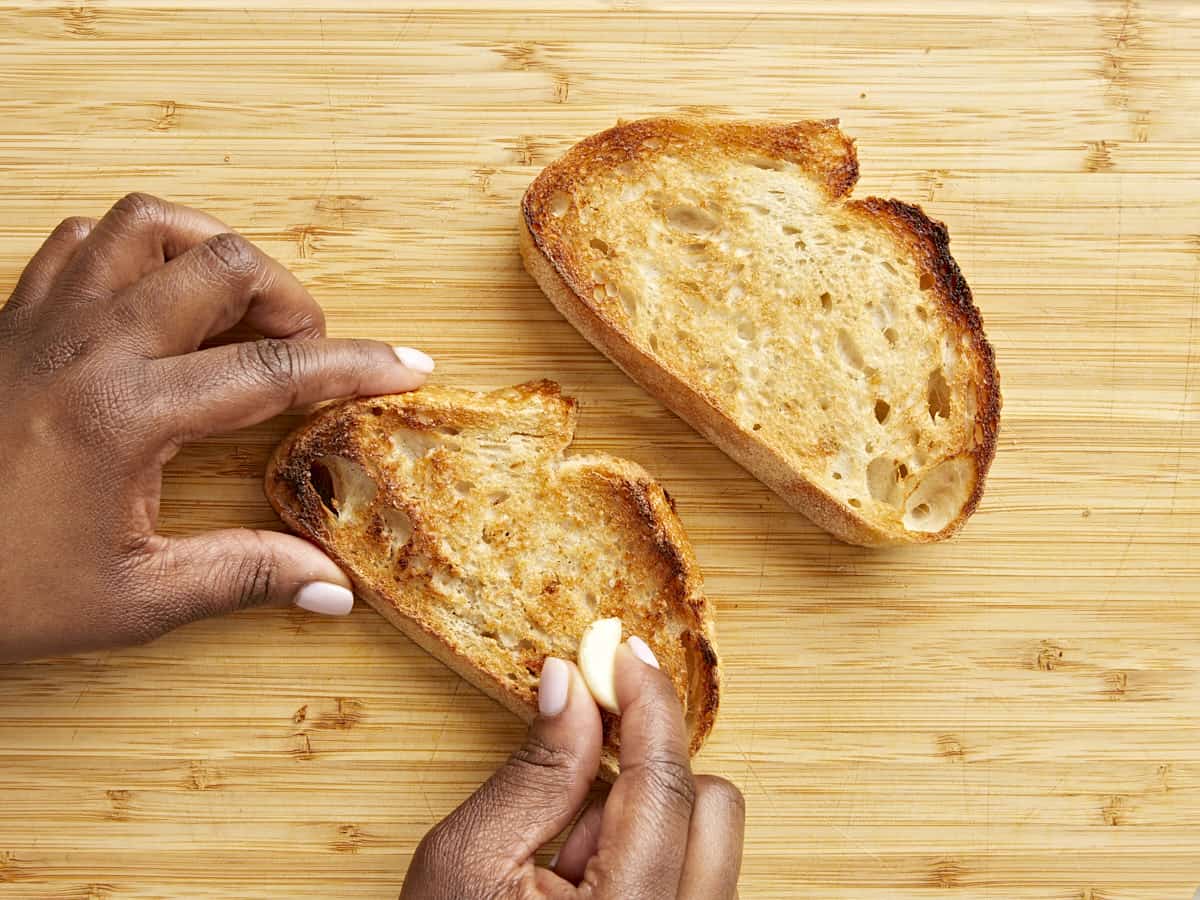
Rub 1 peeled garlic clove over the top of the warm toasted bread, making sure to fully cover the entire surface area.

A hand holding a fork and mashing avocado in a white bowl.

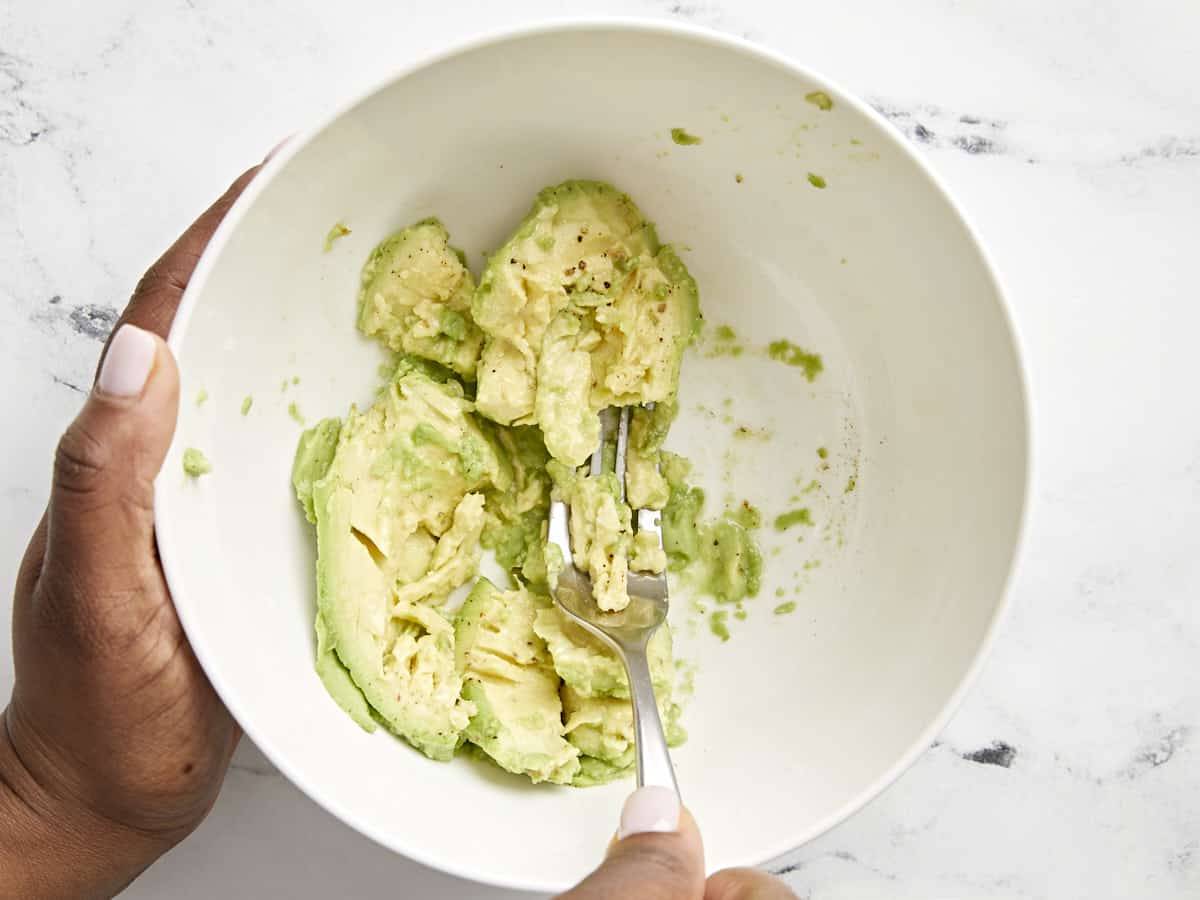
Next, halve 1 avocado and remove the pit. Scoop out the avocado flesh from both halves and place it in a medium bowl. Add a small squeeze of lemon juice (about 1 tsp), 1/8 tsp salt and 1/8 tsp freshly cracked black pepper to the bowl and mash the avocado with a fork. I recommend leaving it just a little chunky, but you can certainly mash until it’s completely smooth. It’s up to you!

Overhead view of 2 pieces of plain avocado toast on a white plate.

Divide the avocado mixture and spread on top of each slice of toast. Top with a pinch of red pepper flakes and a pinch of sea salt (optional). Enjoy as is or try out one of the recipe variations listed below.😉

Avocado toast with sliced tomatoes and balsamic glaze drizzled on top.

Recipe Variation 1: If you love juicy, ripe tomatoes then this variation is just for you! Top your avocado toast with two slices of tomatoes, a drizzle of balsamic glaze, and freshly cracked black pepper. This combo is perfect for the summer when tomatoes are in their peak season. So delicious!

Two slices of avocado toast with a hard boiled egg and soft scrambled egg on top.

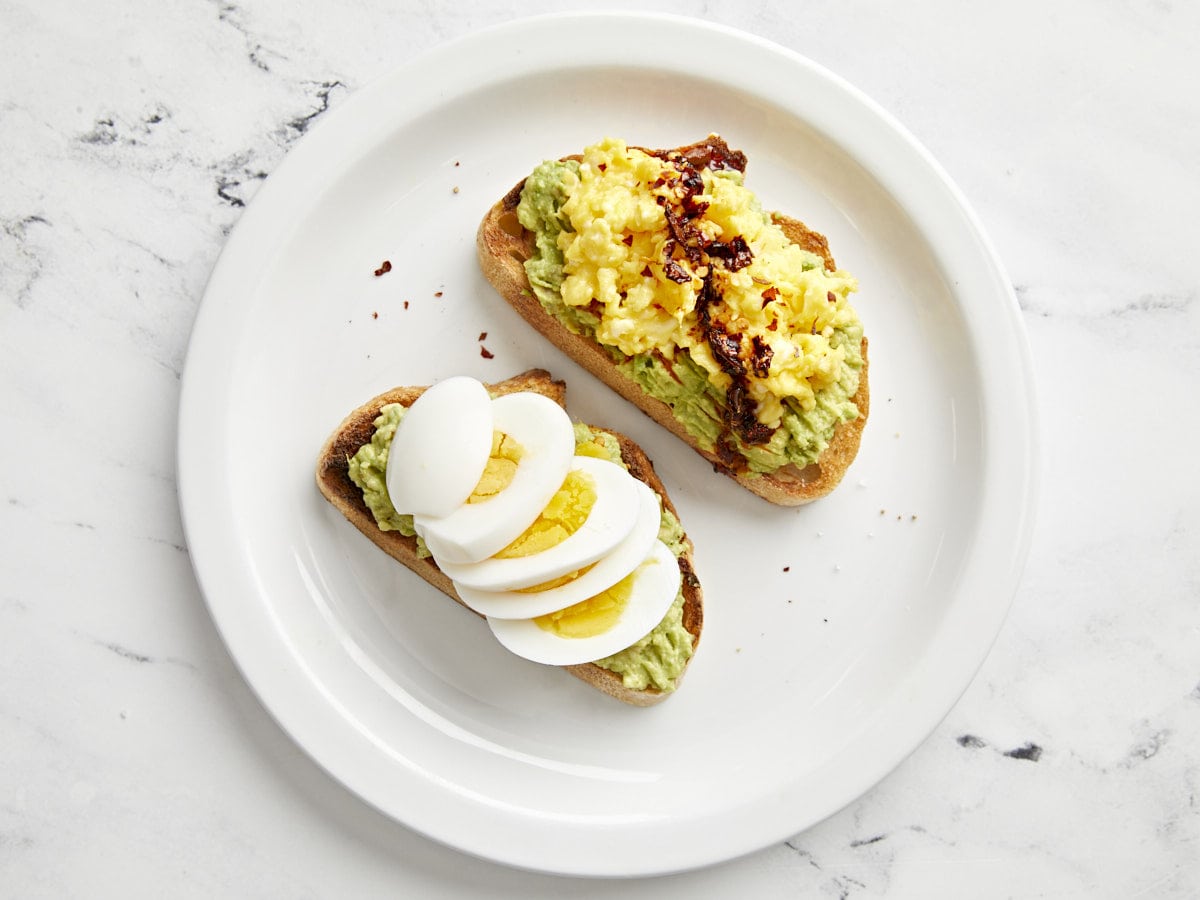
Recipe Variation 2: My absolute favorite way to enjoy avocado toast is by adding some scrambled eggs, a fried egg, or hard boiled egg on top. You can even take it a step further and add a little chili crisp on top too!

Avocado toast with cottage cheese on top.

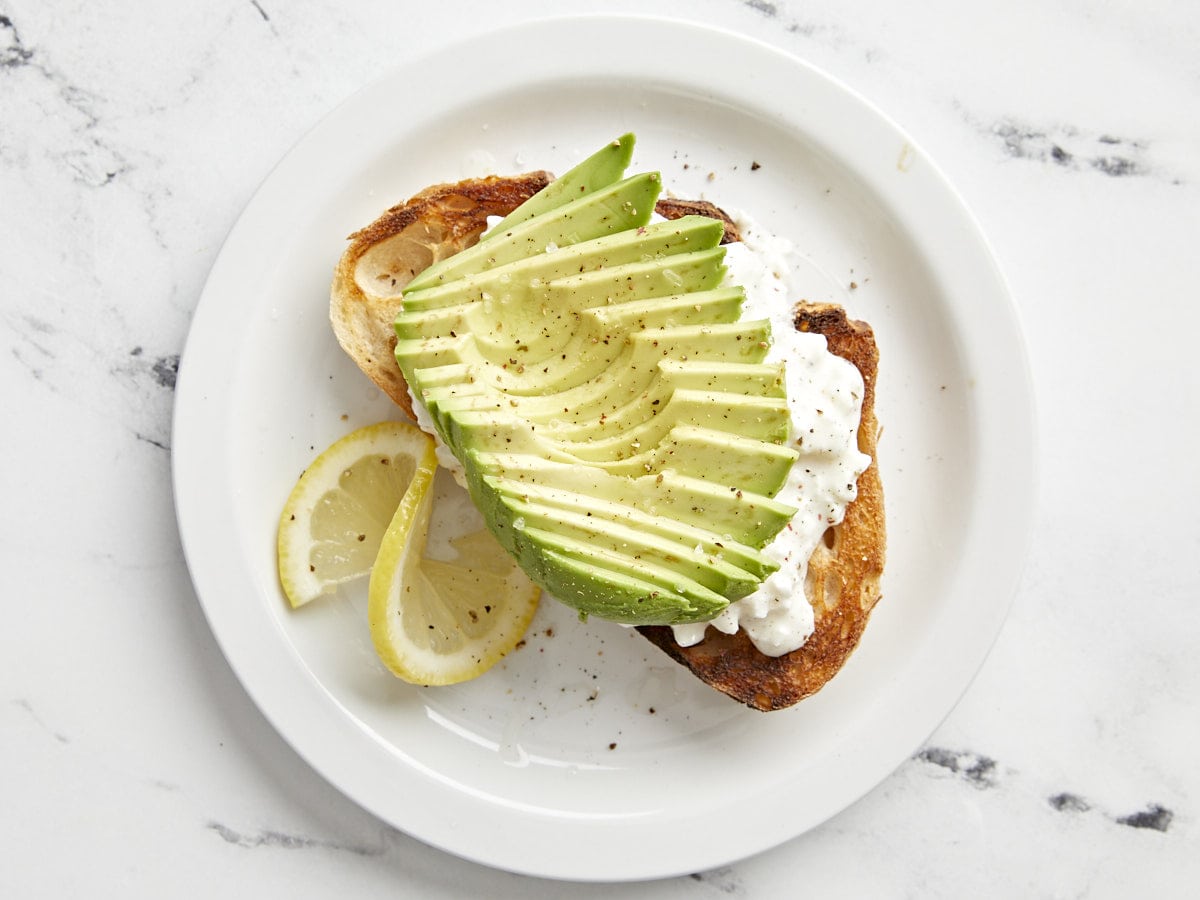
Recipe Variation 3: And for all of my cottage cheese lovers out there, try topping your thick crusty bread with a spoonful or two of small curd cottage cheese, 1/2 avocado sliced, salt, freshly cracked black pepper, and a squeeze of fresh lemon juice. Enjoy!

Overhead view of avocado toast made 4 different ways with parsley, avocado, and a napkin on the side.

The post Avocado Toast appeared first on Budget Bytes.

Ranch Oyster Crackers

Ranch Oyster Crackers are an easy and delicious snack made with just 5 ingredients. They’re perfect for parties, football games, and more!

The post Ranch Oyster Crackers appeared first on Budget Bytes.

If there’s something you can never have too much of it’s definitely party snacks! These buttery Ranch Oyster Crackers are coated in melted butter, and seasoned with ranch seasoning and a small amount of red pepper flakes for just a little kick. My mom actually makes a similar recipe with regular saltine crackers, but I absolutely LOVE how cute these smaller oyster crackers are, and how easy it is to share and pass around at a party. They’re perfect for family get-togethers, holiday parties and of course game days! But fair warning…you can easily get addicted to these and eat half a pan. Trust me, I know!

Side close up view of ranch oyster crackers in a white serving dish.

What Are Ranch Oyster Crackers?

Ranch Oyster Crackers are a small party snack that’s primarily made with oyster crackers, ranch seasoning, and butter. It’s super delicious and can easily be made in under 30 minutes with just 5 ingredients. We made these in our test kitchen twice and both times they were gone in minutes! So if you want to impress your family and friends at your next event and you don’t want to spend a lot of money or time in the kitchen, then these ranch oyster crackers are sure to be a hit!

Ingredients For Ranch Oyster Crackers

5 simple ingredients are all you need to make this insanely delicious ranch oyster crackers recipe!

  • Oyster Crackers: Oyster crackers come in lots of different sizes depending on which store and brand you purchase. We used a 10 oz. bag for this recipe that we purchased at our local Aldi store.
  • Butter: If butter is a little too costly for you, you can substitute with vegetable or canola oil. We tested both methods (butter and oil) and the butter added a lot more depth of flavor. However, the oil version was still quite tasty in my opinion.
  • Ranch Seasoning: We used a store-bought ranch seasoning packet, but we also have a homemade ranch seasoning mix recipe in case you have a well-stocked pantry and want to whip up your own mix.
  • Garlic Powder & Red Pepper Flakes: Just a little bit of garlic powder and red pepper flakes rounds out the flavor of these tasty party crackers and still keeps this recipe super simple and easy to make!

Storing Leftovers

If you happen to have any ranch oyster crackers left over, and that’s a big IF, you can certainly store the leftovers in an airtight container at room temperature for up to 7 days.

Overhead view of ranch oyster crackers in a white serving bowl.
Print

Ranch Oyster Crackers

Ranch Oyster Crackers are an easy and delicious snack made with just 5 ingredients. They're perfect for parties, football games, and more!
Course Appetizer, Side Dish
Cuisine American
Total Cost $4.71 recipe / $0.39 serving
Prep Time 5 minutes
Cook Time 20 minutes
Total Time 25 minutes
Servings 12 (about 1/2 cup each)
Calories 139kcal

Ingredients

  • 1/2 cup salted butter $1.07
  • 1 oz. ranch seasoning packet* $2.19
  • 1/2 tsp garlic powder $0.05
  • 1/2 tsp red pepper flakes $0.05
  • 10 oz. oyster crackers $1.35

Instructions

  • Preheat the oven to 250°F. Add the butter to a small bowl and melt in the microwave. Once the butter is melted add the ranch seasoning packet (or 3 Tbsp of homemade ranch seasoning), the garlic powder, and the red pepper flakes to the bowl. Whisk the ingredients together until they are well combined.
  • In a separate large bowl add the oyster crackers, then pour the butter mixture over the oyster crackers. Mix carefully with a rubber spatula until all the oyster crackers are well coated in the butter and seasoning.
  • Spread the seasoned crackers on a parchment lined baking sheet. Bake in the preheated oven for 10 minutes. After 10 minutes, remove the baking sheet from the oven and give the crackers a quick stir. Place the baking sheet back in the oven and bake for another 10 minutes.
  • After the oyster crackers have finished baking, remove them from the oven and allow them to cool slightly before transferring them to a serving bowl. Enjoy!

See how we calculate recipe costs here.

Notes

*Feel free to substitute with a homemade ranch seasoning mix.

Nutrition

Serving: 1serving | Calories: 139kcal | Carbohydrates: 15g | Protein: 2g | Fat: 8g | Sodium: 369mg | Fiber: 1g
Very close macro view of ranch oyster crackers.

How to Make Ranch Oyster Crackers – Step by Step Photos

Melted butter, ranch seasoning and spices in a bowl.

Preheat the oven to 250°F. In a small bowl melt 1/2 cup of butter in the microwave. To the melted butter add a 1 oz. ranch seasoning packet (or 3 Tbsp of homemade ranch seasoning), 1/2 tsp garlic powder, and 1/2 tsp red pepper flakes. Whisk the ingredients together until they are well combined.

Melted butter mixture being poured over oyster crackers in a bowl.

In a separate large bowl add one 10 oz. bag of oyster crackers, then pour the butter mixture over the oyster crackers. Mix carefully with a rubber spatula until all the oyster crackers are well coated in the butter and seasoning.

Ranch oyster crackers on a parchment lined baking sheet prebaked.

Spread the seasoned crackers on a parchment-lined baking sheet. Bake in the preheated oven for 10 minutes. After 10 minutes, remove the baking sheet from the oven and give the crackers a quick stir. Place the baking sheet back in the oven and bake for another 10 minutes.

Baked ranch oyster crackers on a parchment lined baking sheet.

After the oyster crackers have finished baking, remove them from the oven and allow them to cool slightly before transferring them to a serving bowl.

Ranch oyster crackers in a white serving bowl with a hand grabbing a few out.

Enjoy these super flavorful and buttery Ranch Oyster Crackers at your next family gathering, Super Bowl party, or any holiday event!

Very close up view of ranch oyster crackers in a pile.

The post Ranch Oyster Crackers appeared first on Budget Bytes.

Sausage Meatballs and Kale Sheet Pan Meal

This hearty, tangy, and succulent Sausage Meatball and Kale Sheet Pan Meal is perfect for busy days when you just don’t feel like cooking.

The post Sausage Meatballs and Kale Sheet Pan Meal appeared first on Budget Bytes.

This hearty Sausage Meatballs and Kale Sheet Pan Meal is chock full of deep, tangy flavors and succulent textures! It’s perfect for those days when you don’t feel like cooking. And if you’re at the point where you can’t bring yourself to make a meatball, just slice sausage in its casing to get this meal in the oven even faster. PS This sheet pan dinner meal preps excellently. Quick cooking, super filling, no fuss, and you can make it for the week! What’s not to love?

Overhead shot of Sausage Meatball and Kale Sheet Pan Meal.

What You’ll Need

This Italian Sausage Meatball and Kale Sheet Pan Meal is quick, easy, and endlessly versatile! Here’s what you’ll need to make it:

  • Italian Sausage– I use ground spicy Italian sausage but you can use sweet Italian or any of your favorite ground sausages, including plant-based ones. You can also remove the sausage from its casing or skip making meatballs altogether and just slice it in its casing. Fat adds flavor and delivers a tender meatball, so skip low-fat sausages or ground meats.
  • Milk– adds moisture to the sausage and helps create depth of flavor. If you are cooking dairy-free, try using almond milk or coconut milk. If you’re really watching your pennies, just use water.
  • Panko Breadcrumbs– add texture and keep the meatballs from drying out (after a soak in milk). You can substitute Panko with regular breadcrumbs or crushed crackers.
  • Egg – helps to bind the meatballs so they keep their shape. Substitute the egg with 3 tablespoons of plain yogurt, 1/4 ricotta cheese, or 1/3 cup of unsweetened apple sauce.
  • Kale– is hearty and can stand up to a high-heat roast. You can substitute it with other hearty greens like Collards or Swiss Chard.
  • Cherry Tomatoes– deepen in flavor when roasted, but feel free to sub with other fresh elements like bell peppers, mushrooms, and onions. In a pinch, used canned tomatoes. Just make sure to drain them and give them a rough chop.
  • Potatoes– add bulk to this easy meal and soak up all the flavors from the drippings—sub with sweet potatoes or other root vegetables like carrots, radishes, or parsnips.
  • Spices and Seasonings– smoked paprika, chili flakes, garlic powder, brown sugar, dijon mustard, red wine vinegar, and olive oil dress the veggies and greens in robust flavors.
  • Grated Parmesan Cheese– is the chef’s kiss in this dish. The cheese adds umami (AKA savoriness) and a touch of creamy saltiness. Omit it if you like, or substitute it with nutritional yeast.
Overhead shot of Sausage Meatball and Kale Sheet Pan Meal.

What Can I Serve With It?

Make this Italian Sausage Meatball and Kale Sheet Pan Meal even more filling by serving it with Homemade Garlic Bread, Easy Soda Bread, or Hot Honey Cornbread. You can also pair it with a light dessert like Chocolate Mousse, Vanilla Pudding, or No-Churn Strawberry Ice Cream.

How To Store Leftovers

Store leftovers in an airtight container and refrigerate for up to four days. If meal prepping, add fresh kale on top of the roasted ingredients to keep it from wilting. You can freeze in an airtight container for up to a month with a sheet of plastic or parchment on the surface to prevent frostbite. Thaw in your fridge overnight. You can eat leftovers cold or warm them in a microwave until steaming.

Overhead shot of Sausage Meatball and Kale Sheet Pan Meal in a white bowl with a hand holding the bowl and a wooden spoon serving a portion into the bowl.
Overhead shot of Sausage Meatball and Kale Sheet Pan Meal in a white bowl.
Print

Sausage Meatball and Kale Sheet Pan Meal

This hearty Italian Sausage Meatballs and Kale Sheet Pan Meal is chock full of deep, tangy flavors and succulent textures! It's perfect for those days when you don't feel like cooking.
Course Brunch, Dinner, Lunch
Cuisine American
Total Cost ($15.57 recipe / $3.89 serving)
Prep Time 15 minutes
Cook Time 20 minutes
Total Time 35 minutes
Servings 4 bowls
Calories 928kcal

Ingredients

  • 1 lb red potatoes, quartered $1.25
  • 3/4 cup olive oil, divided $1.44
  • 1 tsp smoked paprika $0.10
  • 3 1/2 tsp kosher salt, divided $0.28
  • 1/4 tsp black pepper $0.02
  • 1/4 tsp red pepper flakes $0.08
  • 1 pint cherry tomatoes $3.49
  • 1/2 cup panko breadcrumbs $0.50
  • 1/4 cup milk $0.06
  • 1 lb Italian Ground Sausage $4.99
  • 1 large egg, beaten $0.17
  • 1 1b kale, chopped $2.49
  • 3 Tbsp red wine vinegar $0.42
  • 2 tsp Dijon mustard $0.06
  • 1 tsp brown sugar $0.02
  • 1/2 tsp garlic powder $0.08
  • 2 Tbsp Parmesan cheese, grated $0.12

Instructions

  • Preheat oven to 450°F. Place quartered red potatoes in a large bowl and drizzle with 1/4 cup olive oil. Mix smoked paprika, 2 teaspoons of salt, black pepper, and chili flakes. Sprinkle over the potatoes and toss. Place the potatoes in a sheet pan.
  • In the same bowl, add the cherry tomatoes and sprinkle with 1/4 teaspoon salt. Scatter them over the potatoes.
  • Soak the breadcrumbs in milk. Break up Italian sausage in a large bowl. Mix in breadcrumbs and egg. Wet your fingers with a bit of leftover oil from the bowl the tomatoes were in. Roll 16 meatballs and place them on the sheet pan between the potatoes and tomatoes.
  • Bake for 10 minutes, then turn the meatballs and bake for another 10 minutes.
  • While the meatballs bake, add 1/2 lb of the kale to the same bowl the potatoes and tomatoes were in. Mix red wine vinegar, 1/2 cup olive oil, Dijon mustard, brown sugar, garlic powder, and 1/4 teaspoon salt. Toss the kale in the dressing, massaging it into the leaves.
  • Remove the sheet pan from the oven, and scatter kale all over.
  • Roast for 3 to 4 minutes until the kale has charred in spots. To serve, split raw kale between 4 bowls. Top with charred kale and tomatoes and mix. Finally, top with meatballs and potatoes. Garnish with parmesan cheese.

See how we calculate recipe costs here.

Nutrition

Serving: 1bowl | Calories: 928kcal | Carbohydrates: 32g | Protein: 24g | Fat: 79g | Sodium: 3048mg | Fiber: 3g
Side shot close up of a wood spoon holding a portion of Sausage Meatball and Kale Sheet Pan Meal.

How to Make Sausage Meatballs And Kale Sheet Pan MeAL – Step by Step Photos

Overhead shot of potatoes being dressed in a white bowl.

Preheat the oven to 450°F. Place 1 pound of quartered red potatoes in a large bowl and drizzle with 1/4 cup olive oil. Mix 1 teaspoon of smoked paprika, 2 teaspoons of salt, ¼ teaspoon of pepper, and 1/4 teaspoon chili flakes. Sprinkle over the potatoes and toss. Place the potatoes in a sheet pan.

Overhead shot of tomatoes being dressed in a white bowl.

In the same bowl that you dressed the potatoes, add the sliced pint of cherry tomatoes and sprinkle with 1/4 teaspoon salt. Scatter them over the potatoes.

Overhead shot of ground Italian Sausage, breadcrumbs, and egg in a white bowl.

Soak the breadcrumbs in milk. Break up Italian sausage in a large bowl. Mix in breadcrumbs and egg. Wet your fingers with a bit of leftover oil from the bowl the tomatoes were in. Roll a 1-ounce meatball and place it on the sheet pan between the potatoes and tomatoes. Repeat with the remaining sausage until you have 16 meatballs.

Overhead shot of meatballs, potatoes, and tomatoes in sheet pan.

Bake for 10 minutes, then turn the meatballs and bake for another 10 minutes.

Overhead shot of kale being massaged.

While the meatballs bake, add 1/2 pound of kale to the same bowl the potatoes and tomatoes were in. Mix 3 tablespoons of red wine vinegar, 1/2 cup olive oil, 2 teaspoons Dijon mustard, 1 teaspoon brown sugar, 1/2 teaspoon garlic powder, and 1/4 teaspoon salt. Toss the kale in the dressing, massaging it into the leaves.

Overhead shot of kale being placed in the sheet pan.

Remove the sheet pan from the oven, and scatter kale all over.

Overhead shot of finished Sausage Meatball and Kale Sheet Pan Meal.

Roast for 3 to 4 minutes until the kale has wilted and charred in spots. To serve, split the 1/2 pound of leftover raw kale between 4 bowls. Top with charred kale and tomatoes and mix. Finally, top with meatballs and potatoes. Garnish with parmesan cheese and chow down!

Overhead shot of Sausage Meatball and Kale Sheet Pan Meal in a white bowl with a wood spoon serving a portion into the bowl.

More Easy Sheet Pan Meals

The post Sausage Meatballs and Kale Sheet Pan Meal appeared first on Budget Bytes.

Beef And Tomato Rice Bowl

This budget-friendly, easy Beef Tomato Rice Bowl is lip-smackingly good, endlessly adaptable, and perfect for a quick weeknight dinner!

The post Beef And Tomato Rice Bowl appeared first on Budget Bytes.

This budget-friendly, easy Beef and Tomato Rice Bowl is lip-smackingly good, endlessly adaptable, and perfect for a quick weeknight dinner! What’s not to love about buttery rice, unctuous ground beef, tangy tomatoes, and earthy garbanzo beans? Ready in thirty, I bet you have everything you need to make this incredibly tasty and super-filling meal in your pantry right now!

Overhead shot of Beef and Tomato Rice Bowl with fork in it.

Ingredients For Beef And Tomato Rice Bowl

What I love the most about this Beef and Tomato Rice Bowl recipe is how ridiculously versatile it is. But before we get into variations, let’s go over the ingredients you’re going to need:

  • Ground Beef – adds flavor and bulk to the mixture. You can substitute ground beef with plant-based ground beef or minced mushrooms.
  • Onion and Garlic – these aromatics help build depth and add flavor. Use 1 tablespoon of onion powder or 3 tablespoons of dried onion flakes as a substitute for the fresh onion. To substitute the fresh garlic, use a 1/2 teaspoon of granulated garlic.
  • Diced Tomatoes – add acidity that helps cut through the fattiness of the beef and increases the bulk. You can substitute the diced tomatoes with equal parts fresh tomatoes, crushed tomatoes, or tomato sauce. However, depending on your substitution, the texture of the beef mixture will change.
  • Chickpeas – add earthiness and increase bulk. Substitute with your favorite canned bean, just make sure they are drained. If you want to use dry beans, you will need to rehydrate them first and cook through.
  • Oregano, Cumin, and Red Pepper Flakes – all add flavor. Substitute with 3/4 teaspoon of your favorite spice blend.
  • Rice – We used Jasmine rice, but feel free to use whatever rice you have on hand. You can also serve the beef mixture over cauliflower rice, mashed potatoes, or over a bed of wilted greens.

Variations

  1. For a vegan version of this dish, use your favorite plant-based ground beef alternative and substitute the chicken broth with veggie broth. Use soy sauce instead of Worcestershire sauce.
  2. To add bulk and increase servings, consider adding diced carrots or potatoes, chopped spinach or kale, or sliced mushrooms or zucchini to the beef mixture.
  3. Skip the rice and serve the beef mixture over Riced Cauliflower, Mashed Potatoes, or Roasted Vegetables.
  4. Serve the dish with some of your favorite toppings like shredded cheddar cheese, a dollop of sour cream, or a side of sliced avocado.

How To Store Leftovers

You can store Beef and Tomato Rice Bowl leftovers in an air-tight container for up to four days in the fridge. They will keep up to four months in the freezer. If freezing, cover the surface with plastic wrap or parchment before sealing the container, which prevents freezer burn. If meal prepping, refrigerating, or freezing, add the beef mixture to the container first and then top it with the rice. This will prevent the rice from absorbing all of the sauce. You can reheat leftovers in a microwave. Cook in 30-second increments until the beef mixture is steaming.

Side shot of Beef and Tomato Rice Bowl.
Overhead shot of Beef and Tomato Rice Bowl with fork in it.
Print

Beef and Tomato Rice Bowl

This budget-friendly, easy Beef Tomato Rice Bowl is lip-smackingly good, endlessly adaptable, and perfect for a quick weeknight dinner!
Course Dinner, Lunch
Cuisine American
Total Cost ($7.78 recipe / $1.95 serving)
Prep Time 5 minutes
Cook Time 30 minutes
Total Time 35 minutes
Servings 4 bowls
Calories

Ingredients

  • 2 Tbsp cooking oil $0.08
  • 1/2 lb ground beef $4.00
  • 1 3/4 tsp salt, divided $0.05
  • 1 yellow onion, diced $0.42
  • 2 cloves garlic, minced $0.10
  • 1/2 tsp oregano $0.05
  • 1/4 tsp ground cumin $0.03
  • 1 tsp Worcestershire sauce $0.03
  • 1 can diced tomatoes, 15 oz $1.00
  • 1/2 cup chicken broth $0.08
  • 1 can chickpeas, 15 oz, drained $0.79
  • 2 cups rice $0.85
  • 3 cups water $0.00
  • 2 Tbsp salted butter $0.28
  • 1 pinch red pepper flakes $0.02

Instructions

  • Set a deep stainless steel skillet over medium-high heat and add the cooking oil. Once the oil has warmed, add the ground beef and sprinkle it with a 1/2 teaspoon salt. Once the beef has browned, remove it from the pan and set aside. Keep about 2 tablespoons of rendered fat in the pan.
  • Add the diced onion to the pan and cook until translucent, about 2 minutes. Add the minced garlic to the pan and cook until fragrant, about 1 minute.
  • Add the beef back to the pan with oregano, ground cumin, and Worcestershire sauce. Top the meat with the diced tomatoes and their juices. Stir to combine.
  • Add the chicken broth and drained chickpeas to the beef mixture. Sprinkle with 1/4 teaspoon salt and stir to combine. Cover the pan and cook until the chickpeas soften, about 20 minutes.
  • While the beef mixture cooks, add the rice to a rice cooker, alonf with the water, salted butter, and remaining 1 teaspoon of salt.
  • When the beef and tomato mixture finishes cooking, sprinkle with red pepper flakes. Divide the rice into four bowls and top with the beef mixture.

See how we calculate recipe costs here.

Overhead shot of Beef and Tomato Rice Bowl with fork in it.

How to Make Beef and Tomato Rice Bowl – Step by Step Photos

Overhead shot of ground beef browning in silver sauté pan.
Set a deep stainless steel skillet over medium-high heat and add 2 tablespoons of cooking oil. Once the oil has warmed, add the 1/2 pound of ground beef and sprinkle it with a 1/2 teaspoon salt. As the beef browns, use a wooden spoon to break up large chunks into smaller pieces. Once the beef has browned, remove it from the pan and set aside. Keep about 2 tablespoons of rendered fat in the pan.
Overhead shot of onions cooking in ground beef fat in silver sauté pan.

Add the diced onion to the pan and cook until translucent, about 2 minutes. Next, add the 2 minced cloves of garlic to the pan and cook until fragrant, about 1 minute.

Overhead shot of beef and tomatoes added to onions in silver sauté pan.

Add the beef back to the pan along with 1/2 teaspoon of oregano, 1/4 teaspoon of ground cumin, and 1 teaspoon of Worcestershire sauce. Then top the meat with one 15-ounce can of diced tomatoes and their juices. Stir to combine.

Overhead shot of garbanzo beans added to ground beef mixture in sauté pan.

Add 1/2 cup of chicken broth and one 15-ounce can of drained chickpeas to the beef mixture. Then sprinkle with 1/4 teaspoon salt and stir to combine. Cover the pan and cook until the chickpeas have softened, about 20 minutes.

Overhead shot of cooked rice in a rice maker.

While the beef mixture cooks, add 2 cups of rice to a rice cooker, along with 3 cups of water, 2 tablespoons of salted butter, and 1 teaspoon of salt. Cover and cook. If you don’t own a rice cooker, check out our blog post on How To Cook Rice.

Overhead shot of hand sprinkling red pepper flakes into finished ground beef, tomato, and garbanzo bean mixture.

When the beef and tomato mixture is finished cooking, sprinkle with a pinch of red pepper flakes, or more to taste. Then, divide the rice into four bowls and top with the beef mixture. Finally, sit back and enjoy this hearty meal you’ve made with very minimal effort!

More Easy Rice Bowls

The post Beef And Tomato Rice Bowl appeared first on Budget Bytes.

Baked Eggs

Baked eggs are an easy and affordable lazy weekend breakfast AND a great way to use up leftovers in your fridge.

The post Baked Eggs appeared first on Budget Bytes.

We’re all about “catch-all” recipes here at Budget Bytes—flexible recipes that you can add just about anything to, so you can use up the leftover odds and ends in your fridge. This Baked Eggs recipe is especially great because it’s an almost effortless way to treat yourself to an extra special weekend breakfast AND use up your leftovers at the same time. Now that’s what I call working smarter, not harder. 🙌

Close up overhead view of bread dipping into a casserole dish full of baked eggs.

What Are Baked Eggs?

I know, the name sounds self-explanatory, but let me explain a little further about what we’ve got going on in this dish. These baked eggs are simply eggs that have been cracked into a casserole dish with a few “extras” (like vegetables and cheese), a little seasoning, and a splash of cream to keep the eggs moist and delicate as they bake. It’s seriously the easiest breakfast dish you can make.

Baked eggs are usually baked only to the point where the whites are softly set and the yolks are still liquid. The yolks act as a sauce that pours over the eggs as they’re eaten, and it can be dipped or stopped up with some good bread. It’s the type of delicious simplicity that I love!

Overhead view of a casserole dish full of baked eggs with spinach and tomatoes.

How Long to Bake Eggs

The amount of time needed to bake eggs to perfection is going to depend on several factors like the size and material of your baking dish, the temperature of the ingredients when they go into the oven, how many eggs you’re baking, and your oven’s temperature. So it’s imperative that you check the eggs early and keep a close eye on them as they bake.

I suggest baking eggs at either 350ºF or 375ºF and checking their doneness after about 10 minutes. If the whites are still not set, give them a few more minutes and just watch them closely.

What Else Can I Add?

One of the main reasons I love baked eggs is that they’re extremely versatile. Here are some ideas for other ingredients you can add to baked eggs:

  • Meat: try diced deli ham, cooked bacon, or cooked breakfast sausage.
  • Vegetables: bell pepper, onion, mushrooms, artichokes, zucchini.
  • Cheese: Parmesan, Chevre, Swiss, Cotija.

You can also drizzle your favorite sauce over your baked eggs, like salsa, hollandaise sauce, or chimichurri. Get creative with this baked eggs recipe!

What to Serve with Baked Eggs

Baked eggs are begging to be served with some crusty bread, a toasted English muffin, or a biscuit. You can dip the bread or spoon the baked eggs right on top of the bread or biscuit. Either way, you don’t want to lose a drop of those liquid gold yolks! Round out the meal with some oven baked bacon or maple breakfast sausage, and then maybe some lemon blueberry scones for dessert. ;)

Side view of bread being dipped into a casserole of baked eggs.
Print

Baked Eggs

Baked eggs are an easy and affordable lazy weekend breakfast AND a great way to use up leftovers in your fridge.
Course Breakfast, Brunch
Cuisine American
Total Cost $3.55 recipe / $0.89 serving
Prep Time 10 minutes
Cook Time 15 minutes
Total Time 25 minutes
Servings 4
Calories 155kcal

Ingredients

  • 1 Tbsp butter $0.14
  • 2 cups fresh spinach* $0.65
  • 1 cup grape tomatoes $1.00
  • 4 large eggs $0.83
  • 1/8 tsp salt $0.01
  • 1/8 tsp freshly cracked black pepper $0.01
  • 1/8 tsp crushed red pepper $0.01
  • 2 Tbsp heavy cream $0.21
  • 2 Tbsp crumbled feta** $0.69

Instructions

  • Preheat the oven to 375ºF. Melt the butter and brush the inside of an 8×8-inch casserole dish.
  • Roughly chop the spinach and slice the tomatoes in half. Sprinkle the spinach and tomatoes inside the casserole dish.
  • Crack the eggs into the casserole dish on top of the spinach and tomatoes. Season with the salt, pepper, and crushed red pepper. Drizzle the heavy cream over the eggs, then sprinkle the crumbled feta on top.
  • Transfer the casserole dish to the oven and bake for about 15 minutes, or just until the whites are set and the yolks are still liquid. (start checking around 10 minutes and add time as needed). Serve with crusty bread for dipping!

See how we calculate recipe costs here.

Notes

*You can use frozen spinach in place of fresh, just make sure to fully thaw and squeeze out the excess moisture first.
**You can use any type of cheese you like, although creamier cheeses work best.
To increase the servings to two eggs per person, simply keep all of the other ingredients the same and add 8 eggs to the dish instead of four. Baking time may increase.

Nutrition

Serving: 1Serving | Calories: 155kcal | Carbohydrates: 3g | Protein: 9g | Fat: 12g | Sodium: 280mg | Fiber: 1g
Overhead view of bread being dipped into baked eggs.

How to Make Baked Eggs – Step by Step Photos

Prepping the baking dish with melted butter.

Begin by preheating the oven to 375ºF. Melt 1 Tbsp butter and brush the inside of an 8×8-inch baking dish with the melted butter.

Fresh spinach being chopped.

Prep your add-ins. We roughly chopped two handfuls of fresh spinach and sliced one cup of grape tomatoes. You could also sauté your vegetables first, if you prefer.

Eggs being cracked into the casserole dish.

Place the spinach and tomatoes in the baking dish. Crack four eggs on top of the spinach and tomatoes.

Cream being drizzled over the eggs.

Drizzle 2 Tbsp heavy cream over the eggs. The fat and moisture in the cream helps keep the eggs soft and moist while they bake.

Seasoned eggs in the baking dish.

If you’re adding cheese, sprinkle that over top (we added about 2 Tbsp crumbled feta). Season the eggs with about ⅛ tsp each of salt, pepper, and crushed red pepper.

Finished baked eggs in the casserole dish.

Bake the eggs in the preheated 375ºF oven for about 15 minutes, or until the whites are set and the yolks are still liquid (the tops might get a little cloudy, but that’s okay). Start taking a peek at the eggs after about 10 minutes, just to make sure you don’t over cook them.

Finished baked eggs in the casserole dish with bread on the side.

Enjoy the baked eggs with some crusty bread, biscuits, bacon, or sausage! Oh, and don’t forget a cup of really good coffee… 🤤

The post Baked Eggs appeared first on Budget Bytes.

Chicken Alfredo Bake

Transform stovetop Chicken Alfredo into a delicious, decadent casserole with this easy Chicken Alfredo Bake recipe!

The post Chicken Alfredo Bake appeared first on Budget Bytes.

This Chicken Alfredo Bake is the ultimate, crowd-pleasing casserole! This creamy and indulgent pasta bake will become one of your favorite dishes to prepare, too, because it’s super easy to make ahead and then assemble just before baking. Not to mention, it’s so cheesy and delicious that everyone will ask for seconds! (That’s right, no leftovers in sight!)

A golden brown chicken alfredo bake in a round, white enamel casserole dish on a wooden background surrounded by a yellow and gray striped dish towel in the bottom left, a wooden cutting board with shaved Parmesan cheese in the top left corner, a clove of garlic, sprigs of parsley, and small wooden bowl of breadcrumbs in the top right corner, and a small wooden bowl of uncooked pasta in the bottom right corner. The right side of the casserole has been stirred with a large wooden spoon that's resting in the dish.

What is a chicken alfredo bake?

This Baked Chicken Alfredo is a fun spin on one of our most popular dinner recipes: Chicken Alfredo. We take the stovetop version of this dish to the next level by sending it on a trip to the oven…blanketed with seasoned breadcrumbs and tons of shredded cheese! (Because what could be better?!) 

Ingredients & substitutions

  • Chicken: We used boneless, skinless chicken breasts in this recipe, but you could also use boneless, skinless chicken thighs or 2 cups of rotisserie chicken. 
  • Alfredo Sauce: We made a double batch of our Homemade Alfredo Sauce (what we call an “Ameri-fredo sauce”) in the same skillet we used to cook the chicken. It can also be substituted with around 3 cups (or 24 oz.) of store-bought alfredo sauce. (But I promise, ours is better!)
  • Pasta: We used rotini in our pasta bake because it grabs onto that creamy sauce oh-so-well! Any medium-sized pasta like fusilli, penne, macaroni, or rigatoni works, too.
  • Frozen Vegetables: We added some frozen broccoli because the dish needed something fresh to balance out all the other rich ingredients. If you don’t like broccoli, try frozen peas, or a frozen vegetable mix (like ones with diced carrots, peas, and corn).
  • Buttered Breadcrumbs: Making buttery, seasoned breadcrumbs from scratch with panko will ensure the topping is as crispy and delicious as possible. Seasoning them yourself also gives you full control over the flavor. But they could be replaced with store-bought, seasoned Italian breadcrumbs or fresh breadcrumbs if desired.

MAKE AHEAD & AVOID LEFTOVERS

This is one of the dreamiest recipes of all time…but it isn’t quite as creamy and dreamy once reheated. For that reason, we suggest making a half batch instead of planning on a lot of leftovers. On the other hand, since every individual element of this recipe can be made ahead and kept in the fridge for up to 4 days, you could still make up the whole recipe and just bake it up at different times! Here’s how to prepare this pasta bake ahead of time:

  • Mix up the prepared chicken, cooked pasta, and thawed broccoli. Split the mixture into smaller portions. Store each serving in a glass container separately from the alfredo sauce. (If you want to mix the sauce in ahead of time, I guess you could — but it may soak into the cooked pasta over time.)
  • When you’re ready to bake up a serving, let it sit a room temperature for a few minutes (to slightly warm the glass dish), mix in the alfredo sauce, and top with cheese and breadcrumbs.
  • Bake for 20-25 minutes, or until the center of the pasta bake reaches an internal temperature of 165℉, and the toppings achieve the same visual cues in the recipe).
A large serving of chicken alfredo bake in a flat, white bowl, and a black fork is resting on the right side of the bowl. The bowl is sitting on a wood background surround with a yellow and gray striped dish cloth, a dark wooden cutting board with Parmesan Cheese shavings on it, and a sprig of parsley and a bowl of untoasted breadcrumbs.

I swear, y’all….this recipe is SUPER EASY to throw together. (Despite the long ingredient list and the number of steps!) It’s also a great blueprint for making just about any pasta bake you can dream up!

A golden brown chicken alfredo bake in a round, white enamel casserole dish on a wooden background surrounded by a yellow and gray striped dish towel in the bottom left, a wooden cutting board with shaved Parmesan cheese in the top left corner, a clove of garlic, sprigs of parsley, and small wooden bowl of breadcrumbs in the top right corner, and a small wooden bowl of uncooked pasta in the bottom right corner.
Print

Chicken Alfredo Bake

Transform stovetop chicken alfredo into a super-cheesy, decadent casserole with this Chicken Alfredo Bake recipe! It’s super easy to make (or make ahead!), and so delicious there won’t be any leftovers!
Course Dinner, Pasta
Cuisine American, Italian
Total Cost $12.80 recipe / $2.13 serving
Prep Time 15 minutes
Cook Time 1 hour 10 minutes
Bake Time 30 minutes
Total Time 1 hour 55 minutes
Servings 6 1 cup each
Calories 829kcal

Ingredients

Parmesan Chicken:

  • 2 boneless, skinless chicken breasts (about 1 1/3 lbs. total) $3.89
  • 2 Tbsp olive oil, divided $0.26
  • 1 Tbsp grated Parmesan cheese $0.08
  • 1/2 tsp Italian seasoning $0.05
  • 1/2 tsp red pepper flakes $0.05
  • 1/2 tsp salt $0.01
  • 1/2 tsp black pepper $0.01
  • 3 Tbsp water $0.00

Buttered Breadcrumbs:

  • 2 Tbsp butter $0.30
  • 1/2 cup panko breadcrumbs $0.35
  • 1/4 tsp Italian seasoning $0.03
  • 1/4 tsp garlic powder $0.03
  • 1/4 tsp red pepper flakes $0.03
  • 1/4 tsp salt $0.01
  • 1/4 tsp black pepper $0.01

Alfredo Sauce/Pasta Bake:

  • 4 Tbsp butter $0.60
  • 4 cloves garlic, minced $0.30
  • 2 cups heavy cream $2.00
  • 2 cups Italian shredded cheese blend, divided $2.49
  • 1/4 tsp Italian seasoning $0.03
  • 1/4 tsp garlic powder $0.03
  • 1/4 tsp red pepper flakes $0.03
  • 1/4 tsp salt $0.01
  • 1/4 tsp black pepper $0.01
  • 8 oz. rotini, uncooked $0.66
  • 10 oz. frozen broccoli florets $1.49

Instructions

Parmesan Chicken:

  • Cut the chicken breasts into 1” chunks. Coat the chicken with 1 tablespoons of oil and season it with the grated Parmesan cheese, Italian seasoning, garlic powder, red pepper flakes, salt, and black pepper.
  • Heat 1 tablespoons of oil in a large skillet over medium heat. Sear the chicken until the bottom of each piece is brown and the sides start to turn white (about 5 minutes).
  • Add 3 tablespoons of water to the pan, releasing the chicken pieces from the bottom of the skillet, and flip each one. Continue cooking until the chicken is evenly browned on all sides and fully cooked in the center (about 5 minutes). Remove the chicken from the skillet, leaving behind any stuck-on bits of chicken to flavor the alfredo sauce.

Buttered Breadcrumbs:

  • Melt the butter in a small skillet over medium heat. Once the butter has completely melted, stir in the panko breadcrumbs, Italian seasoning, garlic powder, red pepper flakes, salt, and black pepper.
  • Toast the breadcrumbs, stirring occasionally, until all the butter is absorbed and the breadcrumbs are toasted and golden but not brown (about 5 minutes).
  • Transfer the breadcrumbs to a bowl to stop the cooking process and set them aside to cool.

Alfredo Sauce:

  • Melt the butter over medium heat in the same large skillet used to cook the chicken (without wiping it out). Add the minced garlic and sauté until fragrant (about 2 minutes).
  • Whisk in the heavy cream, Italian seasoning, garlic powder, red pepper flakes, salt, and black pepper. Let it come up to a boil, stirring occasionally (about 5 minutes).
  • Turn the heat down to low, and add 1.5 cups of shredded cheese a handful at a time, whisking until the cheese is fully melted before adding more (about 5 minutes). The alfredo sauce will continue to thicken as it cools.

Assembly:

  • Preheat the oven to 375℉. Thaw the frozen broccoli in a colander, breaking down any large florets into bite-size pieces. Set aside.
  • At the same time, boil a large pot of water on high heat. Once the water is rapidly boiling, add the rotini and cook until it is just tender (about 7 minutes). Do not overcook the pasta, as it will soften further in the oven. Drain the pasta in a colander and set aside.
  • Mix together the cooked chicken, cooked pasta, thawed broccoli, and alfredo sauce in a casserole dish. Top the casserole with ½ cup of shredded cheese and the toasted breadcrumbs.
  • Bake the casserole until all the cheese is melted and the breadcrumbs are golden brown (about 25-30 minutes).

See how we calculate recipe costs here.

Nutrition

Serving: 1.5cups | Calories: 829kcal | Carbohydrates: 40g | Protein: 40g | Fat: 58g | Sodium: 760mg | Fiber: 3g
A side shot of a chicken alfredo bake with broccoli in a round, white enamel cast iron baking dish with a black rim. A wooden serving spoon is lifting out a heaping spoonful of the pasta slightly above the casserole dish. There is a yellow and gray striped dish cloth slightly visible in the bottom left side of the image, and blurred in the background are a black bowl of uncooked pasta and a bunch of Italian parsley.

How to Make Chicken Alfredo Bake – Step by Step Photos

A white bowl of uncooked chicken breast chunks seasoned with grated Parmesan cheese, salt, black pepper, Italian seasoning and red pepper flakes. The bowl is sitting on a marble background.

Cut 2 chicken breasts into 1” chunks. Combine 1 tablespoon of grated Parmesan cheese, 1/2 teaspoon of Italian seasoning, 1/2 teaspoon of garlic powder, 1/2 teaspoon red pepper flakes, 1/2 teaspoon of salt, and 1/2 teaspoon of black pepper. Coat the chunks of chicken in 1 tablespoon of olive oil and then toss them in the seasoning mixture.

A large stainless steel skillet is sitting on a white marble background. In the skillet are chunks of cooked chicken breast and some olive oil.

Heat a large skillet over medium heat. Add 1 tablespoon of olive oil. Saute the chicken until the bottom of each piece is brown and the sides start to turn white (About 10 minutes). Add 3 tablespoons of water to release the chicken from the skillet, and flip each piece. Continue cooking the chicken until cooked through and no pink remains (About 5 minutes). Remove the chicken from the skillet and set aside to cool. Also, reserve the pan (without wiping it out!) to use when cooking the alfredo sauce.

A stainless steel skillet filled with toasted, seasoned Panko breadcrumbs sitting on a white marble background.

While the chicken is cooking, melt 2 tablespoons of butter in a small skillet over medium heat. Once the butter has completely melted, stir in 1/2 cup panko breadcrumbs, 1/4 teaspoon of Italian seasoning, 1/4 teaspoon of garlic powder, 1/4 teaspoon of red pepper flakes, 1/4 teaspoon of salt, and 1/4 teaspoon of black pepper. Toast the breadcrumbs, stirring occasionally, until all the butter is absorbed and the breadcrumbs are toasted and golden but not brown. (About 7 minutes.) Set aside to cool.

A large stainless steel skillet on a background of white marble. The skillet is covered with fond after cooking chicken and there is a chunk of unmelted butter in the center and a pile of minced garlic.

In the same large skillet used to cook the chicken (without wiping it out), melt 4 tablespoons of butter on medium heat. Add the minced garlic and saute until fragrant. (About 2 minutes.) Use a metal whisk to scrape up the stuck bits of chicken and seasonings left behind in the pan as you cook the garlic, which will infuse the alfredo sauce with tons of flavor!

A large stainless steel skillet with butter and sautéed garlic, and heavy cream being poured from a glass measuring cup into the skillet from the left side of the pan.

Whisk in 2 cups of heavy cream. Then add 1/4 teaspoon of Italian seasoning, 1/4 teaspoon of garlic powder, 1/4 teaspoon of red pepper flakes, 1/4 teaspoon of salt, and 1/4 teaspoon of black pepper. Let the cream come up to a boil, stirring occasionally. (About 5 minutes.)

A large stainless steel skillet filled with heavy cream mixed with sautéed garlic, butter and seasonings. Grated parmesan cheese is sprinkled across the top of the heavy cream mixture from a small white bowl by a hand hovering over the bottom right side of the skillet.

Turn the heat down to low, and add 1½ cups of shredded cheese a handful at a time, whisking until the cheese is fully melted. (About 5 minutes.)

A large stainless steel skillet on a white marble background. The skillet is filled with a finished homemade alfredo sauce, and a hand in visible in the bottom right of the image and is stirring the mixture with a metal balloon whisk.

The alfredo sauce will continue to thicken as it cools. 

A medium-size stainless steel pot filled with cloudy pasta water and cooked rotini. A wooden spoon with a gray, silicon spoon is being held above the pot to show that the pasta is fully cooked. The pot is sitting on a white marble backdrop.

Preheat the oven to 375℉. Thaw the frozen broccoli in a colander, breaking down any large florets into bite-size pieces. At the same time, boil a large pot of water on high heat. Once the water is rapidly boiling, add the rotini and cook until it is just tender. (About 7 minutes). Do not overcook the pasta, as it will soften further in the oven. Set the cooked pasta and broccoli aside.

A circular, white enamel cast iron with a black rim sitting on a marble background. The casserole dish is filled with a mixture of cooked pasta, cooked chunks of seasoned chicken breast, and broccoli florets. Homemade alfredo sauce is being poured over the mixture from a stainless steel skillet raised above the casserole from the left side of the frame.

Mix together the cooked chicken, cooked pasta, and thawed broccoli in a casserole dish. Pour over the alfredo sauce and stir well.

A round, white enamel cast iron baking dish with a black rim is sitting on a white marble background. The baking dish is filled with a mixture of cooked pasta, broccoli florets, cooked chunks of chicken breast and alfredo sauce. A hand in the lower right corner of the casserole dish is sprinkling toasted breadcrumbs over the pasta bake.

Top the casserole with ½ cup of shredded Italian cheese and then sprinkle over 1/2 cup of buttered breadcrumbs. 

A chicken alfredo bake with broccoli topped with melted cheese and golden brown toasted breadcrumbs in a round, white enamel baking dish with a black rim that's sitting on a white, marble background.

Bake the casserole until all the cheese is melted and the breadcrumbs are golden brown (About 25-30 minutes).

A large serving of chicken alfredo bake in a flat, white bowl, and a black fork is resting on the right side of the bowl. The bowl is sitting on a wood background surround with a yellow and gray striped dish cloth, a dark wooden cutting board with Parmesan Cheese shavings on it, and a sprig of parsley and a bowl of untoasted breadcrumbs.

I’m craving this meal again — just LOOKING at it! ~Marion :)

The post Chicken Alfredo Bake appeared first on Budget Bytes.

Sheet Pan Pizza

Sheet-Pan Pizza is a low-effort recipe guaranteed to make any occasion special and satisfy cravings for take-out pizza at half the cost.

The post Sheet Pan Pizza appeared first on Budget Bytes.

Sheet Pan Pizza is the solution for anyone hoping to make crave-worthy, restaurant-quality pizza at home—at half the cost of carry-out! Our recipe for Sheet Pan Pizza will level up any casual date night in, make for an unforgettable family dinner, or serve as an interactive party dish where everyone helps pick the toppings. Sheet Pan Pizza is not just for special occasions. It’s also the perfect “take-out fake out” meal for two that will yield enough leftovers to check off some weekly meal prep!

A vertical image of a baked sheet pan pizza topped with pizza sauce, cheese, pepperonis, pickled jalepenos and honey that is not sliced.

WHAT IS SHEET PAN PIZZA?

This recipe for Sheet Pan Pizza combines my two favorite kinds of take-out pizza. The crust is a sturdy Foccacia bread, typically used for Sicilian-style “Grandma Pie,” that is baked and then covered edge-to-edge with tons of cheese and toppings—sort of like a Detroit-Style pizza—and then baked again! Sheet Pan Pizza is a fun way to feed a crowd and can easily be divided into sections so everyone in the family gets to have a few slices with their favorite sauce and toppings.

WHAT YOU NEED TO MAKE A SHEET PAN PIZZA:

  • A SHEET PAN: We suggest using a standard 18” x 13” rimmed metal baking sheet or the 16″ x 12.5″ x 1″ enamelware pan in our Shop.
  • PIZZA DOUGH: Our No-Knead Focaccia is oh-so-tasty on its own, but next level as the base of a giant pizza. Totally worth the extra time to make it from scratch! (You can also use store-bought pizza dough—see note below.)
  • OLIVE OIL: We used as little olive oil as possible to make this recipe budget-friendly. (Feel free to use a bit more!) You can substitute or mix it with plain cooking oil to reduce costs even more, but the pizza crust will lack the distinctive taste olive oil provides.
  • STORE-BOUGHT SAUCE: We chose a store-bought, traditional pizza sauce in order to keep things simple. You can totally make your own homemade pizza sauce! Or swap it out for a jar of alfredo sauce, vodka sauce, prepared pesto, or BBQ sauce!
  • TONS OF SHREDDED CHEESE: You need a good amount of cheese for this recipe, but it’s totally worth the extra ingredients to balance out all the bread, sauce, and toppings. 
  • YOUR FAVORITE PIZZA TOPPINGS: Keep it classic or mix it up—anything goes when it comes to Sheet Pan Pizza!
An extreme close up of a single slice of sheet pan pizza raised above the rest of the pizza with a spatula.

DO I HAVE TO MAKE MY OWN CRUST?

I would highly suggest making the pizza crust in this recipe – our shockingly-easy No-Knead Homemade Focaccia. It pretty much does the work on its own! You can substitute the homemade crust with 1 lb. of store-bought pizza dough for this Sheet Pan Pizza recipe (and start with the second set of instructions on the recipe card), but the results will be slightly different from the pizza we made.

TIP: Making Two Pizzas

  • If doubling the recipe: Prepare a doubled amount of pizza dough at once in a very large mixing bowl. Slice the large ball of dough in half (after the first ferment), and transfer each to its own 1/2 sheen pan for the second rise. Follow the recipe as written, also rotating and flipping the baking sheets halfway through both bakes so both pizzas cook evenly.
  • Alternatively, when making two smaller pizzas: Slice the risen ball of dough in half and transfer each to its own 1/4 sheet pan for the second rise. Split the remaining ingredients between the pizzas, and reduce both baking times by about 5 minutes each (also relying on the visual cues as a guide to prevent over-baking or under-baking the crust).

MAKE AHEAD & MAKE IT EASIER

  • You can make the dough for this Sheet Pan Pizza ahead and store it tightly covered in the fridge for up to 24 hours before baking it. Let it sit out at room temperature for about 30 minutes before transferring it to the sheet pan.
  • You can also pre-bake the pizza crust up to 8 hours ahead. Let the bread cool completely before covering it to keep it from getting soggy. When you’re ready to eat, just top the crust with sauce and toppings and bake it again for 10-15 minutes.
A horizontal image of a fully baked sheet pan pizza topped with pizza sauce, shredded cheese, pepperonis, jalepenos and honey that's held up with two white dish towels.
A vertical image of a baked sheet pan pizza topped with pizza sauce, cheese, pepperonis, pickled jalepenos and honey sliced and a spatula is removing the bottom right slice.
Print

Sheet Pan Pizza

Sheet Pan Pizza is a low-effort recipe guaranteed to make any occasion special and satisfy cravings for take-out pizza at half the cost.
Course Dinner, Main Course, Meal Prep
Cuisine American, Italian
Prep Time 30 minutes
Cook Time 45 minutes
Resting Time 2 hours 45 minutes
Total Time 4 hours
Servings 7 people
Calories 539kcal
Cost $9.98 RECIPE / $1.41 SERVING

Equipment

Ingredients

Crust:

  • 4 cups all-purpose flour $0.61
  • 2 cups water $0.00
  • 1 1/2 tsp salt $0.03
  • 2 tsp instant yeast 0.48
  • 2 Tbsp cornmeal $0.03
  • 1 Tbsp olive oil* $0.15

Pizza:

  • 3 Tbsp olive oil, divided* $0.45
  • 1/2 tsp salt $0.01
  • 1/2 tsp Freshly cracked black pepper $0.02
  • 1/2 tsp Italian seasoning $0.05
  • 1/2 tsp red pepper flakes $0.05
  • 1 14oz. jar pizza sauce $1.59
  • 2 cups shredded mozzarella $2.49
  • 1/2 cup Parmesan cheese, shredded or grated $0.75
  • 1/2 cup pepperoni slices (about 3 oz.) $1.50
  • 1/3 cup sliced pickled jalapeños $0.66
  • 2 Tbsp honey $0.38

Instructions

Crust:

  • In a large mixing bowl, combine the flour, water, salt, and instant yeast. Stir until just combined and no streaks of flour remain.
  • Drizzle 1 tablespoon of olive oil around the sides of the bowl, and lift the dough with your hands to make sure the bottom and sides of the bowl are well-coated with the oil.
  • Cover the bowl and let the dough rise in a warm, dry place for 2 hours, or in the refrigerator for up to 24 hours. The dough should double in size and appear bubbly, wet, and very fluffy.**
  • Coat your fingers with a few drops of olive oil and then scrape the dough from the sides of the bowl, turning it over a few times to form a ball. Rest the dough for 5 minutes.

Pizza:

  • Brush 1 tablespoon of olive oil on the bottom and sides of 1 rimmed baking sheet and then sprinkle 2 tablespoons of cornmeal evenly on the bottom of the pan.
  • Coat the ball of pizza dough with 1 tablespoon of oil and flip it out of the bowl (oil side down) on the rimmed baking sheet, using a spatula to scrape any oil left in the bowl on top of the dough.
  • Gently press down the center of the dough and push it outward toward each corner of the pan. Let the dough rest again, uncovered, until it rises slightly and spreads to fill the sheet pan completely (About 30-45 minutes). While the dough rests, preheat the oven to 425℉.
  • Coat your fingers with oil and make dimples all over the dough, also pushing the dough into the corners again if needed. Brush the dough with the remaining 1 tablespoon of olive oil and sprinkle over the salt, fresh-cracked black pepper, Italian seasoning, and red pepper flakes. Bake the crust for 25 minutes, or until the surface of the bread is evenly golden brown.
  • Remove the crust from the oven and carefully spread the pizza sauce on top from edge to edge. Then top with the mozzarella cheese, parmesan cheese, pepperoni, pickled jalapenos, and if desired, a pinch of salt, pepper, and other seasonings
  • Bake the pizza for another 10-15 minutes or until the cheese has melted and started to brown.
  • Remove the pizza from the oven and drizzle the entire surface lightly with honey. Let it cool for 5 minutes and then slice the pizza into 15 squares. Serve each slice topped with more parmesan cheese and fresh-cracked black pepper.

See how we calculate recipe costs here.

Notes

* Olive oil will add a distinct flavor to the pizza crust but can be substituted (or mixed) with cooking oil to make this recipe more budget-friendly. 
** The dough may need more time to rise in the sheet pan if coming out of a cold refrigerator. 

Nutrition

Serving: 2slices | Calories: 539kcal | Carbohydrates: 65g | Protein: 20g | Fat: 22g | Sodium: 1225mg | Fiber: 3g

How to Make Sheet Pan pIzza – Step by Step Photos

Ingredients for a foccacia-style pizza crust mixed together in a white bowl with a wooden spatula sticking out of the bottom left side of the bowl.

Combine 4 cups of all-purpose flour, 2 cups of water, 1 ½ teaspoons of salt, and 2 teaspoons of instant yeast in a large bowl. (If using a single-serving packet of yeast, which contains about 2 1/4 teaspoons, you can use the whole thing!) Stir until just combined and no streaks of flour remain. Drizzle 1 tablespoon of olive oil around the sides of the bowl, and lift the dough with your hands to make sure the bottom is also coated. Cover the bowl and let it ferment in a warm, dry place for 2 hours or in the refrigerator for up to 24 hours. (If coming from the fridge, the dough may need an additional 30 minutes of resting time at room temperature.)

Ingredients for a no-knead focaccia style pizza crust after they have fermented for two hours in a white bowl. A left hand is stablizing the bowl with the right hand pulls the dough away from the side of the bowl.

After the first ferment, the dough should roughly double in size and appear bubbly, wet, and very fluffy. Scrape the dough off the sides of the bowl with your hands, turning it over a few times to form a ball. Let it rest in the bowl for about 5 minutes to prevent the dough from tearing. Brush the bottom and sides of the sheet pan with 1 tablespoon of olive oil and sprinkle 2 tablespoons of cornmeal evenly on the bottom.

Raw pizza dough that has been fermented once and turned out onto a rimmed baking sheet and pressed out into a rectangle for a second ferment.

Coat the ball of pizza dough with 1 tablespoon of olive oil and flip it out of the bowl onto the prepared sheet tray (oil side down), using a spatula to scrape any oil left in the bowl on top of the dough. Gently press down the center of the dough and push it outward toward each corner of the pan. Let the dough rest again, uncovered, until it spreads to fill the sheet pan completely (about 30-45 minutes). Preheat the oven to 425℉.

A raw pizza dough that has fermented for a second time on a rimmed baking tray, two hands are pressing dimples into the center of the dough.

Coat your fingers with oil and make dimples all over the dough, also pushing the dough into the corners again if needed. Brush the dough with the remaining 1 tablespoon of olive oil and sprinkle over a 1/2 teaspoon of salt, 1/2 teaspoon of freshly-cracked black pepper, 1/2 teaspoon of Italian seasoning, and 1/4 teaspoon of red pepper flakes.

A lightly golden pizza crust that was topped with olive oil, salt, pepper, italian seasoning and red pepper flakes and then baked.

Bake the crust for 25 minutes, or until the surface of the bread is lightly golden brown and has developed a still-tender, but firm crust. When pressed lightly (And carefully, don’t burn yourself!), the center of the crust should spring back and should look and feel fully cooked – not squish and soft.

A par-baked pizza crust on a rimmed baking tray that's topped with pizza sauce, shredded mozzarella cheese, parmesan cheese, pepperonis and pickled jalapeño slices that needs to be baked again.

Top the fully-baked pizza crust evenly from edge-to-edge with 1 1/2 cups of prepared pizza sauce (from a 14 oz. jar), 2 cups of shredded mozzarella cheese, 1/2 cup of shredded or grated parmesan cheese, 1/2 cup of pepperoni slices (about 3 oz. or half a standard package), 1/3 cup of pickled jalapenos (about 1/3 of a standard jar), and if desired, another pinch of salt, pepper, and other seasonings.

A fully baked sheet pan pizza that is golden brown and topped with crispy pepperonis, melted cheese and pickled jalapeño slices and a hand is drizzling honey on the right center of the pizza.

Bake the pizza for another 10-15 minutes or until the cheese has melted and started to brown. Remove the pizza from the oven and drizzle the entire surface lightly with honey. Let it cool for about 5 minutes (so the toppings don’t slide off), and slice the pizza into 15 squares. Serve each slice topped with more parmesan cheese and fresh-cracked black pepper.

An extreme close up of baked sheet pan pizza topped with pepperonis and jalepenos that's being drizzled with honey.

Y’all, I love the combo of sweet & spicy toppings we used in this recipe, but I’m always looking for new ideas for my next Sheet Pan Pizza Party! What sauces and toppings will you put on your Sheet Pan Pizza? Tell us in the comments! ~ Marion :)

The post Sheet Pan Pizza appeared first on Budget Bytes.