Maybe it’s an unpopular opinion, but I prefer a savory breakfast to a sweet breakfast 10/10. I’m even happier when my breakfast has a spicy kick to it, and this simple Shakshuka recipe delivers! Loaded with fragrant spices, this hearty and filling homemade Shakshuka pleases all the senses with great textures, deep flavors, and a beautiful red color that comes out of the oven sizzling hot. You won’t be disappointed. Not to mention, the leftovers are even better, making this vegetarian budget-friendly staple a regular in my breakfast recipe rotation.

What is Shakshuka?
Shakshuka, also known as shakshouka and chakchouka, is believed to have originated in Tunisia and is a staple dish in many North African and Middle Eastern countries. In some Arabic dialects, “shakshuka” translates to “all mixed up’ or “mixture,” which perfectly describes this flavorful recipe. Eggs are gently poached in a spicy red pepper and tomato sauce, which is seasoned with fragrant spices like cardamom, cumin, paprika, and chili powder. It’s a one-pan meal often served for breakfast, but I’d never say no to having it for dinner!
Ingredients
Here’s what you’ll need to make this easy shakshuka recipe:
- Olive Oil: Softens the veggies and adds some healthy fats.
- Vegetables: Yellow onion, red bell pepper, and celery add texture and bulk out the sauce.
- Seasonings: Salt, black pepper, smoked paprika, cumin, and cayenne pepper are traditional seasonings in many egg shakshuka recipes. I also add oregano, cinnamon, and cardamom for even more depth of flavor. (If cardamom isn’t a spice you often gravitate towards, I recommend giving it a try! It adds so much warmth and complexity to dishes, like in this recipe or these chai spiced scones.)
- Jalapeño: I said I love a spicy kick! If you’re not into spicy, you can skip the cayenne and add only 1 jalapeño, or skip the jalapeño altogether and add a green bell pepper.
- Garlic: A staple in many savory recipes.
- Canned Fire Roasted Diced Tomatoes: Adds a smoky note to the sauce. Plain diced tomatoes will also work.
- Tomato Paste: Creates an even richer tomato flavor.
- Lemon: I use the zest from a lemon and one tablespoon of lemon juice to brighten up the flavors.
- Sugar: A small amount of sugar helps balance out the acidity of the tomatoes.
- Water: Depending on how thick you like your sauce, you can add a little water to thin it out.
- Eggs: Use as many or as few eggs as you like, depending on how many servings you want. You don’t even need to use eggs if you want to make a vegan version or you don’t like eggs! The tomato sauce is flavorful enough on its own, and you can skip the oven step altogether if you don’t use eggs.
- Fresh Parsley: For garnishing.
What Else Can I Add?
This is a great ‘clear your fridge out’ recipe because it’s so forgiving and tastes great no matter what you throw in. Here are some fun variations you can try:
- Add in extra veggies like zucchini, mushrooms, or spinach.
- Pour in some canned chickpeas or beans to make a smoky white bean shakshuka.
- If you eat meat, cook up ground beef or sausage before adding the other ingredients.
- Switch out the fresh jalapeño for canned green chilies and use cilantro instead of parsley for a southwestern twist (like in this salsa poached eggs recipe!)
- Olives, capers, or artichoke hearts would also be delicious additions to the sauce.
- Top with crumbled feta or dollops of labneh (cheese made from strained yogurt) for a creamy, tangy contrast.
Eggs in Purgatory vs Shakshuka
Shakshuka is often compared to other baked egg recipes, such as Italian eggs in purgatory. While they’re prepared in a similar way (eggs cooked in tomato sauce), eggs in purgatory have a more Italian influence, with ingredients like basil and Parmesan. This differs from shakshuka, which has North African and Middle Eastern flavors, utilizing spices like cumin and cardamom. Also, eggs in purgatory recipes don’t usually include red bell pepper—a staple in shakshuka. Both are delicious in their own right but originate from different regions and have distinct flavor profiles!
Serving Suggestions
My family loves this recipe served with sliced avocado and fresh pita bread. A side of white bean hummus or falafel would be delicious, too! But whatever you do, you MUST serve this with some sort of bread to soak up all of that delicious sauce—a slice of no-knead bread, homemade garlic bread, or even focaccia rolls—anything you like! A side salad like our Mediterranean tuna salad, falafel salad, or even this street corn salad would be perfect for lunch or dinner.
How to Store
This recipe tastes just as good when served as leftovers! Let your baked shakshuka cool completely before storing in an airtight container in the fridge for 1-2 days (with eggs) or 3-4 days (without eggs). For freezing, remove the eggs and store in a freezer-safe container for up to 6 months. Let it thaw before reheating on the stove top. You can always add fresh eggs when reheating for a hot breakfast or dinner option!


Shakshuka Recipe
Equipment
Ingredients
- 3 Tbsp olive oil $0.57
- 1 large yellow onion, diced $0.94
- 1 red bell pepper, diced $1.48
- 2 jalapeño, seeded and diced $0.80
- 5 ribs celery, diced $0.75
- 2 tsp salt $0.02
- 2 Tbsp smoked paprika $0.98
- 1 ½ tsp cardamom $1.02
- ¼ tsp cinnamon $0.02
- ¼ tsp cayenne pepper $0.06
- 1 tsp oregano $0.21
- 1 tsp cumin $0.08
- ½ tsp freshly cracked black pepper $0.04
- 4 cloves garlic, minced $0.12
- 1 14.5 oz can fire roasted diced tomatoes, with juices* $1.23
- 2 Tbsp tomato paste $0.14
- 1 lemon, zested + 1 Tbsp juice $0.68
- 2 tsp sugar $0.01
- 1 cup water, as needed $0.00
- 3 eggs (optional)** (see note) $0.90
- 2 Tbsp fresh parsley for garnish $0.10
Instructions
- Preheat oven to 350 degrees. Drizzle olive oil in a large, oven-safe skillet or oven-safe sauté pan and add diced yellow onion, diced red bell pepper, seeded and diced jalapeño, and diced celery. Add salt, smoked paprika, cardamom, cinnamon, cayenne pepper, oregano, cumin and black pepper.
- Stir and cook down on medium heat until all vegetables are softened and spices are fragrant, about 10-12 minutes.
- Add minced garlic, fire roasted diced tomatoes with juices, tomato paste, lemon zest and juice, and sugar. Stir and cook an additional 10 minutes, until fragrant and well-combined. Add water, as needed to thin out the sauce if you want it to be a little more brothy and less thick. I like mine to be the consistency of a hearty stew or chili, but not pasty.
- Make egg-size dents in the sauce with the back of a large spoon or a ladle, and crack an egg into each spot. You can add one egg for however many people you are trying to serve.**
- Transfer the pan with the eggs to the preheated oven for 8-12 min until the egg whites are opaque.*** Top with black pepper and fresh parsley.
- Serve with toasted pita and fresh avocado (optional). Enjoy!
See how we calculate recipe costs here.
Notes
Nutrition

how to make Shakshuka – step by step photos

Preheat oven to 350 degrees. Drizzle 3 Tbsp olive oil in a large, oven-safe skillet or oven-safe sauté pan and add 1 diced yellow onion, 1 diced red bell pepper, 2 seeded and diced jalapeño, and 5 diced ribs celery. Add 2 tsp salt, 2 Tbsp smoked paprika, 1 ½ tsp cardamom, ¼ tsp cinnamon, ¼ tsp cayenne pepper, 1 tsp oregano, 1 tsp cumin and ½ tsp black pepper.
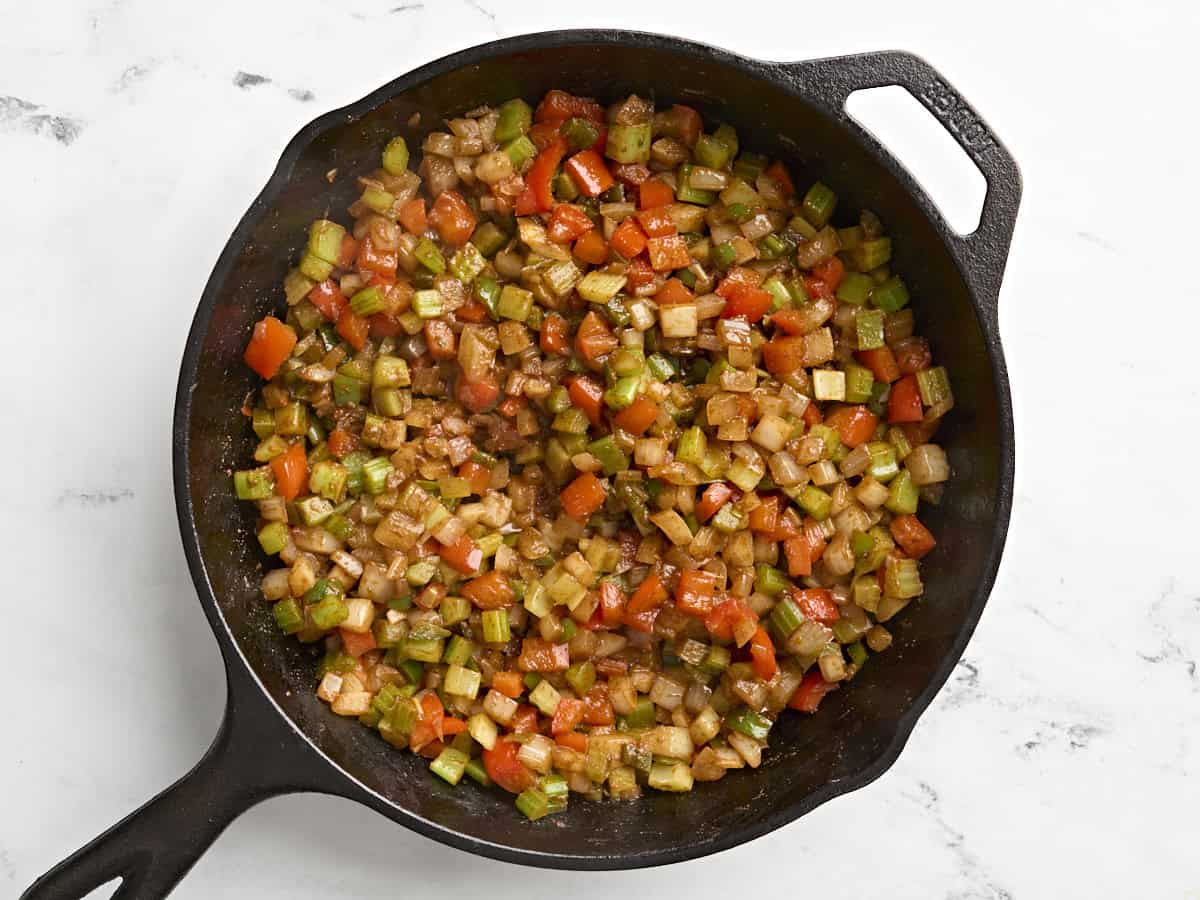
Stir and cook down on medium heat until all vegetables are softened and spices are fragrant, about 10-12 minutes.

Add 4 cloves minced garlic, a 14.5 oz can of fire roasted diced tomatoes with juices, 2 Tbsp tomato paste, lemon zest from 1 lemon, 1 Tbsp lemon juice, and 2 tsp sugar. Stir and cook an additional 10 minutes, until fragrant and well-combined. Add 1 cup water, as needed to thin out the sauce if you want it to be a little more brothy and less thick. I like mine to be the consistency of a hearty stew or chili, but not pasty.

Make egg-size dents in the sauce with the back of a large spoon or a ladle, and crack an egg into each spot. You can add one egg for however many people you are trying to serve.

Transfer the pan with the eggs to the preheated oven for 8-12 min until the egg whites are opaque. Top with black pepper and 2 Tbsp fresh parsley. Serve with toasted pita and fresh avocado (optional). Enjoy!

If you’re serving this recipe for shakshuka with eggs, break the yolk and let it ooze into the tomato sauce for maximum flavor explosion!
More Baked Egg Recipes


The post Shakshuka appeared first on Budget Bytes.