Best Veggie Burgers

Are you on the lookout for a delicious, nutritious, and kid-friendly veggie burger recipe? Look no further! These are the Best Veggie Burgers packed with wholesome ingredients, full of flavor, and sure to be a hit with both kids and adults. If you love my black bean burgers and lentil chickpea burgers, you’ve got to…

The post Best Veggie Burgers appeared first on Weelicious.

Are you on the lookout for a delicious, nutritious, and kid-friendly veggie burger recipe? Look no further! These are the Best Veggie Burgers packed with wholesome ingredients, full of flavor, and sure to be a hit with both kids and adults. If you love my black bean burgers and lentil chickpea burgers, you’ve got to try these next!
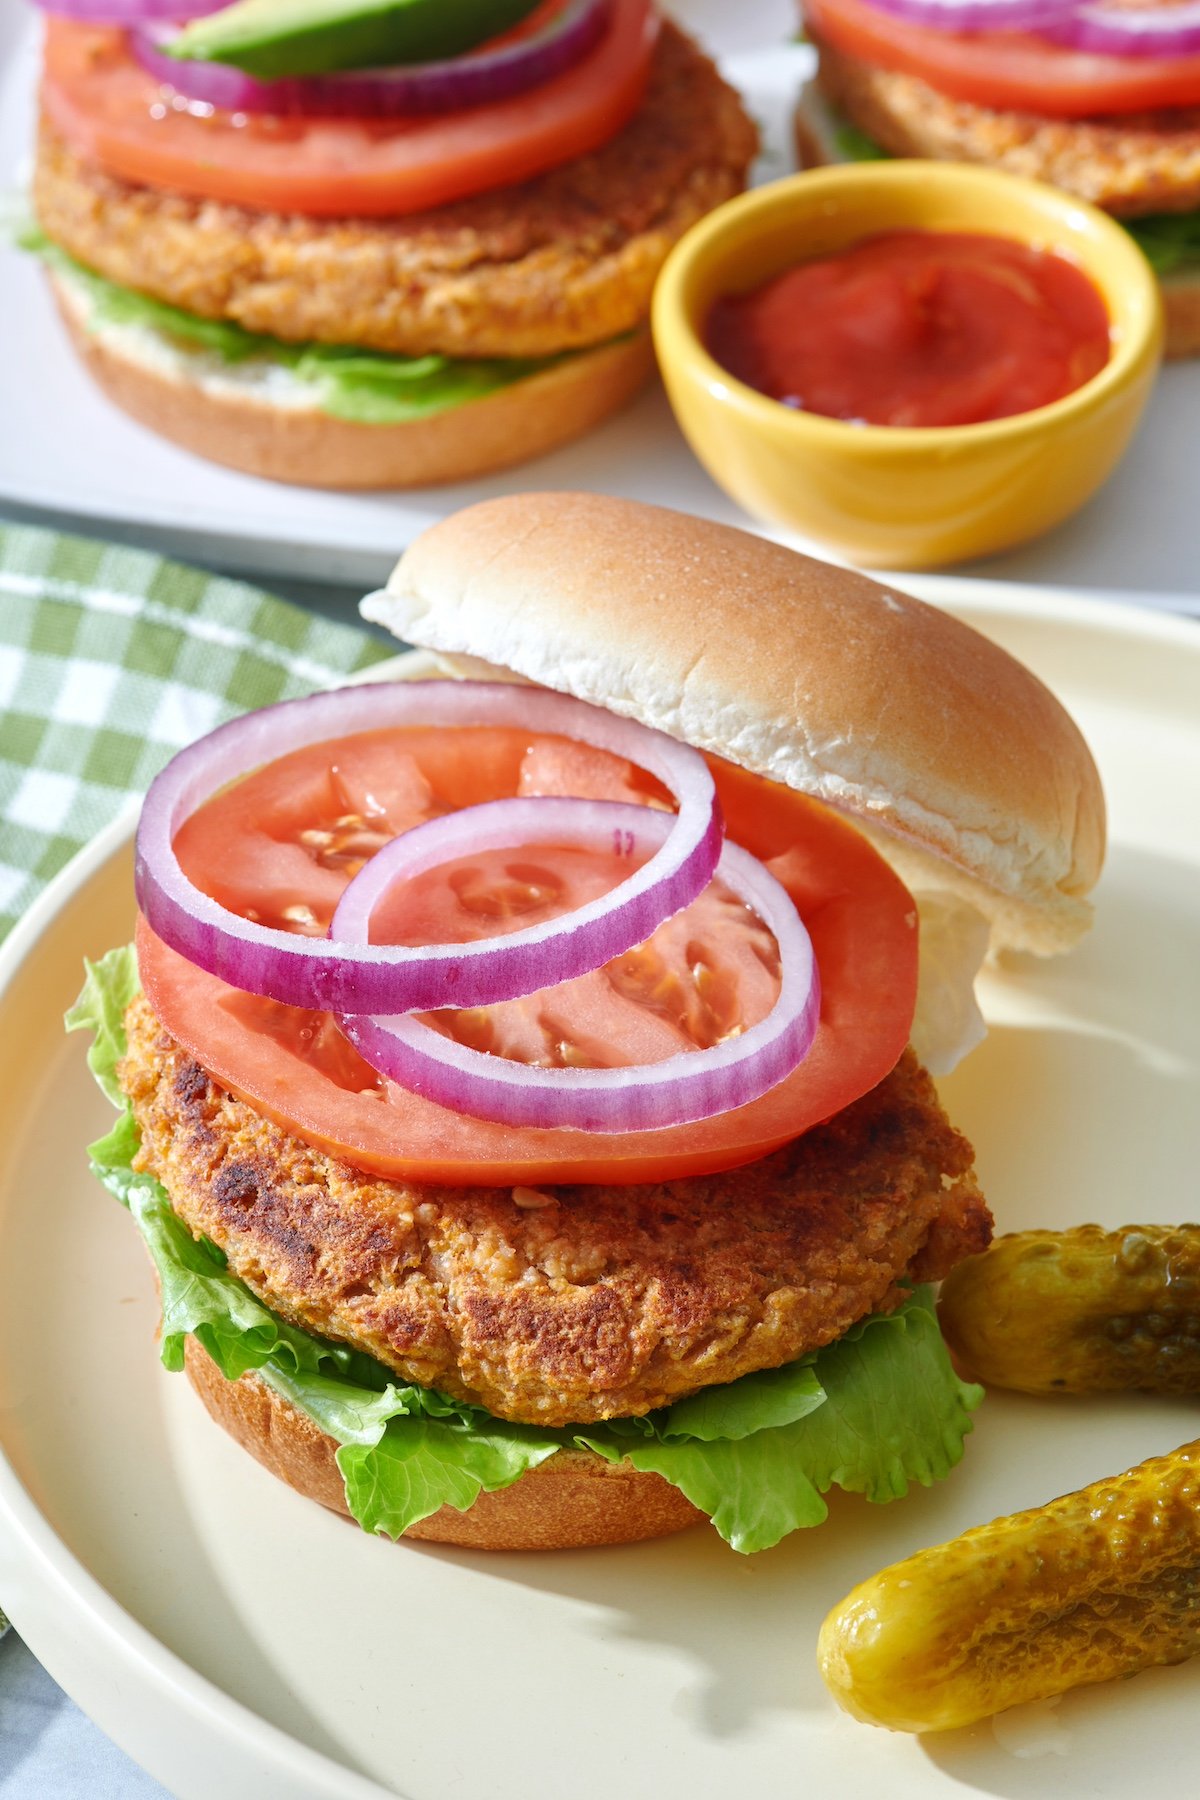
The best veggie burger topped with lettuce, onion and tomato on a serving plate.

Why You’ll Love This Recipe

  • Nutritious: Packed with bulgur wheat, pinto beans, and carrots, these burgers are a good source of protein, fiber, and vitamins. You can feel good about feeding these to your little ones.
  • Easy to Make: With simple ingredients and only a few steps, this recipe is perfect for busy parents that need dinner on the table ASAP.
  • Kid-Approved: These veggie burgers are mild in flavor and have a great texture that kids love.
  • Freezer-Friendly: This veggie burger recipe freezes beautifully making it a great recipe to prep ahead of time for an easy weeknight dinner. Keep a batch in the freezer ready for when you need something quick, delicious and healthy.

The Ingredients

Veggie burger ingredients.
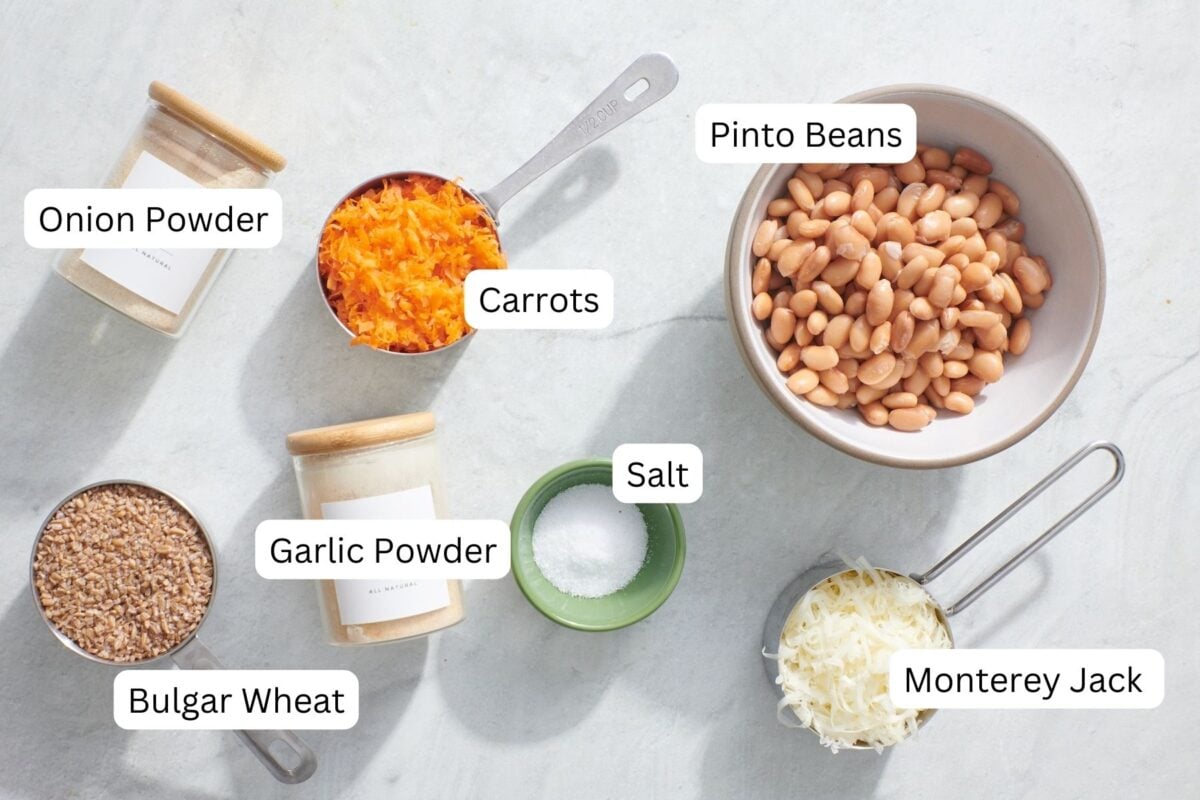
  • Bulgur wheat: Bulgar wheat is a nutritious whole grain that provides a chewy texture and nutty flavor to the burgers, along with fiber and protein – super important for vegetarian eaters!
  • Pinto beans: Beans are a great source of plant-based protein and fiber, giving the burgers a hearty texture and taste.
  • Monterey Jack cheese: The cheese adds a creamy texture and extra flavor while helping bind the burger patties together.
  • Carrot: Grated carrots add a slight sweetness, vibrant color, and extra vitamins like beta-carotene.
  • Seasonings: This recipe calls for garlic powder, onion powder and salt to enhance the overall flavor of the burgers.

*For a full list of ingredients and instructions, see the recipe card below*

Variations and Substitutions

  • Cheese: Feel free to substitute the Monterey Jack with cheddar or mozzarella cheese. You could also sub a dairy-free cheese to make these burgers vegan.
  • Beans: Swap pinto beans for black beans if that’s what you have on hand.
  • Spices: You can customize the flavor by adding different seasonings like cumin, smoked paprika, or even chili powder if your kids can handle a little heat.
  • Gluten-Free: Use quinoa or brown rice instead of bulgur wheat for a gluten-free option.

How to Make the Best Veggie Burgers

Cooked bulgar wheat in a pot.

Step 1: Place the bulgar wheat and water in a pot. Bring to a boil, cover then reduce to a simmer for 13 minutes. After the bulgur has cooked, place in a bowl and let cool.

Pulsed pinto beans in food processor.

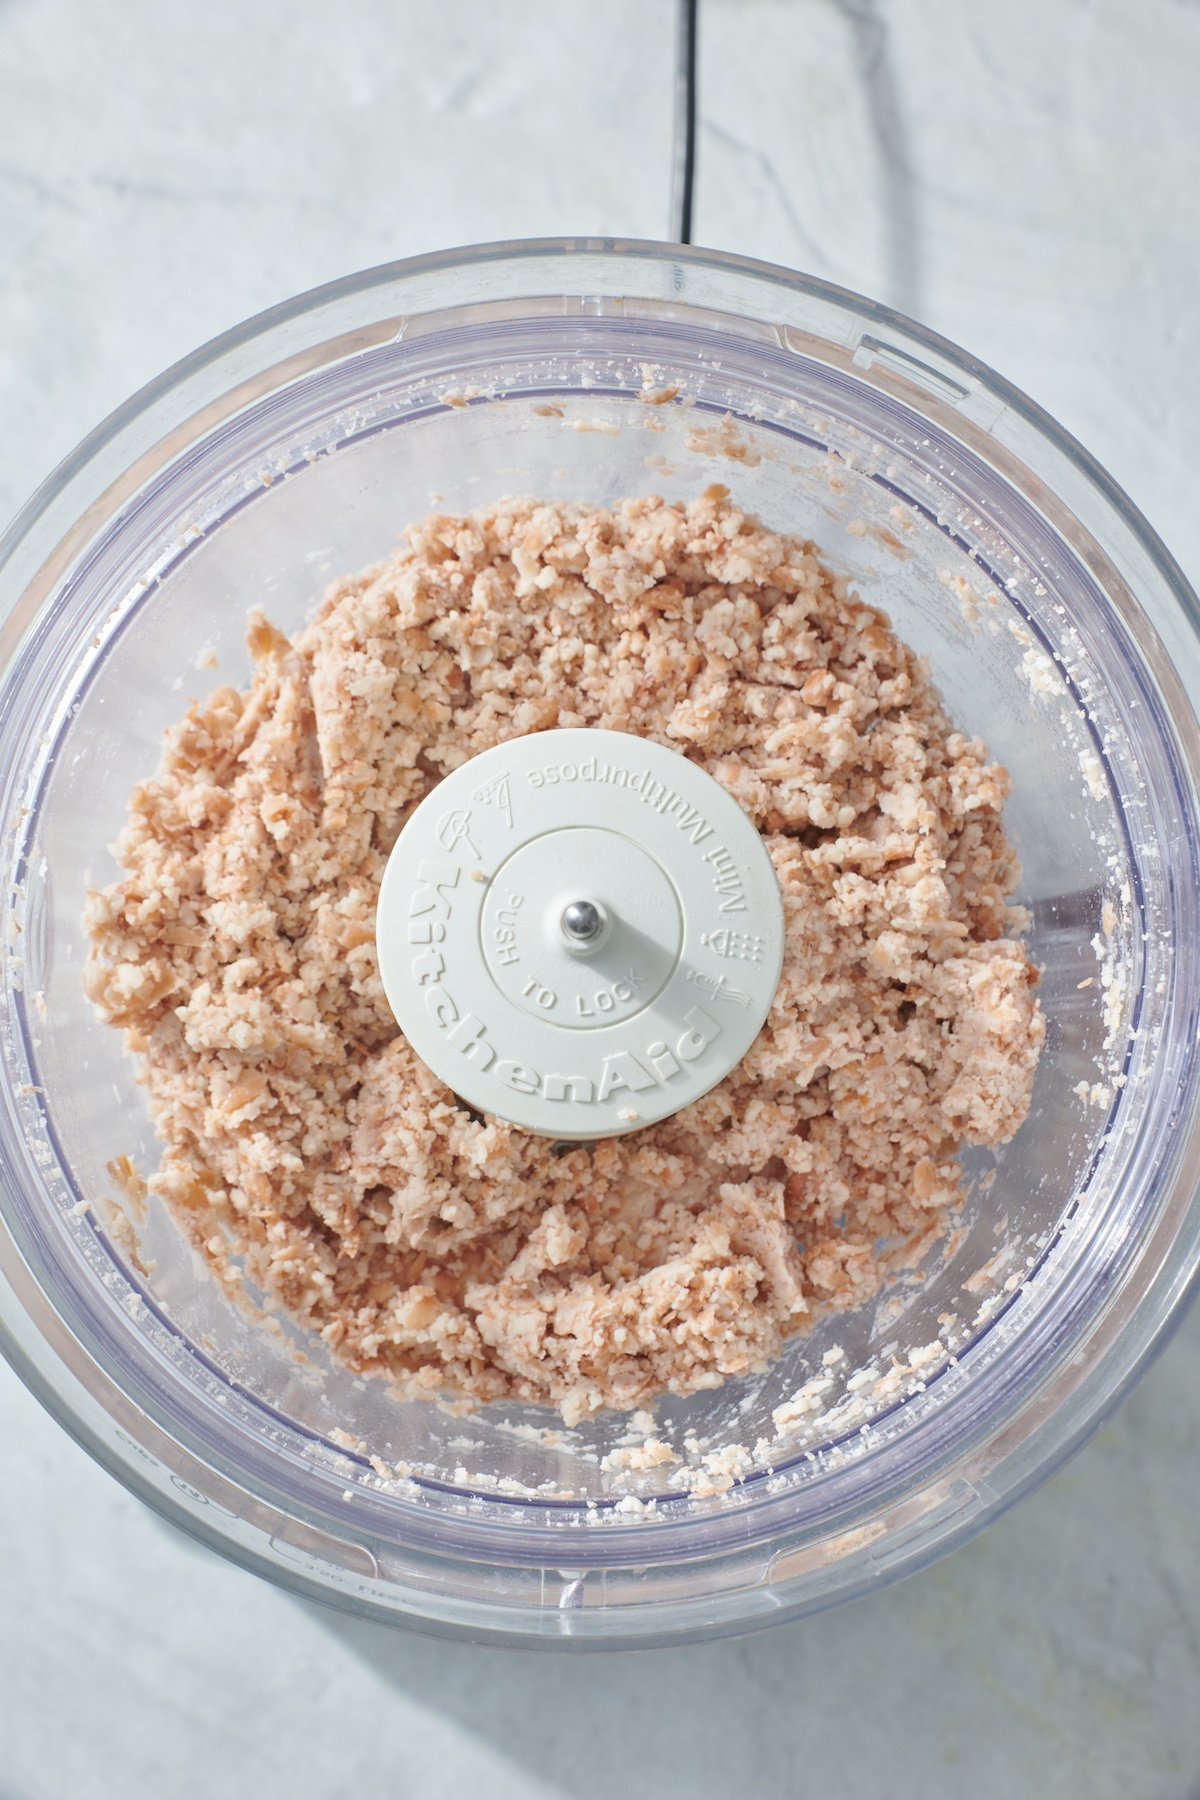
Step 2: Place the pinto beans in a food processor and pulse until finely chopped.

Veggie burger mixture in food processor.

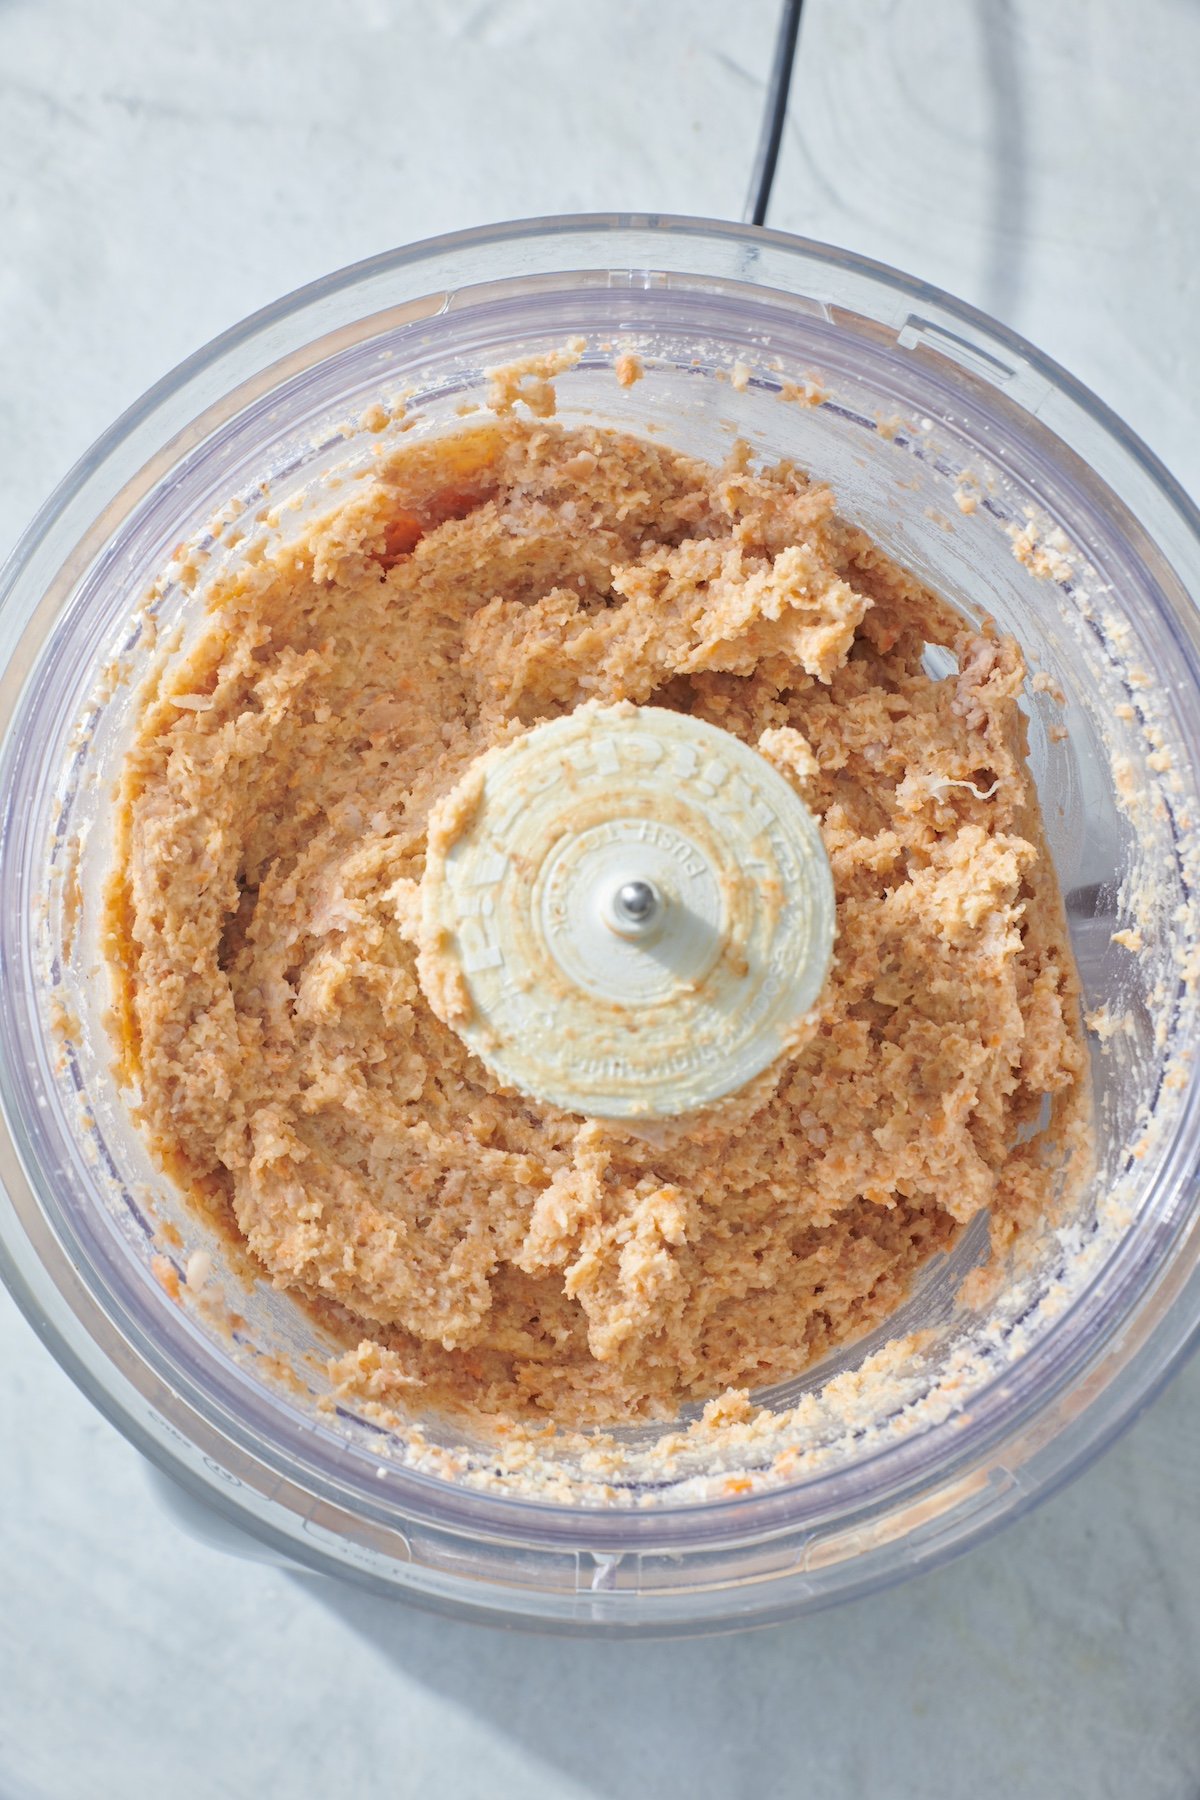
Step 3: Add the cooked bulgur wheat, cheese, carrot, salt, garlic and onion powder to the beans in the food processor and pulse to combine.

Four veggie burger patties on plate before being cooked.

Step 4: Form mixture into 4 evenly sized patties.

Four veggie burgers in saute pan.

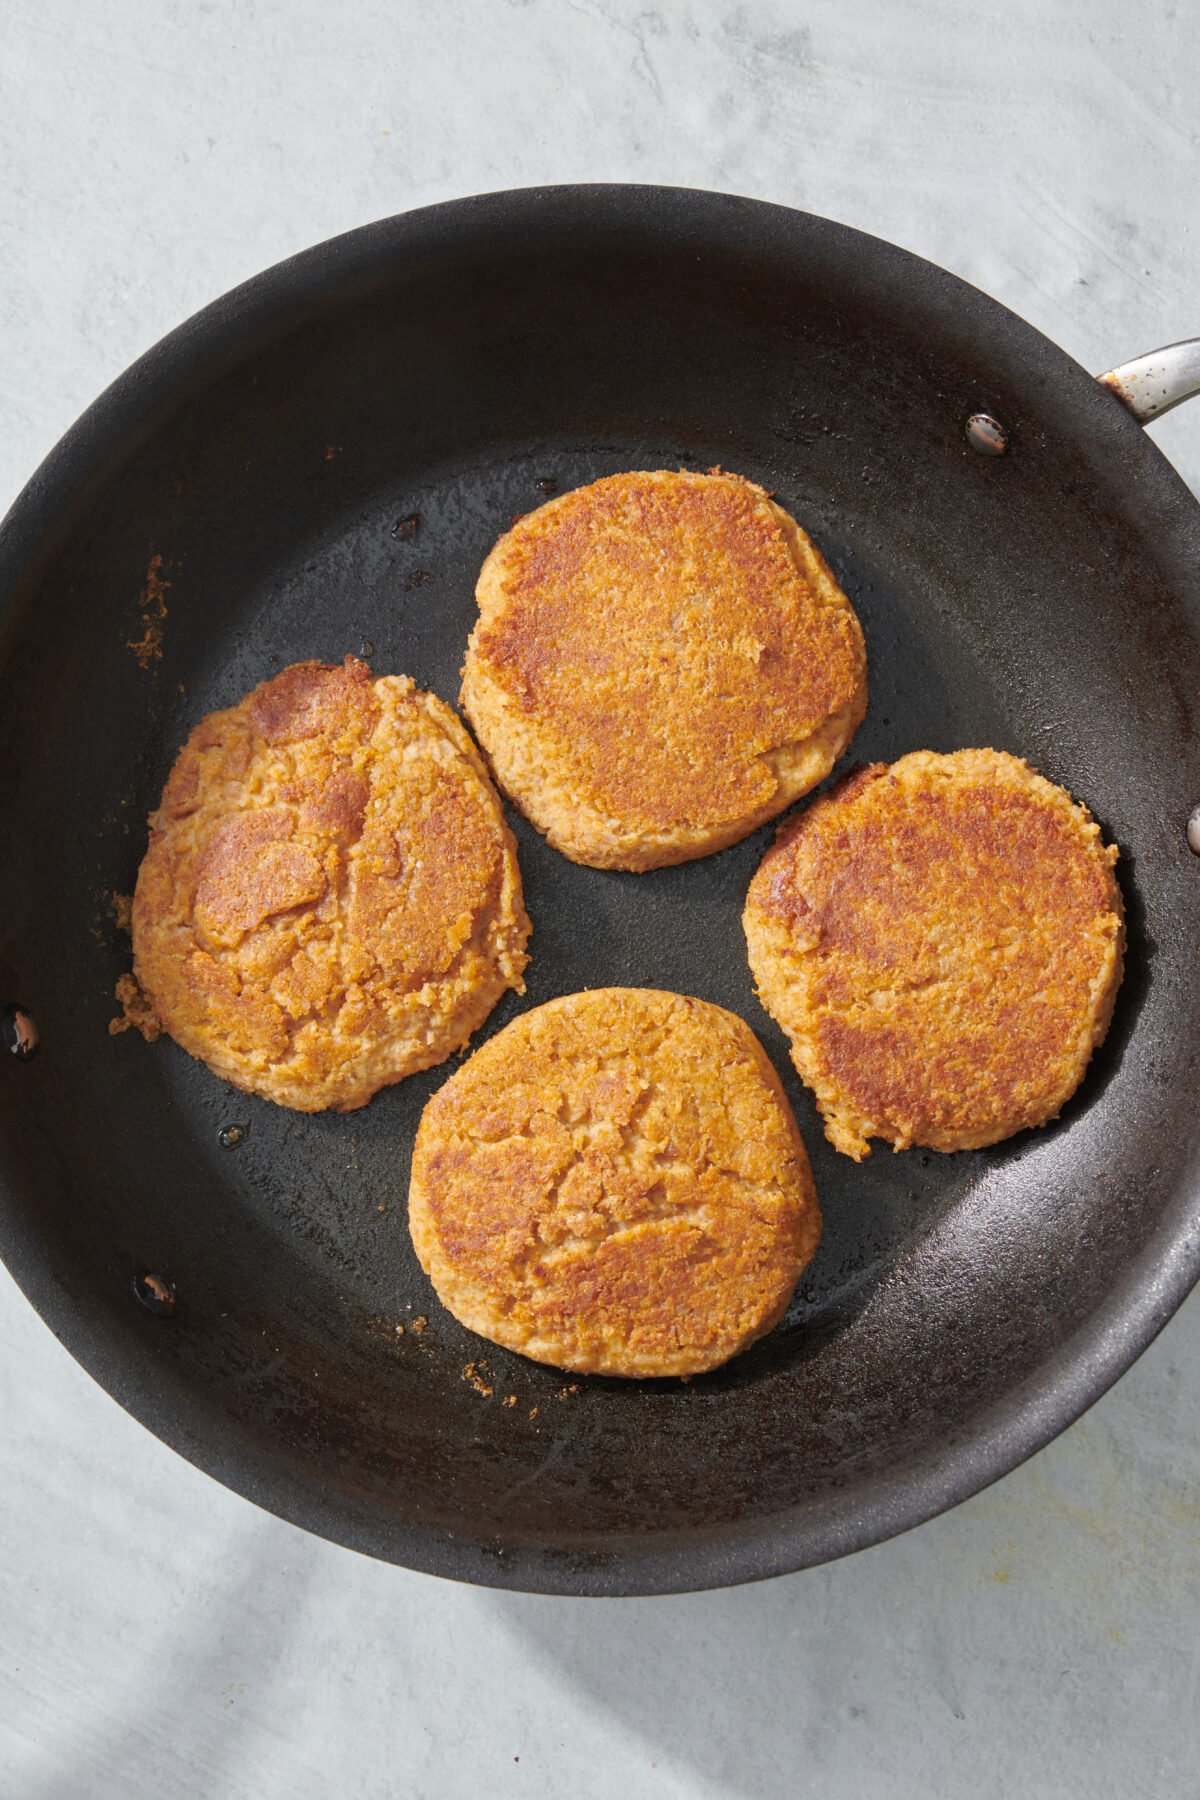
Step 5: Heat oil in a large sauté pan over medium heat and cook the burgers for 3-4 minutes on each side.

Veggie burger on bun topped with lettuce, tomato, onion and avocado.

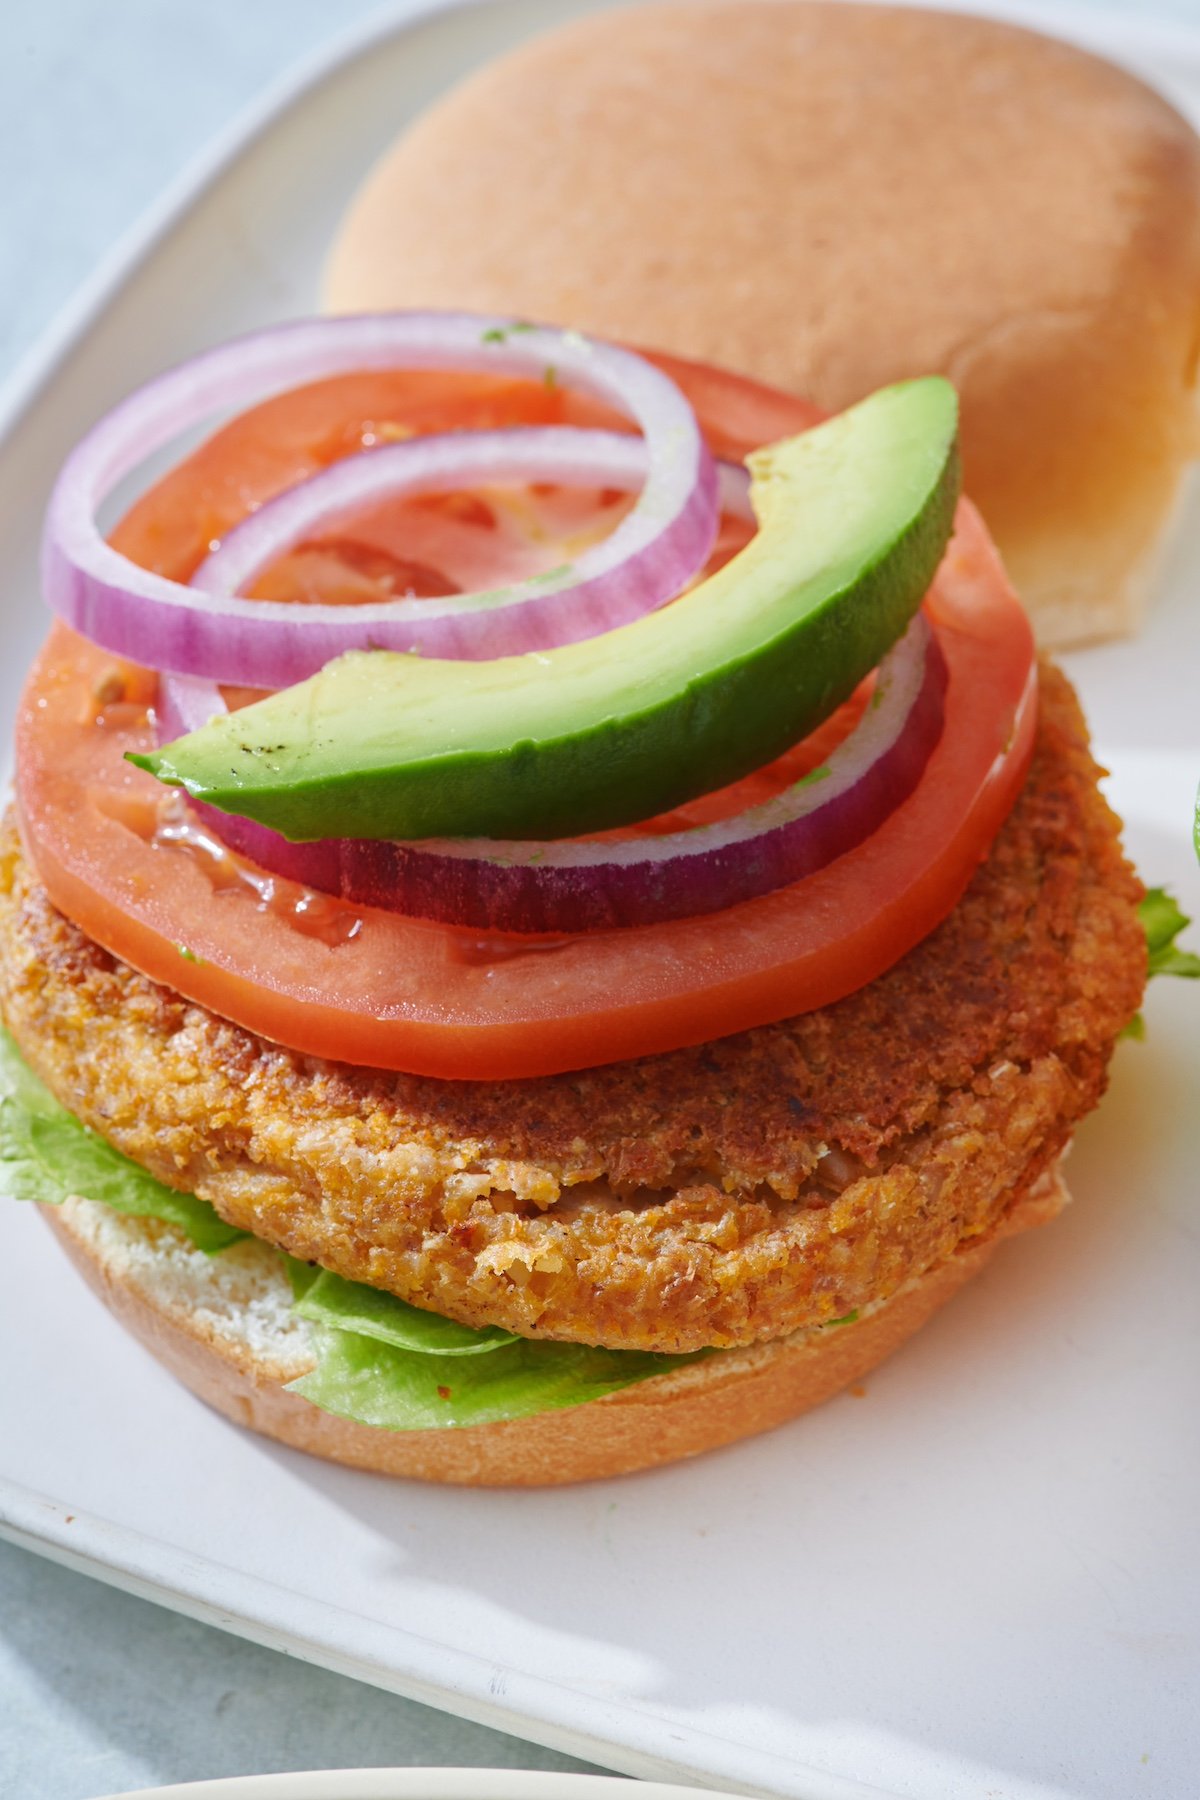
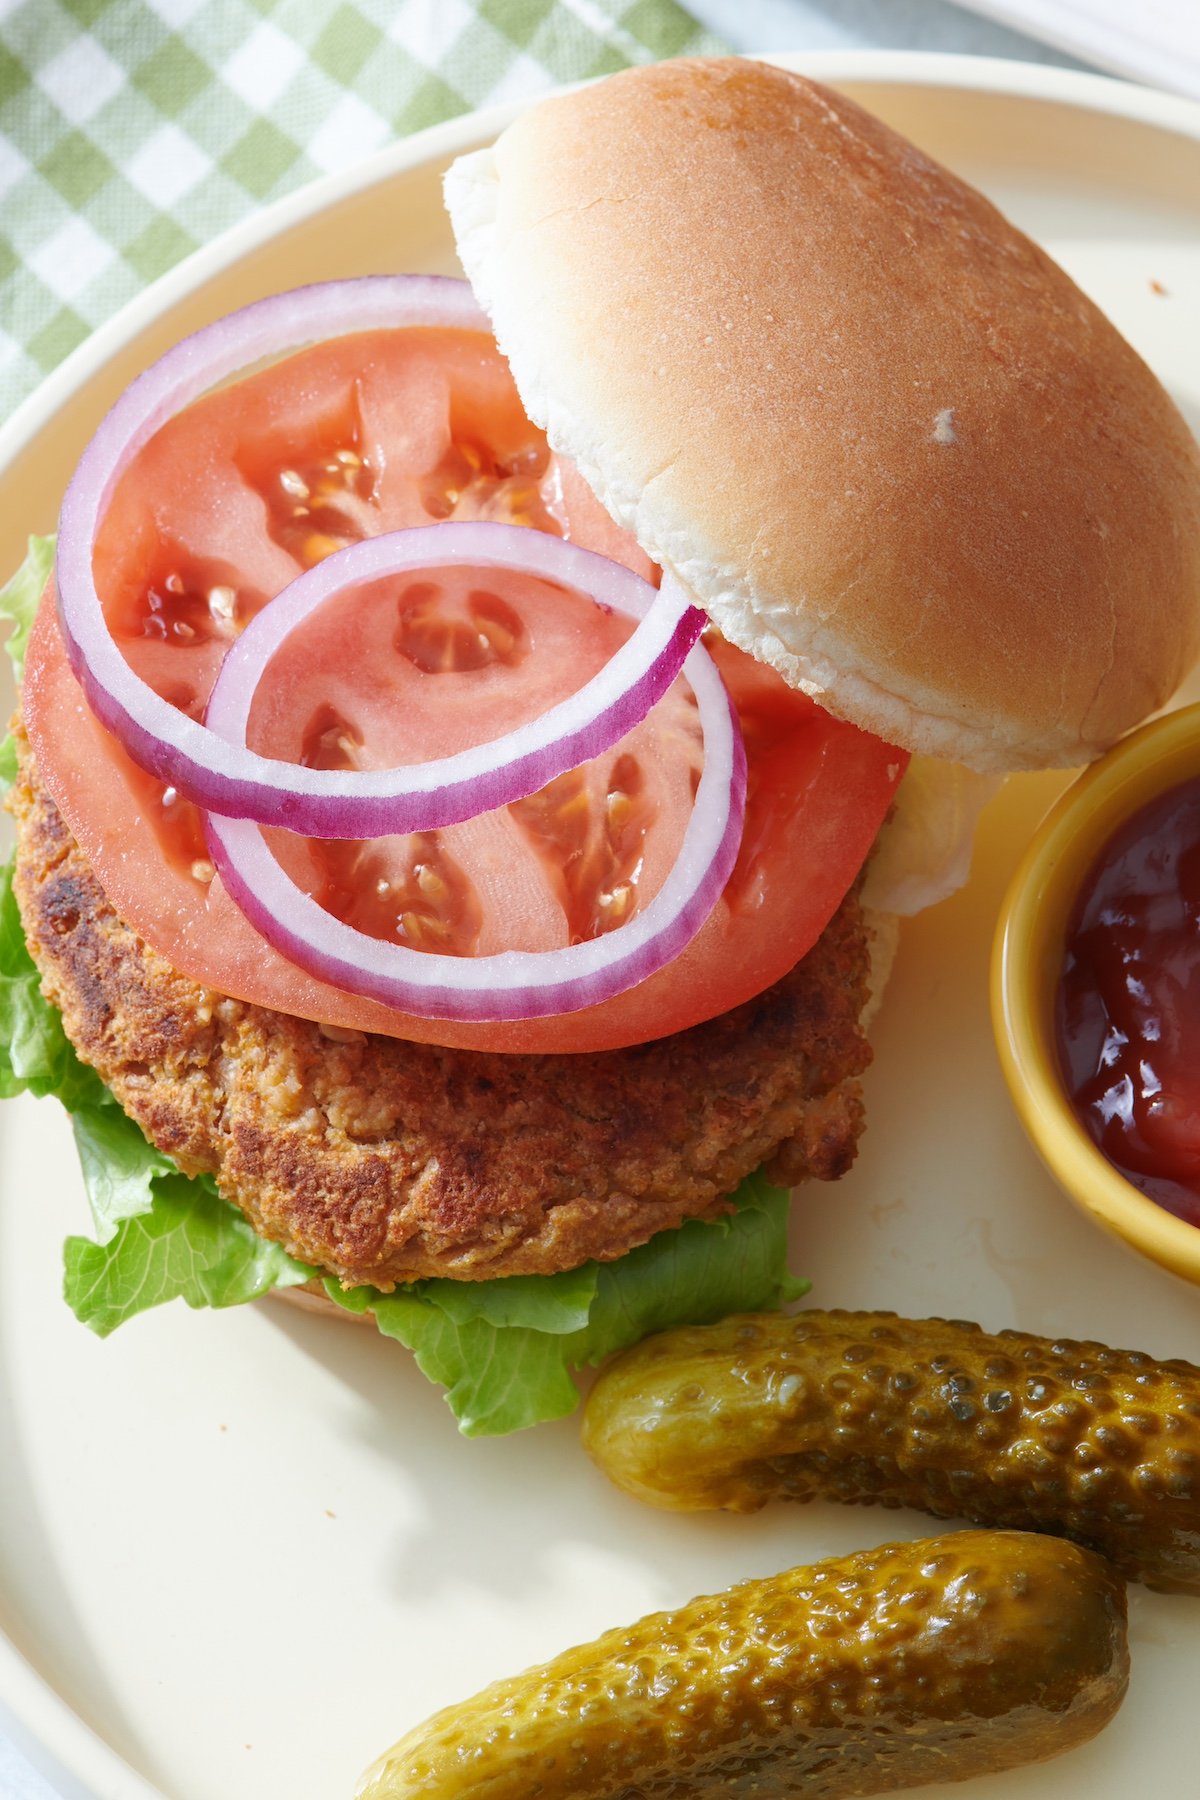
Step 6: Place patties on buns, add desired toppings and serve.

Tips & Tricks

  • Don’t Over-blend: When you food process the beans and other ingredients, try not to over-blend. The mixture should be combined but still have some texture to it.
  • Chill the Patties: For firmer patties, chill them in the refrigerator for about 30 minutes before cooking.
  • Oil the Pan: Make sure the oil is hot before adding the patties to prevent sticking and to get that nice crispy exterior.

Serving Suggestions Veggie Burgers

Veggie burgers pair well with tons of sides. Make the perfect meal for the whole family and serve your veggie burgers with any of these delicious, easy side dishes

FAQs

Can I make veggie burgers ahead of time?

Yes! You can prep veggie burger patties ahead of time and keep them in the fridge for up to 24 hours or freeze for longer storage.

How do I freeze veggie burgers?

After forming the patties and before cooking, place them on a baking sheet in the freezer for 1 hour. Then transfer to a zippered bag or other freezer safe airtight container. Defrost in the refrigerator before cooking.

Veggie burger with tomato, red onion and lettuce on a plate.

More Vegetarian Burger Recipes

These are the best veggie burgers you can make! They’re super easy, delicious and kids will love them. If you make these burgers let me know what you think by leaving a rating and comment below!

Want more WeeliciousSubscribe to my newsletter and follow me on InstagramFacebook and TikTok for all the newest recipes!

Print

Veggie Burgers

This is the best veggie burger packed with wholesome ingredients, full of flavor, and sure to be a hit with both kids and adults.
Course Dinner
Cuisine American
Prep Time 20 minutes
Cook Time 8 minutes
Total Time 28 minutes
Servings 4
Calories 358kcal

Equipment

  • Food Processor
  • saute pan or cast iron skillet

Ingredients

  • 1/2 cup bulgur wheat
  • 1 cup water
  • 15 ounce can pinto beans, rinsed and drained
  • 1/2 cup grated Monterey Jack cheese
  • 1/2 cup grated carrot
  • 1/2 teaspoon kosher salt
  • 1/2 teaspoon garlic powder
  • 1/2 teaspoon onion powder
  • 1 tablespoon olive oil
  • 4 burger buns
  • toppings of choice (ketchup, mustard, lettuce, tomato and red onion are some of our favorites)

Instructions

  • Place the bulgar wheat and water in a pot. Bring to a boil, then reduce to a simmer and cover for 13 minutes.
  • After the bulgur has cooked, place in a bowl and let cool.
  • Place the pinto beans in a food processor and pulse until finely chopped.
  • Add the cooked bulgur, cheese, carrot, salt, garlic and onion powder to the beans in the food processor and pulse to combine.
  • Form mixture into 4 equal patties.
  • Heat oil in a large sauté pan over medium heat and cook the burgers for 3-4 minutes on each side.
  • Place burgers on buns with desired toppings and serve.

Video

Notes

To Freeze: After forming patties and before cooking, place patties on a baking sheet in the freezer for 1 hour, then transfer to a zippered bag or other food-safe freezer container. Defrost in the refrigerator then follow recipe directions for cooking.
Prep ahead: You can prep veggie burger patties ahead of time and keep them in the fridge for up to 24 hours before cooking.
Don’t Over-blend: When you food process the beans and other ingredients, ensure you don’t over-blend. The mixture should be combined but still have some texture to it.
Chill the Patties: For firmer patties, chill them in the refrigerator for about 30 minutes before cooking.
Oil the Pan: Make sure the oil is hot before adding the patties to prevent sticking and to get that nice crispy exterior.

Nutrition

Calories: 358kcal | Carbohydrates: 53g | Protein: 15g | Fat: 10g | Saturated Fat: 4g | Polyunsaturated Fat: 2g | Monounsaturated Fat: 4g | Cholesterol: 13mg | Sodium: 889mg | Potassium: 480mg | Fiber: 9g | Sugar: 5g | Vitamin A: 2408IU | Vitamin C: 2mg | Calcium: 231mg | Iron: 4mg

The post Best Veggie Burgers appeared first on Weelicious.

Baked Zucchini Slices

Do you know a zucchini naysayer? Well, make them these crunchy, light, and delicious Baked Zucchini Slices and watch them change their tune in an instant! Breading and baking zucchini coins creates the perfect side dish or appetizer that the whole family will love. Why I Love This Recipe The Ingredients *For a full list…

The post Baked Zucchini Slices appeared first on Weelicious.

Do you know a zucchini naysayer? Well, make them these crunchy, light, and delicious Baked Zucchini Slices and watch them change their tune in an instant! Breading and baking zucchini coins creates the perfect side dish or appetizer that the whole family will love.

Baked zucchini coins on serving platter with marinara sauce in a bowl on the side.

Why I Love This Recipe

  • Kid-Friendly Zucchini Recipe: Many people steam zucchini, but it often turns out limp and soggy, which kids don’t usually like. This baked zucchini slices recipe is the perfect way to get kids to enjoy this vegetable. They come out crispy, crunchy, and absolutely delicious.
  • Tasty and Healthy: Since this recipe is baked, it’s a healthy way to enjoy crispy breaded zucchini without the hassle of having to deep fry the zucchini slices in tons of oil.
  • Versatile: Serve these baked zucchini coins as an appetizer with some marinara sauce or ranch for dipping or as a side with any of your favorite mains dishes like Chicken Meatballs with Mini Wheel Pasta, Perfect Roast Chicken or Southern Style Pork Tenderloin to name a few.

The Ingredients

Baked zucchini slices ingredients.
  • Zucchini: Fresh zucchinis are the star of this recipe. Choose firm, medium-sized zucchinis with shiny skin for the best texture and flavor. Zucchinis are packed with vitamins A and C, potassium, and antioxidants.
  • Breadcrumbs (panko or regular): Breadcrumbs provide the perfect crunchy coating for the zucchini slices. Panko breadcrumbs, which are lighter and flakier, give an extra crispy texture (my preference), while regular breadcrumbs offer a more traditional crunch. Either type will be perfect!
  • Grated parmesan cheese: Parmesan cheese adds flavor and richness to the breading making these baked zucchini slices even more delicious.
  • Flour: Flour is the secret ingredient in the breading process that helps create an extra-crispy coating for the zucchini coins.
  • Egg: The egg acts as the binding agent, helping the breadcrumb mixture adhere to the zucchini slices.

*For a full list of ingredients with measurements see the recipe card below*

Baked Zucchini Recipe Tips

  • Evenly Slice Zucchini: For consistent cooking, try to slice the zucchini into even 1/4-inch rounds. Using a sharp knife or a mandoline slicer can help you with achieving uniform slices. This ensures that the zucchini coins cook evenly and crisp up uniformly in the oven.
  • Have a wet hand and a dry hand: If you’ve made Crispy Chicken Parmesan or Eggplant Parmesan Sticks you know breading can get a little messy at times. To help, use one hand for dunking zucchini slices in egg wash and transferring to the panko mixture (your wet hand), then switch to a dry hand for coating and placing them on the baking sheet.
  • Don’t forget the oil: Drizzle or spray your breaded zucchini slices with oil before baking them. The oil is what creates that beautiful golden color when they bake.
  • Don’t crowd the baking sheet: Cook the zucchini coins in and even layer with a little space between each one. If you overcrowd the baking sheet they’ll steam in the oven and won’t get nice and crispy.

How to Make Baked Zucchini Slices

Three bowls. One with flour, another with beaten egg and the third with panko breading. A hand is dipping a zucchini coin in the flour bowl.

Step 1: Mix the breadcrumbs, parmesan cheese, garlic powder and salt in a shallow bowl. Whisk the egg in a separate bowl. Place the flour in a third bowl.

Hand holding a breaded zucchini coin with the breading station bowls.

Step 2: Make an assembly line with the bowls, and first dip the zucchini coins into the flour, then the egg and finally into the bread crumb mixture, coating evenly and repeating with all the zucchini coins.

Breaded zucchini coins on baking sheet.

Step 3: Place all of the coins on the baking sheet. Arrange so they’re not touching and spray with cooking oil.

Baked zucchini coins on baking sheet.

Step 4: Bake for 18-20 minutes or until the breadcrumbs are golden. Serve as a side dish or on their own with favorite dipping sauces.

FAQs

Can I air fry zucchini slices?

Yes! You know I love my air fryer. To air fry these breaded zucchini coins, simply heat your air fryer to 400°F and cook for 8-10 minutes, or until golden brown. Be sure to arrange them in a single layer with a bit of space between each piece of zucchini for even cooking

Can I freeze leftover baked zucchini slices?

Yes! I would recommend freezing after the zucchini coins are baked. To freeze, allow them to cool completely, then transfer them to a single layer on a baking sheet and freeze until solid. Once frozen, transfer the zucchini coins to a resealable freezer bag or airtight container. When ready to enjoy, reheat the frozen zucchini coins in a preheated oven at 375°F for 10-15 minutes, or until heated through and crispy.

Baked zucchini coins on serving platter.

More Easy Zucchini Recipes

These Baked Zucchini Coins are a delicious, healthy, and kid-friendly recipe that everyone will love. Easy to prepare and incredibly versatile, they make the perfect addition to any meal. Whether you’re looking to introduce more vegetables into your family’s diet or just want a tasty new way to enjoy zucchini, this recipe is a must-try. Let me know what you think of this recipe by leaving a rating and comment below!

Want more WeeliciousSubscribe to my newsletter and follow me on InstagramFacebook and TikTok for all the newest recipes!

Baked zucchini coins on serving platter with marinara sauce in a bowl on the side.
Print

Baked Zucchini Slices

These Baked Zucchini Slices are a delicious, healthy, and kid-friendly recipe that everyone will love. Easy to prepare and incredibly versatile, they make the perfect addition to any meal.
Course Appetizer, Side
Cuisine American
Prep Time 15 minutes
Cook Time 20 minutes
Total Time 35 minutes
Servings 4
Calories 120kcal

Equipment

  • Baking sheet
  • Chef's Knife or Mandoline

Ingredients

Instructions

  • Preheat oven to 450°F and coat a large baking sheet with cooking spray or line with parchment paper.
  • Mix the breadcrumbs, parmesan cheese, garlic powder and salt in a shallow bowl.
  • Whisk the egg in a separate bowl.
  • Place the flour in a third bowl.
  • Make an assembly line with the bowls, and first dip the zucchini coins into the flour, then the egg and finally into the bread crumb mixture, coating evenly and repeating with all the zucchini coins.
  • Place all of the zucchini coins on the baking sheet. Arrange so they’re not touching, spray with cooking oil and bake for 18-20 minutes or until the breadcrumbs are golden.
  • Serve as a side dish or on their own with favorite dipping sauces.

Video

Notes

Evenly Slice Zucchini: For consistent cooking, try to slice the zucchini into even 1/4-inch rounds. Using a sharp knife or a mandoline slicer can help you with achieving uniform slices. This ensures that the zucchini coins cook evenly and crisp up uniformly in the oven.
Have a wet hand and a dry hand: Use one hand for dunking zucchini slices in egg wash and transferring to the panko mixture (your wet hand), then switch to a dry hand for coating and placing them on the baking sheet.
Don’t forget the oil: Drizzle or spray your breaded zucchini slices with oil before baking them. The oil is what creates that beautiful golden color when they bake.
Don’t crowd the baking sheet: Cook the zucchini coins in and even layer with a little space between each one. If you overcrowd the baking sheet they’ll steam in the oven and won’t get nice and crispy.
To Air Fry: heat your air fryer to 400°F and cook for 8-10 minutes, or until golden brown. Be sure to arrange them in a single layer with a bit of space between each piece of zucchini for even cooking
To Freeze: Allow zucchini slices to cool completely, then transfer them to a single layer on a baking sheet and freeze until solid. Once frozen, transfer the zucchini coins to a resealable freezer bag or airtight container. When ready to enjoy, reheat the frozen zucchini coins in a preheated oven at 375°F for 10-15 minutes, or until heated through and crispy.

Nutrition

Calories: 120kcal | Carbohydrates: 16g | Protein: 6g | Fat: 4g | Saturated Fat: 2g | Polyunsaturated Fat: 1g | Monounsaturated Fat: 1g | Trans Fat: 0.01g | Cholesterol: 52mg | Sodium: 481mg | Potassium: 312mg | Fiber: 2g | Sugar: 3g | Vitamin A: 318IU | Vitamin C: 18mg | Calcium: 93mg | Iron: 1mg

The post Baked Zucchini Slices appeared first on Weelicious.

Breakfast Cupcakes

Breakfast Cupcakes are light and fluffy pancake muffins topped with an airy whipped cream cheese and strawberry preserves “frosting”. Move over Waffle French Toast, Birthday Cupcakes are the new go-to for a fun birthday breakfast (even though they’re easy enough to make year-round!) Who says you can’t have cupcakes for breakfast?! Coming up with this recipe was a happy…

The post Breakfast Cupcakes appeared first on Weelicious.

Breakfast Cupcakes are light and fluffy pancake muffins topped with an airy whipped cream cheese and strawberry preserves “frosting”. Move over Waffle French Toast, Birthday Cupcakes are the new go-to for a fun birthday breakfast (even though they’re easy enough to make year-round!) Who says you can’t have cupcakes for breakfast?!

Breakfast Cupcake wit pink frosting, rainbow color sprinkles and birthday candle in the center.

Coming up with this recipe was a happy accident. I was working my PB&J Pancakes Sandwiches recipe and ended up testing them several times to arrive at the perfect combination. There was still a ton of pancake batter leftover, and I wasn’t sure what I was going to do with all the extra. I hate wasting food, but I was also too lazy to make 100 pancakes. Does anyone have the patience for that?

Then, just to see what would happen, I poured all the extra batter into muffin tins and popped them in the oven. I couldn’t believe the results! Why hadn’t I thought of this before? They had become the perfect muffin as my daughter Chloe called it (or “cupcake” as my son Kenya chimed in). Inspired to take things one step further, I whisked together some strawberry preserves and cream cheese to make “icing” and — voila — the Breakfast Cupcake was born!

Why I Love Breakfast Cupcakes

  • Kid-Friendly Surprise: The best part about these Breakfast Cupcakes is that you’ll have a new good morning surprise for your family, and they’ll never know these are cupcakes that aren’t loaded with sugar (like these Dark Chocolate Cupcakes). It’ll feel like you’re having a delicious dessert for breakfast without the sugar crash by noon.
  • Quick and Efficient: These pancake muffins are a convenient way to serve pancakes, especially for a crowd. Instead of standing over the stovetop flipping pancake after pancake, you can pour the batter into muffin cups and bake them all at once! Speaking of, my Sheet Pan Pancake recipe is great for quick and easy pancakes for a crowd too!
  • Customizable: Breakfast cupcakes are so much fun because you can add whatever you like to them. You could sprinkle in a few chocolate chips, blueberries or even some mashed raspberries for a raspberry pancake muffin.

The Ingredients:

Ingredients for breakfast cupcakes. From top left going clockwise: cream cheese, baking powder, egg, peanut butter, jam, flour, sugar, salt and milk.
  • All purpose flour: The foundation of the breakfast cupcake.
  • Baking powder: This ingredients acts as the leavening agent, helping the cupcakes rise evenly in the oven.
  • Peanut butter: Gives a delicious nutty flavor for this recipe while adding a bit of protein too.
  • Egg: The egg binds everything together and gives the cupcake structure.
  • Sugar: We use very little sugar in this recipe, but just enough to make this a nice breakfast treat!
  • Milk: Provides moisture and tenderness for the perfect decadent breakfast cupcake.
  • Cream cheese: Whether you use whipped or regular cream cheese, this ingredient forms a delicious base for our simple cupcake frosting.
  • Jelly, jam, or preserves of your choice: Add a burst of fruity sweetness to our frosting, infusing each bite with delightful flavor.

*See recipe card for full list of ingredients with measurements*

Substitutions and Variations:

There are plenty of ways to make this recipe suit your tastes and preferences.

  • Type of Nut/Seed Butter: If you have a nut allergy you need to consider, this recipe works with any nut or seed butter you prefer. Feel free to use sunflower seed butter, almond butter or even cashew butter.
  • Type of Flour: The texture will be affected slightly, but feel free to use your preferred flour. Whole wheat, white whole wheat or a cup-for-cup gluten free flour would work in this recipe.
  • For the Sugar: Honey, agave or maple syrup could be used in place of the sugar in this recipe. The texture will vary slightly but won’t majorly affect the recipe overall.
  • Egg Substitutions: While I haven’t tested it out, I’ve had readers say they experimented with using egg replacers in this recipe and they turned out great. Other commenters mentioned substituting 1/4 cup Greek yogurt for the egg. Again, I didn’t try it out myself so do with that what you will 🙂
  • Flavor Variations: Feel free to add chocolate chips, fresh berries or anything you’d normally enjoy added into your pancakes!

How to Make Breakfast Cupcakes

A bowl with combined wet ingredients and a seprate bowl next to it with the combined dry ingredients.

Step 1: Whisk the flour, baking powder and salt in a bowl until thoroughly incorporated. In a separate bowl, whisk the peanut butter, egg and sugar until combined, then whisk in the milk until incorporated.

breakfast cupcake batter in a mixing bowl

Step 2: Whisk the wet ingredients into the dry ingredients until just combined. You don’t want to over beat the mixture.

a 12 cup muffin tin with batter in each well.

Step 3: Grease or line muffin tins and fill 2/3 of the way up with the batter.

baked breakfast cupcakes in muffin tin

Step 4: Bake for 20 minutes or until a toothpick comes out clean. Allow to cool completely then topping with jelly frosting.

*See recipe card for jelly frosting instructions*

Frequently Asked Questions

How do I store leftover Breakfast Cupcakes?

Keep your Breakfast Cupcakes fresh by storing them in an airtight container in the refrigerator for up to 4 days. When you’re ready to enjoy your Breakfast Cupcakes, simply reheat them in the microwave, toaster oven, or oven until warmed through.

Can I freeze Breakfast Cupcakes?

Yes! Extend the shelf life of your Breakfast Cupcakes by freezing them. After allowing them to cool completely, place unfrosted cupcakes on a baking sheet and freeze for 1-2 hours. Once frozen, transfer them to a freezer bag or container. They can remain in the freezer for up to 3 months.

Can I use this pancake muffin batter to make regular pancakes?

Yes, this batter is able to be used to make pancakes.

Can I use a mini muffin tin to make Breakfast Cupcakes?

Yes! If you want mini muffins, follow the instructions adjusting the cook time to 18-20 minutes or until a toothpick comes out clean.

A serving platter with 10 breakfast cupcakes with jelly frosting and rainbow colored sprinkles.

More “Cupcakes” for Breakfast

I’m so happy I stumbled upon making these Breakfast Cupcakes. Accidents happen, and aren’t they delicious?! Now, this recipe a go-to for my kids’ birthday breakfasts every year and they love it! Who says you can’t have your (breakfast cup)cake and eat it too! If you loved this recipe, consider leaving a comment and a rating below!

Want more Weelicious? Subscribe to my newsletter and follow me on Instagram, Facebook and TikTok for all the newest recipes!

Print

Breakfast Cupcakes

Breakfast Cupcakes are light and fluffy pancake muffins and topped with an airy whipped cream cheese and strawberry preserves “frosting”. They make the perfect special birthday breakfast, but they're really a treat that you can happily serve any time of year!
Course Breakfast
Cuisine American
Prep Time 5 minutes
Cook Time 20 minutes
Total Time 25 minutes
Servings 12
Calories 146kcal

Equipment

Ingredients

Breakfast Cupcakes:

Jelly Frosting:

  • 1/2 cup whipped or regular cream cheese, room temperature
  • 1/4 cup jelly, jam or preserves

Instructions

  • Preheat oven to 350°F.
  • Whisk the flour, baking powder and salt in a bowl.
  • In a separate bowl, whisk the peanut butter, egg and sugar until combined, then whisk in the milk until incorporated.
  • Whisk the wet ingredients into the dry ingredients until just combined (you don't want to over beat the mixture).
  • Grease or line a standard 12 cup muffin tin and fill 2/3 of the way up with the batter.
  • Bake for 20-25 minutes or until a toothpick comes out clean.
  • Cool cupcakes completely. Spread the top of each cupcake with frosting (instructions below) and serve.

Jelly Frosting:

  • Place all ingredients in a bowl and whisk until throughly combined (you want the mixture to be smooth like frosting).
  • Spread on cupcakes and serve.

Video

Notes

To Store: Keep your Breakfast Cupcakes fresh by storing them in an airtight container in the refrigerator for up to 4 days.
To Freeze: After allowing them to cool completely, place unfrosted cupcakes on a baking sheet and freeze for 1-2 hours. Once frozen, transfer them to a freezer bag or container. They can remain in the freezer for up to 3 months.
To Reheat: When you’re ready to enjoy your Breakfast Cupcakes, simply reheat them in the microwave, toaster oven, or oven until warmed through.
For Mini Muffins: Adjust cook time for mini muffins to 18-20 minutes or until a toothpick comes out clean.
 

Nutrition

Calories: 146kcal | Carbohydrates: 19g | Protein: 4g | Fat: 7g | Saturated Fat: 3g | Polyunsaturated Fat: 1g | Monounsaturated Fat: 2g | Trans Fat: 0.002g | Cholesterol: 25mg | Sodium: 148mg | Potassium: 68mg | Fiber: 1g | Sugar: 6g | Vitamin A: 150IU | Vitamin C: 1mg | Calcium: 57mg | Iron: 1mg

The post Breakfast Cupcakes appeared first on Weelicious.