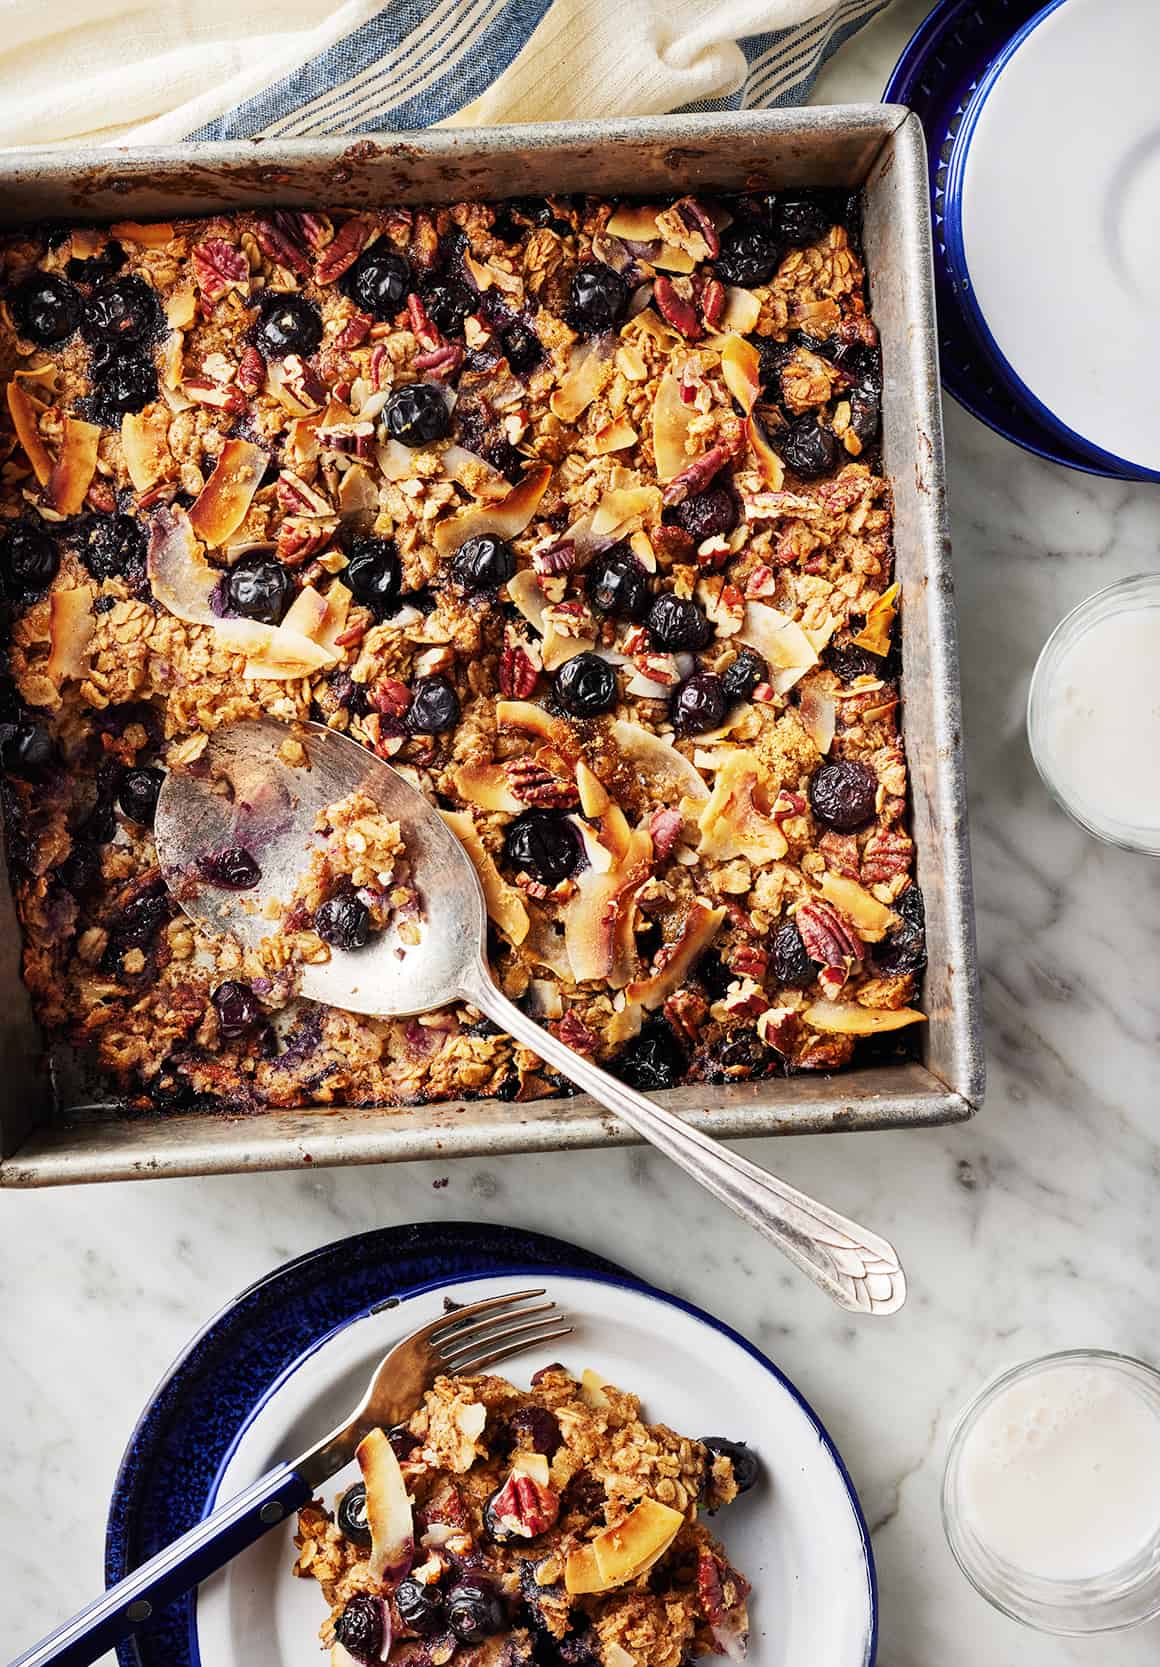
If you’ve never roasted delicata squash before, get ready to fall in love! When winter squash appears at farmers markets and grocery stores each year, I’m excited to get my hands on all of it – acorn squash, butternut squash, sugar pi…
If you’ve never roasted delicata squash before, get ready to fall in love! When winter squash appears at farmers markets and grocery stores each year, I’m excited to get my hands on all of it – acorn squash, butternut squash, sugar pie pumpkins, and more. But delicata squash is my favorite by far. Nicknamed the “sweet potato squash,” it has a sweet, velvety flesh that caramelizes beautifully in the oven. But that’s not all. Thanks to its small size and thin, edible skin, it’s super easy to work with. That’s right – you don’t have to peel it! In fact, […]
Say hello to the BEST veggie burger recipe! Of course, that’s just my opinion, but once you try it, I think you’ll agree. For one, these patties are grill-able! And if you’d rather be spending time in the sun than in the kitchen, you …
Say hello to the BEST veggie burger recipe! Of course, that’s just my opinion, but once you try it, I think you’ll agree. For one, these patties are grill-able! And if you’d rather be spending time in the sun than in the kitchen, you can even make them a day or two in advance. But that’s not all. This veggie burger has an amazing meaty texture and savory, smoky flavor. It’ll keep its shape when it’s stuffed inside a bun, and it’s delicious with fancy fixings or with good old ketchup and mustard. Unlike many packaged veggie burgers, its incredible […]
Want to make amazing bread? This homemade bread is easy to make and very versatile: it works for sandwiches, toast, and more! Want a go-to easy homemade bread recipe? Here’s ours! This recipe works for just about anything. It’s perfect for sandwiches, making toast, or serving with soup. Even better, it really is easy compared to other breads you’ll bake. (It’s loads simpler than sourdough bread.) You don’t need specialized equipment, and it bakes right in a 9-inch loaf pan. It’s got a little whole wheat flour, oats, and seeds on the top for added nutrients and flavor. You’ll never need to buy bread again! We think you’re going to love it…because our family is obsessed. How to make homemade bread: an overview Here’s an overview of how to make homemade bread! Here’s the basic outline of what you’re getting yourself into. What’s the total time? Baking this homemade bread takes 2 1/2 to 3 hours total, then 1.5 hours to cool it. It’s a project you’ll want to save for days off of work like weekends. (Or if you’re feeling ambitious, start early on a weeknight.) Here are the basic steps: Mix & knead the dough 15 minutes active […]
Want to make amazing bread? This homemade bread is easy to make and very versatile: it works for sandwiches, toast, and more!
Want a go-to easy homemade bread recipe? Here’s ours! This recipe works for just about anything. It’s perfect for sandwiches, making toast, or serving with soup. Even better, it really is easy compared to other breads you’ll bake. (It’s loads simpler than sourdough bread.) You don’t need specialized equipment, and it bakes right in a 9-inch loaf pan. It’s got a little whole wheat flour, oats, and seeds on the top for added nutrients and flavor. You’ll never need to buy bread again! We think you’re going to love it…because our family is obsessed.
How to make homemade bread: an overview
Here’s an overview of how to make homemade bread! Here’s the basic outline of what you’re getting yourself into. What’s the total time? Baking this homemade bread takes 2 1/2 to 3 hours total, then 1.5 hours to cool it. It’s a project you’ll want to save for days off of work like weekends. (Or if you’re feeling ambitious, start early on a weeknight.) Here are the basic steps:
Mix & knead the dough
15 minutes active time
Proof 1
45 to 60 minutes, hands off
Shape
10 minutes active time
Proof 2
40 to 50 minutes, hands off
Bake
30 minutes, hands off
Cool
90 minutes, hands off
Equipment list: what you need!
One of the great things about this homemade bread is that you need minimal equipment! Sourdough bread requires lots of specialized equipment, and our favorite artisan bread recipe requires a Dutch oven. But this one? You only really need a loaf pan! There are 2 items that are optional:
Required tools for homemade bread (really, only one thing!)
Why use a kitchen scale when baking homemade bread? Weighing out ingredients is the most accurate way to measure flour. Its volume varies based on the environment! But for this homemade bread recipe, exact precision is not as important as something like sourdough. So you can get away with cup measures!
Why use an instant read thermometer? Reading the bread’s internal temperature is the best way to determine whether the bread is fully baked. But you can get away with baking without it! Just judge whether the top is nicely golden brown.
What’s in this this homemade bread?
This homemade bread recipe is technically a white bread, but Alex and I wanted to infuse it with more nutrients and flavor. So it’s also got whole wheat flour and oats in the bread dough! This adds great flavor and helps to make it more filling. You can also add optional seeds to the top to get a nice contrasting texture.
This homemade bread recipe calls for two proofs. If you don’t watch the Great British Baking Show like we do, you might wonder: What is proofing? Proofingis letting the bread dough rest so that it rises. This creates the desired fluffy texture of the bread (also called the crumbe).
What temperature should bread be proofed at?
Warm place: For best results, the proofing temperature should be between 80°F and 90°F. Many ovens have a proofing setting you can use for this step. (Just don’t forget about your proofing bread and accidentally turn on the oven to make something else!)
Room temperature: With this homemade bread, you can also proof at room temperature. The proofing temperature for sourdough bread is much more important since it’s a little more touchy. The bread can be proofed at either temperature.
How to store homemade bread
Another important thing about homemade bread is storage instructions! Because it doesn’t have preservatives like store-bought bread, the storage will be different than you might expect. Alex and I were thrilled when we tested this bread and it held up very well with both methods.
Room temperature: Store the bread at room temperature wrapped in plastic for 2 to 3 days
Refrigerator: Store refrigerated wrapped in plastic for up to 1 week (this bread stores refrigerated much better than an artisan loaf)
Freeze: Slice the bread into pieces, wrap in plastic, and it can freeze for 3 months
This homemade bread is perfect with a slather of nut butter and drizzle of honey
Serving this bread!
This bread works wonderfully for so many things! Here’s what we like to use it for:
Sandwiches: Use it for any of our vegetarian sandwiches like chickpea salad sandwich! Perfect for office desk lunches or school lunches.
Make the dough: In a small saucepan, melt the butter over low heat. Once melted, remove from the heat and stir in the milk so it is just warm.
In a large bowl, combine the melted butter and milk with the maple syrup, warm water, and yeast and mix with a wooden spoon or dough whisk until just combined. In a separate bowl, stir together whole wheat flour, all purpose flour, oats and kosher salt. Add the flours and oats to the bowl and stir with the spoon until just combined. Turn the dough out onto a clean, lightly floured countertop and form the dough into a ball.
Knead the dough: Knead the dough by pushing with the base of your palm, then reforming it into a ball. Continue kneading for 8 minutes until the dough feels pillowy and has a smooth, stretchy exterior. If the dough is very sticky, add a small amount of flour while kneading. Alternatively: attach the dough hook to a stand mixer and start the mixer on medium-low speed, then allow the mixer to knead for 8 minutes.
Proof 1: Place the dough ball in a clean bowl and cover with a clean dish towel. Allow the dough to stand in a warm place (proof) until it rises to double in size, about 45 minutes to an 1 hour.
Shape the dough: Once proofed, grease an 8 to 9-inch loaf pan. Turn the dough onto a counter and gently press the dough into a large rectangle about 1/2-inch thick. The short side of the rectangle should be about the width of the long edge of the loaf pan. Roll the dough into a log (the width of the loaf pan). Pinch the seams on the sides and bottom of the roll and then place it into the greased pan seam-side down. Gently press the dough to fill the bottom of the pan.
Proof 2: Cover with a clean dish towel and allow to proof for 40 to 50 minutes until the dough rises about 1 inch above the rim.
Meanwhile, preheat the oven to 350°F.
Bake the bread: Once proofed, brush with the top of the loaf with water. If desired, sprinkle the seeds on the top. Bake 30 to 35 minutes. The bread is done when the top is golden brown and the inside of the bread reaches 190°F on an instant read thermometer. Remove the bread to a cooling on a rack and cool completely, at least 90 minutes. (However tempting, cutting the bread while warm will ruin its texture!)
Serve (+ storage info): Slice the bread and serve. Store the bread at room temperature for 2 to 3 days wrapped in plastic, or refrigerator for up to a week. The bread can also be frozen, sliced into pieces and wrapped in plastic, for 3 months.
I was browsing some older cookbooks recently. There are so many really great new cookbooks that come out every season that it’s easy to forget some of the beloved ones waiting patiently on our shelves, for us to return to them. Before electronics came on the scene, I used to curl up every night under the cover with an actual book or two, before dozing…
I was browsing some older cookbooks recently. There are so many really great new cookbooks that come out every season that it’s easy to forget some of the beloved ones waiting patiently on our shelves, for us to return to them. Before electronics came on the scene, I used to curl up every night under the cover with an actual book or two, before dozing off to bed.
The downside was that I always ended up bookmarking recipes that I wanted to make, and I’d get excited, and start running up and down (in back and forth) in my mind, about how I’m going to gather the ingredients when I wake up the next morning. Recently one that I came across was a recipe for Multigrain Biscotti in a cookbook from the ’90s that had nearly two dozen ingredients in it. But they sounded so good, I made a little (okay…not-so-little) shopping list, for the next day, using that list as a bookmark, planning to make them the next day.