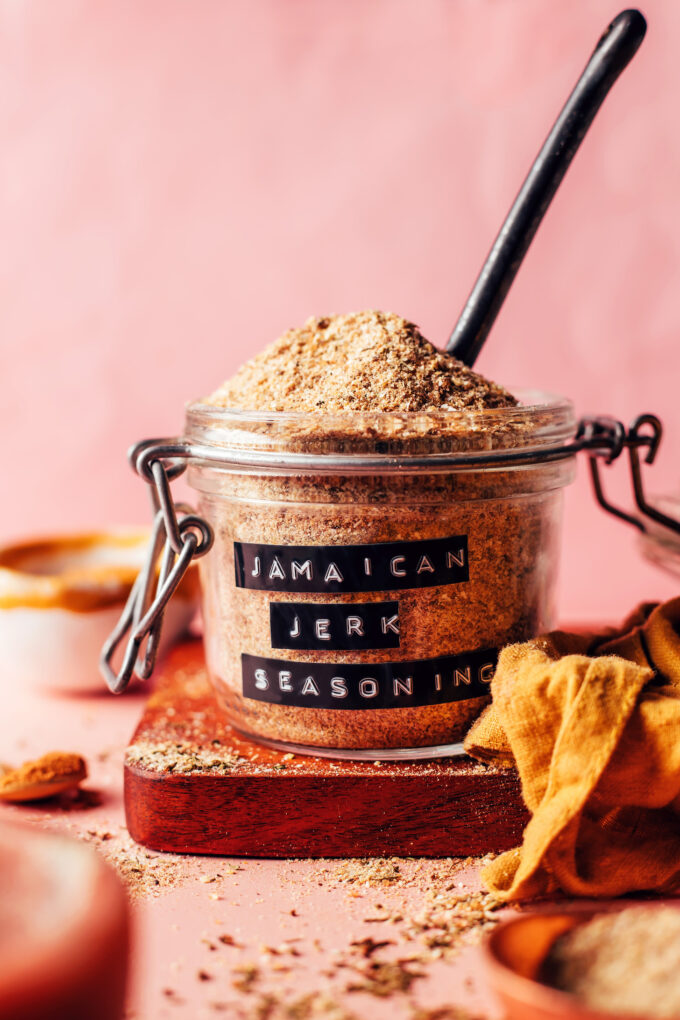
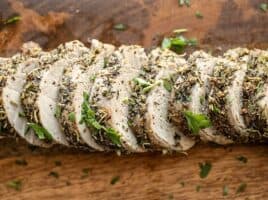
Spicy, savory, salty, and sweet? Jamaican jerk seasoning has it going on! When a recent craving arose for the bold, balanced flavors of this Caribbean spice mix, we got into the kitchen attempting to replicate its magic with ingredients we had on hand….
Spicy, savory, salty, and sweet? Jamaican jerk seasoning has it going on! When a recent craving arose for the bold, balanced flavors of this Caribbean spice mix, we got into the kitchen attempting to replicate its magic with ingredients we had on hand.
Our inspired version comes together in just 5 minutes with easy-to-find ingredients! It’s so versatile and adds instant flavor to everything from chicken to plantains, veggies, chickpeas, and more.
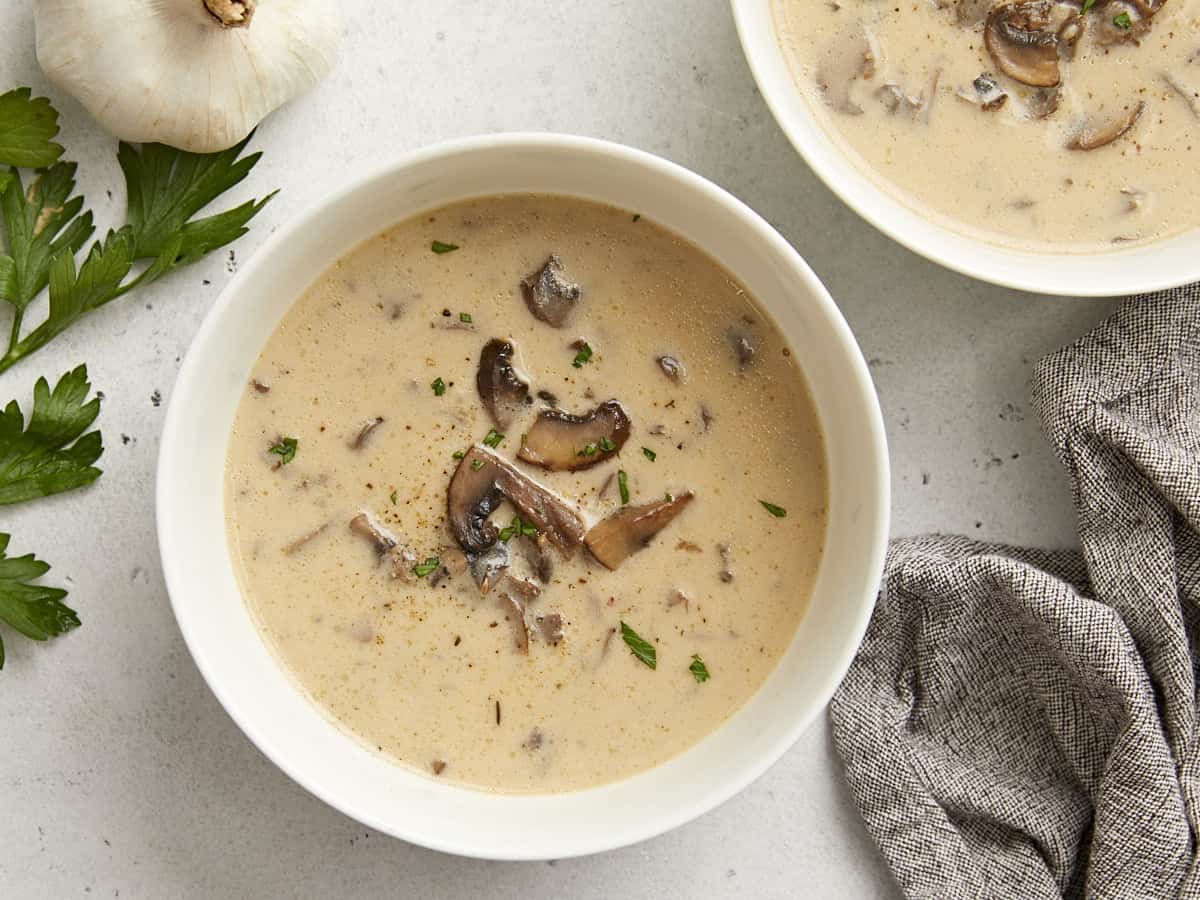
I’m all about the creamy soups during the cold winter months, and this incredibly creamy Mushroom Soup is one of the best. This mushroom soup recipe is so easy to make and is as cozy as it gets. You’ll want to serve this soup with some crusty bread or crackers to soak up every drop of that savory creamy broth because it is just to die for. And the best part? Because this mushroom soup is so simple and uncomplicated, it’s also very inexpensive, even when the cost of mushrooms is on the higher side!
Ingredients for Mushroom Soup
I love this Creamy Mushroom Soup for its simplicity. It’s just sautéed mushrooms, a creamy broth, and a few simple seasonings. Here’s what you’ll need to make this mushroom soup:
Mushrooms: I highly suggest using baby bella mushrooms for this soup because they have a nice deep color and rich flavor. White button mushrooms will not add as much color or flavor to the soup. You could also chop up some larger portobello mushroom caps to use in place of the Baby Bellas.
Olive Oil: Olive oil is used to sauté the mushrooms so they get a nice deep brown color, which adds both flavor and color to the soup.
Garlic: Garlic adds depth to the flavor and Pairs just perfectly with the flavor of the mushrooms.
Butter: Butter adds richness to the soup and combines with the flour to create a roux, which thickens the broth.
Flour: All-purpose flour combines with the butter to create a roux, which thickens the broth. Without the flour, the broth will be very thin.
Vegetable Broth: Vegetable broth is the base for this soup and it provides complexity to the flavor, as well as a nice brown color. You can use mushroom broth instead if you have it.
Heavy Cream: Heavy cream adds a deliciously rich and creamy flavor to the soup.
Seasonings: This mushroom soup is seasoned simply with salt, pepper, thyme, and soy sauce. The soy sauce adds a wonderfully earthy umami flavor that enhances the mushrooms.
What Else Can I Add?
If you want to put your own spin on this mushroom soup recipe, here are a few other ingredients you can add:
Paprika: Add sweet paprika to make it closer to a Hungarian Mushroom Soup.
Onion: If you want even more savory vegetable flavor, sauté a finely diced onion with the mushrooms.
Sour Cream: To make the soup even richer and to add a slight tang, stir a few dollops of sour cream into the broth at the end.
Homemade Croutons: Top your soup with homemade croutons for a delicious garlicky crunch!
Make it Vegan
It’s very easy to convert this recipe to a vegan mushroom soup. Simply use coconut oil in place of the butter to make the roux, and then use full-fat coconut milk in place of the heavy cream. Coconut milk tastes really good in savory recipes like this and actually pairs very well with mushrooms! Check out our Vegan Creamy Mushroom Ramen for another example of these flavors together.
What to Serve with mushroom Soup
The broth in this soup is extremely rich and creamy and you’re going to want to sop up every drop, so I highly suggest serving it with some crusty bread like our No-Knead Bread, Focaccia Rolls, or Soda Bread. Or, if you don’t want to make homemade bread, at least make sure you have some crackers on hand!
Using really good, full-flavored broth is key to making mushroom soup taste its best. We suggest using Better Than Bouillon to make the broth used in this soup because it has tons of flavor, is budget-friendly, and reduces waste compared to boxed and canned broths. We used their vegetable-flavored bouillon, but you could certainly use their mushroom flavor if you have it.
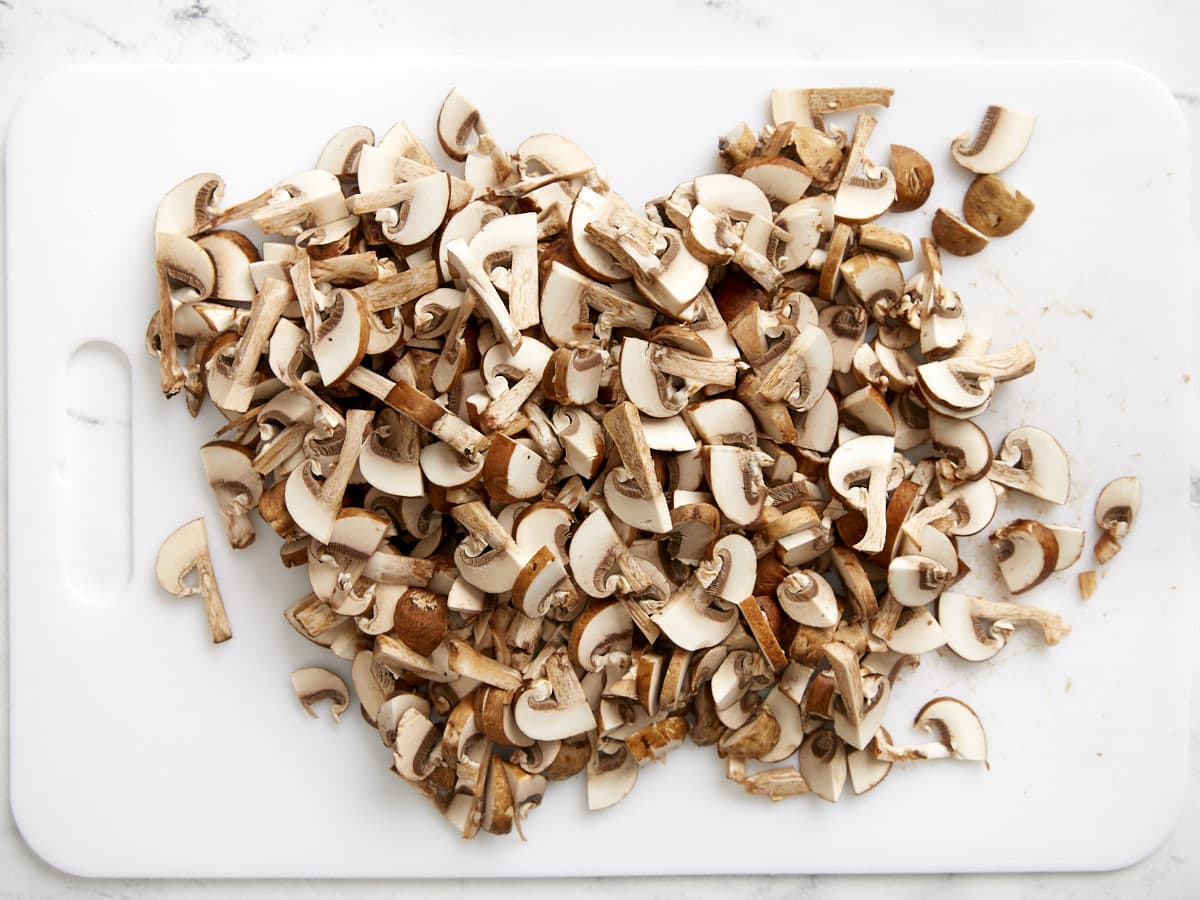
Wash the mushrooms to remove any dirt or debris. Slice the mushrooms and mince the garlic.
Add the olive oil, mushrooms, and a pinch of salt and pepper to a soup pot. Sauté the mushrooms over medium heat until they have released all of their moisture, all the liquid has evaporated from the bottom of the pot, and the mushrooms become very dark brown. Add the minced garlic and continue to sauté for one minute more.
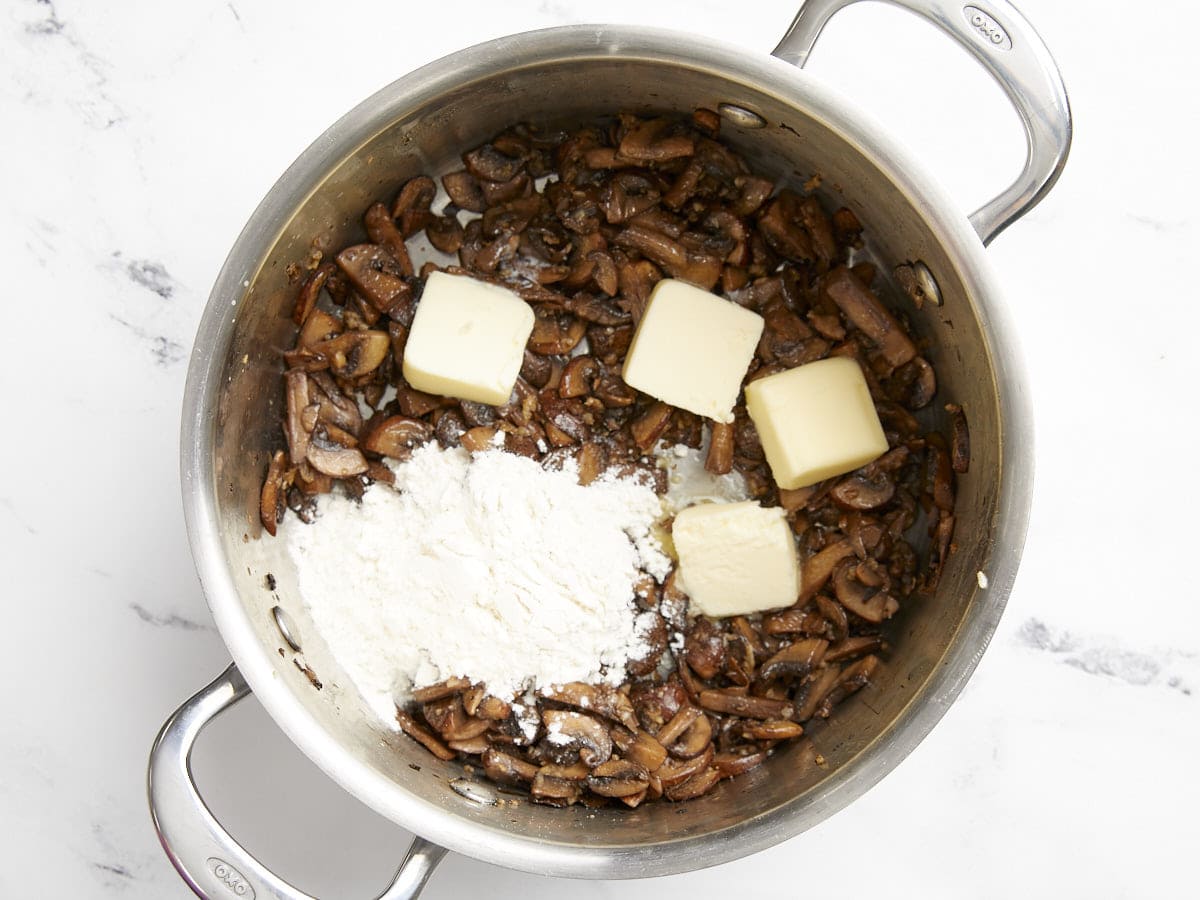
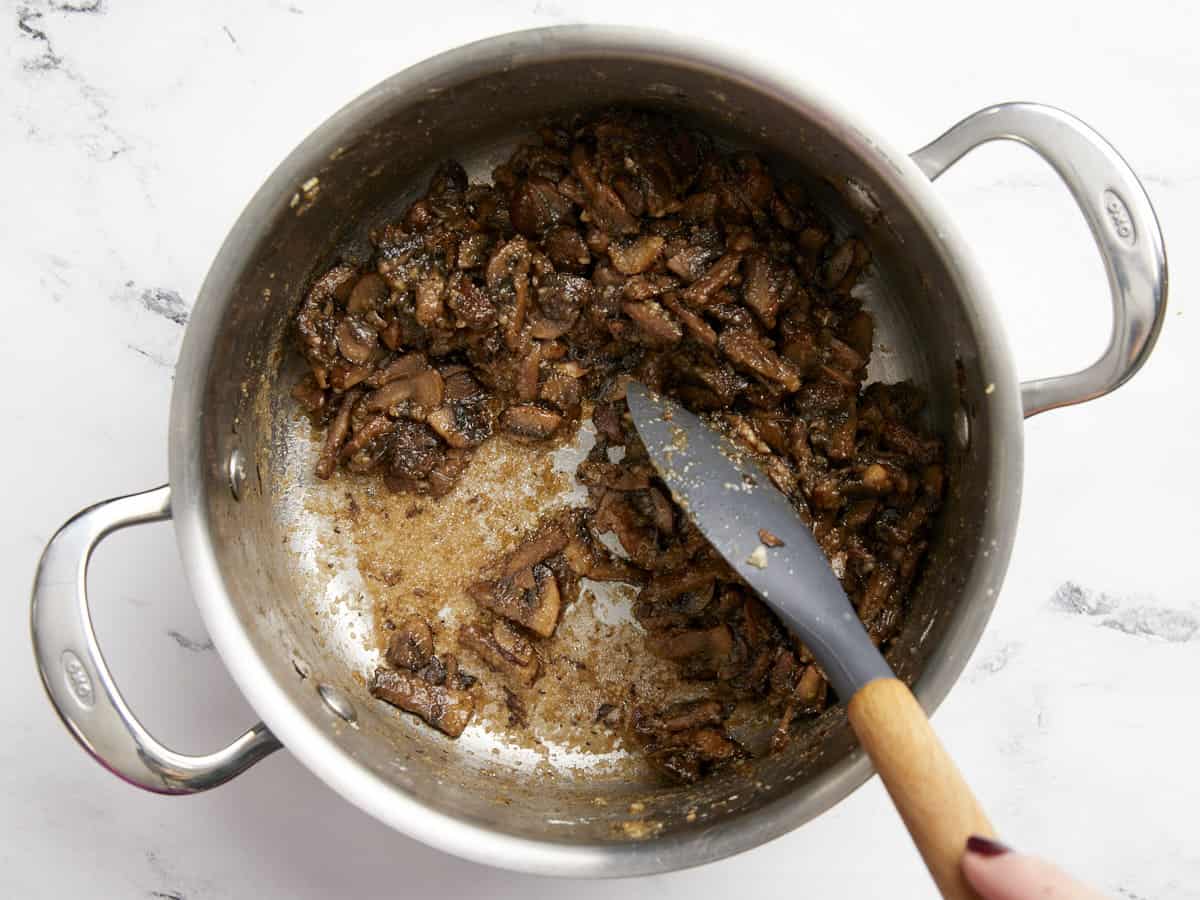
Add the butter and flour to the pot. Stir and cook for about two minutes more, or until the butter coats the bottom of the pot and turns deep golden brown.
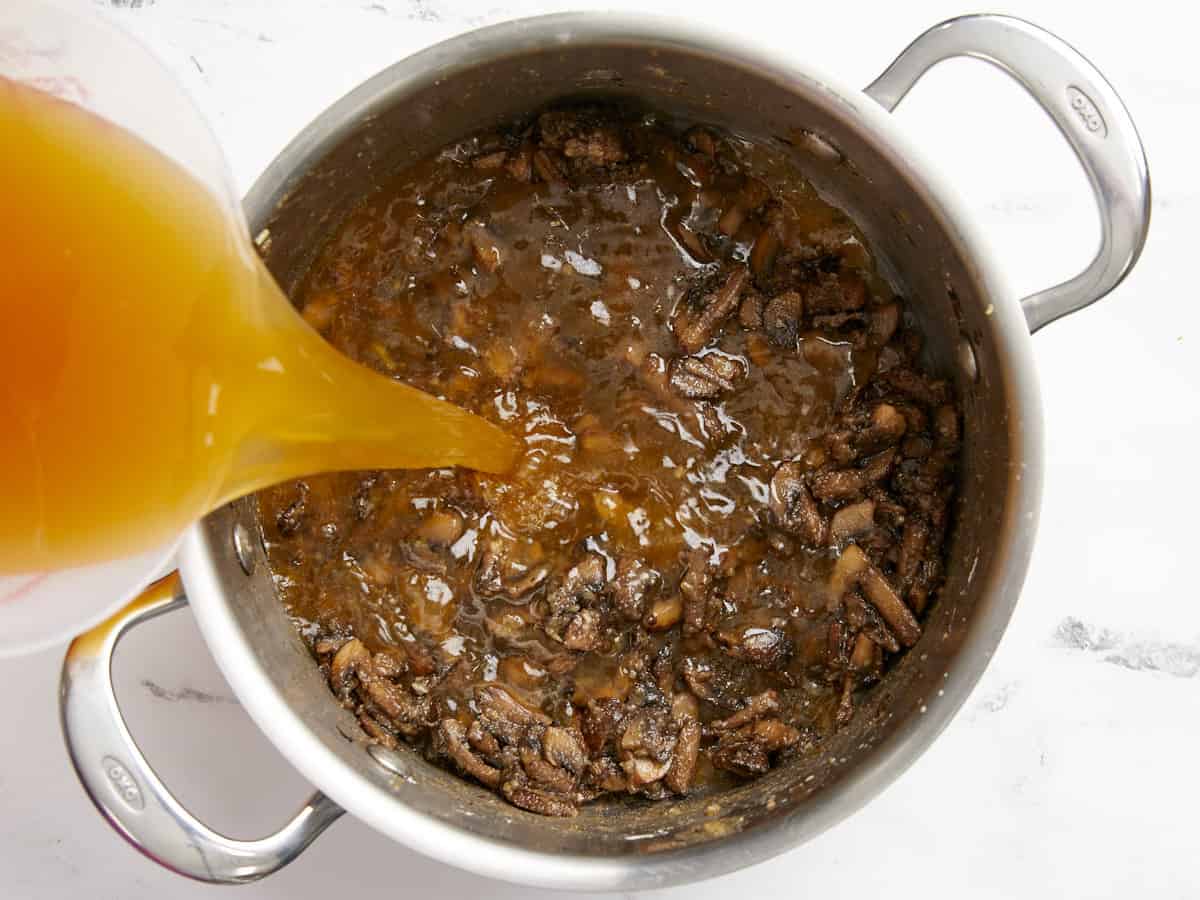
Once the flour mixture is a bit browned, add the vegetable broth, soy sauce, and thyme. Stir to dissolve all of the flour from the bottom of the pot. Allow the liquid to come up to a simmer, at which point the flour will slightly thicken the broth.
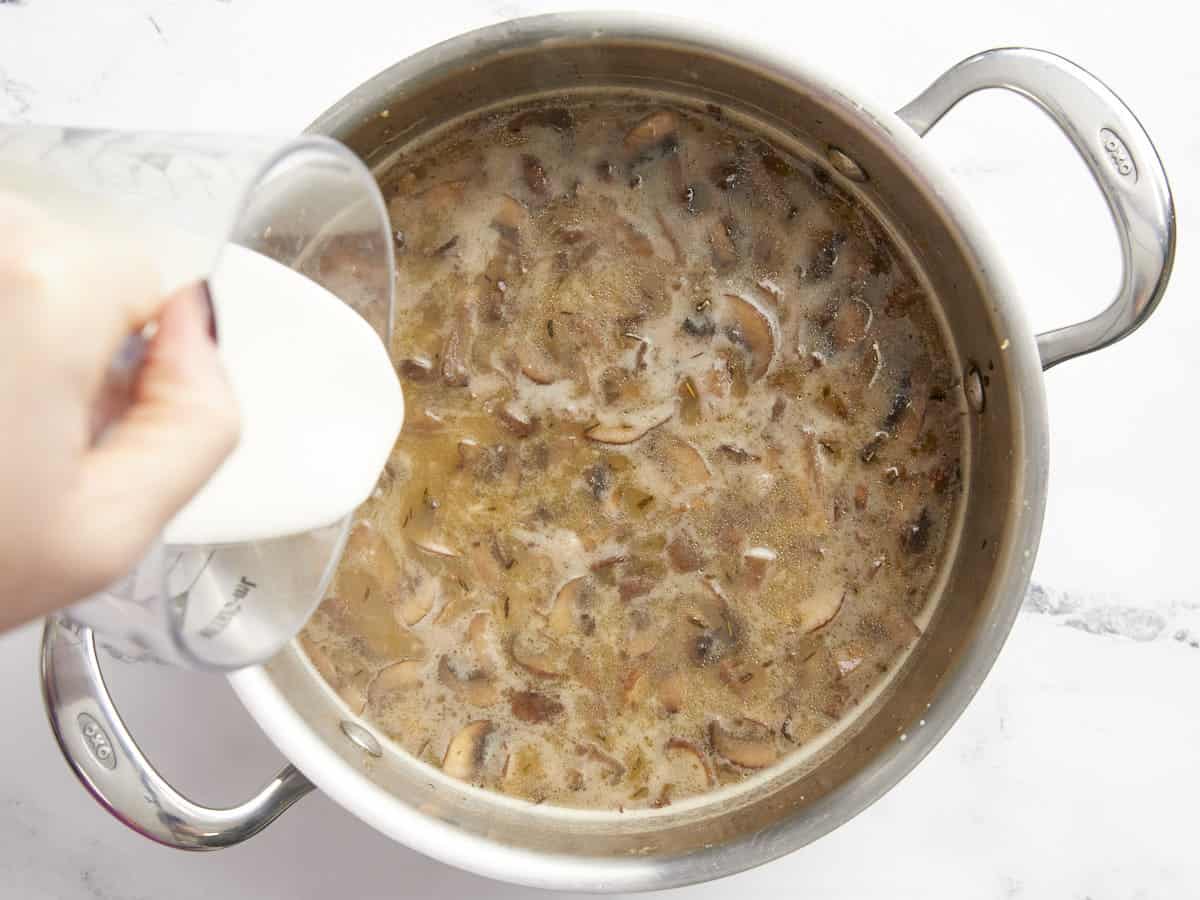
Finally, stir the cream into the soup. Give the soup a taste and adjust the salt or pepper to your liking. Serve with crusty bread and enjoy!
How to Make Creamy Mushroom Soup – Step by Step Photos
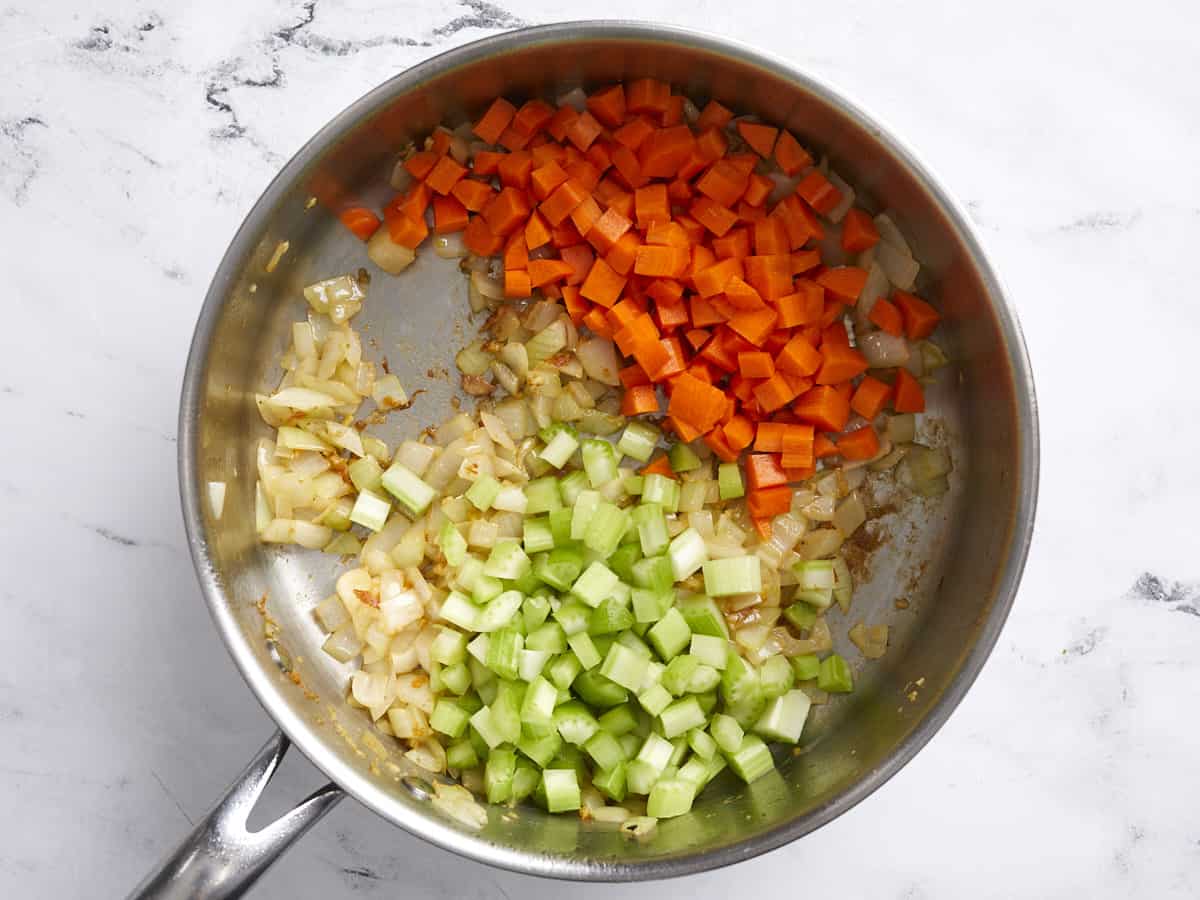
Begin by rinsing and slicing one pound of baby Bella mushrooms.
Add the mushrooms to a soup pot with 1 Tbsp olive oil and a pinch of salt and pepper. Sauté the mushrooms over medium heat until they release all of their water, the water evaporates, and the mushrooms begin to brown. Add three cloves of minced garlic and sauté for about one minute more.
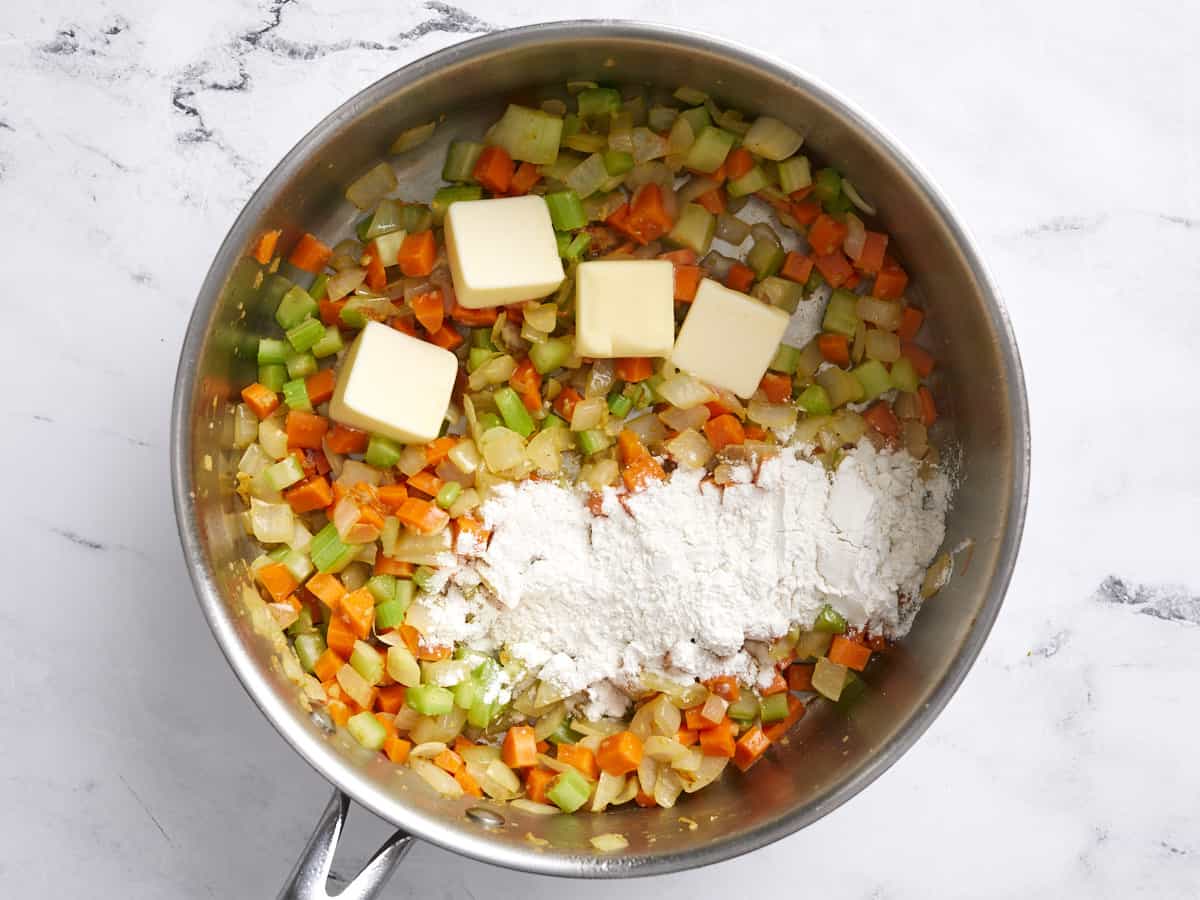
Add 3 Tbsp of salted butter and 4 Tbsp all-purpose flour to the pot. Continue to stir and cook over medium heat, allowing the butter to melt and create a paste with the flour that coats the mushrooms.
The butter and flour will begin to coat the bottom of the pot. When it becomes medium brown, it’s time to add the liquid to the pot.
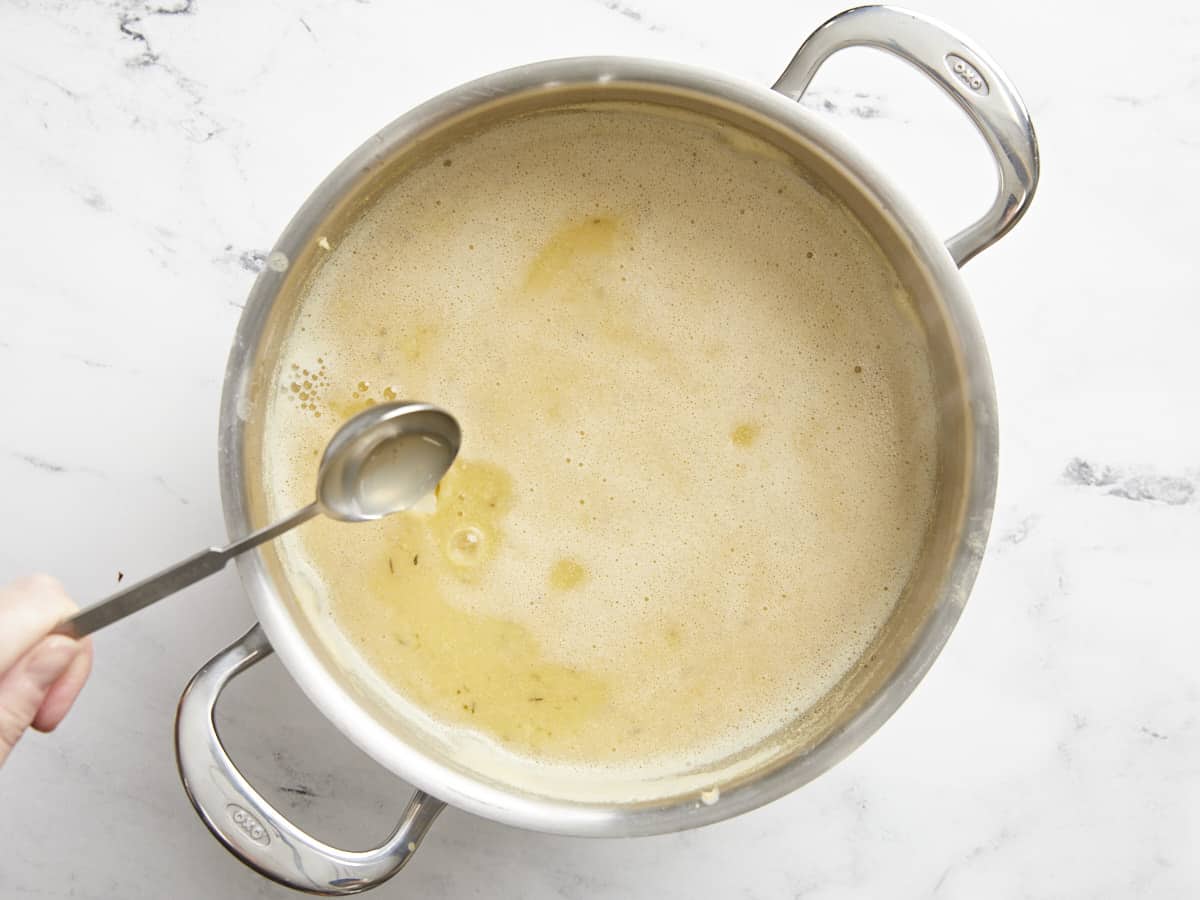
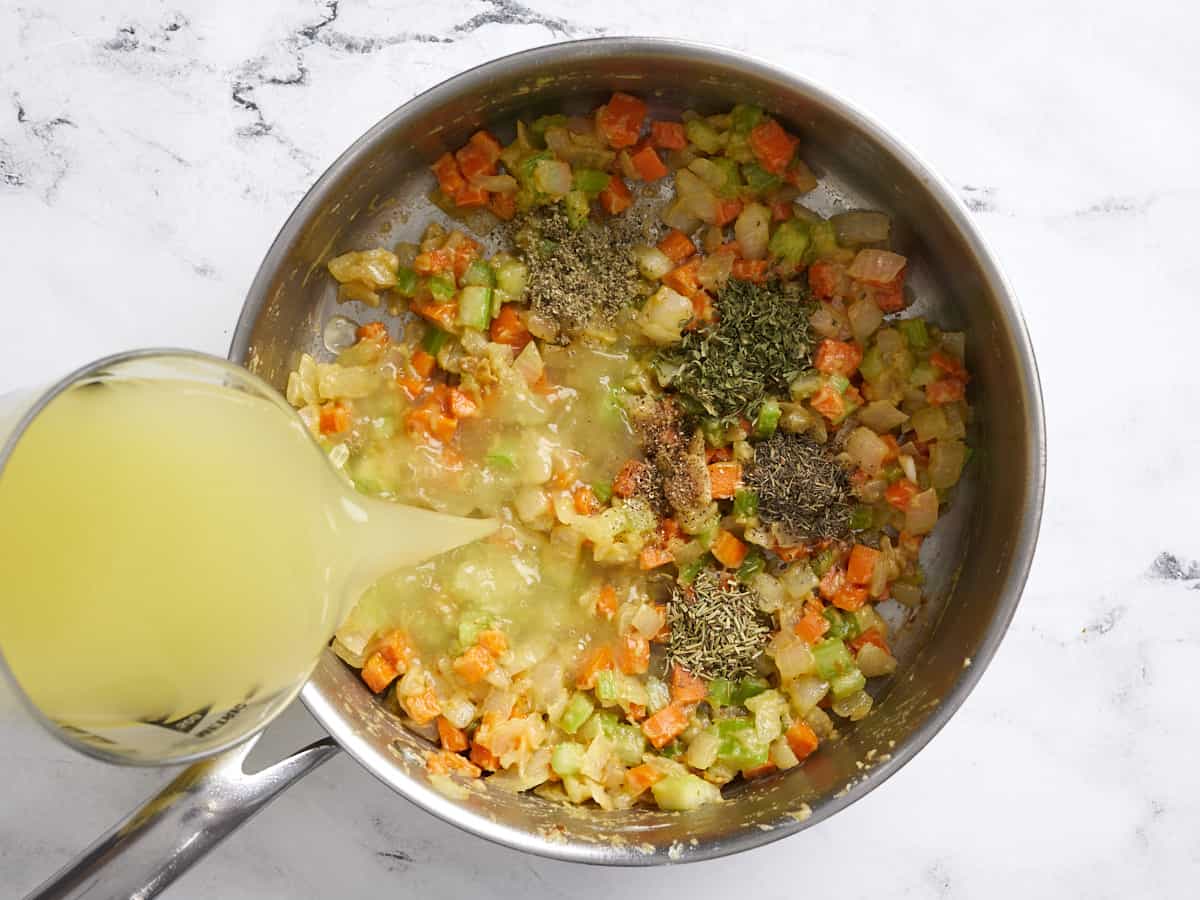
Add three cups of vegetable broth, ⅛ tsp thyme, and 1 tsp soy sauce to the soup pot and stir to dissolve all of the browned bits off the bottom of the pot. Allow the broth to come up to a boil, at which point it will thicken slightly from the flour and butter roux.
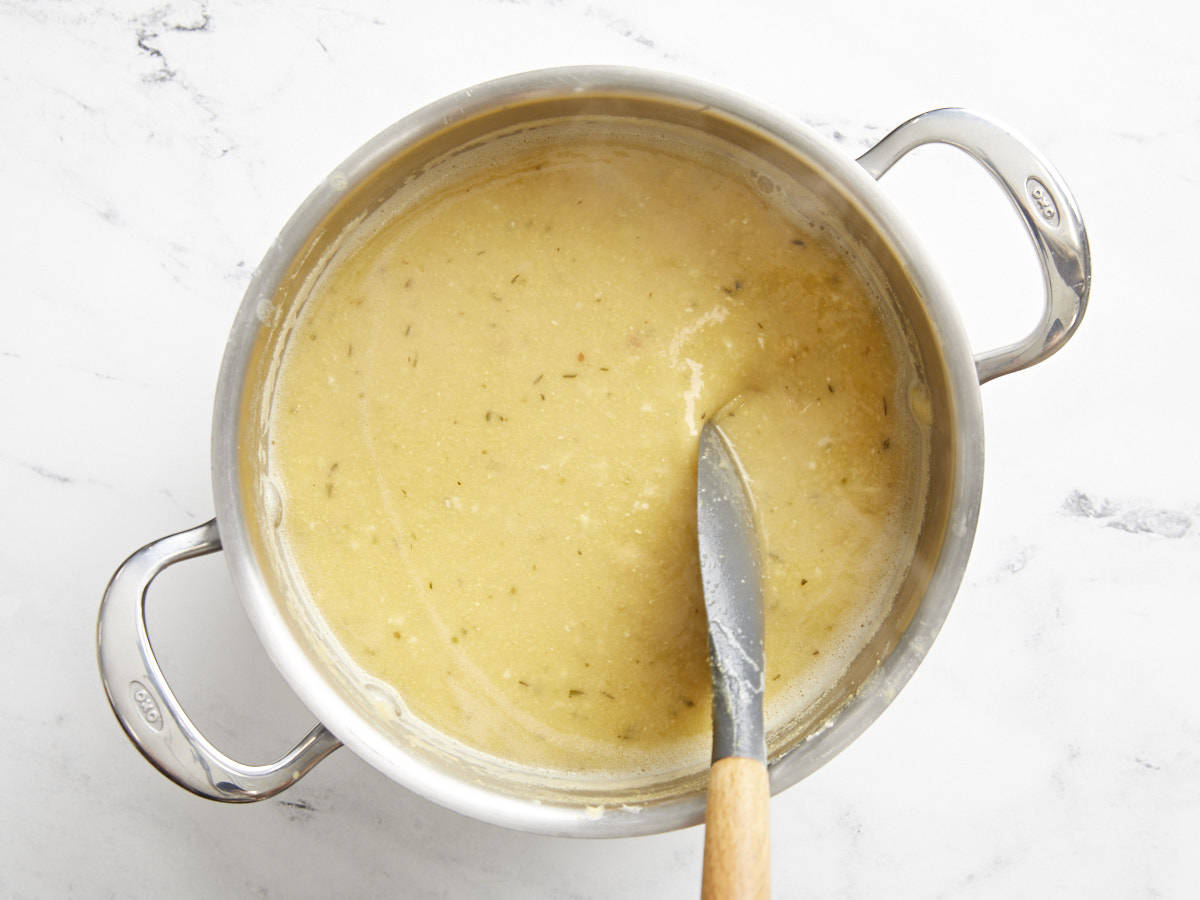
Once the soup has reached a boil, turn the heat down to medium-low and add ½ cup heavy cream. Allow the soup to heat through and begin to simmer gently.
Taste the soup and adjust the salt or other seasonings if desired. The soup may need additional salt depending on the salt content of the broth used. We used Better Than Bouillon, which tends to be on the salty side, so we did not need any additional salt.
Serve the creamy mushroom soup with your favorite crusty bread and enjoy!
Quick and easy soups made with canned beans have become my favorite go-to easy meal when I’m too tired to cook and too broke to eat out. I’ve made several variations of this soup over the years, including the viral Rosemary Garlic White Bean Soup, but this week I made a Mediterranean-inspired Lemony Chickpea Soup. It’s fast, easy, has bright flavors, and pairs perfectly with some crusty bread for a simple no-fuss meal.
This incredibly simple Lemony Chickpea soup combines puréed chickpeas, broth, and some seasoning to create a perfectly comforting and flavorful bowl of soup. And since most of these ingredients are shelf-stable, this is a pantry meal you can make any time with no planning head.
Ingredients for Lemony Chickpea Soup
Here’s all you’ll need to make this deliciously easy chickpea soup:
Garlic: A hefty dose of garlic gives this soup a deep savory flavor and perfectly balances the bright lemon.
Olive Oil: Olive oil is used to sauté the garlic and give the soup a little bit of richness in the mouthfeel.
Chickpeas: This recipe uses canned chickpeas to make the entire preparation fast and easy. If you prefer to use chickpeas cooked from dry, you’ll need about 4-5 cups of cooked chickpeas.
Chicken Broth: Broth adds a lot of savory depth to the soup as well as the salt needed to make each flavor pop.
Lemon: A splash of lemon juice brightens up the flavors in the soup, provides a nice contrast to the savory garlic flavor, and gives the soup a fresh Mediterranean flavor.
Seasoning: The seasoning profile for the soup is fairly simple with just a little bit of thyme, oregano, red pepper, and black pepper. Keeping the seasoning light gives the soup a bright and fresh flavor.
What to Serve with Lemony Chickpea Soup
This chickpea soup is just begging for some crusty bread for dipping, so I highly suggest making a loaf of our easy no-knead bread or focaccia rolls. Or, if you need something a little faster, homemade garlic bread would also be amazing with this soup. And, if you want some veggies on the side, a simple side salad would be awesome, or you could go with something a little heftier, like tortellini salad.
Tips for Smooth Chickpea Soup
Canned chickpeas can often be a bit on the firm side, so to make sure your chickpea soup is extra smooth you may need to pre-boil the chickpeas, but it depends largely on the brand of chickpeas. Some canned chickpeas are quite soft, while others are very firm or borderline undercooked.
If your chickpeas are very firm, simply empty the can and liquid into a small saucepot and simmer them for about 10 minutes. Let the chickpeas cool before transferring to the blender to purée.
Add 2 of the cans of chickpeas to a blender with the liquid in the can and purée until smooth.* Drain the third can of chickpeas and set aside.
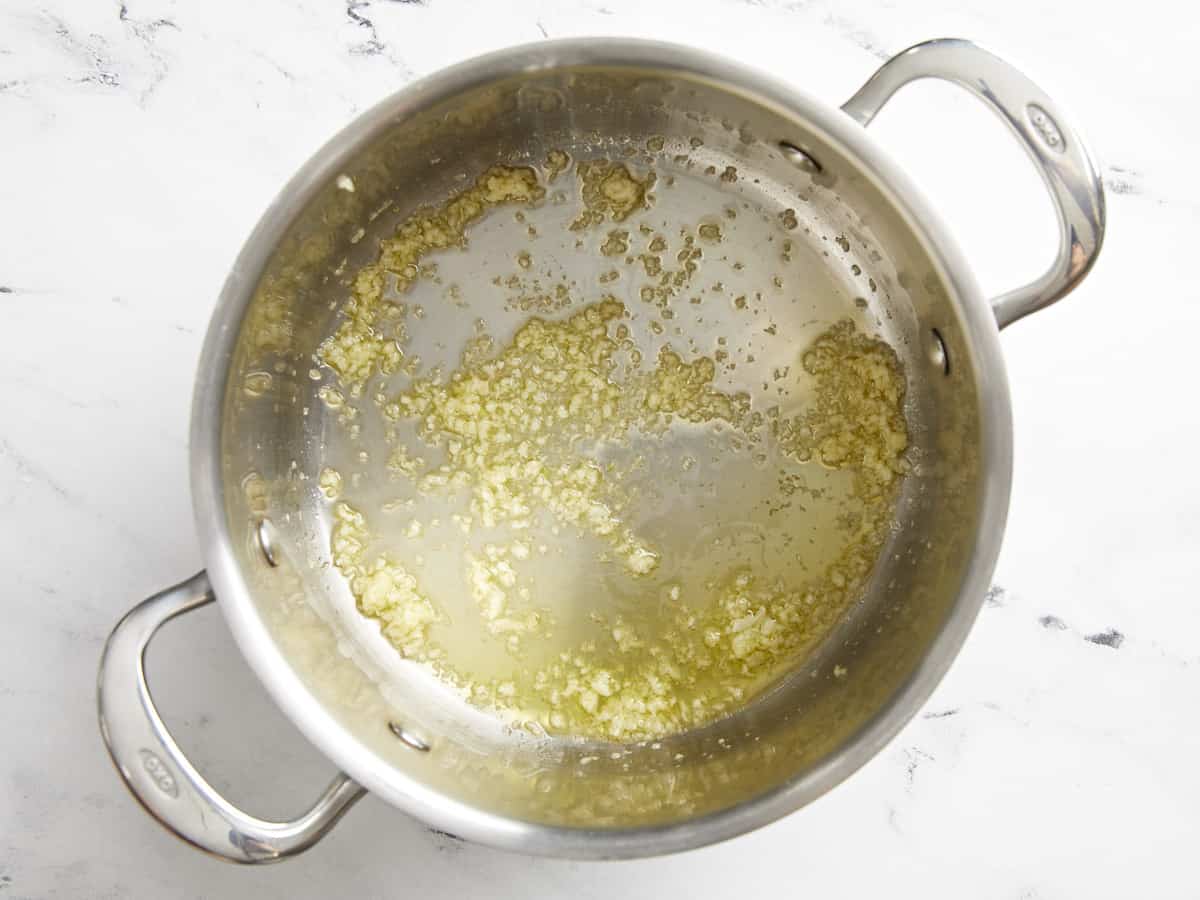
Mince the garlic and add it to a saucepot with the olive oil. Sauté the garlic over medium heat for about one minute, or just until the garlic becomes very fragrant.
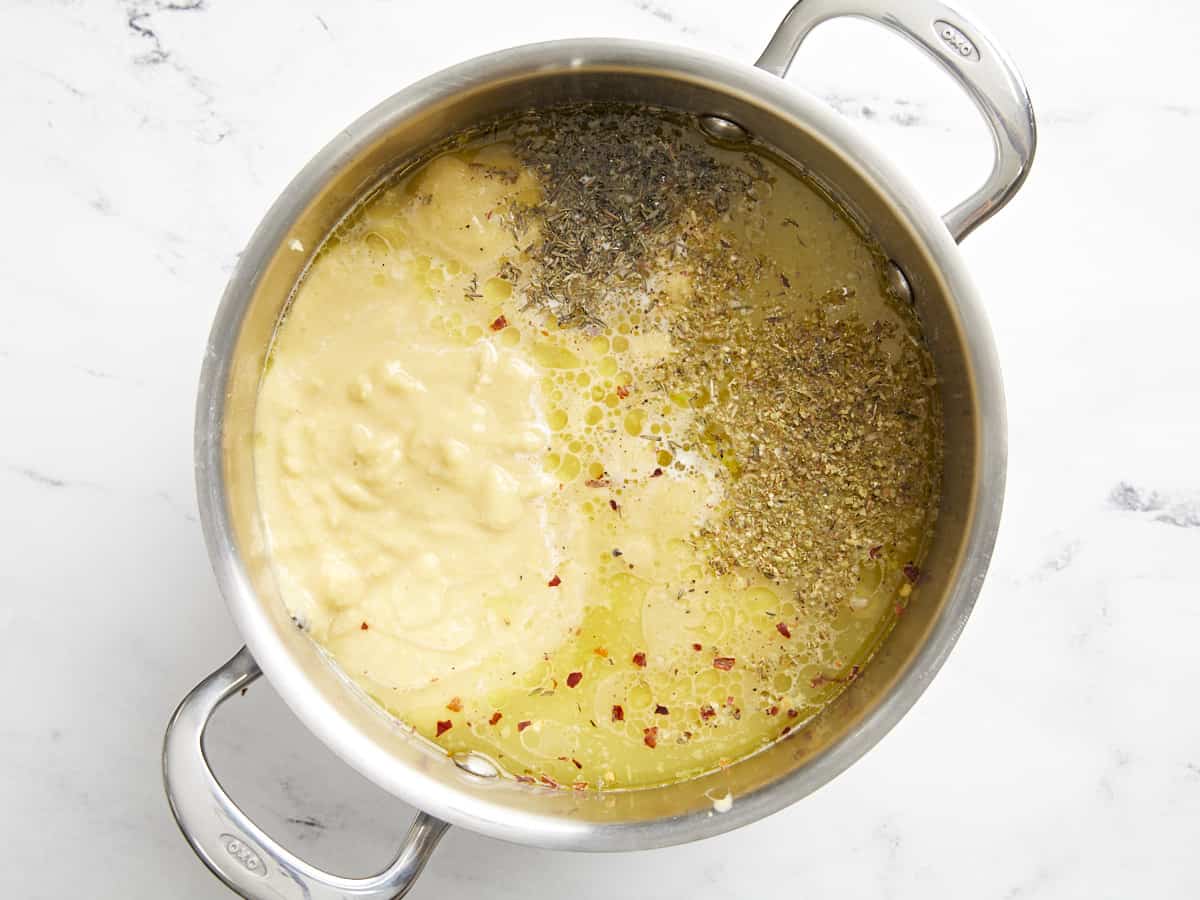
Add the puréed chickpeas, drained chickpeas, chicken broth, thyme, oregano, red pepper, salt, and pepper to the soup pot with the garlic. Stir to combine.
Allow the soup to come up to a simmer, then simmer for 10 minutes, stirring occasionally.
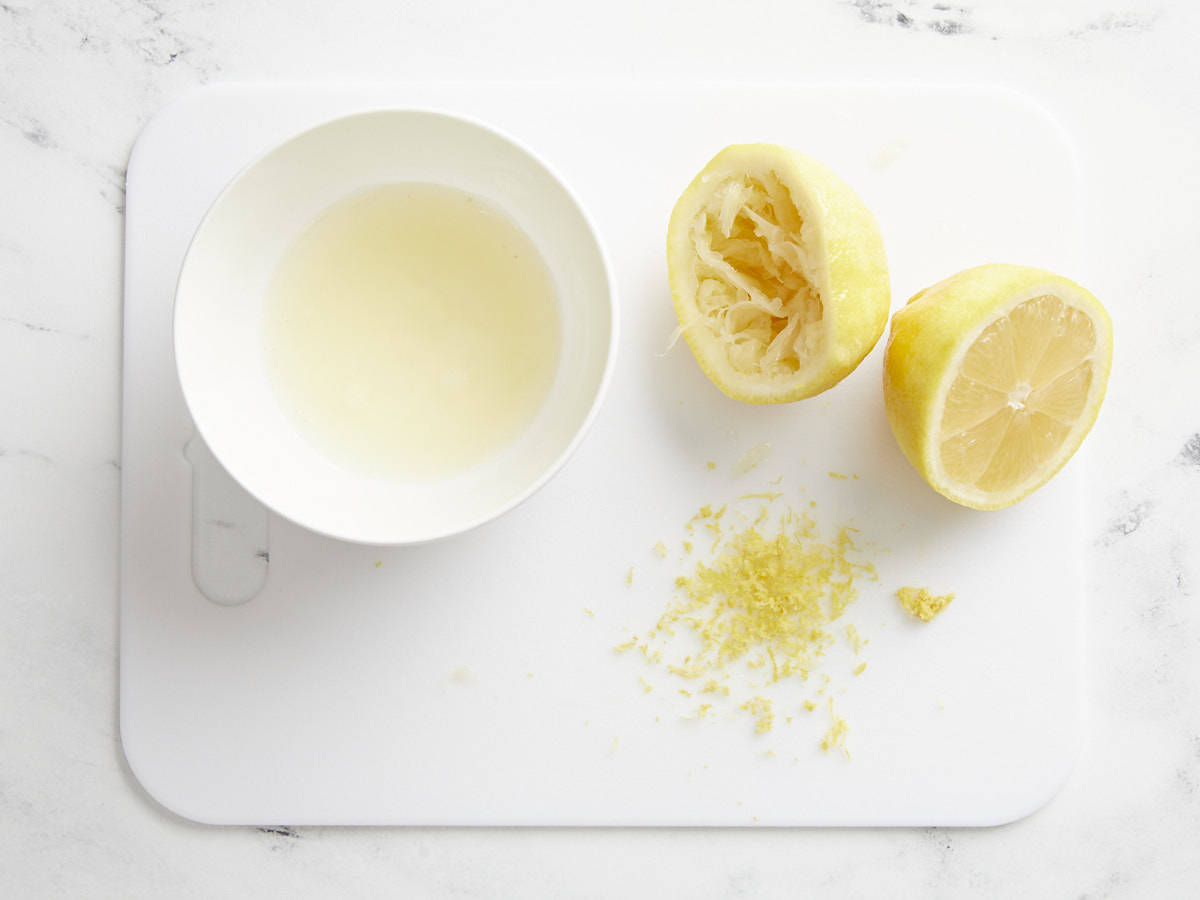
While the soup simmers, zest and juice half of the lemon (you'll need about 2 Tbsp juice and ½ tsp zest). Slice the remaining lemon for garnish.
After the soup has simmered, add 2 Tbsp juice and a pinch of lemon zest, then stir to combine.
Taste the soup and adjust the salt, lemon juice, pepper, or other herbs to your liking. The amount of salt needed to properly flavor the soup will depend on the salt content of your broth, so make sure to salt to taste at the end.
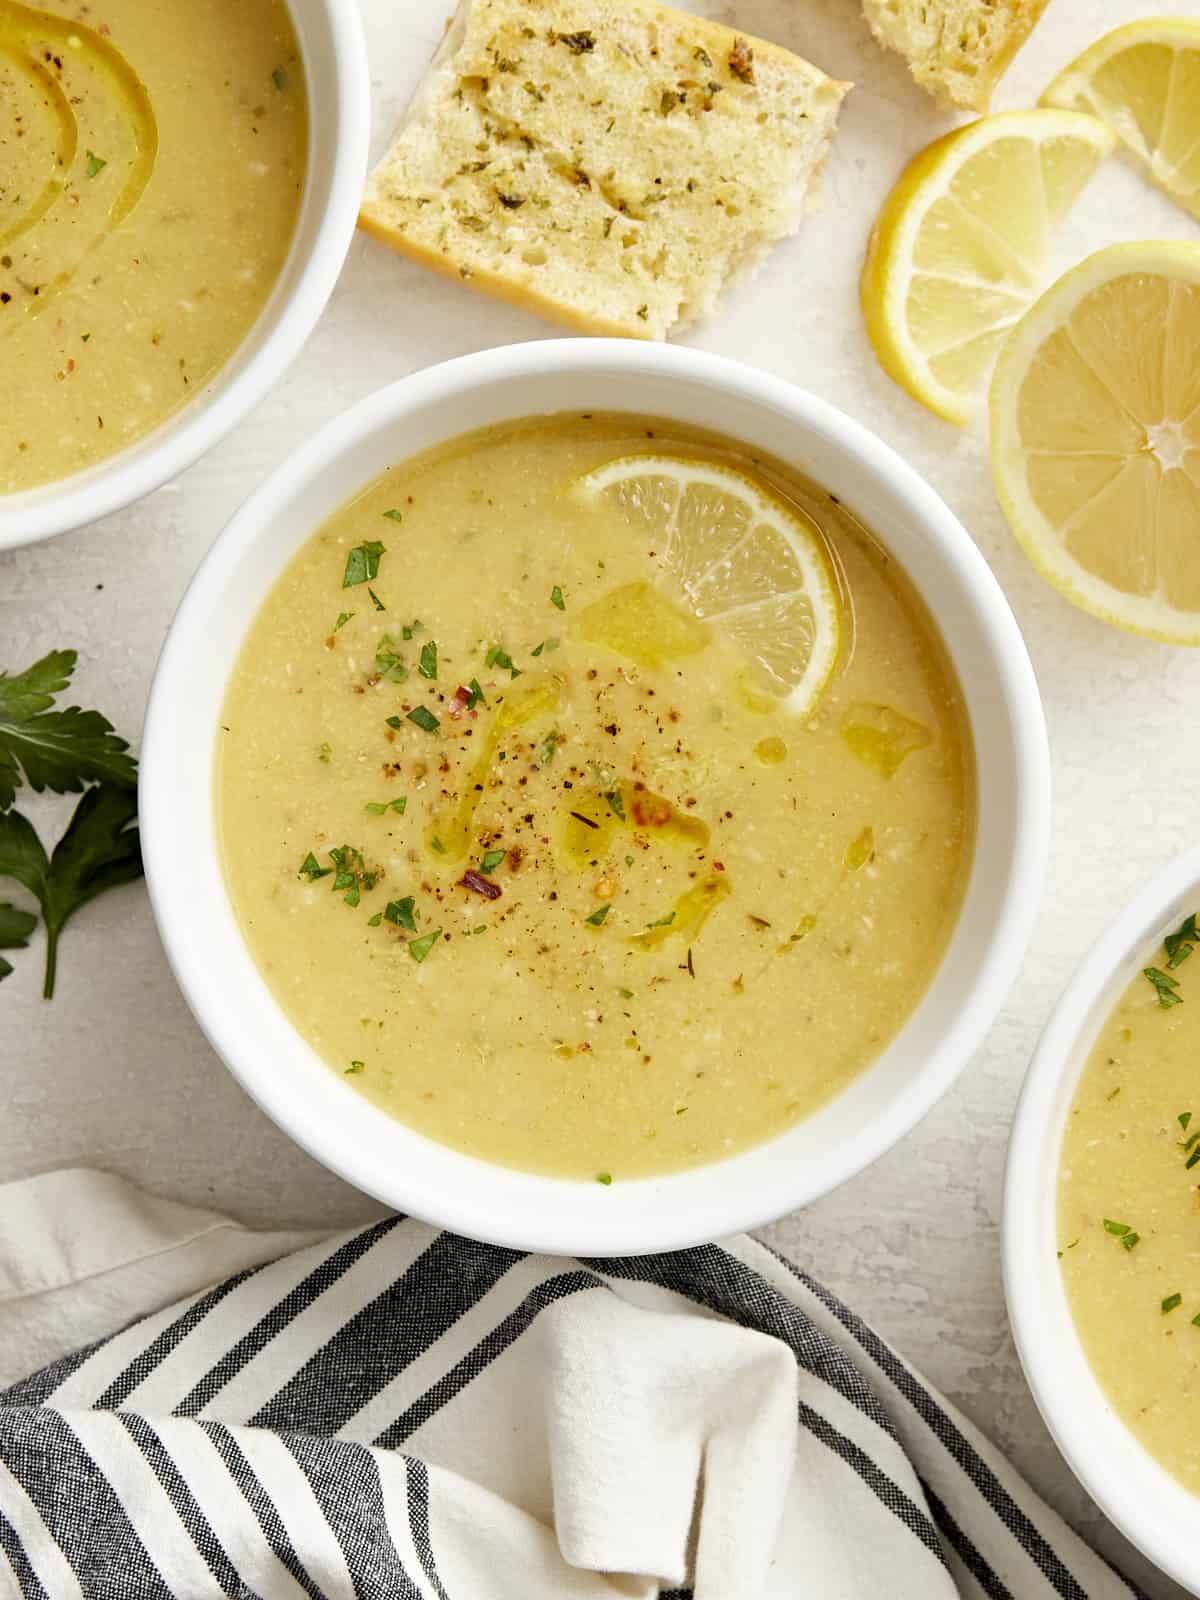
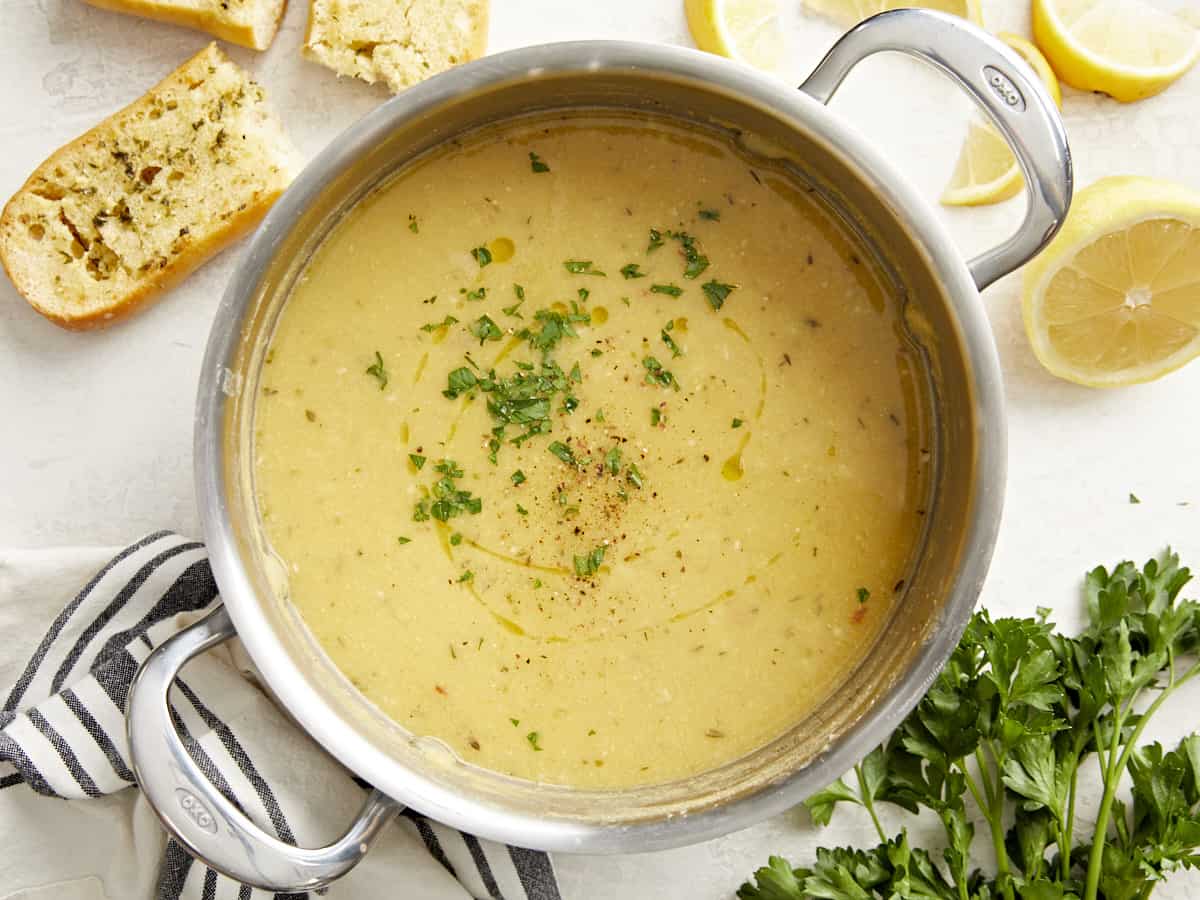
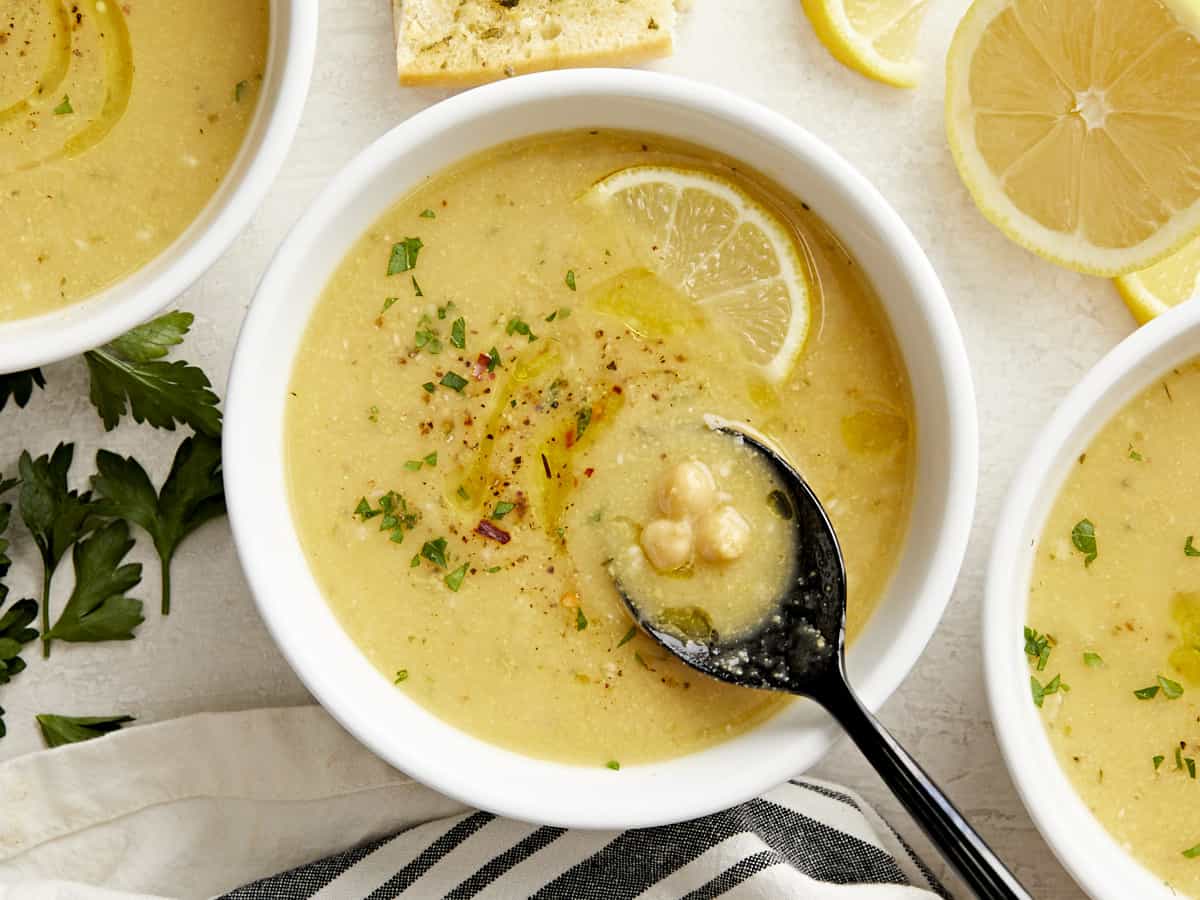
Garnish the soup with the remaining lemon slices and zest, a drizzle of olive oil, and more pepper if desired, then serve with crusty bread and enjoy!
*Some brands of canned chickpeas are quite firm. To make the soup really smooth you may need to pre-simmer the beans for about 10 minutes to make them softer before blending.
How to Make Lemony Chickpea Soup – Step by Step Photos
Add two 15oz. cans of chickpeas to a blender, with the liquid in the can, and purée until smooth. If the brand of chickpeas you’re using are extra firm, you may want to simmer the chickpeas in the liquid for about 10 minutes before blending to soften them more. Let the simmered chickpeas cool slightly before blending, as blending hot liquids can be dangerous.
Mince four cloves of garlic (or more, if you’d like!) and add them to a saucepot with 2 Tbsp olive oil. Sauté the minced garlic over medium heat for about one minute, or just until the garlic becomes very fragrant.
Add the puréed beans, one can of drained chickpeas, 2 cups of chicken broth, ½ tsp dried thyme, ½ tsp dried oregano, 1 pinch of crushed red pepper, ¼ tsp salt, and ¼ tsp pepper to the pot. Stir to combine and bring the soup up to a simmer over medium heat.
Let the soup simmer for about 10 minutes, stirring occasionally. Meanwhile, zest and juice half of a lemon (you’ll need 2 Tbsp juice and about ½ tsp zest). Slice the other half of the lemon to use as a garnish.
After the soup has simmered for about 10 minutes, add 2 Tbsp lemon juice to the soup along with a pinch of lemon zest.
Taste the soup and adjust the salt, lemon juice, zest, or other herbs to your liking. The amount of salt needed will depend on the salt content of the broth used and it can really help the flavors pop, so make sure to salt to taste at the end.
Garnish the soup with the remaining slices of lemon and lemon zest, extra pepper, and a drizzle of olive oil. We also had some parsley in the fridge, so we added some of that for color.
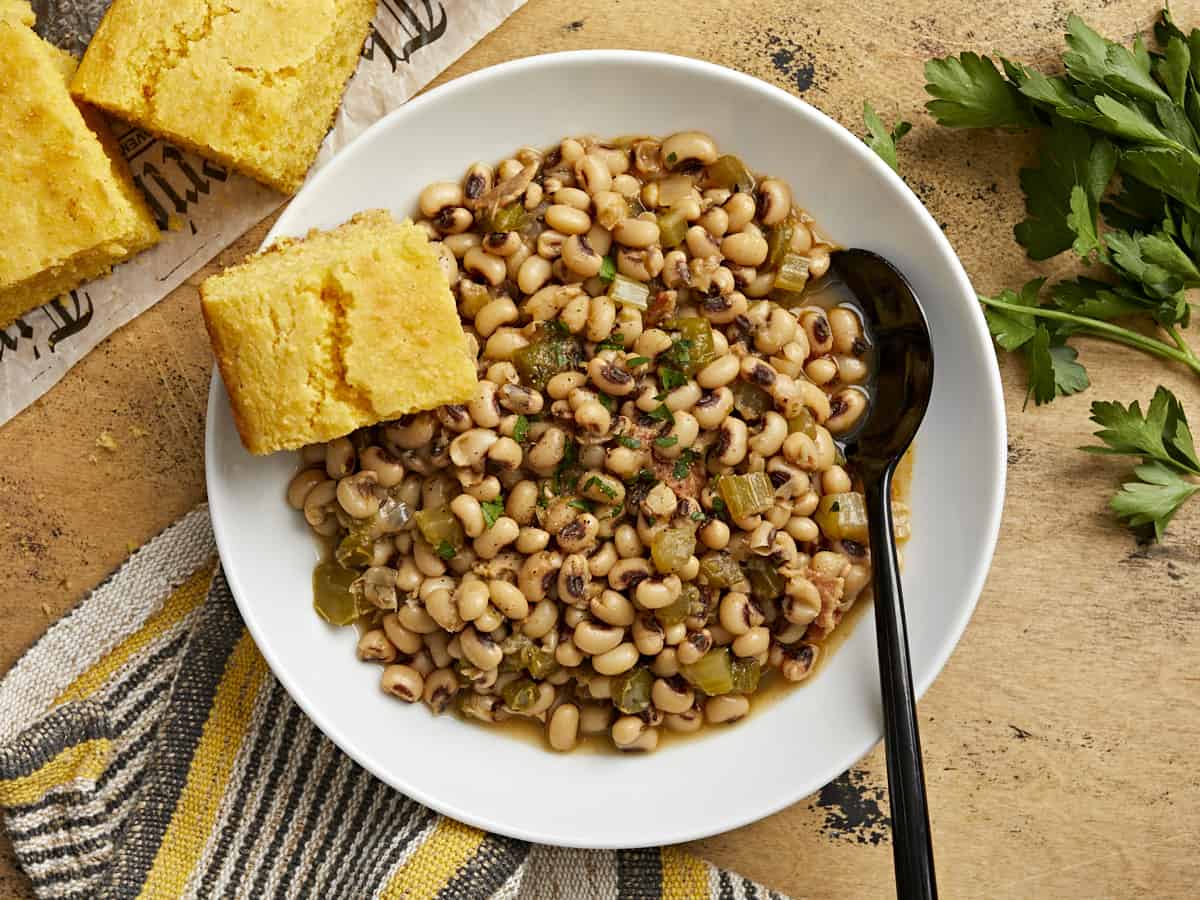
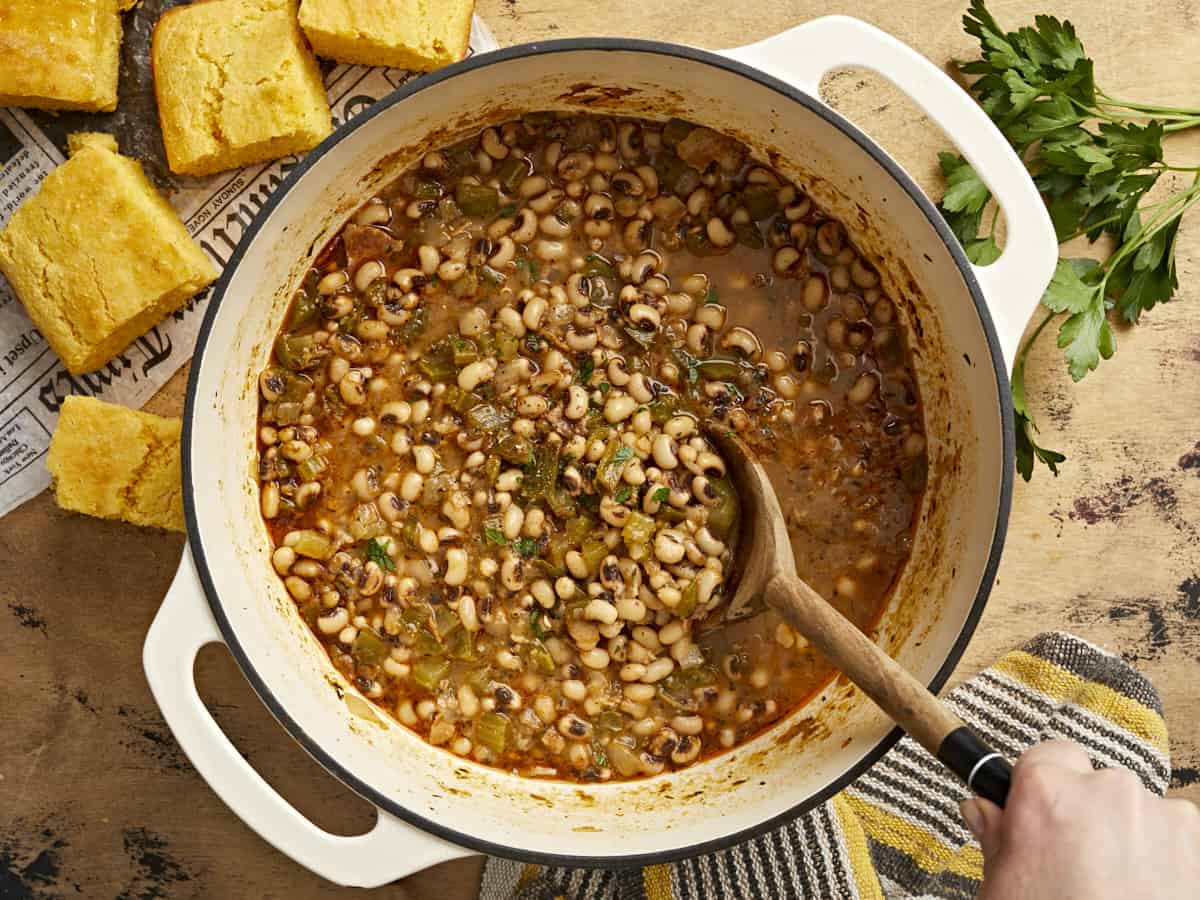
It may be tradition to eat black-eyed peas on New Year’s Day, but I’m here to say that you need to be making these delicious and budget-friendly beans year-round! This big ol’ pot of peas is hearty, delicious, freezer-friendly, and about as budget-friendly as it gets. So try them out this New Year’s Day and then add them to your regular rotation for the coming year. Your wallet and taste buds will thank you. ;)
What Are Black-Eyed Peas?
Black-eyed peas are a small white legume with a black dot, or “eye”, in the center. They’re traditionally served on New Year’s Day in the United States alongside collard greens (or mustard or turnip greens) to bring wealth in the new year. The black-eyed peas represent coins, while the greens signify paper dollars. Some even believe you must consume 365 black-eyed peas to bring the wealth, so make sure to dish yourself up an extra large bowl!
Ingredients for Black-Eyed Peas
Here’s what you’ll need to make this incredibly delicious pot of black-eyed peas:
Black-Eyed Peas: You’ll need one pound of dry black-eyed peas. You can find these near the other dry beans in the grocery store, or on a special display if you’re buying near the New Year!
Bacon: Bacon gives the black-eyed peas a deliciously smoky flavor and the fat gives the peas body and a wonderful mouthfeel. You can substitute by adding a ham hock or smoked turkey wing to the peas before simmering and using a bit of oil to sauté the vegetables in the beginning.
Vegetables: The black-eyed peas are flavored with a medley of vegetables like onion, garlic, bell pepper, and celery. The vegetables add flavor, color, and texture to the dish.
Spices: The pot of peas is seasoned with a savory mix of smoked paprika, oregano, thyme, cayenne pepper, and black pepper.
Chicken Broth: The black-eyed peas cook in chicken broth for maximum flavor. Make sure to use a good broth to ensure the peas are very flavorful. We like to use Better Than Bouillon because it’s cost-effective and has great flavor
Salt: As with any bean, it’s very important to add salt to taste at the end of cooking. Salt doesn’t just make food “salty” but it amplifies all of the flavors so you can taste each and every ingredient.
Recipe Variations
Vegetarian or Vegan: To make these black-eyed peas vegetarian, simply skip the bacon and use a few tablespoons of coconut oil to sauté the vegetables. The coconut oil has a similar mouthfeel to pork fat, making the peas extra hearty. You’ll also want to increase the smoked paprika slightly to make up for the smokiness of the bacon and swap vegetable broth for chicken broth.
Slow Cooker: To make black-eyed peas in the slow cooker, simply add all of the ingredients (including the pre-soaked peas) to a slow cooker and cook on high for about four hours, or until the peas are tender.
Canned Black-Eyed Peas: If you’re in a rush or forgot to soak your peas, canned black-eyed peas are a great shortcut. Simply follow our recipe for Quickie Black-Eyed Peas with Greens.
The Quick Soak Method
If you don’t have time to soak your beans overnight (or you just forgot), you can use the quick soak method to get the beans ready for cooking in about an hour. Here’s how to quick soak beans:
Rinse the beans with cold water, then add them to a large pot. Add enough fresh water to cover the beans by 2-3 inches.
Place a lid on the pot, turn the heat on to high, and bring the beans up to a boil. Allow the beans to boil for two minutes.
Remove the beans from the heat and let them sit in the hot water, with the lid in place, for one hour.
Rinse the soaked beans and continue to use them in place of the beans soaked overnight.
How to Store Leftover Black-Eyed Peas
This recipe is great for meal prep because the leftovers are amazing. Store the cooked black-eyed peas in the refrigerator for up to five days, or, once they’re chilled, transfer single portions to the freezer for longer storage. They can be kept in the freezer for about three months and easily reheated in the microwave or on the stovetop over medium-low heat, stirring often.
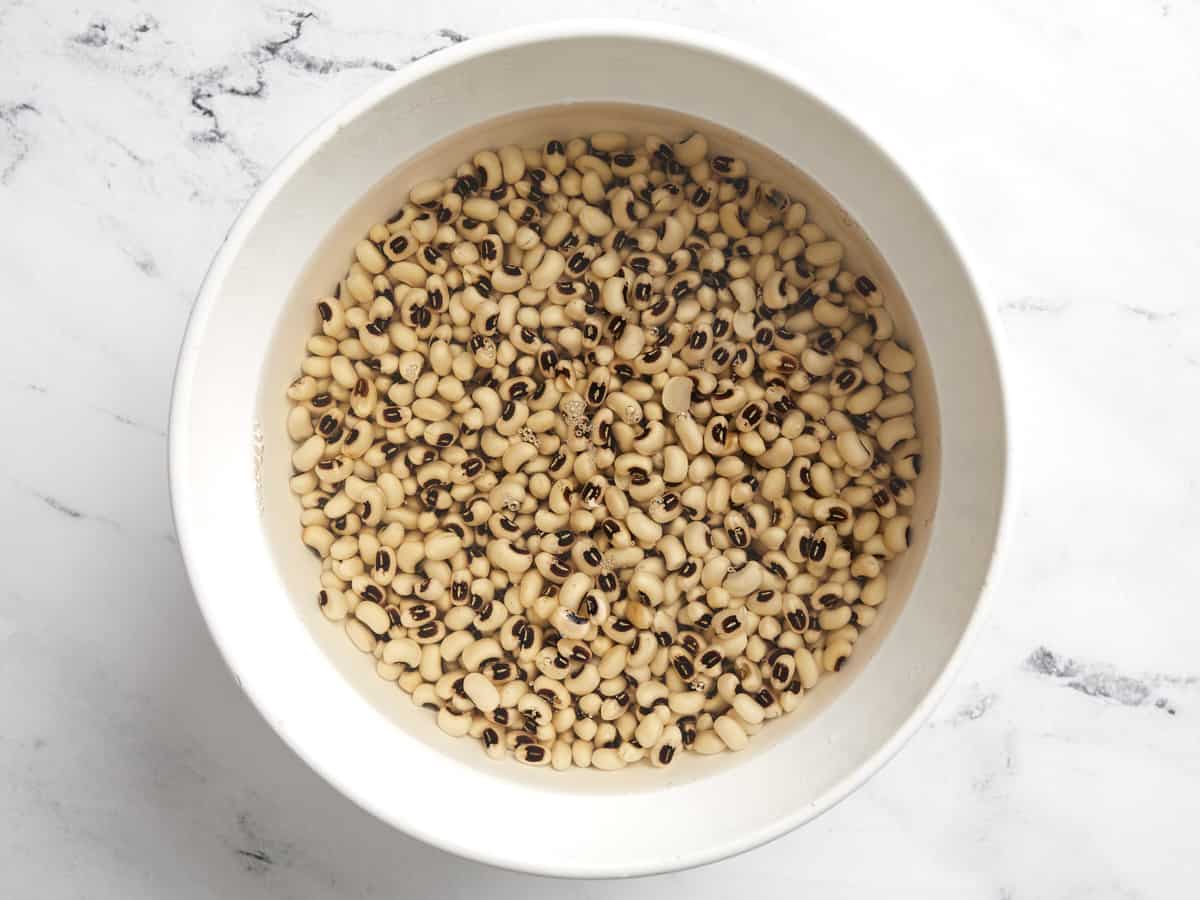
The day before, rinse the peas with cool water then place them in a large bowl and cover with 2-3 inches of cold water. Soak the peas in the refrigerator for eight hours or overnight.
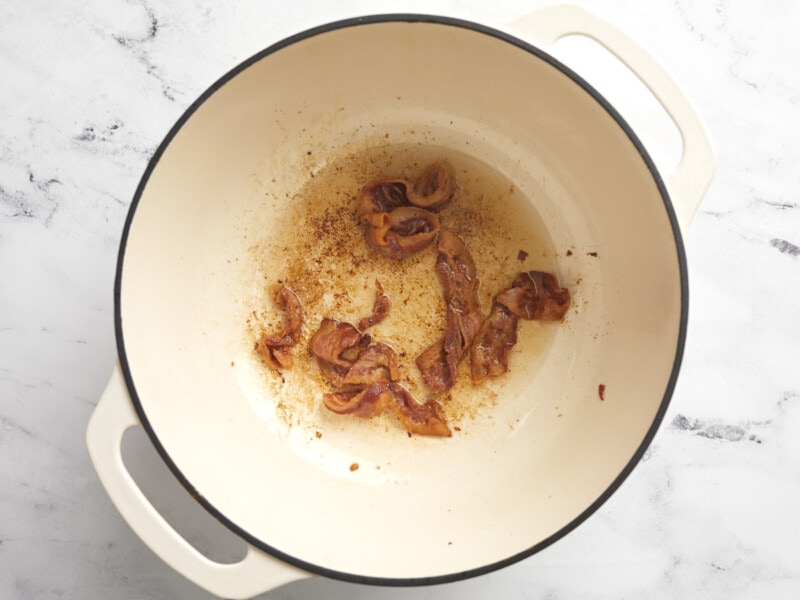
When you're ready to cook the peas, add the bacon to a large pot and cook over medium heat until the bacon is brown and crispy. Remove the bacon, saving it for later, and leave all of the bacon grease in the pot.
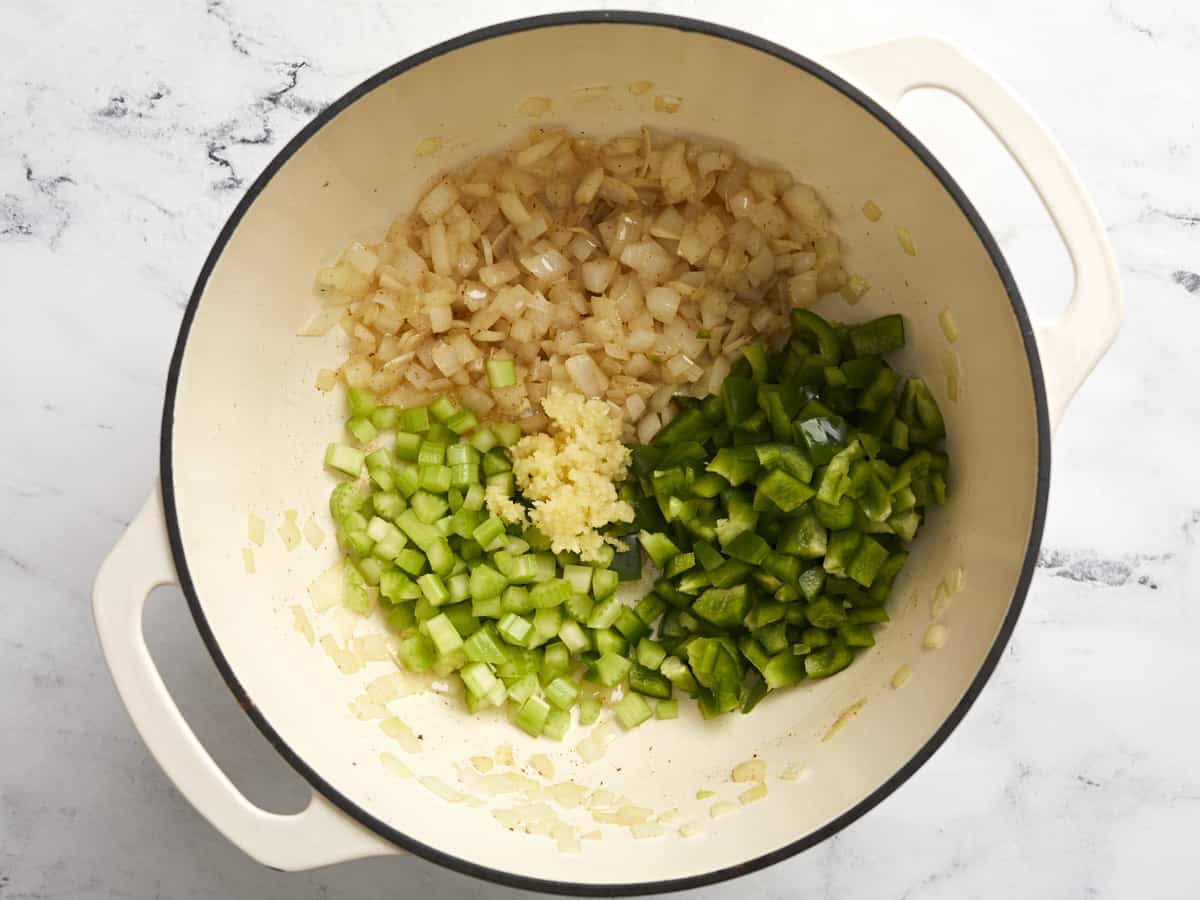
Dice the onion, bell pepper, and celery, and mince the garlic. Add the onion to the pot with the bacon grease and cook over medium until the onion is tender.
Add the bell pepper, celery, and garlic to the pot and continue to cook for about five minutes more.
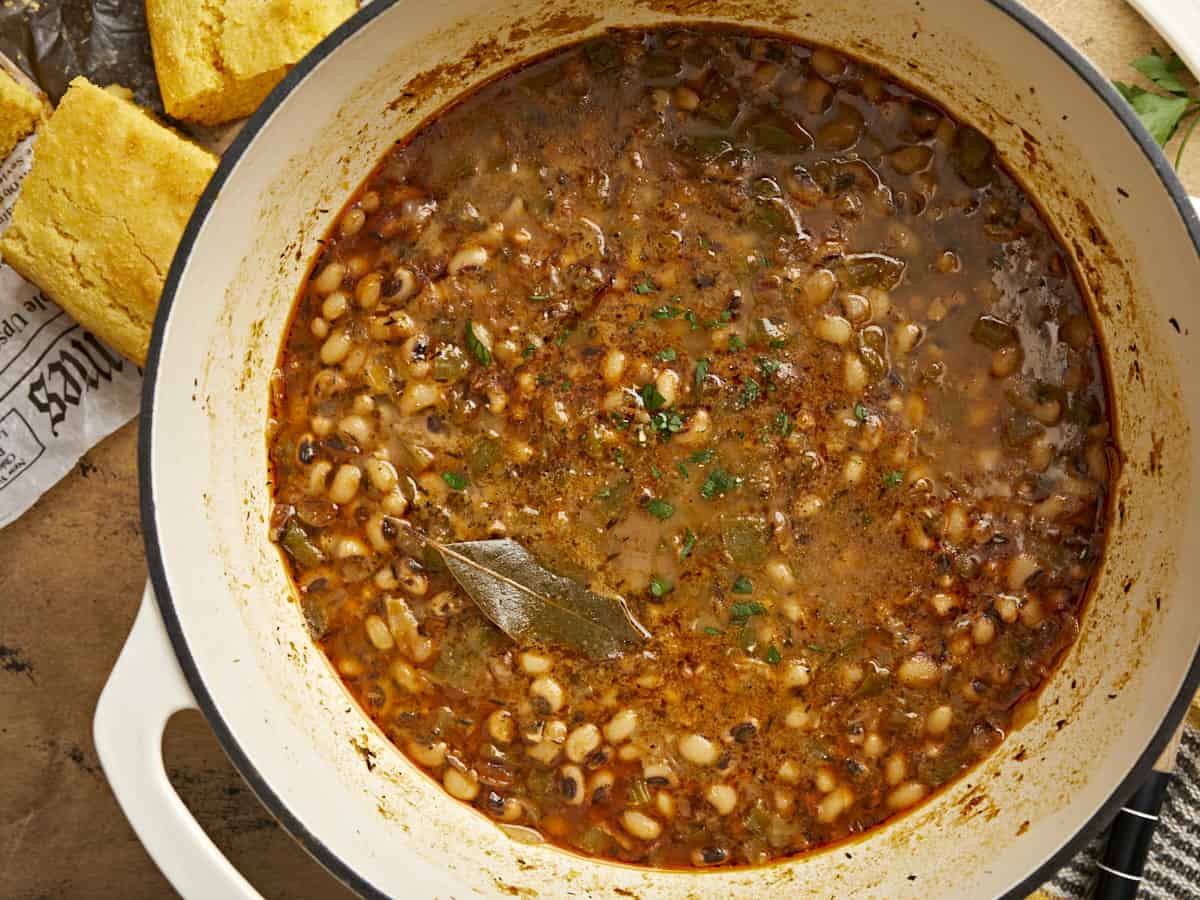
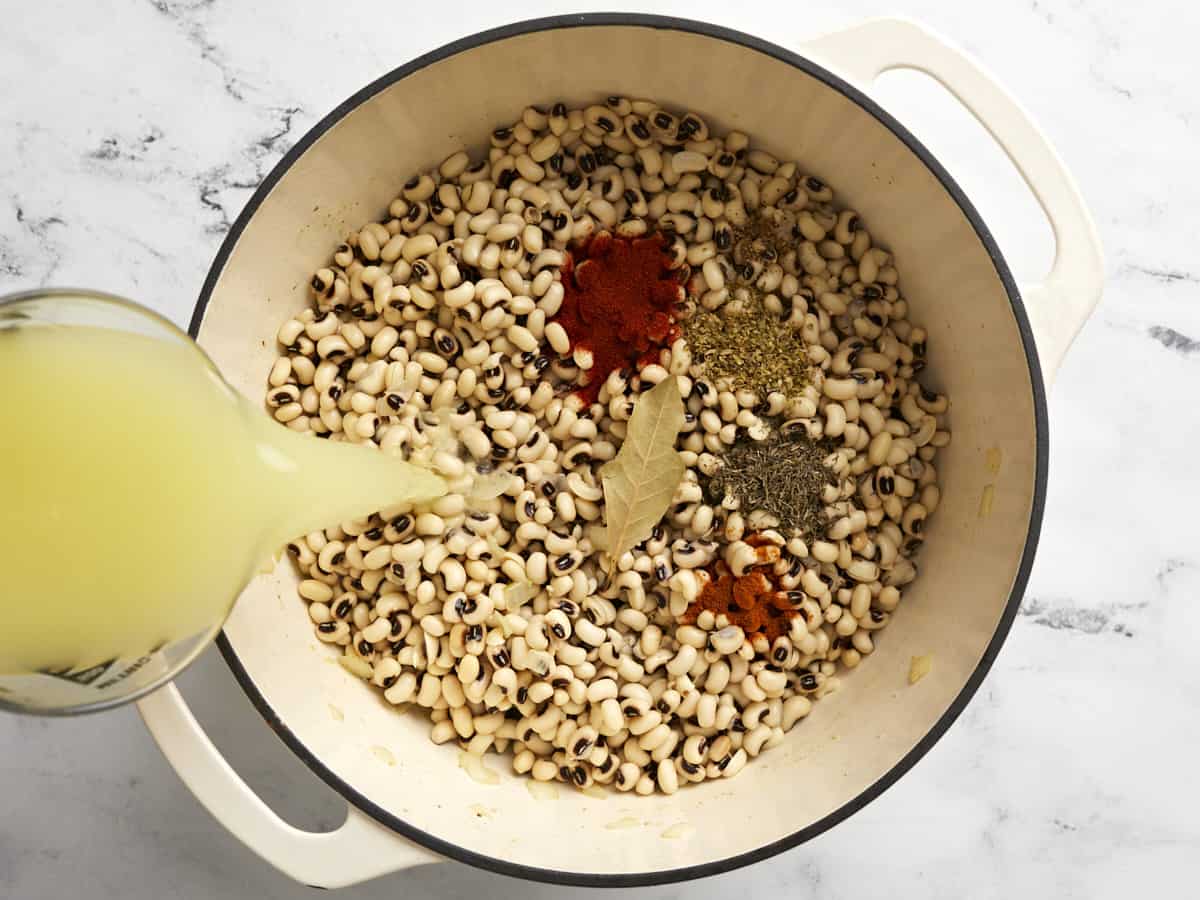
Drain the peas and give them a brief rinse. Add the peas to the pot along with the smoked paprika, oregano, thyme, cayenne pepper, black pepper, bay leaf, and chicken broth. Stir everything to combine, then place a lid on the pot.
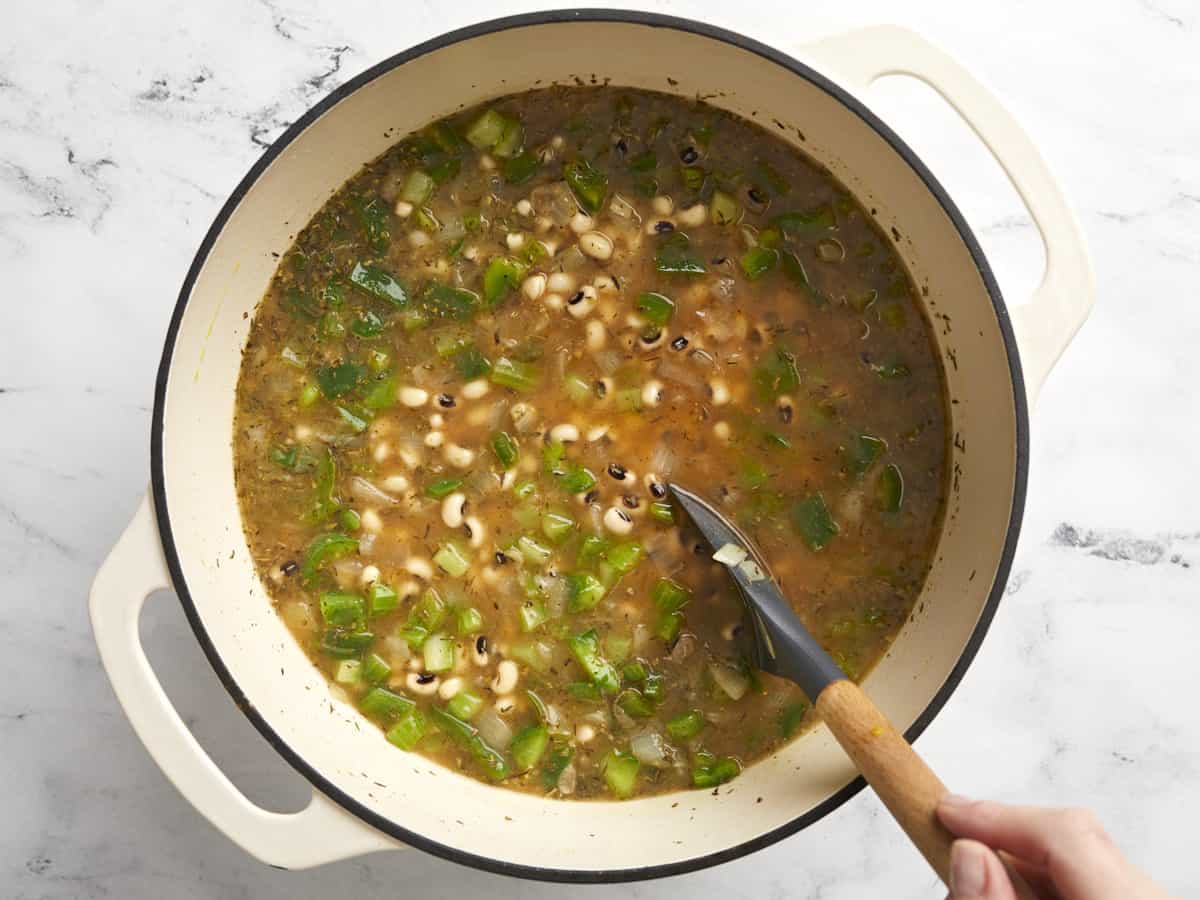
Turn the heat up to medium-high and allow the pot to come to a boil. Once it reaches a full boil, turn the heat down to medium-low and let the peas simmer for one hour, stirring occasionally, or until the peas are tender.
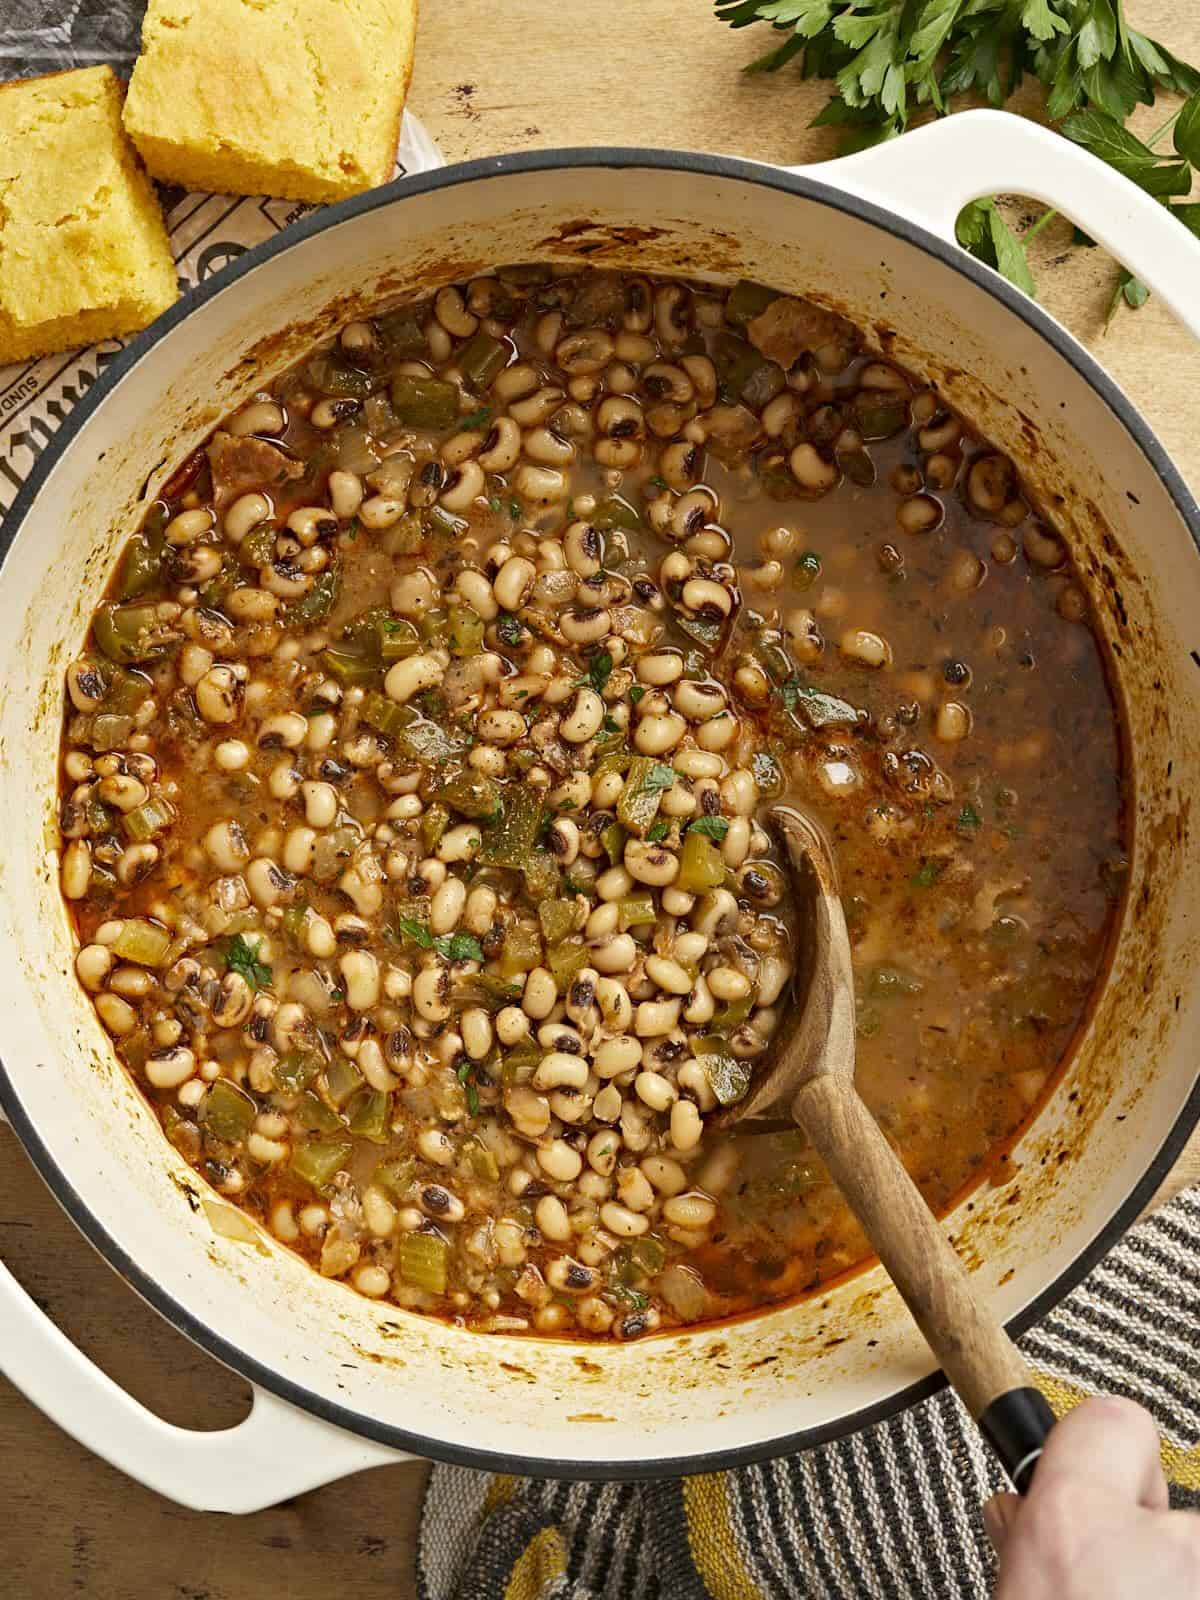
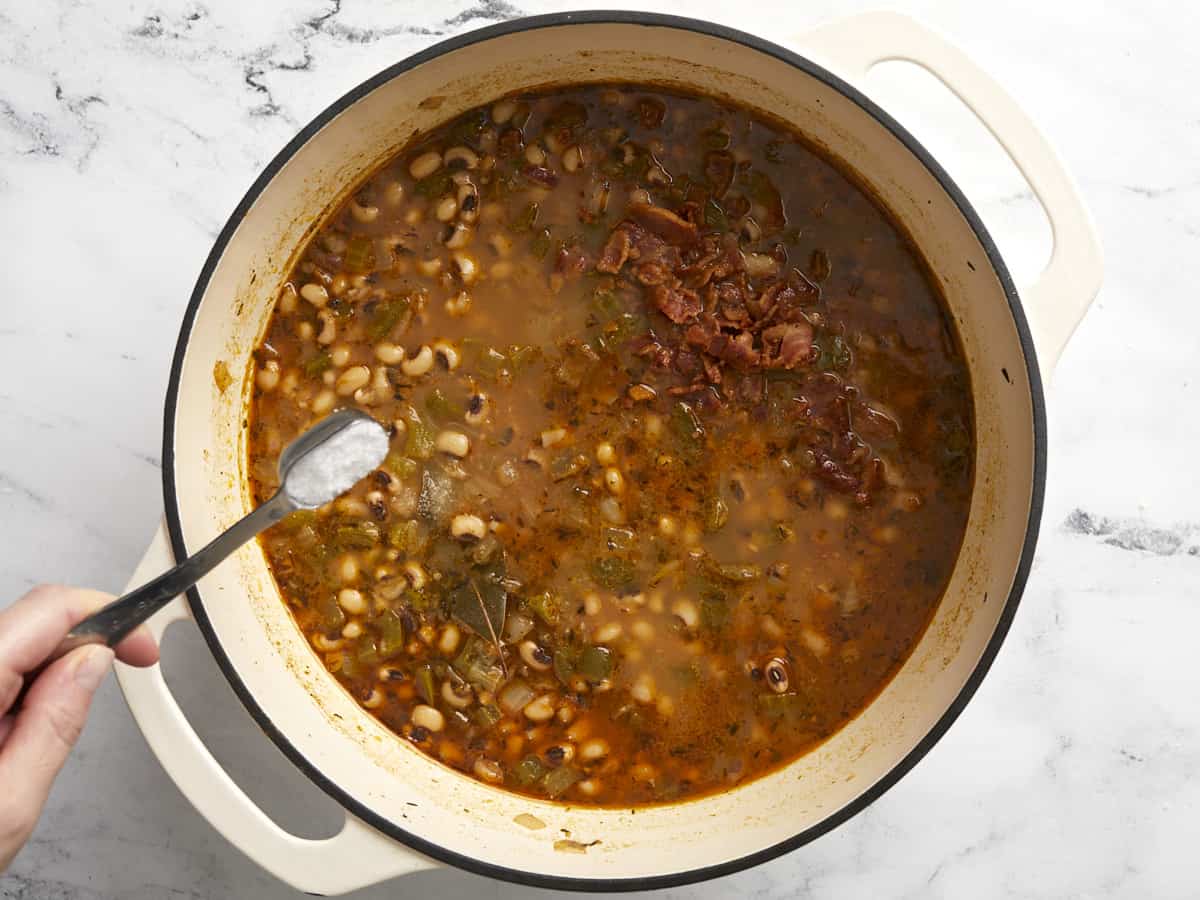
Once the peas have softened, crumble the bacon and stir it back into the pot. Season the peas with salt to taste, starting with ½ tsp and adding more until the flavors of the pot pop.
Remove the bay leaf from the pot and serve the peas with a side of collard greens and cornbread, or over a bowl of rice.
The night before, begin soaking the black-eyed peas. Rinse the peas well with cool water, then place them in a large bowl and cover with at least three inches of water. Soak the peas for at least eight hours in the refrigerator.
When you’re ready to cook the peas, add 4oz. bacon to a large pot and cook over medium heat until the bacon is brown and crispy. Remove the bacon and set it aside for later, leaving all of the bacon grease in the pot.
Dice one yellow onion, one green bell pepper, and two stalks of celery. Mince four cloves of garlic. Add the diced onion to the pot with the bacon grease and sauté over medium heat until the onions are soft, then add the bell pepper, celery, and garlic. Continue to sauté for about five minutes more.
Add the drained black-eyed peas to the pot along with 1 teaspoon smoked paprika, 1 teaspoon dried oregano, 1 teaspoon dried thyme, ¼ teaspoon cayenne pepper, ¼ tsp black pepper, one bay leaf, and four cups of chicken broth.
Stir all of the ingredients together, place a lid on the pot, and turn the heat up to medium-high. Allow the pot to come to a boil. Once it reaches a full boil, turn the heat down to medium-low and let the peas simmer, stirring occasionally, for one hour or until the peas are tender.
Once the peas are soft, crumble the bacon and stir it into the pot. Season the pot of peas with salt, starting with ½ teaspoon, and then add more to taste. The total amount needed will vary depending on how much salt is in the chicken broth used, but we used one teaspoon total.
Remove the bay leaf then serve with a side of collard greens and cornbread, or over a bed of rice. Enjoy!
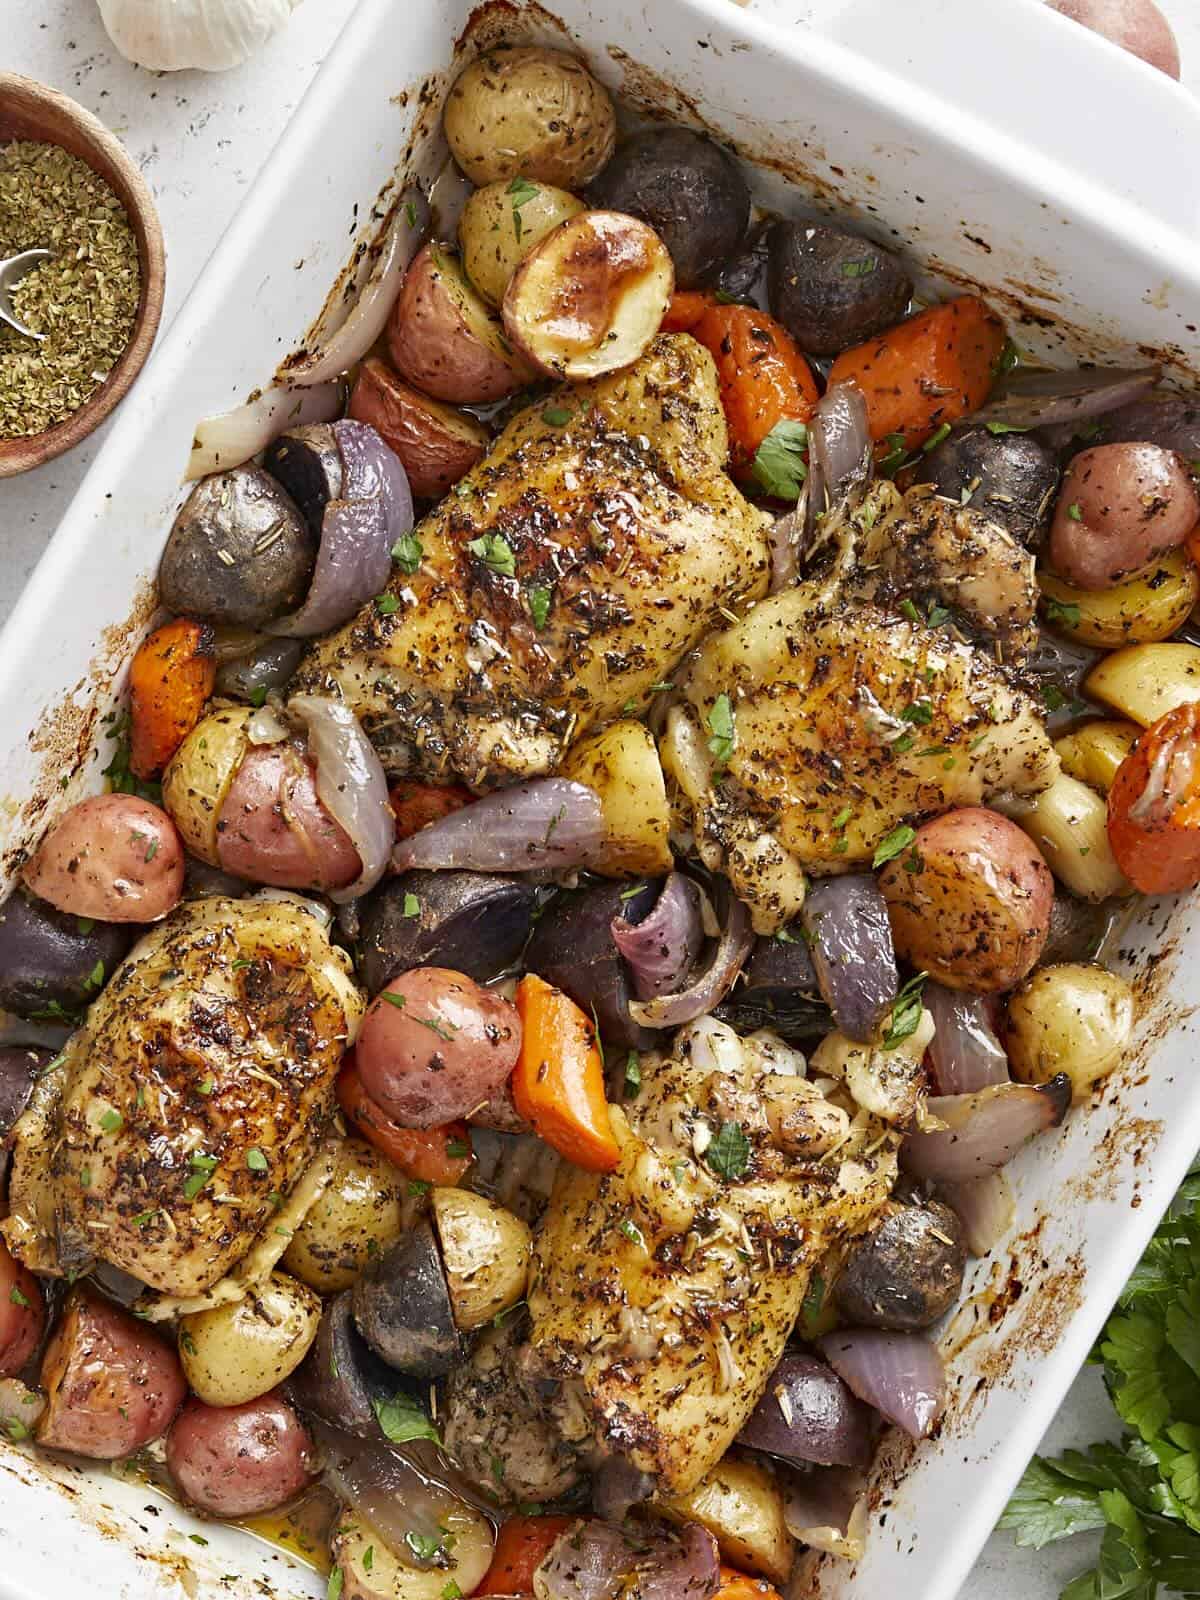
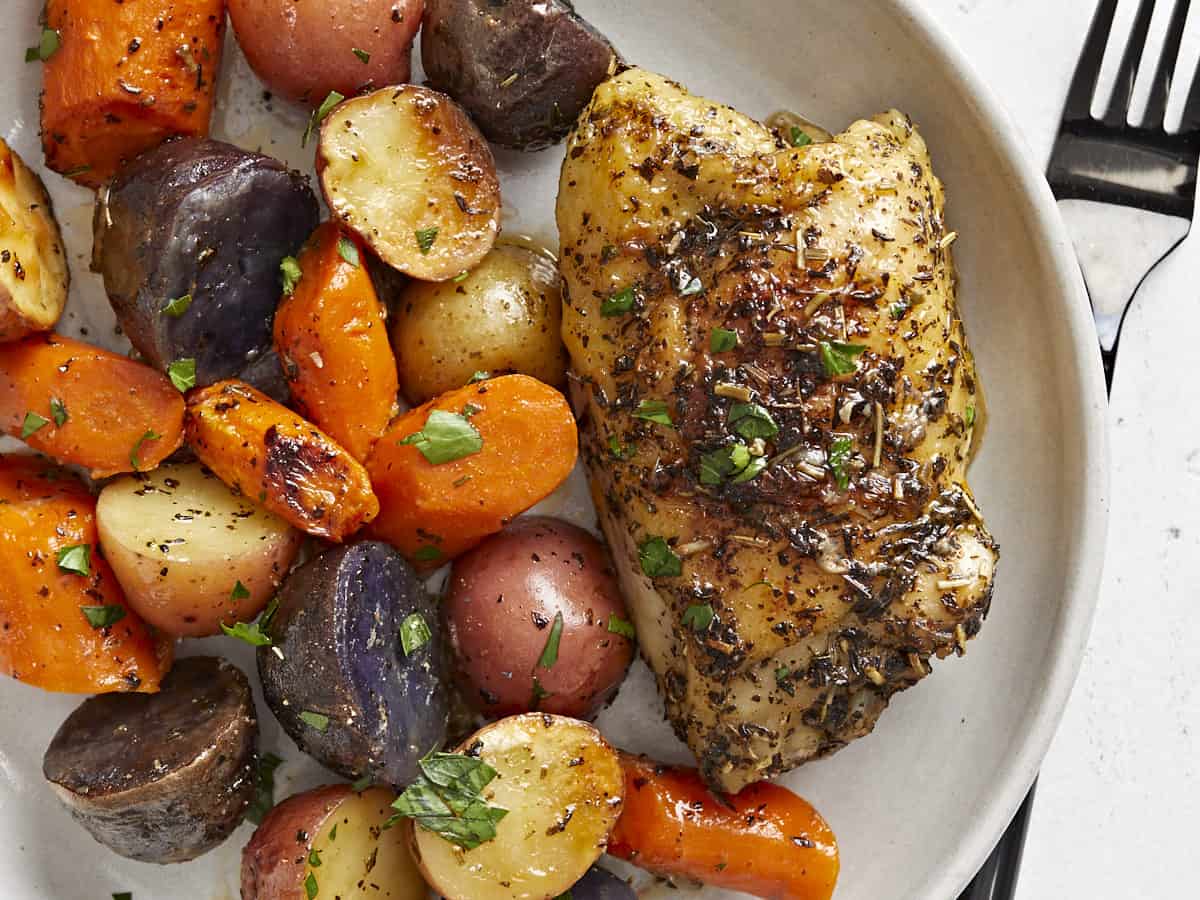
Roasting is my preferred method of cooking this time of year because it’s easy and hands-off, plus it creates the most scrumptious caramelized flavors and super tender and juicy meat. Not to mention, it will help keep your kitchen warm and cozy. 😏 This recipe for Roasted Chicken and Vegetables combines budget-friendly bone-in chicken thighs with a medley of winter vegetables and an herb-infused seasonoing for a hearty meal that will keep you full and warm on cold winter nights.
Why I Love This Dish
Roasting absolutely transforms food. It caramelizes the natural sugars in the vegetables, making their flavor deep and sweet. It browns the skin on the chicken making it crispy and delicious, all while keeping the meat inside tender and juicy. Plus, all of that time in the oven allows all of the flavor of the herbs to infuse every bite. It’s ✨magical✨.
The best part, though, is that roasting is very hands-off, meaning you can go take care of other things while the food in the oven working its magic. There’s a little bit of chopping and seasoning in the beginning, but then it just goes into the oven and an hour it comes out delicious! BOOM!
Ingredients for Roasted Chicken and Vegetables
Here’s what you’ll need to make this cozy winter dinner:
Chicken Thighs: I used bone-in, skin-on chicken thighs for this recipe because they are budget-friendly and always turn out super tender and juicy. You can also use chicken drumsticks, but I would avoid boneless or skinless cuts of chicken because they will dry out with this longer cooking time (and you won’t get that beautifully crispy skin!).
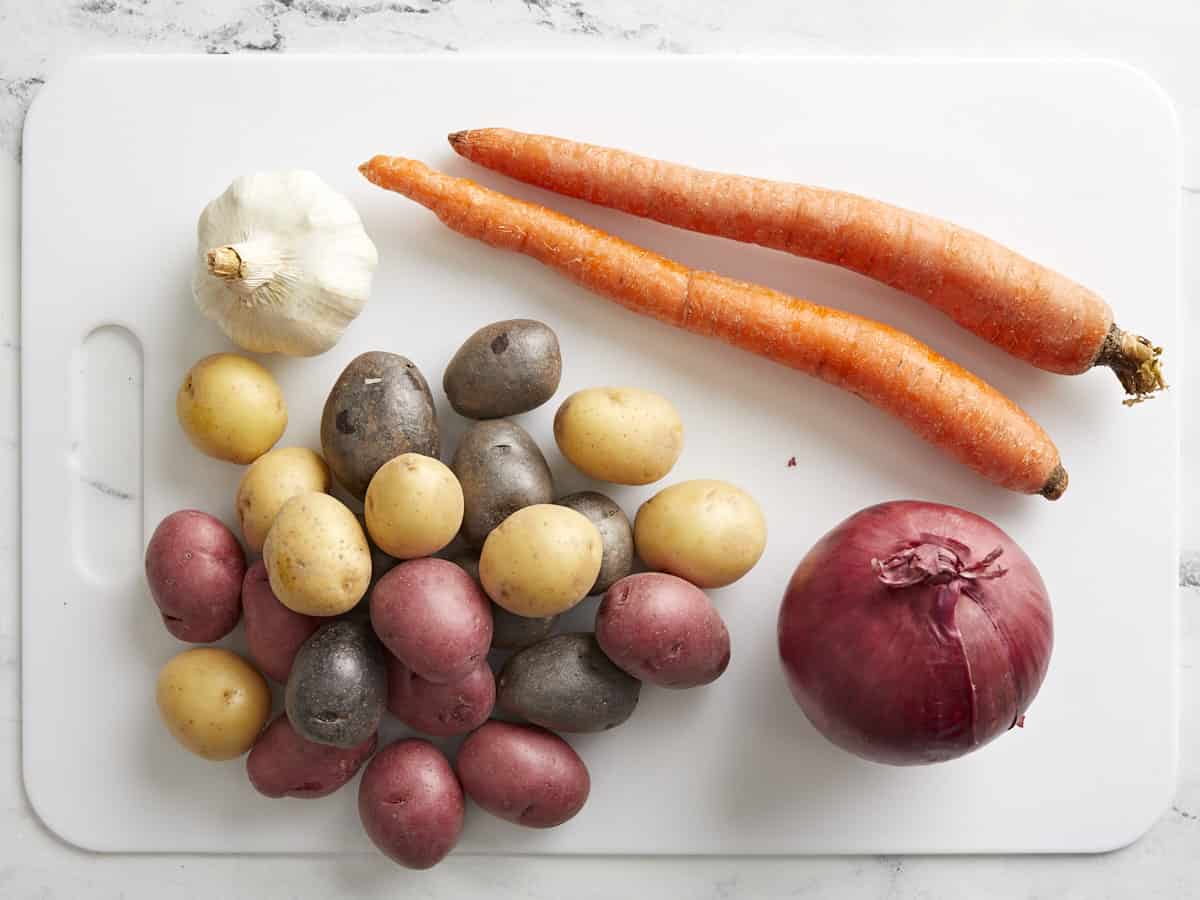
Vegetables: I used a combination of potatoes, carrots, garlic, and onions to create a colorful, filling, and flavorful mix. The potatoes and carrots are firm enough to hold up to the long roasting time, the potatoes absorb all of that amazing flavor, and the garlic and onions get deliciously soft and caramelized in the process. I used tri-colored baby potatoes, but if those are out of budget you can use red potatoes cut into 1-inch pieces.
Herbs and Spices: To add flavor to the chicken and vegetables I added a hefty dose of seasonings including dried basil, dried thyme, dried rosemary, paprika, garlic powder, salt, and pepper. Every bite will have maximum flavor!
Olive Oil: Oil helps the seasoning stick to the chicken and vegetables and it also helps prevent them from drying out from the heat of the oven. Instead of shriveled dry vegetables, you’ll get tender caramelized vegetables and crispy chicken skin!
What Kind of Baking Dish to Use
You’ll want to use a very large casserole dish for the roasted chicken and vegetables so the ingredients have good exposure to the hot air. Aim for a dish that is at least 9×13 inches and around 3-4 quarts in volume. Glass or ceramic work best, but if you have a metal casserole dish you may need to reduce the cooking time slightly as the dish will heat up faster. A sheet pan will allow the ingredients to be too far spread out, causing more evaporation and less of the flavorful juices that soak into the potatoes.
How to Store Leftovers
This cozy meal makes a great meal prep, if you are feeding just yourself or have a household of two. Simply divide the chicken and vegetables into single-serving containers after cooking, then refrigerate. The chicken and vegetables will stay good for about four days in the refrigerator and can be reheated quickly in the microwave.
Preheat the oven to 425ºF. Wash and cut the baby potatoes in half (or, if using larger potatoes, cut into 1-inch pieces). Wash and slice the carrots into 1-inch pieces. Peel and cut the red onion into wedges. Peel the garlic cloves and leave them whole.
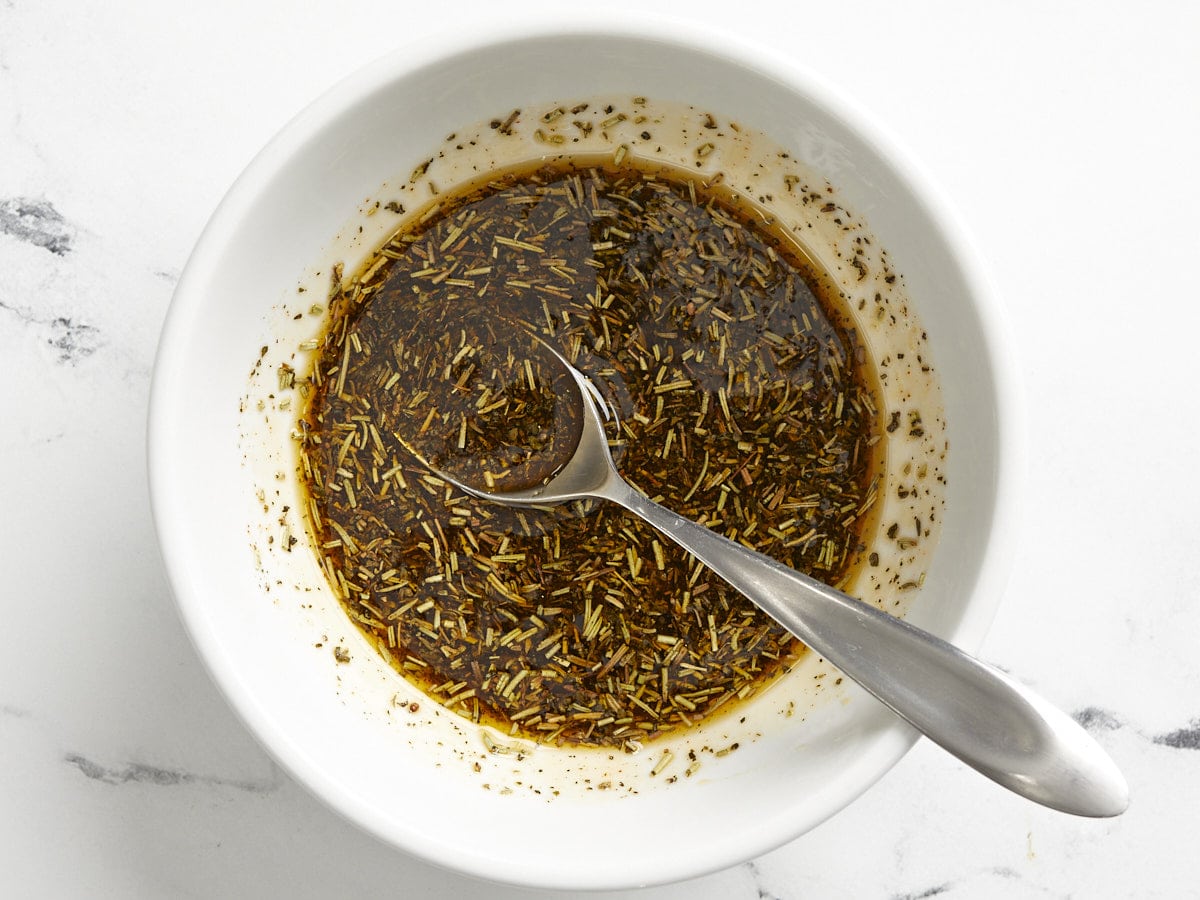
Add the olive oil, basil, rosemary, thyme, garlic powder, paprika, salt, and pepper in a bowl and stir until well combined.
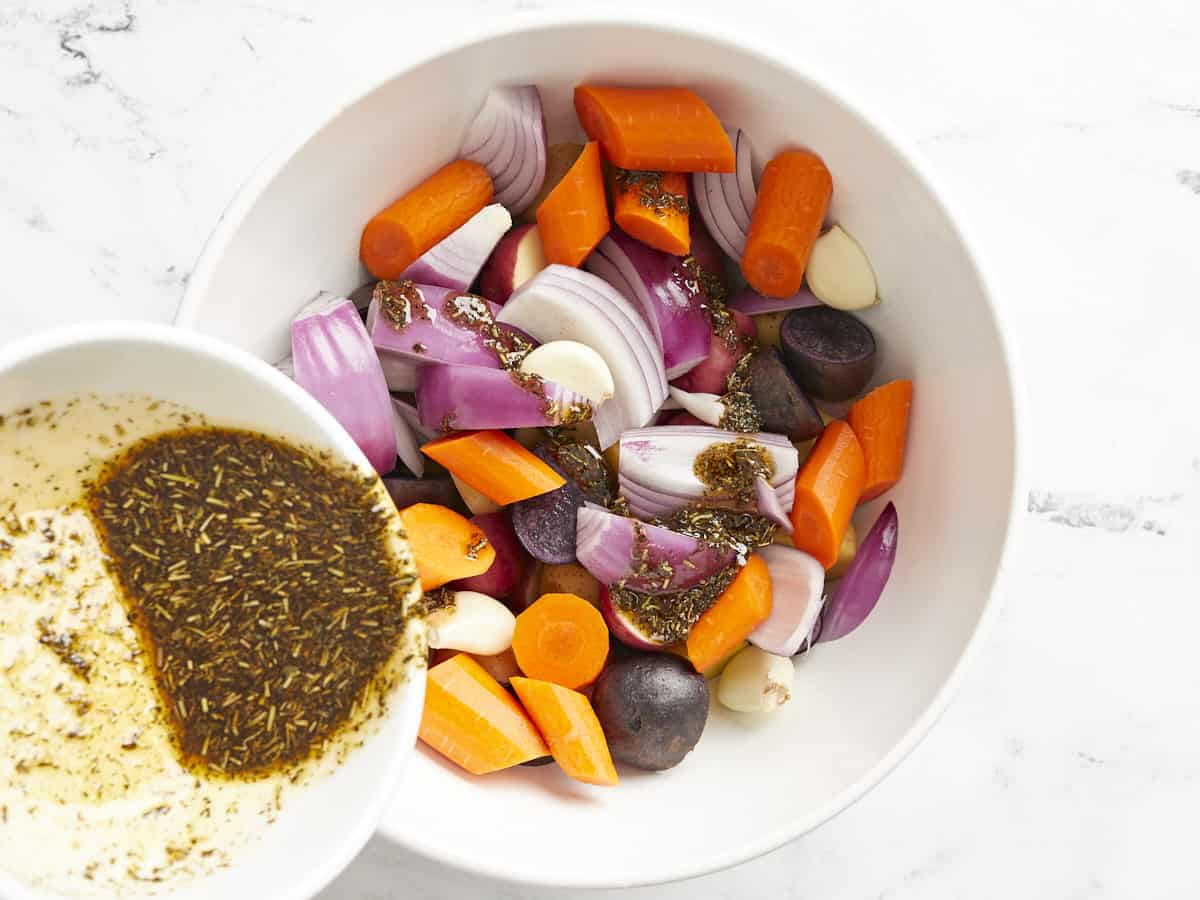
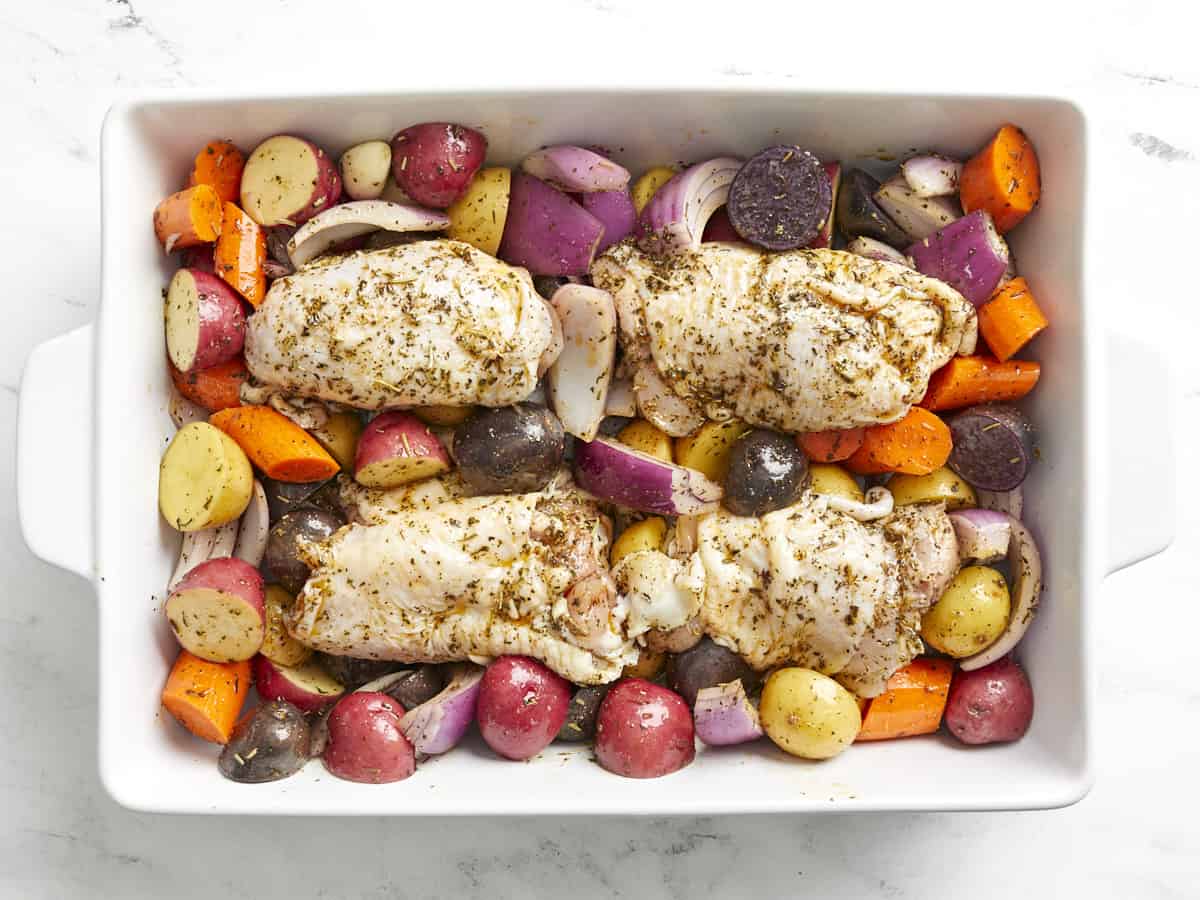
Place the prepared vegetables in a large bowl and drizzle half of the seasoning over top. Toss the vegetables until they are fully coated in oil and herbs, then transfer them to a 9×13-inch or larger casserole dish.
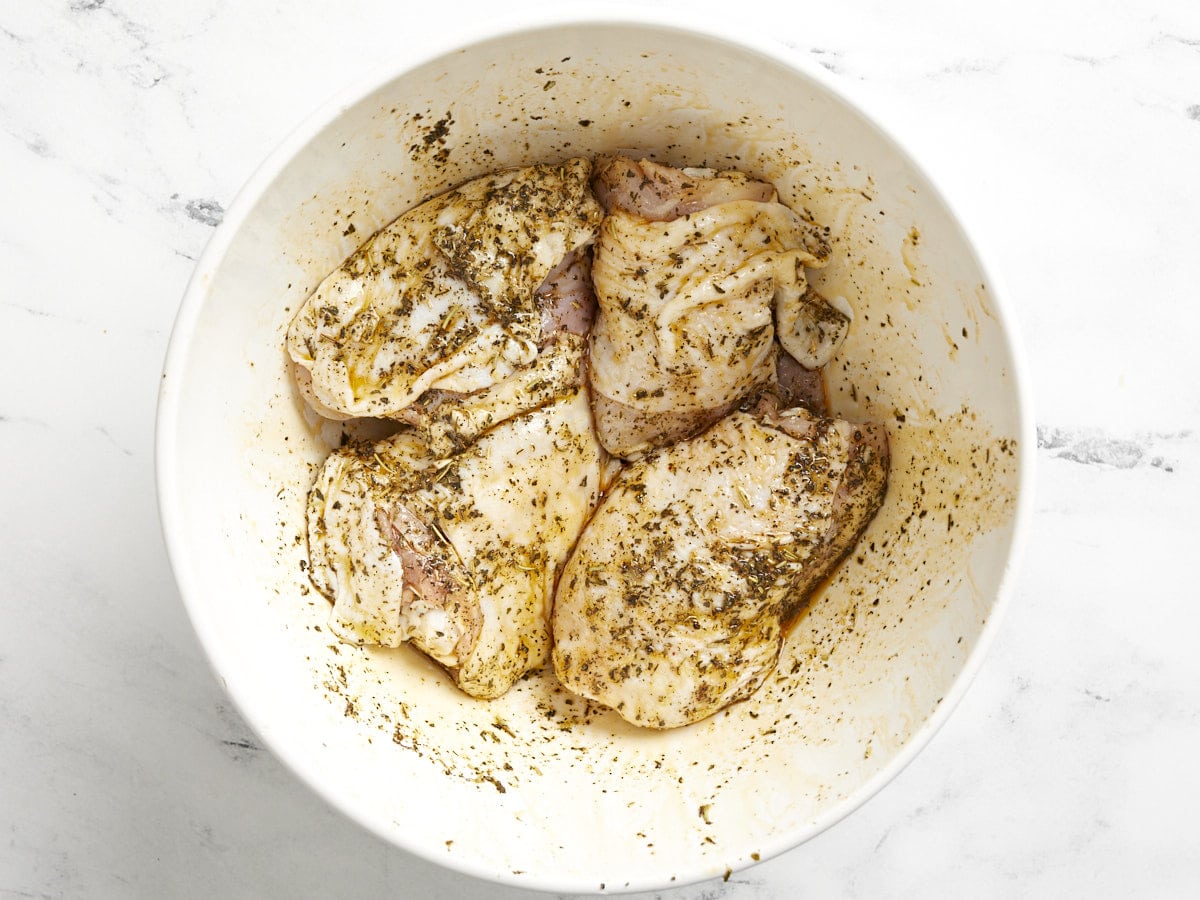
Place the chicken thighs into the same bowl and pour the remaining oil and herbs over top. Toss until the chicken is fully coated, then nestle the chicken down into the vegetables in the casserole dish, making sure the chicken is not covered with vegetables.
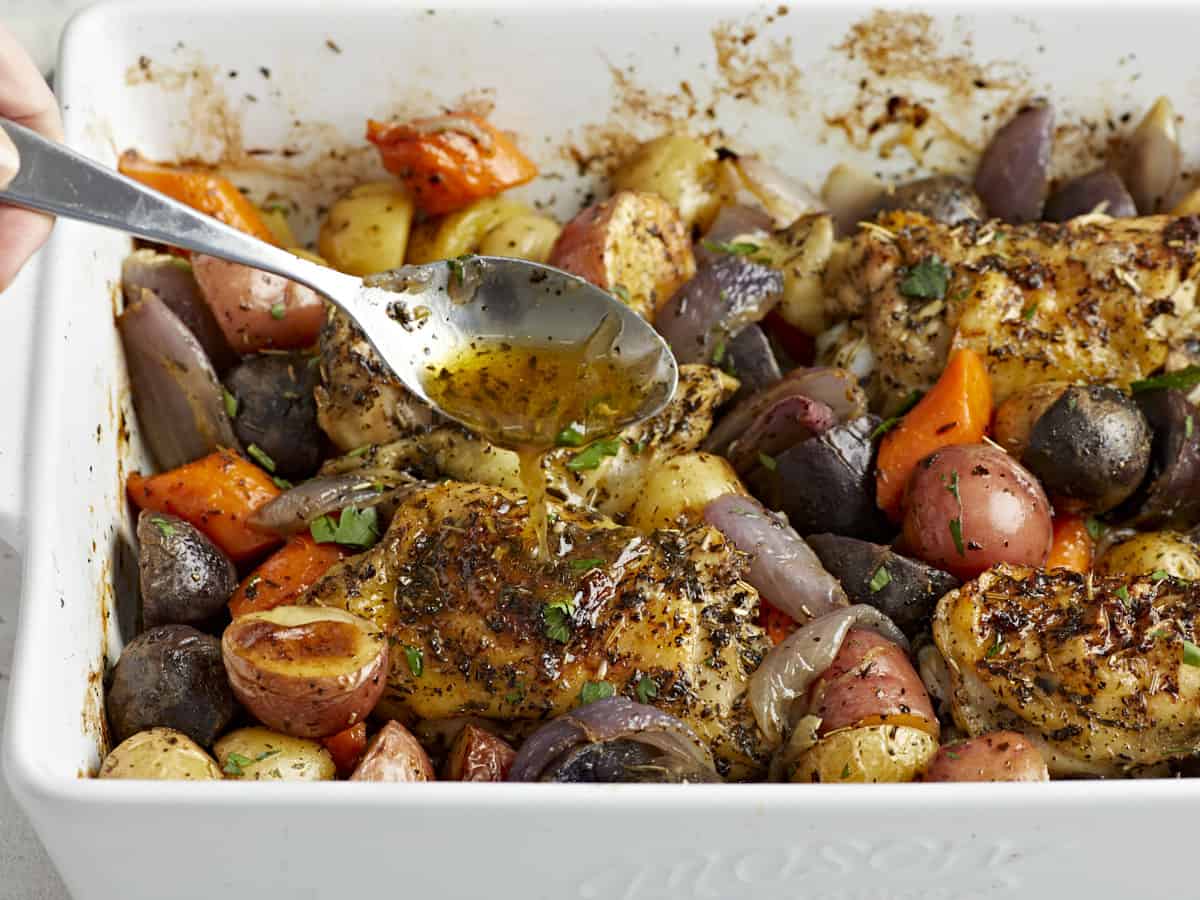
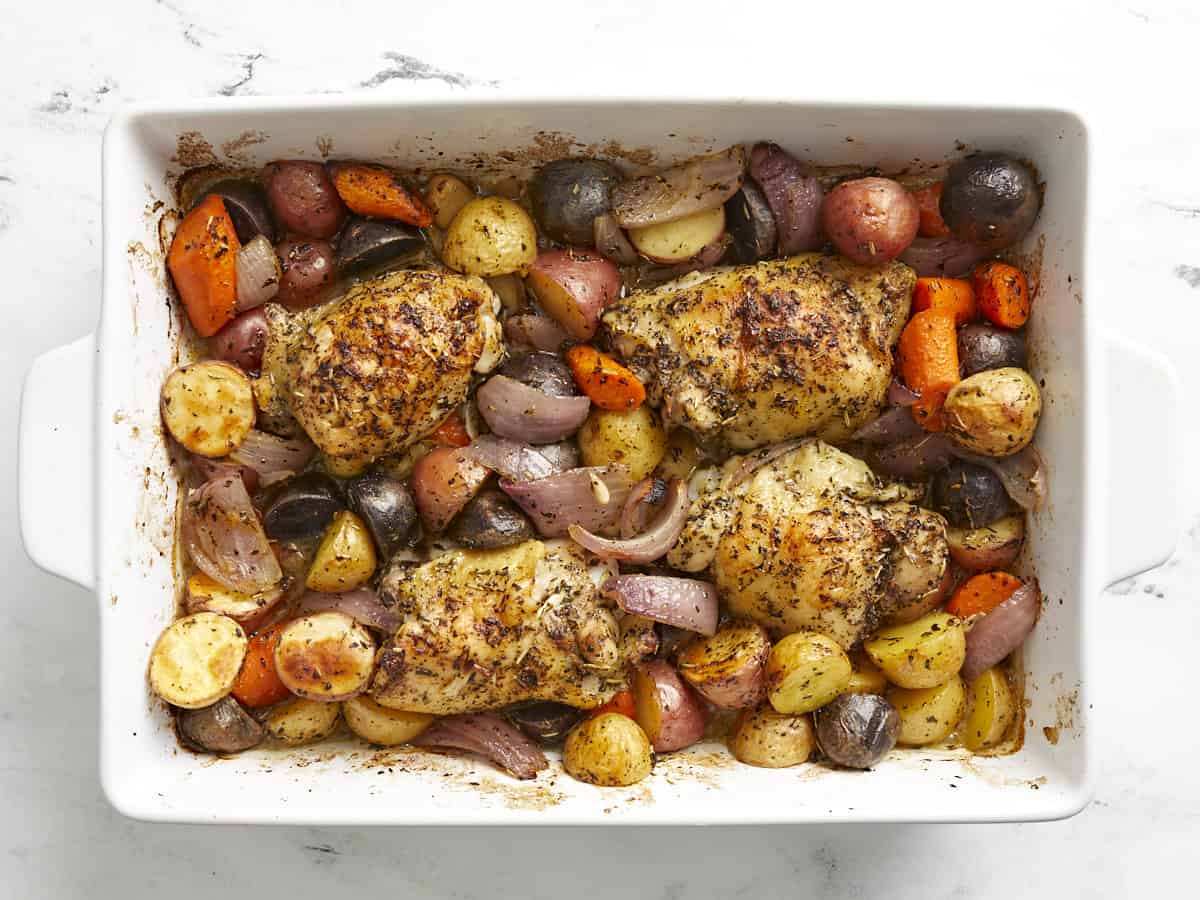
Roast the chicken and vegetables in the preheated 425ºF oven for 40 minutes, then remove the casserole dish and carefully stir the vegetables. Spoon some of the liquid from the bottom of the dish over the chicken, then return the dish to the oven and roast for an additional 20 minutes or until the chicken skin is golden brown and crispy and the vegetables are browned and caramelized. Serve hot.
How to Make Roasted Chicken and Vegetables – Step by Step Photos
Preheat the oven to 425ºF. Begin by preparing the vegetables. Wash and slice 24 oz. potatoes in half (or into 1-inch pieces if using larger red potatoes). Wash and slice two large carrots into 1-inch pieces. Peel and slice one red onion into wedges. Peel four cloves of garlic and leave them whole.
Prepare the seasoning mix for the chicken and vegetables. In a bowl combine ¼ cup olive oil with 2 teaspoons dried basil, 1 teaspoon dried thyme, 1 teaspoon dried rosemary, ½ teaspoon garlic powder, ¼ teaspoon paprika, 1 teaspoon salt, and ½ teaspoon black pepper.
Place the prepared vegetables in a large bowl and drizzle half of the seasoning mix over top. Toss the vegetables until they are fully coated in the oil and herbs. Transfer the seasoned vegetables to a very large casserole dish.
Place four bone-in, skin-on chicken thighs (about 2 lbs.) into the same bowl and pour the remaining seasoning over the top. Toss the chicken thighs until they are fully coated.
Nestle the chicken thighs down into the vegetables in the casserole dish. Make sure the vegetables are not covering the chicken. Transfer the casserole dish to the preheated 425ºF oven.
Roast the chicken and vegetables in the oven for about 40 minutes, then remove the dish and carefully stir the vegetables in the casserole dish and spoon some of the liquid from the bottom of the dish over the chicken. Return the chicken and vegetables to the oven and roast for another 20 minutes, or until the vegetables are golden and caramelized and the chicken skin is golden and crispy.
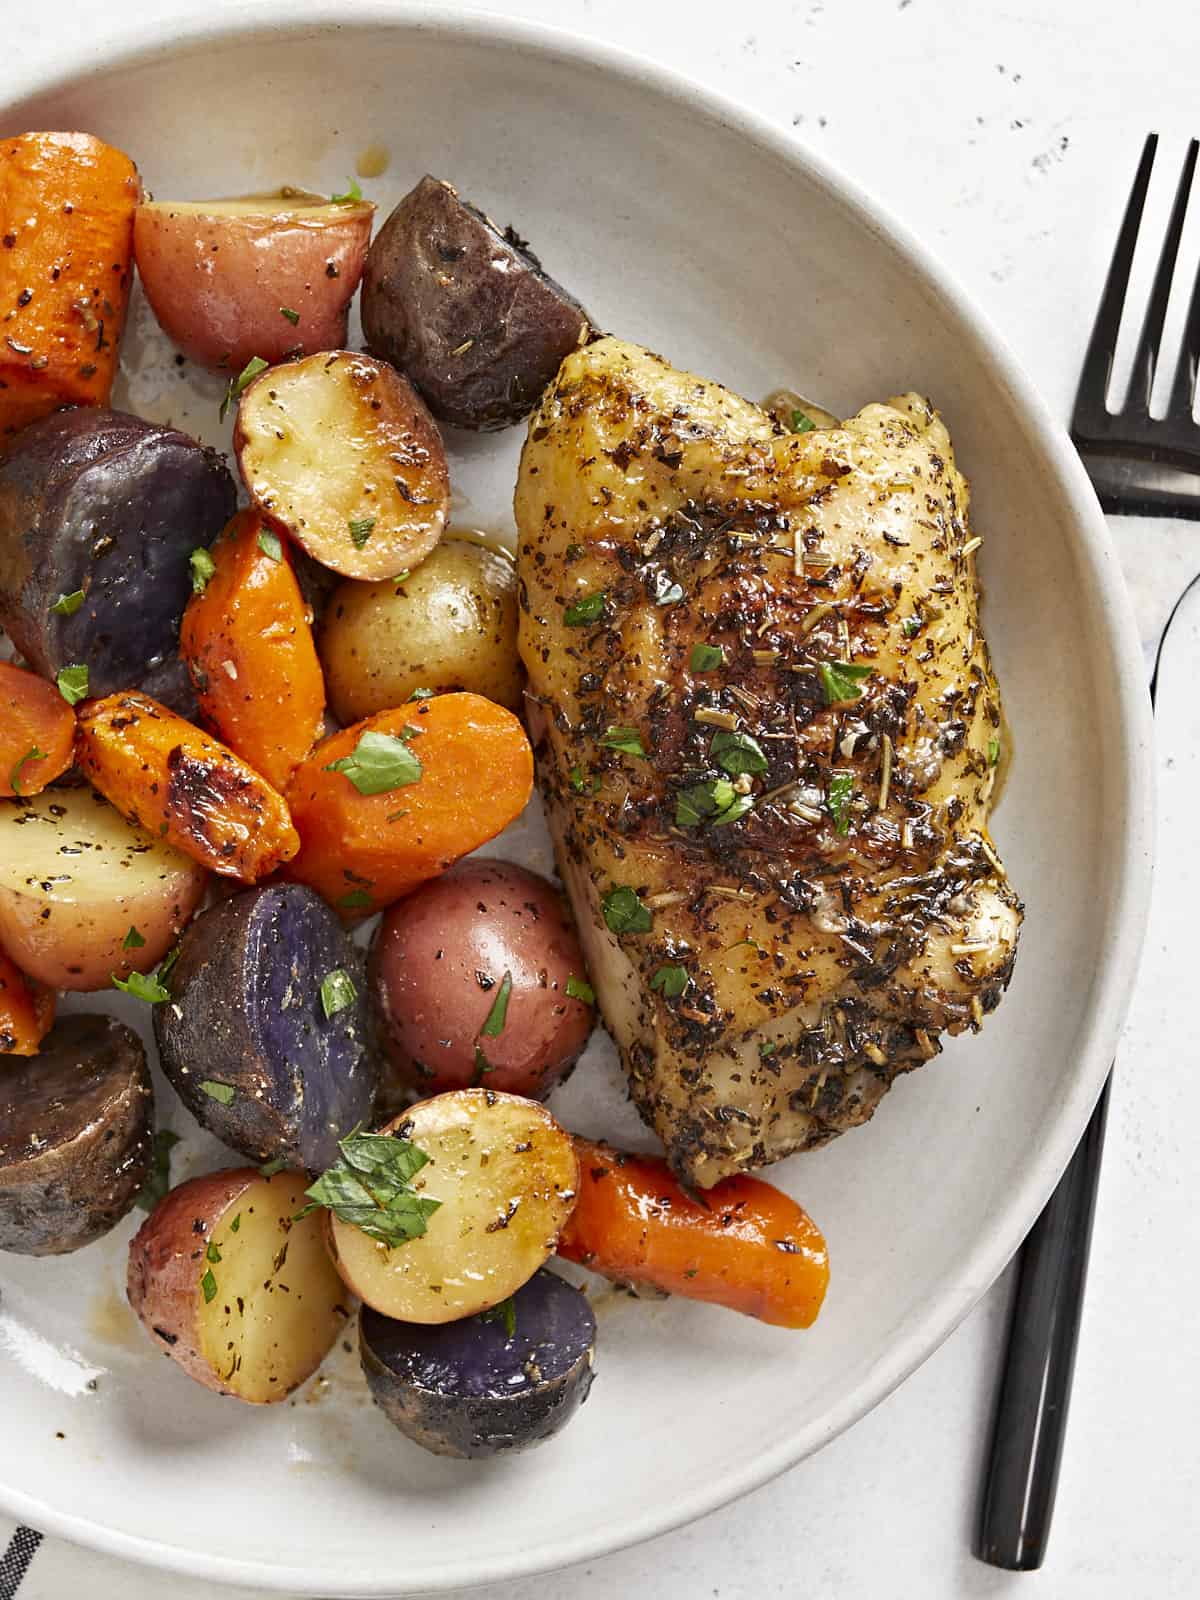
(Garnished with parsley for color, not needed for flavor.)
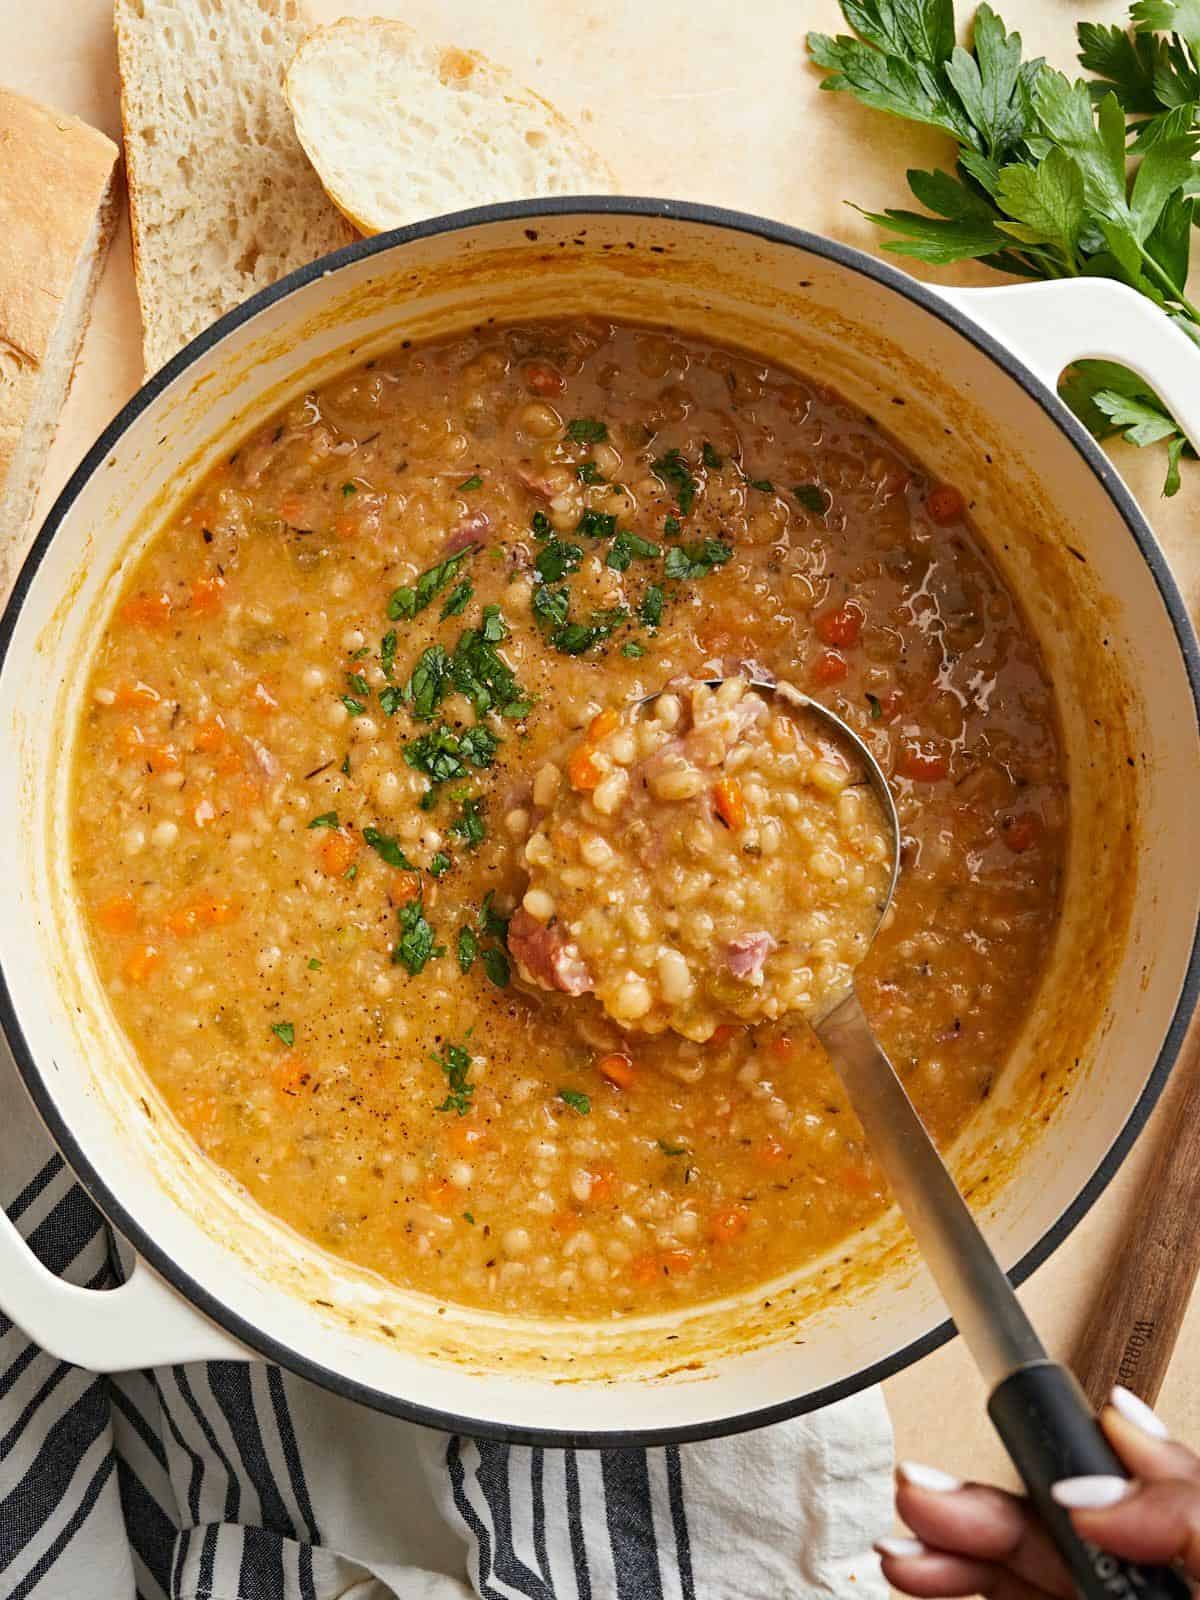
Y’all, I’m on a roll with these simple, cozy, soup recipes! I had one extra ham hock left over from making Split Pea Soup a few weeks ago, so I decided to test a simple Navy Bean Soup recipe. I used dry, uncooked navy beans because they’re more economical than canned beans and you can infuse a lot of flavor into them. Then I just paired the navy beans with some vegetables, a smoked ham hock, and lots of herbs and spices. The results…a hearty, creamy, and absolutely delicious navy bean soup! Trust me, you’ll be blown away by how flavorful this soup is and just how easy it is to make!
INGREDIENTS FOR NAVY BEAN SOUP
Here are the ingredients you’ll need to make this comforting & delicious navy bean soup:
Navy Beans – We start things off with dry, uncooked navy beans. Navy beans are creamy and break down easily in the soup.
Vegetables – A combination of aromatics like onion, celery, carrots, and garlic are sautéed with a little bit of olive oil to add a great base layer of flavor and depth to the soup.
Ham Hock – Ham and beans just go together like peanut butter and jelly!😄 The smoked ham hock we used infused a ton of smoky, salty, flavor into the navy beans! We also tested this recipe with just regular diced ham, but it did not provide the same type of rich flavor as a ham bone. However, smoked turkey wings are a great alternative to use if you don’t want to use ham.
Spices – A combination of dried spices like thyme, oregano, and smoked paprika adds a rich color and wonderful flavor to the soup.
Chicken Broth – Make sure you use a good quality chicken broth as a lot of the soup flavor will come from the broth. We use Better than Bouillon for our broth.
Do I Need To Soak Navy Beans Overnight?
Although it’s not mandatory, we did soak the navy beans overnight to help soften the beans and speed up the cooking process. You could also do a quick soak method if you are pressed for time.
To do the “quick soak method” start by giving the dry beans a quick rinse with cold water in a colander. Remove any stones or debris that you see. Next add the navy beans to a large pot and cover with water. Bring the pot to a boil over high heat. Once boiling, continue to cook, uncovered, for 2 minutes. After 2 minutes, remove the pot from the heat, cover the pot with a lid, and allow the beans to soak in the hot water for 1 hour. Drain and rinse the beans well before cooking!
Storing Leftovers
This navy bean soup recipe makes a big batch, so save the leftovers for lunch the next day or freeze for later. You can store the soup in an airtight container in the refrigerator for up to 4-5 days. Or freeze in freezer-safe containers for up to 3 months.
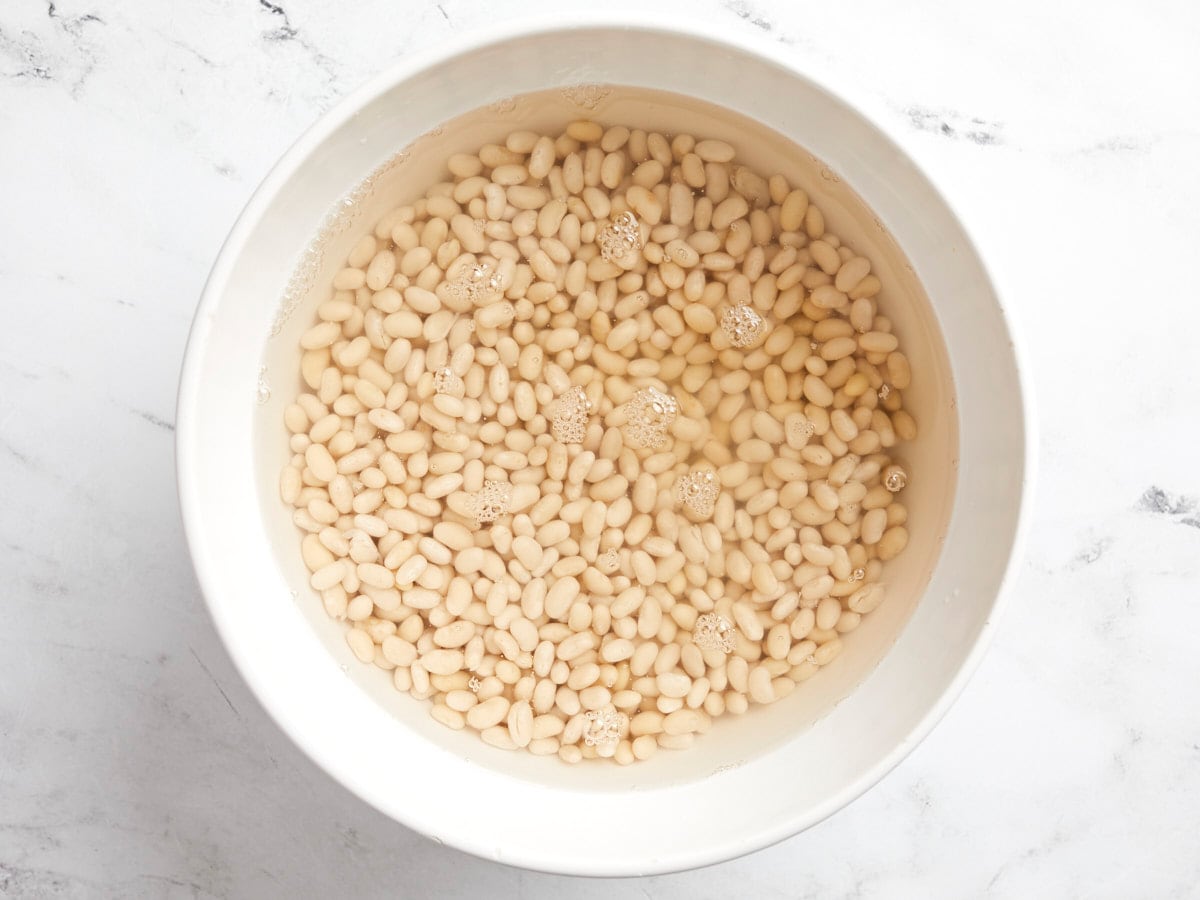
Start by soaking the dry navy beans overnight. Place the beans in a bowl, cover them with cold water, and place the bowl in the refrigerator. The next day, drain and rinse the beans.
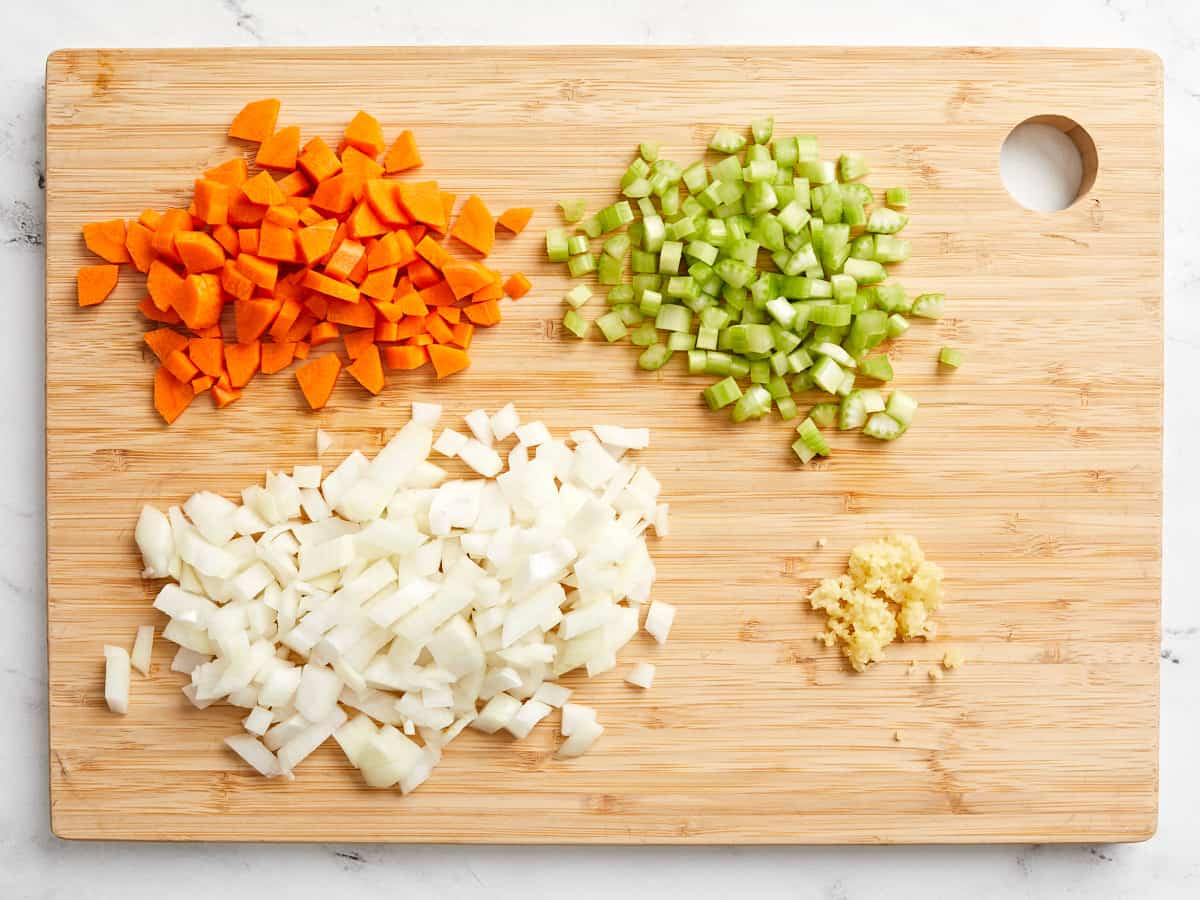
Dice the onion, the carrot, and the celery stalk. Mince the garlic cloves.
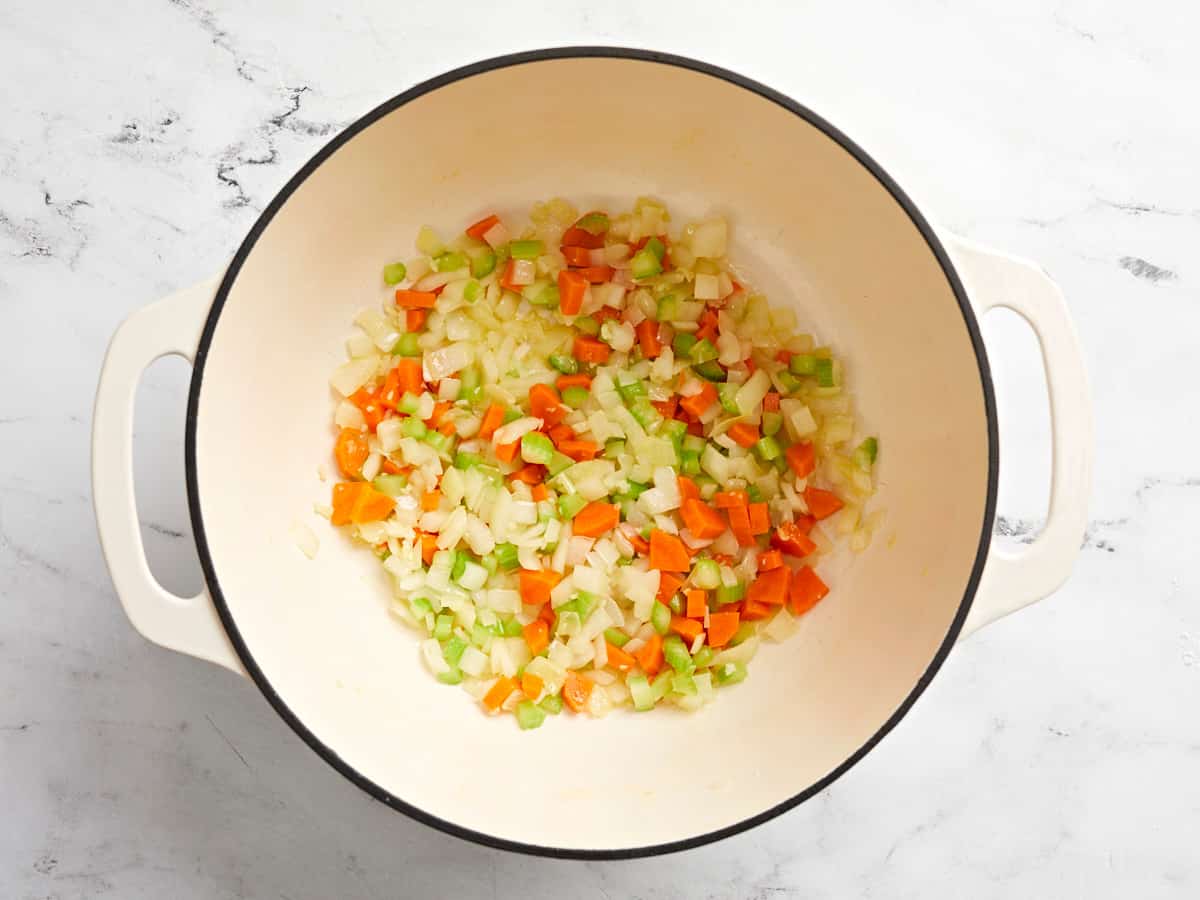
Sauté the onion, carrot, celery, and garlic in a large soup pot or Dutch oven with olive oil over medium heat, until the onions are soft and translucent.
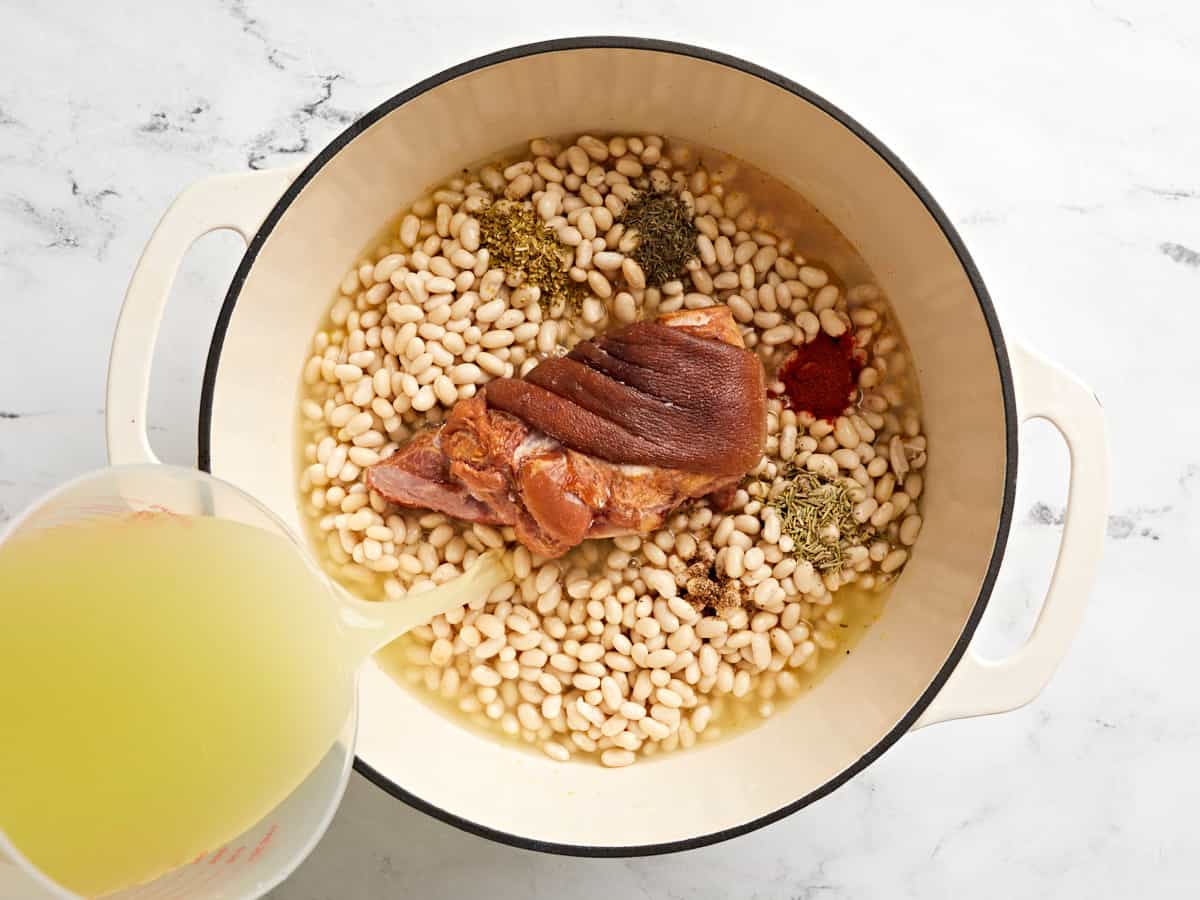
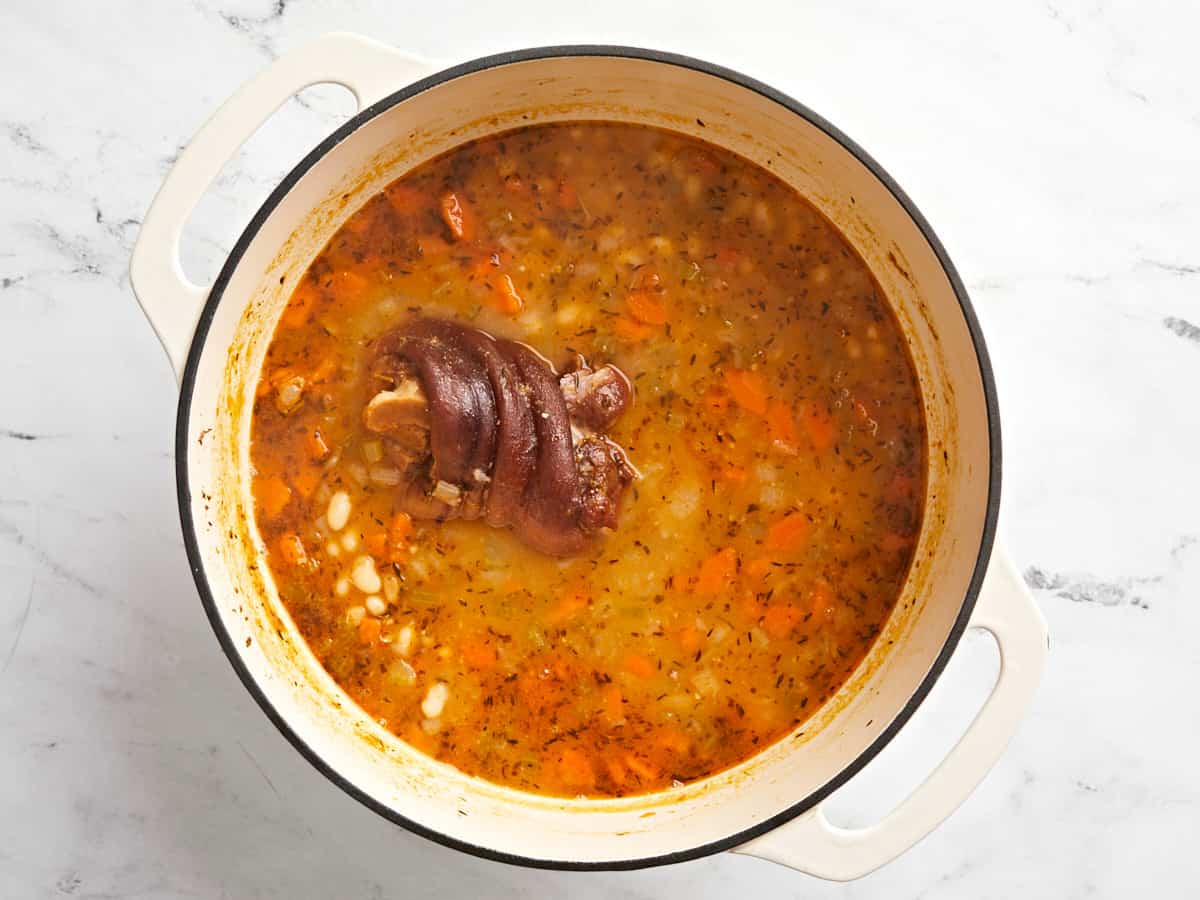
Add the soaked & drained beans, ham hock, dried thyme, dried oregano, dried rosemary, smoked paprika, black pepper, and chicken broth to the pot. Gently stir to combine all the ingredients.
Place a lid on the pot and bring it up to a boil. Once boiling, turn the heat down to medium-low and let the soup simmer, stirring occasionally, until the beans are tender and begin to break down (approximately 1.5 hours). Flip the ham hock over once or twice, while the soup is simmering, so that it gets even exposure to the hot liquid.
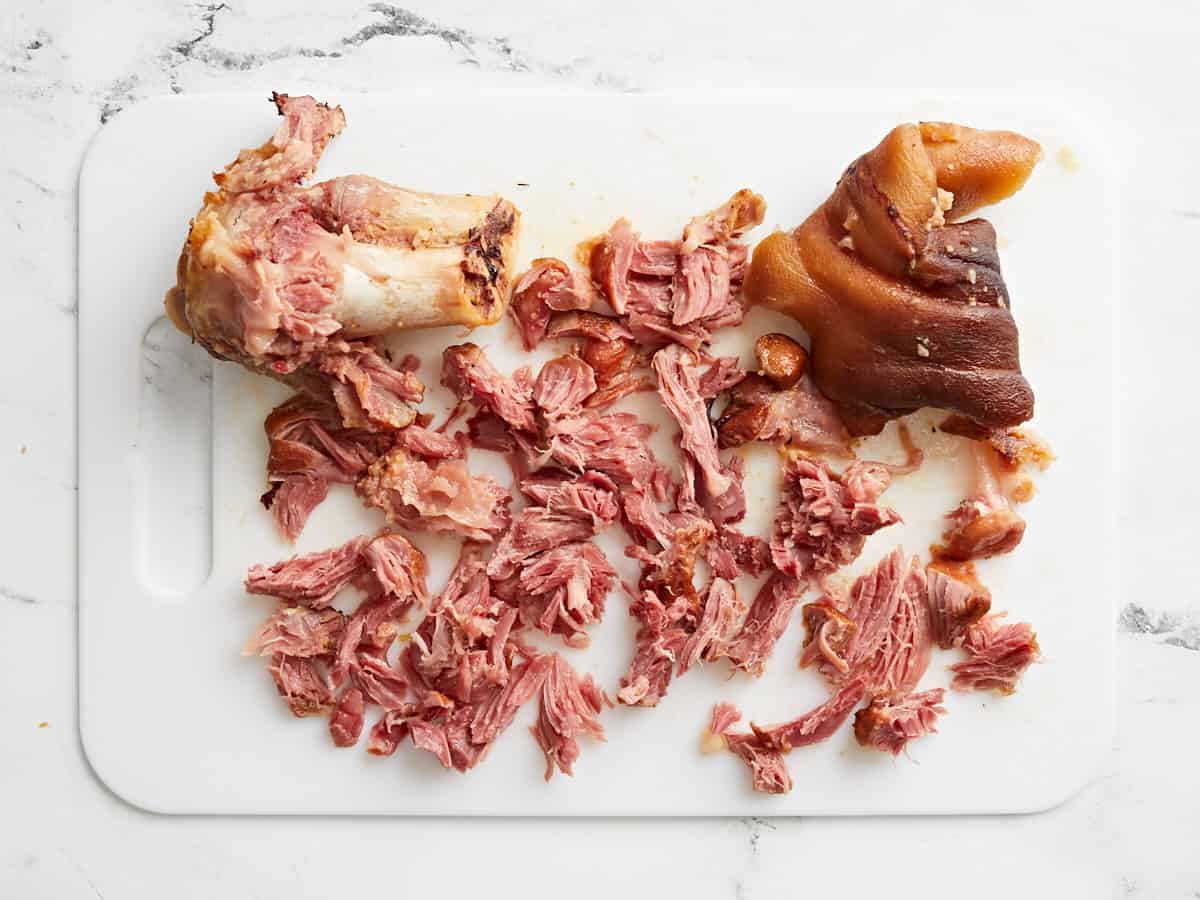
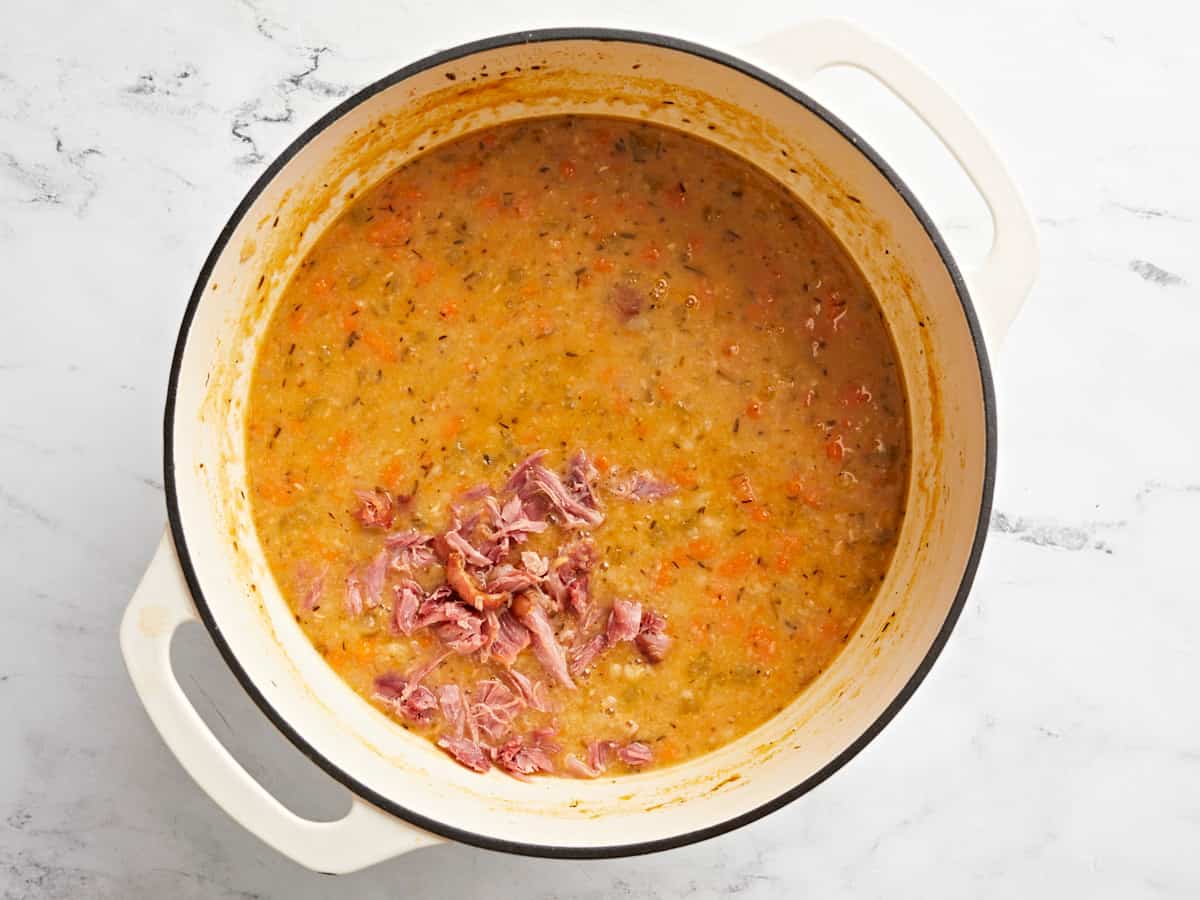
Once the beans are tender, remove the ham hock and pull the meat from the bone, then add the ham meat back to the soup.
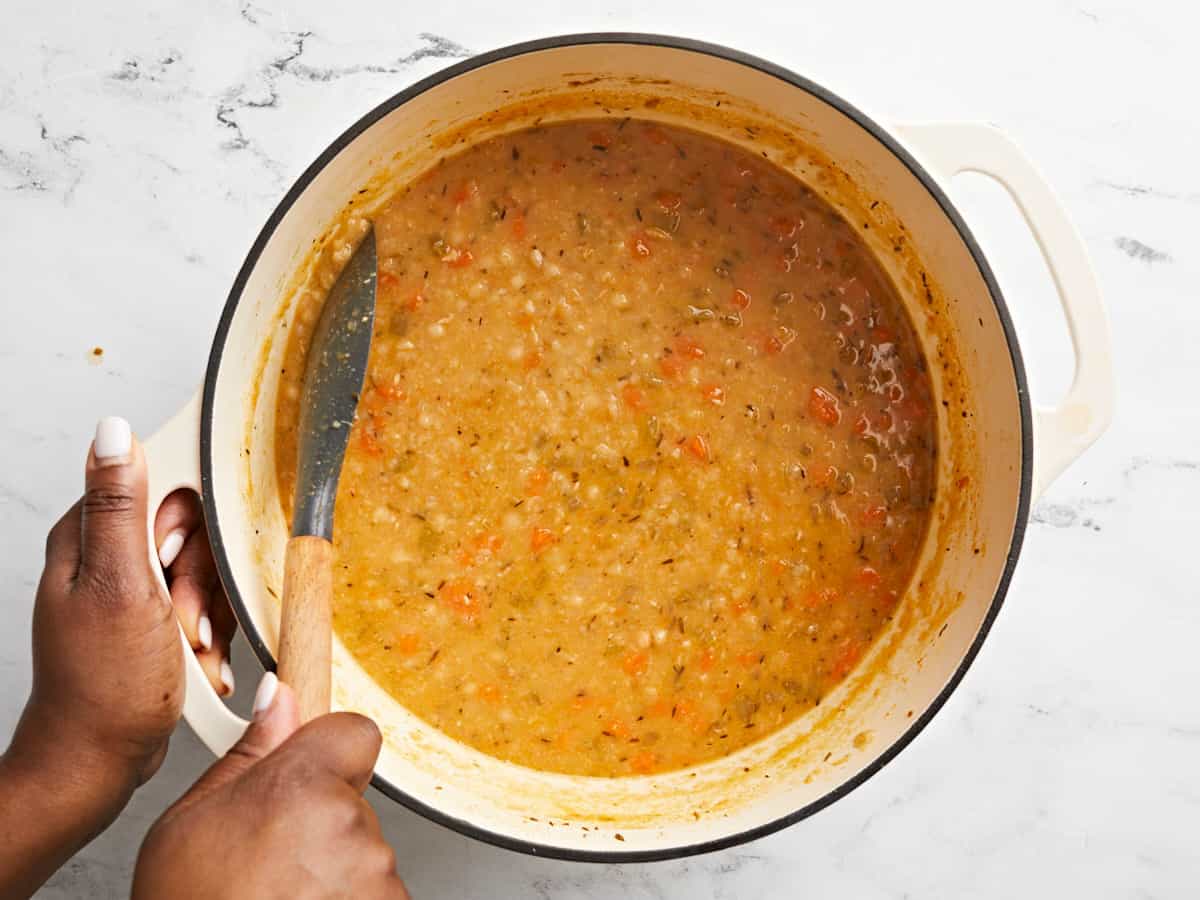
Now mash some of the beans against the side of the pot and stir the mashed beans back into the soup. Continue to simmer the soup uncovered for about 30 minutes to reduce some of the liquid and to thicken the soup further.
Taste the soup and add salt, if needed. I ended up adding 1/4 tsp of salt after tasting. The amount of salt needed will depend highly on the type of broth used. Serve hot with some crusty bread for dipping and enjoy!
Start by soaking the navy beans overnight. Place 1 lb. of dry navy beans in a bowl, cover them with cold water, and place the bowl in the refrigerator. The next day, drain and rinse the beans.
Dice one onion, one carrot, and one celery stalk. And mince two garlic cloves.
Sauté the onion, carrot, celery, and garlic in a large soup pot or dutch oven with 2 Tbsp olive oil over medium heat, until the onions are soft and translucent.
Now add the soaked & drained beans, 1 ham hock, 1/2 tsp dried thyme, 1/2 tsp dried oregano, 1/2 tsp dried rosemary, 1/2 tsp smoked paprika, 1/4 tsp freshly ground black pepper, and 6 cups of chicken broth to the pot. Gently stir to combine all the ingredients.
Place a lid on the pot and bring it up to a boil. Once boiling, turn the heat down to medium-low and let the soup simmer, stirring occasionally, until the beans are tender and begin to break down (approximately 1.5 hours).
Once the beans are tender, remove the ham hock and pull the meat from the bone.
Then add the ham meat back to the soup.
Now mash some of the beans against the side of the pot and stir the mashed beans back into the soup. Continue to simmer the soup uncovered for about 30 minutes to reduce some of the liquid and to thicken the soup further.
Taste the soup and add salt, if needed. I ended up adding 1/4 tsp of salt after tasting. The amount of salt needed will depend highly on the type of broth used. Garnish with some fresh chopped parsley (optional). Now the only thing left to do is enjoy a big bowl of this cozy navy bean soup with some crusty bread for dipping and soaking up all that yumminess! Enjoy!
Tender chicken thighs simmered in a rich gravy and topped with fluffy dumplings makes these chicken and dumplings the perfect comfort food for cold nights.
I’m thoroughly obsessed with this chicken and dumplings recipe. This is some serious comfort food and I’m all about comfort food. 😅 We’re talking tender chicken thighs cooked in a rich gravy with a medley of colorful vegetables and then topped with tender, fluffy, and flavorful dumplings. This recipe is so cozy that eating a bowl of these chicken and dumplings feels like being wrapped up in a big warm hug. And the best part? They’re made 100% from scratch. 🙌 Ugh, brb, I need to go make another batch because my mouth is WATERING.
What Are Chicken and Dumplings?
Chicken and dumplings can mean different things depending on where you live, but they’re always super cozy, filling, and comforting. While they usually always have tender chicken smothered in a savory gravy as their base, the dumplings can either be a thick noodle, or a pillowy biscuit steamed on top of the gravy. I love both versions, but today we’re making the pillowy cloud dumplings!
Ingredients for Chicken and Dumplings
Here’s what you’ll need to make these delicious chicken and dumplings:
Chicken: I used boneless, skinless chicken thighs because they’re almost impossible to overcook and they always stay moist and tender, making this recipe foolproof. You can use chicken breast if you prefer, just be careful not to overcook the chicken.
Vegetables: A mix of onion, garlic, carrot, and celery provides the flavor base for the gravy, as well as adds a ton of color and texture to the dish.
Butter and Flour: A butter and flour roux is used to thicken the gravy and add a ton of rich flavor to the gravy.
Herbs: Parsley, thyme, rosemary, sage, and pepper create a classic chicken soup flavor profile that is extra warm and cozy.
Chicken Broth and Milk: The gravy is made with a combination of broth and milk for tons of flavor and a creamy finish.
Dumplings: The dumplings are made with a simple mix of flour, milk, melted butter, herbs, baking powder, salt, and sugar. They come together in minutes with very little mixing required!
How to Store the Leftovers
Leftover chicken and dumplings are SO delicious, so make sure to save some for lunch the next day! Simply divide the leftovers into single-serving containers and refrigerate. The gravy will get quite thick when refrigerated, but they’re still delicious! Chicken and dumplings will stay good in the refrigerator for about 3-4 days.
You can also freeze the chicken and dumplings. Once chilled in the refrigerator, transfer the chicken and dumplings to the freezer and store for 2-3 months. To reheat the frozen chicken and dumplings either thaw in the refrigerator overnight before microwaving until hot, or use the defrost function on the microwave.
Tips for Fluffy Dumplings
Make sure the dumpling batter is moist enough. It should be a soft, sticky, scoopable dough. If it’s too dry, the dumplings won’t be able to puff up as much.
Make sure the gravy is simmering before adding the dumplings. The dumplings need the steam action from the simmering gravy to cook and fluff up.
Keep the lid on the pot the entire time the dumplings are cooking (this holds in the steam and ensures they cook from all sides.
Don’t make the dumplings too big. They’ll double in size as they cook and larger dumplings will take much longer to cook.
Heat the olive oil in a deep skillet or Dutch oven over medium heat. Once hot, add the chicken thighs and brown on each side. The chicken does not need to be cooked through at this point, just make sure they get very brown on the outside. Transfer the partially cooked chicken to a clean bowl.
After removing the chicken from the skillet, add the diced onion and minced garlic and sauté over medium heat until the onions have softened. Stir to dissolve the browned bits off the bottom of the skillet as the onions cook.
Add the diced carrot and celery to the skillet with the onion and garlic and continue to sauté for about five minutes more.
Add the butter and flour to the skillet and stir until the butter has melted and created a paste with the flour that coats the vegetables. Continue to cook and stir this mixture for about two minutes.
Add the parsley, thyme, rosemary, sage, salt, pepper, chicken broth, and milk to the skillet. Turn the heat up to medium-high and continue to stir and cook until the mixture comes up to a simmer and thickens into a gravy.
Dice the chicken and add it back to the skillet with the vegetables and gravy. Cover with a lid and let the chicken simmer in the gravy over medium heat while you prepare the dumplings.
Dumplings
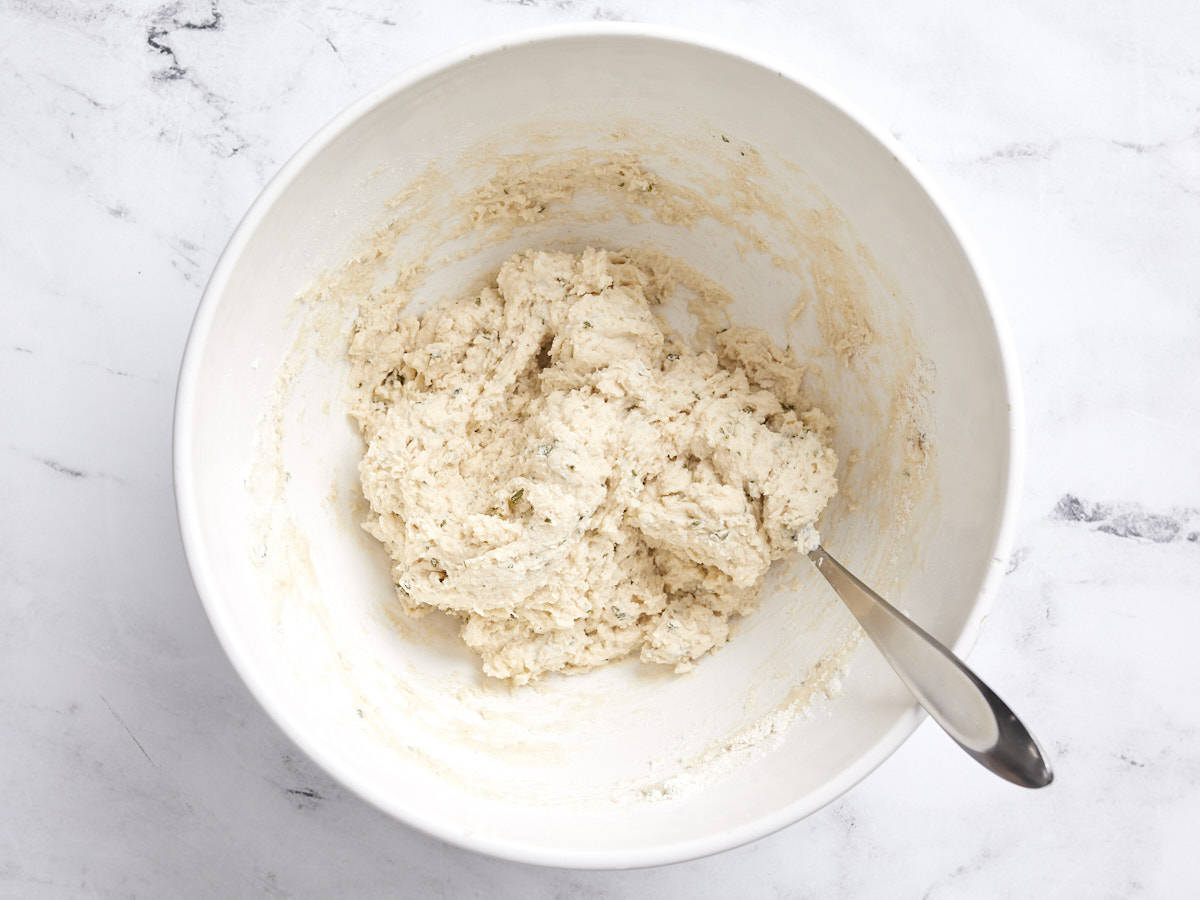
To prepare the dumplings, combine the flour, parsley, sugar, salt, baking powder, garlic powder, and pepper in a bowl.
Pour the milk and melted butter into the flour mixture, then stir until a soft, scoopable batter is formed. Do not over stir.
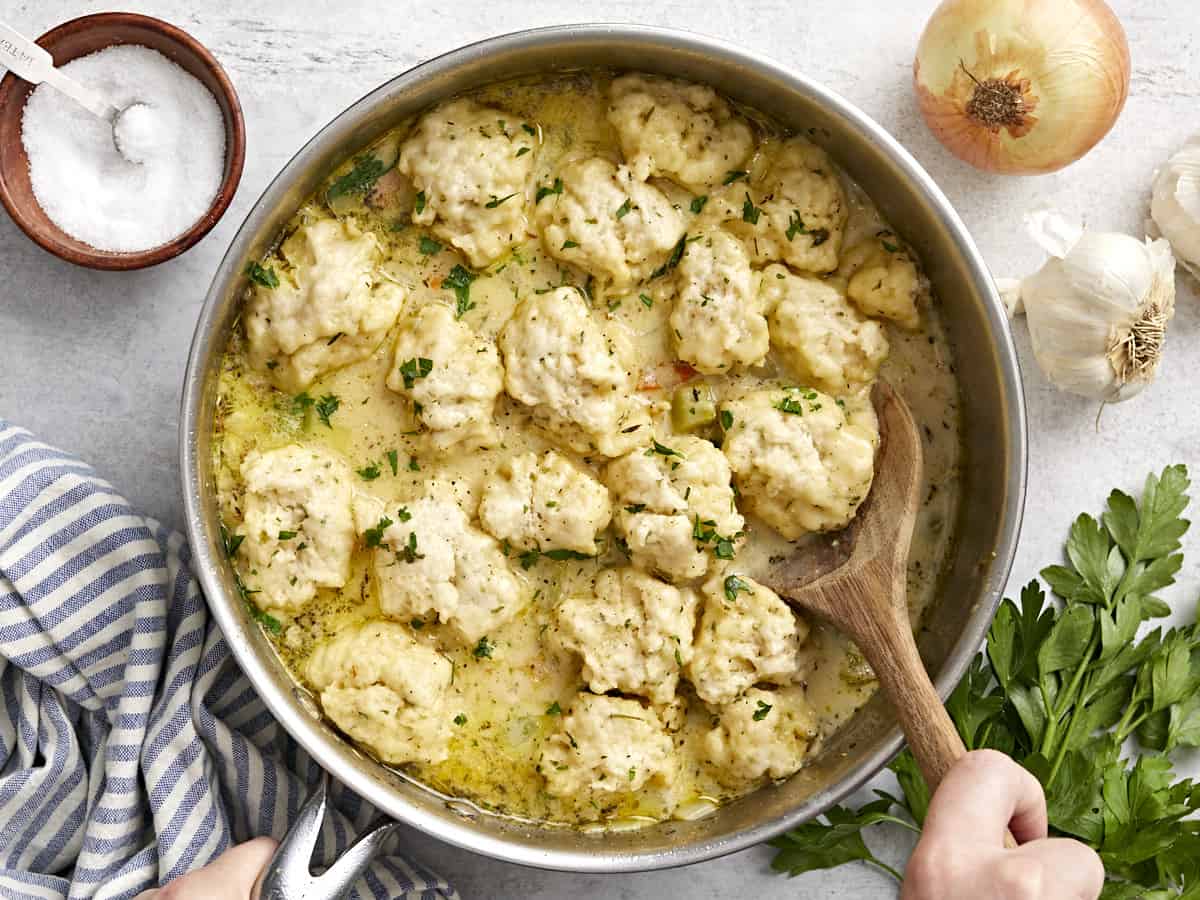
Remove the lid from the chicken and gravy and drop the dumpling batter onto the surface of the gravy in 2 tablespoon dollops. You should get about 12 dumplings.
Make sure the gravy is still simmering, then place the lid back on the skillet and allow the dumplings to simmer for 15 minutes. Make sure they're simmering the entire time. After 15 minutes the dumplings should have doubled in size and will be fluffy and cooked in the center. Serve hot and enjoy!
Add 1 Tbsp olive oil to a large deep skillet and heat over medium. Once hot, add four boneless, skinless chicken breasts to the pan and allow them to brown very well on each side. The chicken doesn’t need to cook through at this point, just make sure it gets very brown. Remove the browned chicken to a clean cutting board and set aside.
Add two minced cloves of garlic and one diced yellow onion to the skillet and sauté over medium heat until the onions are softened. Add two diced carrots and two diced celery stalks and continue to sauté over medium for 2-3 minutes more.
Add four tablespoons of butter and ¼ cup of all-purpose flour to the skillet. Continue to stir and cook over medium heat. The butter will melt and combine with the flour to create a sort of paste that coats the vegetables. Continue to cook this mixture for about two minutes more.
Add 1 tsp dried parsley, ½ tsp dried thyme, ½ tsp dried rosemary, ½ tsp dried sage, ½ tsp salt, ¼ tsp pepper, 2 cups chicken broth, and 1 cup milk to the skillet. Whisk the ingredients together, making sure to dissolve any browned bits from the bottom of the skillet. Turn the heat up to medium-high and allow this mixture to come back up to a simmer, at which point it will thicken into a gravy.
Once the mixture has thickened to a gravy, dice the chicken thighs and stir them back into the skillet. Cover with a lid and allow the chicken to simmer in the gravy while you prepare the dumplings.
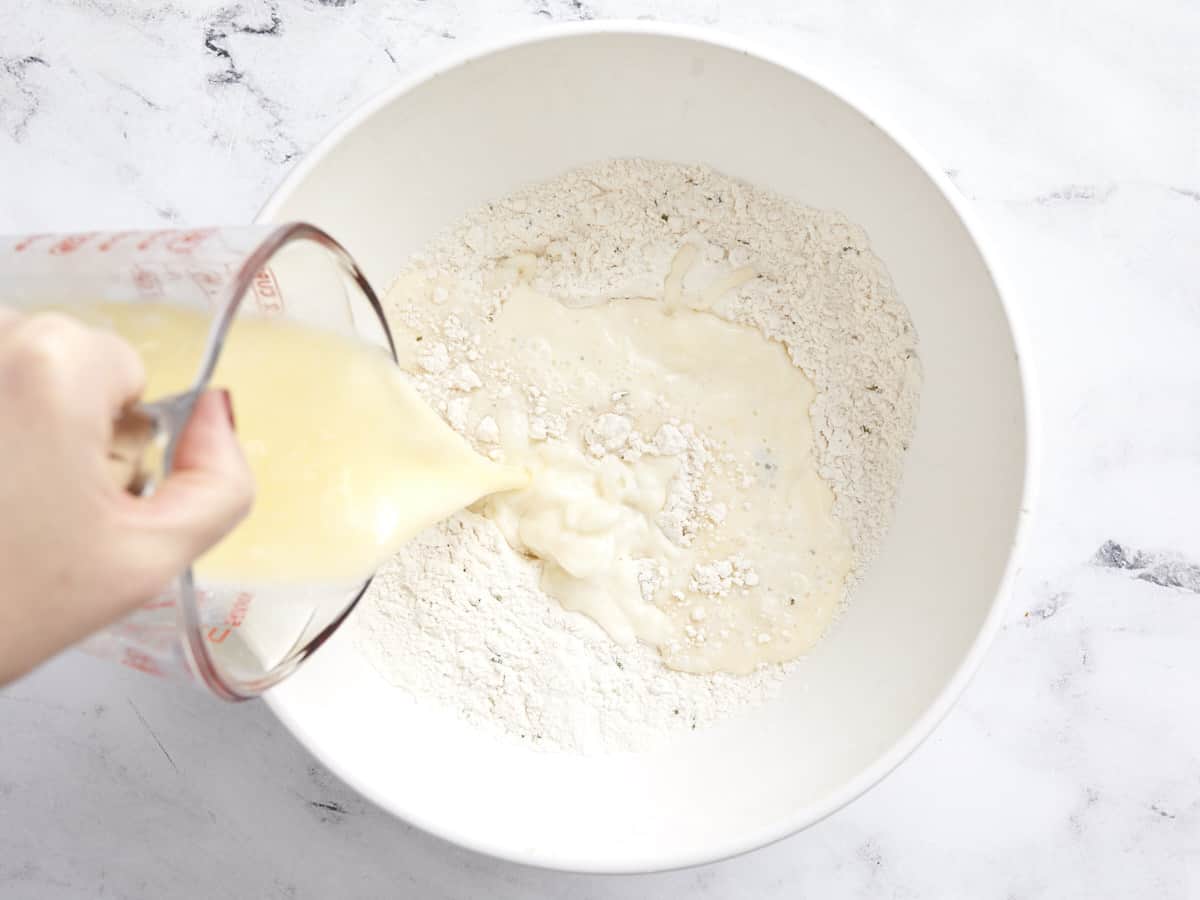
To make the dumplings, stir together 1 cup all-purpose flour, ½ tsp salt, 1.5 tsp baking powder, ⅛ tsp garlic powder, ⅛ tsp pepper, 1 tsp dried parsley, and ½ tsp sugar in a bowl. Melt 2 Tbsp butter and combine it with ½ cup milk. Pour the milk mixture into the flour mixture.
Stir the wet and dry ingredients together until it forms a soft, sticky dough. It should be soft enough that you can easily scoop it with a spoon.
Make sure the gravy is fully simmering, then drop the dumpling dough into the gravy in 2 Tbsp portions. The dumplings will expand quite a bit as they steam, so don’t worry that they don’t fully cover the surface.
Place the lid on the skillet and allow the dumplings to steam in the simmering gravy for 15 minutes without lifting the lid. Make sure the gravy is simmering the whole time. After 15 minutes they should be about double in size. Cut one open to make sure it’s fluffy all the way through.
Serve the chicken and dumplings hot and enjoy! (shown garnished with parsley for color)
If there’s one seasoning blend you need in your cabinet, it’s Cajun Seasoning. Whether you make your own blend or buy it pre-made from the store, this punchy blend of herbs and spices will bring life to whatever you’re cooking. Case in point: this Cajun Potato Salad. If regular potato salad is just a little too boring for you, you’ve got to try this slightly spicy, super flavorful, and ultra-creamy potato salad. You’ll never want it any other way.
What is Cajun Potato Salad?
To avoid confusion, this isn’t a classic Cajun dish, but rather potato salad seasoned with a Cajun seasoning blend to give it a ton of spicy, smoky, herb-filled flavor. In addition to adding a hefty dose of herbs and spices, I used spicy Creole mustard and a dash or two of hot sauce in the dressing to really take it over the top. I also added a handful of chopped and green onion to keep that Cajun flavor theme going. This potato salad is just PACKED with flavor!
What Kind of Potatoes to Use
Usually, I like a waxy potato like Yukon Gold or red potatoes for a potato salad, but for this Cajun Potato Salad recipe I used softer Russet potatoes. I like the way the Russet potatoes kind of break down and half-mash as you mix them with the dressing. If you do want to use Yukon Gold or red potatoes, make sure to cut them into smaller pieces so you get a nice potato to dressing ratio once mixed together.
Homemade Vs. Store-Bought Cajun Seasoning
I used my own blend of Homemade Cajun Seasoning for this potato salad, but if you don’t have a well-stocked spice cabinet you can definitely use a store-bought Cajun seasoning blend. Make sure to check the bottle to see if the seasoning blend contains salt. If the store-bought seasoning does not contain salt, make sure to add some to the recipe below (½ to ¾ tsp added to the dressing should do it).
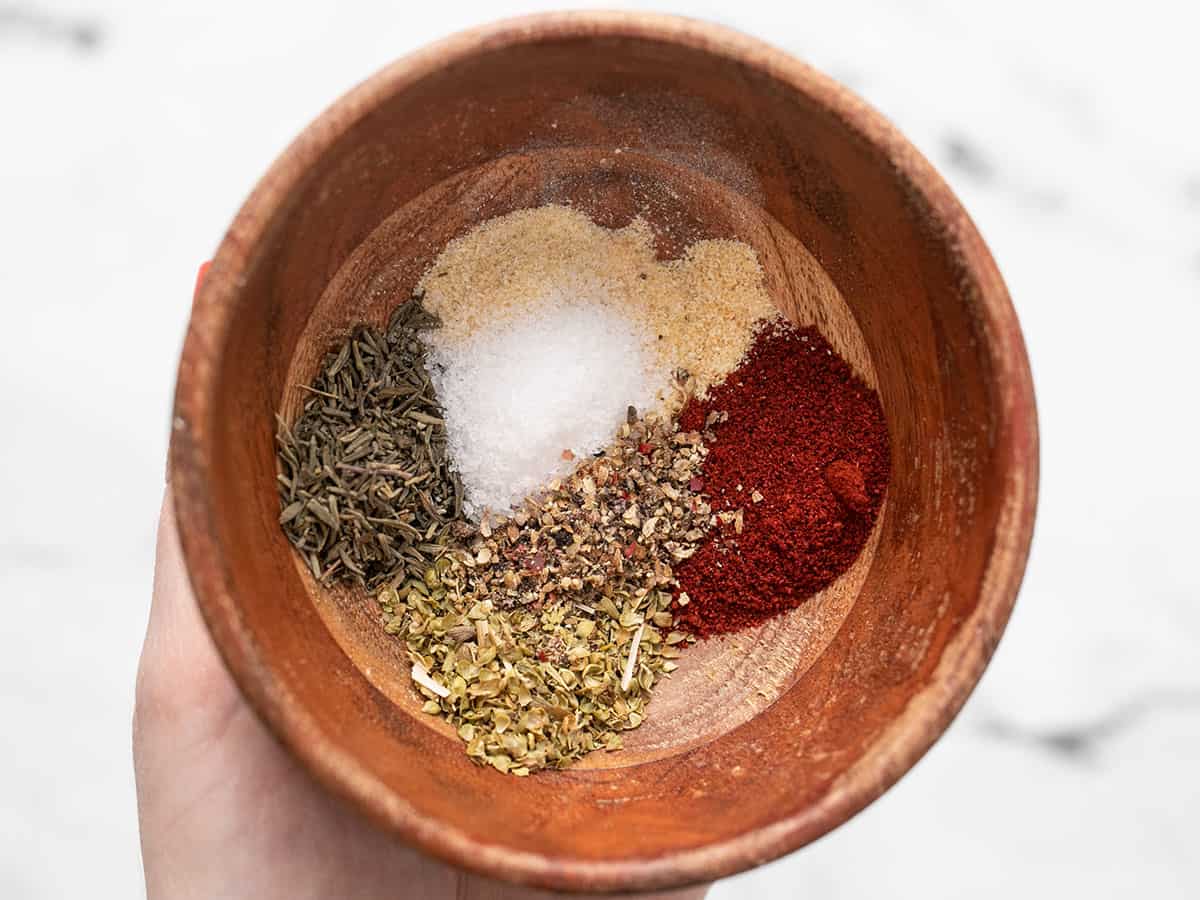
Combine the herbs and spices for the Cajun seasoning and set aside.
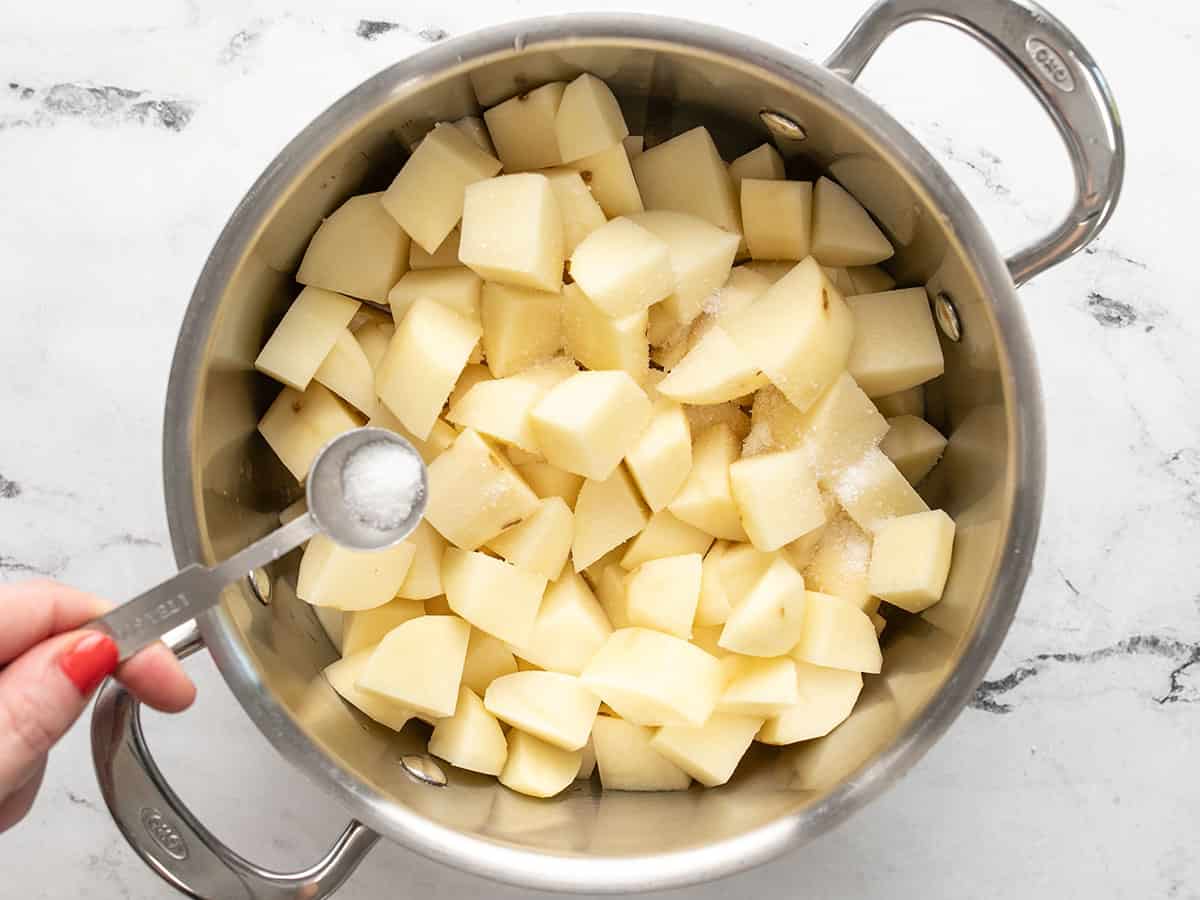
Peel and dice the potatoes into ½-inch cubes. Place the cubed potatoes in a large pot, sprinkle 1 tsp salt over top, then cover with water.
Place a lid on the pot and bring it up to a boil over medium-high heat. Once boiling, reduce the heat slightly and continue to boil the potatoes until they are very tender (about 8 minutes, test with a fork). Drain the potatoes in a colander and rinse briefly with cool water.
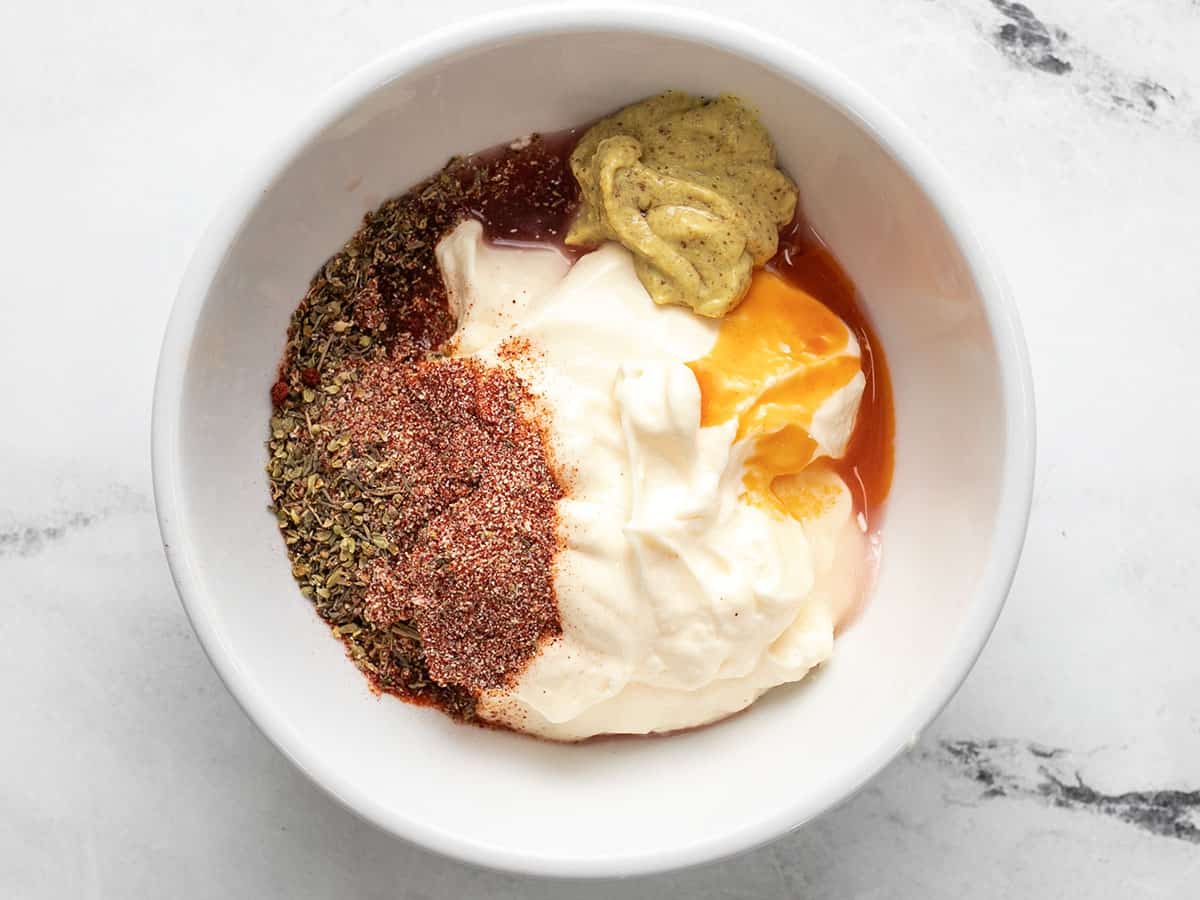
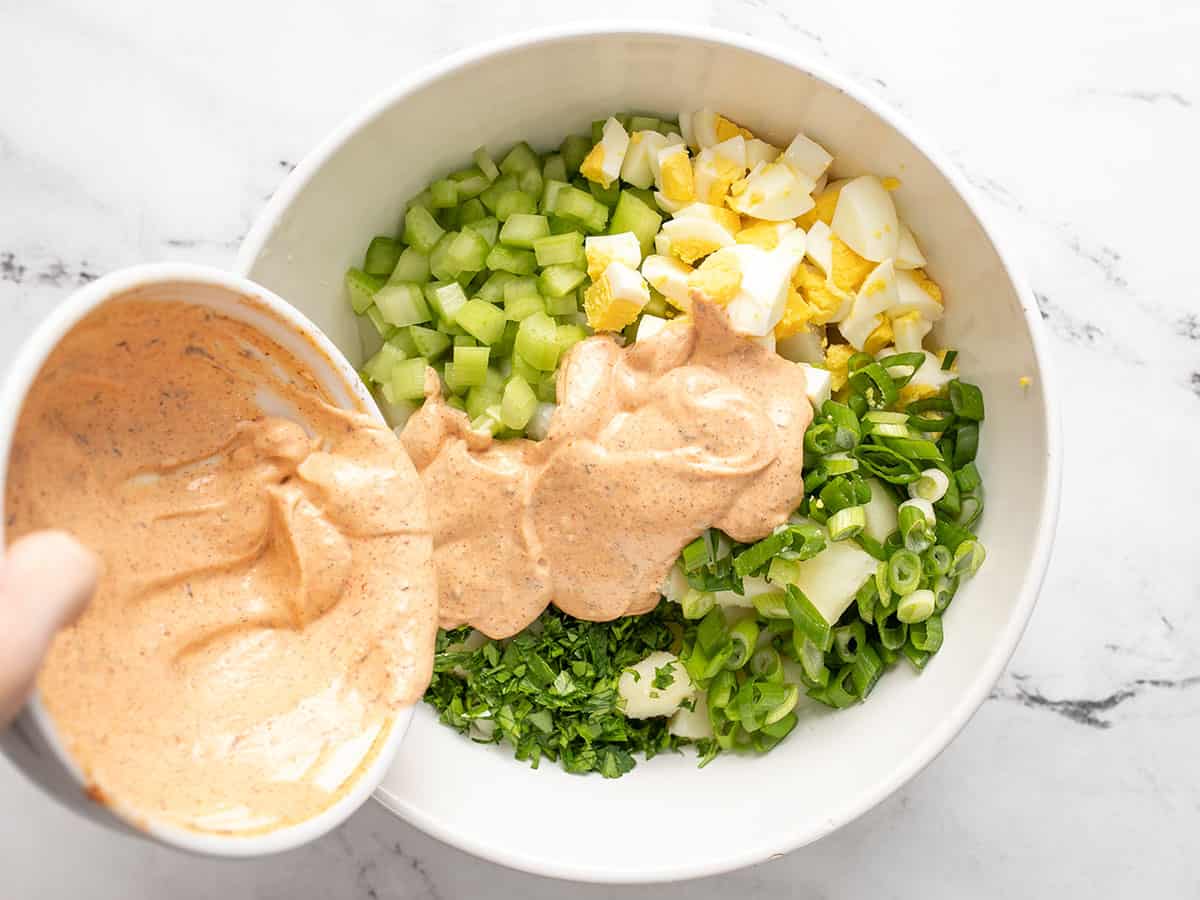
While the potatoes are boiling, prepare the potato salad dressing so the flavors have some time to blend. In a bowl, stir together the mayonnaise, mustard, red wine vinegar, hot sauce, sugar, and the prepared Cajun seasoning. Set the dressing aside.
Chop the hard boiled eggs, finely dice the celery, slice the green onions, and chop the parsley.
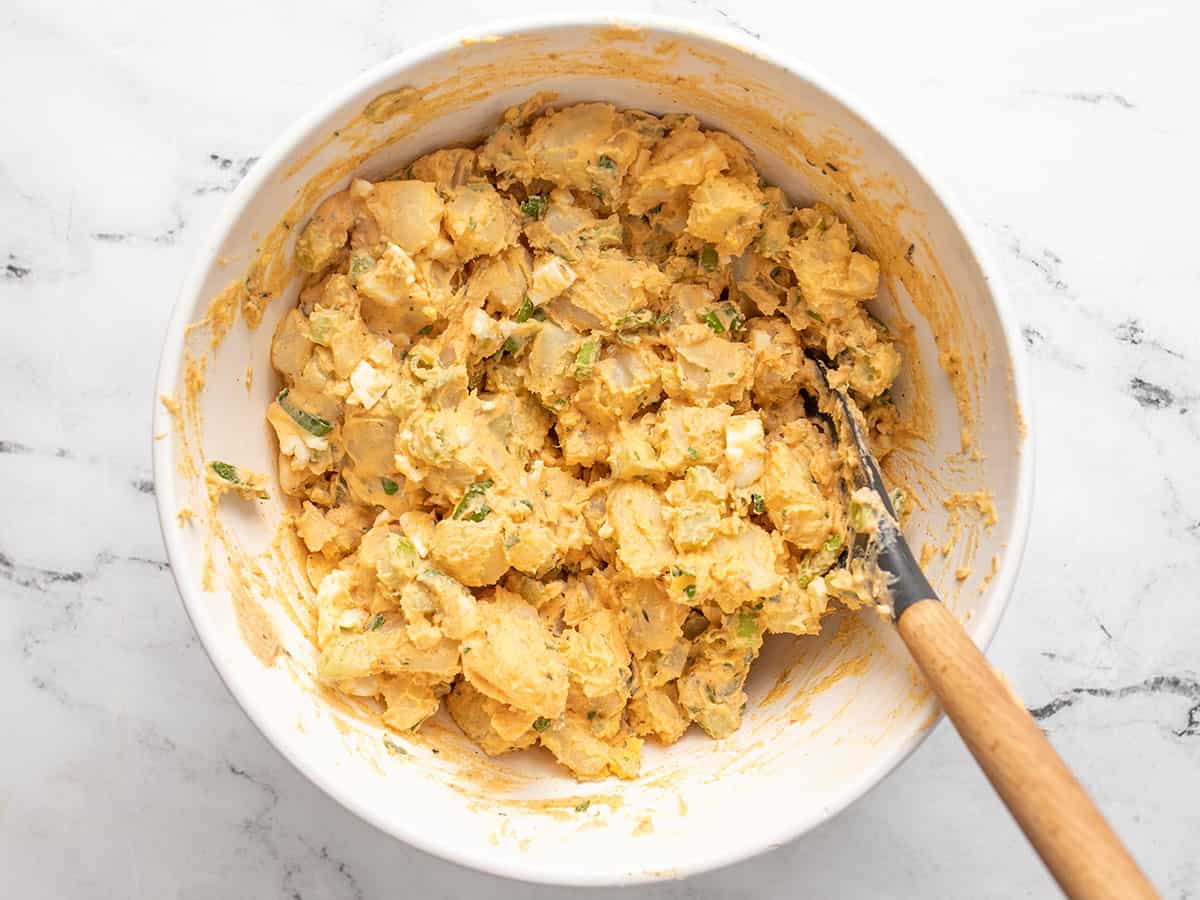
Once the potatoes are mostly cooled, transfer them to a large bowl with the eggs, celery, green onion, and parsley. Pour the dressing over top, then stir until everything is well combined. Give the potato salad a taste and adjust the salt or other seasonings to your liking. Serve warm or chill until ready to eat.
*In place of the homemade Cajun seasoning, you can use about 1 Tbsp store-bought Cajun seasoning. Make sure to check if the seasoning contains salt and if it doesn’t, you’ll need to add salt to the potato salad dressing.
How to Make Cajun Potato Salad – Step by Step Photos
Peel and dice 2.5 lbs. russet potatoes into ½-inch pieces. Place the potatoes in a pot and sprinkle 1 tsp salt over top. Cover the potatoes with water, place a lid on the pot, and bring the potatoes up to a boil over medium-high heat. Once boiling, turn the heat down slightly and continue to boil the potatoes until very soft, about 8 minutes (test with a fork–the potato should pierce easily). Drain the potatoes in a colander and rinse briefly with cool water.
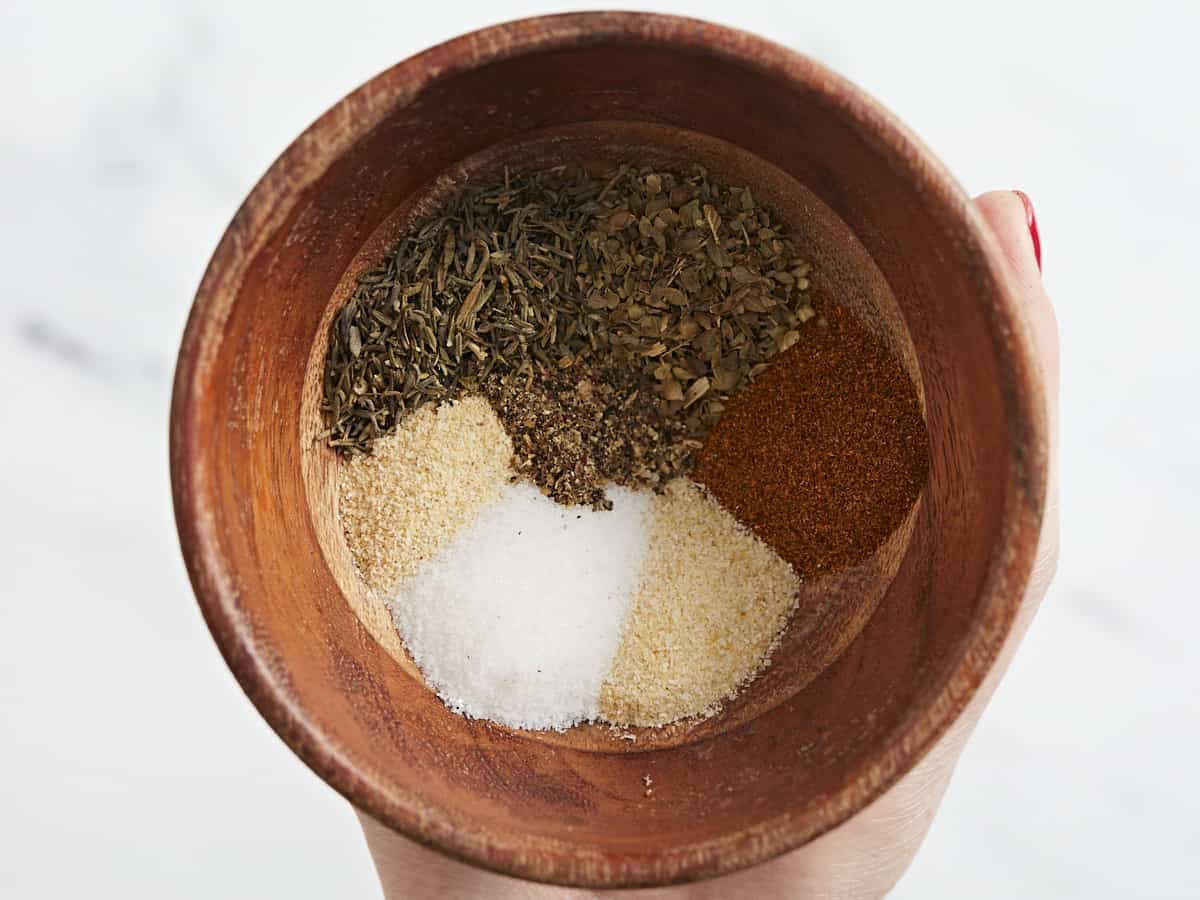
For the Cajun seasoning, combine 1 tsp smoked paprika, ½ tsp dried thyme, ½ tsp dried oregano, ¼ tsp garlic powder, ¼ tsp onion powder, ⅛ tsp cayenne pepper, ¼ tsp freshly cracked pepper, and ¾ tsp salt.
While the potatoes are boiling, prepare the potato salad dressing so the flavors have time to blend a bit. Add 1 cup mayonnaise, 2 Tbsp Creole mustard, 1 Tbsp red wine vinegar, the prepared Cajun seasoning blend, ½ tsp hot sauce, and ¼ tsp sugar.
Stir the dressing ingredients together until smooth. Set the dressing aside.
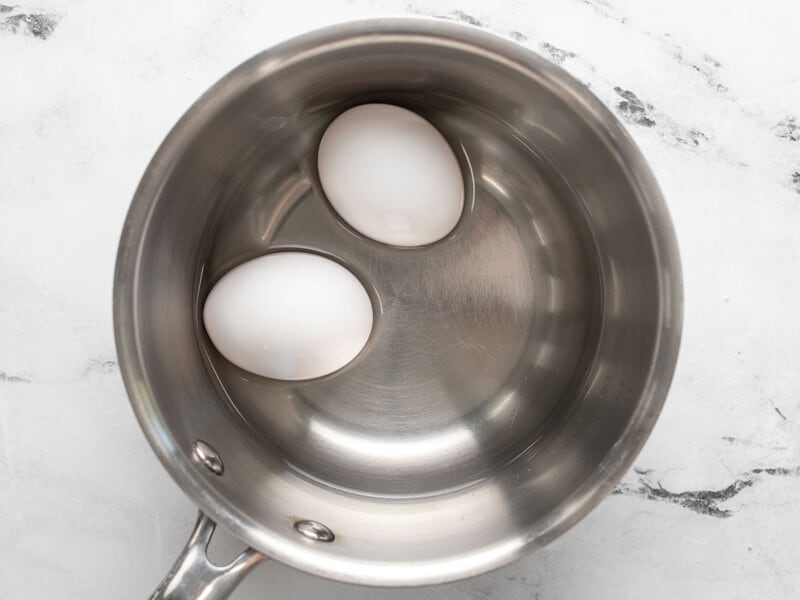
Hard boil two eggs. I like to use my soft-boiled egg method, but increase the simmer time to 12 minutes, but you can also boil them using a traditional hard-boiled egg method. Cool the eggs, then chop them into small pieces.
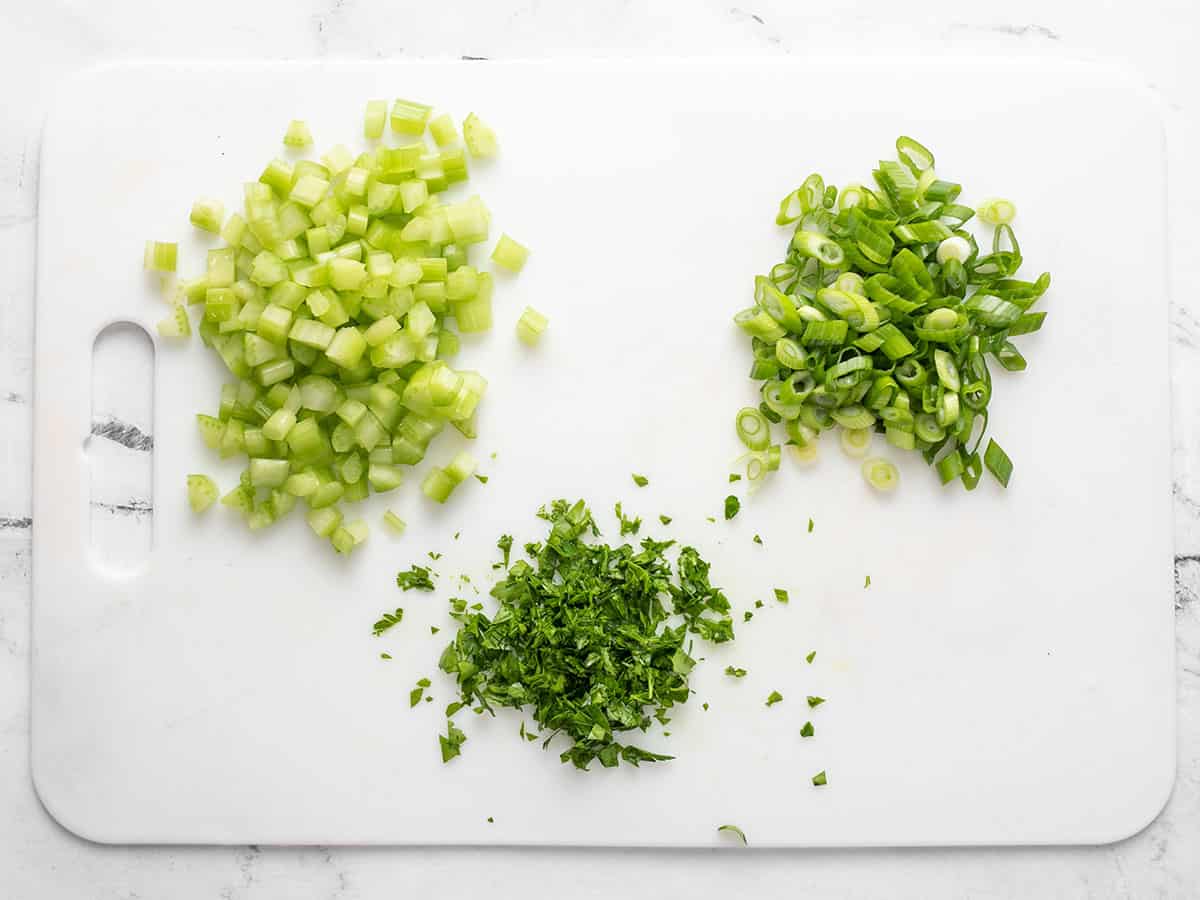
Chop two stalks of celery into small pieces, slice three green onions, and finely chop about 2 Tbsp parsley.
Add the cooled potatoes, eggs, celery, green onion, and parsley to a large bowl. Pour the dressing over top.
Stir until everything is evenly combined and coated in dressing. Give the potato salad a taste and adjust the salt, hot sauce, or other seasonings to your liking.
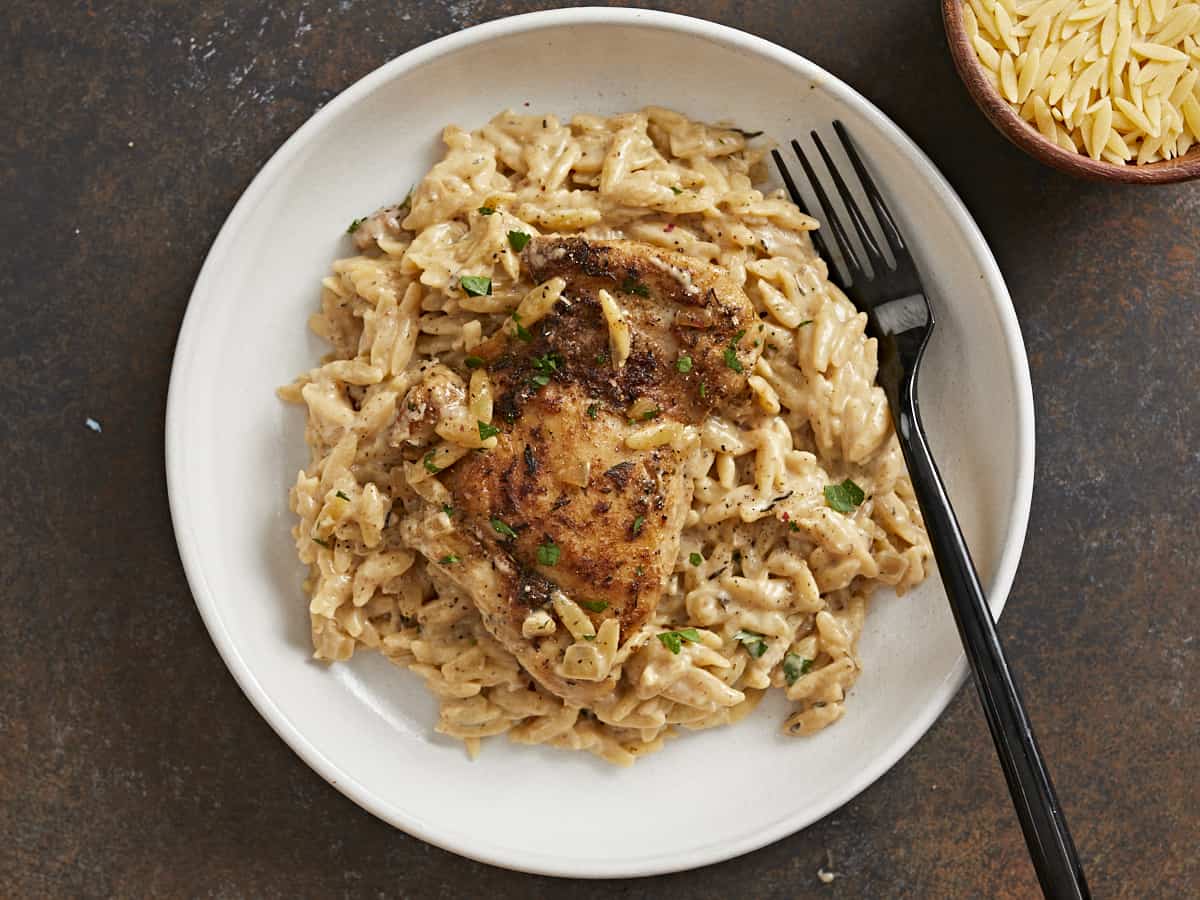
When you’re having one of those days when you think you don’t have time to cook anything, try this easy, buttery, and super tasty Creamy Chicken and Orzo Skillet! It’s hearty, rich, comforting, and a perfect dinner for when you want to do anything but spend time in the kitchen. Bonus: it cooks in one pan! Can you ask for anything more?
What is Orzo?
Orzo is a tiny football-shaped pasta that looks like rice but cooks much faster. Like rice, it soaks up all the water it’s cooked in, so you don’t have to worry about draining. That makes it an excellent choice for a speedy one-pan meal.
What You’ll Need
You are just a few spices and a handful of ingredients away from an incredible dinner! Here’s what you’ll need to make this Creamy Chicken And Orzo Skillet.
Seasoning Blend– We’re making our own with paprika, oregano, thyme, garlic powder, onion powder, and pepper. In a pinch, you can also use a heaping tablespoon of your favorite seasoning blend, though you should steer clear of anything super salty.
Boneless Chicken Thighs– These cook much faster than bone-in chicken thighs and their juices help flavor the orzo.
Yellow Onion– Adds depth and a subtle sweetness to the dish.
Garlic– Also adds depth and lends a slight nuttiness when cooked.
Orzo– This pasta cooks quickly and adds bulk. If you don’t have access to orzo, substitute it with a quick-cooking pasta like ditalini or pearl couscous. You can also use rice, but you’ll have to adjust the cooking time so it has enough time to cook.
Vegetable Broth– You need a liquid to cook the orzo and this broth does the trick without overpowering the dish. You can substitute it with water or chicken broth.
Cream– Creates a velvety, creamy sauce.
Butter– Helps pull the sauce together.
Parmesan– Adds depth and a touch of saltiness to the sauce. It also helps give it texture.
What Can You Serve With Creamy Chicken And Orzo?
This creamy Chicken and Orzo Skillet pairs well with a fresh side salad or roasted veggies. Some great options include:
The orzo will absorb much of the creamy sauce it’s cooked in, but the leftovers are still tasty. Store in the fridge for 3 to 4 days in an airtight container. However, do this within two hours of cooking the dish. Chicken left at room temperature any longer than that can contain enough harmful bacteria to give you food poisoning. You can also freeze leftovers for up to 2 months in an airtight container. Thaw in the fridge overnight and reheat on a stovetop or in the microwave until the chicken is steaming.
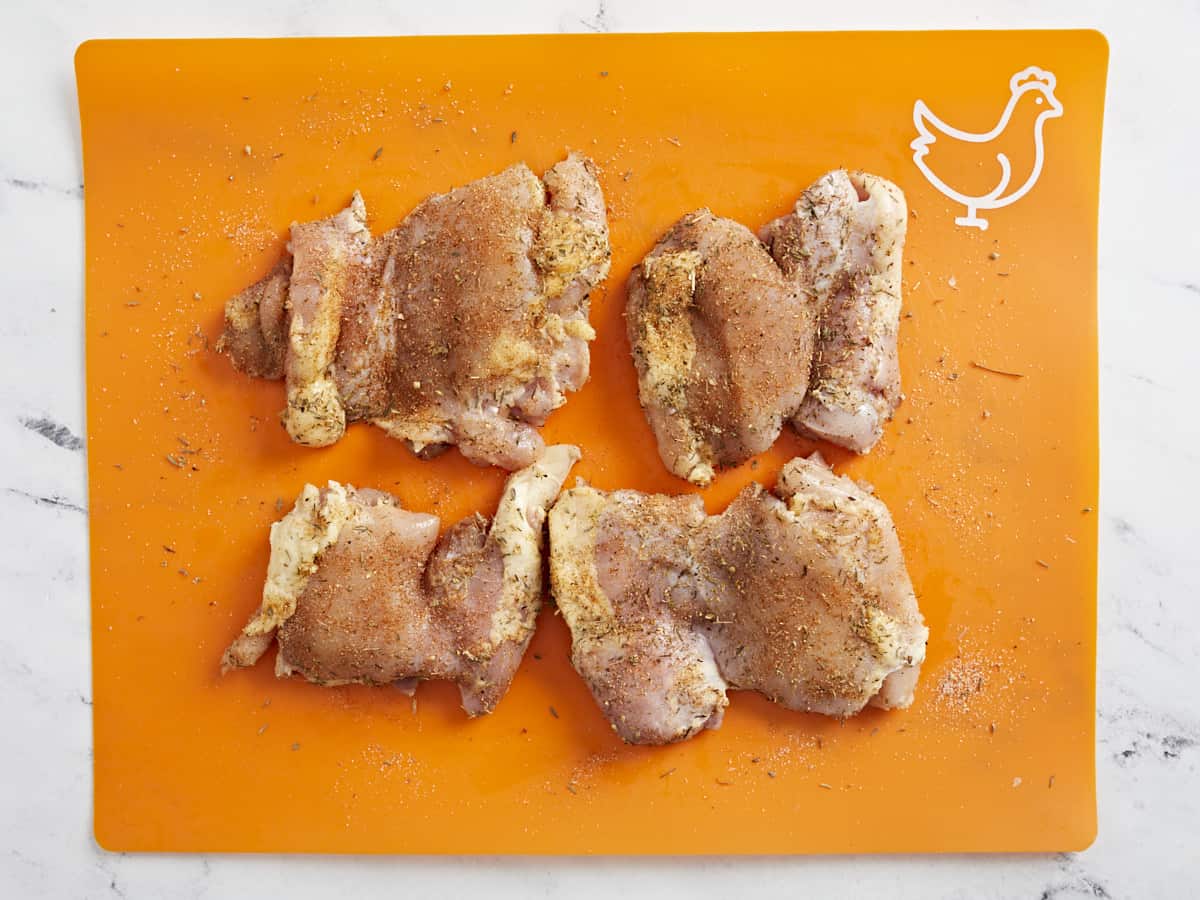
Add the paprika, dried oregano, dried thyme, garlic powder, onion powder, salt, and pepper to a small bowl. Mix until combined.
Blot the chicken thighs dry with a paper towel, then season both sides liberally with the seasoning blend.
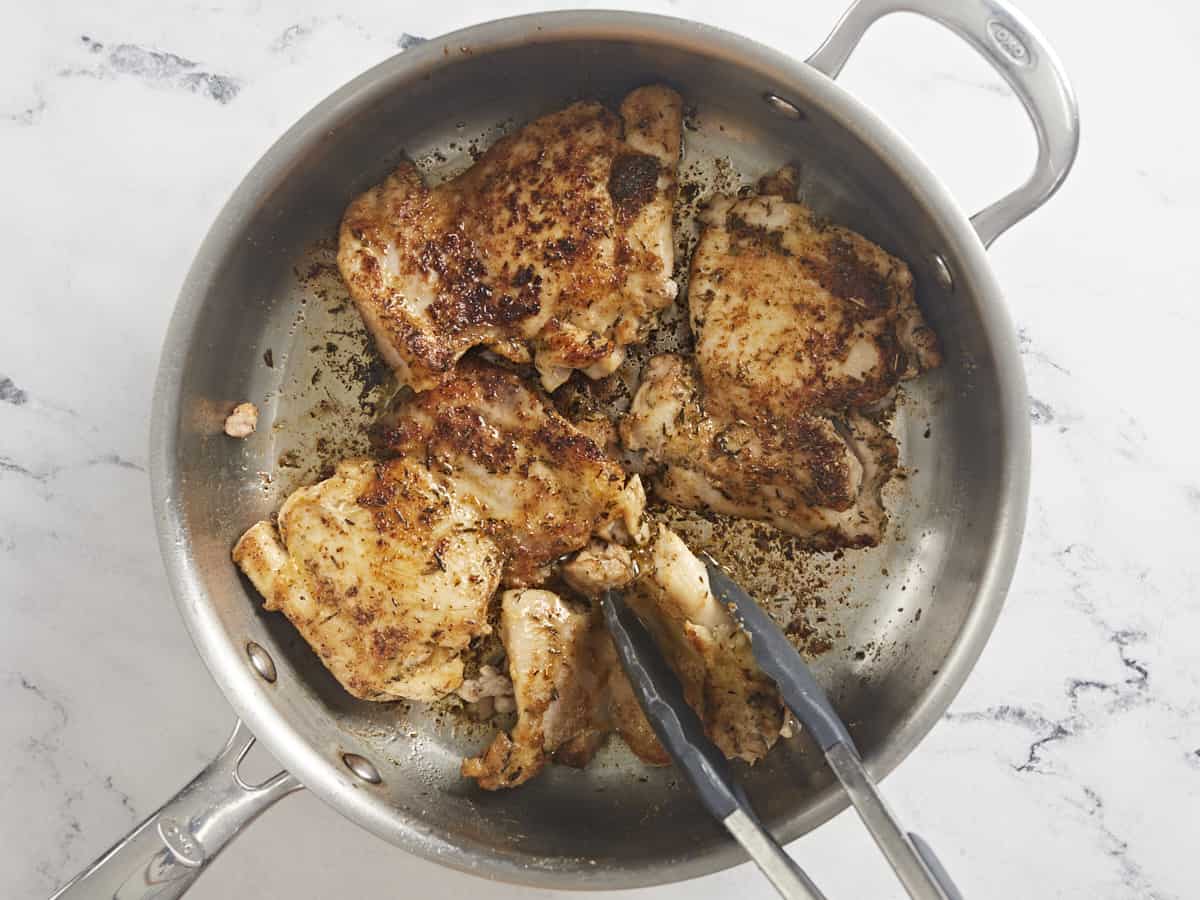
Heat a large deep skillet over medium and add the cooking oil. Add the seasoned chicken thighs and cook undisturbed until well browned, about 5 minutes. Flip and repeat on the other side. Remove the chicken from the pan.
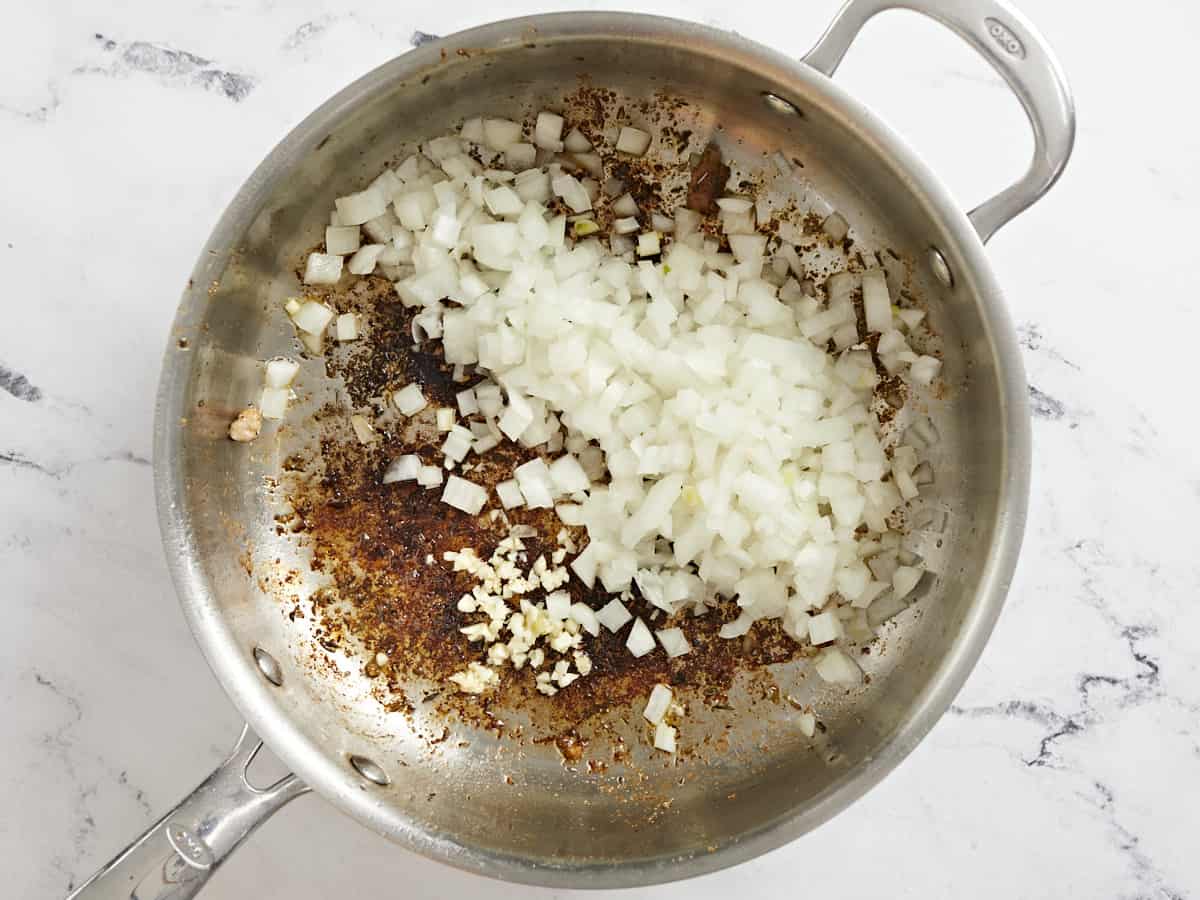
Turn the heat down to low, and add the onion and garlic. Saute until the onions are translucent, about 3 minutes.
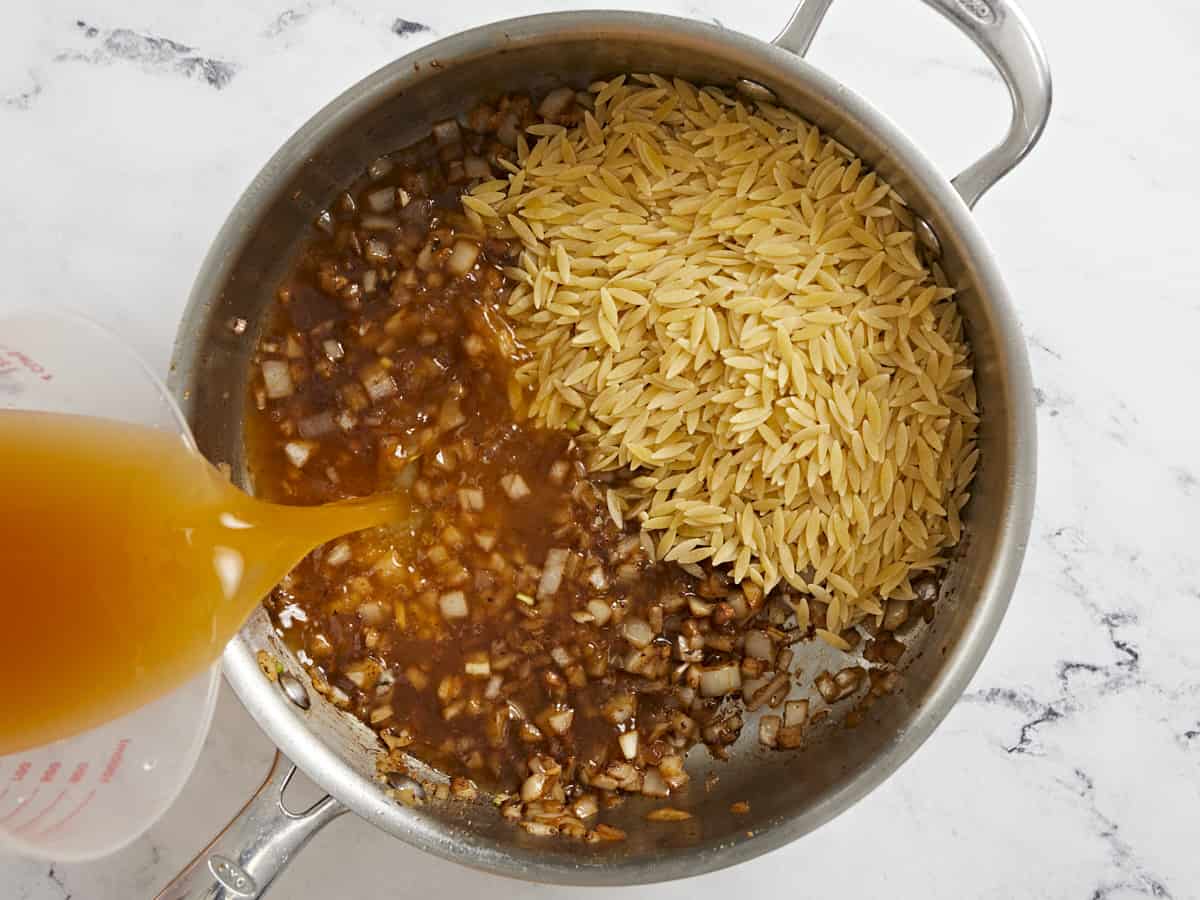
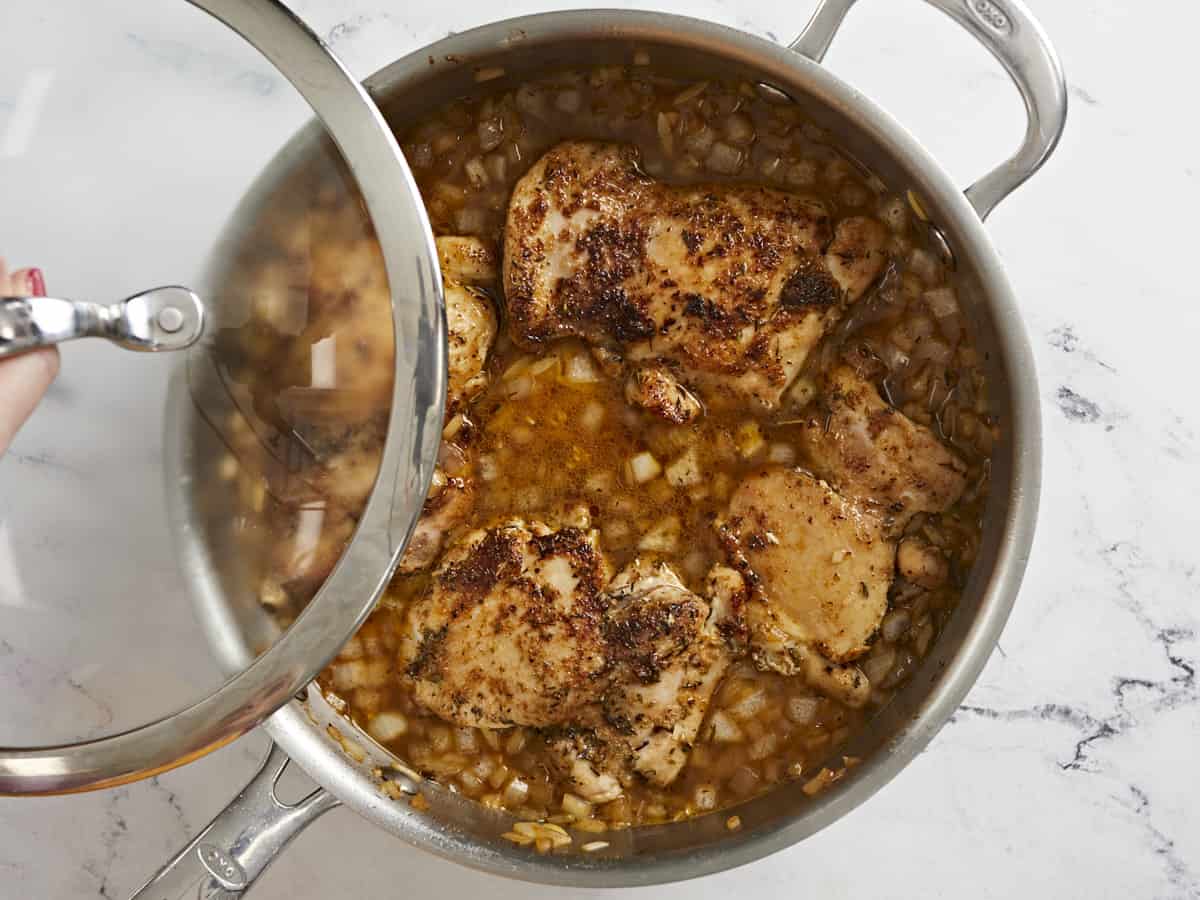
Add the orzo and chicken broth to the skillet and stir well to help dissolve the crispy browned bits from the bottom of the pan. Return the chicken to the pan and nestle it down into the orzo.
Place a lid on the skillet, turn the heat up to medium-high, and let the broth come to a full boil. Then turn the heat down to low. Let the skillet simmer for about 15 minutes or until most of the broth is absorbed.
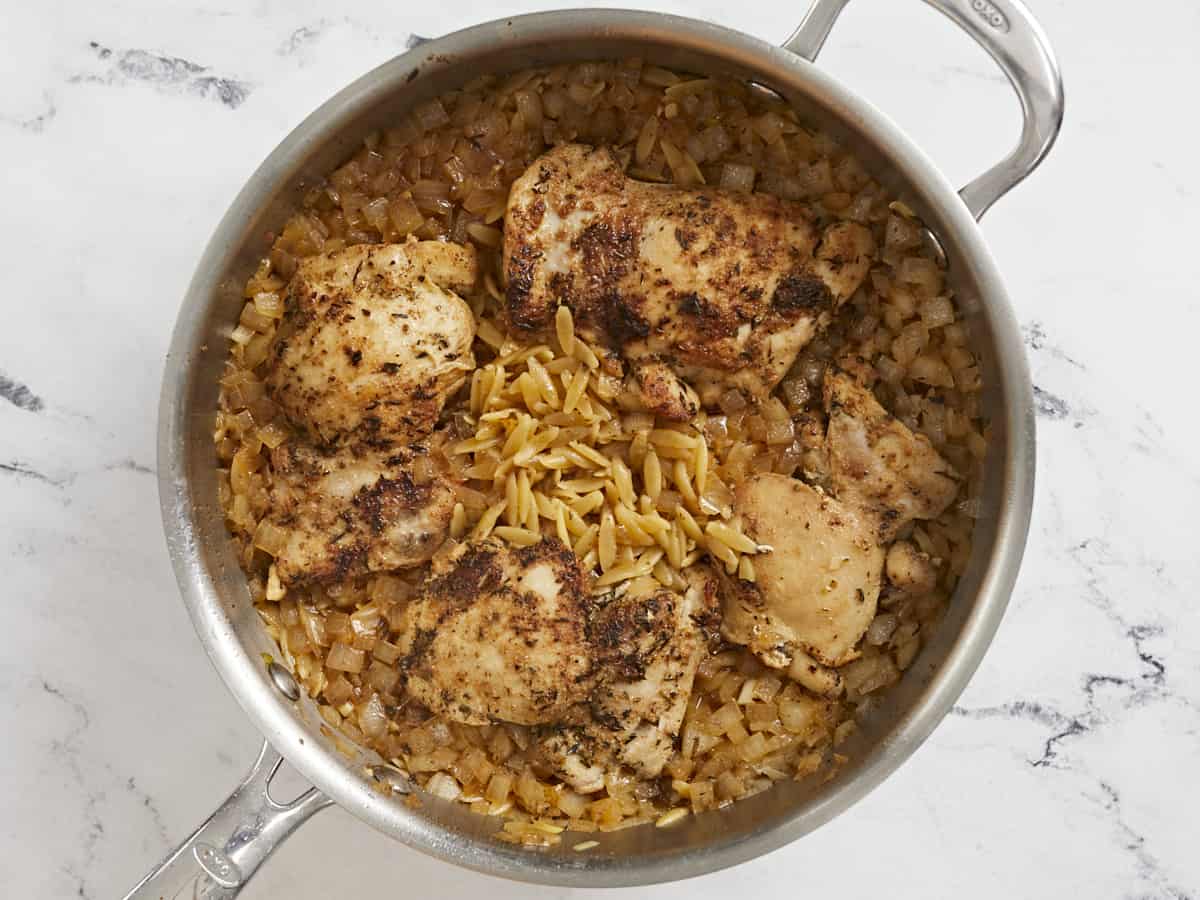
After about 15 minutes, the orzo should be tender and most of the broth absorbed, but there will still be a little sauce in the skillet. Remove the chicken from the skillet.
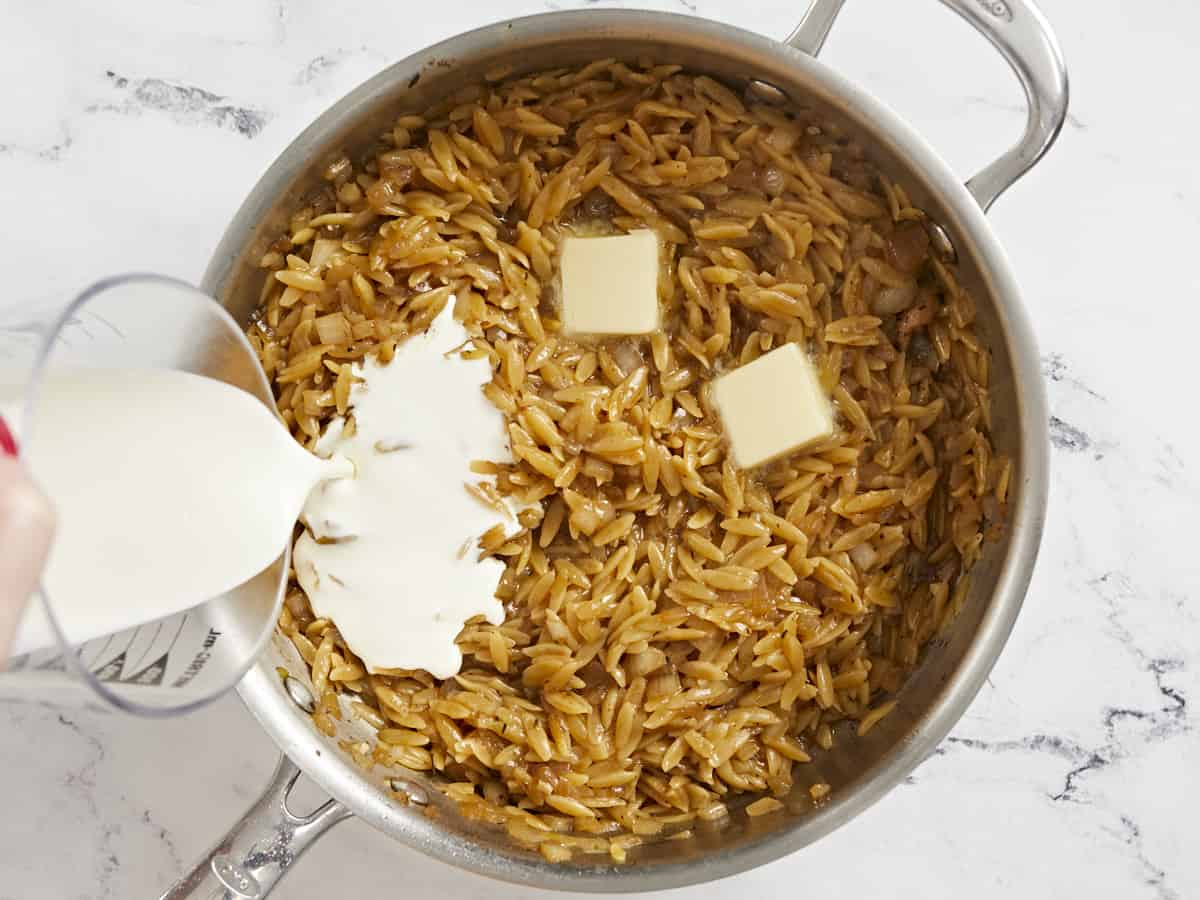
Add the cream and the butter to the skillet. Stir and heat over low until the butter melts and the cream is hot.
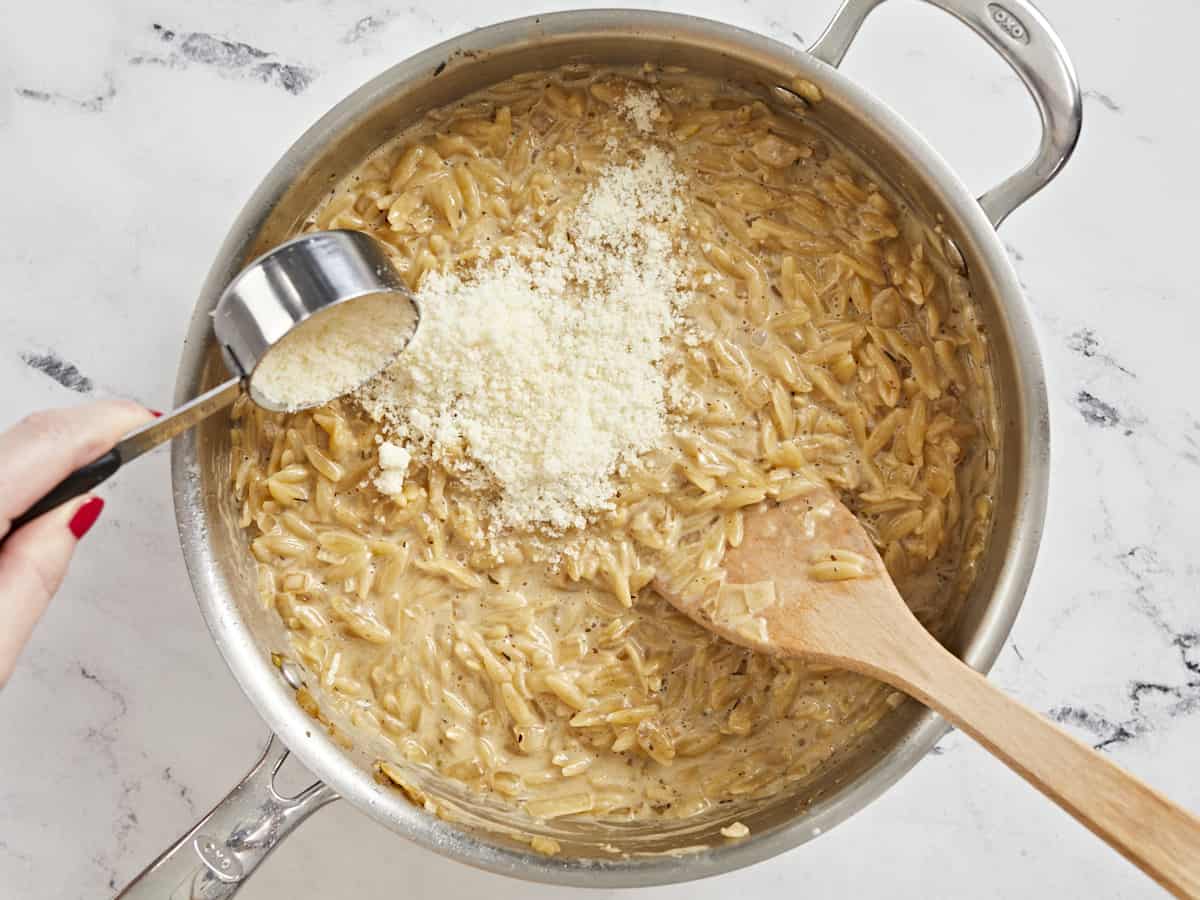
Add the Parmesan and stir to combine.
Finally, return the chicken to the skillet. If desired, garnish with parsley.
How to Make Creamy Chicken And Orzo Skillet – Step by Step Photos
Add 1 teaspoon paprika, 1 teaspoon dried oregano, 1 teaspoon dried thyme, 1/2 teaspoon garlic powder, 1/2 teaspoon onion powder, 1/2 teaspoon salt, and 1/4 teaspoon pepper to a small bowl. Mix until combined.
Blot the 1.25 pounds of chicken thighs dry with a paper towel, then season both sides liberally with the seasoning blend.
Heat a large deep skillet over medium. Once hot, add 2 tablespoons of cooking oil. Add the seasoned chicken thighs and cook undisturbed until well browned, about 5 minutes. Flip and repeat on the other side. Remove the chicken from the pan and place it on a clean plate. The chicken will finish cooking when simmered with the orzo.
Turn the heat down to low and add the diced onion and 2 cloves of minced garlic to the skillet. Saute until the onions are translucent, about 3 minutes.
Add the 1/2 cup orzo and the 1 1/2 cups of chicken broth to the skillet and stir well to help dissolve the crispy browned bits from the bottom of the pan. Then return the chicken to the pan and nestle it down into the orzo.
Place a lid on the skillet, turn the heat up to medium-high, and let the broth come to a full boil. Then turn the heat down to low. Let the skillet simmer for about 15 minutes or until most of the broth is absorbed. If at any point it stops simmering, increase the heat slightly until it starts to simmer again.
After about 15 minutes, the orzo should be tender and most of the broth absorbed, but there will still be a little sauce in the skillet. Remove the chicken from the skillet.
Then add the 1/2 cup of cream and the 2 tablespoons of butter to the skillet. Stir and heat over low until the butter melts and the cream is hot.
Next, add the 1/4 cup parmesan and stir to combine.
Finally, return the chicken to the skillet. If you’d like, garnish with chopped Italian parsley and serve. Pair with a side salad or roasted veggies for an incredibly filling meal! Wasn’t that easy?
Move over, butternut squash! Carrots are back and ready to be the new SOUPer star in this creamy vegan carrot soup. It’s rich thanks to coconut milk and subtly spicy from red pepper flakes, making it super warming and perfect for the transition from wi…
Move over, butternut squash! Carrots are back and ready to be the new SOUPer star in this creamy vegan carrot soup. It’s rich thanks to coconut milk and subtly spicy from red pepper flakes, making it super warming and perfect for the transition from winter to spring!
The best part? It’s made in 1 pot with just 10 ingredients you may have around right now. Let us show you how it’s done!