Perfect Sautéed Mushrooms (Quick & Easy!)
This really is the best sautéed mushrooms recipe! This go-to method with lemon juice and fresh herbs makes a great…
This really is the best sautéed mushrooms recipe! This go-to method with lemon juice and fresh herbs makes a great…
This quick broccoli and cheese recipe takes just 10 minutes and uses a simple method for tender, gooey, cheesy broccoli.…
 If you love a classic Caesar Salad but want something without anchovies, you’ll love this Little Gem Salad with Creamy…
The post Little Gem Salad with Creamy Cacio e Pepe Dressing appeared first on The Defined Dish.
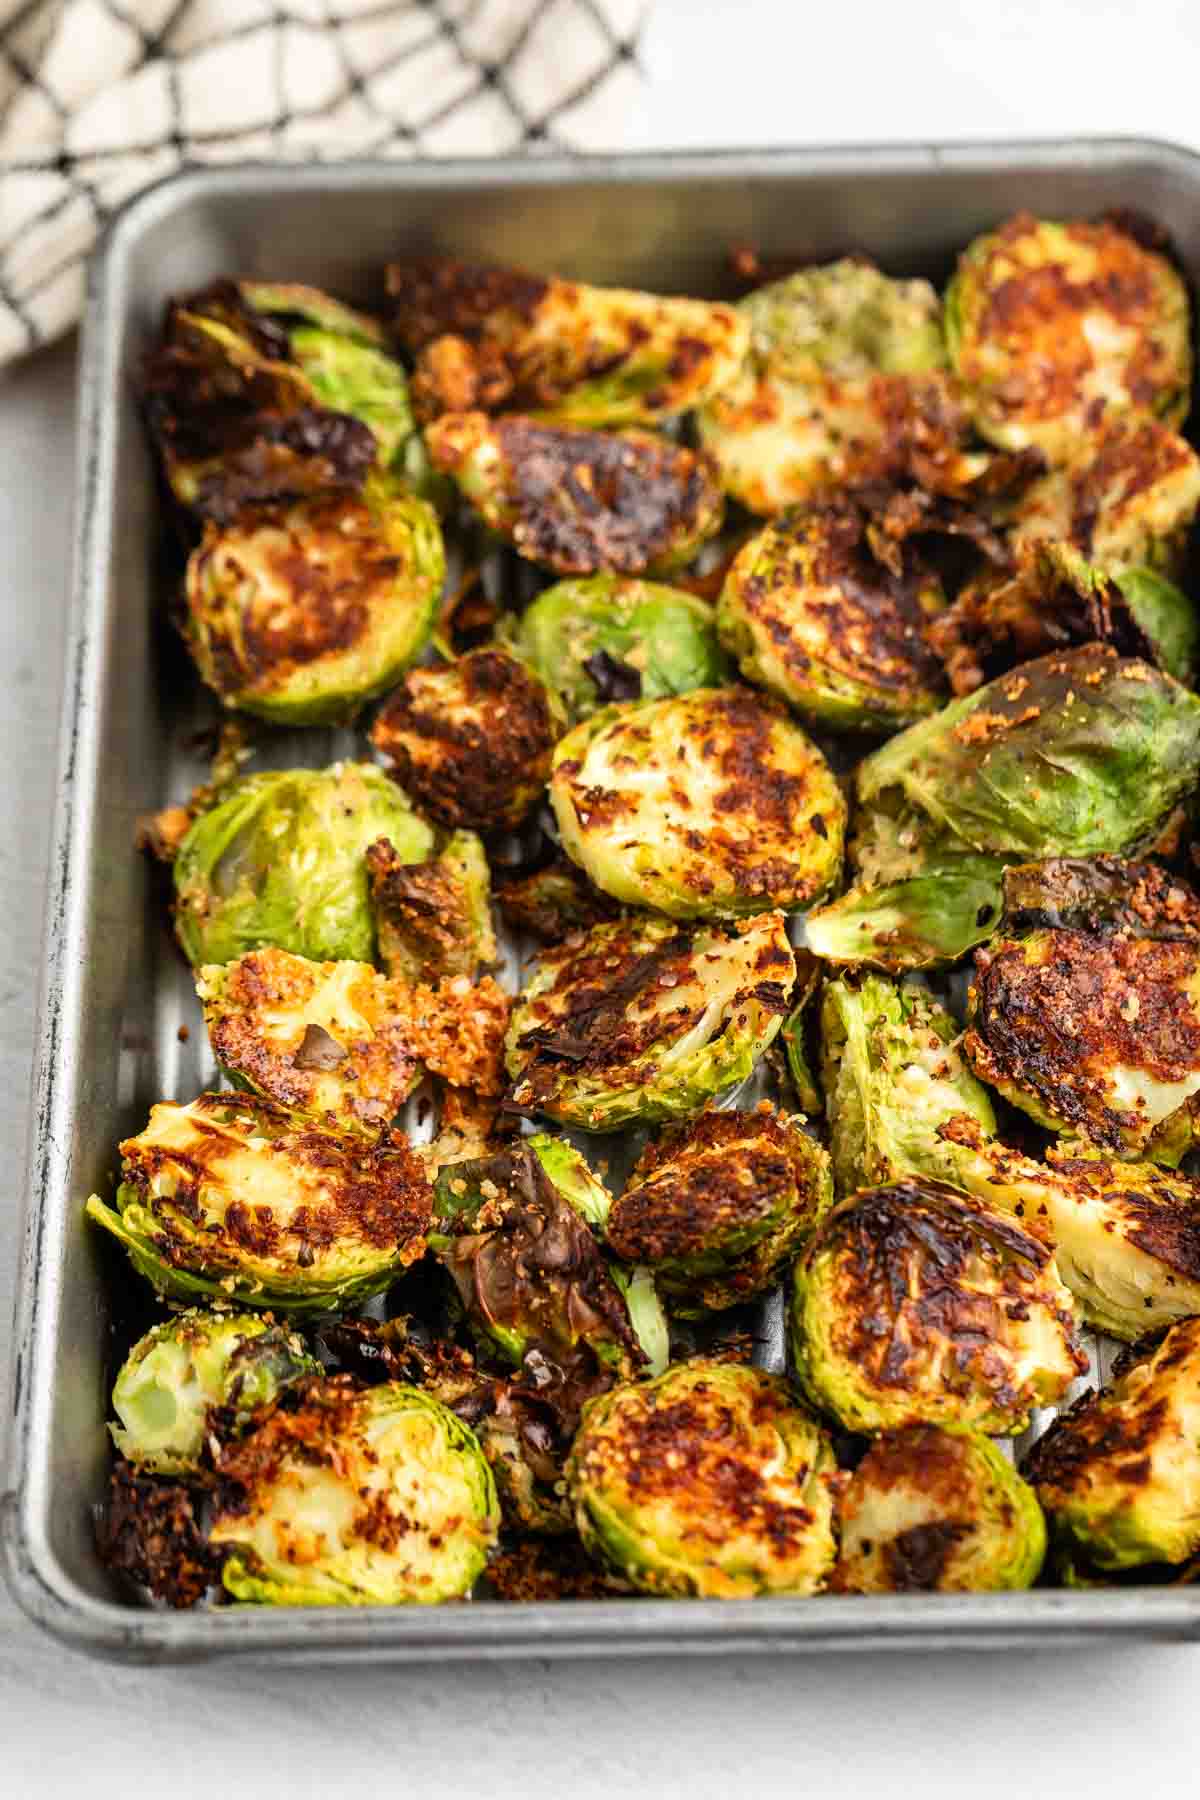
Here’s my secret technique for perfectly crispy Brussels sprouts! These oven-roasted Brussels sprouts get caramelized and crispy, then tossed with…
Learn how to cook perfect boiled carrots in just 5 minutes with this simple stovetop method. These tender, buttery carrots…
These horseradish mashed potatoes are creamy with a kick! They’re the ultimate zesty side dish for steak, prime rib, or…
 Parmesan Roasted Brussels Sprouts are one of my favorite side dishes! They’re tender and crispy around the edges and flavored with Parmesan cheese. Learn how to roast Brussels sprouts the right way, so they come out perfect every time! If you think you’re not a fan of Brussels sprouts, then you’ve never had them roasted.…
My strongest opinion on Thanksgiving sides is that whenever possible, they should come in a casserole dish (or its chic French cousin, a gratin). I don’t mean that your sides should be limited to things that swim in cream, cheese, butter…
Texas caviar is a fresh and zesty mix of beans and veggies. It’s perfect for parties, picnics, and summer cookouts,…
Make this easy steak fries recipe at home! These crispy baked potato wedges are golden on the outside, fluffy inside,…
 If you want to level up your holiday side dishes this year, you need to make these Roasted Calabrian Chili…
The post Roasted Calabrian Chili Green Beans with Crispy Shallots appeared first on The Defined Dish.
These honey glazed carrots are tender, glossy, and perfectly caramelized. A quick stovetop side dish with the perfect balance of…
Here’s how to make steamed carrots and get crisp-tender perfection in 10 minutes! This healthy side dish method keeps carrots…
These healthy and easy side dishes for chicken make protein into dinner, from crispy roasted vegetables to creamy pastas and…
This farro with mushrooms recipe takes the chewy whole grain to new heights! It’s sauteed with garlic, fresh herbs and…
These cheese fries are a delicious combination of crispy fries and creamy, homemade cheese sauce, making them the perfect appetizer, side dish, or party snack!
This easy succotash recipe combines corn, beans, and veggies for a colorful side dish full of fresh flavor that everyone…
NEW!
In just minutes, these quick pickled red onions become your secret weapon for next-level flavor. Tender-crisp slices of red onion combine with tangy apple cider vinegar, silky maple syrup, and sea salt, creating a sweet, zesty bite that brightens every meal.
The post Quick Pickled Red Onions appeared first on Simple Green Smoothies.
A zesty Tuscan kale salad with a healthy homemade Italian dressing, shredded Tuscan kale, onions and seasoned bread crumb crunchies!
Sauteed button mushrooms make an easy and flavorful side dish! This simple recipe transforms ordinary white mushrooms that taste irresistibly…
This Healthy Broccoli Slaw Recipe is full of sesame, vinegar, and crunch and ready in under 10 minutes. Meal prep gold!
Here’s how to cook maitake mushrooms with this easy sautéed recipe featuring garlic, soy sauce, and sesame oil! These earthy,…
This sauteed zucchini recipe comes out perfectly tender every time! In just 10 minutes you can make this bland veggie…
Celebrate summer with this vegan peach salad, a simple side dish bursting with fresh flavors thanks to juicy peaches, creamy avocados, crunchy nuts, and leafy greens. Drizzle the simple balsamic vinaigrette over top for an unforgettable summer meal!
This easy sautéed spinach and mushrooms recipe pairs cremini mushrooms with spinach, garlic, and lemon for a bright, healthy side…