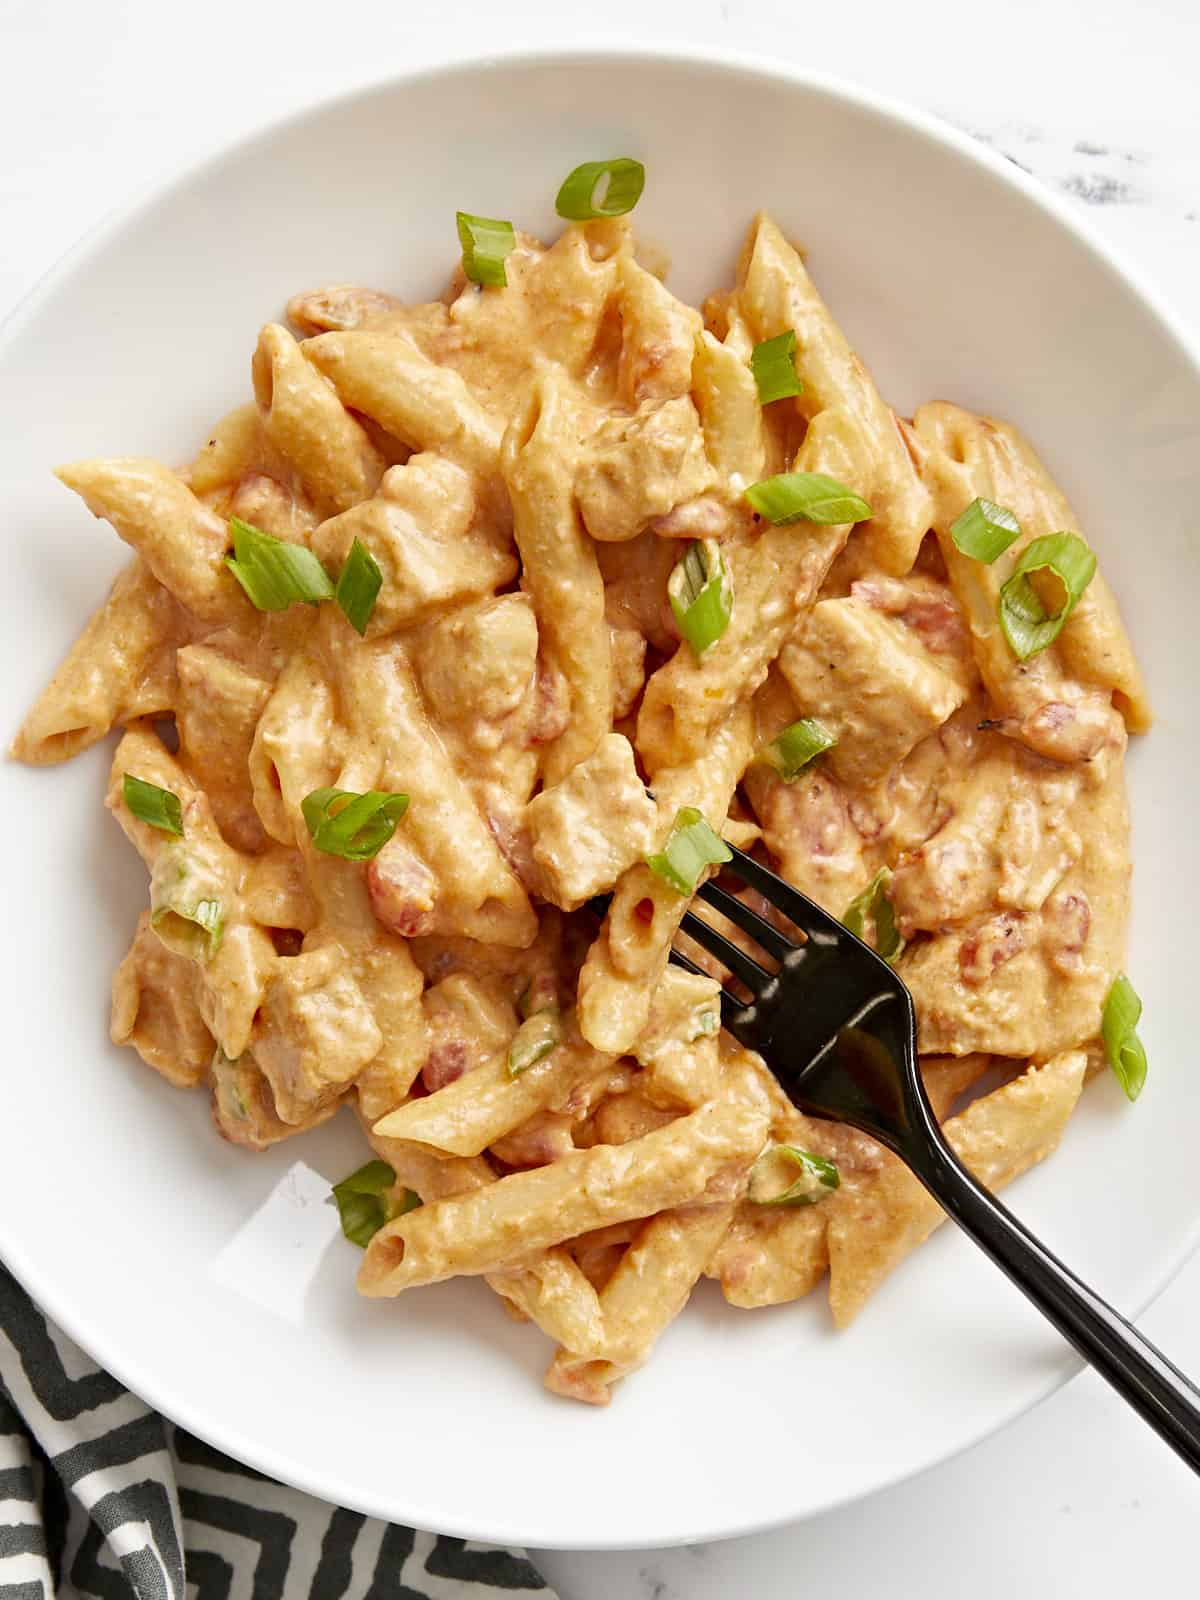
One thing I’ve learned over the years is that most dips can also double as an amazing pasta sauce, and this Buffalo Chicken Pasta is a great example. I took all of the creamy, tangy, spicy goodness of buffalo chicken dip and made it into a deliciously cheesy one-pot pasta. So gather around all of my spicy food friends, you’re going to want to make this easy, creamy, and addictive Buffalo Chicken Pasta ASAP!
Ingredients for Buffalo Chicken Pasta
This cheesy buffalo chicken pasta starts with all of the same ingredients as buffalo chicken dip, then we add a few more to make it a little saucier and give the dish just a touch more flavor and texture. Here’s what you’ll need to make buffalo chicken pasta:
- Chicken Breast: We use one boneless, skinless chicken breast for this recipe and stretch it across four servings to keep things budget-friendly. You can use diced boneless, skinless chicken thighs for an even less expensive option. Or, you can add leftover chopped or shredded cooked rotisserie chicken to the pasta at the end. If using pre-cooked rotisserie chicken, just add the remaining spices to the sauce.
- Seasoning: We seasoned the chicken breast with garlic powder, onion powder, cayenne pepper, and salt for extra flavor.
- Butter: Butter balances the heat and acidity of the hot sauce and helps give this dish that classic buffalo sauce flavor.
- Chicken Broth: In true one-pot pasta style, the pasta is cooked in chicken broth for maximum flavor.
- Pasta: We used a classic penne pasta for this dish, but you could also use bowtie, rotini, or any short pasta shape.
- Cheese: A combination of cream cheese and Monterey jack cheese keeps the sauce extra creamy and smooth without the need for a flour and butter roux.
- Hot Sauce: Franks Red Hot Sauce is the classic sauce used for any “Buffalo” flavored dish, but any vinegar-based cayenne hot sauce will also be delicious.
- Worcestershire sauce: Worcestershire adds just the right of umami and sweetness to the buffalo sauce, preventing it from having a flat flavor.
- Petite Diced Tomatoes: To give this pasta more texture and flavor, we added a can of petite diced tomatoes.
- Green Onion: We topped this pasta with sliced green onion for a little dose of savory freshness at the end.
What Else Can I Add?
If you have a little extra wiggle room in your budget, you can add even more goodies to this buffalo chicken pasta to make it ✨extra✨. Try topping the pasta with crumbled blue cheese, or stirring in some bacon crumbles. If you love a crunchy topping, try crushing some butter crackers or tortilla chips and sprinkling them on top of the pasta just before serving. And while it is totally unconventional, I think some small broccoli florets would be awesome in this, kind of like broccoli mac and cheese!
What to Serve with Buffalo Chicken Pasta
This buffalo chicken pasta is pretty rich, so you’re going to want something light and refreshing to serve on the side. You can opt for a super Simple Side Salad, a classic Caesar Salad, or maybe a simple Cucumber Tomato Salad. Or just go with the theme and serve up some carrot and celery sticks with blue cheese dressing for dipping!
Tips for Making One Pot Pasta
One-pot pasta can be tricky for some because the pasta is cooked in a much smaller amount of liquid than traditional pasta cooking methods. Here are a few tips to make sure your one-pot pasta cooks evenly and to the right texture:
- Use heavy, thick-bottomed cookware to help the ingredients heat evenly.
- Use a burner that is close in diameter to the bottom of your pot to ensure even heating.
- The broth does not need to fully cover the pasta for it to cook, so resist the urge to add more water or broth in the beginning. Steam will help the pasta above the water line to cook, and the pasta will be stirred to ensure it all has contact with the liquid.
- Make sure the liquid is simmering the whole time the pasta is cooking. If the heat is too low, or the liquid is only simmering in the center of the pot, the pasta will cook unevenly and get gummy.
- Stir the pot occasionally to prevent sticking and help everything cook evenly.
- Use your judgment. If the pasta looks close to being cooked through, but there is too much liquid left in the skillet, let it finish simmering with the lid off. If the liquid is gone but your pasta is still not tender, add a splash of more water or broth and continue to simmer until tender.
Buffalo Chicken Pasta
Ingredients
- 1 boneless, skinless chicken breast (about ⅔ lb.) $3.33
- 1/2 tsp garlic powder $0.05
- 1/2 tsp onion powder $0.05
- 1/2 tsp cayenne pepper $0.05
- 1/4 tsp salt $0.02
- 1 Tbsp cooking oil $0.04
- 2 Tbsp butter $0.26
- 8 oz. penne pasta $0.67
- 1 15oz. can petite diced tomatoes $1.00
- 1.5 cups chicken broth $0.28
- 4 oz. cream cheese $1.10
- 1/4 cup hot sauce $0.52
- 1/2 tsp Worcestershire sauce $0.02
- 1/2 cup shredded Monterey jack cheese $0.58
- 2 green onions, sliced (optional) $0.16
Instructions
- Cut the chicken into ½-¾ inch pieces. Combine the garlic powder, onion powder, cayenne pepper, and salt, then sprinkle it over the chicken pieces. Toss the chicken in the spices until everything is well coated.
- Heat the cooking oil in a large deep skillet over medium-high heat until very hot. Once hot, add the chicken and allow tge chicken to brown on all sides. The chicken does not need to be cooked through at this point.
- Add the uncooked pasta, canned diced tomatoes (with the liquid), and the chicken broth to the skillet with the chicken. Stir to dissolve all of the browned bits off the bottom of the skillet.
- Place a lid on the pot and allow the broth to come up to a strong simmer. The broth will not fully cover the pasta, but that is okay. Once the broth is simmering, briefly stir the pasta, replace the lid, then turn the heat down to medium-low.
- Allow the pasta to simmer in the broth for 10-12 minutes or until the pasta is tender and most of the liquid has been absorbed, stirring once or twice throughout, and always replacing the lid after stirring.
- Once the pasta is tender and only a small amount of thickened liquid remains in the skillet, cut the cream cheese into chunks and add it to the past along with the butter, hot sauce, and Worcestershire sauce. Stir and cook over medium-low heat until the cream cheese has fully melted into the pasta.
- Add the shredded Monterey jack cheese and stir until melted into the sauce. Top with sliced green onions, then serve hot.
See how we calculate recipe costs here.
Nutrition
How to Make Buffalo Chicken Pasta – Step by Step Photos
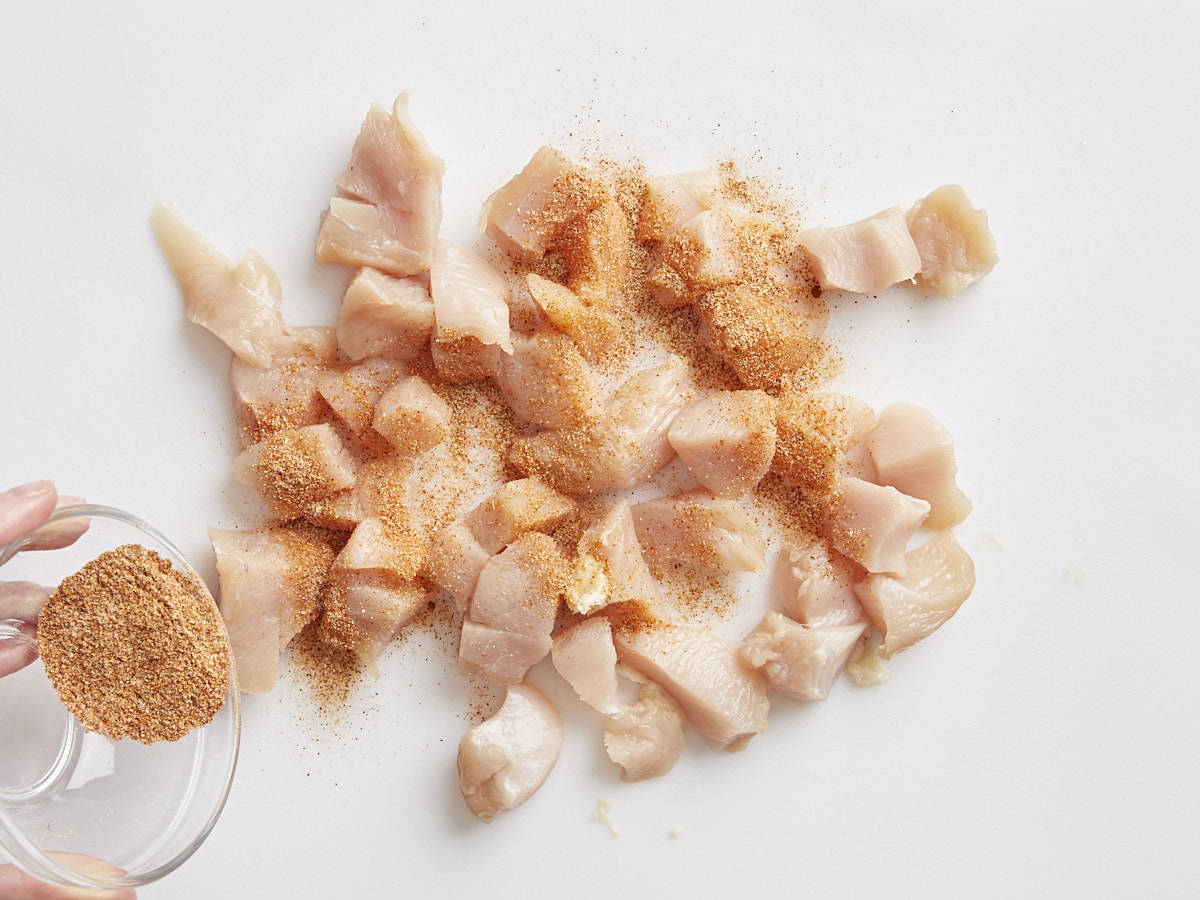
Dice one boneless, skinless chicken breast (about ⅔ lb.) into small ½-¾ inch pieces. Combine ½ tsp garlic powder, 1/2 tsp onion powder, ½ tsp cayenne pepper, and ¼ tsp salt, then sprinkle it over the chicken. Toss the chicken until it is evenly coated in spices.
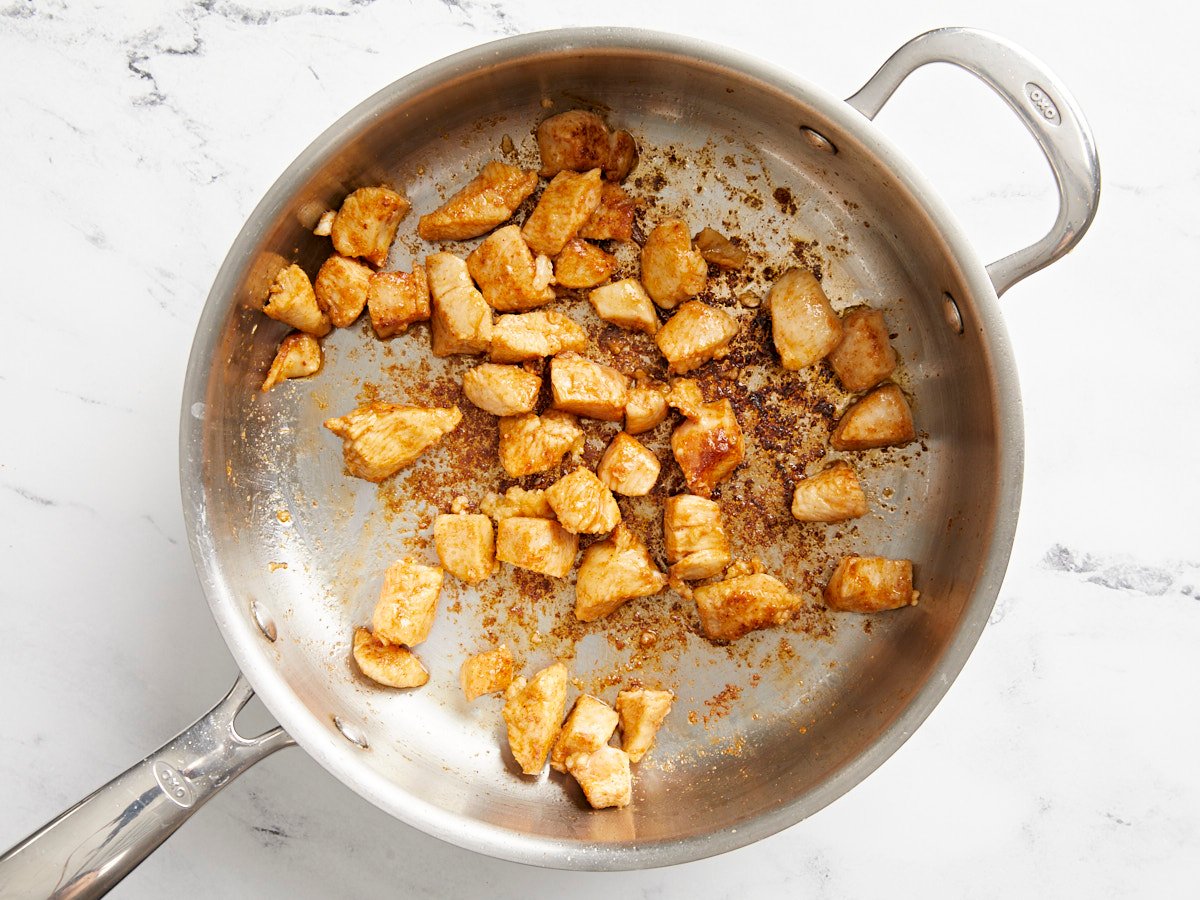
Heat 1 Tbsp of cooking oil in a large deep skillet over medium-high until very hot. Once hot, add the chicken and allow it to brown on all sides. The chicken does not need to cook through here, just let it brown on the outside.
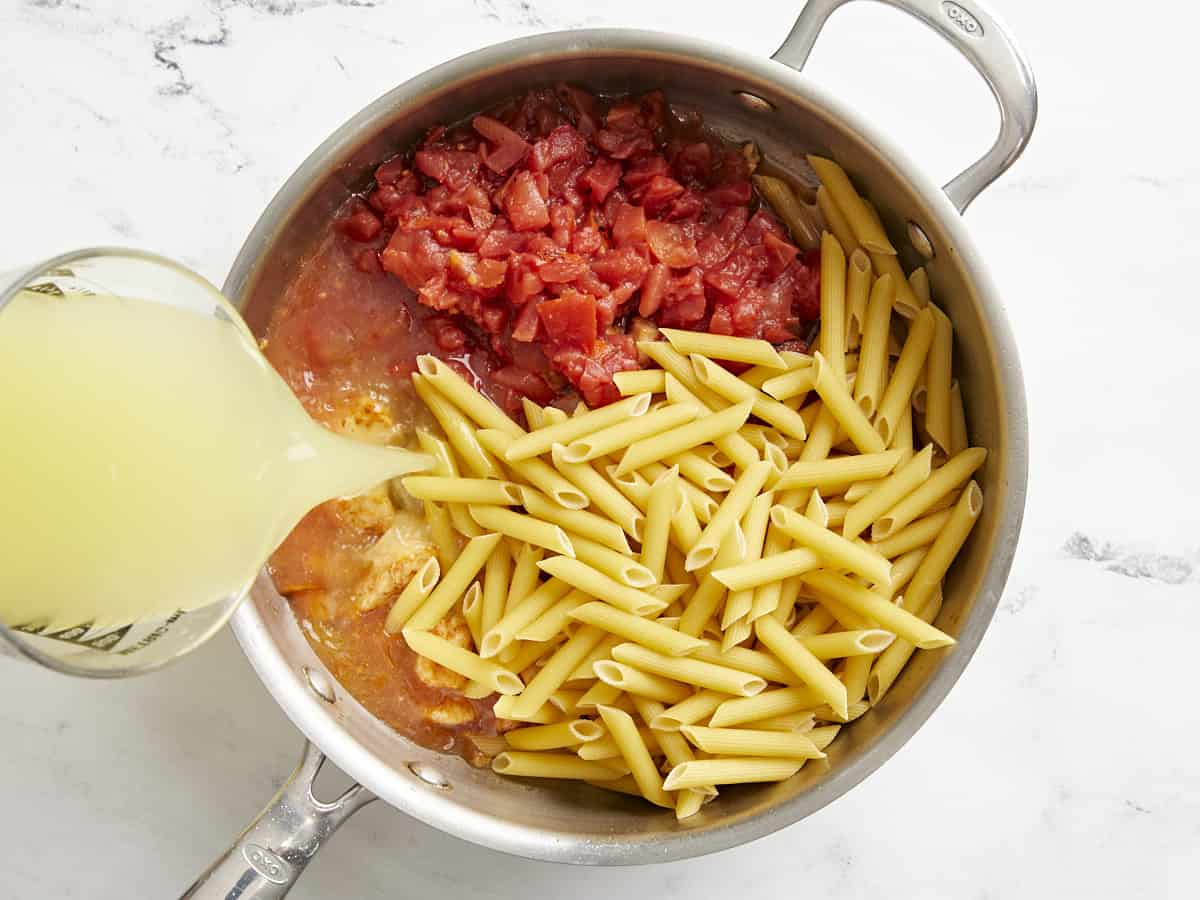
Add 8 oz of uncooked pasta, one 15oz. can of petite diced tomatoes (with the liquid), and 1.5 cups of chicken broth to the skillet with the chicken.
Stir everything well, making sure to dissolve all the browned bits off the bottom of the skillet. The broth will not fully cover the pasta, but that’s okay. Do not add extra liquid at this point.
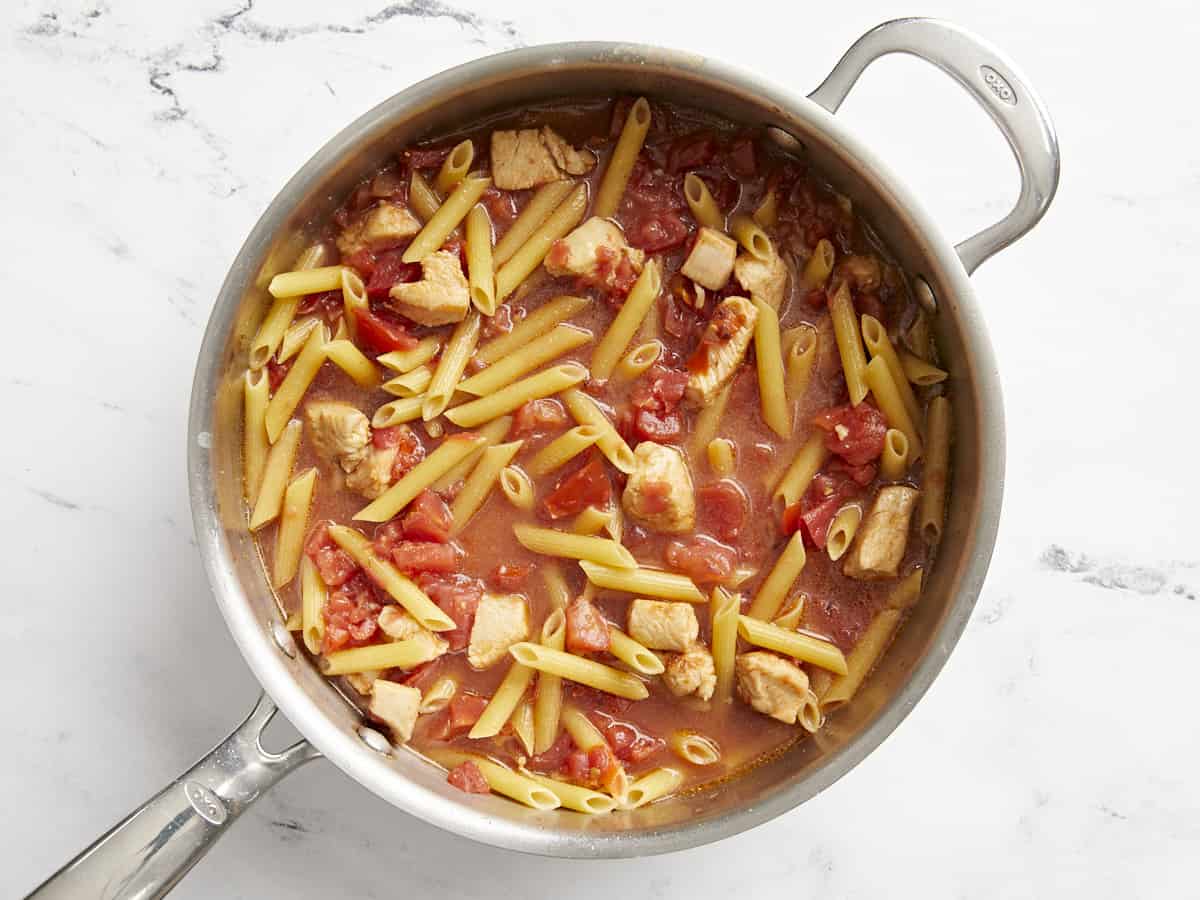
Place a lid on the pot and allow the broth to come up to a strong simmer. Once simmering, give the pasta a quick stir to loosen it from the bottom, replace the lid, then turn the heat down to medium-low. Let the pasta simmer over medium-low for 10-12 minutes, or until the pasta is tender and only a small amount of saucy liquid remains.
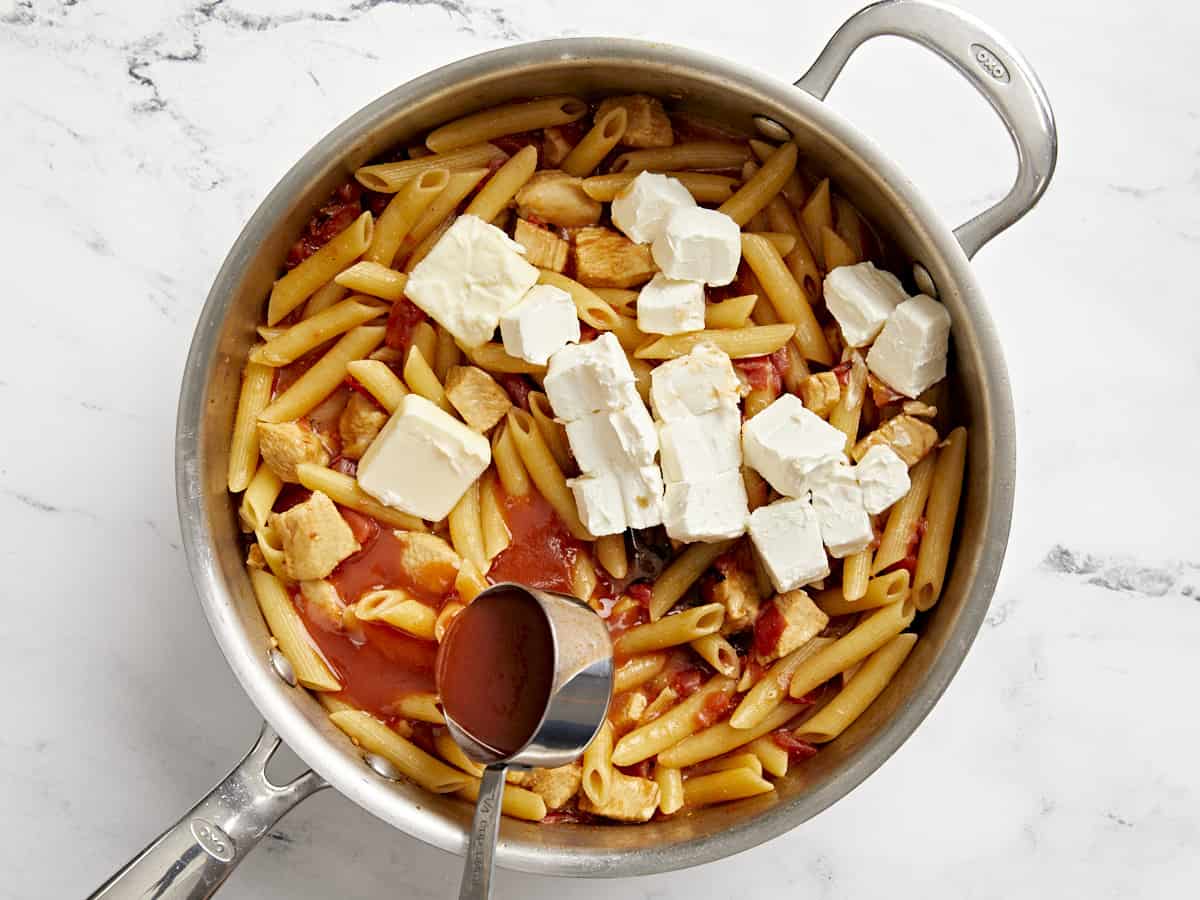
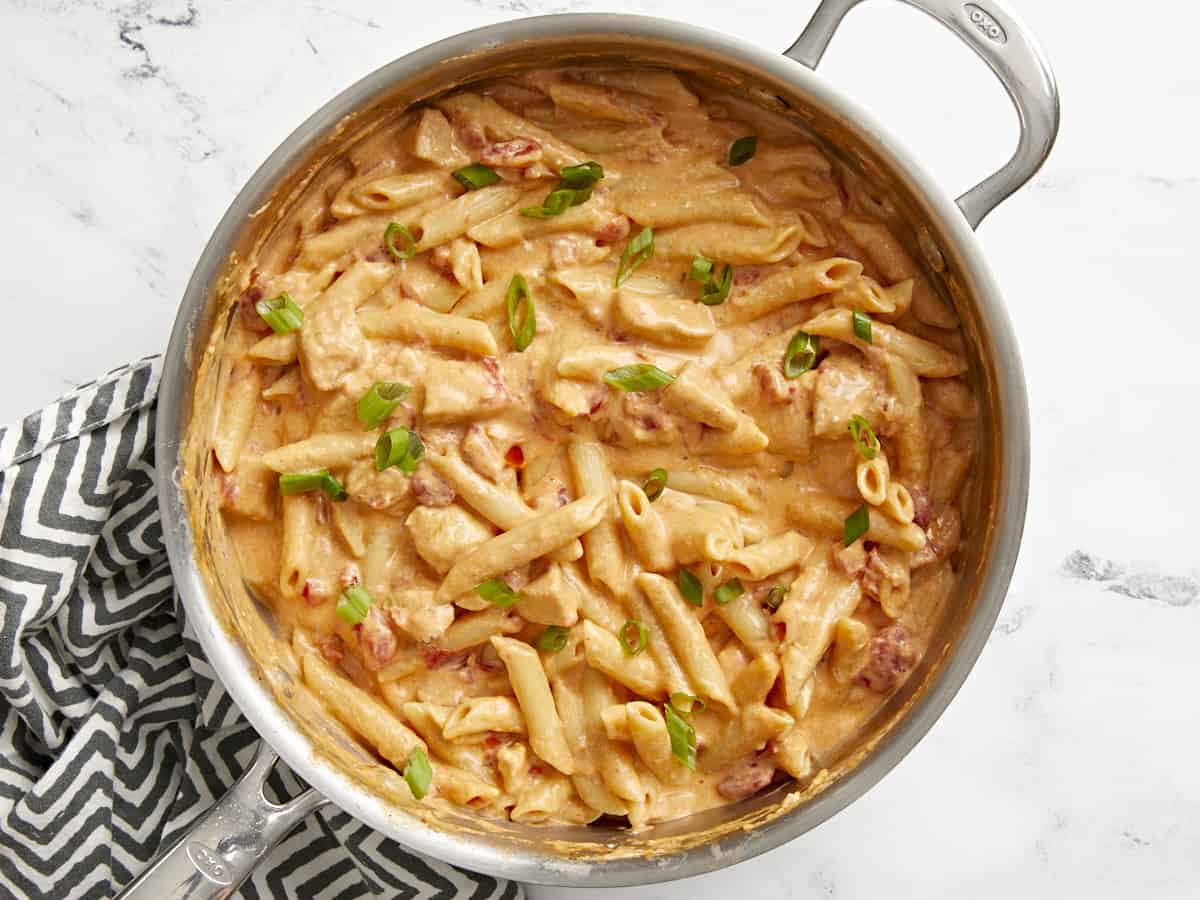
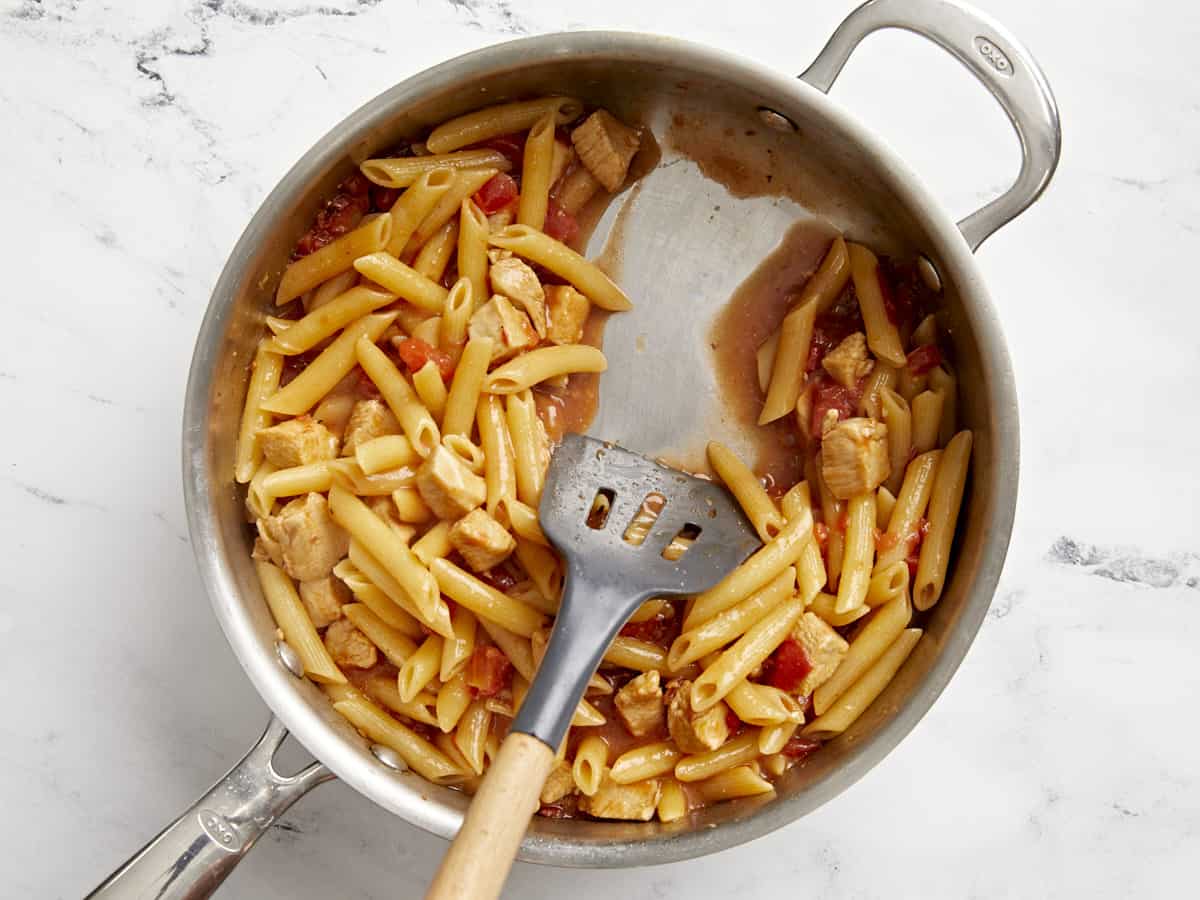
Once the pasta is tender and most of the liquid is absorbed, it’s time to make the buffalo sauce. Add 4oz. of cream cheese (cut into chunks), 2 Tbsp butter, ¼ cup hot sauce, and ½ tsp Worcestershire sauce. Continue to stir and cook over medium-low until the cream cheese is fully melted into the sauce.
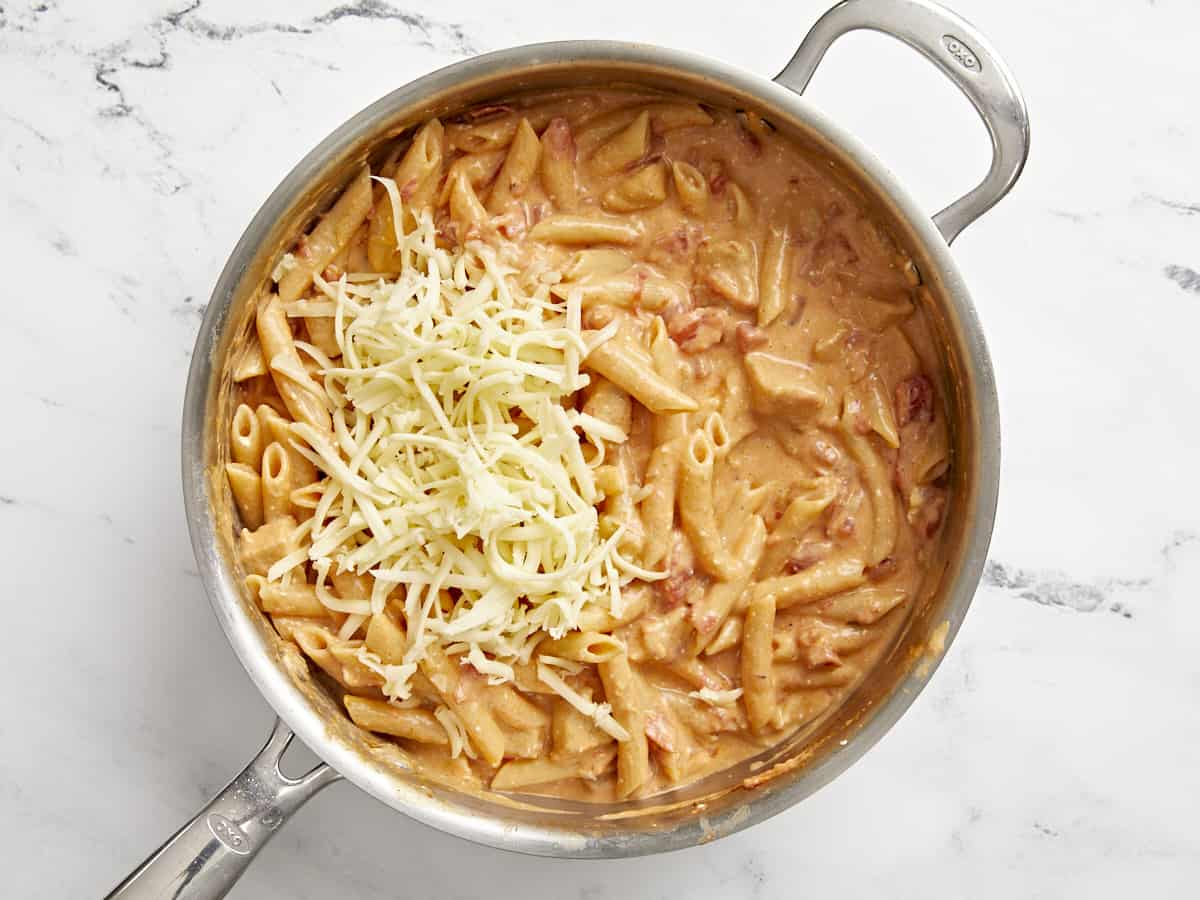
Add ½ cup of shredded Monterey Jack cheese to the skillet and stir until it has melted into the sauce.
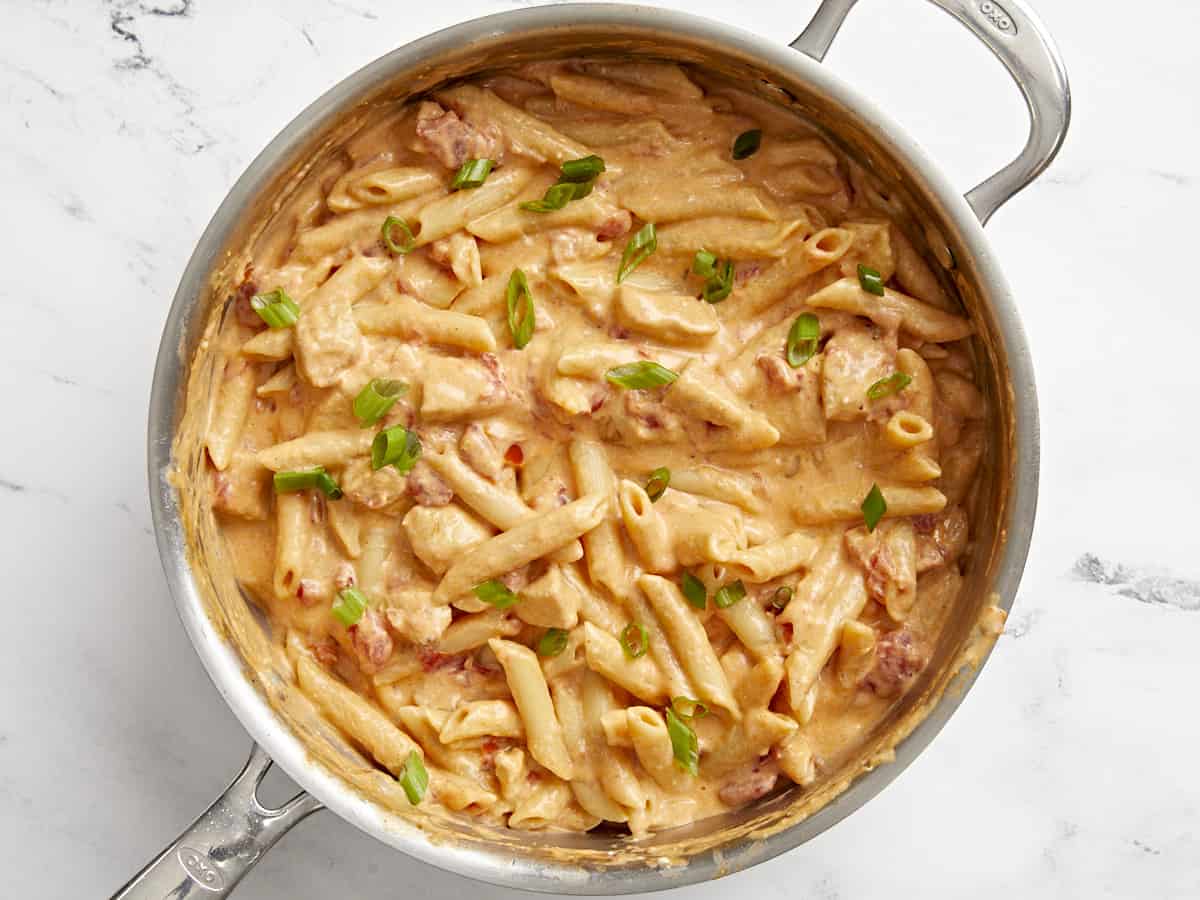
Top the buffalo chicken pasta with sliced green onions and serve hot!

More Buffalo Sauce Recipes


The post Buffalo Chicken Pasta appeared first on Budget Bytes.