Root Beer Float Pie
This root beer float pie takes everything you love about a classic root beer float and…
The post Root Beer Float Pie appeared first on Salty Side Dish.
This root beer float pie takes everything you love about a classic root beer float and…
The post Root Beer Float Pie appeared first on Salty Side Dish.
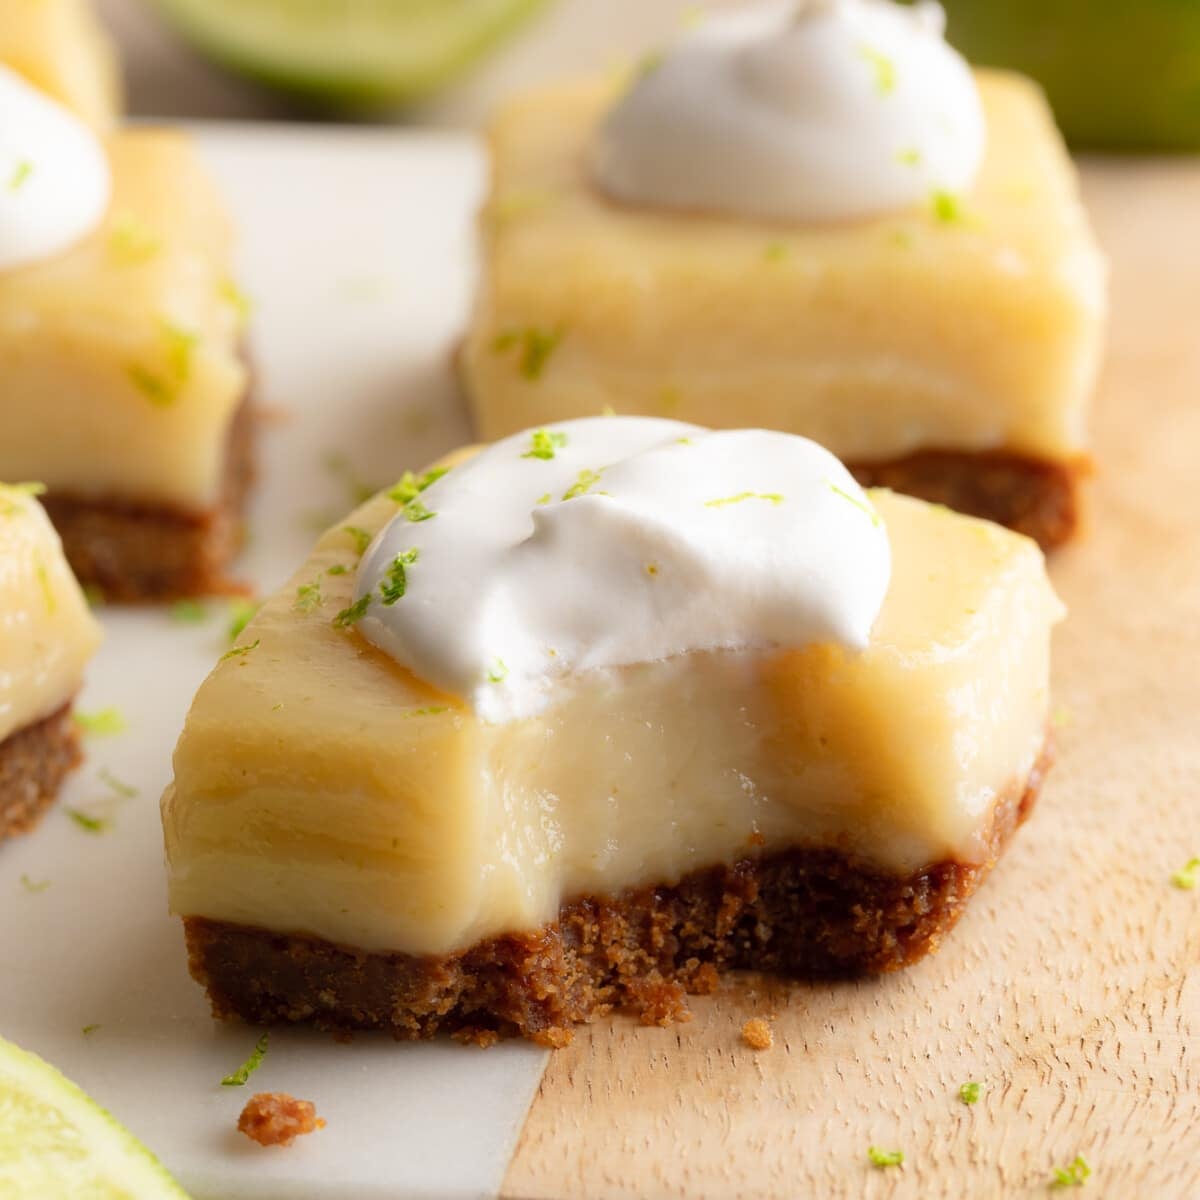
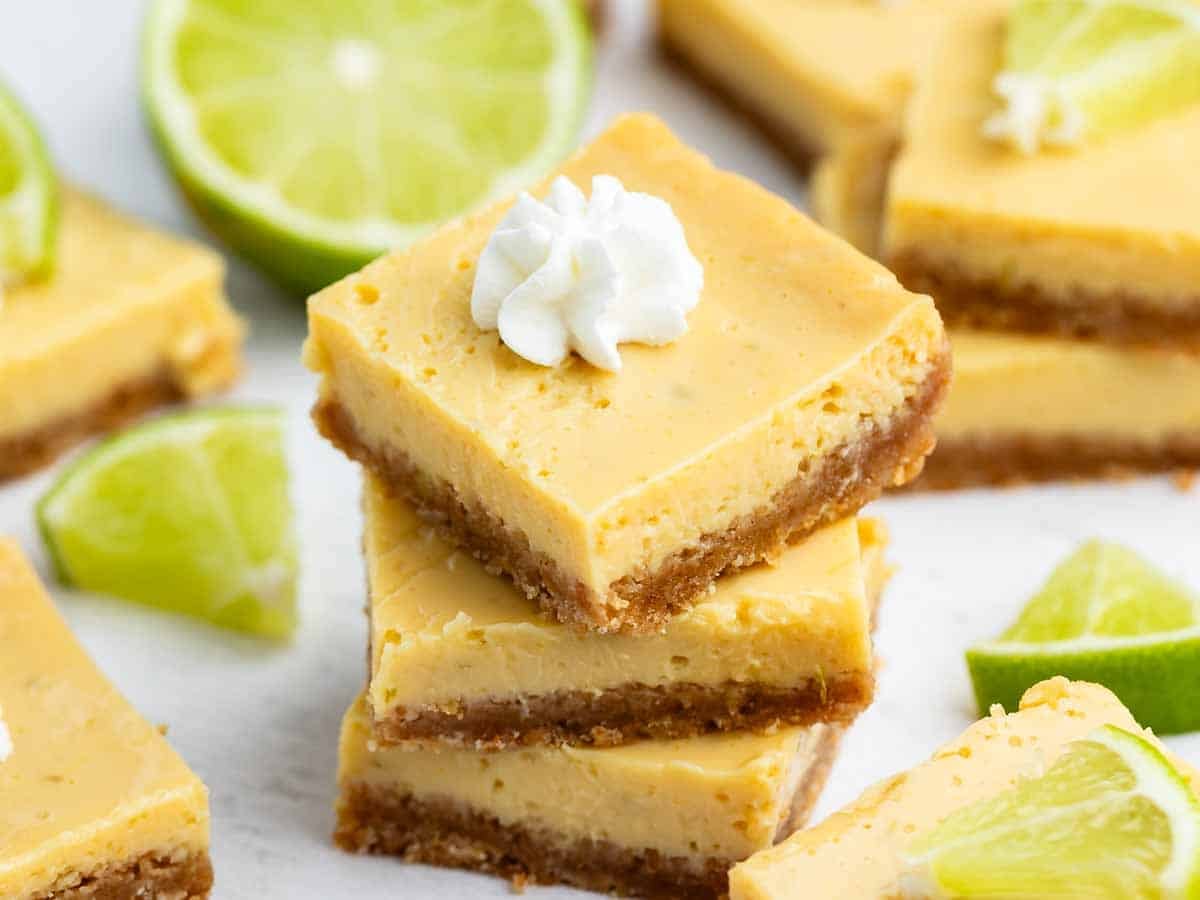 Key Lime Bars are key lime pie but in handheld bar form: a buttery graham cracker crust with a creamy, tart key lime filling. These are super easy to make with simple ingredients, and they’re perfect whenever you’re craving citrus desserts. I never had Key Lime Pie until I was in my 30s, can you…
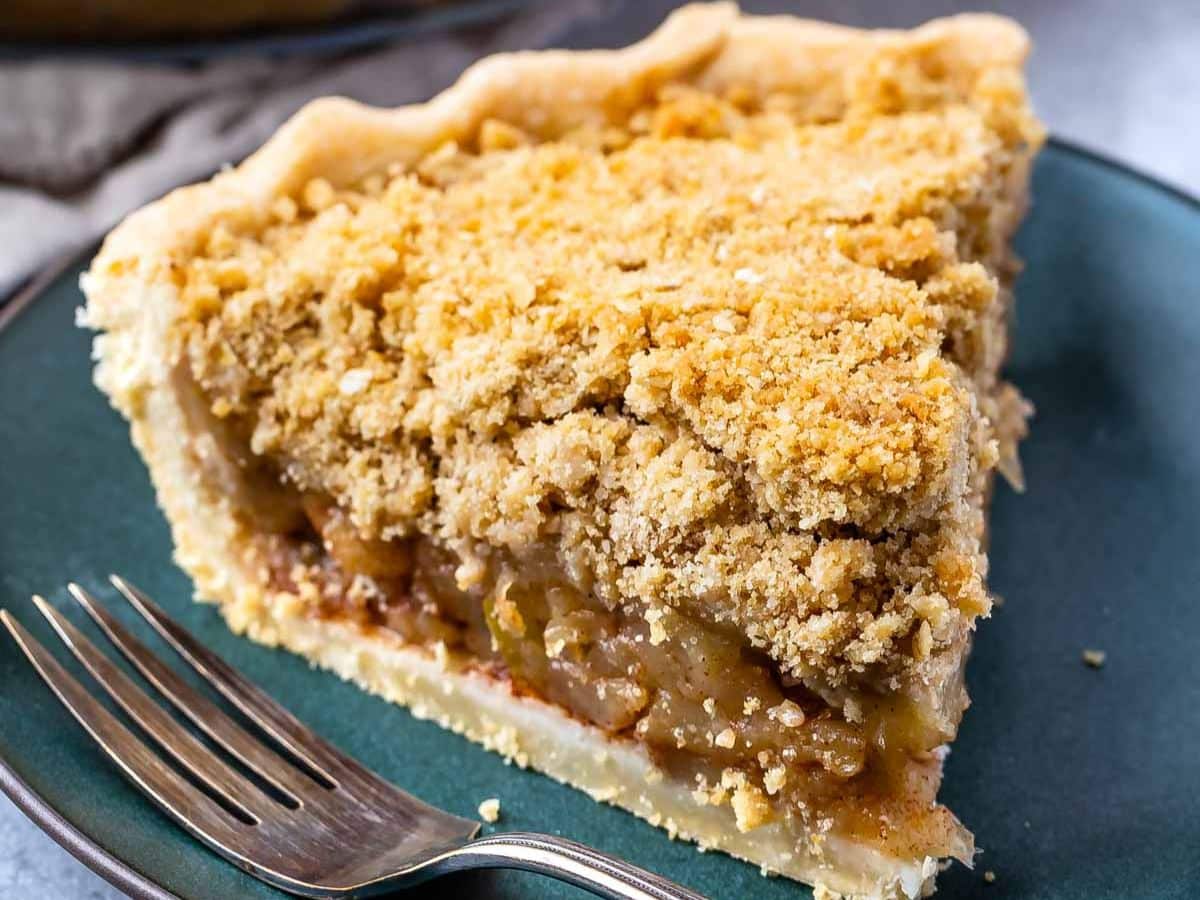 Love Apple Pie? You must try my Apple Pie with Oatmeal Cookie Crumble. It’s an epic recipe with perfectly cooked apples and the best crumble you’ll ever eat. I have been making crumb apple pie for years (in fact, it was the reason I started this blog). So when I was trying to come up…
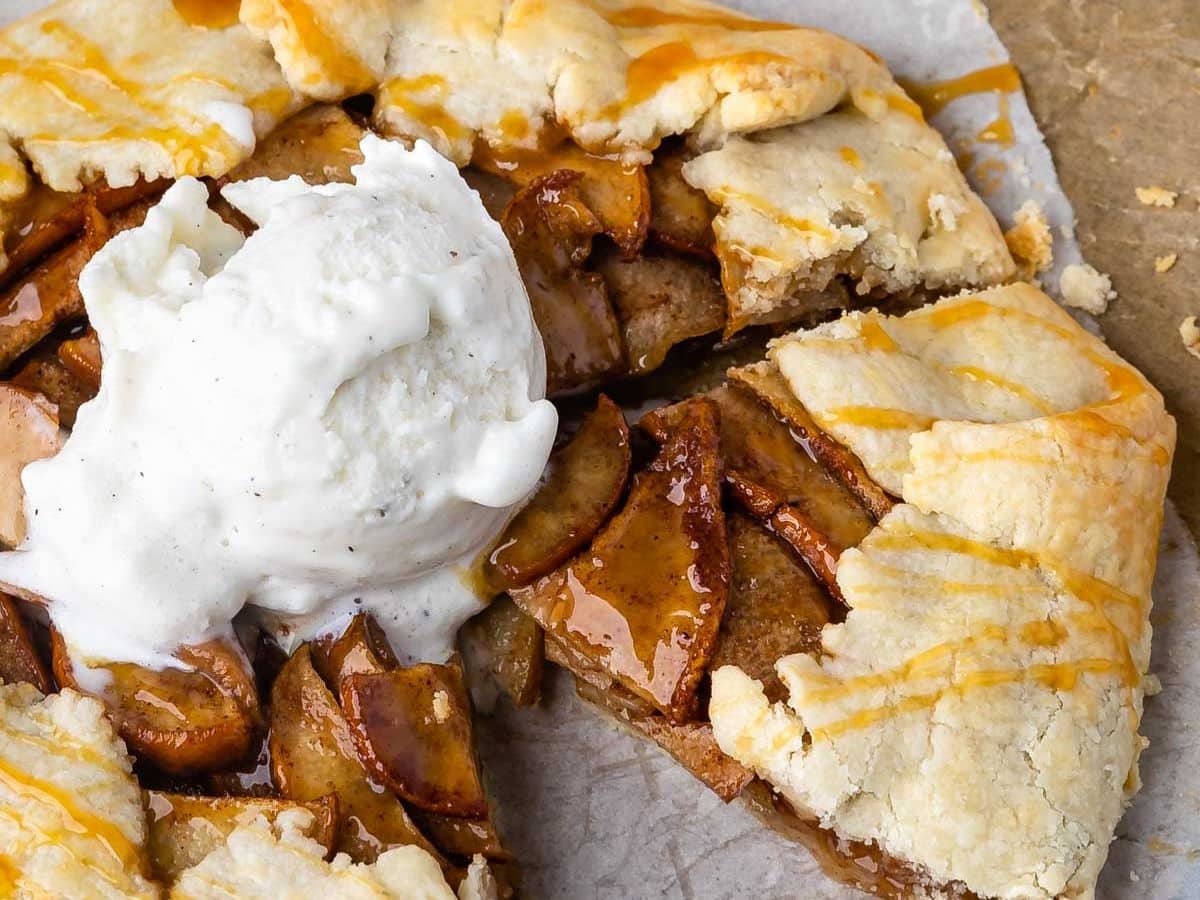 A Caramel Pear Galette is a rustic pie full of perfectly cooked juicy pears, caramel, and spices. It’s easy to make (no pie dish!) and the perfect fall dessert! A galette is basically fruit on top of a pastry. It’s similar to a pie but doesn’t have a top crust or a lot of other…
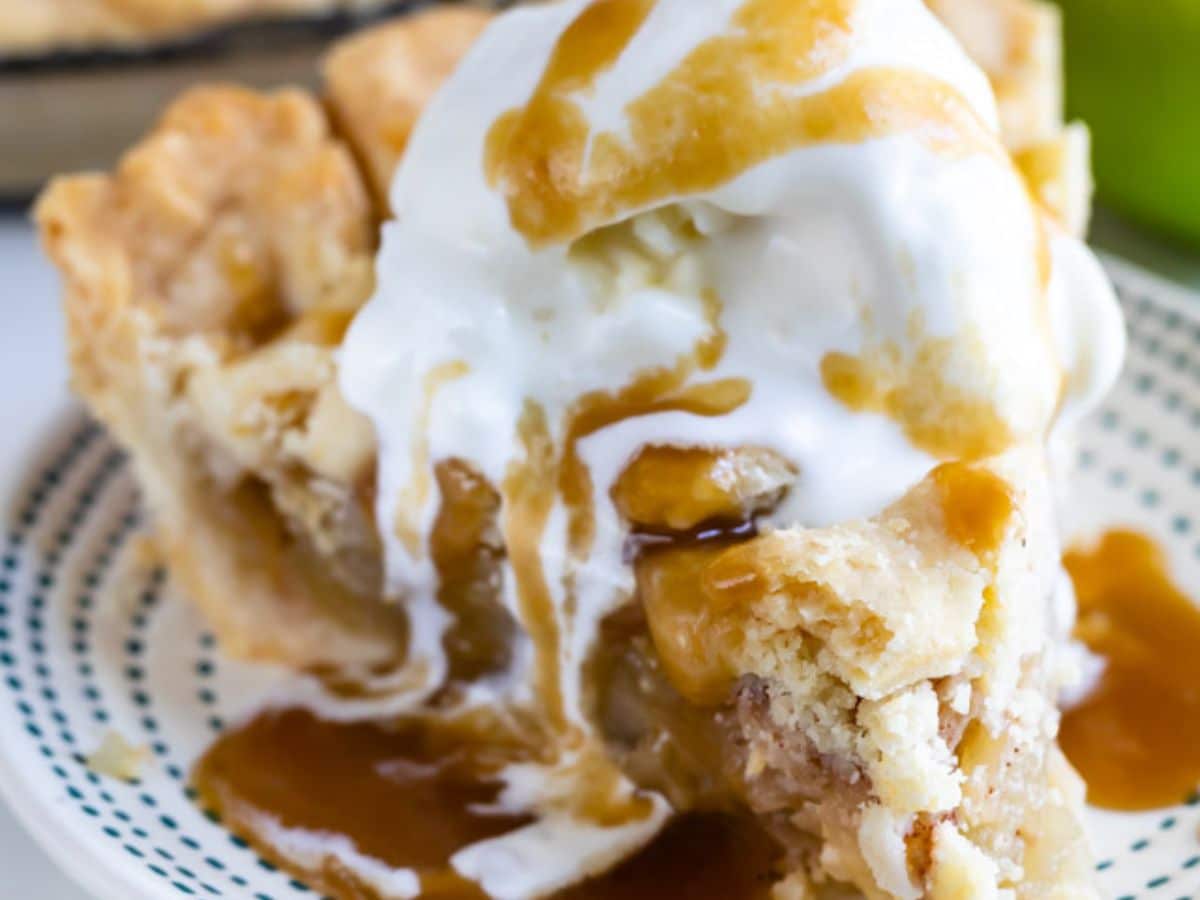 Salted Caramel Apple Pie is the best apple pie recipe – perfectly cooked apples baked with salted caramel sauce in a homemade pie crust! It’s one of my favorite Thanksgiving pie recipes – but it’s perfect all fall or all year long! This caramel apple pie takes a classic apple pie recipe and gives it…
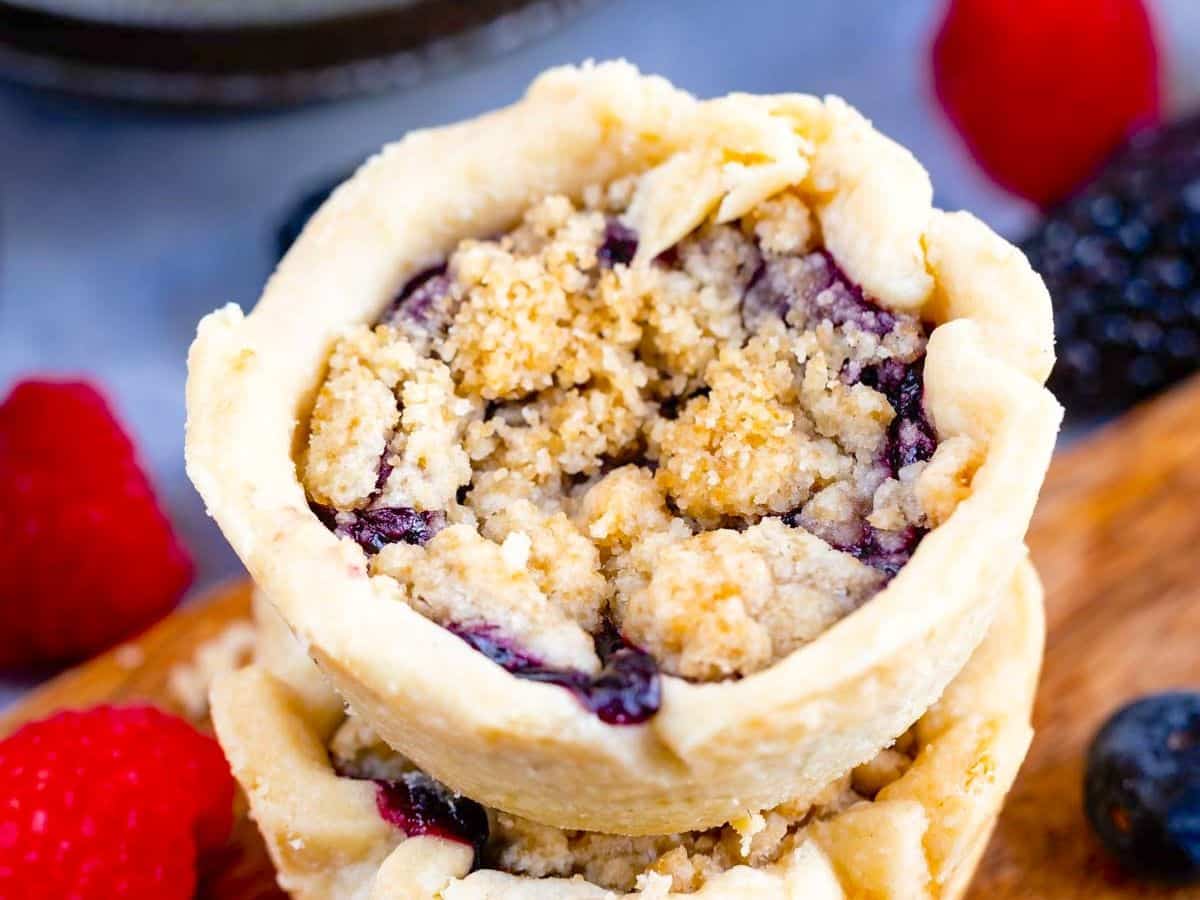 Mini Berry Pies are completely from scratch: a buttery pie crust filled with a jammy berry pie filling and topped with a sweet crunchy crumble. Mini Pies are so much easier to serve (and eat) than regular pie. These are perfect for any holiday! I love making mini pies because I can’t help but make…
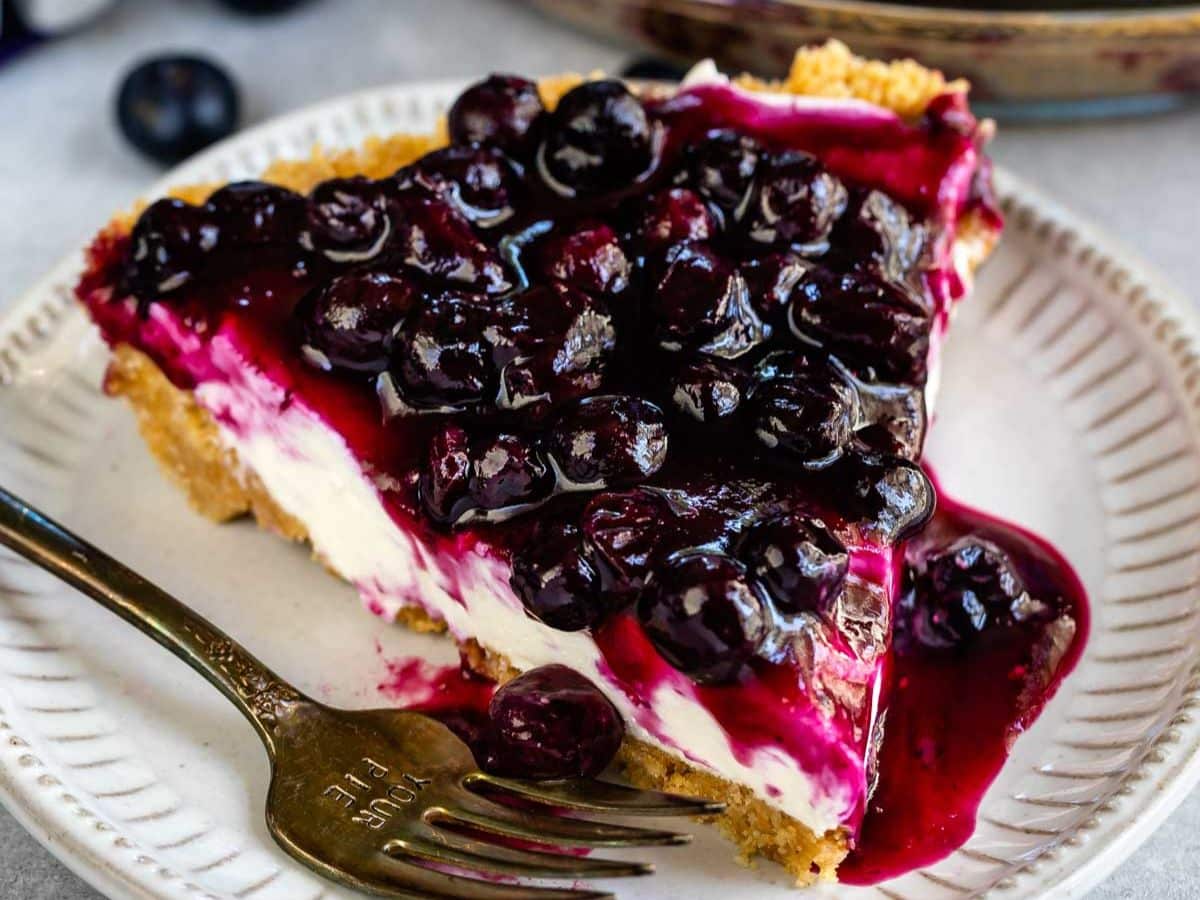 This Blueberry Cream Cheese Pie recipe has a graham cracker crust, a no bake cheesecake filling topped with blueberry pie filling. It’s creamy, cool, and easy to make – you can even make it entirely from scratch. This will become your favorite summer pie! This easy no-bake blueberry pie cream cheese recipe combines two popular…
The post Easy No-Bake Ice Cream Pie appeared first on Princess Pinky Girl.
If you’ve ever made an ice cream pie for a party and watched people assume it took hours, you know exactly why I keep making this one. It’s an Oreo cookie crust, lay…
 These 9-ingredient Vegan Key Lime Pie Bars layer a creamy, tangy key lime filling over a baked Biscoff crust. They’re easy to make and taste just like the pie! Love vegan pie bars? 🥧 Then you’ll have to try my Blueberry Pie Bars, my Vegan Pecan Bars, and my Blackberry Pie Bars, too. I look…
I brought this grasshopper pie to bunco and it disappeared fast. Not in a polite “everyone took a slice” way, but in a “who took the last piece?” kind of way. I had multiple people ask for the recipe before the night was even over, which honestly doesn…
This easy Banoffee Pie recipe could be the best no-bake pie ever. It’s made with a graham cracker crust, creamy dulce de leche, fresh banana slices, and homemade whipped cream. How to make Banoffee Pie: Graham Cracker Crust: Please make homemade graham cracker crust –it only takes 15 minutes and the store-bought ones are flavorless…
This creamy vegan pumpkin pie recipe rivals any traditional version with its silky texture and warm spices. It is easy…
This classic Southern Chess Pie recipe is rich, sweet, and made with simple pantry ingredients for flaky pie crust and custard-like filling. How to make Chess Pie: Pie Crust: Use one unbaked 9-inch pie crust. (My Perfect Pie Crust recipe makes two so you can freeze one for another day). Make Filling: In a mixing…
This easy Sheet Pan Pumpkin Pie recipe is the perfect dessert to feed a crowd during the holidays! It serves up to 24 people and takes just 35 minutes to bake. How to make Sheet Pan Pumpkin Pie: The Pie Crust: I will continue to shout from the rooftops how EASY my homemade pie crust…
Our easy Millionaire Pie recipe is a creamy no-bake dessert loaded with pineapple, cherries, coconut, and pecans in a graham cracker crust. How to make Millionaire Pie: Whip Cream Cheese and Cream: The cream cheese needs to be at room temperature so that you can mix it until smooth. Then add the cream and extracts.…
Bake up comfort without breaking the bank! These 23 easy pie recipes include sweet and savory favorites you’ll love for holidays and weeknights.
The post 23 Easy Pie Recipes appeared first on Budget Bytes.
I’m obsessed with this rich and gooey Chocolate Pecan Pie; it’s the perfect twist on the classic, with melty chocolate chips and crunchy pecans in every bite. How to make Chocolate Pecan Pie: Pie Crust: Make homemade pie crust and place the dough in a 9” pie dish. Refrigerate while you make the filling. Make…
Our no-bake Peanut Butter Pie recipe is rich and creamy, made with just a few simple ingredients in 20 minutes (no baking required)! It’s the perfect make-ahead dessert for holidays, potlucks, or when you’re craving a quick and indulgent treat. How to make Peanut Butter Pie: Make Oreo Pie Crust: Pulse Oreos into crumbs in…
20 Thanksgiving pie recipes including cream, fruit, custard, and more. Find your perfect holiday dessert to complete the festive table. Thanksgiving is quickly approaching, and it’s time to plan your Thanksgiving menu! This week, we’ve put …
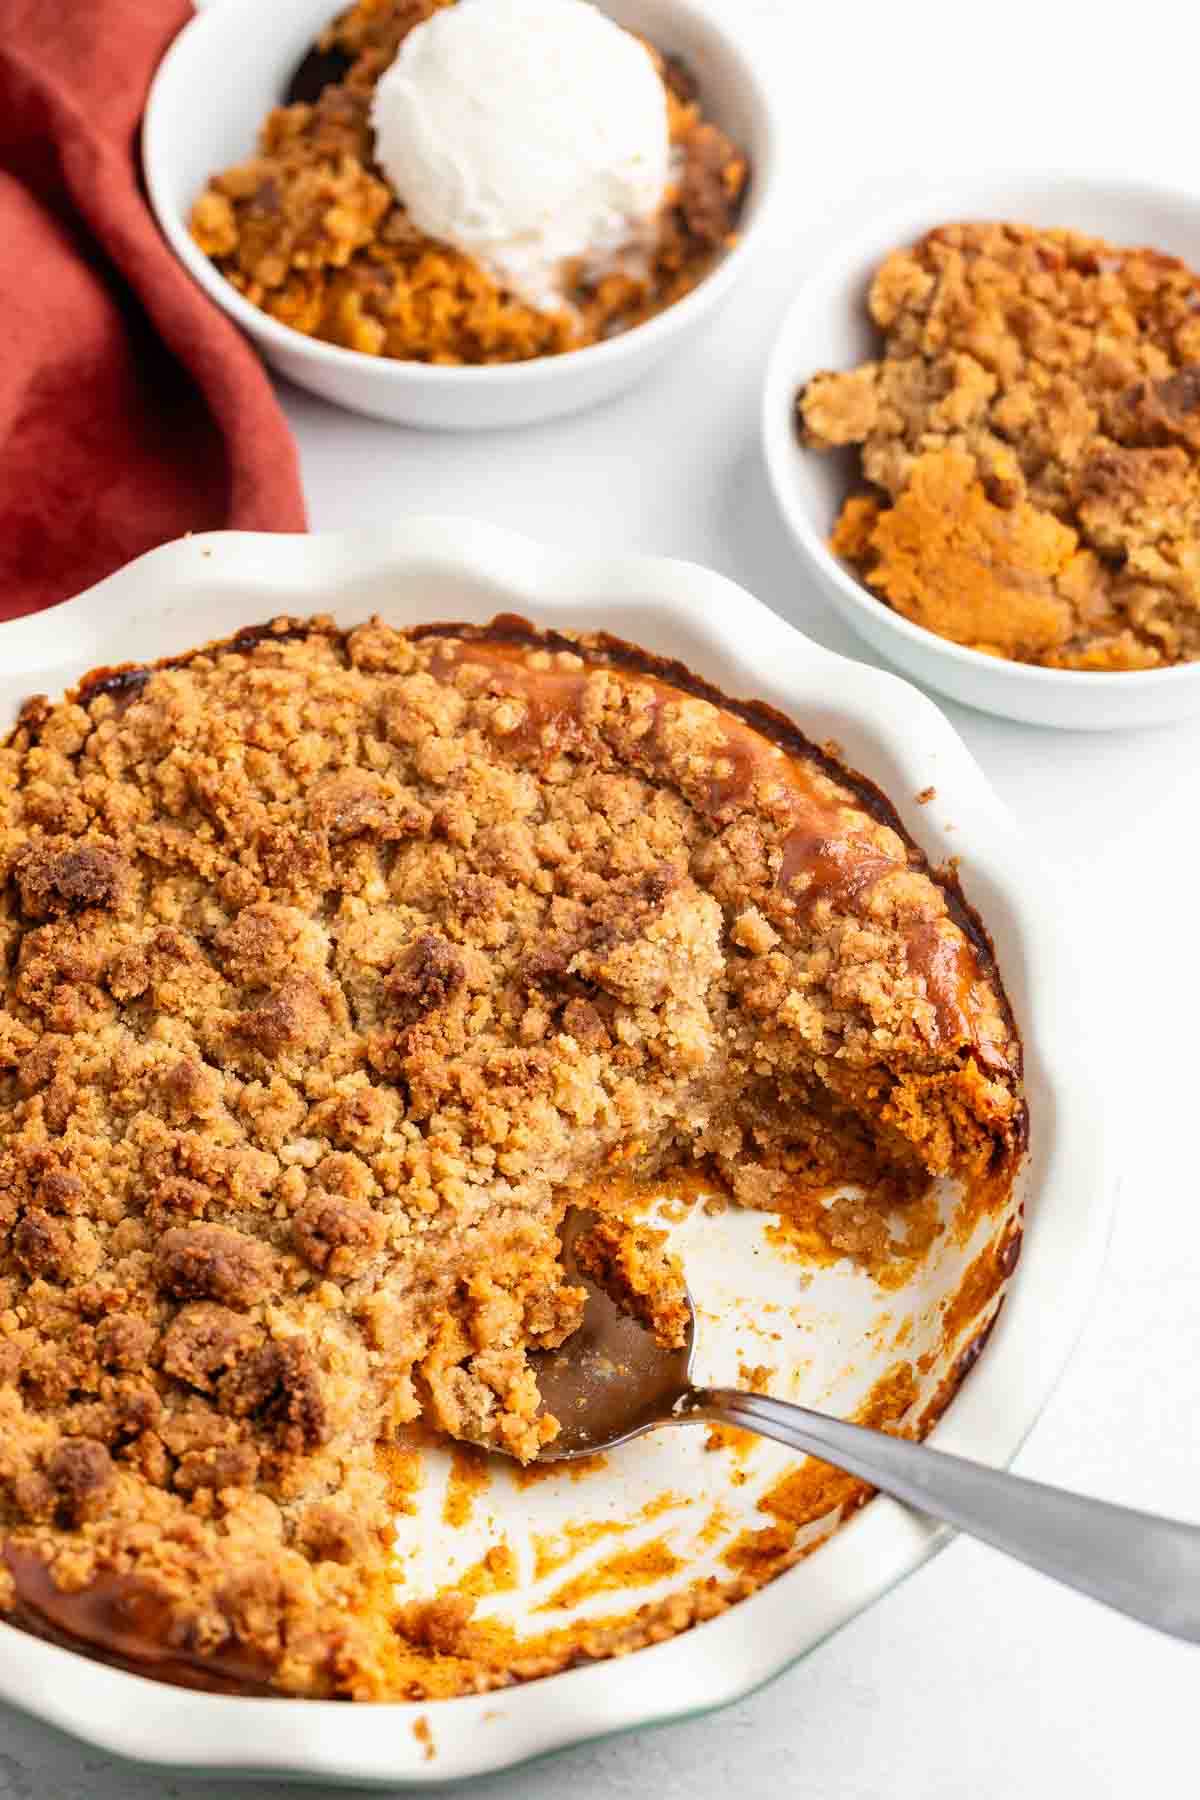 Pumpkin Crisp is basically a pumpkin crumble pie without the crust – it’s got a creamy pumpkin pie filling with a crunchy thick crumble topping. It’s the perfect fall dessert with pumpkin spices and cinnamon and will become a favorite for sure. I have so many pumpkin recipes and sometimes I struggle to come up…
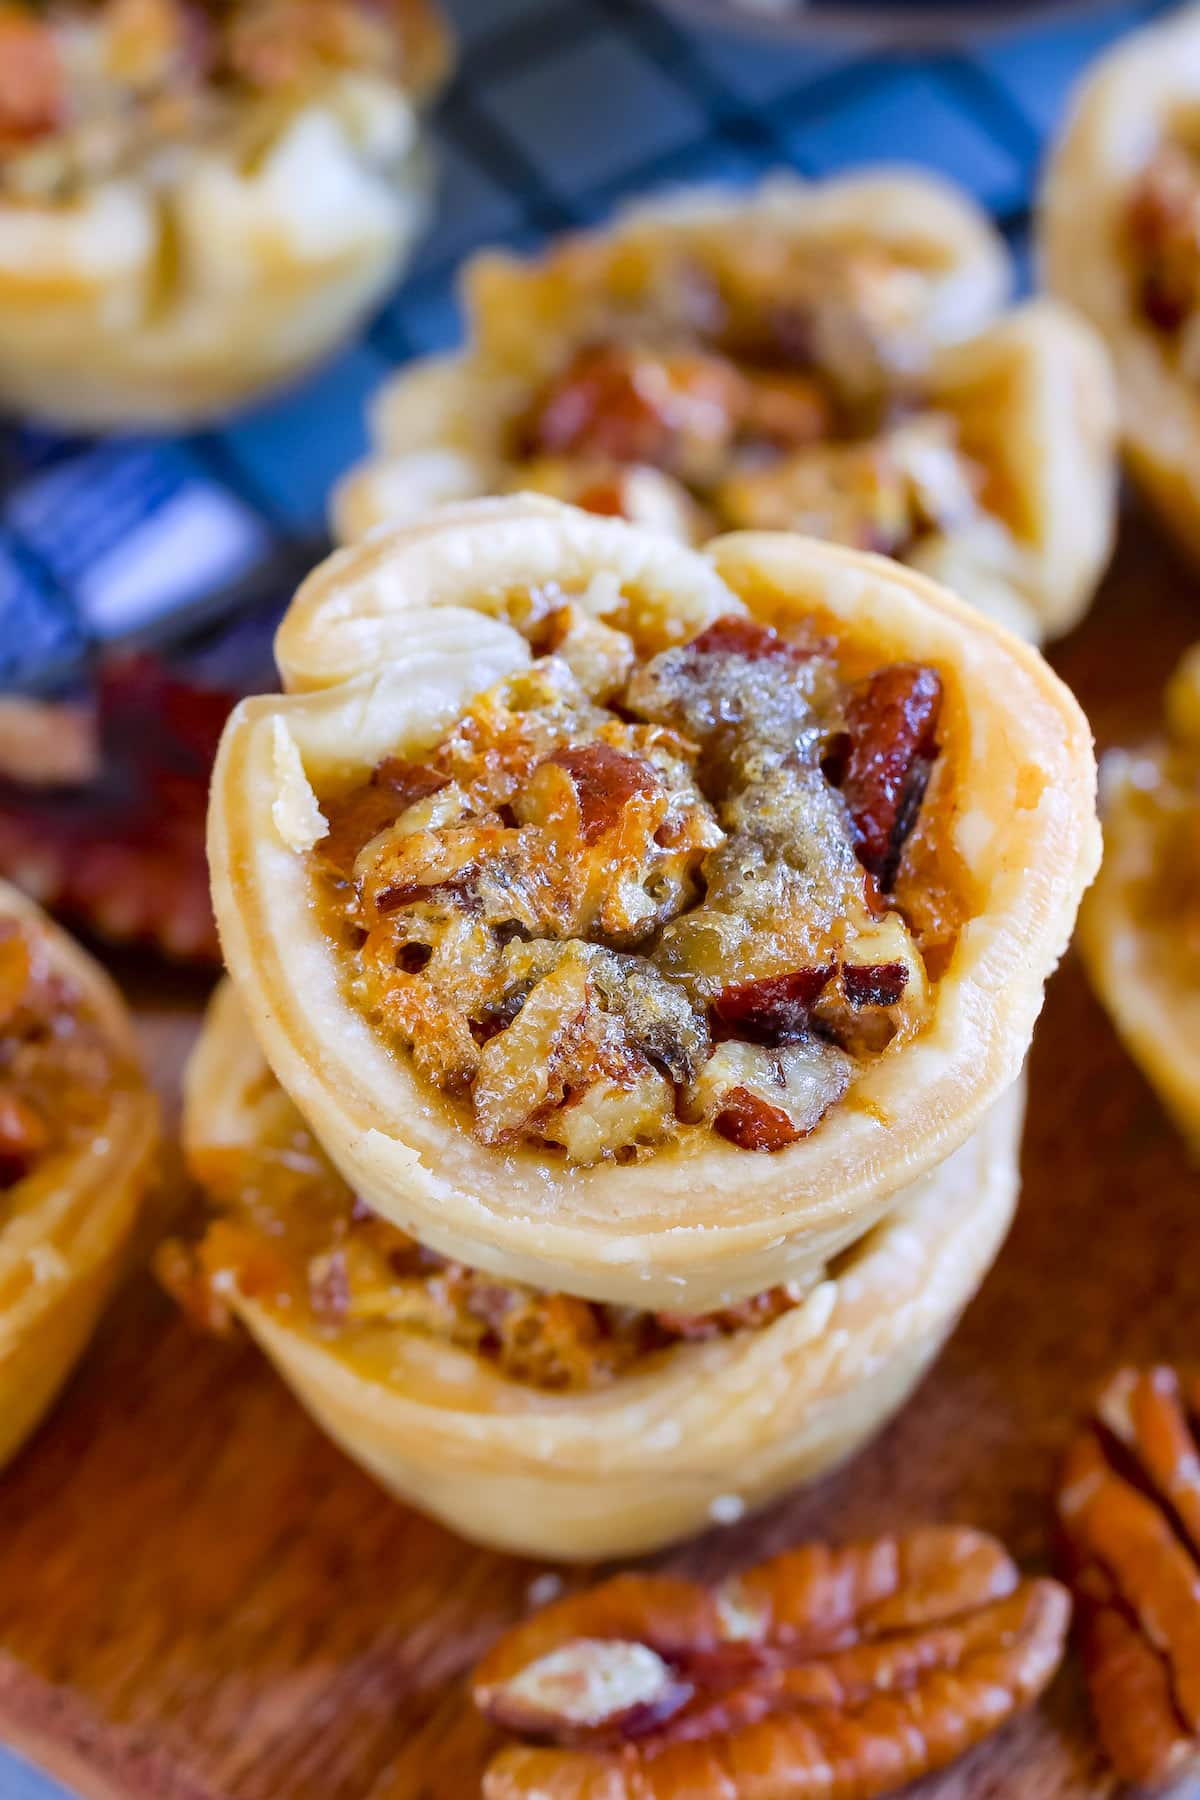 Mini Pecan Pies are the perfect bite size pie recipe! This is the same classic pecan pie recipe you love but made in a mini muffin pan. Crunch crust, gooey filling and loads of pecans – a holiday favorite. Pecan Pie is THE dessert we love to make for Thanksgiving. My mom’s pecan pie recipe,…
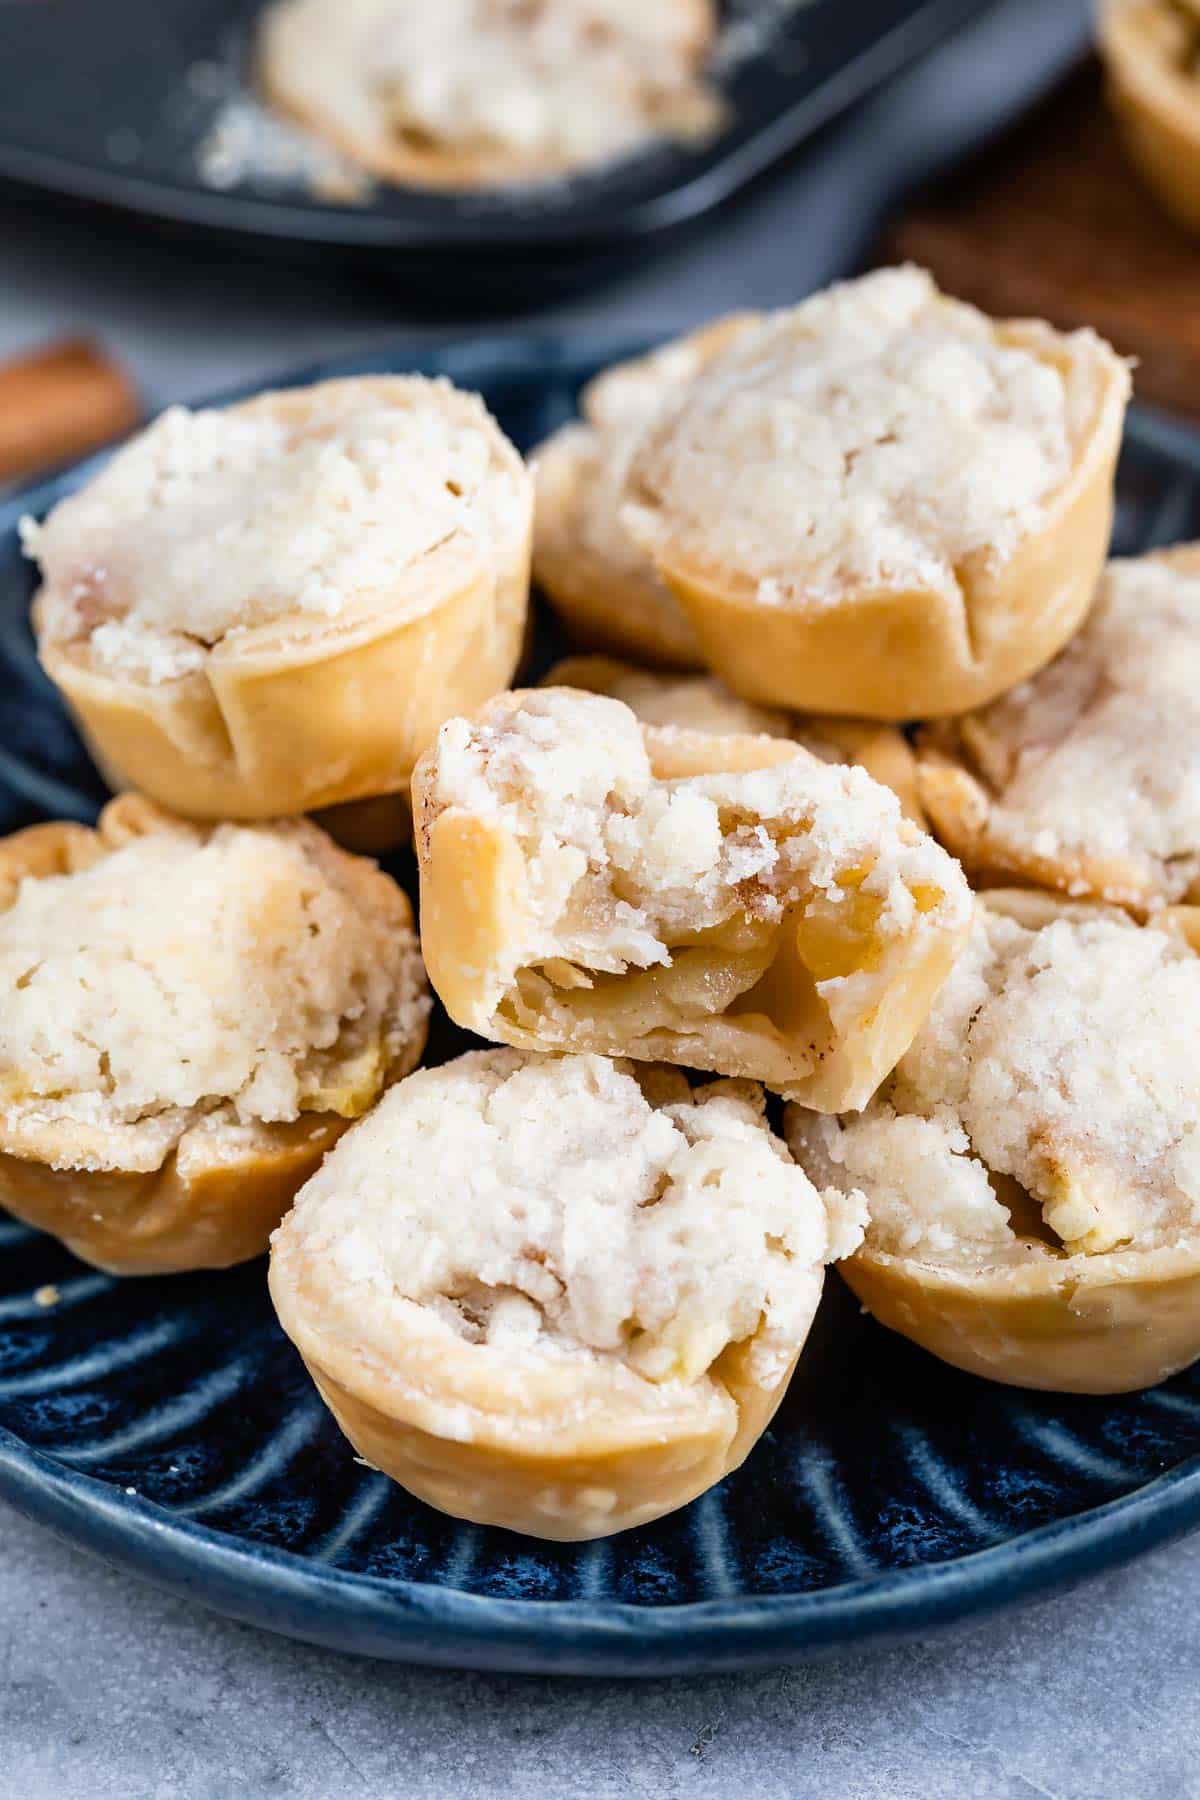 These Mini Apple Pies are bite sized apple pies with crumb topping – they’re so easy to make from scratch and so good. With a buttery crust, perfectly cooked apples, and crumble topping, they’re the perfect apple pie recipe. I love making mini food because they’re easier to serve (no messy cutting) and they’re easier…
Our easy Pear Pie recipe is an absolute show-stopper, made with juicy, fall-spiced pears and a buttery flaky crust. How to make a Pear Pie: Pie Crust: A homemade pie is only as good as the pie crust. Even if you’ve never made one before, my fool-proof pie crust recipe turns out perfectly every time…
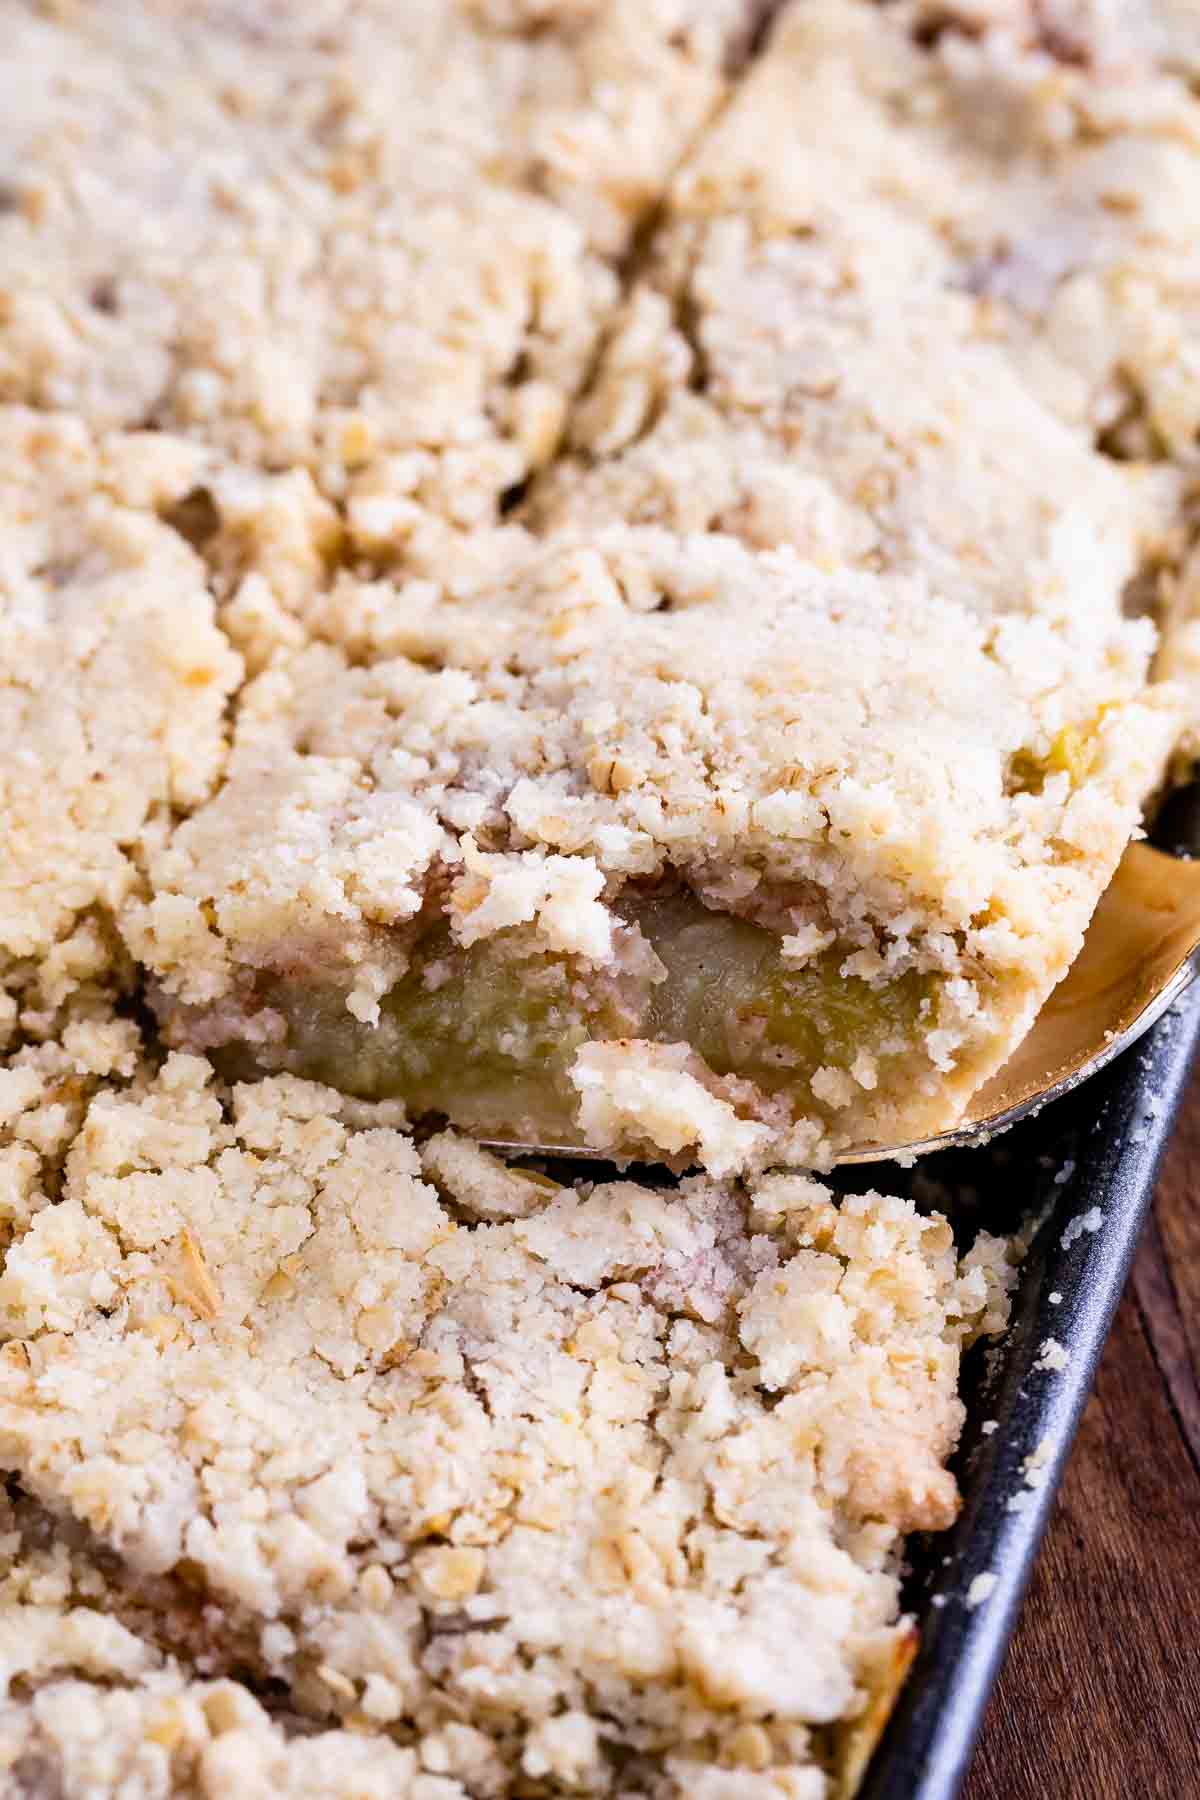 Apple Slab Pie is my favorite kind of pie: it’s baked in a sheet pan so there is more crust and crumble ratio to apples. This recipe is completely from scratch – I’ve done all the math for you to convert my favorite dutch apple pie to a slab pie! Do you love pie? I…
 This homemade Raisin Pie recipe features a sweet, cinnamon-spiced raisin filling baked inside a flaky homemade pie crust. It’s a classic old-fashioned pie that’s perfect for Thanksgiving, Christmas, or any holiday gathering. Bringing Back an Old‑Fashioned Favorite From Plump Raisins to Perfect Filling Grandma Knew Best, This Raisin Pie Proves It Old-Fashioned, Full-Flavored, and Flat-Out…