Sweet and Sour Tofu Meatballs
 Learn how to make Tofu Meatballs with Sweet and Sour Sauce! This simple high-protein meal tosses baked tofu meatballs, stir-fried vegetables, and pineapple in a tangy sauce. Great for dinners or a party appetizer. Looking for more vegan meatball recipes? Give my Vegan Grape Jelly Meatballs, my Easy Vegan Meatballs (perfect for spaghetti), and these…
 This simple Caramelized Onion Pasta transforms pantry staples into an incredibly savory, rich, and comforting meal. Great for busy nights or cozy family dinners! For more delicious vegan pasta recipes, check out my Vegan Carbonara, One Pot Vegan Pasta, and Roasted Tomato Pasta. Consider me obsessed with this Caramelized Onion Pasta. I came up with…
 This Pumpkin Hummus puts a festive spin on your favorite dip, using classic hummus ingredients, pumpkin puree, cinnamon, and a touch of maple syrup. Want even more hummus recipes? Don’t miss my Best and Easiest Hummus, Beet Hummus, and Lemon Dill Hummus! I’m the kind of person who will put pumpkin in almost anything during…
 This Cranberry Orange Sauce is easy to make with cranberries, freshly squeezed orange juice, orange zest, and sugar. It’s a 20-minute condiment you NEED at your holiday dinner! Make it ahead of time or freeze it for later. For more easy vegan holiday side dishes, check out my Vegan Dinner Rolls, my Easy Vegan Gravy,…
 Hearty Stuffed Butternut Squash for fall! This side or main dish stuffs roasted butternut squash with a delicious tempeh sausage, wild rice, and mushroom filling. Bring it to Thanksgiving or make it for dinner! Looking for more cozy vegan butternut squash recipes? You’ll love my Butternut Squash Lasagna, this Butternut Squash and Sweet Potato Soup,…
 Silky smooth Carrot and Ginger Soup made with roasted veggies and a pop of zesty ginger! It’s creamy, a little spicy, and even better with toppings. Slow cooker instructions included. For more cozy vegan fall and winter soups, check out my Roasted Vegetable Soup, my Vegan Butternut Squash Soup, and my Vegan Pumpkin Soup. I’m…
 These Sweet Potato Black Bean Enchiladas are smothered in homemade vegan enchilada sauce, stuffed with seasoned veggies and beans, and topped with avocado crema. The ultimate vegan comfort food! Love vegan enchiladas? Check out my Vegan Enchilada Casserole, Vegan Sour Cream Enchiladas, and Skillet Enchiladas next! My vegan Sweet Potato Black Bean Enchiladas are just…
 These super crispy Vegan Cutlets are made with seitan, white beans, breadcrumbs, and Italian seasonings. Perfect for serving with gravy, mashed potatoes, pasta, and more! Easy to pan-fry or bake. Love making vegan meat substitutes from scratch? Try my Vegan Fried Chicken, Vegan Steak, or Vegan Pepperoni recipes next! You may be surprised at just…
 This spiced Air Fryer Butternut Squash is so easy to make! Ready in 30 minutes, the warm, cozy, and tender squash cubes are perfect for serving on the side of Thanksgiving dinner or on top of a fall salad. Want to make even more vegan butternut squash recipes? Try this Vegan Butternut Squash Soup, this…
 Want to eat the rainbow? Make this Roasted Vegetable Soup! It’s a budget-friendly and nourishing comfort food full of colorful roasted vegetables. Each slurp is smooth, creamy, and satisfying! I have plenty of other vegan soups and stews to choose from, like The Best Lentil Soup, Easy Vegan Tomato Soup, and Vegan Zuppa Toscana! I…
 This super cozy Sweet Potato Red Lentil Stew is chock-full of tender sweet potatoes, soft red lentils, kale, and warm spices. It’s an easy, one-pot comfort food designed to keep you warm all winter long! Stay warm this winter with even more vegan soup and stew recipes, like my Vegan Irish Stew, this Ultimate Vegan…
 Make these soft and thick Vegan Pumpkin Snickerdoodles for a fall treat! They’re easy to make in 1 bowl with real pumpkin, cream of tartar, and pumpkin pie spices, then rolled in cinnamon sugar for extra sweetness. Check out my other fall cookie recipes while you’re here, like my Vegan Pumpkin Cookies, Pumpkin Chocolate Chip…
 Creamy and cozy Pumpkin Overnight Oats are a perfect make-ahead breakfast for fall. Enjoy them on the go or dress them up with sweet toppings! Looking for more vegan breakfast recipes you can make ahead of time? Check out my Vegan Breakfast Burritos, this Vegan Breakfast Casserole, and these Peanut Butter Overnight Oats next. Pumpkin…
 This Italian-inspired Creamy White Bean Skillet is so luxurious, with soft cannellini beans simmered in a rich sauce with spinach, tomatoes, basil, and vegan parmesan. An easy comfort food made in just one pan! Do you have extra cans of white beans in your cupboard? Use them to make my White Bean Dip, White Bean…
 This is the best Vegan Philly Cheesesteak, with seasoned soy curls and mushrooms, sautéed peppers and onions, and a gooey dairy-free cheese sauce in every bite! Perfect for game days and mouthwatering family meals. Looking for even more unforgettable vegan sandwiches? Check out my Vegan BBQ Sandwich, Vegan Banh Mi, and Chickpea Salad Sandwich recipes! …
 These easy Vegan Breakfast Sausage Patties are a breeze to make in one bowl, pan-fried to crispy perfection, and freeze like a dream! Make them for your next Sunday brunch or layer them in a breakfast sandwich. If you’re craving even more amazing vegan breakfast recipes, then you should try my JUST Egg Omelette, Tofu…
 These Tofu Lettuce Wraps are a P.F. Chang’s copycat that stuffs crisp and refreshing lettuce cups with an ultra-flavorful, protein-packed tofu filling. One bite and you’ll be hooked! Searching for more vegan meals that rival your favorite takeout? My Easy Vegan Biryani is the best rice dish ever, my Kung Pao Tofu tastes just like…
 These Roasted Brussels Sprouts are perfectly crisp on the outside, tender on the inside, and drizzled with balsamic vinegar. That’s why they’re the best! A quick and easy side dish to make for any occasion. If you’re looking for even more everyday vegetable side dishes, you’ll also love this Roasted Squash and Zucchini, My Favorite…
 This Mexican Street Corn Dip will be the talk of the party! Made with charred corn, a spicy and cheesy sauce, and a ton of flavor-packed toppings, it’ll easily become your new favorite summer snack. Make it a party to remember by pairing this street corn dip with even more creamy vegan dips! Try my…
 Add some big and bold flavors to your burritos, tacos, tofu scramble and more with this Vegan Chorizo! Easy to make from soy crumbles and simple seasonings, these meaty chorizo crumbles are just as good as the real thing. Looking for even more epic toppings to load into your vegan tacos? You’ll love the pulled…
 One bite of these 15-minute Garlic Noodles and you’ll be hooked! An incredibly easy recipe perfect for quick weeknight dinners or anytime you’re craving a garlicky, flavor-packed dish. Add tofu, vegetables, or anything else you like! Craving more slurpalicious noodles? These Teriyaki Noodles are deceptively simple, my Thai Peanut Noodles taste as good as they…
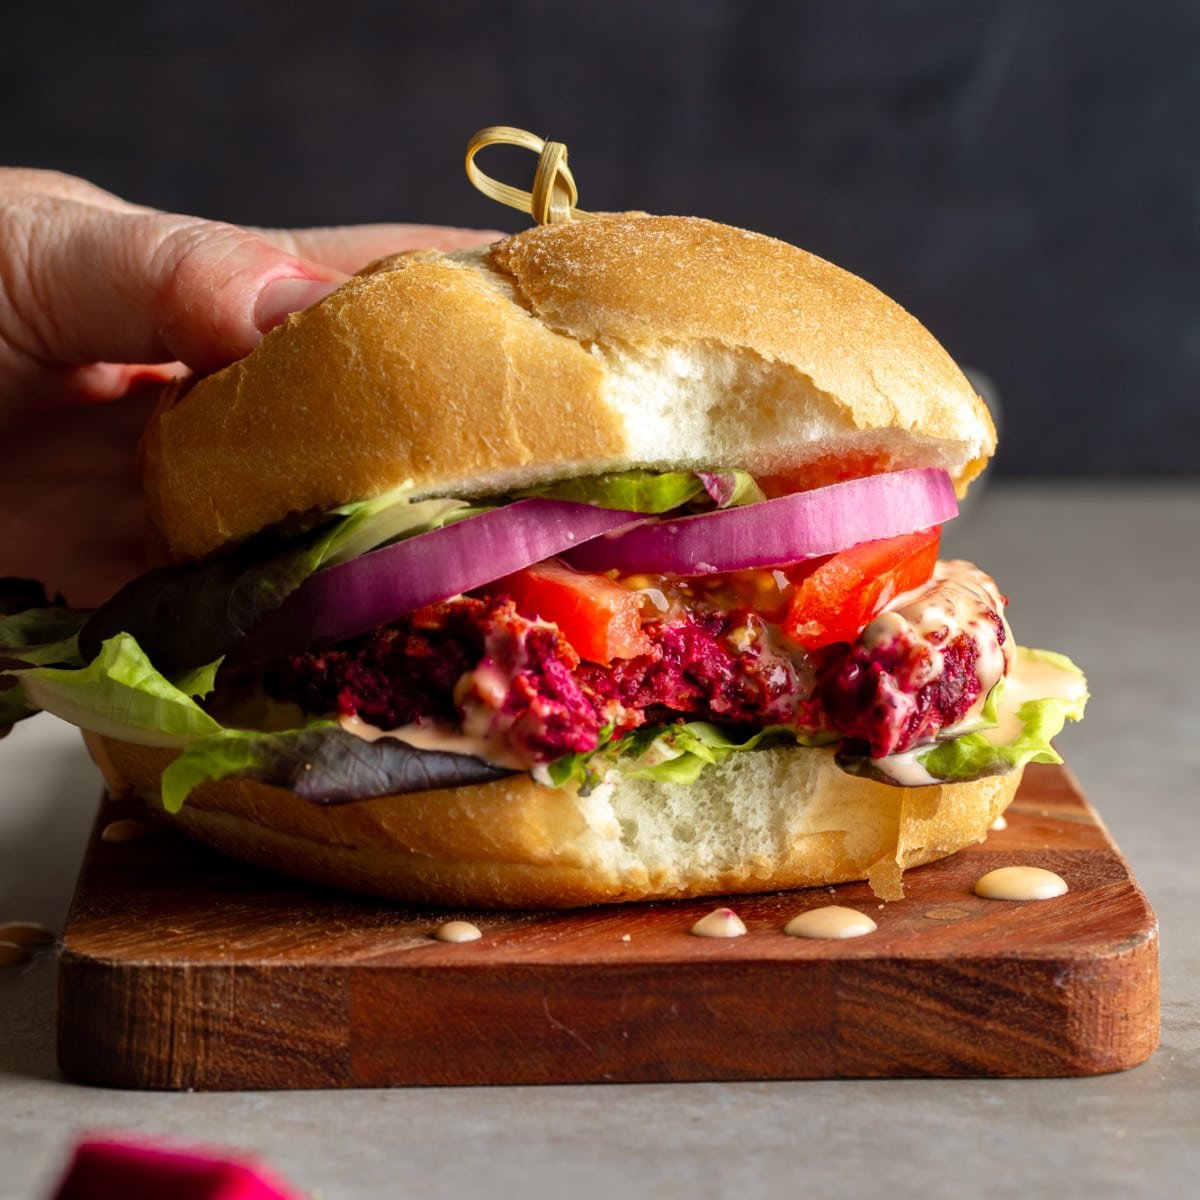 These gorgeous Kidney Beet Burgers are so easy to make and jam-packed with flavor! A budget-friendly mix of canned beans, shredded beets, oats, and seasonings makes each bite tender and meaty. If you love homemade veggie burgers, you’ll also enjoy my Sweet Potato Black Bean Burgers, Chickpea Burgers, and Best Veggie Burgers as well! I’ve…
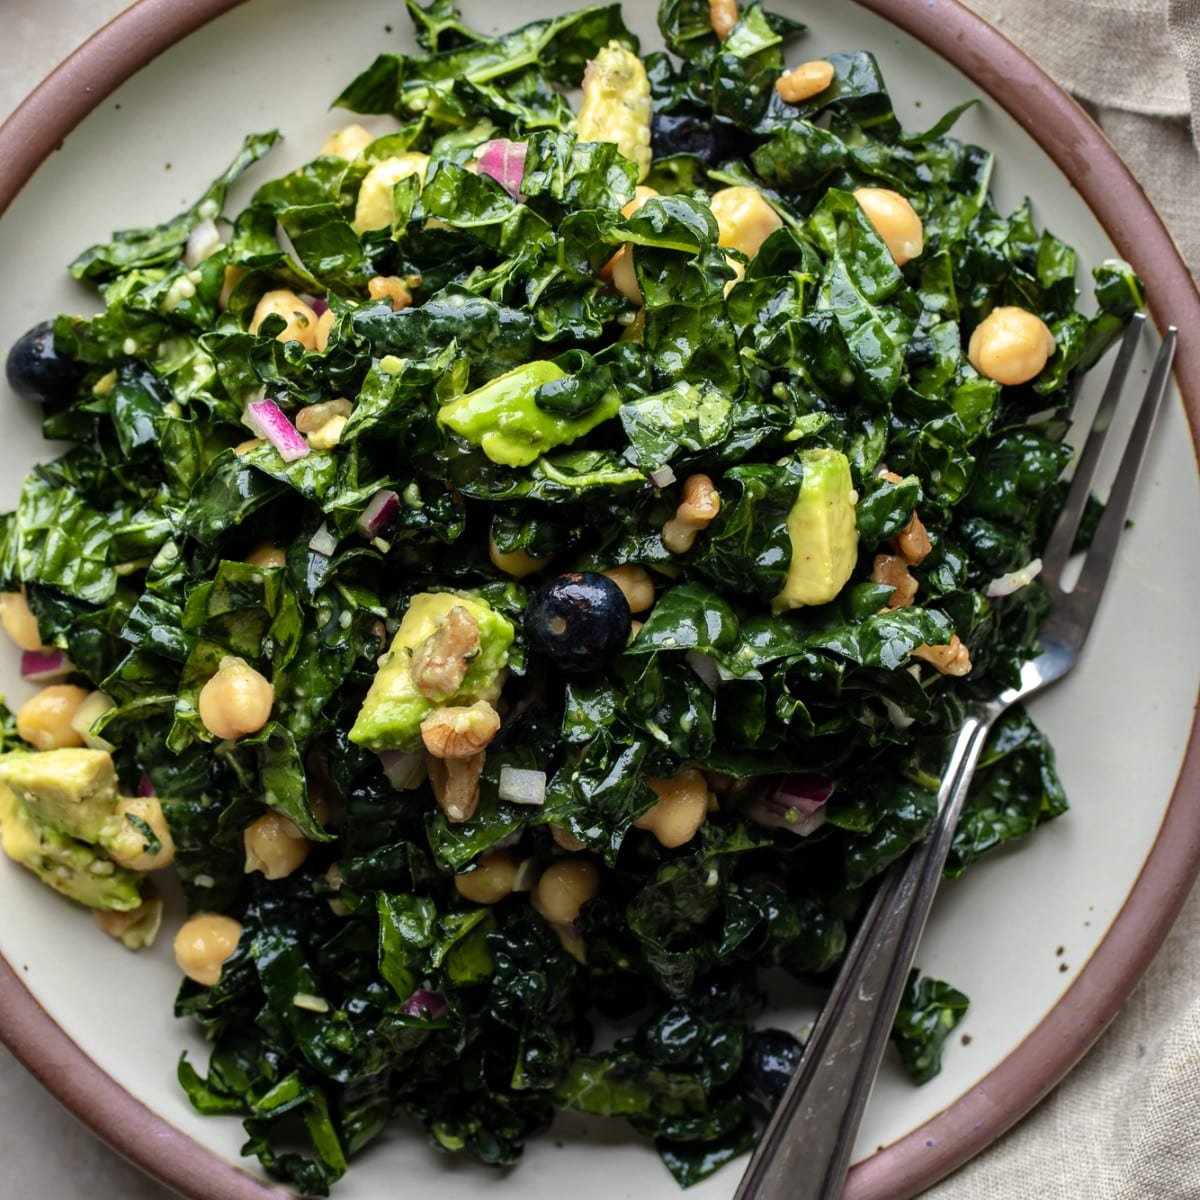 This is THE kale salad I make all the time! A mix of kale, fresh veggies, fruits, and nuts is tossed in a bright lemon dressing to leave you with the perfect light lunch or simple side dish. Do you have leftover fresh kale? Use it to make this Kale Caesar Salad for everyday dinners,…
 Cauliflower goes from ‘blah’ to ‘yum!’ in these Crispy Cauliflower Tacos! Panko-coated cauliflower is roasted until golden, then drizzled with chipotle cream to make this easy taco recipe a must-try for weeknight meals and Taco Tuesday. Looking for more plant-based taco recipes? You’ll also love these Shredded Tofu Tacos, Spicy Potato Tacos, and Jackfruit Tacos!…
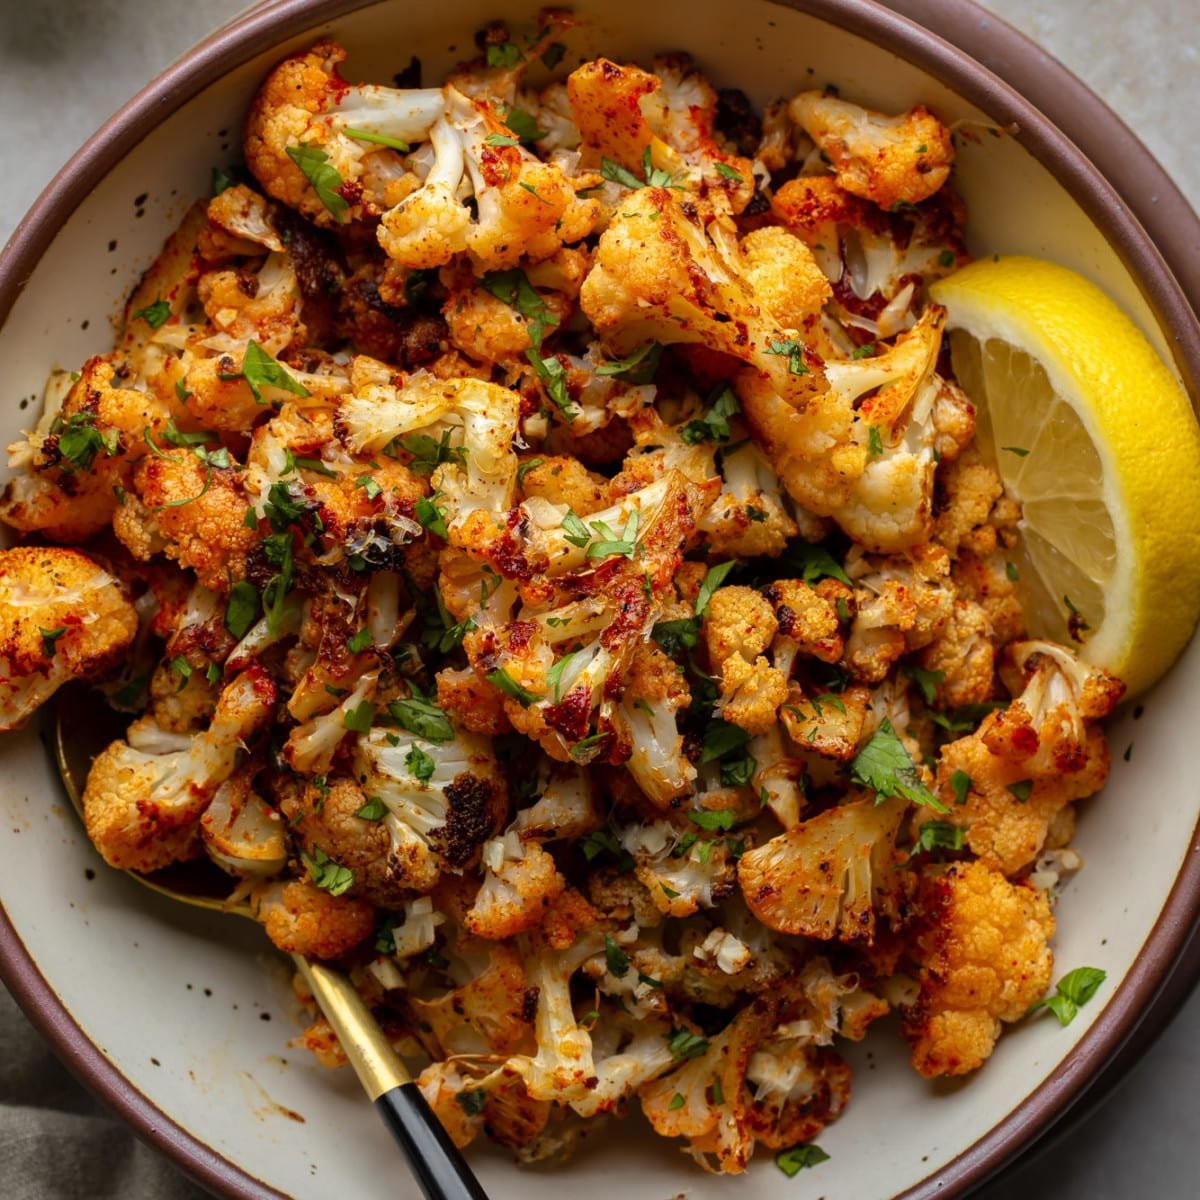 This is my favorite way to make roasted cauliflower and it’s the best vegetable side dish to complete any meal! Boring raw cauliflower transforms in the oven into a golden, crispy, flavor-packed deliciousness. A squeeze of fresh lemon juice after roasting takes it to the next level. Want even more ideas for roasted vegetable side…