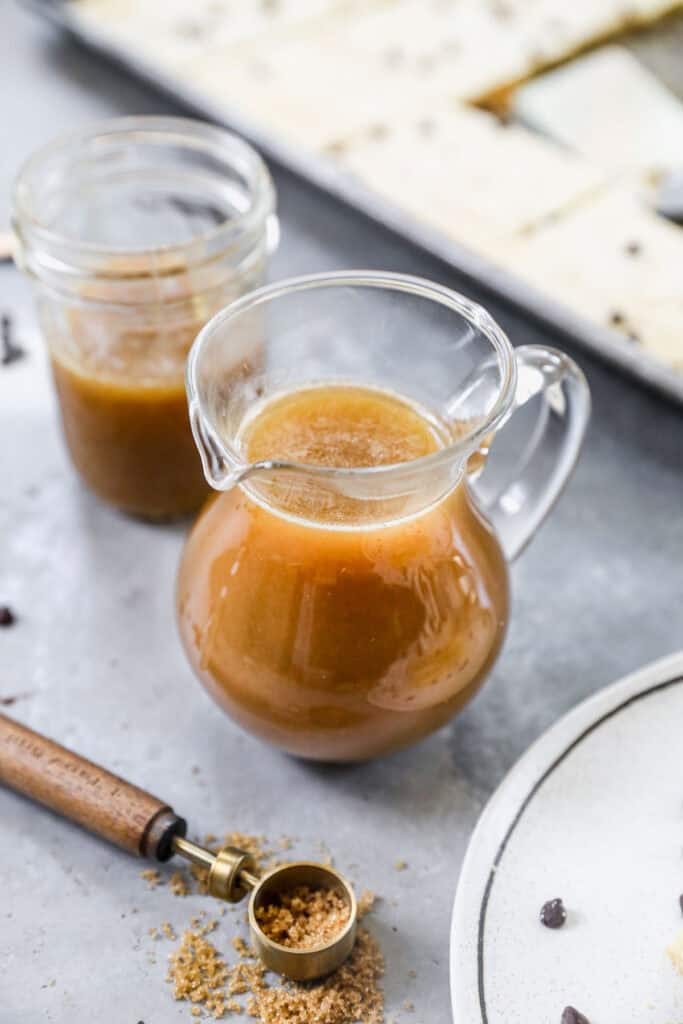
Did you know you can make homemade Pancake Syrup in just 10 minutes, using pantry ingredients we all have around? It’s so good, you’ll never want to buy syrup again. I’m a huge fan of breakfast recipes–particularly pancakes! Some current favorites are Cottage Cheese Pancakes, Pumpkin Pancakes, Crunchy French Toast, Yeasted Waffles, and Sheet Pan…
Did you know you can make homemade Pancake Syrup in just 10 minutes, using pantry ingredients we all have around? It’s so good, you’ll never want to buy syrup again.
10-minute Pancake Syrup is my favorite pancake upgrade.
Really though, this easy homemade syrup will make any pancakes or French toast feel special, and it couldn’t be easier or quicker to make. It’s an obvious match for our Buttermilk or Whole Wheat Pancakes, classic French Toast and Belgian Waffles. I can’t wait for you to give it a go!
How to make Pancake Syrup:
In a large saucepan: Melt butter over medium heat. Whisk in sugar, buttermilk, vanilla, and cinnamon and bring to a full boil. Reduce heat to low and cook for 2 minutes, whisking constantly.
Whisk in Baking Soda; it will foam and rise. Remove from heat and set aside for a few minutes before serving.
Store Homemade pancake syrup in the fridge for up to a month. Reheat in the microwave for a few seconds before serving.
More breakfast favorites for homemade buttermilk syrup:
Our easy Pancake Syrup recipe only takes 10 minutes and will make you feel like you're in a fancy restaurant. It uses pantry ingredients and is so good, you'll never want to buy syrup again.
In a large saucepan, melt butter. Add sugar, buttermilk, vanilla, and cinnamon then whisk to combine. Bring mixture to a full boil, and once boiling, reduce to simmer for 2 minutes while whisking constantly.
Whisk in baking soda and cook for 30 more seconds, whisking constantly. Mixture will foam and rise.
Remove from heat and set aside to rest for a few minutes before serving.
Store leftover pancake syrup in the fridge for up to a month. Reheat in the microwave for a few seconds before serving.
When it comes to capturing the essence of summer in a jar, nothing quite compares to a Homemade Peach Sauce. And, this recipe is all about maximizing the fresh fruity sweetness of ripe, sun-kissed peaches to create a versatile sauce that can elevate any dish. Sugar brings out the peach’s natural sweetness, a combination of…
When it comes to capturing the essence of summer in a jar, nothing quite compares to a Homemade Peach Sauce. And, this recipe is all about maximizing the fresh fruity sweetness of ripe, sun-kissed peaches to create a versatile sauce that can elevate any dish. Sugar brings out the peach’s natural sweetness, a combination of orange and lemon provides balance and brightness, and a secret ingredient adds a delightful complexity. The resulting delicious sauce is the perfect accompaniment to both sweet and savory dishes!
Peachy Perfection: A Colorado Summer Staple
Every summer, Coloradans eagerly anticipate the arrival of Palisade peaches. These tender, flavor-packed, and juicy peaches are a true testament to Colorado’s agricultural prowess. While they start appearing in grocery stores and farmers’ markets as early as late June, I prefer to wait until late July or August for the peak of the season. By the end of August, my kitchen is overflowing with the fragrant bounty of these delectable peaches!
The Quest for the Perfect Fresh Peach Sauce Recipe
Last summer during peach season, I embarked on a mission to create a homemade peach sauce that would be the perfect topping for my Aunt Dee-Dee’s legendary cheesecake. The goal was to develop a sauce that wasn’t overly complicated or sweet and allowed the natural flavor of the peaches to shine through. After experimenting with various ingredients and methods, I’ve finally arrived at a peach sauce that I’m confident is worthy of sharing.
Why This Recipe Works:
Simplicity. This recipe requires minimal effort and only a handful of basic ingredients.
Fresh, deep peach flavor. The peaches take center stage, while the other ingredients enhance their natural sweetness and complexity. Sugar brings out the peach’s natural sweetness, a combination of orange and lemon provides balance and brightness, and a secret ingredient adds a delightful complexity (see next bullet!).
Unique twist. The addition of peach-infused (or plain) white balsamic vinegar adds a surprising depth of flavor that elevates the overall taste.
Versatility. The sauce can complement both sweet and savory dishes. In addition to Aunt-Dee Dee’s Cheesecake, you can drizzle it over French toast, pancakes or waffles for a heavenly breakfast, or serve it alongside grilled meats for a mouthwatering twist. I also like to stir it into plain yogurt for a delicious snack!
Delicious Peach Sauce Recipe Ingredients
To create this divine homemade peach sauce, you’ll need just a few ingredients (quantities and other details are provided in the recipe card below):
Fresh ripe, yellow peaches – the key to a truly exceptional peach sauce lies in using fresh, ripe, in-season peaches. I buy my peaches hard, then let them ripen on the kitchen counter until fragrant and soft to the touch. I find this approach results in sweet peaches that are full of flavor and not bruised.
Granulated sugar – sugar balances the fruit’s acidity, intensifies its sweetness, and creates a more balanced and flavorful sauce
Navel orange – orange juice contributes a sweeter, citrusy flavor that complements the natural sweetness of the peaches. Also including zest creates a more layered and complex flavor profile.
Lemon – lemon juice adds a bright, tart tanginess that balances the peach’s sweetness. Lemon zest provides brightness and depth to the sauce.
Coarse kosher or sea salt – amps up the flavor even more!
Cornstarch – a small amount of cornstarch thickens the sauce slightly.
An optional (but recommended) ingredient is Peach White Balsamic Vinegar. Its acidity enhances all the other flavors in the sauce, along with a bit of sweetness that prevents the sauce from becoming too tangy. You can substitute plain white balsamic vinegar if you can’t find peach-infused.
How to Make Peach Sauce
Making delicious homemade peach sauce is a straightforward process that yields amazing results. Here’s all you have to do:
Prep the peaches. Cut an X on the bottom of each peach, then, one at a time, drop them in boiling water for 45-60 seconds. Cool to the touch, then pull off skins. Cut in half, twist halves to pull apart, then slice and chop into small pieces (around 1/4 to 1/2-inch).
Cook sauce. In a large saucepan, stir together peaches, sugar, water, orange zest, lemon zest, orange juice, and lemon juice. Bring to a boil, reduce heat, and simmer for 35 minutes, stirring occasionally.
Add salt and cornstarch. Stir in salt and cornstarch mixed with water; cook just until it thickens, around 3 to 4 minutes.
Add vinegar, cool, and refrigerate. Remove from the heat and stir in vinegar. Cool to room temperature, transfer to an airtight container, and place in the refrigerator for at least 2 hours.
Variations and Substitutions
While the basic peach sauce recipe is delicious as is, there are ways in which you can modify it to suit your tastes and/or dietary restrictions. Here are a few ideas:
After adding the vinegar, stir in 1/3 cup chopped toasted chopped nuts – almonds, pecans, walnuts, or pistachios
Stir in a splash of brandy, bourbon, or dark rum in place of the vinegar.
Use brown sugar instead of granulated sugar, for a darker color and more complex flavor profile.
Add ground cinnamon (around 1/2 teaspoon) when cooking the peaches.
Add 1/4 teaspoon vanilla or almond extract when cooking the peaches.
Add 1/2 to 1 teaspoon chopped jalapeno peppers when cooking the peaches (this version works best with cooked meats).
Serving Suggestions for Homemade Peach Sauce
There are seemingly endless ways to use this amazing sauce! Here are a few suggestions:
Breakfast options – spoon over French toast, our Blueberry Buttermilk Pancakes, or waffles. Alternatively, stir into plain or vanilla yogurt and top with berries and granola.
Dinner options – Serve alongside grilled or roasted pork, chicken or fish.
Dessert options – Spoon over Aunt Dee Dee’s Cheesecake, our Mini Lemon Cakes, vanilla ice cream, pound cake slices, or shortcake. You could also make a yogurt parfait, layering yogurt, peach sauce, and granola in a wine glass.
Storing Peach Sauce
Once the peach sauce has cooled, transfer it to an airtight container and store it in the refrigerator. It will last for 5 days. Can also be frozen for up to 3 months.
Frequently Asked Questions about Peach Sauce
Do I need to peel the fresh peaches?
While you don’t necessarily need to peel the peaches, I prefer the smoother texture of the sauce without the peel included.
Can I use frozen peaches to make peach sauce?
Yes, you can use frozen peaches to make peach sauce. Simply thaw the peaches before using them, and proceed with the recipe as directed. The frozen peaches may result in a slightly thinner sauce, so you may need to add a bit more cornstarch.
Can I use canned peaches instead of fresh?
Yes, you can use canned peaches to make peach sauce, though the flavor and texture may not be as vibrant as with fresh peaches. Make sure to drain them well before using.
Can I use white peaches in peach sauce?
You can, but the resulting sauce will be paler in color and slightly sweeter with a milder flavor.
Can I use peach sauce as a substitute for other fruit sauces?
Absolutely! Peach sauce can be used as a substitute for apricot, mango, strawberry, blueberry, or even cranberry sauce.
When it comes to capturing the essence of summer in a jar, nothing quite compares to a Homemade Peach Sauce. And, this recipe is all about maximizing the fresh fruity sweetness of ripe, sun-kissed peaches to create a versatile sauce that can elevate any dish. Sugar brings out the peach’s natural sweetness, a combination of orange and lemon provides balance and brightness, and a secret ingredient adds a delightful complexity. The resulting delicious sauce is the perfect accompaniment to both sweet and savory dishes!
1 1/2 teaspoons cornstarch mixed with 1 1/2 teaspoons water (looks like milk)
1 teaspoon Peach White Balsamic Vinegar – can substitute plain white balsamic vinegar (or omit)
Instructions
In a large saucepan, stir together peaches, sugar, water, orange zest, lemon zest, orange juice, and lemon juice. Bring to a boil, reduce heat, and simmer for 35 minutes.
Stir in salt and cornstarch mixture; cook just until it thickens, around 3 to 4 minutes.
Remove from the heat and stir in vinegar. Cool to room temperature, transfer to an airtight container, and place in the refrigerator for at least 2 hours.
Serve at room temperature.
Notes
Make ahead: Sauce will last up to 5 days in the refrigerator. It can also be frozen for up to 2 months.
Serving suggestions: Serve spooned over grilled or roasted pork, chicken, fish, Aunt Dee-Dee’s Cheesecake, Lemon Mini Cakes, ice cream, shortcake, pound cake, French toast, waffles, or Blueberry Buttermilk Pancakes. Can also be stirred into plain or vanilla yogurt (I prefer Greek).
Our homemade Pico de Gallo recipe takes 10 minutes to make and instantly elevates any dish (or serve it with tortilla chips!) If you’re looking for delicious dip recipes try Homemade Hummus, Pepper Jelly, Easy Homemade Salsa, or Street Corn Dip! How to make Pico de Gallo: Combine chopped tomatoes, onion, cilantro and jalapeño in…
Our homemade Pico de Gallo recipe takes 10 minutes to make and instantly elevates any dish (or serve it with tortilla chips!)
I keep ingredients for this irresistible pico on hand at all times. It instantly adds a splash of color, burst of flavor, and elevates every dish. Obviously you’ll want to serve it with Mexican faves like tacos, burritos, and quesadillas, but it’s also a mighty friend to eggs, avocado toast, grilled chicken or fish, or just scoop up with tortilla chips.
(Let’s not confuse fresh pico de gallo–made with fresh tomatoes, onion, cilantro and jalapeño–with homemade salsa, which has more of a chunky sauce consistency, and can be made with cooked, roasted, canned or fresh tomatoes). When I’m looking for fresh and bold topping, pico de gallo is my go to.
How to make Pico de Gallo:
Combine chopped tomatoes, onion, cilantro and jalapeño in a bowl. Season with salt and a spritz of lime juice. Serve on your favorite Mexican dishes, or with chips. Store in the fridge for up to 5 days.
Make Ahead and Storage Instructions:
To Make Ahead: Pico is my favorite when made an hour or two in advance. It can be kept in the fridge for about a week, depending on the freshness of your ingredients.
Recipe Variations:
Spicy Pico de Gallo: Keep the jalapeño seeds and add extra jalapeño peppers if you’d like.
Add Avocado: Stir in some diced avocado right before serving.
Add Mango: Stir in diced avocado right before serving, for a fun flavor twist.
This homemade Pico de Gallo recipe only takes 10 minutes and is made with fresh tomatoes, cilantro, red onion, and jalapeño. It is bursting with fresh flavors and instantly elevates any dish, or can be enjoyed with chips.
Combine diced tomatoes, onion, cilantro and jalapeño in a bowl. Season with salt and add lime juice to taste.
Top on your favorite Mexican food, eggs, avocado toast, chicken, or serve with chips.
Video
Notes
Yield: Makes about 4 cups.Make Ahead Instructions: prepare Pico de Gallo an hour or two in advance, stored in the fridge. Leftovers will keep for a few days in the fridge.Spicy Pico de Gallo: Keep the jalapeño seeds and add extra jalapeño peppers if you’d like.Add Avocado: Stir in some diced avocado right before serving.Add Mango: Stir in diced avocado right before serving, for a fun flavor twist.
Balsamic glaze needs only 2 ingredients and 15 minutes to make the most flavorful sauce to go on your favorite salads, chicken, vegetables, and more!
The post Homemade Balsamic Glaze appeared first on The Stay At Home Chef.
Balsamic glaze needs only 2 ingredients and 15 minutes to make the most flavorful sauce to go on your favorite salads, chicken, vegetables, and more!
Basil Pesto is easy to make, tastes way better than anything you can buy at the store, and stays good in the fridge for several days. Use it on pastas, sandwiches, gnocchi, pizza, and more!
The post Homemade Basil Pesto appeared first on The Stay At Ho…
Basil Pesto is easy to make, tastes way better than anything you can buy at the store, and stays good in the fridge for several days. Use it on pastas, sandwiches, gnocchi, pizza, and more!
Pure Vanilla Extract will elevate everything you bake, and you can make your own in just 5 minutes. It’s great for gifting with my free labels, and can even be re-filled when you run out. There are certain basic essentials I always make from home to save money, and they’re just way better, like Taco…
Pure Vanilla Extract will elevate everything you bake, and you can make your own in just 5 minutes. It’s great for gifting with my free labels, and can even be re-filled when you run out.
Homemade Vanilla Extract is the inexpensive baking upgrade you need.
I’ve been making our Vanilla Extract recipe for many years and it’s my favorite way to save money while still getting high quality, pure vanilla extract for baking. The best part is, once your vanilla runs out, you can refill the bottle with vodka, using the same used vanilla beans (they last for two batches). It’s makes a great gift, using our free labels, bottles, and label paper, for neighbors at Christmas or a housewarming gift to a friend.
What you’ll need:
Vanilla Beans: Use high quality Grade B Vanilla Madagascar Beans (or Tahitian or Mexican beans, if you prefer). You need 4-5 vanilla beans for every 8 ounces (1 cup) of vodka. Find vanilla beans in the baking aisle or online (I’ve bought them from Costco, too).
Alcohol: 80 proof Vodka–any cheap brand will work. Brandy, rum, or bourbon also work, for different flavor variation.
Glass jars to put the vanilla in. A basic Mason jar works for personal everyday use, or these 4oz or 8oz glass jars are perfect for gifting to friends and neighbors.
There are Grade A and Grade B vanilla beans. Grade A beans have above 25% moisture (water) so they’re easy to split open for desserts like ice cream or crème brûlée. Grade B vanilla beans have less than 25% moisture, so they’re perfect for vanilla extract where they brew for a long time, can produce a stronger flavor ,and are usually less expensive. Grade A vanilla beans will work if that’s what you have on hand.
Madagascar Vanilla Beans: The most common flavor used in vanilla extract.
Tahitian Vanilla Beans: Has hints of cherry and anise.
Mexican Vanilla Beans: Has hints of clove and nutmeg.
How to make Vanilla Extract:
Score Vanilla Beans: Gently cut slits lengthwise in the vanilla beans with a sharp knife then place beans in a jar. (You may need to cut them in half to fit in the jar). You need 4-5 Vanilla bean per 8 ounces (1 cup) alcohol.
Add Vodka: Using a funnel, carefully fill the bottle with Vodka. Make sure the vanilla pods are fully submerged in alcohol. Secure lid tightly and shake gently. Rest/brew for 6 months in a cool dark place. Use it in your favorite cakes, cookies and other desserts.
Vanilla extract is the perfect gift, so I’ve provided these FREE Printable Labels that are 2” squares, to stick on your bottles for gifts. I use my regular printer to print them off on this label paper.
Gather ingredients and jar(s). You will need 4-5 beans for every 8 ounces (1 cup) of alcohol.
Gently cut slits, lengthwise down the vanilla beans, using a sharp knife. Place the vanilla beans in jar (cut them in half if needed, to submerge them in alcohol).
Fill jars with vodka. Secure lid tightly on the bottle and shake gently.
Allow to steep/brew for at least 2 months, or ideally 6-12 months for best flavor. Shake bottles occasionally. Write date on jars or use our labels.
When running low, add more vodka to the bottle and brew again, reusing the same beans for up to one more batch.
Video
Notes
Vanilla Beans: Use high quality Grade B Vanilla Madagascar Beans (or Tahitian or Mexican beans, if you prefer). Find vanilla beans in the baking aisle or online (I’ve bought them from Costco, too).
Alcohol: 80 proof Vodka–any inexpensive brand will work. Try brandy, rum, or bourbon for different flavor variation.
Containers: A basic Mason jar works for personal everyday use, or these 4oz or 8oz glass jars are perfect for gifting to friends and neighbors.
Quick and easy avocado crema is a tangy, delicious topping for tacos, nachos, burritos, and more. Made with just a few simple ingredients, you’ll find yourself making this recipe every Taco Tuesday!
There’s something I love about a quick and easy condiment that can dress up a ton of different meals.
Like, if you have guests over for dinner and put out a jar of homemade ranch dressing, they’ll immediately think you’re fancier than you really are. (Don’t tell them how easy it is to make!)
Same thing goes for this avocado crema. If you put out a bowl of avocado crema on a taco bar, your friends will totally think you spent tons of time and energy on it. Our secret is that it only took about 5 minutes and 4 ingredients to make.
This homemade Basil Pesto is the perfect from scratch recipe! My ultimate pesto recipe is so easy to make and adds so much flavor to so many recipes. If food could be a perfume, I’d want this one. Make a batch of pesto for dinner today! Best Recipe for Basil Pesto I’ll never forget the…
This homemade Basil Pesto is the perfect from scratch recipe! My ultimate pesto recipe is so easy to make and adds so much flavor to so many recipes. If food could be a perfume, I’d want this one. Make a batch of pesto for dinner today!
Best Recipe for Basil Pesto
I’ll never forget the first time I saw pesto: I was in college and hanging out at my boyfriend’s apartment. His roommate brought home a pesto pizza and it was the weirdest thing I’d ever seen. A green sauce on pizza? No thanks!
I then started to grow basil in my garden when I met my husband, and expanded my palate to new things. I have to say, I fell in love with pesto after trying it a few times but I my infatuation with it didn’t start until I began making homemade pesto myself.
Not only is it delicious, but pesto is easy to make from scratch. This classic recipe is a game changer: it’s one of the best sauces that you can use in so many ways. Store-bought pesto is good, but homemade pesto is so much better!
Basil Pesto Ingredients
Basil: Traditionally, pesto is made with fresh basil leaves. I love the smell of basil! You must use FRESH basil for the best pesto. The basil is why it’s called green pesto!
Toasted pine nuts: These add a nutty flavor to the sauce and are a super important component. Check the bulk bin section so you don’t have to buy a whole package.
Parmesan cheese: Use a block of parmesan – not pre shredded and don’t use the green can.
Garlic: A must in pesto!
Olive oil: The oil is the emulsifier in the recipe – what makes it sauce. So be sure to use a good quality oil (we love extra virgin olive oil).
Recipe Swaps
Make Pistachio or Walnut Pesto by using walnuts in place of pine nuts, or you can use almonds.
Same if you want to make my pesto recipe with almonds!
Lemon Basil Pesto – add lemon juice from half a lemon before the oil.
Tomato Pesto – instead of using basil, use a jar of sun-dried tomatoes in oil (you’ll need less olive oil this way).
Spicy Pesto – add some red Chile flakes to the mixture with the cheese and garlic.
Swap arugula, cilantro, or parsley for the basil.
Pecorino Romano cheese works as well
Add some freshly ground black pepper for extra flavor.
How to make Classic Basil Pesto Recipe
Toast your pine nuts for a deeper flavor. Stir them often until they just start to get golden and don’t walk away from the stove. Nuts burn fast so keep a close eye on them. While toasting the pine nuts isn’t absolutely required, it adds a toasty depth of flavor to the pesto sauce, so I highly recommend it.
Pesto is made in a food processor (or you can use a powerful blender). It only takes about 5 minutes! All you have to do to make the pesto is add the basil, garlic, nuts, and Parmesan cheese to the food processor.
Pulse to chop the ingredients fine.
Then add your extra-virgin olive oil slowly, while the machine is running, to for the pesto sauce.
What goes with pesto?
There are so many uses for my ultimate pesto recipe! One recipe makes just over a cup of pesto and can be used in several meals:
Store homemade pesto in an airtight container in the refrigerator for just a few days. There are no preservatives so it will not last as long as store-bought.
You can freeze pesto too – either in an airtight container or portion it into an ice cube tray and place in the freezer. Then store the pesto ice cubes in baggies for easy grab and go dinners.
FAQs
How do you store homemade pesto?
Since homemade pesto doesn’t have preservatives, it will only last (at most) a week in the refrigerator. I recommend planning two or three uses for your fresh pesto, or you can freeze it.
Place pine nuts in a small skillet over medium-low heat. Stir often, cooking for just a few minutes, until they start to brown. Remove from heat and cool.
Place basil, pine nuts, garlic, and parmesan in a the bowl of a food processor or blender. Pulse until a paste forms. Add 1/2 teaspoon salt and pulse to combine.
While running the machine, pour in olive oil, starting with 1/2 cup. Once the pesto emulsifies it will become a thick sauce. If you want thinner pest, add another 1/4 cup olive oil.
Video
Notes
Recipe from The Simple Kitchen by Donna & Chad Elick
Tangy, sweet heat makes this peach barbecue sauce a go-to choice for all your summer cookouts. It’s made with fresh…
The post Peach Barbecue Sauce appeared first on Southern Food and Fun.
Tangy, sweet heat makes this peach barbecue sauce a go-to choice for all your summer cookouts. It’s made with fresh…
Cooked low and slow for a rich flavor, this crockpot spaghetti sauce is deceptively easy to make. Your family will never guess that you only spent a few minutes of hands-on time making this sauce!
Spaghetti is always a hit around here, so this crockpot spaghetti sauce is my new favorite weeknight dinner recipe. Sometimes I will even make a double batch so we can eat some right away and freeze the rest for later.