Skillet Cranberry and Apple Cake

This easy skillet cake with cranberries and apples highlights some of my favorite fall flavors – in a lightly spiced batter.

This easy skillet cake with cranberries and apples highlights some of my favorite fall flavors – in a lightly spiced batter.

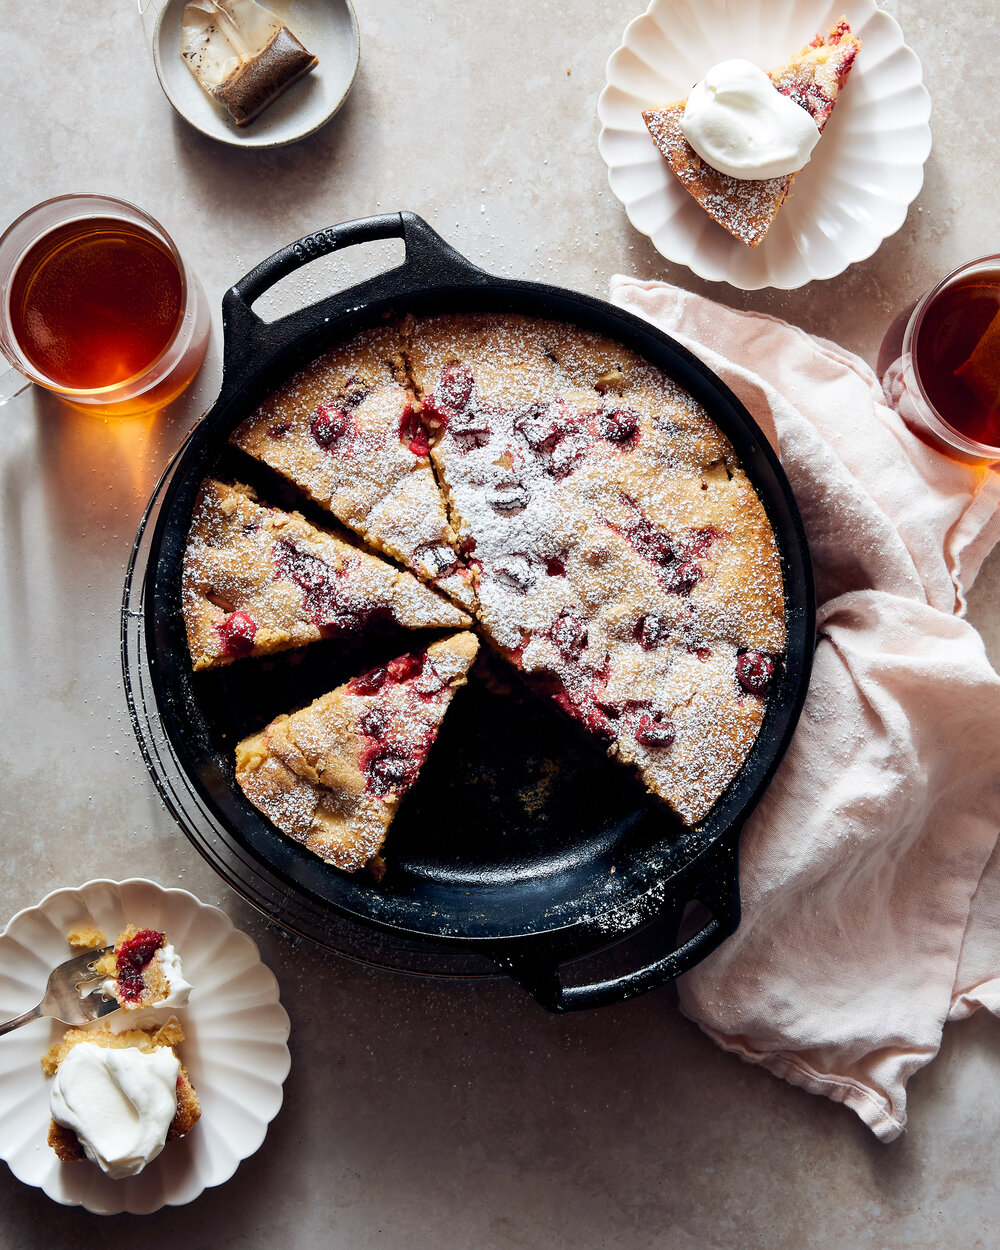
 Fall and winter are such cozy seasons for baking that I find myself with something in the oven at least a few times a week. This skillet cake is a wonderfully versatile recipe that you can really serve any time of day.


This post is sponsored by Lodge Cast Iron. Their new bakeware line is gorgeous, sturdy, super versatile (hello, stove to oven to table!) and sure to become some of your favorites. I’ve used Lodge Cast Iron for years in my kitchen and I was very excited to learn about their new line of bakeware including this Baker’s Skillet which is perfect for everything from a savory quiche to a simple and comforting cake like this one. 


Have a slice with tea or coffee in the afternoon, but make sure to save a bit for breakfast the next day too. Or, you can dress it up with a little bit of confectioner’s sugar and whipped crème fraiche for a gorgeous, low lift dessert.

 The addition of rye flour here makes the cake exceptionally tender and I love the addition of tart cranberries for both color and a little pop of bright flavor that offsets the sweet and spice. If you don’t keep rye flour you can substitute and equal amount of all purpose or whole wheat flour, and feel free to sub pears for the apples too. 


Skillet Rye Cranberry Apple Cake

Makes one 9 or 10-inch cake


 3/4 cup (150g) light brown sugar

2 large eggs

1/2 cup (115g) unsalted butter, melted

2/3 cup (160g) crème fraiche

1 teaspoon cinnamon

1/4 teaspoon nutmeg

1 cup (130g) all purpose flour

1/2 cup (65g) light rye flour

2 teaspoons baking powder

3/4 teaspoon kosher salt

1 1/2 cups peeled and chopped apple, from 1 large apple

3/4 cup (75g) fresh or frozen cranberries

4 teaspoons crunchy sugar like turbinado 

Confectioners sugar and whipped crème fraiche to serve, if desired


1. Position a rack in the center of your oven and preheat the oven to 350°F. Generously butter the Lodge Bakers’s Skillet or 9-inch cake pan

2. In a large bowl, whisk the brown sugar and eggs until pale and foamy, about 1 minute. Add the melted butter, crème fraiche, and spices. Whisk until smooth and emulsified. 

3. Add the flour, baking powder, and salt and whisk until almost combined. 

4. Switch to a rubber spatula and add the cranberries and apples. Fold to combine making sure no streaks of flour remain.

4. Spoon the batter into the prepared pan and smooth the top of the batter with an offset spatula. Sprinkle the sugar over the top. 

5. Bake until puffed and golden, and a tester inserted into the center comes out clean, 25 to 35 minutes. Set the pan on a rack to cool. Serve warm or room temperature with a dusting of confectioners sugar and whipped crème fraiche if desired.

Pumpkin Olive Oil Cake with Maple Olive Oil Glaze from Snacking Cakes

This one-bowl Pumpkin Olive Oil Cake with Maple Olive Oil Glaze is as easy as can be. It’s a great alternative to pie for Thanksgiving too. The maple olive oil glaze is sweet and savory all at once and has the most velvety texture.

This one-bowl Pumpkin Olive Oil Cake with Maple Olive Oil Glaze is as easy as can be. It’s a great alternative to pie for Thanksgiving too. The maple olive oil glaze is sweet and savory all at once and has the most velvety texture.

If you’re feeling to tired or to stressed for pie this Thanksgiving, or maybe you just don’t like pie (I know you’re out there!) - let me humbly suggest this Pumpkin Olive Oil Cake that comes together in one bowl without much fuss. You have probably guessed this already, but it’s a recipe from my new book Snacking Cakes!

It has all of the warm spices you could possibly want, and is topped with maple olive oil glaze and a pinch of sea salt for a sweet and savory vibe that makes it a great snack for anytime of day. You might even want to make one now to snack on as you’re cooking today and tomorrow…Just a thought!

It’s the perfect size for the small gatherings we are all having this year, and if you have leftovers they make an excellent breakfast the next day. We baked it as a loaf for the book, but you can certainly bake it in a round or square pan too.

Stay safe out there everyone. Happy Thanksgiving!


Pumpkin Olive Oil Cake with Maple Olive Oil Glaze from Snacking Cakes

Pumpkin cake isn’t just for the fall, and this version, spiked with a bit of allspice and black pepper, has a hit of warmth that makes it more exciting than your average pumpkin spice mix. The glaze has a sweet and savory thing going on that pairs beautifully with the spices. If you prefer your pumpkin cake unadorned, feel free to skip the glaze and just sprinkle a few tablespoons of untoasted pepitas over the top of the cake batter before it goes into the oven.


Pumpkin Olive Oil Cake

1 cup (200g) light brown sugar

2 large eggs


1 cup (230g) pumpkin puree


½ cup (120ml) olive oil

1 teaspoon ground cinnamon

½ teaspoon ground cardamom

1/8 teaspoon ground allspice

A few grinds of black pepper

½ teaspoon kosher salt

1½ cups (190g) all-purpose our

1 teaspoon baking powder

½ teaspoon baking soda

2 tablespoons chopped toasted pepitas (optional)


Maple Olive Oil Glaze

1 cup (100g) confectioners’ sugar

2 tablespoons olive oil


2 tablespoons maple syrup


1 to 2 tablespoons hot water

Pinch of kosher salt

Chopped pepitas (optional)

Flaky salt (optional)


1. Position a rack in the center of your oven and preheat the oven to 350°F. Butter or coat an 8-inch square baking pan with nonstick spray. Line the pan with a strip of parchment paper that hangs over two of the edges.

2. MAKE THE CAKE: In a large bowl, whisk the brown sugar and eggs until pale and foamy, about 1 minute. Add the pumpkin puree, olive oil, cinnamon, cardamom, allspice, pepper, and kosher salt. Whisk until smooth and emulsified.

 3. Add the flour, baking powder, and baking soda and whisk until well-combined and smooth.

4. Pour the batter into the prepared pan, tap the pan gently on the counter to release any air bubbles, and smooth the top of the batter with an offset spatula. Sprinkle the pepitas over the top if you are not going to glaze the cake.

5. Bake until puffed and golden, and a tester inserted into the center comes out clean, 25 to 35 minutes. Set the pan on a rack to cool for about 15 minutes. Then use the parchment paper
to lift the cake out of the pan and set it on the rack to cool completely.

6. MAKE THE GLAZE: Combine the confectioners’ sugar, olive oil, maple syrup, 1 tablespoon of the hot water, and a pinch of kosher salt in a medium bowl. Whisk until smooth, adding more water as necessary to make a thick but pourable glaze.

7. Pour the glaze over the cooled cake and sprinkle with the pepitas and flaky salt, if desired. Let the glaze set for about 20 minutes before slicing the cake. (Store the cake, well wrapped, at room temperature for up to three days.)

Use Another Pan

LOAF: Bake in a 9 x 5 x 3-inch loaf pan until puffed and golden, and a skewer inserted into the center comes out clean, 50 to 60 minutes. You’ll need a half batch of glaze to coat the cake in a thin layer.

ROUND: Bake in a 9-inch round pan until puffed and golden, and a tester inserted into the center comes out clean, 25 to 35 minutes.

SHEET: Double the ingredients for the cake and bake in a
9 x 13-inch pan until puffed and golden, and a tester inserted into the center comes out clean, 30 to 40 minutes. Double the ingredients for the glaze, too.

Dress It Up

Add a dollop of Brown Sugar Whip (page 180) or a scoop of ice cream (or both!) to slices of cake before serving.

Flavor Variations

PUMPKIN CHOCOLATE CHIP CAKE: Prepare the cake as directed, then fold in ½ cup (85g) chopped bittersweet chocolate just before pouring the batter into the pan. Top with Cocoa Glaze (page 135).

 RYE PUMPKIN CAKE: Substitute ½ cup (65g) light rye flour for the all-purpose flour. This version is also quite nice with a bit of chocolate folded into the batter.

Crushed Raspberry and Strawberry Pavlova


We are still in a bit of an in between produce season, but the weather is warming up and the sun is out so I am craving fresh fruit desserts like it’s my job. I guess it kind of is my job…I love to make desserts like this pavlova because it is fairly low lift and aside from a low, slow bake in the oven for the meringue (which you can make the day before if it’s not too humid where you live) everything comes together in a few minutes.

The tart crushed raspberries provide some nice sauciness here and contrast well with sweet strawberries and the crisp, pillowy meringue. Make sure to use the best strawberries you can find for this dessert, and adjust the sugar to your personal tastes. In NYC we get some really nice organic berries from California but they are $$ so you may just want to bookmark this until they are in season locally where you live. The mini mint leaves are also totally optional, but they do add a nice freshness and beautiful pop of contrasting color.


Crushed Raspberry and Strawberry Pavlova

Crisp and chewy meringue, pillowy whipped cream, and sweet-tart berries are combined to make this super springy, and fairly simple dessert. Assemble just before serving for the best textural experience as the meringue will weep and melt as it sits.

Meringue

4 large egg whites

1 cup (200g) superfine sugar

1 1/2 teaspoons cornstarch

1/4 teaspoon salt

1/8 teaspoon cream of tartar

1 teaspoon vanilla extract

1 teaspoon white vinegar

Berries

1 pound of the best strawberries you can find

1/2 cup fresh raspberries

2 teaspoons sugar

1/2 vanilla bean, seeds scraped

pinch salt

To Serve

1 cup (240ml) heavy cream 

1 tablespoon sugar

mint leaves

To make the meringue: Preheat the oven to 250ºF (130ºC/Gas Mark 1/2). Trace an 8-inch (20cm) circle onto a piece of parchment paper and flip it upside down on a baking sheet.

Stir the cornstarch and sugar together in a small bowl. In the bowl of a stand mixer fitted with the whisk attachment or with a handheld electric mixer in a large bowl, beat the egg whites, salt, and cream of tartar on high speed until soft peaks form. With the mixer running, slowly add the sugar mixture about one tablespoon at a time until you have added all of the sugar and the egg whites are stiff and glossy about 7 minutes. Add the vanilla extract and vinegar and mix for 30 more seconds.

Dollop the meringue onto the prepared baking sheet and use an offset spatula to spread it evenly to the edges of the traced circle. Make a shallow indent in the center of the meringue which will hold all of the delicious toppings. Bake the meringue for 1-1 1/2 hours or until the outside looks dry and slightly creamy in color. Turn off the oven and prop the door ajar with a wooden spoon. Let the meringue cool completely in the oven. It should feel firm and crackly when you press it, but will be soft and marshmallowy in the center. When cooled, you should be able to gently peel it off of the parchment paper and place it on a serving platter or cake stand.  

To make the topping: Slice the strawberries in half if they are small, quarters if they are large. Combine the raspberries, sugar, vanilla bean seeds and a pinch of salt in a large bowl and crush the berries with a fork. Gently stir in the strawberries and let the fruit macerate for a few minutes. Taste and add a bit more sugar if desired, keeping in mind that the meringue will be quite sweet.

Whip the cream and sugar together to soft peaks. Top the cooled meringue with the whipped heavy cream, followed by the berries. Sprinkle mint leaves over the top and serve immediately.