If you love hummus and the rich flavor of tomatoes, you’ll ADORE this simple sun-dried tomato hummus. It’s SO versatile, creamy, easy to make, and adds instant flavor to just about everything. Enjoy it on pita, veggies, crackers, sandwiches, and more.
…
If you love hummus and the rich flavor of tomatoes, you’ll ADORE this simple sun-dried tomato hummus. It’s SO versatile, creamy, easy to make, and adds instant flavor to just about everything. Enjoy it on pita, veggies, crackers, sandwiches, and more.
It’s perfect for parties, picnics, meal prep, road trips, and everything in between! Just 15 minutes and a food processor or blender required. Let’s make hummus!
This recipe is adapted from the Simple Sun-Dried Tomato Hummus in our cookbook!
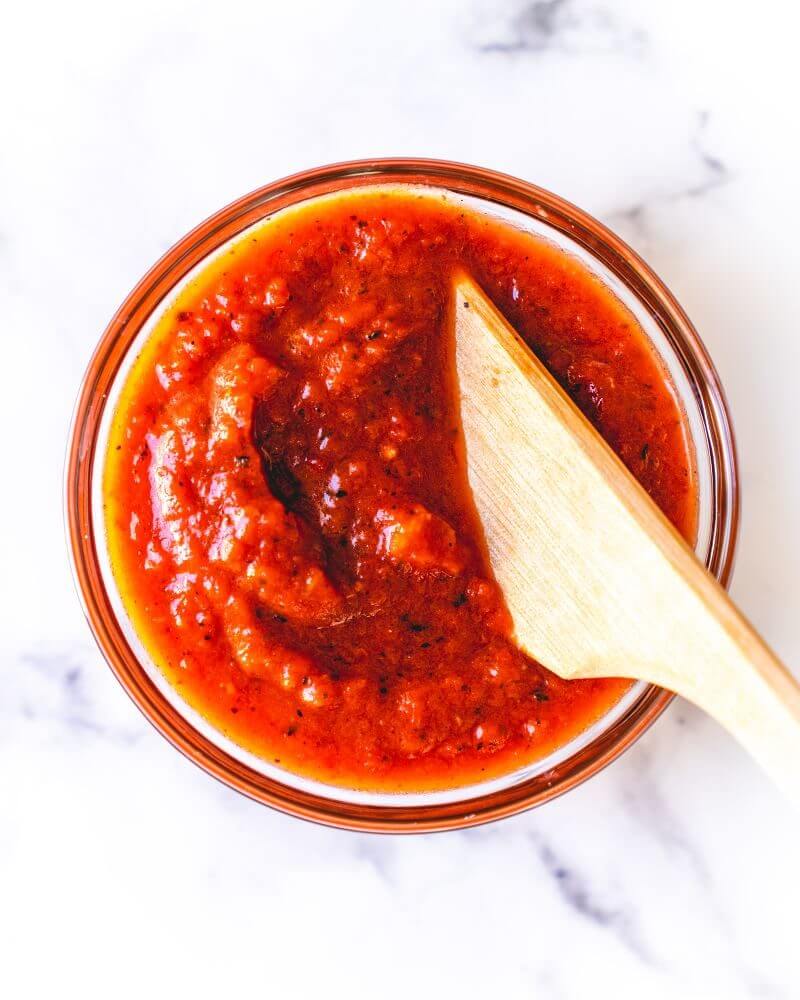
This homemade pizza sauce recipe is full of zingy, garlicky flavor and gets rave reviews! It uses only 5 ingredients…
This homemade pizza sauce recipe is full of zingy, garlicky flavor and gets rave reviews! It uses only 5 ingredients and takes only 5 minutes: there’s no cooking required.
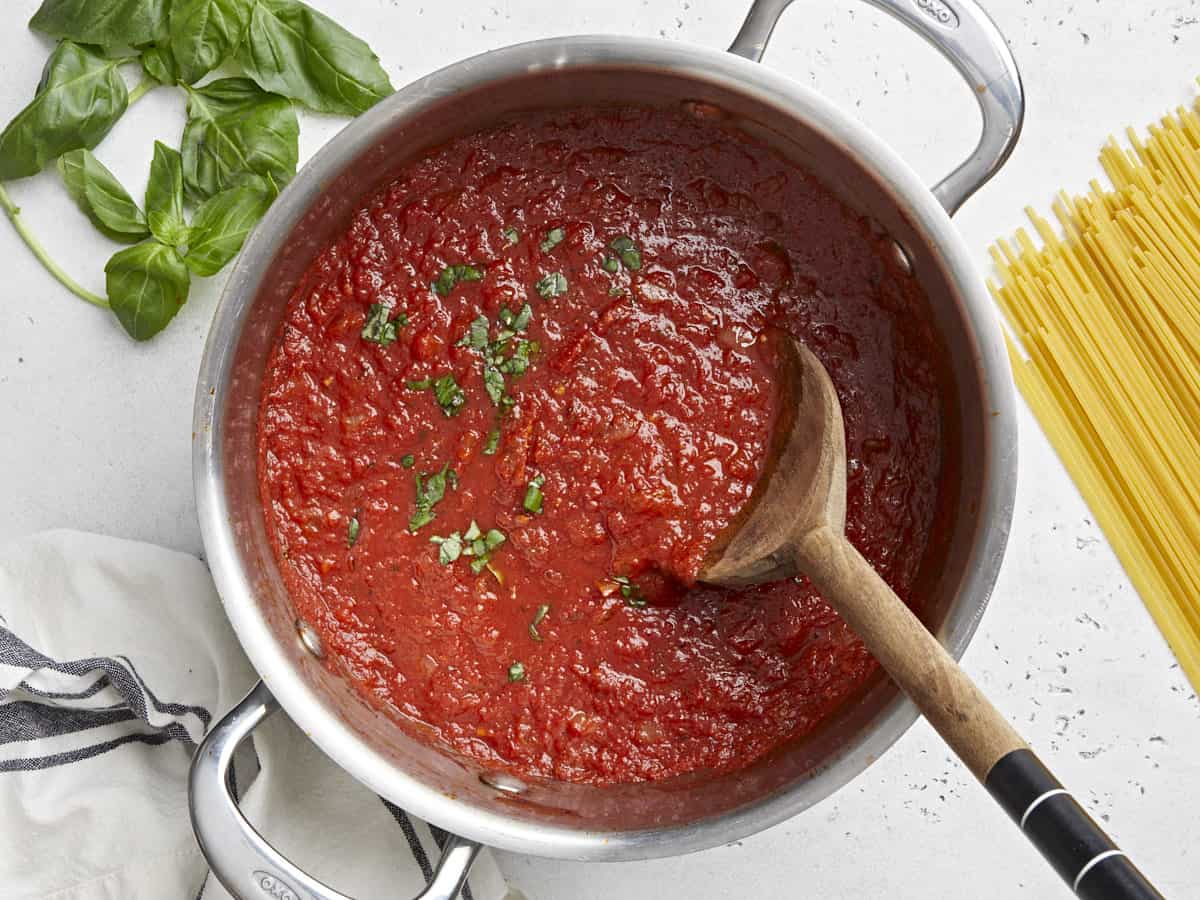
Making a pizza? Here’s the go-to recipe you need: this homemade pizza sauce recipe! All you need are 5 ingredients and 5 minutes. Dip your spoon in, and you’ll be amazed at the flavor: it’s garlicky, rich, tangy and bright.
Why we love this recipe: This pizza sauce is one of our most-used on this website: we’ve made it more times than we can count. The garlicky, tangy flavor can’t be beat, and it’s beyond simple to make. Once you try it, you’ll never go back. Come, experience the magic!
Featured reader comment
“Absolutely delicious and totally easy. I’ve been making it for years now, so it’s time to show my love with a 5 star rating. Had a pizza party with friends and they loved the sauce so much we put it on the table to drizzle on our slices!” -Leila
Ingredients in this pizza sauce recipe
There are just 5 ingredients in this pizza sauce recipe. Even better: it requires no cooking at all! The flavor depends on the quality of your ingredients, so choose wisely. Here are a few things to know about the ingredients:
Canned fire roasted tomatoes: Try to find this type of canned tomato if at all possible! Roasting tomatoes over an open flame adds a mellow, sweet flavor. Several brands carry this special type of tomato. If you can’t find them, use the highest quality crushed tomatoes you can find: San Marzano tomatoes are a good substitute. Double check that the can says crushed before purchasing.
Small garlic clove: Garlic cloves widely vary in size. This recipe calls for a small clove. If you don’t have one, use half a medium or a quarter of a large clove. This is important so that the sauce doesn’t end up too garlicky.
Dried oregano: Make sure to use dried oregano that’s fairly new so that the flavor is strong enough. If it’s been in your cabinet over 1 year, it’s time for a refresh!
Olive oil and salt: Use extra virgin olive oil, and no recipe is complete without a pop of kosher salt.
Pro tip
Keep one thing in mind about this pizza sauce: it has a loose texture that’s similar to what’s use in a traditional Neapolitan pizza. Don’t expect it to be like canned American pizza sauce, which can have extra ingredients like sugar and thickeners like cornstarch. Use a very thin layer of it on top of the pizza dough.
How to make homemade pizza sauce
How to make homemade pizza sauce? Many methods simmer the sauce on the stovetop. But after loads of testing, we found that fire roasted tomatoes make it possible to mix right up without cooking. Every time we make it, when I dip my spoon into that beautiful red sauce, it’s beyond my wildest dreams. We used to make it in a blender, but it works simply mixed by hand too! Here are the steps:
Step 1: Peel and finely mince the garlic. Or if you’re using the blender method, peel the garlic clove and slice it into a few rough pieces.
Step 2: Mix the garlic with crushed fire roasted tomatoes, olive oil, oregano, and salt until the olive oil incorporates. Or, throw them in a blender and then blend until fully combined.
Step 3: Spread a very thin layer of the pizza sauce onto your favorite pizza dough recipe.
It’s as simple as that. Take a taste, and you’ll be amazed by the flavor! We’ve had countless people tell us that it’s the best pizza sauce they’ve ever had.
Top pizza dough recipes
We’ve made this pizza sauce recipe so many times, we’ve lost count! To make your own homemade pizza, try one of these pizza dough recipes for the crust:
Try this pizza dough recipe, our tried and true favorite that works every time!
Use this easy pizza sauce recipe on any of your favorite pizza recipes! You can also use it as a dipping sauce for grilled cheese or breadsticks, in baked pasta, or for a pizza quesadilla. Here are some of our favorite ways to use it:
This pizza sauce recipe is vegetarian, gluten free, vegan, plant based, dairy-free, and refined sugar free.
Frequently asked questions
Why make no-cook pizza sauce?
There are several advantages! It’s quicker and easier than cooked sauces, requires minimal ingredients, and allows the fresh flavors of the tomatoes to shine through. Additionally, cooking pizza sauce can make it lose its vibrant color and acidity.
Isn’t no-cook sauce too watery for pizza?
Fire-roasted tomatoes have a thicker consistency and more concentrated flavor than regular canned tomatoes. They offer the perfect base for a no-cook sauce that won’t leave your pizza soggy.
What kind of fire-roasted tomatoes should I use?
Crushed fire-roasted tomatoes work well. Don’t substitute diced unless you run the sauce through a blender first.
I don’t have fire-roasted tomatoes. Can I use regular canned tomatoes?
You can, but the flavor won’t be as rich and flavorful. Opt for high-quality canned tomatoes like San Marzano tomatoes, and consider adding a pinch of smoked paprika to mimic the fire-roasted flavor.
What herbs can I add to this sauce?
Finely minced fresh basil is a classic addition, but oregano, thyme, or a pinch of red pepper flakes are also delicious options.
How much garlic is too much garlic?
Garlic preference is subjective, but 1 small clove should be enough for a flavorful yet balanced sauce.
How long can I store leftover sauce?
Store leftover sauce in an airtight container in the refrigerator for up to 1 week. You can also freeze it for up to 3 months.
Finely mince the garlic (or if using the blender method, simply chop it into a few rough pieces).
Stir together all ingredients in a bowl until the oil incorporates. Or, place all ingredients in a blender and blend until fully combined (this makes a slightly runnier textured sauce).
To serve, spread a very thin layer of sauce on top of pizza dough, keeping in mind that this sauce has a loose texture that’s similar to what’s used in a traditional Neapolitan pizza or Margherita pizza. (Don’t expect it to be like canned American pizza sauce, which can have extra ingredients like sugar and thickeners like cornstarch.) Store refrigerated for 1 week or frozen up to 3 months.
*Fire roasted tomatoes are key to the flavor! They’re available at many mainstream groceries these days and have a mellow, sweet flavor. If you absolutely cannot find them, use a high quality brand of crushed tomatoes: San Marzano tomatoes are a good substitute. Do not use diced tomatoes, unless you use the blender method for the sauce.
Make restaurant-quality Italian dressing at home with this simple recipe! This zesty dressing is full of flavor and perfect for…
Make restaurant-quality Italian dressing at home with this simple recipe! This zesty dressing is full of flavor and perfect for salads, pasta salads, and more.
One of the top salad dressing recipes to make homemade: Italian dressing! This zingy Italian American vinaigrette is a staple that many of us have grown up with. Ever tried making it at home instead of opting for bottled?
As two cookbook authors, we’ve found the key to a great salad is a homemade salad dressing: they don’t have preservatives or added ingredients, are extremely tasty, and are quick to make! This zesty Italian dressing recipe is a fan-favorite recipe from our popular chopped salad, and it’s become our go-to easy vinaigrette for all types of salads.
This Italian dressing recipe is a standby recipe we’ve been making for over a decade. It all started with our famous chopped salad, which is always a hit with friends and family. Every time we serve it, people ask us for the recipe! Over the years, readers have constantly given us feedback they love it to. Here’s what we love about this recipe:
It’s delicious. Our readers have left comments like “IMO, This IS the best Italian dressing!” and “Wow this was so good! I made it for a Italian inspired mixed green salad that I made for guests and everyone loved it. I will definitely be making it again!”
It’s simple to whip up in 5 minutes. You need a few ingredients, a bowl and a whisk.
It’s versatile. You can use it on many different salads: and even as a marinade!
Ingredients you’ll need
Turns out, Italian dressing is actually an Italian American creation, not a traditional Italian food! It’s a vinaigrette type dressing used in American and Canadian cuisine. In Italy, salads are dressed with olive oil, vinegar, lemon juice and salt at the table, not typically with a pre-mixed salad dressing. Italian dressing is an American creation that approximates the flavors and herbs in Italian food, like olive oil, garlic, basil, oregano and thyme.
The ingredients you’ll need for this Italian dressing are:
White wine vinegar: This pantry ingredient brings in the tangy flavor (helpful so you don’t have to buy a fresh lemon). Make sure to use white wine vinegar, not white vinegar, which has a very strong, acidic flavor.
Dijon mustard: Mustard adds tangy, savory flavor and helps to make the perfect emulsion.
Maple syrup or sugar: Adding a hint of sugar balances the acidity in this dressing. Maple syrup adds sweetness and not a strong maple flavor, so it’s our preference here.
Garlic: Everything is better with a little fresh garlic, and it carries the flavor of this dressing.
Dried oregano, thyme, and basil: The combination of these herbs make the perfect flavor. We’ve experimented with Italian seasoning, but this combination tastes better.
Olive oil: This heart-healthy oil is the binder in this dressing, making it cling to salad greens and vegetables.
Tips for how to make an emulsion
This homemade Italian dressing recipe is incredibly simple. The flavor is zesty and bright, full of garlic, white wine vinegar, maple syrup or sugar, Dijon mustard, and olive oil. Add to that a mix of Italian-style dried herbs: basil, thyme, and oregano, which bring in earthy flair. To make an emulsion for this homemade Italian salad dressing recipe, simply whisk it by hand. Here are a few tips:
Use a medium-sized bowl. To get the oil and vinegar to incorporate into a creamy emulsion, here’s a tip: use a medium-sized bowl to allow for enough movement of the whisk. (Trust us, we’ve tried it in small bowls before and it’s difficult to get the oil and vinegar to combine properly.)
Add the olive oil little by little. Add it tablespoon by tablespoon and whisk in between each until the oil fully incorporates.
Use Dijon mustard. Don’t leave out the mustard! Dijon mustard helps to form and lock in the emulsion. We’ve used this technique in our other vinaigrette recipes, like our Classic Vinaigrette and Balsamic Vinaigrette.
Ways to serve this Italian dressing recipe
This homemade Italian dressing recipe is perfect on any type of salad that you throw together! We’ve made it for years and have lots of readers who use it as a go-to salad dressing. It works well on many types of salad recipes, like a chopped salad, kale salad, or any green salad with flavors that would go with an Italian-style vinaigrette. Here are a few ideas of how to use it:
How would you serve this Italian salad dressing recipe? Let us know in the comments below!
More homemade salad dressing recipes
Homemade dressings have big, bold flavor and are easy to whip up! In fact, we rarely buy bottled dressing. Outside of this homemade Italian dressing recipe, here are a few of our other favorite salad dressing recipes:
In a medium bowl, whisk together the white wine vinegar, Dijon mustard, and maple syrup. Grate in the garlic clove, then whisk together with the oregano, thyme, basil, and kosher salt.
Gradually whisk in the olive oil, adding 1 tablespoon at a time and whisking until it incorporates, until an emulsion forms. Serve immediately. Store refrigerated and bring to room temperature before serving (keeps at least 2 weeks).
Category:Salad Dressing
Method:Whisked
Cuisine:American
Keywords: Italian dressing, Italian dressing recipe, Homemade italian dressing, How to make italian dressing,
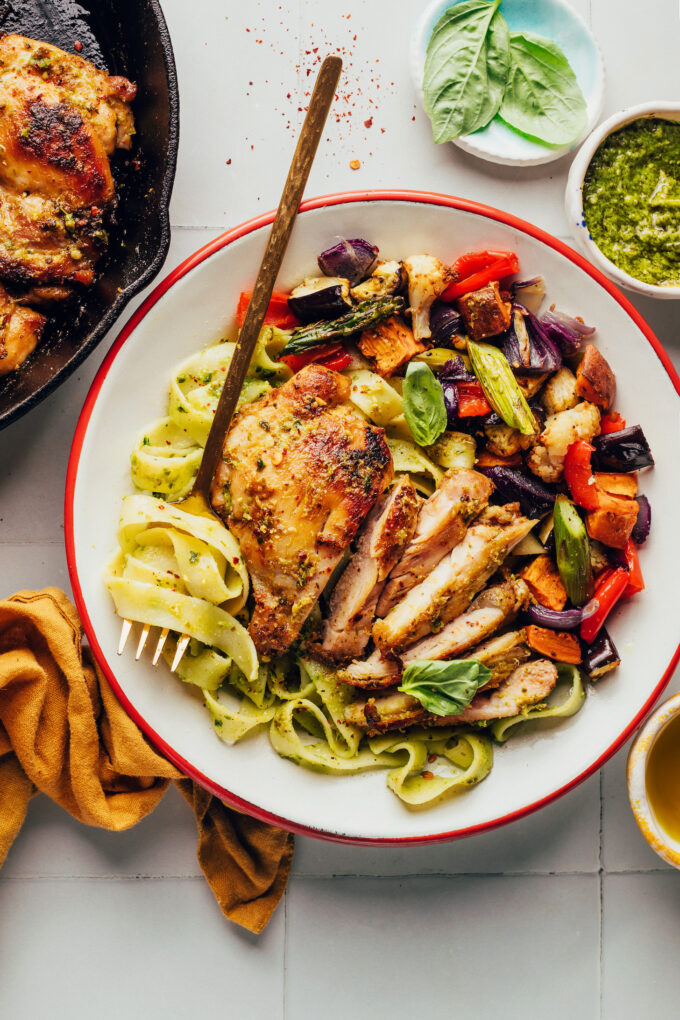
Sometimes we post what we’re eating on Instagram and you want the recipe right away. Waiting for good things is hard, but you’ve proved you can do hard things. The wait for our pesto baked chicken thighs is finally over, and we have a feeling the…
Sometimes we post what we’re eating on Instagram and you want the recipe right away. Waiting for good things is hard, but you’ve proved you can do hard things. The wait for our pesto baked chicken thighs is finally over, and we have a feeling the recipe will be on repeat in your kitchens!
This garlicky, herby dish comes together in just 20 minutes and pairs well with just about anything, including salads, pasta, potatoes, and roasted veggies.
I know it’s super easy just to open up a jar of store-bought marinara sauce and pour it over your pasta, and sometimes that’s all the energy we have (no shame), but hear me out. This easy marinara sauce recipe is surprisingly simple, super inexpensive, and you get to control the ingredients (great for those watching their sugar or sodium intake). Plus, homemade marinara sauce is very freezer-friendly, so you can make a double batch now and save the other half for the nights when you have no energy. It heats through in minutes and you’re good to go with zero effort!
What is Marinara Sauce?
Marinara sauce is a simple tomato-based pasta sauce. It’s characterized by its simple list of ingredients, which leads to an uncomplicated and bright tomato flavor. The texture of marinara sauce is usually very uniform without large chunks, which allows it to coat pasta evenly. Marinara sauce is most often used as a sauce for pasta, but it can also be used in many other dishes or as a dipping sauce.
Ingredients for Marinara Sauce
Marinara sauce in its most simple form is just puréed tomatoes (or passata) and a small amount of herbs and spices. I’ve added a couple more ingredients here to satisfy my American palate, but the recipe remains very simple. Here’s what you’ll need to make this marinara sauce recipe:
Onion: The natural sugars in onion add a touch of sweetness to the sauce, which helps balance the acidity of the tomatoes.
Garlic: Garlic pairs so well with tomato sauce that I just had to add some to round out the savory flavors. That being said, you can skip it for a more traditional marinara sauce flavor.
Olive Oil: Olive oil helps the onion sauté without burning and it adds some body to the sauce.
Crush Tomatoes: A large can of crushed tomatoes provides bulk to this sauce with a fairly smooth texture. If you can not get crushed tomatoes where you live, passata will also work.
Tomato Paste: A little bit of tomato paste added to the sauce helps thicken it up and intensifies the tomato flavor.
Herbs: Dried basil and oregano round out the flavor of this sauce and give it a subtle herbal finish.
Brown Sugar: Adding sugar is a short cut with tomato sauce that helps balance the acidity without having to simmer the sauce for a long period of time. You can skip the brown sugar, but I love the balance it brings to the flavor.
Salt: Salt is arguably the most important ingredient in any dish as it helps our tongue distinguish between different flavors. If your sauce is not properly salted, you will not be able to taste its full flavor.
What Kind of Tomatoes to Use for Marinara Sauce
This recipe is written using canned crushed tomatoes, which offer both convenience and a low price. While you most definitely can make marinara sauce using fresh tomatoes, that would require several more steps and a reformulation of the recipe to account for the extra water and flavor differences.
When choosing the canned crushed tomatoes for this recipe, keep in mind that there can be quite a drastic flavor difference between brands. If budget is your main concern, this recipe makes a great sauce even when using generic-brand canned tomatoes. But, if you want to get a bit fancier, you can opt for a premium or imported brand, or even buy whole canned San Marzano tomatoes and purée them yourself. Even when you opt for a more expensive canned tomato, this recipe is still very easy and budget-friendly, making it a great option for special occasions like date night in!
How to Use Marinara Sauce
We all know that marinara sauce is great on pasta, but you can use it for other recipes, as well! Here are some other ways to use this easy homemade marinara sauce:
Use it on pizza for a lighter tomato flavor. It’s particularly great on Margherita pizzas.
Use it as a base for soup by adding more seasoning, broth, and other items like pasta, meatballs, or vegetables.
How to Store And Reheat
As mentioned, this marinara sauce recipe freezes beautifully. After cooking the marinara sauce, transfer it to the refrigerator until completely chilled. The sauce will stay good in the refrigerator for 4-5 days, or you can transfer it to the freezer for longer storage. Just make sure the sauce is in a freezer-safe container, label and date it, and then freeze for up to three months. To reheat, simply transfer the frozen sauce to a saucepot and heat over medium-low, stirring often, until heated through.
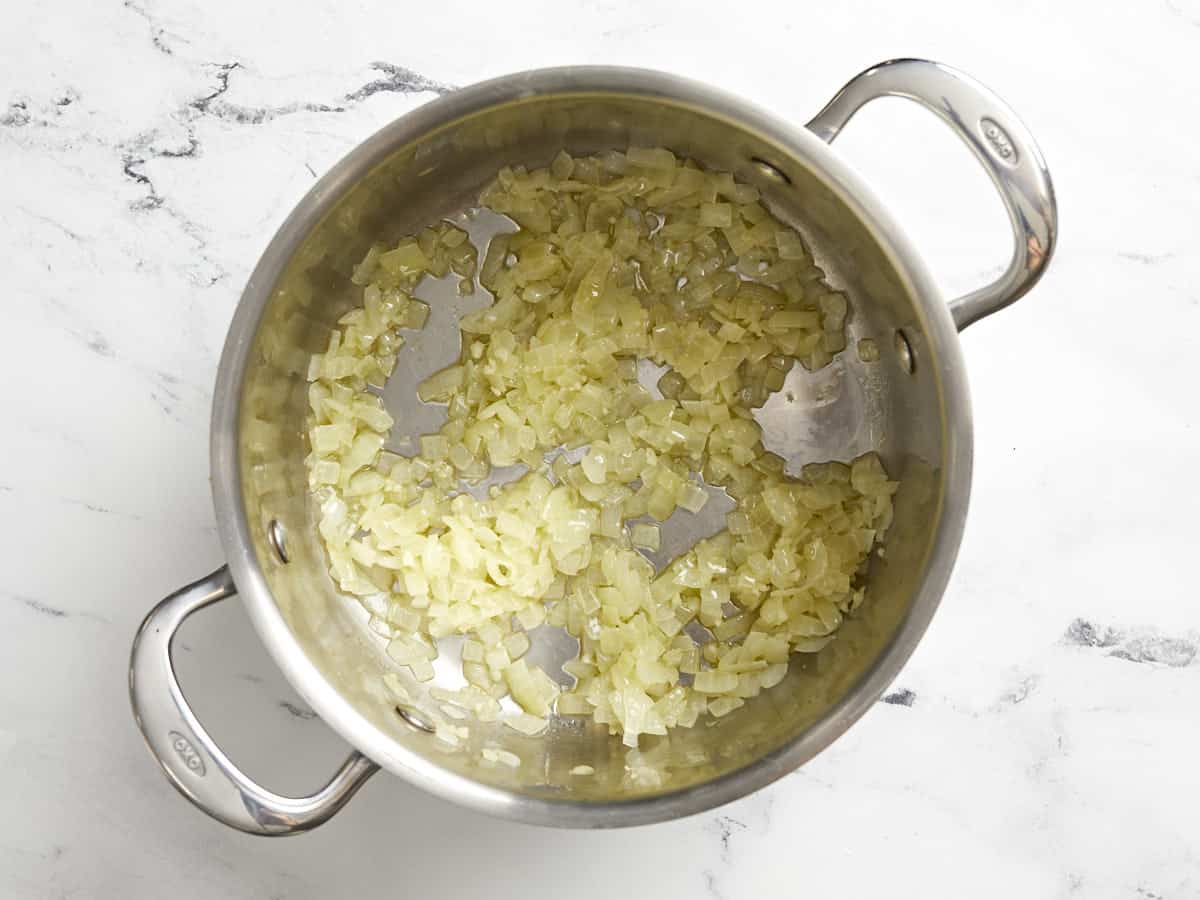
Dice the onion and mince the garlic. Add the onion, garlic, and olive oil to a sauce pot and sauté over medium heat until the onions are soft and translucent (about 5 minutes).
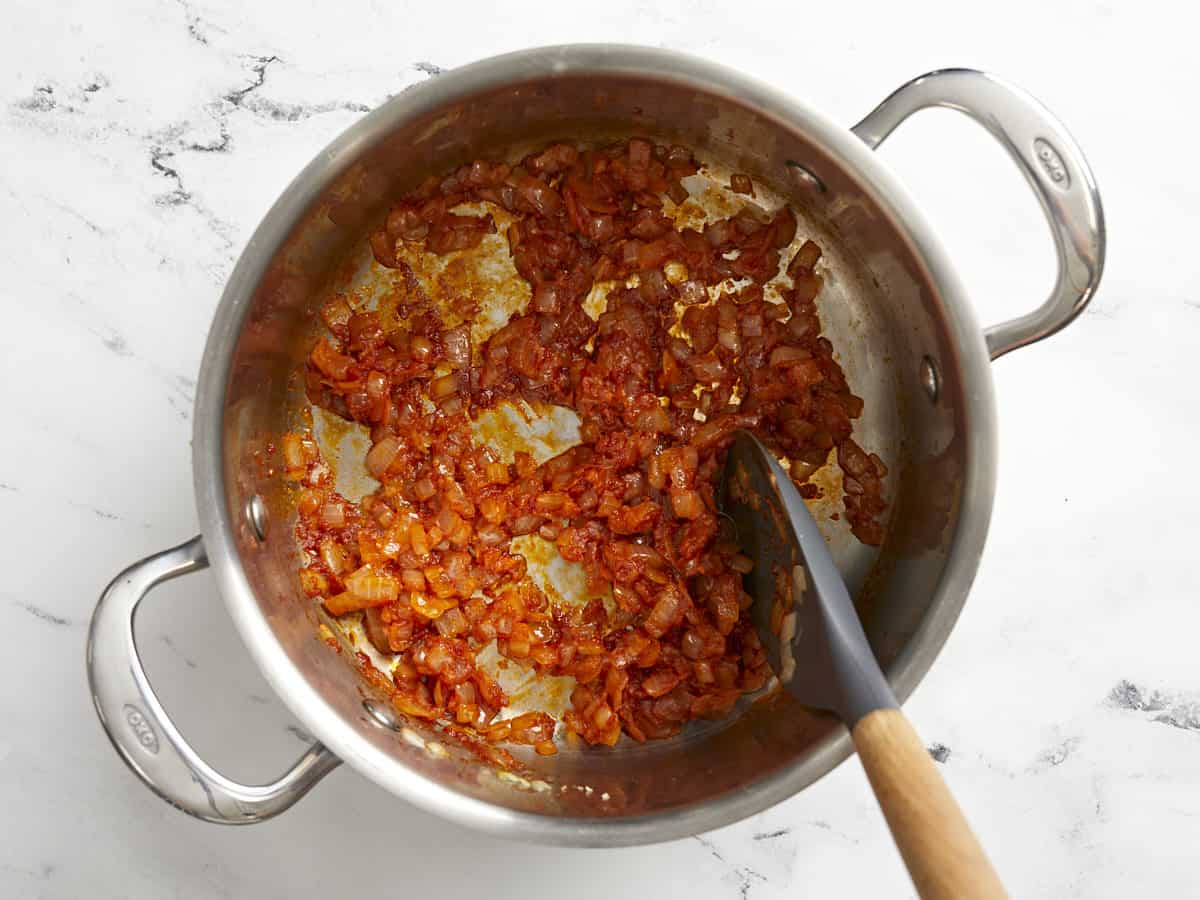
Add the tomato paste and continue to stir and cook for 3-5 minutes more, or until the tomato paste takes on a slightly darker color. This caramelizes the sugars in the tomato paste to give it a slightly sweeter and less acidic flavor.
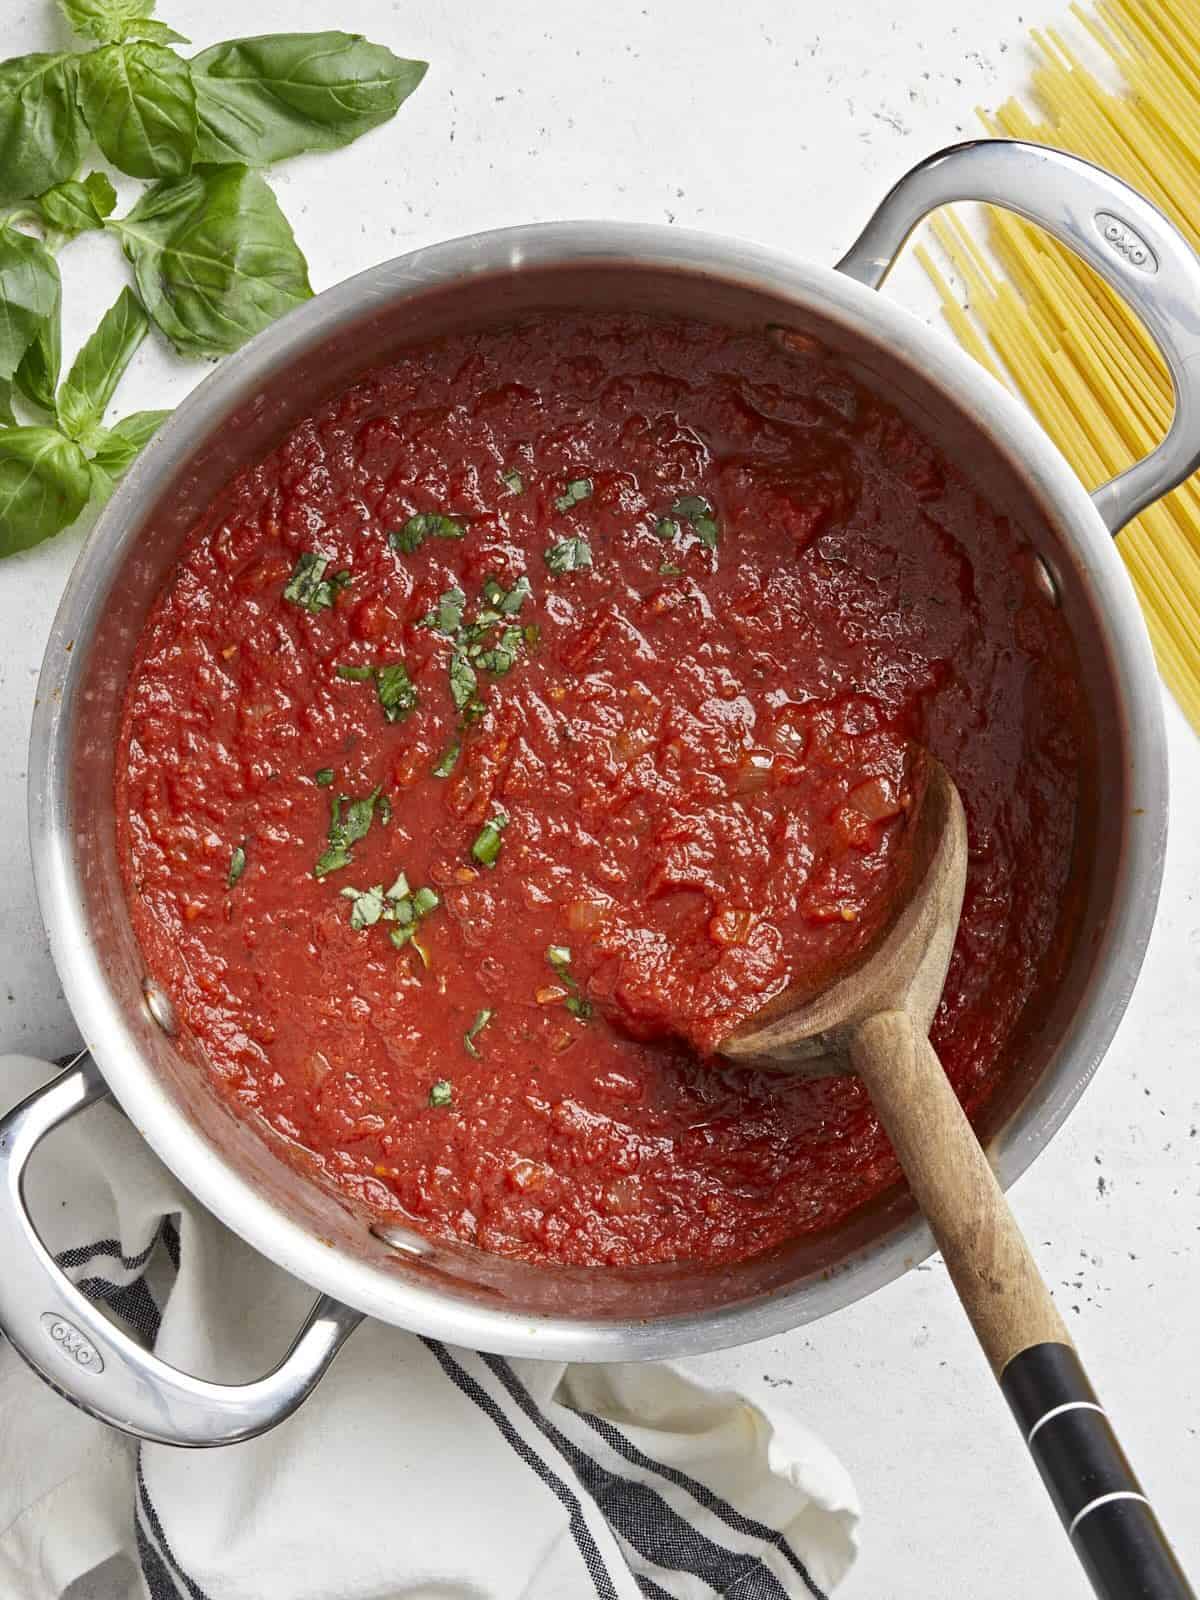
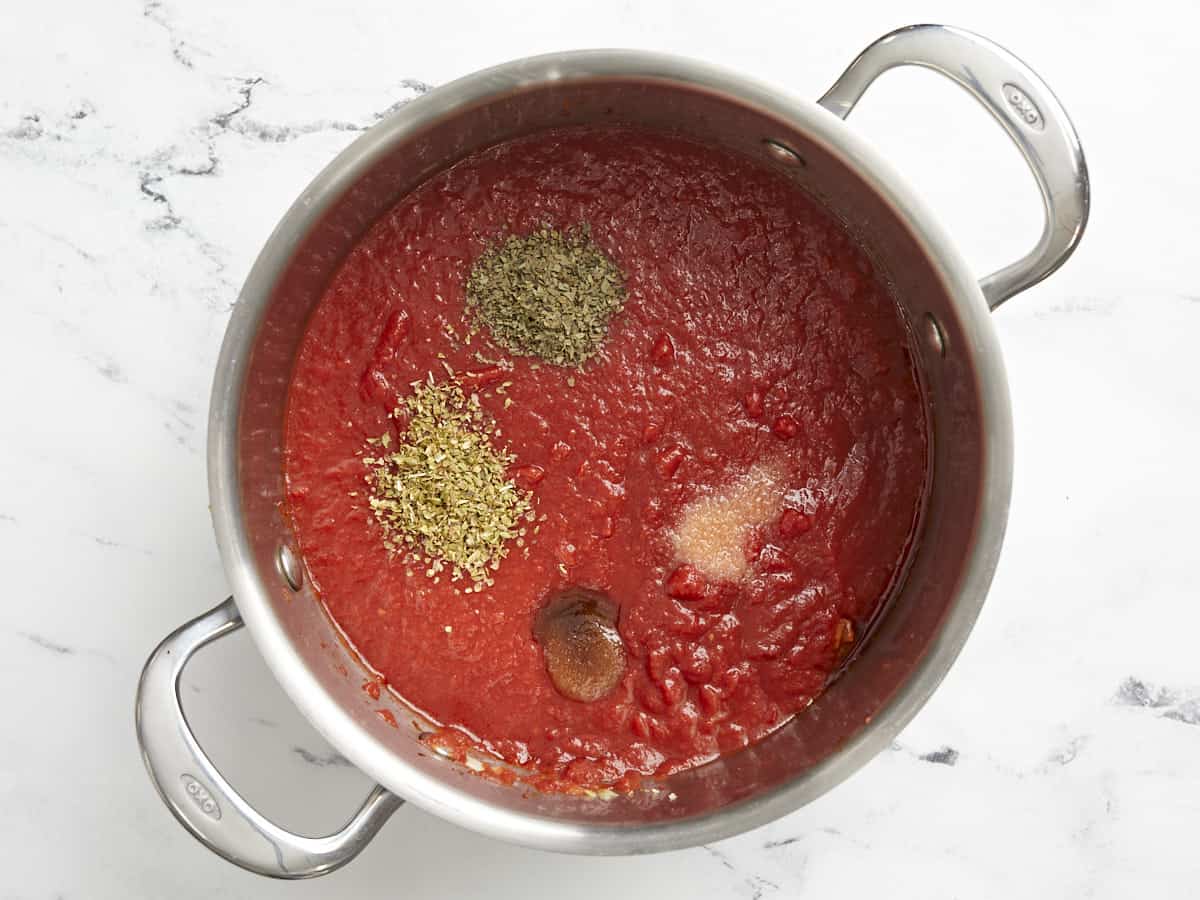
Add the crushed tomatoes, basil, oregano, brown sugar, and salt to the pot. Stir to combine and dissolve any tomato paste from the bottom of the pot.
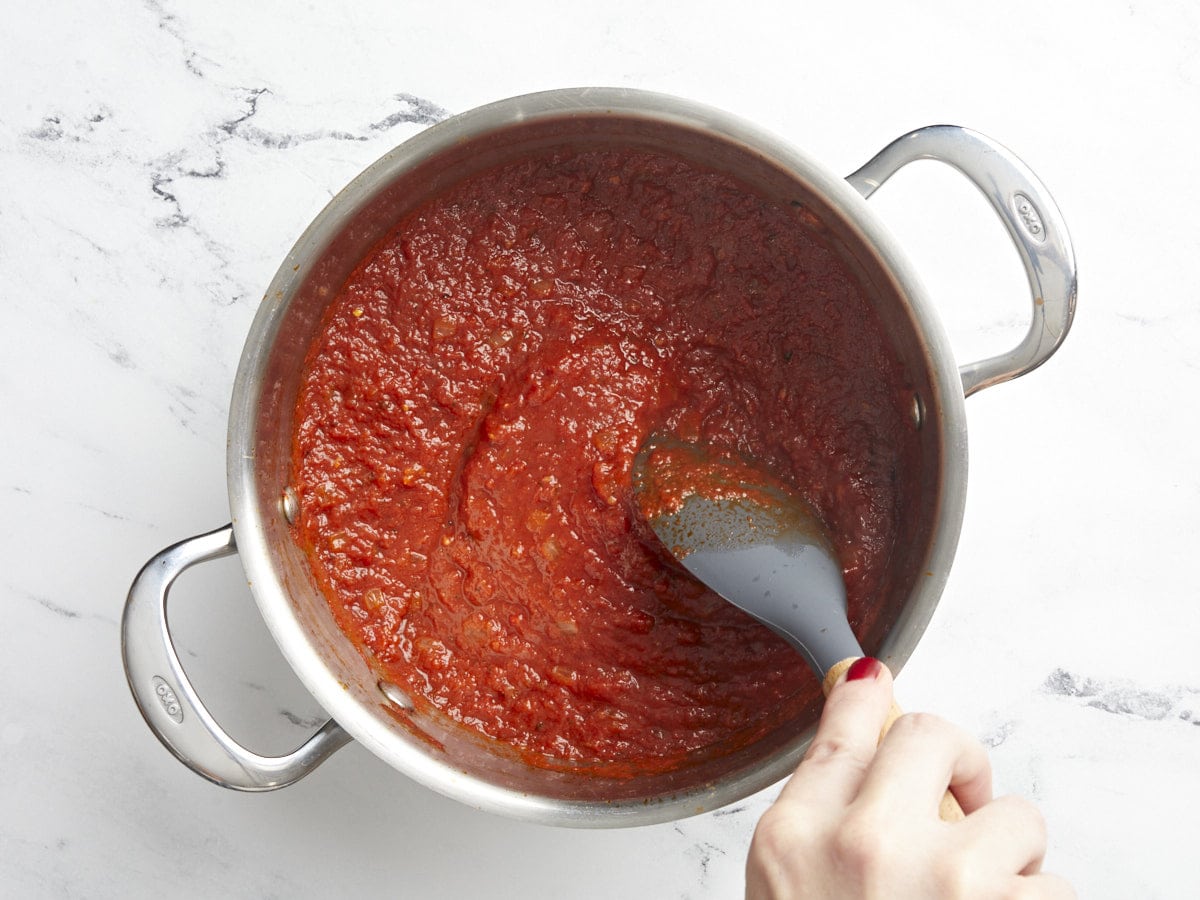
Allow the sauce to come to a gentle simmer, then reduce the heat to medium-low, partially cover the pot, and allow the sauce to simmer for about 30 minutes, stirring occasionally.
After simmering for 30 minutes, taste the sauce and adjust the salt, sugar, or other seasonings to your liking. If the sauce is too acidic for your liking, you can let it simmer longer (about one hour) or add more sugar. Serve hot or refrigerate until ready to eat.
Dice one yellow onion and mince two cloves of garlic. Add the onion, garlic, and 2 Tbsp olive oil to a sauce pot and sauté over medium heat until the onions are soft and translucent (about 5 minutes).
Add 2 Tbsp of tomato paste to the pot and continue to stir and cook for 3-5 minutes more, or until the tomato paste takes on a slightly darker color. This caramelizes the sugars in the tomato paste, adding a natural sweetness.
Finally, add one 28oz. can of crushed tomatoes, ½ tsp dried basil, ½ tsp dried oregano, 1 tsp brown sugar, and 1 tsp salt. Stir to combine and dissolve any tomato paste from the bottom of the pot. Allow the sauce to come to a gentle simmer.
Once simmering, turn the heat down to medium-low, partially cover the pot, and let the sauce simmer for about 30 minutes, stirring occasionally. Leaving a lid on the pot but slightly ajar can help prevent splatter.
After simmering for 30 minutes, give the marinara sauce a taste and adjust the salt or other herbs to your liking. If it’s still too acidic for your taste, you can either simmer it longer (around 1 hour total), or add more sugar.
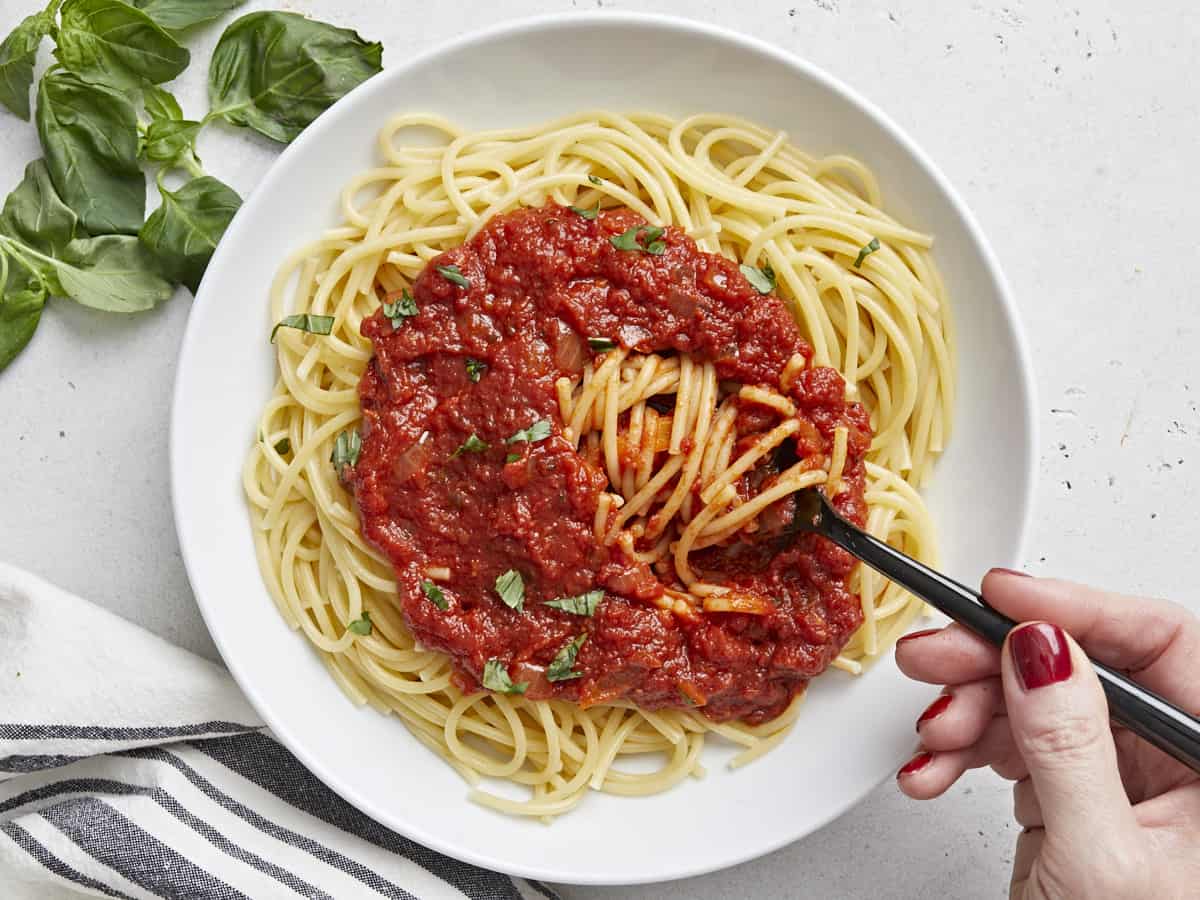
Serve the homemade marinara sauce over pasta, use it for a dipping sauce, or freeze it for later!
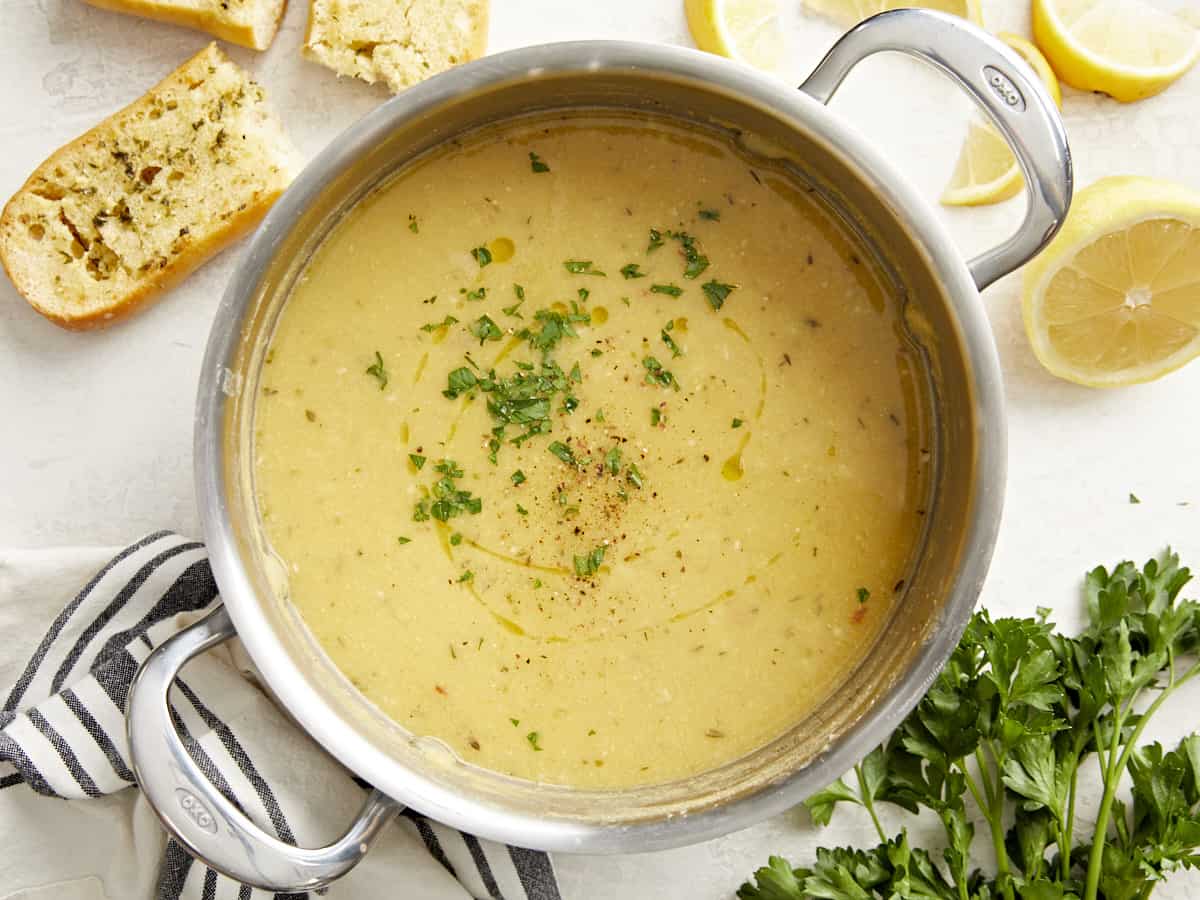
Quick and easy soups made with canned beans have become my favorite go-to easy meal when I’m too tired to cook and too broke to eat out. I’ve made several variations of this soup over the years, including the viral Rosemary Garlic White Bean Soup, but this week I made a Mediterranean-inspired Lemony Chickpea Soup. It’s fast, easy, has bright flavors, and pairs perfectly with some crusty bread for a simple no-fuss meal.
This incredibly simple Lemony Chickpea soup combines puréed chickpeas, broth, and some seasoning to create a perfectly comforting and flavorful bowl of soup. And since most of these ingredients are shelf-stable, this is a pantry meal you can make any time with no planning head.
Ingredients for Lemony Chickpea Soup
Here’s all you’ll need to make this deliciously easy chickpea soup:
Garlic: A hefty dose of garlic gives this soup a deep savory flavor and perfectly balances the bright lemon.
Olive Oil: Olive oil is used to sauté the garlic and give the soup a little bit of richness in the mouthfeel.
Chickpeas: This recipe uses canned chickpeas to make the entire preparation fast and easy. If you prefer to use chickpeas cooked from dry, you’ll need about 4-5 cups of cooked chickpeas.
Chicken Broth: Broth adds a lot of savory depth to the soup as well as the salt needed to make each flavor pop.
Lemon: A splash of lemon juice brightens up the flavors in the soup, provides a nice contrast to the savory garlic flavor, and gives the soup a fresh Mediterranean flavor.
Seasoning: The seasoning profile for the soup is fairly simple with just a little bit of thyme, oregano, red pepper, and black pepper. Keeping the seasoning light gives the soup a bright and fresh flavor.
What to Serve with Lemony Chickpea Soup
This chickpea soup is just begging for some crusty bread for dipping, so I highly suggest making a loaf of our easy no-knead bread or focaccia rolls. Or, if you need something a little faster, homemade garlic bread would also be amazing with this soup. And, if you want some veggies on the side, a simple side salad would be awesome, or you could go with something a little heftier, like tortellini salad.
Tips for Smooth Chickpea Soup
Canned chickpeas can often be a bit on the firm side, so to make sure your chickpea soup is extra smooth you may need to pre-boil the chickpeas, but it depends largely on the brand of chickpeas. Some canned chickpeas are quite soft, while others are very firm or borderline undercooked.
If your chickpeas are very firm, simply empty the can and liquid into a small saucepot and simmer them for about 10 minutes. Let the chickpeas cool before transferring to the blender to purée.
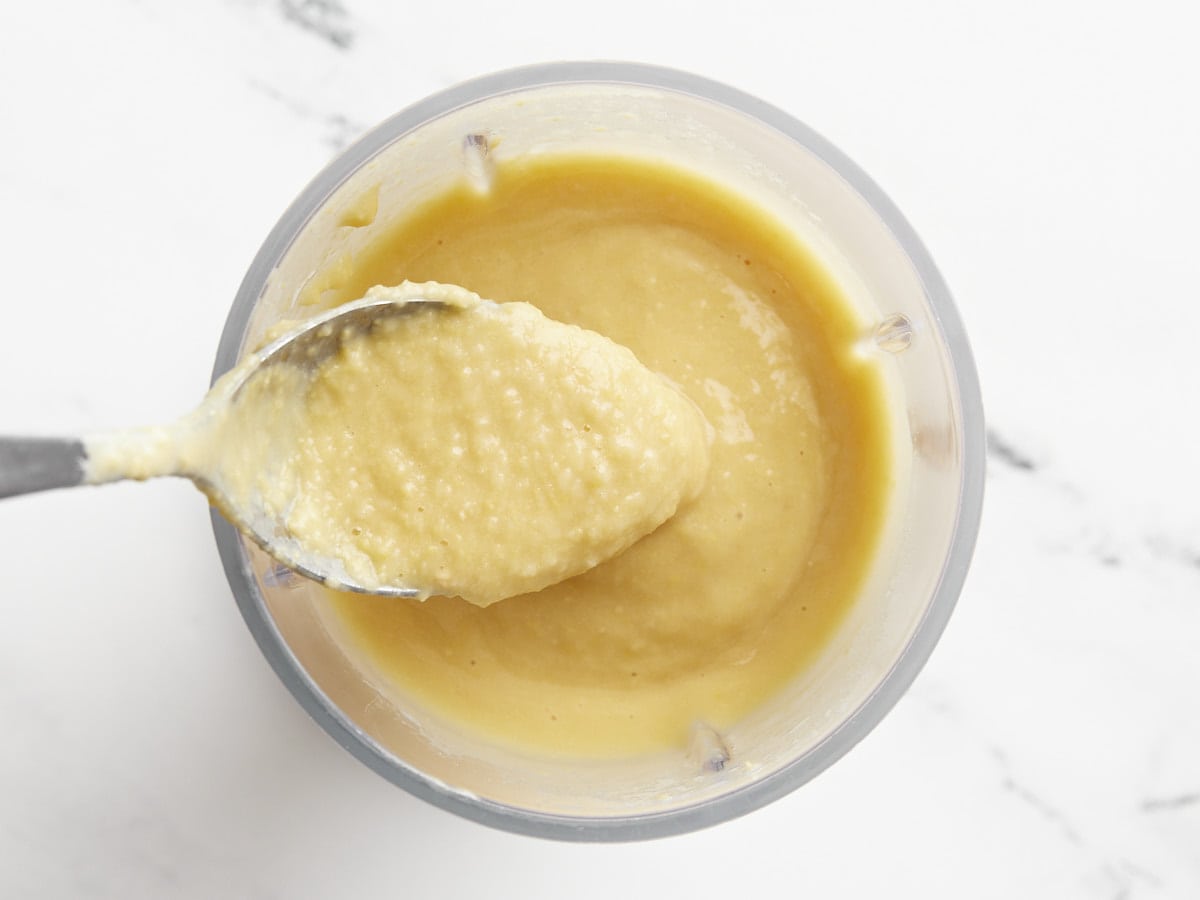
Add 2 of the cans of chickpeas to a blender with the liquid in the can and purée until smooth.* Drain the third can of chickpeas and set aside.
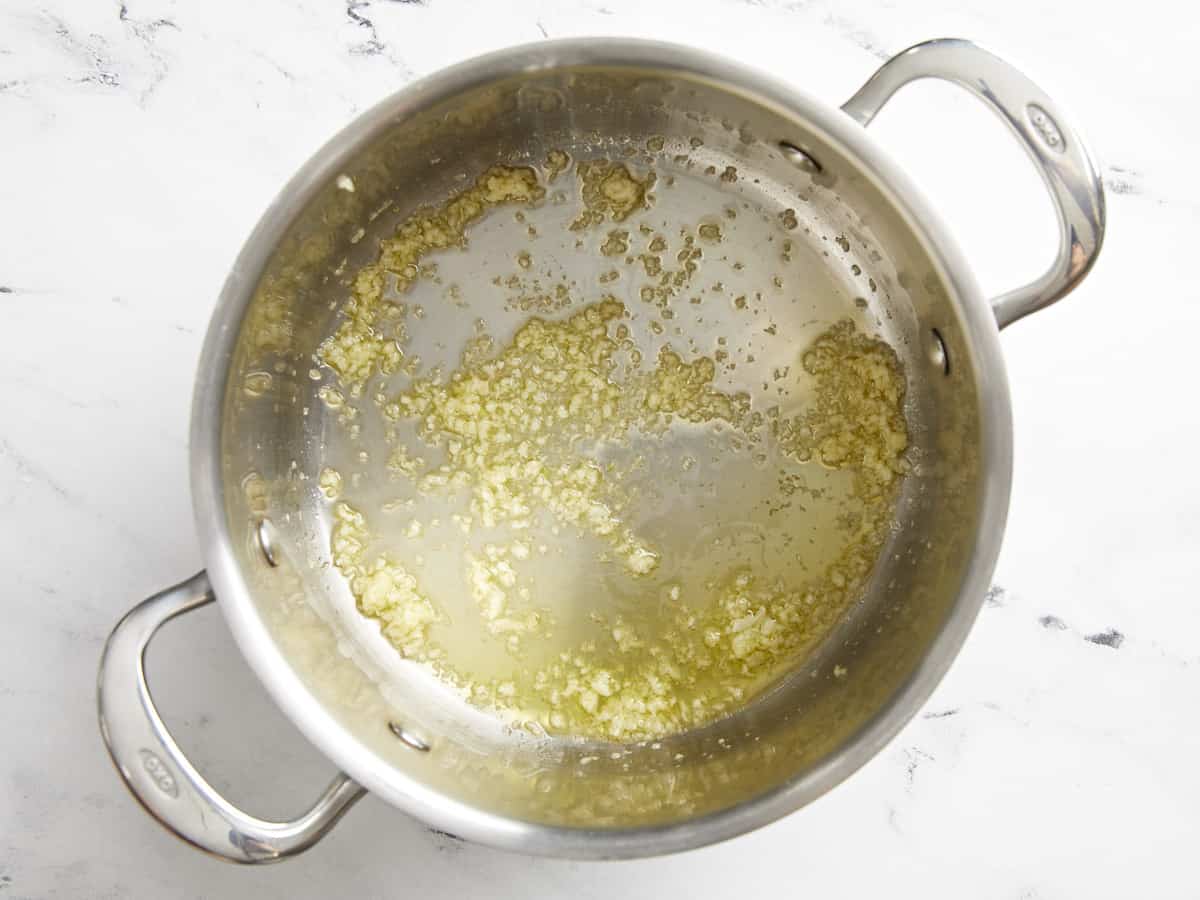
Mince the garlic and add it to a saucepot with the olive oil. Sauté the garlic over medium heat for about one minute, or just until the garlic becomes very fragrant.
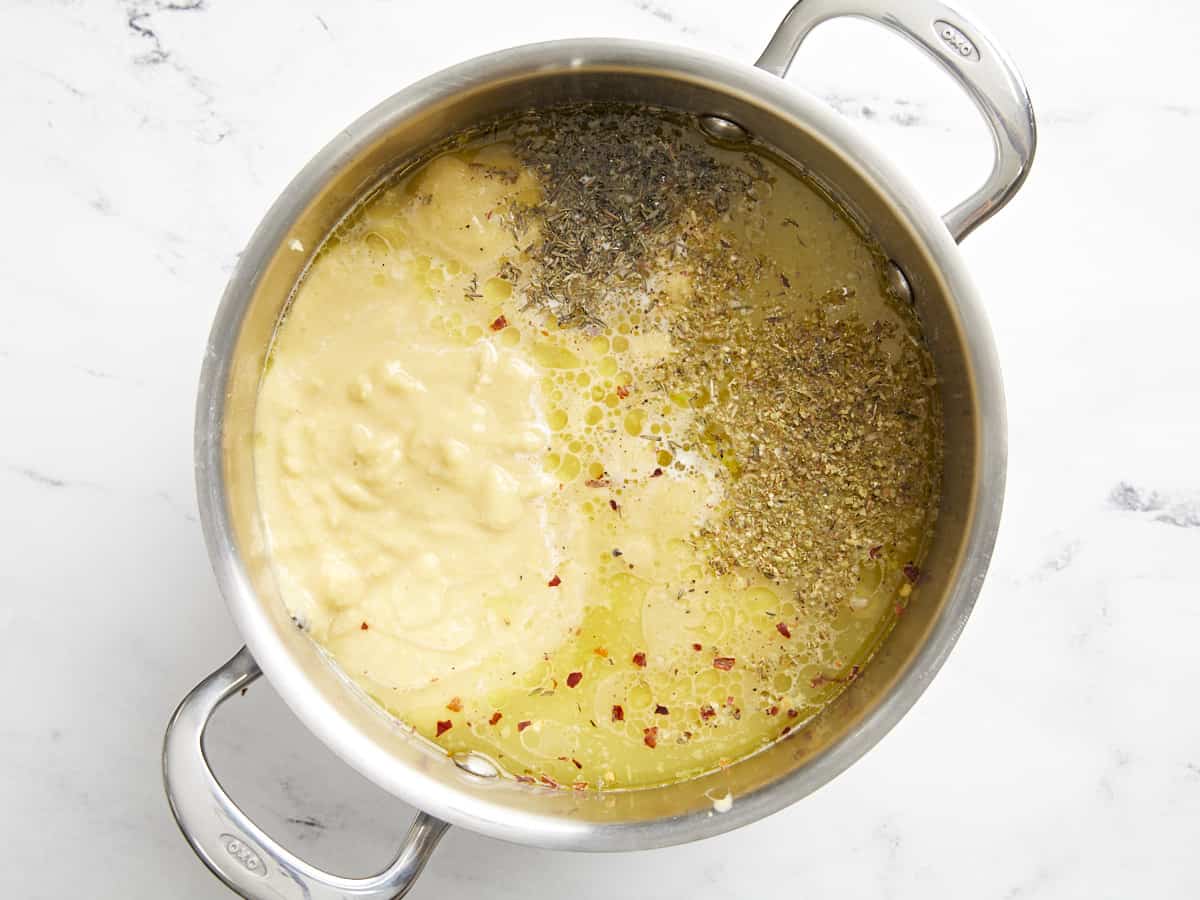
Add the puréed chickpeas, drained chickpeas, chicken broth, thyme, oregano, red pepper, salt, and pepper to the soup pot with the garlic. Stir to combine.
Allow the soup to come up to a simmer, then simmer for 10 minutes, stirring occasionally.
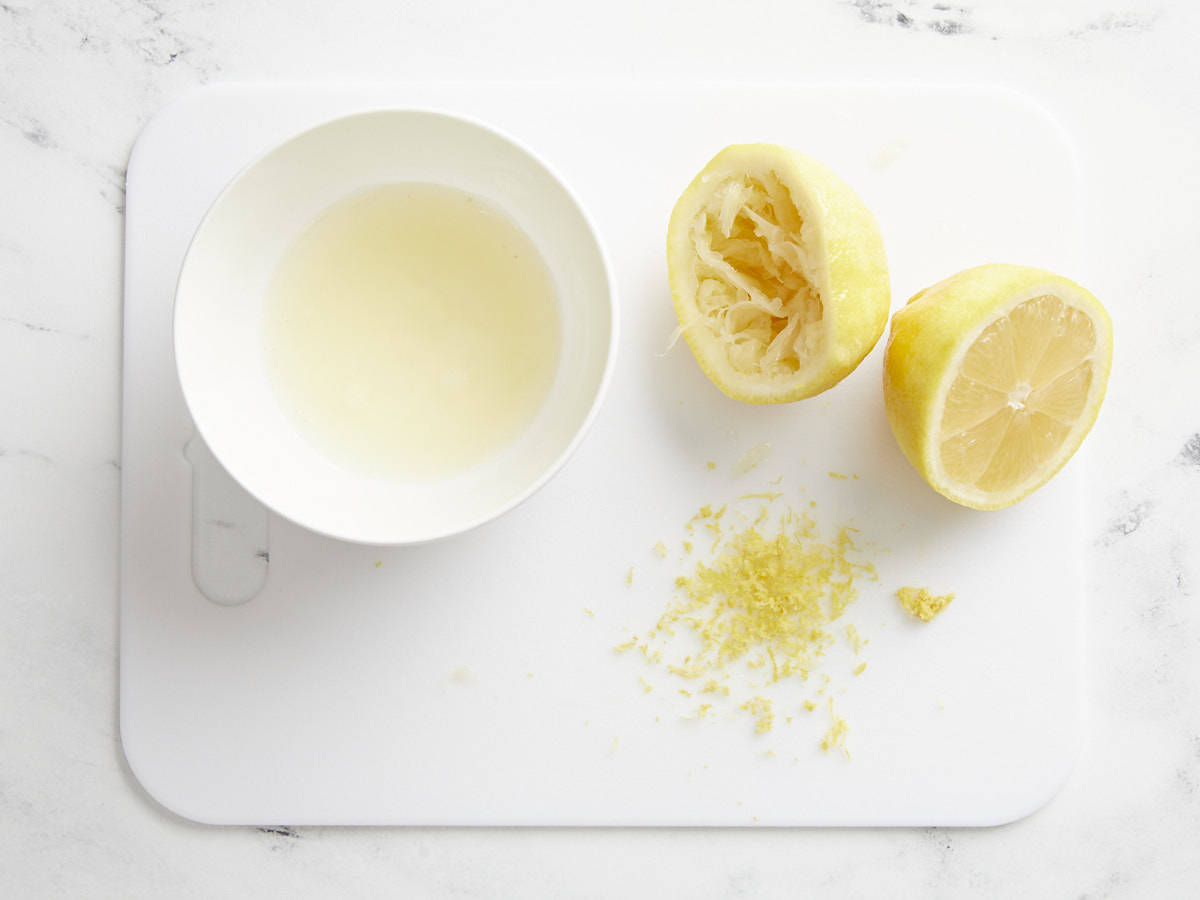
While the soup simmers, zest and juice half of the lemon (you'll need about 2 Tbsp juice and ½ tsp zest). Slice the remaining lemon for garnish.
After the soup has simmered, add 2 Tbsp juice and a pinch of lemon zest, then stir to combine.
Taste the soup and adjust the salt, lemon juice, pepper, or other herbs to your liking. The amount of salt needed to properly flavor the soup will depend on the salt content of your broth, so make sure to salt to taste at the end.
Garnish the soup with the remaining lemon slices and zest, a drizzle of olive oil, and more pepper if desired, then serve with crusty bread and enjoy!
*Some brands of canned chickpeas are quite firm. To make the soup really smooth you may need to pre-simmer the beans for about 10 minutes to make them softer before blending.
How to Make Lemony Chickpea Soup – Step by Step Photos
Add two 15oz. cans of chickpeas to a blender, with the liquid in the can, and purée until smooth. If the brand of chickpeas you’re using are extra firm, you may want to simmer the chickpeas in the liquid for about 10 minutes before blending to soften them more. Let the simmered chickpeas cool slightly before blending, as blending hot liquids can be dangerous.
Mince four cloves of garlic (or more, if you’d like!) and add them to a saucepot with 2 Tbsp olive oil. Sauté the minced garlic over medium heat for about one minute, or just until the garlic becomes very fragrant.
Add the puréed beans, one can of drained chickpeas, 2 cups of chicken broth, ½ tsp dried thyme, ½ tsp dried oregano, 1 pinch of crushed red pepper, ¼ tsp salt, and ¼ tsp pepper to the pot. Stir to combine and bring the soup up to a simmer over medium heat.
Let the soup simmer for about 10 minutes, stirring occasionally. Meanwhile, zest and juice half of a lemon (you’ll need 2 Tbsp juice and about ½ tsp zest). Slice the other half of the lemon to use as a garnish.
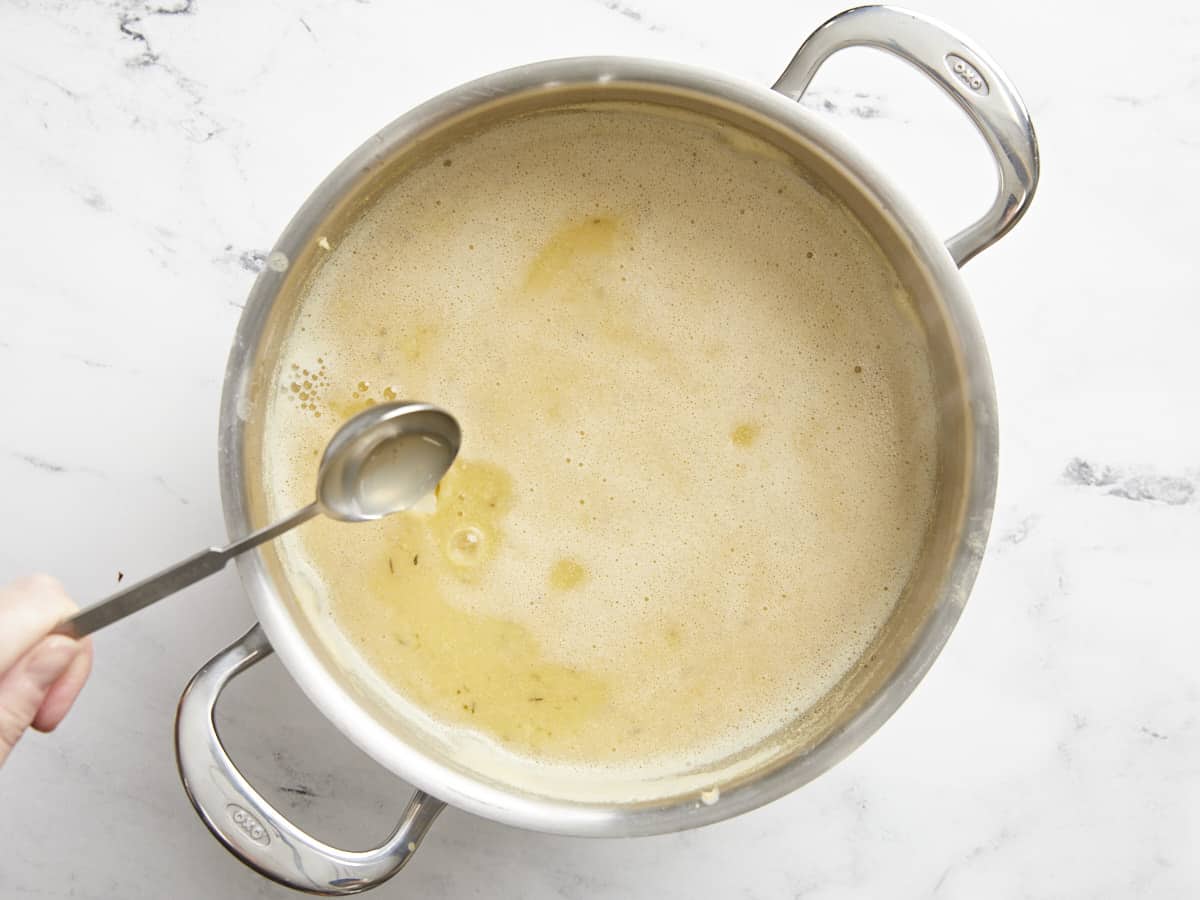
After the soup has simmered for about 10 minutes, add 2 Tbsp lemon juice to the soup along with a pinch of lemon zest.
Taste the soup and adjust the salt, lemon juice, zest, or other herbs to your liking. The amount of salt needed will depend on the salt content of the broth used and it can really help the flavors pop, so make sure to salt to taste at the end.
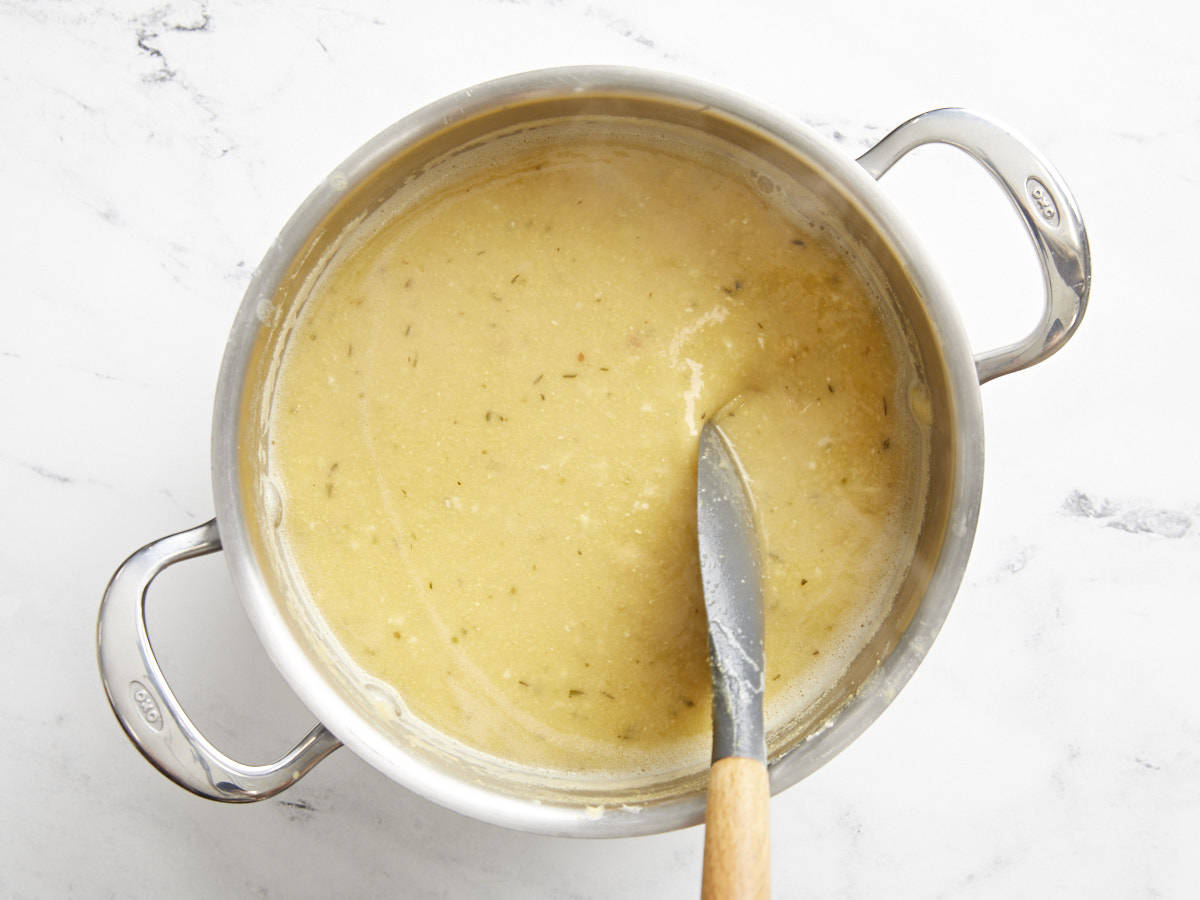
Garnish the soup with the remaining slices of lemon and lemon zest, extra pepper, and a drizzle of olive oil. We also had some parsley in the fridge, so we added some of that for color.
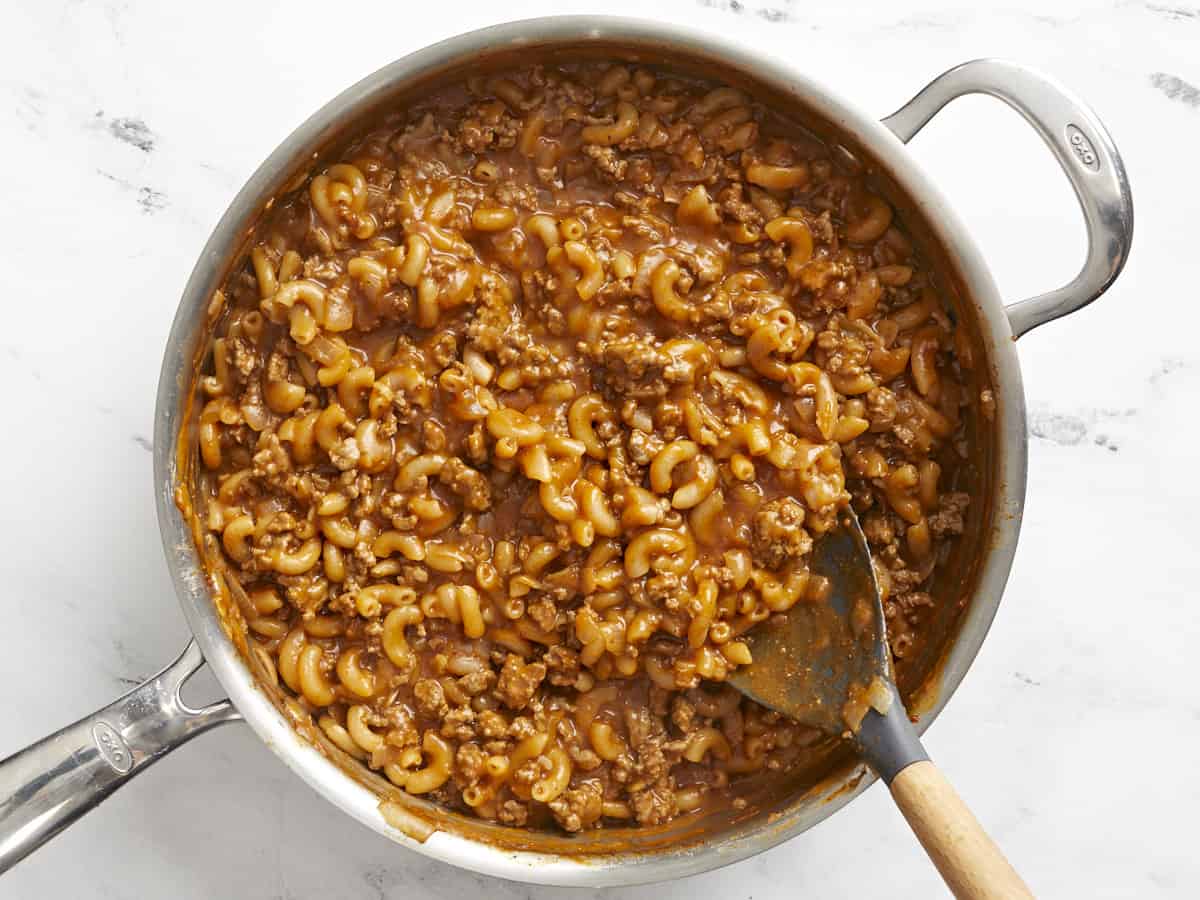
So you grew up on Hamburger Helper, but now you’re an adult and have a more ✨refined✨ palate (read: sarcasm). Well, this One Pot Chili Mac recipe is your grown-up “I actually know how to cook now” substitute! And don’t worry, it’s almost just as easy as the boxed mix. Promise. It’s rich, hearty, cheesy, beefy comfort food pasta all cooked in one easy-to-clean pot. WIN!
What Is Chili Mac?
Chili Mac is simply macaroni noodles drenched in a rich tomato-based meat sauce, seasoned with chili spices, and with plenty of creamy cheddar cheese melted in. Some recipes also include beans, but I’m going for more of a Hamburger Helper dupe with mine, so I went sans beans. And you might be thinking, “I call that Goulash in my house.” While Chili Mac is similar to American Goulash in that they both contain macaroni noodles and a tomato-based meat sauce, they differ in their seasonings and flavor profiles.
Ingredients for Chili Mac
Here’s what you’ll need to make your own homemade chili mac:
Onion and Garlic: The delicious meat sauce starts with onions and garlic sautéed in olive oil to give the beef plenty of flavor.
Ground Beef: Ground beef makes this dish super hearty and delicious, while still being quick and easy to make. Opt for 85 or 90% lean ground beef to avoid having to drain the fat from the pan.
Flour: A little flour cooked into the sauce helps thicken it up into a delicious gravy-like consistency.
Spices: A mix of spices are added to the sauce for maximum flavor, including chili powder, smoked paprika, garlic powder, and oregano.
Tomato Sauce: Tomato sauce gives the sauce a tangy tomato flavor and adds to the chili flavor profile.
Beef Broth: Beef broth adds tons of flavor to this dish and enough salt to keep everything properly seasoned. If using a low-sodium broth, you may need to add a little salt at the end to taste to really help the flavors pop. We used Better Than Bouillon to make our beef broth for maximum flavor.
Macaroni: Macaroni noodles are an inexpensive and filling ingredient that helps stretch the cost of the beef and keep the entire recipe budget-friendly.
Cheddar Cheese: Cheddar cheese is stirred into the sauce and added on top of the noodles for extra cheesy flavor!
What Else Can I Add?
If you want to take your chili mac to the next level, try adding one or more of these ingredients:
As with any pasta dish, the macaroni will continue to get softer as it absorbs moisture from the sauce, so if softer pasta is not tolerable to you, you may not enjoy the leftovers. That being said, I will gobble up these leftovers without a second thought and love making this Chili Mac for meal prep and even to stock my freezer. I simply refrigerate single-serving portions for up to five days or freeze for up to three months. Let frozen portions thaw in the refrigerator overnight, then reheat using the microwave.
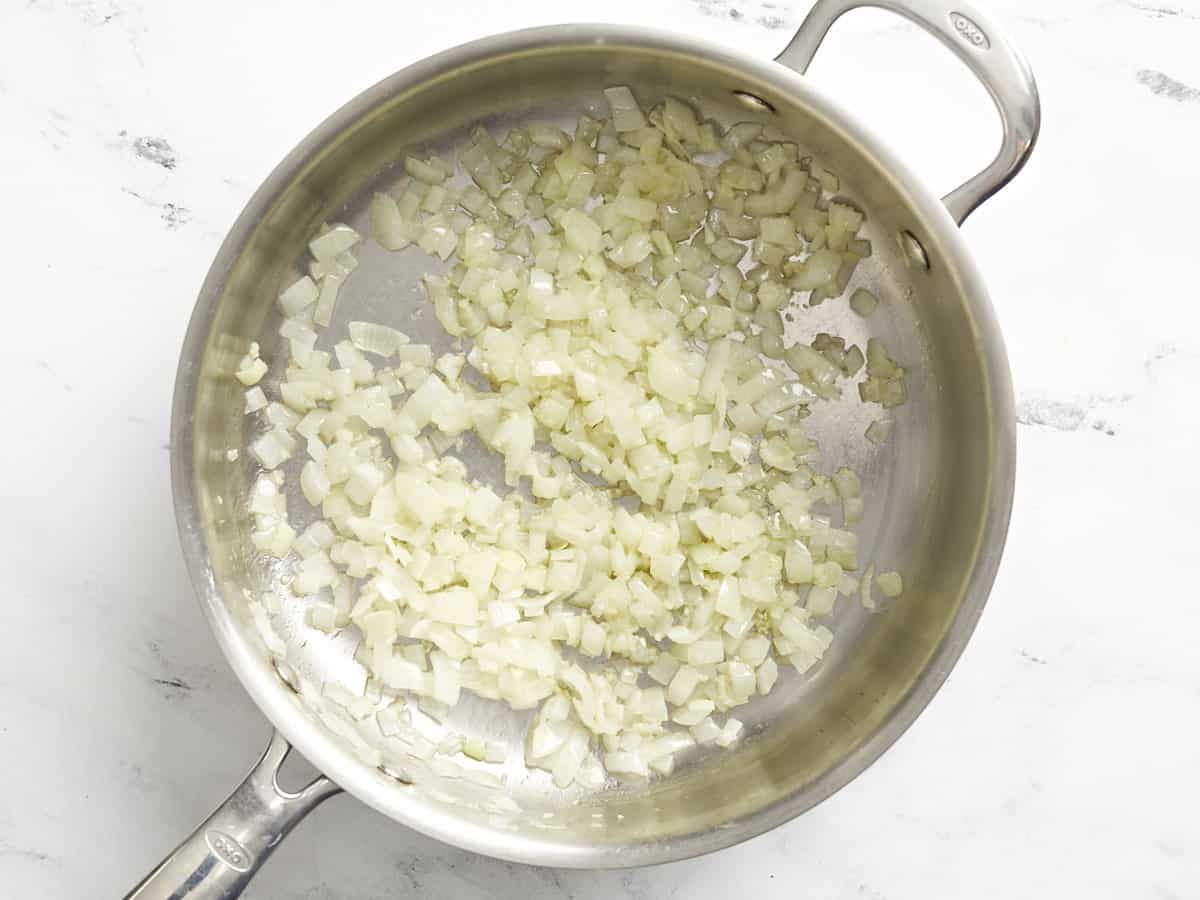
Dice the yellow onion and mince the garlic. Add the onion and garlic to a large deep skillet or Dutch oven with the olive oil and sauté over medium heat until the onions are soft and translucent (about 5 minutes).
Add the ground beef to the skillet and continue to stir and cook until the beef is cooked through. If using a higher fat content ground beef, you may want to drain off the excess fat at this point.
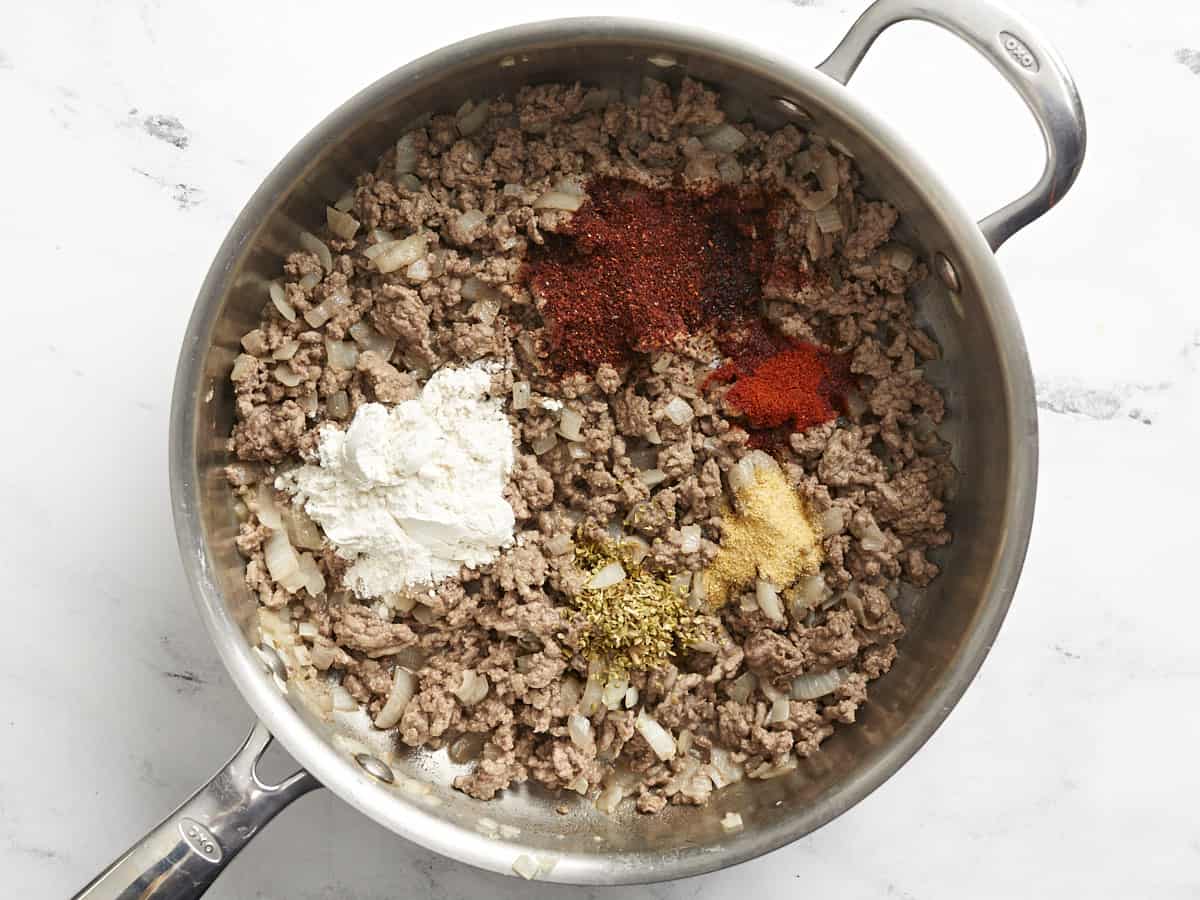
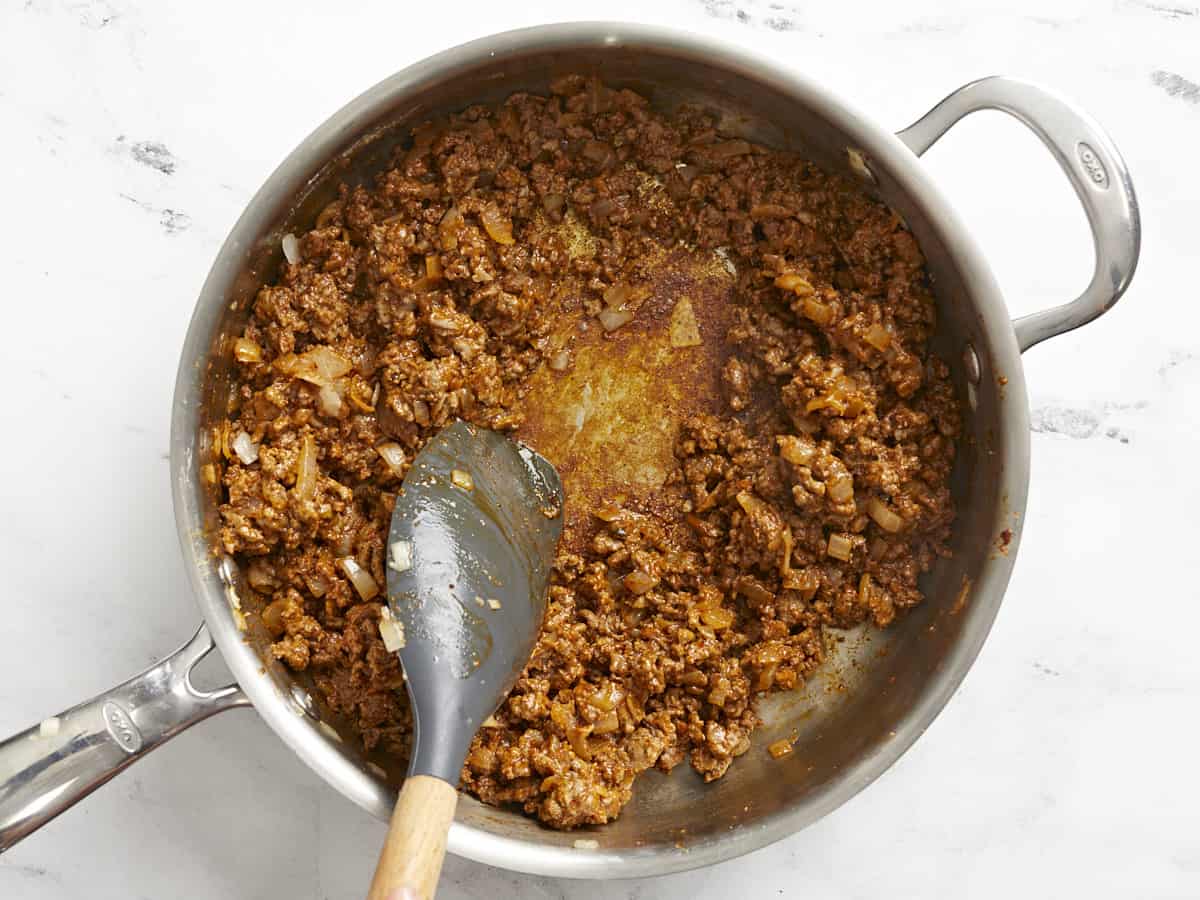
Add the flour, chili powder, smoked paprika, garlic powder, and oregano to the skillet with the beef and onions. Continue to cook and stir for about two minutes, allowing the flour and spices to coat the bottom of the skillet, but not burn.
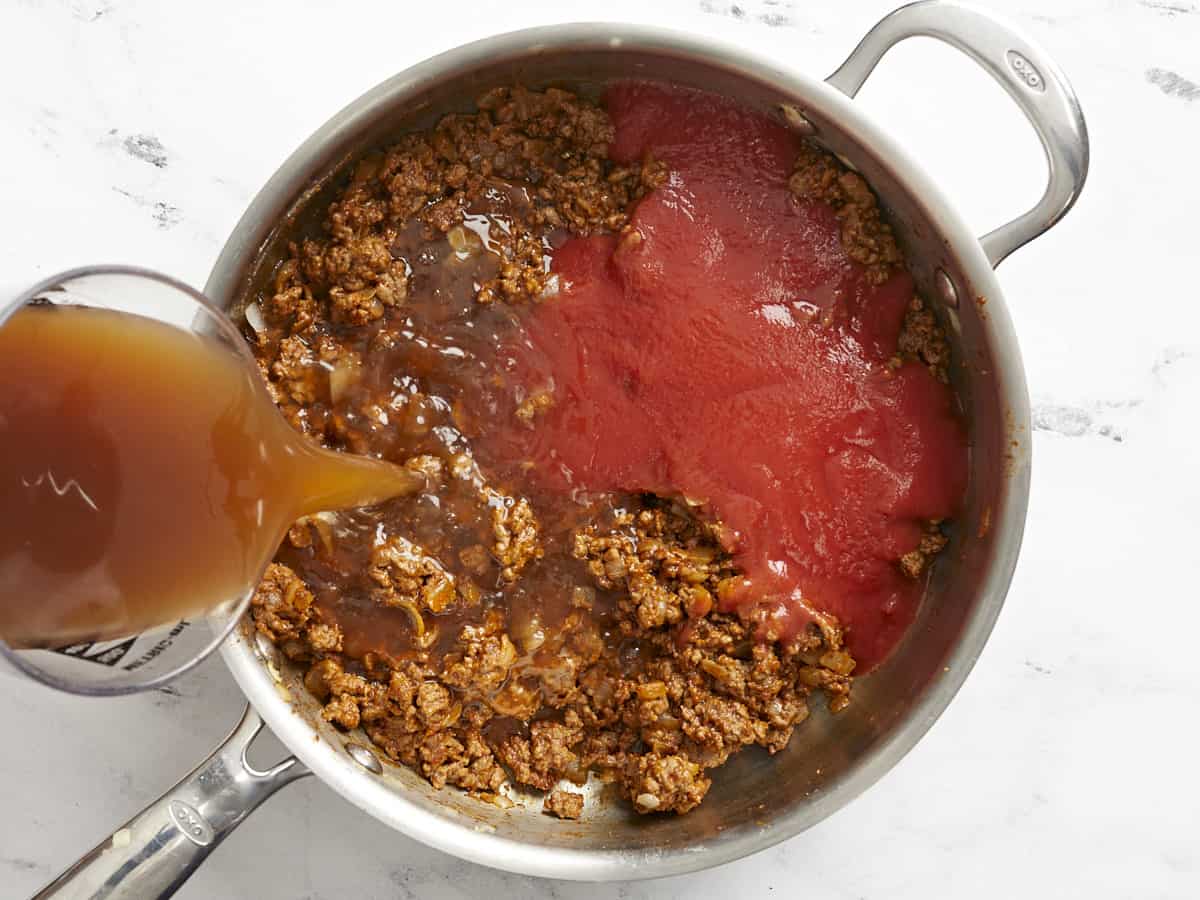
Add the tomato sauce and beef broth to the skillet and stir well to combine, making sure to scrape and dissolve any browned bits off the bottom of the skillet.
Add the uncooked macaroni and stir to combine. Place a lid on the skillet and turn the heat up to medium-high. Allow the broth to come up to a full boil. Once boiling, give the pasta a quick stir to loosen any that is stuck to the bottom, turn the heat down to medium-low, and place the lid back on top.
Allow the macaroni to simmer, stirring every few minutes and always replacing the lid, until the macaroni is tender and the broth has reduced to a rich red gravy (about 10 minuts).
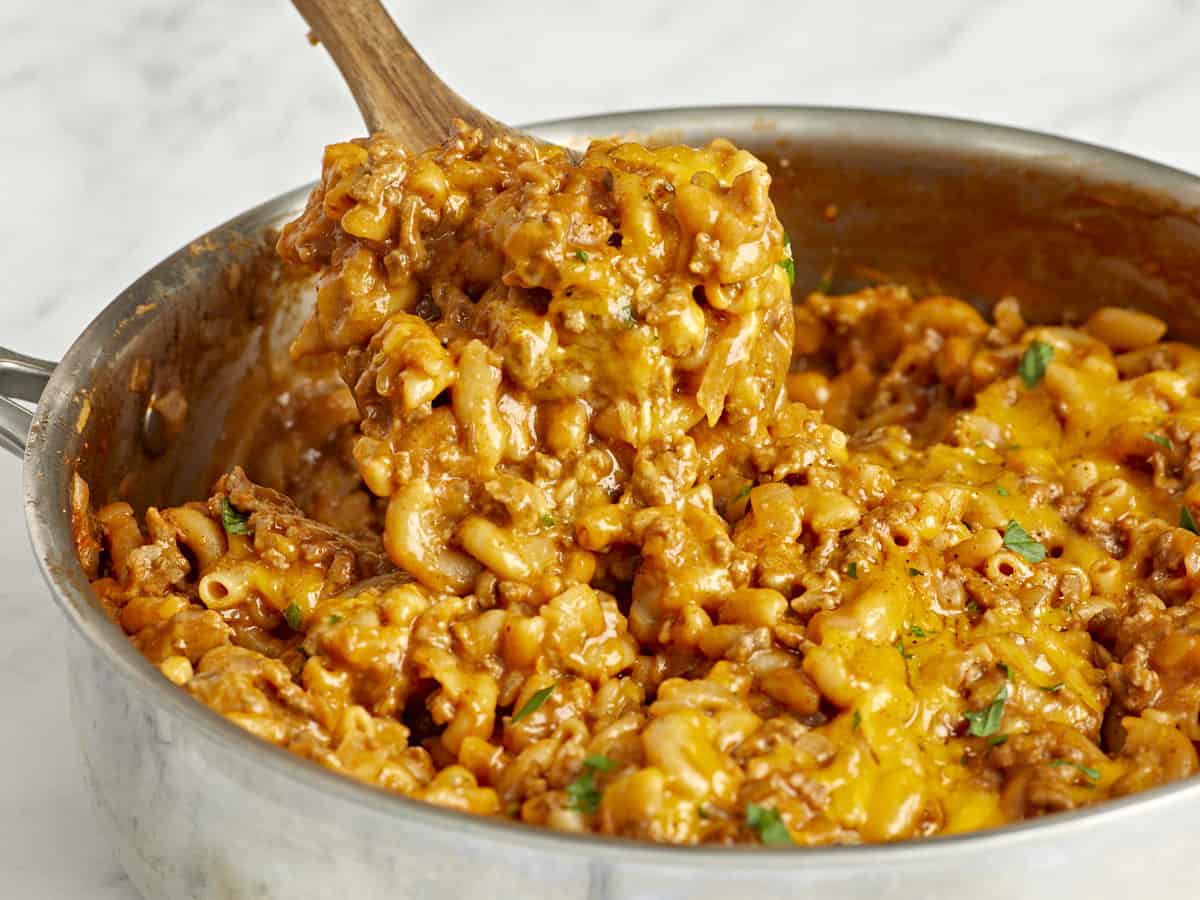
Stir half of the shredded cheese into the sauce until melted, and sprinkle the remainder on top. Place a lid on the pot, turn the heat off, and allow the residual heat to melt the cheese on top. Serve hot and enjoy!
Dice one yellow onion and mince two cloves of garlic. Add the onion and garlic to a large deep skillet or Dutch oven with 1 tablespoon of olive oil and sauté over medium heat until the onions are soft and translucent (about 5 minutes).
Add one pound of ground beef to the skillet and continue to stir and cook until the beef is fully browned. If you’re using a higher fat content beef, drain the excess fat out of the pan. Next, add 2 tablespoons of flour, 1 tablespoon of chili powder, ½ teaspoon of smoked paprika, ½ teaspoon of garlic powder, and ½ teaspoon of dried oregano.
Continue to stir and cook the flour and spices into the beef for about two minutes, allowing it to coat the bottom of the skillet, but not burn.
Add one 8oz. can of tomato sauce and three cups of beef broth to the skillet. Stir well until everything is evenly combined, making sure to scrape and dissolve all of the browned bits off the bottom of the skillet.
Add ½ pound (about 2 cups) of uncooked macaroni to the skillet and stir to combine. Place a lid on the skillet, turn the heat up to medium-high, and allow the broth to come up to a boil. Once boiling, give everything a quick stir to loosen any macaroni from the bottom of the skillet, turn the heat down to medium-low, and place the lid back on top.
Let the macaroni simmer in the broth, stirring every few minutes or so and always placing the lid back on top, until the macaroni is tender and the broth has reduced to a saucy red gravy (about 10 minutes).
Add ½ cup of shredded cheddar cheese to the chili mac and stir it into the sauce until melted.
Sprinkle the remaining ½ cup of shredded cheese on top. Place a lid on the skillet and turn the heat off. Let the residual heat melt the cheese, then serve. You can garnish with chopped cilantro or sliced green onions, if desired.
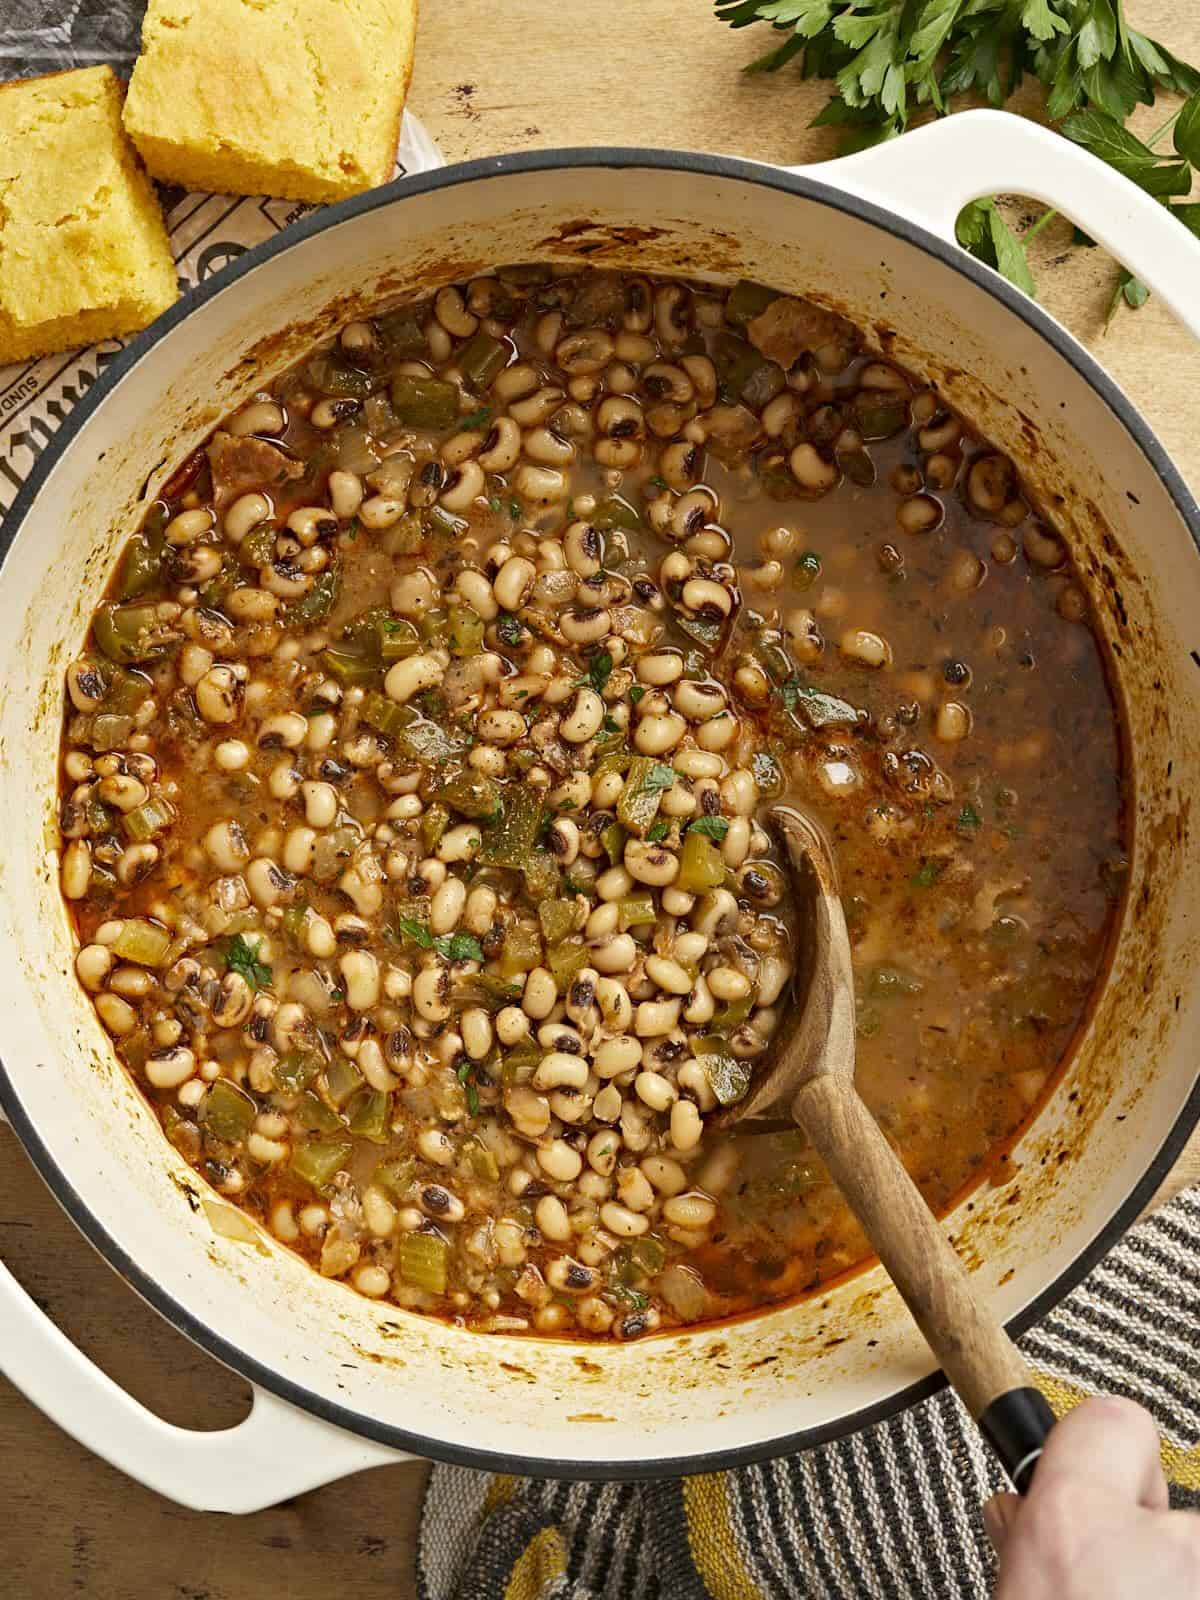
It may be tradition to eat black-eyed peas on New Year’s Day, but I’m here to say that you need to be making these delicious and budget-friendly beans year-round! This big ol’ pot of peas is hearty, delicious, freezer-friendly, and about as budget-friendly as it gets. So try them out this New Year’s Day and then add them to your regular rotation for the coming year. Your wallet and taste buds will thank you. ;)
What Are Black-Eyed Peas?
Black-eyed peas are a small white legume with a black dot, or “eye”, in the center. They’re traditionally served on New Year’s Day in the United States alongside collard greens (or mustard or turnip greens) to bring wealth in the new year. The black-eyed peas represent coins, while the greens signify paper dollars. Some even believe you must consume 365 black-eyed peas to bring the wealth, so make sure to dish yourself up an extra large bowl!
Ingredients for Black-Eyed Peas
Here’s what you’ll need to make this incredibly delicious pot of black-eyed peas:
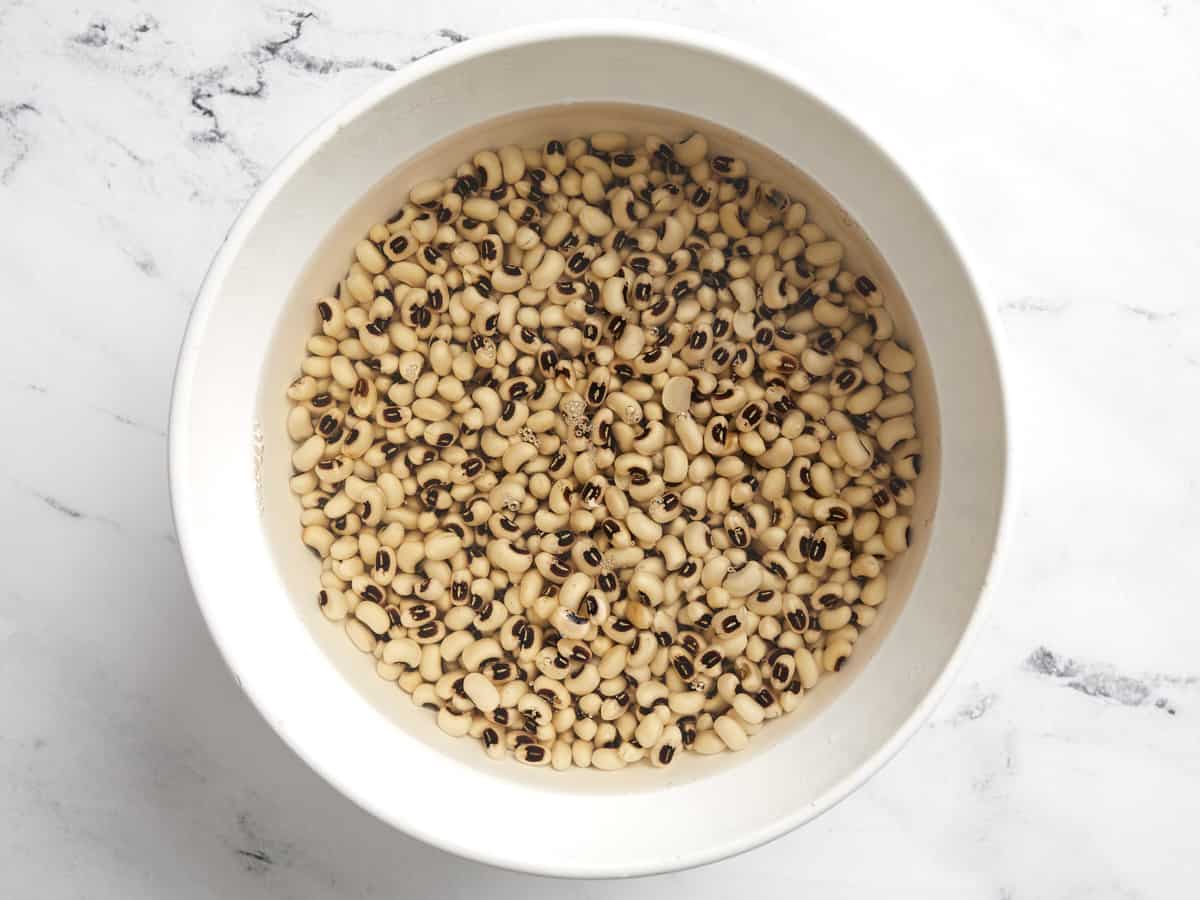
Black-Eyed Peas: You’ll need one pound of dry black-eyed peas. You can find these near the other dry beans in the grocery store, or on a special display if you’re buying near the New Year!
Bacon: Bacon gives the black-eyed peas a deliciously smoky flavor and the fat gives the peas body and a wonderful mouthfeel. You can substitute by adding a ham hock or smoked turkey wing to the peas before simmering and using a bit of oil to sauté the vegetables in the beginning.
Vegetables: The black-eyed peas are flavored with a medley of vegetables like onion, garlic, bell pepper, and celery. The vegetables add flavor, color, and texture to the dish.
Spices: The pot of peas is seasoned with a savory mix of smoked paprika, oregano, thyme, cayenne pepper, and black pepper.
Chicken Broth: The black-eyed peas cook in chicken broth for maximum flavor. Make sure to use a good broth to ensure the peas are very flavorful. We like to use Better Than Bouillon because it’s cost-effective and has great flavor
Salt: As with any bean, it’s very important to add salt to taste at the end of cooking. Salt doesn’t just make food “salty” but it amplifies all of the flavors so you can taste each and every ingredient.
Recipe Variations
Vegetarian or Vegan: To make these black-eyed peas vegetarian, simply skip the bacon and use a few tablespoons of coconut oil to sauté the vegetables. The coconut oil has a similar mouthfeel to pork fat, making the peas extra hearty. You’ll also want to increase the smoked paprika slightly to make up for the smokiness of the bacon and swap vegetable broth for chicken broth.
Slow Cooker: To make black-eyed peas in the slow cooker, simply add all of the ingredients (including the pre-soaked peas) to a slow cooker and cook on high for about four hours, or until the peas are tender.
Canned Black-Eyed Peas: If you’re in a rush or forgot to soak your peas, canned black-eyed peas are a great shortcut. Simply follow our recipe for Quickie Black-Eyed Peas with Greens.
The Quick Soak Method
If you don’t have time to soak your beans overnight (or you just forgot), you can use the quick soak method to get the beans ready for cooking in about an hour. Here’s how to quick soak beans:
Rinse the beans with cold water, then add them to a large pot. Add enough fresh water to cover the beans by 2-3 inches.
Place a lid on the pot, turn the heat on to high, and bring the beans up to a boil. Allow the beans to boil for two minutes.
Remove the beans from the heat and let them sit in the hot water, with the lid in place, for one hour.
Rinse the soaked beans and continue to use them in place of the beans soaked overnight.
How to Store Leftover Black-Eyed Peas
This recipe is great for meal prep because the leftovers are amazing. Store the cooked black-eyed peas in the refrigerator for up to five days, or, once they’re chilled, transfer single portions to the freezer for longer storage. They can be kept in the freezer for about three months and easily reheated in the microwave or on the stovetop over medium-low heat, stirring often.
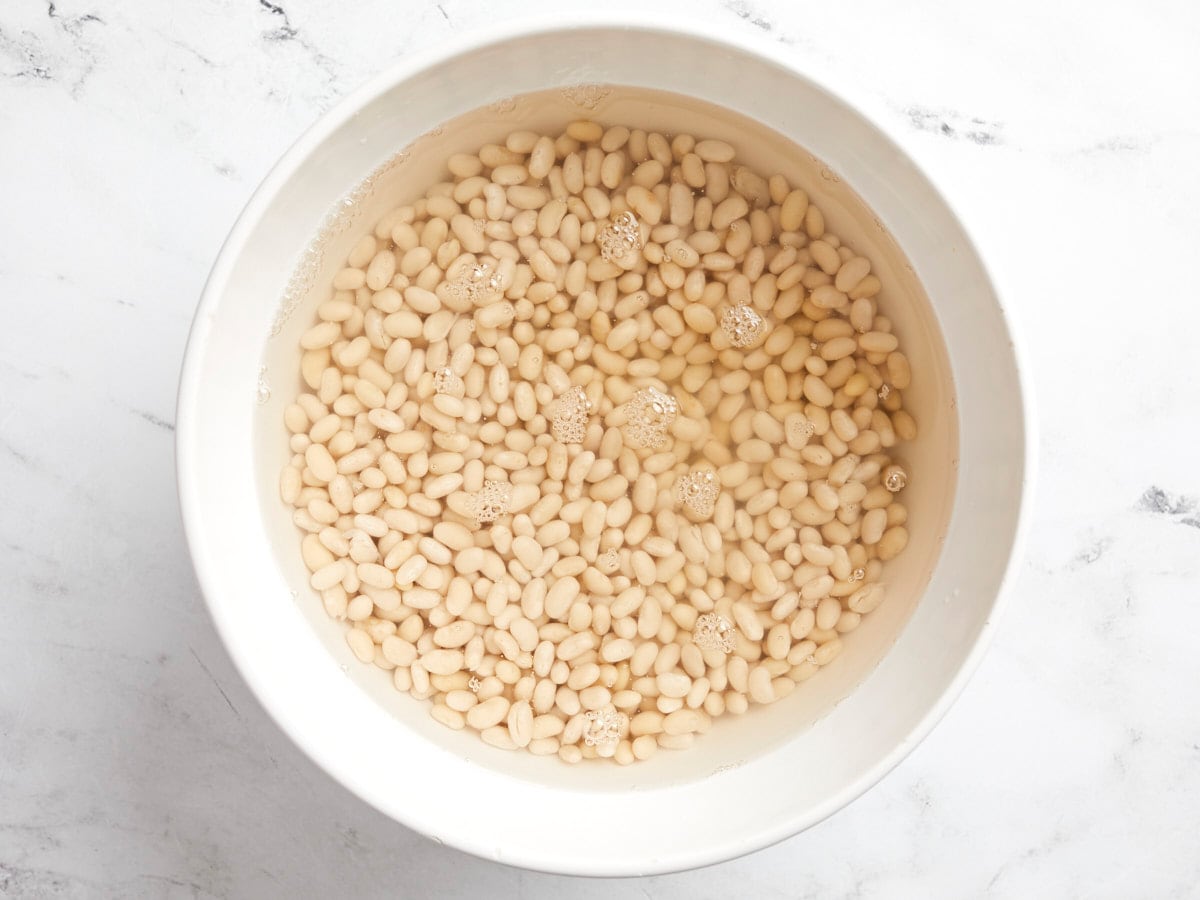
The day before, rinse the peas with cool water then place them in a large bowl and cover with 2-3 inches of cold water. Soak the peas in the refrigerator for eight hours or overnight.
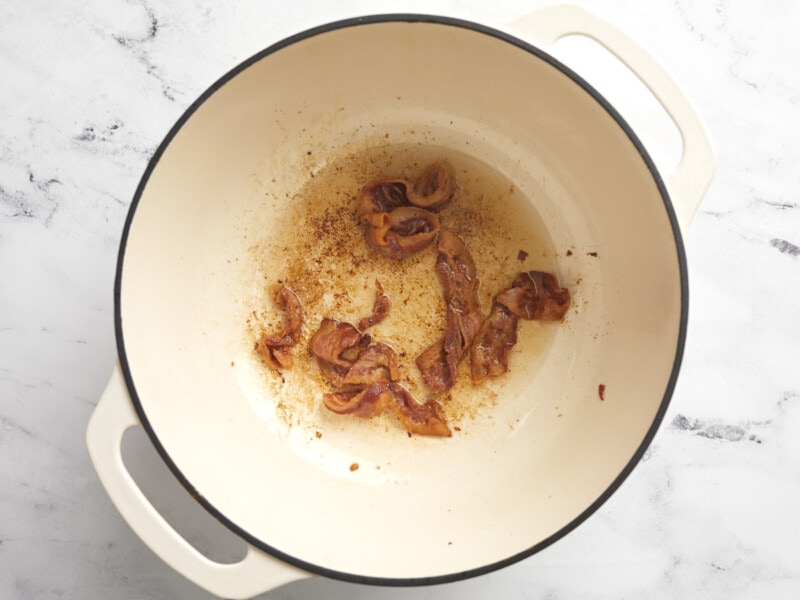
When you're ready to cook the peas, add the bacon to a large pot and cook over medium heat until the bacon is brown and crispy. Remove the bacon, saving it for later, and leave all of the bacon grease in the pot.
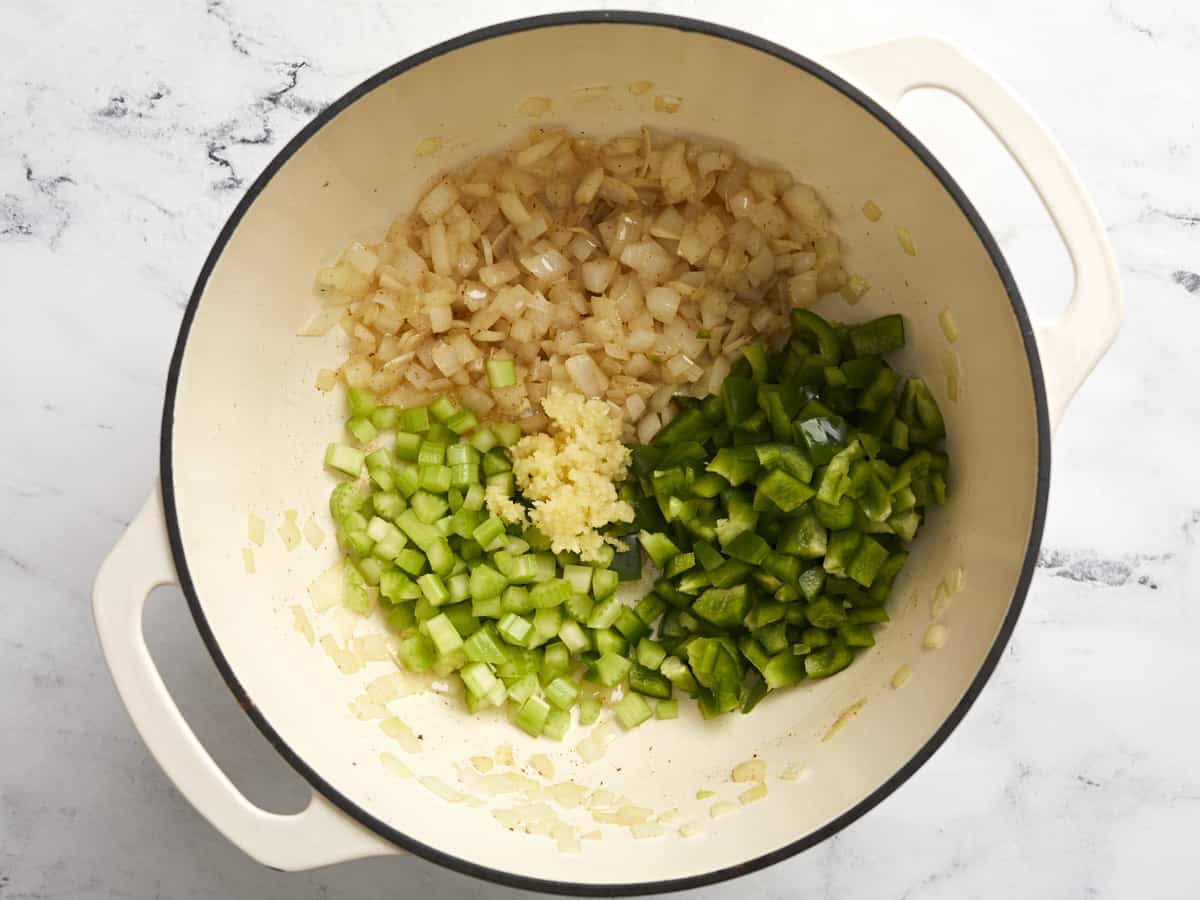
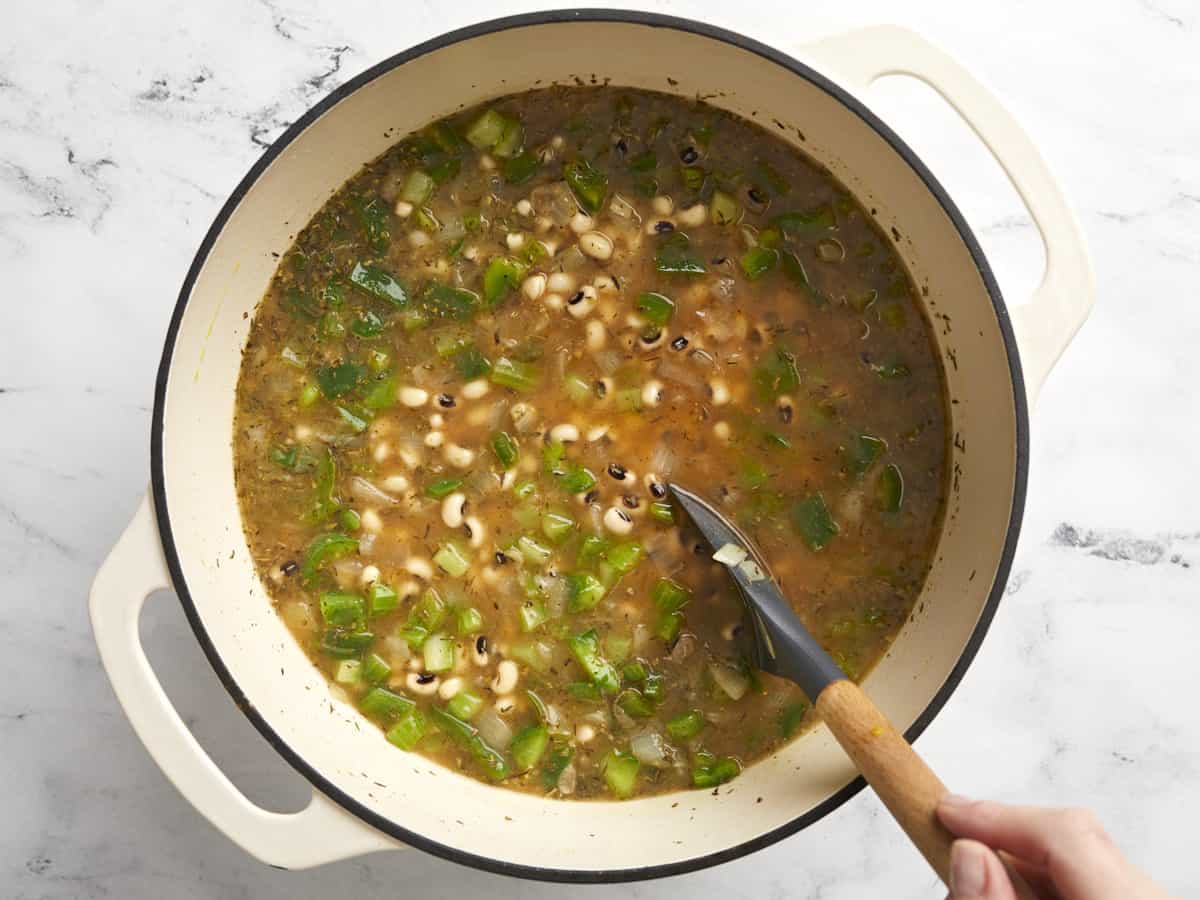
Dice the onion, bell pepper, and celery, and mince the garlic. Add the onion to the pot with the bacon grease and cook over medium until the onion is tender.
Add the bell pepper, celery, and garlic to the pot and continue to cook for about five minutes more.
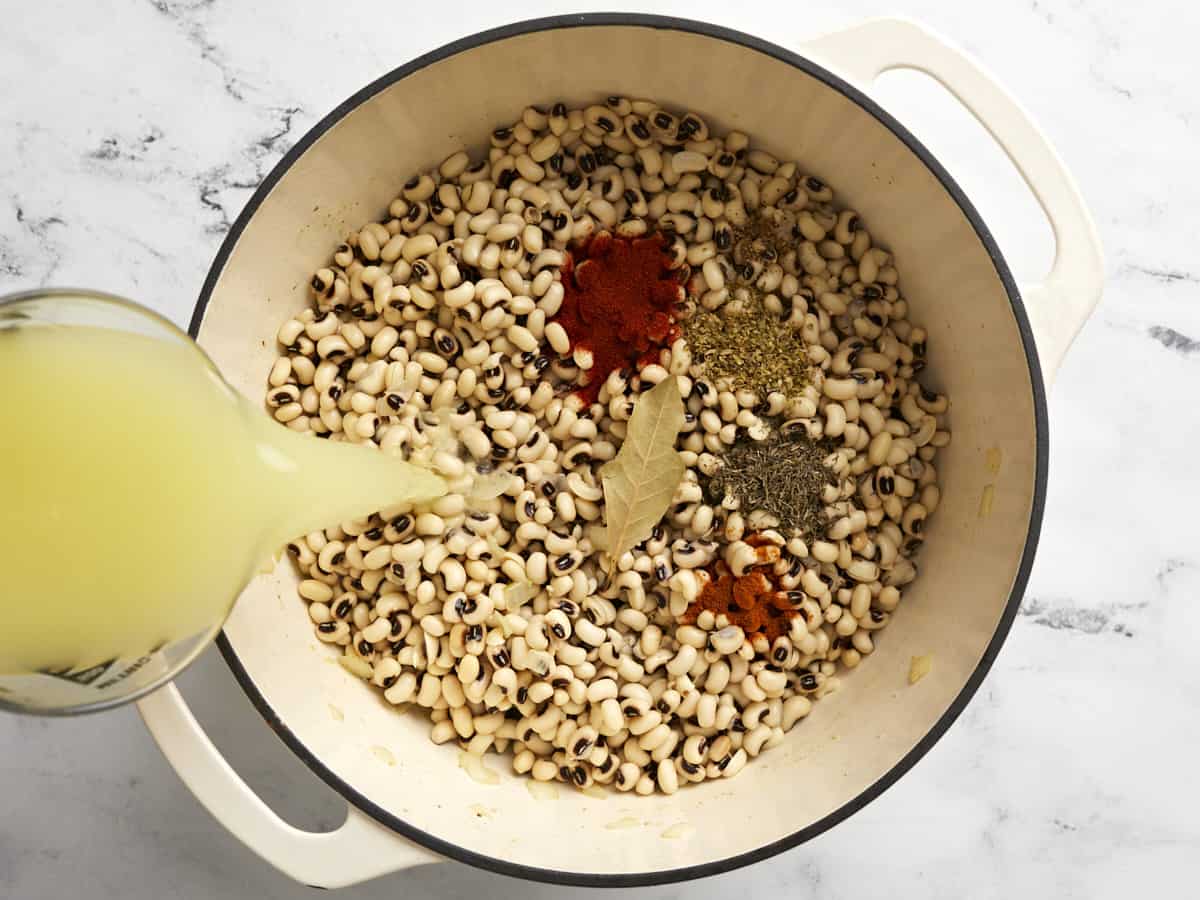
Drain the peas and give them a brief rinse. Add the peas to the pot along with the smoked paprika, oregano, thyme, cayenne pepper, black pepper, bay leaf, and chicken broth. Stir everything to combine, then place a lid on the pot.
Turn the heat up to medium-high and allow the pot to come to a boil. Once it reaches a full boil, turn the heat down to medium-low and let the peas simmer for one hour, stirring occasionally, or until the peas are tender.
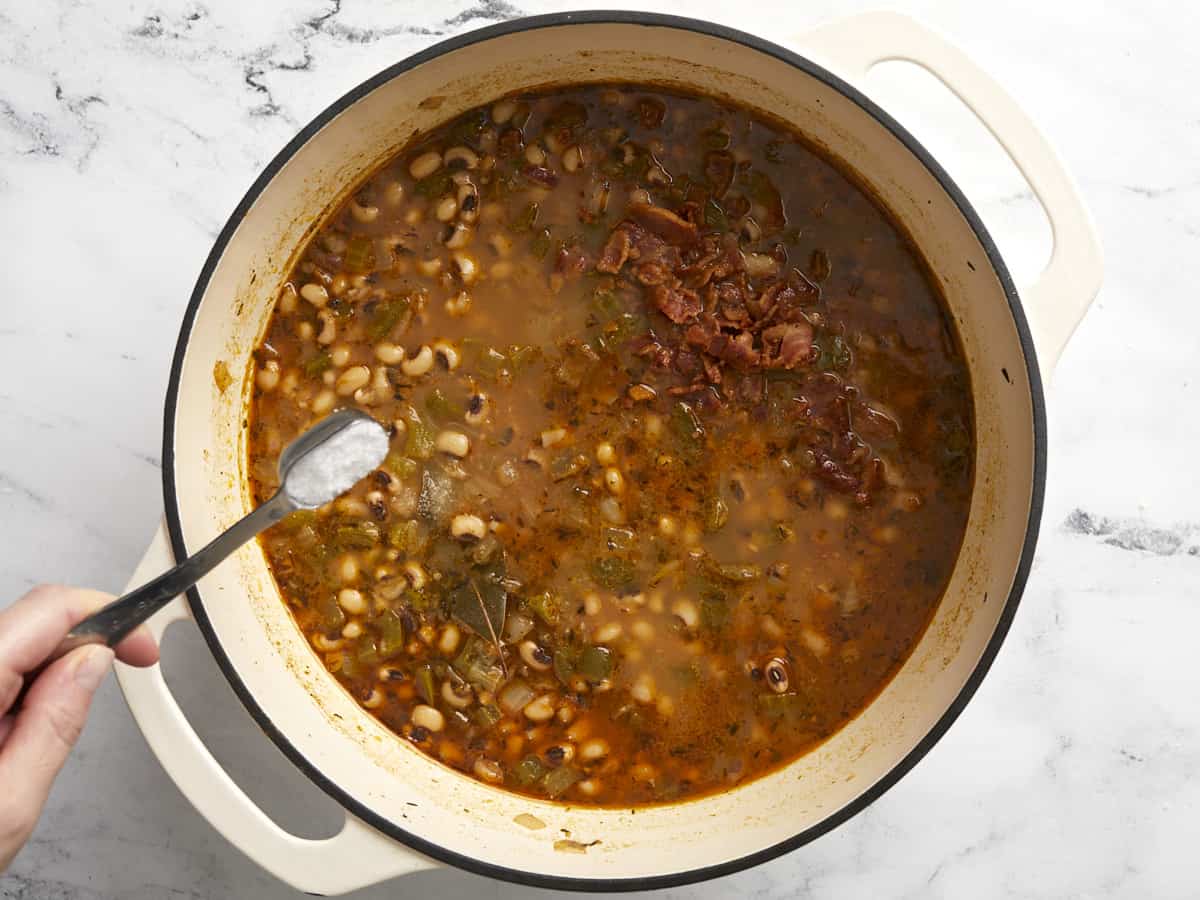
Once the peas have softened, crumble the bacon and stir it back into the pot. Season the peas with salt to taste, starting with ½ tsp and adding more until the flavors of the pot pop.
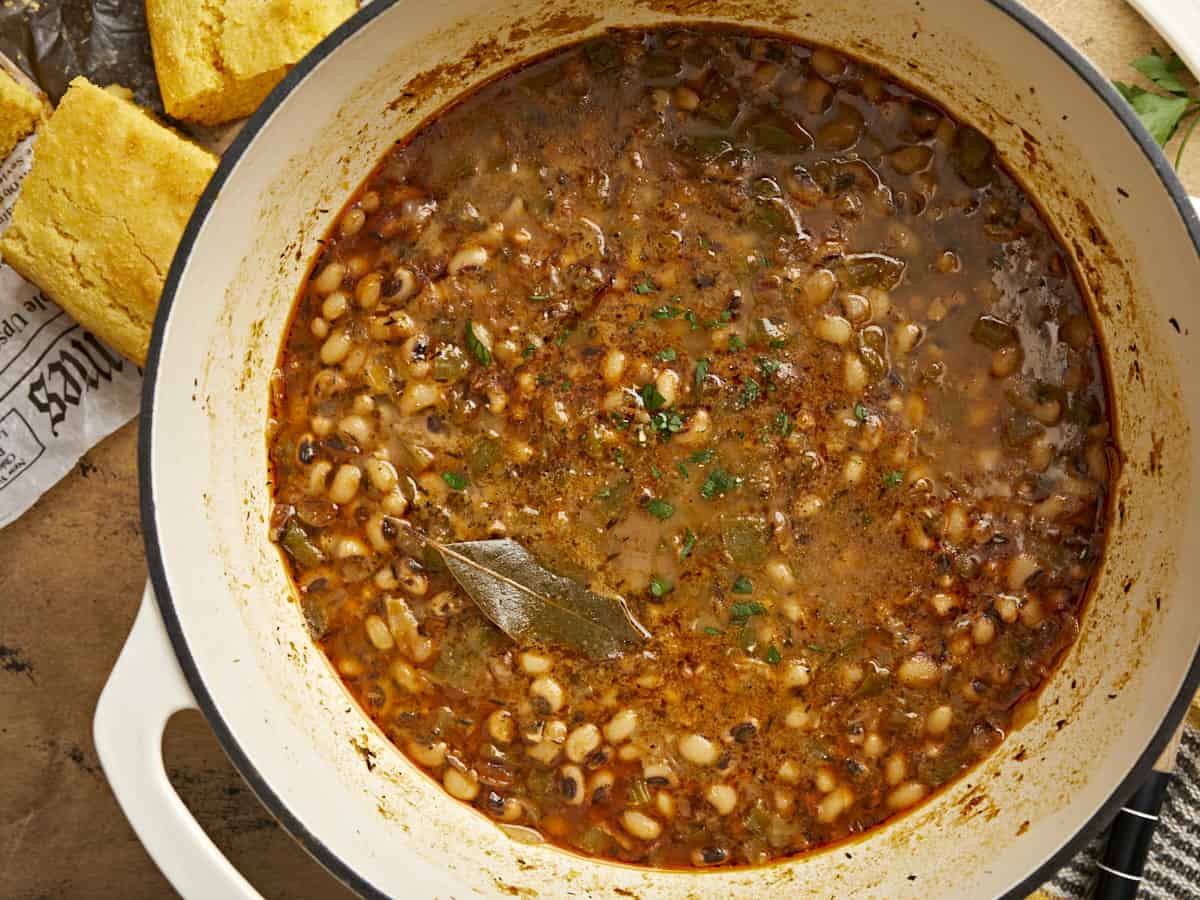
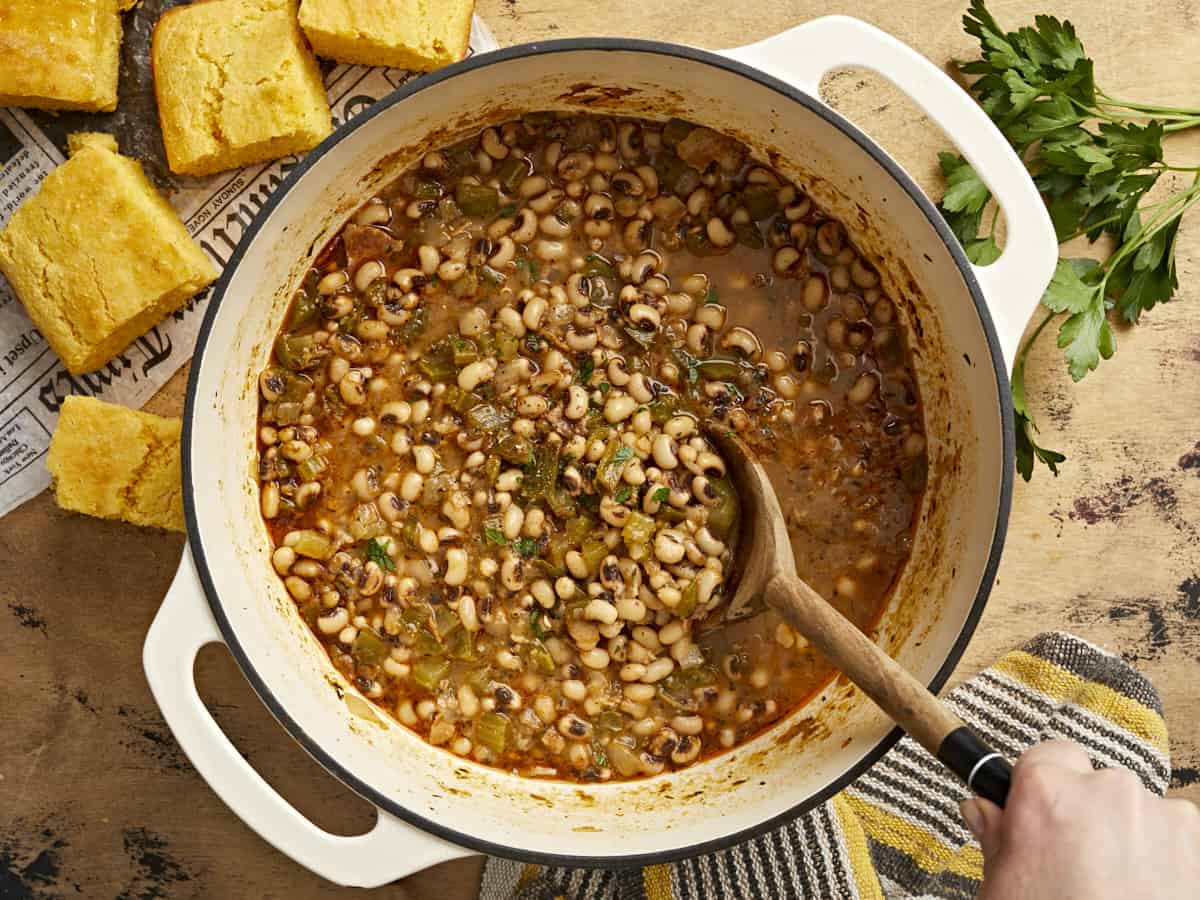
Remove the bay leaf from the pot and serve the peas with a side of collard greens and cornbread, or over a bowl of rice.
The night before, begin soaking the black-eyed peas. Rinse the peas well with cool water, then place them in a large bowl and cover with at least three inches of water. Soak the peas for at least eight hours in the refrigerator.
When you’re ready to cook the peas, add 4oz. bacon to a large pot and cook over medium heat until the bacon is brown and crispy. Remove the bacon and set it aside for later, leaving all of the bacon grease in the pot.
Dice one yellow onion, one green bell pepper, and two stalks of celery. Mince four cloves of garlic. Add the diced onion to the pot with the bacon grease and sauté over medium heat until the onions are soft, then add the bell pepper, celery, and garlic. Continue to sauté for about five minutes more.
Add the drained black-eyed peas to the pot along with 1 teaspoon smoked paprika, 1 teaspoon dried oregano, 1 teaspoon dried thyme, ¼ teaspoon cayenne pepper, ¼ tsp black pepper, one bay leaf, and four cups of chicken broth.
Stir all of the ingredients together, place a lid on the pot, and turn the heat up to medium-high. Allow the pot to come to a boil. Once it reaches a full boil, turn the heat down to medium-low and let the peas simmer, stirring occasionally, for one hour or until the peas are tender.
Once the peas are soft, crumble the bacon and stir it into the pot. Season the pot of peas with salt, starting with ½ teaspoon, and then add more to taste. The total amount needed will vary depending on how much salt is in the chicken broth used, but we used one teaspoon total.
Remove the bay leaf then serve with a side of collard greens and cornbread, or over a bed of rice. Enjoy!
Y’all, I’m on a roll with these simple, cozy, soup recipes! I had one extra ham hock left over from making Split Pea Soup a few weeks ago, so I decided to test a simple Navy Bean Soup recipe. I used dry, uncooked navy beans because they’re more economical than canned beans and you can infuse a lot of flavor into them. Then I just paired the navy beans with some vegetables, a smoked ham hock, and lots of herbs and spices. The results…a hearty, creamy, and absolutely delicious navy bean soup! Trust me, you’ll be blown away by how flavorful this soup is and just how easy it is to make!
INGREDIENTS FOR NAVY BEAN SOUP
Here are the ingredients you’ll need to make this comforting & delicious navy bean soup:
Navy Beans – We start things off with dry, uncooked navy beans. Navy beans are creamy and break down easily in the soup.
Vegetables – A combination of aromatics like onion, celery, carrots, and garlic are sautéed with a little bit of olive oil to add a great base layer of flavor and depth to the soup.
Ham Hock – Ham and beans just go together like peanut butter and jelly!😄 The smoked ham hock we used infused a ton of smoky, salty, flavor into the navy beans! We also tested this recipe with just regular diced ham, but it did not provide the same type of rich flavor as a ham bone. However, smoked turkey wings are a great alternative to use if you don’t want to use ham.
Spices – A combination of dried spices like thyme, oregano, and smoked paprika adds a rich color and wonderful flavor to the soup.
Chicken Broth – Make sure you use a good quality chicken broth as a lot of the soup flavor will come from the broth. We use Better than Bouillon for our broth.
Do I Need To Soak Navy Beans Overnight?
Although it’s not mandatory, we did soak the navy beans overnight to help soften the beans and speed up the cooking process. You could also do a quick soak method if you are pressed for time.
To do the “quick soak method” start by giving the dry beans a quick rinse with cold water in a colander. Remove any stones or debris that you see. Next add the navy beans to a large pot and cover with water. Bring the pot to a boil over high heat. Once boiling, continue to cook, uncovered, for 2 minutes. After 2 minutes, remove the pot from the heat, cover the pot with a lid, and allow the beans to soak in the hot water for 1 hour. Drain and rinse the beans well before cooking!
Storing Leftovers
This navy bean soup recipe makes a big batch, so save the leftovers for lunch the next day or freeze for later. You can store the soup in an airtight container in the refrigerator for up to 4-5 days. Or freeze in freezer-safe containers for up to 3 months.
Start by soaking the dry navy beans overnight. Place the beans in a bowl, cover them with cold water, and place the bowl in the refrigerator. The next day, drain and rinse the beans.
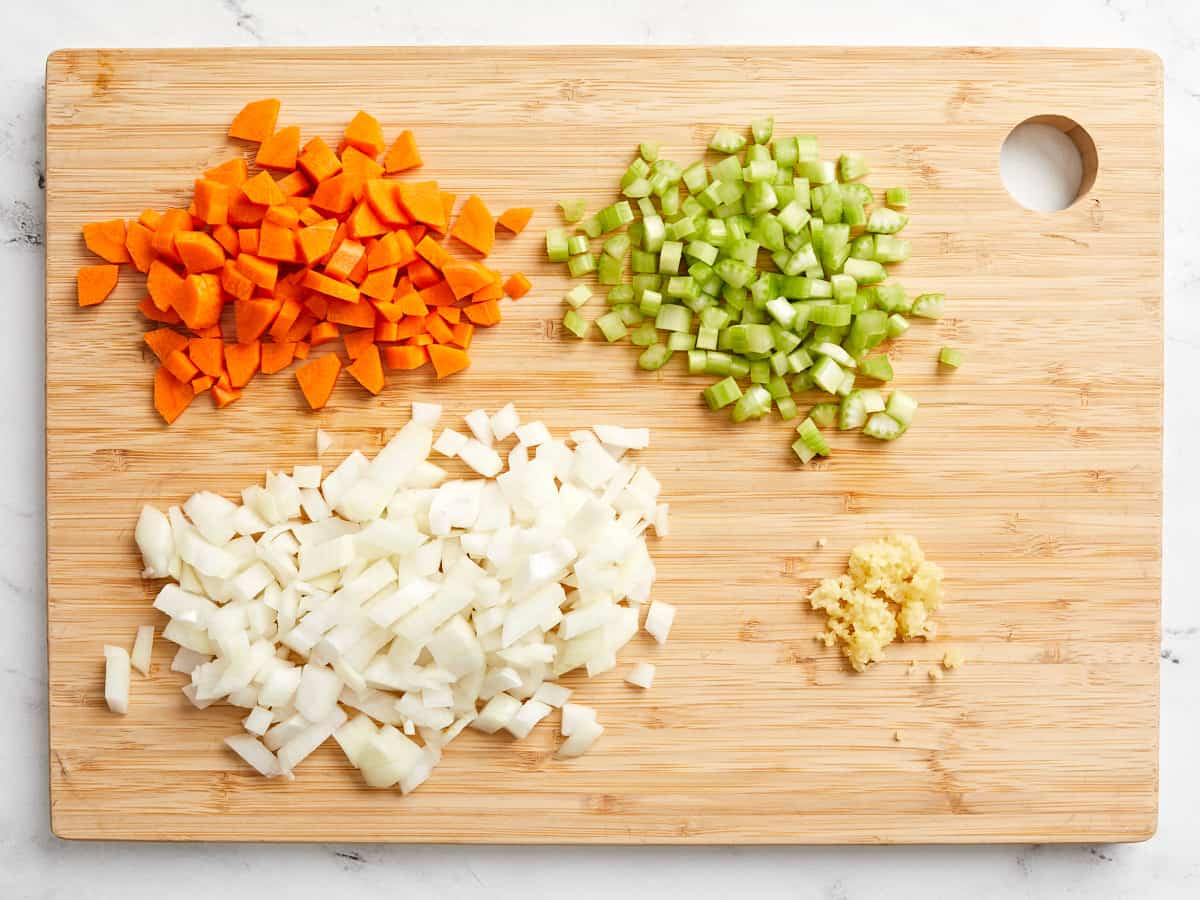
Dice the onion, the carrot, and the celery stalk. Mince the garlic cloves.
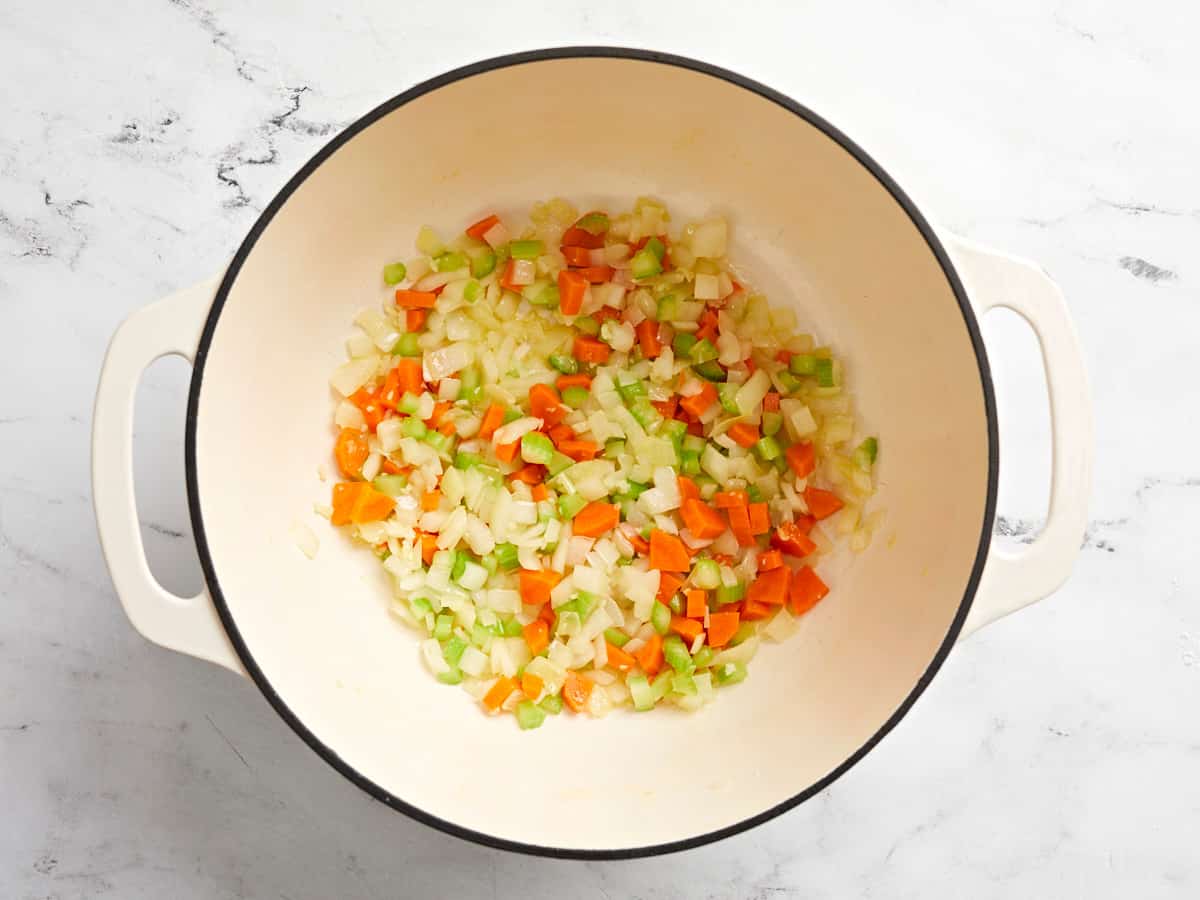
Sauté the onion, carrot, celery, and garlic in a large soup pot or Dutch oven with olive oil over medium heat, until the onions are soft and translucent.
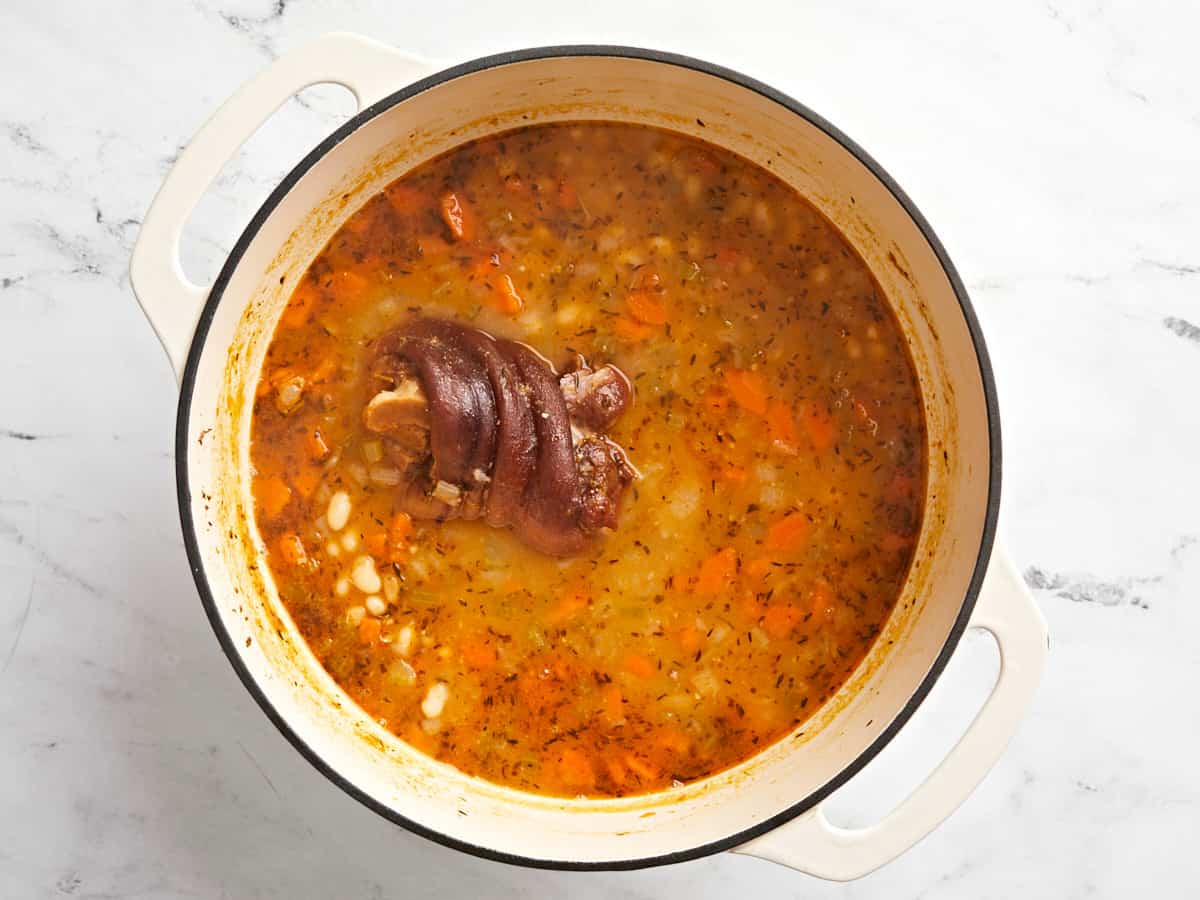
Add the soaked & drained beans, ham hock, dried thyme, dried oregano, dried rosemary, smoked paprika, black pepper, and chicken broth to the pot. Gently stir to combine all the ingredients.
Place a lid on the pot and bring it up to a boil. Once boiling, turn the heat down to medium-low and let the soup simmer, stirring occasionally, until the beans are tender and begin to break down (approximately 1.5 hours). Flip the ham hock over once or twice, while the soup is simmering, so that it gets even exposure to the hot liquid.
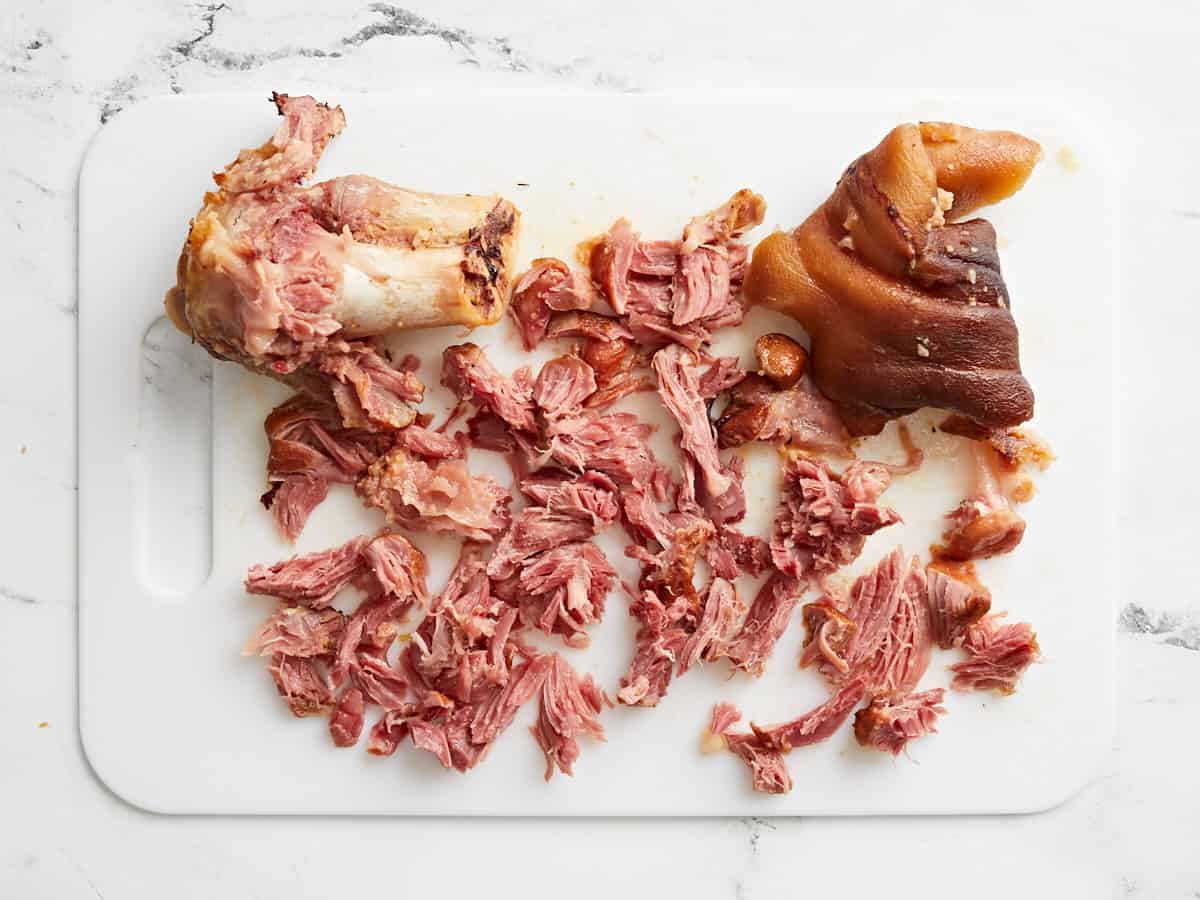
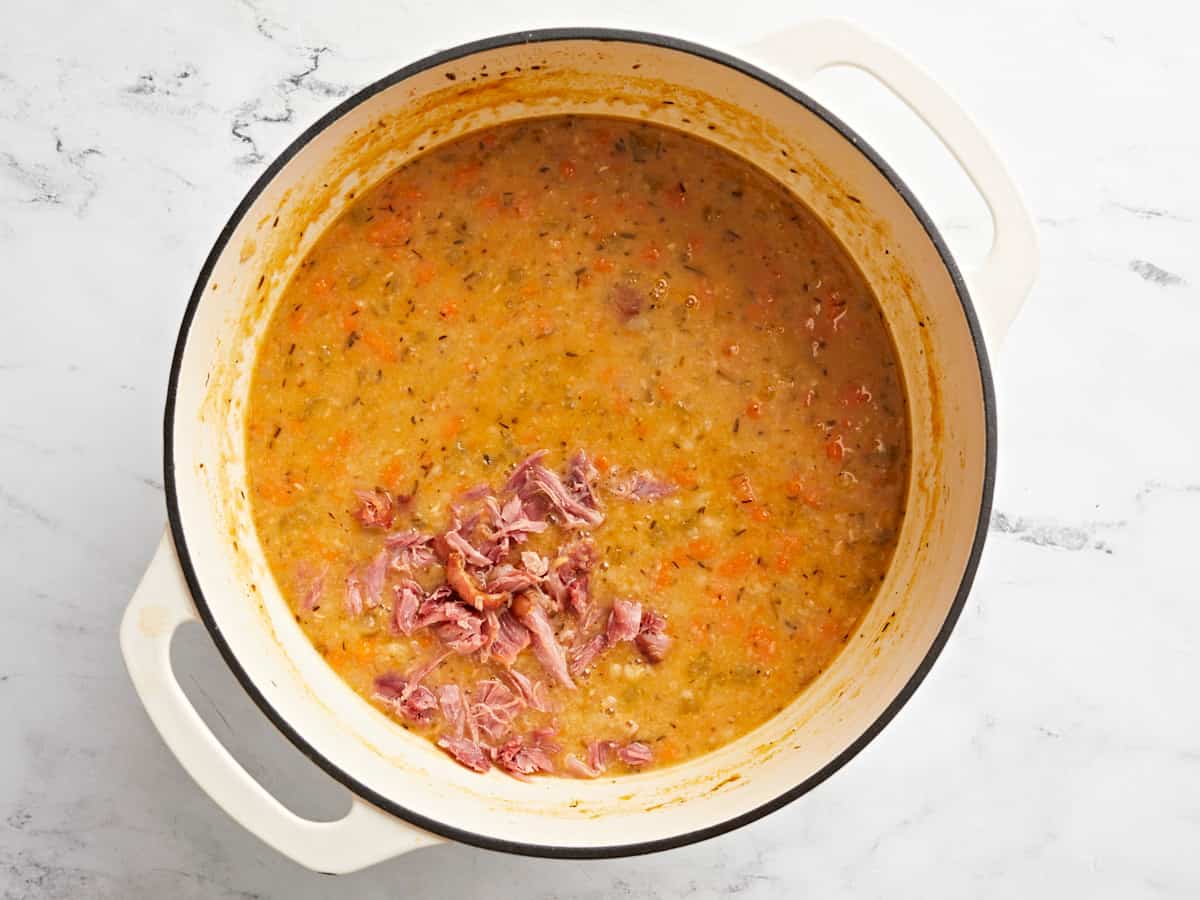
Once the beans are tender, remove the ham hock and pull the meat from the bone, then add the ham meat back to the soup.
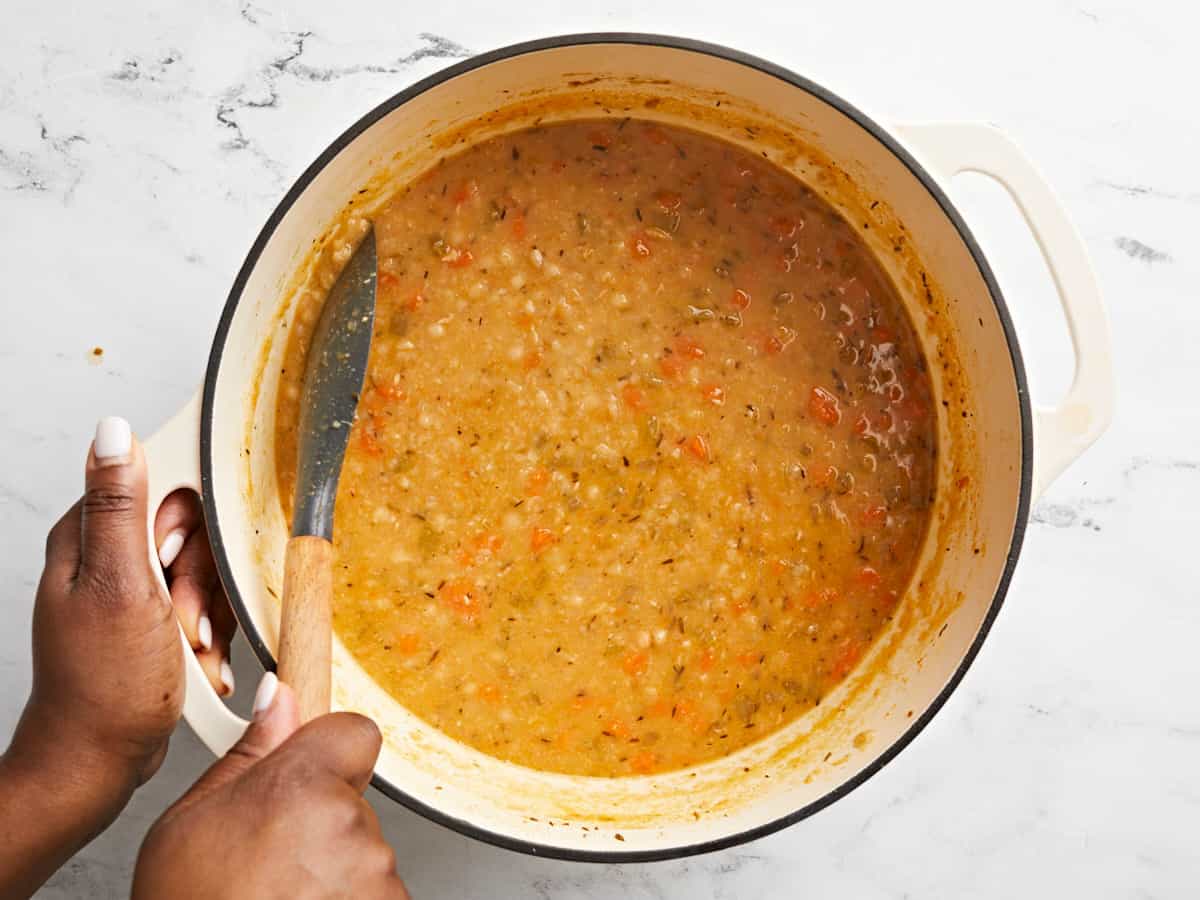
Now mash some of the beans against the side of the pot and stir the mashed beans back into the soup. Continue to simmer the soup uncovered for about 30 minutes to reduce some of the liquid and to thicken the soup further.
Taste the soup and add salt, if needed. I ended up adding 1/4 tsp of salt after tasting. The amount of salt needed will depend highly on the type of broth used. Serve hot with some crusty bread for dipping and enjoy!
Start by soaking the navy beans overnight. Place 1 lb. of dry navy beans in a bowl, cover them with cold water, and place the bowl in the refrigerator. The next day, drain and rinse the beans.
Dice one onion, one carrot, and one celery stalk. And mince two garlic cloves.
Sauté the onion, carrot, celery, and garlic in a large soup pot or dutch oven with 2 Tbsp olive oil over medium heat, until the onions are soft and translucent.
Now add the soaked & drained beans, 1 ham hock, 1/2 tsp dried thyme, 1/2 tsp dried oregano, 1/2 tsp dried rosemary, 1/2 tsp smoked paprika, 1/4 tsp freshly ground black pepper, and 6 cups of chicken broth to the pot. Gently stir to combine all the ingredients.
Place a lid on the pot and bring it up to a boil. Once boiling, turn the heat down to medium-low and let the soup simmer, stirring occasionally, until the beans are tender and begin to break down (approximately 1.5 hours).
Once the beans are tender, remove the ham hock and pull the meat from the bone.
Then add the ham meat back to the soup.
Now mash some of the beans against the side of the pot and stir the mashed beans back into the soup. Continue to simmer the soup uncovered for about 30 minutes to reduce some of the liquid and to thicken the soup further.
Taste the soup and add salt, if needed. I ended up adding 1/4 tsp of salt after tasting. The amount of salt needed will depend highly on the type of broth used. Garnish with some fresh chopped parsley (optional). Now the only thing left to do is enjoy a big bowl of this cozy navy bean soup with some crusty bread for dipping and soaking up all that yumminess! Enjoy!
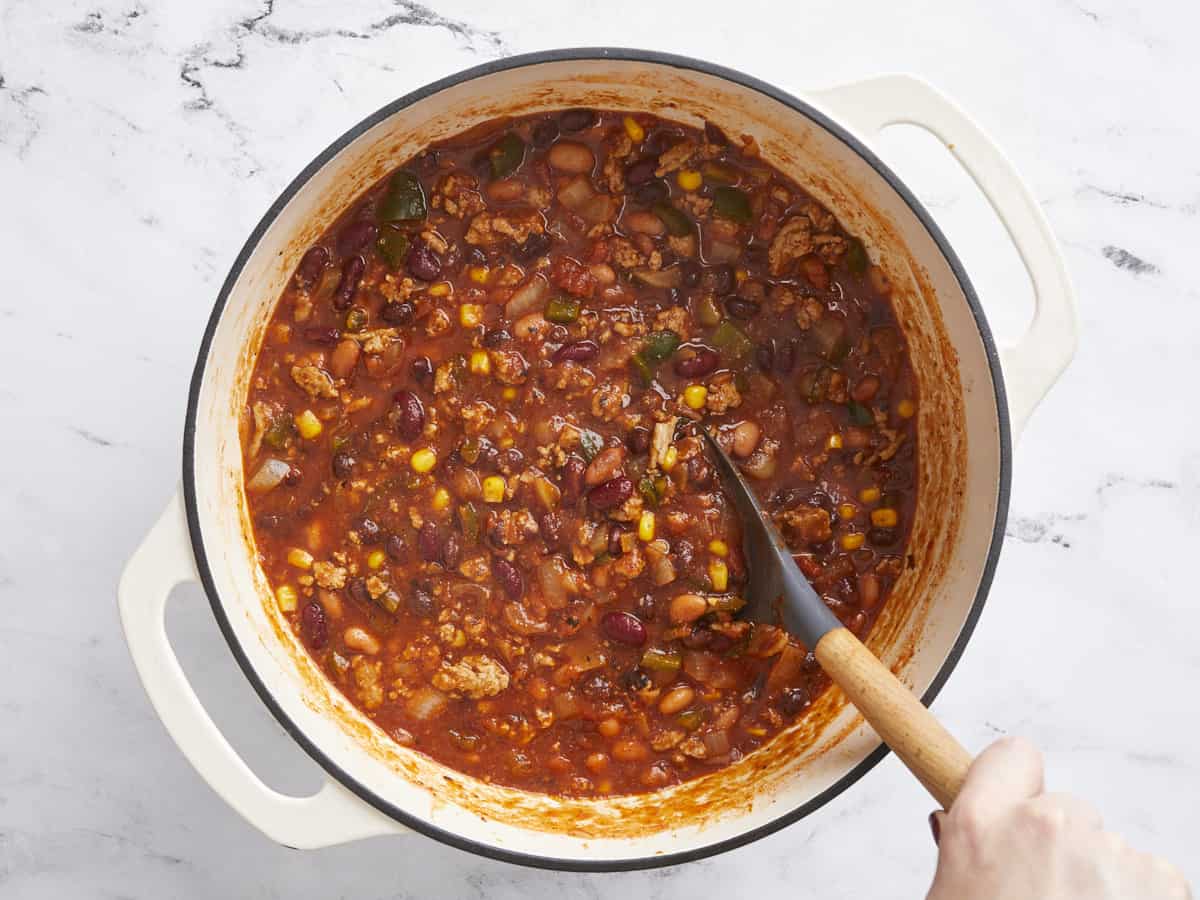
I make chili at least every other week during the fall and winter months, so naturally I’ve come up with quite a few variations of our classic chili recipe over the years. This Turkey Chili is a little bit lighter and is chock full of colorful vegetables. It’s the perfect chili recipe for the transition season when the leaves are just starting to fall but the air is still a little on the warm side. ;)
What’s in Turkey Chili?
Turkey chili starts with a similar base as a classic chili recipe: ground meat cooked in a rich and flavorful tomato-based sauce, and seasoned with tons of warm spices. Because ground turkey has a lighter flavor, we went with a lighter, zestier flavor profile and added a ton of colorful vegetables and beans.
Ingredients for Turkey Chili
Here’s what you’ll need to make turkey chili:
Ground Turkey: Opt for dark meat turkey or ground turkey with at least a little fat. Extra-lean ground turkey breast can get a little dry and tough when simmered in chili.
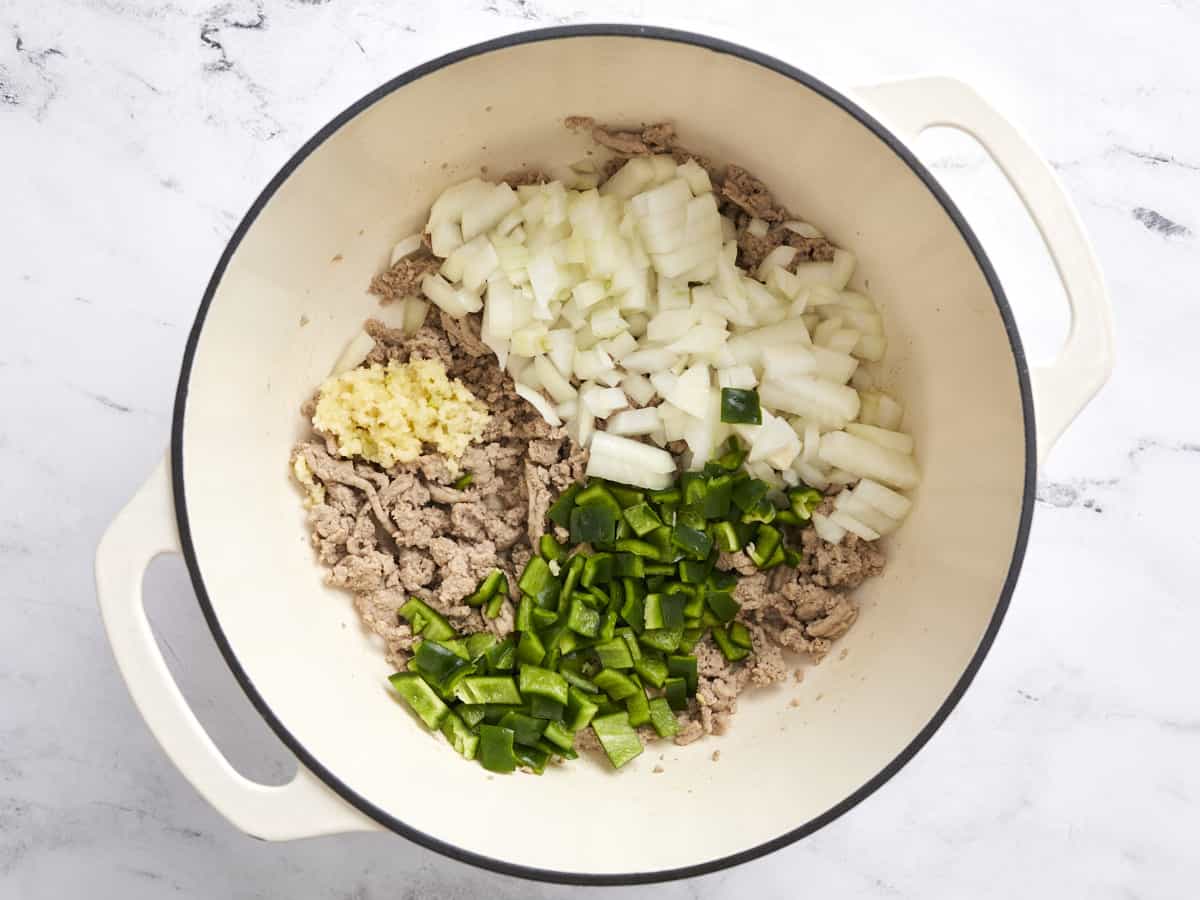
Onion and Garlic: Every good chili starts with onion and garlic to create a deeply savory flavor base! I went with four cloves of garlic for this recipe, but feel free to measure with your heart. ;)
Poblano Pepper & Corn: A diced poblano pepper and some frozen corn kernels add a lot of flavor and color to this chili, making it extra festive. Poblanos can be spicy, though, so if you need a mild heat, skip the pepper or substitute with a green bell pepper.
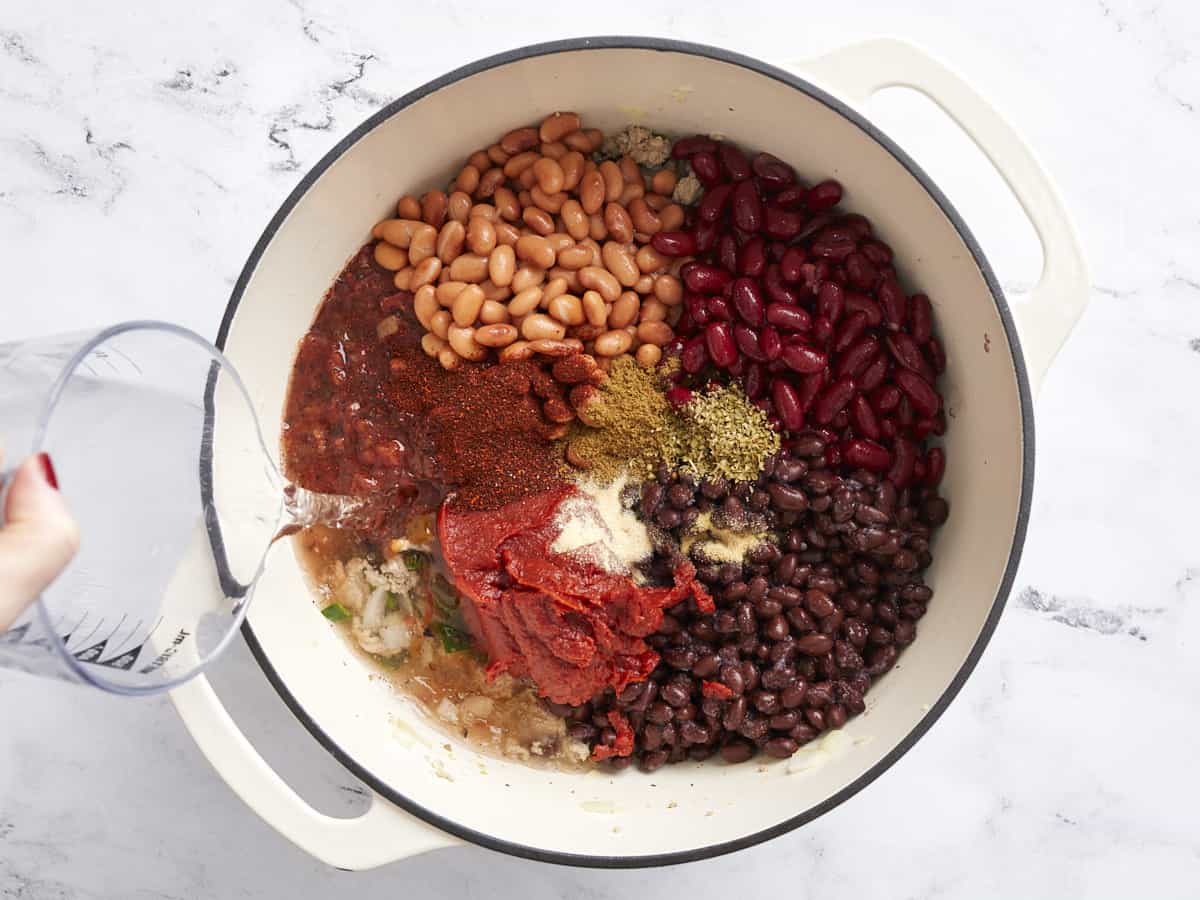
Beans: A combination of kidney beans, black beans, and pinto beans adds even more color, texture, and flavor to this chili. The beans are very flexible, so if you only want black beans or kidney beans, you can certainly substitute them to fit your needs.
Tomatoes: Diced tomatoes add texture to our chili while tomato paste helps thicken the sauce and adds a really rich tomatoey flavor.
Herbs & Spices: The secret to the sauce! We use our homemade chili seasoning, which is a mix of chili powder, cumin, oregano, garlic powder, onion powder, salt, and pepper, to season our turkey chili.
Make it Vegetarian
This turkey chili is super easy to make vegetarian. Simply swap the ground turkey with an extra can of beans (kidney, black beans, or even pinto beans), or your favorite meat substitute, like soy crumbles.
Slow Cooker Instructions
Chili is a great slow cooker recipe. To make this turkey chili in your slow cooker, first brown the ground turkey in a skillet, then add it to the slow cooker with all of the other ingredients (reduce the water to 1 cup). Cook the chili on high for 3 hours or low for 6 hours.
How to Store Leftovers
After cooking the turkey chili, divide it into single-serving containers and store in the refrigerator for 4-5 days. Once chilled in the refrigerator, you can transfer some to the freezer for longer storage (about 3 months).
To reheat the chili, either microwave on high, stirring occasionally, until heated through. Or add to a sauce pot and cook over medium-low, stirring often, until heated through.
What to Serve with Turkey Chili
Chili and cornbread were made for each other, so try pairing this turkey chili with our Jalapeño Cheddar Cornbread or Sweet Potato Cornbread. And don’t forget the toppings for your chili! Try adding a sprinkle of cheddar cheese, sliced green onions, or cilantro. Or maybe a dollop of sour cream, some corn chips, or pickled jalapeños.
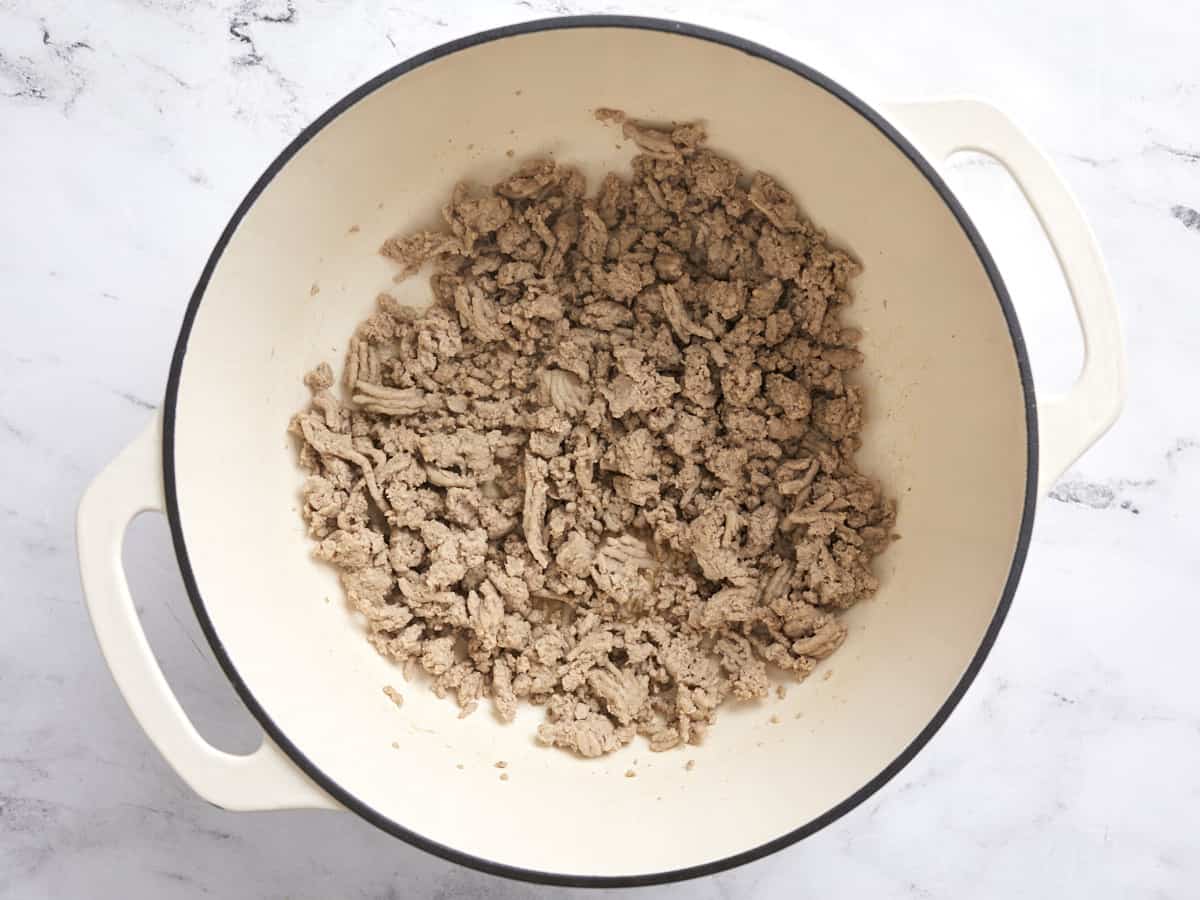
Add the olive oil and ground turkey to a large pot and cook over medium heat until the turkey is cooked through. Break the ground turkey up into pieces as it cooks.
While the turkey is cooking, dice the onion and poblano pepper, and mince the garlic. Add the onion, poblano, and garlic to the pot and continue to sauté for a few minutes more, or until the onions are soft and translucent.
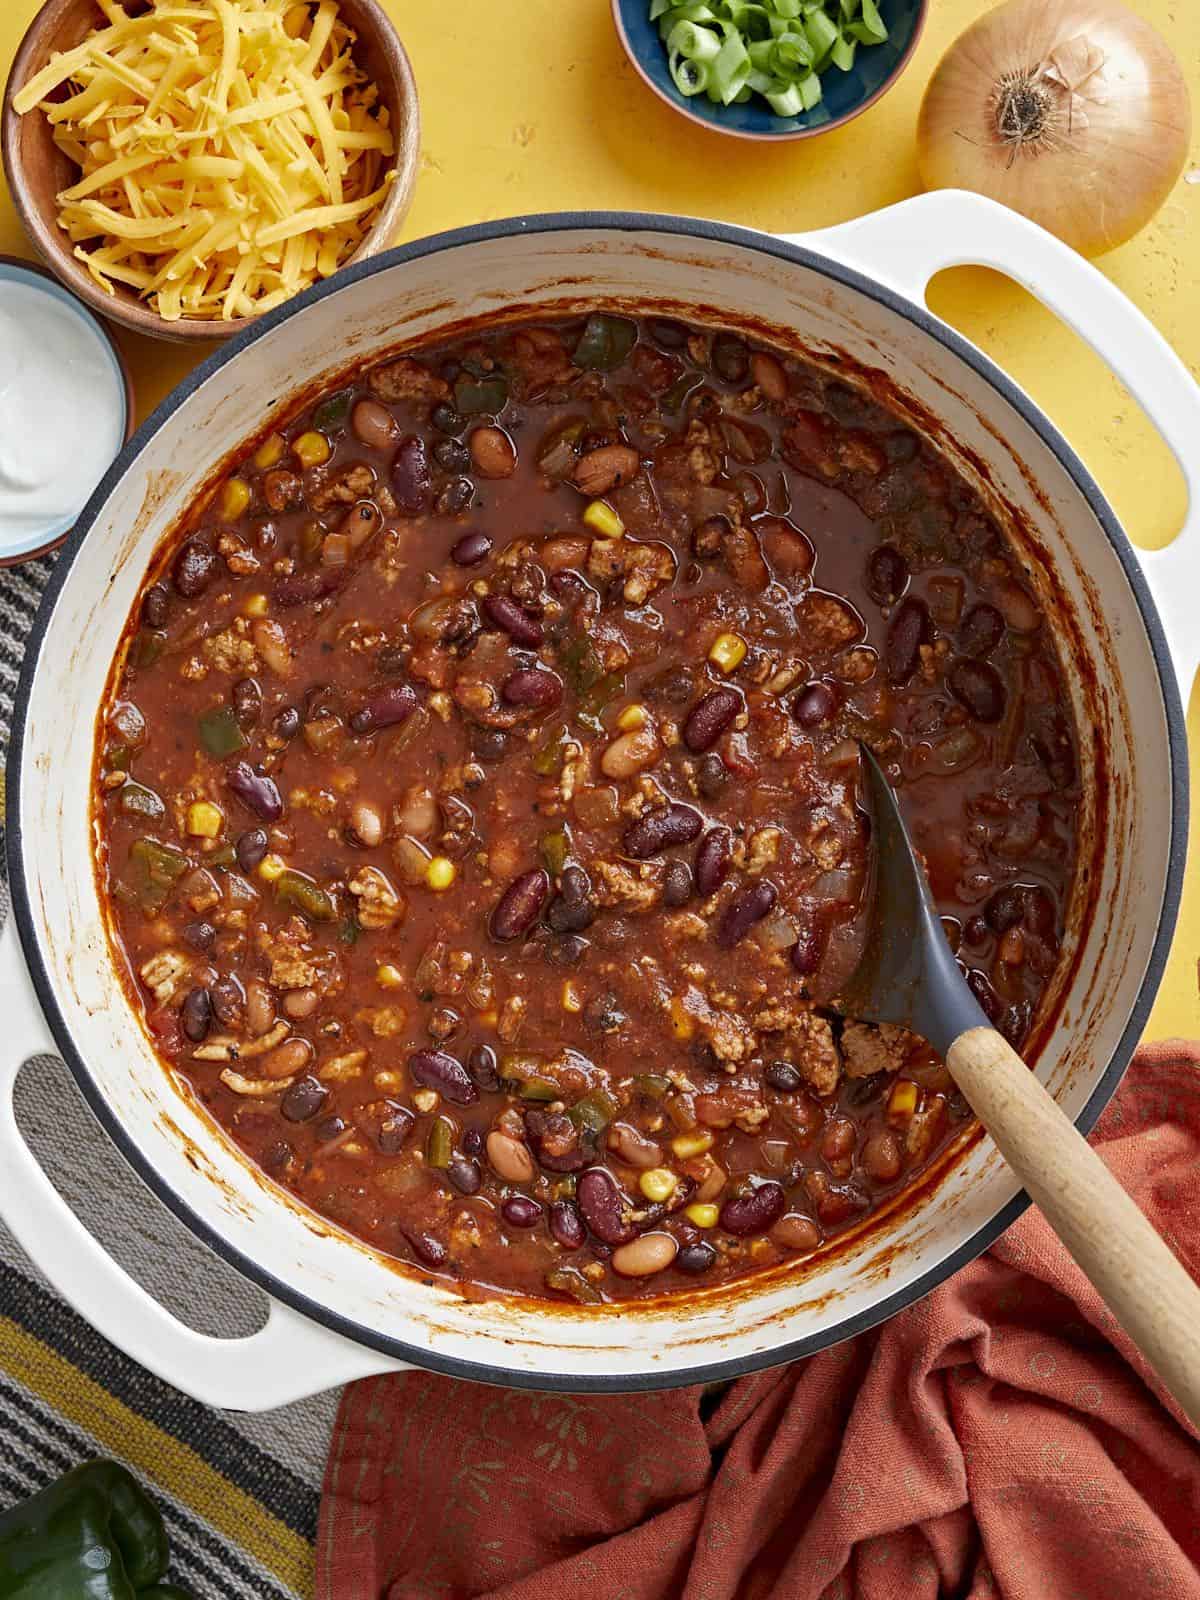
Add the canned beans (drained), frozen corn (no need to thaw), diced tomatoes (with juices), tomato paste, chili powder, cumin, oregano, onion powder, garlic powder, salt, pepper, and water. Stir to combine.
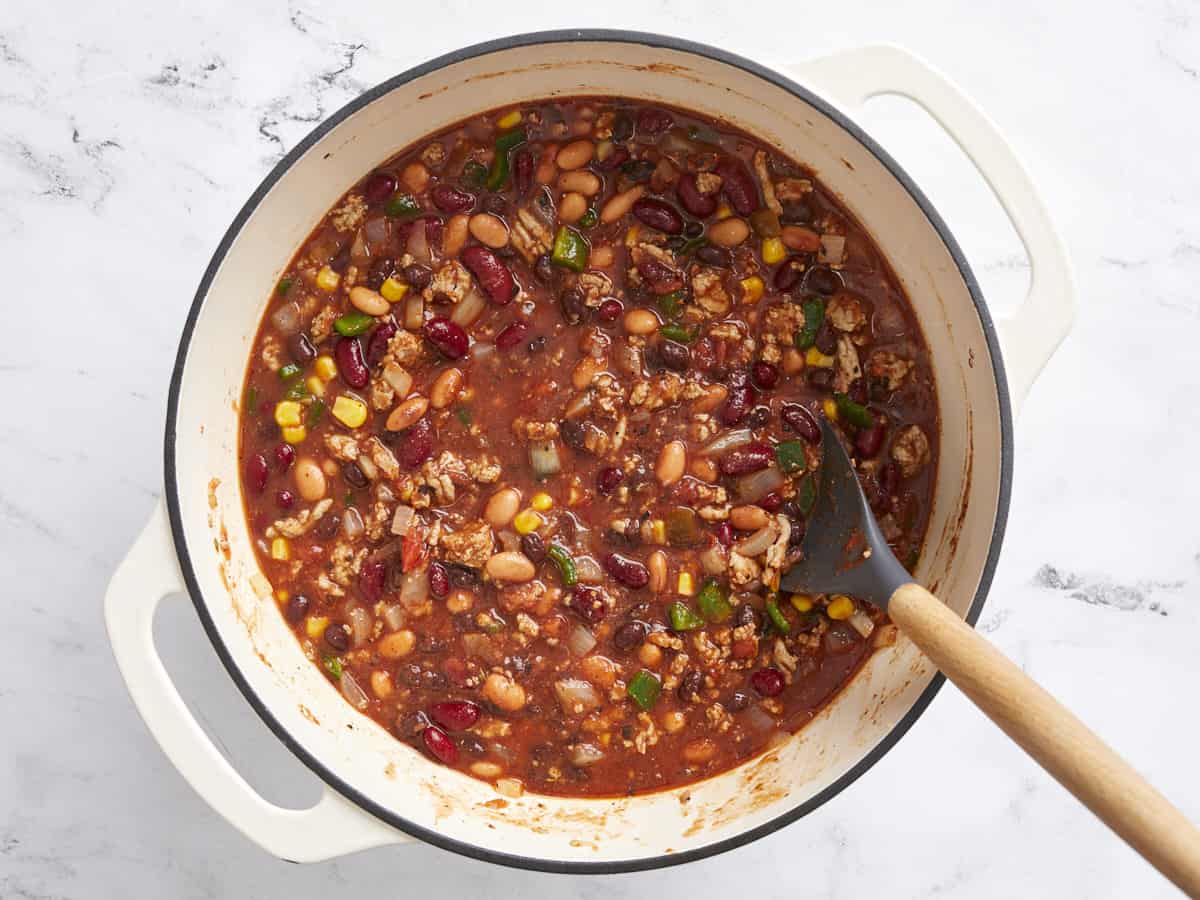
Place a lid on the pot and allow the chili to come up to a simmer. Once simmering, reduce the heat to medium-low and continue to simmer for 30 minutes (or longer, if preferred), stirring occasionally. After 30 minutes, taste and adjust the seasoning to your liking, then serve.
Add 2 Tbsp olive oil and one pound of ground turkey to a large pot. Cook over medium heat until the ground turkey is cooked through.
While the turkey is browning, mince four cloves of garlic, dice one yellow onion, and dice one poblano pepper. Add the garlic, onion, and pepper to the pot and continue to cook and stir over medium heat until the onions have softened.
Next, add one 15oz. can of kidney beans (drained), one 15oz. can of black beans (drained), one 15oz. can of pinto beans (drained), one 15oz. can of fire-roasted diced tomatoes (with juices), one 6oz. can of tomato paste, 1 cup frozen corn kernels, 1 Tbsp chili powder, 1 tsp cumin, ½ tsp dried oregano, ¼ tsp garlic powder, ½ tsp onion powder, ¾ tsp salt, ¼ tsp pepper, and 2 cups water to the pot.
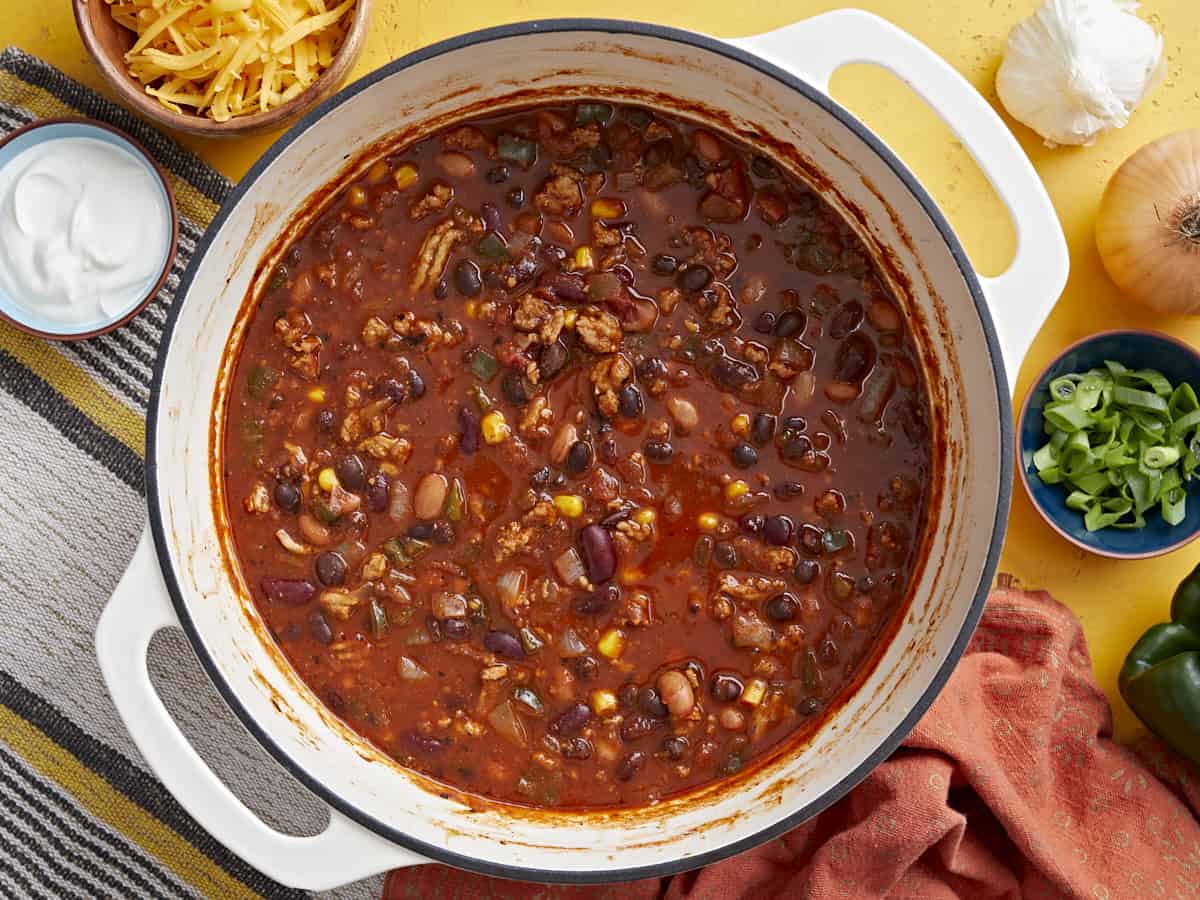
Stir everything to combine, then place a lid on the pot and allow it to come up to a simmer.
Once simmering, reduce the heat to medium-low and let it simmer for 30 minutes. Give it a taste, adjust the seasoning to your liking, and serve!
And don’t forget to pile it high with your favorite chili toppings!