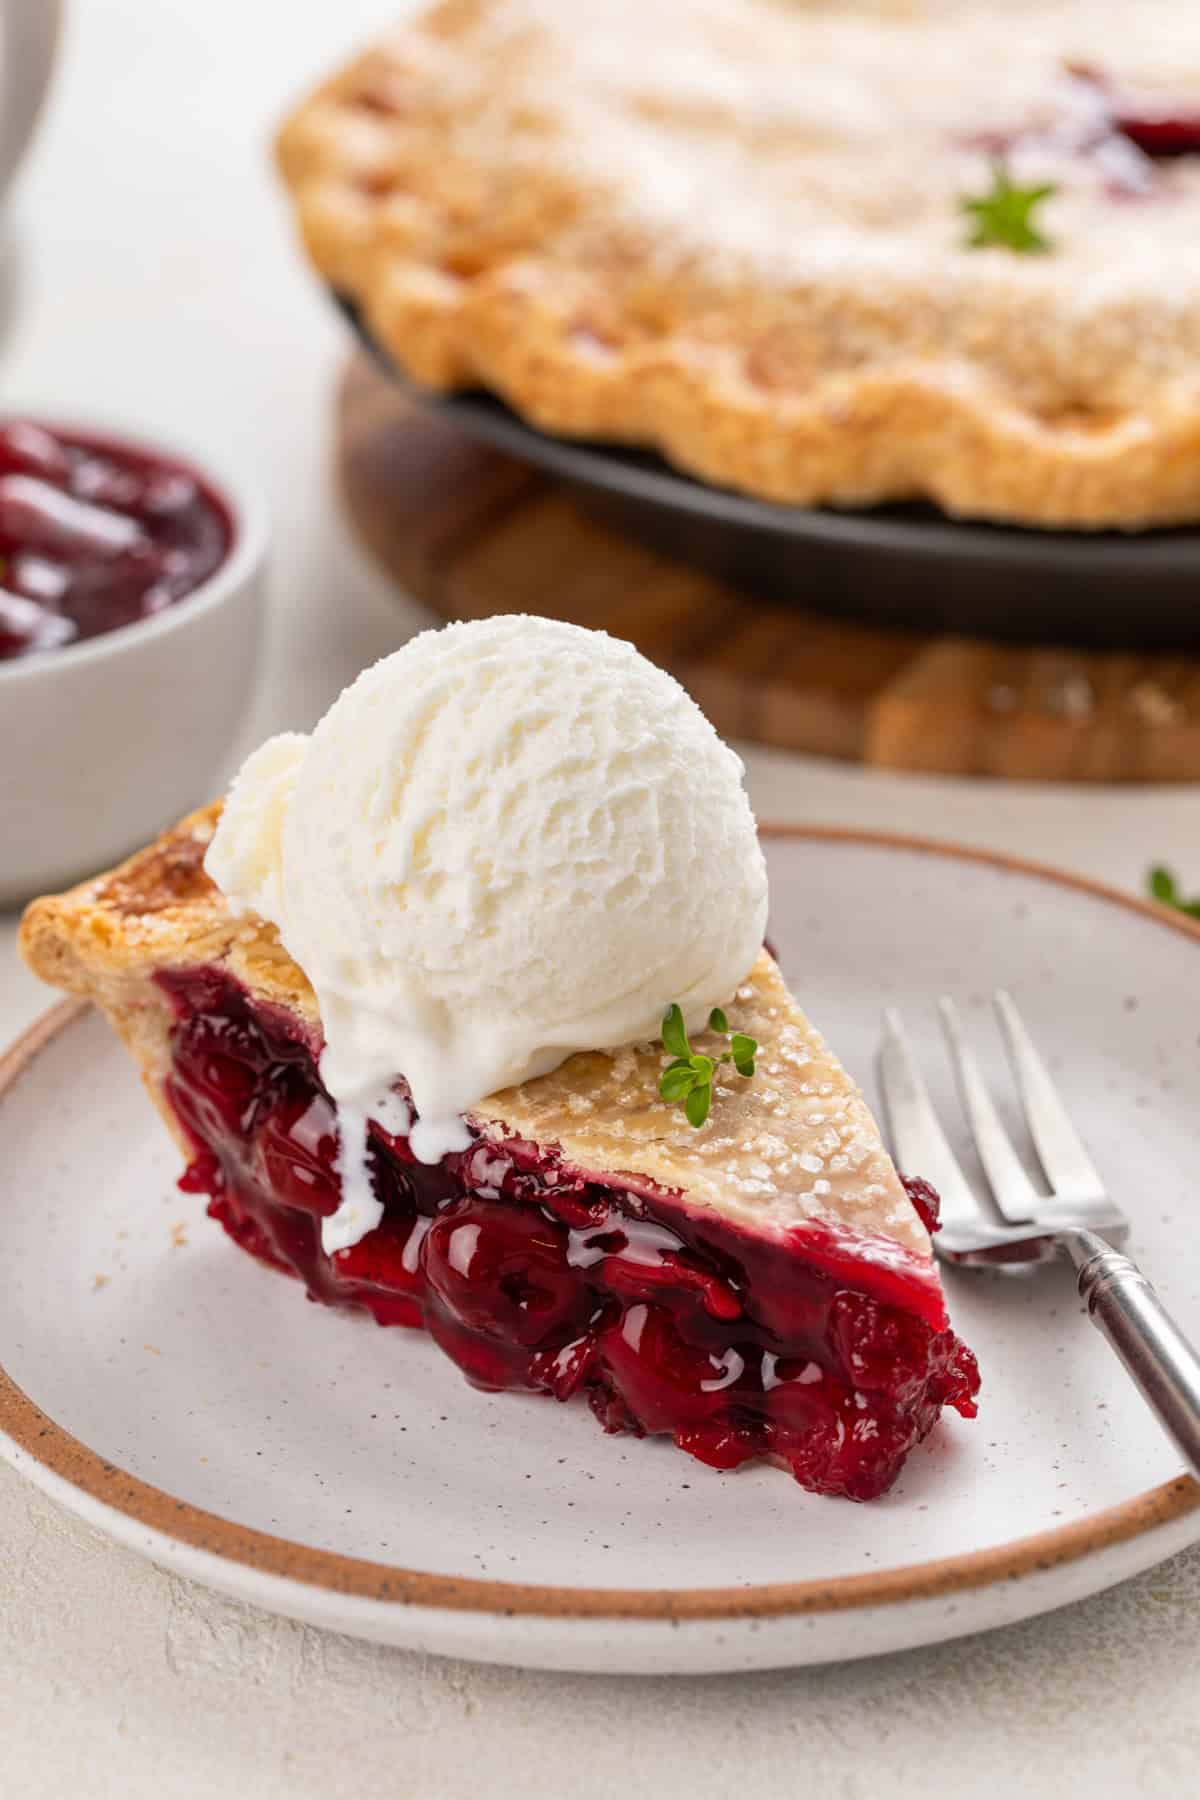
Made with tart cherries and flaky pie crust, sour cherry pie is the ultimate summer pie. Serve it with a scoop of vanilla ice cream to savor every bite of the season.
One thing we do really well here in the Midwest is summer produce. From the very best sweet corn to the juiciest strawberries and blueberries, our farmers sure know what they’re doing.
Most of the country’s tart cherries come out of Michigan. If you live in Michigan or one of the neighboring states, you probably have seen piles of these bright red beauties at your farmers’ markets.
This year, make sure you grab some and bring them home to make this sour cherry pie.
Savor the cheesy goodness of Hasselback Chicken, stuffed with bacon, zucchini, and Monterey Jack cheese. A flavorful meal that’s pretty enough for any occasion!
Savor the cheesy goodness of Hasselback Chicken, stuffed with bacon, zucchini, and Monterey Jack cheese. A flavorful meal that's pretty enough for any occasion!
Our delicious Pork Chop Casserole is tender pork chops with ultra-cheesy scalloped potatoes topped with crispy onions. It’s an easy recipe for any night!
Our delicious Pork Chop Casserole is tender pork chops with ultra-cheesy scalloped potatoes topped with crispy onions. It's an easy recipe for any night!
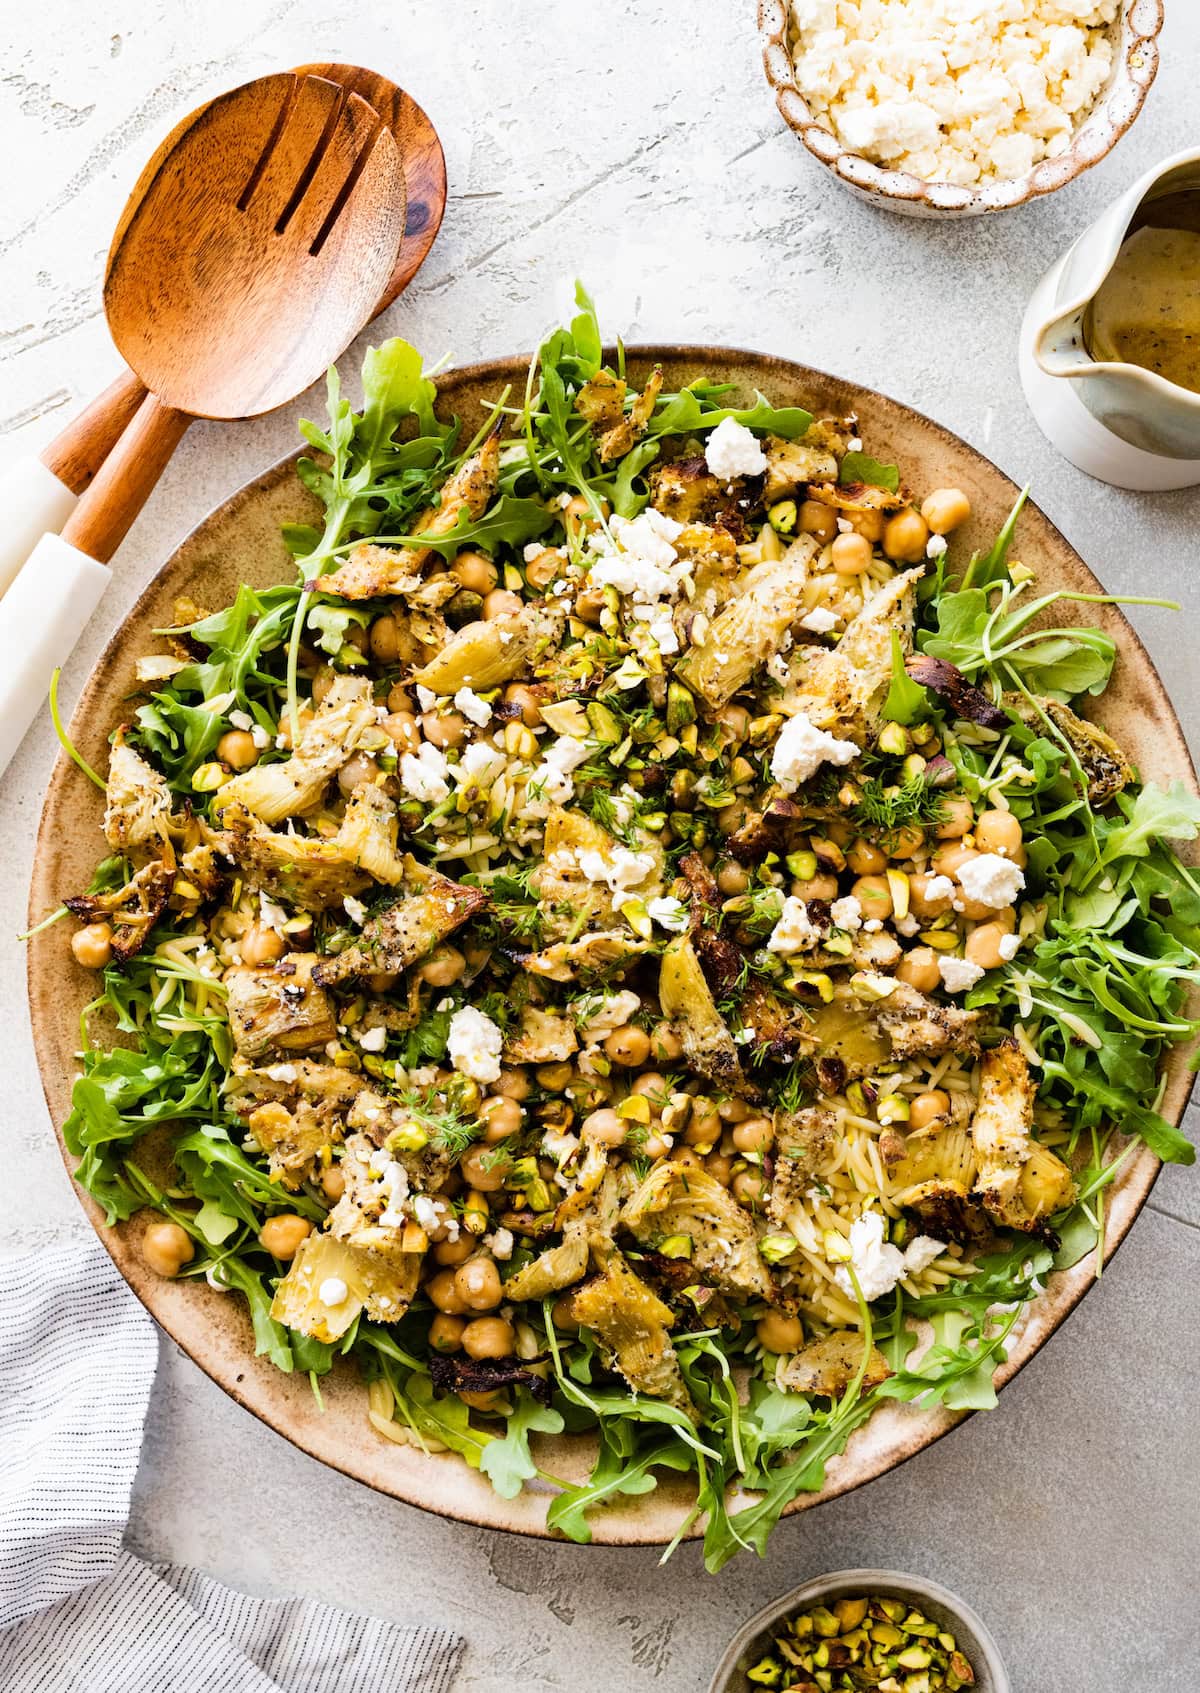
Artichokes are one of my favorite vegetables. I love using them to make pizza, salads, chicken, lasagna, and of course the classic spinach artichoke dip. I also love using them in this Roasted Artichoke Chickpea Orzo Salad. The flavors are phenomenal a…
Artichokes are one of my favorite vegetables. I love using them to make pizza, salads, chicken, lasagna, and of course the classic spinach artichoke dip. I also love using them in this Roasted Artichoke Chickpea Orzo Salad. The flavors are phenomenal and it’s the perfect salad for spring and summer. SO fresh and delicious! Orzo…
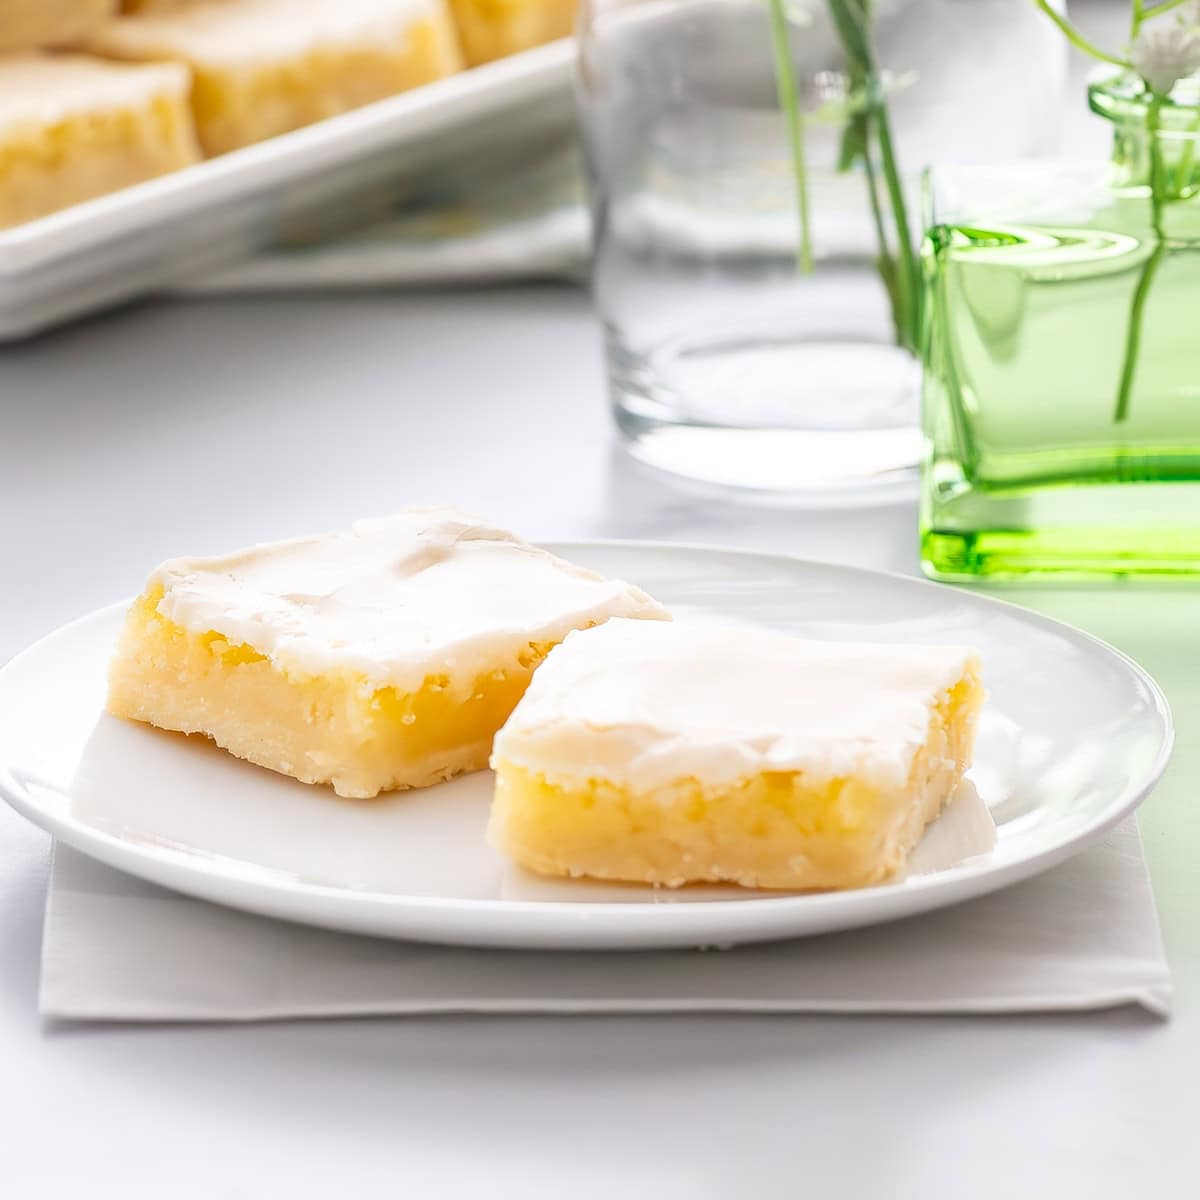
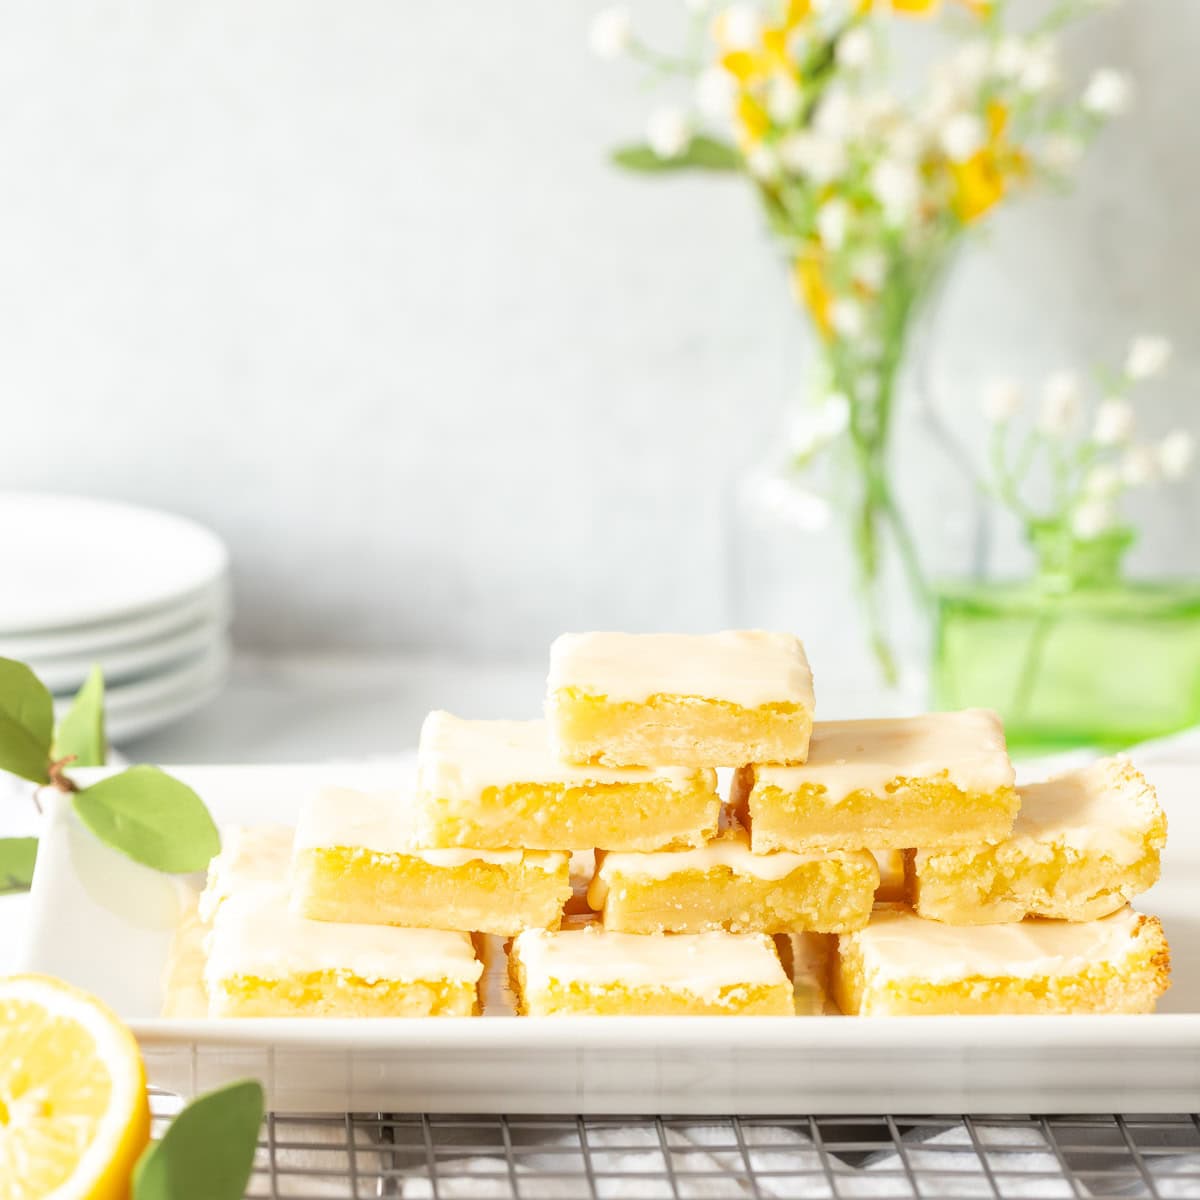
Sunshine on a plate! Straight from my grandmother Nama’s kitchen, these Homemade Lemon Bars are a treasured family recipe. Lovingly passed down for three generations, this recipe is surprisingly easy to prepare with readily available pantry ingredients. Bursting with citrusy flavor from both fresh lemon juice and zest, the addition of a unique ingredient makes…
Sunshine on a plate! Straight from my grandmother Nama’s kitchen, these Homemade Lemon Bars are a treasured family recipe. Lovingly passed down for three generations, this recipe is surprisingly easy to prepare with readily available pantry ingredients. Bursting with citrusy flavor from both fresh lemon juice and zest, the addition of a unique ingredient makes them lighter than other, more dense lemon bars. And, with the perfect balance of sweet and tart, these homemade lemon bars appeal to both young and old, making them a delightful dessert for any occasion, from family dinner to bridal showers or graduation celebrations.
What is a Lemon Bar?
A lemon bar is a popular cookie consisting of a tart lemon filling layered on top of a buttery shortbread crust. After baking, the dessert is typically cut into small squares or rectangles for serving. Lemon bars are known for their refreshing citrus flavor and are enjoyed as a sweet treat or dessert.
Why This is the BEST Lemon Bars Recipe
These luscious cookies hold special memories for me. My maternal grandmother, whom we called Nama, always whipped them up whenever we visited her in Tucson (she actually called them Lemon Love Notes!). They were so delicious, that we insisted Mom recreate them for us back home. And the tradition continues! Every time I serve these cookies, they vanish in a flash, with at least one person inevitably asking for the recipe. Here’s what makes this lemon bar recipe stand out:
Balanced flavors. I find lemon bar cookies are often too lemony or too sugary. Nama’s recipe achieves just the right balance between sweet and tart, ensuring every bite is just right.
More zesty lemon flavor. Adding fresh lemon zest alongside lemon juice infuses the bars with an extra layer of citrusy depth.
Lighter filling. Unlike denser, more stiff lemon bars, ours offer a lighter lemon filling, thanks to the addition of baking powder. Its leavening action subtly lifts the filling during baking.
Frosted topping. Versus most other lemon bars that are topped with powdered sugar, Nama’s lemon bars stand out with a delectable frosting. This elegant finish not only adds a creamy richness but also complements the tangy lemon flavor perfectly.
Easy to prepare. Nama’s easy-to-follow recipe guarantees consistent results every time.
Crowd pleaser. Whether you’re serving a family gathering or a party with friends, these lemon bars are guaranteed to be a hit with everyone, young and old alike.
Ingredients for Homemade Lemon Bars
Here are the key ingredients you’ll need to create these bright, refreshing lemon bars from scratch (quantities are provided in the recipe card below):
Cookie crust
Butter – Nama, mom and I all use salted butter for the best taste. If you opt for unsalted butter, add 1/4 teaspoon salt
Powdered (Confectioners’) sugar
All-purpose flour
Lemon filling
Large eggs
Granulated sugar
Lemons – I recommend using regular lemons and not Meyer, as the latter’s lower acidic content results in less tangy flavor, making the cookies bland
Baking powder – don’t skip as this is the key to making the filling lighter.
Table salt
Frosting
Butter, salted
Powdered (Confectioners’) sugar
Whole milk – you can substitute 2% milk
Vanilla extract
How to Make Lemon Bars from Scratch
Follow these simple steps to achieve a delicious cookie-like crust and a luscious lemon filling:
A. Preheat oven and prep pan (if needed)
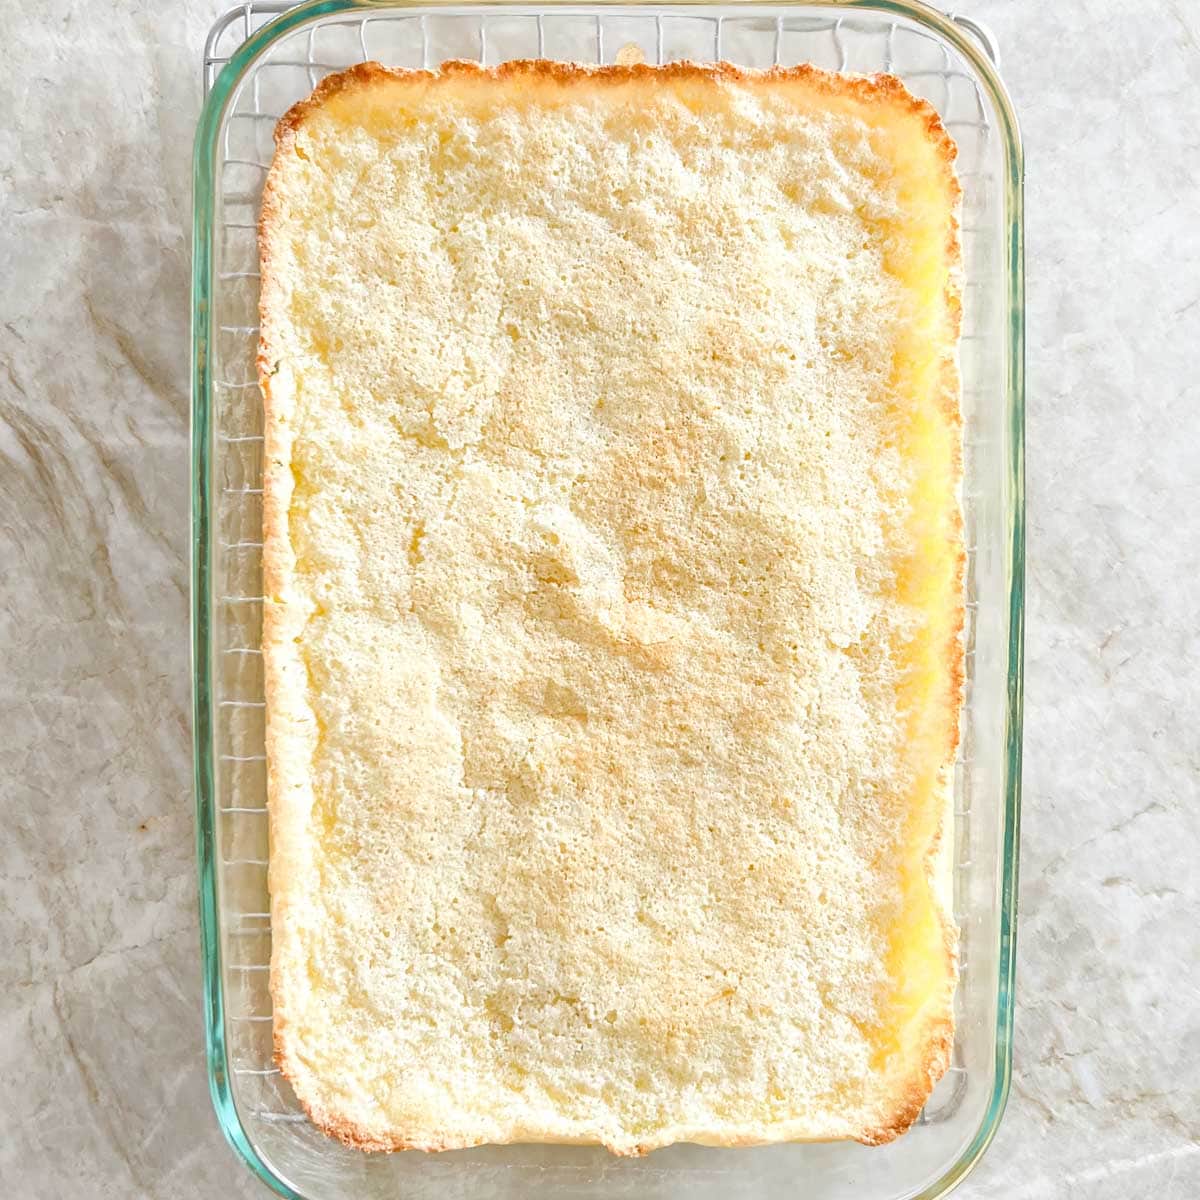
Preheat oven to 325 degrees. You have the option to use a 7 by 11-inch glass baking dish as is or line it with two pieces of parchment paper, placed crosswise. (I don’t recommend using a metal pan.) The paper will make it easier to remove the cookies from the pan, but you will not get those lightly browned chewy edges.
B. Cookie crust
Combine butter and sugar. With an electric mixer fitted with the paddle attachment, blend together the butter and powdered sugar until smooth, fluffy, and light in color, around 3 to 4 minutes.
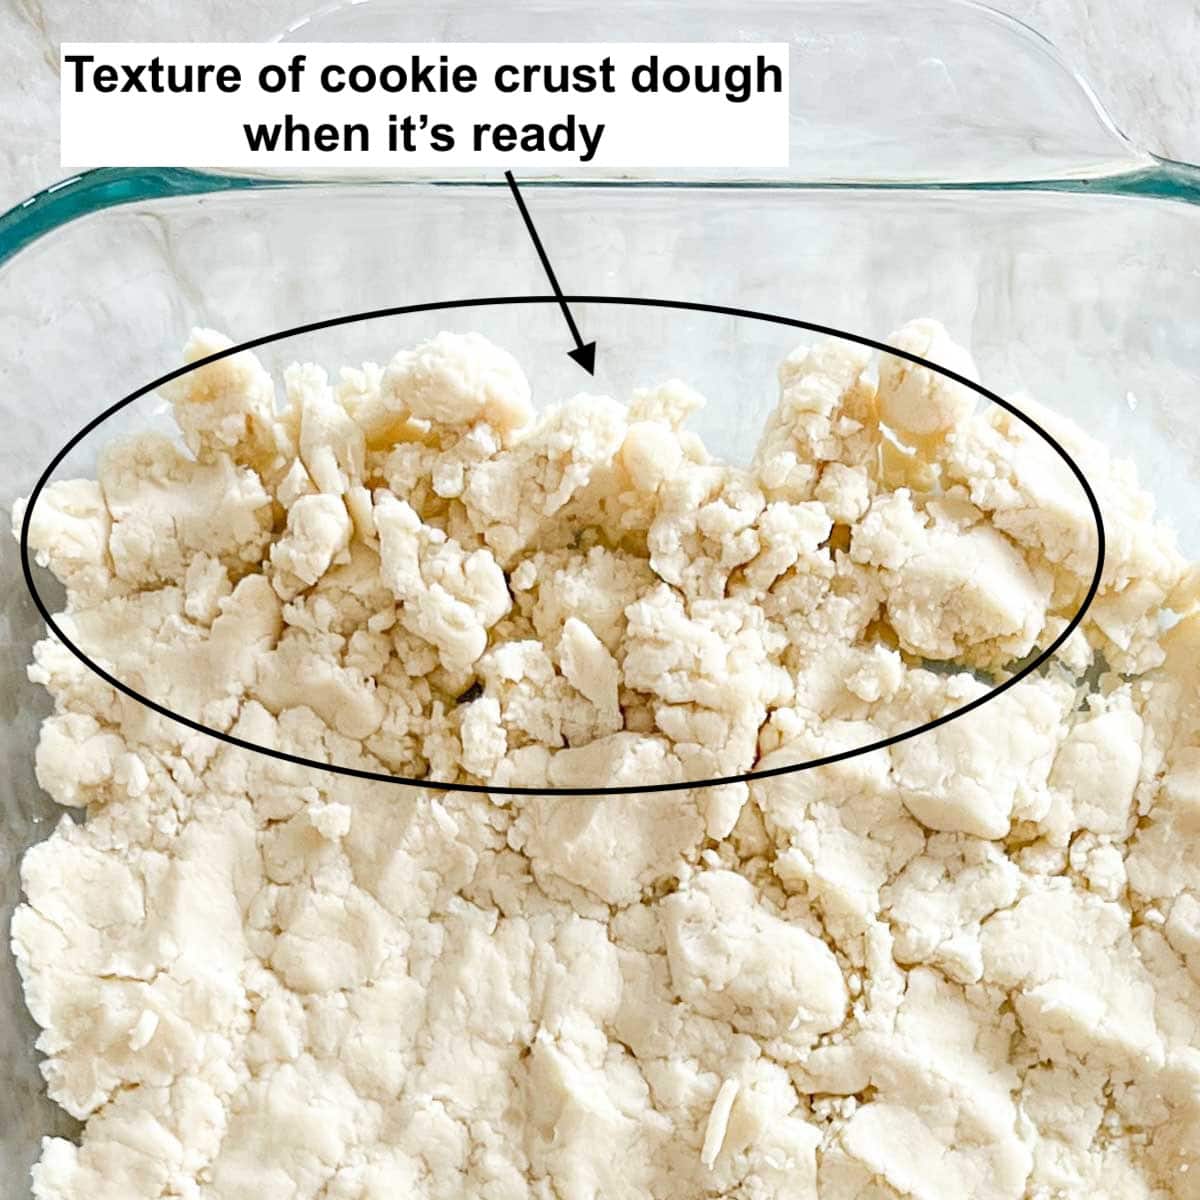
Add flour. Add the flour and mix just the mixture starts to form clumps. Don’t overmix.
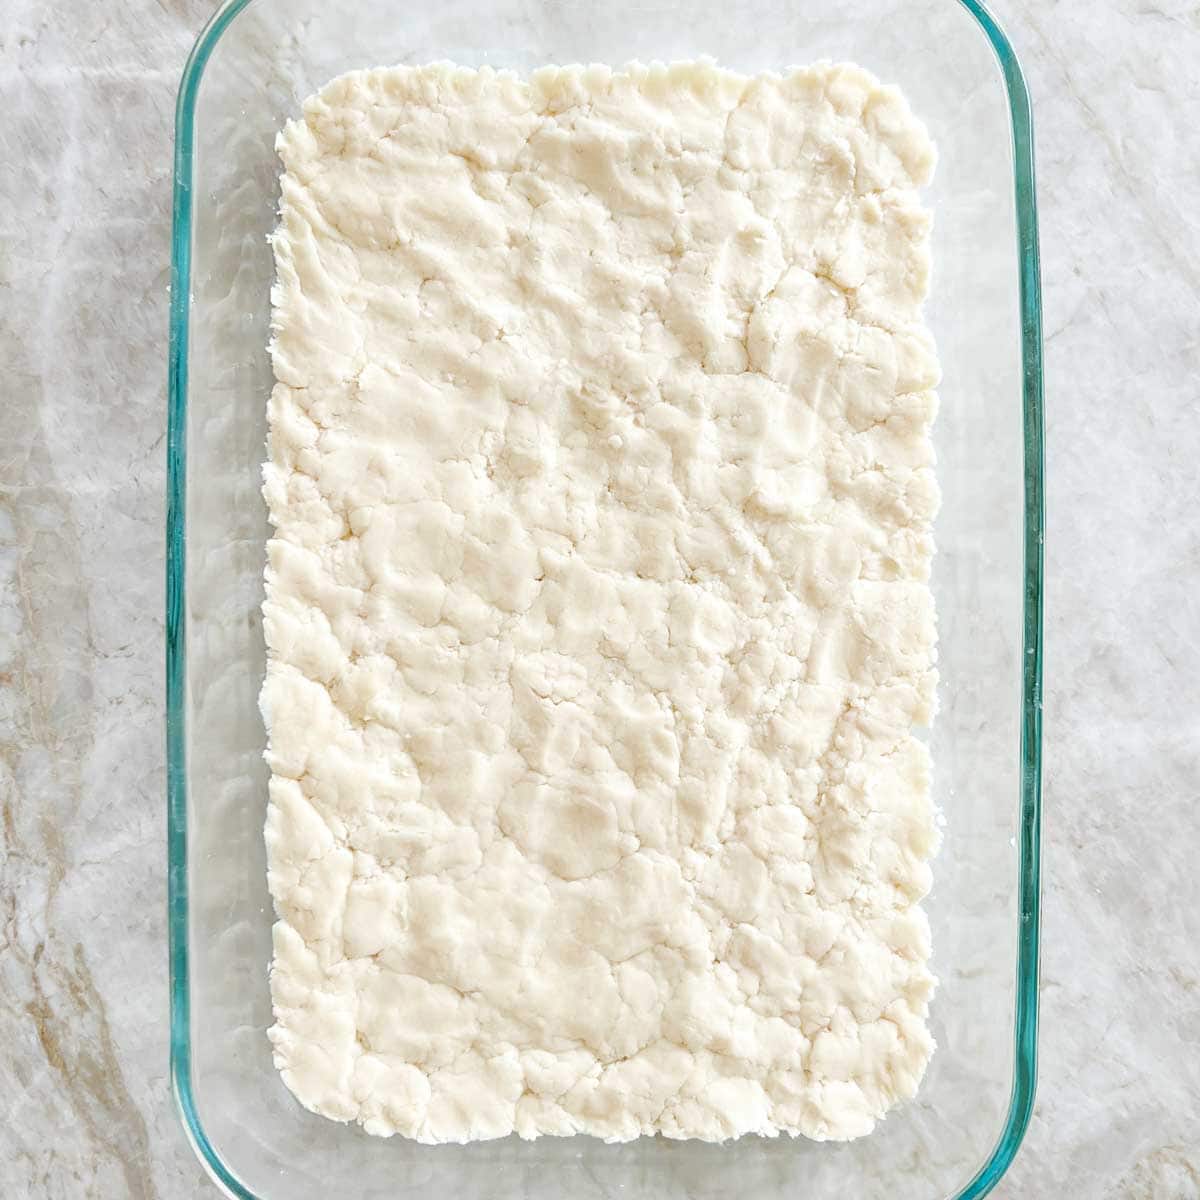
Press into pan. Press dough into the bottom of the prepared baking pan, in an even layer.
Bake. Bake for 15 minutes. Remove from oven and set aside (don’t turn the oven off).
C. Lemon filling
Combine eggs and sugar. Again with the electric mixer, beat the eggs and sugar together just until light in color and well blended.
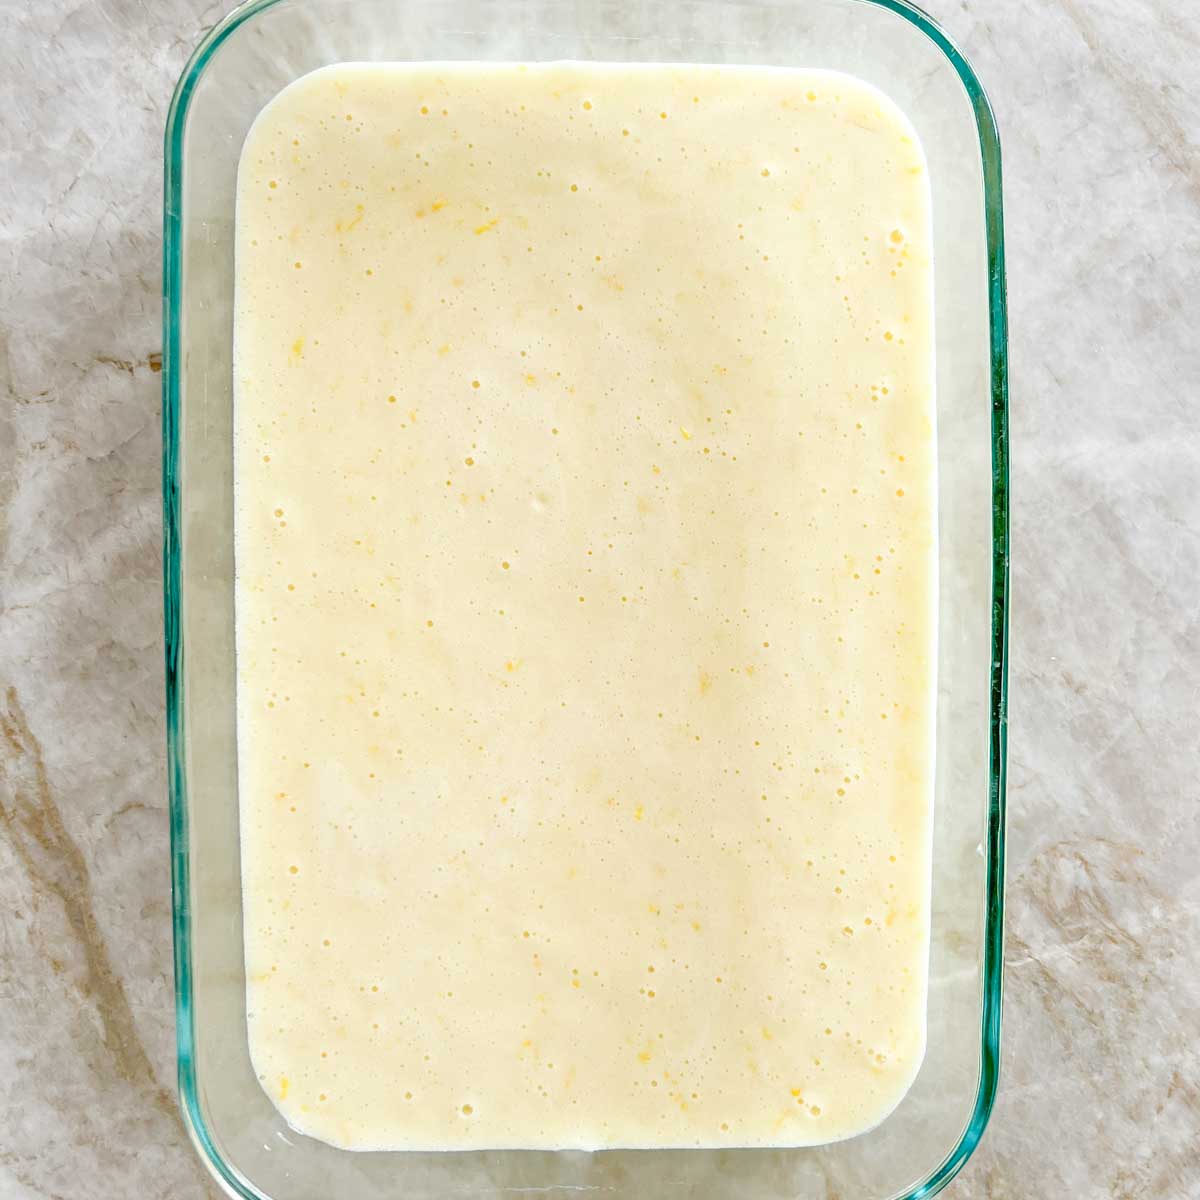
Add remaining ingredients; blend. Add the lemon juice, lemon zest, baking powder and salt and blend until just mixed.
Add to crust. Spread the lemon mixture over top of baked crust.
Bake. Bake for 20 to 25 minutes or until set – gently press the top with your finger to test. (Lemon filling will have puffed up and then settled down a bit). Set aside to cool in the pan for at least one hour before frosting.
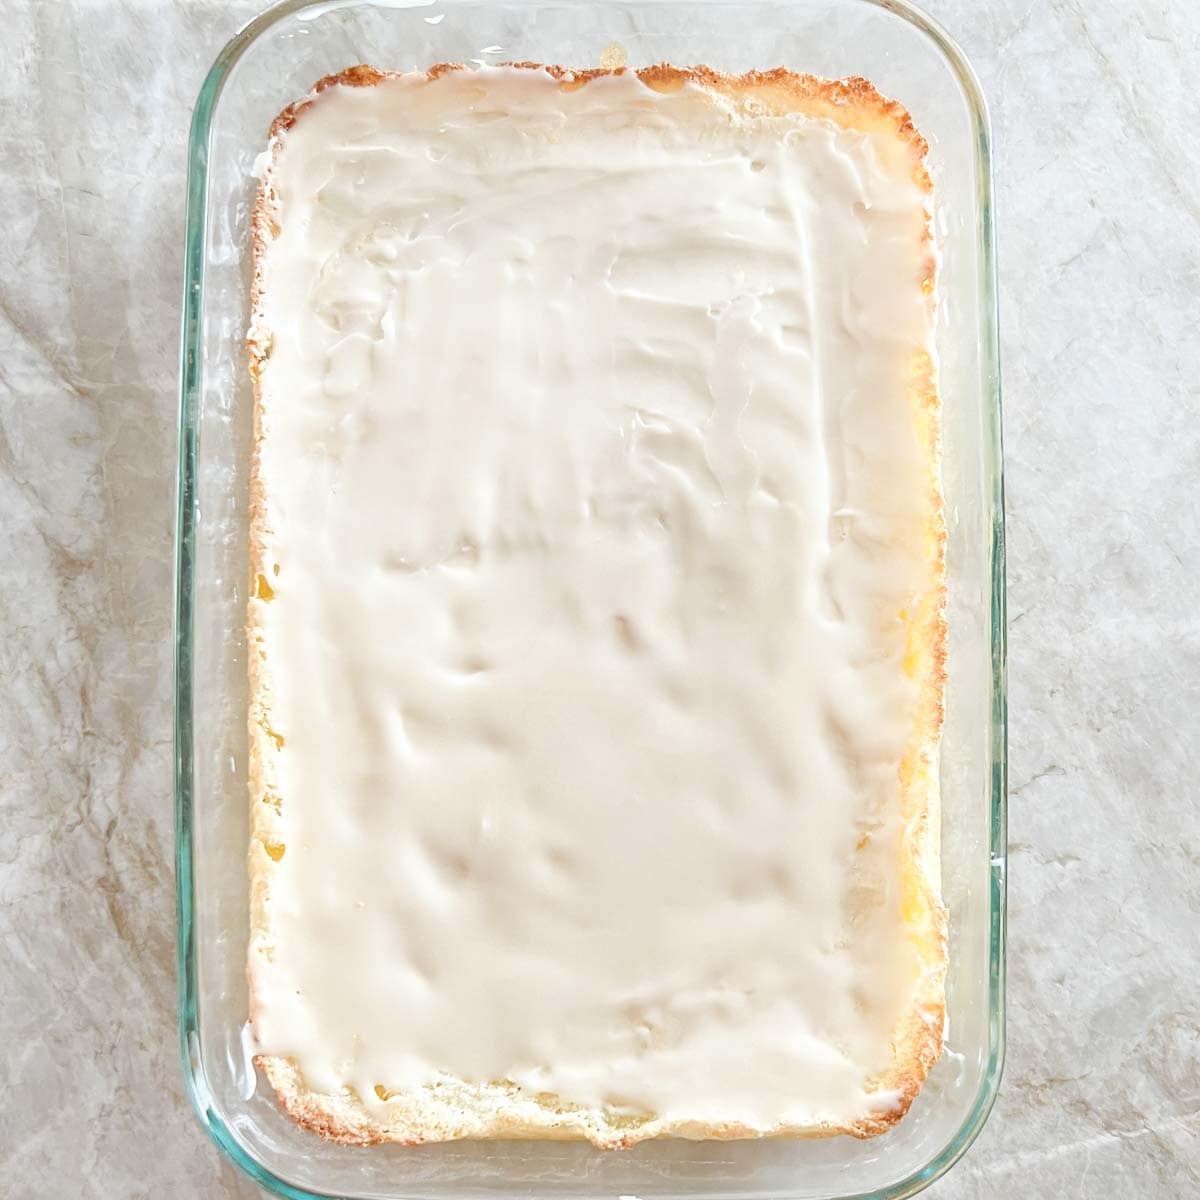
D. Frosting
Combine ingredients. In a small mixing bowl, whisk all ingredients together until frosting consistency. Add more milk if too thick or more sugar if too thin.
Spread on cookies. Spread over the top of the cooled bars. Refrigerate for at least one hour.
Variation in Method – Without an Electric Mixer
If you don’t have an electric mixer, you can combine the lemon bar ingredients for each layer the way my grandmother did in her original recipe – by hand:
For the Crust: Place all crust ingredients in a mixing bowl, and using a fork, gently blend just until they are well combined and the mixture is forming clumps.
For the Lemon Filling: Place the eggs and sugar in a large mixing bowl and whisk until light in color and well blended. Add remaining ingredients and whisk until well combined.
Tips for the Best Lemon Bars
Here are my tips to ensure that your lemon bars turn out perfectly every time:
Use fresh lemons. For the best flavor, always use freshly squeezed lemon juice and zest. Bottled lemon juice lacks the vibrant taste that fresh lemons provide. And, I don’t recommend using Meyer lemons in this recipe; they have less “zing” due to their lower acidity.
Don’t overmix the crust. Overmixing the ingredients can lead to a tough and chewy crust. Stop mixing as soon as the ingredients are combined and forming lumps.
Bake the crust before adding the filling. Don’t skip this step! Pre-baking the crust ensures that it holds its shape and doesn’t become soggy when the lemon filling is added.
Cool the bars completely. It’s important to let the lemon bars cool to room temperature before frosting, so the frosting adheres properly.
Refrigerate before slicing. You need to refrigerate these cookies for at least one hour before slicing, to allow them to set. They will be much easier to slice cold!
Variations on the Classic Lemon Bars Recipe
While this easy lemon bars recipe is undeniably delicious, there are several ways to make them your own. Here are a few ideas:
Add candied ginger. Following on the heels of my Blueberry Lemon Tart recipe, add chopped candied ginger to the filling.
Add coconut. Add shredded coconut into the crust or sprinkle it on top of the bars.
Let me know (in the comments below) if you come up with some other fun modifications!
How to Serve This Recipe for Lemon Bars
To serve this easy dessert:
Using a sharp knife cut the refrigerated cookies into bars. I usually cut them into 15 pieces, but for a larger group, I cut them slightly smaller, into around 24 pieces.
Place on a serving platter or individual serving plates.
Add a small sprig of fresh mint leaves to the plate or platter for a pop of contrasting color.
Note that if you stack the cookies for a long time (e.g., other than to quickly serve), place parchment paper between the layers to keep them from sticking together.
How to Store Lemon Bars
If you have any leftover lemon bars or want to prepare them in advance, cover them tightly with aluminum foil or plastic wrap and refrigerate. They are best when consumed within 2 to 3 days, but will last up to 4 to 5 days. They can also be frozen for up to 2 months. Thaw, covered, in the refrigerator overnight. (See note in section above about stacking the bars.)
Lemon Bars FAQs
Can I use bottled lemon juice instead of fresh lemons?
While it is possible to use bottled lemon juice, I recommend using fresh lemons for the best flavor. Bottled lemon juice lacks the bright, tangy taste that fresh lemons provide.
Can I substitute margarine for butter in the crust?
While margarine can be used as a substitute, the flavor and texture of the crust may be slightly different. Butter is preferred for its rich flavor and superior baking properties.
Can I use a different type of citrus fruit, such as oranges or limes?
Lemon bars are traditionally made with lemons, but you can experiment with other citrus fruits. Let me know how they turn out!
Can I make the lemon bars gluten-free?
Yes, you can make gluten-free lemon bars by using 1 cup gluten-free flour and 1/2 teaspoon xanthan gum. Double-check that all of your other ingredients are also gluten-free.
Do lemon bars need to be refrigerated?
Yes, for best results keep them well covered, in the refrigerator.
How long do lemon bars last in the fridge?
Lemon bars are best eaten within 2 to 3 days, but will last up to 4 to 5 days.
Can you freeze lemon bars?
Yes, you can freeze these lemon bars. It’s best to wrap each bar with plastic wrap, then place in a freezer-safe ziptop baggie. They will last for up to 2 months. Thaw overnight in the refrigerator.
Sunshine on a plate! Straight from my grandmother Nama’s kitchen, these Homemade Lemon Bars are a treasured family recipe. Lovingly passed down for three generations, this recipe is surprisingly easy to prepare with readily available pantry ingredients. Bursting with citrusy flavor from both fresh lemon juice and zest, the addition of a unique ingredient makes them lighter than other, more dense lemon bars. And, with the perfect balance of sweet and tart, these homemade lemon bars appeal to both young and old, making them a delightful dessert for any occasion, from family dinner to bridal showers or graduation celebrations.
Prep Time:10 minutes
Cooling time:120 minutes
Cook Time:40 minutes
Total Time:2 hours 50 minutes
Yield:15 to 24 bar cookies
Ingredients
Cookie Crust
1/2 cup salted butter, softened
1/4 cup powdered (Confectioners’) sugar
1 cup all-purpose flour
Lemon Filling
2 large eggs
1 cup granulated sugar
1 tablespoon fresh lemon zest (about 2 medium lemons)
Preheat oven to 325 degrees. Optional (see note below): line a 7 by 11-inch pan with parchment paper.
Cookie Crust
With an electric mixer, blend together the butter and powdered sugar until smooth, fluffy, and light in color, around 3 to 4 minutes. Add the flour and mix just the mixture starts to form clumps. Don’t overmix.
Press dough into the bottom of the 7 by 11-inch baking dish.
Bake for 15 minutes. Remove from oven and set aside (don’t turn the oven off).
Lemon filling
Again with the electric mixer, beat the eggs and sugar together just until light in color and well blended. Add the lemon juice, lemon zest, baking powder and salt and blend until just mixed. Spread over top of cooked crust.
Bake for 20 to 25 minutes or until set – gently press the top with your finger to test. (Lemon filling will have puffed up and then settled down a bit). Set aside to cool in the pan for at least one hour before frosting.
Frosting
In a small mixing bowl, whisk all ingredients together until frosting consistency. Add more milk if too thick or more sugar if too thin.
Spread over the top of the cookies.
Refrigerate for at least one hour. Cut into bars (either 18, 24, or 28, depending on how large you want the cookies to be).
Store the cookies, covered, in the refrigerator. Can serve cold or at room temperature.
Notes
Note about baking dish: If you line the pan with parchment paper the cookies will be easier to remove from the pan. However, you won’t get those browned, chewy edges; your choice.
High altitude: No adjustments are necessary up to 7000 feet. Above that level, reduce the baking powder to 1/4 teaspoon.
Gluten free: Substitute 1 cup gluten-free flour and 1/2 teaspoon xanthan gum for the 1 cup flour. Double-check that all of your other ingredients are also gluten-free.
Author:From “A Well-Seasoned Kitchen®” by Sally Clayton and Lee Clayton Roper
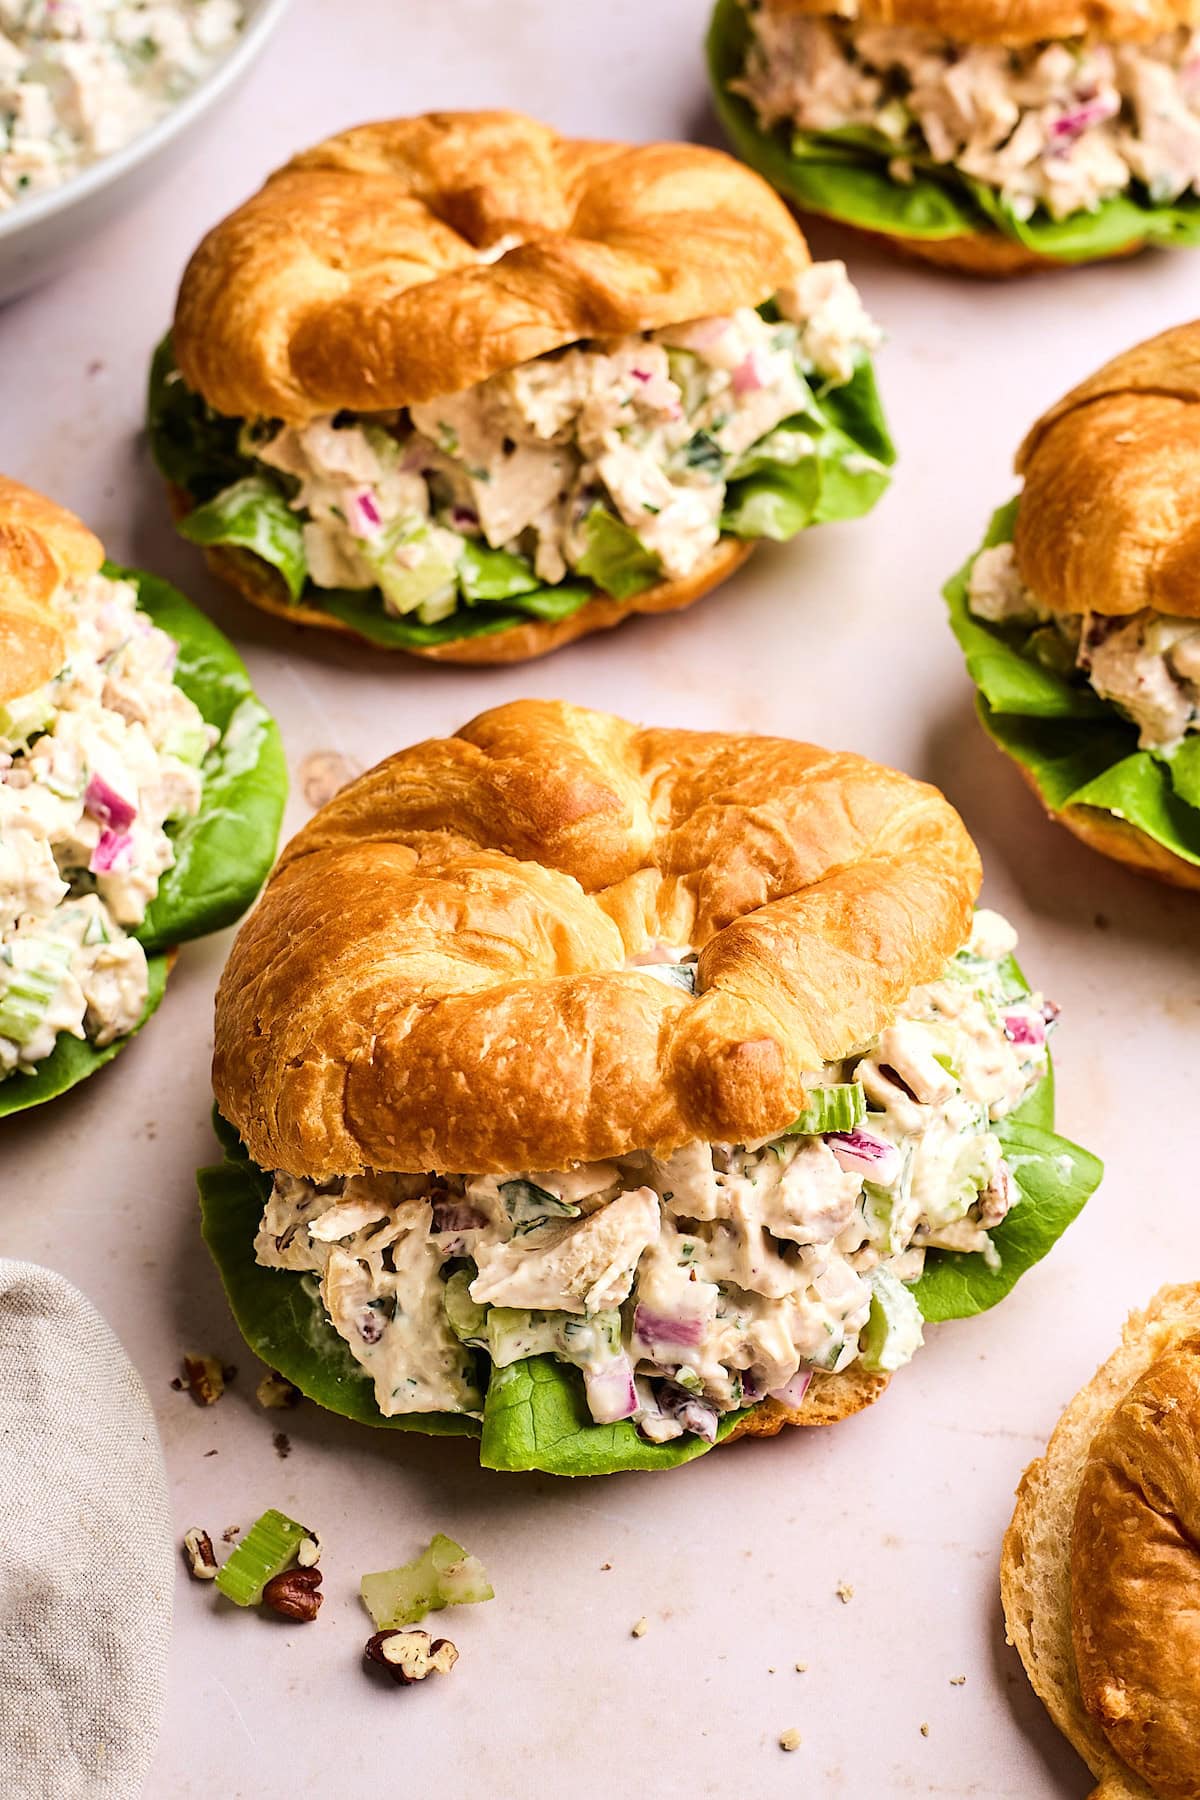
Chicken Salad is a CLASSIC salad recipe that is always a crowd pleaser. The salad is easy to make and a great recipe to make when you have leftover chicken or rotisserie chicken. To make the salad, toss chopped cooked chicken in a creamy dressing with …
Chicken Salad is a CLASSIC salad recipe that is always a crowd pleaser. The salad is easy to make and a great recipe to make when you have leftover chicken or rotisserie chicken. To make the salad, toss chopped cooked chicken in a creamy dressing with celery, onion, pecans, and fresh herbs. This recipe is…
Made easy with frozen vegetables and baking mix, this bisquick breakfast casserole is a savory, cheesy brunch dish that can be prepped ahead or just before serving.
If you’ve been following MBA for a while, you know that I’m a big fan of my homemade bisquick mix. It’s one of my favorite homemade kitchen staples – maybe only surpassed by my pumpkin pie spice.
You also probably know how much I love my hash brown breakfast casserole. So when I realized I could use my homemade bisquick to make another super easy and delicious breakfast casserole, I was on it immediately.
I love a sweet treat, especially after lunch or before bed. I like to keep my Peanut Butter Protein Balls, Monster Cookie Energy Balls, or these Chocolate Brownie Protein Balls. They are SO easy to make, you only need a few basic ingredients, and they …
I love a sweet treat, especially after lunch or before bed. I like to keep my Peanut Butter Protein Balls, Monster Cookie Energy Balls, or these Chocolate Brownie Protein Balls. They are SO easy to make, you only need a few basic ingredients, and they are SO rich and decadent. I keep them in my…
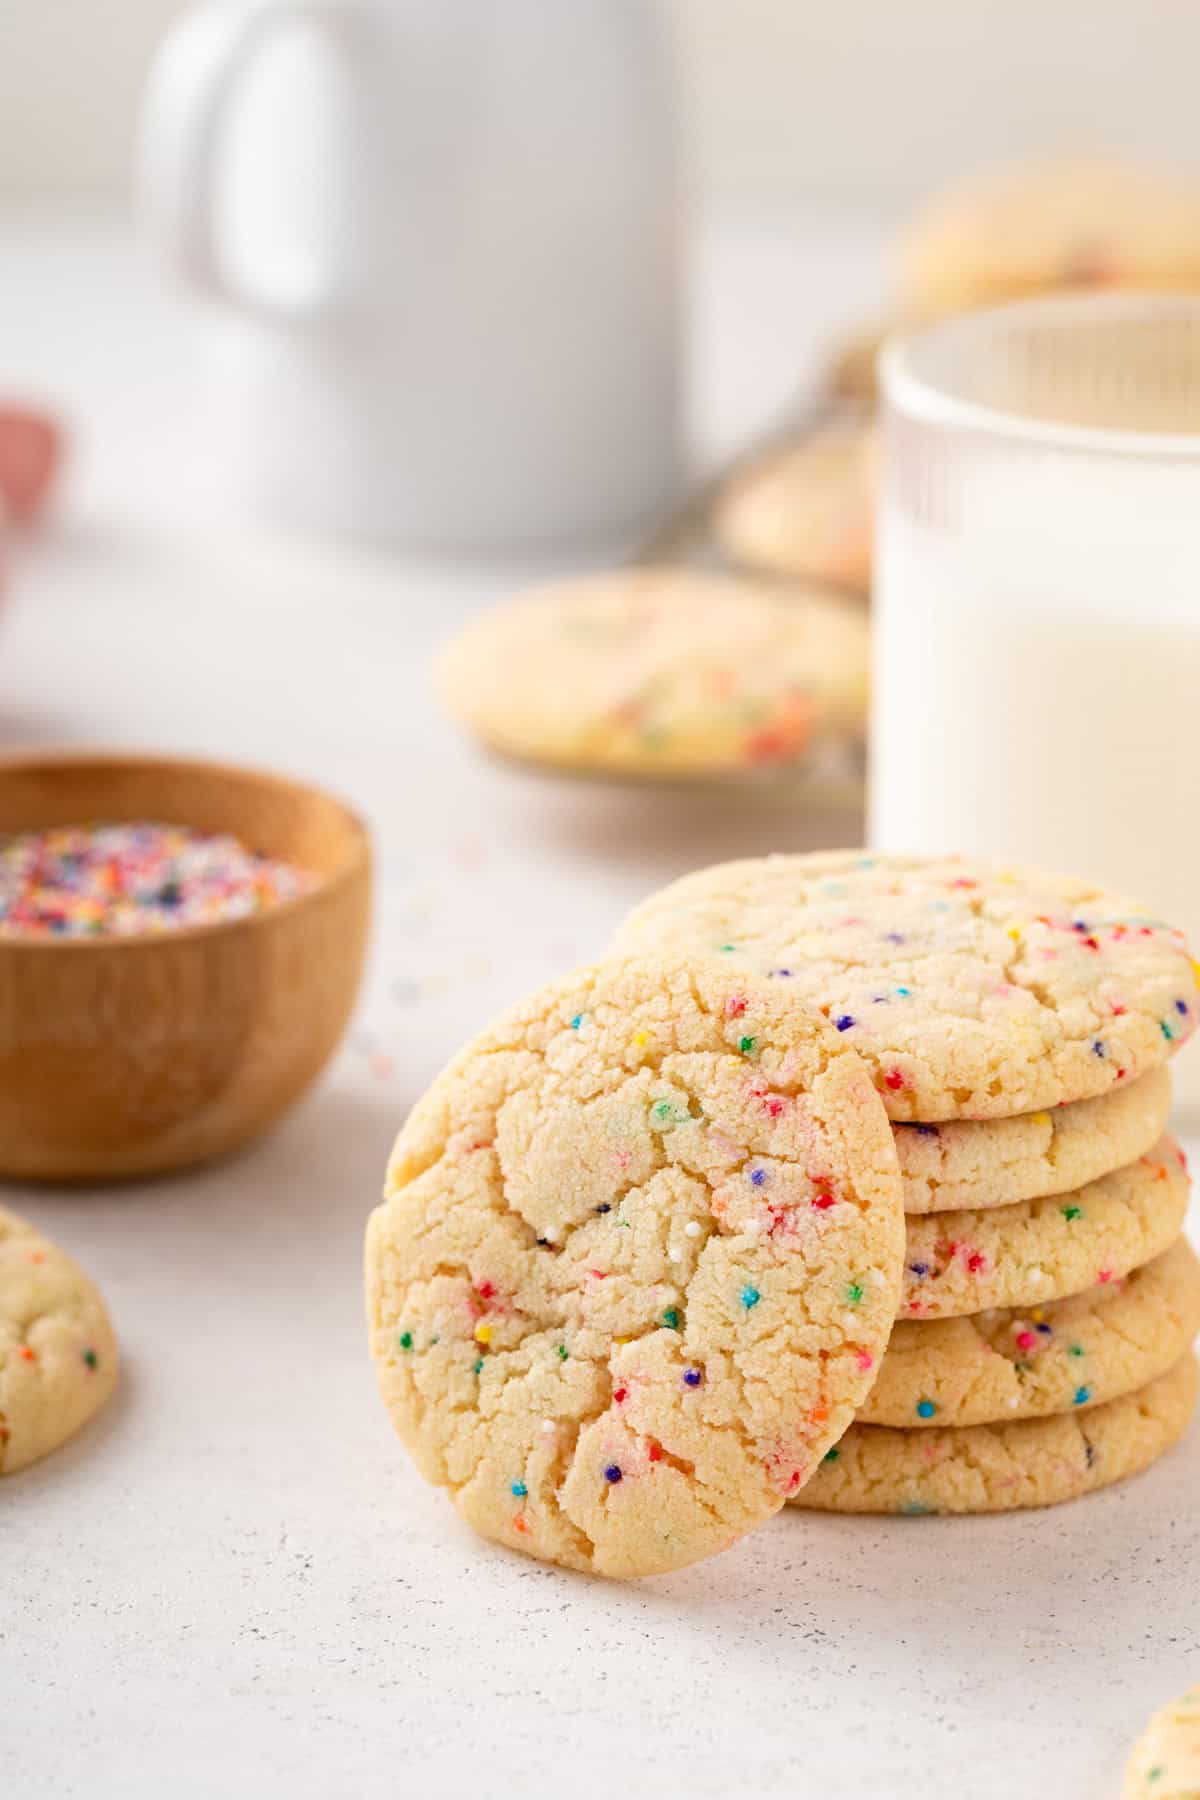
Chewy, easy sugar cookies come together in a snap with zero chilling, rolling out, or cutting required. Make these cookies extra colorful and fun by adding nonpareil sprinkles or sandwiching them with buttercream frosting.
I’m a self-professed sugar cookie connoisseur. I’ll take ’em frosted, cut-out, rolled in sugar, soft, chewy, crispy, or straight out of the plastic container from the bakery section at Walmart.
What I’m saying is that I’m fairly obsessed with sugar cookies and I’m honestly not very picky about them.
Wait, maybe that makes me less of a connoisseur and more of a human sugar cookie garbage disposal. Whatevs.
While I do appreciate a beautiful sugar cookie complete with royal icing, I’m more of a buttercream type of girl. And I’m impatient. It’s why I love no-chill sugar cookies when I do want to make cut-outs.
And I’m definitely not fancy, so these easy sugar cookies are totally my thing. They come together in less than 10 minutes with everyday ingredients that I’m betting you have in your fridge and pantry right now.
 Artichokes are one of my favorite vegetables. I love using them to make pizza, salads, chicken, lasagna, and of course the classic spinach artichoke dip. I also love using them in this Roasted Artichoke Chickpea Orzo Salad. The flavors are phenomenal and it’s the perfect salad for spring and summer. SO fresh and delicious! Orzo…
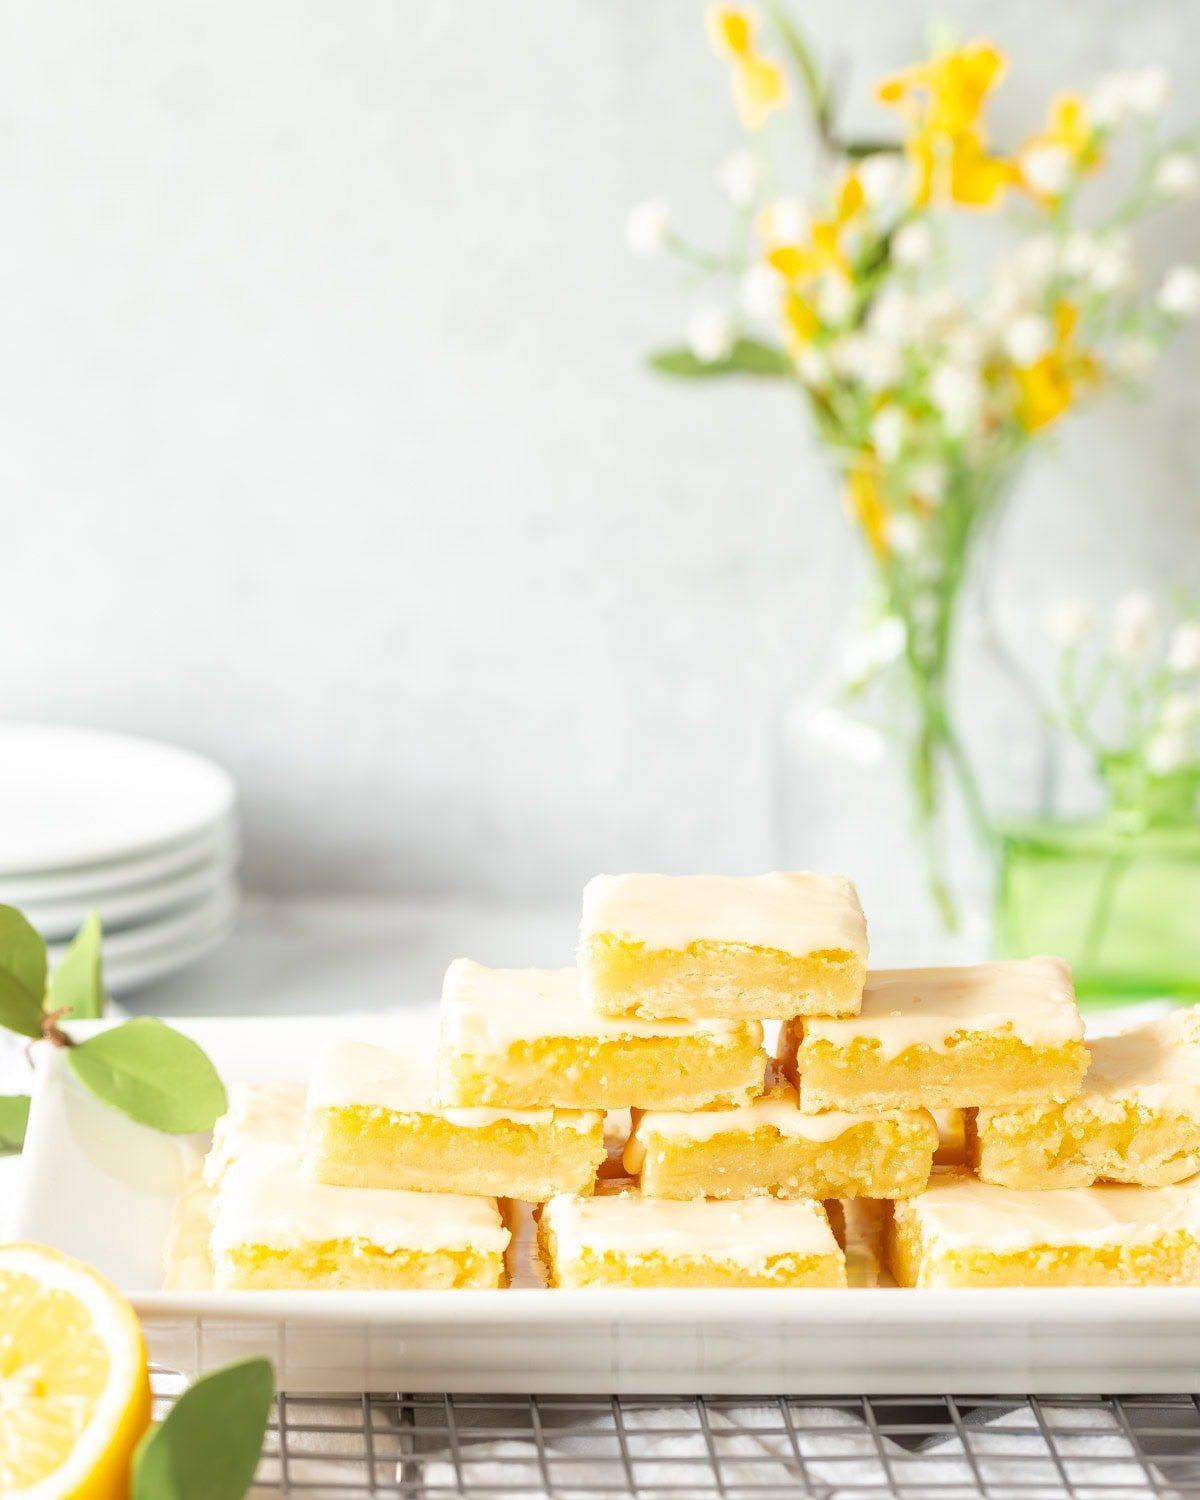


 Chicken Salad is a CLASSIC salad recipe that is always a crowd pleaser. The salad is easy to make and a great recipe to make when you have leftover chicken or rotisserie chicken. To make the salad, toss chopped cooked chicken in a creamy dressing with celery, onion, pecans, and fresh herbs. This recipe is…
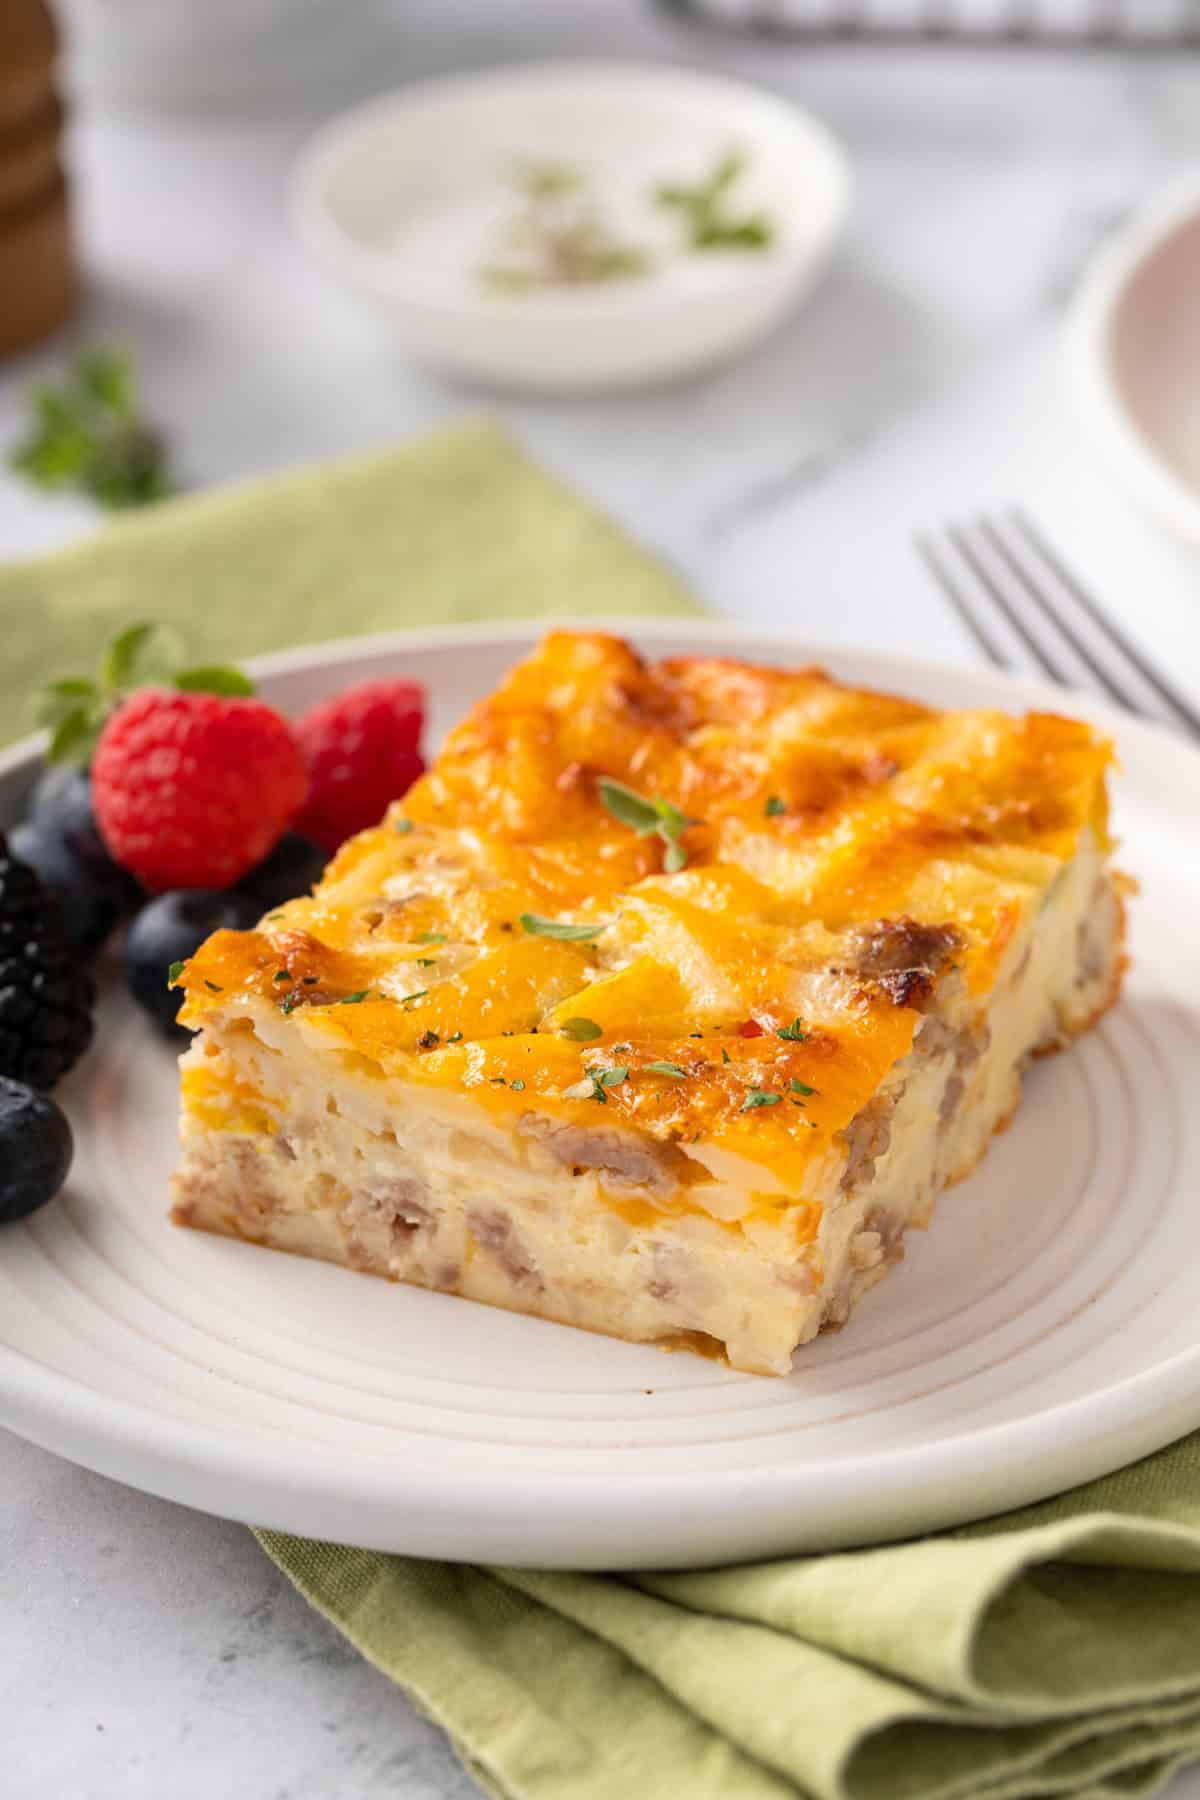
 I love a sweet treat, especially after lunch or before bed. I like to keep my Peanut Butter Protein Balls, Monster Cookie Energy Balls, or these Chocolate Brownie Protein Balls. They are SO easy to make, you only need a few basic ingredients, and they are SO rich and decadent. I keep them in my…