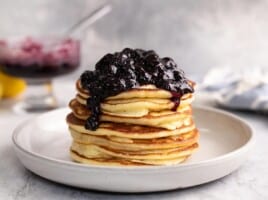
I’m always looking for ways to get breakfast and dinner on the table faster and these Sheet Pan Pancakes might just be my new best friend! Not only are they easy to whip up, but they’re super convenient. You can pour the entire pancake batter on one baking sheet and top it with your favorite toppings, or leave it plain and let everyone add their own toppings after it bakes. What I love most about these sheet pan pancakes are that they’re perfect for breakfast meal prep. They freeze perfectly and whenever I need a quick breakfast, I just pop 2 pancakes in my toaster and breakfast is done!🙌
Why Sheet Pan Pancakes?
I’m not sure if your family loves pancakes as much as mine, but it has now turned into our Saturday morning routine. But flipping and making several batches of regular pancakes takes quite a while. And I have to try and keep the first few batches warm in the oven, while I make the rest of the pancakes. Sheet Pan Pancakes keeps you from having to do that back and forth dance. You can make pancakes for the whole family in one big batch, all on one baking sheet, and customize it with their favorite mix-ins and toppings. It’s honestly genius!
Ingredients For Sheet Pan Pancakes
To make these sheet pan pancakes, I used our homemade pancakes recipe as a base foundation and adjusted the measurements to accommodate a larger portion size. Here’s what you’ll need:
- All-Purpose Flour: Flour adds structure and is the foundation of the pancakes.
- Baking Powder: Baking powder is what makes the pancakes light and fluffy instead of dense and gummy.
- Sugar: A little bit of sugar adds the perfect amount of sweetness to the pancakes.
- Milk: Milk combines with the flour to add moisture and helps create the batter.
- Egg: Eggs help hold the pancakes together and also helps leaven the pancakes.
- Butter: Butter adds flavor and richness to the pancakes.
- Vanilla Extract: A small amount of vanilla extract adds a wonderful flavor and depth to the pancake.
- Salt: A little bit of salt helps enhance the flavor of the pancakes.
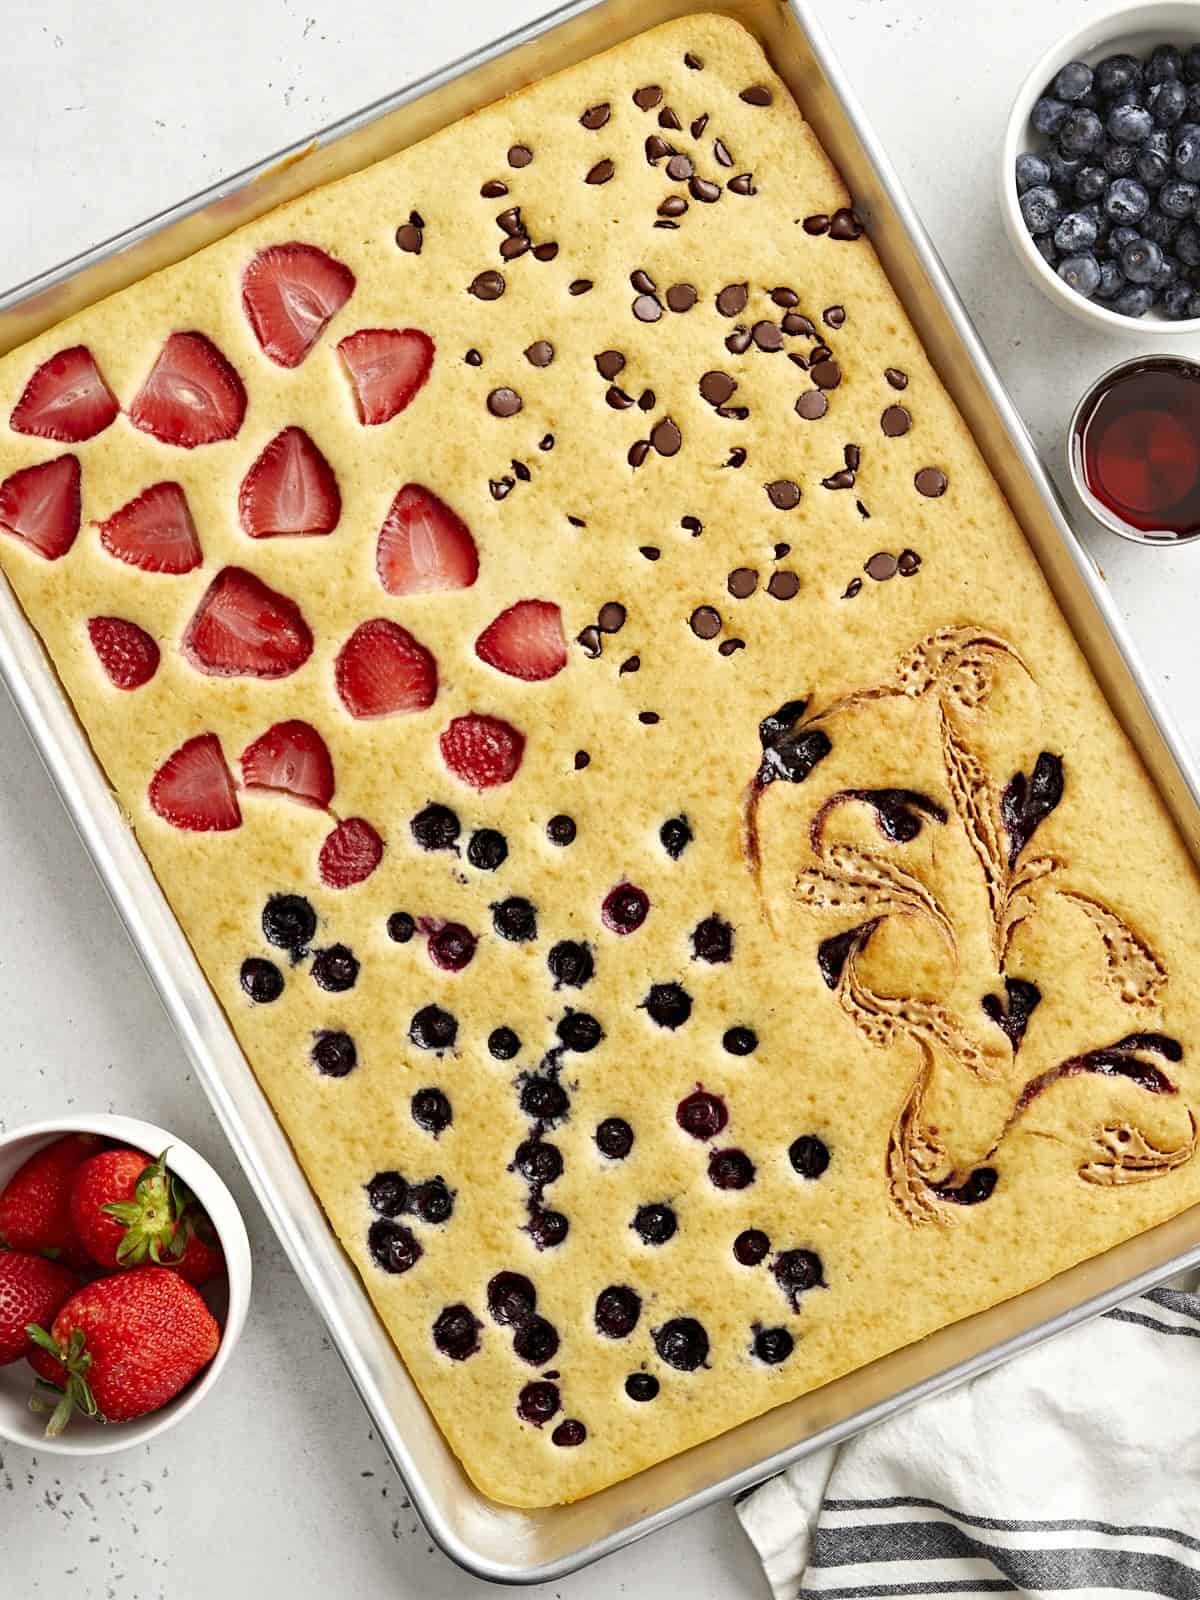
- Toppings: This is where you can really have fun! I used a combination of my favorite fruits like strawberries and blueberries. And for some variety I added some chocolate chips and peanut butter & raspberry jam.
More Toppings and Mix-in Ideas
My favorite part about making sheet pan pancakes is adding different mix-ins and toppings. I personally love adding fresh fruit, but here are some more topping ideas for you to try:
- Sliced bananas
- Mixed berries (raspberries, blueberries and blackberries)
- Nuts
- Nutella
- Caramel sauce
- Cherry sauce
- Strawberry syrup
- Whipped cream or powdered sugar after it bakes.
Recipe Tips!
- Don’t overmix the batter. Stir the dry and wet ingredients together until they are just combined and there are no traces of dry flour left in the bowl. Over-mixing the batter will develop the gluten in the flour and make the pancakes rubbery rather than soft and fluffy.
- Grease your sheet pan well. Make sure to generously coat your sheet pan well with cooking spray to keep the pancakes from sticking.
- Dry your fruit well. If you’re adding fresh fruit, make sure to wash and dry your fruit well with paper towels to prevent any excess water or fruit juices from bleeding into the pancake batter.
- If necessary, use some parchment paper. Sheet pan pancakes seem to work better with baking sheets that aren’t too old. So if your baking sheet is older or a little beat up, you may want to line it with some parchment paper first.
How To Store & Freeze Sheet Pan Pancakes
What I love most about making sheet pan pancakes is that they’re extremely easy to store and freeze for later when you need a quick & easy breakfast. To store, let the pancakes cool completely, then transfer them to an airtight container and refrigerate for up to 3 days.
To freeze, place the cooled pancakes in a freezer safe storage bag, in single layers with parchment paper between the layers to prevent sticking. Freeze for up to 3 months. You can easily reheat frozen pancakes in a toaster or in the microwave until hot.
Sheet Pan Pancakes
Equipment
Ingredients
- 2 cups all-purpose flour $0.40
- 1/4 cup granulated sugar $0.10
- 1 Tbsp baking powder $0.18
- 3/4 tsp salt $0.08
- 1 1/2 cup milk $0.30
- 2 large eggs $0.33
- 4 Tbsp butter, melted $0.53
- 1 tsp vanilla extract $0.30
- cooking spray
Optional Toppings*
- fresh strawberries, sliced
- blueberries
- chocolate chips
- peanut butter and fruit jam
Instructions
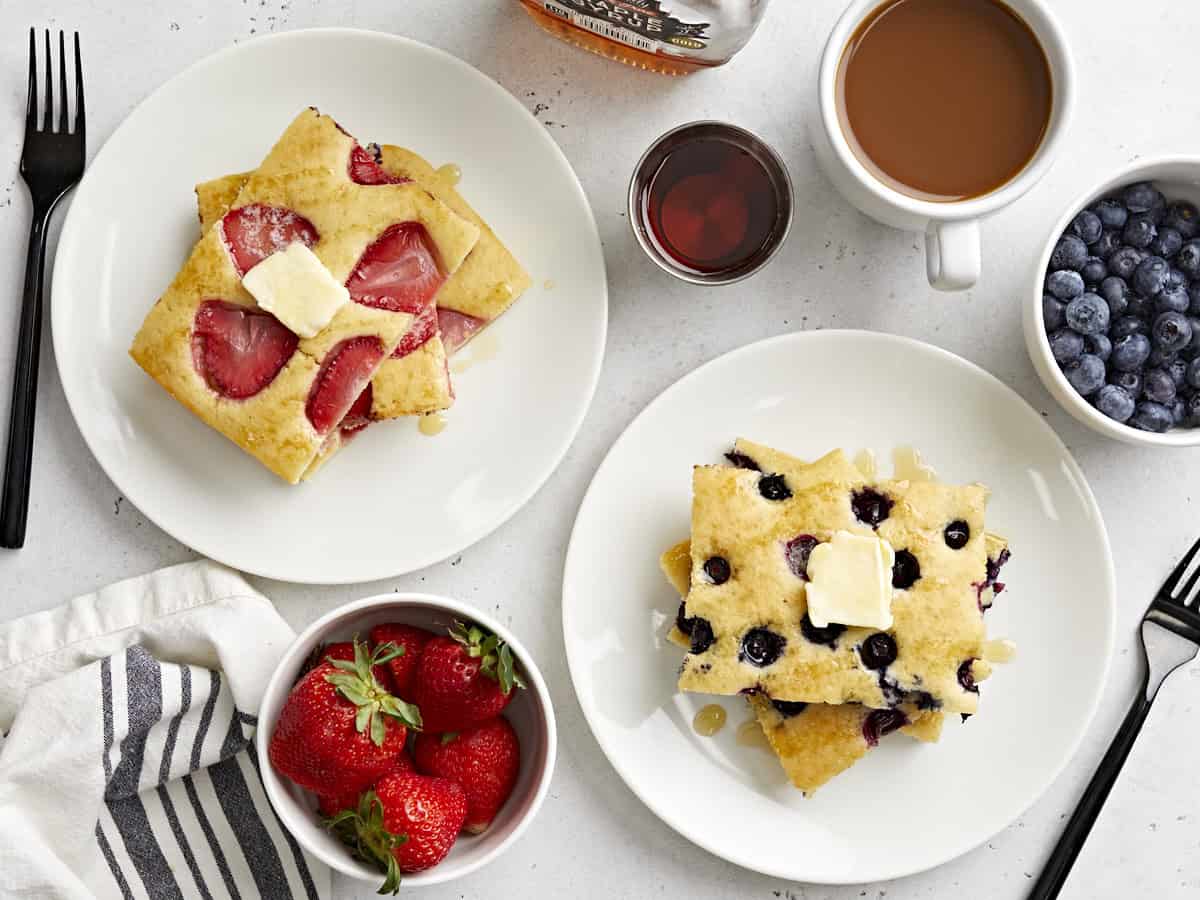
- Preheat the oven to 425°F. In a large bowl whisk together the flour, sugar, baking powder, and salt.
- In the same bowl, add in the milk, eggs, melted butter, and vanilla extract. Whisk the wet ingredients together with the dry ingredients until just combined. Be careful not to over mix.
- Generously coat a 11×17-inch rimmed baking sheet with cooking spray. Pour the pancake batter onto the baking sheet. Spread the batter evenly around the baking sheet with a rubber spatula or tap the pan a few times on the counter to even out the batter.
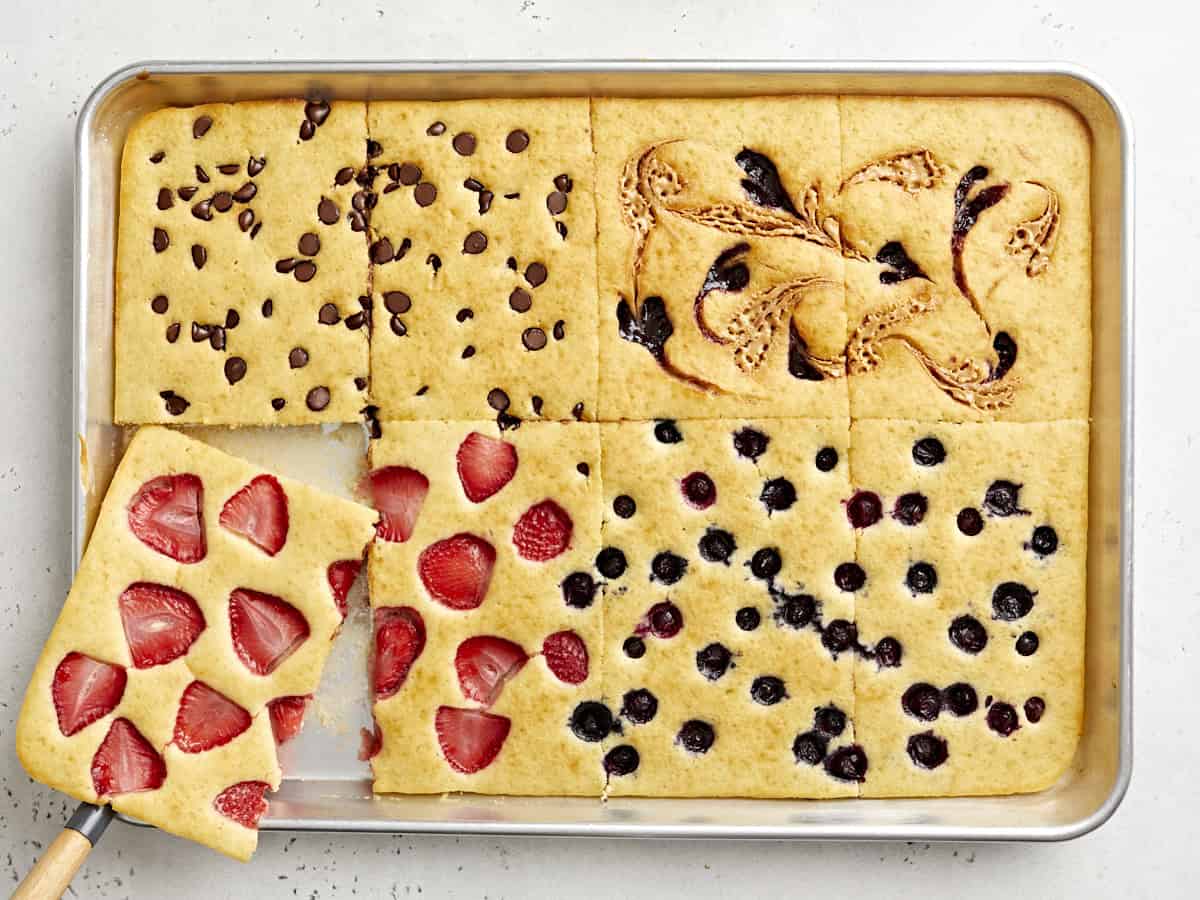
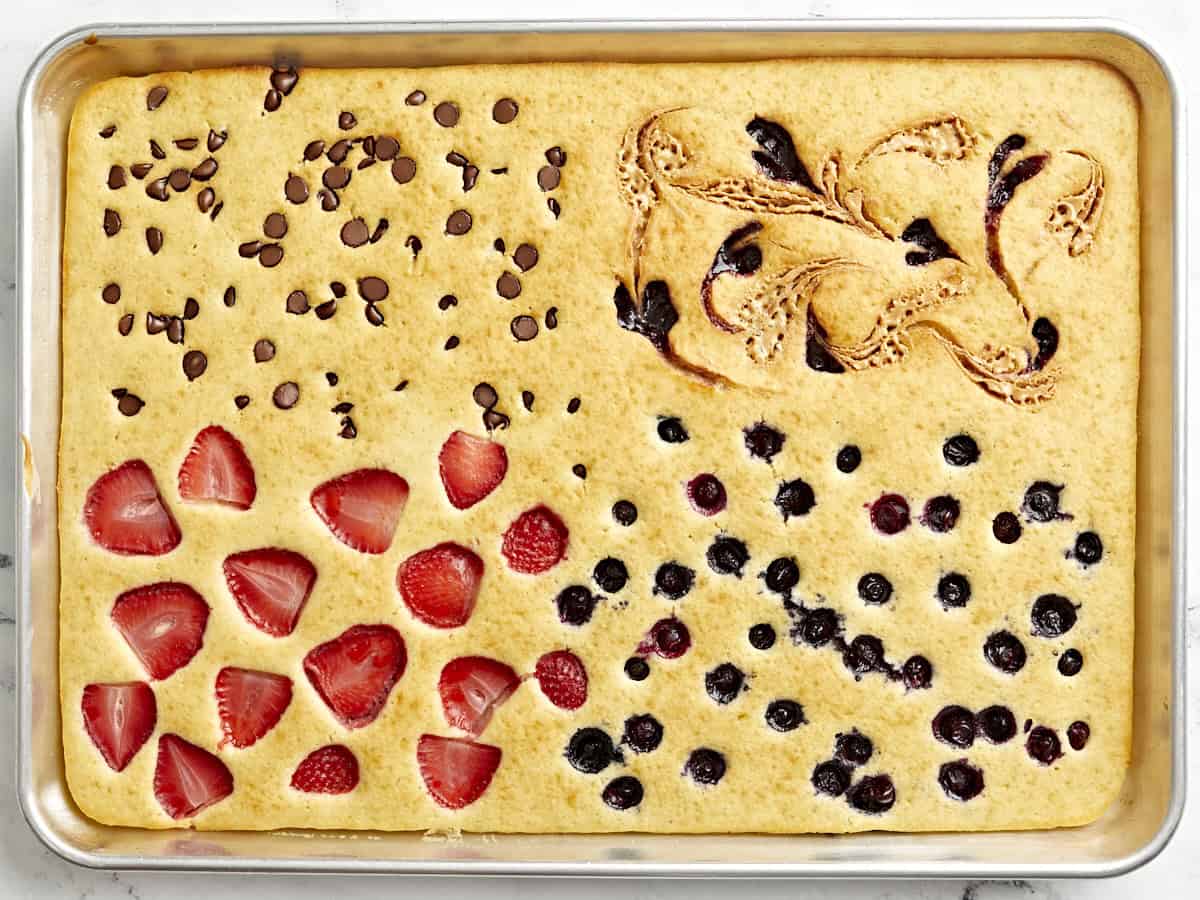
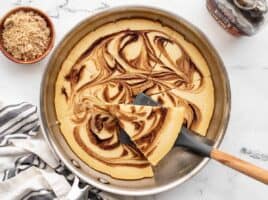
- Visually divide the pancake batter into four equal sections and add your desired toppings on top into each section. I used a combination of sliced strawberries, blueberries, chocolate chips, and a peanut butter and raspberry jam swirl. To make the pb&j swirl, I simply added dollops of natural peanut butter and jam, then swirled the two together using a toothpick.
- Place the sheet pan in the oven and bake for 18-20 minutes or until golden brown.
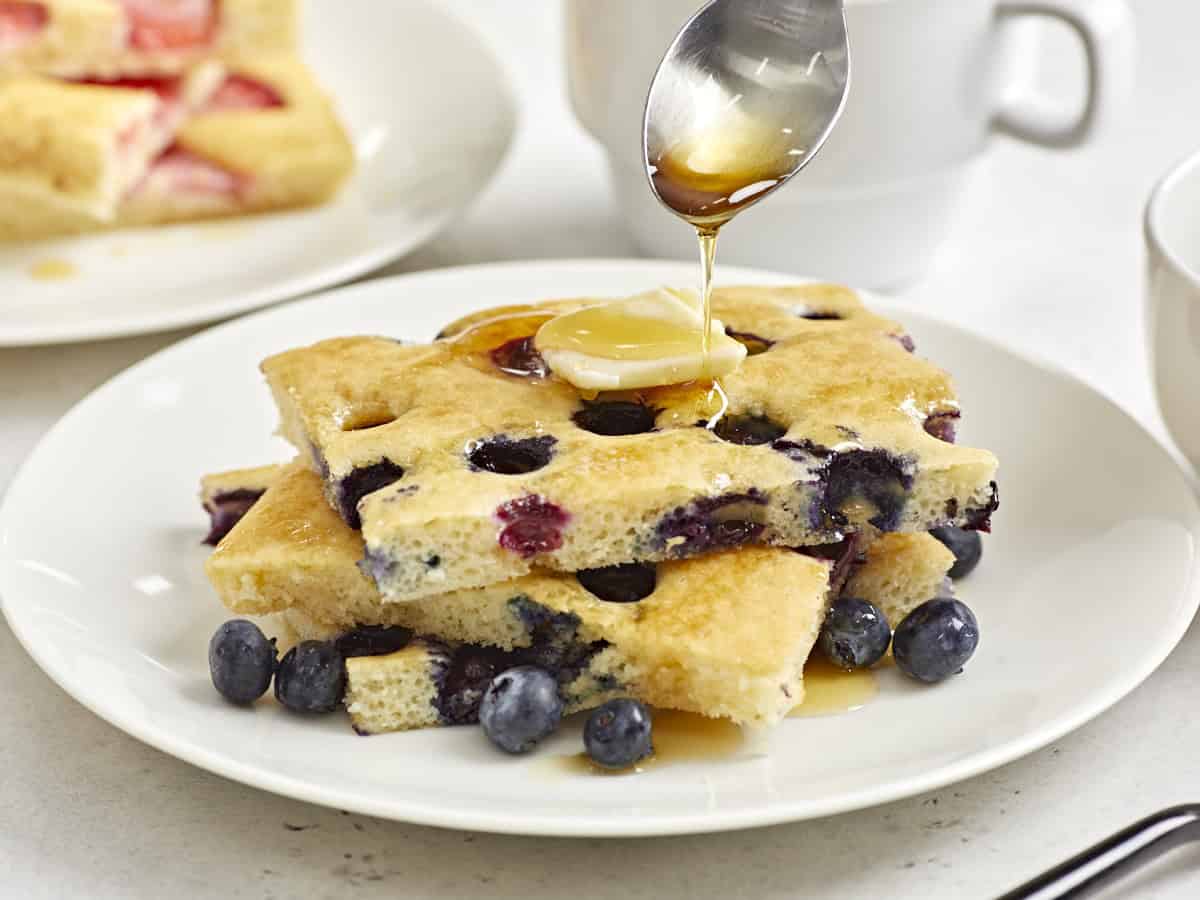
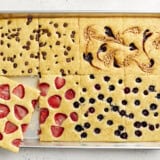
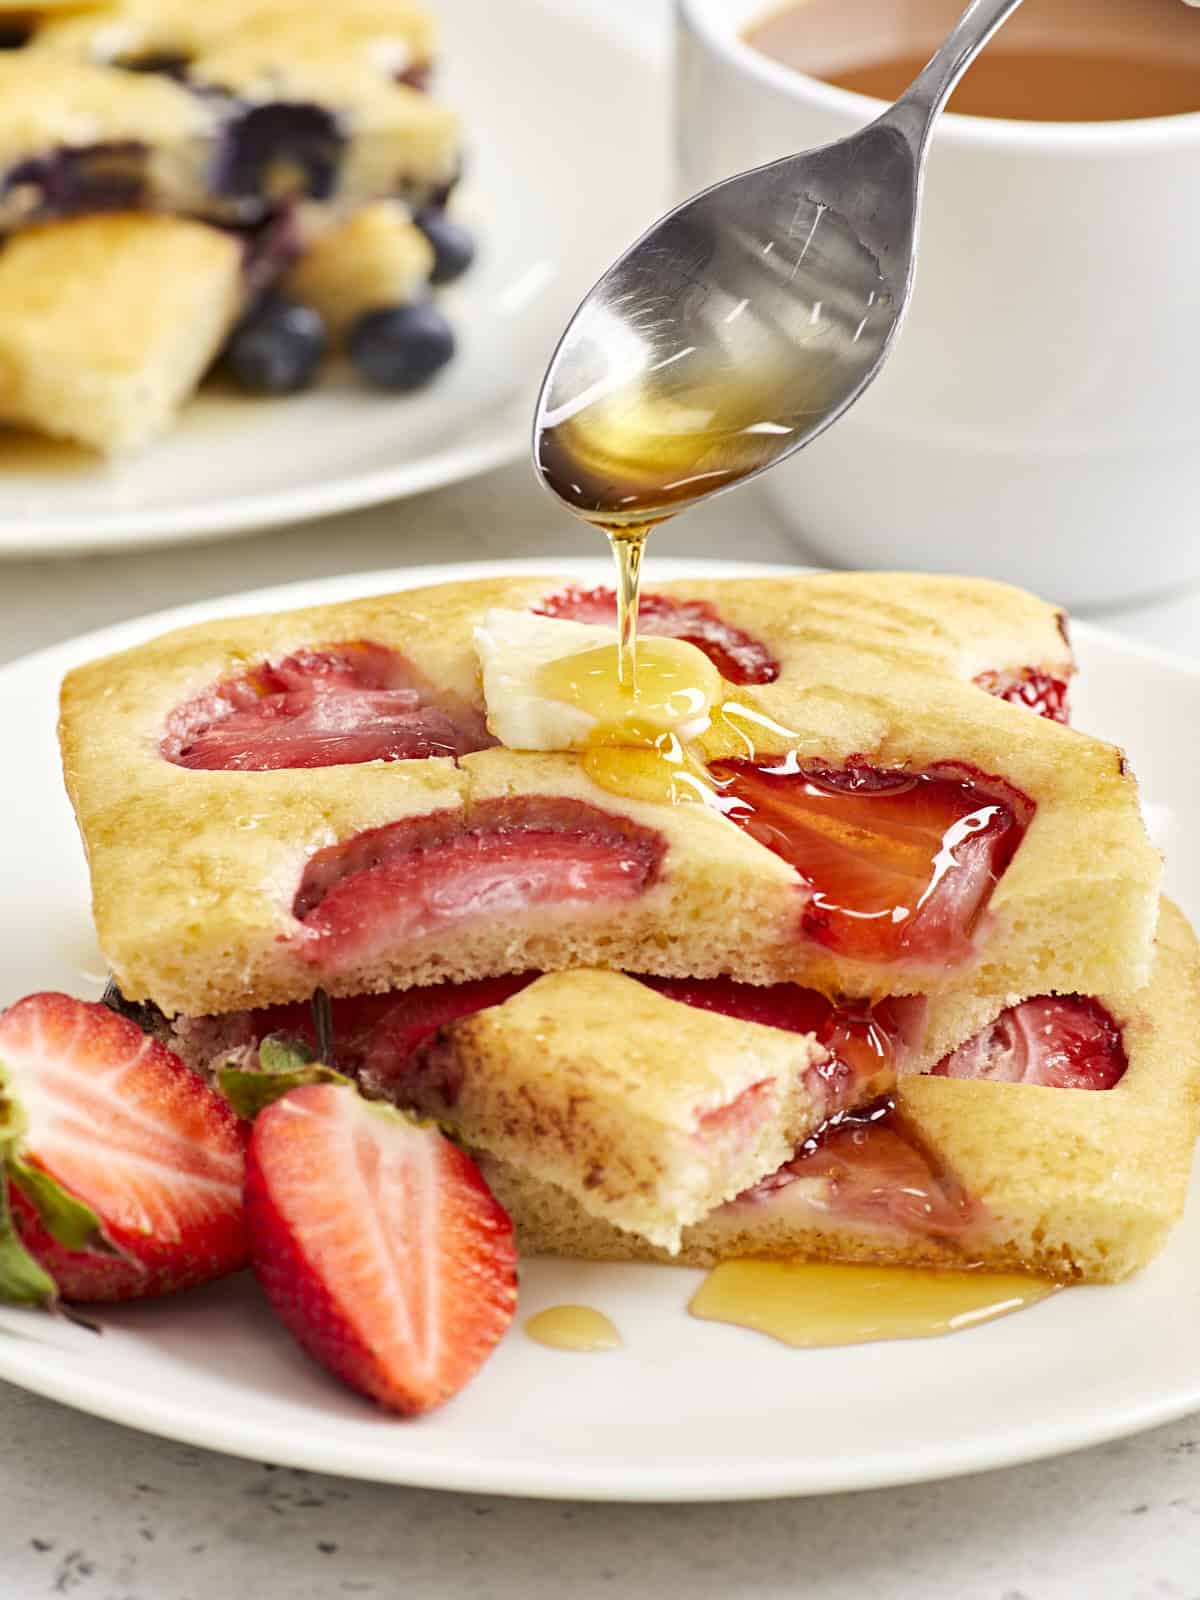
- Allow the pan to cool slightly, then slice the sheet pan pancake into 8 equal portions. Feel free to make smaller slices if you want to make more servings. Serve warm with syrup and extra toppings if you like. Enjoy!
See how we calculate recipe costs here.
Notes
Nutrition
How to Make Sheet Pan Pancakes – Step by Step Photos
Preheat the oven to 425°F. In a large bowl whisk together 2 cups all-purpose flour, 1/4 cup granulated sugar, 1 Tbsp baking powder, and 3/4 tsp salt.
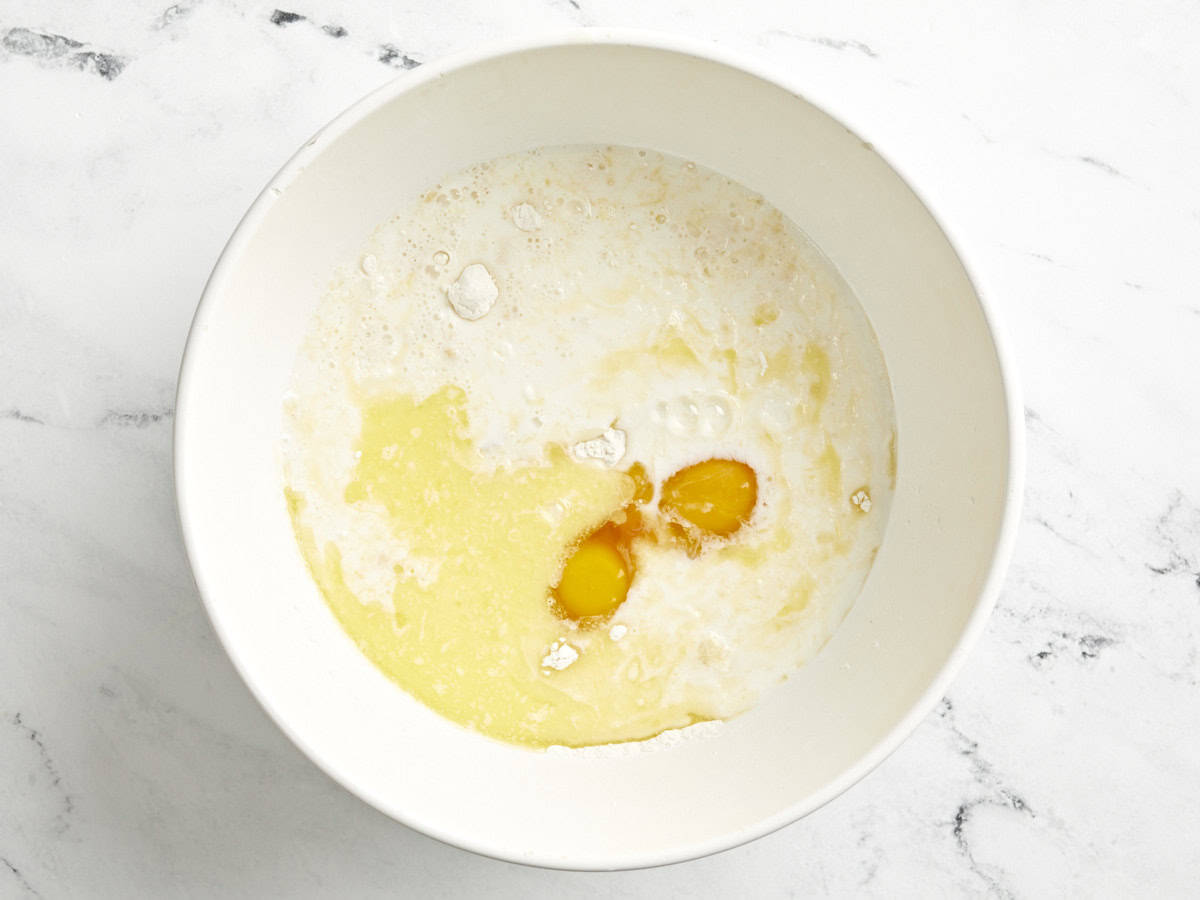
In the same bowl, add in 1 1/2 cups milk, 2 large eggs, 4 Tbsp melted butter, and 1 tsp vanilla extract.
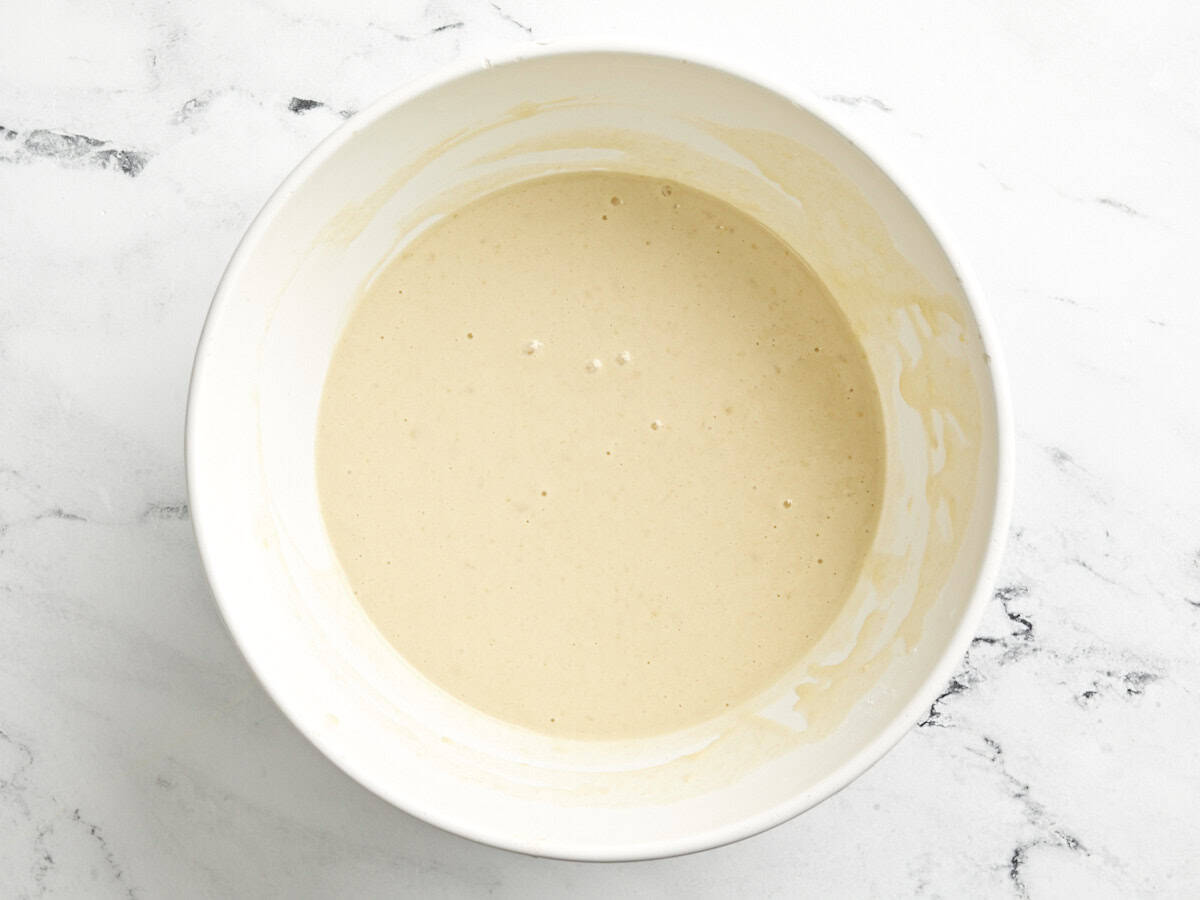
Whisk the wet ingredients together with the dry ingredients until just combined. Be careful not to over mix at this point.
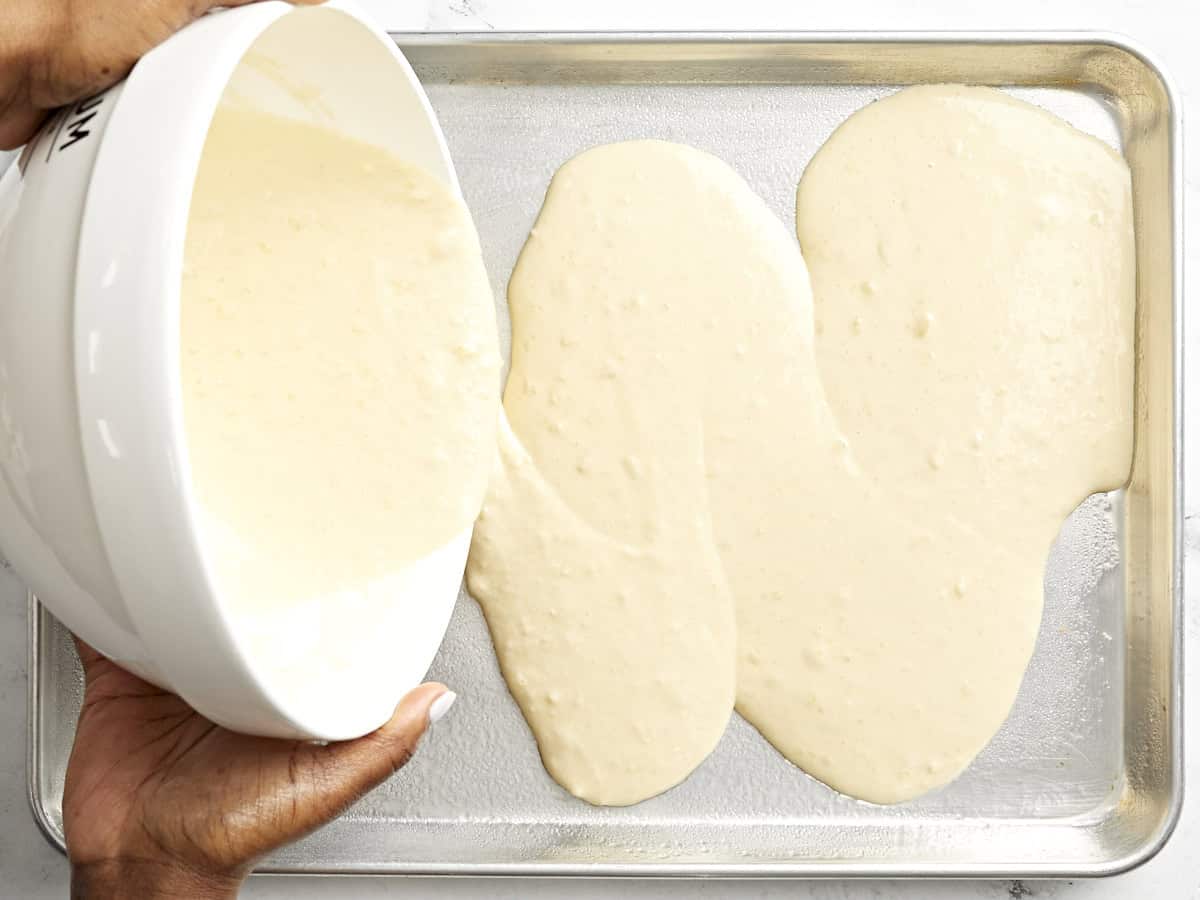
Generously coat an 11×17-inch rimmed baking sheet with cooking spray. Pour the pancake batter onto the baking sheet. Spread the batter evenly around the baking sheet with a rubber spatula or tap the pan a few times on the counter to even out the batter.
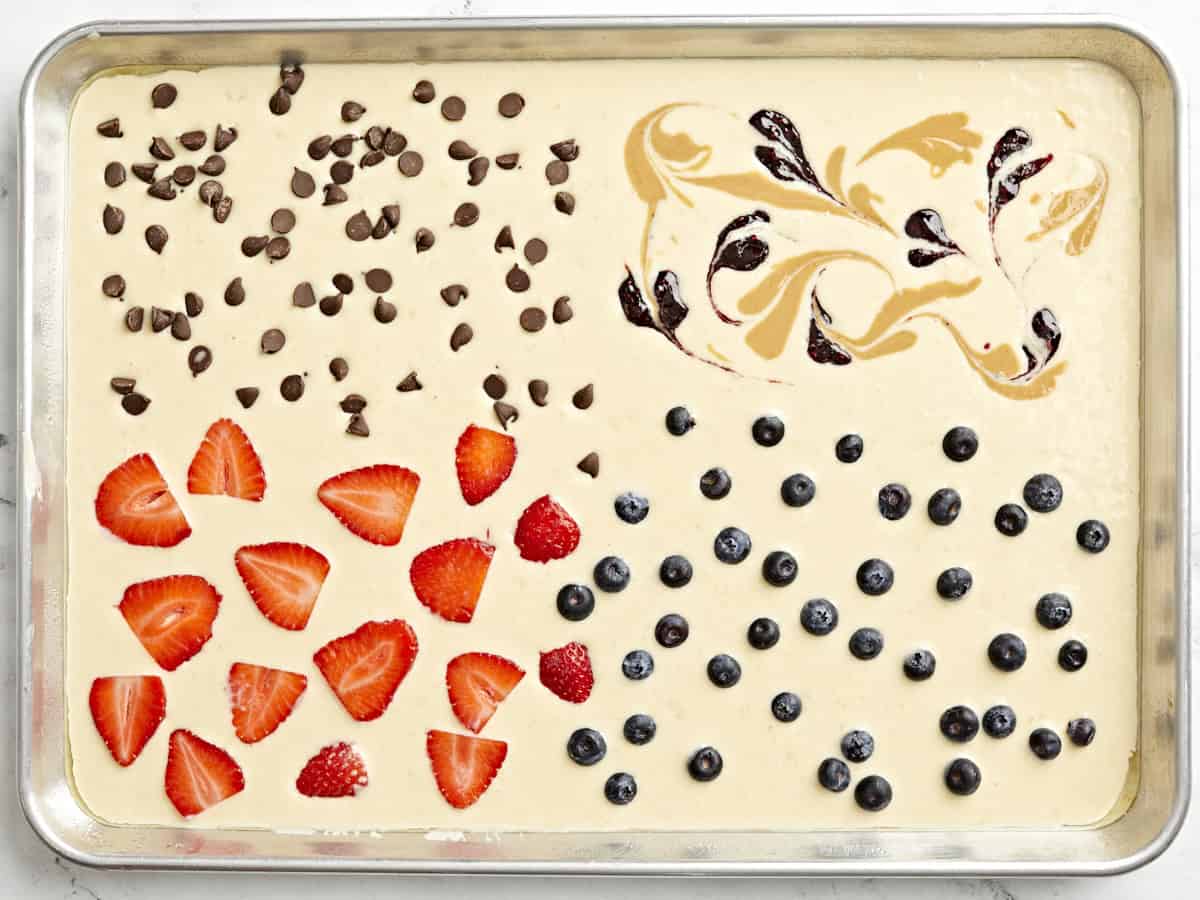
Visually divide the pancake batter into four equal sections and add your desired toppings on top into each section. I used a combination of sliced strawberries, blueberries, chocolate chips, and a peanut butter and raspberry jam swirl. To make the pb&j swirl, I simply added dollops of natural peanut butter and jam, then swirled the two together using a toothpick.
Place the sheet pan in the pre-heated oven and bake for 18-20 minutes or until golden brown.
Allow the pan to cool slightly, then slice the sheet pan pancake into 8 equal portions. Feel free to make smaller slices if you want to make more servings. Serve warm with syrup and extra toppings if you like!
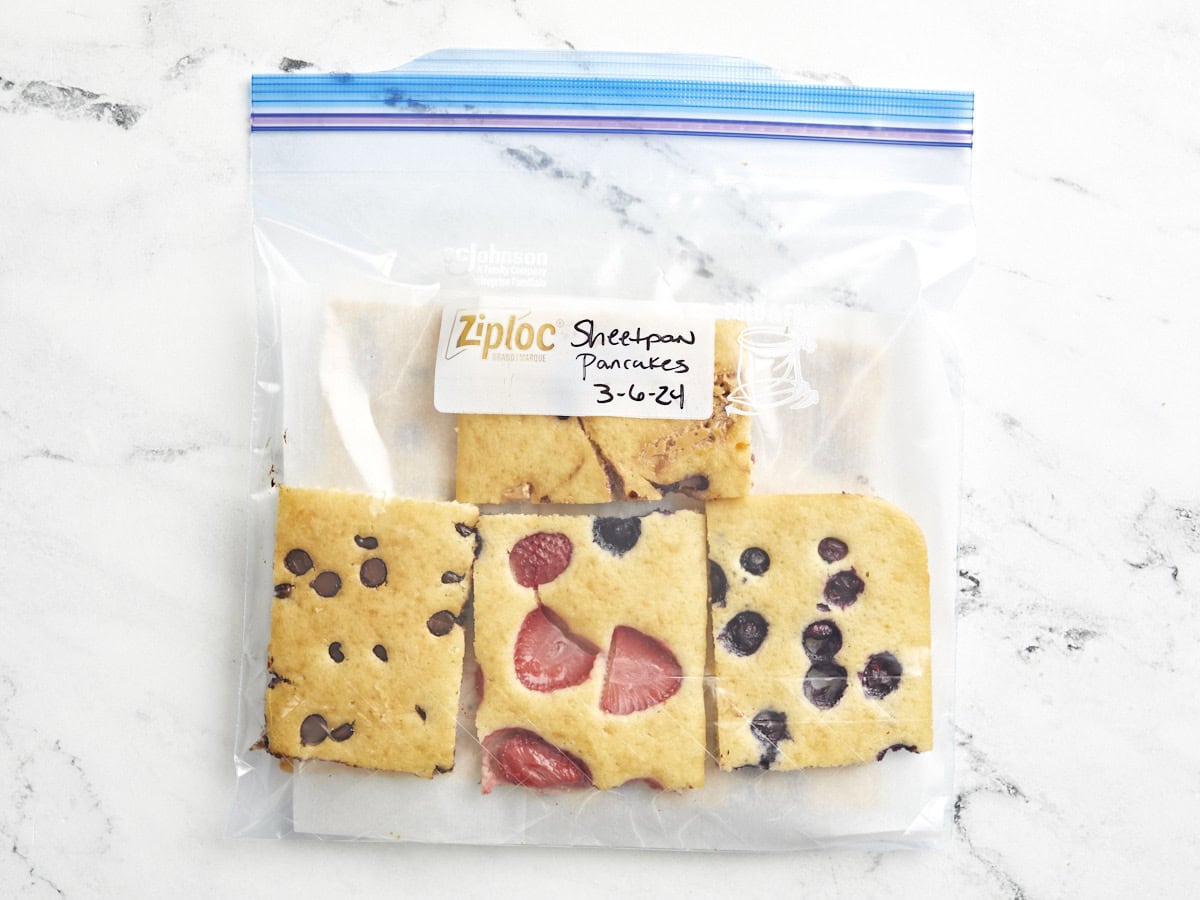
These pancakes are super easy to freeze! Just place the cooled pancakes in a freezer safe storage bag, in single layers with parchment paper between the layers to prevent sticking. Freeze for up to 3 months.

You can easily reheat frozen pancakes in a toaster or in the microwave until hot.
More Pancake Recipes

The post Sheet Pan Pancakes appeared first on Budget Bytes.