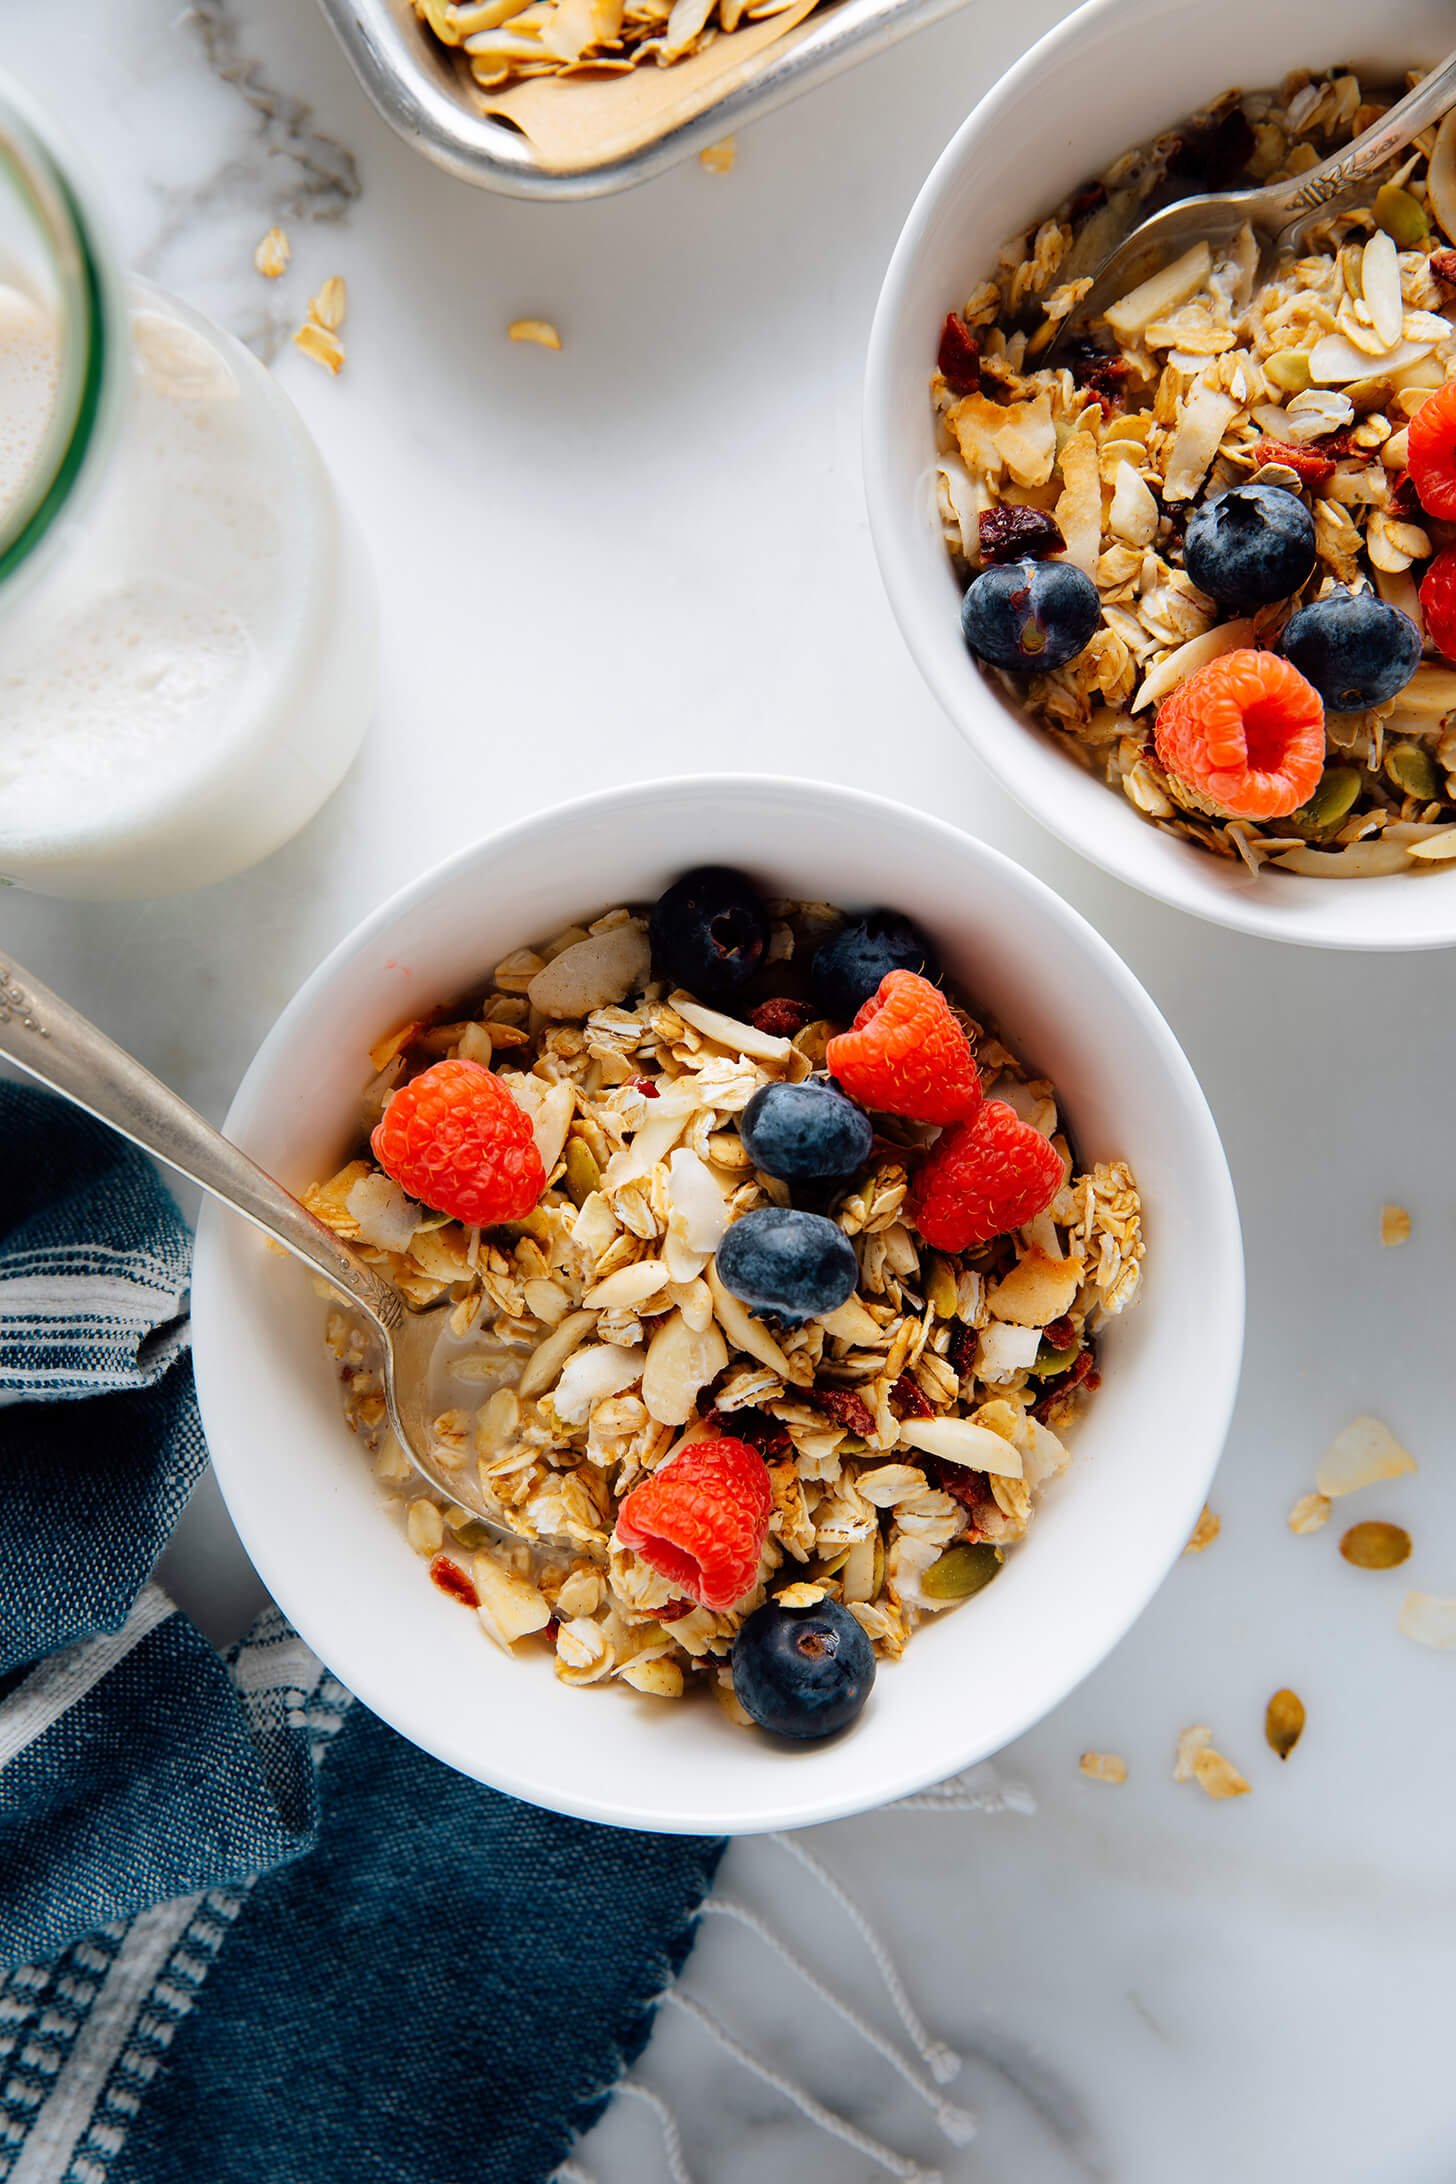
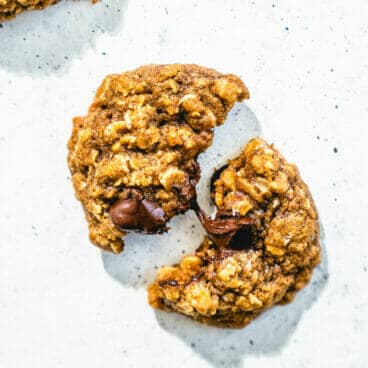
Looking for a wholesome, make-ahead breakfast recipe? Muesli is the answer! Muesli is essentially homemade oat cereal, which originated in Switzerland. Just add milk, and maybe some…
Looking for a wholesome, make-ahead breakfast recipe? Muesli is the answer! Muesli is essentially homemade oat cereal, which originated in Switzerland. Just add milk, and maybe some fresh fruit. It stores well in the freezer for up to six months.
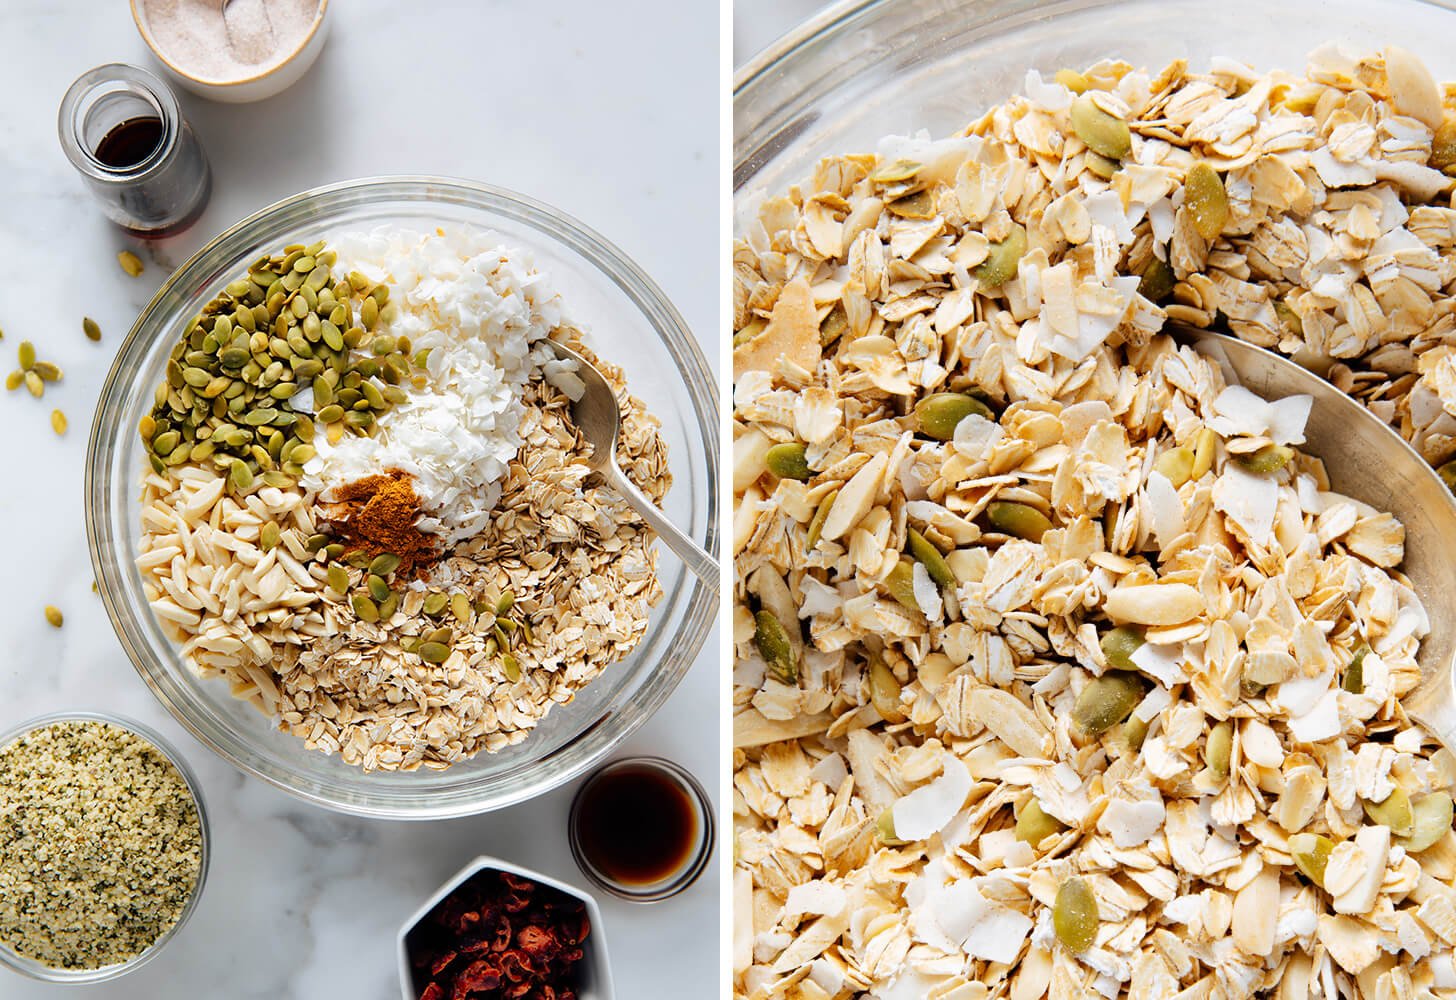
Not all mueslis are created equally—some are bland and blah. Not this one! This nutritious muesli recipe offers loads of texture and flavor. It features old-fashioned oats, nuts and seeds, optional coconut, and chopped dried fruit.
Toasting the muesli in the oven makes a world of difference. It brings out the savory, nutty flavors in the oats, nuts and seeds and makes your kitchen smell lovely. The oven’s heat also firms up the oats a bit, offering even more texture. It’s absolutely worth the effort!
My other trick is adding a maple syrup splash to the mixture before toasting. The subtle sweetness substantially improves the flavor.
You probably have everything you need to make muesli already, so let’s preheat the oven and start mixing. Below, you’ll find many options for adapting the recipe to your pantry.
I love making all kinds of cookies; peanut butter, sugar cookies, oatmeal, chocolate, chocolate chip, etc. I also love making these Almond Cookies. They are easy to make, but impressive to serve. These lovely little cookies are DELICIOUS! If you like a…
I love making all kinds of cookies; peanut butter, sugar cookies, oatmeal, chocolate, chocolate chip, etc. I also love making these Almond Cookies. They are easy to make, but impressive to serve. These lovely little cookies are DELICIOUS! If you like almonds and almond extract, you will LOVE these cookies! The cookies are soft, buttery,…
Linzer cookies are traditional Austrian jam-filled sandwich cookies! This classic recipe is simple to whip up at home.
When it comes to Christmas cookies, here’s one type we can’t resist: Linzer cookies! This classic Austrian sandwich cookie stars buttery almond shortbread with fun cutout window to show a layer of fruity preserves, making a treat that’s nuanced and just sweet enough. This recipe spells childhood nostalgia for us, and here we’re sharing a traditional recipe for this classic cookie!
Ingredients in linzer cookies
Linzer cookies are a shortbread jam-filled sandwich cookie based on the Austrian dessert Linzer torte, a tart made with ground nuts and fruit preserves. Linzer cookies bring in those signature flavors by making a shortbread with both all-purpose flour and almond flour, which gives it a complex, nutty flavor. The traditional shape features cut-out windows where the jam shows through.
This recipe comes from my dear Austrian friend Milena’s mother: Milena currently lives in Vienna, but we grew up together in Minnesota eating Linzer cookies at the holidays. This recipe has the nostalgia of childhood all over it for us, and it’s perfect for the holidays, Valentine’s Day, or any time you need a sweet treat. Here’s what you’ll need for classic Linzer cookies:
Flour
Almond flour
Cinnamon
Fine sea salt
Unsalted butter
Granulated sugar
Egg
Vanilla extract
Raspberry jam or other fruit preserves
Powdered sugar
Tip: use almond flour, not almond meal!
Avoid using almond meal for Linzer cookies: look for almond flour when you are shopping. You should be able to find it at your local grocery, depending on your location.
Almond flour is made from blanched almonds, or almonds with their skins removed. It’s ground very finely, resulting in a fluffy texture in baked goods.
Almond meal contains the skins, making it darker brown in color instead of off-white like almond flour. It has a coarser grind than almond flour and results in denser, chewy texture in baked goods.
Linzer cookie cutter and an alternative
Linzer cookies are a cutout cookie with a twist! Instead of cutting out just one cookie, you’ll need two: a cookie with a window and a solid cookie. There are special cookie cutters just for this purpose, but you can also use a alternative based on what you have at home.
Option 1: Use a Linzer cookie cutter. We like this Linzer cookie cutter. It comes with various cutout window shapes: hearts, stars, flowers, etc. It is worth buying if you plan to make Linzer cookies multiple times!
Option 2: Use a 2-inch circular cutter and a smaller shape for the window. If you happen to have both of these shapes on hand, it’s easy to make your own version of cutout cookies!
Tips for making the cookies
Linzer cookies are a fun baking project that results in visually-stunning, sugar dusted cookies with bright shapes of jam. There are a few notes for how to put together this recipe:
Chill the dough 1 to 3 hours. This is important with a cutout cookie dough: you’ll want it nice and cold to get uniform shapes.
Gently roll the dough slightly less than 1/4-inch thick. This makes just the right thickness for the finished cookie.
Simple cutout window shapes (like circles and hearts) are easier to cut out. The stars were a little trickier to cut, and they became more distorted when baked. But, they still turned out great.
Linzer cookie storage info
Once you’ve made your linzer cookies, you probably won’t be eating all 30 at once. How to store them? Here are some tips and notes about storage:
The cookies taste crisp the first day, then soft after storage. They’re delicious both ways, but we like the soft version best!
Store in a container with a few layers of parchment paper or foil between each. The powdered sugar on the bottom layer of cookies after a few days, so it’s good to protect between each layer.
Store at room temperature for 2 days or refrigerated up to 2 weeks. With room temperature storage, the powdered sugar can start to melt on the cookies that are stacked in layers beneath other cookies. We recommend storing them refrigerated for longer term storage.
Or, freeze for up to 3 months. The powdered sugar topping is a little fragile, so keep in mind the cookies look best when they are fresh.
More cookie recipes
Love a good batch of cookies? Here are a few more fun cookie recipes to enjoy:
Linzer cookies are traditional Austrian jam-filled sandwich cookies! This classic recipe is simple to whip up at home.
Ingredients
2 cups (240 g) flour, sifted
1 cup (120 g) almond flour
1 teaspoon cinnamon
½ teaspoon fine sea salt
1 cup (2 sticks) unsalted butter, softened
2/3 cup granulated sugar
1 egg
1 teaspoon vanilla extract
1 ⅓ cups raspberry jam
Powdered sugar, for dusting
Instructions
In a medium bowl, whisk the flour, almond flour, cinnamon and salt.
In the bowl of a stand mixer add the butter and sugar. Beat with the paddle attachment on medium speed until light and fluffy, 2 to 3 minutes. Add the egg and vanilla, and mix on low speed until combined. Gradually add the flour mixture and continue mixing on low speed until just combined, about 30 seconds. Divide the dough into two disks. Wrap the disks in plastic wrap and refrigerate for 1 to 3 hours.
Preheat the oven to 350°F.
Take one disc of dough out of the fridge and place it on a floured surface. Using a light touch, roll the dough out until it is slightly less than 1/4-inch thick. Use plenty of flour on the counter and the rolling pin to prevent sticking. Moving quickly so the dough remains chilled, use a linzer cookie cutter (or a 2-inch round cutter and smaller heart-shaped cutter) to cut an equal number of cookies with and without a hole in the center. Place excess dough back in the refrigerator and re-roll it after it’s chilled again (after baking the first sheet). Place the cookies on a baking sheet and refrigerate the sheet for 5 minutes.
Transfer the baking sheet directly to the oven and bake for 11 to 14 minutes, until lightly browned. Cool the cookies for 1 minute on the cookie sheet. Then transfer to a cooling rack.
Repeat with remaining disc of dough and re-rolled scraps of dough.
Cool the cookies completely, at least 15 minutes. Then sift powdered sugar the cookies with the cutout centers. On the bottom cookies, spread a layer of jam about 1/8” thick (about 2 teaspoons per cookie), not quite to the edges of a cookie. Then very gently press on the top cookie to sandwich the jam.
Repeat for all cookies to make 30 to 32 sandwiches. Store room temperature with several sheets of parchment paper between the cookies for up to 2 days*, or refrigerated for 2 weeks. You can also freeze for up to 3 months. The cookies taste crispy the first day, and become softer after storage (both delicious, but we prefer the softer version!).
Notes
*With room temperature storage, the powdered sugar can start to melt on the cookies that are stacked in layers beneath other cookies. We recommend storing them refrigerated for longer term storage.
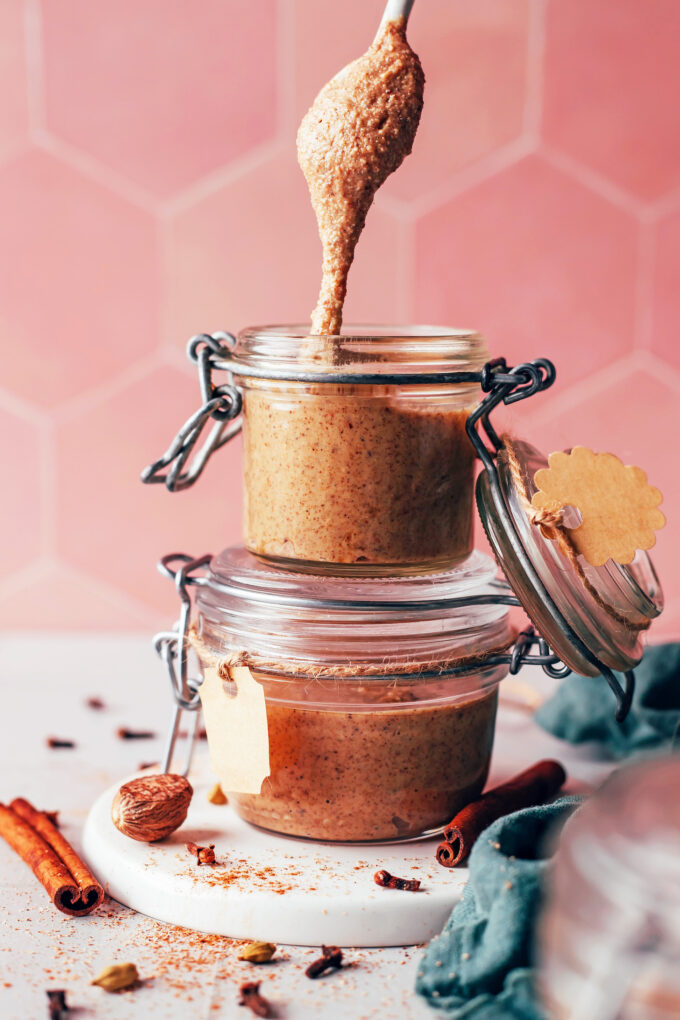
The warming, sweet + spicy flavors of a chai latte infused into a creamy, spreadable snack? Yes, please! This homemade chai-spiced nut butter jazzes up any boring breakfast and makes a sweet holiday gift for friends and family.
Just 20 minutes and 9 in…
The warming, sweet + spicy flavors of a chai latte infused into a creamy, spreadable snack? Yes, please! This homemade chai-spiced nut butter jazzes up any boring breakfast and makes a sweet holiday gift for friends and family.
Just 20 minutes and 9 ingredients are required for you to check homemade holiday gift giving off your to-do list. Let’s make nut butter!
How to Make Homemade Chai-Spiced Nut Butter
This creamy, warming spread begins with lightly roasting cashews and almonds to bring out their natural richness.
Green beans almondine (amandine) is a classic French dish. It may sound fancy, but it is basically green beans with a garnish of almonds. Sometimes simple recipes are the best and that is definitely true with this recipe. The bright green beans are sau…
Green beans almondine (amandine) is a classic French dish. It may sound fancy, but it is basically green beans with a garnish of almonds. Sometimes simple recipes are the best and that is definitely true with this recipe. The bright green beans are sautéd with shallot and garlic for flavor and topped with toasted sliced…
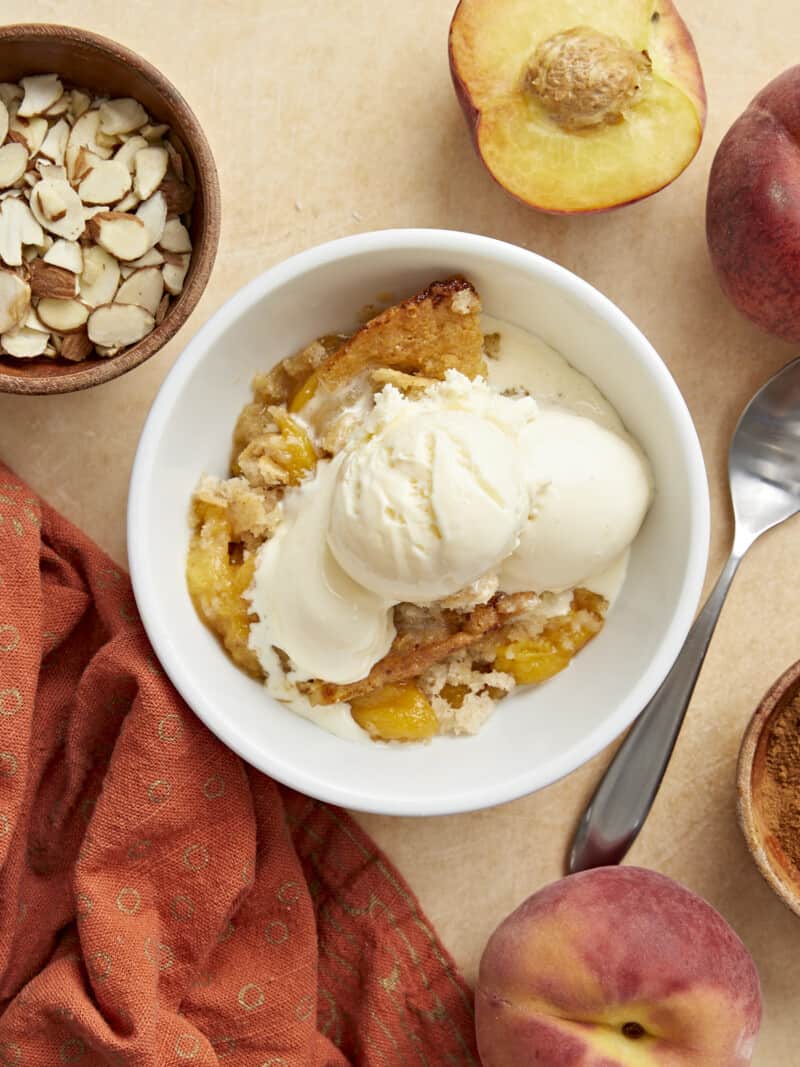
This luscious peach crisp recipe is full of warm, gooey, lightly cinnamon-y summer peaches. It’s finished with a crisp-but-tender oat and almond topping. Add a scoop of…
This luscious peach crisp recipe is full of warm, gooey, lightly cinnamon-y summer peaches. It’s finished with a crisp-but-tender oat and almond topping. Add a scoop of melty vanilla ice cream for the perfect late summer dessert.
Like my other crisp recipes, the recipe just-so-happens to be gluten free, so you can share it with more of your friends. Please don’t dismiss this recipe if you’re not gluten free (I’m not). It’s simply the best peach crisp I’ve ever had!
As a bonus, this crisp is a healthier option than most others. I replaced half of the butter with yogurt, which gives it an awesome, faint tang. It also has less sugar in it than most, because ripe, juicy peaches are plenty sweet as is. Frozen peaches are not nearly as nice.
Peach season is in full swing, so load up the cart with fresh peaches while you still can. Enjoy the leftovers for breakfast with Greek yogurt. You can’t beat that!
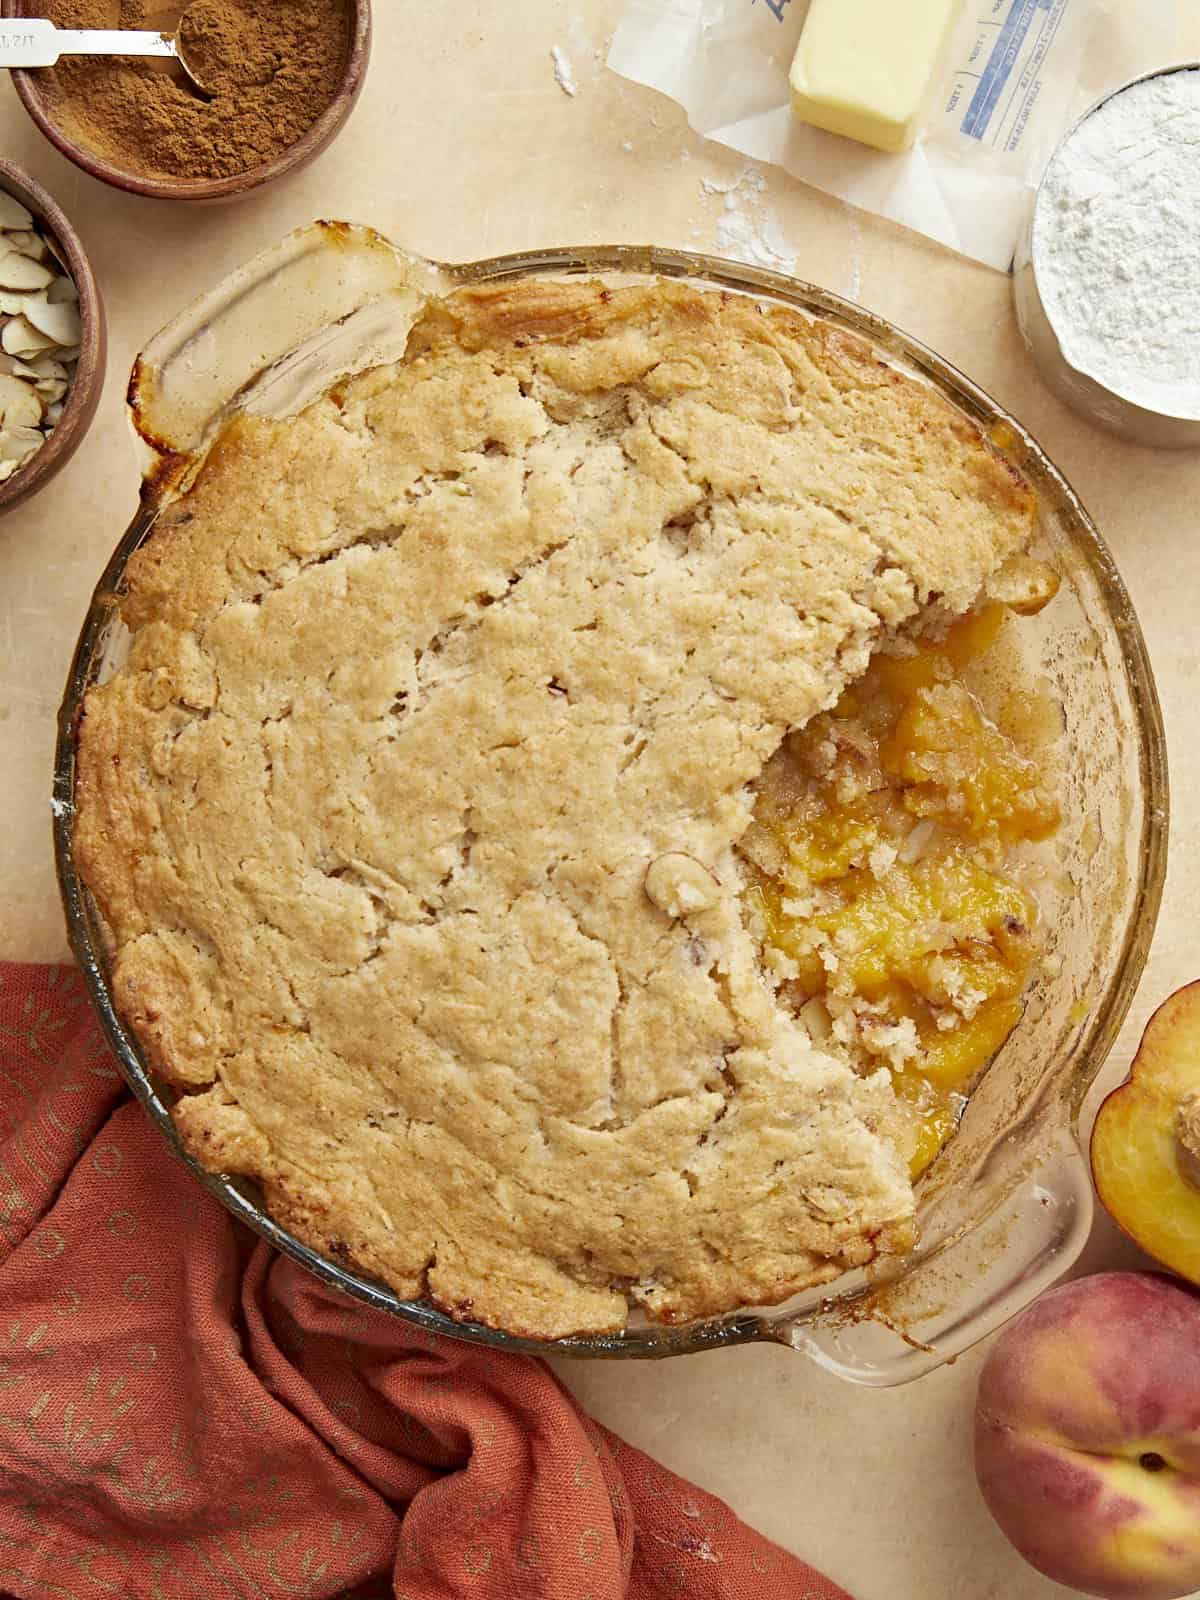
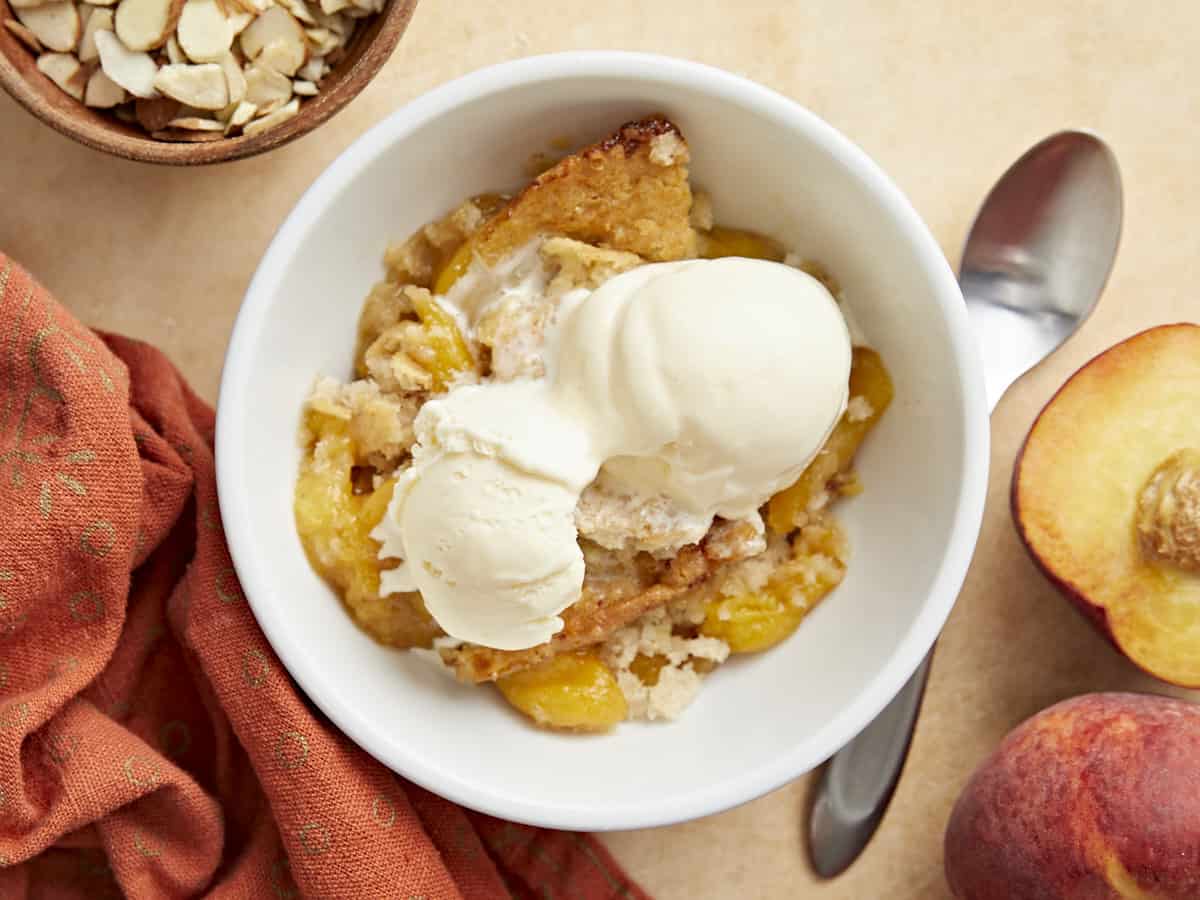
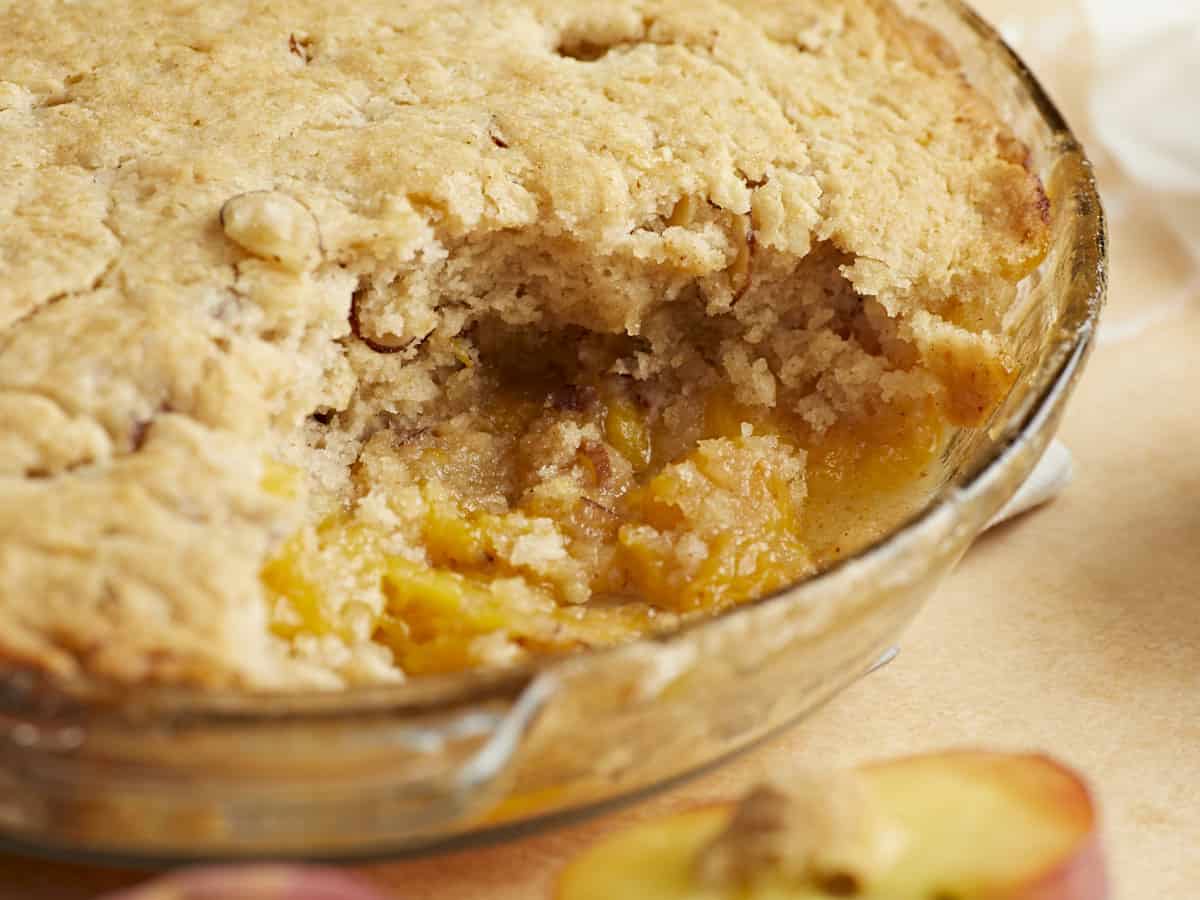
This buttery old-fashioned peach cobbler hits! Juicy summer peaches and a crispy cake-like topping will always be a crowd-pleaser, which is why this homemade peach cobbler recipe is perfect for any occasion, from a simple weeknight dessert to the star of the potluck. Plus, you can make it with fresh, canned, or frozen peaches, so it’s an easy recipe that’s also easy on your wallet! (It comes in at under a dollar a serving! Woot!!)
What Is Peach Cobbler
Peach Cobbler is often credited as a dessert created in the American South, but it’s actually Native American in origin. This dish of sweet, juicy summer peaches baked with a simple buttery batter is so easy to make and so yummy it’s almost criminal. Be warned: it smells so good that your loved ones will beg to devour it straight from the oven. Let it rest a few minutes before you dig in because it’s LAVA HOT. I speak from experience.
Ingredients For Peach Cobbler
You might want to double this recipe for Peach Cobbler because it will go fast, and you might have some feelings about that. I recently had two teenagers destroy the whole thing before I finished my first serving, and I was inundated with waves of deep resentment. Here’s what you’ll need to make Peach Cobbler:
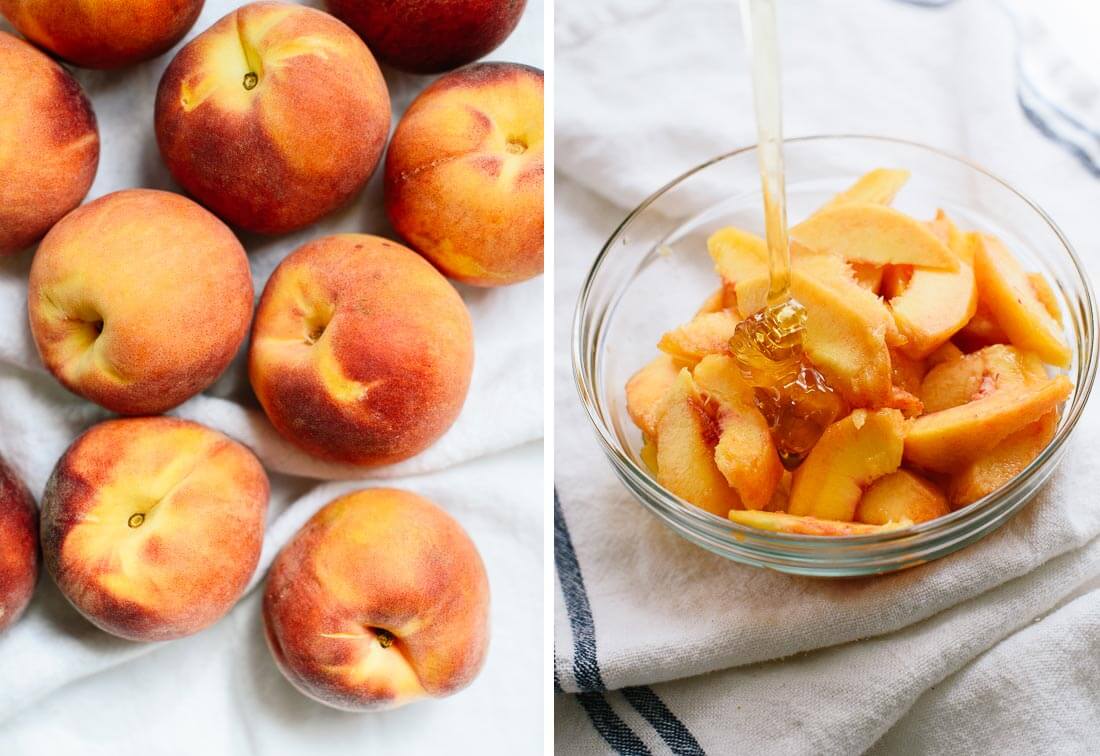
Peaches– are the star of the show here. You can use fresh, canned, or frozen. You don’t have to peel your peaches if you don’t want to. It’s a textural thing for me. If using canned, get them in their own juices, and don’t discard the juices. If they are canned in syrup, again, keep the juices, but omit the brown sugar in the recipe. If using frozen, let them thaw before mixing with the other ingredients.
Sugar – helps sweeten the batter and the filling and deepens the color of the crust. You’ll use brown and granulated, though if you only have one type, use what you have. This recipe is very forgiving.
Spices – cinnamon pairs beautifully with peaches, adding a gentle dimension to the flavor profile. I also use a touch of ground ginger and nutmeg to create a deeper flavor, but if your peaches are super tasty, feel free to skip them both.
Lemon Juice– adds a much-needed acidity to the sweet filling and helps thicken the peach juices. You can use fresh or bottled.
Cornstarch– helps thicken the peach juices while keeping them clear and glossy. If you don’t have cornstarch, thicken the filling with 2 teaspoons of all-purpose flour. FYI, it might get a little cloudy.
All Purpose Flour– creates the batter for the cobbler. We have not tested this recipe with gluten-free flour and can’t give any specific guidance, though I bet it would be tasty with almond flour.
Baking Powder – leavens and aerates the batter. If you don’t have baking powder, use 1/2 teaspoon of baking soda and add a tablespoon of lemon juice to the cup of milk called for in this recipe.
Almonds – pair incredibly with peaches and add texture to the cobbler. While I use sliced, feel free to use chopped. You can substitute the almonds with pecans or walnuts. Skip the almonds if you have a nut allergy or if they’re not as budget-friendly as you’d like.
Milk and Butter– create the batter. The fat in the milk keeps the crumb velvety, so use whole or add a tablespoon more butter if you’re using 2% milk. If you want to keep things vegan, use plant-based butter and milk.
Vanilla – scents the batter but can also be skipped if you don’t have any on hand.
Peach cobbler is good for up to three days. Since it contains dairy, you’ll want to refrigerate it after it cools in an air-tight container. If you have leftovers, try to enjoy them within a day, as the flavors and textures dull quickly. You can also freeze peach cobbler. Cool it before storing it in an air-tight container with parchment paper on the surface. It will keep for up to 3 months.
How To Reheat Peach Cobbler
It’s best to reheat peach cobbler in a 350°F oven until steaming. If reheating from frozen, it’s fine to put the cobbler in the oven straight from the freezer. While you can reheat peach cobbler leftovers in a microwave, the texture of the cobbler will change. If you choose to go the microwave route, heat it in 30-second increments until steaming.
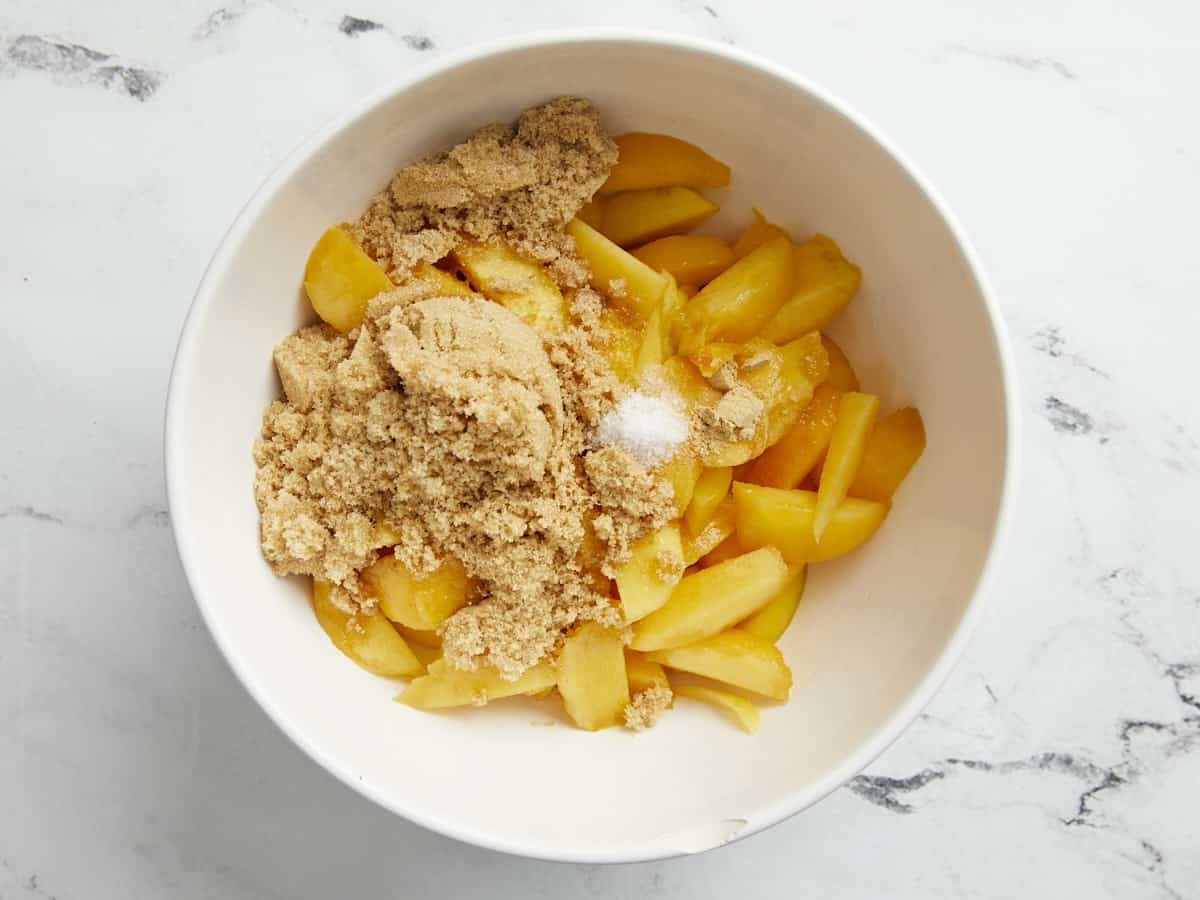
Set a rack in the middle of the oven and preheat it to 350°F. In a large bowl, mix the sliced peaches, brown sugar, salt, and ground ginger. Let the peaches sit for five minutes to absorb the sugar and spices and release their juices.
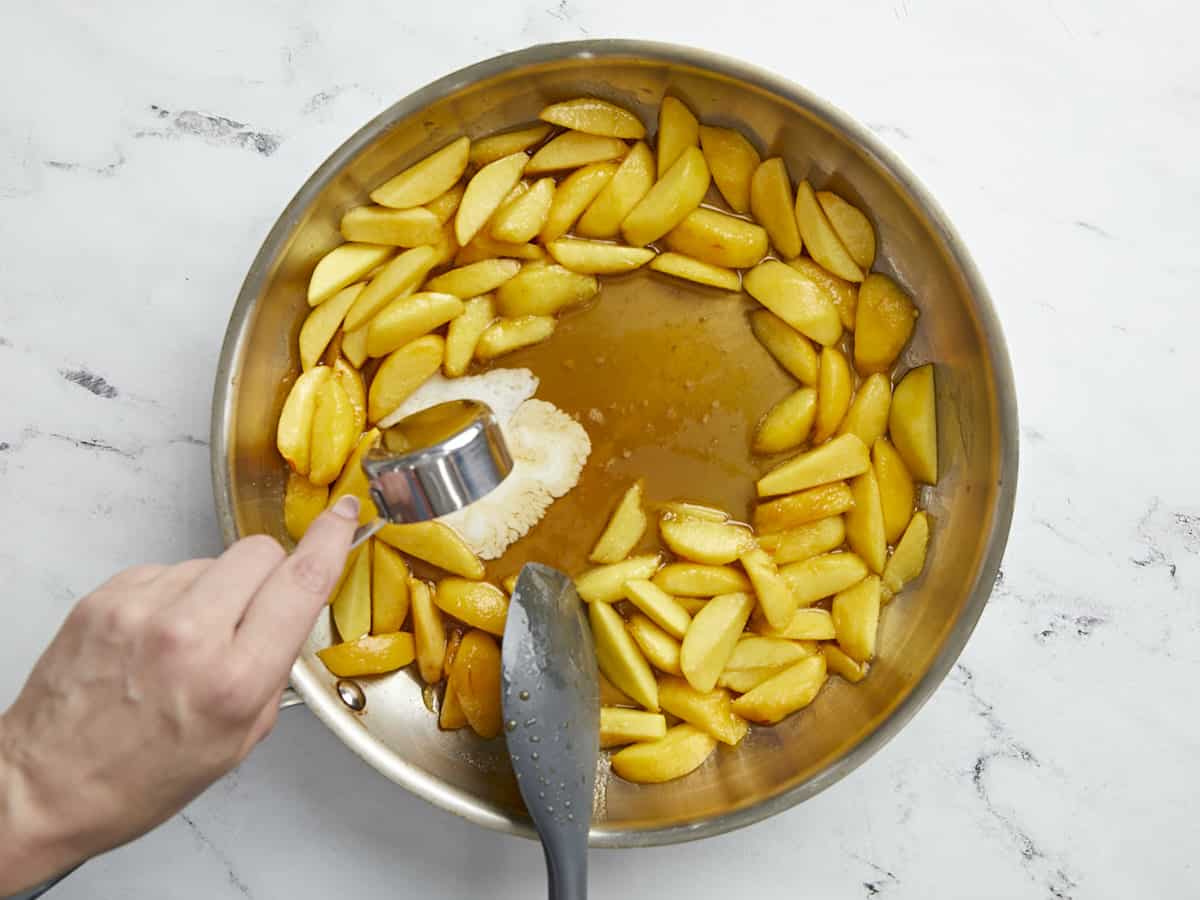
Set a large skillet over medium heat and add the peaches and their juices. Cook down the juices for about 5 minutes. Mix the cornstarch with the lemon juice to create a slurry, then add it to the peaches and stir well. Turn the heat to mid-high and bring to a boil.
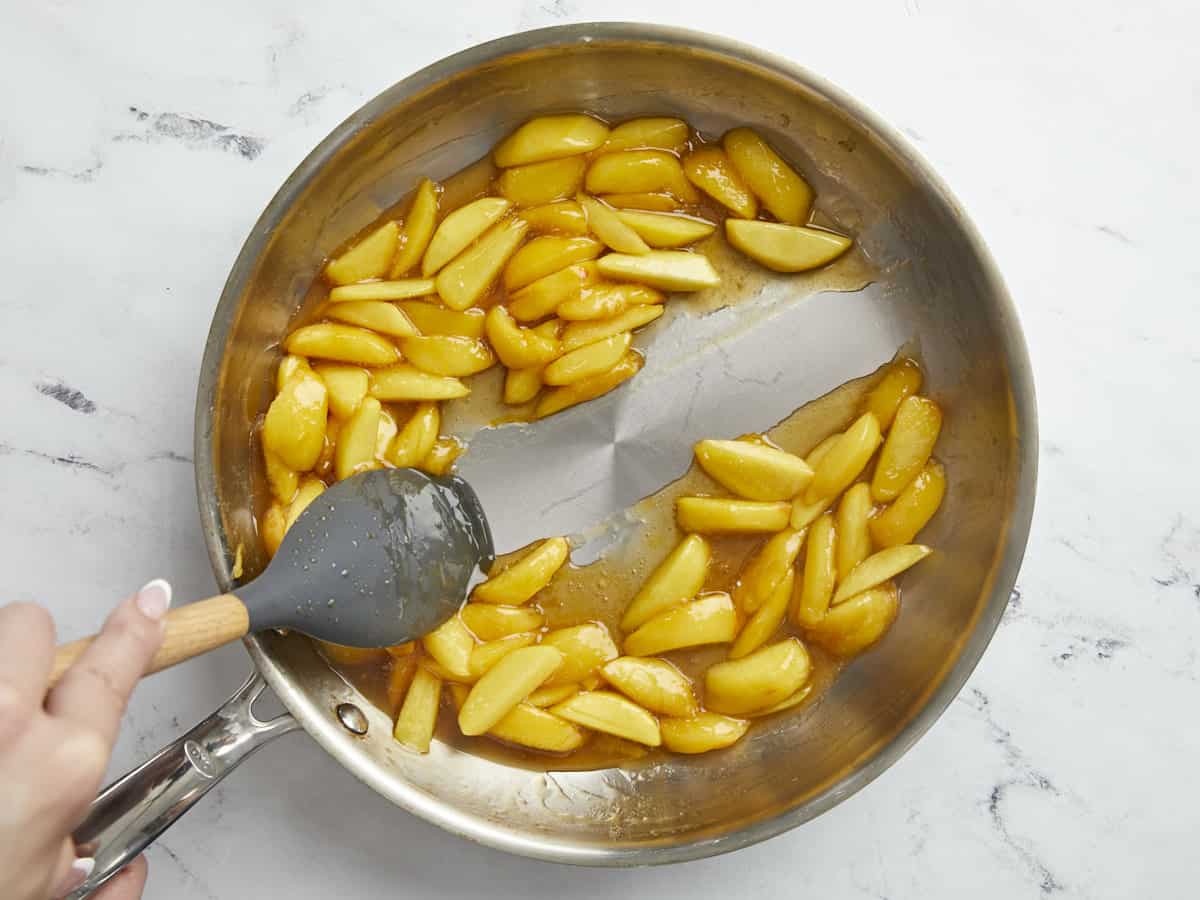
When the juices have thickened to the point that they stay separated when you run a spoon through them (about 5 minutes), take the pan off the heat.
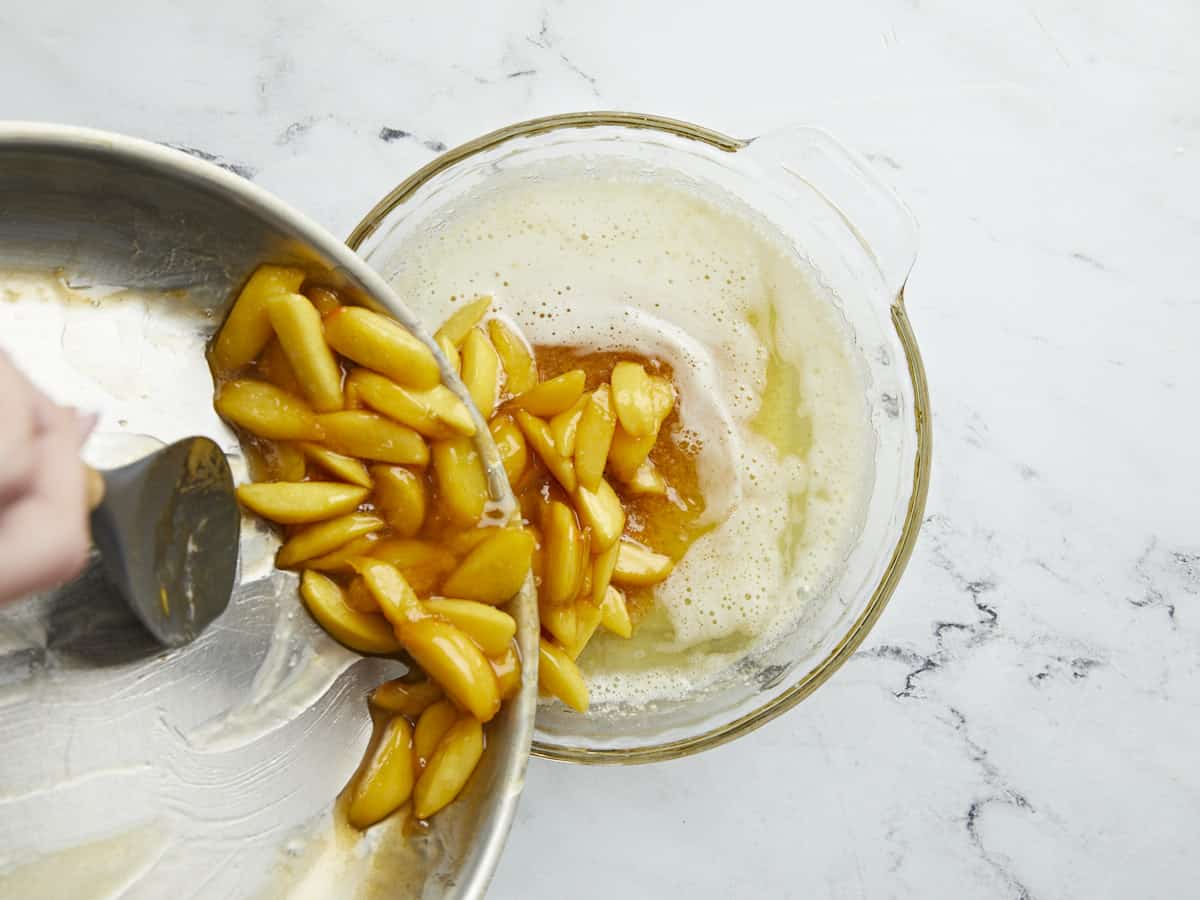
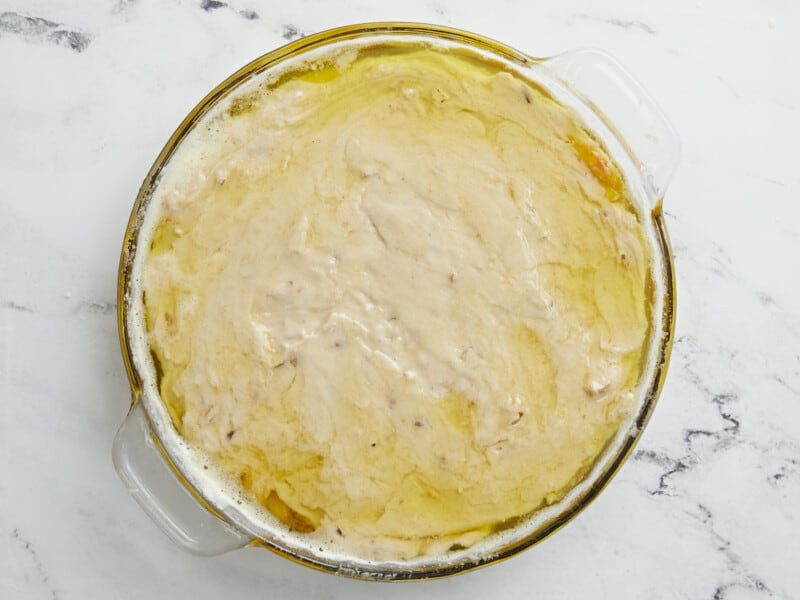
Add the melted butter to the pie dish and add the cooked peaches and their juices to the dish.
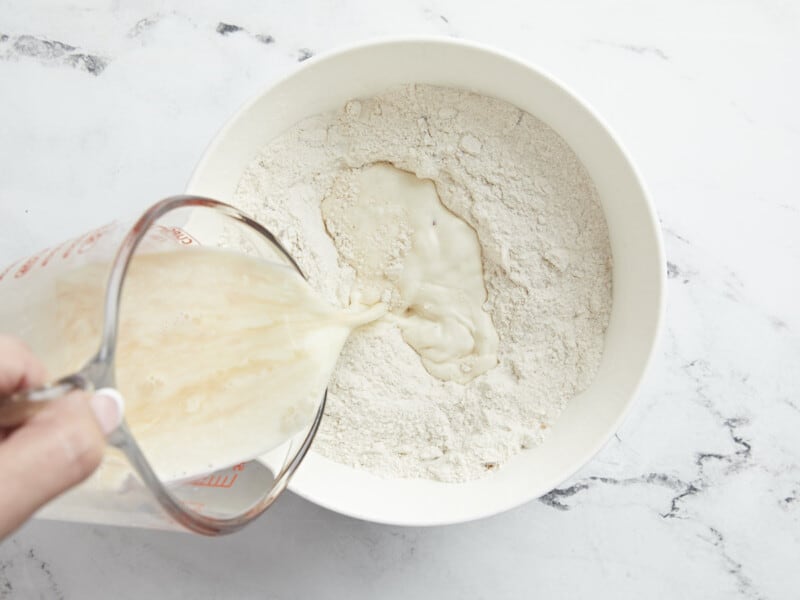
In a large bowl, mix the flour, sugar, sliced toasted almonds, baking powder, cinnamon, nutmeg, and salt.
Stir in the milk and vanilla and mix lightly, just until a batter forms. Pour the batter on top of the peaches.
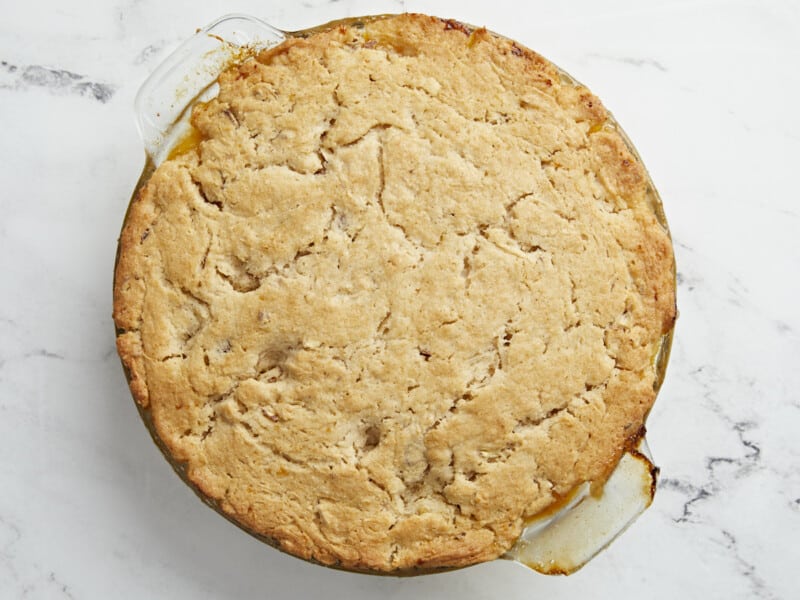
Bake until the cobbler is golden brown, about 35 minutes. Cool before serving and enjoy!!
*You do not have to peel the peaches if you don’t want to. If using canned peaches, use two 15-ounce cans of peaches in their own juices. Do not drain the juices. If using frozen sliced peaches, use 2 pounds, but thaw them before mixing them with the brown sugar.
Set a rack in the middle of the oven and preheat it to 350°F. In a large bowl, mix the 6 sliced peaches, 1/2 cup brown sugar, 1/4 teaspoon salt, and 1/8 teaspoon ground ginger. Let the peaches sit for five minutes to absorb the sugar and spices and release their juices.
Set a large skillet over medium heat and add the peaches and their juices. Cook down the juices for about 5 minutes. Mix 1 teaspoon of cornstarch with 1 tablespoon of lemon juice to create a slurry, then add it to the peaches and mix in well. Turn the heat to mid-high and bring to a boil.
When the juices have thickened to the point that they stay separated when you run a spoon through them (about 5 minutes), take the pan off the heat.
Add 8 tablespoons of melted butter to the pie dish and add the cooked peaches and their juices to the dish.
In a large bowl, mix the 1 1/2 cups flour, 1 cup sugar, 1/2 cup sliced toasted almonds, 1 1/2 teaspoons baking powder, 1/4 teaspoon cinnamon, 1 pinch nutmeg, and 1/4 teaspoons salt. Stir in 1 cup milk and 1 teaspoon vanilla and mix lightly, just until a batter forms.
Pour the batter on top of the peaches. The butter will rise to the top. I prefer a buttery, crispy topping, so I don’t stir the batter into the peaches. If you’d like to have some of the peaches popping through the topping, mix it lightly into the peaches.
Bake until the cobbler is golden brown, about 35 minutes. Let it cool for a few minutes before serving and collecting ALL OF THE COMPLIMENTS. For the most amazing experience, top it with ice cream or whipped cream!
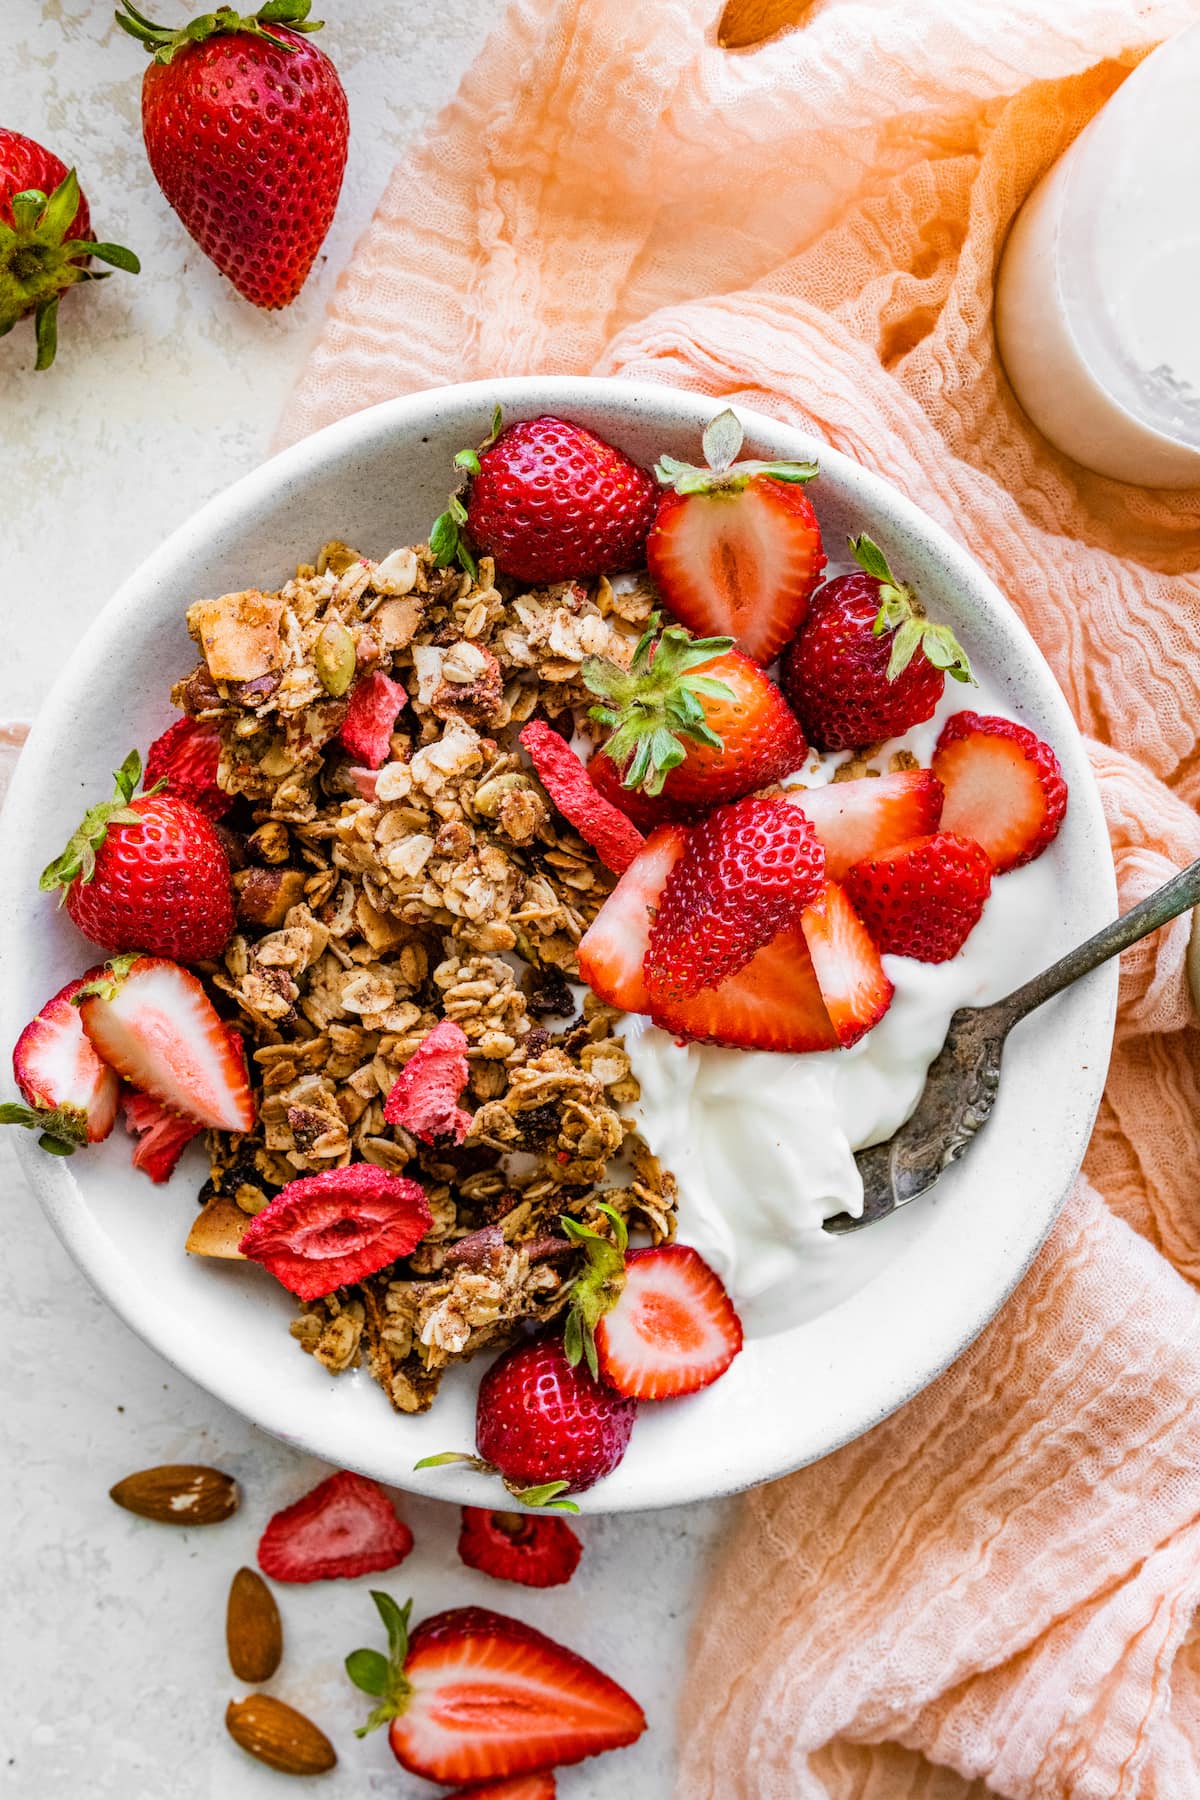
I love making homemade granola because I love eating homemade granola. A few favorites include: lemon blueberry, almond butter, peanut butter, chocolate, and chocolate chip cookie granola clusters. I also love this Strawberry Granola, especially during…
I love making homemade granola because I love eating homemade granola. A few favorites include: lemon blueberry, almond butter, peanut butter, chocolate, and chocolate chip cookie granola clusters. I also love this Strawberry Granola, especially during the spring and summer months. The strawberry flavor is so good! The granola is sweet, crunchy, and made with…
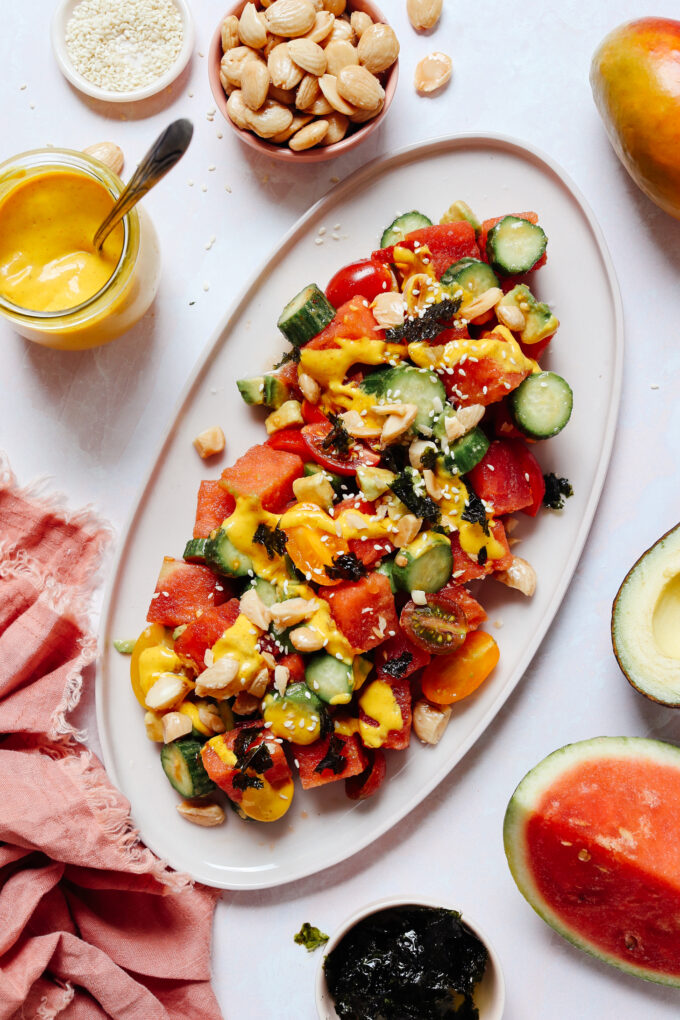
True Food, you’ve stolen our hearts with your Watermelon Salad. We’re talking one of the best salads we’ve ever eaten. A homemade rendition had to happen!
Friends, it’s now your turn to be swept off your feet. Just 20 minutes stand between …
True Food, you’ve stolen our hearts with your Watermelon Salad. We’re talking one of the best salads we’ve ever eaten. A homemade rendition had to happen!
Friends, it’s now your turn to be swept off your feet. Just 20 minutes stand between you and this show-stopping, sweet + spicy watermelon salad that’s so hydrating, fresh, and perfect for summer. Let us show you how it’s done!
The base of this AMAZING salad is crunchy cucumber and sweet watermelon with bites of avocado and cherry tomatoes.
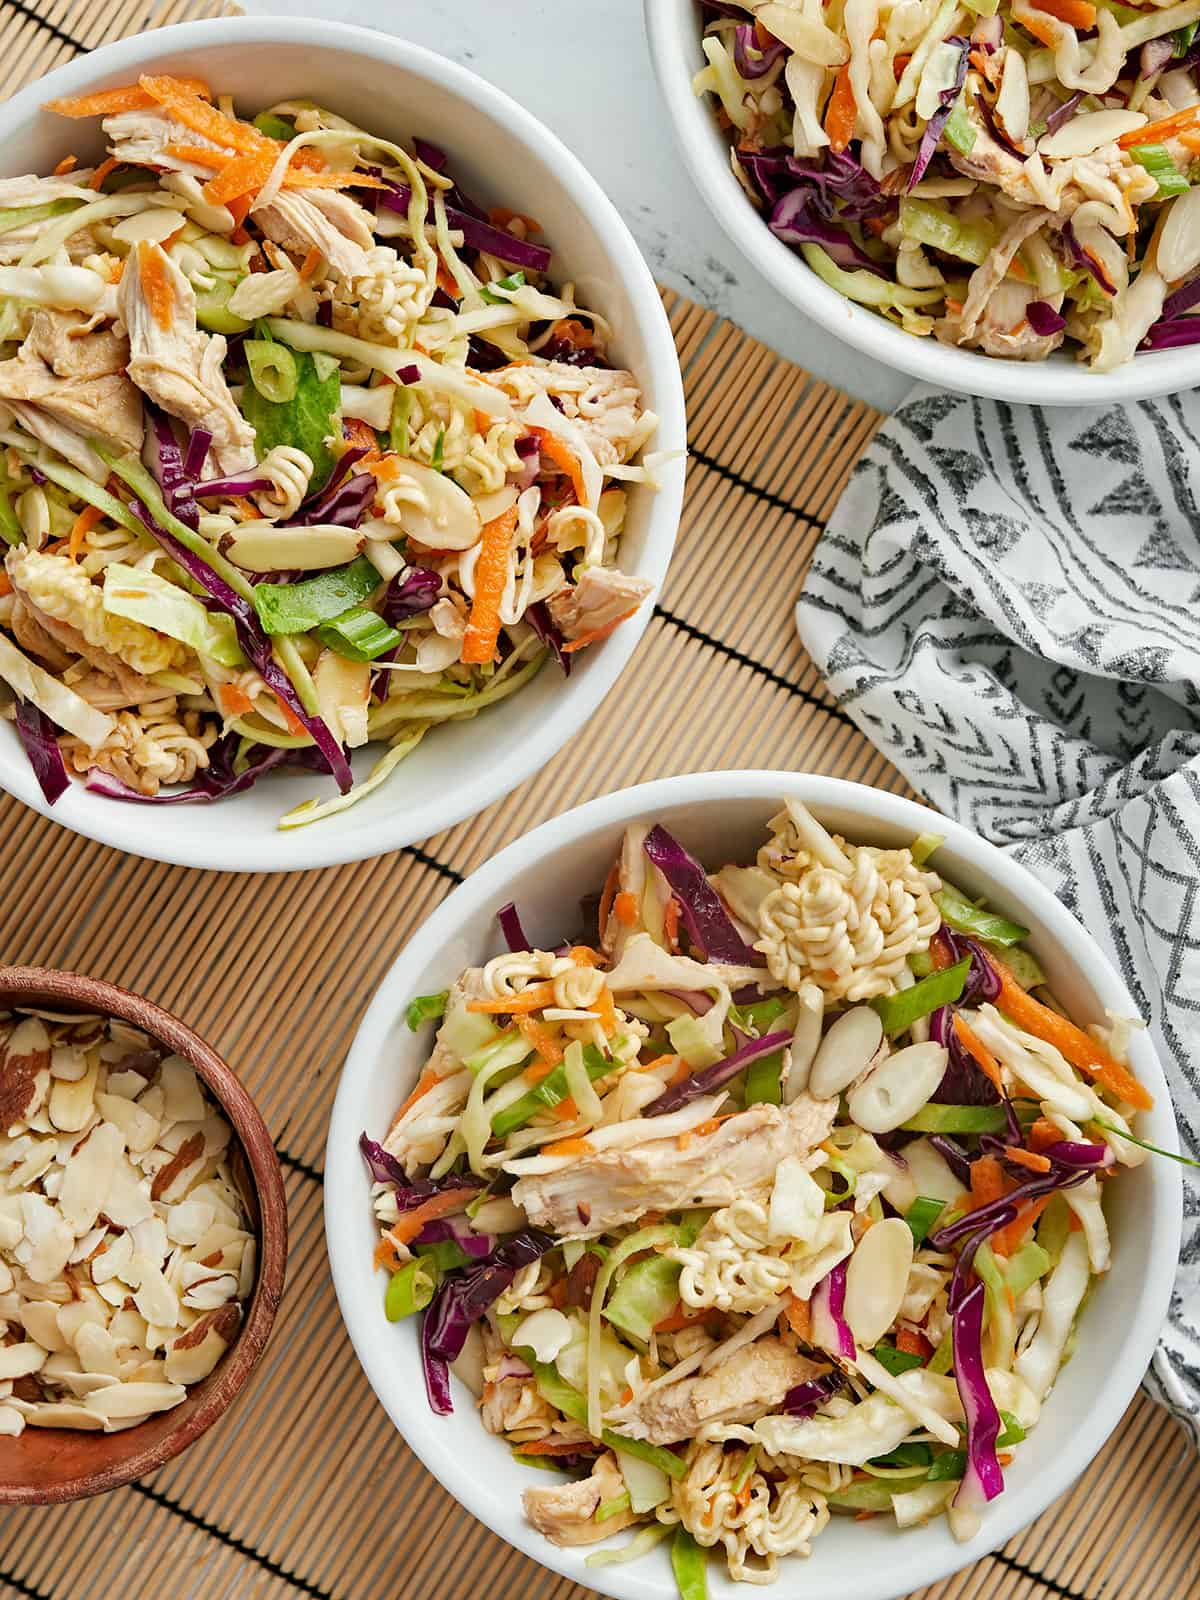
This Ramen Noodle Salad is something we ate often when I was growing up and I still love it just as much today. Why? Because it’s light, fresh, filling, uses simple and inexpensive ingredients, and holds up well in the fridge so you can eat the leftovers for days (less cooking, more eating!). Keep this recipe bookmarked because it’s going to get you through those long hot days of Summer!
What is Ramen Noodle Salad?
This Ramen noodle salad is simply a mix of finely shredded cabbage, chicken, carrots, green onion, almonds, and …drum roll… uncooked instant ramen noodles for a little extra CRUNCH! The salad also features a simple light dressing that has Asian inspired flavors, like ginger, rice vinegar, and soy sauce. A lot of people call this salad Chinese Chicken Salad, but it’s not an authentic Chinese recipe, so we’re rebranding it with a more accurate name, Ramen Noodle Salad.
What Kind of Cabbage to Use
This salad is usually made with Napa cabbage, which has a slightly lighter and more delicate texture than regular green cabbage, but it’s totally flexible. Napa cabbage was a little on the expensive side when I was at the store this week so I swapped it out for some green cabbage and added a little purple cabbage for color. You can use all green cabbage if you want, or if you want to take an even bigger short cut just use two bags of pre-shredded coleslaw mix (cabbage and carrots) instead of shredding your own. …But freshly shredded always tastes better. ;)
What Else Can I Add?
I love salads because you can add so many different things to them and this Ramen Noodle Salad is no exception! Here are some other fun ingredients you can add to the ramen noodle salad, if you have them on hand:
Mandarin oranges
Sesame seeds
Cashews
Avocado
Cucumber
Edamame
Peanuts
Shredded broccoli stems
HOW TO STORE THE LEFTOVERS
If you plan to meal prep this ramen noodle salad (highly recommend), you have a couple of options. If you want the ramen noodles to stay super crunchy, don’t stir them into the salad before storing. Simply sprinkle them over each serving just before eating. I kind of like the way the ramen soaks up the flavor of the dressing over time, but you do you! The almonds will also soften slightly as the salad is refrigerated. The salad will last about 3-4 days in the fridge.
Make the dressing first. Whisk together the salad oil, rice vinegar, honey, soy sauce, ginger, garlic powder, and toasted sesame oil. Set the dressing aside.
Shred the cabbage as finely as possible. Shred the carrot and slice the green onions. Crush the instant ramen noodles (discard the seasoning packet or save it for another use).
Place the cabbage, carrot, green onion, almonds, crushed ramen noodles, and shredded chicken in a large bowl. Pour the prepared dressing over top. Toss the salad until everything is evenly combined and coated in dressing. Serve immediately or refrigerate until ready to eat.
How to Make Ramen Noodle Salad – Step by Step Photos
Make the dressing first. Whisk together ¼ cup neutral salad oil, ¼ cup rice vinegar, 2 Tbsp honey, 2 tsp soy sauce, 1 tsp ground ginger, ¼ tsp garlic powder, and 1 tsp toasted sesame oil. Set the dressing aside.
Shred about six cups of cabbage for the salad. You can use green cabbage, purple cabbage, Napa cabbage, or any mix of the above. Shred the cabbage as finely as possible.
Shred one carrot and slice four green onions.
Shred about two cups of cooked chicken breast. We used a rotisserie chicken, but you could cook your own chicken breast or even use canned chicken breast.
Place the shredded cabbage, carrot, green onion, and chicken in a bowl. Crush one 3 oz. package of instant ramen noodles (discard seasoning packet or save for another use). Add the crushed ramen noodles and ¼ cup sliced almonds to the bowl. Pour the prepared dressing over top.
Toss the salad well until everything is evenly mixed and coated in dressing.
Serve the ramen noodle salad immediately or refrigerate up to four days. Always give the salad a good stir just before serving to redistribute the dressing.
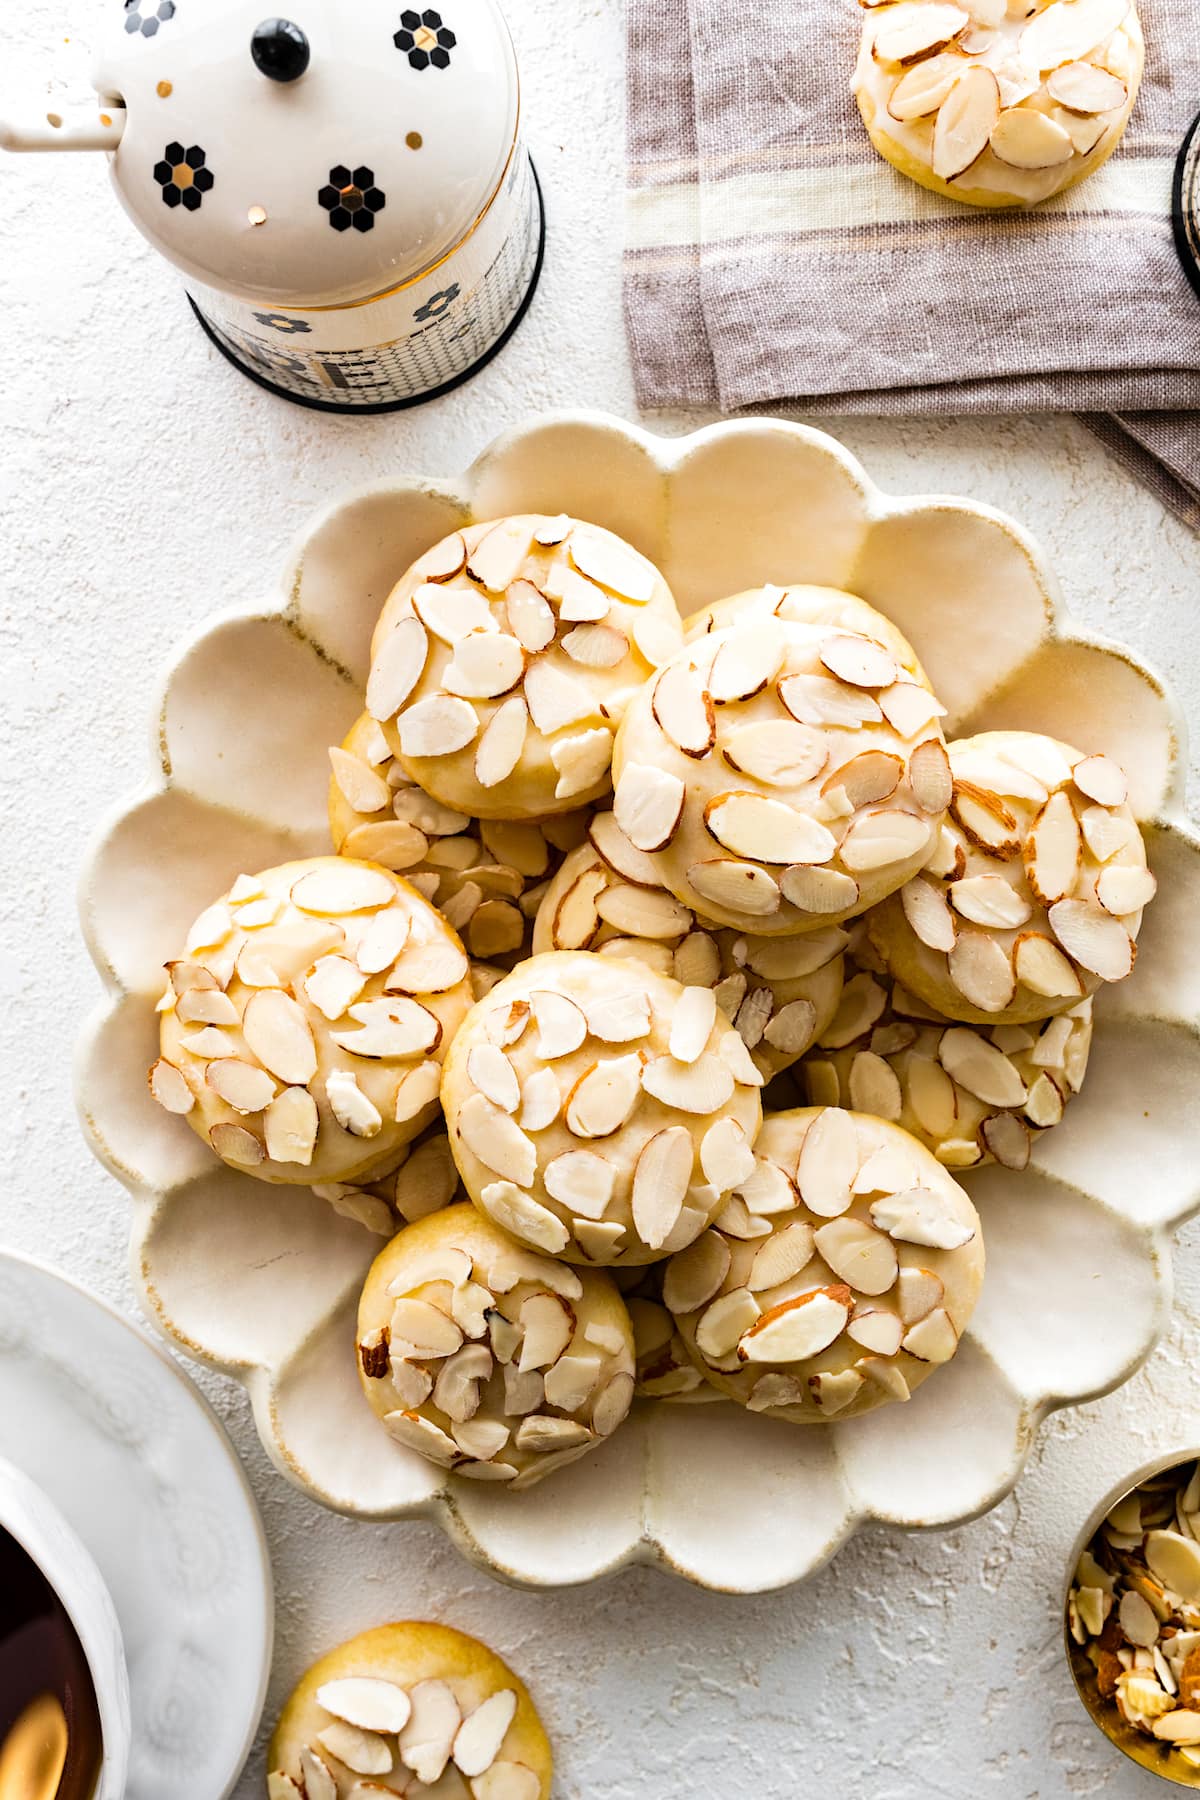 I love making all kinds of cookies; peanut butter, sugar cookies, oatmeal, chocolate, chocolate chip, etc. I also love making these Almond Cookies. They are easy to make, but impressive to serve. These lovely little cookies are DELICIOUS! If you like almonds and almond extract, you will LOVE these cookies! The cookies are soft, buttery,…


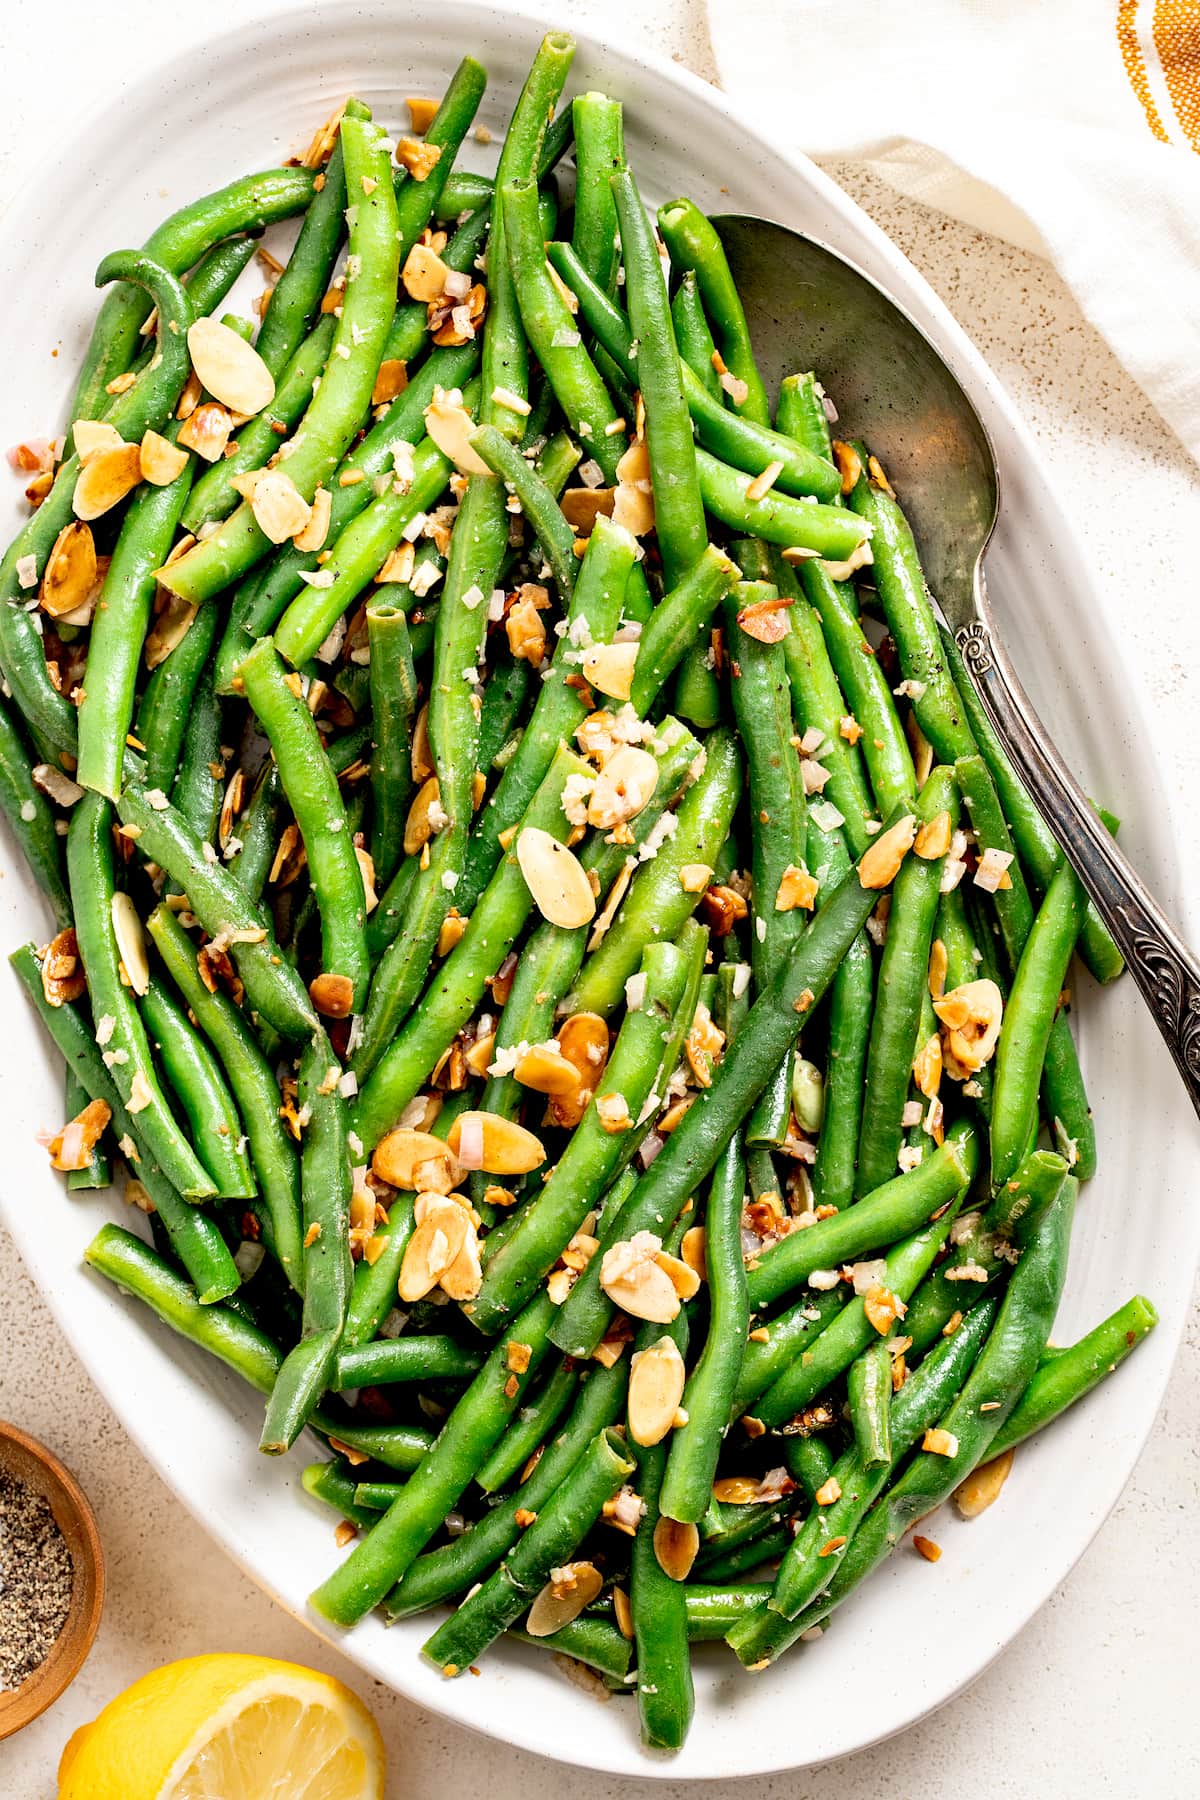 Green beans almondine (amandine) is a classic French dish. It may sound fancy, but it is basically green beans with a garnish of almonds. Sometimes simple recipes are the best and that is definitely true with this recipe. The bright green beans are sautéd with shallot and garlic for flavor and topped with toasted sliced…
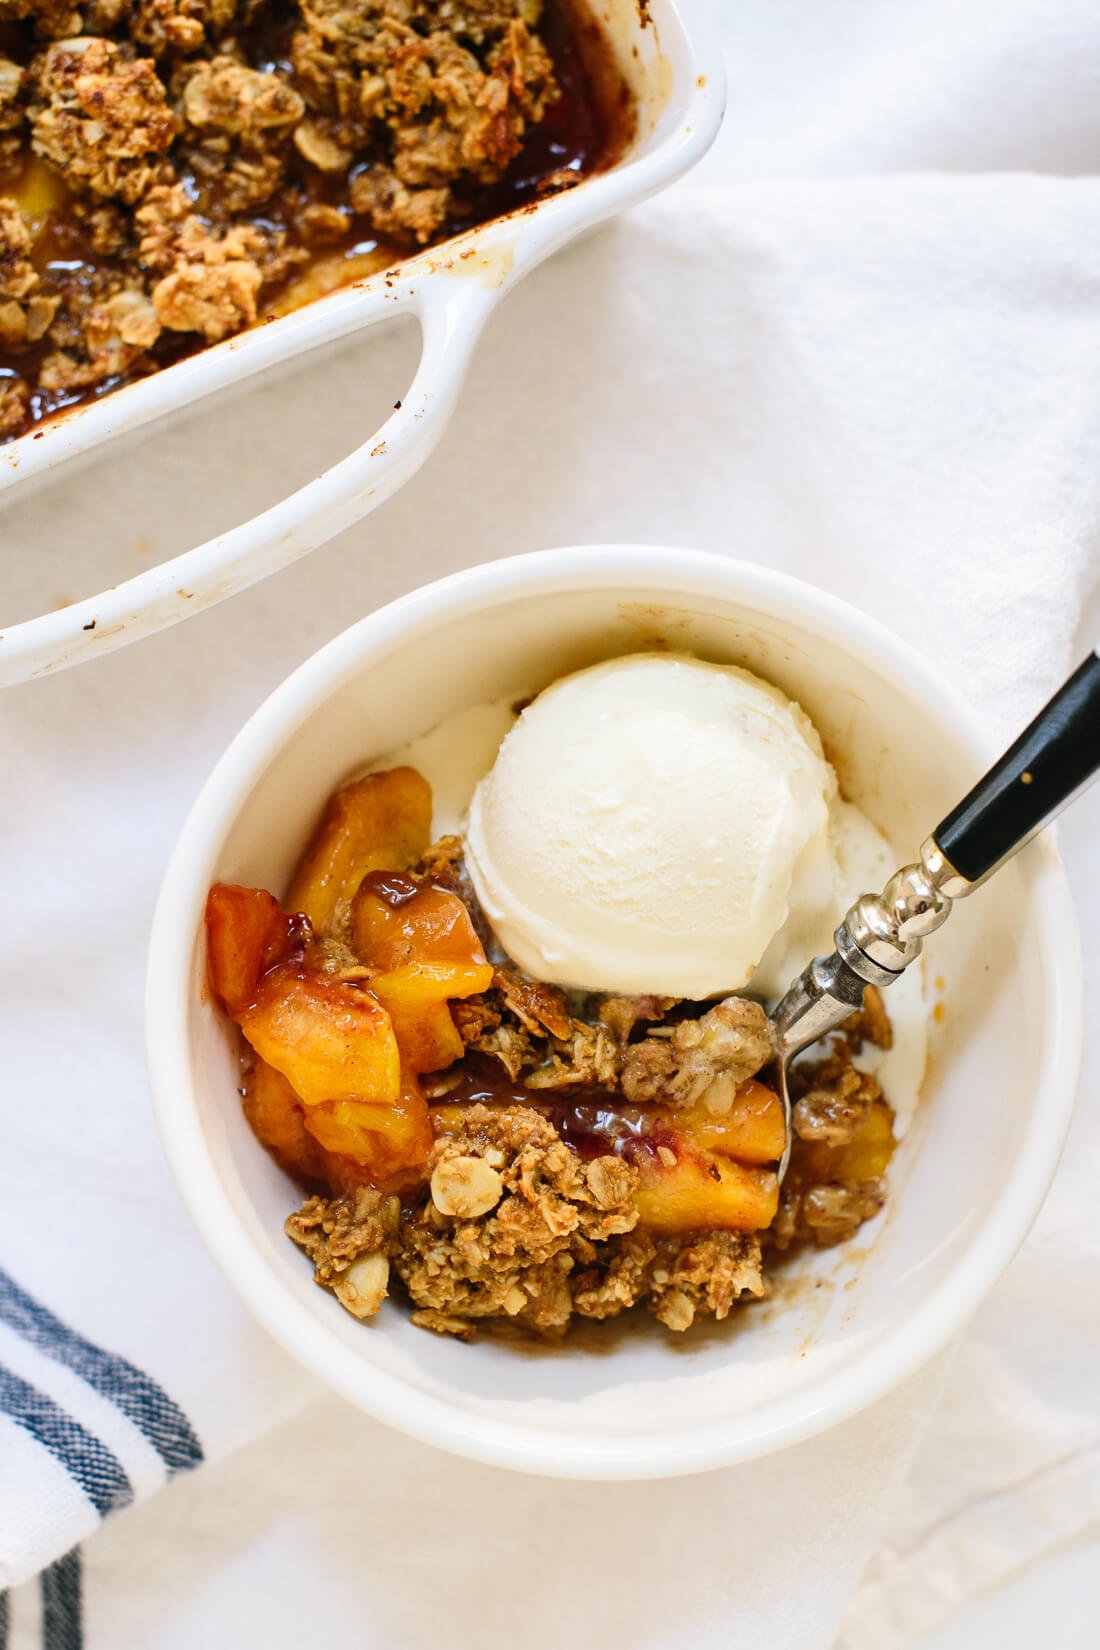


 I love making homemade granola because I love eating homemade granola. A few favorites include: lemon blueberry, almond butter, peanut butter, chocolate, and chocolate chip cookie granola clusters. I also love this Strawberry Granola, especially during the spring and summer months. The strawberry flavor is so good! The granola is sweet, crunchy, and made with…