This quick and easy high-protein Coconut Chicken Rice Bowl is perfect for lunch or dinner for my gluten-free, dairy-free friends! Coconut Chicken Rice Bowl I whipped up this healthy Coconut Chicken Rice Bowl for dinner the other night, and my family lo…
This quick and easy high-protein Coconut Chicken Rice Bowl is perfect for lunch or dinner for my gluten-free, dairy-free friends! Coconut Chicken Rice Bowl I whipped up this healthy Coconut Chicken Rice Bowl for dinner the other night, and my family loved them, so I had to share. They’re like coconut curry chicken but without […]
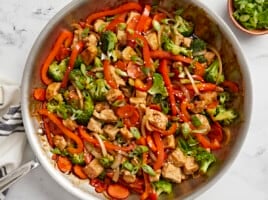
Thai fried rice gets it’s unique flavor from jasmine rice, fish sauce, soy sauce and chili peppers. Use your favorite protein like chicken, shrimp, or tofu. Thai Fried Rice Making Thai fried rice is a flavorful way to use up leftover rice and inc…
Thai fried rice gets it’s unique flavor from jasmine rice, fish sauce, soy sauce and chili peppers. Use your favorite protein like chicken, shrimp, or tofu. Thai Fried Rice Making Thai fried rice is a flavorful way to use up leftover rice and incorporate a mix of protein and savory ingredients. There’s a great Thai […]
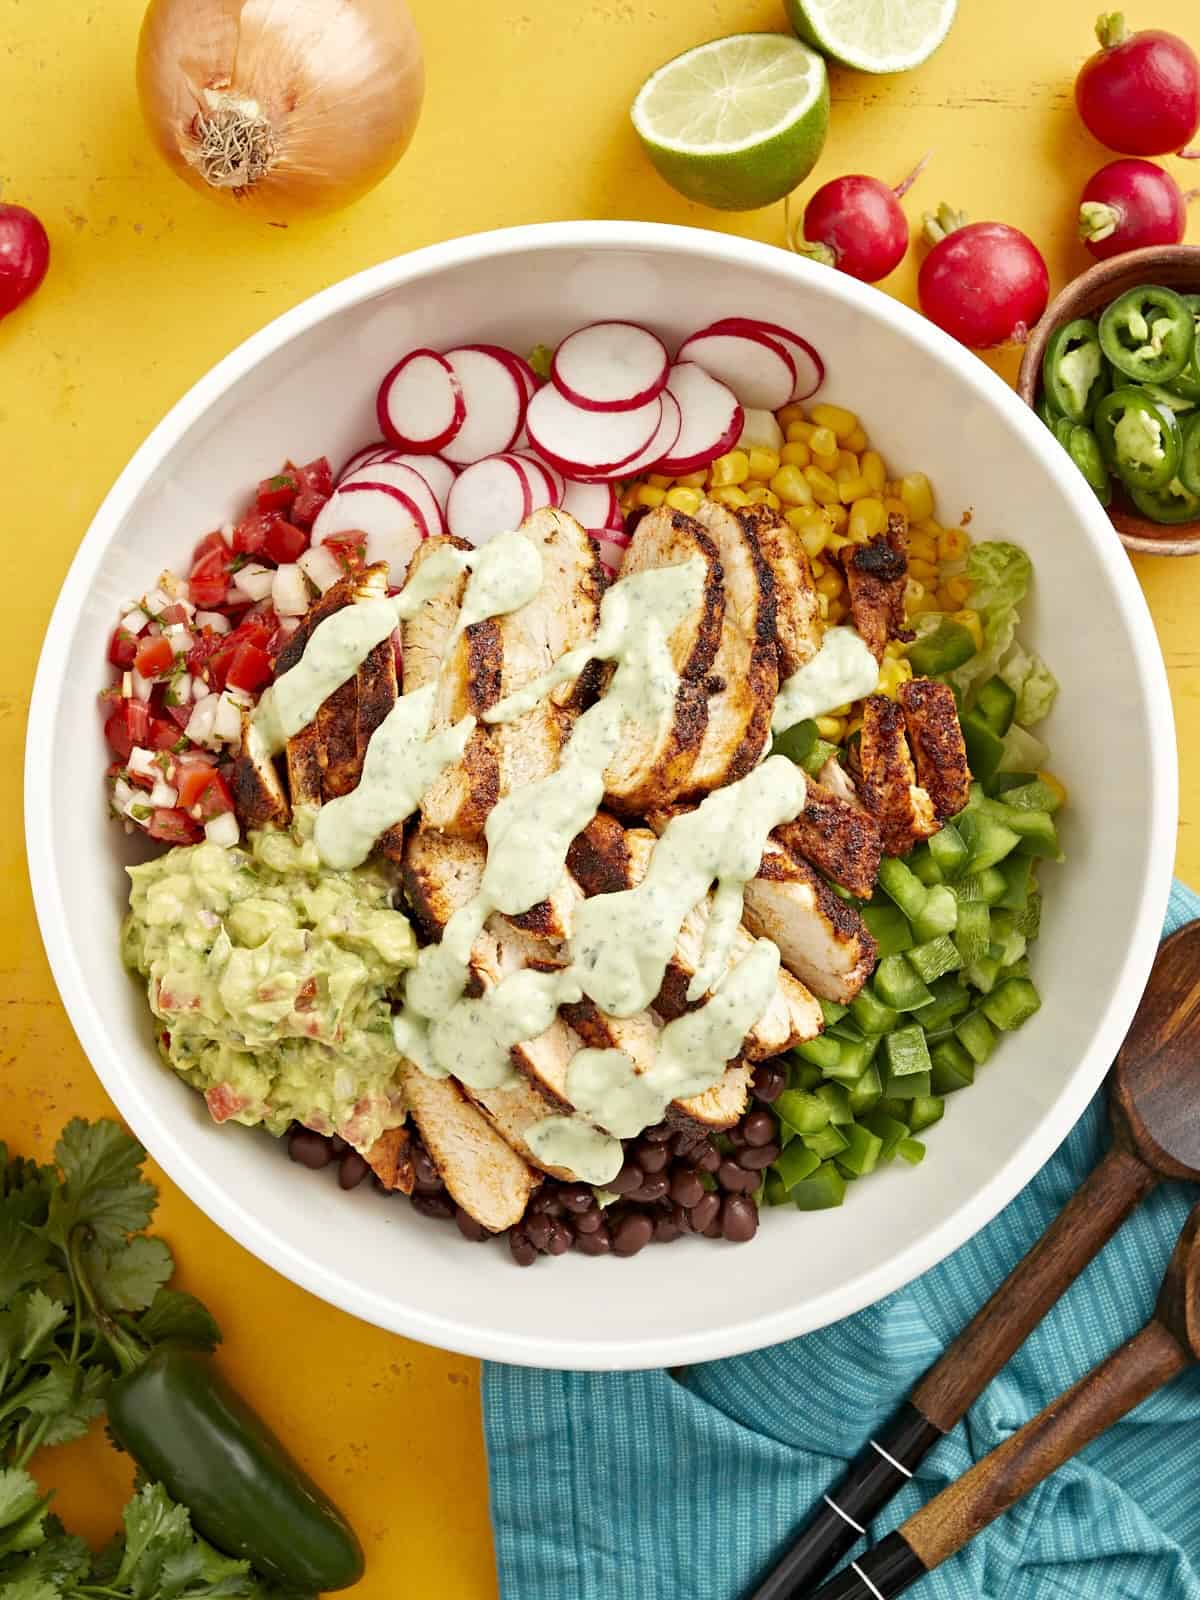
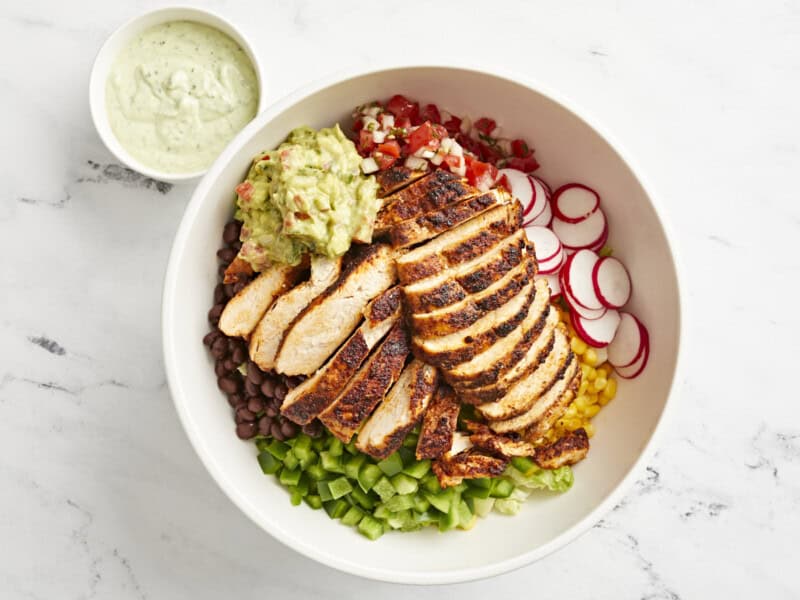
I have a major weakness for Southwestern flavors, and this Santa Fe salad is the ultimate combination. It’s loaded with tender, juicy chicken, fresh veggies, and creamy black beans. I love it tossed in our creamy avocado dressing. It’s a great hearty entrée-sized salad that’ll keep you full for hours. If you are plant-baseed, this flavor bomb of a salad still packs the same punch without the chicken. This salad is a true crowd pleaser.
What Is A Santa Fe Salad?
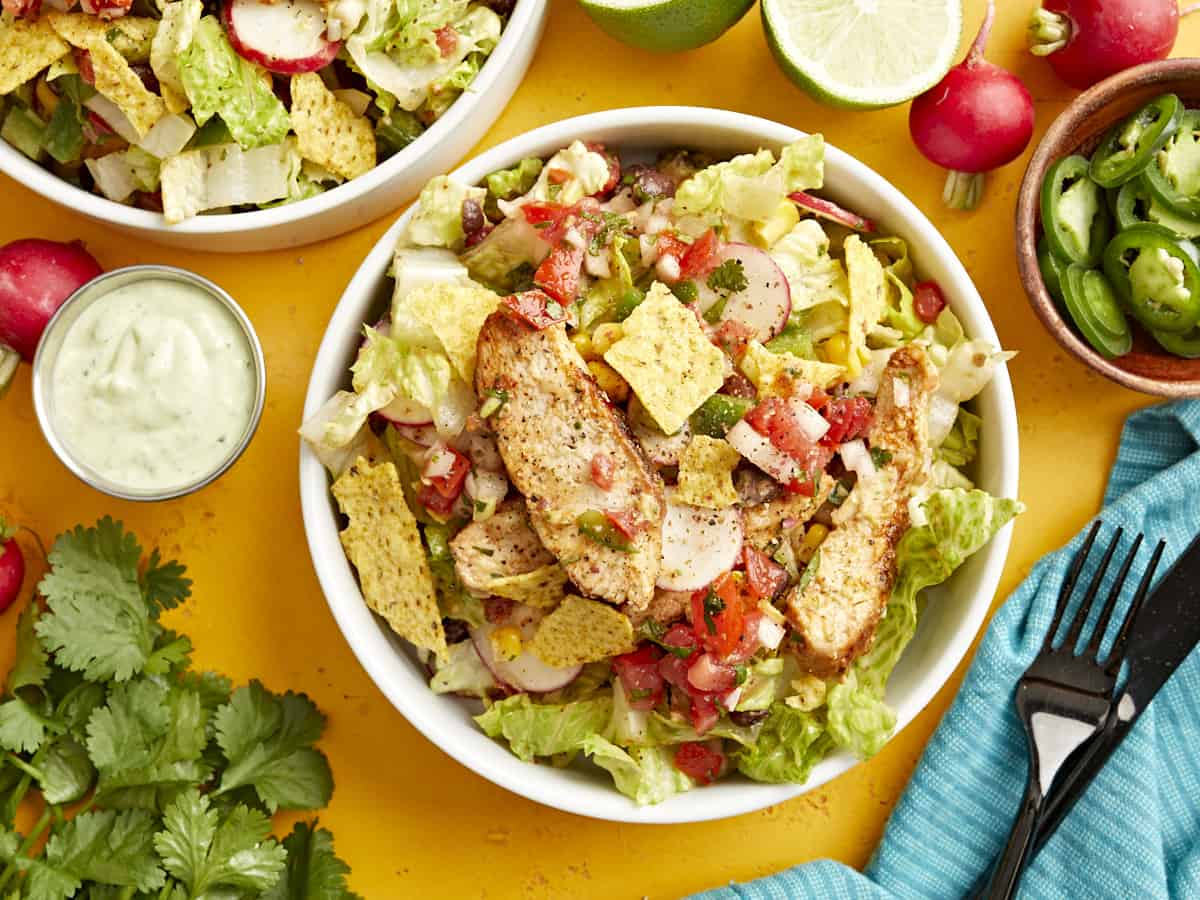
This tasty Santa Fe salad recipe starts with a bed of romaine lettuce topped with Southwestern favorites, like corn, black beans, bell pepper, cheese, and tortilla chips. Top it off with our favorite creamy avocado dressing, some fresh pico de gallo, and a dollop of homemade guacamole for a filling salad that’s bursting with flavor!
Ingredients
Here’s what you’ll need to make a Santa Fe salad:
Chicken Breasts: Tender, juicy chicken breasts are a great source of protein on this hearty salad. For a budget-saving option, chicken thighs work well. If you’re vegetarian or vegan, substitute the chicken with extra-firm tofu (seasonings and all) or go heavier on the black beans. Mmm!
Olive Oil: Helps the spices stick to the chicken and helps the chicken sear in the pan.
Seasonings: Chili powder, paprika, cayenne pepper, ground cumin, garlic powder, onion powder, salt, and pepper add Southwestern flair to the chicken.
Romaine Lettuce: The perfect crunchy base for this salad. Buy whole heads rather than the pre-chopped bagged stuff to save money.
Bell Pepper: I like to use a green bell pepper, but any color works well to add some crunch!
Frozen Corn: You can also use fresh or canned corn– just be sure to drain and rinse first if you use canned.
Canned Black Beans: Add creaminess and extra protein to this salad.
Cheddar Cheese: Adds a hint of saltiness. Mexican blend also works well.
Tortilla Chips: I like to crumble some on top for extra crunch.
Creamy Avocado Dressing: Pulls the whole salad together. If you’re short on time, use a store-bought chipotle or Southwest ranch dressing.
As with most salads, I recommend storing the veggie components separately from the chicken and dressing and tossing everything together just before serving. This helps protect the lettuce from wilting. Stored correctly, this salad should keep well in the refrigerator for up to 3 days, making it great for meal prep!
Add the avocado, sour cream, minced garlic, salt, lime juice, and cilantro to a food processor or blender. Puré until smooth. Cover and set aside in the refrigerator.
Chop romaine lettuce into bite-sized pieces and transfer to a large salad bowl.
Dice bell peppers, slice radishes, thaw frozen corn, and rinse and strain canned black beans. Add this and 1/2 cup of pico de gallo to the large salad bowl on top of chopped romaine lettuce. Cover and keep in the refrigerator while you prepare the chicken.
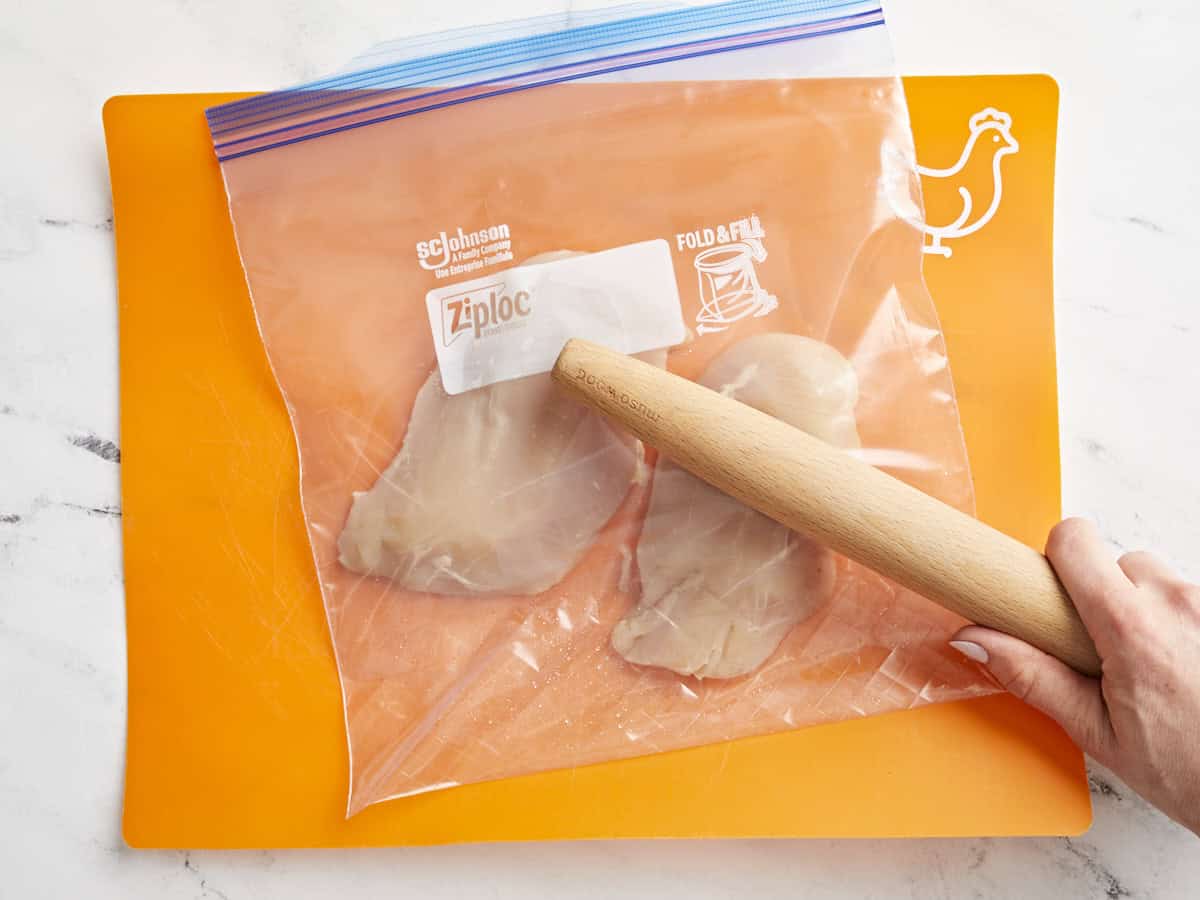
Place the chicken breasts inside a heavy duty food storage bag and flatten with a rolling pin or a tenderizing mallet until the breasts are consistently about 3/4 inch thick. Start in the middle at the thickest part of each breast for more even cooking. This step helps the chicken cook more evenly.
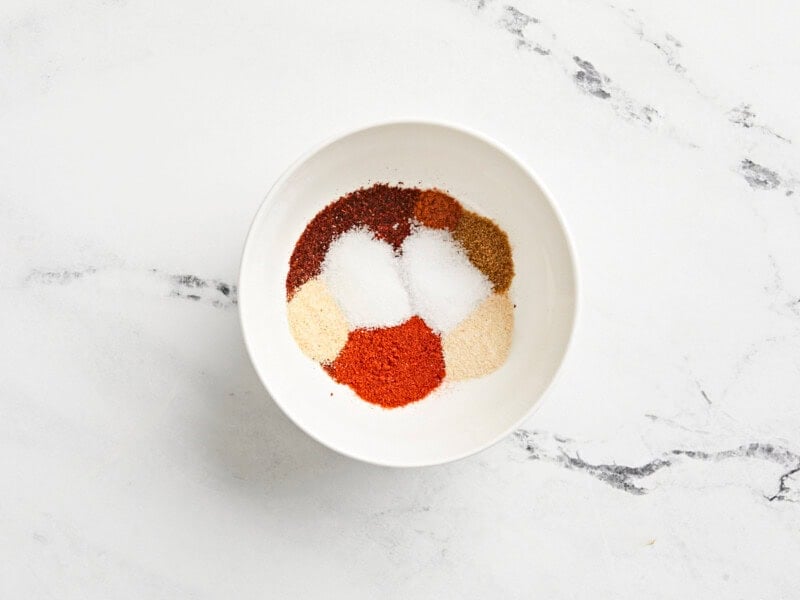
Prepare the Santa Fe Chicken seasoning blend by combining chili, paprika, cayenne, cumin, garlic powder, onion powder, salt, and black pepper.
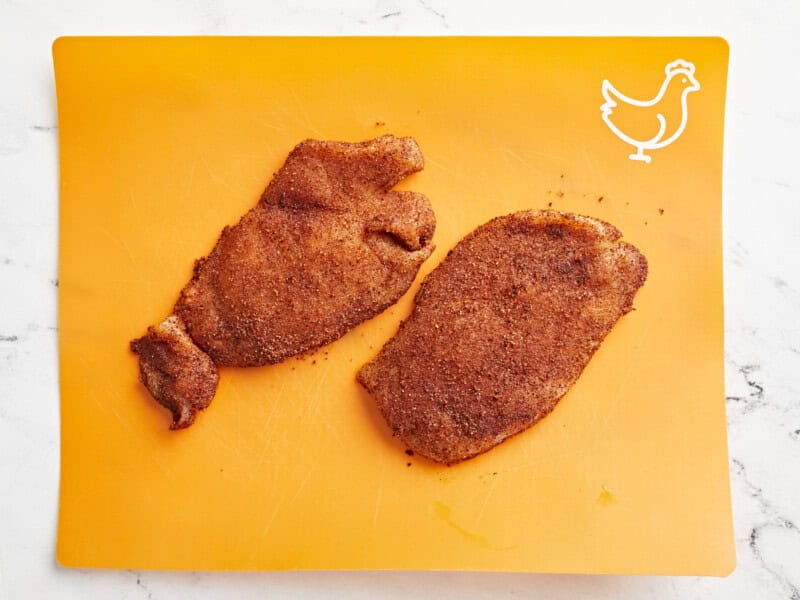
Rub chicken breasts with 1 Tbsp olive oil and divide the seasoning blend between the them, making sure to thoroughly coat the entire surface of each chicken breast with seasoning.
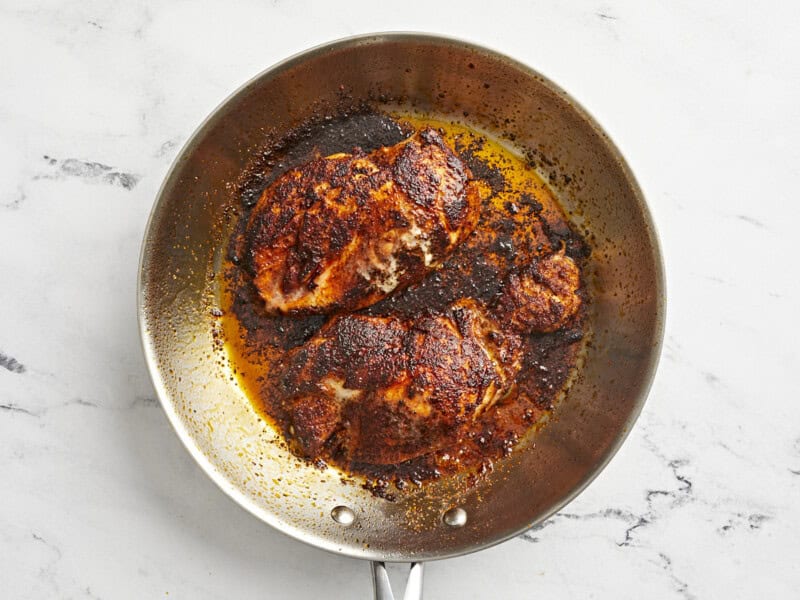
In a large skillet, add 1 Tbsp olive oil over medium-high heat. When the oil is glistening and hot, add the chicken breasts. Cook your chicken for a total of 10-12 minutes, flipping halfway. While the chicken cooks, do not wiggle or disturb it except for flipping. Remove the chicken from the heat when it reaches an internal temperature of 160°F. Allow chicken to rest on a cutting board for 5-10 minutes before slicing into strips. After resting, the chicken should reach an internal temperature of 165°F.
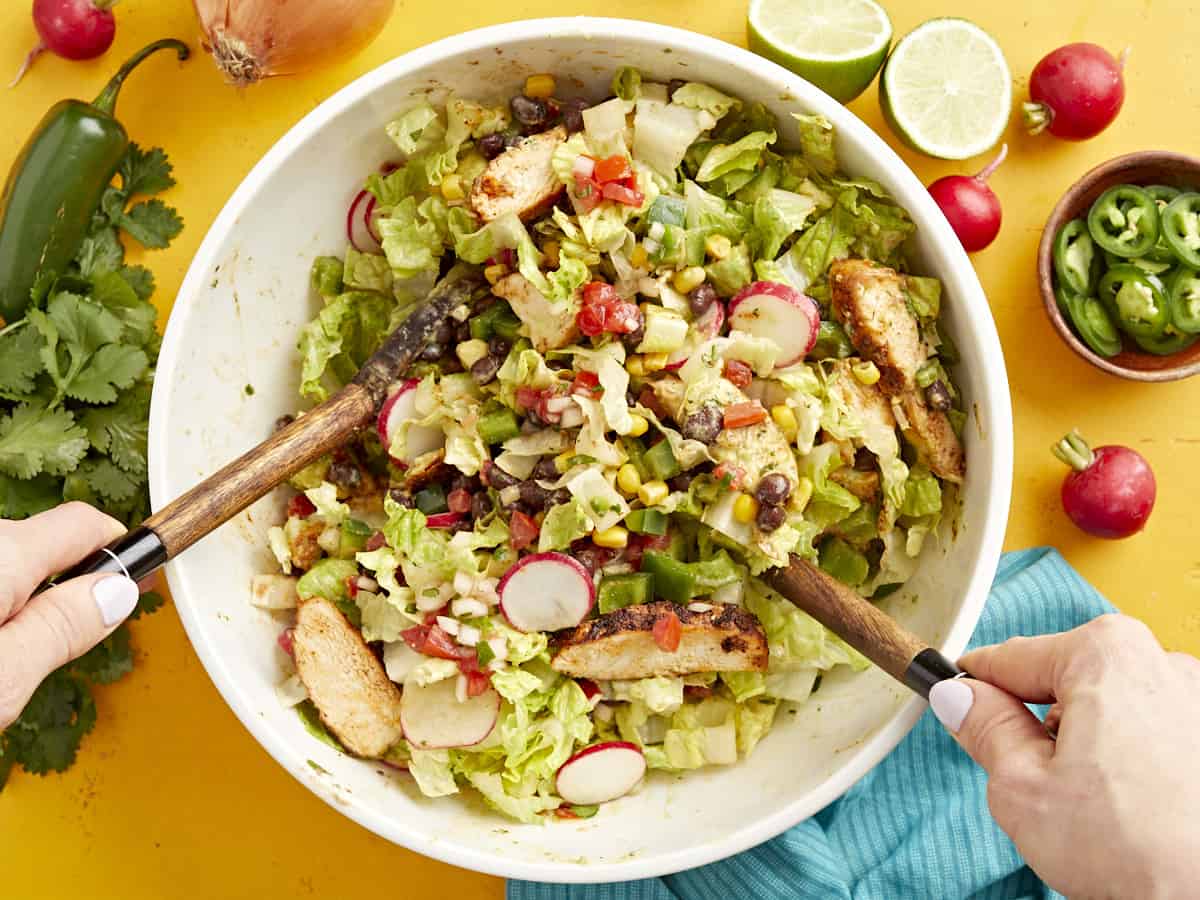
Fan out the sliced chicken on top of the salad and drizzle creamy avocado dressing over the top. Toss and serve!
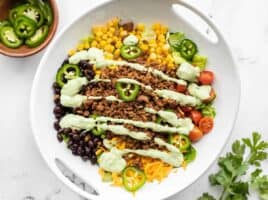
how to make a Santa Fe Salad – step by step photos
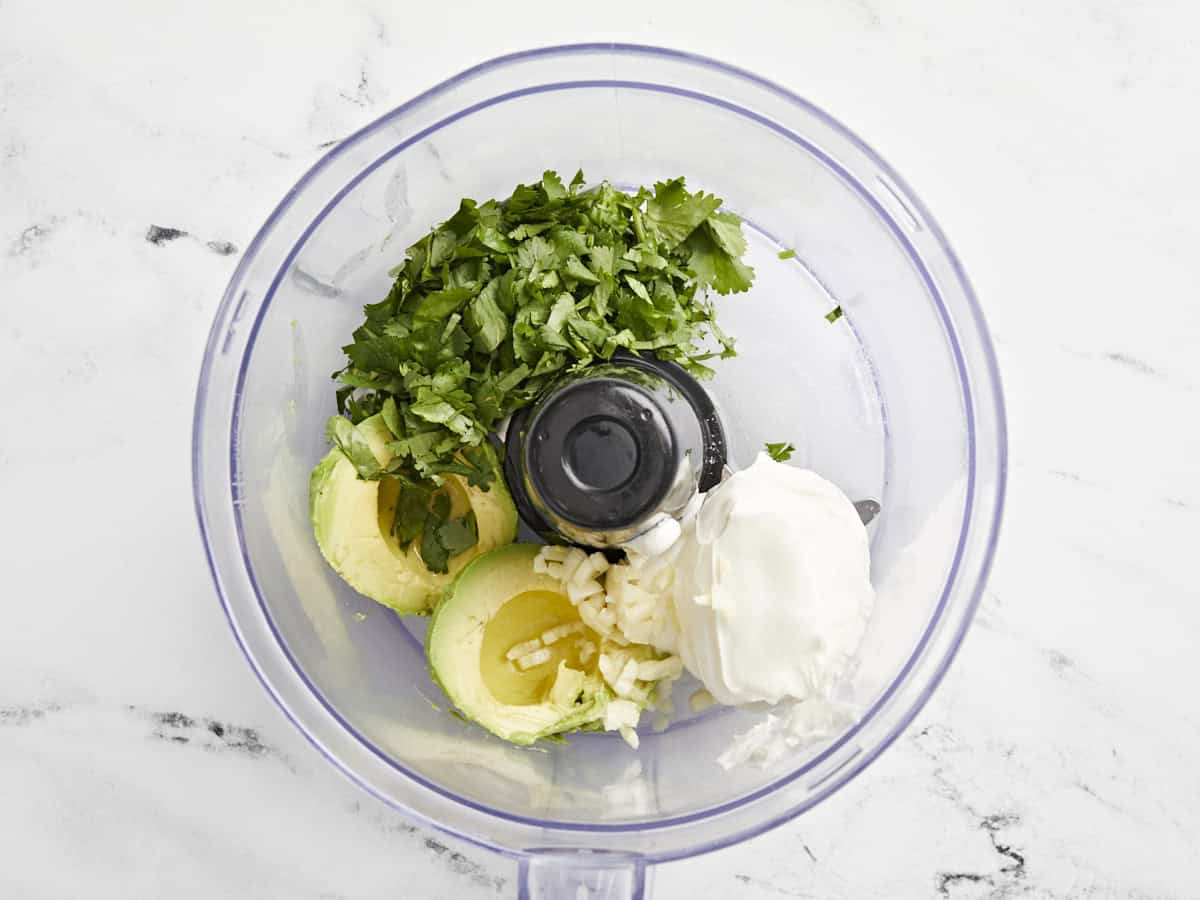
Add 1 avocado, ½ cup sour cream, 1 clove of garlic (minced), ¼ tsp salt, 2 Tbsp lime juice, and ¼ bunch cilantro to a food processor or blender.
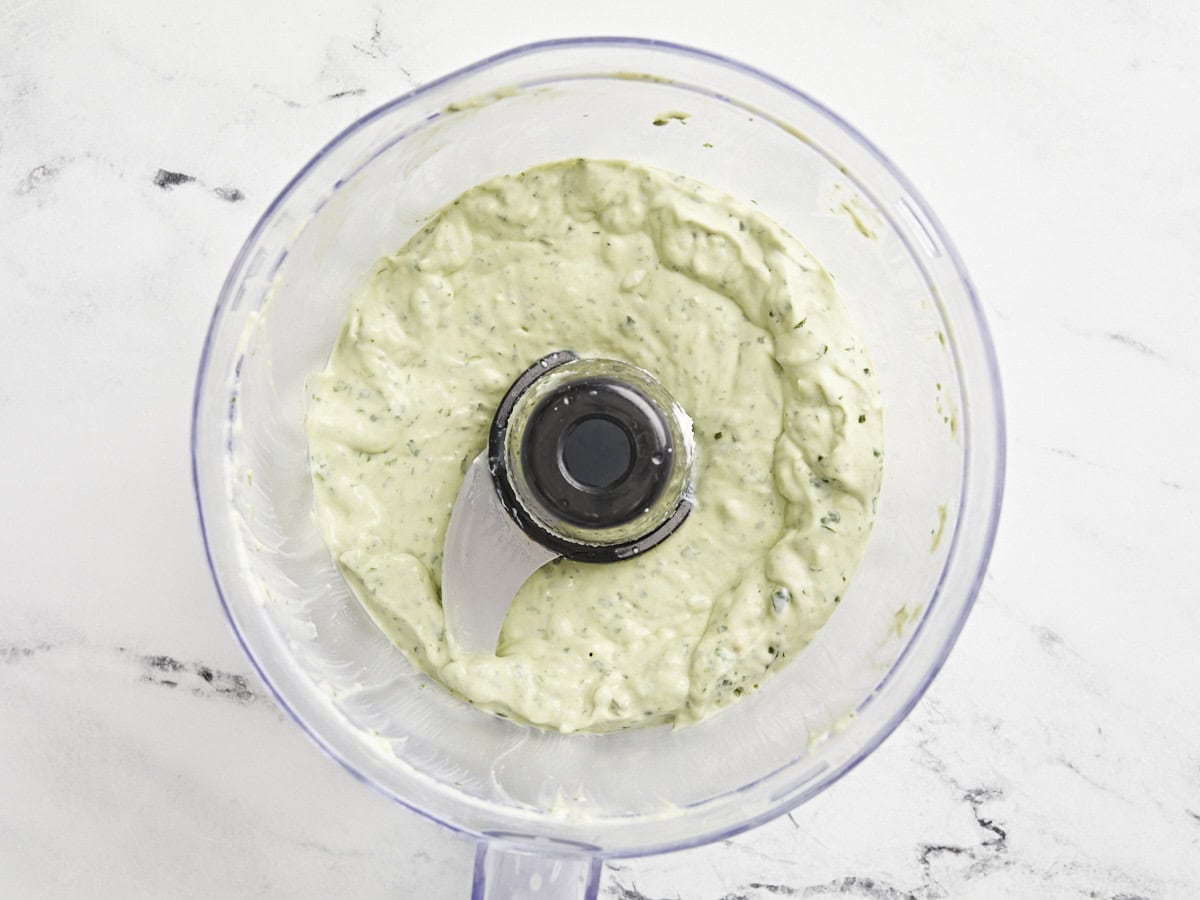
Puré until smooth. Cover and set aside in the refrigerator.
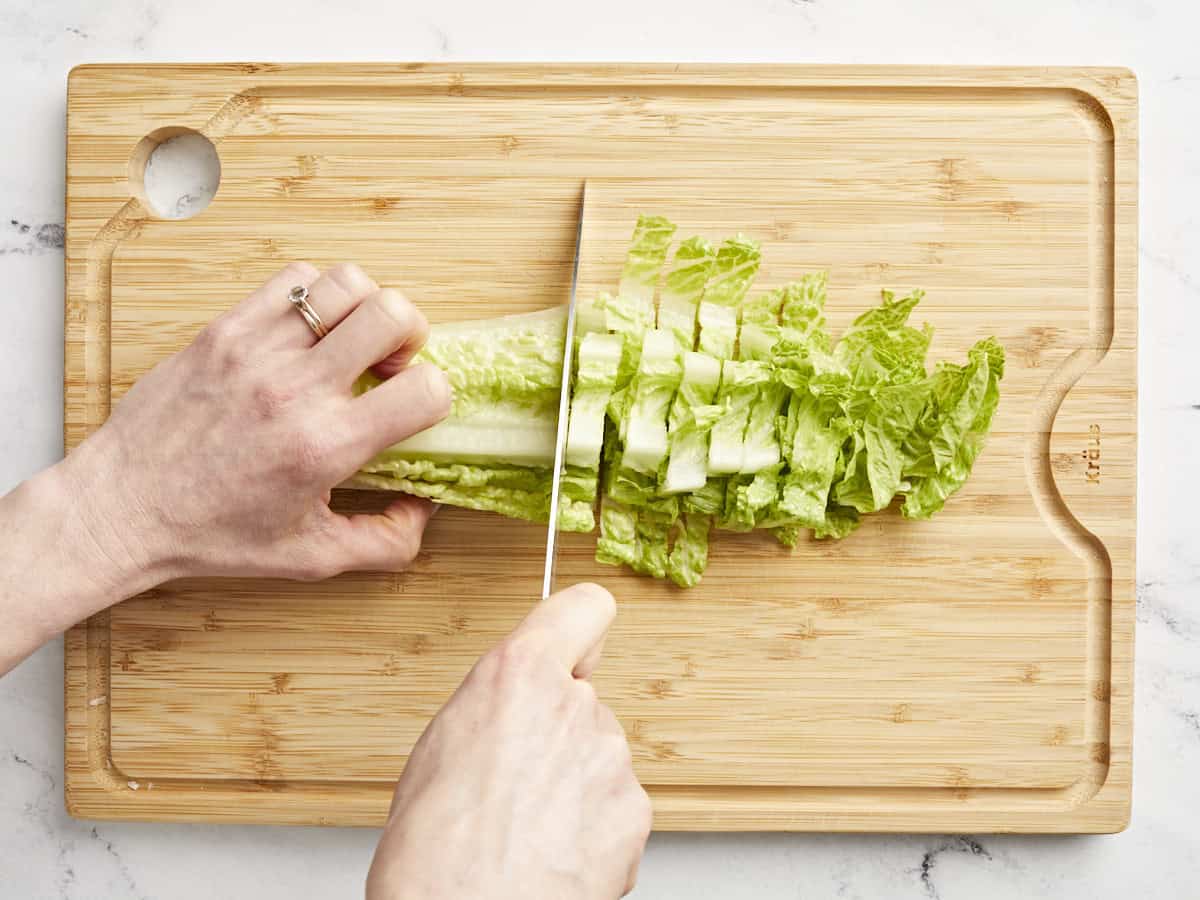
Chop 2 heads of romaine lettuce into bite-sized pieces and transfer to a large salad bowl.
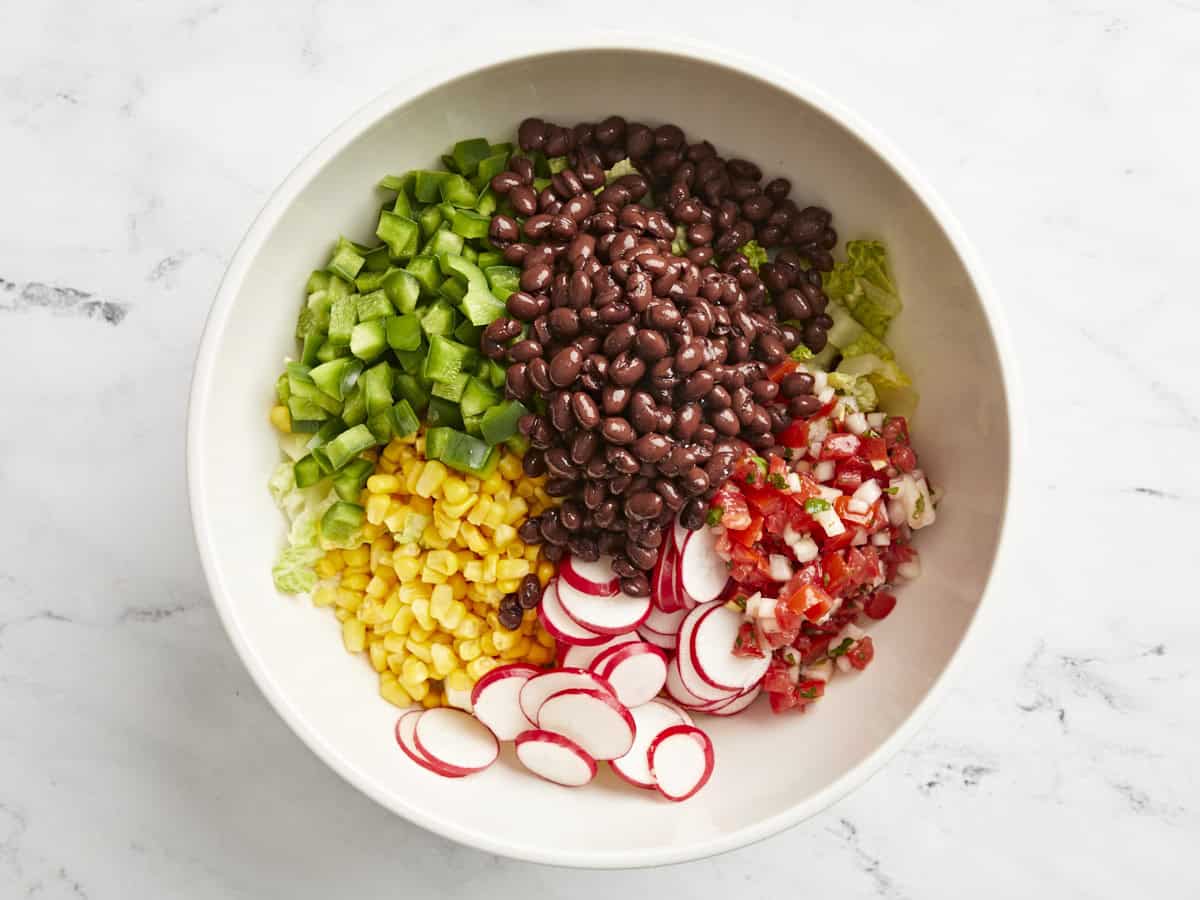
Dice 1 bell pepper, slice 5 radishes, thaw 1 cup frozen corn, and rinse and strain 1 can of black beans. Add this and 1/2 cup of pico de gallo to the large salad bowl on top of chopped romaine lettuce. Cover and keep in the refrigerator while you prepare the chicken.
Place the chicken breasts inside a heavy duty food storage bag and flatten with a rolling pin or a tenderizing mallet until the breasts are consistently about 3/4 inch thick. Start in the middle at the thickest part of each breast for more even cooking. This step helps the chicken cook more evenly.
Prepare the Santa Fe Chicken seasoning blend by combining 1 Tbsp chili, 2 tsp paprika, 1/2 tsp cayenne, 1 tsp cumin, 1 tsp garlic powder, 1 tsp onion powder, 1 tsp salt and 1 tsp black pepper together.
Rub chicken breasts with 1 Tbsp olive oil and divide the seasoning blend between the them, making sure to thoroughly coat the entire surface of each chicken breast with seasoning.
In a large skillet, add 1 Tbsp olive oil over medium-high heat. When the oil is glistening and hot, add the chicken breasts. Cook your chicken for a total of 10-12 minutes, flipping halfway. While the chicken cooks, do not wiggle or disturb it except for flipping. Remove the chicken from the heat when it reaches an internal temperature of 160°F. Allow chicken to rest on a cutting board for 5-10 minutes before slicing into strips. After resting, the chicken should reach an internal temperature of 165°F.
Fan out the sliced chicken on top of the salad and drizzle Creamy Avocado Dressing over the top. Toss and serve!
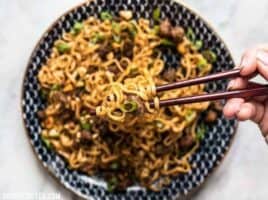
Everyone should have an easy sauce and noodles pad Thai recipe to whip up at home. Sweet, sour, and savory, pad thai is great paired with other Asian-influenced recipes, like spiral cucumber salad. This dish is commonly made with shrimp or chicken (as …
Everyone should have an easy sauce and noodles pad Thai recipe to whip up at home. Sweet, sour, and savory, pad thai is great paired with other Asian-influenced recipes, like spiral cucumber salad. This dish is commonly made with shrimp or chicken (as seen here) and can be a stand-alone dinner dish or a hearty...
Chicken Saltimbocca is made with pounded chicken breasts stuffed with prosciutto and sage in a light white wine sauce. Lighter Chicken Saltimbocca Chicken Saltimbocca is a variation of the traditional Italian dish Saltimbocca, which typically features …
Chicken Saltimbocca is made with pounded chicken breasts stuffed with prosciutto and sage in a light white wine sauce. Lighter Chicken Saltimbocca Chicken Saltimbocca is a variation of the traditional Italian dish Saltimbocca, which typically features veal cutlets wrapped with prosciutto and sage. I order this dish all the time from my favorite Italian restaurant, […]
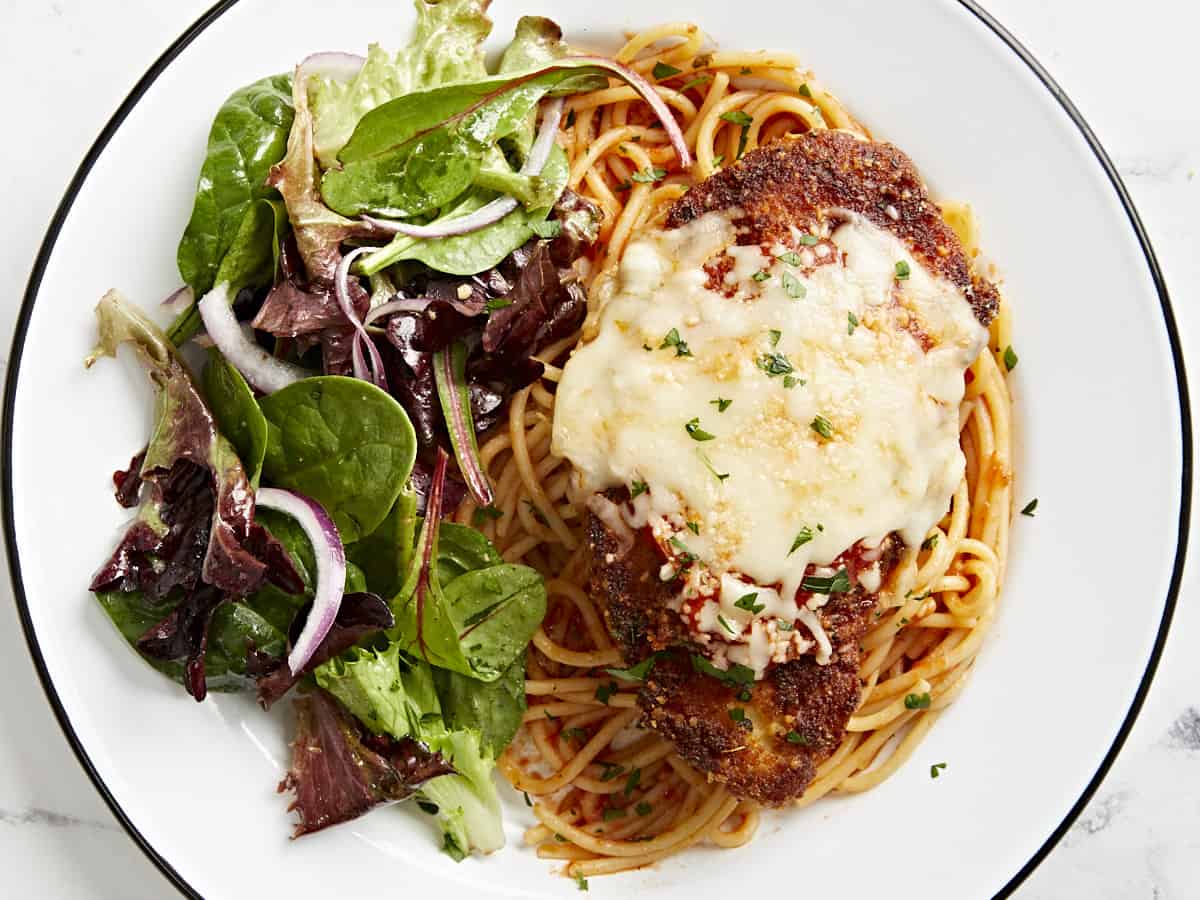
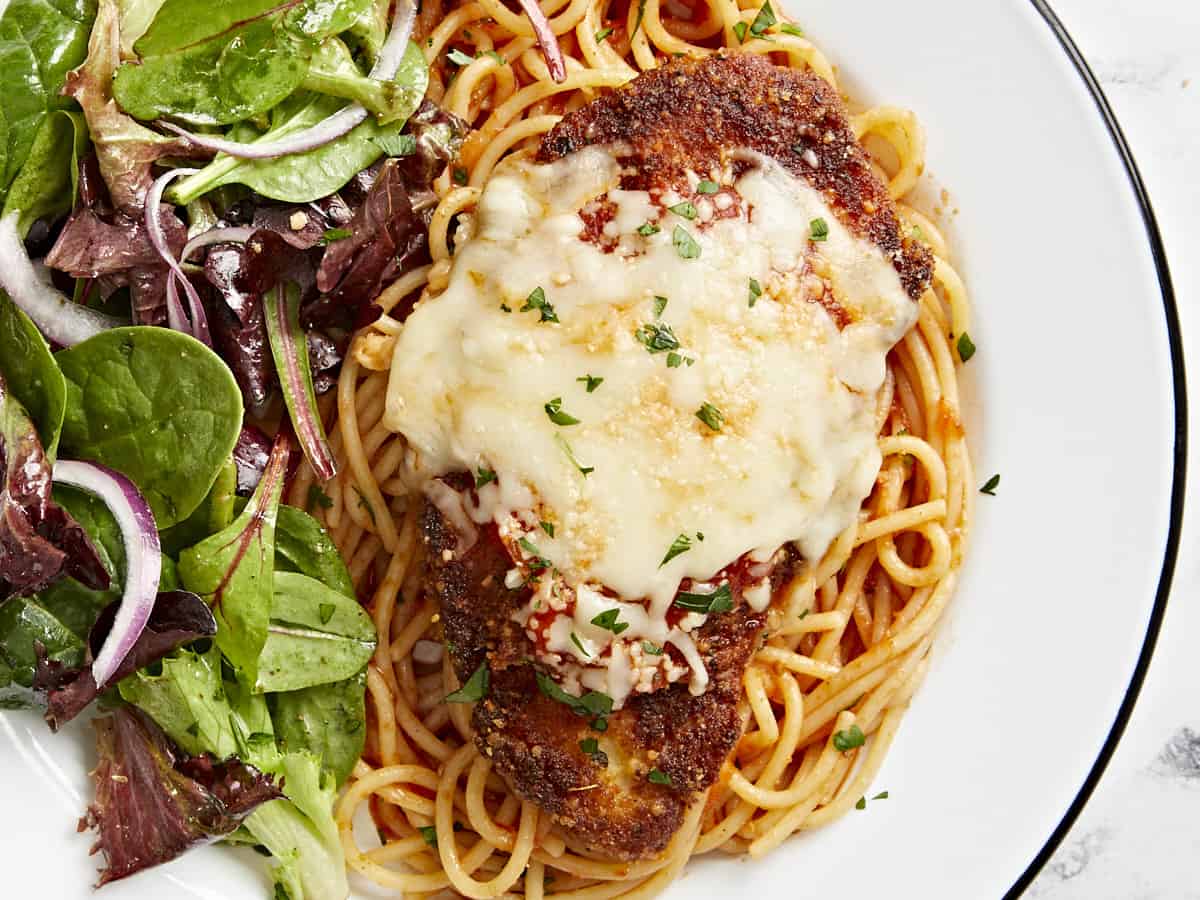
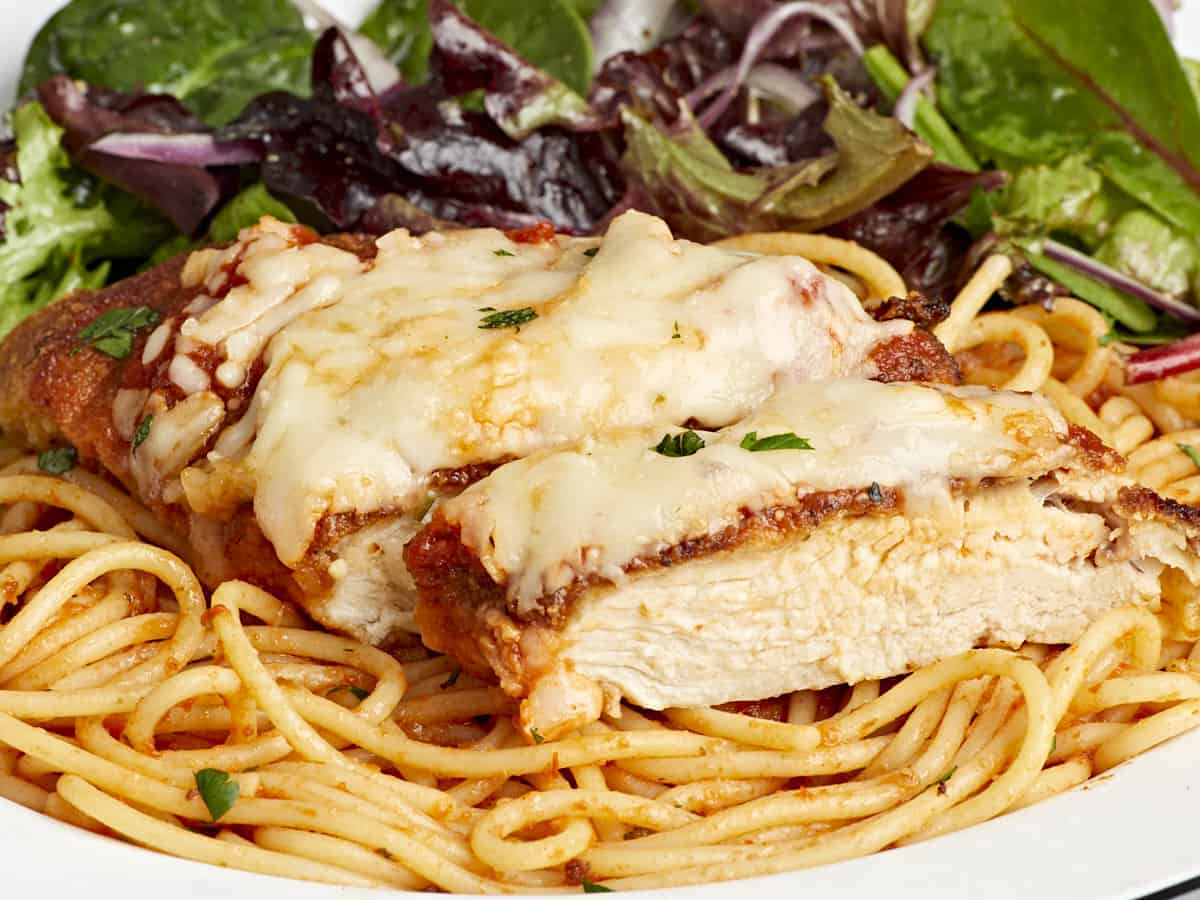
When I think of comfort food, I always think of chicken parmesan. It’s everything I want in a cozy meal– crispy, saucy chicken topped with melty cheese! This one-pan chicken parmesan recipe is so easy to make and guaranteed to be a hit. Served over spaghetti and topped with a healthy dose of parmesan cheese, it’s a recipe I come back to time and time again.
What Is Chicken Parmesan?
You’ll probably recognize Chicken Parmesan as a dish from every American-Italian restaurant menu. It is a dish that consists of breaded chicken breast covered in tomato sauce and mozzarella, parmesan, or even provolone cheese.
Ingredients Needed
Here’s what you’ll need to make chicken parmesan:
Chicken Breasts: You’ll need 2 large chicken breasts for this recipe because each chicken breast will be sliced into 2 cutlets for 4 servings.
Breadcrumbs: We’re using plain breadcrumbs so we can season them to our liking and create a crispy breading on the chicken.
Grated Parmesan: You can use pre-grated or grate your own parmesan.
Seasonings: Garlic powder, Italian seasoning, salt, and freshly cracked black pepper season the chicken as well as the bread crumbs.
Egg: Egg helps adhere the breading to the chicken.
All-Purpose Flour: A bit of flour helps to thicken the sauce.
Cooking Oil: Any neutral oil that you like to cook with is fine.
Marinara Sauce: We like using our Homemade Marinara Sauce! But your favorite jarred sauce would work just fine.
Mozzarella Cheese: We used pre-shredded, but you’re welcome to shred your own! Low moisture, whole-milk mozzarella will work best here, as fresh mozzarella has a bit too much moisture. You can even use provolone cheese if you like.
Fresh Parsley: Totally optional, but it does add a lovely freshness at the end!
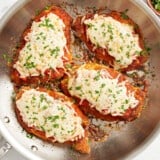
Most chicken parmesan recipes will have you crisp up the chicken in a pan and then transfer it to the oven to finish cooking and melt the cheese. In this recipe, everything is done in the skillet to save time and clean up!
Make sure your pan is big enough to accommodate all of the chicken pieces (we used a 12-inch skillet) and you’ll need a lid that will fit the pan in order to melt the cheese and warm the marinara.
If you don’t have a lid or something to tent the pan with (tin foil should work as well!) You can transfer to a baking sheet lined with a rack and bake at 375°F for 10 minutes until the cheese is melted.
You’re welcome to warm up your marinara sauce before adding it to the chicken, but I find that it warms up enough while the cheese is melting.
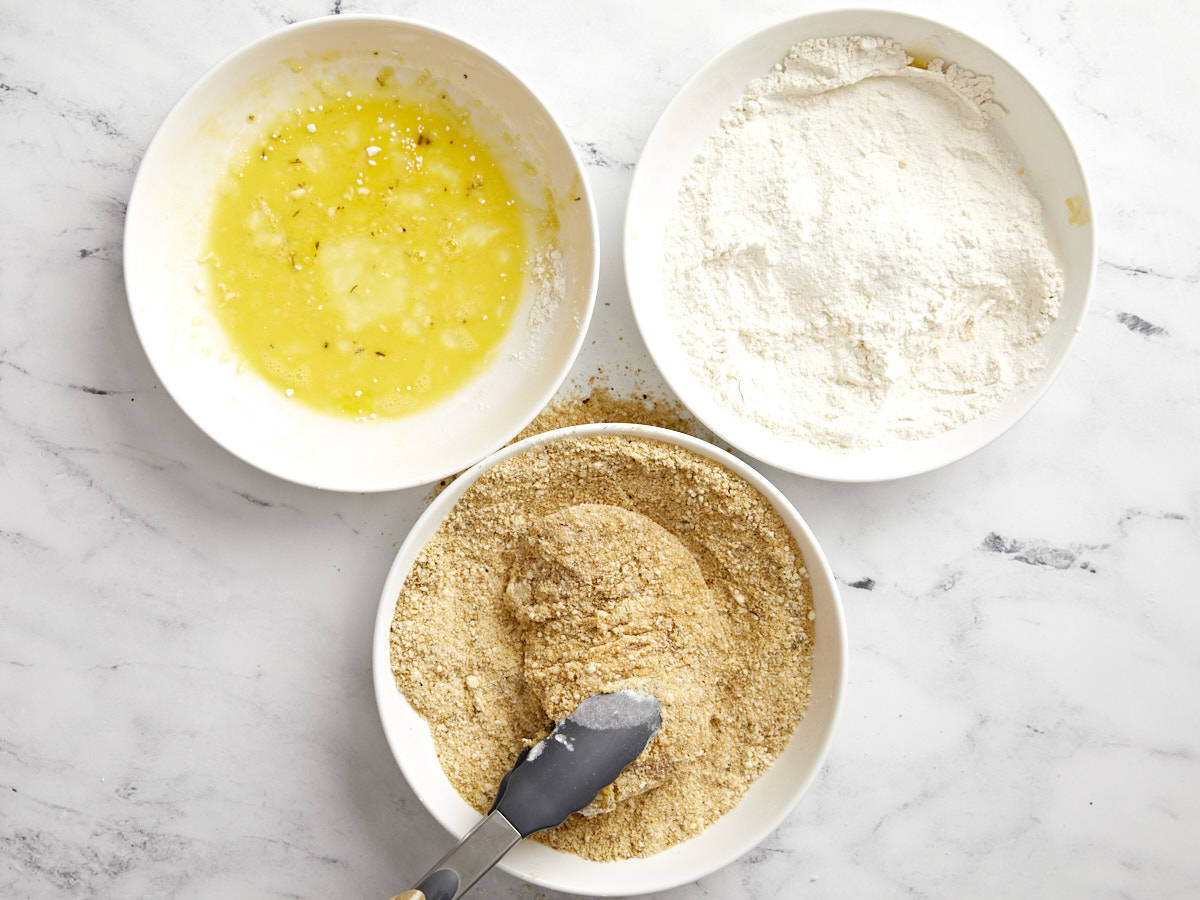
Use a sharp knife to carefully filet the chicken breasts lengthwise into two cutlets, making 4 cutlets total. You can also use pre-cut chicken cutlets.
Lightly season both sides of the chicken with a pinch of salt and pepper, Italian seasoning, and garlic powder.
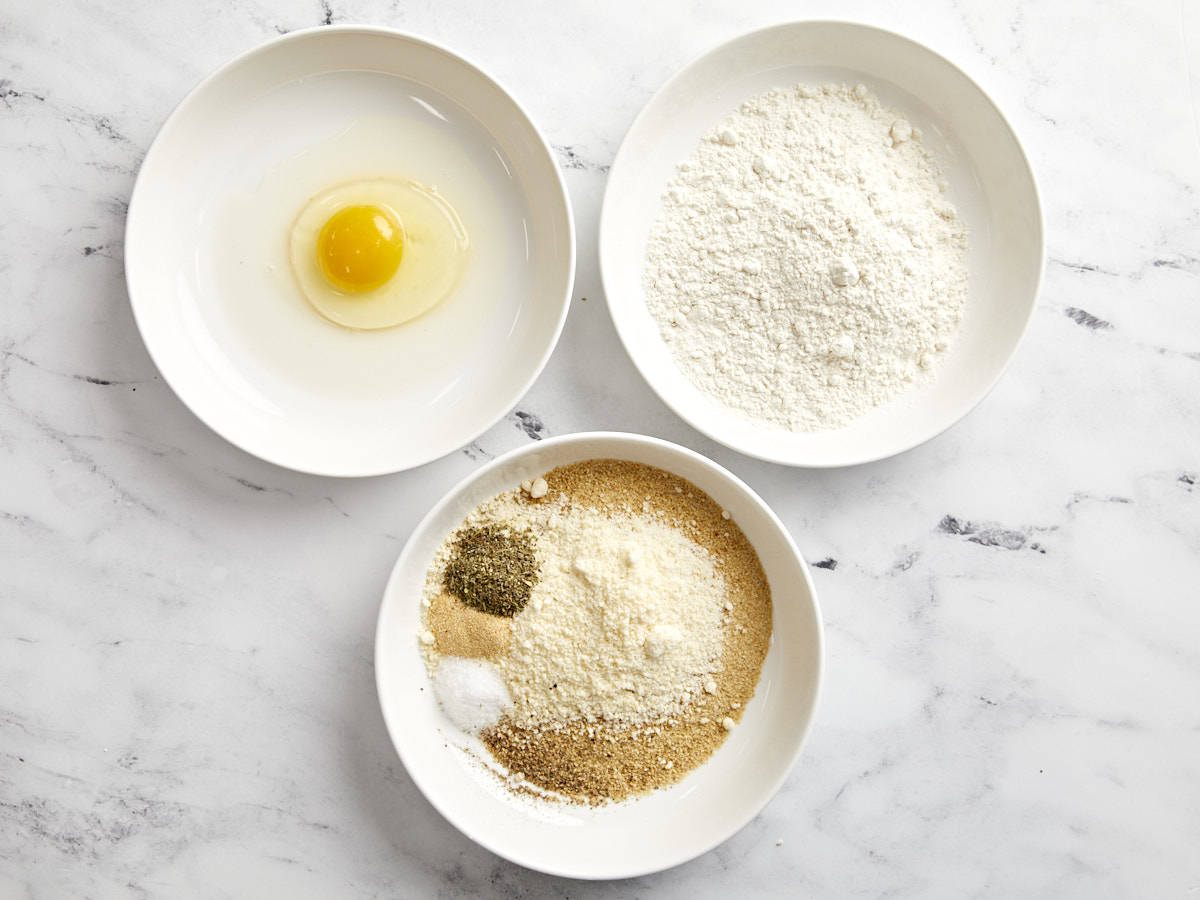
In a wide shallow bowl or container, combine the bread crumbs, parmesan, garlic powder, Italian seasoning, salt, and some freshly cracked pepper.
In a separate wide shallow bowl or container, whisk the egg until smooth.
In a third shallow bowl, add the flour.
Dredge each piece of chicken into the flour, dusting off any excess. Then, dip in the egg mixture, making sure to fully coat the chicken and dripping off any excess. Finally, dip the chicken in the seasoned bread crumbs, again coating well on both sides.
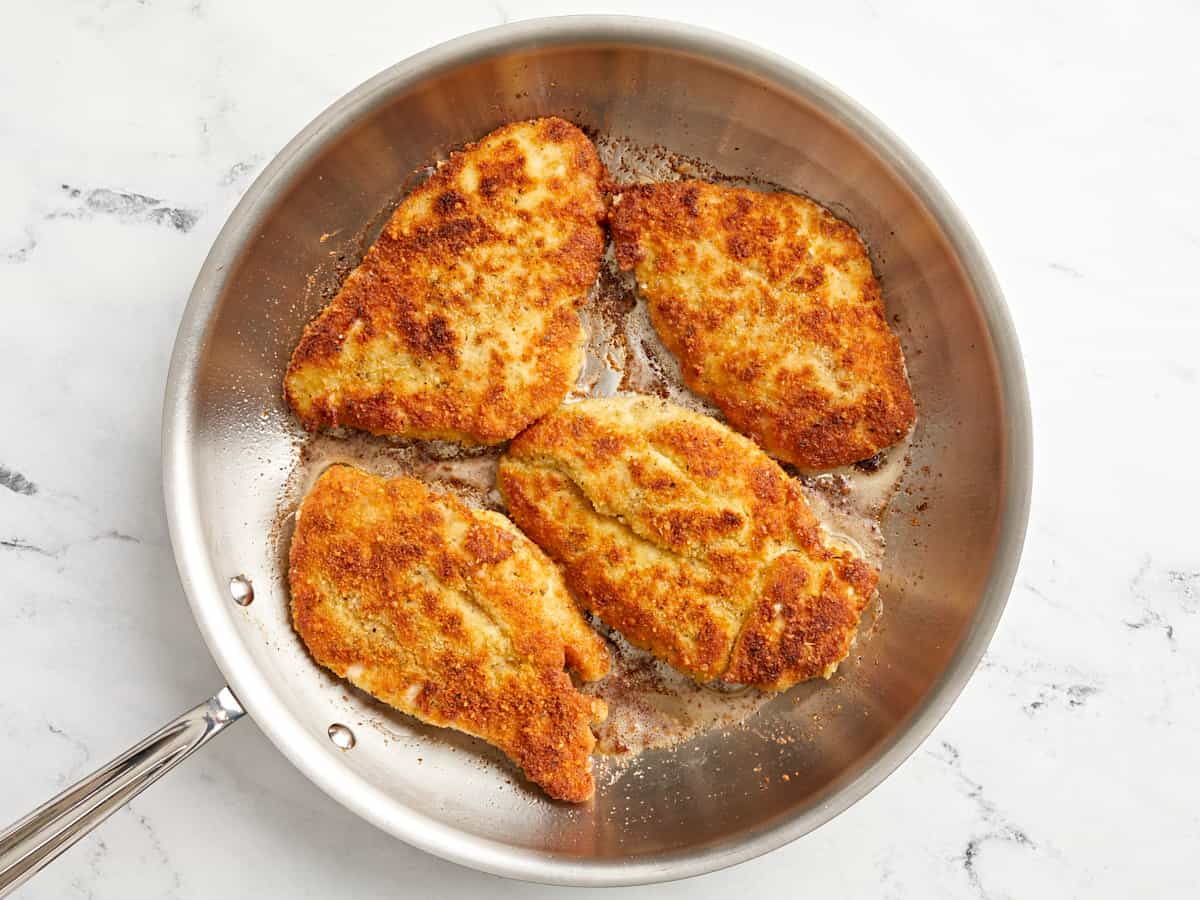
Heat the cooking oil in a large skillet over medium-high heat. When the skillet and oil are very hot, add the chicken and cook on the first side until golden brown, about 5 minutes.
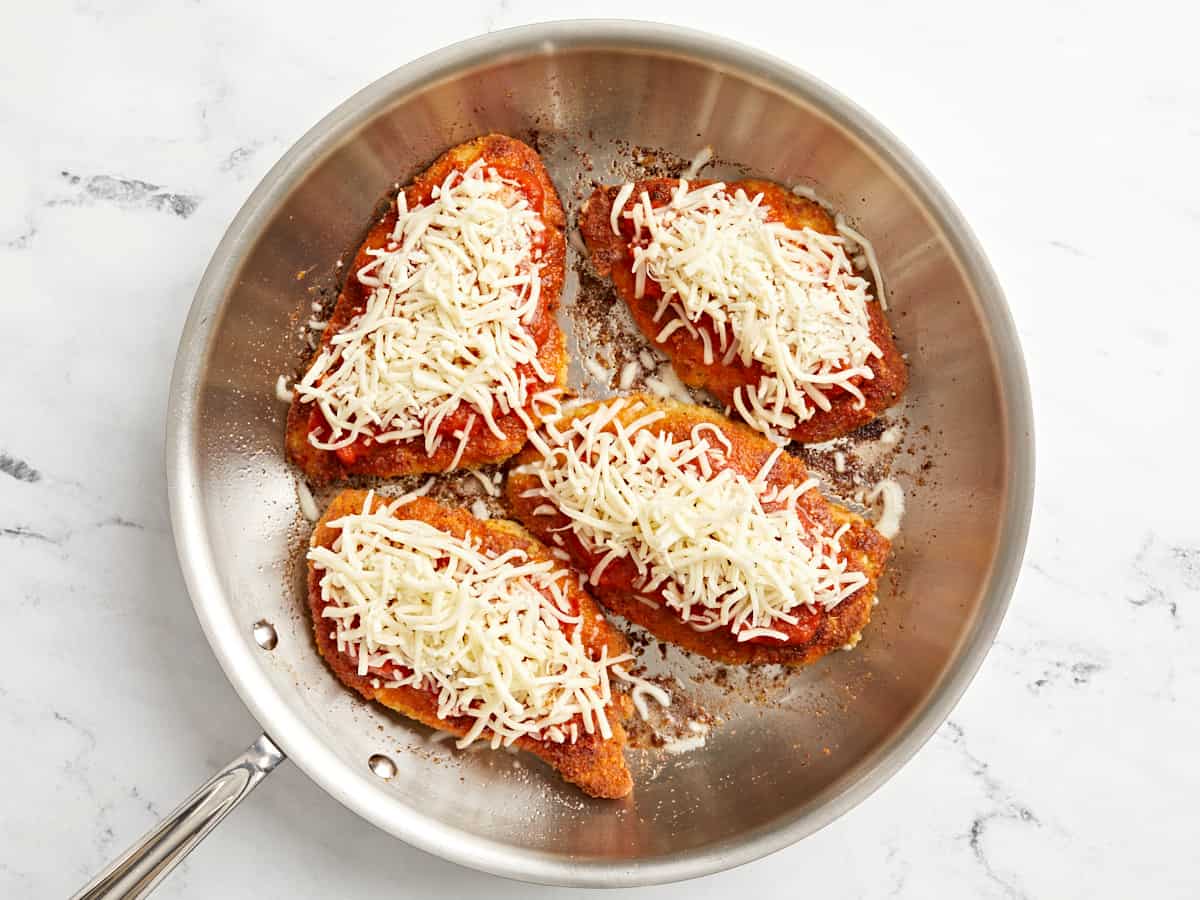
Flip the chicken and turn the heat down to medium. Top each cutlet with 2 tbsp of marinara sauce and ¼ cup shredded mozzarella cheese. Place a lid on the skillet to allow the cheese to fully melt, the marinara sauce to warm up, and the chicken to cook all the way through, about 5-7 more minutes.
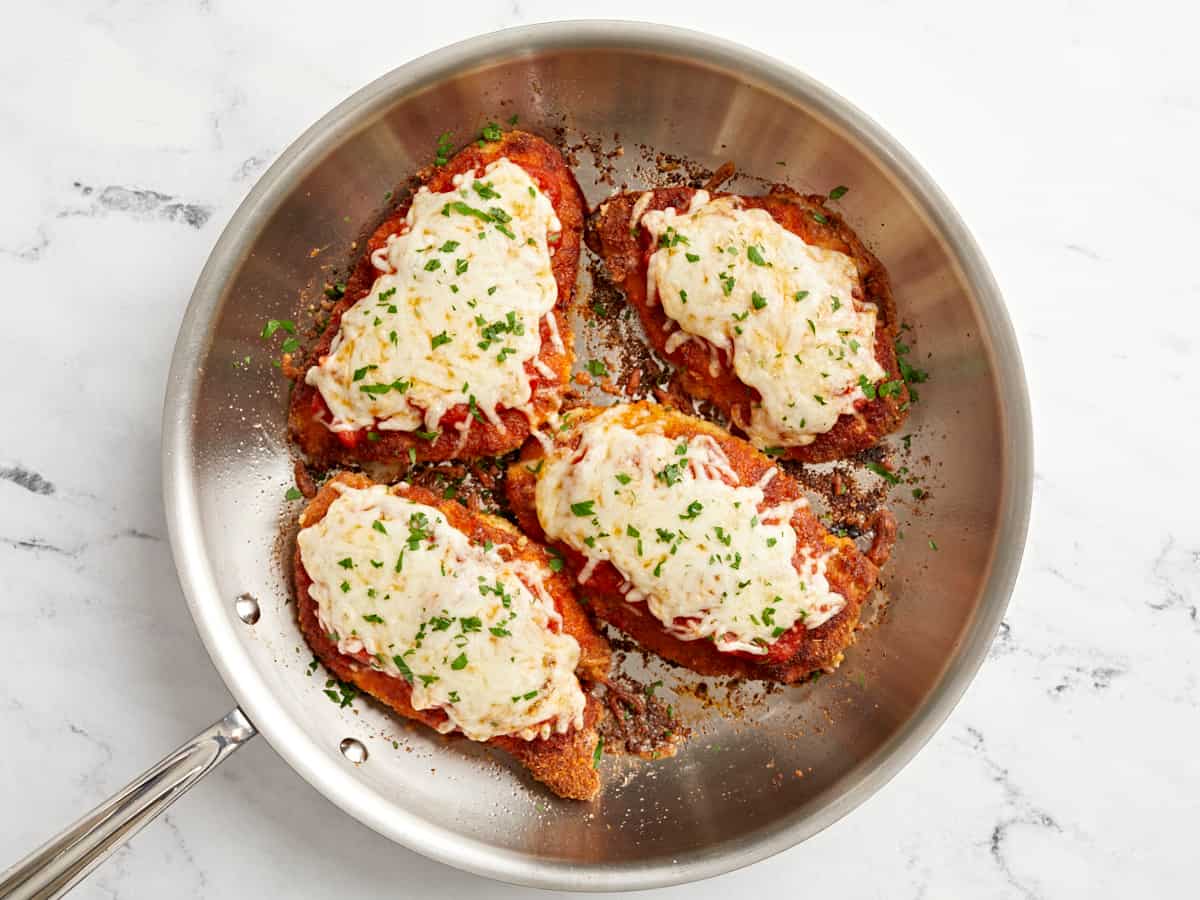
Top the chicken with fresh chopped parsley (optional) and serve with spaghetti and additional marinara.
how to make Chicken Parmesan – step by step photos
Use a sharp knife to carefully filet 2 boneless, skinless chicken breasts lengthwise into two cutlets, making 4 cutlets total. You can also use pre-cut chicken cutlets. Lightly season both sides of the chicken with a pinch of salt, pepper, Italian seasoning, and garlic powder.
In a wide shallow bowl or container, combine 1 cup breadcrumbs, 1/3 cup grated parmesan, 1 tsp garlic powder, 1 tsp Italian seasoning, 1 tsp salt, and some freshly cracked pepper. In a separate wide shallow bowl or container, whisk 1 egg until smooth. In a third shallow bowl, add 1/2 cup all-purpose flour.
Dredge each piece of chicken into the flour, dusting off any excess. Then, dip in the egg mixture, making sure to fully coat the chicken and dripping off any excess. Finally, dip the chicken in the seasoned bread crumbs, again coating well on both sides.
Heat 1/4 cup cooking oil in a large skillet over medium-high heat. When the skillet and oil are very hot, add the chicken and cook on the first side until golden brown, about 5 minutes.
Flip the chicken and turn the heat down to medium. Top each cutlet with 2 tbsp of marinara sauce and 1/4 cup shredded mozzarella cheese. Place a lid on the skillet to allow the cheese to fully melt, the marinara sauce to warm up, and the chicken to cook all the way through, about 5-7 more minutes.
Top the chicken with 1 Tbsp fresh chopped parsley (optional) and serve with spaghetti and additional marinara.
This chicken parmesan is the ultimate comfort meal!
With food costs skyrocketing, it’s a must to eat from home while still enjoying your favorite restaurants and fast food menu items. This copycat Panda Express orange chicken recipe (and soon-to-come our copycat Panda Express fried rice recipe) is…
With food costs skyrocketing, it’s a must to eat from home while still enjoying your favorite restaurants and fast food menu items. This copycat Panda Express orange chicken recipe (and soon-to-come our copycat Panda Express fried rice recipe) is a great way to park it in front of the TV with a plate full of...
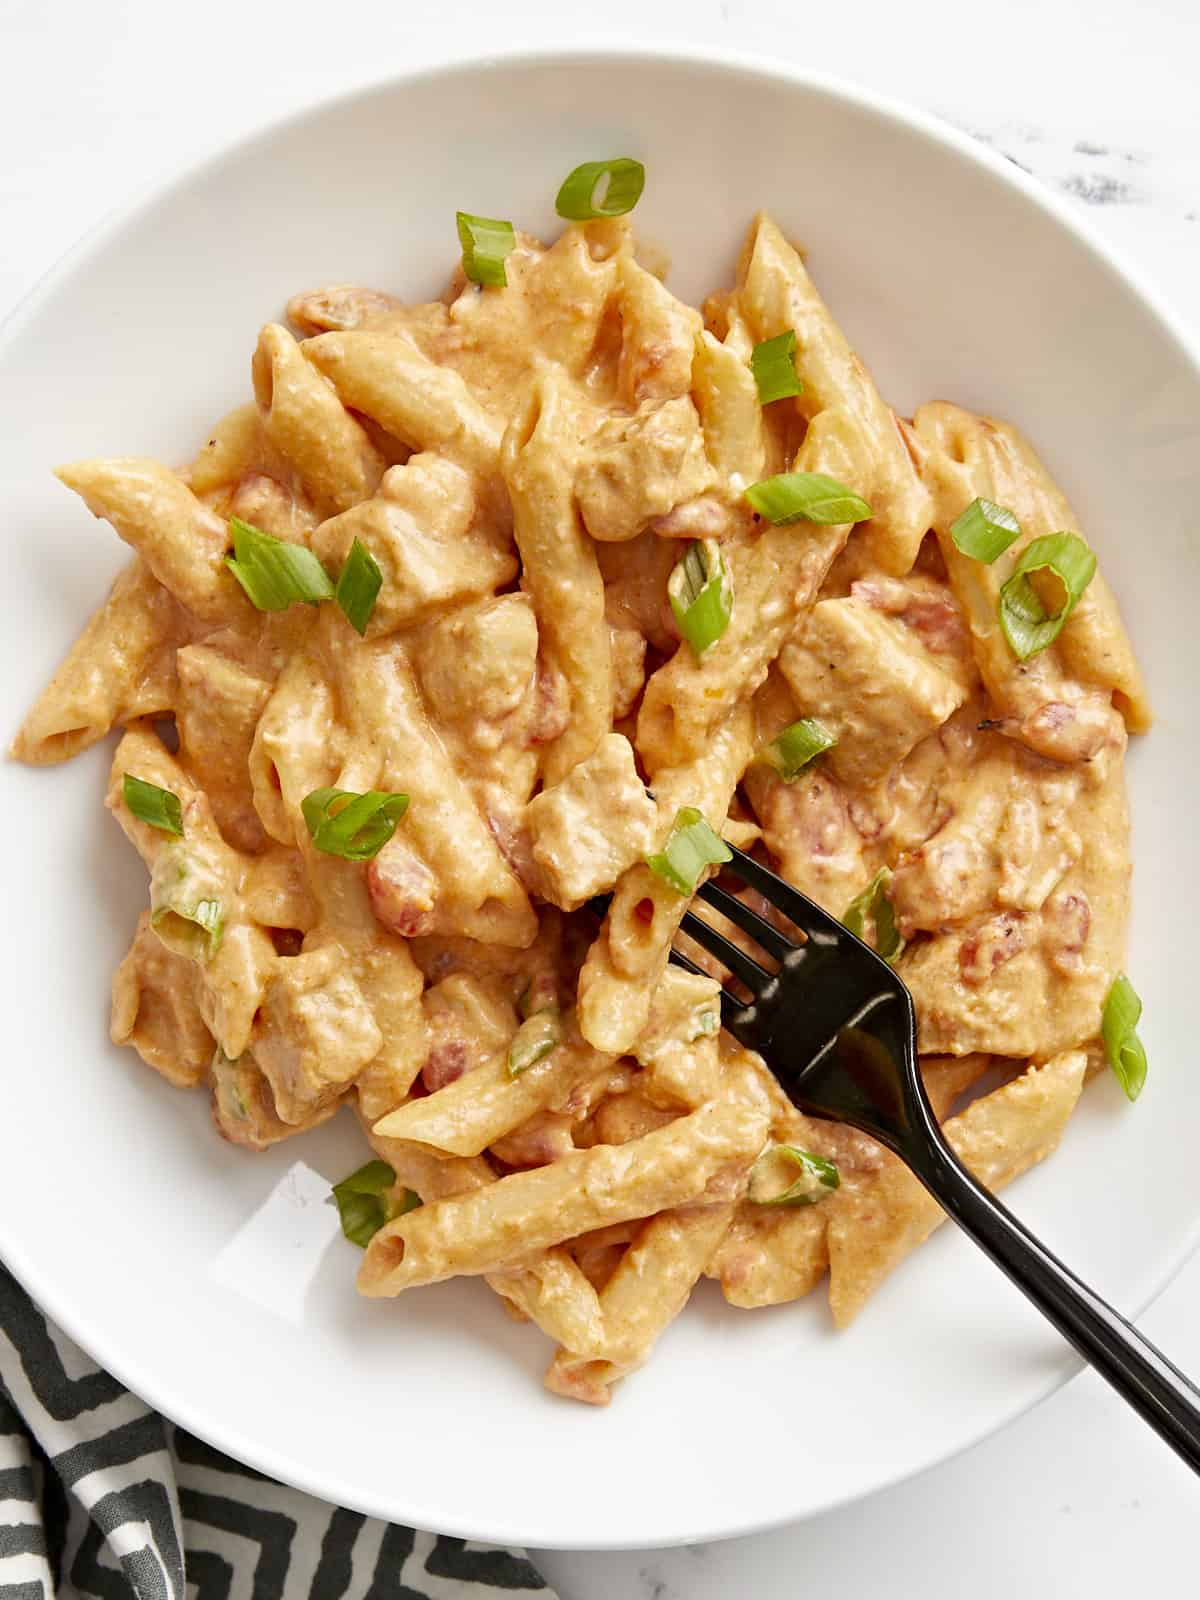
One thing I’ve learned over the years is that most dips can also double as an amazing pasta sauce, and this Buffalo Chicken Pasta is a great example. I took all of the creamy, tangy, spicy goodness of buffalo chicken dip and made it into a deliciously cheesy one-pot pasta. So gather around all of my spicy food friends, you’re going to want to make this easy, creamy, and addictive Buffalo Chicken Pasta ASAP!
Ingredients for Buffalo Chicken Pasta
This cheesy buffalo chicken pasta starts with all of the same ingredients as buffalo chicken dip, then we add a few more to make it a little saucier and give the dish just a touch more flavor and texture. Here’s what you’ll need to make buffalo chicken pasta:
Chicken Breast: We use one boneless, skinless chicken breast for this recipe and stretch it across four servings to keep things budget-friendly. You can use diced boneless, skinless chicken thighs for an even less expensive option. Or, you can add leftover chopped or shredded cooked rotisserie chicken to the pasta at the end. If using pre-cooked rotisserie chicken, just add the remaining spices to the sauce.
Seasoning: We seasoned the chicken breast with garlic powder, onion powder, cayenne pepper, and salt for extra flavor.
Butter: Butter balances the heat and acidity of the hot sauce and helps give this dish that classic buffalo sauce flavor.
Chicken Broth: In true one-pot pasta style, the pasta is cooked in chicken broth for maximum flavor.
Pasta: We used a classic penne pasta for this dish, but you could also use bowtie, rotini, or any short pasta shape.
Cheese: A combination of cream cheese and Monterey jack cheese keeps the sauce extra creamy and smooth without the need for a flour and butter roux.
Hot Sauce: Franks Red Hot Sauce is the classic sauce used for any “Buffalo” flavored dish, but any vinegar-based cayenne hot sauce will also be delicious.
Worcestershire sauce: Worcestershire adds just the right of umami and sweetness to the buffalo sauce, preventing it from having a flat flavor.
Petite Diced Tomatoes: To give this pasta more texture and flavor, we added a can of petite diced tomatoes.
Green Onion: We topped this pasta with sliced green onion for a little dose of savory freshness at the end.
What Else Can I Add?
If you have a little extra wiggle room in your budget, you can add even more goodies to this buffalo chicken pasta to make it ✨extra✨. Try topping the pasta with crumbled blue cheese, or stirring in some bacon crumbles. If you love a crunchy topping, try crushing some butter crackers or tortilla chips and sprinkling them on top of the pasta just before serving. And while it is totally unconventional, I think some small broccoli florets would be awesome in this, kind of like broccoli mac and cheese!
What to Serve with Buffalo Chicken Pasta
This buffalo chicken pasta is pretty rich, so you’re going to want something light and refreshing to serve on the side. You can opt for a super Simple Side Salad, a classic Caesar Salad, or maybe a simple Cucumber Tomato Salad. Or just go with the theme and serve up some carrot and celery sticks with blue cheese dressing for dipping!
Tips for Making One Pot Pasta
One-pot pasta can be tricky for some because the pasta is cooked in a much smaller amount of liquid than traditional pasta cooking methods. Here are a few tips to make sure your one-pot pasta cooks evenly and to the right texture:
Use heavy, thick-bottomed cookware to help the ingredients heat evenly.
Use a burner that is close in diameter to the bottom of your pot to ensure even heating.
The broth does not need to fully cover the pasta for it to cook, so resist the urge to add more water or broth in the beginning. Steam will help the pasta above the water line to cook, and the pasta will be stirred to ensure it all has contact with the liquid.
Make sure the liquid is simmering the whole time the pasta is cooking. If the heat is too low, or the liquid is only simmering in the center of the pot, the pasta will cook unevenly and get gummy.
Stir the pot occasionally to prevent sticking and help everything cook evenly.
Use your judgment. If the pasta looks close to being cooked through, but there is too much liquid left in the skillet, let it finish simmering with the lid off. If the liquid is gone but your pasta is still not tender, add a splash of more water or broth and continue to simmer until tender.
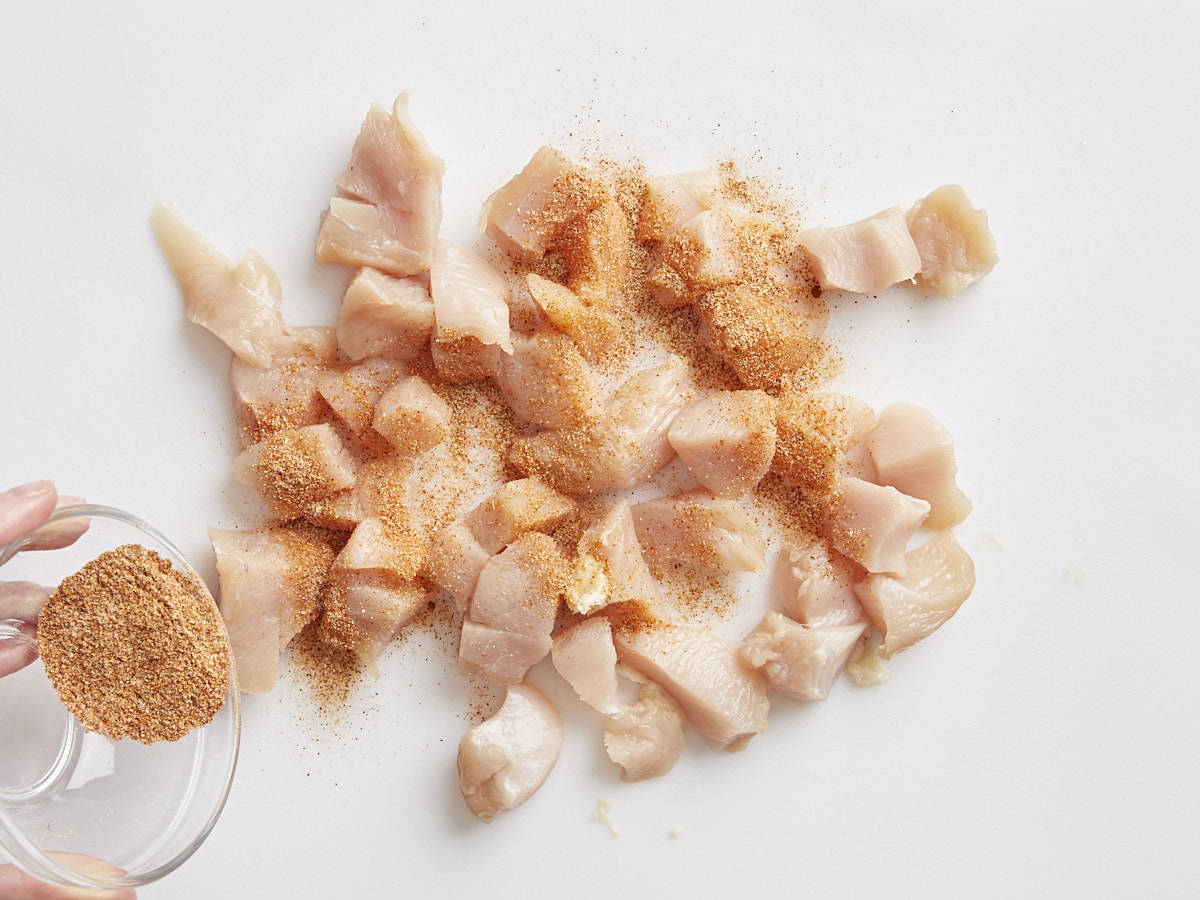
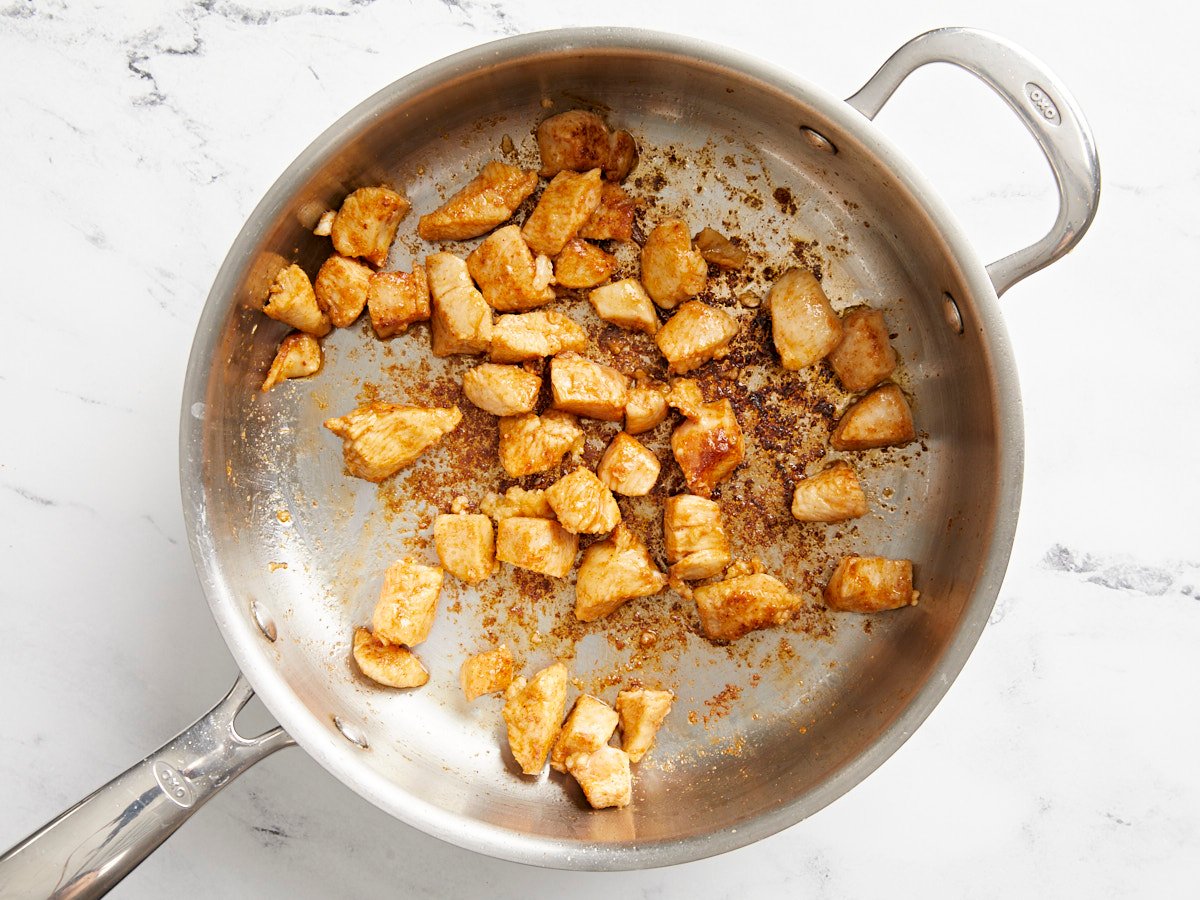
Cut the chicken into ½-¾ inch pieces. Combine the garlic powder, onion powder, cayenne pepper, and salt, then sprinkle it over the chicken pieces. Toss the chicken in the spices until everything is well coated.
Heat the cooking oil in a large deep skillet over medium-high heat until very hot. Once hot, add the chicken and allow tge chicken to brown on all sides. The chicken does not need to be cooked through at this point.
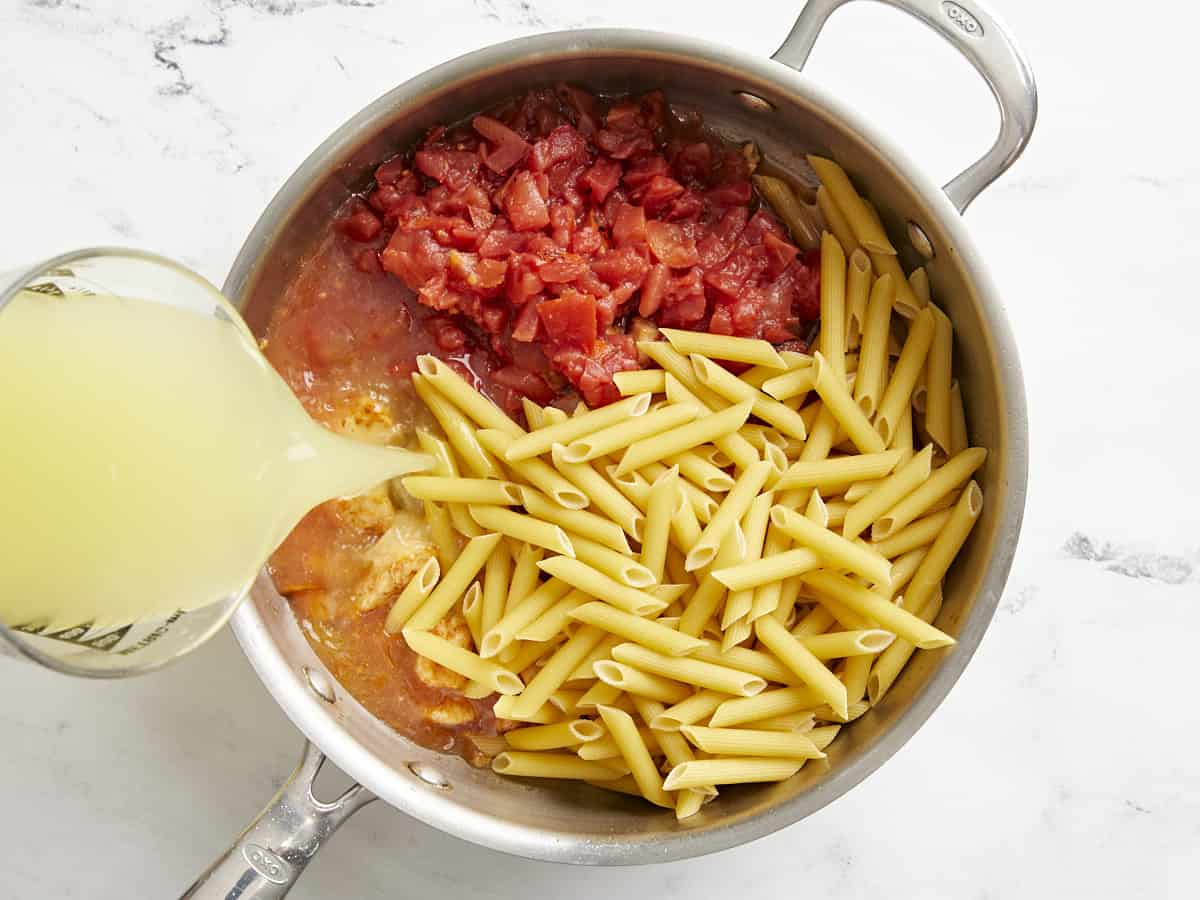
Add the uncooked pasta, canned diced tomatoes (with the liquid), and the chicken broth to the skillet with the chicken. Stir to dissolve all of the browned bits off the bottom of the skillet.
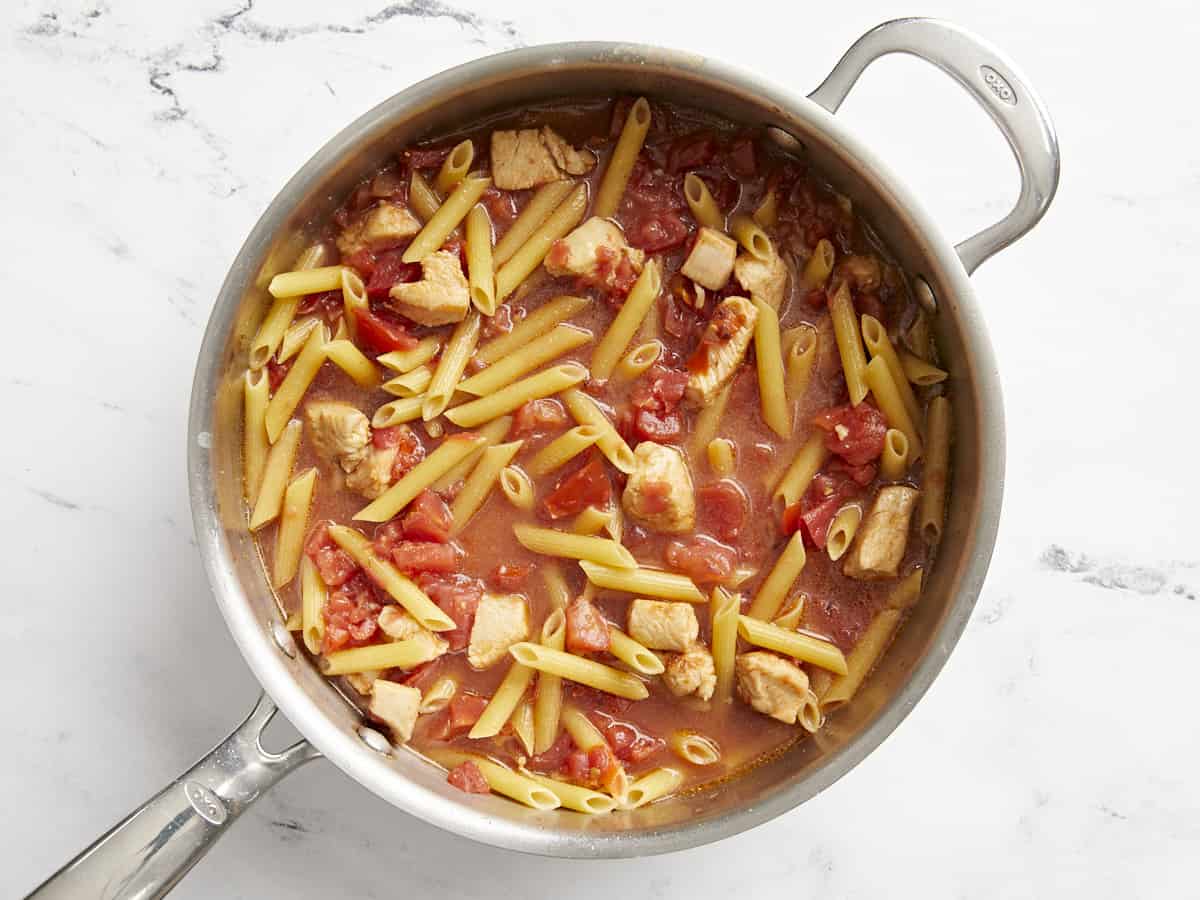
Place a lid on the pot and allow the broth to come up to a strong simmer. The broth will not fully cover the pasta, but that is okay. Once the broth is simmering, briefly stir the pasta, replace the lid, then turn the heat down to medium-low.
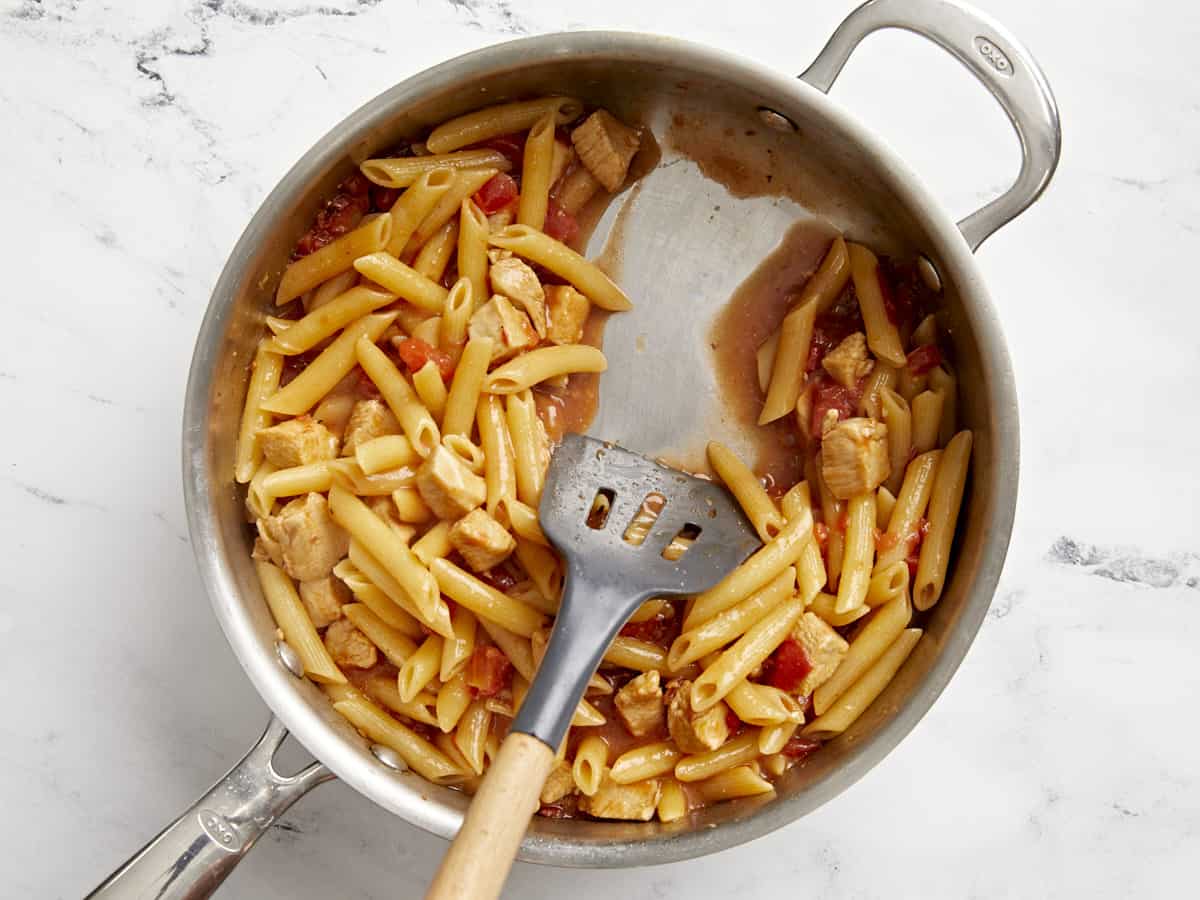
Allow the pasta to simmer in the broth for 10-12 minutes or until the pasta is tender and most of the liquid has been absorbed, stirring once or twice throughout, and always replacing the lid after stirring.
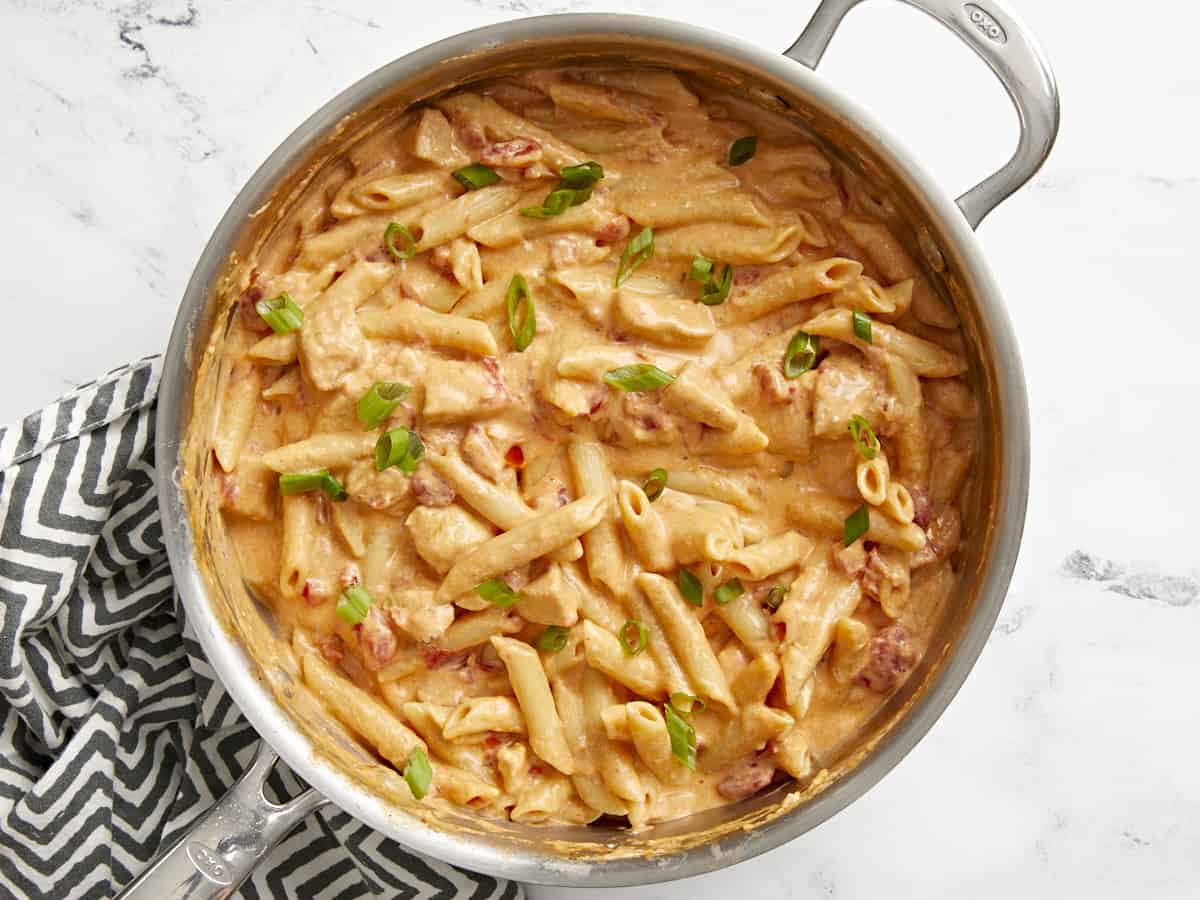
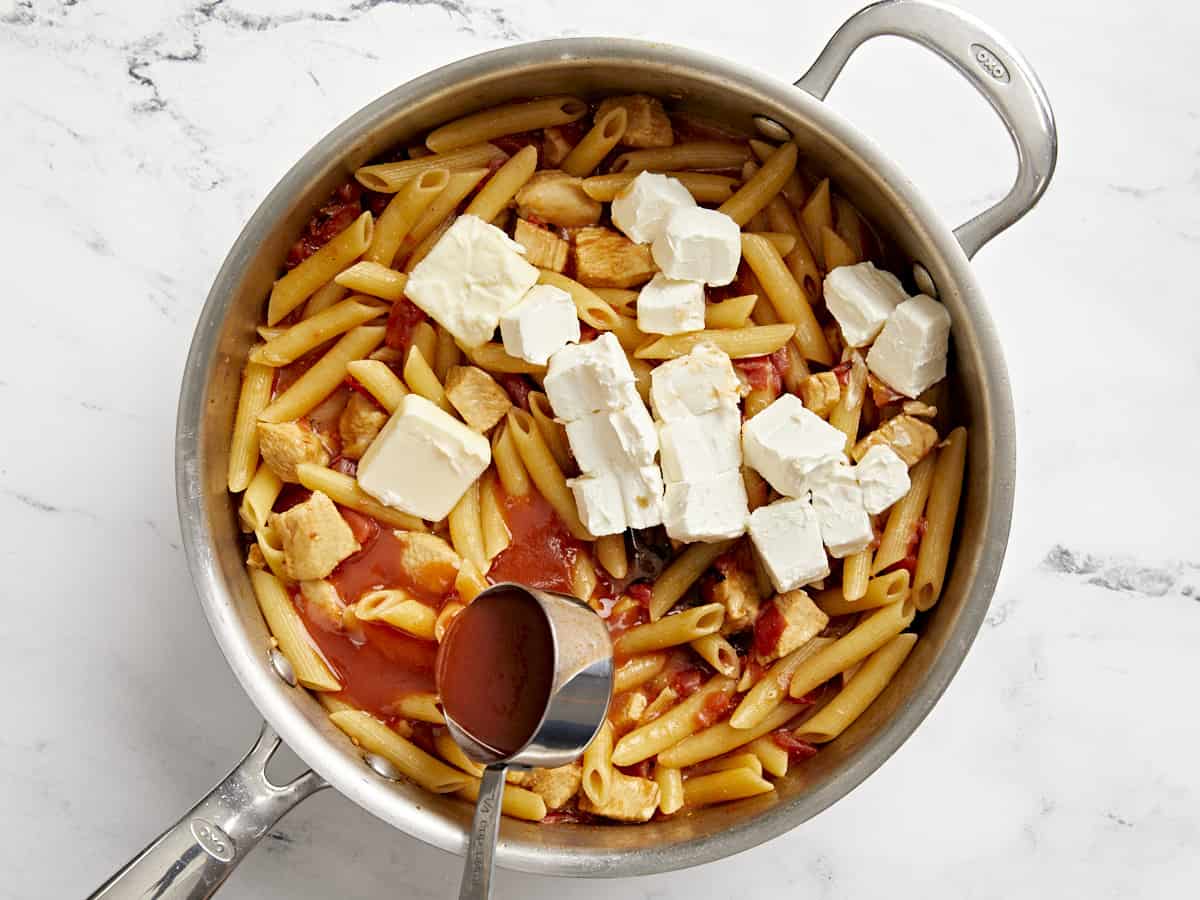
Once the pasta is tender and only a small amount of thickened liquid remains in the skillet, cut the cream cheese into chunks and add it to the past along with the butter, hot sauce, and Worcestershire sauce. Stir and cook over medium-low heat until the cream cheese has fully melted into the pasta.
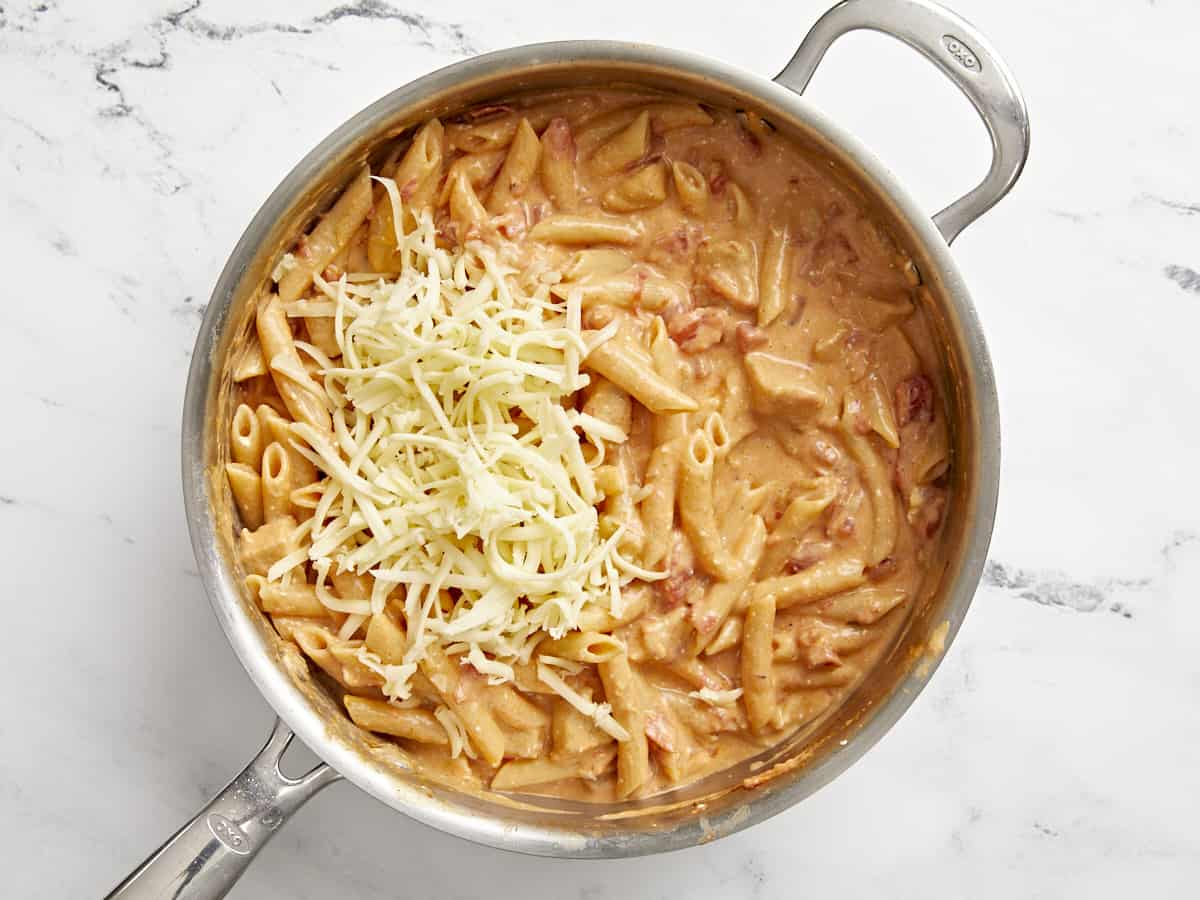
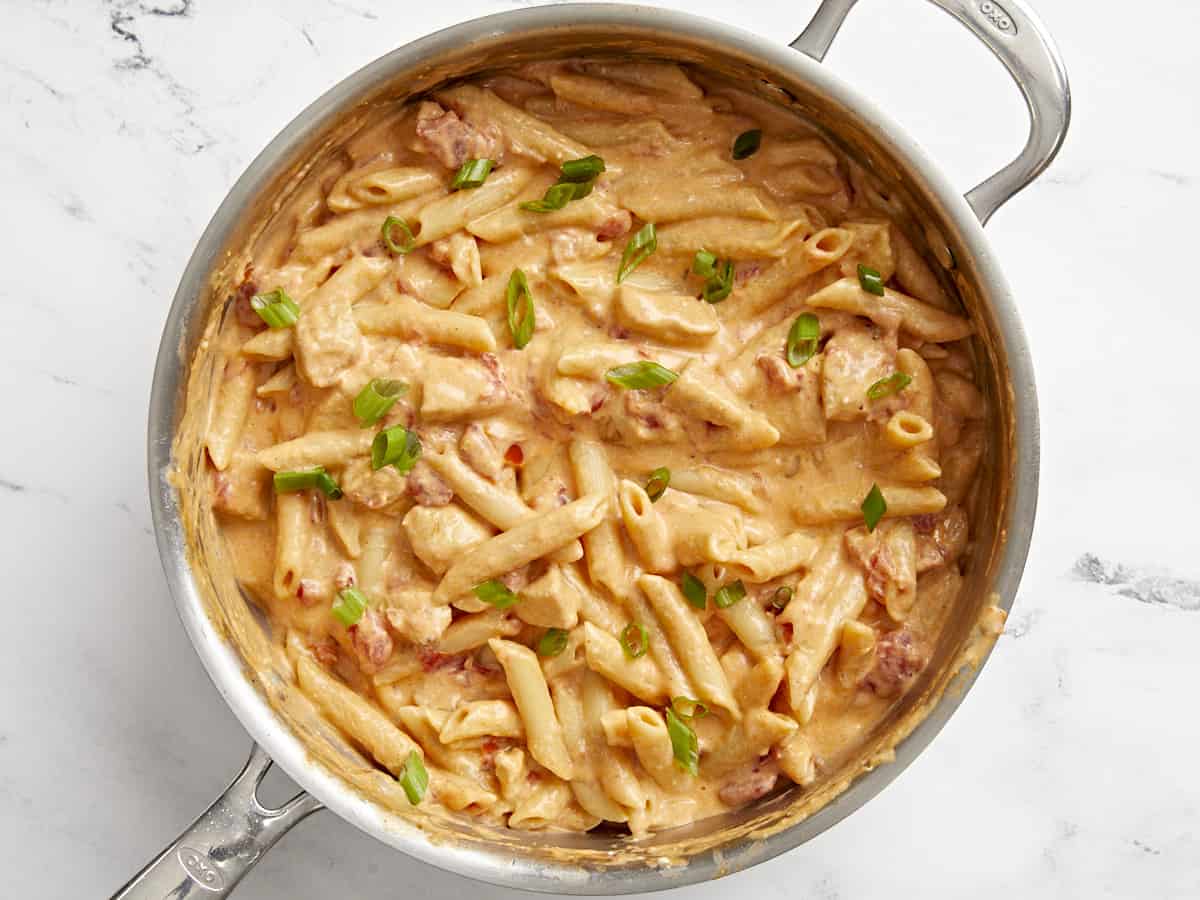
Add the shredded Monterey jack cheese and stir until melted into the sauce. Top with sliced green onions, then serve hot.
How to Make Buffalo Chicken Pasta – Step by Step Photos
Dice one boneless, skinless chicken breast (about ⅔ lb.) into small ½-¾ inch pieces. Combine ½ tsp garlic powder, 1/2 tsp onion powder, ½ tsp cayenne pepper, and ¼ tsp salt, then sprinkle it over the chicken. Toss the chicken until it is evenly coated in spices.
Heat 1 Tbsp of cooking oil in a large deep skillet over medium-high until very hot. Once hot, add the chicken and allow it to brown on all sides. The chicken does not need to cook through here, just let it brown on the outside.
Add 8 oz of uncooked pasta, one 15oz. can of petite diced tomatoes (with the liquid), and 1.5 cups of chicken broth to the skillet with the chicken.
Stir everything well, making sure to dissolve all the browned bits off the bottom of the skillet. The broth will not fully cover the pasta, but that’s okay. Do not add extra liquid at this point.
Place a lid on the pot and allow the broth to come up to a strong simmer. Once simmering, give the pasta a quick stir to loosen it from the bottom, replace the lid, then turn the heat down to medium-low. Let the pasta simmer over medium-low for 10-12 minutes, or until the pasta is tender and only a small amount of saucy liquid remains.
Once the pasta is tender and most of the liquid is absorbed, it’s time to make the buffalo sauce. Add 4oz. of cream cheese (cut into chunks), 2 Tbsp butter, ¼ cup hot sauce, and ½ tsp Worcestershire sauce. Continue to stir and cook over medium-low until the cream cheese is fully melted into the sauce.
Add ½ cup of shredded Monterey Jack cheese to the skillet and stir until it has melted into the sauce.
Top the buffalo chicken pasta with sliced green onions and serve hot!
One-Pot, Creamy Chicken Pasta Primavera made with lean chicken breast, spring veggies, and a light cream sauce. A delicious, high-protein dinner idea! Chicken Pasta Primavera Primavera means “spring” in Italian, so I thought the name for this high-prot…
One-Pot, Creamy Chicken Pasta Primavera made with lean chicken breast, spring veggies, and a light cream sauce. A delicious, high-protein dinner idea! Chicken Pasta Primavera Primavera means “spring” in Italian, so I thought the name for this high-protein pasta dish was fitting since it’s made with spring asparagus, leeks, artichokes, and peas. The creamy sauce […]
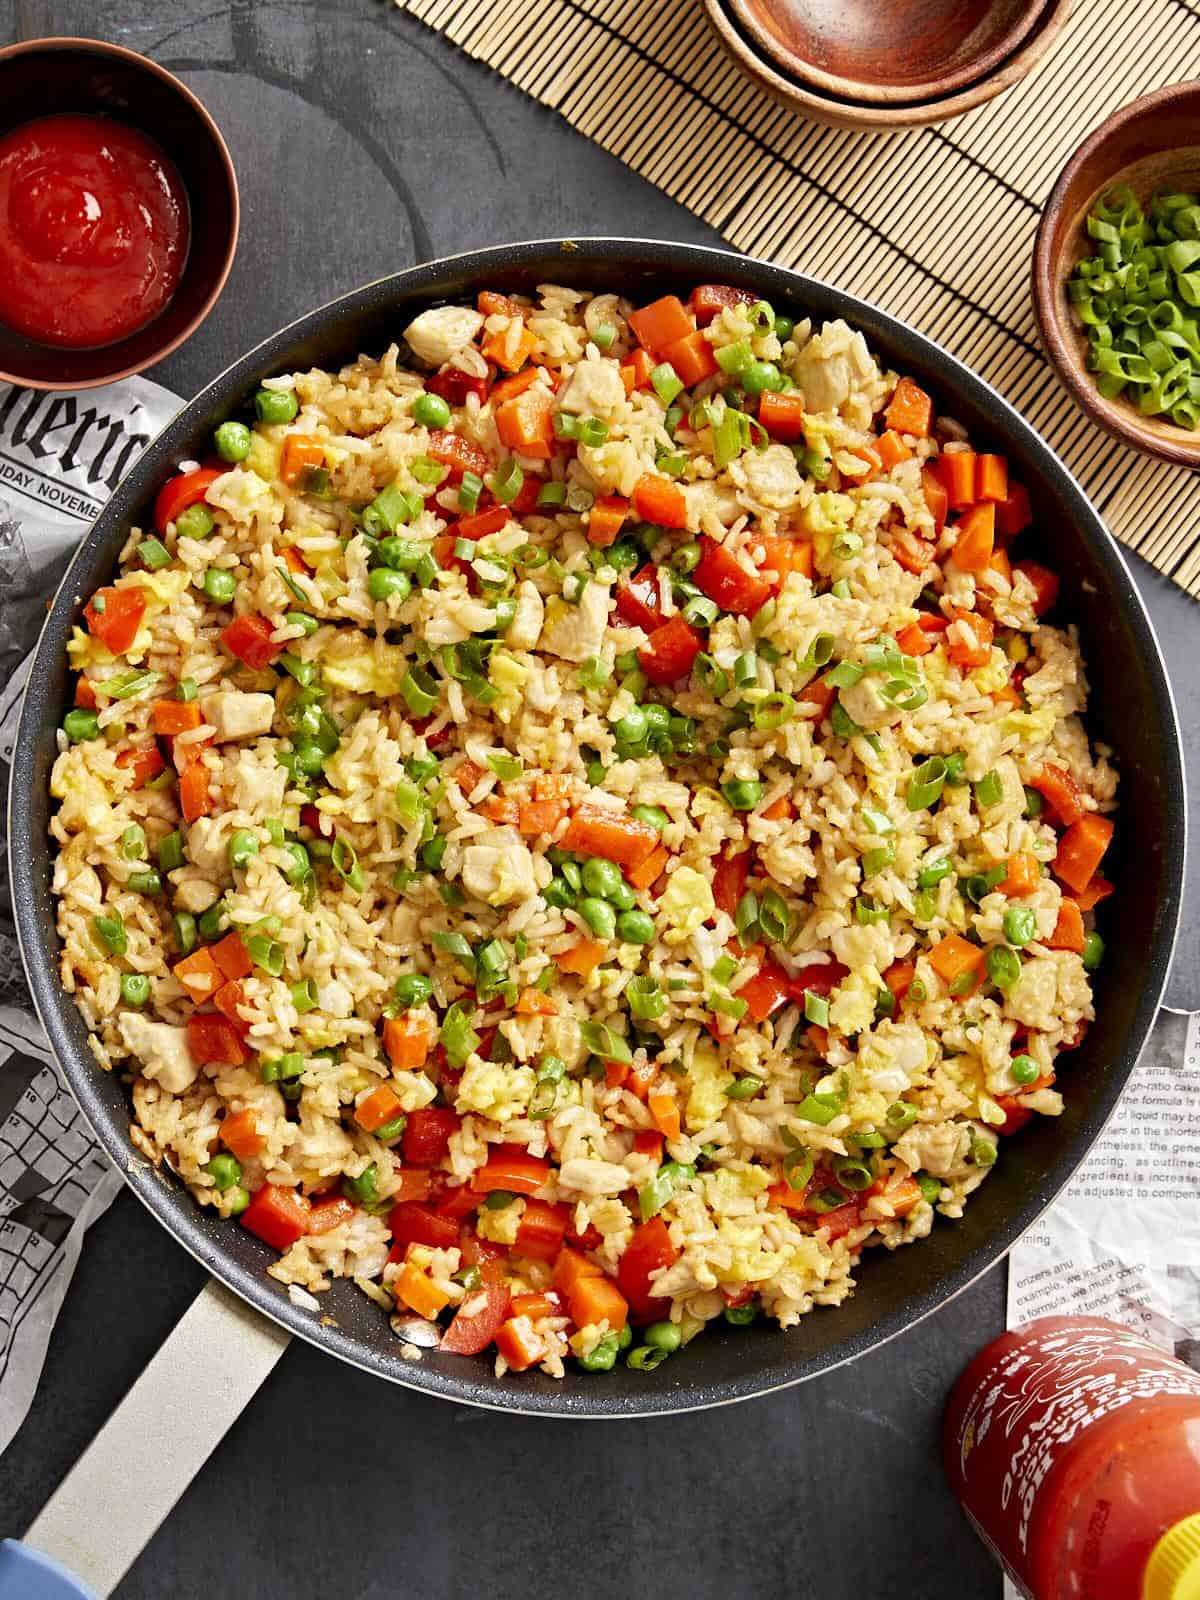
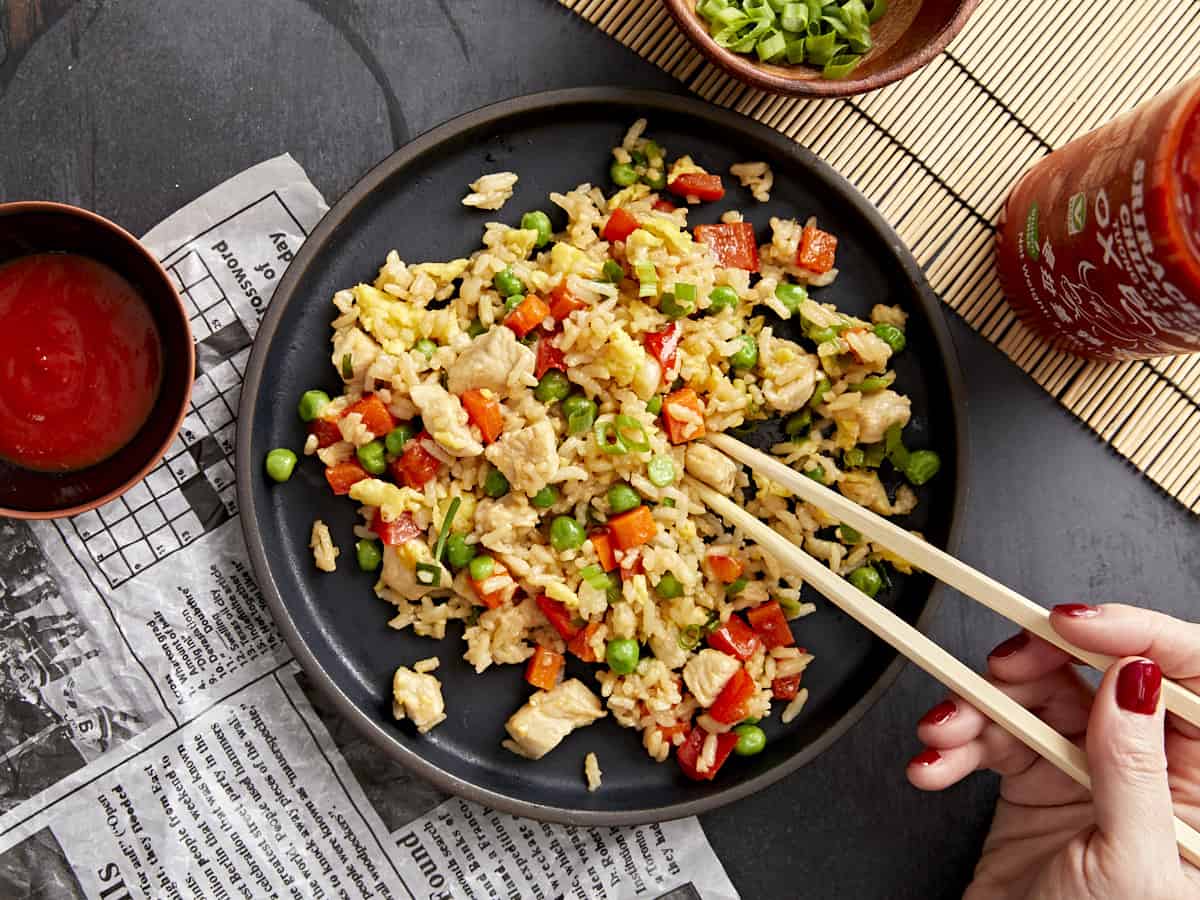
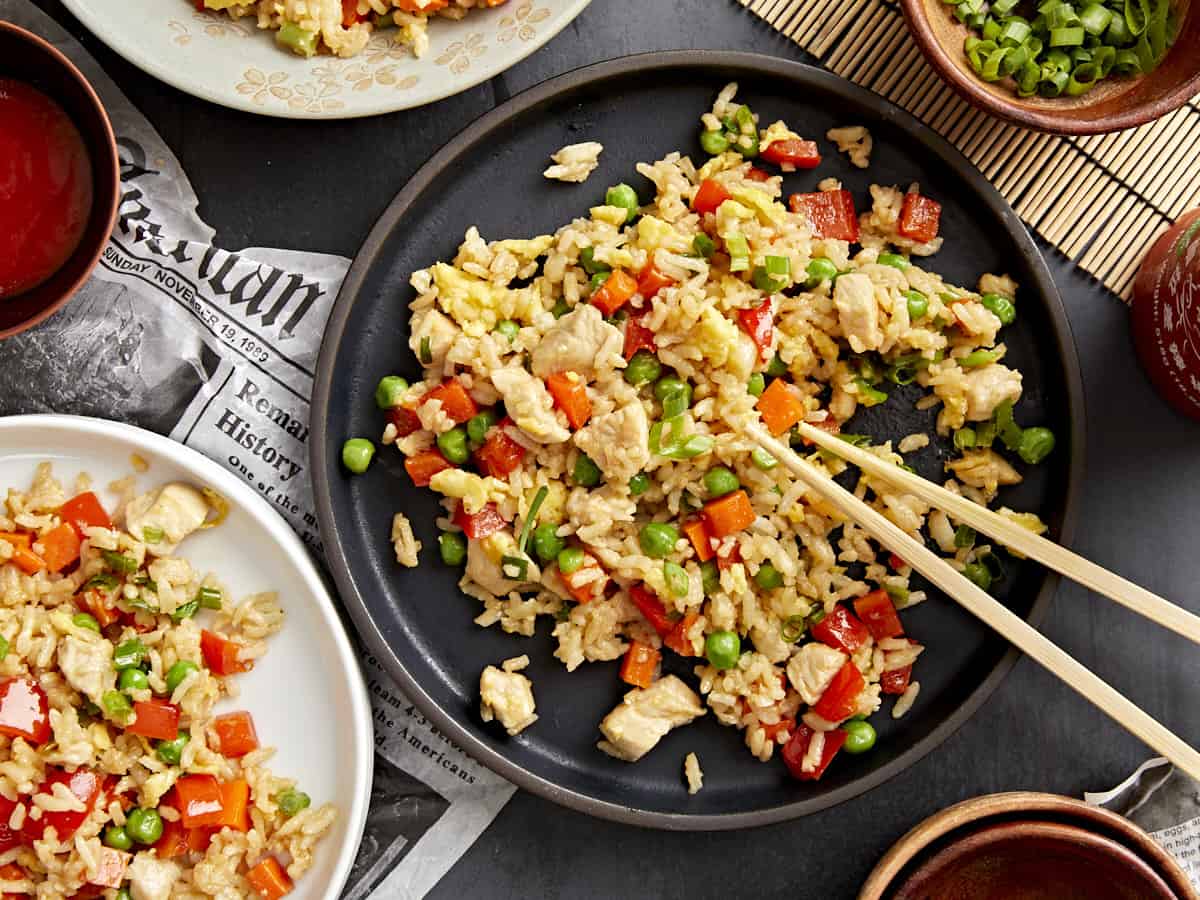
We’re all guilty of ordering Chinese takeout on a desperate night. But with this Chicken Fried Rice recipe, you won’t have to resort to that any longer! Make delicious, ultra-flavorful chicken fried rice that tastes even better than takeout– and costs less too. Easily stretch leftover rice and a single chicken breast into a budget-friendly and satisfying meal the whole family will love!
What is Chicken Fried Rice?
Chicken fried rice is a Chinese dish made with cooked rice that is stir-fried in a wok with chicken, vegetables, and eggs, and seasoned with a savory sauce. It’s extremely flexible and budget-friendly, which is why we love this dish! The recipe below is an American adaptation, using a skillet instead of a wok and ingredients that are easily sourced in most American grocery stores. If you are vegetarian, you can make this without the chicken, or try our Vegetable Fried Rice recipe!
Do I Need a Wok?
This recipe is designed to be made easily in a regular pan; however, we highly recommend using a nonstick pan over stainless steel. We found in testing that some of the eggs stuck to the bottom of the stainless steel pan and burned, adding an unpleasant flavor to the whole dish.
Ingredients for Chicken Fried Rice
Here’s what you’ll need to make chicken fried rice:
Chicken Breast: You’ll need 1 large boneless skinless chicken breast (about 2/3 lb.) for this recipe.
Oil: Toasted sesame oil adds a warm and nutty flavor, while cooking oil (we like canola or vegetable) helps everything cook without burning.
Soy Sauce: Adds rich, salty, umami flavor. If you’re gluten-free, you can use tamari or coconut aminos instead.
Garlic: Creates a savory and earthy base of flavor.
Ginger: Fresh ginger will create the best flavor, but paste or powder will also work.
Vegetables: We used green onions, carrot, red bell pepper, and frozen peas.
Eggs: Scrambled eggs help stretch this recipe, adding extra protein and healthy fats.
Cooked and Cooled Rice: To avoid clumpy or gummy fried rice, use rice that has been previously cooked and completely cooled.
What Else Can I Put In Chicken Fried Rice?
If you have any leftover veggies from previous dinners, you can chop them up and toss them in this tasty chicken fried rice. It’s also easy to grab a bag of frozen mixed vegetables (carrots, peas, corn, and green beans) to save on prep time!
How To Store Leftovers
Store leftover chicken fried rice in an airtight container in the refrigerator for up to 3 days. Reheat in a pot set over medium-low heat with a little bit of water added to rehydrate the rice. You can also sprinkle some water over individual portions and microwave in 30-second increments until warmed through.
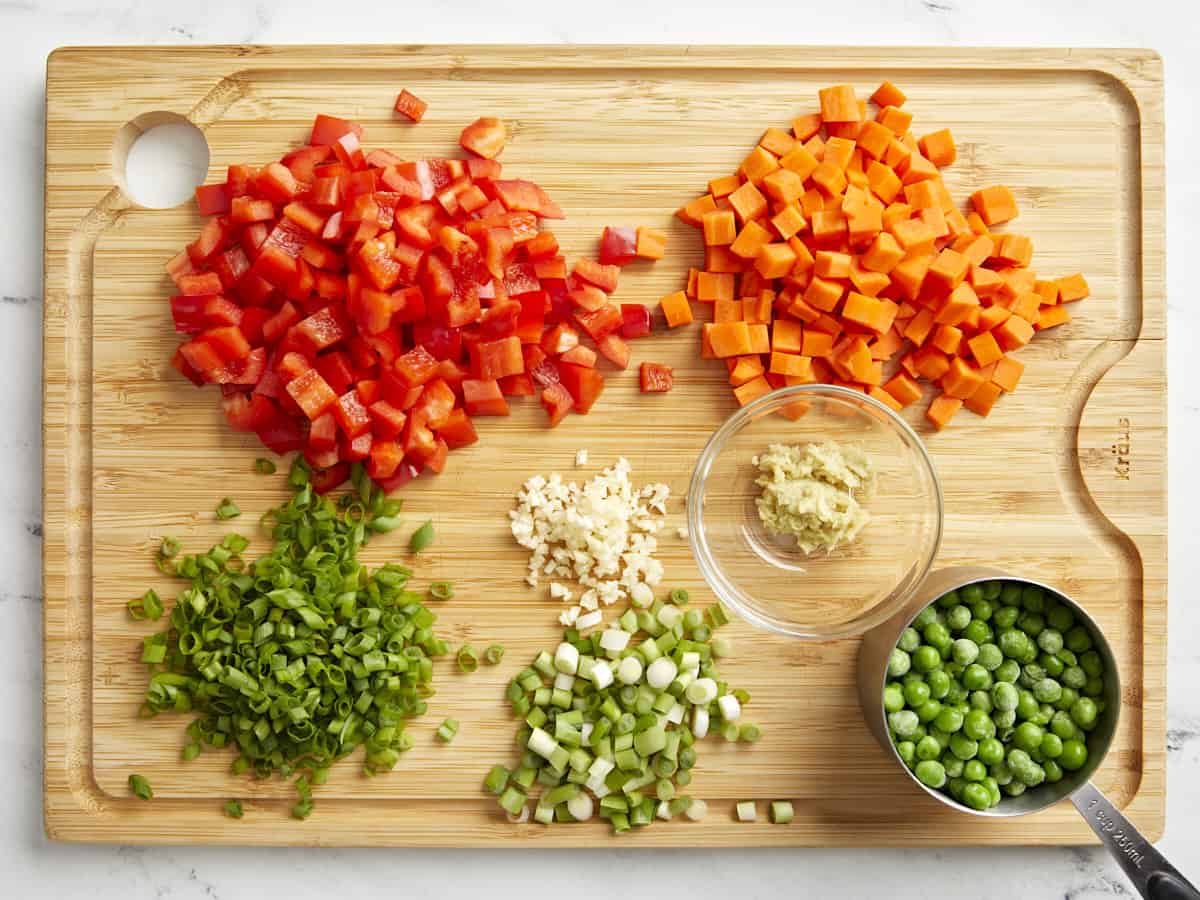
Prepare the vegetables beforehand so they’re ready to go when needed. Mince the garlic, grate the ginger, dice the carrot and bell pepper, slice the green onions (separate the green ends from the white ends), and measure the frozen peas.
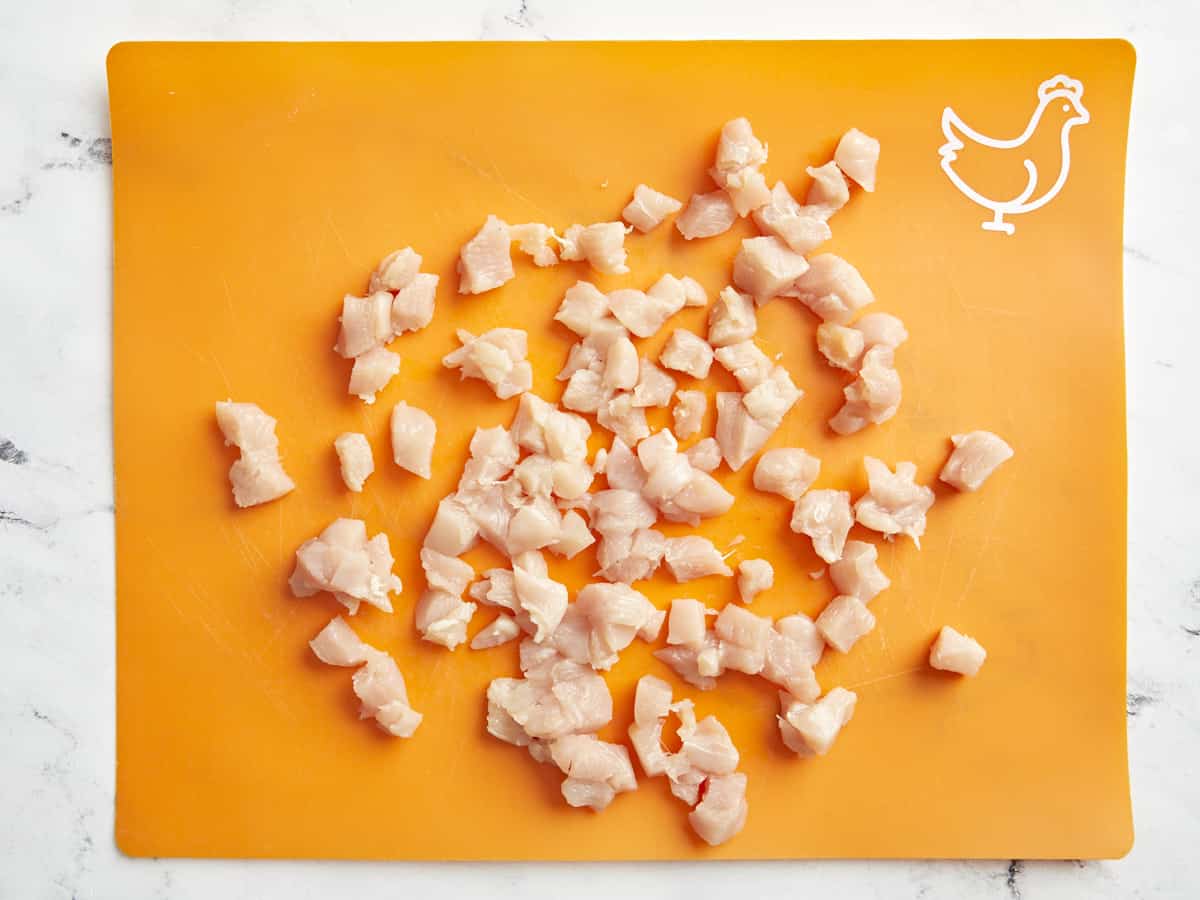
On a separate, clean cutting board, cut your chicken into ½ inch pieces so you get a little in every bite. Set aside (and wash your hands!)
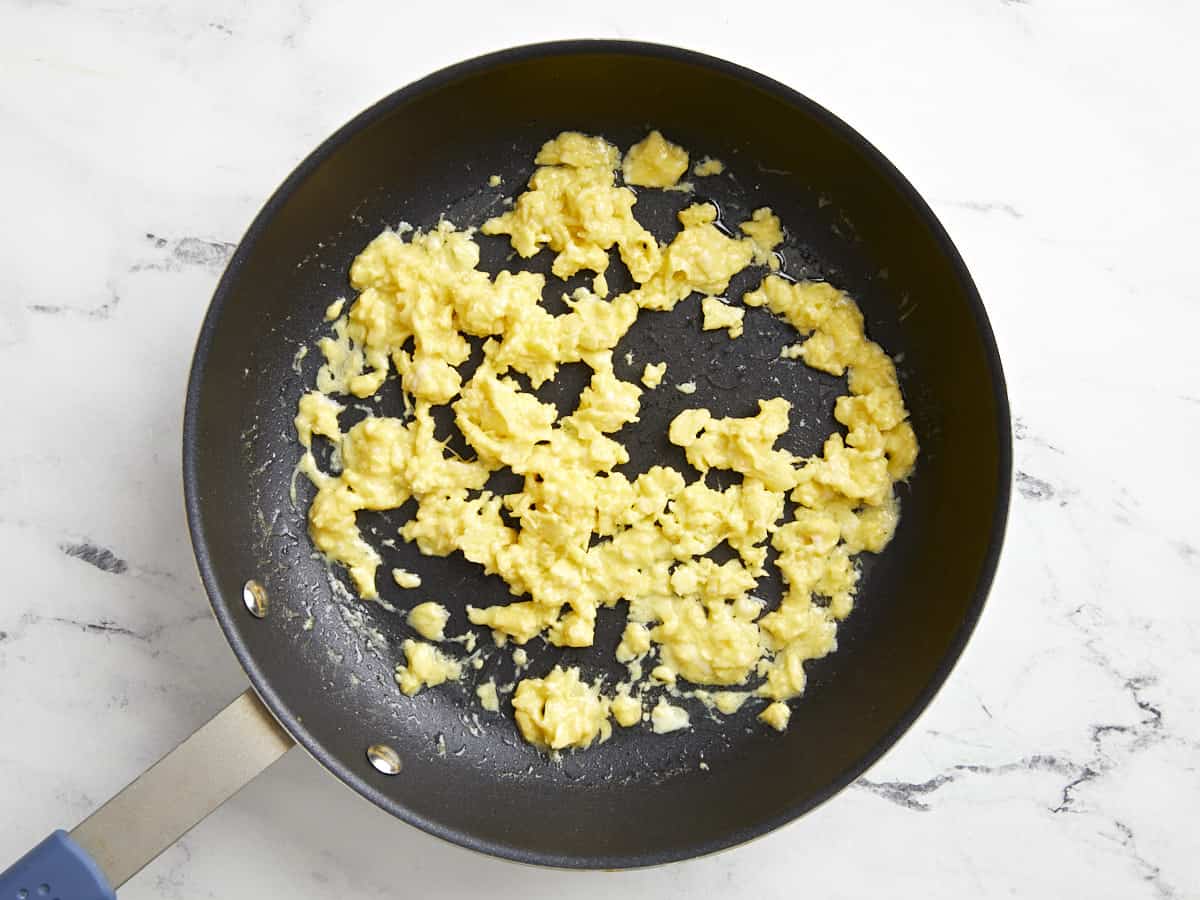
Lightly whisk the eggs in a small bowl. Heat a large skillet over medium heat. Once hot, add 2 Tbsp of cooking oil and swirl to coat the surface. Add the eggs and gently scramble until cooked through. Transfer the cooked eggs to a clean bowl or plate off to the side.
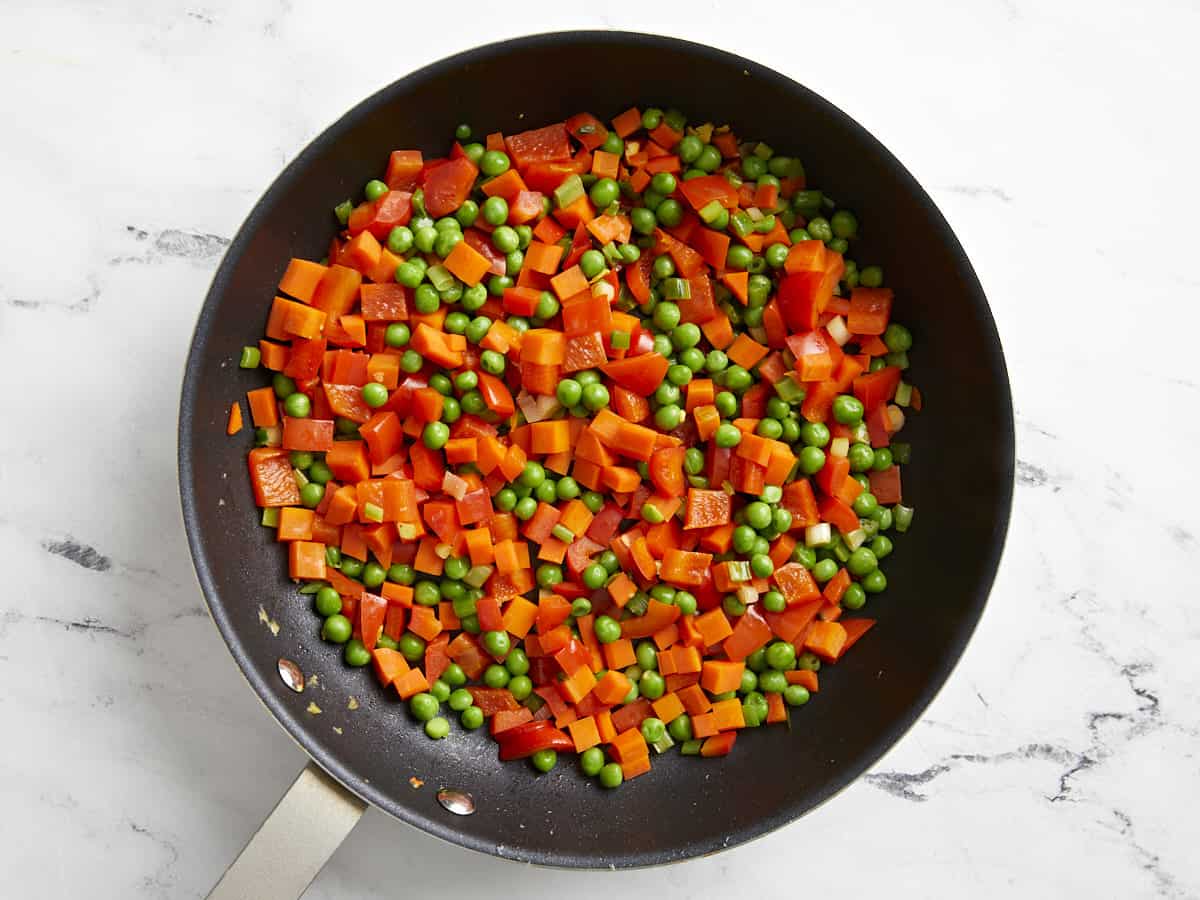
Turn the heat up to medium-high. Add the diced carrots, stir, and cook for about two minutes. Next, add the bell pepper and the white firm ends of the green onions. Cook and stir for one minute more. Finally, add the frozen peas and stir and cook until heated through. Transfer the vegetables to a clean bowl or plate.
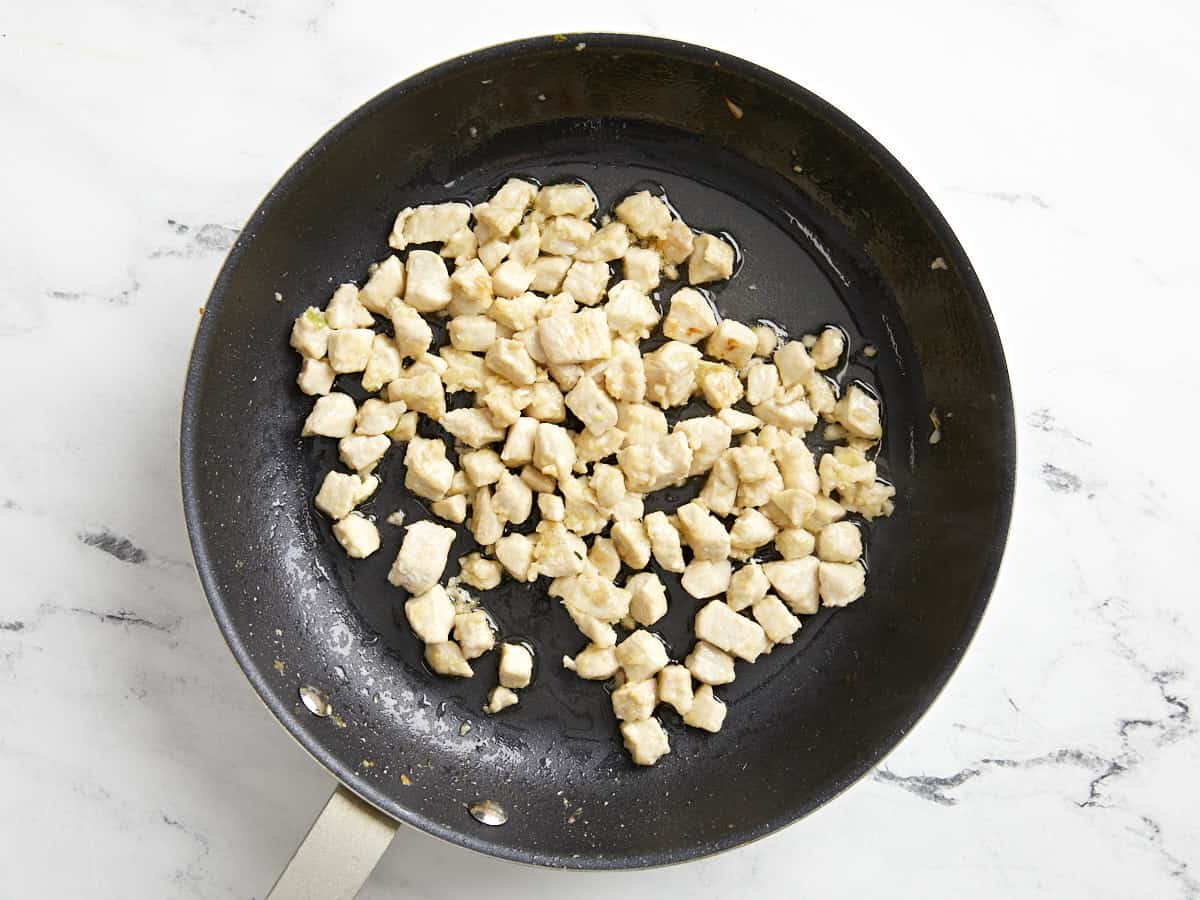
Add the remaining 1 Tbsp cooking oil to the skillet and swirl to coat the surface. Add the ½ inch pieces of chicken and completely cook through, about 4 minutes. Once the chicken is about ½ of the way cooked through (2-3 minutes), add the garlic and ginger and cook for an additional 2-3 minutes.
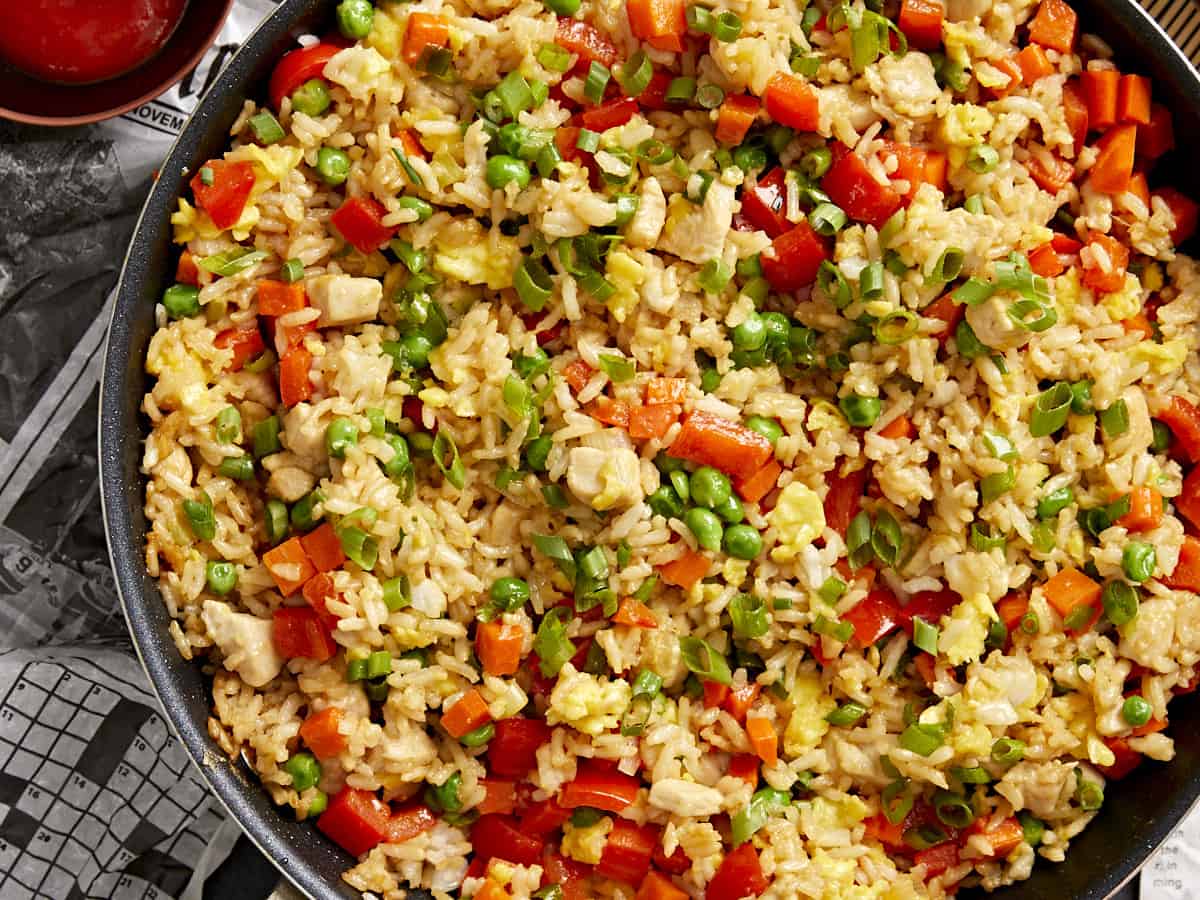
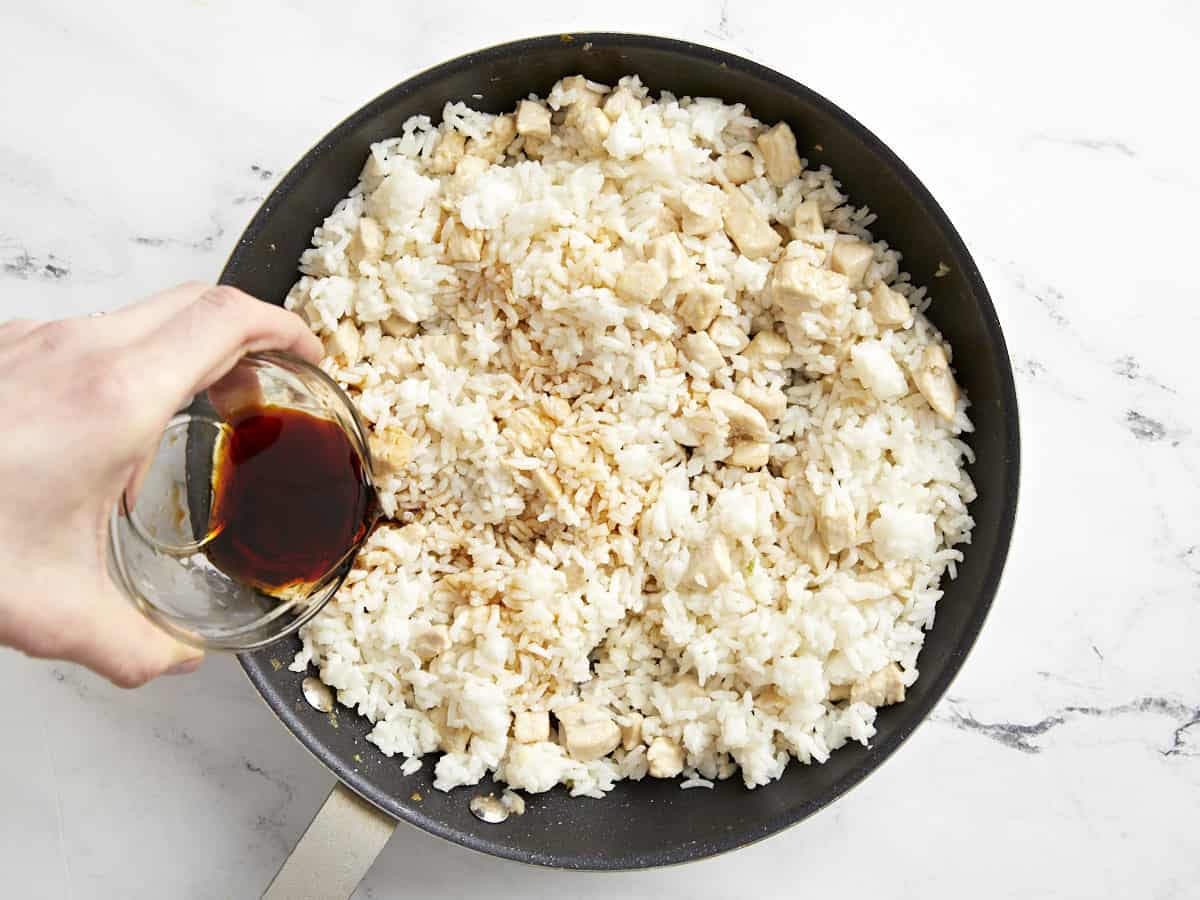
Then, add the cooked and cooled rice to the skillet. Stir and cook the chicken and rice together for about 2 minutes, or until the rice is heated through. Pour the soy sauce and toasted sesame oil over the rice. Stir the rice and sauce together until evenly combined. Turn the heat off.
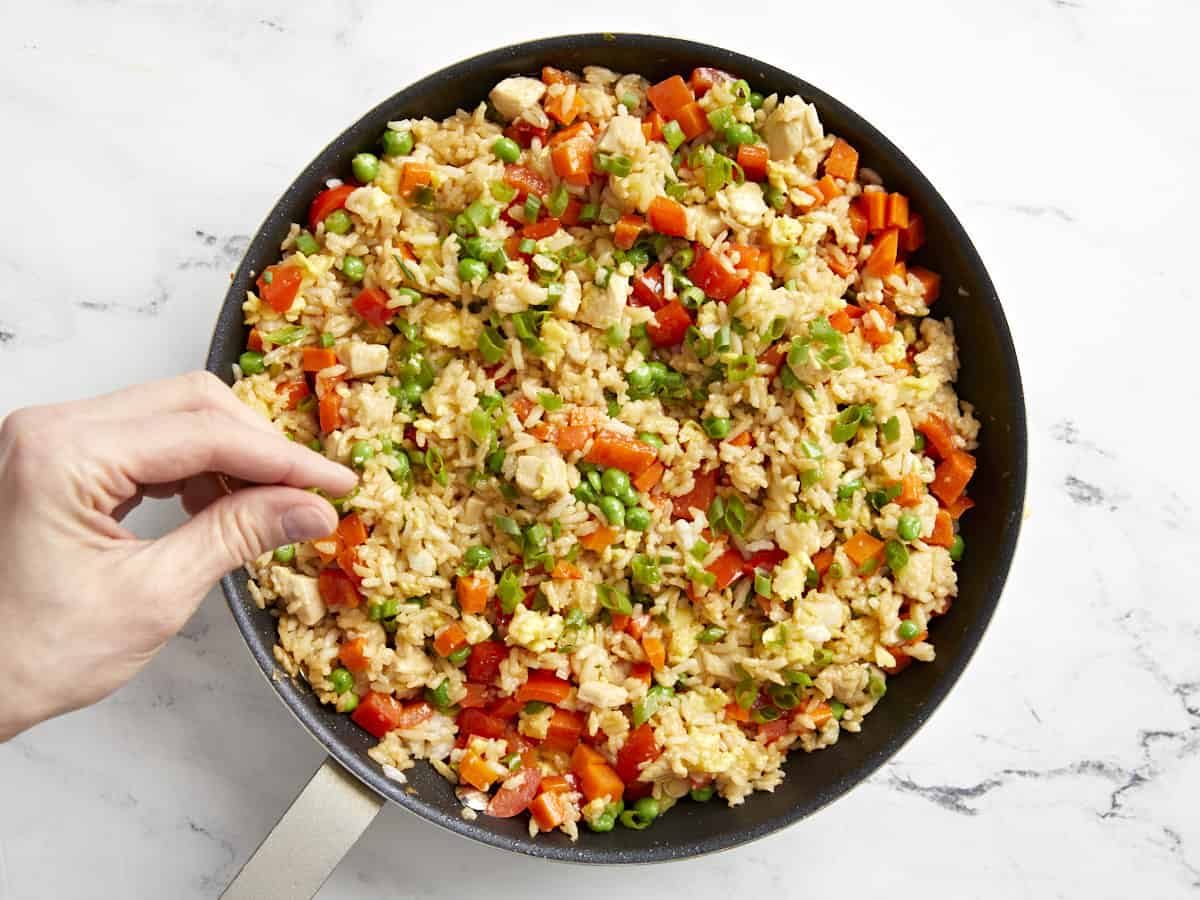
Add the eggs and vegetables back to the skillet with the chicken and rice and stir to combine. Allow the residual heat to heat everything through. Top with the remaining green ends of the sliced green onions. Taste and adjust the soy sauce or sesame oil to your liking.
how to make Chicken Fried Rice – step by step photos
Prepare the vegetables beforehand so they’re ready to go when needed. Mince the garlic, grate the ginger, dice the carrot and bell pepper, slice the green onions (separate the green ends from the white ends), and measure the frozen peas.
On a separate, clean cutting board, cut your chicken into ½ inch pieces so you get a little in every bite. Set aside (and wash your hands!)
Lightly whisk the eggs in a small bowl. Heat a large skillet over medium heat. Once hot, add 2 Tbsp of cooking oil and swirl to coat the surface. Add the eggs and gently scramble until cooked through. Transfer the cooked eggs to a clean bowl or plate off to the side.
Turn the heat up to medium-high. Add the diced carrots, stir, and cook for about two minutes. Next, add the bell pepper and the white firm ends of the green onions. Cook and stir for one minute more. Finally, add the frozen peas and stir and cook until heated through. Transfer the vegetables to a clean bowl or plate.
Add the remaining 1 Tbsp cooking oil to the skillet and swirl to coat the surface. Add the ½ inch pieces of chicken and completely cook through, about 4 minutes. Once the chicken is about ½ of the way cooked through (2-3 minutes), add the 2 cloves of garlic and 1 tsp ginger and cook for an additional 2-3 minutes.
Then, add the cooked and cooled rice to the skillet. Stir and cook the chicken and rice together for about 2 minutes, or until the rice is heated through. Pour the 3 Tbsp soy sauce and 3 Tbsp toasted sesame oil over the rice. Stir the rice and sauce together until evenly combined. Turn the heat off.
Add the eggs and vegetables back to the skillet with the chicken and rice and stir to combine. Allow the residual heat to heat everything through. Top with the remaining green ends of the sliced green onions. Taste and adjust the soy sauce or sesame oil to your liking.
This flavorful chicken fried rice is so much better than takeout!