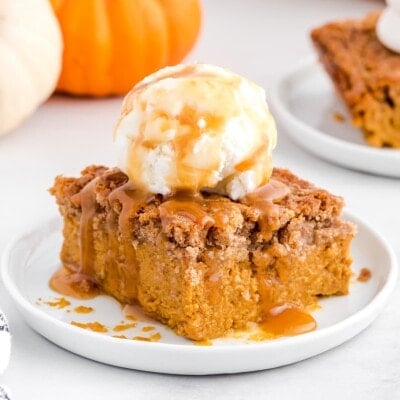
Easy Pumpkin Dump Cake
Pumpkin Dump Cake is one of our most popular recipes with my readers for a reason – it takes 10 minutes to prep and is ready to bake even before the oven is preheated! Equally easy as it is delicious, it’s no wonder w…
Pumpkin Dump Cake is one of our most popular recipes with my readers for a reason – it takes 10 minutes to prep and is ready to bake even before the oven is preheated! Equally easy as it is delicious, it’s no wonder why this recipe has almost 100 5-star reviews and 500,000 views! The…
Apple Pie Filling recipe is a unique composition of cinnamon and spice flavors that additionally enhance the taste of apples. I always prepare more when I want to bake an apple pie because each of my household members comes and “tests” it, so in the end, I end up with half a portion of the …
Apple Pie Filling recipe is a unique composition of cinnamon and spice flavors that additionally enhance the taste of apples. I always prepare more when I want to bake an apple pie because each of my household members comes and “tests” it, so in the end, I end up with half a portion of the recipe. The kids and husband love to eat the apple pie filling straight from the pot. It’s so incredibly delicious!
How to choose the best ingredients for Apple Pie Filling
Apples – I must admit that the flavor of the filling will also be given by the apples from which you make it. There are different types of apples, and they are sweeter or sour. You can read their short characteristics below.
Types of apples
Cripps Pink / Pink Lady – Cripps Pink is a cross between Golden Delicious and Lady Williams. It is also perfect for apple pie filling because it has a golden, delicious cooking behavior. They are medium sweet, crispy and juicy.
Fuji – crispy, firm, juicy, sweet-tart balance, keeps its shape while baking.
Gala, these apples are perfect for a snack, but I also like them in apple pie because I practically don’t have to use sugar for apple pie filling.
Golden Delicious – The Golden Delicious apple is yellow with an occasional pink blush. It’s often referred to as “Apple Lite” and is loved by those who prefer a mild, sweet taste. Unlike tart apples, Golden Delicious has a buttery, honeyed flavor that is excellent for satisfying your sweet tooth. It’s great for baking apple pies and crisps, especially when mixed with more tart apples like Granny Smiths. This creates a beautiful flavor combination that will delight your taste buds all year round. Even Julia Child recommends these apples for apple pie in her recipes.
Granny Smith – Granny Smith apples are renowned for their distinctive tart flavor and characteristic green flesh, often adorned with a red blush. They are ideal for creating delectable cakes, pies, and pastries. Nonetheless, I opt for using sweeter apples to avoid excessive sugar in my baked goods.
Honeycrisp – This Honeycrisp apple has a mild, honeyed flavor and a satisfying crunch. It is crisp and sweet, staying firm when cooked, making it perfect for baking.
McIntosh – has delicate, white flesh. It is best used in snacks and applesauce, but some people like its tart flavor in cakes, too.
Jonagold – A cross between Golden Delicious and Jonathan, Jonagolds have a lovely aromatic flavor, are both sweet and spicy, and retain their shape while baking.
Unsalted butter—Butter is one of the key ingredients in this filling, and it is responsible for its delicious taste. When apples are fried in butter, they absorb their flavor and pair perfectly with cane sugar, creating a delightful sauce for the filling at the end of the cooking process.
Muscovado sugar is unrefined cane sugar that contains natural molasses. Molasses have more excellent health properties, and this sugar enriches the flavor of the filling.
Cinnamon, Ginger, Ground cloves, and Nutmeg—these spices create a perfect combination for apples, and I can’t imagine apple pie without them. They enhance the flavor and provide a unique aroma.
Salt—My grandma always said that a pinch of salt always balances the sweet taste, and I agree.
Lemon juice – adds a bit of acidity to the filling, especially if the apples are sweet, which I always encourage. The lemon juice perfectly balances the taste; you don’t have to add water to dissolve the starch.
Roll the lemon to release the juices, then cut it in half and squeeze out the juice!
Moreover, by adding something acidic to the apple filling, you stop the overcooking process of the apples, and at that time, you decide that the apples are soft and firm enough to be included in your baked goods.
Starch – is a natural thickener, although apples contain pectin. They would thicken themselves with longer cooking, but it would be more of a mousse than an apple pie filling.
However, I only sometimes add starch when making apple pie filling. For my fast apple pie, where I don’t bake the apples first, breadcrumbs in small amounts are perfect for absorbing the juice from the apples during baking. You can also try this quick version of apple pie.
Tips and tricks
It’s best to start preparing the apples once you have everything else ready. Steeping the apples is a quick process, and if you prepare them earlier, they may darken and become brown in color.
I recommend preparing the filling if you have a pot or a deep cast iron pan. Cast iron pans retain heat perfectly, ensuring that the apples bake quickly and evenly.
You can also prepare extra apple pie filling, and freeze it, or pasteurize it in jars. Apple pie filling contains sugar, which acts as an excellent preservative. You can use a quick pasteurization method by pouring the hot apple pie filling into sterilized jars, cleaning the top thoroughly to remove any filling residue, and tightly sealing the lids. Place the jars lid side up on a clean cloth and let them cool. You’ll know the jars are sterilized when the lid is securely tucked inside and you can’t press it with your finger. Jars prepared this way can be stored for up to 6 months if sealed properly.
For maximum juice extraction from a lemon, roll it on the cutting board using the palm of your hand before cutting it in half. This technique ensures that the juice is released before you peel the lemon, allowing you to use as much of the juice as possible.
Sides To Serve
An Apple Pie Filling Recipe can be used to make apple pie. It can also be used as a filling for Crepes or Funnel Cakes and added to breakfast items like French toast or porridge.
You Can also serve it warm with Rum Rising Ice Creamor Greek yogurt for a quick dessert. Whichever way you choose to use it, the apple pie filling is guaranteed to delight your taste buds with its incredible flavor.
What can you use to enrich apple pie filling?
My preferred add-ons to apple filling are:
It’s best to choose seedless raisins to avoid affecting the taste.
Dried cranberries taste similar to raisins, but they offer more minerals and antioxidants, making them a healthier alternative to raisins.
Walnuts, especially pecans, are ideal nuts for the apple pie filling recipe. These nuts are my favorite; I like incorporating them into cakes and salads. I appreciate them not only for their taste but also for their unique health benefits. Adding these nuts to your apple pie filling enhances the flavor and adds a healthy dose of fats and nutrients. I’m not implying that walnuts lack these qualities because that wouldn’t be accurate, but pecans taste better.
Substitute
Similarly to apple pie filling, you can also prepare fillings from other fruits such as pears, peaches, and nectarines.
How to make Apple Pie Filling
Start by washing the apples under running water and scrubbing the skin with a brush. The peel and seeds can be used to make apple cider vinegar at home, which is best for cooking.
Next, peel the apples, cut them into quarters, and remove the seeds.
Cut the prepared apples into approximately 1-inch long and ¼-inch wide pieces. For a rustic look, cut the apple quarters into random slices. This method saves time and gives the pie a homemade touch.
Once the apples are prepared and the spices and sugar are ground, mix all the spices in one bowl.
Also, prepare half a lemon juice. Mix the starch with the juice. This will be used at the end of preparing the apple pie filling.
Heat a pan and melt the butter. Once hot, add the apples and fry them for about 15 minutes, stirring constantly.
When the apples release their juice and are soft but not overcooked, reduce the heat. Then add cinnamon and the rest of the spices. Mix well and add muscovado sugar. When combined with the apple juice, the sugar will quickly become a liquid and create a thick sauce.
Once everything is mixed, add the juice and starch to firm up the apple pieces. The lemon juice will give the apples a slightly sour taste and prevent them from overcooking. This way, the apples in the dessert will retain their texture and not turn to mush.
Enjoy!
How to store Apple Pie Filling
Here’s a simple guide on how to store apple pie filling to ensure it stays fresh and delicious. If you plan to use it within a week, store it in a jar in the fridge. Freezing it in a closed bag or container is the best option for extended storage. If you want to store it for up to 6 months, consider pasteurizing the jar and storing it in a cool place. These methods will help you enjoy your homemade apple pie filling for an extended period.
Apple Pie Filling recipe is a unique composition of cinnamon and spice flavors that additionally enhance the taste of apples.
Course Dessert
Cuisine American, Polish
Keyword apple desert, apple pie
by Meal Type Desserts
by Season Fall, Winter
by Ingredients Apples
Prep Time 15 minutesminutes
Cook Time 25 minutesminutes
Servings 8people
Calories 190kcal
Author Daria
Ingredients
45ozapples
2ozunsalted butter
1/2cupmuscovado sugar cane
1tbspcinnamon
1/3tspginger
1/3tspground cloves
1/3tspnutmeg
1/4tspsalt
1/2lemon juice
1tspstarch
Instructions
Start by washing the apples under running water and use a brush to scrub the skin. You can use the peel and seeds to make apple cider vinegar at home, which is the best for cooking.
Next, peel the apples, cut them into quarters, and remove the seeds.
Cut the prepared apples into approximately 1-inch long and ¼-inch wide pieces. For a rustic look, cut the apple quarters into random slices. This method saves time and gives the pie a homemade touch.
Once the apples are prepared and the spices and sugar are ground, mix all the spices in one bowl.
Also, prepare half a lemon juice. Mix the starch with the juice. This will be used at the end of preparing the apple pie filling.
Heat a pan and melt the butter. Once hot, add the apples and fry them for about 15 minutes, stirring constantly.
When the apples release their juice and are soft but not overcooked, reduce the heat. Then add cinnamon and the rest of the spices. Mix well and add muscovado sugar. The sugar will quickly turn into a liquid and create a thick sauce when combined with the apple juice.
Once everything is mixed, add the juice and starch to firm up the apple pieces. The lemon juice will give the apples a slightly sour taste and prevent them from overcooking. This way, the apples in the dessert will retain their texture and not turn to mush.
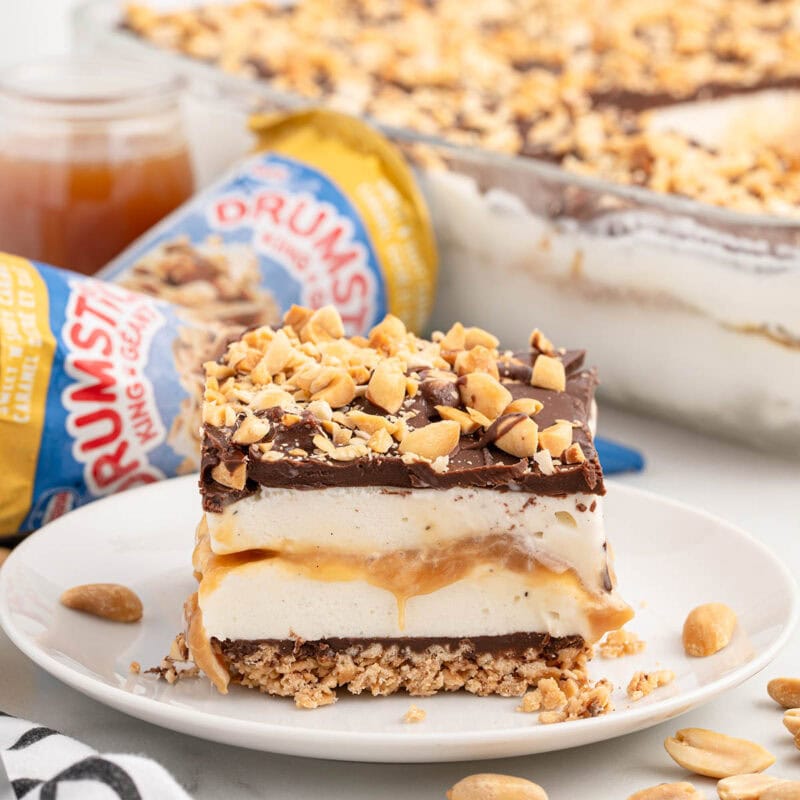
Drumstick Ice Cream Cake
Everyone needs a homemade Drumstick Ice Cream Cake when nostalgia hits in the heat of summer. This recipe deconstructs all the components of my favorite frozen dairy dessert and prepares it as a multi-serving sliceable snack. N…
Everyone needs a homemade Drumstick Ice Cream Cake when nostalgia hits in the heat of summer. This recipe deconstructs all the components of my favorite frozen dairy dessert and prepares it as a multi-serving sliceable snack. No bake Drumstick Cake Recipe Our easy Drumstick Ice Cream Cake recipe requires no cooking! It’s perfect for beginners…
Learn how to make a fun watermelon cake with eight ingredients and just over 60 minutes for a summertime treat full of sweet, fruity flavor!
The post Watermelon Cake appeared first on All Things Mamma.
Learn how to make a fun watermelon cake with eight ingredients and just over 60 minutes for a summertime treat full of sweet, fruity flavor!
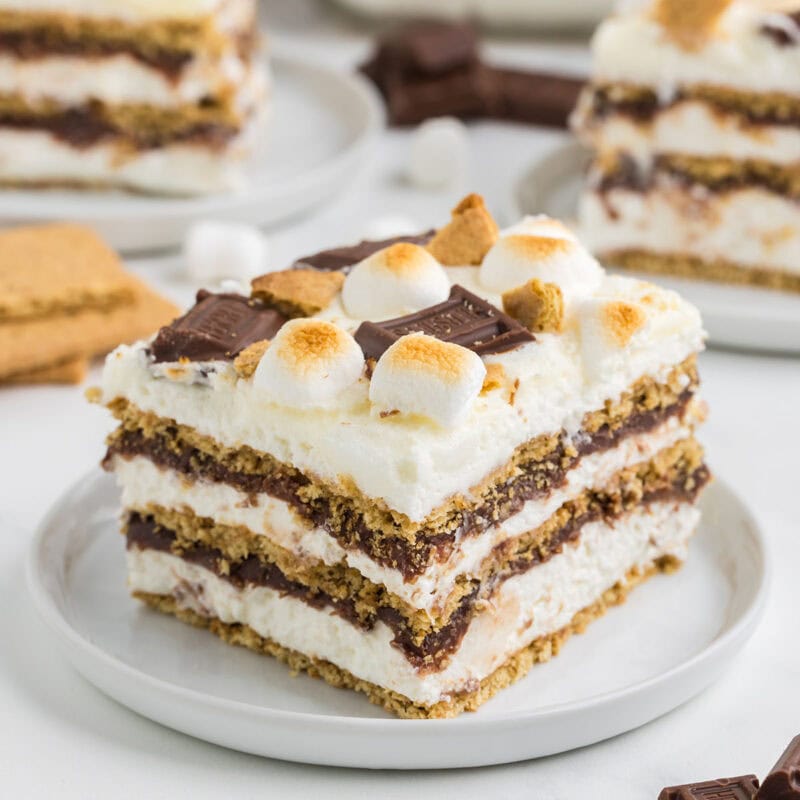
S’mores Icebox Cake
Our S’mores Icebox Cake brings the classic campfire sandwich indoors, but served as a rich and creamy no-bake cake. This recipe skips the roasting stick and loads layers of marshmallow cream and chocolate between sheets of gra…
Our S’mores Icebox Cake brings the classic campfire sandwich indoors, but served as a rich and creamy no-bake cake. This recipe skips the roasting stick and loads layers of marshmallow cream and chocolate between sheets of graham crackers. The ultimate sweet treat for summer comes complete with torched toasted marshmallows on top! No Bake S…
Easy Icebox Cake
This no-bake Icebox Cake combines layers of graham crackers and whipped cream to create a treat that’s perfect for any occasion. It’s fuss-free and brings a touch of nostalgia to your table. With just a few ingredients and …
This no-bake Icebox Cake combines layers of graham crackers and whipped cream to create a treat that’s perfect for any occasion. It’s fuss-free and brings a touch of nostalgia to your table. With just a few ingredients and a bit of chill time, you’ll have a delicious dessert that’s always a crowd-pleaser. Graham Cracker Icebox…
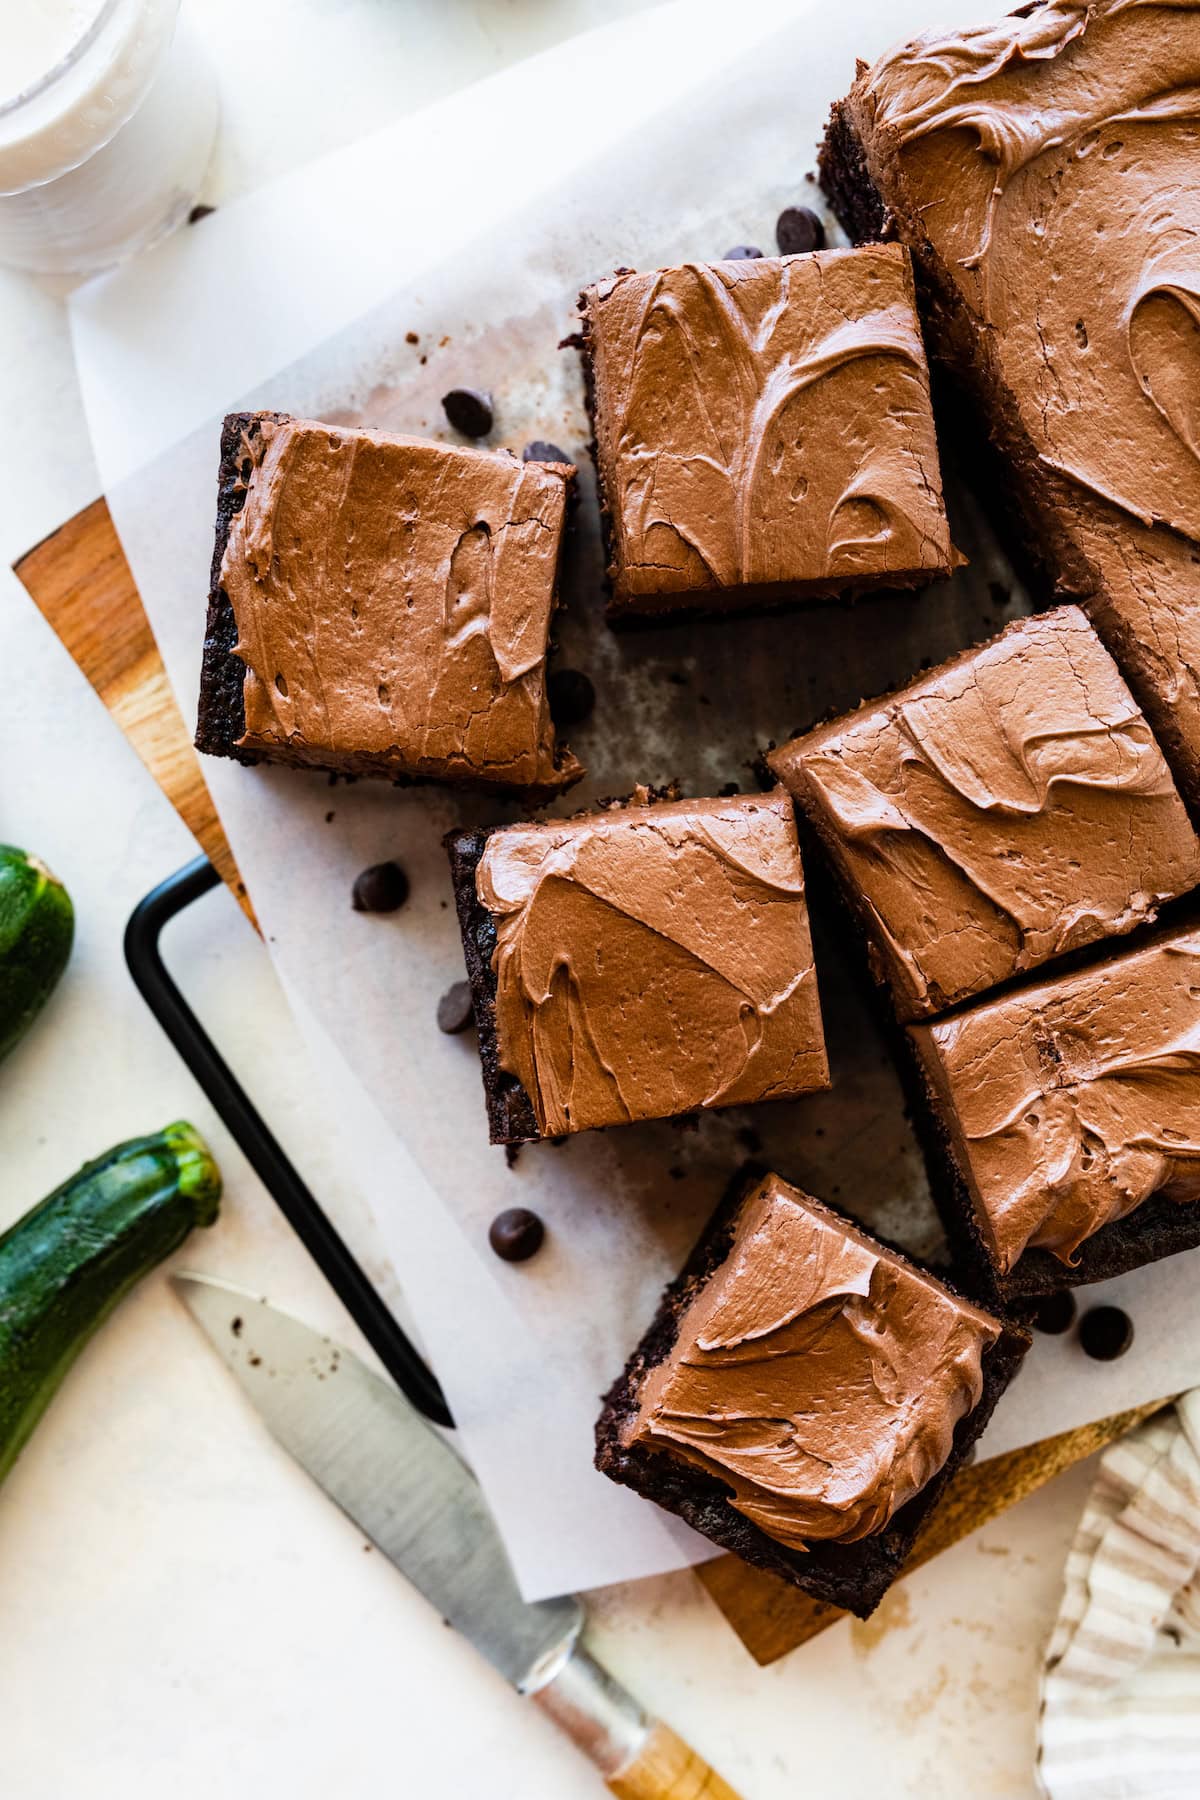
I LOVE baking with zucchini, especially during the summertime when I have lots of garden zucchini to use up. A few of my favorite zucchini recipes are my Chocolate Zucchini Bread, Zucchini Brownies, Oatmeal Zucchini Cookies, and Lemon Zucchini Bread. W…
I LOVE baking with zucchini, especially during the summertime when I have lots of garden zucchini to use up. A few of my favorite zucchini recipes are my Chocolate Zucchini Bread, Zucchini Brownies, Oatmeal Zucchini Cookies, and Lemon Zucchini Bread. Whenever I am craving a decadent dessert I love making my Chocolate Zucchini Cake. You…
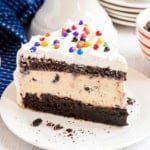
Brownie Ice Cream Cake has layers of fudgy brownie, cookies and cream ice cream, and hot fudge sauce. Make this…
Brownie Ice Cream Cake has layers of fudgy brownie, cookies and cream ice cream, and hot fudge sauce. Make this decadent frozen dessert ahead of time and stash it in the freezer for your next special occasion!
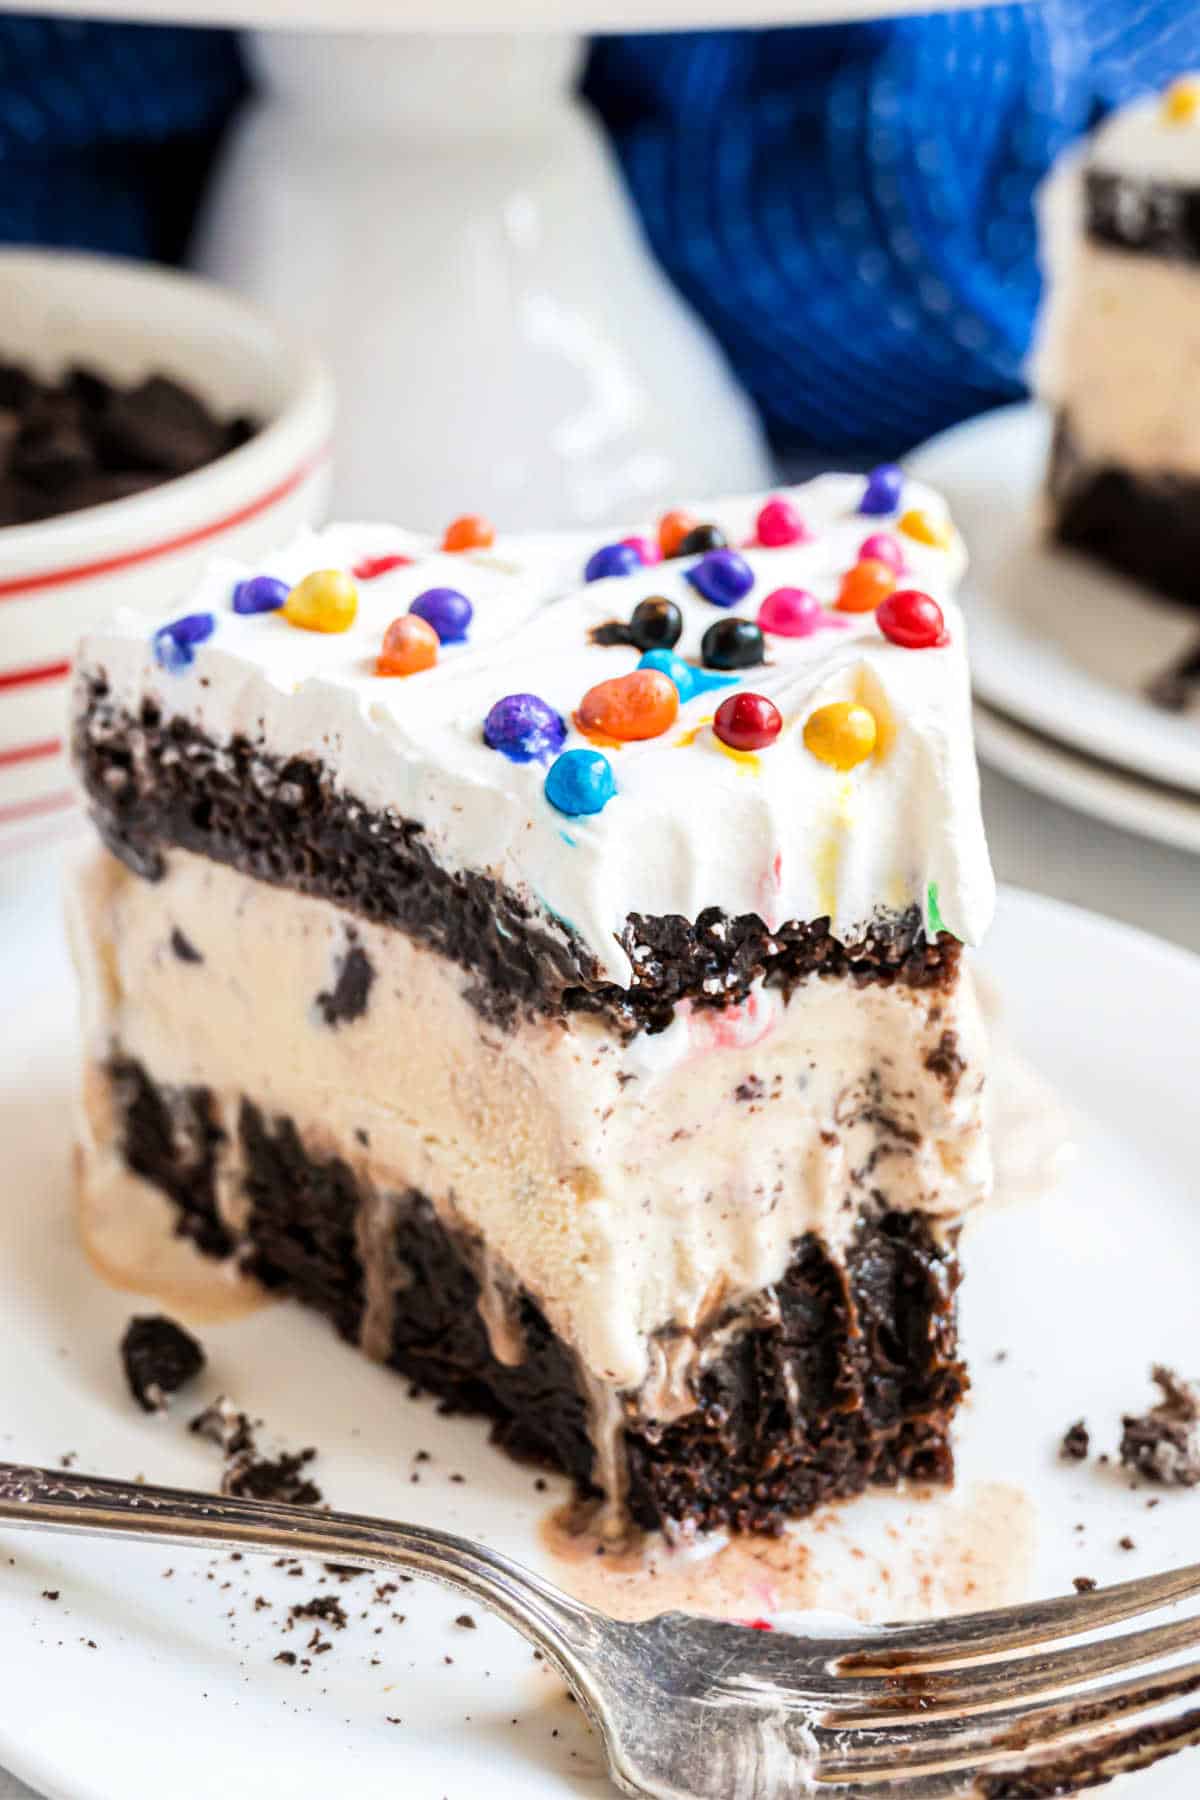
You’ve had ice cream cake before. However, have you ever experienced an ice cream cake quite like this one?
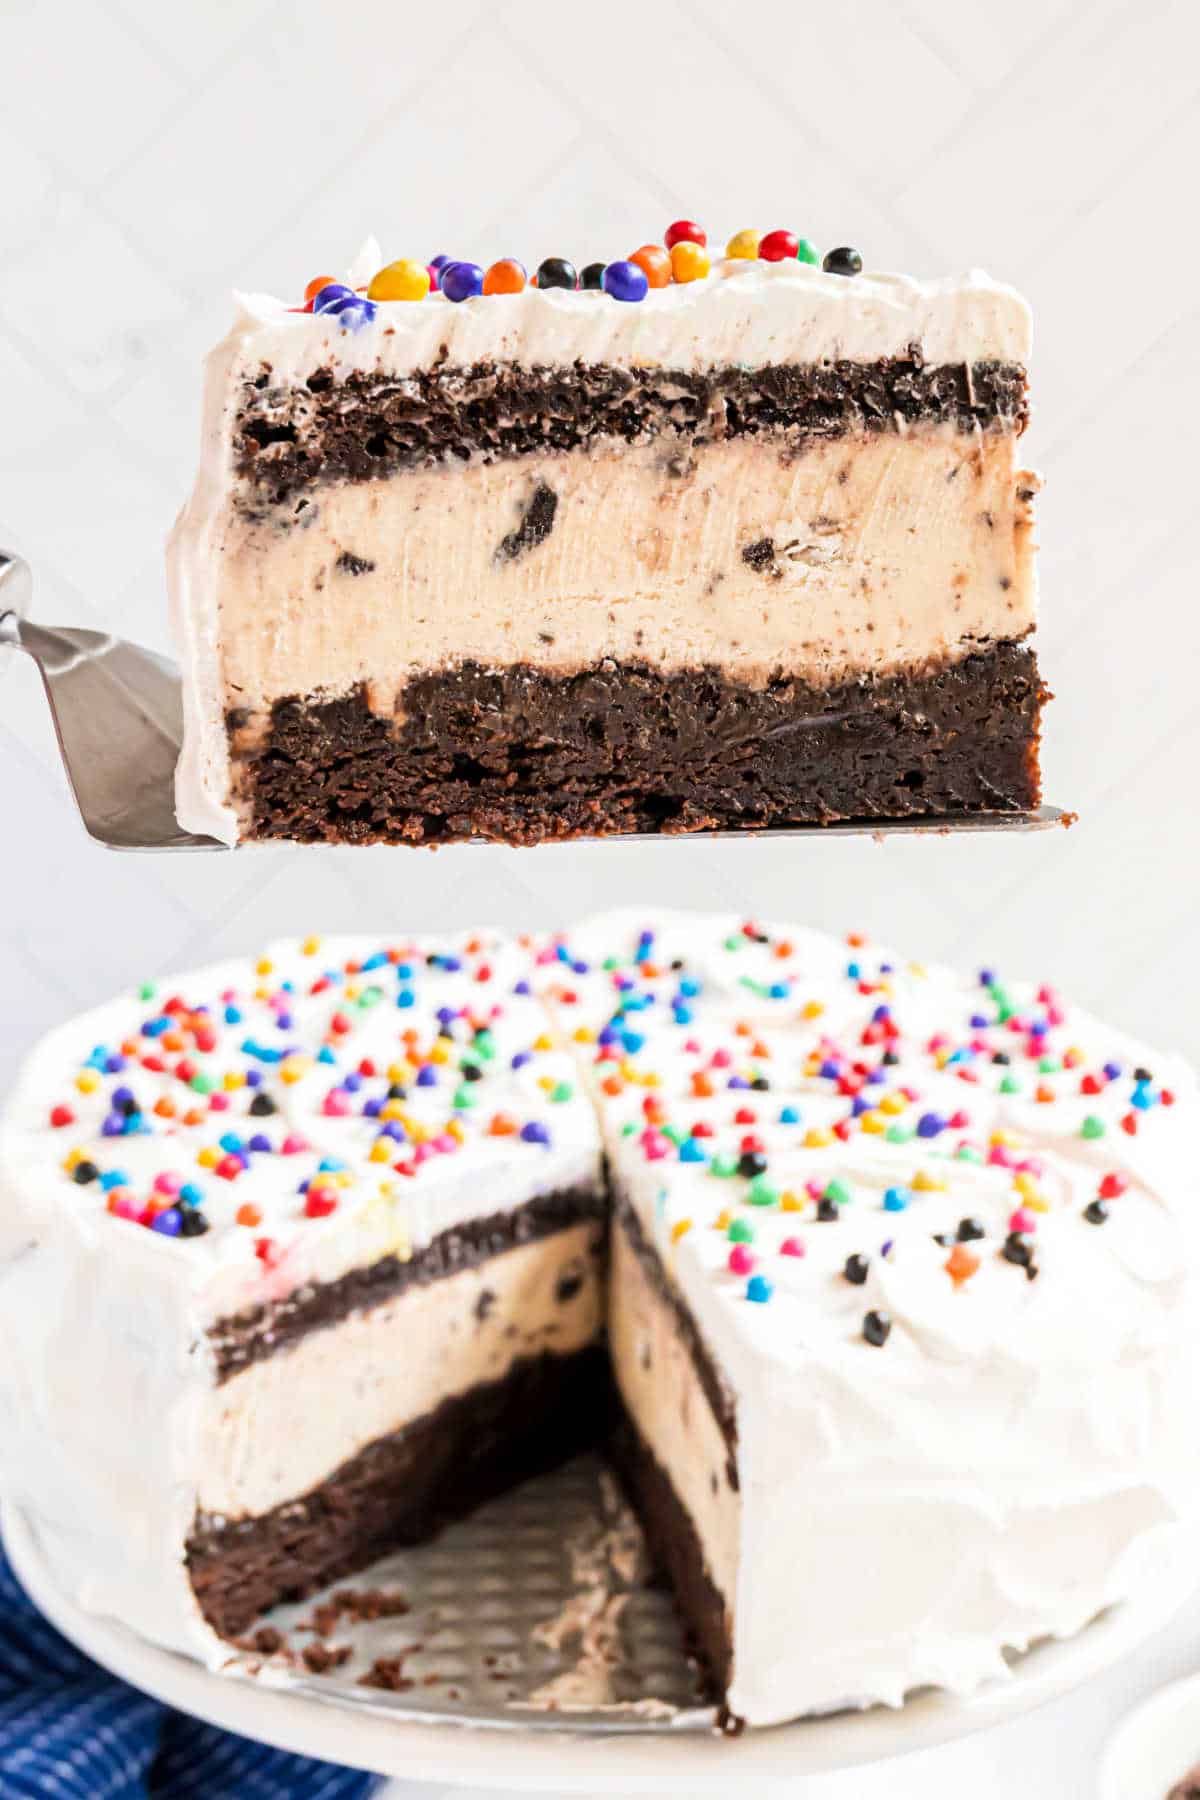
This Brownie Ice Cream Cake recipe uses rich, fudgy, chocolate brownies instead of cake layers. Make a delicious dessert by layering brownies with cookies and cream ice cream, then topping it with whipped cream.
At the center of the whole thing? A generous spread of hot fudge and Oreo cookies.
Give into your sweet tooth. This cookies and cream ice cream cake is worth it!
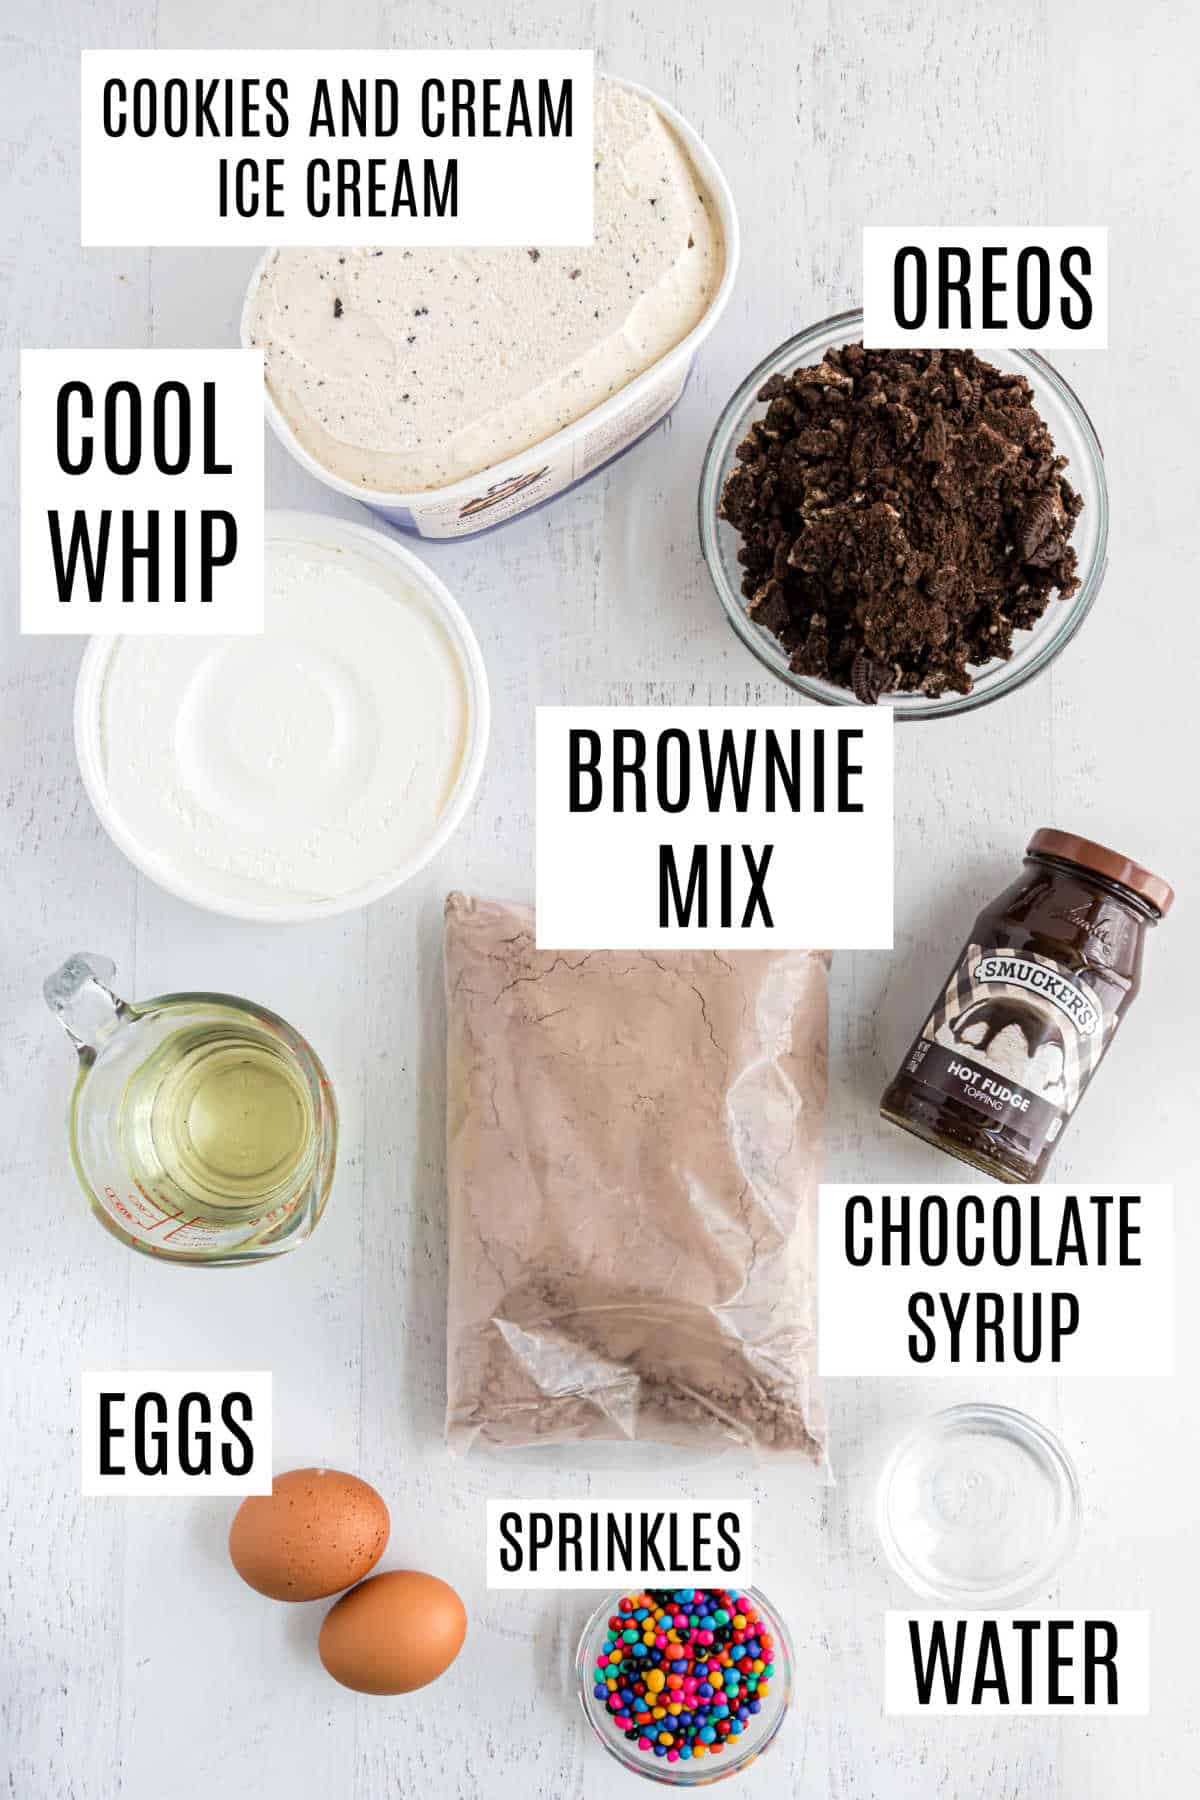
Ingredients Needed
Brownies. We used a basic brownie mix. If you can find a funfetti brownie, save the sprinkles for the topping. Or try a homemade brownie batter instead!
Hot fudge sauce. You don’t need to heat it for this recipe.
Oreo cookies. Or use any similar style chocolate sandwich cookies crushed into small pieces.
Cool whip. If you prefer, you can use real whipped cream for topping this cake instead. Or use our homemade cool whip – which is a stabilized whipped cream.
How to Make a Brownie Cake
Don’t let the steps to making this cake overwhelm you. Easier than it appears!
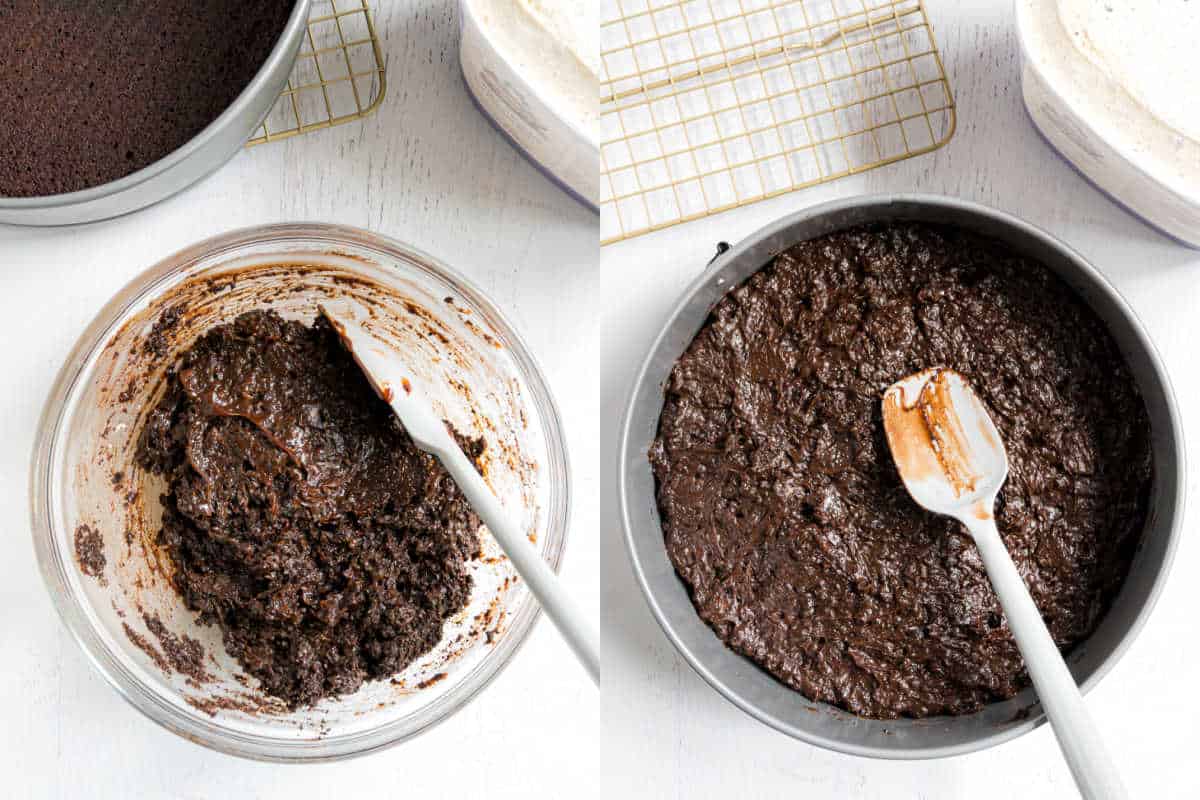
Prepare the brownies.
You’ll need two 9-inch round cake pans. While the brownies are cooling, get the rest of your ingredients ready.
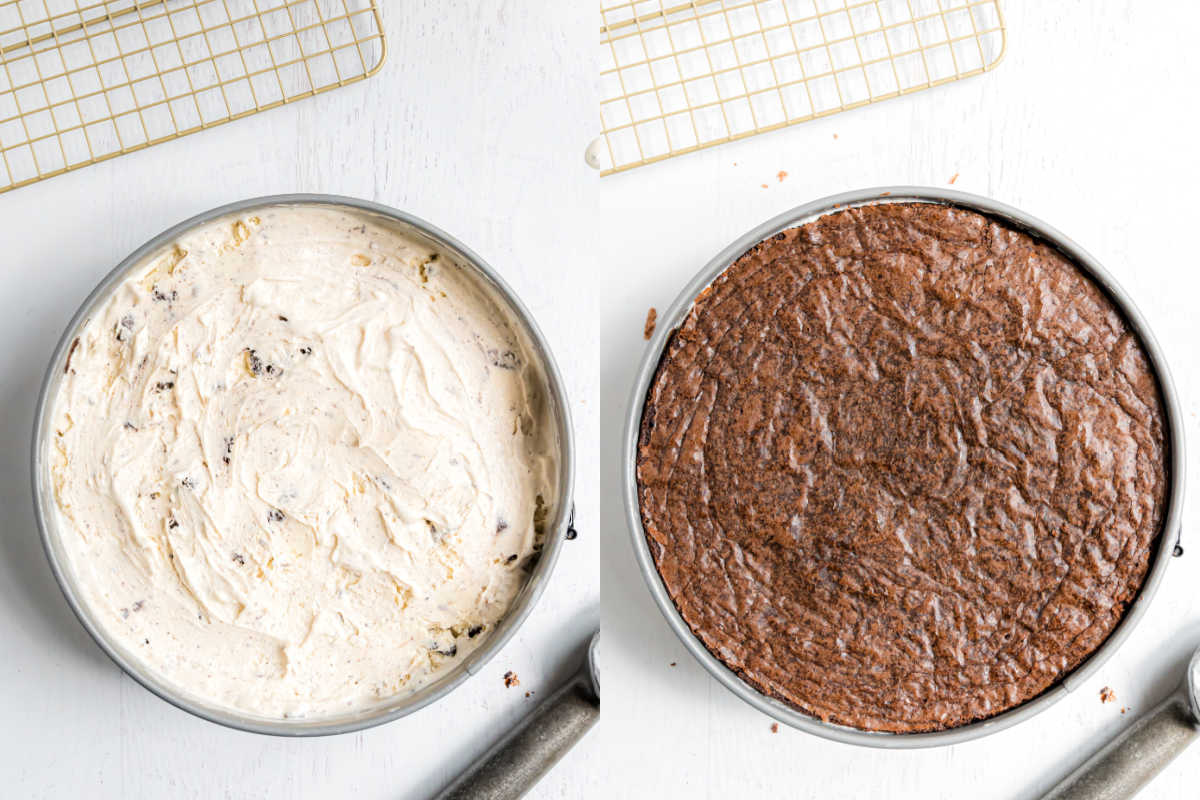
Make the filling.
Combine the hot fudge sauce and crushed Oreo cookies. Take the ice cream out of the freezer to let it soften for a few minutes on the counter.
Assemble.
Add the layers to a spring form pan in the following order:
First brownie layer.
Hot fudge.
Ice cream.
Second brownie layer.
Now wrap the brownie ice cream cake in foil and freeze for at least two hours. When you’re ready to enjoy your delicious dessert, remove the cake from the pan.
Cover it with cool whip and sprinkles (if desired) and a drizzle of magic shell, if desired, before serving!
Tips and Tricks
Make sure to use a brownie mix that makes enough for a 13 x 9 inch pan. Use the ingredients needed on the package.
Store leftover ice cream cake covered in the freezer for up to 1 month.
Line your baking pans with parchment paper. For best results, use scissors to trim the parchment so it easily fits into your pans.
Recipe FAQs
Can I make ice cream cake ahead of time?
Yes, you can make this brownie ice cream cake up to a week ahead of time! Store it in the freezer and add the whipped topping just before serving.
How do you crush the Oreos?
You can crush Oreos using a food processor or a rolling pin. If you choose to use the food processor, be careful not to overdo it. You don’t want fine crumbs. To crush cookies with a rolling pin, place the cookies in a zip top bag. Roll the rolling pin over the cookies with firm pressure a few times to break them into pieces.
Can I use real whipped cream instead?
Yes, real whipped cream makes a delicious substitute for Cool Whip if you prefer it.
What other ice cream flavors can I use?
If you don’t have cookies and cream ice cream, try chocolate or vanilla ice cream instead! Both taste great with the brownie and Oreo flavors in this dessert.
Brownie Ice Cream Cake has layers of fudgy brownie, cookies and cream ice cream, and hot fudge sauce. Make this decadent frozen dessert ahead of time and stash it in the freezer for your next special occasion!
Course Cake
Cuisine American
Keyword brownie cake, ice cream cake with brownies
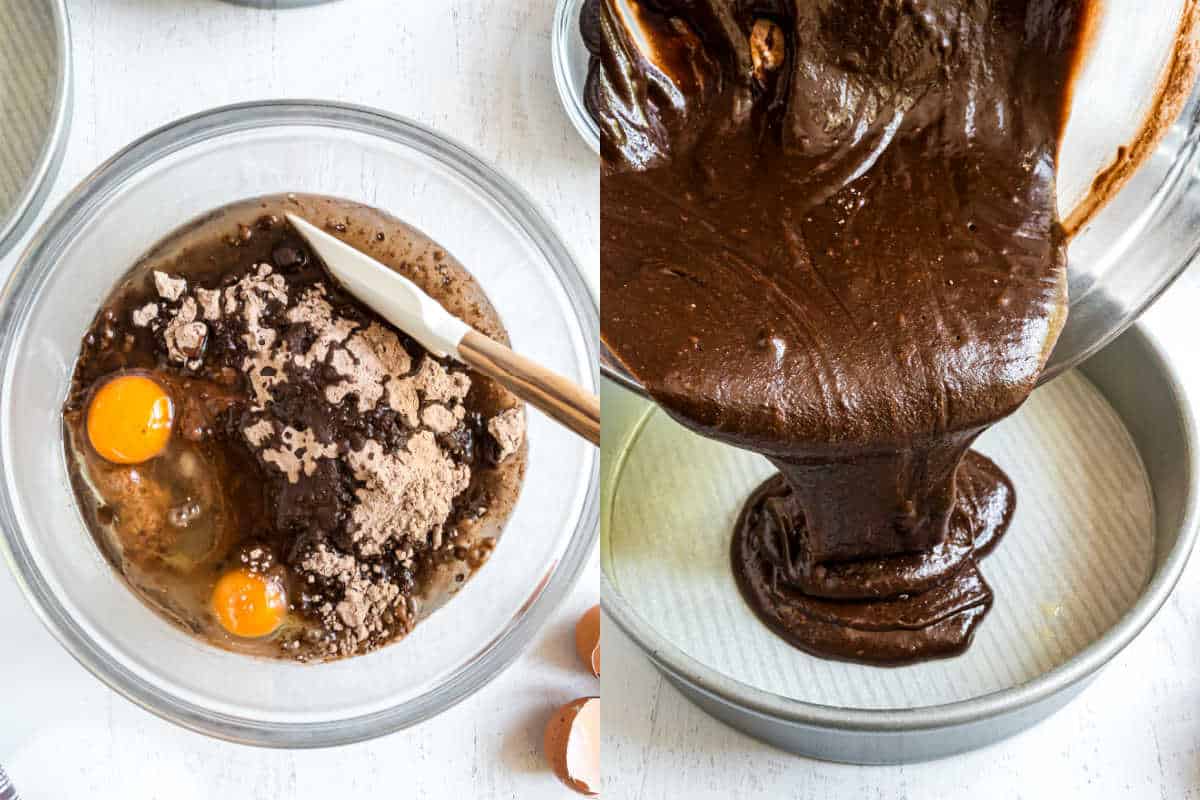
Prepare brownies by combining the brownie mix, oil, water and eggs. Stir until well blended. Grease and flour two 9-inch cake pans, placing a piece of parchment paper in the bottom of each pan (use scissors to trim). Pour brownie batter into pans.
Bake in a 350°F oven for about 17-20 minutes. Remove from pans and cool completely.
In a small bowl, combine the hot fudge sauce (do not heat it) with the crushed cookies.
Place one layer of brownie cake in the bottom of a 9-inch springform pan. Top with the hot fudge and cookie mixture. Next, scoop out the cookies and cream ice cream and spread over the top of the hot fudge mixture. I removed the ice cream from the freezer for about 15 minutes to let it soften slightly for this step.
Finally, place the second layer of brownie over the ice cream and cover with foil. Freeze for about 2 hours (or more).
When ready to serve, remove the springform pan and cover the cake with the whipped topping. Add the reserved funfetti sprinkles from the brownie mix to the top of the cake. ENJOY.
Store remaining cake, covered, in the freezer for up to a week for best flavor.
Notes
Be sure to choose a brownie mix that makes enough to fill a 13×9 pan.
Store leftover ice cream cake covered in the freezer for up to 1 week.
I prefer rainbow chip sprinkles. They taste great and look so pretty too!
Line your baking pans with parchment paper. For best results, use scissors to trim the parchment so it easily fits into your pans.
Caramel Apple Eclair Cake
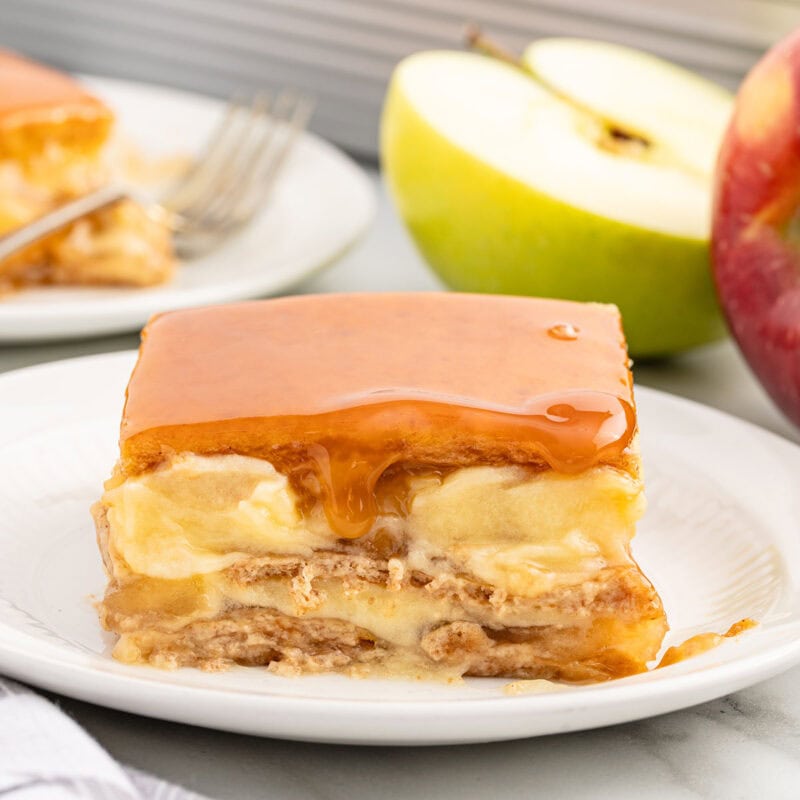
This no bake Caramel Apple Eclair Cake recipe couldn’t be any easier to make because it’s conveniently prepared with canned apple pie filling, packages of instant pudding, graham crackers, and caramel sundae toppin…
This no bake Caramel Apple Eclair Cake recipe couldn’t be any easier to make because it’s conveniently prepared with canned apple pie filling, packages of instant pudding, graham crackers, and caramel sundae topping. What’s not to love about layers of creamy pudding and fruit filling sandwiched between sheets of graham crackers, especially when covered with…
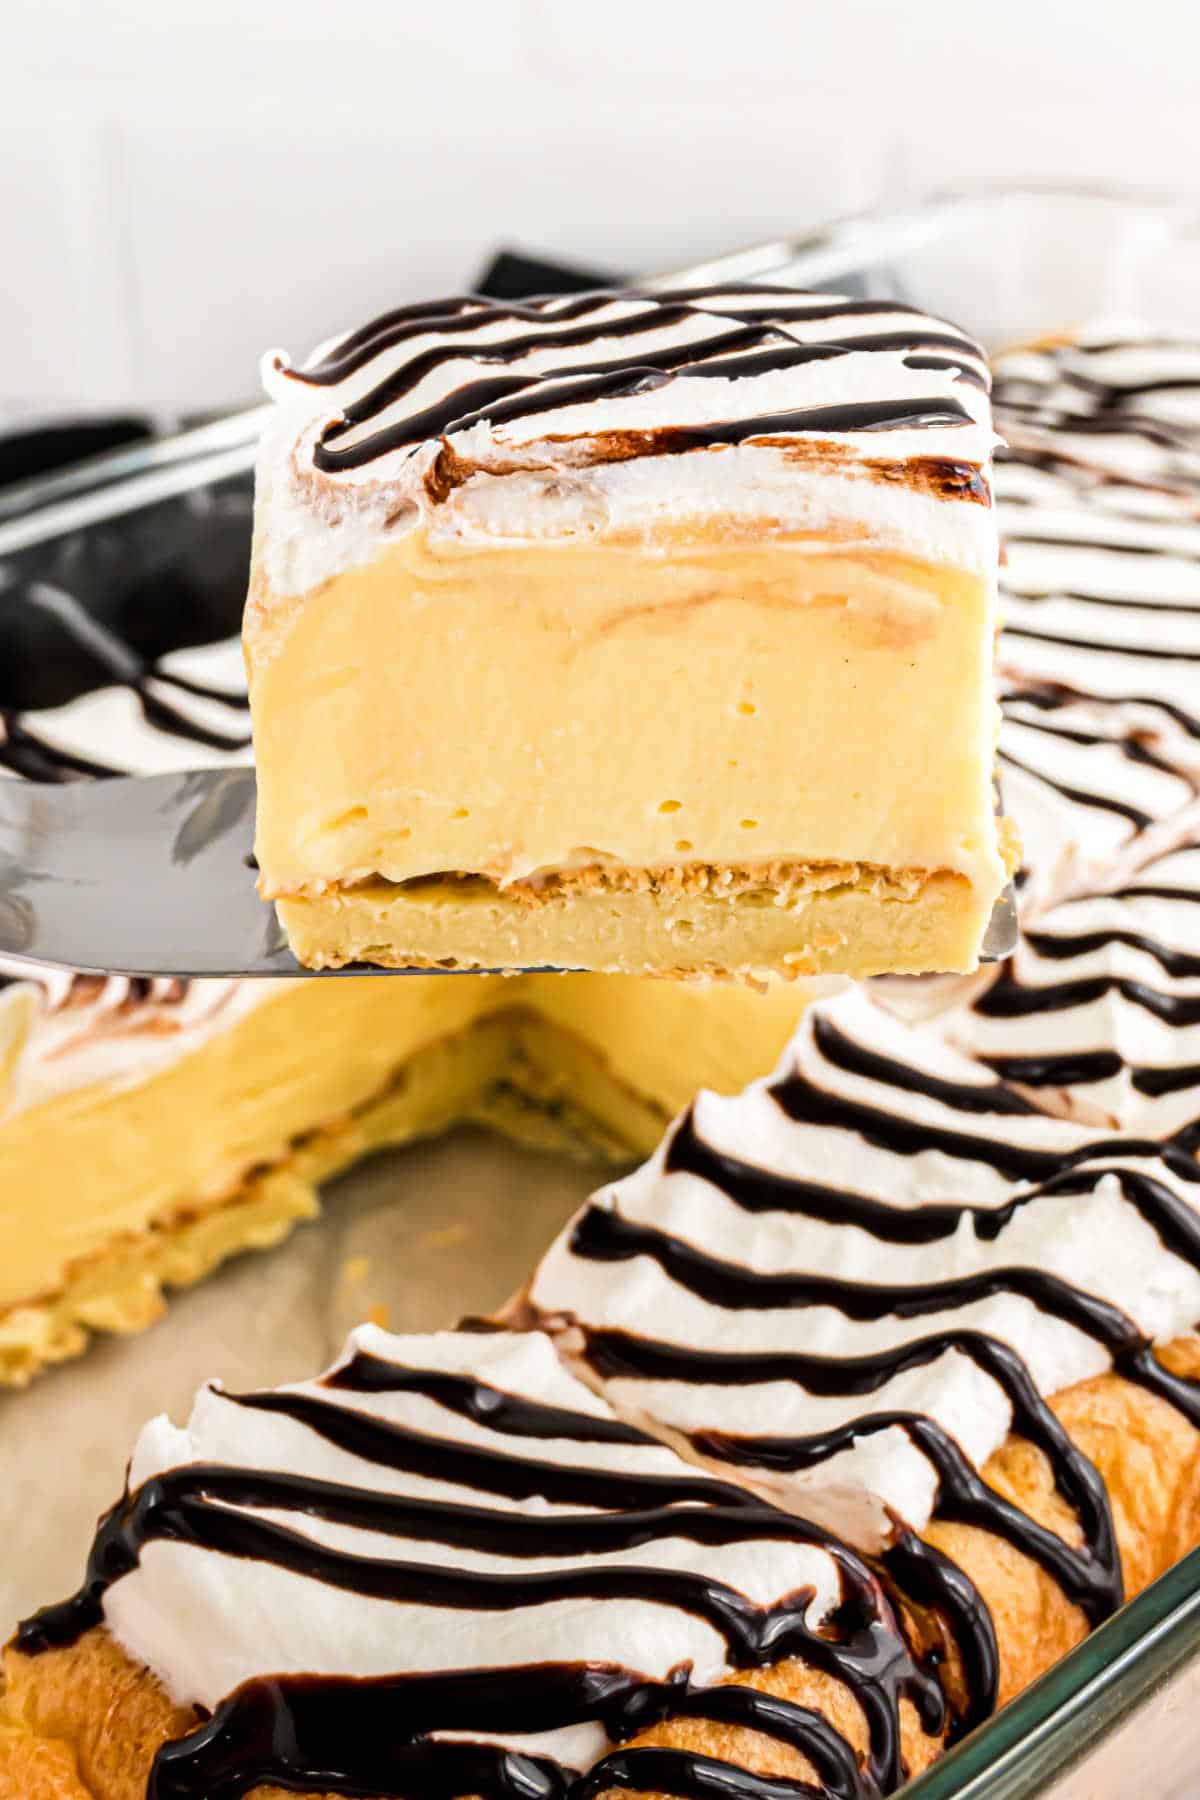
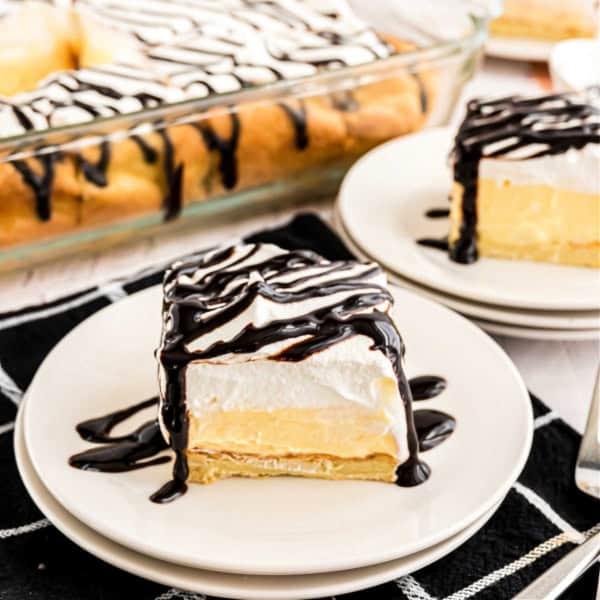
The best Cream Puff Cake recipe, featuring a fluffy crust, easy vanilla filling, and of course, chocolate. This cream puff recipe will…
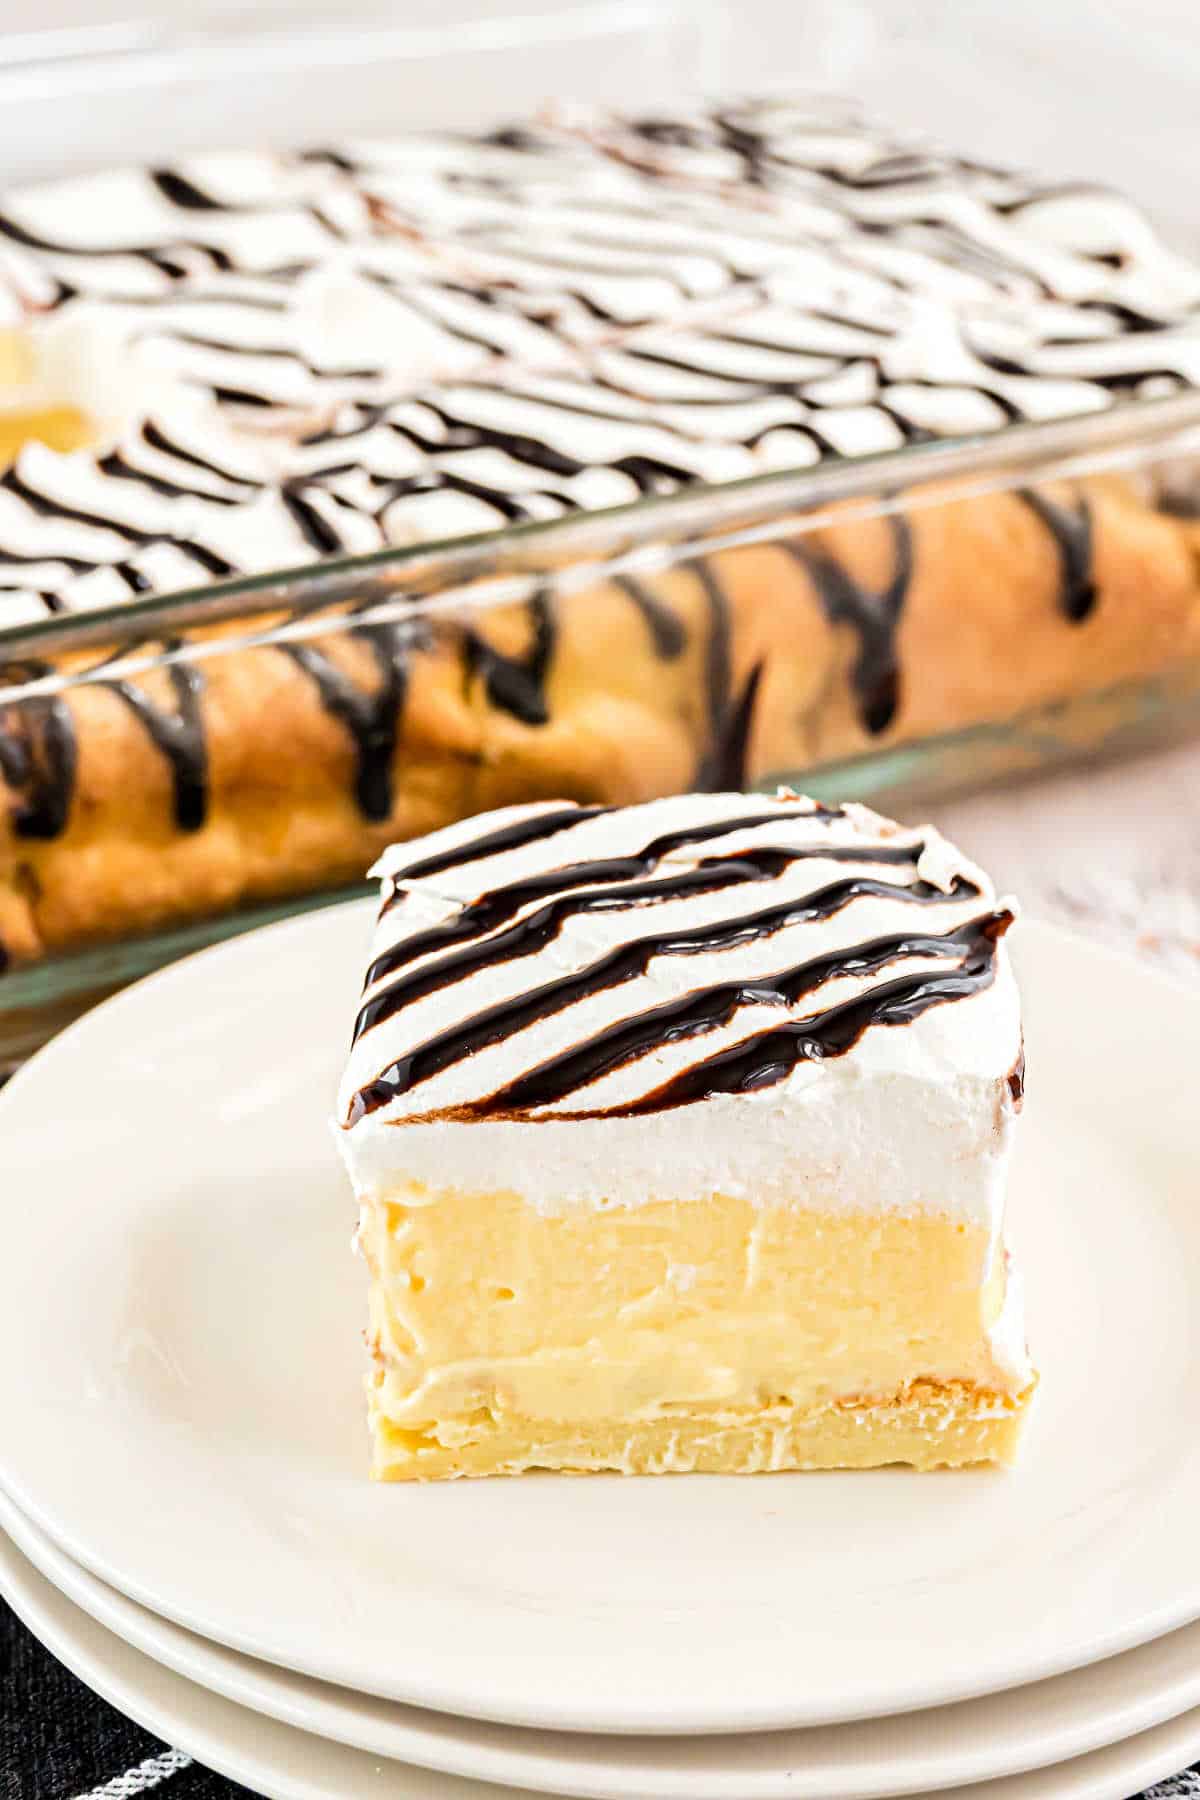
The best Cream Puff Cake recipe, featuring a fluffy crust, easy vanilla filling, and of course, chocolate. This cream puff recipe will be your new favorite dessert!
If you’ve tried a Cream Puff, you know how delicious they taste.
The texture of the pastry is slightly chewy, but also light and airy. And it traditionally contains a vanilla pastry cream.
Today’s Cream Puff Cake recipe is an easy version of the traditional dessert.
Here’s why I love it:
This is the best (and easiest!) way to make cream puffs for a crowd! Cream puff cake is always a winner for potlucks and backyard barbecues.
It has homemade flavor with shortcut ingredients. Cool Whip and pudding mix make it easy to assemble!
Needless to say, this cream puff cake is delicious, but I also love the contrasting textures. The airy, chewy crust is the perfect base for all that whipped vanilla cream!
If you enjoy this sweet dessert, you should try making my tres leches cake next!
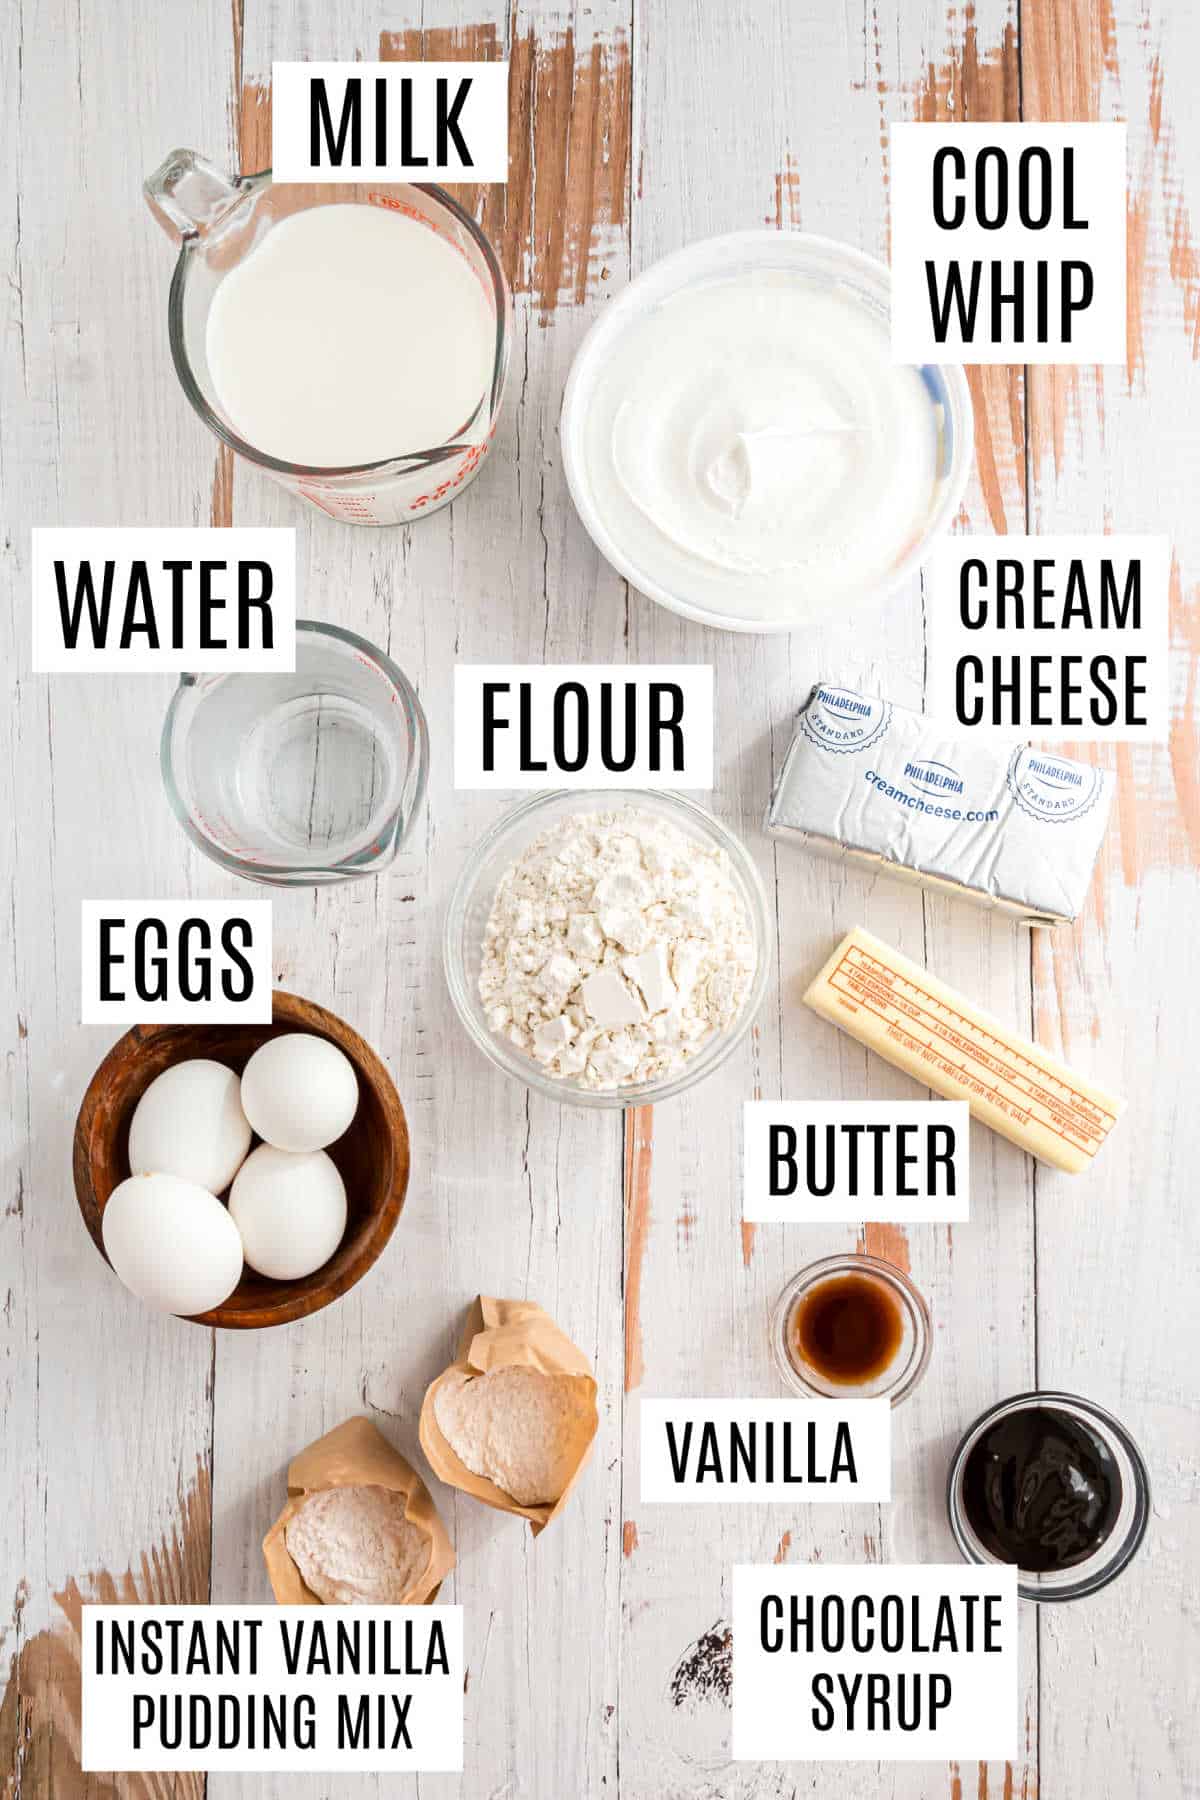
Important Ingredient Notes
Unsalted butter – The go-to for baking! Unless a recipe says otherwise, always assume you should use unsalted butter.
All-purpose flour – I use the flour to make something called choux pastry. The crust gets puffy thanks to steam instead of a traditional leavener like baking soda or powder.
Vanilla extract – I recommend pure vanilla extract, not imitation.
Eggs – Eggs also help give choux pastry its signature texture.
Instant vanilla pudding mix – Regular vanilla or French vanilla both work for this cream puff cake recipe.
Milk – I recommend whole milk for the richest cream filling, but any kind you have on hand is fine.
Cream cheese – Use the kind that comes in a block not a tub.
Prepare: Preheat your oven to 400ºF. Coat a 13×9 baking dish with baking spray.
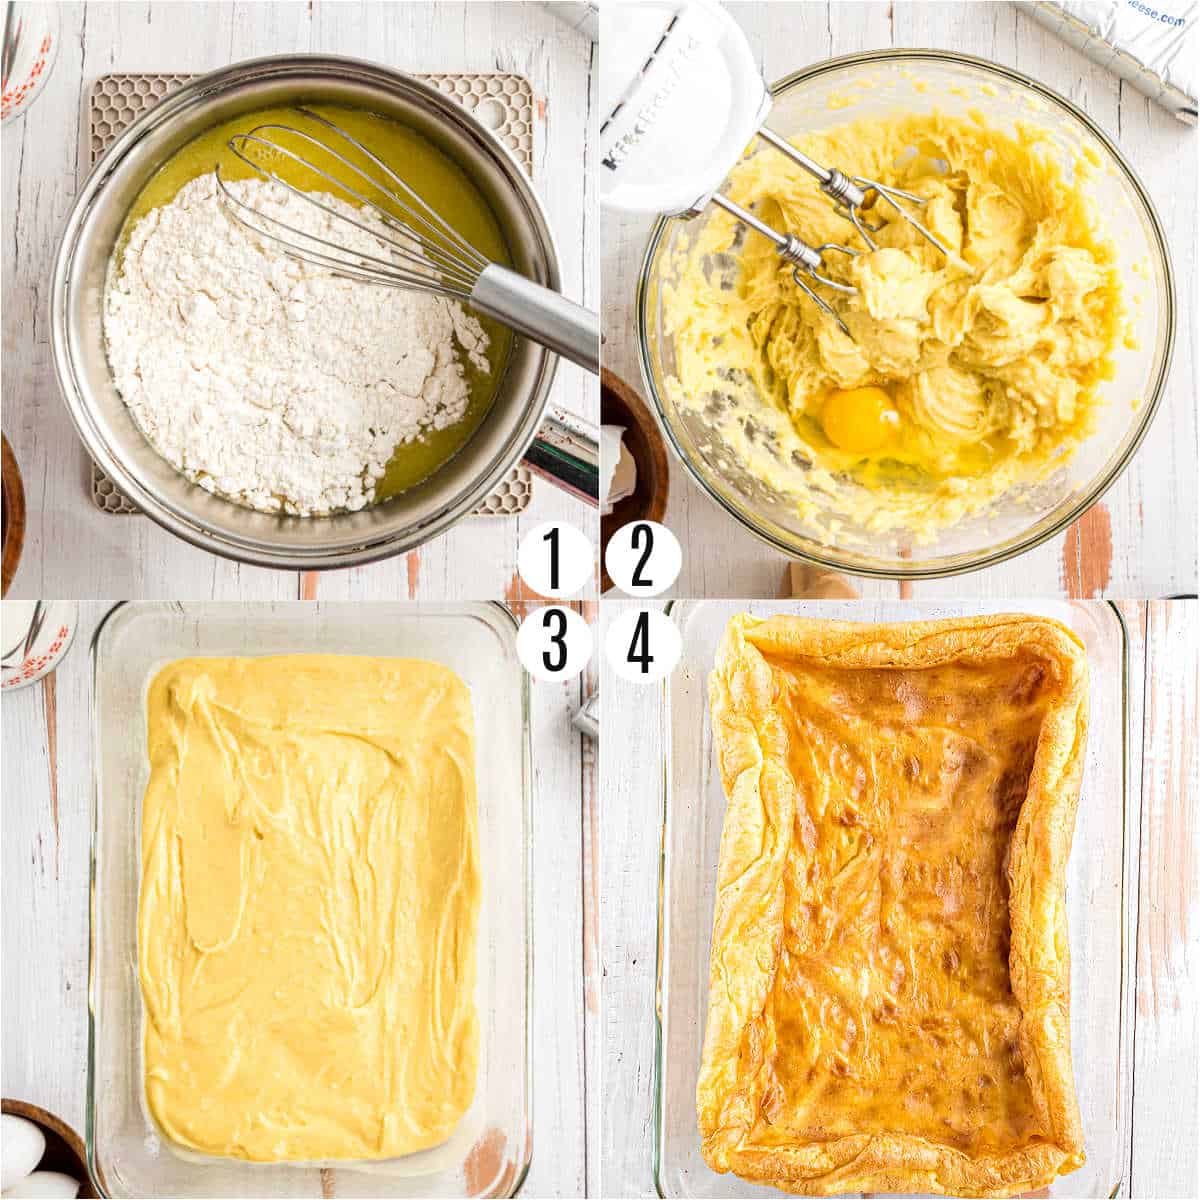
Make the Choux Pastry:
In a small saucepan, add the butter and water.
Bring the mixture to a boil over medium high heat.
Remove the pan from heat and whisk in the flour.
Pour the flour mixture into a mixing bowl and beat in the eggs one at a time until well blended.
Mix in the vanilla extract.
Bake: Spread the pastry crust into the prepared baking dish. Bake for 30 minutes, then remove from the oven and cool completely.
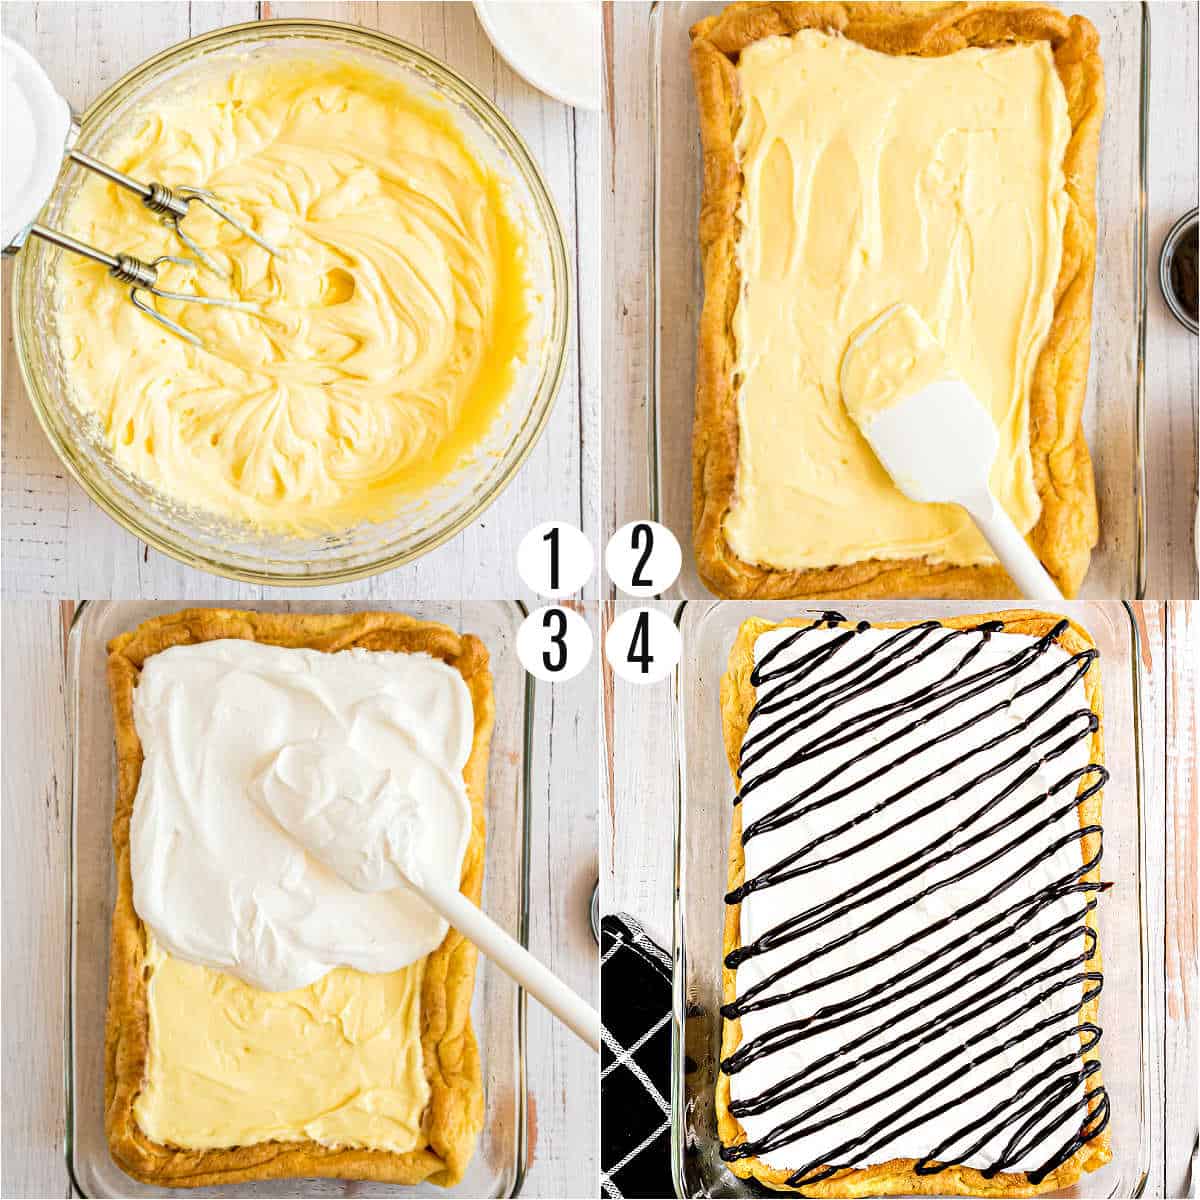
Make the cream: In a large bowl, whisk together the pudding mix and milk until blended. Beat in the softened cream cheese for 3-4 minutes.
Assemble: Pour the cream into the cooled crust. Top with homemade whipped cream or whipped topping and chill for at least one hour. Drizzle with chocolate syrup or top with chocolate chips before serving.
Tips and Tricks
Start by softening the cream cheese at room temperature. This will ensure that it mixes in smoothly and evenly into the cream.
You can make this cake ahead of time. The cake will still taste fresh and delicious, just like when you first made it.
You can also make cream puff cake ahead in parts—either make the cream topping or the crust ahead of time. This is perfect for busy times when you don’t have much time to cook. Especially helpful before a party when you have a lot of tasks to complete.
Store cream puff cake in the refrigerator for up to four days. I don’t recommend freezing it.
More Easy Custard Recipes
If you love this cake with the creamy, custard like filling, here are a few of my favorite desserts that are similar:
Traditional Chocolate Eclair Cake made with layers of graham cracker, pudding mix, and chocolate ganache.
This easy Banana Eclair Cake is a favorite summer treat. It consists of layers of cinnamon graham crackers, vanilla pudding, and fresh banana. No need to bake it! To top it off, I literally topped it off with a cinnamon glaze!
This Strawberry Eclair Cake is made with a filling of Cheesecake JELL-O. Plus there’s no oven needed which means it’s perfect for the warmer weather!
Easy, fried Boston Cream Donuts in under 30 minutes! Made using biscuits and filled with a creamy pudding mixture, these are sure to tempt you! Don’t forget the rich chocolate ganache!
The Best Cream Puff Cake recipe featuring a fluffy crust, easy vanilla filling, and of course, chocolate. You’ll love this homemade version of a cream puff!
Preheat oven to 400 degrees F. Spray a 13×9 baking dish with baking spray. Set aside.
In a small saucepan, add the butter and water. Bring to a boil over medium high heat. Remove from heat and whisk in flour.
Pour flour mixture into a mixing bowl and add in eggs one at a time until well blended. Add vanilla extract.
Spread into prepared baking dish. Bake for 30 minutes.
Remove from oven and cool completely.
In a mixing bowl, whisk together the pudding mix and milk until blended. Beat in softened cream cheese (for about 3-4 minutes).
Pour into cooled crust. Top with cool whip. Drizzle with chocolate syrup.
Refrigerate for at least one hour. ENJOY.
Video
Notes
One of the things I love about this cake is you can make it a day or two in advance and it will still have the same texture and flavor as if you just prepared it


 I LOVE baking with zucchini, especially during the summertime when I have lots of garden zucchini to use up. A few of my favorite zucchini recipes are my Chocolate Zucchini Bread, Zucchini Brownies, Oatmeal Zucchini Cookies, and Lemon Zucchini Bread. Whenever I am craving a decadent dessert I love making my Chocolate Zucchini Cake. You…
  Brownie Ice Cream Cake has layers of fudgy brownie, cookies and cream ice cream, and hot fudge sauce. Make this…
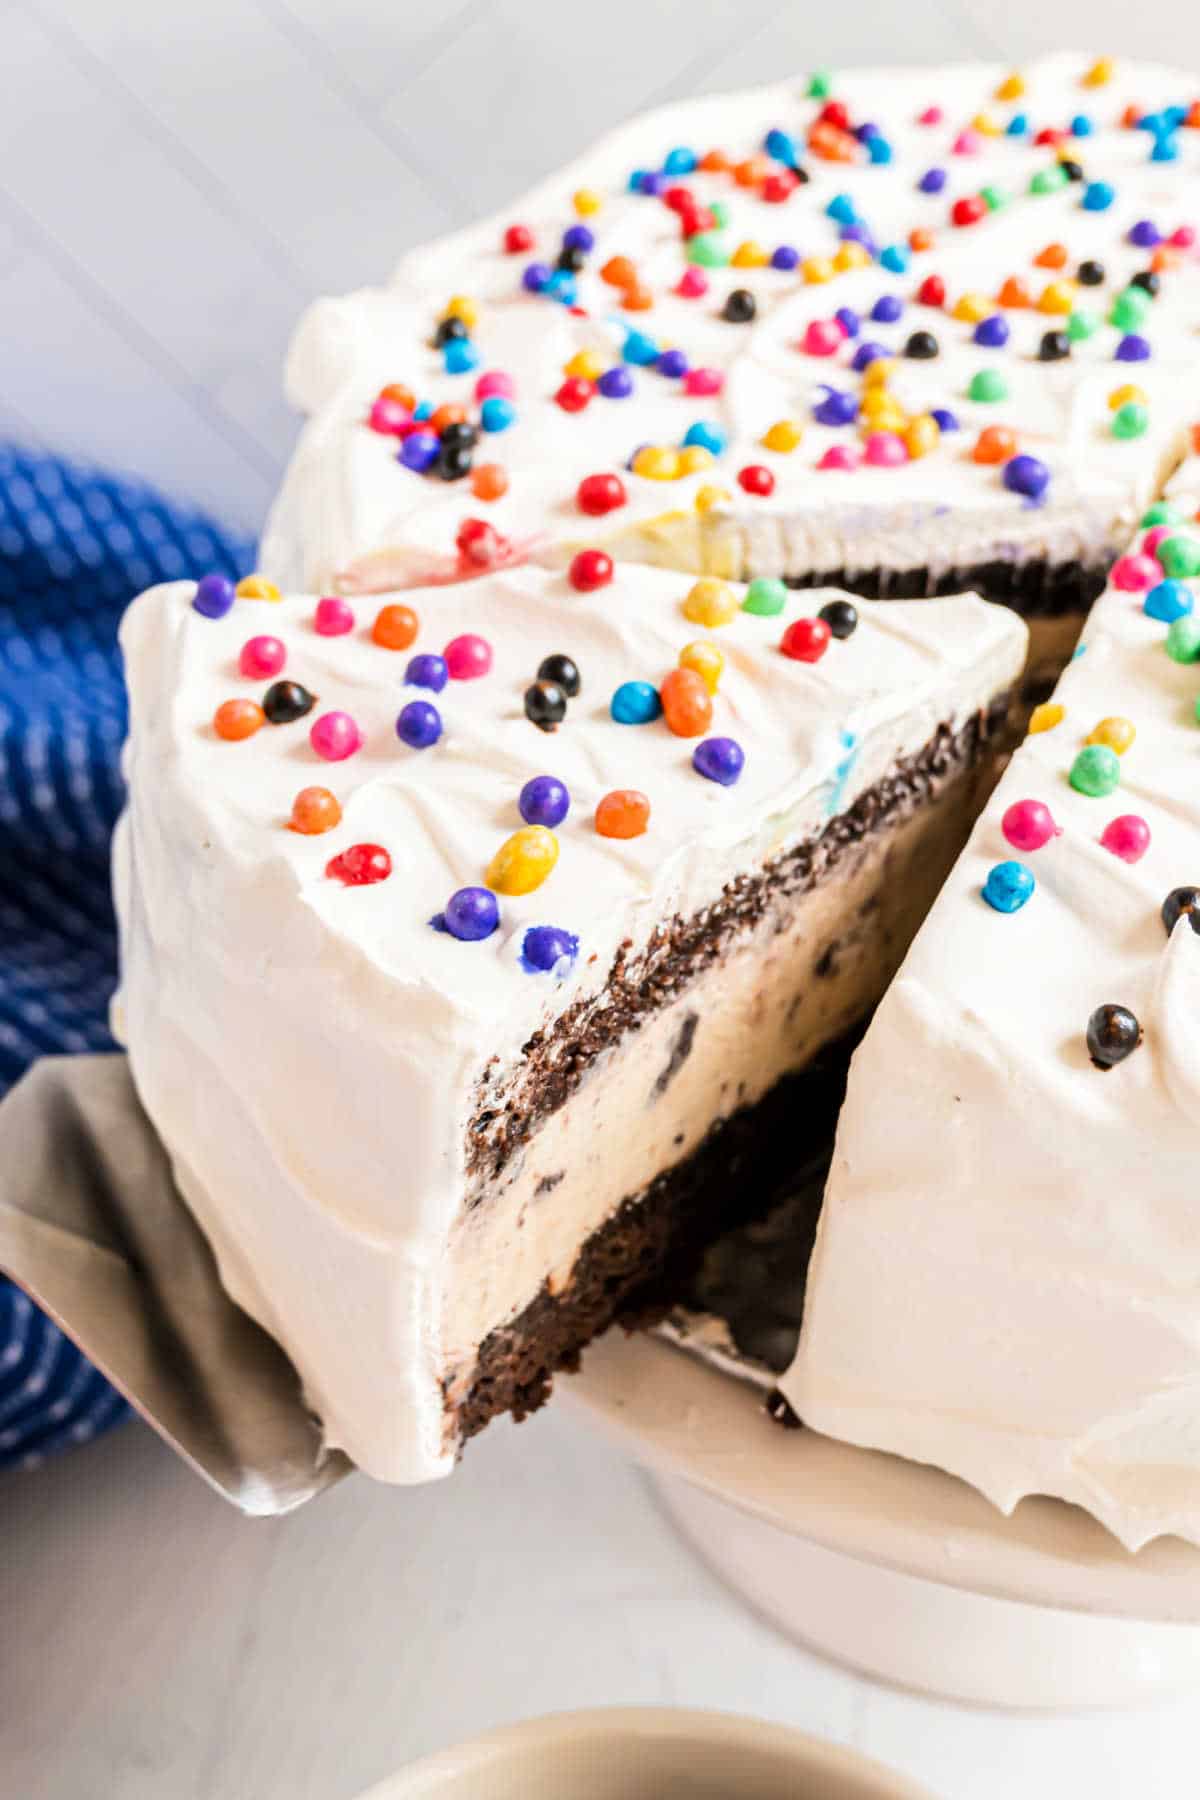
 The best Cream Puff Cake recipe, featuring a fluffy crust, easy vanilla filling, and of course, chocolate. This cream puff recipe will…