This quick and easy high-protein Coconut Chicken Rice Bowl is perfect for lunch or dinner for my gluten-free, dairy-free friends! Coconut Chicken Rice Bowl I whipped up this healthy Coconut Chicken Rice Bowl for dinner the other night, and my family lo…
This quick and easy high-protein Coconut Chicken Rice Bowl is perfect for lunch or dinner for my gluten-free, dairy-free friends! Coconut Chicken Rice Bowl I whipped up this healthy Coconut Chicken Rice Bowl for dinner the other night, and my family loved them, so I had to share. They’re like coconut curry chicken but without […]
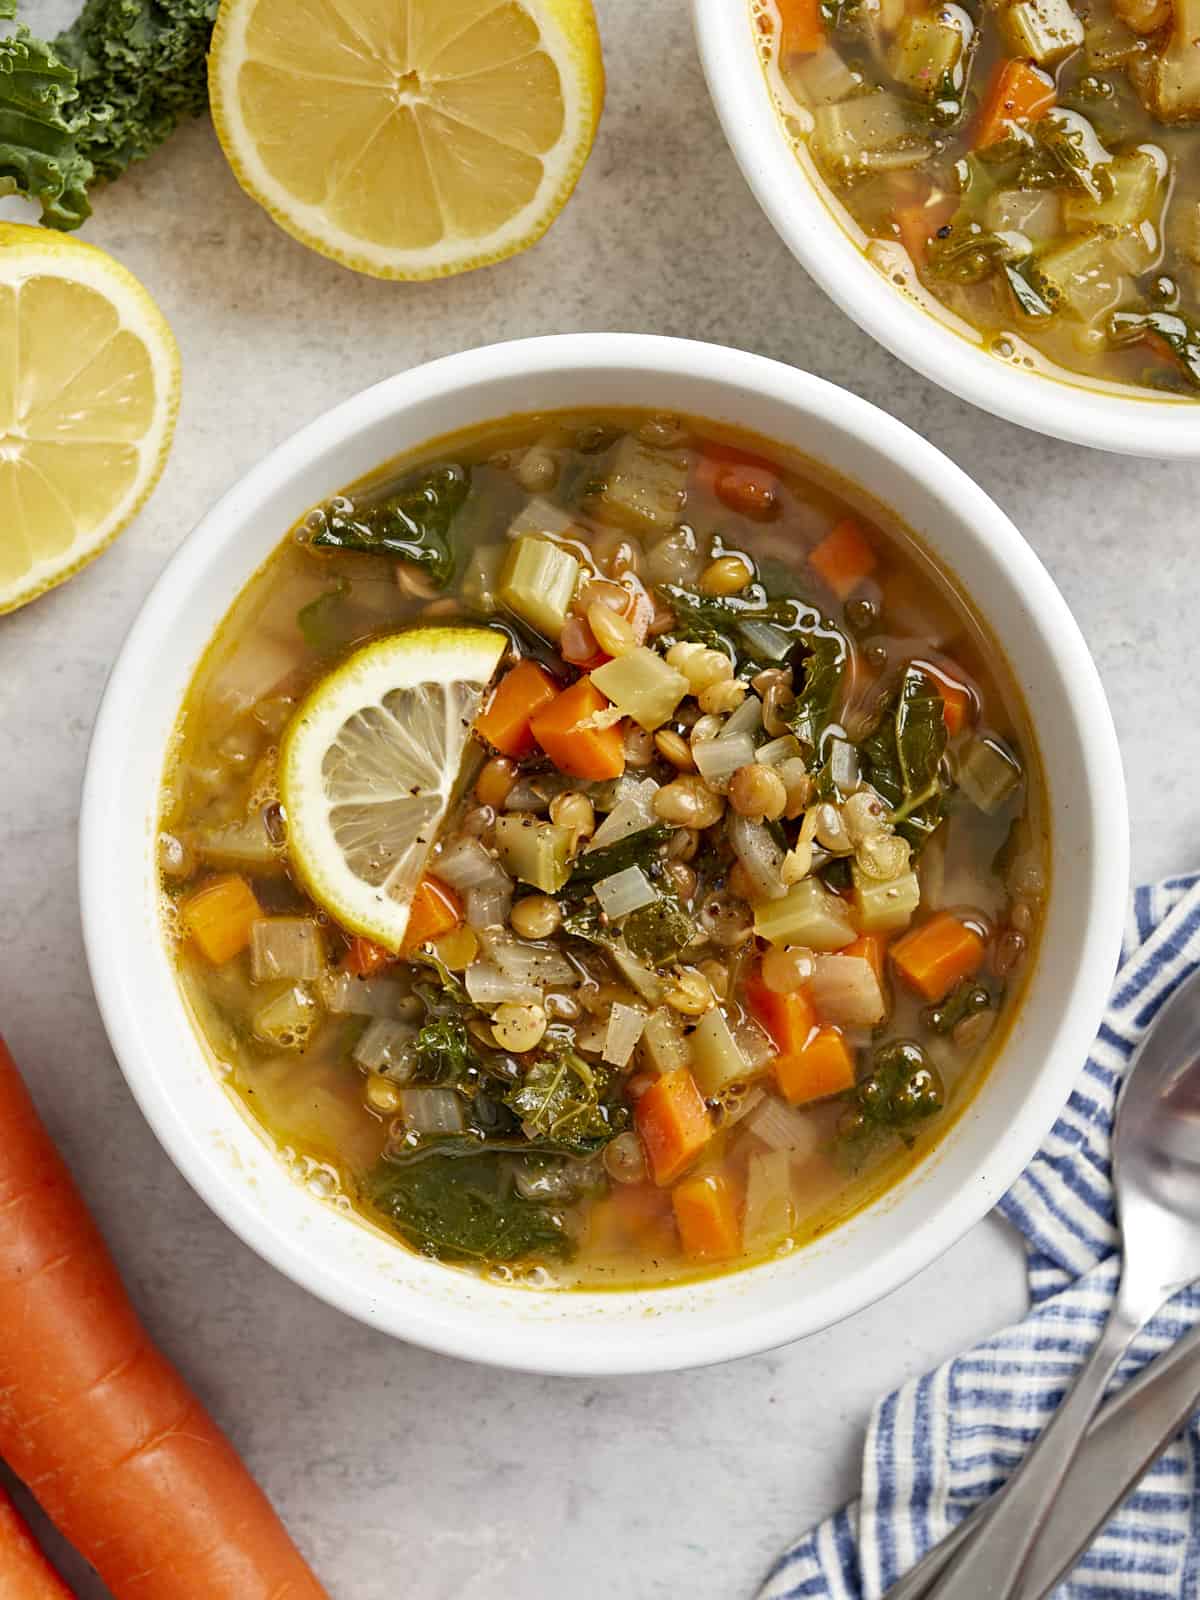
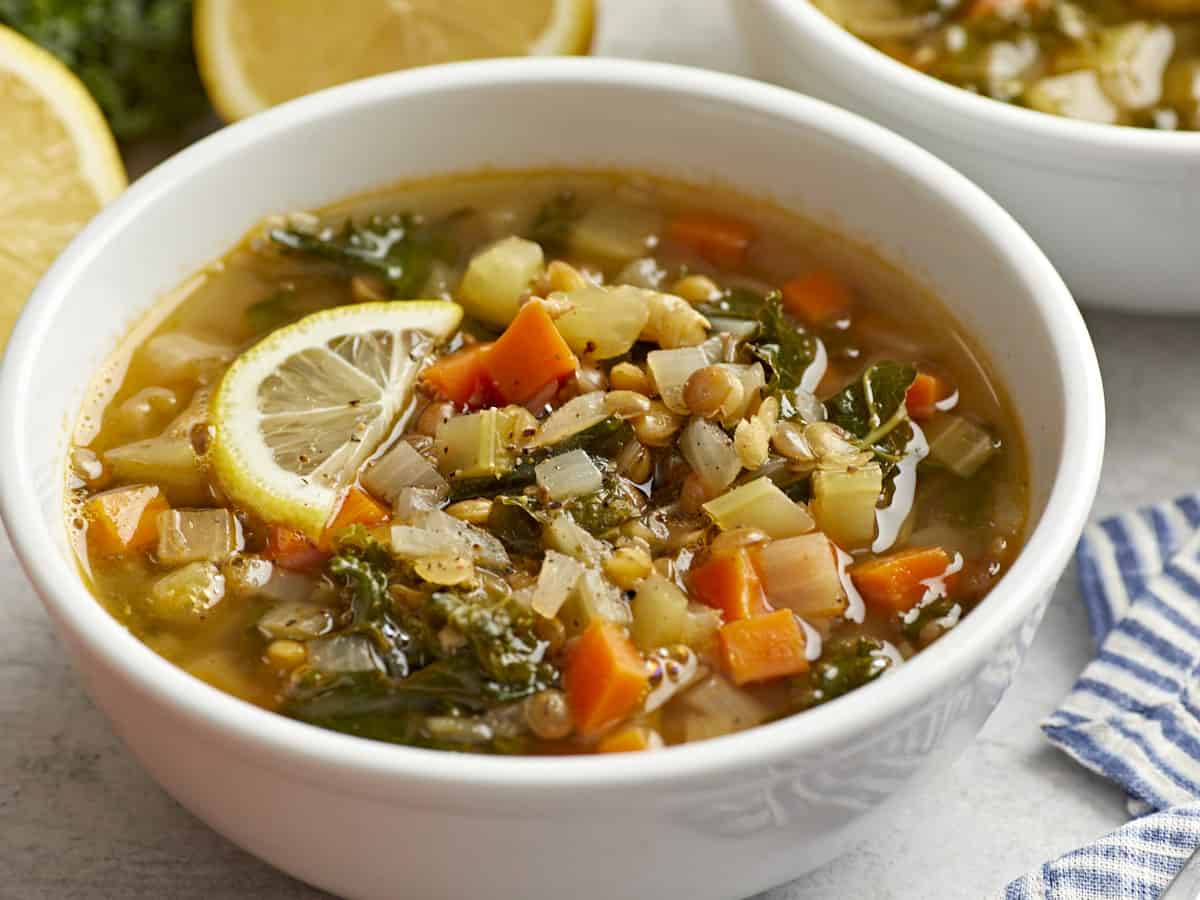
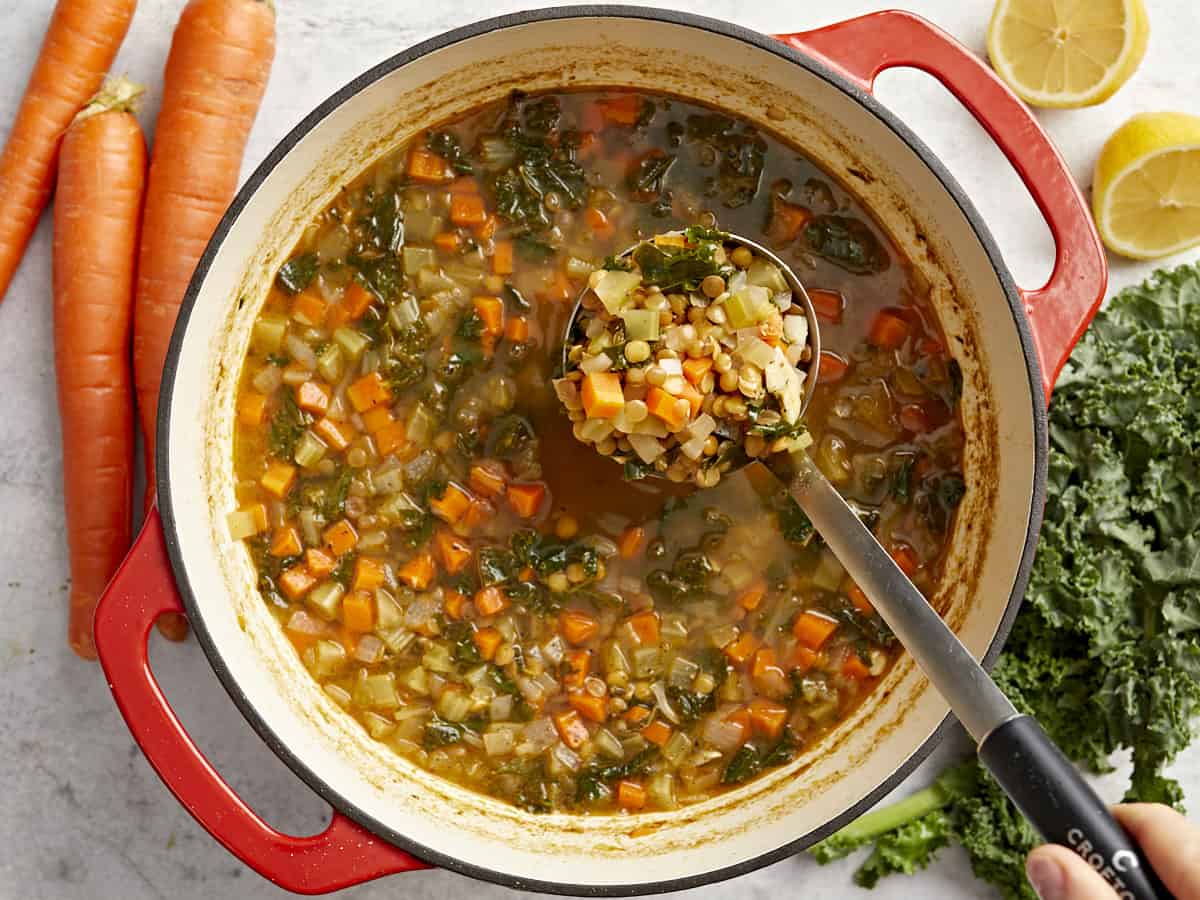
In my opinion, a bright and refreshing soup is the perfect way to welcome spring, and this vegan Mediterranean Lentil Soup is the perfect comforting meal for the rainy days to come. A rich and flavorful broth loaded with veggies, lentils, and kale will fill you up for pennies and is a great recipe for fridge clean out day. Finish it off with a squeeze of lemon juice for a delicious and easy weeknight meal.
Why Make Mediterranean Lentil Soup?
The first time I experienced cinnamon in a savory dish was while cooking at a Lebanese restaurant and it was life changing! This Mediterranean Lentil Soup is the perfect introduction to the savory use of cinnamon. This clean and flavorful lentil soup is a vegan flavor explosion. It’s loaded with protein and fiber, naturally gluten-free, and super versatile. You can toss in just about any veggie or green, so raid the fridge and get cooking!
Ingredients for Mediterranean Lentil Soup
Here’s what you’ll need to make Mediterranean lentil soup:
Oil: Olive oil is our preferred choice in this recipe for its Mediterranean flavor profile, but vegetable or canola oil will work in a pinch.
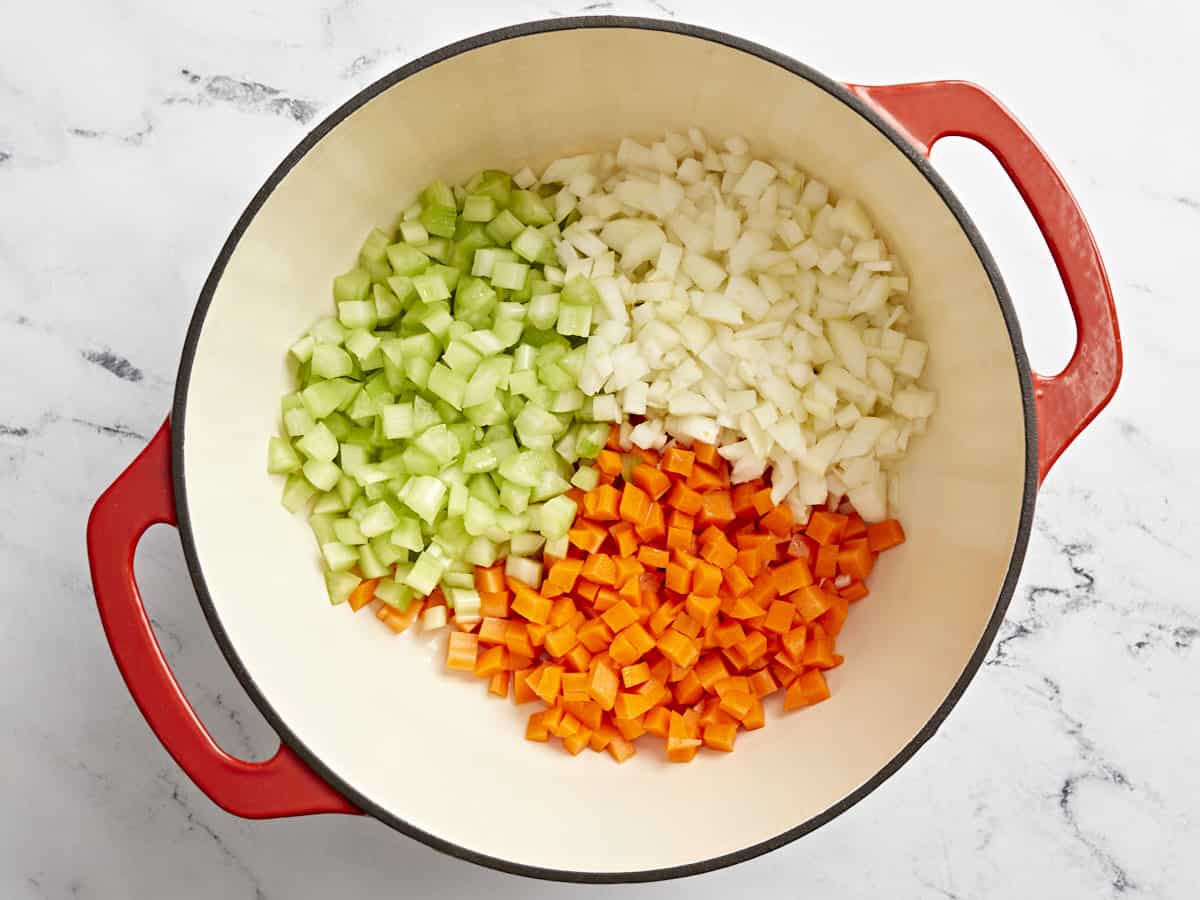
Mirepoix: A combination of small diced yellow onion, carrots, and celery creates an earthy and sweet base of flavor for this soup.
Garlic: The large pieces of crushed garlic versus mincing it fine is intentional to bring out the natural sweetness and flavor of cooked garlic instead of the sometimes-overwhelming bite it has when minced.
Cumin: Adds a savory and nutty Mediterranean flavor to this soup.
Cinnamon: A great savory application of the spice! It will warm you up from the inside out and make your house smell fantastic.
Lentils: We used brown lentils for their firm texture.
Vegetable Broth: We used Vegetable flavored Better Than Bouillon in this recipe. If using another brand, make sure salt is not the first ingredient or it’s a waste of money!
Lemon Juice: Gives the soup a brightness that is seriously addictive. You can use fresh-squeezed lemon juice and save half of your lemon for garnishing each bowl, or you can use a bottled lemon juice. I always have lemons in the kitchen, so we had some to garnish with, too!
Kale: Swiss chard, rainbow chard, spinach, escarole, and all varieties of kale work great, too.
Salt and Pepper: Enhance the natural flavors of the soup.
Which color lentils are best for soup?
Brown or green lentils work best for this soup, as they will keep their shape after cooking, which is what we’re looking for texture-wise. Red lentils are not recommended because they cook quicker and will dissolve into the soup as they cook, creating a thick and mushy texture.
How to Store Leftovers
Store leftover Mediterranean lentil soup in an air-tight container in the refrigerator for up to 4 days. This soup also freezes super well for up to 3 months when stored properly in an air-tight container. Let thaw overnight in the refrigerator before reheating in a pot set over medium-low heat until warmed through.
Rinse the lentils in a strainer under cold water until the water runs clear.
Heat the oil in a large soup pot set over medium-high heat. Add in the onions, carrots, and celery and cook until they become tender, about 6-7 minutes, stirring frequently. Season with salt and pepper.
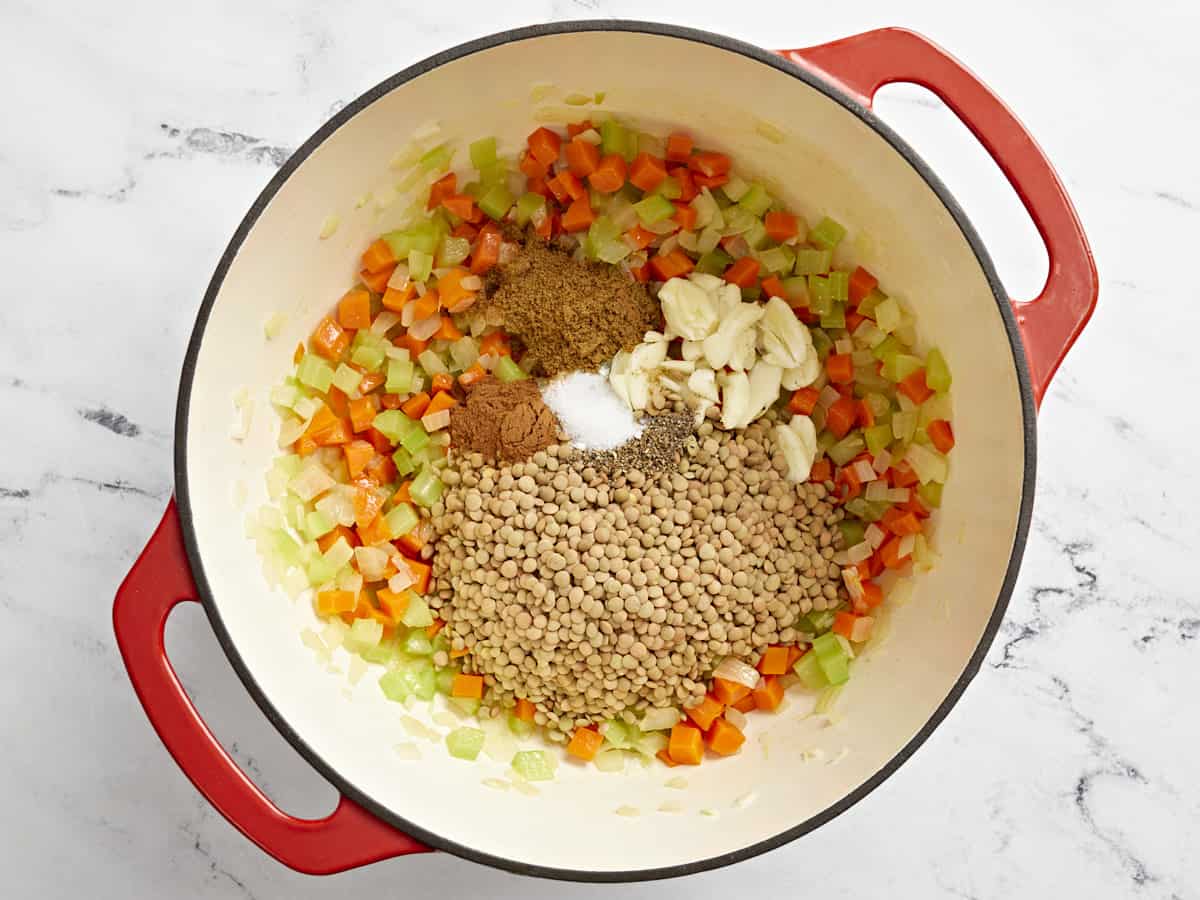
Stir in the garlic, cumin, and cinnamon. Heat until fragrant, about 60 seconds. Add the lentils to the pan and heat for 1-2 minutes to slightly toast.
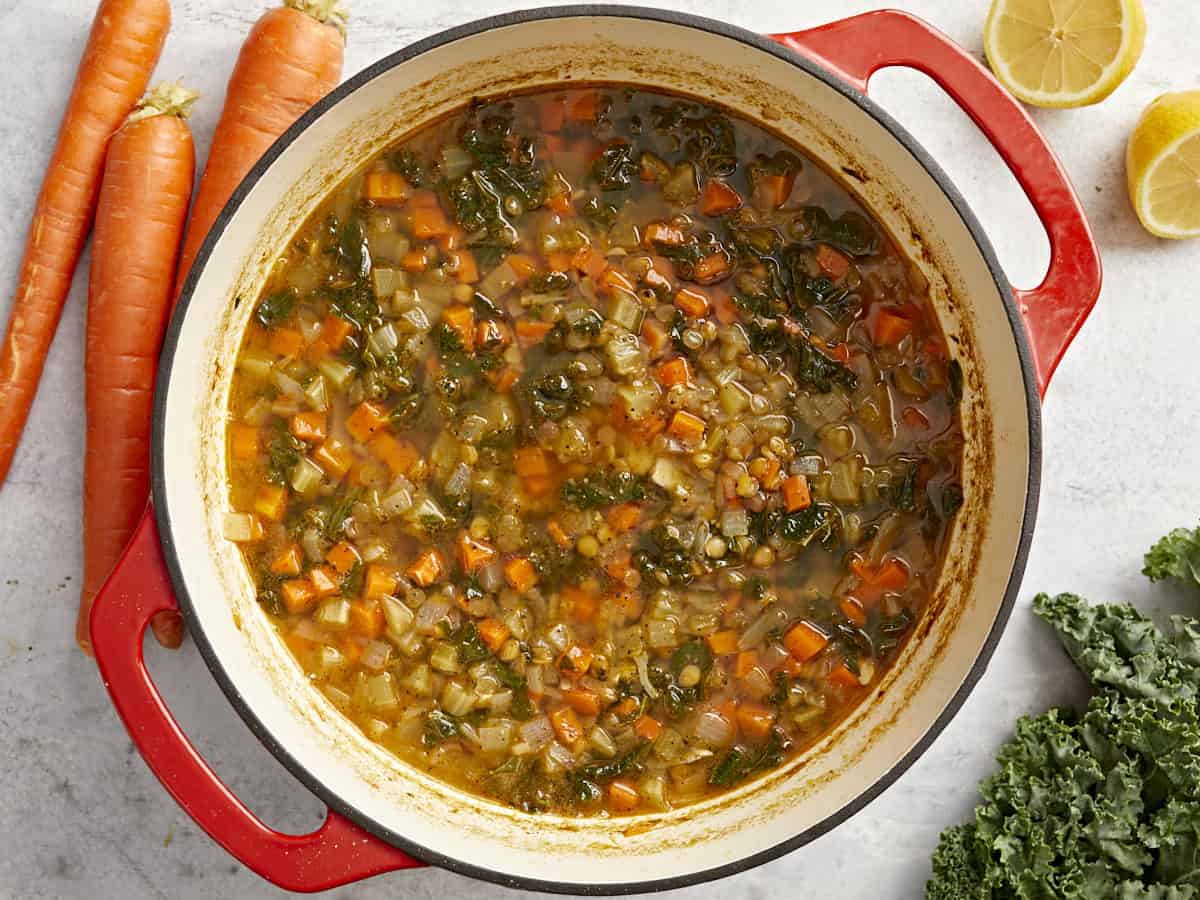
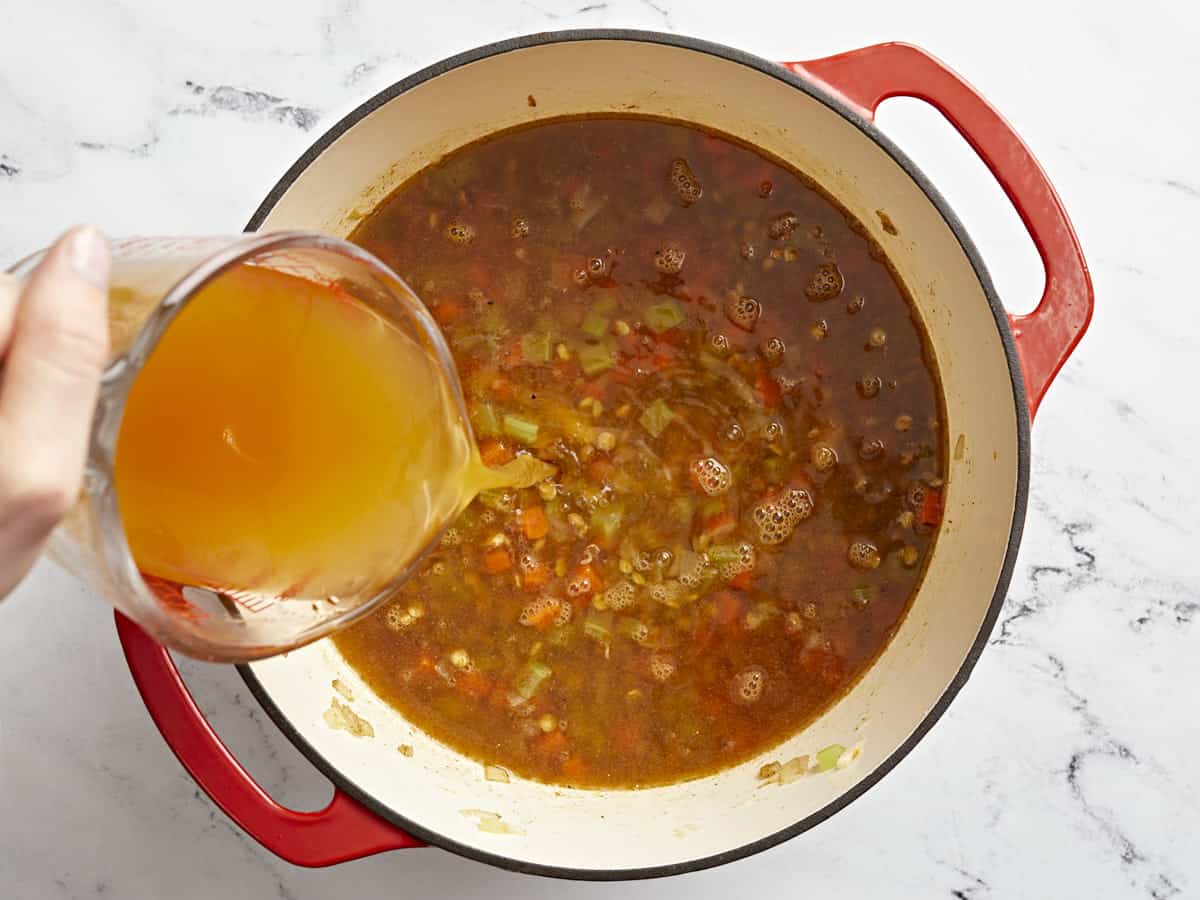
Pour in the vegetable broth, water, and lemon juice, then bring the pot to a boil. Reduce heat to low and simmer until the lentils are tender, about 30-45 minutes.
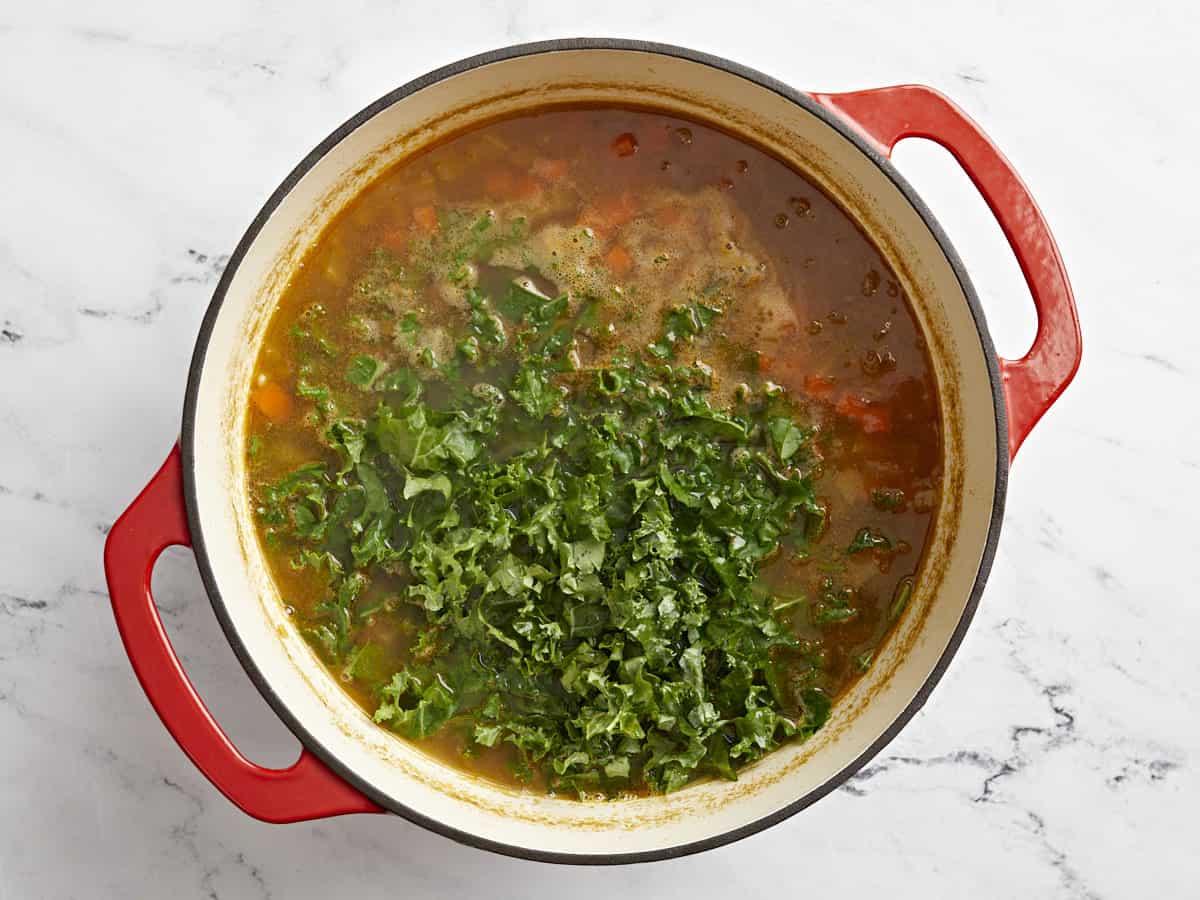
Stir in the greens, season with additional salt, pepper, and lemon juice to taste before serving.
how to make Mediterranean Lentil Soup – step by step photos
Rinse 1 cup brown or green lentils in a strainer under cold water until the water runs clear. Heat 2 Tbsp olive oil in a large soup pot set over medium-high heat. Add in 1 diced yellow onion, 2 diced medium carrots, and 3 diced stalks celery and cook until they become tender, about 6-7 minutes, stirring frequently. Season with 1 tsp salt and 2 tsp pepper.
Stir in 5 crushed cloves garlic, 2 tsp ground cumin, and 1 tsp cinnamon. Heat until fragrant, about 60 seconds. Add the lentils to the pan and heat for 1-2 minutes to slightly toast.
Pour in 8 cups vegetable broth and 4 oz. lemon juice, then bring the pot to a boil. Reduce heat to low and simmer until the lentils are tender, about 30-45 minutes.
Stir in 3 cups chopped kale, season with additional salt, pepper, and lemon juice to taste before serving.
This Mediterranean lentil soup is going to be your new favorite!
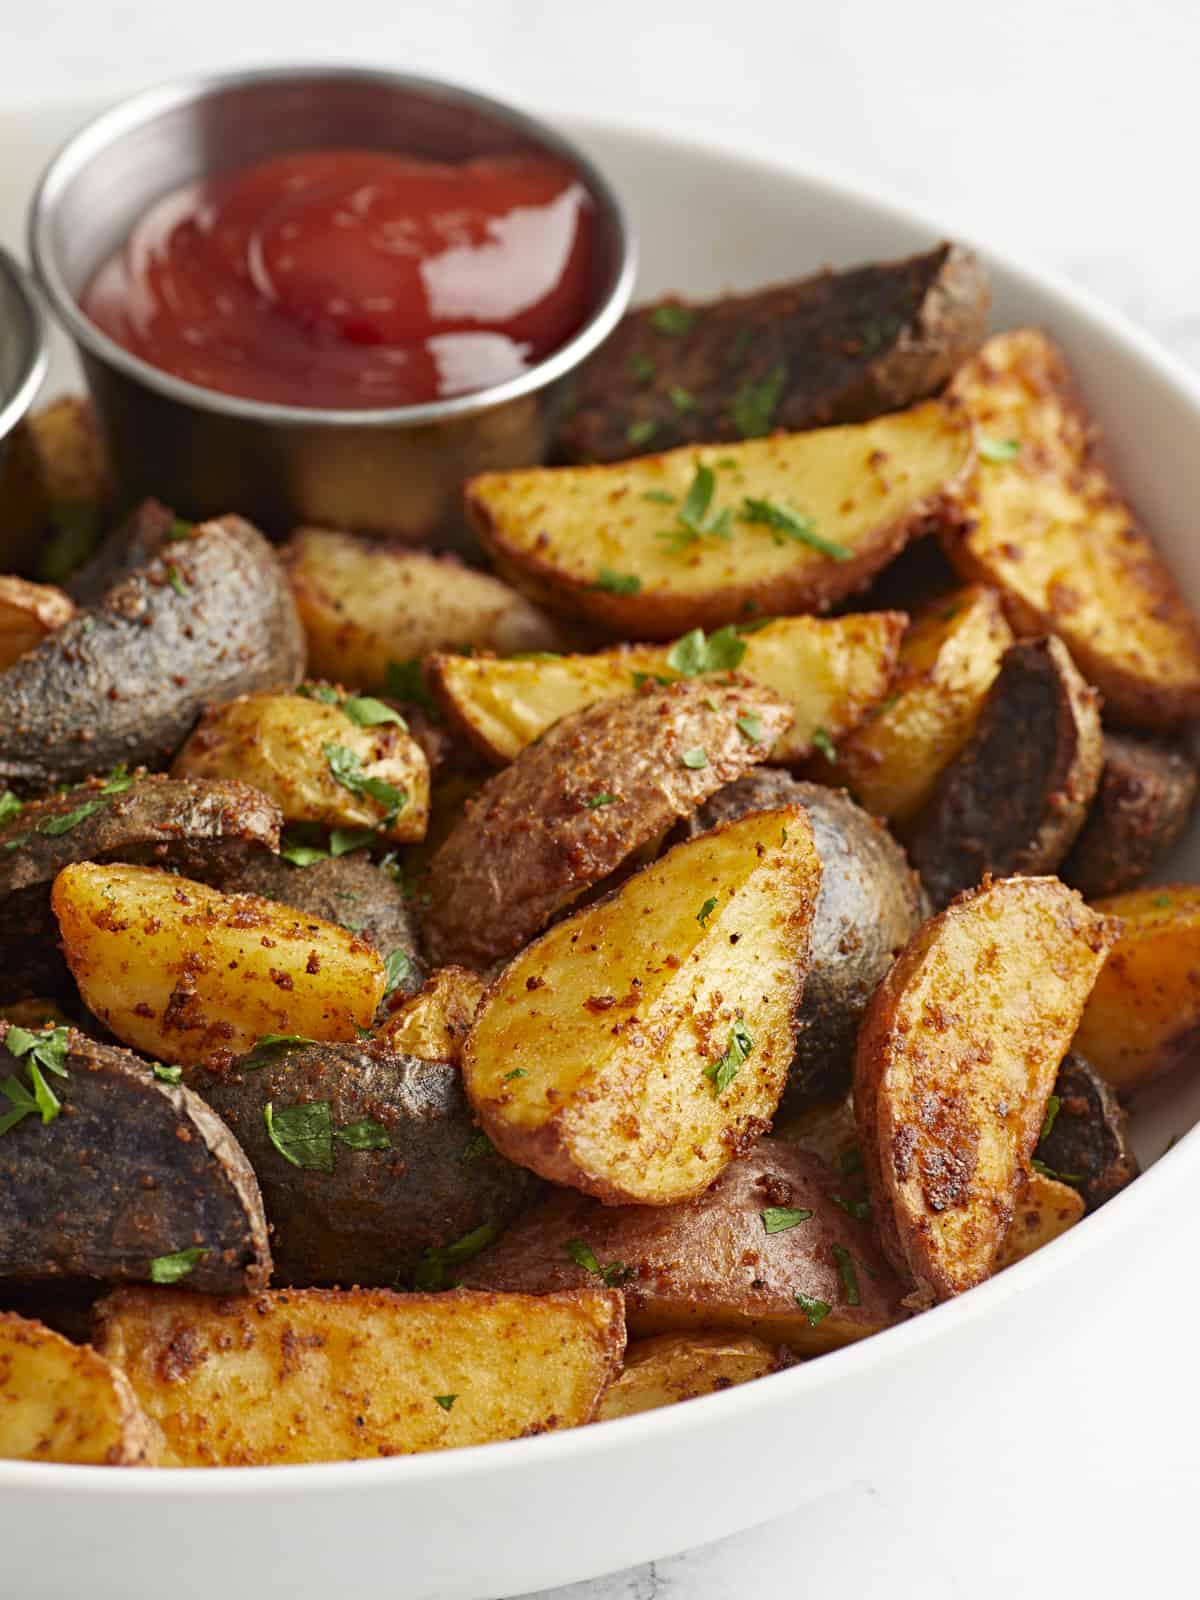
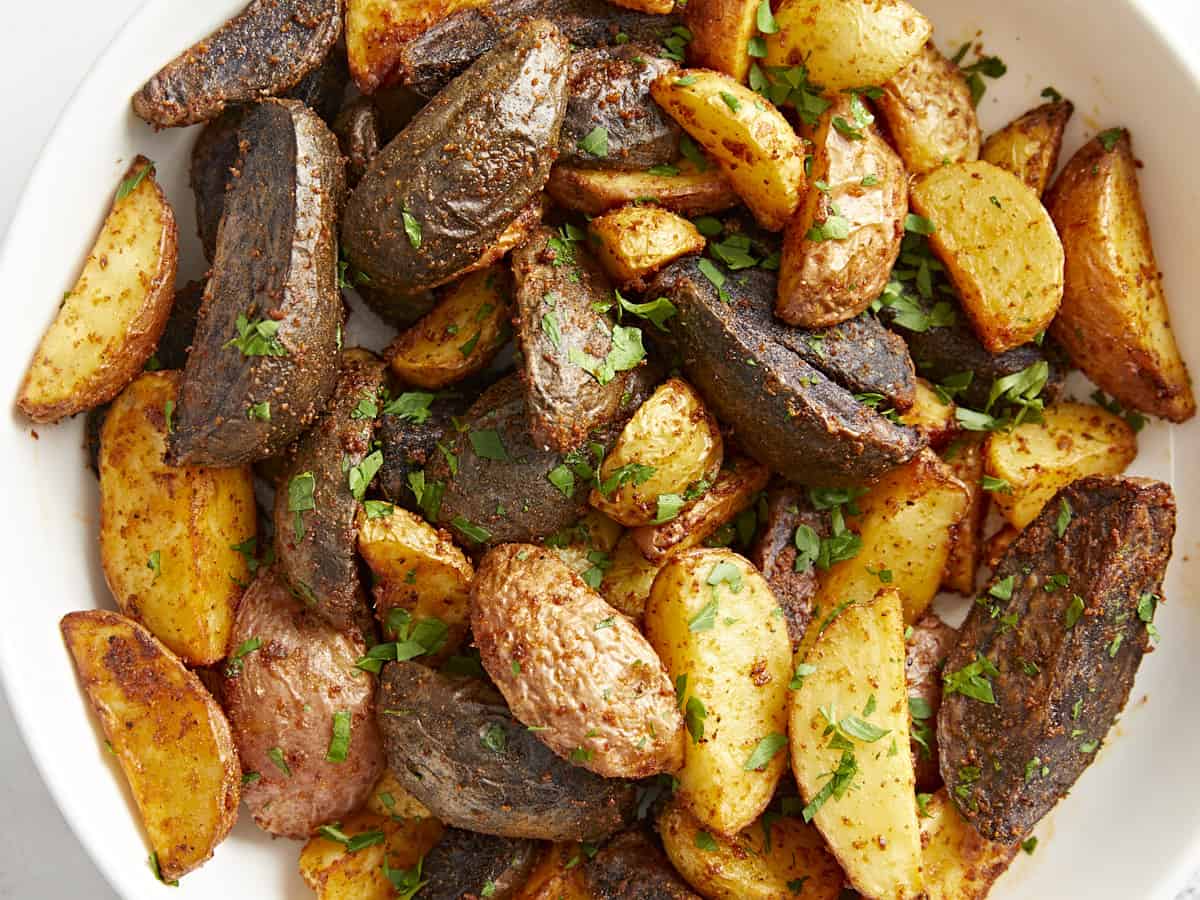
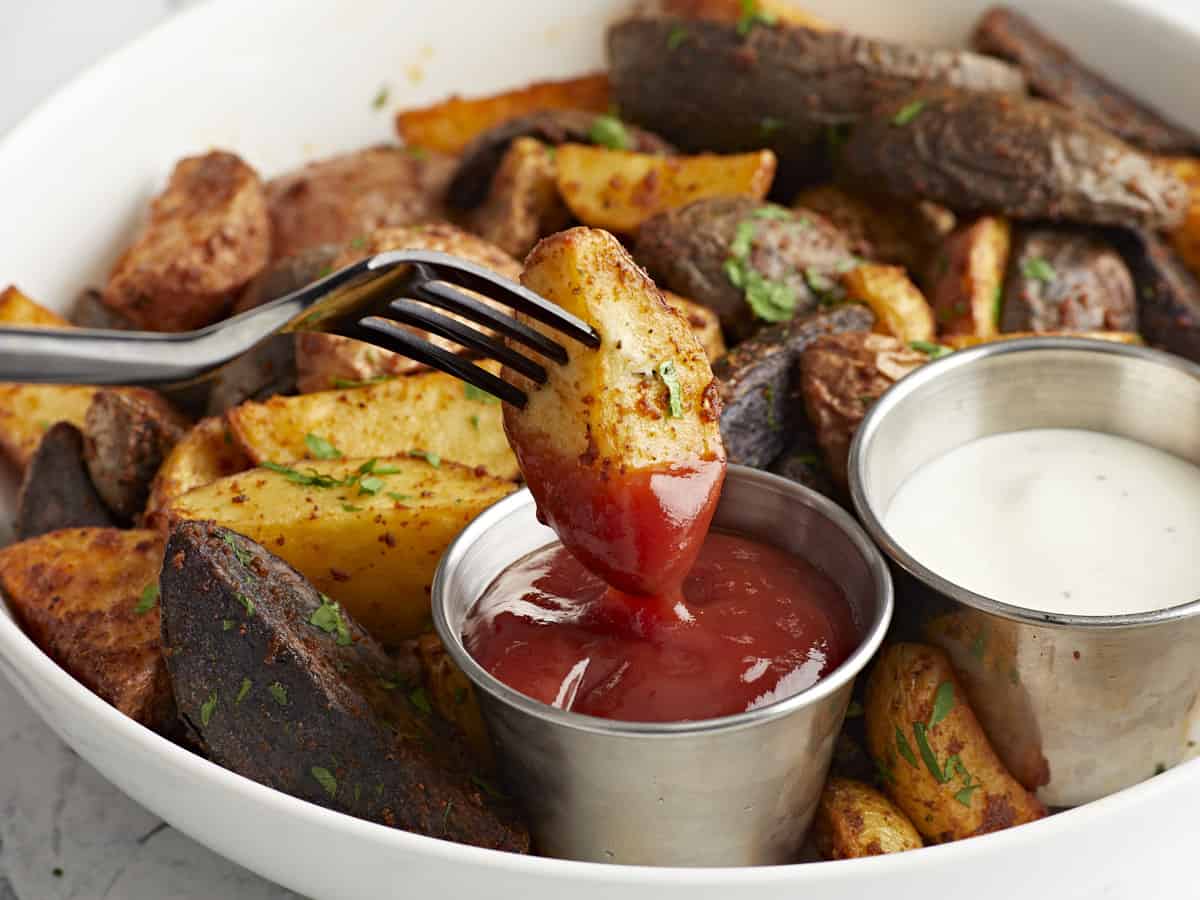
Potatoes, or “spuds” as my Irish brother-in-law affectionately calls them, are truly a favorite for just about everyone. Potatoes can be cooked 1,000 ways and they always steal the show! These air fryer potatoes are proof of that. Soft on the inside and crispy on the outside, they’re like mini baked potatoes. They are seriously delicious dipped in ketchup, mayo, or Comeback Sauce. This air fryer potato recipe is great to use with whatever potatoes you have on hand, making it the perfect recipe for fridge clean out day.
Why Make Potatoes in the Air Fryer?
Listen, we love roasted potatoes. They’re simple and delicious. But sometimes you need potatoes right now, and roasting just isn’t quick enough. Using an air fryer, these potatoes are roasted to perfection in less than half the time. So, the next time you have a potato emergency, this air fryer potato recipe is here for you. You can thank us later!
Ingredients for Air Fryer Potatoes
Here’s what you’ll need to make air fryer potatoes:
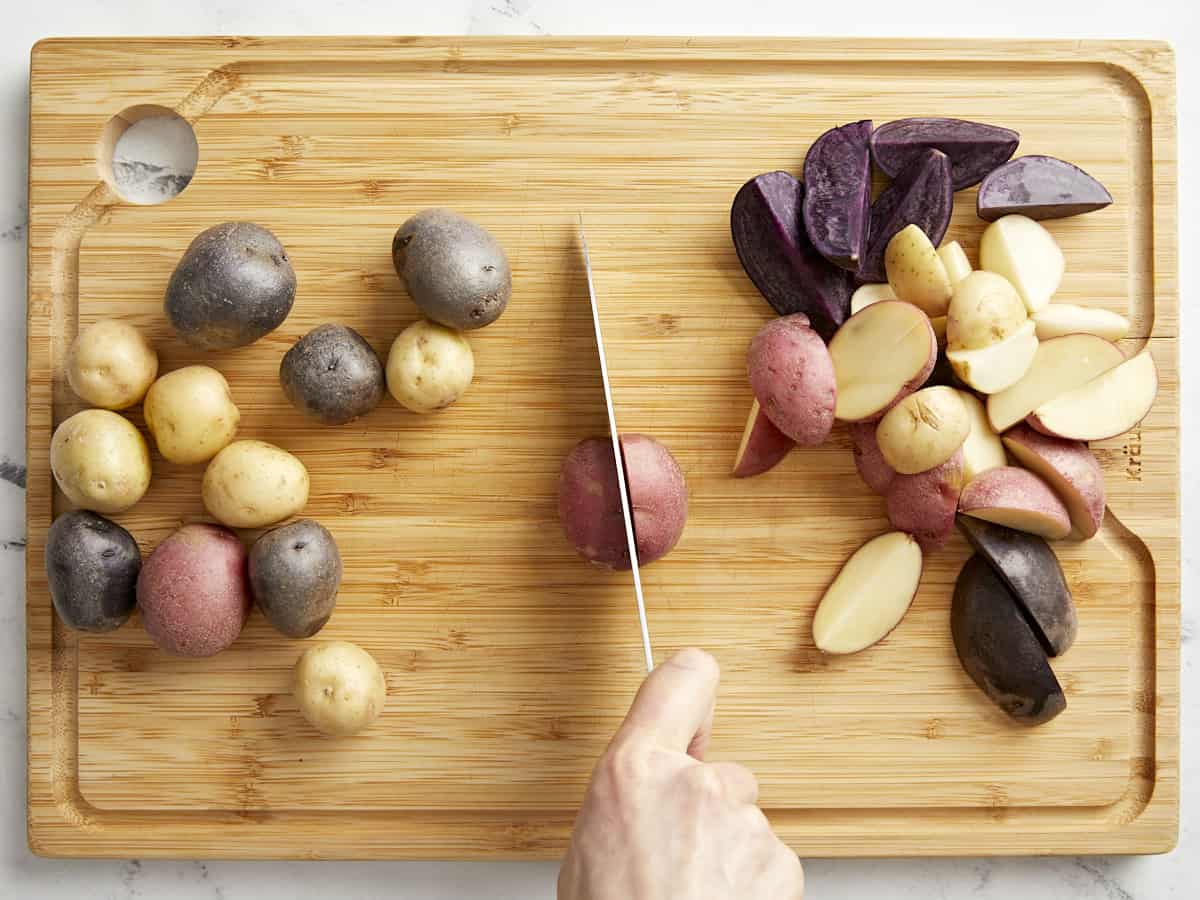
Potatoes: You can use any variety of mini potatoes. We found some tri-color potatoes on sale, so we used those!
Oil: Helps keep the potatoes moist as they cook and helps them get nice and crispy on the outside. We used olive oil, but you could also use vegetable or canola oil.
Spices: A combination of garlic powder, onion powder, smoked paprika, salt, and pepper creates a smoky and savory flavor and the paprika adds a pop of color.
Fresh Parsley: Adds a little bit of greenery and freshness.
Should I Soak the Potatoes?
We did not do this, but cutting and soaking potatoes in cold water releases some of the starches and can make the potatoes crispier! Our potatoes were more like tiny bites of the perfect baked potato!
What Else Can I Put On Air Fryer Potatoes?
We love the seasoning mix listed in the recipe below, but the sky is the limit! Here are some other ways you can season your air fryer potatoes:
how to make Air Fryer Potatoes – step by step photos
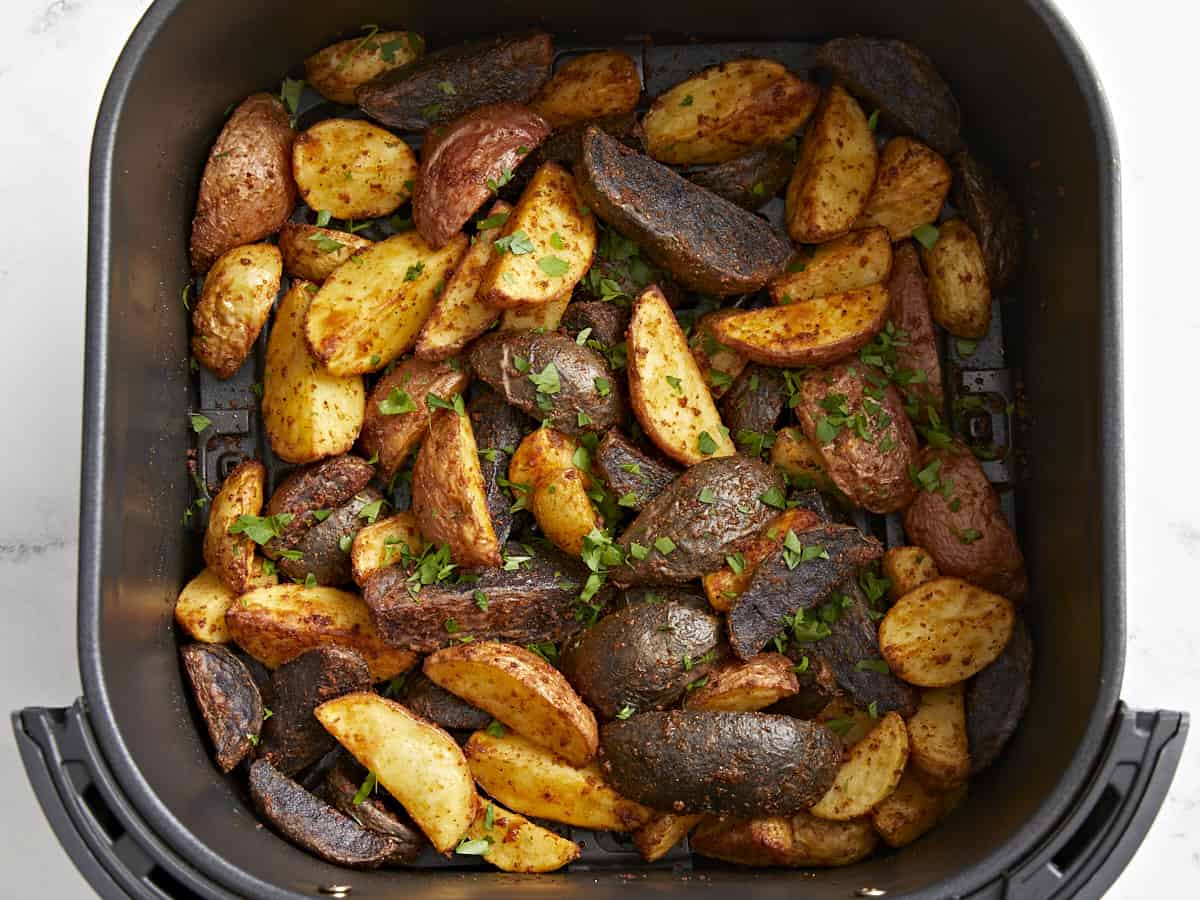
Preheat the air fryer to 400°F for 4 minutes. Quarter 1 lb. of baby potatoes.
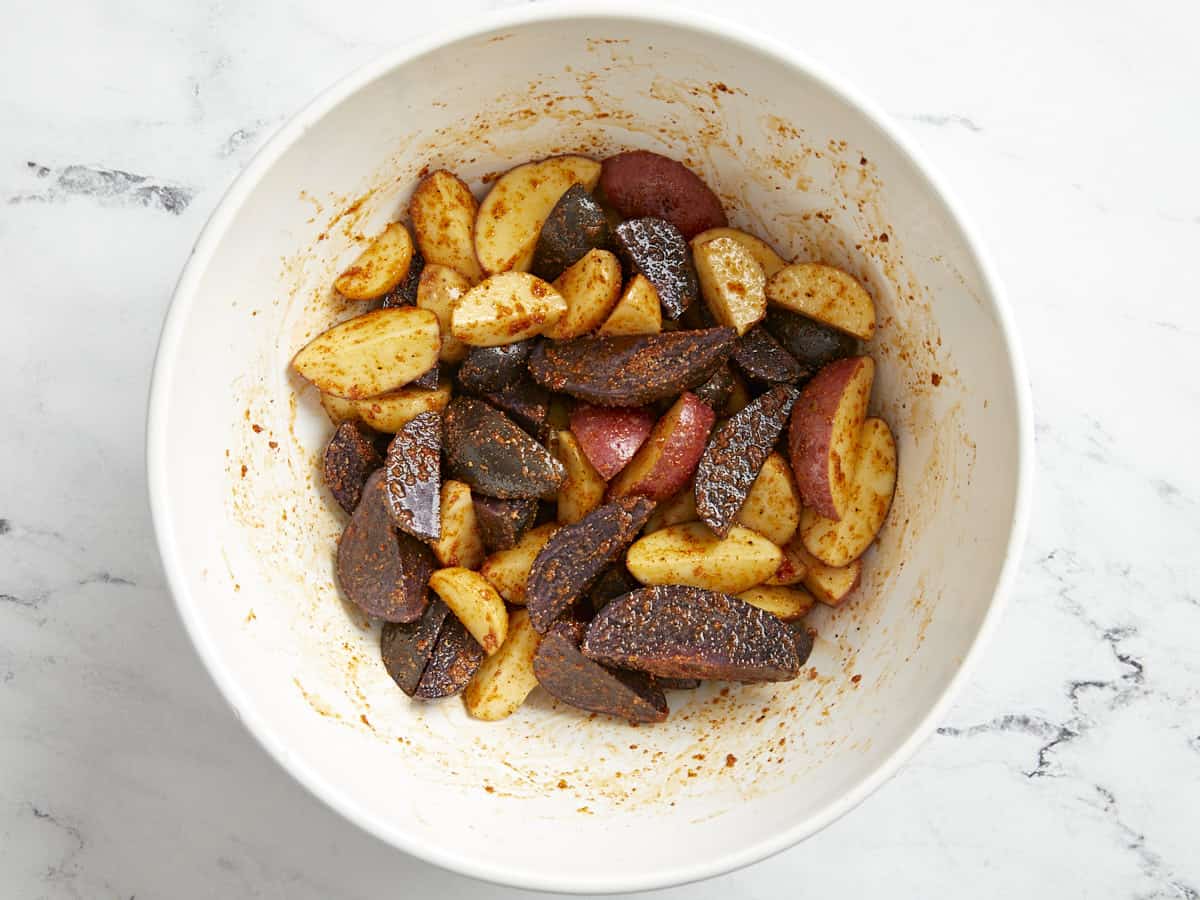
Add the potatoes to a large bowl. Toss the quartered baby potatoes with 1/2 Tbsp olive oil, 1/2 tsp garlic powder, 1/2 tsp smoked paprika, 1/2 tsp onion powder, and a pinch of salt and pepper.
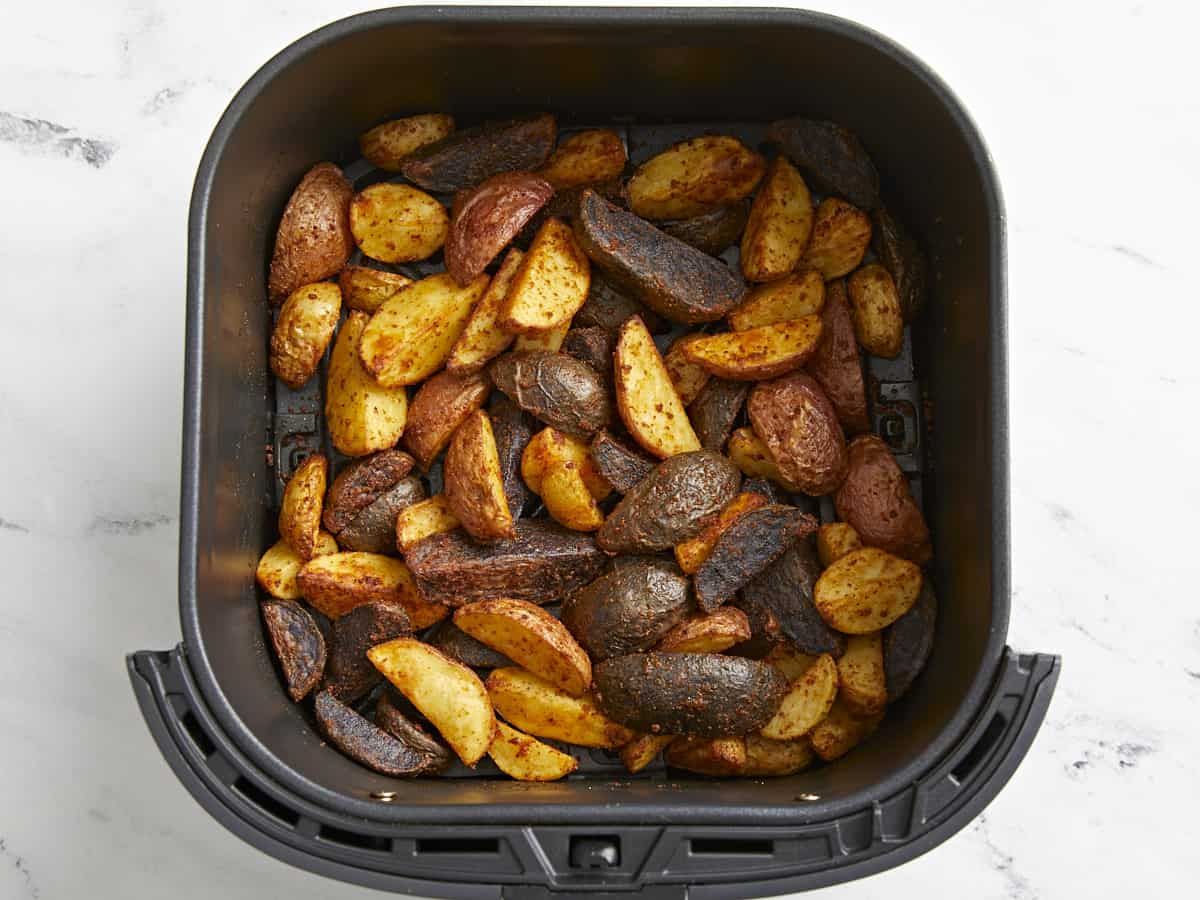
Cook for 15 minutes in the air fryer, until golden brown with crispy edges, stopping halfway through to shake. Garnish with 1 tsp minced fresh parsley and additional salt and pepper, if needed.
These air fryer potatoes are the ultimate crispy side dish!
Avocado toast was all the rage just a few years ago, but I have good news…this easy 5-10 minute meal never goes out of style. It only requires a few simple ingredients, but you can always spice things up with extra toppings to make it a super filling meal. Today I’m sharing my favorite basic avocado toast recipe along with helpful tips and 3 easy recipe variations. It’s quick and easy which makes it perfect to whip up for breakfast, lunch or a midday snack. And for those of you who are avocado toast experts, like my colleague Jess, then I’m sure you have a few favorite combinations as well. Wanna share? Let’s meet in the comments!😉
Ingredients For Avocado Toast
You only need a few simple ingredients to make a classic avocado toast. Here’s what I used:
Avocado: Avocado is one of the main ingredients, so you’ll want to choose it wisely. Look for avocados that have a slight give when squeezed, but are not mushy.
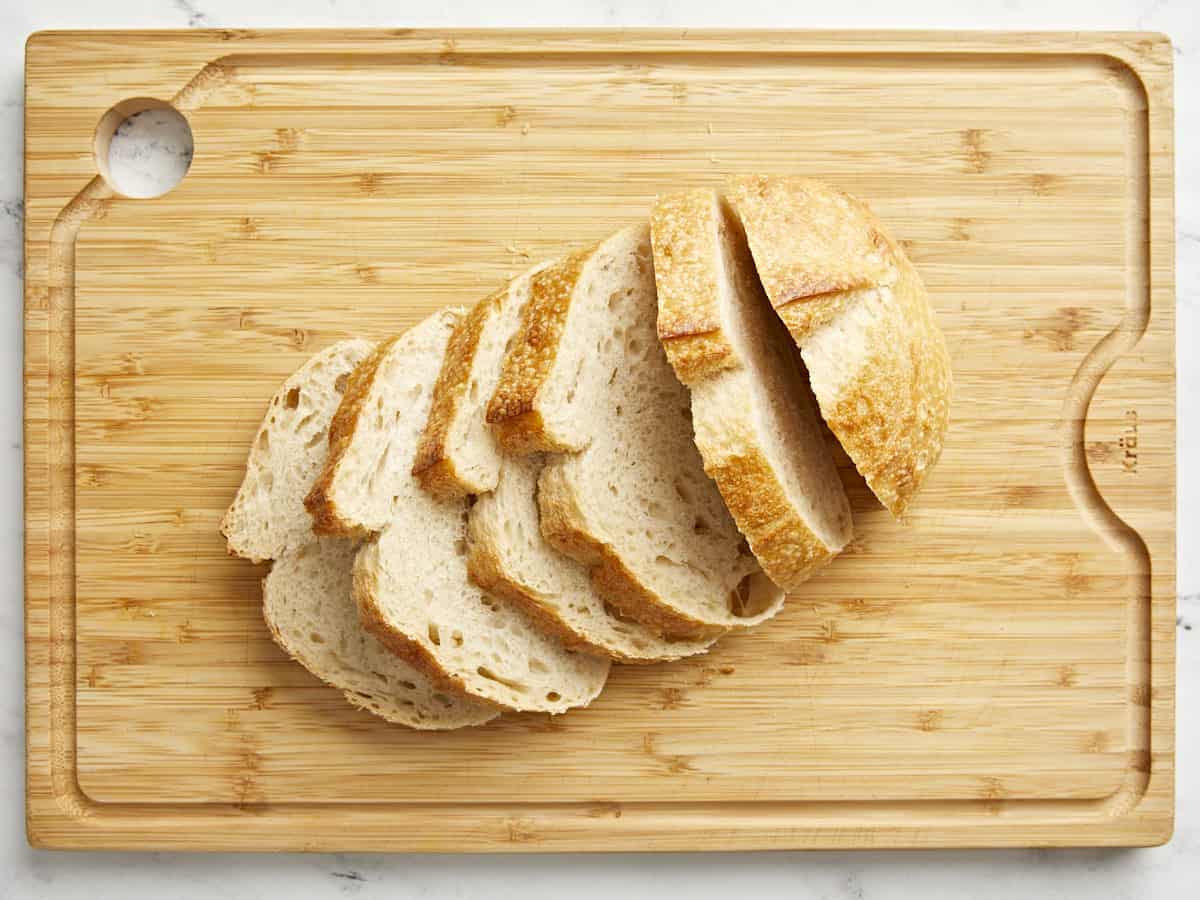
Bread: You’ll want to choose a good quality, sturdy bread. I like using sourdough or whole grain bread.
Garlic: Rubbing a little bit of fresh garlic over toasted bread while it’s still warm adds incredible flavor.
Lemon: A small squeeze of fresh lemon juice adds a pop of brightness and keeps the avocado from browning.
Salt & Pepper: Don’t skip the salt! Just a pinch of salt and pepper enhances the flavor of the avocado toast.
Red pepper flakes (optional): This is optional but it adds a kick and a little bit of extra heat to the avocado toast.
Tips For Making The Best Avocado Toast
Choose your bread wisely: Use a good quality, sturdy bread for the base of your avocado toast like sourdough, multigrain or whole grain bread. Toasted, sturdy bread holds the mashed avocado and any extra toppings a lot better than white sandwich bread.
Picking the perfect avocado: When picking your avocado, look for blackish, dark-green skin, which indicates the avocado has ripened. Also give the avocado a gentle press with your finger, the flesh should give slightly under pressure. If it’s mushy, its time has passed.
Don’t skip the extras! Yes, rubbing your toast with a fresh garlic clove may seem like an unnecessary step, but it adds SO much flavor and compliments this simple meal perfectly. Also the small squeeze of lemon juice gives just the right about of brightness and the pinch of salt makes all the flavors pop!
Topping Ideas
There are lots of fun ways to enjoy your avocado toast! In addition to the recipe variations listed in the step-by-step photos below, here are a few more ingredients and topping ideas for you to try:
Cut 2 slices of sturdy bread. Toast the bread in a toaster or in a skillet on the stovetop until golden brown.
Rub the peeled garlic clove over the top of the warm toasted bread, making sure to fully cover the entire surface area.
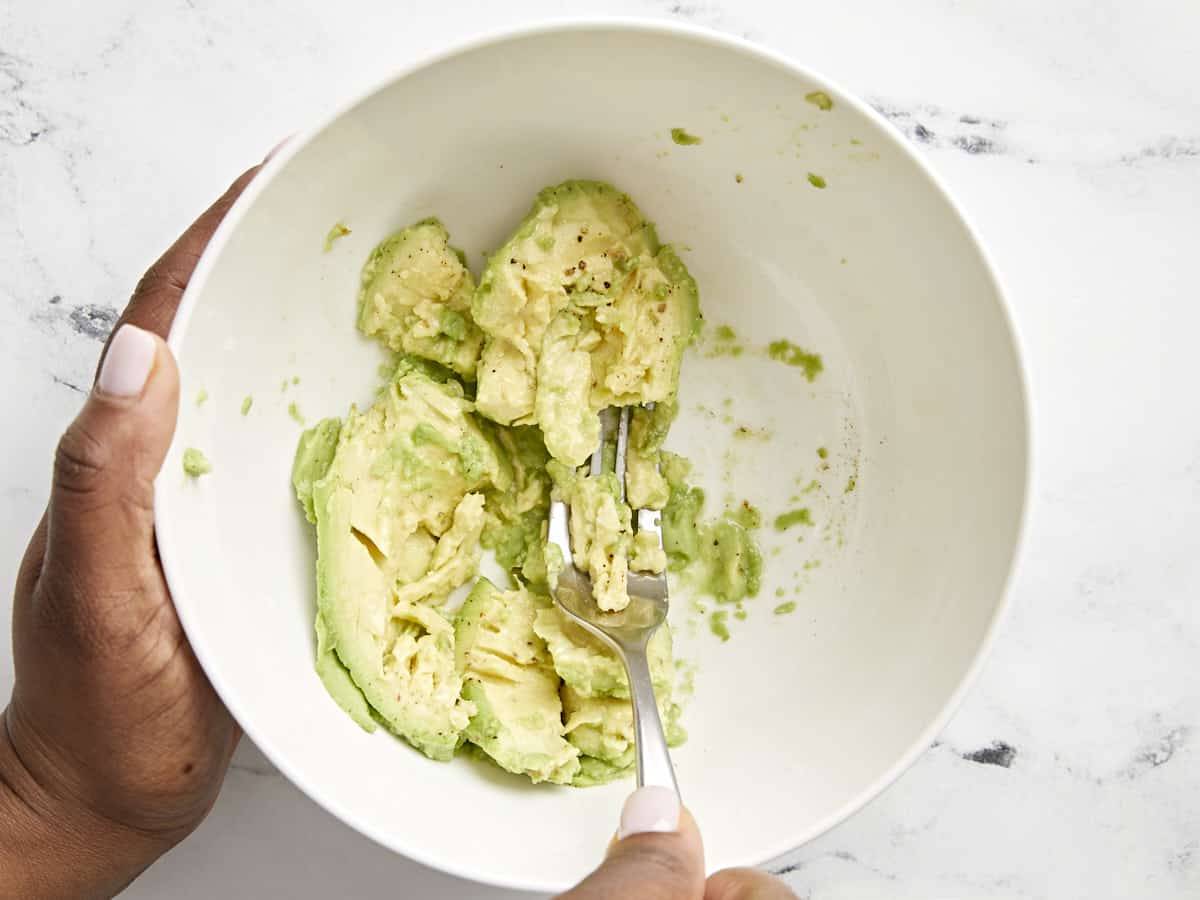
Next, halve the avocado and remove the pit. Scoop out the avocado flesh from both halves and place it in a bowl. Add a small squeeze of fresh lemon juice (about 1 tsp), salt and pepper to the bowl and mash the avocado with a fork. I recommend leaving it just a little chunky.
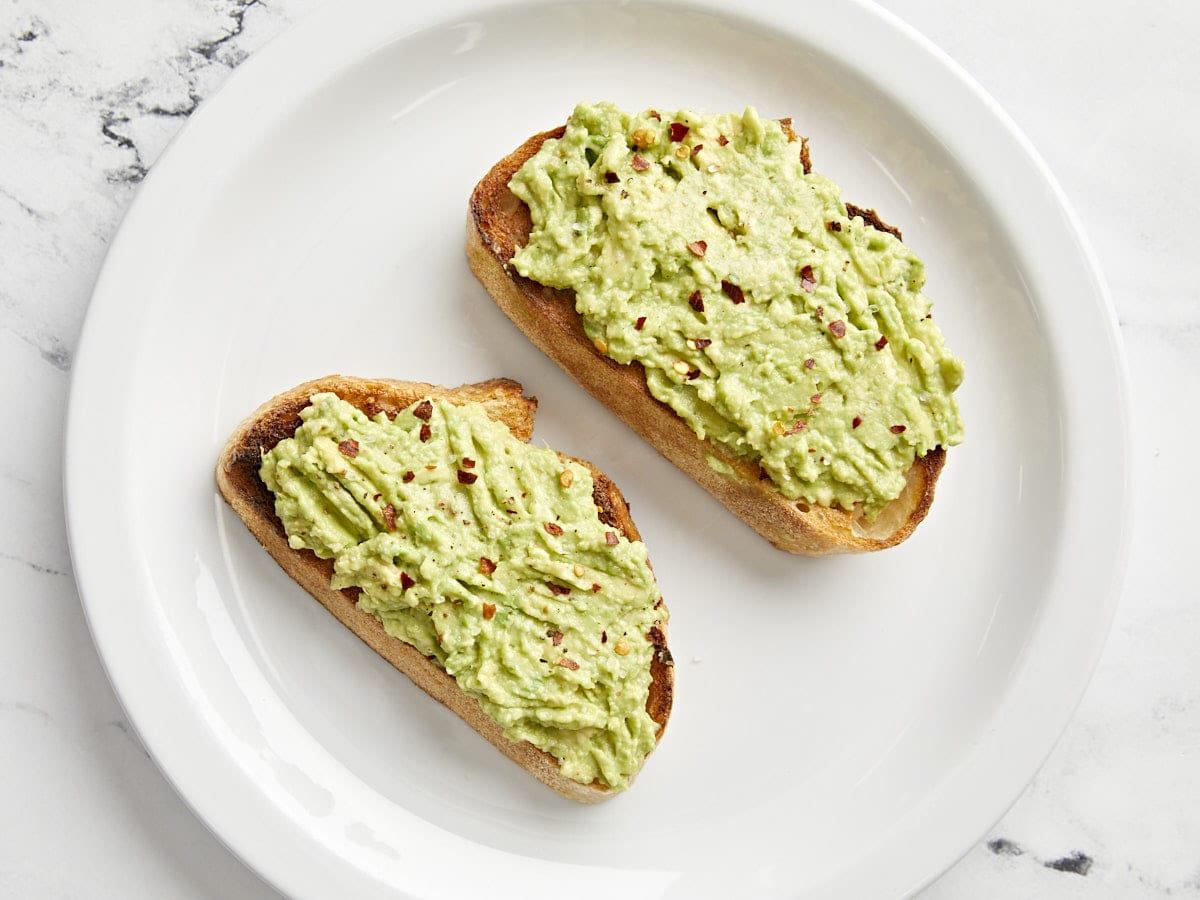
Divide the avocado mixture and spread it on top of each slice of toast. Top with a pinch of red pepper flakes and a pinch of sea salt (optional).
Cut 2 slices of sturdy bread. Toast the bread in a toaster or on the stovetop until golden brown.
Rub 1 peeled garlic clove over the top of the warm toasted bread, making sure to fully cover the entire surface area.
Next, halve 1 avocado and remove the pit. Scoop out the avocado flesh from both halves and place it in a medium bowl. Add a small squeeze of lemon juice (about 1 tsp), 1/8 tsp salt and 1/8 tsp freshly cracked black pepper to the bowl and mash the avocado with a fork. I recommend leaving it just a little chunky, but you can certainly mash until it’s completely smooth. It’s up to you!
Divide the avocado mixture and spread on top of each slice of toast. Top with a pinch of red pepper flakes and a pinch of sea salt (optional). Enjoy as is or try out one of the recipe variations listed below.😉
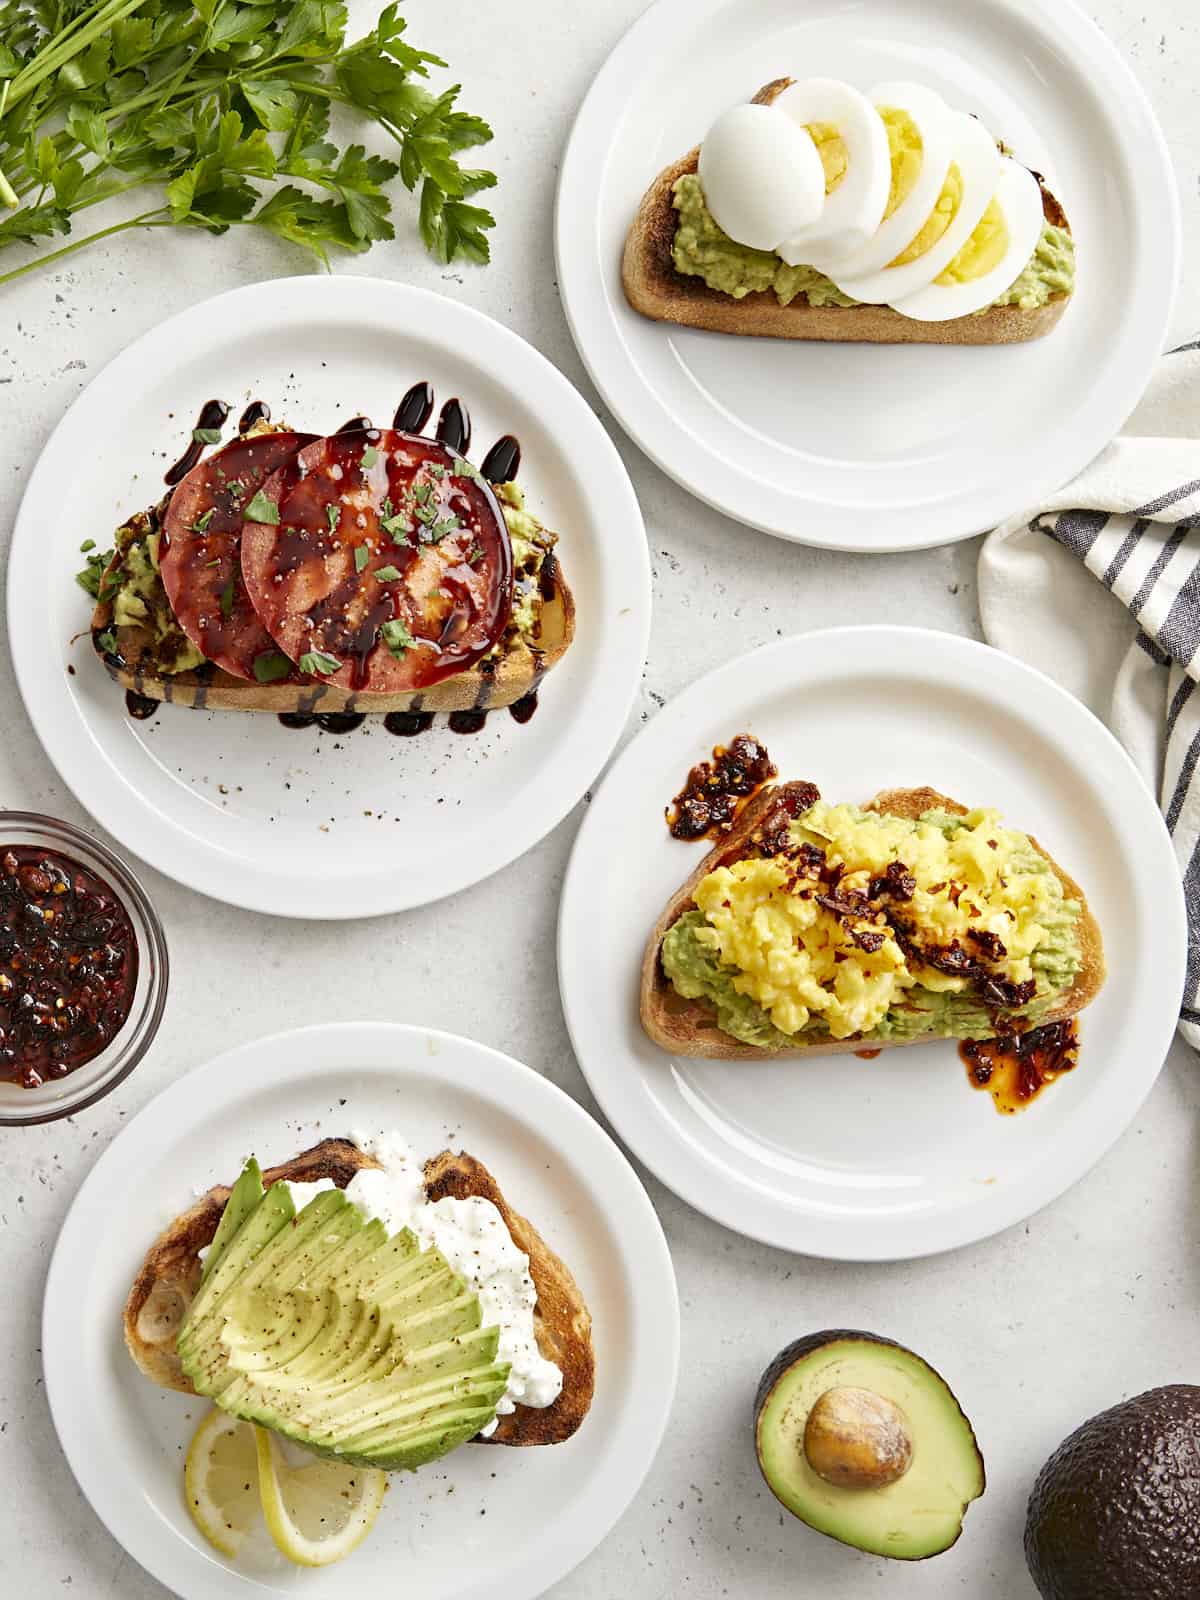
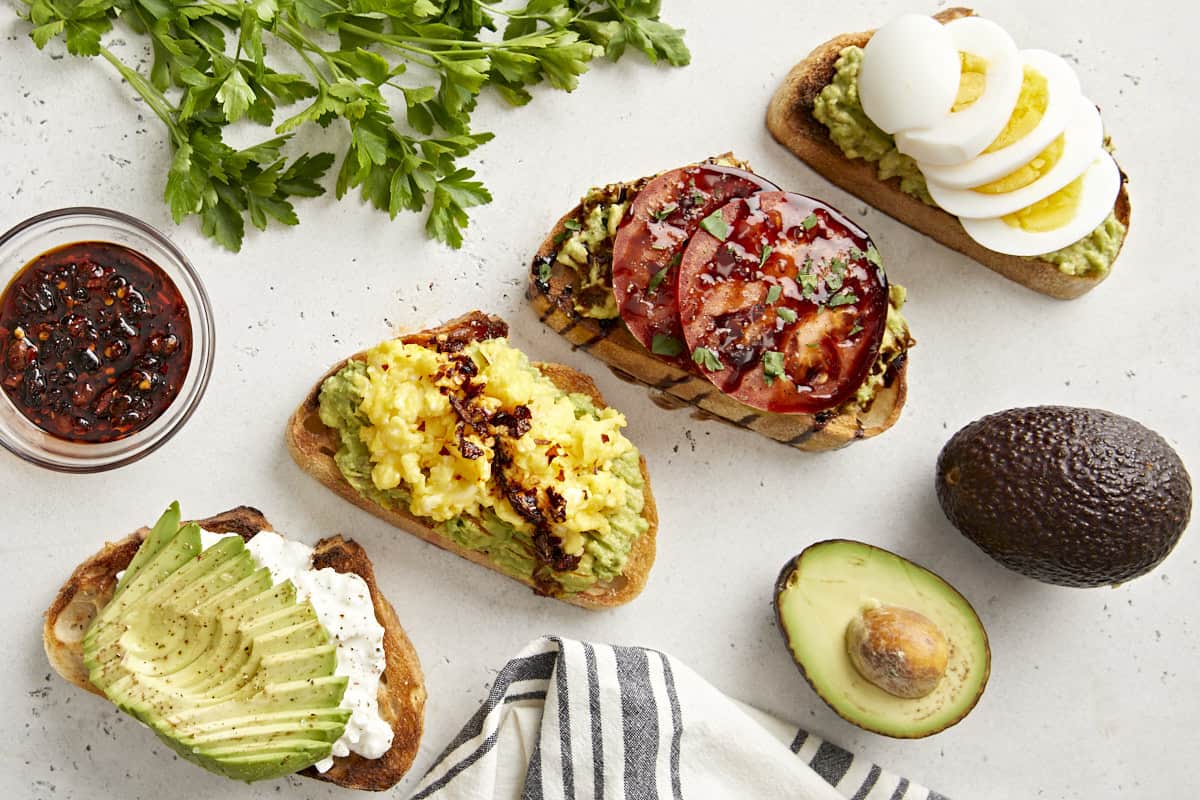
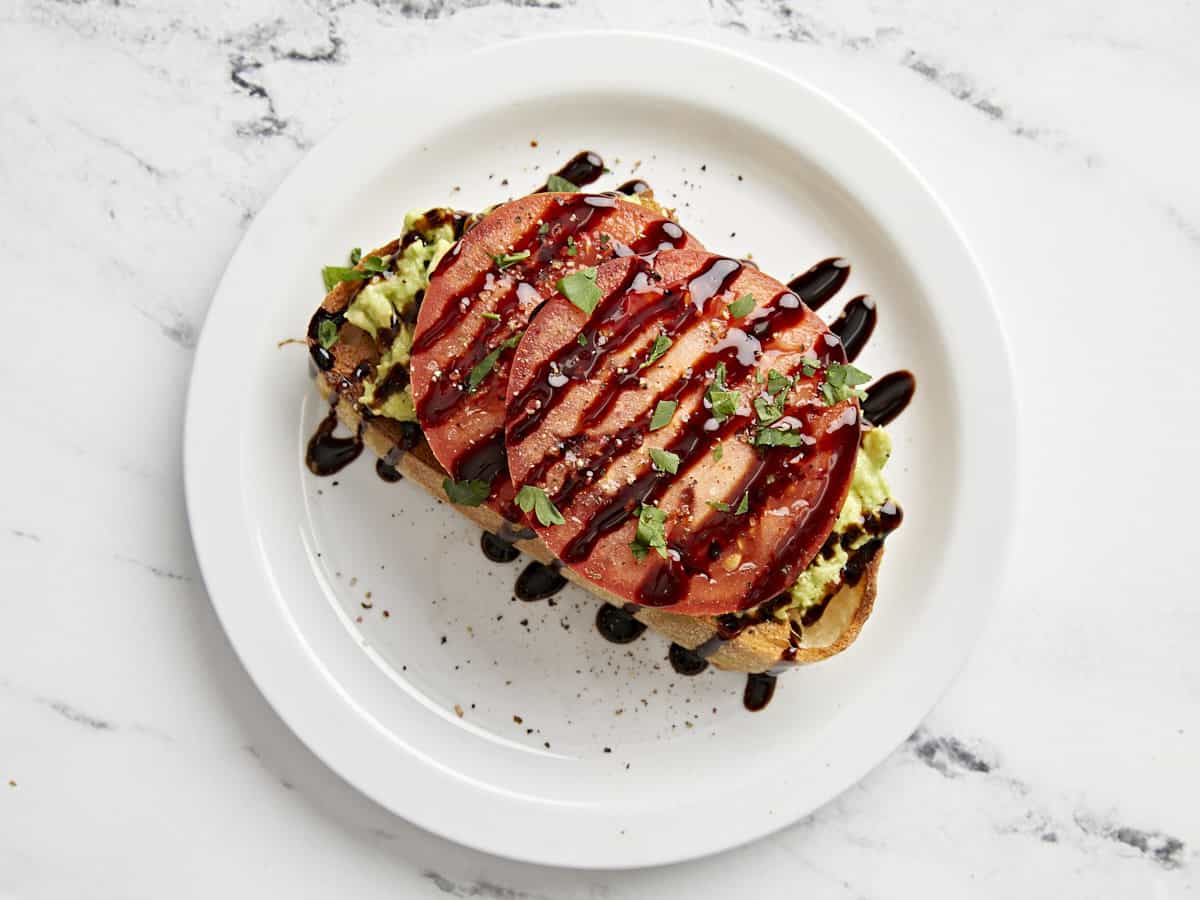
Recipe Variation 1: If you love juicy, ripe tomatoes then this variation is just for you! Top your avocado toast with two slices of tomatoes, a drizzle of balsamic glaze, and freshly cracked black pepper. This combo is perfect for the summer when tomatoes are in their peak season. So delicious!
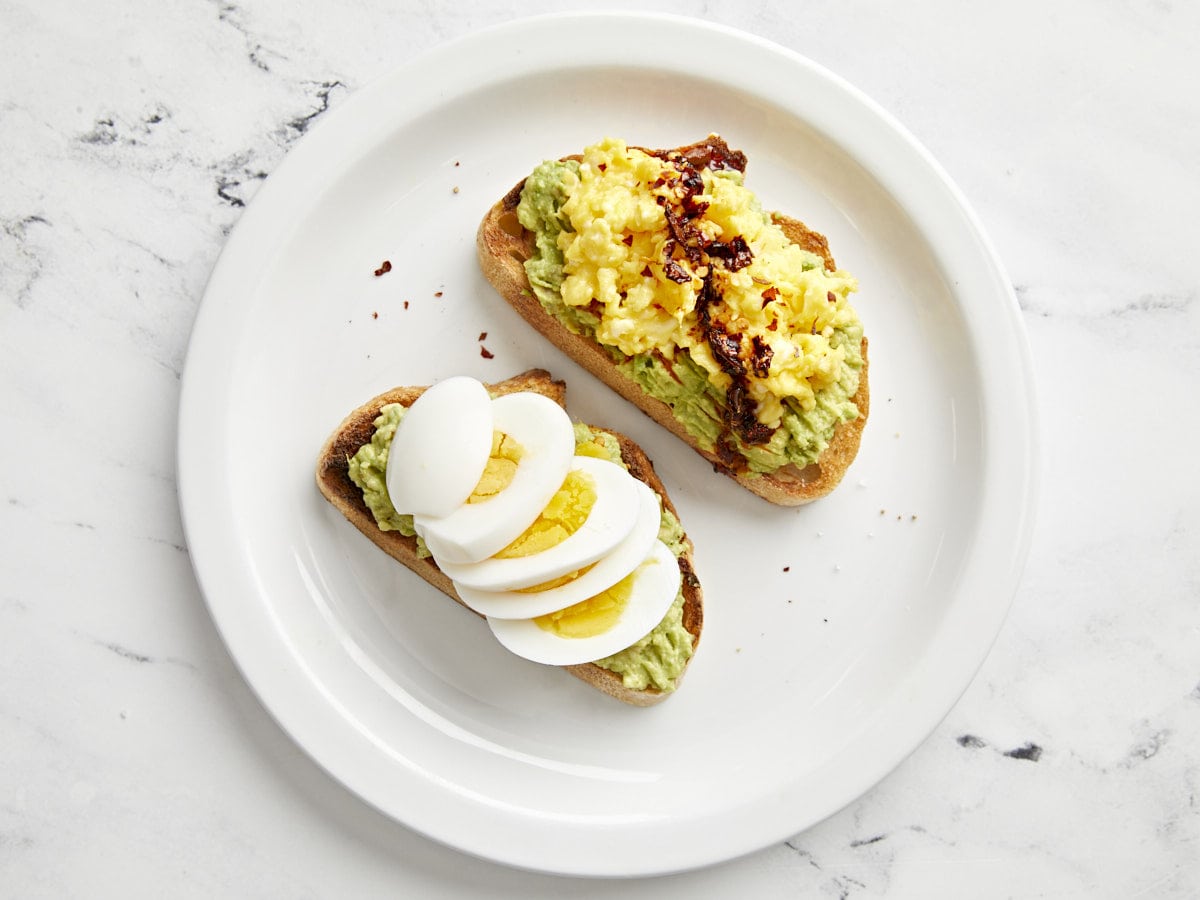
Recipe Variation 2: My absolute favorite way to enjoy avocado toast is by adding some scrambled eggs, a fried egg, or hard boiled egg on top. You can even take it a step further and add a little chili crisp on top too!
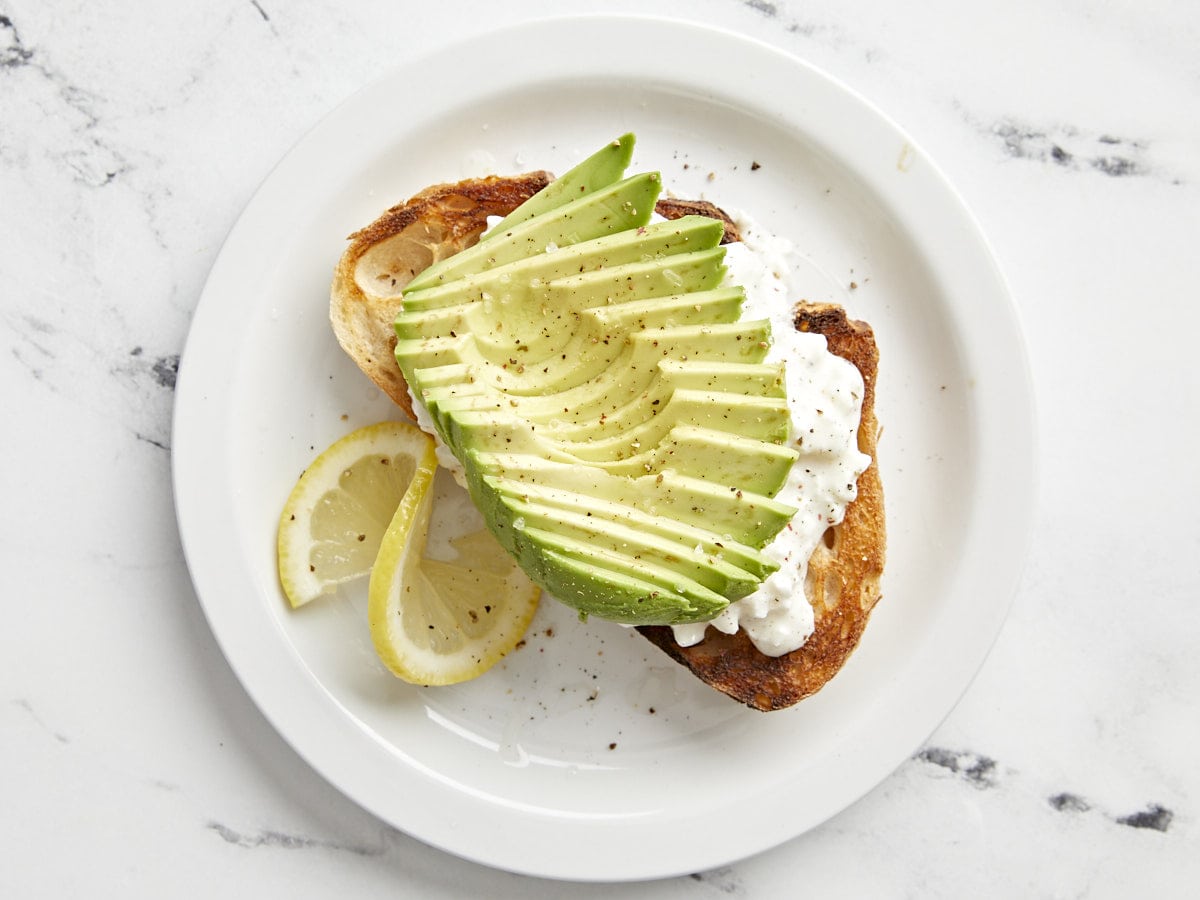
Recipe Variation 3: And for all of my cottage cheese lovers out there, try topping your thick crusty bread with a spoonful or two of small curd cottage cheese, 1/2 avocado sliced, salt, freshly cracked black pepper, and a squeeze of fresh lemon juice. Enjoy!
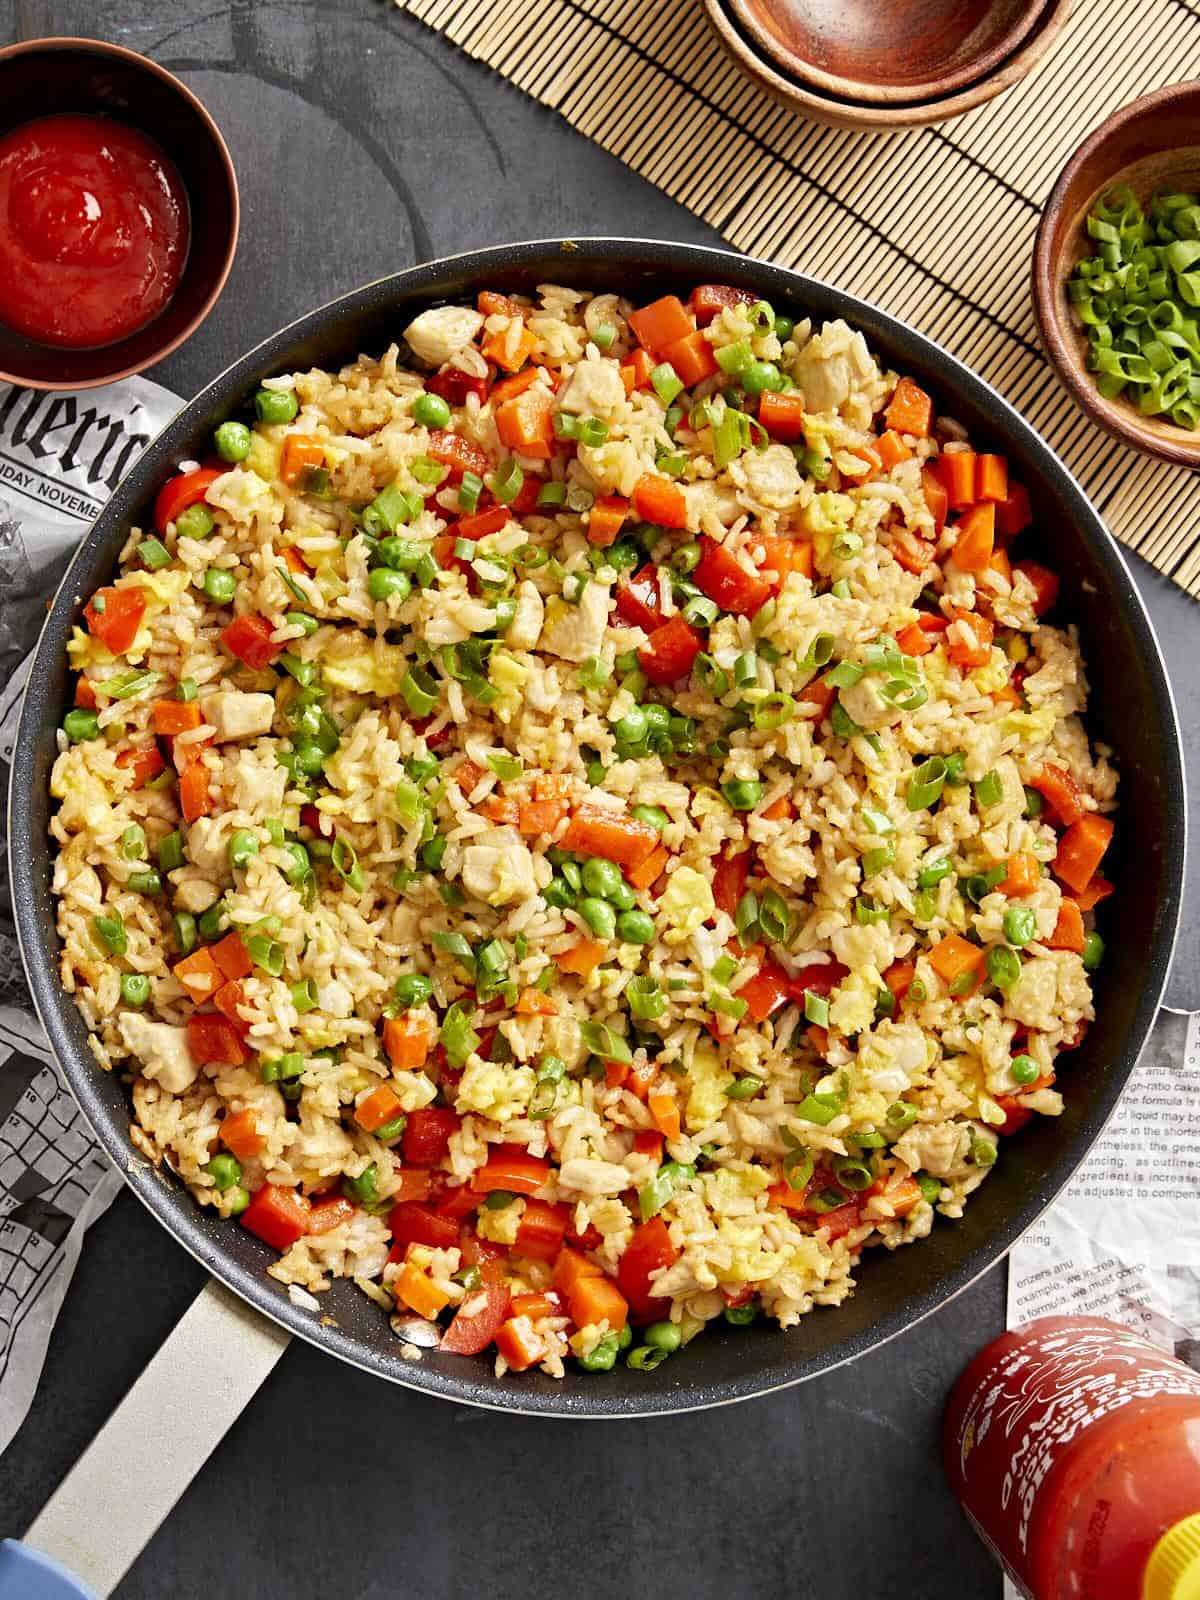
We’re all guilty of ordering Chinese takeout on a desperate night. But with this Chicken Fried Rice recipe, you won’t have to resort to that any longer! Make delicious, ultra-flavorful chicken fried rice that tastes even better than takeout– and costs less too. Easily stretch leftover rice and a single chicken breast into a budget-friendly and satisfying meal the whole family will love!
What is Chicken Fried Rice?
Chicken fried rice is a Chinese dish made with cooked rice that is stir-fried in a wok with chicken, vegetables, and eggs, and seasoned with a savory sauce. It’s extremely flexible and budget-friendly, which is why we love this dish! The recipe below is an American adaptation, using a skillet instead of a wok and ingredients that are easily sourced in most American grocery stores. If you are vegetarian, you can make this without the chicken, or try our Vegetable Fried Rice recipe!
Do I Need a Wok?
This recipe is designed to be made easily in a regular pan; however, we highly recommend using a nonstick pan over stainless steel. We found in testing that some of the eggs stuck to the bottom of the stainless steel pan and burned, adding an unpleasant flavor to the whole dish.
Ingredients for Chicken Fried Rice
Here’s what you’ll need to make chicken fried rice:
Chicken Breast: You’ll need 1 large boneless skinless chicken breast (about 2/3 lb.) for this recipe.
Oil: Toasted sesame oil adds a warm and nutty flavor, while cooking oil (we like canola or vegetable) helps everything cook without burning.
Soy Sauce: Adds rich, salty, umami flavor. If you’re gluten-free, you can use tamari or coconut aminos instead.
Garlic: Creates a savory and earthy base of flavor.
Ginger: Fresh ginger will create the best flavor, but paste or powder will also work.
Vegetables: We used green onions, carrot, red bell pepper, and frozen peas.
Eggs: Scrambled eggs help stretch this recipe, adding extra protein and healthy fats.
Cooked and Cooled Rice: To avoid clumpy or gummy fried rice, use rice that has been previously cooked and completely cooled.
What Else Can I Put In Chicken Fried Rice?
If you have any leftover veggies from previous dinners, you can chop them up and toss them in this tasty chicken fried rice. It’s also easy to grab a bag of frozen mixed vegetables (carrots, peas, corn, and green beans) to save on prep time!
How To Store Leftovers
Store leftover chicken fried rice in an airtight container in the refrigerator for up to 3 days. Reheat in a pot set over medium-low heat with a little bit of water added to rehydrate the rice. You can also sprinkle some water over individual portions and microwave in 30-second increments until warmed through.
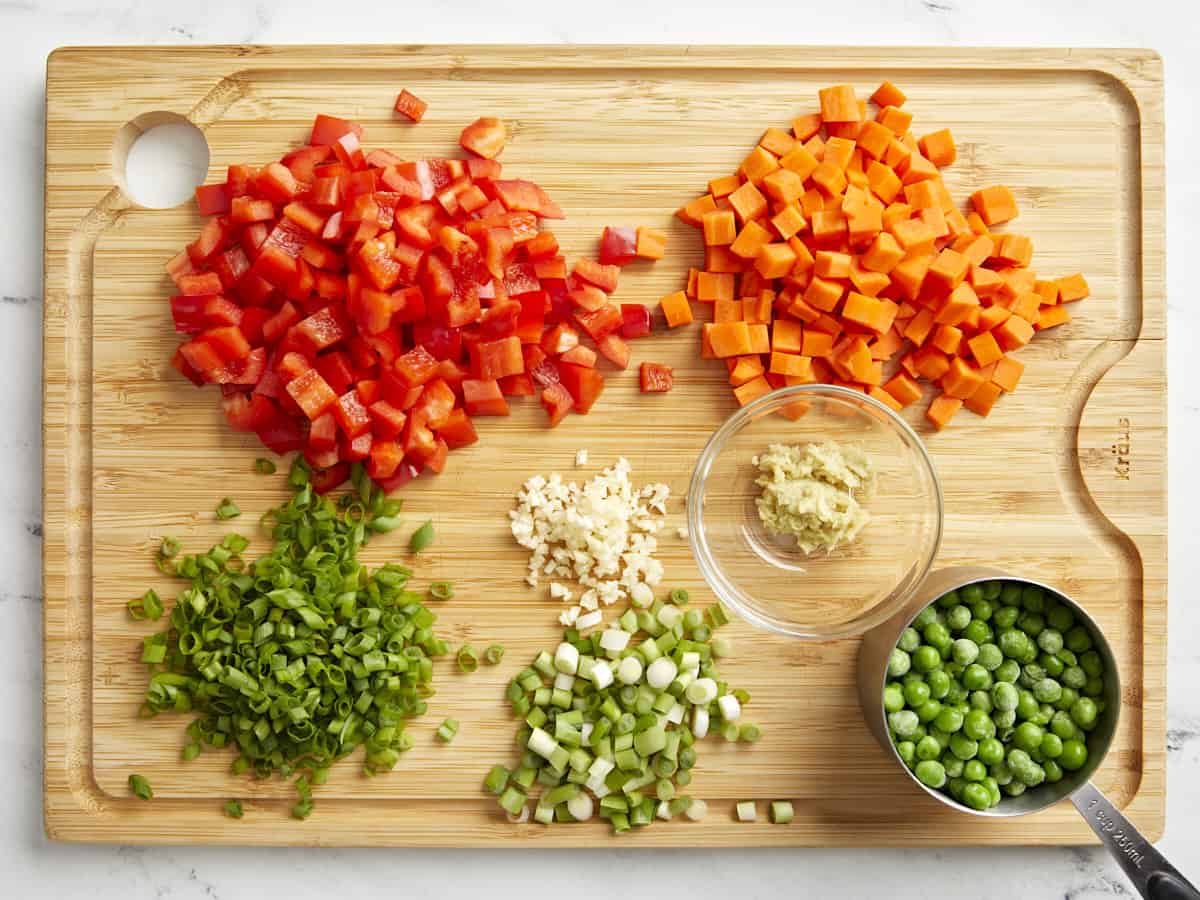
Prepare the vegetables beforehand so they’re ready to go when needed. Mince the garlic, grate the ginger, dice the carrot and bell pepper, slice the green onions (separate the green ends from the white ends), and measure the frozen peas.
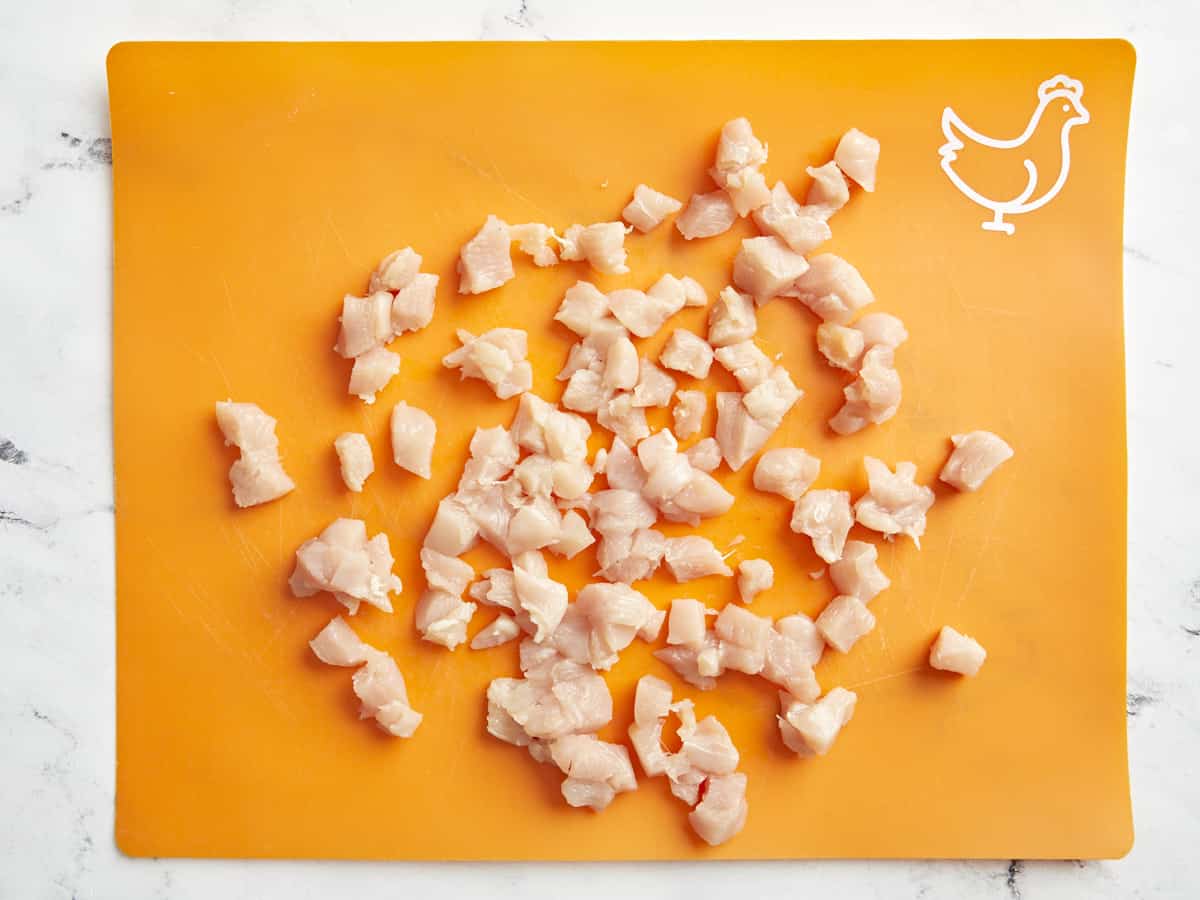
On a separate, clean cutting board, cut your chicken into ½ inch pieces so you get a little in every bite. Set aside (and wash your hands!)
Lightly whisk the eggs in a small bowl. Heat a large skillet over medium heat. Once hot, add 2 Tbsp of cooking oil and swirl to coat the surface. Add the eggs and gently scramble until cooked through. Transfer the cooked eggs to a clean bowl or plate off to the side.
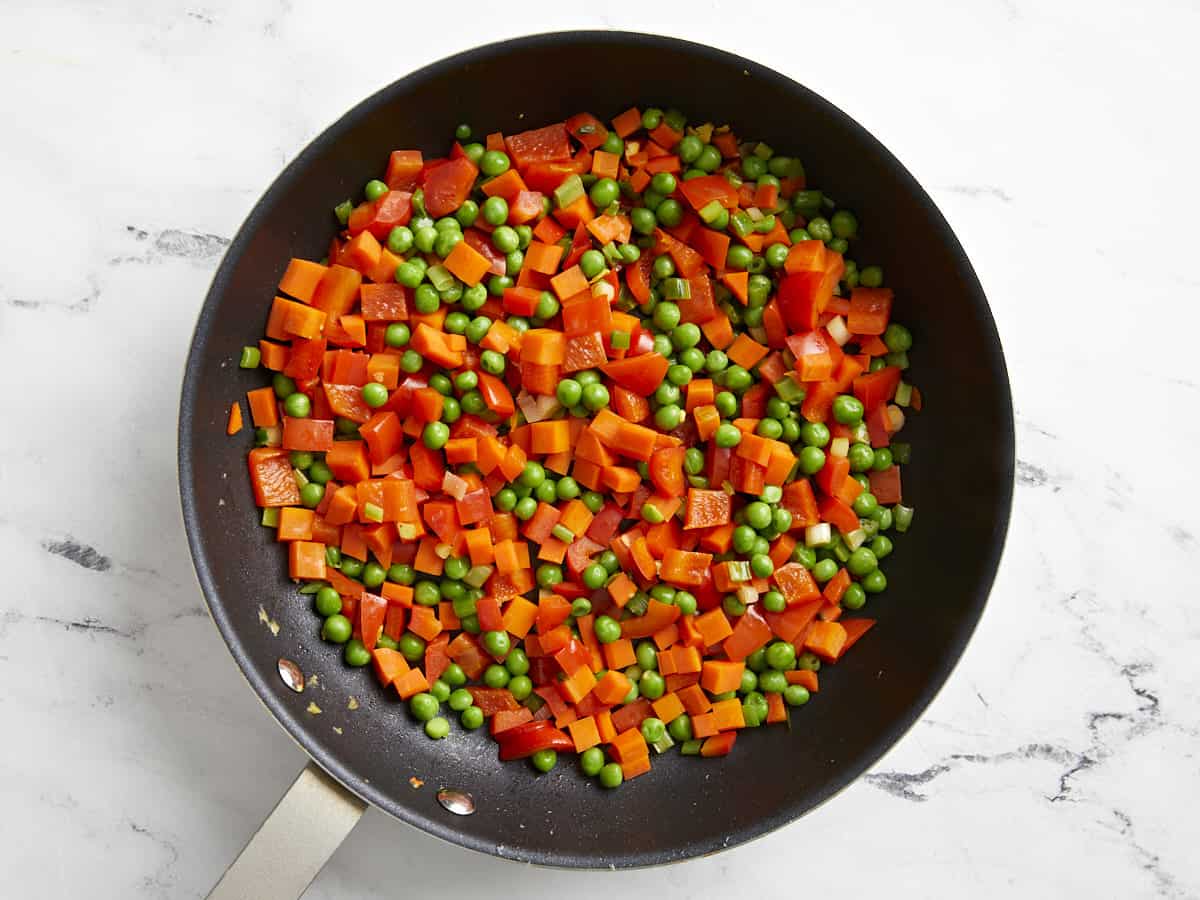
Turn the heat up to medium-high. Add the diced carrots, stir, and cook for about two minutes. Next, add the bell pepper and the white firm ends of the green onions. Cook and stir for one minute more. Finally, add the frozen peas and stir and cook until heated through. Transfer the vegetables to a clean bowl or plate.
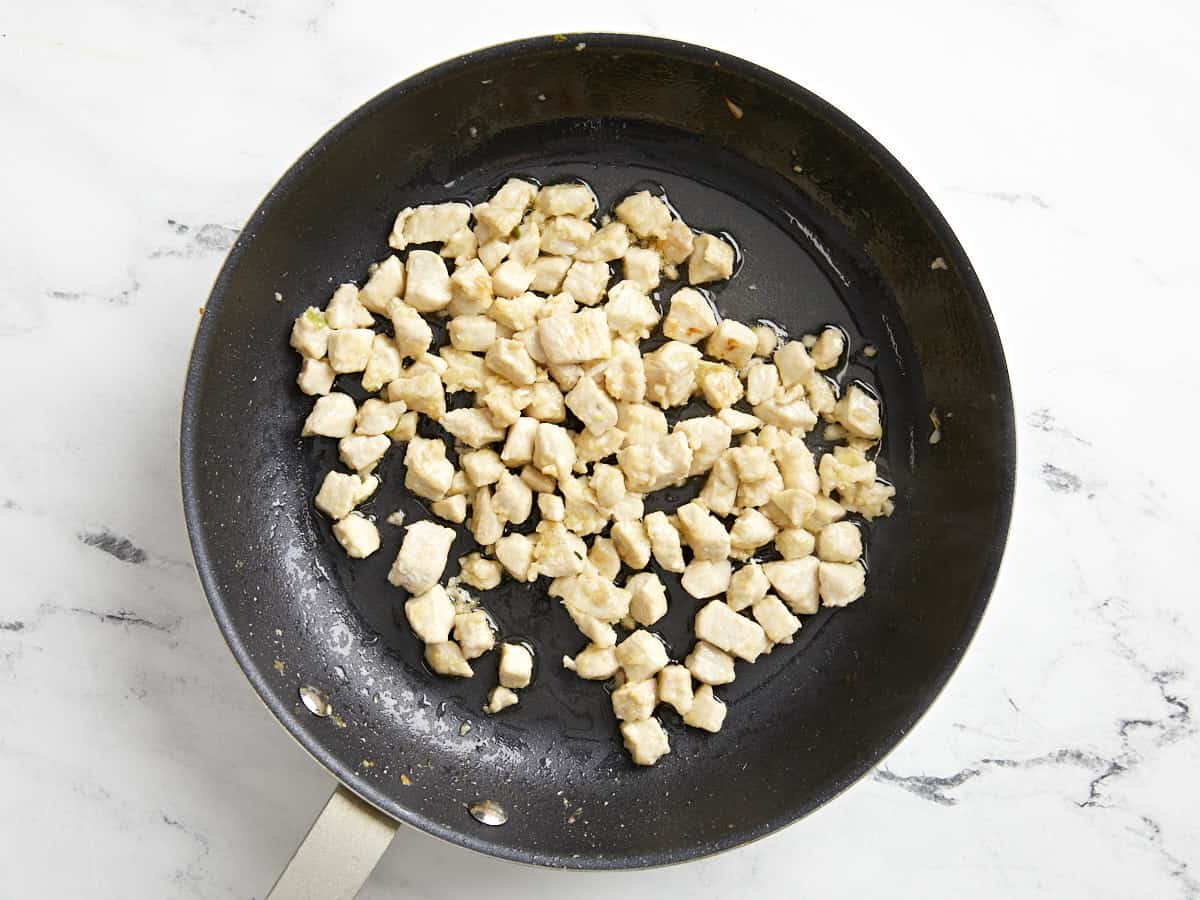
Add the remaining 1 Tbsp cooking oil to the skillet and swirl to coat the surface. Add the ½ inch pieces of chicken and completely cook through, about 4 minutes. Once the chicken is about ½ of the way cooked through (2-3 minutes), add the garlic and ginger and cook for an additional 2-3 minutes.
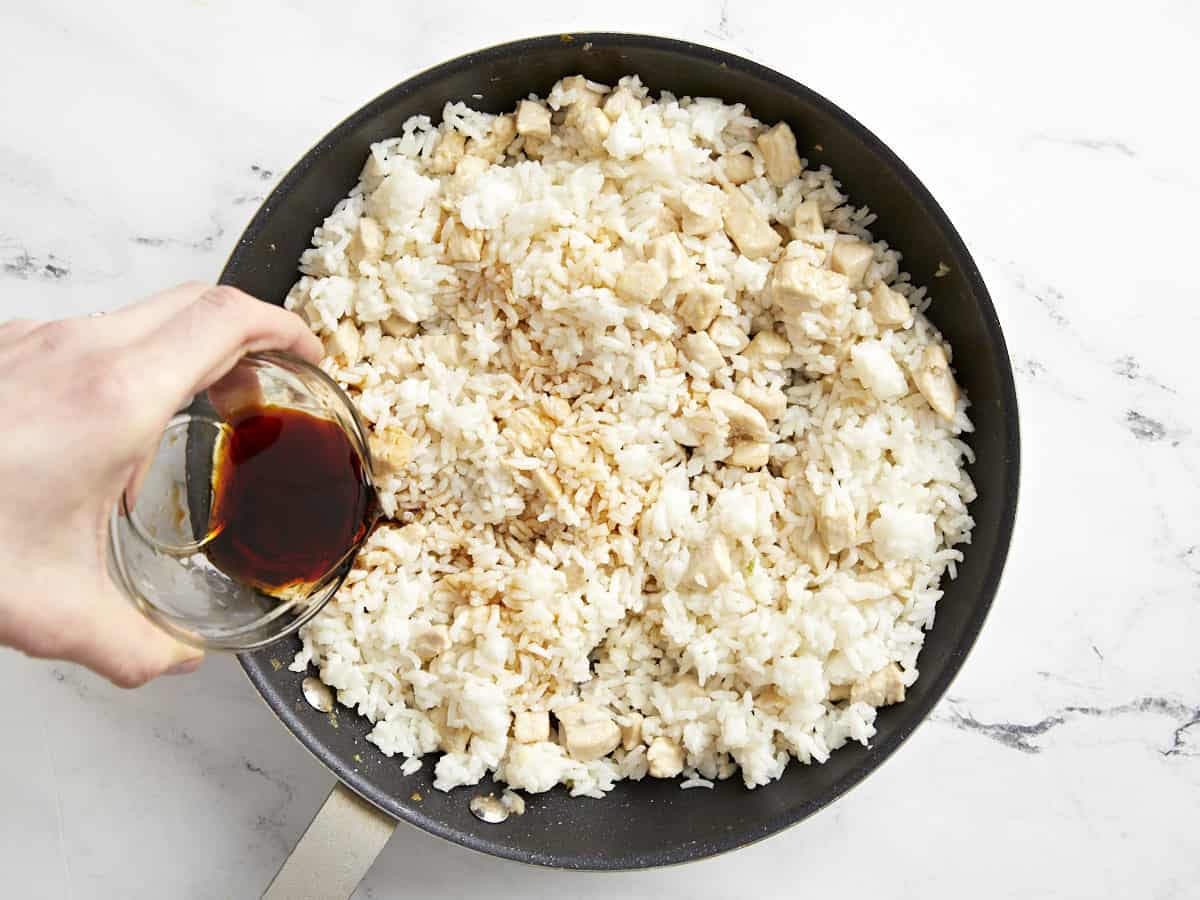
Then, add the cooked and cooled rice to the skillet. Stir and cook the chicken and rice together for about 2 minutes, or until the rice is heated through. Pour the soy sauce and toasted sesame oil over the rice. Stir the rice and sauce together until evenly combined. Turn the heat off.
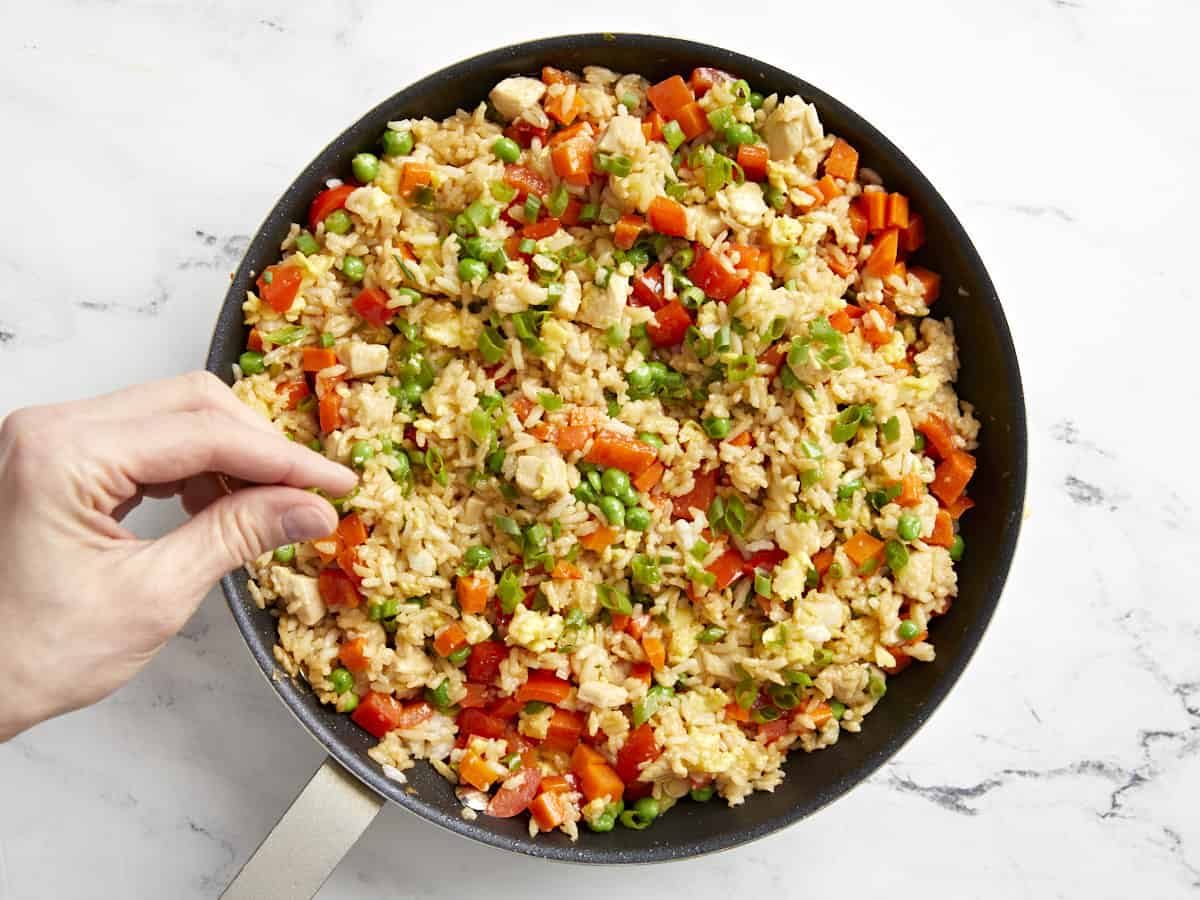
Add the eggs and vegetables back to the skillet with the chicken and rice and stir to combine. Allow the residual heat to heat everything through. Top with the remaining green ends of the sliced green onions. Taste and adjust the soy sauce or sesame oil to your liking.
how to make Chicken Fried Rice – step by step photos
Prepare the vegetables beforehand so they’re ready to go when needed. Mince the garlic, grate the ginger, dice the carrot and bell pepper, slice the green onions (separate the green ends from the white ends), and measure the frozen peas.
On a separate, clean cutting board, cut your chicken into ½ inch pieces so you get a little in every bite. Set aside (and wash your hands!)
Lightly whisk the eggs in a small bowl. Heat a large skillet over medium heat. Once hot, add 2 Tbsp of cooking oil and swirl to coat the surface. Add the eggs and gently scramble until cooked through. Transfer the cooked eggs to a clean bowl or plate off to the side.
Turn the heat up to medium-high. Add the diced carrots, stir, and cook for about two minutes. Next, add the bell pepper and the white firm ends of the green onions. Cook and stir for one minute more. Finally, add the frozen peas and stir and cook until heated through. Transfer the vegetables to a clean bowl or plate.
Add the remaining 1 Tbsp cooking oil to the skillet and swirl to coat the surface. Add the ½ inch pieces of chicken and completely cook through, about 4 minutes. Once the chicken is about ½ of the way cooked through (2-3 minutes), add the 2 cloves of garlic and 1 tsp ginger and cook for an additional 2-3 minutes.
Then, add the cooked and cooled rice to the skillet. Stir and cook the chicken and rice together for about 2 minutes, or until the rice is heated through. Pour the 3 Tbsp soy sauce and 3 Tbsp toasted sesame oil over the rice. Stir the rice and sauce together until evenly combined. Turn the heat off.
Add the eggs and vegetables back to the skillet with the chicken and rice and stir to combine. Allow the residual heat to heat everything through. Top with the remaining green ends of the sliced green onions. Taste and adjust the soy sauce or sesame oil to your liking.
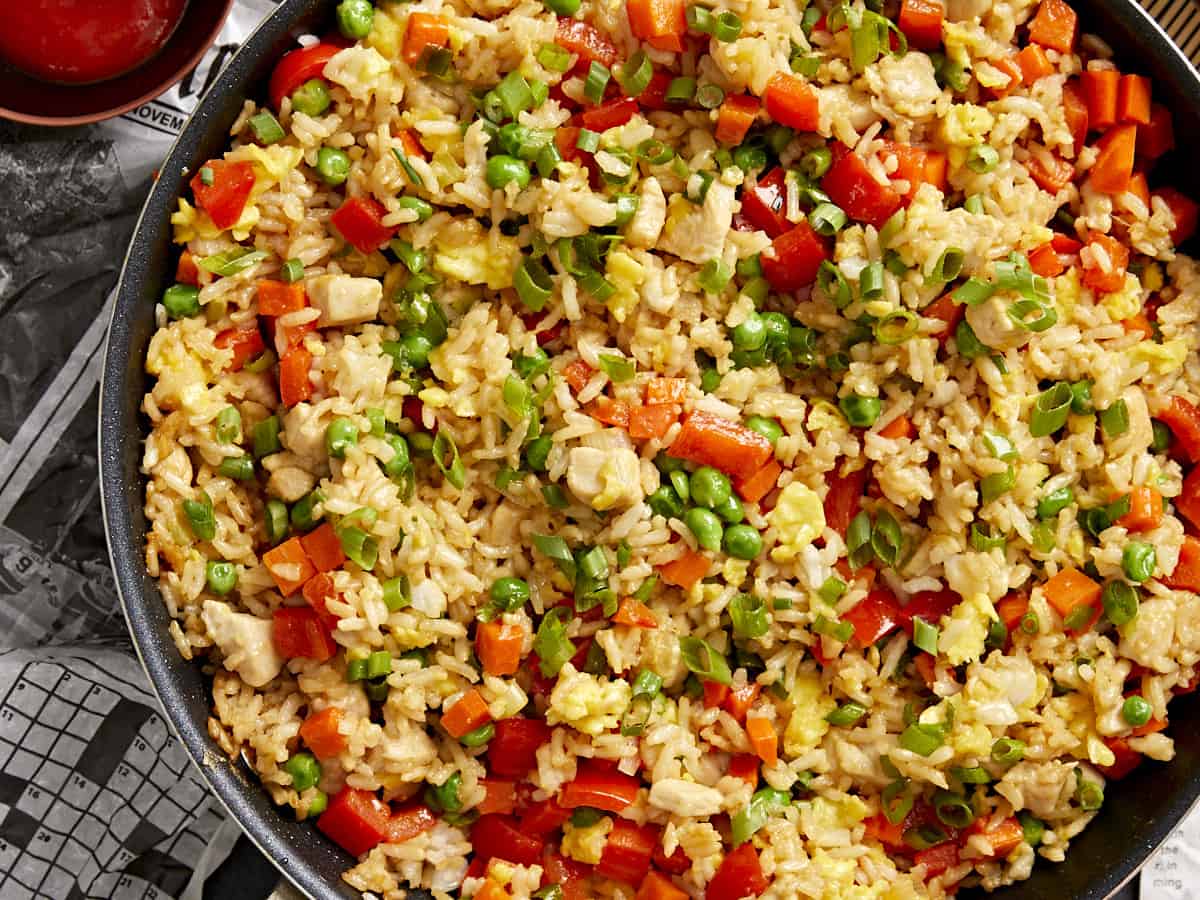
This flavorful chicken fried rice is so much better than takeout!
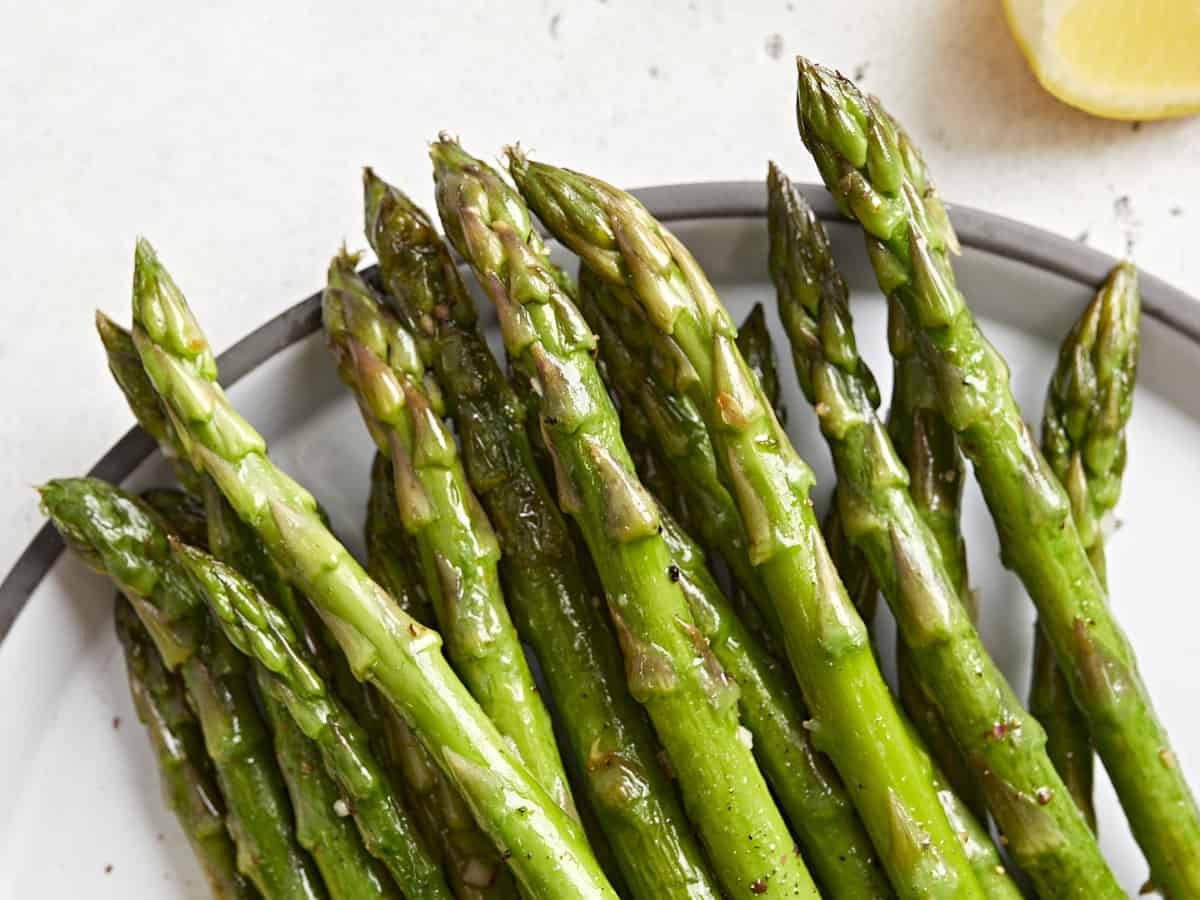
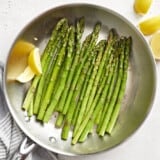
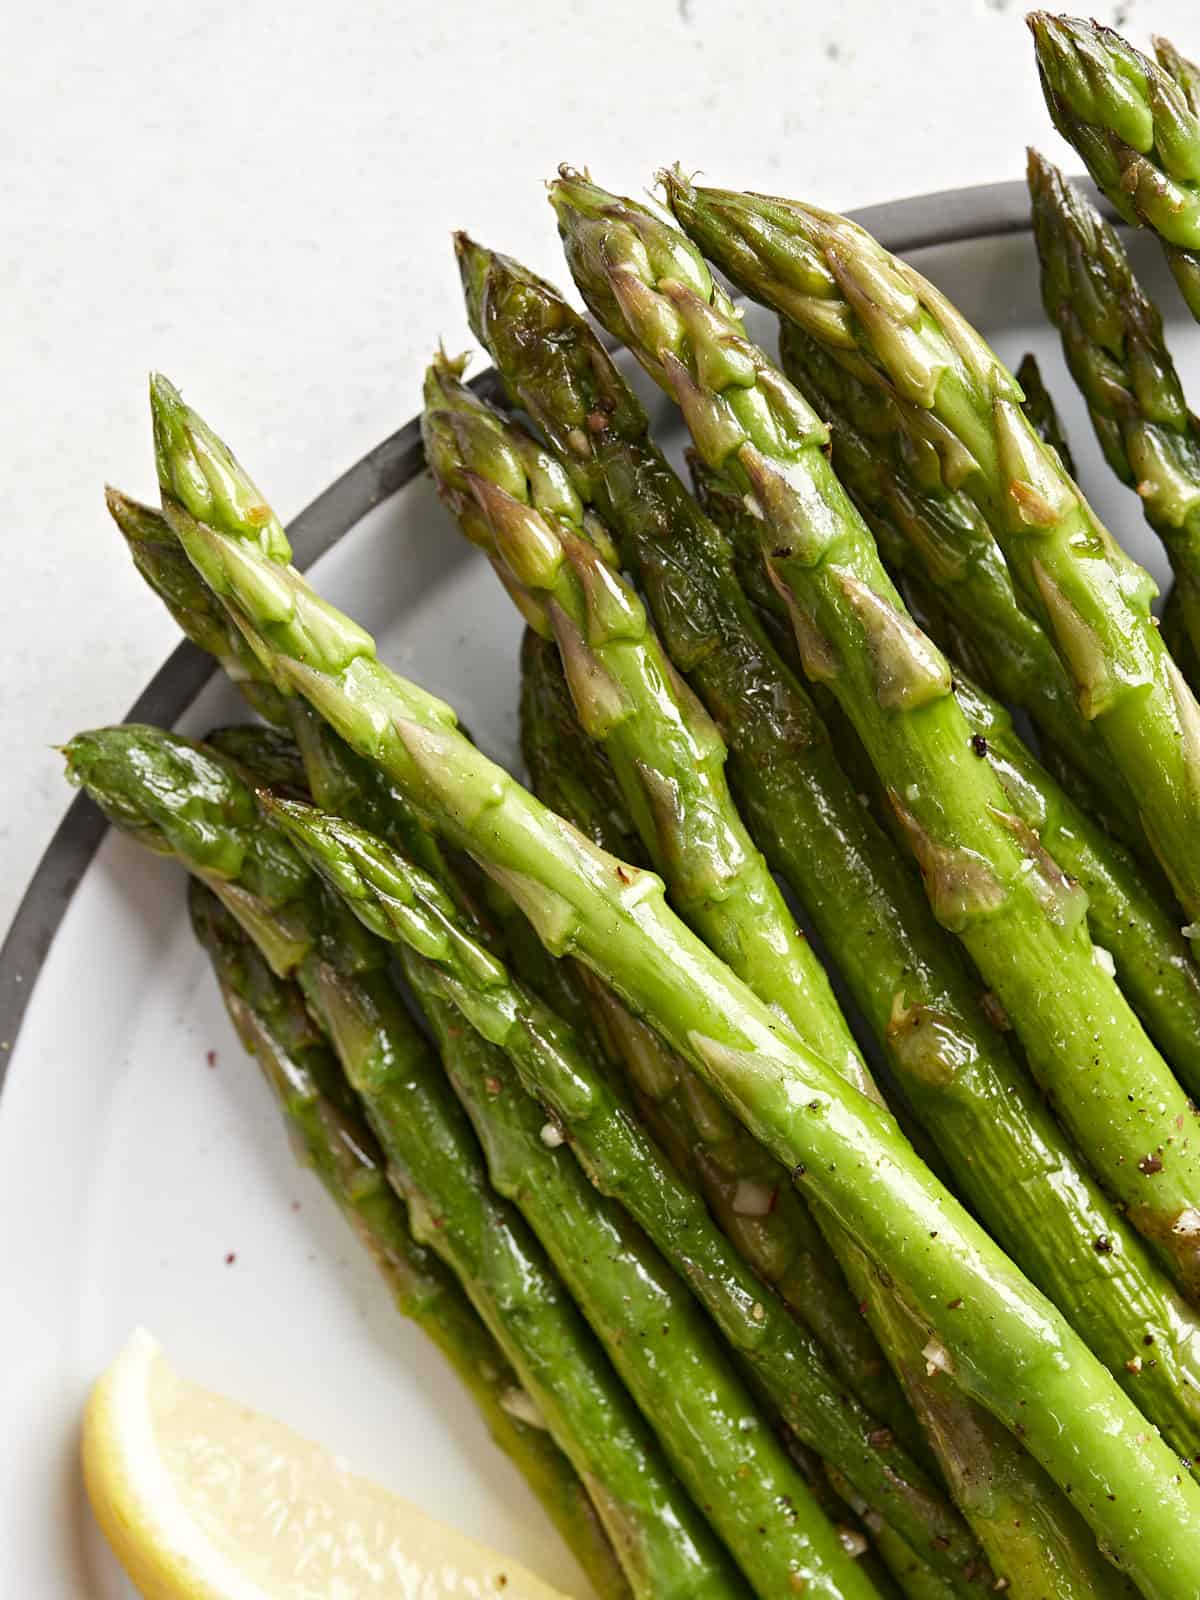
Making an impressive main dish is hard work, so we’re partial to simple sides that pack a punch with little effort. This sauteed asparagus is crunchy, flavorful, and delightfully easy to make. All you need is a bunch of asparagus, oil, garlic, salt, and pepper. It’s almost too easy!
Ingredients for Sauteed Asparagus
Here’s what you’ll need to make sauteed asparagus (psst: there are only 6 ingredients!):
Asparagus: Choose stalks that are firm to the touch and do not appear limp or wilted. The tips should be closed tightly.
Oil: Coats the asparagus to help it brown in the pan without burning. We like olive oil for the rich taste it imparts, but canola or vegetable will also work well.
Garlic: Adds a subtle earthy and savory flavor.
Salt and Pepper: Enhance the natural flavor of the asparagus.
Lemon: Adds a pop of brightness and freshness to the cooked asparagus.
What Else Can I Add?
This is a great recipe for playing with different seasoning blends. Try: nmn nbgy
Asparagus does not need to be cooked for long. Once it turns bright green from end to end, it’s done! In fact, it’s even better a little underdone. It should not be mushy or floppy in texture and appearance, it should hold its “spear” shape when cooked correctly.
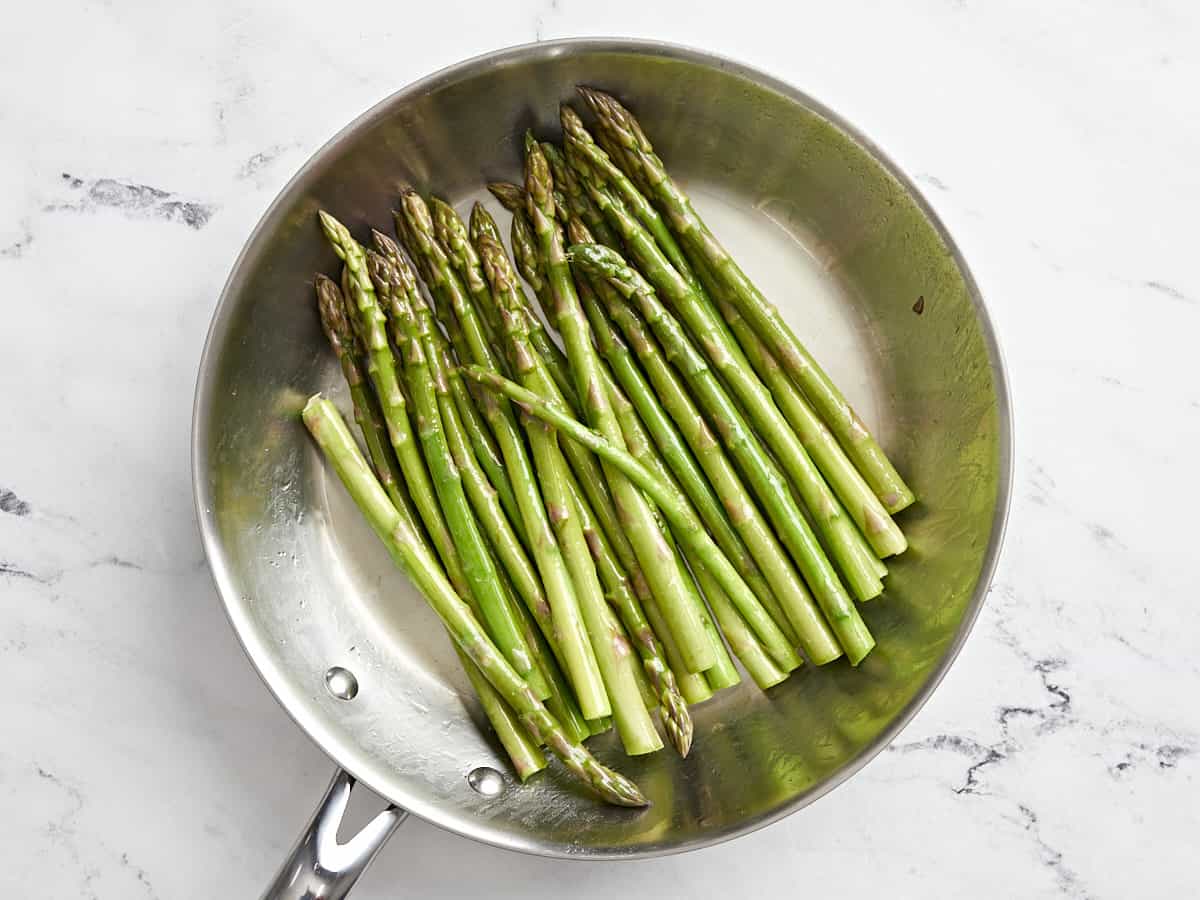
Add oil to a large frying pan on medium high heat. Add asparagus and gently shake to cover each spear with oil. Add the salt and pepper and cook, shaking every so often, until asparagus turns bright green, about 5 minutes.
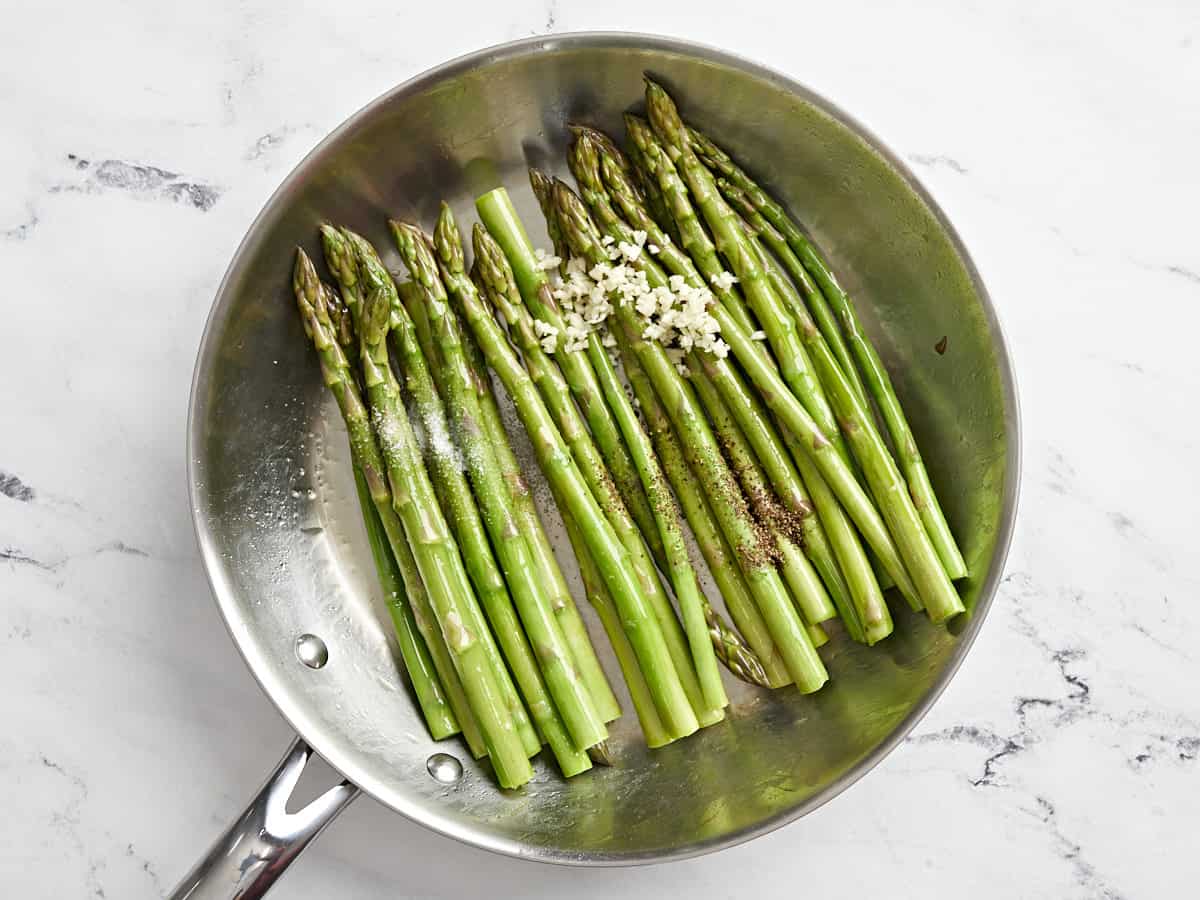
Add the minced garlic to pan and cook for another 1-2 minutes until fragrant.
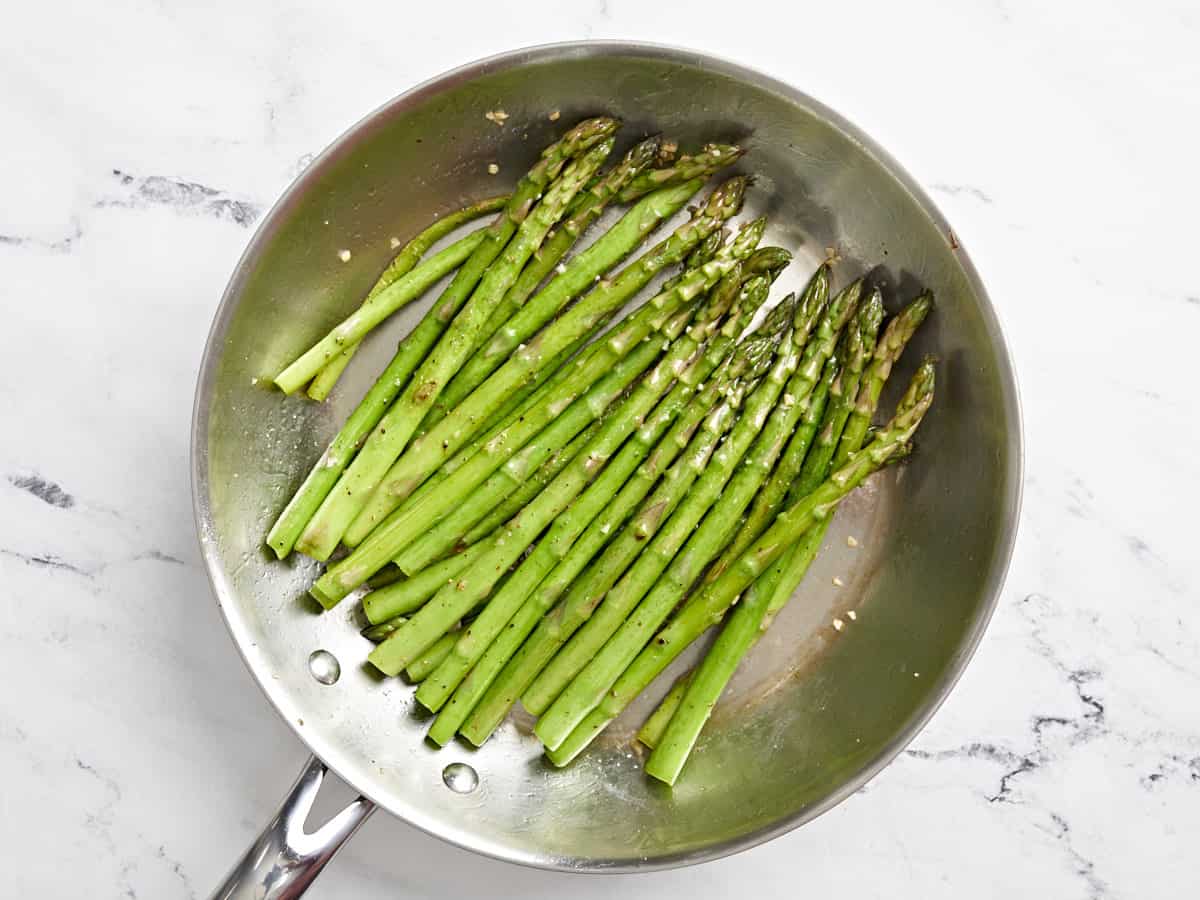
Remove the asparagus and spritz with a squeeze of lemon juice. Adjust salt and pepper to your liking.
how to make Sautéed Asparagus – step by step photos
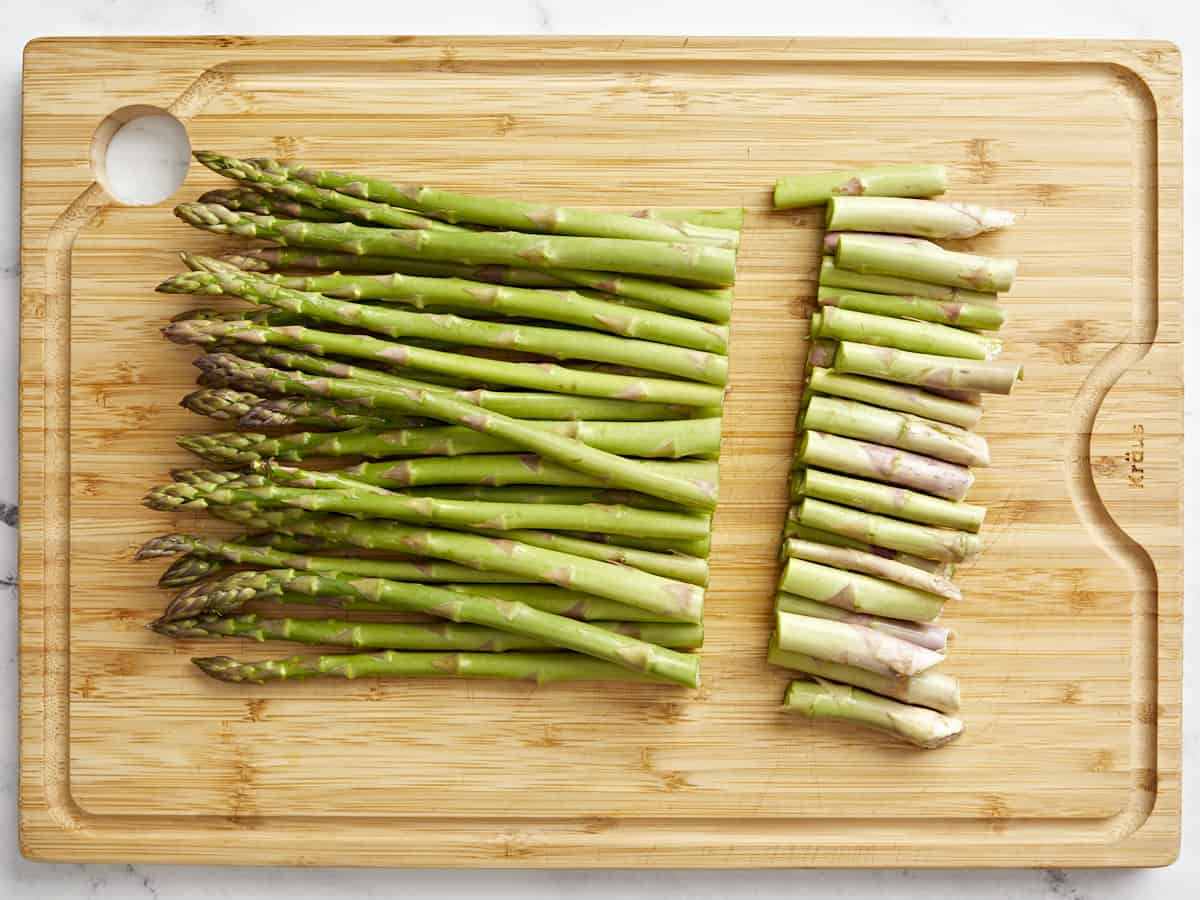
Cut off the woody ends of 1 bunch asparagus.
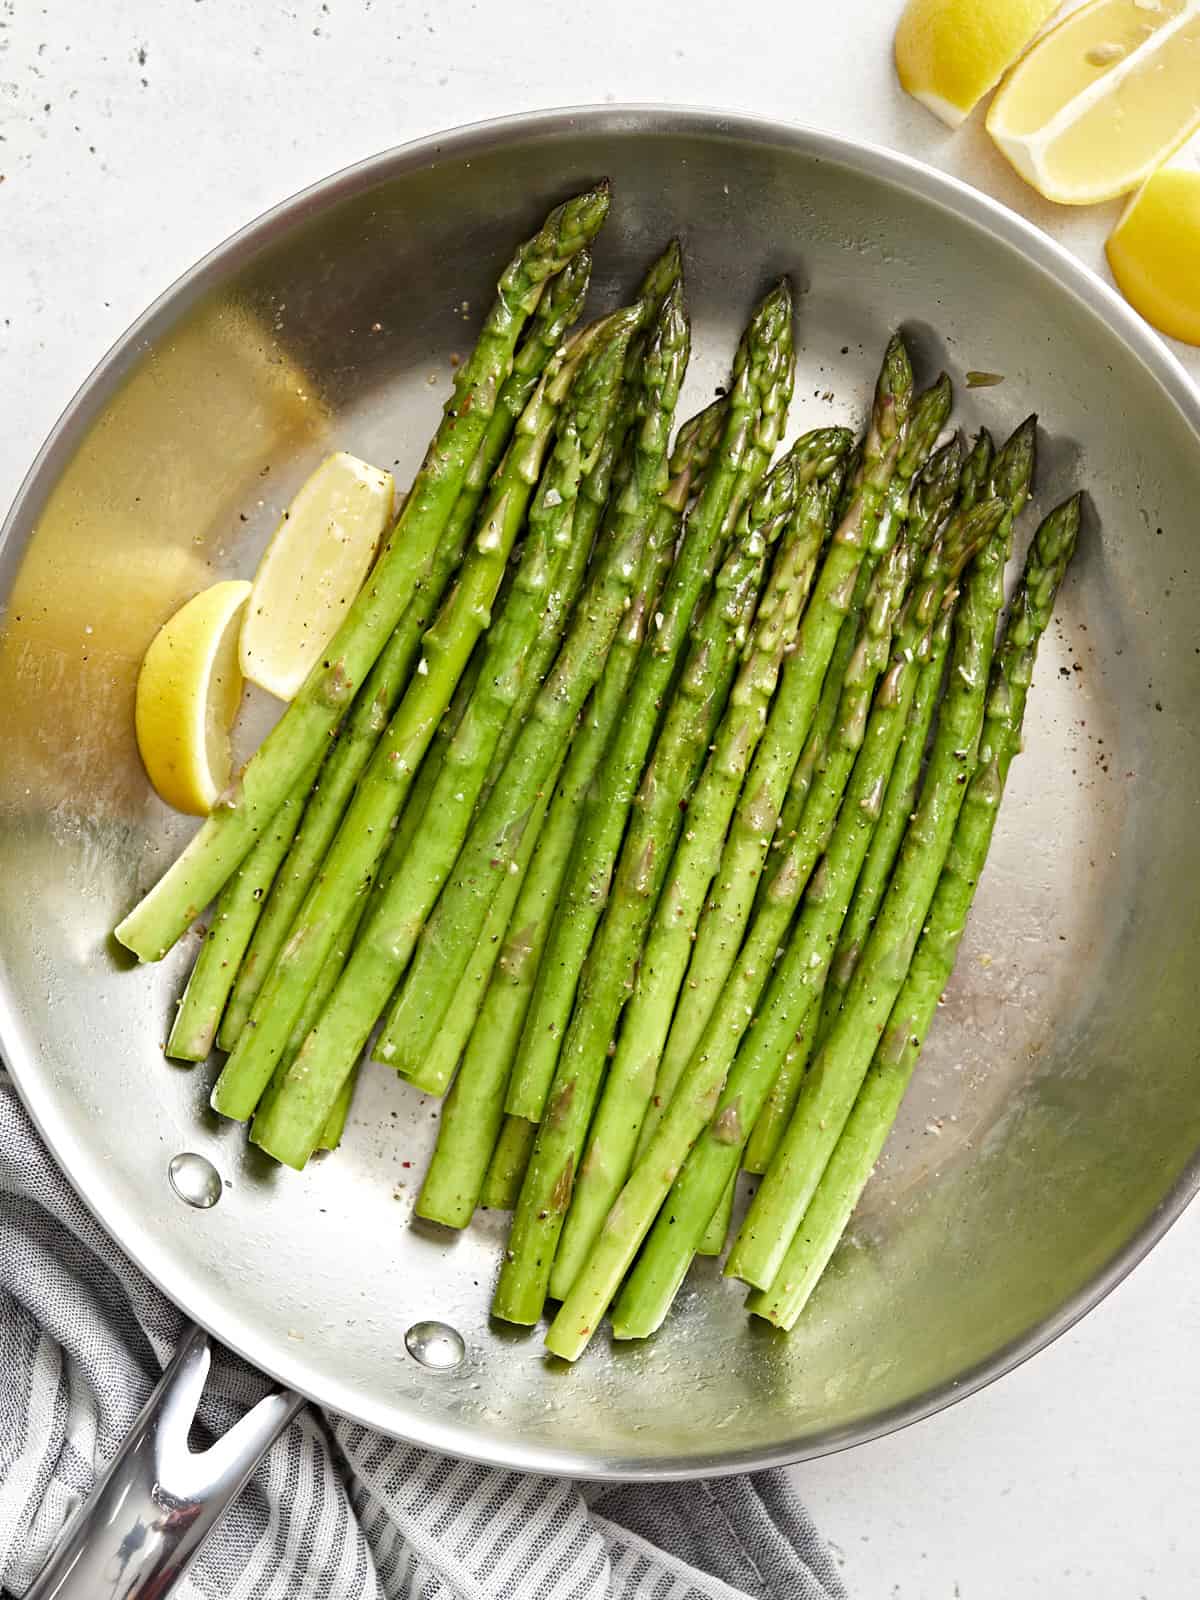
Add 1 Tbsp olive oil to a large frying pan on medium-high heat, then add the asparagus and gently shake to cover each spear with oil. Shake every so often, until asparagus turns bright green, about 5 minutes.
Sprinkle over 1 tsp salt and 1 tsp pepper and add 1 clove minced garlic to the pan and cook for another 1-2 minutes until fragrant.
Remove asparagus and spritz with a squeeze of lemon juice from 1 whole lemon. Adjust salt and pepper to your liking.
This sautéed asparagus is so simple and delicious!
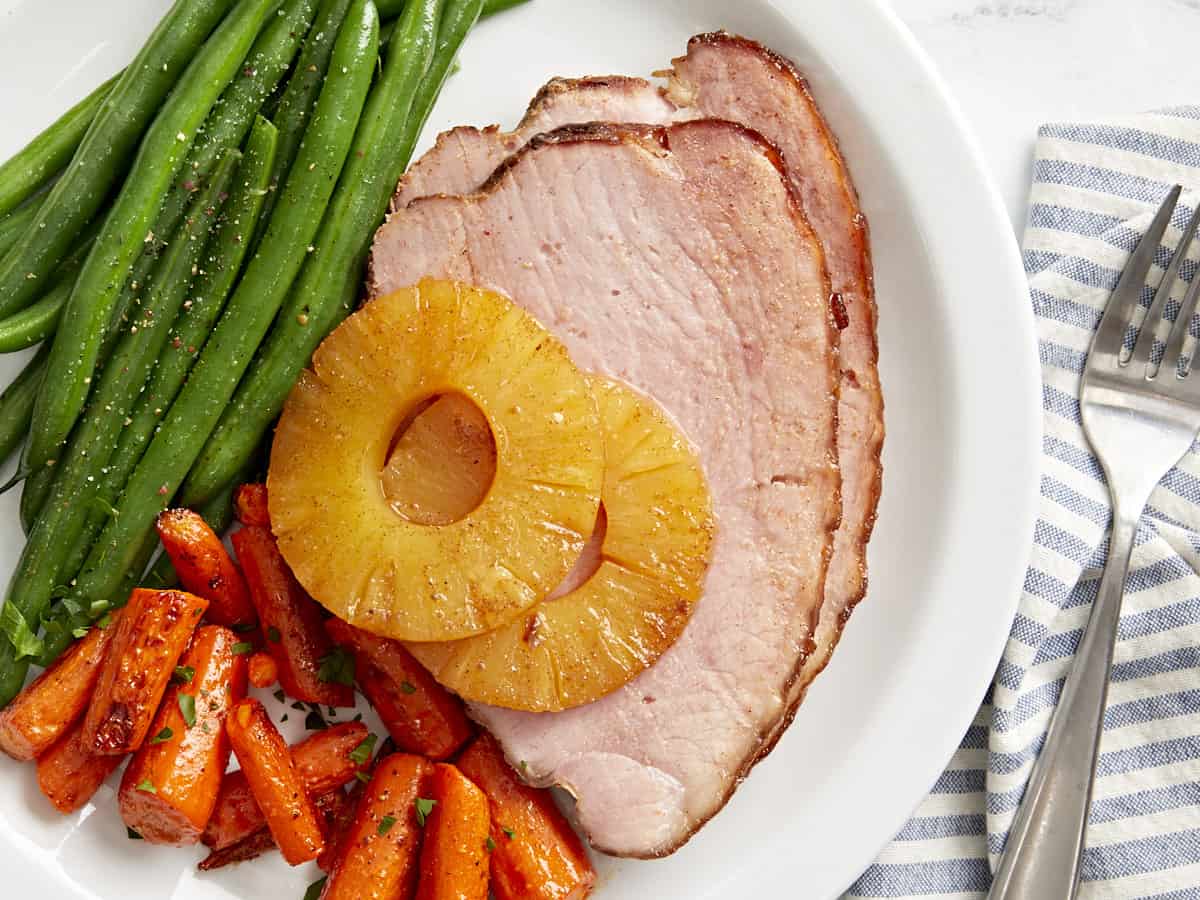
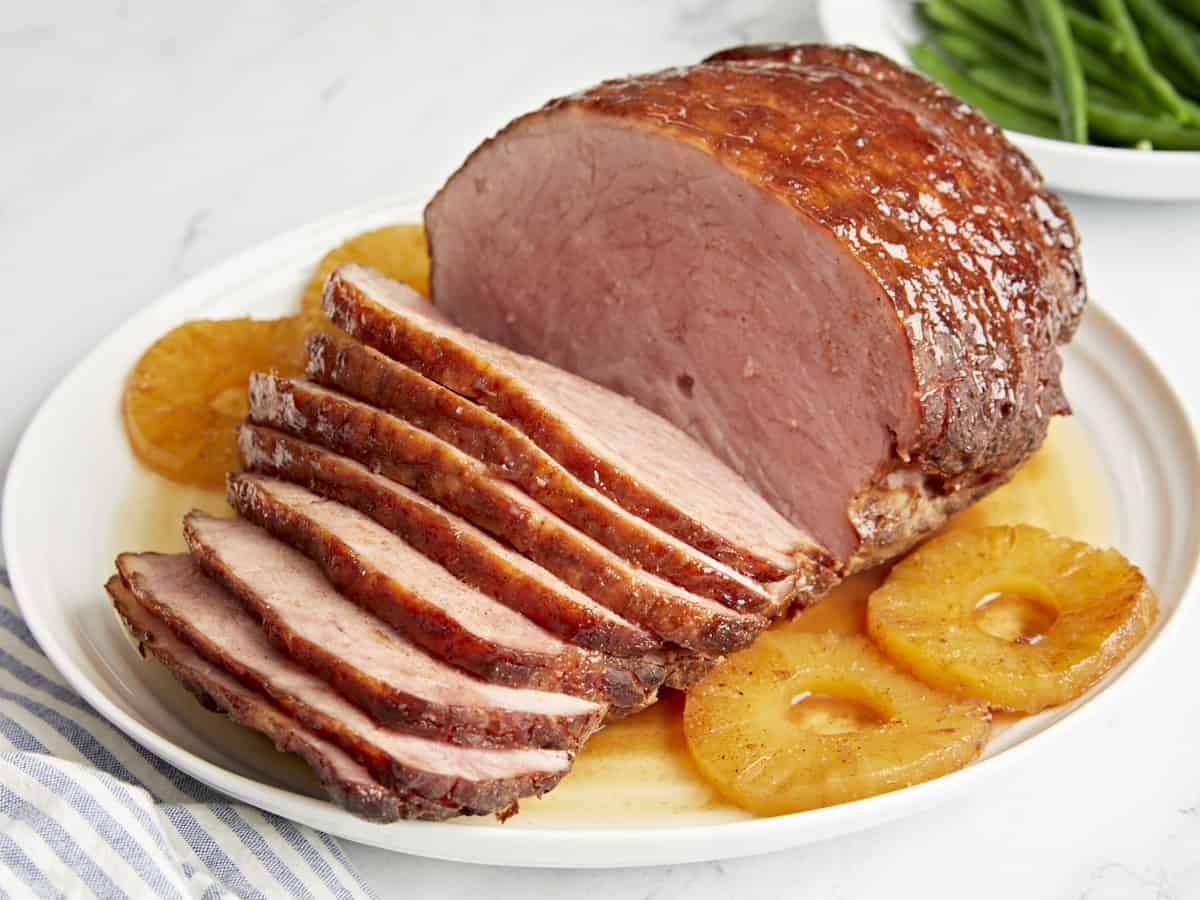
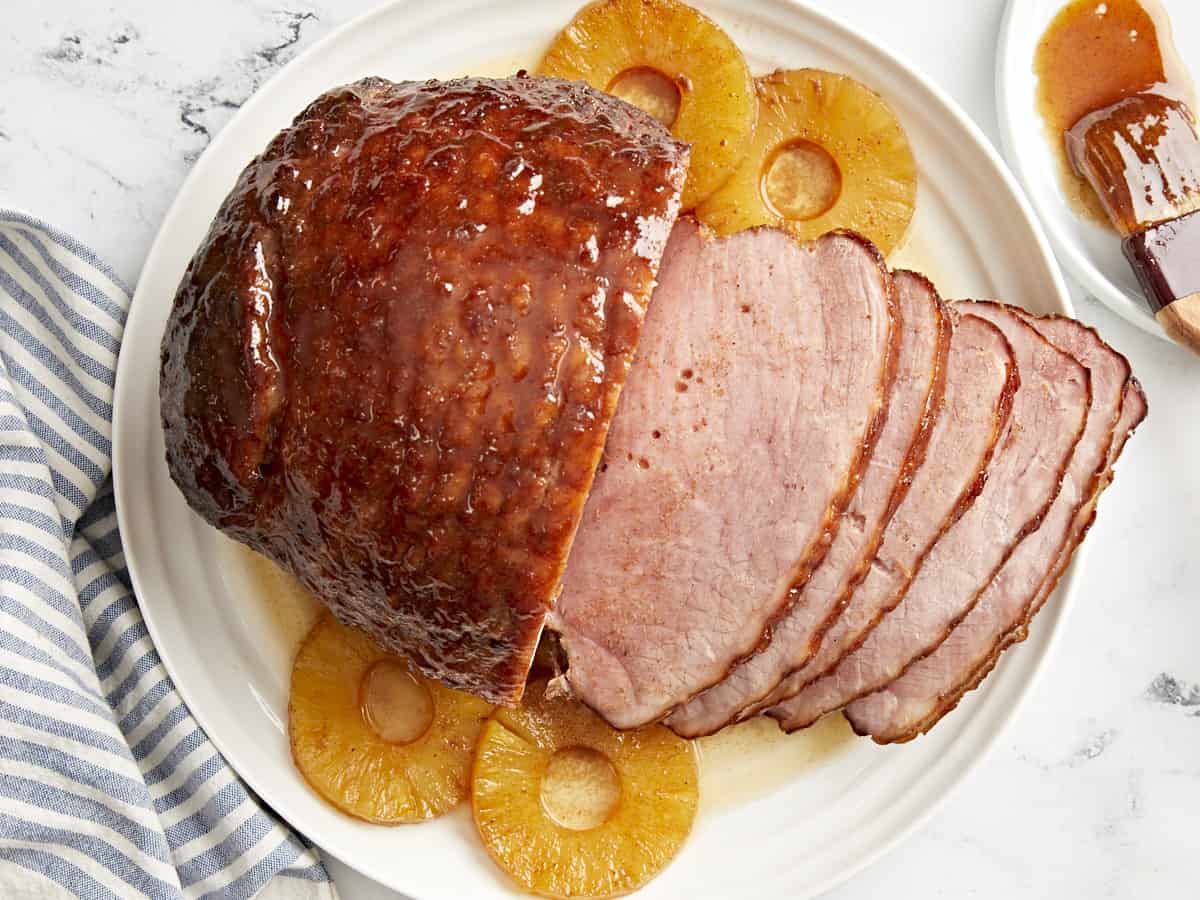
When the holidays roll around (Hello, Easter!), there’s nothing my family craves more than a sweet and savory baked ham. I know what you’re thinking, ham is expensive. But this baked ham recipe is proof that a typically expensive meat can be budget-friendly. By using a boneless ham, we don’t waste a single dollar on bones, and it comfortably feeds 11 people. That’s a lot of ham! The texture of this ham is perfectly juicy with a great chew to it. The glaze makes the outside nice and crisp but still tender. There’s nothing quite like a beloved holiday tradition!
Why Make Baked Ham?
While Easter traditionally calls for lamb, ham has become the dominant centerpiece because it’s much less expensive and more readily available, both things we love here at Budget Bytes. This baked ham recipe is a true superstar. Salty, savory ham coated in a sweet and tangy glaze made from brown sugar and pineapple juice is just so good. The glaze is super sticky, extra sweet, and gives a beautiful color to your ham. Adding the pineapple juice to the glaze recipe really makes this glaze shine (literally and figuratively!)
Ingredients for Pineapple Ham
Here’s what you’ll need to make baked ham:
Smoked Ham: We tested a bone-in ham and a boneless ham. Because hams are priced by weight, we found the boneless hams to be cheapest and offered in smaller quantities. We ended up going with a 5.5lb. ham for this recipe.
Sliced Pineapple: The pineapple helps keep the ham moist during cooking. Did you know pineapple also contains natural acidic enzymes that help tenderize any meat you cook with it?
Water: Helps steam heat your ham and keep it moist. The amount varies based on the size of your roasting pan. You will want 1/2 inch of liquid in the bottom of the pan to ensure your ham is nice and juicy.
Spices: Salt, pepper, garlic powder, onion powder, and pumpkin pie spice create a beautiful blend of sweet and savory flavors.
Brown Sugar: Adds depth of flavor, a beautiful color and sweetness to the glaze.
Dijon Mustard: Adds balancing bitter notes, earthiness and tanginess to the glaze.
Do you bake a ham covered or uncovered?
We found that it’s best to bake this ham tented with foil to seal in moisture. Without the foil, the ham tends to dry out and turn tough. Remove the foil in the last 10 or so minutes of baking to reduce and brown the glaze.
Tips
Most hams sold in the U.S. are fully cooked but require several hours of heating in the oven. So, you can pop it in the oven and then focus on the rest of your side dishes!
If you do not need this much meat or your budget is stretched because of the cost of the ham, hunt for a smaller ham. Sometimes if you go to the deli counter, they can help you. Hams are sold by weight, so if you plan on 1/2 – 1/3 pound per person, that will help you choose which size ham your family needs!
I know the thought of “pumpkin spice ham” may sound strange, but pumpkin pie spice is a blend of cinnamon, cloves, allspice, ginger, nutmeg, and black pepper… all perfect flavors to compliment a juicy, sweet-but-savory ham!
I only filled the bottom of our roasting dish with 1/2 inch of water. A lot of recipes call for 1 inch, but the drippings are great for basting or using as a gravy and we found them to be too diluted if we did the 1 inch of water.
The pineapples slid off to the side after the glazing at the end, but they did their job keeping the ham moist and tender. The glazing at the end of cooking will make your ham nice and shiny on the outside, so don’t worry about taking your ham in and out of the oven to baste it (unless you want to, certainly won’t hurt it!) You can always opt to just keep it tented and baste at the end.
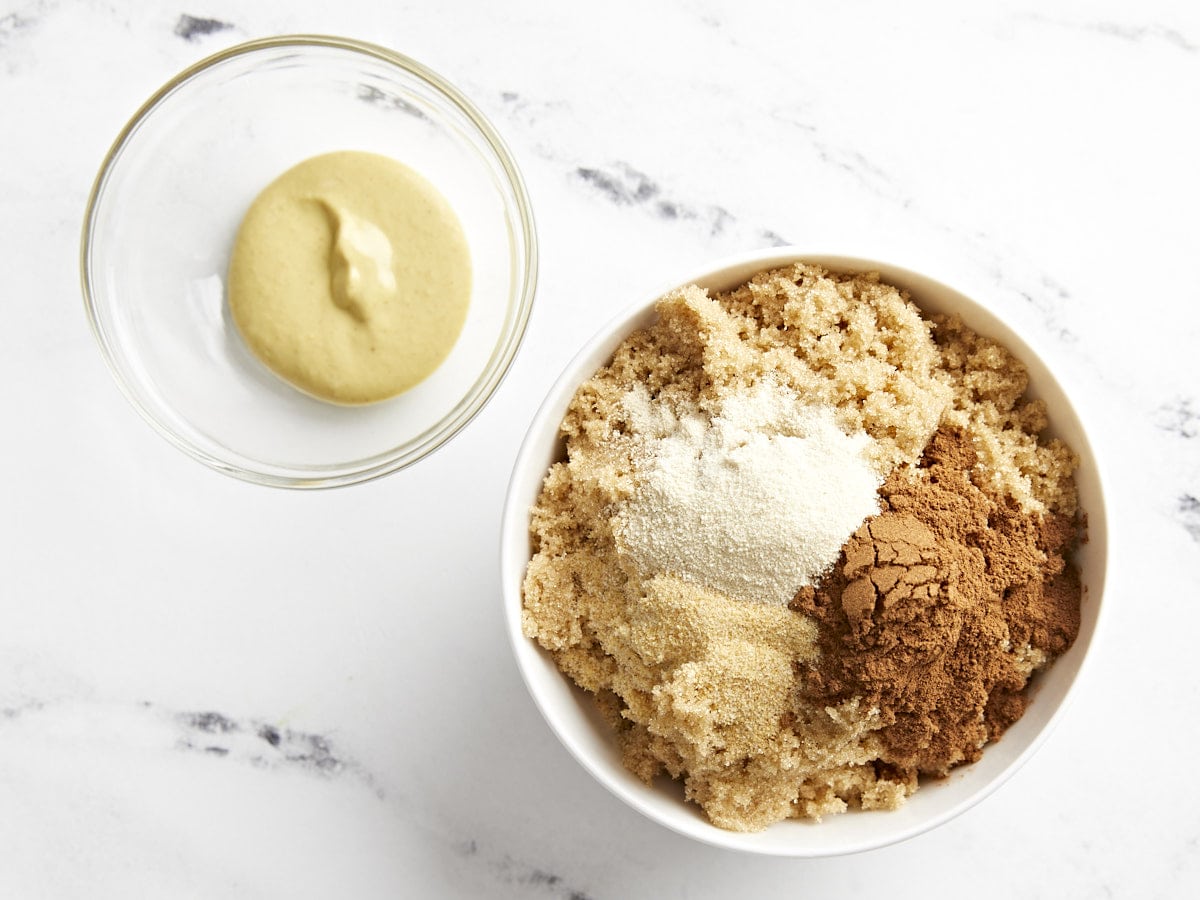
Gather all glaze ingredients and preheat oven to 350°F.
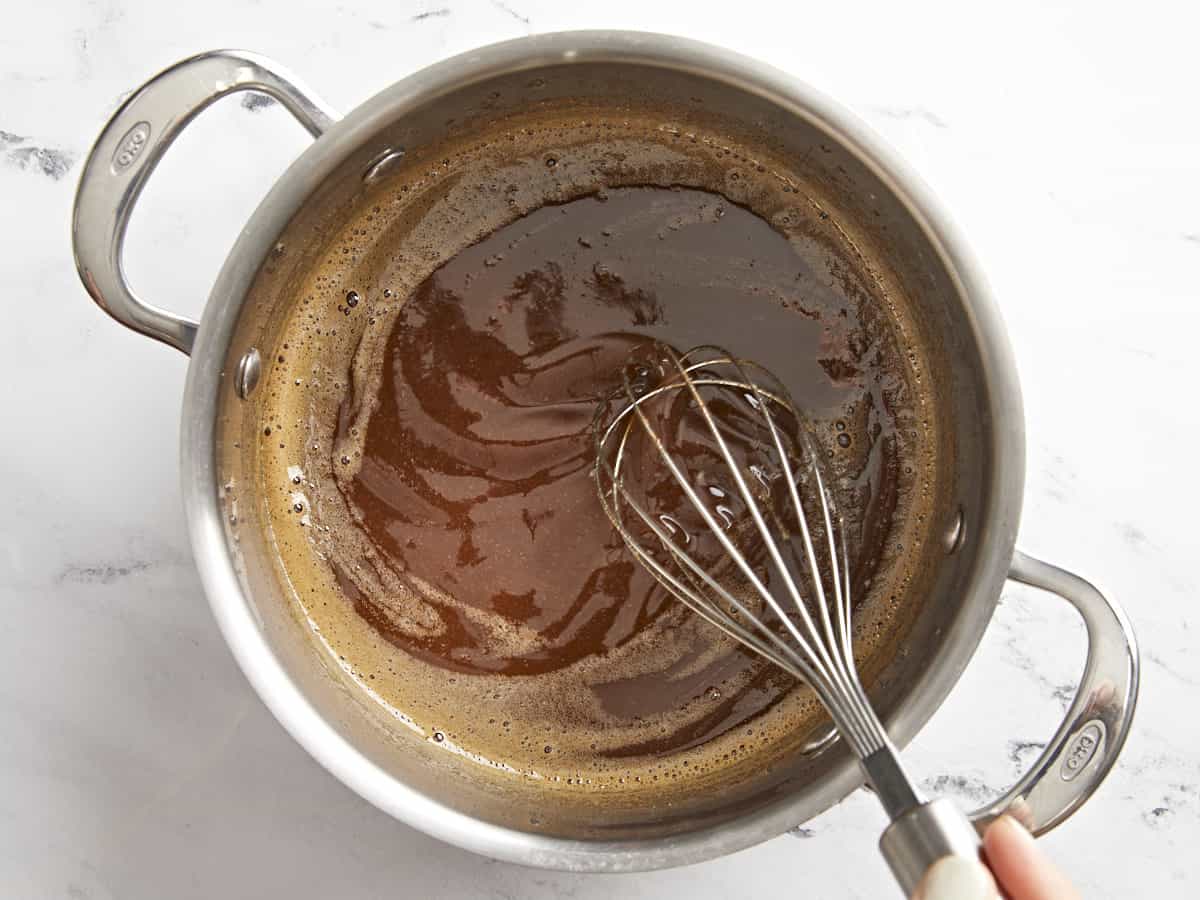
In a saucepan, whisk together pineapple juice (one 15oz can yields about 1 cup of juice), brown sugar, dijon mustard, garlic powder, salt, pepper, onion powder, and pumpkin pie spice.
Cook the glaze down over medium heat until it is reduced by half.
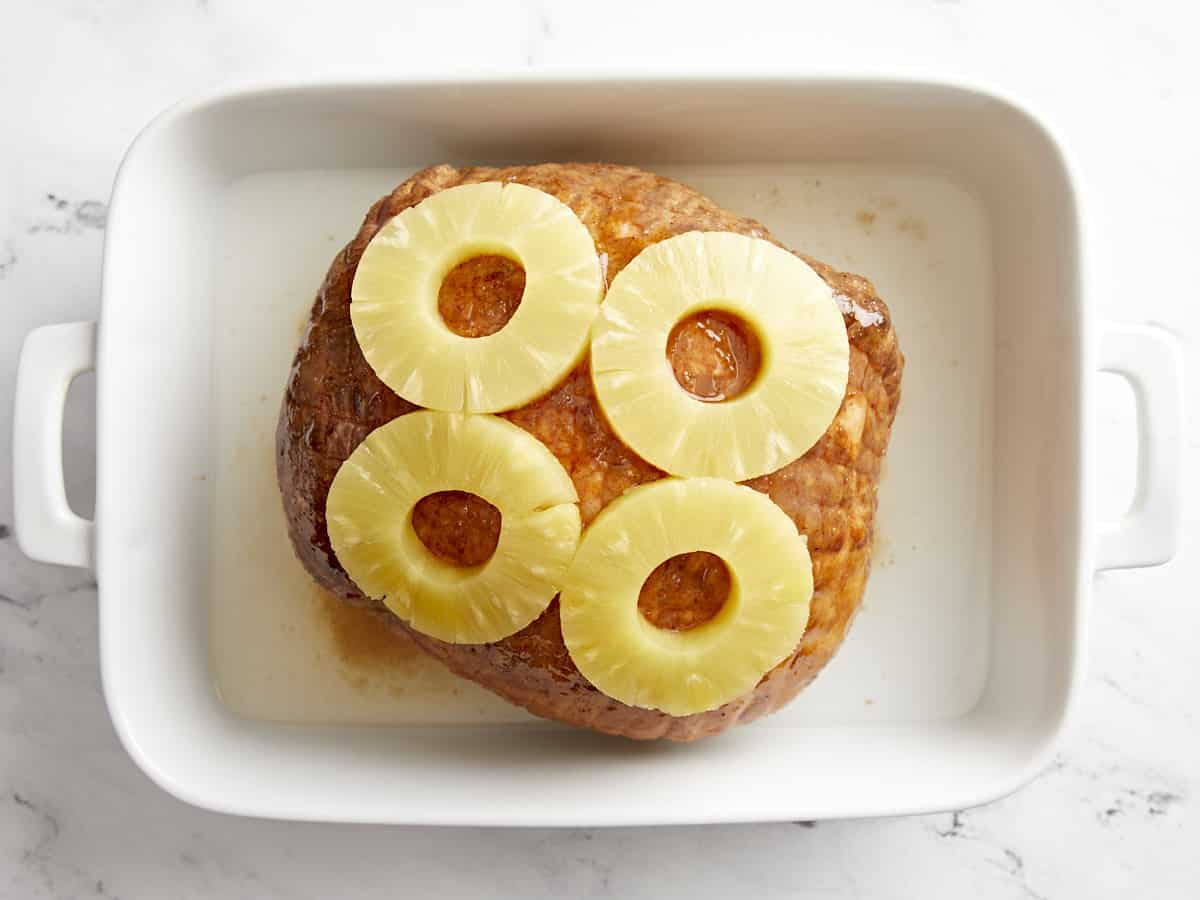
Place the ham cut side down in the roasting pan of your choosing.
Brush the ham with half the glaze mixture and cover it with slices of canned pineapple. Add 1/2 inch of water to the bottom of the roasting pan.
Make a tinfoil tent to cover the entire ham. Place the tinfoil over the ham and bake for 20 minutes per pound of meat, or until the internal temperature reaches 145°F. Baste the ham periodically, using a baster or a large spoon.
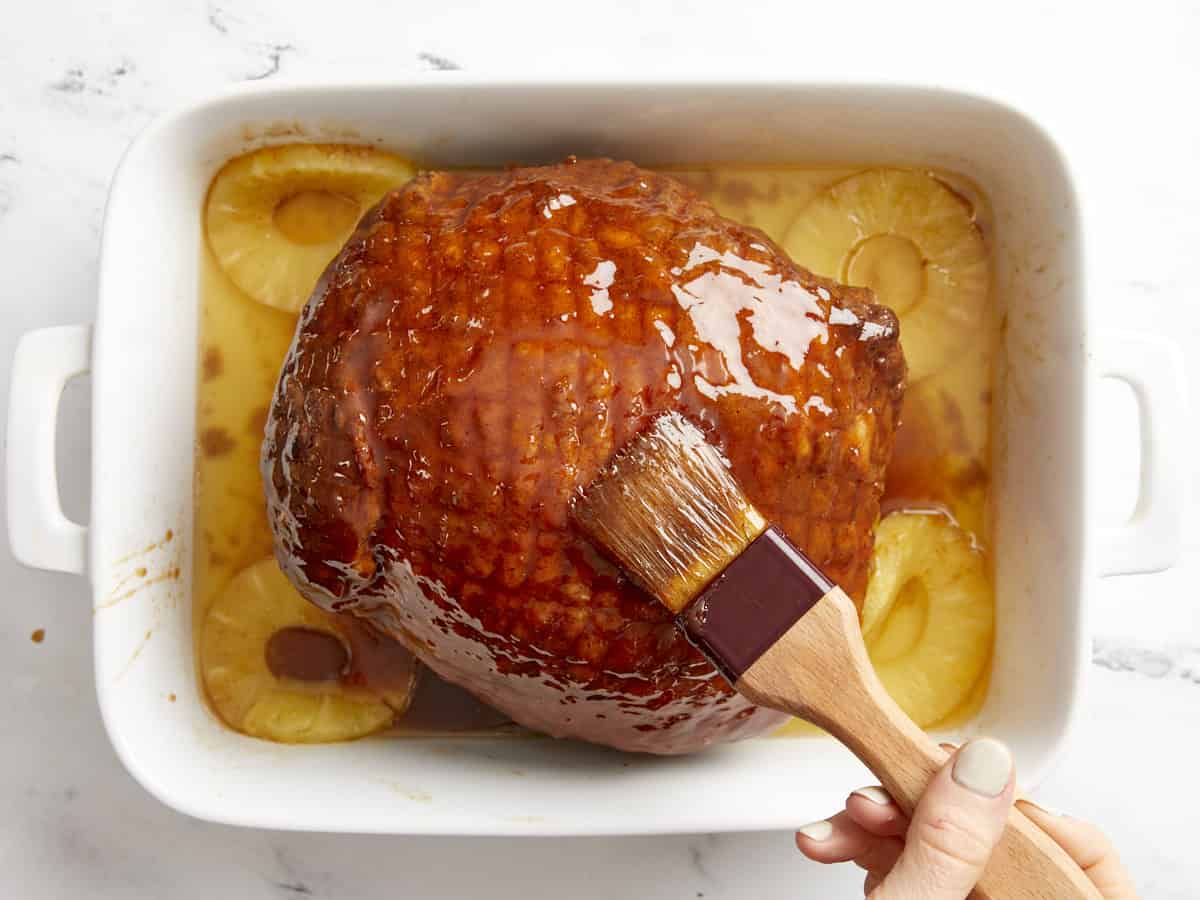
Once the ham reaches 145°F, remove the tinfoil tent and baste. Then, brush the ham with all remaining glaze.
Gather all glaze ingredients and preheat oven to 350°F.
Whisk together pineapple juice (one 15 oz. can yields about 1 cup of juice), 1 cup brown sugar, 1 Tbsp Dijon mustard, 1 tsp garlic powder, 1 tsp salt, 1 tsp pepper, 1 tsp onion powder, and 2 tsp pumpkin pie spice. Cook the glaze down over medium heat until it is reduced by half.
Place 5.5 lb. boneless smoked ham cut side down in the roasting pan of your choosing. Pour 1/2 inch of water into the bottom of the roasting pan. Brush the ham with half of the glaze mixture and cover it with slices of canned pineapple. Then, make a tinfoil tent to cover the entire ham. You want to cook the ham for approximately 20 minutes per pound, or until the internal temperature reaches 145°F. Baste the ham periodically, using a standard baster or a large spoon.
Once the ham reaches an internal temperature of 145°F, remove the tinfoil tent and baste the ham with pan drippings and brush the ham with all remaining glaze.
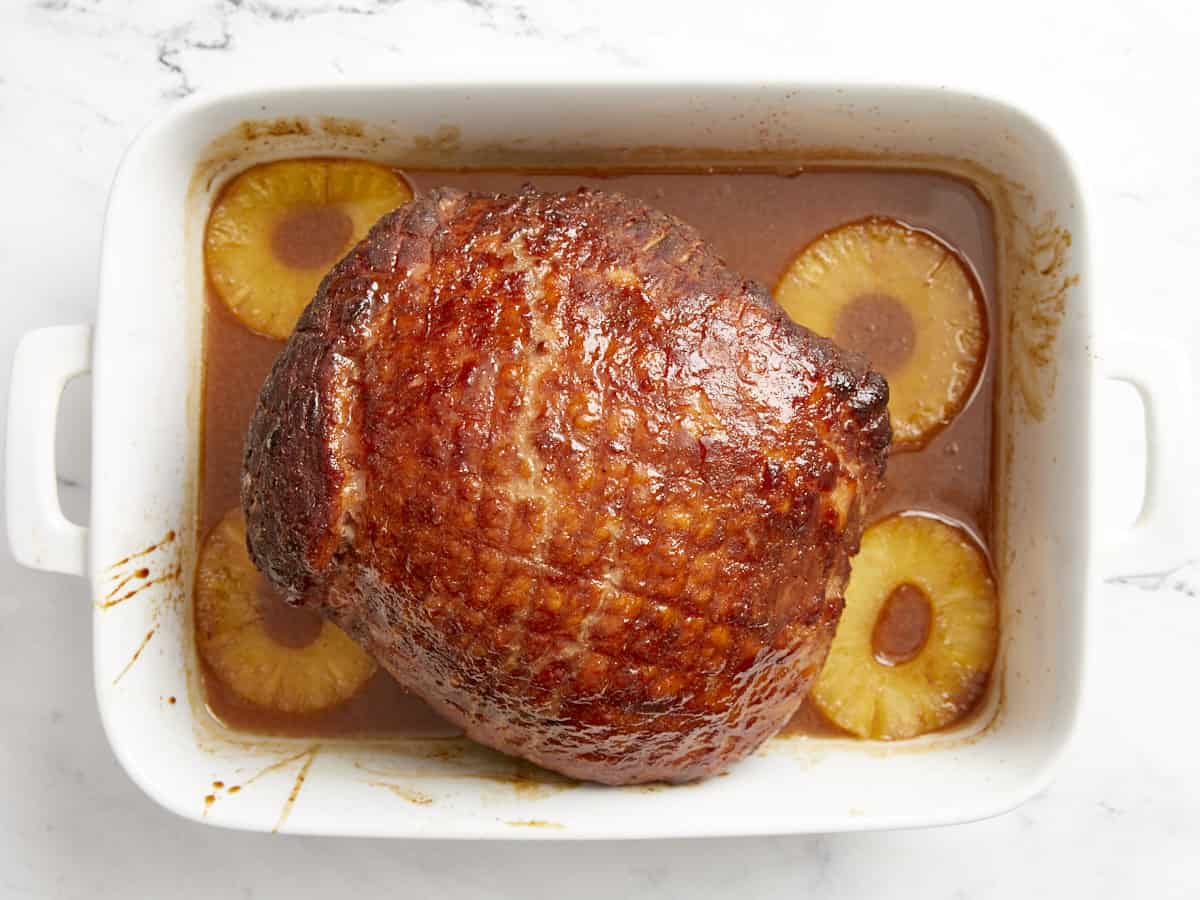
When your ham is done, it should have an internal temperature of 145°F.
This delicious baked ham will be the star of your holiday table!
Deviled Eggs are a classic appetizer that’s always fun to serve at parties, Easter, potlucks, and during the holidays. It’s one of my mom’s favorite dishes to make for family gatherings and it always surprises me how fast they disappear! But it doesn’t have to be a special occasion to make these tasty little bites. They’re easy enough to make any day of the week and they’re a lot cheaper to make homemade. Keep the toppings simple or play around with some of our favorites listed below!😉
What Are Deviled Eggs?
Deviled eggs are eggs that have been hard-boiled, cut in half, then the yolks mixed with other ingredients before stuffing them back into the whites. They can be basic, super fancy, or anywhere in between. They’re perfect for parties, potlucks, family gatherings, and during the holidays. Or during the week when you just have a craving for some tasty deviled eggs! There are so many options and different toppings to choose from when making deviled eggs, which makes them a LOT of fun!
Ingredients For Deviled Eggs
To make things easy we followed the same formula as our small batch deviled eggs recipe, that we already love, with one extra addition. So here’s everything you’ll need:
Mayonnaise: Mayo gives the filling a creamy, smooth texture.
Dijon mustard: Dijon mustard adds great tang and flavor to the deviled eggs.
Seasoning salt: To season the egg mixture we use Tony Chachere’s Creole seasoning, but you can use any brand of seasoning salt like Lawry’s, Morton’s, or even a generic store brand.
Dill relish: Relish is the extra added ingredient and my personal favorite! It adds lots of great dill flavor and some much-needed texture to the filling.
How Long Should You Boil Your Eggs?
When it comes to how long to boil eggs for deviled eggs, I followed our step-by-step guide on How To Make Hard Boiled Eggs and the eggs came out perfect!
The short answer is – boil large eggs for about 12 minutes to make hard boiled eggs. But there are a few other factors to keep in mind. I’ll share more details below.
Topping Ideas
This is where it really gets fun! We topped our deviled eggs with some chopped air fryer bacon, sliced green onions, and a little bit of paprika. But you can use all sorts of other toppings to make them your own or just to use up different ingredients in your fridge. Here are some more ideas for deviled eggs toppings:
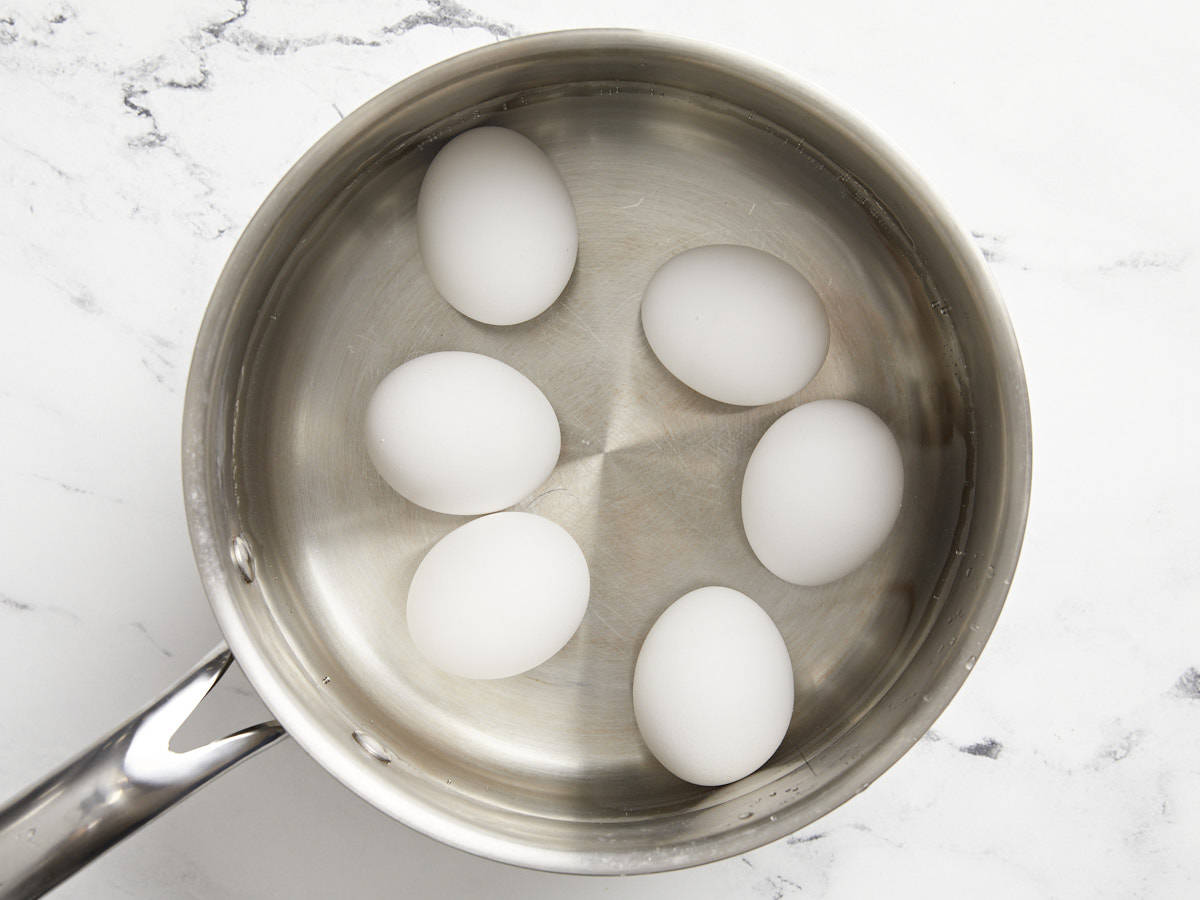
Add the cold eggs to a saucepot. Add enough water to the pot to cover the eggs by one inch.
Place a lid on the pot and bring the water up to a boil over high heat. Once the water reaches a full rolling boil, turn the heat off and leave the pot on the burner (with the lid on) for about 12 minutes.
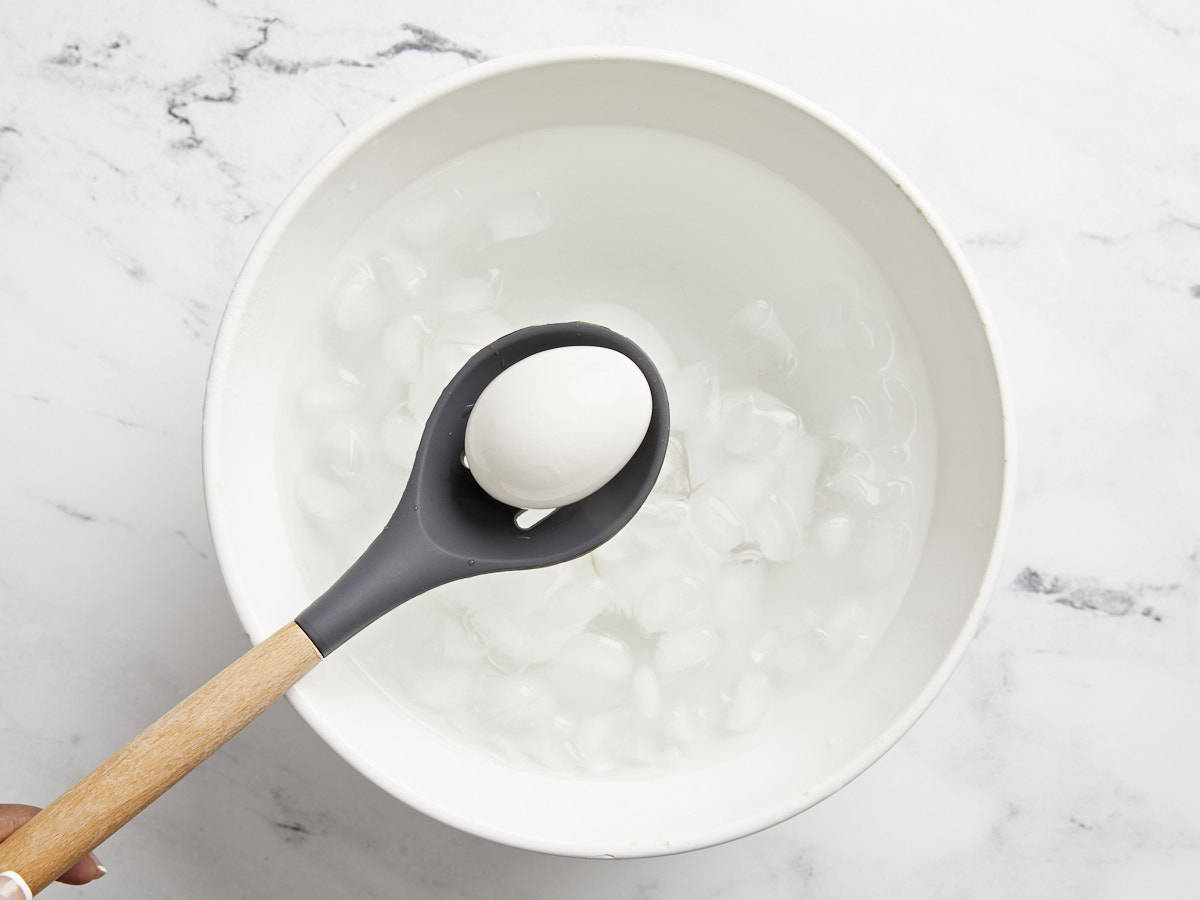
After 12 minutes, transfer the eggs to a bowl of ice water and chill the eggs for about 5 minutes.
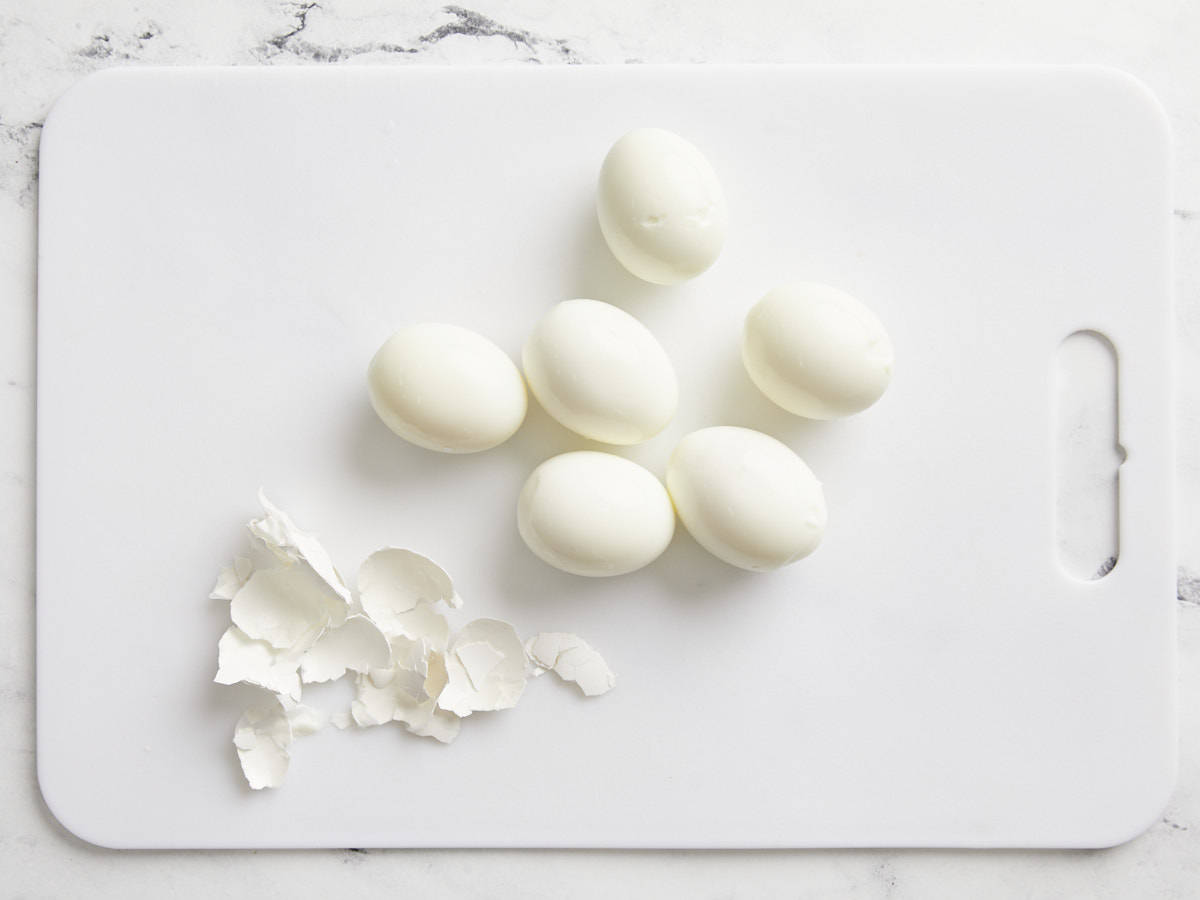
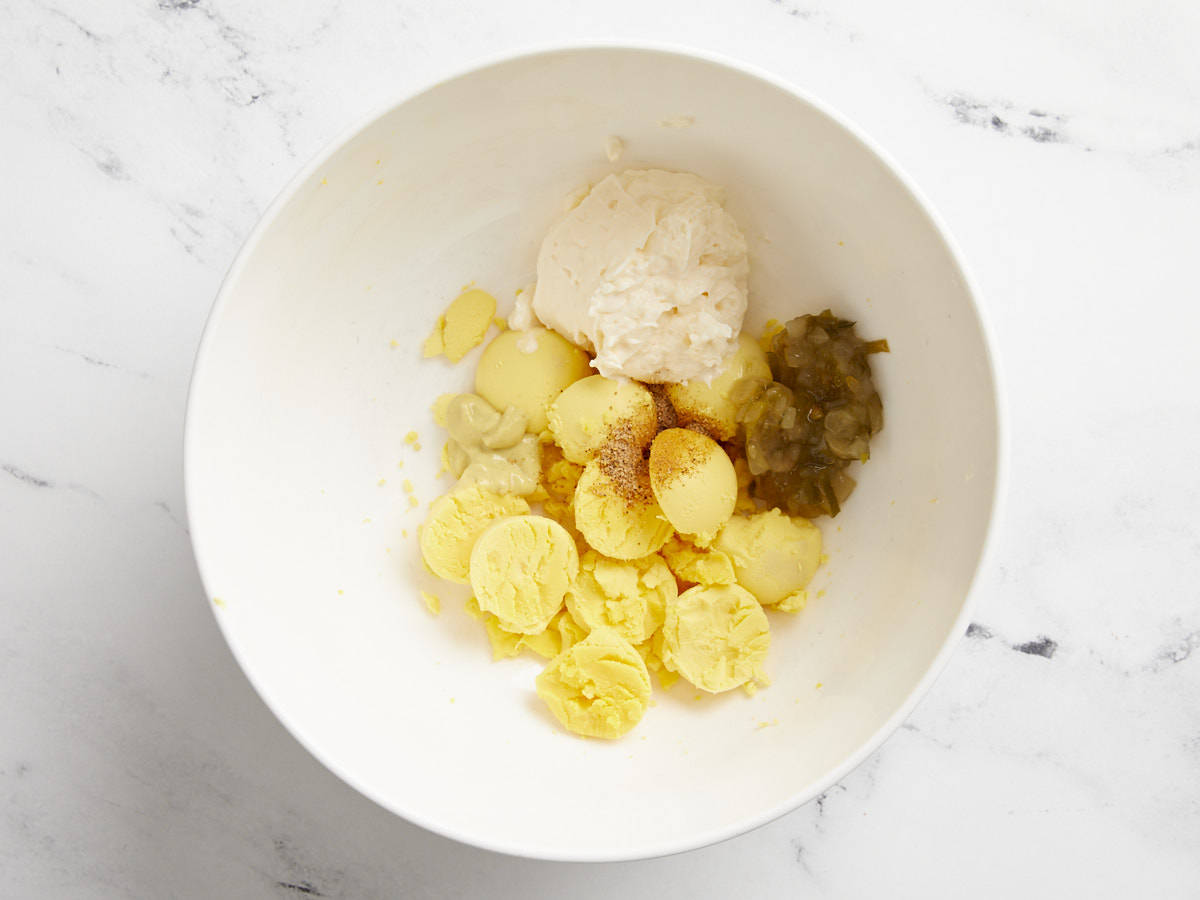
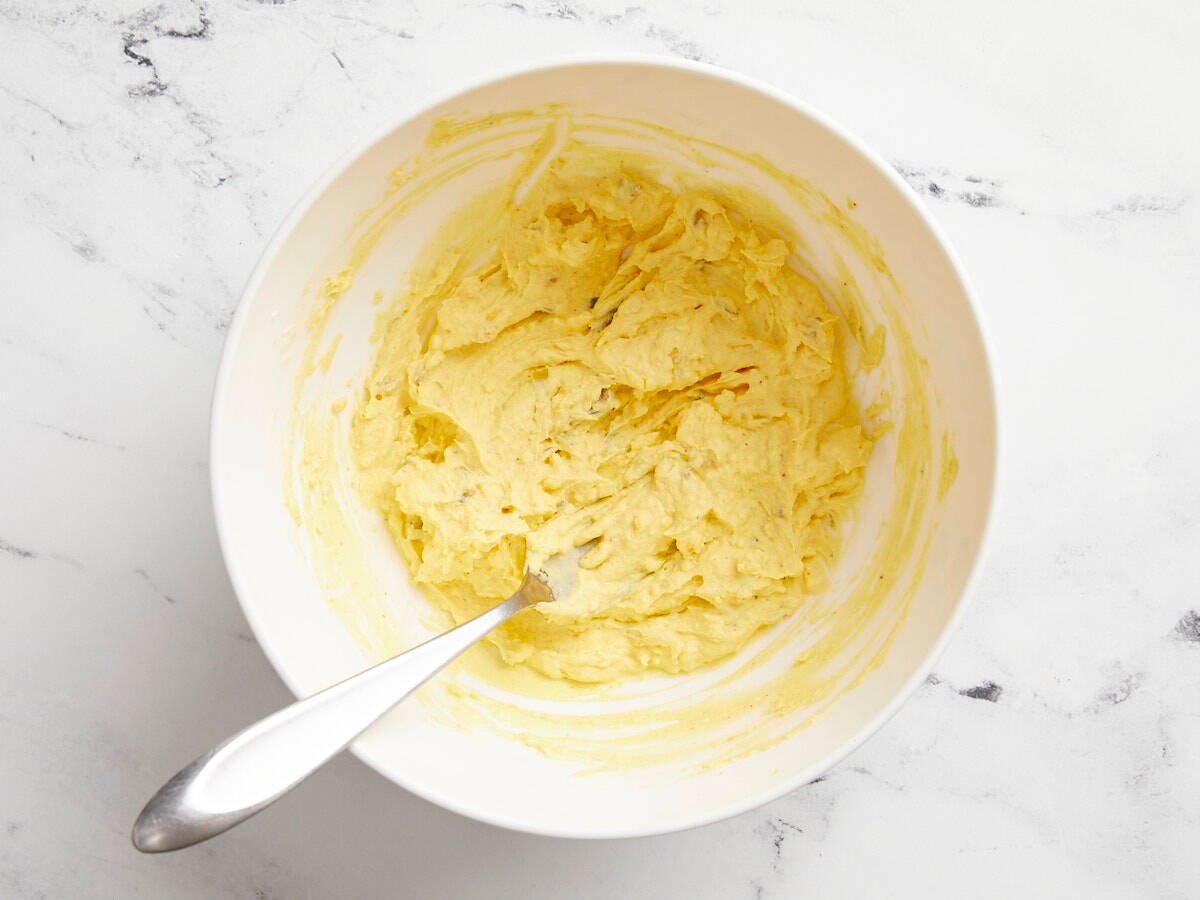
Next, peel the eggs then slice them in half. Pop the yolks out of the white and place them in a bowl. Add the mayonnaise, Dijon mustard, seasoning salt, and dill relish and mash everything together to combine.
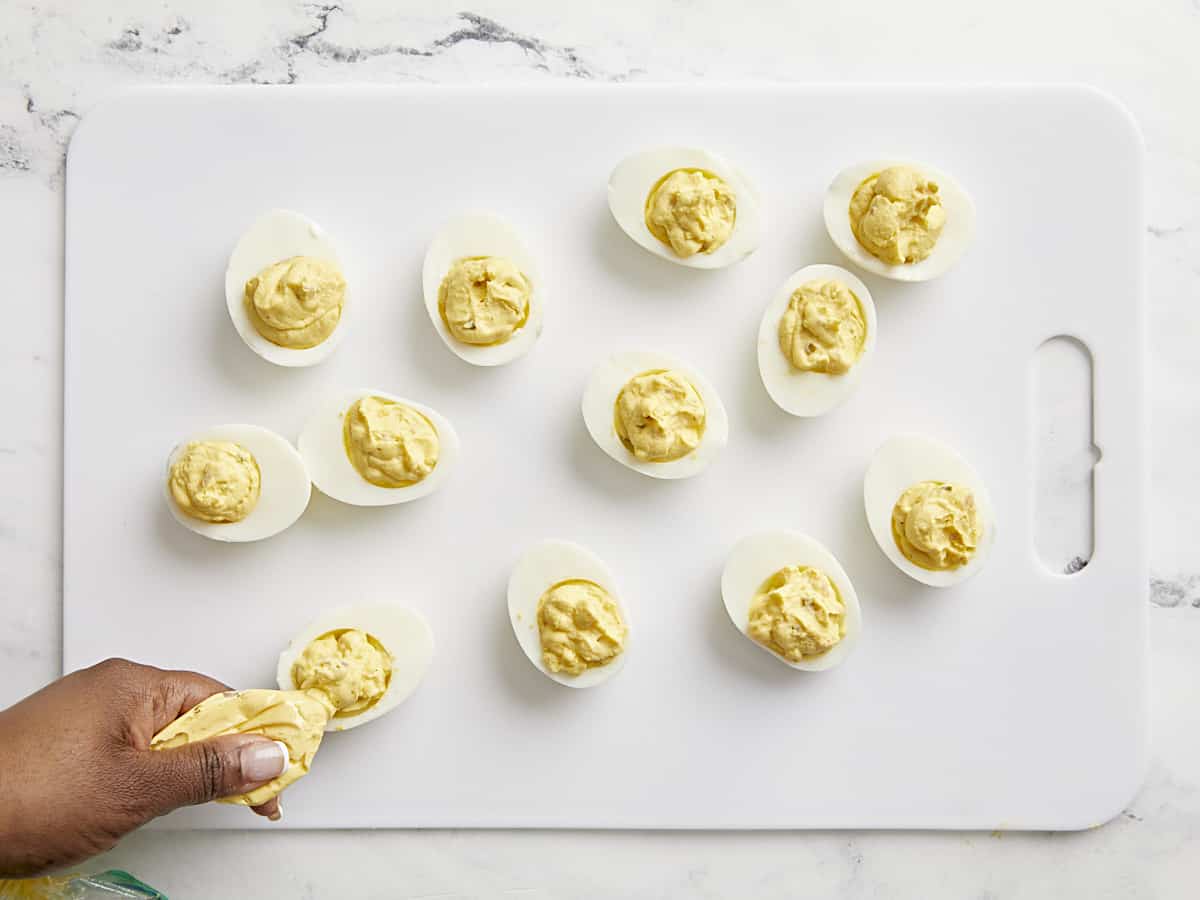
Spoon the seasoned yolk mixture back into the whites or place the mixture in a sandwich or freezer bag, snip off one corner of the bag, and pipe the filling into the egg whites.
Garnish the deviled eggs with your favorite toppings like paprika, chopped bacon, or sliced green onions. Serve and enjoy!
Add 6 large cold eggs to a sauce pot. Add enough water to the pot to cover the eggs by one inch. Place a lid on the pot and bring the water up to a boil over high heat. Once the water reaches a full rolling boil, turn the heat off and leave the pot on the burner (with the lid on) for about 12 minutes.
After 12 minutes, transfer the eggs to a bowl of ice water for about 5 minutes.
After the eggs have chilled, carefully peel the eggs then slice them in half.
Pop the yolks out of the white and place them in a bowl. Add 1/4 cup mayonnaise, 3/4 tsp Dijon mustard, 1/4 tsp seasoning salt, and 1 Tbsp dill relish.
Mash the yolks together with the rest of the ingredients to combine.
Spoon the seasoned yolk mixture back into the whites or place the mixture in a sandwich or freezer bag, snip off one corner of the bag, and pipe the filling into the egg whites.
Garnish the deviled eggs with your favorite toppings like paprika, chopped bacon, or sliced green onions. Serve and enjoy!
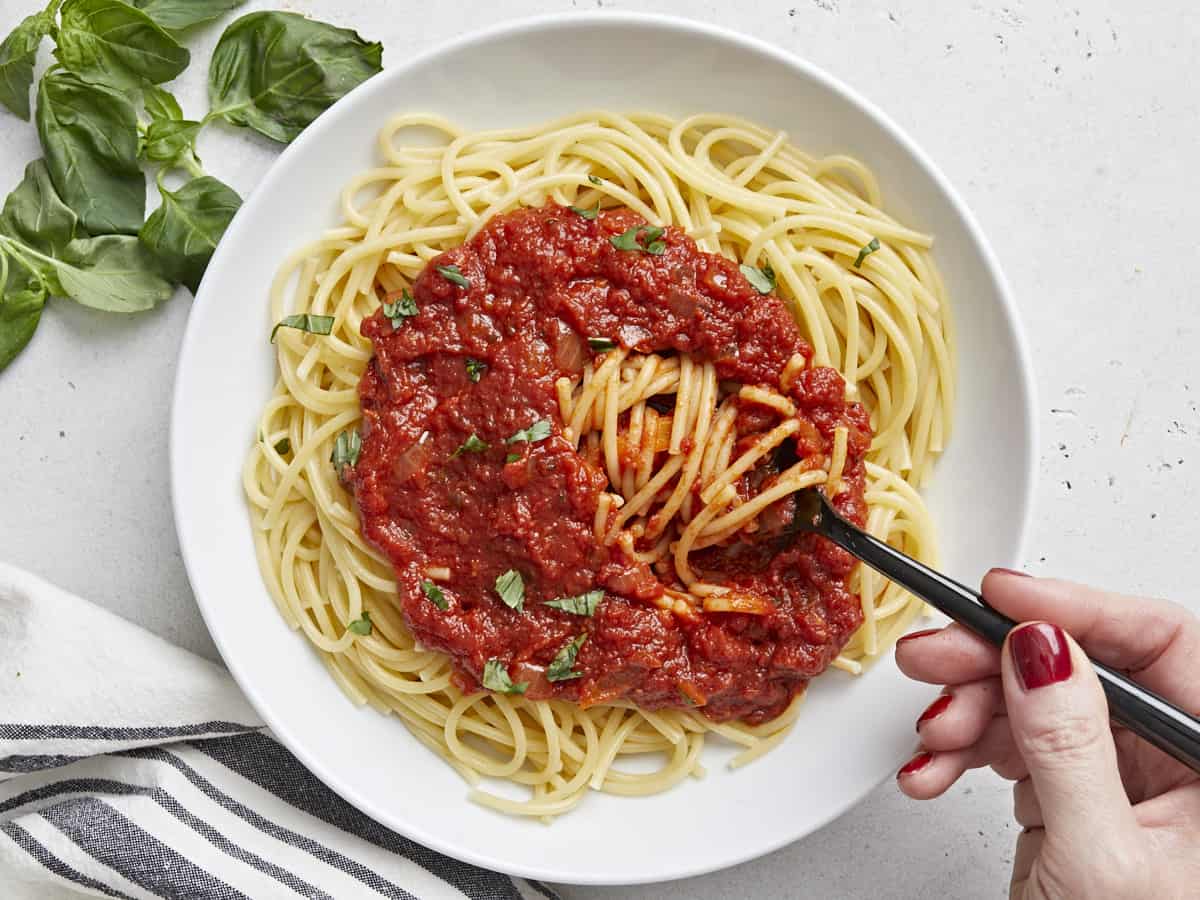
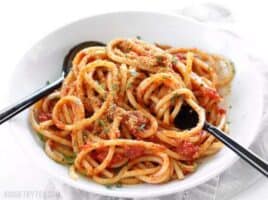
I know it’s super easy just to open up a jar of store-bought marinara sauce and pour it over your pasta, and sometimes that’s all the energy we have (no shame), but hear me out. This easy marinara sauce recipe is surprisingly simple, super inexpensive, and you get to control the ingredients (great for those watching their sugar or sodium intake). Plus, homemade marinara sauce is very freezer-friendly, so you can make a double batch now and save the other half for the nights when you have no energy. It heats through in minutes and you’re good to go with zero effort!
What is Marinara Sauce?
Marinara sauce is a simple tomato-based pasta sauce. It’s characterized by its simple list of ingredients, which leads to an uncomplicated and bright tomato flavor. The texture of marinara sauce is usually very uniform without large chunks, which allows it to coat pasta evenly. Marinara sauce is most often used as a sauce for pasta, but it can also be used in many other dishes or as a dipping sauce.
Ingredients for Marinara Sauce
Marinara sauce in its most simple form is just puréed tomatoes (or passata) and a small amount of herbs and spices. I’ve added a couple more ingredients here to satisfy my American palate, but the recipe remains very simple. Here’s what you’ll need to make this marinara sauce recipe:
Onion: The natural sugars in onion add a touch of sweetness to the sauce, which helps balance the acidity of the tomatoes.
Garlic: Garlic pairs so well with tomato sauce that I just had to add some to round out the savory flavors. That being said, you can skip it for a more traditional marinara sauce flavor.
Olive Oil: Olive oil helps the onion sauté without burning and it adds some body to the sauce.
Crush Tomatoes: A large can of crushed tomatoes provides bulk to this sauce with a fairly smooth texture. If you can not get crushed tomatoes where you live, passata will also work.
Tomato Paste: A little bit of tomato paste added to the sauce helps thicken it up and intensifies the tomato flavor.
Herbs: Dried basil and oregano round out the flavor of this sauce and give it a subtle herbal finish.
Brown Sugar: Adding sugar is a short cut with tomato sauce that helps balance the acidity without having to simmer the sauce for a long period of time. You can skip the brown sugar, but I love the balance it brings to the flavor.
Salt: Salt is arguably the most important ingredient in any dish as it helps our tongue distinguish between different flavors. If your sauce is not properly salted, you will not be able to taste its full flavor.
What Kind of Tomatoes to Use for Marinara Sauce
This recipe is written using canned crushed tomatoes, which offer both convenience and a low price. While you most definitely can make marinara sauce using fresh tomatoes, that would require several more steps and a reformulation of the recipe to account for the extra water and flavor differences.
When choosing the canned crushed tomatoes for this recipe, keep in mind that there can be quite a drastic flavor difference between brands. If budget is your main concern, this recipe makes a great sauce even when using generic-brand canned tomatoes. But, if you want to get a bit fancier, you can opt for a premium or imported brand, or even buy whole canned San Marzano tomatoes and purée them yourself. Even when you opt for a more expensive canned tomato, this recipe is still very easy and budget-friendly, making it a great option for special occasions like date night in!
How to Use Marinara Sauce
We all know that marinara sauce is great on pasta, but you can use it for other recipes, as well! Here are some other ways to use this easy homemade marinara sauce:
Use it on pizza for a lighter tomato flavor. It’s particularly great on Margherita pizzas.
Use it as a base for soup by adding more seasoning, broth, and other items like pasta, meatballs, or vegetables.
How to Store And Reheat
As mentioned, this marinara sauce recipe freezes beautifully. After cooking the marinara sauce, transfer it to the refrigerator until completely chilled. The sauce will stay good in the refrigerator for 4-5 days, or you can transfer it to the freezer for longer storage. Just make sure the sauce is in a freezer-safe container, label and date it, and then freeze for up to three months. To reheat, simply transfer the frozen sauce to a saucepot and heat over medium-low, stirring often, until heated through.
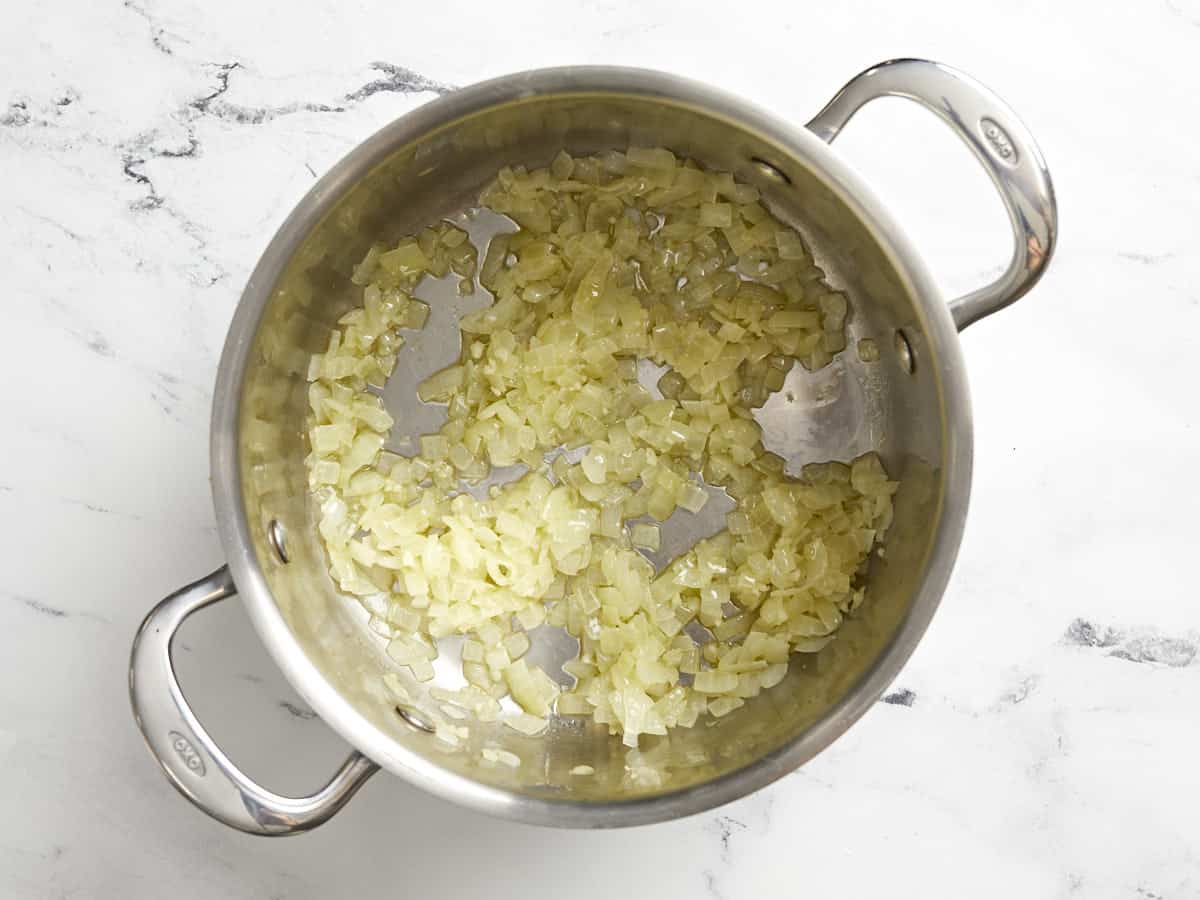
Dice the onion and mince the garlic. Add the onion, garlic, and olive oil to a sauce pot and sauté over medium heat until the onions are soft and translucent (about 5 minutes).
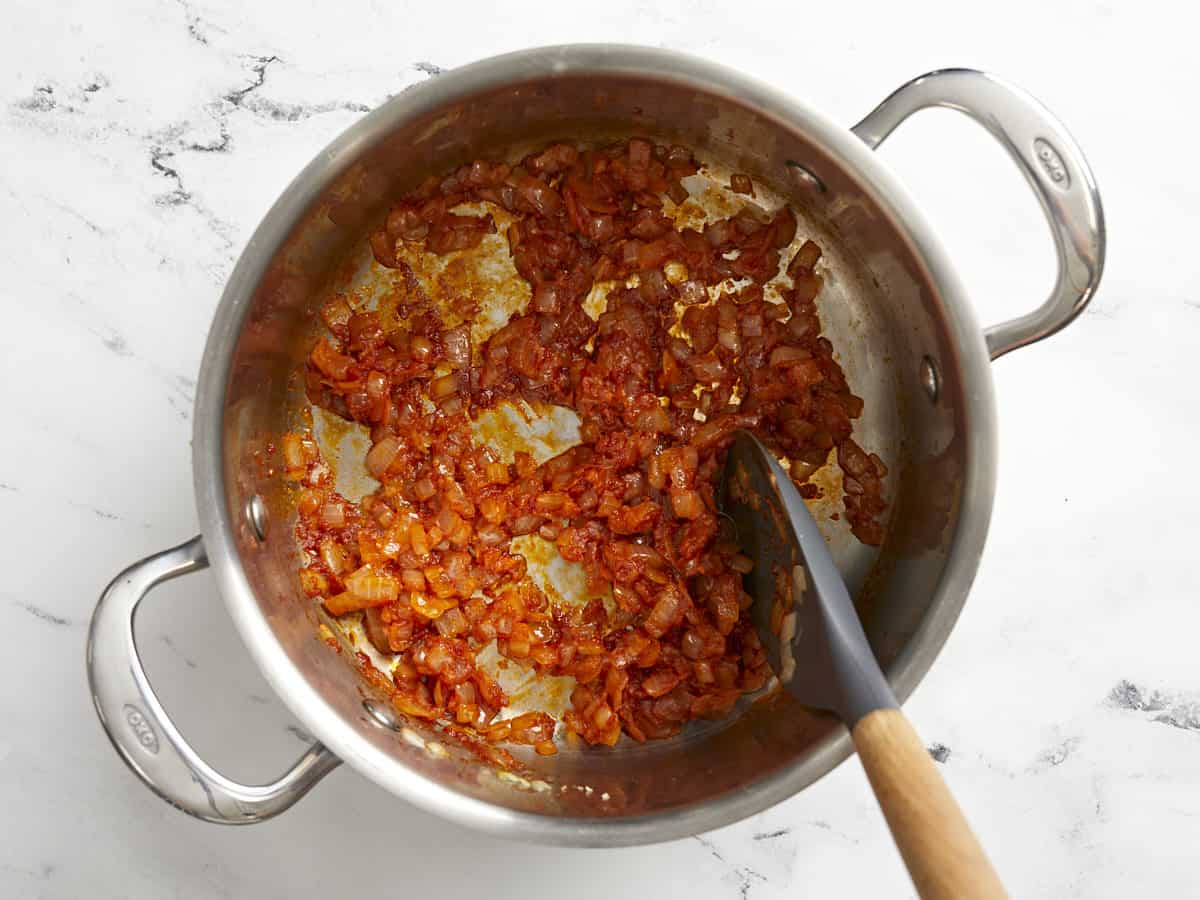
Add the tomato paste and continue to stir and cook for 3-5 minutes more, or until the tomato paste takes on a slightly darker color. This caramelizes the sugars in the tomato paste to give it a slightly sweeter and less acidic flavor.
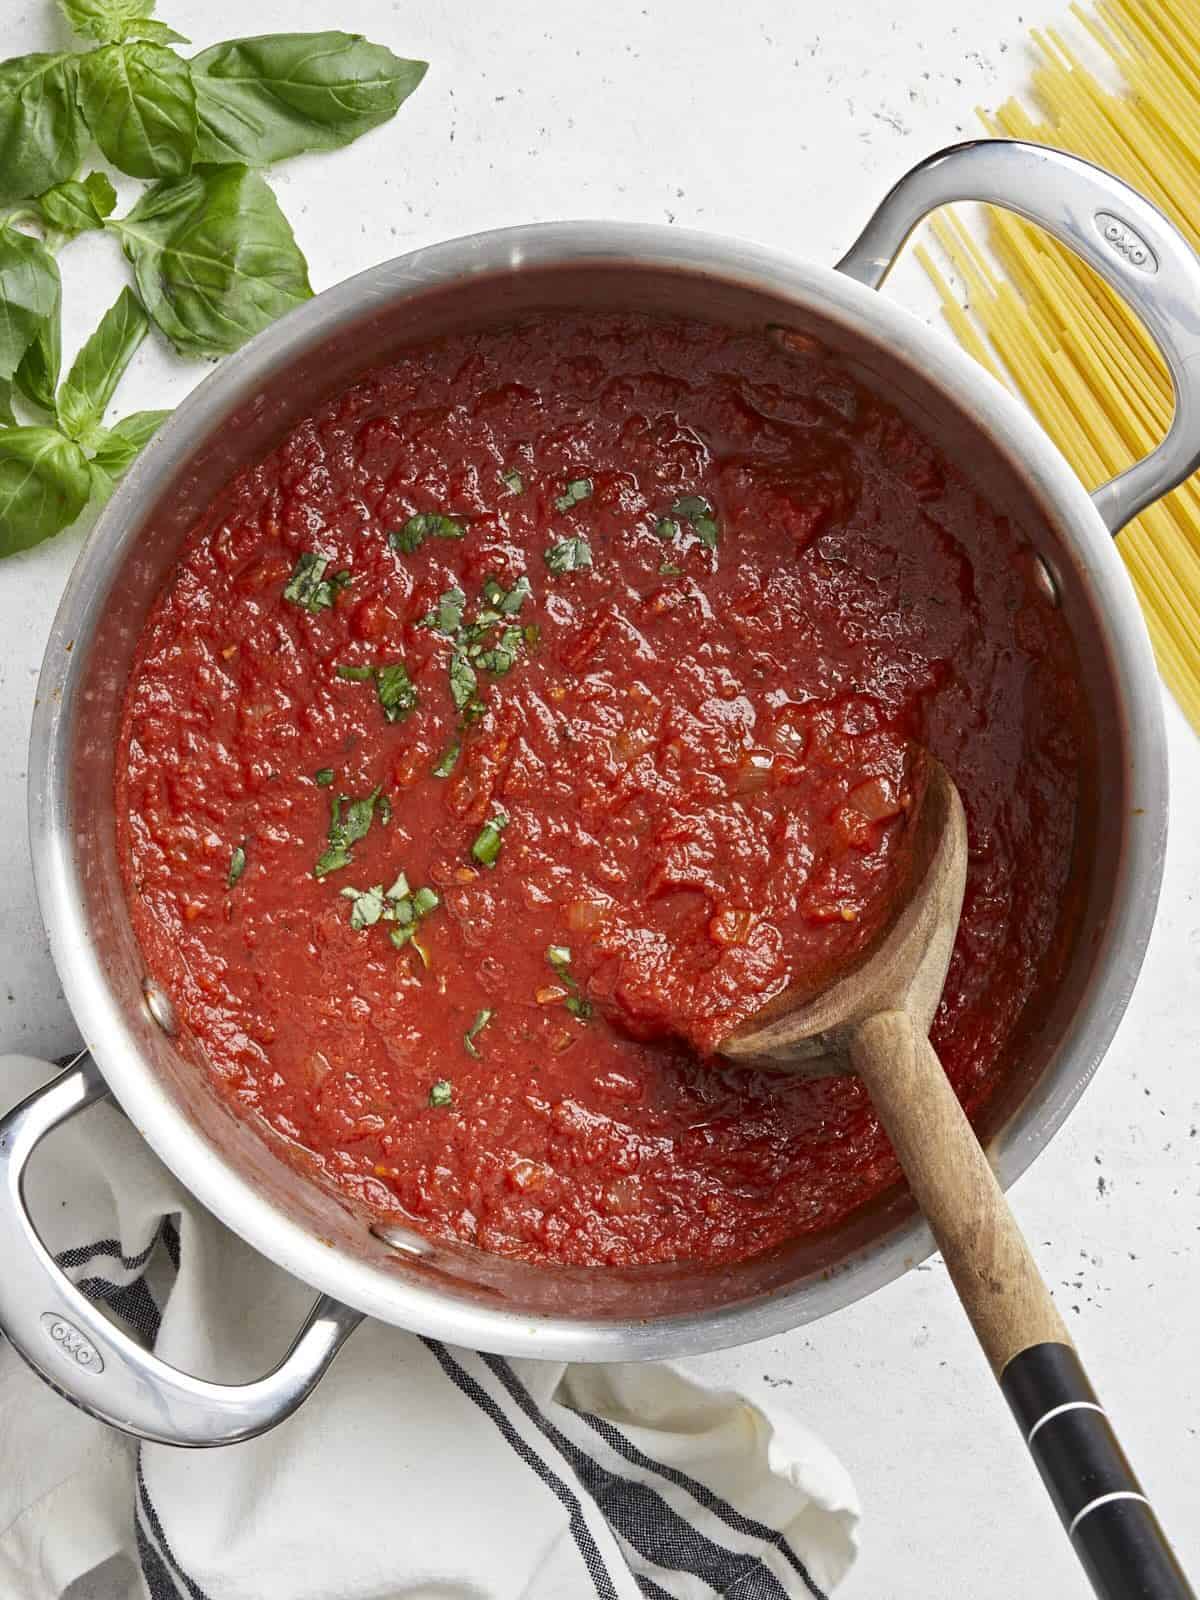
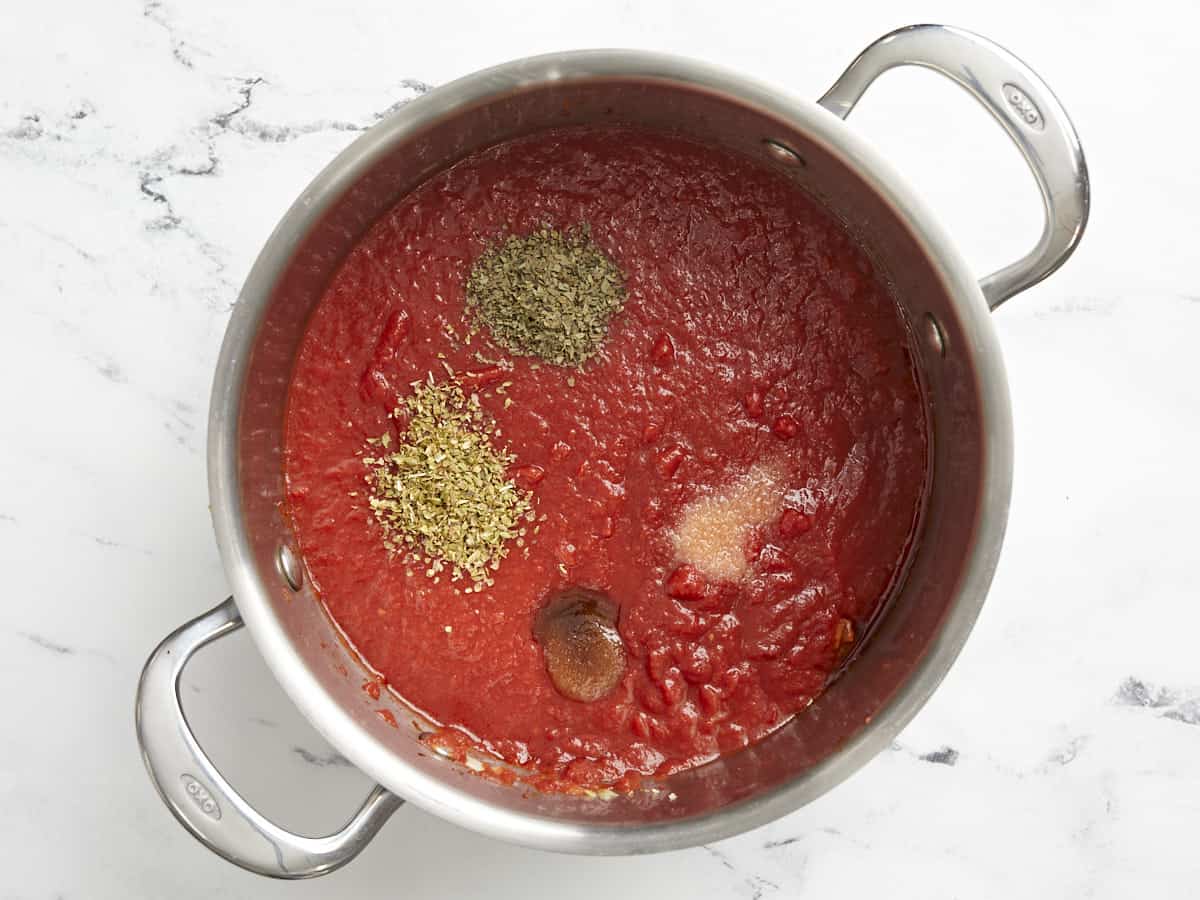
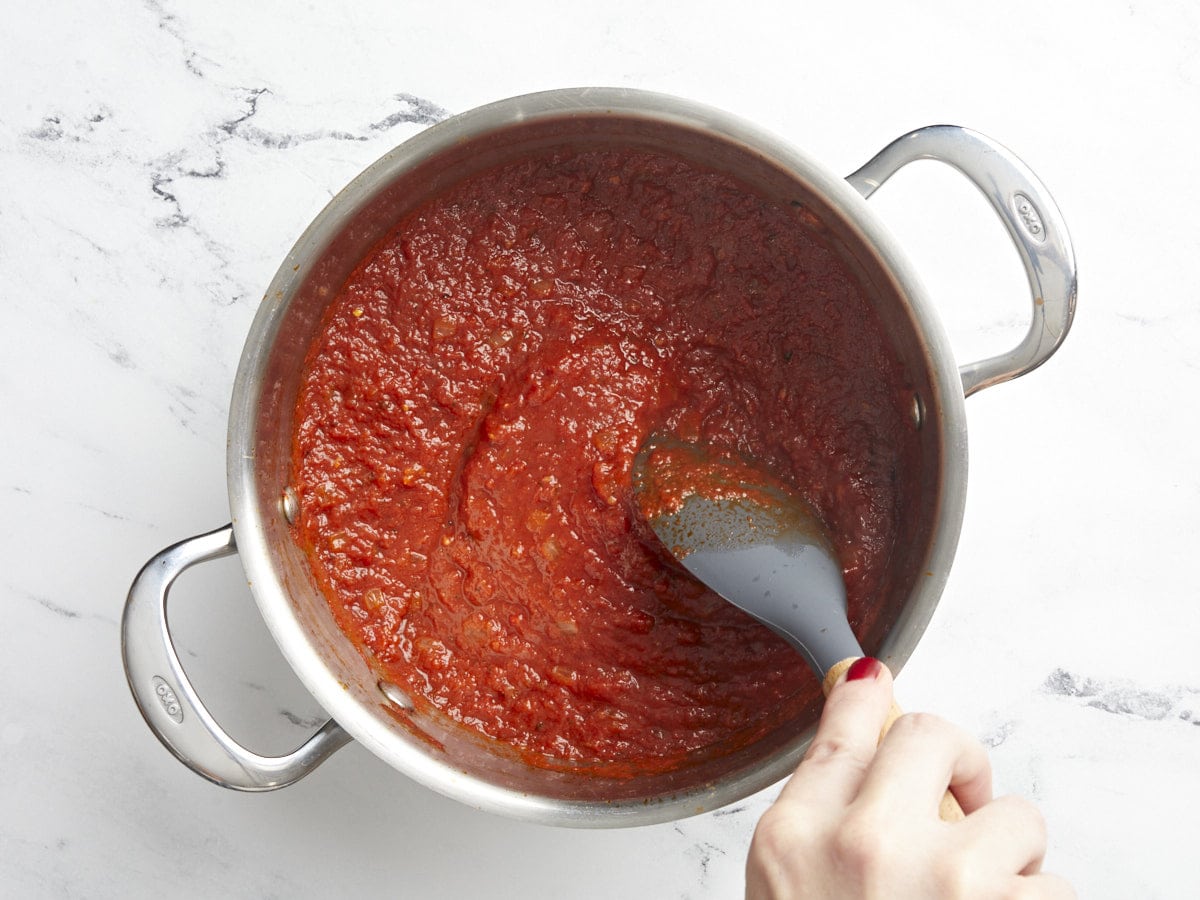
Add the crushed tomatoes, basil, oregano, brown sugar, and salt to the pot. Stir to combine and dissolve any tomato paste from the bottom of the pot.
Allow the sauce to come to a gentle simmer, then reduce the heat to medium-low, partially cover the pot, and allow the sauce to simmer for about 30 minutes, stirring occasionally.
After simmering for 30 minutes, taste the sauce and adjust the salt, sugar, or other seasonings to your liking. If the sauce is too acidic for your liking, you can let it simmer longer (about one hour) or add more sugar. Serve hot or refrigerate until ready to eat.
Dice one yellow onion and mince two cloves of garlic. Add the onion, garlic, and 2 Tbsp olive oil to a sauce pot and sauté over medium heat until the onions are soft and translucent (about 5 minutes).
Add 2 Tbsp of tomato paste to the pot and continue to stir and cook for 3-5 minutes more, or until the tomato paste takes on a slightly darker color. This caramelizes the sugars in the tomato paste, adding a natural sweetness.
Finally, add one 28oz. can of crushed tomatoes, ½ tsp dried basil, ½ tsp dried oregano, 1 tsp brown sugar, and 1 tsp salt. Stir to combine and dissolve any tomato paste from the bottom of the pot. Allow the sauce to come to a gentle simmer.
Once simmering, turn the heat down to medium-low, partially cover the pot, and let the sauce simmer for about 30 minutes, stirring occasionally. Leaving a lid on the pot but slightly ajar can help prevent splatter.
After simmering for 30 minutes, give the marinara sauce a taste and adjust the salt or other herbs to your liking. If it’s still too acidic for your taste, you can either simmer it longer (around 1 hour total), or add more sugar.
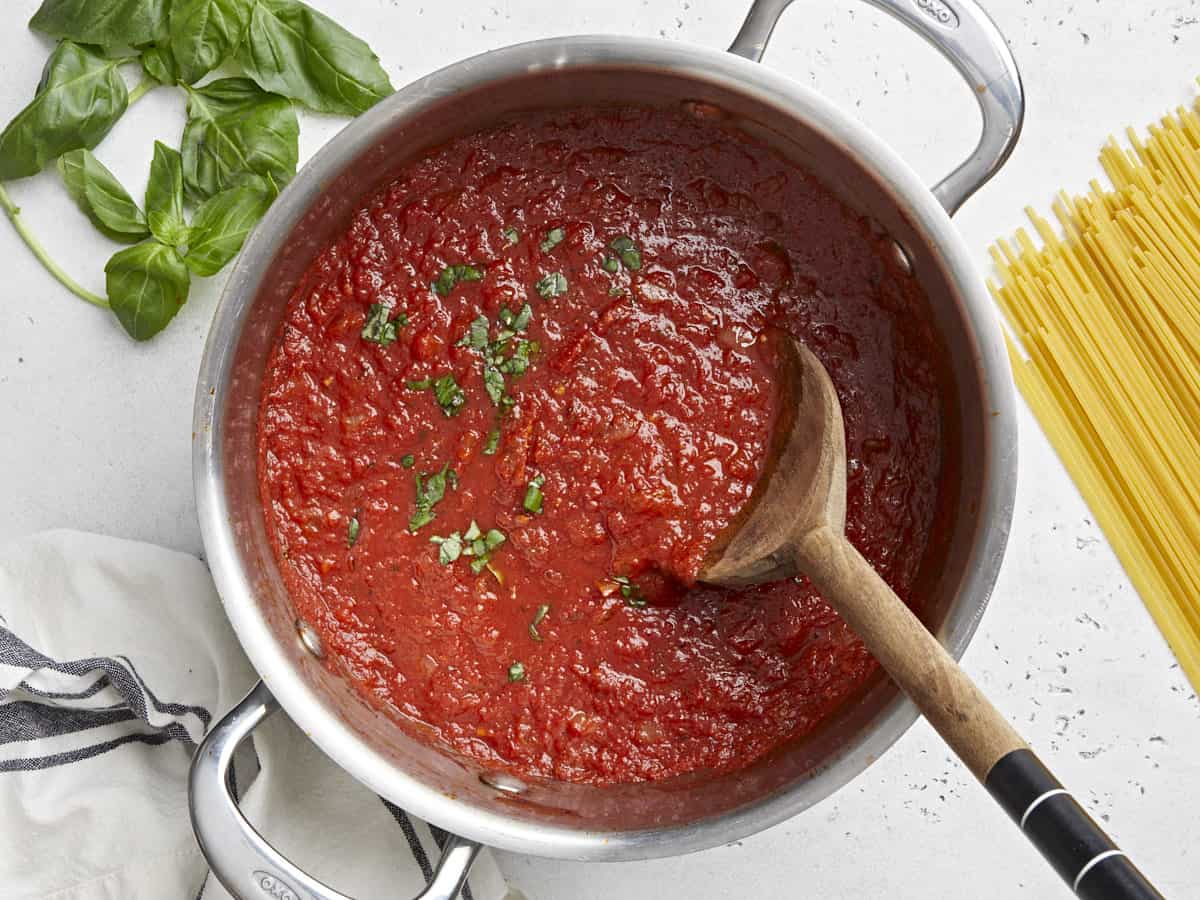
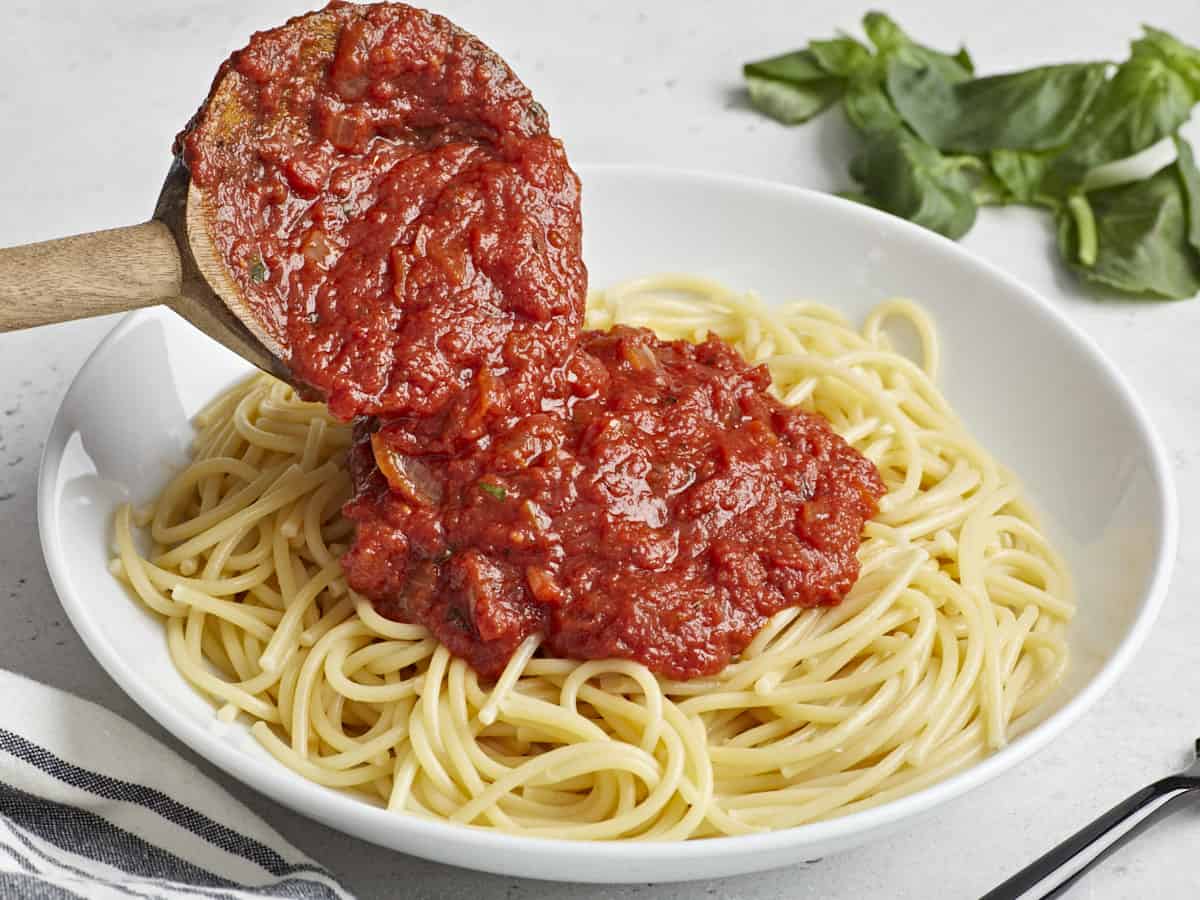
Serve the homemade marinara sauce over pasta, use it for a dipping sauce, or freeze it for later!
I really love french fries, but deep frying can be such a hassle. On busy weeknights when I’m craving a crispy side, I make these Air Fryer French Fries, and all my troubles just melt away! Seasoned simply with olive oil, garlic and onion powder, and salt, these fries pack a punch and are mess-free! This air fryer french fry recipe is the kind of easy side dish I’m serving up every week because it’s just so simple.
Why Make French Fries in the Air Fryer
I don’t know about you, but I love my air fryer. It’s the perfect little hero appliance for all types of fried foods. If you hate a mess in the kitchen as much as I do, you need this air fryer french fries recipe in your life! These fries are just as crispy as if they came fresh from the fryer but without the hassle and burning eyes! This is the perfect recipe to use up those last few potatoes from that 5-pound bag in the pantry before they start sprouting.
Ingredients for Air Fryer French Fries
You’re just 5 simple ingredients away from crispy, crunchy french fries! Here’s what you’ll need to make air fryer french fries:
RussetPotatoes: Just one pound of potatoes, or approximately 2 medium Russet potatoes, is all you need to make air fryer french fries. Russet are creamy on the inside and a classic fry potato, but Yukon Gold are a great choice if you like firmer fries.
Olive Oil: A little bit of olive oil (or cooking oil of your choice– vegetable or canola can help cut costs) to help the seasoning stick to the potatoes and help the potatoes to brown evenly while cooking.
Seasoning: A combination of onion powder, garlic powder, and salt is simple but oh-so flavorful!
What Else Can I Add to Air Fryer French Fries?
This simple seasoning blend is quick, easy, and delicious, but you can also get creative with seasonings. Try:
To get the crispiest french fries in the air fryer, follow these tips:
Soak the cut potatoes to remove excess starch.
Pat the potatoes dry to remove excess moisture. Moisture is the enemy of crispy.
Work in batches to ensure every fry is crisp. Overcrowding can lead to soggy fries, so cook in a single layer with space in between.
Test each batch of fries to ensure they are properly cooked.
When in doubt, keep cooking! Every air fryer is a little different, so your fries may need more time.
Recrisp all of the fries together for 1-2 minutes in the air fryer at the end so everything is hot and ready for serving.
How to Store Leftovers
Once cooked and cooled, these air fryer french fries can be stored in an air-tight container in the refrigerator for up to 5 days or frozen for longer storage. Reheat in a single layer in a 350°F air fryer for 3-5 minutes, or until warmed through and crispy. They’ll stay fresh in the freezer for up to 3 months and can be thawed overnight in the refrigerator before reheating.
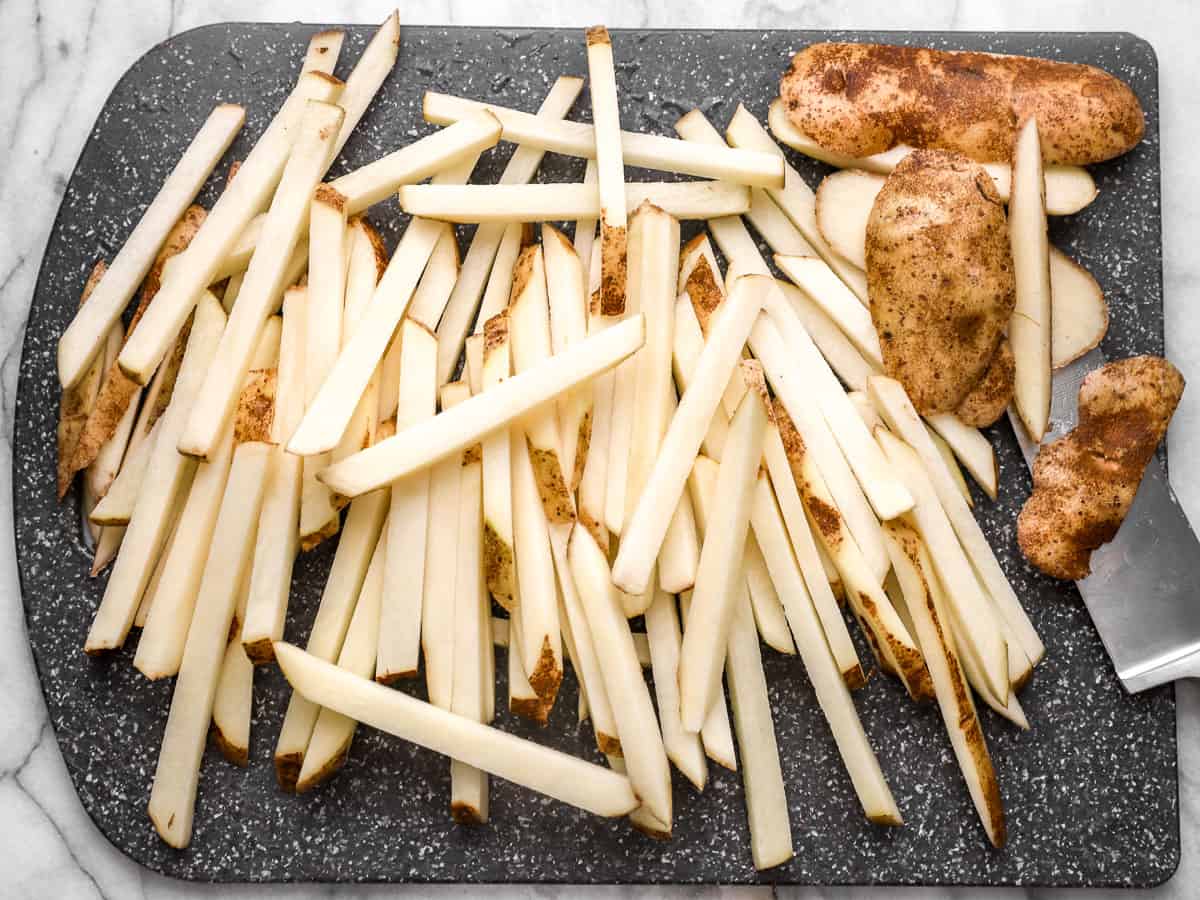
Wash and dry the potatoes, then slice them into 1/4-inch matchsticks.
Soak the cut potatoes in a large bowl of cool water for 15 minutes. While the potatoes soak, preheat the air fryer to 380°F.
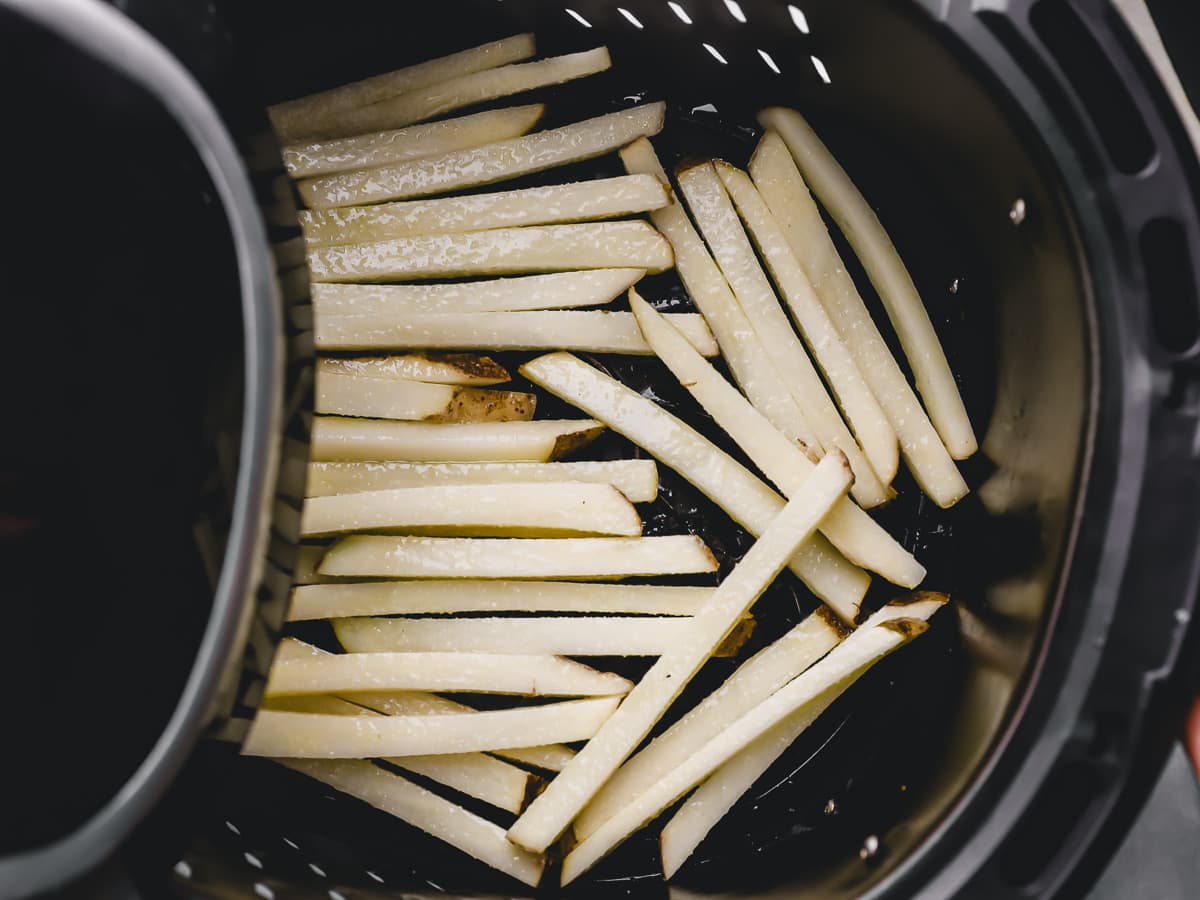
Once the potatoes have finished soaking, pat them dry with paper towels. Place the potatoes in a large bowl, drizzle with olive oil, and sprinkle with garlic powder, onion powder, and salt. Toss to coat evenly.
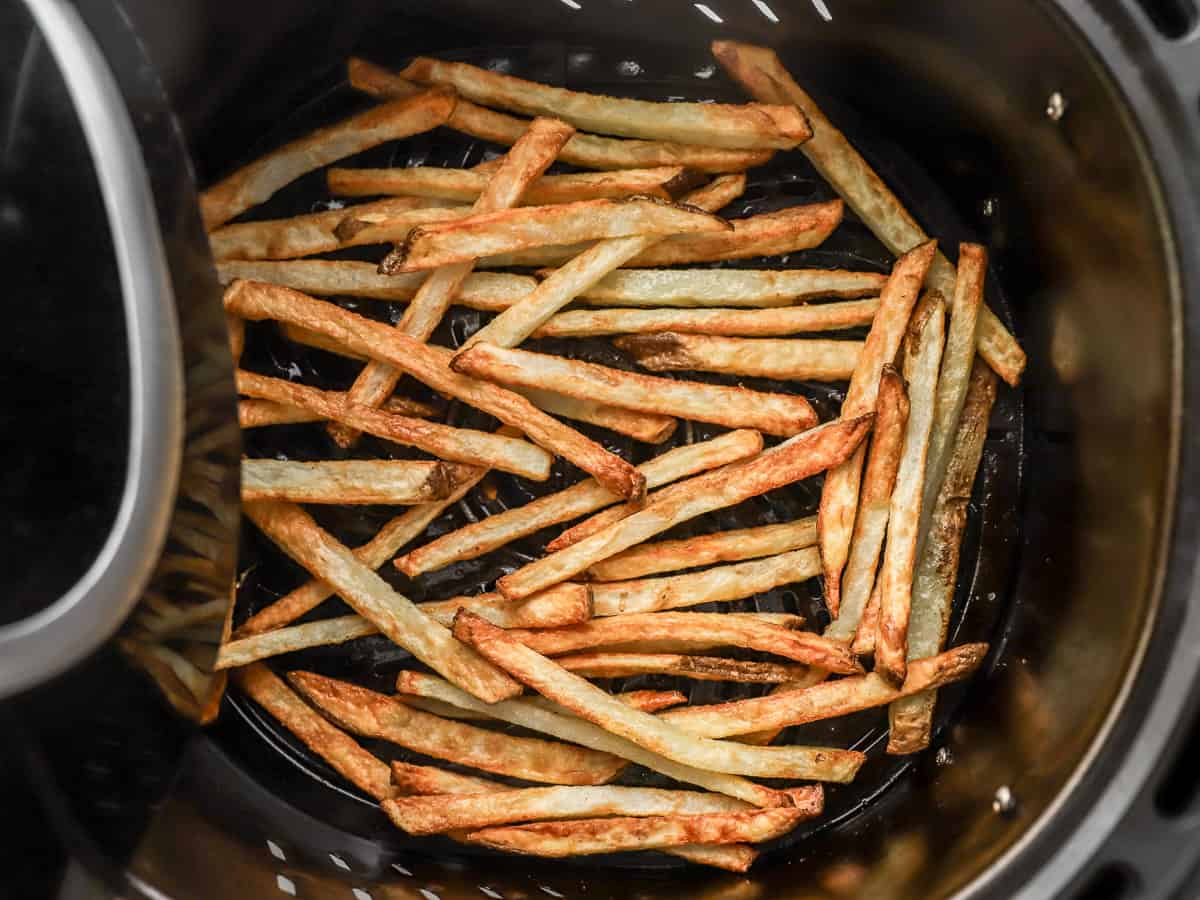
Working in batches, arrange the fries in an even layer in the preheated air fryer and cook until golden brown and crispy, about 10-15 minutes.
Repeat with the remaining fries until they have all been cooked. Serve immediately.
how to make Air Fryer French Fries – step by step photos
Wash and dry 1 lb. of Russet potatoes, then slice them into 1/4-inch matchsticks.
Soak the cut potatoes in a large bowl of cool water for 15 minutes. While the potatoes soak, preheat the air fryer to 380°F.
Once the potatoes have finished soaking, pat them dry with paper towels. Place the potatoes in a large bowl, drizzle with 3 Tbsp of olive oil, and sprinkle with 1/2 tsp garlic powder, 1/2 tsp onion powder, and 1/2 tsp salt. Toss to coat evenly.
Working in batches, arrange the fries in an even layer in the preheated air fryer and cook until golden brown and crispy, about 10-15 minutes. Repeat with the remaining fries until they have all been cooked. Serve immediately.
These fries are the ultimate weeknight hero. Simple, mess-free, and so flavorful!