Looking for a wholesome, make-ahead breakfast recipe? Muesli is the answer! Muesli is essentially homemade oat cereal, which originated in Switzerland. Just add milk, and maybe some…
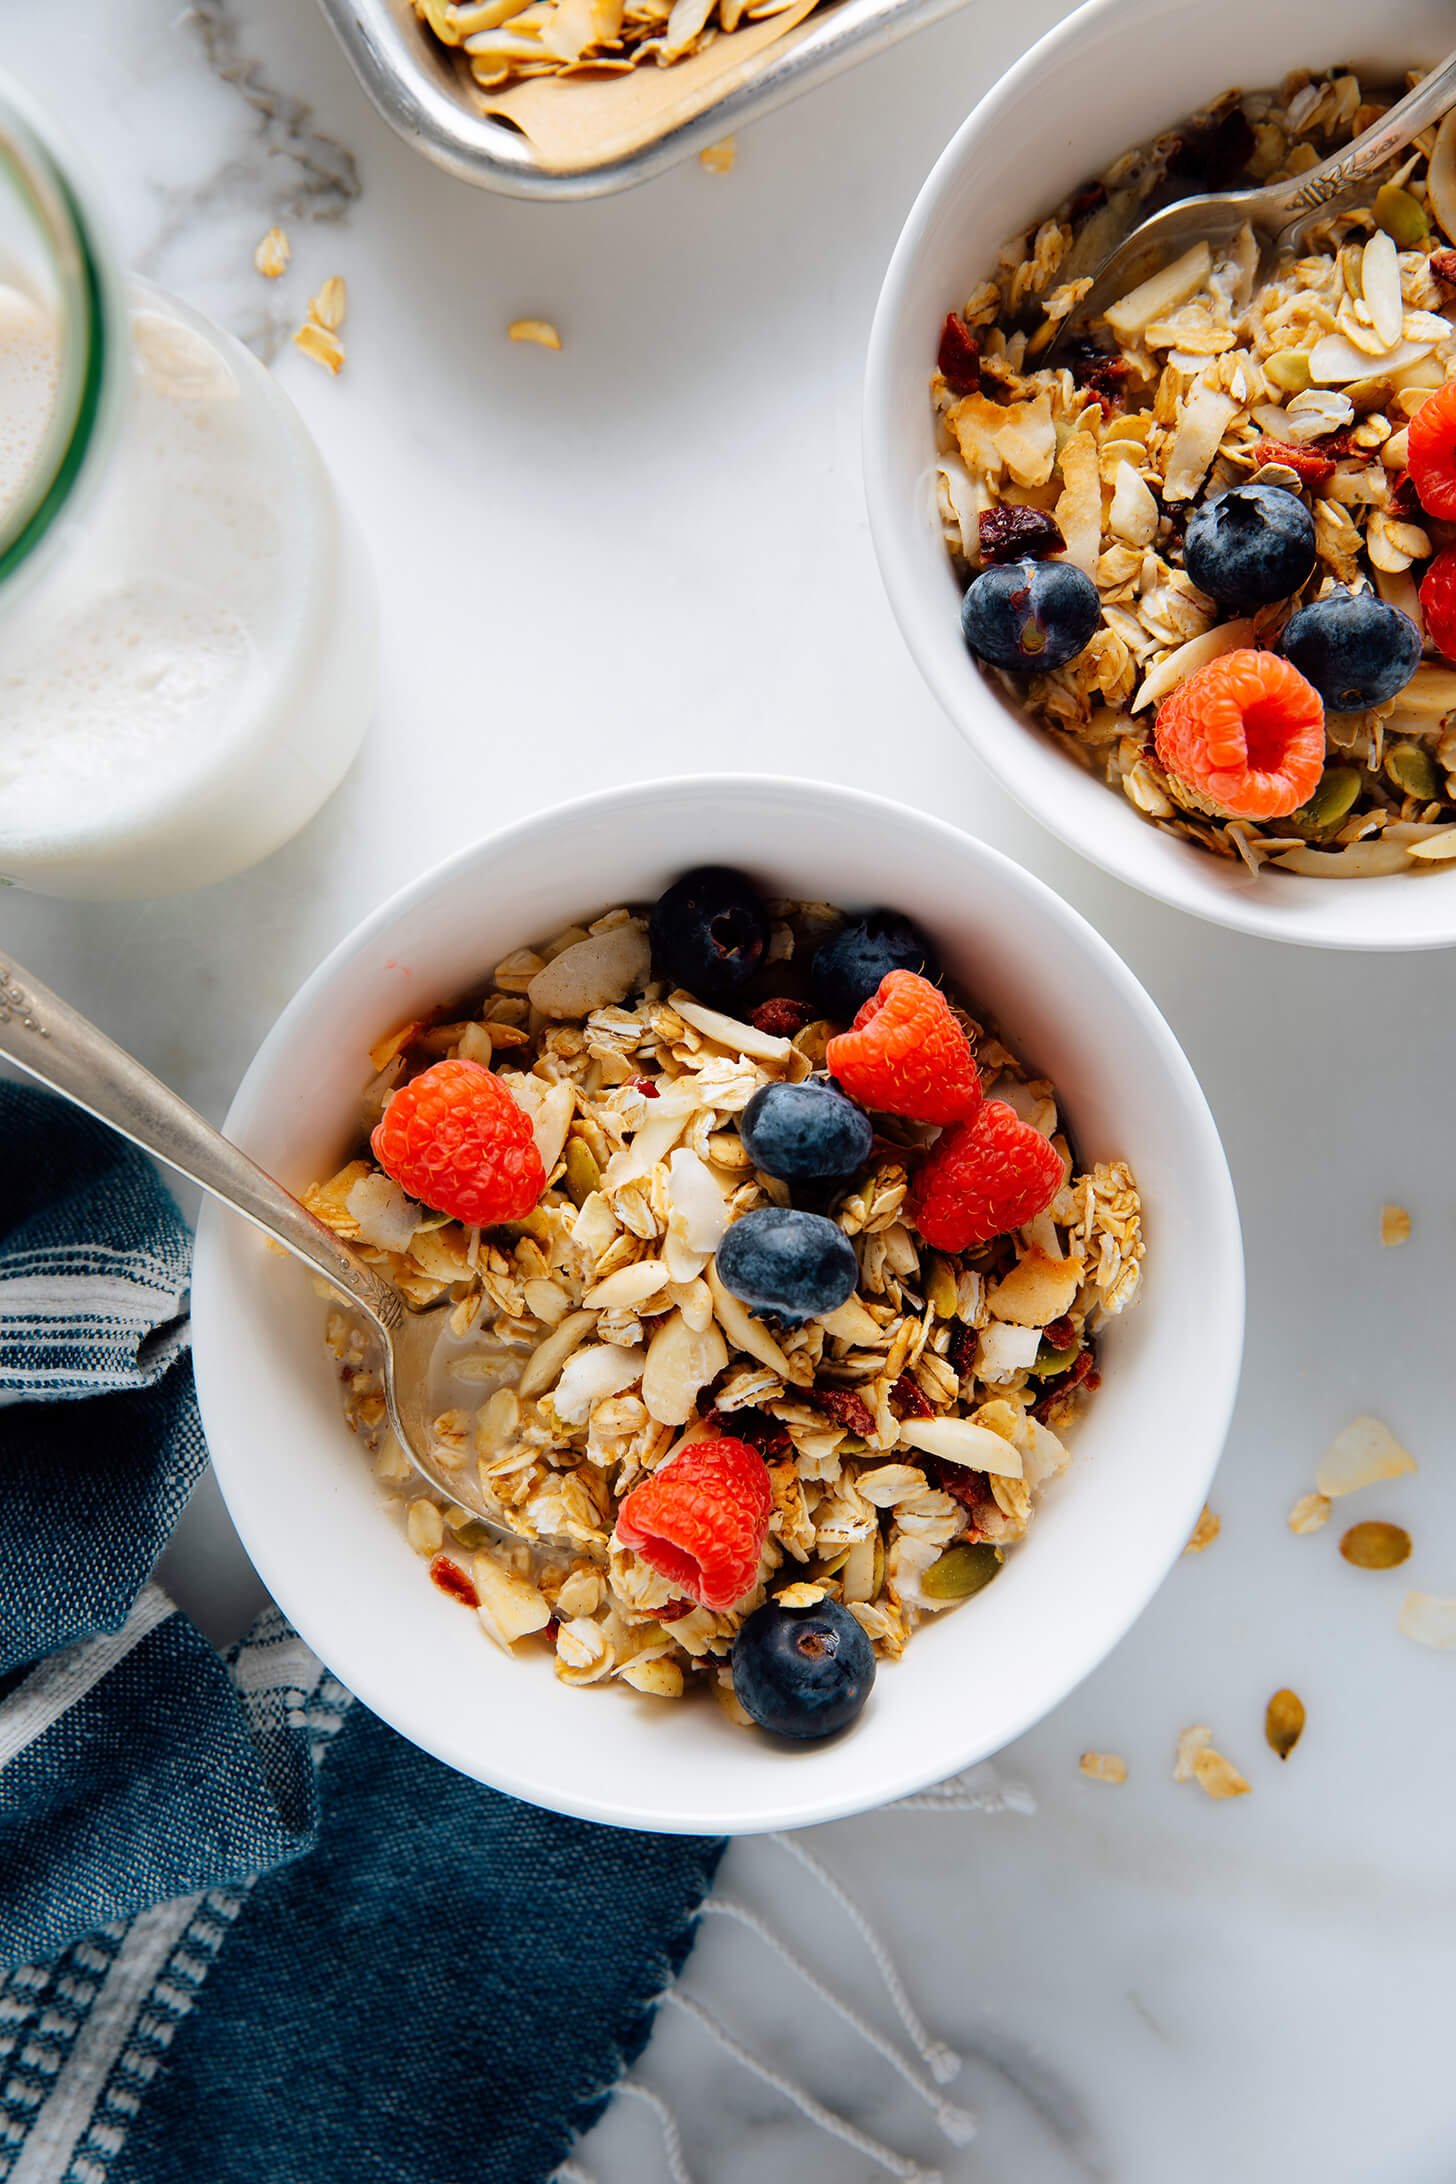
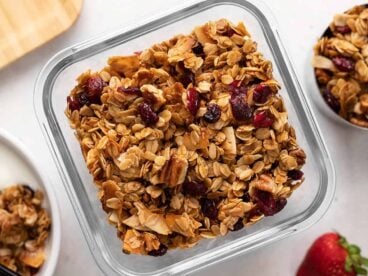
Looking for a wholesome, make-ahead breakfast recipe? Muesli is the answer! Muesli is essentially homemade oat cereal, which originated in Switzerland. Just add milk, and maybe some fresh fruit. It stores well in the freezer for up to six months.
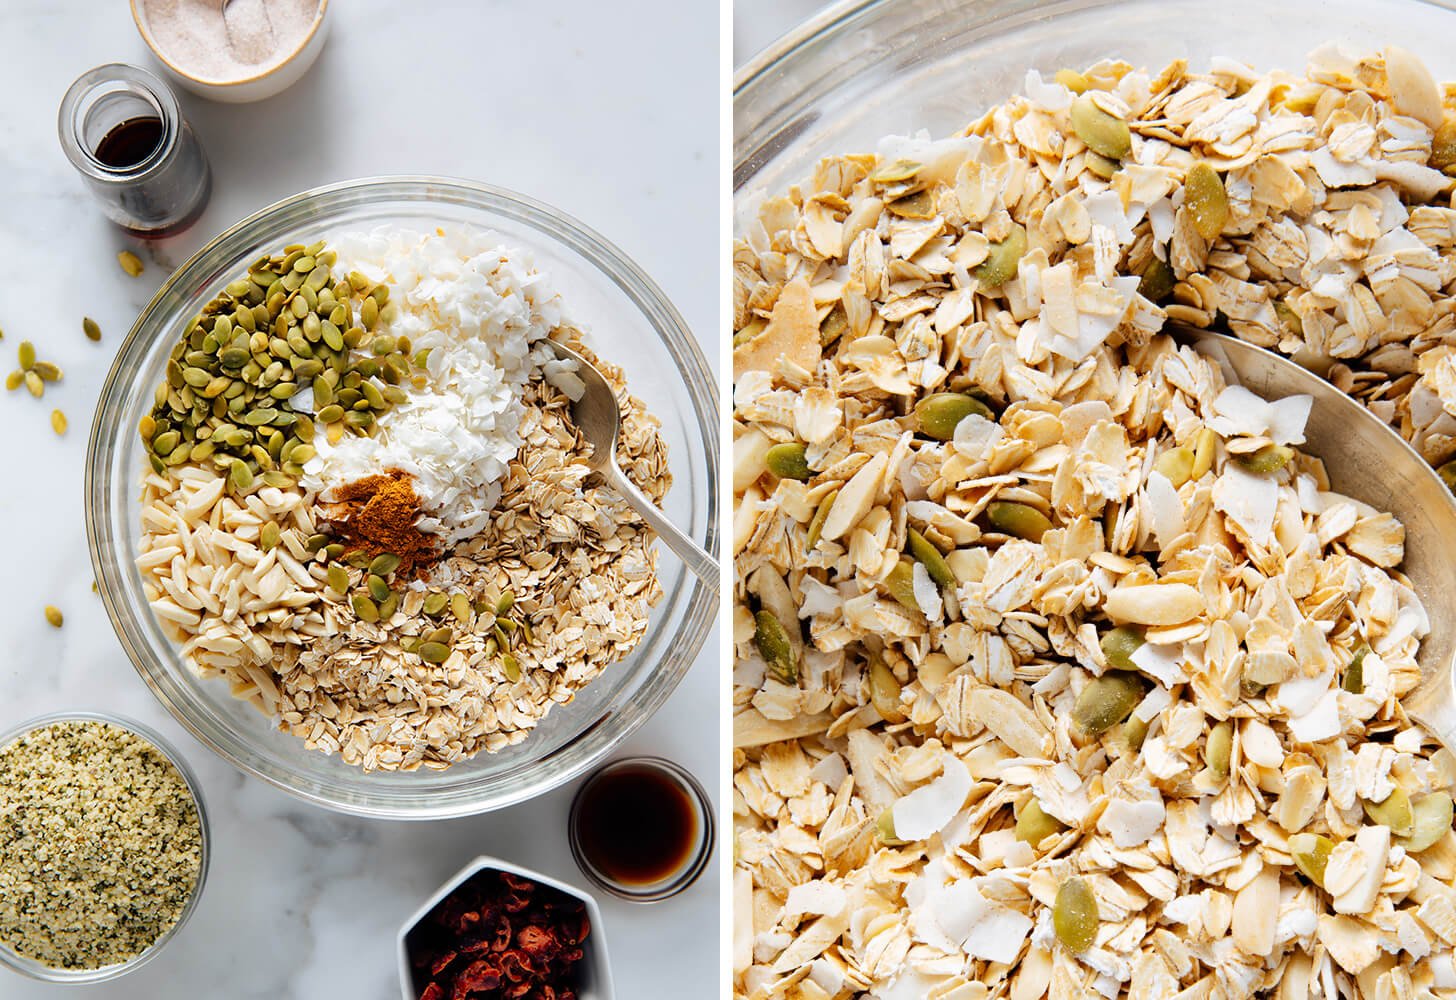
Not all mueslis are created equally—some are bland and blah. Not this one! This nutritious muesli recipe offers loads of texture and flavor. It features old-fashioned oats, nuts and seeds, optional coconut, and chopped dried fruit.
Toasting the muesli in the oven makes a world of difference. It brings out the savory, nutty flavors in the oats, nuts and seeds and makes your kitchen smell lovely. The oven’s heat also firms up the oats a bit, offering even more texture. It’s absolutely worth the effort!
My other trick is adding a maple syrup splash to the mixture before toasting. The subtle sweetness substantially improves the flavor.
You probably have everything you need to make muesli already, so let’s preheat the oven and start mixing. Below, you’ll find many options for adapting the recipe to your pantry.
This moist, decadent vegan chocolate cake is the perfect ending to any dinner night! Made 100% from scratch and topped with a rich yet light chocolate whipped cream, it requires just one bowl for the batter and one for the frosting. If you love chocola…
This moist, decadent vegan chocolate cake is the perfect ending to any dinner night! Made 100% from scratch and topped with a rich yet light chocolate whipped cream, it requires just one bowl for the batter and one for the frosting. If you love chocolate as much as I do, your mouth will certainly water...
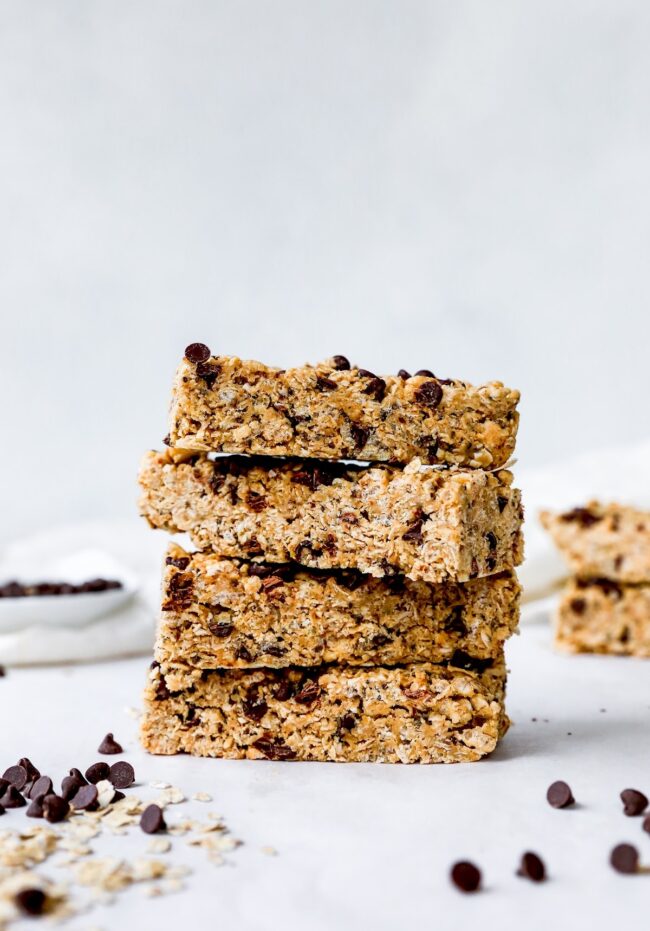
I try to always have homemade granola bars in the fridge for an easy grab and go breakfast or snack. These granola bars are easy to make and made with basic pantry ingredients. They are satisfying, sweet, and taste so much better than store bought gran…
I try to always have homemade granola bars in the fridge for an easy grab and go breakfast or snack. These granola bars are easy to make and made with basic pantry ingredients. They are satisfying, sweet, and taste so much better than store bought granola bars. These are our favorite granola bars because we…
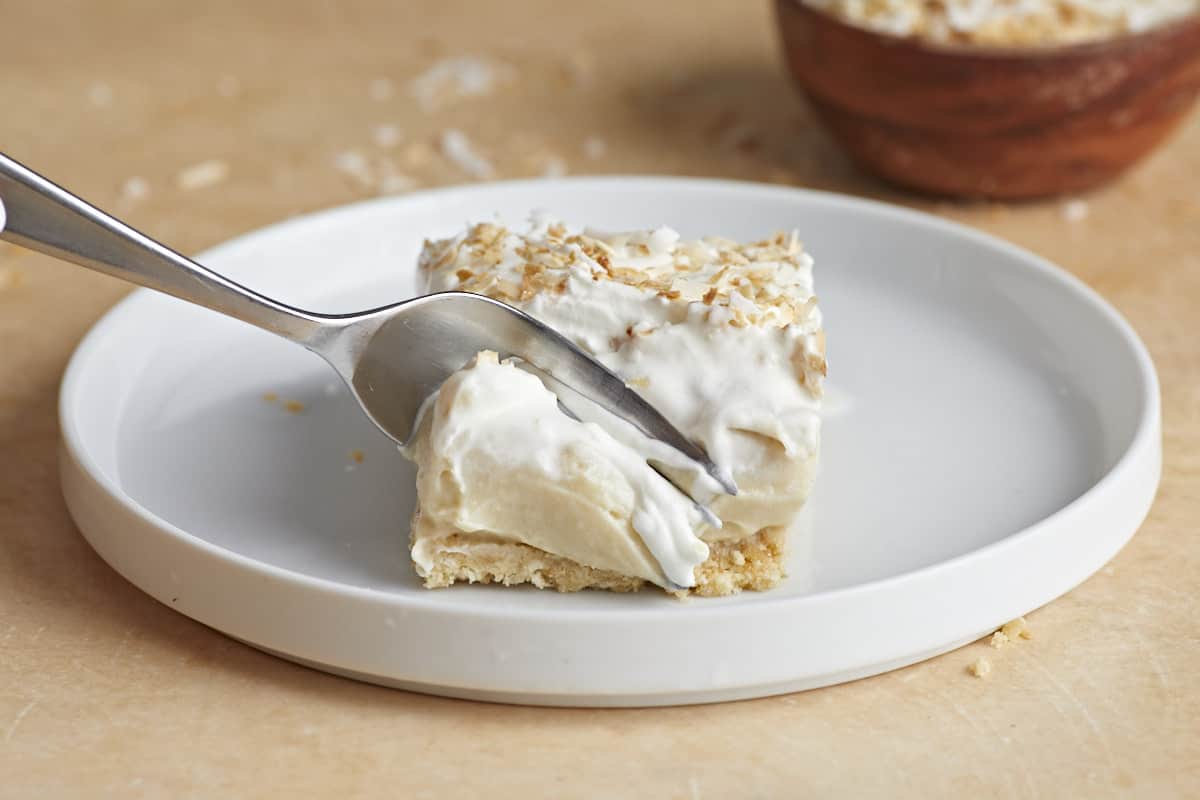
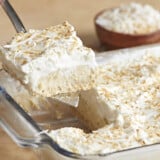
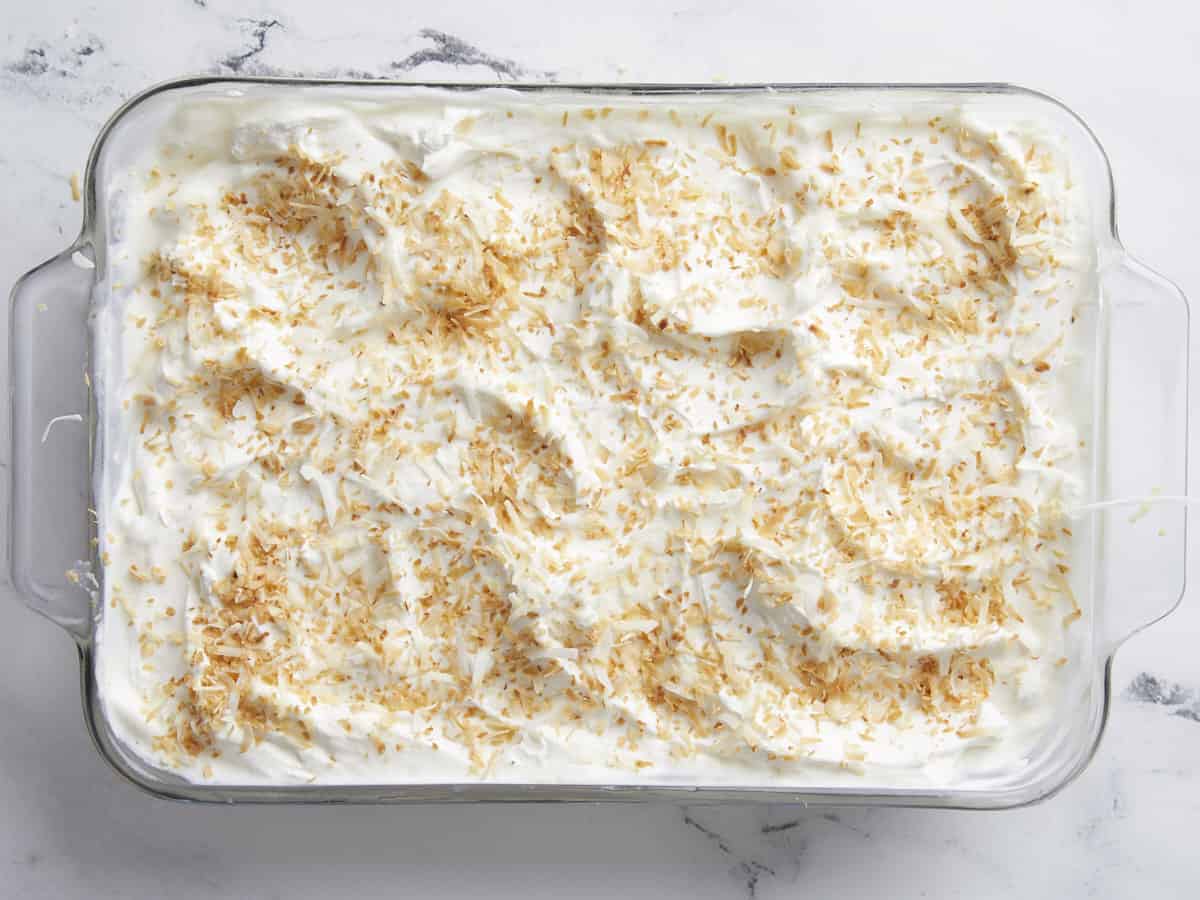
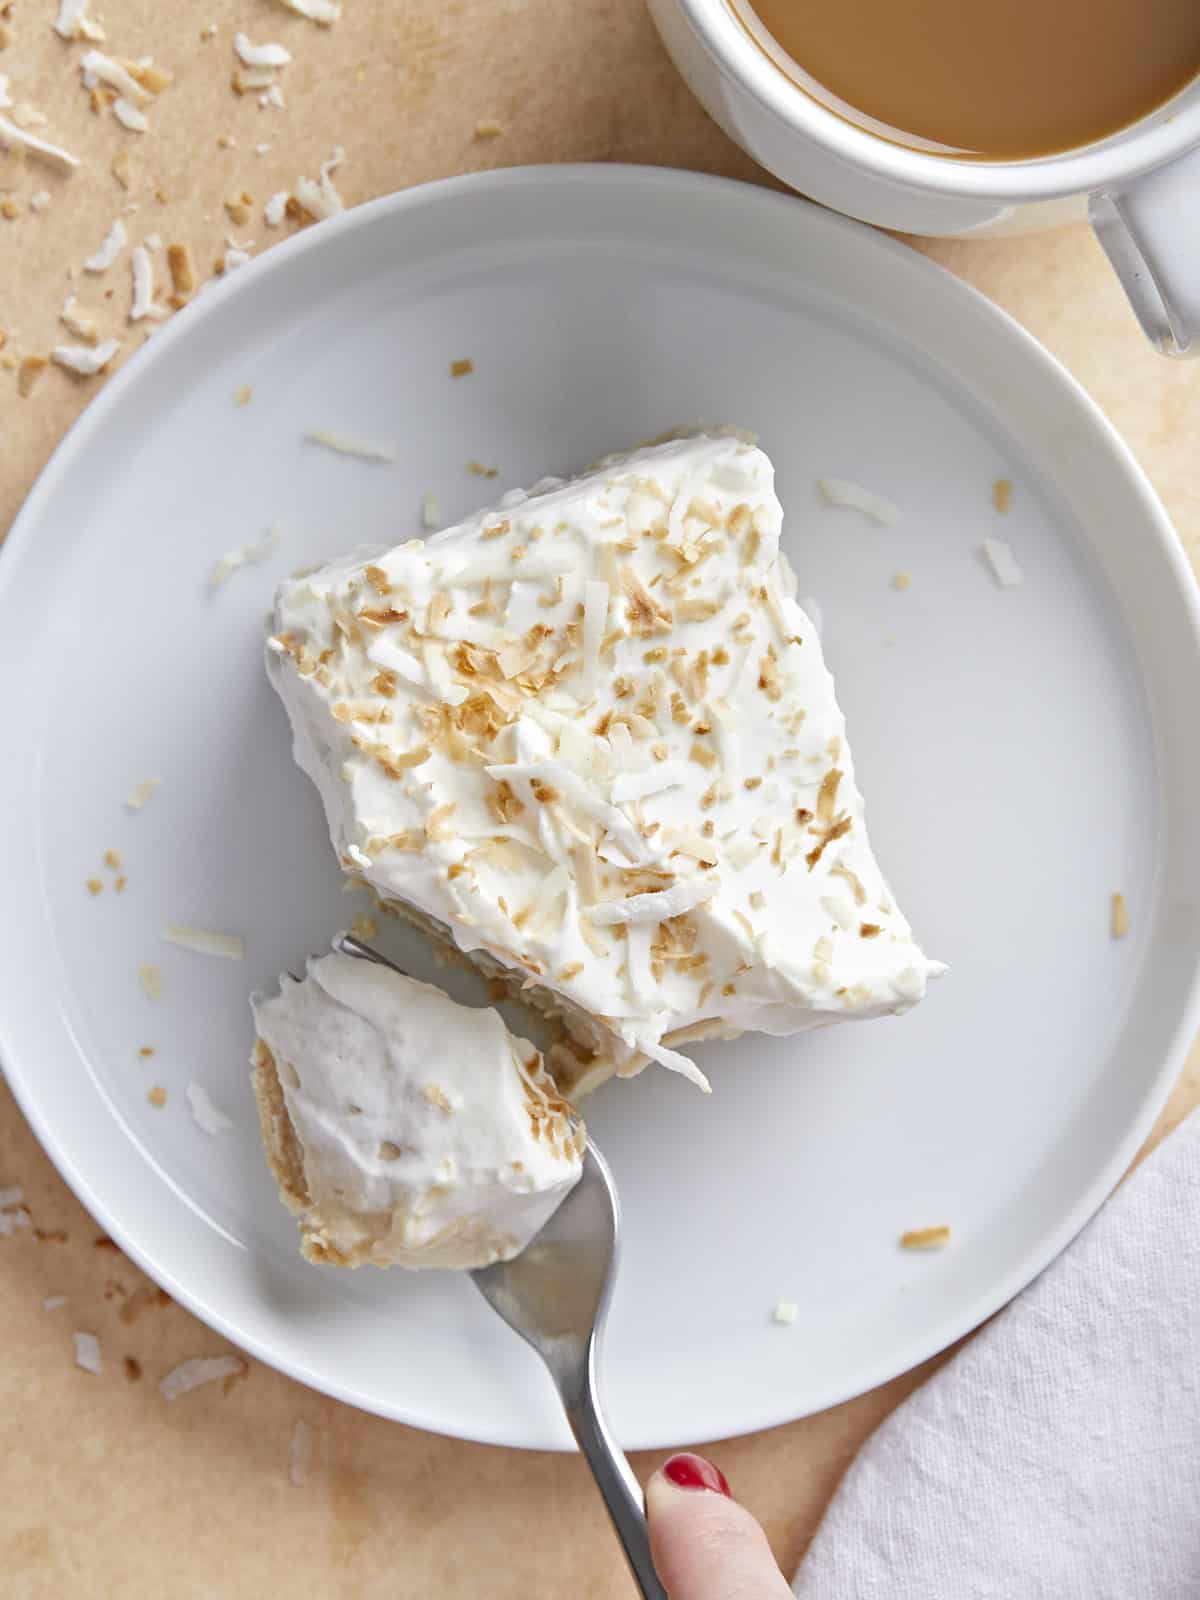
These Coconut Cream Pie Bars are so decadent that I could eat them for breakfast, lunch, and dinner. (And by could, I mean I HAVE.) They’re made with a buttery vanilla cookie crust and a rich and velvety coconut cream filling and topped with dollops of vanilla-scented whipped cream. You get 24 slices from this easy Coconut Cream Pie Bars recipe, so it’s perfect for a school bake sale or a large get-to-gether. I’m obsessed!
What Are Coconut Cream Pie Bars?
Coconut Cream Pie Bars are basically a simplified Coconut Cream Pie. Instead of making a pie crust and blind baking it, I use a cookie crust that comes together in seconds. I put the most work into the filling, steeping coconut milk with coconut flakes to really punch in on that tropical flavor. The flakes are strained out to create the silkiest texture, and the whole thing is topped with canned whipped cream (which can withstand a hot summer day without liquifying). The final touch is a generous sprinkle of crunchy toasted coconut flakes.
Ingredients For Coconut Cream Pie Bars
This recipe scores a 100 for convenience. You can make the crust and fill it with custard a day ahead, then refrigerate until it’s go time. You can even freeze it up for up to three months. Just leave the whipped cream topping and coconut flake garnish for when you’re ready to serve. Here’s what you need to make Coconut Cream Pie Bars:
Unsweetened Flaked Coconut: helps flavor the coconut milk custard and is used as a garnish. I use unsweetened to control the amount of sugar in the recipe. If you want to use sweetened coconut flakes, skip the sugar. You don’t have to strain the coconut flakes out of the custard, but chunky custard isn’t my thing, so I do.
Coconut Milk, Condensed Milk, and Evaporated Milk: create our custard base. If two cans of coconut milk are out of your budget, replace one can with a second can of evaporated milk and steep the mixture for an hour instead of 20 minutes.
Brown Sugar and Granulated Sugar: these sweeten the custard, with the brown sugar adding notes of molasses to deepen the flavor.
All-Purpose Flour and Cornstarch: help thicken the custard.
Eggs: Egg yolks thicken the custard and help deepen its color. Reserve the white for a different preparation, or use them to make meringue!
Salted Butter: adds a velvety finish to the custard.
Vanilla Extract: rounds out the flavor of the filling
Whipped Cream Topping: I use canned whipped cream because it’s stabilized and tends to hold up on a hot summer day. But if you’re eating this in a controlled and cool environment, and you’re not scared of the cream getting a little soupy, try it with frozen whipped cream or our easy Homemade Whipped Cream.
How To Store Coconut Cream Pie Bars
Place leftover bars in an airtight container, top with a piece of parchment paper, seal, and refrigerate for up to 3 days or freeze for up to 3 months. If you plan on making the bars to freeze for later, skip the whipped cream topping and coconut flake garnish. Pour the custard into the cookie crust and refrigerate it until it sets. Then top it with a sheet of parchment directly on the surface, wrap it in two layers of aluminum, and keep it in an airtight container (or wrap it in plastic.) Thaw the frozen bars in the refrigerator before topping them with whipped cream and garnishing them with coconut flakes.
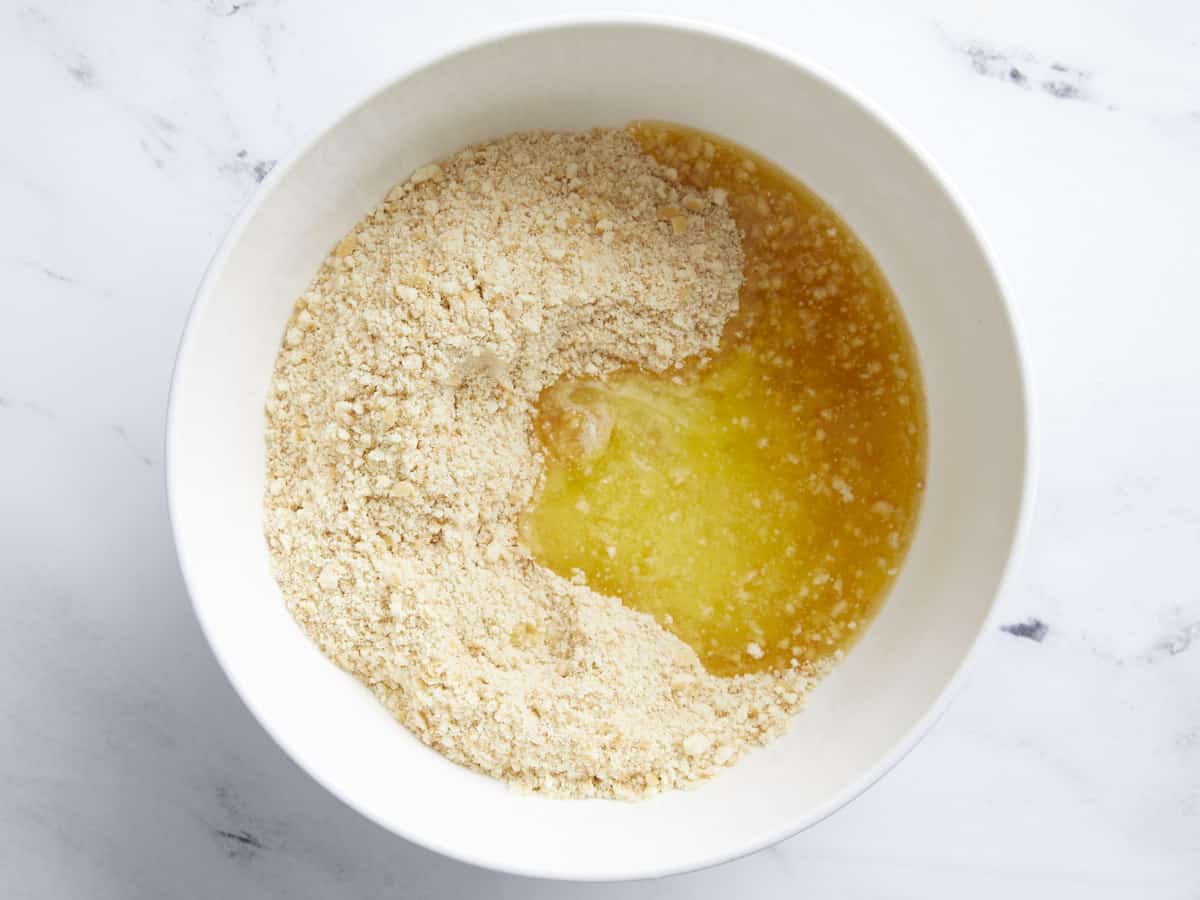
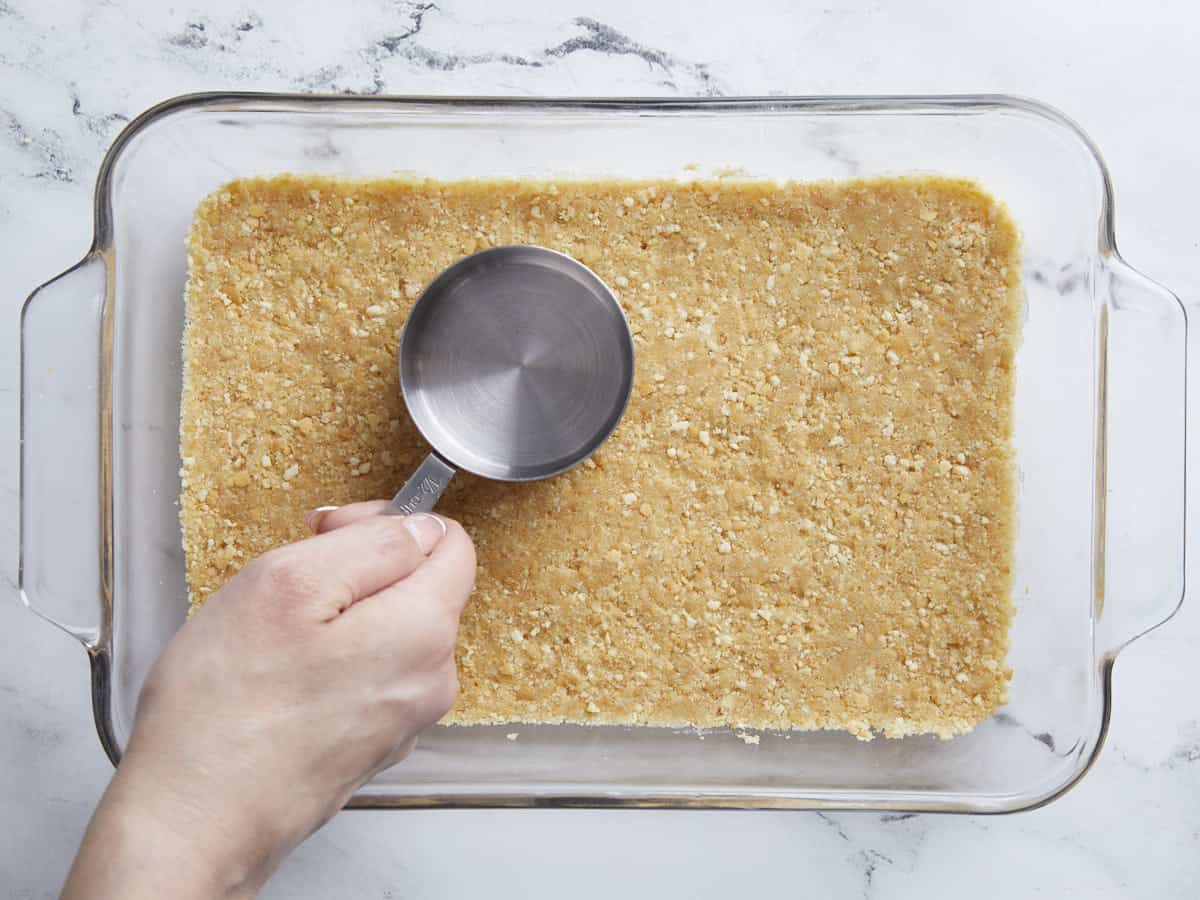
In a blender or food processor, blend the vanilla wafers into a sandy consistency.
Mix in the melted butter and salt until the cookie crumbs are completely saturated and have deepened in color.
Press the cookie crust into an 11×7-inch baking dish in an even layer and freeze. If you don't have an 11×7-inch dish, use any square or rectangle dish with a 10-cup (2.5 qt) volume.
Filling
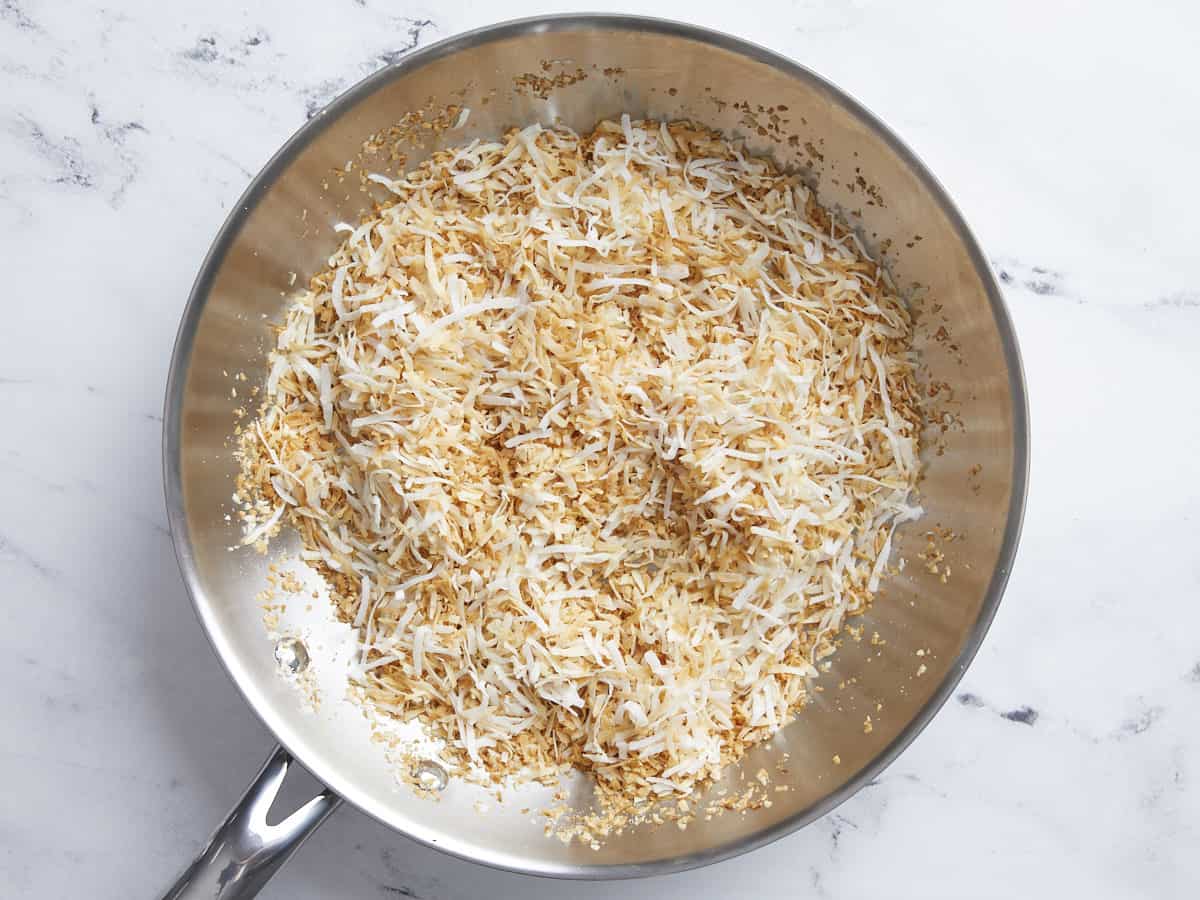
Add the unsweetened coconut flakes to a large saucepan set over medium heat. Toast the flakes, stirring occasionally so they don't burn. Remove them from the pan when they are golden brown.
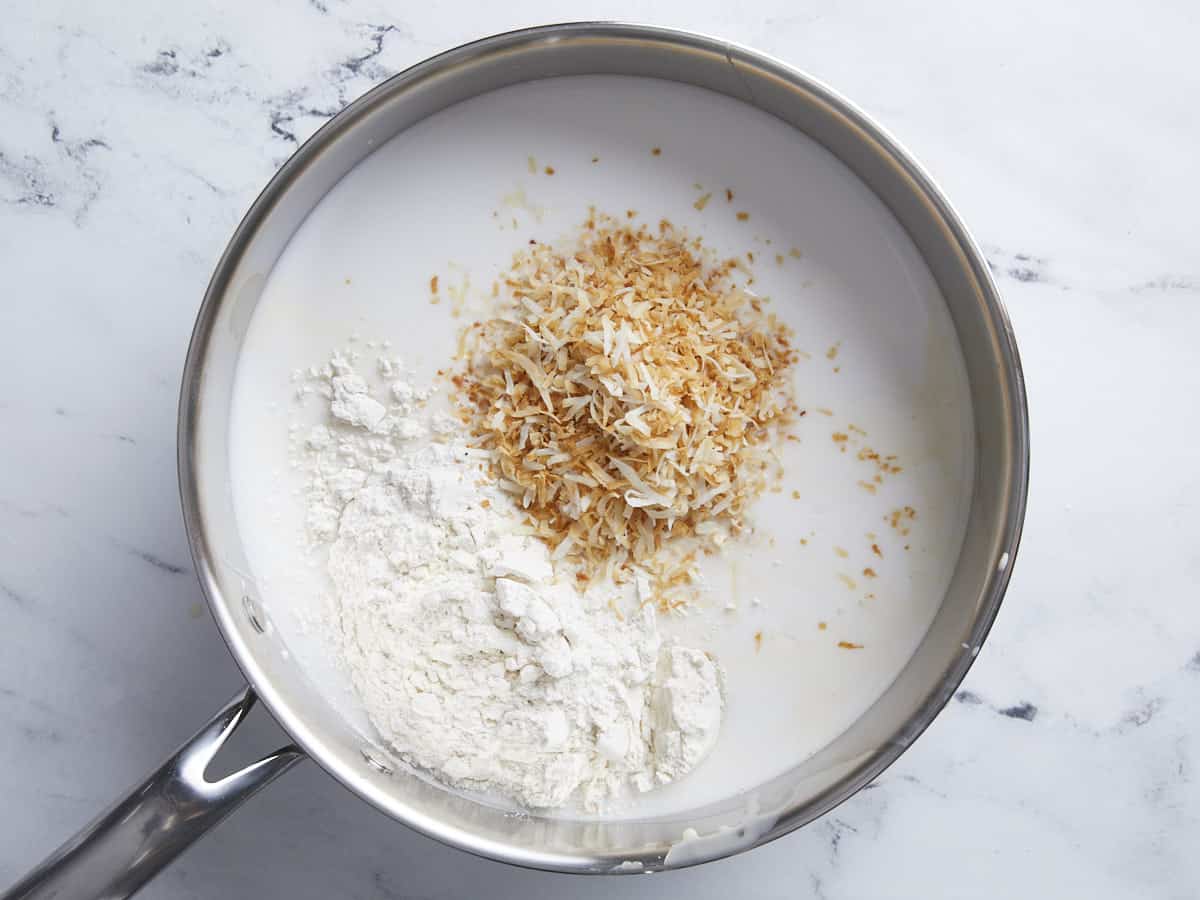
Add 1 cup of the toasted coconut flakes, the condensed milk, evaporated milk, coconut milk, salt, and flour to a heavy-bottomed saucepan set over medium heat. Stir until everything is combined and the milk has thickened, about 5 minutes.
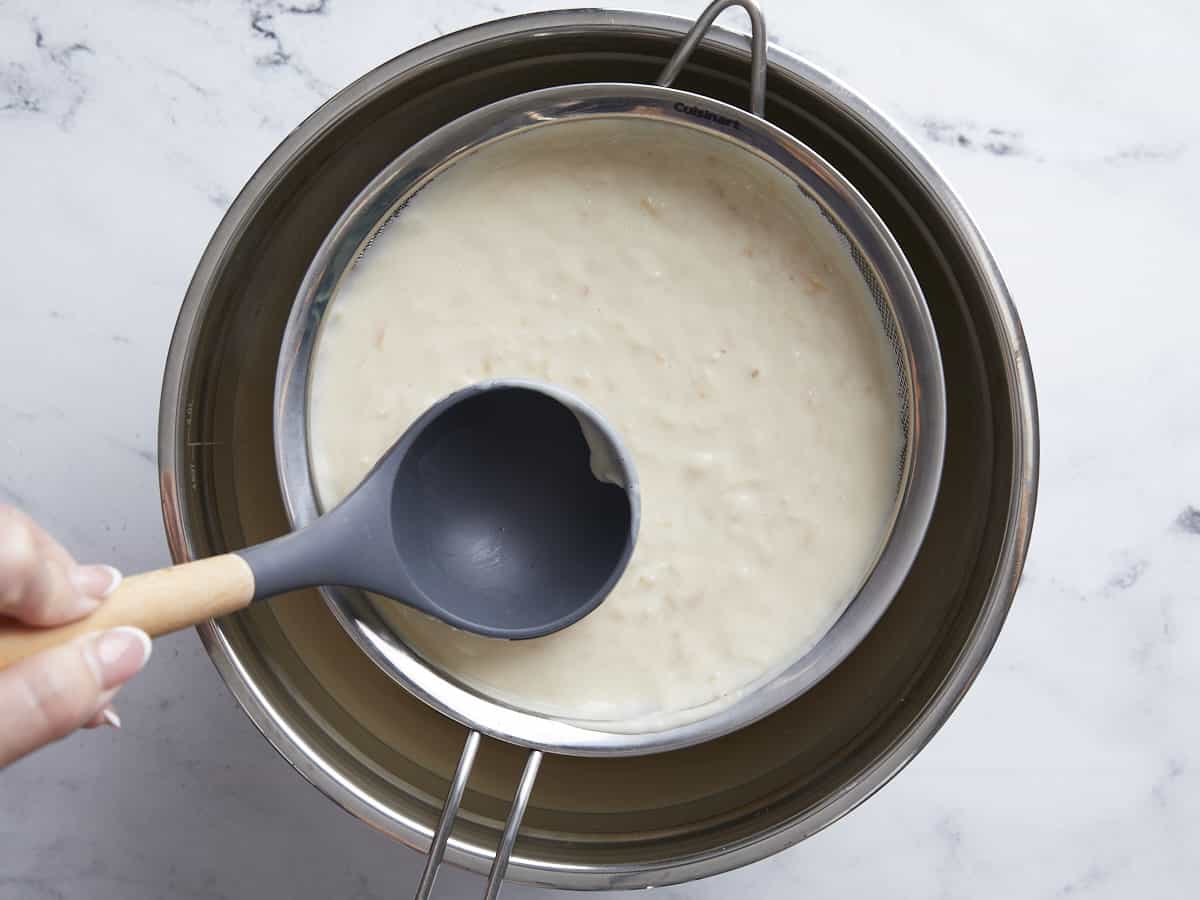
Take the milk mixture off the heat and let it steep for 20 minutes. Use a fine-mesh sieve to strain the coconut flakes from the milk mixture and discard. Add the milk mixture back to the pan and set over medium heat.
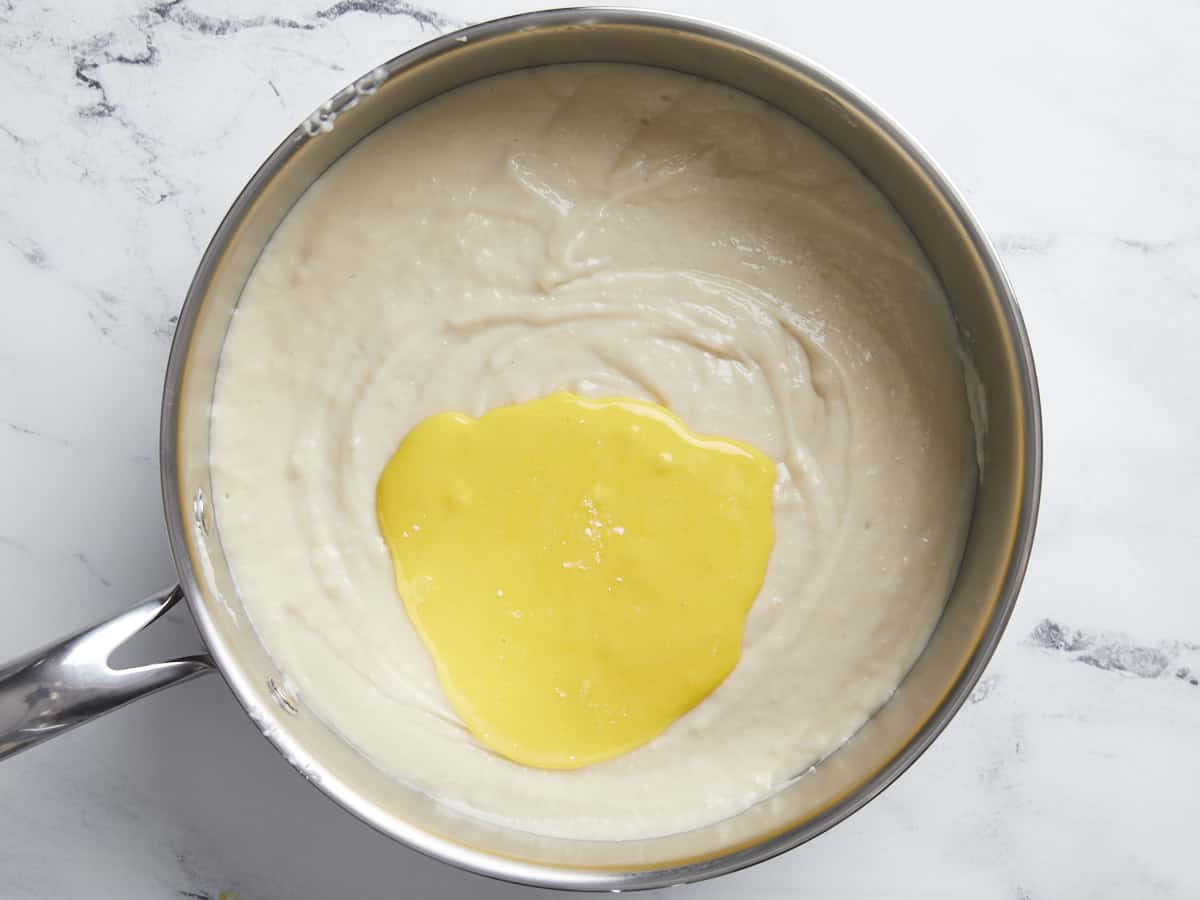
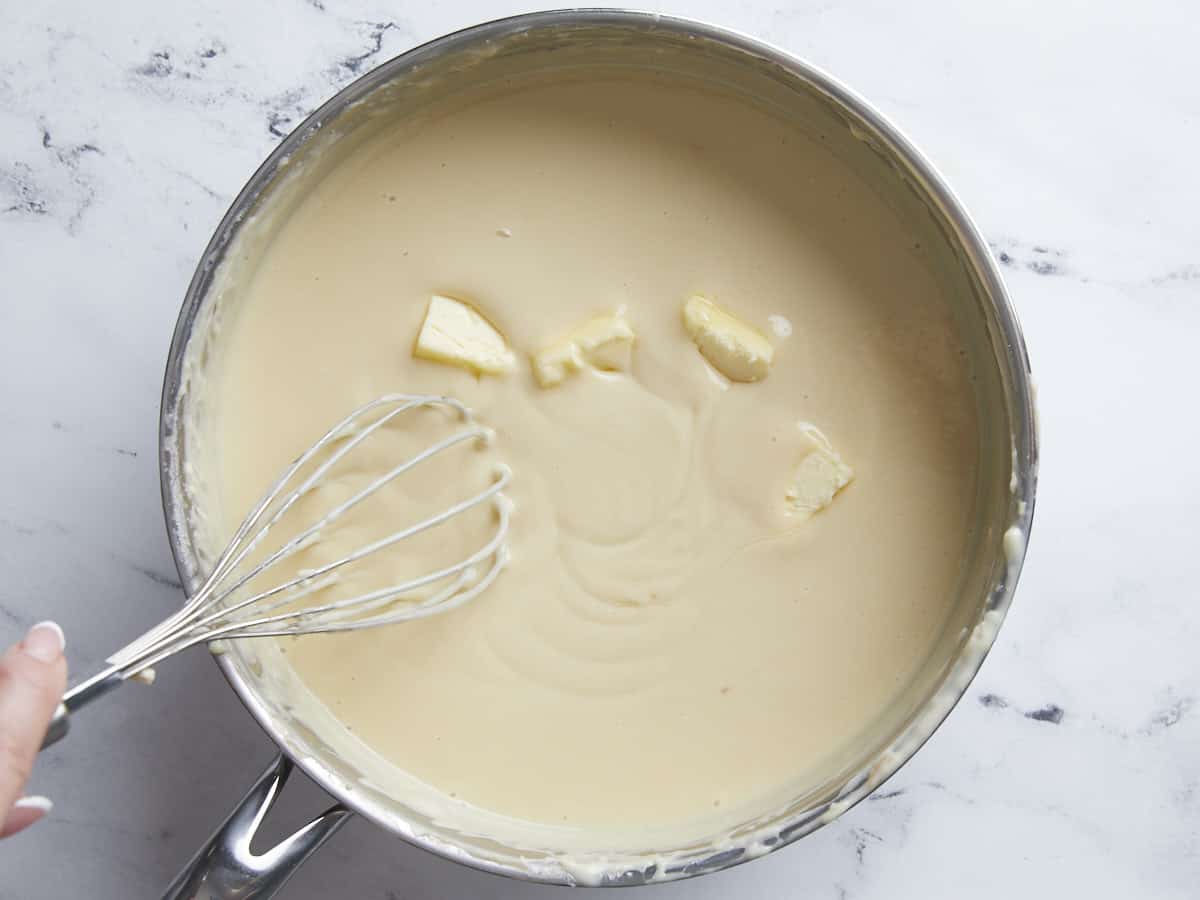
In a small bowl, add the water to the egg yolks. Mix in the cornstarch to create a slurry, then add it to the milk mixture in the pan. Cook over medium heat, stirring constantly until the custard bubbles in spurts.
Take the pan off the heat and add the butter and vanilla extract. Mix until the butter dissolves.
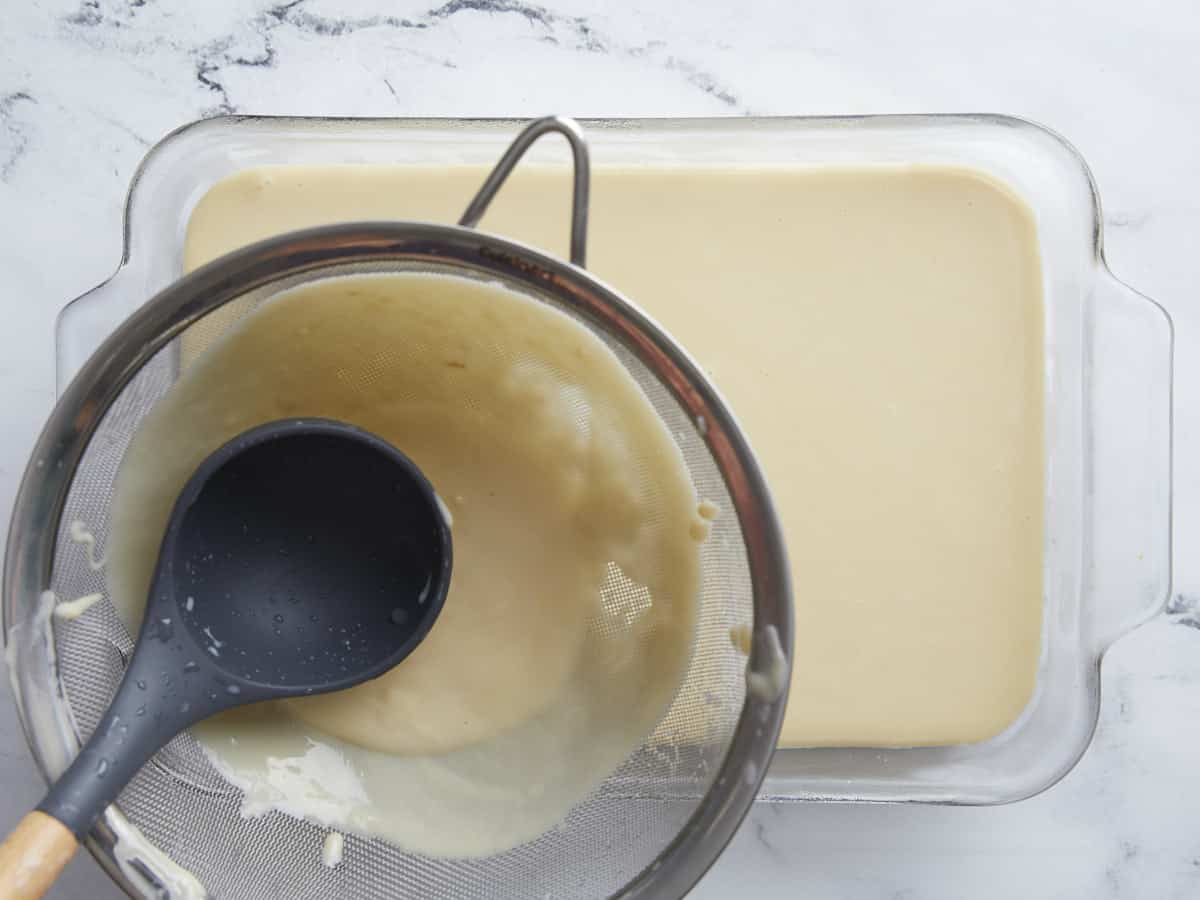
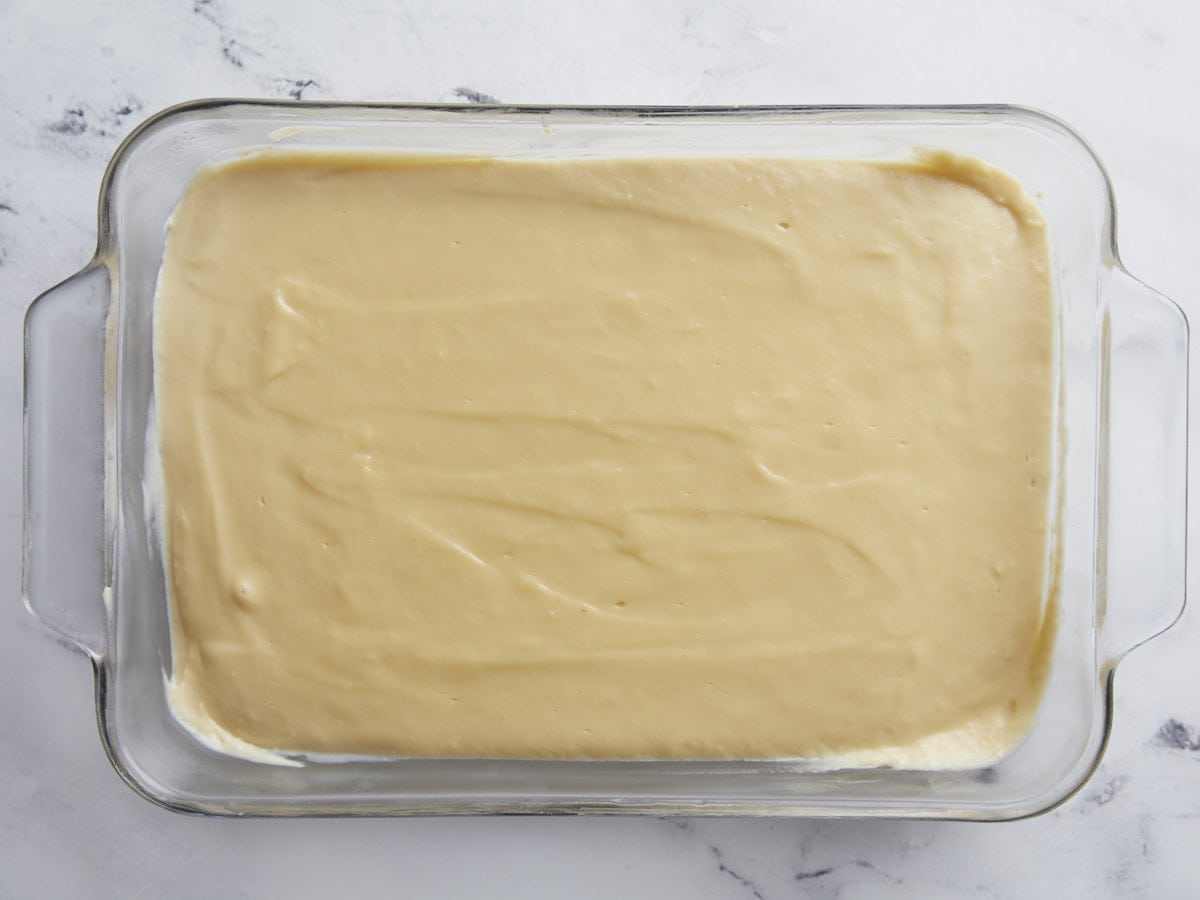
Strain the mixture through a fine-mesh sieve directly into the chilled crust. Refrigerate until set, about 2 to 3 hours.
Top with whipped cream topping and sprinkle the whipped cream with the remaining 1/2 cup of toasted coconut flakes.
How to Make Coconut Cream Pie Bars – Step by Step Photos
In a blender or food processor, blend the 8 ounces of vanilla wafers into a sandy consistency. Mix in 1/2 cup of melted butter and a pinch of salt until the cookie crumbs are completely saturated and have deepened in color.
Press the cookie crust into an 11×7-inch baking dish in an even layer and freeze. If you don’t have an 11×7-inch dish, use any square or rectangle dish with a 10-cup volume.
Add the 1 1/2 cups of unsweetened coconut flakes to a large saucepan set over medium heat. Toast the flakes, stirring occasionally so they don’t burn. Remove them from the pan when they are golden brown.
Add 1 cup of toasted coconut flakes, one 14oz. can of condensed milk, one 12oz. can of evaporated milk, two 13.5oz. cans of coconut milk, 1/4 teaspoon of salt, and 3/4 cup of flour to a heavy-bottomed saucepan set over medium heat. Stir until everything is combined and the milk has thickened, about 5 minutes.
Take the milk mixture off the heat and let it steep for 20 minutes. Use a fine-mesh sieve to strain the coconut flakes from the milk mixture and discard. Add the milk mixture back to the pan and set over medium heat.
In a small bowl, add 2 tablespoons of water to the 3 egg yolks. Mix in the 1/4 cup of cornstarch to create a slurry, then add it to the milk mixture. Cook over medium heat, stirring constantly until the custard bubbles in spurts.
Take the pan off the heat and add the 4 tablespoons of butter and 1 teaspoon of vanilla extract. Mix until the butter dissolves.
Strain the mixture through a fine-mesh sieve directly into the chilled crust.
Refrigerate until set, about 2 to 3 hours.
Top with 2 cups of whipped cream topping and sprinkle the whipped cream with the remaining 1/2 cup of toasted coconut flakes.
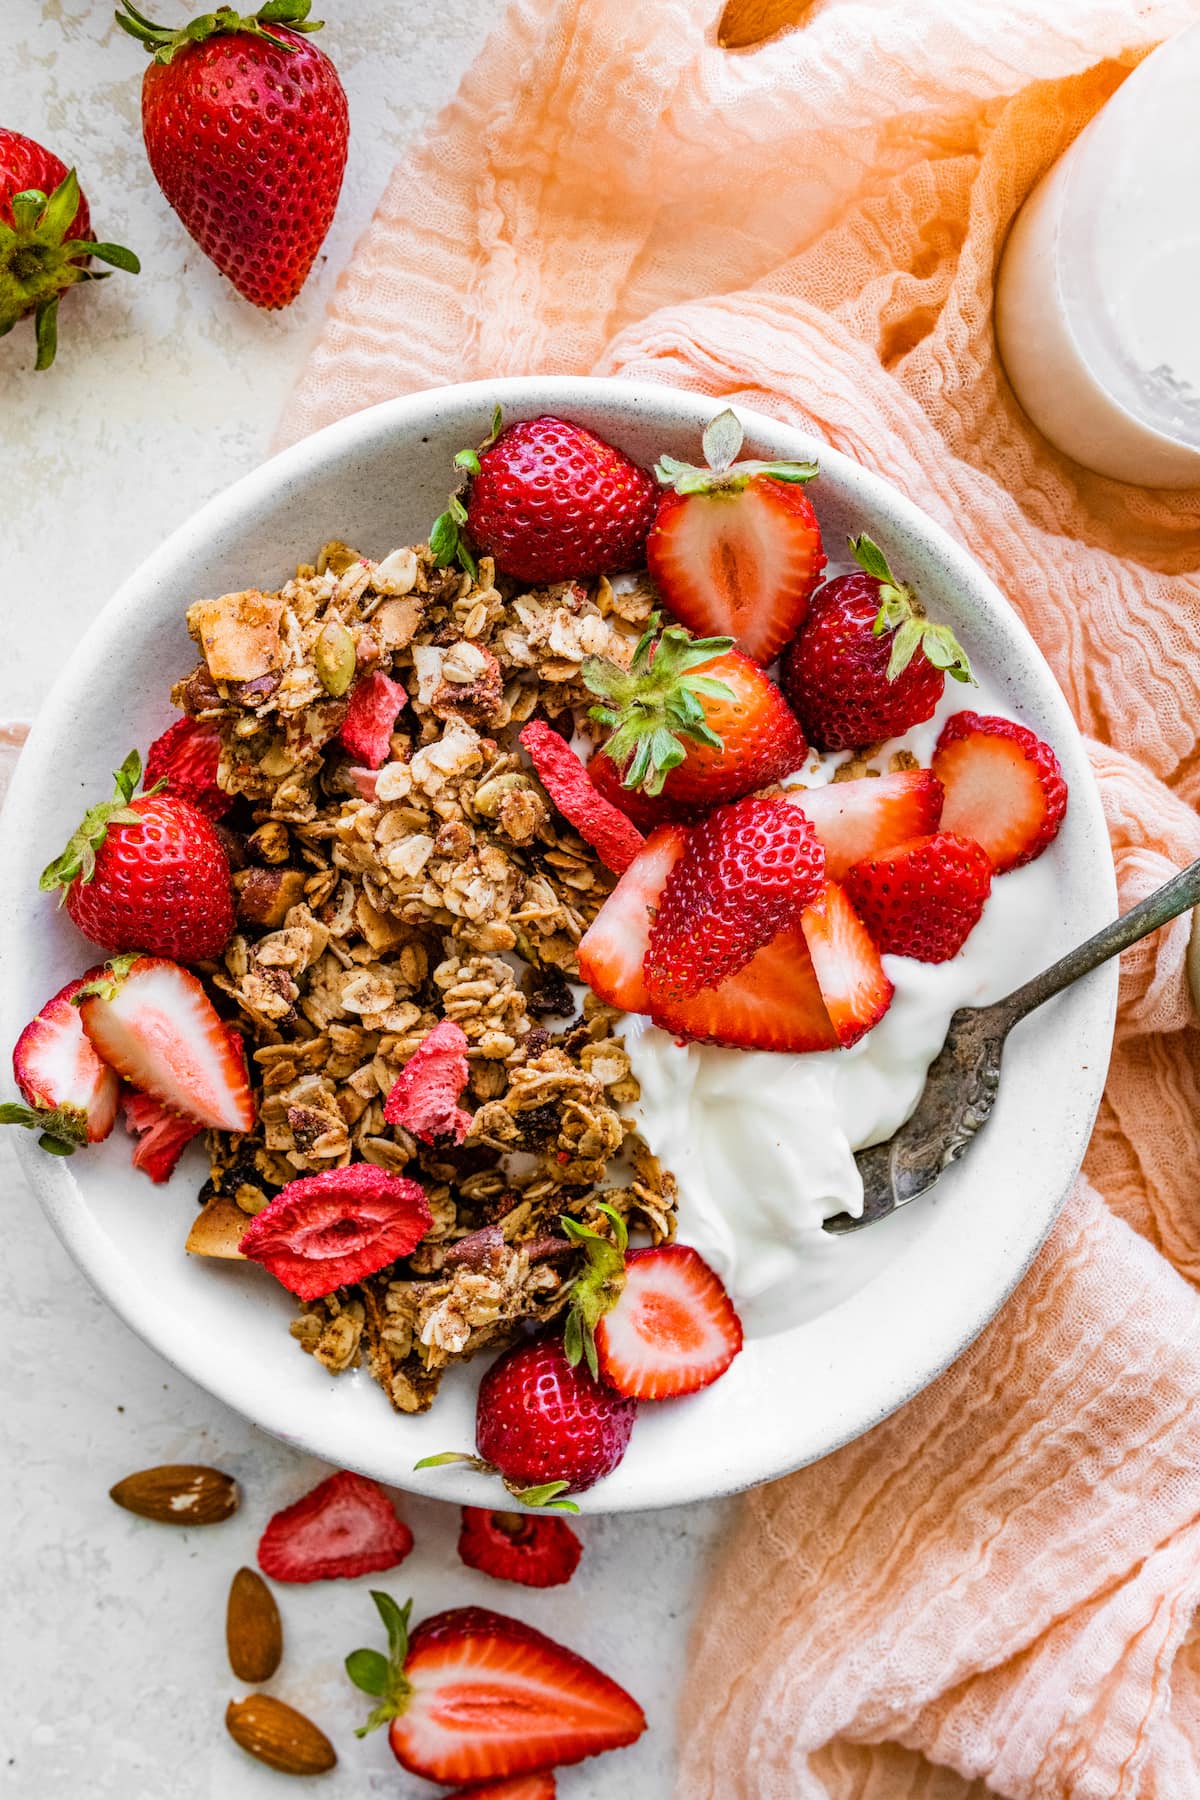
I love making homemade granola because I love eating homemade granola. A few favorites include: lemon blueberry, almond butter, peanut butter, chocolate, and chocolate chip cookie granola clusters. I also love this Strawberry Granola, especially during…
I love making homemade granola because I love eating homemade granola. A few favorites include: lemon blueberry, almond butter, peanut butter, chocolate, and chocolate chip cookie granola clusters. I also love this Strawberry Granola, especially during the spring and summer months. The strawberry flavor is so good! The granola is sweet, crunchy, and made with…
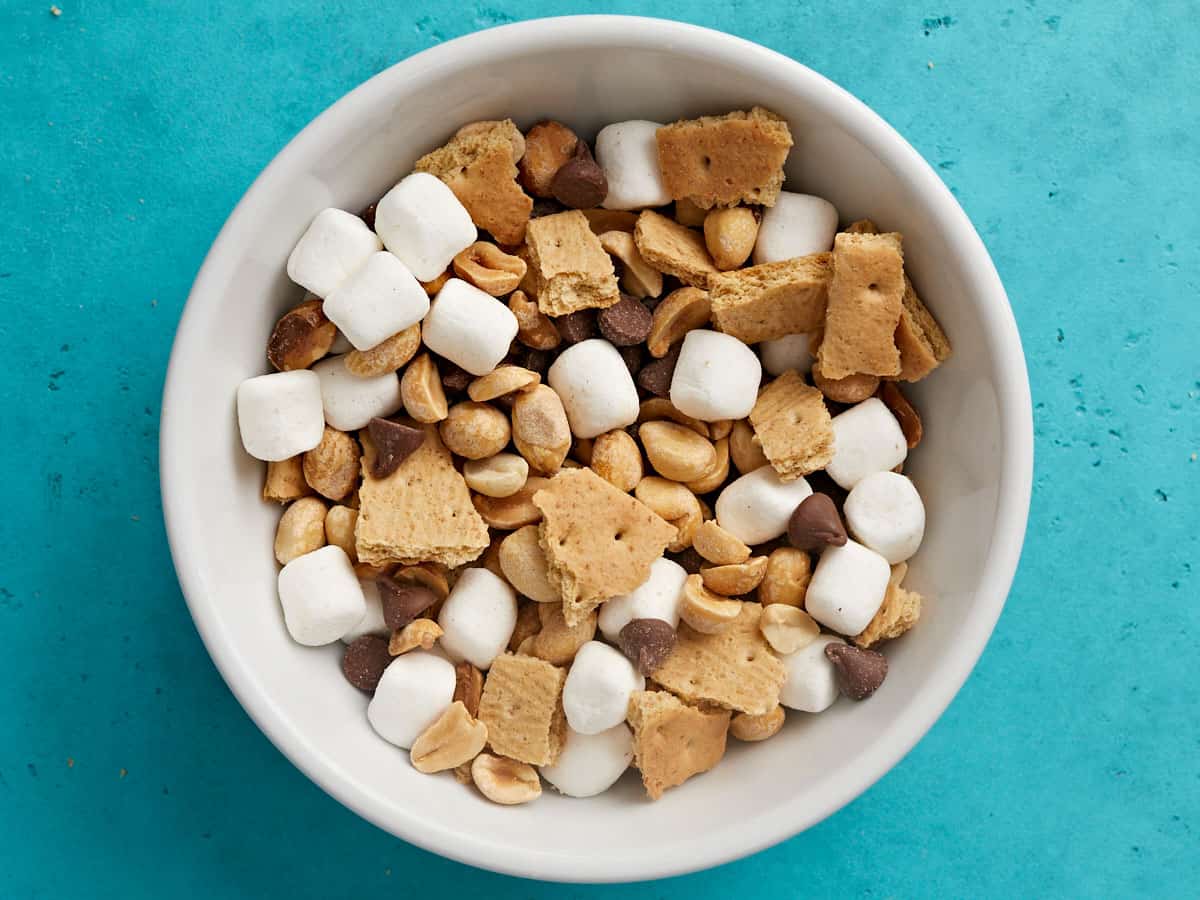
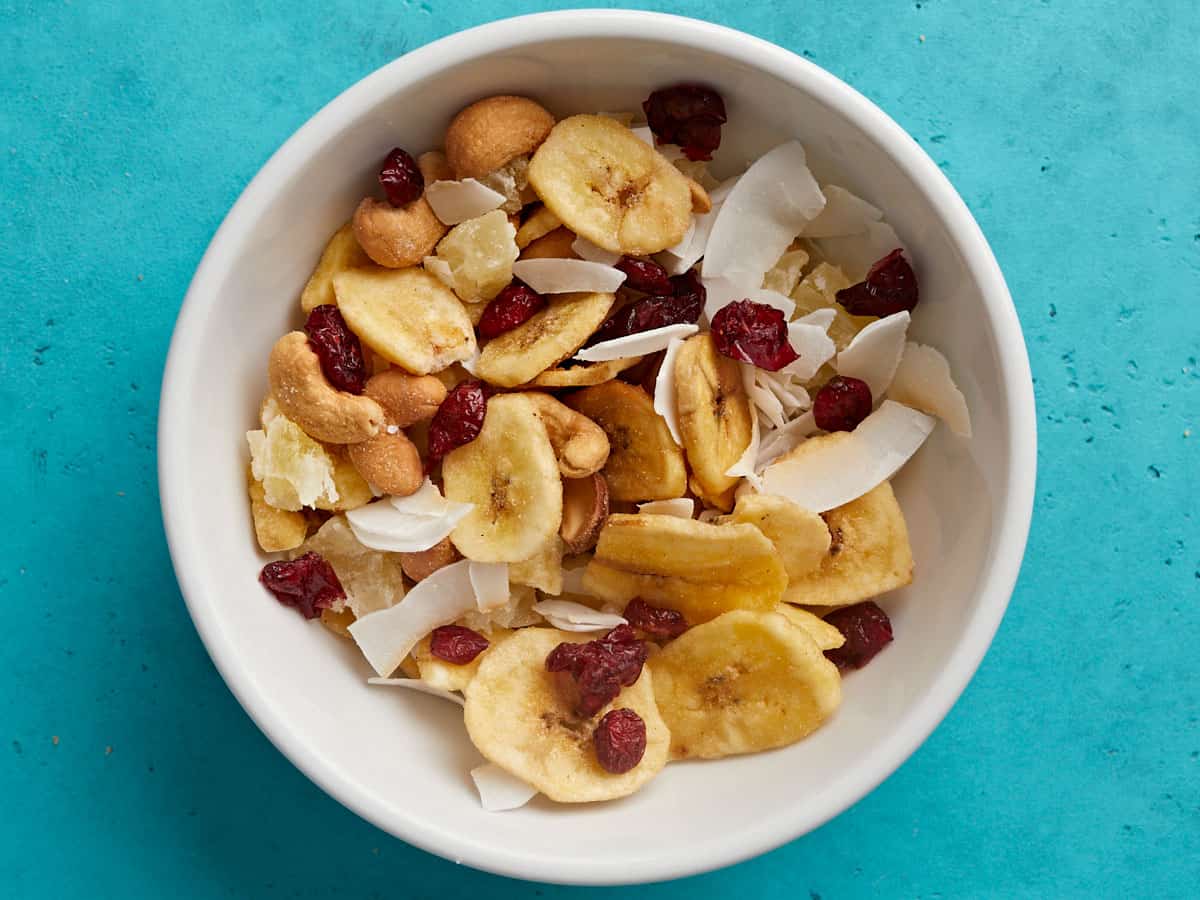
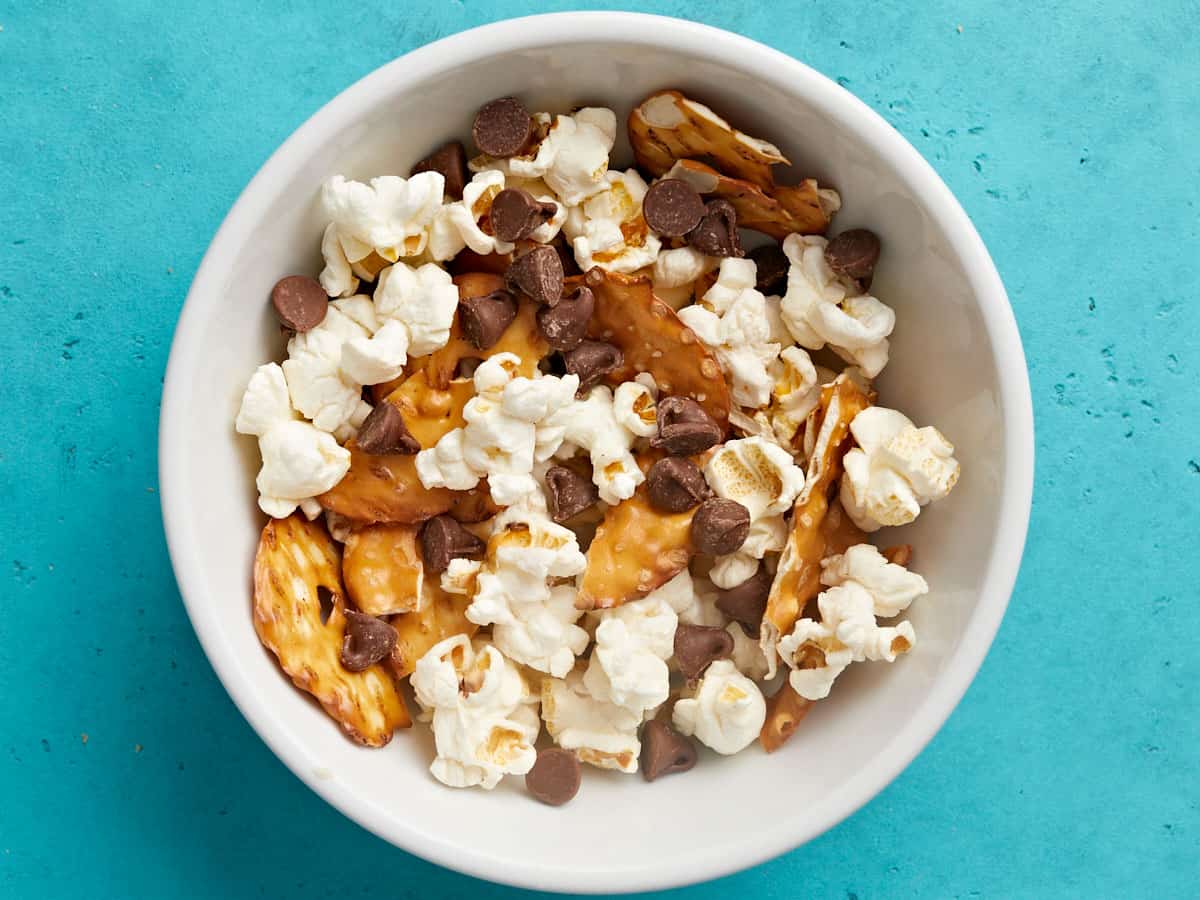
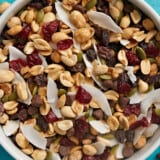
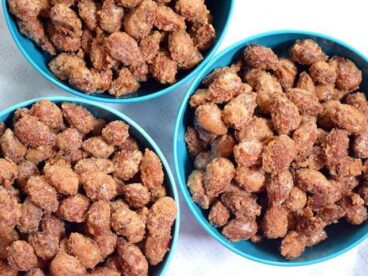
Trail mix is a great way to clean out your pantry and make a quick and easy snack out of your leftover forgotten-about ingredients. Because I don’t know if you’re like me, but small amounts of random ingredients tend to collect in the back of my pantry just like half-used bottles of sauces in my fridge. If you don’t stay on top of them it can quickly get out of control and result in a LOT of food waste. Instead of letting those ingredients get lost in the pantry, let’s do some Spring cleaning and make trail mix! Reduce waste and make a delicious snack? YES PLEASE.
What iS Trail Mix Made Of?
Trail mix (also known as scroggin) is simply a mix of nuts, seeds, fruit, and sometimes other ingredients. With every handful of this simple snack mix you get a nice combination of sweet and savory flavors, protein, carbs, and fat, plus tons of texture and color, making it fun to eat. It’s an easy snack to eat on the go (no heating or utensils required) and is a great source of energy during activities where you don’t want a super full stomach, like hiking.
Everyone makes trail mix a little bit different, but the classic mix that you’ll find in stores is usually peanuts, raisins, M&Ms, and sometimes a second nut like almonds or cashews. I love how flexible trail mix is because it allows you to make any combination of ingredients that fits your budget, the ingredients you have on hand, and the flavors you prefer.
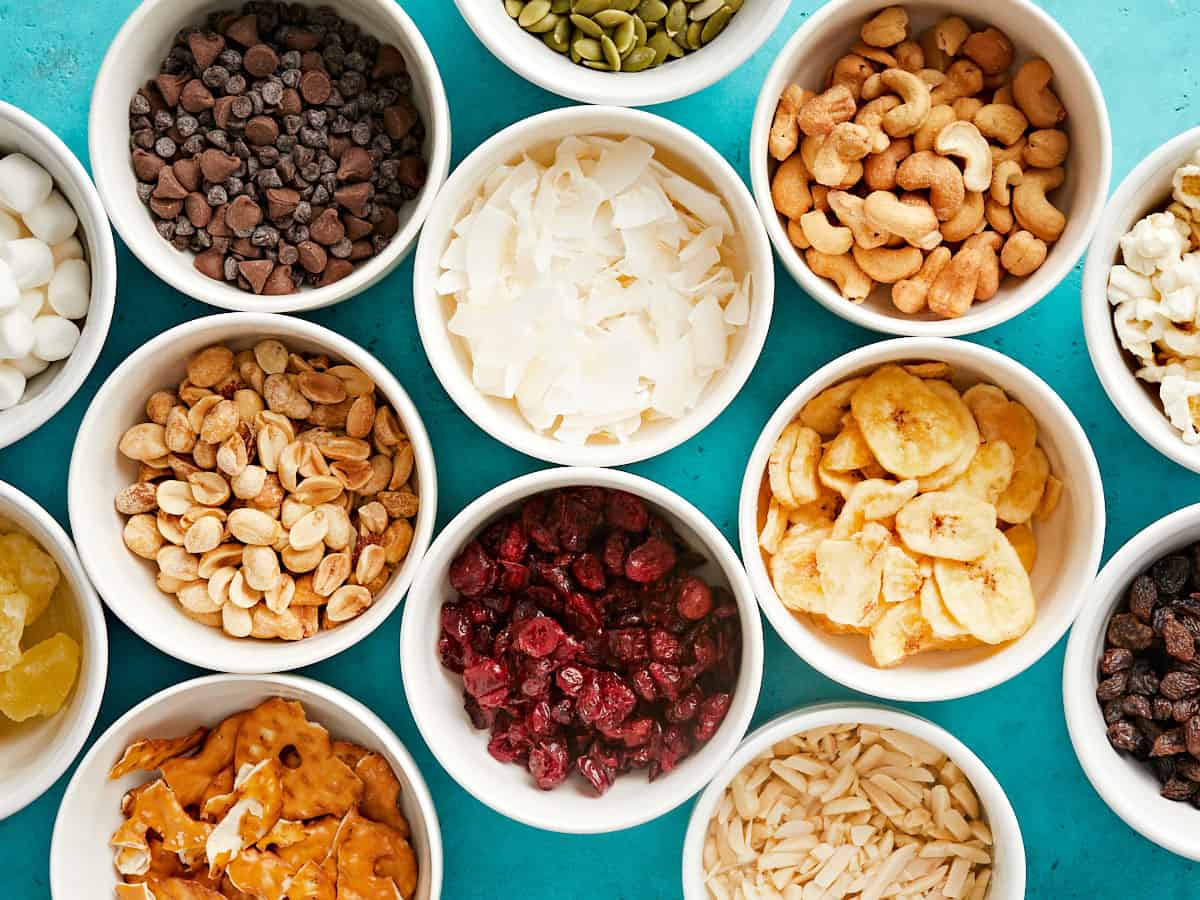
Other Ingredients for Trail Mix
If looking in your pantry for trail mix ideas is a little overwhelming, here are some ingredients that are perfect for trail mix:
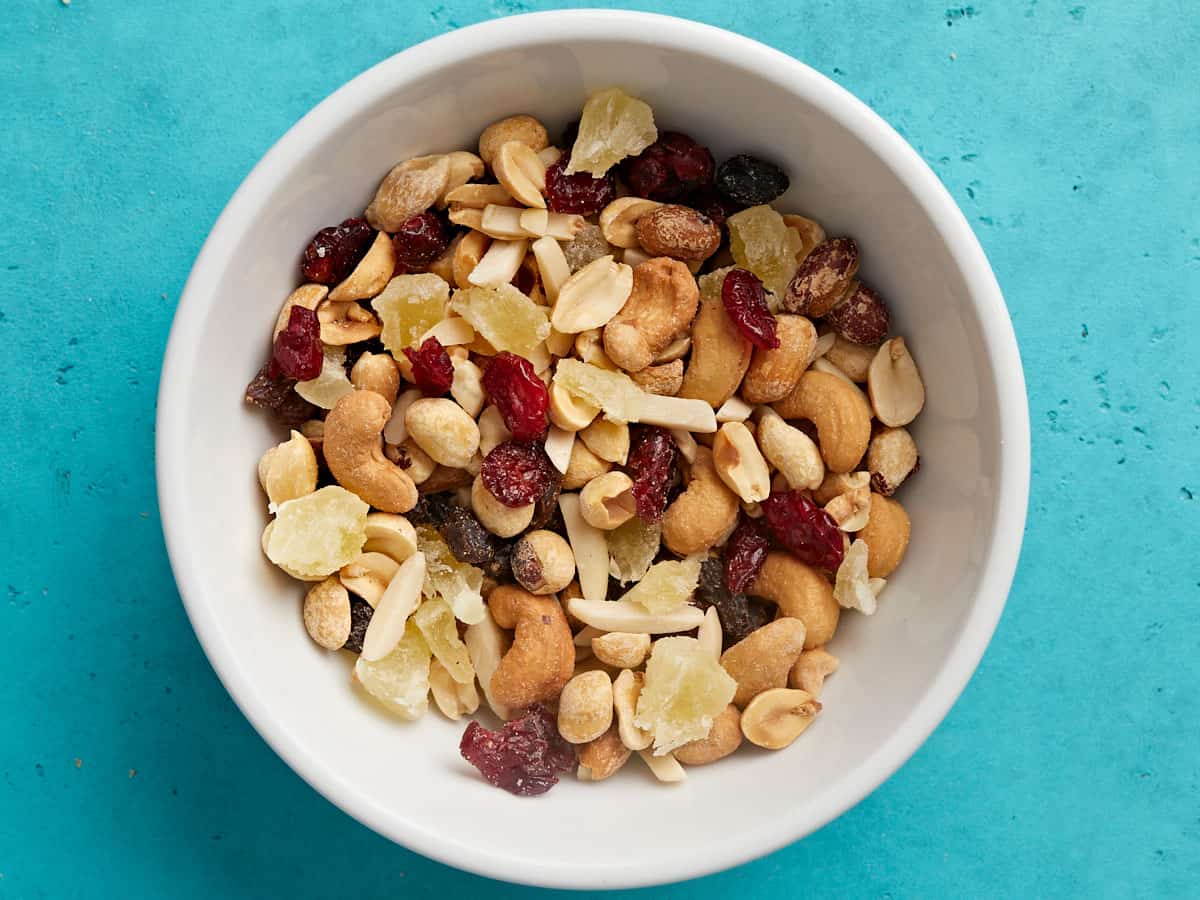
Nuts and dried fruit can be expensive, which is why I like to just use random leftover ingredients that I find in my pantry. BUT you can also tweak the ratios of your trail mix to keep the total cost low. Make sure to bulk up your trail mix with less expensive ingredients and then add in just a small handful of the more expensive ingredients.
Expensive: most nuts, pumpkin seeds, dried fruit (other than raisins), brand name snacks (M&Ms, Cheeze-its, etc.)
Trail Mix Flavor Combinations
I’ve included a very basic trail mix recipe below, but if you still need a little inspo for your own homemade mix, here are some fun combos that I’ve made in the past:
Because trail mix is made out of all dry, shelf stable ingredients, you’ll want to store it the same way you store the individual ingredients–in an air-tight container away from sunlight and moisture. I highly suggest keeping the trail mix in something clear, like a glass jar or zip top baggies, so you’ll see and remember that you have the trail mix on hand. Even better yet, divide it into small single-serving containers so you’ve got snacks ready to grab and go for the day!
This baked oatmeal recipe is my favorite breakfast of the moment. I love that it can serve a group for a special breakfast or brunch, but it’s also the kind of thing that you can make on a weekend and reheat on busy mornings throughout the week. …
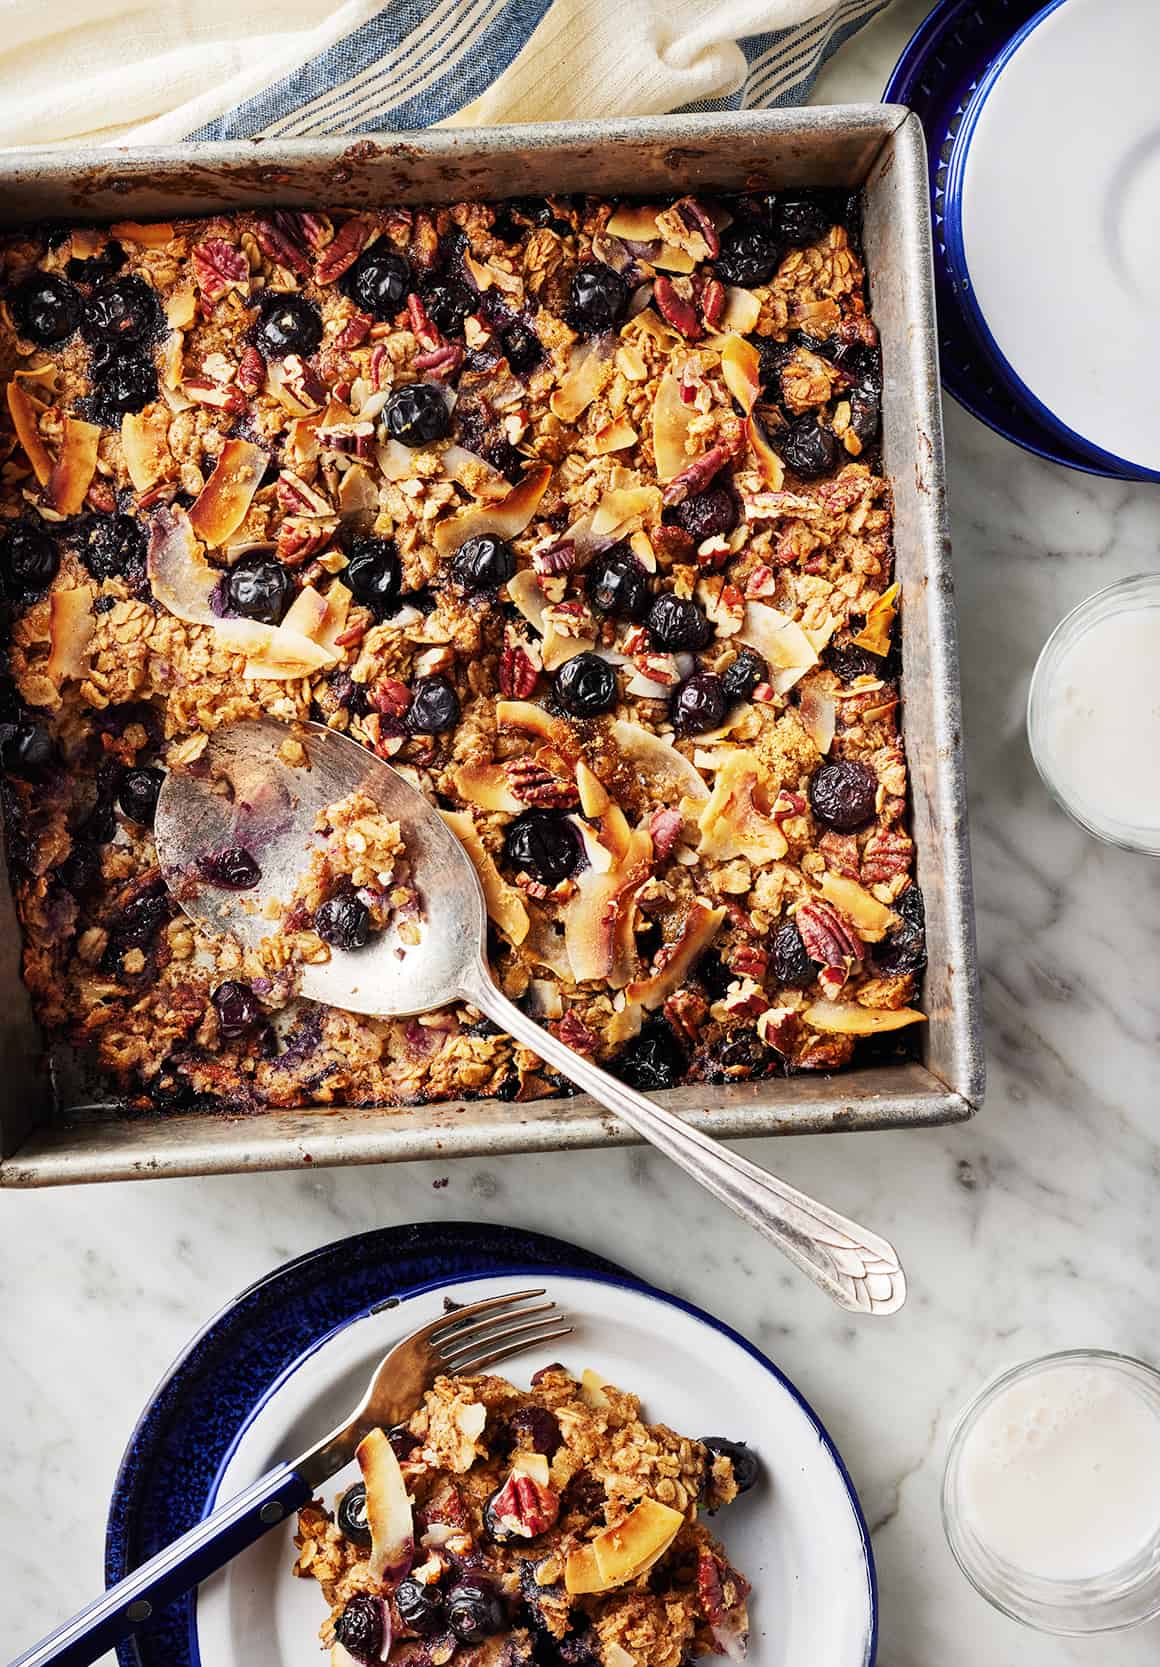
This baked oatmeal recipe is my favorite breakfast of the moment. I love that it can serve a group for a special breakfast or brunch, but it’s also the kind of thing that you can make on a weekend and reheat on busy mornings throughout the week. This blueberry baked oatmeal is made with healthy ingredients—think fresh fruit, almond butter, and whole rolled oats—but it tastes like a treat. The top is toasty and nutty, featuring a layer of pecans and coconut flakes that crisp up beautifully in the oven. The middle, on the other hand, stays soft and creamy, […]
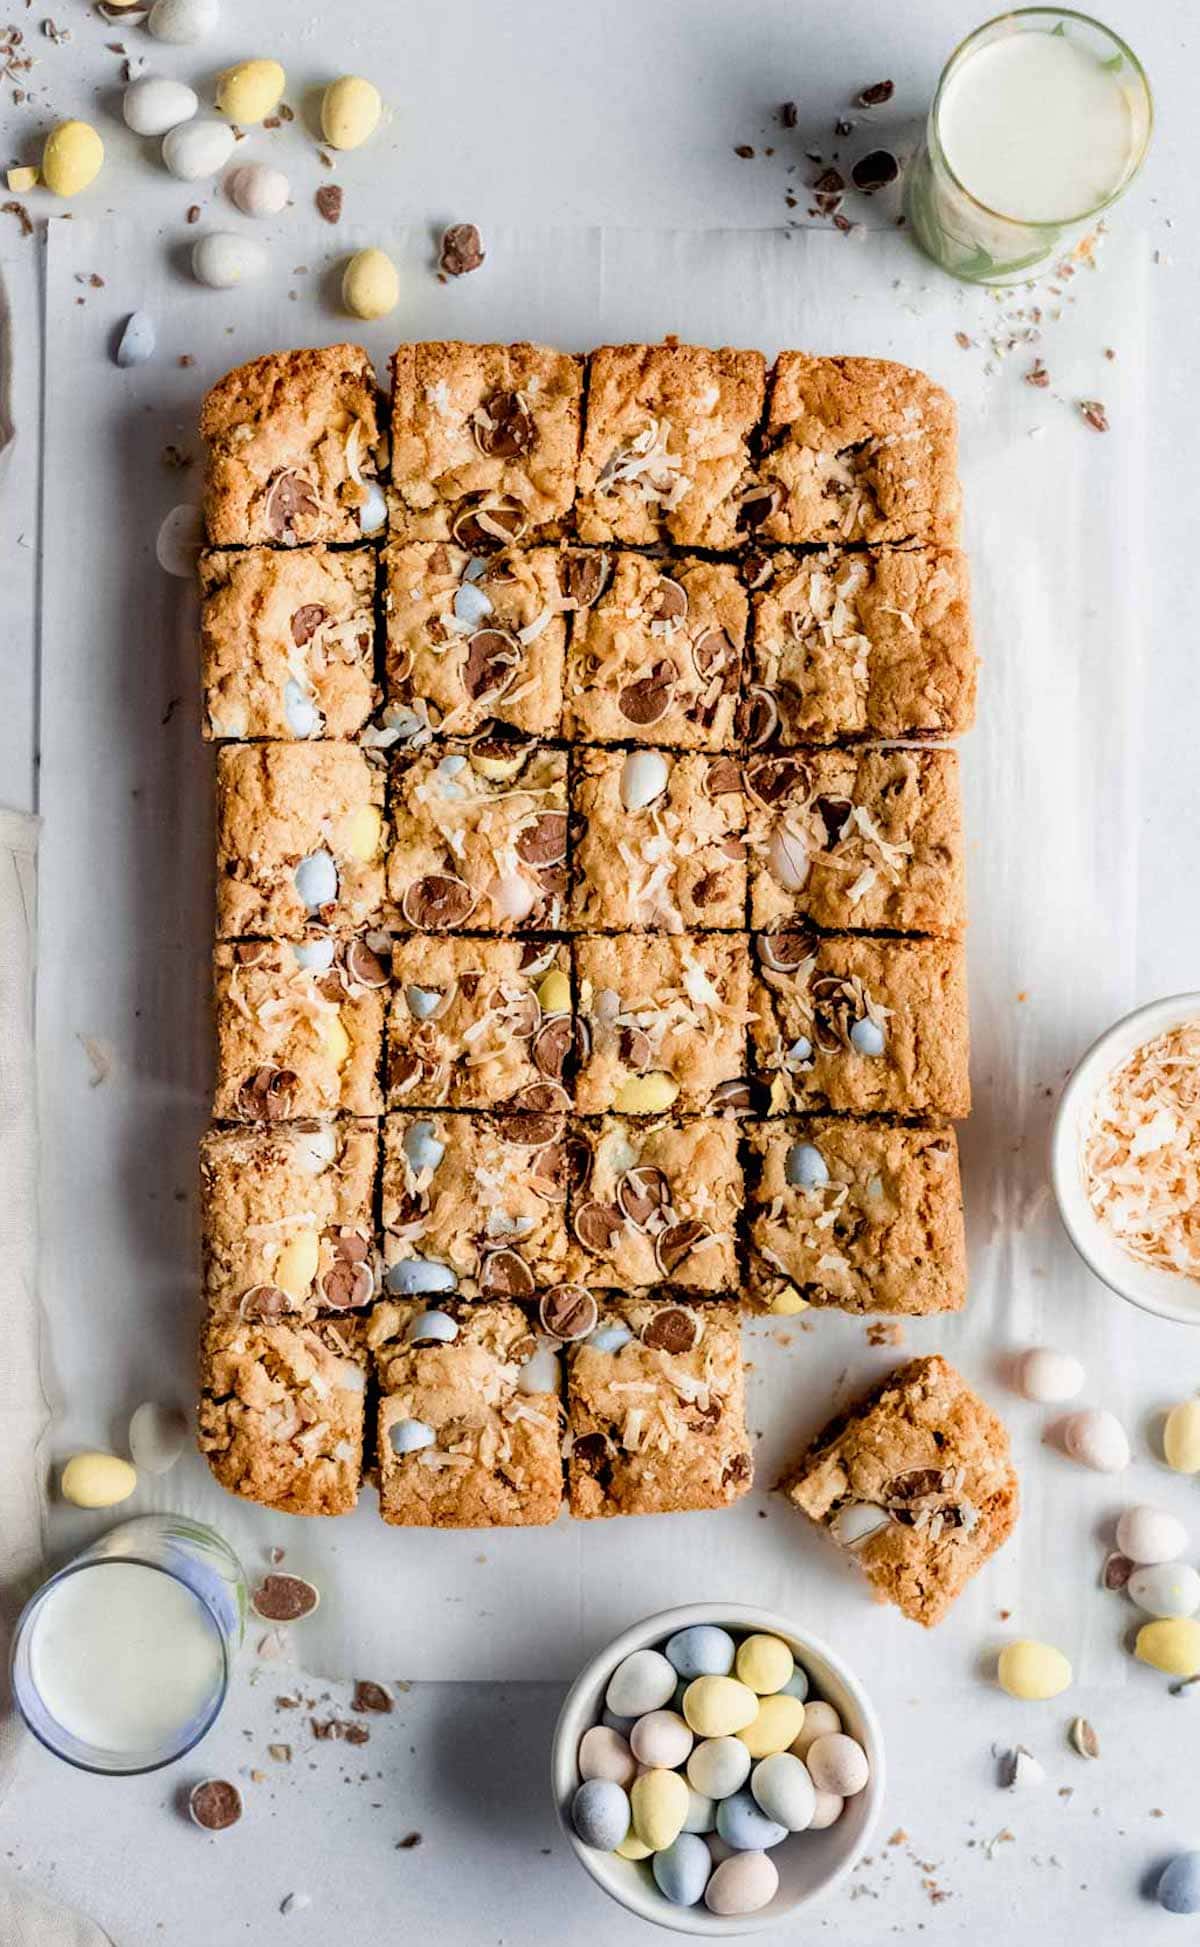
Easter candy is my favorite candy, especially Cadbury Mini Eggs. The pretty pastel chocolate eggs with a thin candy shell are pure deliciousness! I buy several bags so I can eat them by the handful and make my Cadbury Egg Cookies. They are the BEST coo…
Easter candy is my favorite candy, especially Cadbury Mini Eggs. The pretty pastel chocolate eggs with a thin candy shell are pure deliciousness! I buy several bags so I can eat them by the handful and make my Cadbury Egg Cookies. They are the BEST cookies! Whenever I am feeling lazy or don’t have time…
These Buttermilk Coconut Waffles are easy to make and loaded with shredded coconut, giving them not only a nice coconut flavor, but a little extra texture because you’ll get some in every bite. As a coconut fan, I’m always happy to start my morning with a little taste of the tropics.
These Buttermilk Coconut Waffles are easy to make and loaded with shredded coconut, giving them not only a nice coconut flavor, but a little extra texture because you’ll get some in every bite. As a coconut fan, I’m always happy to start my morning with a little taste of the tropics.
If you have a good waffle iron, waffles are a surprisingly easy way to start your day. Like pancakes, the batter for this recipe can be mixed up in just a couple of minutes. Unlike pancakes, however, there is no need to stand over the stove because the iron does all the work for you while you do other morning tasks, such as brewing up some fresh coffee to go with those waffles. The point that I am trying to make here is that, while waffles are a wonderful weekend food, they are a fantastic way to get an average weekday off to a great start and don’t take that much more effort than making toast.
I used sweetened coconut in these waffles and highly recommend that you do the same. This is primarily because the waffles are not very sweet on their own and the additional sweetness of the coconut helps it to stand out even more. It is also because sweetened coconut is a little softer than unsweetened coconut and that softness blends nicely into the tender interior of the waffles. The batter itself is a straightforward buttermilk belgian waffle batter that I’ve used several times before. It has a small amount of cornstarch in it that keeps the waffles tender and light.
While I did use a belgian waffle iron, you can make these waffles using a traditional waffle iron, as well. If your iron is a very different shape or size, you might get slightly more or fewer waffles from this recipe, though it should definitely make enough to serve at least four people. If you are serving a big group, feel free to double the recipe. Also, be sure to store ready-to-eat waffles in a warm oven to keep them crisp until you’ve finished cooking the whole batch of batter, so that everyone can sit down to eat at the same time.
I served these up with maple syrup but coconut syrup or another tropical flavor is the best way to go if you have some on hand. Leftover waffles can be frozen and reheated in the oven or the toaster, too.
Buttermilk Coconut Waffles
2 cups all purpose flour
2 tbsp cornstarch
2 tbsp sugar
2 tsp baking powder
1/2 tsp baking soda
1/4 tsp salt
1 1/2 cups buttermilk
2 large eggs
1/4 cup vegetable oil
1 tsp vanilla extract
1 cup sweetened, shredded coconut
In a large bowl, whisk together flour, cornstarch, sugar, baking powder, baking soda and salt.
In a medium bowl, whisk together buttermilk, eggs, vegetable oil and vanilla extract. Make a well in the center of the dry ingredients and pour buttermilk mixture in. Whisk or stir until batter comes together and no streaks of dry ingredients are visible. Fold in shredded coconut until evenly distributed.
Preheat Belgian waffle iron until very hot. Grease lightly with melted butter or cooking spray. Pour about 1 cup of batter (more or less, depending on your iron) into your waffle iron and cook according to the manufacturer’s directions until deep golden on both sides (about 4 minutes in my iron).
Serve immediately, or place in a 250F oven to keep warm while you finish making the the rest of the batch of waffles. Sprinkle waffles with additional coconut before serving.
Light and fluffy coconut cupcakes are topped with a coconut-lime buttercream for one incredibly flavorful treat. No one would ever guess these cupcakes started off with a cake mix! I love coconut. I know not everyone feels the same way. A lot of people are a big ol’ nope when it comes to coconut. And …
Light and fluffy coconut cupcakes are topped with a coconut-lime buttercream for one incredibly flavorful treat. No one would ever guess these cupcakes started off with a cake mix!
I love coconut.
I know not everyone feels the same way. A lot of people are a big ol’ nope when it comes to coconut. And that’s ok!
So if that’s you, I know you’ll love these coconut cupcakes, packed with coconut flavor from the tender cupcake to the coconut-lime buttercream frosting.
And the best part? They’re totally easy to make with a cake mix!
 I try to always have homemade granola bars in the fridge for an easy grab and go breakfast or snack. These granola bars are easy to make and made with basic pantry ingredients. They are satisfying, sweet, and taste so much better than store bought granola bars. These are our favorite granola bars because we…
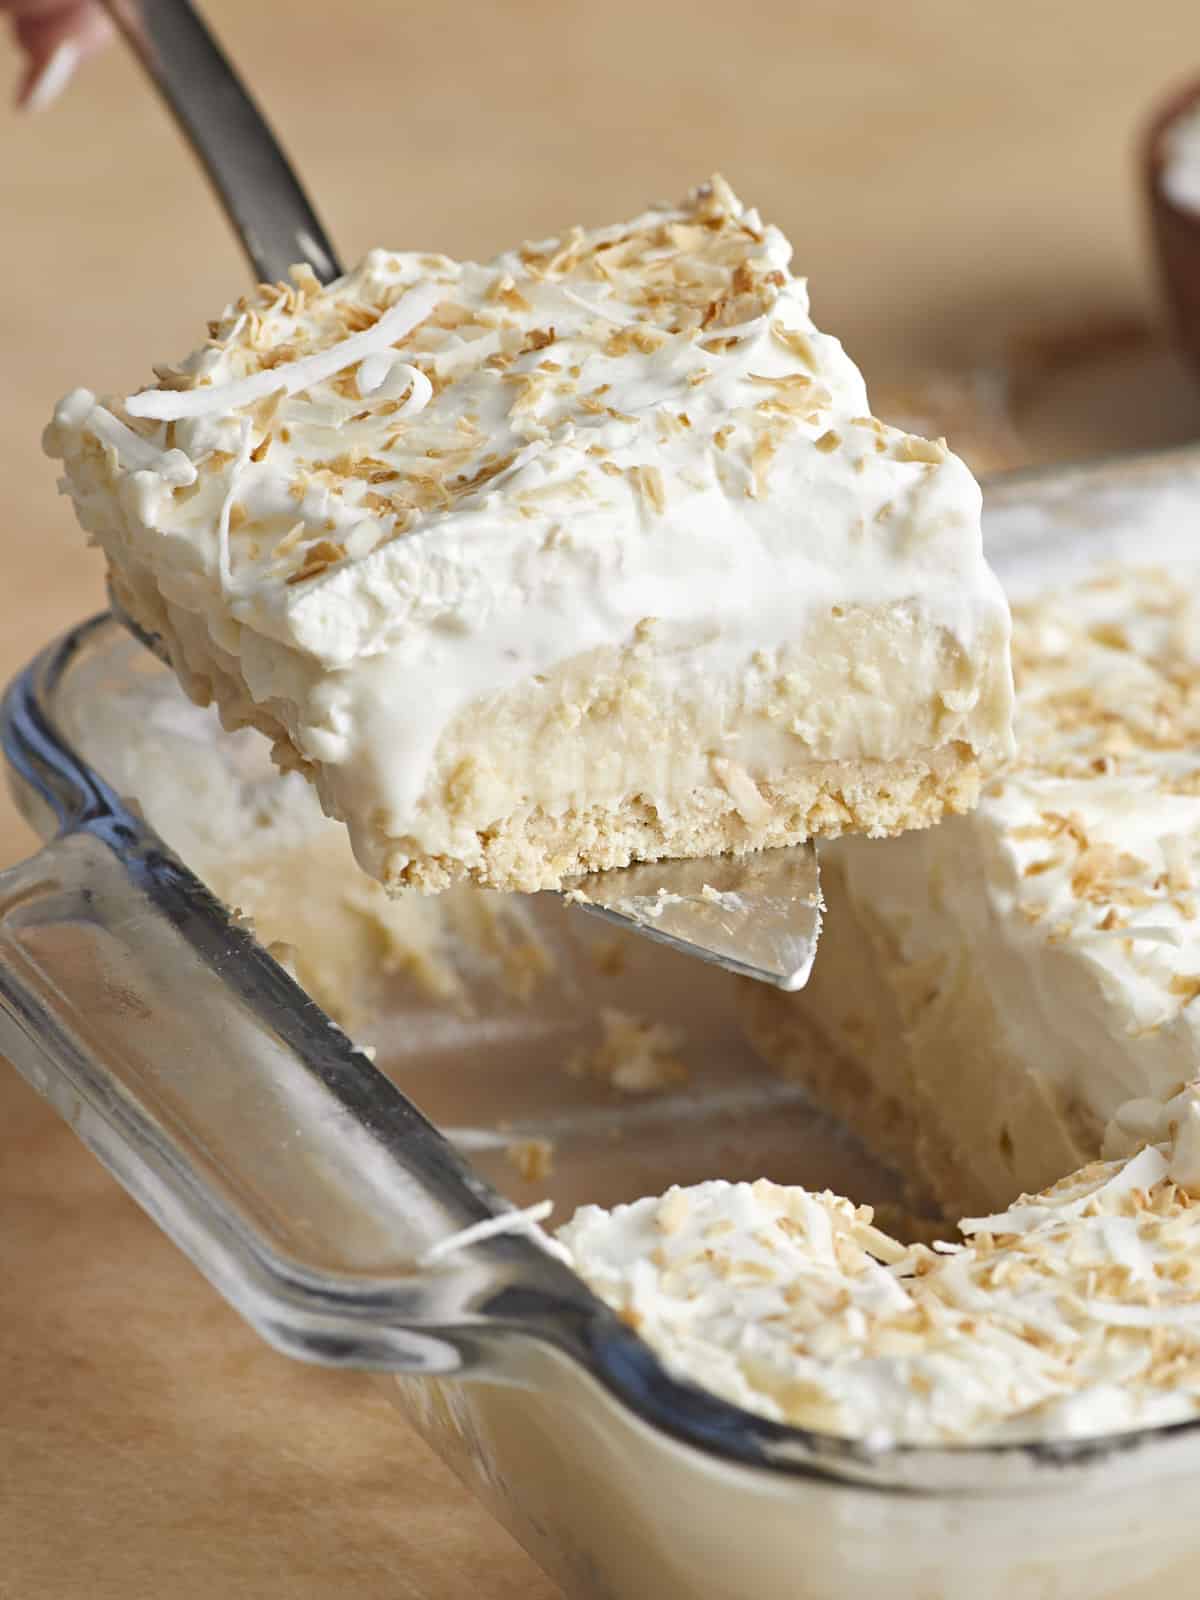


 I love making homemade granola because I love eating homemade granola. A few favorites include: lemon blueberry, almond butter, peanut butter, chocolate, and chocolate chip cookie granola clusters. I also love this Strawberry Granola, especially during the spring and summer months. The strawberry flavor is so good! The granola is sweet, crunchy, and made with…
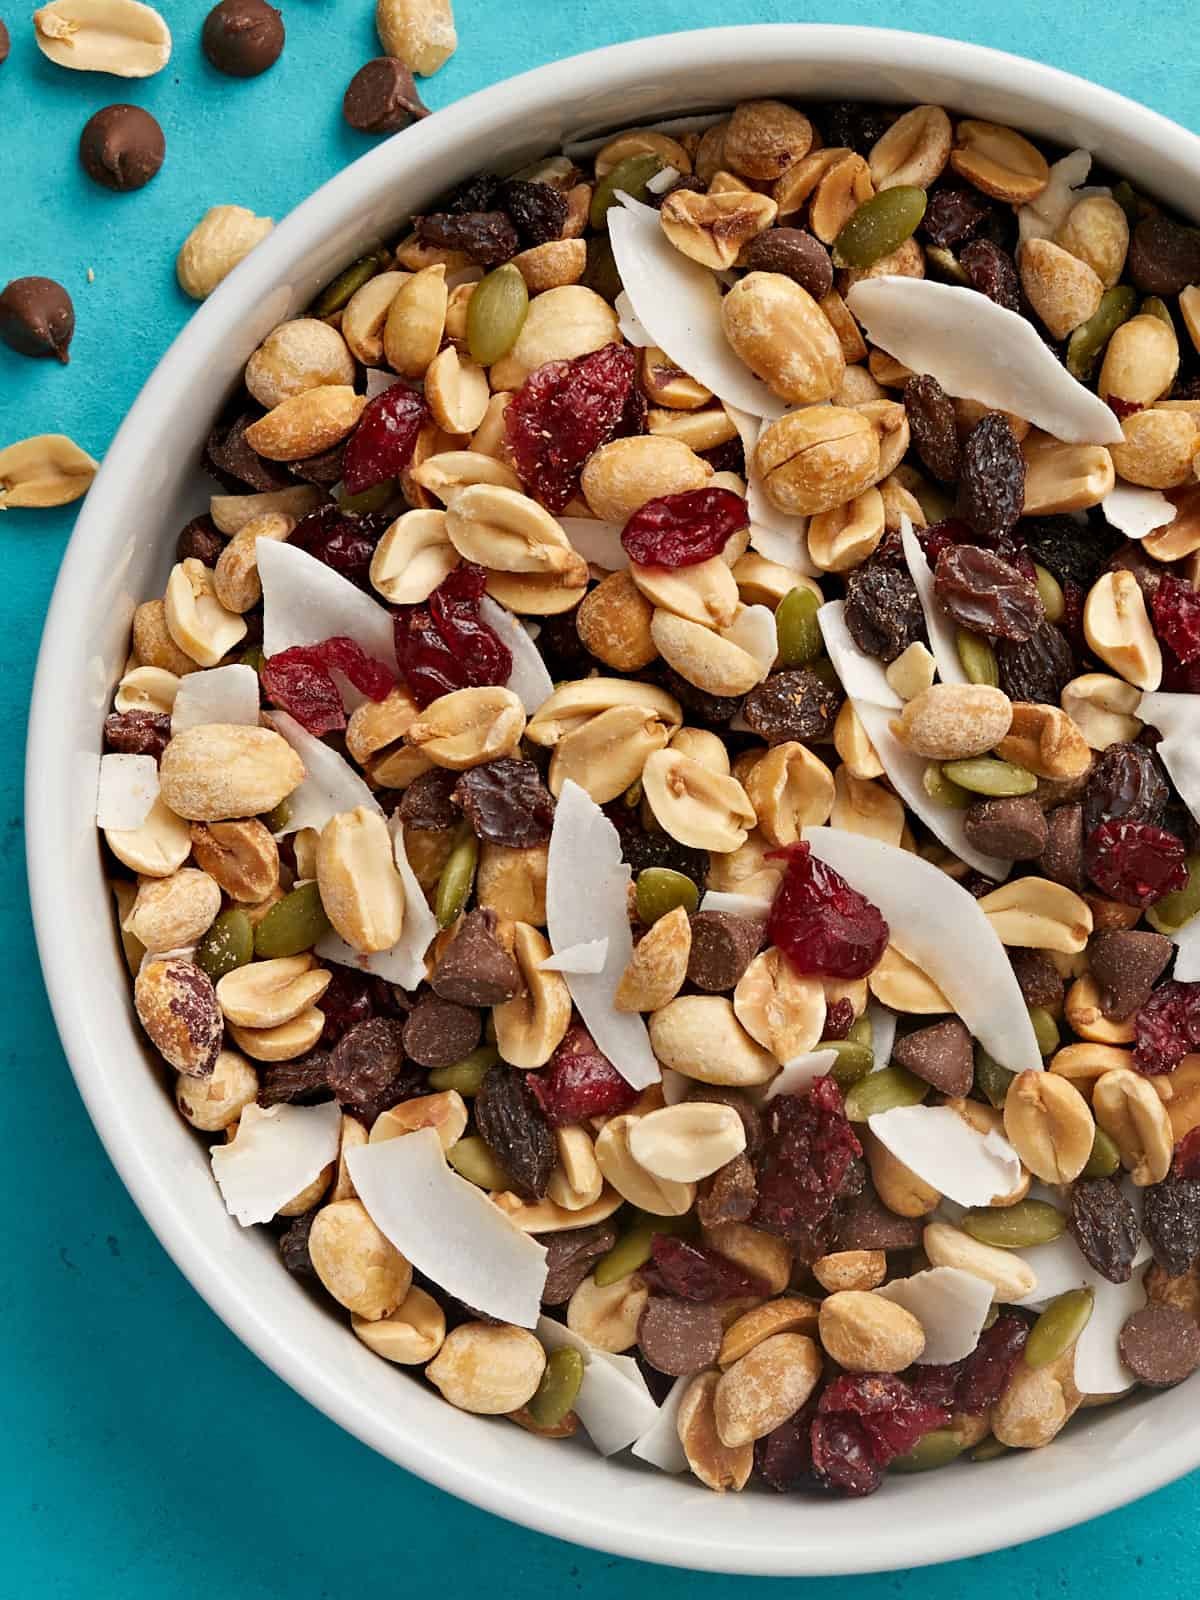

 Easter candy is my favorite candy, especially Cadbury Mini Eggs. The pretty pastel chocolate eggs with a thin candy shell are pure deliciousness! I buy several bags so I can eat them by the handful and make my Cadbury Egg Cookies. They are the BEST cookies! Whenever I am feeling lazy or don’t have time…