Chicken Marsala

This budget-friendly chicken Marsala recipe is so rich and flavorful, you won’t believe it didn’t come from your favorite Italian restaurant!

The post Chicken Marsala appeared first on Budget Bytes.

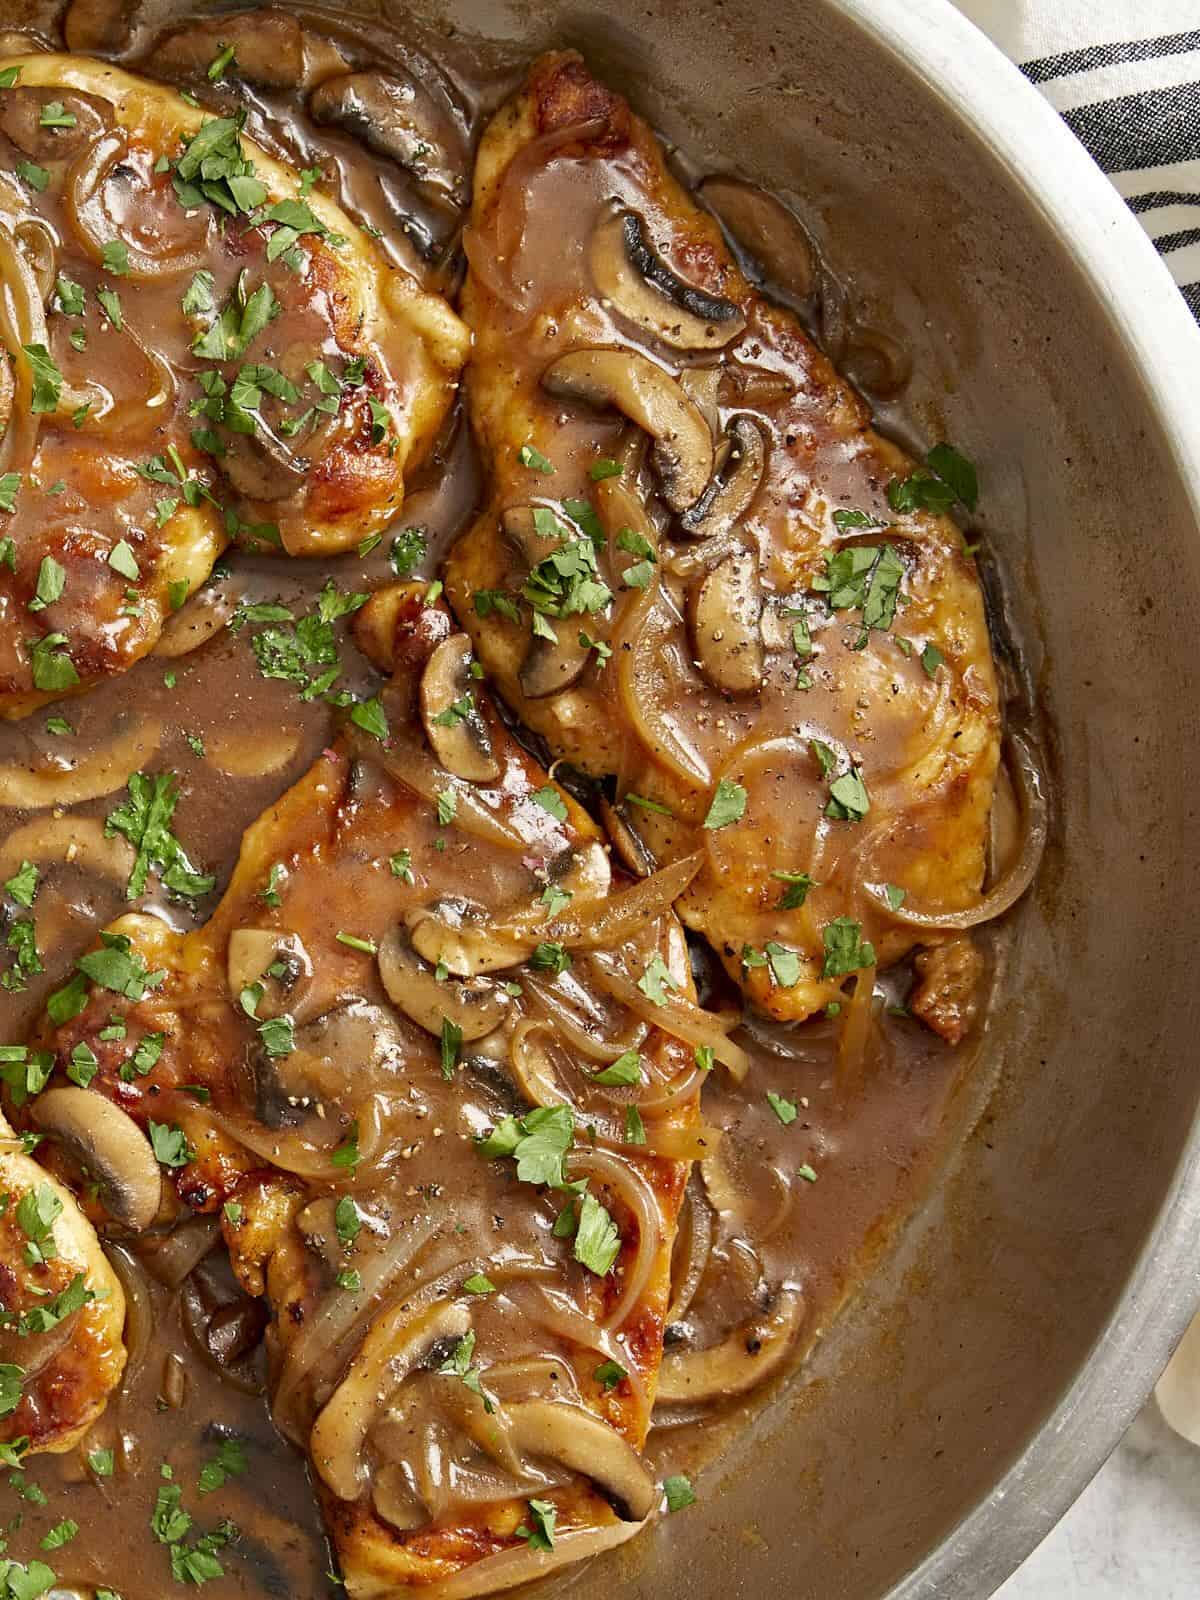
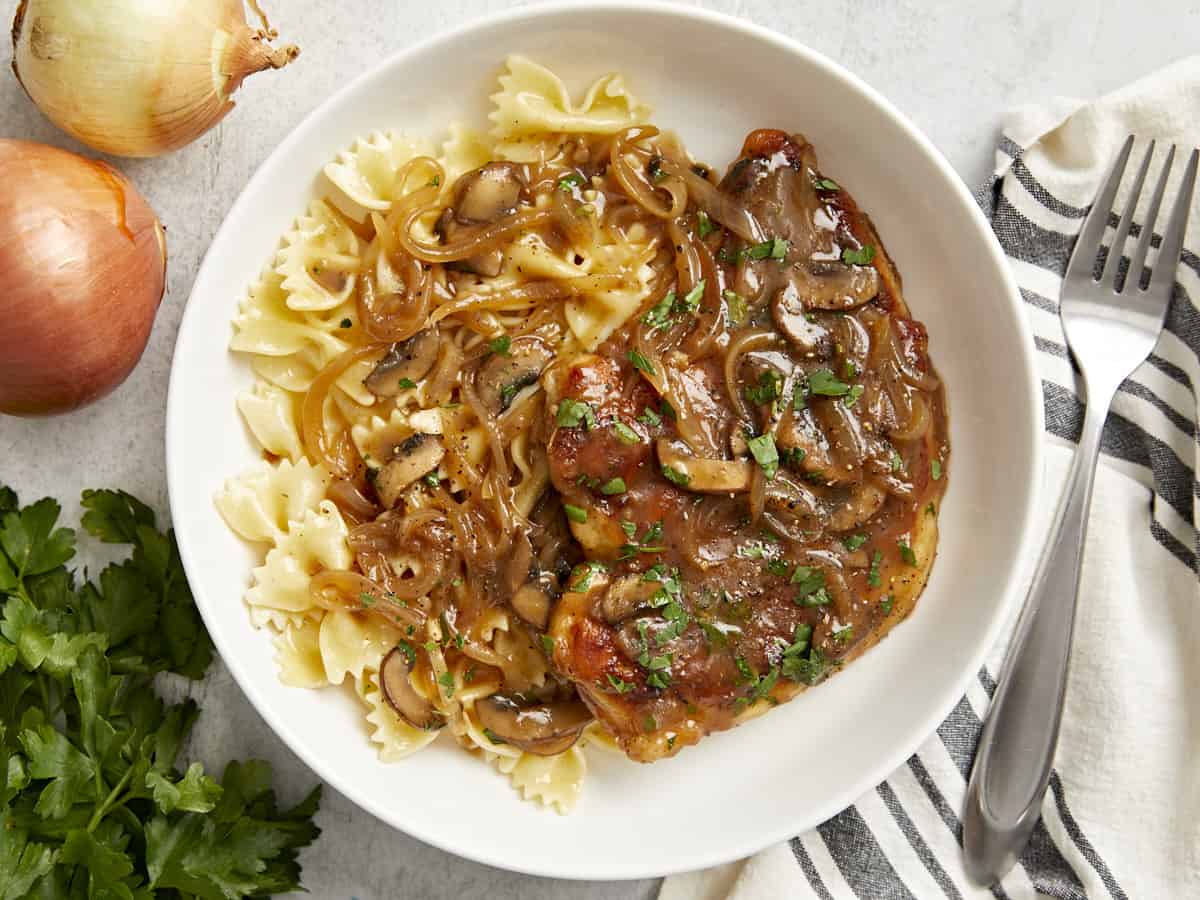
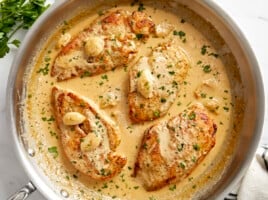
I love taking classic recipes and adapting them to be budget-friendly, and chicken Marsala is my latest endeavor. This Chicken Marsala recipe is so rich and flavorful, you won’t believe it didn’t come from your favorite Italian restaurant. Your family will be begging for this easy dinner recipe on repeat because it’s just that good!

partial overhead view of chicken marsala in a pan.

What is Chicken Marsala?

Chicken Marsala is a classic Italian dish, made from thinly sliced and pounded chicken breasts coated in a wine-based sauce enriched with butter and mushrooms. The mushrooms add what’s known as umami taste, a meaty, savory flavor that makes this dish so craveable.

Chicken Marsala Ingredients

Here’s what you’ll need to make chicken marsala:

  • Vegetable Oil: Helps to cook the chicken and vegetables without burning them. Canola or olive oil also works well here.
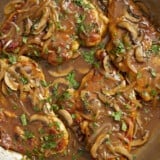
  • Chicken: Boneless, skinless chicken breasts are the classic choice for this recipe. Slice them in half and pound them to create what’s known as escalopes.
  • Seasonings: Salt, pepper, and Italian herb seasoning add classic Italian flavor to the chicken.
  • Flour: All-purpose flour creates wonderful browning on the chicken breasts and helps to thicken up the sauce.
  • Mushrooms: We highly suggest using baby bella mushrooms because they have a rich flavor and add earthiness to the dish.
  • White Onion: Cooked white onion adds a touch of sweetness. Yellow or sweet onion will also work, so use whatever you have on hand.
  • Chicken Broth: Forms the savory base of the sauce. We used bouillon because it’s super budget-friendly. Vegetable bouillon or broth is also fine.
  • Marsala Cooking Wine: This has unique sweet, rich, and smoky notes and gives this chicken its signature flavor. Cooking wine is much more budget-friendly than straight Marsala wine since it is shelf-stable so none will go to waste!
  • Butter: Salted butter enriches the sauce, making it glossy and rich.
  • Italian Parsley: Adds a pop of color and freshness to this dish.

What can you use instead of Marsala wine for chicken Marsala?

Can’t find Marsala cooking wine? Try using ¼ cup balsamic vinegar and ¼ cup white grape juice instead. There are red and white marsala varieties out there, but the red kind (sweeter) is what’s typically used in Chicken Marsala. You can also use straight Marsala wine instead of cooking wine.

Does the alcohol cook off in Chicken Marsala?

The process of reducing the sauce will evaporate the alcohol in Marsala wine, but if you’re serving this to kids, you may want to use the balsamic/grape juice alternative. Studies from the FDA show that wine simmered for 15 minutes may still contain up to 40% of its alcohol content. Designated “cooking wines” are not meant to be drunk but they are not alcohol-free. They contain salt and other preservatives which extend their shelf life.

What to Serve with Chicken Marsala

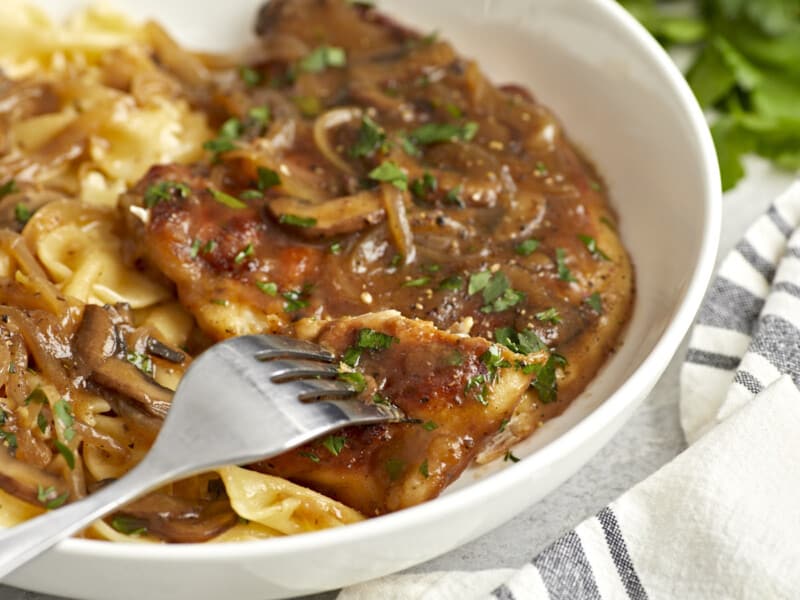
We served our chicken Marsala with cooked bowtie pasta, also known as Farfalle. Any kind of noodle will work, or try olive oil mashed potatoes for a different take. Add a side of lemon butter green beans or lemon garlic roasted asparagus for a well-rounded meal.

overhead view of chicken marsala in a white dish with bowtie pasta.
overhead view of chicken marsala in a pan.
Print

Chicken Marsala

This budget-friendly chicken Marsala recipe is so rich and flavorful, you won't believe it didn't come from your favorite Italian restaurant!
Course Dinner, Main Course
Cuisine Italian
Total Cost $12.52 recipe / $3.13 serving
Prep Time 15 minutes
Cook Time 20 minutes
Total Time 35 minutes
Servings 4
Calories 407kcal
Author Jess Rice

Equipment

Ingredients

  • 3 Tbsp vegetable oil, divided $0.12
  • 2 boneless, skinless chicken breasts $5.69
  • 1 1/2 tsp salt, divided $0.05
  • 1 tsp freshly cracked black pepper $0.05
  • 1 Tbsp dried Italian herb seasoning blend $0.30
  • 1/2 cup all-purpose flour $0.16
  • 8 oz. baby bella mushrooms, sliced (roughly 2 cups) $2.08
  • ½ white onion, julienned $0.39
  • 1 cup chicken broth $0.09
  • ½ cup Marsala cooking wine $3.20
  • 2 Tbsp salted butter $0.27
  • 2 Tbsp fresh Italian parsley, minced $0.12

Instructions

  • Cut the chicken breasts in half lengthwise. Place one chicken breast at a time in a heavy-duty freezer bag (unsealed) and use a tenderizing mallet (or a rolling pin… whatever is safe and sturdy that you have on hand) to hammer each one 1/4" thin, starting in the thicker middle part of the breasts and working your way to the ends. Repeat this process until all breast pieces are 1/4" thick and equally flat.
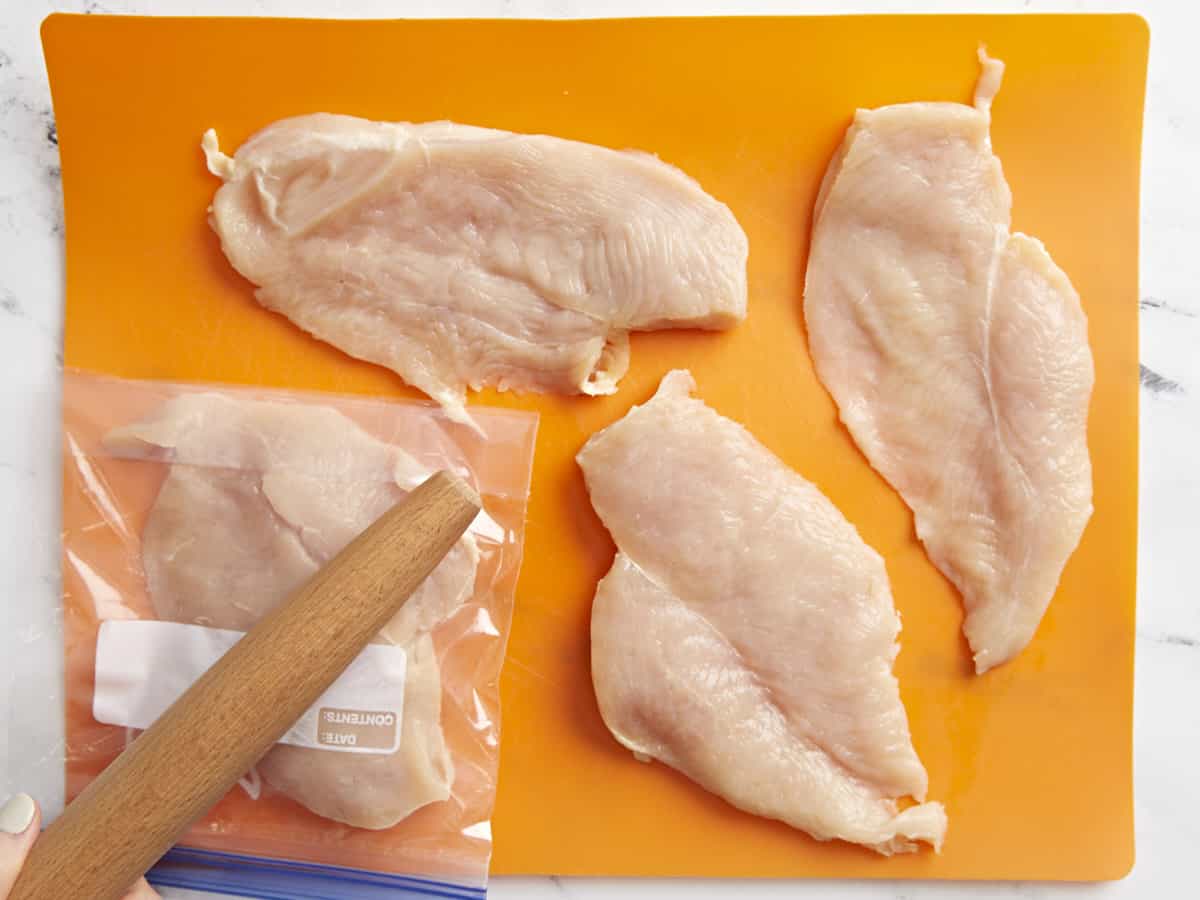
  • Combine ½ tsp salt, black pepper, dried Italian herb seasoning, and all-purpose flour in a shallow bowl, reserving 1 Tbsp of flour. Lightly coat the chicken breasts in the seasoning mixture and shake off excess flour. Transfer to a clean plate.
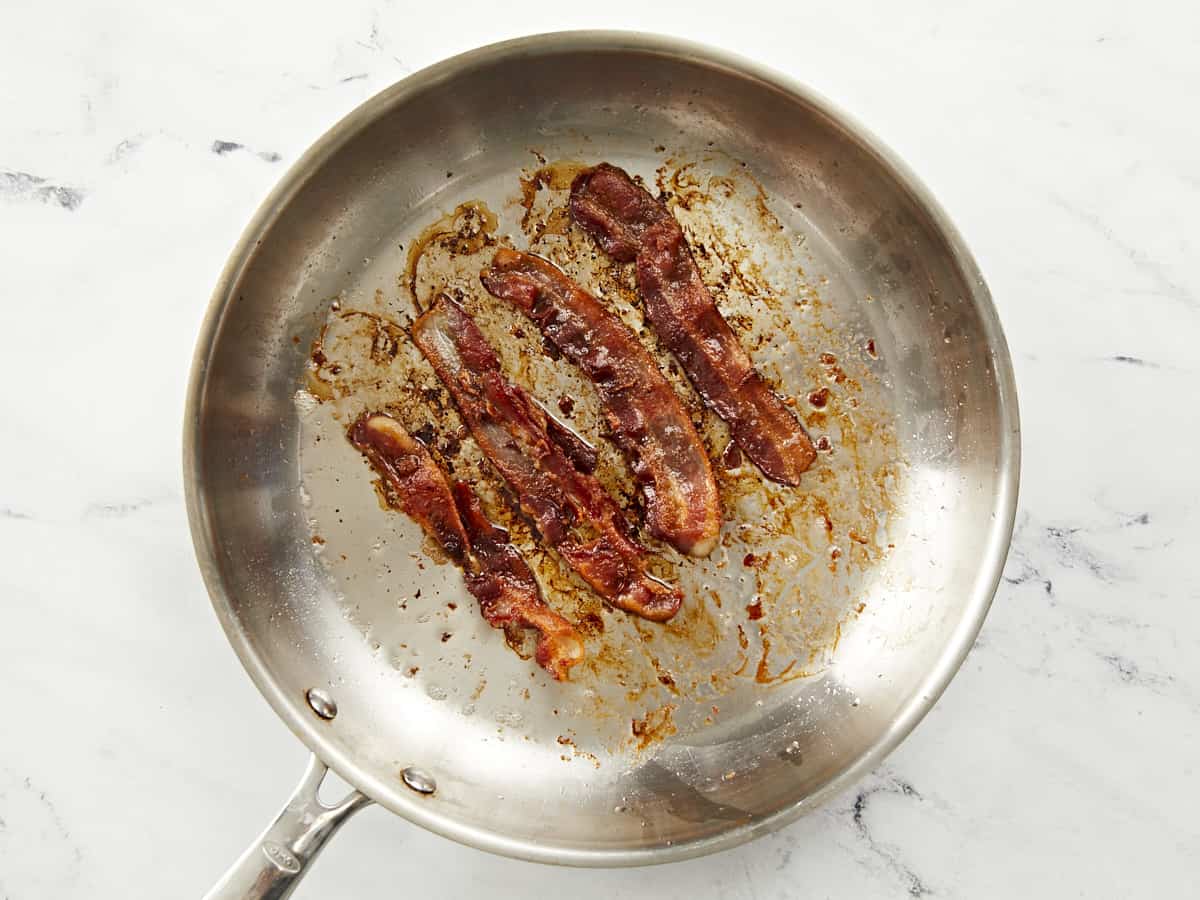
  • Heat vegetable oil in a large skillet over medium-high heat. Once hot, add the chicken breasts and cook on each side for 3-4 minutes. Try to not crowd your pan! You can do this in 2 batches if you need to. Once the chicken is cooked, transfer to a clean plate and cover with foil to keep warm.
  • Turn the heat down to medium. Add 1 tsp sea salt, sliced mushrooms and onions. Spread them out on the pan, flipping as needed so each mushroom piece browns, about 3 minutes. Scrape the bottom of your pan with a wooden spoon as you go; the browned bits on the bottom become a tasty part of your sauce!
  • Add the Marsala wine and broth to the pan, scraping the browned bits off the bottom again. Simmer until the liquid reduces by 1/3, about 4 minutes on medium-high heat.
  • Now, make a slurry with your reserved 1 Tbsp of flour; whisk the flour with a small amount of water or liquid from your cooking pan until there are no lumps. Then, whisk in the flour “slurry”, minced parsley, and butter until it has completely melted. Finally, add the chicken cutlets back, flipping them halfway, cooking for another 4 minutes total. Let the sauce thicken while the chicken finishes cooking in the sauce.
  • Garnish with additional minced parsley and adjust salt and pepper to your liking. Enjoy over any pasta you have on hand!

See how we calculate recipe costs here.

Nutrition

Serving: 1serving | Calories: 407kcal | Carbohydrates: 21g | Protein: 29g | Fat: 19g | Sodium: 1280mg | Fiber: 2g
overhead view of chicken marsala in a pan.

how to make Chicken Marsala – step by step photos

A rolling pin pounding chicken breasts to even thickness on an orange cutting board.

Cut 2 boneless, skinless chicken breasts in half lengthwise. Place one chicken breast at a time in a heavy-duty freezer bag (unsealed) and use a tenderizing mallet (or a rolling pin… whatever is safe and sturdy that you have on hand) to hammer each one 1/4″ thin, starting in the thicker middle part of the breasts and working your way to the ends. Repeat this process until all breast pieces are 1/4″ thick and equally flat.

dredging chicken breasts in seasoned flour.

Combine ½ tsp salt, 1 tsp black pepper, 1 Tbsp dried Italian herb seasoning, and 1/2 cup all-purpose flour in a shallow bowl, reserving 1 Tbsp of flour. Lightly coat the chicken breasts in the seasoning mixture and shake off excess flour. Transfer to a clean plate.

2 chicken breasts cooking in a pan.

Heat 3 Tbsp oil in a large skillet over medium-high heat. Once hot, add the chicken breasts and cook on each side for 3-4 minutes. Try to not crowd your pan! You can do this in 2 batches if you need to.

sliced onions and mushrooms in a pan.

Turn the heat down to medium. Add 1 tsp sea salt, 8 oz. sliced mushrooms, and ½ julienned onion. Spread them out on the pan, flipping as needed so each side browns, about 3 minutes. Scrape the bottom of your pan with a wooden spoon as you go; the browned bits on the bottom become a tasty part of your sauce!

marsala wine poured over mushrooms and onions in a pan.

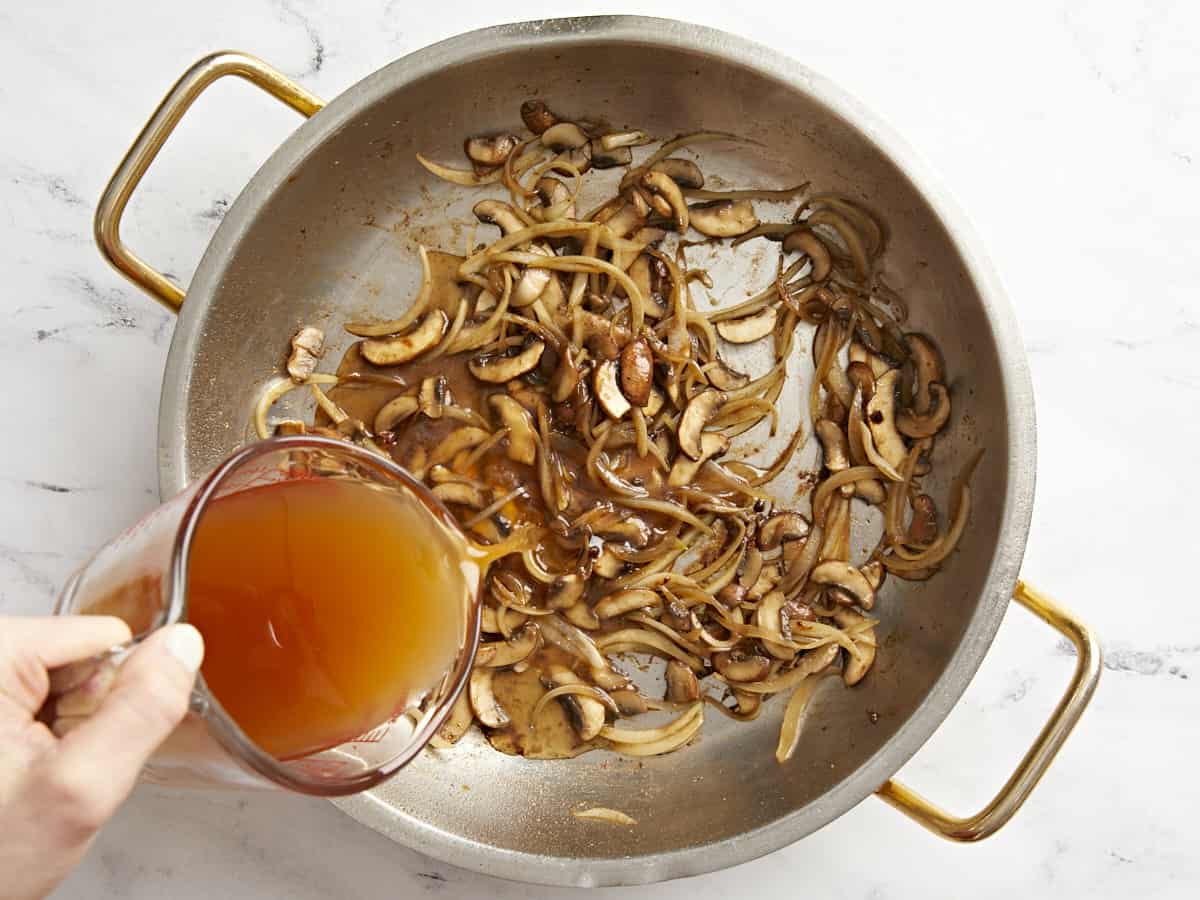
Add ½ cup Marsala wine and 1 cup broth to a cup. Pour it into the pan, scraping the browned bits off the bottom again. (I combined the broth and Marsala wine and added them at the same time.) Simmer until the liquid reduces by 1/3, about 4 minutes on medium-high heat.

butter added to marsala sauce in a pan.

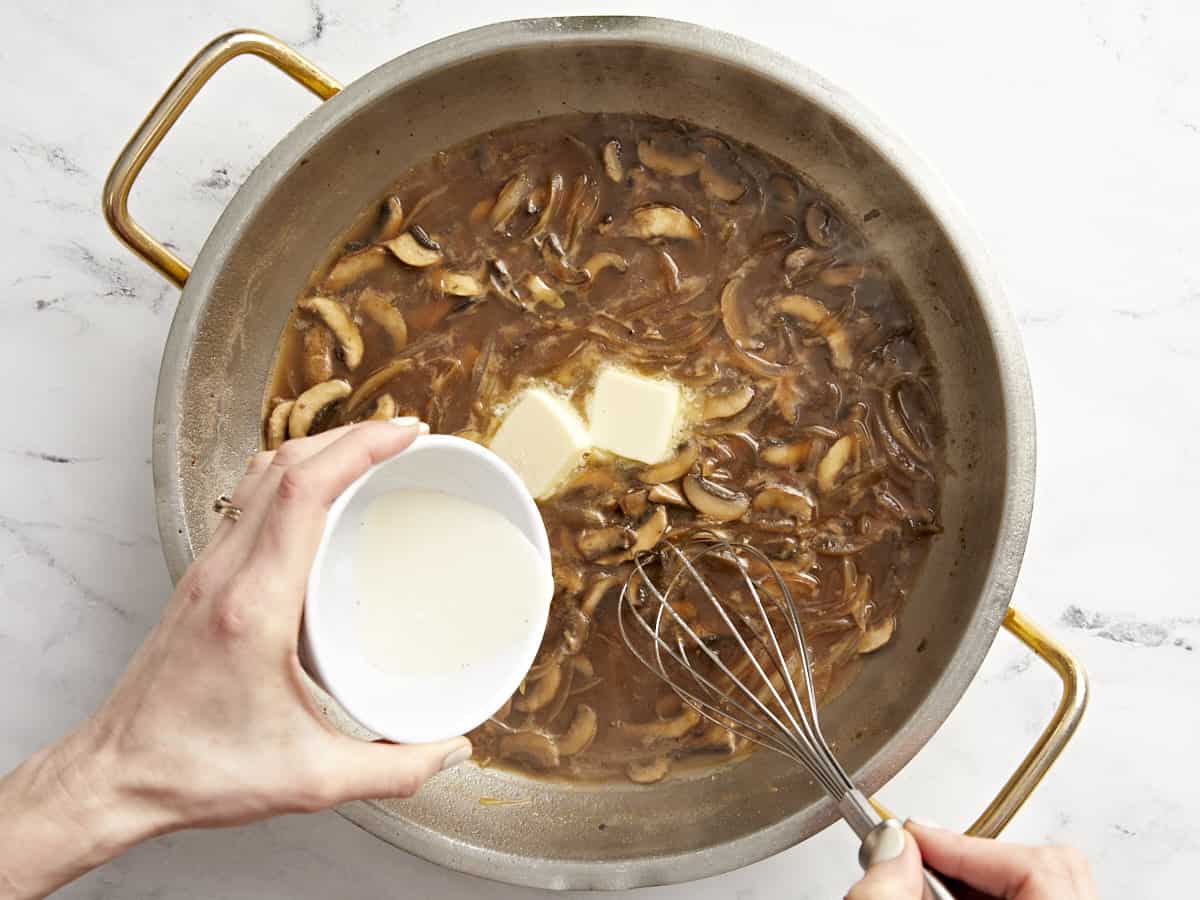
Now, make a slurry with your reserved 1 Tbsp of flour; whisk the flour with a small amount of hot water or liquid from your cooking pan until there are no lumps. Then, whisk in the flour “slurry”, 2 Tbsp minced parsley, and 2 Tbsp salted butter until it has completely melted. Finally, add the chicken cutlets back, flipping them halfway, cooking for another 4 minutes total. Let the sauce thicken while the chicken finishes cooking in the sauce.

chicken marsala in a pan.

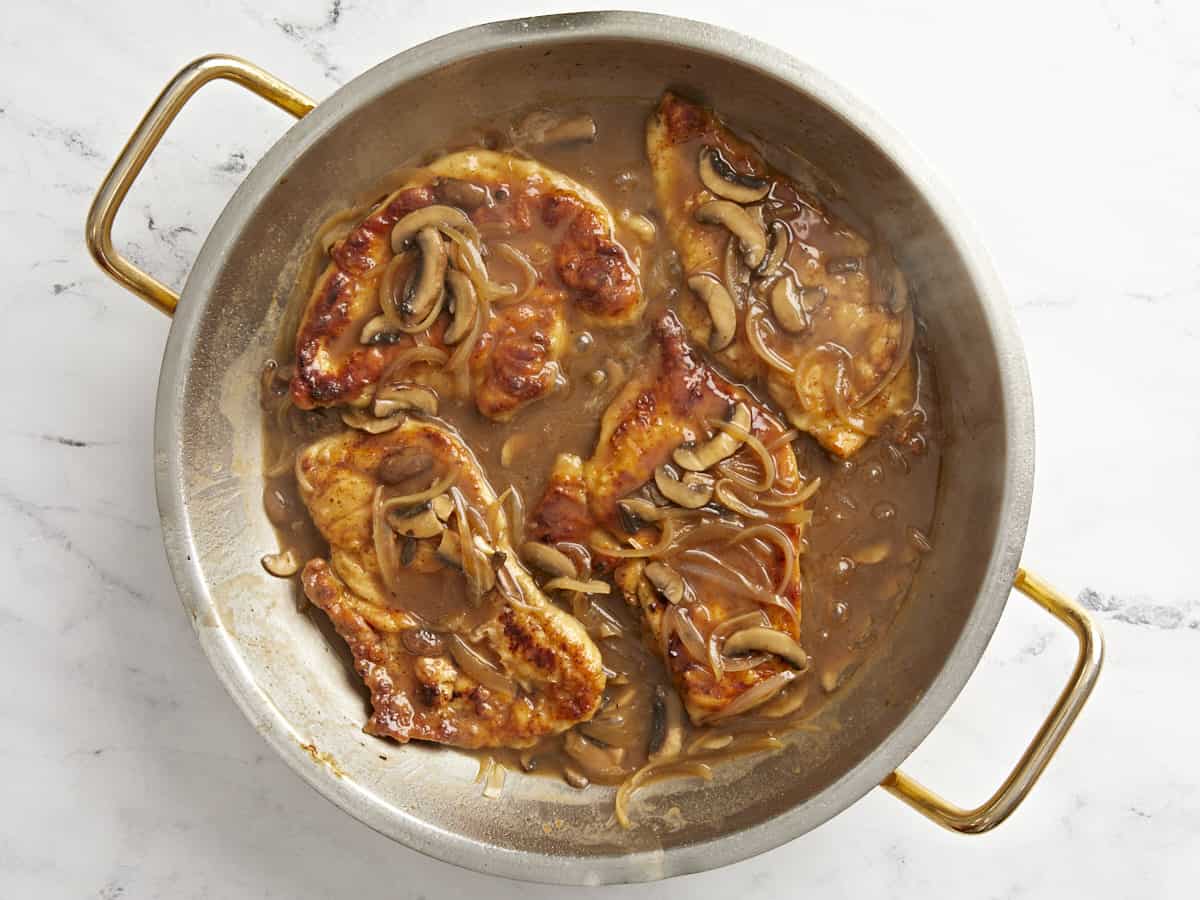
Garnish with additional minced parsley and adjust salt and pepper to your liking. Pour over your favorite pasta and enjoy!

a fork holding a piece of chicken marsala above a shallow dish.

This chicken Marsala recipe is even better than your favorite Italian restaurant!
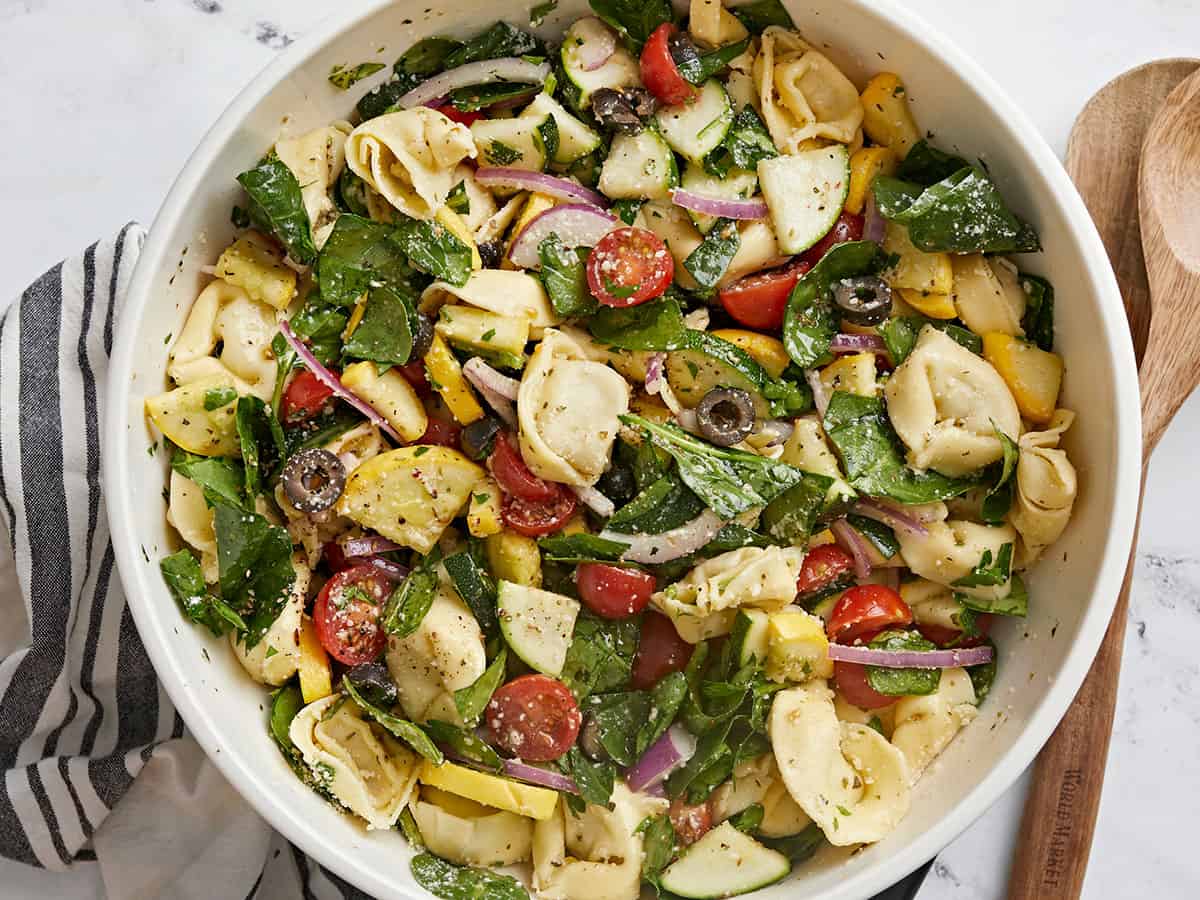
The post Chicken Marsala appeared first on Budget Bytes.

Green Goddess Salad

This creamy, crunchy, and tangy Green Goddess salad is as delicious as it is easy to make, plus it’s ridiculously budget-friendly.

The post Green Goddess Salad appeared first on Budget Bytes.

This Green Goddess Salad recipe is so good every time I take a bite, I feel like screaming, “I can’t believe this is cabbage!”. If you’re looking for a delicious and refreshing salad that’s super easy to make and ridiculously budget-friendly (you will never pay for bagged salad again), then you need to try Green Goddess Salad. The creamy, herb-packed Green Goddess Dressing it’s made with is to die for.

Overhead shot of Green Goddess Salad in a white bowl.

What Is Green Goddess Salad?

Green Goddess Salad is believed to have been created in the 1920s in San Francisco as an homage to an actor in the play The Green Goddess. It’s usually a mixture of leafy greens and a zesty, herbaceous Green Goddess Dressing.

Ingredients for Green Goddess Salad

My recipe for Green Goddess Salad uses cabbage as the primary green, so this salad keeps well, making it a perfect choice for potlucks. Though I keep things simple to keep this recipe budget-friendly, this salad is often served with croutons and grilled shrimp or chicken. Here’s what you’ll need to make Green Goddess Salad:

  • Green Cabbage: is the base of our salad. It’s very budget-friendly and has a great shelf life. But if cabbage isn’t your thing, you can def sub this cabbage with about 8 cups of your favorite chopped greens.
  • Fennel Bulb: adds the traditional black licorice note that Green Goddess is known for. You can substitute the fennel with a cup of fresh tarragon leaves. make sure to reserve the fronds for an addition to the Green Goddess Dressing or to use as a garnish.
  • Green Onions: add pungency to the mix. If you don’t have green onions, sub with half a small white onion.
  • Italian Parsley: adds deep green color to the salad and grassy notes. You can substitute it with curly parsley if you wish or fresh basil.
  • Green Goddess Dressing: this herbaceous concoction is fantastic when prepared fresh (definitely check out our easy recipe!), but you can also get it pre-made at most major supermarkets.
Overhead shot of Green Goddess Salad being tossed in a white bowl.

How To Store Green Goddess Salad

This salad keeps really well. Though you can mix the dressing into the greens and refrigerate the salad for up to 5 days, the flavors mellow considerably. If you’re going to premix, I recommend giving it a good stir, tasting the greens, and adding a few pinches of salt and maybe a crack or two of black pepper before serving. I do not recommend freezing this salad, as the textures of the greens will change considerably as they thaw.

What To Serve With Green Goddess Salad

This is a perfect salad to bring to a get-together because it travels really well. Its herbaceous tangy notes make it a perfect pairing for lighter dishes like Easy Fish Tacos with Cumin Lime Slaw, Salmorejo, Tuna Patties, or Chicken Lettuce Wraps. But it is also hearty enough to pair with bolder flavors like BBQ Ribs, Sausage Kebabs, Roasted Chicken, and Classic Homemade Meatloaf.

Side shot of Green Goddess Salad in a white bowl.
Overhead shot of Green Goddess Salad in a white bowl.
Print

Green Goddess Salad

This creamy, crunchy, and tangy Green Goddess salad is as delicious as it is easy to make, plus it's ridiculously budget-friendly.
Course Salad
Cuisine American
Total Cost ($13.69 recipe / $1.71 serving)
Prep Time 20 minutes
Total Time 20 minutes
Servings 8 2-cup servings
Calories 110kcal

Ingredients

  • 1 fennel bulb $3.49
  • 4 green onions $0.45
  • 1 green cabbage (about 3 lbs) $2.23
  • 1 cup Italian parsley leaves $0.79
  • 2 cups Green Goddess Dressing $6.73

Instructions

  • Rinse the fennel bulb under cool water. Slice the fennel bulb in half from root to stem. Trim off the stem, reserving the fennel fronds to use in the Green Goddess Dressing. If you've purchased pre-made dressing, use the fennel fronds as garnish.
  • Slice around the triangle-shaped core of each fennel bulb half. Place each half in a bowl of water to prevent the fennel from browning. Then chop each fennel half into 1/4-inch thick slices. Finally, cut the fennel slices into 1/4-inch dice. Keep the diced fennel in the water until ready to use.
  • Remove the roots from the green onions and then slice in 1/8 inch slices on the diagonal. Rough chop the Italian Parsley leaves.
  • Slice the green cabbage in half, and cut around the core. Next, cut each cabbage half into 1/4-inch thick slices. Then cut each slice into 1/4-inch strips. Finally, cut each strip into 1/4-inch dice. You should have about 10 to 12 cups of chopped cabbage.
  • Place the cabbage, onions, Italian parsley, fennel fronds, and fennel in a large bowl. Top with the Green Goddess Dressing. Toss the greens in the dressing. 
  • Taste the greens about ten minutes after adding the dressing; if necessary, add salt and pepper. If you are preparing the salad ahead of time, give it a big stir before serving, and add salt and pepper if necessary.

See how we calculate recipe costs here.

Nutrition

Serving: 1serving | Calories: 110kcal | Carbohydrates: 14g | Protein: 4g | Fat: 6g | Sodium: 91mg | Fiber: 4g

How to Make Green Goddess Salad – Step by Step Photos

Overhead shot of a fennel bulb sliced in half on a wood cutting board.

Rinse 1 fennel bulb under cool water. Slice the fennel bulb in half from root to stem. Trim off the stem, reserving the fennel fronds to use in the Green Goddess Dressing. If you’ve purchased pre-made dressing, use the fennel fronds as garnish.

Overhead shot of a fennel bulb being sliced on a cutting board.

Slice around the triangle-shaped core of each fennel bulb half. Place each half in a bowl of water to prevent the fennel from browning. Then chop each fennel half into 1/4-inch thick slices. Finally, cut the fennel slices into 1/4-inch dice. (Squares of fennel slices that are 1/4 inch by 1/4 inch.) Keep the diced fennel in the water until ready to use.

Overhead shot of sliced green onions and parsley on a cutting board.

Remove the roots from 4 green onions and then slice in 1/8-inch slices on the diagonal. Rough chop 1 cup of Italian Parsley leaves.

Overhead shot of green cabbage being sliced on a cutting board.

Slice 1 green cabbage in half, and cut around the core. Next, cut each cabbage half into 1/4-inch thick slices. Then cut each slice into 1/4-inch strips. Finally, cut each strip into 1/4-inch dice. You should have about 10 to 12 cups of chopped cabbage.

Overhead shot of Green Goddess Dressing being added to chopped greens in a white bowl.

Place the cabbage, onions, Italian parsley, fennel fronds, and fennel in a large bowl. Top with 2 cups of Green Goddess Dressing. Toss the greens in the dressing.

Overhead shot of Green Goddess Salad in a white bowl.

The dressing will add loads of flavor to the greens, but it will also extract some of their water. So taste them about ten minutes after adding the dressing, and if necessary, add salt and pepper to taste. If you are preparing the salad ahead of time, give it a big stir before serving, and add more salt and pepper if necessary. I hope you enjoy this one as much as we did! Beth and I both couldn’t stop eating it!

Side shot of Green Goddess Salad in a white bowl.

The post Green Goddess Salad appeared first on Budget Bytes.

Green Goddess Dressing

This creamy, herbaceous Green Goddess Dressing is perfect for hearty summer salads or as a tangy dip for fresh or roasted summer vegetables.

The post Green Goddess Dressing appeared first on Budget Bytes.

This creamy, herbaceous, and super velvety Green Goddess Dressing had everyone at the studio eating it straight out of the bowl! So versatile and easy to make, you can pair it with a simple side salad, mix it into a slaw, or serve it as a dip with a platter of snowpeas and baby carrots. PS It’s a touch more expensive than most homemade dressings, but it’s perfect if you have an herb garden or an abundance of herbs you need to do something with. Plus you know exactly what’s in it. (I can’t identify half of the ingredients in a name-brand Green Goddess dressing because so many are chemical preservatives.)

Overhead shot of Green Goddess Dressing in a wood bowl garnished with herbs.

What Is Green Goddess Dressing?

Bright and herbaceous, the original Green Goddess Dressing was created in 1923 in San Francisco as an homage to an actor in the play The Green Goddess. There are many variations of Green Goddess, but the basic ingredients remain the same. The original recipe used multiple fresh herbs, anchovies, lemon juice, and mayonnaise. My recipe keeps with tradition by mixing herbs but simplifies the original recipe significantly to keep it budget-friendly.

Ingredients for Green Goddess Dressing

This is such a lovely summer dressing for any salad, but pairs exceptionally well with a hearty slaw. It is also a great way to use up any fresh herbs that you have on hand, so feel free to play with this ingredient list. Just make sure to use tender herbs, and leave woodier herbs (like Rosemary) for different preparations. Here’s what you’ll need to make delicious Green Goddess Dressing:

  • Italian Parsley, Basil, and Fennel Fronds: are the green in our Green Goddess. The fennel fronds add a black licorice note and can be substituted with tarragon. Feel free to add other fresh herbs you want to use up, like mint or dill. The key to success with this Green Goddess dressing recipe is to use fresh herbs, so if you only have dried, try making a different dressing.
  • Sour Cream: Adds tangy creaminess to the dressing. If you don’t have sour cream, try Greek yogurt or mayonnaise. We also have an excellent tutorial for How To Make Sour Cream.
  • Green Onions: add a mild onion flavor and can be substituted with chives or, in a pinch, white onion or shallot. If you don’t like onions, just omit them.
  • Garlic: is used for pungency, though there’s not enough in the dressing to give it a garlicky top note. Feel free to add more than what my recipe calls for to adjust to your taste. If you’re not a garlic fan, just leave it out.
  • Lemon: the juice and zest lend citrus notes and help pull everything together. If you don’t have lemon, substitute it with additional vinegar, or try using a lime.
  • Apple Cider Vinegar: adds a soft fruity acidity. You can use any other mild vinegar like rice wine or white wine. Deeply colored vinegars like balsamic and red wine, will muddy the color of the dressing, but if it’s all you have, they will still taste great.

What PairS With Green Goddess Dressing?

This velvety, tart dressing has grassy notes from all of the herbs it’s made with and pairs beautifully with any hearty salad, especially the Green Goddess Salad it was created for. Use it to dress a Simple Side Salad, or use it as substitute for the dressing in Easy Creamy Cole Slaw. This Green Goddess Salad Dressing recipe is also great as a dip for Vegetable Snack Packs and Roasted Summer Vegetables.

How To Store Green Goddess Dressing

Add any leftover dressing to an airtight container and refrigerate for up to a week. While some people do freeze their Green Goddess Dressing, it will dull the color and the flavor and you will have to blend it again, as the components tend to separate as they thaw. I prefer to refrigerate it.

Overhead shot of Green Goddess Dressing in a wood bowl garnished with herbs.
Side shot of Green Goddess Dressing in a wood bowl with a black spoon drizzling some in.
Print

Green Goddess Dressing

This creamy, herbaceous Green Goddess Dressing is perfect for hearty summer salads or as a tangy dip for fresh or roasted summer vegetables.
Course Dressing, Salad
Cuisine American
Total Cost ($6.73 recipe / $0.42 serving)
Prep Time 5 minutes
Total Time 5 minutes
Servings 16 2 Tbsp servings
Calories 34kcal

Ingredients

  • 1 cup basil leaves $2.99
  • 1/2 cup Italian parsley leaves $0.24
  • 1/4 cup fennel fronds* $0.77
  • 4 green onions, roots removed $0.45
  • 2 cloves garlic, minced $0.16
  • 1 lemon, juiced and zested $0.79
  • 1 cup sour cream $1.25
  • 1 Tbsp apple cider vinegar $0.06
  • 1/8 tsp salt, or more to taste $0.01
  • 1 pinch fresh ground black pepper, or more to taste $0.01

Instructions

  • Rough chop the basil leaves, Italian parsley leaves, fennel fronds, and green onions. Mince garlic. Zest and juice the lemon. Measure out the sour cream and the apple cider vinegar.
  • Add the sour cream to a blender. Top with the basil leaves, Italian parsley leaves, fennel fronds, green onions, garlic, lemon juice and zest, apple cider vinegar, salt, and black pepper. Puree until smooth. If necessary, add more salt and pepper to taste. Drizzle over your favorite salad and enjoy!

See how we calculate recipe costs here.

Notes

*Fennel fronds are the wispy, licorice flavored leaves on a fennel bulb. If you cannot source them, try using tarragon instead.

Nutrition

Serving: 1serving | Calories: 34kcal | Carbohydrates: 2g | Protein: 1g | Fat: 3g | Sodium: 25mg | Fiber: 0.4g

How to Make Green Goddess Salad Dressing – Step by Step Photos

Overhead shot of Green Goddess Dressing ingredients on a wood cutting board.

Rough chop 1 cup basil leaves, 1/2 cup Italian parsley leaves, 1/4 cup fennel fronds, and 4 green onions. Mince 2 cloves garlic. Zest and juice 1 lemon.

Overhead shot of Green Goddess Dressing in a blender.

Add 1 cup of sour cream to a blender. Top with basil leaves, Italian parsley leaves, fresh fennel fronds, green onions, garlic, the juice and zest of 1 lemon, 1 tablespoon of apple cider vinegar, 1/8th teaspoon salt, and 1 pinch of black pepper. Puree until smooth. If necessary, add more salt and pepper to taste. Drizzle over your favorite summer salad or use as a dip for summer veggies!

Side shot of Green Goddess Dressing in a wood bowl with a black spoon drizzling some in.

More Easy Salad Dressings

The post Green Goddess Dressing appeared first on Budget Bytes.

Tortellini Salad

This fresh, vibrant, and utterly delicious Tortellini Salad feeds a crowd on a dime. The best part: you can put it together in minutes!

The post Tortellini Salad appeared first on Budget Bytes.

This fresh, vibrant, and utterly delicious Tortellini Salad feeds a crowd on a dime. My favorite part? It only takes a few minutes to put together. Plus, you can make it ahead of time and store it in the fridge for up to 3 days. Win! Win! Win! It’s perfect for picnics, potlucks, or a light lunch at home. Get ready to put this Tortellini Salad recipe on repeat!

Overhead shot of tortellini salad in a white bowl.

What is Tortellini Salad?

Tortellini is a type of pasta stuffed with meat, vegetables, or cheese, then shaped into a small ring. To make the salad, the cooked and cooled tortellini is mixed with summer vegetables, herbs, greens, and a vinaigrette. Sometimes chopped cured meats or pickled peppers are added. For me, the pure joy of it is that it comes together in three steps, it’s super filling, and it’s a perfect choice for when you have an army to feed but don’t want to spend a lot of time in the kitchen.

Ingredients for Tortellini Salad

The pasta is the star here, and though you can use any kind of tortellini, we chose cheese tortellini to keep the flavor profile simple. Here’s what you need to make Tortellini Salad:

  • Tortellini– any kind will do. If you can’t access this ingredient, substitute it with rotini, farfalle, penne, orecchiette, or gnocchi. (And call it Pasta Salad!)
  • Cherry tomatoes – these bring a pop of color and a touch of sweetness and acidity to the party. If you’re not a fan of tomatoes, try using red bell peppers instead.
  • Red onion– sharp, assertive, and spicy, this ingredient is a great way to break up the fattiness of the tortellini. You can substitute with green onion, white onion, or yellow onion.
  • Summer vegetables like squash and zucchini– these fresh veggies add more texture than flavor and also help bulk up your salad. Substitute with cucumber or carrots.
  • Black olives– add a touch of brininess. Substitute with green olives or capers.
  • Baby spinach and Italian Pasley– add herbaceous peppery notes. Substitute the spinach with kale or arugula. If you’re not a fan of parsley, use basil.
  • Parmesan cheese – helps round out the flavors and adds a touch of nuttiness.
  • Italian Dressing– pulls everything together and adds zing. Substitute with any lightly flavored vinaigrette.
Side shot of tortellini salad in a white bowl with dressing being poured in.

Tips For Making The Best Tortellini Salad

  • You can use store-bought Italian dressing for convenience, but for a more flavorful salad, use our recipe for Italian Dressing.
  • Bulk up the salad with more low-cost, in-season veg to transform a pound of tortellini into 16 servings instead of 12. Use any fresh veg, greens, and fresh summer herbs you have on hand. Just cut everything in similar sizes.
  • Add a little acidity and heat with pickled cherry peppers or banana peppers.
  • For a heartier salad, add chopped grilled chicken or shrimp. Or try adding chopped salami.

What To Serve with Tortellini Salad

Though it makes a wonderful meal on its own, you can also serve Tortellini Salad as part of a larger meal, like a backyard barbecue or picnic. It’s a perfect side for Greek Marinated Chicken or Quick Garlic Butter Shrimp. I love serving it with No-Knead Homemade Focaccia and Balsamic Roasted Vegetables.

How To Store Tortellini Salad

Tortellini salad keeps up to 3 days in the fridge. Just make sure to store leftovers in an airtight container. If you want to make the salad ahead of time, I recommend making the tortellini, chopping and salting the squash and zucchini, and prepping the rest of the ingredients. Add the tortellini to a large container and top with the veg and then the greens. Mix with Parmesan and dressing when you’re ready to serve.

Side shot of tortellini salad in a white bowl.
Overhead shot of tortellini salad in a white bowl.
Print

Tortellini Salad

This fresh, vibrant, and utterly delicious Tortellini Salad feeds a crowd on a dime. The best part: you can put it together in minutes!
Course Brunch, Dinner, Lunch
Cuisine Italian
Total Cost ($17.57 recipe / $1.46 serving)
Prep Time 5 minutes
Cook Time 10 minutes
Total Time 15 minutes
Servings 12 cups
Calories 186kcal

Ingredients

  • 1 summer squash $1.10
  • 1 zucchini $0.75
  • 1/2 tsp salt $0.02
  • 1 pint cherry tomatoes $3.00
  • 1/2 red onion $0.38
  • 2 cups fresh baby spinach, packed $3.49
  • 1/2 cup sliced black olives $1.99
  • 3/4 cup Italian dressing $1.42
  • 1/2 cup chopped Italian Parsley $0.30
  • 1/4 cup Parmesan cheese $0.33
  • 1 lb cheese tortellini $4.79

Instructions

  • First, cook the tortellini according to the package directions. Then drain well and cool in a very large bowl in the fridge.
  • While the tortellini is cooking, slice the summer squash and the zucchini into 1/4-inch rounds and then quarter the rounds. Add them to a large bowl and sprinkle with salt and mix.
  • Slice the cherry tomatoes in half. Slice the red onion in 1/4 inch half moons and soak it in cold water to dull its sharp flavor. Chop the parsley, and if the baby spinach leaves are large, chop them as well.
  • Once the tortellini has cooled, top it with the cherry tomatoes, red onion, baby spinach, and sliced black olives. Then drizzle with 1/2 cup of Italian dressing.
  • Next, top the salad with chopped Italian parsley and Parmesan cheese. Then drizzle with the final 1/4 cup of Italian dressing. Finally, mix, and serve! Wasn't that easy?

See how we calculate recipe costs here.

Notes

*Soak the red onion in cold water for a few minutes to dull the sharp flavor.

Nutrition

Serving: 1cup | Calories: 186kcal | Carbohydrates: 22g | Protein: 7g | Fat: 8g | Sodium: 543mg | Fiber: 3g
Overhead shot of tortellini salad in a white bowl.

How to Make Tortellini Salad – Step By Step Photos

Overhead shot of tortellini cooking in a silver pot with a wood-handled spoon in it.

First, cook one pound of tortellini according to the package directions. Then drain well and cool in a very large bowl in the fridge.

Overhead shot of chopped veggies in a white bowl with salt being sprinkled on top.

While the tortellini is cooking, slice the summer squash and the zucchini into 1/4-inch rounds and then quarter the rounds. Add them to a large bowl and sprinkle with salt and mix.

Overhead shot of chopped tomato, onion, and spinach.
Slice the cherry tomatoes in half. Slice the red onion in 1/4 inch half moons and soak it in cold water to dull its sharp flavor. Chop the parsley, and if the baby spinach leaves are large, chop them as well.
Overhead shot of dressing being poured on tortellini with veggies and greens on top of it in a white bowl.

Once the tortellini has cooled, you’re ready to assemble. First, top the tortellini with 1 pint of halved cherry tomatoes, 1/2 sliced red onion, 2 cups fresh baby spinach, and 1/2 cup sliced black olives. Then drizzle with 1/2 cup of Italian dressing.

Overhead shot of dressing being poured on tortellini with veggies and greens on top of it in a white bowl.

Next, top the salad with 1/2 cup of chopped Italian parsley and 1/4 cup of Parmesan cheese. Then drizzle with the final 1/4 cup of Italian dressing. Finally, mix, and serve! Wasn’t that easy? Now go feed your army and enjoy your time with them instead of spending it in your kitchen!

Overhead shot of tortellini salad in a white bowl.

More Easy Salads

The post Tortellini Salad appeared first on Budget Bytes.

Easy Quiche Lorraine

You’re going to love this silky, savory, and ridiculously Easy Quiche Lorraine! The puff pastry crust makes it absolutely effortless!

The post Easy Quiche Lorraine appeared first on Budget Bytes.

You’re going to love this silky, savory, and ridiculously Easy Quiche Lorraine! The puff pastry crust makes it absolutely effortless! Chock full of bacon and swiss cheese, this creamy custard baked in a pastry crust can be served hot or cold for breakfast, lunch, or brunch. Serve it with a side dish to make it a filling dinner. I love that you can prepare it a day ahead and that it takes almost no time to assemble. Just cook the bacon and aromatics, mix the custard ingredients, and go!

Overhead shot of a slice of Quiche Lorraine being lifted out of the pie plate.

What is Quiche Lorraine?

Quiche Lorraine is what my kid calls an egg pie. It’s a custard set in a pastry crust that gets its name from the Lorraine region in France. Traditionally it’s made with eggs, cream, bacon, and swiss cheese. But feel free to use the ingredients you have. It’s your kitchen!

What You’ll Need

The best part of making this Quiche Lorraine recipe is its versatility. If you’re not intent on keeping things traditional, you can substitute almost all ingredients to better fit your preferences.

  • Eggs – these create the custard necessary to bind all of the ingredients together. You can substitute eggs with a vegan egg alternative, like Just Egg.
  • Cream Cheese, Heavy Cream, and Milk– the fat in the cream cheese, heavy cream, and milk helps create a silky custard texture. You can substitute the heavy cream with all milk and two tablespoons of butter. Use plant-based cream cheese, heavy cream, and milk alternatives if you don’t do dairy.
  • Bacon– adds a big hit of smoky, salty savoriness. You can substitute it with ham, pancetta, salami, or your favorite meatless bacon alternative. If you don’t do pork, use diced roasted chicken or turkey.
  • Swiss Cheese – is the traditional choice for Quiche Lorraine, but use whatever cheese you have handy. Gouda, provolone, cheddar, and mozzarella are all excellent substitutions.
  • Puff Pastry – is the vehicle that holds the filling. Par-baking the puff pastry helps keep it from getting soggy as the liquid custard bakes. Pie crust is the traditional choice for quiche, and makes a great substitute for puff pastry. Of course, you can always make my Easy 3-Ingredient Pie Crust.
  • Onion and Garlic – these aromatics help flavor the custard. You can substitute them with leeks, green onions, or shallots. You can also replace the onion with one teaspoon of onion powder or one tablespoon of dried onion flakes and the garlic with one-eighth of a teaspoon of garlic powder. Add them to the custard when you add the nutmeg to prevent scorching.
  • Nutmeg– just a pinch helps enhance the creamy flavor of the custard. If you don’t have nutmeg, skip it.
Side shot of a slice of Quiche Lorraine being lifted out of the pie plate.

What To Serve With Quiche Lorraine

You can take Quiche Lorraine from a light breakfast or lunch to a full-on dinner by pairing it with a soup, salad, or a veggie-based side dish. Try some of these Budget Bytes favorites!

How To Store Quiche Lorraine

Allow your quiche to cool completely before storing it in the fridge. If leaving it in the pie pan, cover leftovers with plastic wrap or aluminum foil and refrigerate for up to four days. You can also slice what’s left of the quiche and store the slices in an airtight container. To freeze leftovers, portion and wrap the pieces in aluminum foil, then place them in a freezer-safe container. They will remain fresh for up to a month.

How To Reheat Leftovers

Bring refrigerated slices to room temperature while you preheat your oven to 350°F. Thaw frozen slices overnight in the fridge. Then, cover the crust with aluminum foil or a pie shield and reheat for fifteen minutes or until steaming. In a pinch, you can reheat leftovers in your microwave, but be warned, the texture will become slightly rubbery.

Overhead shot of a slice of Quiche Lorraine on a white plate with a fork in it.
Overhead shot of a slice of Quiche Lorraine being lifted out of the pie plate.
Print

Easy Quiche Lorraine

You're going to love this silky, savory, and ridiculously Easy Quiche Lorraine! The puff pastry crust makes it absolutely effortless!
Course Breakfast, Brunch, Dinner, Lunch
Cuisine French
Total Cost $10.13 recipe / $1.27 serving
Prep Time 10 minutes
Cook Time 35 minutes
Total Time 45 minutes
Servings 8 slices
Calories 446kcal

Ingredients

  • 1 sheet puff pastry $3.25
  • 4 strips bacon $1.00
  • 1 yellow onion, diced $0.41
  • 1 clove garlic, minced $0.08
  • 2 cups shredded Swiss cheese $2.15
  • 4 oz cream cheese $1.10
  • 1/4 cup heavy cream, plus more for brushing crust edges $0.42
  • 1/4 cup milk $0.17
  • 5 eggs, lightly beaten $1.33
  • 1/4 tsp ground nutmeg $0.10
  • 1/2 tsp salt $0.04
  • 1/4 tsp Freshly cracked black pepper $0.02
  • 2 Tbsp chopped fresh Italian parsley for garnish (optional) $0.06

Instructions

  • Set a rack in the middle of your oven and preheat it to 425°F. Next, roll the puff pastry into an 11-inch square and transfer it to a 9-inch diameter pie plate. Then puncture the bottom of the puff pastry a few times with a fork and trim the edges.
  • Cover the puff pastry with a sheet of parchment paper and add a pound of dry beans or pie weights. Then, cover the edges of the pastry with a pie shield or ring made of aluminum foil to prevent them from burning. Bake for fifteen minutes.
  • While the puff pastry par-bakes set a heavy-bottomed skillet over medium heat. Add the bacon strips and cook until crispy. Next, chop the bacon into bits. Set aside the chopped bacon and reserve the drippings.
  • Remove the puff pastry from the oven. Carefully remove the pie shield. Then carefully remove the parchment paper with the beans or pie weights.*
  • Cook the onion in the bacon drippings until translucent (about 2 minutes). Next, add the garlic clove and cook until fragrant (about 1 minute).
  • In a large bowl, beat the cream cheese, heavy cream, and milk until smooth.
  • Add the eggs, nutmeg, salt, and freshly ground pepper. Finally, set aside 2 tablespoons of chopped bacon for garnish and add the rest to the filling.
  • Pour the filling into the prebaked crust. Brush the crust with 1 teaspoon of heavy cream.
  • Cover the edges of the quiche with a pie shield or aluminum foil ring. Bake until the crust is golden brown and the filling sets, about 25 minutes. Remove the pie shield and cool the quiche for 10 minutes before serving. Finally, garnish with remaining bacon bits and chopped Italian parsley.*

See how we calculate recipe costs here.

Notes

*Dry beans can be cooled, stored in an air-tight container, and reserved for future use as pie weights.
*You will know the quiche has set when you insert a toothpick in the center and it comes out clean.

Nutrition

Serving: 1slice | Calories: 446kcal | Carbohydrates: 17g | Protein: 16g | Fat: 35g | Sodium: 434mg | Fiber: 1g
Overhead shot of Quiche Lorraine in a pie plate.

How to Make Quiche Lorraine – Step by Step Photos

Overhead shot of puff pastry being trimmed.
Set a rack in the middle of your oven and preheat it to 425°F. Next, roll 1 sheet of puff pastry into an 11-inch square. Transfer the puff pastry to a 9-inch diameter pie plate. Trim the edges.
Overhead shot of dry beans/ pie weights being added to the parchment paper-lined sheet of puff pastry.

Cover the puff pastry with a sheet of parchment paper and add a pound of dry beans or pie weights. Next, cover the edges of the pastry with a pie shield or ring made of aluminum foil to prevent them from burning. Bake for fifteen minutes.

Overhead shot of bacon frying in a pan.

While the puff pastry par-bakes set a heavy-bottomed skillet over medium heat. Add the 4 strips of bacon and cook until crispy. Next, chop the bacon into bits. Set aside the chopped bacon and reserve the drippings.

Overhead shot of beans being removed from par-baked crust.

Remove the puff pastry from the oven and carefully remove the pie shield and the parchment paper with the dry beans/pie weights. The beans can be cooled, stored in an airtight container, and reused for future preparations.

Overhead shot of onions and garlic being cooked in a pan with bacon drippings.

Next, cook 1 diced yellow onion in the bacon drippings until translucent (about 2 minutes). Then, add 1 minced garlic clove and cook until fragrant (about 1 minute).

Overhead shot of whipped cream cheese, heavy cream, and milk.

In a large bowl, beat 4 ounces of cream cheese, 1/4 cup of heavy cream, and 1/4 cup of milk until smooth.

Overhead shot of quiche ingredients in a bowl.

Add the 5 eggs, ¼ teaspoon of nutmeg, ½ teaspoon of salt, and ¼ teaspoon of freshly ground pepper. Next, set aside 2 tablespoons of bacon for garnish and add the rest of the chopped bacon into the filling.

Overhead shot of cream being brushed on puff pastry.
Finally, pour the filling into the prebaked crust. Then, brush the edges of the crust with 1 teaspoon of heavy cream.
Overhead shot of Quiche Lorraine in a pie plate.
Cover the edges of the quiche with a pie shield or aluminum foil ring. Then bake until the crust is golden brown and the filling sets, about 25 minutes. You will know the filling has set when you insert a toothpick in the middle and it comes out clean. Cool for 10 minutes before serving. Finally, garnish with remaining bacon bits and chopped Italian parsley.
Side shot of a slice of Quiche Lorraine being lifted out of the pie plate.

More Easy Quiche and Frittata Recipes

The post Easy Quiche Lorraine appeared first on Budget Bytes.