Good Morning Protein Cookies

Looking for a breakfast treat that’s both delicious and packed with protein? My Good Morning Protein Cookies are the perfect solution! Whether you need a quick grab-and-go breakfast or a healthy snack for the kids, these cookies will hit the spot. They’re soft, chewy and incredibly easy to make. Why I Love This Recipe The Ingredients Variations and…

The post Good Morning Protein Cookies appeared first on Weelicious.

Looking for a breakfast treat that’s both delicious and packed with protein? My Good Morning Protein Cookies are the perfect solution! Whether you need a quick grab-and-go breakfast or a healthy snack for the kids, these cookies will hit the spot. They’re soft, chewy and incredibly easy to make.

Good morning protein cookies on purple serving platter.

Why I Love This Recipe

  • Healthy and Filling: With a mix of oats, seeds, and nut butter, these cookies provide a healthy dose of protein and fiber to keep you full all morning. Looking for something similar? Try my Protein Bars recipe!
  • Kid-Friendly: What could be more kid-approved than a cookie for breakfast? Just like my other breakfast cookies recipe, these are naturally sweetened with maple syrup or honey and have just the right amount of chocolate to make them a hit with kids.
  • Easy to Make: Minimal prep, one bowl, and you can refrigerate or freeze the dough to bake fresh anytime!
  • Versatile: Whether you prefer pumpkin puree or apple butter, raisins or dried cherries, this recipe can be easily adapted to your preferences.
  • Allergy Friendly: These breakfast cookies are naturally gluten free since the flour you’d have in a traditional cookie is replaced with old fashioned oats, and they can be nut free if you use your favorite seed butter instead of peanut butter. Plus, they’re vegan and dairy free!

The Ingredients

Good Morning Protein Cookies ingredients.
  • Old-fashioned oats: Oats provide a hearty base that’s high in fiber and helps keep you full longer.
  • Banana: Bananas add natural sweetness and help bind the ingredients together. Choose a super ripe banana for extra sweetness!
  • Pumpkin Puree or Apple Butter: Both options add moisture and flavor. Pumpkin brings a boost of vitamins, while apple butter gives a sweet, fruity touch.
  • Nut or seed butter of choice: Choose your favorite! Peanut, almond, cashew, or sunflower butter all add healthy fats and protein.
  • Maple syrup or Honey: Natural sweeteners that complement the nut butter and fruit, adding just the right amount of sweetness.
  • Cinnamon: A warm spice that enhances the flavor of the cookies and adds a little antioxidant boost.
  • Chia or hemp seeds: Both chia and hemp seeds provide extra protein, fiber, and omega-3 fatty acids.
  • Dried raisins or cherries:Dried fruit adds a chewy texture and natural sweetness to every bite.
  • Kosher salt: A pinch of salt balances the sweetness and enhances the other flavors.
  • Chocolate chips: Because a little chocolate makes everything better! Milk chocolate adds sweetness, while dark chocolate offers a richer flavor and is dairy free.

Variations and Substitutions

  • Switch Up the Nut Butter: If you’re allergic to nuts or prefer something different, use seed butter like sunflower butter instead of peanut butter.
  • Try Different Sweeteners: Swap the maple syrup or honey with agave syrup or brown rice syrup for a different flavor.
  • Mix Up the Add-ins: Swap raisins for dried cranberries or chopped apricots, or add nuts like walnuts or almonds for extra crunch.
  • Make It Vegan: Use maple syrup instead of honey, and choose dairy-free dark chocolate chips.
  • Gluten-Free Option: Make sure your oats are certified gluten-free to keep this recipe gluten-free for those with sensitivities.

How to Make Good Morning Protein Cookies Recipe

Combined ingredients in mixing bowl.

Step 1: Preheat your oven to 325°F. Place all of the ingredients in a standing mixer or in a bowl to beat with a hand mixer and mix until throughly combined. Refrigerate dough for 30-60 minutes.

Protein cookies before baked.

Step 2: Using a 1/4 cup ice cream scoop, place mixture on a parchment or silicone mat lined baking sheet and use your palm to gently press into 1 inch thick circles.

Baked protein cookies on baking sheet.

Step 3: Bake cookies for 18-20 minutes or until starting to turn golden. Cool on baking sheet for 15 minutes and then transfer to rack to cool completely.

Tips and Tricks

  • Flatten the Cookies: These cookies aren’t going to spread in the oven. Make sure to flatten them out with your palm to shape them into cookies.
  • Storing the Cookies: Store these cookies in an airtight container for up to a week. They also freeze well if you want to save them for later.
  • Chocolate Chip Toppings: This is more of a note for aesthetic purposes, but save a few chocolate chips to place on top of the cookies so they each have a beautiful display of chocolatey goodness on top.
Protein cookies on purple platter.

More Grab and Go Breakfast Treats

These Good Morning Protein Cookies are perfect for busy mornings when you need a quick, nutritious bite. They’re also great to pack in lunchboxes for the kids or as a mid-day snack to keep you going. Let me know what you think of this recipe by leaving a comment and rating below!

Want more WeeliciousSubscribe to my newsletter and follow me on InstagramFacebook, and TikTok for all the newest recipes!

Print

Good Morning Protein Cookies

Good Morning Protein Cookies are easy to make and super healthy. They're gluten free, vegan and the perfect grab and go breakfast or snack. 
Course Breakfast
Cuisine American
Prep Time 40 minutes
Cook Time 20 minutes
Total Time 1 hour
Servings 12
Calories 278kcal

Ingredients

  • 2 cups old fashioned oats (gluten free if you have an intolerance)
  • 1 banana, mashed
  • 1/4 cup pumpkin puree or apple butter
  • 1 cup nut or seed butter of choice (peanut butter, almond, cashew or sun butter work)
  • 1/4 cup maple syrup or honey
  • 1 teaspoon cinnamon
  • 1 tablespoon chia or hemp seeds
  • 1/2 cup dried raisins or cherries
  • 1/2 teaspoon kosher salt
  • 1/2 cup milk or dark chocolate chips

Instructions

  • Preheat oven to 325°F.
  • Place all of the ingredients in a standing mixer or in a bowl to beat with a hand mixer and mix until throughly combined.
  • Refrigerate dough for 30-60 minutes.
  • Using a 1/4 cup ice cream scoop place mixture on a parchment or silicone mat lined baking sheet and use your palm to gently press into 1 inch thick circles. 
  • Bake cookies for 18-20 minutes or until starting to turn golden. Cool on baking sheet for 15 minutes and then transfer to rack to cool completely.

Notes

  • Flatten the Cookies: These cookies aren’t going to spread in the oven. Make sure to flatten them out with your palm to shape them into cookies.
  • Storing the Cookies: Store these cookies in an airtight container for up to a week. They also freeze well if you want to save them for later.
  • Chocolate Chip Toppings: This is more of a note for aesthetic purposes, but save a few chocolate chips to place on top of the cookies so they each have a beautiful display of chocolatey goodness on top.

Nutrition

Calories: 278kcal | Carbohydrates: 32g | Protein: 8g | Fat: 15g | Saturated Fat: 5g | Polyunsaturated Fat: 3g | Monounsaturated Fat: 6g | Cholesterol: 0.1mg | Sodium: 200mg | Potassium: 318mg | Fiber: 4g | Sugar: 12g | Vitamin A: 808IU | Vitamin C: 1mg | Calcium: 48mg | Iron: 2mg

The post Good Morning Protein Cookies appeared first on Weelicious.

Pickled Jalapeños

I consider myself a pickle connoisseur, and I dare say that these pickled jalapeños are the best. These pickled jalapeños are fresh and lightly crisp, with the…

The post Pickled Jalapeños appeared first on Cookie and Kate.

pickled jalapenos with taco ingredients

I consider myself a pickle connoisseur, and I dare say that these pickled jalapeños are the best. These pickled jalapeños are fresh and lightly crisp, with the perfect level of heat. They’re so much better than their store-bought counterparts, which have been sitting on the shelf for who knows how long.

To make this recipe, you’ll need fresh jalapeños, vinegar, water, an optional garlic clove, and salt. That’s it—the rest of the magic is due to the method.

how to prepare jalapenos

These pickles will taste fully pickled after a four-hour rest in the refrigerator, so make them earlier in the day or the night before you need them. They retain their lovely flavor for about one month in the refrigerator.

These pickled jalapeños offer the perfect spicy pop to my meals! I hope you love them as much as I do.

Continue to the recipe...

The post Pickled Jalapeños appeared first on Cookie and Kate.

Banana Wheat Germ Muffins

These nutritious Banana Wheat Germ Muffins are super healthy, delicious and a great way to use your overripe bananas. Wheat germ adds great taste and is so good for you too! Why You’ll Love This Recipe The Ingredients Variations and Substitutions How to Make Banana Wheat Germ Muffins Step 1: Preheat oven to 350 degrees. Combine flour, wheat…

The post Banana Wheat Germ Muffins appeared first on Weelicious.

These nutritious Banana Wheat Germ Muffins are super healthy, delicious and a great way to use your overripe bananas. Wheat germ adds great taste and is so good for you too!

Banana Wheat Germ Muffins on pink and purple plates.

Why You’ll Love This Recipe

  • Simple to make with everyday ingredients.
  • Packed with fiber and nutrients from wheat germ.
  • Naturally sweetened with ripe bananas and honey instead of tons of sugar. I have tons of recipes using ripe bananas you could try!
  • Moist, tender, and perfect for breakfast or a snack.
  • Ready in under 30 minutes!

The Ingredients

Banana Wheat Germ Muffins Ingredients.
  • All-purpose flour: The base for a fluffy muffin.
  • Wheat germ: Adds texture and nutritional benefits.
  • Baking Soda & Baking Powder: Work together to help the muffins rise.
  • Very ripe bananas: Since there’s very little additional sweetener in these muffins, using very ripe, naturally sweet bananas is imperative. The spottier, the better!
  • Honey: We use honey (or agave) instead of granulated sugar in this recipe to naturally sweeten the muffins.
  • Vegetable oil: Keeps the muffins tender.
  • Vanilla extract: Adds a rich depth of flavor.
  • Large egg: Binds the ingredients together.

Variations and Substitutions

  • Add-Ins: Try adding some dark chocolate chips, dried fruit or chopped nuts for extra flavor and texture.
  • Sweetener: Feel free to use maple syrup instead of honey or agave to sweeten the muffins.
  • Wheat Germ: If you don’t have wheat germ, feel free to substitute it with oat bran or whole wheat flour.

How to Make Banana Wheat Germ Muffins

Banana Wheat Germ Muffins dry ingredients combined in mixing bowl.

Step 1: Preheat oven to 350 degrees. Combine flour, wheat germ, baking powder, baking soda, salt in a bowl.

Banana wheat germ muffin wet ingredients combined in mixing bowl.

Step 2: In a standing mixer or with a hand mixer, combine the 3 bananas, honey or agave, oil, vanilla and egg. Beat until combined and bananas are mashed.

Banana wheat germ muffin batter in mixing bowl.

Step 3: Gently mix in the dry ingredients in 3 stages until just combined. Do not over-mix.

Wheat germ muffin batter in muffin tin.

Step 4: Grease or line muffin cups or mini loaf pans and fill 3/4 full with the mixture.

Wheat germ muffin batter in muffin tin. Each muffin topped with a slice of banana.

Step 5: Place the slices of banana on top of each filled muffin cup or decoratively over the loaf pan.

Baked banana wheat germ muffins in muffin tin.

Step 6: Bake 15 minutes for mini muffin cups, 20 for regular muffin cups or 25 minutes for mini loaf pans or until a toothpick comes out clean.

Make-Ahead and Storage

Muffins are so great to make each week to have on hand. We always have a batch on the counter or in the freezer. These banana wheat germ muffins are great to make ahead for a quick breakfast or healthy snack. Store them in an airtight container at room temperature for up to three days or freeze them for longer storage. Just warm them up when you’re ready to enjoy! I’m also loving Flourless Pumpkin Chocolate MuffinsSpinach Cake Muffins, and Carrot Pineapple Muffins right now!

Tips and Tricks

  • Use very ripe bananas for maximum sweetness and flavor.
  • Don’t over-mix the batter to keep the muffins light and fluffy.
Banana wheat germ muffins stacked on top of each other.

More Healthy Muffin Recipes

Next time you have a craving for a delicious banana muffin, try these! They’re packed with nutrients, easy to make and so delicious. Let me know what you think of this recipe by leaving a comment and rating below!

Want more WeeliciousSubscribe to my newsletter and follow me on InstagramFacebook, and TikTok for all the newest recipes!

Banana Wheat Germ Muffins on pink and purple plates.
Print

Banana Wheat Germ Muffins

Banana Wheat Germ Muffins are super healthy, delicious and a great way to use your overripe bananas. Wheat germ adds great taste and is so good for you!
Course Breakfast, Snack
Cuisine American
Prep Time 5 minutes
Cook Time 20 minutes
Total Time 25 minutes
Servings 12
Calories 190kcal

Equipment

Ingredients

Instructions

  • Preheat oven to 350°F.
  • Combine flour, wheat germ, baking powder, baking soda, salt in a bowl.
  • In a standing mixer or with a hand mixer, combine the 3 bananas, agave, oil, vanilla and egg. Beat until combined and bananas are mashed.
  • Gently mix in the dry ingredients in 3 stages until just combined. Do not over-mix.
  • Grease or line muffin cups or mini loaf pans and fill 3/4 full with the mixture.
  • Place the slices of banana on top of each filled muffin cup or decoratively over the loaf pan.
  • Bake 15 minutes for mini muffin cups, 20 for regular muffin cups or 25 minutes for mini loaf pans or until a toothpick comes out clean.
  • Cool and serve.

Notes

  • Use very ripe bananas for maximum sweetness and flavor.
  • Don’t over-mix the batter to keep the muffins light and fluffy.
  • Storage: Store in an airtight container at room temperature for up to three days or freeze for longer storage.

Nutrition

Calories: 190kcal | Carbohydrates: 33g | Protein: 4g | Fat: 5g | Cholesterol: 15mg | Sodium: 280mg | Fiber: 3g | Sugar: 16g

The post Banana Wheat Germ Muffins appeared first on Weelicious.

Chocolate Chia Pudding

close up on a jar of chocolate chia pudding topped with berries and whipped cream.This Chocolate Chia Pudding recipe is blended so you don’t notice the seeds! An easy and healthy breakfast or snack made with only 5 ingredients. Want more vegan pudding recipes? My Vegan Chocolate Pudding, Vegan Banana Pudding, and Tofu Chocolate Mousse recipes are too good to miss. If the texture of chia pudding is what’s…

close up on a jar of chocolate chia pudding topped with berries and whipped cream.

This Chocolate Chia Pudding recipe is blended so you don’t notice the seeds! An easy and healthy breakfast or snack made with only 5 ingredients.

Want more vegan pudding recipes? My Vegan Chocolate Pudding, Vegan Banana Pudding, and Tofu Chocolate Mousse recipes are too good to miss.

close up on a jar of chocolate chia pudding topped with berries and whipped cream.

If the texture of chia pudding is what’s keeping you from enjoying this tasty and healthy treat, then you’ve gotta try my blended Chocolate Chia Pudding recipe. By blending the chia seeds with oat milk and a handful of other ingredients, you get an ultra-smooth and creamy treat perfect for a fiber-filled breakfast or snack.

A combination of chia seeds, maple syrup, cocoa powder and oat milk gives this dreamy chocolate delight a healthy boost so you can enjoy it for breakfast or snacks. Top it off with some fresh berries and a dollop of vegan whipped cream, and you have something that looks and tastes indulgent but always leaves you feeling great.

Why you’ll love this chia pudding recipe

  • A blended version of the classic – My chocolate chia pudding is as creamy and smooth, but you don’t have to blend it if you don’t want to. 
  • For chocolate lovers – Whether you’re craving something chocolatey for breakfast or dessert, this rich and decadent pudding has you covered.
  • Healthy, but you’d never know it – Chia seeds load this healthy dairy-free treat with omega-3 fatty acids and fiber, while maple syrup acts as a natural sweetener.
ingredients for chocolate chia pudding in a blender.

How to make blender chocolate chia pudding

Find the complete recipe with measurements in the recipe card below.

Add all of the chia pudding ingredients to a high-powered blender and blend until the mixture is smooth, creamy, and thick.

Pour the pudding into a container or multiple small containers, seal with a lid, and place it in the fridge for at least 2 hours.

You can serve the pudding immediately after blending, but it will be a little warm. I find that it’s much more enjoyable and has a thicker, more “pudding-like” consistency after chilling.

Serve the chia pudding for a healthy chocolate dessert or a grab-and-go breakfast and enjoy! 

blended chocolate chia pudding in a blender.

Topping ideas

The only way to make this sweet treat even better is with the right toppings. Before you dig into a bowl, top your healthy chocolate chia pudding with:

  • Raspberries, strawberries, or blueberries
  • Banana slices
  • A dollop of vegan whipped cream
  • Homemade granola
  • Chopped almonds, walnuts, hazelnuts, or pecans
  • Hemp seeds, ground flax, shredded coconut, or extra chia seeds
  • A drizzle of vegan salted caramel
  • Chocolate shavings or vegan chocolate chips

Frequently asked questions

Is vegan chia pudding good for you?

Yes, chia seed pudding is very good for you. Chia seeds are a great source of omega-3 fatty acids and fiber. It doesn’t hurt that this recipe is dairy-free and naturally sweetened with maple syrup, too!

Do I have to blend the chia seeds with the pudding ingredients?

No, you don’t have to. You can make this chocolate chia seed pudding the traditional way by simply stirring the seeds with the other ingredients in a medium bowl. Set the mixture aside for 15 minutes to thicken, then stir once more before chilling.

How long should chia seeds soak in chia pudding?

Blender chia pudding is thick as soon as it’s blended, so it really only needs to chill in the fridge for 2 hours to help it reach that perfect rich consistency. Classic chia pudding (see above) should be left to chill for at least 2 to 3 hours, or overnight.

How long will it last?

The leftover chia pudding, whether it’s stored in one large airtight container or individual sealed containers/jars, will last for up to 6 days in the refrigerator.

Can I freeze chia pudding?

Yes, chocolate chia pudding freezes well for about 2 months. Thaw individual servings in the fridge overnight, then enjoy!

close up on a jar of chocolate chia pudding topped with berries and whipped cream.
Print

Chocolate Chia Pudding

This Chocolate Chia Pudding recipe is blended so you don't notice the seeds! An easy and healthy breakfast or snack made with only 5 ingredients.
Course Snack
Cuisine American
Prep Time 5 minutes
Total Time 5 minutes
Servings 4 servings
Calories 249kcal

Ingredients

  • 1/2 cup chia seeds
  • 2 cups oat milk
  • 5 tablespoons pure maple syrup
  • 1/4 cup natural unsweetened cocoa powder
  • 1/2 teaspoon pure vanilla extract

Instructions

  • Add all ingredients to a high powered blender and blend on high speed until creamy and thick. Scrape down the sides of the blender as needed.
  • Transfer to a container (or portion into multiple small containers), cover and place in the refrigerator to chill for at least 2 hours, if possible. It can be enjoyed right away but it might be a little warm from blending and it will thicken as it chills. Serve with toppings like fruit or whipped cream.
  • It will keep in the refrigerator for about 6 days, making the perfect grab and go breakfast or snack.

Notes

  1. You may use another milk if you prefer – soy milk will add more protein which I like and coconut milk will make it even richer and creamier.
  2. You can simply stir the seeds with the other ingredients, then let thicken without stirring for 15 minutes. Stir once more before placing in the refrigerator to thicken for at least 2-3 hours. Then stir again and serve. I just prefer blended chia pudding personally.

Nutrition

Serving: 1of 4 servings | Calories: 249kcal | Carbohydrates: 41g | Protein: 7g | Fat: 9g | Saturated Fat: 1g | Polyunsaturated Fat: 5g | Monounsaturated Fat: 1g | Sodium: 63mg | Potassium: 284mg | Fiber: 10g | Sugar: 24g | Vitamin A: 258IU | Vitamin C: 0.3mg | Calcium: 341mg | Iron: 3mg

Beef and Broccoli Stir Fry

Need dinner on the table in no time and on a budget? This Beef and Broccoli Stir Fry is for you! It’s full of flavor, ready in under 30 minutes and a 100% kid-approved recipe that we make time and time again! Why I Love This Recipe The Ingredients *For a full list of ingredients…

The post Beef and Broccoli Stir Fry appeared first on Weelicious.

Need dinner on the table in no time and on a budget? This Beef and Broccoli Stir Fry is for you! It’s full of flavor, ready in under 30 minutes and a 100% kid-approved recipe that we make time and time again!

Beef and broccoli served over white rice in red bowl.

Why I Love This Recipe

  • Quick and Easy: Just like my Orange Chicken and Mu Shu Chicken recipes, this 30-minute meal is perfect for busy weeknights when you need dinner on the table ASAP.
  • Family Favorite: This Beef and Broccoli Stir Fry is one of our go-to weeknight meals that everyone in the family LOVES. Stir fry recipes are such a crowd pleaser!
  • Flavorful: The combination of garlic, ginger, soy sauce, and honey creates a delicious balance of savory and sweet.
  • Healthier Than Takeout: Making beef and broccoli at home means you can control the ingredients that go into the dish creating a healthier version of your favorite takeout dinner.

The Ingredients

Beef and broccoli ingredients.
  • Soy Sauce: This is the base of our sauce, giving that salty umami flavor.
  • Sesame Oil: Toasted sesame oil adds a nutty depth of flavor to the sauce.
  • Honey: A hint of sweetness to balance out the salty soy sauce.
  • Garlic & Ginger: These aromatics are essential for a flavorful stir fry.
  • Corn Starch: Helps thicken the sauce so it clings to the beef and broccoli.
  • Beef: I love using sirloin, but flank, skirt, or tri-tip work well too!
  • Broccoli: Fresh or frozen broccoli adds the perfect crunch and loads of nutrients to this dish.
  • Vegetable Oil: Perfect for high-heat cooking, ensuring your beef sears beautifully.

*For a full list of ingredients and instructions, see the recipe card below.

Variations and Substitutions

  • Protein Swap: Feel free to swap out the beef for chicken, shrimp, or even tofu for a vegetarian version. Just adjust cooking time accordingly.
  • Veggie Boost: You can easily add other veggies like bell peppers, snap peas, or carrots for extra color, nutrients and texture.
  • Low-Sodium Option: If you want to reduce the salt content, use low-sodium soy sauce.
  • Gluten-Free: Swap the soy sauce for tamari or a gluten-free alternative.

How to Make Beef and Broccoli Stir Fry

Skirt steak marinating in clear plastic bag.

Step 1: In a small bowl, whisk together the soy sauce, sesame oil, honey, garlic and ginger. Place the beef in a Ziploc bag (or glass bowl). Pour in half of the sauce mixture to coat the beef. Marinate for either 20 minutes on the counter or covered overnight in the fridge.

Corn starch slurry in small glass bowl.

Step 2: Whisk the cornstarch and water together and add to the remaining sauce mixture.

Steak cooking in sauté pan.

Step 3: Heat a wok or large sauté pan over high heat, add 2 teaspoons oil and add the beef. Cook for 4 minutes and remove beef to a clean bowl.

Broccoli in sauté pan.

Step 4: Add the remaining 1 teaspoon of oil to the pan and cook the broccoli for 2 minutes.

Beef and broccoli in sauté pan.

Step 5: Add the beef back into the pan. Make a well in the center and pour in the sauce. Cook until the sauce is thick and everything is heated through, about 2 minutes.

Beef and broccoli served over white rice.

Step 7: Serve over steamed white rice, brown rice or noodles.

Tip and Tricks

  • Cut the Beef Against the Grain: Slicing the beef against the grain ensures tender, melt-in-your-mouth pieces.
  • Don’t Overcook the Broccoli: You want the broccoli to remain crisp-tender, so keep an eye on it to avoid overcooking.
  • Use a Hot Pan: Make sure your wok or pan is nice and hot before adding the beef. This will give it that beautiful sear.

FAQs

Can I use frozen broccoli in beef and broccoli stir fry? 

Absolutely! Frozen broccoli works great in this recipe. Cook until it’s tender but still crisp not overcooked and mushy.

How do I store leftover beef and broccoli?

Store any leftovers in an airtight container in the fridge for up to 3 days. You can easily reheat it in a pan or the microwave.

What should I serve with beef and broccoli stir fry?

Steamed white or brown rice is a classic choice, but this stir fry is also delicious with noodles or even cauliflower rice for a lower-carb option.

What cut of beef is best for beef and broccoli stir fry?

Flank steak is the best cut for beef and broccoli stir fry due to its tenderness and flavor when sliced thin. Sirloin, skirt steak, and tri-tip are also great options for quick cooking and rich taste.

Beef and broccoli stir fry on white serving platter.

More Quick and Easy Dinners

This easy stir fry dish is one of those go-to meals you’ll find yourself making on repeat! With its bold flavors and ease of preparation, beef and broccoli is sure to become a family favorite. Let me know what you think of this recipe by leaving a comment and rating below!

Want more WeeliciousSubscribe to my newsletter and follow me on InstagramFacebook, and TikTok for all the newest recipes!

Print

Beef and Broccoli Stir Fry

Need dinner on the table in no time and on a budget? Then this Beef and Broccoli Stir Fry is for you!
Course Main Dish
Cuisine Asian
Prep Time 20 minutes
Cook Time 8 minutes
Total Time 28 minutes
Servings 4
Calories 390kcal

Ingredients

  • 1/3 cup soy sauce
  • 1/2 teaspoon sesame oil (i like to use toasted)
  • 1 tablespoon honey
  • 1 clove garlic, finely chopped or grated
  • 1 teaspoon fresh ginger, finely chopped or grated
  • 1 teaspoon corn starch
  • 1 teaspoon water
  • 1 pound boneless sirloin, tri tip, flank or skirt steak (sliced into 2 x 1/2 inch strips)
  • 1 package (14 ounces) frozen or fresh broccoli florets
  • 3 teaspoons vegetable oil

Instructions

  • Whisk together the soy sauce, sesame oil, honey, garlic and ginger.
  • Place the beef in a Ziploc bag (or glass bowl), pouring in half of the sauce mixture to coat the beef. Marinate for either 20 minutes on the counter or covered overnight in the fridge.
  • Whisk the cornstarch and water together and add to the remaining sauce mixture.
  • Heat a wok or large sauté pan over high heat, add 2 teaspoons oil and add the beef. Cook for 4 minutes and remove beef to a clean bowl.
  • Add the remaining 1 teaspoon of oil to the pan and cook the broccoli for 2 minutes.
  • Add the beef back into the pan. Make a well in the center and pour in the sauce. Cook until the sauce is thick and everything is heated through, about 2 minutes.
  • Serve over brown rice.

Video

Notes

  • Cut the Beef Against the Grain: Slicing the beef against the grain ensures tender, melt-in-your-mouth pieces.
  • Don’t Overcook the Broccoli: You want the broccoli to remain crisp-tender, so keep an eye on it to avoid overcooking.
  • Use a Hot Pan: Make sure your wok or pan is nice and hot before adding the beef. This will give it that beautiful sear.
  • Storage: Store leftovers in an airtight container in the refrigerator for up to 3 days. Reheat in a sauté pan or microwave.

Nutrition

Calories: 390kcal | Carbohydrates: 13g | Protein: 35g | Fat: 22g | Cholesterol: 110mg | Sodium: 1280mg | Fiber: 3g | Sugar: 6g

The post Beef and Broccoli Stir Fry appeared first on Weelicious.

Breakfast Bread Pudding

Making Breakfast Bread Pudding might sound complicated, but in reality, it couldn’t be easier, especially if you prep it the night before! It’s super delicious with bites of sweet apples and raisins and the warmth of cinnamon and vanilla. Why I Love This Recipe The Ingredients *For a full list of ingredients and instructions, see the recipe…

The post Breakfast Bread Pudding appeared first on Weelicious.

Making Breakfast Bread Pudding might sound complicated, but in reality, it couldn’t be easier, especially if you prep it the night before! It’s super delicious with bites of sweet apples and raisins and the warmth of cinnamon and vanilla.

Why I Love This Recipe

  • Flavorful: This breakfast bread pudding recipe is sweet (but not too sweet), made with bite-sized chunks of apples, raisins and a dash of cinnamon and vanilla extract. It’s so delicious and comforting. You could even serve it for dessert. If you’re looking for a more savory breakfast bread pudding, try my Breakfast Casserole recipe!
  • Make Ahead: The key to this dish being even easier is preparing it ahead of time. I’m a big fan of recipes like this. Just like my Refrigerator Oatmeal and Chia Seed Pudding the prep is so simple, and as you already know, I’d prefer to cook the night before than in the morning! It freezes super beautifully too. Just make sure you do it before baking.
  • Great for a Crowd: I love dishes like this one because you can serve it to a crowd easily. It’s the perfect recipe for holidays like Thanksgiving when you have a lot of cooking on the horizon but a crew that still needs breakfast before the big event.

The Ingredients

Breakfast bread pudding ingredients on countertop.
  • Large eggs: Eggs give your bread pudding that custardy texture while holding everything together.
  • Milk: A bit of milk adds moisture to the dish.
  • Honey, Vanilla and Cinnamon: These ingredients add a touch of sweetness and overall warmth to the bread pudding making it irresistibly delicious. 
  • Small apples: We like to use Gala, Fiju or Golden Delicious apples for this recipe, but any apple you love will work. Cut them into small pieces for a pop of sweet apple in every bite.
  • Raisins: I like to add raisins for chewiness and more natural sweetness.
  • Bread of Choice: Fresh or stale 1 inch chunks of bread will work here, so feel free to use that loaf of bread that you weren’t sure what to do with! Whether it’s challah, multigrain, french or brioche, it will be delicious.

*For a full list of ingredients and instructions, see the recipe card below.

Variations and Substitutions

  • Milk Swap: Any type of milk will work in this breakfast bread pudding recipe so feel free to use plant-based milk if that’s what you prefer.
  • Bread: I’ve made this recipe with challah bread, multigrain sandwich bread, whole wheat and even a french loaf and they all turned out perfectly. Feel free to experiment!
  • Dried Fruits: You could substitute any dried fruit in place of the raisins. Or, make this even more decadent and add some chocolate chips!

How to Make Breakfast Bread Pudding

Eggs, milk, honey, cinnamon, vanilla and salt in mixing bowl.

Step 1: Preheat the oven to 350°F. Whisk the eggs, milk, honey, vanilla, cinnamon and salt in a large bowl.

Breakfast bread pudding ingredients combined in mixing bowl.

Step 2: Stir in the apples, raisins and bread cubes. Using your hands or a rubber spatula, combine the ingredients to make sure everything is evenly coated.

Breakfast bread pudding in baking dish.

Step 3: Transfer the mixture to a greased or parchment lined 8-inch baking dish pressing down lightly. Cover with foil and allow to rest for 15 minutes.

Baking dish covered with aluminum foil.

Step 4: Bake for 30 minutes covered. Uncover and continue to cook for an additional 20 minutes. Bake until golden and cooked through.

Freezing and Reheating Tip

  • Freeze for Meal Prep: Cover tightly and freeze the unbaked breakfast bread pudding so you can have a last minute breakfast on hand. To reheat, bake from frozen and add 8 minutes to the cooking time.
  • Reheating Tip: I served leftovers of this to my kids two days in a row by pouring a little milk or cream over the top and microwaving until it’s heated through. Super yummy!
Serving of breakfast bread pudding on green plate.

More Make Ahead Breakfasts

When you’re looking for an to easy breakfast recipe, this Breakfast Bread Pudding should come to mind! Prep it the night before and your morning will be a breeze. Let me know what you think of this recipe by leaving a comment and rating below!

Want more WeeliciousSubscribe to my newsletter and follow me on InstagramFacebook, and TikTok for all the newest recipes!

Print

Breakfast Bread Pudding

Breakfast Bread Pudding might sound complicated, but in reality, it couldn't be easier. Or more delicious!
Course Breakfast
Cuisine American
Prep Time 15 minutes
Cook Time 50 minutes
Total Time 1 hour 5 minutes
Servings 6
Calories 230kcal

Equipment

  • 8 inch baking dish

Ingredients

  • 3 large eggs
  • 3/4 cup milk
  • 3 tablespoons honey (or to taste)
  • 1 teaspoon vanilla
  • 1 teaspoon ground cinnamon
  • pinch kosher salt
  • 2 small apples, peeled, cored and cut into small dice (I like Gala, Fuji or Golden Delicious)
  • 1/3 cup raisins
  • 4 cups whole wheat or multigrain bread (fresh or stale bread), cut in 1-inch cubes (you can use any type of bread you have on hand)

Instructions

  • Preheat the oven to 350°F.
  • Butter a 1 1/2-quart, 8-inch baking dish.
  • Beat the eggs, milk, honey, vanilla, cinnamon and salt in a large bowl.
  • Stir in the apples, raisins and bread cubes. Using your hands or a rubber spatula, combine the ingredients to make sure everything is evenly coated.
  • Transfer the mixture to the prepared dish pressing down lightly. Cover with foil and allow to rest for 15 minutes. (*You can prepare the breakfast bread pudding ahead at this point. Cover and refrigerate overnight.)
  • Bake for 30 minutes covered. Uncover and continue to cook for an additional 20 minutes. Bake until golden and cooked through.
  • Serve.

Notes

  • Freeze for Meal Prep: Cover tightly and freeze the unbaked breakfast bread pudding so you can have a last minute breakfast on hand. To reheat, bake from frozen and add 8 minutes to the cooking time.
  • Reheating Tip: I served leftovers of this to my kids two days in a row by pouring a little milk or cream over the top and microwaving until it’s heated through. Super yummy!

Nutrition

Calories: 230kcal | Carbohydrates: 40g | Protein: 9g | Fat: 4g | Cholesterol: 115mg | Sodium: 200mg | Fiber: 4g | Sugar: 26g

The post Breakfast Bread Pudding appeared first on Weelicious.

Veggie-Packed White Bean Minestrone

Fall is near, but summer veggies are still here. Enter: A cozy soup with a mix of fall and summer produce! This easy, flavorful, 1-pot minestrone is LOADED with veggies and white beans for a fiber- and nutrient-packed dish. 
It’s light yet satisfy…

Veggie-Packed White Bean Minestrone

Fall is near, but summer veggies are still here. Enter: A cozy soup with a mix of fall and summer produce! This easy, flavorful, 1-pot minestrone is LOADED with veggies and white beans for a fiber- and nutrient-packed dish. 

It’s light yet satisfying, comes together with simple ingredients and methods, and is perfect for the seasonal transition. Grab your bread because soup is on!

We’ve shared a minestrone recipe before and this one is similar…but with a twist: potatoes instead of pasta!

Veggie-Packed White Bean Minestrone from Minimalist Baker →

Crispy Air Fryer Chickpeas

Quick and healthy, these Crispy Air Fryer Chickpeas are a satisfying snack that are crunchy, flavorful, and packed with protein! Plus, they’re incredibly easy to make with just three simple ingredients. Why I Love This Recipe Chickpeas, also known as garbanzo beans, are a powerhouse snack packed with protein and fiber. These air fryer crispy…

The post Crispy Air Fryer Chickpeas appeared first on Weelicious.

Quick and healthy, these Crispy Air Fryer Chickpeas are a satisfying snack that are crunchy, flavorful, and packed with protein! Plus, they’re incredibly easy to make with just three simple ingredients.

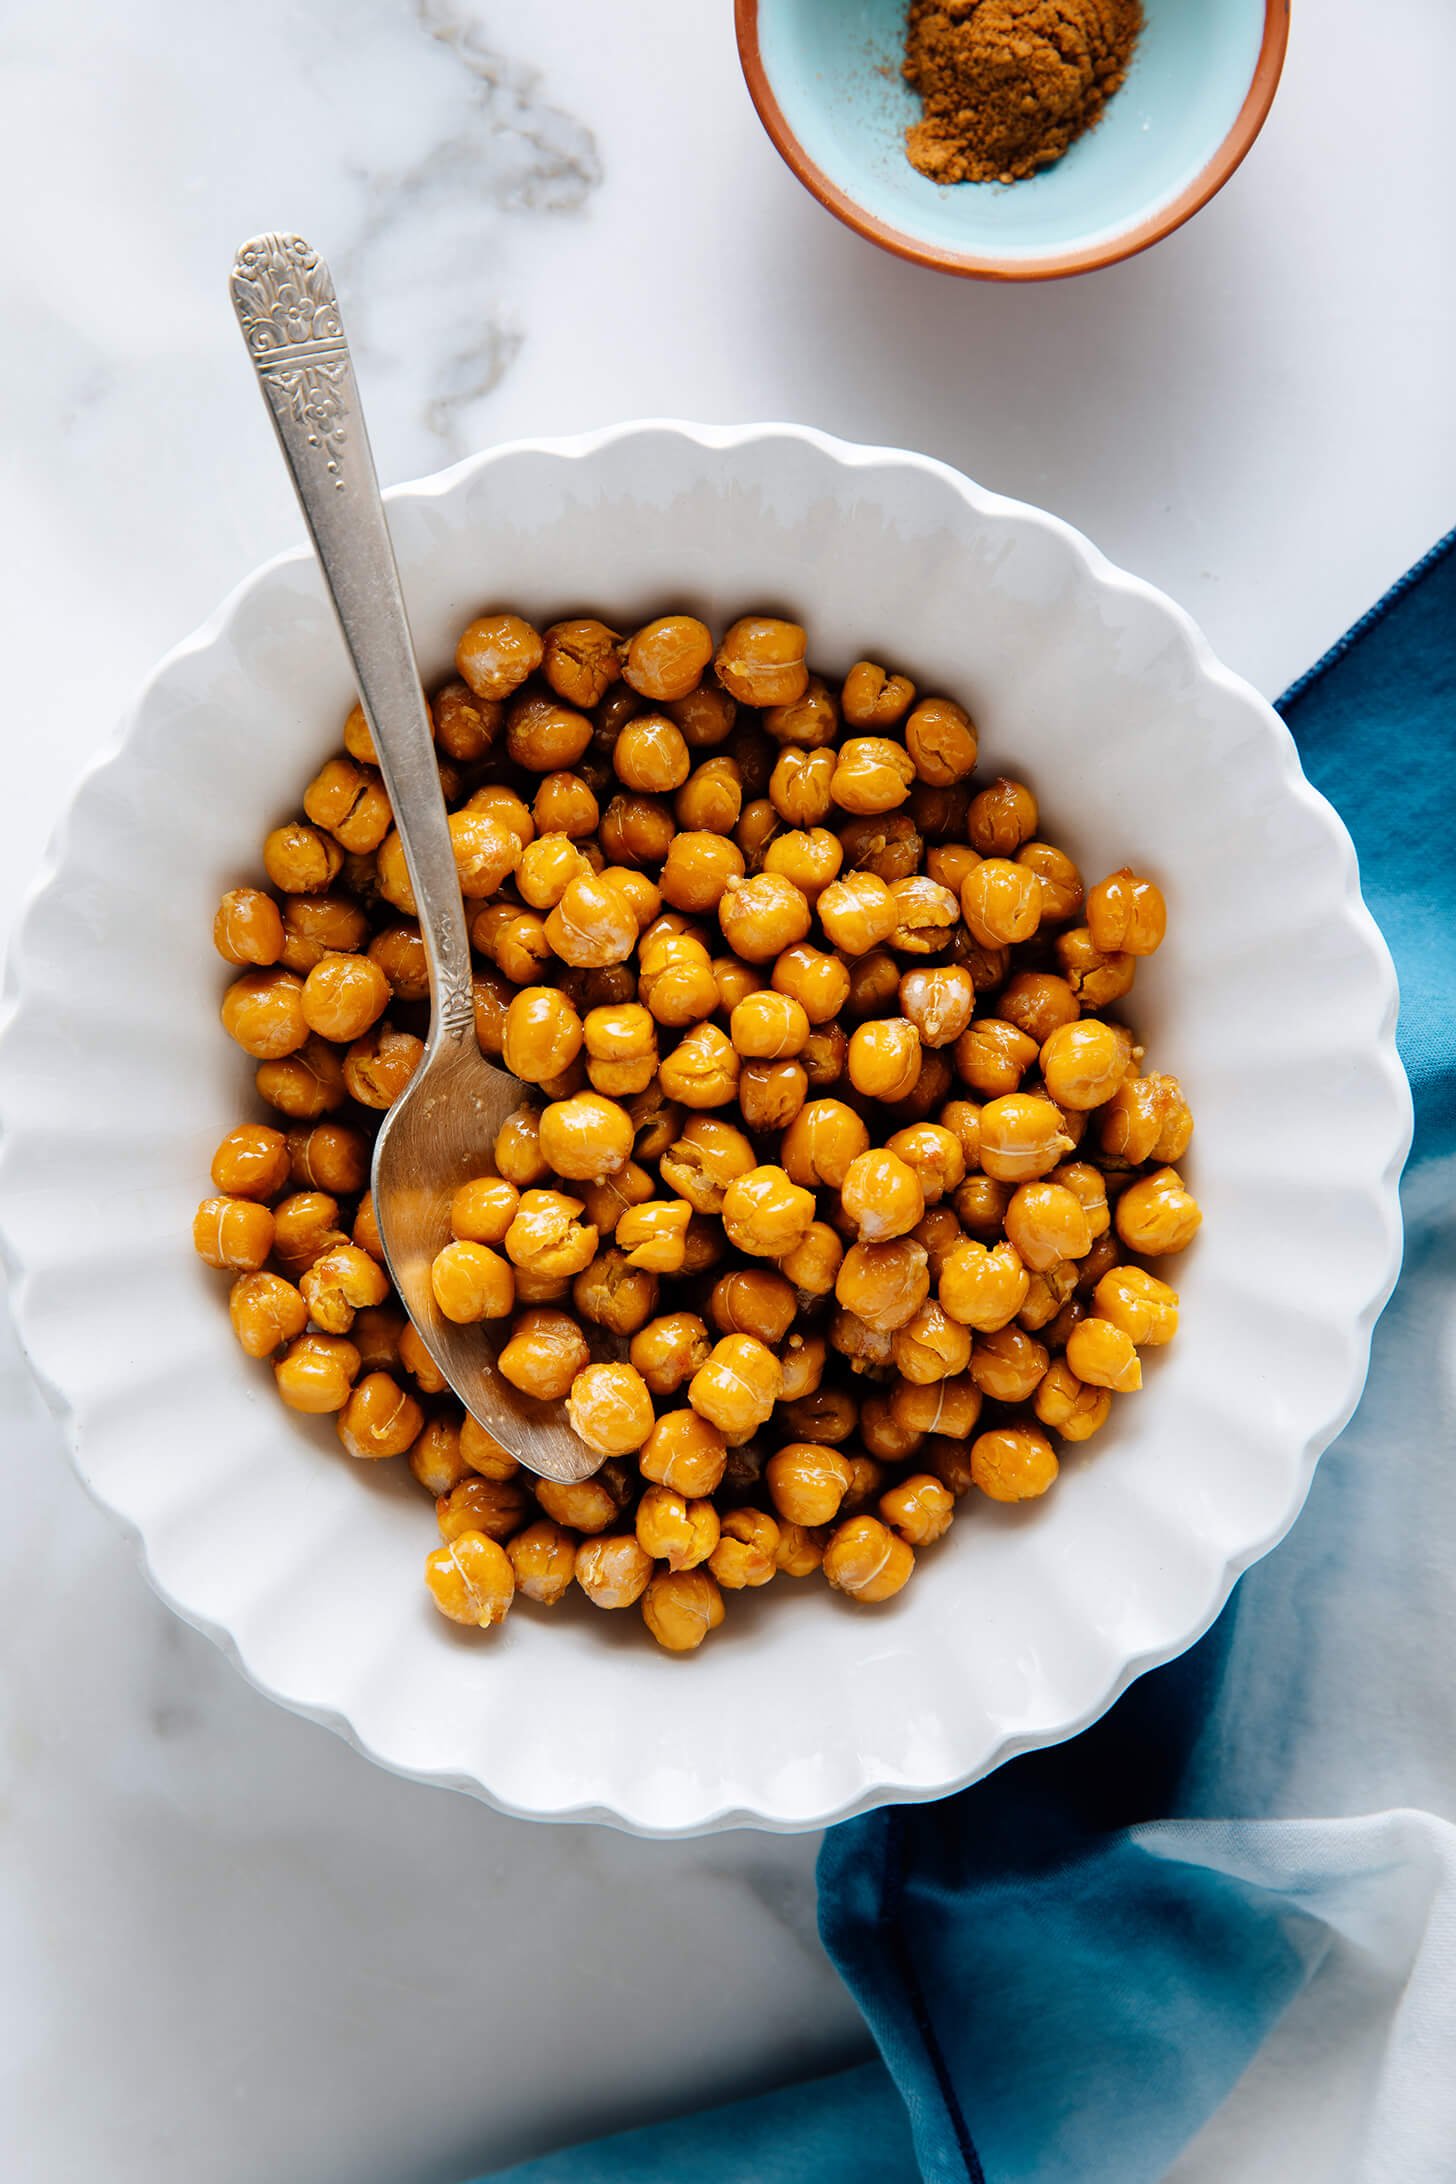
Air Fryer Crispy Chickpeas in serving bowl.

Why I Love This Recipe

Chickpeas, also known as garbanzo beans, are a powerhouse snack packed with protein and fiber. These air fryer crispy chickpeas are everything you crave in a snack—perfectly crunchy, salty, and downright addictive. You could even add them to a salad for some crunch! They’re so versatile that you can even make a sweet version, like my Roasted Honey Cinnamon Chickpeas.

What I love about Air Fryer Crispy Chickpeas is how easy they are to customize. Just like with my paper bag popcorn, the flavor possibilities are endless. Plus, they’re bite-sized, making them the ideal grab-and-go snack. The air fryer has become one of my favorite kitchen tools—it’s fast, efficient, and doesn’t require heating up the oven. Even my kids are getting in on the fun, experimenting with different recipes and enjoying the quick results.

The Ingredients

Air Fryer Roasted Chickpeas ingredients.

You only need 3 basic ingredients to make this delicious snack:

  • Chickpeas (Garbanzo Beans): Canned chickpeas are a great source of protein. When roasted in the air fryer, they become super crispy and totally addictive.
  • Oil: Just a couple teaspoons of your favorite cooking oil — Olive oil and avocado oil are great choices.
  • Kosher Salt: A sprinkle of salt is crucial in this recipe. Feel free to experiment with other seasonings like garlic powder, smoked paprika, or cumin to make this snack your own.

How to Make Crispy Air Fryer Chickpeas

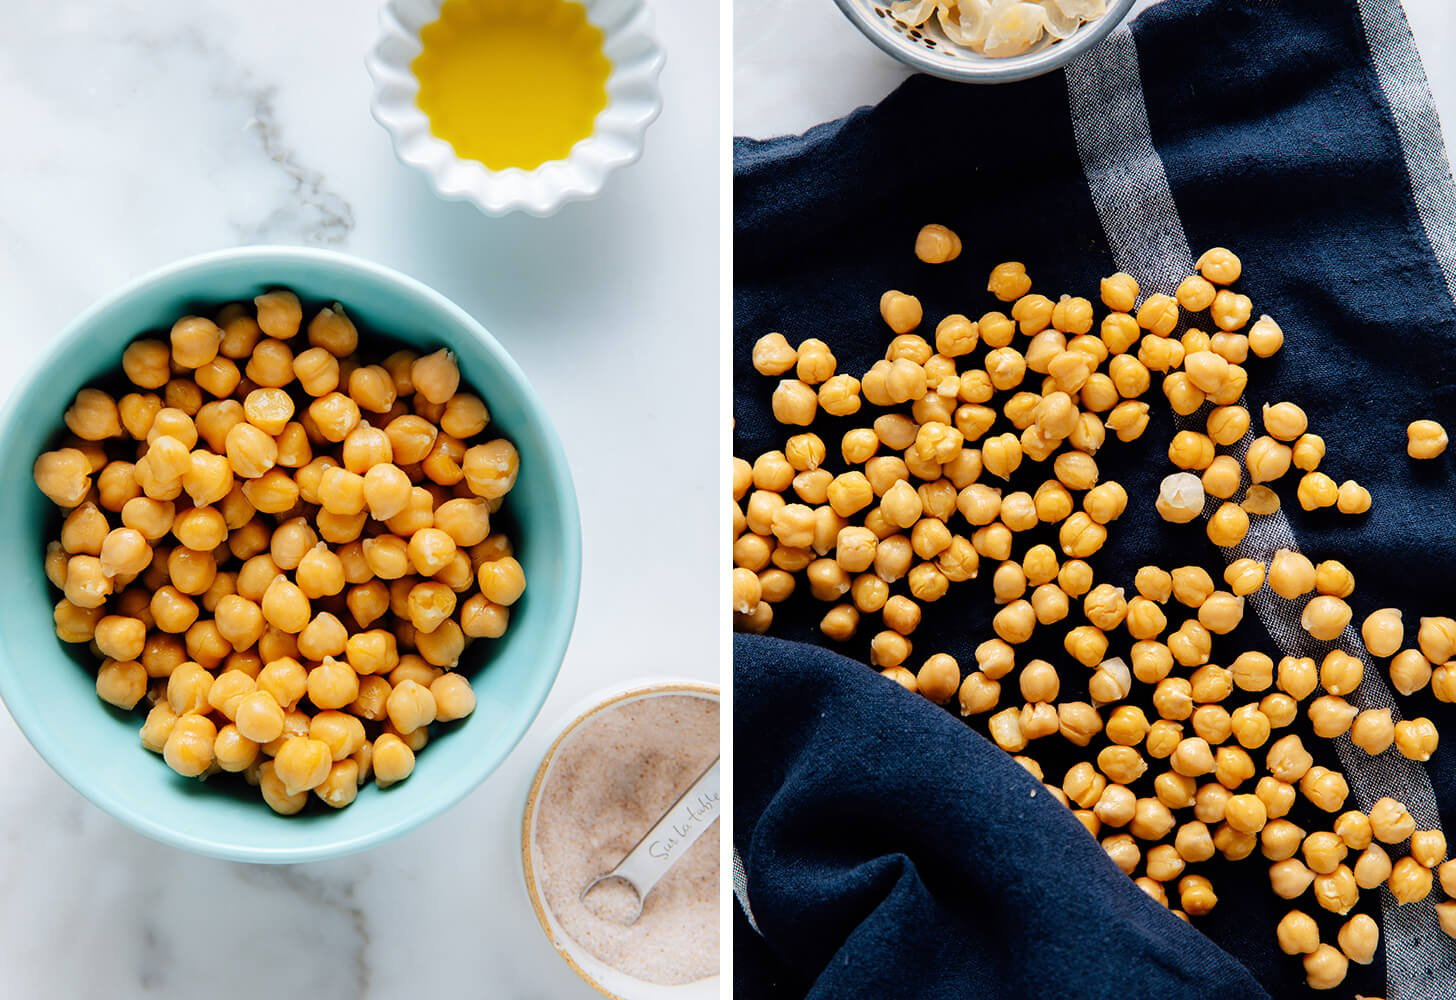
Chickpeas rinsed, drained and patted dry in glass bowl.

Step 1: Drain and rinse chickpeas. Pat them dry with a paper towel or tea towel. Place chickpeas, oil and salt in a bowl and toss to coat.

Chickpeas in air fryer basket.

Step 2: Place chickpeas in air fryer basket.

Roasted chickpeas in air fryer basket.

Step 3: Air fry chickpeas at 375°F for 15 minutes or until golden.

Tips and Tricks

  • Dry Chickpeas Well: Removing as much moisture as possible before air frying will give you the crispiest chickpeas.
  • Customize Your Seasoning: Feel free to experiment with different seasonings like smoked paprika, garlic powder, or cumin for a flavor twist. Or opt for a sweeter version of roasted chickpeas and make my Roasted Honey Cinnamon Chickpeas.
  • Storage Tips: If you have leftovers (though they’re usually too good to last!), store them in an airtight container at room temperature for up to two days. Re-crisp them in the air fryer for a few minutes before serving if you need! I like to stash mine in a mason jar in my car or purse so they’re always on hand when we’re driving around between school and activities.

FAQs

Why are my roasted chickpeas not crispy?

The key to super crispy chickpeas is to dry them really well after rinsing them. Use a paper towel or tea towel to pat them dry. The drier they are when they go into the air fryer, the crispier they’ll become.

Does air frying chickpeas make them less healthy?

Air frying chickpeas is actually one of the healthier cooking methods. Most of the protein, fiber, and minerals in chickpeas remain intact, making air-fried chickpeas a nutritious and delicious snack option!

Why are my chickpeas popping in the air fryer?

Chickpeas pop in the air fryer because the moisture inside turns into steam, building up pressure. To minimize popping, dry your chickpeas well and avoid overcrowding the basket for even cooking.

Air Fryer Crispy Chickpeas in serving bowl.

More Crunchy Snacks

Crispy Air Fryer Chickpeas are the ultimate healthy snack! They’re simple to make, endlessly customizable, and always delicious. Whether you’re prepping school snacks for the week or just need something to munch on during the afternoon, these crispy chickpeas are sure to hit the spot.

Want more WeeliciousSubscribe to my newsletter and follow me on InstagramFacebook, and TikTok for all the newest recipes!

Print

Air Fryer Crispy Chickpeas

These air fryer crispy chickpeas comes out addictively crunchy and salty, which is what I am often looking for in a snack! 
Course Side, Snack
Cuisine American
Prep Time 2 minutes
Cook Time 15 minutes
Total Time 17 minutes
Servings 4
Calories 117kcal

Equipment

Ingredients

  • 1 15-ounce can chickpeas, drained and rinsed
  • 2 teaspoons oil
  • 1/4 teaspoon kosher salt

Instructions

  • Drain and rinse your chickpeas then pat dry thoroughly with a paper towel or tea towel.
  • Place chickpeas, oil and salt in a bowl and toss to coat.
  • Place chickpeas in air fryer basket and air fry at 375°F for 15 minutes or until golden. 

Notes

  • Dry Chickpeas Well: Removing as much moisture as possible before air frying will give you the crispiest results.
  • Customize Your Seasoning: Feel free to experiment with different seasonings like smoked paprika, garlic powder, or cumin for a flavor twist. Or opt for a sweeter version of roasted chickpeas and make my Roasted Honey Cinnamon Chickpeas.
  • Storage Tips: Store leftovers in an airtight container at room temperature for up to two days. Re-crisp them in the air fryer for a few minutes before serving if you need!

Nutrition

Calories: 117kcal | Carbohydrates: 15g | Protein: 6g | Fat: 4g | Saturated Fat: 0.4g | Polyunsaturated Fat: 2g | Monounsaturated Fat: 2g | Trans Fat: 0.01g | Sodium: 460mg | Potassium: 163mg | Fiber: 5g | Vitamin A: 17IU | Vitamin C: 0.1mg | Calcium: 40mg | Iron: 1mg

The post Crispy Air Fryer Chickpeas appeared first on Weelicious.

Pantry Leftover Chicken Chili

Let your creativity run wild with this simple, satisfying recipe.

A great burst of flavor! Pantry leftover chicken chiliLet your creativity run wild with this simple, satisfying recipe.

Crispy Rice Paper Spring Rolls

These rice paper spring rolls have a crispy texture and a savory, delicious veggie filling with marinated shredded tofu. Plus, they’re completely vegan too! Finding the perfect vegan spring roll recipe can be challenging, but I assure you that th…

These rice paper spring rolls have a crispy texture and a savory, delicious veggie filling with marinated shredded tofu. Plus, they’re completely vegan too! Finding the perfect vegan spring roll recipe can be challenging, but I assure you that this one is delicious. The marinated shredded tofu adds a lot of flavor, and the crispy...

Read More

The post Crispy Rice Paper Spring Rolls appeared first on My Pure Plants.