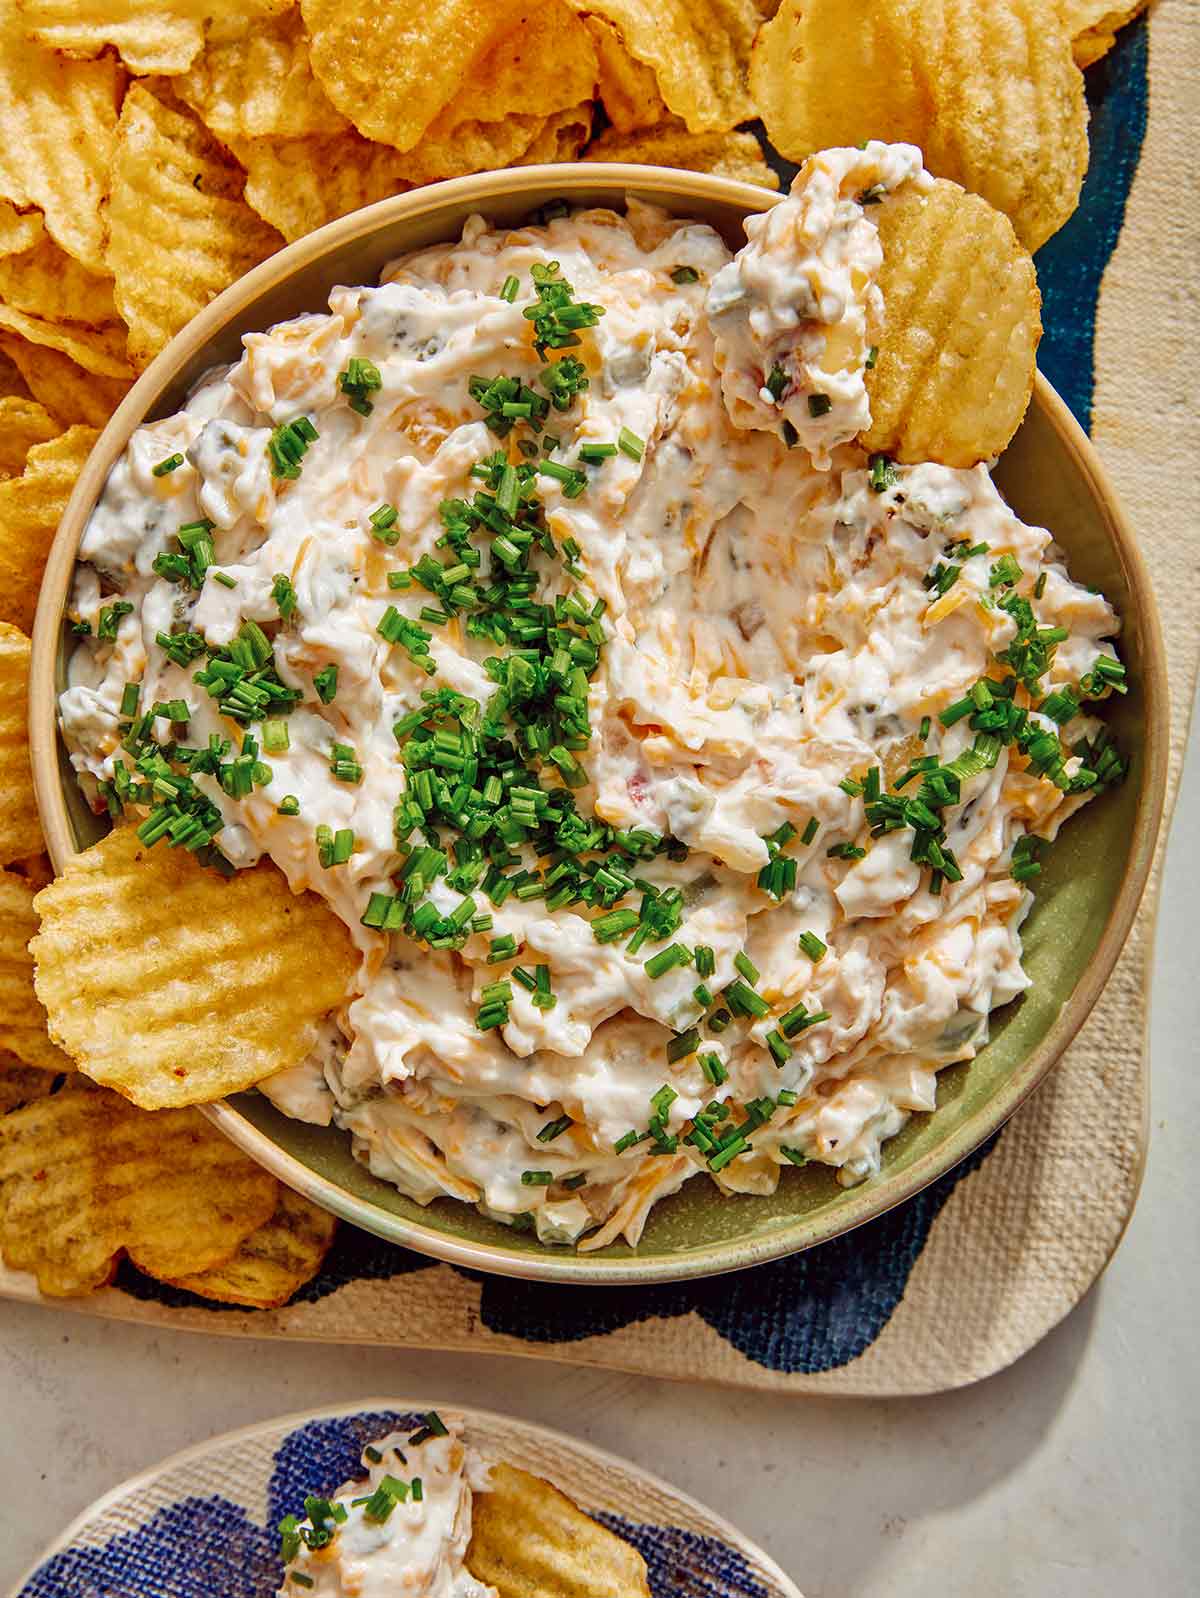
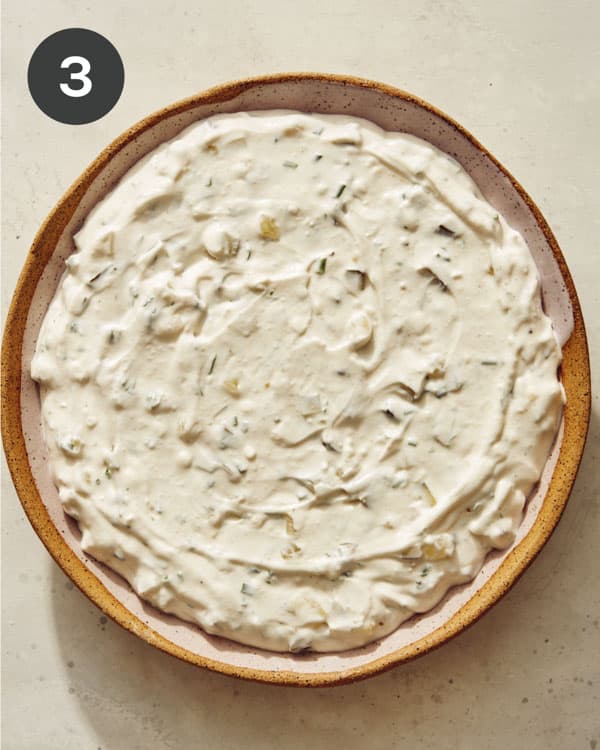
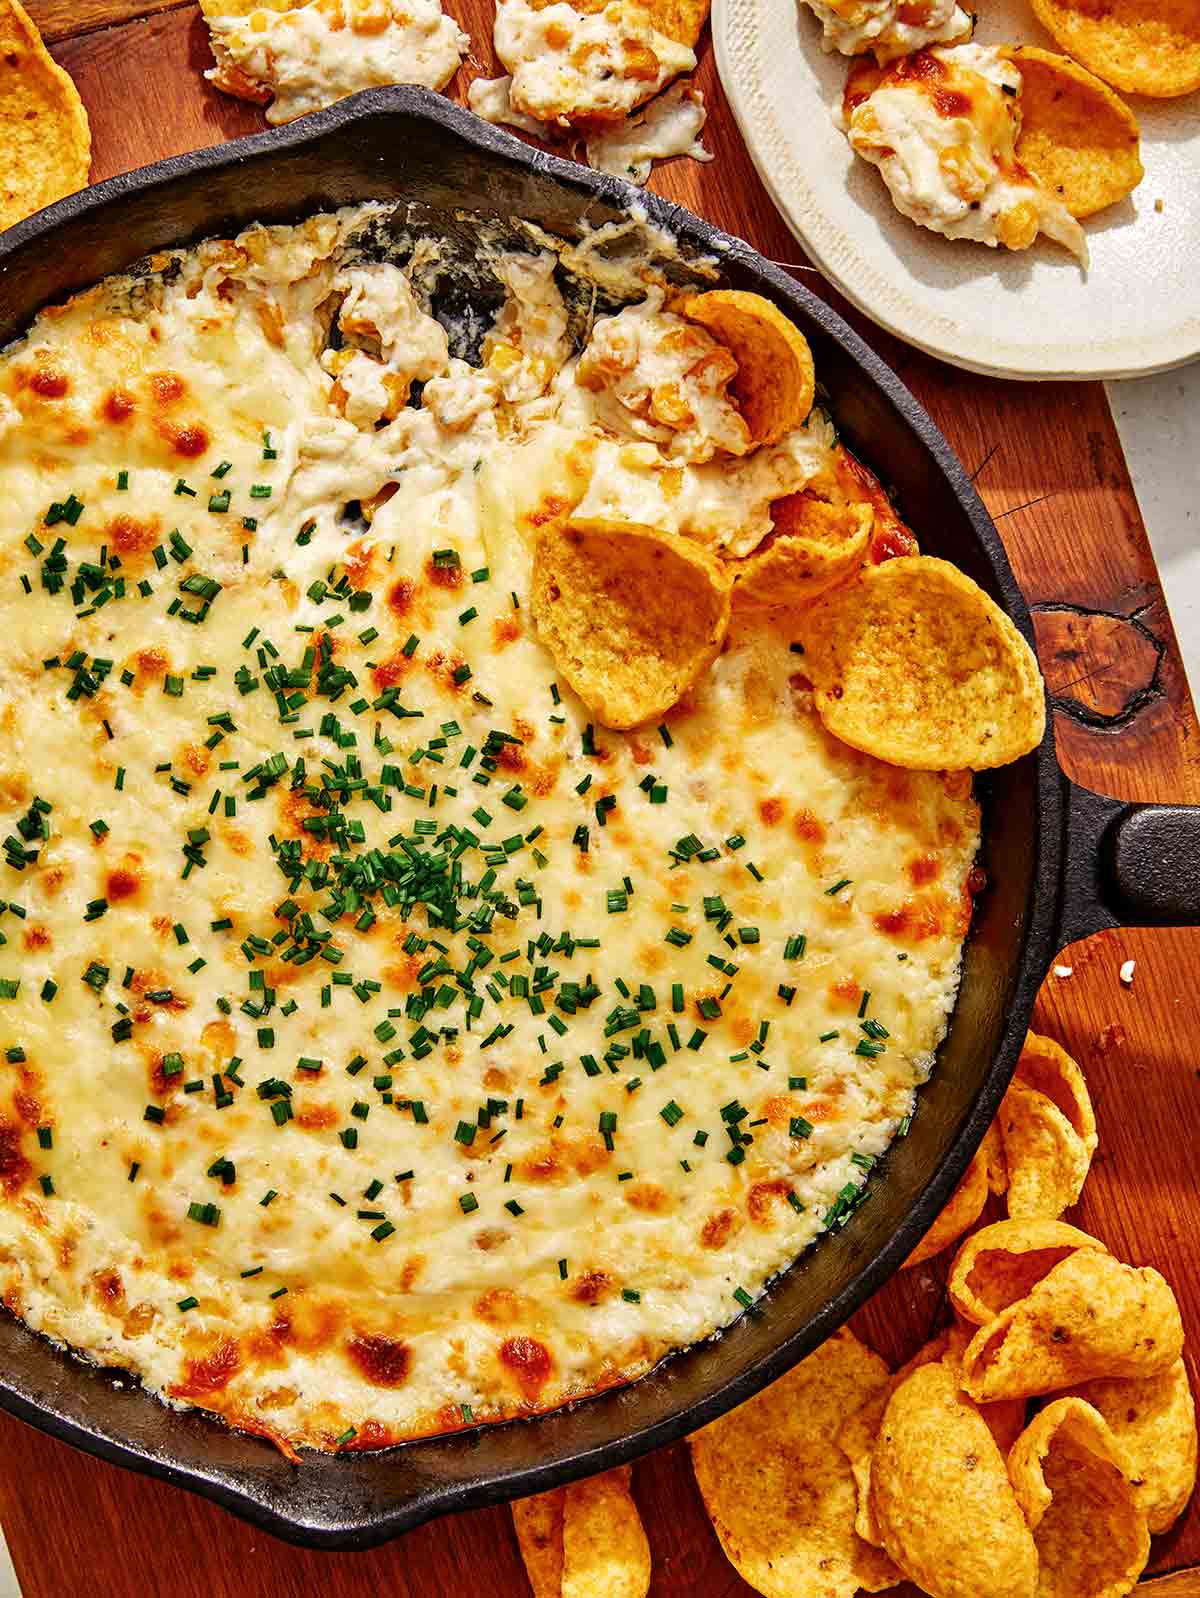
Our loaded baked potato dip takes all of your favorite potato toppings: bacon, shredded cheese, and chives, and combines them in a rich and creamy dip. We took things up a notch by mixing caramelized onions and cornichons into the dip for a flavor upgrade you didn’t know you needed. This dip takes only 20 minutes to make and is the perfect pairing for everything from french fries and pretzels to pepper wedges and cucumber…
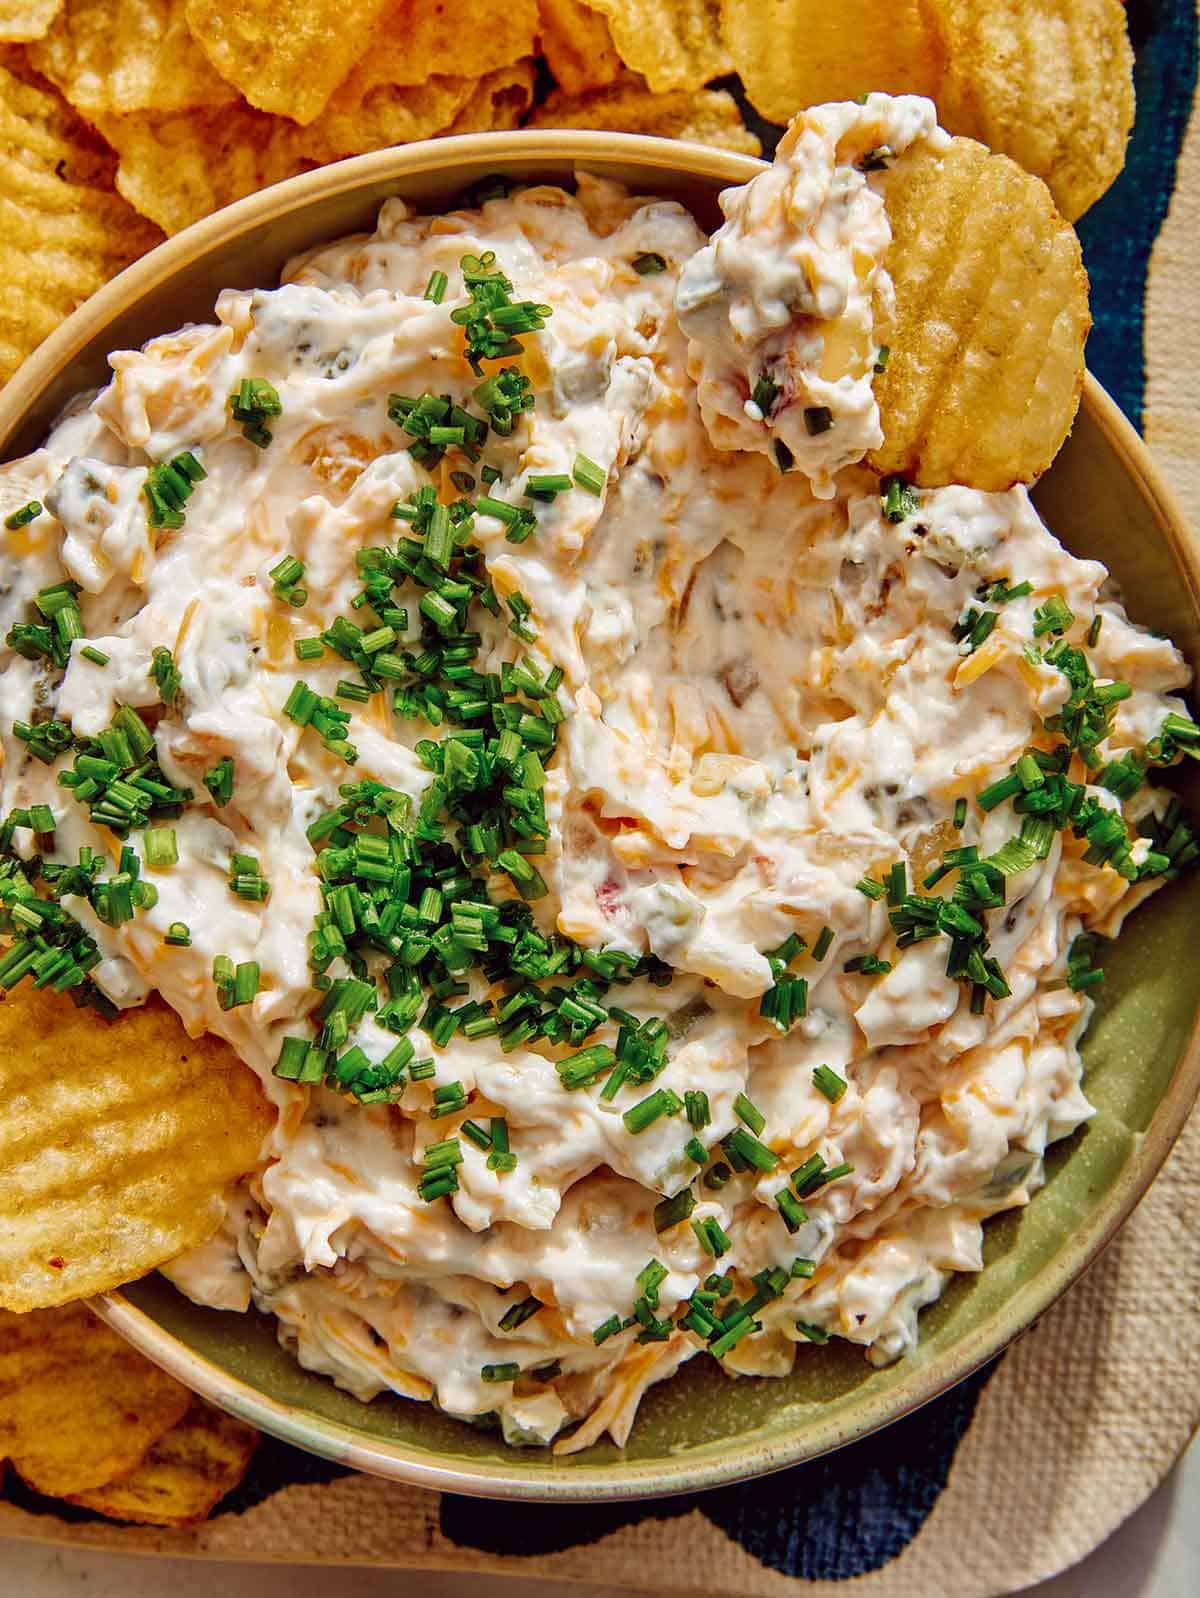
Our loaded baked potato dip takes all of your favorite potato toppings: bacon, shredded cheese, and chives, and combines them in a rich and creamy dip. We took things up a notch by mixing caramelized onions and cornichons into the dip for a flavor upgrade you didn’t know you needed.
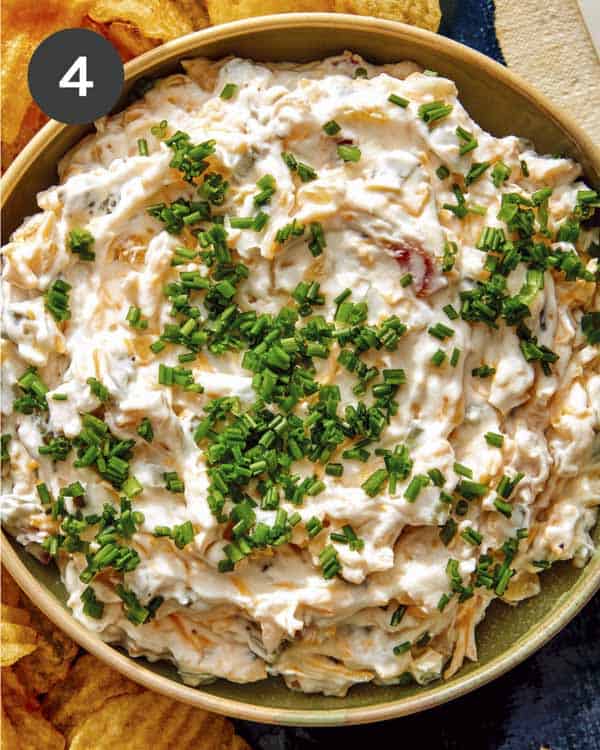
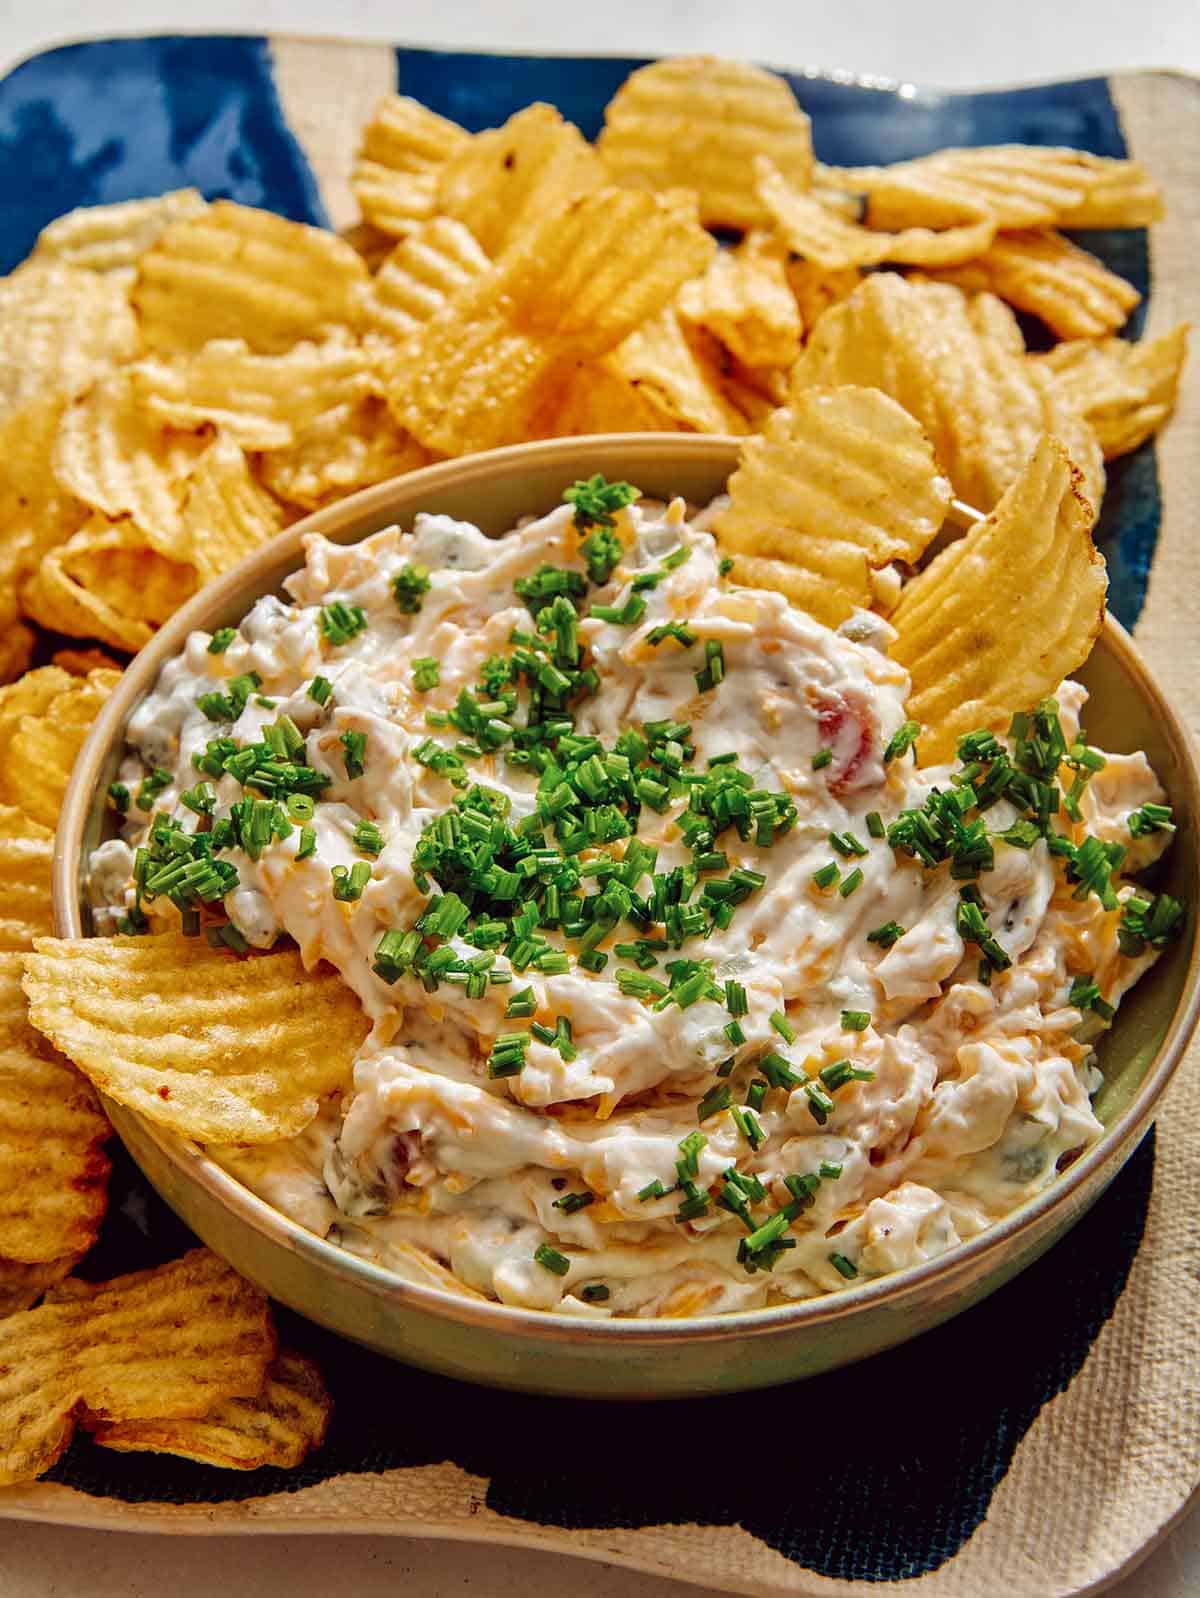
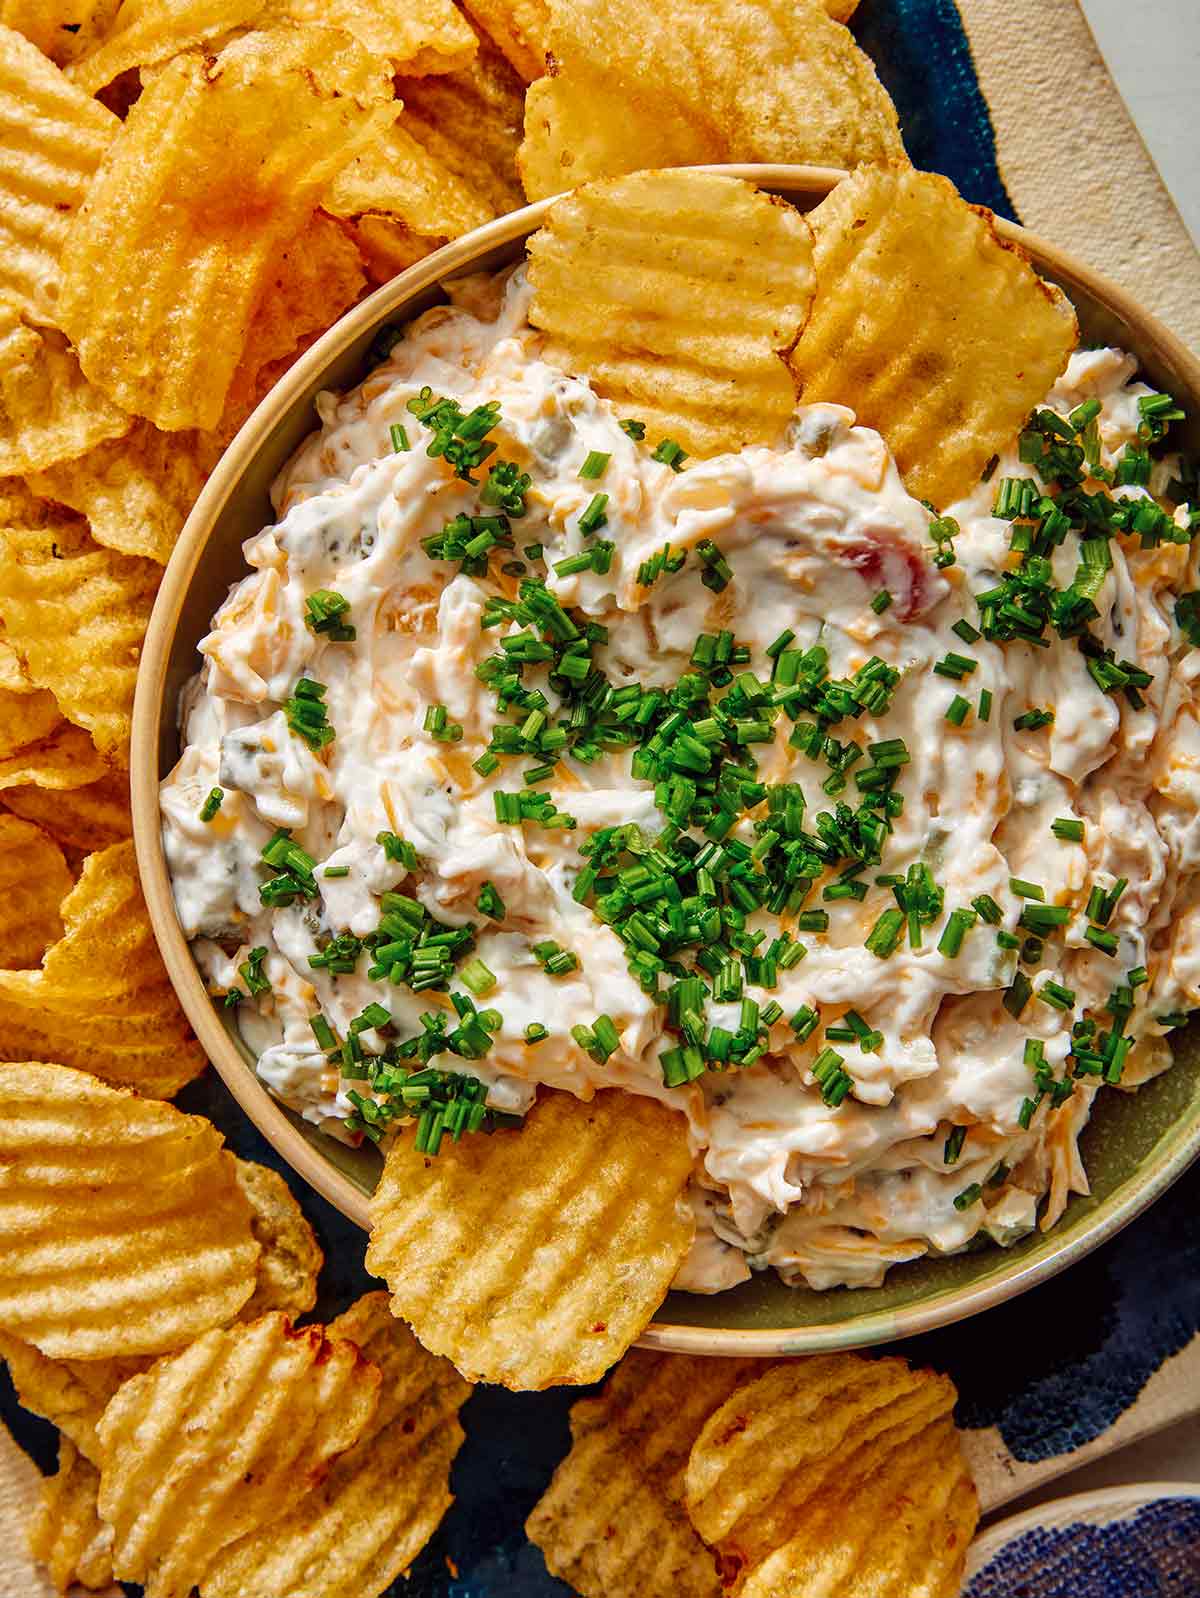
This dip takes only 20 minutes to make and is the perfect pairing for everything from french fries and pretzels to pepper wedges and cucumber rounds. To serve a crowd, we like adding this to a giant snack board along with fried pickle dip and beer cheese. Just don’t forget our favorite dipper for this loaded dip, which includes everything but the potato: potato chips!
How to Make Baked Potato Dip
Ingredients
Process
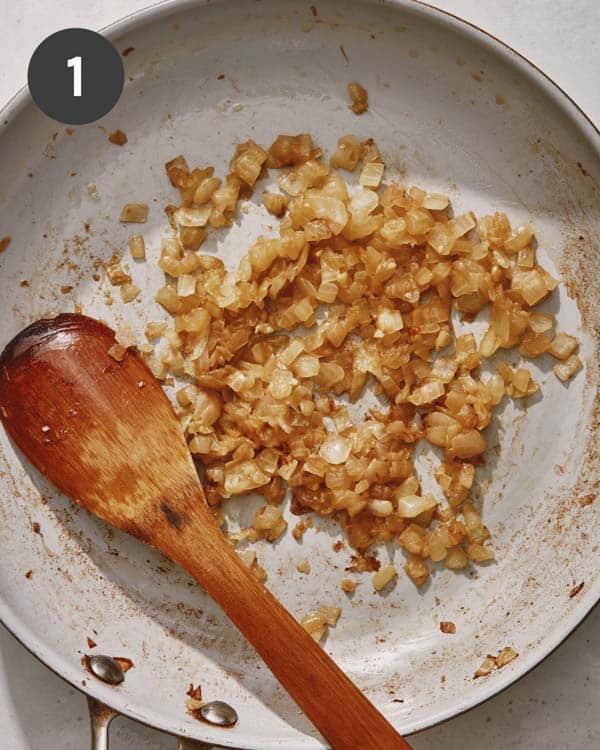
Place a pan over medium-low heat. Add oil, followed by diced onion. Caramelize onions, stirring occasionally, about 12 to 15 minutes. Stir in grated garlic and continue to cook for 1 minute. Remove from heat and set aside to slightly cool.
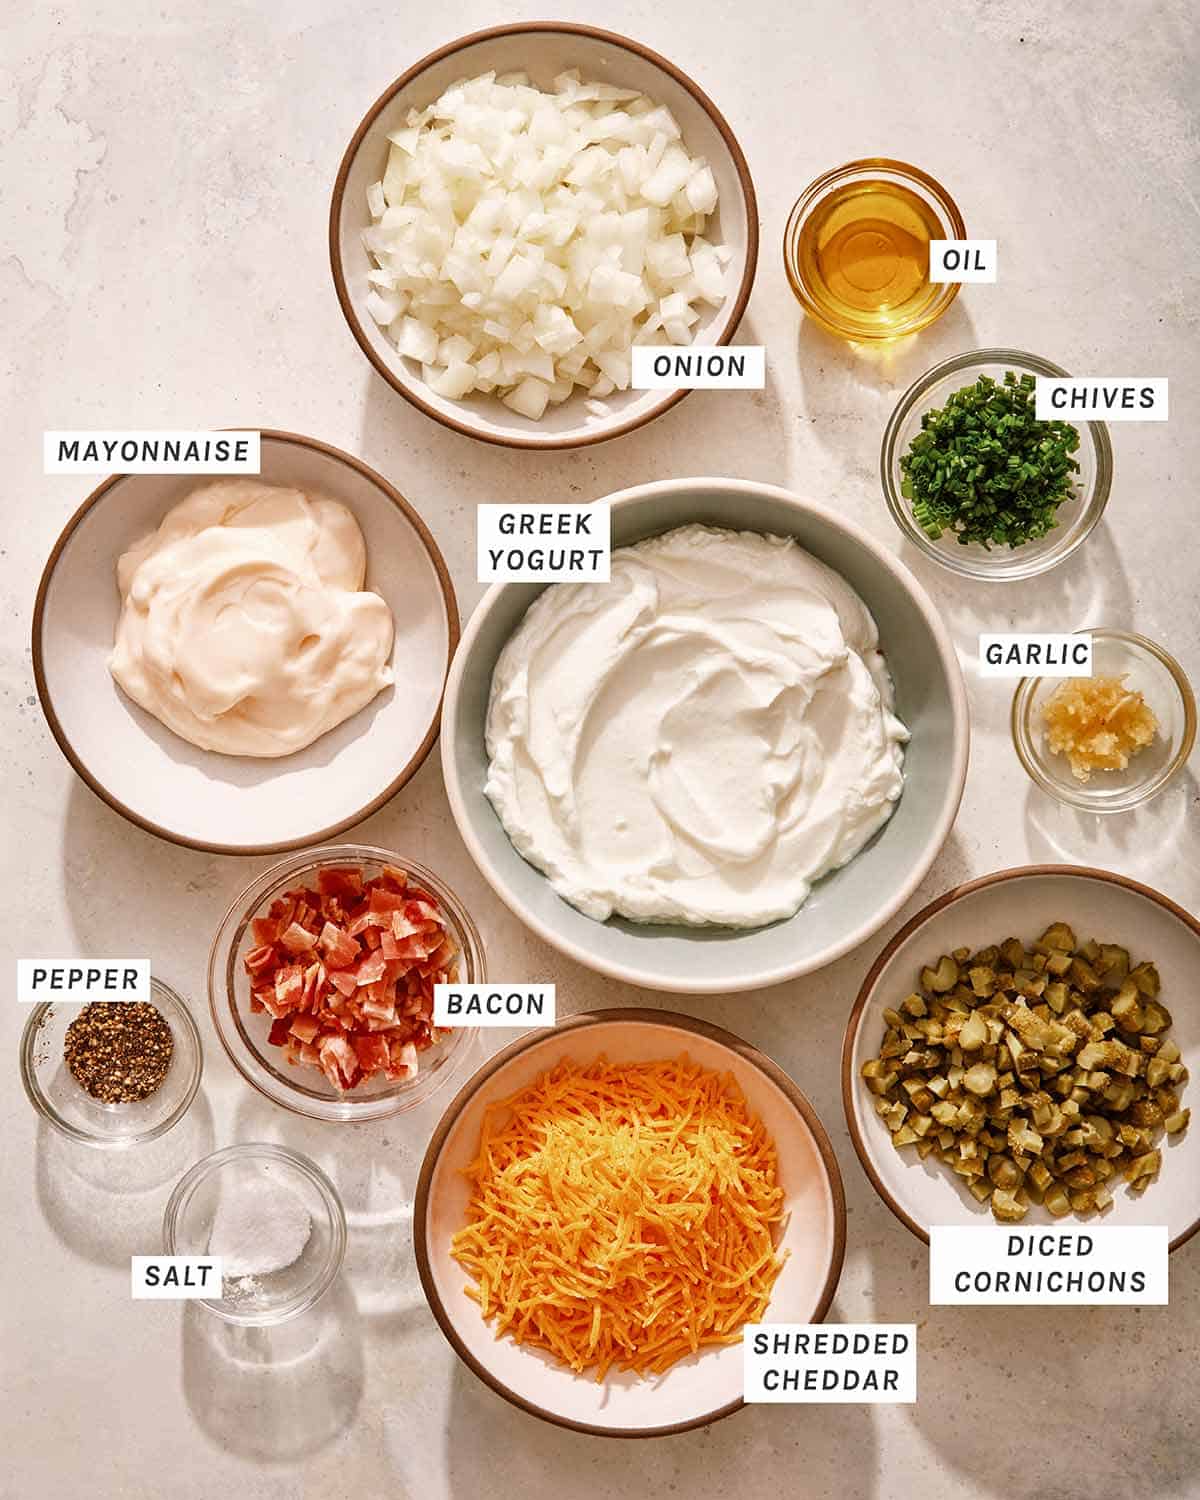
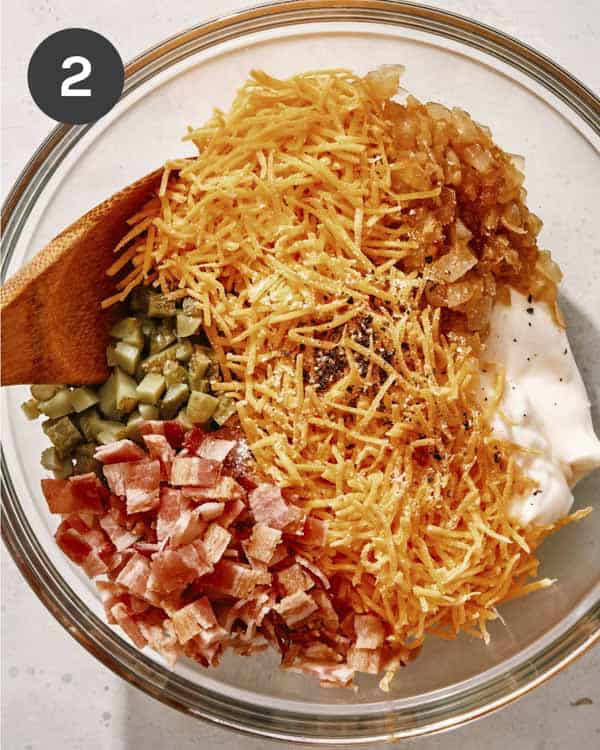
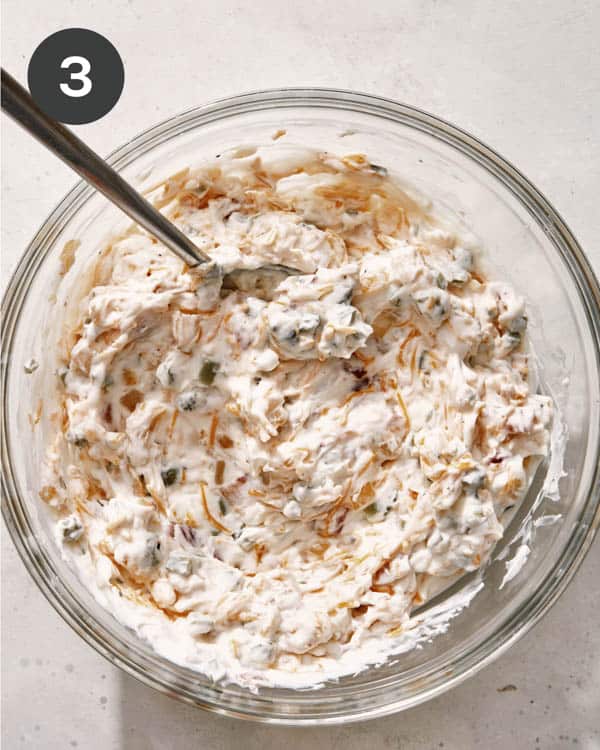
In a mixing bowl, combine Greek yogurt, kewpie, caramelized onions, cornichons, crumbled bacon, and finely shredded cheddar. Season with salt and pepper.
Fold together until combined.
Top with sliced chives and serve.
Tips for Success
If the heat is too high when cooking your onions, they’ll brown instead of caramelize. Lower heat helps bring out the sugars, making the onions soft as they brown instead of crispy.
Dice the cornichons finely and grate, or finely mince, the garlic so that their flavor disperses throughout the dip.
You can serve this dip chilled or slightly at room temperature.
Store leftovers in an airtight container for up to 3 days. This dip is also perfect for making a day or two ahead of time. As it sits, the ingredients combine and create a more intense flavor profile.
Variations
Make it spicy by adding a diced jalapeno pepper or a sprinkle of red chili flakes or cayenne pepper to taste.
Swap finely shredded cheddar for smoked cheddar, pepper jack, Gouda, or even blue cheese to change the flavor.
For a vegetarian baked potato dip, leave out the bacon.
Add diced green pepper or mushroom to the onions as they caramelize for added vegetables.
Top the dip with a swirl of BBQ sauce, hot sauce, or buffalo sauce for an extra burst of flavor.
1/2cupKewpie mayonnaise(American mayonnaise is fine)
2/3cupfinely diced cornichons(15-20)
2/3cup finely shredded cheddar
2stripscooked and crumbled bacon
salt and pepper to taste
garnish
3 1/2tablespoonsthinly sliced chives
Instructions
Place a pan over medium-low heat. Add oil, followed by diced onion. Caramelize onions, stirring occasionally, about 12 to 15 minutes.
Stir in grated garlic and continue tocook for 1 minute. Remove from heat and set aside to slightly cool.
In a mixing bowl combine Greek yogurt, kewpie, caramelized onions, cornichons, crumbled bacon, and finely shredded cheddar. Season with salt and pepper.
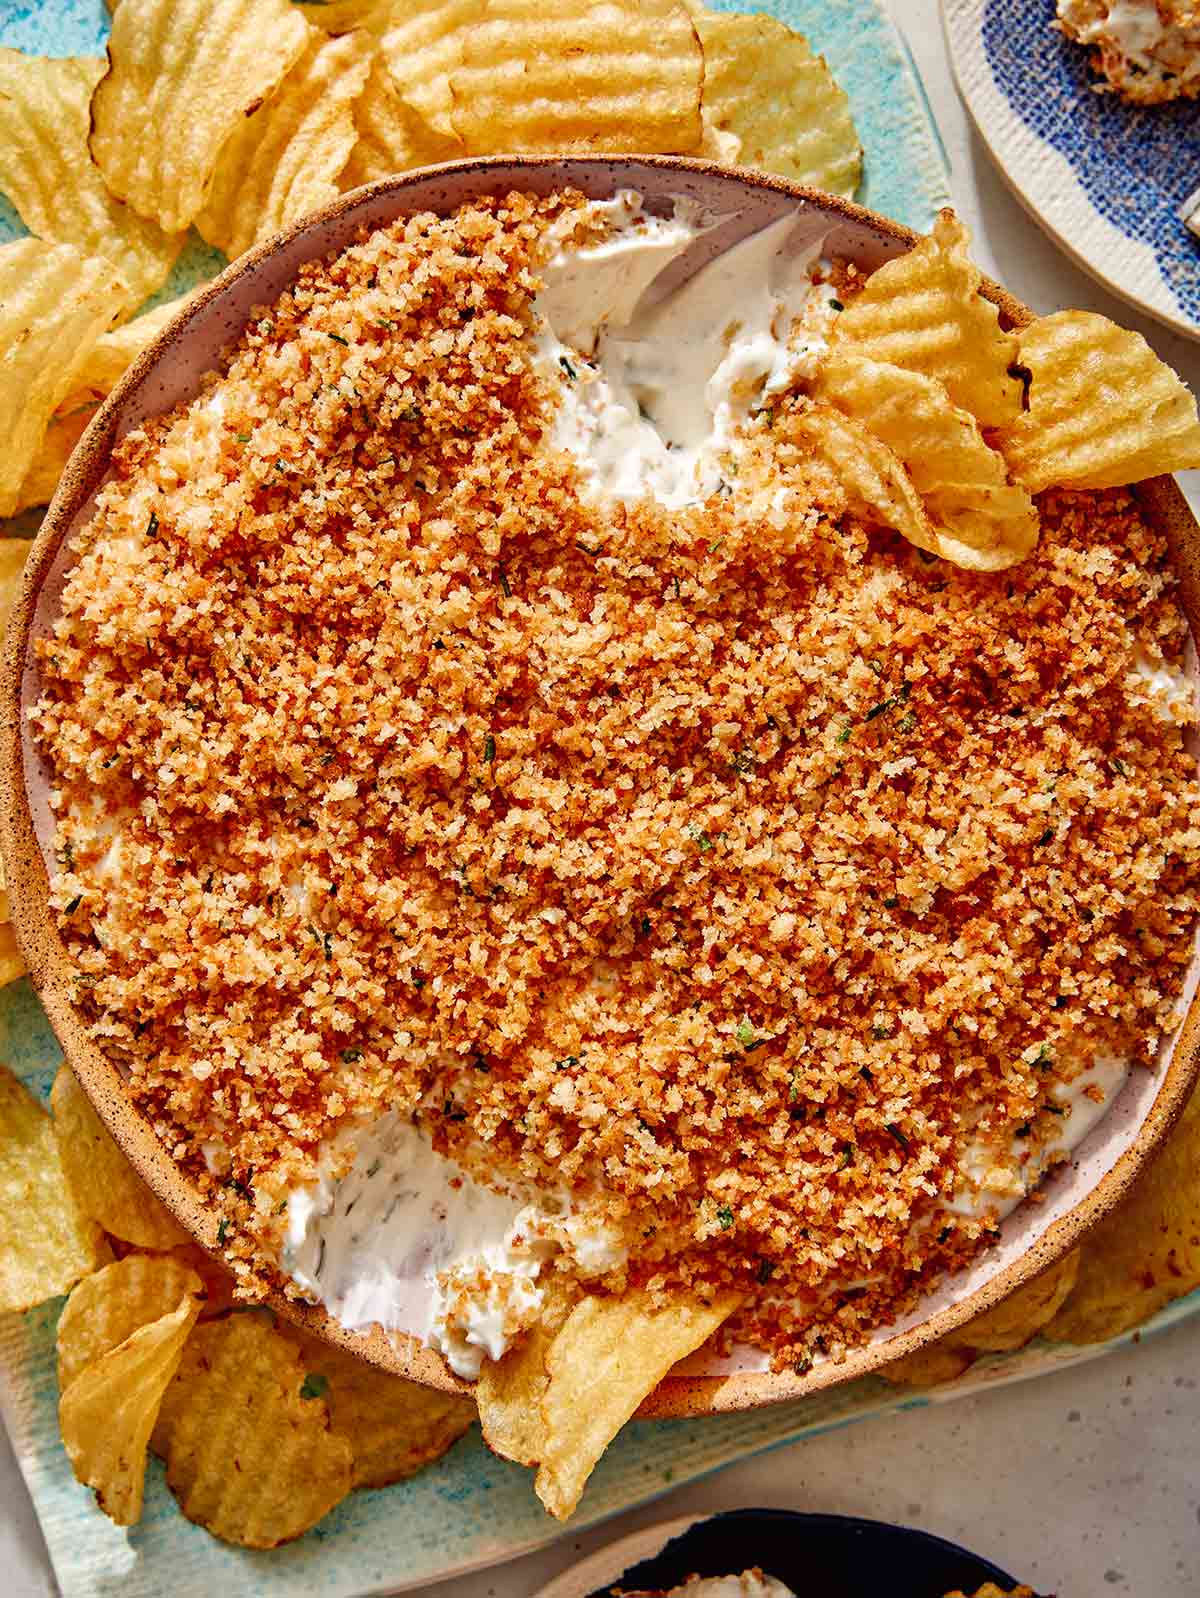
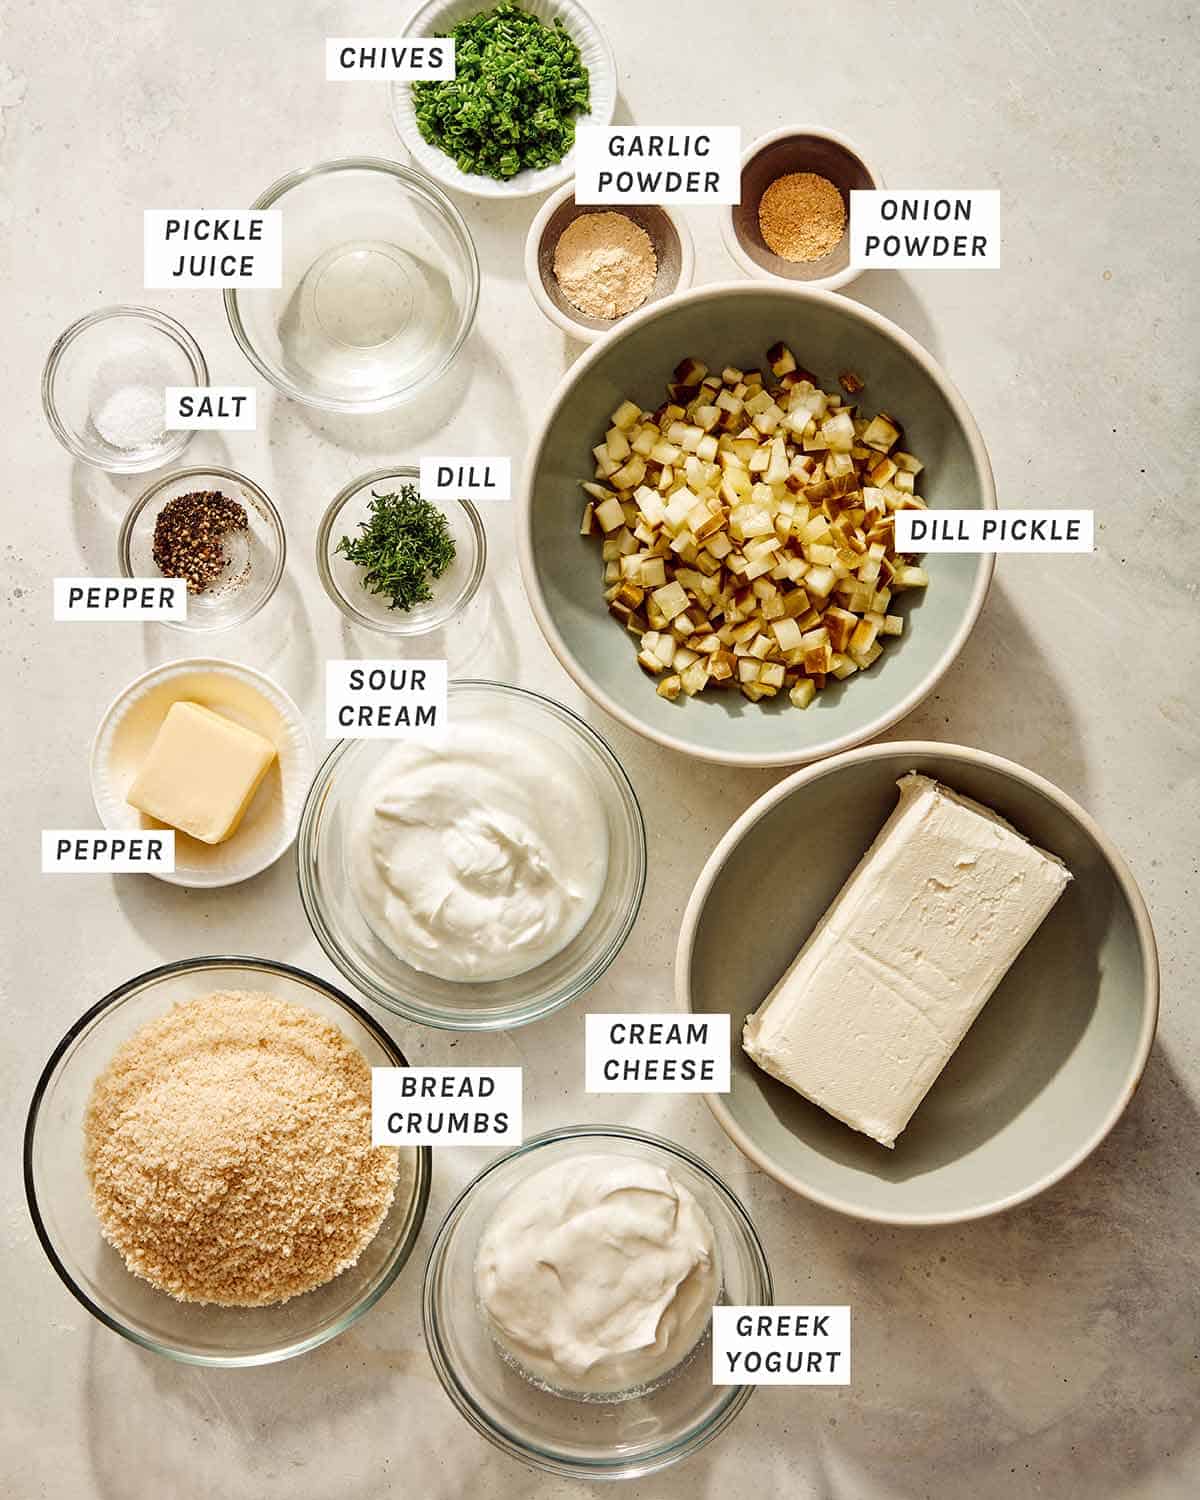
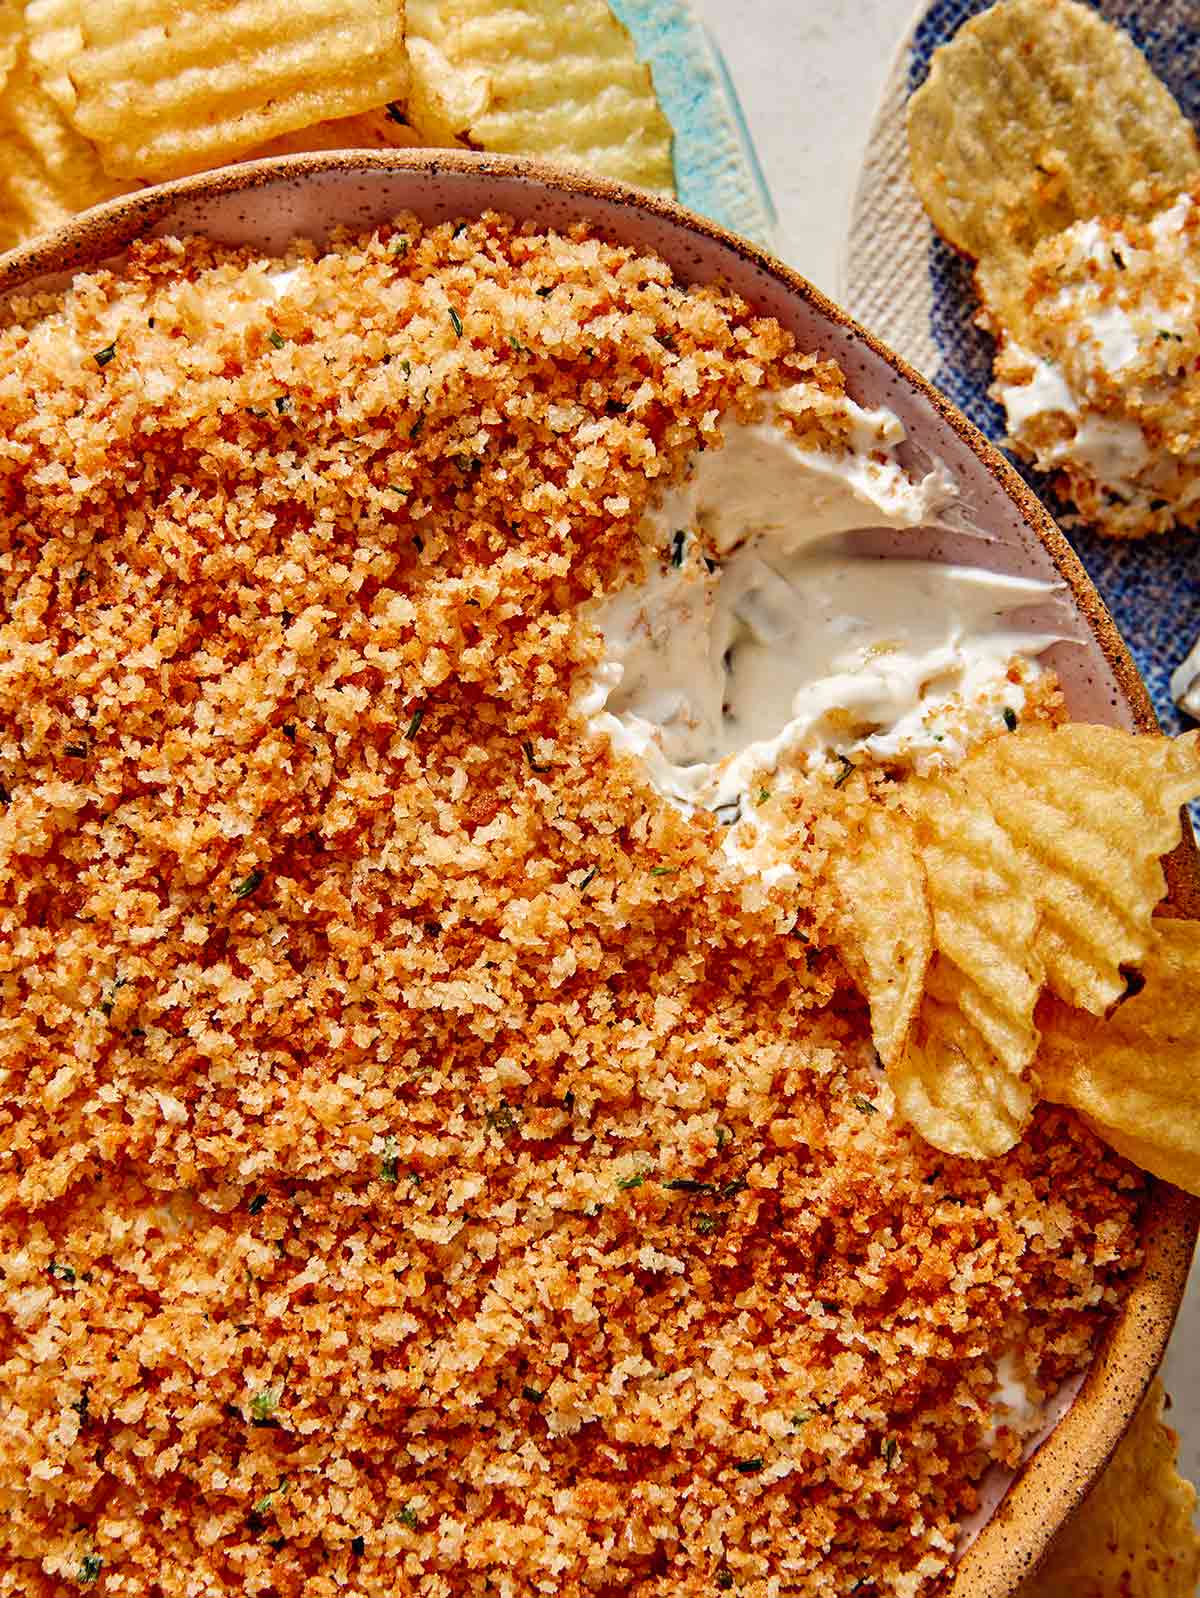
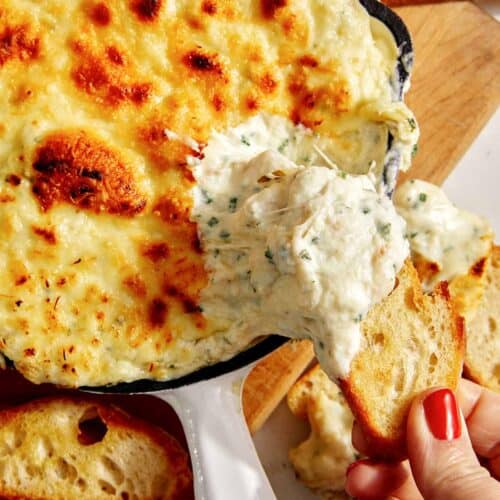
Creamy, tangy, and covered in a crunchy panko crust, this fried pickle dip is one of our favorites for game day. It’s a bit milder than our spicy pickle dip for the guests who don’t love the heat but crave the flavor and crunch of dill pickles. With a rich and creamy base made from a mixture of sour cream, cream cheese, and Greek yogurt and plenty of diced dill pickles and seasonings, every bite…
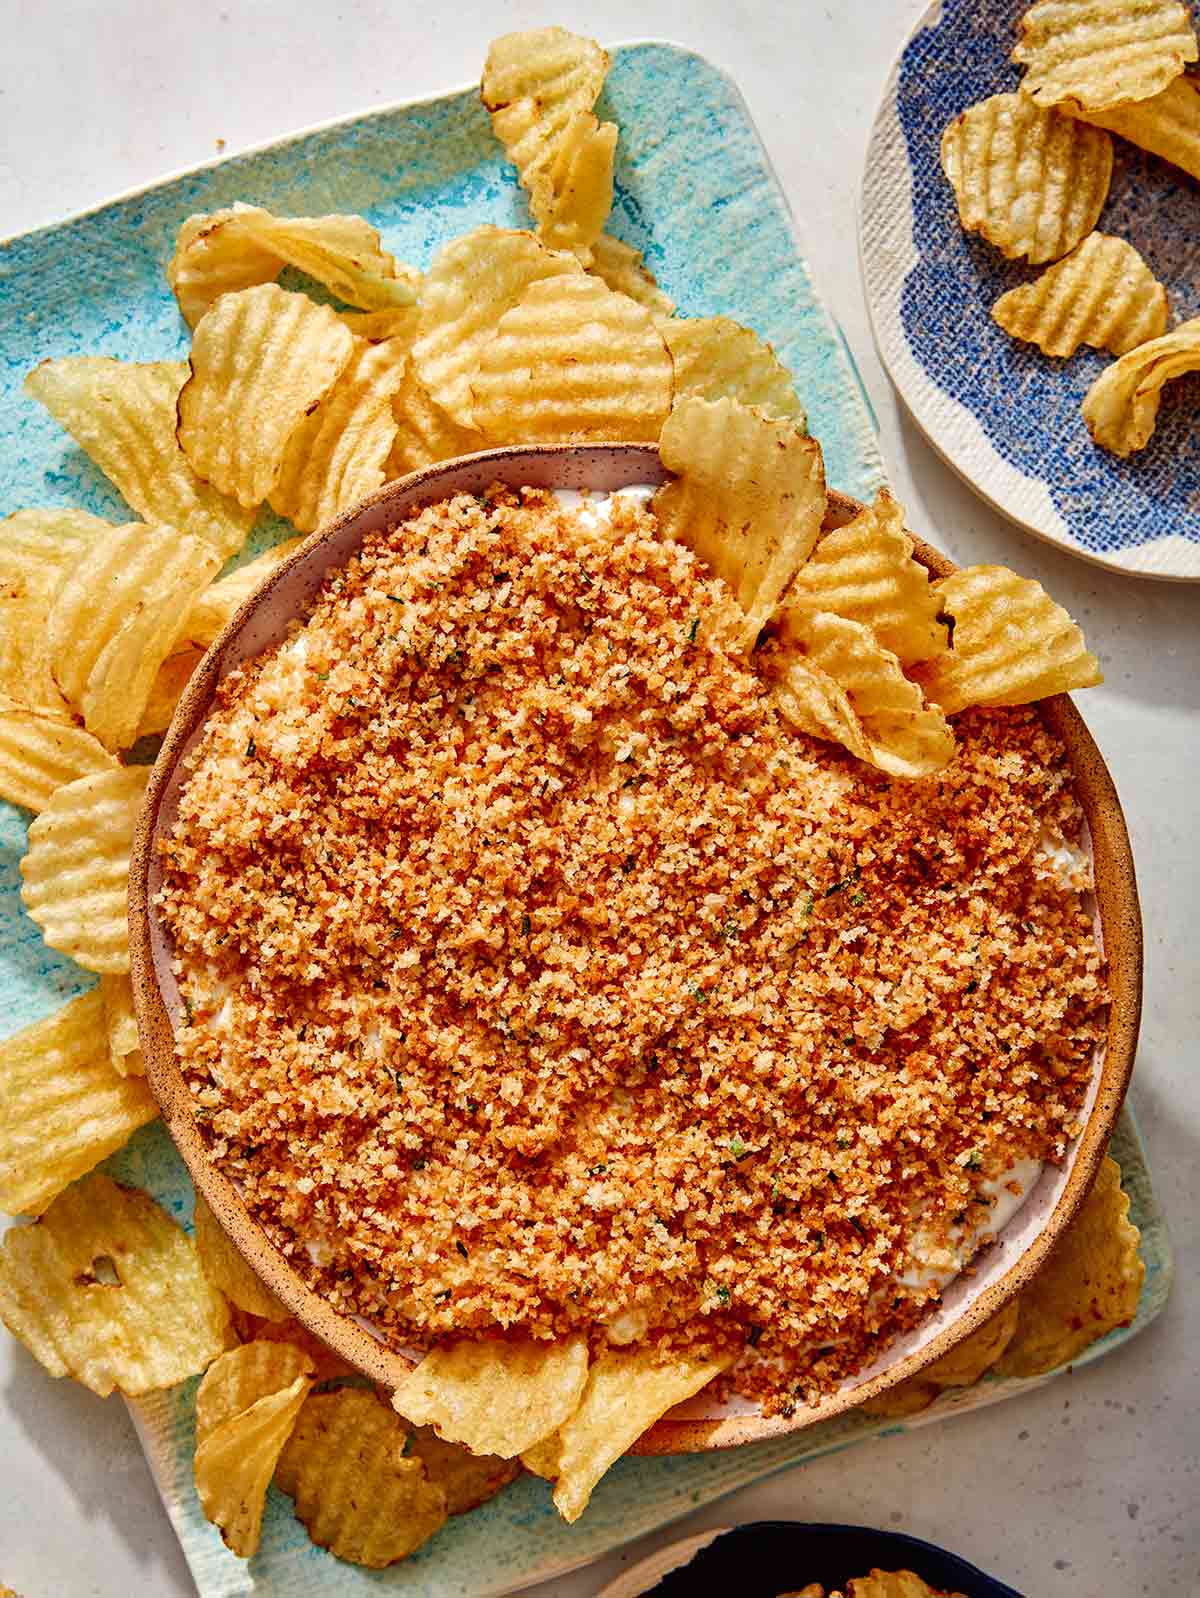
Creamy, tangy, and covered in a crunchy panko crust, this fried pickle dip is one of our favorites for game day. It’s a bit milder than our spicy pickle dip for the guests who don’t love the heat but crave the flavor and crunch of dill pickles.
With a rich and creamy base made from a mixture of sour cream, cream cheese, and Greek yogurt and plenty of diced dill pickles and seasonings, every bite is beyond flavorful. What really makes this pickle dip pop is the top layer of fried panko that truly makes this a fried pickle chip in dip form.
Whether you’re making an appetizer for the football game or looking for easy party food to set out at your next family get-together, this is the dip for you!
How to Make Fried Pickle Dip
Ingredients
Process
In a bowl, combine cream cheese, yogurt, and sour cream. Mix together until fully combined and smooth.
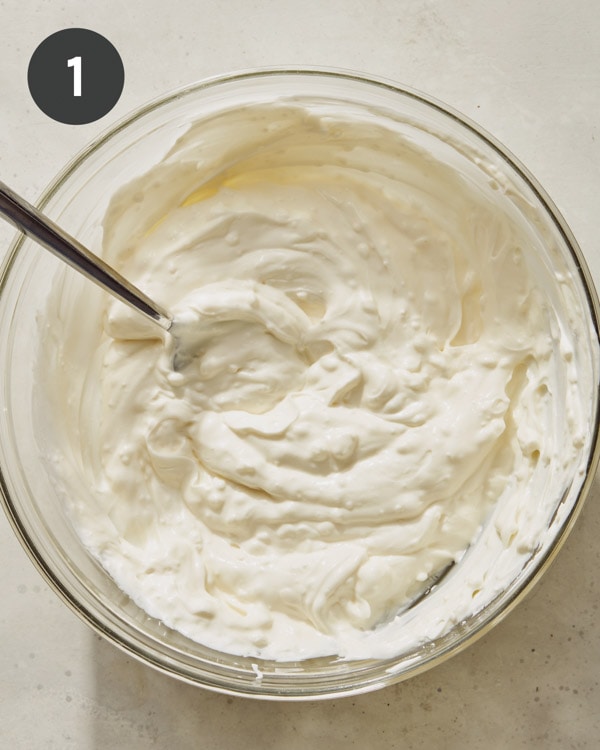
Add pickles, pickle juice, dill, chives, garlic powder, and onion powder. Stir together. Season with salt and pepper and stir again.
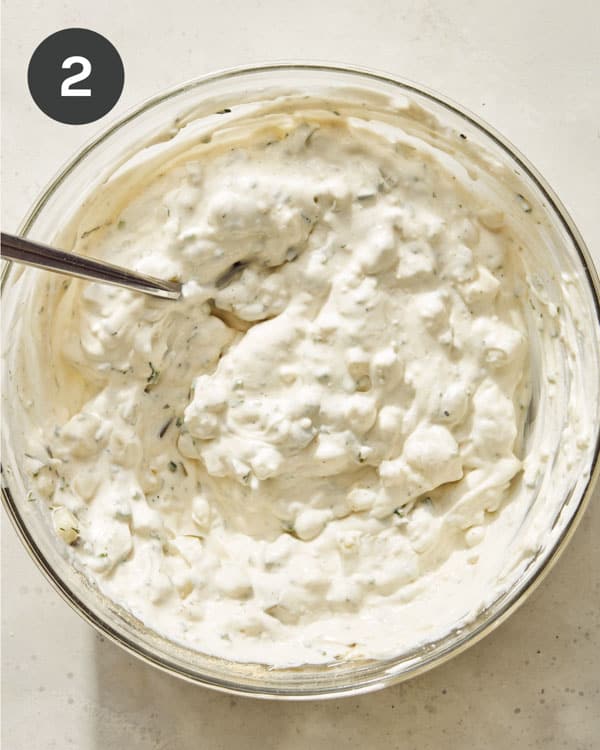
Pour mixture into a serving bowl and smooth top.
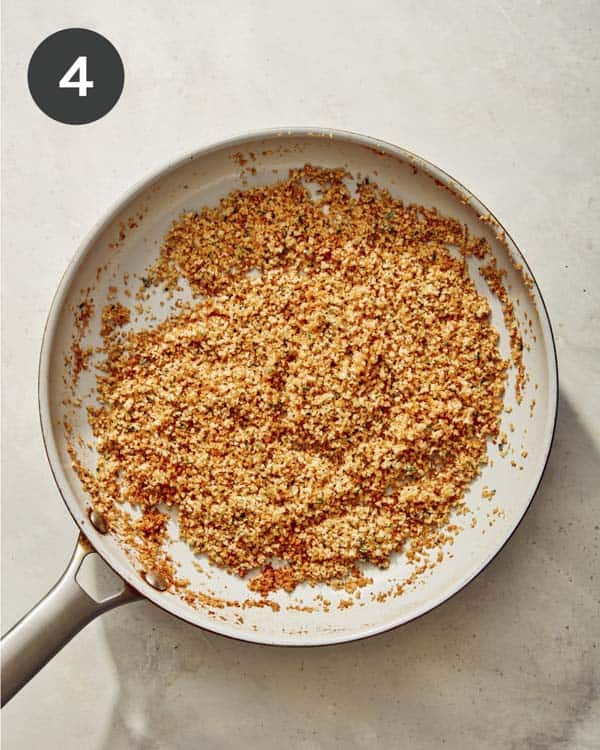
Melt butter in a skillet over medium heat. Add panko crumbs and toast until golden brown. Remove panko crumbs from the heat and stir in chives (or dill).
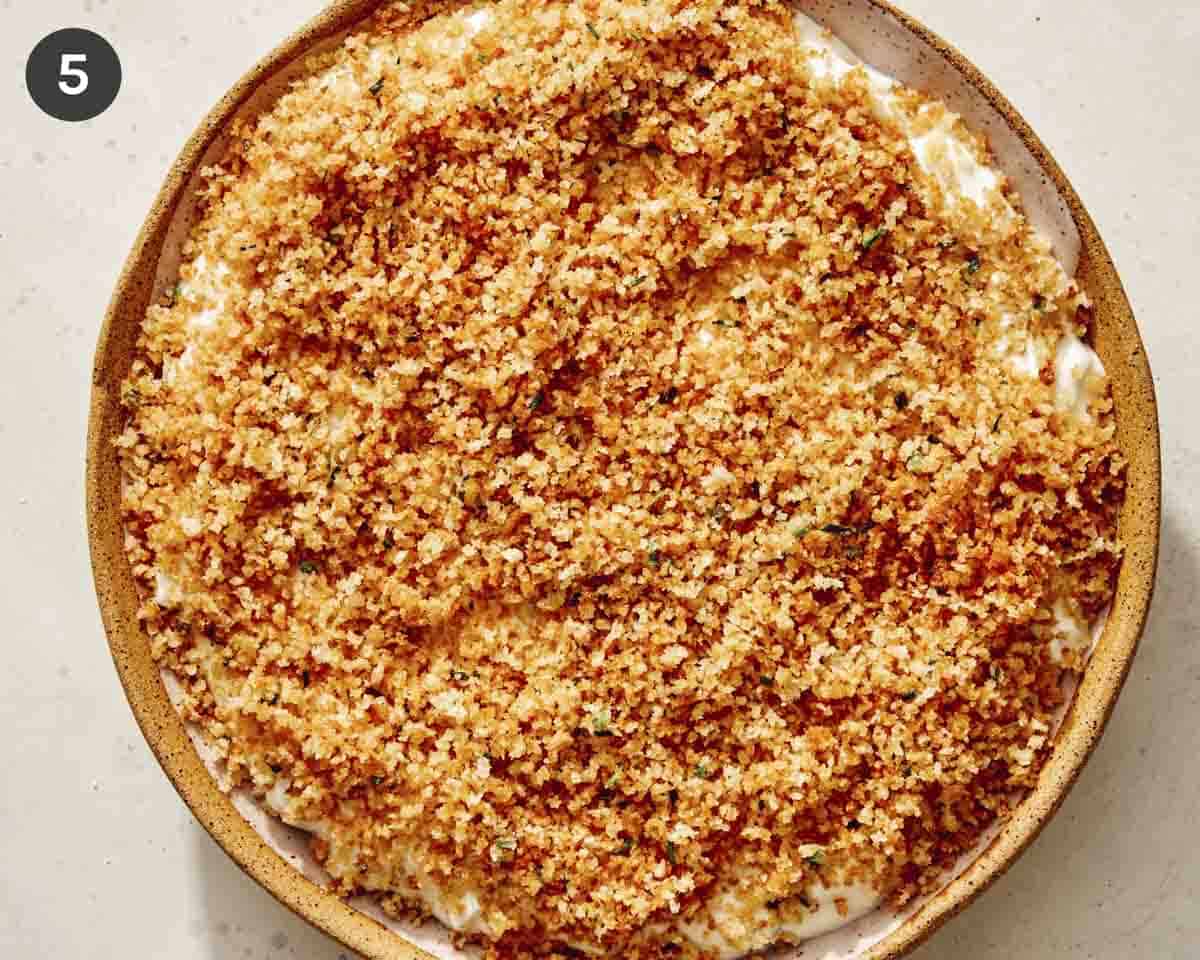
Pour toasted crumbs over dip in an even layer and serve with chips, crostini, crudité, pretzels, etc.
Tips for the BEST Fried Pickle Dip
This pickle dip is incredibly simple, but here are a few key tips to give you the very best dip each and every time.
Make sure the cream cheese is 100 percent softened to room temperature. This ensures the texture is rich and creamy, without any lumps or bumps of cream cheese hanging around.
Watch the panko closely! Once the panko starts to brown, it can go from toasted to burnt fairly quickly.
Toast the panko just before serving. The panko will go from crispy to chewy as it soaks in the moisture from the dip. While this won’t make it taste bad, you’ll get the full crunchy effect of the fried pickle dip if you toast and top it just before serving.
Variations
Add a diced jalapeno pepper for a spicy kick.
Stir one-third to one-half cup of freshly shredded cheese, like sharp cheddar or pepper jack, into the dip before topping with the fried panko.
Add extra veggies like finely diced red pepper or green onions for more color and flavor.
Add three strips of diced, crispy bacon into the dip for a smoky, meaty flavor.
Make Ahead Instructions
You can make this dip up to three days before serving. Combine all of the dip ingredients as directed and store them in an airtight container in the refrigerator.
Just before serving, toast your panko and sprinkle on top.
Our fried pickle dip is a blend of tangy dill pickles, savory seasonings, and a rich and creamy base, all topped with toasted panko. Just like your favorite fried pickle chips, but in a dip!
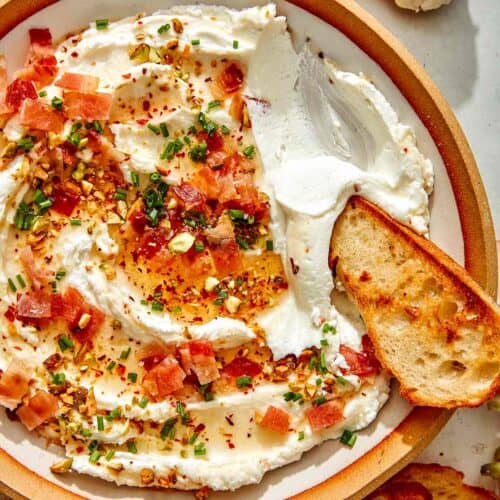
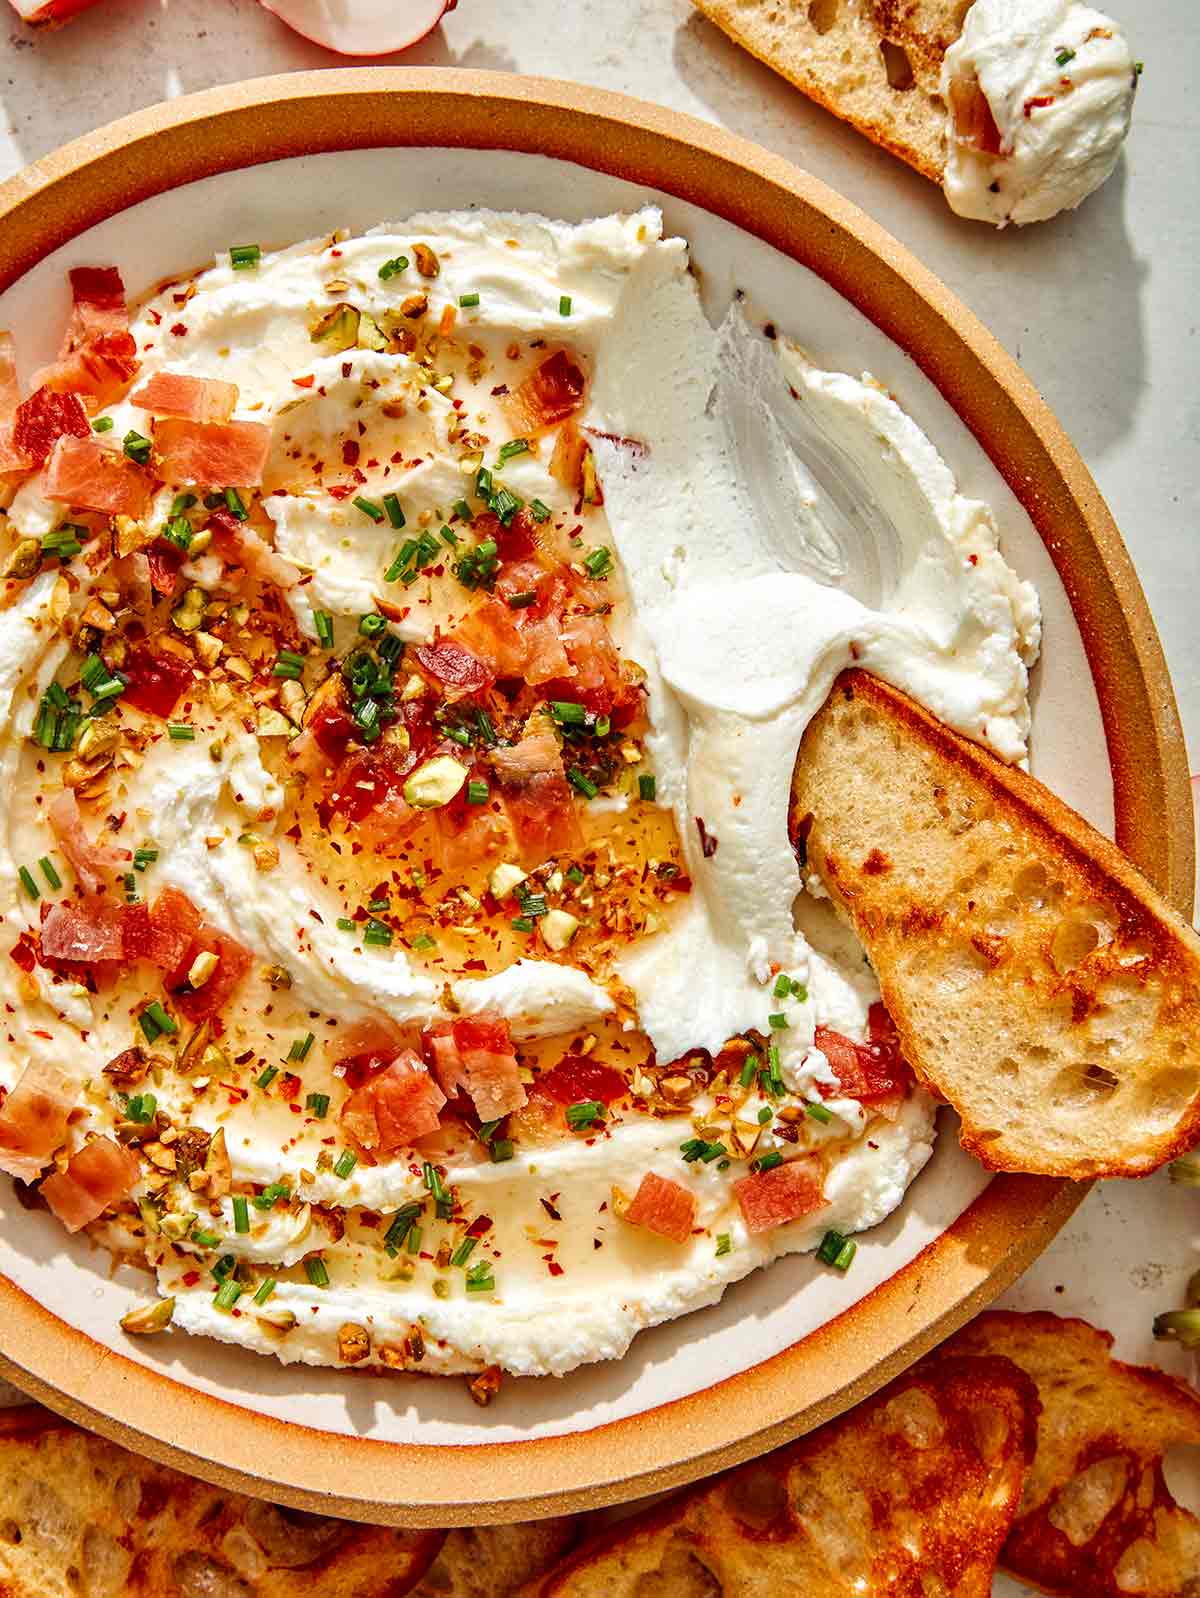
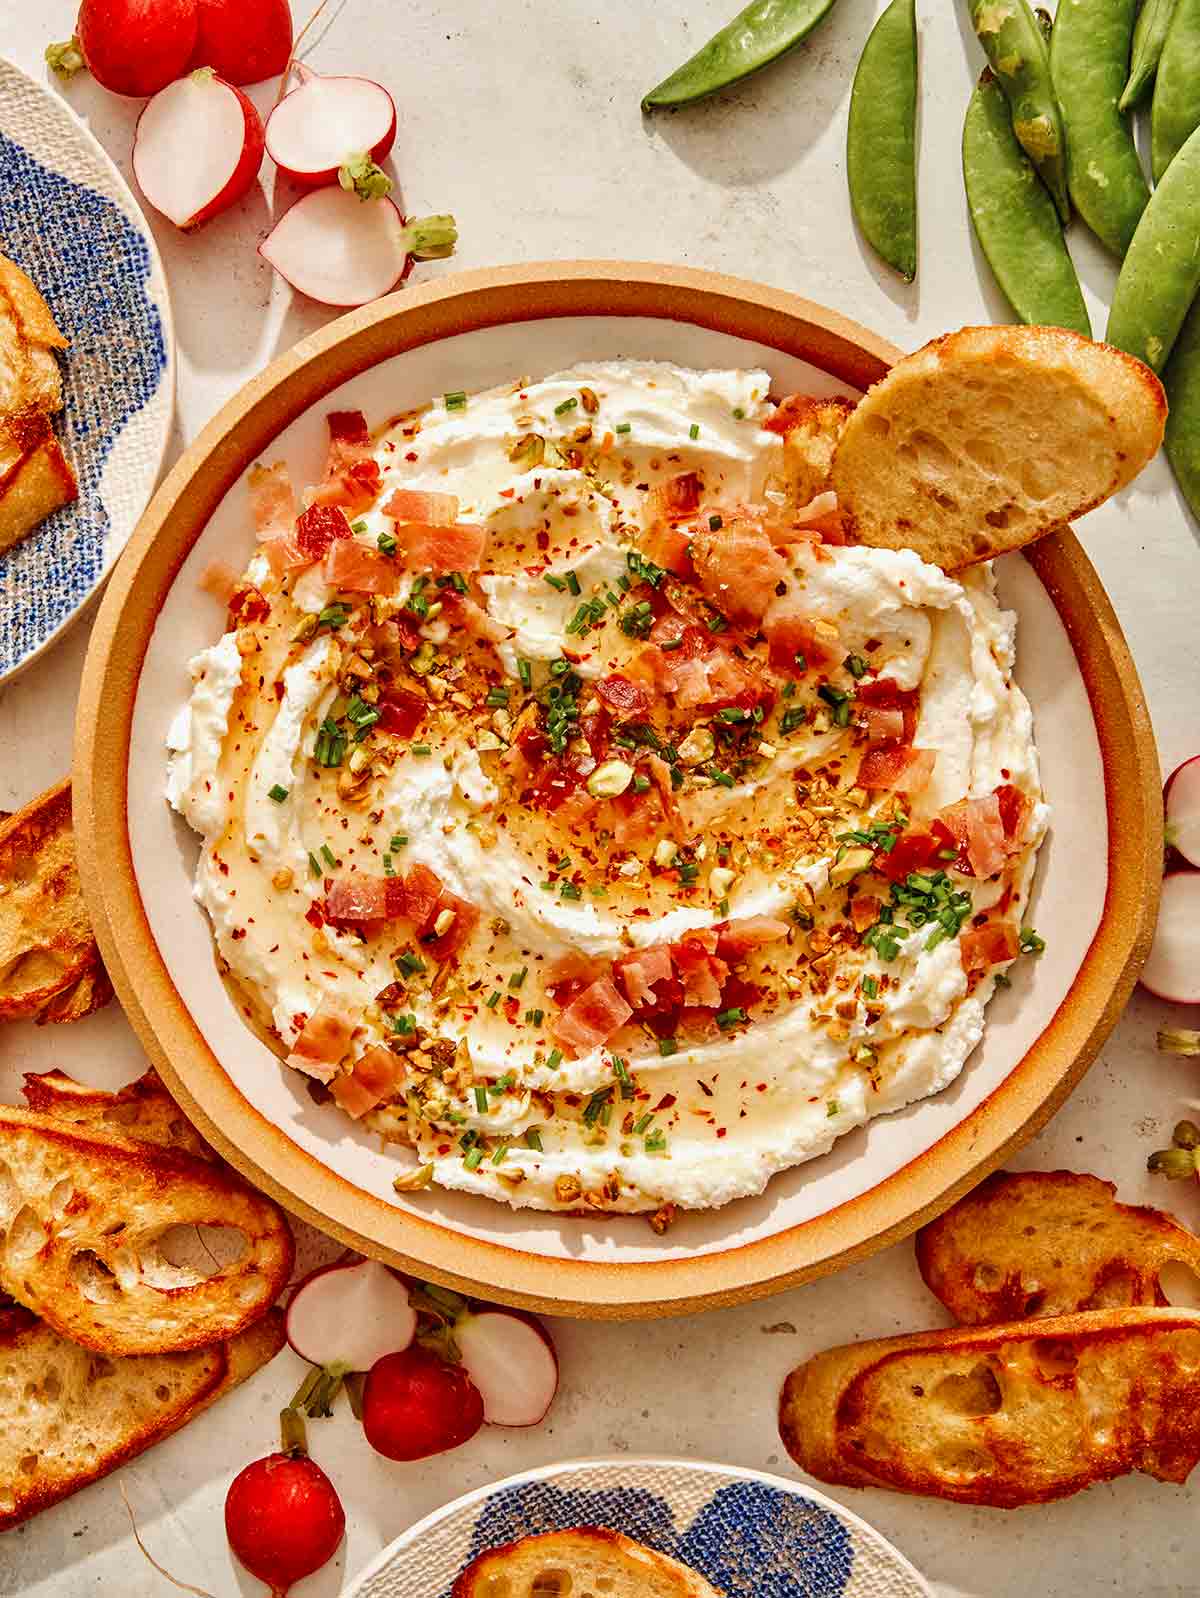
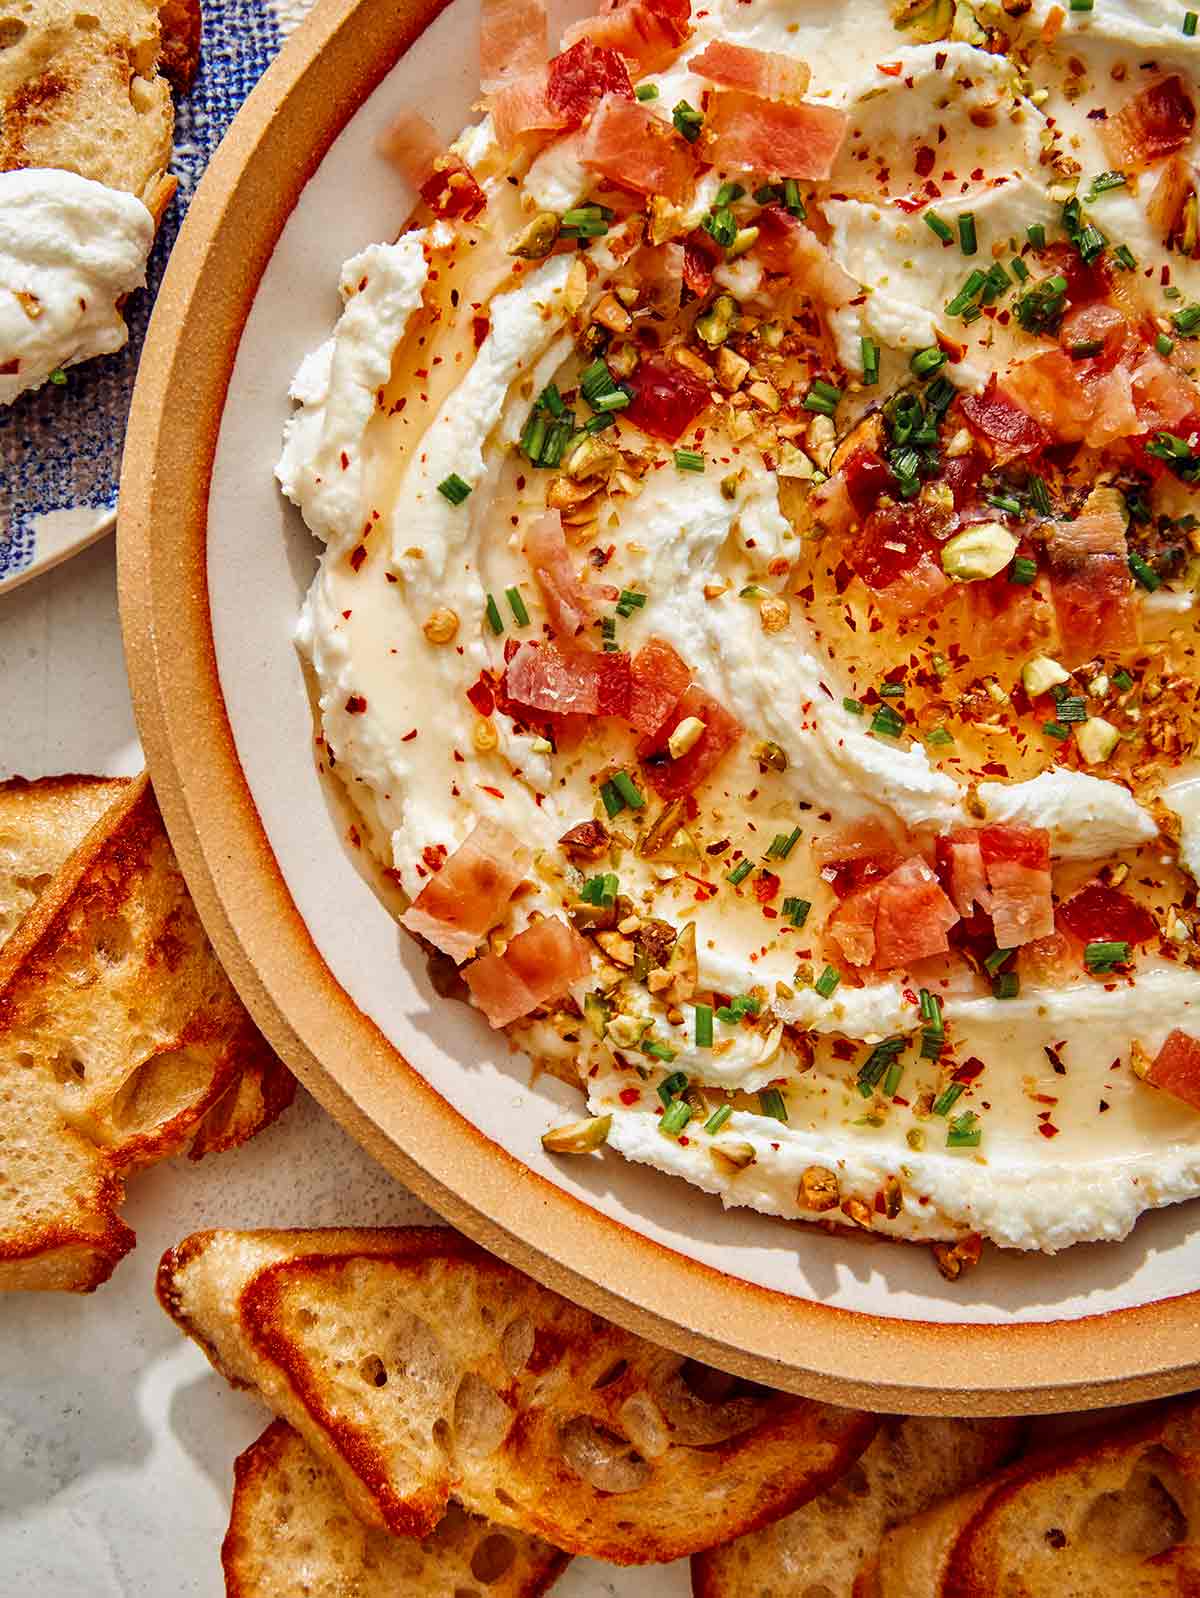
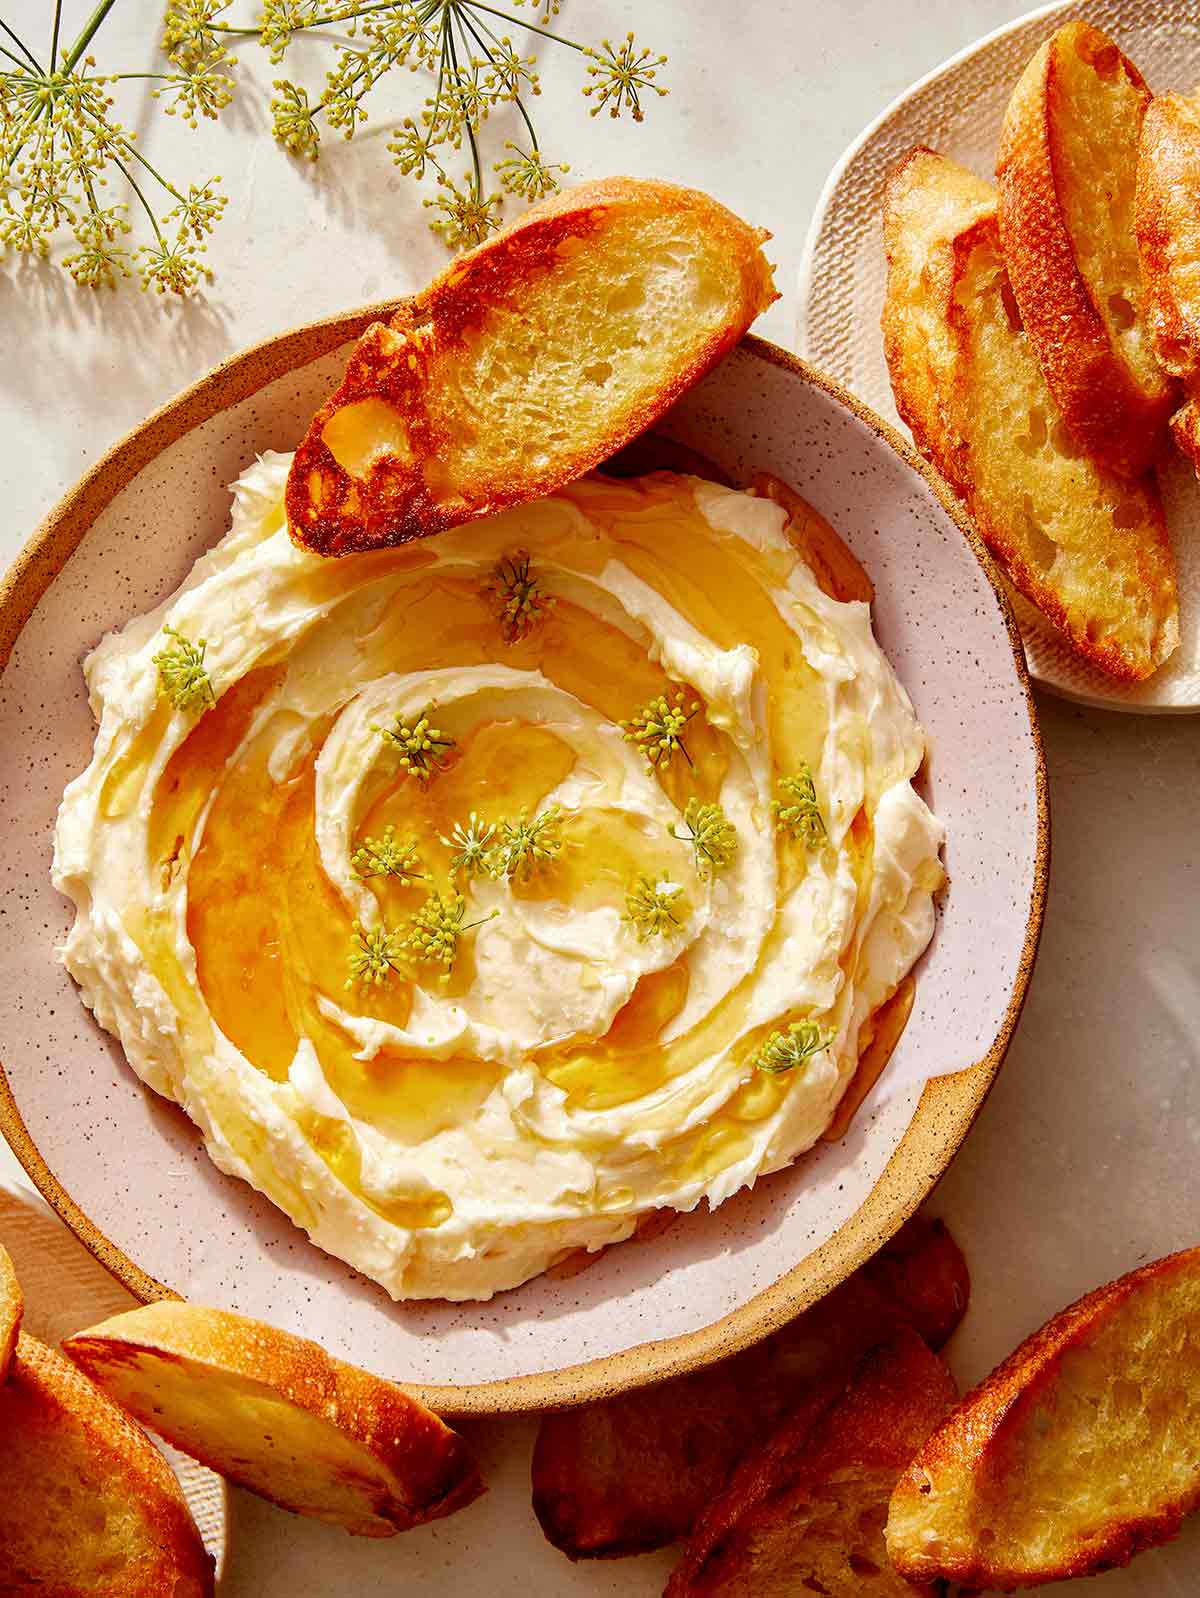
Don’t let the simplicity of our Whipped Goat Cheese fool you into thinking it’s less than spectacular. Whipping goat cheese and cream together creates a velvety, smooth, and tangy spread that pairs incredibly well with hot honey, everything seasoning, bacon crumbles, and sliced green onion. It takes only 10 minutes to put together, and you’ll watch it disappear just as fast as guests spoon it onto crostini and dive back in for more. Serve this…
Don’t let the simplicity of our Whipped Goat Cheese fool you into thinking it’s less than spectacular. Whipping goat cheese and cream together creates a velvety, smooth, and tangy spread that pairs incredibly well with hot honey, everything seasoning, bacon crumbles, and sliced green onion. It takes only 10 minutes to put together, and you’ll watch it disappear just as fast as guests spoon it onto crostini and dive back in for more.
Serve this on a plate as an appetizer, or use the whipped goat cheese on salads, spread on sandwiches, topped on grilled meat, or spooned onto pizza.
How to Make Whipped Goat Cheese
Ingredients
Process
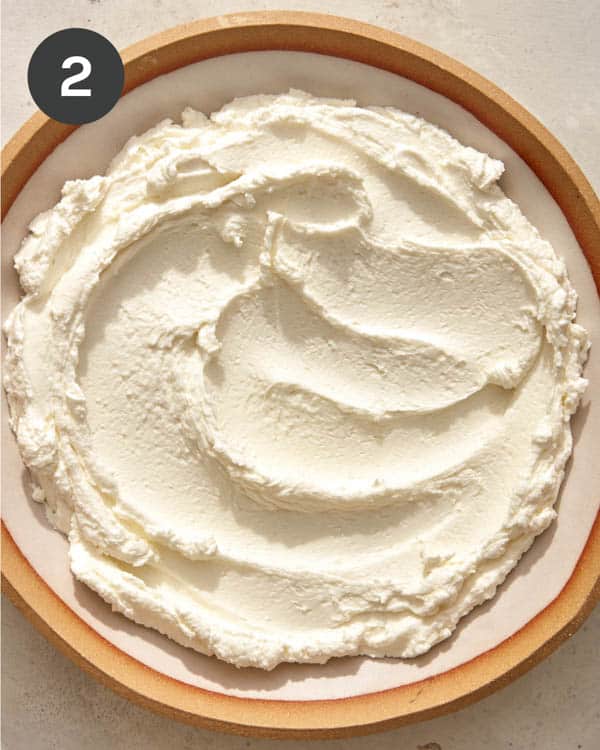
Place the goat cheese and cream (if using) into a food processor and blend it until smooth.
Transfer the whipped goat cheese to a plate with a wide rim or a wide-mouthed bowl and spread it into an even layer.
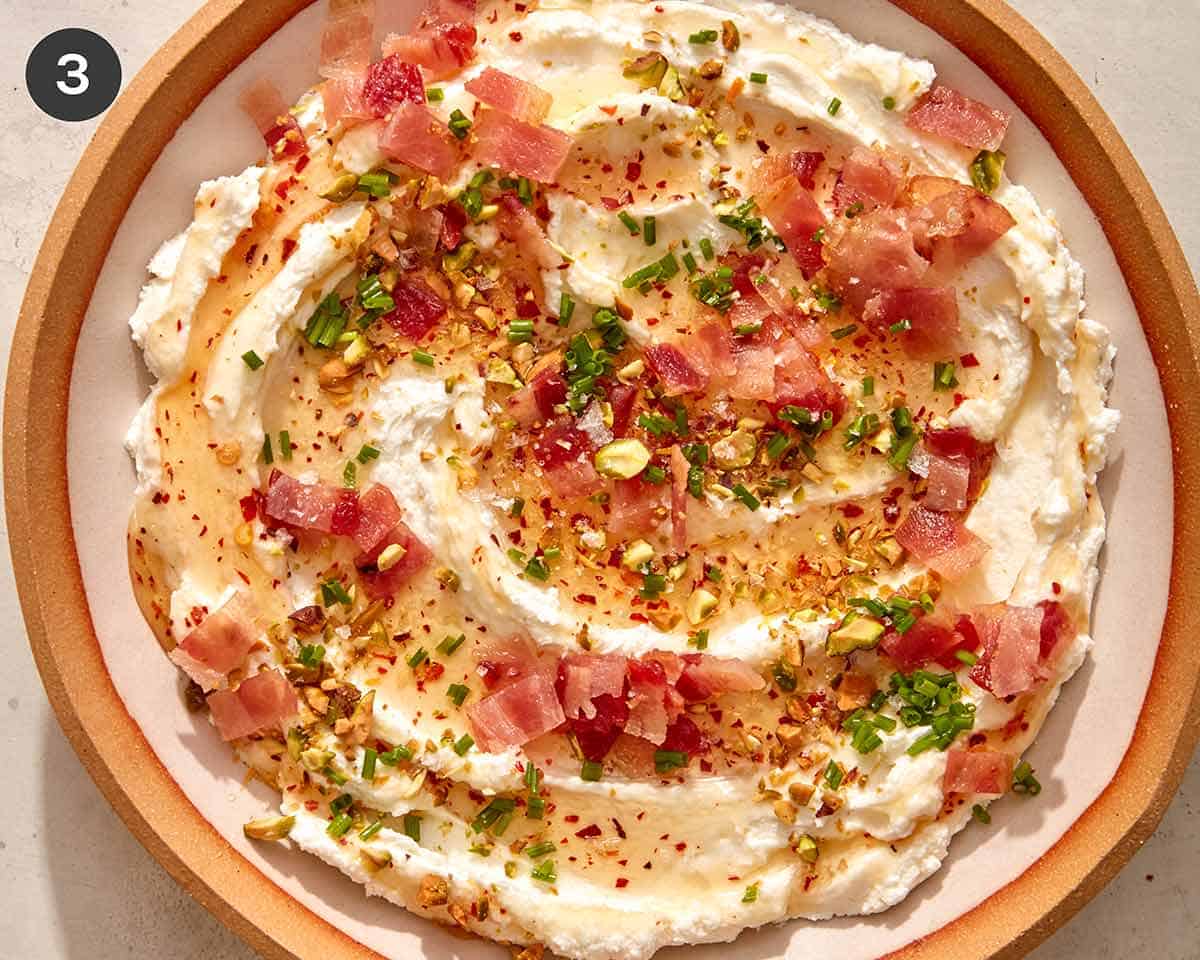
Top the goat cheese with a drizzle of hot honey. Then top it with bacon, everything seasoning, and green onions. Serve with crostini.
Why We Love Whipped Goat Cheese
It’s incredibly simple. This whipped goat cheese is just two main ingredients (or one if you leave out the heavy cream), and a handful of toppings. It takes less than 10 minutes to whip together for a decadent last-minute appetizer.
It’s versatile. While we love serving this on a plate with crostini or crackers, you can use this whipped goat cheese to top bread, pizza, grilled vegetables, meat, eggs, and more. In addition to the many ways you can use it, you can also change up the toppings for a variety of flavors!
Easy to make ahead. If you’re in charge of an appetizer for your next party, a plate of whipped goat cheese can be prepared up to two days in advance. Just prep the goat cheese and get your toppings ready. Drizzle and sprinkle everything on top just before serving.
Purpose of Heavy Cream in Whipped Goat Cheese
Heavy cream is optional in our recipe, but we absolutely love what it does to it. Whipping a small amount of heavy cream into the goat cheese helps thin out the texture and creates a smoother, more luxurious dip. If you choose to skip the cream, your whipped goat cheese will still be smooth, but it will be much thicker with less of a “whipped” texture.
Variations
Once you have your base of goat cheese whipped and spread on a plate, the toppings you can add are truly endless. If you want to try something different than our suggested hot honey, everything seasoning, bacon, and green onions, try any of these additions or a combination for a whole new flavor!
Honey
Toasted chopped walnuts
Pistachios
Cinnamon
Roasted red peppers
Roasted garlic
Fresh herbs, including parsley, thyme, oregano, dill, basil, rosemary, or cilantro
Citrus zest from lemons, limes, or oranges
Fruit compote, including blueberry, strawberry, cherry, or raspberry
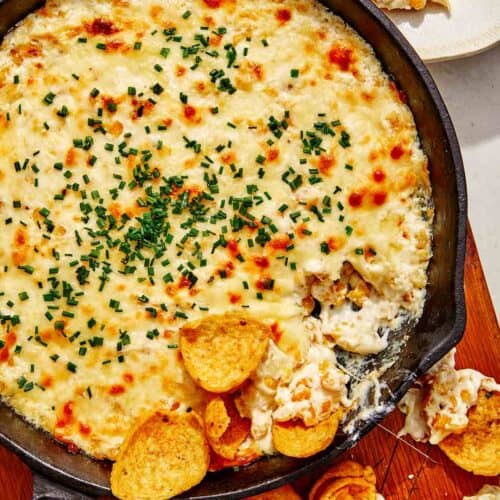
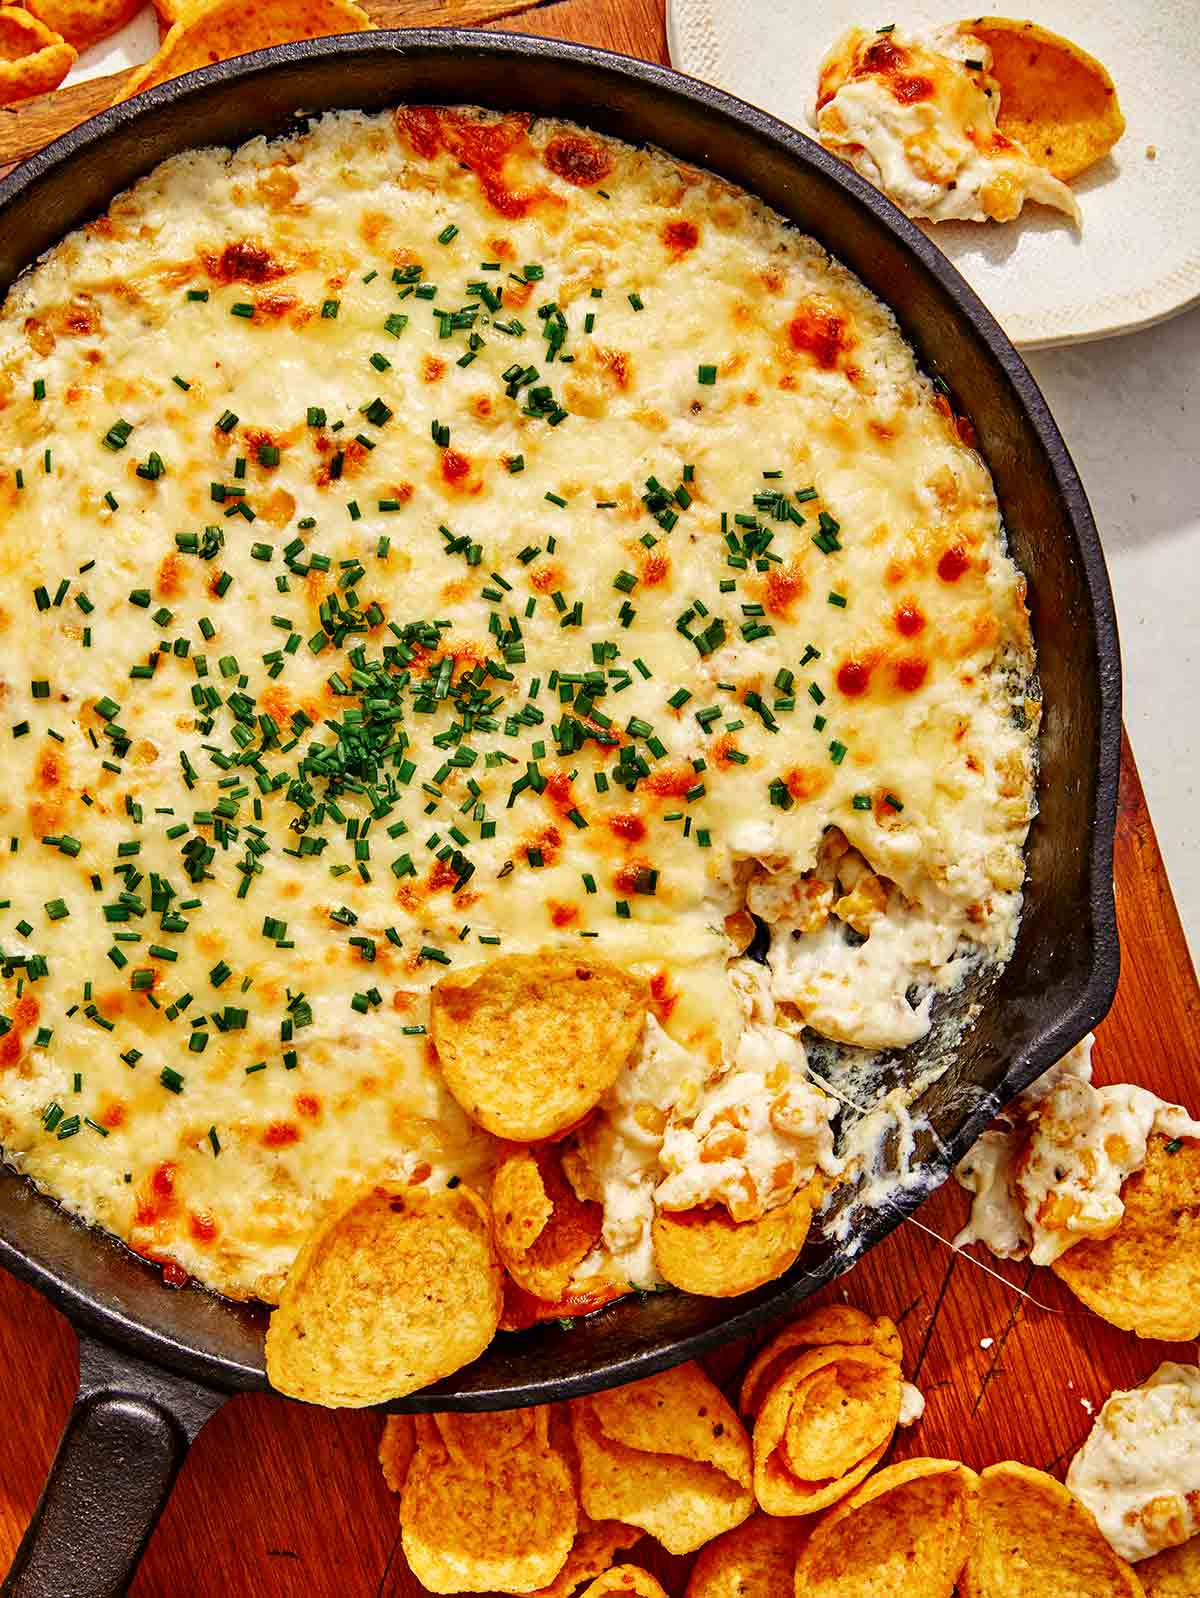
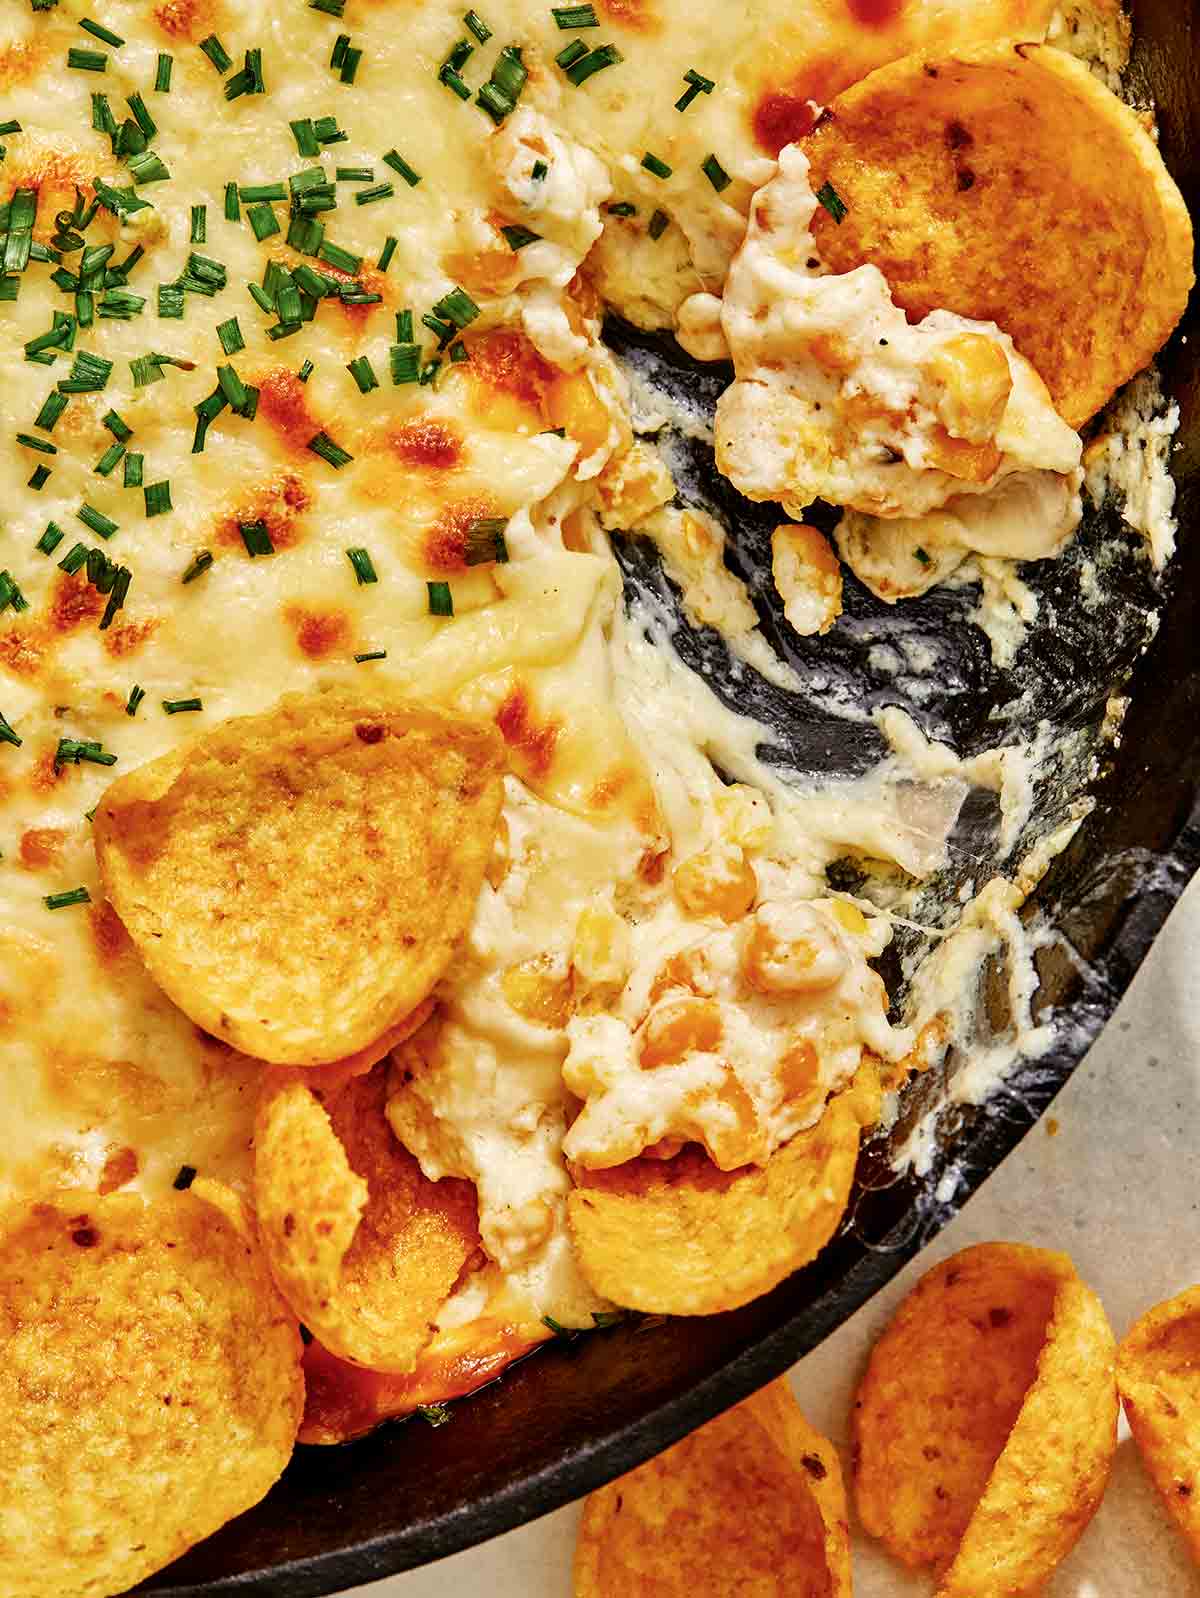
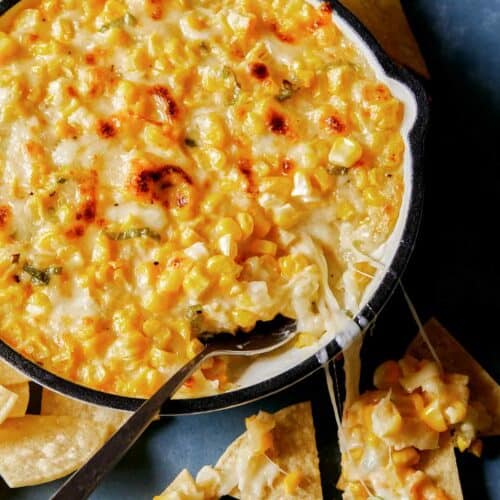
In less than 30 minutes, you’ll be serving up and diving into a pan of this decadent creamed corn dip that’s the perfect meld of three cheeses, corn, and spices. We love serving this dip with a big bowl of corn chips whenever we have guests over, but especially for game days and holiday parties when a crave-worthy dip is an absolute necessity. Try serving it as a dip-trio with our buffalo chicken dip with…
In less than 30 minutes, you’ll be serving up and diving into a pan of this decadent creamed corn dip that’s the perfect meld of three cheeses, corn, and spices. We love serving this dip with a big bowl of corn chips whenever we have guests over, but especially for game days and holiday parties when a crave-worthy dip is an absolute necessity. Try serving it as a dip-trio with our buffalo chicken dip with pita chips and roasted onion dip alongside a plate of veggies.
Using canned corn helps this appetizer come together incredibly quickly and with minimal effort. A little sauteing, stirring, and baking is all you need to do for this crowd-pleasing appetizer.
How to Make Creamed Corn Dip
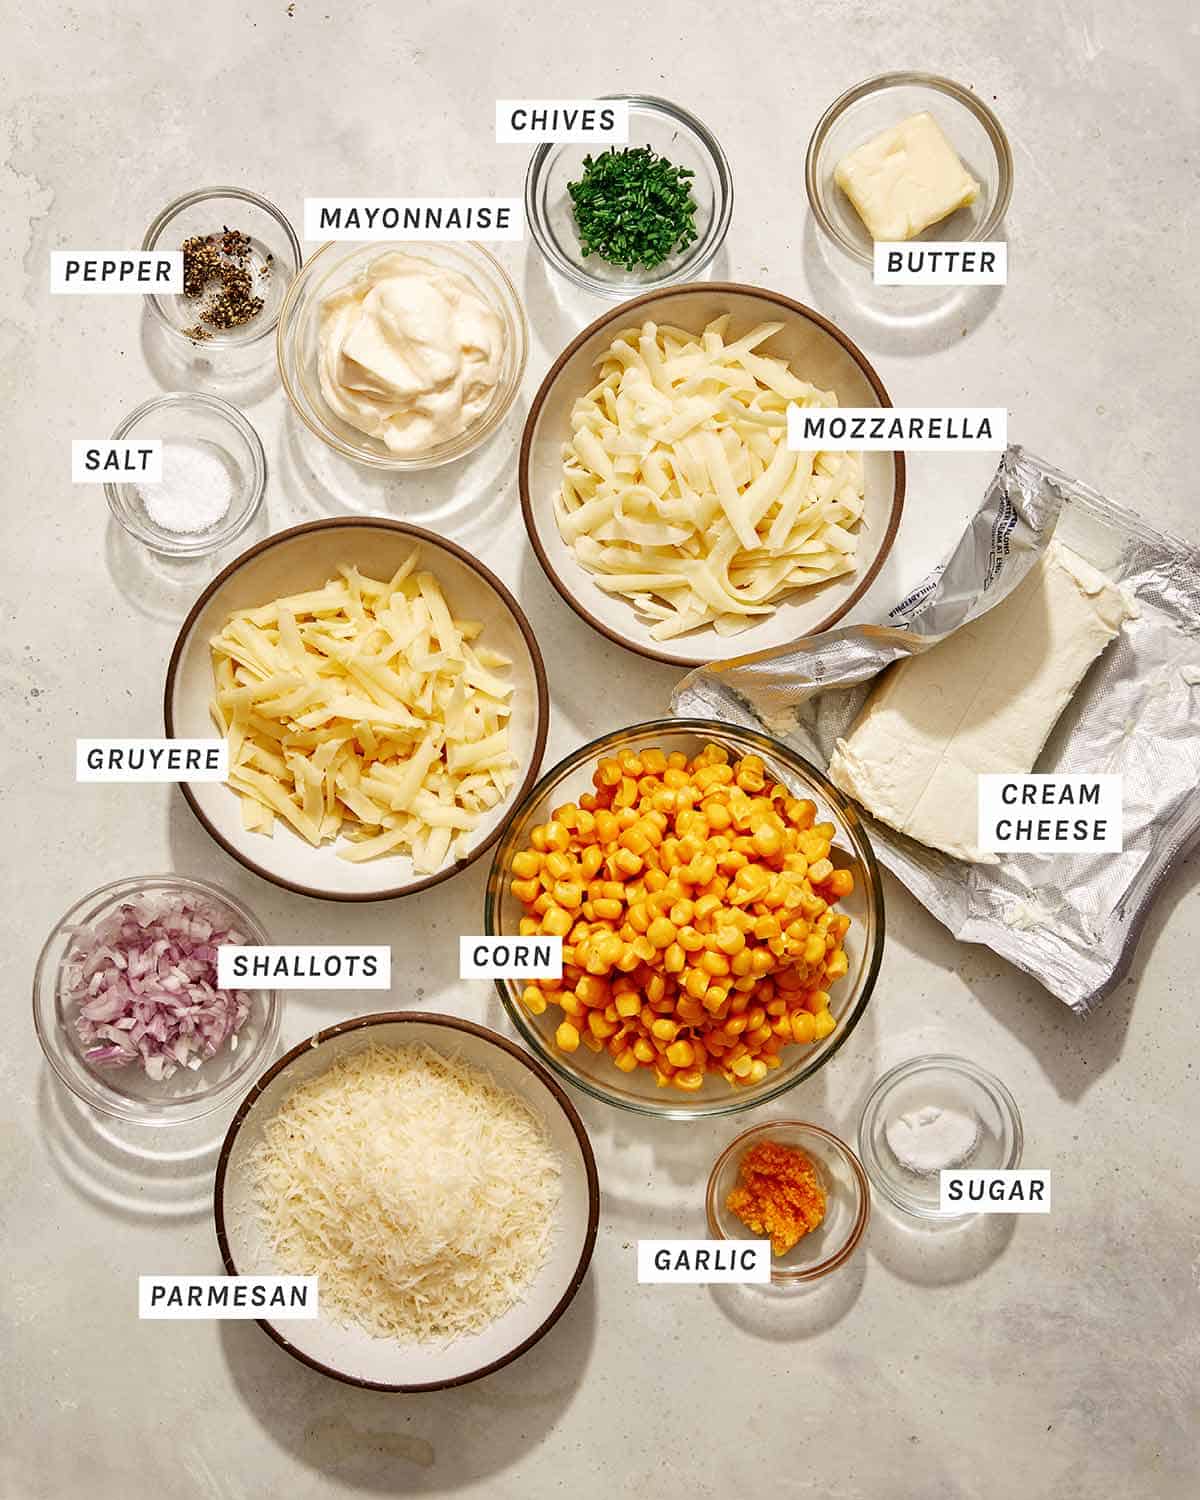
Ingredients
Process
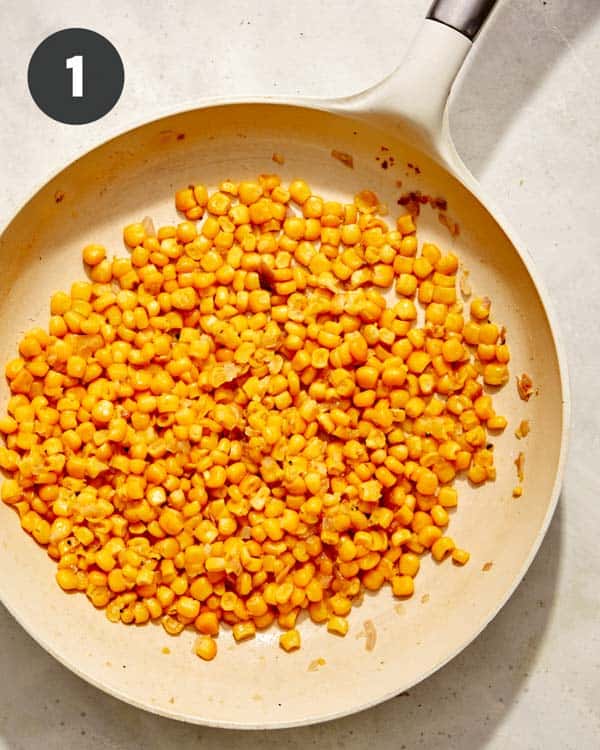
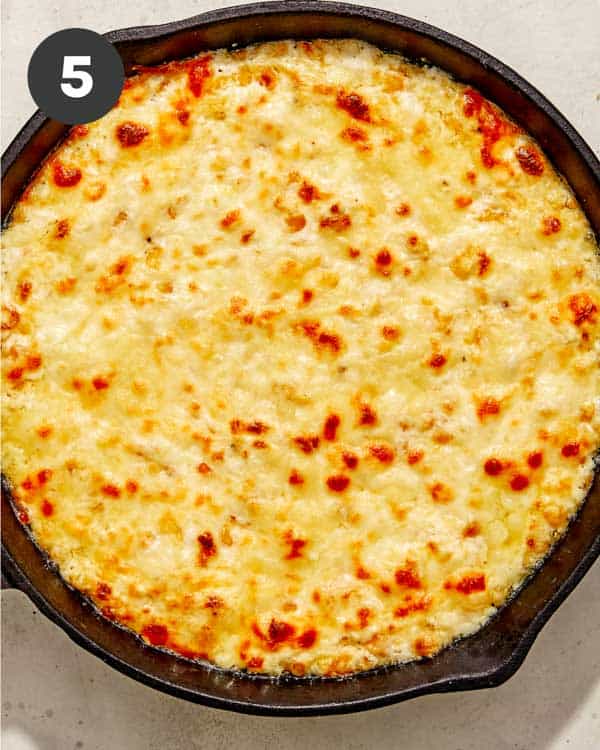
Preheat oven to 375˚F. In a pan, melt butter over medium heat. Add shallots and garlic and sauté for 1 minute. Add corn and continue to cook for 3 to 4 minutes. Stir in sugar and season with salt and pepper. Cook for 1 more minute. Remove from heat.
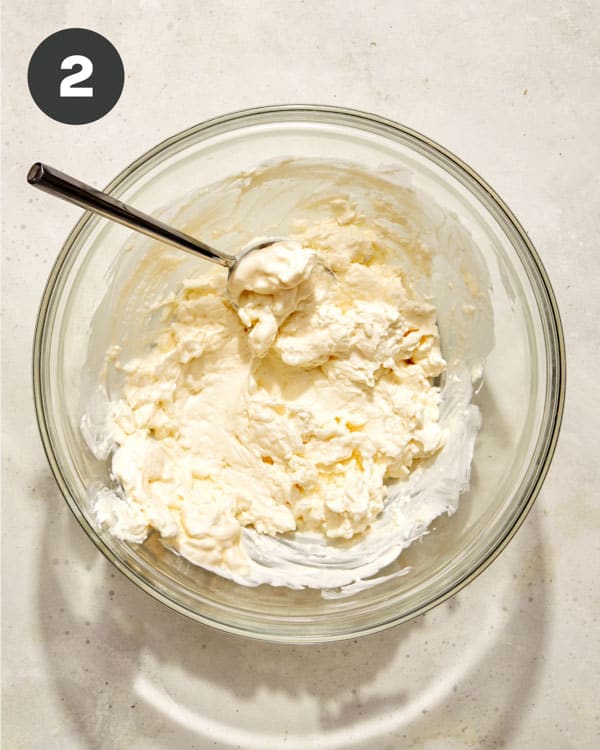
Place cream cheese and mayonnaise into a large mixing bowl and stir together to break up the block of cream cheese.
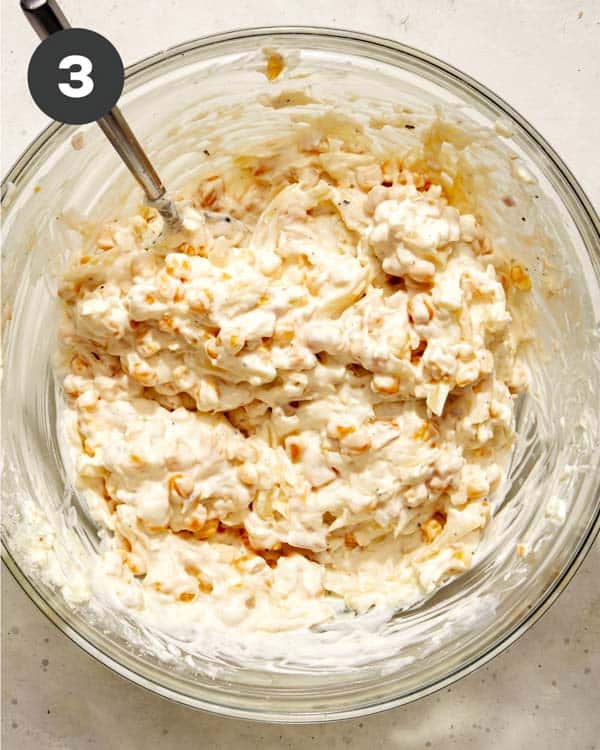
Add all of the corn mixture and all but 2 tablespoons each of the mozzarella, gruyere, and Parmesan—season with salt and pepper. Mix until completely and evenly combined.
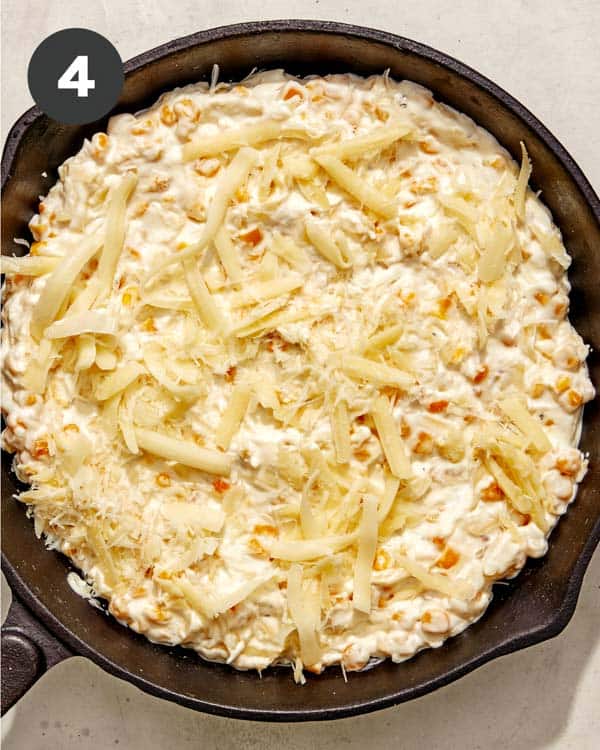
Pour the mixture into a 3-4 cup baking dish or 8-inch skillet and smooth the top. Sprinkle with the remaining cheese.
Bake the creamed corn dip for 15 minutes. Then place it under the broiler for 30 seconds to 1 minute.
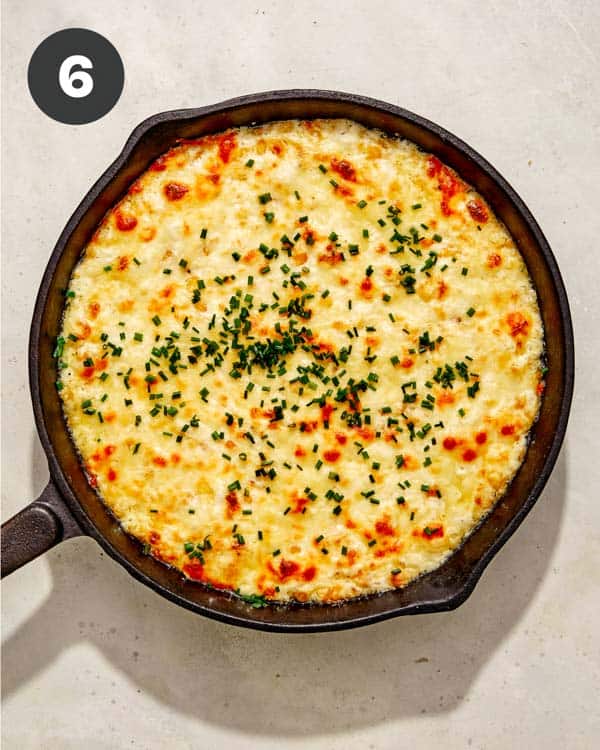
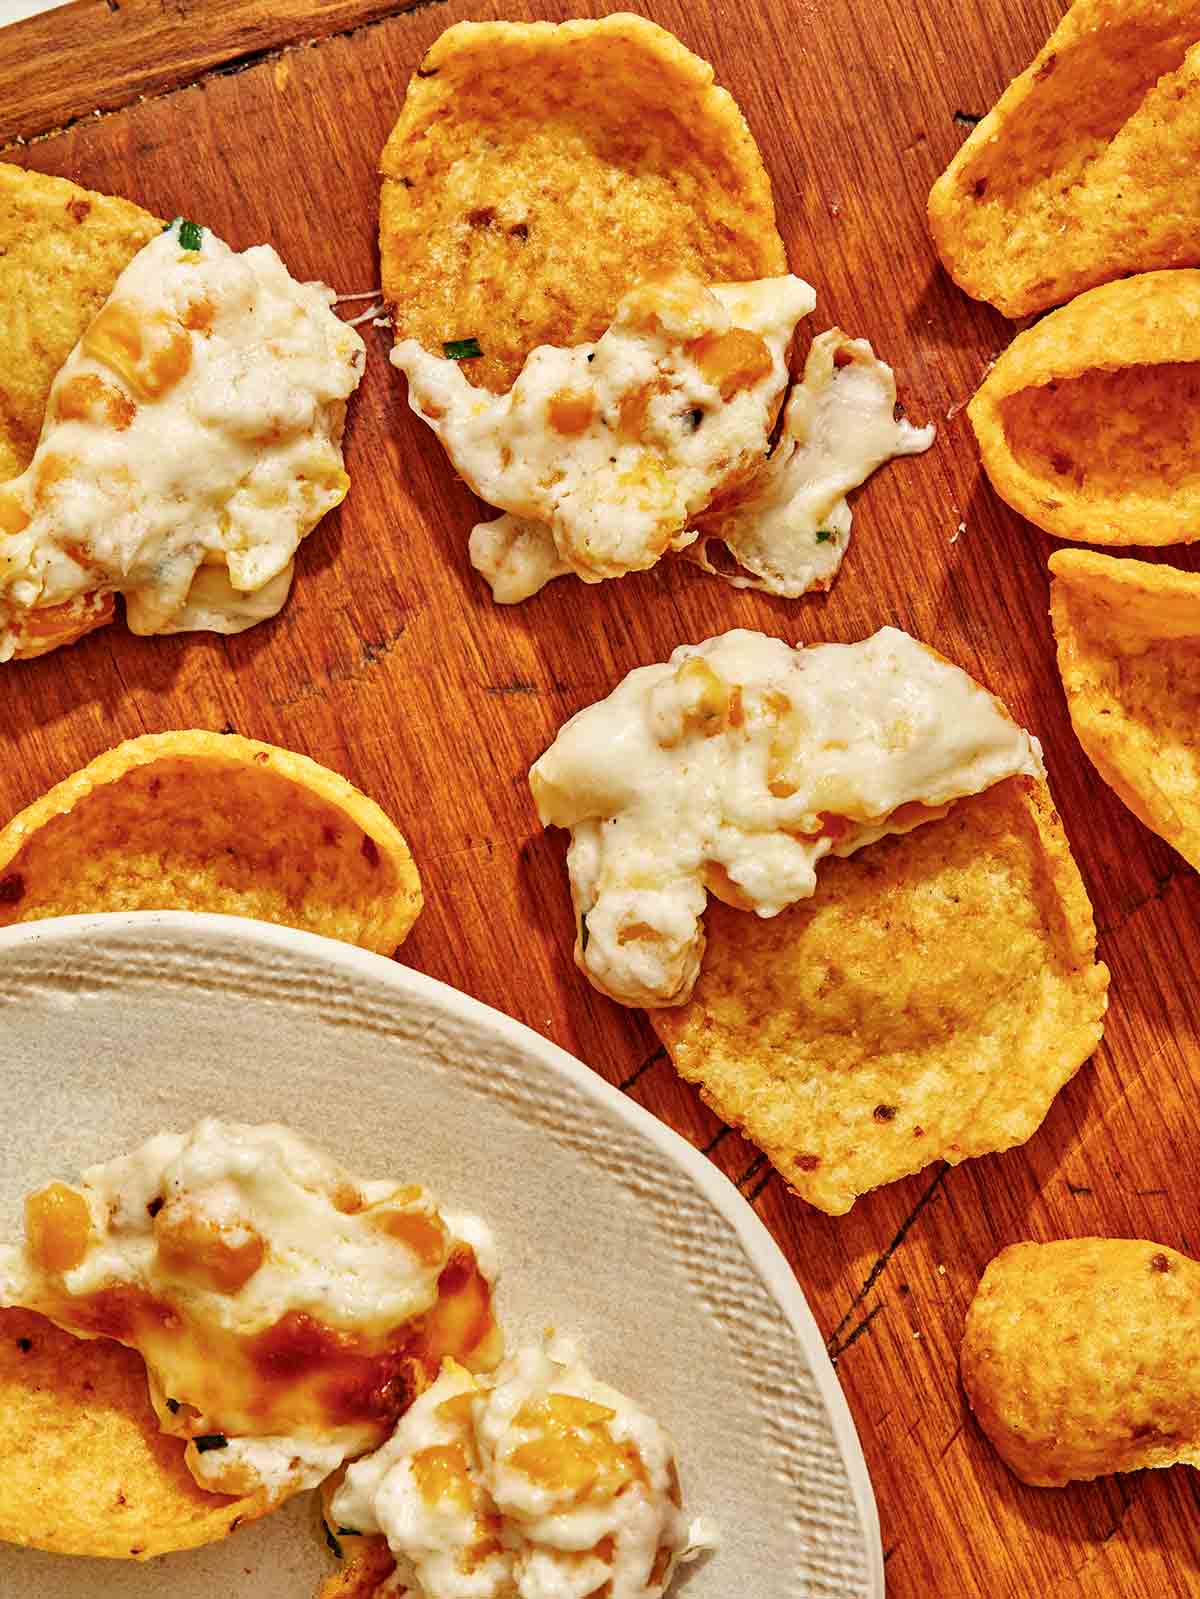
Remove the pan from the oven, top it with chives, and serve with corn chips.
Using Canned Corn vs Fresh Corn vs Frozen Corn
While we use canned corn for convenience and uniform flavor, you can use any corn for this recipe.
Fresh corn: We love using fresh corn in recipes when it’s in season! If using fresh corn off the cob, you’ll need to cook it before adding it to the dip.
Canned corn: Canned corn is packed at peak ripeness and is ready to be tossed into the recipe straight from the can after being drained and rinsed.
Frozen corn: Like canned corn, frozen corn is picked and frozen when ripe, so the flavor is fresh and uniform any time of year. If using frozen corn, empty it into a colander and thaw it under running water before adding it to the dip.
Prep Ahead Instructions and Storing and Reheating Leftovers
Prep Ahead
To make this recipe even easier, with less hands-on time during the day of serving, you can prepare a few things ahead of time so it’s ready to go.
Prepare everything for this creamed corn dip, up to step 4, just before it needs to be baked in the oven. Cover and refrigerate the unbaked dip for up to 48 hours. When you’re ready to serve, place the dip in the pan and continue to bake as directed. If baked straight from the refrigerator, it may need a couple extra minutes in the oven.
Storing and Reheating Leftovers
To store leftovers, place them in an airtight container in the refrigerator for up to 3 days. The best way to reheat your creamed corn dip is to place it back into an oven-safe pan or baking dish and bake at 375˚F for 5-7 minutes or until heated through and bubbly again.
Variations for our Creamed Corn Dip
We kept this recipe pretty basic because it tastes incredible without many extras. But with a few additions, you can give this corn dip a whole new flavor. Try some of these fun variations:
Make it spicy. Dice up a jalapeno pepper and saute it along with the shallots and garlic, or add 1/4- 1 teaspoon of cayenne pepper.
Swap the cheeses. With three types of cheese, there’s plenty of room to experiment with different varieties to find your favorite. Try incorporating Pepper Jack, Monterey Jack, or Sharp Cheddar.
Add bacon. Dice a few slices of cooked bacon and stir it into the dip before baking. Then, sprinkle the top with minced chives before serving.
A little sweet, a little spice. Sweet corn already has a subtle sweetness, but you can take that up a notch by adding a hefty drizzle of honey to the dip and balancing it with a couple of splashes of your favorite hot sauce.
This piping hot creamed corn dip is loaded with mozzarella, gruyere, and parmesan for a cheesy, lusciously decadent dip that's perfect for game day tailgates, parties, or anytime you need an irresistible appetizer on the table.
Add shallots and garlic and sauté for 1 minute. Add corn and continue to cook for 3 to 4 minutes. Stir in sugar and season with salt and pepper. Cook for 1 more minute. Remove from heat.
Place cream cheese and mayonnaise into a large mixing bowl and stir together to breakup block of cream cheese.
Add all corn mixture, and all but 2 tablespoons each mozzarella, gruyere, and Parmesan. Season with salt and pepper.
Mix together until completely and evenly combined.
Pour mixture into a 3-4 cup baking dish or 8-inch skillet and smooth top.
Sprinkle with remaining cheese.
Bake creamed corn dip for 15 minutes. Then broil for 30 seconds to 1 minute. Remove from oven, top with chives and serve with corn chips.
Notes
Prep Ahead InstructionsTo make this recipe even easier, with less hands-on time during the day of serving, you can prepare a few things ahead of time so it’s ready to go.Prepare everything for this creamed corn dip, up to step 4, just before it needs to be baked in the oven. Cover and refrigerate the unbaked dip for up to 48 hours. When you’re ready to serve, place the dip in the pan and continue to bake as directed. If baked straight from the refrigerator, it may need a couple extra minutes in the oven.Storing and Reheating LeftoversTo store leftovers, place them in an airtight container in the refrigerator for up to 3 days. The best way to reheat your creamed corn dip is to place it back into an oven-safe pan or baking dish and bake at 375˚F for 5-7 minutes or until heated through and bubbly again.
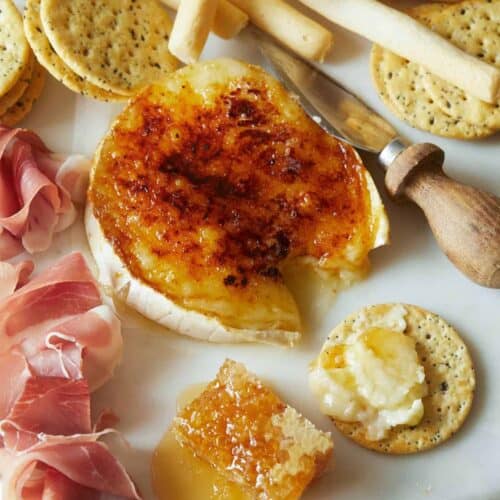
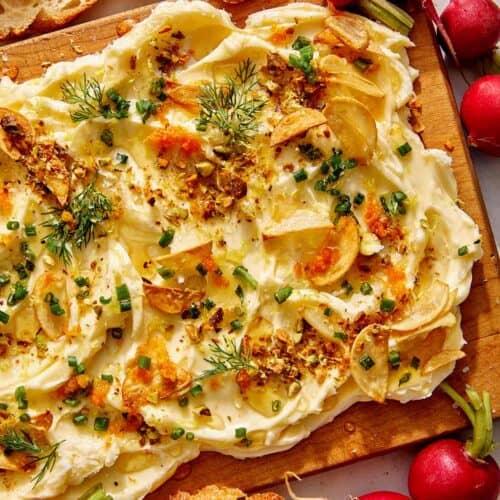
If you’re new to Whipped Brie – you’re in for a HUGE treat! This 1 ingredient appetizer (3-4 ingredients if you include the toppings) will become your new favorite thing to eat and bring to get togethers. It couldn’t be easier to make and is always crazy popular and gone within minutes! We promise you won’t want to eat brie another way after trying this out! How to Make Whipped Brie Ingredients Process Why Whipped…
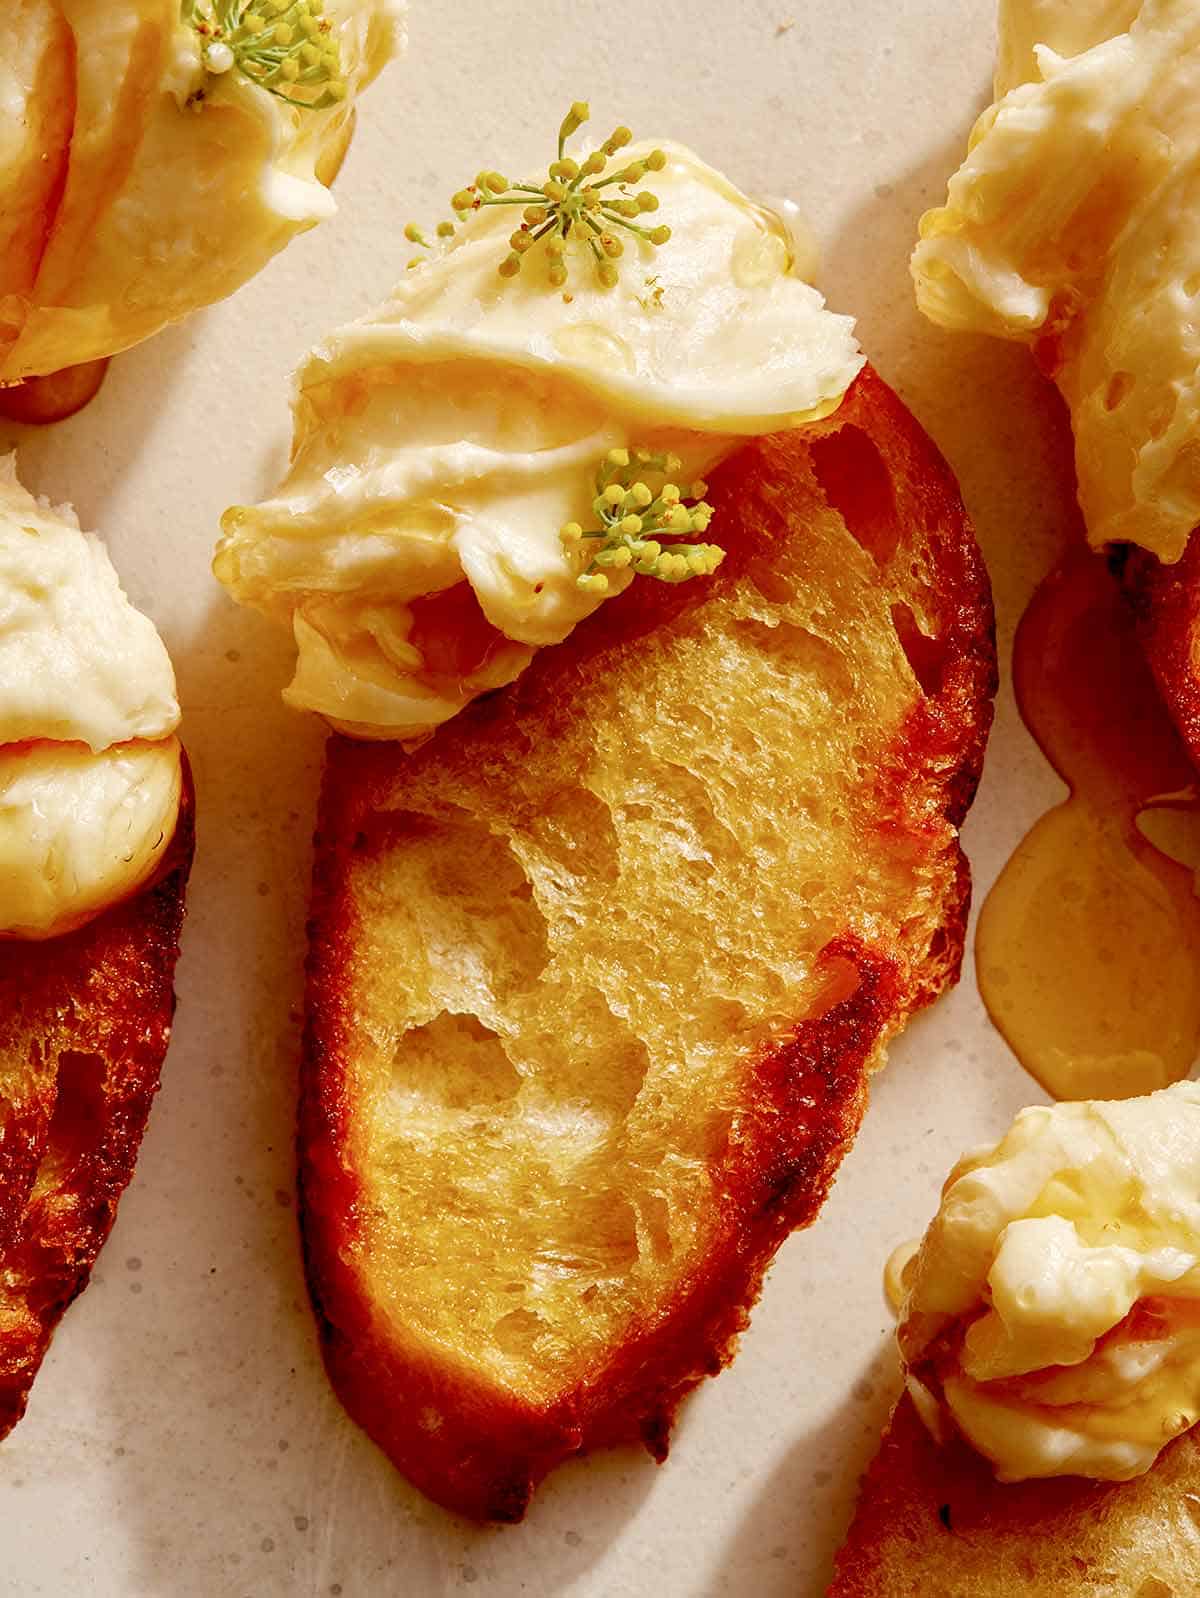
If you’re new to Whipped Brie – you’re in for a HUGE treat! This 1 ingredient appetizer (3-4 ingredients if you include the toppings) will become your new favorite thing to eat and bring to get togethers.
It couldn’t be easier to make and is always crazy popular and gone within minutes! We promise you won’t want to eat brie another way after trying this out!
How to Make Whipped Brie
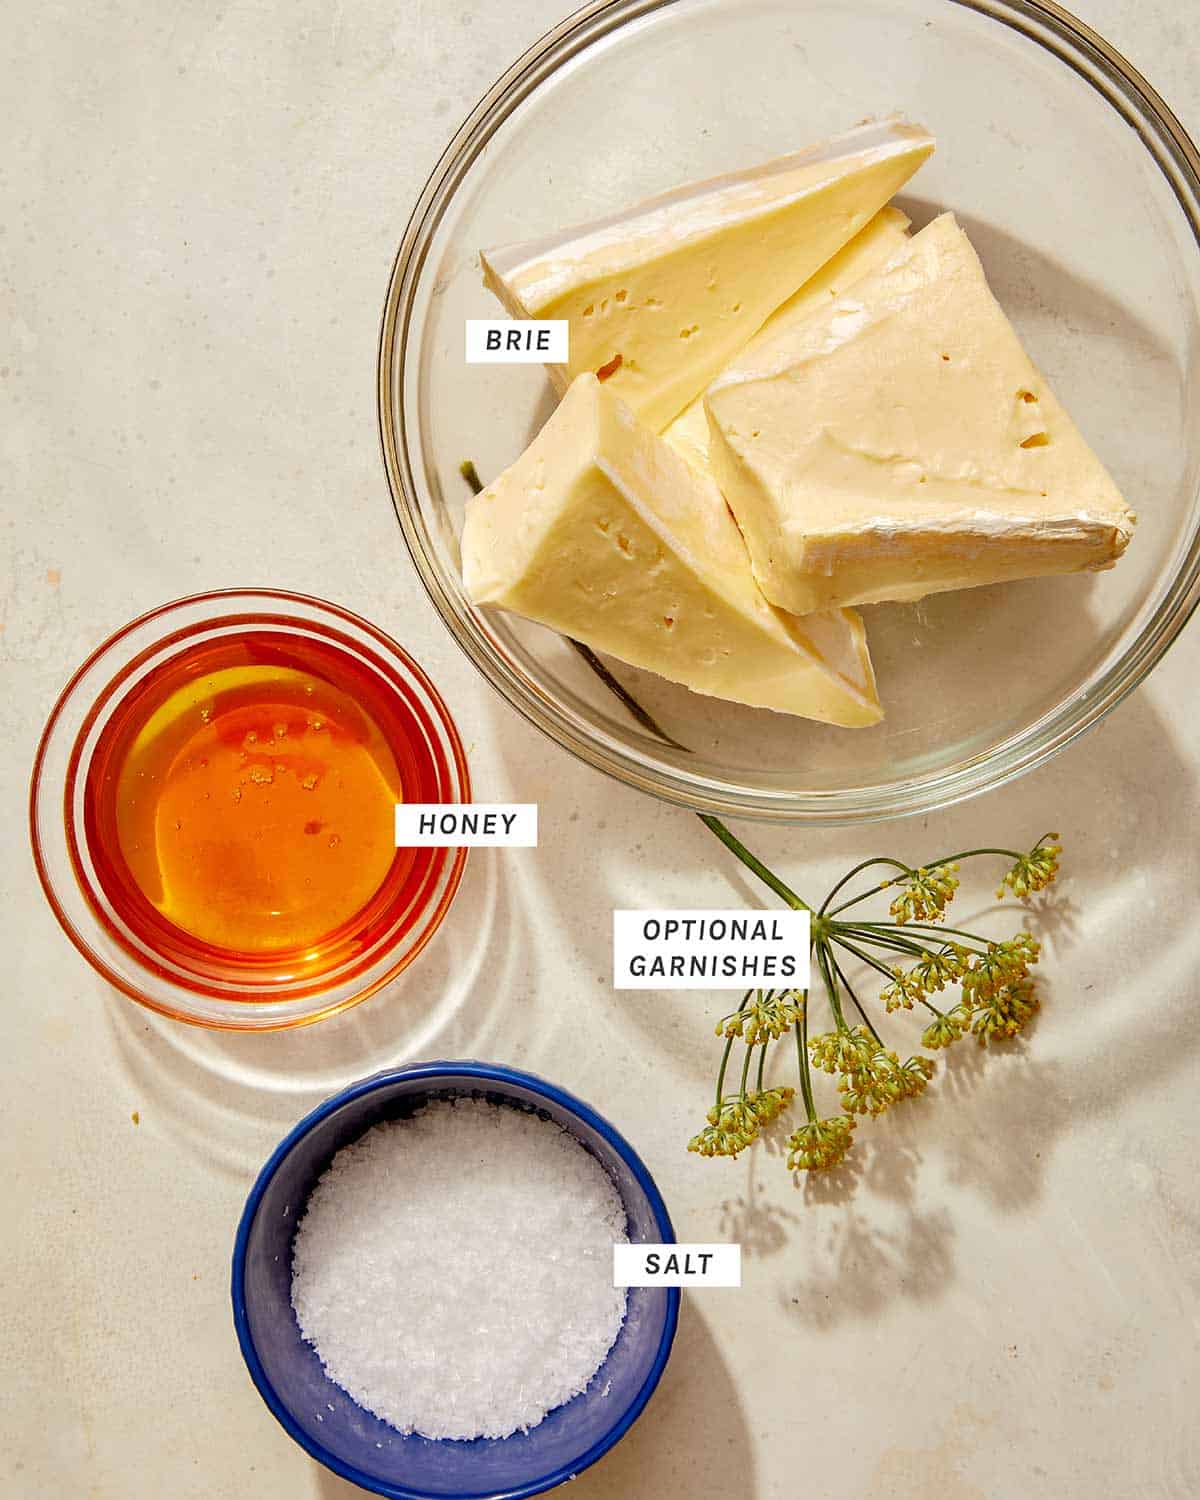
Ingredients
Process
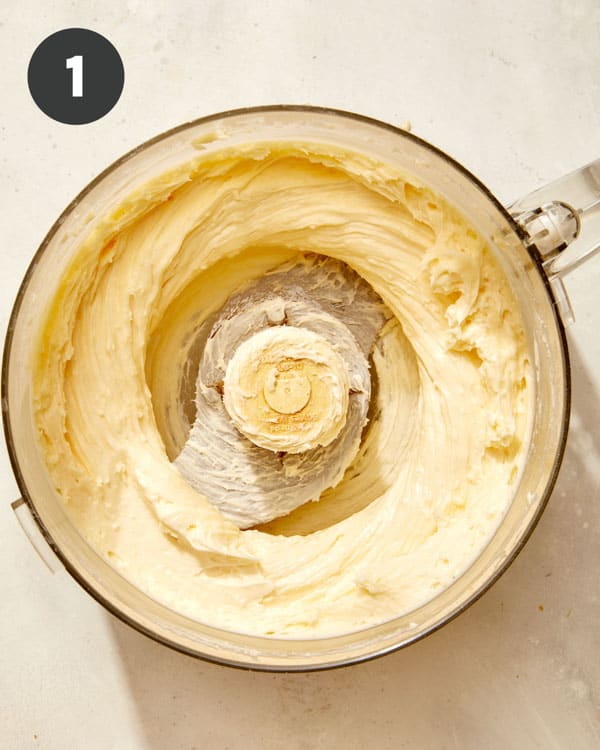
Place brie into the well of a food processor and blend until smooth.
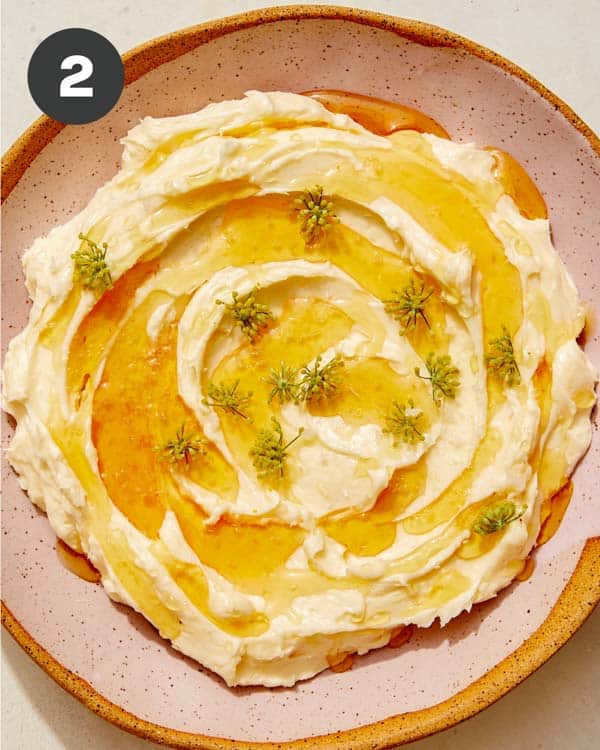
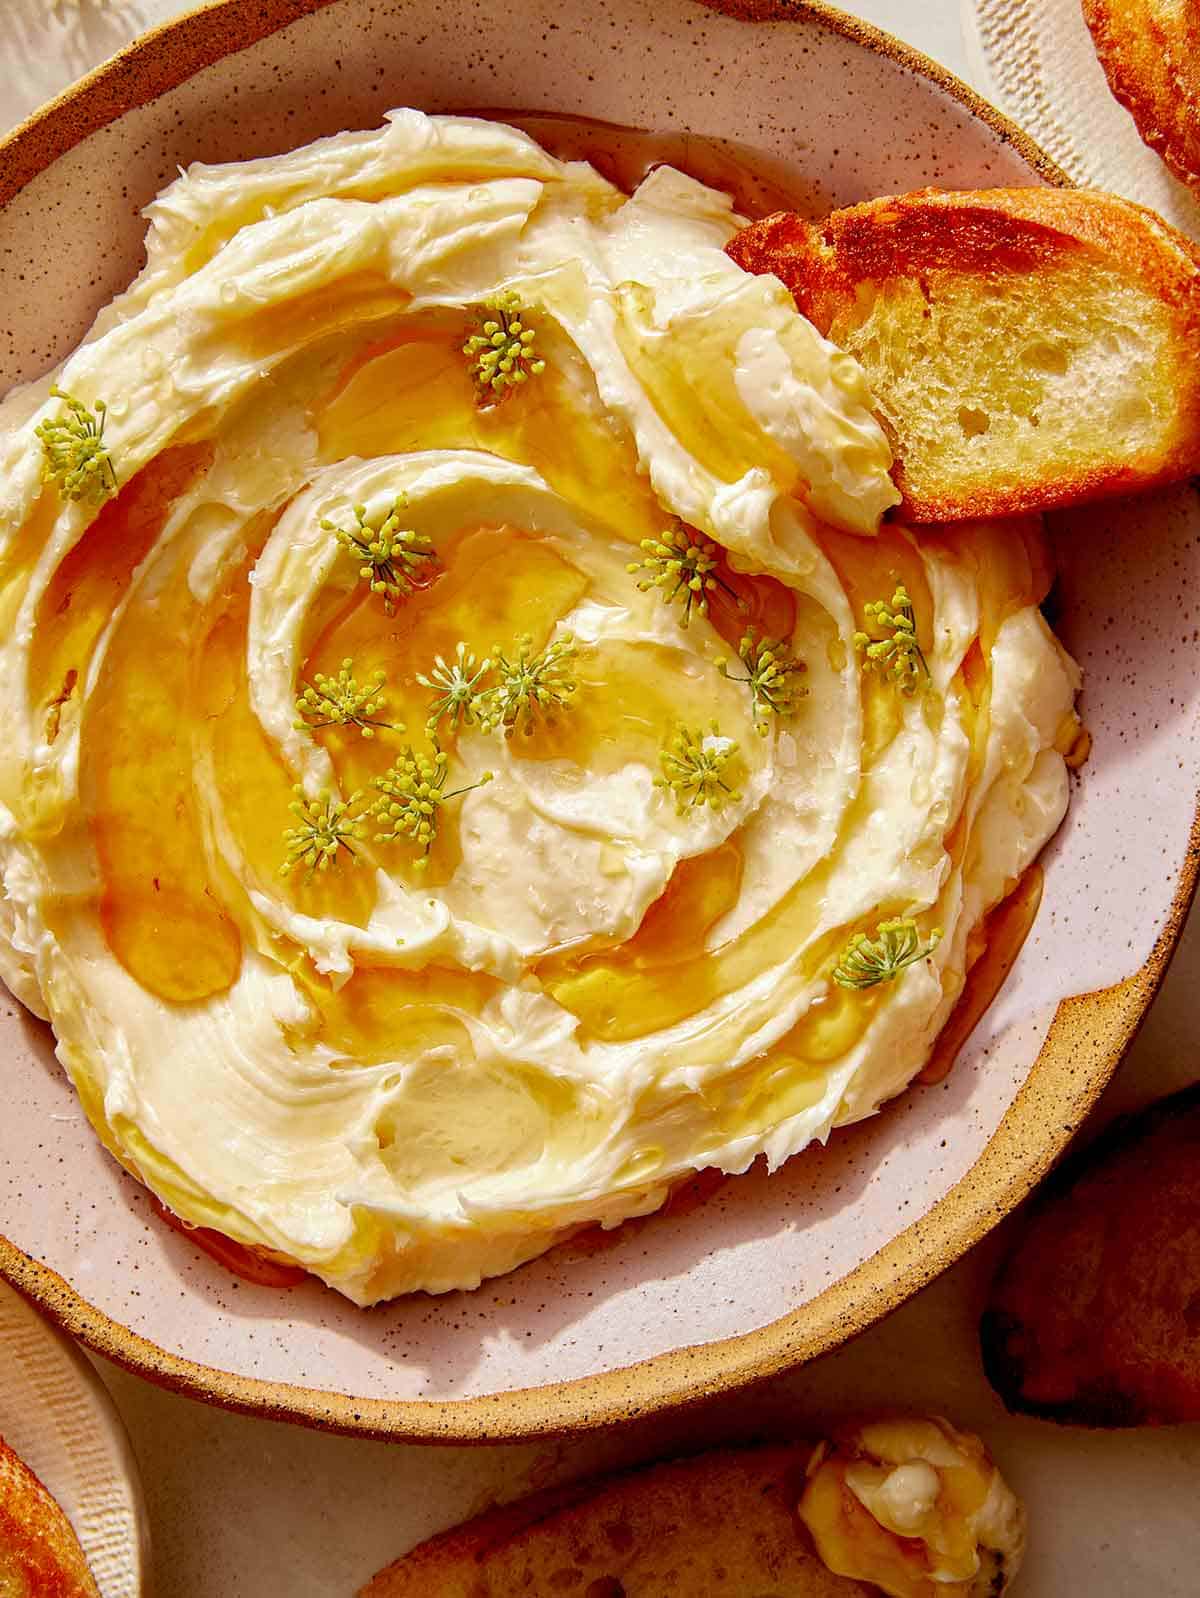
Transfer brie to a bowl and top with honey and sea salt flakes. Finish with herb blossoms of choice, if using. Serve with crostini or crackers.
Why Whipped Brie is the BEST
When you whip the brie in a food processor you’re aerating it, leaving you with the silkiest and fluffiest brie ever! The creamy texture can’t be beat! Whipping it also turns it into a delightfully dippable treat.
Variations
Fold fresh herbs into the mixture or your favorite spices.
Add some roasted garlic to the food processor to give the brie a delicious caramelized garlic flavor.
Top the brie with some warm jam instead of honey or even a little maple syrup.
What to Serve with Whipped Brie
Some of our favorite things to serve with this dish are:
Although we think this dish is best served fresh you can certainly make it ahead of time.
Whip brie until light, fluffy and smooth. Transfer to an airtight container and refrigerate for up to 2 days.
When ready to use, set container of brie on the counter, at room temp, for 30 minutes. Stir thoroughly to soften the cheese back up. Transfer to a serving bowl and top with honey, sea salt flakes and fennel flowers (or other herbs of choice) if using.
More Delicious and Easy Appetizer Recipes You Will Love
Whipped Brie – one of the most delicious, decadent and simple appetizers that will be devoured in minutes. We love making this for special occasions or when we just want to enjoy a delicious snack at home!
Place brie into the well of a food processor and blend until smooth.
Transfer brie to a bowl and top with honey and sea salt flakes.
Finish with herb blossoms of choice, if using.
Serve with crostini or crackers.
Notes
Make Ahead InstructionsWhip brie until light, fluffy and smooth. Transfer to an airtight container and refrigerate for up to 2 days.When ready to use, set container of brie on the counter, at room temp, for 30 minutes. Stir thoroughly to soften the cheese back up. Transfer to a serving bowl and top with honey, sea salt flakes and fennel flowers (or other herbs of choice) if using.
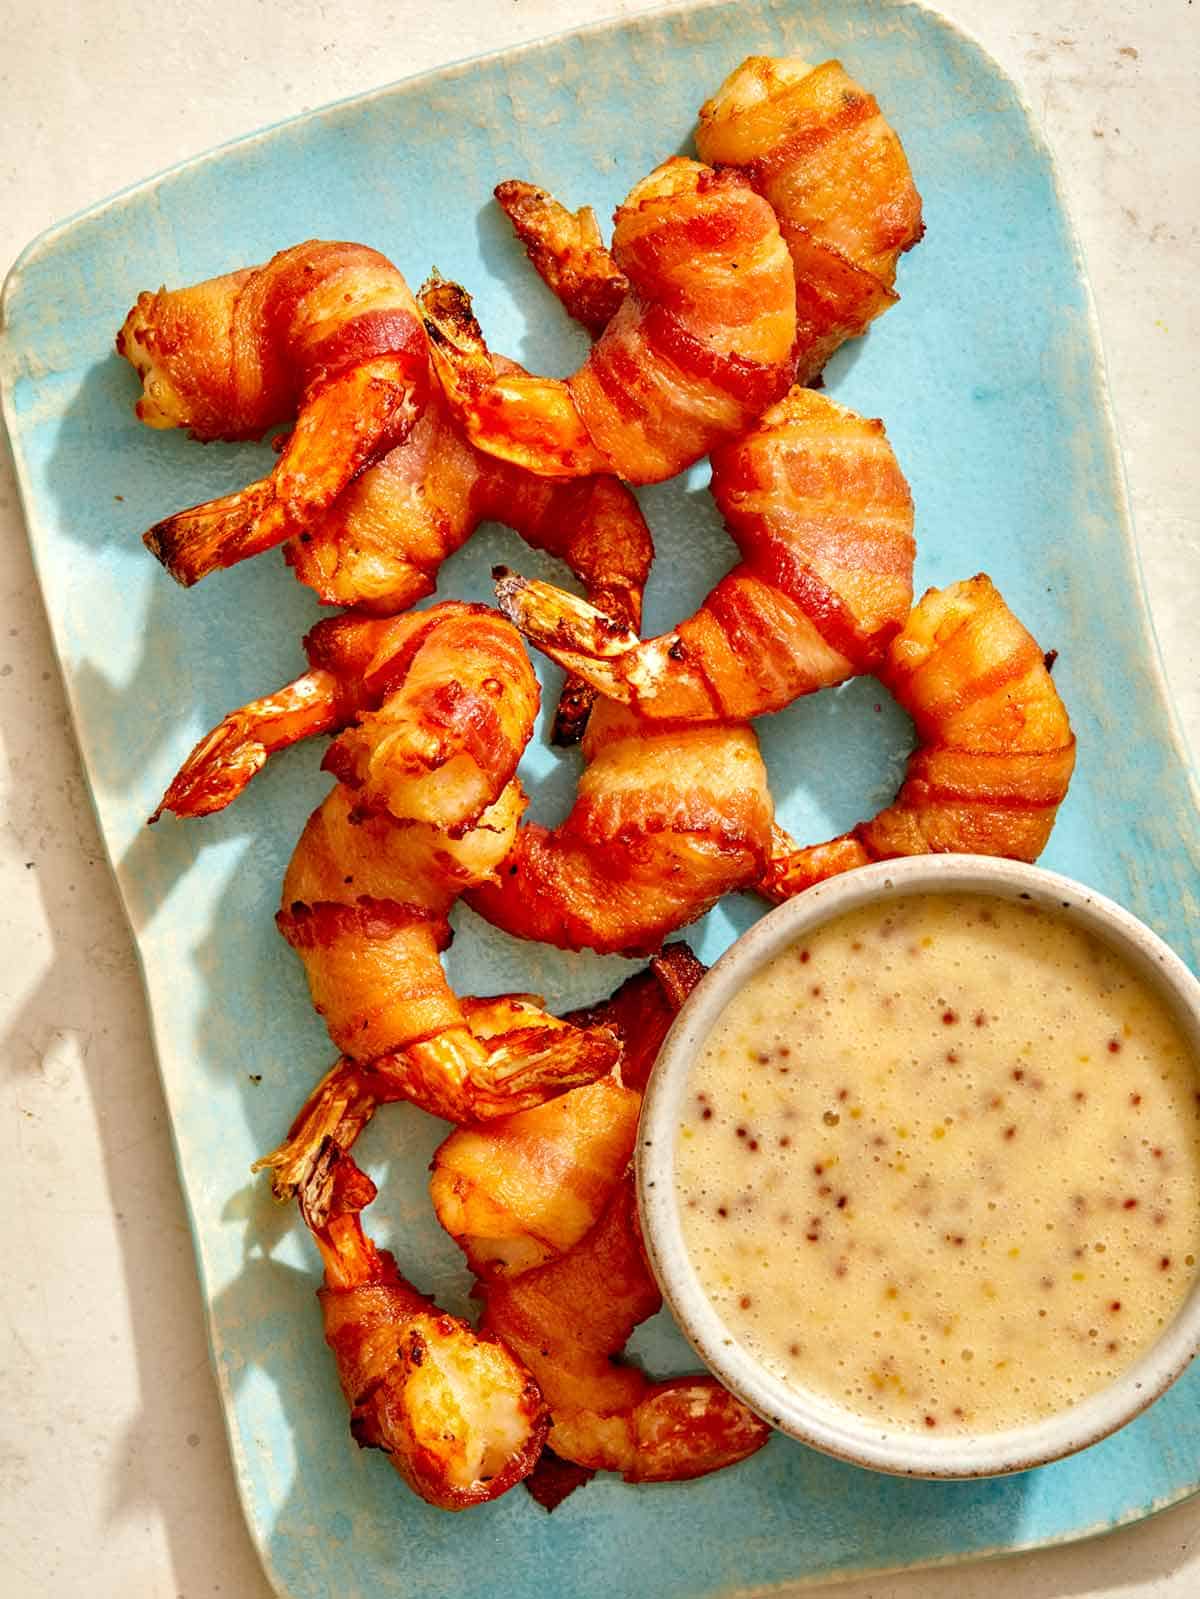
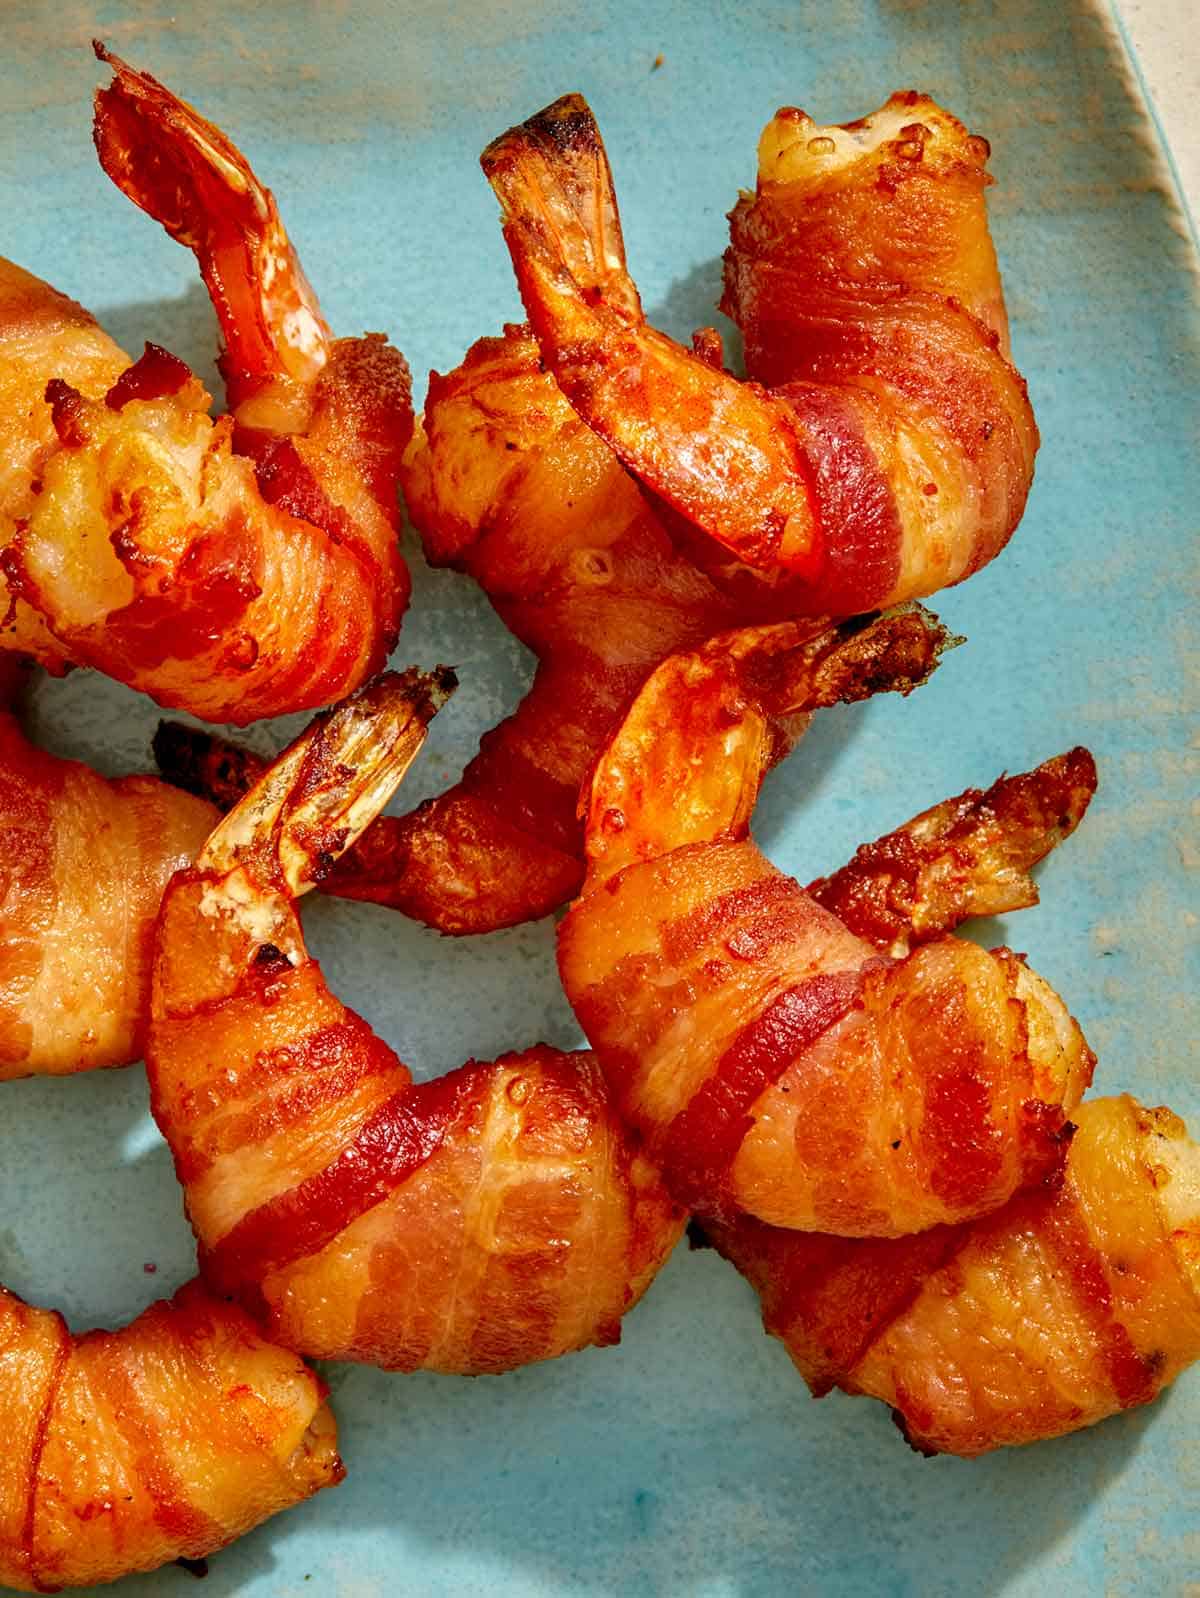
Want to please a crowd with an appetizer that will fly off the plate as fast as you can serve them? These Air Fryer Bacon Wrapped Shrimp take less than 30 minutes from start to finish and are sure to please any crowd. The air fryer helps keep the shrimp succulent and tender while crisping up the thin-sliced bacon to absolute perfection. And if you’re worried about time, these are incredibly easy to prep ahead,…
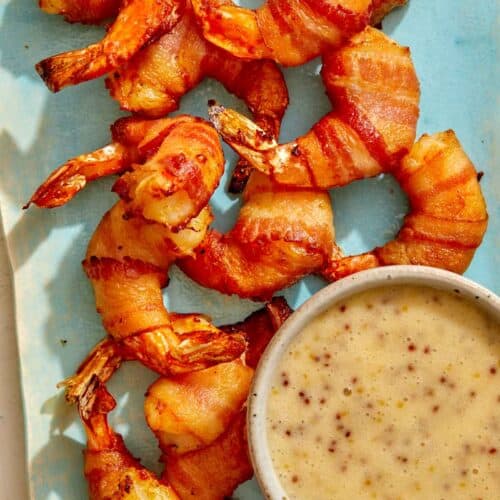
Want to please a crowd with an appetizer that will fly off the plate as fast as you can serve them? These Air Fryer Bacon Wrapped Shrimp take less than 30 minutes from start to finish and are sure to please any crowd. The air fryer helps keep the shrimp succulent and tender while crisping up the thin-sliced bacon to absolute perfection. And if you’re worried about time, these are incredibly easy to prep ahead, and just toss in the air fryer when you’re ready to serve.
Serve these bacon-wrapped shrimp bites on a platter with a dish of our sweet and tangy honey mustard sauce, and maybe a dish of homemade BBQ sauce or Chick-fil-A Sauce for variety!
Why We Love Air Fryer Bacon Wrapped Shrimp
Easy to prep ahead of time and cook just before serving.
They take only 10 minutes to cook!
The air fryer gets the bacon extra crispy in less time than the oven.
Using the air fryer for these bacon-wrapped shrimp keeps the oven open for other foods you may be cooking when hosting a party.
While this is the perfect appetizer, you can also serve it over salads or as an entree.
How to Make Air Fryer Bacon Wrapped Shrimp
Ingredients
Process
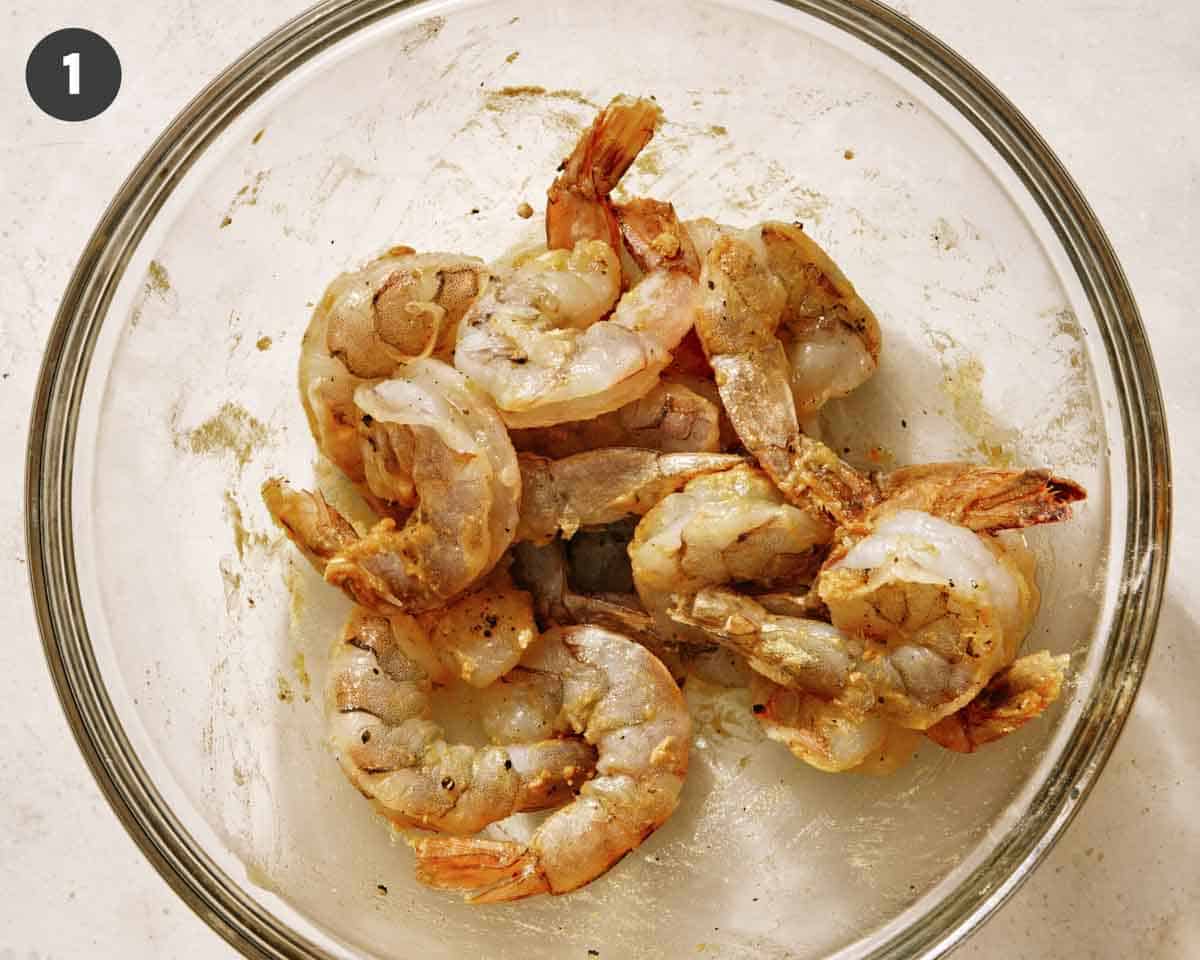
In a mixing bowl, toss shrimp, garlic powder, oil, and pepper together.
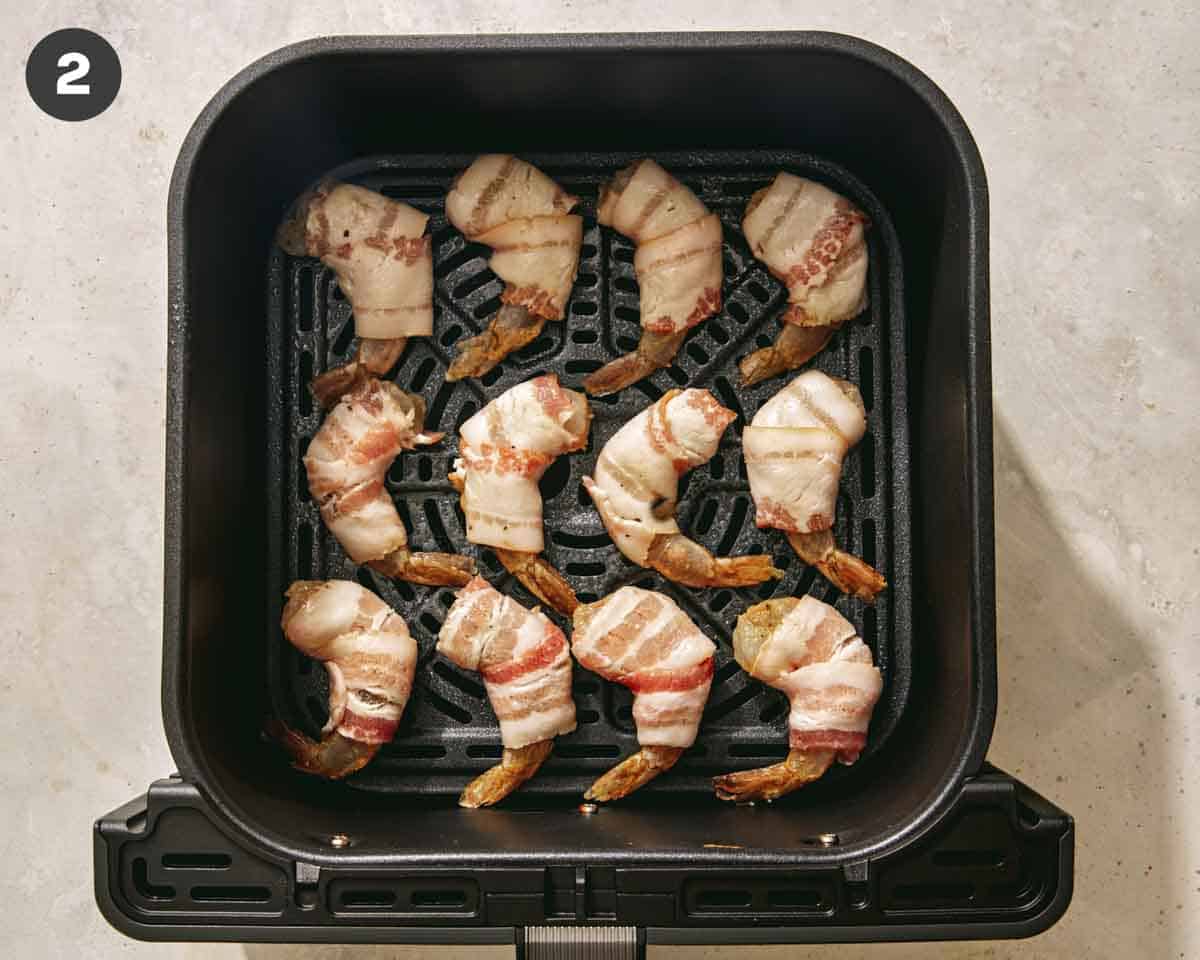
Wrap each shrimp in 1/2 slice of bacon. Lightly spray the air fryer basket with cooking spray and add the shrimp with the bacon seam side down.
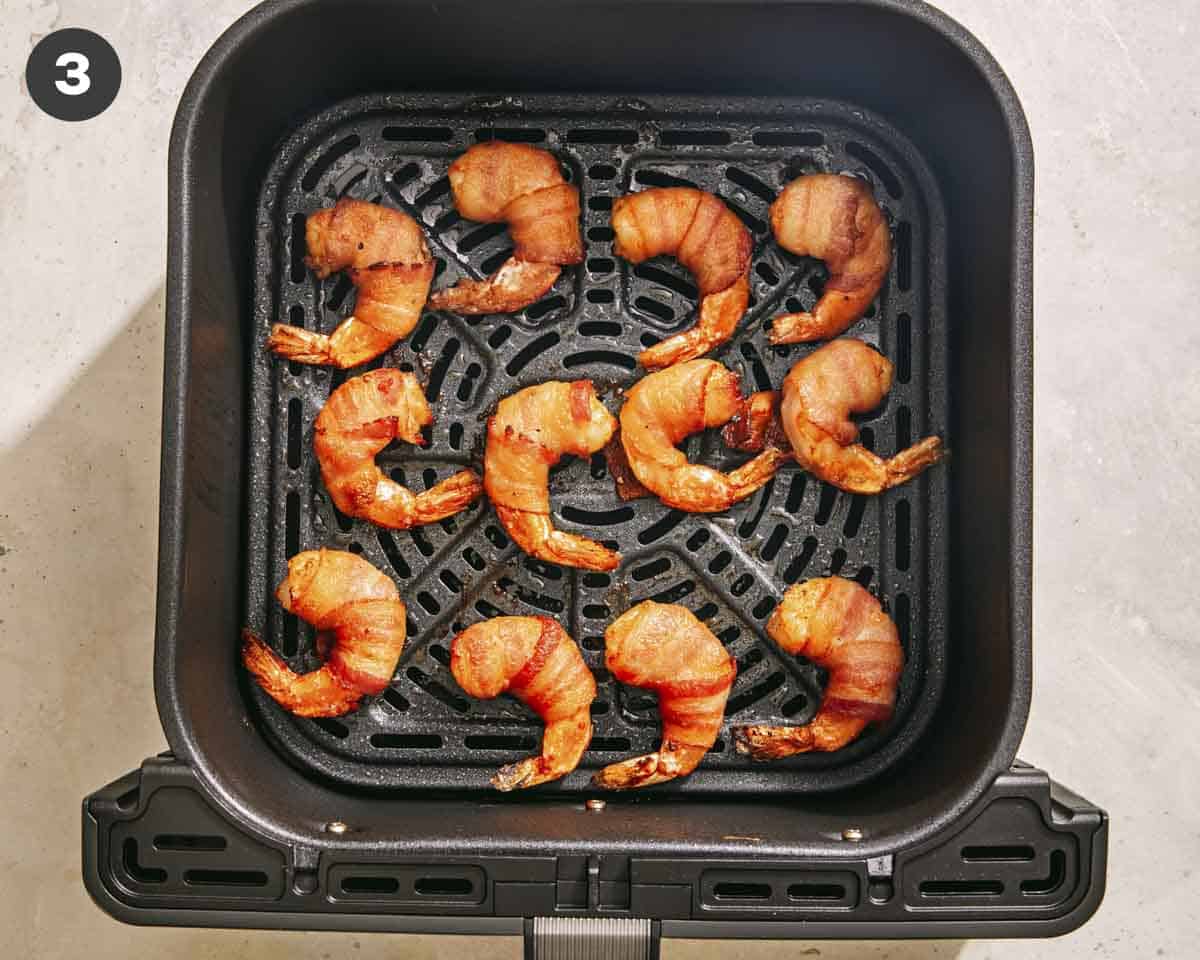
Air fry the bacon-wrapped shrimp at 400˚F, for 10 minutes.
Tips and Tricks for Making This Recipe
Choose “large” shrimp, or ones that include 21-25 per pound. If you use smaller or bigger, the shrimp and bacon may not be done at similar times, causing one to become overcooked. If you use larger shrimp, you may be able to use a whole slice of bacon instead of a half, but the cooking time will be longer.
Use only thin-sliced bacon.
There’s no need for toothpicks if you air fry them with the bacon seam down.
We like to leave the tail on the shrimp so that we have something to hold while dipping it into the honey mustard sauce, but feel free to remove the tail first if serving these with a fork.
If you’re making an extra large batch of these, you can bake them in the oven. Preheat the oven to 400˚F, line and baking sheet with foil, and bake for 15-20 minutes or until the bacon is crispy.
Best Type of Bacon to Use for Bacon Wrapped Shrimp
When wrapping shrimp, the type of bacon you use matters. We recommend choosing regular or thin-sliced bacon that has the least amount of fat per strip as possible.
Choosing thick-cut or turkey bacon leads to the shrimp overcooking while the bacon is still undercooked.
Prep Ahead and Storing Instructions
You can prepare these bacon-wrapped shrimp up to 24 hours ahead of time. Just follow all of the steps until they’re ready to go into the air fryer, place them in an airtight container, and refrigerate until you’re ready to cook.
If you want to make them further in advance, freeze them in a freezer-safe container for up to three months. When you’re ready to use, take them out of the freezer, let them thaw overnight in the refrigerator, and continue to cook in the air fryer as directed.
Storing Leftovers and Reheating
Once cooked, store any leftovers in the refrigerator for up to 3 days in an airtight container. These can also be frozen when fully cooked. Just add them to a freezer bag or container and freeze for up to 3 months. When ready to use, thaw overnight in the refrigerator.
To reheat, we recommend popping them back in the air fryer for 3-4 minutes at 400˚F.
What to Serve with Air Fryer Bacon Wrapped Shrimp
There are so many ways to enjoy this recipe, whether it’s as an appetizer, side, or main course. Try some of these pairings:
The perfect 30-minute appetizer, this Air Fryer Bacon Wrapped Shrimp has tender bites of shrimp wrapped in salty, crispy bacon, all slathered in a sweet and tangy honey mustard sauce.
12(21-25 count) shrimppeeled, deveined with tails intact
2teaspoons garlic powder
1teaspoonolive oil
1/4teaspoonblack pepper
6slicesbaconcut in half crosswise (with some of the fat trimmed)
Instructions
honey mustard
Combine honey mustard ingredients into a bowl and whisk together. Set aside.
shrimp
In a mixing bowl toss together shrimp, garlic powder, oil, and pepper.
Wrap each shrimp in 1/2 slice bacon.
Lightly spray air fryer basket with cooking spray and add shrimp, bacon seam side down.
Air fry bacon wrapped shrimp at 400˚F, for 10 minutes.
Remove from air fryer and serve with honey mustard
Notes
**Recipe Makes 12******1 Serving is 3 pieces (Nutritional Information Does Not Include Honey Mustard)***Tips and Tricks for Making This Recipe
Choose “large” shrimp, or ones that include 21-25 per pound. If you use smaller or bigger, the shrimp and bacon may not be done at similar times, causing one to become overcooked. If you use larger shrimp, you may be able to use a whole slice of bacon instead of a half, but the cooking time will be longer.
Use only thin-sliced bacon.
There’s no need for toothpicks if you air fry them with the bacon seam down.
We like to leave the tail on the shrimp so that we have something to hold while dipping it into the honey mustard sauce, but feel free to remove the tail first if serving these with a fork.
If you’re making an extra large batch of these, you can bake them in the oven. Preheat the oven to 400˚F, line and baking sheet with foil, and bake for 15-20 minutes or until the bacon is crispy.
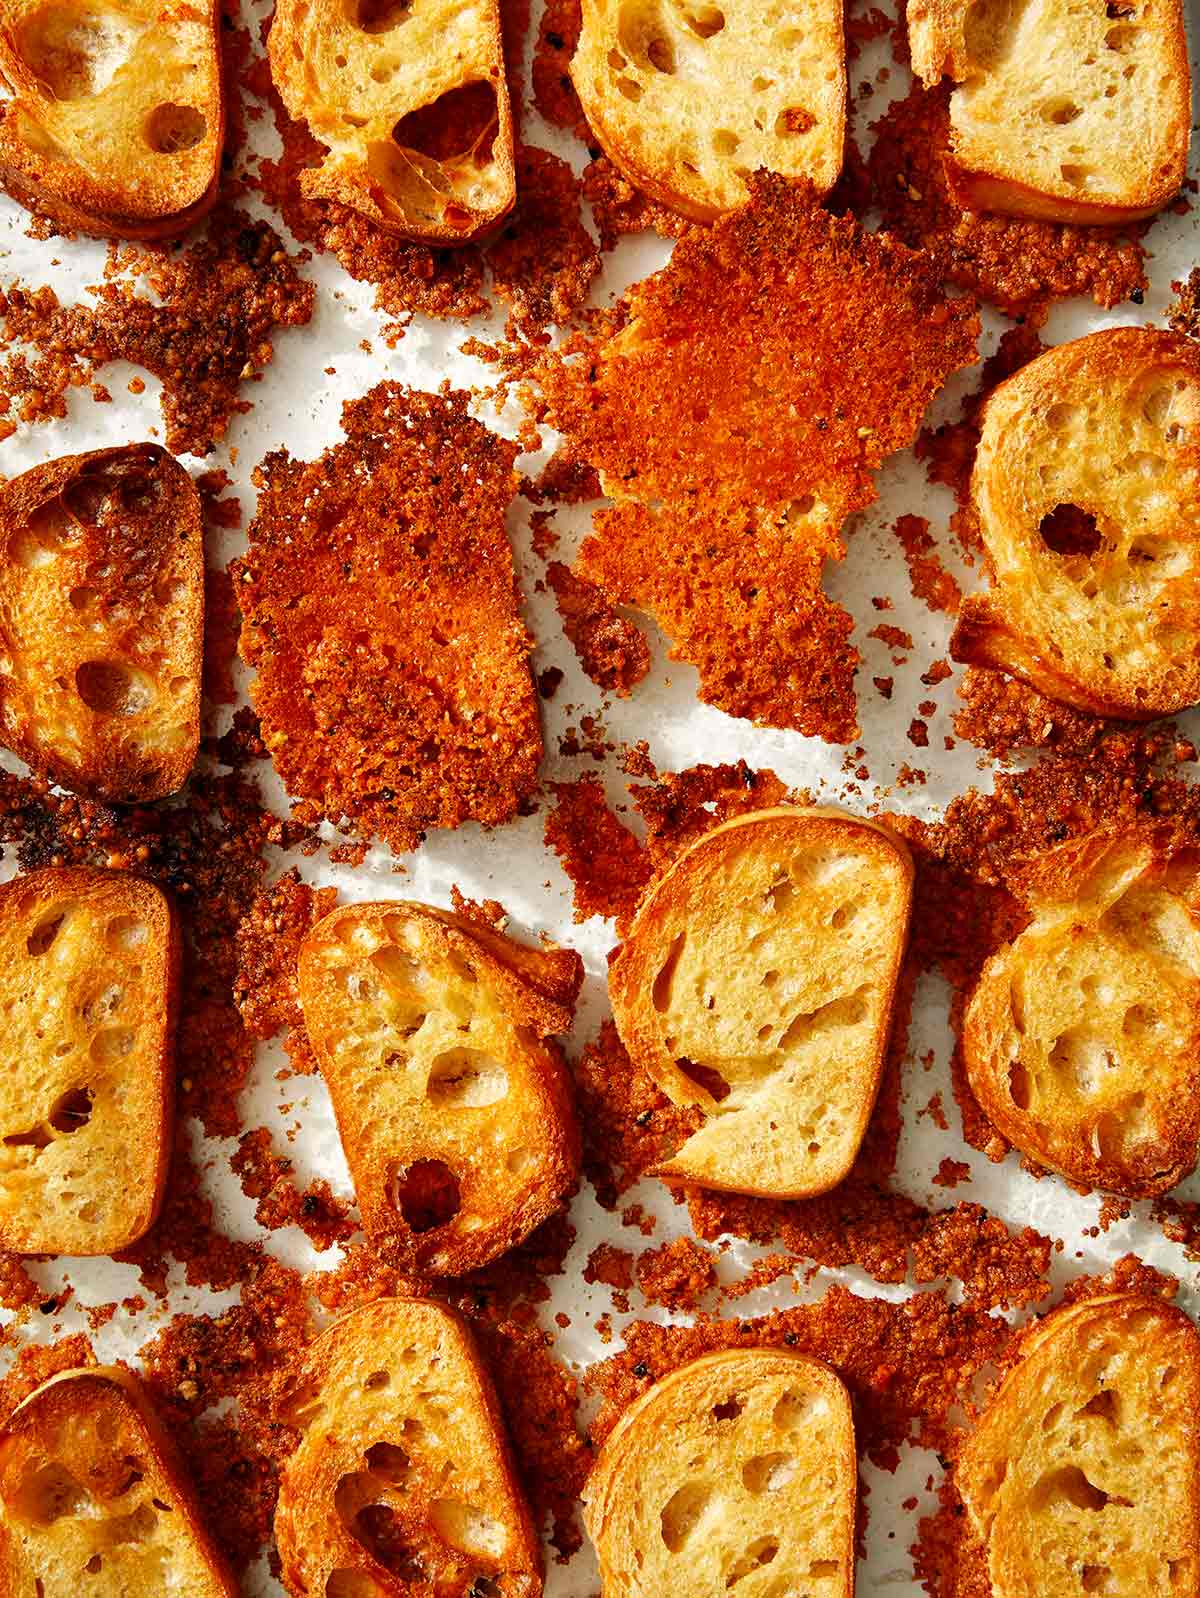
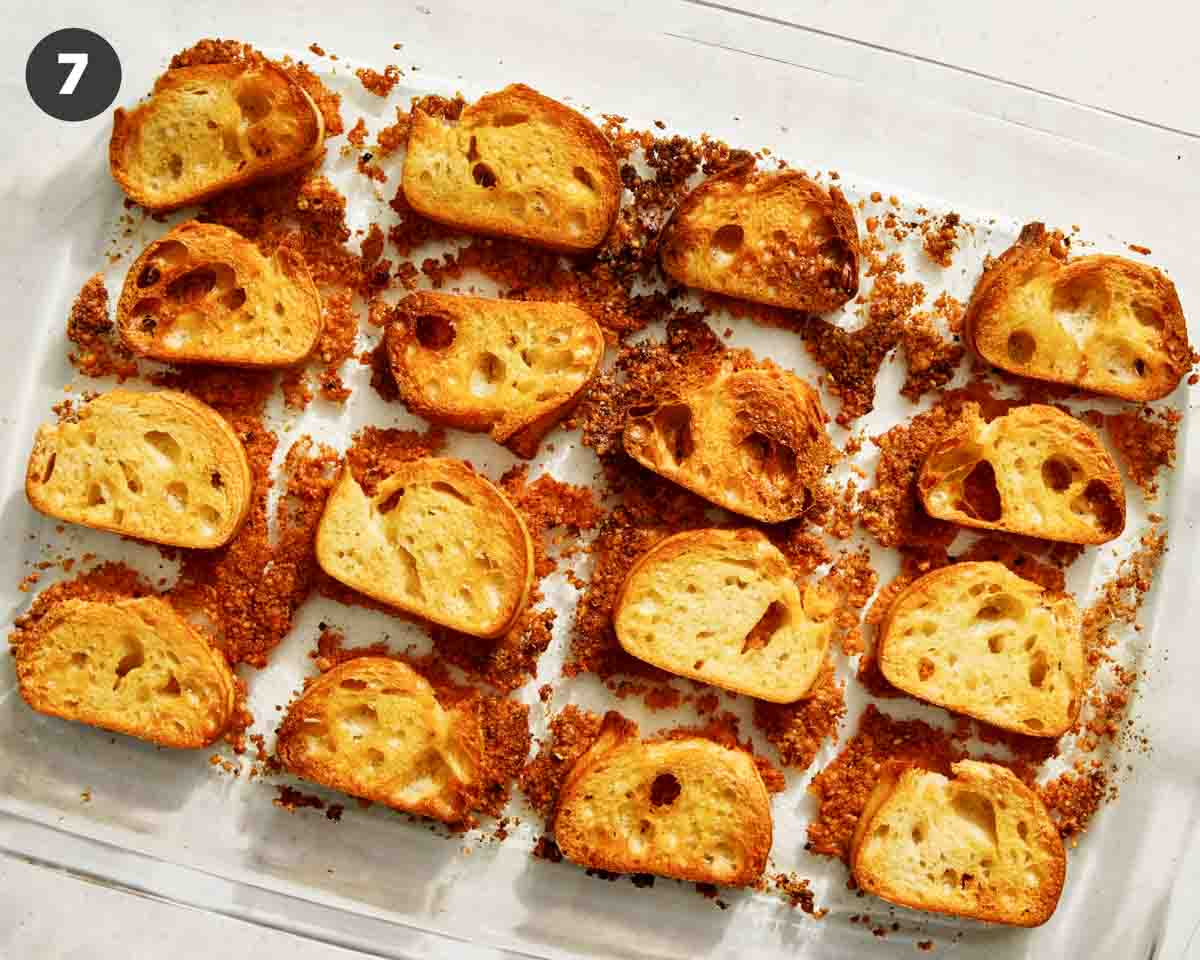
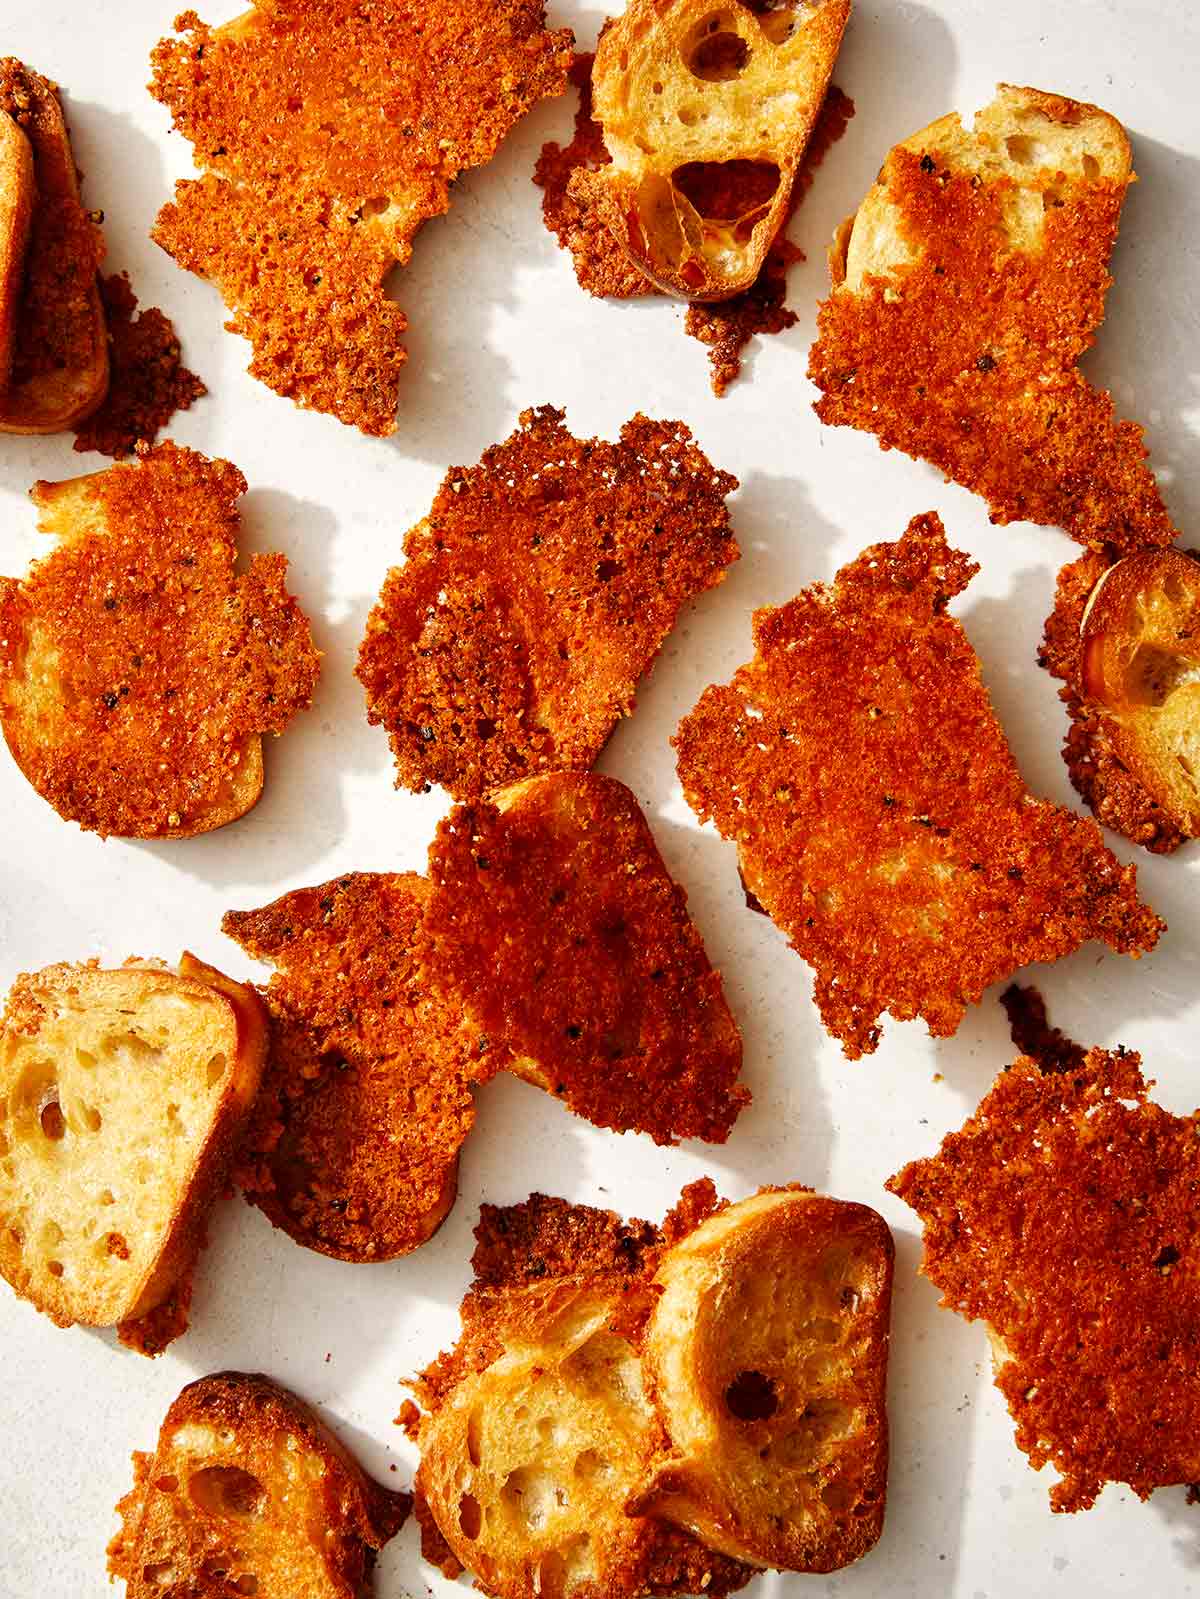
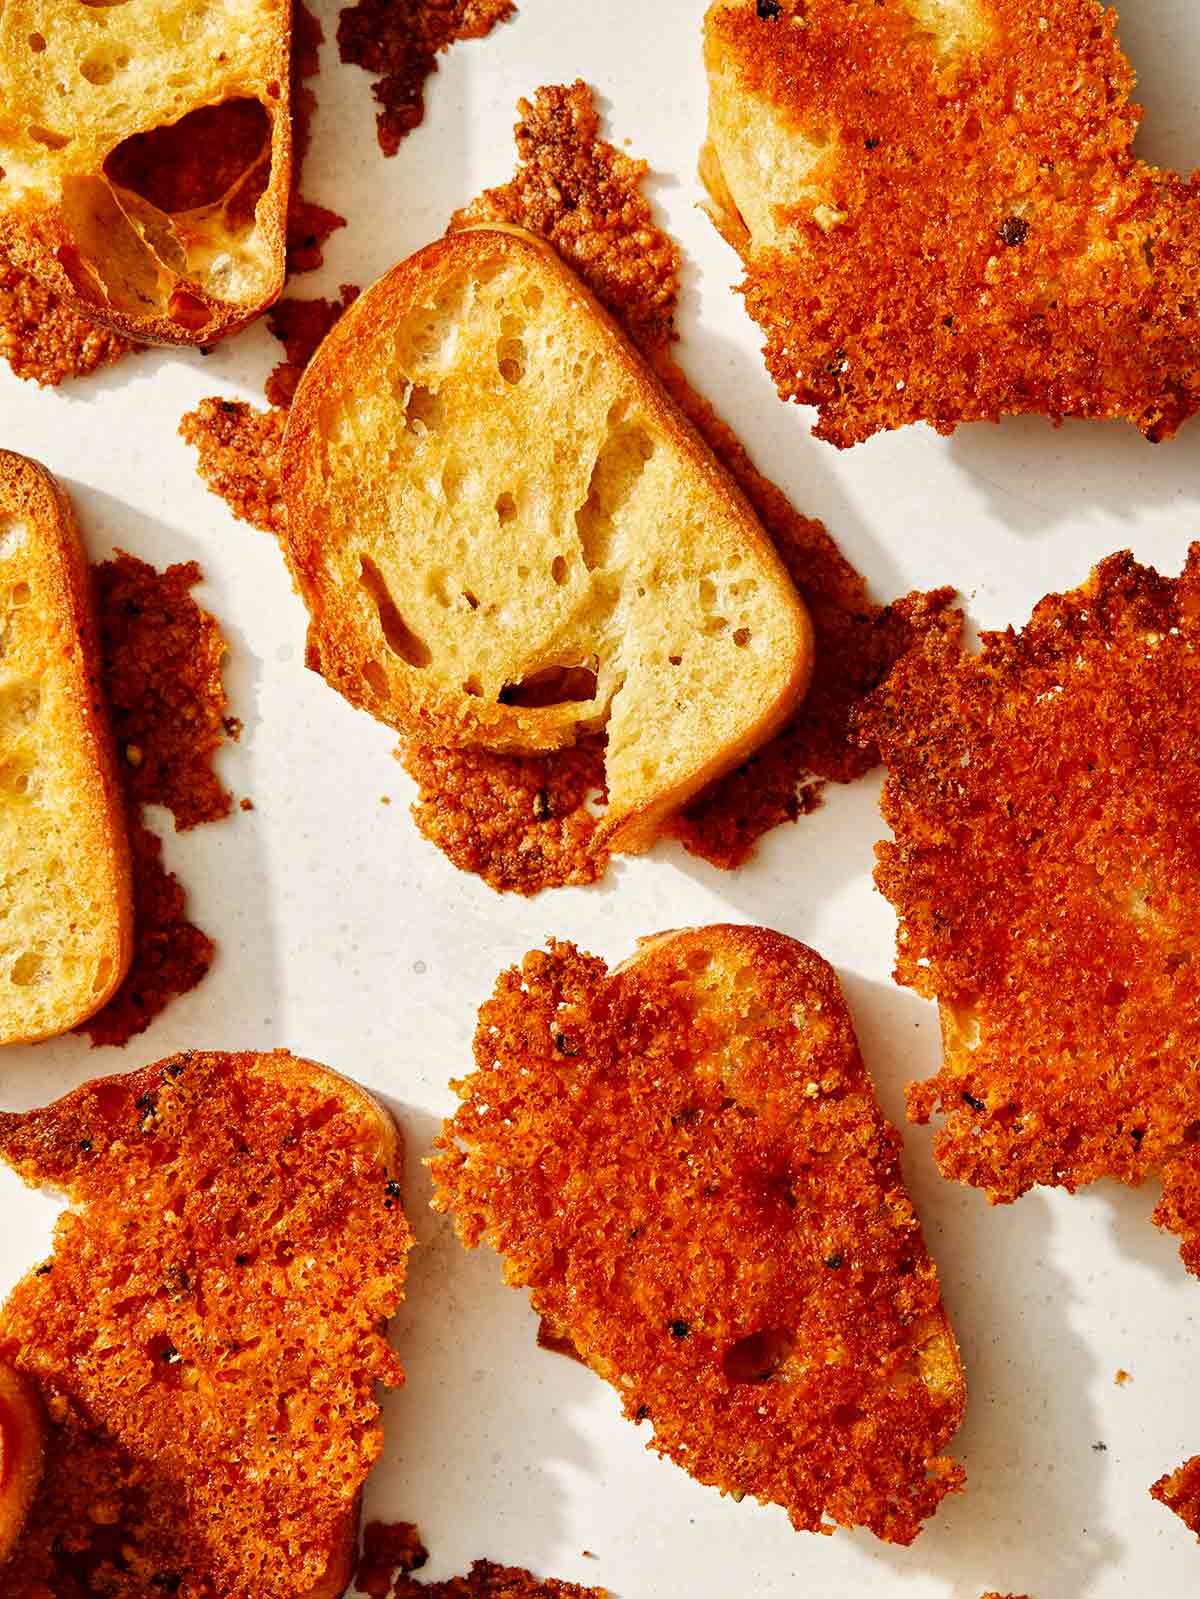
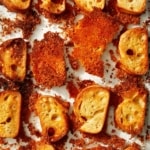
We love parmesan crusted ANYTHING and these Parmesan Crusted Crostini are no exception! Modeled after the viral Parmesan Crusted Potatoes, we thought these crostini would surely be a hit! We were right. These are definitely the best crostini we’ve ever made and we might like them even more than the potato version bc of how versatile they are! Not only do they make delicious snacks on their own, but they also make the most delicious…
We love parmesan crusted ANYTHING and these Parmesan Crusted Crostini are no exception! Modeled after the viral Parmesan Crusted Potatoes, we thought these crostini would surely be a hit! We were right.
These are definitely the best crostini we’ve ever made and we might like them even more than the potato version bc of how versatile they are! Not only do they make delicious snacks on their own, but they also make the most delicious crostini, topped with nearly anything you can imagine!
How to Make Parmesan Crusted Crostini
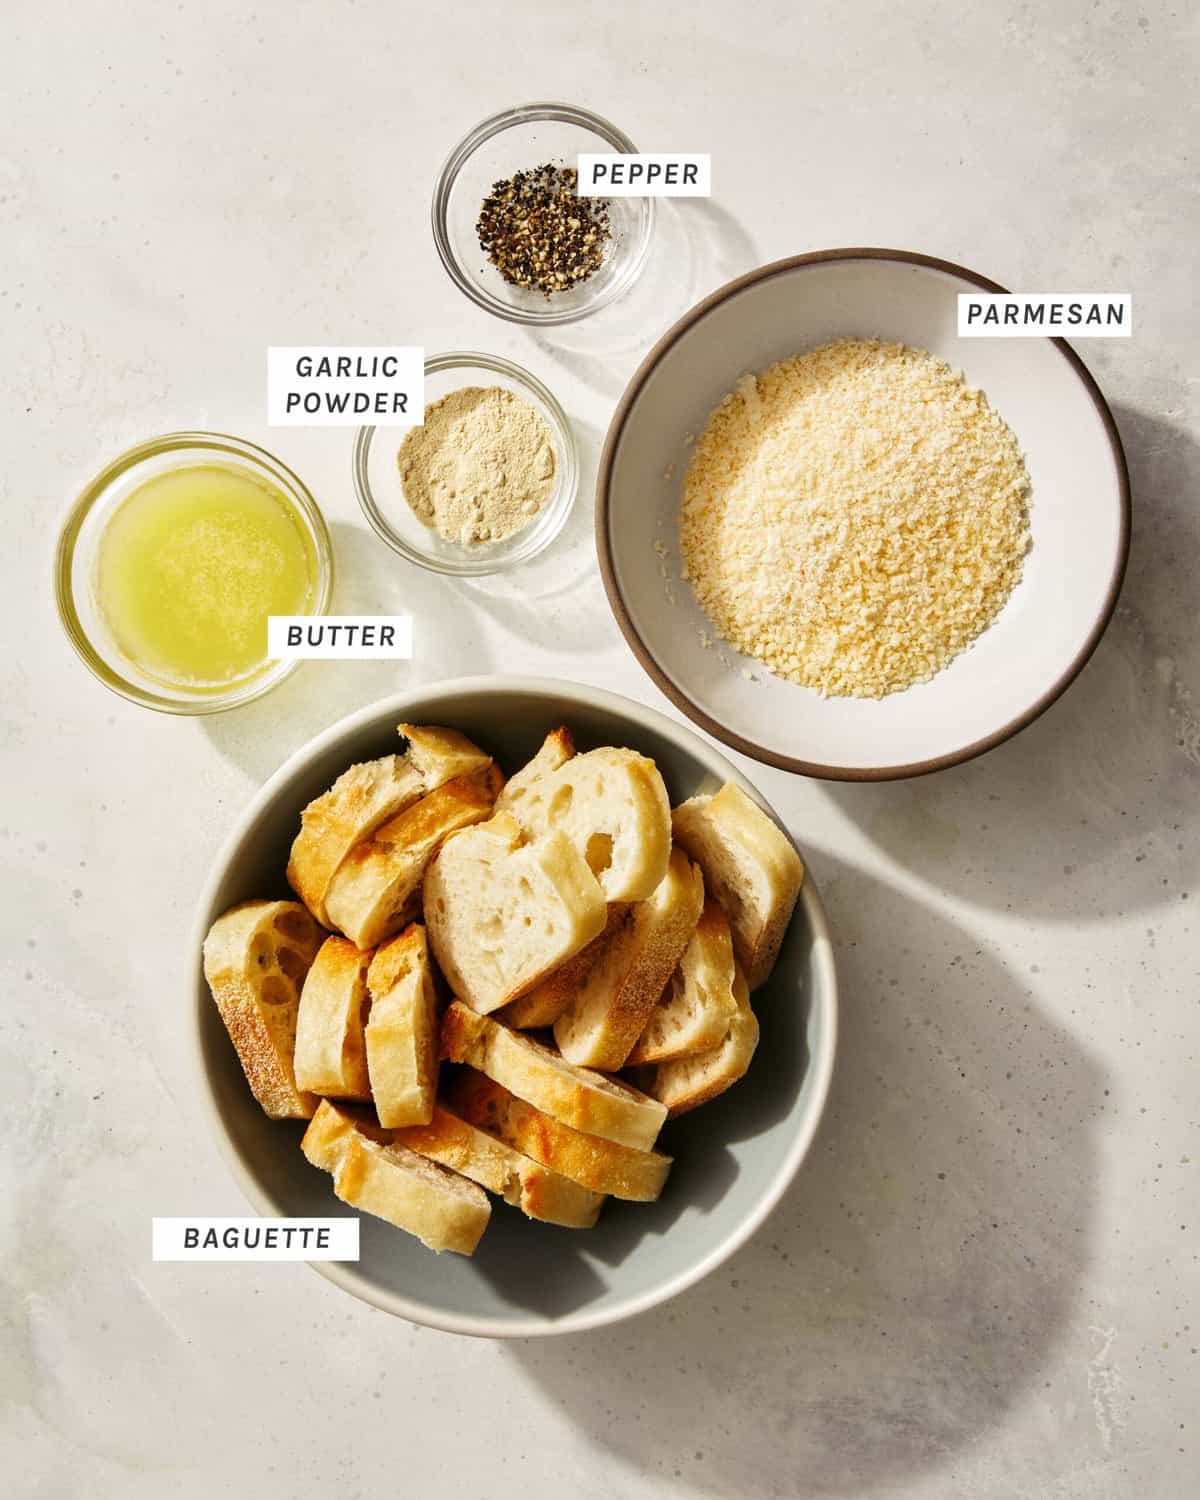
Ingredients
Process
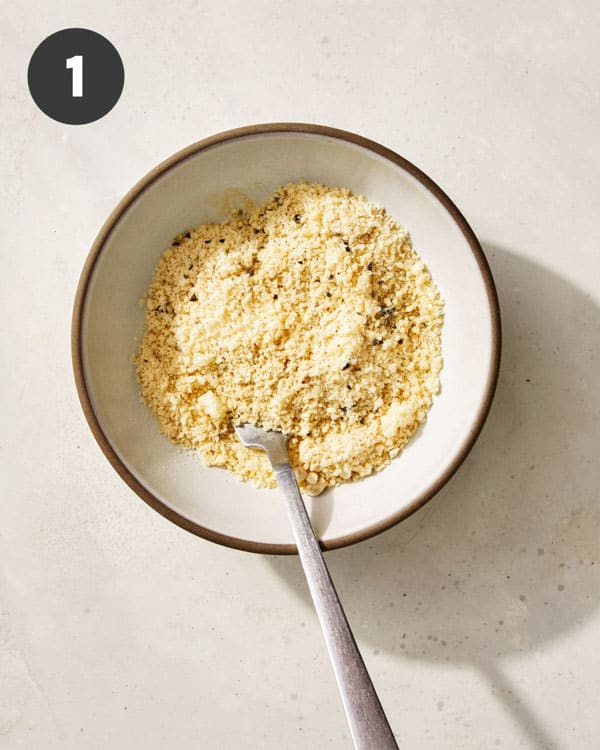
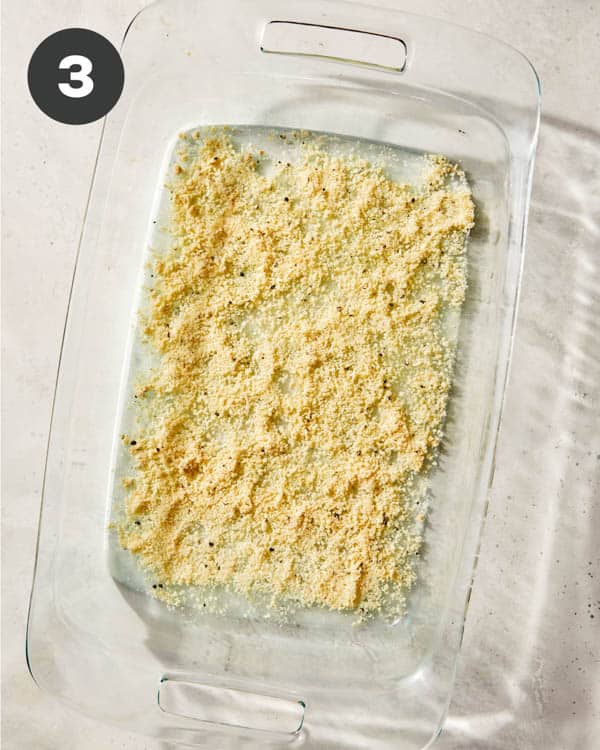
Preheat oven to 400˚F. In a small bowl combine grated parmesan, garlic powder and black pepper. Mix together.
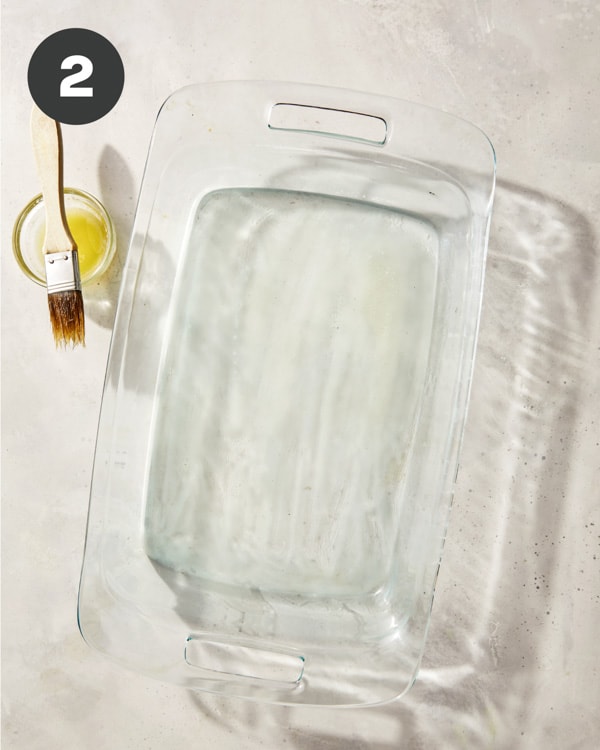
Brush bottom of a 9”x 13” glass baking dish with 1 tablespoon melted butter.
Evenly sprinkle parmesan mixture into baking dish.
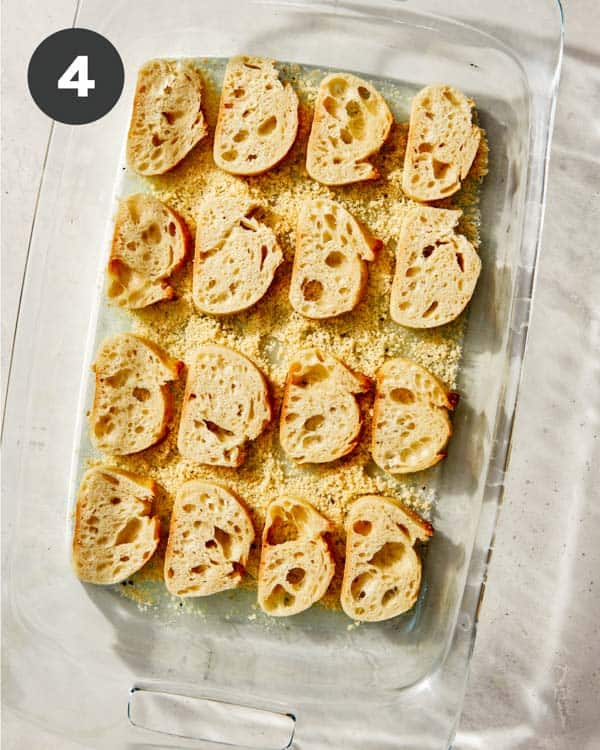
Top with sliced baguette, leaving space between each piece.
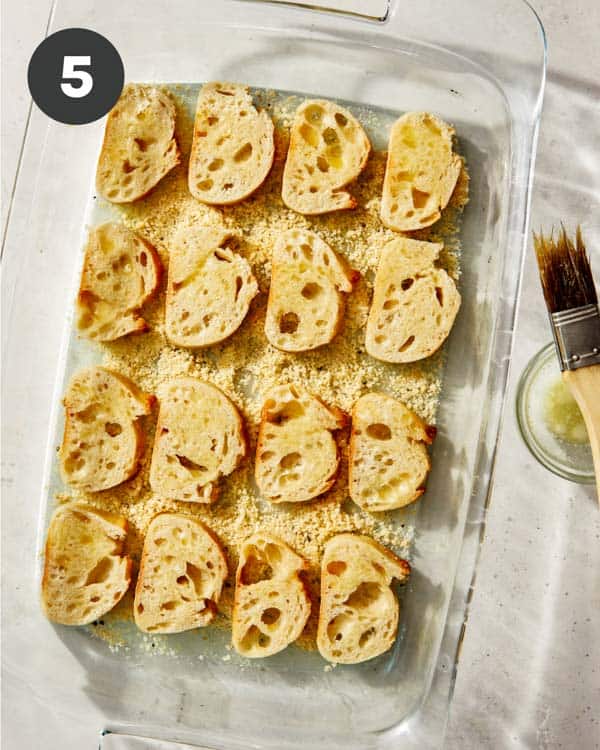
Lightly brush the tops of each piece of baguette with remaining butter.
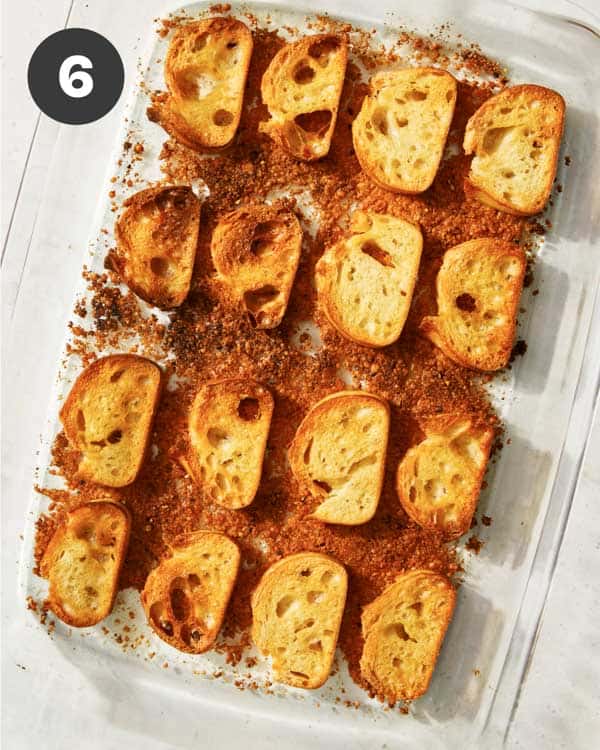
Bake for 15 to 18 minutes or until parmesan has browned and crisped and the crostini are lightly toasted on top. Remove baking dish from oven.
Gently break apart crisped parmesan crostini pieces. Top with toppings of choice and serve!
Tips and Tricks for Success
Makes sure the baking dish has a full and even layer of parmesan covering the bottom for maximum crostini coverage.
Once you press the sliced baguette into the baking dish leave it along. Moving the pieces of bread around will prevent the glorious parmesan ‘overhang’ from forming, which is one of the best parts!
Be sure to leave a small amount of space between each slice of baguette, in the baking dish, to ensure even baking. This will also help to create the parmesan ‘overhang’ on each crostini.
Storing Instructions
These parmesan crusted crostini taste best when enjoyed fresh from the oven, but they also store well in an airtight container, at room temperature, for up to 3 days.
What to Serve with Our Parmesan Crusted Crostini
We mentioned earlier how these make the most delicious snack just on their own, but we also LOVE topping them with a variety of things. They truly are the best crostini ever! Some of our favorite toppings and pairings are:
topped with thinly sliced prosciutto, brie, crushed nuts, and a drizzle of honey
We guarantee our Parmesan Crusted Crostini will become your new favorite snack and base for all the delicious and yummy things like bruschetta, dips and more!
Preheat oven to 400˚F. In a small bowl combine grated parmesan, garlic powder and black pepper. Mix together.
Brush bottom of a 9”x 13” glass baking dish with 1 tablespoon melted butter.
Evenly sprinkle parmesan mixture into baking dish. Top with sliced baguette, leaving space between each piece. Lightly brush the tops of each piece of baguette with remaining butter.
Bake for 15 to 18 minutes or until parmesan has browned and crisped and the crostini are lightly toasted on top.
Remove baking dish from oven and gently break apart crisped parmesan crostini pieces.
Top with toppings of choice and serve!
Notes
**Each serving is 1 crostini**Tips and Tricks for Success
Makes sure the baking dish has a full and even layer of parmesan covering the bottom for maximum crostini coverage.
Once you press the sliced baguette into the baking dish leave it along. Moving the pieces of bread around will prevent the glorious parmesan ‘overhang’ from forming, which is one of the best parts!
Be sure to leave a small amount of space between each slice of baguette, in the baking dish, to ensure even baking. This will also help to create the parmesan ‘overhang’ on each crostini.
Storing InstructionsThese parmesan crusted crostini taste best when enjoyed fresh from the oven, but they also store well in an airtight container, at room temperature, for up to 3 days.
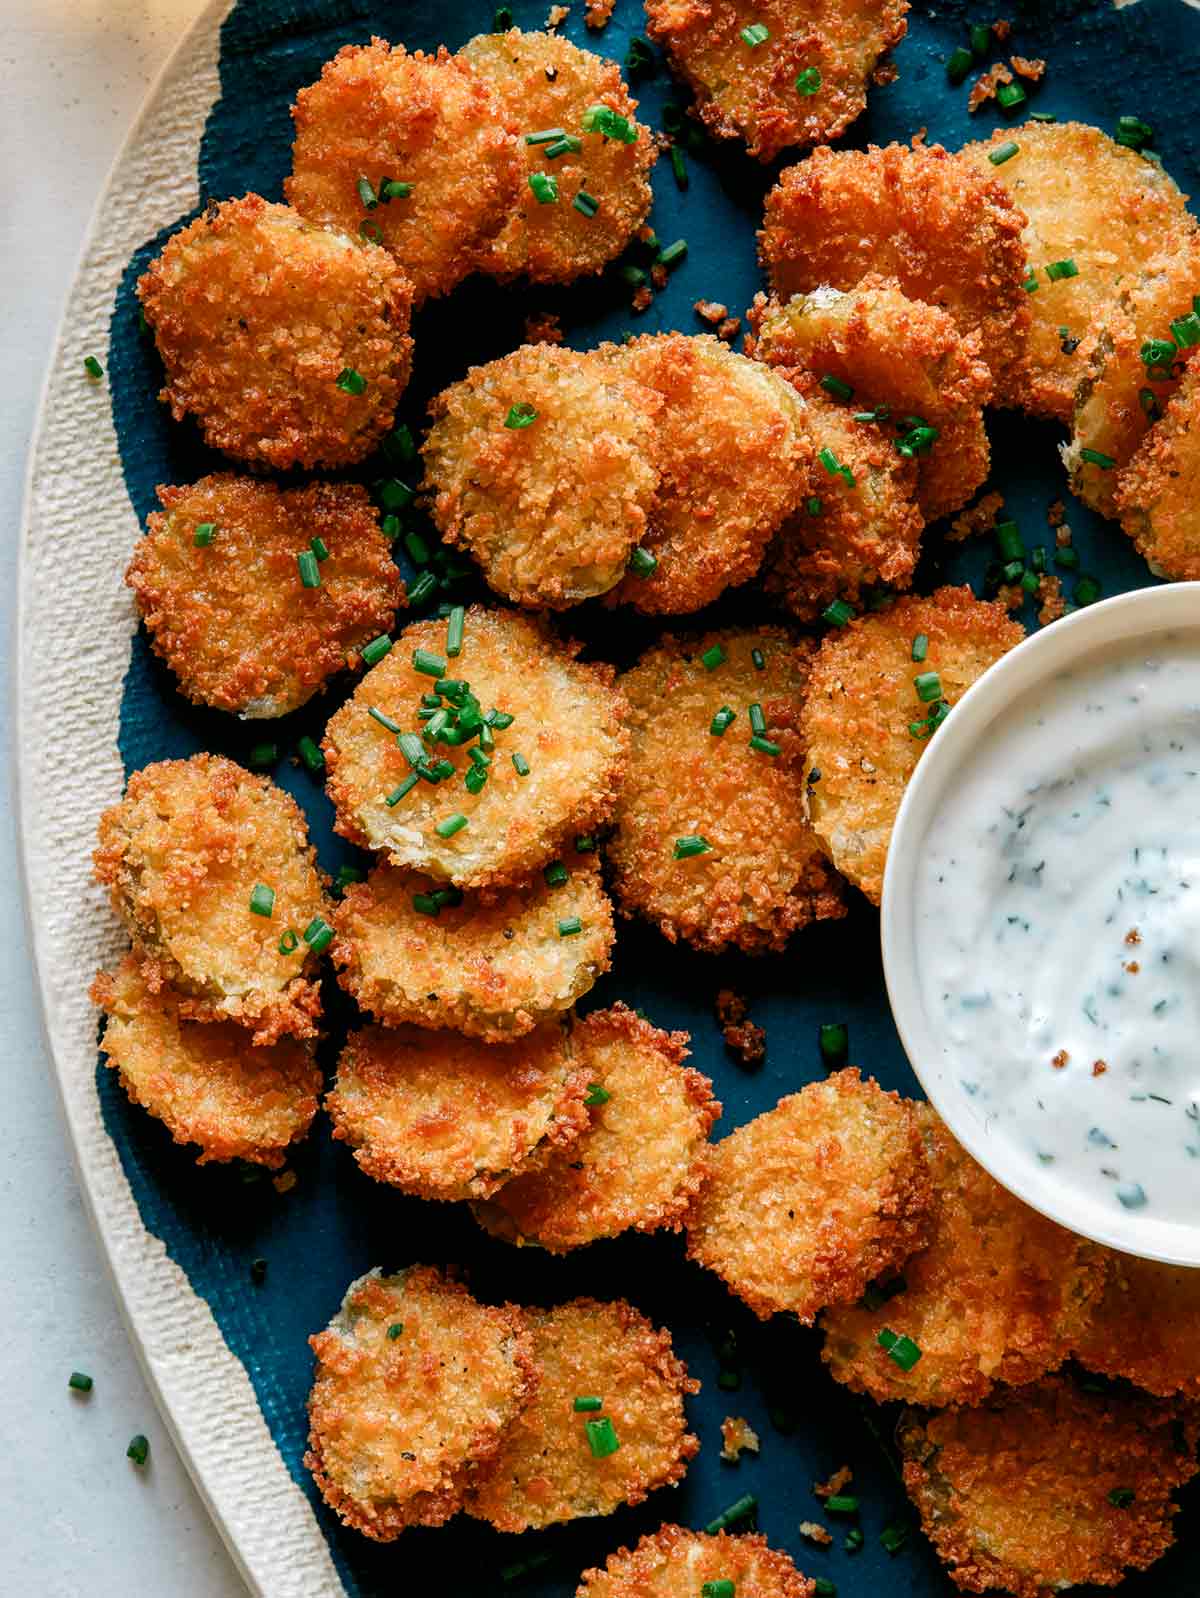
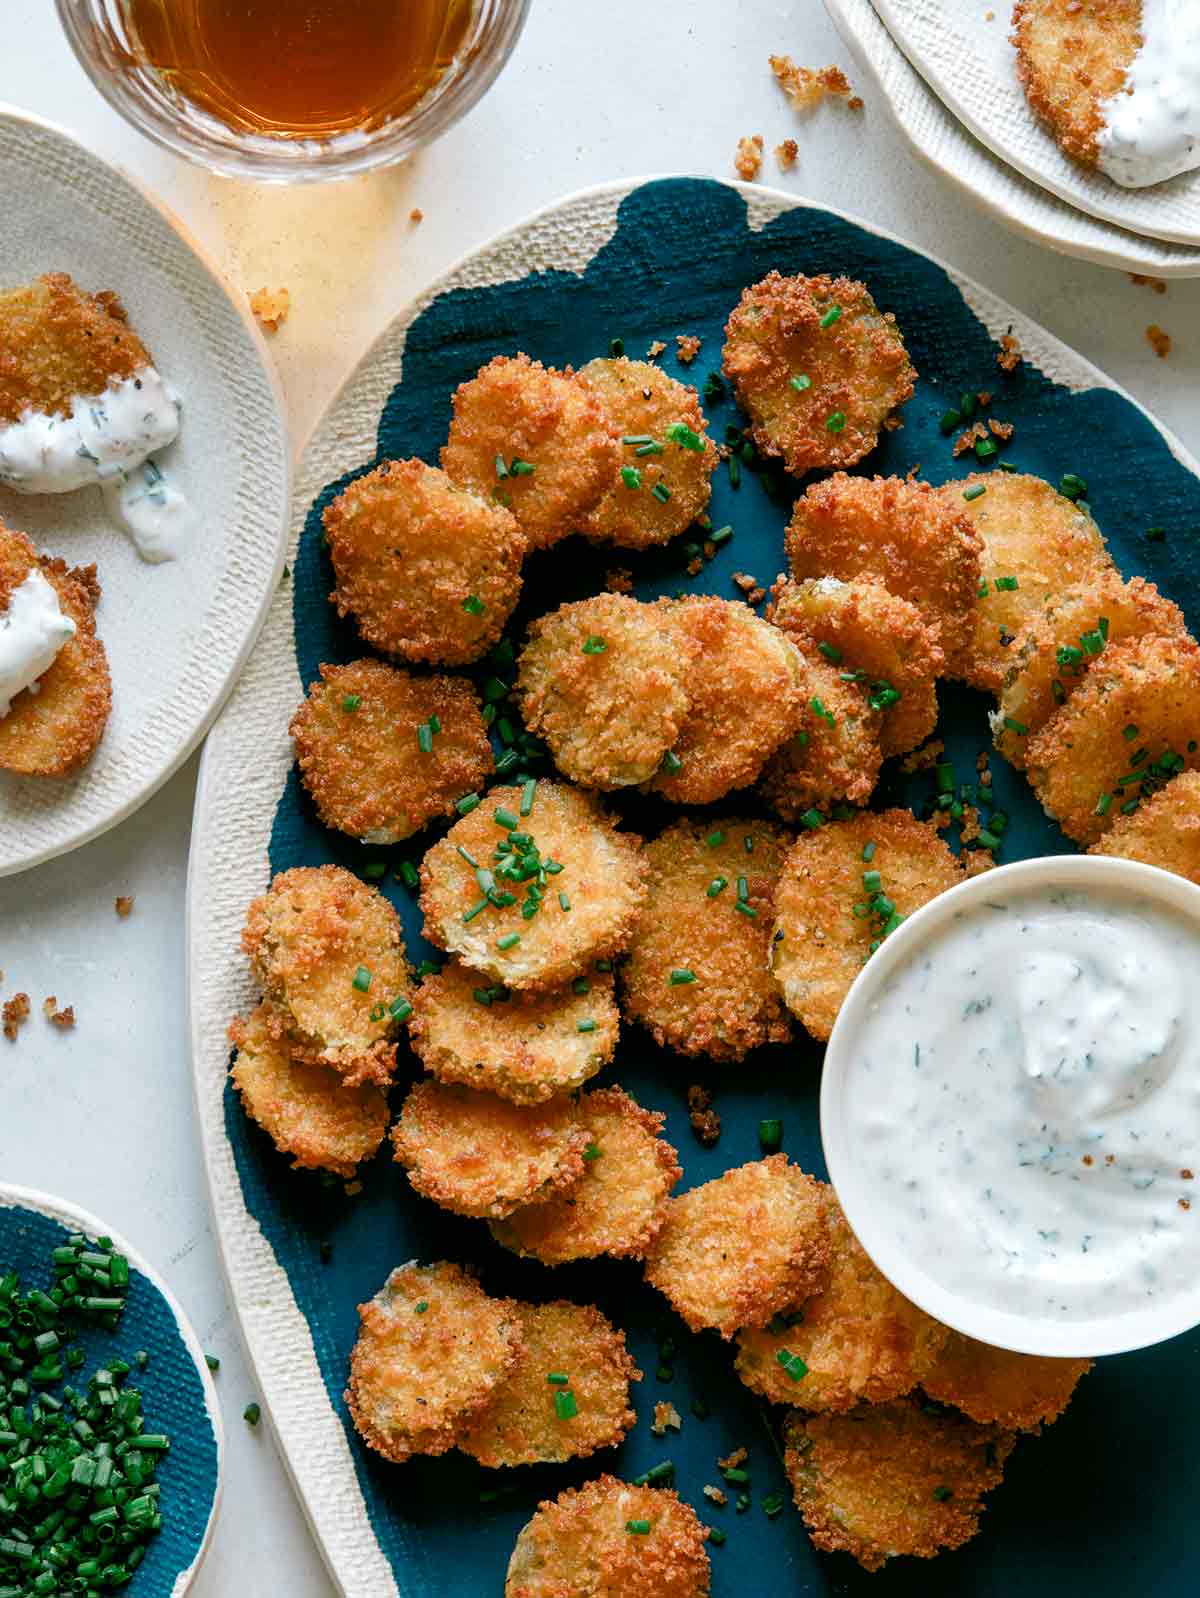
I love Fried Pickle Chips – like really LOVE them! I don’t have them often and get excited if I see them on a menu. Unfortunately the last couple times I’ve gotten them I’ve been pretty disappointed. They arrived at the table in a big oily clump and were soggy. No thank you. I love our fried pickle chips so much because they’re always extra crispy and delicious. They’re simple to make, can be frozen…
I love Fried Pickle Chips – like really LOVE them! I don’t have them often and get excited if I see them on a menu. Unfortunately the last couple times I’ve gotten them I’ve been pretty disappointed. They arrived at the table in a big oily clump and were soggy. No thank you.
I love our fried pickle chips so much because they’re always extra crispy and delicious. They’re simple to make, can be frozen and one of the first snacks to disappear when making them for a crowd. I’ve provided baking and air fryer instructions too since not everyone likes frying at home and they make for a healthier option. We serve them up with our Homemade Ranch Dressing for the perfect pairing!
How to Make Our Fried Pickle Chips
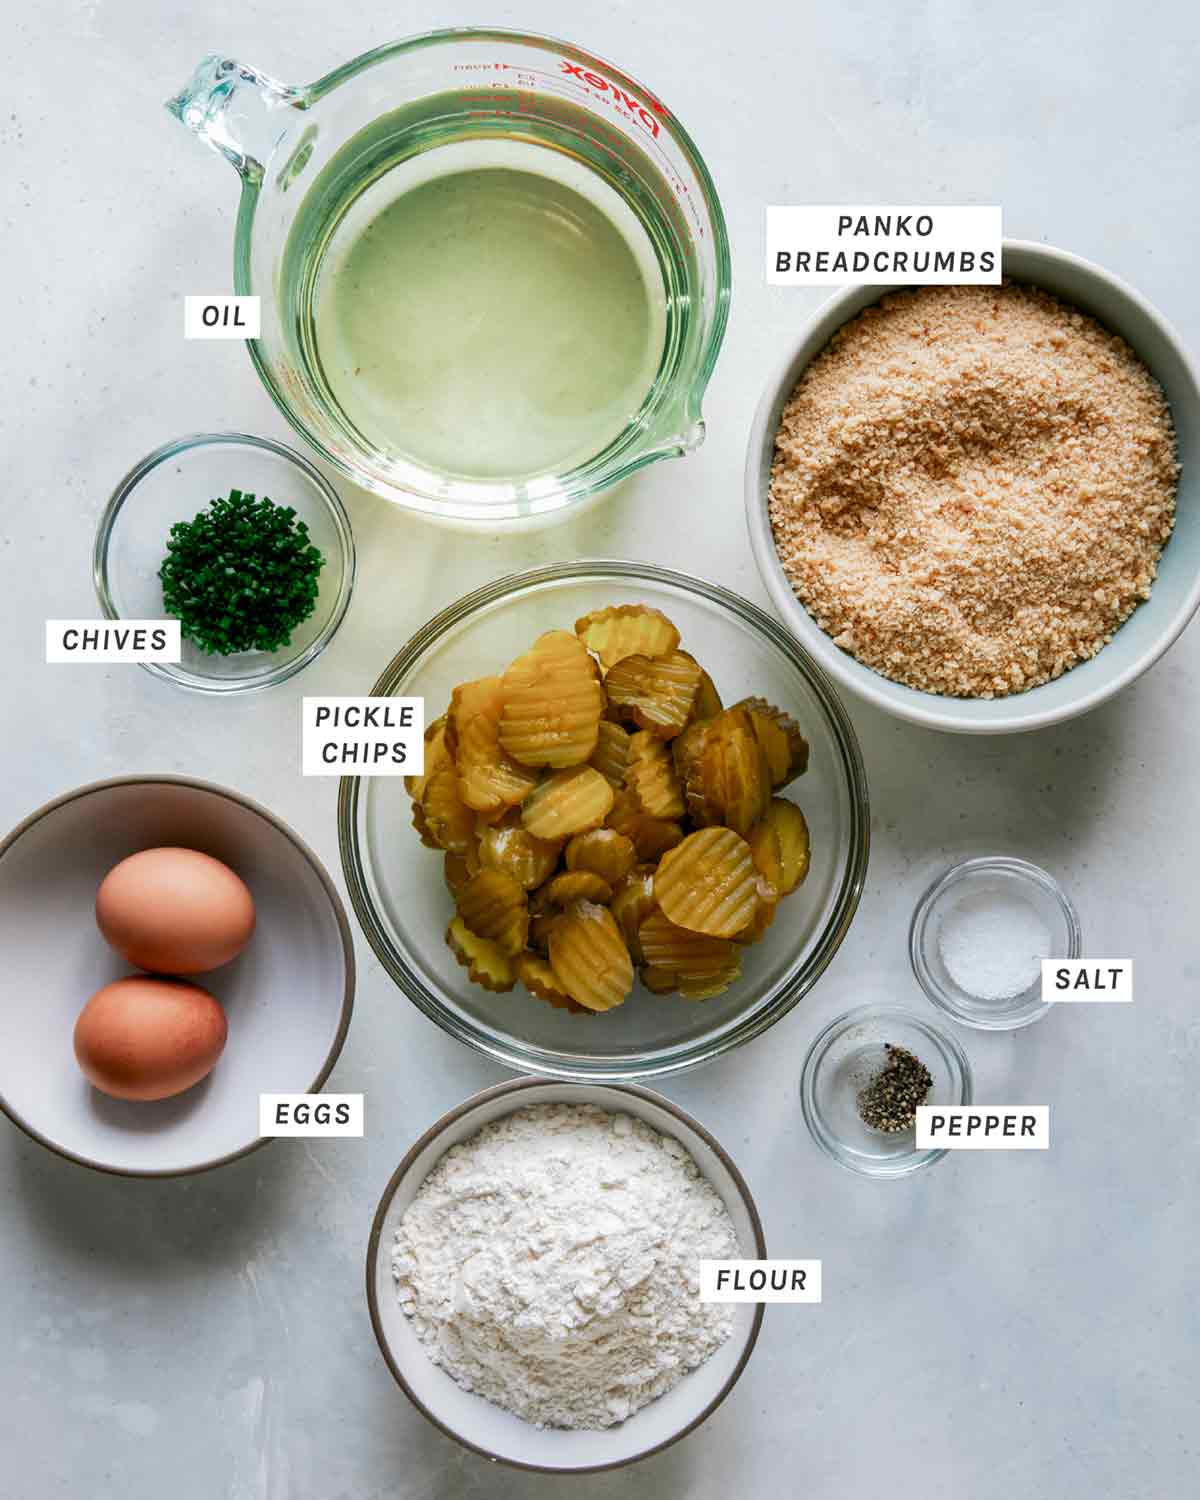
Ingredients
Process
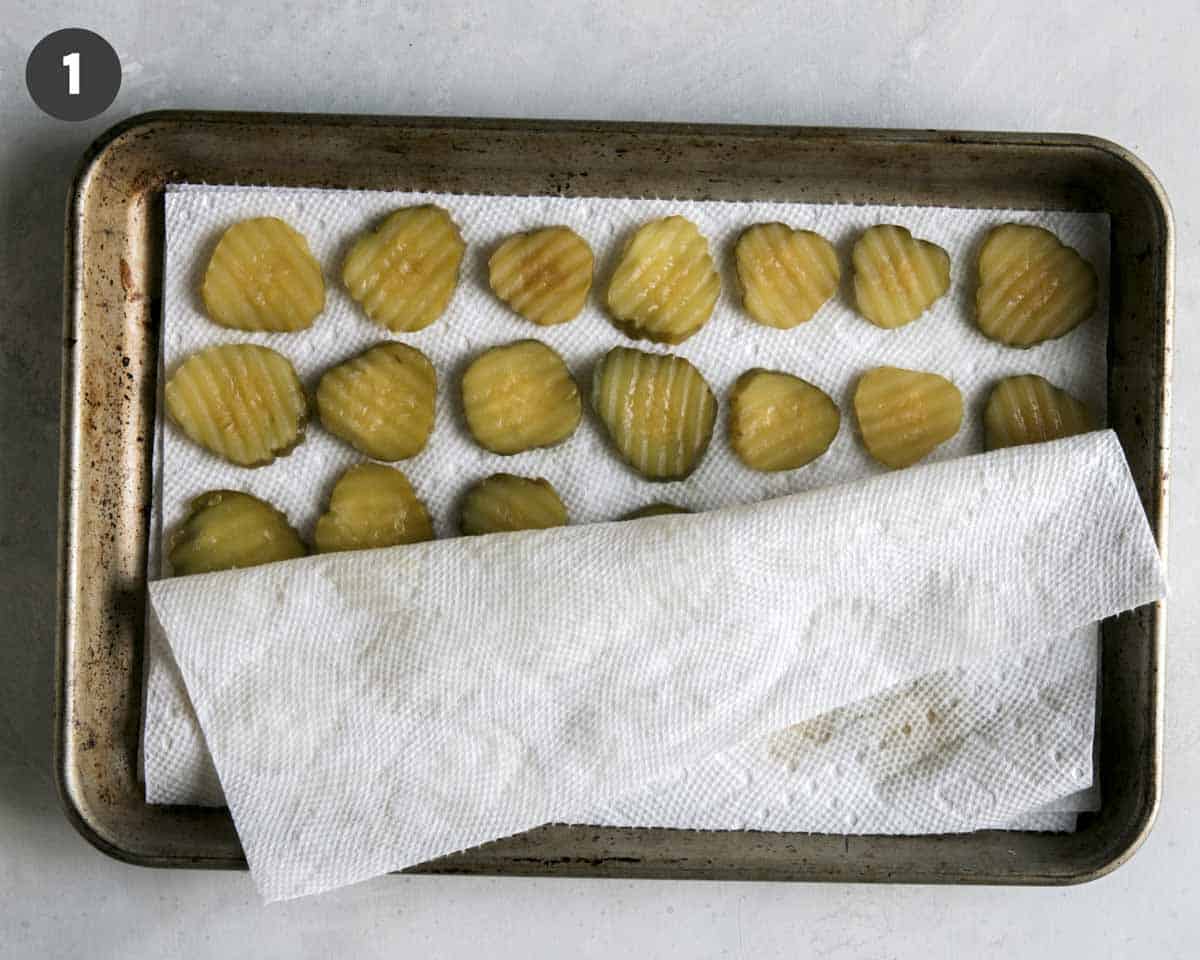
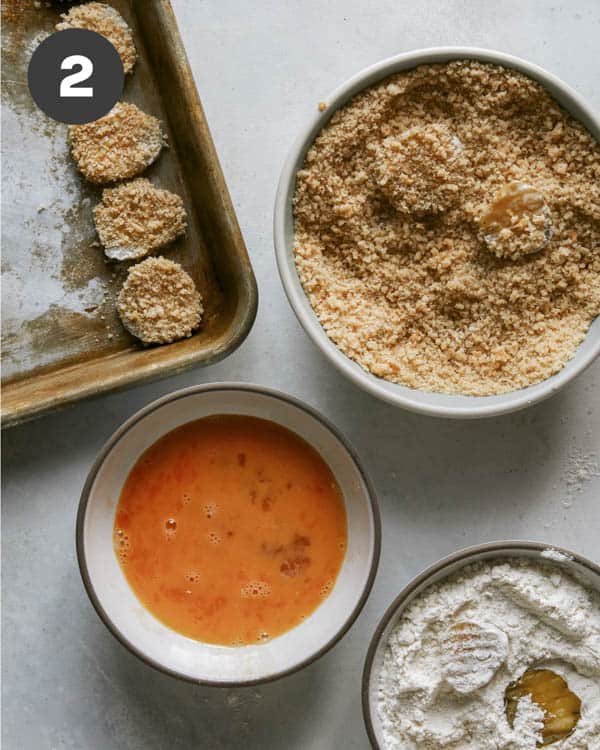
Preheat oil to 350°F. Firmly press pickle chips, in a single layer, between layers of paper towels or clean kitchen towels to remove any excess liquid/brine.
Place flour, eggs and panko in three separate shallow dishes. Dredge pickle chips in flour, shaking off any excess, followed by the egg and finally in the panko until fully coated.
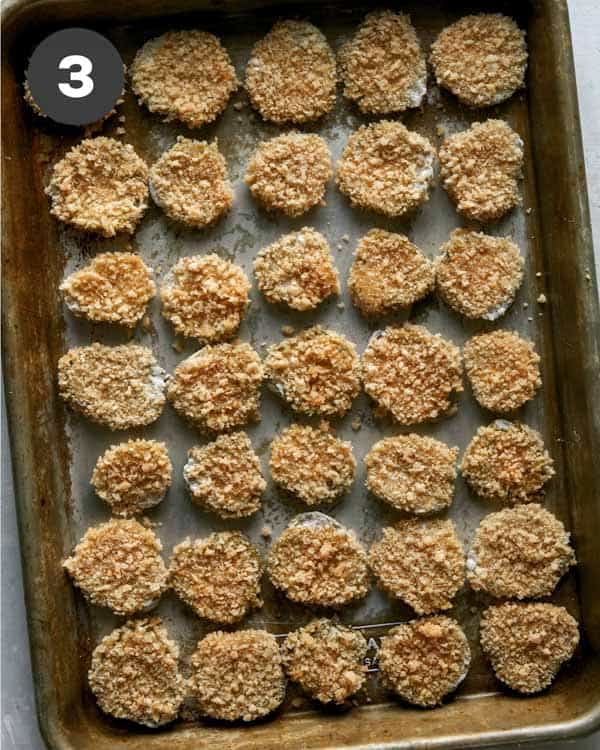
Set coated pickle chips onto a baking sheet and place in the refrigerator for about 20 minutes.
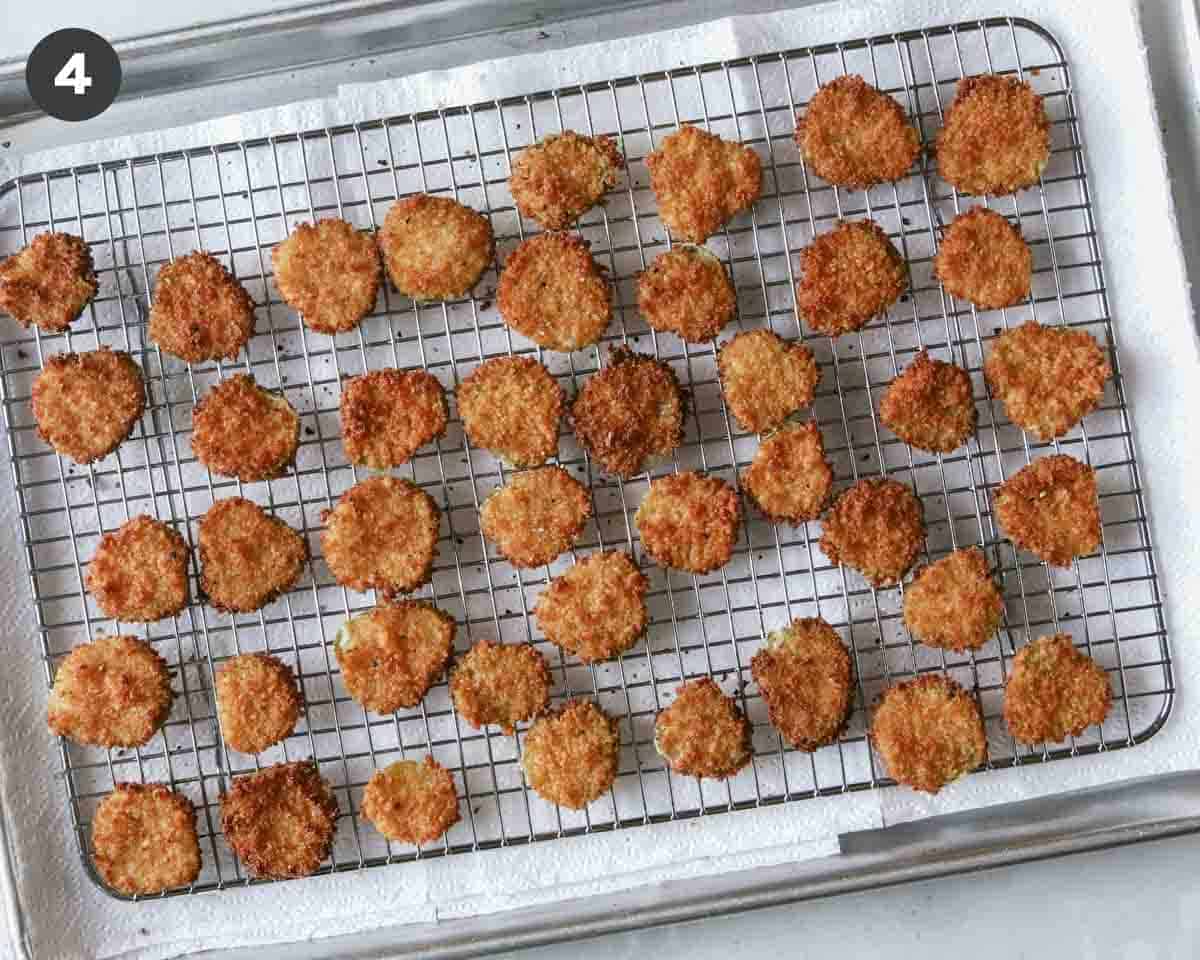
Remove pickle chips from refrigerator and fry in batches, for about 2 to 3 minutes or until lightly browned and crisp. Drain onto paper towels (or a cooling rack lined with a baking sheet) and lightly season with salt and pepper. Repeat until all the pickle chips have been fried.
We love how easy these Fried Pickle Chips are to whip up!
Baking and Air-Frying Instructions For Fried Pickle Chips
Oven Instructions
Preheat oven to 375˚F. Once pickle chips have been panko coated, coat a baking sheet with cooking spray oil. Coat both sides of each pickle chip with cooking spray oil and transfer to the prepared baking sheet, spacing each about 1/2 inch apart.
Bake pickle chips for 8 minutes. Remove baking sheet from oven and flip each pickle chip. Place baking sheet back into the oven and bake for an additional 6 to 8 minutes or until golden brown.
Air Fryer Instructions
Preheat oven to 400˚F. Once pickle chips have been panko coated, coat an air fryer basket with cooking spray oil. Coat both sides of each pickle chip with cooking spray oil and transfer to the prepared basket, spacing each about 1/4 inch apart (this will have to be done in batches).
Air-fry pickle chips for 4 minutes. Flip each pickle chip and continue to air-fry for an additional 3 to 4 minutes or until pickle chips are golden brown.
Freezing Instructions
Line panko coated pickle chips onto a baking sheet in a single layer, making sure the chips are not touching one another. If one baking sheet isn’t enough, place a piece of parchment paper over the first layer of pickle chips and repeat with remaining pickle chips.
Place baking sheet in freezer and freeze until all pickle chips are frozen, at least 2 hours. Transfer frozen pickle chips to a resealable freezer bag. Remove as much air from the bag as you can and seal. Place bag into freezer for up to 3 months.
Tips and Tricks for Success
Firmly pat the pickle chips dry with paper towels or clean dish towels to avoid any soggy fried pickle chips.
Press the panko breadcrumbs firmly onto the pickle chips. This will help the coating to stick to the pickle chips once they are fried.
Refrigerate the panko coated pickle chips. This will help the coating to stick to the pickle chips once they are fried.
Our Fried Pickle Chips are easy to make, delicious and really pack a big crunch! They're great appetizers for any game day or casual get together. We promise you won't find a soggy fried pickle chip in the bunch!
Firmly press pickle chips, in a single layer, between layers of paper towels or clean kitchen towels to remove any excess liquid/brine.
Place flour, eggs and panko in three separate shallow dishes.
Dredge pickle chips in flour, shaking off any excess, followed by the egg and finally in the panko until fully coated. Set coated pickle chips onto a baking sheet lined with parchment and place in the refrigerator for about 20 minutes.
Remove pickle chips from refrigerator and fry in batches, for about 2 to 3 minutes or until lightly browned and crisp.
Drain onto paper towels and season lightly with salt and pepper. Repeat until all the pickle chips have been fried. Top with sliced chives and serve immediately with homemade ranch dressing.
Video
Notes
Baking and Air-Frying Instructions for Fried Pickle ChipsOven InstructionsPreheat oven to 375˚F. Once pickle chips have been panko coated, coat a baking sheet with cooking spray oil. Coat both sides of each pickle chip with cooking spray oil and transfer to the prepared baking sheet, spacing each about 1/2 inch apart.Bake pickle chips for 8 minutes. Remove baking sheet from oven and flip each pickle chip. Place baking sheet back into the oven and bake for an additional 6 to 8 minutes or until pickle chips are golden brown.Air Fryer InstructionsPreheat oven to 400˚F. Once pickle chips have been panko coated, coat an air fryer basket with cooking spray oil. Coat both sides of each pickle chip with cooking spray oil and transfer to the prepared basket, spacing each about 1/4 inch apart (this will have to be done in batches).Air-fry pickle chips for 4 minutes. Flip each pickle chip and continue to air-fry for an additional 3 to 4 minutes or until pickle chips are golden brown.Freezing Instructions for Fried Pickle ChipsLine panko coated pickle chips onto a baking sheet in a single layer, making sure the chips are not touching one another. If one baking sheet isn’t enough, place a piece of parchment paper over the first layer of pickle chips and repeat with remaining pickle chips.Place baking sheet in freezer and freeze until all pickle chips are frozen, at least 2 hours. Transfer frozen pickle chips to a resealable freezer bag. Remove as much air from the bag as you can and seal. Place bag into freezer for up to 3 months.Tips and Tricks for Fried Pickle Chips Success
Firmly pat the pickle chips dry with paper towels or clean dish towels to avoid any soggy fried pickle chips.
Press the panko breadcrumbs firmly onto the pickle chips. This will help the coating to stick to the pickle chips once they are fried.
Refrigerate the panko coated pickle chips. This will help the coating to stick to the pickle chips once they are fried.