Huevos rancheros are the best way to start the day! I think so, at least. After years of living in Austin, I love any breakfast made with tortillas + salsa + eggs. Huevos rancheros are one of the simplest and most delicious. I’m sharing my easy h…
Huevos rancheros are the best way to start the day! I think so, at least. After years of living in Austin, I love any breakfast made with tortillas + salsa + eggs. Huevos rancheros are one of the simplest and most delicious. I’m sharing my easy huevos rancheros recipe below, complete with tips, variations, and ways to get ahead. I hope it becomes a staple in your rotation, and not just for breakfast. This huevos rancheros recipe makes a great lunch or dinner too! Huevos Rancheros Ingredients Here’s what you’ll need to make this huevos rancheros recipe: Corn tortillas – Don’t […]
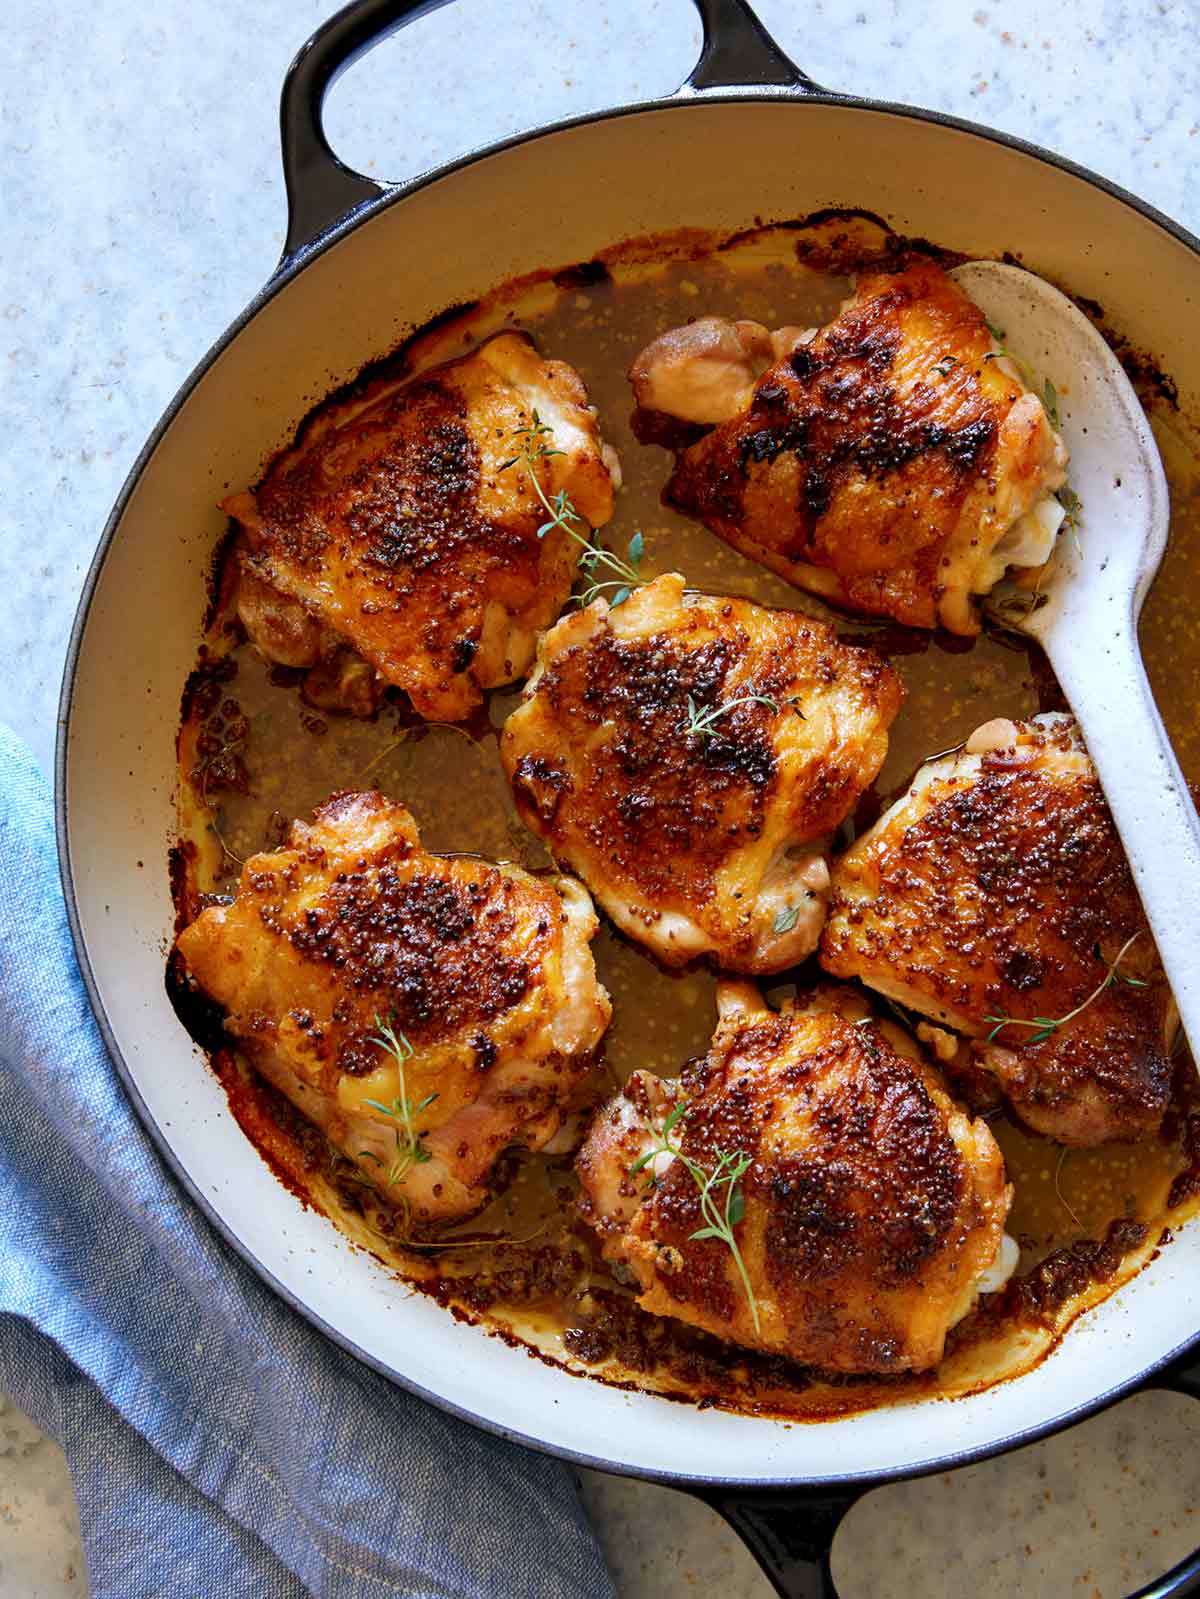
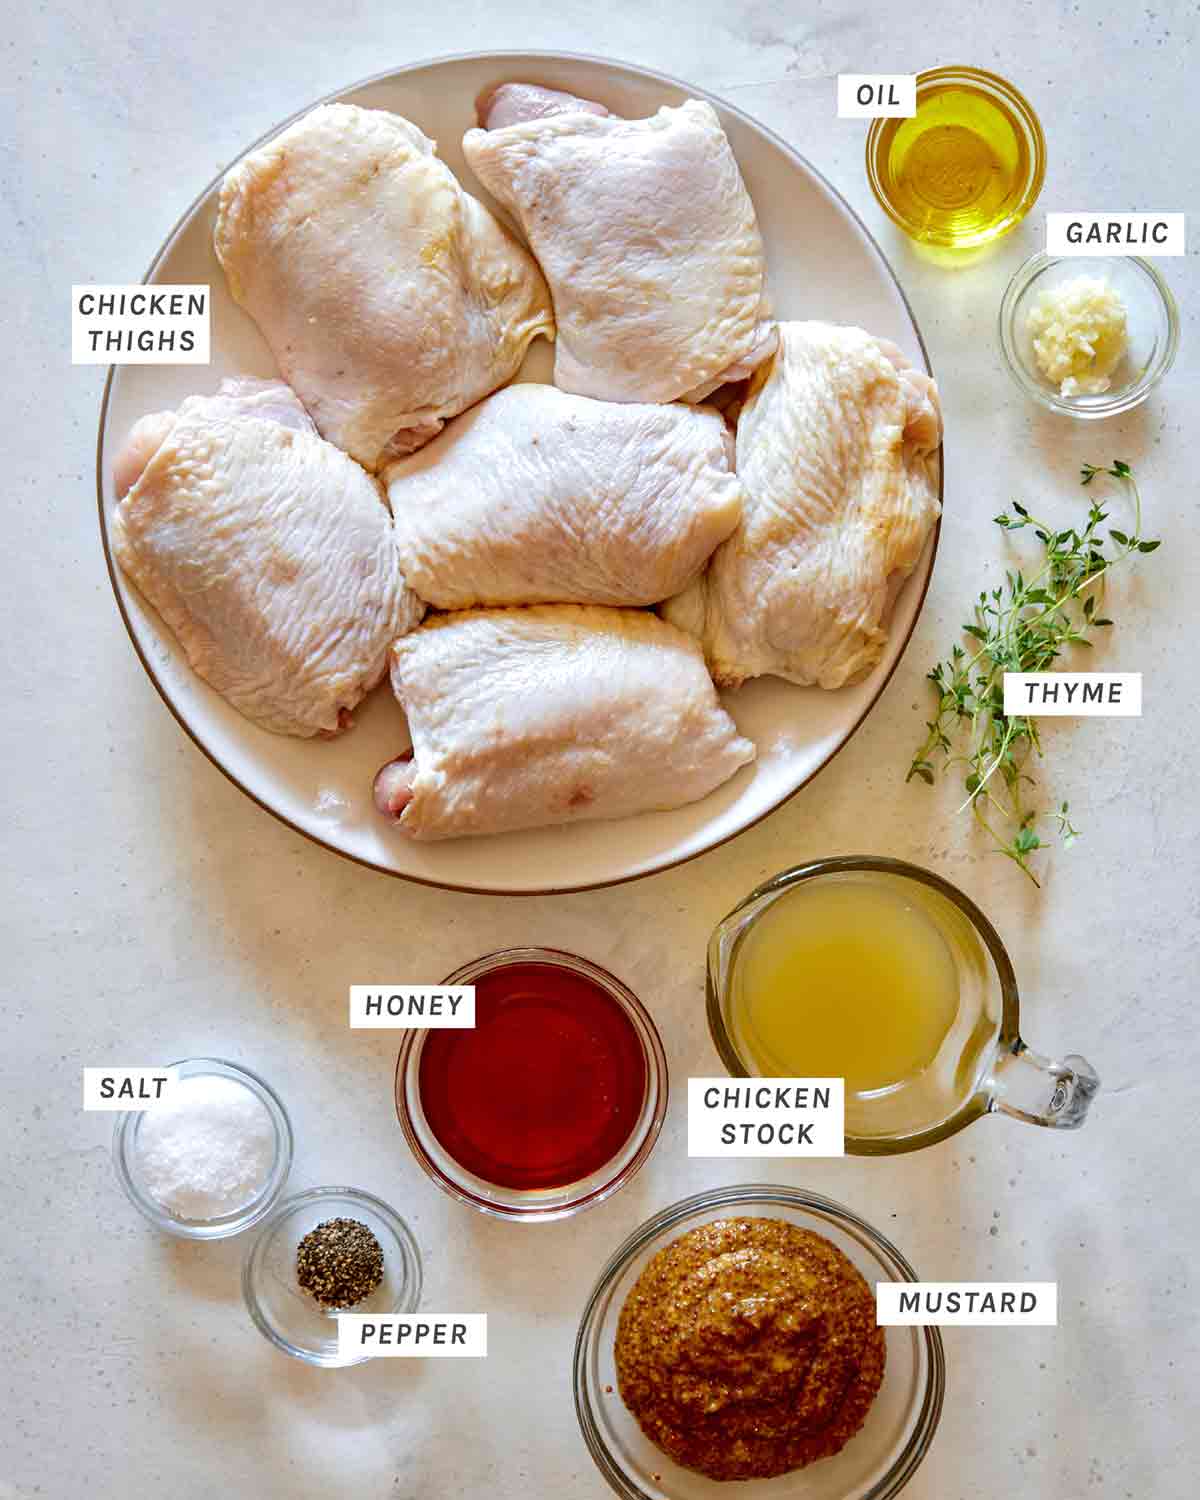
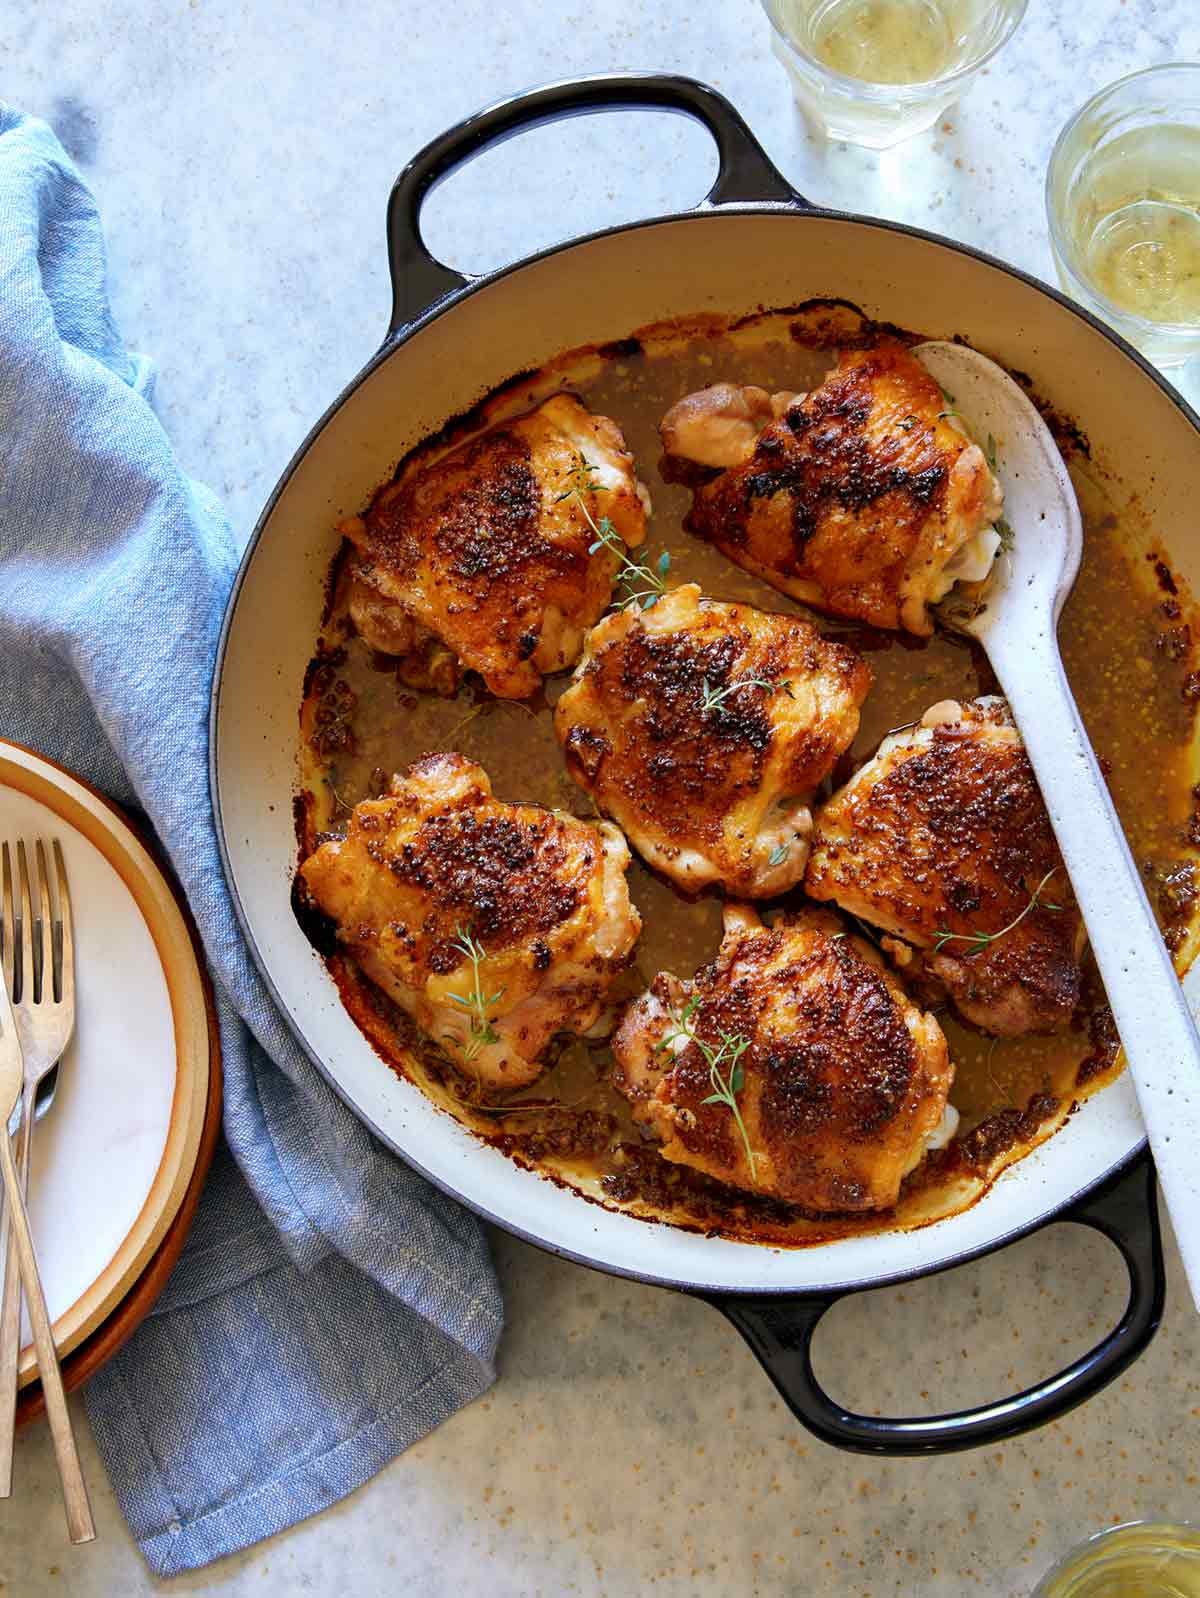
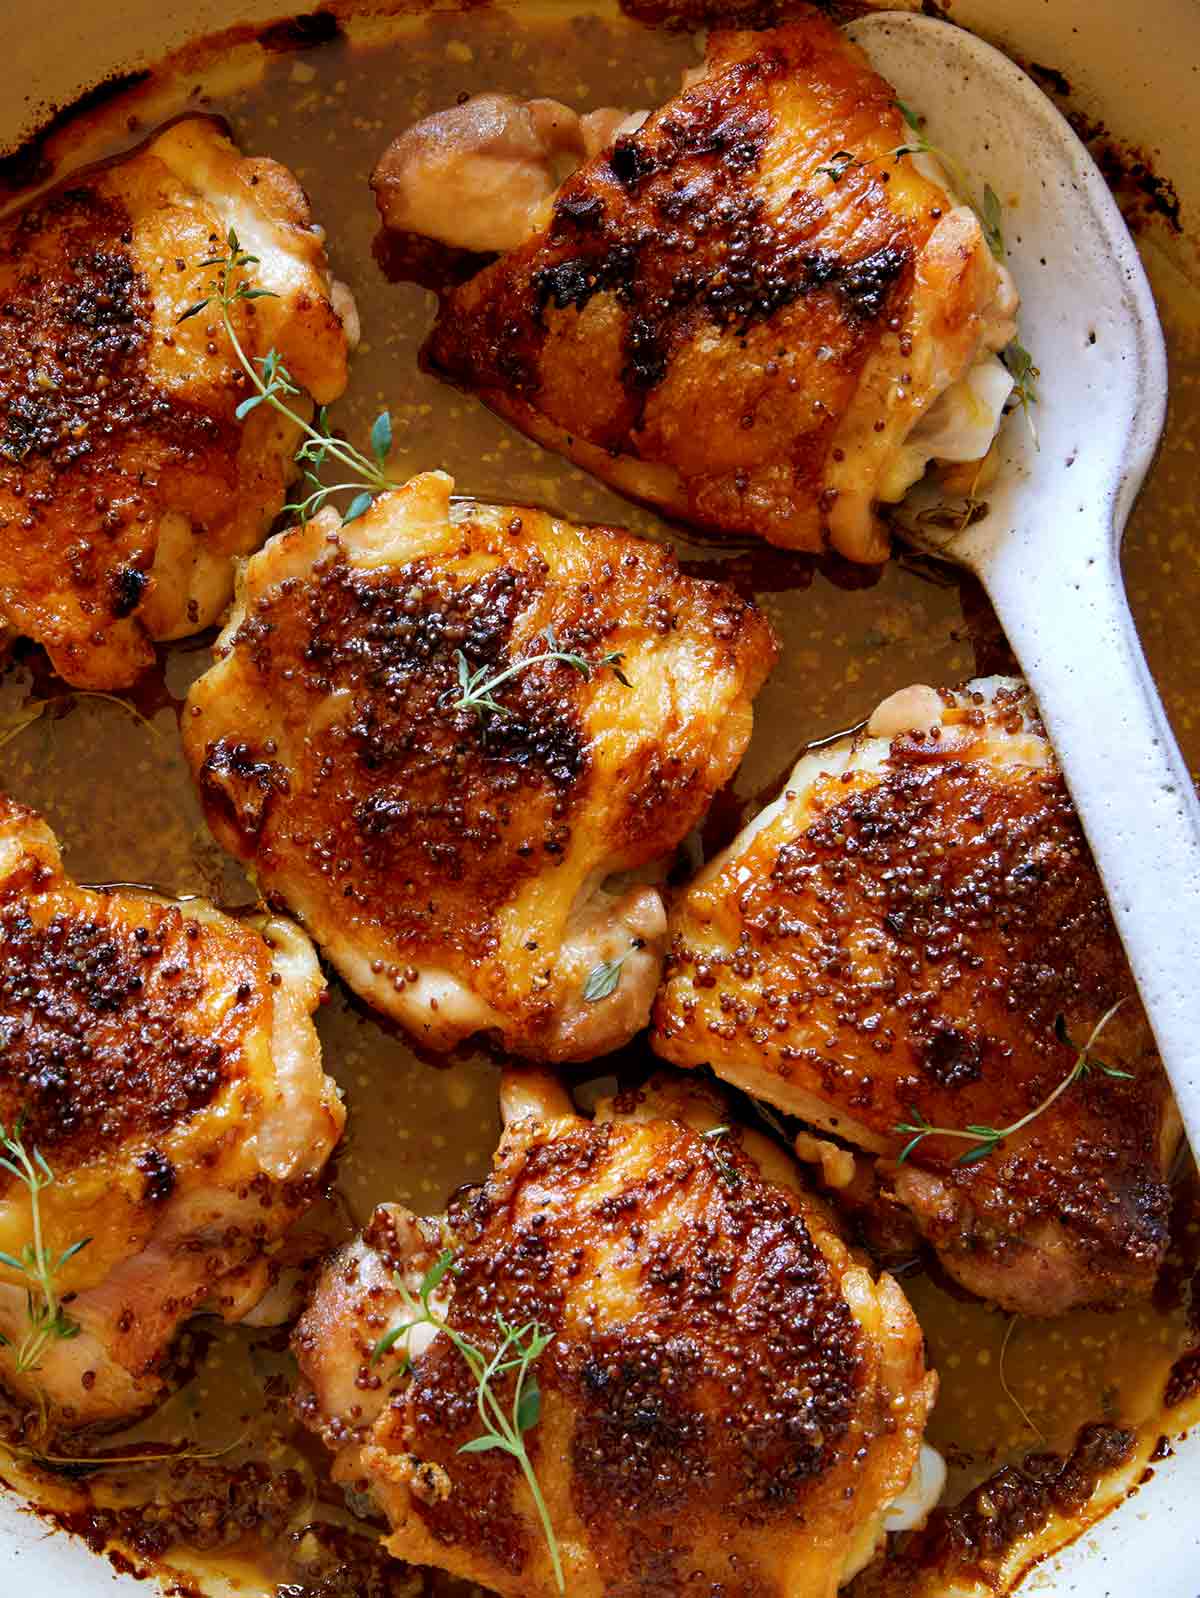
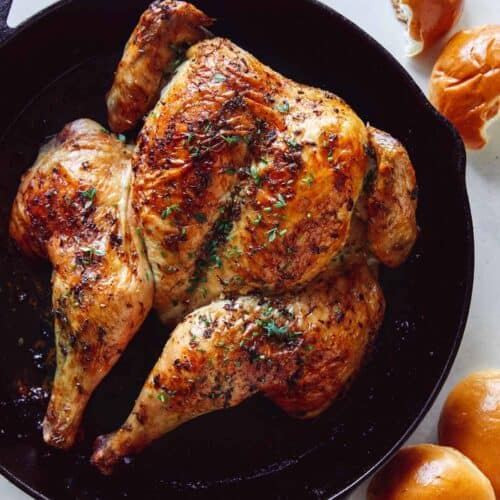
There are two things I always have stocked in my freezer, homemade dumplings/potstickers and chicken thighs. They’re two of the easiest and most perfect things to pull out of the freezer, thaw and cook up to make a delicious, protein packed meal. These Oven Baked Chicken Thighs are one of my favorite dinners to make during the week. They’re super low maintenance and taste so good! Our version is a simple honey mustard version studded…
There are two things I always have stocked in my freezer, homemade dumplings/potstickers and chicken thighs. They’re two of the easiest and most perfect things to pull out of the freezer, thaw and cook up to make a delicious, protein packed meal.
These Oven Baked Chicken Thighs are one of my favorite dinners to make during the week. They’re super low maintenance and taste so good! Our version is a simple honey mustard version studded with garlic and thyme for an extra savory flavor. It’s seriously the best and easiest chicken thighs recipe ever!
How to Make Oven Baked Chicken Thighs
Ingredients
Process
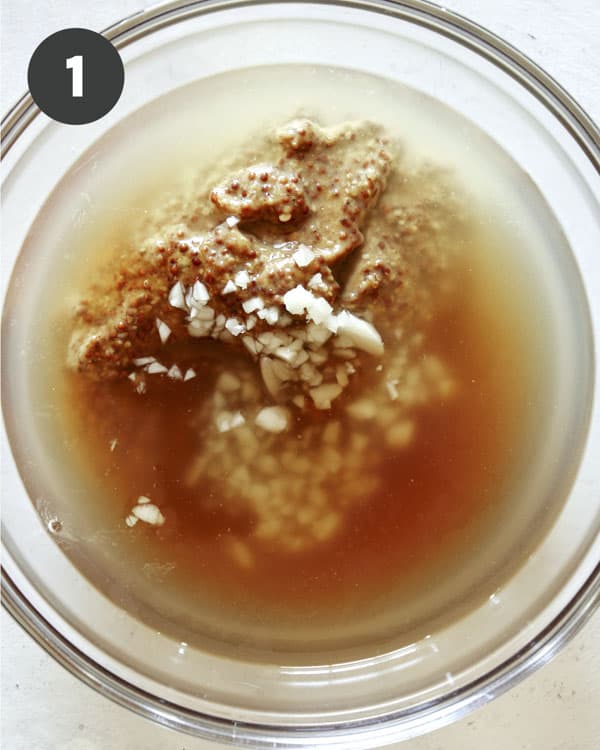
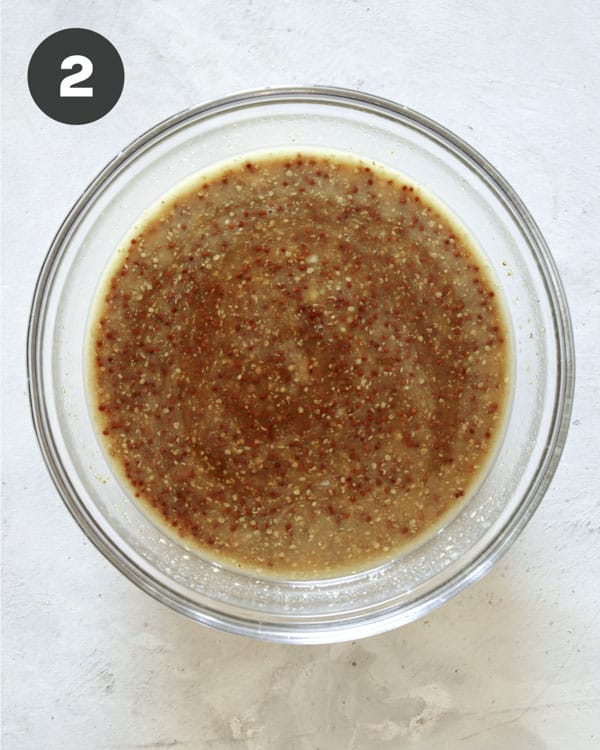
Honey Mustard Sauce
In a mixing bowl, combine mustard, honey, stock, and garlic.
Whisk together.
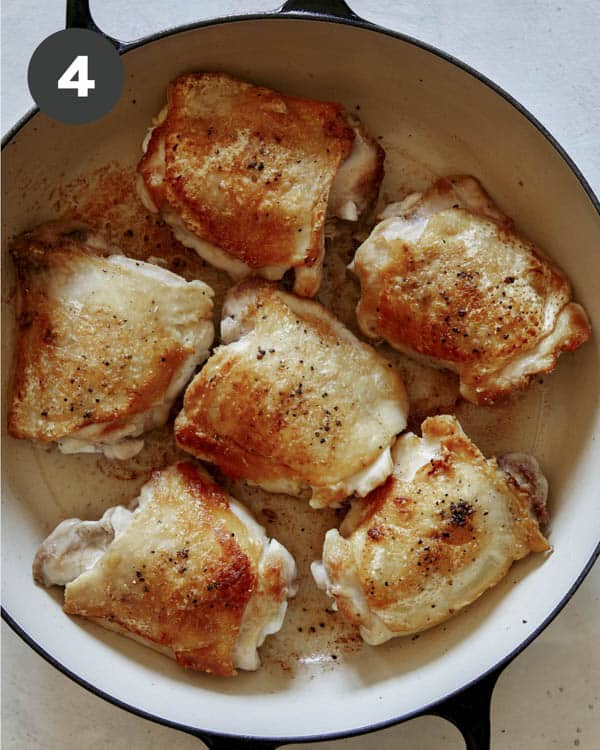
Prepping and Cooking the Chicken Thighs
Season chicken thighs generously with salt and pepper on both sides.
Heat a skillet with olive oil and sear chicken thighs skin side down in a skillet for about browned. Flip each thigh over and continue to cook for a couple minutes. Remove from heat. (this can be done in batches so you don’t overcrowd the skillet when searing). Once all thighs have been seared, drain almost all fat from skillet and fit all thighs into skillet, if done in batches.
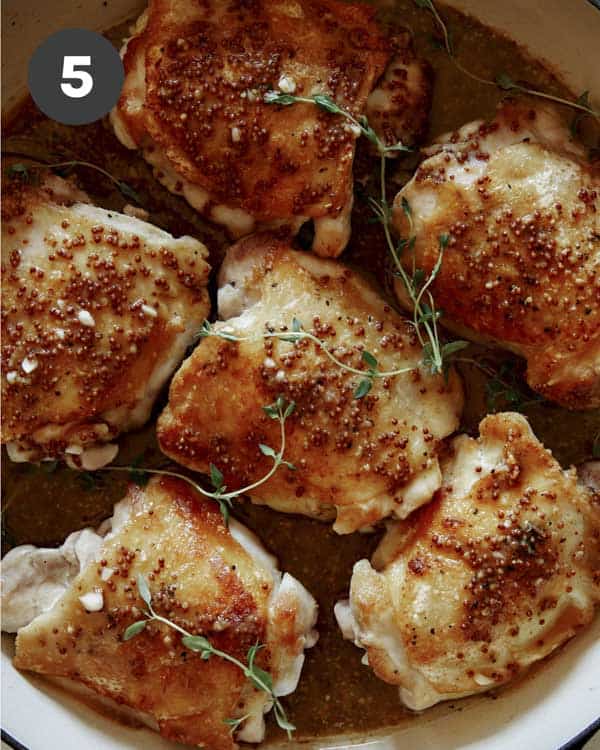
Pour sauce over chicken thighs and add thyme sprigs.
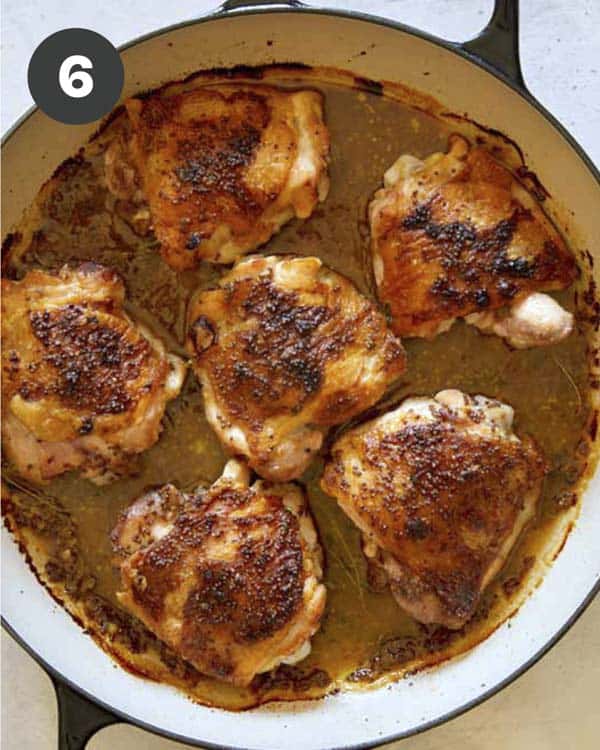
Place skillet in oven and bake until the internal temperature of chicken reaches 175˚F and juices run clear when pierced with a knife. Remove skillet from oven and allow chicken to rest, about 5 minutes. Spoon sauce over chicken thighs, season with a little more salt and pepper and sprinkle with fresh thyme leaves.
Since chicken thighs are dark meat, they are more forgiving when it comes to cooking than chicken breasts. They also take longer to cook through. I generally say it’s a good idea to bake chicken thighs (that are bone-in) at 375˚F for at least 30-40 minutes, after searing them, to make sure they’re completely cooked through. Again, they’re more forgiving so if you end up baking them for up to an hour, you should still be okay without the meat getting dry or tough.
For baked boneless chicken thighs, you need less time. I usually bake boneless chicken thighs at 375˚F for 25 to 30 minutes, after searing them off.
Tips and Tricks for Oven Baked Chicken Thigh Success
We love searing the thighs before pouring the sauce over them and baking. This will render some of the fat as well as help the skin get nice and crispy.
If you want extra crispy skin, avoid pouring the sauce directly over the seared thighs and just pour the liquid around the thighs. Alternatively, remove the seared thighs from the skillet/braiser, pour in the sauce and then nestle the thighs (skin-side up) back into the sauce.
Pat the chicken thighs dry before seasoning and searing them to further help optimize the crispy skin.
If you’re unsure about the doneness of the chicken just use a meat thermometer to check the internal temperature.
Storing, Reheating and Freezing Leftover Oven Baked Chicken Thighs
Storing and Reheating
This dish will keep for up to 3 days stored in an airtight container in the refrigerator. To reheat, transfer thighs and sauce to a baking dish and cover tightly with foil. Bake at 350˚F for 10 to 15 minutes or until just heated through.
Freezing and Reheating
To freeze leftovers, place thighs and sauce in an airtight, freezable baking dish, tightly wrap in foil and freeze for up to 6 months. To reheat, place frozen, covered baking dish in a 350˚F oven and bake for 30 to 40 minutes or until heated through.
Variations for our Baked Chicken Thighs Recipe
You can use boneless skinless chicken thighs if you prefer, just reduce the baking time by about 10 minutes.
Boneless, skinless (or bone-in and skin-on) chicken breast can also be used in this recipe, just reduce the baking time by 15-20 minutes.
We mentioned above that searing the thighs before baking them will help the skin stay crispy, but if that isn’t important to you and you want to save a bit of time and effort you can definitely just bake the thighs in the sauce without searing them. You can also use a baking dish instead of a skillet if you take this route. You may need to add a few minutes to the overall baking time, but that’s it!
Add some spices to the chicken thighs before searing them for even more added flavor like smoked paprika, Italian seasoning, cumin or garlic powder.
We call for stone ground mustard in this recipe because we love the gritty texture. A great substitute is whole grain mustard, and our Homemade Whole Grain Mustard is so easy to make and a delicious condiment to keep in your refrigerator!
A simple recipe for Homemade Whole Grain Mustard that’s delicious and easy to make. We love using this mustard to make dressings and as a spread for sandwiches or on a cheese plate.
The BEST Oven Baked Chicken Thighs you'll ever taste. These juicy thighs are baked in a simple, honey mustard sauce studded with garlic and thyme for a deliciously savory dish you can enjoy any day of the week.
In a mixing bowl, whisk together mustard, honey, stock, and garlic. Set aside.
Place a large skillet over medium high heat. Once skillet is hot, add oil.
Season chicken thighs generously with salt and pepper.
Sear chicken thighs skin side down for about 3 minutes or until browned. Flip each thigh over and continue to cook for an additional 2 minutes. Remove from heat. (this can be done in batches so you don’t overcrowd the skillet when searing). Once all thighs have been seared, drain all but 1 tablespoon fat from skillet and fit all thighs into skillet, if done in batches.
Pour sauce over chicken thighs and add thyme sprigs.
Place skillet in oven and bake for 35 to 40 minutes (or until the internal temperature of chicken reaches 175˚F and juices run clear when pierced with a knife).
Remove skillet from oven and allow chicken to rest, about 5 minutes.
Spoon sauce over chicken thighs, season with a little more salt and pepper and sprinkle with fresh thyme leaves. Serve.
Video
Notes
Tips and Tricks for Oven Baked Chicken Thigh Success
We love searing the thighs before pouring the sauce over them and baking. This will render some of the fat as well as help the skin get nice and crispy.
If you want extra crispy skin, avoid pouring the sauce directly over the seared thighs and just pour the liquid around the thighs. Alternatively, remove the seared thighs from the skillet/braiser, pour in the sauce and then nestle the thighs (skin-side up) back into the sauce.
Pat the chicken thighs dry before seasoning and searing them to further help optimize the crispy skin.
If you’re unsure about the doneness of the chicken just use a meat thermometer to check the internal temperature.
Storing, Reheating and Freezing Leftover Oven Baked Chicken ThighsStoring and ReheatingThis dish will keep for up to 3 days stored in an airtight container in the refrigerator. To reheat, transfer thighs and sauce to a baking dish and cover tightly with foil. Bake at 350˚F for 10 to 15 minutes or until just heated through.Freezing and ReheatingTo freeze leftovers, place thighs and sauce in an airtight, freezable baking dish, tightly wrap in foil and freeze for up to 6 months. To reheat, place frozen, covered baking dish in a 350˚F oven and bake for 30 to 40 minutes or until heated through.
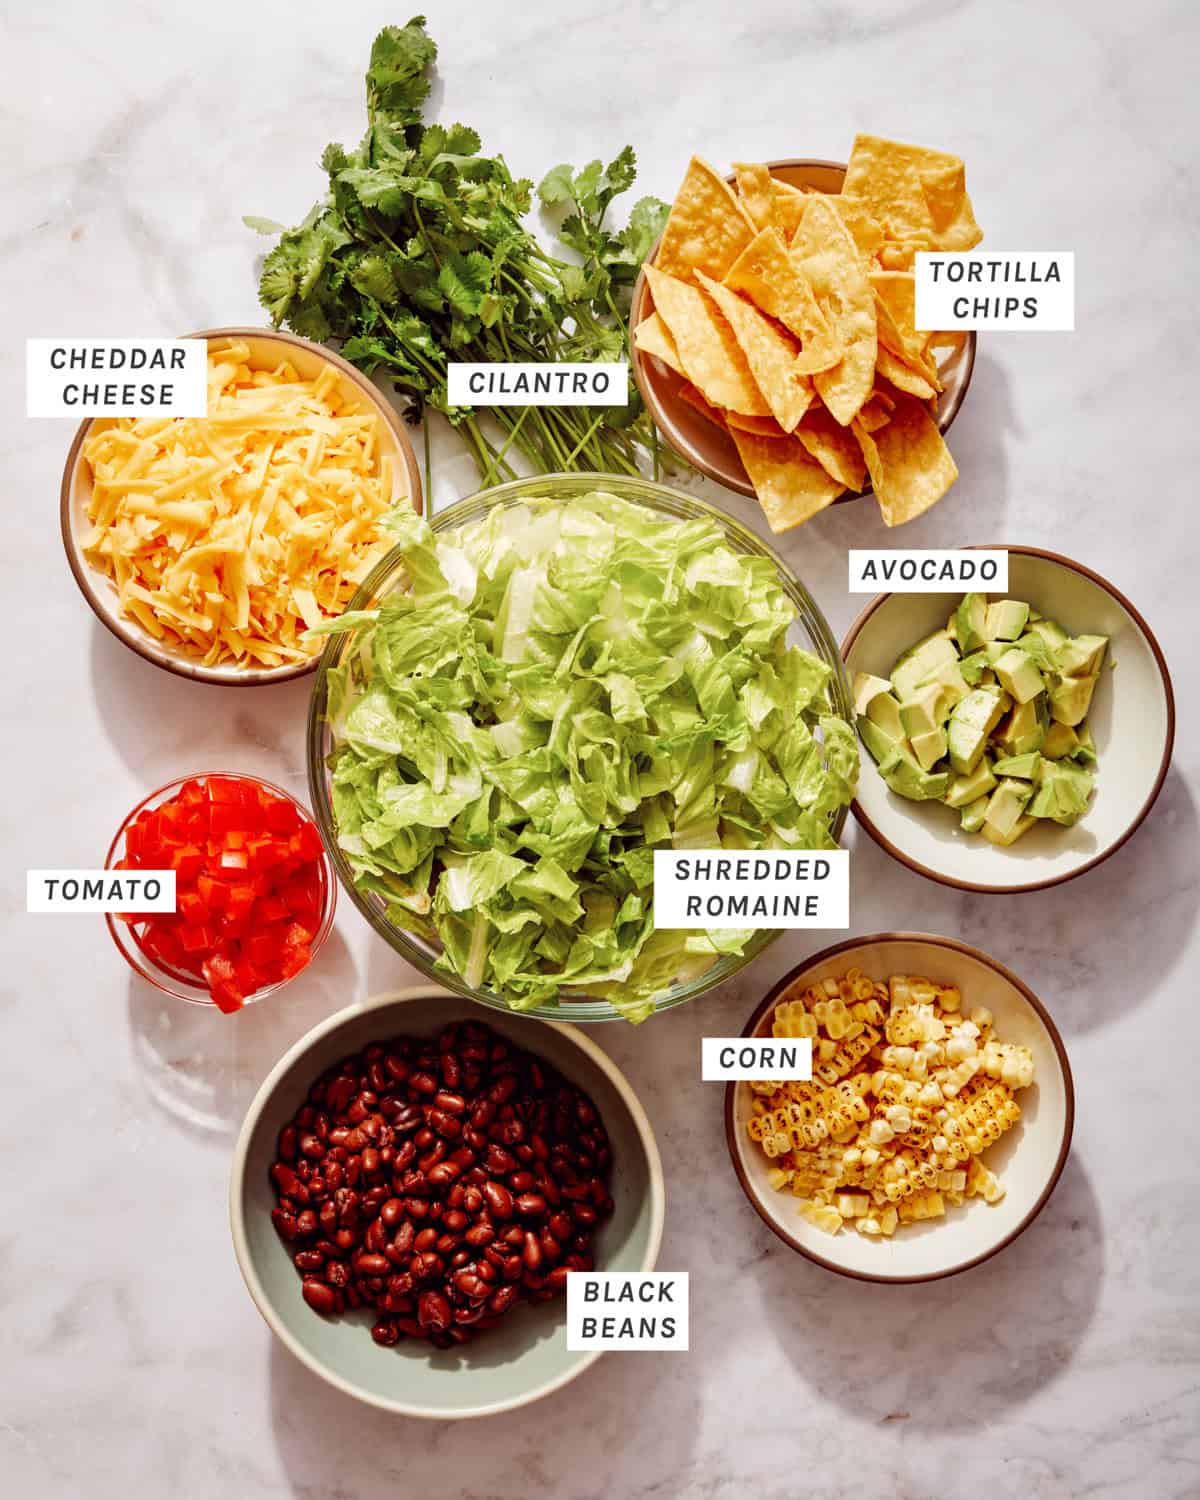
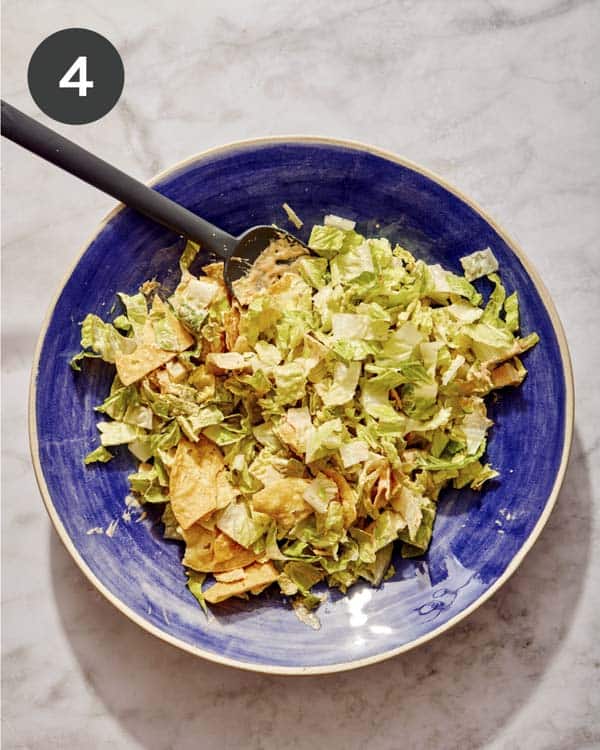
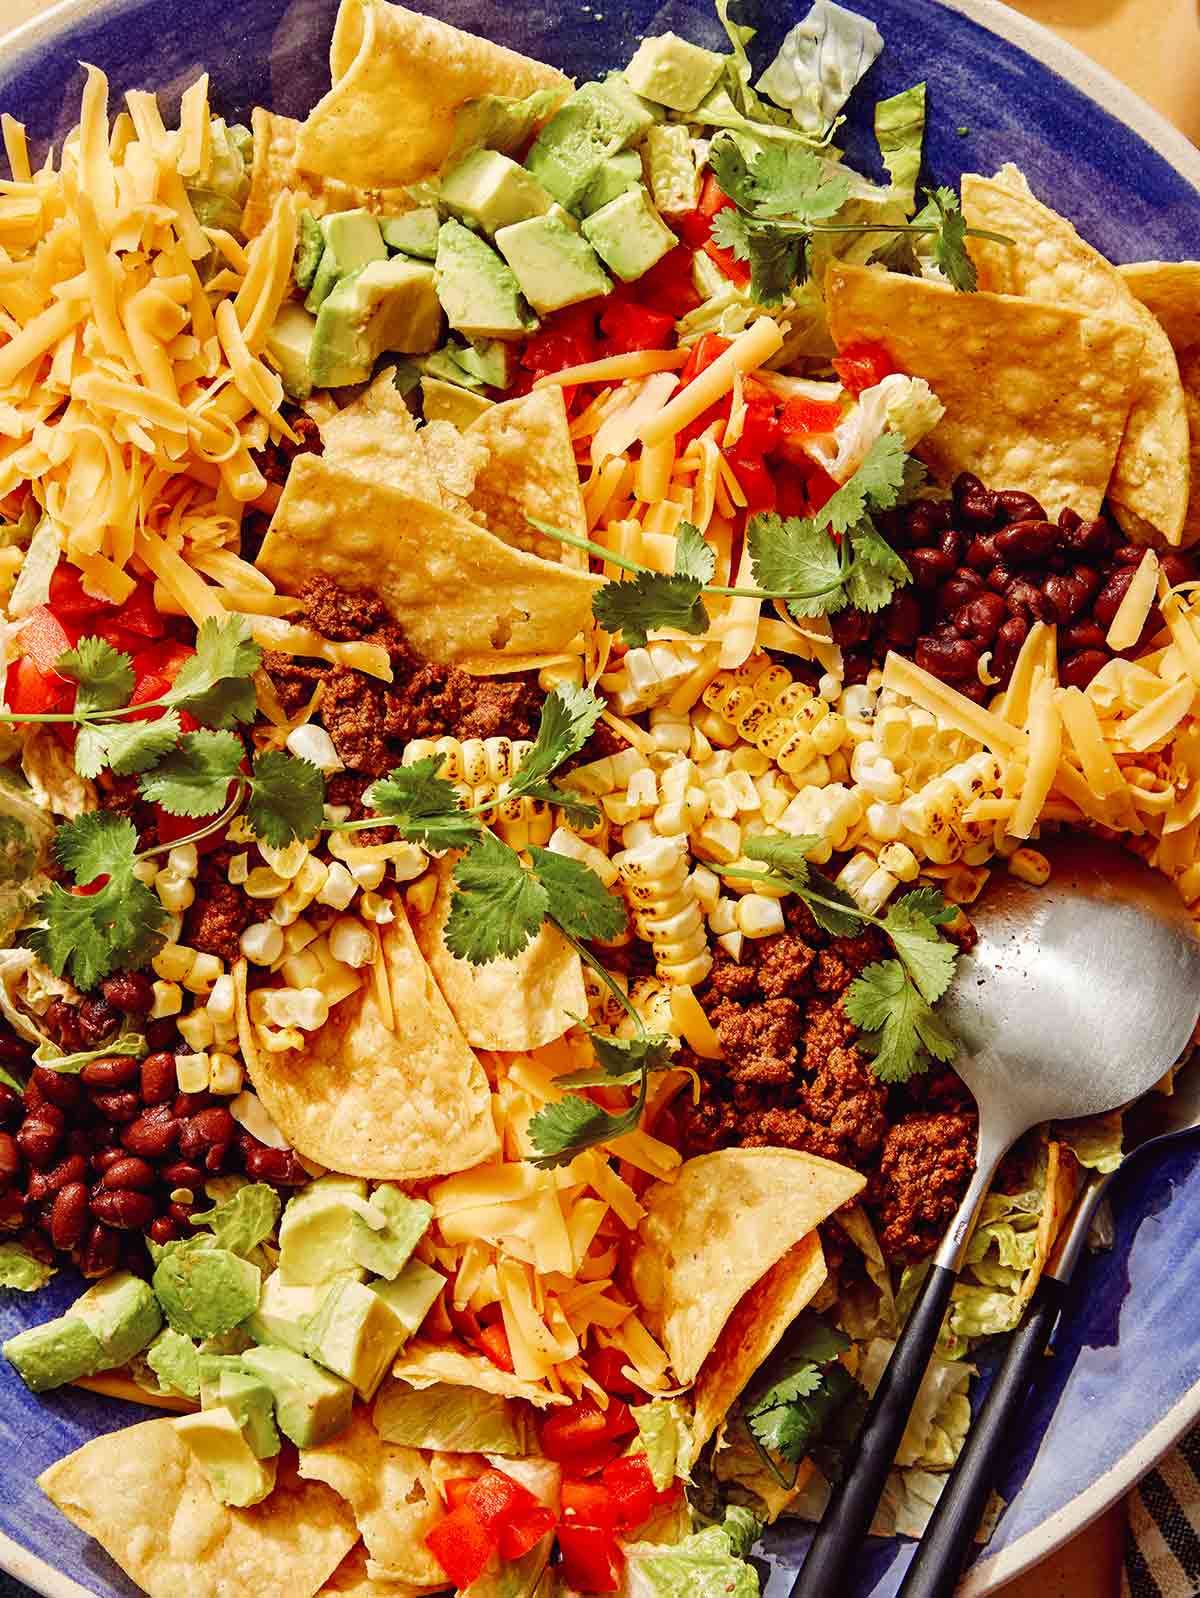
Tacos aren’t reserved for Tuesdays, although we love a good mid-week crunchy taco or taco dip. This hearty taco salad recipe is perfect any day of the week. Whether you’re enjoying dinner at home or need a passing dish, we know you’ll love this recipe. Crisp romaine and seasoned beef are all topped with corn, tomatoes, black beans, shredded cheese, sliced jalapeno, and avocado. Then just to take this salad over the top, add a…
Tacos aren’t reserved for Tuesdays, although we love a good mid-week crunchy taco or taco dip. This hearty taco salad recipe is perfect any day of the week. Whether you’re enjoying dinner at home or need a passing dish, we know you’ll love this recipe. Crisp romaine and seasoned beef are all topped with corn, tomatoes, black beans, shredded cheese, sliced jalapeno, and avocado.
Then just to take this salad over the top, add a generous drizzle of creamy chipotle dressing. It’s cool and spicy, bringing all the flavors together. Bring this taco salad to your next potluck or picnic, or serve as a main course with appetizers of chips, guacamole, and homemade mango salsa.
How to Make Our Taco Salad Recipe
Ingredients
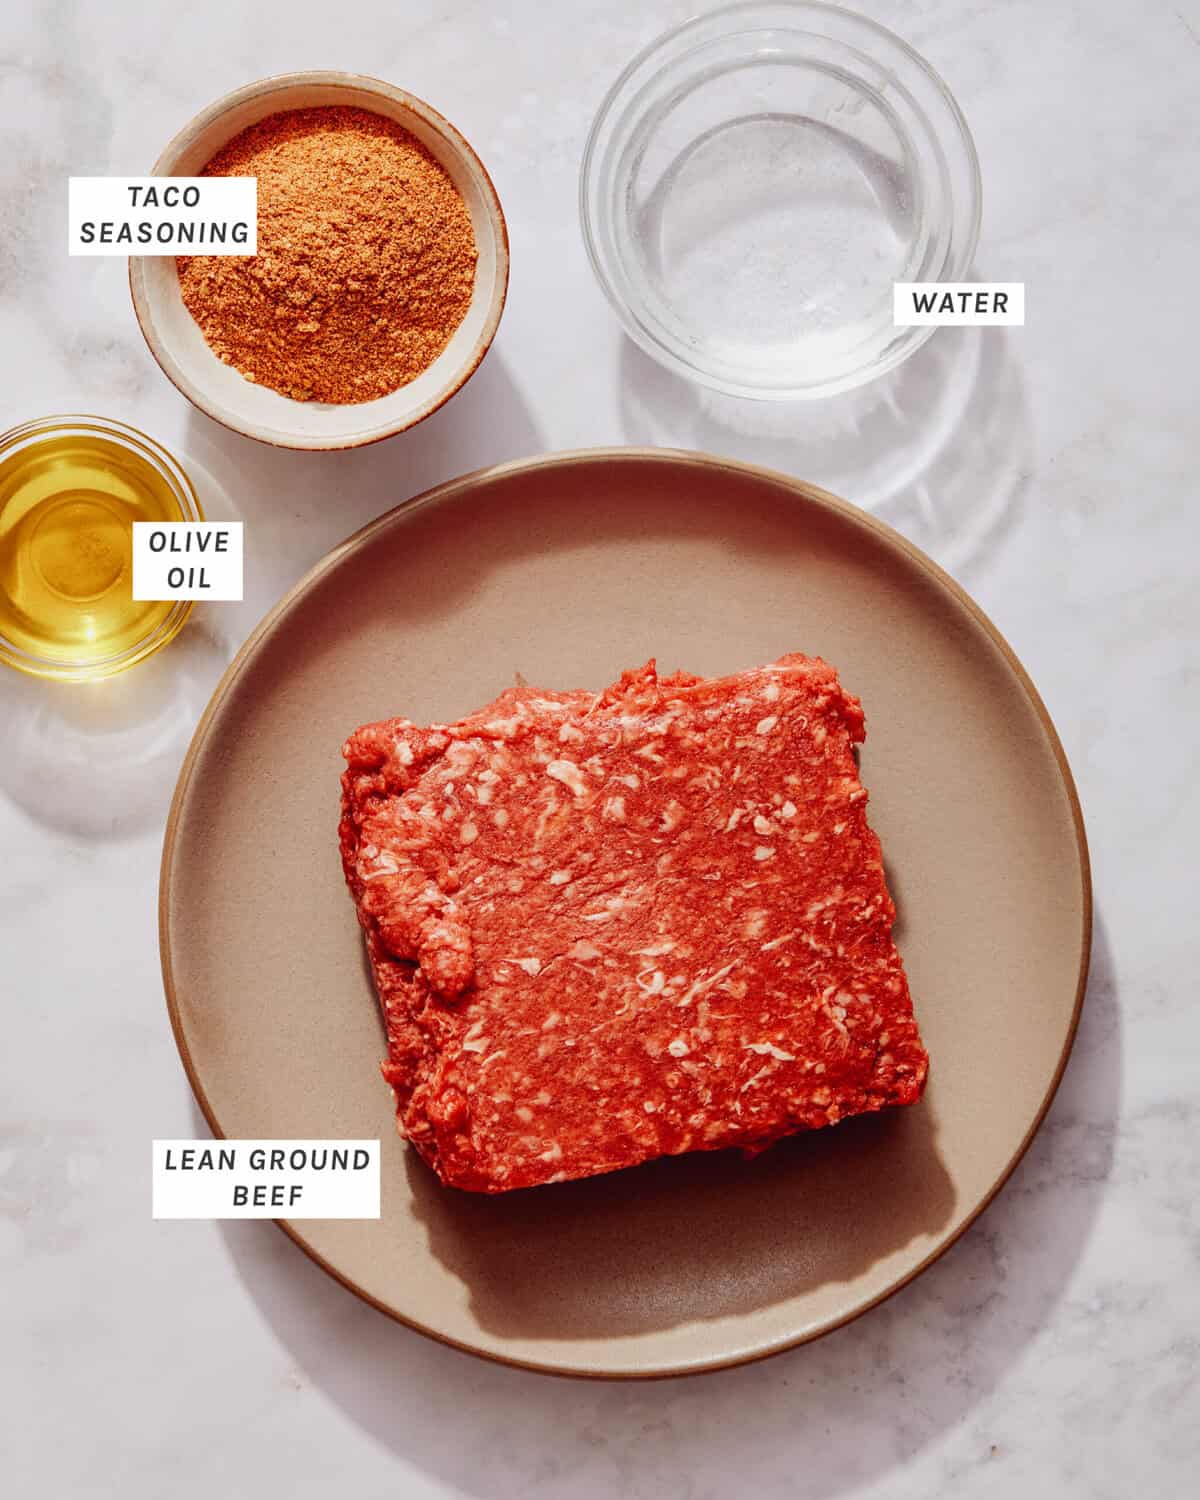
Beef
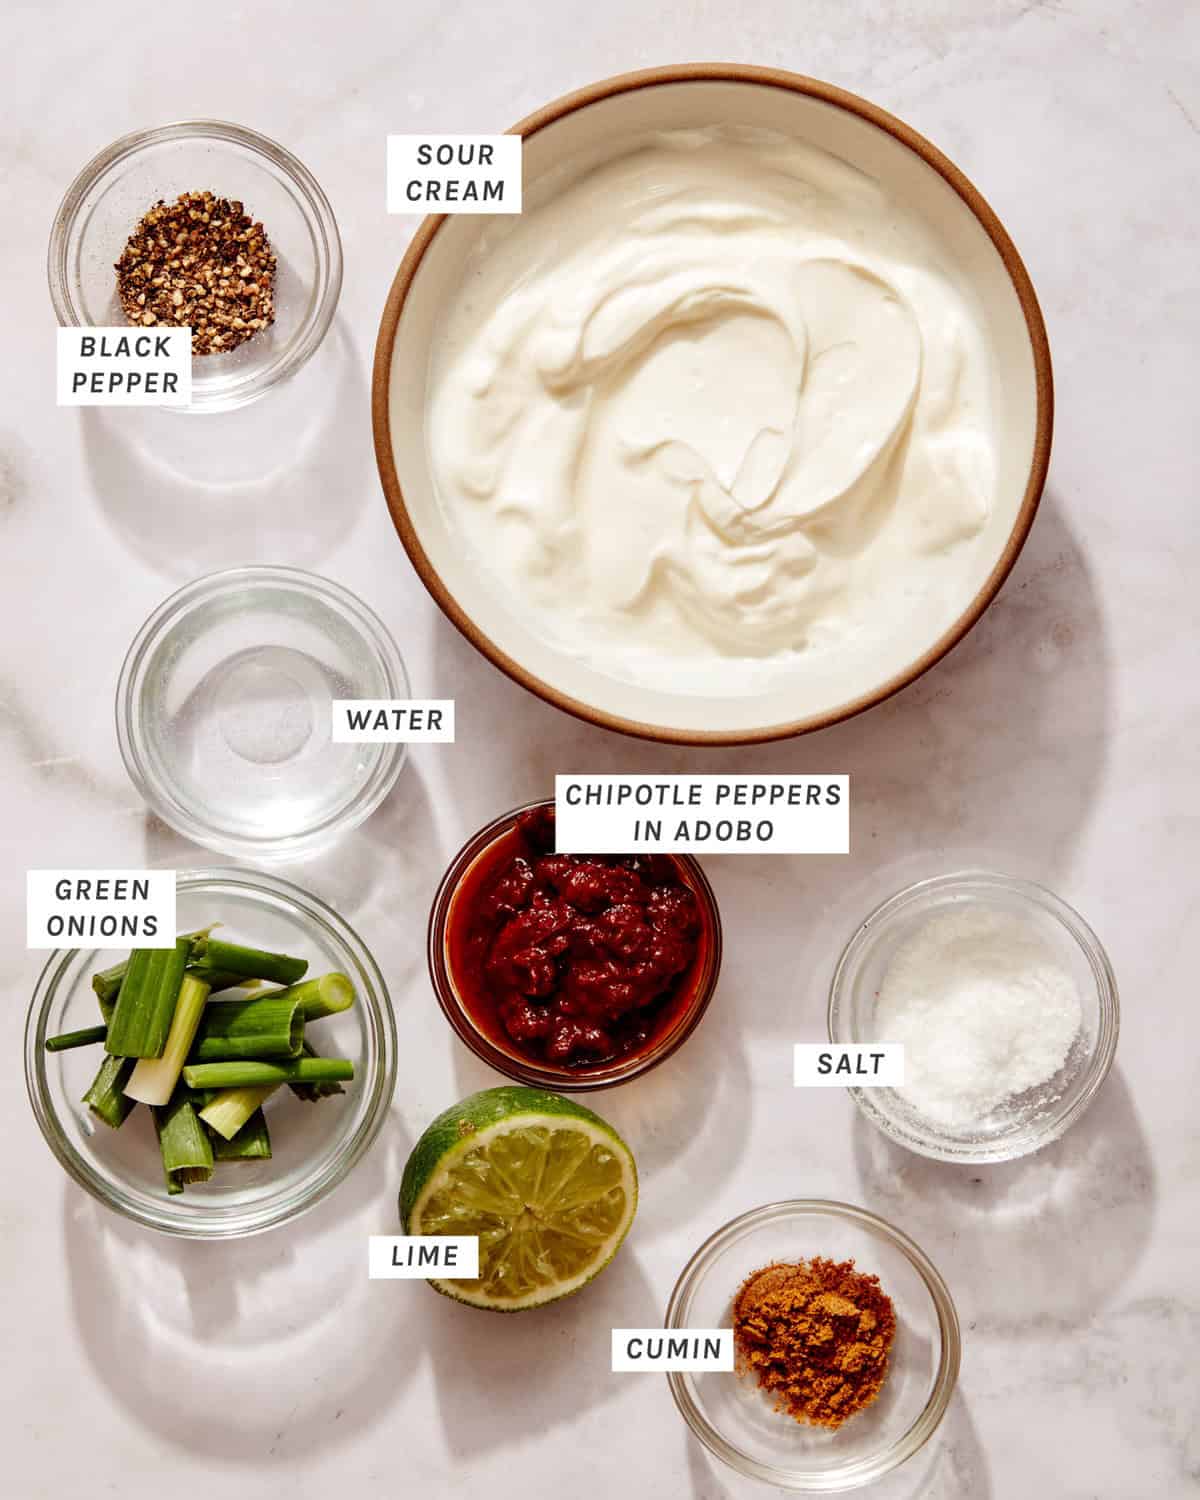
Dressing
Assembly
Process
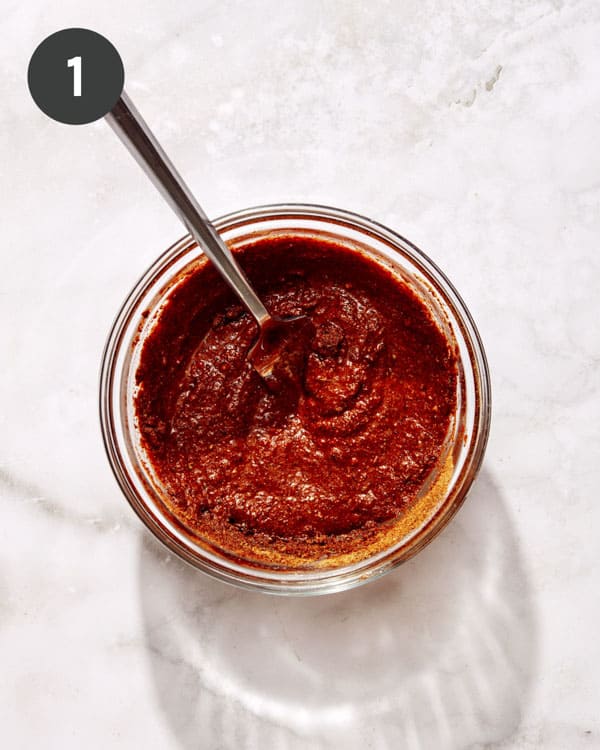
In a small bowl, stir together taco seasoning and water to form a paste.
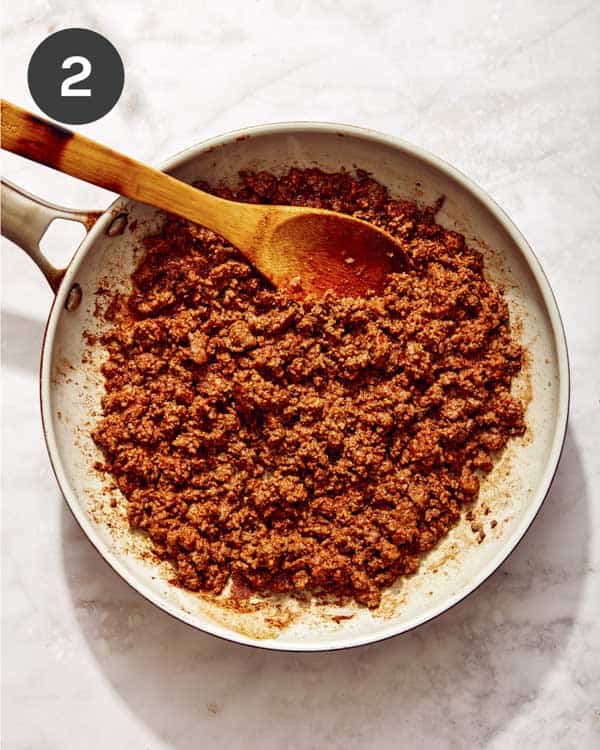
Place a large pan over medium-high heat. Add oil and ground beef, using a wooden spoon to break the beef up into small pieces. Cook until beef has just browned, 2 to 3 minutes. Pour the paste into the pan and stir into beef. Continue to stir until beef is evenly seasoned and cooked through, 2 to 3 minutes. Remove from heat and set aside to slightly cool.
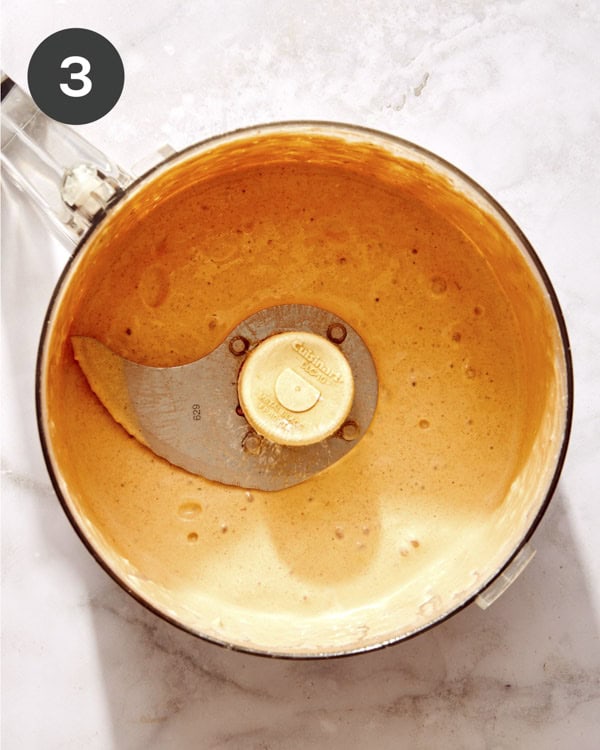
In a food processor, combine all dressing ingredients and blend until smooth. Adjust salt and pepper to taste as needed.
In a large salad bowl, combine romaine, chips, and 1/2 dressing. Toss together until evenly coated.
Add corn, tomatoes, black beans, shredded cheese, sliced jalapeno, and avocado. Drizzle with remaining dressing and toss together. Serve.
Why Romaine Lettuce is Our Pick for Taco Salad
Romaine is our favorite lettuce for taco salad (and any salad that has a lot of hearty ingredients added to it). The crisp crunch and heavy-duty texture help it stand up to add-ins like beef, beans, tomatoes, and avocado. It also has a higher nutritional value being a leafy green.
Iceberg lettuce is most commonly used in taco salad recipes, and while it works, the lack of flavor and nutrients make it our second choice.
More Great Lettuce/Cabbage Options for Our Taco Salad Recipe
If you want to try other lettuce options for your taco salad, feel free to swap half or all of the romaine with any of the following:
Spinach: adds more tenderness to the salad while increasing the nutrients like vitamin C and magnesium.
Kale: chopped kale leaves add a heartier and chewier texture while also adding some bitterness that goes well with the chipotle dressing.
Cabbage: add a handful of shredded green or purple cabbage for some extra crunch and a burst of peppery flavor.
Butter lettuce: we love butter lettuce for our chicken lettuce wraps, but they also add a nice soft texture and mild taste to taco salad!
Tips for the BEST Taco Salad!
Make it easier! Use prewashed and chopped lettuce, swap avocado for premade guac (that’s always fresh), use store-bought dressing, and swap the diced tomatoes for packaged pico de gallo to save time and effort making this taco salad.
Crumble the beef as you cook it. Small pieces of ground beef help make sure each bite has a little bit of flavorful, tender taco meat!
If you’re making this for a potluck or crowd, double the recipe and keep the dressing, avocado, and tortilla chips separate until just before serving! You can also serve this “taco bar style” with all the toppings on the side.
Substitutions and Variations
Swap the ground beef. Use ground turkey, ground chicken, or even tofu in place of the ground beef.
Swap the dressing. If you don’t want to make the creamy chipotle dressing, you could also use a storebought ranch, southwest ranch, or even a dollop of sour cream and salsa.
Make the dressing dairy-free. Instead of sour cream, use a dairy-free plain yogurt for the creamy chipotle dressing. (And skip the cheese or use vegan cheese for a completely non-dairy taco salad).
Make it vegan: Use tofu or vegan beef crumbles instead of ground beef, skip the cheese, and use a dairy-free dressing or the substitute above for dairy-free creamy chipotle dressing.
Make a layered salad. Instead of mixing everything into a large bowl, layer all of the ingredients into a glass mixing bowl, giving it a fun presentation!
Swap the cheese. We use shredded cheddar cheese, but feel free to swap this with cotija, queso fresco, Pepperjack, Monterrey Jack,
Add some crunch. For an extra texture boost, top the salad with pepitas, corn nuts, or diced jicama.
Prep Ahead and Storing Instructions
To make meal assembly as easy as possible, go ahead and prep the beef, romaine, and dressing ahead of time.
Beef. Cook and season the beef, then let cool. Store in an airtight container in the refrigerator for up to 3 days before assembling.
Romaine. Wash, dry, and chop the romaine leaves. Store in an airtight container with a paper towel to help absorb moisture for 1-3 days before assembling.
Dressing. Make the dressing as directed. Store in the refrigerator for up to 1 week.
If you want to store leftovers of this salad, only add the dressing to the salad that’s being eaten, as it will cause the lettuce to become soggy if it’s stored together. Store the dressing and salad separately in the refrigerator.
Crispy romaine, seasoned beef, and a flavorful, creamy chipotle ranch dressing bring this Taco Salad Recipe to life, perfect for a summer potluck or an easy weeknight meal!
Course dinner, lunch, Main Course, main dish, Salad
In a small bowl stir together taco seasoning and water to form a paste.
Place a large pan over medium-high heat. Add oil and ground beef, using a wooden spoon to break the beef up into small pieces. Cook until beef has just browned, 2 to 3 minutes. Pour paste into pan and stir into beef. Continue to stir until beef is evenly seasoned beef has cooked through, 2 to 3 minutes. Remove from heat and set aside to slightly cool.
dressing
In a food processor combine all dressing ingredients and blend together until smooth. Adjust salt and pepper to taste as needed.
assembly
In a large salad bowl combine romaine, chips and 1/2 dressing. Toss together until evenly coated.
Add corn, tomatoes, black beans, shredded cheese, sliced jalapeno, and avocado. Drizzle with remaining dressing and toss together. Serve.
Notes
Tips for the BEST Taco Salad!
Make it easier! Use prewashed and chopped lettuce, swap avocado for premade guac (that’s always fresh), use store-bought dressing, and swap the diced tomatoes for packaged pico de gallo to save time and effort making this taco salad.
Crumble the beef as you cook it. Small pieces of ground beef help make sure each bite has a little bit of flavorful, tender taco meat!
If you’re making this for a potluck or crowd, double the recipe and keep the dressing, avocado, and tortilla chips separate until just before serving! You can also serve this “taco bar style” with all the toppings on the side.
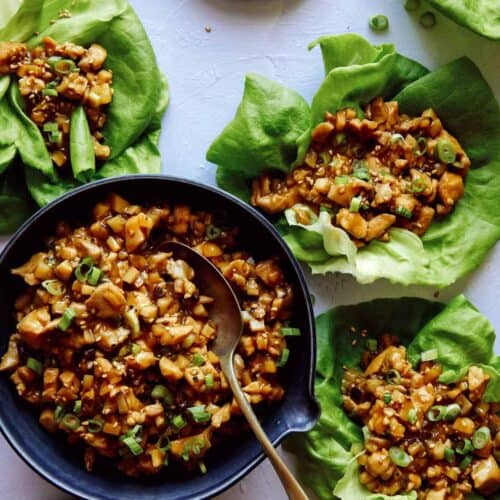
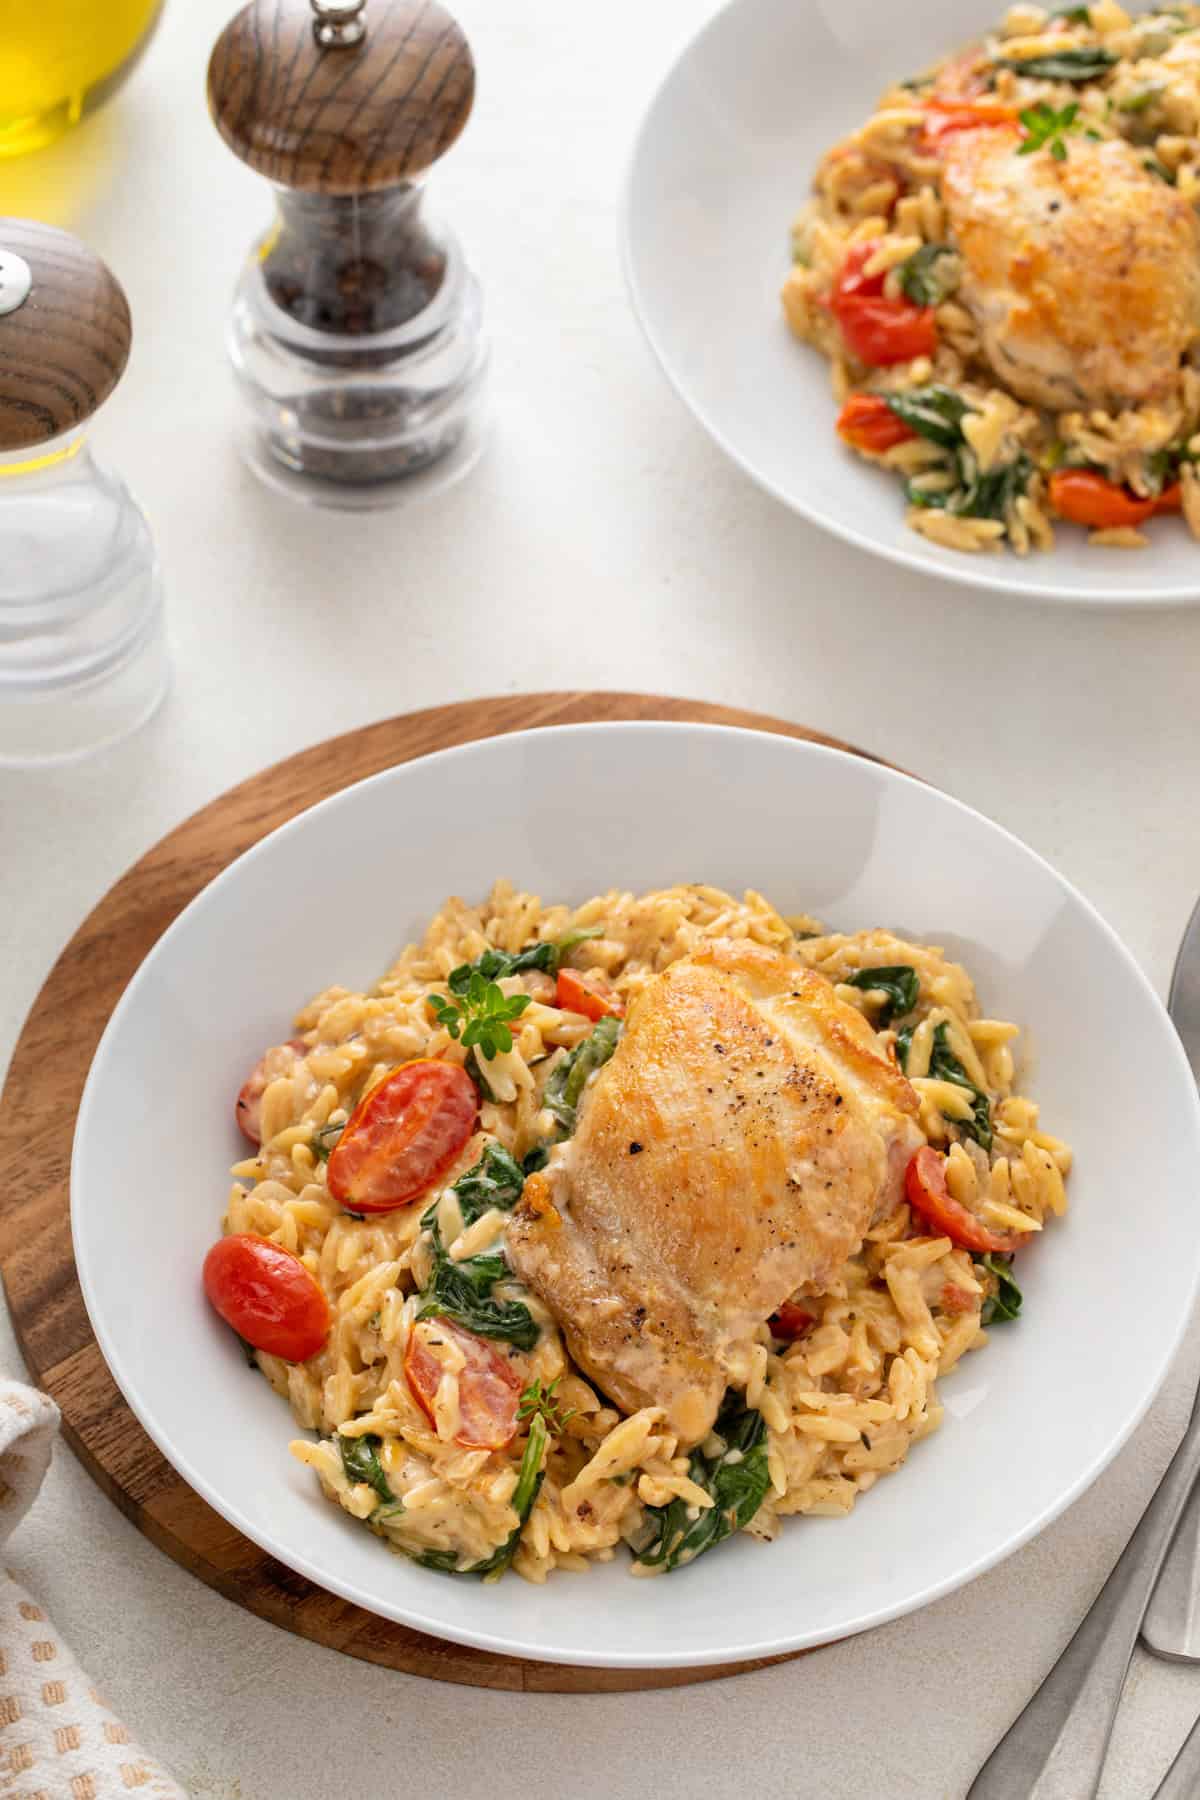
Tender chicken, orzo pasta, tomatoes and spinach come together in a lemony cream sauce for a delicious dinner made all in one pan. This one-pot lemon chicken and orzo will become a weeknight dinner favorite in no time!
We love one-pot dinners around here. There’s nothing better than minimal cleanup and having a meal that my family will happily gobble up.
One-pot spaghetti and one-pot beef stroganoff are big hits around here. I wanted to add to my list of one-pot dinners with something around chicken and orzo (one of my favorite little pasta shapes) and this one-pot lemon chicken and orzo was born.
Between the chicken, the orzo, and the spinach and tomatoes, this is truly a full meal in one pan. Talk about a weeknight dinner win!
This asparagus quiche recipe is a total showstopper! Flaky pastry crust, tender asparagus spears, and a savory cheese filling come…
This asparagus quiche recipe is a total showstopper! Flaky pastry crust, tender asparagus spears, and a savory cheese filling come together for a satisfying and impressive dish.
The buttery scent of this asparagus quiche recipe in the oven may win you one or two marriage proposals—or at least it will have the neighbors wandering by to snatch up a slice! It’s packed with savory, cozy flavor, perfect for spring brunches or light dinners with a crisp glass of white wine.
Why we love this recipe: This asparagus quiche is worth every second of time for the satisfaction you’ll get from making a quiche from scratch. Plus, it’s easy to make in advance. We served it to guests who went gaga over this one. Come: let’s make quiche!
How to make this asparagus quiche recipe: an overview!
In under 2 hours, you’ve got a complete masterpiece of an asparagus quiche recipe: made completely from scratch. That includes a homemade quiche crust. Want a shortcut? You can do store-bought crust too: see below. But we highly recommend the homemade crust: it’s crispy, buttery perfection. Here’s what to expect from this process timing-wise:
Make the quiche dough
20 minutes, active
Freeze the crust
15 minutes, inactive
Blind bake the dough+ make the filling
25 minutes, active
Bake the quiche
40 to 50 minutes, inactive
Here is an overview in photographs of how to make this asparagus quiche. For all the details, jump to the full recipe below.
Step 1: Make the quiche crust (go this quiche crust recipe for instructions). Freeze it for 15 minutes. Blind bake the crust with pie weights at 375°F for 15 minutes.
Step 2: Make the filling: sauté the asparagus. Whisk together the eggs, milk, cream, salt, and pepper. Place grated smoked mozzarella cheese in bottom of the crust. Pour the egg mixture over the top. Sprinkle the sauteed asparagus and feta cheese crumbles.
Step 3: Bake the quiche for 40 to 50 minutes at 350°F.
Tips for homemade quiche crust
Ever made a quiche crust from scratch? It’s pretty simple, but you do need a few dough-making techniques. Working with dough takes time and practice. If it’s your first time, give yourself patience and grace.
Use a standard 9-inch pie plate, not deep dish. Deep dish will be too thick for the filling amount here.
A pastry cloth can be helpful (optional). It helps for rolling out the dough so it doesn’t stick on the counter. If you don’t have one, just lightly dust the counter with flour.
Use the tines of a fork to decorate the edge. This is easier than a fluted edge, though either works.
You’ll freeze the crust 15 minutes before blind baking it. This helps the crust to hold its shape while blind baking. This freezer method shortcuts refrigerating for a few hours. (You’re welcome!)
Blind baking is key for the crust
The biggest key to making an asparagus quiche recipe is blind baking the crust. Blind baking is baking a pie crust without the filling. This makes sure that crust is perfectly firm before you add the wet filling, which is especially important for a custard pie like a quiche because the filling is so wet. If you don’t blind bake, you’ll get soggy bottom crust for sure (we did!). Here’s what to know about blind baking and how to get the perfect flaky crust:
Prick holes with a fork all over the crust. This is called docking the crust: it makes it puff up less while in the oven.
Add pie weights: like dried beans or rice! You can use ceramic pie weights (we used these) to weigh down the crust so it doesn’t get too puffy. Or, you can use dried beans or dry rice! It doesn’t harm the beans or rice: you can still cook them as normal after using them as weights.
Shortcut: use store-bought crust
Yes, you can short-cut the effort to make your homemade crust and go with a store-bought pastry crust. Any type of purchased pie crust works (we don’t have a favorite brand since we always make our own). You’ll still need to blind bake the store-bought crust! So start in the recipe below at Step 3.
Make ahead instructions
Yes, it takes about 2 hours to make! But here’s the thing: only about 1 hour of it is active time. Even better: it saves VERY well. It’s so easy to make the night before, or even a few days in advance! Here’s what to do:
Make the entire quiche 1 to 3 days in advance. Then refrigerate it until serving!
Warm in a 200 degree oven for about 20 minutes before serving. It’s also delicious cold, but we like it warmed up.
Saves 5 days refrigerated. Wrap it in plastic or aluminum to keep it fresh.
Ways to serve asparagus quiche
This asparagus quiche recipe is a total showstopper! We served this at a spring birthday brunch for my mom and everyone went crazy over it. In fact, it was suddenly gone before we knew it! It was absolutely perfect for a festive occasion (it would be great for Easter or Mother’s Day). While recipe testing, we also ate it for dinner: which was perfect as well. Here are some ways to serve quiche:
Pre-cooking the asparagus for a few minutes is essential to ensure it’s tender throughout the quiche.
How can I avoid a soggy quiche crust?
Soggy quiche crust can happen for a few reasons. Make sure your dough is chilled before baking to prevent it from melting too quickly. It’s essential to pre-bake (blind bake) the crust for a few minutes before adding the filling.
Can I use a store-bought pie crust?
Absolutely! Using a store-bought crust is a great time-saver. Just follow the package instructions for pre-baking.
How can I tell when my quiche is done?
The quiche is done when the center is no longer jiggly and a toothpick inserted comes out clean. The crust should also be golden brown.
This asparagus quiche recipe is a total showstopper! Flaky pastry crust, tender asparagus spears, and a savory cheese filling come together for a satisfying and impressive dish.
Make the quiche crust: Preheat the oven to 375°F. In a medium bowl, mix the all-purpose flour, kosher salt, and baking powder. Slice the butter into pieces, then cut it into the flour mixture using a pastry blender until a coarse meal texture is obtained. Sprinkle the ice water over the flour 1 tablespoon at a time, mixing gradually with fork until the dough sticks together. Add additional water by the tablespoon until the dough comes together but is not sticky. Form the dough into a ball.
Roll out and freeze the dough: If you have a pastry cloth, set it up and dust it with flour; otherwise, flour a clean work surface. Put on a rolling pin cover (optional), and either way, dust the pin in flour. Roll the dough to an even 12-inch circle (which corresponds to the 9-inch pie pan). Use a rolling pin to transfer the dough to the pie pan (make sure it is standard and not deep dish). Fold the overhanging dough backwards and seal it to form a rim. Then press it with the tines of a fork to decorate the edges (see the photos). Use a fork to gently prick holes in the bottom and sides of the crust (this helps it to not puff up while blind baking). Freeze the crust for 10 minutes before blind baking.
Blind bake the crust: Remove the dough from the freezer and place a sheet of parchment paper on top of the crust. Fill the dough with pie weights (we used two sets of these), dry beans, or dry rice. Bake for 15 minutes, then carefully remove the parchment and weights and bake additional 8 minutes until the bottom is lightly browned. Remove from the oven and go to Step 5.
Sauté the asparagus: Meanwhile, wash the asparagus and trim off the ends. Cut the stalks into bite-sized pieces. In a large skillet, heat the olive oil over medium high heat. Add the asparagus, ¼ teaspoon kosher salt, and a few grind black pepper. Cook, stirring occasionally, until the largest pieces are tender, about 5 to 8 minutes. This depends on the thickness and maturity of the asparagus, so it’s different every time! Taste and remove when it’s just tender and still bright green, but not crunchy.
Reduce the oven heat: When the crust is done blind baking, remove it from the oven and reduce the heat of the oven to 350°F.
Make the filling: In a medium bowl, whisk together the eggs, milk, cream, ¾ teaspoon kosher salt, and several grinds black pepper. Place the grated smoked mozzarella cheese in bottom of the crust. Pour the egg mixture over the top. Sprinkle the sauteed asparagus and feta cheese crumbles.
Bake: Bake 40 to 50 minutes minutes, until the center is set and the top is lightly browned. Cool at least two hours. It’s easiest to make the night before, so you can refrigerate until serving. Re-warm in a 200°F oven for 20 minutes. (You can also serve it cold.) Leftovers stay for 5 days refrigerated.
Notes
*You can also use a storebought pastry crust to shortcut some time. You’ll still need to blind bake the crust, so start with Step 3.
Made with only 4 simple ingredients, these 7UP biscuits are a dream! These fluffy, buttery biscuits come together in just minutes and are delicious for breakfast or as a side for dinner.
I love finding new ways to use my homemade bisquick mix. It’s one of my very favorite kitchen staples to keep on hand, and it makes so many recipes so quick and easy.
Recipes like apple cobbler and impossible coconut pie are staples for us, since I can toss them together in almost no time. And with our packed schedule these days, fast is necessary.
These 7UP biscuits are yet another easy bisquick recipe. They have an unusual mix of ingredients that turns into super fluffy, buttery, tender biscuits that you’ll want to eat for every meal of the day.
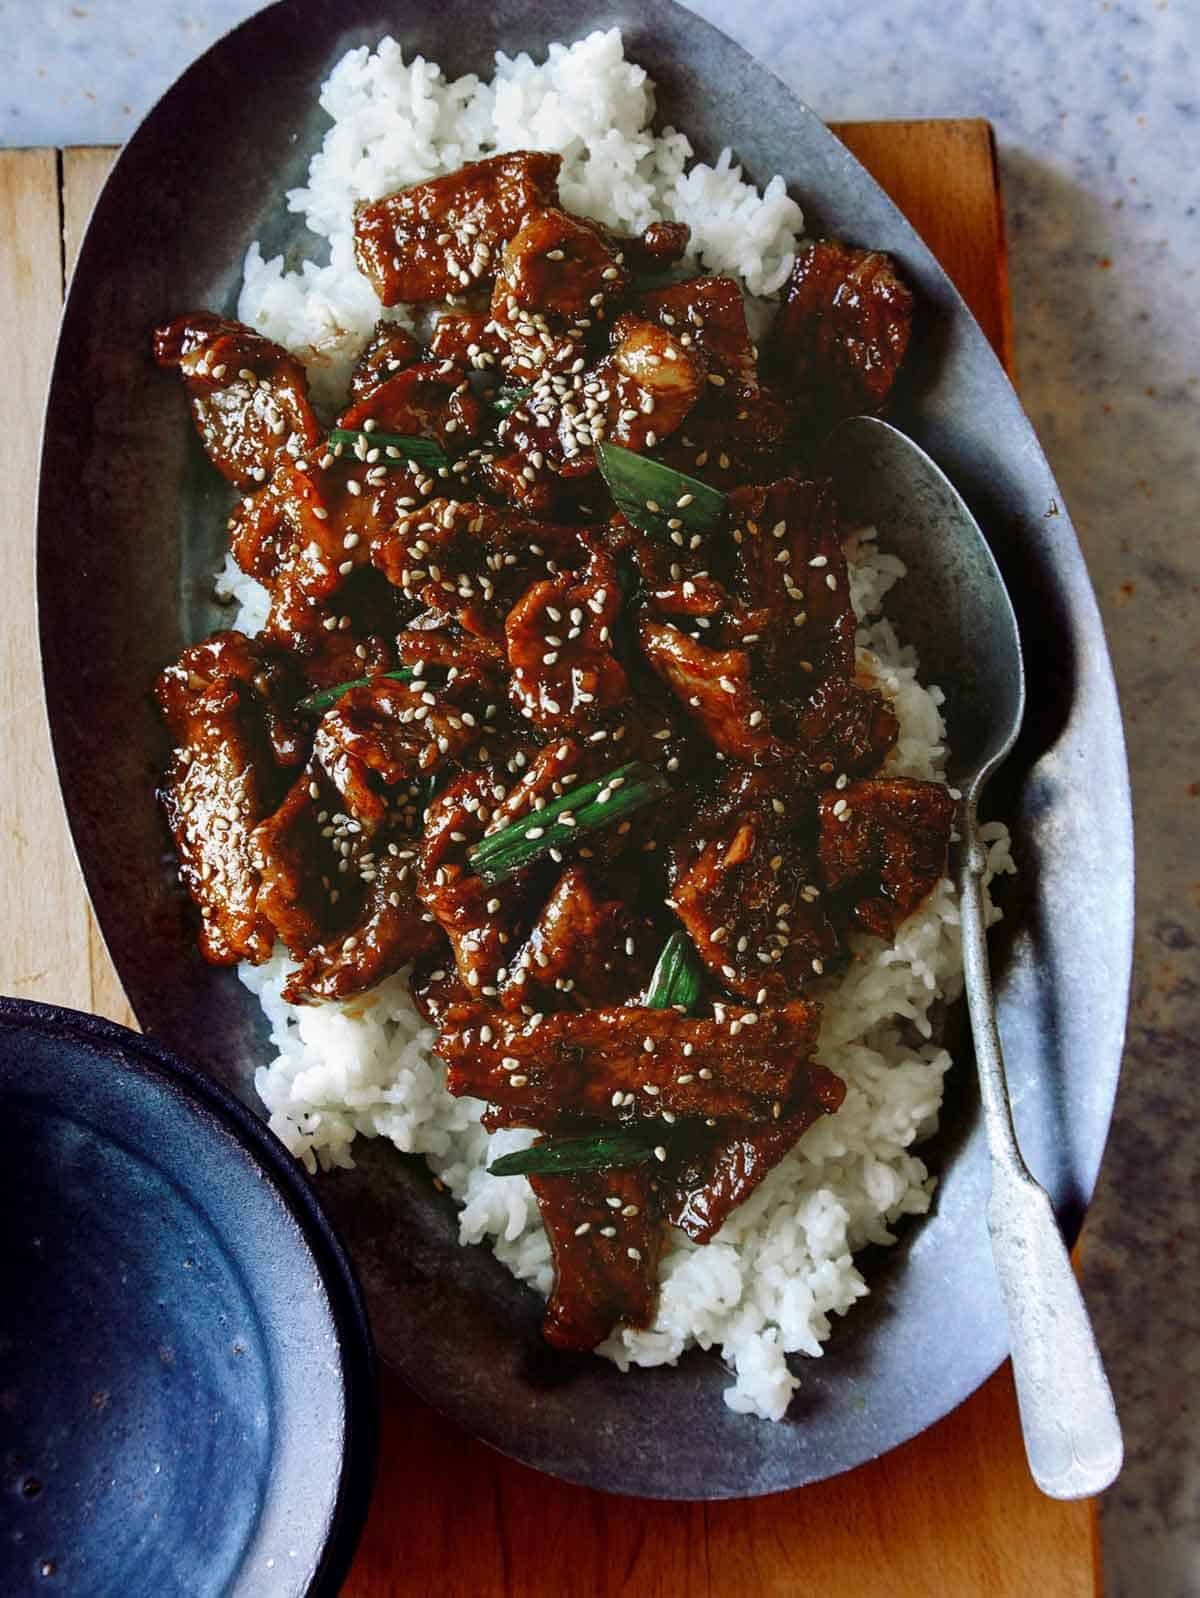
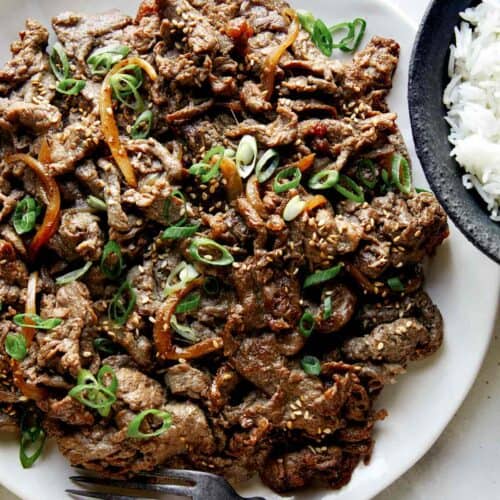
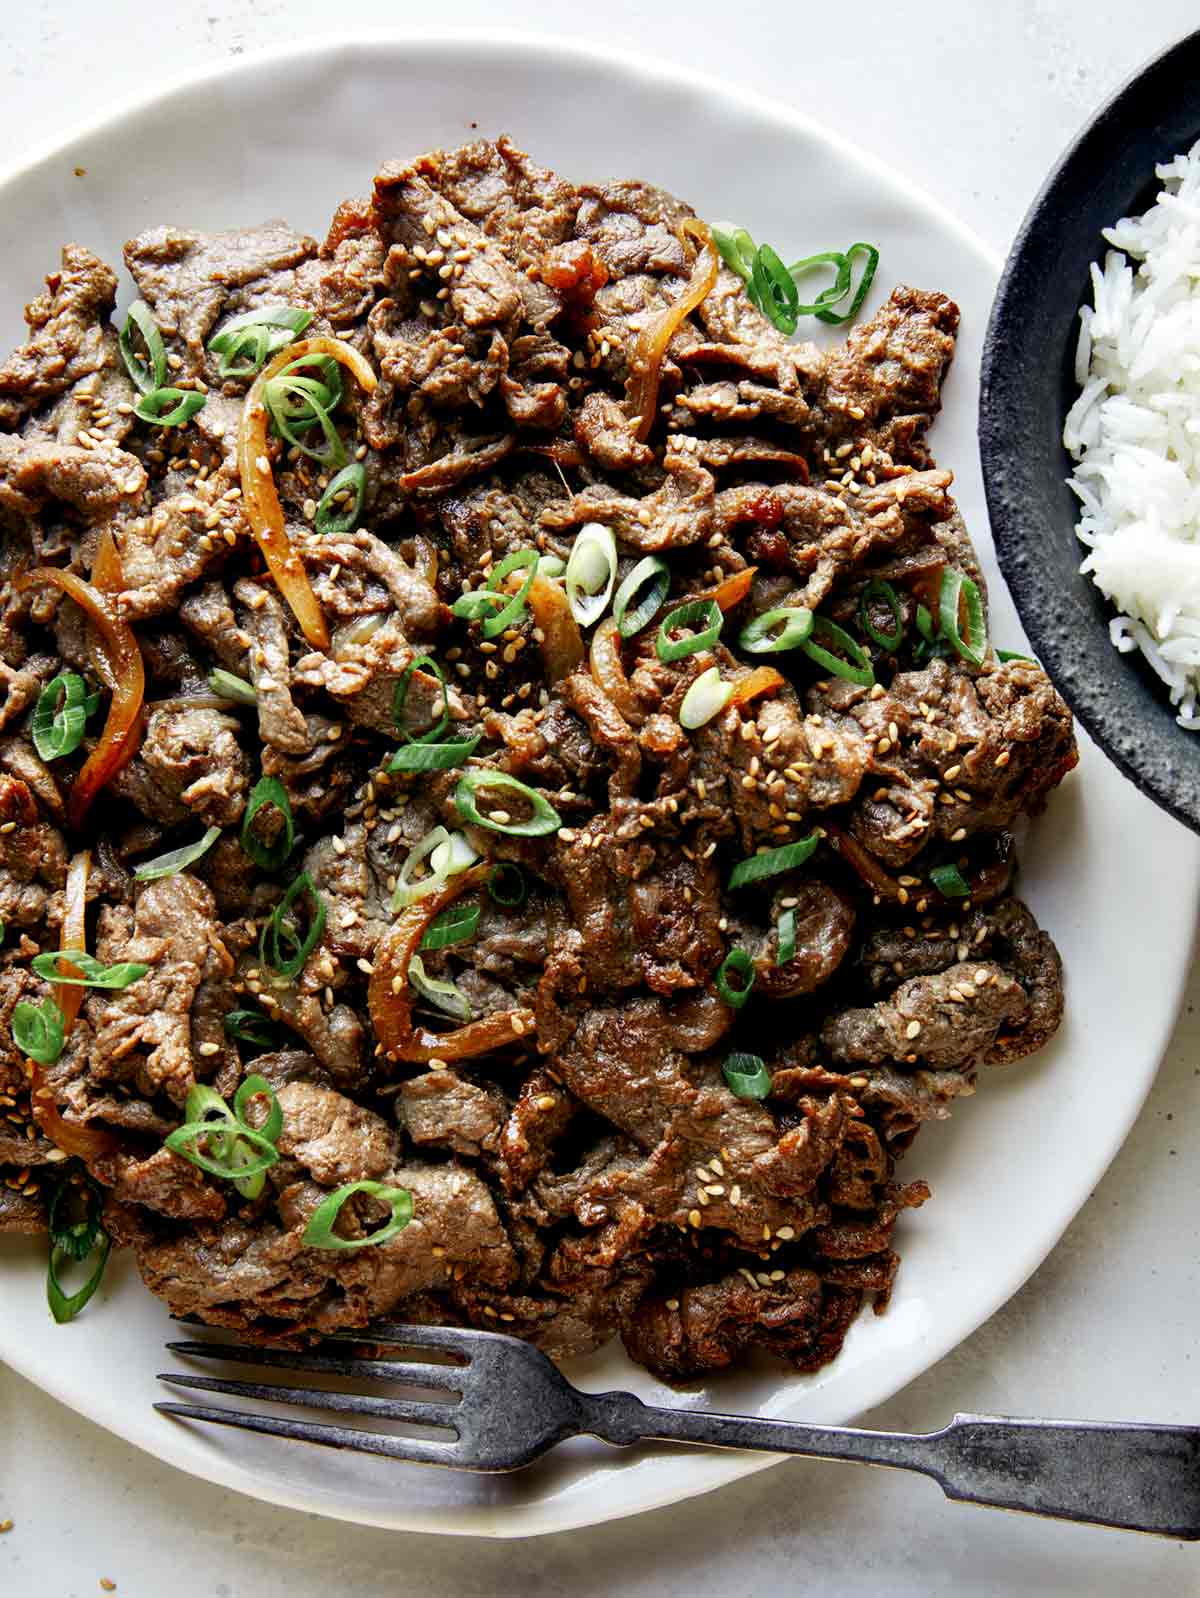
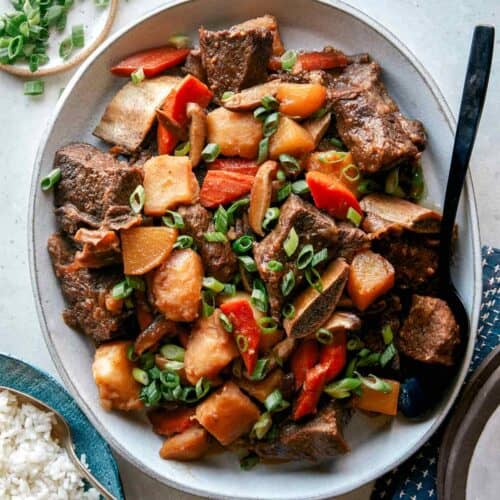
Korean Beef Bulgogi is something my mom made for dinner frequently while I was growing up. My mom’s bulgogi is a family favorite and I still look forward to it whenever we get together. Since my parents live in Chicago and I live in LA, I decided I needed to learn to make it myself, so I could enjoy it whenever I wanted. I love that this dish can be enjoyed in so many ways….
Korean Beef Bulgogi is something my mom made for dinner frequently while I was growing up. My mom’s bulgogi is a family favorite and I still look forward to it whenever we get together. Since my parents live in Chicago and I live in LA, I decided I needed to learn to make it myself, so I could enjoy it whenever I wanted.
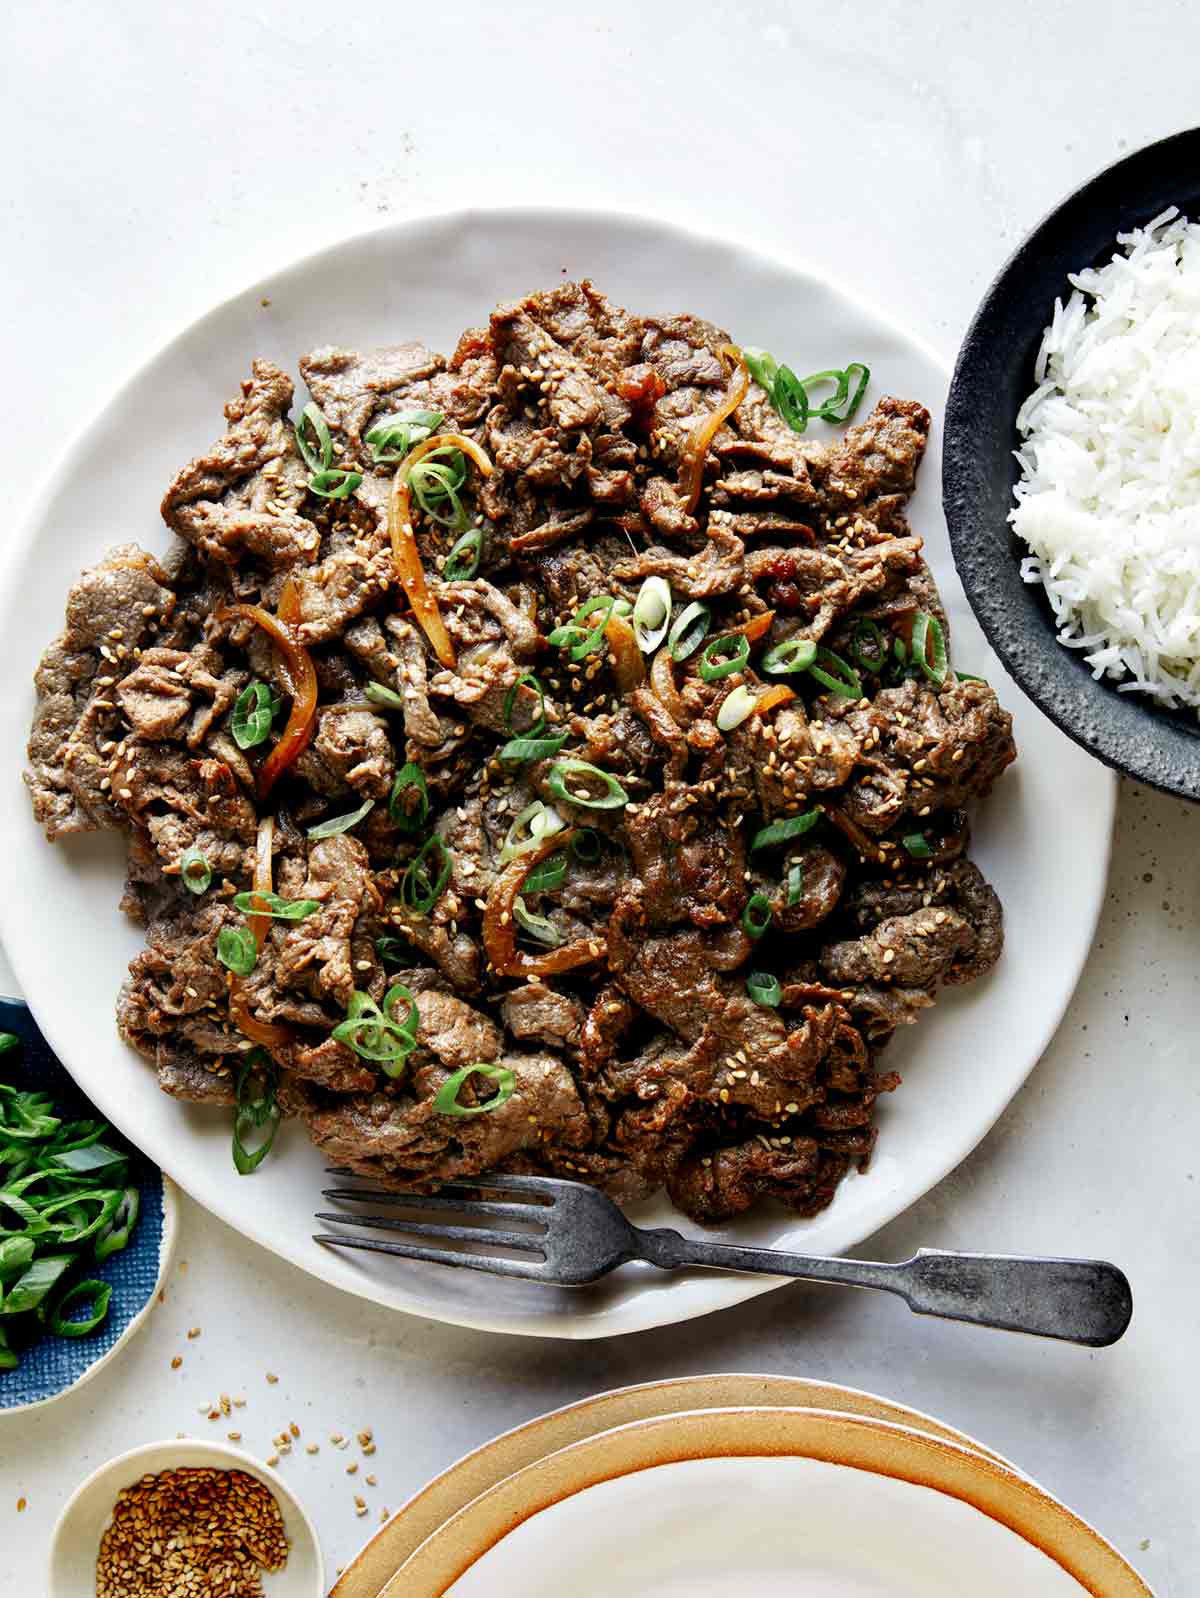
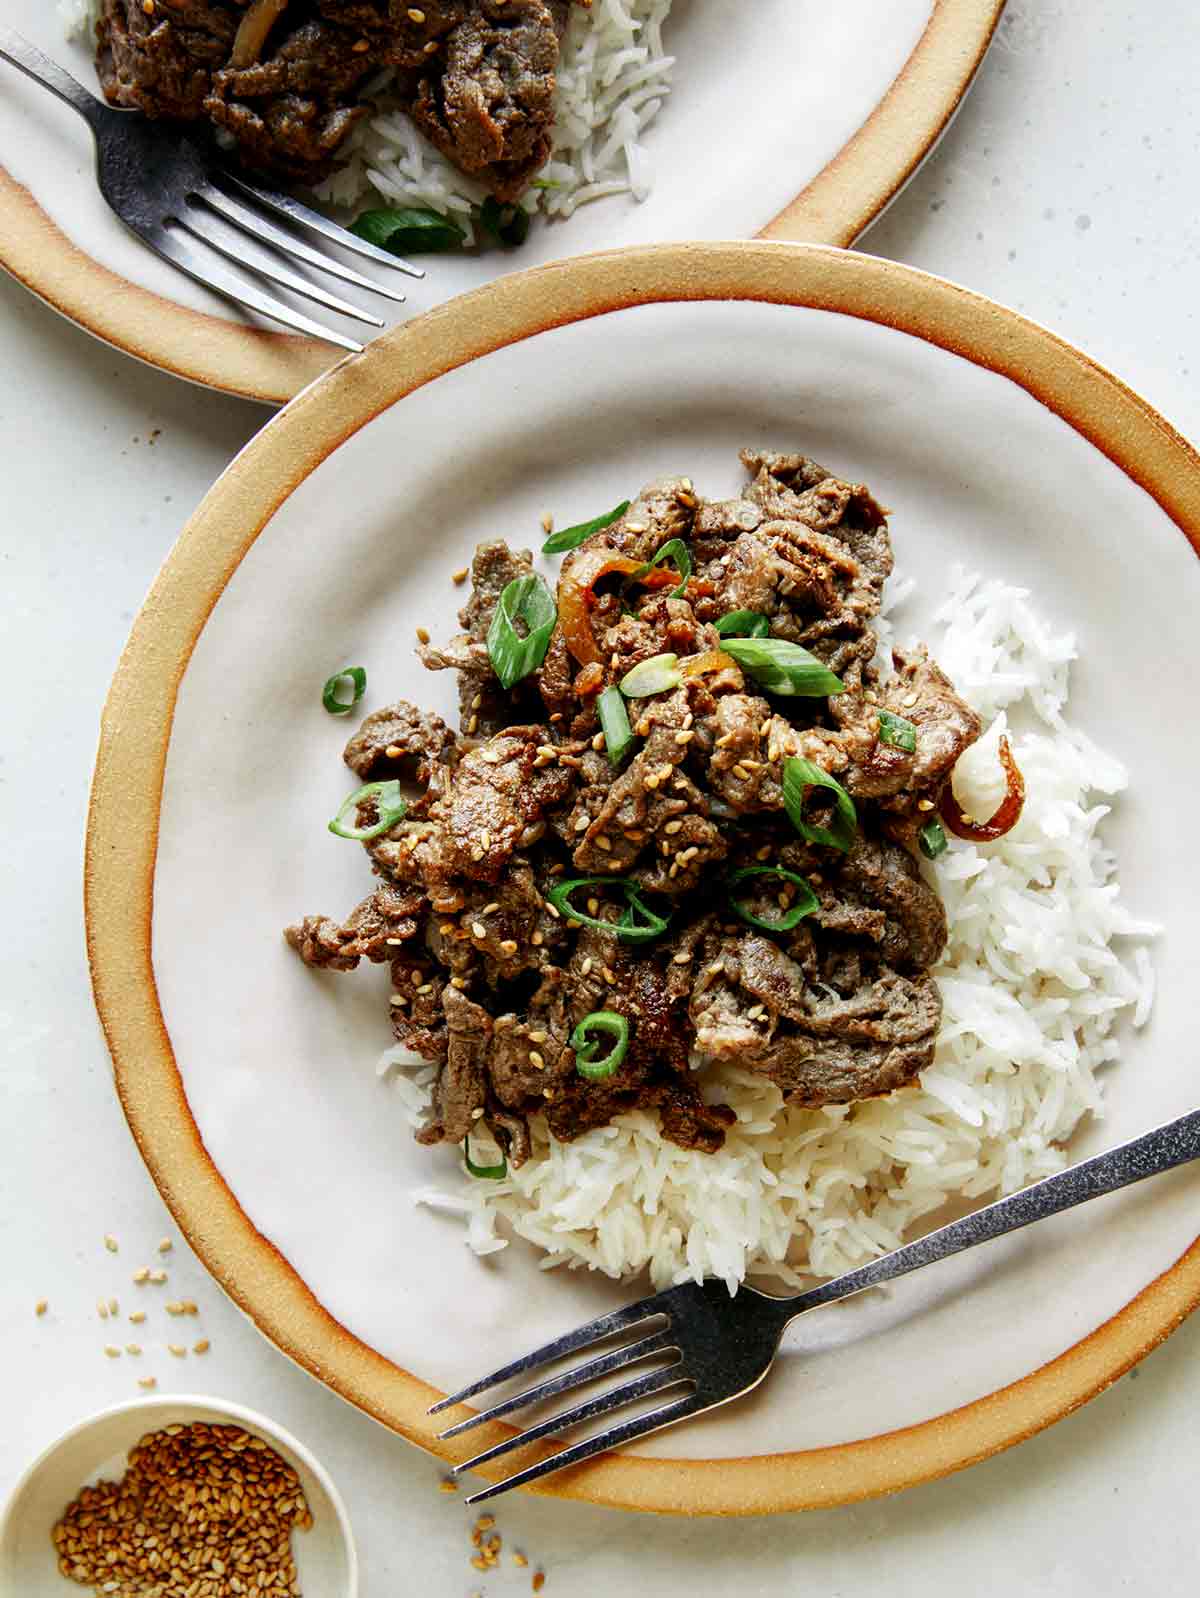
I love that this dish can be enjoyed in so many ways. You can simply serve it with a side of steamed rice, in tacos and burritos, as a filling ingredient for kimbap, in nachos, tossed together with noodles, diced and cooked into a fried rice, the options are really endless!
What is Bulgogi and What Does it Taste Like?
Bulgogi is a popular Korean BBQ dish (literally translating to “fire meat”) made of thinly sliced marinated beef ribeye or sirloin. The beef is marinated in a blend of soy sauce, sesame oil, onion, garlic, ginger, sugar, asian pear, and black pepper. It’s marinated for several hours which flavors and tenderizes the meat.
The flavor of bulgogi is savory, salty and sweet. Our recipe has a mildly sweet and salty flavor – more mild than other recipes or what you may have tasted from a Korean bbq restaurant. If you want to up the sweetness or the saltiness or both, just add a couple more teaspoons of brown sugar and soy sauce (or a couple extra pinches of salt) to the marinade. Also, always taste the marinade before combining it with the beef to ensure the flavor is to your liking.
How to Make Our Korean Beef Bulgogi
Ingredients
Process
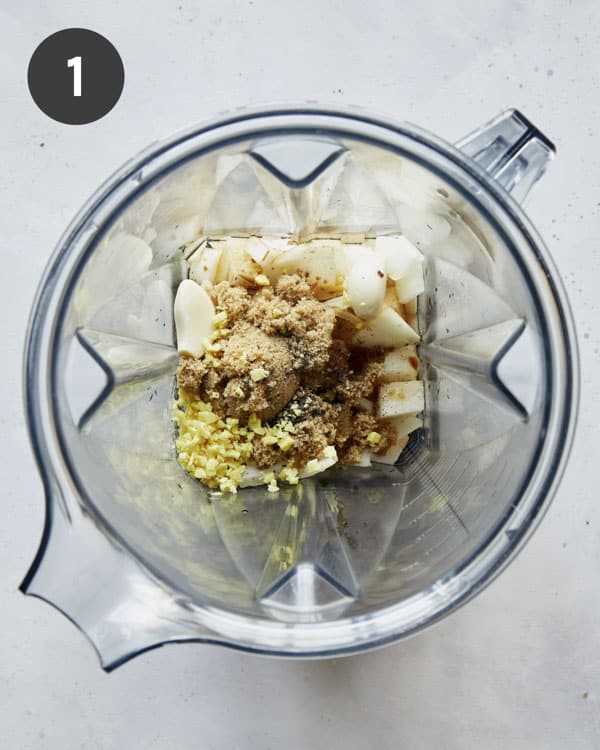
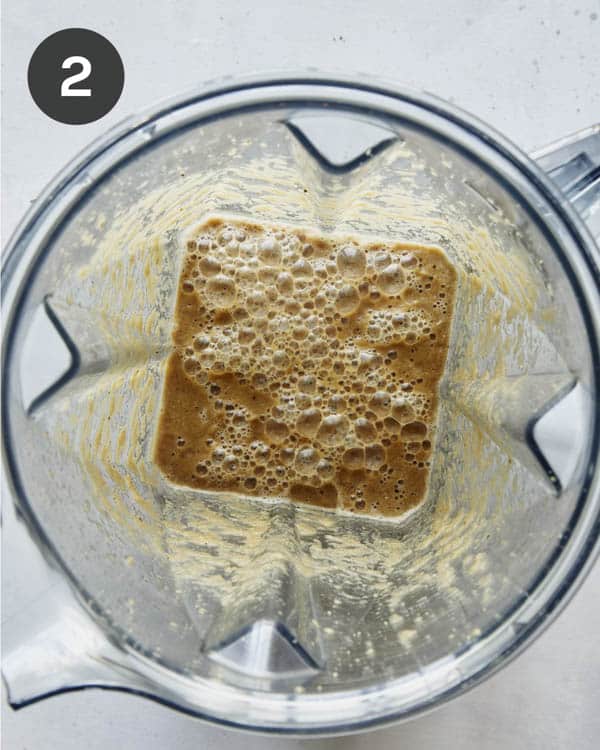
Place all marinade ingredients into a blender.
Blend until smooth.
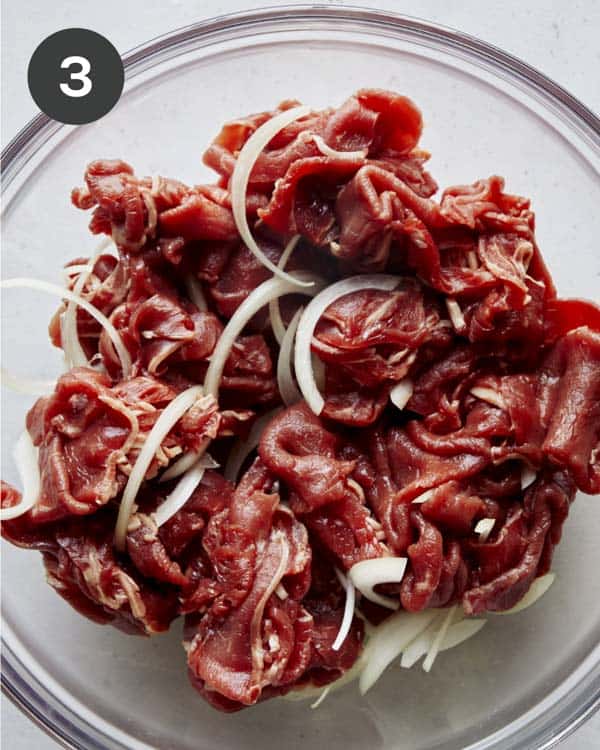
Place beef and thinly sliced onion into a mixing bowl and toss together.
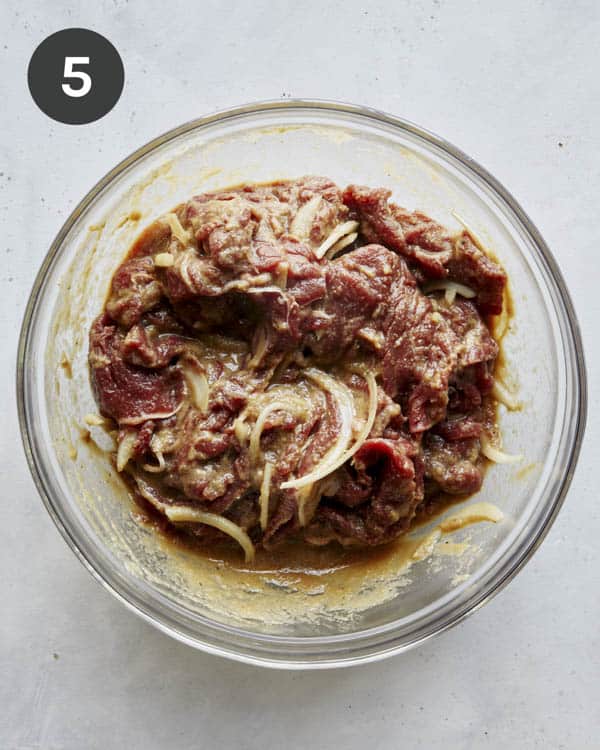
Pour marinade over beef and onion mixture.
Mix together until all beef is well and evenly coated.
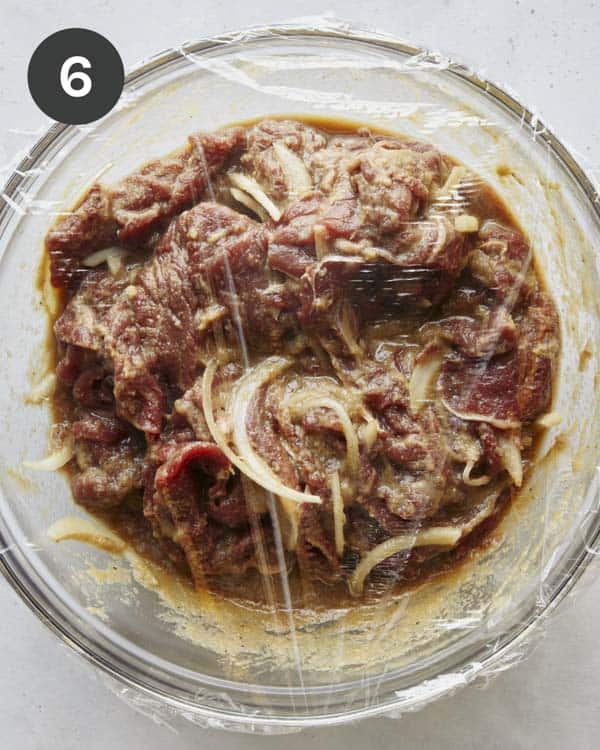
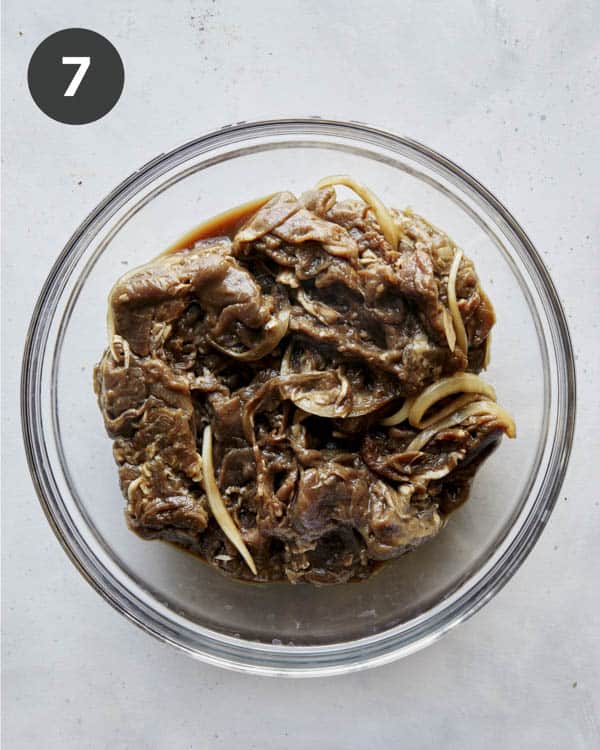
Cover beef and refrigerate for at least 6 hours and up to 24 hours.
Remove from refrigerator, uncover and allow mixture to sit for about 10 minutes.
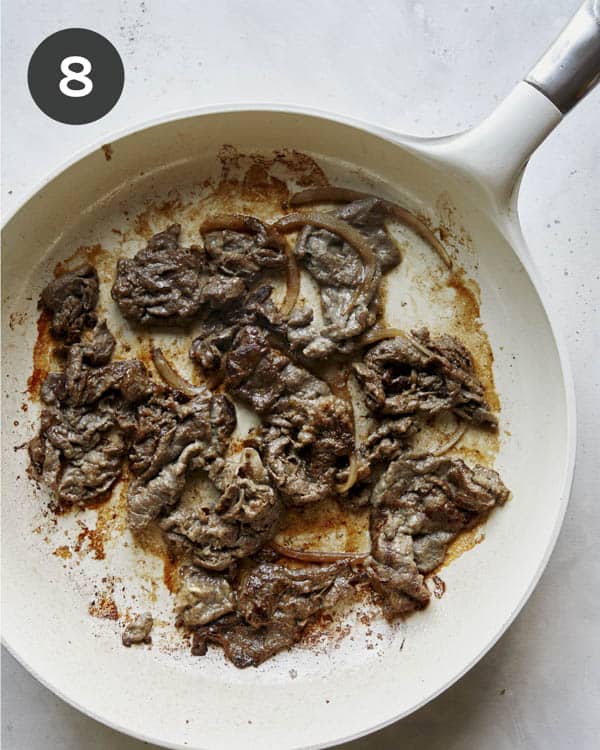
Place a large skillet over medium-high heat. Once skillet is hot add half vegetable oil and swirl to coat. Add half beef and onion mixture and cook, stirring beef as needed until cooked through. Transfer beef to a plate. Add remaining oil to skillet followed by remaining beef and onion and repeat until beef has just cooked through and sliced onions just begin to soften. Remove from heat and combine with rest of the cooked bulgogi.
Best Cuts of Beef to Use for Bulgogi
Boneless ribeye steak is our cut of choice for this recipe and the most popular because it is tender and flavorful with nice marbling. Sirloin is also commonly used to make bulgogi and is slightly leaner that ribeye. You can also use flank steak in a pinch with good results, but the texture won’t be quite as tender.
Where to Find Pre-Shaved Beef for Bulgogi
Shaved (or very thinly sliced) beef can be found at practically all Korean, Chinese and Japanese markets and most other asian markets. Some Trader Joes locations also sell shaved ribeye!
If you’re unable to find pre-shaved or thinly sliced beef, you can buy a boneless steak and slice it yourself. If you do decide to slice it yourself make sure to partially freezing the beef first in your freezer (about 15 to 30 minutes) before attempting to slice it. Partially freezing the beef makes it way easier to slice very thin and even pieces.
Grilling vs Pan Searing
Bulgogi can be cooked on both a grill or in a pan/skillet. If using a pan or skillet natural juices will release and gather in the pan, which is often enjoyed with the cooked beef. If using a grill, there will be a distinct ‘char-grilled’ flavor. The flavors will be ever so slightly different depending on how the beef is cooked, but equally delicious!
Can Bulgogi be Frozen?
Yes, our Korean Beef Bulgogi recipe can be marinated and frozen (uncooked) ahead of time for up to 2 months.
Freezing Instructions
Marinate beef for at least 6 hours. Transfer mixture to a freezer-proof ziploc bag, removing all the air, and seal. Freeze for up to 2 months. When ready to use, thaw beef in the refrigerator overnight. Drain off any excess liquid from the bag. Cook bulgogi in skillet with oil over high heat for 4 to 6 minutes, flipping halfway through, and serve.
This Korean Beef Bulgogi recipe is a version of my mom's recipe I enjoyed so much growing up (and still enjoy today!). It's so simple to make at home and the beef is tender, packed with tons of classic Korean bbq flavor! It's the best homemade version you'll find!
Place beef and thinly sliced onion into a mixing bowl and toss together.
marinade
Place all marinade ingredients into a blender and blend until smooth.
Pour marinade over beef and onion mixture and mix together until all beef is well and evenly coated.
Cover beef and refrigerate for at least 6 hours and up to 24 hours.
Place a large skillet over medium-high heat. Once skillet is hot add half vegetable oil and swirl to coat. Add half beef and onion mixture and cook for 4 to 6 minutes, stirring beef as needed until cooked through. Transfer beef to a plate. Add remaining oil to skillet followed by remaining beef and onion and repeat until beef has just cooked through and sliced onions just begin to soften. Remove from heat and combine with rest of the cooked bulgogi.
Top bulgogi with remaining green onion and sesame seeds and serve with rice.
Notes
Best Cuts of Beef to Use for BulgogiBoneless ribeye steak is our cut of choice for this recipe and the most popular because it is tender and flavorful with nice marbling. Sirloin is also commonly used to make bulgogi and is slightly leaner that ribeye. You can also use flank steak in a pinch with good results, but the texture won’t be quite as tender.Where to Find Pre-Shaved Beef for BulgogiShaved (or very thinly sliced) beef can be found at practically all Korean, Chinese and Japanese markets and most other asian markets. Some Trader Joes locations also sell shaved ribeye.If you’re unable to find pre-shaved or thinly sliced beef, you can buy a boneless steak and slice it yourself. If you do decide to slice it yourself make sure to partially freezing the beef first in your freezer (about 15 to 30 minutes) before attempting to slice it. Partially freezing the beef makes it way easier to slice very thin and even pieces.Freezing InstructionsMarinate beef for at least 6 hours. Transfer mixture to a freezer-proof ziploc bag, removing all the air, and seal. Freeze for up to 2 months. When ready to use, thaw beef in the refrigerator overnight. Drain off any excess liquid from the bag. Cook bulgogi in skillet with oil over high heat for 4 to 6 minutes, flipping halfway through, and serve.Grilling vs Pan SearingBulgogi can be cooked on both a grill or in a pan/skillet. If using a pan or skillet natural juices will release and gather in the pan, which is often enjoyed with the cooked beef. If using a grill, there will be a distinct ‘char-grilled’ flavor. The flavors will be ever so slightly different depending on how the beef is cooked, but equally delicious!
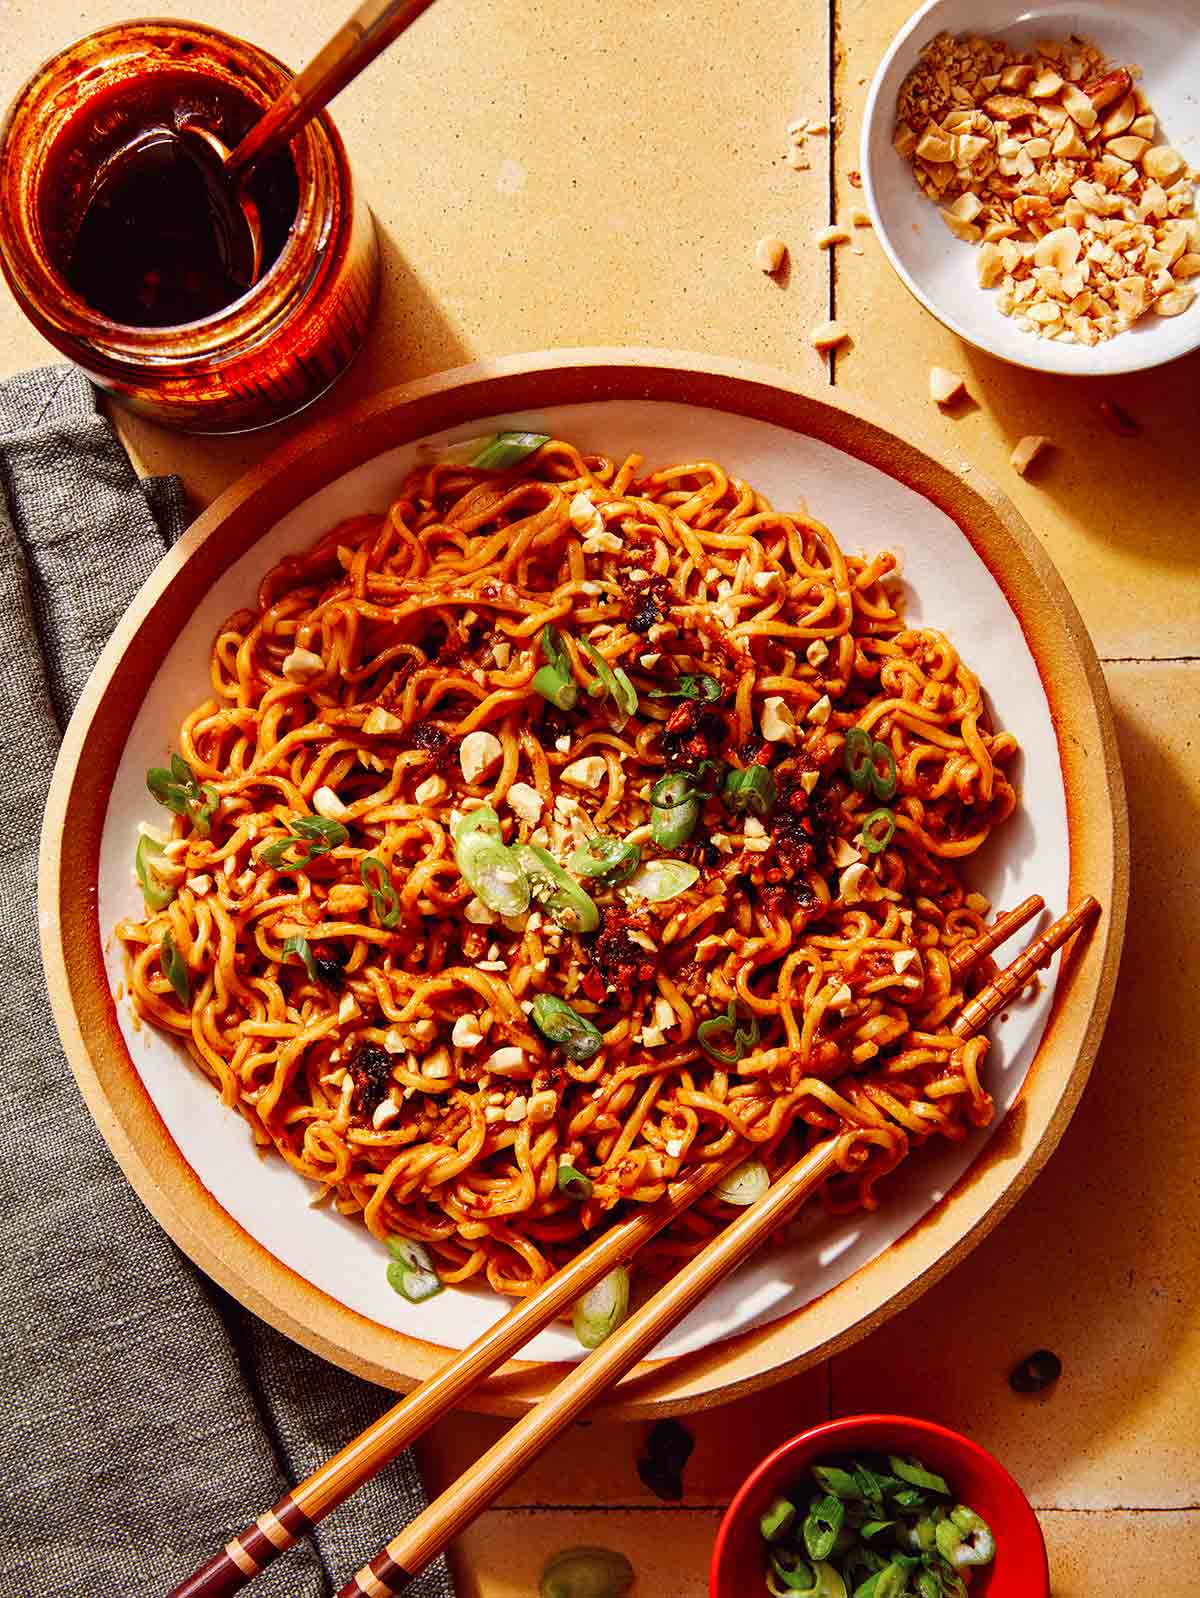
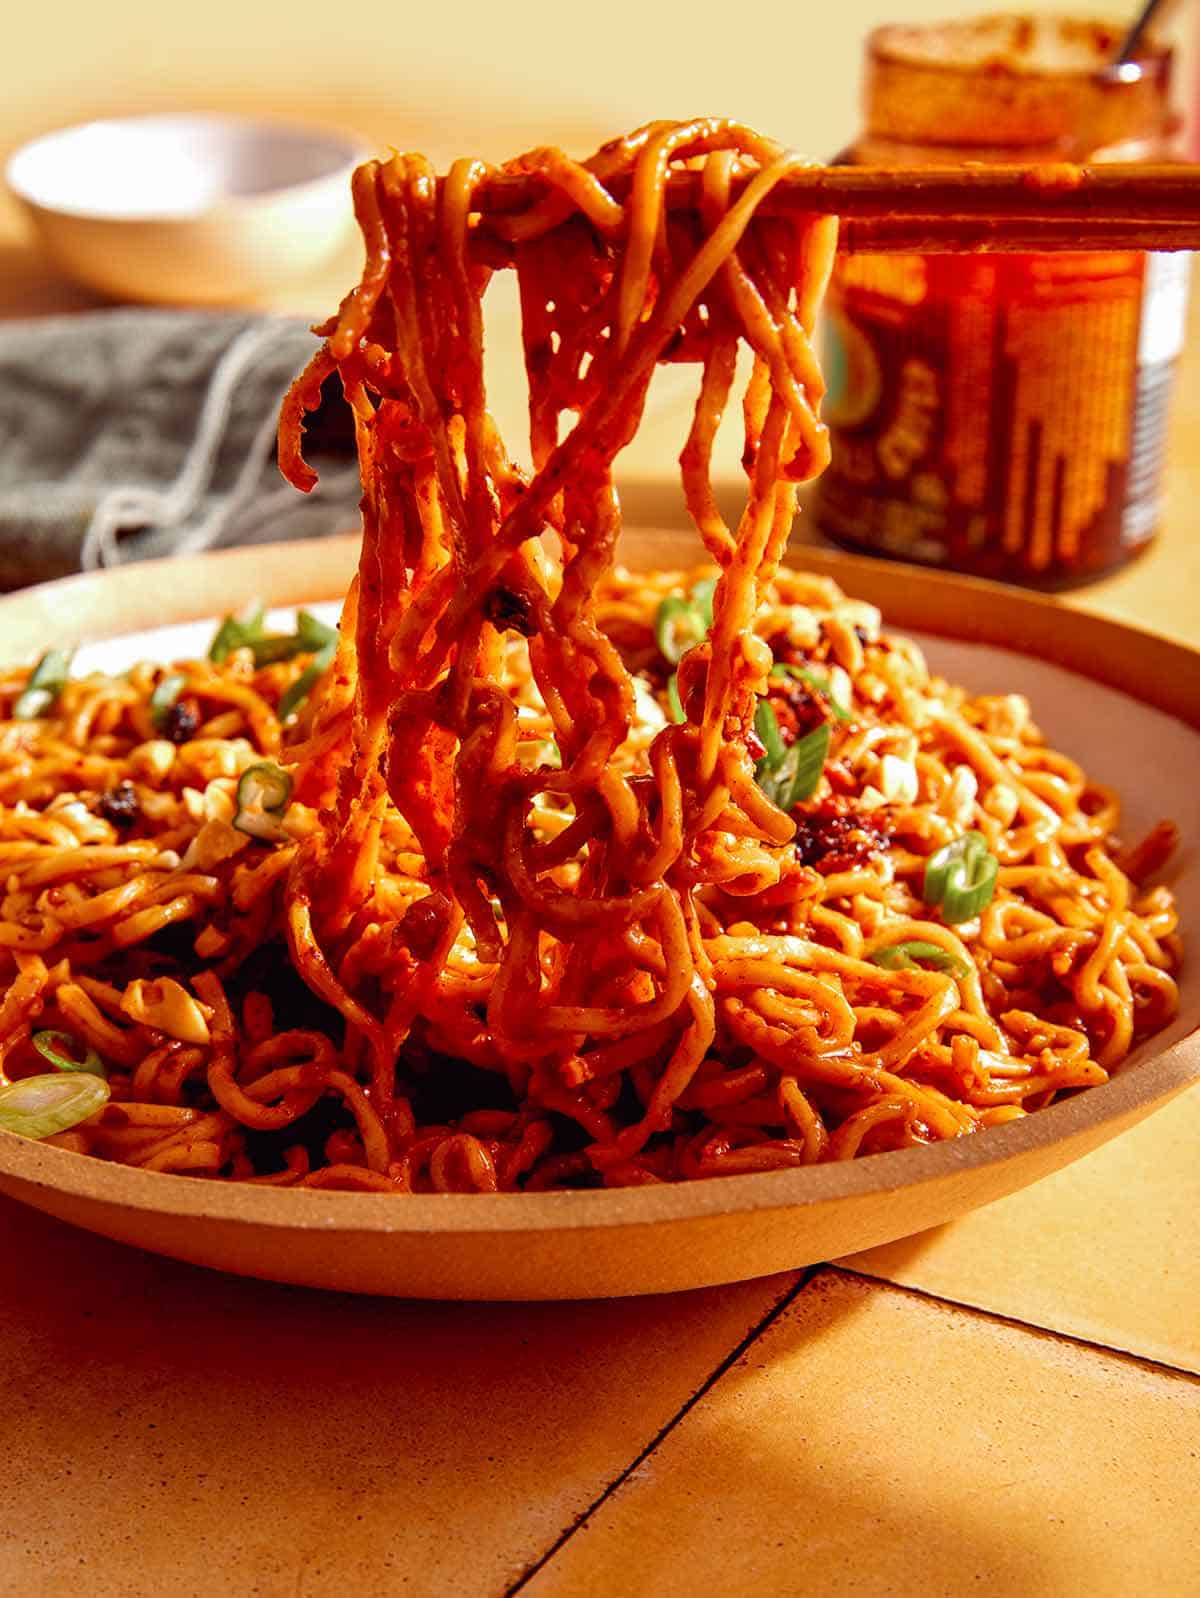
It’s no secret we love our noodles. Dishes like Garlic Noodles, Jajangmyeon, and Red Curry Noodles are quick, simple, and pack a lot of flavor. And these Spicy Ramen Noodles are no exception. Quick-cooking ramen noodles are coated in a spicy, creamy sauce for incredible flavor and satisfying meal or side in under 10 minutes. These spicy ramen noodles can be eaten on their own, with a protein like chicken or tofu, or served alongside…
It’s no secret we love our noodles. Dishes like Garlic Noodles, Jajangmyeon, and Red Curry Noodles are quick, simple, and pack a lot of flavor. And these Spicy Ramen Noodles are no exception. Quick-cooking ramen noodles are coated in a spicy, creamy sauce for incredible flavor and satisfying meal or side in under 10 minutes.
These spicy ramen noodles can be eaten on their own, with a protein like chicken or tofu, or served alongside chicken satay or beef and broccoli. However you eat them, don’t wait. This recipe is soon to be your favorite quick and easy comfort food!
How to Make Spicy Ramen Noodles
Ingredients
Process
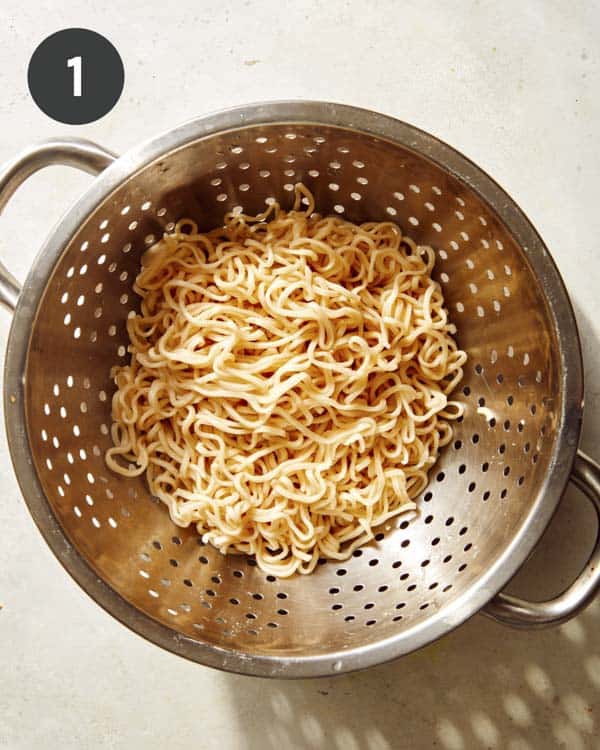
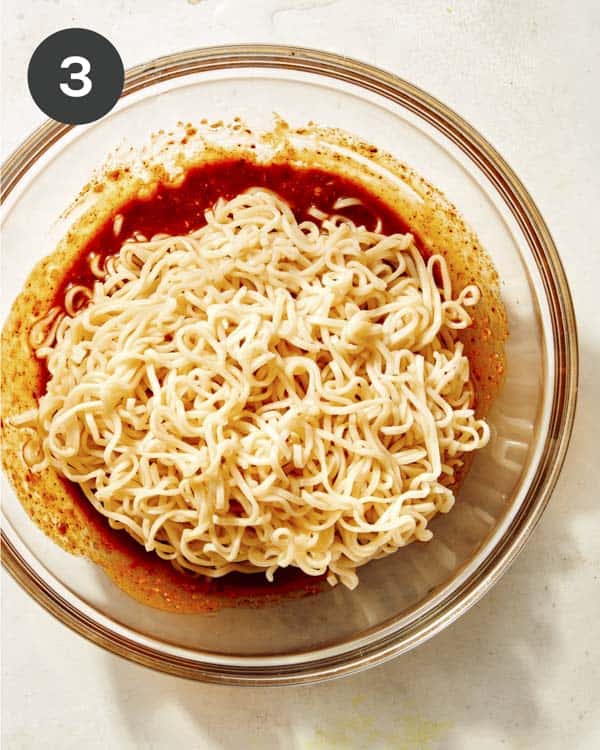
Cook noodles in boiling water according to pack directions. Drain, rinse in a colander under cool water, and set aside.
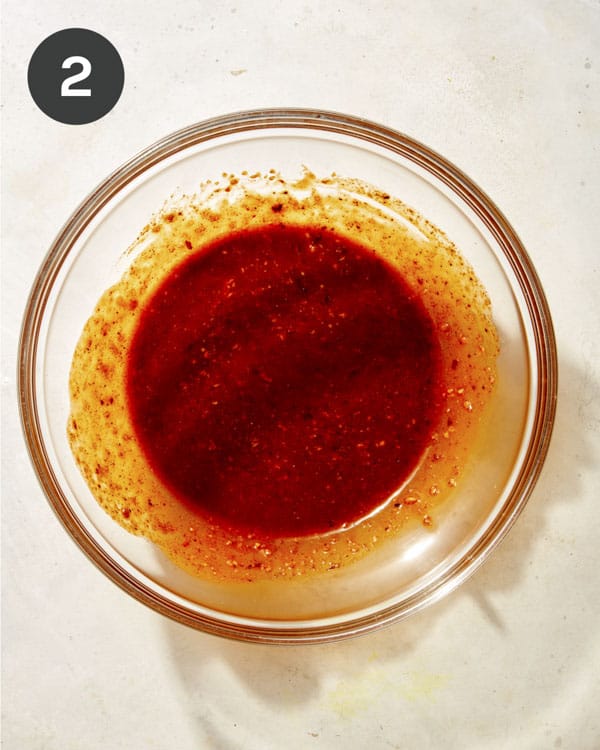
In a mixing bowl, whisk together chili crisp, water, peanut butter, rice wine vinegar, soy sauce, sugar, and garlic. Set aside.
Add noodles to a mixing bowl and toss together with sauce until evenly coated.
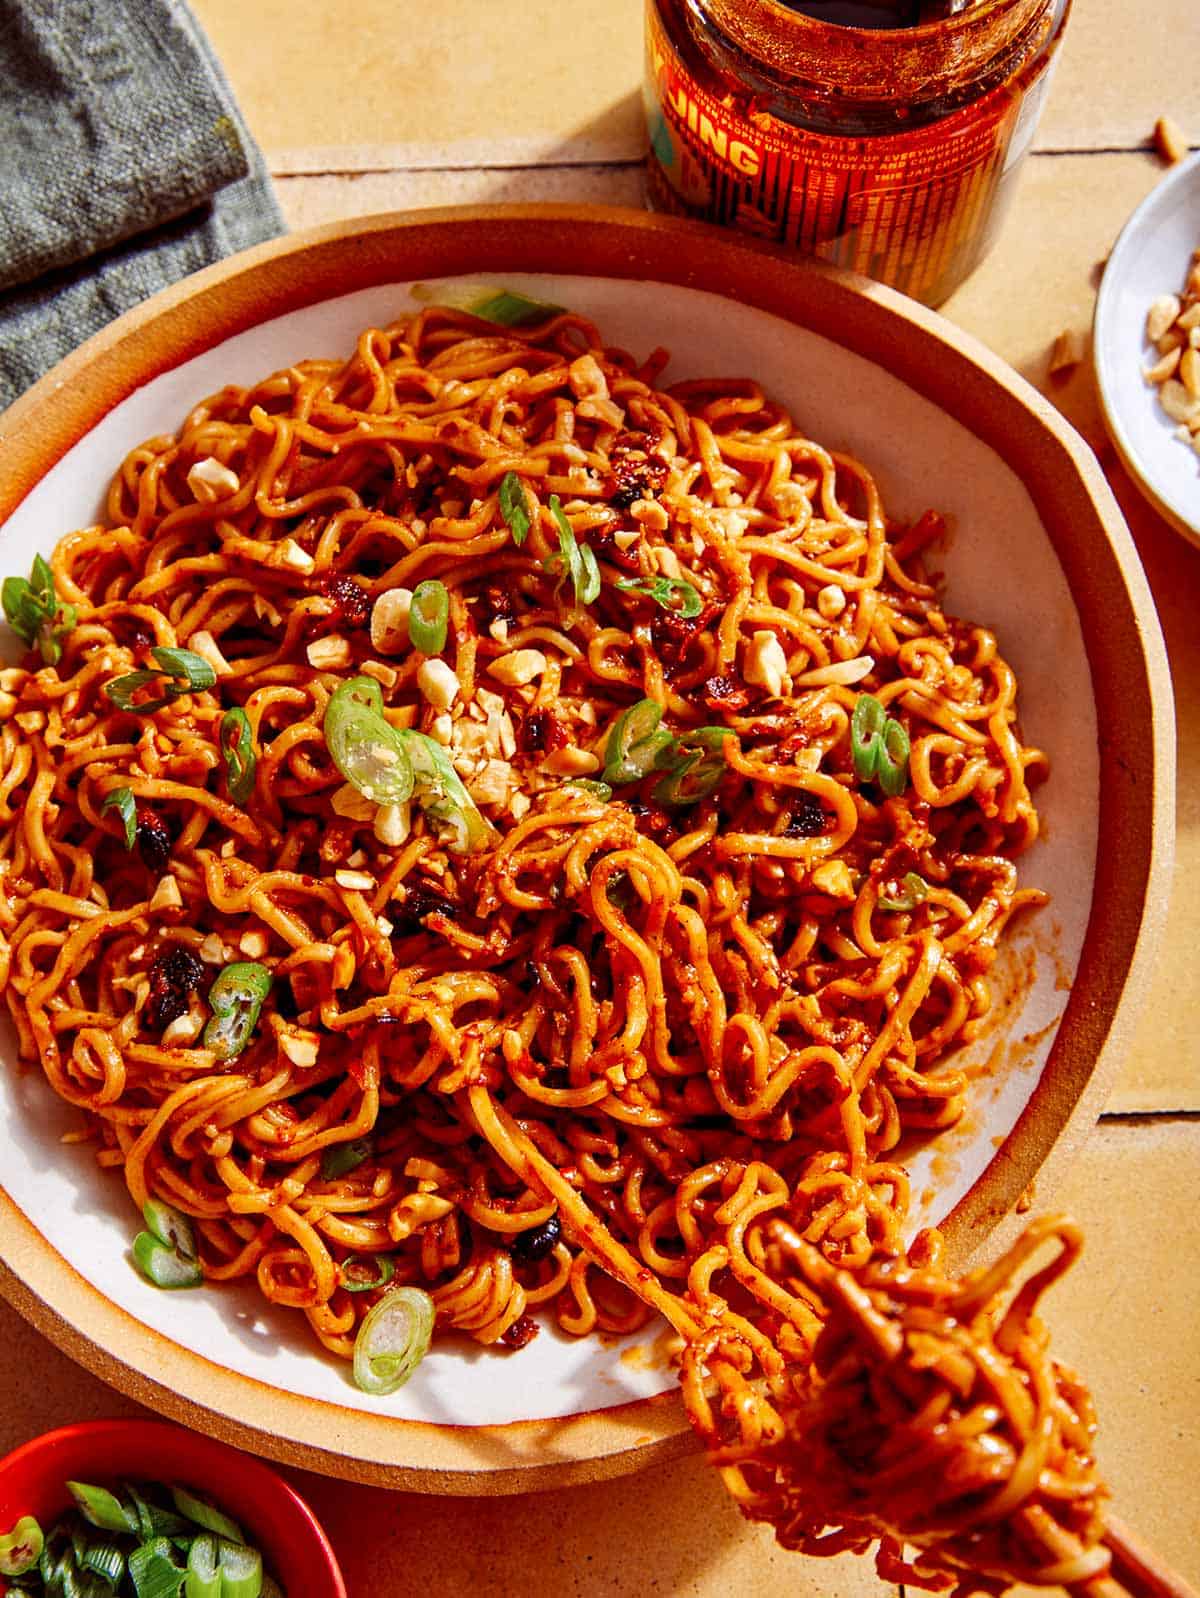
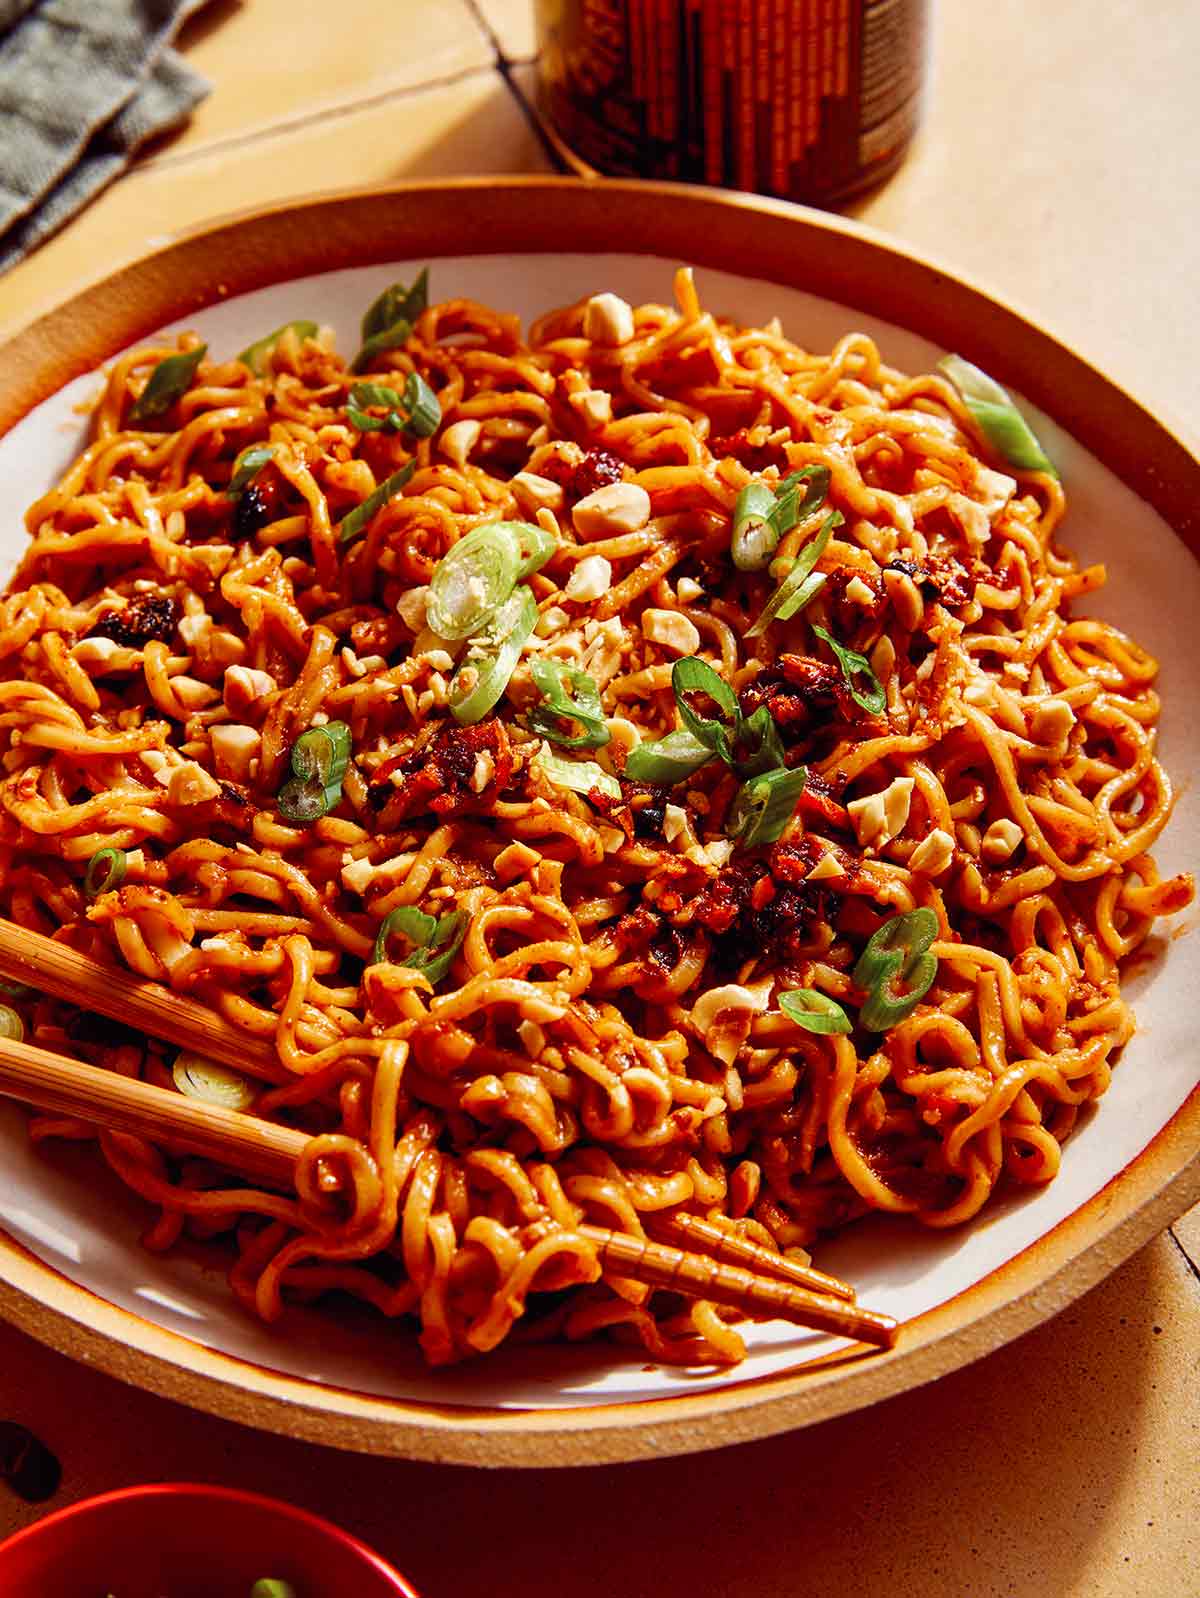
Transfer noodles to a serving bowl and top with crushed peanuts, green onions and more chili crisp.
Why We Love Spicy Ramen Noodles
They’re quick and easy. You only need 10 minutes and a handful of pantry ingredients to toss this recipe together. It’s perfect for a weeknight dinner or a last-minute meal.
It’s easy to customize. Like a lot of spice? Just add more chili crisp. Want it creamier? Increase the peanut butter. There are so many ways to customize this recipe’s flavor and texture, including adding various proteins and vegetables to make it a whole meal in one! Look at the variations below for some ideas!
So. much. flavor. Noodles and sauce make this recipe sound basic, but the amount of flavor in every bite is phenomenal. The chili crisp, peanut butter, soy sauce, and vinegar (and a little sugar) make the sauce pop with a savory, spicy flavor you’ll love.
Impressive without the fuss. If you need a meal with visual appeal – this is it! Saucy noodles topped with a handful of crushed peanuts and freshly sliced green onions make this dish look amazing with almost no effort on your part.
Tips and Tricks for Success
For perfectly springy noodles, make sure you only boil them as long as directed and as soon as you drain them, rinse them under cold water. This stops the cooking process and helps the noodles hold their texture.
If the sauce is too thick, add half a teaspoon of water at a time until you get your desired thickness. You want it thick enough to coat the noodles but thin enough that it’s able to stir into and coat the noodles easily.
Give the sauce a taste before coating the noodles. Here are some simple ways to troubleshoot your sauce:
It’s too thick. Add water.
It’s too spicy. Add more peanut butter and soy sauce to mellow it out.
It’s too tangy. Add more peanut butter.
It’s too sweet. Add more soy sauce.
Best Instant Ramen Noodles to Choose
We love to use Ichiban ramen noodles for this recipe since they’re easy to find at most grocery stores and online and have a thinner noodle than some other brands, but any of these ramen noodle brands will work with this recipe:
Shin
Buldak
Maruchan
Nissin
Paldo
Substitutions and Variations for Our Spicy Ramen Noodles
Add vegetables. Stir fry or roast broccoli, onions, mushrooms, or peppers. Add chopped water chestnuts or bamboo to add nutrients, flavor, and texture variety to your spicy ramen.
Include a protein. Add grilled or sauted beef, chicken, or shrimp to your noodles. for a high-protein and filling meal.
Swap the peanut butter. If you don’t like peanut butter or you have an allergy, feel free to swap it with unflavored almond butter or sunflower butter.
Chili crisps. While these really bring a lot of amazing flavor and texture, if you don’t have chili crisps, you can swap it with some hot chili oil and crunched-up crispy fried onions or sesame seeds.
Rice wine vinegar. If you don’t have rice wine vinegar, apple cider vinegar will also work, it will just add a bit more tanginess.
Swap the noodles. While we love the thinness and texture of ramen, you can use various other noodles like soba, udon, rice noodles or pappardelle pasta.
Adjust the spice level. If you like a lot of heat, add more chili crisps or even some sliced chili peppers or extra red chili pepper flakes. If you want a more mild noodle, reduce the amount of chili crisps.
Quick-cooking ramen noodles coated in a spicy, savory sauce make our Spicy Ramen Noodles the best weeknight dinner! It's ready in just 10 minutes, uses common pantry ingredients, and has endless variations for the perfect comfort meal!
Cook noodles in boiling water according to pack directions. Drain, rinse in colander under cool water and set aside.
In a mixing bowl whisk together chili crisp, water, peanut butter, mirin, soy sauce, sugar, and garlic. Set aside.
Add noodles to mixing bowl and toss together with sauce until evenly coated.
Transfer noodles to a serving bowl and top with crushed peanuts, green onions and more chili crisp.
Notes
**Nutritional information does not include additional chili crisp drizzled on for garnish**Tips and Tricks for Success
For perfectly springy noodles, make sure you only boil them as long as directed and as soon as you drain them, rinse them under cold water. This stops the cooking process and helps the noodles hold their texture.
If the sauce is too thick, add half a teaspoon of water at a time until you get your desired thickness. You want it thick enough to coat the noodles but thin enough that it’s able to stir into and coat the noodles easily.
Give the sauce a taste before coating the noodles. Here are some simple ways to troubleshoot your sauce:
It’s too thick. Add water.
It’s too spicy. Add more peanut butter and soy sauce to mellow it out.
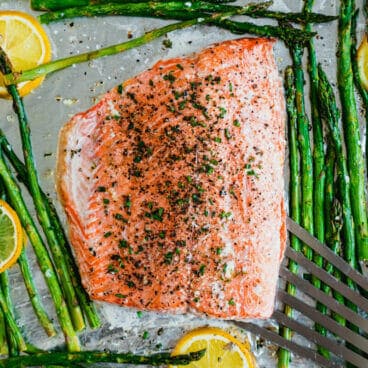
Dinner doesn’t get easier than this! This salmon and asparagus recipe delivers a healthy and flavorful meal in under 30…
Dinner doesn’t get easier than this! This salmon and asparagus recipe delivers a healthy and flavorful meal in under 30 minutes, baked on a sheet pan with lemon for a zesty kick.
We’ve got a new solution to an easy dinner that pleases everyone: this baked salmon and asparagus recipe! It’s simple and done in under 30 minutes, but tastes like something you’d order at a restaurant. Roasting it up on a sheet pan with lemon slices and fresh herbs adds effortless flavor that feels fresh yet refined.
Somehow in all our years of home cooking we’d never made a sheet pan meal exactly like this, and now it’s solidly in our repertoire! Alex and I love it for healthy weeknight dinners with a wedge salad.
Thin asparagus is key!
For this salmon and asparagus recipe, buy the thinnest asparagus you can find! Thin, young asparagus spears are more tender and sweeter than large stalks, which can be tough. We can usually find thin bunches at our local grocery or farmers markets. Thin asparagus ensures it is fully roasted once the salmon is baked.
Pro tip: When working with asparagus: always trim off the tough, woody bottoms of the stalks. Here’s how to trim asparagus.
What to look for when buying salmon
The other important part of this salmon and asparagus recipe is the quality of the salmon! Here are three tips:
Fresh salmon is best. The very best salmon is fresh from your local seafood counter, not frozen.
Buy wild caught salmon. Fish that is wild caught in your country is usually a sustainable choice. There are also quality options in well-regulated farms.*
For this salmon and asparagus recipe you’ll be cooking both at the same time. The asparagus should cook in about the same time as the salmon here, but you should base the timing on the salmon itself.
Step 1: Preheat the oven to 425°F. Line a baking sheet with foil. Place trimmed asparagus on the baking sheet and toss it with olive oil, salt and pepper.
Step 2: Place salmon on the foil, drizzle with olive oil and salt and pepper. Place asparagus around the salmon and place lemon wheels on top. Squeeze lemon over everything and top with fresh herbs.
Step 3: Bake 9 to 12 minutes until the asparagus is tender and the salmon is just tender and pink at the center (the internal temperature should be between 125 to 130°F in the center).
For exact steps and quantities, go to the full recipe below.
Baking tip: Place lemon slices on the asparagus, not the salmon. Placing the lemon on top of the salmon makes the top gooey, not crispy: which is not as tasty!
Seasoning variations
Fresh lemon and herbs is simple, yet classic. Here’s what to know about adding these seasonings to salmon and asparagus:
Use fresh herbs like chives, thyme, mint, basil, or whatever you have on hand! We like chives and thyme from our garden.
Mix it up with salmon seasoning. This homemade salmon seasoning is our favorite.
Sides to serve with salmon and asparagus
Make this baked salmon and asparagus recipe into a healthy meal by adding a salad or a whole grain. Here are some easy side dish recipes we’d pair with it:
Wedge salad: We’ve made it several times with a wedge salad and it’s a crisp contrast.
Celery salad: This celery salad with apple and Parmesan is refreshing.
This salmon and asparagus recipe is gluten-free, dairy-free, and pescatarian.
What kind of salmon should I use for salmon and asparagus?
You can use any type of salmon you like, such as Atlantic salmon, king salmon, sockeye salmon, or Coho salmon. Make sure the fillets are similar in thickness for even cooking. Sockeye salmon is typically thinner, so it will cook faster.
Can I use frozen asparagus?
We don’t recommend using frozen asparagus for this recipe, since it can come out mushy.
What if I don’t have lemons?
You can make this recipe without fresh lemon, but it really adds a pop of flavor to the asparagus.
Can I add other vegetables to the sheet pan?
Yes, but you may need to add them to the sheet pan first if they don’t cook in 9 to 12 minutes like the asparagus. For example, roasted broccoli takes 20 to 25 minutes at 450°F (230°C), and roasted green beans take 13 to 15 minutes.
Dinner doesn’t get easier than this! This salmon and asparagus recipe delivers a healthy and flavorful meal in under 30 minutes, baked on a sheet pan with lemon for a zesty kick.
Minced fresh herbs (like chives, mint or thyme), for garnish
Instructions
Allow salmon to come to room temperature.
Preheat the oven to 425°F. Line a baking sheet with foil.
Trim the asparagus. Place it on the baking sheet and toss it with 2 tablespoon olive oil (this also oils the foil). Sprinkle with ½ teaspoon kosher salt and fresh ground black pepper.
Pat the salmon dry and place it on the foil. Drizzle it with 1 teaspoon olive oil. Sprinkle the salmon with ½ teaspoon kosher salt and fresh ground black pepper. Place asparagus around the salmon. Slice the lemon into wheels and place them on top of the asparagus (but not the salmon). Squeeze juice from the two ends of the lemon onto the tray. Then add the chopped fresh herbs on top of everything.
Bake 9 to 12 minutes until the asparagus is tender at the thickest part, and the salmon is just tender and pink at the center (the internal temperature should be between 125 to 130°F in the center for done). If the salmon is done before the asparagus (the asparagus is thick), remove it from the tray and continue cooking just the asparagus until tender.
Notes
*Thin asparagus is best, so try to find the thinnest you can when shopping. If all you can find is thicker asparagus, you may need a little longer to roast (up to 15 minutes). Just remove the salmon from the tray if it’s already done and finish the asparagus by itself.
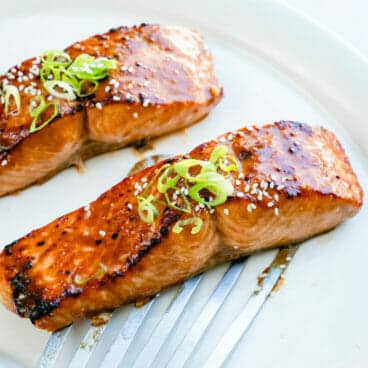
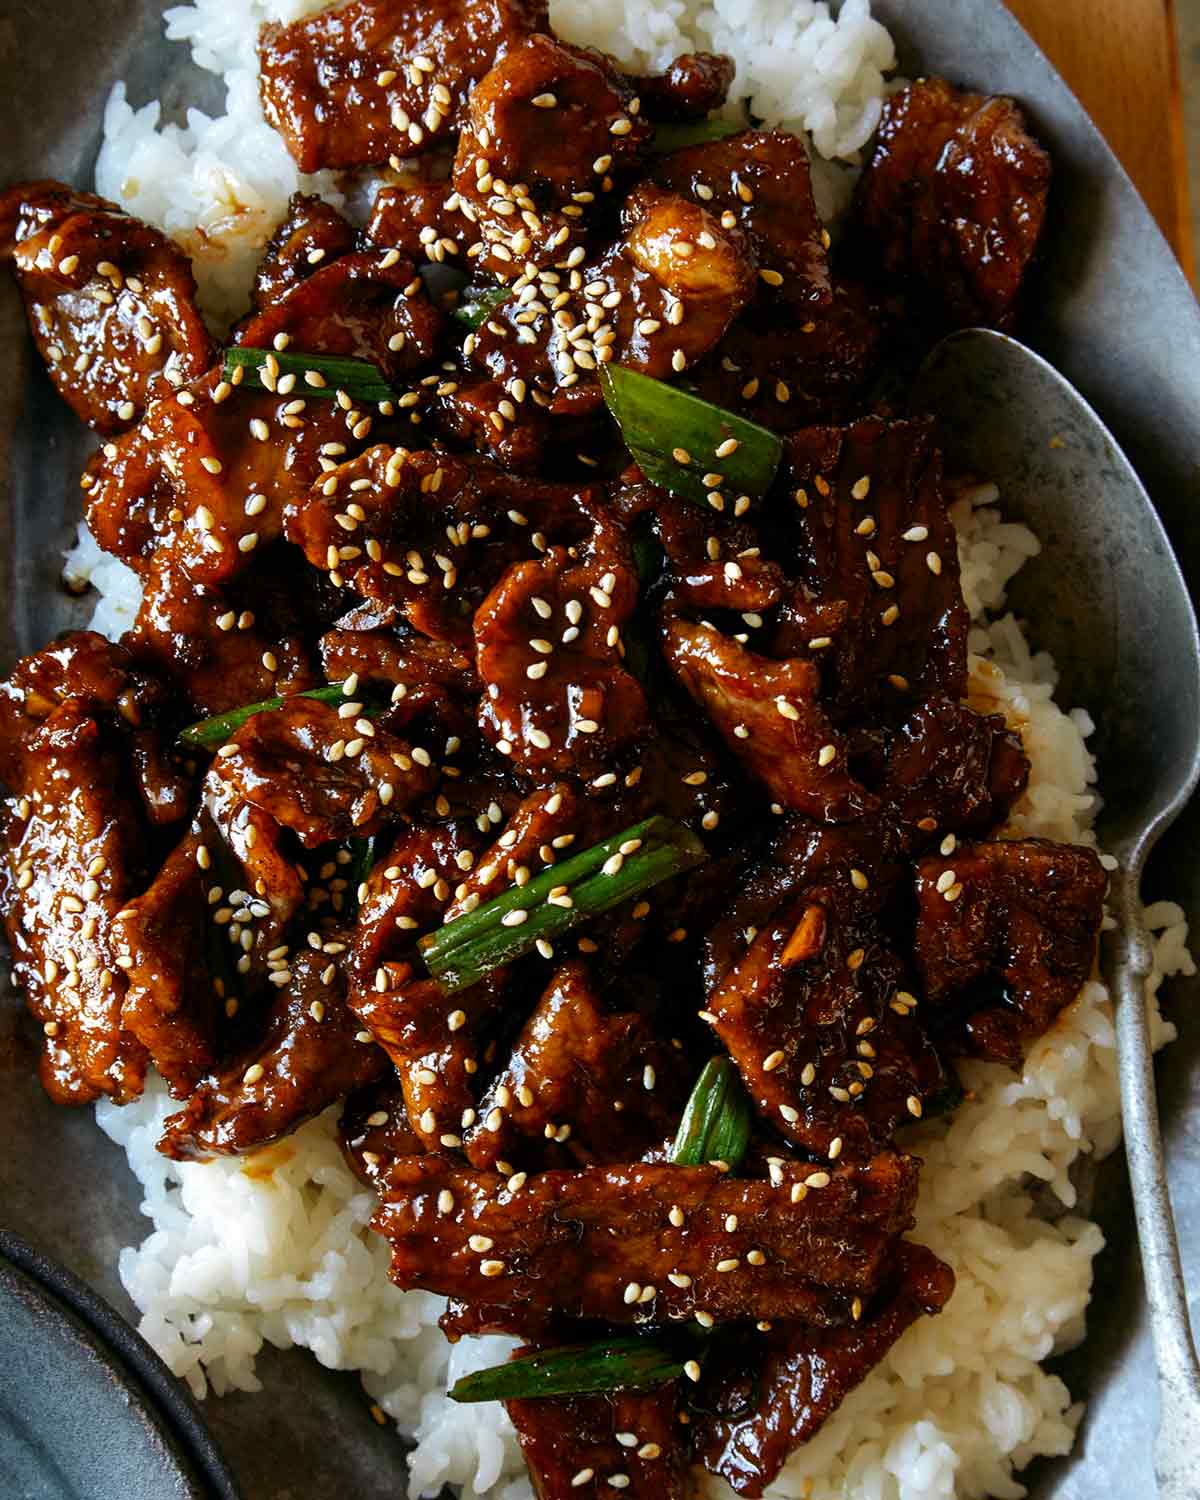
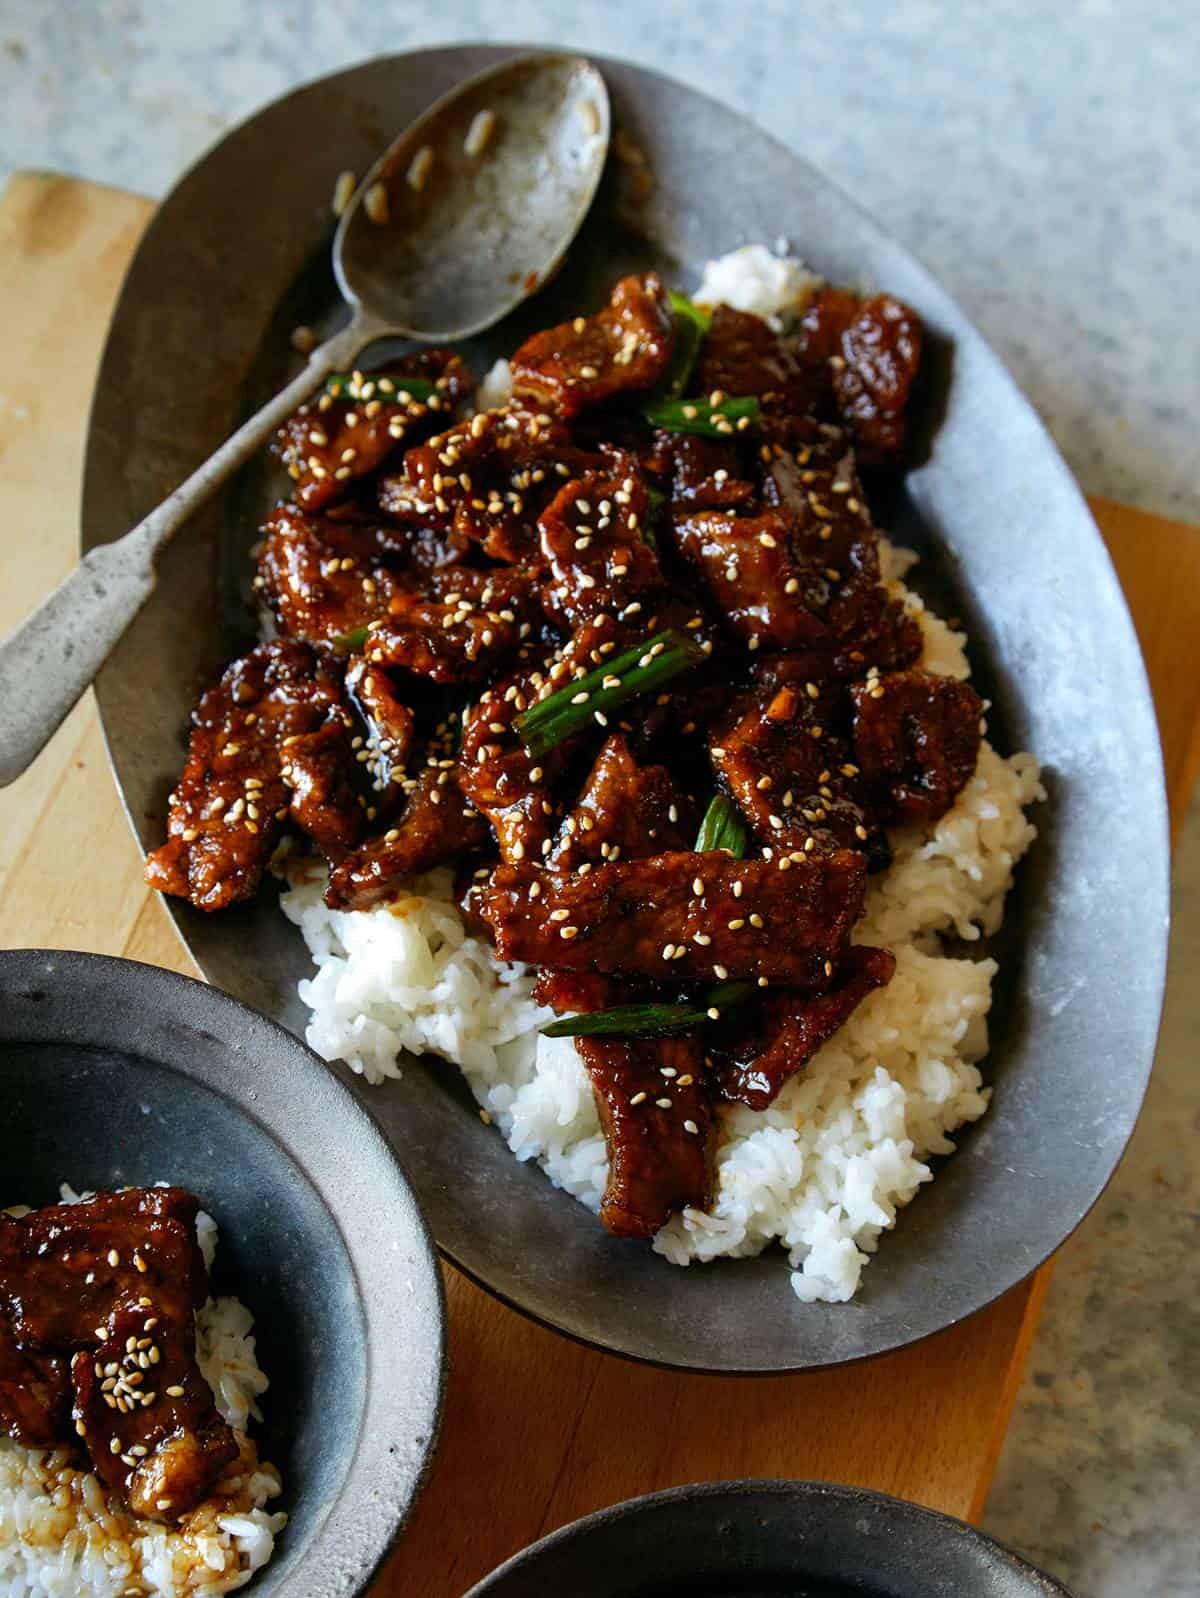
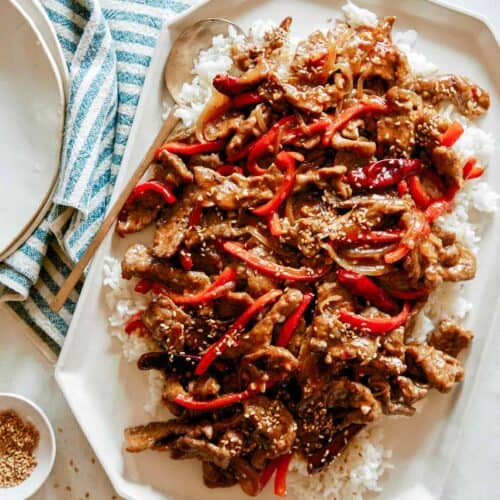
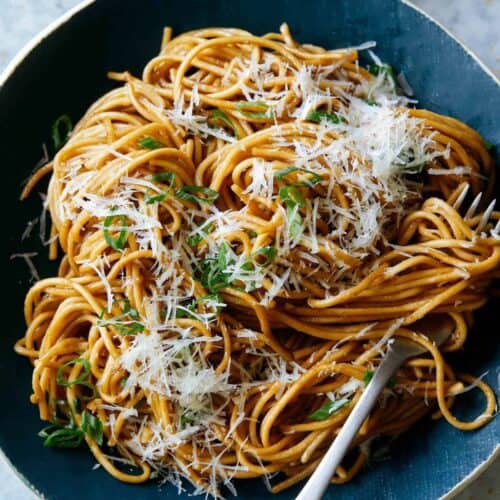
We’re so excited to share our Mongolian Beef Recipe with you all! The first time I had the dish was P.F. Changs Mongolian Beef and I immediately fell in love. The tender beef coated in a sweet and savory sauce was absolutely delicious! Our version is very similar in flavor and texture to their version in the best way! This Chinese takeout inspired dish also couldn’t be easier (and a bit healthier) to make at…
We’re so excited to share our Mongolian Beef Recipe with you all! The first time I had the dish was P.F. Changs Mongolian Beef and I immediately fell in love. The tender beef coated in a sweet and savory sauce was absolutely delicious! Our version is very similar in flavor and texture to their version in the best way! This Chinese takeout inspired dish also couldn’t be easier (and a bit healthier) to make at home and is one of our top, family loved recipes on our entire site!
Our Mongolian beef is incredibly quick and easy to make. In fact, it can be made in under 30 minutes making it a perfect weeknight dinner! Serve it with a little steamed rice and broccoli and you have a quick, delicious and flavor packed complete meal! We love making a double batch so we have plenty of leftovers to enjoy the next day.
What is Mongolian Beef?
Mongolian beef is a popular stir-fry beef dish, made in a wok, served in Chinese restaurants. It was created in Taiwan, during the 1950’s, when Chinese BBQ was becoming a trendy cuisine. Its most notable trait is the tenderized slices of beef simmered together in a sweet and savory sauce.
The name of the dish refers to Mongolian barbecue style of cooking, which is quick and over high heat. The dish itself isn’t actually associated with Mongolian cuisine.
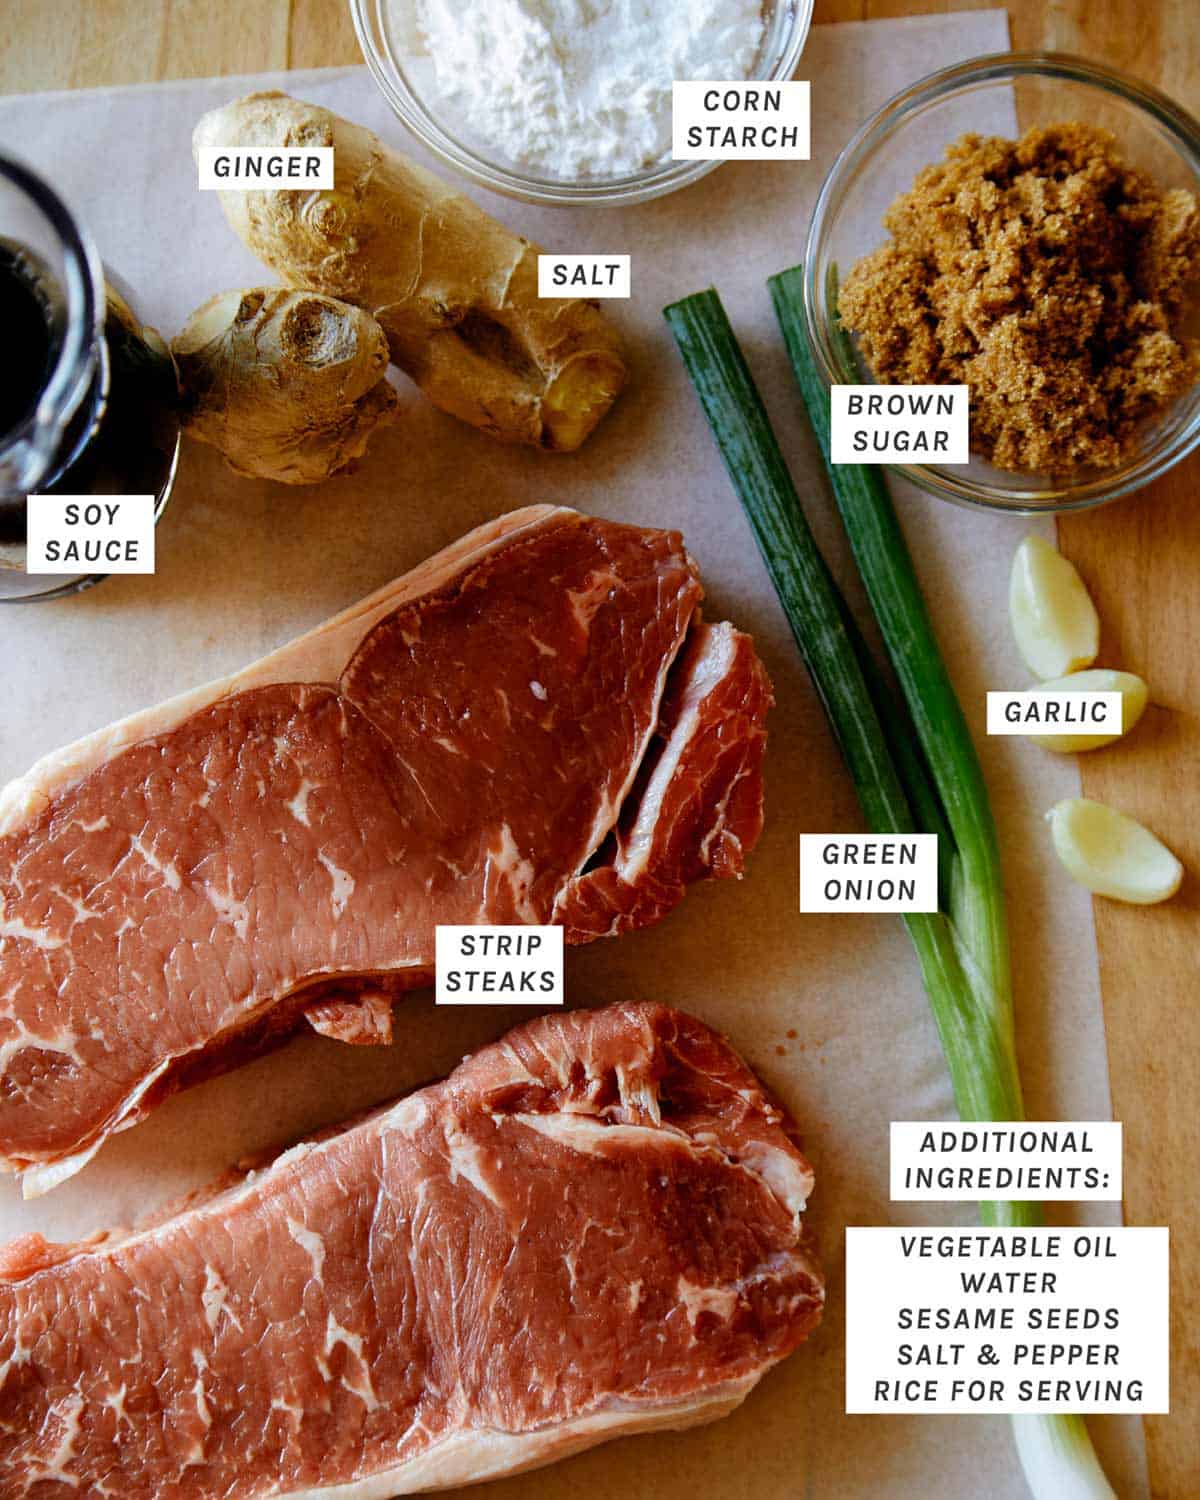
How to Make Our Mongolian Beef Recipe
Ingredients
Process
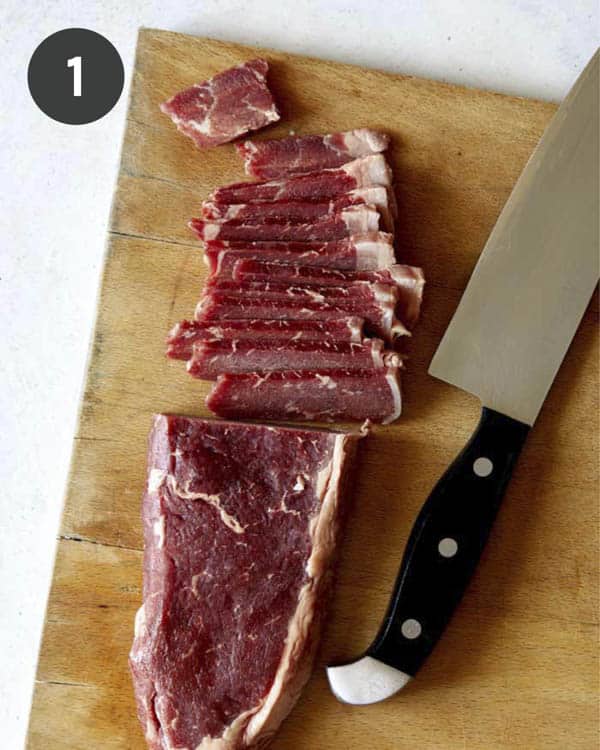
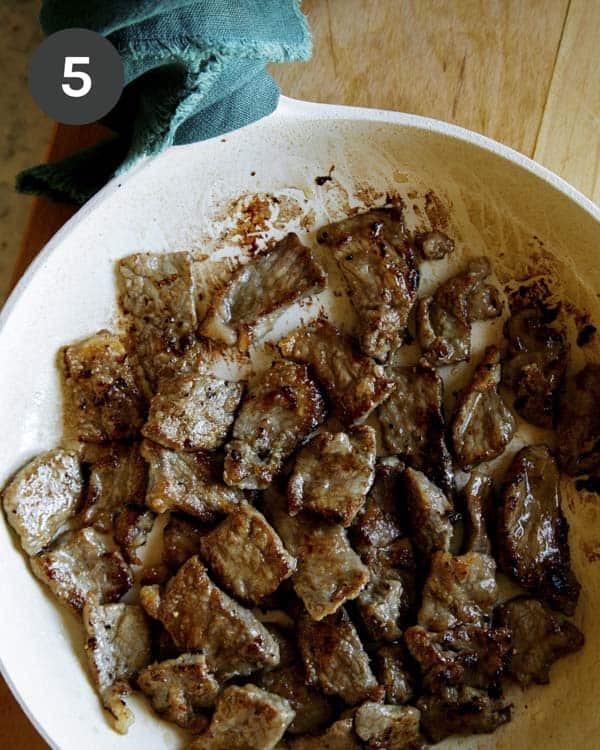
Slice steak into 1/4″ thick piece, against the grain and season with salt and pepper.
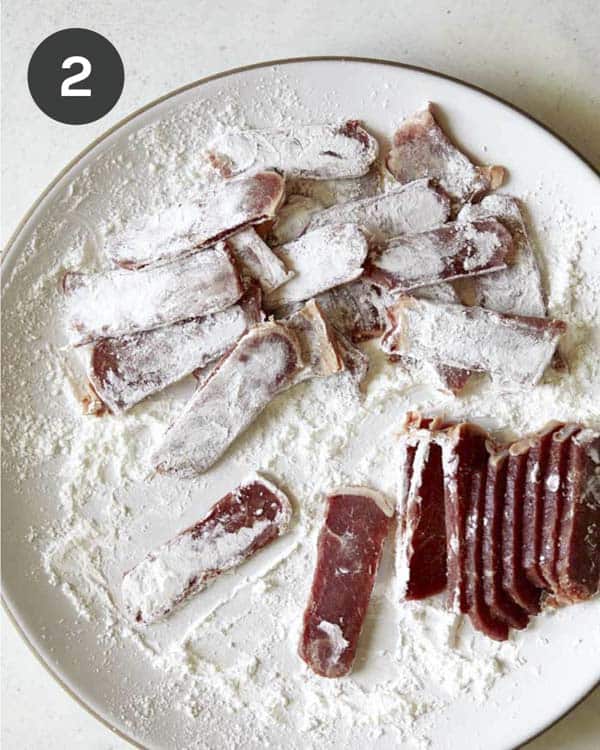
Toss steak pieces in cornstarch until fully and evenly coated. Set aside.
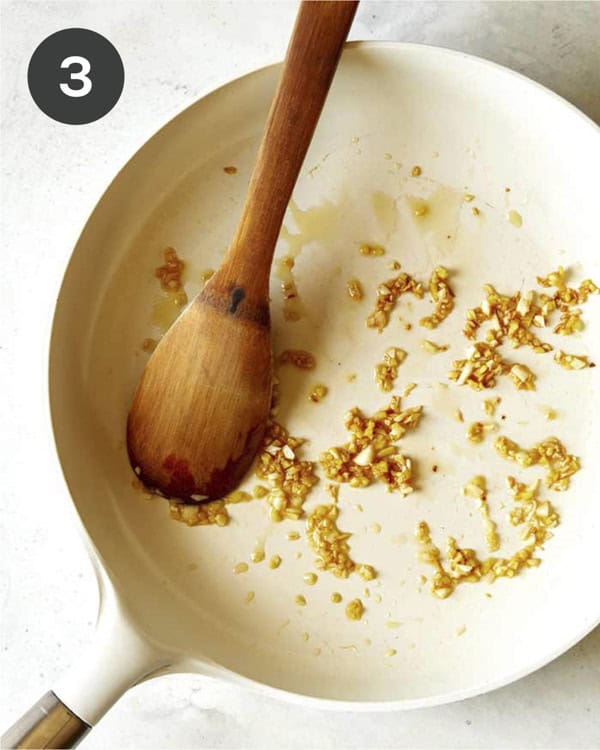
Heat a skillet over medium-high heat and add some oil. Sauté the ginger and garlic until fragrant.
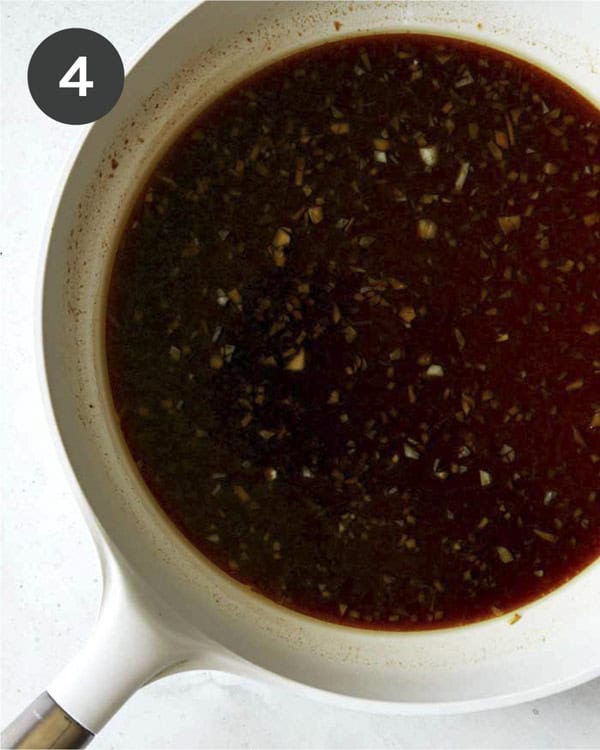
Add soy sauce, water and sugar and bring to a boil until sugar dissolves. Pour sauce into a measuring cup and set aside.
Place skillet back over heat and add more oil. Add steak and sear until evenly browned on both sides.
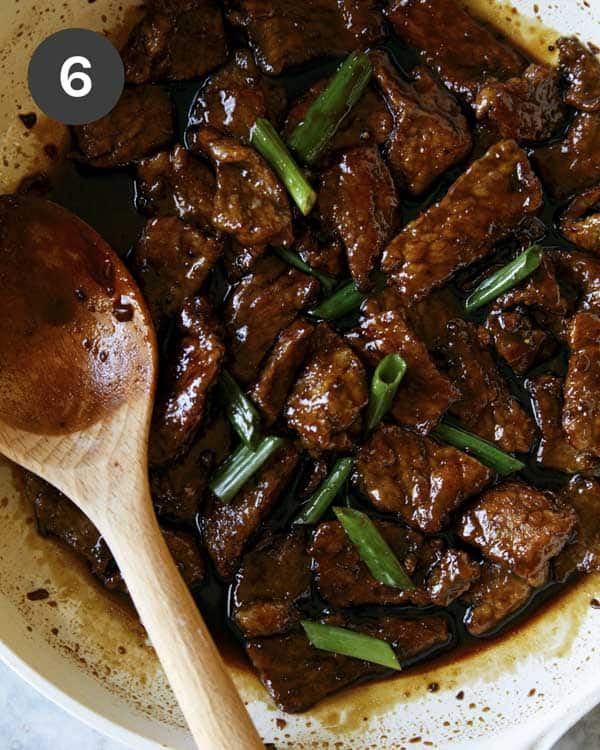
Pour sauce back into skillet and stir together with meat. Allow sauce to thicken. Add green onion and continue to simmer until sauce is thick enough to coat the back of a wooden spoon. Serve Mongolian beef over steamed rice. So easy!
Best Cut of Beef to Use for Mongolian Beef
Flank steak is the most traditional cut used for Mongolian beef and a cut we often used to use. It has great flavor, cooks quickly and can get incredibly tender. It’s still a great option to use today!
The reason we use NY strip steaks for our recipe is because NY strip steaks have similar qualities in flavor and cooking speed, but it’s a naturally tender cut and with flank steak getting increasingly popular and pricey, the price per pound are comparable these days.
Prep, Make Ahead and Freezing Instructions
Prep Ahead
To make sauce ahead, cool sauce and pour into an airtight container and store in the refrigerator for up to 5 days. To make steak ahead, slice steak and store in an airtight container in the refrigerator for up to 1 day.
When ready to cook, toss beef in salt, pepper and cornstarch. Sear coated steak in skillet as written in recipe. Warm the sauce in a saucepan for a few minutes before adding it to the seared meat. This will help to avoid the temperature dropping in the skillet, not allowing for quick and even cooking.
Fully Make Ahead
Make recipe as written and cool completely. Transfer to an airtight container and store in the refrigerator for up to 3 days. When ready to serve, pour entire mixture into a large skillet and simmer over medium-low heat until warmed through, about 5 to 6 minutes.
Freezing
To freeze, cool Mongolian beef completely before transferring into a freezer friendly container. Store in freezer for up to 3 months. To reheat, transfer freezer bag to refrigerator and thaw overnight. Pour thawed mixture into a skillet and simmer over medium-low heat until sauce has thickened up and beef has just heated through.
Variations for Our Mongolian Beef Stir Fry
Incorporate some veggies into the dish! We love adding some bite sized broccoli florets into the mix. Mongolian beef and broccoli is SO good! We also love throwing in a handful of spinach to the dish for added fiber or sliced red peppers for crunch!
Add some heat with some dried thai chiles, crushed red pepper flakes or a spoonful of chile sauce ( like sriracha or sambal).
Use chicken instead of beef! Yes, this recipe is called Mongolian beef, but subbing in chicken is such an easy and equally delicious substitute!
Make it vegetarian friendly by swapping the beef out for cubes of firm tofu or strips of seitan. Gently press excess liquid from the tofu before cutting it into pieces and continue on with the recipe as written!
Tips and Tricks for Mongolian Beef Success
Coating beef in cornstarch is important because it helps to tenderize the beef. It also helps to thicken the sauce, allowing it to fully coat the beef.
Flank steak (sliced against the grain) is most commonly used to make Mongolian beef, although any quick cooking beef works great. New York strip steaks are ourcut of beef of choice, as flank steak isn’t always found at all grocery stores and New York strip steak generally is readily available Flank steak has also gotten quite expensive in the last 5 years or so and prices are now similar between cuts. Both flank steak and NY strip steaks work really well for this recipe and we recommending whichever you’re able to find and prefer.
Sear the sliced beef in batches to avoid overcrowding in the pan. This will allow the beef to sear properly and prevent the slices from steaming.
Can This be Made in an Instant Pot or Slow Cooker?
Yes, you can definitely make Instant Pot Mongolian Beef, but we really don’t think there’s a need to do so unless you don’t have access to a stovetop. Our recipe is so quick and easy that it will actually take longer setting up your instant pot, cooking it and waiting for the steam function to complete, then it will be just making on the stove in a pan!
We do not recommend making this dish in a slow cooker. As we mentioned above, this recipe is too quick and easy to need extra equipment (that’s meant to make things easier). The texture of the beef can easily go from perfectly tender to mush or very dried out using an instant pot and we don’t think it’s worth the effort of using a slow cooker.
What to Serve with Our Easy Mongolian Beef Recipe
This dish is commonly served with a side steamed rice. We usually like to serve ours over a bed of steamed rice so some of the sauce absorbs into the rice. It’s so good! We also love serving this dish with garlic noodles, chow mein and a side of lightly roasted green beans.
In the U.S. Mongolian beef is also commonly served over a bed of fried cellophane noodles, which adds a light, crisp texture to the overall dish. We opted out of the fried noodle version since frying the noodles would add an extra step and more clean-up in the end, but it is a delicious alternative!
Other Delicious Asian Inspired Recipes You Will Love
The BEST Mongolian Beef Recipe you will ever taste! A quick, easy and ridiculously delicious stir fry dish of tender beef coated in a slightly sweet and savory sauce, Inspired by P.F. Changs Mongolian beef recipe. Serve it over steamed rice and a side of sautéed or steamed veggies for a complete meal everyone will love!
Season sliced steak with salt and pepper. Toss steak in cornstarch until fully and evenly coated. Set aside.
Place a large skillet over medium-high heat and add 1 tablespoon oil. Add garlic and ginger and sauté for 1 minute. Add soy sauce, water and sugar and bring to a boil until sugar dissolves, about 2 minutes.
Pour sauce into a liquid measuring cup and set aside.
Place skillet back over heat and add remaining oil. Add steak and sear until evenly browned on both sides, 1 to 2 minutes per side.
Pour sauce back into skillet and stir together with beef. Simmer and allow sauce to thicken, 1 to 2 minutes.
Toss in green onion and continue to cook for 1 more minute until sauce is thick enough to coat the back of a wooden spoon.
Pour Mongolian beef over steamed rice and serve.
Video
Notes
**Nutritional information does not include steamed rice**Tips and Tricks for Success
Coating the sliced beef in cornstarch is important because it helps to tenderize the beef. It also helps to thicken the sauce, allowing it to fully coat the beef.
Flank steak (sliced against the grain) is most commonly used to make Mongolian beef, although any quick cooking beef works great. We use New York strip steaks in our version, as flank steak isn’t always found at all grocery stores and New York strip steaks generally are. Both flank steak and NY strip steaks work really well for this recipe and we recommending whichever you’re able to find and prefer.
Sear the sliced beef in batches to avoid overcrowding in the pan. This will allow the beef to sear properly and prevent the slices from steaming.


 Pro tip: When working with asparagus: always trim off the tough, woody bottoms of the stalks. Here’s