This vegan lasagna soup puts everything you love about your favorite vegan lasagna in a rich and cozy soup. No baking or layering required—just a big spoon!
This vegan lasagna soup puts everything you love about your favorite vegan lasagna in a rich and cozy soup. No baking or layering required—just a big spoon!
This fajita salad recipe is one of our our go-to dinner ideas, bursting with charred vegetables and covered in a…
This fajita salad recipe is one of our our go-to dinner ideas, bursting with charred vegetables and covered in a creamy salsa ranch dressing! We eat it often and it works for almost any diet: it’s easily gluten-free, vegetarian, or vegan—plus it’s ideal for serving a crowd!
Why we love this recipe
Hello and welcome to one of our favorite ever easy dinner ideas that works for any diet: fajita salad! Fajita salad is simply fajita fixings on top of a salad, turning the Tex Mex favorite into a bowl meal. And if you know us: there’s nothing we love more than a good bowl meal!
Alex and I eat a spin on this almost every week. It’s full of charred vegetables, and crunchy greens, with this creamy salsa ranch dressing that you’re going to want to put on everything! You can make it with either grilled chicken or pinto beans, so it works for gluten-free, vegetarian, and vegan diets. it’s such a fun recipe for parties and serving a crowd! (Serve with this margarita recipe, just because.)
Components in a fajita salad
This fajita salad is so customizable: it works as an easy weeknight meal, or a summer grilled meal on the patio! The grill method takes about 1 hour to complete, so it’s great for weekends or when you have time to fire it up. Here are the basic components in a good fajita salad recipe:
Fajita veggies: We like a mix of multi-colored bell peppers, onions, and garlic. Then you’ll need a few spices: cumin, chili powder, garlic powder, and onion powder. We prefer using our own mixture to a pre-made fajita mix.
Chicken or pinto beans: It’s absolutely delicious with grilled chicken, but for vegetarian or vegan diets, pinto beans are just as satisfying.
Fresh veggies: You’ll use a base of romaine lettuce, plus fresh cherry tomatoes. We like grilling avocado slices along with the fajita veggies (optional).
Salsa ranch dressing: A few ingredients like sour cream, mayo, and salsa combine into an absolutely delicious creamy drizzle! If you prefer, you can simply use sour cream mixed with salsa, or this easier salsa dressing.
Methods: grilling, skillet, and sheet pan
There are a few different methods for making fajitas. The main method is the grill, but we’ve got a few alternatives for you:
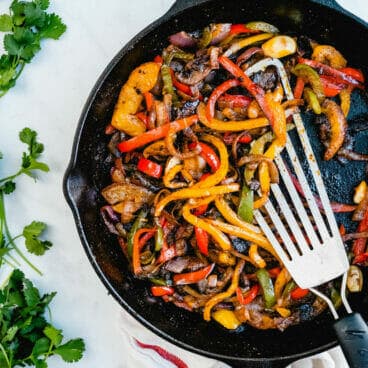
Grilled: In the recipe below for fajita salad, we grill the fajita veggies and the chicken or beans (the beans go in packets). This is our preferred method because it infuses a delicious charred flavor.
Skillet: If you prefer, you can simply whip up these skillet fajita veggies to use in your fajita salad. For the chicken, make pan seared chicken breast with the seasonings in this recipe. For the beans, simply warm them on the stove.
Oven: You can also make sheet pan fajitas using this vegan fajitas recipe!
Sauce variations
This salsa ranch dressing is one if our favorite parts of this recipe! (Well, every part of this recipe is our favorite…but I digress.) It’s so intensely creamy and savory. But you can use a few other options:
Sour cream or mayo mixed with salsa: This cheater method works pretty well, and you don’t even need to measure! (We tried it.)
This fajita salad recipe is a great gluten-free dinner, vegetarian dinner, and vegan dinner. You can store leftover vegetables and chicken for up to 3 days refrigerated; gently reheat in a skillet before serving.
Dietary notes
This fajita salad recipe is gluten-free. With the pinto beans it is vegetarian. For dairy-free and vegan, use cilantro sauce, chipotle sauce or cashew cream as the sauce.
Fajita salad is a fun and flavorful way to enjoy all the classic fajita ingredients – grilled meats or veggies, peppers, onions, and sometimes beans – but in a lighter salad format. Think of it as your favorite fajita fillings, minus the tortillas, piled onto a bed of crisp greens and drizzled with a zesty dressing.
What kind of dressing should I use for fajita salad?
It’s best to assemble the salad just before serving to keep the greens crisp, but you can prep all the ingredients ahead of time. Grill your meats and veggies, whip up your dressing, and chop your toppings. When you’re ready to eat, simply toss everything together.
This fajita salad recipe is one of our our go-to dinner ideas, bursting with charred vegetables and covered in a creamy salsa ranch dressing! It’s delicious with either chicken or beans as the protein. We eat it often and it’s easily gluten-free, vegetarian, or vegan—plus it works great for serving a crowd!
Ingredients
For the veggies
3 bell peppers (red, yellow, and green)
1 medium red onion
1 medium white onion
3 garlic cloves
1 tablespoon olive oil
2 teaspoons cumin
1 teaspooneach chili powder, garlic powder, and smoked paprika
For the chicken (or skip to Step 3 for plant-based): Pat the chicken dry with a paper towel. If not already in cutlets, slice the chicken in half horizontally (see these steps for how to butterfly chicken). Add the chicken to a container and add the olive oil, garlic powder, onion powder, oregano, cumin, chili powder, kosher salt, and a few grinds of black pepper. Mix with your hands until evenly coated. Cover and marinate until ready to grill.
For the beans: Drain and rinse the beans, and place them on a square of aluminum foil. Mix the beans with 1 tablespoon olive oil, the same spices as the chicken, and ½ teaspoon kosher salt. Fold up the sides of the foil to form a square packet.
Thinly slice the bell peppers and onions. Smash the garlic cloves. Place them in a bowl and toss with 2 tablespoons of the olive oil, cumin, chili powder, garlic powder, smoked paprika, kosher salt and fresh ground pepper. Spread on a large piece of foil and seal the foil tight.
Place the foil pack with the vegetables on the grill and cook for 15 minutes, then carefully use tongs to open the pack. Continue to grill until veggies are tender and lightly charred, about 10 to 15 minutes.
Meanwhile, make the salsa ranch dressing. Prepare the lettuce and tomatoes. Rub avocado halves with olive oil and add a pinch of salt.
When the vegetables are almost finished grilling: Grill the chicken breasts until grill marks appear and it releases from the grates, 2 to 4 minutes. Flip and cook until no longer pink in the center and the internal temperature is 165°F, 2 to 4 minutes. Remove to a platter and cover with foil. Allow to rest for 5 minutes before slicing for maximum juiciness. Alternatively, place the bean packet on the grill and grill for 5 minutes.
Grill the avocados cut side down for 4 minutes, until grill lines appear and they are bright green.
Place the greens on a plate, then top with the vegetables, grilled chicken or beans, tomatoes, jalapenos and cilantro. Drizzle with the desired amount of dressing and serve. If making in advance, refrigerate the components separately; bring the dressing to room temperature before serving. Leftover chicken, veggies, and beans store up to 3 days, refrigerated.
What goes with pasta salad? Serve this versatile dish as a main or a side! You can try it as…
What goes with pasta salad? Serve this versatile dish as a main or a side! You can try it as a side dish for burgers, sandwiches, chicken or fish, or as a main dish for lunch or dinner with other salads, slaws, and more.
Pasta salad is one of our summer staples: it’s so hearty and versatile and can be served in so many ways. But what goes with pasta salad? What pairs perfectly with this crowd-pleasing side dish?
The fun part is this: pasta salad works as either a main dish or a side! Here are a few of the main ideas for what to serve pasta salad:
Serve it for lunch with veggies and dip, crackers or bread, or fresh fruit
Serve it as a dinner with other summer salads like bean salad, cucumber salad, or watermelon salad
Serve it as a side for burgers, sandwiches, chicken, or fish.
As two cookbook authors and recipe experts, Alex and I have made lots of cold pasta salad recipes. Keep reading for all the dishes we like to serve alongside!
If you're serving pasta salad as a side, here's a great main dish to serve alongside: the Caprese sandwich! This riff on the classic Italian salad from Capri layers the classic ingredients as a sandwich filling, with an irresistibly creamy pesto aioli that adds a pop of savory brightness to each bite.
These grilled veggie kabobs skewer all the best vegetables and are easy to throw on the grill! They’re a great side dish for any summer meal, and work with pasta salad whether it's a main or a side.
Cucumber salad is ideal for everything from summer potlucks to patio barbecues to picnics, and pairs perfectly with everything from salmon to a grilled burger to pasta salad. The thinly sliced cucumbers and onions are salty, tangy, and lightly sweet all at once, a nice contrast to savory pasta salad.
Grilled chicken is a great main dish to serve with pasta salad! We’ve figured out the trick to an ultra-moist piece of meat that melts in your mouth. Every time we serve it, everyone raves.
What goes with pasta salad? Try a pesto grilled cheese! Adding gives the best garlicky, herby flavor to the gooey melty cheese, making it one irresistible sandwich that's quick to make.
Bean salad provides a nice tangy contrast to pasta salad: plus it's packed with plant-based protein so it helps to make a filling meal! Our recipe is a fresh spin and so easy to throw together for picnics and potlucks.
Apple slaw makes a tangy, fresh counterpoint to pasta salad! It pairs cabbage with carrots, apples, and a creamy poppy seed dressing: the perfect fresh, easy side dish!
Sandwiches pair well with pasta salad, so how about this one with salmon and creamy dill sauce! There’s something so satisfying about a good fish sandwich, and why not swap in salmon for the traditional breaded fish? Add a fillet of pan seared or grilled salmon onto a bun, then top with feta crumbles, red onion and creamy, lemony dill sauce.
If you're serving pasta salad as a lunch idea, it's perfect with a side of vegetables and ranch dip! All you need are some raw carrots, celery, and broccoli to round out the meal in a fresh and healthy way. This ranch dip is made with Greek yogurt, or you can use hummus as a vegan option!
Salads that pair well with pasta salad are vegetable based salads that are big on veggies, to contrast the pasta and creamy dressing. This lighter spin on the classic broccoli salad is cunchy and savory sweet, it stars broccoli, raisins, and a flavor-popping dressing.
If you need vegetarian main to go with pasta salad, try a veggie burger! There are lots of purchased options available at the grocery, or make it homemade! This veggie burger is easy to grill or pan fry, satisfyingly hearty, and sure to please even the most devoted meat-eaters.
Here's a great recipe that goes with pasta salad: kale slaw! This colorful mix of fresh veggies is simple to put together and tastes refreshingly sweet tart. It stars hearty kale, crisp apples, sweet carrot, and a zingy maple apple cider vinegar dressing.
Corn salad is a fun recipe to serve with pasta salad for contrasting flavors and textures. This one is all about fresh flavor: sweet bursts of corn, juicy tomatoes, and herbaceous basil pair with a tangy, light vinaigrette.
Fruit skewers are the perfect pairing with pasta salad. This is a simple concept that’s more like an idea than a recipe: but it makes everyone go crazy for pure, fresh fruit. Use whatever fruit you like and if desired, serve with our favorite 3 ingredient fruit dip.
Sandwiches go well with pasta salad, and this one is a fan favorite! It’s basically a vegetarian chicken salad sandwich, or a chickpea tuna salad. Made with smashed chickpeas, crunchy veggies, and a creamy dressing, it's so tasty that it’s become one of our most popular chickpea recipes ever!
Watermelon salad is a perfect contrast with pasta salad: it's fresh, juicy, and sweet! This classic combination of sweet juice melon and salty cheese is one of summer’s great pleasures. This summer salad has grown to massive popularity in recent years, and for good reason: it’s beyond delicious, and fast and easy to make,
Pair pasta salad with this loaded hummus dip for a fun and easy meal, either lunch or dinner! Spread hummus on a platter or bowl, then top with cucumber, tomatoes, olives and feta cheese and dip with pita chips or bread.
If you're planning to serve pasta salad with a few summer salads, this dil potato salad is a great option! Think: tangy potatoes, drenched in a naturally creamy sauce made with olive oil and vinegar, punchy fresh herbs, and savory capers to round it out.
Here's a great pairing with pasta salad: the chicken pesto sandwich! It stars grilled chicken breast topped with herby basil pesto, fresh mozzarella, and ripe tomatoes, all nestled between two slices of crusty bread.
A strawberry salad with greens is a nice contrast to serve with pasta salad. This one uses our favorite balsamic vinaigrette dressing to accentuate the bright red sweet berries. Paired with red onions and toasted almonds, it’s a simple and delicious side everyone loves!
Pasta salad is perfect with almost any main dish. This baked salmon recipe is our total go-to, from when friends visit to a quick weeknight dinner. You’ll never need another recipe! it's perfectly seasoned, has a crispy top, and it's easy to make.
One of our simplest recipes to pair with pasta salad is this easy arugula salad! You don't even need to make a dressing: just toss the baby arugula leaves with lemon juice, olive oil, and Parmesan shavings. It's so refreshing! Add sliced apples as another flavor contrast.
What goes with pasta salad? Try vegan lentil sloppy joes! They're a deliciously filling plant-based dinner made with lentils, tomatoes, and seasonings. The tangy flavor makes them a crowd-pleaser, and they’re a huge hit at our house. Serve on a bun with pickles for the true sloppy joe experience.
Pan seared chicken breast is a great main dish for pasta salad, and this recipe comes out irresistibly seasoned with a golden brown crust and a juicy, tender interior! Here are all our tips and tricks to this family favorite. You can also chop it up and add it to pasta salad to make it more filling!
Grilled shrimp makes an easy meal out of pasta salad. This grilled shrimp is perfectly seasoned and over the top delicious! It’s easy and cooks up in 5 minutes.
A fun pairing with pasta salad is this garbanzo bean salad: it's protein-packed and bursting with fresh flavors! Simple ingredients and a quick prep time make it an easy and healthy meal prep option.
Cornbread works as a side for pasta salad, and this one is a family favorite! It's made in a cast iron skillet (though you can use any type of oven-safe skillet that’s on hand). Bake it up and it has just the right thickness, moist crumb, and savory sweetness you want in a great cornbread.
Make a simple meal out of pasta salad by adding grilled salmon! Here's our tried-and-true easy method that comes out tender with a lightly crisp crust. Even better, it’s sprinkled with our tasty magical seasoning blend. This salmon seasoning tastes so good, you’ll want to put it on everything.
Last up in what to serve with pasta salad, here's a quick cooking main dish everyone loves: shrimp kabobs! This grilled recipe is a new family favorite: it’s got a custom seasoning blend that makes this juicy seafood taste irresistible! Take them over the top with our creamy Comeback Sauce for the best treat!
Top pasta salad recipes
Alex and I love pasta salad, and we make it often in the summer or for lunches. Here are a few different types of cold pasta salad recipes:
Classic: This Classic Pasta Salad has a mix of vegetables, cheese, olives, and a zingy vinaigrette.
What goes with pasta salad? This versatile dish can be a main or a side! Serve it as a side dish for burgers, sandwiches, chicken or fish, or as a main dish with salads, slaws, and more. There are so many ways to eat this tasty recipe! This Mediterranean pasta salad recipe is bursting with fresh flavor! Mix up a batch as an easy side dish or quick lunch.
1 cup feta cheese crumbles (omit for vegan and add more salt)
Instructions
Start a large pot of well-salted water to boil. Boil the pasta until al dente according to the package instructions. Drain the pasta and run cool water over it until it’s room temperature.
Meanwhile, slice the cucumber and tomatoes, chop the sundried tomatoes and artichoke hearts, and slice the onion.
In a large bowl, whisk together the lemon zest, lemon juice, red wine vinegar, garlic, Italian seasoning, and kosher salt. Then whisk in the olive oil.
Once the pasta is done, add it to the large bowl of dressing and toss with the chopped vegetables. Add the feta cheese and fresh ground black pepper and stir to combine.
Taste and add more salt to taste if necessary. Serve immediately. Stores up to 5 days refrigerated (leftovers taste great; allow to come to room temperature and add a swirl more olive oil or a bit more salt as necessary).
These vegan lentil sloppy joes are deliciously filling plant-based dinner made with lentils, tomatoes, and seasonings! The tangy flavor makes…
These vegan lentil sloppy joes are deliciously filling plant-based dinner made with lentils, tomatoes, and seasonings! The tangy flavor makes them a crowd-pleaser, and they’re a huge hit at our house. Serve on a bun with pickles for the true sloppy joe experience.
Why we love this recipe
If you grew up on sloppy joes like we did (or even if you didn’t), you’re going to love this spin on the classic! Our lentil sloppy joes recipe has all the hearty, tangy flavor of the classic, but it’s an easy vegan recipe that’s 100% plant-based.
The best part is you can make it in 30 minutes! It makes a large batch of 8 servings (true to form, since sloppy joes are intended to feed a crowd). Ketchup, tomato paste, and a few seasonings make a savory flavor that’s irresistible. The first time we made them, we loved watching our toddler shovel in bite after bite! It’s a kid favorite that adults love, too.
Ingredients you’ll need
Lentil sloppy joes star one of our very favorite plant-based ingredients: lentils! We love them because they’re delicious, inexpensive, packed with plant-based protein (which makes vegan recipes more filling), and shelf stable for up to 3 years. How’s that for a rockstar ingredient? Here are the main ingredients you’ll need, plus salt and olive oil:
Brown or green lentils: These are cheap and easy to find. Avoid substituting other varieties (like red or French) since they cook differently.
Green bell pepper and onion: These are standard in the classic version of sloppy joes.
Garlic: Fresh garlic adds a savory meaty flavor that’s essential in vegan dinners, we find.
Tomato paste, ketchup, Dijon, brown sugar: These ingredients make the base of the tangy sauce.
Vegan Worcestershire sauce: If you eat fully vegan or plant-based, use vegan Worcestershire sauce or this Worcestershire sauce substitute.
Garlic powder, cumin and smoked paprika: These savory spices form a meaty base.
This lentil sloppy joes recipe comes together quickly! A few recipe tips before you get right to it:
The recipe makes 8 servings, so it’s a big batch. You can make half if desired. But we love having leftovers to eat again or put on a vegan taco salad.
Cook the lentils first until tender, about 20 minutes. You’ll leave all the liquid in the pan when mixing it with the sauce, so you’ll want most of it to be evaporated.
You can chop the ingredients for the sauce while the lentils cook. Short cut! Chop and sauté while the lentils are cooking. It makes for quick prep time!
Storing leftovers and make ahead info
We like these lentil sloppy joes best the day they are cooked, but they taste great the next day too! You can store leftovers refrigerated for up to 4 days. Reheat in a saucepan, adding an extra squeeze of ketchup if it seems dry.
Another way to make this in advance is to make the lentils and sauce and refrigerate them separately. Then mix together and heat on the stovetop before serving.
What to serve with vegan lentil sloppy joes
To us, something about sloppy joes screams potato chips! But if you’re up for serving with more veggies (which we are!), here are a few more ideas on what to serve alongside. If you eat fully vegan, in some recipes you may need to use vegan mayo or feta (or omit the cheese).
This lentil sloppy joes recipe is vegan (with vegan buns), plant-based, vegetarian, and dairy-free. For gluten-free, use a gluten-free bun.
Frequently asked questions
Are vegan lentil sloppy joes as satisfying as the traditional version?
They can be! Lentils provide a hearty texture and a good amount of protein, while the blend of spices and savory ingredients delivers the classic sloppy joe flavor you crave.
Of course, there’s nothing quite like the taste of ground beef, so if you’re trying to impress a meat lover you may want to try purchased plant-based crumbles.
Can I use other types of lentils besides brown or green lentils?
We don’t suggest substituting lentil varieties here. Red lentils in particular become very mushy.
Are there any gluten-free options for the buns?
Many grocery stores now offer gluten-free hamburger buns. Alternatively, you can use lettuce wraps or even serve the sloppy joe filling over rice or quinoa for a grain bowl-inspired twist.
These vegan lentil sloppy joes are deliciously filling plant-based dinner! The tangy flavor makes them a crowd-pleaser, and they’re a huge hit at our house. Serve on a bun with pickles for the true sloppy joe experience.
1 teaspoon each garlic powder, cumin, and smoked paprika
8 buns (vegan if desired)
Bread and butter pickles, to serve
Instructions
In a large saucepan, place the lentils, 6 cups water, and 2 teaspoons kosher salt. Bring to a rapid simmer. Reduce the heat and simmer uncovered for about 20 to 25 minutes, until the lentils are tender but still hold their shape and there is only a bit of liquid left in the pan.
Meanwhile, prepare the vegetables as noted in the ingredient list.
In another large saucepan or skillet, heat the olive oil over medium high heat. Add the bell pepper and onion and cook for 5 minutes until the onions are translucent. Add the garlic and cook for 1 minute. Stir in the tomato paste, ketchup, mustard, brown sugar, Worcestershire sauce, garlic powder, cumin and smoked paprika. (If the lentils are not yet ready at this point, remove the heat and allow the sauce to rest until they are done). Once the lentils are cooked, add them and the pan liquid to the tomato mixture, then simmer for 5 minutes until thickened and warm. Taste and add salt if desired.
Serve on a bun with pickles. (If desired, toast the buns prior to serving.) Make ahead: Leftovers save for 3 to 4 days. Make in advance, refrigerate and then reheat in a saucepan. Add an extra squeeze of ketchup if it seems dry.
This pan seared chicken breast comes out irresistibly seasoned with a golden brown crust and a juicy, tender interior! Here…
This pan seared chicken breast comes out irresistibly seasoned with a golden brown crust and a juicy, tender interior! Here are all our tips and tricks to this family favorite—serve it with a few sides, or add to salads, tacos rice bowls, and more.
Why we love this recipe
What Alex and I turn to most often for dinners, we find, are the most basic go-to methods. Yes, we love a good Tuscan chicken or chicken piccata. But we’ve made this pan seared chicken breast more times than we can count!
It comes out golden seared and juicy on the inside, seasoned with our favorite blend of spices. We use it for everything and our family inhales it! (Really.) We like adding rice or orzo, or slicing it and adding it to Caesar salad, chicken pasta salad, or power bowls! It’s so versatile and you can make it in 15 minutes.
Ingredients for pan seared chicken breast
You’ll need just a handful of ingredients for this recipe, and outside of the chicken, you likely have them on hand in your pantry:
Chicken breast: Buy organic chicken if at all possible. Look for boneless skinless chicken breasts, or cutlets if possible. If you can’t find cutlets, you can butterfly them by slicing them in half horizontally.
Olive oil: Olive oil is our cooking oil of choice, and it infuses delicious flavor into the seared chicken.
Spices: A custom blend of equal parts garlic powder, onion powder, smoked paprika, and dried oregano add big savory flavor to the chicken breasts.
Steps for pan seared chicken breast
The basic steps for pan seared chicken breast are simple. Butterflying the chicken breast before you cook it is essential for even cooking and getting a juicy, tender texture (or you can buy it in cutlets). If you’re ready, jump to the recipe below for exact quantities.
Step 1:Butterfly the chicken (if not in cutlets) by slicing in half horizontally, then opening it up and cutting along the fold to separate the two halves. Pat it dry and season with salt. In a small bowl, mix the seasonings and sprinkle on both sides of the chicken.
Step 2: Add olive oil to a large skillet and heat over medium heat. Add the chicken and cook until browned on both sides, 3 to 5 minutes per side. When the internal temperature is 165°F, remove to a plate and rest for 5 minutes.
Step 3: Slice into strips if desired, then serve.
Tip
This is our favorite chicken recipe because it comes together in just 15 minutes and you don’t need to fire up a grill! Substitute it for grilled chicken in recipes like a Chicken Pesto Sandwich or a Grilled Chicken Salad.
Ways to serve pan seared chicken breast
This seared chicken is so versatile. You can eat it as a main with a few simple side dishes, or in salads, bowl meals, tacos, sandwiches, etc. One of my favorite things to order at a restaurant is a salad and adding chicken to make it a main dish: this is your way to do that at home!
Leftover cooked chicken stores for 3 to 4 days refrigerated. It’s best eaten immediately after cooking, but it works made ahead too. Reheat it in a skillet on the stovetop for a minute or two over medium heat before serving.
Dietary notes
This pan seared chicken breast recipe is gluten-free and dairy-free.
Frequently asked questions
What type of pan is best for searing chicken?
A heavy-bottomed skillet, such as cast iron or stainless steel, is ideal for pan-searing chicken. These pans retain heat well, allowing for a consistent sear and preventing the chicken from sticking.
Do I need to use oil when pan-searing chicken?
Yes, using oil is essential for pan-searing chicken. It helps prevent the chicken from sticking to the pan, promotes even browning, and contributes to a crispy, flavorful crust.
Should I cover the chicken while searing it?
Never cover chicken while pan-searing! Covering the pan will trap steam, preventing the chicken from developing a crispy crust.
How do I keep my chicken juicy and prevent it from drying out?
A few things: make sure to butterfly it before cooking or buy cutlets! This ensures even cooking. Use a meat thermometer to ensure it reaches the proper internal temperature of 165°F (74°C), and don’t cook it beyond that. Let the chicken rest for 5 minutes after cooking to allow the juices to redistribute.
½ teaspooneach garlic powder, onion powder, dried oregano, and smoked paprika
Freshly ground black pepper
2 tablespoons olive oil
Instructions
If you buy the chicken as breasts that are not already butterflied or in cutlets, butterfly the chicken by placing your hand over the top of each chicken breast and using a sharp knife to carefully slice the breast horizontally, leaving the edge intact so it can open up like a book. Unfold the breast like a book, then cut along the fold to separate the two halves.
Pat the chicken dry with a paper towel and sprinkle on both sides with the kosher salt (use 1 ¼ teaspoons if the chicken is closer to 1 ½ pounds). In a small bowl, mix the garlic powder, onion powder, oregano, smoked paprika, and a few grinds of black pepper, then sprinkle over the chicken.
Add the olive oil to a large stainless steel or cast iron skillet and heat over medium high heat. Add the chicken and cook for 3 to 5 minutes per side, until browned on both sides. When the internal temperature is 165°F or the center is no longer pink, remove to a plate. Rest 5 minutes before slicing (if desired) and serving. Leftovers last up to 3 days refrigerated.
This sweet potato hummus recipe puts a vibrant orange twist on classic hummus! Super creamy and smooth with sweet, earthy, and nutty flavors, it’s a healthy dip to serve at parties or to enjoy as a simple snack with veggies and pita.
This sweet potato hummus recipe puts a vibrant orange twist on classic hummus! Super creamy and smooth with sweet, earthy, and nutty flavors, it’s a healthy dip to serve at parties or to enjoy as a simple snack with veggies and pita.
Turn tomatoes into gold with our tomato confit recipe, which tastes like a burst of summer sunshine! Slow roasting cherry…
Turn tomatoes into gold with our tomato confit recipe, which tastes like a burst of summer sunshine! Slow roasting cherry tomatoes in olive oil turns them rich and concentrated, with a jammy, melt-in-your-mouth texture and sweet caramelized flavor.
If you’ve got tomatoes, we’ve got two words for you: tomato confit. As cookbook authors, Alex and I are constantly on the lookout for new flavors and this one has us absolutely drooling—we created it inspired by dish we had on our recent trip to France.
Slow roasting cherry tomatoes in olive oil with garlic and fresh herbs concentrates their flavor, making them jammy and sweet. It really does taste like pure sunshine! You can serve tomato confit in so many ways: on crostini, pizza, sandwiches, pasta, or over creamy yogurt tahini sauce as a summer appetizer. So. darn. good. It’s like a love letter to summer (consider it ours).
Ingredients in confit tomatoes
Tomato confit is a dish where tomatoes are cooked slowly in olive oil at a low temperature. Confit is a French word that comes from the root word “to preserve,” so you can make confit with many ingredients like garlic confit or duck confit (the well-known version). You can add garlic, herbs and other seasonings to the olive oil in tomato confit to add dimension to the flavor. Here are the ingredients you’ll need:
Cherry tomatoes: You can use any type of grape or cherry tomatoes: using a multi-colored mix looks especially stunning. Ripe, local in-season tomatoes are best. Cherry tomato confit is the most common, since the small round shape help them hold together.
Extra virgin olive oil: Olive oil is ideal for confit.
Garlic: Using garlic adds a depth to the flavor here, and it’s absolutely delicious. Feel free to use more garlic if you like!
Fresh thyme: Thyme sprigs infuse just the right flavor. You could try other hardy herbs like rosemary or sage. If you like the flavor of tender herbs like basil, use them when serving.
How to make tomato confit (basic steps)
Making a confit is simple: all you need is time. You’ll need about 1 hour and 15 minutes to make tomato confit, but it’s well worth it! Here are the basic steps (or jump to the recipe):
Step 1: Preheat the oven to 300°F. In a small baking dish, add the tomatoes, garlic, salt, thyme, and olive oil. Mix to combine.
Step 2: Transfer to the oven to bake for 1 hour and 15 minutes, until tender with a fork (if not tender, cook 5 to 10 minutes more). Allow to cool for 5 to 10 minutes.
Step 3: If serving with tahini yogurt sauce, stir together the ingredients for the sauce, then spread it in a layer onto a plate and top with fresh herbs. Or, serve over burrata, on pizza, in a sandwich, and more.
Storing tomato confit
While something like garlic confit lasts for a few weeks refrigerated, we’ve found tomato confit is best served the day you make it. The tomatoes become fairly fragile and it doesn’t have quite the same look after refrigeration.
You can spoon the cooled mixture into a clean jar, seal, and store for up to 3 days. However, keep in mind the olive oil does solidify and the tomatoes tend to break apart. Allow to stand at room temperature for 20 to 30 minutes until the olive oil is liquid again before serving.
Ways to serve tomato confit
Tomato confit is extremely versatile and can be used in so many ways! We love it best served over this creamy tahini yogurt sauce as an appetizer, using bread or crostini to dip. It’s inspired by an appetizer we had at this restaurant in France, and it is heart-meltingly good! Here are a few more ideas for how to serve it:
This tomato confit recipe is vegetarian, vegan, plant-based, dairy-free and gluten-free.
Frequently asked questions
What is the difference between tomato confit and roasted tomatoes?
Tomato confit requires the tomatoes to be fully submerged in oil, while roasted tomatoes are usually only lightly coated. In addition, tomato confit is cooked at a much lower temperature (around 300°F). This slow and gentle cooking process results in a softer, more jammy texture and a more concentrated flavor compared to roasted tomatoes, which are typically cooked at higher temperatures for a shorter duration.
Can I use any type of tomato for confit?
While you can technically use any type of tomato, smaller varieties like cherry or grape tomatoes are often preferred for confit as they have a higher ratio of flesh to seeds and tend to hold their shape better during the long cooking process.
What type of oil should I use for tomato confit?
A good quality extra virgin olive oil is typically recommended for tomato confit as it adds a rich flavor and helps preserve the tomatoes. However, you can also use other oils like avocado oil or grapeseed oil if you prefer.
Can I add other ingredients to my tomato confit?
Yes, you can enhance the flavor of your tomato confit by adding various herbs and spices. Common additions include garlic, thyme, rosemary, oregano, chili flakes, or even a pinch of sugar to balance the acidity.
Turn tomatoes into gold with our cherry tomato confit recipe, which tastes like a burst of summer sunshine! Slow roasting cherry tomatoes in olive oil turns them rich and concentrated, with a jammy, melt-in-your-mouth texture and sweet caramelized flavor.
Preheat the oven to 300°F. Wash and dry the tomatoes.
In a small baking dish, add the cherry tomatoes, garlic, salt, thyme, and olive oil. Mix to combine. Transfer to the oven to bake for 1 hour and 15 minutes, until tender with a fork (if not tender, cook 5 to 10 minutes more). Allow to cool for 5 to 10 minutes.
If serving with tahini yogurt sauce, stir together the ingredients for the sauce, then spread it in a layer onto a plate and top with fresh herbs, serving with bread or crostini for dipping. The confit is also great served over burrata as an appetizer, as a pizza topping, in a sandwich, and more.
Notes
Storage info: Tomato confit is best served the day of making. You can also spoon the cooled mixture into a clean jar, seal, and store for up to 3 days. However, keep in mind the olive oil does solidify and the tomatoes tend to break apart. Allow to stand at room temperature for 20 to 30 minutes until the olive oil is liquid again before serving.
Grilled Zucchini is a summertime favorite! Our recipe features a little lemon, garlic, and Italian seasoning for a simple side that’s ready for the grill in minutes.
The post Lemon Garlic Grilled Zucchini appeared first on The Stay At Home Chef.
Grilled Zucchini is a summertime favorite! Our recipe features a little lemon, garlic, and Italian seasoning for a simple side that's ready for the grill in minutes.
Here’s one of our very favorite green salad recipes: this Mediterranean salad! It’s packed with crunchy fresh vegetables like cucumber…
Here’s one of our very favorite green salad recipes: this Mediterranean salad! It’s packed with crunchy fresh vegetables like cucumber and onion, juicy tomatoes, briny olives, and topped with a sprinkle of salty feta, fresh herbs, and a zingy lemony vinaigrette. It’s a hit every time we serve it!
If there was a green salad we make all the time, it’s this one! After 14 years of writing this food blog, I’m not sure how we haven’t shared this until now. Meet our perfect Mediterranean salad!
Why we love this recipe: This one is so satisfying, full of crunchy veggies like cucumber and onion, salty pops of feta and Kalamata olives, and hints of fresh herbs. We are dill fiends, so we love it with hints of herbaceous fresh dill. Top it off with our Greek Salad Dressing and it’s a perfect side dish, or top it with protein for a filling and healthy dinner!
There are many ways to make a Mediterranean salad, and here’s our spin! It’s designed as a side salad, but as I mentioned above there are loads of ways to add protein to make it a main dish (my favorite thing to order when I’m out to eat).
Here’s what you’ll need:
Romaine lettuce: We like the crunch of romaine. If you have to substitute, use butter lettuce.
Cucumber, onion, and tomato: These vegetables also star in the famous Greek salad.
Kalamata olives: Kalamata olives are key, but you can swap in other varieties like Castelvetrano.
Feta cheese: Feta is key here for the briny salty flavor, and it’s evocative of a Greek salad. You can omit it for vegan diets (or use vegan feta, purchased or homemade).
This Mediterranean salad recipe uses our favorite homemade Greek salad recipe, but it still only takes about 20 minutes to make. Here are the basic steps (or jump to the recipe):
Step 1: Chop the fresh ingredients.
Step 2: In a medium bowl, whisk the red wine vinegar, lemon juice, Dijon mustard, oregano, optional garlic, and salt in a medium sized bowl. Gradually whisk in the olive oil.
Step 3: Add the fresh ingredients to a plate or bowl, topping with feta cheese and fresh herbs. Top with dressing and serve.
Variations and additions
How to mix up this Mediterranean salad recipe? First, you can add different vegetables or swap in different dressings. Here are a few ideas:
Chickpeas or white beans: To add vegan protein, add drained and rinsed chickpeas or white beans
Bell peppers: Add fresh chopped red or green bell pepper or even sliced roasted bell peppers.
Canned artichoke hearts: Chopped artichokes add a tangy flair.
Broccoli: Mix in a bit of raw broccoli florets, or even steamed cauliflower.
Quinoa: A bit of cooked quinoa also makes a heartier salad.
Our other favorite thing to do with Mediterranean salad is to make it into a healthy dinner idea! Often we’ll do this when we’re ordering at a restaurant, since many have this option. It’s a great way to make this salad into a gluten free dinner. Some ideas for adding protein are:
Tofu: Make baked tofu or crispy tofu (we love tofu on a salad: if you salt it enough it almost tastes like feta!).
Storing leftovers and make ahead notes
If you want to make this Mediterranean salad ahead, you can chop the vegetables in advance and make the dressing, storing both in separate containers. It’s best to chop the tomato as close to serving as possible. When serving, allow the dressing to come to room temperature, then assemble the salad.
For storing leftover salad, leftovers with dressing last for up to 1 day refrigerated (salads do become soggy over time).
More salad recipes
Before you get to the recipe, here area a few more favorite green salad recipes we love! Hope you enjoy this one and let us know in the comments below what you think.
This Mediterranean salad is vegetarian and gluten-free. For plant-based, vegan and dairy-free, omit the feta cheese.
Frequently asked questions
What kind of olives should I use?
Kalamata olives are a classic choice for Mediterranean salad, but you can also use other varieties like black olives, green olives, or a mix.
Can I make the salad dressing ahead of time?
Yes, you can prepare the vinaigrette in advance and store it in the refrigerator for up to a week. Just bring it to room temperature shake it well before using to re-emulsify the dressing.
What other fresh herbs can I use besides dill?
Dill is a common herb in Mediterranean cuisine, but you can also try parsley, mint, oregano, or a combination of your favorite herbs.
How do I prevent my salad from getting soggy?
To avoid a soggy salad, wait to dress the salad until right before serving. You can also pat the vegetables dry after washing them to remove excess moisture.
Here’s one of our very favorite green salad recipes: this Mediterranean salad! It’s packed with crunchy fresh vegetables like cucumber and onion, juicy tomatoes, briny olives, and topped with a sprinkle of salty feta, fresh herbs, and a zingy lemony vinaigrette. It’s a hit every time we serve it!
In a medium bowl, whisk together the red wine vinegar, lemon juice, Dijon mustard, oregano, kosher salt and black pepper. Gradually whisk in the olive oil, adding 1 tablespoon at a time and whisking until it incorporates, until an emulsion forms. Serve immediately. Store refrigerated and bring to room temperature before serving (keeps at least 2 weeks). The dressing may separate after sitting which is okay; simply whisk again before serving.
To serve, place the greens on a plate. Top with the vegetables, then feta crumbles and herbs. Drizzle with the desired amount of dressing and serve.
Notes
As an alterative, substitute Tahini Sauce for the Greek Salad Dressing.
Variations: Add drained rinsed chickpeas or chopped red or green bell pepper.
If you want to make this Mediterranean salad ahead, you can chop the vegetables in advance and make the dressing, storing both in separate containers. It’s best to chop the tomato as close to serving as possible. When serving, allow the dressing to come to room temperature, then assemble the salad.
For storing leftover salad, leftovers with dressing last for up to 1 day refrigerated (salads do become soggy over time).


 How do you plan to serve your tomato confit? Are you as obsessed as we are? Let us know in the comments below: we’d love to hear from you.


