Simple Sauteed Broccoli

Make your broccoli taste amazing in just 10 minutes! This easy sauteed broccoli highlights its fresh flavor and comes out…

Make your broccoli taste amazing in just 10 minutes! This easy sauteed broccoli highlights its fresh flavor and comes out perfectly crisp tender.

Sauteed broccoli in pan.

In need of a healthy and easy side dish? Here’s a “recipe” that’s more of an idea than anything: sauteed broccoli! It might sound basic, but you’ll be surprised at the amount of flavor it’s possible to get from perfectly cooking this vegetable!

Why we love this recipe: Broccoli is often overcooked, leaving it soggy and without flavor. Here Alex and I will show you our go-to simple sauteed broccoli recipe: how to cook it so it’s lightly browned but perfectly crisp tender and flavorful!

🥦 Other favorite ways to cook broccoli? Try our steamed broccoli, roasted broccoli, and roasted broccoli and carrots recipes, or head to How to Cook Broccoli for more!

Sauteed Broccoli in pan with spoon.

How to make sauteed broccoli…the right way!

Broccoli is basic, right? But so many home cooks cook it way beyond the point of no return. Overcooked broccoli is the worst: it’s limp and lifeless. Instead, you’ll want to cook it just to the point where it’s tender, but still bright green and crisp. Even better: it takes less time! There’s no reason to spend the time extra overcooking it (ha!). Here are our tips on how to make the best sauteed broccoli:

Step 1: Chop the broccoli into florets.

Step 1: Chop into medium-sized florets. Try to leave a good amount of the stem to make a lovely shape, so the broccoli doesn’t look stubby! Chop them into medium-sized pieces: not so small they disintegrate, but not so large they’re too tough to cut.

Step 2: Saute the broccoli in a large skillet.

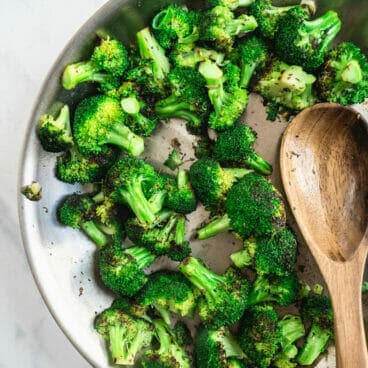
Step 2: Heat olive oil in a large skillet over medium heat. Add the broccoli and sautĂ© for 5 minutes. Watch the pan and stir so the broccoli doesn’t get too browned. Stir in the seasonings (salt, spices, etc).

Step 3: Cover the broccoli and steam.

Step 3: Cover and cook 2 minutes more. Covering the broccoli at the end locks in the moisture and steams it, helping it to get fully cooked through and tender instead of more browned.

And that’s it! Perfectly seasoned sauteed broccoli in just 10 minutes.

Ways to season sauteed broccoli

The key to great tasting sauteed broccoli is the seasonings! First and foremost, make sure to salt it perfectly to taste. Then to accessorize, we used sliced green onion, Italian seasoning, and garlic powder (see the recipe below). If you have a lemon, topping with lemon zest gives it the perfect zing! Here are a few more ideas for flavoring:

  • Grated Parmesan or Pecorino Romano cheese
  • Feta cheese or goat cheese crumbles
  • Rice vinegar, soy sauce (in place of the last ¼ teaspoon salt), and sesame seeds
  • A drizzle of balsamic reduction
  • Slivered toasted almonds
  • Minced garlic
  • Grated ginger
  • Panko and dried herbs

A bit on broccoli nutrition

Broccoli is a super nutritious cruciferous vegetable! It’s high in fiber (with 2.4 grams per 1 cup), which is helpful for keeping you full and helping with digestion. It also has relatively high protein for a vegetable (2.5 grams per 1 cup), and is high in Vitamin C, K and iron. Read more broccoli nutrition facts here.

Main dishes to pair with it!

Of course, there’s no end to dishes to pair with this sauteed broccoli! It’s so versatile that it literally goes with anything (like a perfect pair of jeans!). Here are a few ideas for mains that would pair nicely:

Dietary notes

This sauteed broccoli recipe is vegetarian, vegan, plant-based, dairy-free, and gluten-free.

Frequently asked questions

What’s the best type of broccoli for sauteing?

Fresh broccoli florets are ideal. Look for firm, deep green florets with tight buds. Avoid broccoli with yellowing florets or a mushy texture.

Can I use frozen broccoli?

We don’t recommend it. Frozen broccoli florets have a softer texture and may release more water during cooking.

Steamed or sautĂ©ed? What’s the difference?

Steaming broccoli preserves its vibrant green color and slightly more nutrients. Sautéing allows for browning and caramelization, developing a deeper and more complex flavor.

Do I need to blanch broccoli before sauteing?

Blanching (briefly boiling) broccoli florets for a minute or two before sauteing can help soften them slightly and ensure even cooking. However, it’s not essential, especially if you prefer your broccoli with a bit of a bite.

What can I add to my sauteed broccoli for extra flavor?

The possibilities are endless! Popular additions include garlic, shallots, ginger, red pepper flakes, soy sauce, lemon juice, toasted nuts, or even a sprinkle of parmesan cheese.

Print
Sauteed broccoli

Simple Sauteed Broccoli


  • Author: Sonja Overhiser
  • Prep Time: 3 minutes
  • Cook Time: 7 minutes
  • Total Time: 10 minutes
  • Yield: 4

Description

Make your broccoli taste amazing in just 10 minutes! This easy sauteed broccoli highlights its fresh flavor and comes out perfectly crisp tender.


Ingredients

  • 1 1/2 pounds (2 large heads) broccoli 
  • 2 green onions
  • 2 tablespoons olive oil
  • 2 teaspoons Italian seasoning
  • ⅛ teaspoon garlic powder
  • ½ teaspoon kosher salt, plus more to taste
  • Optional: 1 teaspoon lemon zest
  • Dress it up: Add a sprinkle of shredded Parmesan cheese or feta cheese!

Instructions

  1. Chop the broccoli into medium sized florets (leave a good amount of the stem for a nice shape; see the photo). Thinly slice the green onions.
  2. In a large skillet over medium heat, heat the olive oil. Add the broccoli florets and sauté for 5 minutes, stirring occasionally (the broccoli will lightly brown in parts). Stir in the green onion, Italian seasoning, garlic powder, and kosher salt.
  3. Cover and cook for 2 to 3 minutes more, until crisp tender but still bright green. Taste and add a few pinches of salt if needed (make the flavor pop!) and fresh ground pepper. Remove the broccoli to a bowl and serve immediately. Sprinkle with the lemon zest, if using.
  • Category: Side Dish
  • Method: Sauteed
  • Cuisine: Vegan

Keywords: Sauteed Broccoli

Chorizo Stuffed Bell Peppers

These Chorizo Stuffed Bell Peppers are packed with southwest flavor, perfectly portioned for meal prep, and freezer-friendly!

The post Chorizo Stuffed Bell Peppers appeared first on Budget Bytes.

We’re in love with stuffed bell peppers here at the Budget Bytes kitchen, so I decided to make a new variation just so I could have an excuse to eat stuffed bell peppers again. These Chorizo Stuffed Bell Peppers are full of super flavorful Mexican chorizo, hearty rice, and a rich sauce, then topped with melty mozzarella cheese. They’re SO filling, perfectly portioned for meal prep or freezer cooking, and quite flexible if you want to change up the ingredients to make them even more budget-friendly! Put this one one your to-cook list because I know you’re going to love them!

Overhead view of chorizo stuffed bell peppers in a baking dish on a yellow background.

Ingredients for Chorizo Stuffed Bell Peppers

These stuffed bell peppers are packed with flavorful herbs and spices and a rich tomato-y sauce so that every bite is deee-licious. Here are the ingredients for chorizo stuffed bell peppers:

  • Bell Peppers: You’ll need three bell peppers to make six servings for this recipe. We used a mix of colors to make it more festive, but you can use any color pepper that fits your budget.
  • Mexican Chorizo: Mexican chorizo is a fresh (not cured) sausage that is packed with spices. You can usually either buy this loose or in links. If you buy them in links, simply squeeze the meat out of the casing into the skillet. I like Johnsonville brand, but many larger grocery stores also make their own generic version.
  • Garlic & Onion: A little fresh onion and garlic add flavor and texture to the bell pepper stuffing.
  • Rice: Long grain white rice bulks up this meal to make it filling while keeping the cost low. We cook the rice right in the pot with the chorizo, spices, and broth for maximum flavor.
  • Chicken Broth: The rice is cooked in chicken broth to ensure that every bite is super flavorful. We use Better Than Bouillon to make our broth because it’s budget-friendly and has great flavor.
  • Tomato Paste: Tomato paste is added to the broth to help create an enchilada sauce-like flavor in the rice mixture.
  • Diced Green Chiles: Green chiles add even more flavor, color, and texture to the filling. If you prefer a milder stuffed pepper, you can leave out the green chiles or look for a mild green chile.
  • Spices: We packed this bell pepper stuffing with even more spices including chili powder, cumin, garlic powder, cayenne pepper, and salt.
  • Mozzarella: The stuffed bell peppers are topped with mozzarella cheese for a rich finish, but you can substitute with a different type of cheese if preferred, like Monterey jack, pepper jack, cheddar, or a Mexican blend.
  • Green Onion: A few sliced green onions sprinkled over top of the stuffed bell peppers add a fresh finish, but are entirely optional!

What Else Can I Add?

This recipe is pretty flexible, so if you want to change it up or make it more budget-friendly, here are some other ingredients you can add:

  • Beans: Try swapping half of the chorizo with a can of black beans or pinto beans for more fiber and less cost.
  • Diced Tomatoes: If you want more color and texture in your bell pepper filling, try adding a drained can of petite diced tomatoes, or diced tomatoes with chiles (Rotel).
  • Sweet Potato: Chorizo and sweet potato are a perfect flavor pair. Replace half of the chorizo with one small finely diced sweet potato for a spicy-sweet flavor profile (add it with the rice so it can simmer and soften with the rice).

Mexican Chorizo vs. Spanish Chorizo

It’s really important to use the correct type of chorizo for this recipe. You’ll need Mexican chorizo, which is a fresh (uncooked & uncured) sausage. You’ll find Mexican chorizo in the fresh meat department, usually near bratwurst and other fresh sausages. Spanish chorizo is a cured, sliceable sausage that you’ll usually find near cheese, pepperoni, or other charcuterie-type foods.

What to Serve with Chorizo Stuffed Bell Peppers

These southwest-inspired peppers are really filling on their own, but if you want to serve something on the side they pair really well with Cumin Lime Roasted Sweet Potatoes, Cowboy Caviar, Sweet Potato Cornbread, or Warm Corn and Avocado Salad.

How To Store Leftovers

I love making stuffed bell peppers for meal prep, so this is how I store and reheat them. The cooked bell peppers can be stored in the refrigerator for 4-5 days. I like to reheat them quickly in the microwave (about 2 minutes each).

Or, once chilled in the refrigerator, you can transfer them to the freezer. I suggest packaging them individually in a freezer-safe, air-tight container, so you can reheat one at a time as needed. Frozen stuffed bell peppers can be thawed in the refrigerator overnight and then reheated the next day in the microwave, or thawed straight from the freezer in the microwave using the defrost function, then heated through on full power.

Side view of a fork lifting some stuffing out of the bell pepper with the cheese pulling.
Overhead view of chorizo stuffed bell peppers in a round baking dish.
Print

Chorizo Stuffed Bell Peppers

These Chorizo Stuffed Bell Peppers are packed with southwest flavor, perfectly portioned for meal prep, and freezer-friendly!
Course Dinner, Main Course
Cuisine Amercian, Mexican
Total Cost $12.91 recipe / $2.15 serving
Prep Time 5 minutes
Cook Time 1 hour
Total Time 1 hour 5 minutes
Servings 6
Calories 380kcal

Ingredients

  • 3 bell peppers $4.07
  • 1 lb. Mexican chorizo $4.99
  • 1 yellow onion $0.37
  • 2 cloves garlic $0.16
  • 1 4oz. can diced green chiles $0.99
  • 2 Tbsp tomato paste $0.20
  • 2 tsp chili powder $0.20
  • 1/2 tsp cumin $0.05
  • 1/2 tsp garlic powder $0.05
  • 1/4 tsp cayenne pepper $0.02
  • 1/4 tsp salt $0.02
  • 1/2 cup long grain white rice (uncooked) $0.13
  • 1 cup chicken broth $0.19
  • 1 cup shredded mozzarella $1.25

Instructions

  • Preheat the oven to 350ºF. Cut each bell pepper in half so there is a top and bottom portion, then remove the seeds and ribs. You can either carefully cut the stem out of the center of the top half, or eat around it later. Place the halved bell peppers in a baking dish, cut sides up. Par-bake in the preheated oven for 15 minutes.
  • Add the chorizo to a large deep skillet and cook over medium heat until browned. While the chorizo is cooking, dice the onion and mince the garlic. Add the onion and garlic to the chorizo and continue to cook until the onions are softened.
  • Add the diced green chiles, tomato paste, chili powder, cumin, garlic powder, cayenne pepper, and salt to the skillet and stir until combined.
  • Add the uncooked rice and chicken broth to the skillet and stir until combined again. Place a lid on the skillet, turn the heat up to medium-high, and allow the broth to come up to a boil.
  • As soon as the broth begins to boil, turn the heat down to low and let the rice simmer over, low without lifting the lid or stirring, for 20 minutes. After 20 minutes, turn off the heat and let it rest for five more minutes.
  • Finally, remove the lid and gently stir the rice and chorizo mixture. All of the broth should be absorbed and the rice tender.
  • Divide the rice and chorizo mixture between the six bell pepper halves, then top with shredded cheese. Cover the baking dish and return it to the 350ºF oven and bake for 20 minutes more. Finally, top with sliced green onions and serve!

See how we calculate recipe costs here.

Nutrition

Serving: 1pepper | Calories: 380kcal | Carbohydrates: 24g | Protein: 18g | Fat: 24g | Sodium: 1032mg | Fiber: 3g
Overhead view of two stuffed bell peppers on a plate with a fork digging into one.

How to Make Chorizo Stuffed Bell Peppers – Step by Step Photos

Prepped bell peppers in a baking dish.

Begin by preheating the oven to 350ºF. Cut three bell peppers in half to create a top and bottom piece for each pepper. Scoop out the seeds and ribs. You can either cut out the stem from the top half of the peppers, or eat around them later. Place the halved peppers in a baking dish and par-bake them for 15 minutes in the fully preheated 350ºF oven.

Cooked chorizo and onion in a skillet.

Meanwhile, cook 1 lb. of Mexican chorizo in a large deep skillet over medium heat until browned. The chorizo has plenty of fat, so you likely won’t need to add any additional to the skillet. Dice one yellow onion and mince 2 cloves of garlic. Add the onion and garlic to the skillet with the chorizo, and continue to cook until the onions are softened.

Green chiles, tomato paste, and spices added to the skillet.

Add one 4oz. can of diced green chiles, 2 Tbsp tomato paste, 2 tsp chili powder, ½ tsp cumin, ½ tsp garlic powder, ¼ tsp cayenne pepper, and ¼ tsp salt to the meat and onions. Stir to combine.

Rice added to the skillet, broth being poured in the side.

Add ½ cup of uncooked long grain white rice and 1 cup of chicken broth to the skillet. Stir well to combine, then place a lid on top, and turn the heat up to medium-high. When the broth reaches a full boil, turn the heat down to low and allow it to continue to simmer over low (without removing the lid or stirring) for 20 minutes. After 20 minutes, turn the heat off and let it rest for 5 more minutes.

Cooked chorizo and rice in the skillet being scooped to the side with a spoon.

After simmering for 20 minutes the broth should be absorbed and the rice should be tender. Gently stir the rice and chorizo mixture with a spoon.

Filled bell peppers in a baking dish being topped with shredded cheese.

Divide the rice and chorizo mixture between the six par-baked bell pepper halves, then top with shredded mozzarella cheese (about 1 cup). Cover the dish and bake in the 350ºF oven for 20 minutes.

Finished stuffed bell peppers topped with sliced green onion.

Top the chorizo stuffed bell peppers with sliced green onions and serve!

Close up side view of a fork lifting some of the filling out of a stuffed bell pepper.

Enjoy the cheesy chorizo-y goodness!!

The post Chorizo Stuffed Bell Peppers appeared first on Budget Bytes.

Buffalo Chicken Pasta

This Buffalo Chicken Pasta recipe is the perfect combination of creamy, tangy, and spicy flavors. It’s a must-try for spicy food lovers.

The post Buffalo Chicken Pasta appeared first on Budget Bytes.

One thing I’ve learned over the years is that most dips can also double as an amazing pasta sauce, and this Buffalo Chicken Pasta is a great example. I took all of the creamy, tangy, spicy goodness of buffalo chicken dip and made it into a deliciously cheesy one-pot pasta. So gather around all of my spicy food friends, you’re going to want to make this easy, creamy, and addictive Buffalo Chicken Pasta ASAP!

Close up overhead view of a bowl full of buffalo chicken pasta with a fork.

Ingredients for Buffalo Chicken Pasta

This cheesy buffalo chicken pasta starts with all of the same ingredients as buffalo chicken dip, then we add a few more to make it a little saucier and give the dish just a touch more flavor and texture. Here’s what you’ll need to make buffalo chicken pasta:

  • Chicken Breast: We use one boneless, skinless chicken breast for this recipe and stretch it across four servings to keep things budget-friendly. You can use diced boneless, skinless chicken thighs for an even less expensive option. Or, you can add leftover chopped or shredded cooked rotisserie chicken to the pasta at the end. If using pre-cooked rotisserie chicken, just add the remaining spices to the sauce.
  • Seasoning: We seasoned the chicken breast with garlic powder, onion powder, cayenne pepper, and salt for extra flavor.
  • Butter: Butter balances the heat and acidity of the hot sauce and helps give this dish that classic buffalo sauce flavor.
  • Chicken Broth: In true one-pot pasta style, the pasta is cooked in chicken broth for maximum flavor.
  • Pasta: We used a classic penne pasta for this dish, but you could also use bowtie, rotini, or any short pasta shape.
  • Cheese: A combination of cream cheese and Monterey jack cheese keeps the sauce extra creamy and smooth without the need for a flour and butter roux.
  • Hot Sauce: Franks Red Hot Sauce is the classic sauce used for any “Buffalo” flavored dish, but any vinegar-based cayenne hot sauce will also be delicious.
  • Worcestershire sauce: Worcestershire adds just the right of umami and sweetness to the buffalo sauce, preventing it from having a flat flavor.
  • Petite Diced Tomatoes: To give this pasta more texture and flavor, we added a can of petite diced tomatoes.
  • Green Onion: We topped this pasta with sliced green onion for a little dose of savory freshness at the end.

What Else Can I Add?

If you have a little extra wiggle room in your budget, you can add even more goodies to this buffalo chicken pasta to make it ✨extra✨. Try topping the pasta with crumbled blue cheese, or stirring in some bacon crumbles. If you love a crunchy topping, try crushing some butter crackers or tortilla chips and sprinkling them on top of the pasta just before serving. And while it is totally unconventional, I think some small broccoli florets would be awesome in this, kind of like broccoli mac and cheese!

What to Serve with Buffalo Chicken Pasta

This buffalo chicken pasta is pretty rich, so you’re going to want something light and refreshing to serve on the side. You can opt for a super Simple Side Salad, a classic Caesar Salad, or maybe a simple Cucumber Tomato Salad. Or just go with the theme and serve up some carrot and celery sticks with blue cheese dressing for dipping!

Tips for Making One Pot Pasta

One-pot pasta can be tricky for some because the pasta is cooked in a much smaller amount of liquid than traditional pasta cooking methods. Here are a few tips to make sure your one-pot pasta cooks evenly and to the right texture:

  • Use heavy, thick-bottomed cookware to help the ingredients heat evenly.
  • Use a burner that is close in diameter to the bottom of your pot to ensure even heating.
  • The broth does not need to fully cover the pasta for it to cook, so resist the urge to add more water or broth in the beginning. Steam will help the pasta above the water line to cook, and the pasta will be stirred to ensure it all has contact with the liquid.
  • Make sure the liquid is simmering the whole time the pasta is cooking. If the heat is too low, or the liquid is only simmering in the center of the pot, the pasta will cook unevenly and get gummy.
  • Stir the pot occasionally to prevent sticking and help everything cook evenly.
  • Use your judgment. If the pasta looks close to being cooked through, but there is too much liquid left in the skillet, let it finish simmering with the lid off. If the liquid is gone but your pasta is still not tender, add a splash of more water or broth and continue to simmer until tender.
Overhead view of a pan full of buffalo chicken pasta with a striped napkin on the side.
Overhead view of a bowl full of buffalo chicken pasta.
Print

Buffalo Chicken Pasta

This Buffalo Chicken Pasta recipe is the perfect combination of creamy, tangy, and spicy flavors. It's a must-try for spicy food lovers.
Course Dinner
Cuisine American
Total Cost $8.13 recipe / $2.03 serving
Prep Time 5 minutes
Cook Time 25 minutes
Total Time 30 minutes
Servings 4
Calories 545kcal

Ingredients

  • 1 boneless, skinless chicken breast (about ⅔ lb.) $3.33
  • 1/2 tsp garlic powder $0.05
  • 1/2 tsp onion powder $0.05
  • 1/2 tsp cayenne pepper $0.05
  • 1/4 tsp salt $0.02
  • 1 Tbsp cooking oil $0.04
  • 2 Tbsp butter $0.26
  • 8 oz. penne pasta $0.67
  • 1 15oz. can petite diced tomatoes $1.00
  • 1.5 cups chicken broth $0.28
  • 4 oz. cream cheese $1.10
  • 1/4 cup hot sauce $0.52
  • 1/2 tsp Worcestershire sauce $0.02
  • 1/2 cup shredded Monterey jack cheese $0.58
  • 2 green onions, sliced (optional) $0.16

Instructions

  • Cut the chicken into ½-¾ inch pieces. Combine the garlic powder, onion powder, cayenne pepper, and salt, then sprinkle it over the chicken pieces. Toss the chicken in the spices until everything is well coated.
  • Heat the cooking oil in a large deep skillet over medium-high heat until very hot. Once hot, add the chicken and allow tge chicken to brown on all sides. The chicken does not need to be cooked through at this point.
  • Add the uncooked pasta, canned diced tomatoes (with the liquid), and the chicken broth to the skillet with the chicken. Stir to dissolve all of the browned bits off the bottom of the skillet.
  • Place a lid on the pot and allow the broth to come up to a strong simmer. The broth will not fully cover the pasta, but that is okay. Once the broth is simmering, briefly stir the pasta, replace the lid, then turn the heat down to medium-low.
  • Allow the pasta to simmer in the broth for 10-12 minutes or until the pasta is tender and most of the liquid has been absorbed, stirring once or twice throughout, and always replacing the lid after stirring.
  • Once the pasta is tender and only a small amount of thickened liquid remains in the skillet, cut the cream cheese into chunks and add it to the past along with the butter, hot sauce, and Worcestershire sauce. Stir and cook over medium-low heat until the cream cheese has fully melted into the pasta.
  • Add the shredded Monterey jack cheese and stir until melted into the sauce. Top with sliced green onions, then serve hot.

See how we calculate recipe costs here.

Nutrition

Serving: 1.5cups | Calories: 545kcal | Carbohydrates: 46g | Protein: 30g | Fat: 26g | Sodium: 1193mg | Fiber: 2g

How to Make Buffalo Chicken Pasta – Step by Step Photos

diced chicken breast with seasoning being sprinkled on top.

Dice one boneless, skinless chicken breast (about ⅔ lb.) into small ½-¾ inch pieces. Combine ½ tsp garlic powder, 1/2 tsp onion powder, ½ tsp cayenne pepper, and ¼ tsp salt, then sprinkle it over the chicken. Toss the chicken until it is evenly coated in spices.

Browned chicken pieces in a skillet.

Heat 1 Tbsp of cooking oil in a large deep skillet over medium-high until very hot. Once hot, add the chicken and allow it to brown on all sides. The chicken does not need to cook through here, just let it brown on the outside.

Tomatoes, pasta, and broth added to the skillet.

Add 8 oz of uncooked pasta, one 15oz. can of petite diced tomatoes (with the liquid), and 1.5 cups of chicken broth to the skillet with the chicken.

Uncooked pasta in the skillet with the chicken and tomatoes.

Stir everything well, making sure to dissolve all the browned bits off the bottom of the skillet. The broth will not fully cover the pasta, but that’s okay. Do not add extra liquid at this point.

Cooked pasta in the skillet, a spatula pulling the pasta to the side to show the thickened sauce.

Place a lid on the pot and allow the broth to come up to a strong simmer. Once simmering, give the pasta a quick stir to loosen it from the bottom, replace the lid, then turn the heat down to medium-low. Let the pasta simmer over medium-low for 10-12 minutes, or until the pasta is tender and only a small amount of saucy liquid remains.

Cream cheese, hot sauce, butter, and Worcestershire added to the skillet.

Once the pasta is tender and most of the liquid is absorbed, it’s time to make the buffalo sauce. Add 4oz. of cream cheese (cut into chunks), 2 Tbsp butter, ¼ cup hot sauce, and ½ tsp Worcestershire sauce. Continue to stir and cook over medium-low until the cream cheese is fully melted into the sauce.

Shredded cheese added to the skillet.

Add ½ cup of shredded Monterey Jack cheese to the skillet and stir until it has melted into the sauce.

buffalo chicken pasta topped with sliced green onions.

Top the buffalo chicken pasta with sliced green onions and serve hot!

Overhead view of a bowl full of buffalo chicken pasta.

The post Buffalo Chicken Pasta appeared first on Budget Bytes.

Chicken Fried Rice

Make delicious, ultra-flavorful chicken fried rice that tastes even better than takeout– and costs less too.

The post Chicken Fried Rice appeared first on Budget Bytes.

We’re all guilty of ordering Chinese takeout on a desperate night. But with this Chicken Fried Rice recipe, you won’t have to resort to that any longer! Make delicious, ultra-flavorful chicken fried rice that tastes even better than takeout– and costs less too. Easily stretch leftover rice and a single chicken breast into a budget-friendly and satisfying meal the whole family will love!

overhead view of chicken fried rice in a frying pan.

What is Chicken Fried Rice?

Chicken fried rice is a Chinese dish made with cooked rice that is stir-fried in a wok with chicken, vegetables, and eggs, and seasoned with a savory sauce. It’s extremely flexible and budget-friendly, which is why we love this dish! The recipe below is an American adaptation, using a skillet instead of a wok and ingredients that are easily sourced in most American grocery stores. If you are vegetarian, you can make this without the chicken, or try our Vegetable Fried Rice recipe!

Do I Need a Wok?

This recipe is designed to be made easily in a regular pan; however, we highly recommend using a nonstick pan over stainless steel. We found in testing that some of the eggs stuck to the bottom of the stainless steel pan and burned, adding an unpleasant flavor to the whole dish.

Ingredients for Chicken Fried Rice

Here’s what you’ll need to make chicken fried rice:

  • Chicken Breast: You’ll need 1 large boneless skinless chicken breast (about 2/3 lb.) for this recipe.
  • Oil: Toasted sesame oil adds a warm and nutty flavor, while cooking oil (we like canola or vegetable) helps everything cook without burning.
  • Soy Sauce: Adds rich, salty, umami flavor. If you’re gluten-free, you can use tamari or coconut aminos instead.
  • Garlic: Creates a savory and earthy base of flavor.
  • Ginger: Fresh ginger will create the best flavor, but paste or powder will also work.
  • Vegetables: We used green onions, carrot, red bell pepper, and frozen peas.
  • Eggs: Scrambled eggs help stretch this recipe, adding extra protein and healthy fats.
  • Cooked and Cooled Rice: To avoid clumpy or gummy fried rice, use rice that has been previously cooked and completely cooled.

What Else Can I Put In Chicken Fried Rice?

If you have any leftover veggies from previous dinners, you can chop them up and toss them in this tasty chicken fried rice. It’s also easy to grab a bag of frozen mixed vegetables (carrots, peas, corn, and green beans) to save on prep time!

How To Store Leftovers

Store leftover chicken fried rice in an airtight container in the refrigerator for up to 3 days. Reheat in a pot set over medium-low heat with a little bit of water added to rehydrate the rice. You can also sprinkle some water over individual portions and microwave in 30-second increments until warmed through.

chopsticks grabbing chicken fried rice from a black plate.
chopsticks grabbing a bite of chicken fried rice from a black plate.
Print

Chicken Fried Rice

Make delicious, ultra-flavorful chicken fried rice that tastes even better than takeout– and costs less too.
Course Dinner, Main Course
Cuisine Chinese
Total Cost ($4.74 recipe / $1.19 serving)
Prep Time 15 minutes
Cook Time 20 minutes
Total Time 35 minutes
Servings 4
Calories 500kcal
Author Jess Rice

Ingredients

  • 2 cloves garlic, minced $0.16
  • 1 tsp grated fresh ginger $0.10
  • 3 green onions, sliced $0.30
  • 1 carrot, diced small $0.16
  • 1 red bell pepper, diced $1.50
  • 1 cup frozen peas $0.50
  • 1 large boneless skinless chicken breast $2.62
  • 2 large eggs $0.46
  • 3 Tbsp cooking oil, divided $0.13
  • 3 Tbsp toasted sesame oil $0.96
  • 3 Tbsp soy sauce $0.15
  • 3 cups cooked and cooled rice $0.62

Instructions

  • Prepare the vegetables beforehand so they’re ready to go when needed. Mince the garlic, grate the ginger, dice the carrot and bell pepper, slice the green onions (separate the green ends from the white ends), and measure the frozen peas.
  • On a separate, clean cutting board, cut your chicken into ½ inch pieces so you get a little in every bite. Set aside (and wash your hands!)
  • Lightly whisk the eggs in a small bowl. Heat a large skillet over medium heat. Once hot, add 2 Tbsp of cooking oil and swirl to coat the surface. Add the eggs and gently scramble until cooked through. Transfer the cooked eggs to a clean bowl or plate off to the side.
  • Turn the heat up to medium-high. Add the diced carrots, stir, and cook for about two minutes. Next, add the bell pepper and the white firm ends of the green onions. Cook and stir for one minute more. Finally, add the frozen peas and stir and cook until heated through. Transfer the vegetables to a clean bowl or plate.
  • Add the remaining 1 Tbsp cooking oil to the skillet and swirl to coat the surface. Add the ½ inch pieces of chicken and completely cook through, about 4 minutes. Once the chicken is about ½ of the way cooked through (2-3 minutes), add the garlic and ginger and cook for an additional 2-3 minutes.
  • Then, add the cooked and cooled rice to the skillet. Stir and cook the chicken and rice together for about 2 minutes, or until the rice is heated through. Pour the soy sauce and toasted sesame oil over the rice. Stir the rice and sauce together until evenly combined. Turn the heat off.
  • Add the eggs and vegetables back to the skillet with the chicken and rice and stir to combine. Allow the residual heat to heat everything through. Top with the remaining green ends of the sliced green onions. Taste and adjust the soy sauce or sesame oil to your liking.

See how we calculate recipe costs here.

Nutrition

Serving: 1serving | Calories: 500kcal | Carbohydrates: 44g | Protein: 23g | Fat: 26g | Sodium: 875mg | Fiber: 4g
close-up overhead view of chicken fried rice in a frying pan.

how to make Chicken Fried Rice – step by step photos

chopped vegetables for chicken fried rice on a cutting board.

Prepare the vegetables beforehand so they’re ready to go when needed. Mince the garlic, grate the ginger, dice the carrot and bell pepper, slice the green onions (separate the green ends from the white ends), and measure the frozen peas.

cubed chicken on an orange cutting board.

On a separate, clean cutting board, cut your chicken into ½ inch pieces so you get a little in every bite. Set aside (and wash your hands!)

cooked scrambled eggs in a frying pan.

Lightly whisk the eggs in a small bowl. Heat a large skillet over medium heat. Once hot, add 2 Tbsp of cooking oil and swirl to coat the surface. Add the eggs and gently scramble until cooked through. Transfer the cooked eggs to a clean bowl or plate off to the side.

diced vegetables in a frying pan.

Turn the heat up to medium-high. Add the diced carrots, stir, and cook for about two minutes. Next, add the bell pepper and the white firm ends of the green onions. Cook and stir for one minute more. Finally, add the frozen peas and stir and cook until heated through. Transfer the vegetables to a clean bowl or plate.

cooked cubed chicken in a frying pan.

Add the remaining 1 Tbsp cooking oil to the skillet and swirl to coat the surface. Add the ½ inch pieces of chicken and completely cook through, about 4 minutes. Once the chicken is about ½ of the way cooked through (2-3 minutes), add the 2 cloves of garlic and 1 tsp ginger and cook for an additional 2-3 minutes.

pouring soy sauce over cooked rice in a frying pan.

Then, add the cooked and cooled rice to the skillet. Stir and cook the chicken and rice together for about 2 minutes, or until the rice is heated through. Pour the 3 Tbsp soy sauce and 3 Tbsp toasted sesame oil over the rice. Stir the rice and sauce together until evenly combined. Turn the heat off.

sprinkling salt over chicken fried rice in a frying pan.

Add the eggs and vegetables back to the skillet with the chicken and rice and stir to combine. Allow the residual heat to heat everything through. Top with the remaining green ends of the sliced green onions. Taste and adjust the soy sauce or sesame oil to your liking.

chopsticks grabbing a bite of chicken fried rice from a black plate.

This flavorful chicken fried rice is so much better than takeout!

The post Chicken Fried Rice appeared first on Budget Bytes.

Spicy Garlicky Sesame Tofu (30 Minutes!)

Welcome to another minimal effort, BIG flavor dish! This quicker-than-takeout sesame tofu is baked to crispy perfection and coated in a drool-worthy, sweet + spicy + garlicky sauce. It might have you questioning whether you’ll ever be ordering takeout …

Spicy Garlicky Sesame Tofu (30 Minutes!)

Welcome to another minimal effort, BIG flavor dish! This quicker-than-takeout sesame tofu is baked to crispy perfection and coated in a drool-worthy, sweet + spicy + garlicky sauce. It might have you questioning whether you’ll ever be ordering takeout again!

Pair with rice and steamed veggies for a simple, 30-minute meal that’s vegan, gluten-free, and naturally sweetened. Let’s make it!

Recipe Inspiration

This recipe is inspired by Sesame Chicken, which is commonly found in Chinese restaurants in the US and Canada (source).

Spicy Garlicky Sesame Tofu (30 Minutes!) from Minimalist Baker →

7 Layer Dip

This easy 7 Layer Dip is the perfect appetizer for parties, football games, and gatherings. No cooking needed and it feeds a large crowd!

The post 7 Layer Dip appeared first on Budget Bytes.

When you need a quick party appetizer that tastes good, is easy to make, and feeds a large crowd…this 7 Layer Dip is the one to make! It has all of my favorite Tex-Mex flavors in one dish and it’s perfect for serving at potlucks, football parties, and family gatherings. I’m always down for any type of chips and dip, but this 7 layer dip takes dips to a whole new level! I’m not sure which part I love the most, the fact that I don’t have to cook anything over a stove to make this recipe or that it comes in at just over $1 per serving. Either way, I highly recommend adding this 7 layer dip recipe to your Super Bowl menu this weekend.😉

Overhead view of 7 layer dip in a glass casserole dish with a napkin, chips, and lime wedges on the side.

What Is 7 Layer Dip?

7 layer dip is an easy party appetizer that’s made by building layers of creamy, flavorful, ingredients like refried beans and guacamole into a 9×13” dish. It’s fun to serve at football parties and family gatherings, there’s no need to heat up a stove, and it’s perfect for feeding a crowd!

Ingredients For 7 Layer Dip

Here’s everything you need to make this easy 7 Layer Dip:

  • Refried Beans: You can certainly make your own refried beans, but to make things easy we used canned refried beans and seasoned it with a few spices.
  • Guacamole: We made a quick batch of our homemade guacamole recipe, but to save time you can easily substitute with your favorite store-bought guacamole.
  • Sour Cream: No need to overthink this layer, just grab a tub of regular sour cream to spread on top of the guacamole. It adds the perfect creamy and tasty flavor to balance the beans and guacamole.
  • Cheddar Cheese: We used medium cheddar cheese but you can certainly use mild or a different flavor cheese if you prefer. And we highly recommend buying the cheese in block form and shredding it yourself for this recipe.
  • Tomatoes: Diced Roma tomatoes or vine-ripe tomatoes both work well and are added on top of the cheese layer.
  • Black Olives: Black olives add wonderful color, texture, and flavor to the dip. Because olives tend to be salty and tangy with bold flavors, you’ll only need a few of them for this 7 layer dip.
  • Green Onions: The final layer is a sprinkle of sliced green onions which add not only great flavor, but also a beautiful vibrant color to the dip!

Recipe Variations

  1. Use taco seasoning – If you happen to have a batch of taco seasoning in your panty, use 1 ½ tablespoons of it instead of the chili powder, cumin, and salt to season your refried beans. This will give the beans even more flavor! You can also mix a little bit in to your sour cream to give it an extra boost of flavor.
  2. Add seasoned ground meat – You can make this 7 layer dip even more filling by adding a layer of taco seasoned ground beef or ground turkey. I would add it right after the refried beans layer.
  3. Add salsa – Your favorite thick salsa also works really well with this dip recipe. If you want to add it as a layer, just make sure to drain any excess liquid from the salsa to keep the dip from getting too soggy.

Storing LEftovers

This dip is definitely best served and eaten the same day it’s made, but if you happen to have leftovers, just store any leftovers covered tightly in the refrigerator for 3-4 days. The guacamole may start to brown slightly and the dip may get a bit watery around the edges, but it will still taste delicious!

Side view of 7 layer dip with a hand holding a chip and scooping some out.
Overhead view of 7 layer dip in a glass casserole dish with a napkin, chips, and lime wedges on the side.
Print

7 Layer Dip

This easy 7 Layer Dip is the perfect appetizer for parties, football games, and gatherings. No cooking needed and it feeds a large crowd!
Course Appetizer, Side Dish
Cuisine Mexican, Southwest
Total Cost $16.72 recipe / $1.11 serving
Prep Time 20 minutes
Total Time 20 minutes
Servings 15 (1/2 cup each)
Calories 170kcal

Ingredients

  • 2 tomatoes $1.46
  • 1 1/2 cups shredded cheddar cheese $1.87
  • 1/2 cup sliced black olives $2.19
  • 3 green onions $0.45
  • 2 16oz. cans refried beans $2.38
  • 1 Tbsp chili powder $0.30
  • 1/2 tsp cumin $0.05
  • 1/4 tsp salt $0.02
  • 2 Tbsp water $0.00
  • 2 1/2 cups guacamole $6.25
  • 1 1/2 cups sour cream $1.75

Instructions

  • Dice the tomatoes, shred the cheddar cheese, drain the black olives, and slice the green onions. Set these ingredients to the side.
  • In a medium bowl add the refried beans along with the chili powder, cumin, salt, and water. Mix these ingredients together until well combined.
  • Spread the seasoned refried beans into the bottom of a 9×13” casserole dish.
  • Next spread the guacamole evenly on top of the refried beans. Then spread the sour cream evenly on top of the guacamole mixture.
  • Sprinkle the shredded cheese evenly on top of the sour cream.
  • Now add the diced tomatoes, black olives, and green onions on top. Make sure everything is spread as evenly as possible.
  • Serve immediately with tortilla chips or cover and place in the refrigerator until ready to serve.

See how we calculate recipe costs here.

Nutrition

Serving: 1serving | Calories: 170kcal | Carbohydrates: 6g | Protein: 4g | Fat: 15g | Sodium: 204mg | Fiber: 3g
Side close up view of 7 layer dip in a glass casserole dish.

How to Make 7 Layer Dip – Step by Step Photos

7 layer dip ingredients on a cutting board.

Dice 2 tomatoes, shred 1 1/2 cups of cheddar cheese, drain 1/2 cup black olives, and slice 3 green onions. Set these ingredients to the side.

Refried beans in a white mixing bowl with seasoning on top.

In a medium bowl add 2-16oz. cans of refried beans along with 1 Tbsp chili powder, 1/2 tsp cumin, 1/4 tsp salt, and 2 Tbsp water. Mix these ingredients together until well combined.

Refried beans spread evenly in a glass casserole dish.

Spread the seasoned refried beans into the bottom of a 9×13” casserole dish.

Guacamole spread evenly on top of refried beans in glass casserole dish.

Next spread 2 1/2 cups of guacamole evenly on top of the refried beans.

Sour cream being spread on top of guacamole with a black spatula.

Then spread 1 1/2 cups of sour cream evenly on top of the guacamole mixture.

Shredded cheese added evenly on top of sour cream layer.

Sprinkle the shredded cheese evenly on top of the sour cream.

Chopped tomatoes, black olives, and sliced green onions added and spread out evenly on top of shredded cheese layer.

Now add the diced tomatoes, black olives, and green onions on top. Make sure everything is spread as evenly as possible.

Overhead view of 7 layer dip in a glass casserole dish with a napkin, chips, and lime wedges on the side.

Enjoy this tasty appetizer dip immediately with tortilla chips or cover and place in the refrigerator until ready to serve.

The post 7 Layer Dip appeared first on Budget Bytes.

Vegan Chili Cheese Fries

Sometimes the only thing that will do is chili cheese fries. Y’know? Luckily, you can now satisfy that craving with this equally comforting vegan version! It feels decadent and special but comes together quickly with wholesome pantry staples (including…

Vegan Chili Cheese Fries

Sometimes the only thing that will do is chili cheese fries. Y’know? Luckily, you can now satisfy that craving with this equally comforting vegan version! It feels decadent and special but comes together quickly with wholesome pantry staples (including fiber-rich lentils!).

Just 10 ingredients required to nourish your body AND soul, friends. Let us show you how it’s done!

Since they’re called chili cheese fries, let’s start by talking about 1) the CHILI, then we’ll get to 2) the CHEESE and 3) the FRIES!

Vegan Chili Cheese Fries from Minimalist Baker →

Chicken Stir Fry

This Chicken Stir Fry recipe is perfect for a quick & easy dinner meal. It has lots of chicken and veggies and a super delicious stir-fry sauce!

The post Chicken Stir Fry appeared first on Budget Bytes.

We’re taking the stress out of worrying about “what’s for dinner” this week and making this quick and easy Chicken Stir Fry recipe. It includes lots of chicken, tons of veggies, and THEE best sweet and savory stir fry sauce! It’s also perfect for using up vegetables that you already have on hand in your fridge or freezer. Not only is it great to add to your weekly dinner rotation, but it also makes a lot, so it’s perfect for meal prep! #winning

Overhead view of chicken stir fry in a large skillet with sliced green onions on the side.

Why I Love Stir Fry Recipes

I make stir fry recipes quite often because it helps take away the mental stress of worrying about what to cook for dinner. They’re quick, easy to make, and super versatile so you can always switch things up. Just pick your favorite protein, a mix of vegetables, make a yummy stir fry sauce, and dinner is ready in about 30 minutes!

Ingredients For Chicken Stir Fry

Here’s what we used to make this easy chicken stir fry recipe:

  • Chicken Breasts: I use boneless, skinless chicken breasts for this recipe, but if your budget is tight, you can also use boneless, skinless chicken thighs instead.
  • Vegetables: This is where you can really be flexible. I used a combination of broccoli, carrots, red bell pepper, and onion for this stir fry. But feel free to choose different vegetables based on your budget, what’s in season, or what’s in your fridge. Sometimes I’ll use just one or two vegetables because that’s what I currently have on hand. Some other great veggie options are green beans, zucchini, mushrooms, snap peas, or different color bell peppers. 
  • Stir Fry Sauce: A good stir fry sauce will definitely bring the entire dish together. I used our same stir fry sauce from our Vegetable Stir Fry recipe as a base, because it’s sooo good, increased the measurements slightly to make it extra saucy, and added a touch of sriracha sauce for just a little kick!

Stir-Fry Recipe Tips

  1. Make the stir fry sauce first. Stir fry recipes cook fast, so you want the sauce to be ready when it’s time to add it to the skillet.
  2. Use a big wok or very large skillet. In order for all of the chicken and vegetables to fit in the skillet with enough space to cook fairly evenly, you’ll want to use a big wok or large skillet. We used a 12-inch skillet for this recipe. 
  3. Don’t overcook the vegetables. You want the vegetables to just be tender-crisp and vibrantly colored. You can always cook them a little longer once the sauce is added at the end, but if you cook them too long in the first steps you’ll end up with limp vegetables that are a drab color.

What To Serve With Chicken Stir Fry

You can easily serve this chicken stir fry with a side of brown or white rice or give our Coconut Rice a try! And if you really want the full take-out experience, whip up some of our Vegetable Fried Rice to serve on the side.

Storing Leftovers

This chicken stir fry recipe stores very well in the fridge and works great for meal prep! You can make it on Sunday, divide it into equal portions, then store in meal prep containers along with your rice. This dish will stay good in the refrigerator for about four days.

Overhead view of a plate of chicken stir fry with white rice and a fork serving some out.
Overhead view of chicken stir fry in a large skillet with sliced green onions on the side.
Print

Chicken Stir Fry

This Chicken Stir Fry recipe is perfect for a quick & easy dinner meal. It has lots of chicken and veggies and a super delicious stir-fry sauce!
Course Dinner, Lunch
Cuisine American, Asian
Total Cost $10.55 recipe / $1.76 serving
Prep Time 15 minutes
Cook Time 20 minutes
Total Time 35 minutes
Servings 6 (about 1 cup each)
Calories 198kcal

Ingredients

Stir Fry Sauce

  • 1/3 cup soy sauce $0.44
  • 3 Tbsp brown sugar $0.12
  • 2 tsp toasted sesame oil $0.20
  • 2 cloves garlic, minced $0.16
  • 2 tsp grated fresh ginger $0.20
  • 1.5 Tbsp cornstarch $0.08
  • 1/3 cup water $0.00
  • 1 tsp sriracha $0.05

Stir Fry

  • 3/4 lb. broccoli 1.75
  • 2 carrots $0.31
  • 1 red bell pepper $1.33
  • 1 small onion $0.32
  • 2 green onions $0.22
  • 2 boneless, skinless chicken breasts (about 1.5 lb. total) $5.25
  • 3 Tbsp cooking oil, divided $0.12

Instructions

  • Start by making the stir fry sauce. Combine the soy sauce, brown sugar, toasted sesame oil, garlic, ginger, sriracha, cornstarch and water in a small bowl. Set the sauce aside.
  • Chop the broccoli into small florets. Slice the red bell pepper, onion, and carrots into similar sized pieces. Slice the green onions. Set all the vegetables aside.
  • Next, cut the chicken breasts into small 1/2 inch sized pieces.
  • Heat a very large skillet or wok over medium-high heat. Once hot add 2 Tbsp of cooking oil and swirl to coat the surface of the skillet. Add the chicken and cook until browned on all sides. Be careful not to overcook the chicken. Once the chicken is browned, remove it from the skillet onto a separate plate and set aside.
  • In the same skillet, add the remaining 1 Tbsp of cooking oil along with the carrots and broccoli. Cook and stir for one minute, or just until the broccoli begins to turn bright green.
  • Next, add the red bell pepper and onion to the skillet. Continue to cook and stir for 1-2 more minutes.
  • Give the stir fry sauce another brief stir. Now add the cooked chicken back to the skillet, then pour the stir fry sauce over the chicken and vegetables. Give everything a stir and allow the sauce to come up to a simmer, at which point it will start to thicken and turn glossy. Continue to cook for 1-2 more minutes or until it has reached your desired doneness.
  • Remove the chicken stir fry from the heat, top with green onions and sesame seeds (optional) and serve!

See how we calculate recipe costs here.

Nutrition

Serving: 1serving | Calories: 198kcal | Carbohydrates: 18g | Protein: 12g | Fat: 10g | Sodium: 819mg | Fiber: 3g
Side close up view of chicken stir fry in a skillet.

How to Make Chicken Stir Fry – Step by Step Photos

Chicken Stir Fry Sauce in a small bowl.

Start by making the stir fry sauce. Combine the 1/3 cup soy sauce, 3 Tbsp brown sugar, 2 tsp toasted sesame oil, 2 cloves minced garlic, 2 tsp grated fresh ginger, 1 tsp sriracha, 1 1/2 Tbsp cornstarch and 1/3 cup water in a small bowl. Set the sauce aside.

Chicken Stir Fry vegetables chopped on a cutting board.

Chop 3/4 lb. of broccoli into small florets. Slice 1 red bell pepper, 1 small yellow onion, and 2 carrots into similar sized pieces. Slice 2 green onions. Set the vegetables aside.

Chicken breasts cut into bite size pieces on a cutting board.

Cut 2 boneless, skinless chicken breasts into small 1/2 inch sized pieces.

Cooked chicken breast pieces in a skillet.

Heat a very large skillet or wok over medium-high heat. Once hot add 2 Tbsp of cooking oil and swirl to coat the surface of the skillet. Add the chicken and cook until browned on all sides. Be careful not to overcook the chicken. Once chicken is browned, remove it from the skillet onto a separate plate and set aside.

Broccoli and carrots being sautéed in a skillet.

In the same skillet, add the remaining 1 Tbsp of cooking oil along with the carrots and broccoli. Cook and stir for one minute, or just until the broccoli begins to turn bright green.

Peppers and onions added to a skillet with broccoli and carrots.

Next, add the red bell pepper and onion to the skillet. Continue to cook and stir for 1-2 more minutes.

Cooked chicken and stir fry sauce being added to vegetables in a skillet.

Give the stir fry sauce another brief stir. Now add the cooked chicken back to the skillet, then pour the stir fry sauce over the chicken and vegetables. Give everything a stir and allow the sauce to come up to a simmer, at which point it will start to thicken and turn glossy. Continue to cook for 1-2 more minutes or until it has reached your desired doneness.

Finished chicken stir fry in a skillet.

Remove the chicken stir fry from the heat, top with green onions and sesame seeds (optional) and dinner is served!

Chicken stir fry on a plate with white rice and a fork serving some out.

The post Chicken Stir Fry appeared first on Budget Bytes.

Jalapeño Poppers

The perfect easy appetizer for New Year’s Eve, tailgating parties, or the big game, this Jalapeño Popper recipe is a spicy, cheesy home run!

The post Jalapeño Poppers appeared first on Budget Bytes.

If you love spicy and you love cheesy, you’ll definitely love Jalapeño Poppers! This cute little appetizer recipe has New Year’s Eve written all over it, and it’s perfectly easy and delicious for football games as well. …Or, if you’re just as obsessed with them as I am, they’re also great for a regular Monday afternoon. 😜

Overhead view of a plate full of jalapeño poppers with a dish of ranch dressing.

What Are Jalapeño Poppers?

Jalapeño poppers are a staple in American pop food culture and are often served at sports bars or other fast-casual restaurants. They can take several forms, sometimes breaded and deep fried, sometimes baked, and sometimes wrapped in bacon, but they always consist of fresh jalapeño peppers stuffed with a flavorful mix of cheese for that spicy-cheesy-creamy flavor combo.

For this jalapeño popper recipe, we went the easy and budget-friendly route (obvi) and opted for baked poppers with just enough bacon added in to give great flavor without making them over-the-top expensive. These jalapeño poppers are easy enough for even a beginner to make, and tasty enough that you’ll be thankful you didn’t drop a ton of cash on ordering out!

Ingredients for Jalapeño Poppers:

Here’s what you’ll need to make this delicious jalapeño popper recipe at home:

  • Fresh Jalapeños: Luckily, jalapeños are usually some of the least expensive items in the produce aisle, but if you can’t find them for a good price at your local chain grocery store, look for a Hispanic or Latin grocery store where they’re guaranteed to be super affordable. Look for Jalapeños that are about 3 inches in length for this recipe.
  • Cheese: We used a mix of cream cheese and cheddar cheese for this recipe so we could get an ultra-creamy finish with a nice cheddar bite. You can also try using Monterey Jack or Pepper Jack (if you like it EXTRA spicy!).
  • Bacon: Bacon is a classic flavor in jalapeño poppers and it gives a nice smokey finish to the flavor profile. We use just enough to give these poppers flavor without driving up the price too high.
  • Seasoning: These jalapeño poppers are seasoned with garlic powder, Everything Bagel Seasoning, and green onions. They’re flavorful but not so complicated that you lose the flavor of the jalapeños and bacon. If you don’t have Everything Bagel Seasoning you can increase the garlic powder in the recipe to ½ tsp, and add ⅛ tsp of both salt and pepper.

Are Jalapeño Poppers Spicy?

Yes, jalapeño poppers are pretty spicy! Despite removing the seeds and ribs (the spiciest part of the jalapeño), some of the spicy oils remain in the jalapeño, giving these poppers just the right amount of spicy heat to balance the creamy cheeses. If you’re not a spicy foods fan you’ll probably want to skip this one!

How to Remove Jalapeño Oil From Your Hands

If you’ve ever cooked with jalapeños before, you know the horror of accidentally touching your eyes afterward. Jalapeños contain natural oils that can easily transfer from your hands to your eyes or any other delicate skin, causing an intense burning sensation, and sometimes just washing your hands isn’t enough to remove the oils. Here are a few extra steps you can take to reduce the burn:

  1. Massage a teaspoon or two of cooking oil into your hands. The oil will help dissolve the spicy oils from the jalapeños that are stuck to your hands.
  2. Wash your hands with dish soap instead of hand soap. Dish soap is formulated to break up oily residues whereas hand soaps are often designed to keep skin moisturized.
  3. Rub your hands with an acidic substance, like lemon juice, vinegar, or tomato sauce. This can help break up any spicy oils left on the skin.
  4. OR just wear gloves while working with the jalapeños and avoid the risk. ;)

What to Serve with Jalapeño Poppers

I love these little poppers on their own, but if you want a dipping sauce I would definitely recommend ranch dressing. I’m not usually a ranch person, but the flavor combination between the spicy jalapeño poppers and cooling ranch dressing is hard to beat! I’d also serve them with another starchy appetizer, maybe something like our Steak Fries or Loaded Smashed Potatoes.

Side view of a plate full of jalapeño poppers with a dish of ranch on the side.
Super close up view of jalapeño poppers on a plate with a bowl of ranch.
Print

Jalapeño Poppers

The perfect easy appetizer for New Year's Eve, tailgating parties, or the big game, this Jalapeño Popper recipe is a spicy, cheesy home run!
Course Appetizer
Cuisine Amercian
Total Cost $3.94 recipe / $0.66 serving
Prep Time 15 minutes
Cook Time 15 minutes
Total Time 30 minutes
Servings 6 (2 poppers each)
Calories 149kcal

Ingredients

  • 2 oz. bacon (about 2 slices) $0.50
  • 6 jalapeños* $1.50
  • 4 oz. room-temperature cream cheese $1.10
  • 1/2 cup shredded cheddar cheese $0.62
  • 1 green onion, sliced $0.10
  • 1 tsp everything bagel seasoning $0.10
  • 1/4 tsp garlic powder $0.02

Instructions

  • Preheat the oven to 425ºF. Cook the bacon in a skillet over medium heat until it is brown and crispy. Remove it from the pan and let it cool on a paper-towel-lined plate.
  • Slice the jalapeños in half lengthwise and then use a spoon to scoop out the seeds and white ribs, being careful not to tear or puncture the peppers.
  • Once the bacon is cool, crumble it into tiny pieces and reserve about 1 tablespoon to use as a topping. Add the bacon to a bowl with the cream cheese, shredded cheddar (reserve a small amount for topping as well), sliced green onion, Everything bagel seasoning, and garlic powder. Mix the ingredients together until they're evenly combined.
  • Divide the cheese filling between the 12 pepper halves and then spread it out to fill and smooth out the top.
  • Place the filled peppers on a large parchment-lined baking sheet then sprinkle the reserved crumbled bacon and cheddar cheese over the top.
  • Bake the peppers for 15 minutes or just until the cheese is melted and slightly bubbly. Avoid over-baking the peppers or else they'll become too soft to pick up and enjoy. Allow the poppers to cool just enough to handle, then serve and enjoy!

See how we calculate recipe costs here.

Notes

*Look for jalapeños that are about 3 inches long.

Nutrition

Serving: 2poppers | Calories: 149kcal | Carbohydrates: 3g | Protein: 5g | Fat: 14g | Sodium: 228mg | Fiber: 0.5g
Super close up view of jalapeño poppers on a plate with a bowl of ranch.

How to Make Jalapeño Poppers – Step by Step Photos

Cooked bacon in a skillet.

Cook about 2 oz. of bacon (about 2 slices) in a skillet over medium heat until it is brown and crispy. Remove the bacon from the skillet and let it drain on a paper towel-lined plate as you prepare the rest of the dish.

Scraping out the insides of the jalapeño peppers.

Slice six jalapeño peppers in half length-wise, then scrape out the seeds and white ribs with a spoon, taking care not to tear the outside of the pepper. To prevent the transfer of spicy oils from your hands to your eyes, mouth, or nose, either use gloves while preparing the peppers or see our tips above for removing jalapeño oil from your hands.

Cheese filling ingredients in a bowl, unmixed.

Once the bacon is cool enough to touch, crumble it into tiny pieces. Reserve about 1 teaspoon of the bacon to use as a topping, then add the rest to a bowl with 4 oz. of room-temperature cream cheese, ½ cup shredded cheddar cheese (reserve about 2 Tbsp for topping), 1 sliced green onion, 1 teaspoon Everything Bagel Seasoning, and ¼ teaspoon garlic powder. Mix these ingredients together until evenly combined.

Cheese filling being spooned into jalapeño halves.

Divide the cheese mixture evenly between the 12 jalapeño halves, then spread it out to fill the peppers, smoothing out the top.

Jalapeño poppers ready to bake on a parchment-lined sheet pan.

Place the filled jalapeños on a large parchment-lined baking sheet, then sprinkle the reserved bacon bits and shredded cheddar over top.

Baked jalapeño poppers on the baking sheet.

Bake the jalapeño poppers in the preheated 425ºF oven for 15 minutes, or just until the cheese is melted and bubbly on top. Avoid overcooking the poppers or else the peppers will get too soft to pick up and eat. Allow the peppers to cool just enough to handle, then serve and enjoy!

Overhead view of a plate of jalapeño peppers with one being dipped into a bowl of ranch.

The post Jalapeño Poppers appeared first on Budget Bytes.

Slow Cooker Potato Soup

This creamy Slow Cooker Potato Soup is rich, comforting and hearty, plus the slow cooker does all the heavy lifting for you!

The post Slow Cooker Potato Soup appeared first on Budget Bytes.

I could literally eat a bowl of creamy potato soup every single day. There was a time when I would call my favorite lunch spots each week just to see if the “soup of the day” was potato soup! Yes, I was that hooked. But nothing, I mean absolutely nothing, beats the taste of homemade potato soup! Even better when the slow cooker does all the work for you. This Slow Cooker Potato Soup is rich, creamy, comforting, and absolutely delicious!

Overhead photo of slow cooker potato soup in a white bowl with sour cream, green onions, and shredded cheese on top.

If you don’t have a slow cooker you can still enjoy a warm bowl of potato soup by making our stovetop Loaded Potato Soup recipe.

Ingredients For Slow Cooker Potato Soup

Here are the ingredients you need to make this delicious, velvety potato soup recipe!

  • Vegetables: A combination of carrots, celery, onion and garlic were used to add depth, flavor, and texture to the soup.
  • Potatoes: Potatoes are of course the foundation for this soup. We used Yukon gold potatoes because we love their creamy texture and they hold up well in the slow cooker. Russet potatoes are also a great option.
  • Seasoning: A simple combination of Italian seasoning, salt and pepper seasons the soup.
  • Chicken Broth: Make sure to use a very flavorful chicken broth as a LOT of the soup flavor will come from the broth. We use Better than Bouillon to make our broth.
  • Flour: A quick and simple slurry with all-purpose flour and water is needed to thicken the soup. We tested the recipe without the slurry and it makes a BIG difference.
  • Heavy Cream & Sour Cream: Heavy cream also helps thicken the soup and gives it a creamy texture. Sour cream adds even more flavor and creaminess to the soup!
  • Cheddar Cheese & Green Onions: We finished the soup with a final pop of extra flavor and color with some fresh shredded cheddar cheese and sliced green onions.

Topping Options

There are several different toppings you can choose from to finish your creamy potato soup. Try any of these options: shredded cheddar cheese, sliced green onions or chives, sour cream, greek yogurt, chopped bacon, homemade croutons, or extra fresh cracked black pepper.

What To Serve With Potato Soup

Just like many soup recipes, this slow cooker potato soup pairs well with a simple side salad, a Caesar salad, or even a fresh pasta salad like our Broccoli Pasta Salad with Tomato Vinaigrette. Soups and sandwiches are also a great combination. Try serving this potato soup with a Chicken Caesar Wrap or a gourmet Spinach and Feta Grilled Cheese!

Storing Leftovers

Store any leftover potato soup in an airtight container in the refrigerator for up to five days. We would not recommend freezing this potato soup recipe. All the dairy and anything thickened with flour or cornstarch tends to separate upon thawing.

Potato soup in a slow cooker with shredded cheese, sliced green onions and a napkin on the side.
Overhead photo of slow cooker potato soup in a white bowl with sour cream, green onions, and shredded cheese on top.
Print

Slow Cooker Potato Soup

This creamy Slow Cooker Potato Soup is rich, comforting and hearty, plus the slow cooker does all the heavy lifting for you!
Course Dinner, Lunch
Cuisine American
Total Cost $8.10 recipe / $1.35 serving
Prep Time 20 minutes
Cook Time 3 hours 10 minutes
Total Time 3 hours 30 minutes
Servings 6 1.5 cups each
Calories 394kcal

Ingredients

  • 2 stalks celery $0.50
  • 2 carrots $0.30
  • 1 yellow onion $0.32
  • 3 cloves garlic $0.24
  • 3 lbs Yukon gold potatoes $3.29
  • 1 tsp Italian seasoning $0.10
  • 1 1/4 tsp salt $0.05
  • 1/2 tsp freshly cracked black pepper $0.02
  • 3 cups chicken broth $0.51
  • 2 Tbsp all-purpose flour $0.04
  • 2 Tbsp water $0.00
  • 1/2 cup heavy cream $0.68
  • 1/2 cup sour cream $0.53
  • 1 cup shredded cheddar cheese, divided $1.16
  • 3 green onions, sliced & divided $0.36

Instructions

  • Wash and dice the celery stalks, peel and dice the carrots, dice the onion, and mince the garlic. Wash, peel, and chop the potatoes into ½ – ¾ inch chunks.
  • Add the potatoes, carrots, celery, onion, and the garlic to a 5 or 6 quart slow cooker or crock pot. Then add the Italian seasoning, salt, and freshly cracked black pepper to the slow cooker.
  • Pour the chicken broth over the vegetables and spices in the slow cooker. Stir all the ingredients together so that everything is evenly distributed. Place the lid on the slow cooker and cook on high for 3 hours.
  • Once the potatoes are almost finished cooking, make a quick flour slurry by adding the flour and water to a small bowl and whisking together until smooth and there are no lumps.
  • After the potato soup has cooked for 3 hours, check to make sure the potatoes are tender and can be easily pierced with a fork. Now add the slurry, heavy cream, and sour cream to the slow cooker. Stir well to combine, replace the lid, and continue to cook on high for an additional 10 minutes.
  • During the last 10 minutes of cooking, while the slurry and heavy cream are thickening the soup, shred the cheddar cheese and slice the green onions.
  • Remove the slow cooker lid then use a potato masher to mash the potato chunks into smaller pieces. Add ½ cup of the shredded cheese and half of the sliced green onions. Stir until the cheese has melted into the soup.
  • Taste the soup and adjust the salt or black pepper to your liking. Use the remaining shredded cheese and green onions to garnish individual bowls. Serve hot and enjoy!

See how we calculate recipe costs here.

Nutrition

Serving: 1.5cups | Calories: 394kcal | Carbohydrates: 49g | Protein: 12g | Fat: 18g | Sodium: 1086mg | Fiber: 6g
A spoonful of soup being lifted from the bowl.

How To Make Slow COoker Potato Soup – Step By Step PHotos

Diced carrots, diced onion, diced celery, and minced garlic on a cutting board.

Wash and dice 2 celery stalks, peel and dice 2 carrots, dice 1 onion, and mince 3 garlic cloves.

Yukon gold potatoes peeled and chopped on a cutting board.

Wash, peel, and chop 3 lbs. of Yukon gold potatoes into roughly ½ – ¾ inch chunks.

Diced vegetables, potatoes, seasoning and chicken broth added to a slow cooker.

Add the potatoes, carrots, celery, onion, and the garlic to a 5 or 6 quart slow cooker or crock pot. Then add 1 tsp of Italian seasoning, 1 1/4 tsp of salt, and 1/2 tsp of freshly cracked black pepper to the slow cooker. Next pour 3 cups of chicken broth over the vegetables and spices in the slow cooker.

Potato soup ingredients added to a slow cooker and mixed.

Stir all the ingredients together so that everything is evenly distributed. Place the lid on the slow cooker and cook on high for 3 hours. Once the potatoes are almost finished cooking, make a quick flour slurry by adding 2 Tbsp of flour and 2 Tbsp of water to a small bowl and whisking together until smooth and there are no lumps.

Heavy cream and sour cream added to potato soup in a slow cooker.

After the potato soup has cooked for 3 hours, check to make sure the potatoes are tender and can be easily pierced with a fork. Now add the flour slurry, 1/2 cup of heavy cream, and 1/2 cup of sour cream to the slow cooker. Stir well to combine, replace the lid, and continue to cook on high for an additional 10 minutes. During the last 10 minutes of cooking, while the slurry and heavy cream are thickening the soup, shred the cheddar cheese and slice 3 green onions.

Potato soup ingredients being mashed with a potato masher in a slow cooker.

Remove the slow cooker lid then use a potato masher to mash the potato chunks into smaller pieces.

Shredded cheese and green onions being added to potato soup in a slow cooker.

Add ½ cup of the shredded cheese and half of the sliced green onions. Stir until the cheese has melted into the soup.

Potato soup in a slow cooker with shredded cheese, sliced green onions and a napkin on the side.

Taste the soup and adjust the salt or black pepper to your liking.

Overhead view of two bowls of slow cooker potato soup.

Use the remaining shredded cheese and green onions to garnish individual bowls. We also topped ours with a little soup cream and some freshly cracked black pepper. Simple, creamy, delicious, and SO GOOD!

The post Slow Cooker Potato Soup appeared first on Budget Bytes.