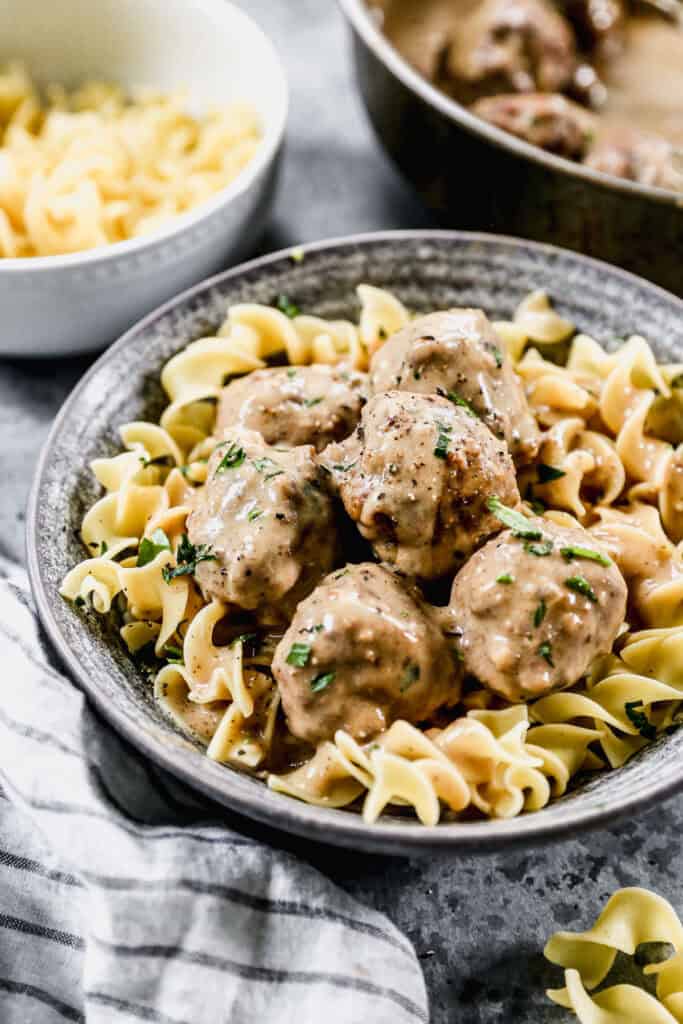
Cherry Clafoutis

An oval baking dish filled with French Cherry Clafoutis, dusted with powdered sugar and ready to serve.This French Cherry Clafoutis recipe has a creamy, custard-like texture and sweet bites of cherries throughout. We serve it warm or cold with a dusting of powdered sugar and a dollop of whipped cream or vanilla ice cream. If you love dessert recipes, you have to try Flourless Chocolate Cake, Strawberry Rhubarb Crisp, or Cannoli…

An oval baking dish filled with French Cherry Clafoutis, dusted with powdered sugar and ready to serve.

This French Cherry Clafoutis recipe has a creamy, custard-like texture and sweet bites of cherries throughout. We serve it warm or cold with a dusting of powdered sugar and a dollop of whipped cream or vanilla ice cream.

If you love dessert recipes, you have to try Flourless Chocolate Cake, Strawberry Rhubarb Crisp, or Cannoli Cake!

An oval baking dish filled with French Cherry Clafoutis, dusted with powdered sugar and ready to serve.

Cherry Clafoutis is the easiest French dessert you can make!

This Cherry Clafouti (pronounced klah-foo-TEE) recipe became an instant family favorite after our friends from France introduced it to us. It’s a dense custard with delicious bites of sweet cherries throughout. It’s traditionally served as dessert, but my mom often made it for Sunday brunch, since it’s not overly sweet.

It’s very easy to make, with basic pantry ingredients and fresh or canned cherries. You could also swap the cherries for plums, prunes, apples, pears, cranberries, or blackberries. C’est délicieux!

How to Make Cherry Clafoutis:

Arrange Cherries: Butter the bottom of a 9 or 10 inch baking dish and arrange cherries evenly at the bottom.

Blend Batter: Add eggs, sugar (reserve 2 tablespoons for later), milk, flour, vanilla, almond extract, and salt. Blend until smooth then pour batter over cherries. Sprinkle reserved 2 Tablespoons sugar on top.

Two images showing fresh, sweet pitted cherries in an oval baking dish and a batter blended in the blender.

Bake and Serve: Bake at 350 degrees F until custard is set (about 35-45 minutes). Check at 30 minutes then loosely cover with foil so it doesn’t get too browned. Once cooled, lightly dust with powdered sugar. Clafoutis is delicious warm, room temp., or cold. Refrigerate leftovers.

Two images showing the best Cherry Clafoutis recipe before and after baking.

Reheating Instructions:

Clafoutis lasts about 3 to 4 days, but is best served within 24 hours. It can be eaten cold or warmed up. Rewarm in the microwave or cover with foil and warm in the oven at 350 degrees F for about 5 to 10 minutes.

Similar Desserts to Try:

Follow me for more great recipes

An oval baking dish filled with French Cherry Clafoutis, dusted with powdered sugar and ready to serve.
Print

Cherry Clafoutis

This French Cherry Clafoutis recipe has a creamy, custard-like texture and sweet bites of cherries throughout. Serve warm or cold with a dusting of powdered sugar.
Course brunch, Dessert, Lunch
Cuisine French
Prep Time 10 minutes
Cook Time 45 minutes
Total Time 55 minutes
Servings 12
Calories 92kcal
Cost 6

Equipment

Ingredients

  • 1 1/2 cups Fresh sweet cherries* , pitted (or use canned cherries, drained–about 1 can)
  • 3 large eggs , room temperature
  • 1/2 cup all-purpose flour
  • 1/2 cup granulated sugar , plus 2 Tablespoons for topping
  • 1 cup whole milk , or half and half
  • 1 1/2 teaspoons vanilla extract
  • 1/2 teaspoon almond extract
  • 1/4 teaspoon salt
  • powdered sugar , for dusting on top

Instructions

  • Preheat oven to 350 degrees F. Generously butter the bottom of a 9 or 10 inch baking dish or pie plate.
  • Arrange cherries evenly around on bottom of dish.
  • In a blender, add eggs, sugar (reserve 2 Tablespoons), milk, flour, extracts and salt. Blend until smooth. Pour batter over cherries and sprinkle with reserved 2 Tablespoons sugar.
  • Bake for about 35-45 minutes, just until custard is set.Allow to cool for at least 15 minutes before serving. Clafoutis is delicious served warm, room temp or cold.
  • Store leftover cherry clafoutis in the fridge for up to 4 days.

Video

Notes

Cherries: Use fresh, sweet cherries or canned cherries (drained) Frozen cherries can also be used, just make sure you thaw and drain the excess liquid first. Cherry Clafouti is traditionally made with unpitted black cherries but I prefer to use pitted cherries so it’s easier to eat. If you decide to use unpitted cherries, make sure your guests are aware.
Variations: Clafoutis can also be made with plums, prunes, apples, pears, cranberries, or blackberries.
Reheating Instructions: Clafoutis lasts about 3 to 4 days, but is best served within 24 hours. It can be eaten cold or warmed up. If you choose to reheat it, microwave it in 15-second intervals until warm, or cover it with foil and bake in the oven at 350 degrees F for about 5 to 10 minutes.


Nutrition

Calories: 92kcal | Carbohydrates: 16g | Protein: 3g | Fat: 2g | Saturated Fat: 1g | Trans Fat: 1g | Cholesterol: 49mg | Sodium: 75mg | Potassium: 102mg | Fiber: 1g | Sugar: 12g | Vitamin A: 112IU | Vitamin C: 1mg | Calcium: 34mg | Iron: 1mg

Follow Me

Get recipe ideas weekly!

I originally shared this recipe March 2021. Updated July 2024.

Frozen Yogurt Recipe

A homemade Frozen Yogurt recipe made with fresh strawberries, scooped and served in a bowl.This homemade Frozen Yogurt recipe can easily be made at home with only FOUR ingredients and no special equipment. Customize it by using any frozen fruit combination. Want more healthy snack recipes? Try Homemade Fruit Pops, Chocolate Overnight Oats, Protein Bars, and Cowboy Caviar! How to make Frozen Yogurt: Blend: Add all ingredients to a…

A homemade Frozen Yogurt recipe made with fresh strawberries, scooped and served in a bowl.

This homemade Frozen Yogurt recipe can easily be made at home with only FOUR ingredients and no special equipment. Customize it by using any frozen fruit combination.

Want more healthy snack recipes? Try Homemade Fruit Pops, Chocolate Overnight Oats, Protein Bars, and Cowboy Caviar!

The best Frozen Yogurt recipe made with fresh strawberries, scooped and served in a bowl.

Homemade Frozen Yogurt is my favorite healthy way to beat the heat.

The best part of making frozen yogurt is you don’t have to have an ice cream maker or any special equipment. You can choose any type of fruit flavor, and it’s inexpensive, lower calorie and fat than regular ice cream. Just blend the ingredients and freeze. You won’t believe how easy it is.

For an even healthier treat, try homemade fruit pops!

How to make Frozen Yogurt:

Blend: Add all ingredients to a high-powered blender (ideally with a tamper) or a food processor and blend until smooth. Add an extra spoonful or two of Greek yogurt, if needed, to help it mix.

Two images showing how to make frozen yogurt by blending frozen fruit, plain Greek yogurt, honey, sugar, and vanilla extract.

Freeze for at least 2-3 hours before scooping and serving. Enjoy!

Two images showing a strawberry mixture spread in a loaf pan and frozen, then after the homemade frozen yogurt is scooped and served in a bowl, topped with sprinkles.

More Frozen Desserts:

Follow me for more great recipes

A homemade Frozen Yogurt recipe made with fresh strawberries, scooped and served in a bowl.
Print

Frozen Yogurt Recipe

This homemade Frozen Yogurt recipe can easily be made at home with only 4 ingredients and no special equipment. Customize it by using any frozen fruit combination.
Course Dessert
Cuisine American
Prep Time 2 hours
Total Time 2 hours
Servings 4
Calories 114kcal
Cost $6

Ingredients

Instructions

  • Add all ingredients to a high-powered blender (ideally with a tamper) or a food processor and blend until smooth. Add an extra spoonful or two of Greek yogurt, if needed, to help it mix.
  • Freeze for at least 2-3 hours before scooping and serving.

Video

Nutrition

Calories: 114kcal | Carbohydrates: 26g | Protein: 3g | Fat: 0.4g | Saturated Fat: 0.04g | Polyunsaturated Fat: 0.2g | Monounsaturated Fat: 0.1g | Trans Fat: 0.003g | Cholesterol: 1mg | Sodium: 11mg | Potassium: 218mg | Fiber: 2g | Sugar: 22g | Vitamin A: 15IU | Vitamin C: 67mg | Calcium: 47mg | Iron: 1mg

Follow Me

Get recipe ideas weekly!

I originally shared this recipe March 2014. Updated March 2019 and July 2024.

Classic Potato Salad

The best Potato Salad recipe with boiled eggs, celery, and chopped potatoes all covered in a creamy dressing.Our easy Potato Salad recipe is creamy, delicious, and the best side dish at any BBQ! I make it with Yukon Gold Potatoes, hard boiled eggs, pickles, celery, and a creamy homemade dressing. Want more side dishes? I love this Corn Salad, Cucumber Salad, Baked Beans, and Street Corn Pasta Salad. How to make Potato…

The best Potato Salad recipe with boiled eggs, celery, and chopped potatoes all covered in a creamy dressing.

Our easy Potato Salad recipe is creamy, delicious, and the best side dish at any BBQ! I make it with Yukon Gold Potatoes, hard boiled eggs, pickles, celery, and a creamy homemade dressing.

Want more side dishes? I love this Corn Salad, Cucumber Salad, Baked Beans, and Street Corn Pasta Salad.

The best Potato Salad recipe with boiled eggs, celery, and chopped potatoes all covered in a creamy dressing.

Forget the Burgers, This Classic Potato Salad is the Real Star of the BBQ

There are so many reasons to love a good ol’ classic potato salad, and our recipe has the yummiest sauce, and flavor combo, making it deserving of its position as a summer BBQ staple. (It’s always so hard to choose between this traditional potato salad recipe, and our baked potato salad recipe. They are different, and both fantastic!) I love that I can potato salad ahead of time and keep it in the fridge until ready to serve.

How to make Potato Salad:

Boil Potatoes: Place whole, unpeeled potatoes in a large pot of water. When it comes to a boil, lower heat and simmer for 10-15 minutes, until potatoes are fork tender. Drain water from pot, leaving potatoes inside, then cover with a lid so they can steam for 5-10 more minutes. Peel potatoes, if desired, then cut into 1-inch chunks.

Make Potato Salad Dressing: Combine egg yolks, mayonnaise, buttermilk, mustard, a splash of pickle juice, and salt and pepper in a bowl.

Combine: Pour dressing over the potatoes. Add chopped egg whites, celery, onion, and pickles. Stir well then cover and refrigerate for a few hours until ready to serve.

Make Ahead and Storage Instructions:

To Make Ahead: potato salad can be made 1-2 days ahead of time. It tastes best if refrigerated for at least a few hours before serving. Store leftover potato salad in the fridge for up to 5 days.

Follow me for more great recipes

Print

Classic Potato Salad

An easy, Classic Potato Salad recipe that's creamy, delicious, made with Yukon Gold Potatoes, hard boiled eggs, pickles, celery, and a creamy homemade dressing.
Course Side Dish
Cuisine American
Prep Time 10 minutes
Cook Time 25 minutes
Refrigerate 2 hours
Total Time 35 minutes
Servings 10
Calories 298kcal
Cost 8

Ingredients

For the salad

  • 3 pounds Yukon Gold Potatoes
  • 4 hard boiled eggs
  • 1 cup mayonnaise
  • 1/4 cup buttermilk
  • 2 Tablespoons yellow mustard (or half dijon)
  • 2 dill pickles , finely chopped, + splash of pickle juice
  • salt and pepper
  • 2 ribs celery , chopped
  • 1/4 cup red onion , chopped

Instructions

  • Boil and Chop Potatoes: Place the whole, unpeeled potatoes in a large pot of water. Bring the water to a boil, then lower the heat and simmer for 10 to 15 minutes, until the potatoes are fork tender. Drain the water completely from the pot and then cover the pot with a lid to allow the potatoes to steam for 5-10 minutes. Peel potatoes, if desired, and cut them into ½ inch chunks.
  • Make Dressing: Separate egg yolks from the whites of the hard boiled eggs and place the yolks in a bowl. Mash the yolks with a fork and then stir in the mayonnaise, buttermilk, mustard, a splash of pickle juice, and salt and pepper, to taste.
  • Assemble: Pour the dressing over the warm potatoes. Chop the egg whites and add them to the potatoes along with the celery, onion, and pickles. Stir well, cover, and refrigerate for a few hours to allow the flavors to blend.

Video

Notes

Make Ahead Instructions: potato salad can be made 1-2 days ahead of time. It tastes best if refrigerated for at least a few hours before serving. Store leftover potato salad in the fridge for up to 5 days.

Nutrition

Calories: 298kcal | Carbohydrates: 25g | Protein: 6g | Fat: 19g | Saturated Fat: 3g | Polyunsaturated Fat: 10g | Monounsaturated Fat: 5g | Trans Fat: 0.04g | Cholesterol: 85mg | Sodium: 326mg | Potassium: 656mg | Fiber: 3g | Sugar: 2g | Vitamin A: 193IU | Vitamin C: 28mg | Calcium: 48mg | Iron: 1mg

Follow Me

Get recipe ideas weekly!

*I first shared this recipe in May 2013. Updated May 2019, May 2023 and July 2024.

Chia Pudding

Overnight Chia Pudding recipe in a jar topped with granola and berries, ready to enjoy.Our Chia Pudding recipe is a healthy breakfast or snack option that tastes like dessert, but is packed with protein, fiber, and healthy fats. It only takes a few minutes to prep and we enjoy it best topped with berries and granola. Try some of our other healthy breakfasts like Chocolate Overnight Oats, Protein Waffles,…

Overnight Chia Pudding recipe in a jar topped with granola and berries, ready to enjoy.

Our Chia Pudding recipe is a healthy breakfast or snack option that tastes like dessert, but is packed with protein, fiber, and healthy fats. It only takes a few minutes to prep and we enjoy it best topped with berries and granola.

Try some of our other healthy breakfasts like Chocolate Overnight Oats, Protein Waffles, Cottage Cheese Pancakes, or Strawberry Overnight Oats!

Overnight Chia Pudding recipe in a jar topped with granola and berries, ready to enjoy.

Breakfast, Snack, Dessert…Chia Pudding is the healthy treat that does it all.

I’m that girl always looking for a breakfast, post work-out snack, or late-night treat that’s healthy, but also curbs my sweet tooth, and this homemade Chia Pudding hits the spot every time. It tastes like a creamy treat, but is full of fiber, healthy fats, and I add a scoop of protein powder so it keeps me fuller longer. It’s a great option if you’re tracking macros or just trying to eat more protein. Make a big batch because it will last all week. I love to top it with fresh berries and my favorite granola.

How to make Chia Pudding:

Combine: Add milk, chia seeds, protein powder, agave, and vanilla to a bowl or jar and stir well. Set aside for 10 minutes, then stir again—the seeds should have started to gel. Cover and refrigerate for at least one hour, or overnight. Keep in the fridge for up to 5 days.

Two images showing how to make chia pudding by dumping all of the ingredients in a glass bowl, then after it's stirred.

Serve with berries and granola on top. If you love this recipe, make sure to try my Chocolate Overnight Oats, Strawberry Overnight Oats, and Pitaya Bowl!

Two images showing the best Chia Pudding in two glass jars, then after granola and berries are added on top.

More High Protein Recipes:

Chocolate Overnight Oats

Vanilla Protein Shake

Breakfast Quesadillas

Protein Crepes, Protein Mug Cake and Protein Ice Cream from our Macro E-Cookbooks

Follow me for more great recipes

Overnight Chia Pudding recipe in a jar topped with granola and berries, ready to enjoy.
Print

Chia Pudding

Our easy and delicious Chia Pudding recipe is our favorite healthy breakfast, post-workout snack, or treat, topped with granola and berries. It's packed protein, fiber, and healthy fats.
Course Breakfast, brunch, Snack
Cuisine American
Prep Time 15 minutes
Refrigerate 1 hour
Total Time 1 hour 15 minutes
Servings 2
Calories 210kcal
Cost $2

Ingredients

  • 1 1/4 cups almond milk , oat milk, or any milk of choice
  • ¼ cup chia seeds
  • 1/4 cup vanilla protein powder
  • 1 Tablespoon pure maple syrup , or agave
  • 1 teaspoon vanilla extract
  • ½ cup fresh chopped berries , for topping
  • ¼ cup healthy granola , for topping

Instructions

  • Mix ingredients: Add milk, chia seeds, protein powder, agave, and vanilla to a bowl or jar and stir well. Set aside for 10 minutes, then stir again—the seeds should have started to gel.
  • Cover and refrigerate for at least one hour, or overnight. Chia pudding will keep in the fridge for up to 5 days.
  • Enjoy: Top with fresh berries and a sprinkle of granola.

Notes

*Nutritional info is for chia pudding only (does not include toppings). 
Servings size is about ¾ cup
Make Ahead Instructions: Chia pudding can be made ahead, stored in the fridge for up to 5 days. 

Nutrition

Calories: 210kcal | Carbohydrates: 19g | Protein: 13g | Fat: 9g | Saturated Fat: 1g | Polyunsaturated Fat: 6g | Monounsaturated Fat: 1g | Trans Fat: 0.03g | Cholesterol: 28mg | Sodium: 242mg | Potassium: 167mg | Fiber: 8g | Sugar: 7g | Vitamin A: 11IU | Vitamin C: 0.3mg | Calcium: 402mg | Iron: 2mg

Follow Me

Get recipe ideas weekly!

Meal Plan (186)

A collage of 5 recipes from meal plan 186.Using a weekly meal plan is the best way to cook healthier for your family, save money, and time! This week’s menu includes our popular Salmon Tacos, Turkey Burgers, Cheese Enchiladas, Cottage Pie and Thai Chicken Lettuce Wraps. Did you know you can SAVE your favorite recipes and ANY of my meal plans? Simply create…

A collage of 5 recipes from meal plan 186.

Using a weekly meal plan is the best way to cook healthier for your family, save money, and time! This week’s menu includes our popular Salmon Tacos, Turkey Burgers, Cheese Enchiladas, Cottage Pie and Thai Chicken Lettuce Wraps.

Did you know you can SAVE your favorite recipes and ANY of my meal plans? Simply create an account (it’s free)!

To save this meal plan to your recipe collection, click here. You can even swap out recipes with your favorites.

A collage of 5 recipes from meal plan 186.

Print Shopping List

Monday: Salmon Tacos $25.79

Tuesday: Turkey Burger $6.64

Wednesday: Cheese Enchiladas $9.38

Thursday: Cottage Pie $20.70

Friday: Thai Chicken Lettuce Wraps $11.70

Shopping list for meal plan 186.

We’ve been sharing 5-day weekly meal plans for many years now and we love the feedback we get from those of you who found our meal plans and who are using them regularly.

Each meal plan has 5 dinner recipes that will serve approximately 4 adults. We’ve tried to be thoughtful about including recipes that the whole family will love as well as varying the recipes to include a variety of different meals so that you’re not having chicken every night!

Why Meal Plan?

If you’re reading this, you probably already have your own ideas about why meal planning is a good idea for your family, but here’s what we think:

1. Prep Ahead Instructions:

Our meal plans come with prep-ahead instructions for every recipe. Even 5 minutes of cutting veggies or prepping a sauce ahead of time will make all the difference in your attitude about making dinner that night. 

2. Budget Information:

Not only are these meal plans FREE but we’ve also included a rough estimate of budget info for each recipes to help you with your grocery planning. You can also swap out recipes and add more budget friendly recipes with just a few clicks. Learn more here.

3. Edit and Customize Meal Plans:

We know families each have unique needs, that’s why we’ve worked hard to make our meal plans fully customizable. You can swap out recipes, change serving sizes, and change the shopping list. Learn more here.

4. New Meal Plans Each Week:

There’s a new meal plan EVERY WEEK and we offer low carb, budget, and seasonal meal plans too. 

5. Get Weekly Meal Plans Sent Straight To Your Inbox:

Sign up here to get our meal plans delivered right to your email every single week. 

Follow Me

Get recipe ideas weekly!

Click the link below to print out your shopping list, and you’re ready to go!

**NOTE: You’ll notice the shopping list includes categories like “pantry staples”, and “spices”. Hopefully, those are items you already have on hand, and you can cross them off of the list.

Print Shopping List

Did you know you can customize this meal plan, swap out recipes, and make your own shopping list? Register for a free account or login to get started!

Print Shopping List

Add this meal plan to your collection.

Sign Up For FREE Weekly Meal Plans

Each 5-day meal plan includes a printable grocery shopping list with budget information, to help save time and money!

Yes, I want free meal plans!
cropped-Hawaiiian-Bowls-Web-8.jpgDay 1
Day 2
Mongolian beef on a plate with rice and chopped green onion on top.Day 3
Chicken Fajita Pasta served in a skillet with a scoop of salsa on top.Day 4
Five chicken taquitos lined on a plate with a bowl of salsa on the side.Day 5

Follow me for more great recipes

Turkey Burgers

Two turkey burgers served in buns, topped with avocado, lettuce and onion.Our Turkey Burger recipe is so flavorful and juicy it rivals any beef burger, (and it’s healthier and protein packed). Cook them on the grill, stove, or in the oven and is ready in just 20 minutes! If you’re a burger fanatic, try our French Onion Burgers, Quinoa Burgers, Greek Burgers with Feta Aioli, Classic…

Two turkey burgers served in buns, topped with avocado, lettuce and onion.

Our Turkey Burger recipe is so flavorful and juicy it rivals any beef burger, (and it’s healthier and protein packed). Cook them on the grill, stove, or in the oven and is ready in just 20 minutes!

If you’re a burger fanatic, try our French Onion Burgers, Quinoa Burgers, Greek Burgers with Feta Aioli, Classic Hamburger, or Black Bean Burger.

I’d choose this Turkey Burger, every time.

I feel like Turkey burgers get a bad wrap, because they’re often flavorless, so consider this recipe my mission to change your mind. These Turkey burgers are just incredible, with the BEST seasoning combo so they taste just as good as classic beef burgers we all love. Plus turkey is leaner than ground beef so it’s a burger you can feel good about eating.

How to make a Turkey Burger:

Make Patties: Gently combine turkey burger ingredients, being careful not to over-mix the meat. Shape into ½ inch thick patties. Use your thumb to make an indention in the center of each patty.

Freeze: Place turkey patties in the freezer for 20 minutes before grilling to help them keep their shape.

Grill: Place on hot greased grill and cook for a few minutes on each side, until 160F on a meat thermometer.

Serve on buns, with desired toppings and condiments of your choice.

Assemble Burgers: Spread Condiments to the bun, like mayonnaise, ketchup, mustard, or BBQ sauce.

Add toppings: lettuce, tomato, onion, pickles, avocado, bacon, sautéed mushrooms.

Recipe Variations:

  • Protein Style: Wrap your juicy turkey burger in a Boston bib lettuce cup with all of your favorite toppings.
  • Spicy Turkey Burger: Mix in a diced jalapeño pepper and mix it into the patty mixture in step 1.
  • Black and Bleu Turkey Burger: Add ¾ cup bleu cheese crumbles to the turkey patty mixture in Step 1. Brown onions in a skillet with butter then place on top of the cooked turkey burger when serving.
  • Gluten Free: Substitute almond flour for bread crumbs and use your favorite gluten free bun.

Make Ahead and Freezing Instructions:

To Make Ahead: Form raw turkey burger patties. Place patties on a parchment lined baking sheet and cover with plastic wrap. Refrigerate up to 1 day before cooking.  

To Freeze: Form raw turkey burger patties. Place patties on a parchment lined baking sheet and “flash freeze” for one hour. Once paritally frozen, layer patties in a freezer safe bag or container, with parchment paper between each, for up to 3 months. Cook from frozen, or thaw before cooking.

Best Side Dishes for Turkey Burgers:

Follow me for more great recipes

Two turkey burgers served in buns, topped with avocado, lettuce and onion.
Print

Turkey Burgers

The best Turkey Burger recipe is juicy, flavorful, and can rival any beef burger! It can be cooked on the grill, stove, or in the oven and is ready in just 20 minutes!
Course Main Course
Cuisine American
Prep Time 10 minutes
Cook Time 10 minutes
Total Time 20 minutes
Servings 4
Calories 353kcal
Cost $8

Ingredients

For serving:

  • 4 hamburger buns
  • Condiments: ketchup, mustard, mayonnaise, BBQ sauce
  • Toppings: lettuce, tomato, onion, pickles, avocado, bacon, sauteed mushrooms, jalapeños

Instructions

  • Mix together ground turkey, garlic powder, onion powder, ketchup, mustard, Worcestershire sauce, salt and pepper, egg and breadcrumbs in a mixing bowl, just until combined.
  • Shape into 4 turkey burger patties about ½ inch thick. (they will be really wet). Use your thumb to make a depression in the center of each patty and place on a plate lined with parchment.
  • Freeze patties for 20 minutes, to help them hold their shape on the grill.
  • Grill: Clean grill grates and grease well with oil. Heat to medium high. Add turkey burgers and grill for a few minutes on each side, until 160 degrees F.
  • Serve on buns, with the condiments and toppings of your choice.

Video

Notes

*Nutritional label is for one turkey burger patty.
Stovetop Instructions: Spray a large pan generously with cooking spray and heat over medium-high. Once hot, cook patties for 4-5 minutes on each side.
Protein Style: Wrap your juicy turkey burger in a Boston bib lettuce cup with all of your favorite toppings.
Spicy Turkey Burger: Mix in a diced jalapeño pepper and mix it into the patty mixture in step 1.
Black and Bleu Turkey Burger: Add ¾ cup bleu cheese crumbles to the turkey patty mixture in Step 1. Brown onions in a skillet with butter then place on top of the cooked turkey burger when serving.
Gluten Free: Substitute almond flour for bread crumbs and use your favorite gluten free bun.
Make Ahead Instructions: Form raw turkey burger patties. Place patties on a parchment lined baking sheet and cover with plastic wrap. Refrigerate up to 1 day before cooking.  
To Freeze: Form raw turkey burger patties. Place patties on a parchment lined baking sheet and “flash freeze” for one hour. Once paritally frozen, layer patties in a freezer safe bag or container, with parchment paper between each, for up to 3 months. Cook from frozen, or thaw before cooking.

Nutrition

Calories: 353kcal | Carbohydrates: 31g | Protein: 28g | Fat: 13g | Saturated Fat: 3g | Polyunsaturated Fat: 4g | Monounsaturated Fat: 4g | Trans Fat: 0.1g | Cholesterol: 125mg | Sodium: 920mg | Potassium: 367mg | Fiber: 1g | Sugar: 5g | Vitamin A: 175IU | Vitamin C: 1mg | Calcium: 115mg | Iron: 4mg

Follow Me

Get recipe ideas weekly!

I originally shared this recipe July 2020. Updated July 2024.

Korean Beef Tacos

Three Korean Beef Tacos on a platter topped with kimchi salsa, guacamole, and cilantro.Our delicious Korean Beef Tacos recipe features the flavor bomb combination of juicy marinated flank steak, kimchi salsa, guacamole, and cilantro, served in warm corn tortillas. Want more grilling recipes? Try Steak Kabobs, Marinated Flank Steak, Cedar Plank Salmon, and French Onion Burgers! How to make Korean Beef Tacos: Marinate Meat and Make Salsa: In a…

Three Korean Beef Tacos on a platter topped with kimchi salsa, guacamole, and cilantro.

Our delicious Korean Beef Tacos recipe features the flavor bomb combination of juicy marinated flank steak, kimchi salsa, guacamole, and cilantro, served in warm corn tortillas.

Want more grilling recipes? Try Steak Kabobs, Marinated Flank Steak, Cedar Plank Salmon, and French Onion Burgers!

Three Korean Beef Tacos with grilled flank steak, kimchi salsa, guacamole, and cilantro on a platter ready to enjoy.

Korean Beef Tacos are our newest taco Tuesday crave.

I’ve had different versions of Korean Beef Tacos at restaurants before and was excited to create my own at home. This creation is truly a taco masterpiece, if I say so myself, and one of my favorite flavor mash-ups! The most flavorful and juicy grilled flank steak topped with a quick kimchi salsa that takes less than 5 minutes, and can be made a day in advance. I strongly recommend making your own corn tortillas (only takes 10 minutes!) to truly put these tacos over the top.

Adding these to my list of grilling season favorites, for sure.

How to make Korean Beef Tacos:

Marinate Meat and Make Salsa: In a bowl, mix the soy sauce, sesame oil, brown sugar, garlic, ginger, and chili paste. Add flank steak to a gallon size resealable bag then pour in marinade and press it around to coat all sides of the meat. Refrigerate for at least 1 hour, or up to overnight. Remove meat from fridge 30 minutes before cooking.

Kimchi Salsa: Mix all ingredients together. (Could be made a day or two ahead).

Two images showing a marinated flank steak in a ziploc bag and all the ingredients needed for a simple kimchi salsa in a bowl.

Cook Steak: Clean and grease your grill (or use a grill pan on the stove). Heat on high and once hot, remove steak from marinade and place on grill. Cook for 3-4 minutes, then flip to the other side and cook for 3-4 more minutes, to your desired doneness; 125 to 130°F for rare, 140°F for medium rare, and 150°F for medium. Remove to a cutting board and rest for 5-10 minutes before slicing into very thin slices.

Two images showing a flank steak being grilled then sliced into thin strips for a Korean taco recipe.

Assemble Tacos: Warm corn tortillas on a hot, dry grill for a few seconds on each side. Top tortillas with a few slices of steak, a good spoonful of kimchi salsa, a little bit of sour cream, then some cilantro on top.

Two images showing Korean style beef tacos being assembled, first with the sliced steak then after all the toppings are on and ready to serve.

Make Ahead Instructions:

To Make Ahead: The beef can be marinated for 1 hour or up to overnight. The kimchi salsa can also be made a day or two in advance.

More Taco Recipes:

Follow me for more great recipes

Three Korean Beef Tacos on a platter topped with kimchi salsa, guacamole, and cilantro.
Print

Korean Beef Tacos

These grilled Korean Beef Tacos have a flavorful and juicy marinated flank steak sliced thinly and placed in a corn tortilla topped with an easy kimchi salsa, guacamole, and cilantro. They are so easy and flavorful, they will be a highlight of your summer.
Course Main Course
Cuisine Korean
Prep Time 12 minutes
Cook Time 8 minutes
Marinate 1 hour
Total Time 1 hour 20 minutes
Servings 6
Calories 208kcal
Cost $15

Ingredients

Steak:

Kimchi Salsa:

  • 1 cup kimchi , finely chopped
  • 1 cup diced tomatoes
  • 1/4 cup white onion , or purple onion, diced

Tacos:

Instructions

  • Marinate Meat: In a bowl, mix the soy sauce, sesame oil, brown sugar, garlic, ginger, and chili paste. Add flank steak to a gallon size resealable bag. Pour in marinade and press it around to coat all sides of the meat. Refrigerate for at least 1 hour, or up to overnight. Remove meat from fridge 30 minutes before cooking.
  • Kimchi Salsa: Mix all ingredients together. (Could be made a day or two ahead).
  • Cook Steak: Clean and grease your grill (or use a grill pan on the stove). Heat on high and once hot, remove steak from marinade and place on grill. Cook for 3-4 minutes, then flip to the other side and cook for 3-4 more minutes, to your desired doneness; 125 to 130°F for rare, 140°F for medium rare, and 150°F for medium.
  • Remove to a cutting board to rest for 5-10 minutes before slicing into very thin slices.
  • Assemble Tacos: Warm corn tortillas on a hot, dry grill for a few seconds on each side. Top tortillas with a few slices of steak, a good spoonful of kimchi salsa, a little bit of sour cream, and some cilantro on top.

Notes

Yield: 12 Tacos, 6 servings (two tacos per serving).
Corn Tortillas: I highly recommend taking a few extra minutes to make homemade corn tortillas for this recipe. All you need is corn flour (masa), water and salt, and they hold together much better than store-bought, and taste incredible.
To Make Ahead: The beef can be marinated for 1 hour or up to overnight. The kimchi salsa can also be made a day or two in advance.
 

Nutrition

Calories: 208kcal | Carbohydrates: 16g | Protein: 20g | Fat: 7g | Saturated Fat: 2g | Polyunsaturated Fat: 1g | Monounsaturated Fat: 3g | Trans Fat: 0.001g | Cholesterol: 46mg | Sodium: 298mg | Potassium: 459mg | Fiber: 3g | Sugar: 2g | Vitamin A: 96IU | Vitamin C: 4mg | Calcium: 62mg | Iron: 2mg

Follow Me

Get recipe ideas weekly!

Corn Tortillas

A stack of homemade Corn Tortillas, ready to use in tacos or enchiladas.Nothing elevates our favorite Mexican recipes like homemade Corn Tortillas, and they only take 15 minutes to make. They’re soft, delicious, and versatile to use (plus they’re healthy!). Want more Mexican Inspired recipes? Try Tacos Al Pastor, Crispy Bean and Cheese Burritos, Tamale Pie, or Horchata. How to make Corn Tortillas: Make Dough: Mix masa…

A stack of homemade Corn Tortillas, ready to use in tacos or enchiladas.

Nothing elevates our favorite Mexican recipes like homemade Corn Tortillas, and they only take 15 minutes to make. They’re soft, delicious, and versatile to use (plus they’re healthy!).

Want more Mexican Inspired recipes? Try Tacos Al Pastor, Crispy Bean and Cheese Burritos, Tamale Pie, or Horchata.

A stack of homemade Corn Tortillas, ready to use in tacos or enchiladas.

Our 15-Minute homemade Corn Tortillas steal the show.

Once you start making corn tortillas from scratch, you will never go back. They’re just too fast and easy to make and will absolutely level up your taco night. It only takes 5 minutes to make the dough, and my kids love helping press and cook them. Plus they’re budget friendly! If you love taco nights, I highly suggest getting a tortilla warmer (for corn or flour tortillas)–it’s one of my favorite things.

How to make Corn Tortillas:

Make Dough: Mix masa harina and salt in a bowl. Add water, a little at a time, stirring to incorporate, until the dough comes together in a ball. It should be soft and come together, but not sticky. Cover bowl of dough with a damp towel to keep moist.

Two images showing masa harina and salt being combined in a bowl then after water is added to make a dough for easy corn tortillas.

Press Tortillas: Form dough into 40 gram size (about the size of a ping pong ball). Place a piece of parchment paper on tortilla press. Place dough ball on parchment paper, place a second piece of parchment on top, then press down to flatten. (If you don’t have a tortilla press, use a heavy flat bottom skillet to press the tortilla flat).

  • TIP: The edges of the tortilla should be smooth and round. If there are cracks, that means the dough is not hydrated enough. Dip your hands in water, roll dough back into a ball with your wet hands, then try again.
Two images showing how to make corn tortillas with a tortilla press.

Cook Tortillas: Peel off parchment and place tortilla on hot skillet. Cook for about 1 minute on each side, flipping once. Remove to a tortilla warmer, or a plate covered with a kitchen towel.

We have so many recipe for you to enjoy homemade corn tortillas with, like tacos,

Two images showing a stack of the best corn tortillas then three of them filled with chicken, sour cream, and herbs.

Reheating Instructions:

To Reheat Leftover Corn Tortillas: Wrap leftover tortillas tightly in plastic wrap then store in the fridge for up to 2 weeks. Reheat on a dry hot skillet.

Enjoy warm Corn Tortillas with:

Save leftover, stale Corn Tortillas for:

Follow me for more great recipes

A stack of homemade Corn Tortillas, ready to use in tacos or enchiladas.
Print

Corn Tortillas

The BEST homemade Corn Tortillas take just a few minutes to make and nothing elevates taco night more! They're authentic, healthy and gluten-free.
Course Main Course
Cuisine Mexican
Prep Time 5 minutes
Cook Time 10 minutes
Total Time 15 minutes
Servings 16
Calories 52kcal
Cost $1

Equipment

Ingredients

  • 2 cups masa harina (I like Maseca or Bob’s Red Mill brands)
  • 1 teaspoon fine sea salt
  • 1 3/4 cup water , or more, if needed

Instructions

  • Dough: Mix masa harina and salt in a bowl. Add water, a little at a time, stirring to incorporate, until the dough comes together in a ball. It should be soft and come together, but not sticky. To tell if the dough is hydrated enough, roll a portion into a ball and squeeze it in your hand until it bulges at one end. If the portion that bulges out has cracks in the dough, it’s too dry. Drizzle a little additional water on the dough and knead it to combine. Cover the bowl of dough with a damp towel to keep moist, while you prepare the tortilla making station.
  • Form balls: Form dough into 40 gram size (about ping pong ball size). Heat dry griddle or skillet over medium-high heat.
  • Press: Place a piece of parchment paper on the tortilla press. Place dough ball on parchment and a second piece of parchment on top. Press down to flatten. (If you don’t have a tortilla press, use a heavy flat bottom skillet to press the tortilla flat).
  • Pro Tip: The edges of the tortilla should be smooth and round after pressed. If there are cracks, that means the dough is not hydrated enough. Dip your hands in water, roll dough back into a ball with your wet hands, and try again.
  • Cook: Remove parchment and place tortilla on hot skillet. Cook for about 1 minute on each side, flipping once. Remove to a tortilla warmer, or a plate covered with a kitchen towel.

Video

Notes

Yield: Makes about 16 tortillas
To Reheat Leftover Corn Tortillas: Wrap leftover tortillas tightly in plastic wrap and store in the fridge for up to 2 weeks. Reheat on a dry hot skillet.

Nutrition

Calories: 52kcal | Carbohydrates: 11g | Protein: 1g | Fat: 1g | Saturated Fat: 0.1g | Polyunsaturated Fat: 0.2g | Monounsaturated Fat: 0.1g | Sodium: 147mg | Potassium: 38mg | Fiber: 1g | Vitamin A: 30IU | Calcium: 20mg | Iron: 1mg

Follow Me

Get recipe ideas weekly!

Vanilla Extract

Homemade Vanilla Extract in a clear bottle with a homemade label, ready to use or gift.Pure Vanilla Extract will elevate everything you bake, and you can make your own in just 5 minutes. It’s great for gifting with my free labels, and can even be re-filled when you run out. There are certain basic essentials I always make from home to save money, and they’re just way better, like Taco…

Homemade Vanilla Extract in a clear bottle with a homemade label, ready to use or gift.

Pure Vanilla Extract will elevate everything you bake, and you can make your own in just 5 minutes. It’s great for gifting with my free labels, and can even be re-filled when you run out.

There are certain basic essentials I always make from home to save money, and they’re just way better, like Taco Seasoning, Healthy Granola, Playdough, and Protein Bars.

Homemade Vanilla Extract in a clear bottle with a homemade label, ready to use or gift.

Homemade Vanilla Extract is the inexpensive baking upgrade you need.

I’ve been making our Vanilla Extract recipe for many years and it’s my favorite way to save money while still getting high quality, pure vanilla extract for baking. The best part is, once your vanilla runs out, you can refill the bottle with vodka, using the same used vanilla beans (they last for two batches). It’s makes a great gift, using our free labels, bottles, and label paper, for neighbors at Christmas or a housewarming gift to a friend.

What you’ll need:

  • Vanilla Beans: Use high quality Grade B Vanilla Madagascar Beans (or Tahitian or Mexican beans, if you prefer). You need 4-5 vanilla beans for every 8 ounces (1 cup) of vodka. Find vanilla beans in the baking aisle or online (I’ve bought them from Costco, too).
  • Alcohol: 80 proof Vodka–any cheap brand will work. Brandy, rum, or bourbon also work, for different flavor variation.
  • Glass jars to put the vanilla in. A basic Mason jar works for personal everyday use, or these 4oz or 8oz glass jars are perfect for gifting to friends and neighbors.
  • Funnel
All of the ingredients needed to make Madagascar vanilla extract at home: vanilla beans, vodka, glass bottles, and homemade labels.

About the Vanilla Beans:

Which Beans to use for Vanilla Extract?

There are Grade A and Grade B vanilla beans. Grade A beans have above 25% moisture (water) so they’re easy to split open for desserts like ice cream or crème brûlée. Grade B vanilla beans have less than 25% moisture, so they’re perfect for vanilla extract where they brew for a long time, can produce a stronger flavor ,and are usually less expensive. Grade A vanilla beans will work if that’s what you have on hand.

  • Madagascar Vanilla Beans: The most common flavor used in vanilla extract.
  • Tahitian Vanilla Beans: Has hints of cherry and anise.
  • Mexican Vanilla Beans: Has hints of clove and nutmeg.

How to make Vanilla Extract:

Score Vanilla Beans: Gently cut slits lengthwise in the vanilla beans with a sharp knife then place beans in a jar. (You may need to cut them in half to fit in the jar). You need 4-5 Vanilla bean per 8 ounces (1 cup) alcohol.

Two images showing how to make vanilla extract by slicing vanilla beans in half then placing in a glass bottle.

Add Vodka: Using a funnel, carefully fill the bottle with Vodka. Make sure the vanilla pods are fully submerged in alcohol. Secure lid tightly and shake gently. Rest/brew for 6 months in a cool dark place. Use it in your favorite cakes, cookies and other desserts.

Two images showing vodka being poured in bottles with vanilla beans, then after the pure vanilla extract is shaken and brewed.

Free Printable Labels for Vanilla Extract:

Vanilla extract is the perfect gift, so I’ve provided these FREE Printable Labels that are 2” squares, to stick on your bottles for gifts. I use my regular printer to print them off on this label paper.

Follow me for more great recipes

Homemade Vanilla Extract in a clear bottle with a homemade label, ready to use or gift.
Print

Homemade Vanilla Extract

Pure Vanilla Extract will elevate everything you bake, and with my step-by-step instructions you can make your own in 5 minutes.
Course How-To, Kitchen Tips, side course
Cuisine American
Prep Time 5 minutes
Total Time 5 minutes
Servings 16 ounces
Calories 77kcal
Cost $10

Equipment

Ingredients

Instructions

  • Gather ingredients and jar(s). You will need 4-5 beans for every 8 ounces (1 cup) of alcohol.
  • Gently cut slits, lengthwise down the vanilla beans, using a sharp knife. Place the vanilla beans in jar (cut them in half if needed, to submerge them in alcohol).
  • Fill jars with vodka. Secure lid tightly on the bottle and shake gently.
  • Allow to steep/brew for at least 2 months, or ideally 6-12 months for best flavor. Shake bottles occasionally. Write date on jars or use our labels.
  • When running low, add more vodka to the bottle and brew again, reusing the same beans for up to one more batch.

Video

Notes

  • Vanilla Beans: Use high quality Grade B Vanilla Madagascar Beans (or Tahitian or Mexican beans, if you prefer). Find vanilla beans in the baking aisle or online (I’ve bought them from Costco, too).
  • Alcohol: 80 proof Vodka–any inexpensive brand will work. Try brandy, rum, or bourbon for different flavor variation.
  • Containers: A basic Mason jar works for personal everyday use, or these 4oz or 8oz glass jars are perfect for gifting to friends and neighbors.

Nutrition

Calories: 77kcal | Carbohydrates: 1g | Fat: 0.5g | Sodium: 0.3mg | Potassium: 0.3mg | Iron: 0.003mg

Follow Me

Get recipe ideas weekly!

I originally shared this post May 2020. Updated July 2024.

Meal Plan (185)

A collage of 5 recipes from meal plan 185.Using a weekly meal plan is the best way to cook healthier for your family, save money, and time! This week’s menu includes our popular Chicken Casserole, Shredded Beef Enchiladas, Pesto Veggie Pizza, Tortellini Caprese Salad and Hawaiian Bowl. Did you know you can SAVE your favorite recipes and ANY of my meal plans? Simply…

A collage of 5 recipes from meal plan 185.

Using a weekly meal plan is the best way to cook healthier for your family, save money, and time! This week’s menu includes our popular Chicken Casserole, Shredded Beef Enchiladas, Pesto Veggie Pizza, Tortellini Caprese Salad and Hawaiian Bowl.

Did you know you can SAVE your favorite recipes and ANY of my meal plans? Simply create an account (it’s free)!

To save this meal plan to your recipe collection, click here. You can even swap out recipes with your favorites.

A collage of 5 recipes from meal plan 185.

Print Shopping List

Monday: Chicken Casserole $6.96

Tuesday: Shredded Beef Enchiladas $25.58

Wednesday: Pesto Veggie Pizza $14.15

Thursday: Tortellini Caprese Salad $18.91

Friday: Hawaiian Bowl $16.62

A shopping list from meal plan 185.

We’ve been sharing 5-day weekly meal plans for many years now and we love the feedback we get from those of you who found our meal plans and who are using them regularly.

Each meal plan has 5 dinner recipes that will serve approximately 4 adults. We’ve tried to be thoughtful about including recipes that the whole family will love as well as varying the recipes to include a variety of different meals so that you’re not having chicken every night!

Why Meal Plan?

If you’re reading this, you probably already have your own ideas about why meal planning is a good idea for your family, but here’s what we think:

1. Prep Ahead Instructions:

Our meal plans come with prep-ahead instructions for every recipe. Even 5 minutes of cutting veggies or prepping a sauce ahead of time will make all the difference in your attitude about making dinner that night. 

2. Budget Information:

Not only are these meal plans FREE but we’ve also included a rough estimate of budget info for each recipes to help you with your grocery planning. You can also swap out recipes and add more budget friendly recipes with just a few clicks. Learn more here.

3. Edit and Customize Meal Plans:

We know families each have unique needs, that’s why we’ve worked hard to make our meal plans fully customizable. You can swap out recipes, change serving sizes, and change the shopping list. Learn more here.

4. New Meal Plans Each Week:

There’s a new meal plan EVERY WEEK and we offer low carb, budget, and seasonal meal plans too. 

5. Get Weekly Meal Plans Sent Straight To Your Inbox:

Sign up here to get our meal plans delivered right to your email every single week. 

Follow Me

Get recipe ideas weekly!

Click the link below to print out your shopping list, and you’re ready to go!

**NOTE: You’ll notice the shopping list includes categories like “pantry staples”, and “spices”. Hopefully, those are items you already have on hand, and you can cross them off of the list.

Print Shopping List

Did you know you can customize this meal plan, swap out recipes, and make your own shopping list? Register for a free account or login to get started!

Print Shopping List

Add this meal plan to your collection.

Sign Up For FREE Weekly Meal Plans

Each 5-day meal plan includes a printable grocery shopping list with budget information, to help save time and money!

Yes, I want free meal plans!
cropped-Hawaiiian-Bowls-Web-8.jpgDay 1
Day 2
Mongolian beef on a plate with rice and chopped green onion on top.Day 3
Chicken Fajita Pasta served in a skillet with a scoop of salsa on top.Day 4
Five chicken taquitos lined on a plate with a bowl of salsa on the side.Day 5

Follow me for more great recipes