The goal: portable, delicious, and a bit nutritious! And so banana buckwheat muffins were born! These nutty, wholesome muffins are vegan, gluten-free, naturally sweetened, and easy to make with just 1 bowl and 10 ingredients required.
They’re gre…
The goal: portable, delicious, and a bit nutritious! And so banana buckwheat muffins were born! These nutty, wholesome muffins are vegan, gluten-free, naturally sweetened, and easy to make with just 1 bowl and 10 ingredients required.
They’re great for after-school snacks, on-the-go breakfasts, and more! Grab your mixing bowl, let’s make muffins!
These 1-bowl buckwheat muffins begin with the wet ingredients: a flax egg, mashed banana, coconut sugar, a little oil, and vanilla.
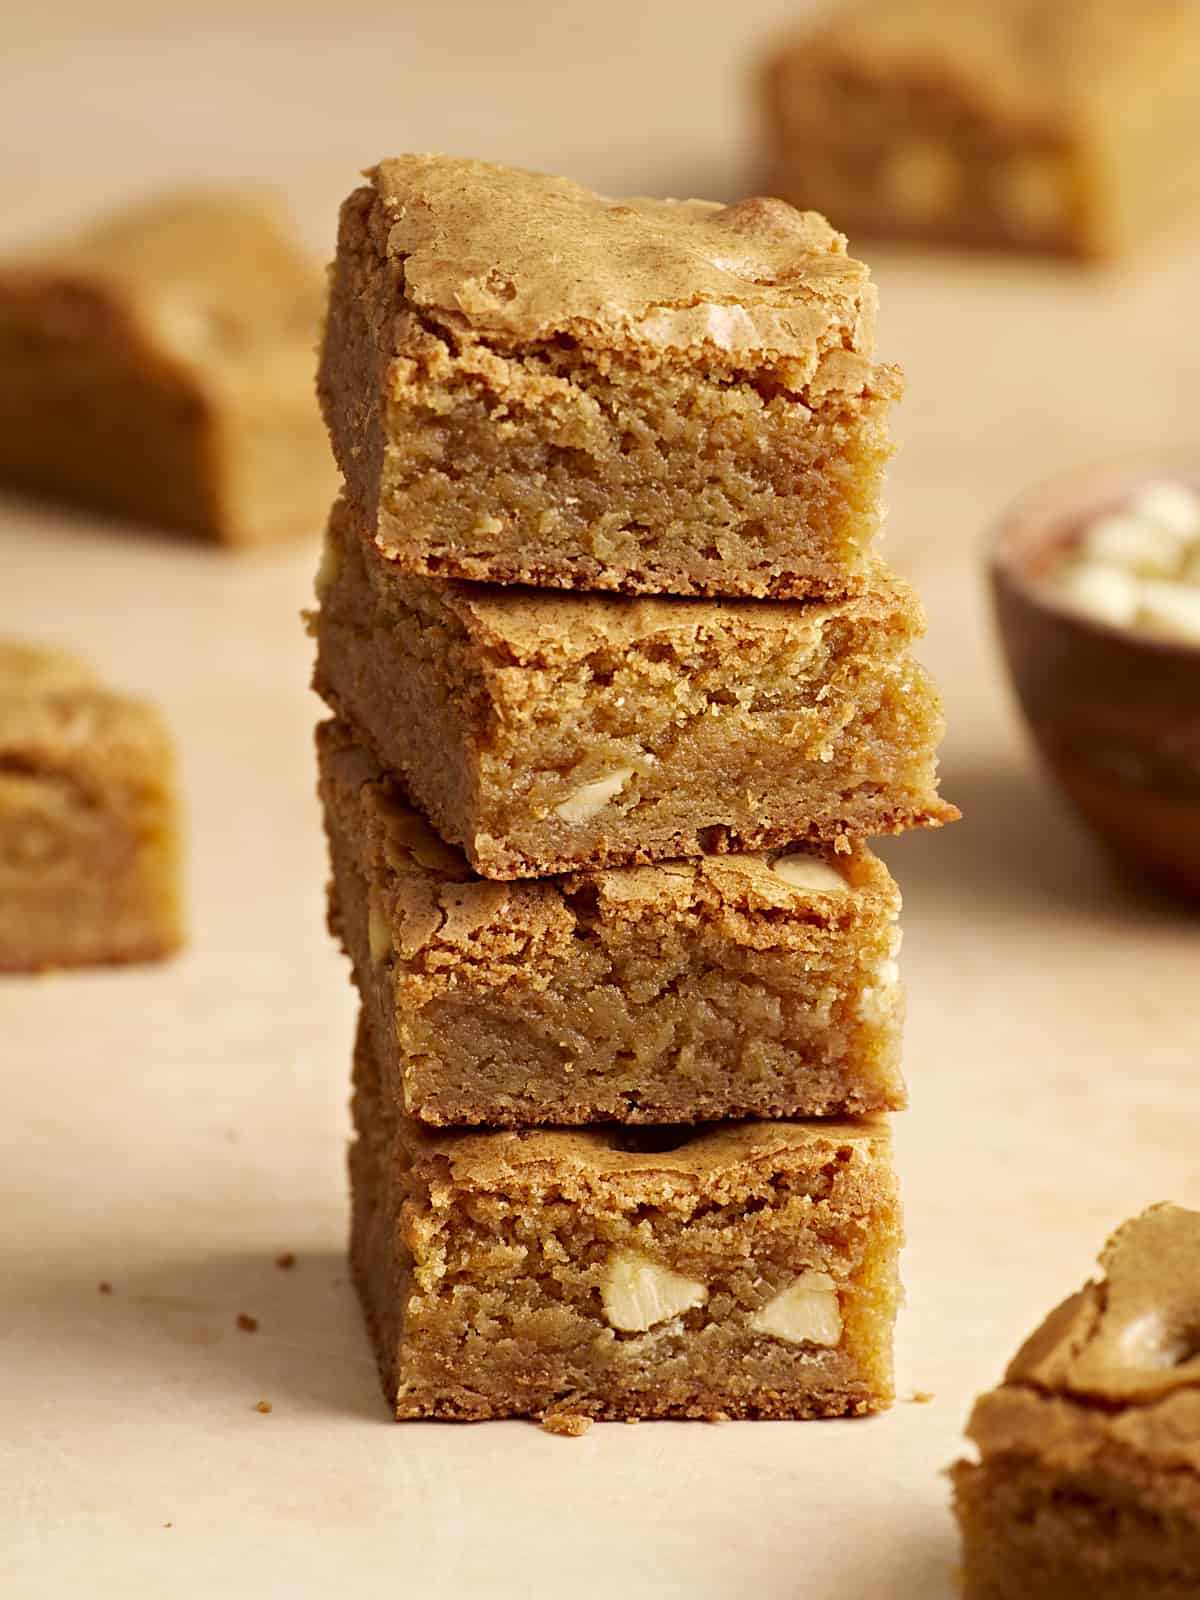
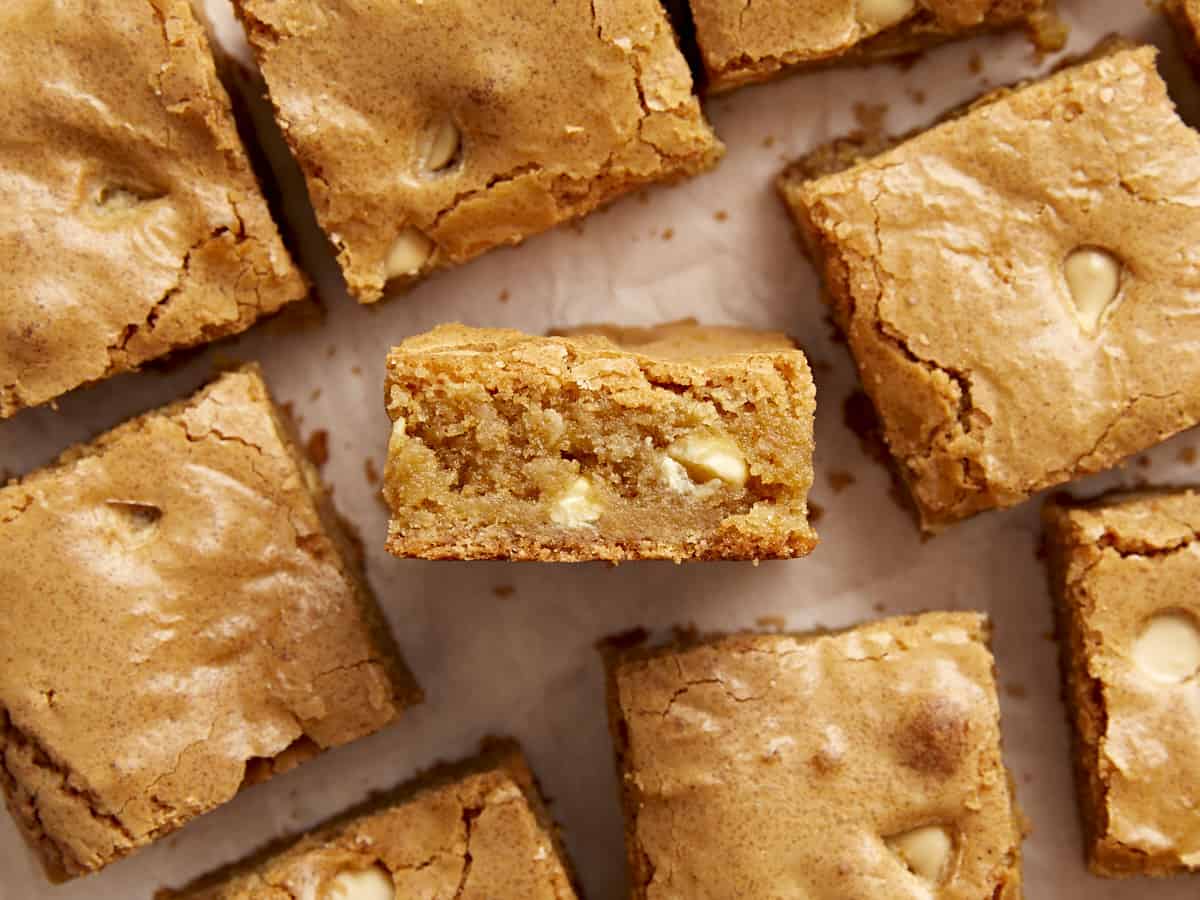
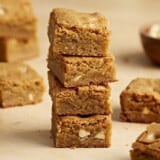
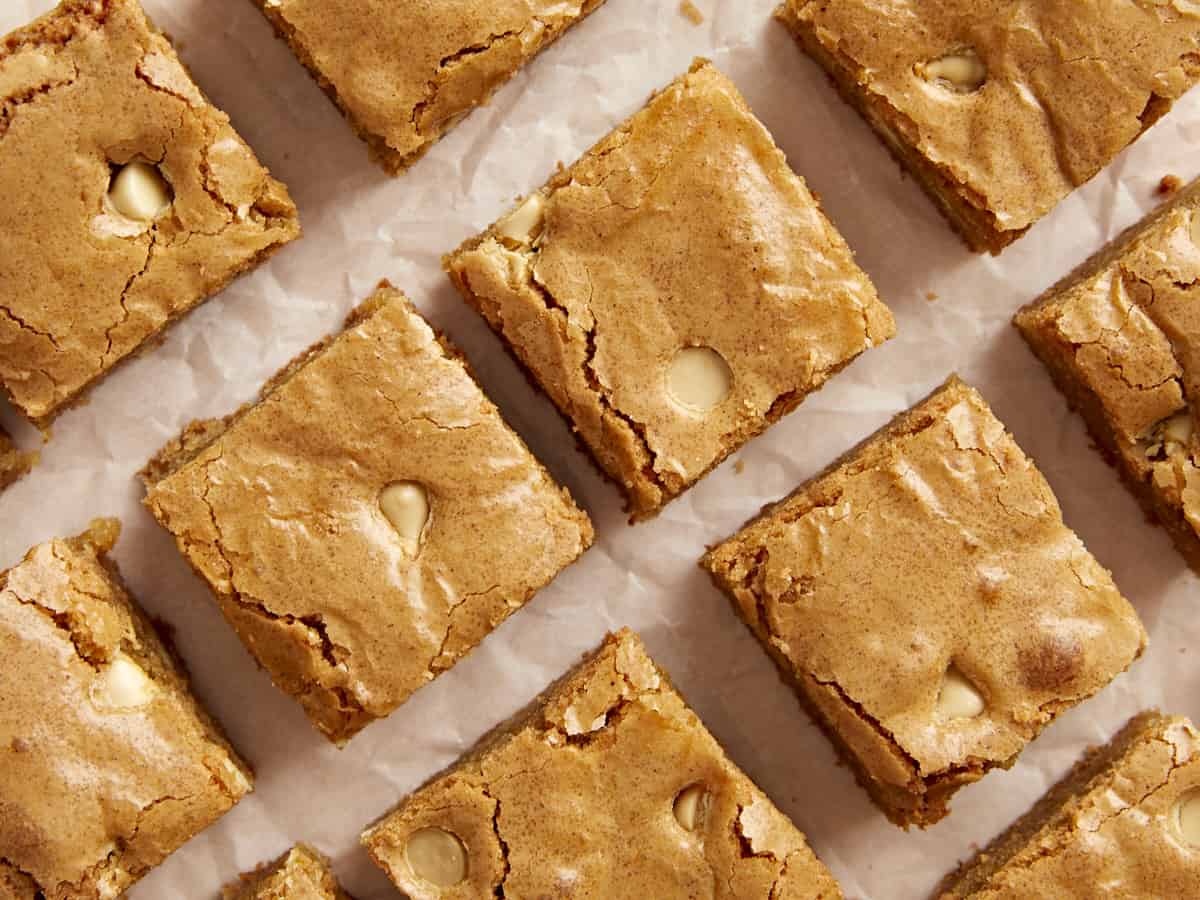
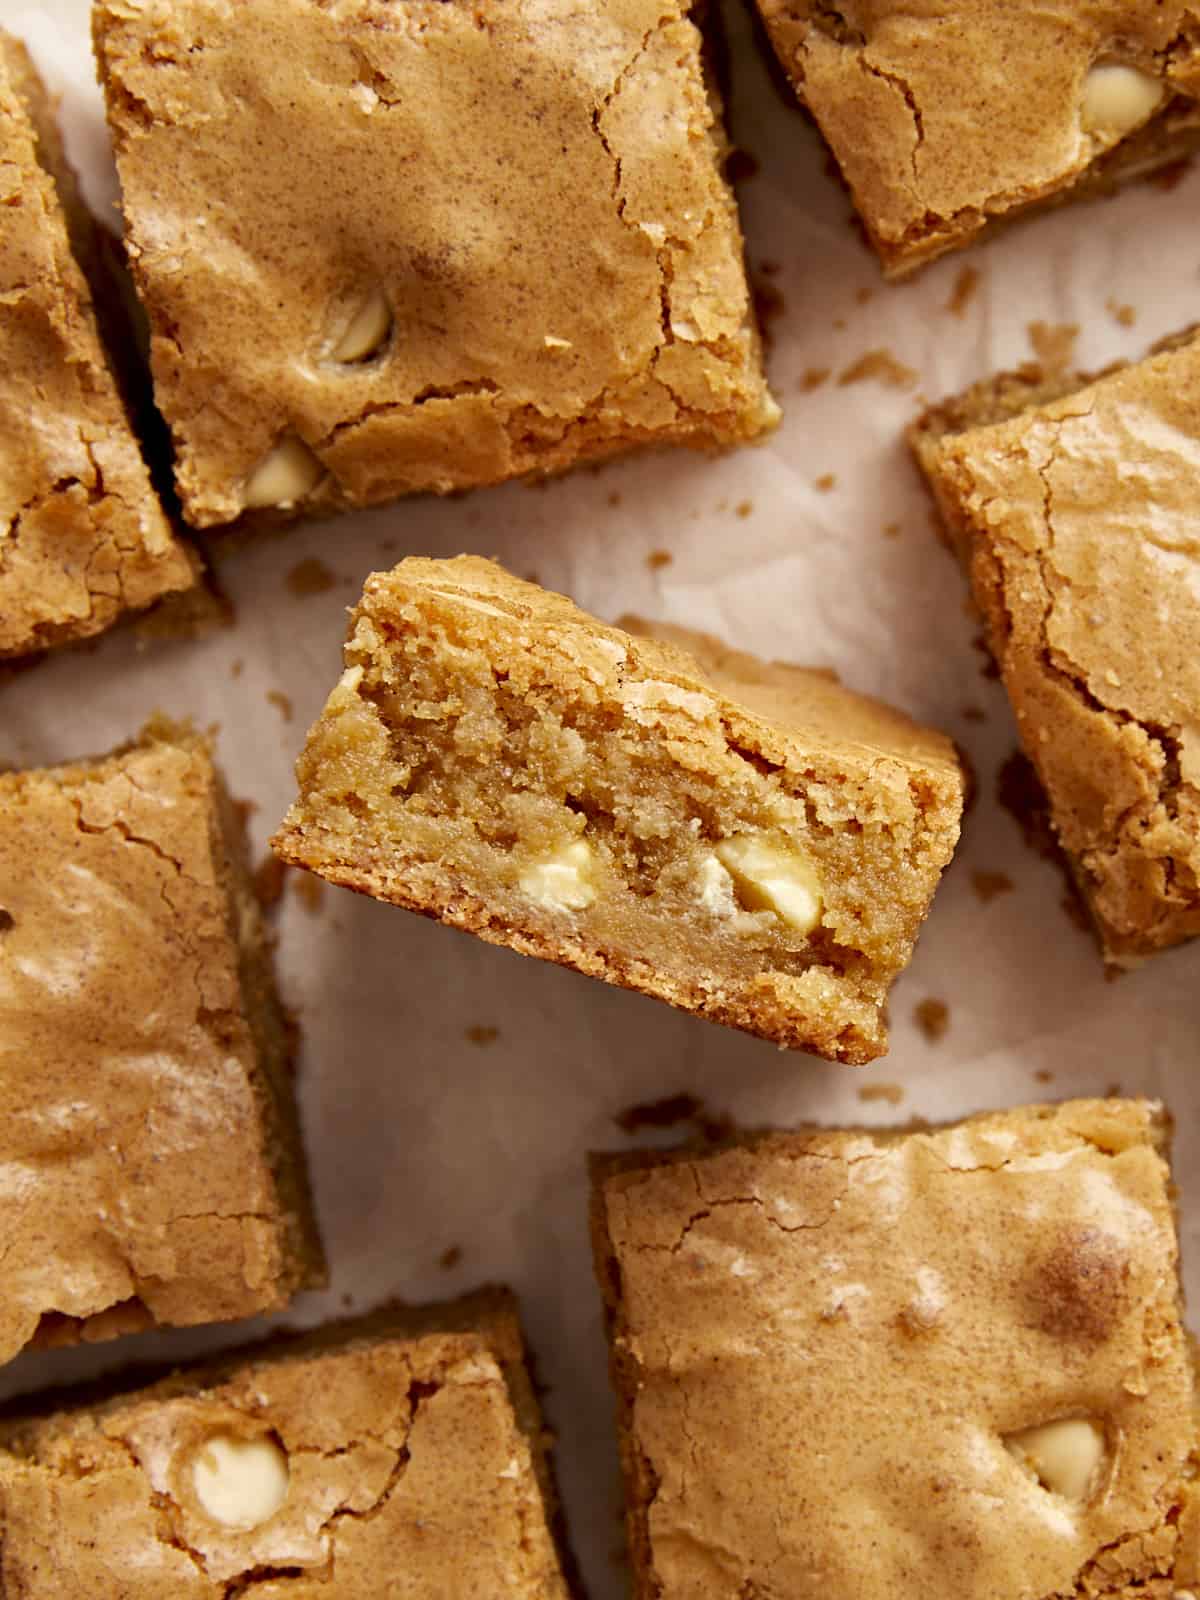
Every now and then I get a taste for something sweet and decadent like homemade cookies, brownies, or carrot cake from my favorite restaurant. But buying pre-made desserts from a store or restaurant can be so expensive. Today, I have a much better option for you! Say hello to these rich, chewy, and buttery Blondies! They’re every bit as delicious as they look and they’re so easy to make. No mixer needed. So if you’re in the mood for baking this weekend or maybe you want to make a sweet treat for Valentine’s Day, these Blondies are sure to be a hit and probably your new favorite dessert!
What Are Blondies?
I like to call these sweet little treats the cousin to our favorite Fudgy Homemade Brownies. Blondies are similar to brownies except they are made without the chocolate flavor of cocoa powder. Instead blondies get their rich flavor from a good amount of brown sugar and vanilla extract. And to make these blondies even more special, we used brown butter, which enhances the flavor and all together gives them a slight caramel, butterscotch taste.
Ingredients For Blondies
Here’s everything you need to make these irresistible Blondie bars:
Brown Butter: We used browned butter to add a rich, nutty, caramel flavor to the blondies. It not only gives it double the flavor, but also adds a beautiful golden brown color to these bars.
Brown sugar & Granulated white sugar: Brown sugar is one of the key ingredients and adds sweetness and lots of moisture to the blondies. We tested this recipe with just brown sugar and also using a combination of brown & white sugar. The use of brown & white sugar was the perfect balance and definitely the winner!
Eggs: Eggs give the blondies strength and helps them bake into a sliceable texture.
Vanilla extract: Vanilla extract adds even more rich flavor to the blondies.
All-purpose flour: Flour provides structure and body to the blondies.
Baking Powder: Baking powder helps the blondies rise.
Salt: A little bit of salt helps the flavors pop.
White chocolate chips: Just a few white chocolate chips added a nice contrast and chocolate flavor to the blondies. We only used a small amount because we didn’t want to take away from the deliciousness of the blondie, but feel free to add more if you want!
Blondie Variations
You can easily swap out the white chocolate chips in this recipe for other candies or nuts based on your own personal preference. Here are a few ideas for you:
Butterscotch chips
Dark or Semi-sweet chocolate chips
Peanut butter chips
M&Ms – use festive colored m&ms for special holidays like pastel colors for Easter, red & pink for Valentine’s Day or green & red for Christmas!
Chopped walnuts or pecans
Dried cherries or dried cranberries
A drizzle of Caramel sauce on top of the batter right before baking
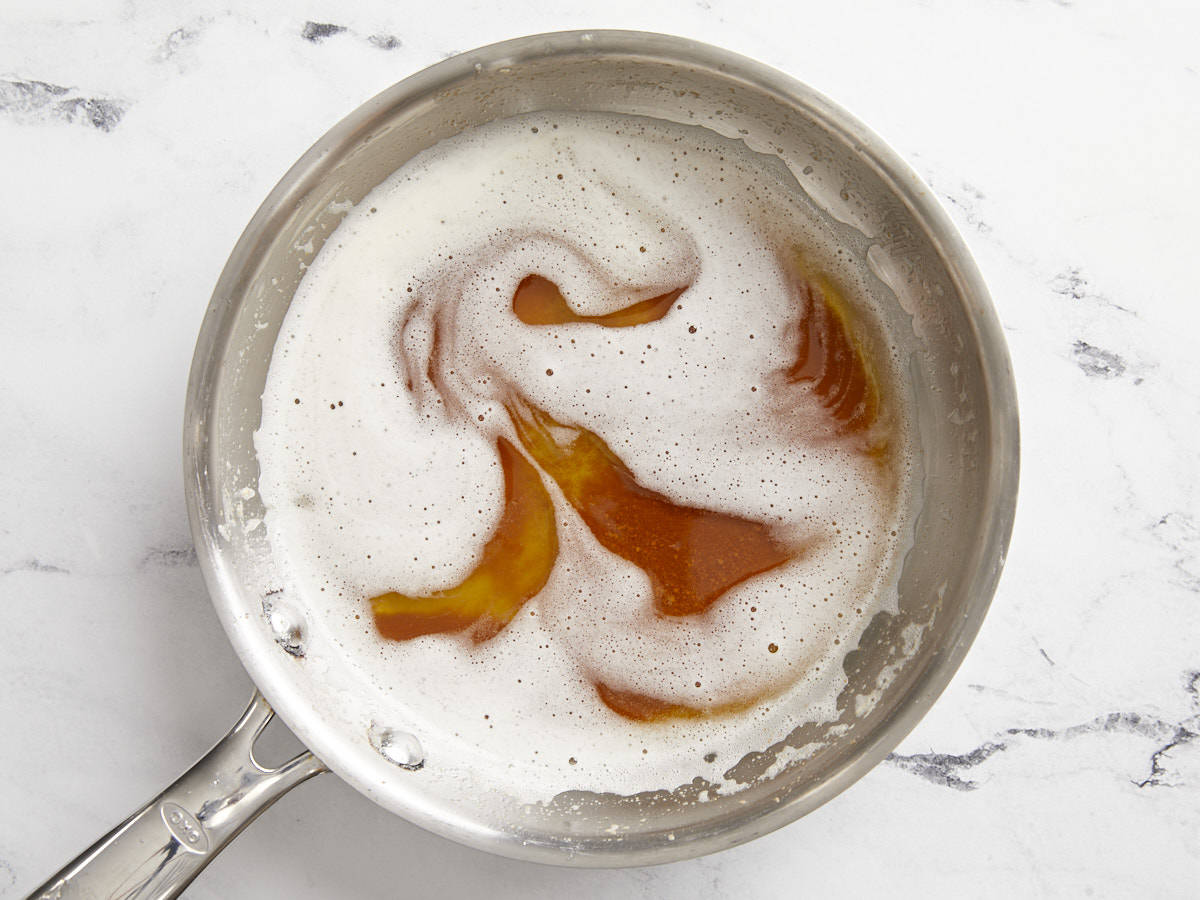
Preheat the oven to 350°F. Cut the butter into several tablespoon-sized chunks and add it to a small light-colored skillet. Heat the butter over medium heat, stirring constantly, until the butter solids turn deep brown and develop a nutty aroma (it will first become foamy, then the solids will sink to the bottom and turn brown).
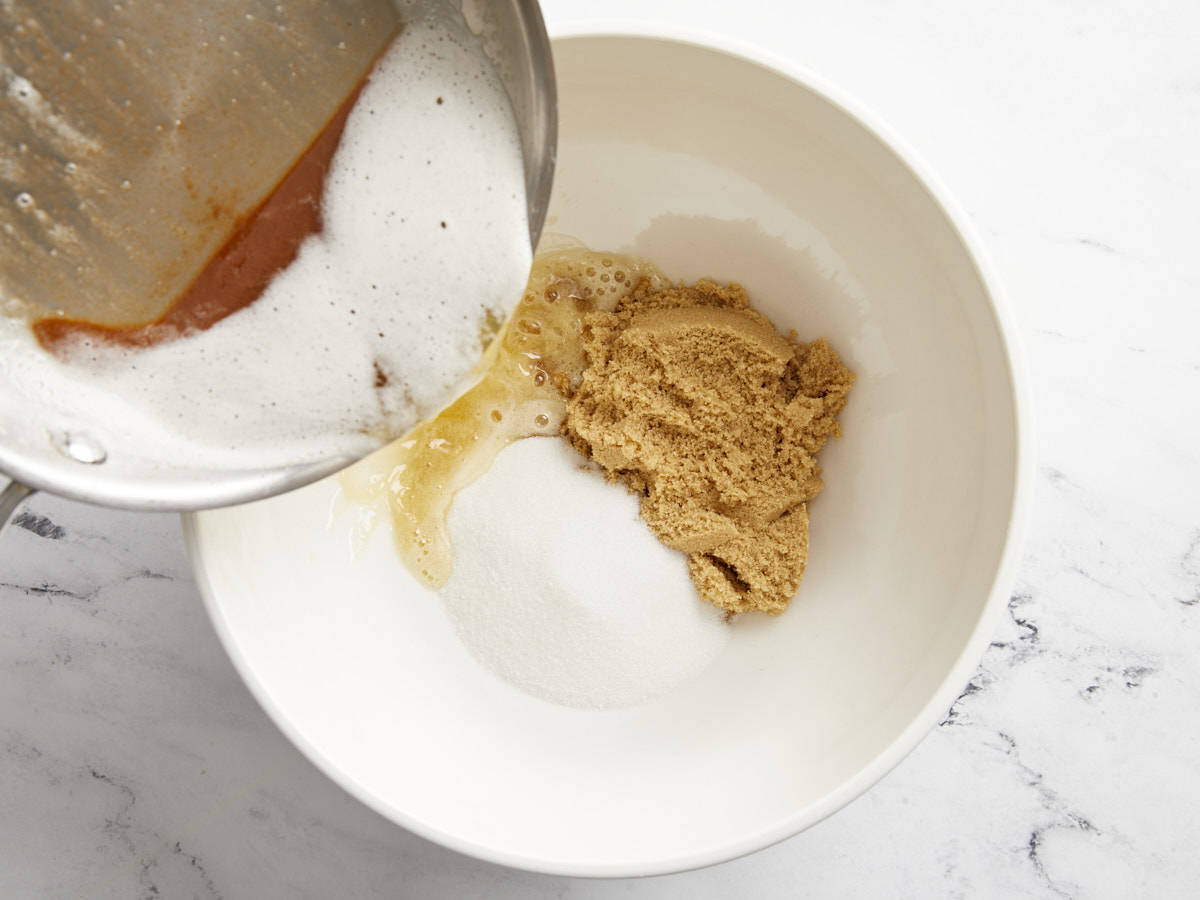
While the butter is browning, add the brown sugar and granulated white sugar to a large mixing bowl.
Once the butter has browned, remove it from the heat immediately to prevent burning, and carefully pour it into the mixing bowl with the sugars. Whisk the brown butter and both sugars together until smooth.
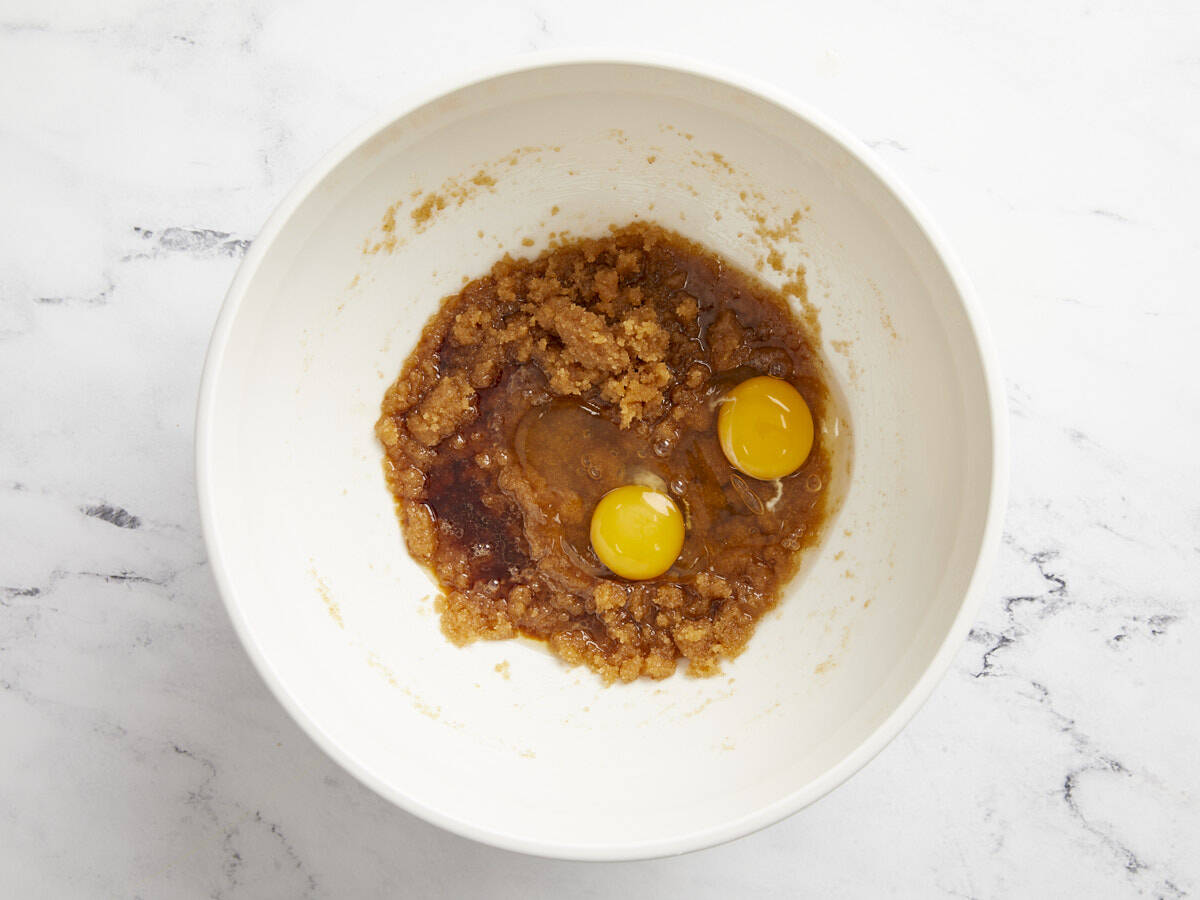
Add the eggs and vanilla extract to the bowl and whisk until smooth.
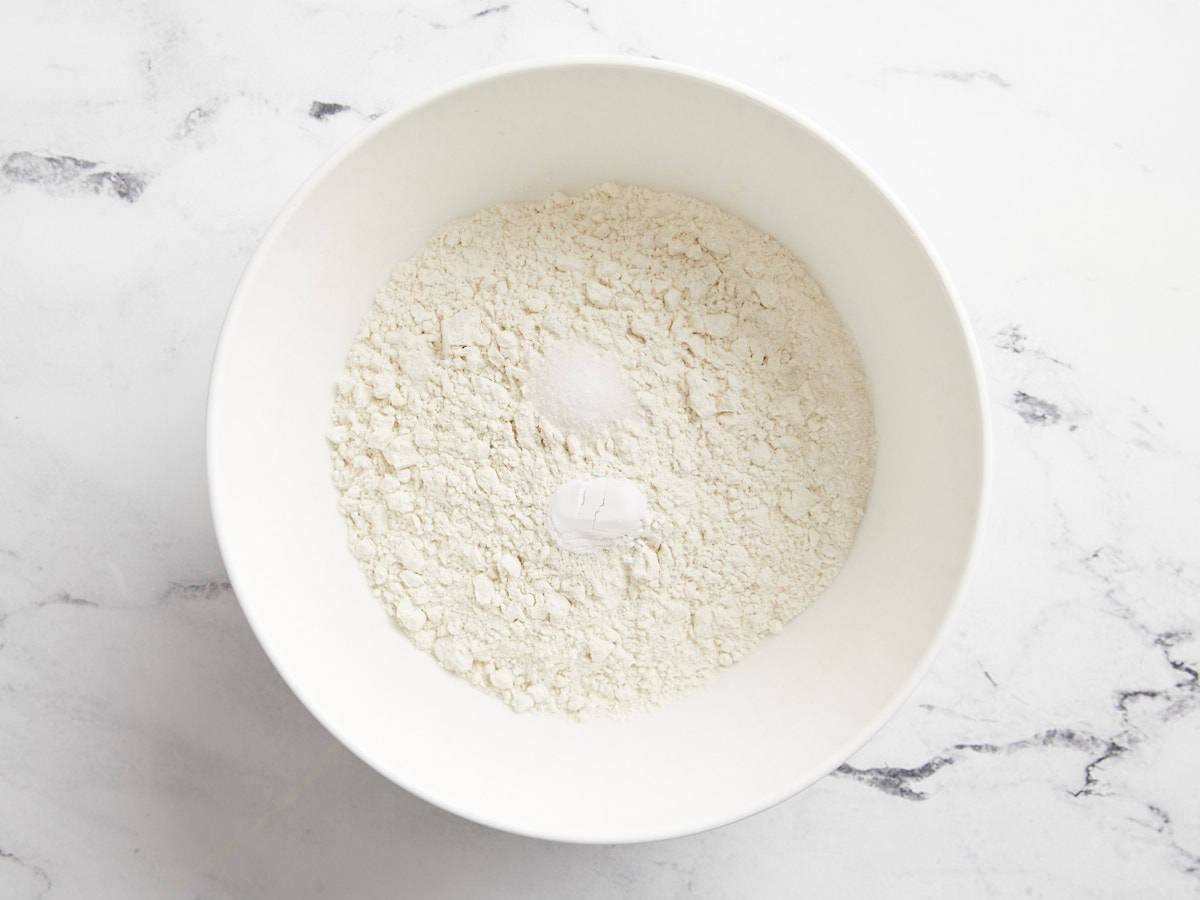
In a separate bowl, stir together the all-purpose flour, baking powder, and salt until well combined. Add the flour mixture to the bowl with the wet ingredients. Use a rubber spatula to stir the flour into the batter until evenly combined.
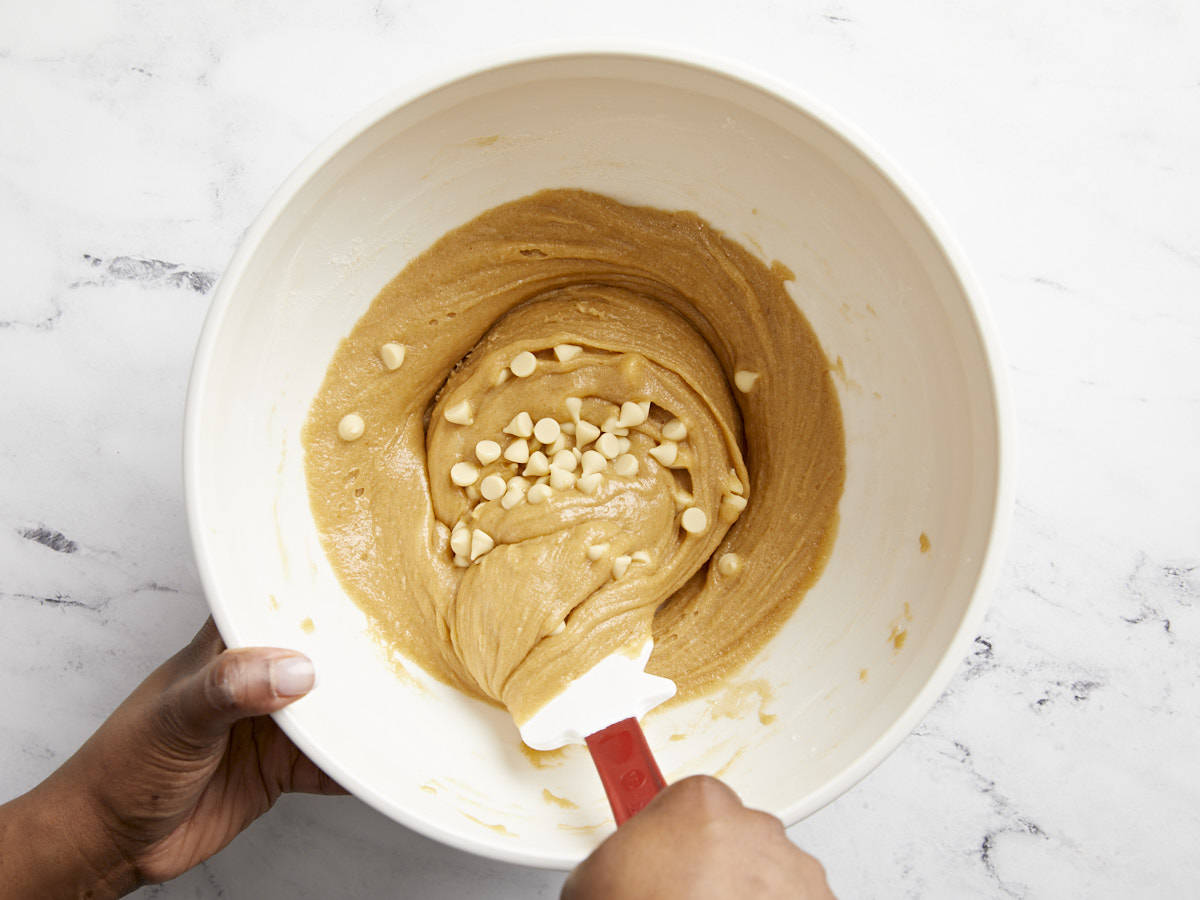
Finally add the white chocolate chips to the batter and fold them in until just combined.
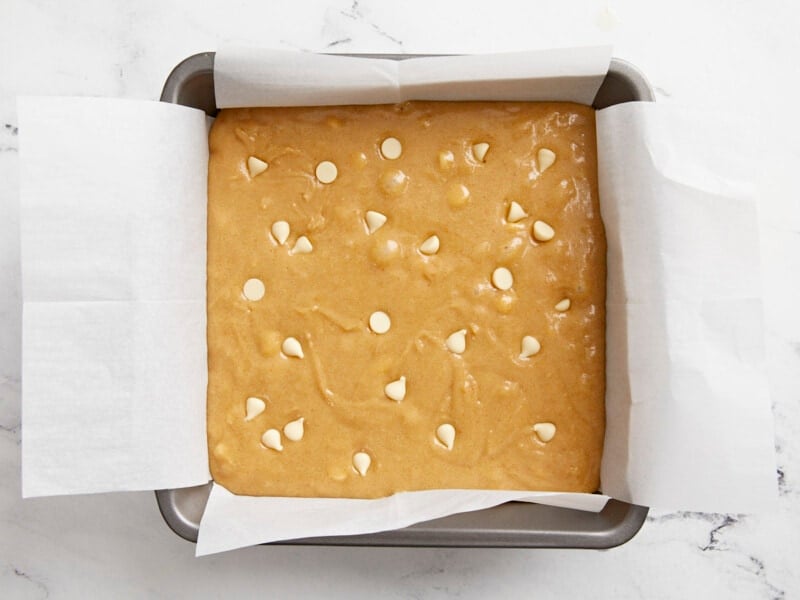
Line an 8×8 baking dish with parchment paper. Add the blondie batter to the baking dish and spread it out evenly. Feel free to add a few more white chocolate chips on top of the batter.
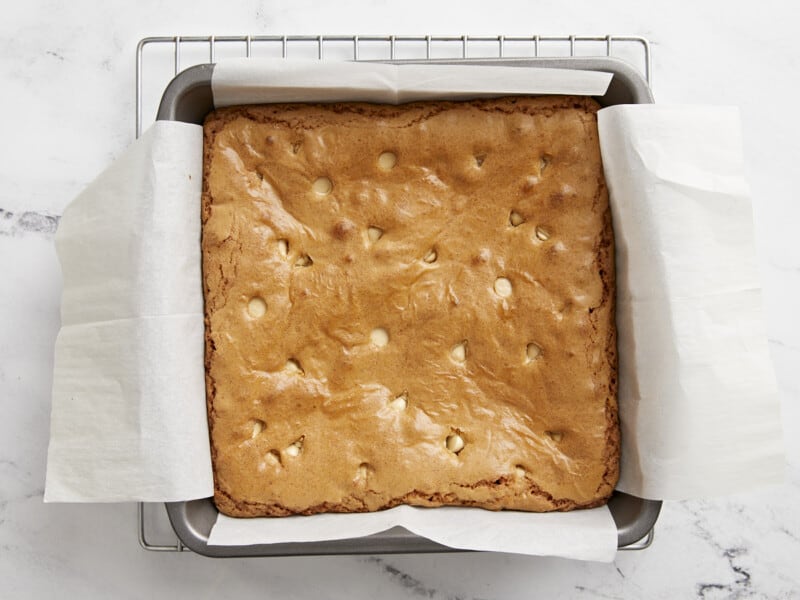
Bake the blondies in the preheated oven for 33-35 minutes or until a toothpick inserted comes out clean.
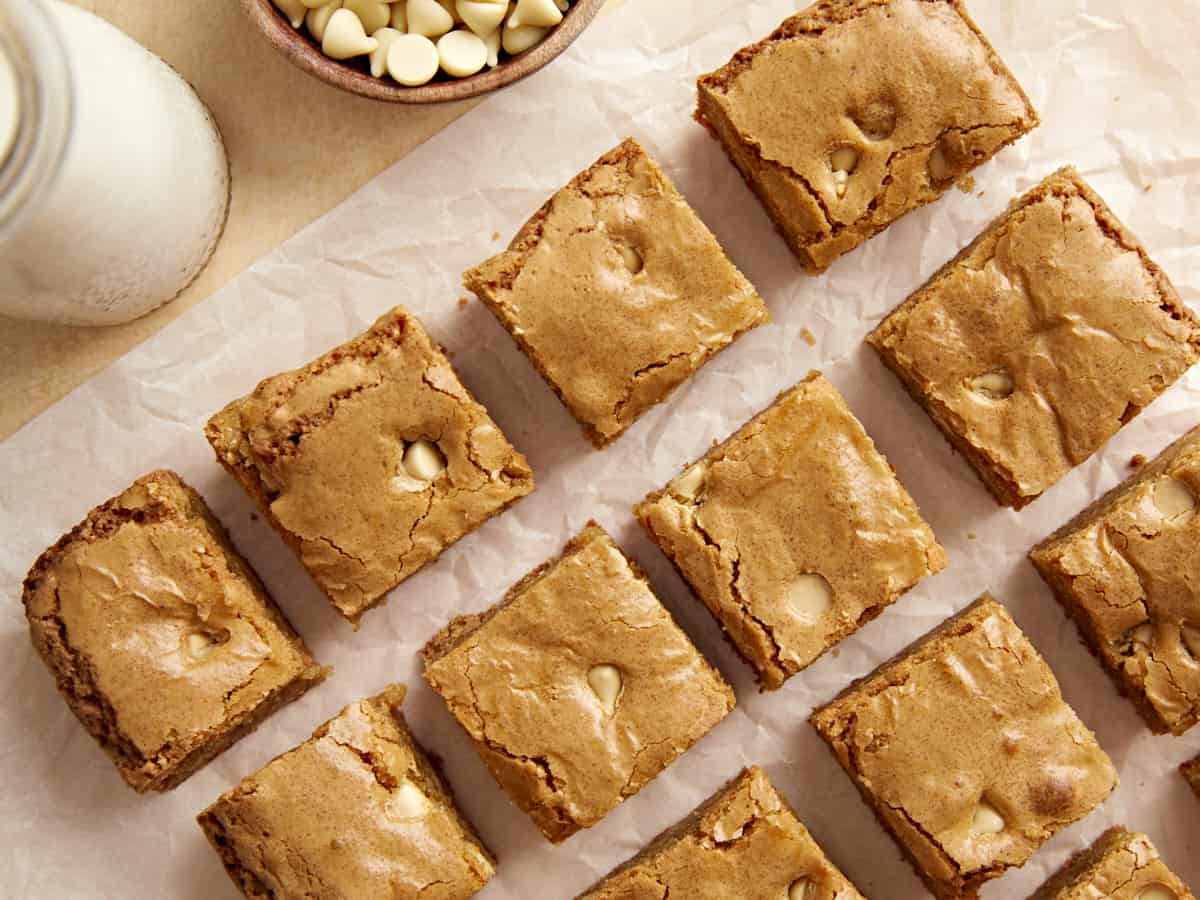
Remove the blondies from the oven and let them cool for 10-15 minutes before lifting the parchment paper out of the baking dish. Slice into 12 bars and serve.
Preheat the oven to 350°F. Cut 12 Tbsps of butter into several tablespoon-sized chunks and add it to a small light-colored skillet. Heat the butter over medium heat, stirring constantly, until the butter solids turn deep brown and develop a nutty aroma (it will first become foamy, then the solids will sink to the bottom and turn brown).
While the butter is browning, add 1 cup brown sugar and 1/2 cup granulated white sugar to a large mixing bowl. Once the butter has browned, remove it from the heat immediately to prevent burning, and carefully pour it into the mixing bowl with the sugars. Whisk the brown butter and both sugars together until smooth.
Add 2 large eggs and 2 tsp vanilla extract to the bowl and whisk until smooth.
In a separate bowl, stir together 1 1/2 cups all-purpose flour, 1/2 tsp baking powder, and 1/4 tsp salt until well combined.
Add the flour mixture to the bowl with the wet ingredients. Use a rubber spatula to stir the flour into the batter until evenly combined.
Finally add 1/4 cup white chocolate chips to the batter and fold until just combined.
Line an 8×8 baking dish with parchment paper. Add the blondie batter to the baking dish and spread it out evenly. Feel free to add a few more white chocolate chips on top of the batter.
Bake the blondies in the preheated oven for 33-35 minutes or until a toothpick inserted comes out clean.
Remove the blondies from the oven and let them cool for 10-15 minutes before lifting the parchment paper out of the baking dish. Slice into 12 bars and enjoy!
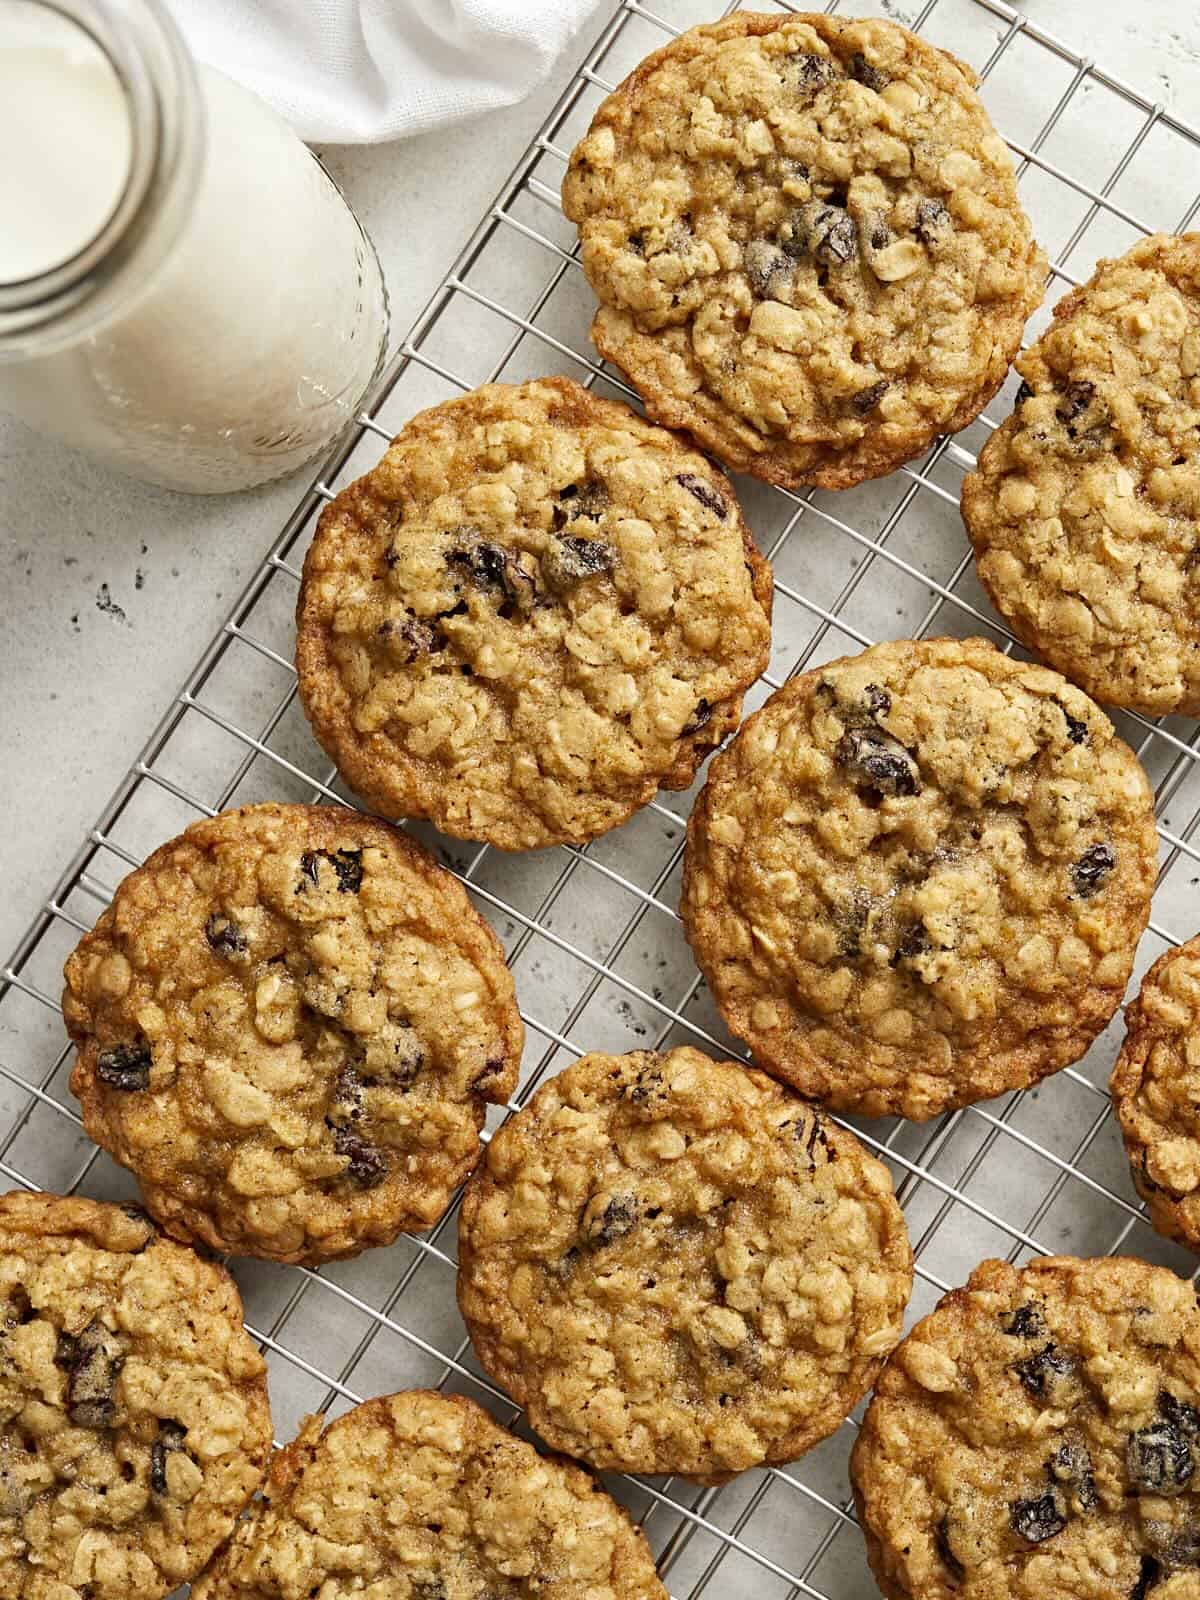
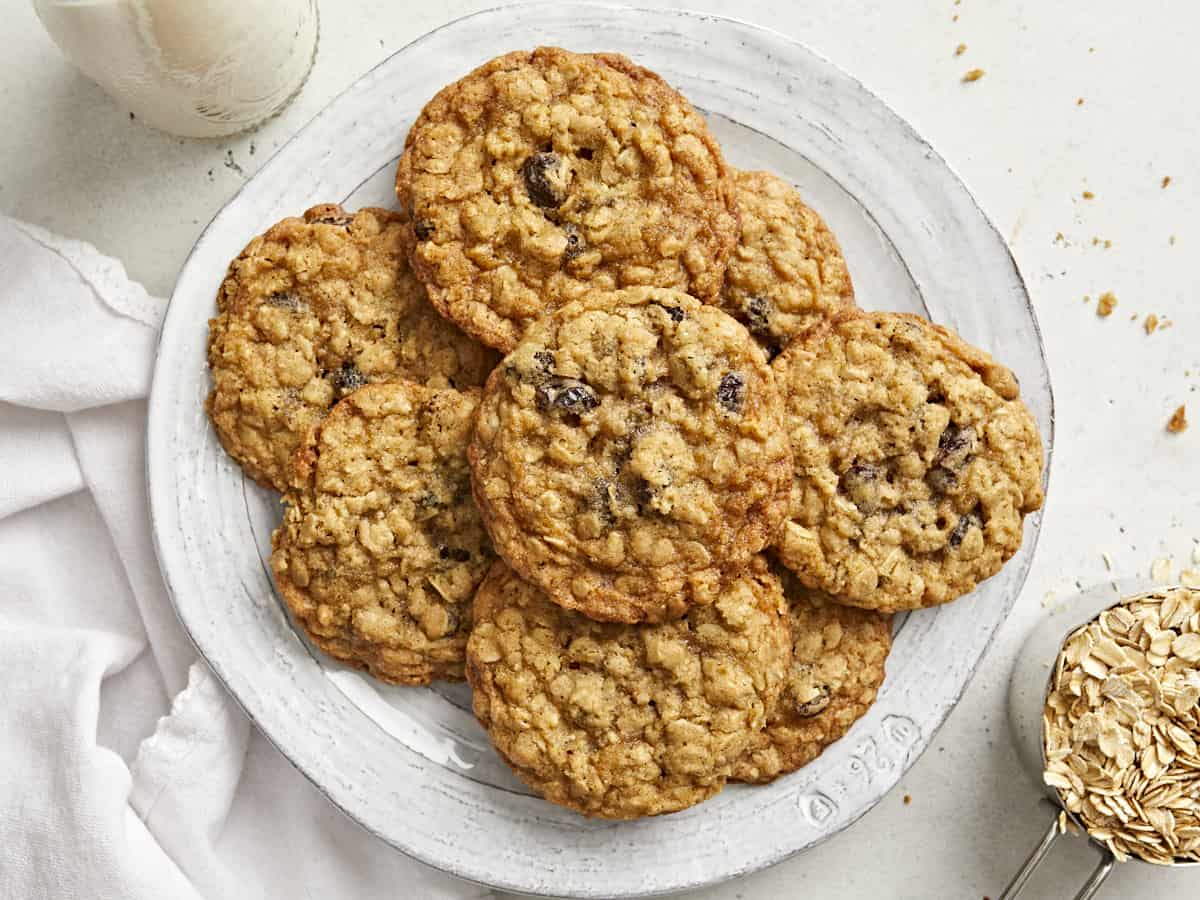
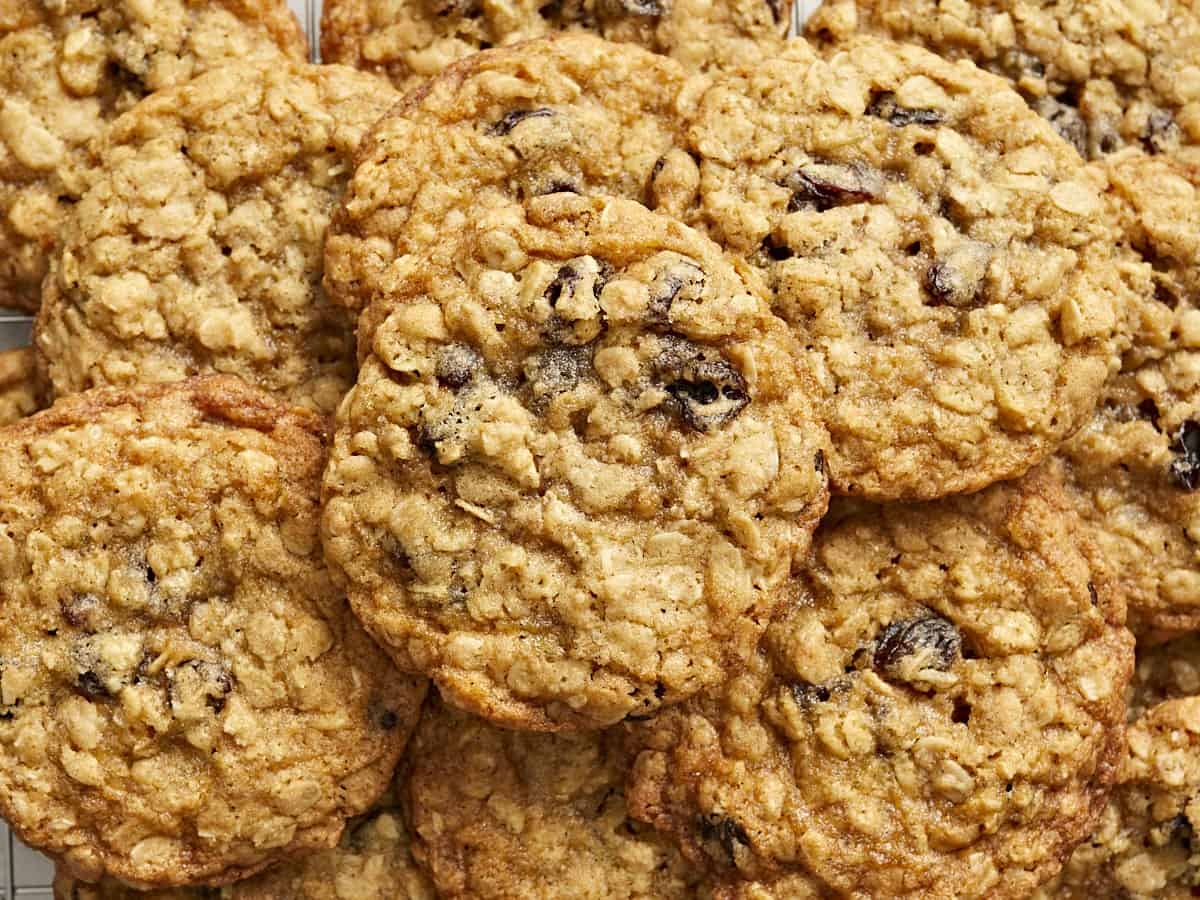
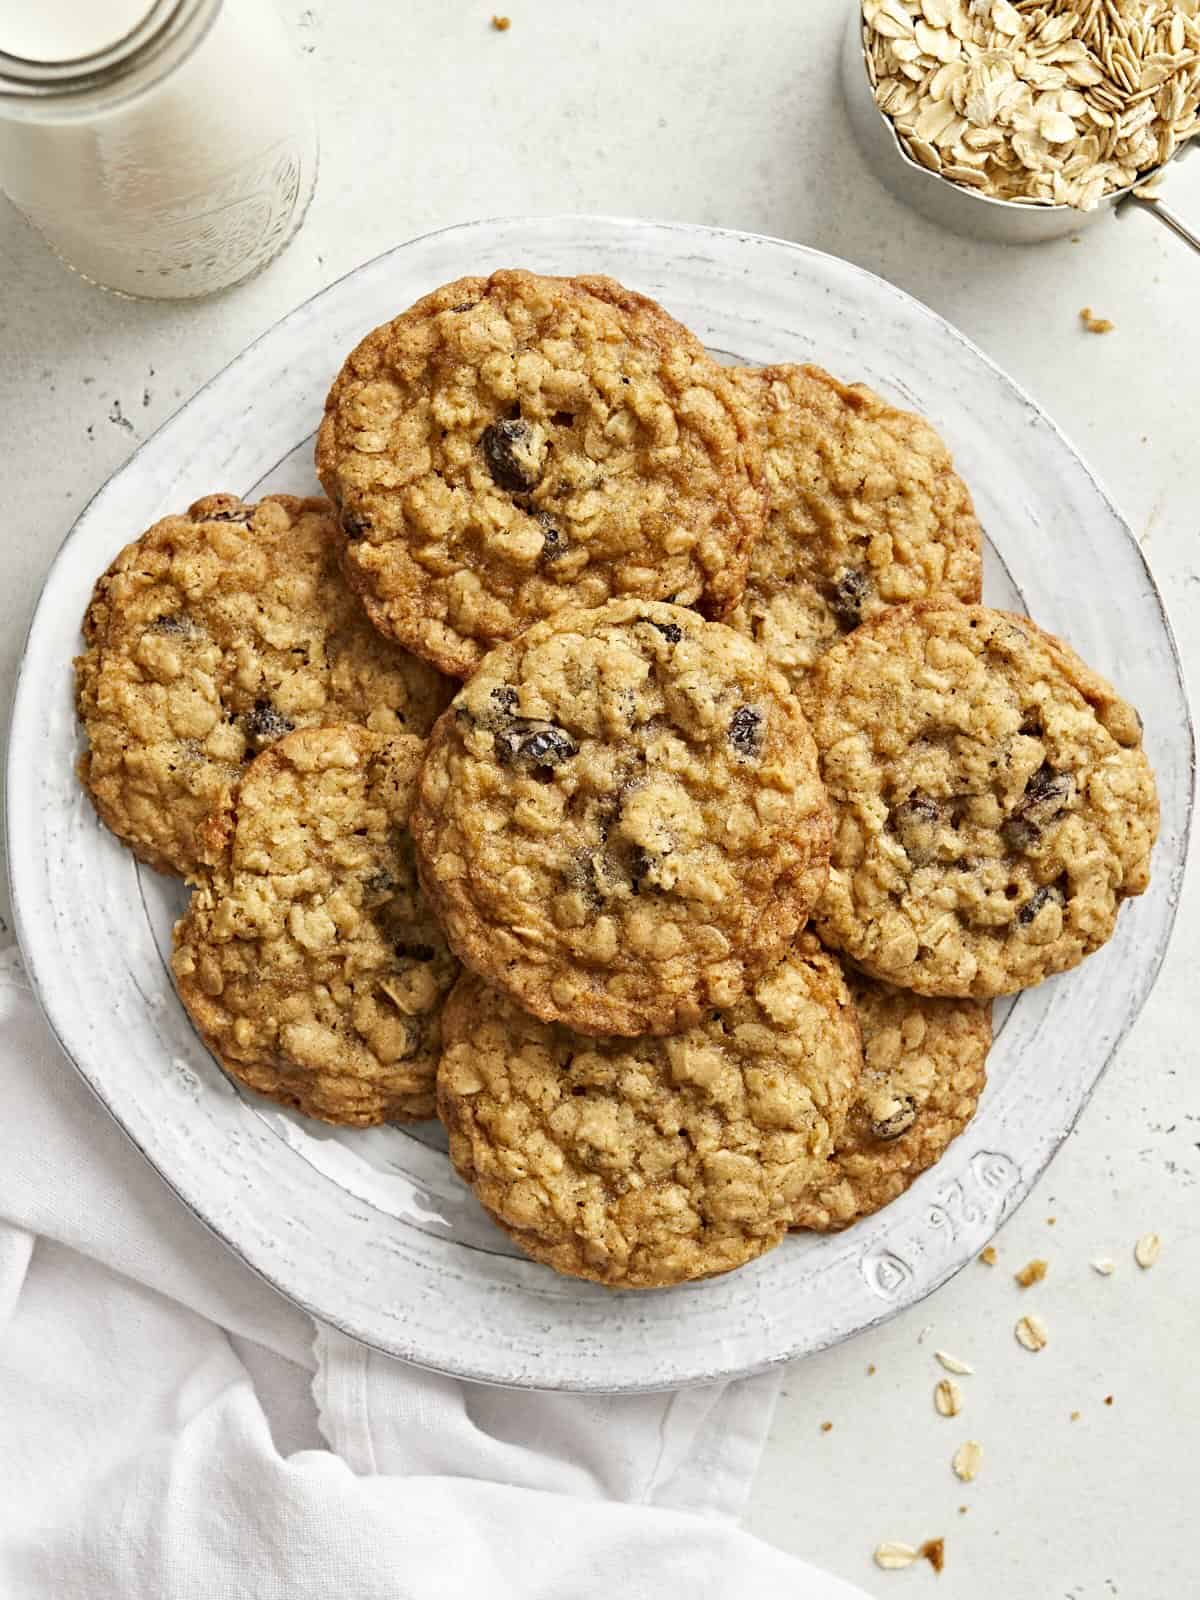
What could possibly be so good that it keeps our team talking about it for weeks? You guessed it…these insanely delicious Oatmeal Cookies! The golden crispy edges and chewy center had us hooked! We added raisins for the classic oatmeal raisin cookie, but feel free to swap out the raisins for your own favorite cookie add-ins. I’ll share a few different options below. Just know these oatmeal cookies are the absolute best way to satisfy your sweet tooth on a budget!😉
Ingredients For Oatmeal Cookies
Here are the ingredients you need to make these delicious oatmeal raisin cookies:
Old-fashioned Rolled Oats: It wouldn’t be an oatmeal cookie without the oats! The oats provide a chewy texture to the cookies. Make sure to use old-fashioned rolled oats and not quick oats.
Butter: Butter is the base for many cookies. It gives the cookies plenty of richness and creamy buttery flavor.
Brown sugar & Granulated white sugar: I like using a combination of both brown and white sugar to sweeten the cookies.
Egg: Egg helps bind all of the ingredients together.
Vanilla: Vanilla extract adds a touch of warm flavor to the cookies.
Baking Soda: A small amount of baking soda helps the cookies rise just a little bit.
Flour: All-purpose flour gives the cookies structure.
Cinnamon: Cinnamon spice adds just a little bit more flavor and the perfect finishing touch to these chewy cookies.
Raisins: Raisins are a classic addition to oatmeal cookies with the perfect contrast and sweetness. But feel free to try some other variations if you wan’t a slightly different flavor profile. We’ll list a few suggestions below.
Oatmeal Cookie Variations
Here are a few different options if you want to switch things up with your oatmeal cookies:
Dried cranberries: I love swapping the raisins for Craisins or dried cranberries whenever I can catch them on sale at my local grocery store.
Chopped nuts: Looking for a little crunch? Add about 1/2 cup of chopped pecans or walnuts to the dough.
Chocolate or Butterscotch chips: These oatmeal cookies also taste great with your favorite baking chips. My favorite combination is a few butterscotch chips and a few chopped pecans. SO good! If you’re adding chocolate or butterscotch chips, I would add them in place of the raisins.
Should You Chill The Cookie Dough?
Many cookie recipes suggest chilling the cookie dough in the refrigerator prior to baking. This is to prevent the cookies from spreading too much in the oven as they bake. We tested these oatmeal cookies two different ways. First, chilling the dough for 30 minutes prior to baking, and second, baking the cookies without chilling the dough. We actually preferred the texture of the cookies without chilling the dough. It yielded a thinner cookie with crispy edges and a perfect chewy center. However, this is more of a personal preference. If you prefer a thicker cookie, then feel free to refrigerate the cookie dough for 30-60 minutes prior to baking.
Storing Oatmeal Cookies
So what happens when you’re feeling snack-ish, you’re craving something sweet, and you forgot about the extra oatmeal cookies that you stashed in your freezer? You realize you just hit the jackpot!! That’s exactly what happened to us at the studio. We had extra cookies that we stored in the freezer and were super excited to gobble them up 2 weeks later. These cookies store very well in an air-tight container at room temperature for up to 1 week or store in a freezer-safe bag for up to 3 months. When you’re in the mood for a little something sweet, just take one or two cookies out of the freezer, thaw at room temperature and enjoy!
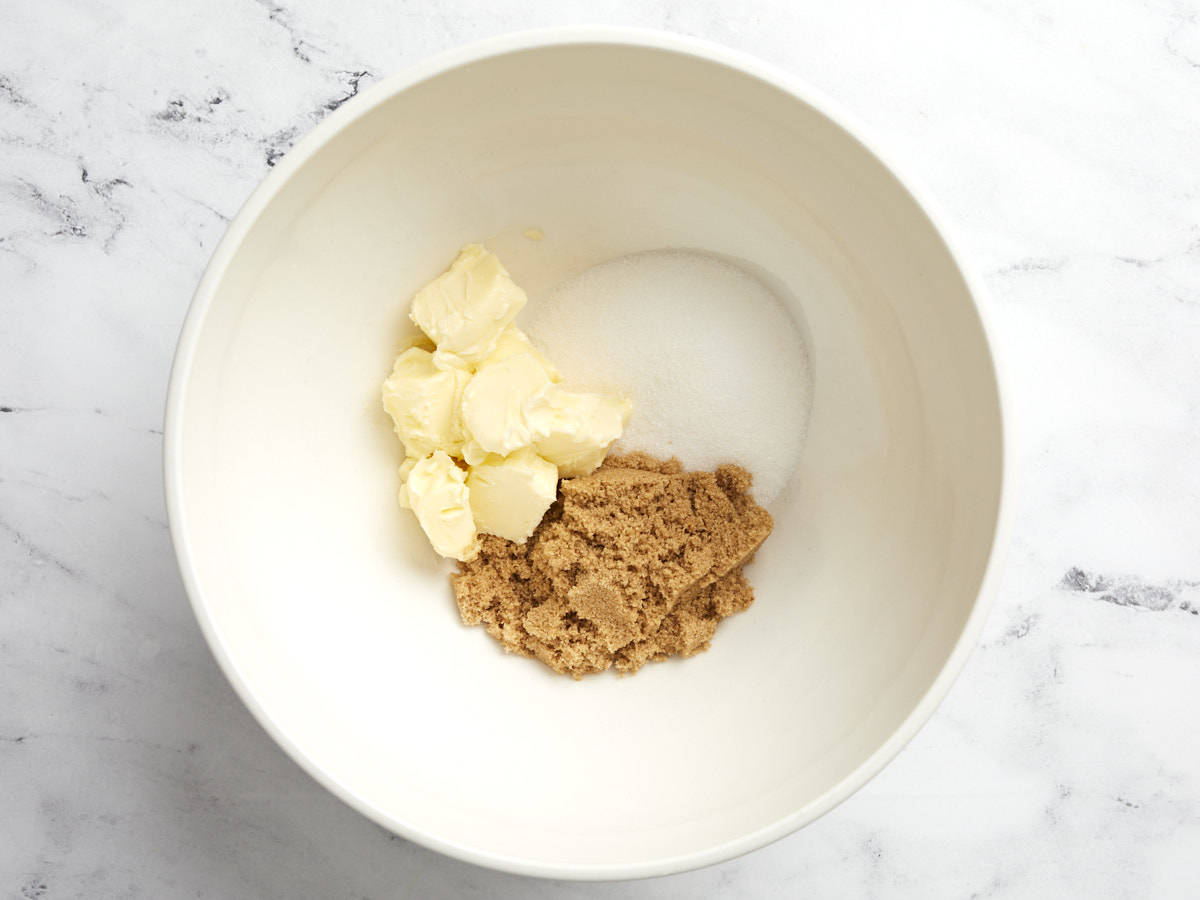
Preheat the oven to 350°F. In a large mixing bowl, add the softened butter, white sugar, and brown sugar. Blend the ingredients together with a hand mixer until smooth.
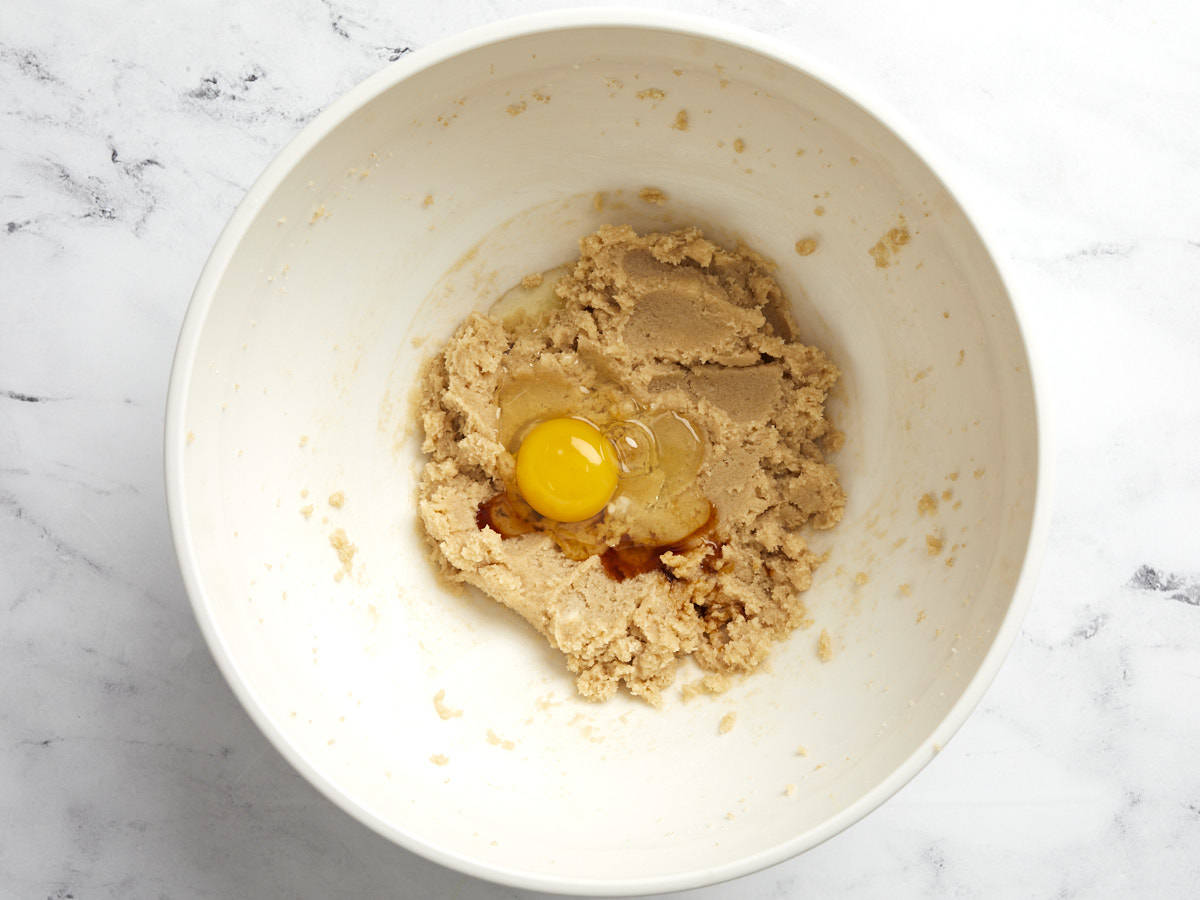
Add the egg and vanilla extract to the bowl and blend with the sugar mixture until smooth.
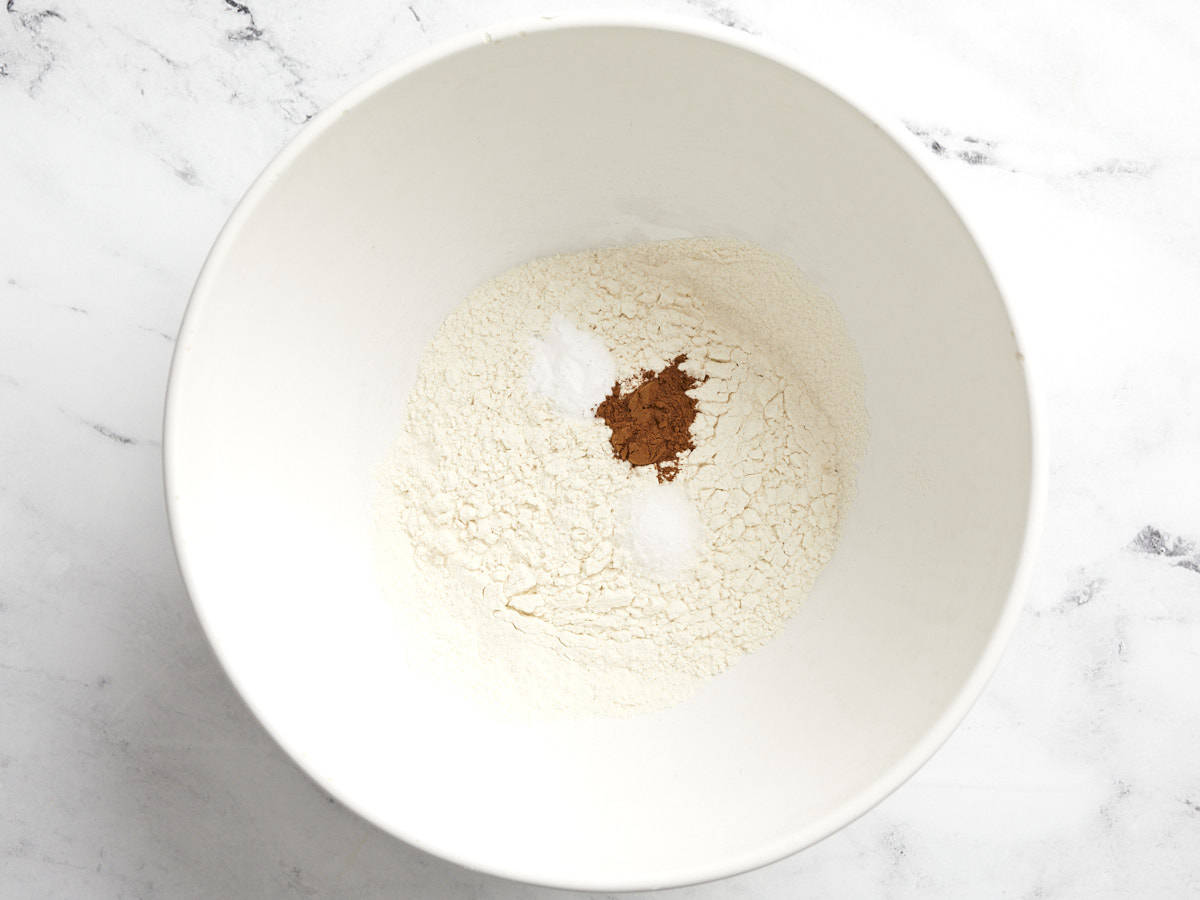
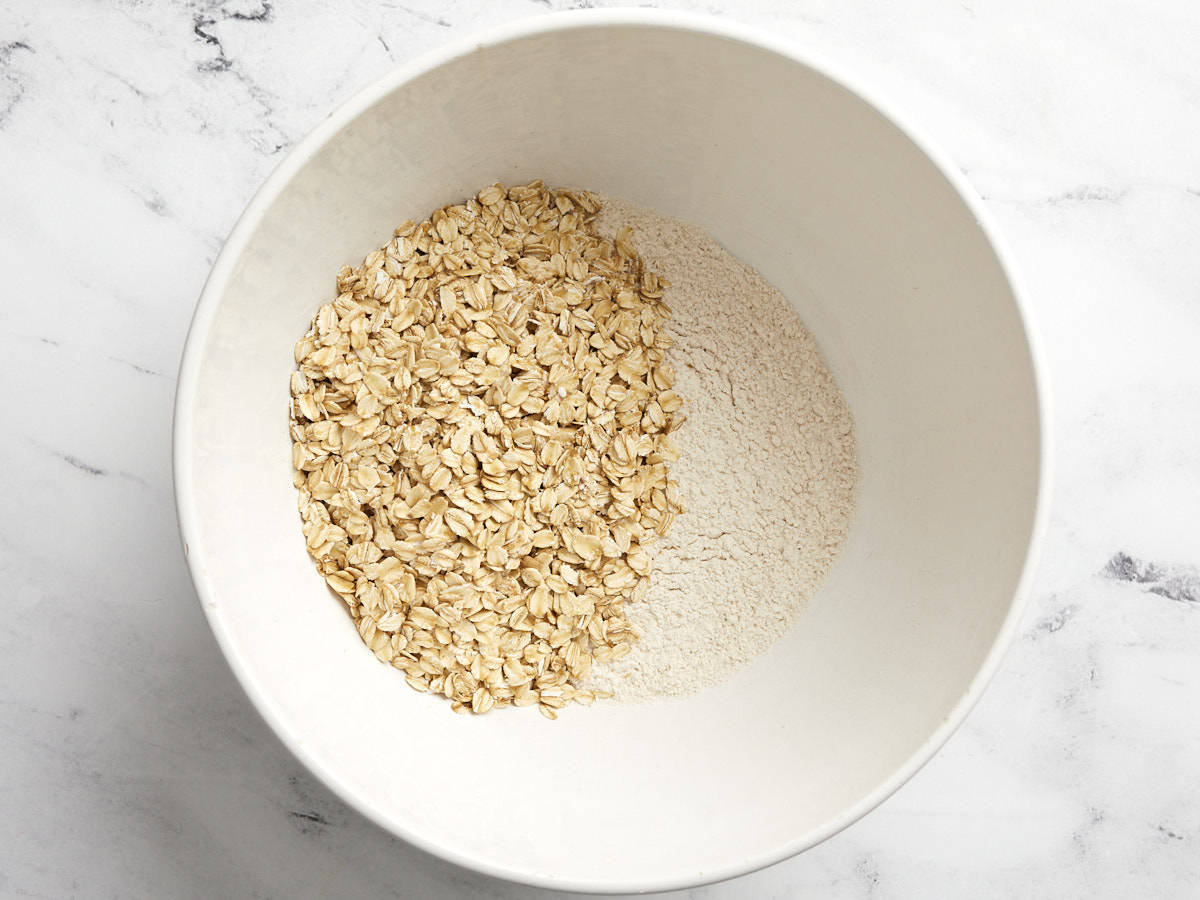
Next in a separate bowl, whisk together the dry ingredients (flour, salt, baking soda, and cinnamon) until well combined. Add the rolled oats to the dry ingredients and mix until combined.
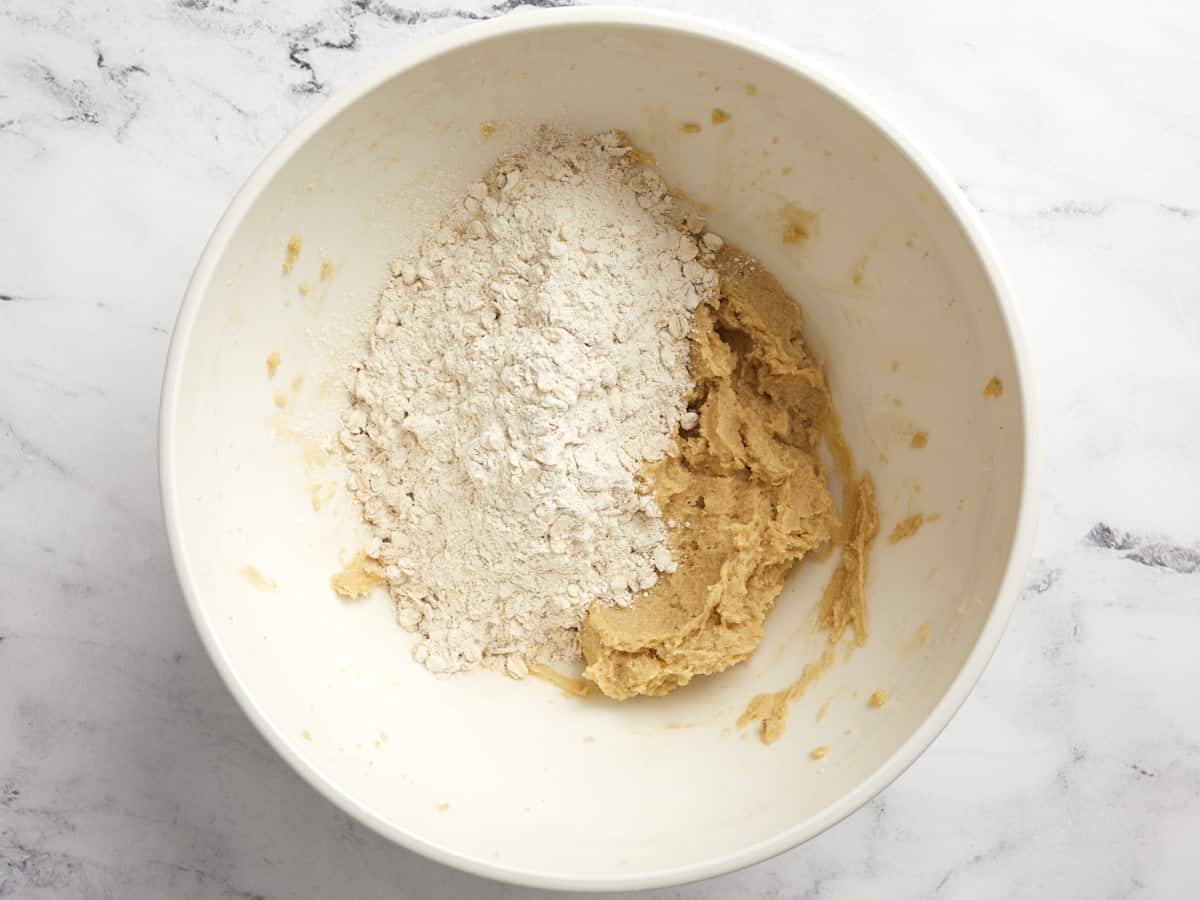
Add all of the dry ingredients to the same bowl as the sugar mixture. Blend the ingredients together with a hand mixer on low speed until just combined. Do not overmix.
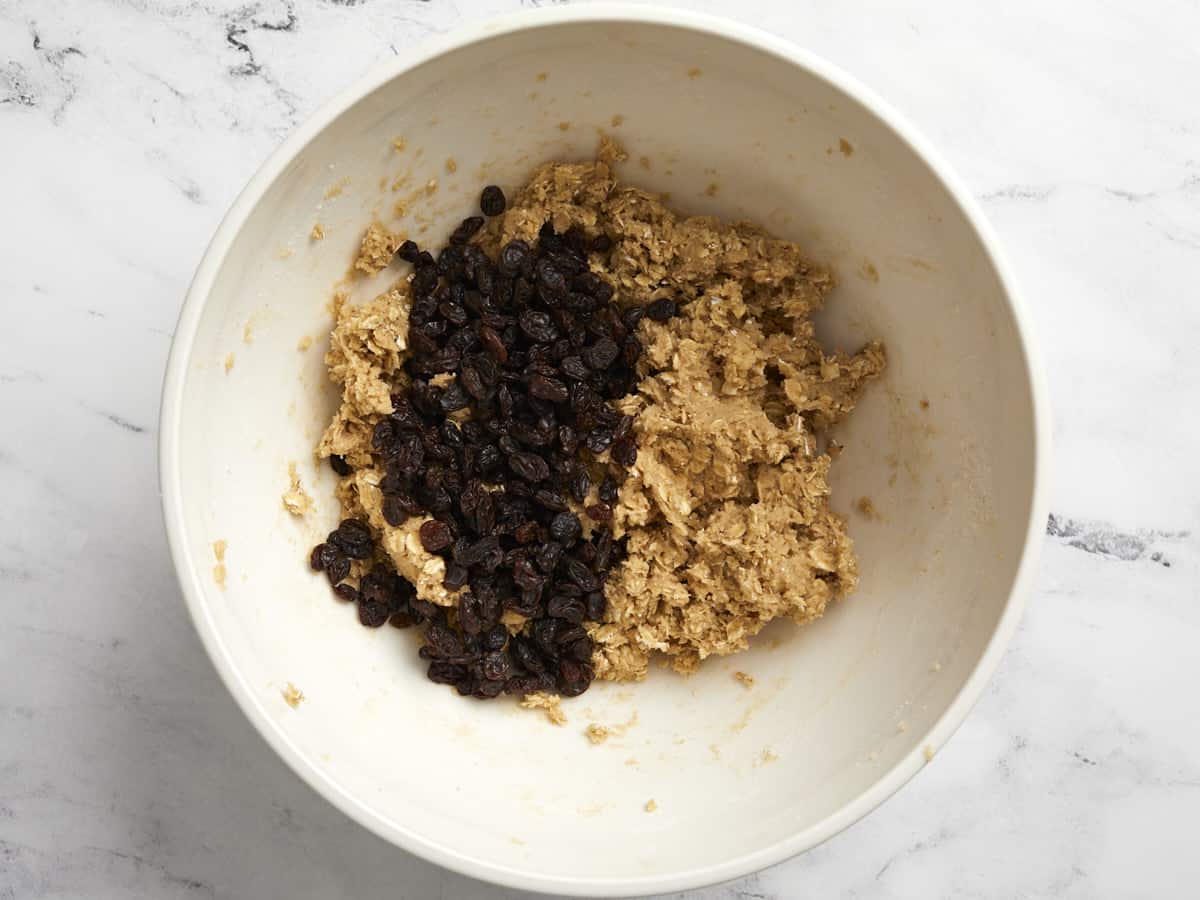
Next add the raisins to the bowl and fold them into the cookie dough with a spatula.
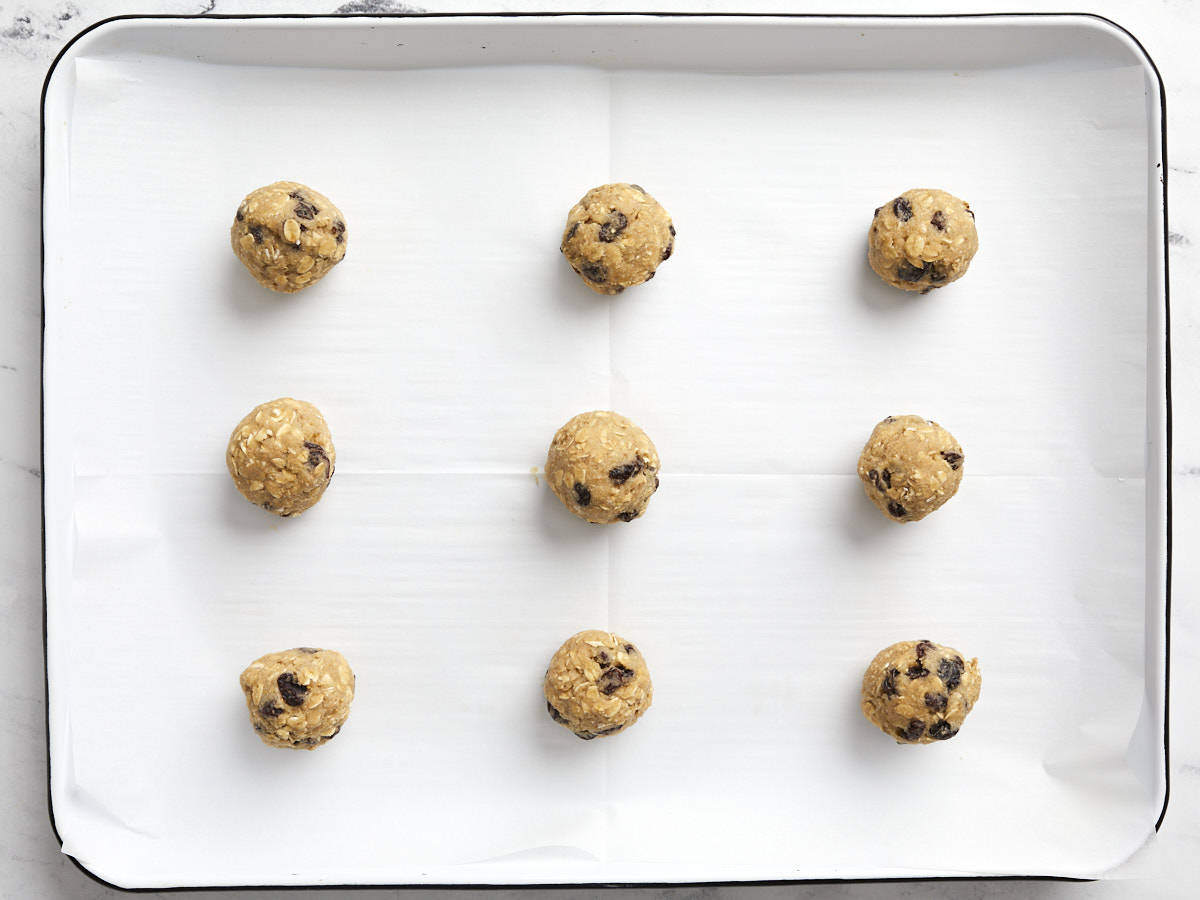
Using a medium cookie scoop or your hands, scoop the cookie dough into roughly 2 Tbsp portions then roll into a ball. Place the cookies on a parchment lined baking sheet about 2-3 inches apart. You'll likely need to cook the cookies in two batches, so keep the remaining dough chilled until ready to roll and bake.*
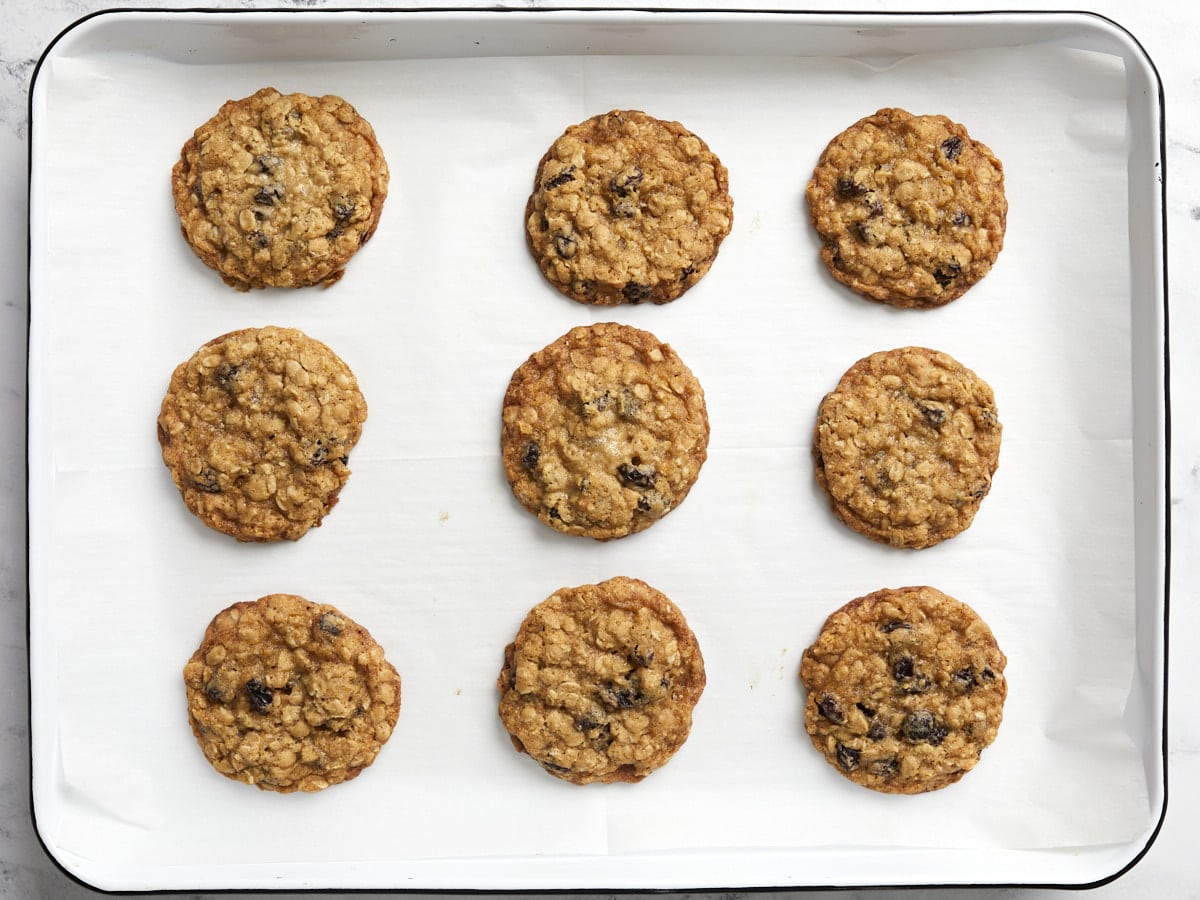
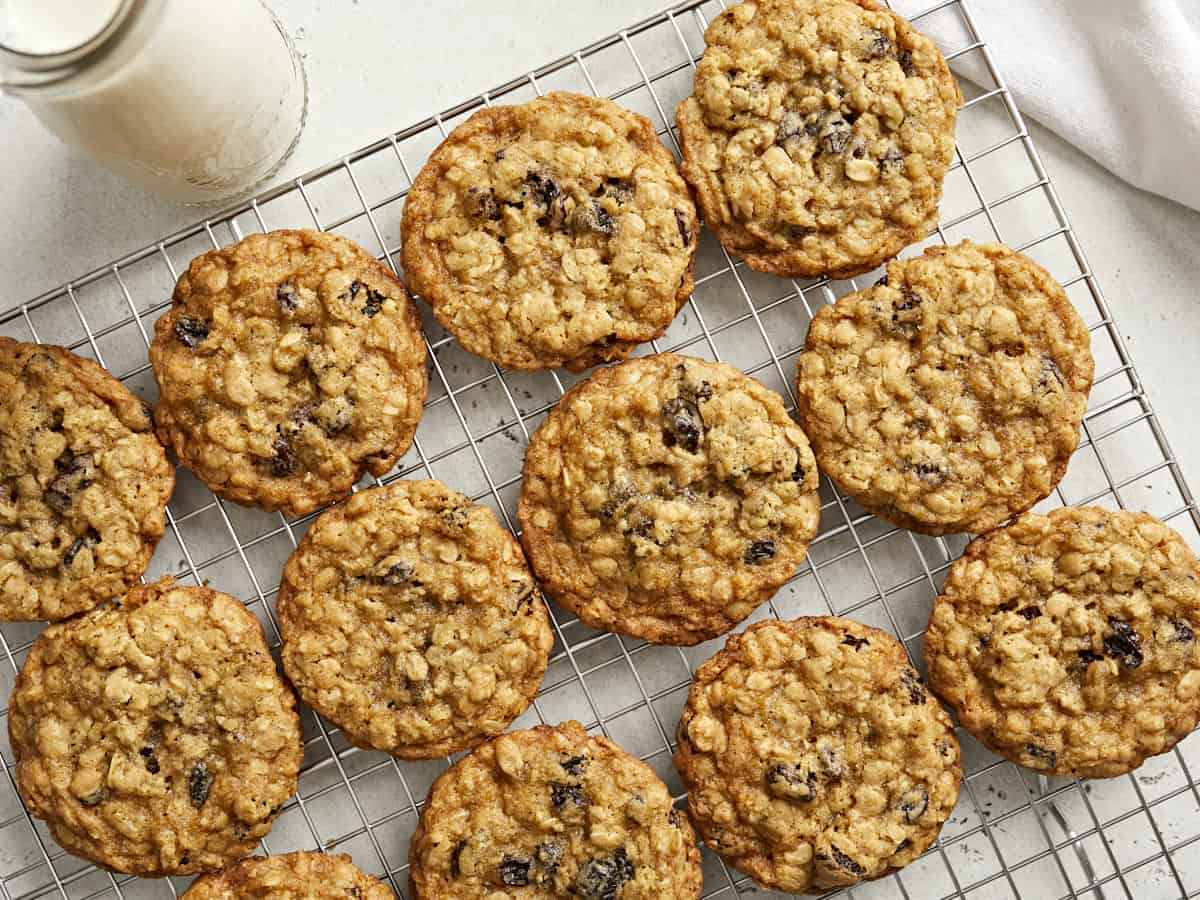
Bake the cookies for 13-14 minutes or until lightly golden brown. The center of the cookies may look too soft when you remove them from the oven, but keep in mind the cookies will continue to set as they cool. Let the cookies cool slightly on the baking sheet before transferring to a wire rack to cool completely. Enjoy!
Preheat the oven to 350°F. In a large mixing bowl, add 10 Tbsp of softened butter, 1/2 cup granulated white sugar, and 1/2 cup brown sugar. Blend the ingredients together with a hand mixer until smooth.
Add 1 egg and 1 tsp vanilla extract to the bowl and blend with the sugar mixture until smooth.
In a separate bowl, whisk together 1 cup all-purpose flour, 1/2 tsp salt, 1/2 tsp baking soda, and 1/2 tsp cinnamon until well combined.
Add 1 1/2 cups old-fashioned rolled oats to the dry ingredients and mix until combined.
Add all of the dry ingredients to the same bowl as the sugar mixture. Blend the ingredients together with a hand mixer on low speed until just combined. Do not overmix.
Next add 3/4 cup of raisins to the bowl and fold them into the cookie dough with a spatula.
Using a medium cookie scoop or your hands, scoop the cookie dough into roughly 2 Tbsp portions, then roll into a ball. Place the cookies on a parchment lined baking sheet about 2-3 inches apart. You’ll likely need to cook the cookies in two batches, so keep the remaining dough chilled until ready to roll and bake.
Bake the cookies for 13-14 minutes or until lightly golden brown. The center of the cookies may look too soft when you remove them from the oven, but keep in mind the cookies will continue to set as they cool.
Let the cookies cool slightly on the baking sheet before transferring to a wire rack to cool completely. Enjoy these irresistible oatmeal cookies with a glass of milk or simply enjoy by themselves and don’t forget to share with your family and friends!😊
What’s better than a milky sweet vanilla iced coffee? It’s so simple to make this Starbucks classic at home, and it tastes even better.
Love a good iced coffee? Welcome to a drink that’s one step better: vanilla iced coffee! The bitter, dark notes of coffee shine with a hint of milk and deliciously sweet homemade vanilla syrup. The best part: it’s so simple to whip up this Starbucks special in your home kitchen! All you need are a handful of ingredients and just a few minutes. This drink is built on cold brew, which we always have a jar of in our refrigerator. It’s perfect in summer but honestly, we drink it year round and I adore it in the winter, dreaming of summer afternoons to come.
Ingredients in vanilla iced coffee
Vanilla iced coffee is simple to make at home, so there’s no need to even leave the comfort of your own home for the coffee shop! Even better, in the long run it’s less expensive than a daily Starbucks run (especially if you make your own cold brew at home). Here’s what you need for vanilla iced coffee:
Milk of choice: 2%, whole, oat milk, almond milk, soy milk, etc.
Vanilla syrup (vanilla extract and granulated sugar)
Ice
Best coffee methods for iced coffee
There are lots of options for coffee when it comes to iced coffee. Our favorite is cold brew, because it has the best strong coffee flavor and it’s easy to find at your local grocery store. You can also make it at home, which saves loads of money. Here are the best coffee methods to try:
Buy or make cold brew. Purchased cold brew is of course the easiest, but it can get pricey. You can also make your own cold brew, which takes just 24 hours. All you need are 1 ½ cups ground dark roast coffee and water, and it will brew in your refrigerator. Go to How to Make Cold Brew.
Make a double strength pot of coffee using your favorite method and double the grounds. Dark roast coffee beans work best for iced coffee.
Make regular strength Moka Pot coffee. The Bialetti makes a nice bold, strong flavor for iced coffee.
How to make vanilla iced coffee: basic steps
Iced coffee is much simpler to make than espresso drinks, since you don’t have to worry about making espresso or frothing milk! Instead, you can just pour cold milk into coffee with ice. Here is an overview of the steps to make vanilla iced coffee (or jump to the recipe below):
Step 3: Add ½ cup strong coffee or cold brew, ¼ cup milk, and 2 teaspoons vanilla syrup to the glass. Stir and enjoy! You can adjust the level of sweetness to taste by adding another teaspoon of vanilla syrup.
Making vanilla syrup at home
It’s not worth going out to find a store-bought vanilla syrup for your vanilla iced latte (unless of course you already grabbed one at Starbucks!). It takes just minutes to make and uses ingredients you probably already have in your pantry. Here’s how to make vanilla syrup:
Combine sugar and water: Place ½ cup each granulated sugar and water in a small saucepan on the stove.
Heat until dissolved: Heat over medium heat for 1 to 2 minutes, stirring until fully dissolved. Do not simmer!
Stir in vanilla: Remove from the heat and add 2 teaspoons vanilla. Cool to room temperature before using.
Store homemade vanilla syrup refrigerated for up to 1 month, though the flavor is best in the first few weeks.
More iced coffee drinks
We hope you think this vanilla iced coffee tastes just as good as Starbucks: or better! You can control the sweetness and milk level to taste, making it endlessly customizable.
Make the strong coffee and let it cool to room temperature, or purchase or make cold brew coffee.
Fill a glass with ice. Pour in the cold brew coffee concentrate (not diluted), milk, and vanilla syrup. Mix and taste; adjust milk and vanilla syrup as desired.
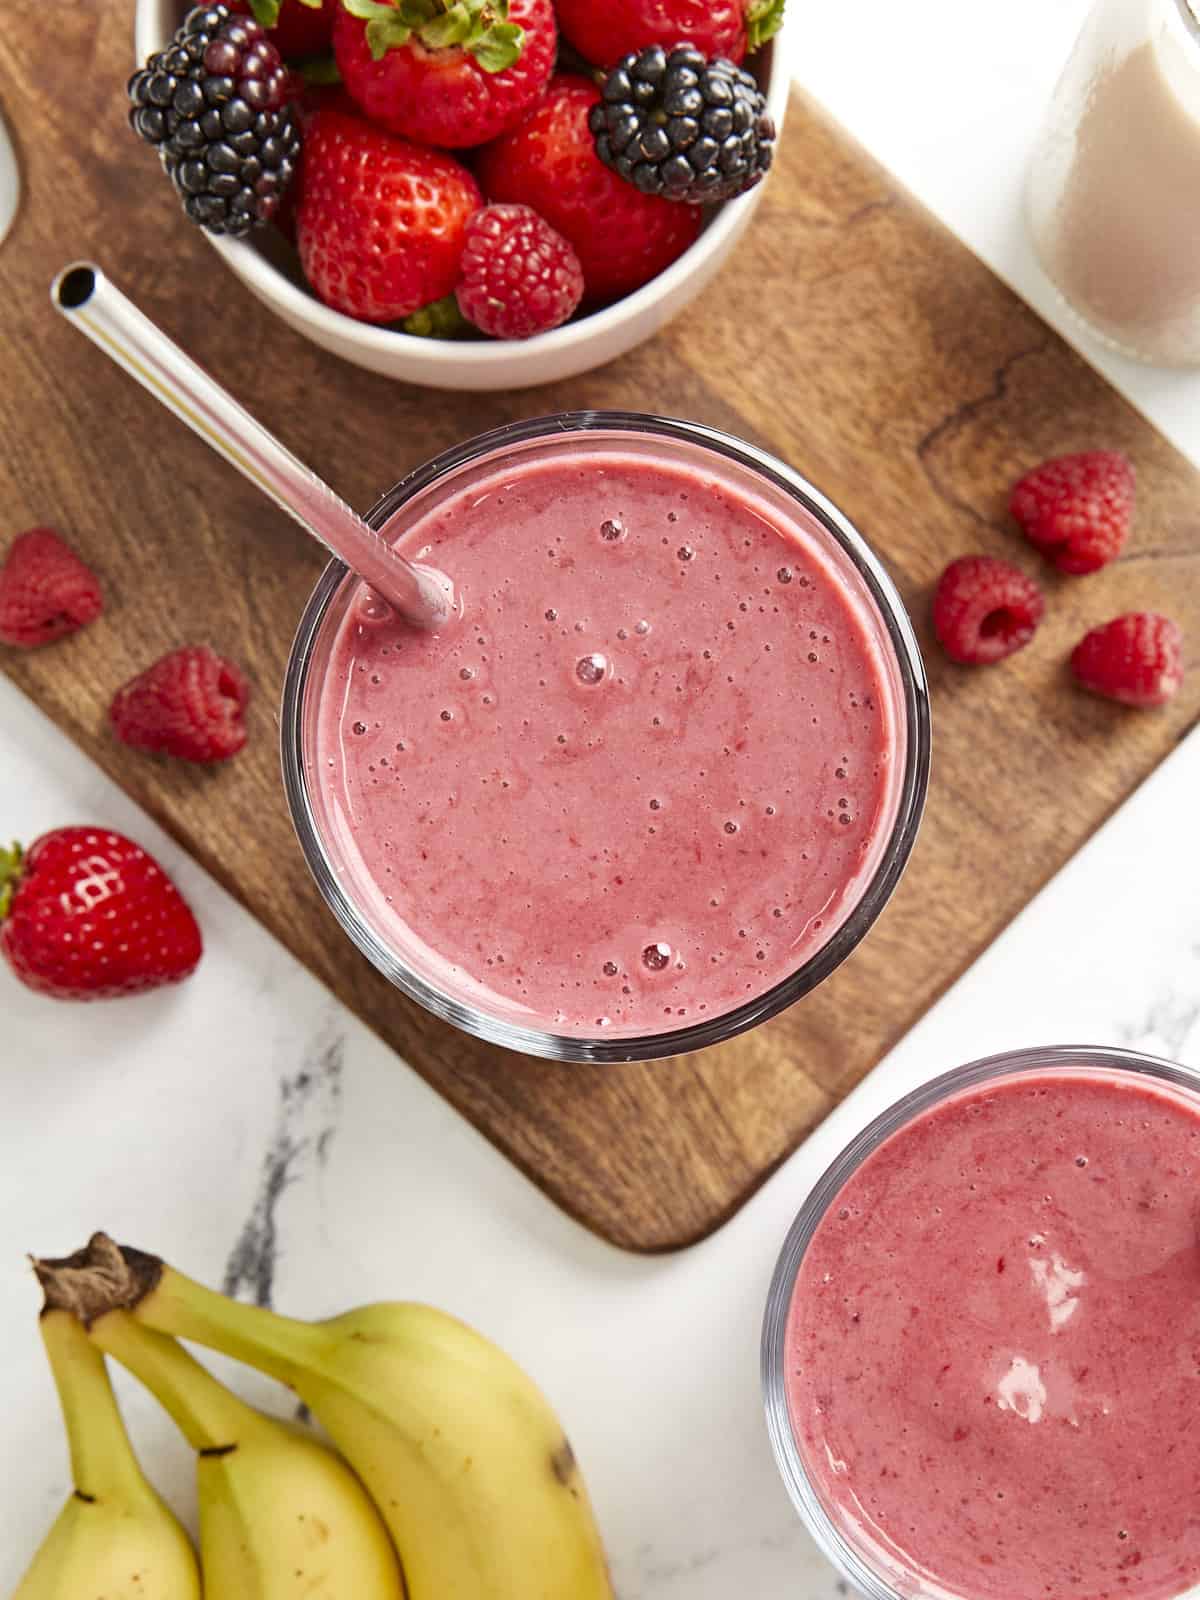
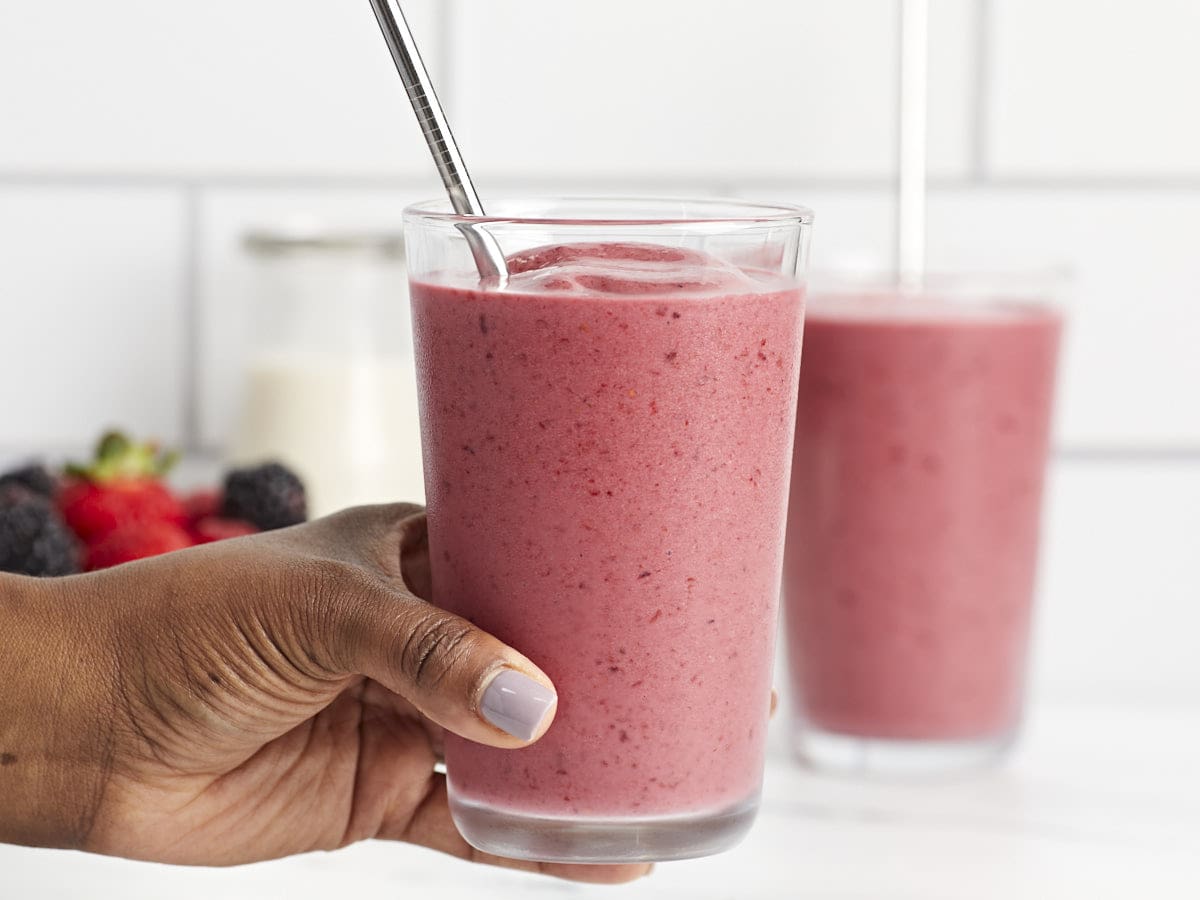
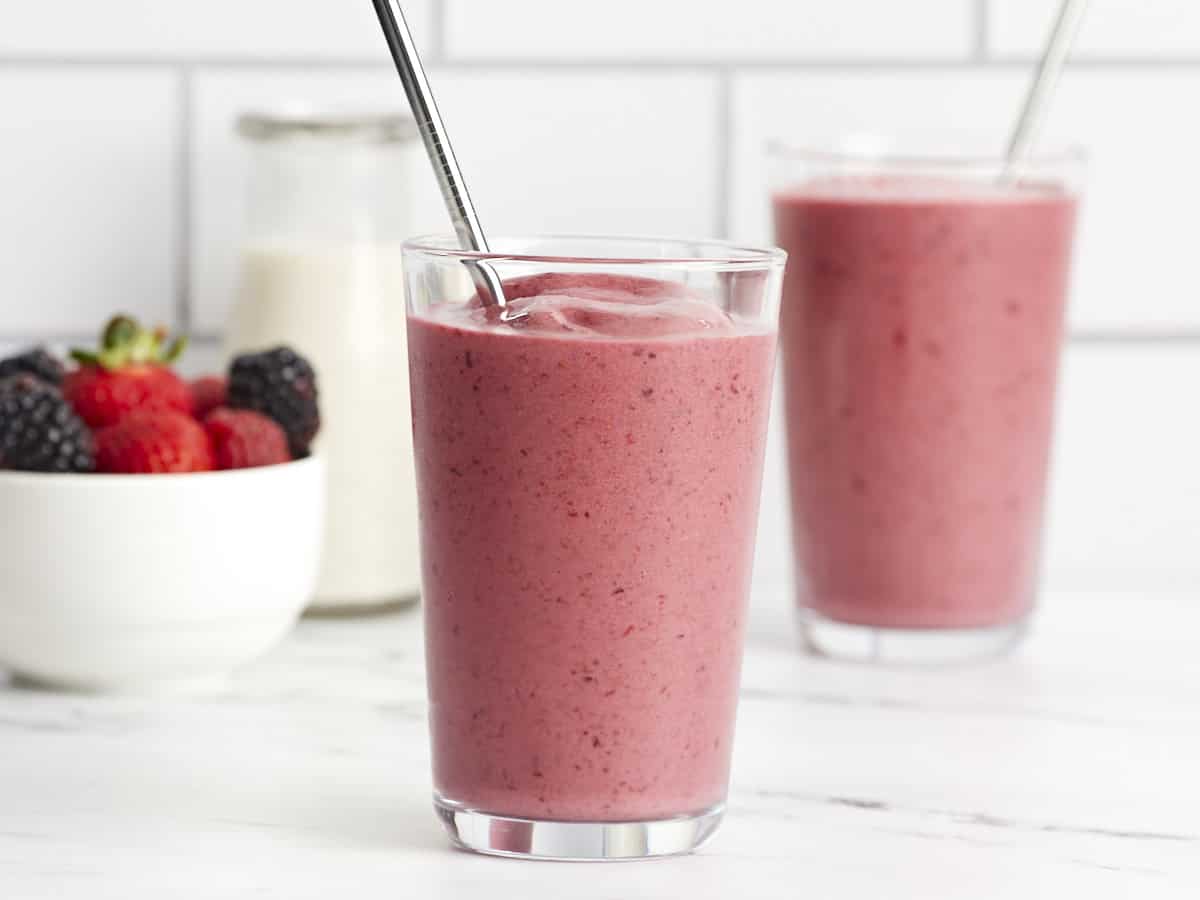
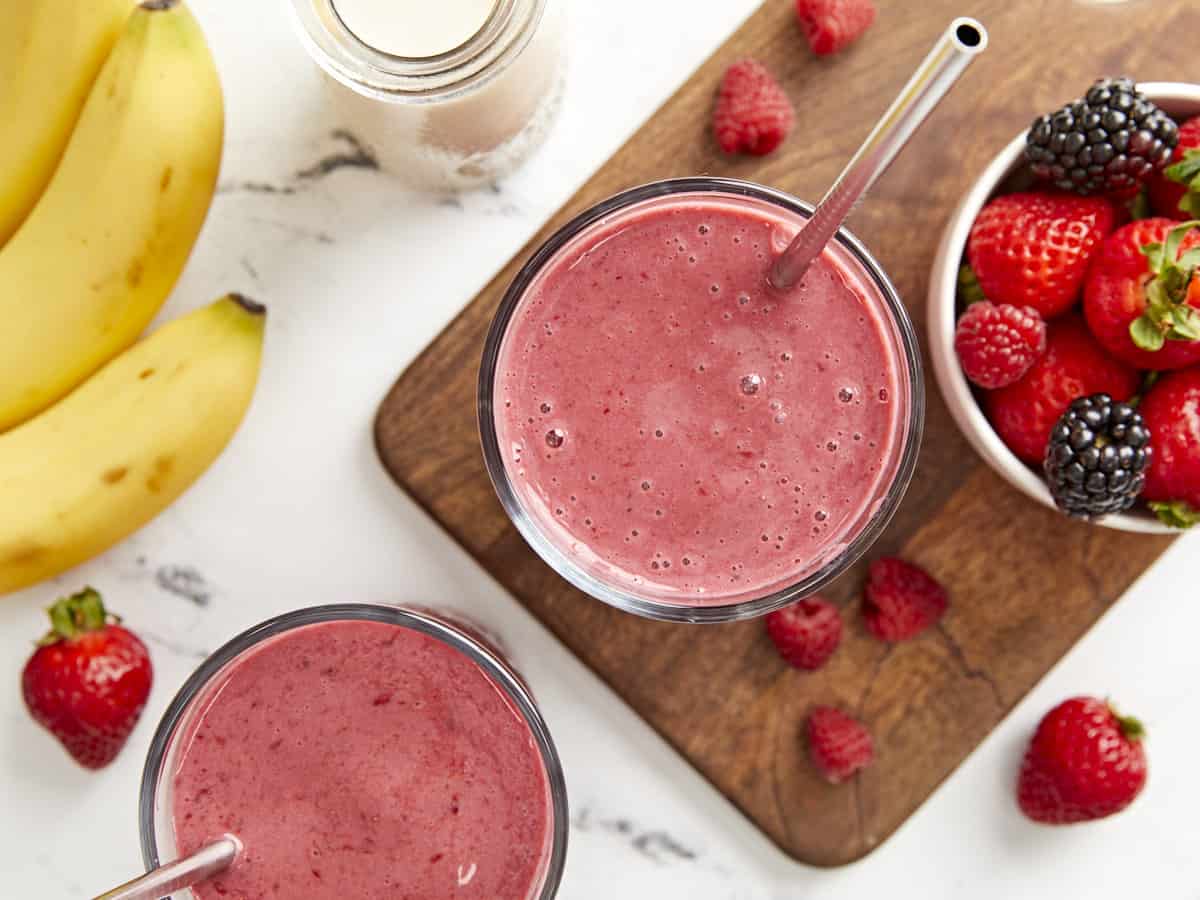
When I don’t have time to make a big breakfast, one of my favorite ways to start the day has always been with a quick smoothie. They’re refreshing, satisfying, easy to make, and perfect for a simple breakfast or a sweet midday snack! I’ve been making smoothies for quite some time and one smoothie that I always find myself coming back to is this Mixed Berry Smoothie recipe. It’s rich, creamy, packed with lots of fruit, and way cheaper than Smoothie King!😄 So no matter if you’re new to smoothies or a smoothie pro, you’ll definitely want to add this one to your smoothie rotation!
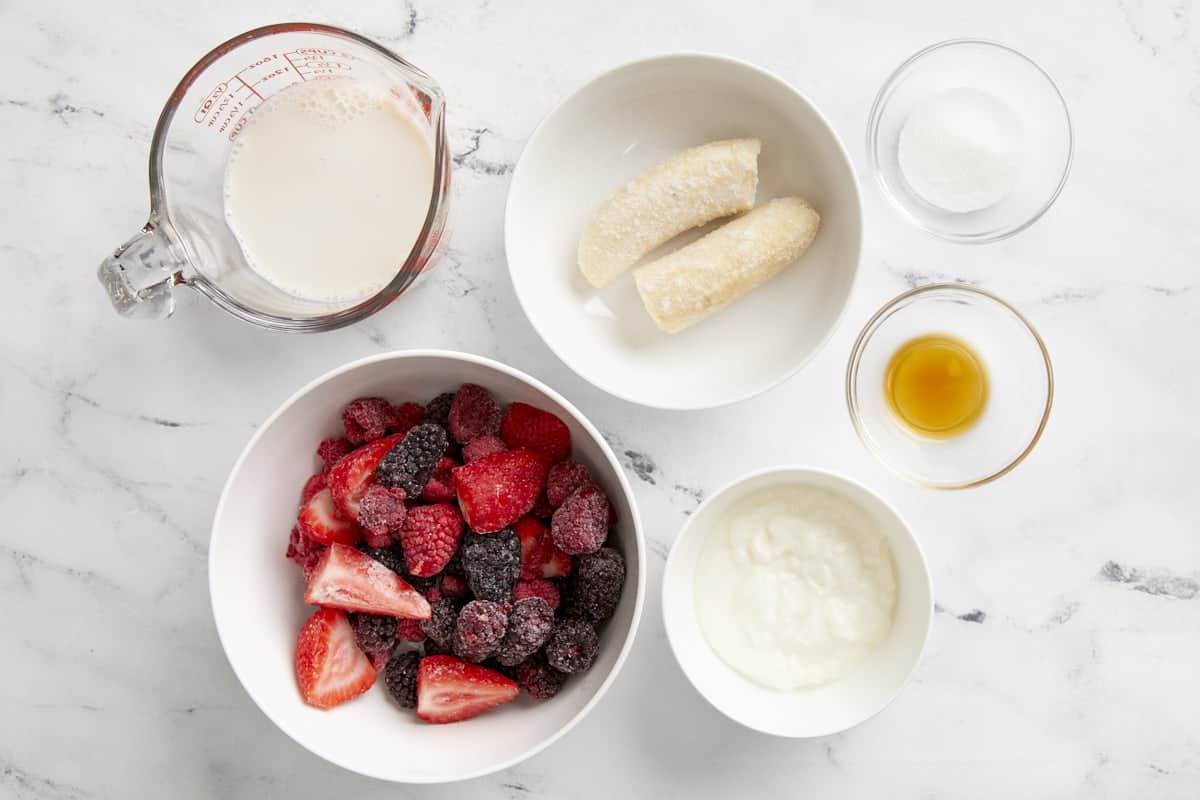
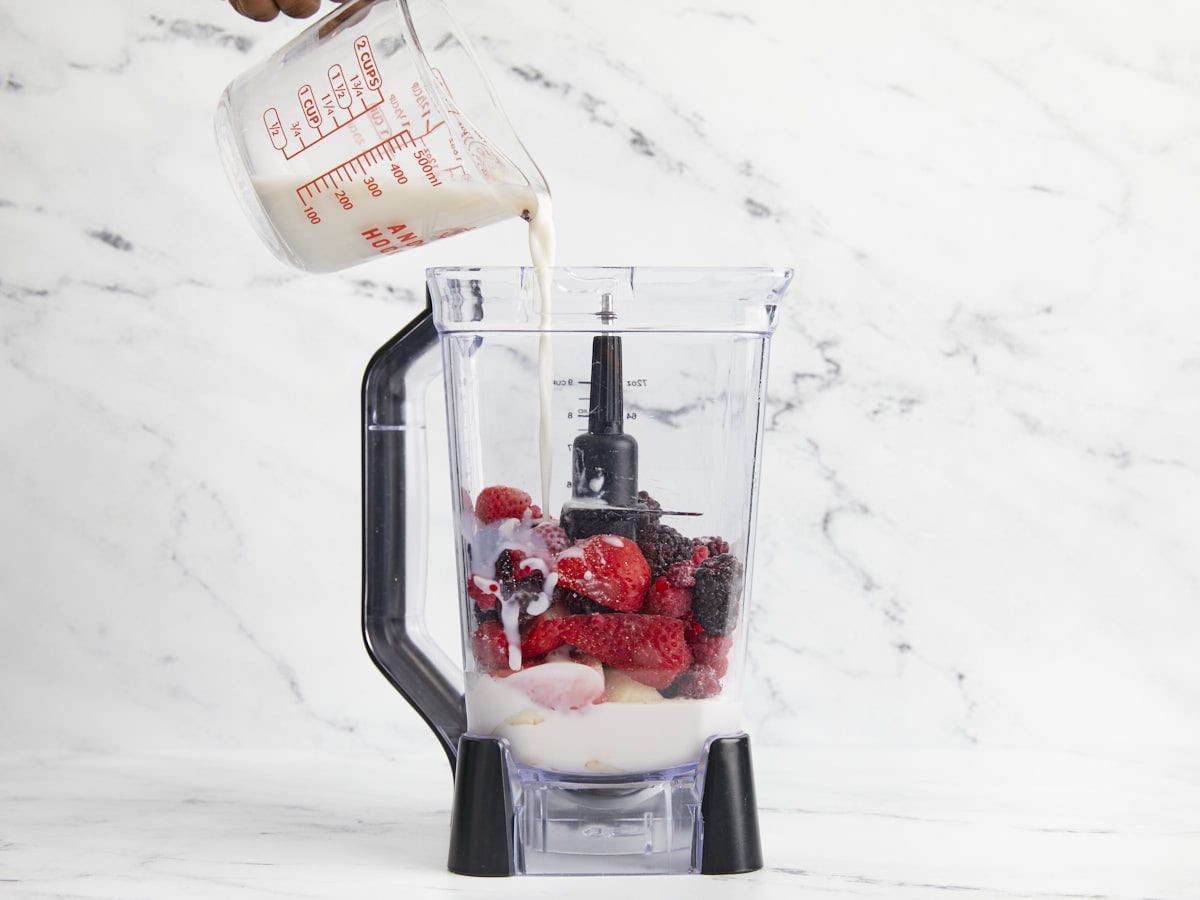
Ingredients For Mixed Berry Smoothie
This mixed berry smoothie recipe is made with simple ingredients and is also very flexible. Here’s what we used:
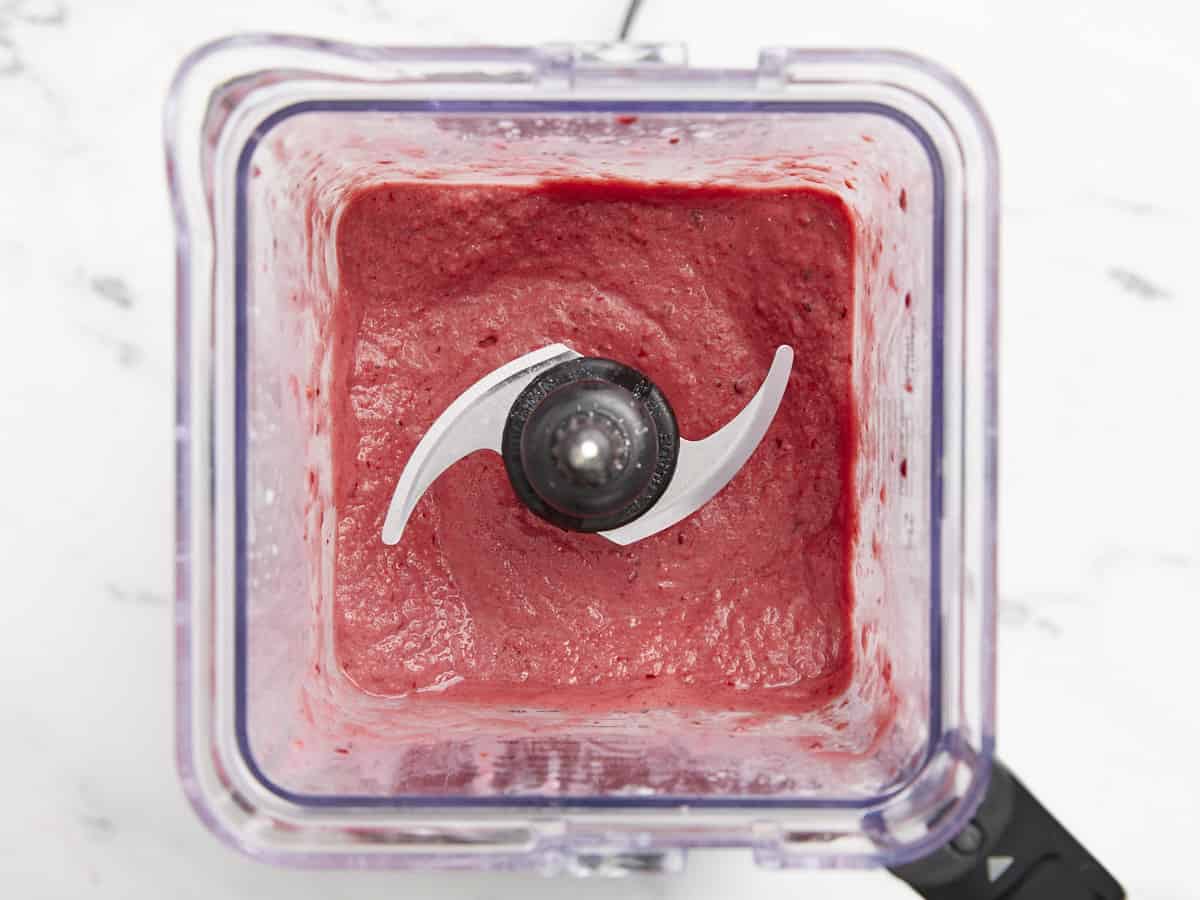
Frozen Mixed Berries: Frozen fruit is the key to getting a super creamy and thick smoothie consistency, without having to use any ice. For the berries we used a mix of frozen strawberries, raspberries, and blackberries. But feel free to use any combination of frozen berries that you like. Frozen berries are also a lot more economical than fresh berries because they don’t go bad quickly in your fridge!
Banana: You can either use a fresh or frozen banana in this smoothie recipe. I opted for a frozen banana to make my smoothie extra thick and keep it from melting too fast.
Almond Milk: We used plain, unsweetened almond milk for our smoothie, but you can use any type of dairy or non-dairy milk that you like.
Yogurt: A little bit of yogurt gives the smoothie a wonderful creamy texture. We used plain yogurt, but a vanilla flavored yogurt would also taste great.
Sugar & Vanilla Extract: A little bit of sugar and vanilla provide sweetness and added flavor. Feel free to substitute with honey in place of the sugar. And if you’re using a vanilla-flavored yogurt or vanilla almond milk, then you can omit the vanilla extract.
What Else Can I Add In My Smoothie?
There are lots of different ingredients you can add to this mixed berry smoothie for extra nutrients and to make it more filling. Here are a few ideas:
Quick oats
Ground flaxseeds
Chia seeds
Hemp seeds
Spinach
Kale
Honey (in place of the sugar)
Make a Smoothie Bowl!
I love using this mixed berry smoothie recipe to make delicious smoothie bowls! The smoothie itself becomes the base foundation of the bowl, then just top the smoothie with yummy toppings like fresh fruit, seeds, granola, and maybe a drizzle of honey. Smoothie bowls are super versatile and easy to customize based on what you currently have in your fridge and pantry. They’re also super filling and just a fun way to turn this breakfast smoothie into a refreshing sweet treat! ;)
Money-Saving Tip!
You can often find great deals on fresh berries when they are in season. Berries are mostly in season during the Summer and early Fall months. Use this time to grab your favorite berries when they are on sale and freeze them for later! Sometimes I even go strawberry picking with my little ones in the month of May, then freeze some of the strawberries to use the rest of the year.
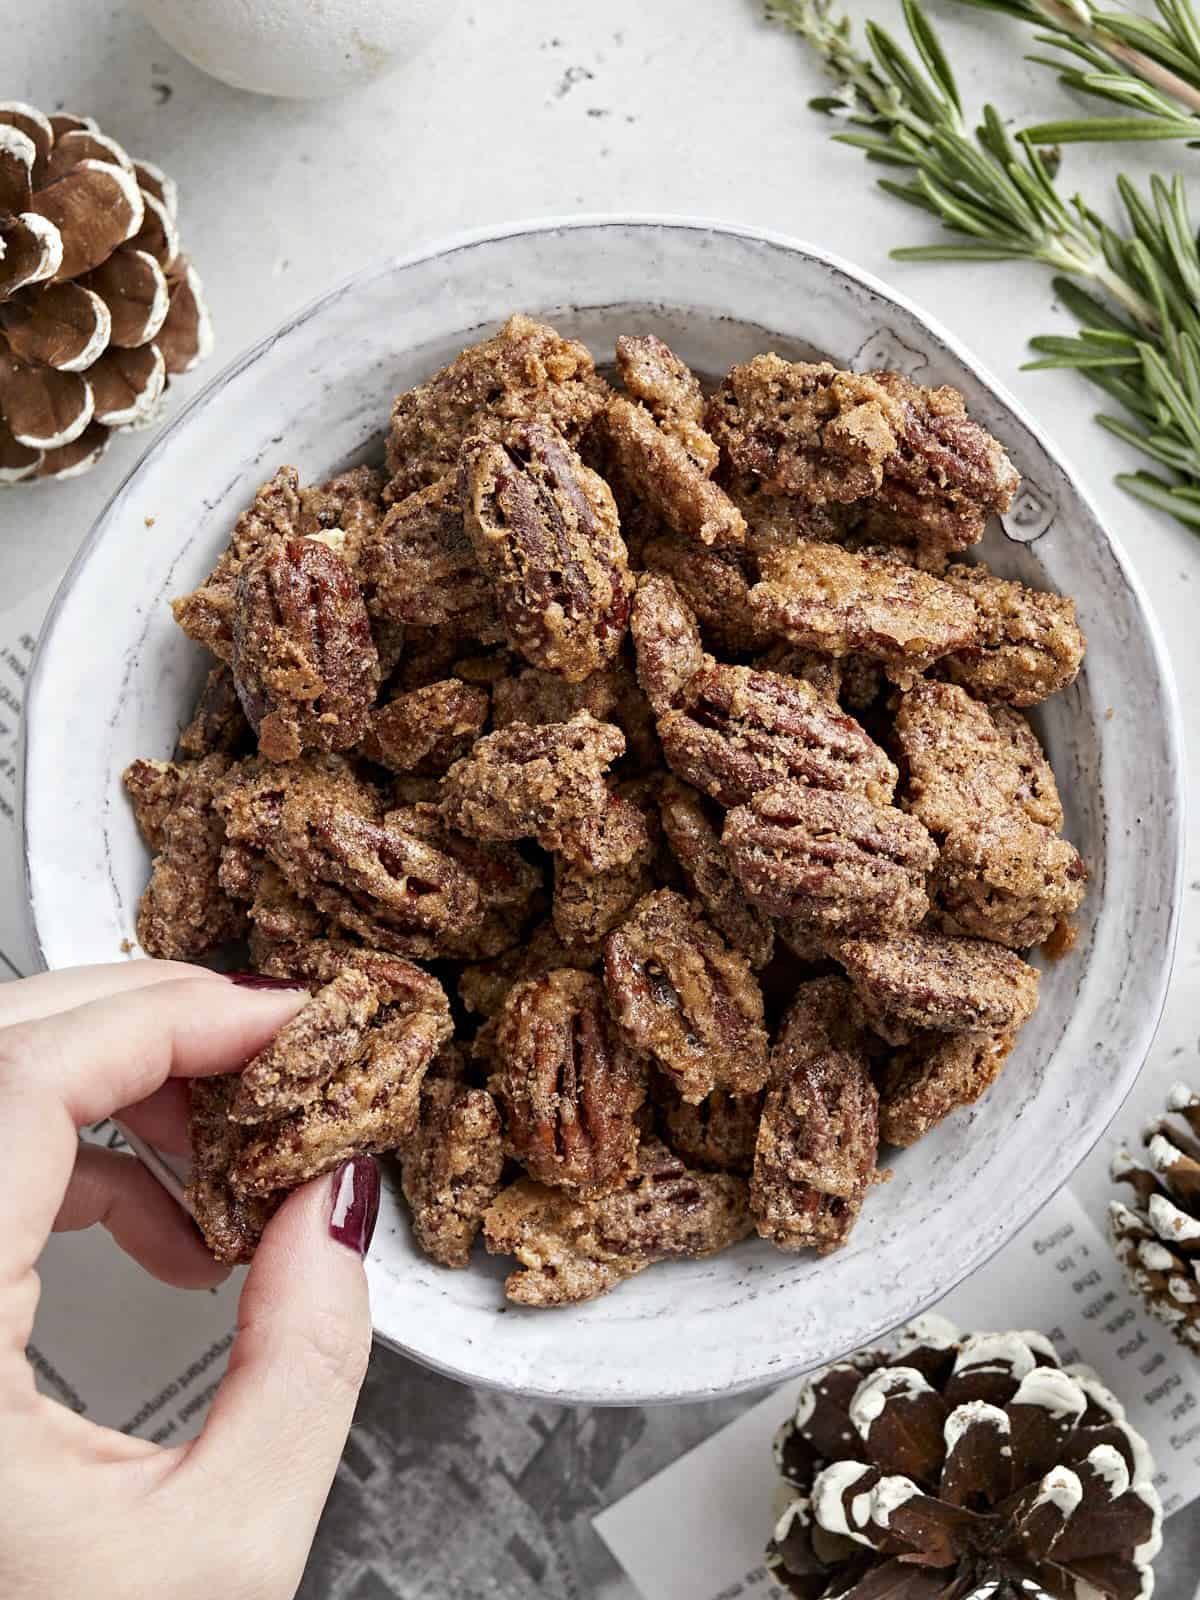
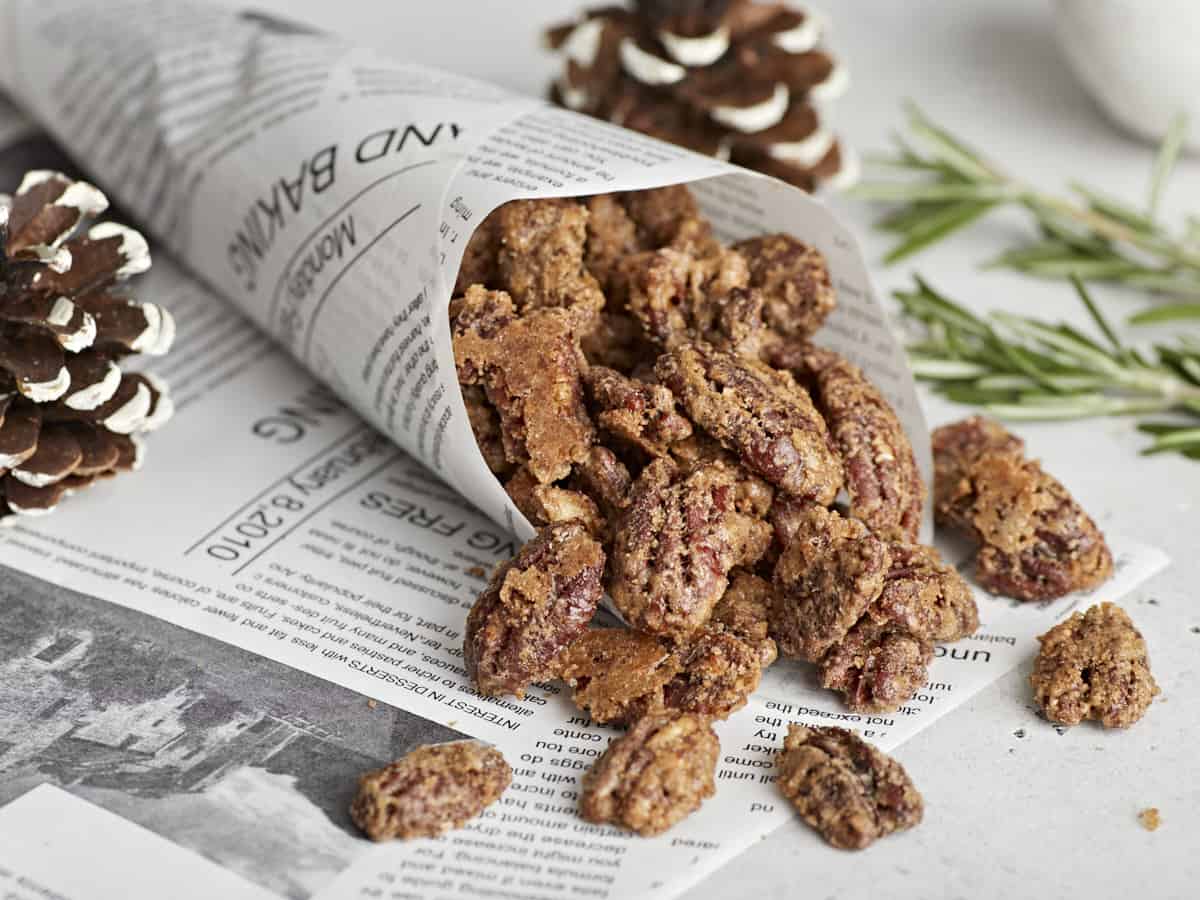
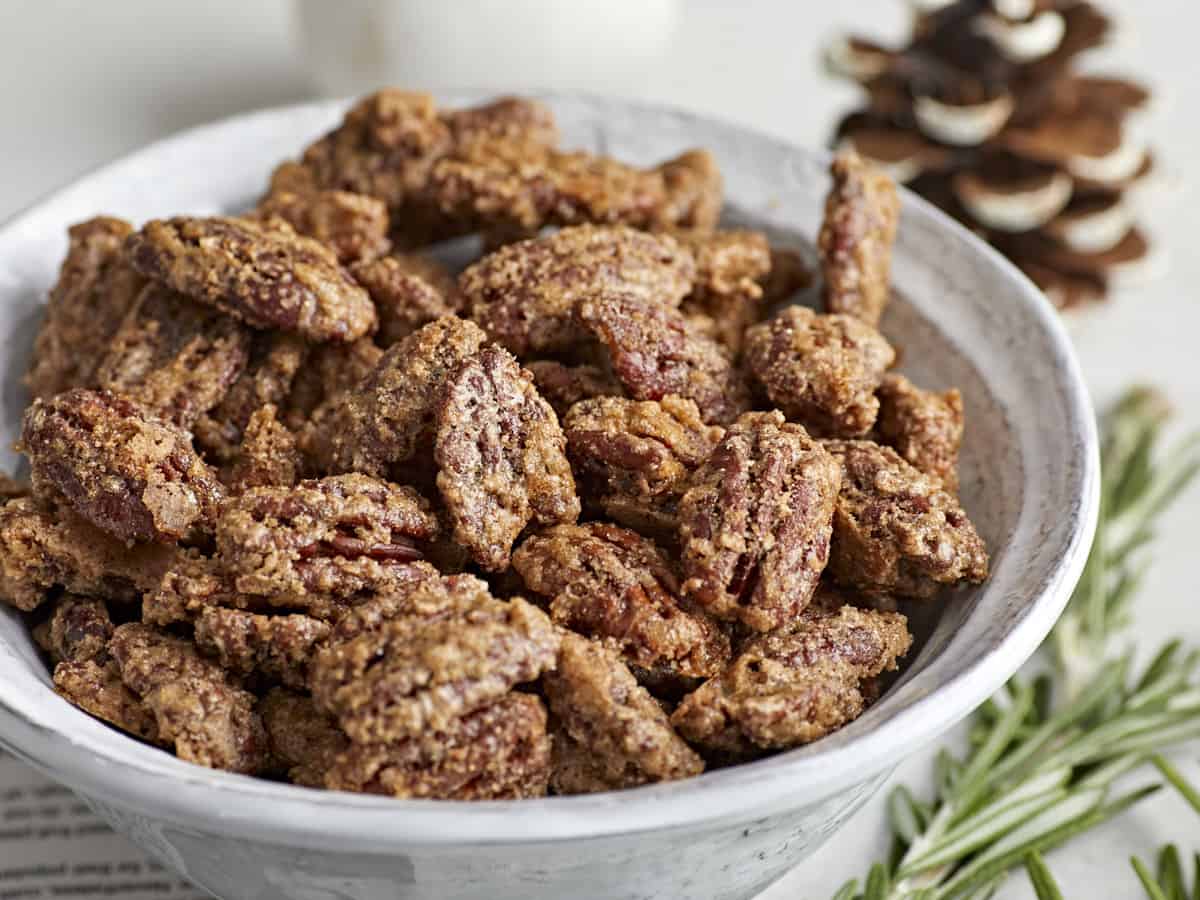
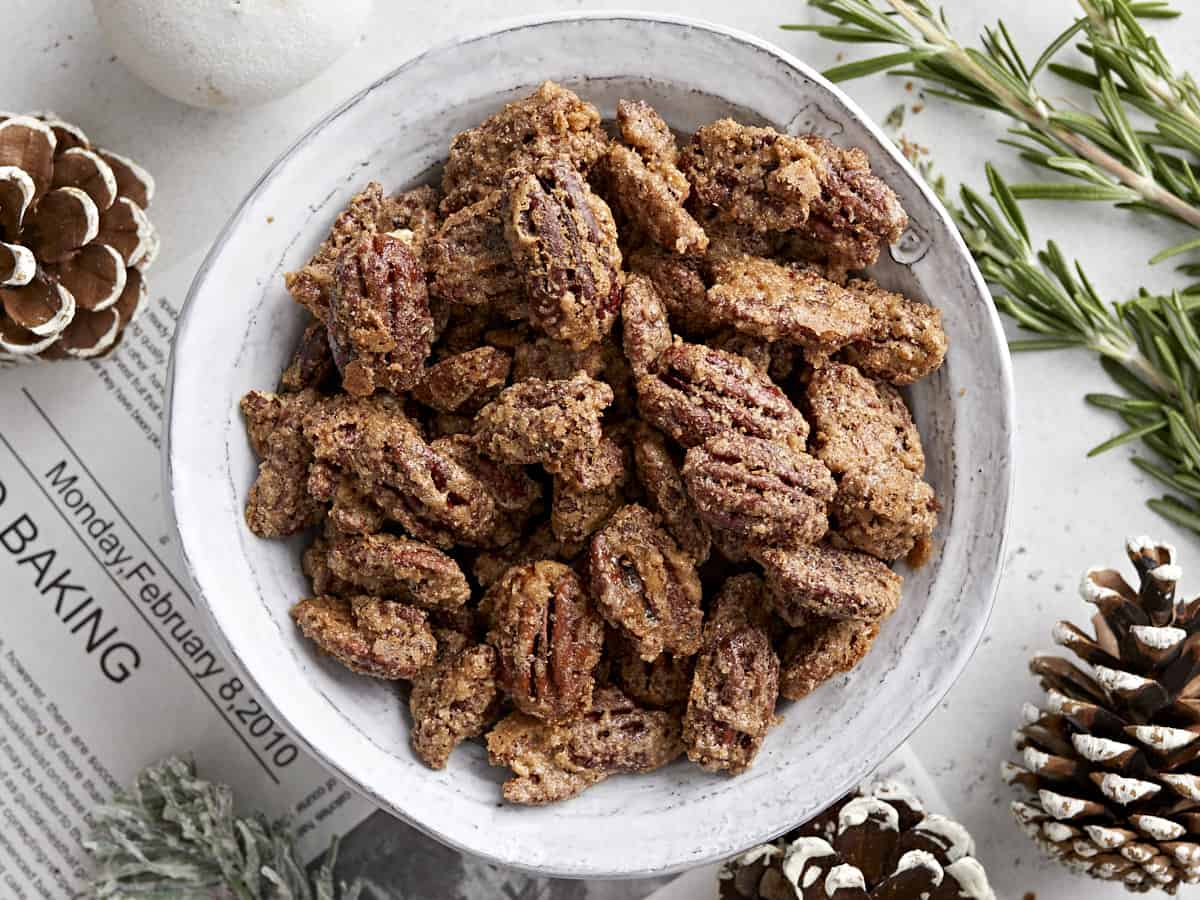
You know those candied pecans they sell from kiosks in shopping malls this time of year? The ones that beckon you from yards away with their buttery, nutty aroma? Well, I’m about to show you how to make them at home with just a few ingredients. They’re the perfect holiday snack for parties or as a little snacky snack while you’re wrapping gifts, watching a classic Christmas movie, or waiting for Christmas dinner to be ready. In other words, bookmark this candied pecans recipe because I promise you’ll be making them over and over for years to come.
What Are Candied Pecans?
This perfect little holiday snack is simply pecan halves that have a crunchy brown sugar, cinnamon, and vanilla-flavored coating. The nuts roast as they bake in the oven, giving them an even toastier, nutty flavor. These candied nuts are absolutely addictive and are the perfect item to bring to any holiday party, or to package up for easy homemade Christmas gifts.
Ingredients for Candied Pecans
You only need a handful of simple ingredients to make this recipe for candied pecans:
Pecan Halves: You’ll need shelled pecan halves for this recipe. Chopped pecans or pecan pieces will be too small for this method. Make sure to check grocery store websites and circulars to find the best price for pecan halves in your area, as this is the most expensive ingredient in the recipe. We got a great deal at ALDI!
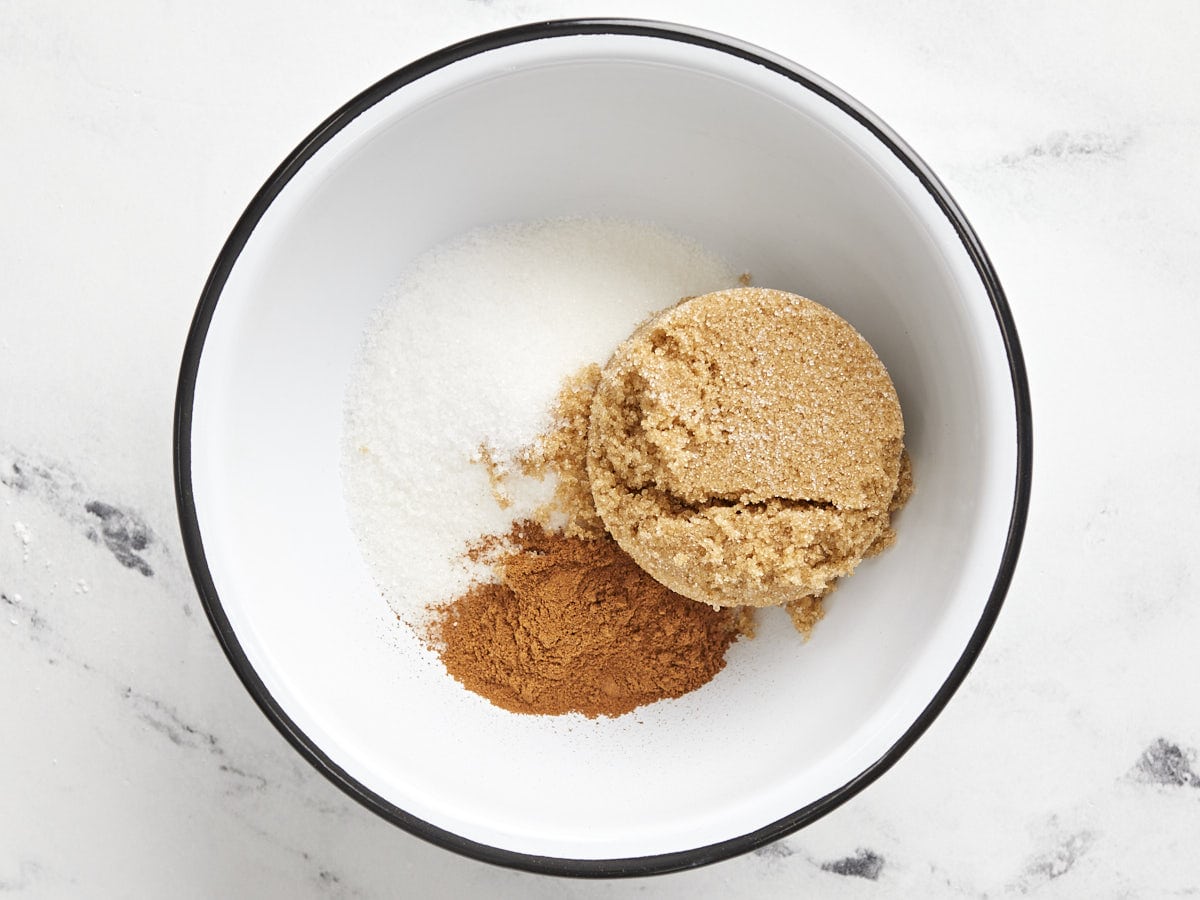
Brown Sugar: Brown sugar gives the sugar coating on the pecans a really rich warm flavor, thanks to the molasses that gives brown sugar it’s characteristic color.
White Sugar: White sugar is added to the brown sugar to create the crunchy coating on the nuts, helping it bake up a little crunchier than brown sugar alone.
Cinnamon: A healthy dose of cinnamon gives the nuts a super warm and cozy flavor, perfect for the holidays
Vanilla: Vanilla adds a warm element to the flavor profile and just pairs perfectly with the cinnamon and nuts.
Egg: Egg white helps the sugar coat the nuts and it changes the texture of the sugar coating to be a really light, airy, and crispy texture instead of a smooth, glassy candy coating.
Salt: A little bit of salt really goes a long way in this recipe to really make the candy coating extra flavorful. The salt balances the sugars and really makes everything pop.
How to Store Candied Pecans
Once the candied pecans are completely cooled, these candied pecans can be stored in an air-tight container at room temperature for about a week, or frozen for longer storage. They’ll stay fresh in the freezer for about three months and can be thawed at room temperature.
Preheat the oven to 350ºF. Add the brown sugar, granulated sugar, cinnamon, and salt to a bowl, then stir them together until evenly combined.
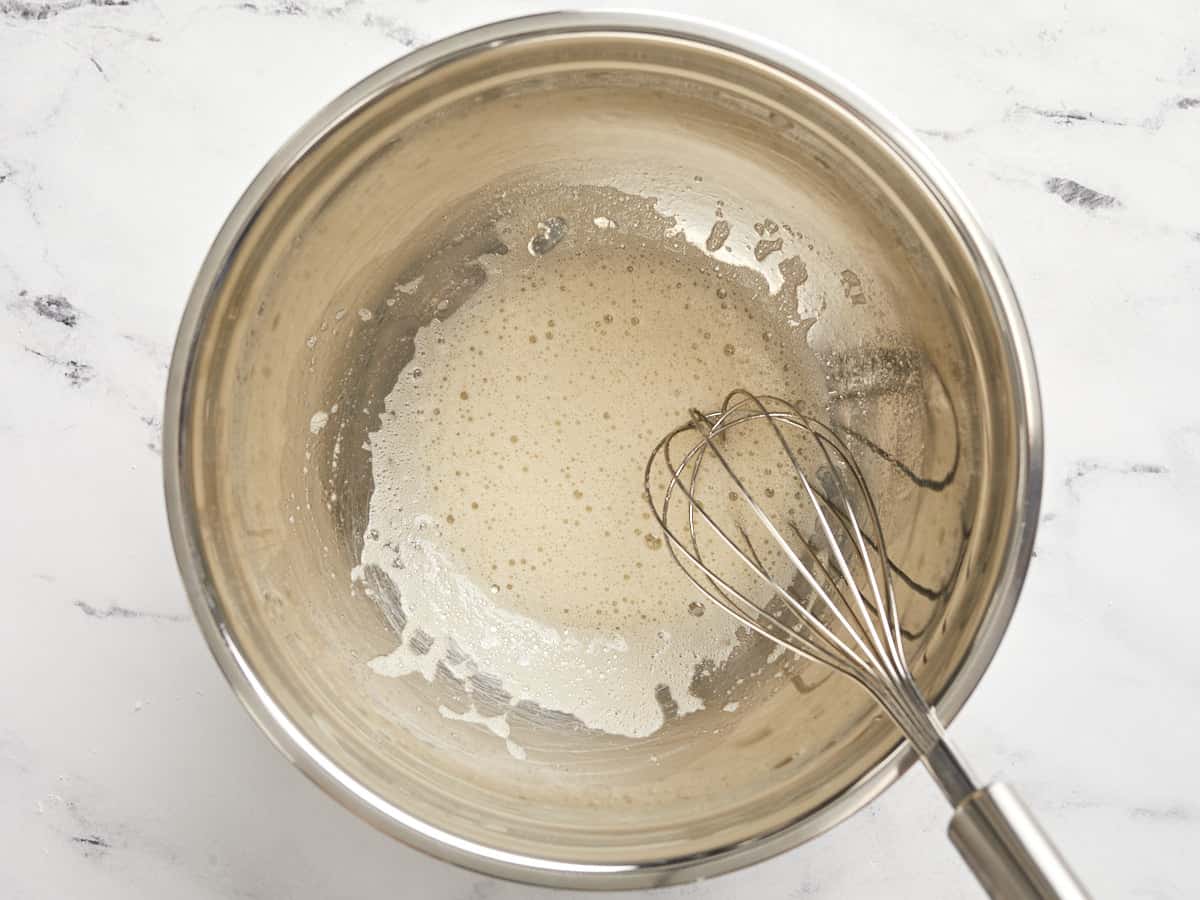
Separate the egg and place the egg white in a large bowl. Lightly whisk the egg white until it is frothy, then add the vanilla extract and briefly whisk again to combine.
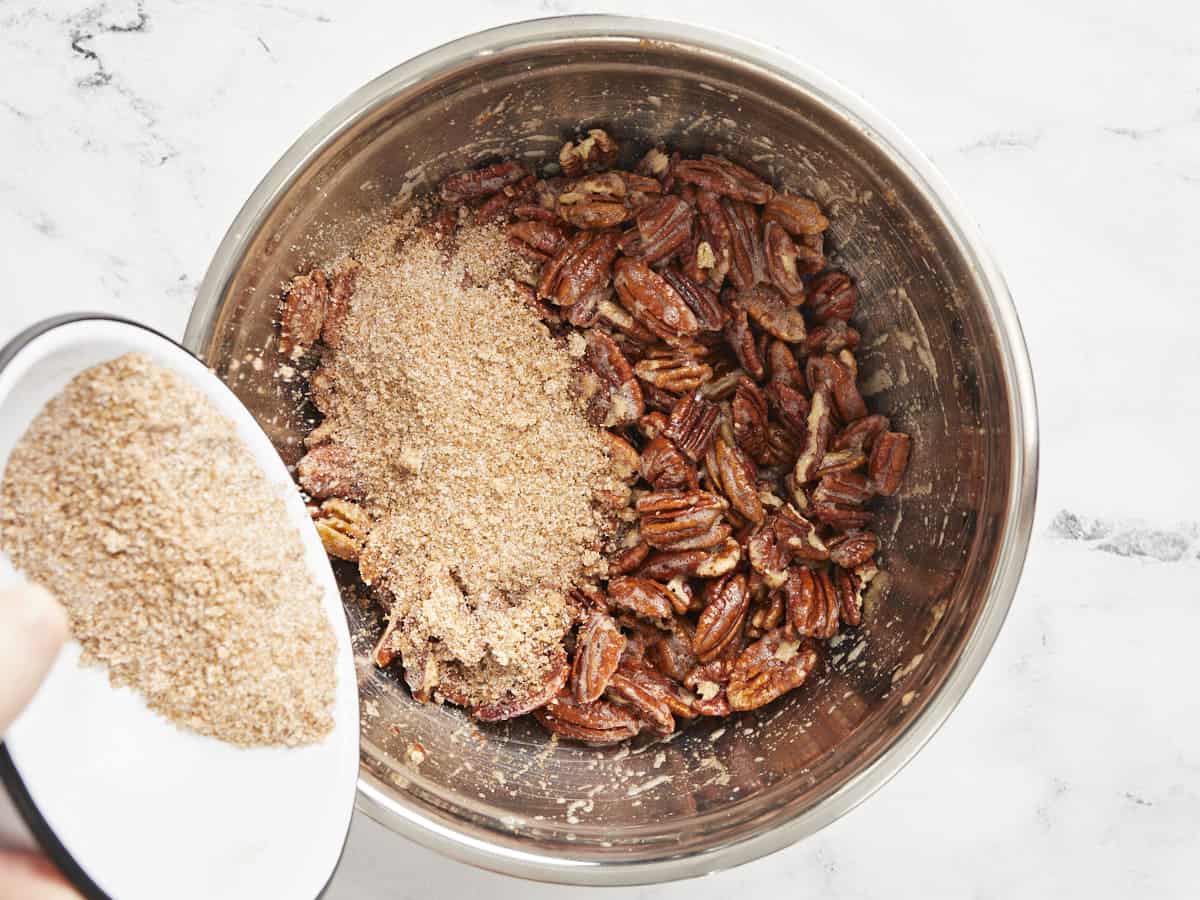
Add the pecans to the egg white mixture and stir to coat. Sprinkle the cinnamon sugar mixture over the nuts and stir to coat again.
Spread the coated nuts out onto a large baking sheet lined with parchment paper.
Bake the nuts in the preheated 350ºF for 25 minutes, stirring once halfway through.
Allow the nuts to cool completely before enjoying or storing for later.
Preheat the oven to 350ºF. Add ⅓ cup brown sugar, ⅓ cup white sugar, 1 tsp cinnamon, and ½ tsp salt to a bowl and stir them together until they’re evenly combined.
Separate one large egg. Add the egg white to a large bowl and whisk it just until it gets a little frothy, then add ½ tsp vanilla extract and whisk briefly again to combine.
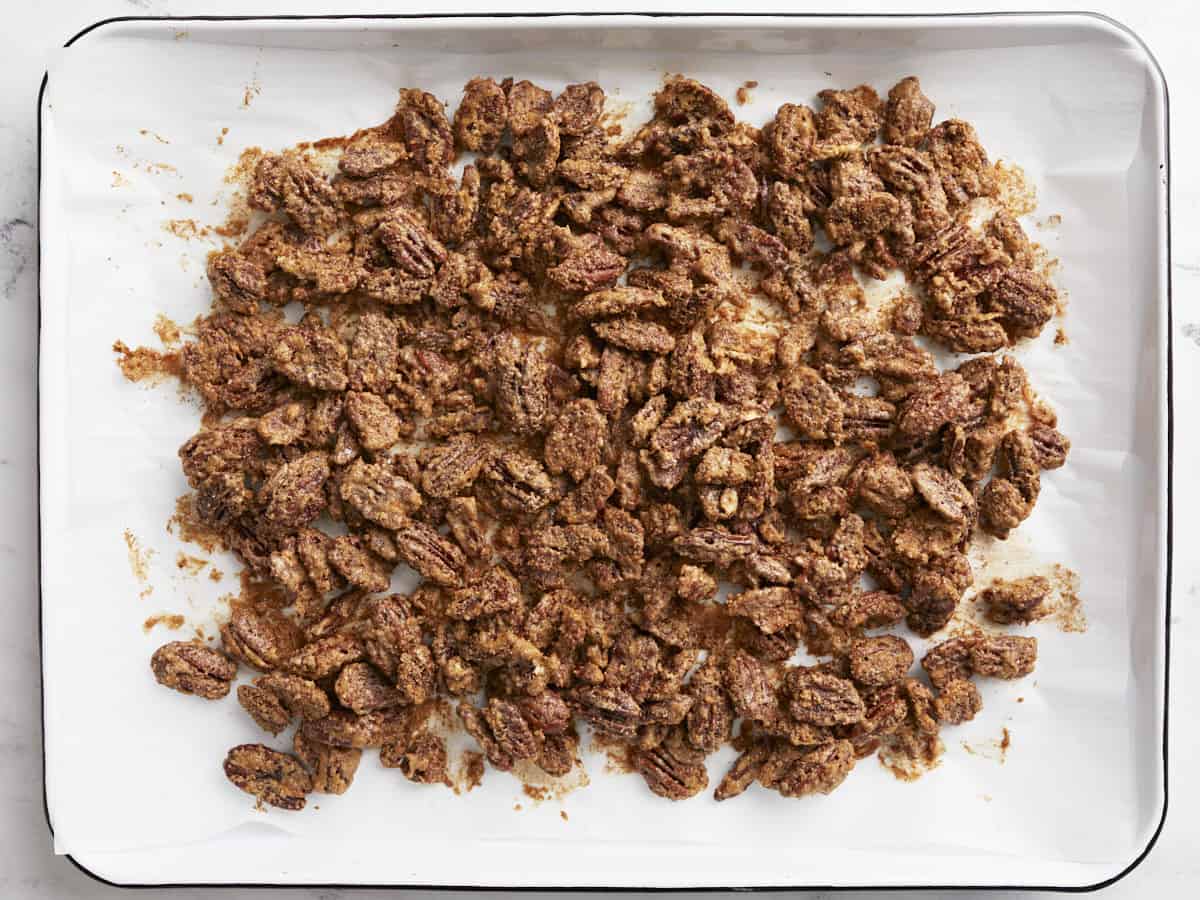
Add 1 lb. pecan halves to the lightly whisked egg whites and stir until the nuts are coated in the egg white. Sprinkle the cinnamon sugar mixture over the nuts and stir to coat again.
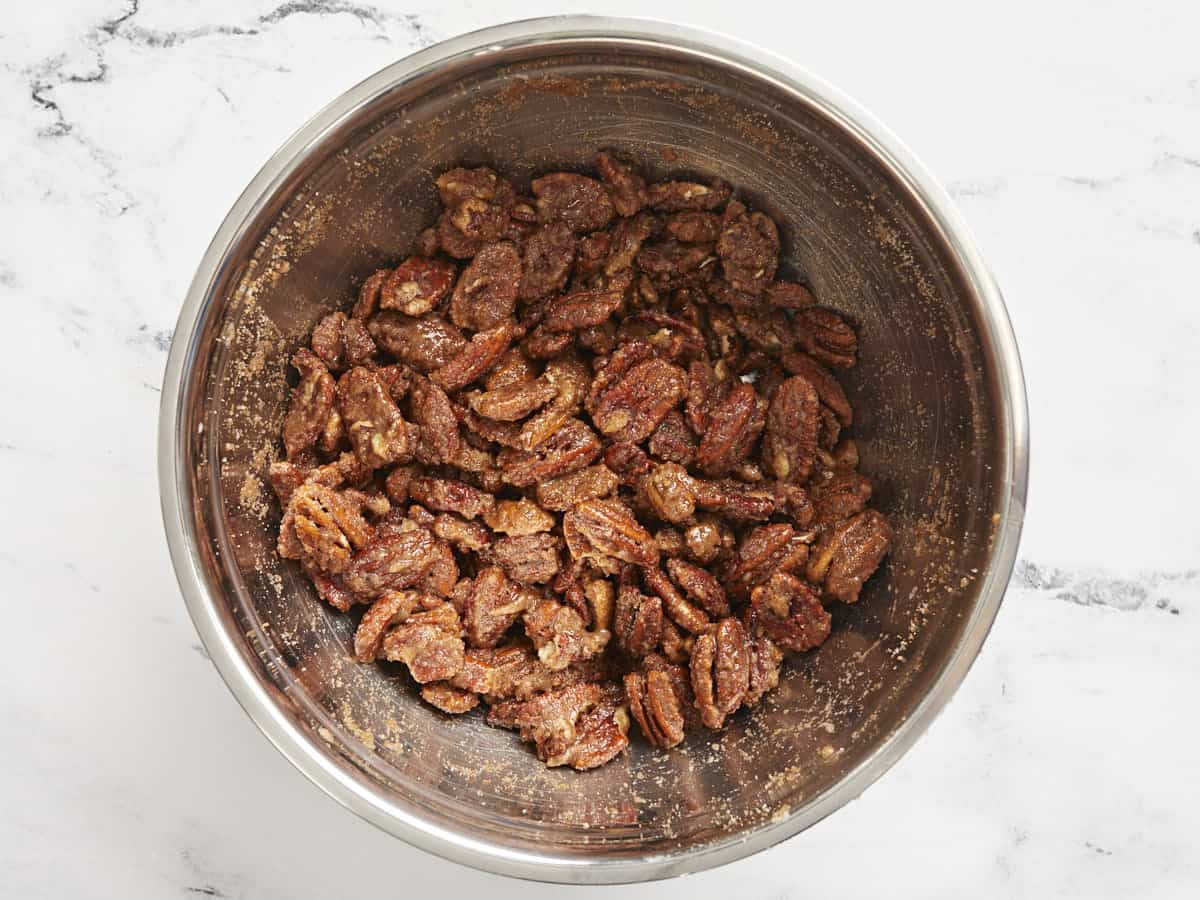
This is what they’ll look like when coated in egg and cinnamon-sugar.
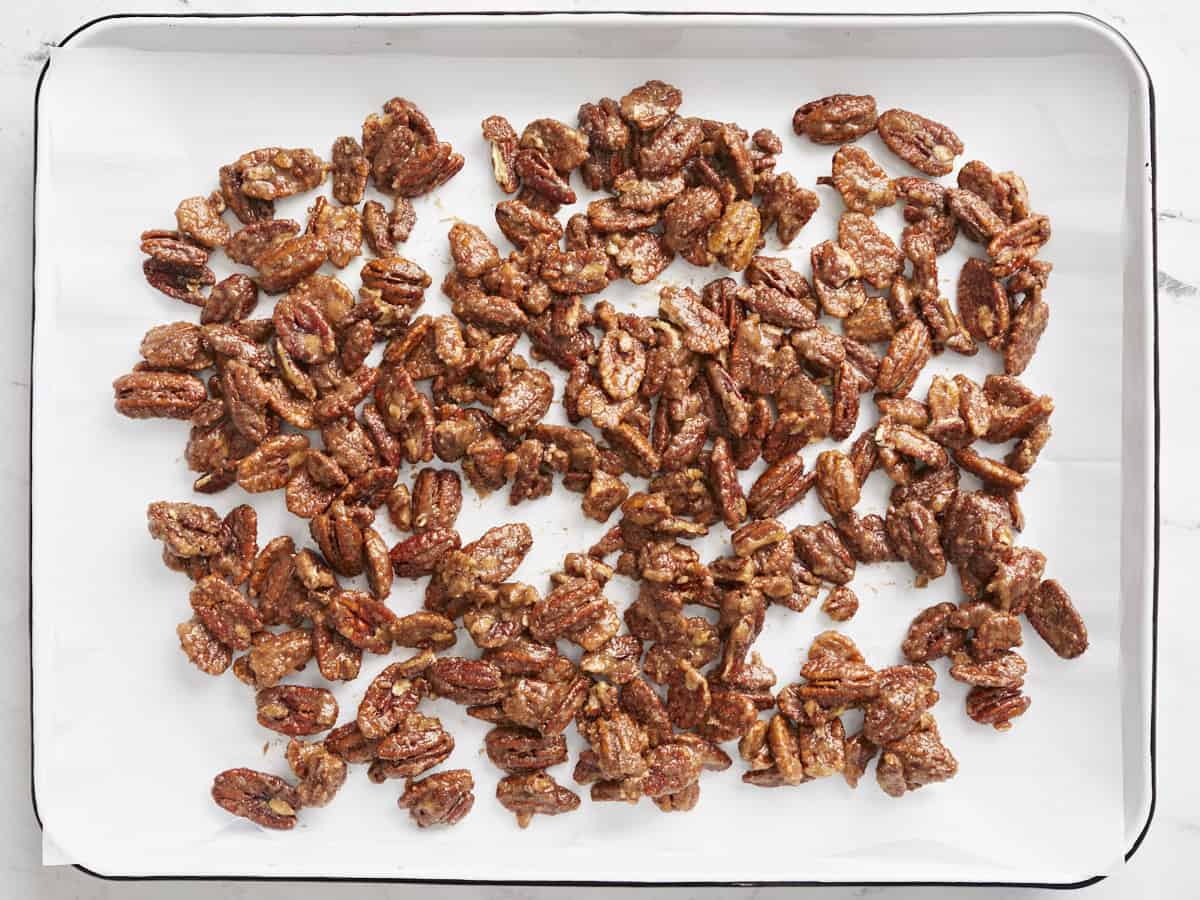
Spread the pecans out onto a baking sheet lined with parchment paper.
Bake the pecans in the preheated 350ºF oven for about 25 minutes, stirring once halfway through. Allow the pecans to cool completely before enjoying or packing for storage.
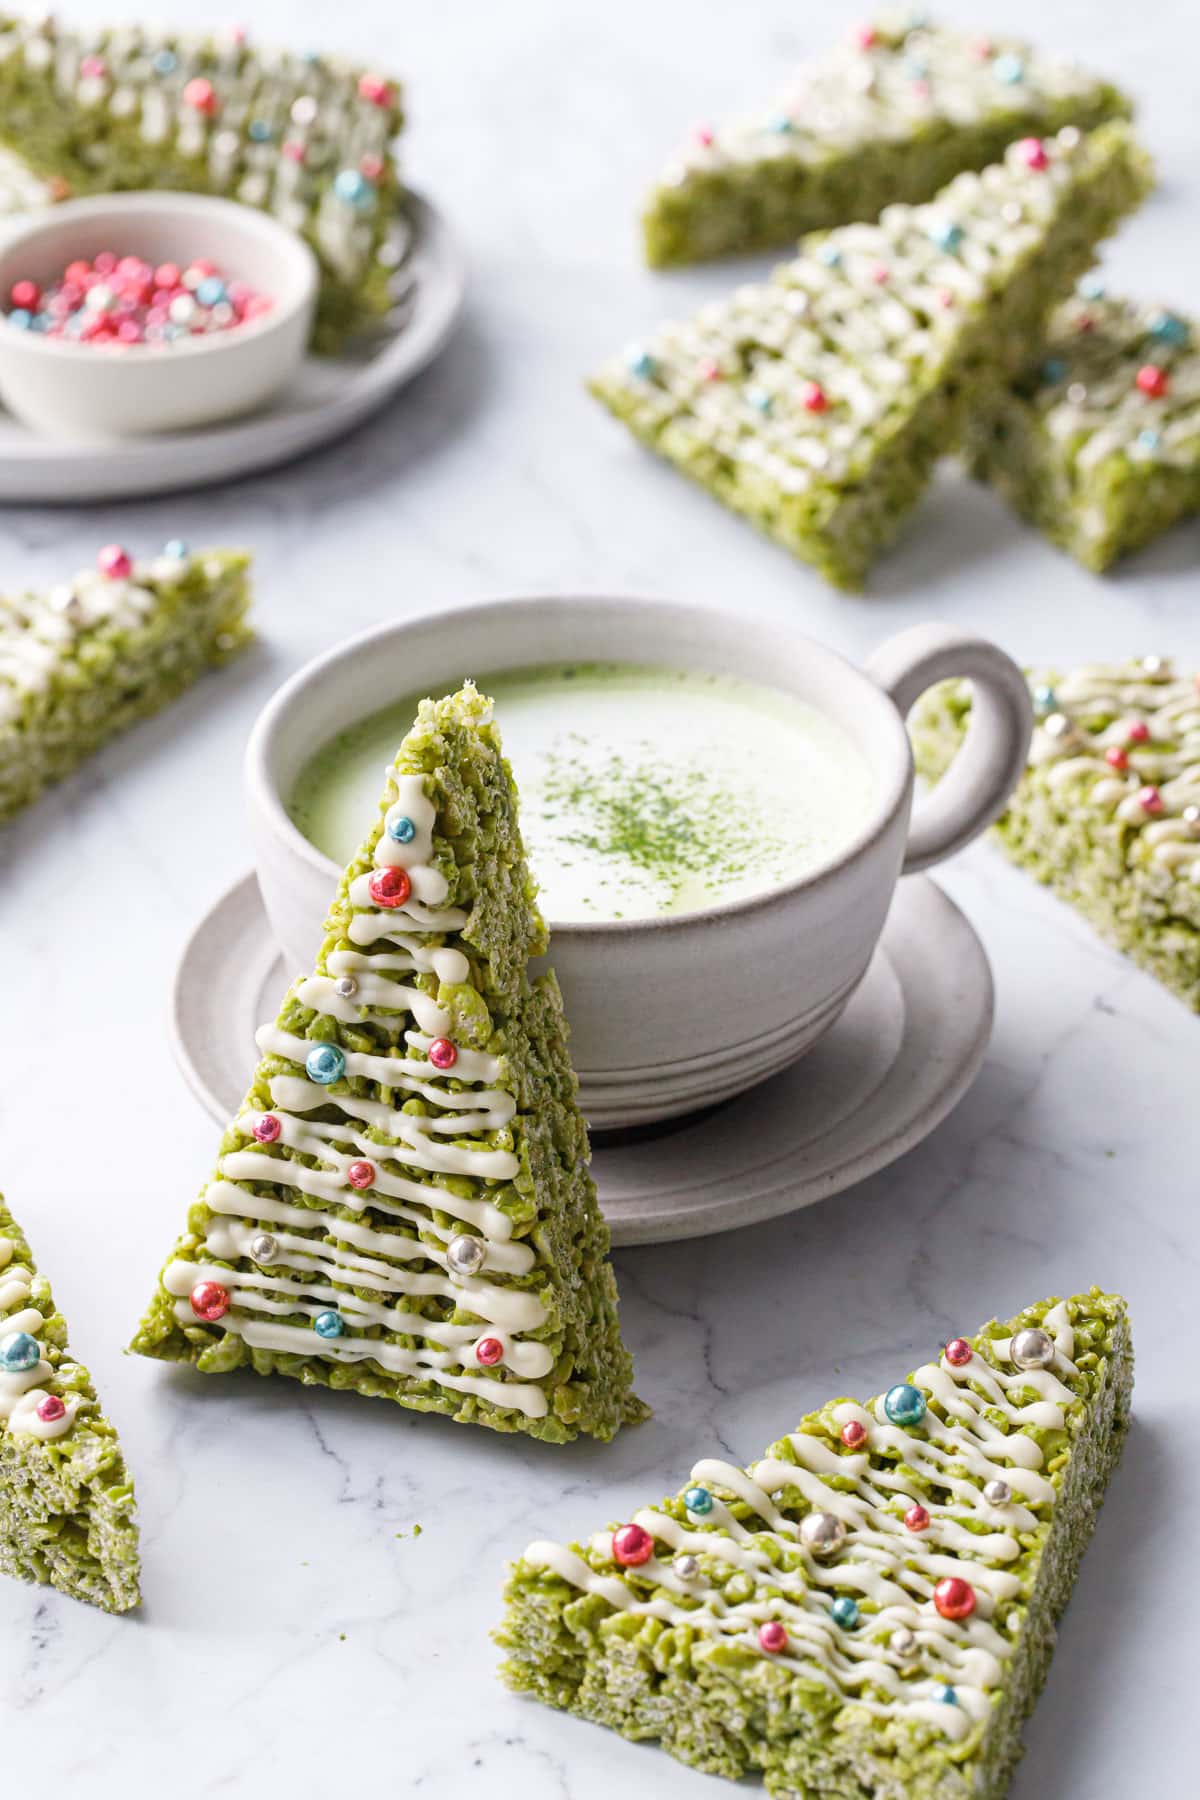
Chewy and gooey and gorgeously green: these festive matcha rice crispy treats are decorated to look like charming Christmas trees, with a natural green color that comes from matcha green tea powder (no food coloring required!) Matcha lovers, this one’s for you! With ample amounts of matcha powder infused in a classic marshmallow cereal treat […]
Chewy and gooey and gorgeously green: these festive matcha rice crispy treats are decorated to look like charming Christmas trees, with a natural green color that comes from matcha green tea powder (no food coloring required!)
Matcha lovers, this one’s for you! With ample amounts of matcha powder infused in a classic marshmallow cereal treat for a quick and easy holiday treat you’re sure to love (did I mention they make perfect homemade holiday gifts?)
Holiday rice crispy treats? Yes, please!
I debated whether or not to go full Christmas for this recipe (which, sans decoration, can really be enjoyed any time of the year!) but these tree-shaped treats (or should I say, treets?) were just too darn cute not to share.
You don’t even need cookie cutters (a usual requirement of tree-shaped goodies), as you can cut perfect triangles from a 13-by-9-pan of treats with just a few simple cuts.
Add a little drizzle of white chocolate and a few strategically-placed sprinkles and voila! Delicious and festive Rice Crispmas Treets!
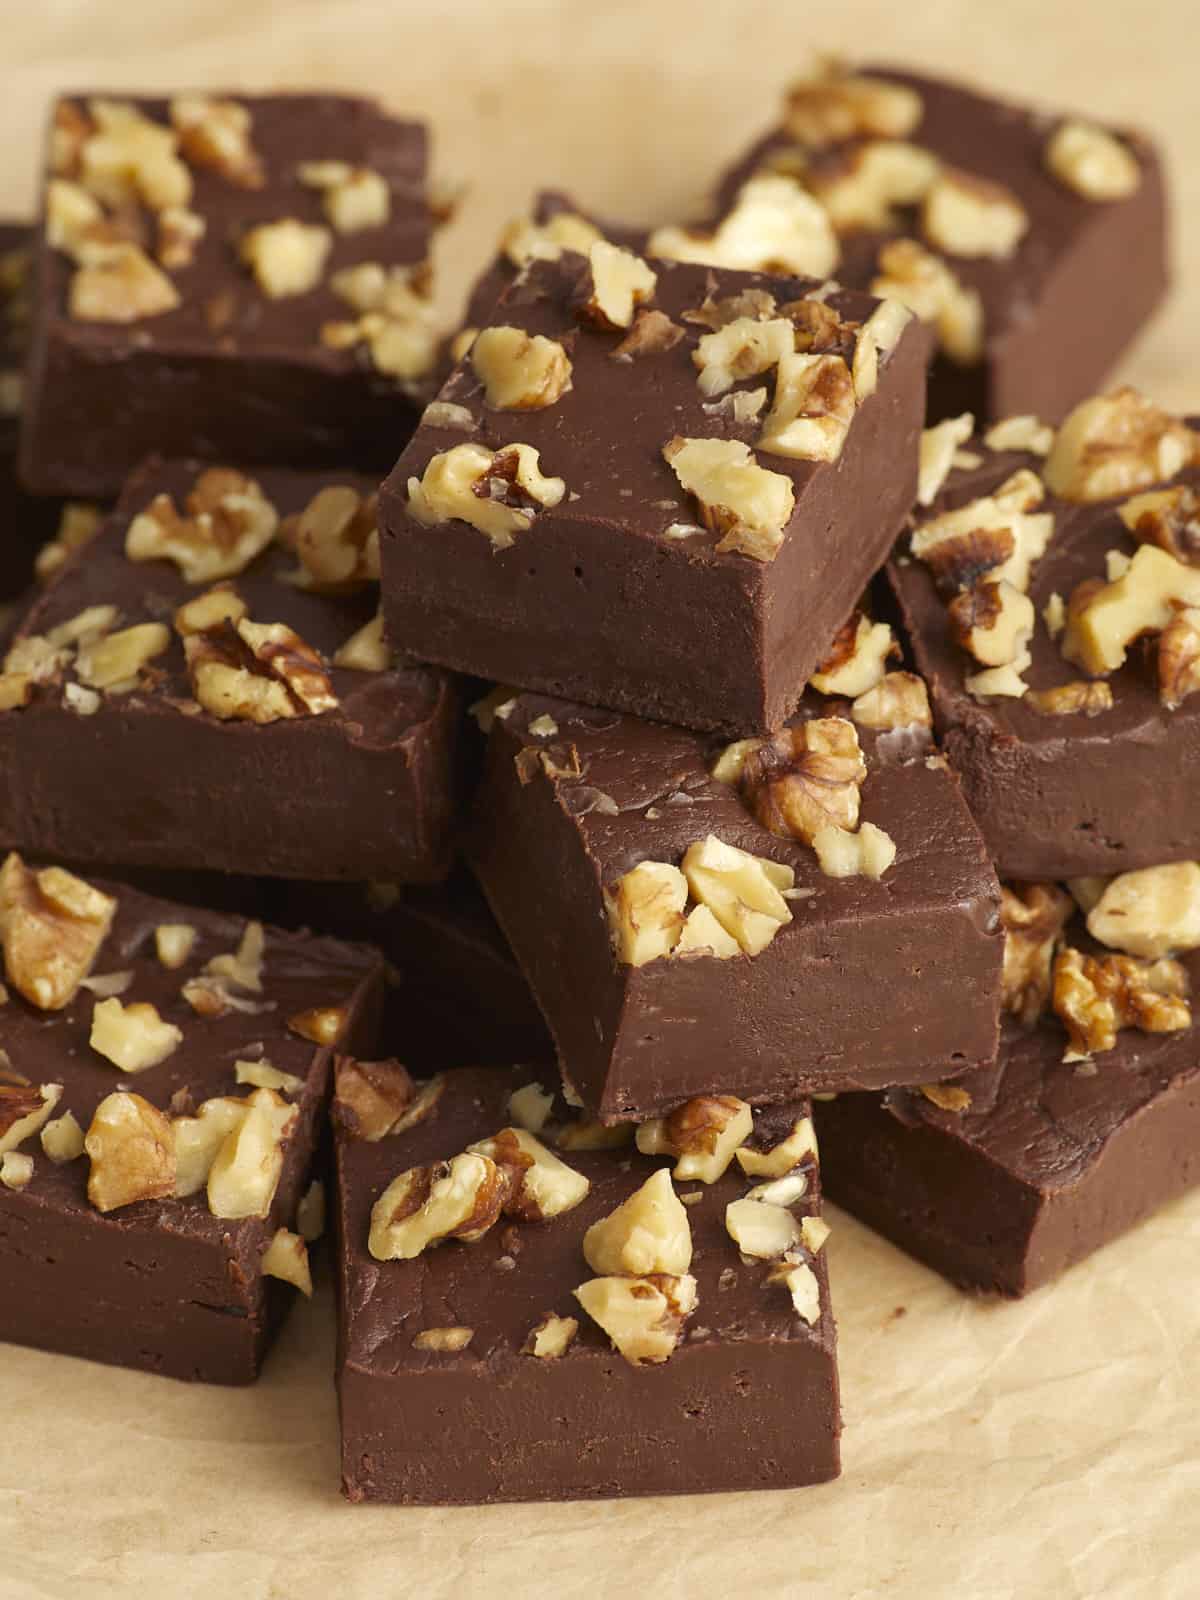
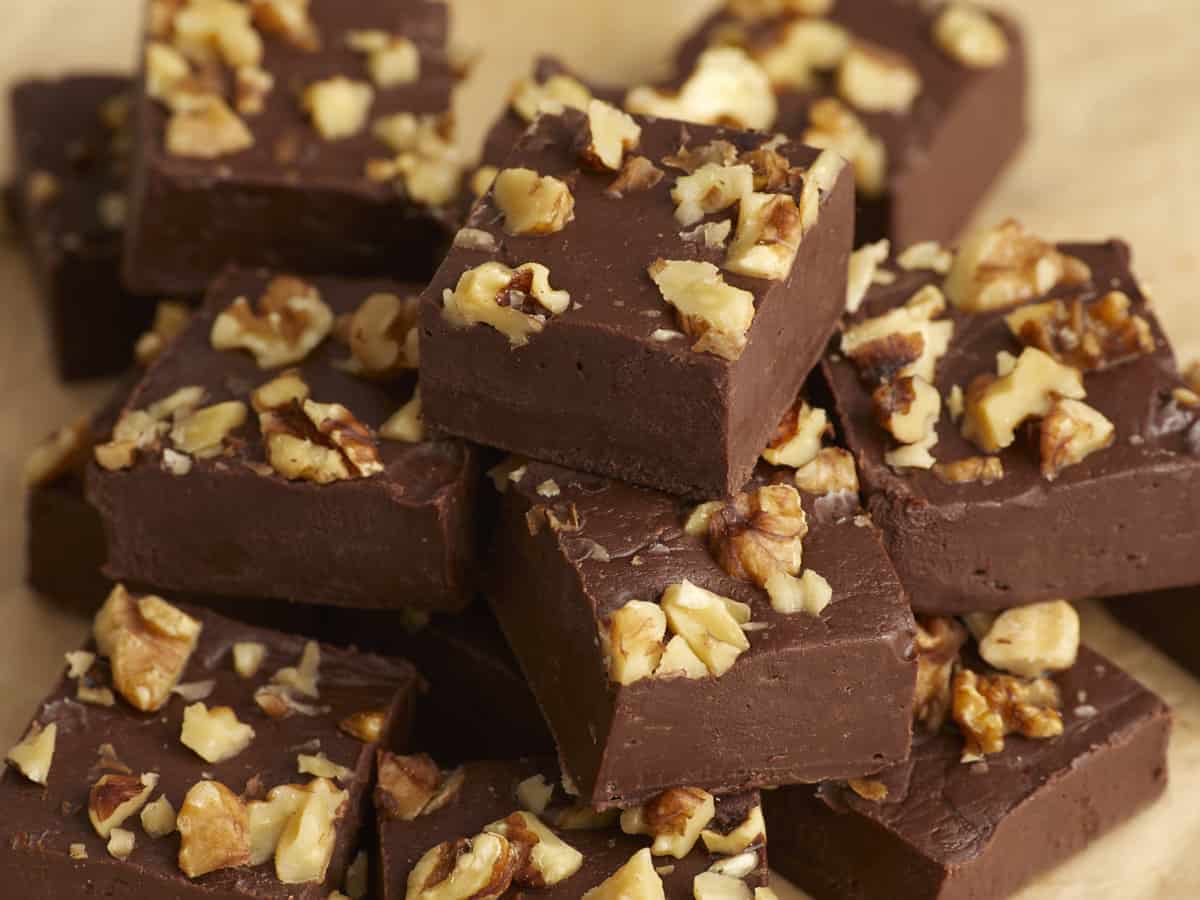
If you’re looking for an easy addition to your Christmas cookie platters, or maybe just a quick way to get your chocolate fix, you’ve got to try this easy homemade chocolate fudge recipe. It’s seriously easy, only takes a few minutes, and makes the most deliciously rich melt-in-your-mouth fudge. And you won’t need a candy thermometer or any other special equipment to make this amazing chocolate fudge. Just melt everything together, let it cool, slice, and serve!
Ingredients for Chocolate Fudge
This chocolate fudge is incredibly simple and at its core only requires three ingredients. I’ve added a couple more items just to take it to the next level, but it’s up to you! Here’s what you’ll need for this awesome chocolate fudge recipe:
Sweetened Condensed Milk: This gives the fudge its rich and sweet flavor and texture and helps soften the chocolate just enough to achieve that thick, fudgy texture.
Semi-Sweet Chocolate Chips: Chocolate chips bring all of that chocolatey flavor to the fudge and help firm the mixture up into sliceable squares.
Vanilla Extract: Vanilla gives the fudge a more dimension and a richer flavor.
Butter: A little bit of butter thrown into the mix gives this fudge an extra rich melt-in-your-mouth finish. Many people skip this ingredient, but I think it’s worth adding for a silkier texture and richer flavor.
Nuts: Nuts are completely optional, but I love how the flavor contrasts the rich fudge and they offer visual appeal. You can skip the walnuts or swap in your favorite nut in its place.
How to Store Homemade Fudge
Once cooled and sliced, you can keep this homemade fudge at room temperature in an air-tight container for about two weeks. It can also be held in the refrigerator, if desired, but the cold air can cause it to slowly dry out. The same goes fro freezing. This fudge is freezer safe, but make sure it’s wrapped very well and in an air-tight container to prevent drying and freezer burn.
More Flavor OPtions
This easy fudge recipe is quite flexible and can be modified to include different ingredients. Here are some ideas for other homemade fudge flavors:
Flavor Extracts: try swapping the vanilla extract with other flavors like peppermint, almond, or orange.
Toppings: Try topping the fudge with different nuts, crushed candy canes, marshmallows, pretzels, graham crackers, or sprinkles.
Chocolate Chips: Try different flavored morsels, like peanut butter, white chocolate, or butterscotch.
Microwave Instructions
You can make this style of homemade fudge using a microwave, but I find using a pot on the stovetop to be much easier. The stovetop method only takes a few minutes more and it’s easier to control the heat and how evenly the ingredients cook. To make this chocolate fudge in the microwave simply add everything to a bowl and microwave on high for one minute, then stir. Continue heating and stirring in 30-second intervals until everything is melted and evenly combined, then transfer to a dish to cool and slice.
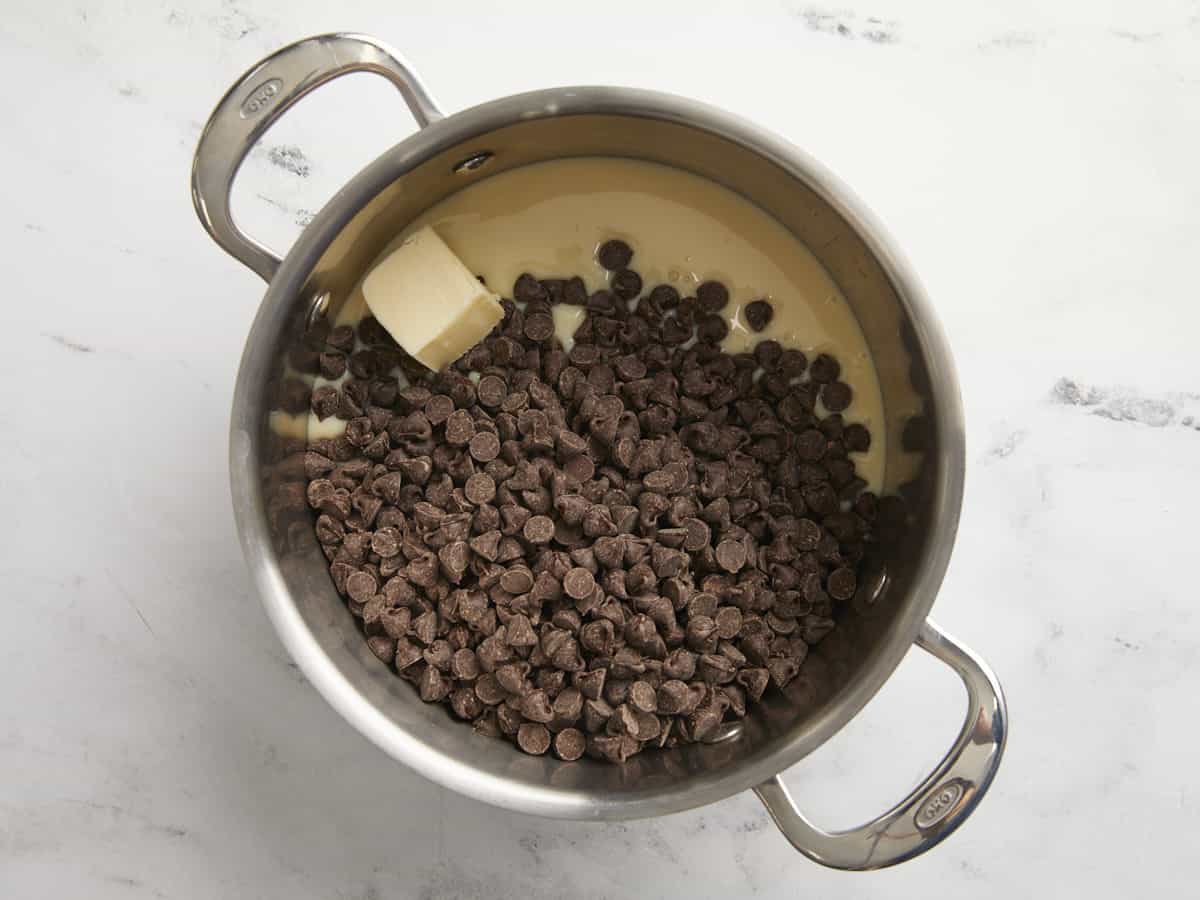
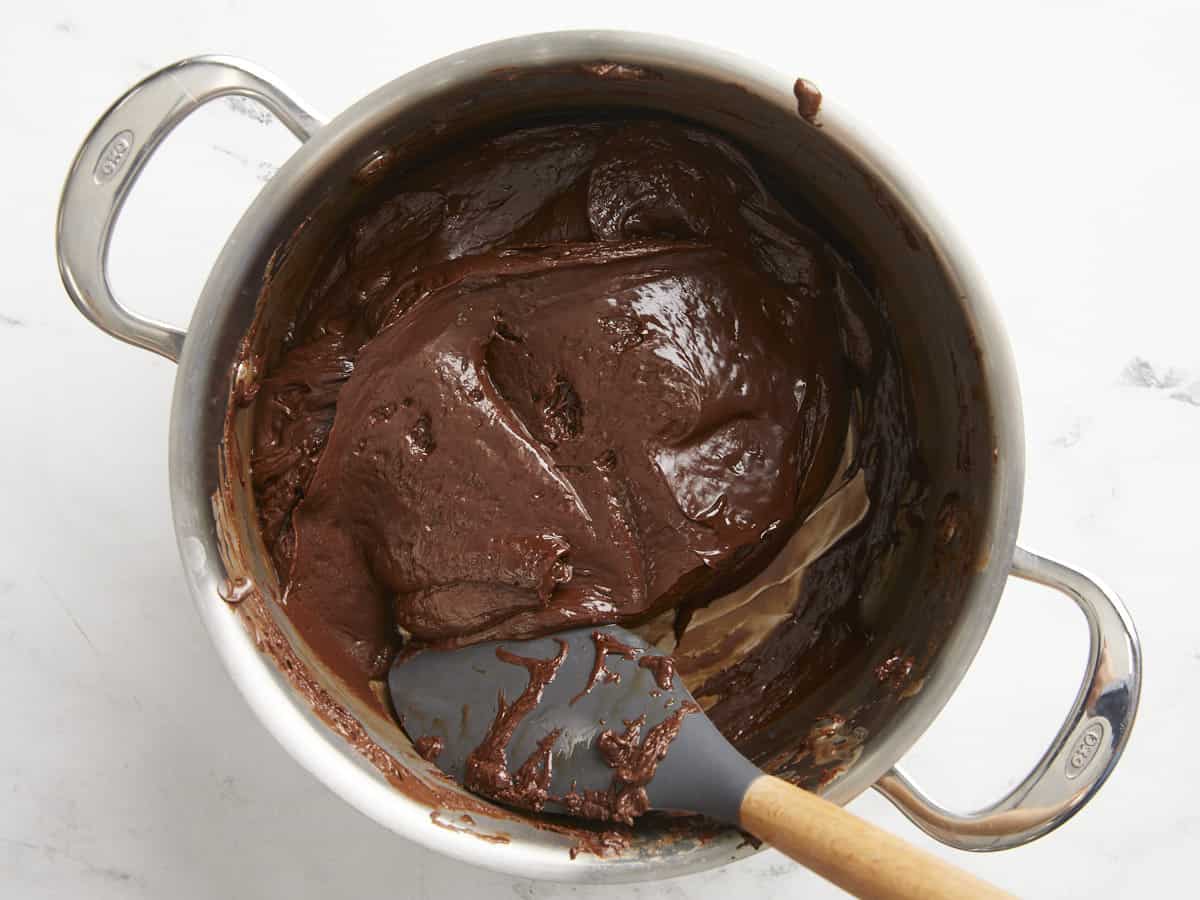
Add the sweetened condensed milk, chocolate chips, butter, and vanilla to a medium saucepot.
Heat the ingredients over medium-low, stirring constantly, until everything is melted and evenly combined. The mixture will be quite thick and glossy when it's ready (see photos below).
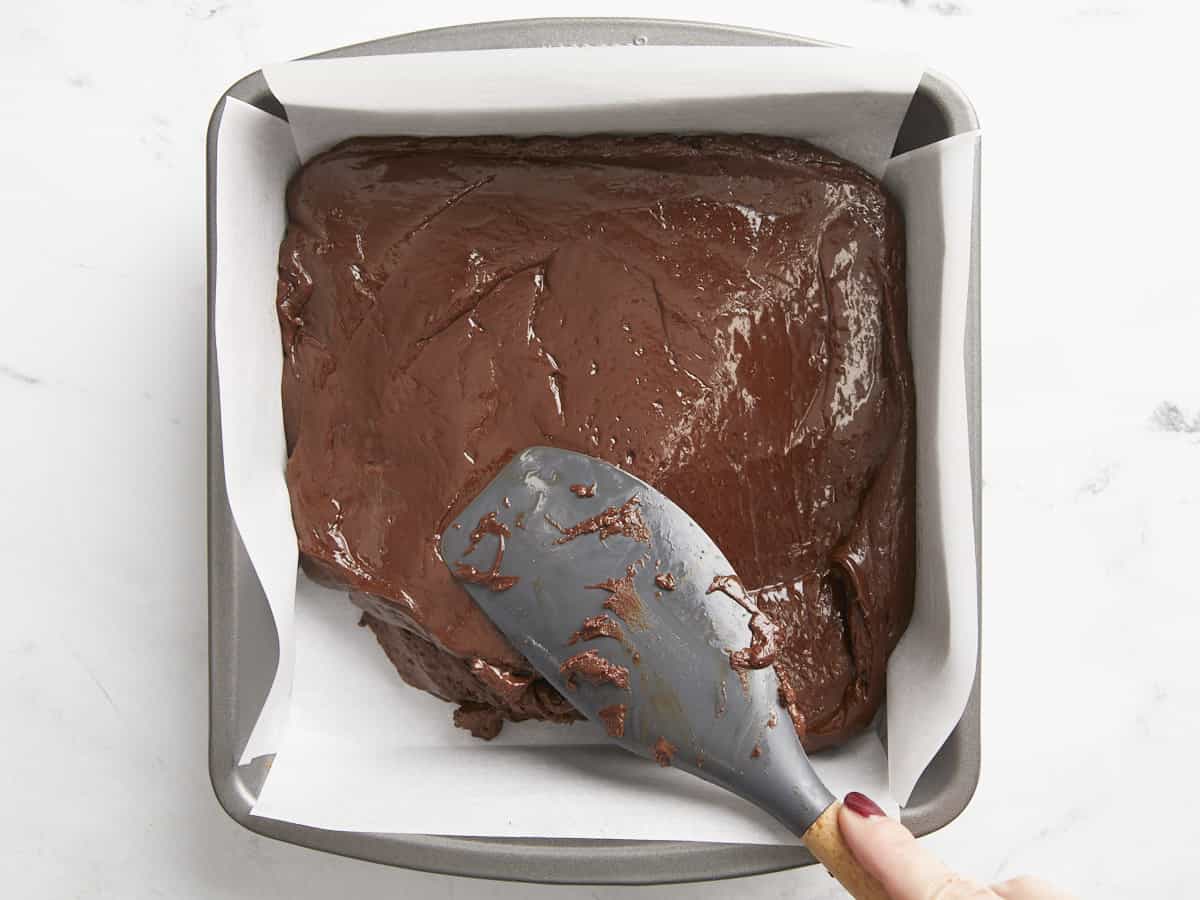
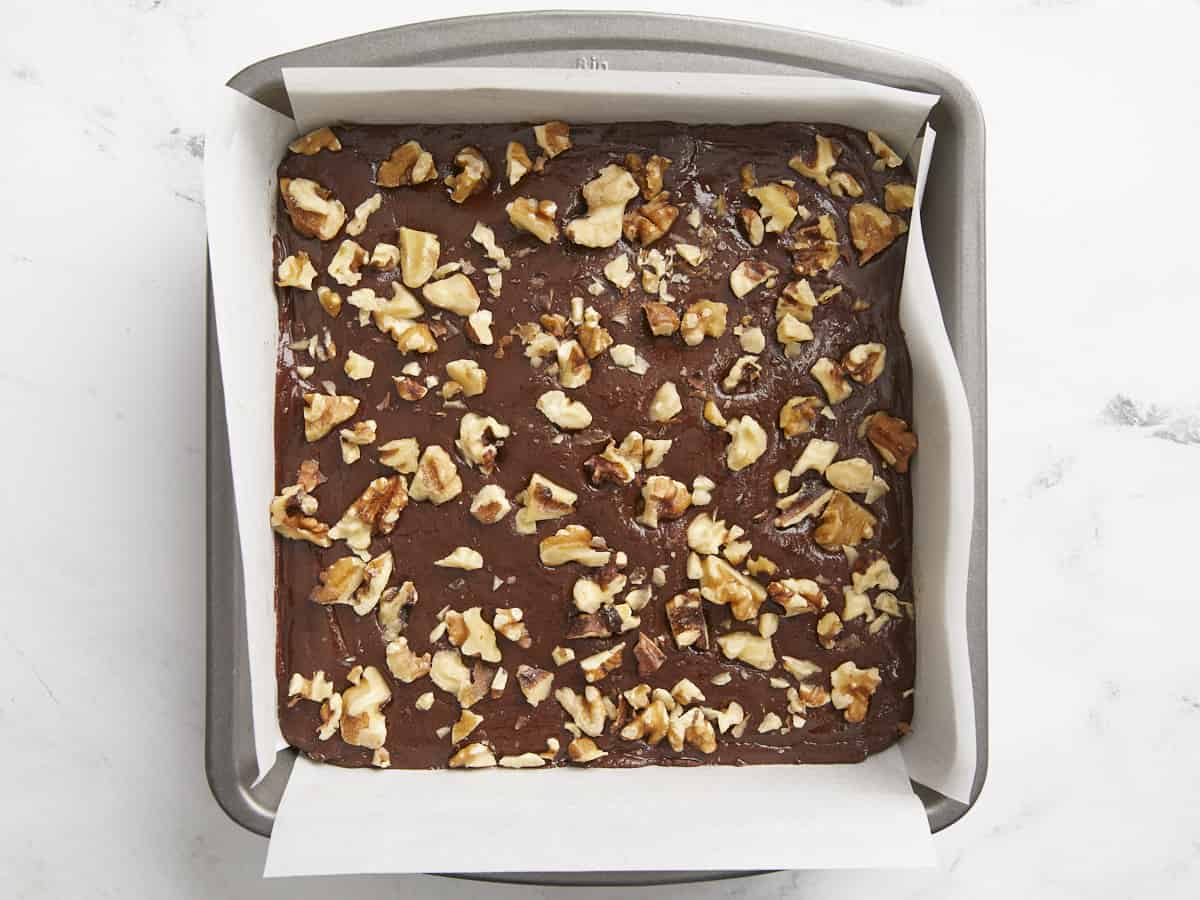
Spread the fudge into a 8×8-inch pan lined with foil or parchment paper. Sprinkle the chopped nuts over top and press them lightly into the surface.
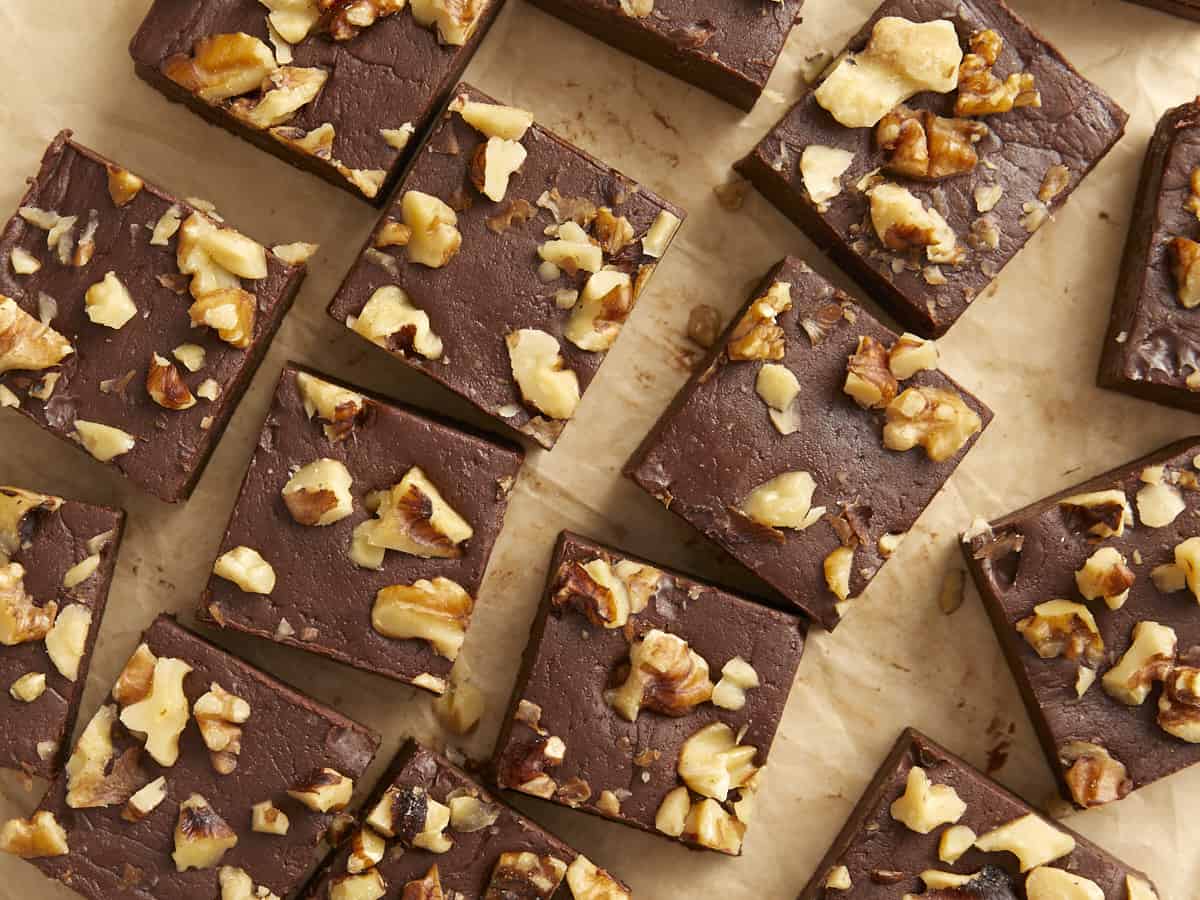
Place the fudge in the refrigerator, uncovered, for about two hours or until fully chilled and firm. Remove the fudge from the refrigerator and slice into 16 pieces, then serve.
Add one 14oz. can of sweetened condensed milk, 3 cups semi-sweet chocolate chips, 2 Tbsp butter, and 1 tsp vanilla extract to a saucepot.
Heat the mixture over medium-low while constantly stirring, until everything has melted and evenly combined. The mixture will be quite thick and glossy when it’s ready.
Spread the fudge into a 8×8-inch baking dish lined with foil or parchment paper.
Sprinkle ½ cup chopped walnuts over top then press them lightly into the surface.
Chill the fudge for two hours in the refrigerator to make sure its very firm before slicing it into 16 pieces. Enjoy chilled or room temperature!
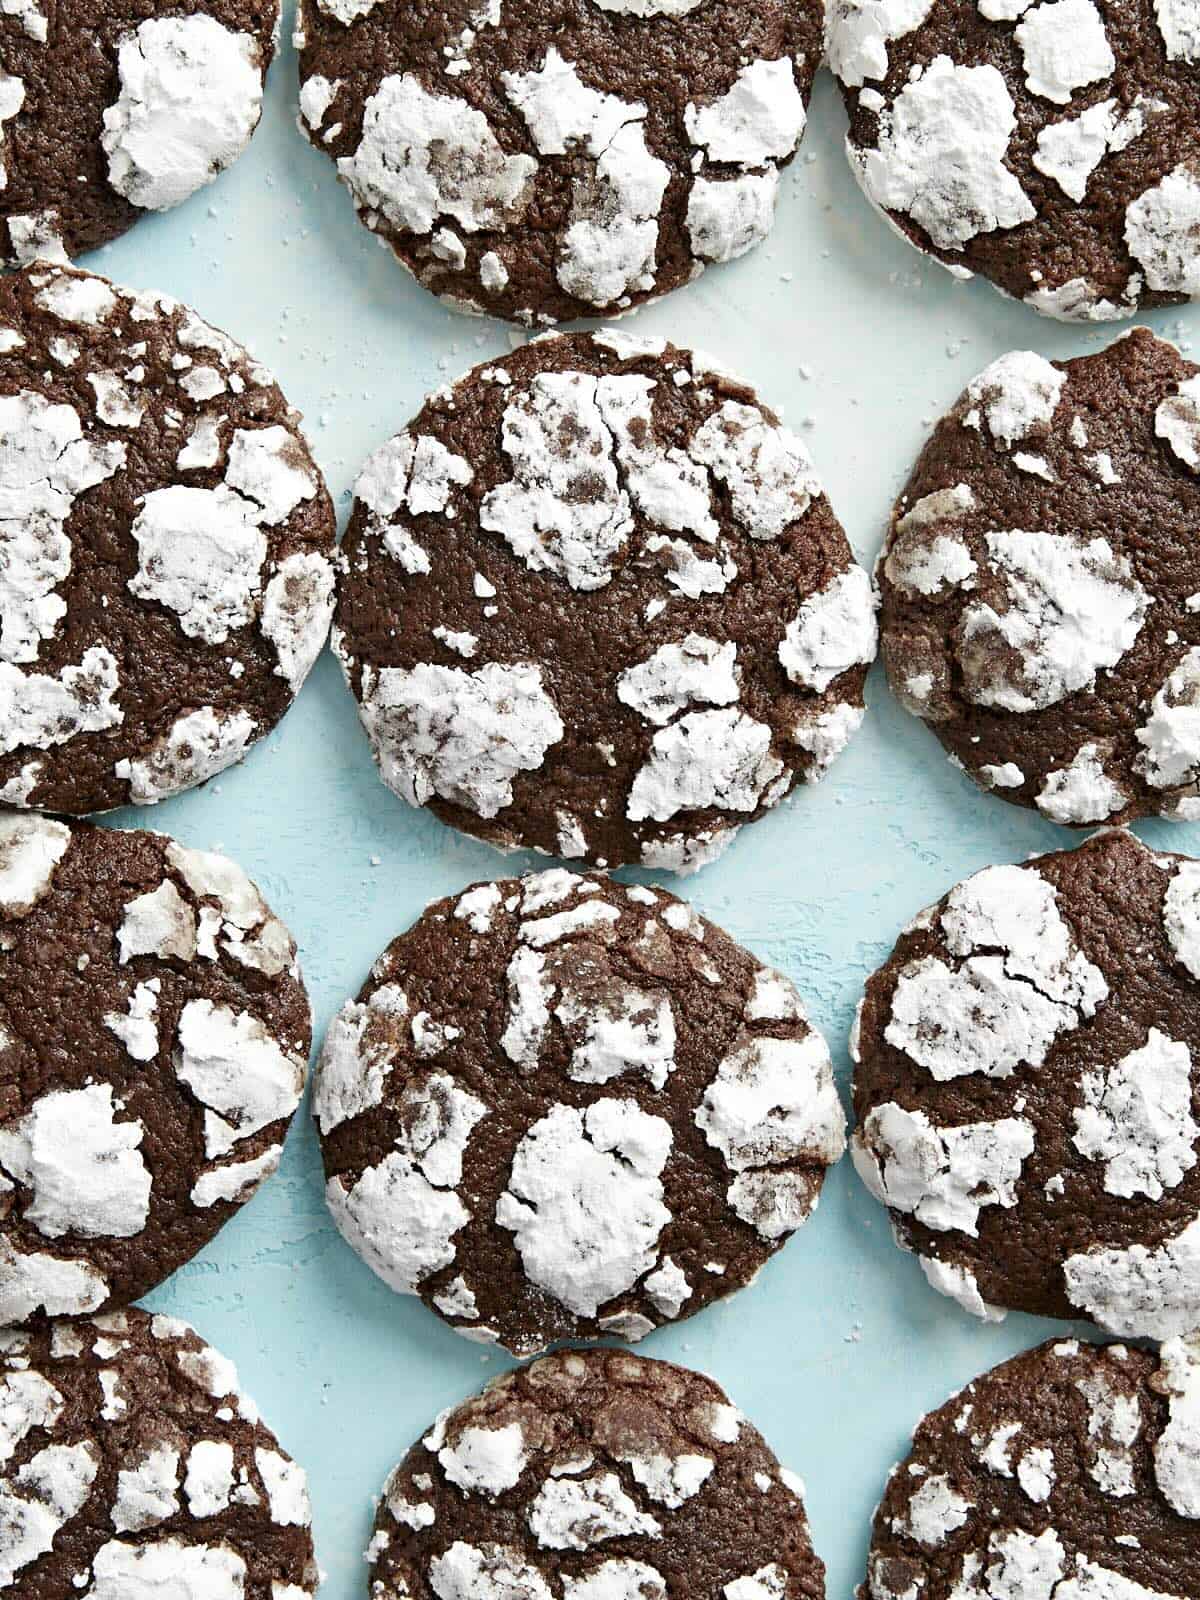
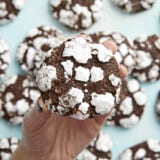
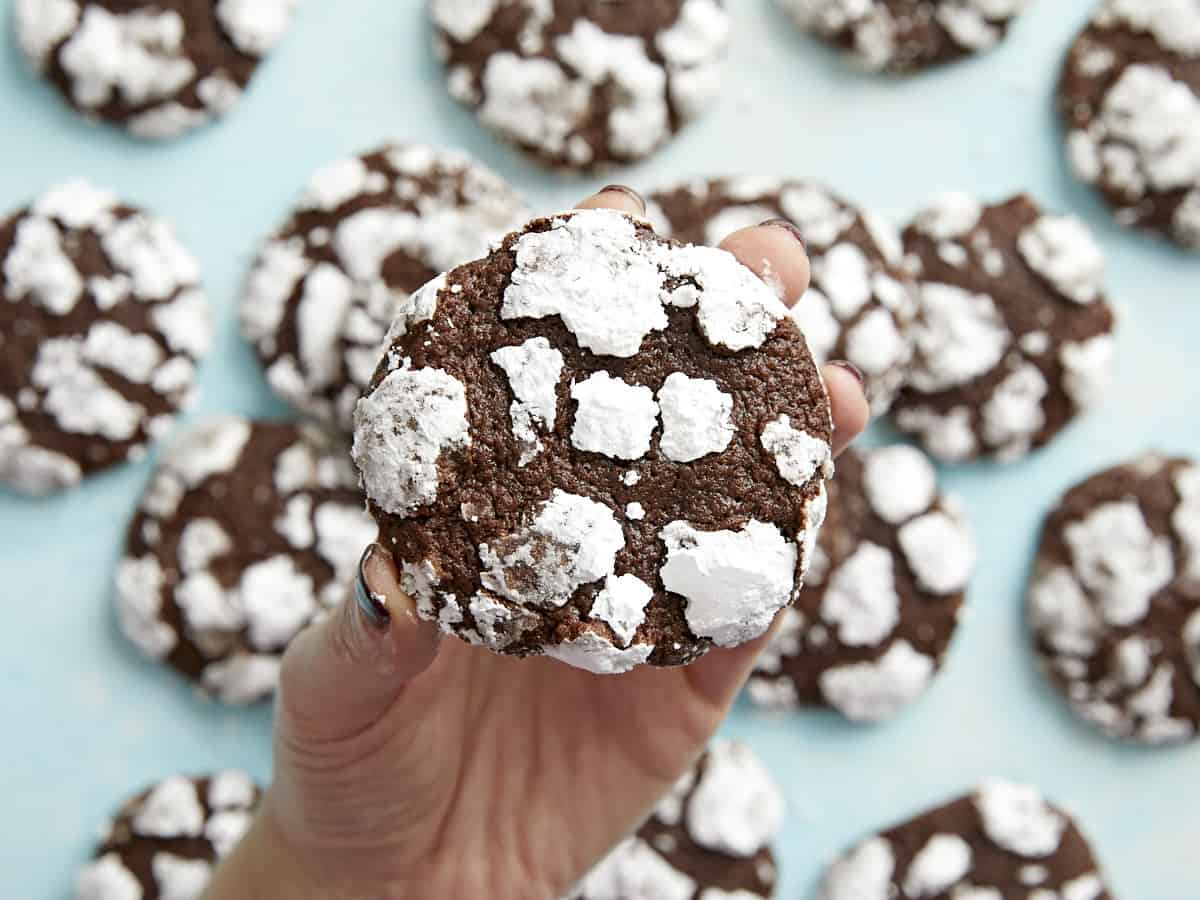
It wouldn’t be Christmastime without cookies, and these Chocolate Crinkle Cookies are one of the best. Their fluffy, melt-in-your-mouth texture is to die for and the powdered sugar coating really gives them that snowy, wintry feel. Chocolate Crinkle Cookies are an absolute must on any Christmas cookie platter!
What Are Chocolate Crinkle Cookies Like?
I love chocolate crinkle cookies because they have a fairly unique texture. They’re light and cakey, but they kind of melt into a rich and fudgy texture in your mouth. The powdered sugar instantly dissolves on your tongue, giving them an almost cooling wintry effect. They’re SO GOOD!
Ingredients for Chocolate Crinkle Cookies
The ingredients for these cookies are super basic, making them really easy to make without much planning. Here’s what you’ll need to make chocolate crinkle cookies:
Butter: All cookies need a good dose of butter for that rich, dessert-like finish! A lot of chocolate crinkle cookie recipes use oil, but I wanted that all-butter flavor. We use salted butter because we always have that on hand.
Sugar: The combination of butter and sugar is what makes cookies so irresistible. You’ll need granulated sugar for the batter and some powdered sugar to get that cool crinkle effect.
Eggs: Eggs help the cookies puff up in the oven and give them strength to stay that way once baked.
Vanilla: Vanilla extract always helps chocolate taste much richer.
All-Purpose Flour: Flour gives the cookies body and strength to hold their shape.
Baking Powder: A little baking powder gives the cookies extra power to puff up in the oven, giving them that nice airy, cakey texture.
Cocoa Powder: Unsweetened cocoa powder gives these cookies all the chocolatey goodness they need.
Salt: A little salt helps the individual flavors in the cookies stand out so every bite is delicious!
What Else Can I Add?
This chocolate crinkle cookie recipe can be modified in several different ways. Try adding a ½ tsp peppermint extract to make a chocolate peppermint cookie, or rolling the cookies in some crushed candy canes after rolling in powdered sugar. You can also stir some mini chocolate chips into the batter for a double-chocolate crinkle! Or, add a Tablespoon or two of instant coffee to the batter to make cafe mocha-flavored crinkles!
Make them Ahead
You can make the dough for these chocolate crinkle cookies and refrigerate up to 2 days before portioning, shaping, and baking, making them a great option if you have several types of cookies you want to bake for Christmas!
How to Store Chocolate Crinkle Cookies
Allow the cookies to cool to room temperature, then store them in an air-tight food storage container at room temperature for about 5 days, or you can freeze them for up to three months.
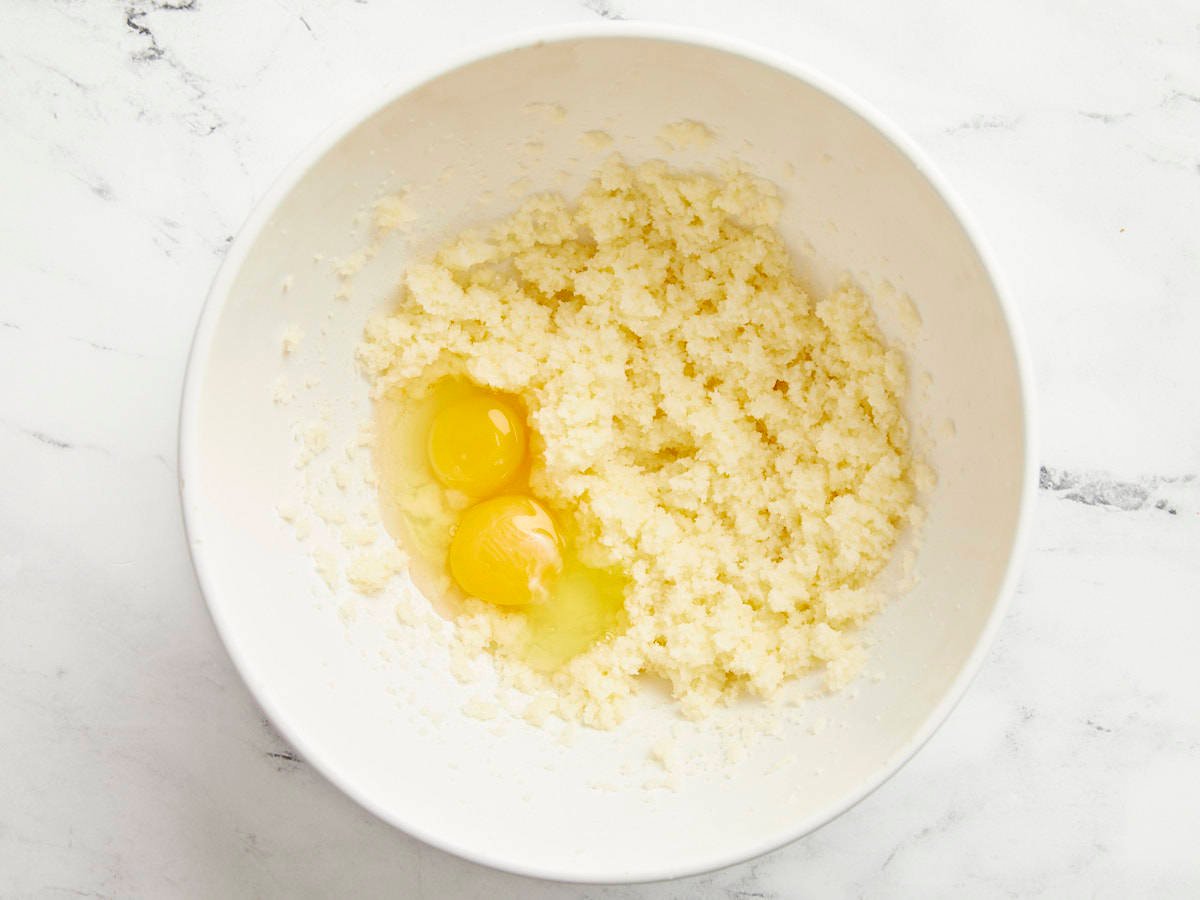
Beat the butter an granulated sugar together on high until light and fluffy (2-3 minutes). Add the eggs and vanilla extract and beat on high again until the mixture is light and creamy (another 2 minutes).
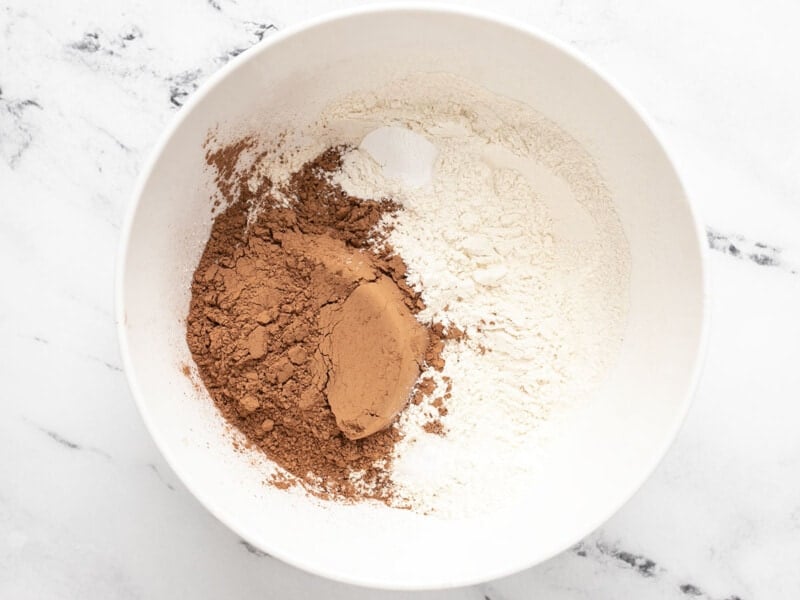
In a separate bowl, whisk together the flour, cocoa powder, baking powder, and salt until evenly combined.
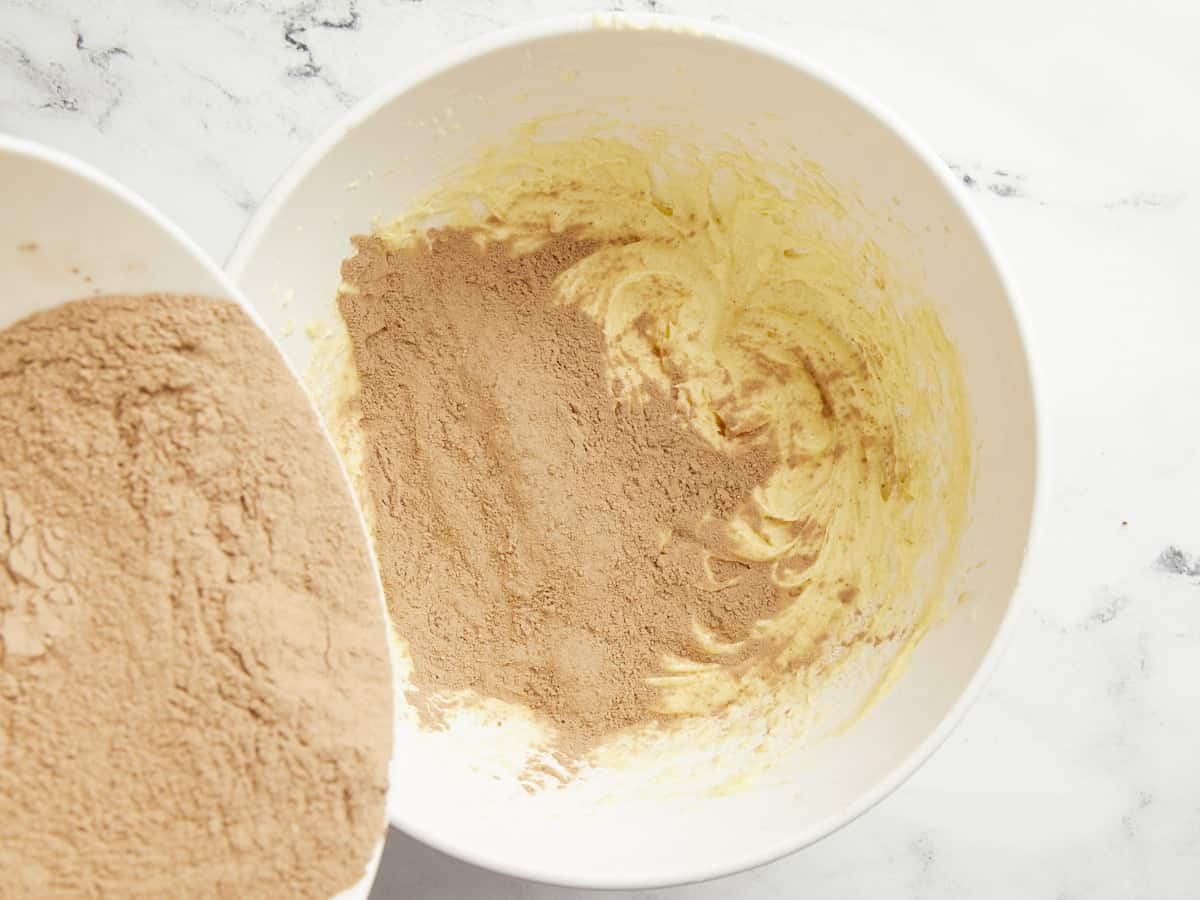
Pour half of the flour mixture into the butter mixture and beat on low until incorporated. Add the remaining flour mixture and beat or stir until incorporated again. The dough should be very thick.
Cover the bowl of cookie dough with plastic and refrigerate for two hours or up to two days.
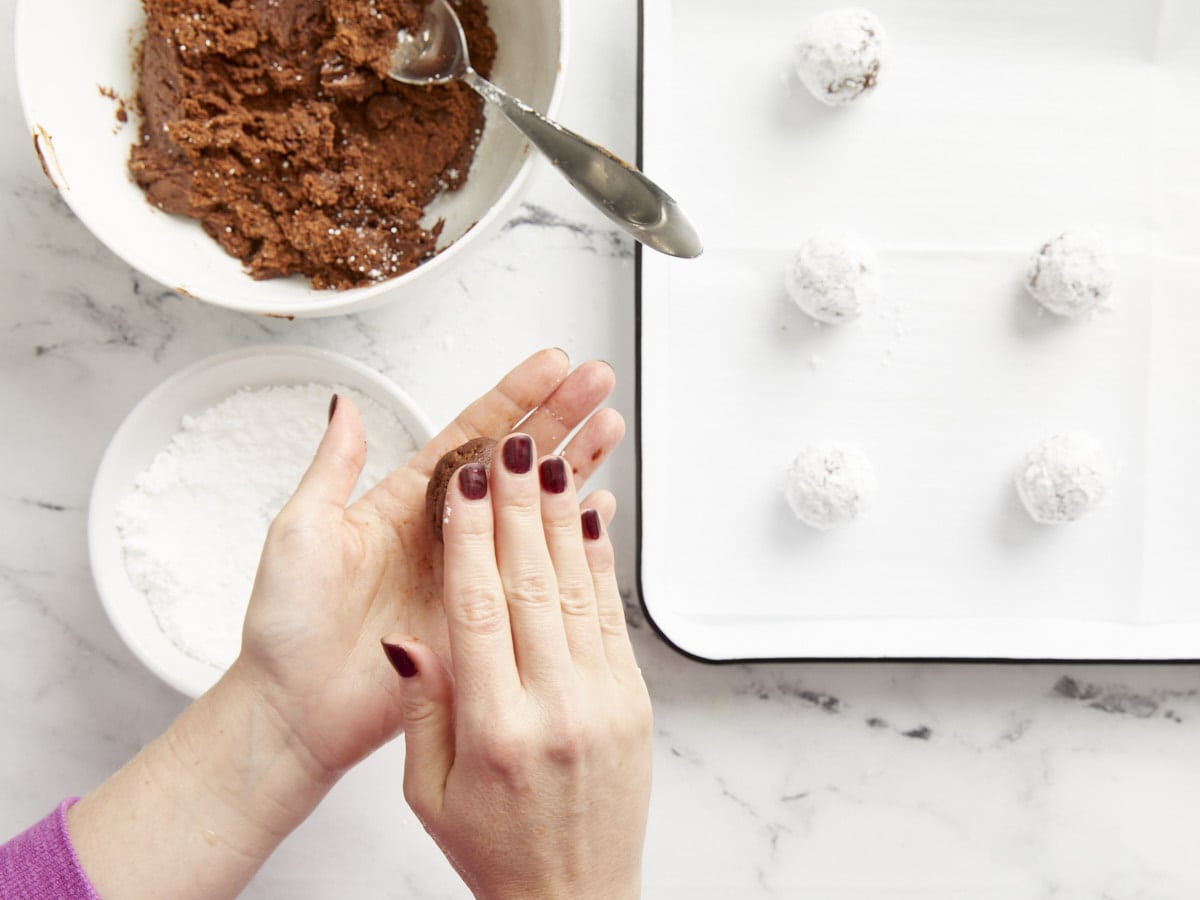
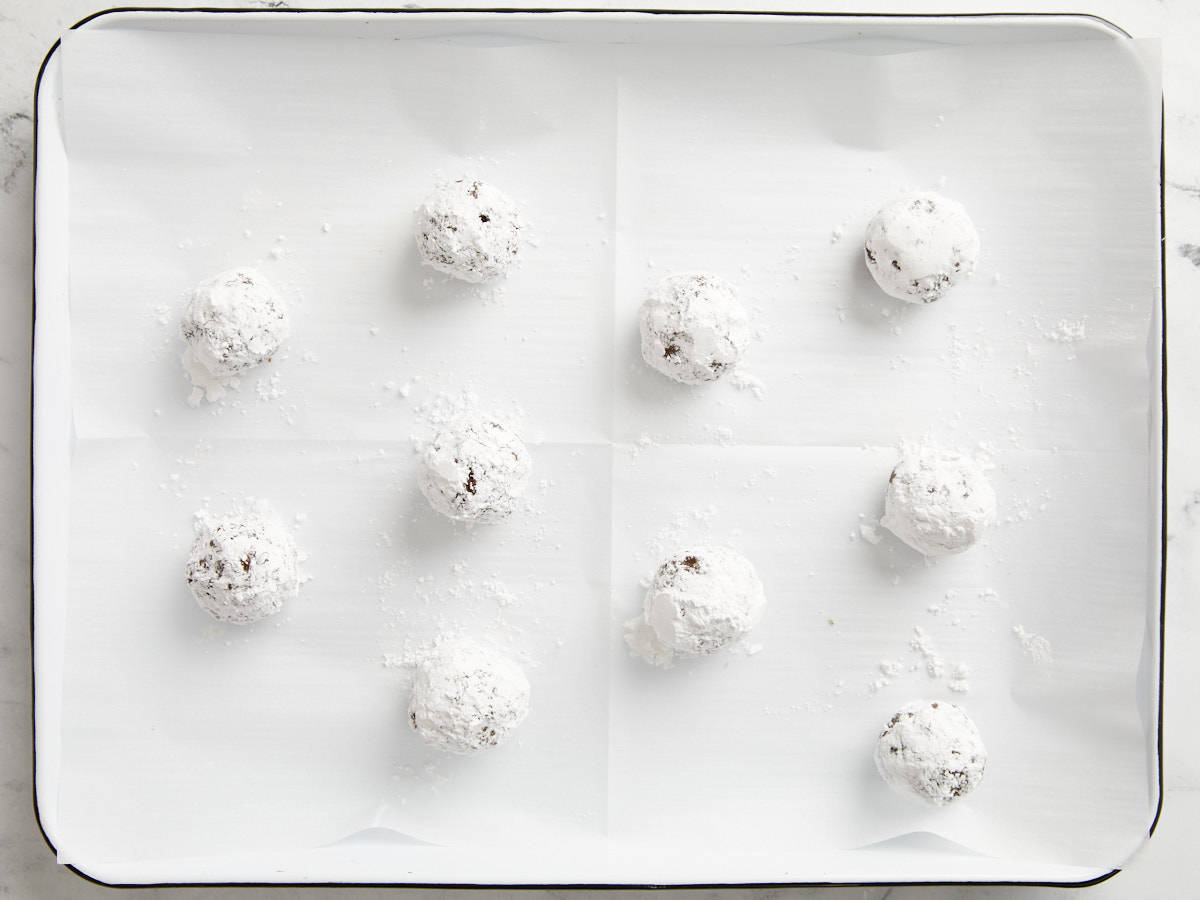
Once ready to bake, preheat the oven to 350ºF. Place the powdered sugar in a bowl for rolling and line a baking sheet with parchment paper. Scoop the cookie dough in 2 Tbsp portions, roll into a ball, then roll to coat in powdered sguar. Place the rolled and coated cookies on the baking sheet 2-3 inches apart. You'll likely need to cook in batches, so keep the remaining dough chilled until ready to roll and bake. Avoid coating the cookies in powdered sugar until just before they go into the oven.
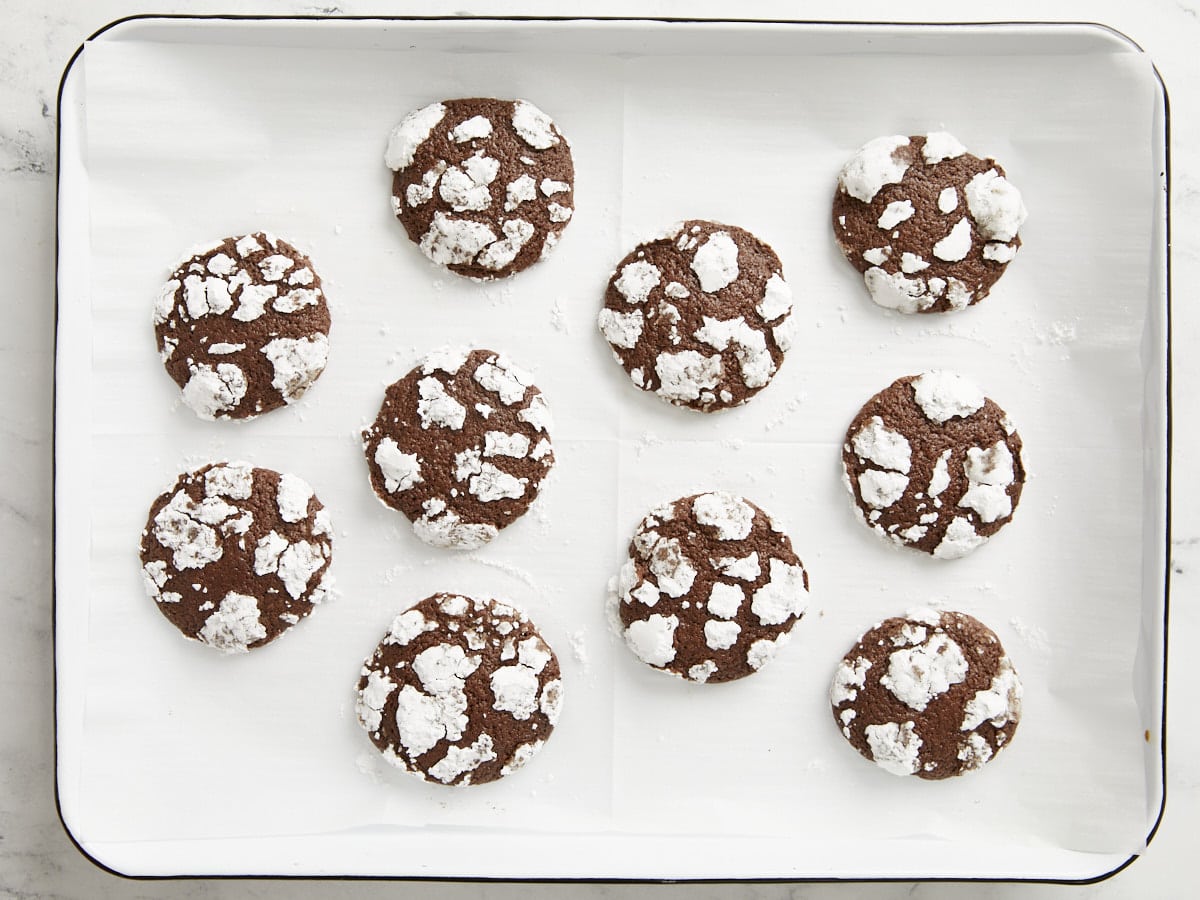
Bake the cookies for 10-12 minutes, or until they're puffed and the powdered sugar is cracked on top. Allow the cookies to cool, then enjoy!
How to Make Chocolate Crinkle Cookies – Step by Step Photos
In a large bowl, cream together 8 Tbsp salted butter and 1 cup granulated sugar with a mixer until light and fluffy. Add two large eggs and 1 tsp vanilla, and beat together again until the mixture is light and creamy.
In a separate large bowl, whisk together 1 1/4 cups all-purpose flour, 1 tsp baking powder, ¼ tsp salt, and ½ cup unsweetened cocoa powder.
Add half of the dry ingredients to the butter mixture and beat on low speed until combined, then add the remaining half and beat again over low until a batter forms.
The batter should be very thick and fairly stiff. Cover the bowl with plastic and refrigerate for 2 hours. This will stiffen the batter even further, making it much easier to shape and it will help the cookies bake without flattening out so much.
When ready to bake, preheat the oven to 350ºF and place ½ cup powdered sugar in a bowl. Take the chilled dough out of the refrigerator and, working quickly, scoop it up in 2 Tbsp portions rolling each portion into a ball, then rolling in the powdered sugar.
Place the rolled sugar-coated cookies on a parchment-lined baking sheet with 2-3 inches between each (they will spread quite a bit when baked). You’ll likely need to bake them in two batches, so keep the dough chilled between each batch. Do not roll the cookies in powdered sugar until just before they go into the oven
Bake the chocolate crinkle cookies for 10-12 minutes, or until they’re puffed and the powdered sugar has “cracked” all over their surface. Allow the cookies to cool before serving and enjoying.
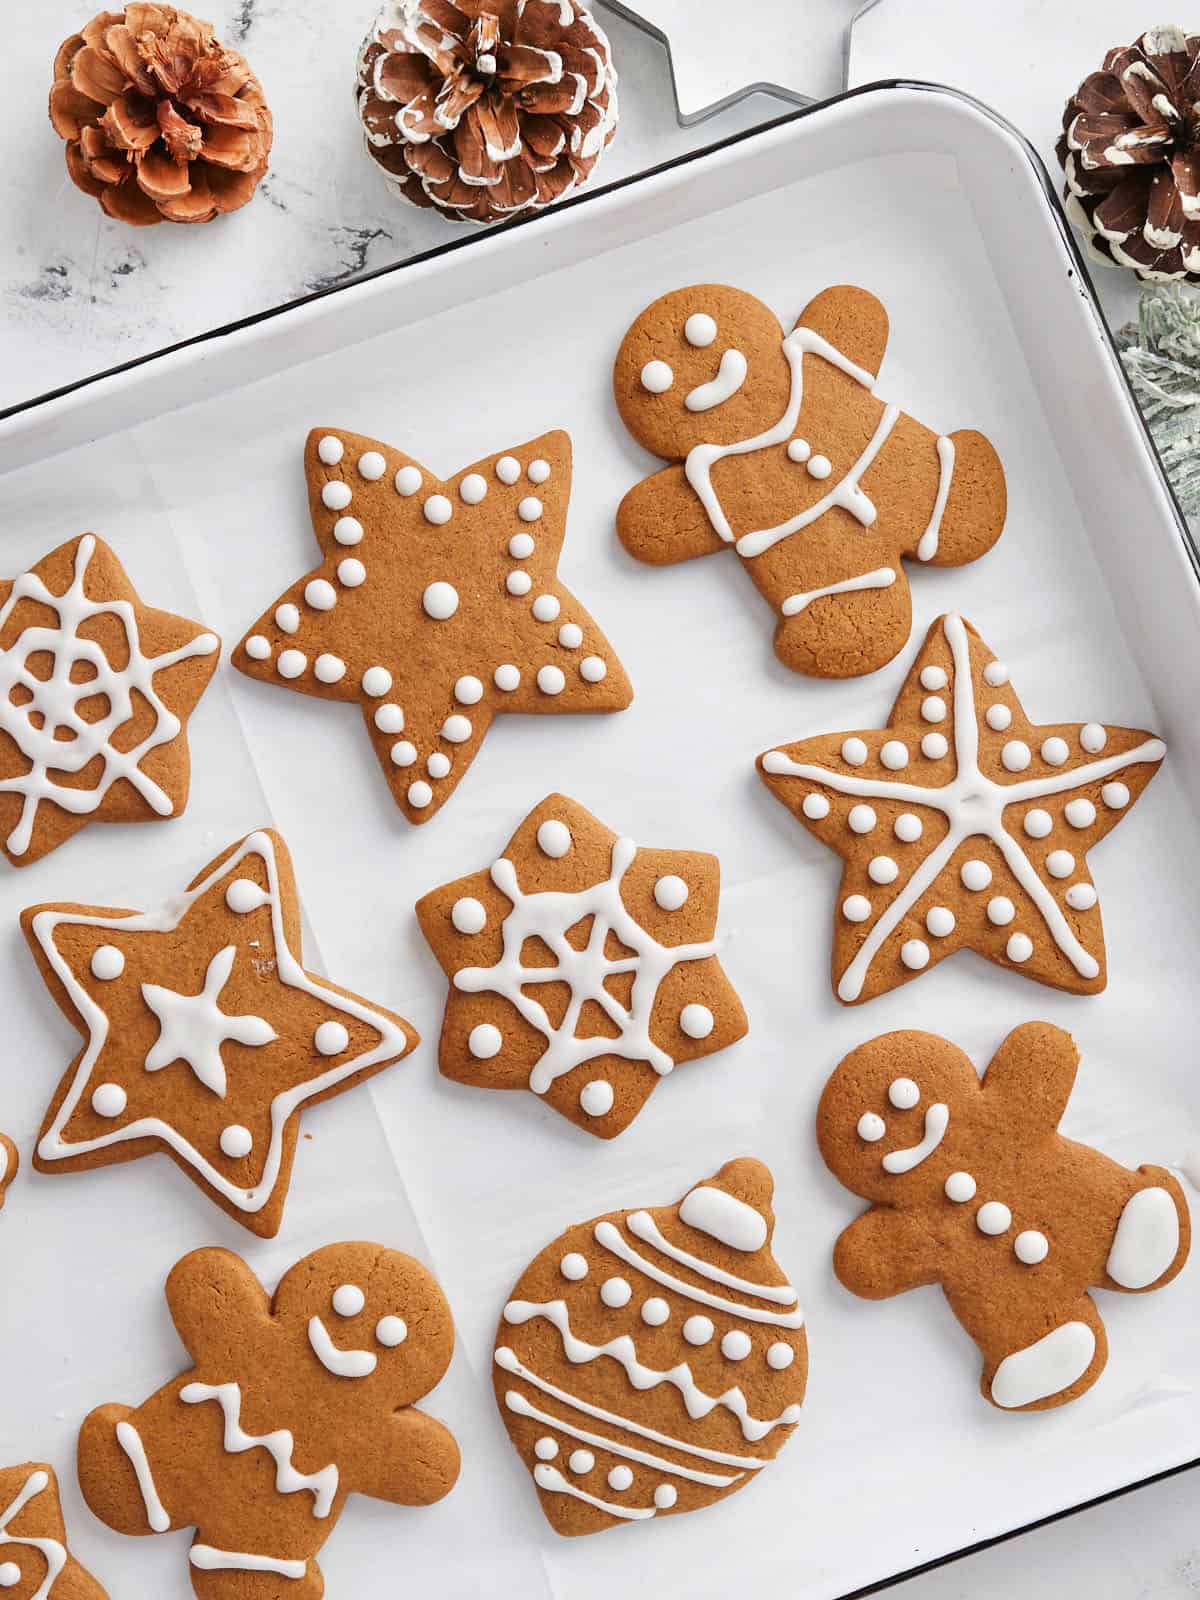
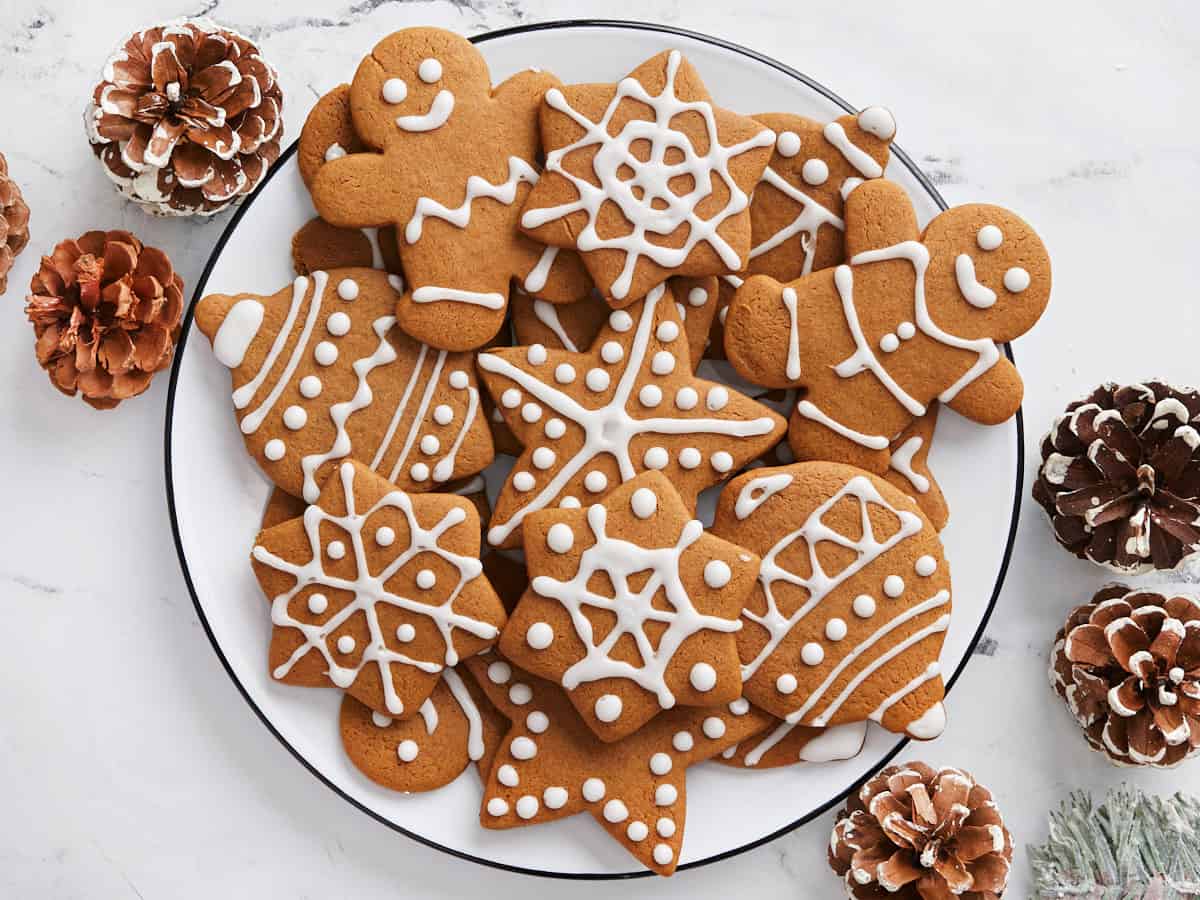
I don’t know if anything can get me in the holiday mood more than baking (and decorating) a batch of Gingerbread Cookies. Their warm, spicy aroma just smells like Christmas, and decorating them is SO. MUCH. FUN. This recipe for gingerbread cookies will make plenty of soft, chewy, spiced cookies for you and your friends and family to decorate, so bookmark this Gingerbread Cookie recipe and make them this weekend. And don’t forget to take a photo and show us your creations on social media!
What Are Gingerbread Cookies?
Gingerbread cookies are a cookie made with rich molasses and plenty of warm spices, like ginger, cinnamon, and cloves. The gingerbread cookies are often cut into the shape of a man (aka gingerbread men), but can also be cut into a variety of holiday-themed shapes. Decorating gingerbread cookies is a popular holiday activity and my personal favorite!
Ingredients for Gingerbread Cookies
Gingerbread cookies have many of the same ingredients as most basic cookies but include a variety of rich and warm spices. Here’s what you’ll need to make gingerbread cookies:
Butter: Butter is the base for many cookies. It gives the cookies plenty of richness and creamy buttery flavor.
Brown Sugar: Brown sugar gives these cookies a deeply rich sweetness, and helps keep the cookies soft.
Molasses: Molasses sweetens the cookies, adds an amazingly deep flavor, and gives the cookies a rich brown color.
Egg: Egg helps give the cookies structure and helps them rise just a little bit while baking.
Vanilla: Vanilla adds to the warm flavor profile of the cookies.
Baking Soda: A small amount of baking soda helps the cookies rise so they are nice and soft.
Flour: All-purpose flour gives the cookies structure and bulk.
Spices: A mix of cinnamon, ginger, cloves, nutmeg, and salt gives the gingerbread cookies tons of warm flavor in every bite! Cinnamon also helps deepen the cookie’s classic brown color.
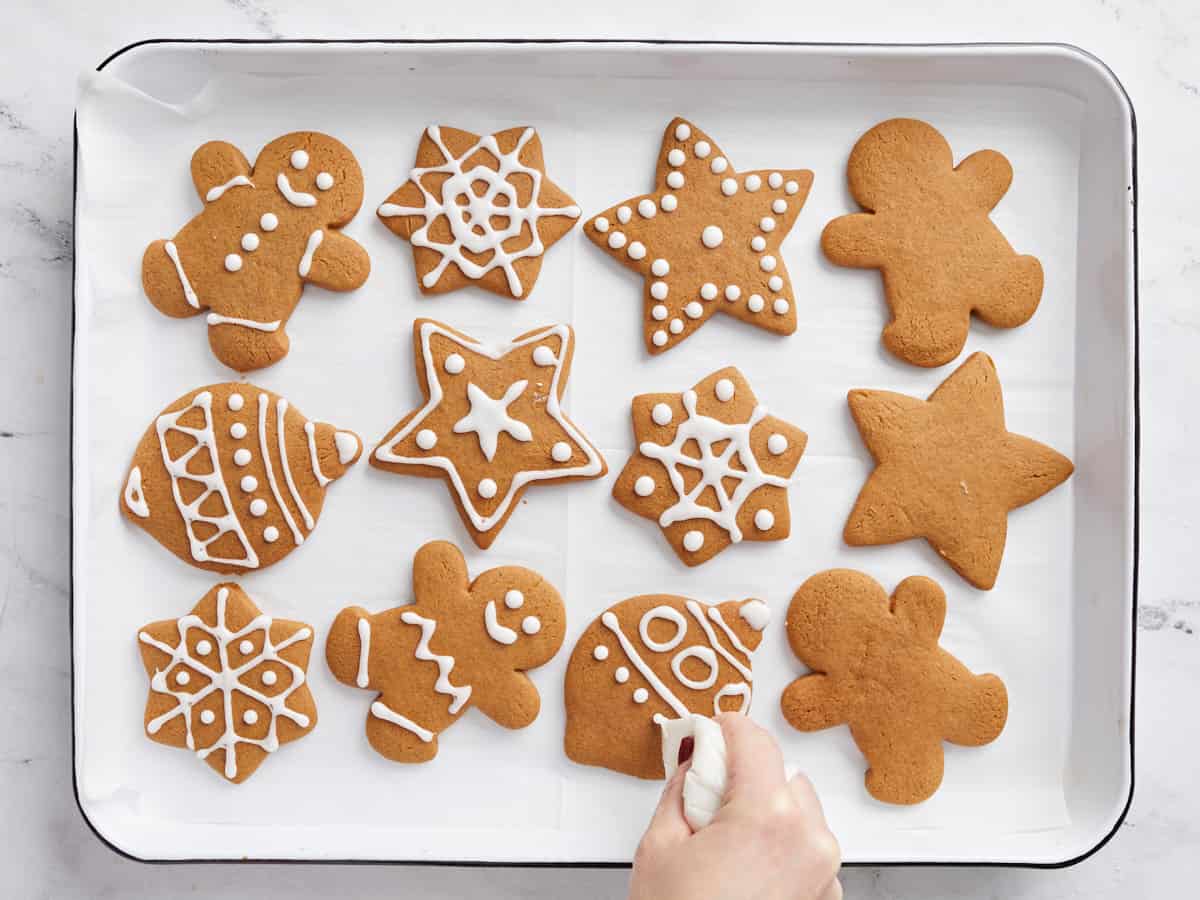
How to Decorate Gingerbread Cookies
While you don’t have to decorate gingerbread cookies, I think that’s half the fun. I like to keep things simple with a basic powdered sugar icing. To make the icing, mix 1 cup powdered sugar with 1-2 Tbsp water, or just enough for it to form a thick icing. You can make multiple batches of the icing and color each one separately with a couple drops of food coloring, for even more decorating fun. Then just spoon the icing into a plastic bag, cut off just a sliver of the corner of the bag to create a piping tip, and then decorate away!
You can also add tons of other fun items to the gingerbread cookies, like sprinkles, red hot candies, peppermints, or any other type of small candy. These extras will take your gingerbread cookies to the next level!
Storing Gingerbread Cookies
Once cooled and decorated (and once the icing has dried), the gingerbread cookies can be stored in an air-tight container at room temperature for about one week. …But I’m sure they’ll all get eaten before then!
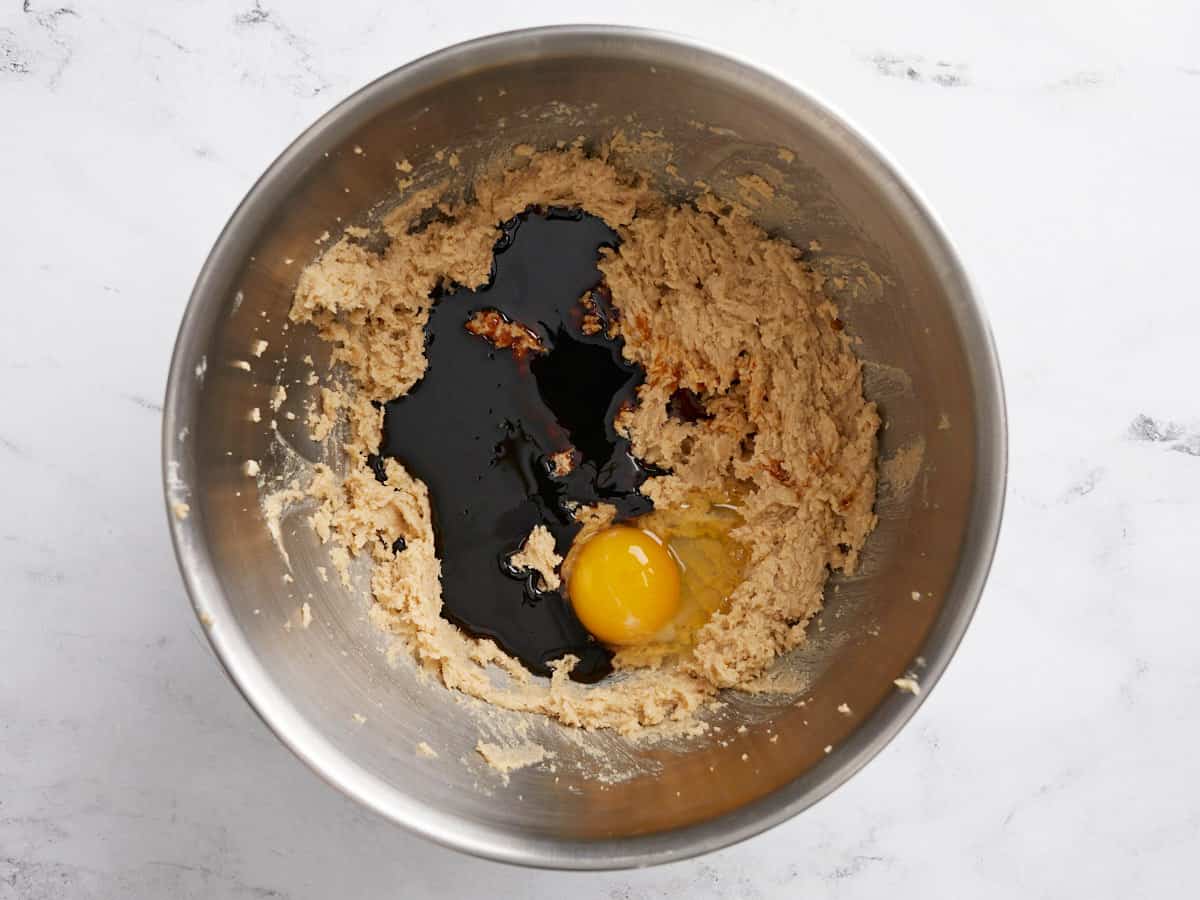
Add the butter and brown sugar to a bowl and use a mixer to beat them together until light and creamy. Add the molasses, vanilla, and egg, and beat until creamy again.
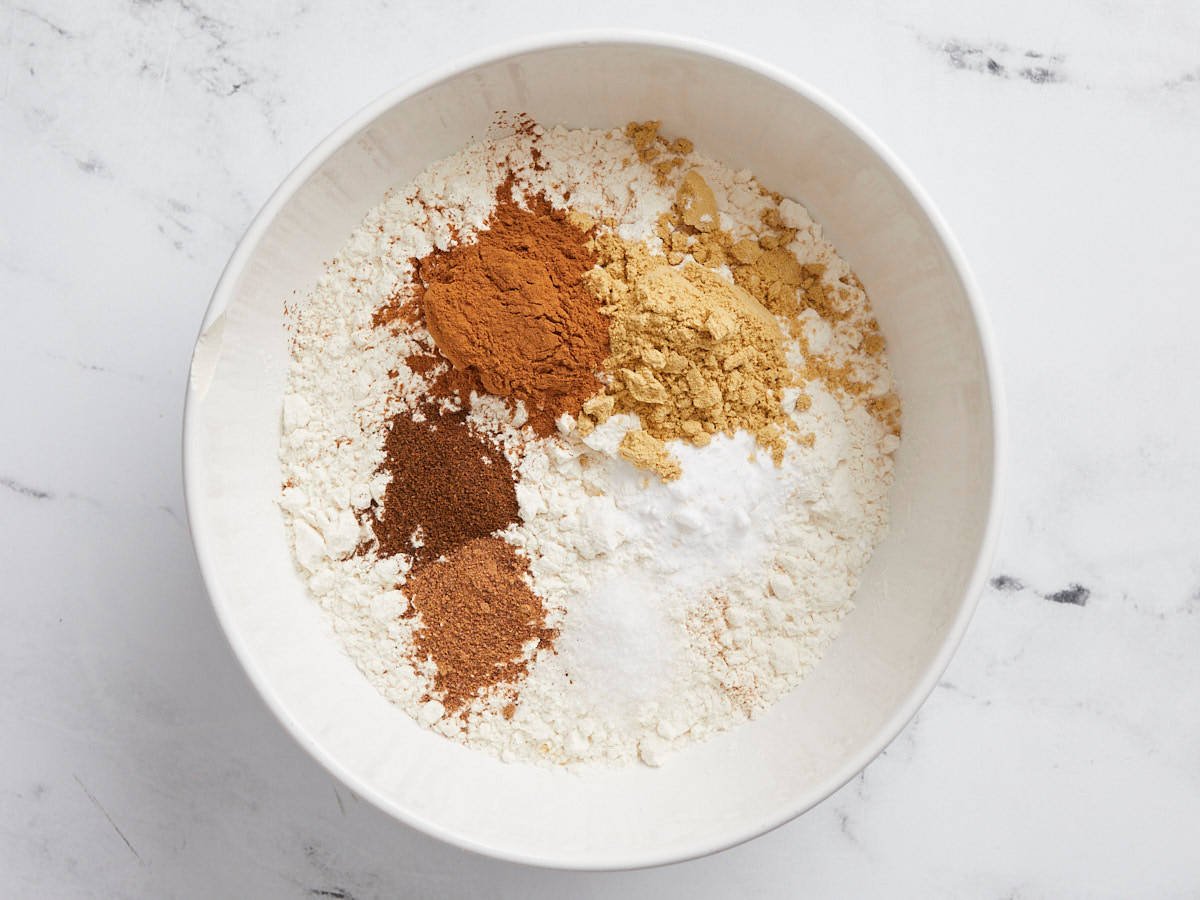
In a separate large bowl, stir together the flour, baking soda, salt, ginger, cinnamon, cloves, and nutmeg.
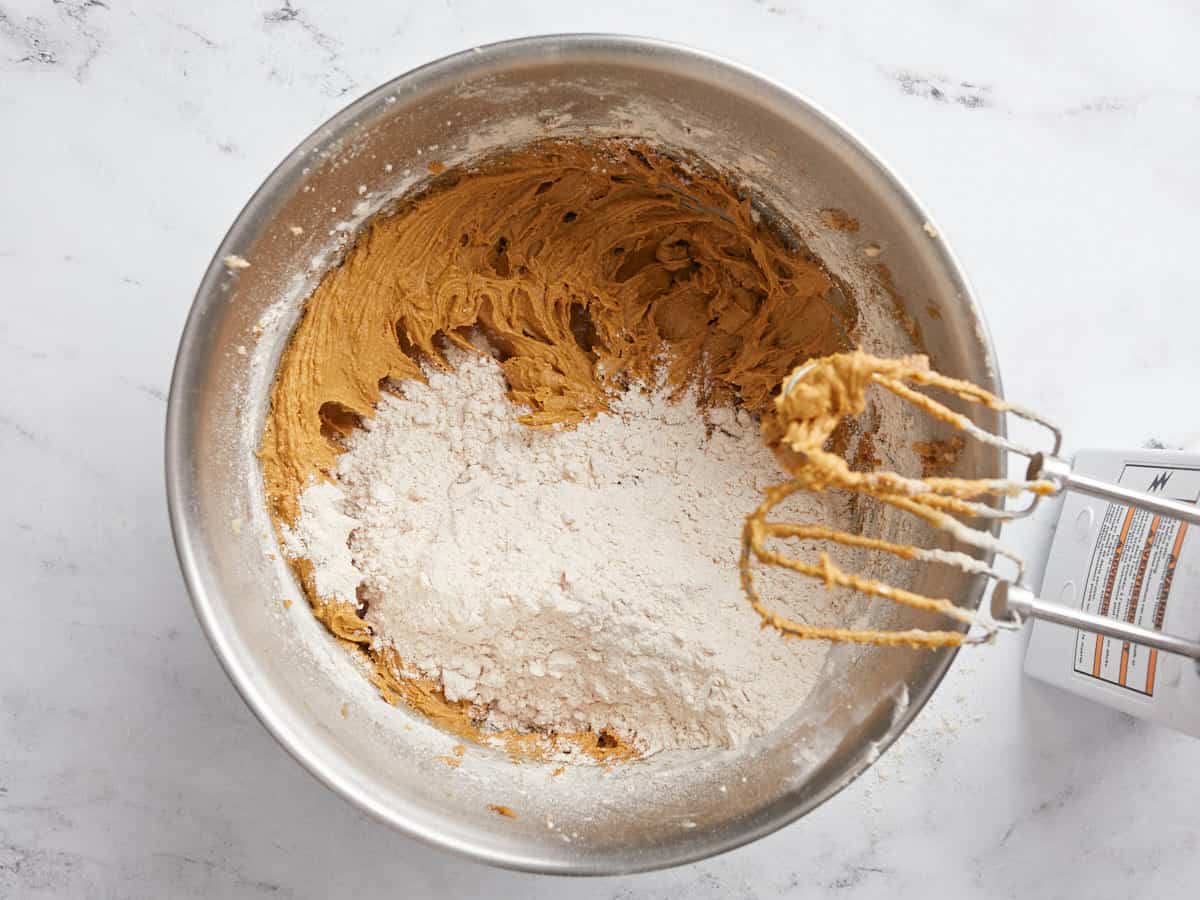
Add about ⅓ of the flour mixture to the butter and sugar mixture, then beat on low speed until incorporated. Repeat until all of the flour has been added to the batter. It should form a very soft cookie dough.
Transfer the cookie dough to a large piece of plastic, shape it into a ball, and wrap it tightly. Refrigerate for at least two hours, or up to one day.
When ready to make the cookies, preheat the oven to 350ºF. Divide the cookie dough in half to make it easier to work with (keep the other half in the refrigerator until ready to use). Roll the dough out on a lightly floured surface until it's about ⅛-inch thick. Cut the dough into your desired shapes and place them on a parchment-lined baking sheet, at least one inch apart.
Bake the cookies for 8 minutes, or until slightly puffed in the center and they are just beginning to brown on the outer edges. Remove the cookies from the oven and allow them to cool completely.
Icing (optional)
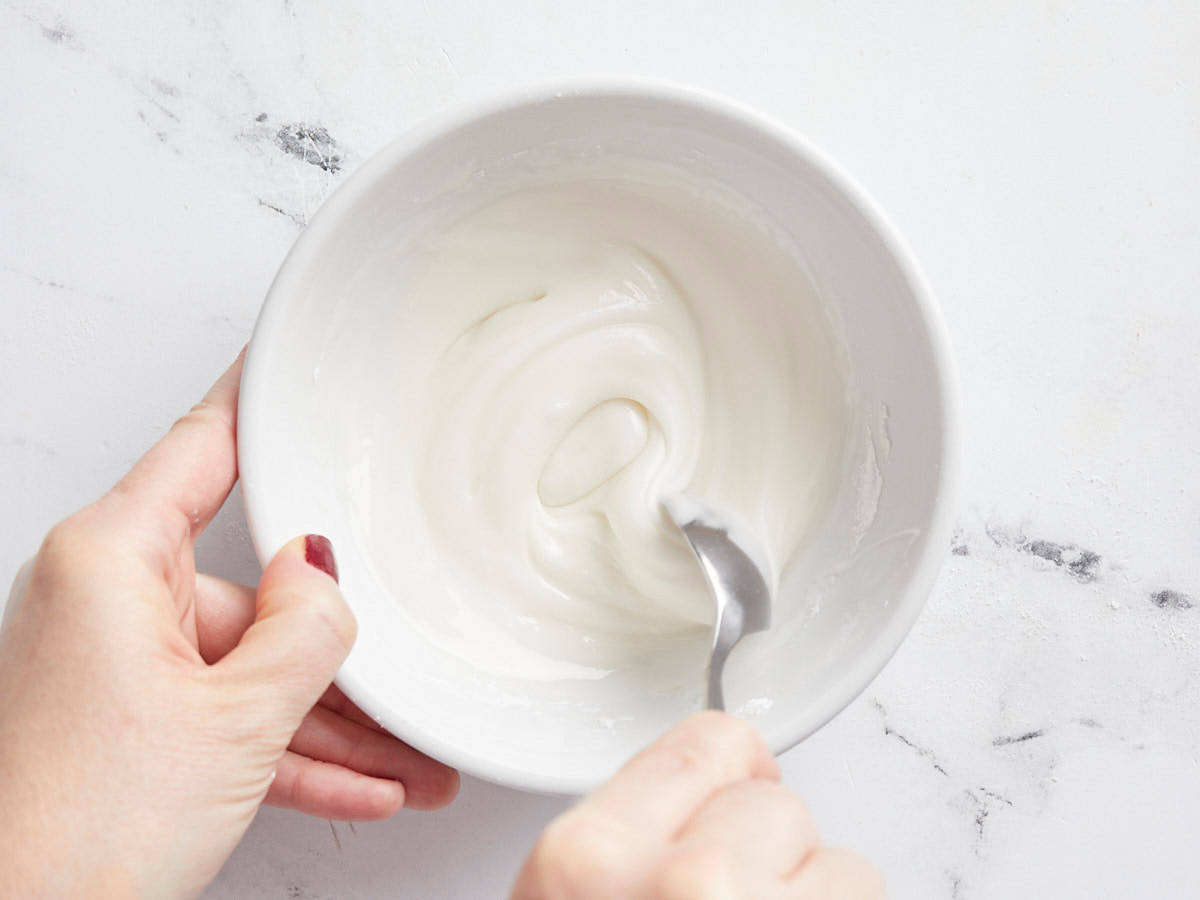
While the cookies are cooling, place the powdered sugar in a bowl and add 1 Tbsp water. Stir to combine, then continue to add water, a very small amount at a time, until it forms a thick icing (about 1-2 Tbsp total).
Place the icing in a plastic bag and cut a very small piece off the corner to create a piping tip. Pipe the icing onto the cooled cookies in your favorite design!
How to Make Gingerbread Cookies – Step by Step Photos
Using a mixer, beat together 12 Tbsp (¾ cup) room-temperature salted butter and ¾ cup brown sugar until light and creamy. Add ½ cup molasses, one tsp vanilla extract, and one large egg, then beat until smooth again.
In a separate bowl, stir together 3 cups of all-purpose flour, 2 tsp cinnamon 1 Tbsp ginger, ½ tsp cloves, ½ tsp nutmeg, and ½ tsp salt.
Add about ⅓ of the flour mixture to the butter and sugar, then beat on low speed until combined. Repeat until all of the flour and spices have been added to the cookie batter.
When all of the flour and spices have been added, you’ll have a very soft cookie batter.
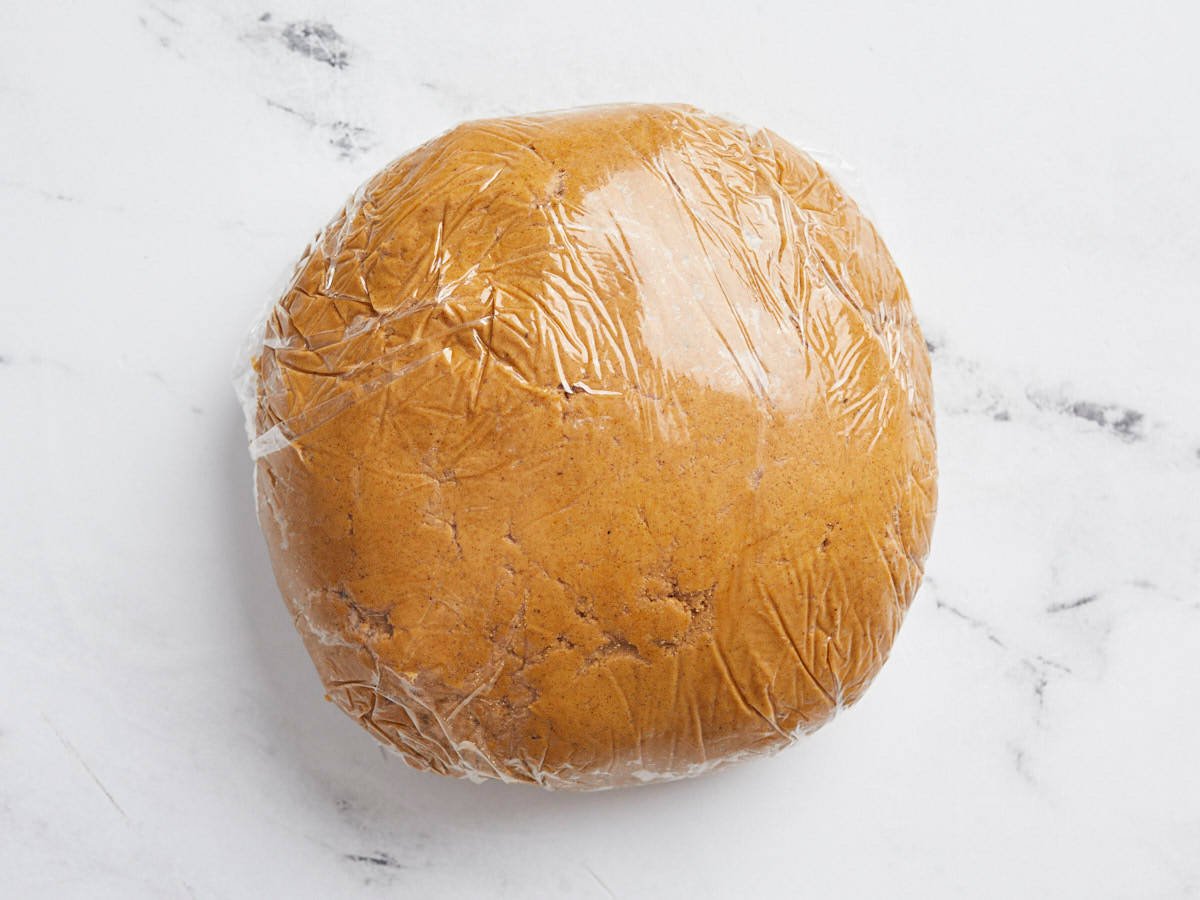
Place the cookie batter on a large sheet of plastic wrap, shape it into a ball, and wrap it tightly. Refrigerate the dough for at least two hours (it can stay refrigerated for up to a day).
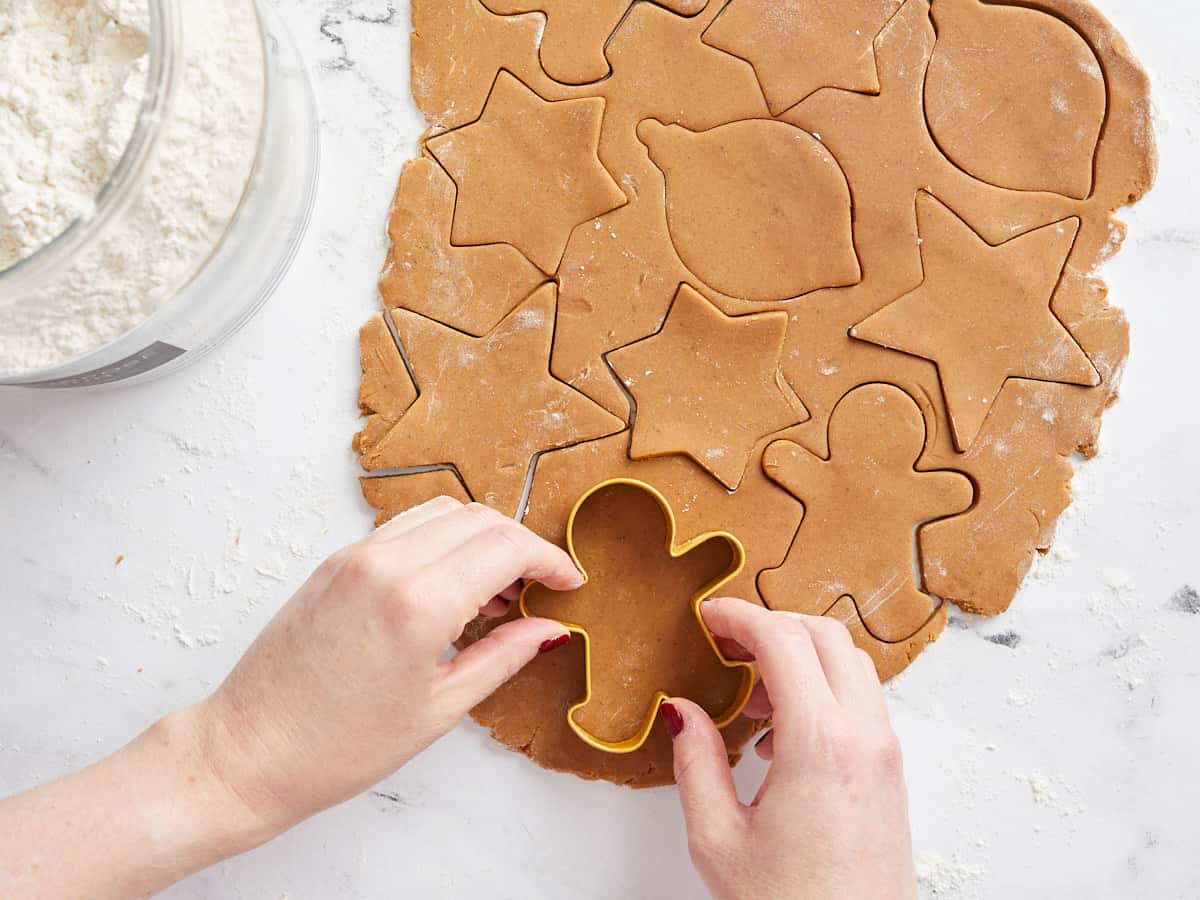
When you’re ready to make the cookies, preheat the oven to 350ºF. Divide the dough in half to make it easier to work with and place the other half in the refrigerator until ready to roll. Roll the dough out on a lightly floured surface until it’s about 1/8-inch thick, then cut into your desired shapes.
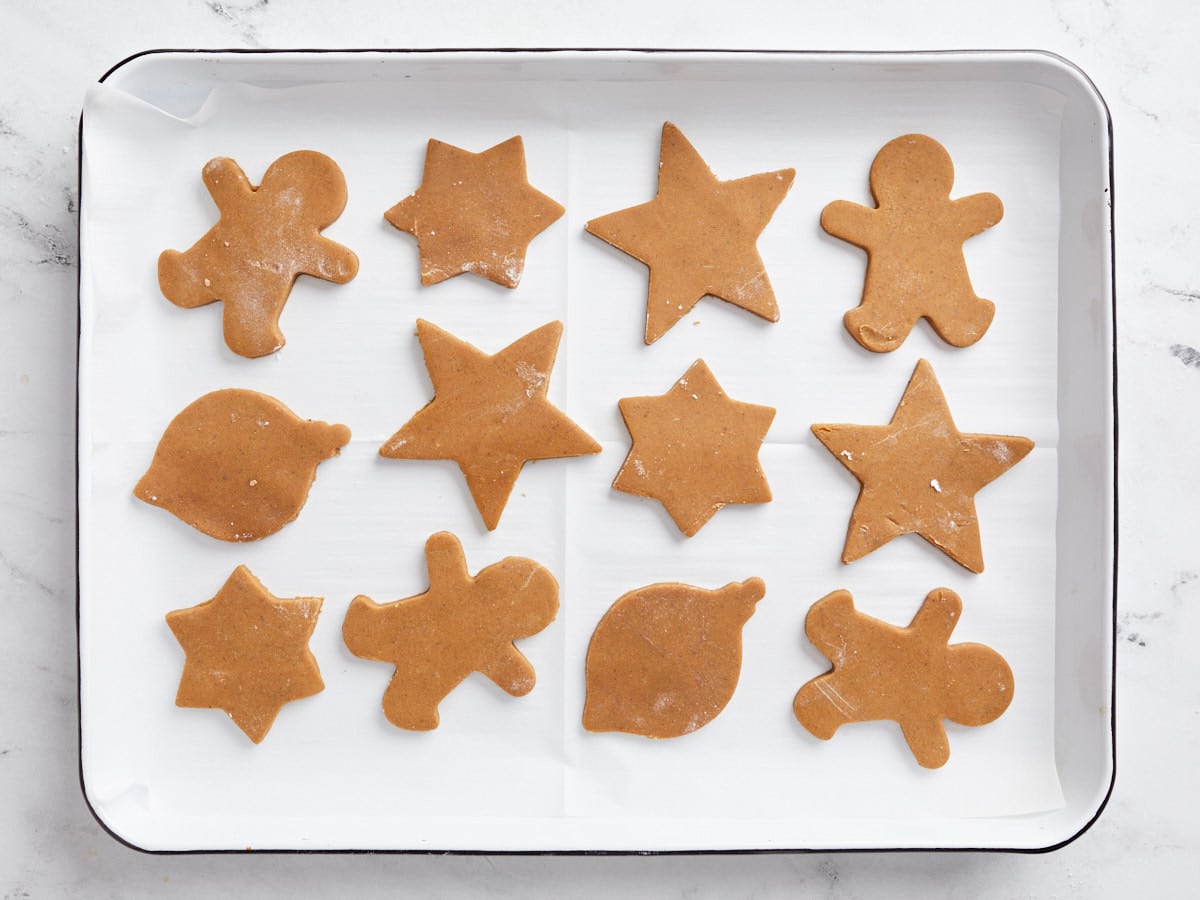
Place the cut cookies on a parchment-lined baking sheet with at least 1 inch between each cookie (they will expand a little). Gather up the dough scraps, roll again, and cut more until there is little or no dough left. Keep any unused dough in the refrigerator so it stays chilled.
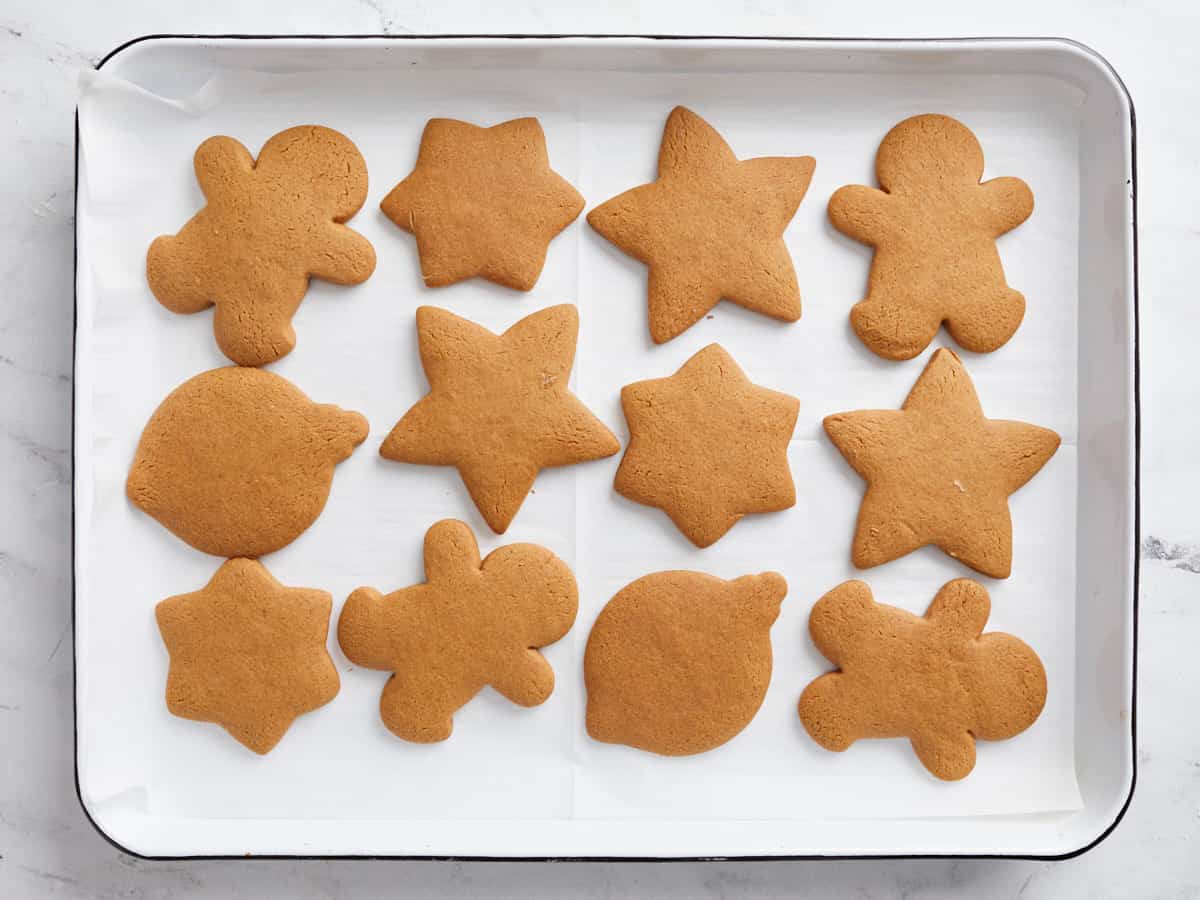
Bake the cookies in the preheated 350ºF oven for 8 minutes, or until slightly puffed in the center and the outer edges are just beginning to brown. Remove them from the oven and allow them to cool.
While the cookies are cooling, prepare the simple powdered sugar glaze. Add 1 cup powdered sugar to a bowl and add 1 Tbsp water. Stir to combine. Continue to add water, a little at a time, until it forms a thick glaze (1-2 Tbsp total water).
Spoon the icing into a plastic bag and cut off a very small piece of the corner to use as a piping tip, then have fun!