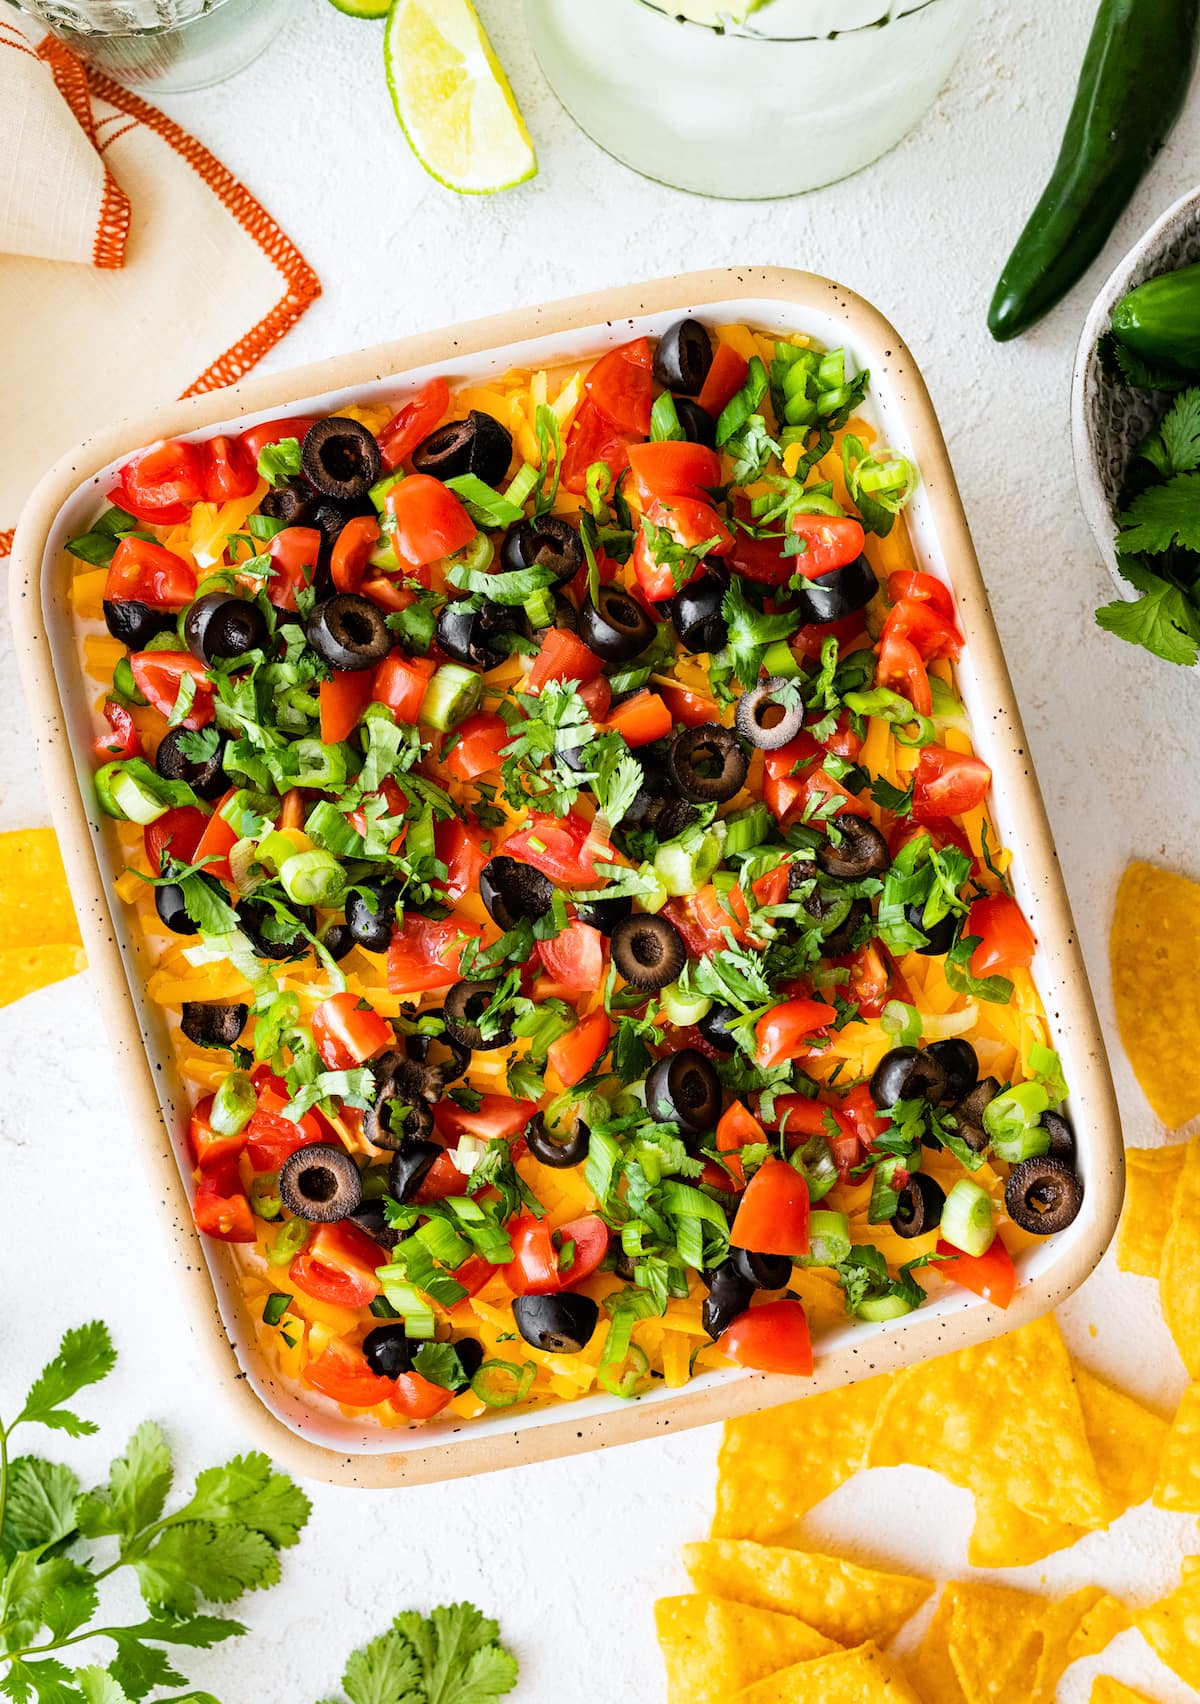
Whenever I need an appetizer to take to a party or potluck, I like to make 7 Layer Dip. It is the PERFECT party dip and always a crowd pleaser. This classic dip is layered with the best ingredients- refried beans, sour cream (or plain Greek yogurt), gu…
Whenever I need an appetizer to take to a party or potluck, I like to make 7 Layer Dip. It is the PERFECT party dip and always a crowd pleaser. This classic dip is layered with the best ingredients- refried beans, sour cream (or plain Greek yogurt), guacamole, salsa, cheese, and toppings! Serve with tortilla…
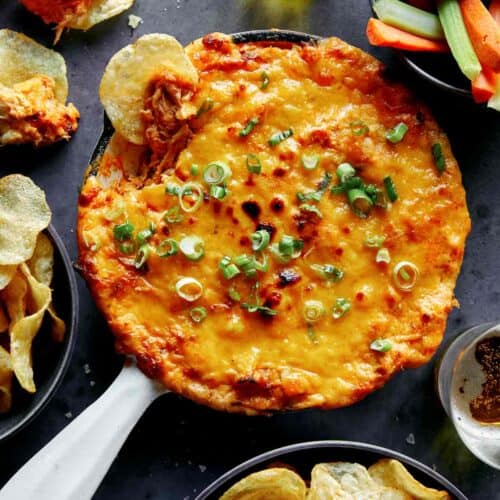
This easy chili cheese dip is always a crowd favorite! Made with a handful of ingredients, this dip comes together in a matter of minutes for the perfect addition to any party. I love a good dip. I could easily make a meal off of chips and dip, and sweet dips – such as my …
This easy chili cheese dip is always a crowd favorite! Made with a handful of ingredients, this dip comes together in a matter of minutes for the perfect addition to any party.
I love a good dip. I could easily make a meal off of chips and dip, and sweet dips – such as my cream cheese fruit dip – are one of my favorite easy desserts.
And since the TikTok algorithm knows way more than it should, it sends dip recipes my way all of the time. Not that I’m complaining. After all, cinnamon rolls with heavy cream are one of my favorite things thanks to TikTok.
A week or two ago a video of someone making their family’s version of chili cheese dip came up on my FYP and I had to put my own twist on it immediately. My dad and brother loved this easy chili cheese dip and I thought you all would enjoy it, too.
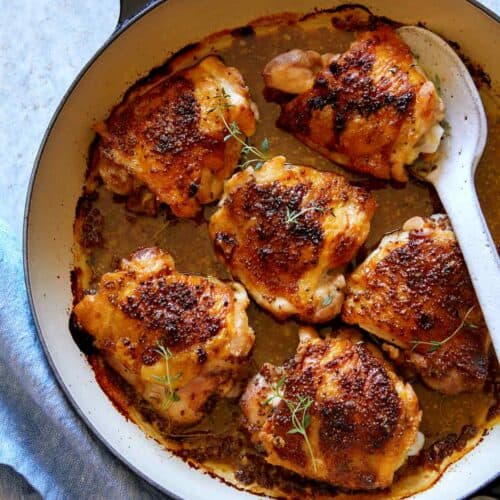
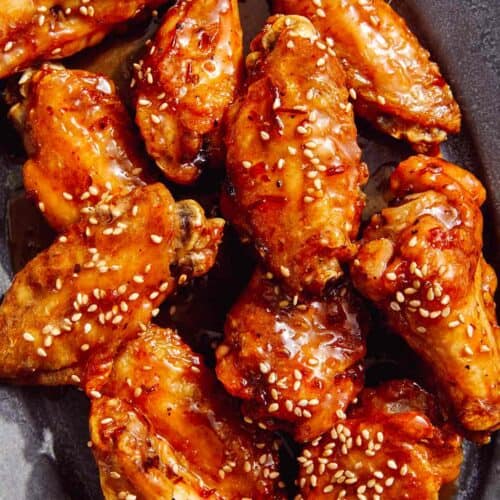
These Garlic Parmesan Wings are baked to crispy perfection, then tossed with melted butter, Parmesan cheese and garlic for an explosion of flavor with every bite!
If you’re into chicken wings, here’s a recipe that will have you smitten: try these garlic Parmesan wings! These homemade wings are easy to whip up, bursting with garlicky goodness, and coated in a Parmesan blanket of bliss. Whether it’s for a game day snack or a weeknight meal (or you just love all things chicken!), these wings are about to become your new obsession. We whipped them up with this lemon pepper sauce that had everyone asking for the recipe!
Ingredient notes for garlic Parmesan wings
Garlic parmesan wings are perfect for game day tables, an appetizer, or a tasty weeknight dinner. They come out lightly crispy infused with an irresistible cheesy, savory flavor.
Chicken wings: Buy split wings for the easiest prep. (Or, you can remove the wing tips.) If you can, buy organic chicken for the best flavor and most sustainable option.
Baking powder: The secret to crispy chicken? Baking powder! This helps to crisp up the skin in the oven, similar to our baked chicken thighs.
Garlic powder, onion powder, smoked paprika, salt, and black pepper: This blend of spices brings out the savory flavor of the chicken.
Salted butter: Salted butter is best, but you can also substitute unsalted butter with 1 pinch of salt.
Garlic: Fresh garlic is crucial to the flavor here!
Grated Parmesan cheese: Use grated Parmesan cheese, the type that is powdery and crumbly, not shredded (which is like large sticks).
Some wings recipes call for using flour to coat the wings to get them even crispier, but there’s no flour needed here! This makes them suitable for gluten-free diets, as well.
Tips for cooking wings
Garlic parmesan wings are simple to whip up and make a deliciously satisfying finger food! There are a few tricks to wings if you’ve never made them before:
Marinade for 30 minutes to 1 hour: Stir together the chicken wings with the baking powder, garlic powder, onion powder, kosher salt and freshly ground black pepper. Refrigerate 30 minutes to 1 hour.
Then, bake the wings for 30 minutes. Place the wings on an aluminum foil-lined sheet for 15 minutes. Flip and bake until browned and starting to become crispy, 15 to 18 minutes.
Add the garlic sauce and Parmesan cheese. Melt the butter in a skillet over medium high heat. Add the wings and cook, turning frequently, until crispy, 1 to 2 minutes. Lower heat to medium and stir in the garlic. Cook 30 seconds until fragrant and then remove from heat. Sprinkle with Parmesan cheese and serve warm.
Make lemon pepper sauce, if desired
The sauce is optional, but it takes these garlic parmesan wings up a level! Lemon pepper sauce is a common dipping sauce for wings. While the name sounds similar, it’s not flavored with lemon pepper, a store-bought seasoning blend of lemon zest, salt and pepper. It simply uses a real lemon to bring in the citrus, and the other ingredients you probably already have in your pantry and fridge. You’ll just need to stir together the following ingredients to make a quick and simple sauce:
Salted butter
Lemon juice and zest
Freshly ground black pepper
Garlic powder
Salt
Storage and leftovers
Garlic parmesan wings are best served immediately, but the taste great at room temperature too. They can sit out for 2 hours at room temperature before they need to be refrigerated. Store leftover wings refrigerated for up to 4 days.
Buy organic chicken if possible
For this garlic parmesan chicken wings recipe, try to buyorganic chicken if possible. Organic is the highest quality meat that was raised sustainably. It is also free of chemicals and additives so it’s the healthiest option for eating: and, it just tastes better! Per the USDA, organic chicken must be raised in living conditions that accommodate their natural behavior, be fed 100% organic feed and forage, and not be given antibiotics or hormones.
Other wing sauces
There are many other ways to serve garlic parmesan wings outside of the lemon pepper sauce! Here are a few options:
These Garlic Parmesan Wings are baked to crispy perfection, then tossed with melted butter, Parmesan cheese and garlic for an explosion of flavor with every bite!
Ingredients
1 ½ pounds chicken wings, split (optional, remove wing tips) and patted dry
In a large bowl, stir together the chicken wings with the baking powder, garlic powder, onion powder, kosher salt and freshly ground black pepper. Refrigerate 30 minutes to 1 hour.
Preheat the oven to 450°F.
Place the wings on an aluminum foil-lined sheet for 15 minutes. Flip and bake until browned and starting to become crispy, 15 to 18 minutes.
Melt the butter in a skillet over medium high heat. Add the baked wings and cook, turning frequently, until crispy, 1 to 2 minutes. Lower heat to medium and stir in the garlic. Cook 30 seconds until fragrant and then remove from heat. Sprinkle with Parmesan cheese and serve warm. If desired, serve with Lemon Pepper Sauce for dipping. Store leftover wings refrigerated for up to 4 days.
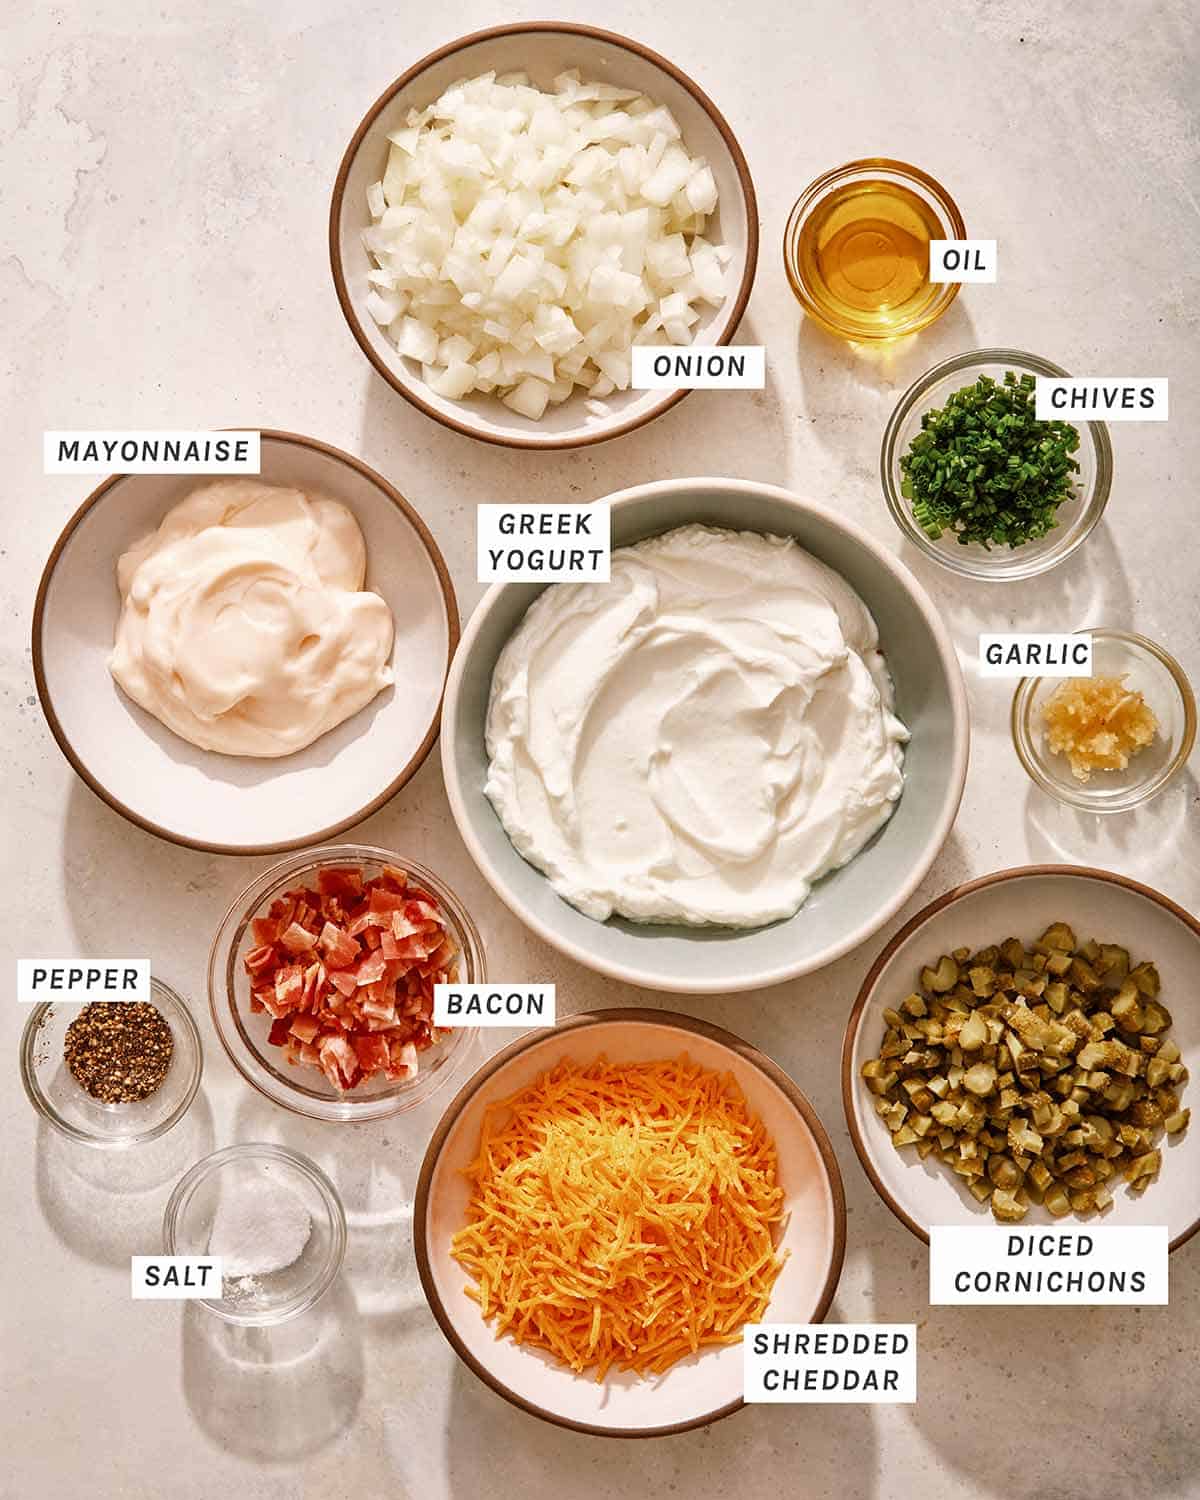
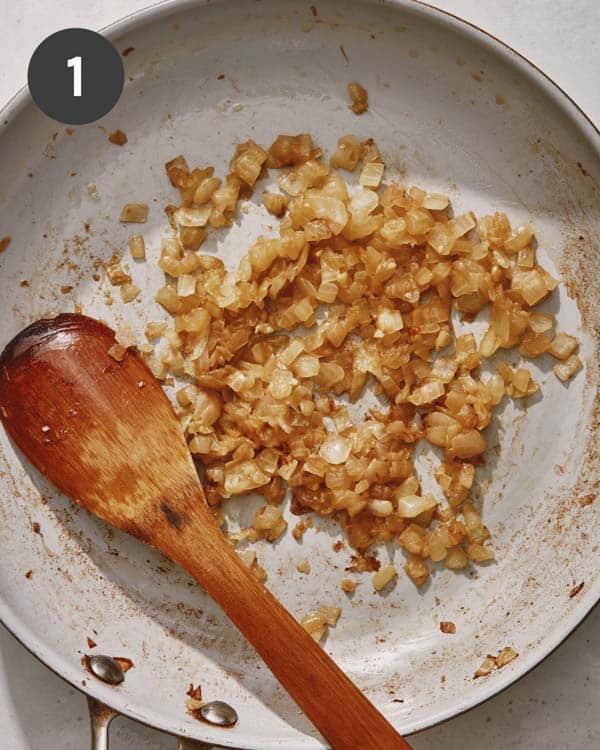
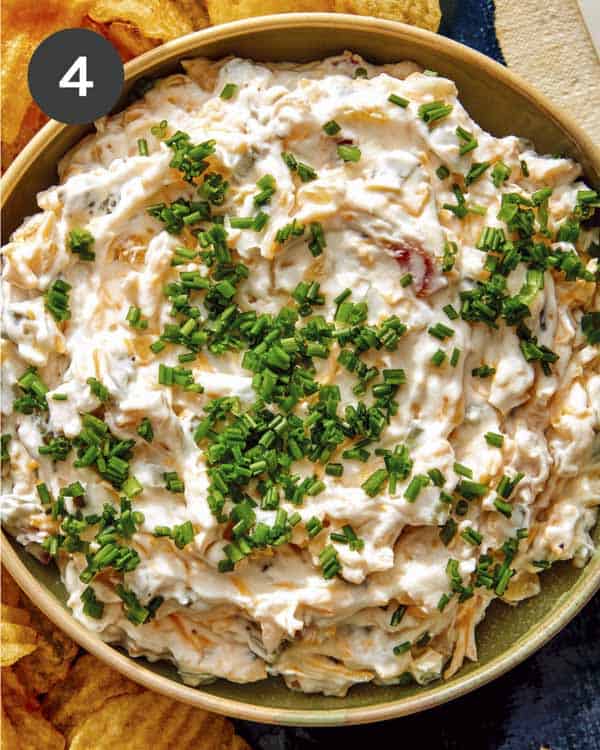
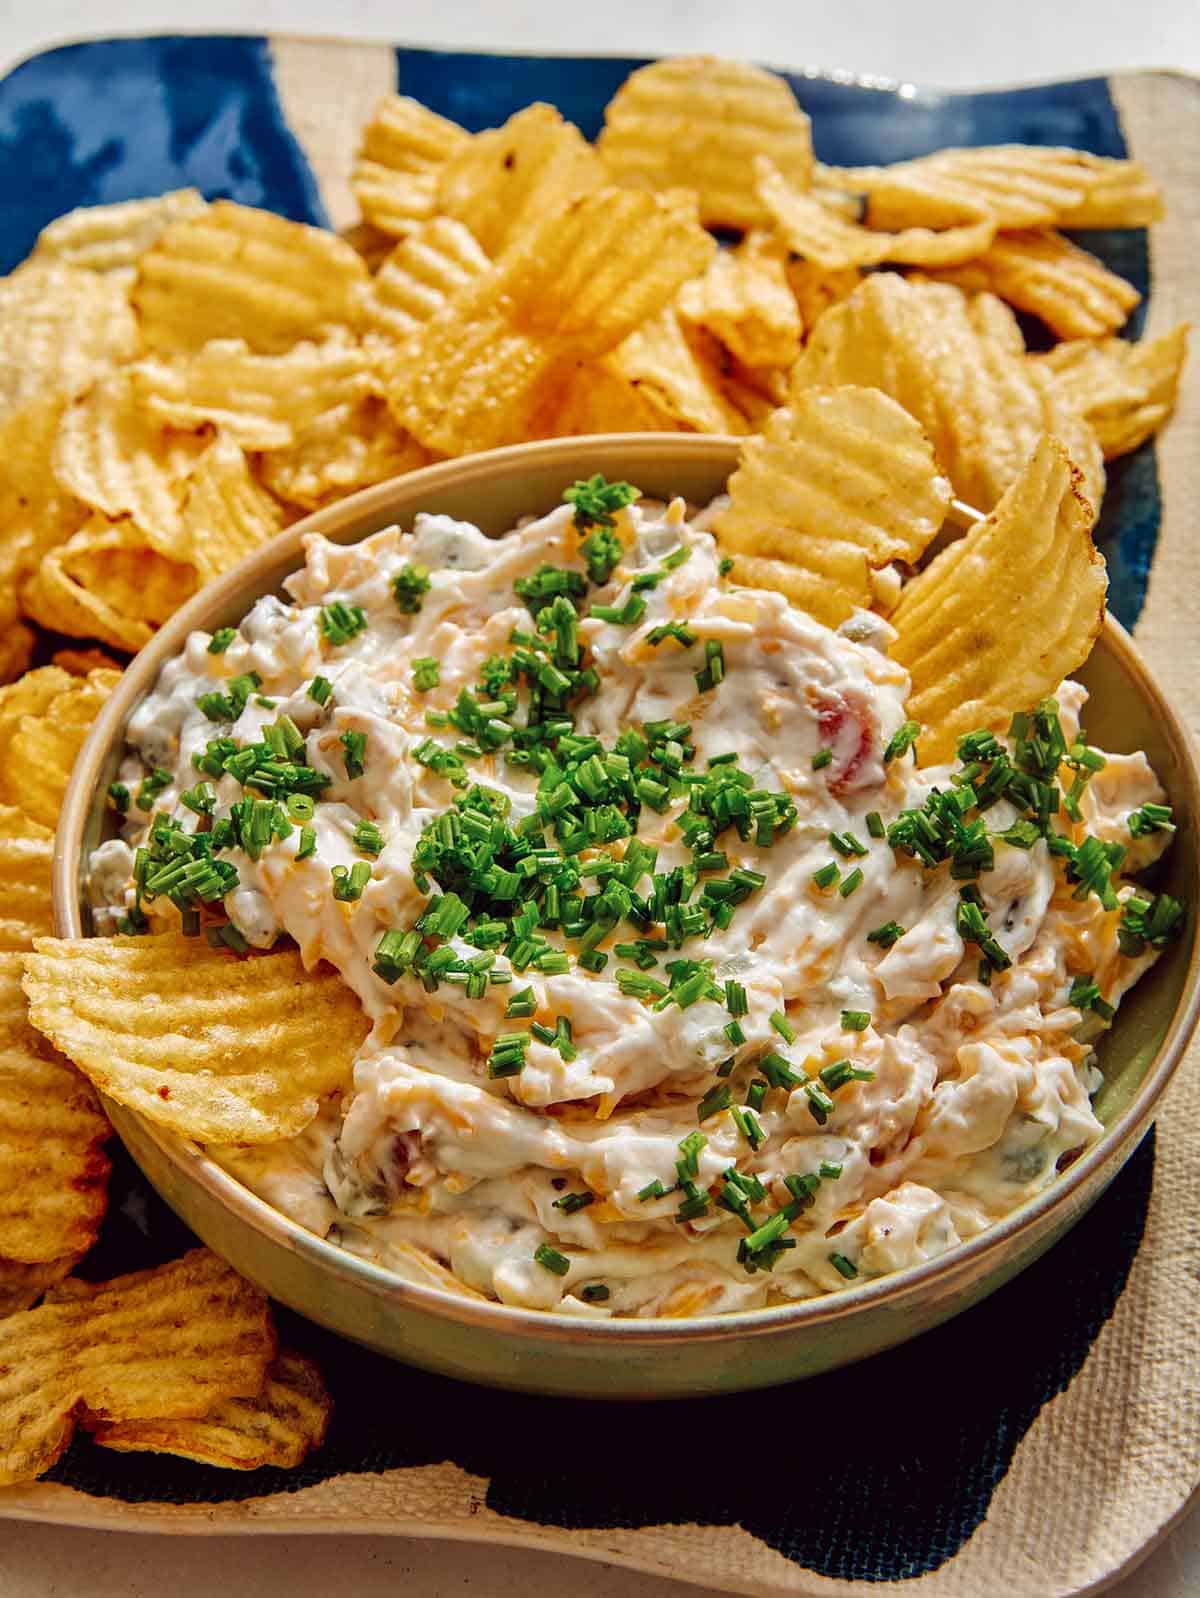
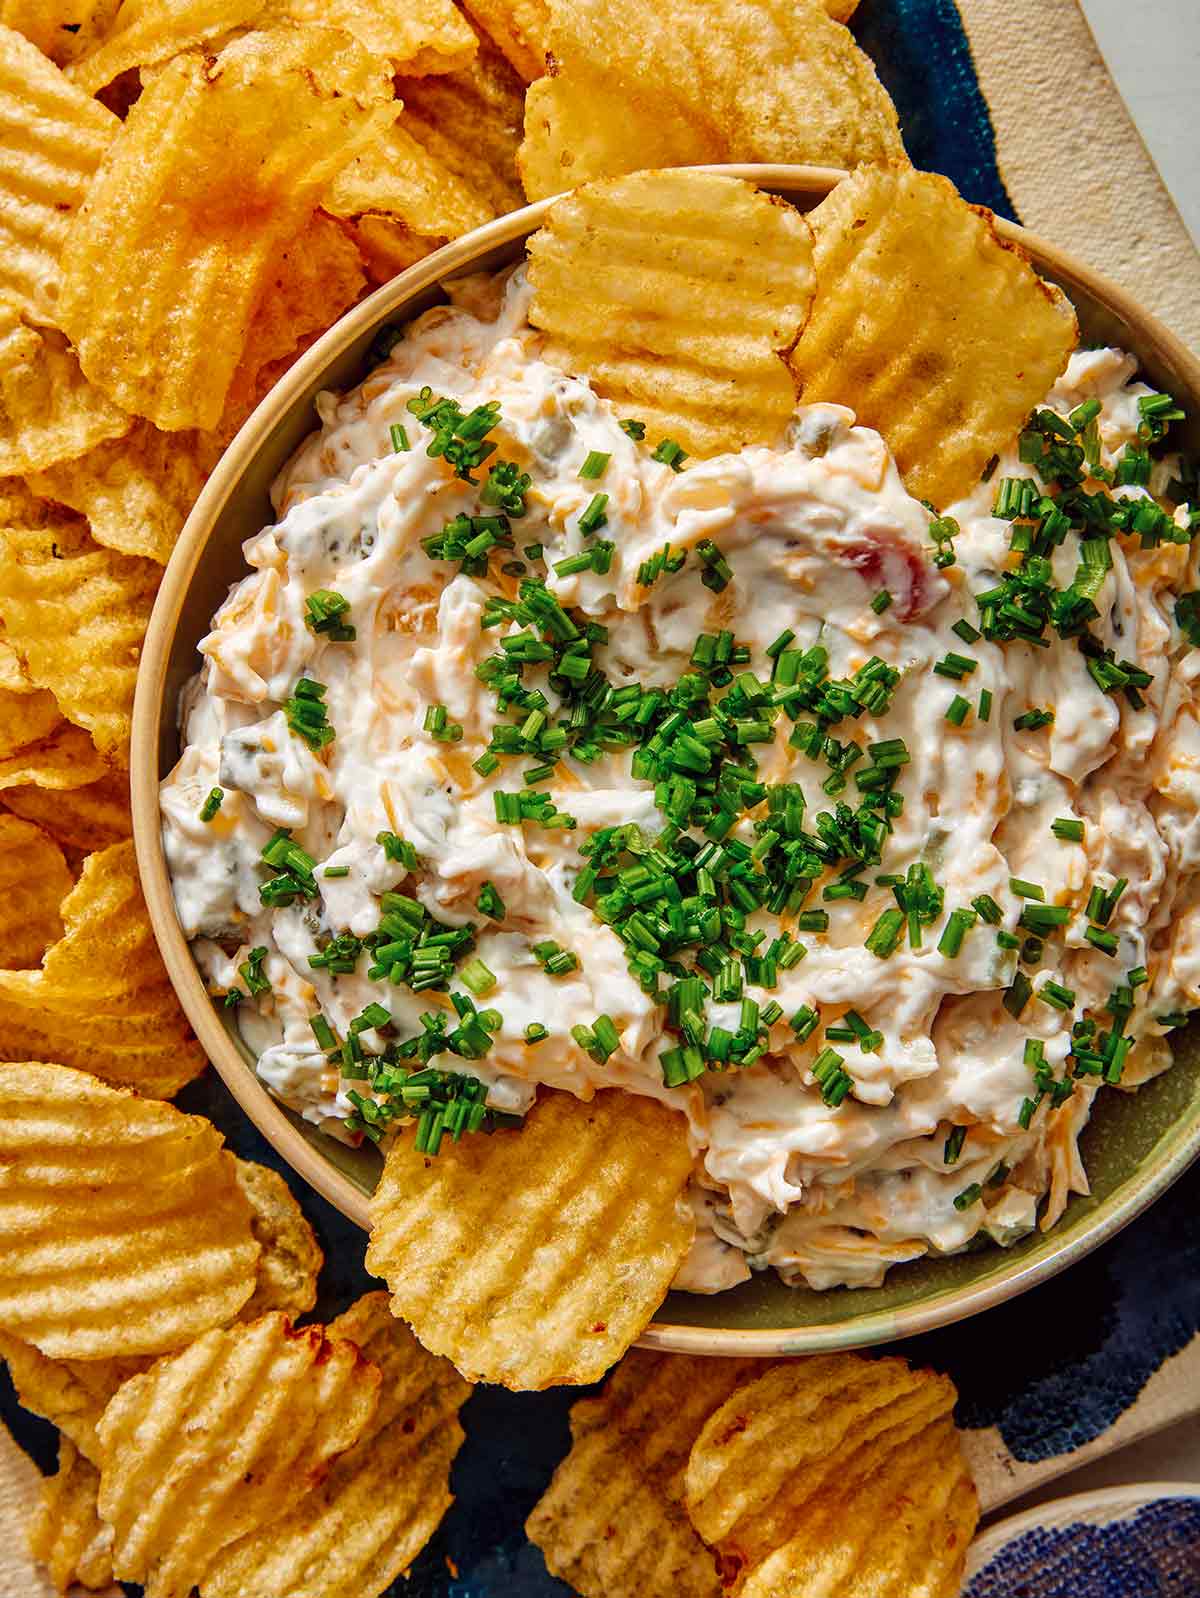
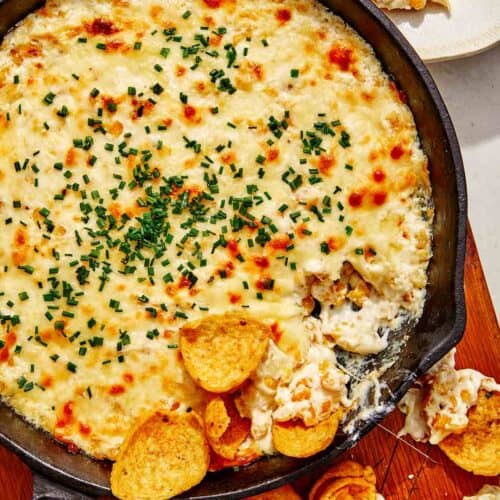
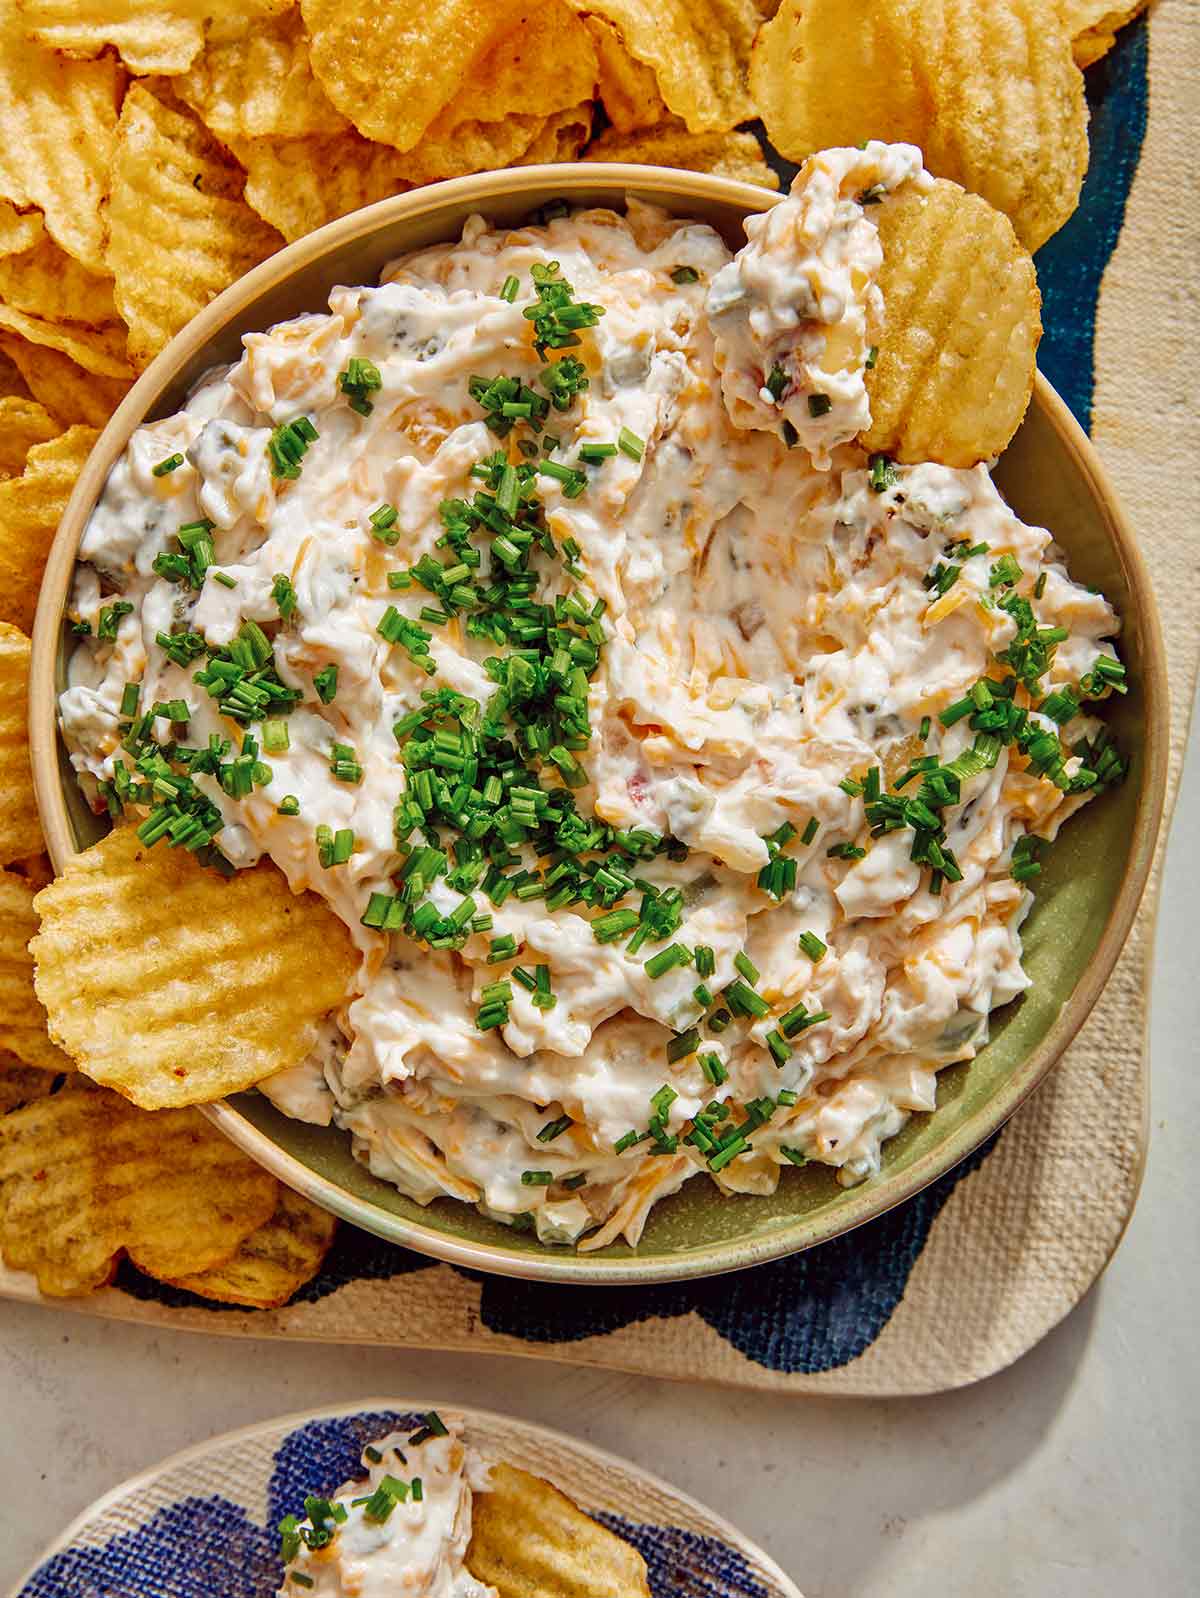
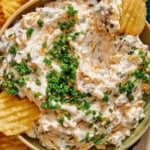
Our loaded baked potato dip takes all of your favorite potato toppings: bacon, shredded cheese, and chives, and combines them in a rich and creamy dip. We took things up a notch by mixing caramelized onions and cornichons into the dip for a flavor upgrade you didn’t know you needed. This dip takes only 20 minutes to make and is the perfect pairing for everything from french fries and pretzels to pepper wedges and cucumber…
Our loaded baked potato dip takes all of your favorite potato toppings: bacon, shredded cheese, and chives, and combines them in a rich and creamy dip. We took things up a notch by mixing caramelized onions and cornichons into the dip for a flavor upgrade you didn’t know you needed.
This dip takes only 20 minutes to make and is the perfect pairing for everything from french fries and pretzels to pepper wedges and cucumber rounds. To serve a crowd, we like adding this to a giant snack board along with fried pickle dip and beer cheese. Just don’t forget our favorite dipper for this loaded dip, which includes everything but the potato: potato chips!
How to Make Baked Potato Dip
Ingredients
Process
Place a pan over medium-low heat. Add oil, followed by diced onion. Caramelize onions, stirring occasionally, about 12 to 15 minutes. Stir in grated garlic and continue to cook for 1 minute. Remove from heat and set aside to slightly cool.
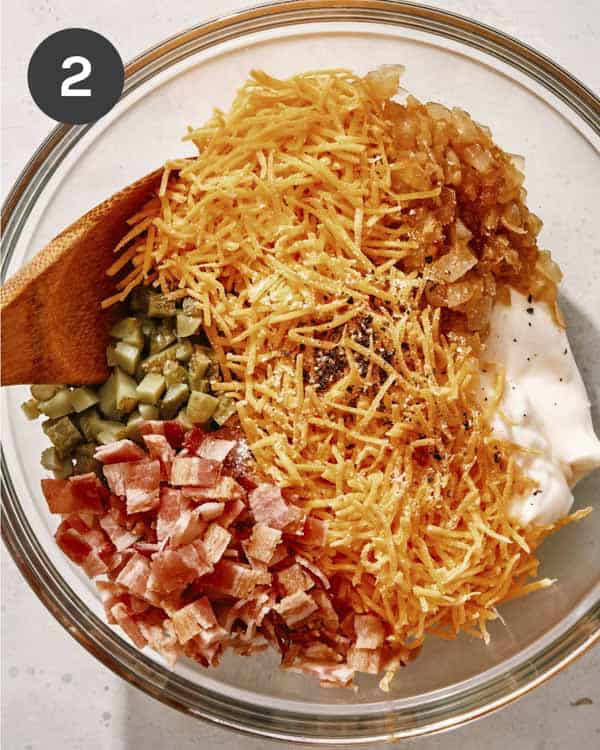
In a mixing bowl, combine Greek yogurt, kewpie, caramelized onions, cornichons, crumbled bacon, and finely shredded cheddar. Season with salt and pepper.
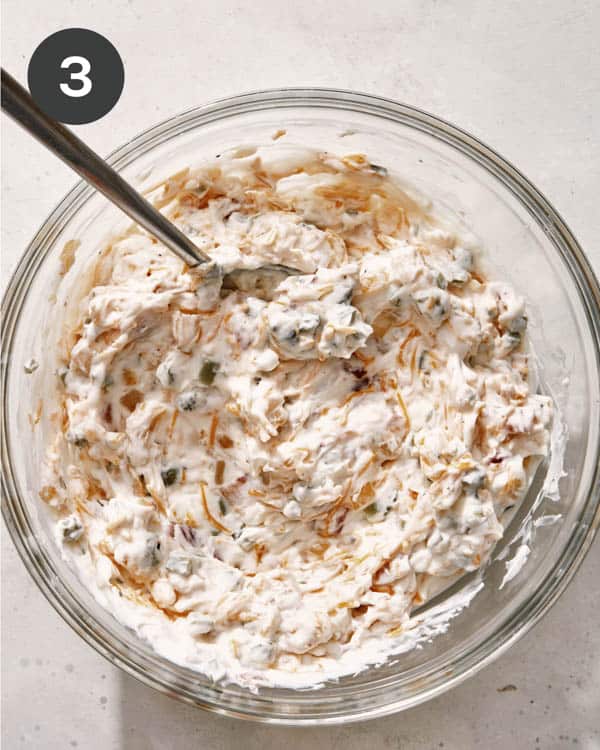
Fold together until combined.
Top with sliced chives and serve.
Tips for Success
If the heat is too high when cooking your onions, they’ll brown instead of caramelize. Lower heat helps bring out the sugars, making the onions soft as they brown instead of crispy.
Dice the cornichons finely and grate, or finely mince, the garlic so that their flavor disperses throughout the dip.
You can serve this dip chilled or slightly at room temperature.
Store leftovers in an airtight container for up to 3 days. This dip is also perfect for making a day or two ahead of time. As it sits, the ingredients combine and create a more intense flavor profile.
Variations
Make it spicy by adding a diced jalapeno pepper or a sprinkle of red chili flakes or cayenne pepper to taste.
Swap finely shredded cheddar for smoked cheddar, pepper jack, Gouda, or even blue cheese to change the flavor.
For a vegetarian baked potato dip, leave out the bacon.
Add diced green pepper or mushroom to the onions as they caramelize for added vegetables.
Top the dip with a swirl of BBQ sauce, hot sauce, or buffalo sauce for an extra burst of flavor.
1/2cupKewpie mayonnaise(American mayonnaise is fine)
2/3cupfinely diced cornichons(15-20)
2/3cup finely shredded cheddar
2stripscooked and crumbled bacon
salt and pepper to taste
garnish
3 1/2tablespoonsthinly sliced chives
Instructions
Place a pan over medium-low heat. Add oil, followed by diced onion. Caramelize onions, stirring occasionally, about 12 to 15 minutes.
Stir in grated garlic and continue tocook for 1 minute. Remove from heat and set aside to slightly cool.
In a mixing bowl combine Greek yogurt, kewpie, caramelized onions, cornichons, crumbled bacon, and finely shredded cheddar. Season with salt and pepper.
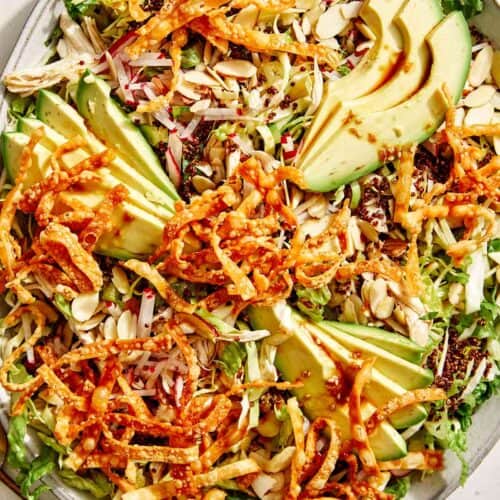
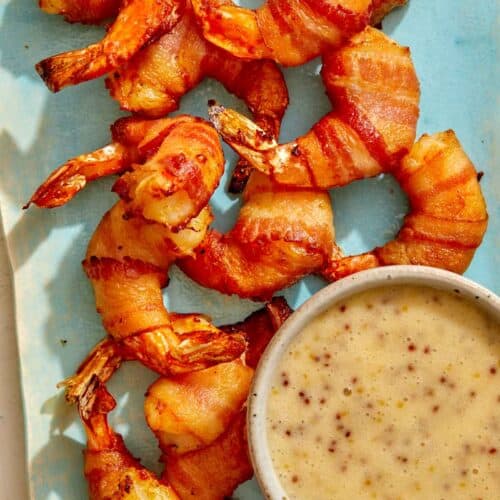
Still planning your menu for the big game? Look no further than these 85 delicious game-day recipes. From dips and small bites to main dishes and desserts, we’ve got everything you need to throw the best game-day party in town. I’ve never been super into watching football, despite being a big fan of game-day snacks. …
Still planning your menu for the big game? Look no further than these 85 delicious game-day recipes. From dips and small bites to main dishes and desserts, we’ve got everything you need to throw the best game-day party in town.
I’ve never been super into watching football, despite being a big fan of game-day snacks.
But now that I’m parenting a certified Swiftie and Taylor’s dating The Guy on the Chiefs…well, let’s just say that the big game is a little bit more on my radar than usual this year.
The food is still the most important part of any game-day party, though, if you ask me. I love loading up on a plate full of chips and dips, but will also never say no to a great sandwich or bowl of chili or helping of cheesy potatoes.
Whether you’re planning a party for the big game or are cooking for your family at home, I’ve pulled together 75+ of the best game-day recipes. From dips to mains to sides and desserts, I’ve got you covered for anything you could possibly want to serve.
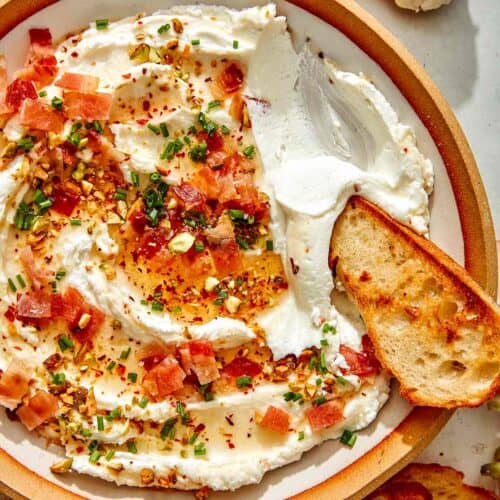
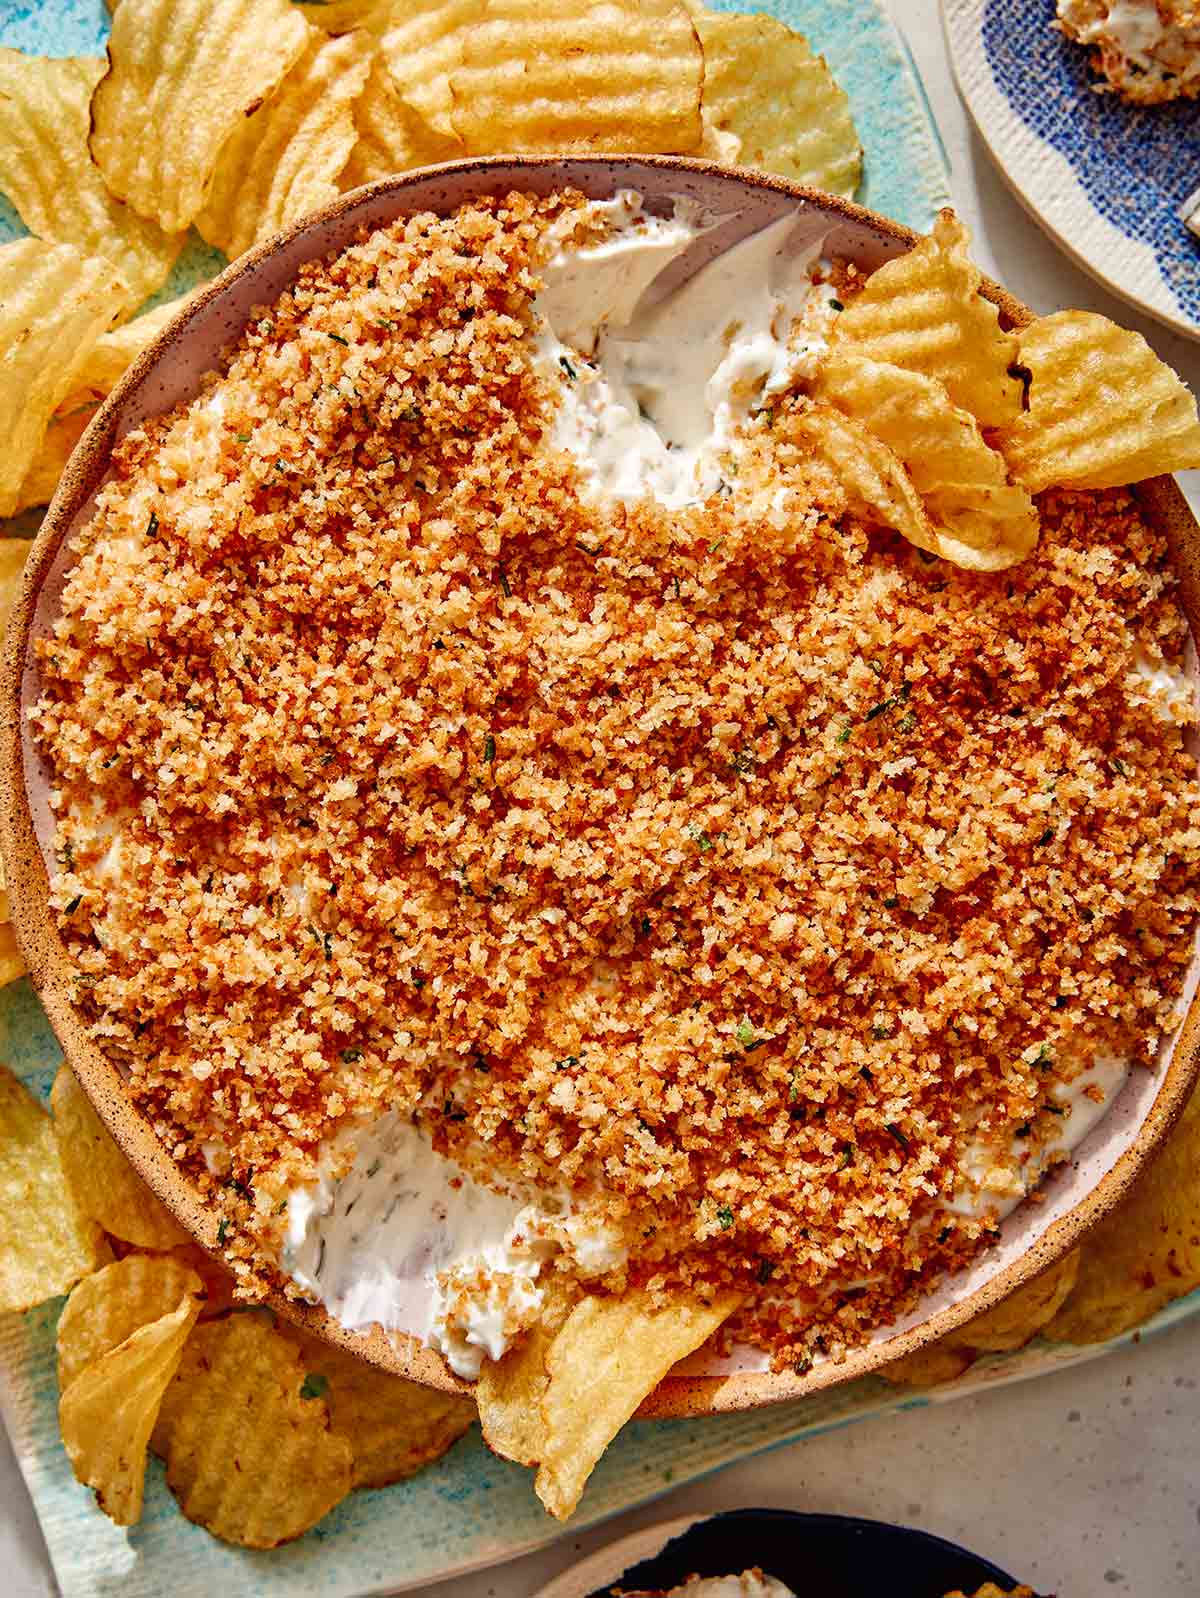
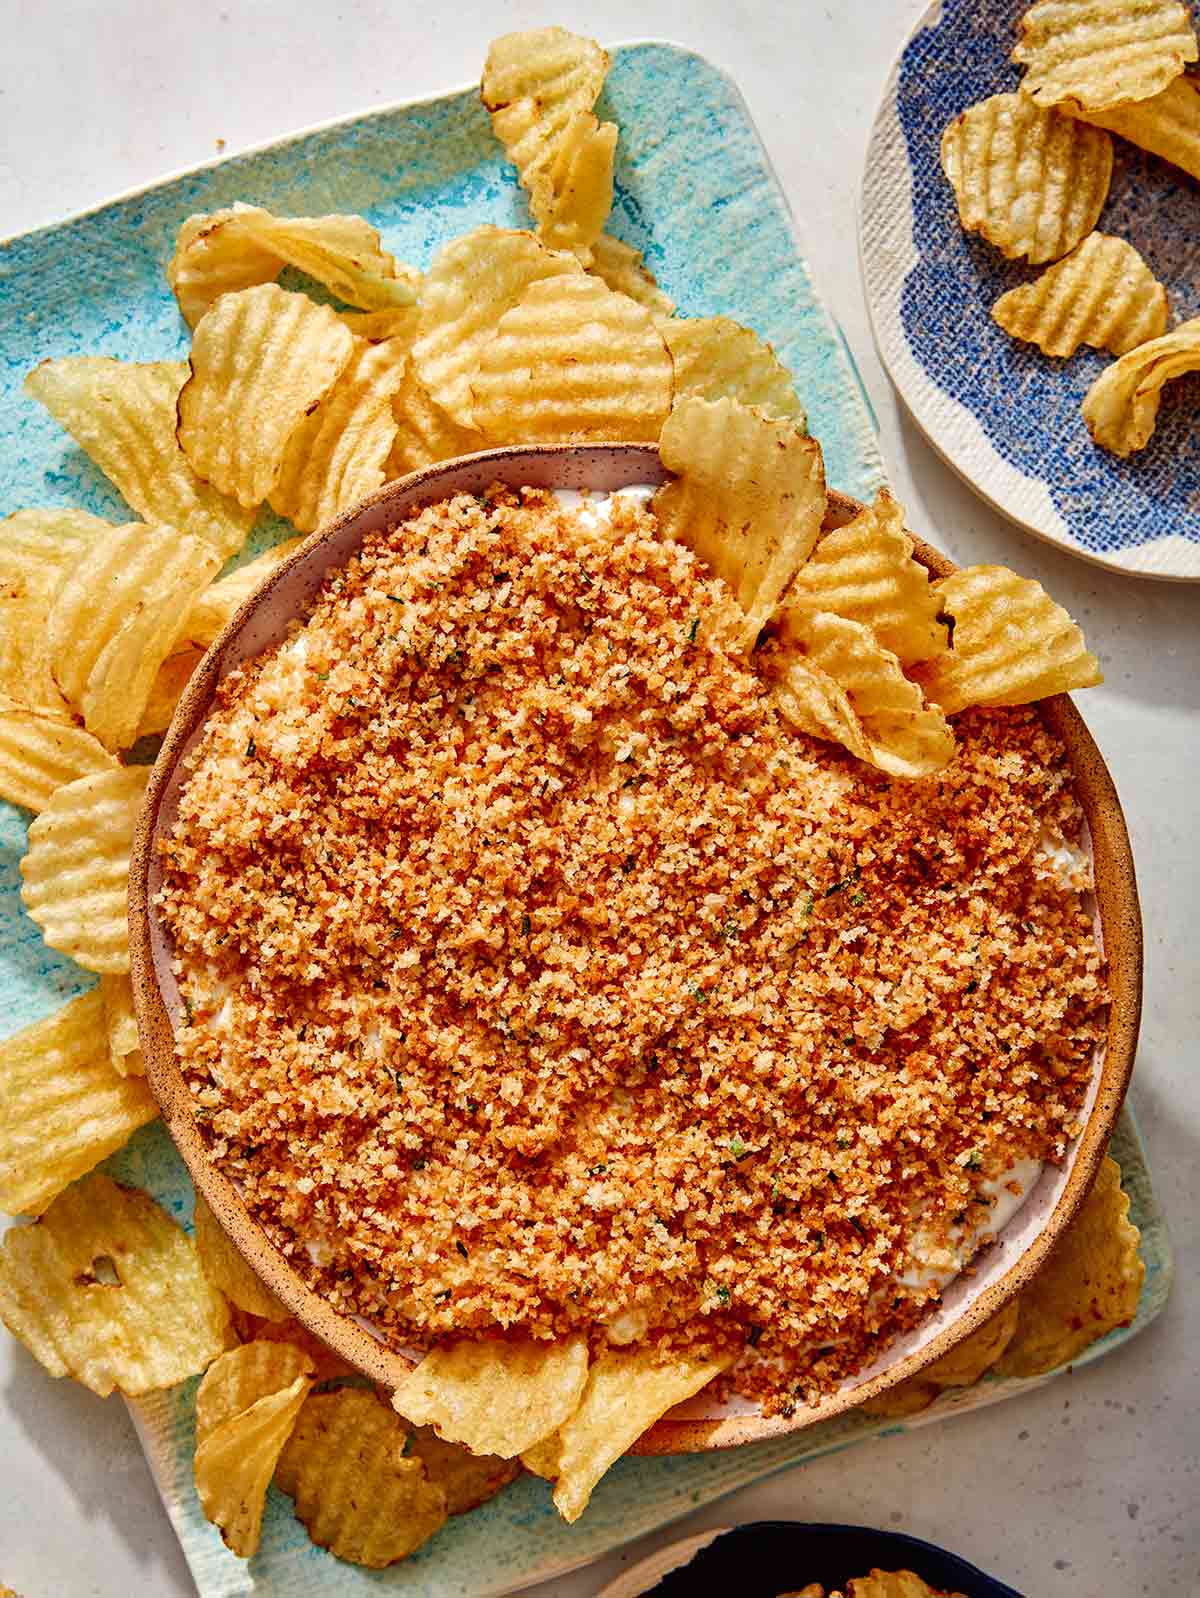
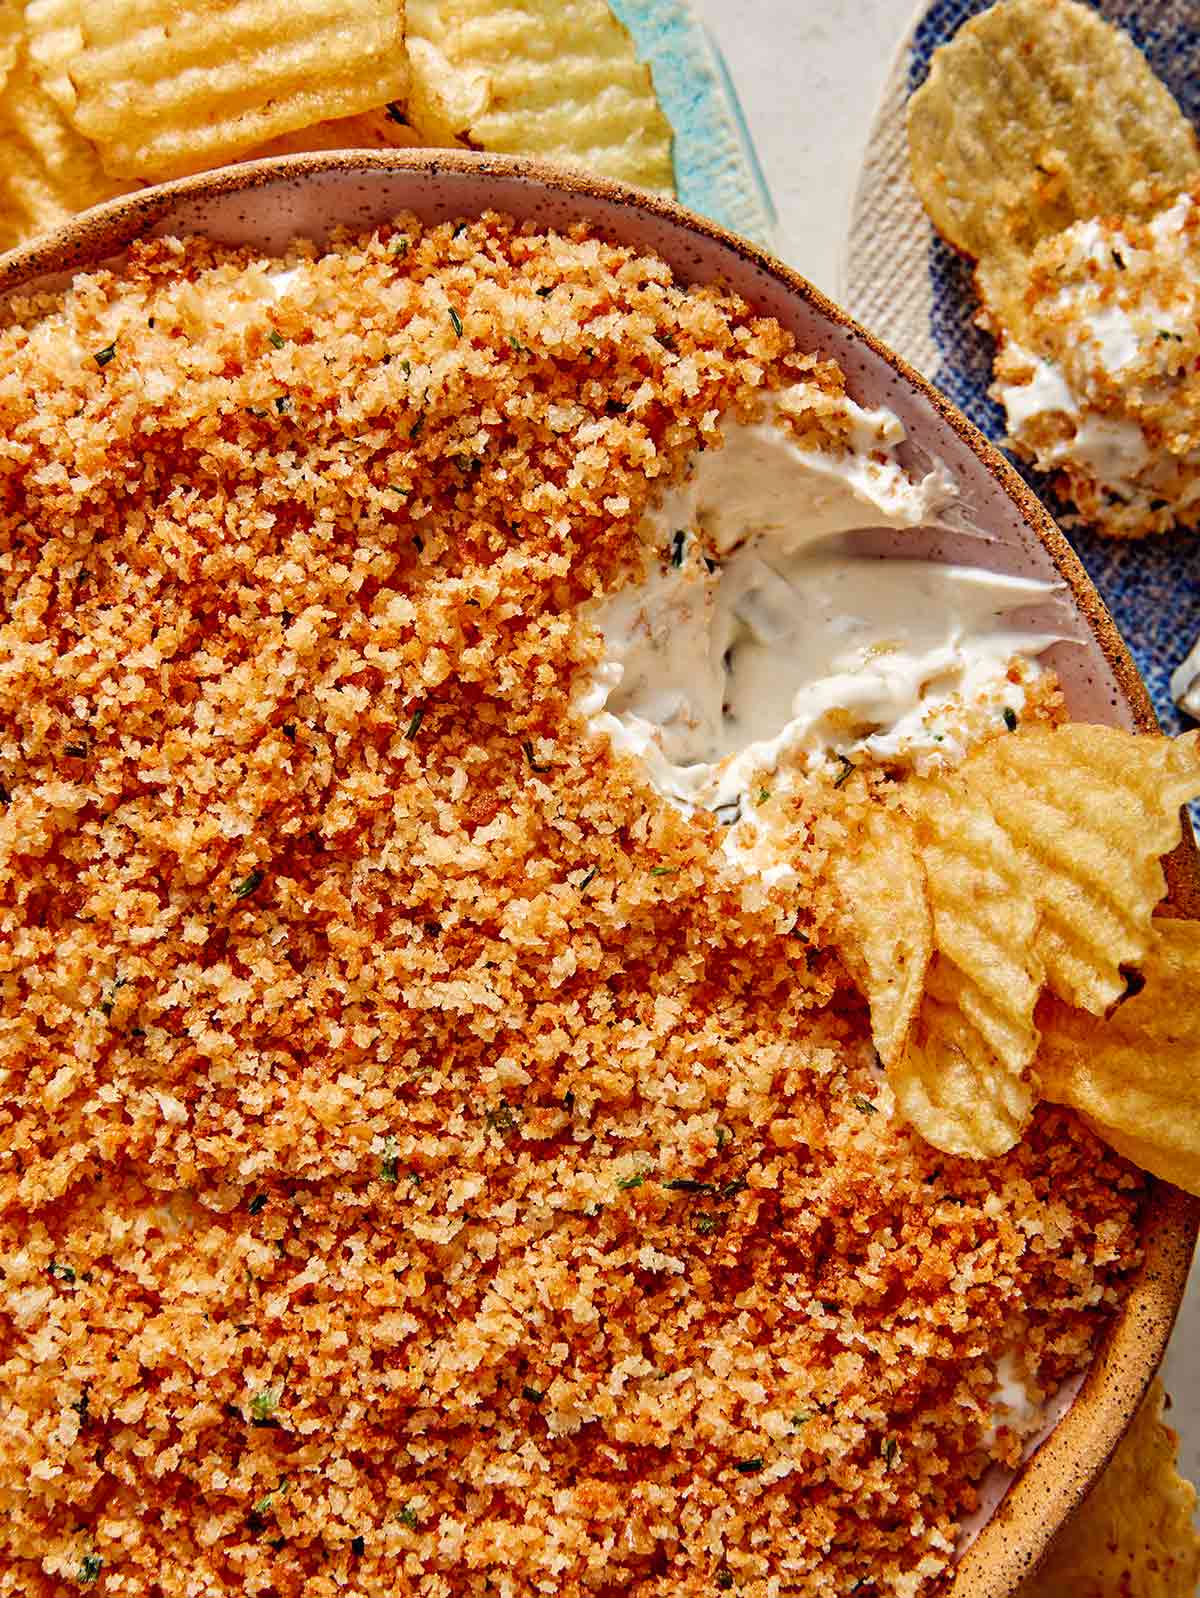
Creamy, tangy, and covered in a crunchy panko crust, this fried pickle dip is one of our favorites for game day. It’s a bit milder than our spicy pickle dip for the guests who don’t love the heat but crave the flavor and crunch of dill pickles. With a rich and creamy base made from a mixture of sour cream, cream cheese, and Greek yogurt and plenty of diced dill pickles and seasonings, every bite…
Creamy, tangy, and covered in a crunchy panko crust, this fried pickle dip is one of our favorites for game day. It’s a bit milder than our spicy pickle dip for the guests who don’t love the heat but crave the flavor and crunch of dill pickles.
With a rich and creamy base made from a mixture of sour cream, cream cheese, and Greek yogurt and plenty of diced dill pickles and seasonings, every bite is beyond flavorful. What really makes this pickle dip pop is the top layer of fried panko that truly makes this a fried pickle chip in dip form.
Whether you’re making an appetizer for the football game or looking for easy party food to set out at your next family get-together, this is the dip for you!
How to Make Fried Pickle Dip
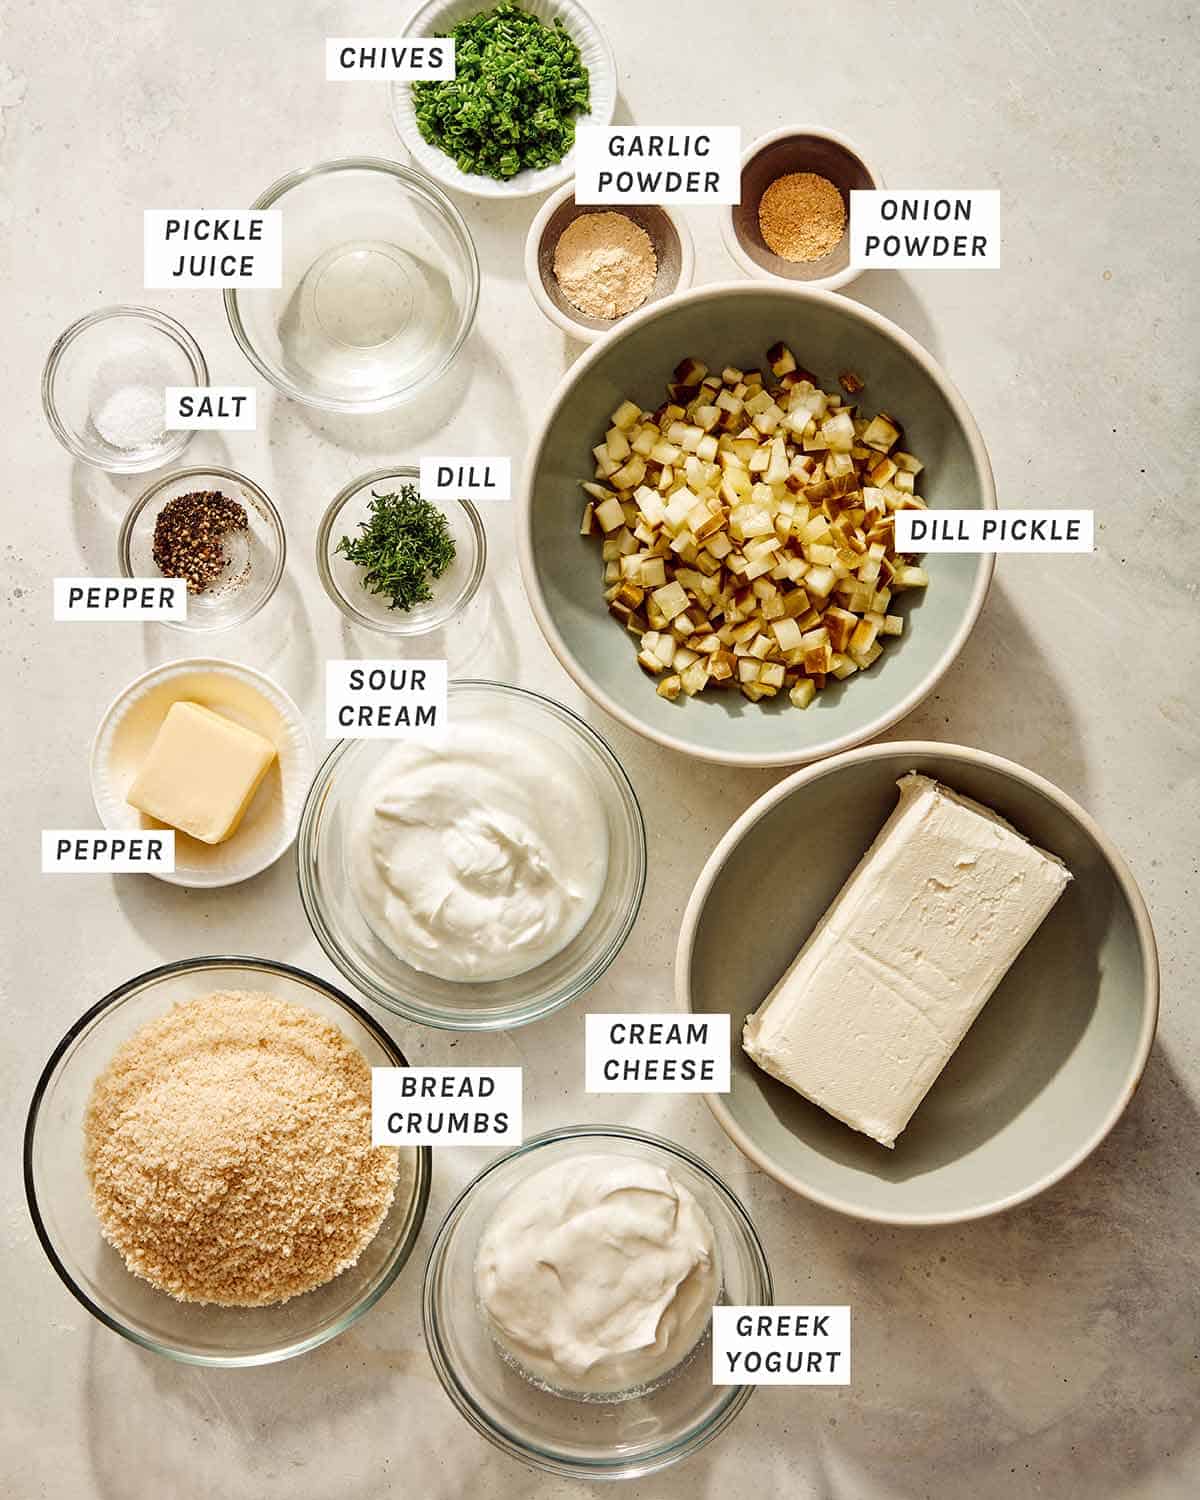
Ingredients
Process
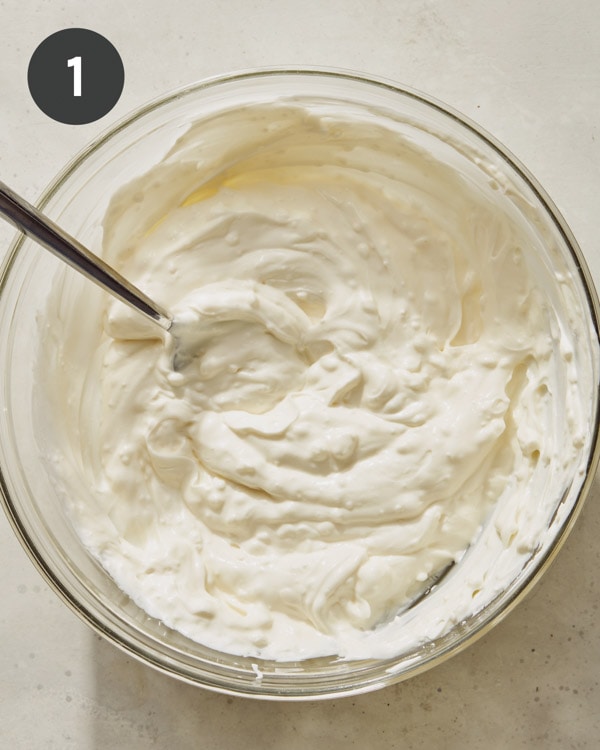
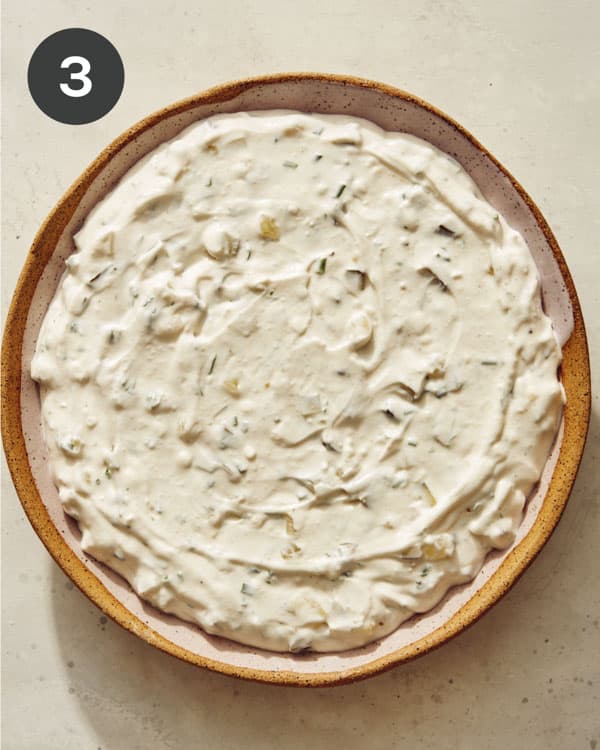
In a bowl, combine cream cheese, yogurt, and sour cream. Mix together until fully combined and smooth.
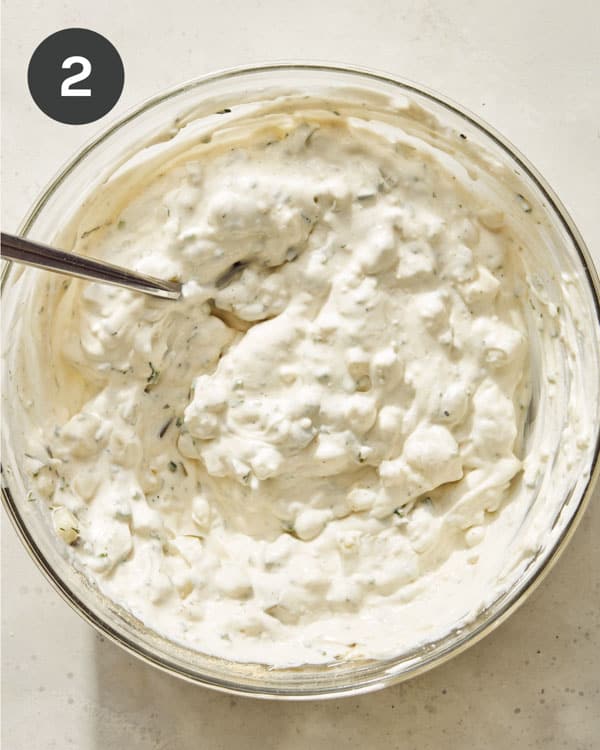
Add pickles, pickle juice, dill, chives, garlic powder, and onion powder. Stir together. Season with salt and pepper and stir again.
Pour mixture into a serving bowl and smooth top.
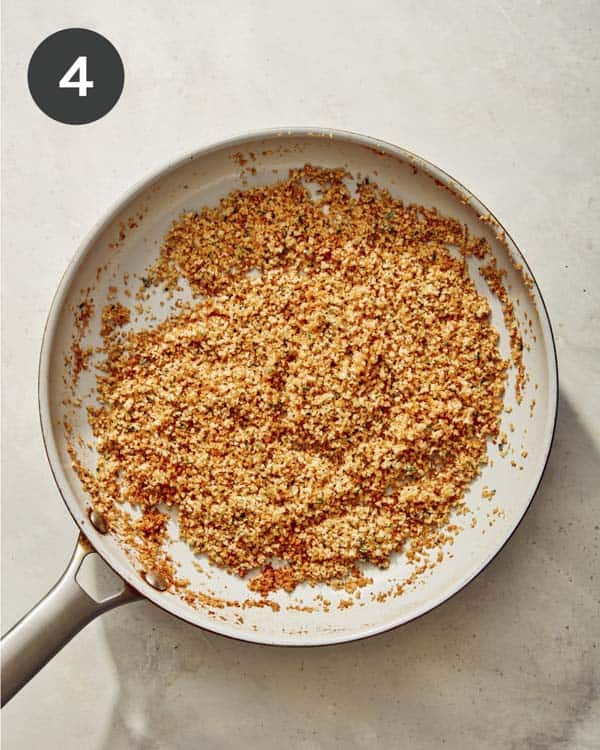
Melt butter in a skillet over medium heat. Add panko crumbs and toast until golden brown. Remove panko crumbs from the heat and stir in chives (or dill).
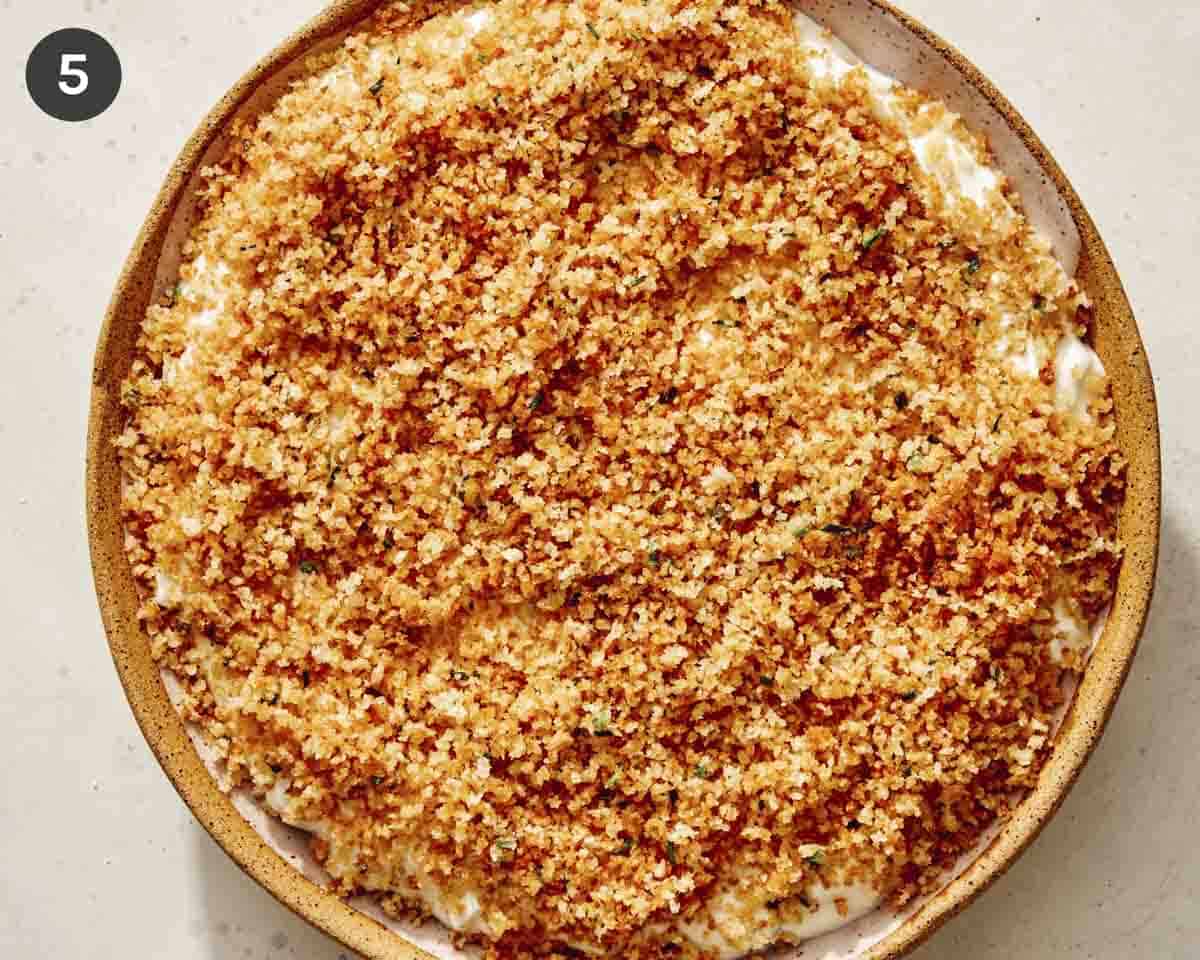
Pour toasted crumbs over dip in an even layer and serve with chips, crostini, crudité, pretzels, etc.
Tips for the BEST Fried Pickle Dip
This pickle dip is incredibly simple, but here are a few key tips to give you the very best dip each and every time.
Make sure the cream cheese is 100 percent softened to room temperature. This ensures the texture is rich and creamy, without any lumps or bumps of cream cheese hanging around.
Watch the panko closely! Once the panko starts to brown, it can go from toasted to burnt fairly quickly.
Toast the panko just before serving. The panko will go from crispy to chewy as it soaks in the moisture from the dip. While this won’t make it taste bad, you’ll get the full crunchy effect of the fried pickle dip if you toast and top it just before serving.
Variations
Add a diced jalapeno pepper for a spicy kick.
Stir one-third to one-half cup of freshly shredded cheese, like sharp cheddar or pepper jack, into the dip before topping with the fried panko.
Add extra veggies like finely diced red pepper or green onions for more color and flavor.
Add three strips of diced, crispy bacon into the dip for a smoky, meaty flavor.
Make Ahead Instructions
You can make this dip up to three days before serving. Combine all of the dip ingredients as directed and store them in an airtight container in the refrigerator.
Just before serving, toast your panko and sprinkle on top.
Our fried pickle dip is a blend of tangy dill pickles, savory seasonings, and a rich and creamy base, all topped with toasted panko. Just like your favorite fried pickle chips, but in a dip!
Quesadillas! They’re delicious, satisfying, and—most importantly—EASY. They’re one of my favorite back-pocket meals, something I can whip up using basic ingredients when I need a simple dinner or work-from-home lunch. I’ve made a lot …
Quesadillas! They’re delicious, satisfying, and—most importantly—EASY. They’re one of my favorite back-pocket meals, something I can whip up using basic ingredients when I need a simple dinner or work-from-home lunch. I’ve made a lot of them over the years, and I’ve learned some handy tips and tricks for making them along the way. I’m sharing them all in this quesadilla recipe! What is a quesadilla? A quesadilla is Mexican dish that consists of a heated, filled, and folded tortilla. Quesadillas originated in central and southern Mexico, and they were first made with corn tortillas and filled with Oaxaca cheese. (The […]
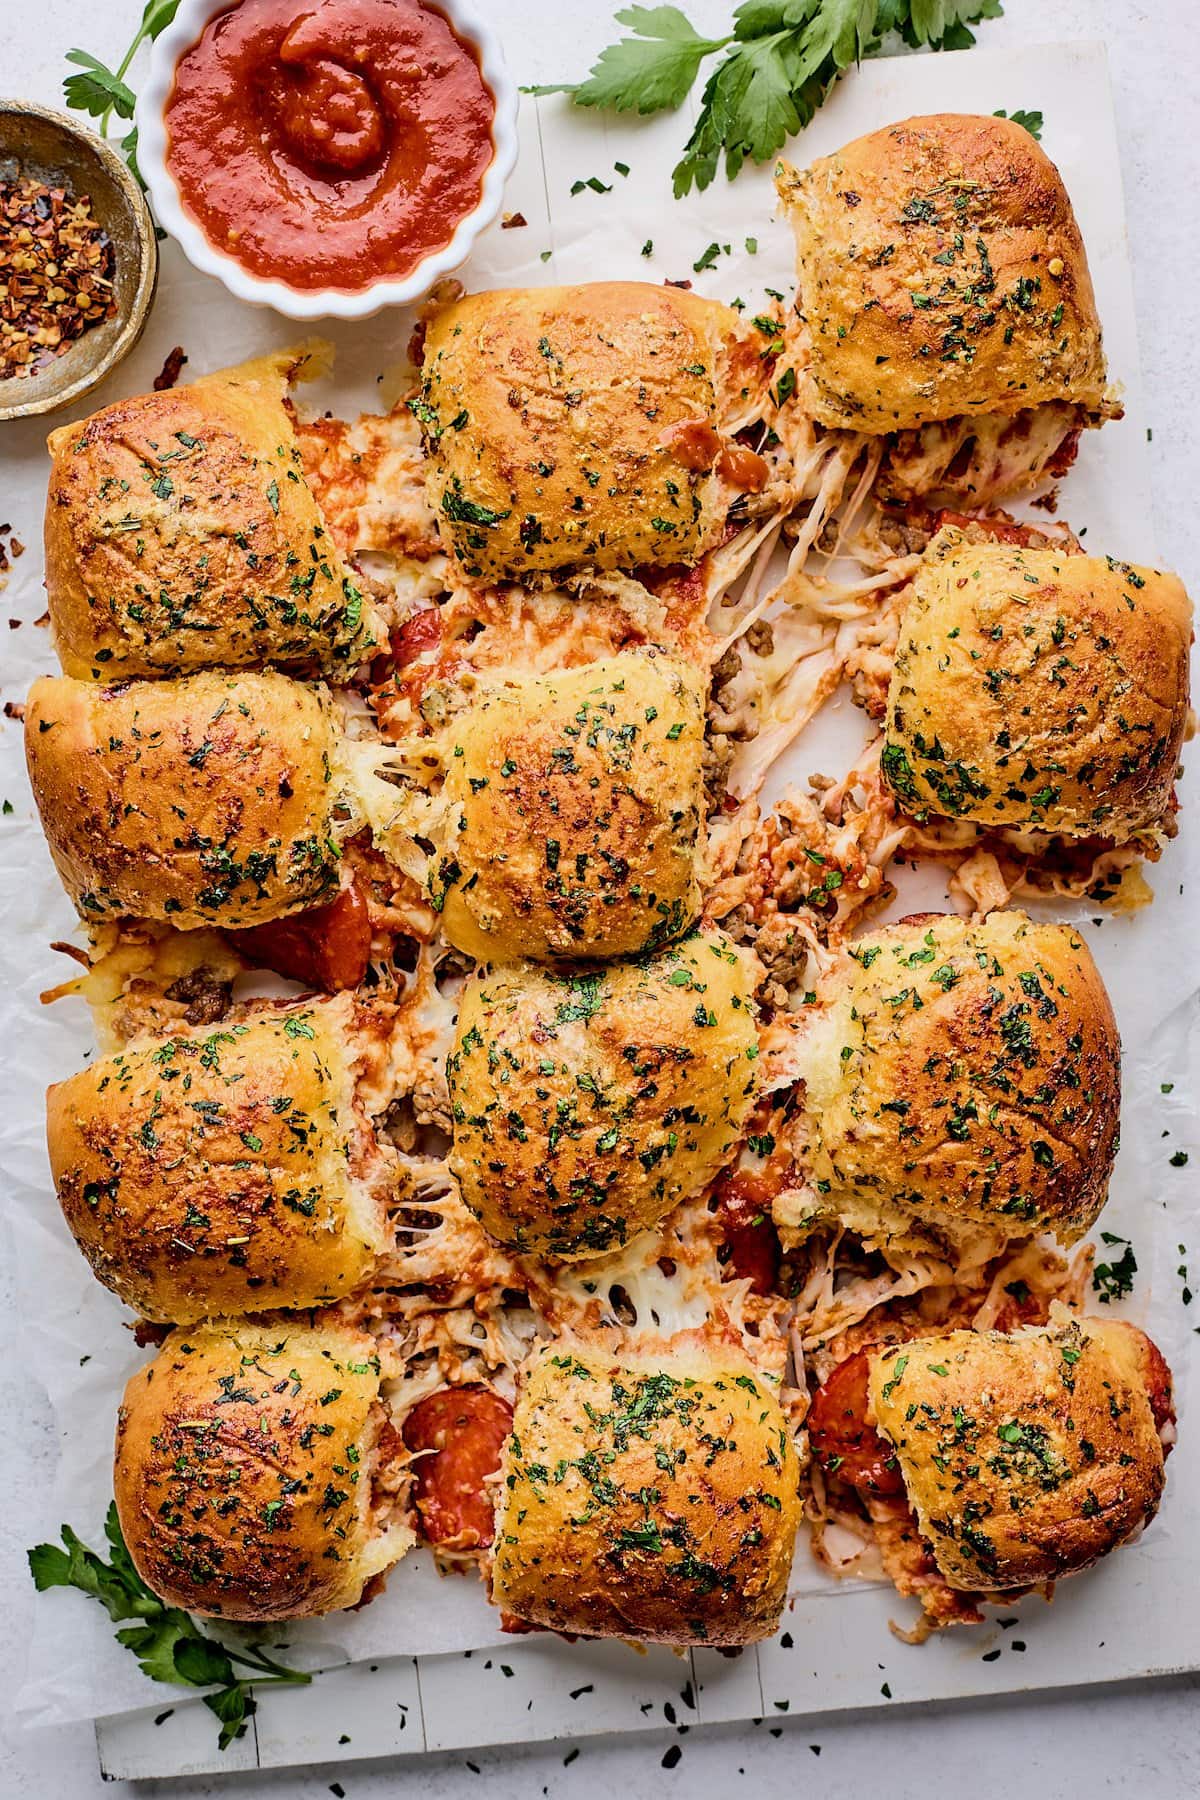
Pizza is a forever favorite food, but have you tried Pizza Sliders? They are a fun twist on classic pizza and always a crowd pleaser. You have to try them. These Hawaiian roll pizza sliders are filled with pizza sauce, shredded mozzarella cheese, peppe…
Pizza is a forever favorite food, but have you tried Pizza Sliders? They are a fun twist on classic pizza and always a crowd pleaser. You have to try them. These Hawaiian roll pizza sliders are filled with pizza sauce, shredded mozzarella cheese, pepperoni, sausage, and brushed with garlic butter. Bake until golden brown and…
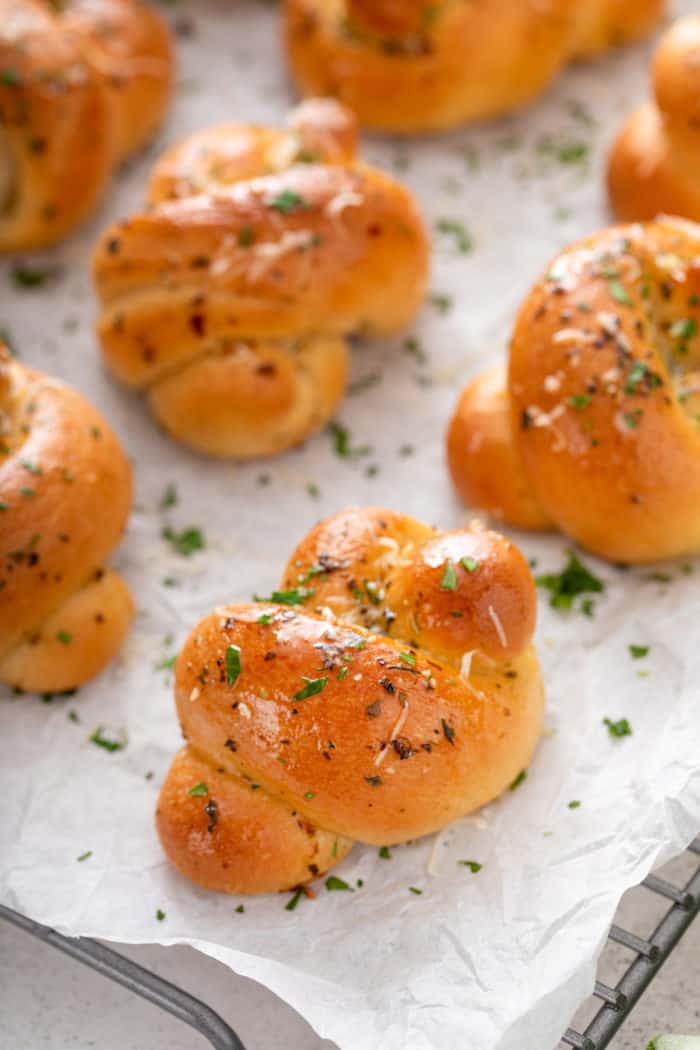
Make your next at-home pasta, pizza, or soup dinner extra special with a batch of the best garlic knots. These fluffy, buttery knots are packed with herbs and garlic for a flavorful addition to any meal. If you love bread and rolls and biscuits as much as I do, you’re in for a treat today. …
Make your next at-home pasta, pizza, or soup dinner extra special with a batch of the best garlic knots. These fluffy, buttery knots are packed with herbs and garlic for a flavorful addition to any meal.
If you love bread and rolls and biscuits as much as I do, you’re in for a treat today.
These garlic knots are SO delicious. They’re also pretty easy to make, so they’re actually something you can throw together on a weeknight.
The dough only needs to rest/rise for 40 minutes total; with shaping and baking time, they’ll take you just over an hour from start to finish, with most of that being hands-off time.
Which means you can get the rest of your dinner ready while these little beauties are rising and baking. Maybe a big pot of soup or pasta? There are no wrong answers when garlic knots are involved.
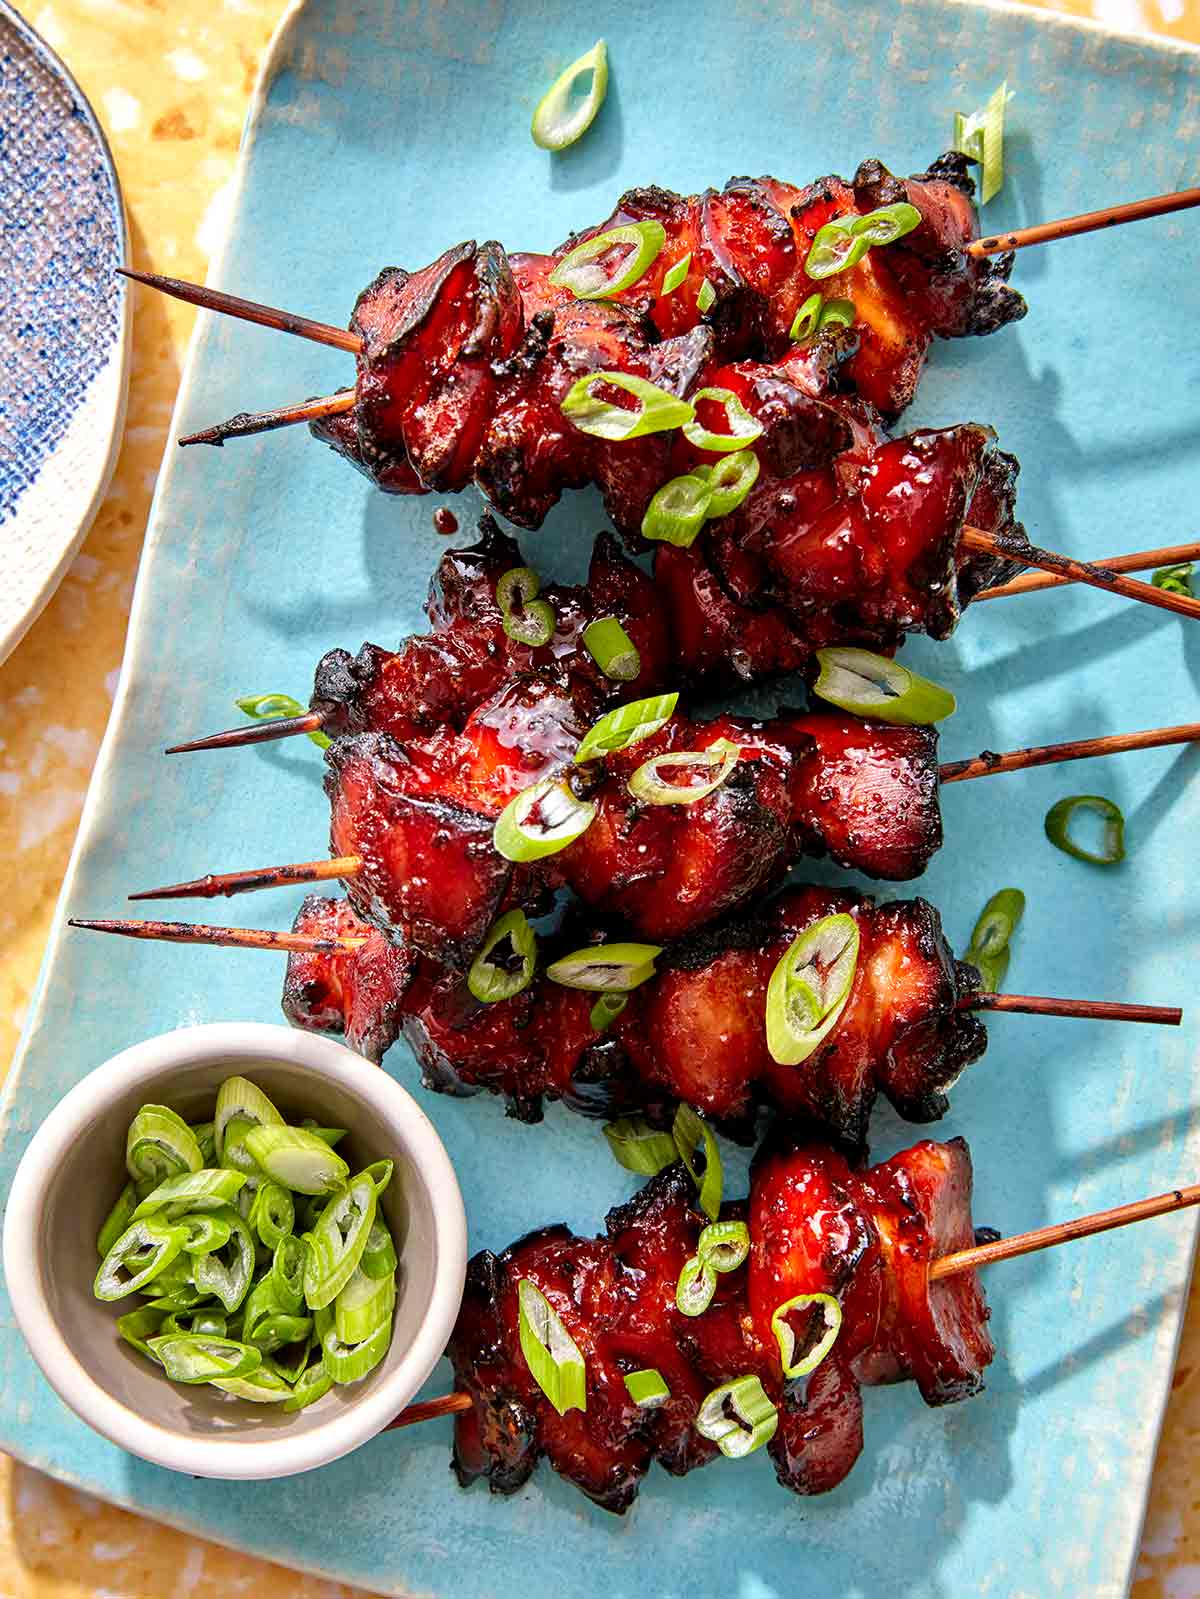
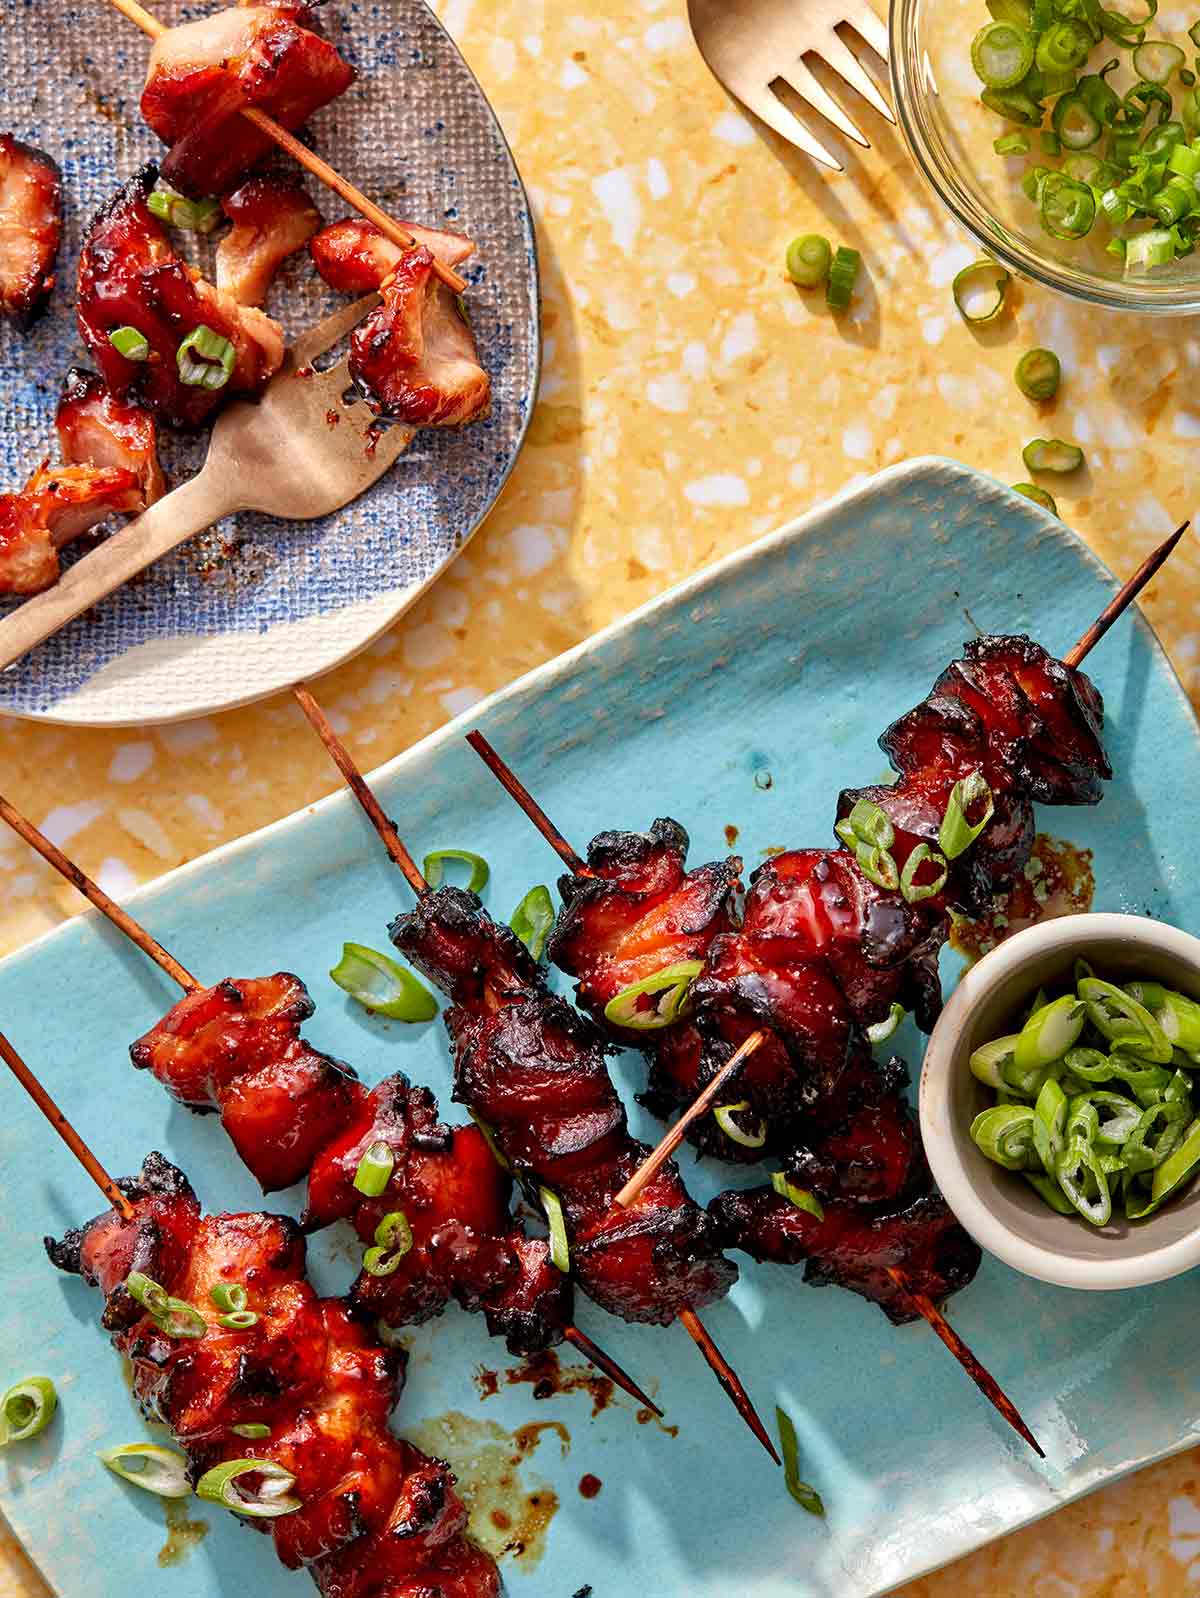
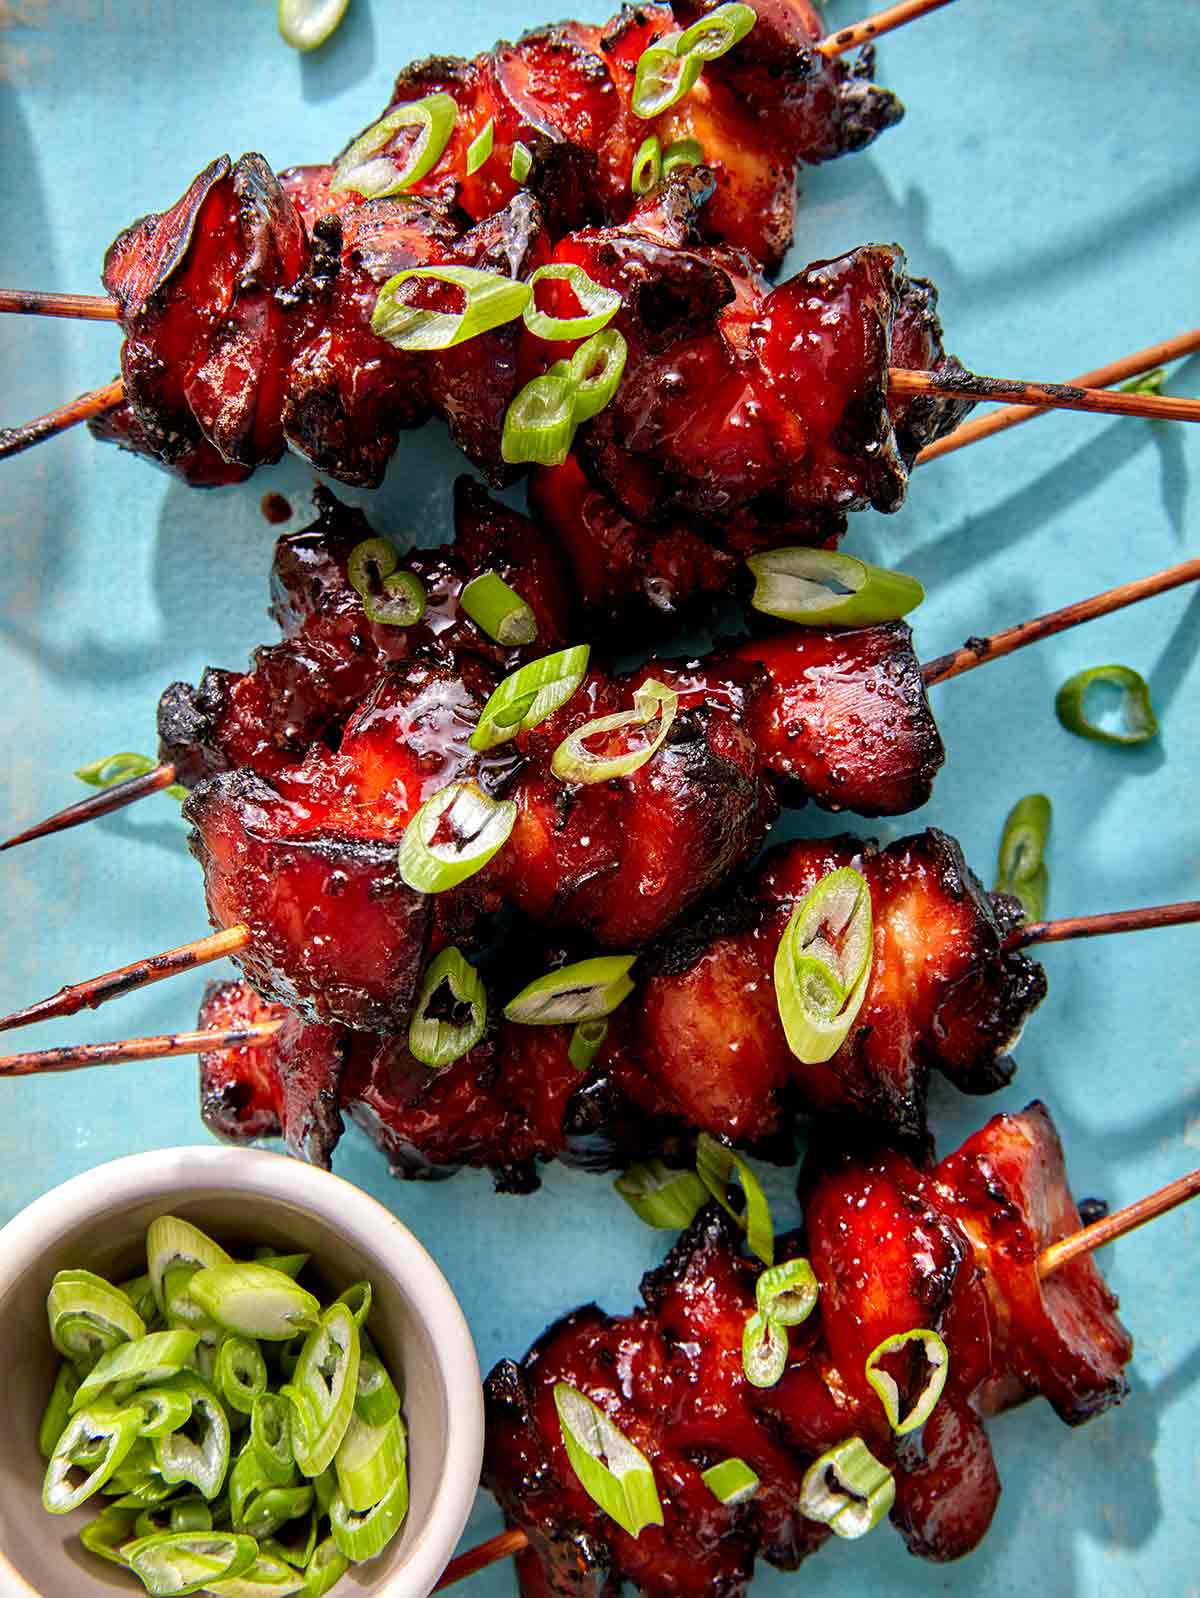
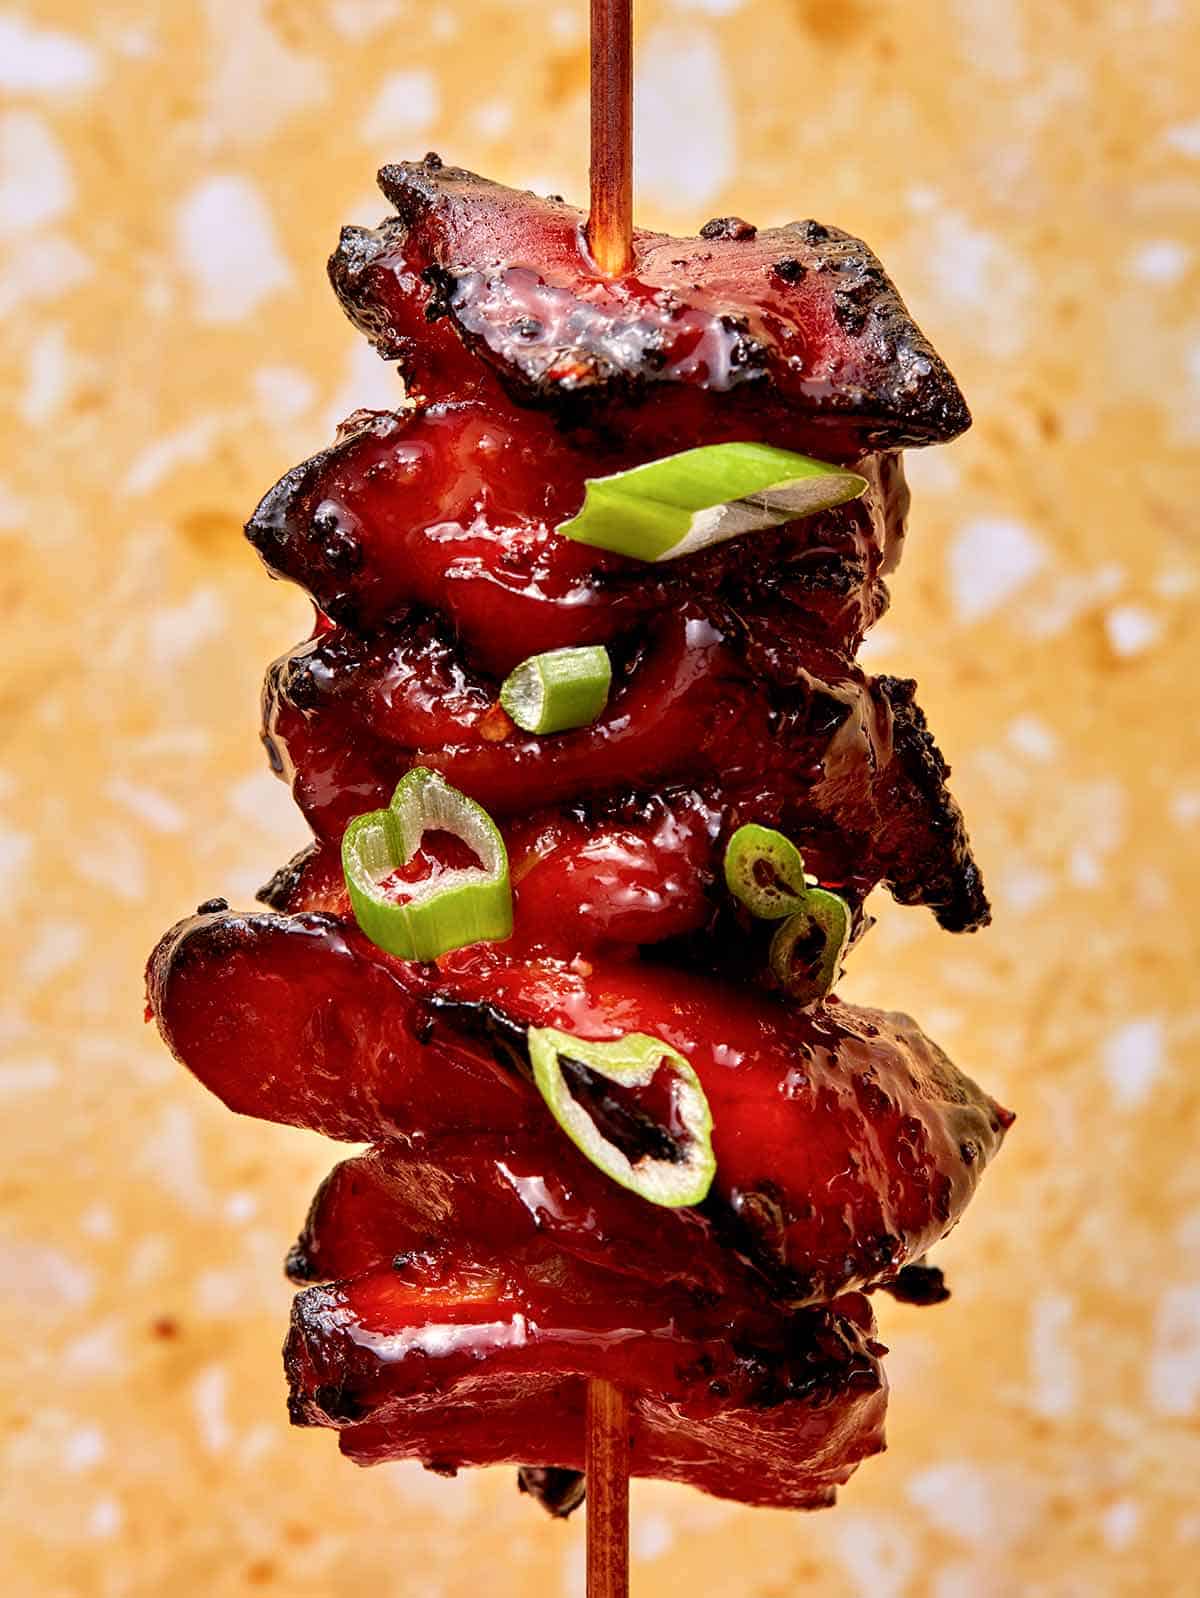
If you typically reserve kabobs or skewers for summertime grilling, you’ll love our air fryer chicken skewer recipe! Pieces of juicy chicken are infused with honey garlic marinade, air-fried to perfection, and then coated with a sweet and sticky glaze just before serving. All served on a skewer for easy presentation and eating! Whether you serve them as an appetizer or overtop of rice for an easy dinner, you’ll love having this chicken skewer recipe…
If you typically reserve kabobs or skewers for summertime grilling, you’ll love our air fryer chicken skewer recipe! Pieces of juicy chicken are infused with honey garlic marinade, air-fried to perfection, and then coated with a sweet and sticky glaze just before serving. All served on a skewer for easy presentation and eating!
Whether you serve them as an appetizer or overtop of rice for an easy dinner, you’ll love having this chicken skewer recipe in your back pocket.
Like our lamb kabobs, these chicken skewers can be served with rice, over mashed potatoes, with romaine leaves, or on their own as an appetizer.
How to Make Honey Garlic Air Fryer Chicken Skewers
Ingredients
Process
In a mixing bowl, combine all sauce ingredients and whisk them together.
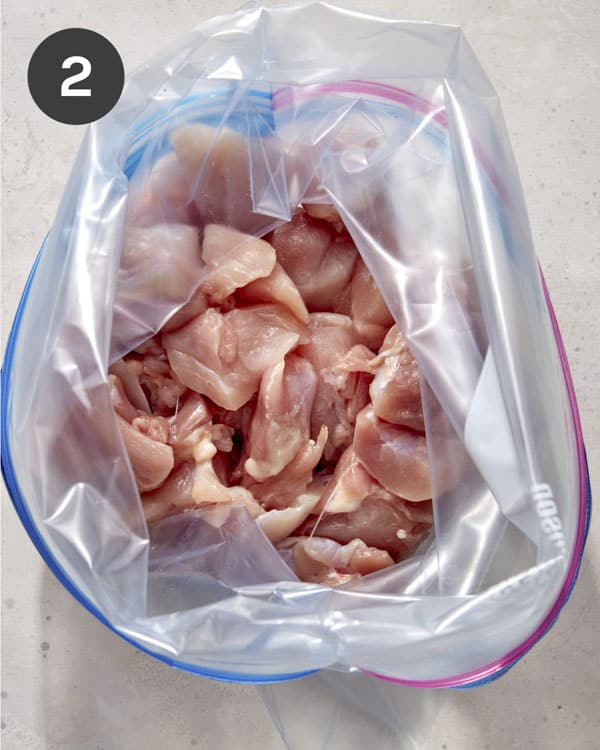
Transfer the chicken to a resealable plastic bag or airtight container.
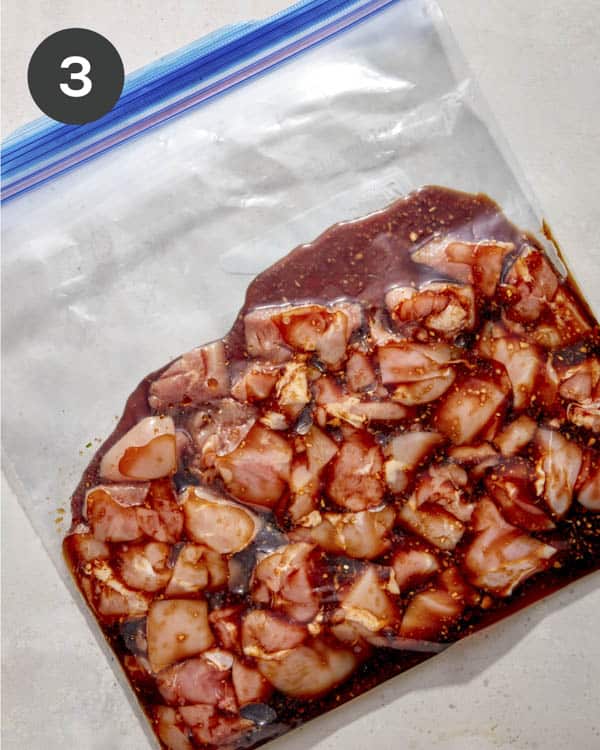
Pour half the marinade over the chicken, tightly seal it, shake it up to mix it, and refrigerate it for at least 4 hours and up to 24 hours.
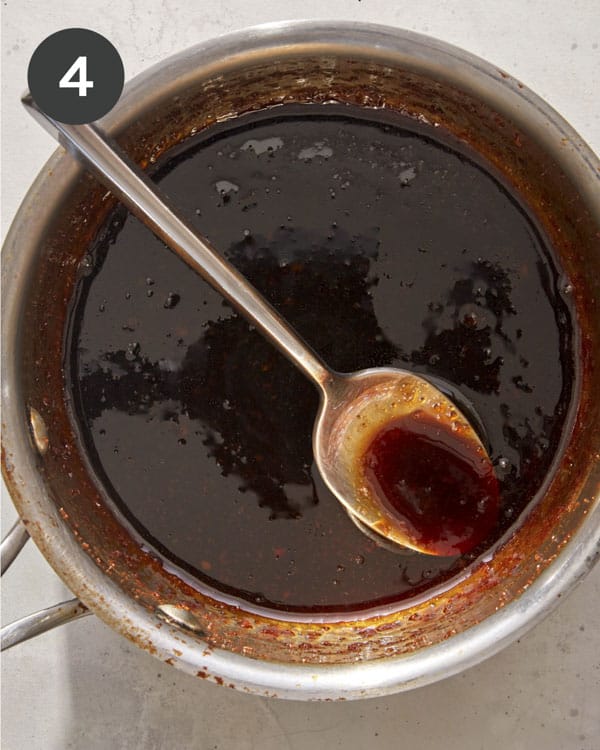
Pour the remaining marinade into a small pot and simmer for 5 to 7 minutes or until slightly reduced (Glaze will thicken as it cools). Remove from heat and set aside.
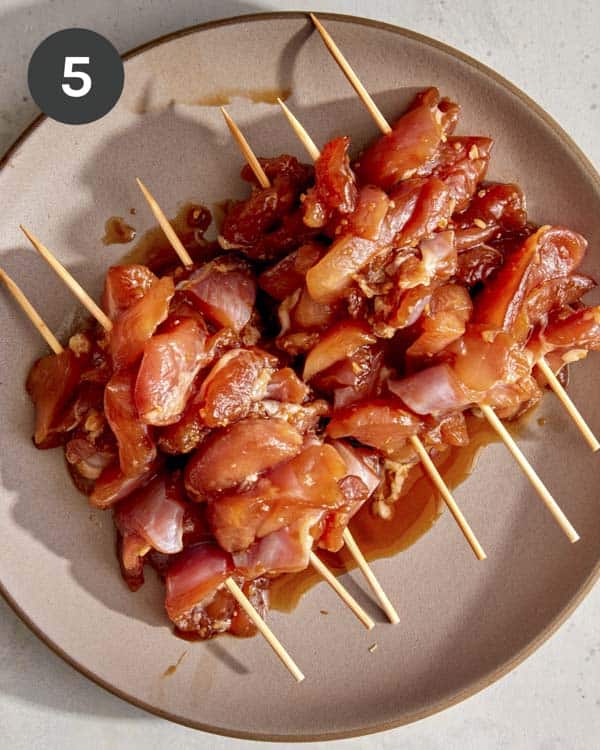
Once the chicken has marinated, pierce 7 to 8 pieces of chicken through each skewer. Repeat until all chicken has been used.
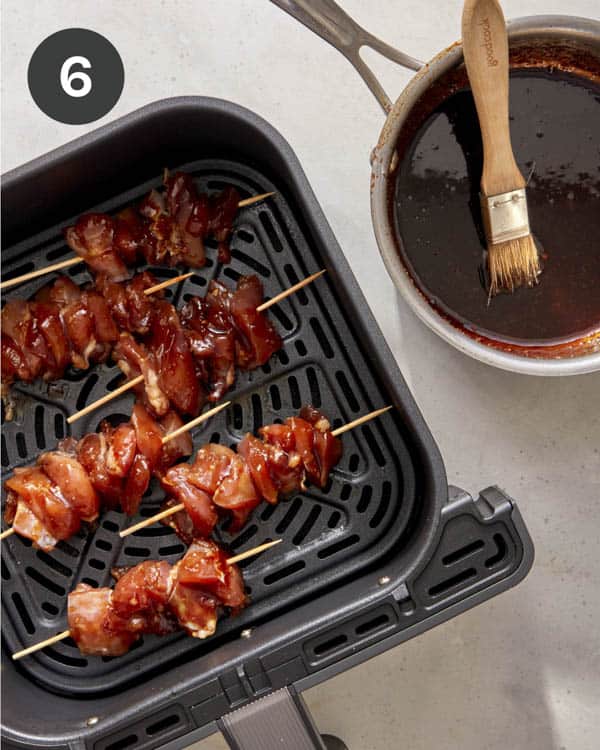
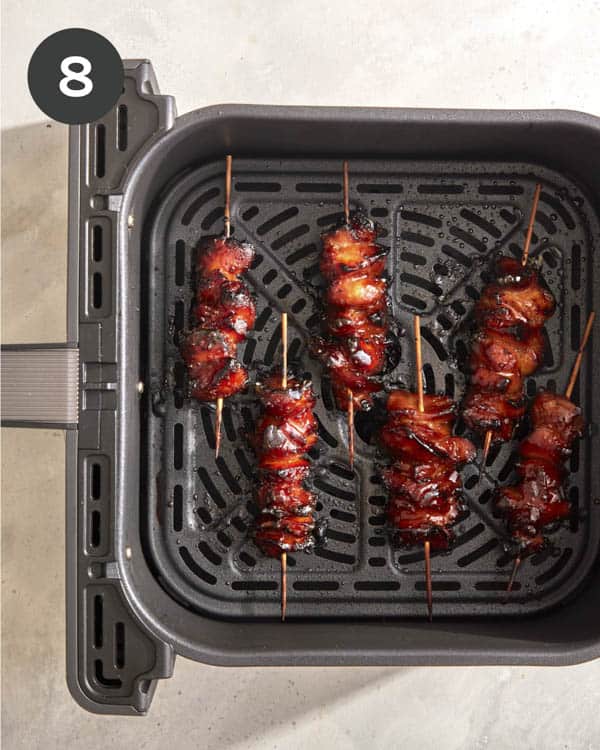
Lightly spray the air fryer basket with cooking spray and top it with skewers, leaving about a 1/2-inch space between each one (cook in batches to avoid overcrowding). Brush each skewer with glaze.
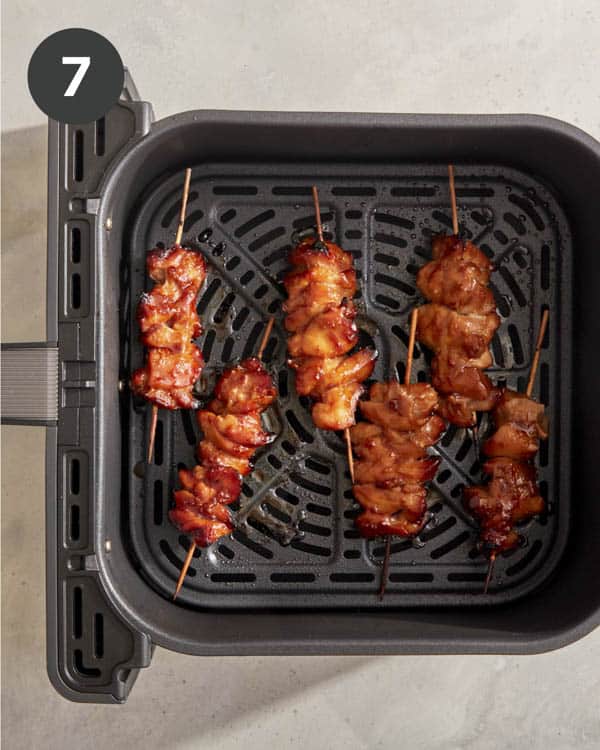
Air-fry chicken skewers at 400˚F for 8 minutes. Flip each skewer and brush with more glaze. Continue to air-fry for an additional 6 to 8 minutes or until the chicken has cooked through.
Remove skewers from the air fryer basket and brush with glaze once more.
Transfer skewers to a serving dish, top with green onion, and serve.
Why Soak Wooden Skewers in Water?
Soaking your wooden skewers in water for at least thirty minutes is an essential step in making these chicken kabobs. This helps prevent the wood from burning or becoming too charred while the chicken cooks.
Not only would burnt wood be a safety hazard, but it can add an unpleasant flavor to the chicken. By soaking the skewers ahead of time, they’ll hold your chicken without catching fire or charring and affecting the flavor of the meat.
Variations
We love this recipe as is, but feel free to make these substitutions for a little variety!
Swap the meat. Instead of chicken thighs, you could use chicken breast or another type of meat altogether. Beef sirloin or ribeye, lamb, pork tenderloin, or turkey breast are all great options for these kabobs.
Make it spicy: Add a tablespoon of sriracha or chili paste to the marinade.
A citrus twist: add the zest and juice of a lemon or an orange.
BBQ: add a few tablespoons of your favorite BBQ sauce (or our sweet and range BBQ) to the marinade.
Make Ahead, Storing and Reheating Instructions
From start to finish, this recipe takes around four and a half hours (including marinade time), but there are plenty of things you can do ahead of time to make dinner as easy as possible.
Make Ahead
Mix the marinade and add the cubed chicken up to 24 hours before cooking. Not only does this make dinner easy, but it also helps add maximum flavor to every bite!
You can also make the glaze ahead of time and store it in the refrigerator until you’re ready to use it, or up to 3 days.
Storing
Store any leftover cooked chicken in an airtight container in the refrigerator for 3-4 days.
Reheating
To reheat the chicken:
Microwave it, covered, on a plate for 30-60 seconds or until warmed.
Bake it in the oven at 350˚, covered, for 5-10 minutes or until warmed through.
In a pan on the stove over medium heat, add a small amount of oil to help keep the chicken from sticking. Add the chicken and saute for 3-5 minutes or until heated through, tossing occasionally.
In the air fryer, preheat the basket to 350˚, add the chicken, and cook for 3-5 minutes or until heated through.
What to Serve with Our Air Fryer Chicken Skewers
For a complete meal, try serving our air-fried honey garlic chicken skewers with:
In a mixing bowl combine all sauce ingredients and whisk together.
Transfer chicken to a resealable plastic bag or airtight container.
Pour half marinade over chicken, tightly seal, shake up to mix and refrigerate for at least 4 hours and up to 24 hours.
Pour remaining marinade into a small pot and simmer for 5 to 7 minutes or until slightly reduced (Glaze will thicken as it cools). Remove from heat and set aside.
Once chicken has marinated, pierce 7 to 8 pieces of chicken through each skewer. Repeat until all chicken has been used.
Lightly spray air fryer basket with cooking spray and top with skewers, leaving about1/2 inch space between each one (cook in batches to avoid overcrowding). Brush each skewer with glaze.
Air-fry chicken skewers at 400˚F for 8 minutes. Flip each skewer and brush with more glaze. Continue to air-fry for an additional 6to 8 minutes or until chicken has cooked through.
Remove skewers from air fryer basket and brush with glaze once more.
Transfer skewers to a serving dish, top with green onion and serve.
Notes
**recipe makes 8 skewers – 2 skewers make 1 serving**
 Whenever I need an appetizer to take to a party or potluck, I like to make 7 Layer Dip. It is the PERFECT party dip and always a crowd pleaser. This classic dip is layered with the best ingredients- refried beans, sour cream (or plain Greek yogurt), guacamole, salsa, cheese, and toppings! Serve with tortilla…
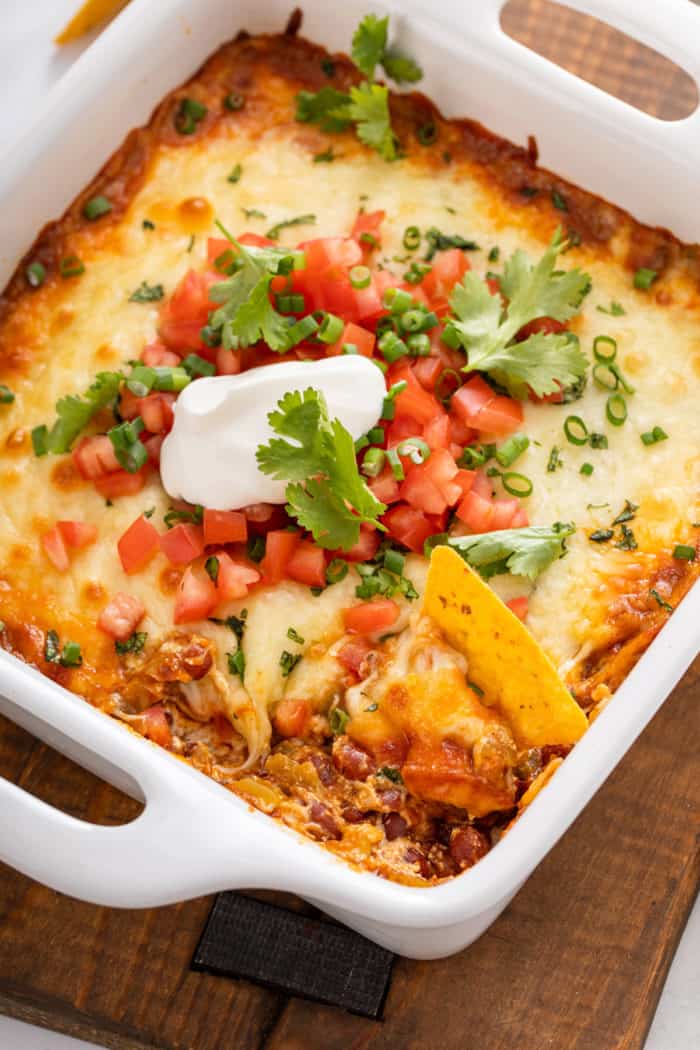


 Pizza is a forever favorite food, but have you tried Pizza Sliders? They are a fun twist on classic pizza and always a crowd pleaser. You have to try them. These Hawaiian roll pizza sliders are filled with pizza sauce, shredded mozzarella cheese, pepperoni, sausage, and brushed with garlic butter. Bake until golden brown and…