Sausage Kebabs

With just a few simple ingredients, Sausage Kebabs are a fast, easy, and delicious way to enjoy summer grilling.

The post Sausage Kebabs appeared first on Budget Bytes.

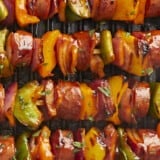
You know me, I love sausage. Especially smoked sausage. It’s packed with SO MUCH flavor that you barely have to do anything to make a delicious meal out of it. And that’s why these sausage kebabs are ridiculously easy, super tasty, and are the perfect summertime meal. They feel as splurgy as going out to eat, except way less expensive. 😉 And don’t worry, if you don’t have a grill, you can still make them using a grill pan or your oven’s broiler!

Overhead view of sausage kebabs on a serving platter with parchment paper.

Ingredients for Sausage Kebabs

Okay, this recipe is so crazy easy, you’re going to love it! You only need to pick up a few simple ingredients at the store to make these awesome kebabs:

  • Smoked Sausage: the sausage is bringing most of the flavor to this party with its herbs and spices and deliciously smoky flavor. You can use any type of smoked sausage that you’d like. Pork sausage, beef sausage, turkey sausage, andouille sausage, kielbasa, whatever you like!
  • Vegetables: I like to go for a rainbow of color to make the kebabs visually enticing, but if you’re working with a very tight budget you can go with just green bell peppers and yellow onions. It’s still going to be delicious!
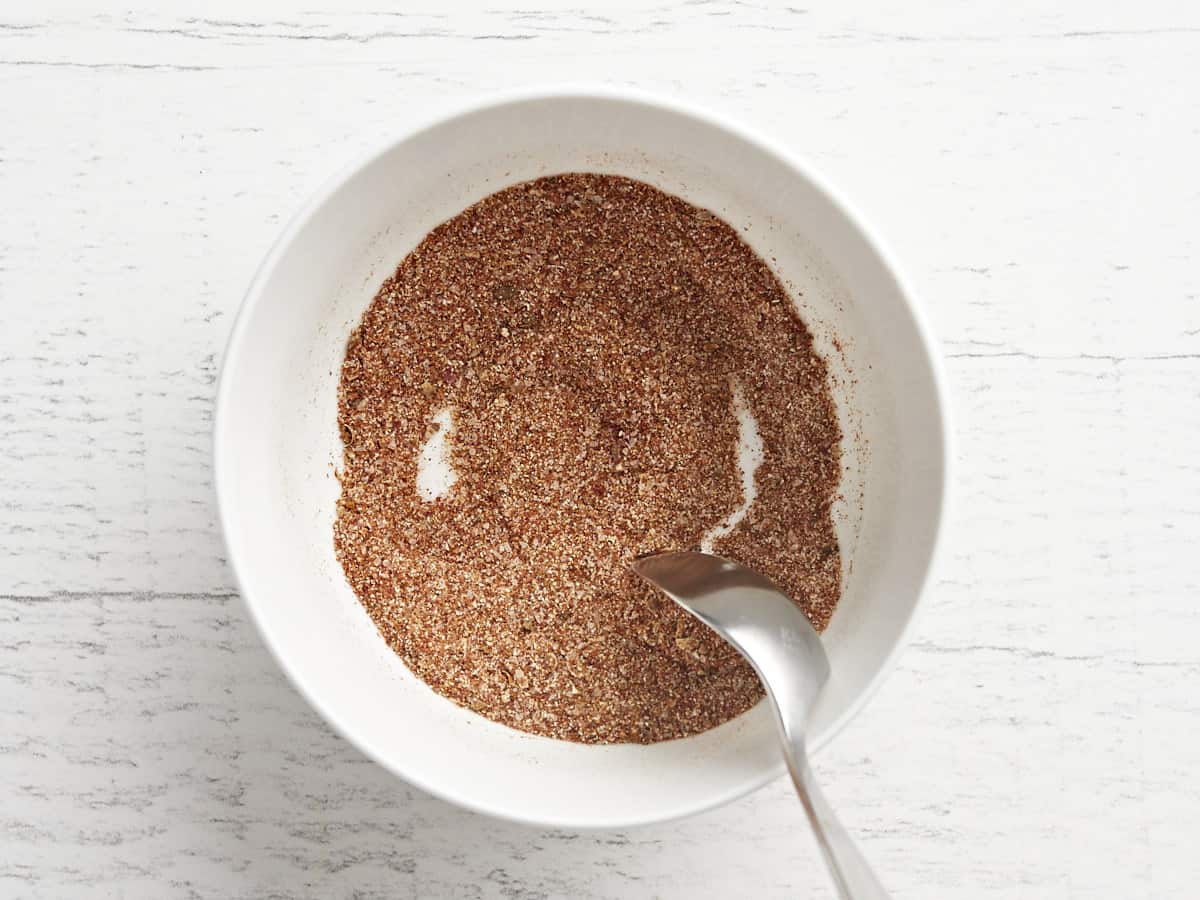
  • Oil and Spices: A simple mix of smoked paprika, garlic powder, salt, and pepper gives everything on the kebabs a nice light coating of extra flavor. The oil helps the spices stick and keeps everything from drying out on the grill.
  • BBQ Sauce: A final slather of BBQ sauce gives the kebabs a sticky sweet and tangy coating that is just to-die-for! You can use any flavor BBQ sauce you’d like. I vote for a hickory smoke or spicy BBQ.

No Grill? No Problem.

These sausage kebabs are perfect for tossing onto a hot grill, but if you don’t have a grill you can still whip them up with no problem using your oven’s broiler or a grill pan on the stove top. The broiler on an oven is very similar to a grill in that it provides close range high heat. If you have a gas stove it’s even closer to being just like the open flame of a grill.

To use a broiler: Adjust the oven’s rack so that it is about 5-6 inches away from the broiler. Turn the broiler on to high. Place a wire cooling rack on a baking sheet, then place the kebabs on top of the wire rack. Transfer the kebabs to the oven and cook under the broiler, watching very closely, until they are slightly charred on top. Flip the kebabs and brush a light coating of BBQ sauce over the cooked side. Continue to cook, flip, and brush with BBQ sauce until all sides are charred, coated in BBQ sauce, and the sauce has caramelized slightly.

To use a grill pan: Heat the grill pan over medium-high heat. Make sure to allow the pan to fully pre-heat for about 10 minutes. Place the kebabs on the grill pan and cook until charred on one side. Flip the kebabs and brush a light coating of BBQ sauce over the cooked side. Continue to cook, flip, and brush with BBQ sauce until all sides are charred, coated in BBQ sauce, and the sauce has caramelized slightly.

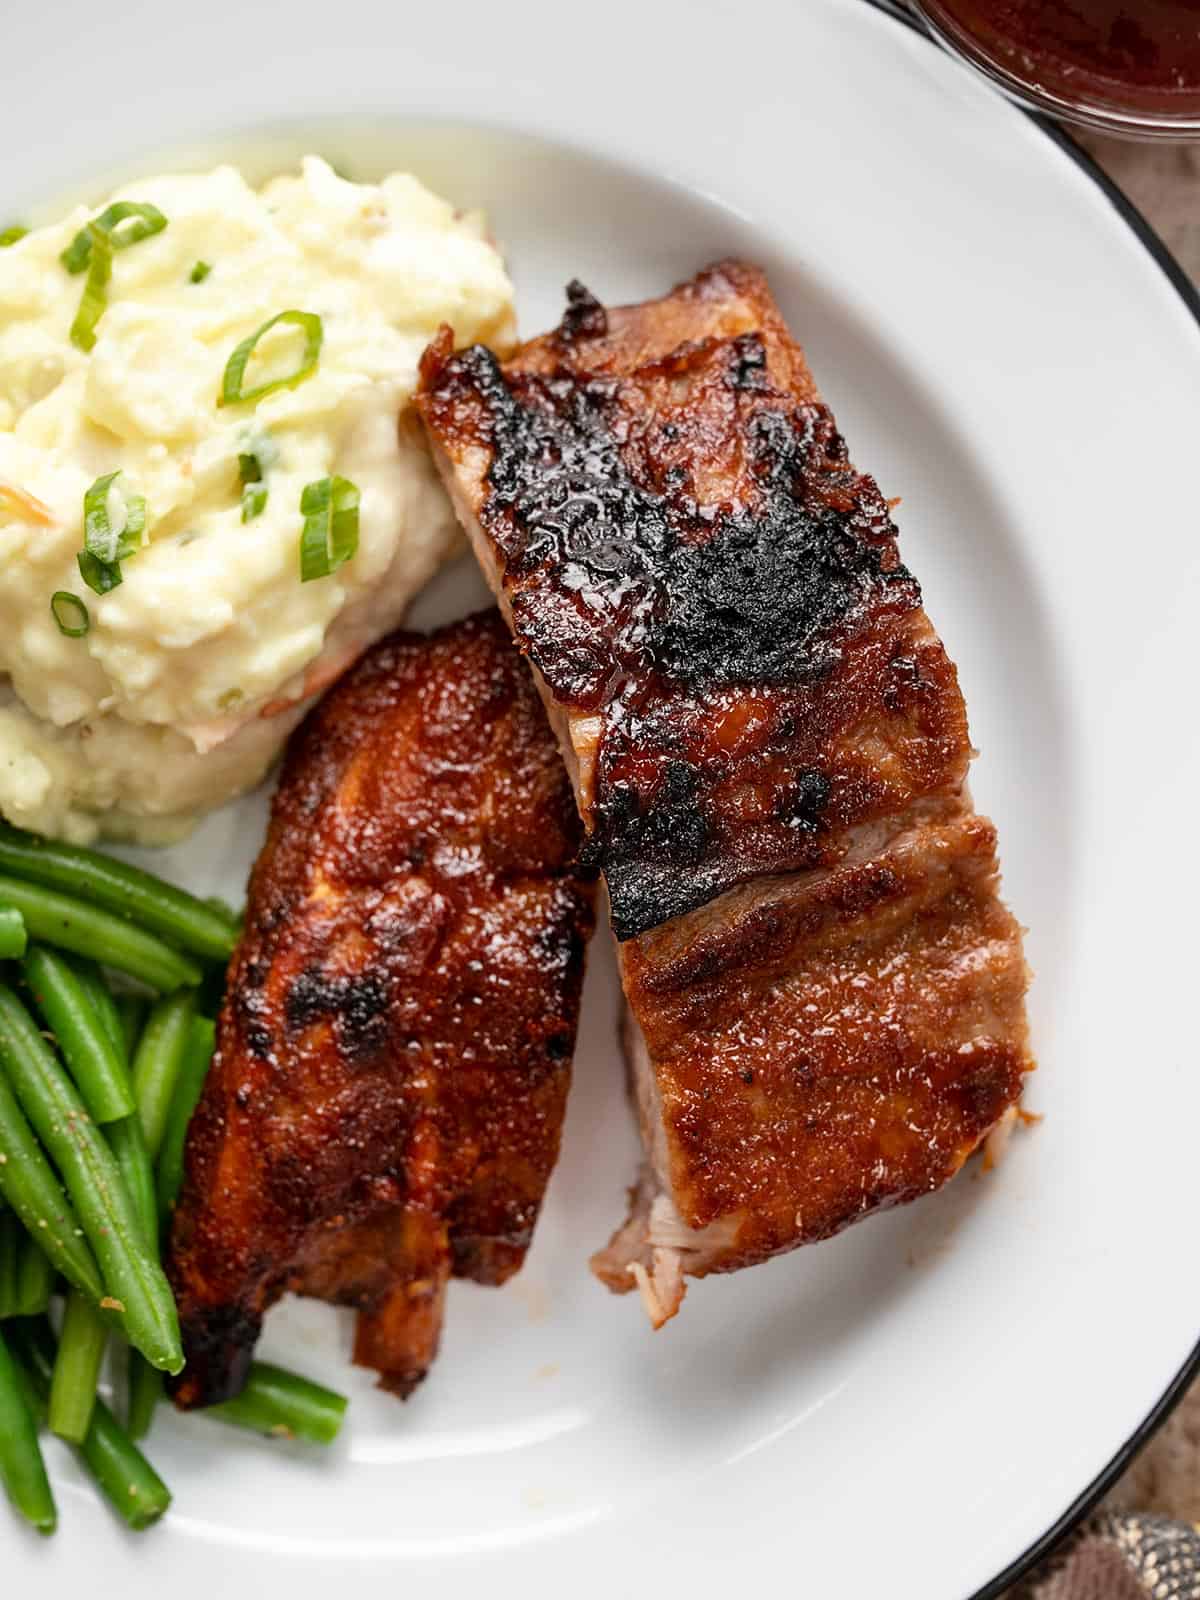
What to Serve with Sausage Kebabs

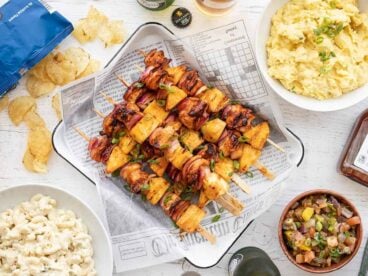
You’ll definitely want to serve these sassy little kebabs with other summertime classics like macaroni salad, vegetable pasta salad, sweet corn salsa, potato salad, three bean salad, and maybe some lemon cream pie for dessert!

Sausage Kebabs on a grill pan with a bowl of BBQ sauce on the side.
Close up overhead view of BBQ sausage kebabs.
Print

Sausage Kebabs

With just a few simple ingredients, Sausage Kebabs are a fast, easy, and delicious way to enjoy summer grilling.
Course Dinner, Main Course
Cuisine American
Total Cost $9.24 recipe / $2.32 serving
Prep Time 20 minutes
Cook Time 20 minutes
Total Time 40 minutes
Servings 4 two kebabs each
Calories 460kcal

Ingredients

Instructions

  • Slice the sausage into ½-inch thick rounds. Chop the onions and bell peppers into 1-inch pieces.
  • Place the sausage and vegetables in a large bowl. Drizzle the cooking oil over top. Combine the smoked paprika, garlic powder, salt, and pepper in a small bowl, then sprinkle over the sausage and vegetables.
  • Toss the sausage and vegetables until well coated in oil and spices.
  • Build the kebabs by skewering the sausage and vegetables in an alternating sequence. You should get about eight kebabs, depending on the size of your skewers and vegetables.
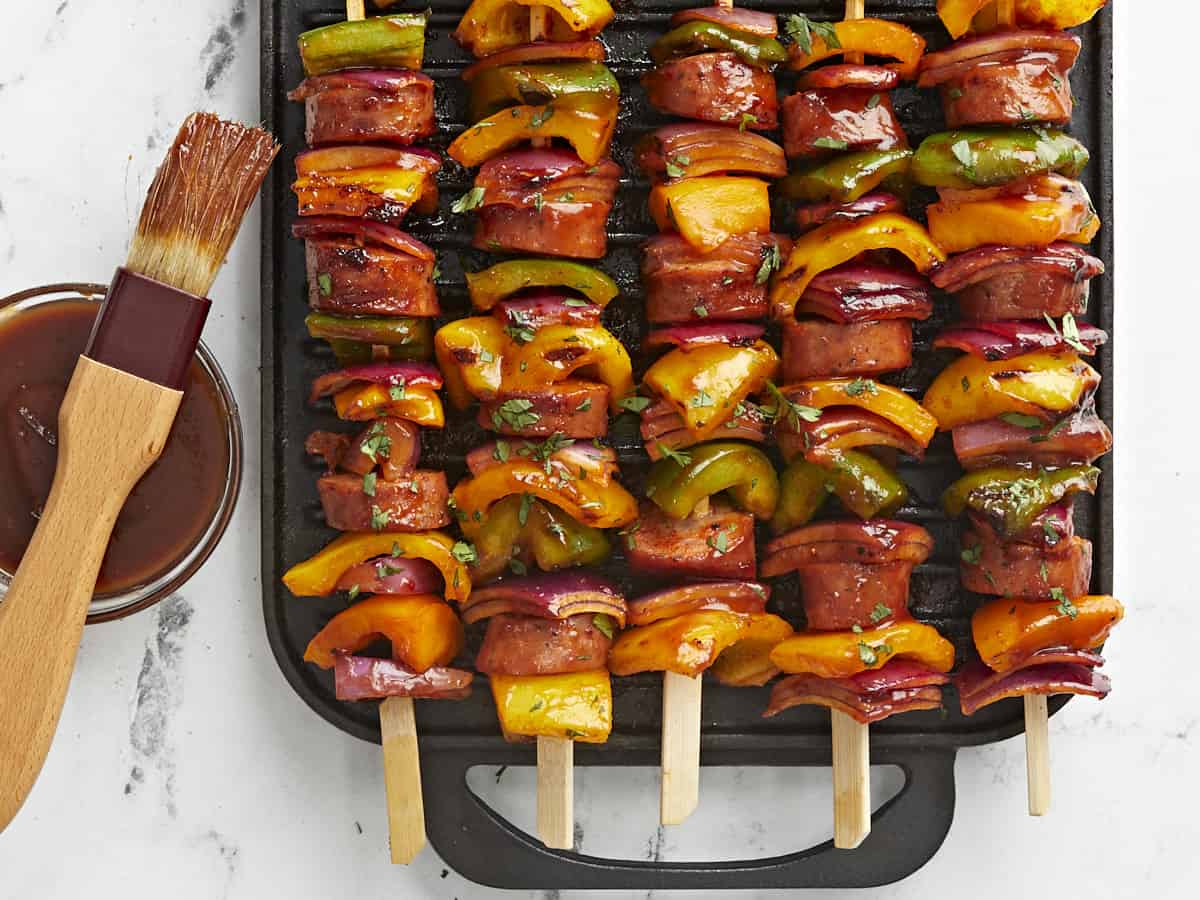
  • Cook the kebabs over a hot grill, on a hot cast iron grill pan (preheated well over medium-high heat), or under your oven's broiler (about 5-6 inches from the broiler) until the kebabs are slightly charred on one side.
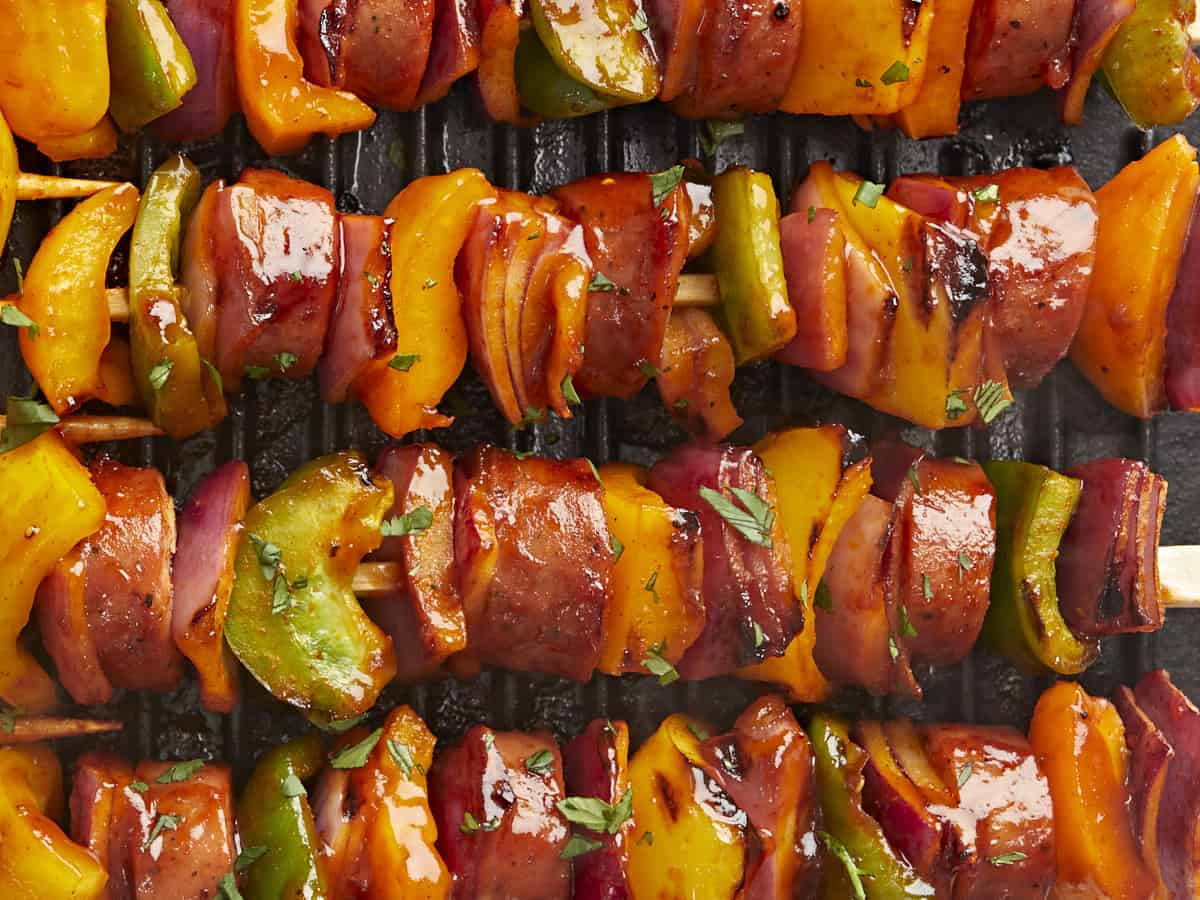
  • Flip the kebabs and continue to cook until charred on a second side. Brush a light coating of BBQ sauce over the side that has already been charred. Continue to cook, turn, and brush on BBQ sauce until the kebabs are charred on all sides and the BBQ sauce is slightly caramelized. Serve hot and enjoy!

See how we calculate recipe costs here.

Notes

Total cook time will vary depending on the cooking method and heat level.

Nutrition

Serving: 2kebabs | Calories: 460kcal | Carbohydrates: 25g | Protein: 14g | Fat: 34g | Sodium: 1358mg | Fiber: 2g
Close up overhead view of BBQ sausage kebabs.

How to Make sausage kebabs – Step by Step Photos

Ingredients for sausage kebabs on a cutting board.

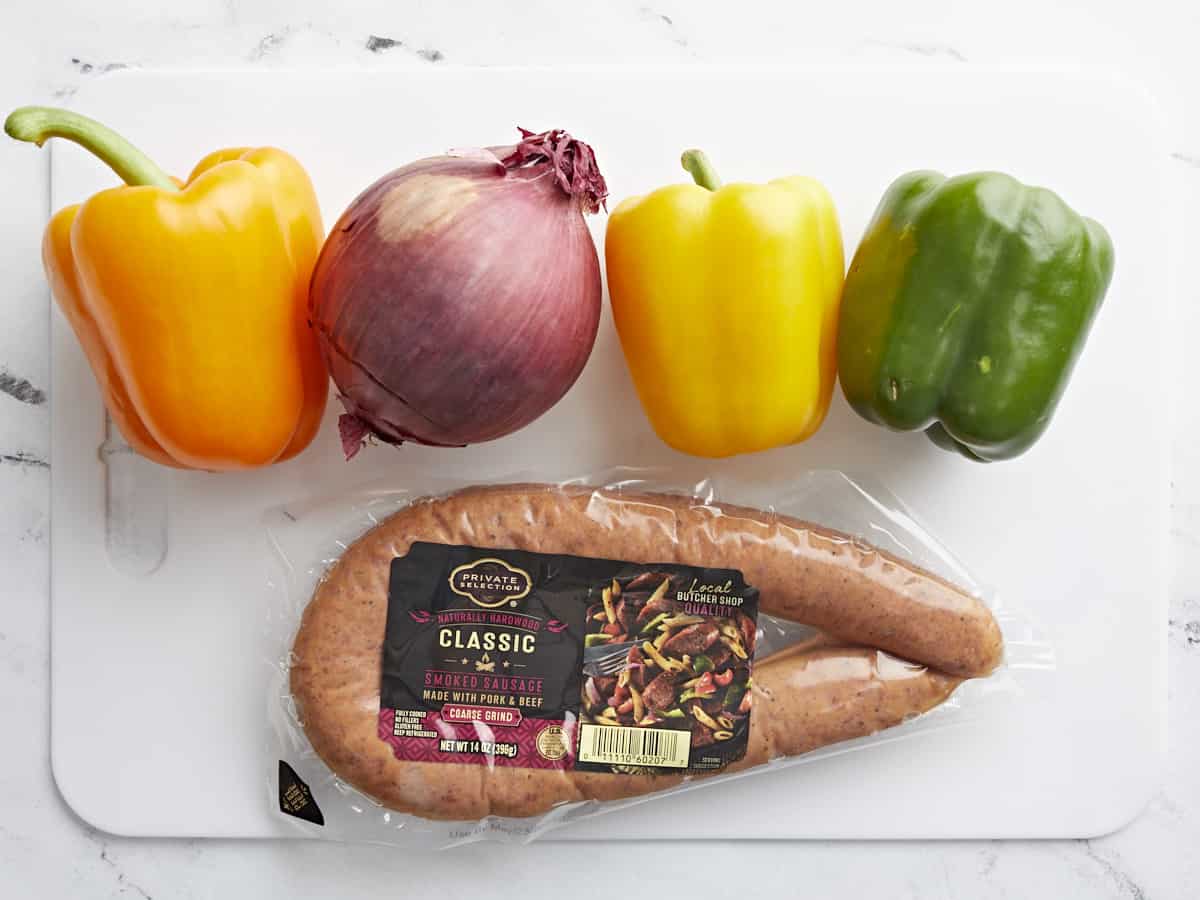
Slice one 14oz. link of smoked sausage into ½-inch thick rounds. Chop one red onion, one green bell pepper, one yellow bell pepper, and one orange bell pepper into one-inch pieces. (You can use any color peppers or onions that fit your budget.)

Sausage and vegetables in a bowl with seasoning being sprinkled over top.

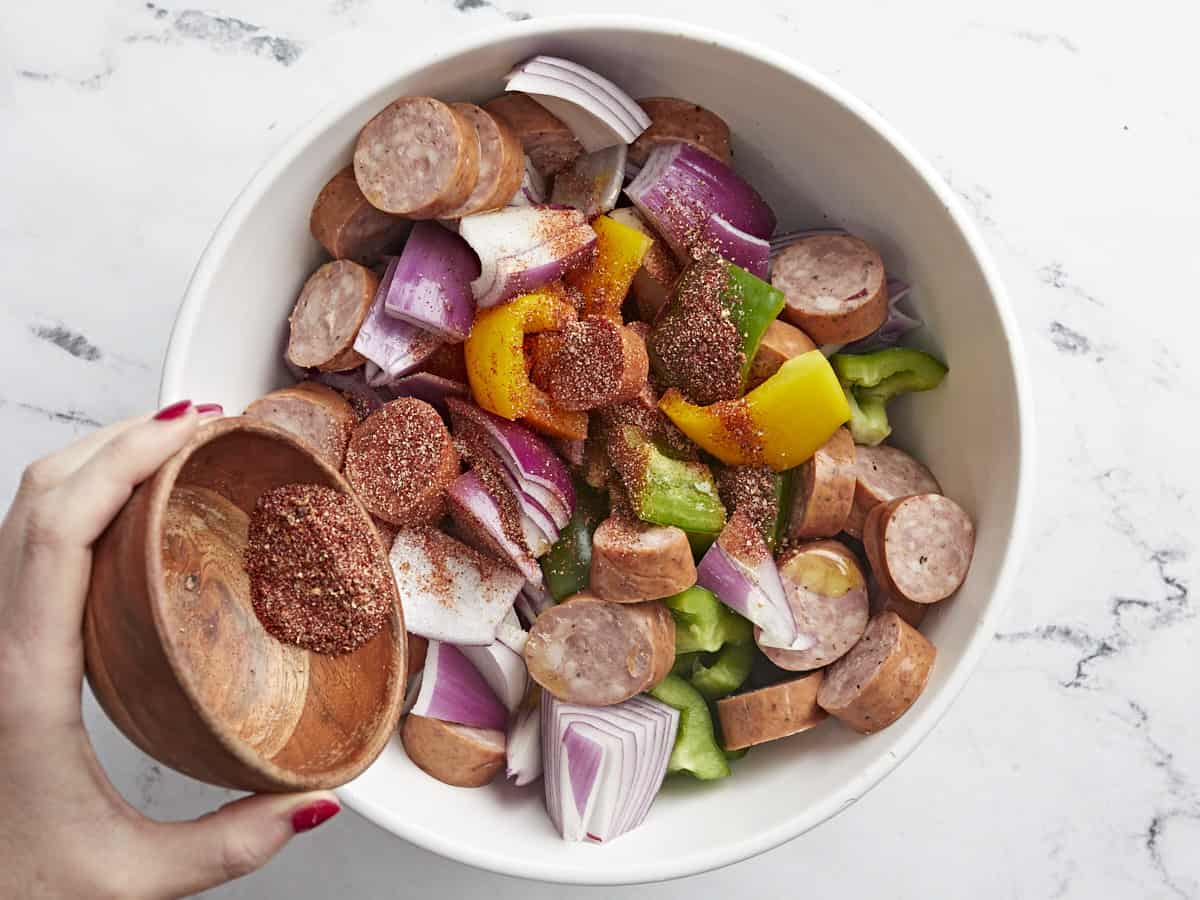
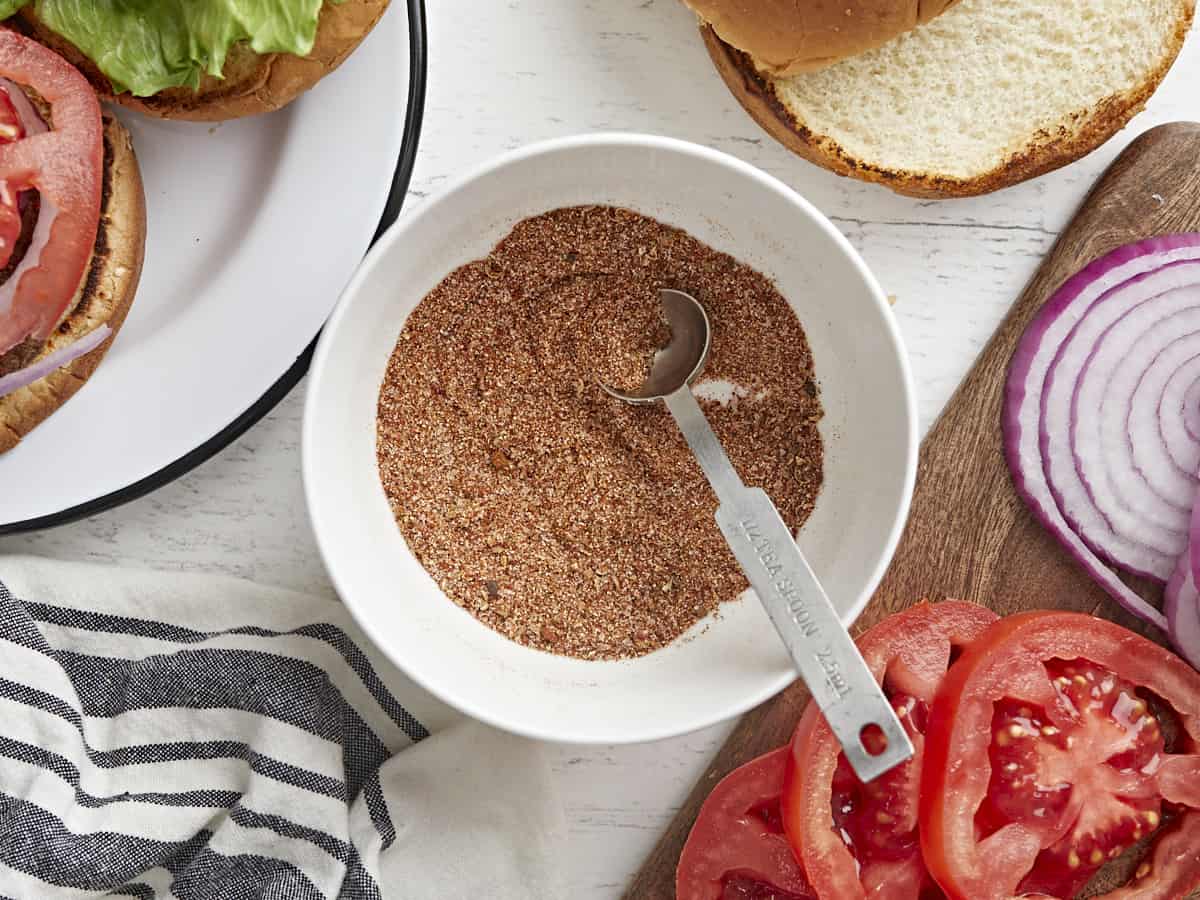
Place the sausage and vegetables into a large bowl. Drizzle 2 Tbsp cooking oil over top. Combine 1 tsp smoked paprika, ½ tsp garlic powder, ¼ tsp salt, and ¼ tsp freshly cracked pepper in a bowl, then sprinkle it over the sausage and vegetables.

Seasoned sausage and vegetables in the bowl.

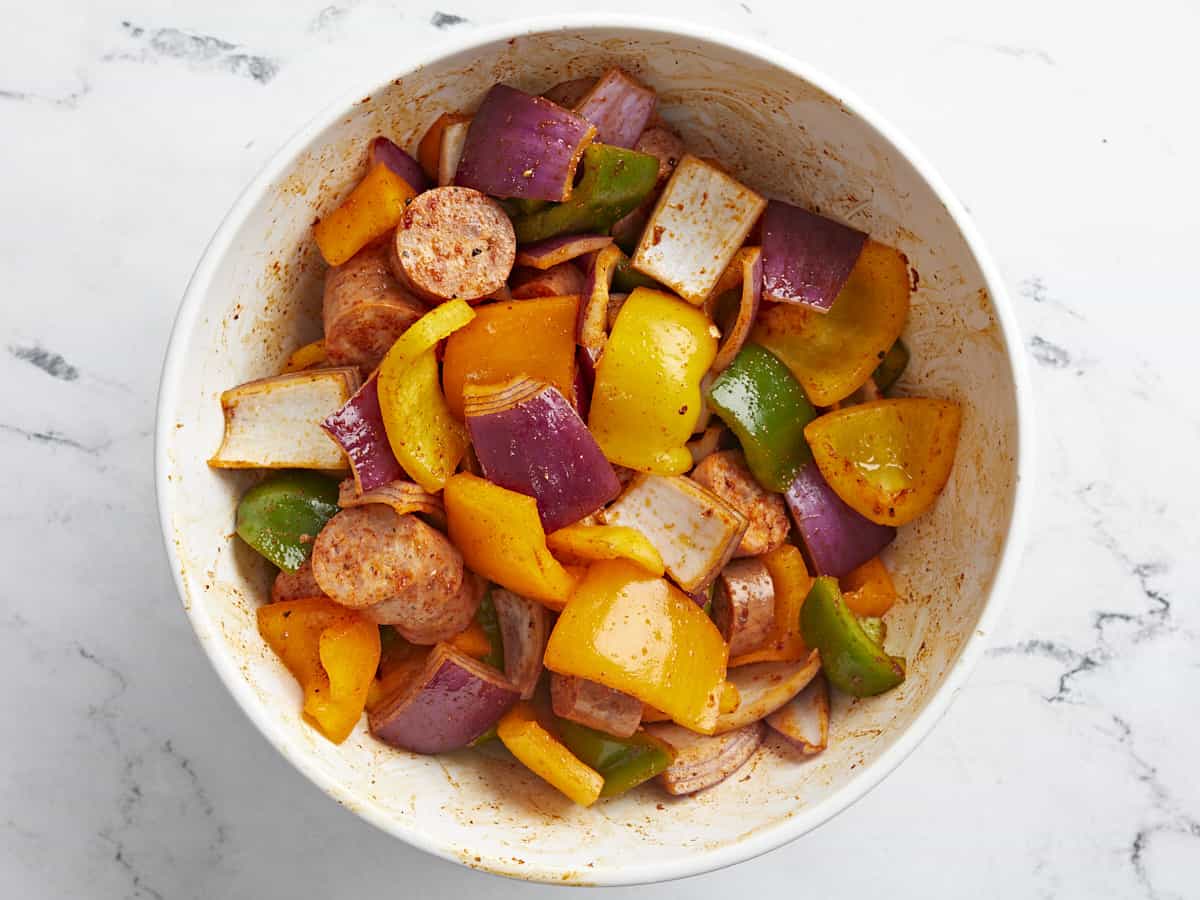
Toss the sausage and vegetables until everything is evenly coated in oil and spices.

Prepared sausage kebabs on skewers, uncooked.

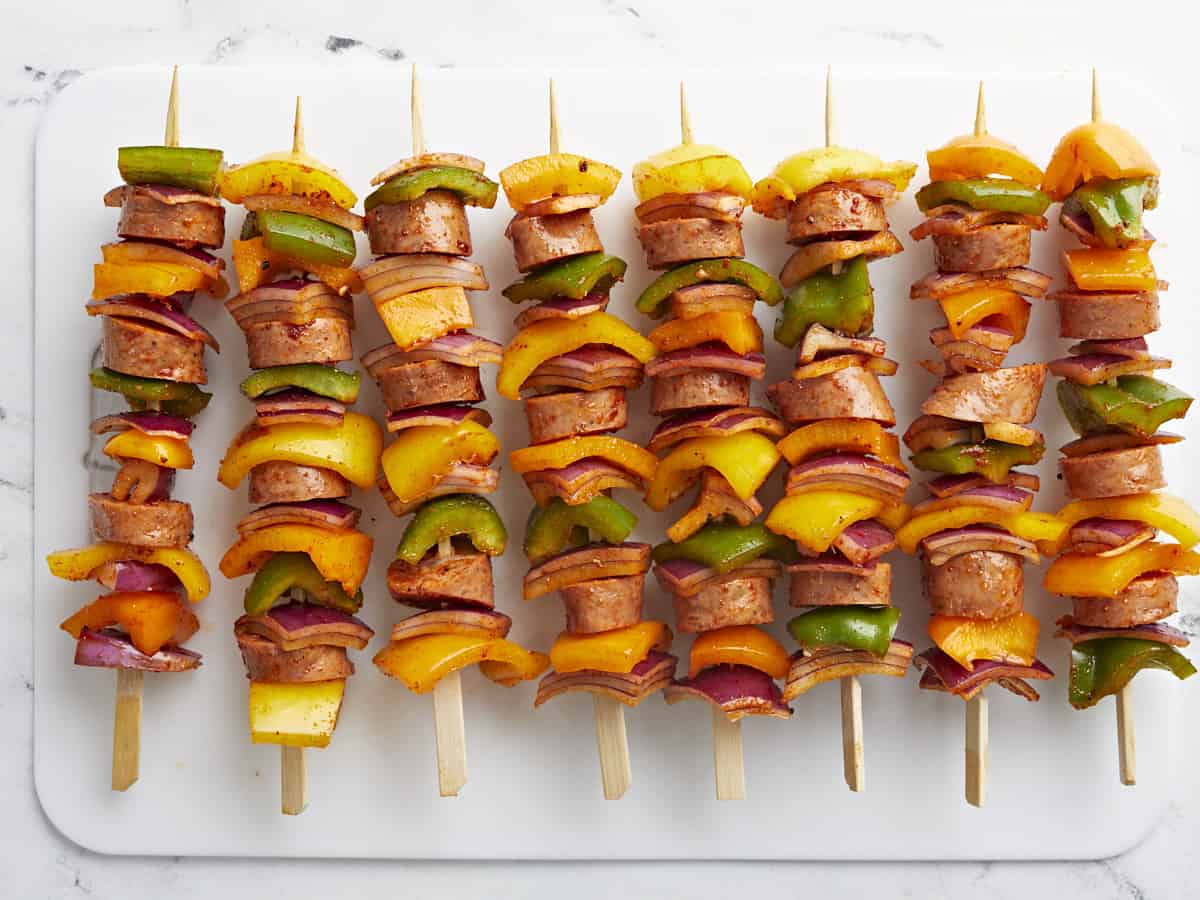
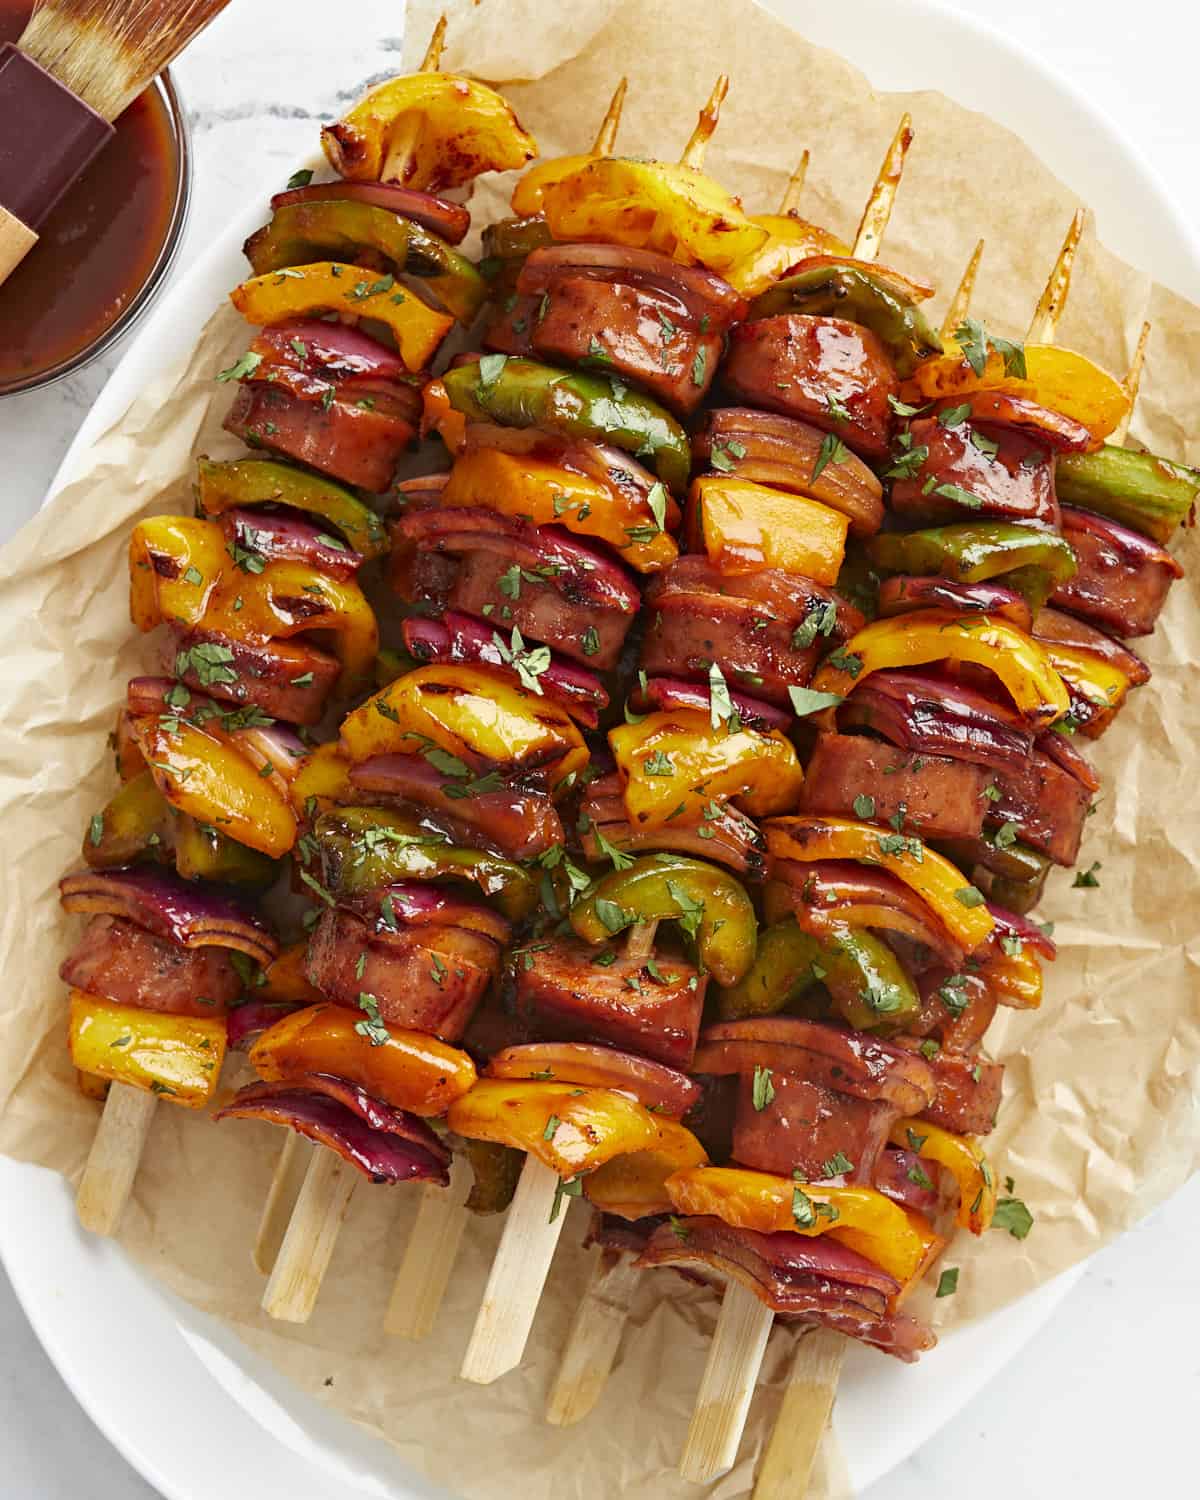
Build the kebabs by skewering the sausage and vegetables in an alternating pattern. You should get about 8 kebabs, depending on the length of your skewers and size of your vegetables.

Sausage kebabs on the grill pan with BBQ sauce being brushed over top.

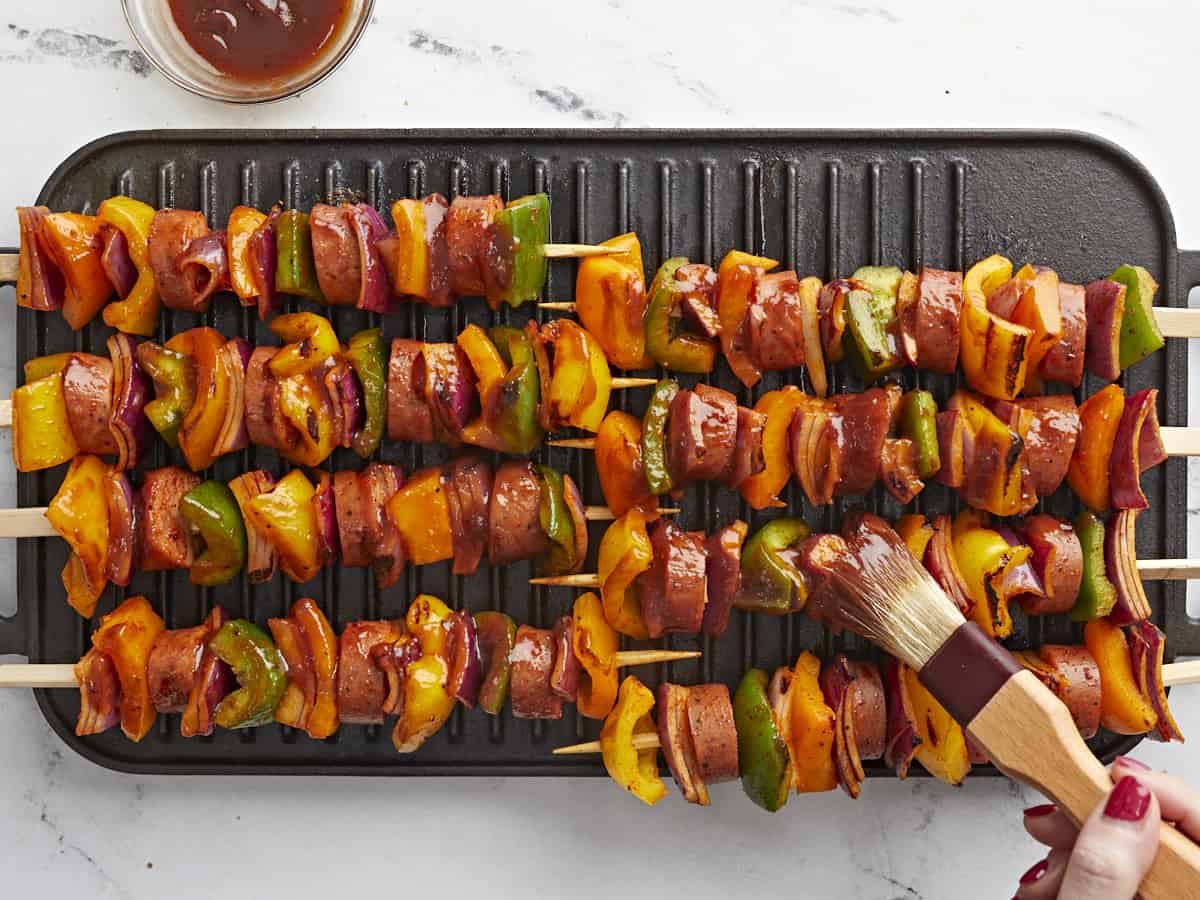
Cook the kebabs on a grill, under your oven’s broiler, or on a hot grill pan until lightly charred on one side. Flip the kebabs and brush a light coating of BBQ sauce over the cooked side. Continue to cook, flip, and brush with BBQ sauce until all sides are charred, coated in BBQ sauce, and the sauce has caramelized slightly.

Side view of sausage kebabs on a serving platter with parchment paper.

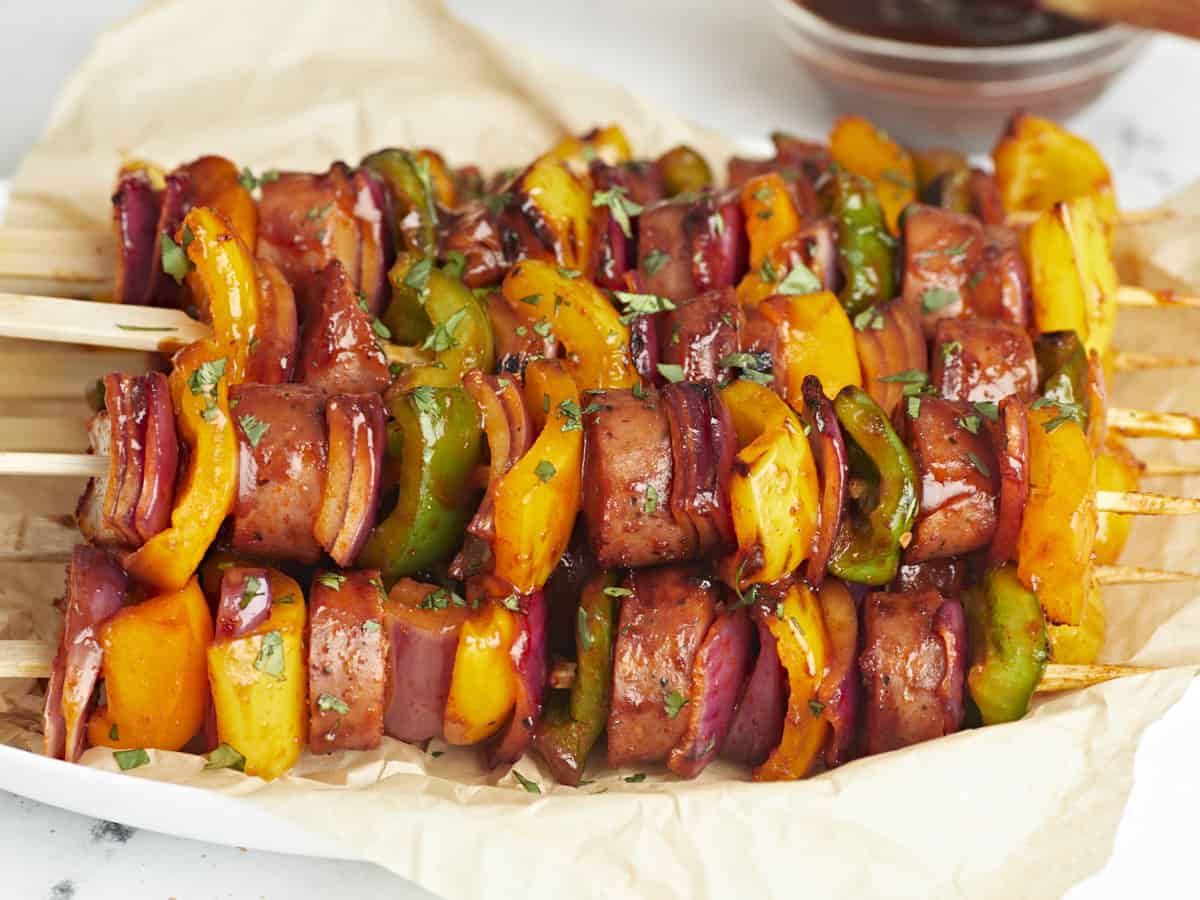
Serve hot and enjoy with your favorite summer sides!

The post Sausage Kebabs appeared first on Budget Bytes.

Creamy Chicken and Gnocchi

Creamy Chicken and Gnocchi is a one-pot meal that’s full of flavor and comfort and is also a quick and easy weeknight dinner.

The post Creamy Chicken and Gnocchi appeared first on Budget Bytes.

This velvety Creamy Chicken and Gnocchi recipe is one of my favorite one-pot meals because it’s easy, you can make it in under thirty minutes, it’s filling, and it’s big-time delicious. Like I’m-not-going-to-stop-eating-this-until-it’s-all-done delicious. Pillowy gnocchi drenched in a rich buttery cream sauce, with pops of juicy chicken and earthy spinach? Ummm, yeah. You’re going to love this one!

What Is Gnocchi?

Gnocchi are small two-inch dumplings made with mashed potatoes, flour, and eggs. They are served sauteed with butter, tomato, or cream-based sauce. In this dish, we pair gnocchi with diced chicken thighs in a buttery cream sauce. It’s basically an elevated meat and potatoes dish, with spinach thrown in because Beth says we need to cook more veggies.

What You’ll Need

You won’t need loads of time or pots and pans, that’s for sure. Everything in this dreamy, silky dish comes together in one skillet in under thirty minutes! Here’s what you’ll need to make Creamy Chicken And Gnocchi:

  • Gnocchi – you can find them frozen or fresh, but I prefer the dried ones as they are more economical, plus I have more room in my pantry than I do in my freezer. You’ll find them in the pasta section of your grocery store.
  • Chicken Thighs– You can also use chicken breast, but be careful not to overcook it, as you want juicy chicken, not dry, chicken-flavored cotton balls. In a pinch, sub the thighs with Italian sausage and skip the seasoning.
  • Heavy cream and Butter– this is a cream sauce, so it is dairy-heavy. You need the fat found in these ingredients to create the velvety sauce that brings everything together. You can substitute the heavy cream with full-fat coconut cream and the butter with vegan butter
  • Parmesan– does double duty, adding savory saltiness to the sauce while also thickening it. Asioago or feta make great substitutions. If you can’t do dairy, use a couple of tablespoons of nutritional yeast, but keep in mind that your sauce will be much looser.
  • Vegetable broth– is used to hydrate the dried gnocchi and helps create the base of our cream sauce. Substitute it with chicken broth or in a pinch, with a cup of water with a tablespoon of tomato sauce mixed in.
  • Onion and Garlic– these aromatics are fried in the chicken thigh fat and help flavor the gnocchi. You can substitute the onion with one tablespoon of onion powder and the garlic with 1/4 teaspoon of garlic powder.
  • Spinach- brings earthiness and a beautiful color to the dish. You can substitute spinach with kale, though it will take a little longer to soften.
  • Italian seasoning – creates an easy flavor base. If you don’t have Italian seasoning, substitute it with one teaspoon of dried oregano, one teaspoon of dried thyme, and one teaspoon of dried rosemary.
  • Smoked paprika – using this spice is optional, but I use it to add a dank, smoky note that helps round out the sharpness of the Italian seasoning. It also lends a golden hue to the sauce.

What To Serve With Creamy Chicken and Gnocchi

This dish is heavy, so pair it with a Simple Side Salad or Panzanella. You can also lean into the heaviness and make Garlic Bread to sop up all the creamy sauce. (It is AMAZING with garlic bread. And garlic counts as a vegetable!)

Storing and Reheating

Because you make this dish with a cream-based sauce, I don’t recommend freezing it, as the cream gets grainy when it thaws. Keep leftovers in an airtight container in the refrigerator for up to 3 days. Reheat in a microwave until steaming.

Side shot of Creamy Chicken and Gnocchi in a silver skillet with a wooden spoon in it.
Print

Creamy Chicken and Gnocchi

This delicious dish is full of pillowy gnocchi drenched in a rich buttery cream sauce, with pops of juicy chicken and earthy spinach. Plus it's so easy, you can make it in under thirty minutes!
Course Dinner, Lunch
Cuisine American, Italian
Total Cost $8.41 recipe / $2.10 serving
Prep Time 5 minutes
Cook Time 20 minutes
Total Time 25 minutes
Servings 4 servings
Calories 756kcal

Ingredients

  • 1.25 lbs chicken thighs (4 to 5 thighs) $4.23
  • 1 Tbsp Italian Seasoning $0.30
  • 1/2 tsp smoked paprika $0.05
  • 1/2 tsp salt $0.04
  • 1/4 tsp pepper $0.02
  • 2 Tbsp cooking oil $0.08
  • 1 medium yellow onion, diced $0.32
  • 2 garlic cloves $0.11
  • 1 lb potato gnocchi (dry) $1.13
  • 2 cups fresh spinach $0.60
  • 1 cup vegetable broth $0.08
  • 1/2 cup heavy cream $0.71
  • 2 Tbsp salted butter $0.30
  • 1/4 cup Parmesan $0.44

Instructions

  • Dice the chicken thighs into 2-inch pieces. Add the chicken to a bowl and top it with Italian seasoning, smoked paprika, salt, and pepper. Mix until combined.
  • Place a large, deep skillet over medium heat and add the cooking oil. Once it's shimmering, add the chicken and cook undisturbed until well browned, about 3 minutes. Stir and brown on the other side, about 3 more minutes. Remove the chicken from the pan when it's cooked through and leave the fat in the pan.
  • Add the onion and garlic to the skillet. Saute until the onions have softened and the garlic is fragrant, about 2 minutes
  • Add the gnocchi and butter to the skillet and brown for 2 minutes.
  • Add the spinach and the broth to the skillet. Cover the pan. Cook for 1 to 2 minutes until the spinach has wilted and the gnocchi has hydrated.
  • Add the heavy cream and salted butter to the skillet. Stir until the butter has melted and the cream is steaming hot but not boiling.
  • Take the skillet off the heat. Add the parmesan to the pan and stir until it melts, creating a velvety sauce.
  • Finally, return the cooked diced chicken to the skillet. Mix gently into the gnocchi and cream sauce. If desired, garnish with parsley.

See how we calculate recipe costs here.

Nutrition

Serving: 1.25cups | Calories: 756kcal | Carbohydrates: 47g | Protein: 32g | Fat: 50g | Sodium: 1186mg | Fiber: 4g

How to Make Creamy Chicken And Gnocchi – Step by Step Photos

Dice 1.25 pounds of chicken thighs (about 4 to 5 thighs) in 2-inch pieces. Add the chicken to a bowl and top it with 1 tablespoon of Italian seasoning, 1/2 teaspoon of smoked paprika, 1/2 teaspoon of salt, and 1/4 teaspoon of pepper. Mix until combined.

Set a large deep skillet over medium heat and add 2 tablespoons of cooking oil. When the oil is shimmering, add the chicken and cook undisturbed until well browned, about 3 minutes. Stir and brown on the other side, about 3 minutes more. Remove the chicken from the pan when it’s cooked through and has reached an internal temperature of 160°F. Leave the rendered fat in the pan.

Add 1 diced onion and 2 cloves of minced garlic to the skillet. Saute until the onions have softened and the garlic is fragrant, about 2 minutes.

Add 1 pound of dry potato gnocchi and 2 tablespoons of salted butter to the skillet. Brown the gnocchi for 2 minutes.

Add 2 cups of spinach and 1 cup of vegetable broth to the skillet. Cover the pan. Cook for 1 to 2 minutes until the spinach has wilted and the gnocchi has hydrated.

Add 1/2 cup of heavy cream and 2 tablespoons of salted butter to the skillet. Stir until the butter has melted and the cream is steaming hot, but not boiling. You’re about to add cheese to the sauce, and cheese curdles at high temperatures, so make sure it isn’t boiling.

Take the pan off the heat. Add 1/4 cup of parmesan to the pan and stir until it melts, creating a velvety sauce.

Finally, return the cooked diced chicken to the skillet. Mix gently into the gnocchi and cream sauce. If desired, garnish with parsley. Serve this dish piping hot, then sit back and enjoy what took you less than a half hour to make!

More Easy One Pot Meals

The post Creamy Chicken and Gnocchi appeared first on Budget Bytes.

BBQ Ribs

You don’t need a big fancy grill to get juicy, tender, fall-off-the-bone BBQ ribs. Your oven can produce lip-smackingly delicious ribs too!

The post BBQ Ribs appeared first on Budget Bytes.

For me, nothing says “Summer is here!” like a succulent rack of BBQ Ribs with All. Of. The. Sides. But maybe, like me, you don’t have a grill or a backyard, or any desire to stand out in the hot sun next to fire. First, I see you. Second, you don’t need a big fancy grill to get juicy, tender, fall-off-the-bone BBQ Ribs. All you need is a baking pan, some foil, and some patience to get oven-baked barbecue ribs on the table that’ll have your whole family asking for more! PS This is a great recipe for Father’s Day, the 4th Of July, or a summer barbecue. So make sure to save it!

Baked ribs on a black plater.

What you need to make BBQ Ribs

Are you ready to skip the grill and fire up your oven? Here’s what you need to make delicious oven-baked barbecue ribs that leave you wishing you’d made a double batch!

  • Ribs– your choice: baby back, spare, short, St. Louis style, you name it. Though cook times will vary, you can make any 3-pound rack using this simple recipe.
  • Barbecue Sauce– we have a great recipe for Homemade BBQ Sauce if you want to make your own, but any BBQ sauce will do. Not only does the sauce add deep flavors, but it also helps caramelize the outer layer of ribs for mouth-wateringly sticky perfection.
  • Spices– a rub is a must if you want to add deep flavor to ribs. For this recipe, we will make our own rub with salt, pepper, garlic powder, onion powder, smoked paprika, brown sugar, cayenne, and mustard powder, but if you have a favorite brand, use 5 tablespoons.
  • Butter – mixing the dry rub with melted butter makes it easy for the seasoning to stick to your ribs as they bake. The butter also adds flavor and keeps your ribs from getting dry.
  • Liquid– placing liquid in the pan will help keep your ribs from drying out. You can use any liquid: water, chicken broth, and if you’re making pork ribs, apple juice works beautifully.

How To Pick Ribs

Here are a few helpful tips to keep in mind when picking ribs:

  1. Look for meaty ribs that are the same thickness from end to end. Press your finger down into the rib to get a feel for how much meat there is on the bone.
  2. Look for ribs marbled throughout with fat, which keeps them juicy and adds flavor. Pass on ribs with big clumps of fat, which adds to the weight and cost of the rack but has to be trimmed before baking.
  3. The ribs should be about the same size and thickness from end to end, which ensures even cooking. Of course, you’ll have some natural tapering at one end, but avoid racks with a considerable size difference from end to end.
  4. Plan on at least 3 to 4 ribs per serving and buy accordingly.
Cut ribs on a white plate with mashed potatoes and green beans.

What To Serve With BBQ Ribs

Kick up your BBQ Ribs 100 notches by serving them with delicious, easy-to-make Budget Bytes classics like:

How To Store And Reheat Ribs

Wrap ribs tightly in plastic or foil and place them in an airtight container. Store leftovers in the fridge for up to three days or in the freezer for up to three months. To reheat from frozen, thaw the ribs in your fridge overnight. When ready to cook, bring the ribs to room temperature while you preheat your oven to 250°F. Line a sheet pan with a rack and fill the pan with a few cups of water. Wrap the ribs in foil, place them on a sheet pan, and warm for about 20 to 30 minutes or until steaming.

Baked ribs on a rack.
Print

BBQ Ribs

You don't need a big fancy grill to get juicy, tender, fall-off-the-bone BBQ ribs. Your oven can produce lip-smackingly delicious ribs too!
Course Dinner, Lunch
Cuisine American
Total Cost ($11.76 recipe / $2.94 serving)
Prep Time 10 minutes
Cook Time 2 hours
Resting Time 15 minutes
Total Time 2 hours 25 minutes
Servings 4 servings of 3-4 ribs
Calories 987kcal

Ingredients

  • 3 lbs pork ribs $8.82
  • 4 Tbsp butter, melted $0.37
  • 2 tsp salt $0.10
  • 1 tsp black pepper $0.10
  • 2 tsp garlic powder $0.20
  • 2 tsp onion powder $0.20
  • 2 tsp smoked paprika $0.20
  • 1 Tbsp brown sugar $0.04
  • 2 tsp cayenne $0.20
  • 2 tsp ground mustard $0.20
  • 3 cups chicken broth $0.39
  • 1 1/2 cups BBQ sauce $0.94

Instructions

  • Place an oven rack in the center of the oven and preheat it to 300°F. Trim the ribs, removing excess fat. Trim the thicker end to even out the thickness. (Cook the trimmed meat with the ribs as a cook's bonus.) Turn the ribs over and remove the silvery membrane from the back of the ribs.
  • Line a sheet pan that's at least 2 inches deep with heavy-duty aluminum foil and place a wire cooling rack in it. If you do not have a cooling rack, crumple a long sheet of aluminum and roll it into a rack-sized donut that is at least 2 inches thick. Place the trimmed ribs on the rack. Pat off any excess moisture with a paper towel.
  • Make a rub by mixing salt, pepper, garlic powder, onion powder, smoked paprika, brown sugar, cayenne, ground mustard, and melted butter.
  • Rub the seasoning generously all over the meaty top of the ribs in a thick layer.
  • Pour chicken broth into the sheet pan, being careful not to pour it on the ribs. Place the sheet pan in the oven. Lower the temperature to 250°F. Bake uncovered for 30 minutes.
  • Cover the ribs in aluminum foil and bake for 60 minutes, rotating the sheet pan midway through.
  • Remove the aluminum foil and brush the ribs with 1 cup of bbq sauce. Bake for an additional 30 minutes or until tender. Every rack is different. The ribs are ready when a fork can easily pull the meat off the bone.
  • Turn the heat in the oven on broil. Brush the ribs with an additional 1/2 cup of bbq sauce and place under the broiler for a few minutes, just until a little char develops. Remove the ribs from the oven and rest for 15 minutes. Cut the ribs to your desired size, serve, and try not to lick your fingers!

See how we calculate recipe costs here.

Nutrition

Serving: 1serving | Calories: 987kcal | Carbohydrates: 51g | Protein: 40g | Fat: 69g | Sodium: 3208mg | Fiber: 2g
Cut ribs on a plate lines with parchment paper.

How to Make BBQ Ribs – Step by Step Photos

Trimming silver skin off the back of a rib rack.

Place a rack in the center of the oven and preheat it to 300°F. Trim the ribs, removing any big clumps of excess fat. Trim the thicker end to even out the thickness and cook the trimmed meat along with the ribs. Cook’s bonus! Turn the ribs over and remove the silvery membrane from the back of the ribs. It gets rubbery when cooked. Use a pairing knife or other sharp small knife to cut away at the skin while you pull it.

Trimmed ribs on a rack.

Line a sheet pan that’s at least 2 inches deep with heavy-duty aluminum foil and place a rack in it. Place the trimmed ribs on the rack. If you do not have a cooling rack, crumple a long sheet of aluminum and roll it into a rack-sized donut that is at least 2 inches thick. Place the trimmed ribs on the rack or aluminum donut. Pat off any excess moisture with a paper towel.

Ingredients for dry rub in a white bowl.

Make a rub by mixing 2 teaspoons of salt, 1 teaspoon of pepper, 2 teaspoons of garlic powder, 2 teaspoons of onion powder, 2 teaspoons of smoked paprika, 1 tablespoon of brown sugar, 2 teaspoons of cayenne, 2 teaspoons of mustard powder, and 4 tablespoons of melted butter.

Covering ribs with dry rub that are set on a rack.

Rub the seasoning generously all over the meaty top of the ribs.

Adding broth to a sheet pan with ribs on a rack.

Pour the chicken broth into the sheet pan, being careful not to pour it on the ribs. Place the sheet pan in the oven. Lower the temperature to 250°F. Bake uncovered for 30 minutes. Cover the ribs in aluminum foil and rotate the sheet pan front to back. Bake for another 30 minutes, then rotate the sheet pan again and bake for an additional 30 minutes.

Adding BBQ sauce to baked ribs on a rack.

Remove the aluminum foil and brush the ribs with 1 cup of bbq sauce. Bake for an additional 30 minutes or until tender. Every rack is different. The ribs are ready when a fork can easily pull the meat off the bone.

Finished baked ribs on a rack.

Turn the heat in the oven on broil. Brush the ribs with an additional 1/2 cup of bbq sauce and place under the broiler for a few minutes, just until a little char develops. Remove the ribs from the oven and rest for 15 minutes. Cut the ribs to your desired size, serve, and try not to lick your fingers!

Cut ribs on a white plate with mashed potatoes and green beans.

More Easy BBQ Recipes

The post BBQ Ribs appeared first on Budget Bytes.

Sausage Meatballs and Kale Sheet Pan Meal

This hearty, tangy, and succulent Sausage Meatball and Kale Sheet Pan Meal is perfect for busy days when you just don’t feel like cooking.

The post Sausage Meatballs and Kale Sheet Pan Meal appeared first on Budget Bytes.

This hearty Sausage Meatballs and Kale Sheet Pan Meal is chock full of deep, tangy flavors and succulent textures! It’s perfect for those days when you don’t feel like cooking. And if you’re at the point where you can’t bring yourself to make a meatball, just slice sausage in its casing to get this meal in the oven even faster. PS This sheet pan dinner meal preps excellently. Quick cooking, super filling, no fuss, and you can make it for the week! What’s not to love?

Overhead shot of Sausage Meatball and Kale Sheet Pan Meal.

What You’ll Need

This Italian Sausage Meatball and Kale Sheet Pan Meal is quick, easy, and endlessly versatile! Here’s what you’ll need to make it:

  • Italian Sausage– I use ground spicy Italian sausage but you can use sweet Italian or any of your favorite ground sausages, including plant-based ones. You can also remove the sausage from its casing or skip making meatballs altogether and just slice it in its casing. Fat adds flavor and delivers a tender meatball, so skip low-fat sausages or ground meats.
  • Milk– adds moisture to the sausage and helps create depth of flavor. If you are cooking dairy-free, try using almond milk or coconut milk. If you’re really watching your pennies, just use water.
  • Panko Breadcrumbs– add texture and keep the meatballs from drying out (after a soak in milk). You can substitute Panko with regular breadcrumbs or crushed crackers.
  • Egg – helps to bind the meatballs so they keep their shape. Substitute the egg with 3 tablespoons of plain yogurt, 1/4 ricotta cheese, or 1/3 cup of unsweetened apple sauce.
  • Kale– is hearty and can stand up to a high-heat roast. You can substitute it with other hearty greens like Collards or Swiss Chard.
  • Cherry Tomatoes– deepen in flavor when roasted, but feel free to sub with other fresh elements like bell peppers, mushrooms, and onions. In a pinch, used canned tomatoes. Just make sure to drain them and give them a rough chop.
  • Potatoes– add bulk to this easy meal and soak up all the flavors from the drippings—sub with sweet potatoes or other root vegetables like carrots, radishes, or parsnips.
  • Spices and Seasonings– smoked paprika, chili flakes, garlic powder, brown sugar, dijon mustard, red wine vinegar, and olive oil dress the veggies and greens in robust flavors.
  • Grated Parmesan Cheese– is the chef’s kiss in this dish. The cheese adds umami (AKA savoriness) and a touch of creamy saltiness. Omit it if you like, or substitute it with nutritional yeast.
Overhead shot of Sausage Meatball and Kale Sheet Pan Meal.

What Can I Serve With It?

Make this Italian Sausage Meatball and Kale Sheet Pan Meal even more filling by serving it with Homemade Garlic Bread, Easy Soda Bread, or Hot Honey Cornbread. You can also pair it with a light dessert like Chocolate Mousse, Vanilla Pudding, or No-Churn Strawberry Ice Cream.

How To Store Leftovers

Store leftovers in an airtight container and refrigerate for up to four days. If meal prepping, add fresh kale on top of the roasted ingredients to keep it from wilting. You can freeze in an airtight container for up to a month with a sheet of plastic or parchment on the surface to prevent frostbite. Thaw in your fridge overnight. You can eat leftovers cold or warm them in a microwave until steaming.

Overhead shot of Sausage Meatball and Kale Sheet Pan Meal in a white bowl with a hand holding the bowl and a wooden spoon serving a portion into the bowl.
Overhead shot of Sausage Meatball and Kale Sheet Pan Meal in a white bowl.
Print

Sausage Meatball and Kale Sheet Pan Meal

This hearty Italian Sausage Meatballs and Kale Sheet Pan Meal is chock full of deep, tangy flavors and succulent textures! It's perfect for those days when you don't feel like cooking.
Course Brunch, Dinner, Lunch
Cuisine American
Total Cost ($15.57 recipe / $3.89 serving)
Prep Time 15 minutes
Cook Time 20 minutes
Total Time 35 minutes
Servings 4 bowls
Calories 928kcal

Ingredients

  • 1 lb red potatoes, quartered $1.25
  • 3/4 cup olive oil, divided $1.44
  • 1 tsp smoked paprika $0.10
  • 3 1/2 tsp kosher salt, divided $0.28
  • 1/4 tsp black pepper $0.02
  • 1/4 tsp red pepper flakes $0.08
  • 1 pint cherry tomatoes $3.49
  • 1/2 cup panko breadcrumbs $0.50
  • 1/4 cup milk $0.06
  • 1 lb Italian Ground Sausage $4.99
  • 1 large egg, beaten $0.17
  • 1 1b kale, chopped $2.49
  • 3 Tbsp red wine vinegar $0.42
  • 2 tsp Dijon mustard $0.06
  • 1 tsp brown sugar $0.02
  • 1/2 tsp garlic powder $0.08
  • 2 Tbsp Parmesan cheese, grated $0.12

Instructions

  • Preheat oven to 450°F. Place quartered red potatoes in a large bowl and drizzle with 1/4 cup olive oil. Mix smoked paprika, 2 teaspoons of salt, black pepper, and chili flakes. Sprinkle over the potatoes and toss. Place the potatoes in a sheet pan.
  • In the same bowl, add the cherry tomatoes and sprinkle with 1/4 teaspoon salt. Scatter them over the potatoes.
  • Soak the breadcrumbs in milk. Break up Italian sausage in a large bowl. Mix in breadcrumbs and egg. Wet your fingers with a bit of leftover oil from the bowl the tomatoes were in. Roll 16 meatballs and place them on the sheet pan between the potatoes and tomatoes.
  • Bake for 10 minutes, then turn the meatballs and bake for another 10 minutes.
  • While the meatballs bake, add 1/2 lb of the kale to the same bowl the potatoes and tomatoes were in. Mix red wine vinegar, 1/2 cup olive oil, Dijon mustard, brown sugar, garlic powder, and 1/4 teaspoon salt. Toss the kale in the dressing, massaging it into the leaves.
  • Remove the sheet pan from the oven, and scatter kale all over.
  • Roast for 3 to 4 minutes until the kale has charred in spots. To serve, split raw kale between 4 bowls. Top with charred kale and tomatoes and mix. Finally, top with meatballs and potatoes. Garnish with parmesan cheese.

See how we calculate recipe costs here.

Nutrition

Serving: 1bowl | Calories: 928kcal | Carbohydrates: 32g | Protein: 24g | Fat: 79g | Sodium: 3048mg | Fiber: 3g
Side shot close up of a wood spoon holding a portion of Sausage Meatball and Kale Sheet Pan Meal.

How to Make Sausage Meatballs And Kale Sheet Pan MeAL – Step by Step Photos

Overhead shot of potatoes being dressed in a white bowl.

Preheat the oven to 450°F. Place 1 pound of quartered red potatoes in a large bowl and drizzle with 1/4 cup olive oil. Mix 1 teaspoon of smoked paprika, 2 teaspoons of salt, ¼ teaspoon of pepper, and 1/4 teaspoon chili flakes. Sprinkle over the potatoes and toss. Place the potatoes in a sheet pan.

Overhead shot of tomatoes being dressed in a white bowl.

In the same bowl that you dressed the potatoes, add the sliced pint of cherry tomatoes and sprinkle with 1/4 teaspoon salt. Scatter them over the potatoes.

Overhead shot of ground Italian Sausage, breadcrumbs, and egg in a white bowl.

Soak the breadcrumbs in milk. Break up Italian sausage in a large bowl. Mix in breadcrumbs and egg. Wet your fingers with a bit of leftover oil from the bowl the tomatoes were in. Roll a 1-ounce meatball and place it on the sheet pan between the potatoes and tomatoes. Repeat with the remaining sausage until you have 16 meatballs.

Overhead shot of meatballs, potatoes, and tomatoes in sheet pan.

Bake for 10 minutes, then turn the meatballs and bake for another 10 minutes.

Overhead shot of kale being massaged.

While the meatballs bake, add 1/2 pound of kale to the same bowl the potatoes and tomatoes were in. Mix 3 tablespoons of red wine vinegar, 1/2 cup olive oil, 2 teaspoons Dijon mustard, 1 teaspoon brown sugar, 1/2 teaspoon garlic powder, and 1/4 teaspoon salt. Toss the kale in the dressing, massaging it into the leaves.

Overhead shot of kale being placed in the sheet pan.

Remove the sheet pan from the oven, and scatter kale all over.

Overhead shot of finished Sausage Meatball and Kale Sheet Pan Meal.

Roast for 3 to 4 minutes until the kale has wilted and charred in spots. To serve, split the 1/2 pound of leftover raw kale between 4 bowls. Top with charred kale and tomatoes and mix. Finally, top with meatballs and potatoes. Garnish with parmesan cheese and chow down!

Overhead shot of Sausage Meatball and Kale Sheet Pan Meal in a white bowl with a wood spoon serving a portion into the bowl.

More Easy Sheet Pan Meals

The post Sausage Meatballs and Kale Sheet Pan Meal appeared first on Budget Bytes.

Air Fryer Fried Chicken

Crispy on the outside and juicy on the inside, Air Fryer Fried Chicken delivers loads of texture and flavor without the fuss of deep frying.

The post Air Fryer Fried Chicken appeared first on Budget Bytes.

Crispy on the outside and juicy on the inside, Air Fryer Fried Chicken is the move if you want loads of texture and flavor without dealing with a pot of used oil and a greasy stovetop. It’s all of the yum with less of the fuss! The hardest thing about frying chicken in an air fryer is not eating the crunchy, golden skin before it hits the table.

Overhead view of Air Fryer Fried Chicken resting on parchment paper and a cooling rack with a small bowl of hot sauce in the background.

Why Cook Chicken In An Air Fryer?

An air fryer is just a countertop convection oven with a cute name. It doesn’t actually fry food. Instead, it circulates hot air around whatever’s in the basket, creating a crispy outer layer while keeping the inside moist and tender. There’s no oil splatter all over your stove (or you), no grease-filled pot to scrub, and you only need a small fraction of the oil used in traditional frying. It’s the perfect vehicle for crispy chicken, and the results will absolutely blow your mind.

What You Need To Air Fry Chicken

I butcher a whole chicken because it’s cheaper, but you can fry any kind of chicken you want: wings, breasts, or thighs. Here’s what you’ll need to make crispy Air Fryer Fried Chicken:

  • Chicken – this recipe is for 3 pounds of chicken. Use whatever combination you like. If your air fryer basket is small, it’s best to fry similar-sized pieces in batches.
  • Buttermilk– is the foundation of your brine. It tenderizes your chicken while also adding tanginess.
  • Spices – help build earthy flavor and soft heat. I use smoked paprika, black pepper, garlic powder, onion powder, oregano, and cayenne pepper. Feel free to substitute this mix with three tablespoons of your favorite spice blend.
  • Egg – helps the flour mixture stick to your chicken.
  • Flour– Helps to build the iconic crispy outer layer of fried chicken.
  • Corn Starch– helps deepen the color of the batter as it cooks and creates a crispy texture.
  • Baking Powder– Helps create an airy batter with loads of crispy nooks and crannies.
  • Oil Spray – you need oil to fry chicken, even in an air fryer. If you don’t have oil spray, put corn oil or vegetable oil in a spray bottle, and use that.
Overhead view of Air Fryer Fried Chicken plated.

How To Fry Chicken In An Air Fryer

  1. For deep flavor and juicy, tender results, brine your chicken. Even a short thirty-minute dip will make a huge difference, but if you can, brine it for at least 2 hours.
  2. Preheat the air fryer. Your air fryer is a countertop oven; like most ovens, you need to preheat it. You may not need to do so for every recipe, but for crispy chicken that’s cooked throughout, it’s a must.
  3. When you’re ready to fry, shake off the excess brine and thoroughly dredge the chicken in seasoned flour mixed with cornstarch and baking soda. The last two ingredients will help crisp the skin.
  4. Spray the floured chicken with enough oil to cover it completely, once before cooking and once mid-cook.
  5. Use a lower temperature (300°F) to give the chicken time to cook without burning the batter, then increase the heat (400°F) to finish cooking the chicken and create a crispy, golden outer layer.
  6. Cook the chicken to 160°F. The chicken will continue to cook after it’s out of the air fryer and that carry-over cooking will take you to the recommended 165°F.

How Long Do I Air Fry Chicken?

Your cook time depends on the cuts of chicken used. The thicker the cut, the longer it takes to reach the required 165°F. Use a thermometer and pull the chicken once it hits 160°F. It will continue to cook outside of the air-fryer, and the temperature will reach 165°F. If you do not have a thermometer, cook the chicken until the juices run clear.

How To Reheat Air Fryer Fried Chicken

Try not to leave the chicken out at room temperature for longer than two hours. Harmful bacteria start to multiply soon after. Refrigerate fried chicken in an air-tight container for up to 3 days. Freeze it for up to 4 months, though the sooner you eat it, the tastier it will be. To reheat it, bring it up to room temperature. Preheat your air fryer to 350°F and cook the chicken until it’s steaming, about 5 minutes.

Overhead close up view of Air Fryer Fried Chicken on parchment paper and a cooling rack.
Print

Air Fryer Fried Chicken

Crispy on the outside and juicy on the inside, Air Fryer Fried Chicken delivers loads of texture and flavor without the fuss of deep frying.
Course Brunch, Dinner, Lunch
Cuisine American
Total Cost $10.39 recipe / $1.04 piece)
Prep Time 15 minutes
Cook Time 40 minutes
Brining Time 30 minutes
Total Time 1 hour 25 minutes
Servings 10 pieces
Calories 470kcal

Equipment

Ingredients

  • 3 lbs chicken, about 10 pieces* $7.10

For the brine:

  • 2 tsp smoked paprika $0.20
  • 1/2 tsp black pepper $0.05
  • 2 tsp garlic powder $0.20
  • 2 tsp onion powder $0.20
  • 2 tsp oregano $0.20
  • 1 tsp cayenne pepper $0.10
  • 1 Tbsp salt $0.15
  • 1 cup buttermilk* $0.32
  • 1 egg, beaten $0.17

For breading the chicken:

  • 2 cups all-purpose flour $0.28
  • 1/4 cup cornstarch $0.12
  • 2 tsp baking powder $0.12
  • 1 tsp salt $0.08
  • 1/2 tsp onion powder $0.05
  • 1/2 tsp garlic powder $0.05
  • 2 oz cooking spray $1.00

Instructions

  • Mix the smoked paprika, black pepper, garlic powder, onion powder, oregano, cayenne pepper, salt, buttermilk, and egg in a large bowl.
  • Place chicken in the bowl and mix until all of the chicken is covered. Place a piece of plastic wrap directly on the surface of the chicken. Marinate in the fridge for at least 30 minutes, preferably 2 hours.
  • Preheat your air-fryer to 300°F. Mix flour, cornstarch, baking powder, salt, onion powder, and garlic powder in a large bowl. Remove one piece of chicken from the brine, shake off the excess brine, and dredge it in the flour mixture. Set it aside and repeat with the remaining pieces of chicken.
  • Spray cooking oil in your air fryer basket until it is completely covered. Place the chicken in the basket in a single layer, making sure no pieces overlap. Spray the top of the chicken with cooking oil until thoroughly covered. Cook for 20 minutes at 300°F.
  • Carefully flip the chicken pieces so as not to destroy the crust. Spray the top surface of the chicken again with cooking oil until thoroughly covered.
  • Cook for 15 to 20 minutes at 400°F, or until chicken skin is crispy and golden and the internal temperature is 160°F. Insert the thermometer in the thickest part of the chicken without touching the bone. Then try not to eat that crispy skin before serving. Forgive yourself if you fail miserably!

See how we calculate recipe costs here.

Notes

*You can make your own buttermilk by mixing 1 cup of whole milk with 1 tablespoon of distilled white vinegar.
*We butchered a whole 3 pound chicken into 10 pieces, but feel free to use  3 pounds of whatever pre-cut chicken you desire, thighs, breasts, wings etc.

Nutrition

Serving: 1pieces | Calories: 470kcal | Carbohydrates: 26g | Protein: 30g | Fat: 27g | Sodium: 1147mg | Fiber: 1g
Overhead view of Air Fryer Fried Chicken plated.

How to Make Air Fryer Fried Chicken – Step by Step Photos

Overhead shot of ingredients for brine.

Mix 2 teaspoons smoked paprika, 1/2 teaspoon freshly ground black pepper, 2 teaspoons onion powder, 2 teaspoons garlic powder, 2 teaspoons oregano, 1 teaspoon cayenne pepper, 1 tablespoon salt, 1 cup buttermilk, and 1 beaten egg in a large bowl.

Overhead shot of chicken in a white bowl covered in buttermilk brine.

Place 10 pieces of chicken in the bowl and mix until all of the chicken is covered. Place a piece of plastic wrap directly on the surface of the chicken. Marinate in the fridge for at least 30 minutes, preferably 2 hours.

Overhead shot of brined chicken being placed in a white bowl full of flour.

Preheat your air-fryer to 300°F. Mix 2 cups all-purpose flour, 1/4 cup cornstarch, 2 teaspoons baking powder, 1 teaspoon salt, 1/2 teaspoon onion powder, and 1/2 teaspoon garlic powder in a large bowl. Remove one piece of chicken from the brine, shake off the excess brine, and dredge it in flour mixture. For a very thick layer of breading, dunk the chicken in the brine again and dredge it in the flour mixture, shaking off the excess. Set it aside and repeat with the remaining pieces of chicken.

Overhead shot of battered chicken placed in an air fryer.

Spray cooking oil in your air fryer basket until it is completely covered. Place the chicken in the basket in a single layer making sure no pieces are overlapping. Spray the top of the chicken with cooking oil until thoroughly covered. Cook for 20 minutes at 300°F.

Overhead shot of tongs flipping air fryer fried chicken in an air fryer basket.

Carefully flip the chicken pieces so as not to destroy the crust. Spray the top surface of the chicken again with cooking oil until thoroughly covered.

Overhead shot of finished air fryer fried chicken in an air fryer basket.

Cook for 15 to 20 minutes at 400°F, or until chicken skin is crispy and golden and the internal temperature is 160°F. It might take a few minutes longer, depending on the size of your air-fryer basket and the amount of chicken in the basket. Insert the thermometer in the thickest part of the chicken without touching the bone. Then try not to eat that crispy skin before serving. Forgive yourself if you fail miserably!

Side shot of air fryer fried chicken on parchment paper.

More Great Chicken Recipes

The post Air Fryer Fried Chicken appeared first on Budget Bytes.

Homemade Burger Seasoning

Make the best hamburgers ever with this easy homemade burger seasoning recipe that will add flavor and depth to your burgers.

The post Homemade Burger Seasoning appeared first on Budget Bytes.

I know Memorial Day is still a couple of weeks away, but if you ask me, grilling season has BEGUN! And whether you’re cooking homemade burgers outside on a grill or inside on a griddle, the first step to making a knock-it-out-of-the-park burger is to season it properly. This super simple homemade burger seasoning takes seconds to make, uses spices that you probably already have on hand, and really does take a ground beef patty to the next level. Try it on your next burger and let me know what you think! (I think you’ll be going back for seconds.)

Overhead view of a bowl full of burger seasoning surrounded by burger toppings.

What’s in Burger Seasoning

Burger seasoning doesn’t have to be fancy to really add a lot of depth of flavor to your homemade hamburgers. For our simple burger seasoning mix we use paprika (smoked and sweet), onion powder, garlic powder, freshly cracked pepper, salt, and just a tiny pinch of cayenne. They’re all pretty basic spices but when they come together they elevate the flavor of the beef without overshadowing it, making the perfect homemade hamburger.

How to Season Burgers

The best way to use this burger seasoning is to sprinkle a light layer on the outside of your already-formed burger patties. When making hamburgers you want to avoid overworking the meat, which can make your burger dense and tough. So gently shape your burgers then lightly coat them in your burger seasoning for the ultimate juicy and flavorful burger!

How Much Burger Seasoning to Use

I suggest using about ¼ to ½ tsp of burger seasoning per side of a ¼ lb. burger patty, but you can add more or less to taste. The recipe below makes about 1 Tbsp of burger seasoning, so that should be enough for about four burger patties.

If you want to make more burger seasoning at a time, simply adjust the number of servings listed in the servings box in the recipe card below and the rest of the ingredients will auto adjust for you.

burger seasoning being sprinkled over hamburger patties.

P.S. This really basic seasoning blend is great on just about everything. Try it on steak fries, pork or beef roasts, or grilled steaks!

A bowl of burger seasoning surrounded by cooked burger patties and toppings.
Print

Burger Seasoning

Make the best hamburgers ever with this easy homemade burger seasoning recipe that will add flavor and depth to your burgers.
Course Seasoning
Cuisine American
Total Cost $0.33 recipe / $0.08 serving
Prep Time 3 minutes
Total Time 3 minutes
Servings 4 (about ¾ tsp per burger)
Calories 5kcal

Ingredients

Instructions

  • Combine all of the ingredients in a bowl. Use immediately or store in a an air-tight container, away from light and heat, until ready to use.
  • To use the burger seasoning, sprinkle about ¼ to ½ tsp of seasoning over each side of a burger patty before cooking.

See how we calculate recipe costs here.

Nutrition

Serving: 1serving | Calories: 5kcal | Carbohydrates: 1g | Protein: 0.2g | Fat: 0.1g | Sodium: 292mg | Fiber: 0.4g

How to Make burger seasoning – Step by Step Photos

Individual spices in a bowl before stirring.

In a small bowl, combine 1 tsp sweet paprika, ½ tsp smoked paprika, ½ tsp garlic powder, ½ tsp onion powder, ¼ tsp freshly cracked pepper, ⅛ tsp cayenne pepper, and ½ tsp salt.

Stirred burger seasoning in the bowl.

Stir the spices together and then they’re ready to use! Get ready for the juiciest, most flavorful burger ever!

You can also make this in larger batches and store it as you would any spice or seasoning blend – in an air-tight container, away from heat and light.

What’s your favorite burger add-in? Let us know in the comments below!

The post Homemade Burger Seasoning appeared first on Budget Bytes.

Cajun Potato Salad

Cajun Potato Salad is creamy, spicy, smoky, and absolutely packed with flavor! It’s the perfect side dish for any summer gathering.

The post Cajun Potato Salad appeared first on Budget Bytes.

If there’s one seasoning blend you need in your cabinet, it’s Cajun Seasoning. Whether you make your own blend or buy it pre-made from the store, this punchy blend of herbs and spices will bring life to whatever you’re cooking. Case in point: this Cajun Potato Salad. If regular potato salad is just a little too boring for you, you’ve got to try this slightly spicy, super flavorful, and ultra-creamy potato salad. You’ll never want it any other way.

Overhead view of Cajun Potato Salad in a bowl.

What is Cajun Potato Salad?

To avoid confusion, this isn’t a classic Cajun dish, but rather potato salad seasoned with a Cajun seasoning blend to give it a ton of spicy, smoky, herb-filled flavor. In addition to adding a hefty dose of herbs and spices, I used spicy Creole mustard and a dash or two of hot sauce in the dressing to really take it over the top. I also added a handful of chopped and green onion to keep that Cajun flavor theme going. This potato salad is just PACKED with flavor!

What Kind of Potatoes to Use

Usually, I like a waxy potato like Yukon Gold or red potatoes for a potato salad, but for this Cajun Potato Salad recipe I used softer Russet potatoes. I like the way the Russet potatoes kind of break down and half-mash as you mix them with the dressing. If you do want to use Yukon Gold or red potatoes, make sure to cut them into smaller pieces so you get a nice potato to dressing ratio once mixed together.

Homemade Vs. Store-Bought Cajun Seasoning

I used my own blend of Homemade Cajun Seasoning for this potato salad, but if you don’t have a well-stocked spice cabinet you can definitely use a store-bought Cajun seasoning blend. Make sure to check the bottle to see if the seasoning blend contains salt. If the store-bought seasoning does not contain salt, make sure to add some to the recipe below (½ to ¾ tsp added to the dressing should do it).

What to Serve with Cajun Potato Salad

This flavorful potato salad is the perfect side dish to go with grilled or BBQ meat, or to take with you to a summer BBQ or potluck. Serve it along side Slow Cooker Pulled Pork, Red Beans and Rice, Roasted Bratwurst with Peppers and Onions, Baked Chicken Drumsticks, or Quick BBQ Chicken. And don’t forget to make some Collard Greens to go along with it!

Close up side view of Cajun Potato Salad in a bowl.
Close up overhead shot of Cajun Potato Salad in a bowl.
Print

Cajun Potato Salad

Cajun Potato Salad is creamy, spicy, smoky, and absolutely packed with flavor! It's the perfect side dish for any summer gathering.
Course Lunch, Side Dish
Cuisine American
Total Cost $5.22 recipe / $0.87 serving
Prep Time 15 minutes
Cook Time 15 minutes
Total Time 30 minutes
Servings 6 1 cup each
Calories 441kcal

Ingredients

Cajun Seasoning*

  • 1 tsp smoked paprika $0.10
  • 1/2 tsp dried thyme $0.05
  • 1/2 tsp dried oregano $0.05
  • 1/4 tsp garlic powder $0.02
  • 1/4 tsp onion powder $0.02
  • 3/4 tsp salt $0.04
  • 1/4 tsp freshly cracked black pepper $0.02
  • 1/4 tsp cayenne pepper $0.02

Potato Salad

  • 2.5 lbs. russet potatoes $1.90
  • 1 tsp salt (for cooking water) $0.05
  • 2 large hard boiled eggs $0.42
  • 2 stalks celery $0.47
  • 3 green onions $0.33
  • 1/4 cup chopped parsley $0.20
  • 1 cup mayonnaise $1.22
  • 2 Tbsp Creole mustard (or spicy brown mustard) $0.15
  • 1 Tbsp red wine vinegar $0.13
  • 1/2 tsp hot sauce $0.02
  • 1/4 tsp sugar $0.01

Instructions

  • Combine the herbs and spices for the Cajun seasoning and set aside.
  • Peel and dice the potatoes into ½-inch cubes. Place the cubed potatoes in a large pot, sprinkle 1 tsp salt over top, then cover with water.
  • Place a lid on the pot and bring it up to a boil over medium-high heat. Once boiling, reduce the heat slightly and continue to boil the potatoes until they are very tender (about 8 minutes, test with a fork). Drain the potatoes in a colander and rinse briefly with cool water.
  • While the potatoes are boiling, prepare the potato salad dressing so the flavors have some time to blend. In a bowl, stir together the mayonnaise, mustard, red wine vinegar, hot sauce, sugar, and the prepared Cajun seasoning. Set the dressing aside.
  • Chop the hard boiled eggs, finely dice the celery, slice the green onions, and chop the parsley.
  • Once the potatoes are mostly cooled, transfer them to a large bowl with the eggs, celery, green onion, and parsley. Pour the dressing over top, then stir until everything is well combined. Give the potato salad a taste and adjust the salt or other seasonings to your liking. Serve warm or chill until ready to eat.

See how we calculate recipe costs here.

Notes

*In place of the homemade Cajun seasoning, you can use about 1 Tbsp store-bought Cajun seasoning. Make sure to check if the seasoning contains salt and if it doesn’t, you’ll need to add salt to the potato salad dressing.

Nutrition

Serving: 1Cup | Calories: 441kcal | Carbohydrates: 37g | Protein: 7g | Fat: 30g | Sodium: 732mg | Fiber: 3g

How to Make Cajun Potato Salad – Step by Step Photos

Diced potatoes in a pot with salt being sprinkled over top.

Peel and dice 2.5 lbs. russet potatoes into ½-inch pieces. Place the potatoes in a pot and sprinkle 1 tsp salt over top. Cover the potatoes with water, place a lid on the pot, and bring the potatoes up to a boil over medium-high heat. Once boiling, turn the heat down slightly and continue to boil the potatoes until very soft, about 8 minutes (test with a fork–the potato should pierce easily). Drain the potatoes in a colander and rinse briefly with cool water.

Cajun seasoning herbs and spices in a bowl not mixed.

For the Cajun seasoning, combine 1 tsp smoked paprika, ½ tsp dried thyme, ½ tsp dried oregano, ¼ tsp garlic powder, ¼ tsp onion powder, ⅛ tsp cayenne pepper, ¼ tsp freshly cracked pepper, and ¾ tsp salt.

Potato salad dressing ingredients.

While the potatoes are boiling, prepare the potato salad dressing so the flavors have time to blend a bit. Add 1 cup mayonnaise, 2 Tbsp Creole mustard, 1 Tbsp red wine vinegar, the prepared Cajun seasoning blend, ½ tsp hot sauce, and ¼ tsp sugar.

Mixed Cajun potato salad dressing in a bowl being stirred.

Stir the dressing ingredients together until smooth. Set the dressing aside.

Two eggs in a small pot with water.

Hard boil two eggs. I like to use my soft-boiled egg method, but increase the simmer time to 12 minutes, but you can also boil them using a traditional hard-boiled egg method. Cool the eggs, then chop them into small pieces.

Chopped vegetables on a cutting board.

Chop two stalks of celery into small pieces, slice three green onions, and finely chop about 2 Tbsp parsley.

Dressing being poured over potato salad ingredients in the bowl.

Add the cooled potatoes, eggs, celery, green onion, and parsley to a large bowl. Pour the dressing over top.

Finished Cajun Potato Salad in the bowl.

Stir until everything is evenly combined and coated in dressing. Give the potato salad a taste and adjust the salt, hot sauce, or other seasonings to your liking.

Overhead view of a bowl full of Cajun Potato Salad.

The post Cajun Potato Salad appeared first on Budget Bytes.

Nashville Hot Seasoning

Nashville Hot Seasoning is an incredibly peppery blend of spices that’s versatile and easy to make. Use it on way more than fried chicken!

The post Nashville Hot Seasoning appeared first on Budget Bytes.

I know you’ve heard of it, but have you ever tried Nashville Hot Seasoning? Believe it or not, this incredibly hot, peppery blend of spices is ridiculously versatile, and you can use it on way more than fried chicken. But don’t waste money buying a big canister, which will probably sit in your spice drawer, losing potency. Instead, make a small batch at home for pennies. It’s easy and will only take a few minutes!

Overhead shot of Nashville Hot Seasoning in a black bowl with a silver measuring spoon in it.

What Is Nashville Hot Seasoning?

Nashville Hot Seasoning blends cayenne pepper, smoked paprika, and other spices to create a fiery heat. An angry girlfriend originally created it in the 1930s as payback for a cheating boyfriend who’d been out all night. When she made breakfast, she doused her lover’s fried chicken with the ridiculously spicy blend, hoping to make him scream. But he ended up loving the extra spicy chicken and built an empire around it.

What You’ll Need

Nashville Hot Seasoning pairs well with fish, pork, beef, and hearty vegetables. Try it on cauliflower or avocado. Make Nashville Hot deviled eggs. If you’re an adventurous eater, sprinkle it on vanilla ice cream! Here’s what you need to make Nashville Hot Seasoning:

  • Ground Cayenne Pepper- The backbone of your spice blend brings a wallop of heat. For milder heat, lower the amount of cayenne by two teaspoons. For a spicier kick, raise it by two teaspoons. 
  • Smoked Paprika- Adds depth to the mix with a smoky and mildly spicy flavor. Substitute with equal parts chili powder or chipotle chili powder.
  • Dark Brown Sugar- Rounds out the heat with its sweetness. You can also use granulated sugar or light brown sugar.
  • Garlic Powder– Adds pungent garlic flavor. If you only have garlic salt, omit the salt in the recipe.
  • Onion Powder – Adds a sharp, savory note. If you only have onion salt, omit the salt in the recipe.
  • Black Pepper- adds a woody flavor with hints of citrus.
  • Salt- enhances the flavor of the rest of the spices.
Side shot of Nashville Hot Seasoning Blend in a black bowl with a wood spoon in it.

How To Store

Keep Nashville Hot Seasoning in an air-tight container and store it in a cool, dark place. It will stay potent for up to six months. This recipe only makes three tablespoons, so you’ll use it up way before then!

How To Use Nashville Hot Seasoning

It’s time to get creative because you can use Nashville Hot Seasoning on much more than fried chicken! Sprinkle it on these dishes to give them an extra kick:

Overhead close up shot of Nashville Hot Seasoning on a wood spoon.
Side shot of Nashville Hot Seasoning Blend in a black bowl with a wood spoon in it.
Print

Nashville Hot Seasoning

This incredibly peppery blend of spices is ridiculously versatile, and you can use it on more than fried chicken. Try it on fish, pork, beef, hearty vegetables, and even vanilla ice cream!
Course Seasoning
Cuisine American
Total Cost $0.78 recipe / $0.09 serving
Prep Time 3 minutes
Total Time 3 minutes
Servings 9 teaspoons
Calories 5kcal

Ingredients

  • 2 Tbsp cayenne pepper* $0.60
  • 1/8 tsp dark brown sugar* $0.01
  • 1/2 tsp smoked paprika* $0.05
  • 1/4 tsp garlic powder* $0.03
  • 1/4 tsp onion powder* $0.03
  • 1/4 tsp black pepper $0.03
  • 1/4 tsp salt $0.03

Instructions

  • To a small bowl add the cayenne pepper, dark brown sugar, smoked paprika, garlic powder, onion powder, black pepper, and salt.
  • Mix and store in an airtight container in a cool, dry spot.

See how we calculate recipe costs here.

Notes

* For milder heat, lower the amount of cayenne by two teaspoons. For a spicier kick, raise it by two teaspoons. 
*Substitute with granulated sugar or light brown sugar.
*Substitute with chili powder or chipotle chili powder.
*If substituting with garlic salt, omit the salt in the recipe.
*If substituting with onion salt, omit the salt in the recipe.

Nutrition

Serving: 1tsp | Calories: 5kcal | Carbohydrates: 1g | Protein: 0.2g | Fat: 0.2g | Sodium: 65mg | Fiber: 0.4g
Overhead shot of Nashville Hot Seasoning in a black bowl with a silver measuring spoon in it.

How to Make Nashville Hot Seasoning – Step by Step Photos

Overhead shot of the spices that make up Nashville Hot Seasoning in a white bowl.

In a small bowl add 2 tablespoons cayenne pepper, 1/8 teaspoon dark brown sugar, 1/2 teaspoon smoked paprika, 1/4 teaspoon garlic powder, 1/4 teaspoon onion powder, 1/4 teaspoon black pepper, 1/4 teaspoon salt.

Overhead shot of Nashville Hot Seasoning in a white bowl.
Mix it with a fork and you are done! Store in a cool, dark spot in an airtight container, and use your Nashville Hot Seasoning on anything you want to add a spicy kick to!

Other Great Seasoning Blends

The post Nashville Hot Seasoning appeared first on Budget Bytes.

Creamy Garlic Chicken Pasta

Winner winner chicken dinner: this creamy chicken pasta is sure to become a weeknight dinner staple: quick and easy and packed with glorious garlicky flavor (garlic lovers, rejoice!) With a delightfully creamy sauce made with a surprisingly small amount of cream, this fast, filling, and flavorful pasta recipe is the kind of recipe you’ll want […]

The post Creamy Garlic Chicken Pasta first appeared on Love and Olive Oil.

Winner winner chicken dinner: this creamy chicken pasta is sure to become a weeknight dinner staple: quick and easy and packed with glorious garlicky flavor (garlic lovers, rejoice!)

With a delightfully creamy sauce made with a surprisingly small amount of cream, this fast, filling, and flavorful pasta recipe is the kind of recipe you’ll want to make again and again.

Two shallow bowls with Creamy Garlic Chicken Pasta, napkin and forks and a piece of parmesan cheese in the background.

If you’re the kind of person who sees 2 garlic cloves called for in a recipe and instead throws in no fewer than 5, this recipe is for you. It’s got garlic galore, both fresh and powder, for a double dose of garlicky flavor.

Let’s just say Dracula wouldn’t dare come anywhere near your house after serving this dish.

(more…)

Air Fryer Chicken Thighs

Air fryer chicken thighs are super juicy with extra crispy skin, and they only take about 20 minutes to cook to perfection!

The post Air Fryer Chicken Thighs appeared first on Budget Bytes.

I’ll be honest, I wasn’t completely sold on air fryers UNTIL I made these air fryer chicken thighs. When I tell you that these chicken thighs are the most juicy chicken thighs I’ve ever had in my life, I wouldn’t be exaggerating. Add to that a deliciously crispy skin and the fact that they cook in about half the time as in the oven, and I’m SOLD. Air fryer chicken thighs are my new easy dinner go-to.

Close up side view of air fryer chicken thighs on a plate.

Why Cook Chicken in An Air Fryer?

If you haven’t hopped on the air fryer train yet, let me explain what makes this little machine special. Air fryers are mini convection ovens that cook using rapidly circulating hot hair. This constant flow of hot air increases evaporation and gives food a deliciously crispy exterior while cooking fast enough that the interior doesn’t dry out. And that, my friends, is exactly what you need to create super juicy chicken thighs!

What kind of Air Fryer to Use

You can cook chicken thighs in pretty much any type of air fryer. You’ll just need to make sure that the air fryer basket is large enough to cook the number of chicken thighs you’d like to make. We cooked four large chicken thighs in a 5-quart Air Fryer. The chicken thighs should have enough room around them for air to flow freely, keeping in mind that they will shrink some as they cook.

Close up of an air fryer chicken thigh cut open and pierced with a fork.

Ingredients for Air Fryer Chicken Thighs

Air fryer chicken thighs couldn’t be more simple. You only need a few ingredients and you can swap out the seasonings to suit your mood. Here’s what you’ll need for these air fryer chicken thighs:

  • Bone-in skin-on chicken thighs: using bone-in thighs will create the juiciest most flavorful thighs. Boneless chicken thighs will cook much faster but will be less juicy. Skinless chicken will tend to dry out faster and not have that nice crispy exterior.
  • Seasonings: You can use any seasoning mix you’d like, but today we used a simple mix of smoked paprika, garlic powder, onion powder, cayenne pepper, oregano, salt, and pepper.
  • Cornstarch: This helps the skin get extra nice and crispy!
  • Cooking oil: Just a little bit goes a long way with the air fryer! The oil helps the seasoning coat the chicken evenly and helps create that crispy skin.

More Seasoning Ideas

If you want to change up the flavor of your air fryer chicken thighs, try using some of these other seasoning blends:

What to Serve with Air Fryer Chicken Thighs

Since air fryer chicken thighs are such a fast and easy dinner staple, I suggest keeping the side dishes easy as well. You’ll want to serve the chicken thighs with something that you can prepare in the amount of time that it takes the chicken thighs to cook in the air fryer, so I’d serve them with something like three bean salad, mushroom rice, homemade mac and cheese, a simple side salad, or steamed green beans.

Overhead view of air fryer chicken thighs on the plate.
close up side view of air fryer chicken thighs on the plate.
Print

Air Fryer Chicken Thighs

Air fryer chicken thighs are super juicy with extra crispy skin, and they only take about 20 minutes to cook to perfection!
Course Dinner, Main Course
Cuisine American
Total Cost $6.86 recipe / $1.72 serving
Prep Time 5 minutes
Cook Time 20 minutes
Total Time 25 minutes
Servings 4
Calories 601kcal

Ingredients

  • 1 Tbsp cornstarch $0.03
  • 1 tsp smoked paprika $0.10
  • 1/2 tsp garlic powder $0.05
  • 1/4 tsp onion powder $0.02
  • 1/4 tsp dried oregano $0.03
  • 1/8 tsp cayenne pepper $0.02
  • 1/2 tsp salt $0.02
  • 1/4 tsp Freshly cracked pepper $0.02
  • 4 bone-in, skin-on chicken thighs (about 2.25 lbs.) $6.53
  • 1 Tbsp cooking oil $0.04

Instructions

  • In a small bowl, combine the cornstarch, smoked paprika, garlic powder, onion powder, oregano, cayenne, salt, and pepper.
  • Preheat the air fryer to 400ºF. Pat the chicken thighs dry with a paper towel.
  • Place the chicken thighs in a bowl and drizzle the cooking oil over top, then add the cornstarch and seasoning mixture. Toss the chicken thighs until they are well coated in oil and spices.
  • Place the chicken thighs in the air fryer basket, skin side up, and cook for 10 minutes. Flip the chicken thighs and cook for 8 minutes more.
  • Flip one last time so the skin side is up and cook for two minutes. Use a meat thermometer to nake sure the internal temperature has reached 165ºF, and if not, cook for 1-2 minutes longer. Serve the chicken thighs hot with your favorite simple sides!

See how we calculate recipe costs here.

Nutrition

Serving: 1thigh | Calories: 601kcal | Carbohydrates: 3g | Protein: 42g | Fat: 46g | Sodium: 488mg | Fiber: 0.3g

How to Make Air Fryer Chicken Thighs – Step by Step Photos

Seasoning mix in a bowl.

Combine the seasonings and cornstarch in a bowl. The seasoning mix we used today was 1 tsp smoked paprika, ½ tsp garlic powder, ¼ tsp onion powder, ⅛ tsp cayenne pepper, ¼ tsp dried oregano, ½ tsp salt, ¼ tsp pepper, and 1 Tbsp cornstarch.

Chicken thighs being patted dry with paper towel.

Preheat the air fryer to 400ºF. Pat four (about 2.25 lbs. total) bone-in, skin-on chicken thighs dry with a paper towel.

Seasoned chicken thighs in a bowl.

Add the chicken thighs to a bowl and drizzle with 1 Tbsp cooking oil, then sprinkle the seasoning mix over top. Toss the chicken thighs until they are evenly coated in oil and spices.

Chicken thighs in the air fryer, skin side up.

Place the chicken thighs in the air fryer basket, skin side up, making sure there’s at least a little room around each for the air to circulate. The chicken thighs will shrink a bit as they cook, too, allowing for more air flow.

Cooked chicken thighs in the air fryer basket.

Cook the chicken thighs for 10 minutes, then flip and cook for about 8 minutes more. I like to flip them one last time and cook with the skin side up for the final two minutes to make sure that skin is extra crispy! Make sure to test the chicken with a meat thermometer to make sure the internal temperature reaches 165ºF.

Finished air fryer chicken thighs on a plate.

Serve those juicy air fryer chicken thighs and all of their crispy skin goodness with your favorite sides!

close up side view of air fryer chicken thighs on the plate.

Seriously, the juiciest chicken EVER. 🤤

The post Air Fryer Chicken Thighs appeared first on Budget Bytes.