Homemade Margherita Pizza

This margherita pizza recipe tastes like an artisan pie from Italy! It’s the perfect meld of zingy tomato sauce, gooey…

This margherita pizza recipe tastes like an artisan pie from Italy! It’s the perfect meld of zingy tomato sauce, gooey cheese and chewy crust.

Margherita pizza

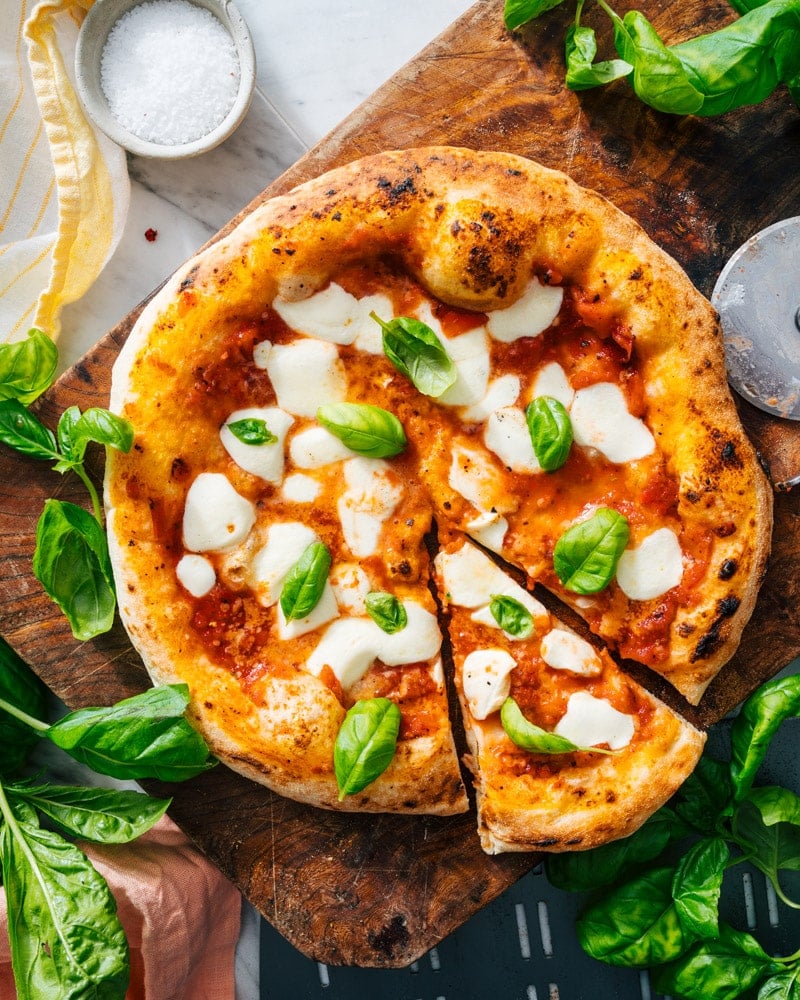
The ultimate pizza pie, in our opinion? The pure and simple pizza Margherita. This iconic Italian pie is truly something special: stretchy mozzarella cheese, garlicky pizza sauce, and peppery basil all piled on a chewy, charred crust.

Alex and I have spent over a decade researching authentic Italian pizza methods, interviewing experts, and even traveling to Naples Italy to taste it for ourselves! Here are the secrets to making the very best margherita pizza.

“I’ve used this recipe with the sauce and dough about 5 times now and every time in perfect! It tastes amazing and all my friends want it now. Super simple and not too time consuming. Love it!” -Christine

How to make margherita pizza: step by step

Here is an overview of how to make margherita pizza. For all the details, jump to the full recipe!

Step 1: Make the pizza dough

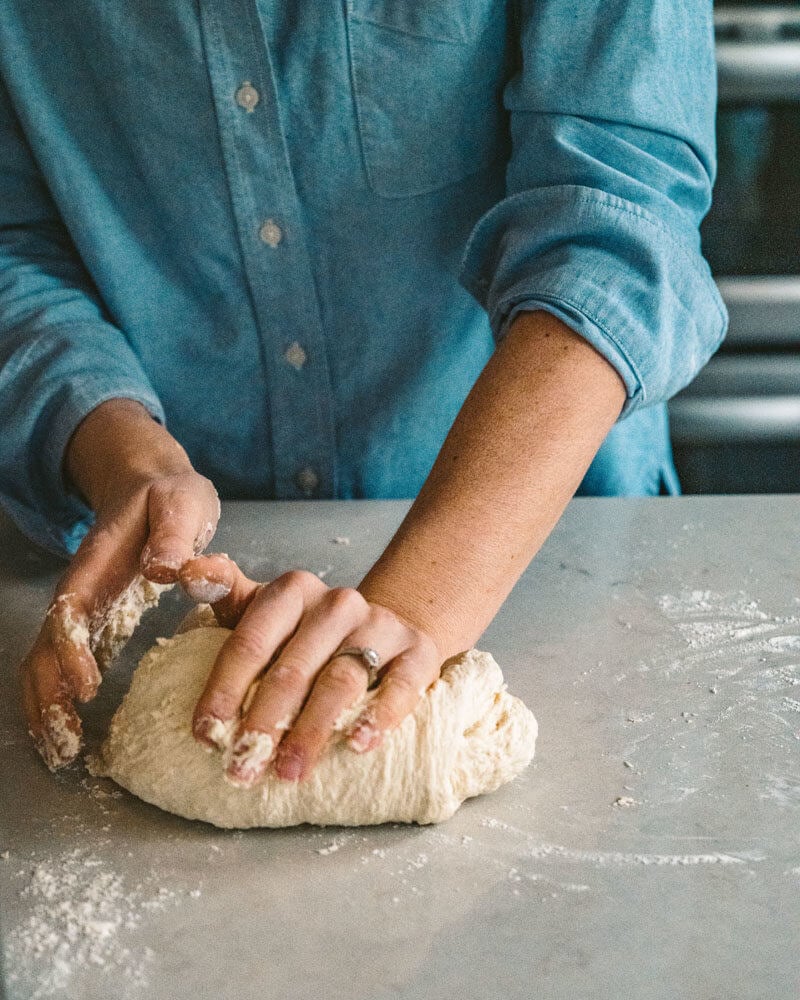
Step 1: Make the pizza dough. You’ll need 15 minutes to make it, then allow it to rise for 45 minutes. You can also make it ahead and refrigerate or freeze until ready to bake.

Step 2: Stretch the pizza

Step 2: Stretch the pizza dough and place it into a pizza peel. Go to How to Stretch Pizza Dough for our tips. Top the pizza with pizza sauce and fresh mozzarella cheese, cut into small pieces.

Step 3 Bake the Margherita pizza on a pizza stone.

Step 3: Bake the pizza on a pizza stone in a 500°F oven for 6 to 7 minutes, or in a pizza oven for 1 to 2 minutes. Remove from the oven and add fresh basil. Go to the full recipe for the tutorial.

Why is it called margherita pizza?

Pizza margherita showcases the colors of the Italian flag: red from the tomato sauce, white from the mozzarella, and green from the basil. The story goes that it was named after Queen Margherita of Savoy, an Italian queen in the 1800’s.

How to pronounce margherita? With an proper Italian accent, it sounds like mar-geh-REE-ta. It sounds like the classic Mexican cocktail, the margarita, which incidentally is a common misspelling of this word!

Tools you’ll need for homemade margherita pizza

It’s easy to make margherita pizza with a few tools and tips! To get that authentic Italian crispy-on-the-outside crust, you need to bake it at a very high temperature on a blazing hot pizza stone. Here are the tools you’ll need:

  • Pizza stone: This is what makes the crust crispy on the outside and soft on the inside. Here’s the pizza stone we recommend.
  • Pizza peel: A pizza peel is a paddle used to slide a pie onto the hot stone in the oven. We recommend this standard pizza peel. A conveyor pizza peel is worth the investment: it’s handy for easily sliding the pizza onto the stone.

🔥Try a pizza oven if you really want to step up your game! True artisan pizza is cooked at temperatures much hotter than your standard oven can achieve. The oven we recommend is relatively inexpensive and heats quickly to 1000°F.

Tips for the pizza dough

Alex and I worked on the pizza dough in this margherita pizza recipe for years, and it’s gotten lots of rave reviews from readers! The recipe incorporates what we’ve learned from some of the premiere pizza chefs in America, who themselves have studied the pizza in Naples. Here are a few tips:

  • The best flour for margherita pizza dough is Tipo 00 flour. This type of Italian flour is used by pizzerias and makes a supple, fluffy dough. We buy our Tipo 00 flour online. All-purpose or bread flour also work, but Tipo 00 makes the best pizza dough, hands down.
  • Use a great pizza dough recipe. Our master pizza dough recipe is the best method for fluffy, artisan-style pizza dough. You can make it using a stand mixer or knead it by hand. Or try thin crust pizza dough, which similar but rolled out using a rolling pin.
  • If desired, try alternative pizza dough recipes that are easier and don’t require a pizza stone or stretching. These sheet pan pizza or focaccia pizza recipes make two pizzas at once in a sheet pan. You can also make cast iron pizza or pan pizza in a skillet.

Pro tip: Make the pizza dough in advance and refrigerate it for up to 3 days: it increases in flavor over time! Or, you can freeze pizza dough for up to 3 months.

Margherita pizza recipe with basil and mozzarella cheese.

Margherita pizza ingredients

In Italy, the traditional margherita pizza topping ingredients are fresh mozzarella cheese, basil leaves, and a sauce made from crushed tomatoes, garlic, salt and herbs. Often the cheese is mozzarella di bufala, a fresh cheese made from the milk of water buffalos that has a creamy texture.

The margherita pizza ingredients you need for topping this recipe are:

  • Tomatoes: Our simple pizza sauce recipe stars canned fire roasted tomatoes, olive oil, garlic, salt and herbs. Fire roasted tomatoes have a sweet, developed flavor and are available at most US grocery stores. Substitutes include San Marzano tomatoes or other best quality canned tomatoes.
  • Cheese: Use fresh mozzarella cheese here, the kind sold in balls, and cut it into small pieces for overall coverage. We like to top with a light sprinkle of grated Parmesan cheese for flavor complexity (but it’s not required).
  • Basil: Fresh basil is key to the flavor of a great margherita pizza. Make sure to add to the pizza after baking so that is stays beautifully green (basil turns black in minutes in the oven).

Video with step by step instructions

Perfecting margherita pizza can be tricky: turns out, it’s easiest to learn by watching. This step-by-step video shows exactly how to make the pizza, from kneading to shaping to baking. We highly recommend watching this before you start!

Margherita pizza recipes

More homemade pizza recipes

Love a great homemade pizza? Here are a few more of our favorite pizza recipes:

Dietary notes

This margherita pizza recipe is vegetarian. For gluten-free, use our Gluten-Free Pizza Dough.

Frequently asked questions

What are the essential ingredients for a Margherita pizza?

A true Margherita pizza features a base of fresh mozzarella cheese, fresh basil leaves, and a sprinkle of salt. They’re placed on a bed of classic tomato sauce atop a hand-stretched pizza dough.

Fresh mozzarella offers a creamy and slightly sweet taste that complements the other ingredients perfectly. If desired, you can top with a thin layer of grated Parmesan cheese.

Can I use other types of tomatoes?

San Marzano tomatoes are prized for their sweetness and acidity, making them ideal for Margherita pizza. We like using canned fire roasted tomatoes for a similar flavor profile.

What kind of pizza dough is best?

A classic Neapolitan pizza dough made with Tipo 00 flour and cooked in a very hot oven is ideal. However, homemade or store-bought pizza dough can work too!

What temperature should I bake my margherita pizza at?

Aim for a high temperature (around 450°F to 500°F) to achieve a crispy crust. Baking on a preheated pizza stone can further enhance the crust’s texture.

When is the best time to add the basil?

Fresh basil is best added after baking. The heat wilts the leaves slightly, releasing their fragrant aroma without burning them.

Can I make this pizza ahead of time?

The dough can be prepared in advance, but assemble and bake the pizza right before serving for optimal freshness and a crispy crust. Leftovers can be reheated in the oven or in a dry skillet on the stovetop (add a drop or two of water and heat covered for a nice way to reheat).

How can I transfer the pizza to the hot oven without a pizza peel?

You can use a parchment paper “peel.” Slide the pizza onto a large piece of parchment paper dusted with flour. Then, carefully slide the parchment paper with the pizza onto the preheated pizza stone or baking sheet in the oven.

Print
Margherita pizza recipes

Homemade Margherita Pizza


  • Author: Sonja Overhiser
  • Prep Time: 1 hour
  • Cook Time: 7 minutes
  • Total Time: 1 hour 7 minutes
  • Yield: 4 servings (2 slices each)

Description

This margherita pizza recipe tastes like an artisan pie from Italy! It’s the perfect meld of zingy tomato sauce, gooey cheese and chewy crust.


Ingredients

For the pizza dough

For the pizza sauce

  • 1 small garlic clove (1/2 medium)
  • 15 ounces crushed fire roasted tomatoes or San Marzano tomatoes
  • 1 tablespoon extra virgin olive oil
  • ½ teaspoon dried oregano
  • ½ teaspoon kosher salt (scant)

For the toppings

  • 1/4 to 1/3 cup pizza sauce
  • ¾ cup shredded mozzarella cheese or 2 to 3 ounces fresh mozzarella cheese
  • Parmesan cheese, for topping (optional)
  • Fresh basil leaves, for garnish

Instructions

  1. Make the pizza dough: Follow the Best Pizza Dough recipe to prepare the dough. (This takes about 15 minutes to make and 45 minutes to rest.)
  2. Place a pizza stone in the oven and preheat to 500°F. OR preheat your pizza oven (here’s the pizza oven we use).
  3. Make the pizza sauce: Cut the garlic into a few rough pieces. Place the garlic, tomatoes, olive oil, oregano and kosher salt in a blender. Blend until fully combined. (You’ll use about ⅓ cup for the pizza; reserve the remaining sauce and refrigerate for up to 1 week.)
  4. Prepare the cheese: If using fresh mozzarella cheese, slice it into ¼ inch thick pieces (see the photos of the pre-baked pizza above). If it’s incredibly watery fresh mozzarella (all brands vary), you may want to let it sit on a paper towel to remove moisture for about 15 minutes then dab the mozzarella with the paper towel to remove any additional moisture.
  5. Bake the pizza: When the oven is ready, dust a pizza peel with cornmeal or semolina flour. (If you don’t have a pizza peel, you can use a rimless baking sheet or the back of a rimmed baking sheet. But a pizza peel is well worth the investment!) Stretch the dough into a circle; see How to Stretch Pizza Dough for instructions. Then gently place the dough onto the pizza peel. 
  6. Spread a thin layer of the pizza sauce over the dough, using about ¼ to ⅓ cup. Add the mozzarella cheese. Top with a thin layer of fresh grated Parmesan cheese (if using) and a few pinches of kosher salt.
  7. Use the pizza peel to carefully transfer the pizza onto the preheated pizza stone. Bake the pizza until the cheese and crust are nicely browned, about 5 to 7 minutes in the oven (or 1 minute in a pizza oven).
  8. Allow the pizza to cool for a minute or two before adding the basil on top (whole leaves, lightly torn, or thinly sliced). Slice into pieces and serve immediately.

Notes

*Make the pizza dough 1 hour in advance (for day of preparation), or you can make it in advance and refrigerate up to 3 days. Refrigerating the dough actually adds to the flavor. Allow refrigerated dough to come to room temperature before using by letting it stand for about 30 to 45 minutes. You can also freeze the dough: go to How to Freeze Pizza Dough.

**Make the pizza sauce up to 1 week in advance and refrigerate.

  • Category: Main Dish
  • Method: Baked
  • Cuisine: Italian

Keywords: margherita pizza recipe, margarita pizza, homemade margarita pizza

Glazed Lemon Bread

Indulge in citrus bliss with this fluffy lemon bread recipe! Its soft texture, vibrant lemon flavor, and zingy glaze make…

A Couple Cooks – Recipes worth repeating.

Indulge in citrus bliss with this fluffy lemon bread recipe! Its soft texture, vibrant lemon flavor, and zingy glaze make it an irresistible loaf for any season.

Lemon Bread recipe with lemon icing

It’s that time of year when we start craving lemon, and here’s the latest in our extensive collection of lemon recipes that you must try: this glazed buttermilk lemon bread recipe! We’ve been authors of baking recipes for over 10 years and we’ve learned a thing or two about baked goods, particularly quick breads. Here we’ve created the moistest, fluffiest, zingiest lemon loaf possible, topped with a flavor-popping zingy citrus glaze! It’s easy to whip up with just 10 ingredients.

What people are saying about this lemon bread recipe

When we create a recipe, we often like to have an independent recipe tester take a crack at it to verify that it’s as delicious and fool-proof as we think it is. This lemon bread recipe was tested by reader Lexi, who gave this testimonial:

“This lemon loaf turned out wonderful! The texture is wonderful, slightly moist, with a nice crumb. The lemon flavor is bright and zesty, balanced well with the sweet lemon glaze. It is so good the next day as well. We had it for breakfast this morning!”

Lemon Bread recipe with glaze and lemon slices

3 key ingredients for perfect lemon bread

Alex and I have been creating baking recipes for over 10 years, and we’ve learned a few things about quick breads. What we’ve learned? You can’t cut corners with baked goods: you’ve got to use the very best ingredients and techniques if you want the best flavor and textures! There are three key ingredients to make a perfect lemon bread in our opinion:

  1. Buttermilk: Turns out, buttermilk is the key to the fluffiest quick breads and muffins with the most tender crumb. We tried avoiding it for years since we didn’t regularly stock it, but it truly does wonders in this lemon bread. Don’t be tempted to make a buttermilk substitution! I learned the importance of buttermilk from professional baker and author Sarah Kieffer, and after using it in recipes I’ve seen a big difference in the texture of our baked goods!
  2. Real lemons: In this recipe, you’ll need lemon zest in the bread itself and lemon juice in the icing. Using lemon juice in the bread isn’t necessary, since it can add a sour flavor instead of infusing a zippy nuance.
  3. Lemon extract: The other key to lemony baked goods is using lemon extract! Over years of testing, we’ve found a combination of extract and real lemon zest makes the very best lemon flavor. It’s easy to find in the baking aisle, and you only use small amounts at a time. This is what makes it taste like a Starbucks lemon loaf!
Lemons

A few quick tips for baking the loaf

There are a few quick tips for baking this lemon bread recipe to make it the best loaf possible. After honing 20 quick bread recipes, here are a few tips for baking a lemon loaf:

  1. Rub the lemon zest into the sugar first. Instead of adding the lemon zest right to the recipe, place the zest in the sugar and use your fingers to rub the zest into the sugar. This activates the essential oils in the zest, helping it to taste more lemony.
  2. Use an aluminum baking pan for best results. Ceramic and glass pans don’t cook as evenly for quick breads. We recommend a 9-inch aluminum loaf pan. You can use an 8-inch pan as well: just increase the bake time slightly.
  3. Use parchment paper to easily remove the bread (and for quicker cooling). We cut the paper so it is the width of the loaf pan, then allow it to extend on either side of the pan to make a “sling” for easily removing the bread. This helps it cool faster, which is required before pouring on the glaze.
Lemon Bread recipe with lemon icing

That lemon glaze really seals in the zingy flavor!

The best part of this lemon bread recipe is the lemon glaze, which is the literal and figurative icing on top! It makes the bread taste significantly more lemony, almost like adding salt to a savory recipe to make it pop. Don’t be tempted to omit the icing! You can, but the bread will have a mellow quality: it’s nice, but it doesn’t have the “BOOM” flavor that it does with the icing. Here are a few tips for applying the lemon glaze:

  • Wait until the bread is cool prior to icing. Otherwise, the icing will melt into the bread.
  • Use a fork for drizzles, or a spatula for a smooth glaze. A fork makes the best drizzly lines: with a spoon it’s a bit too chunky. Use half the glaze for a drizzled look like this lemon blueberry bread. If you’re making the full glaze recipe, use a spatula to spread it on.

Make ahead and storage info

Because it’s made with buttermilk, this lemon bread recipe stays incredibly moist during storage! In fact, it gets even more moist over time. We tested this recipe with sour cream but it came out much drier especially over storage time. Buttermilk for the win!

You can make lemon bread in advance and cover in aluminum foil un-iced, then ice before serving.

The bread lasts at least 5 days at room temperature wrapped in aluminum foil or refrigerated for 10 or more days wrapped in foil (bring to room temperature before enjoying). You can also freeze un-iced bread for up to 3 months. We suggest slicing it into pieces and wrapping it in plastic wrap then a freezer-safe bag or container before freezing.

Lemon Loaf recipe

More of our favorite lemon recipes

There are so many fun lemon recipes try; here are a few of our favorites. Happy cooking!

01

Lemon Blueberry Bread

This lemon blueberry bread recipe is perfection! It’s moist and zesty, studded with fruit and topped with a sweet drizzle.…

02

Lemon Curd

This lemon curd recipe makes the best citrusy spread and topping! Use it for scones, pancakes, cakes and more. Are…

03

Classic Lemon Bars

This easy lemon bars recipe (aka lemon squares) has all of Grandma’s secrets! A zingy custard tops a thick shortbread…

This lemon bread recipe is…

Vegetarian. For vegan, try this Vegan Lemon Loaf. For gluten-free, try this Gluten Free Lemon Loaf.

Print
Lemon Bread recipe with lemon icing

Glazed Lemon Bread


  • Author: Alex Overhiser
  • Prep Time: 30 minutes
  • Cook Time: 1 hour
  • Total Time: 1 hour 30 minutes
  • Yield: 12 slices

Description

Indulge in citrus bliss with this fluffy lemon bread recipe! Its soft texture, vibrant lemon flavor, and zingy glaze make it an irresistible loaf for any season.


Ingredients

For the lemon bread

  • 1 3/4 [245 g] all-purpose flour
  • 1 ½ teaspoons baking powder
  • ¼ teaspoon baking soda
  • ½ teaspoon kosher salt
  • 1 cup plus 2 tablespoons granulated sugar
  • Zest of two medium lemons (about 1 ½ tablespoons)
  • ½ cup melted unsalted butter (or vegetable oil)
  • ¾ cup buttermilk
  • 3 eggs
  • 2 teaspoons lemon extract

For the glaze

  • 1 cup powdered sugar (120 g)
  • 2 tablespoons fresh squeezed lemon juice

Instructions

  1. Preheat the oven to 350°F. 
  2. Grease a 9-inch aluminum loaf pan. Line the pan with a piece of parchment paper, cut so that it extends on two sides to easily remove it from the pan.
  3. In a large bowl, whisk the all-purpose flour, baking powder, baking soda, and salt.
  4. Place the lemon zest in a large bowl with the sugar. Use your fingers to rub the zest into the sugar until it is fragrant (this activates the flavor of the zest).
  5. Whisk in the melted butter, then whisk the eggs one at a time. Whisk in the buttermilk and lemon extract. Switch to a spatula. Add the dry ingredients and stir until smooth. Spread evenly into the prepared pan.
  6. Bake 53 to 55 minutes until the top springs back when touched and a toothpick inserted comes out clean (if the top is not set at this point, bake a few minutes longer). The exact timing will depend on your oven and baking pan.
  7. Cool the bread in the pan for 30 minutes. Then run a knife around the edge and invert the loaf onto a cooling rack. Allow to cool fully to room temperature (about 30 minutes to 1 hour).
  8. Mix the ingredients in a small bowl until it comes together into a smooth icing (if it is too runny add a bit more powdered sugar; if it’s too thick add a few drops more lemon juice). Use a fork to drizzle the top of the bread with the icing (½ recipe) or a spatula to spread it (full recipe).
  9. Make ahead / storage: You can make the bread in advance and cover in aluminum foil un-iced, then ice before serving. The bread lasts at least 5 days at room temperature wrapped in aluminum foil or refrigerated for 10 or more days wrapped in foil (bring to room temperature before enjoying). You can also freeze un-iced bread for up to 3 months (slice it into pieces and wrap it in plastic wrap then a freezer-safe bag or container).
  • Category: Quick Bread
  • Method: Baked
  • Cuisine: Bread
  • Diet: Vegetarian

Keywords: Lemon bread, lemon bread recipe, lemon loaf

A Couple Cooks - Recipes worth repeating.

Strawberry Mousse (3 Ingredients!)

This 3-ingredient strawberry mousse is light, fluffy, and bursting with berry flavor! Made with just strawberries, whipped cream, and a…

A Couple Cooks – Recipes worth repeating.

This 3-ingredient strawberry mousse is light, fluffy, and bursting with berry flavor! Made with just strawberries, whipped cream, and a touch of sweetness, it’s the perfect easy dessert for any occasion.

Strawberry Mousse

Here at A Couple Cooks we’ve been on a kick of creating 3 ingredient recipes, because who doesn’t love simplicity? (We’re even authors of a cookbook of simple recipes.) Here’s our latest simple dessert idea: this strawberry mousse recipe! A combination of ripe berries, heavy cream, and a touch of sweetener takes just minutes to whip up and makes a pile of fluffy, berry-scented goodness. We saw this concept on social media and created our own spin using maple syrup, an immersion blender, and a whisk. If you’re like us, add a handful of crushed pretzels for that nostalgic sweet and salty hit!

All you need are 3 ingredients for this strawberry mousse

There’s a certain satisfaction to making something with only 3 ingredients, right? This sweet treat is perfect for whipping up in a few minutes for dinner guests or with a kid in your life. You’ll need a small blender (or blender, keep reading for why), a whisk, and this handful of ingredients to make this lusciously fluffy berry mousse. Here are the ingredients you’ll need:

  • Strawberries: Try to find the ripest, reddest berries you can. Bonus points for local berries! Keep in mind that out of season berries can be tart and tasteless, so making this in the winter months it’s not as tasty (though you can add more sugar to compensate).
  • Pure maple syrup, honey or sugar: We like this dessert best sweetened with maple syrup, particularly the type marked “Grade A: Dark Color and Robust Flavor” in the US. We find it has the best flavor and avoid any syrups marked amber. Honey works well as a sweetener as well, as does granulated sugar.
  • Heavy cream: This ingredient is what makes the magic! There are no substitutes for heavy cream here, since the dairy fat is what makes the fluffy texture.
Bowl of strawberries in water

A delicious shortcut for mousse

We will admit this strawberry mousse is not “technically” a traditional mousse like this chocolate mousse, which is cooked on the stovetop and thickened with eggs. Think of it as a delicious shortcut! Because of that, the texture is more light and fluffy than a standard mousse. You can refrigerate the mousse after whipping it up, which helps to make more of a “set” texture.

You can adjust the sweetness to taste

We like making this strawberry mousse recipe with 2 tablespoons sweetener, which makes for a lightly sweet mousse. But if you’re used to very sweet desserts or are cooking for a crowd that is, use 3 tablespoons sweetener for a sweet-tasting strawberry mousse. You also may want to use sugar as your sweetener, as it brings a more direct sweetness compared to the nuanced flavor of maple syrup or honey.

Strawberry Mousse recipe in cup with crushed pretzels

Don’t have a small blender? No problem

This recipe uses a small or immersion blender because the overall quantity of berries is so small, it doesn’t blend well in a standard size of blender. (If you’ve tried it, you know!)

A food processor should also work for this recipe. Or, double the recipe and make it in a standard blender so the quantity is large enough to blend. Then just use half the strawberry puree for the mousse and use the rest in other ways (see these ideas!).

Another way to serve it: as strawberry mousse pie!

This strawberry mousse is delicious served up in little jars with crushed pretzels or graham crackers. Or if you like, you can make double the recipe and pour it into a pretzel crust or graham cracker crust! Make sure to refrigerate it for a few hours before serving to set the mousse to a thicker texture.

Strawberry Mousse recipe in cups with strawberries and pretzels in the background

Diet considerations, and a trick for vegan

This strawberry mousse recipe is vegetarian and gluten-free. We have not tested a vegan variation, but we’d suggest trying this vegan heavy whipping cream by Nora Cooks and gently folding in the strawberry puree. Let us know if you try it!

More strawberry recipes we love

Embrace the season with more of our favorite strawberry recipes! We hope you love this recipe and let us know what you think in the comments below.

01

Strawberry Rhubarb Pie

This strawberry rhubarb pie recipe is pure perfection, with thick sweet tart berry filling and flaky pie crust. 5 stars!…

02

Strawberry Ice Cream

This homemade strawberry ice cream recipe is the best! It’s creamy and bursting with pure, sweet tart berry flavor. Everyone…

03

Easy Strawberry Compote

This strawberry compote recipe makes a thick, sweet sauce that’s perfect for drizzling over ice cream, waffles, cheesecake and more!…

Print
Strawberry Mousse

Strawberry Mousse (3 Ingredients!)


  • Author: Alex Overhiser
  • Prep Time: 10 minutes
  • Cook Time: 0 minutes
  • Total Time: 10 minutes
  • Yield: 4 ½ cup servings

Description

This 3-ingredient strawberry mousse is light, fluffy, and bursting with berry flavor! Made with just strawberries, whipped cream, and a touch of sweetness, it’s the perfect easy dessert for any occasion.


Ingredients

  • 1 cup diced strawberries (about 8 ounces)
  • 2 tablespoons* maple syrup (or honey or sugar)
  • 1 cup heavy cream

Instructions

  1. Clean and chop the strawberries. Using a small blender or immersion blender,** blend the berries with the maple syrup. Add the cream and pulse 2 to 3 times until combined. 
  2. Pour the cream mixture into a bowl. Whip with a whisk for 2 minutes until thickened and fluffy. 
  3. Serve immediately or refrigerate until serving. Serve with crushed pretzels or graham crackers if desired.

Notes

*2 tablespoons maple syrup makes for a lightly sweet mousse. Use 3 tablespoons if you prefer a sweet mousse.

**A food processor should also work. Doubling the recipe works in a standard blender since the quantity is large enough to blend. If you don’t have a small blender, you can blend double the berries in a large blender and use half the puree for the mousse.

  • Category: Dessert
  • Method: No Cook
  • Cuisine: Dessert
  • Diet: Vegetarian

Keywords: Strawberry mousse, strawberry mousse recipe

A Couple Cooks - Recipes worth repeating.

Whiskey Sour

Master the classic whiskey sour! This cocktail is easy to make at home with a few simple ingredients for a…

A Couple Cooks – Recipes worth repeating.

Master the classic whiskey sour! This cocktail is easy to make at home with a few simple ingredients for a balance of sweet, tart, and boozy.

Whiskey Sour recipe

Alex and I are certified mixologists and home cocktail makers, and we’ve created over 300 cocktails for this website. But it all goes back to this whiskey sour recipe, which we’ve made too many times to count! This sweet-tart, balanced whiskey drink dates back to the 1870’s, though you may know it as a bar drink made with sour mix.

We created this homemade spin with fresh lemon years ago for Alex’s stepfather, a whiskey sour aficionado, and it became an instant family hit. Here’s the classic recipe and a few riffs and variations on this famous drink!

Jump to the recipe—now.

Ingredients to make a whiskey sour

The whiskey sour is a simple cocktail from the “sour” family of cocktails, using 2 parts whiskey, 1 part lemon juice and 1 part simple syrup. Some people add an egg white, which we’ll get to in a minute (you can also call this version a Boston Sour). The earliest mention of this classic cocktail was in the 1862 book The Bartender’s Guide: How To Mix Drinks by Jerry Thomas.

The whiskey sour is on the list of International Bartender Association’s IBA official cocktails, meaning it has an “official” definition. There are three ingredients you’ll need for a classic whiskey sour, plus the garnish:

  • Whiskey: Use a high quality whiskey. A whiskey sour can be made with rye or bourbon, though it’s most commonly made with bourbon in America (keep reading for more notes on whiskey below).
  • Lemon juice: Always use freshly squeezed juice from real lemons for cocktails. Bottled juice has no comparison.
  • Simple syrup: Simple syrup is a liquid sweetener used in many cocktail recipes and coffee drinks. It’s easy to make at home: go to How to Make Simple Syrup!
Whiskey sour ingredients

Tips on the sweetener

Adjust the sweetness level in a whiskey sour to fit your tastes. A classic sour formula is 2:1:1, which means 2 ounces spirit, 1 ounce citrus and 1 ounce sweetener. We prefer a whiskey sour with ¾ ounce syrup, which lets the whiskey flavor shine. If you prefer a sweeter cocktail, use up to 1 ounce syrup.

While simple syrup is our cocktail sweetener of choice, we’ve found substituting maple syrup tastes even better in a whiskey sour! It brings caramel undertones and a nuance to the flavor that’s missing from simple syrup, which has a more straightforward flavor. In our taste tests with friends and family, maple syrup always wins! Honey is another natural sweetener that works well here.

Whiskey sour with egg white

Add an egg white for extra smoothness

Egg whites are often added to sour cocktails to create a silky texture and a smooth, luxurious mouthfeel. Making a whiskey sour with egg white is also called Boston Sour. Alex and I love a good egg white foam for the personality it gives to a drink (here are all the egg white cocktails we’ve made).

To make that signature frothy consistency, bartenders use what’s called a “dry shake.” The first step is to shake the egg white and the other ingredients without ice to create a stable foam. Ice is then added to the shaker, and the mixture is shaken again to chill and dilute the drink. We don’t always add an egg white to our whiskey sours (and it’s not required), but it’s a fun additional element. Go to our Whiskey Sour with Egg White recipe!

Want an egg free alternative to cocktail foams? This Fee Brothers Cocktail Foamer is becoming popular (we’ve seen it at a few bars).

Bourbon whiskey bottle

The best whiskey for whiskey sours

We like a good mid-priced bourbon for a classic whiskey sour. The vanilla notes, which come from aging in oak barrels, bring a delightful sweetness to the drink. The smoothness of bourbon blends seamlessly with the tart citrus and sugar, but it’s also robust enough to stand up to the bright lemon and sweetener.

When it comes to bourbon, anything in the $25 to $35 range for a 750ml bottle is considered mid-range, but you can go as high end as you like! Some bourbon brands we’d recommend are:

  • $: Elijah Craig Small Batch
  • $$: Four Roses Small Batch or Woodford Reserve
  • $$$: Bulleit 10 Year Bourbon

If you like the spicier flavor of rye whiskey, that works in a whiskey sour too. You can also make a whiskey sour with a blended Scotch. Here are a few more recommendations for the whiskey to use in a sour from Taster’s Club.

How to make a batch of whiskey sour mix

Let’s say you’re looking for a whiskey sour mix, but you don’t want to get one of those store bought containers with lots of sugar. You can also use this recipe as a mix to make lots of drinks at once! Simply mix up a big batch of the simple syrup and lemon juice.

  • Here’s how to make a whiskey sour mix for 8 drinks: Mix 1 cup lemon juice plus ¾ cup pure maple syrup. Or, make this Homemade Sweet and Sour Mix.
  • To make a single drink, measure out 3 ½ tablespoons of the mix with 4 tablespoons whiskey. It’s that simple! For more, go to Whiskey Sour Mix.
Easy whiskey sour recipe splashing out of glass

Variations on the whiskey sour

The whiskey sour is so iconic, there are many variations on this drink! Start with maple syrup variation, followed by Boston Sour, then try these notable variations:

Print
Whiskey sour

Best Whiskey Sour


  • Author: Sonja Overhiser
  • Prep Time: 3 minutes
  • Cook Time: 0 minutes
  • Total Time: 3 minutes
  • Yield: 1 drink

Description

Master the classic whiskey sour! This cocktail is easy to make at home with a few simple ingredients for a balance of sweet, tart, and boozy.


Ingredients

  • 2 ounces whiskey (we prefer bourbon)
  • 1 ounce fresh lemon juice
  • 3/4 to 1 ounce simple syrup*
  • Garnish: Orange peel and a cocktail cherry
  • Ice, for serving

Instructions

  1. Add the whiskey, lemon juice, and simple syrup to a cocktail shaker. Fill with a handful of ice and shake until very cold.
  2. Strain the drink into a lowball or Old Fashioned glass. Serve with ice, an orange peel and a cocktail cherry. 

Notes

To convert to tablespoons, 1 ounce = 2 tablespoons.

* Adjust the sweetness level in a whiskey sour to fit your tastes. We also like substituting maple syrup for the simple syrup, which adds subtle caramel notes to the flavor profile.

  • Category: Drinks
  • Method: Mixed
  • Cuisine: American

Keywords: whiskey sour, whiskey sour recipe, how to make a whiskey sour, bourbon sour

5 more classic cocktails

Outside of this whiskey sour recipe, here are a few of our favorite cocktail recipes:

A Couple Cooks - Recipes worth repeating.