While following a weeknight pork ragú recipe from a celebrity chef who shall remain nameless, I came across the following, offending phrase in the method: “Cook onions until caramelized, 25 to 30 minutes.”
It doesn’t seem to matter how many articles, …
While following a weeknight pork ragú recipe from a celebrity chef who shall remain nameless, I came across the following, offending phrase in the method: “Cook onions until caramelized, 25 to 30 minutes.”
It doesn’t seem to matter how many articles, books, or cooking shows try to set the record straight. Even the experts among us cling to the hope that it’s possible to caramelize onions in 20 or 30 minutes, when in reality it takes about an hour to do it properly.
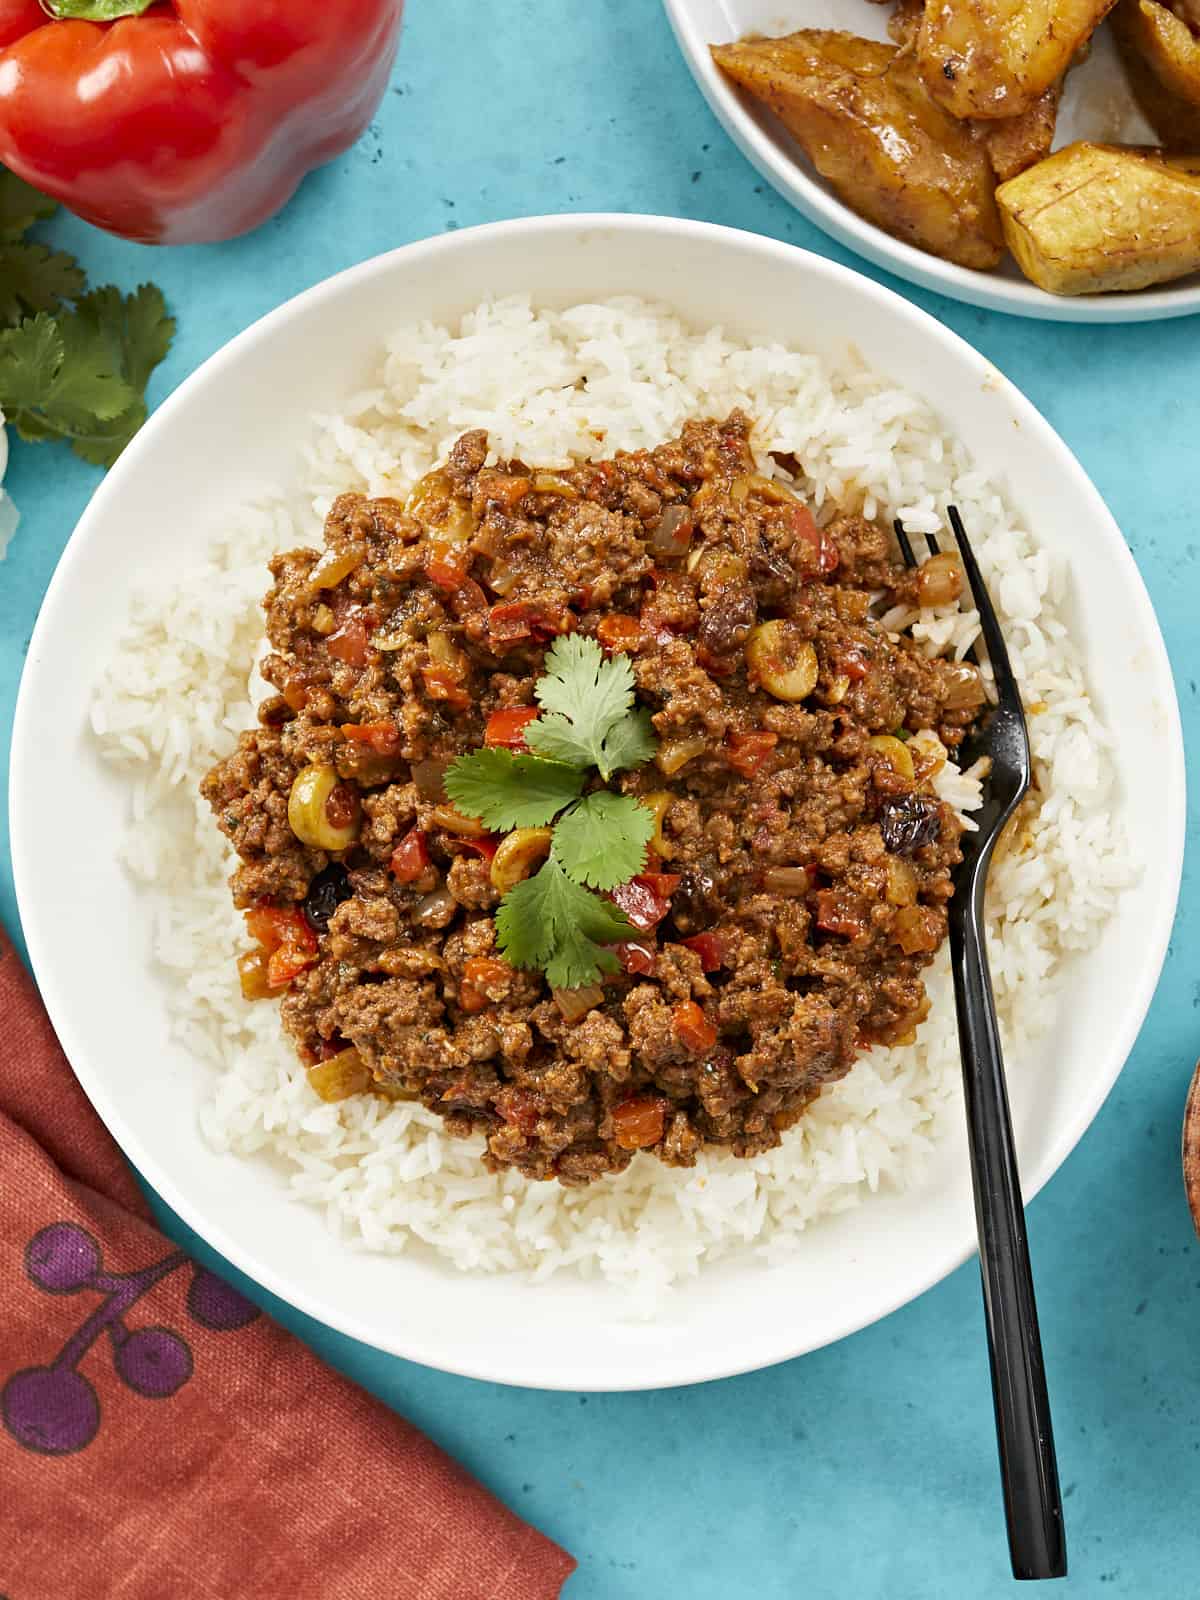
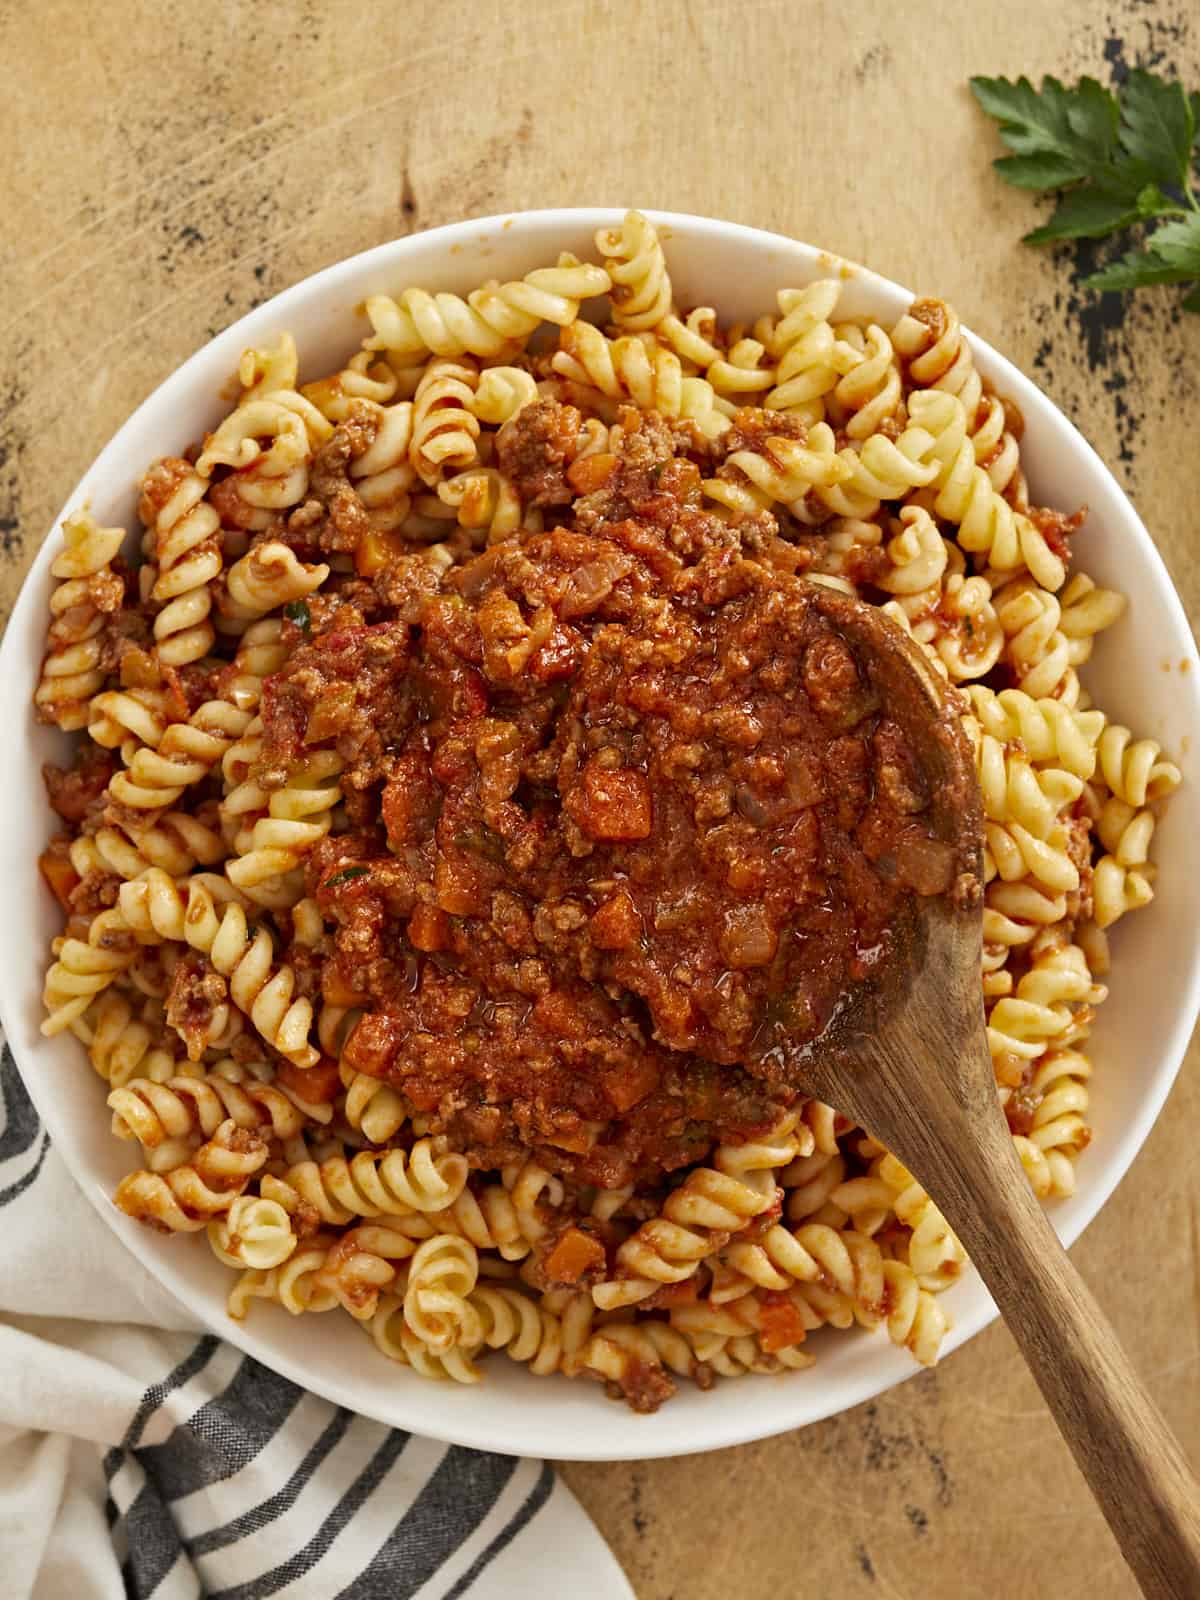
There’s something incredibly satisfying about letting bolognese, the famous Italian meat sauce, simmer on the stove for hours, perfuming your whole house with its meaty aromas. Sigh! While this bolognese recipe is usually served with hearty pasta, you can also work it into baked potatoes, bell peppers, or nachos! I loved it so much that I ate it with rice. (Editor’s note: Dear Beth, have I ever said anything more Puerto Rican?)
What Is Bolognese?
Bolognese is the traditional meat sauce of Bologna, Italy. It’s mostly ground beef with a bit of pork thrown in, stewed in tomatoes, with a touch of milk and butter added to round out the sauce’s acidity. You won’t find aromatics like rosemary, garlic, oregano, or bay leaves in traditional bolognese. Flavors are developed over a long simmer.
What You’ll Need
Our bolognese recipe is not traditional. To keep things budget-friendly, we omitted the pork that’s usually paired with ground beef. Instead, we used a bit of garlic to add depth. Here’s what you’ll need to make bolognese.
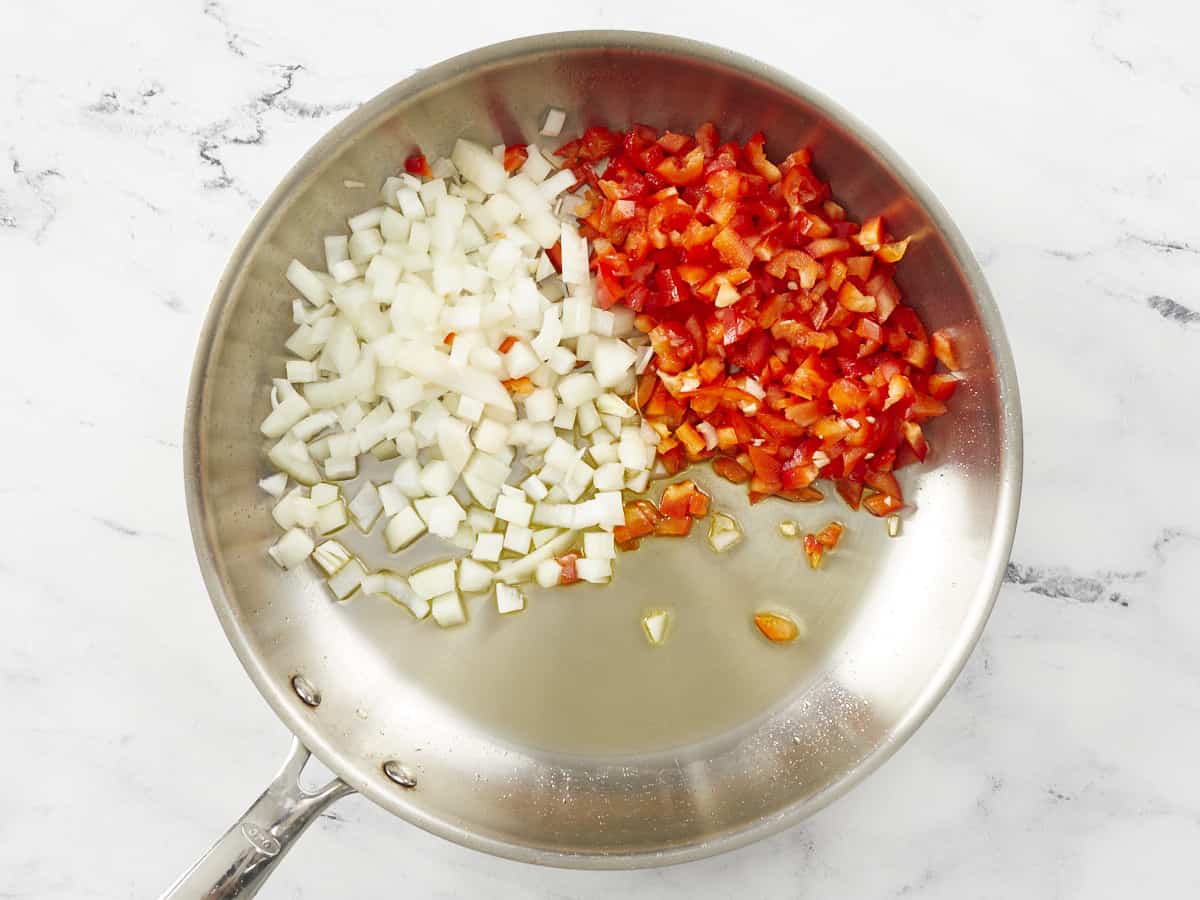
Soffritto– the lightly fried flavor base of many Italian dishes. It’s simply sauteed carrots, celery, and onion.
Ground Beef– because, after all, it is a meat sauce. The beef should be fatty. Lean beef does not work well for this recipe.
Milk and Butter– adding dairy to the sauce helps round out the acidity of the tomatoes.
Wine– you can use red or white. But if you use red, the sauce must cook much longer to mellow the flavor. White wine cooks down much faster, which is why I used it in this recipe. If you don’t want to use wine, substitute it with white grape juice with a bit of white vinegar.
Crushed Tomatoes– traditional bolognese uses pureed fresh tomatoes that take many hours to break down into a sauce. We opted for canned crushed tomatoes for time’s sake and for their budget-friendliness. But feel free to use fresh if you prefer.
Garlic– this is not a traditional ingredient. I added garlic to the recipe to create dimension since our sauce does not simmer all day and does not contain pork. If you want to keep it strictly traditional, omit the garlic, and let the sauce simmer for a few more hours.
What’s the Difference Between Bolognese and Meat Sauce?
The biggest difference between Bolognese and meat sauce is the ratio of meat to tomato. Bolognese is technically a meat sauce, or as they say in Italy, ragù. It differs from American meat sauce because it has a higher ratio of beef to tomato, making it much thicker. It’s also creamier as it’s made with a touch of milk.
How To Make Bolognese Taste Better
Use a large heavy-bottomed pot. A Dutch oven is perfect, as it retains heat and simmers ingredients without scorching them.
Chop the onions, carrots, and celery into small dice. Ensuring all veg is the same size helps them melt into the sauce and creates deeper flavor.
Be patient. Bolognese is a long game. Cook at a simmer for a minimum of 3 hours. Do not boil.
What To Serve With Bolognese
If you’re looking for some great budget-friendly dishes to serve with bolognese, I’ve got you covered! Try any of these Budget Bytes favorites:
Store the sauce in an airtight container, preferably glass or ceramic, as it stains plastic. It will keep in the fridge for up to 4 days and in the freezer for up to 3 months. If you’re freezing bolognese, try doing so in portions, so you only thaw it once. Reheat on the stovetop over medium heat, or in the microwave until it starts to steam. If microwaving it, top it with a paper towel over it so it doesn’t splatter everywhere.
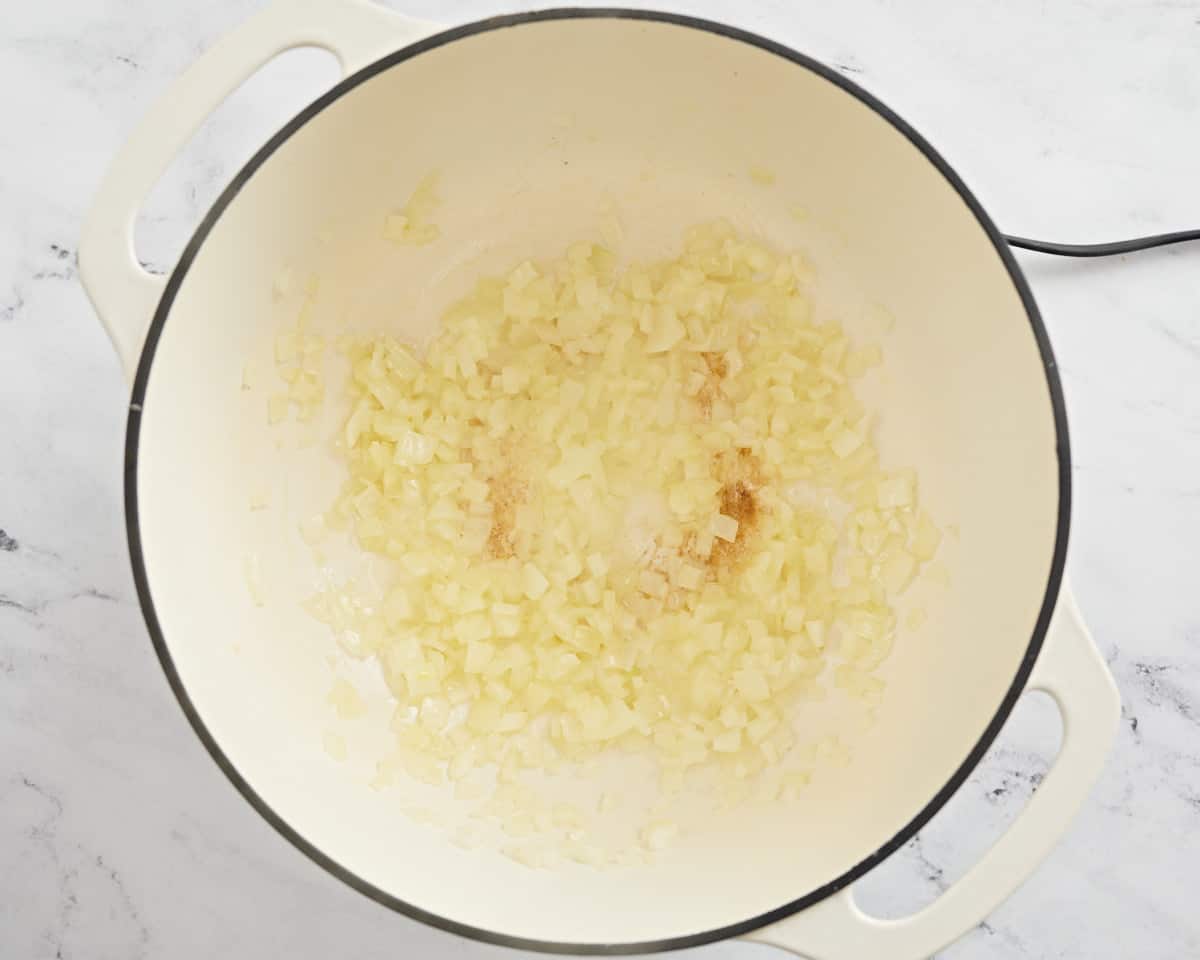
Place a heavy-bottomed pot over medium heat. Add butter to the pan. When the butter foams, add the onion and 1/4 teaspoon salt. Sautée until translucent.
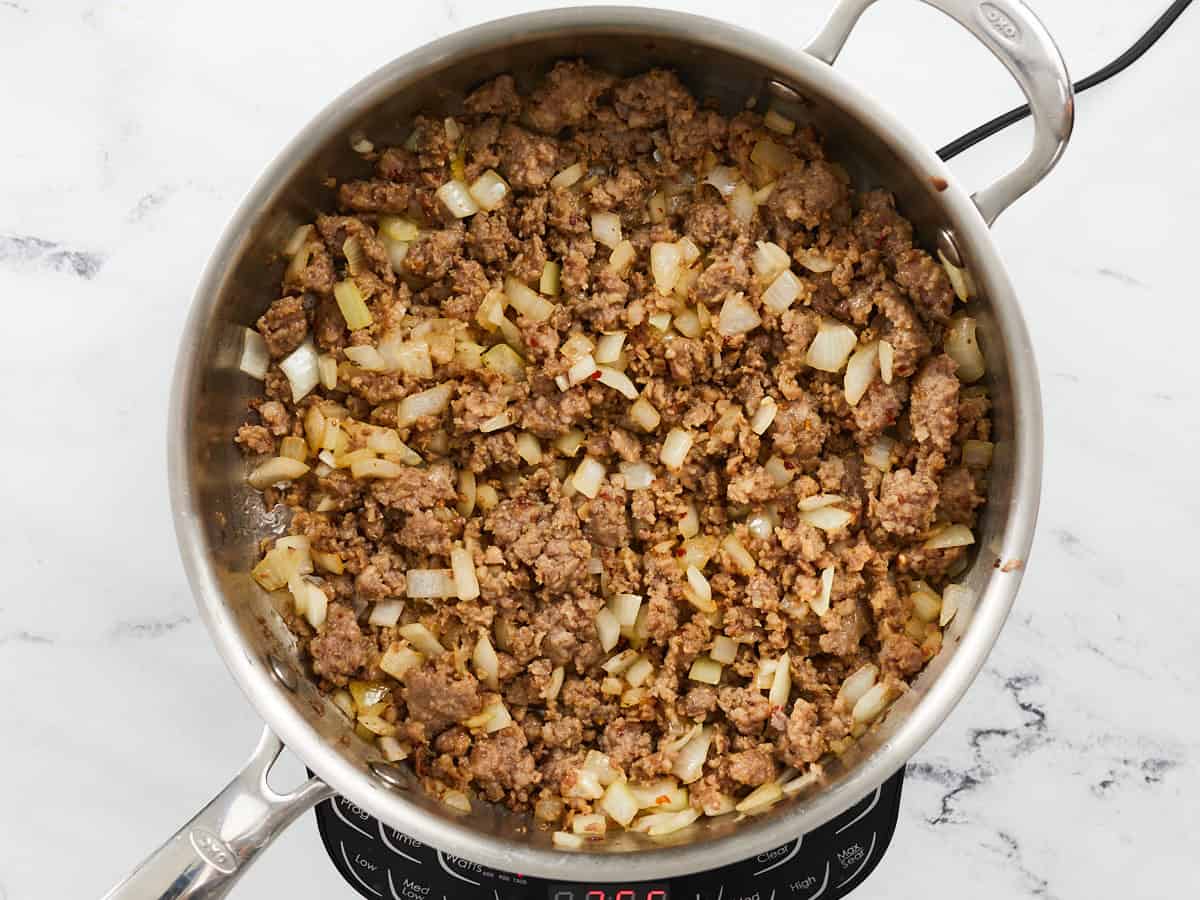
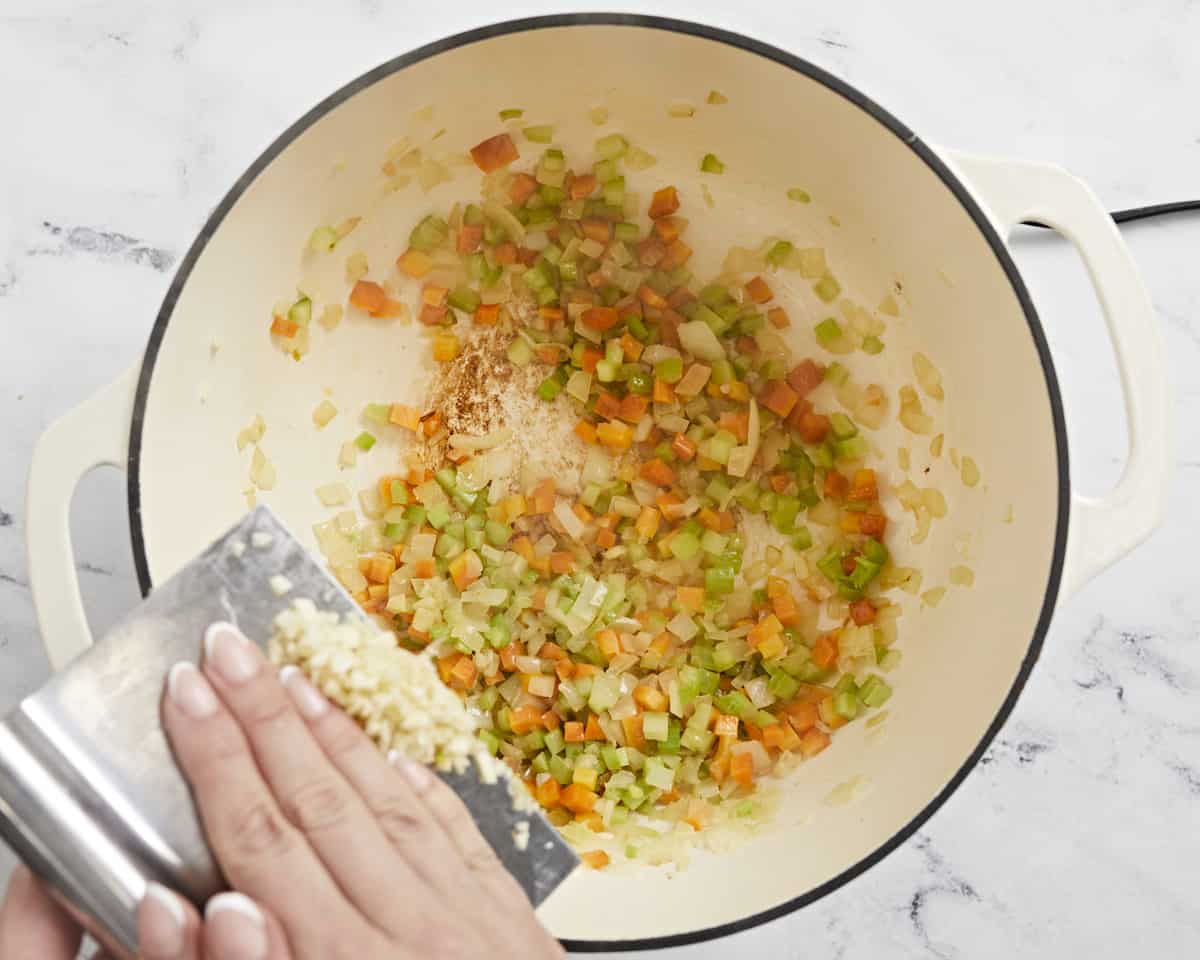
Add the celery and carrot and sautée for two minutes, until they have softened some.
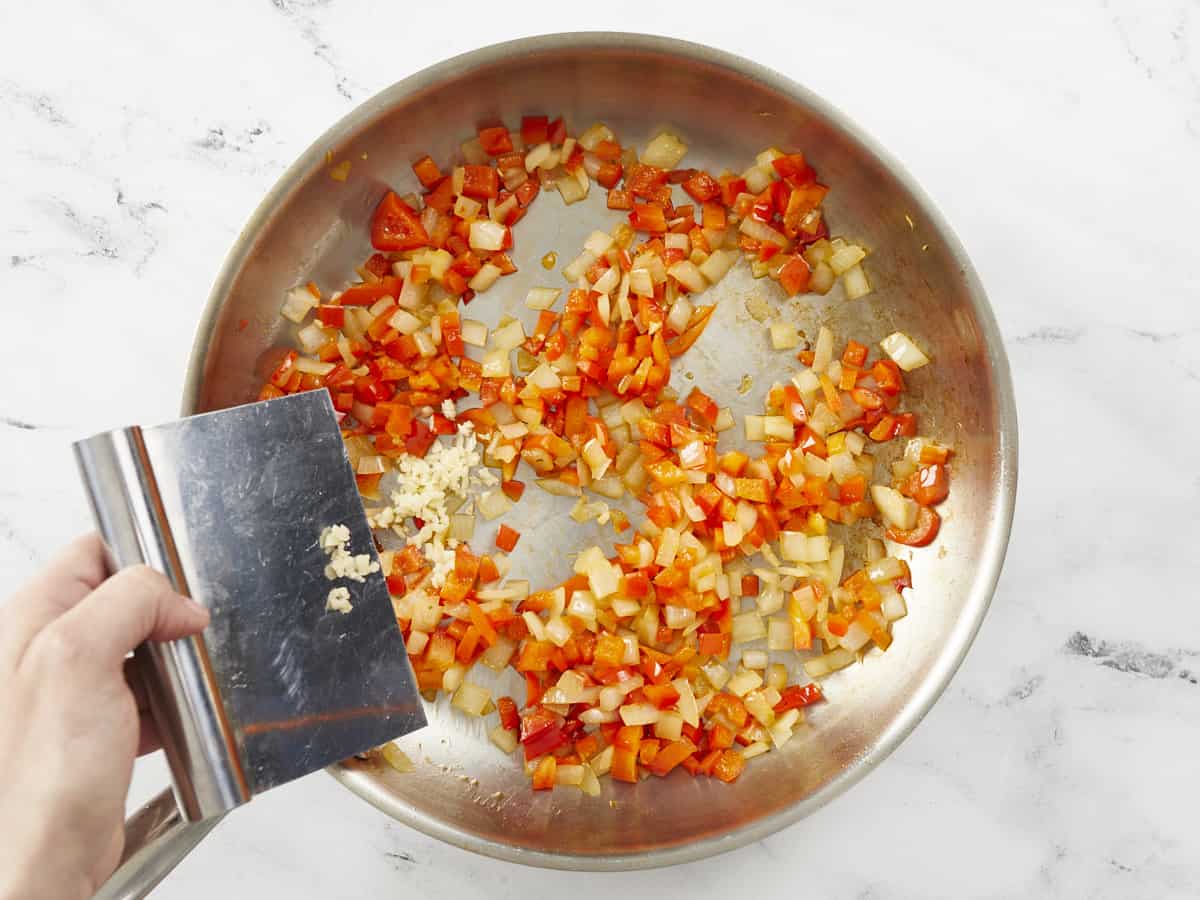
Next, add the garlic and sautée until fragrant, about 1 minute
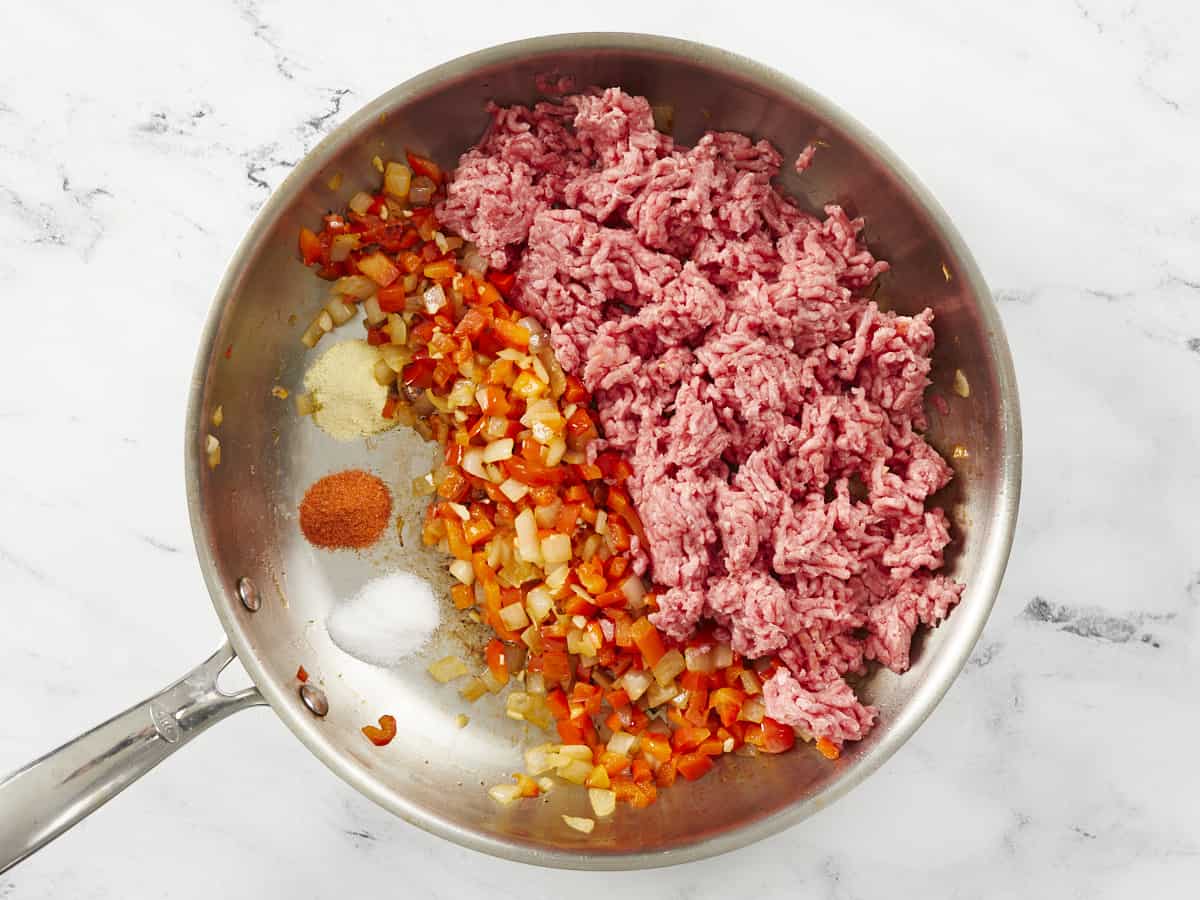
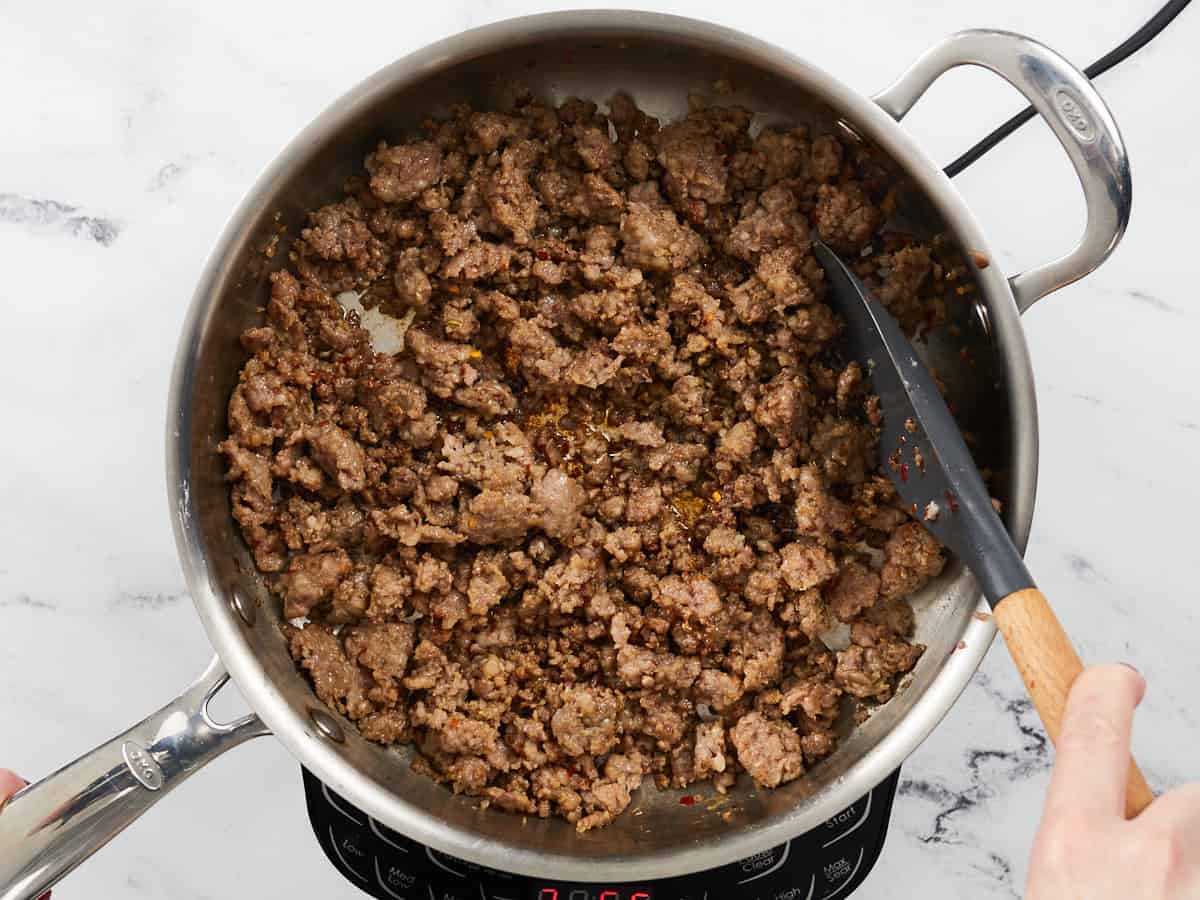
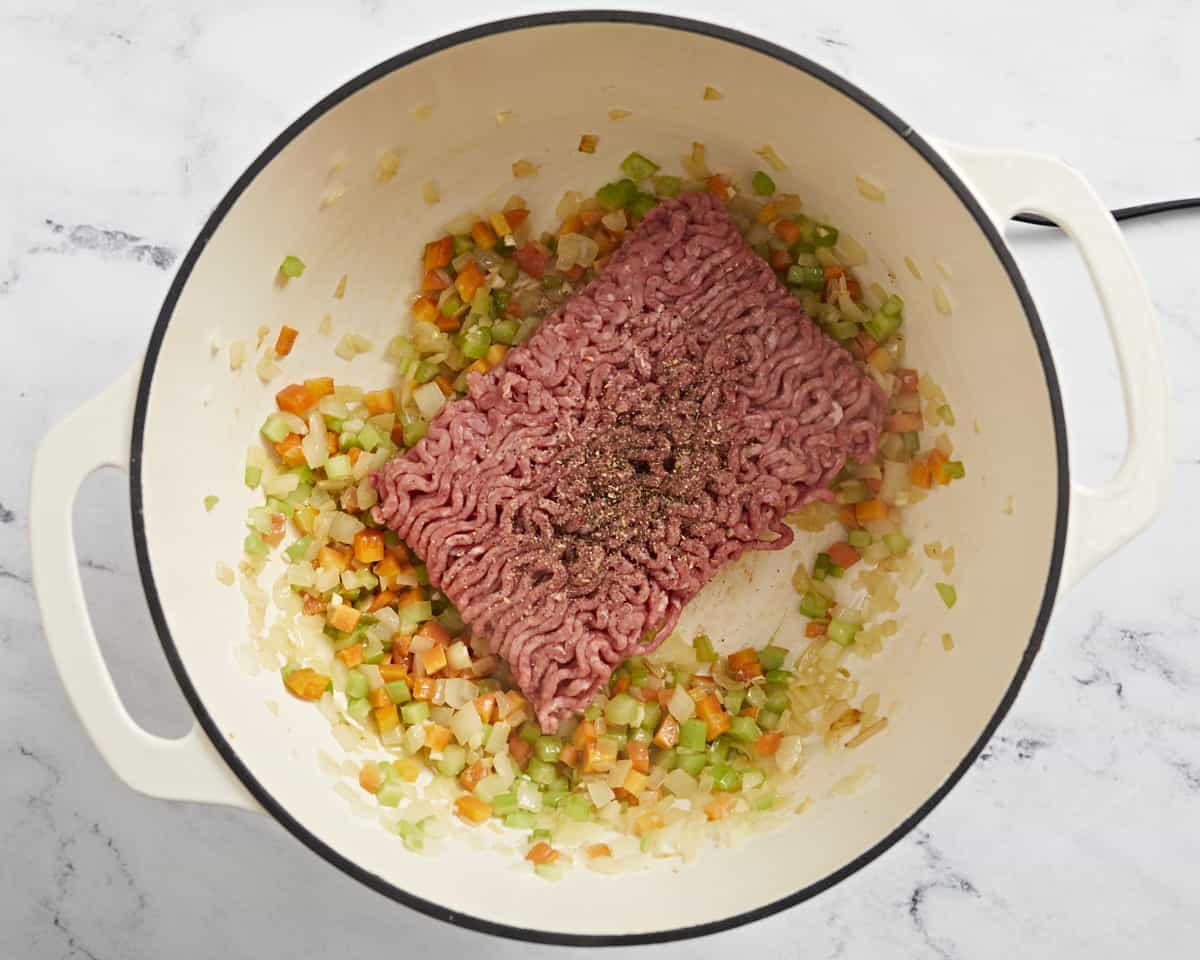
Add the ground beef and pepper. Brown the beef, breaking it up with a wooden spoon as it cooks.
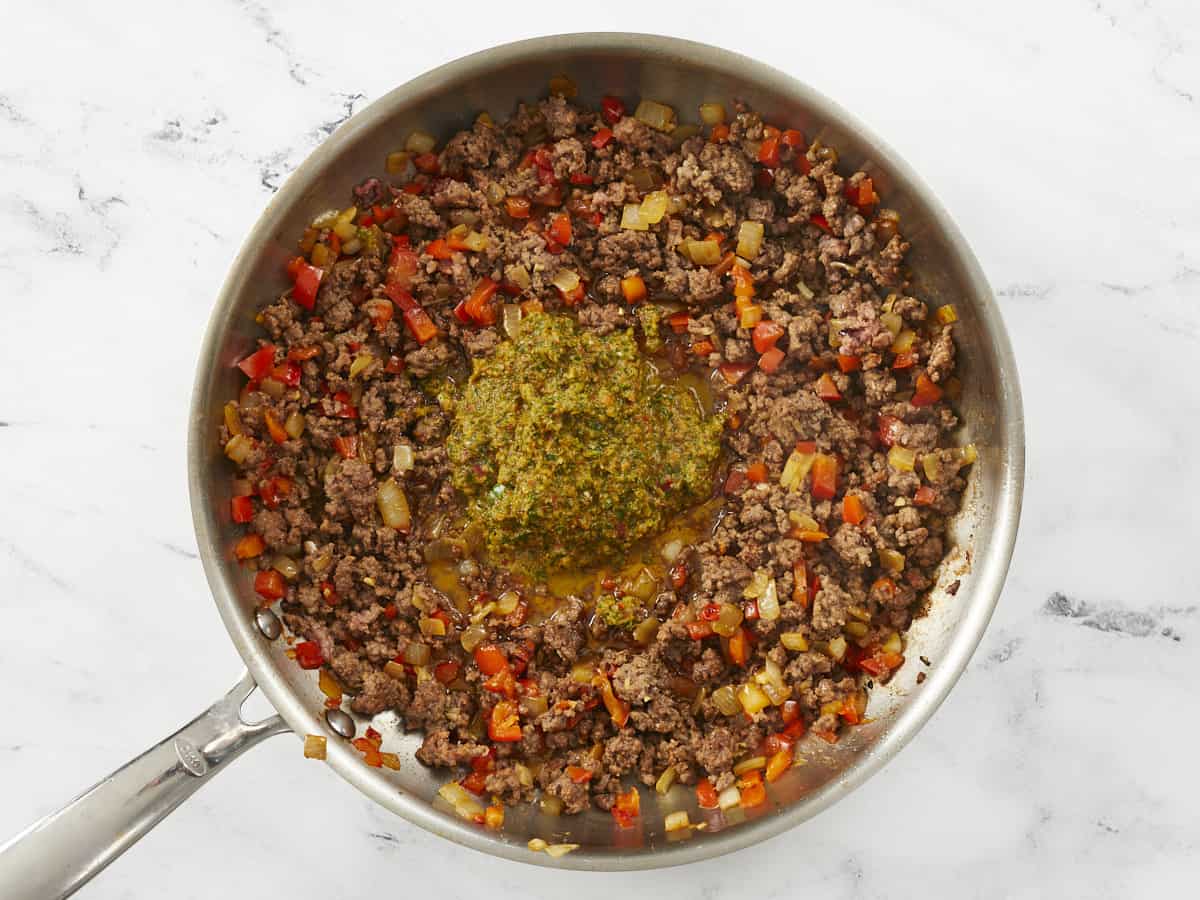
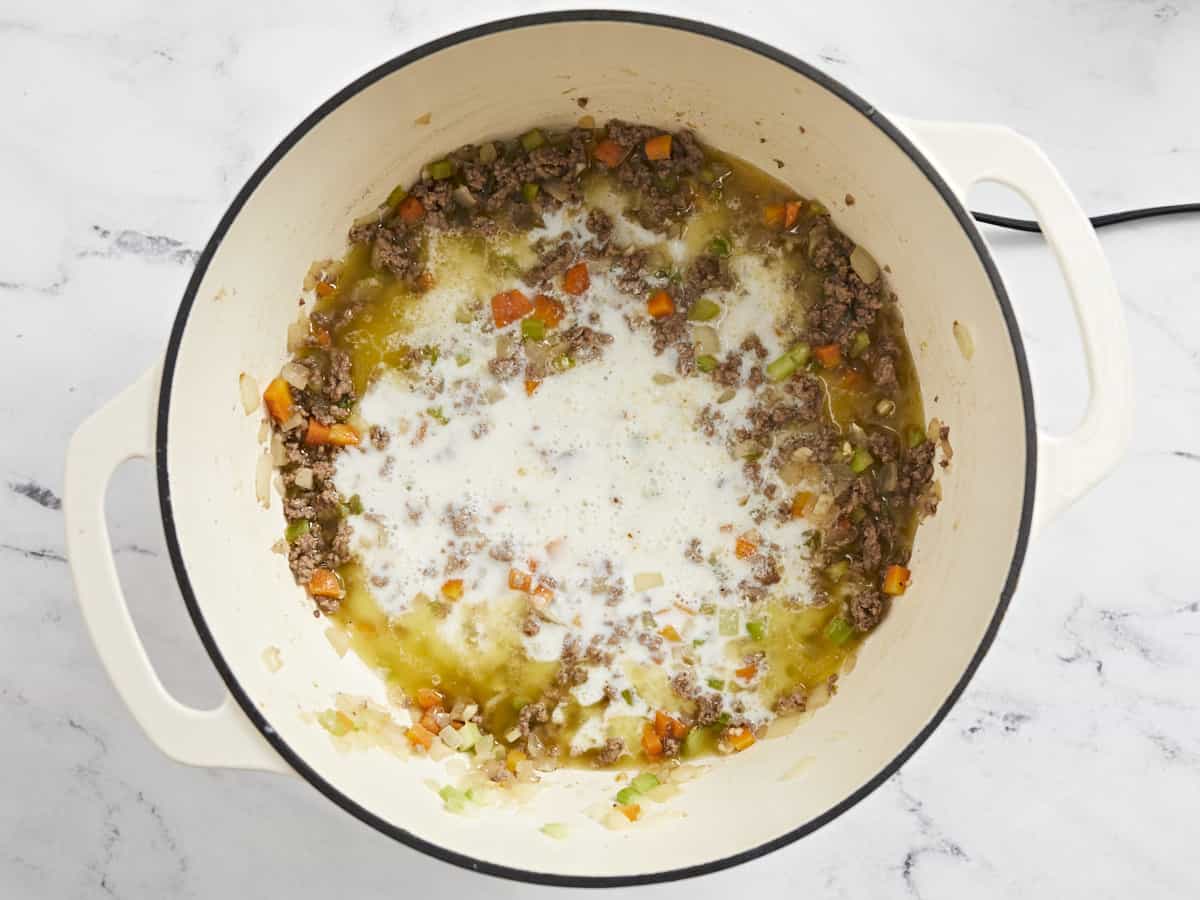
Once the beef has browned, add the milk, wine, and the remaining 1/4 teaspoon salt. Stir occasionally and simmer until the liquid has evaporated completely.
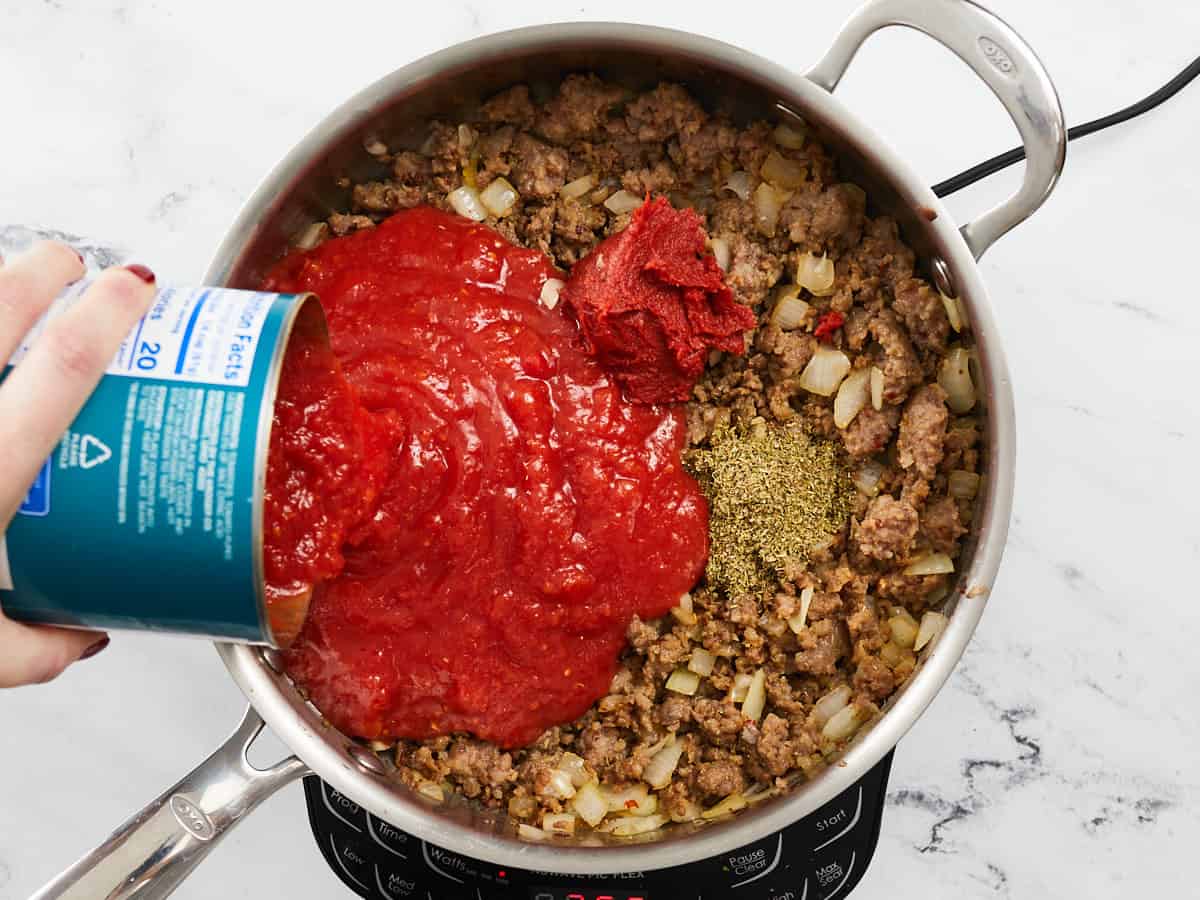
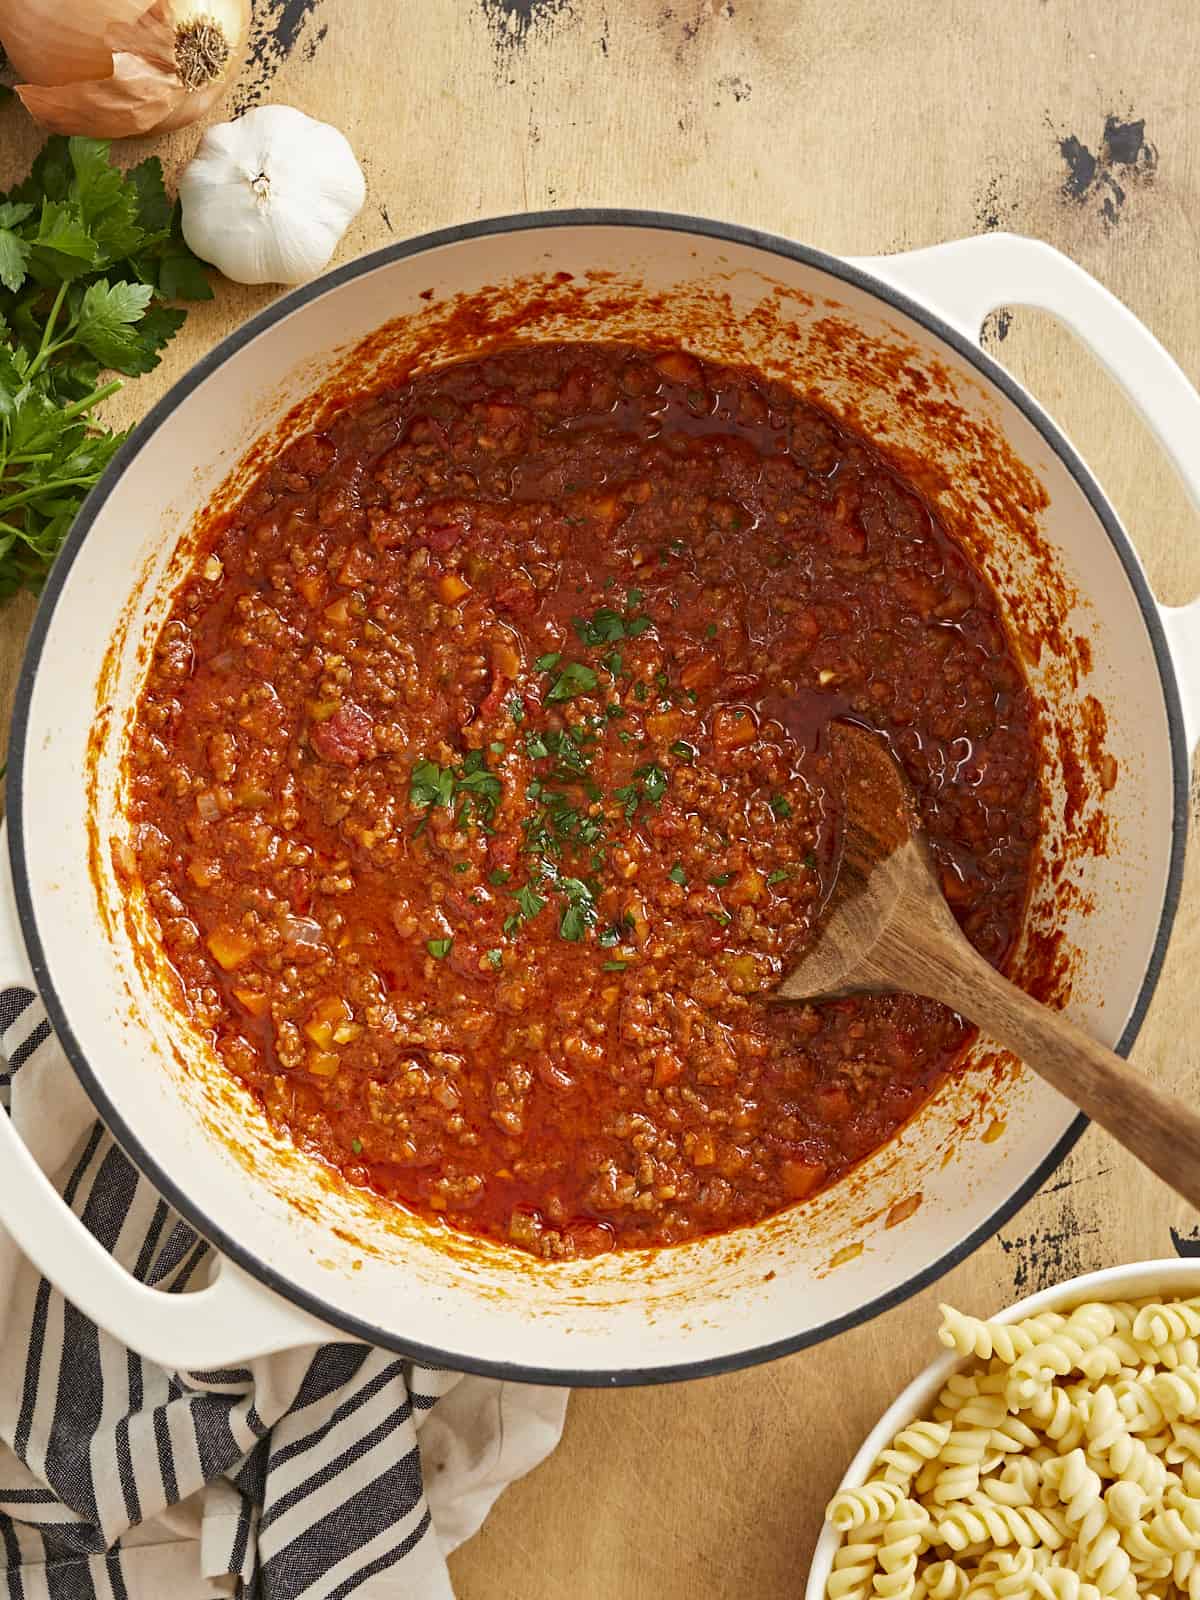
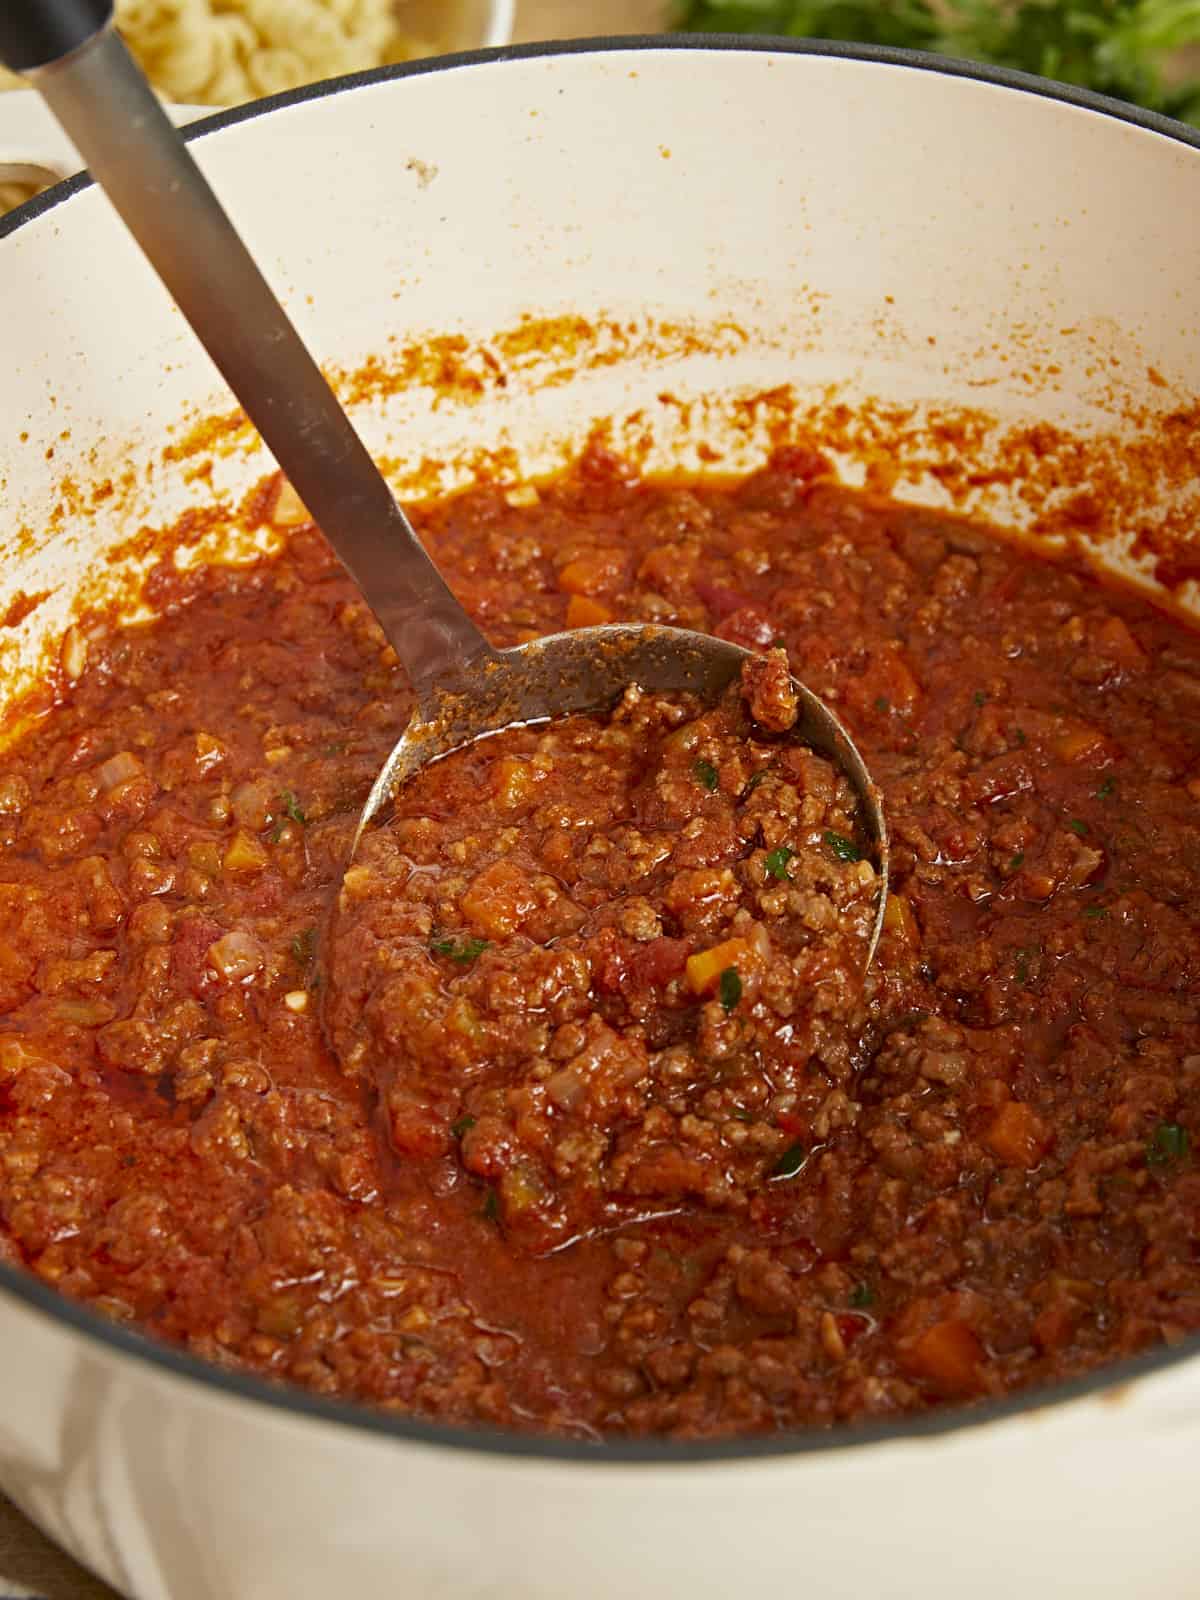
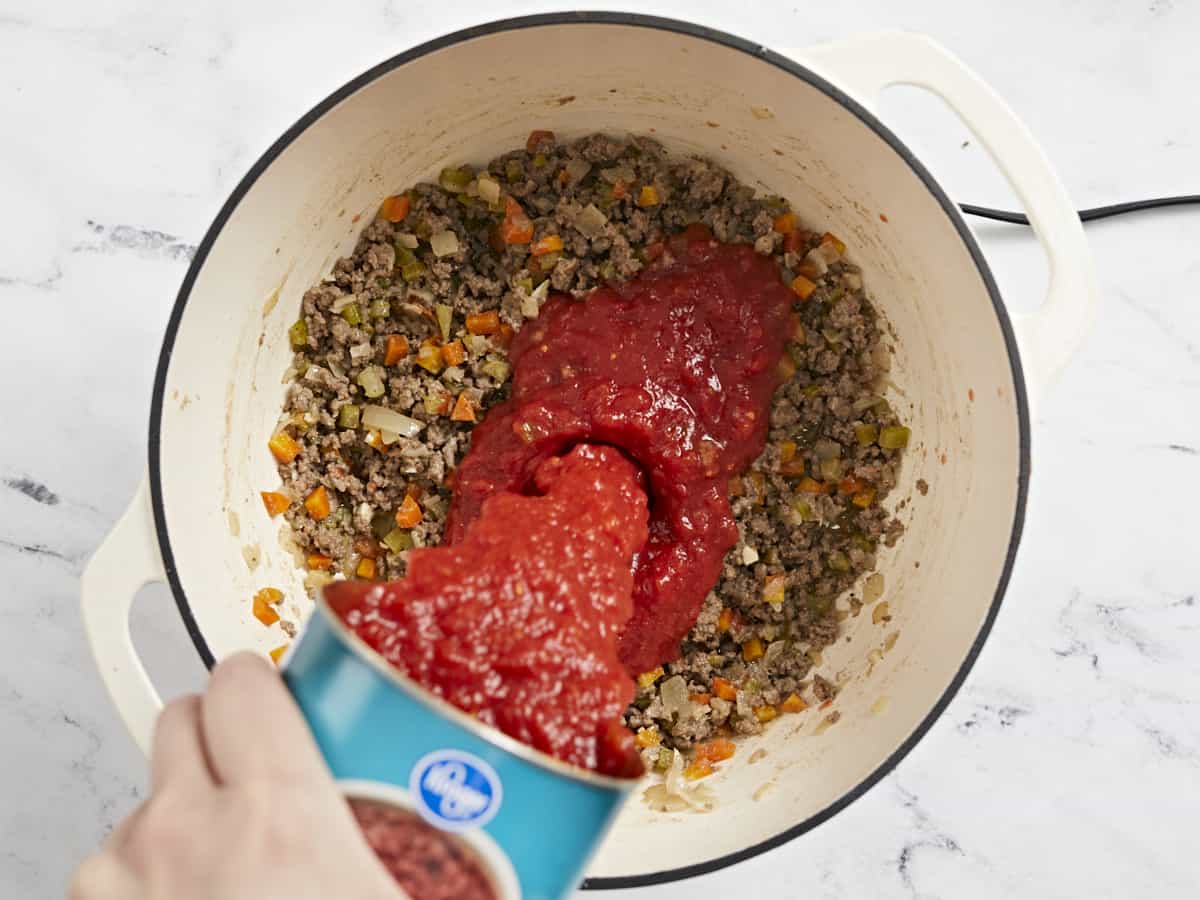
Add the crushed tomatoes. Mix until incorporated. Lower the heat as soon as the tomatoes come up to a boil.
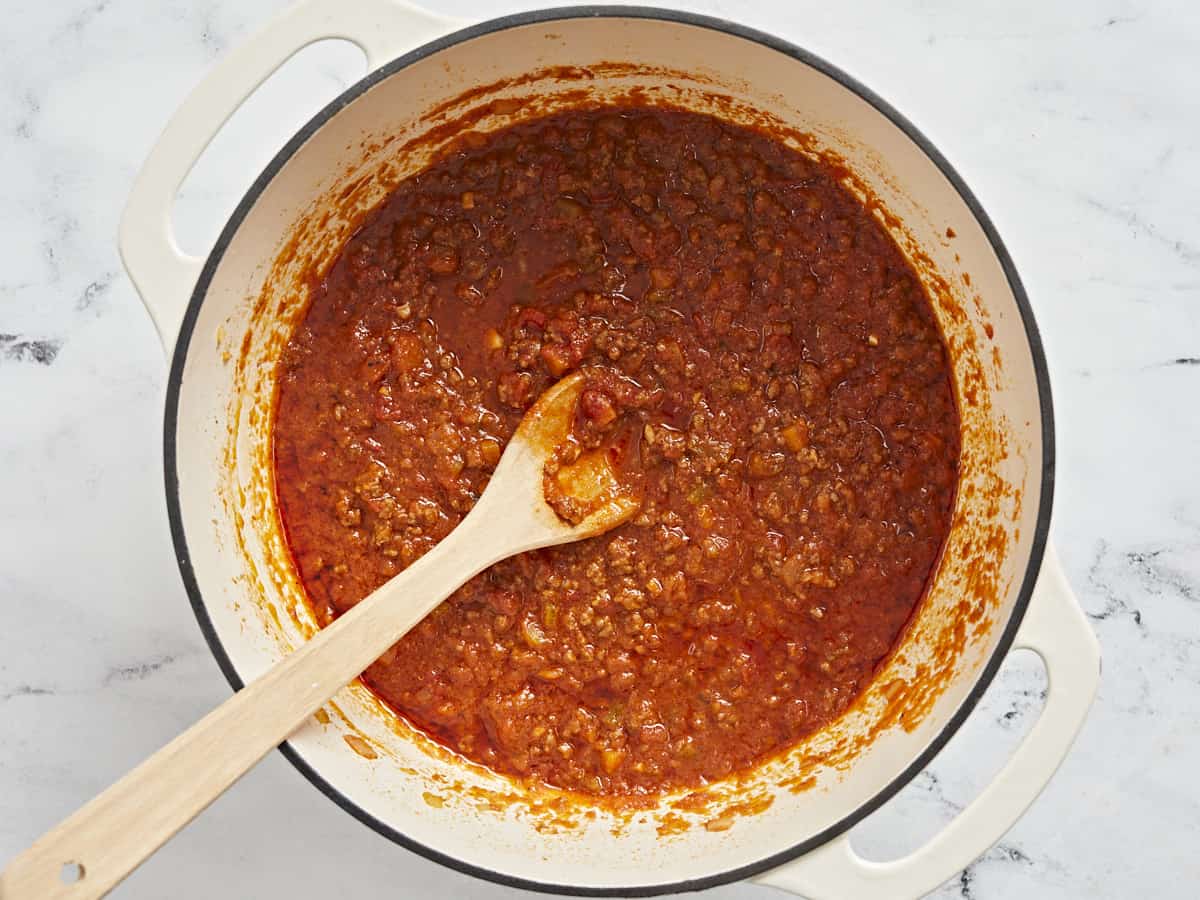
Cook, uncovered, for 3 hours. Stir occasionally. If the sauce dries out, stir in a half cup of water. Once it is finished, taste for salt and pepper.
Place a heavy-bottomed pot (like a Dutch oven) over medium heat. Add 4 tablespoons of butter to the pan. When the butter foams, add 1 medium diced onion and 1/4 teaspoon salt. Sautée until translucent.
Add the 2 stalks of diced celery and the diced carrot and sautée for two minutes, until they have softened some.
Next, add the 2 cloves of minced garlic and sautée until fragrant, about 1 minute.
Add the pound of ground beef and 1/4 teaspoon of pepper. Brown the beef, breaking it up with a wooden spoon as it cooks.
Once the beef has browned, add the cup of milk, the cup of wine, and the remaining 1/4 teaspoon salt. Stir occasionally and simmer until the liquid has evaporated completely.
Add the 28-ounce can of crushed tomatoes. Mix until incorporated. Lower the heat as soon as the tomatoes come up to a boil.
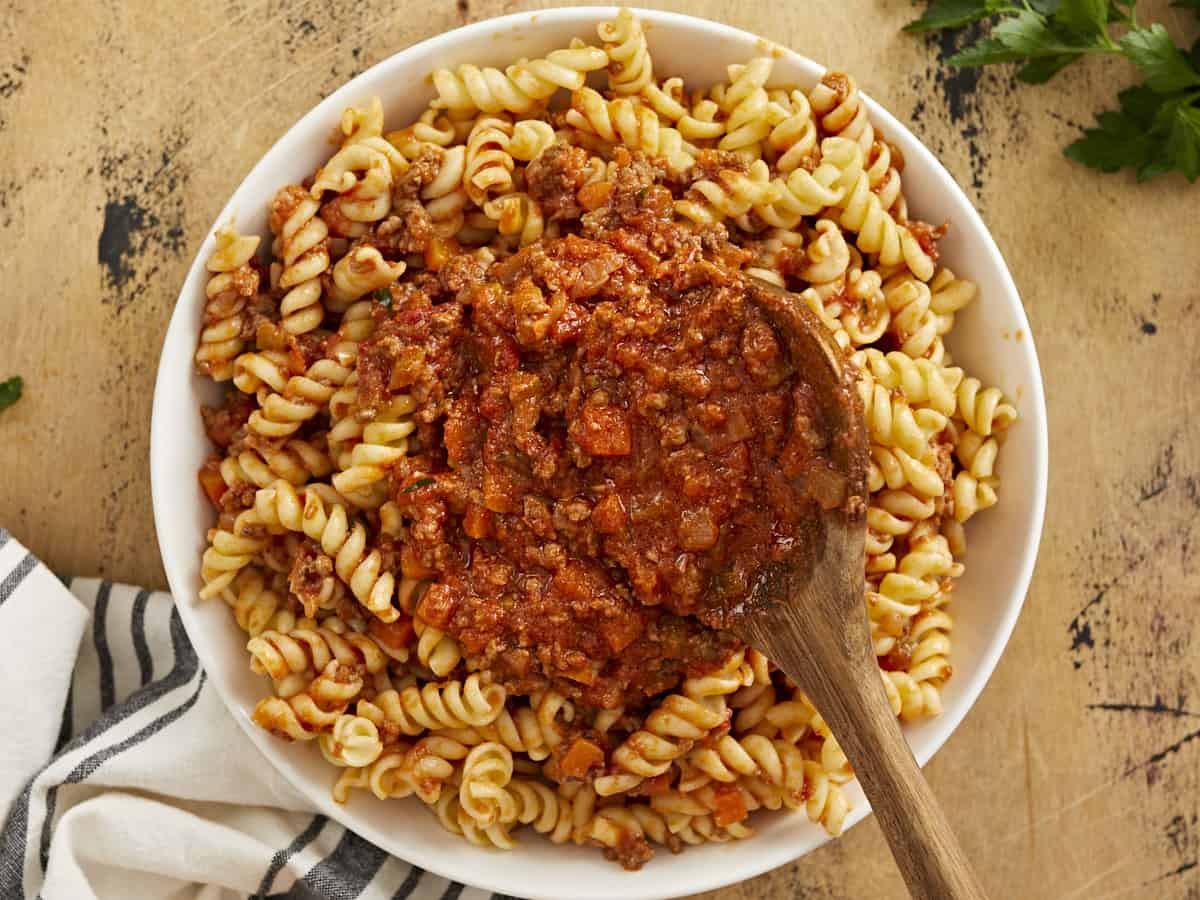
Cook, uncovered, for 3 hours. Stir occasionally. If the sauce dries out, stir in a half cup of water. Once it is finished, taste for salt and pepper and adjust the seasoning. Serve this over hearty pasta like tagliatelle, pappardelle, or rotini. You can also pair it with a baked potato, stuff it into a bell pepper, or serve it over rice or nachos!
This grilled vegetable Napoleon is a showstopper with vibrant, char-grilled layers of veggies like eggplant, zucchini, bell pepper, portobello mushroom, and more. If you want a visually stunning and flavorful side dish, look no further. Served with aro…
This grilled vegetable Napoleon is a showstopper with vibrant, char-grilled layers of veggies like eggplant, zucchini, bell pepper, portobello mushroom, and more. If you want a visually stunning and flavorful side dish, look no further. Served with aromatic basil pesto, it is stunning and flavorful. If you are looking for other easy vegan eggplant recipes,...
This fajita veggies chipotle-style recipe brings the authentic Mexican flavor right into your kitchen. With fresh, colorful vegetables that are tender-crisp and ready in minutes, this recipe is a simple yet delicious addition to your meals. If you love…
This fajita veggies chipotle-style recipe brings the authentic Mexican flavor right into your kitchen. With fresh, colorful vegetables that are tender-crisp and ready in minutes, this recipe is a simple yet delicious addition to your meals. If you love vegan recipes that pack in a lot of veggies, then try my sheet pan fajita veggies...
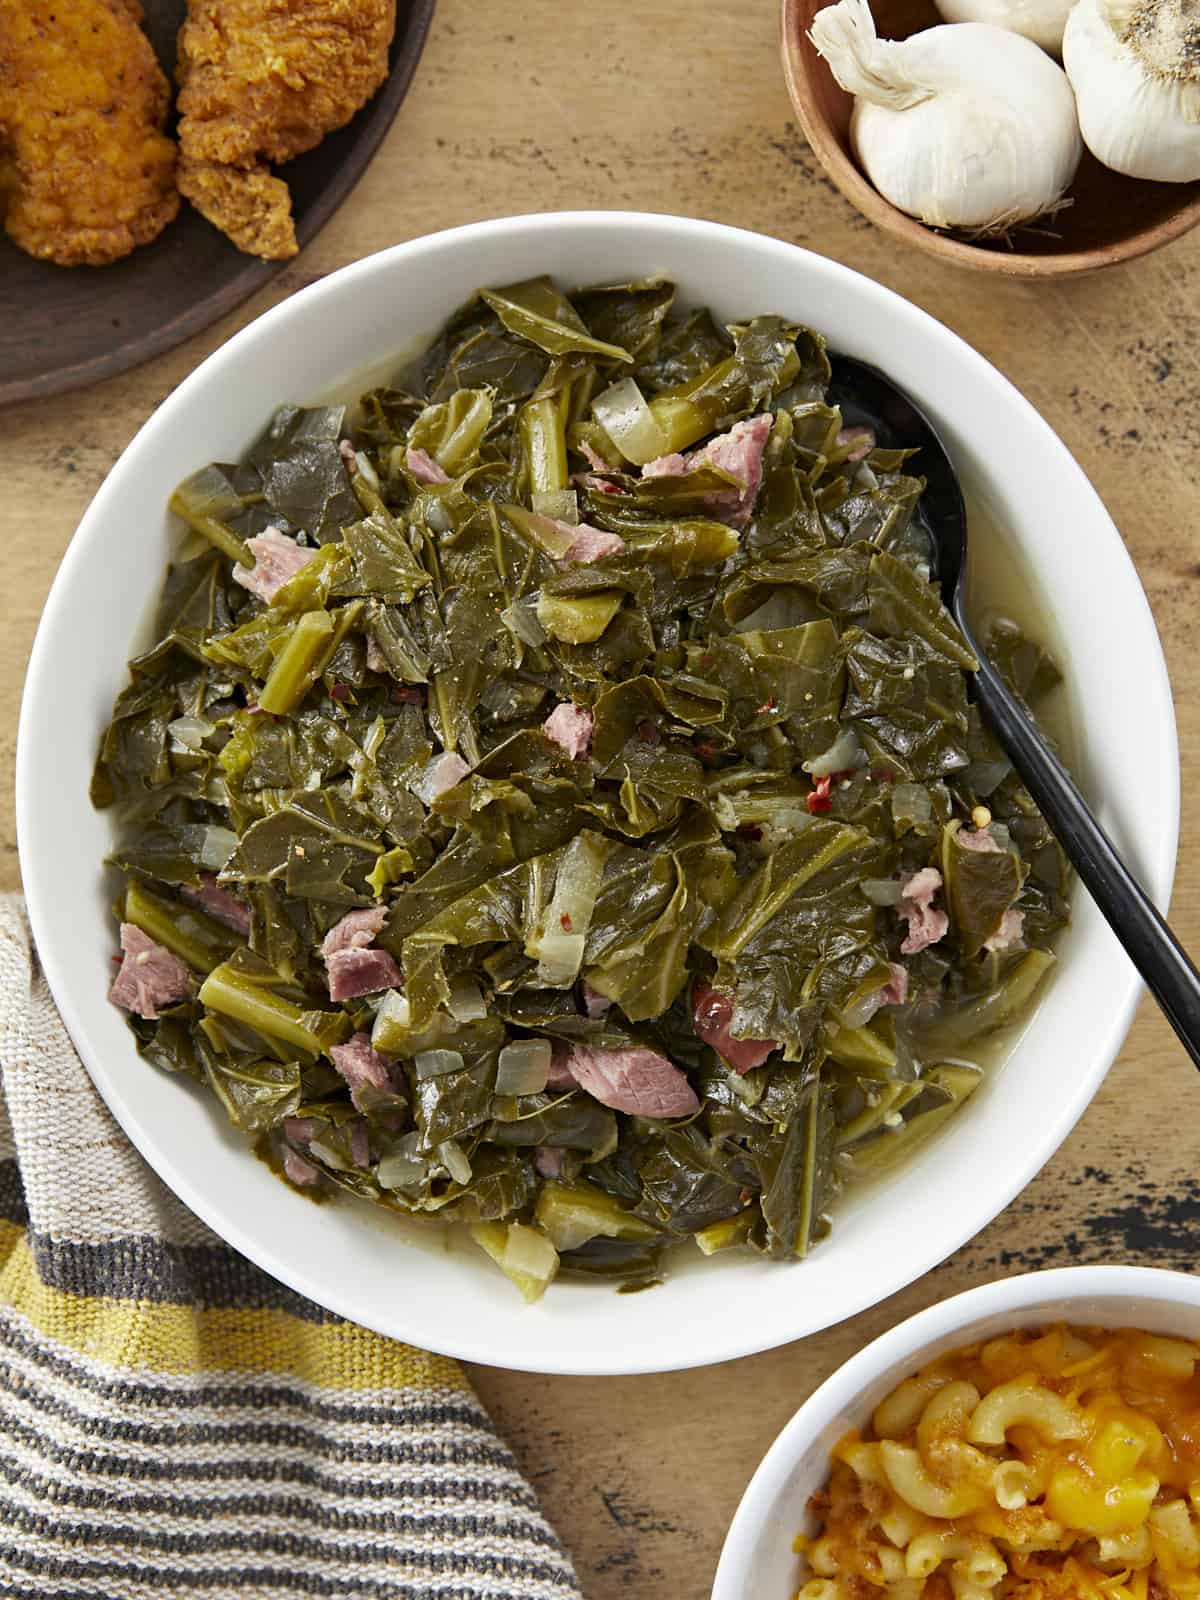
Easter is coming up and I know a lot of people will be cooking a big Easter ham, so here’s an easy recipe that will help you make use of that leftover ham bone, OR that you can make anytime the craving hits using a smoked ham hock. These Collard Greens are super easy, the leftovers reheat beautifully, and they make a great side for just about any dinner. Collard greens are a southern dinner staple and one of my all-time favorite side dishes!
What Are Collard Greens?
Collard greens are a super hearty green leafy cruciferous vegetable in the same family as cabbage and mustard greens. They have a smooth, sturdy, dark green leaf that can be used raw as a wrap, or cooked low and slow until they’re nice and tender.
We’re using the low and slow cooking method for these classic collard greens so the leaves become soft and easily digestible and the flavor deepens as it simmers in a mixture of chicken broth, ham, and aromatics and spices. The end result is a super comforting and flavorful green that you’ll love to serve with your favorite meal.
What Type of Ham to Use
Simmering collard greens with ham gives the greens extra rich flavor and tons of umami that will make you want to come back for seconds (yes, they’re THAT good). We used a smoked ham hock today because they’re inexpensive and provide TONS of flavor. You can also use a leftover ham bone from a ham roast, diced ham, salt pork, or pancetta. Just keep in mind that some type of bone-in ham will deliver the most scrumptious flavor.
Don’t want to use ham? No problem. Smoked turkey wings are a great alternative or you can make a delicious pot of vegetarian collard greens using the same method as our Vegetarian Mustard Greens recipe.
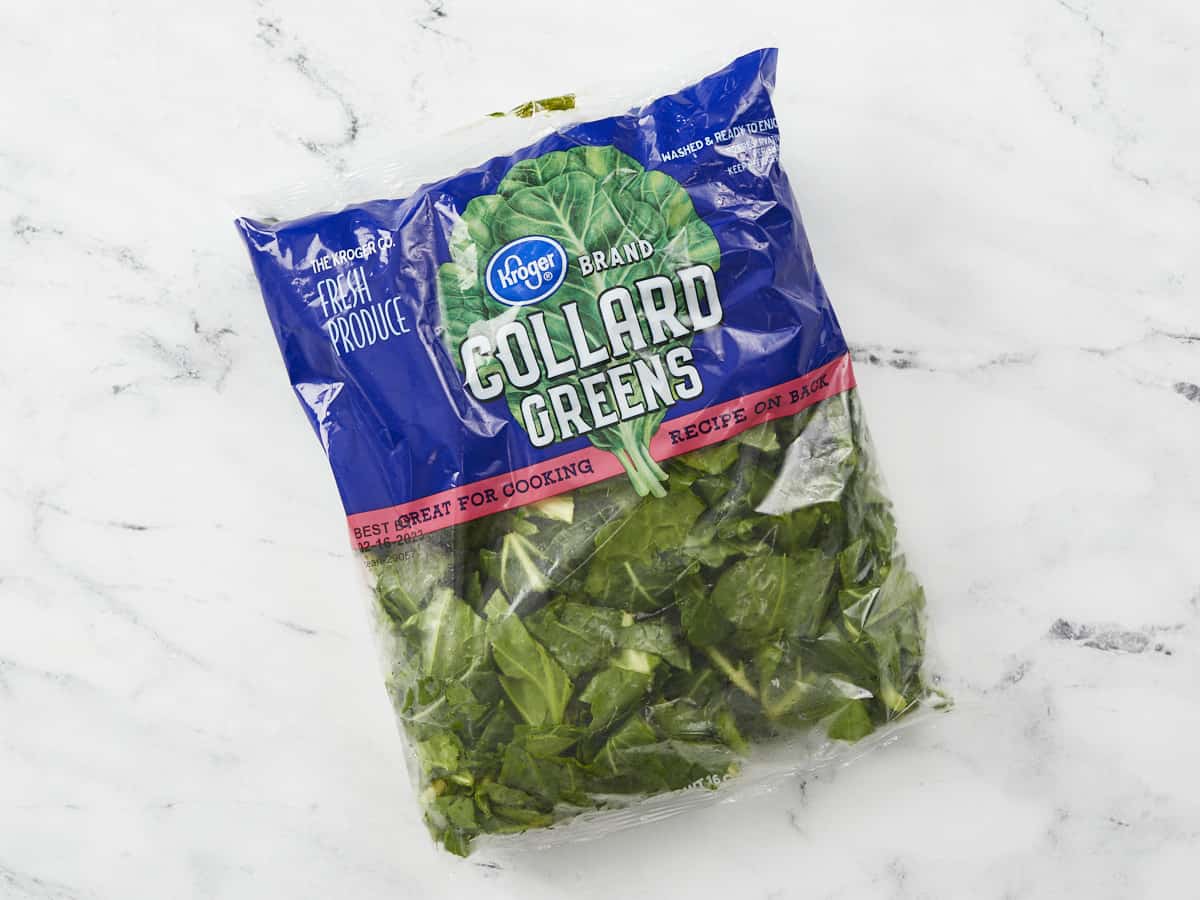
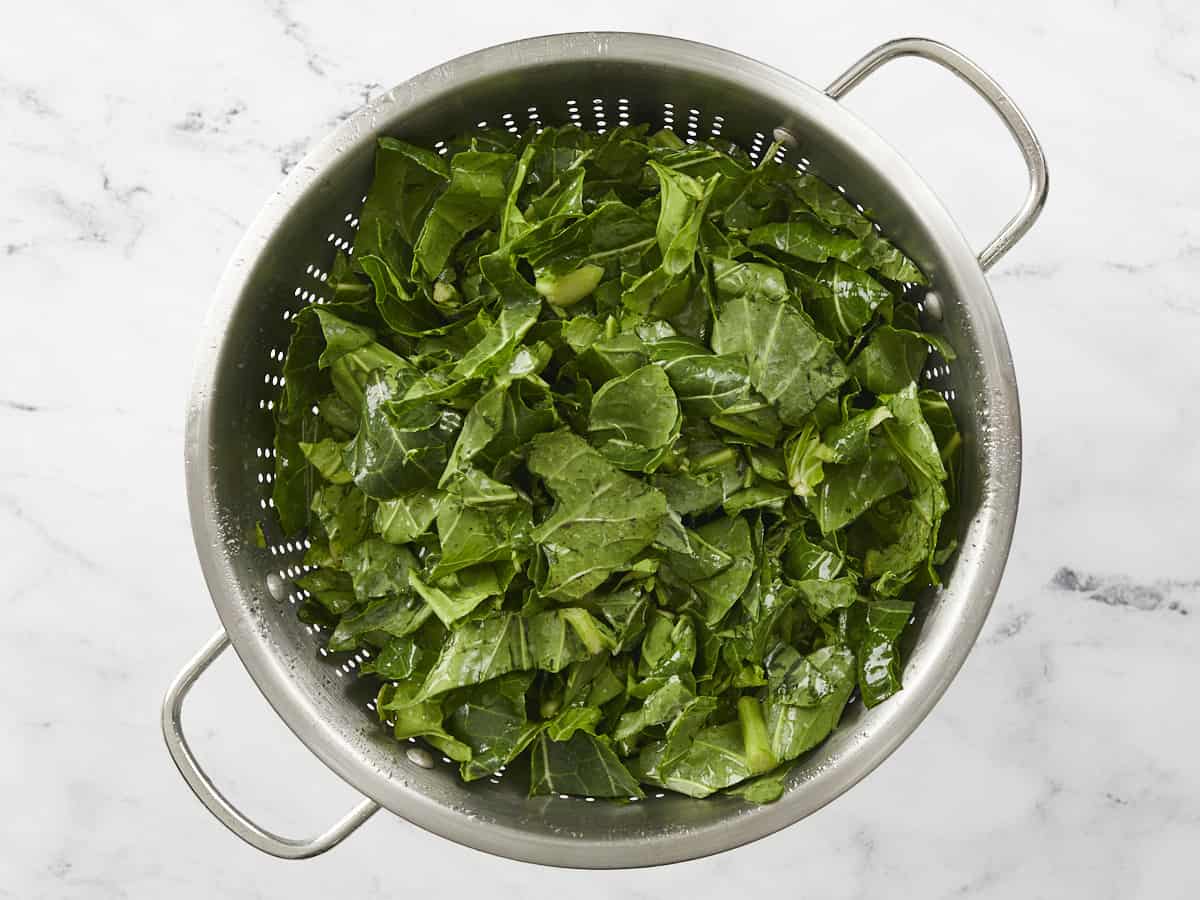
Prepare the collard greens by removing the stems and then chopping the leaves into one to two-inch pieces (or use bagged, pre-chopped collard greens). Place the collard greens in a colander and rinse well.
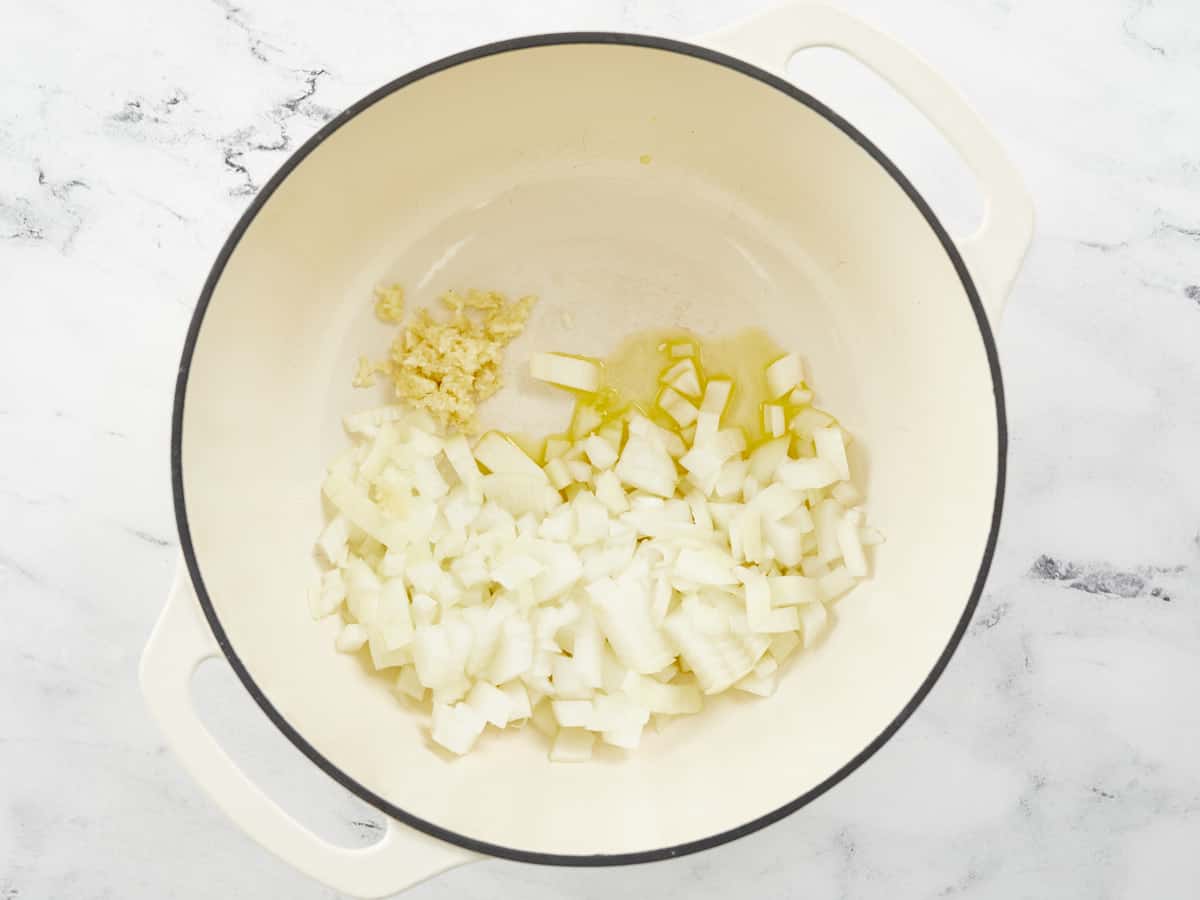
Dice the onion and mince the garlic. Add the onion and garlic to a large soup pot along with the cooking oil. Sauté over medium heat until the onions are soft and translucent.
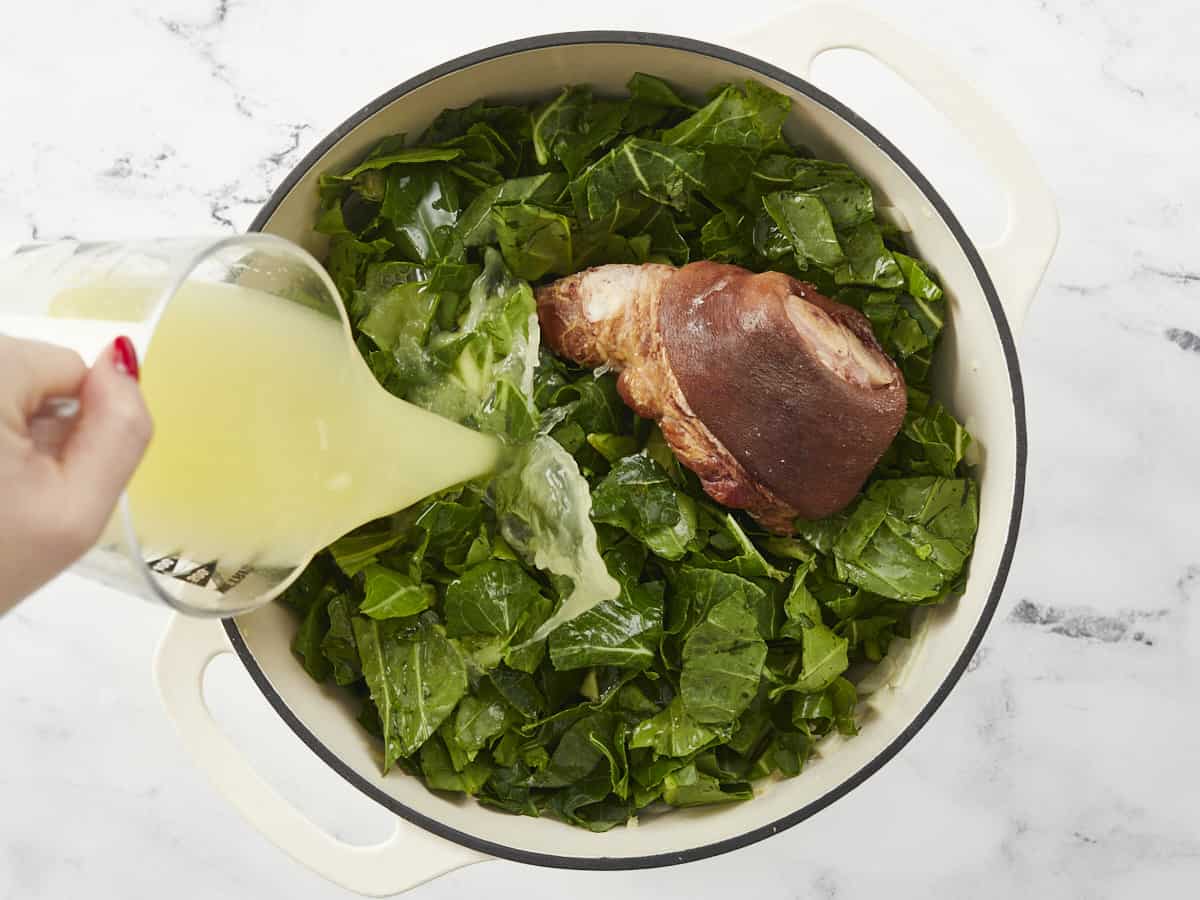
Add the washed collard greens, ham hock, sugar, red pepper, black pepper, and chicken broth to the pot. Stir briefly to combine.
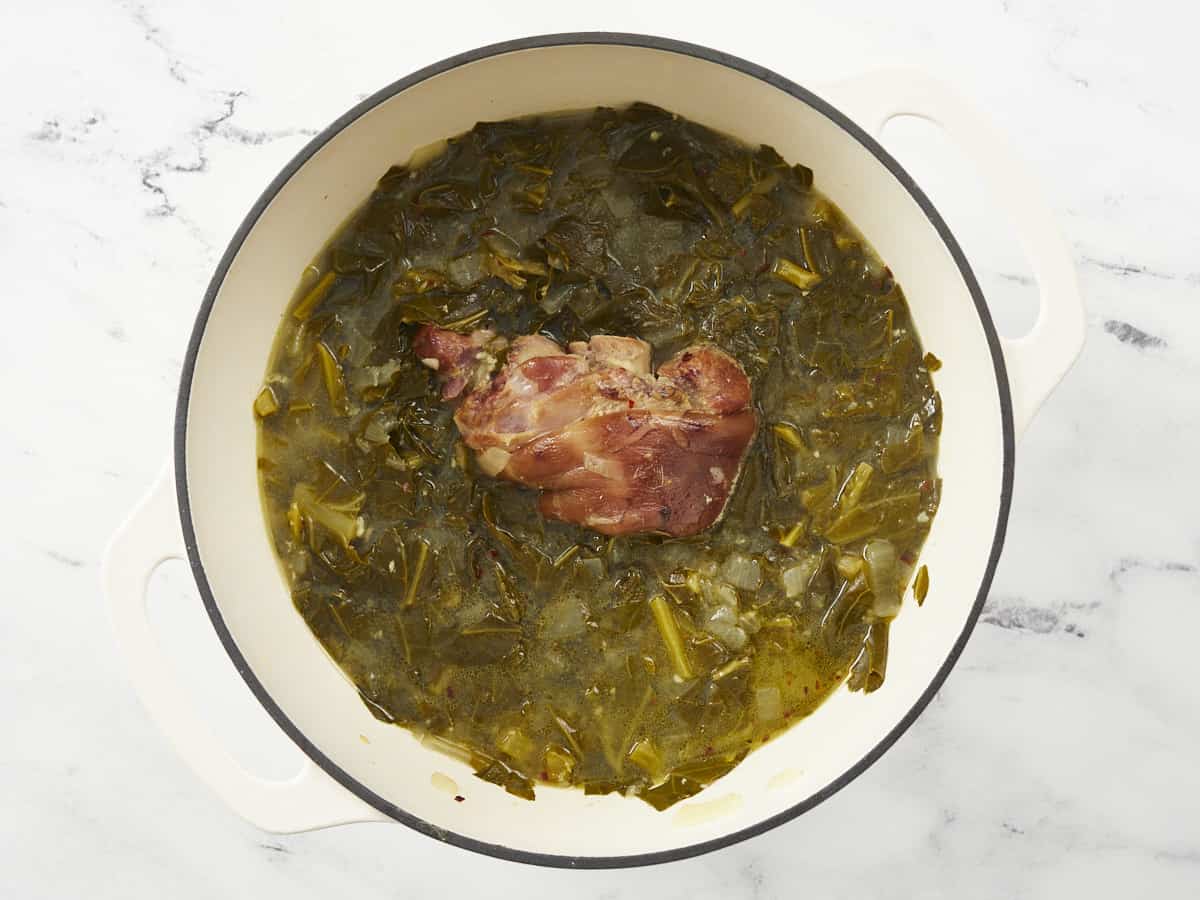
Place a lid on the pot and allow it to come up to a simmer. Once simmering, turn the heat down to low and let the green simmer for one hour, with a lid, stirring occasionally.
After simmering for one hour, taste the greens and see if they are simmered to your desired tenderness. If not, simmer longer.
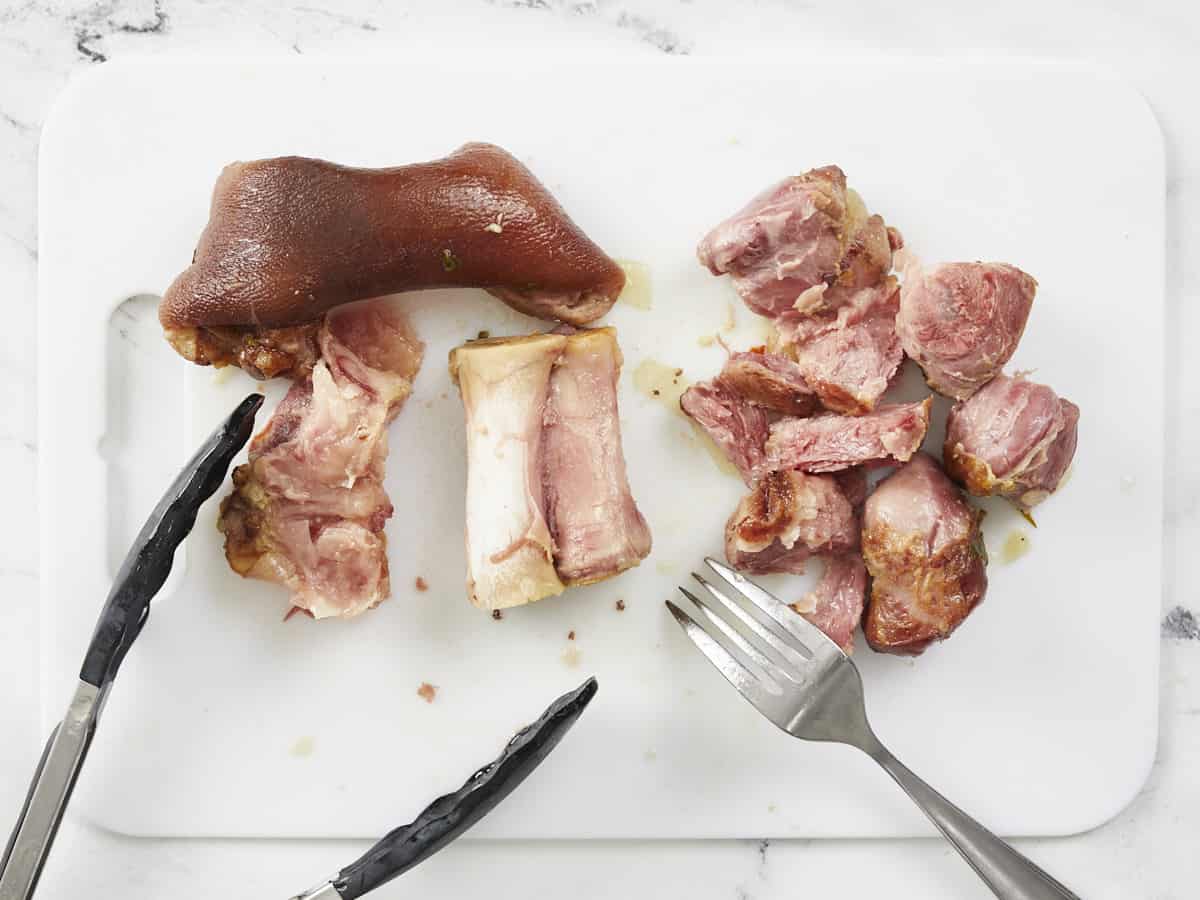
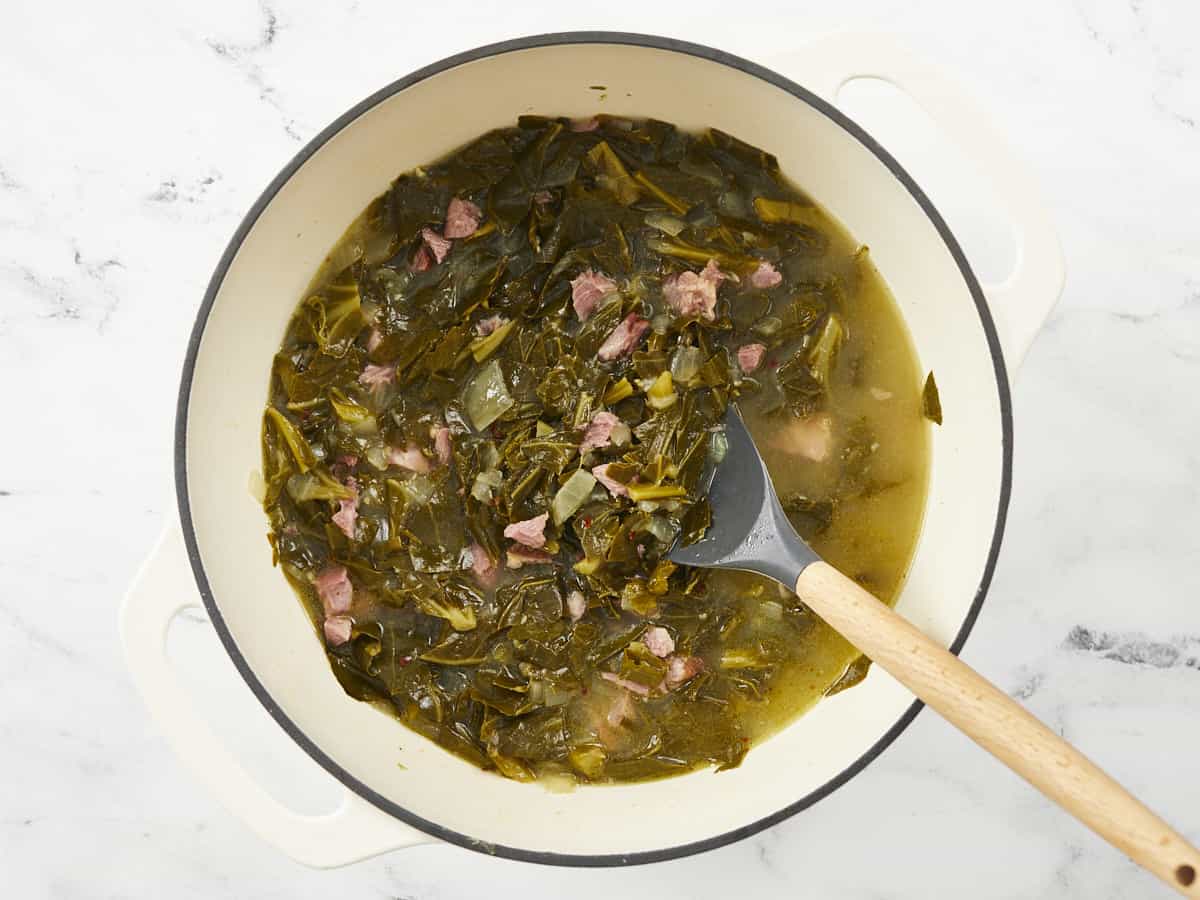
Remove the ham hock and pull the meat from the bone. Chop the ham into small pieces, then stir it back into the greens.
Give the collard greens a final taste and adjust the salt, sugar, or other seasonings to your liking. Serve hot with your favorite meal!
I love to use these bagged chopped collard greens because they’re cheap and half of the work is already done for me! If you don’t have access to pre-chopped collard greens, simply cut out the tough stems of your collard greens then chop the leaves into one to two-inch pieces. You’ll need one pound of collard greens.
Whether you’re using pre-chopped or chopping your own, make sure to wash your collard greens well. There’s no need to wait for them to drain well, as they’ll be simmering in a pot of liquid anyway.
Dice one yellow onion and mince four cloves of garlic. Add both to a large soup pot with one tablespoon of cooking oil. Sauté over medium heat until the onions are soft and translucent (about 5 minutes).
Add the washed collard greens, smoked ham hock, 1/4 tsp crushed red pepper, 1/4 tsp freshly cracked black pepper, 1 tsp sugar, and 4 cups of chicken broth to the pot. Give everything a brief stir, place the lid on top, and let it come up to a simmer.
Once simmering, turn the heat down to low, and allow the collard greens to simmer for one hour (with the lid on top), stirring occasionally. After simmering for one hour, taste the greens to see if they have tenderized to your liking. If not, you can simmer even longer.
Once the collard greens are the texture that you like, remove the ham hock and pull the meat from the bone. Chop the ham into small pieces then return the meat to the pot.
Give the collard greens a taste and adjust the salt, sugar, or other seasonings to your liking.
You’re going to love this silky, savory, and ridiculously Easy Quiche Lorraine! The puff pastry crust makes it absolutely effortless! Chock full of bacon and swiss cheese, this creamy custard baked in a pastry crust can be served hot or cold for breakfast, lunch, or brunch. Serve it with a side dish to make it a filling dinner. I love that you can prepare it a day ahead and that it takes almost no time to assemble. Just cook the bacon and aromatics, mix the custard ingredients, and go!
What is Quiche Lorraine?
Quiche Lorraine is what my kid calls an egg pie. It’s a custard set in a pastry crust that gets its name from the Lorraine region in France. Traditionally it’s made with eggs, cream, bacon, and swiss cheese. But feel free to use the ingredients you have. It’s your kitchen!
What You’ll Need
The best part of making this Quiche Lorraine recipe is its versatility. If you’re not intent on keeping things traditional, you can substitute almost all ingredients to better fit your preferences.
Eggs – these create the custard necessary to bind all of the ingredients together. You can substitute eggs with a vegan egg alternative, like Just Egg.
Cream Cheese, Heavy Cream, and Milk– the fat in the cream cheese, heavy cream, and milk helps create a silky custard texture. You can substitute the heavy cream with all milk and two tablespoons of butter. Use plant-based cream cheese, heavy cream, and milk alternatives if you don’t do dairy.
Bacon– adds a big hit of smoky, salty savoriness. You can substitute it with ham, pancetta, salami, or your favorite meatless bacon alternative. If you don’t do pork, use diced roasted chicken or turkey.
Swiss Cheese – is the traditional choice for Quiche Lorraine, but use whatever cheese you have handy. Gouda, provolone, cheddar, and mozzarella are all excellent substitutions.
Puff Pastry – is the vehicle that holds the filling. Par-baking the puff pastry helps keep it from getting soggy as the liquid custard bakes. Pie crust is the traditional choice for quiche, and makes a great substitute for puff pastry. Of course, you can always make my Easy 3-Ingredient Pie Crust.
Onion and Garlic – these aromatics help flavor the custard. You can substitute them with leeks, green onions, or shallots. You can also replace the onion with one teaspoon of onion powder or one tablespoon of dried onion flakes and the garlic with one-eighth of a teaspoon of garlic powder. Add them to the custard when you add the nutmeg to prevent scorching.
Nutmeg– just a pinch helps enhance the creamy flavor of the custard. If you don’t have nutmeg, skip it.
What To Serve With Quiche Lorraine
You can take Quiche Lorraine from a light breakfast or lunch to a full-on dinner by pairing it with a soup, salad, or a veggie-based side dish. Try some of these Budget Bytes favorites!
Allow your quiche to cool completely before storing it in the fridge. If leaving it in the pie pan, cover leftovers with plastic wrap or aluminum foil and refrigerate for up to four days. You can also slice what’s left of the quiche and store the slices in an airtight container. To freeze leftovers, portion and wrap the pieces in aluminum foil, then place them in a freezer-safe container. They will remain fresh for up to a month.
How To Reheat Leftovers
Bring refrigerated slices to room temperature while you preheat your oven to 350°F. Thaw frozen slices overnight in the fridge. Then, cover the crust with aluminum foil or a pie shield and reheat for fifteen minutes or until steaming. In a pinch, you can reheat leftovers in your microwave, but be warned, the texture will become slightly rubbery.
2Tbspchopped fresh Italian parsley for garnish (optional)$0.06
Instructions
Set a rack in the middle of your oven and preheat it to 425°F. Next, roll the puff pastry into an 11-inch square and transfer it to a 9-inch diameter pie plate. Then puncture the bottom of the puff pastry a few times with a fork and trim the edges.
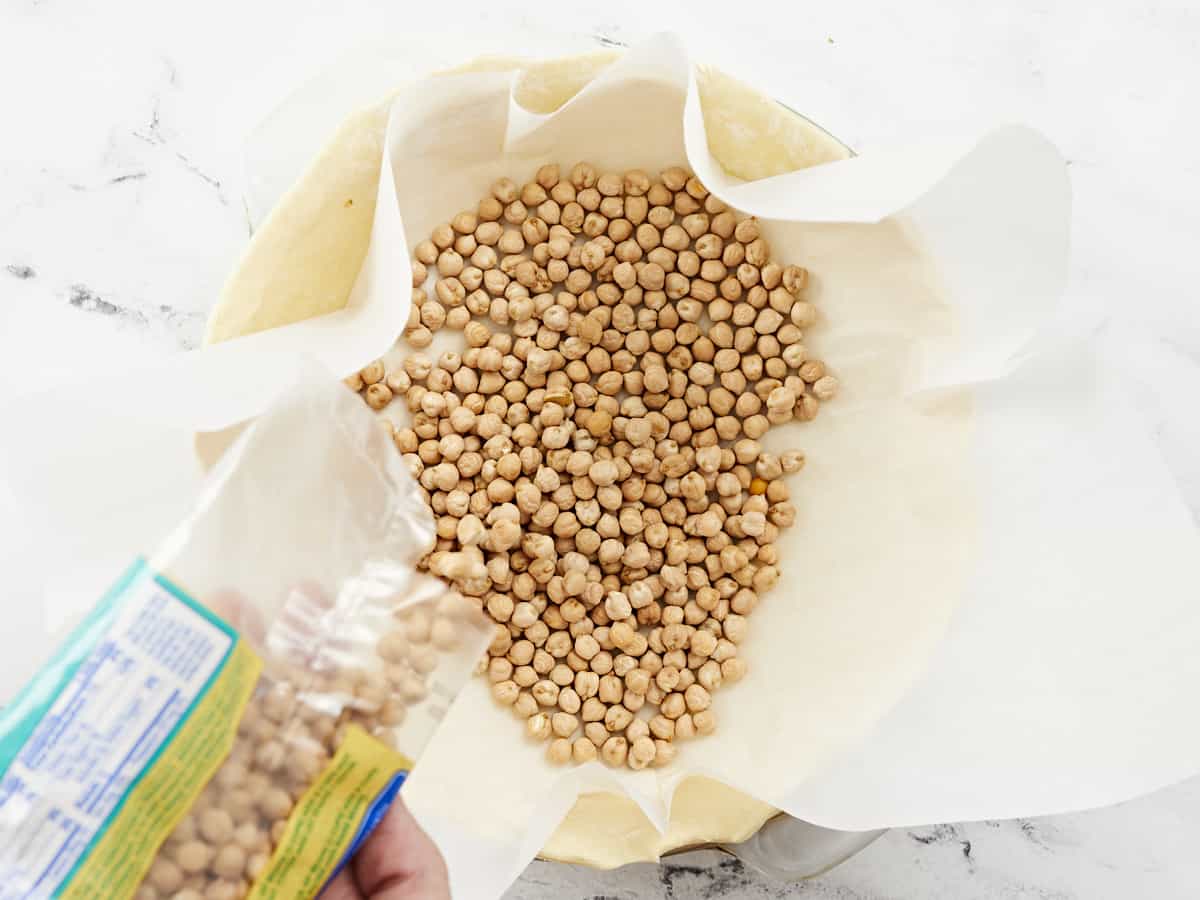
Cover the puff pastry with a sheet of parchment paper and add a pound of dry beans or pie weights. Then, cover the edges of the pastry with a pie shield or ring made of aluminum foil to prevent them from burning. Bake for fifteen minutes.
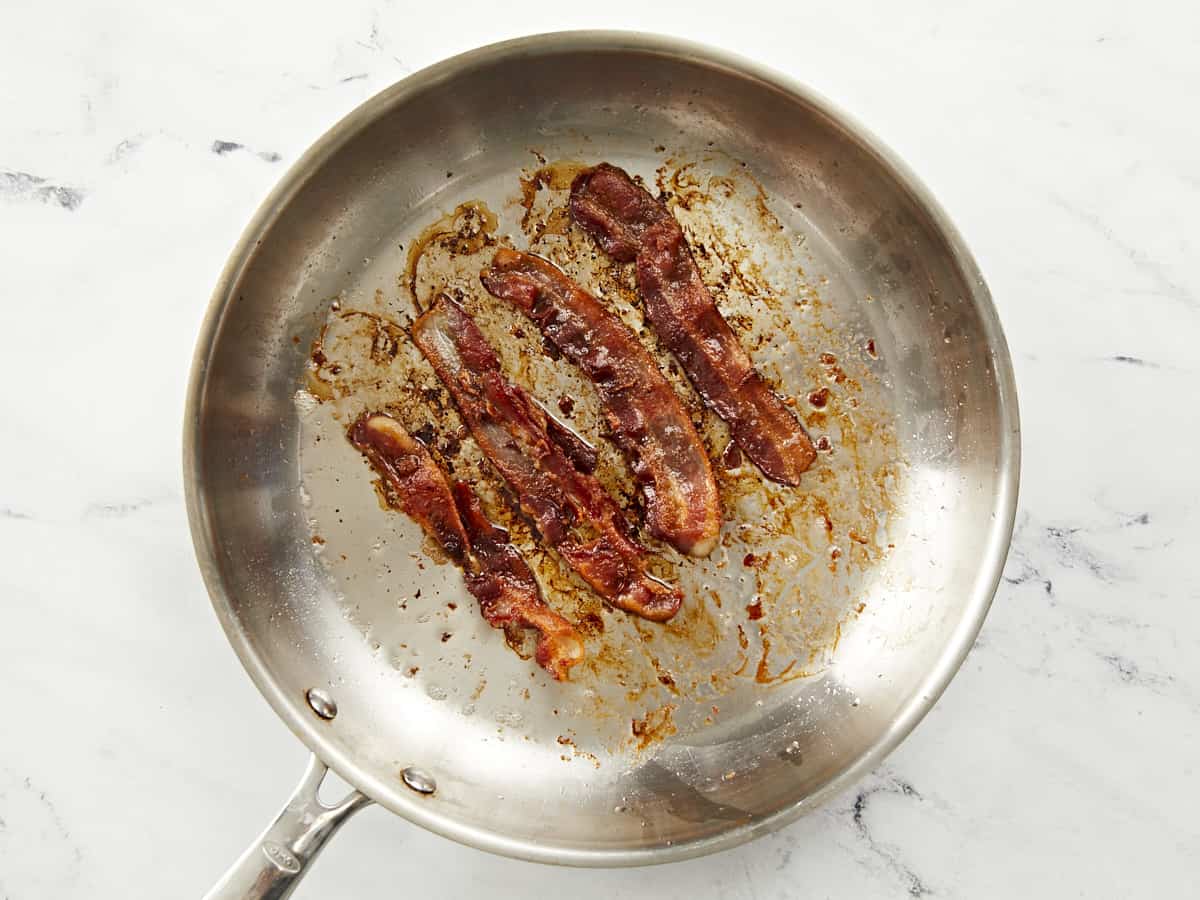
While the puff pastry par-bakes set a heavy-bottomed skillet over medium heat. Add the bacon strips and cook until crispy. Next, chop the bacon into bits. Set aside the chopped bacon and reserve the drippings.
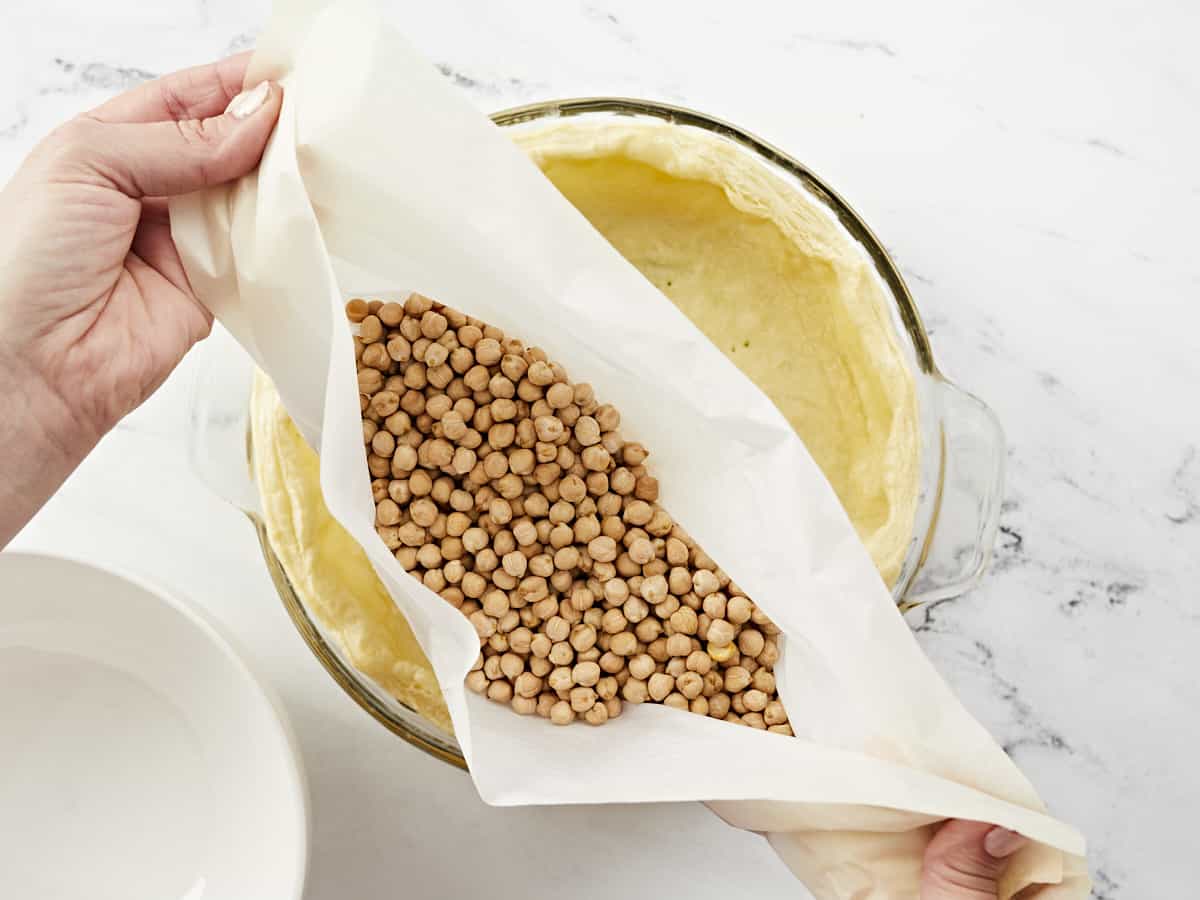
Remove the puff pastry from the oven. Carefully remove the pie shield. Then carefully remove the parchment paper with the beans or pie weights.*
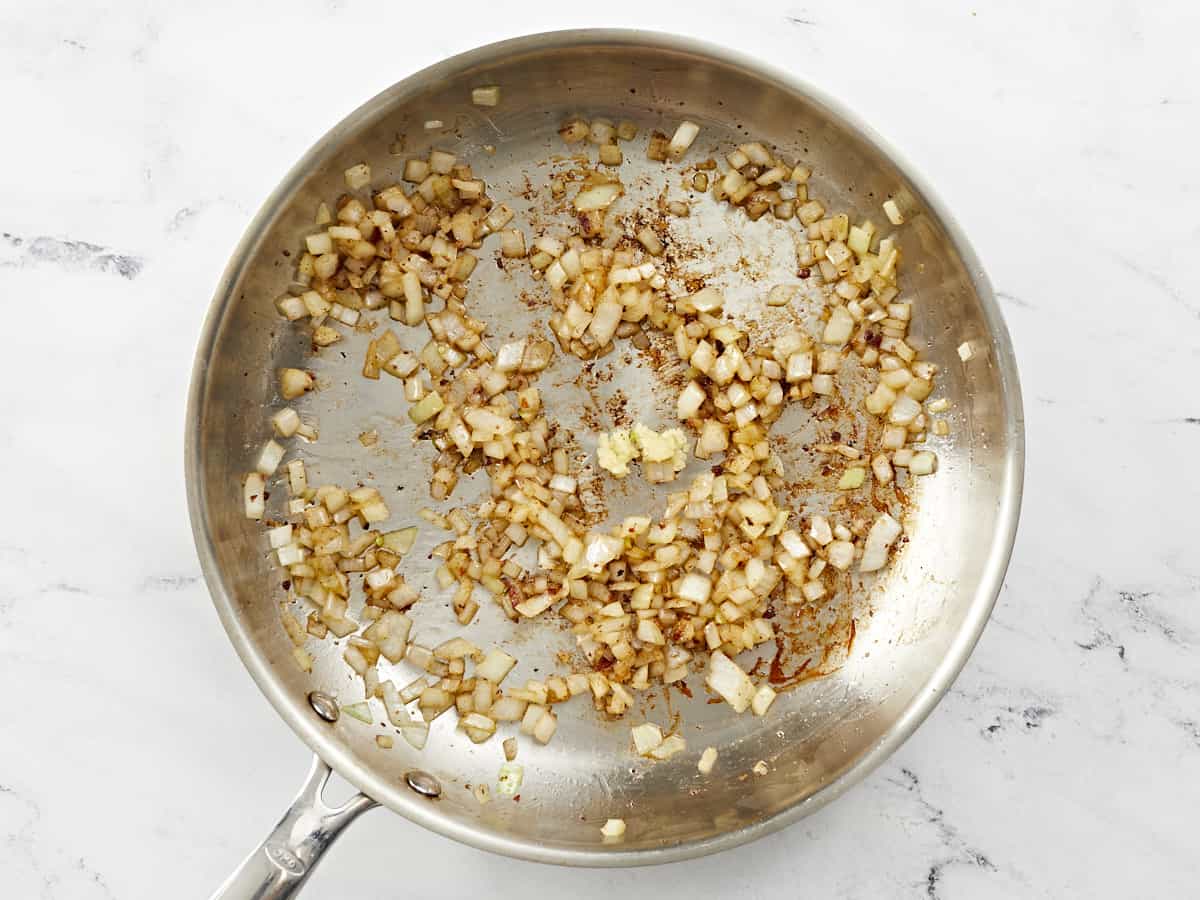
Cook the onion in the bacon drippings until translucent (about 2 minutes). Next, add the garlic clove and cook until fragrant (about 1 minute).
In a large bowl, beat the cream cheese, heavy cream, and milk until smooth.
Add the eggs, nutmeg, salt, and freshly ground pepper. Finally, set aside 2 tablespoons of chopped bacon for garnish and add the rest to the filling.
Pour the filling into the prebaked crust. Brush the crust with 1 teaspoon of heavy cream.
Cover the edges of the quiche with a pie shield or aluminum foil ring. Bake until the crust is golden brown and the filling sets, about 25 minutes. Remove the pie shield and cool the quiche for 10 minutes before serving. Finally, garnish with remaining bacon bits and chopped Italian parsley.*
*Dry beans can be cooled, stored in an air-tight container, and reserved for future use as pie weights.*You will know the quiche has set when you insert a toothpick in the center and it comes out clean.
Set a rack in the middle of your oven and preheat it to 425°F. Next, roll 1 sheet of puff pastry into an 11-inch square. Transfer the puff pastry to a 9-inch diameter pie plate. Trim the edges.
Cover the puff pastry with a sheet of parchment paper and add a pound of dry beans or pie weights. Next, cover the edges of the pastry with a pie shield or ring made of aluminum foil to prevent them from burning. Bake for fifteen minutes.
While the puff pastry par-bakes set a heavy-bottomed skillet over medium heat. Add the 4 strips of bacon and cook until crispy. Next, chop the bacon into bits. Set aside the chopped bacon and reserve the drippings.
Remove the puff pastry from the oven and carefully remove the pie shield and the parchment paper with the dry beans/pie weights. The beans can be cooled, stored in an airtight container, and reused for future preparations.
Next, cook 1 diced yellow onion in the bacon drippings until translucent (about 2 minutes). Then, add 1 minced garlic clove and cook until fragrant (about 1 minute).
In a large bowl, beat 4 ounces of cream cheese, 1/4 cup of heavy cream, and 1/4 cup of milk until smooth.
Add the 5 eggs, ¼ teaspoon of nutmeg, ½ teaspoon of salt, and ¼ teaspoon of freshly ground pepper. Next, set aside 2 tablespoons of bacon for garnish and add the rest of the chopped bacon into the filling.
Finally, pour the filling into the prebaked crust. Then, brush the edges of the crust with 1 teaspoon of heavy cream.Cover the edges of the quiche with a pie shield or aluminum foil ring. Then bake until the crust is golden brown and the filling sets, about 25 minutes. You will know the filling has set when you insert a toothpick in the middle and it comes out clean. Cool for 10 minutes before serving. Finally, garnish with remaining bacon bits and chopped Italian parsley.
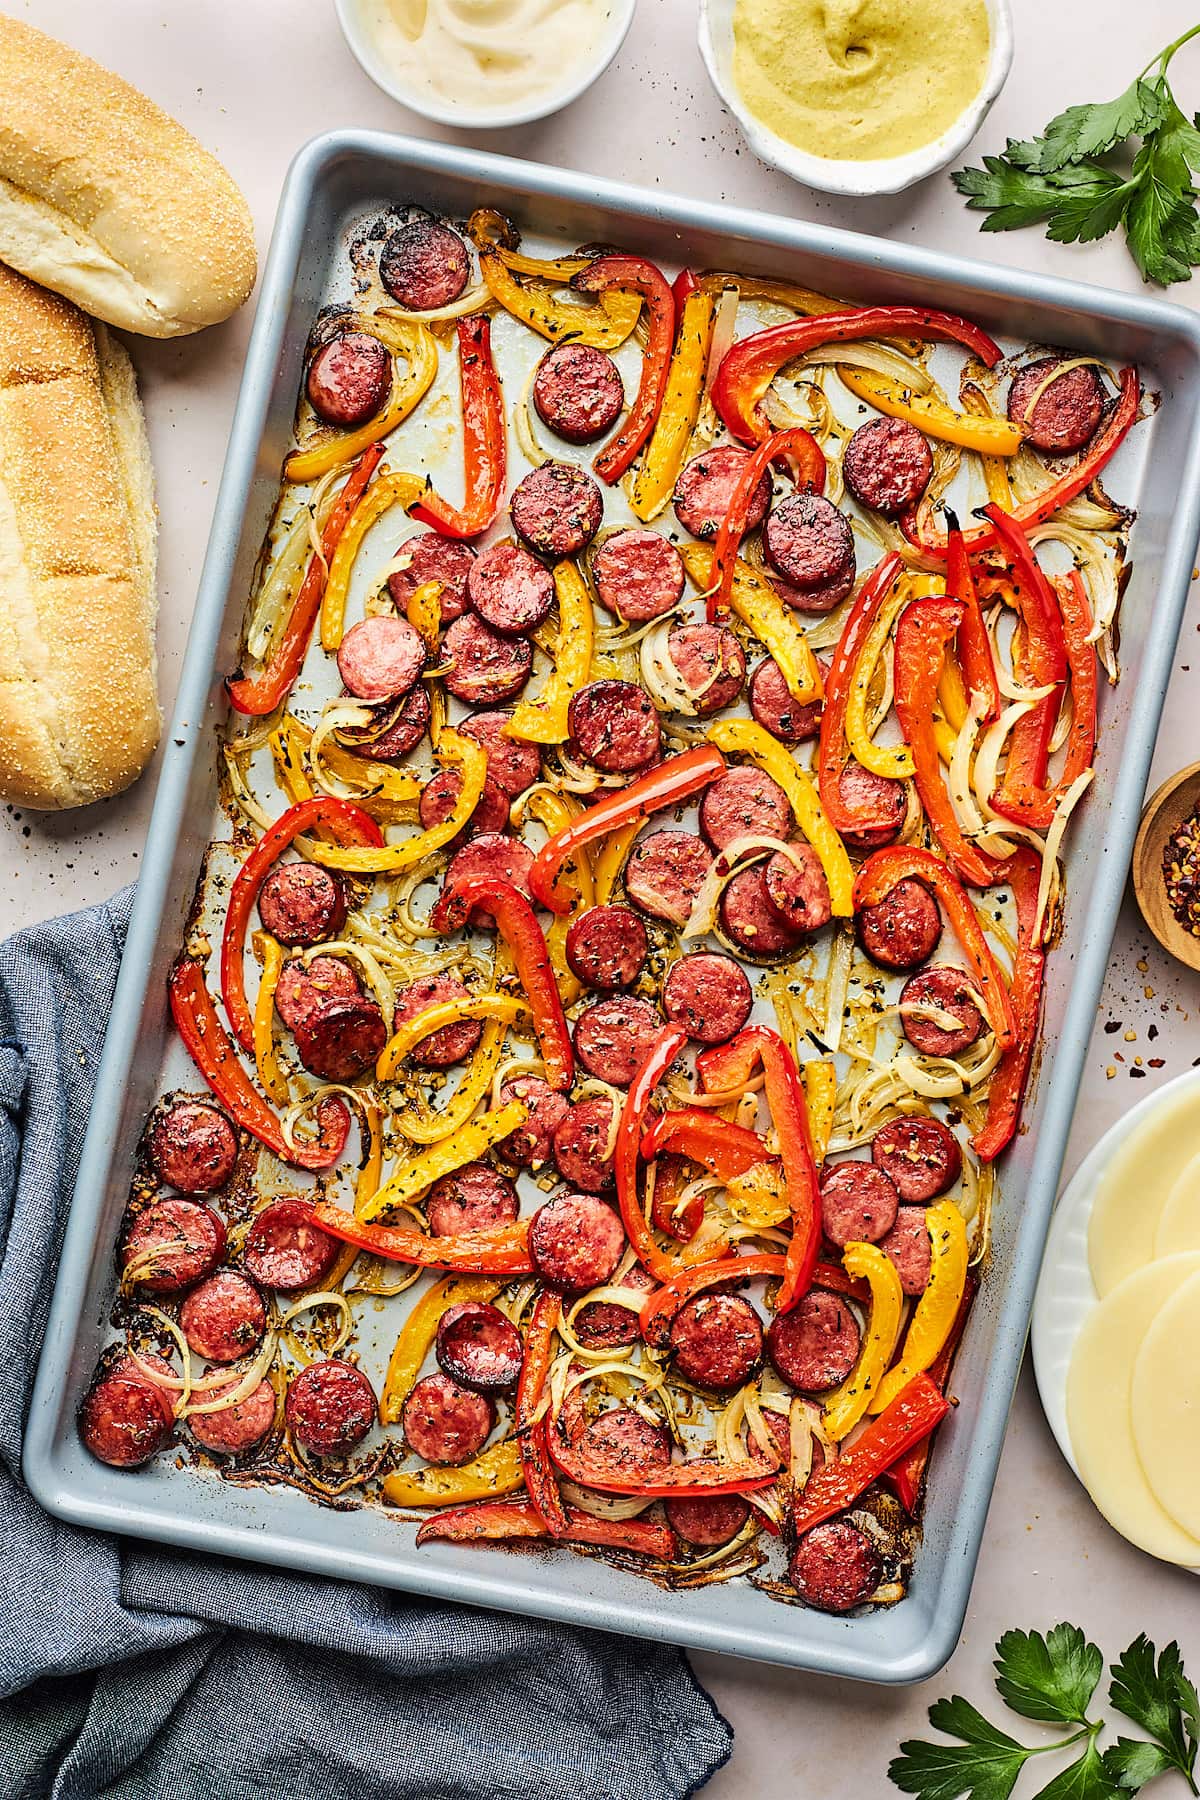
If you are looking for a quick and easy weeknight meal, you have come to the right place. This Sheet Pan Sausage and Peppers recipe only takes 25 minutes to make and is always a dinner winner. Sheet pan meals are the BEST! I love that dinner is made on…
If you are looking for a quick and easy weeknight meal, you have come to the right place. This Sheet Pan Sausage and Peppers recipe only takes 25 minutes to make and is always a dinner winner. Sheet pan meals are the BEST! I love that dinner is made on ONE pan, easy to make…
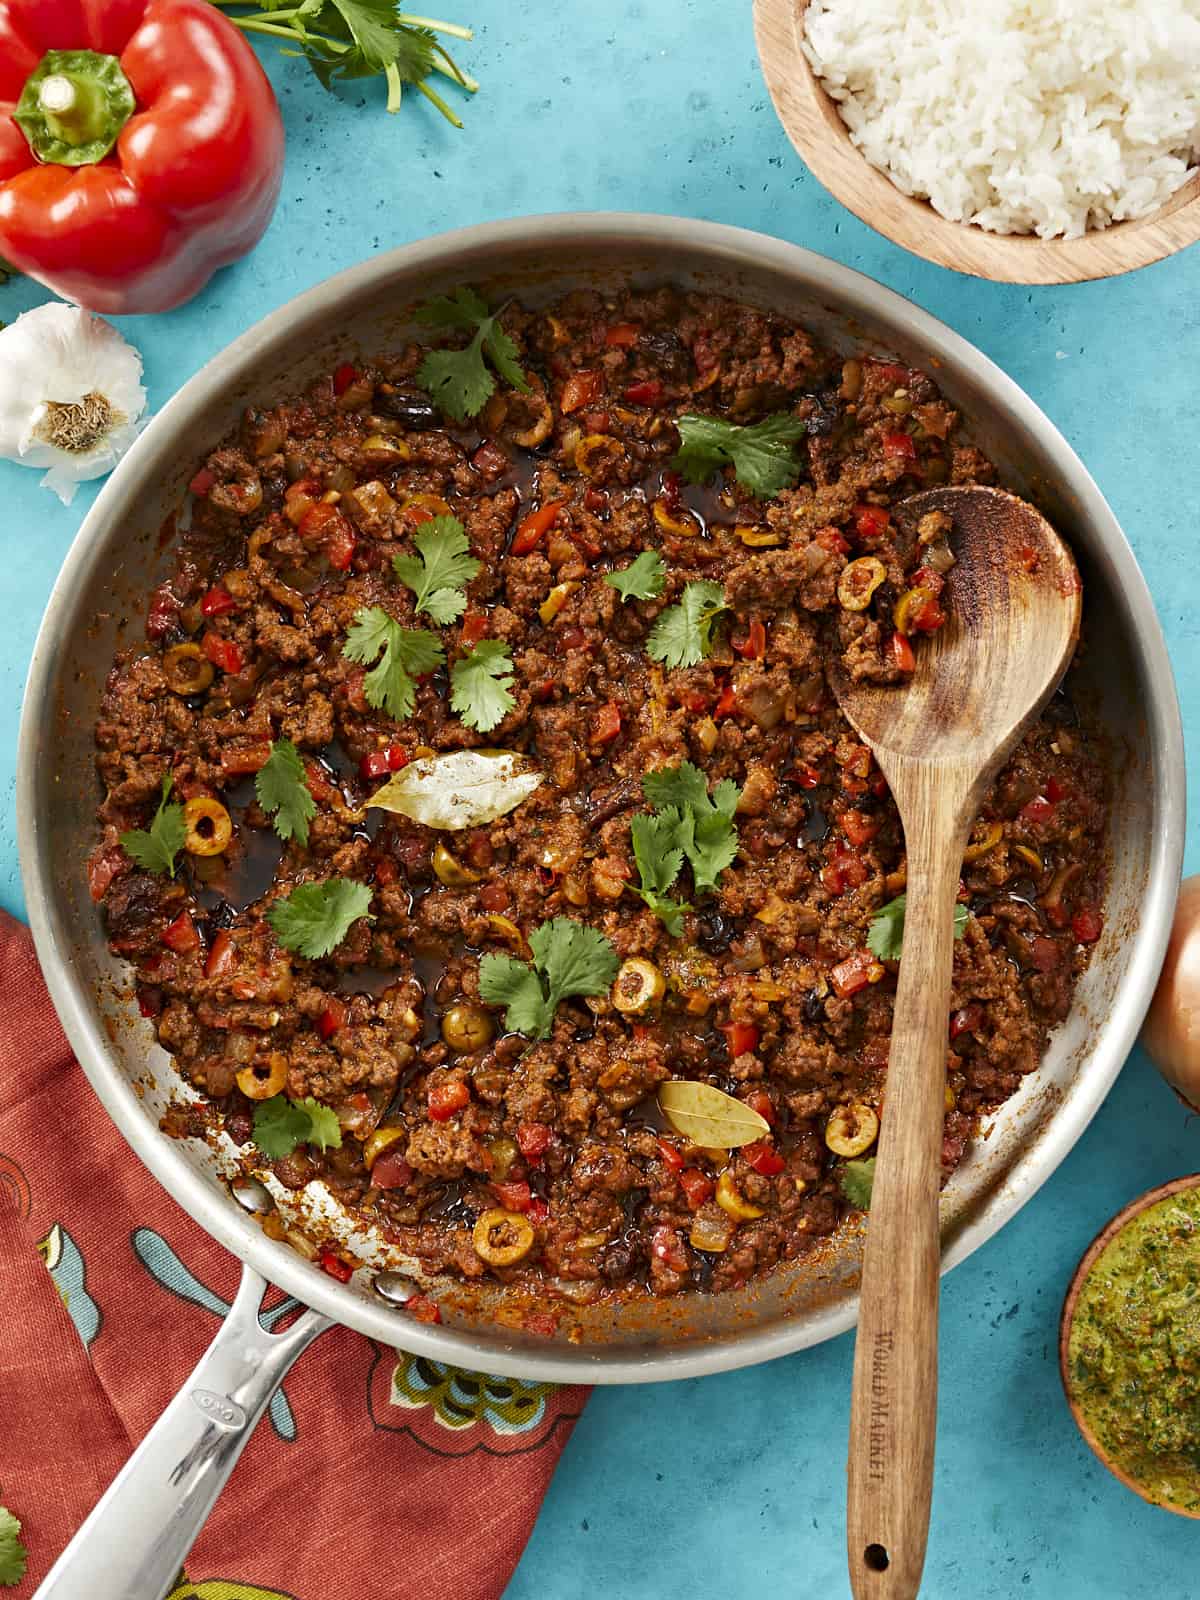
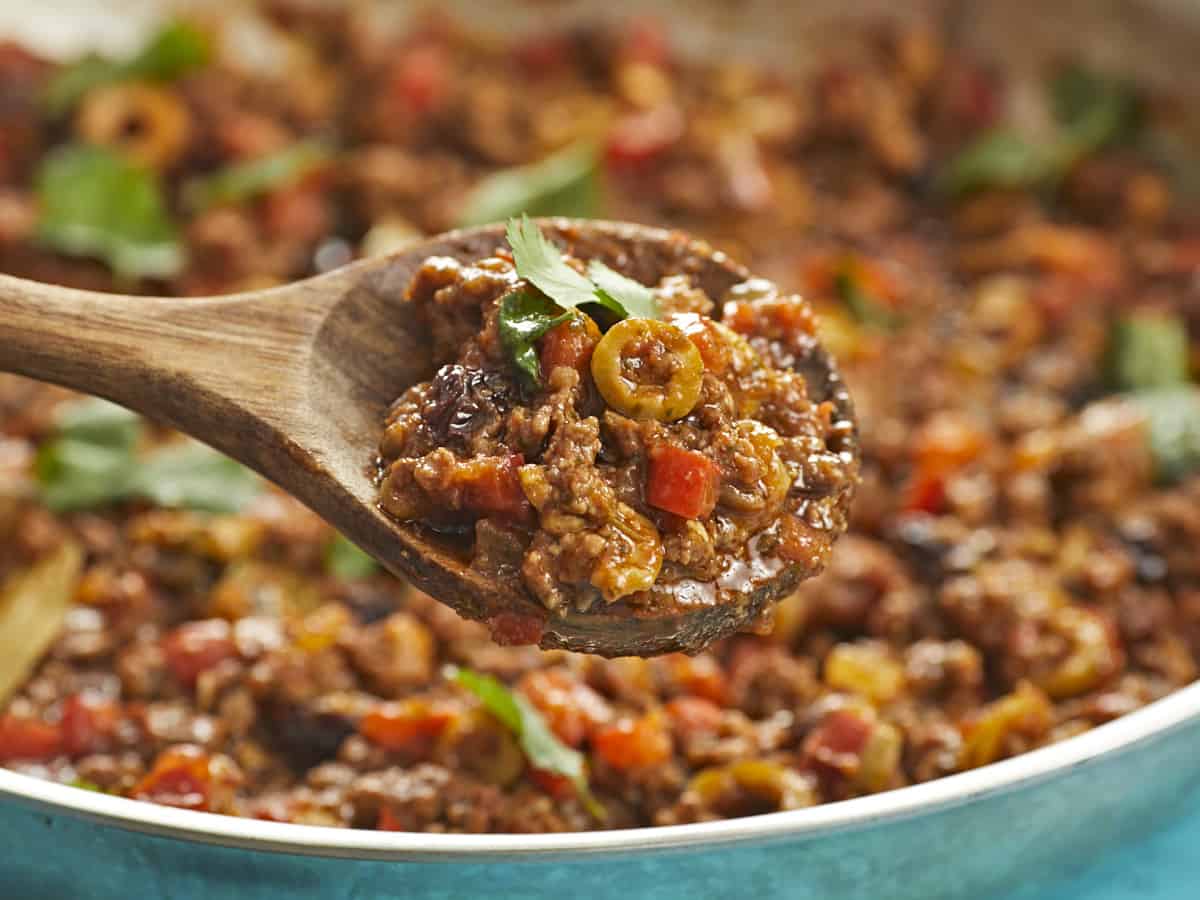
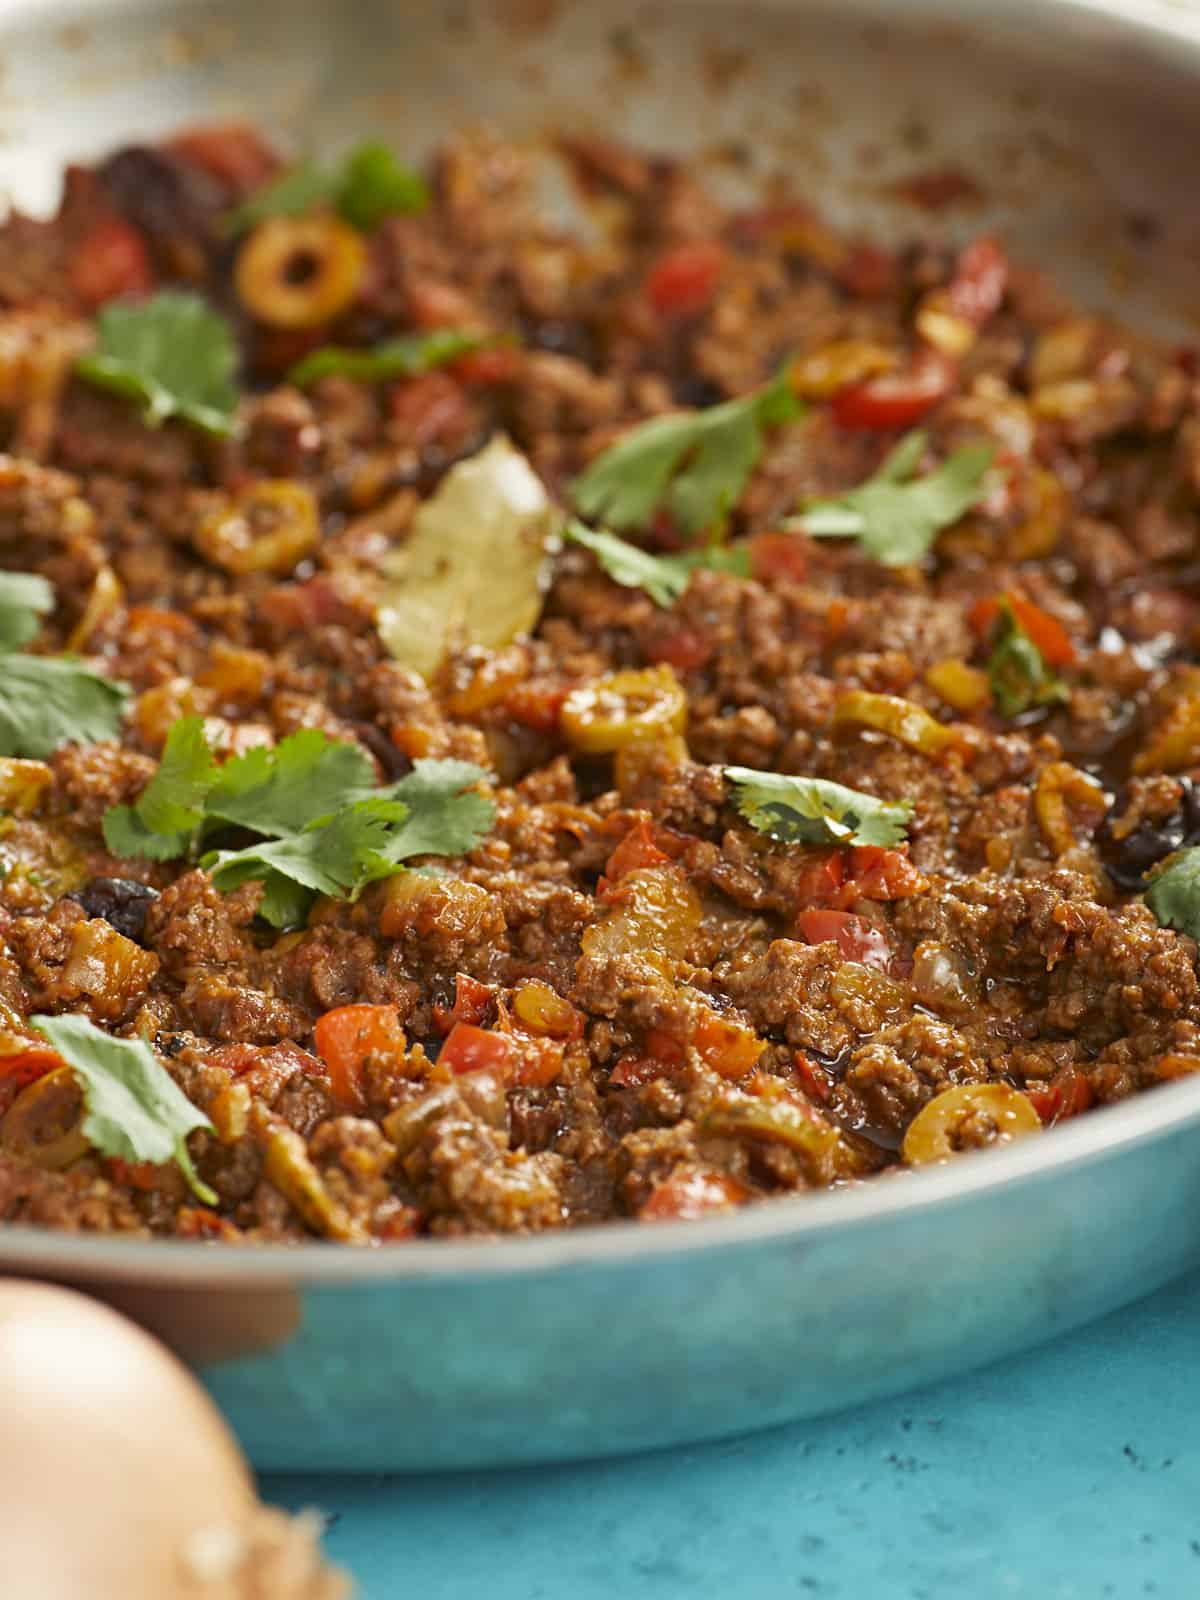
Sweet and savory Puerto Rican-Style Picadillo is a ground beef stew that’s so ridiculously delicious it brings table talk to a complete stop because everyone’s too busy stuffing their face. This beef picadillo recipe is budget-friendly, comes together quickly, and is incredibly versatile. I don’t know any other way to say it: You. Need. To. Make. Picadillo.
A NOTE ON AUTHENTICITY
This is not a historically authentic recipe. We strive to create recipes that are accessible to everyone, which means ingredients need to be available at a mainstream budget grocery store. We test recipes using the least amount of steps, tools, and ingredients while still honoring the spirit of the recipe. I was born and raised in Puerto Rico and look forward to a time when our ingredients are available in mainstream markets. Until then, buen provecho!
What Is Picadillo?
Picadillo is a traditional sweet and savory Latin dish usually made with ground beef stewed in tomato sauce. In Puerto Rico, we cook it in a hearty tomato-based sauce with sofrito, adobo, olives, raisins, and sometimes diced potatoes. To the uninitiated, pairing raisins with beef sounds like blasphemy. But I promise you, IT WORKS.
What You’ll Need
Picadillo comes together in one pan in under 30 minutes. There’s a little chopping involved, and it takes about 7 minutes to assemble the recipe, but the rest of the time it simmers on the stovetop. I love a one-pot hands-off recipe! Don’t you?
Onion, Garlic, and Bell Pepper – this combination creates an aromatic and intensely flavored base
Sofrito – this is the flavor base of many Puerto Rican dishes. I have a simple recipe for you here, though you can definitely take it further if you have access to traditional ingredients like aji dulce and recao.
Sazón and Adobo – these seasoning blends go hand in hand to develop deep, earthy notes. The annatto in the sazón also deepens the color of the sauce. If these are hard to source, I have included recipes for both in the notes section of the recipe card.
Ground Beef – 80/20 is best as the fat adds flavor, but use what you have. You can also make this recipe with ground pork, chicken, lamb, or turkey. If you’re vegetarian or vegan, you can substitute ground beef with a plant-based alternative, chopped mushrooms, or black beans.
Green Olives – I prefer to use the sliced kind with pimento because it’s less work, but feel free to slice whole ones. If you can’t find Green Olives with Pimento (AKA Manzanilla or Spanish Olives), get pitted green olives and add a tablespoon of chopped roasted red pepper to the mix.
Raisins – though dark raisins are traditional, you can also use golden. I sometimes sub raisins with chopped prunes.
White Distilled Vinegar – helps cut through the fattiness of the ground beef and adds a sharp top note. Sub it with Apple Cider Vinegar.
Bay Leaves – have a mild tea-like flavor that sits in the background and helps enhance bolder flavors. Sub with a teaspoon of oregano.
Tomato Sauce – creates a liquid for the ground beef to stew in and adds acidic, fruity brightness.
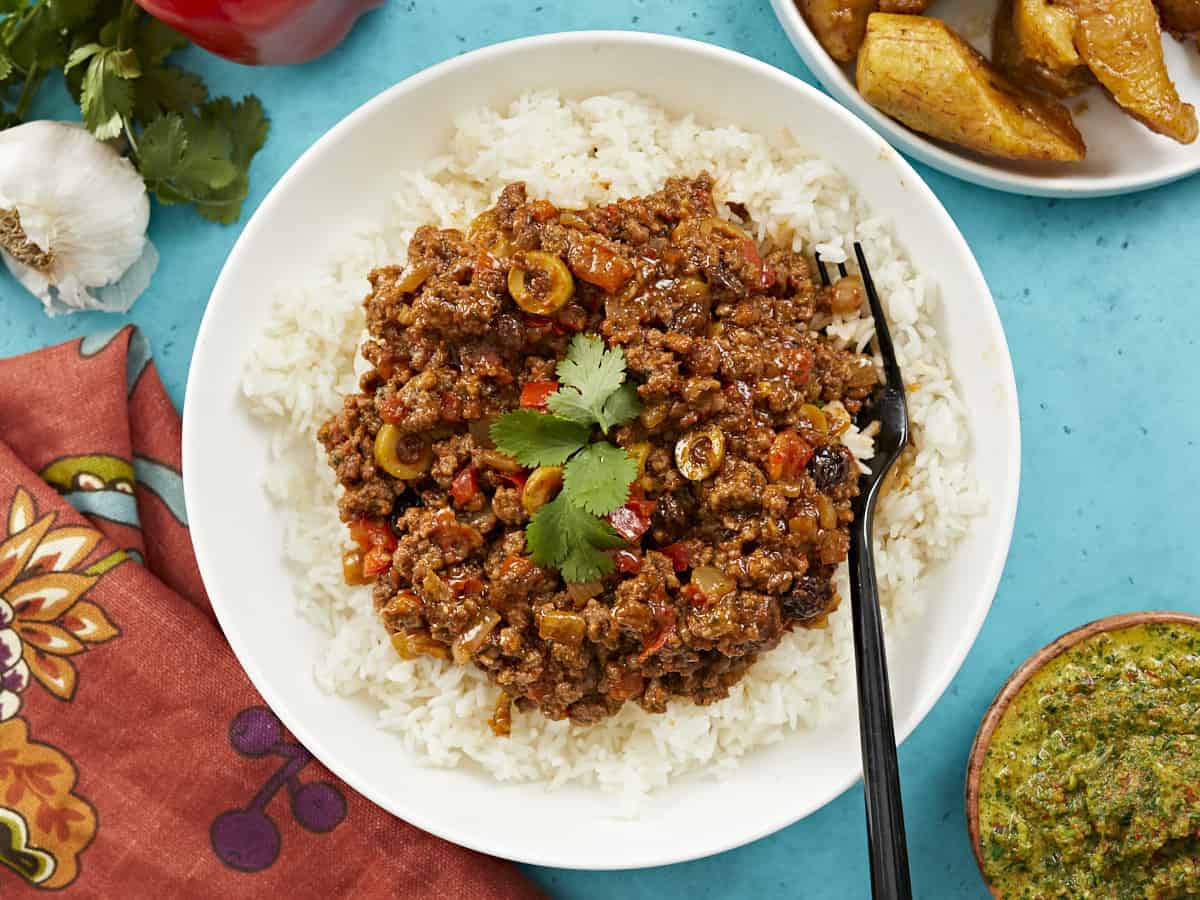
What TO Serve With Picadillo
This sweet and savory ground-beef stew is a weeknight staple at my house because I can eat it as is, or served over rice and mashed potatoes. I can also stuff it into an empanada, a burrito, or a lettuce wrap. I’ve even added it to marinara for Puerto Rican-style spaghetti. Picadillo is all-purpose!
How To Store Picadillo
This is one of those recipes that tastes even better the next day. (I love those recipes.) Store cooled Picadillo in an airtight container with plastic film or wax paper directly on the surface. It keeps in the fridge for up to 5 days and in the freezer for up to 3 months. Thaw frozen Picadillo overnight in the refrigerator, then warm it in a pan set over medium heat or microwave it until steaming.
Place a large skillet over medium-high heat and add the olive oil. When the oil is hot, add the onions and peppers to the pan and cook until the onions are transparent.
Add the garlic to the pan and cook until fragrant.
Add the beef to the pan and sprinkle with salt, sazón, and adobo. As the beef browns, break up big chunks with your spoon.
When the beef has browned, add the sofrito and cook, stirring constantly, until fragrant, about 2 minutes.
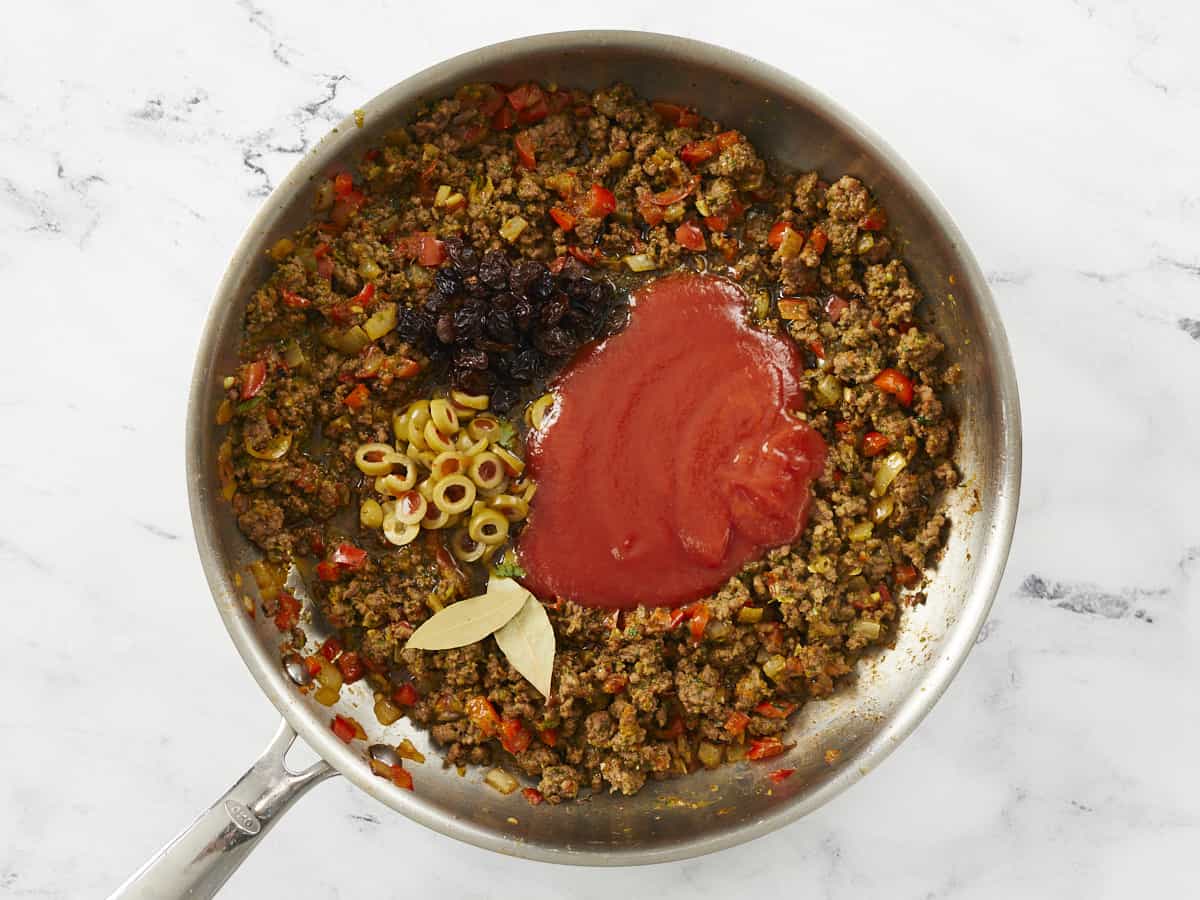
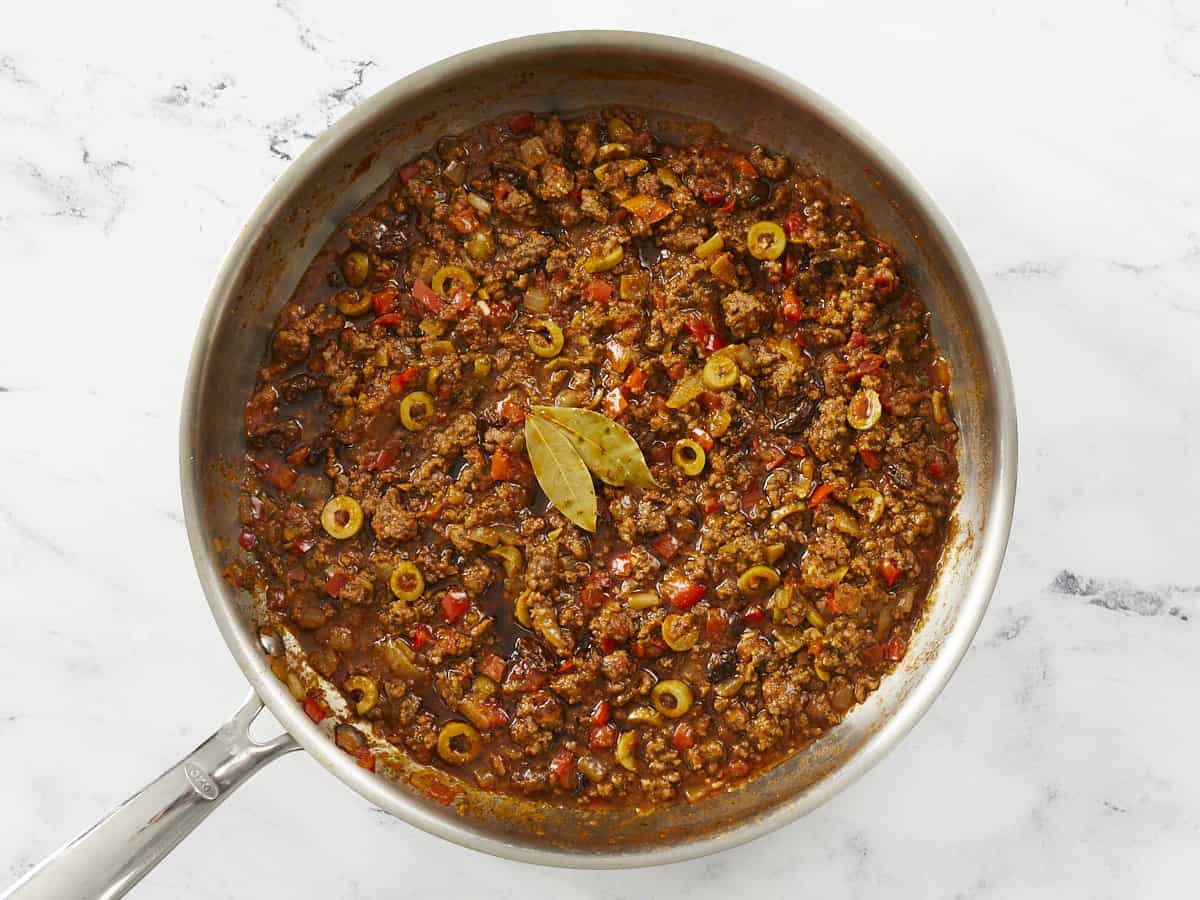
Add the olives, raisins, white vinegar, tomato sauce, bay leaves, and water. Continue to cook, occasionally stirring, for 10 minutes. Take the pan off the heat and allow it cool.
*If using fine salt, lower to 1/2 teaspoon.*A packet of sazón contains about 1.5 teaspoons of sazón. If you cannot source sazón use the following:1/4 teaspoon of garlic powder 1/4 teaspoon ground cumin 1/4 teaspoon ground coriander 1/3 teaspoon ground annatto 1/8 teaspoon turmeric 1/8 teaspoon ground oregano*If you cannot source Adobo, mix your own and then use the amount called for in the recipe. Store the rest in an airtight container.2 Tbsp salt 1 Tbsp garlic powder 1 tsp ground oregano 1 tsp onion powder 1 tsp black pepper 1 tsp ground cumin 1/2 tsp turmeric*Pimento-stuffed green olives are also known as Spanish Olives or Manzanilla Olives.
Place a large saute pan over medium-high heat and add 1 1/2 tablespoons of olive oil. When the oil is hot, add 1 diced onion and 1 diced red bell pepper to the pan and cook until the onions are transparent.
Add 1 tablespoon of minced garlic to the pan and cook until fragrant.
Add the pound of ground beef to the pan and sprinkle with 1 teaspoon coarse salt, 1 and 1/2 teaspoons sazón, and 1 teaspoon adobo. As the beef browns, break up big chunks with your spoon.
When the beef has browned, add the 1/2 cup sofrito and cook, stirring constantly, until fragrant, about 2 minutes. Break up any remaining chunks of ground beef.
Add the 1/2 cup olives, 1/4 cup raisins, 1/2 tablespoon white vinegar, 15 ounces tomato sauce, 2 bay leaves, and 1/4 cup water.
Continue to cook, occasionally stirring, for 10 minutes. Take the pan off the heat and allow the Picadillo to cool slightly before serving. Tell me how long it takes for everyone to start talking again!
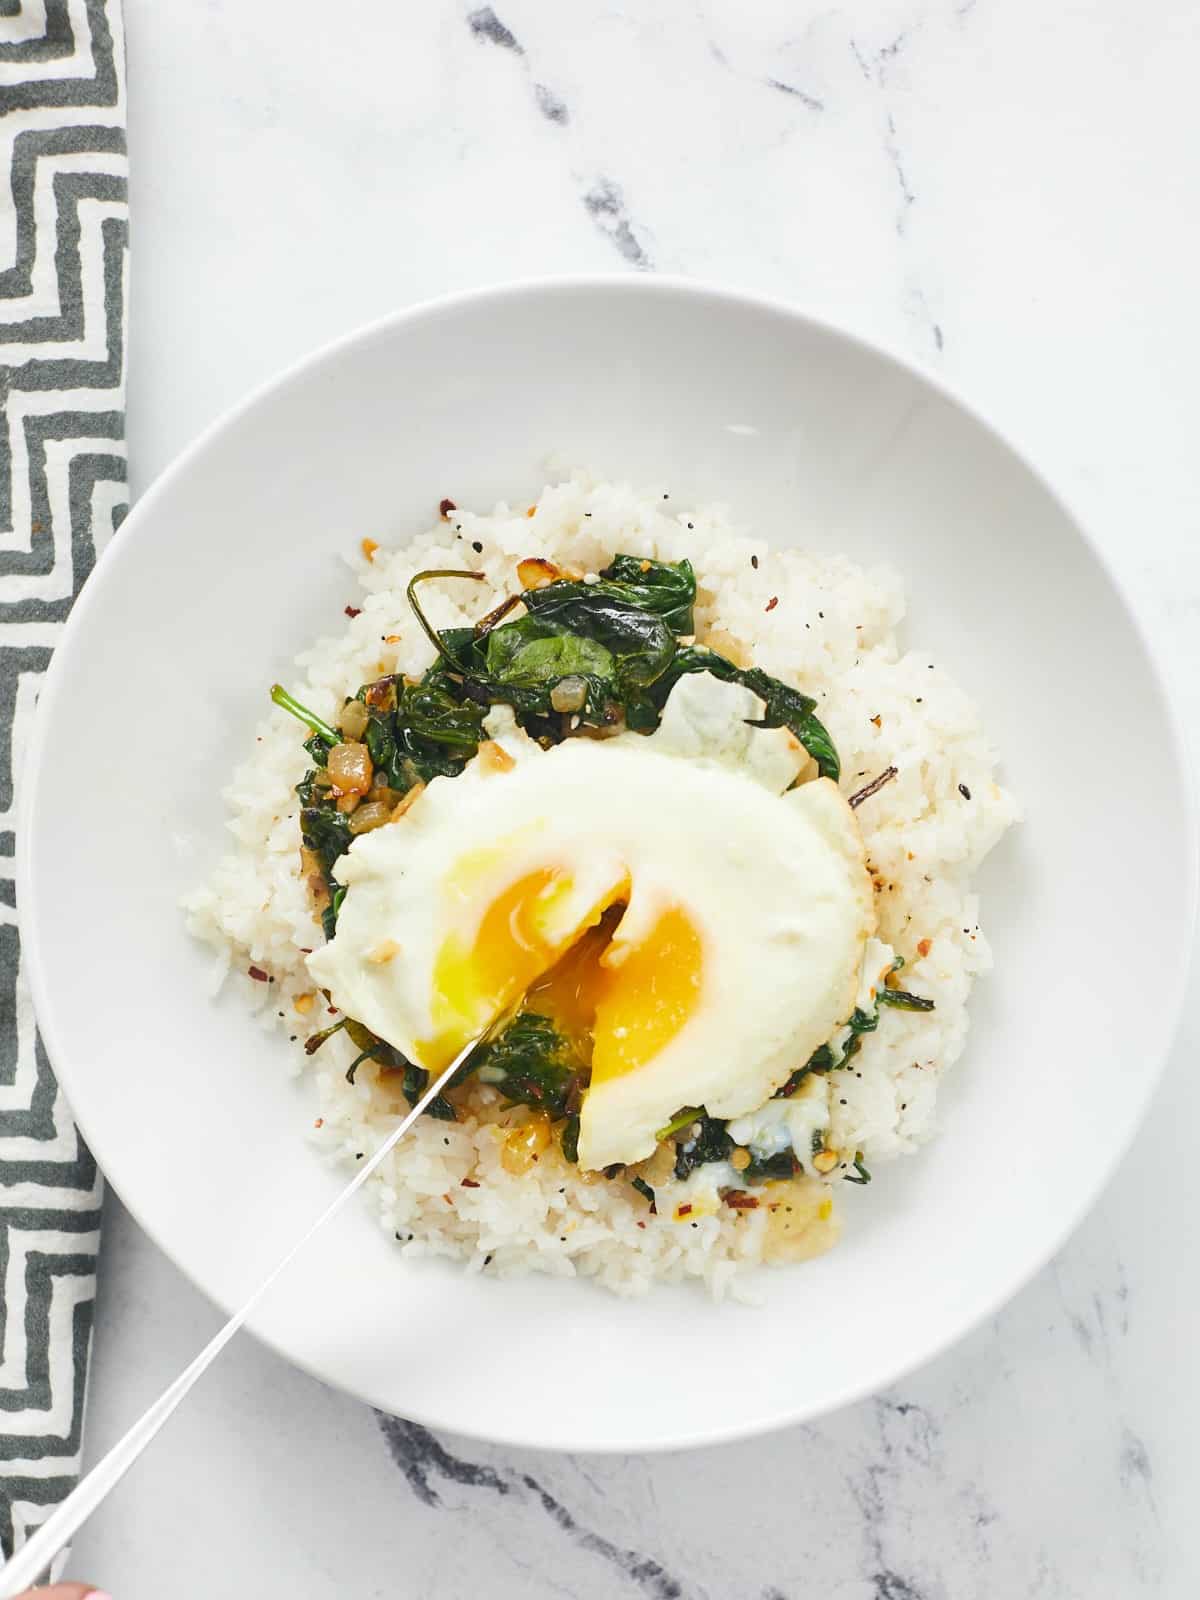
It doesn’t matter how much you love to cook, sometimes you just don’t want to cook. I’ve been there, especially after a long day of testing recipes in the Budget Bytes kitchen. So on those days, I make this utterly satisfying, earthy, vibrant, Everything Bagel Rice Bowl. It’s no fuss, no muss, and so ridiculously yummy I made it every night for a week straight!
What Is Everything Bagel Seasoning?
Sometimes called Everything But The Bagel Seasoning, this is the spice mix you find on top of an Everything Bagel. It’s a punchy blend of onion flakes, garlic flakes, white and black sesame seeds, poppy seeds, and flaky salt. It instantly adds deep flavors and a beautiful pop of texture to anything it touches. It became really popular when Trader Joe’s started selling their version.
What You’ll Need
Everything Bagel Seasoning – a few dashes of this magic and you have all the flavors you need to make your rice bowl sing.
Rice – because it’s not a rice bowl without it. Any kind of rice will do. You can also sub with cauliflower rice. Just follow the cooking directions on the package.
Spinach – is an easy and economical way to add greens. To lower the cost even more, use 6 ounces of frozen spinach. You can also use kale, swiss chard, or mustard greens.
Onions and Garlic– these aromatics flavor the spinach. If you don’t feel like chopping, leave them out or add one teaspoon of Everything Bagel Seasoning to the butter.
Butter – You need a flavorful fat to cook spinach and eggs in, but you can, of course, sub with olive oil, your favorite cooking oil, or (my fave) bacon or chicken drippings.
Eggs – “put an egg on it” is our ethos for a reason. Eggs cook in minutes and create a natural savory sauce. You don’t have to use an egg, but the rice will be dry without it.
How To Make Everything Bagel Seasoning
You can buy Everything Bagel Seasoning for a good price at most big-name supermarkets and get loads of uses out of it. But in case you can’t access it, here’s a quick recipe for about half a cup of seasoning:
2 Tablespoons onion flakes
2 Tablespoons garlic flakes
2 Tablespoons white sesame seeds
2 Tablespoons black sesame seeds
1 Tablespoon sea flaky salt
1 Tablespoon poppy seeds
How To Cook Rice
If there’s one thing you need to know when making a rice bowl, it’s how to cook rice. Beth has a great in-depth tutorial here, but in case you don’t want to leave the page here’s a refresher:
Know the type of rice you’re cooking. The ratio of rice to liquid changes with the kind of rice you use, as does the time it cooks. I use less water in my rice than Beth does. It makes for a toothier, looser grain. If you prefer softer rice, increase the liquid by a half cup.
Short Grain Rice: 1 cup rice – 1 cup liquid – cook 18 minutes
Medium & Long Grain Rice: 1 cup rice –1 1/3 cups liquid –cook 15 minutes
Brown rice: Boil it like pasta (in lots of water until al dente ) for 30 minutes, strain all of the water out, cover the pot, and let the rice rest in it for 10 minutes
Wash the rice. Cleaning the grains under cool running water until the water runs clear eliminates the starches that give you a gloppy result.
Bring the water to a boil before you add it to the rice. It keeps your timing on point.
Low and slow is the way. When the rice comes to a boil, lower the heat. Making rice at a boil makes the grains burst, leaving you with a starchy mess.
Keep it covered. Lifting the lid releases steam, increasing cooking time and ruining the texture. Once the rice is done, rest it for 10 minutes before uncovering it.
What Else Can I Put On Everything Bagel Rice?
Truly, the sky is the limit. Roasted or sauteed vegetables are always a great choice, especially quick-cooking ones. Try chopped peppers, mushrooms, blistered tomatoes, or creamy avocado. If you’re a meat eater, try rotisserie chicken, bacon crumbles, or savory ground beef.
How To Store Leftovers
You can refrigerate this rice bowl for up to 4 days, though I would make the eggs fresh every time. To reheat it, sprinkle it with 1/4 teaspoon water, and microwave it until it’s steaming. You can also freeze it in an air-tight container (again, without the eggs) for up to 3 months.
On those days you don't want to spend much time in the kitchen, make this earthy, vibrant, Everything Bagel Rice Bowl. It's no fuss, no muss, and so ridiculously yummy you'll go in for seconds.
1 cuplong grain rice, rinsed until water runs clear$0.30
5Tbspsalted butter, divided$0.75
1/2tspsalt$0.01
1yellow onion, small dice $0.41
2clovesgarlic, minced$0.24
8ozfresh spinach*$1.30
2largeeggs$0.92
1tspEverything Bagel seasoning plus more for garnish $0.16
Instructions
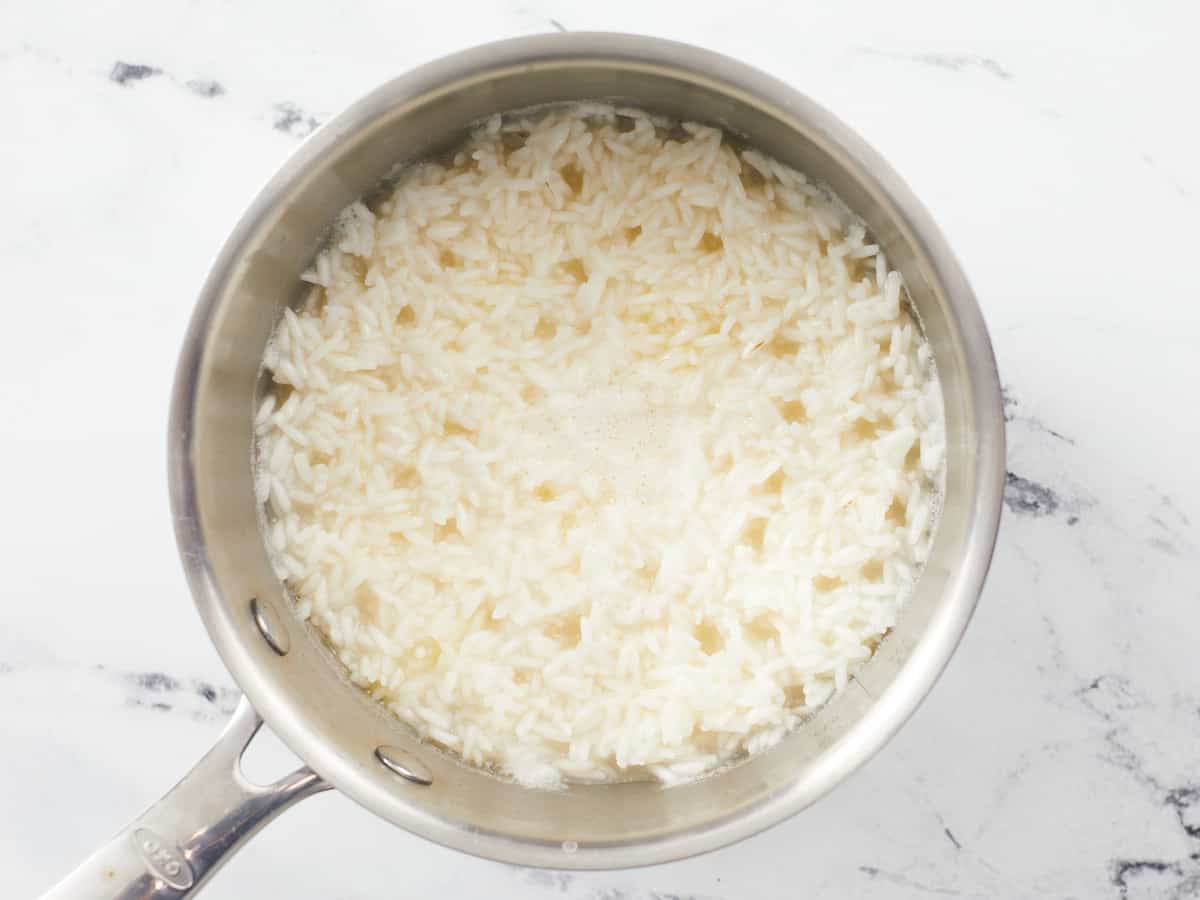
Put the water in a pot large enough to hold the rice (it doubles in size as it cooks). Cover it and bring to a boil. When the water's boiling, add the rinsed rice, 1/4 teaspoon of salt, and 2 tablespoons of butter. Stir to incorporate.
Bring the water to a simmer with the pot uncovered. When steam vents begin to form on the surface, about 3 minutes, reduce the heat to low. Cover and cook for 15 minutes. Rest it off the heat for 10 minutes. Then, remove the lid.
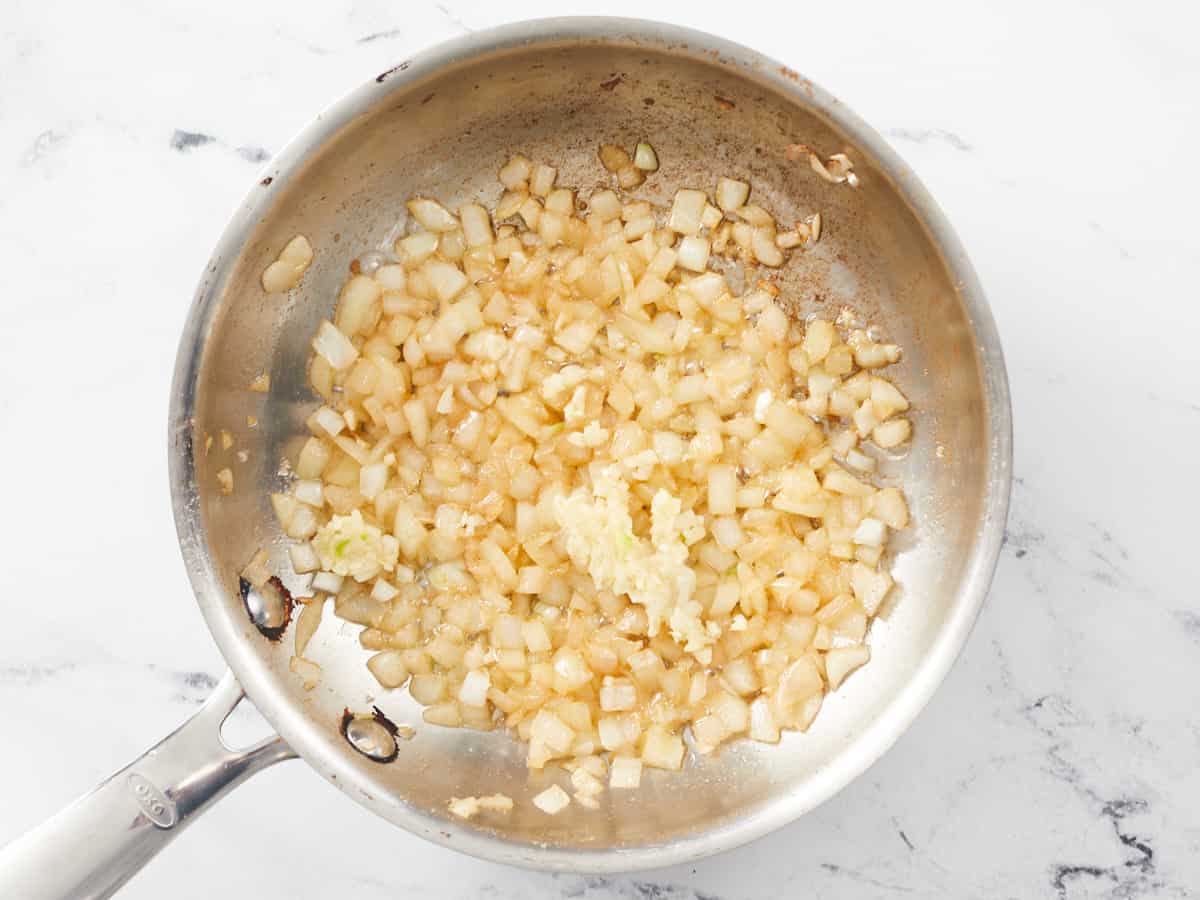
While the rice cooks, melt 2 tablespoons of butter in a pan set over medium heat. When the dairy solids turn golden brown, add the diced onion and cook until translucent, about 3 minutes. Add the garlic and cook for 1 minute.
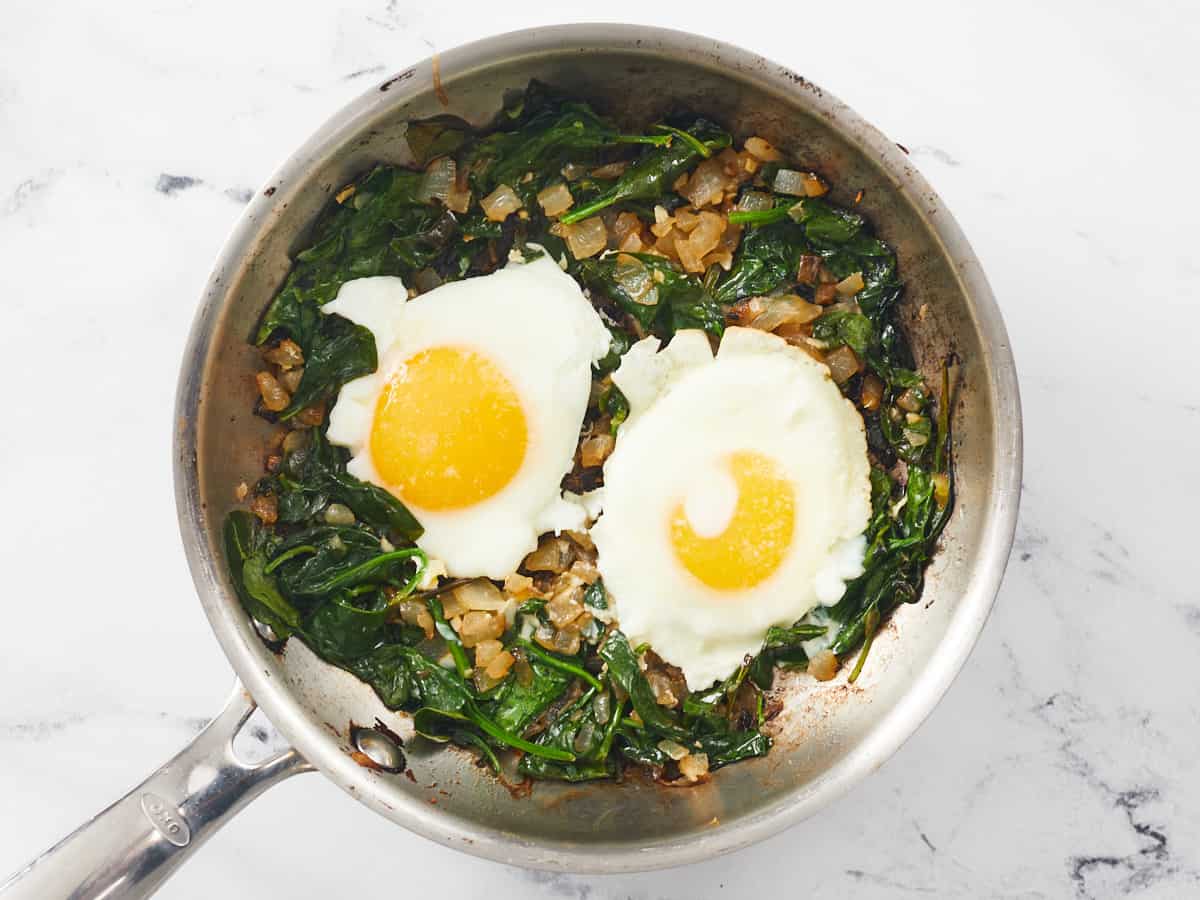
Add the spinach to the pan along with the remaining 1/4 teaspoon of salt. Sauté until it has wilted, about 3 minutes.
Smooth the surface of the spinach and make two indentations with a large spoon. Crack the eggs into a small bowl and then add them to the indentations. Cook, uncovered, until the egg whites become opaque, about 3 minutes.
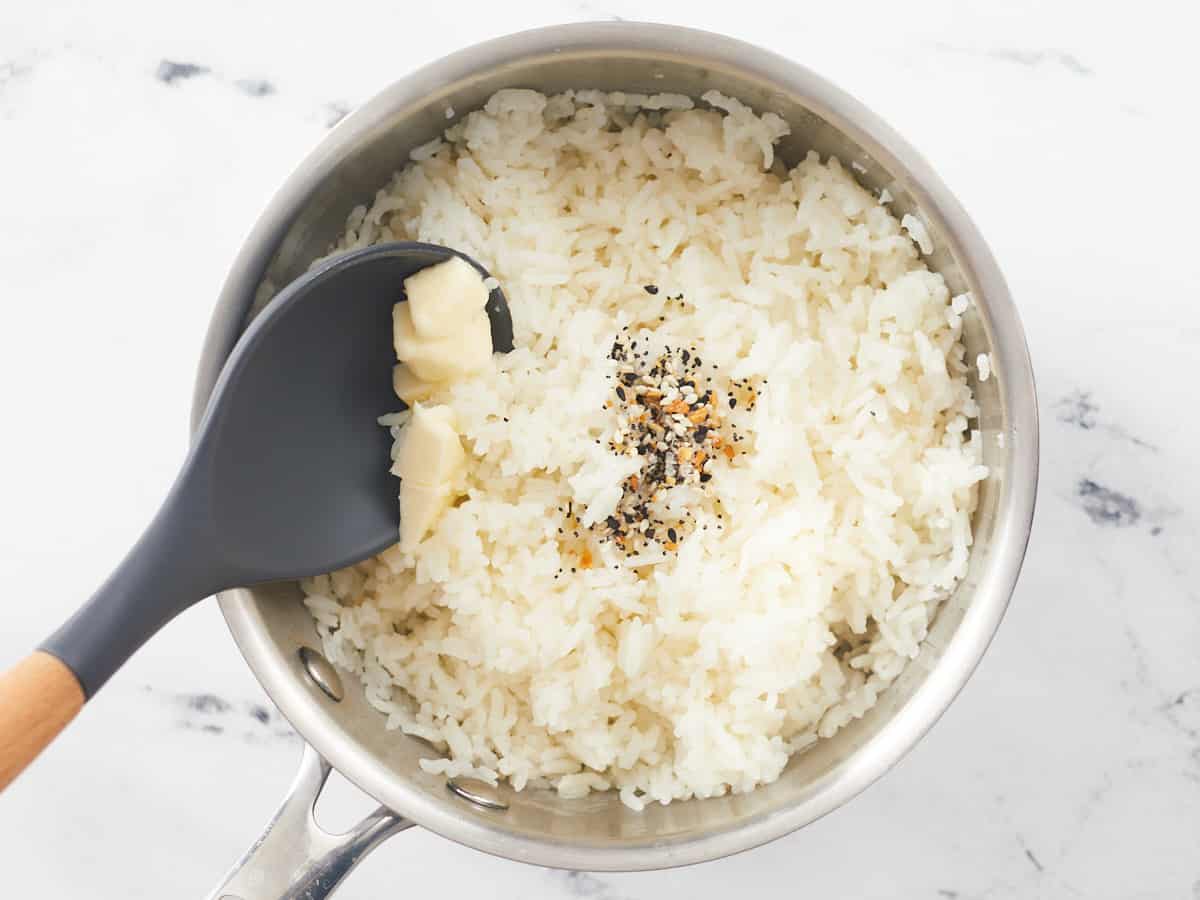
Fluff up the rice. Dice the last tablespoon of butter. Add it to the rice along with the everything bagel seasoning and mix it in.
Plate the rice in 2 bowls. Top each bowl of rice with spinach and an egg. Garnish with an additional sprinkle of everything bagel seasoning.
How to Make Everything bagel Rice Bowls – Step by Step Photos
Measure 1 1/3 cups of water and put it in a pot large enough to hold the rice (remember the rice doubles in size as it cooks). Cover the pot, and bring the water to a full boil. Then add the rinsed cup of rice, 1/4 teaspoon of salt, and 2 tablespoons of butter to the pot.
Keep the rice uncovered while you bring the water back up to a simmer, about 3 minutes. When steam vents begin to form on the surface, reduce the heat to low. Cover the rice with a heavy, well-fitting lid. Cook for 15 minutes without removing the lid. Rest the rice off the heat for ten minutes before removing the lid.
While the rice cooks, add 2 tablespoons of butter to a medium-sized pan set over medium heat. Allow it to melt and foam. When it turns golden brown and smells nutty, add one diced onion. Sauté until translucent, about 3 minutes. Add two cloves of minced garlic and sauté until fragrant, about 1 minute.
Add the 8 ounces of spinach to the pan along with the remaining 1/4 teaspoon of salt. Sauté until it has wilted, about 3 minutes.Smooth out the surface of the spinach. Make two indentations with a large spoon. Crack the 2 eggs into a small bowl and add one to each indentation. Cook, uncovered, until the egg whites become opaque, about 3 minutes.Fluff up the rice. Dice the last tablespoon of butter. Add it to the rice along with the teaspoon of everything bagel seasoning and mix it in.
Divide the rice between 2 bowls. Top each bowl of rice with spinach and an egg. Garnish with an additional sprinkle of everything bagel seasoning. Now all that’s left to do is to sit back, relax, and enjoy the hearty meal you just prepared in no time!
Frozen ravioli is one of my favorite “cheat” ingredients. It’s a nice item to stash in your freezer for last-minute quick dinners when you don’t have anything else planned. And instead of just boiling them and adding sauce, sometimes I like to bake them up lasagna-style! This Baked Ravioli is a truly easy comfort food that takes next to no planning. You’re going to love it!
What is Baked Ravioli?
This super simple dish is a lot like lasagna, but with a LOT less fuss. It’s simply layers of ravioli layered with a rich red meat sauce, then topped with cheese and baked to perfection. For this recipe we use a really simple homemade meat sauce to take everything up a notch, but you can totally use your favorite store-bought red sauce as a sub to make the baked ravioli even easier.
Here are the ingredients you’ll need for baked ravioli:
Italian sausage: The sausage makes this dish super filling and it also brings a lot of built-in herbs and spices that give the sauce and overall casserole a lot of flavor. You can substitute non-pork Italian sausage if preferred, but if you substitute plain ground pork or ground beef you’ll want to double-up on the seasonings in your sauce.
Yellow onion: Onion gives the sauce a nice natural sweetness to balance the acidity of the tomatoes, and a wonderfully savory base flavor.
Crushed tomatoes: this is the base of your red sauce. The fine texture of the tomatoes is just the right texture between chunky and puréed.
Italian seasoning: this simple store-bought seasoning mix is a one-stop shop for seasoning your red sauce. If you don’t have this, you can substitute a mix of dried basil, dried oregano, rosemary, marjoram, and thyme.
Frozen ravioli: the star of the show, frozen ravioli makes this dish come together so quickly and easily. Plus, you can stash it in the freezer for emergencies without it going bad! Use cheese ravioli for the most lasagna-like experience. If you use beef ravioli, you may want to layer in some cheese with your ravioli and sauce before baking, and reduce the amount of Italian sausage in the sauce.
Mozzarella: the final layer of gooey cheese that tops this simple casserole! You can use plain mozzarella or substitute with a mix of Italian cheeses, if you prefer.
Budget Options
I’ll admit, this recipe is a little indulgent with all of that sausage, and using convenience products, like frozen ravioli, will also make the cost a bit higher. BUT there are some swaps you can use to bring the cost of this recipe down even further. Here are some tips:
Swap half of the Italian sausage for sautéed mushrooms, peppers, or spinach.
Make your own Italian sausage by buying plain ground pork and adding in your own spices.
Buy your cheese in bulk to bring the price per cup down.
Use a store-bought red sauce (you’ll need about 32 oz.)
Watch for sales on the sausage and ravioli, then stash them in the freezer to “lock in” that sale price until you’re ready to make your baked ravioli!
How to Store Baked Ravioli
This baked ravioli will hold up in the fridge for about 4-5 days, so it’s great for meal prepping the week ahead! If you want to store it even longer, divide it into single serving portions and then once it’s chilled completely in the refrigerator you can transfer it to the freezer for longer storage (about three months). The frozen portions can be reheated quickly using a microwave for a super fast homemade meal!
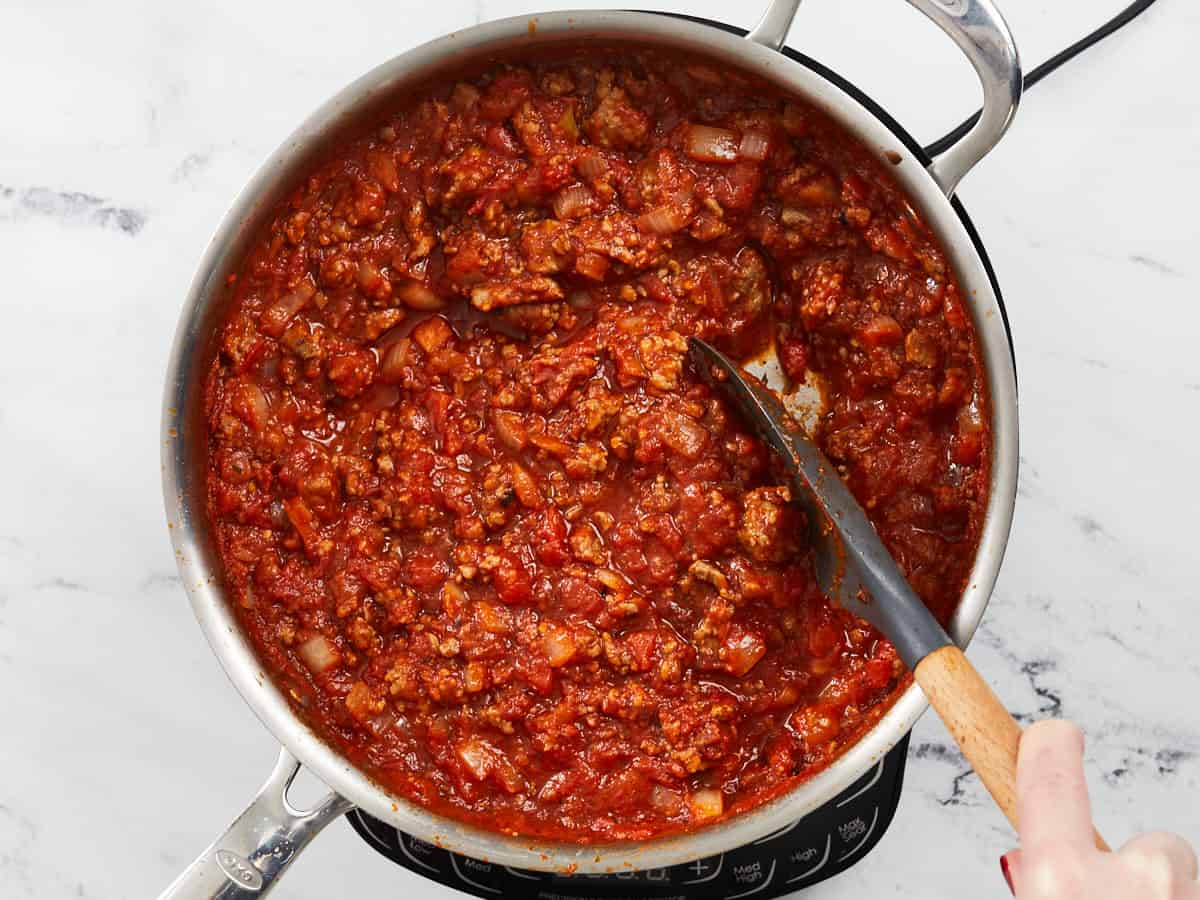
Add the Italian sausage to a large skillet and cook over medium until fully browned.
While the sausage is cooking, dice the onion. Add the onion to the skillet with the cooked sausage and continue to cook and stir over medium heat until the onion is soft and translucent.
Add the crushed tomatoes, tomato paste, and Italian seasoning to the skillet. Stir to combine and bring the sauce up to a simmer.
Once simmering, place a lid on the skillet, turn the heat down to medium-low, and allow the sauce to simmer, stirring occasionally, while you cook the ravioli.
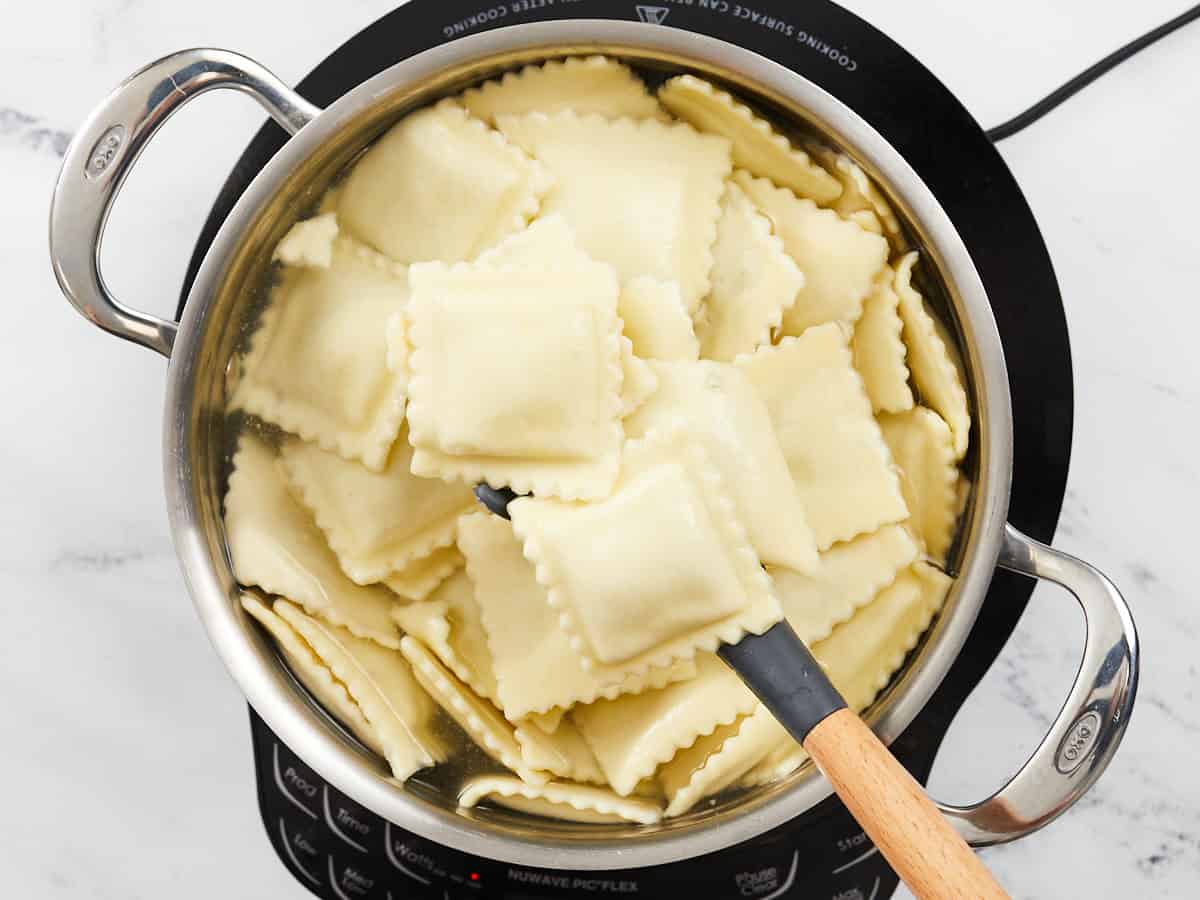
Bring a large pot of water to a boil for the ravioli. Once boiling, add the ravioli and continue to boil for 3-4 minutes, or until cooked through (check the cooking instructions on the package for the recommended cook time). Drain the ravioli in a colander.
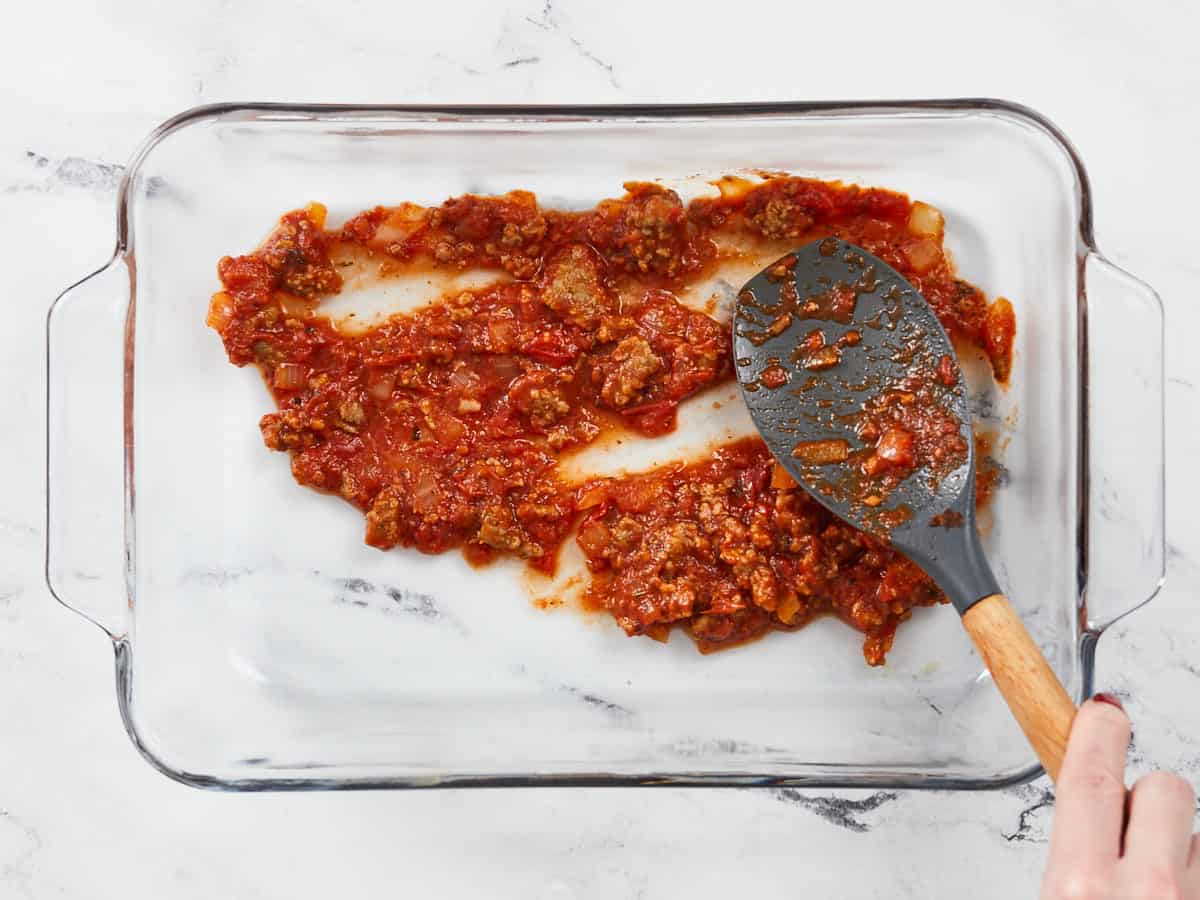
Preheat the oven to 350ºF. Add 1 cup of meat sauce to the bottom of a casserole dish and spread it to cover the surface.
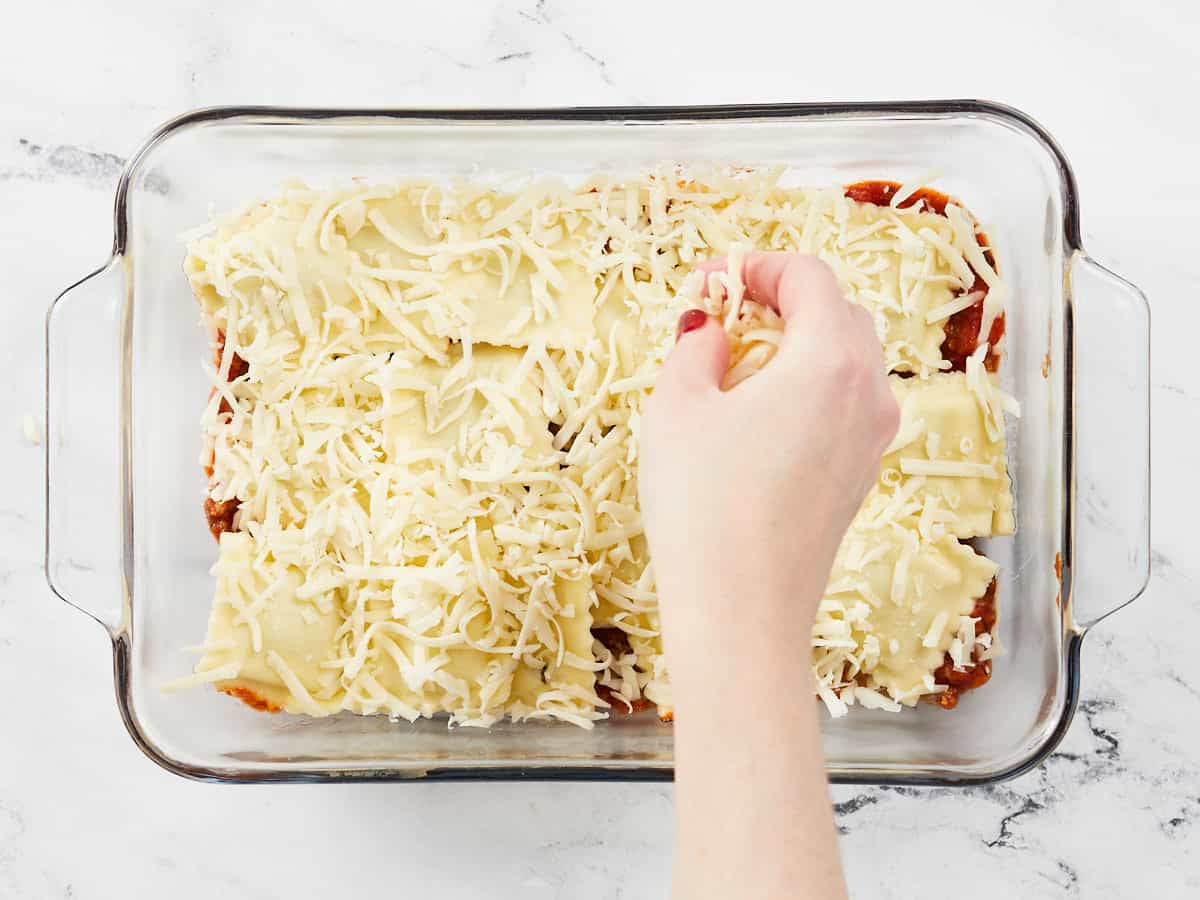
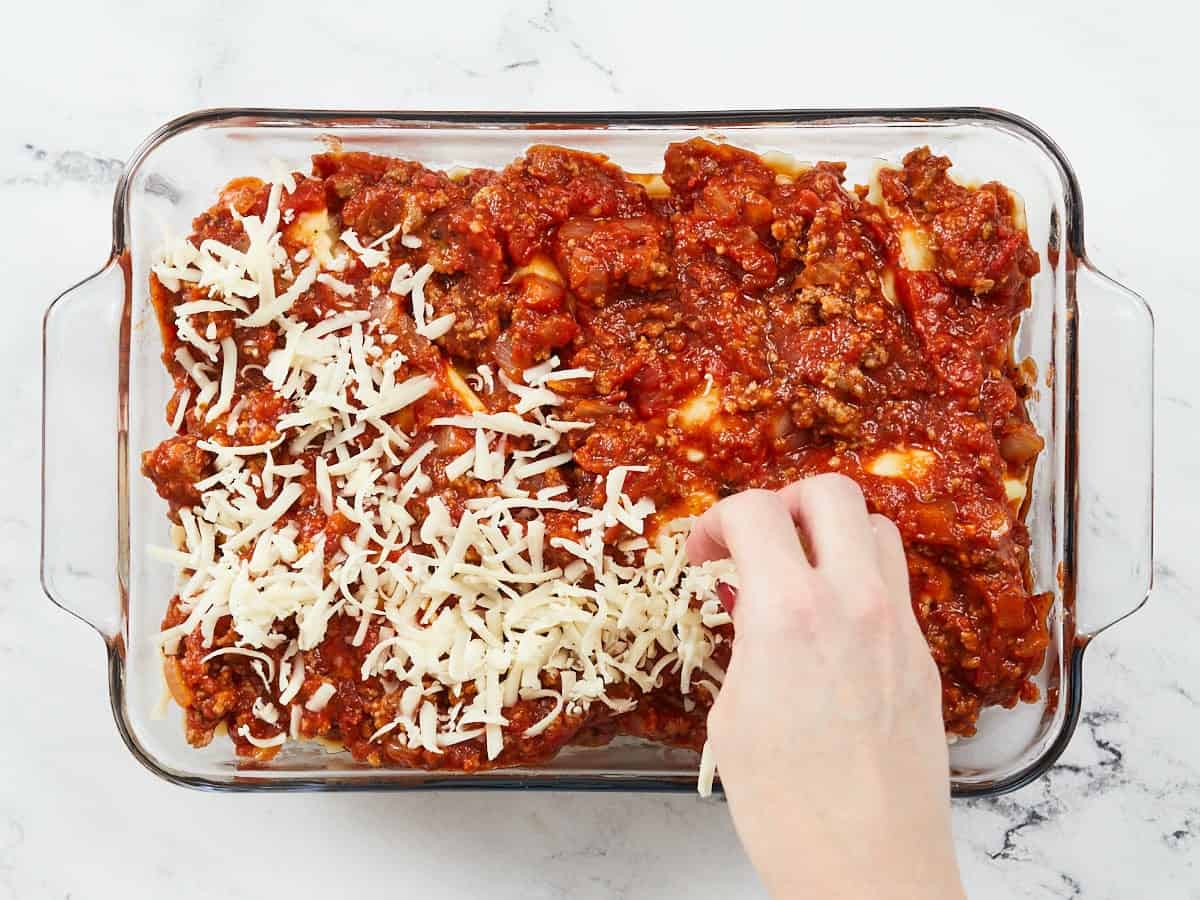
Layer in half of the ravioli followed by half of the shredded mozzarella and 1 cup of sauce.
Layer in the second half of the ravioli followed by 1 cup of sauce and the second half of the shredded mozzarella.
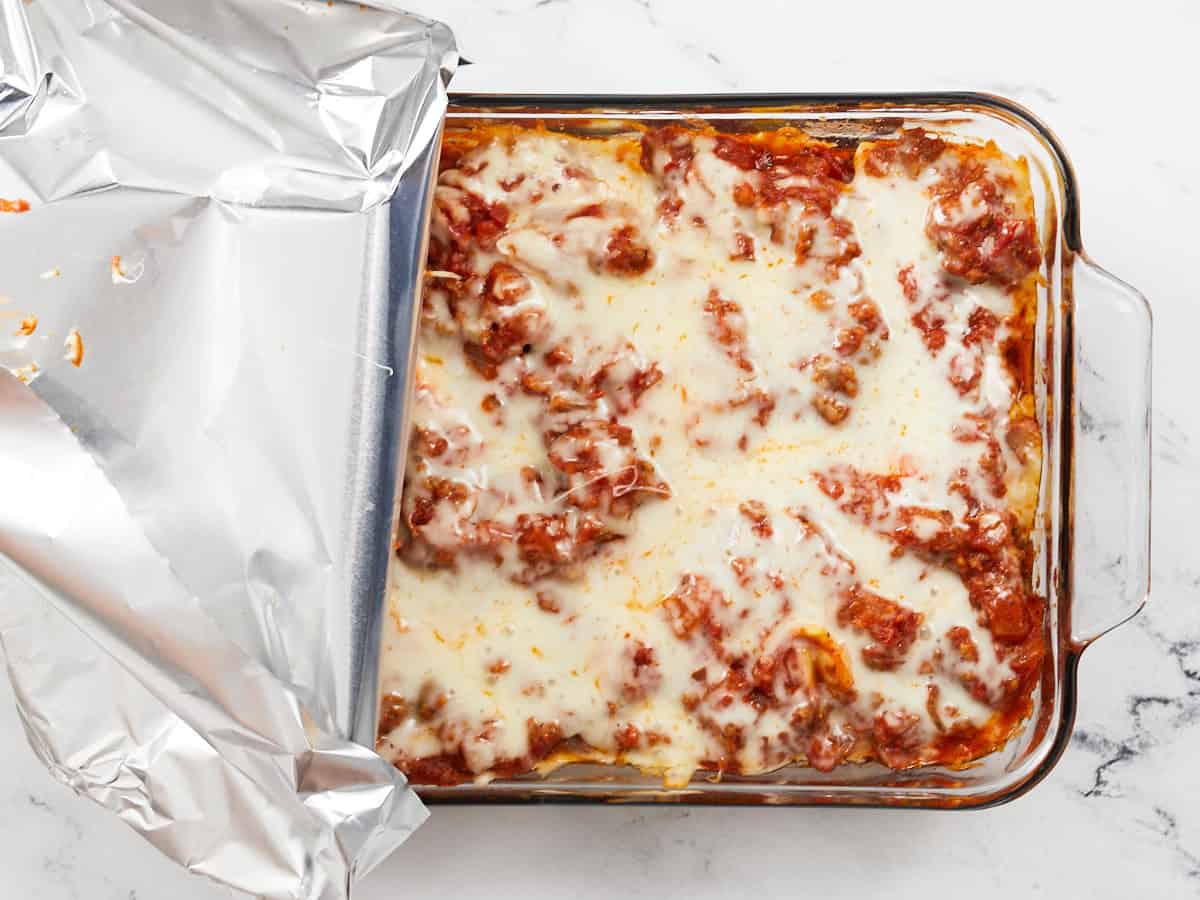
Cover the casserole with foil and bake in the preheated oven for 20 minutes.
Remove the foil, turn the oven from bake to broil, then return the casserole to the oven. Broil for a few more minutes, watching very closely, or until the cheese is browned. Top with chopped parsley if desired, then enjoy!
Add 1 lb. Italian sausage to a large skillet and cook over medium heat, stirring often, until the sausage is fully browned.
While the sausage is cooking, dice one yellow onion. Add it to the skillet with the sausage and continue to cook until the onion is soft and translucent (about five minutes).
Add one 28oz. can of crushed tomatoes, ¼ cup tomato paste, and 1 Tbsp Italian seasoning to the skillet. Stir to combine.
Bring the sauce up to a simmer, then lower the heat to medium-low. Place a lid on the skillet and allow the sauce to simmer, stirring occasionally, while you cook the ravioli.
Bring a large pot of water to a boil for the ravioli. Once boiling, add one 25 oz. bag of frozen cheese ravioli and boil for 3-4 minutes, or until cooked through (check the recommended cook time on the package). Drain the ravioli in a colander.
Preheat the oven to 350ºF. Add about 1 cup of the meat sauce to the bottom of a glass casserole dish and spread it around to cover.
Layer in half of the cooked ravioli, then top with 1 cup of shredded mozzarella.
Layer in another 1 cup sauce, the second half of the ravioli, another cup of sauce, then one final cup of shredded mozzarella cheese.
Cover the casserole with foil and bake in the preheated 350ºF oven for 20 minutes. Remove the foil, switch the oven from bake to broil, and return the casserole to the oven.
Watch the casserole closely and broil for just a few minutes more or until the cheese is slightly browned on top (this can happen quickly, so keep a close eye). Remove from the oven, top with parsley (if desired) and enjoy!


 If you are looking for a quick and easy weeknight meal, you have come to the right place. This Sheet Pan Sausage and Peppers recipe only takes 25 minutes to make and is always a dinner winner. Sheet pan meals are the BEST! I love that dinner is made on ONE pan, easy to make…