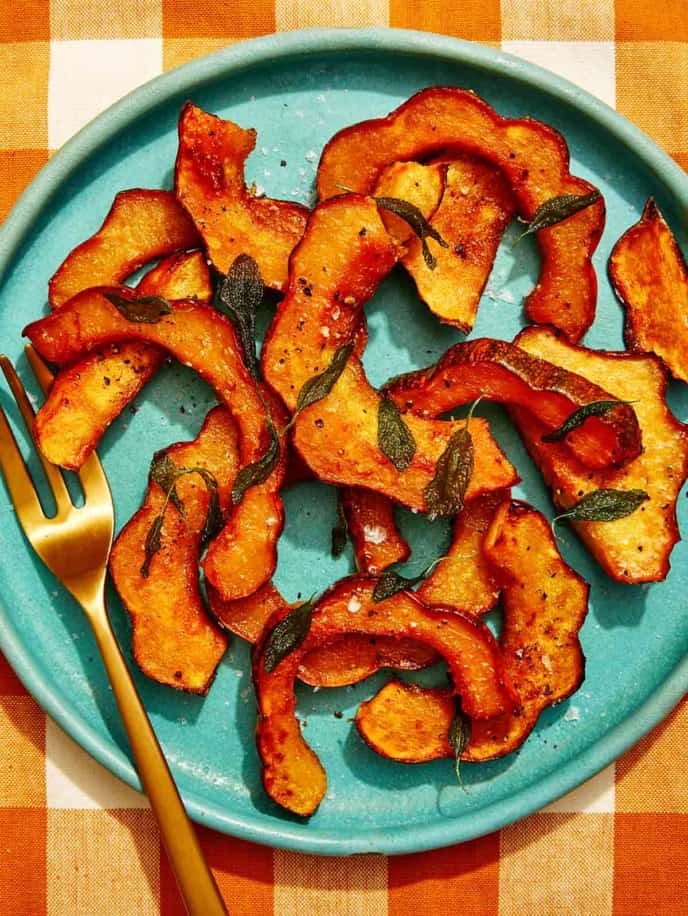
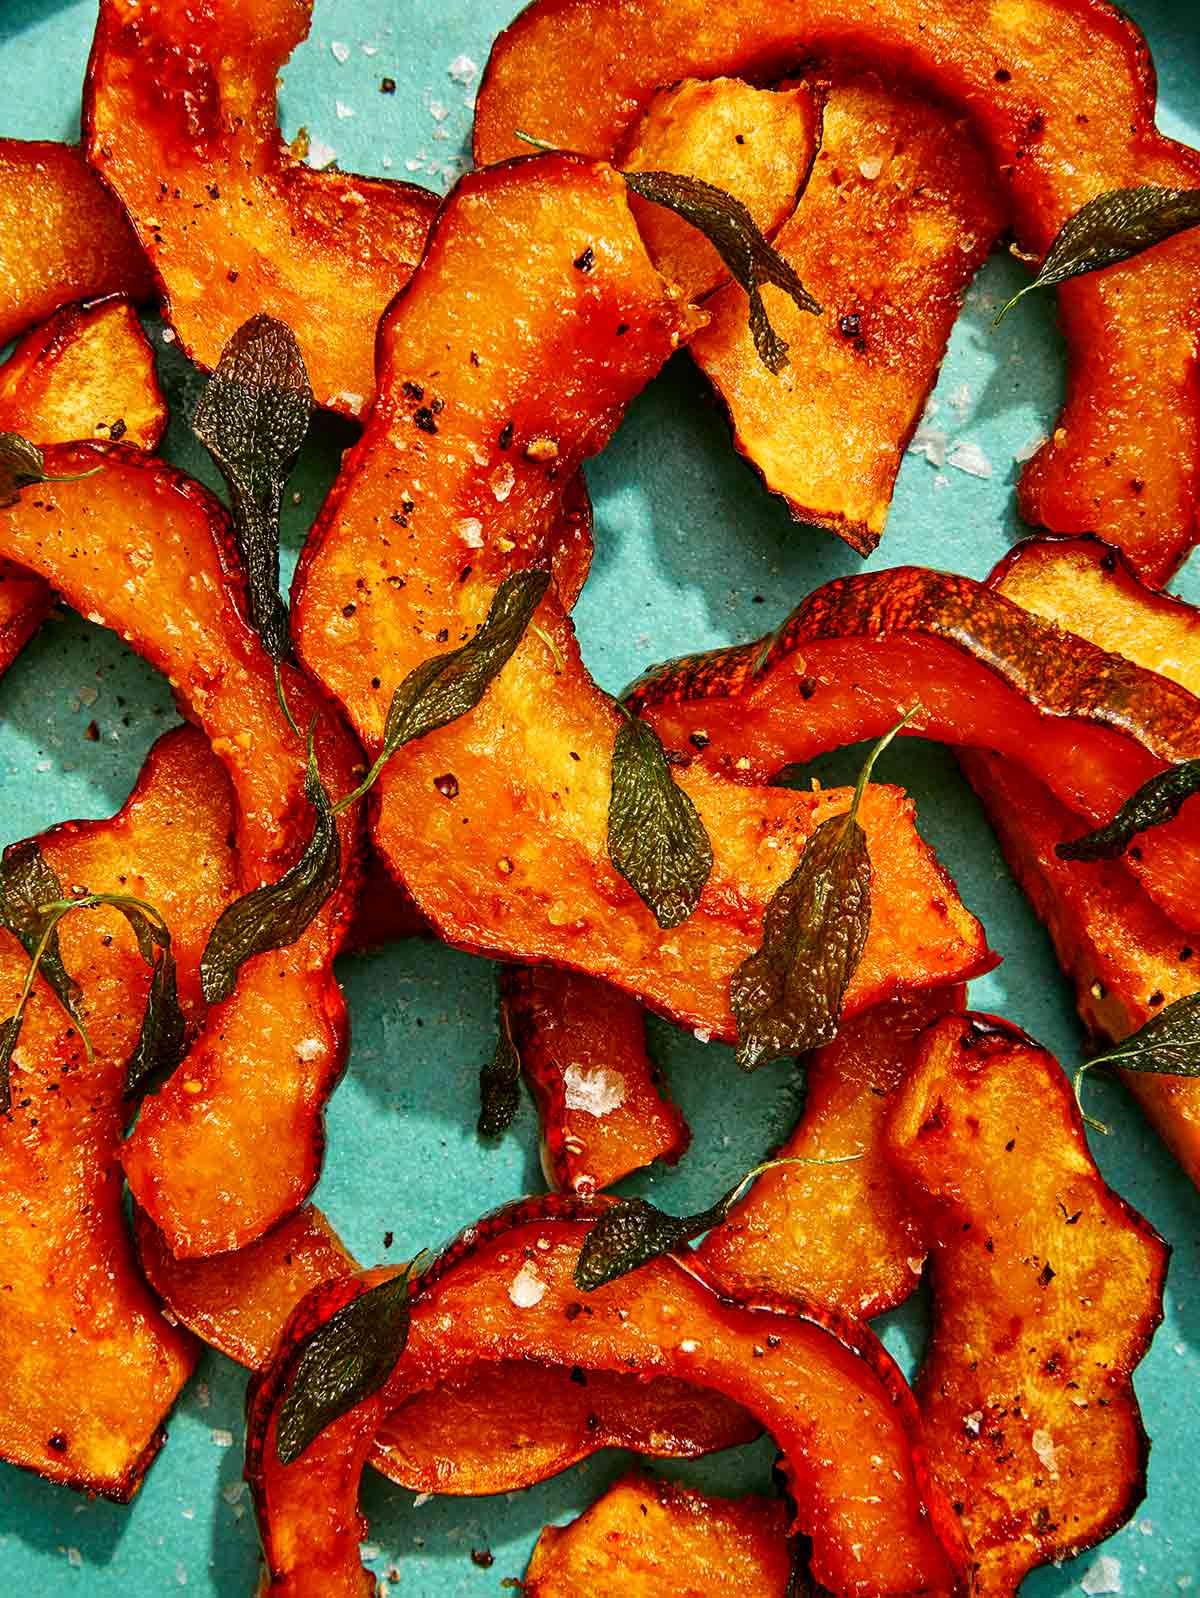
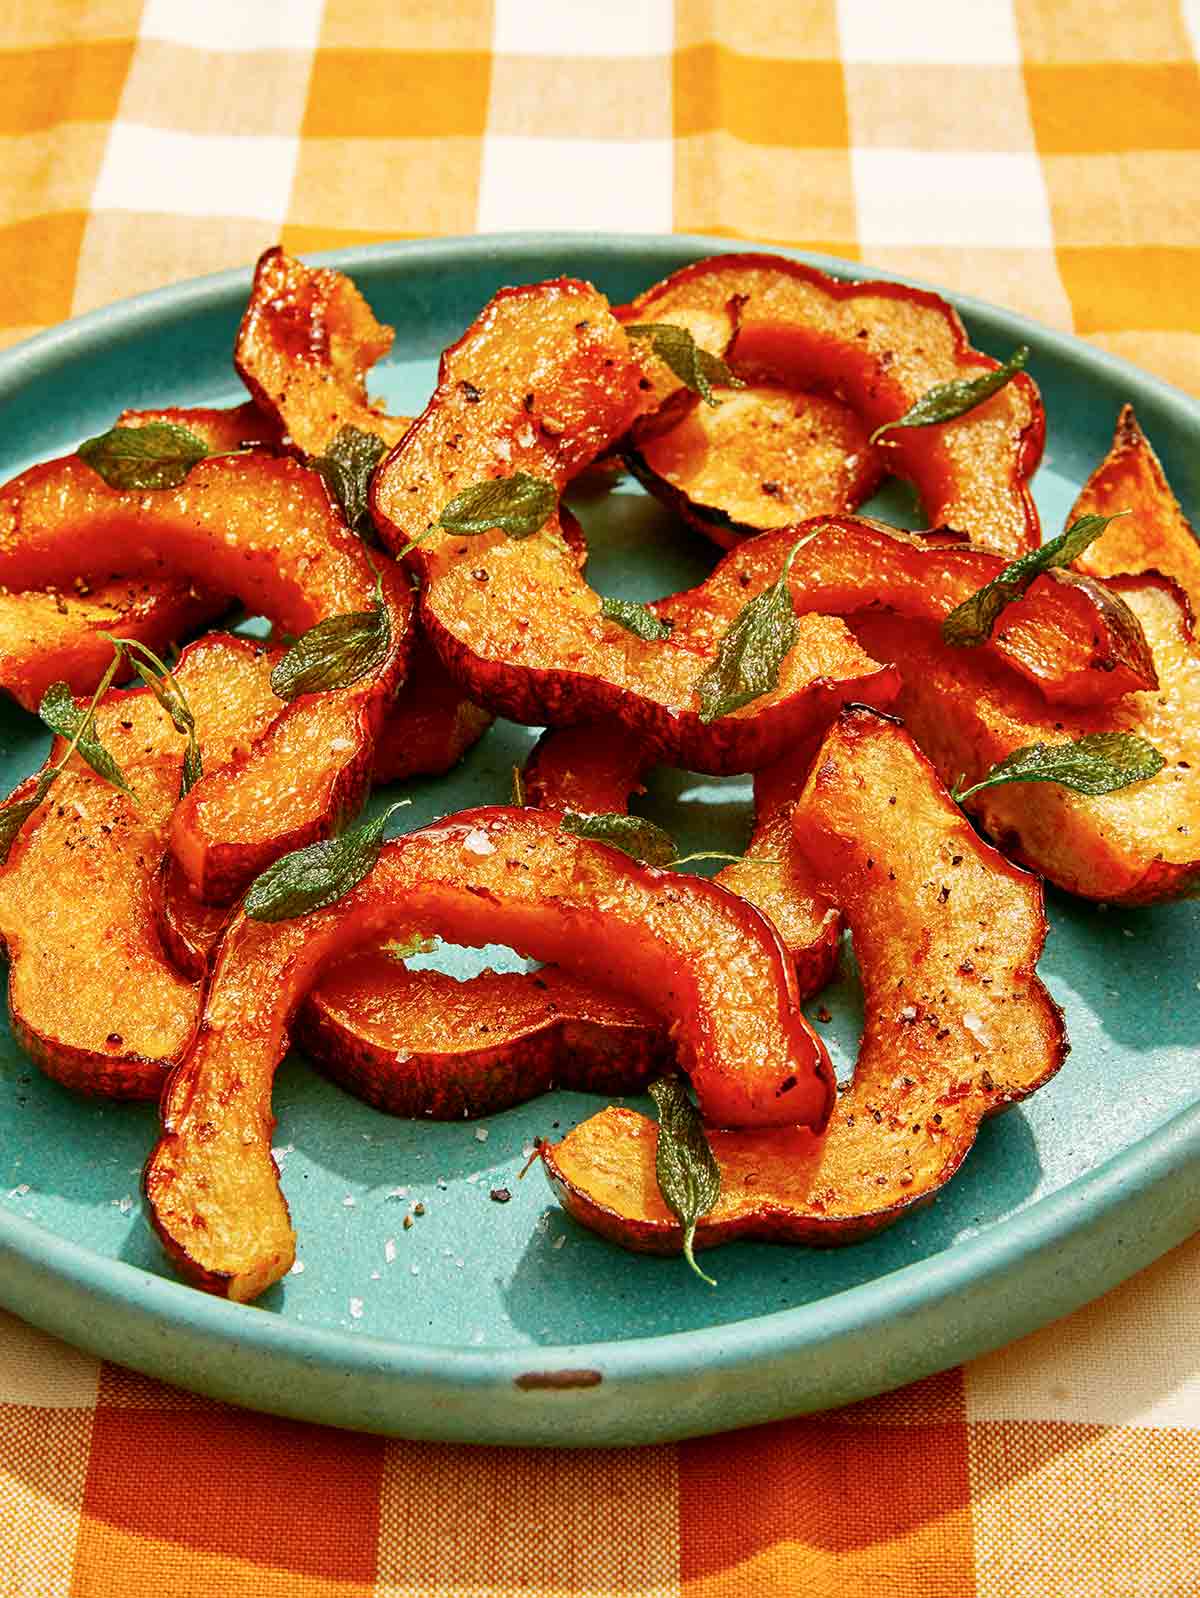
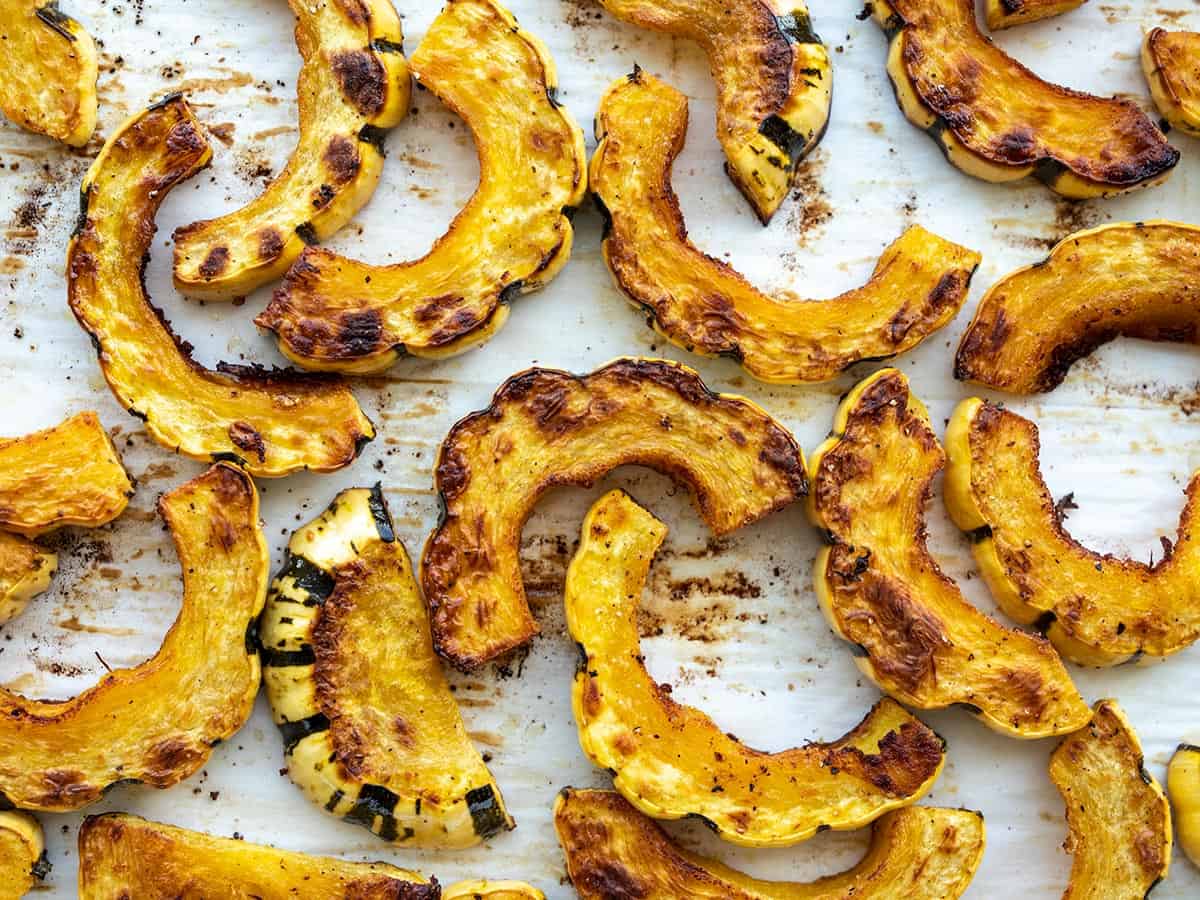
Maple roasted acorn squash is a mostly sweet, slightly savory side dish that goes perfectly with any cool-weather meal. The maple syrup combined with butter and garlic makes a rich and sweet glaze that caramelizes onto the squash for a truly irresistible treat. You can’t go wrong with this quick and easy side dish for any holiday or family party. We love how it looks on a Thanksgiving table! From Maple Balsamic Roasted Duck to…
Maple roasted acorn squash is a mostly sweet, slightly savory side dish that goes perfectly with any cool-weather meal. The maple syrup combined with butter and garlic makes a rich and sweet glaze that caramelizes onto the squash for a truly irresistible treat. You can’t go wrong with this quick and easy side dish for any holiday or family party. We love how it looks on a Thanksgiving table!
From Maple Balsamic Roasted Duck to Maple Pear and Ginger Pie, a little maple syrup can take any dish from good to a complex, sweet, and irresistible dish. Spooning the maple syrup mixture over top of the squash helps the squash to brown as it roasts, and the flavor seeps into each and every bite!
Follow the simple tutorial below to learn how to roast acorn squash so you can enjoy this fall treat all season long.
How to Make Maple Roasted Acorn Squash
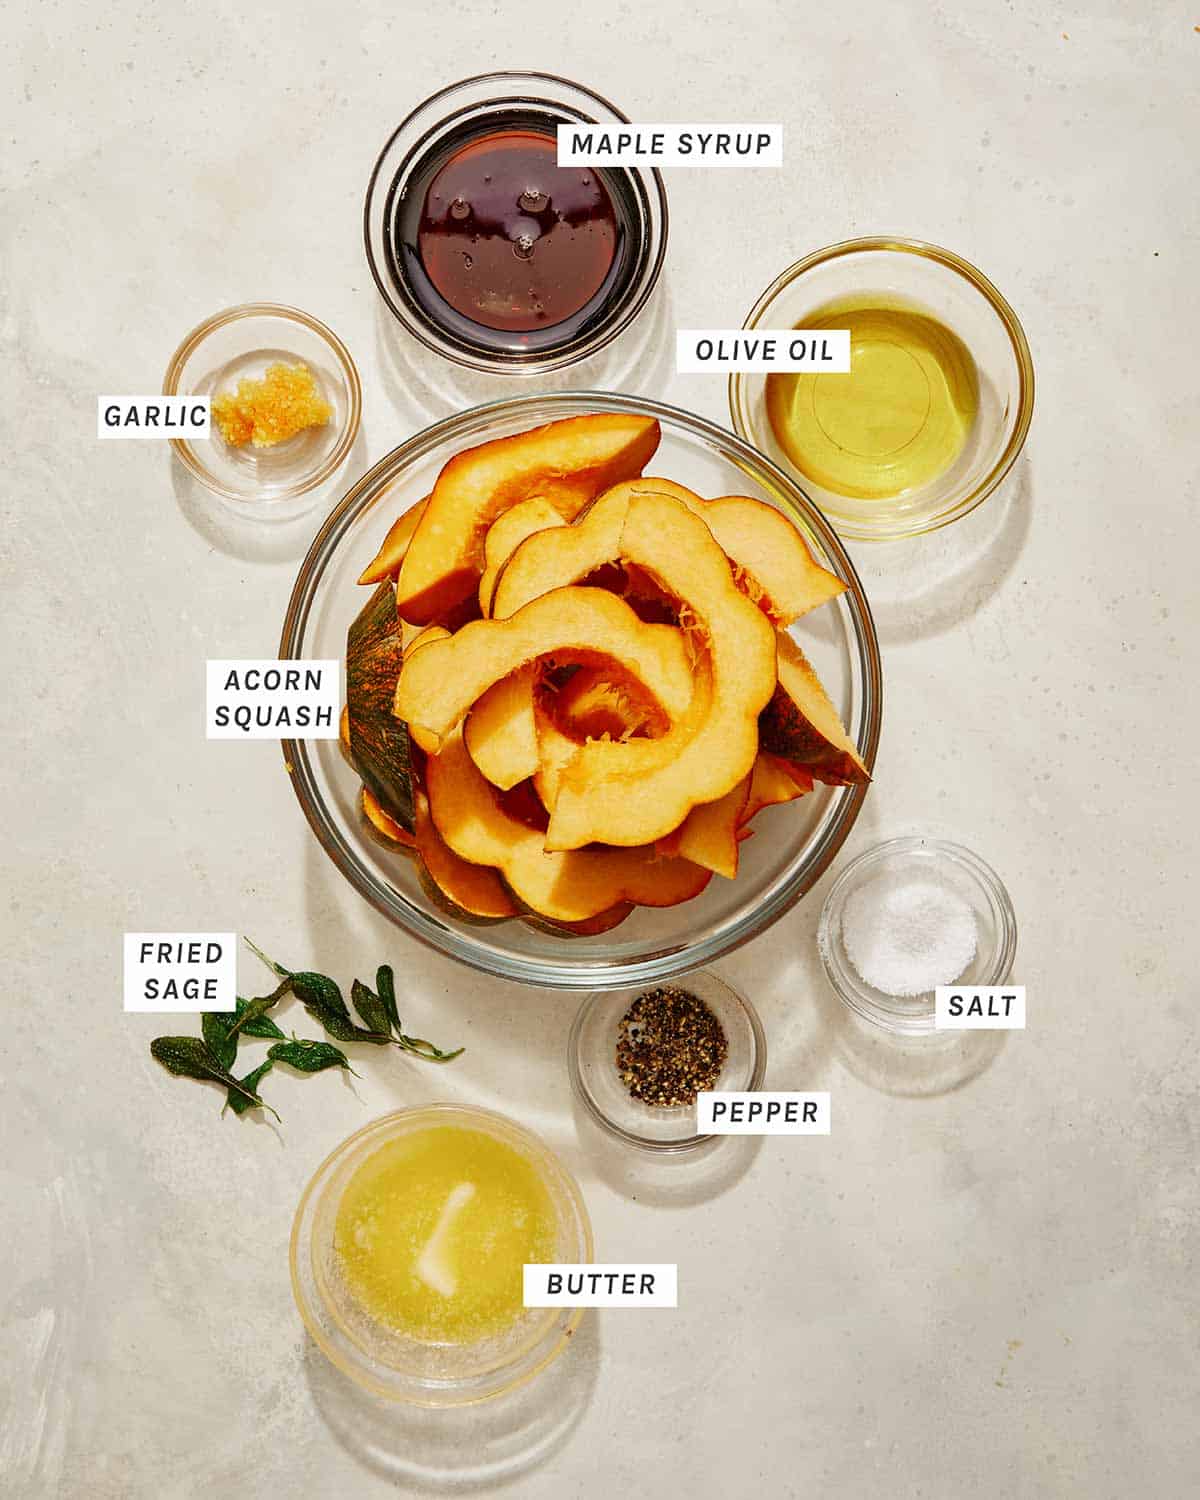
Ingredients
Process
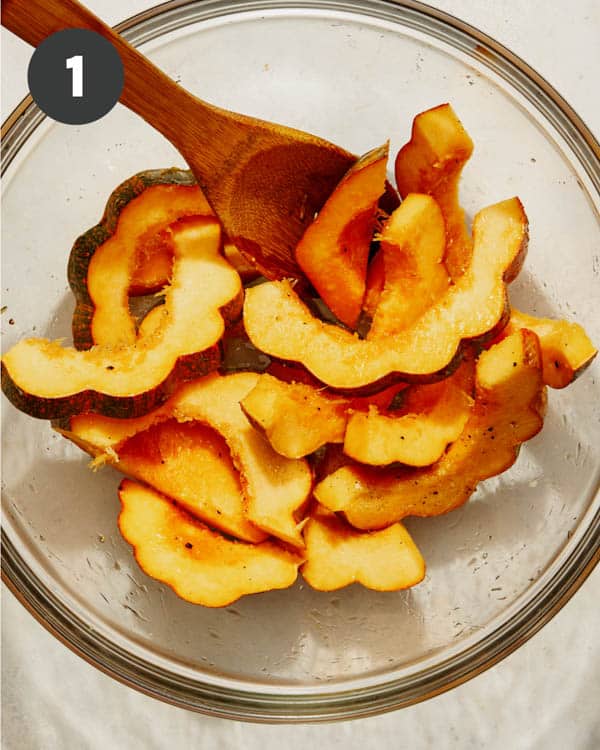
Preheat oven to 400°F. In a large mixing bowl, toss squash, oil, salt, and pepper together.
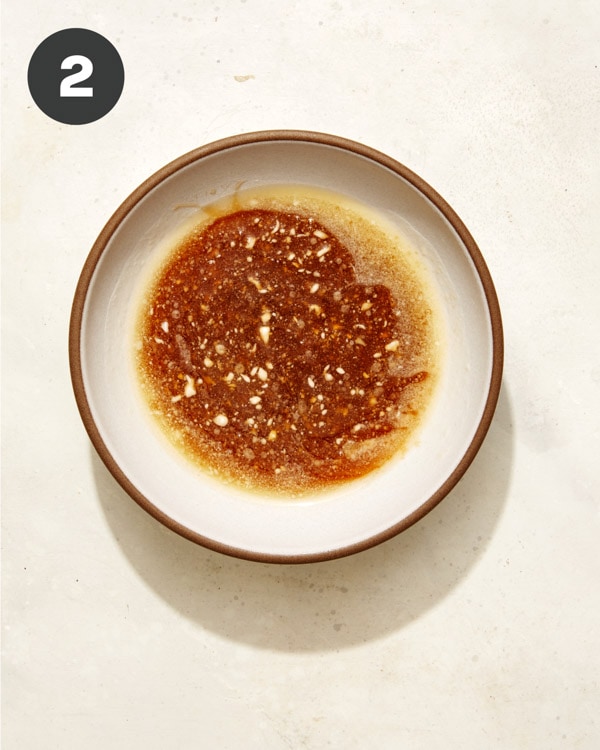
Combine syrup, melted butter, and garlic in a small mixing bowl.
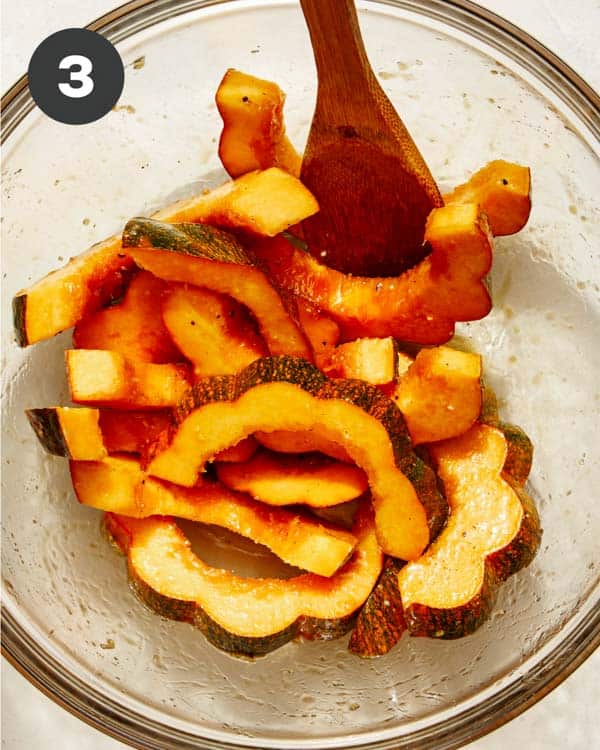
Spoon half the syrup mixture onto the squash and toss together until evenly coated.
Line a sheet with parchment paper. Spread squash pieces onto the prepared baking sheet in a single, even layer.
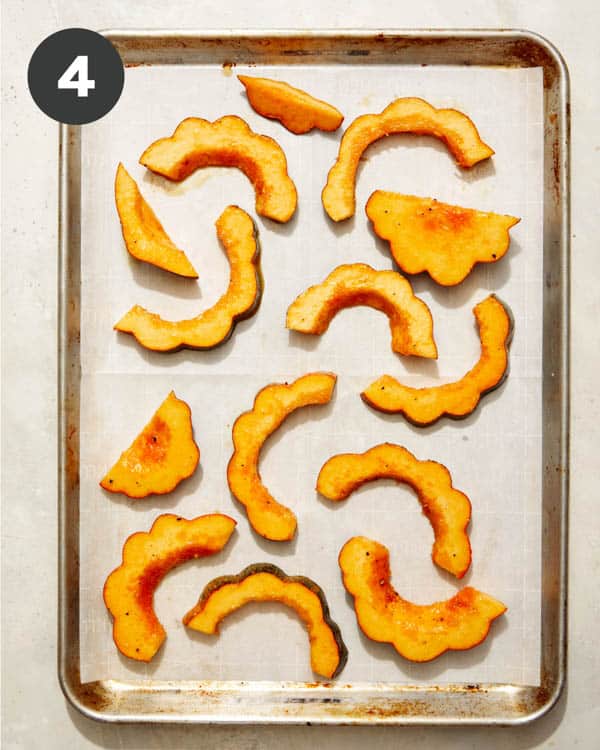
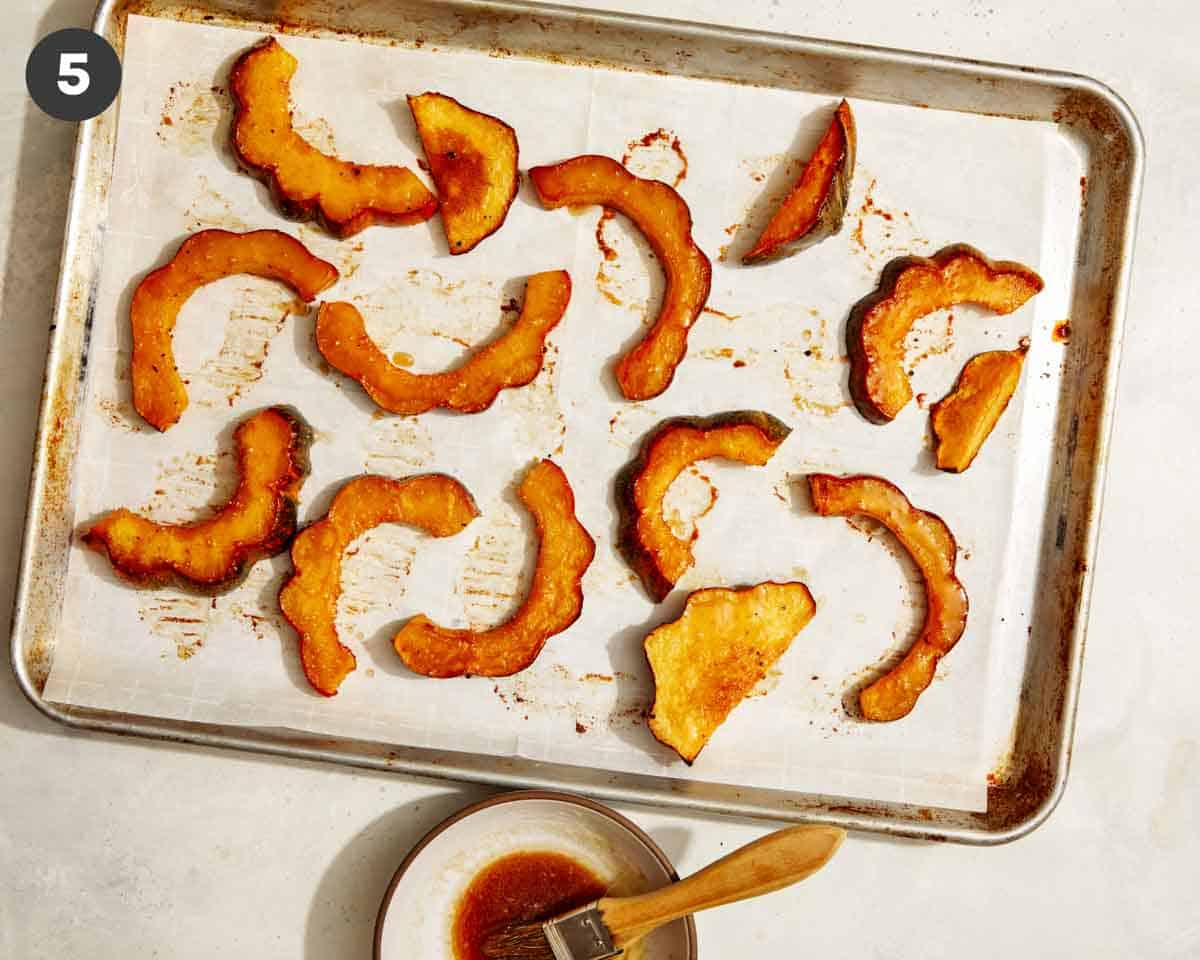
Roast squash for about 15 minutes or until squash begins to soften. Flip each piece and brush with more syrup mixture. Continue roasting for 12 to 15 minutes until fork tender and lightly caramelized.
Top with fried sage, if using, and serve.
Tips and Tricks for Perfectly Roasted Acorn Squash
If you’ve been intimidated by this little green and orange fruit (yes, acorn squash is actually a fruit, not a vegetable!), just follow these simple tips and tricks for perfectly roasted acorn squash every time.
Choose a ripe squash. When selecting acorn squash, pick ones that are heavy for their size, have no soft spots or bruising, and there is a good mix of orange (not yellow) and green on the skin. If the skin is shiny instead of dull, it’s not yet ripe, and if the squash is mostly orange, it may be too ripe.
Prepare your squash by cutting it in half with a sharp knife and a non-slip cutting board. These babies can be slippery, so be extremely careful when cutting. Scoop out the seeds and stringy pieces with a spoon, leaving the smooth flesh inside. Then, flip the squash flesh side down and slice it into half moons. Slice the squash into 1/2-inch slices to keep cooking as even as possible.
Don’t crowd the pan! When baking acorn squash slices, make sure to leave space in between each slice. This helps the squash caramelize.
Wait for the oven to preheat. Roasting at 400°F is crucial for caramelizing your acorn squash without burning. If you cook lower than this, the squash will cook through but won’t brown up, and if you get the temperature too high, the maple syrup and butter mixture may start to burn.
What to Serve with This Dish
Roasted acorn squash is a delicious cold-weather side dish for any entree, but it goes especially well with these fall and winter favorites:
To store leftover roasted squash, place the slices in an airtight container in the refrigerator for up to 5 days. For longer storage, remove the rind from the squash, puree, and freeze for up to 6 months.
To reheat squash from the refrigerator, Preheat the oven to 400°F, then place the squash on a foil-lined pan and bake for 7-10 minutes or until warmed through. Reheating in the oven warms the squash without making it soggy. If you’re not worried about the texture, you can always reheat it in the microwave for 30-60 seconds or until warmed through.
This Maple Roasted Acorn Squash recipe is simple, elegant, and completely delicious with its caramelized maple syrup glaze — perfect for a Thanksgiving or Holiday side dish!
In a large mixing bowl toss together squash, oil, salt, and pepper.
In a small mixing bowl combine syrup, melted butter, and garlic.
Spoon half the syrup mixture onto the squash and toss together until evenly coated.
Line a sheet with parchment paper. Spread squash pieces onto the prepared baking sheet in a single, even layer.
Roast squash for about 15 minutes or until squash begins to soften. Flip each piece and brush with more syrup mixture.
Continue to roast for an additional 12 to 15 minutes until fork tender and lightly caramelized.
Top with fried sage, if using, and serve.
Notes
Tips and Tricks for Perfectly Roasted Acorn SquashIf you’ve been intimidated by this little green and orange fruit (yes, acorn squash is actually a fruit, not a vegetable!), just follow these simple tips and tricks for perfectly roasted acorn squash every time.Choose a ripe squash. When selecting acorn squash, pick ones that are heavy for their size, have no soft spots or bruising, and there is a good mix of orange (not yellow) and green on the skin. If the skin is shiny instead of dull, it’s not yet ripe, and if the squash is mostly orange, it may be too ripe.Prepare your squash by cutting it in half with a sharp knife and a non-slip cutting board. These babies can be slippery, so be extremely careful when cutting. Scoop out the seeds and stringy pieces with a spoon, leaving the smooth flesh inside. Then, flip the squash flesh side down and slice it into half moons. Slice the squash into 1/2-inch slices to keep cooking as even as possible.Don’t crowd the pan! When baking acorn squash slices, make sure to leave space in between each slice. This helps the squash caramelize.Wait for the oven to preheat. Roasting at 400°F is crucial for caramelizing your acorn squash without burning. If you cook lower than this, the squash will cook through but won’t brown up, and if you get the temperature too high, the maple syrup and butter mixture may start to burn.
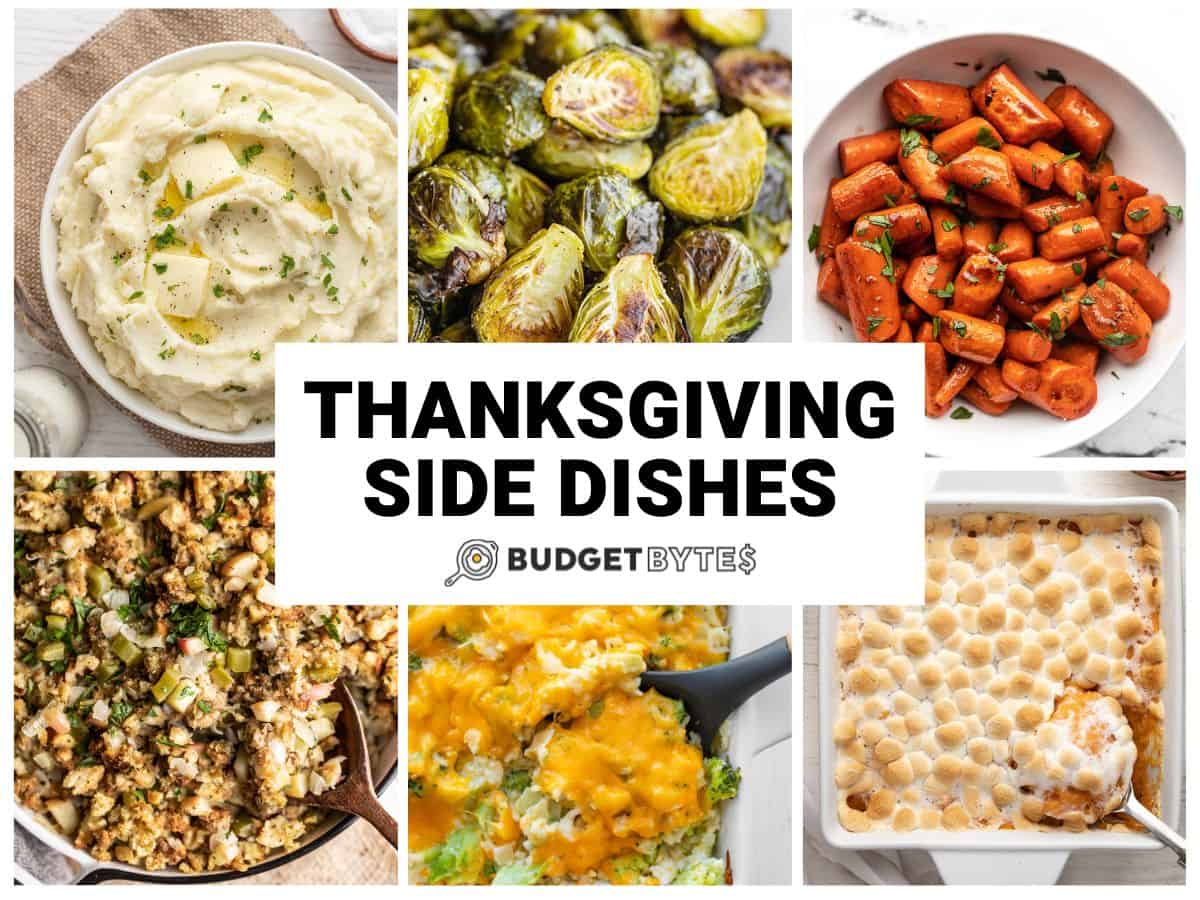
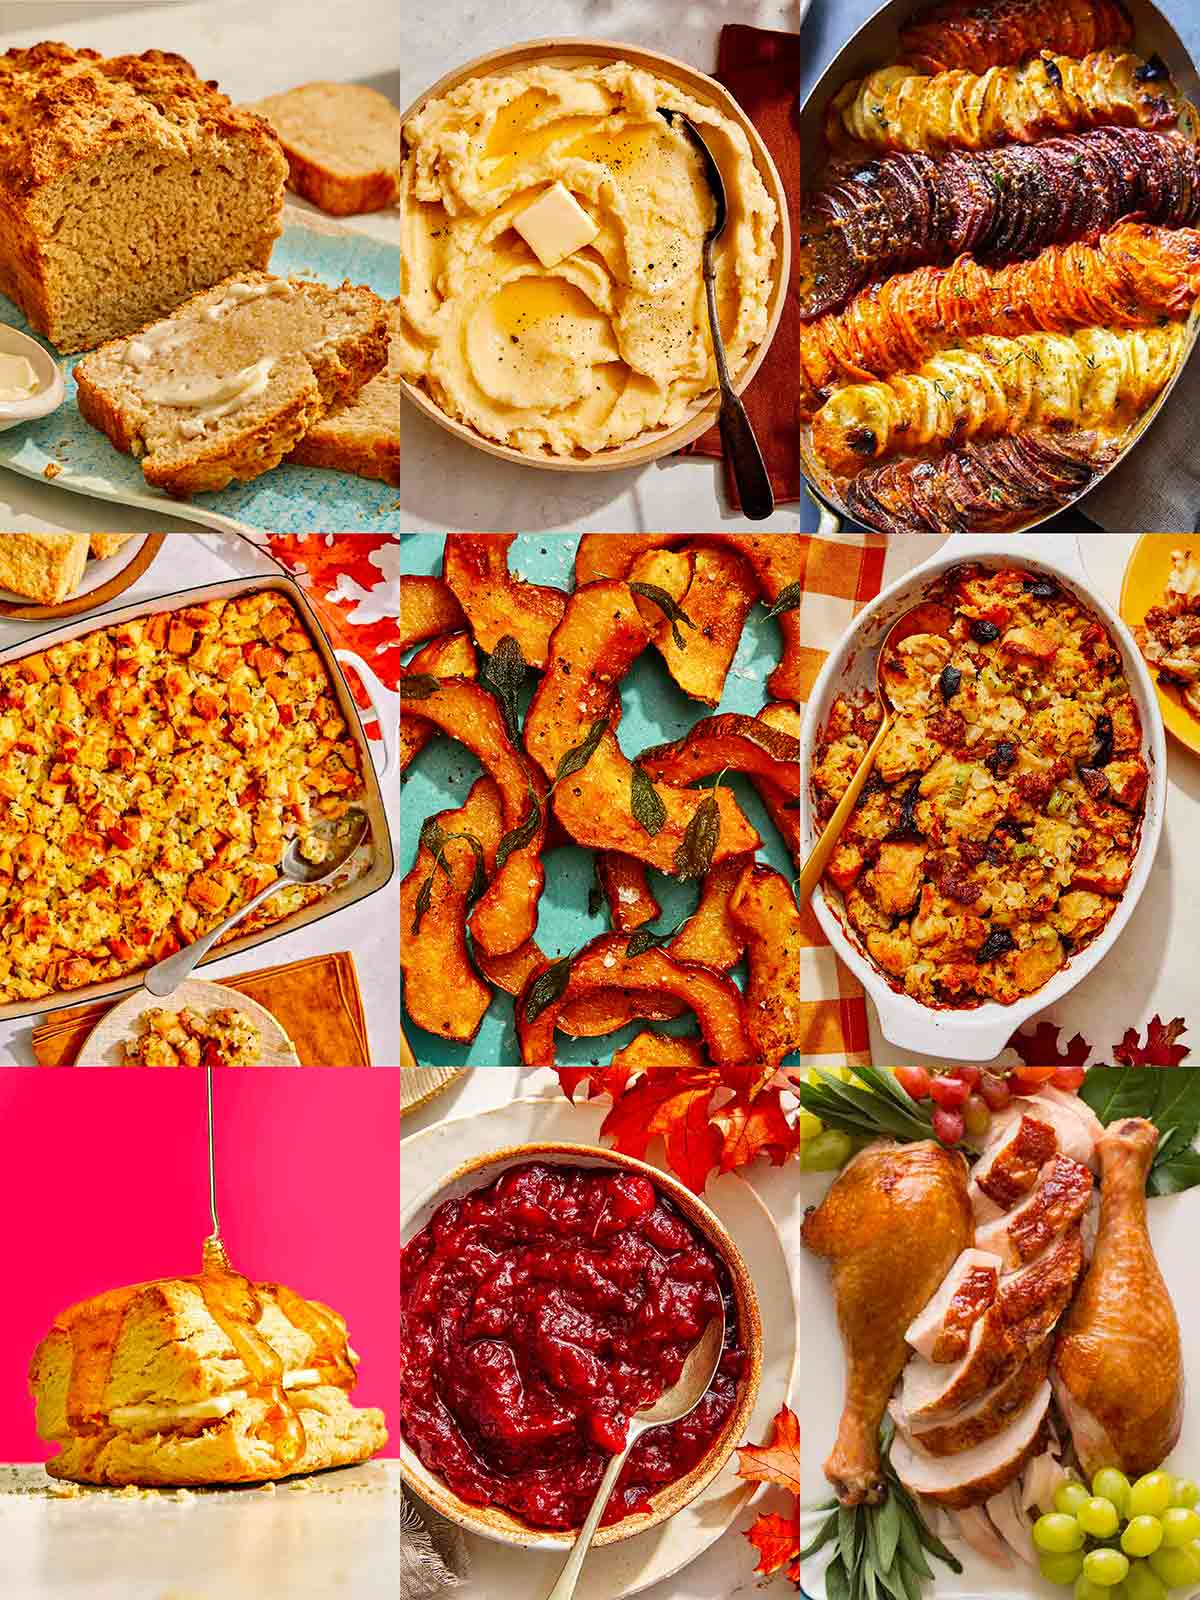
Well, I’m not sure if I’m more excited about the turkey or the sides this year for Thanksgiving. But who am I kidding…it’s definitely all about the sides!!! There’s just so many wonderful side dishes to choose from on Thanksgiving day. You have classic side dishes like mac & cheese, mashed potatoes, savory stuffing, and cranberry sauce. And there’s easy, stress-free sides like roasted Brussels sprouts and creamed spinach. So to help you make your selection this year, we’re sharing over 25 budget-friendly Thanksgiving Side Dishes! And no matter which ones you choose to add to your dinner menu, there’s definitely something here for everyone to enjoy!
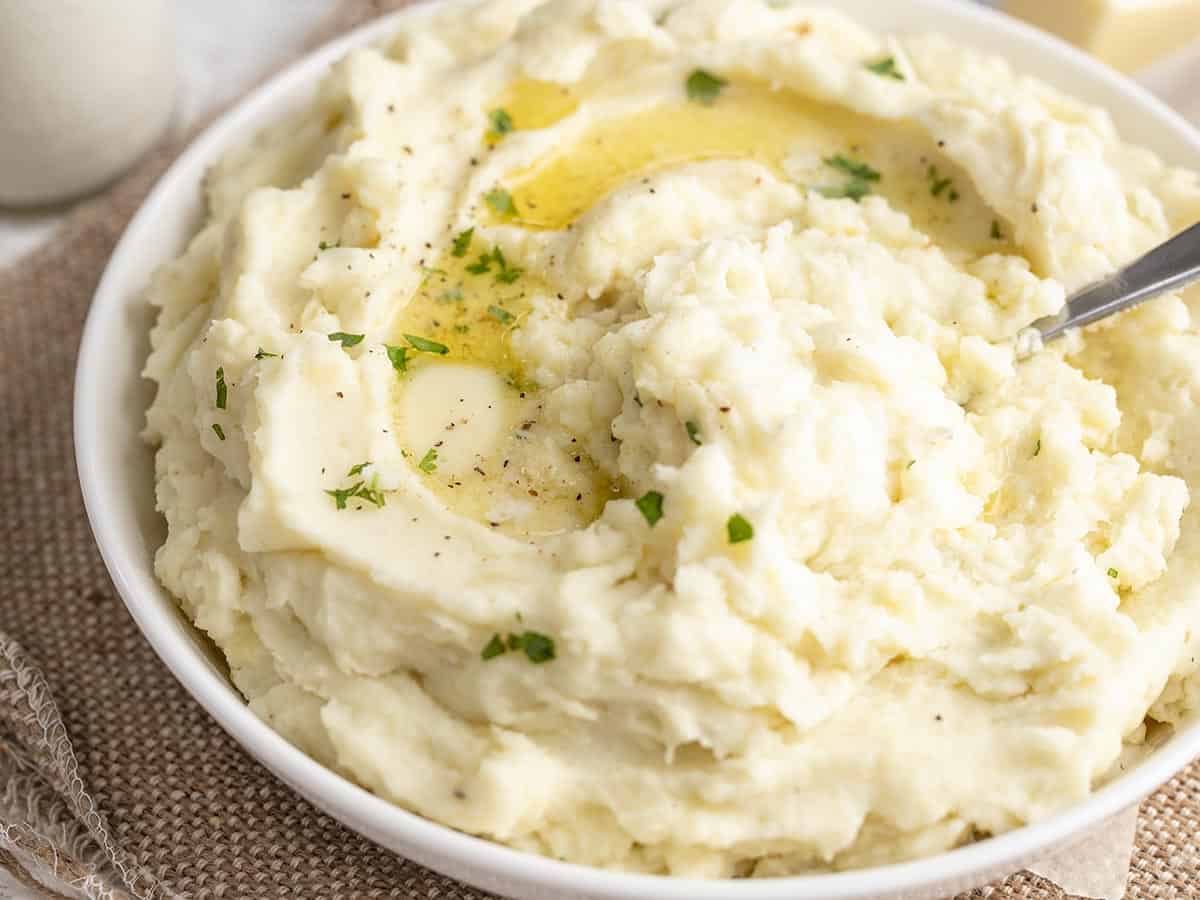
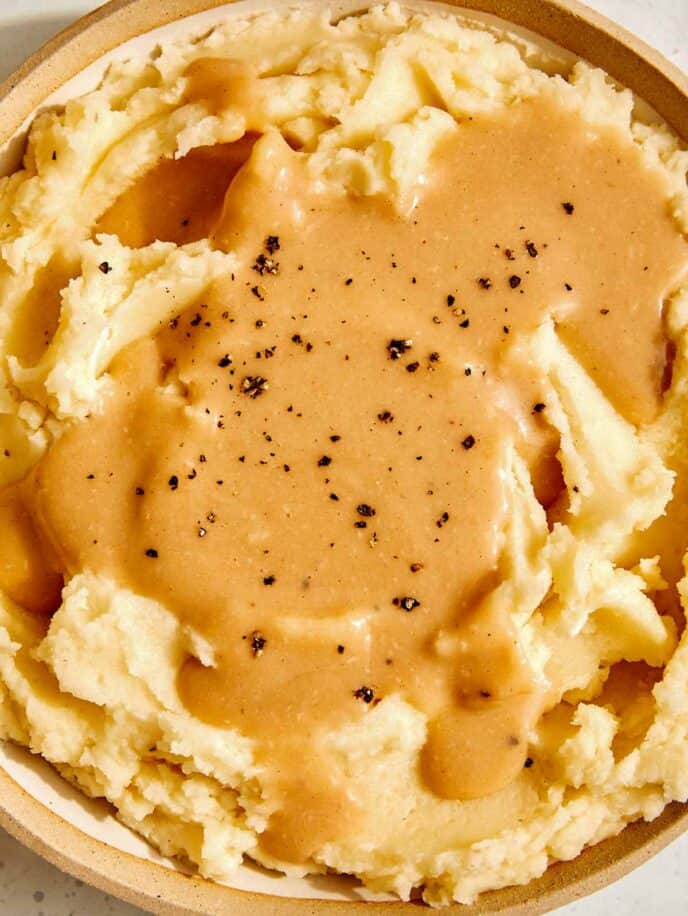
We can’t think of anything that’s better than a big bowl of buttery Mashed Potatoes. These classic mashed potatoes are fluffy, creamy and easy to make in just a few steps.
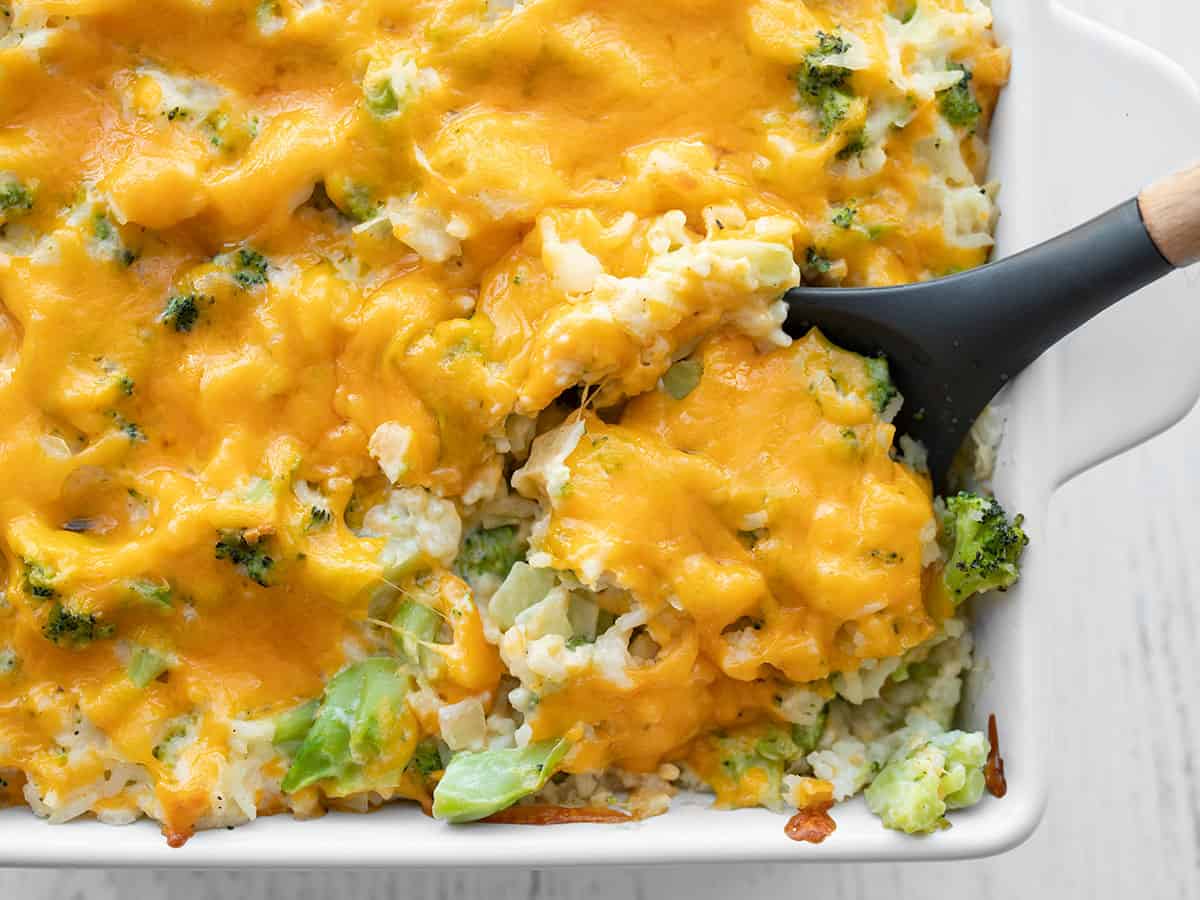
Broccoli Cheddar Casserole is a comforting, classic recipe that is always welcomed at dinner parties. This homemade version comes together quickly and is a great way to use up leftover rice!
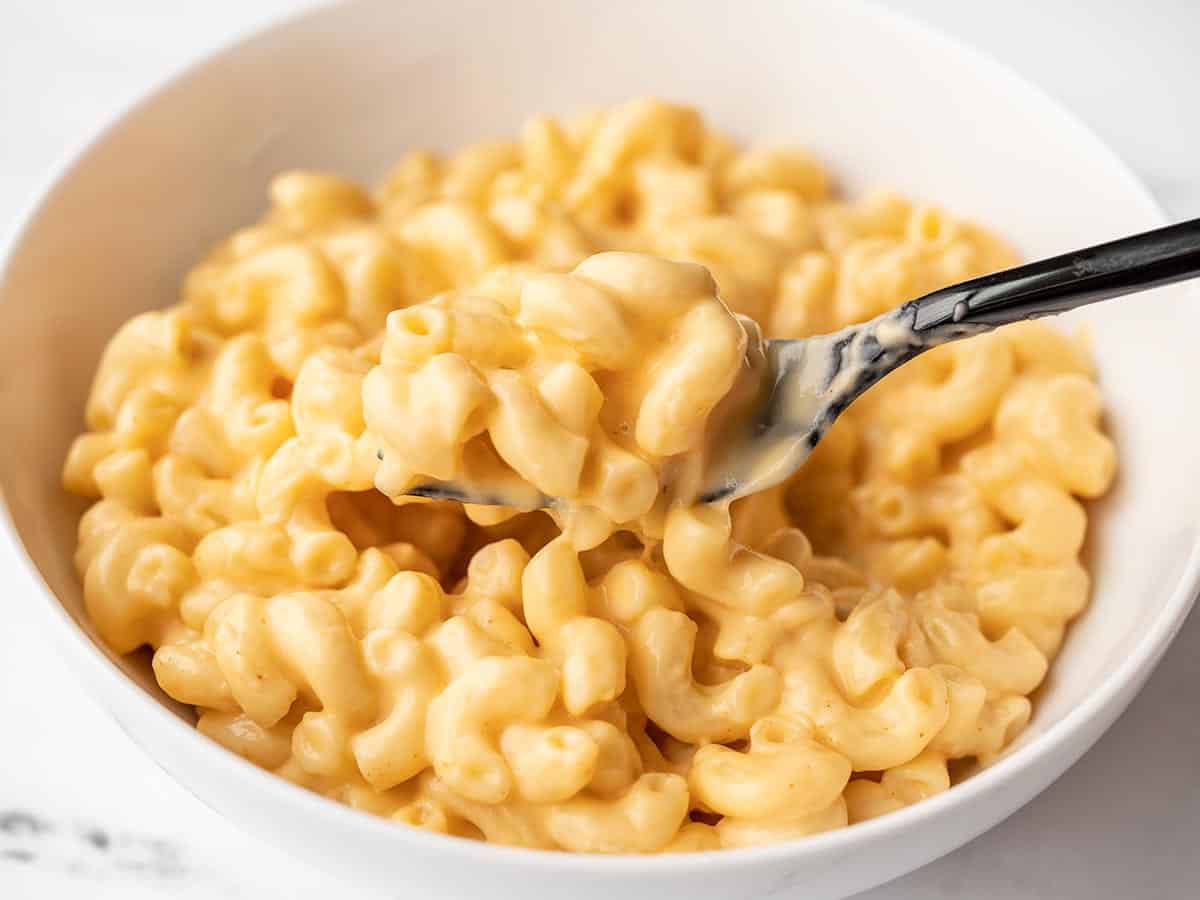
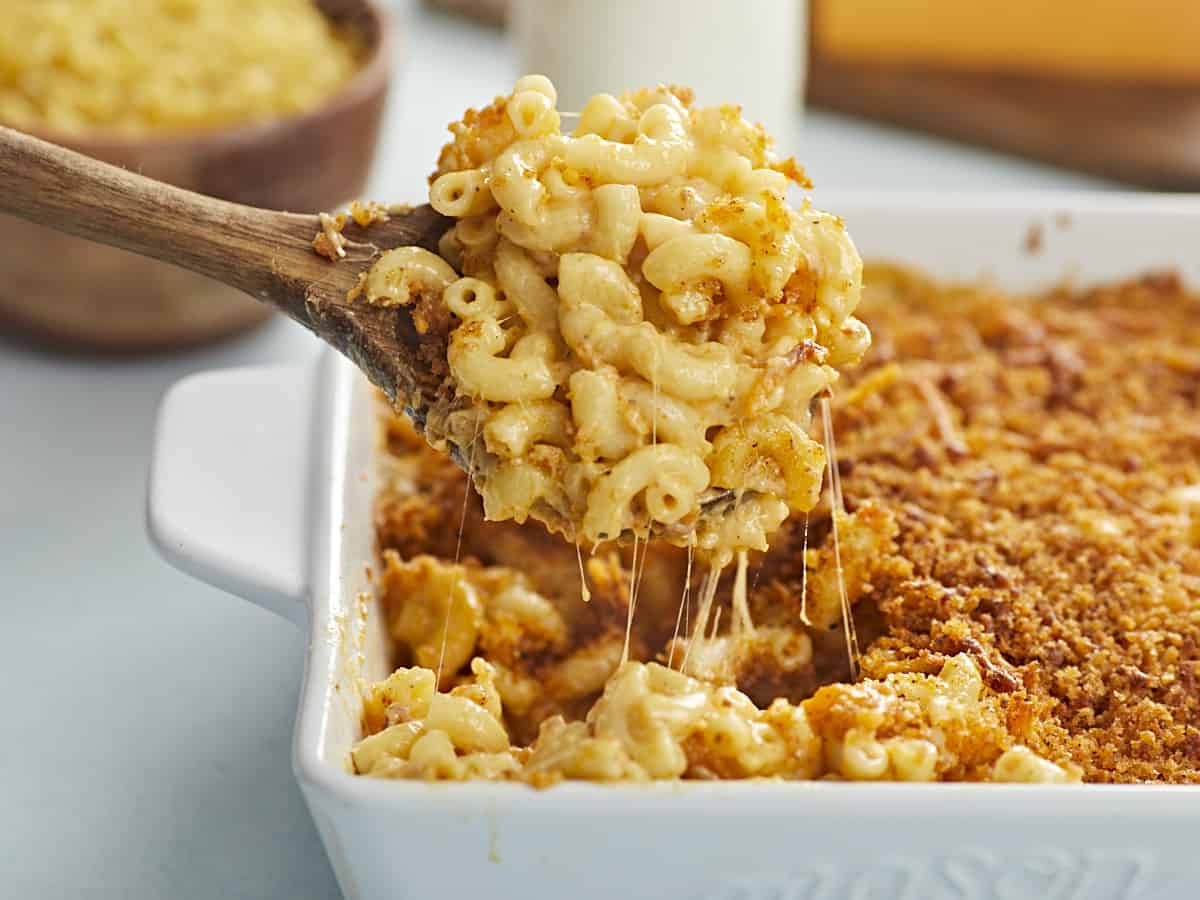
If there’s one side dish that’s always welcomed at holiday gatherings it’s Homemade Mac and Cheese. This classic stovetop macaroni and cheese recipe is made with a classic roux-based cheese sauce that will satisfy all of your cheesy pasta cravings!
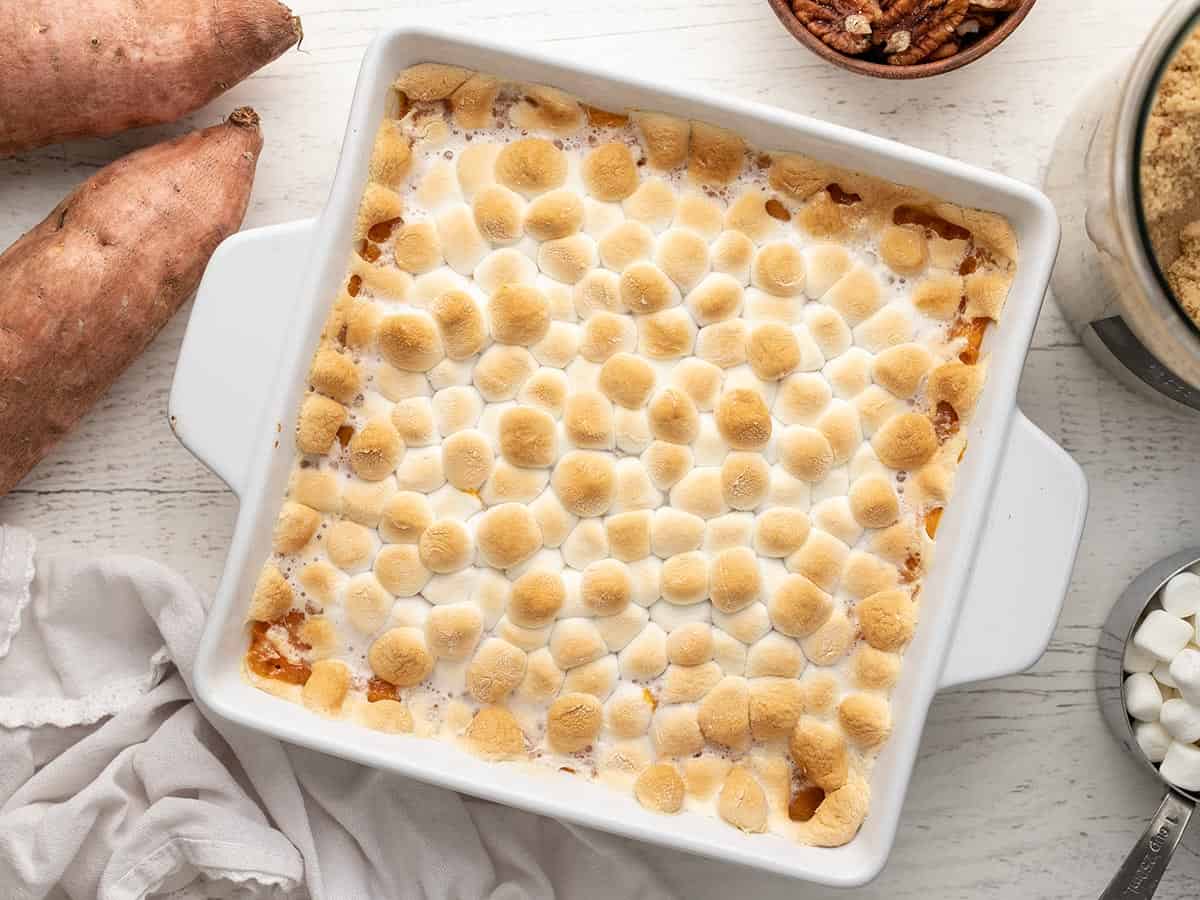
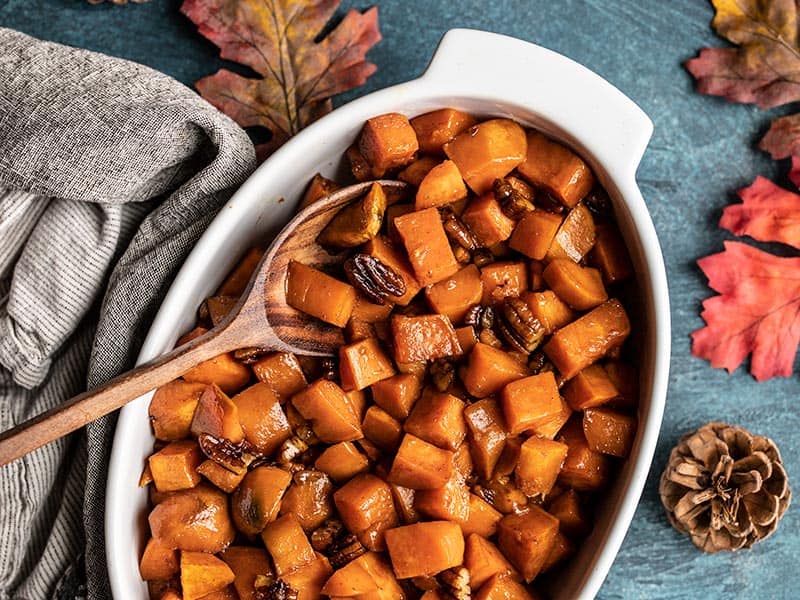
I mean who doesn’t love the classic, irresistible Sweet Potato Casserole? It’s the perfect side dish during the holidays and family gatherings, and can be topped with marshmallows or a decadent pecan streusel.
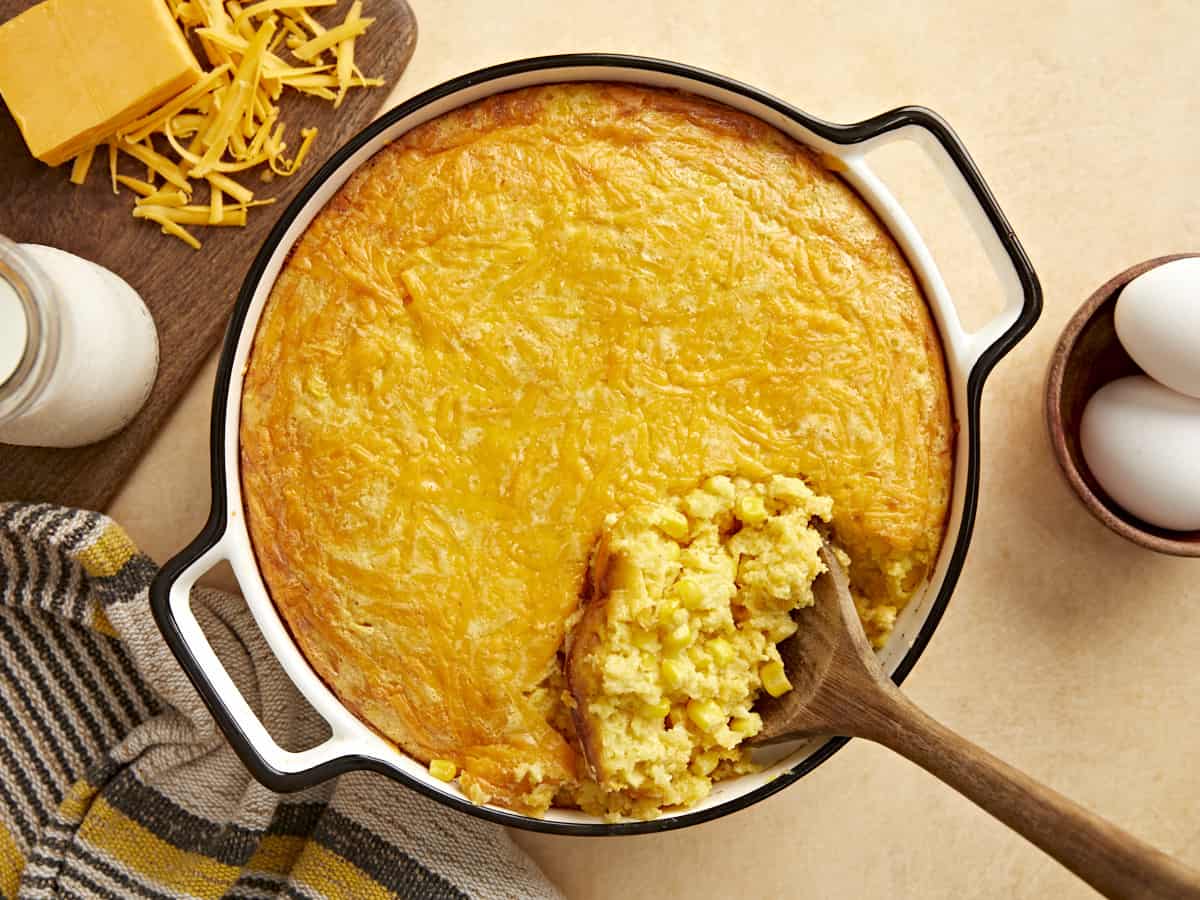
This Corn Pudding recipe is made 100% from scratch (no boxed cornbread mix or canned creamed corn), it’s incredibly easy and it will definitely leave you wanting seconds!
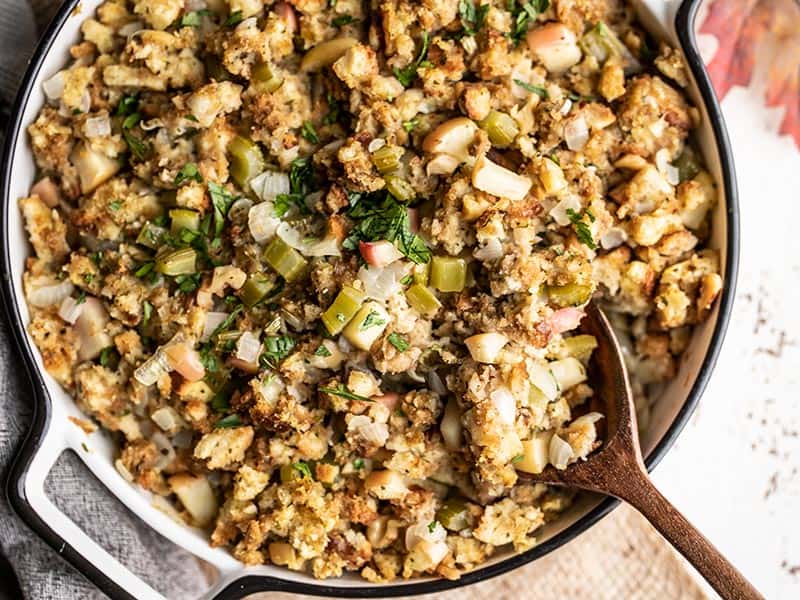
We’re taking stuffing to the next level with this easy Apple Walnut Stuffing recipe. It’s a combination of boxed stuffing mix along with fresh ingredients like apples and chopped walnuts and ready to serve in just 30 minutes!
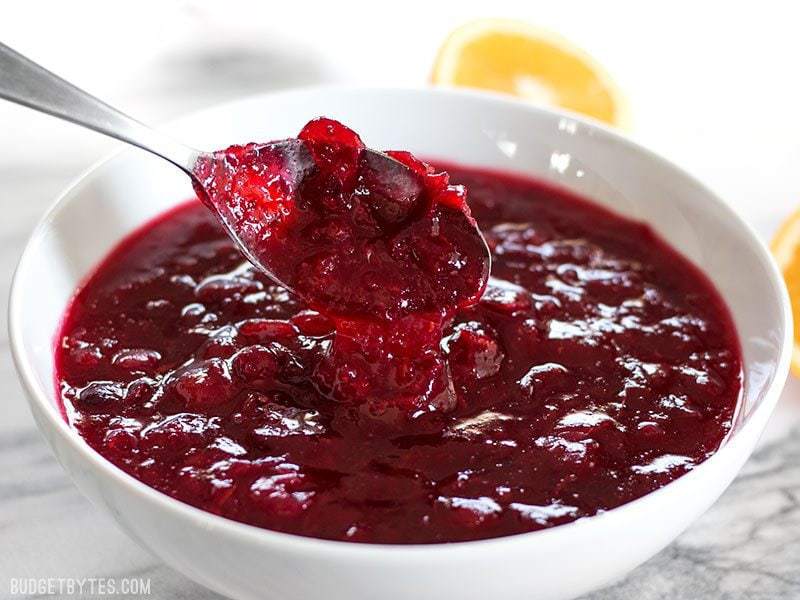
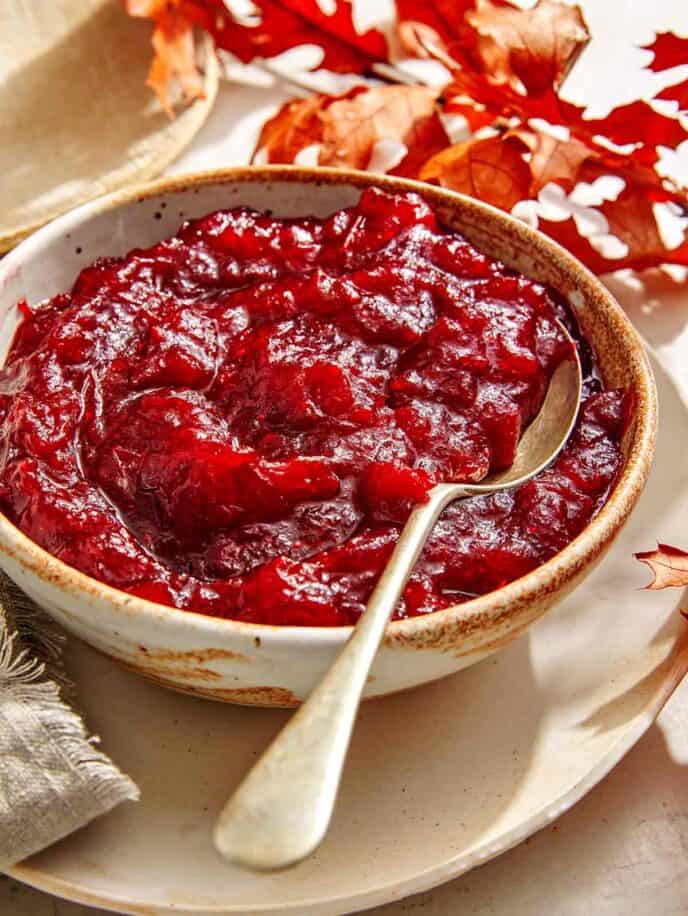
A simple but spectacular homemade Cranberry Sauce made with fresh cranberries and a little sweet orange juice. It will definitely brighten up your Thanksgiving meal!
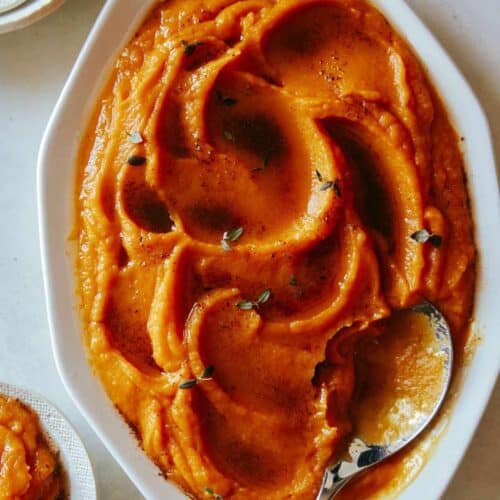
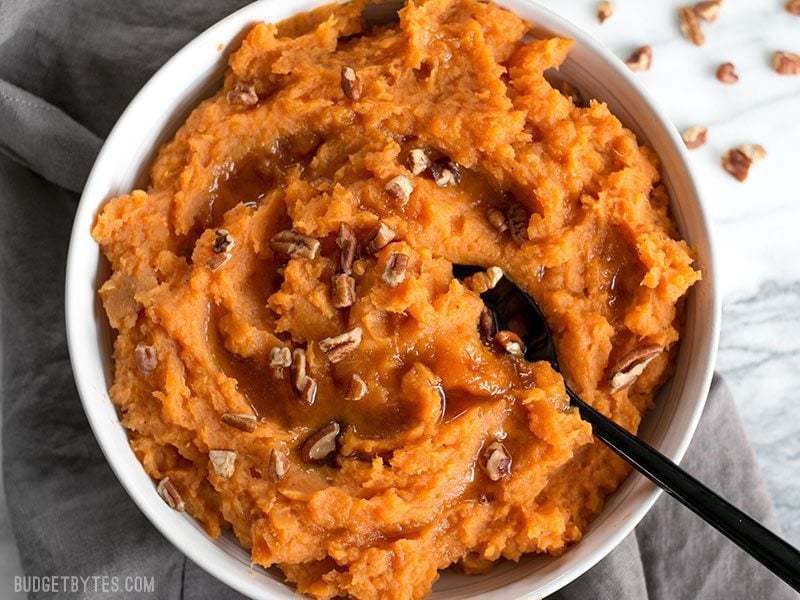
Get ready to experience the magic that brown butter and maple syrup makes with these Maple Brown Butter Mashed Sweet Potatoes! Brown butter creates a nutty, caramel flavor which matches perfectly with the deep flavors of real maple syrup. A simple dish perfect for your holiday meal.
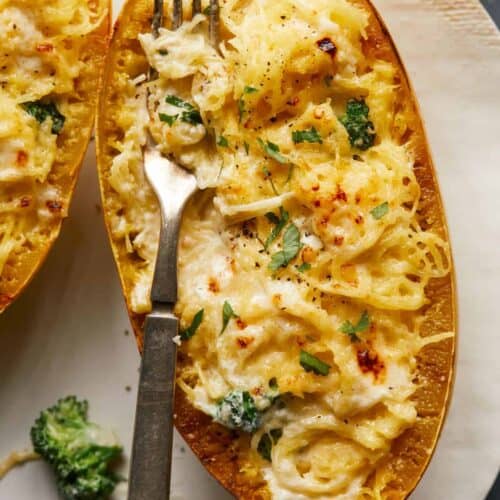
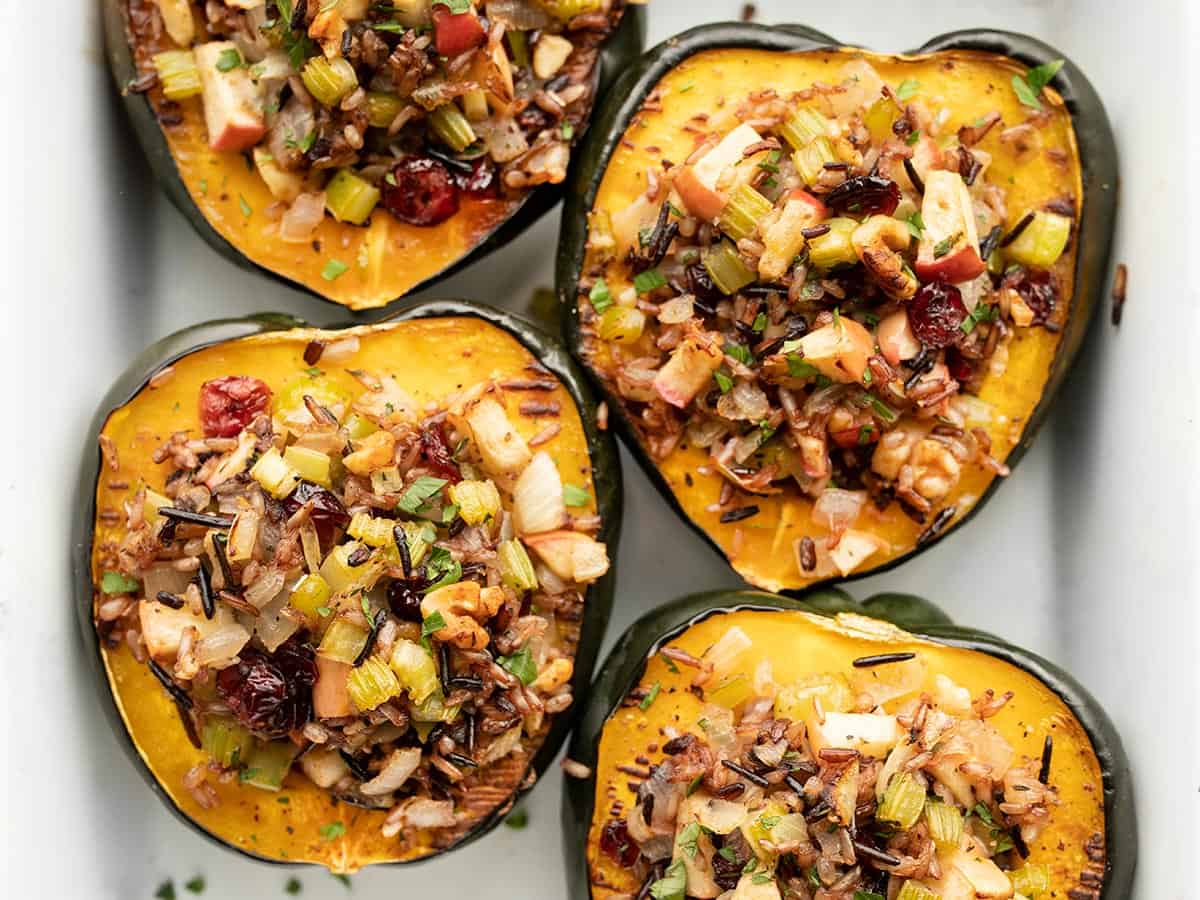
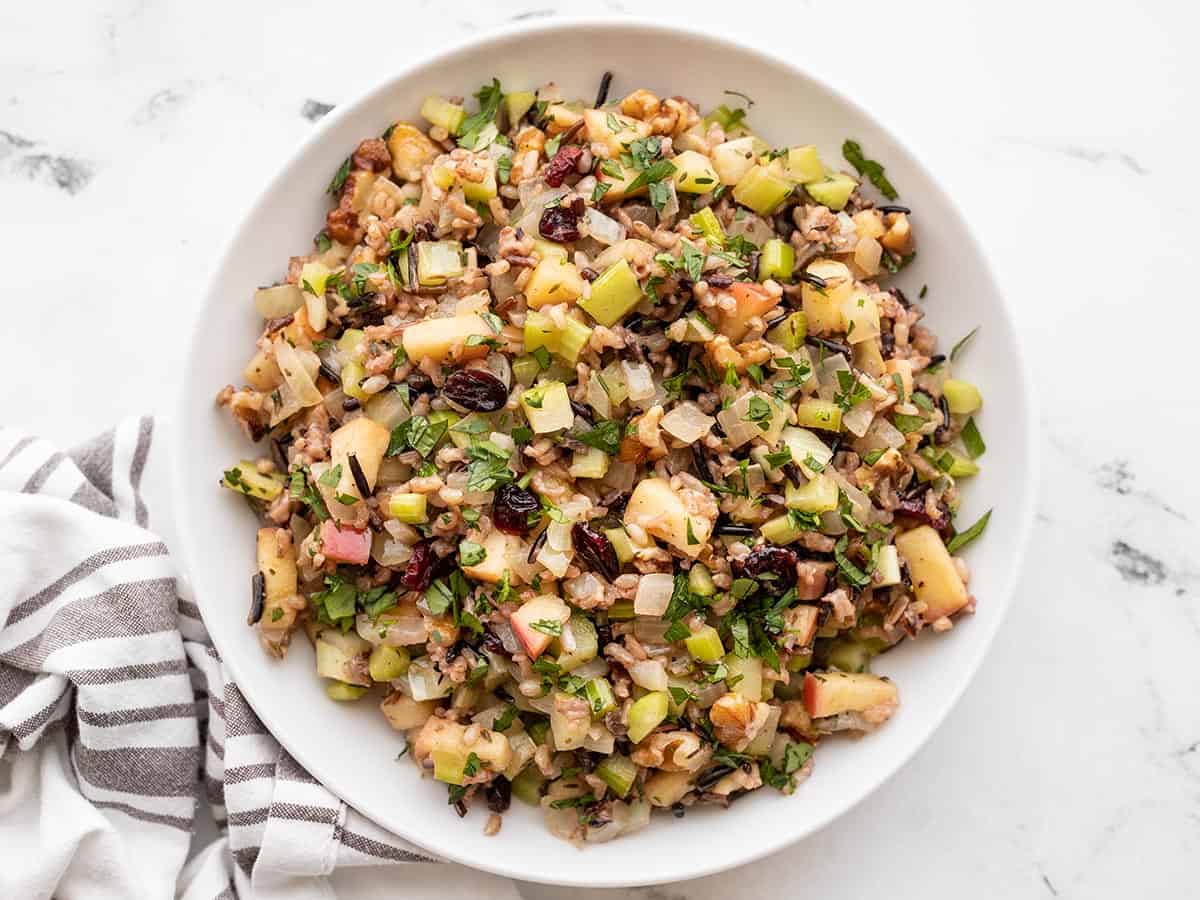
This Wild Rice Stuffed Acorn Squash is a show-stopping Autumn-inspired dish that is absolutely perfect for your Thanksgiving meal. It’s colorful, flavorful, full of texture, and just as delicious as it is beautiful.
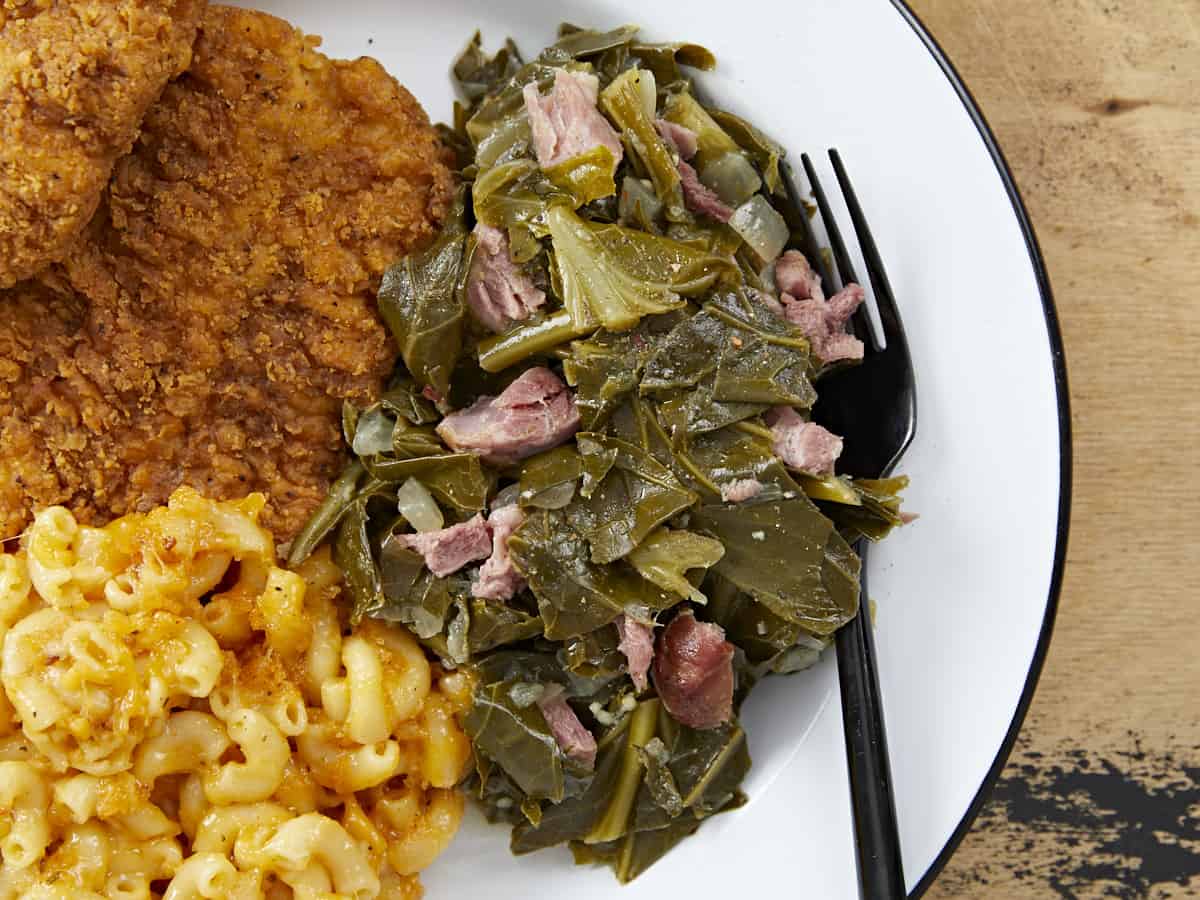
Collard Greens are a classic potluck side dish and are perfect to add to your Thanksgiving menu. This recipe includes smoked ham hock, chicken broth and lots of aromatics and spices!
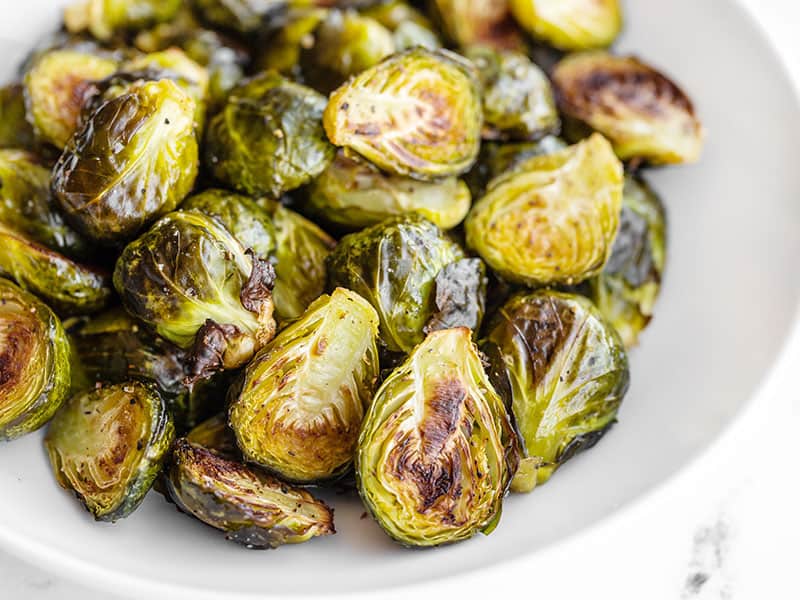
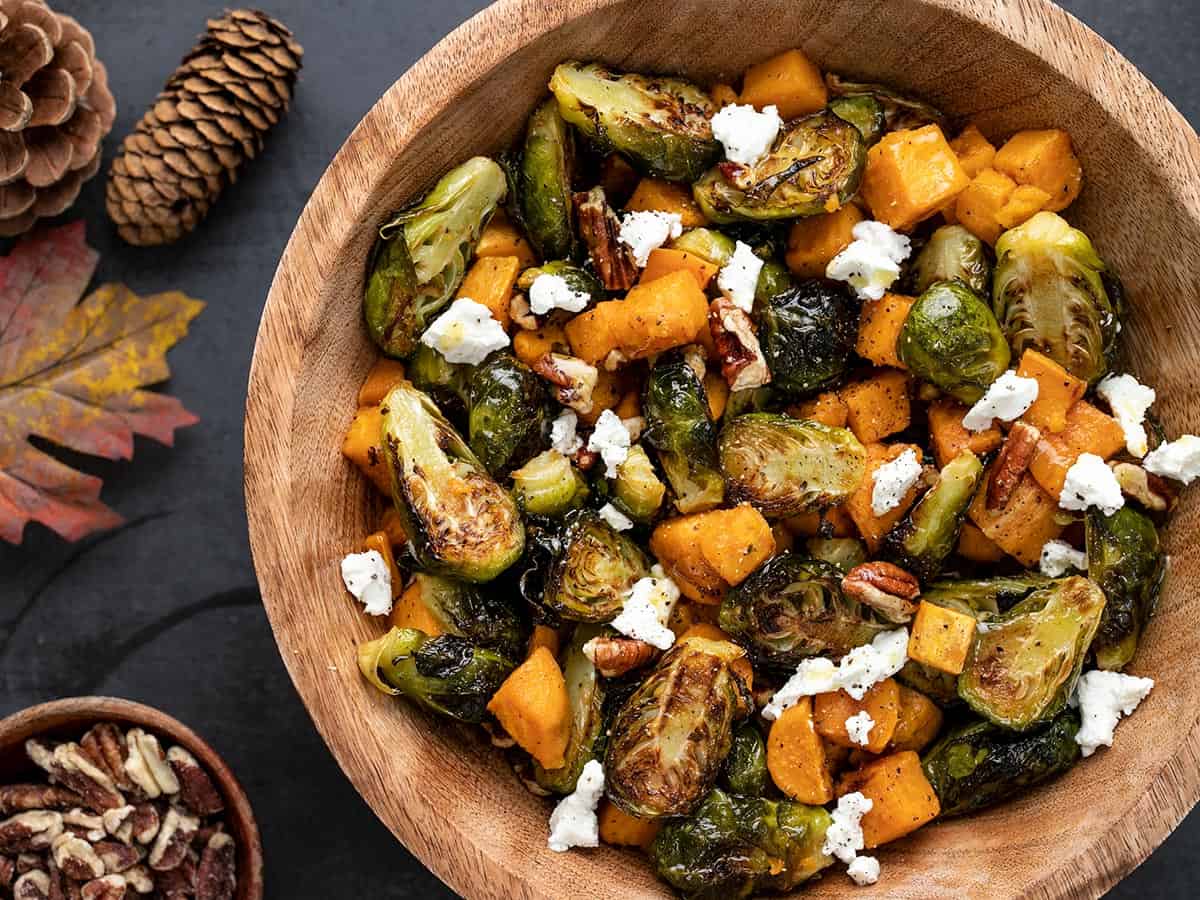
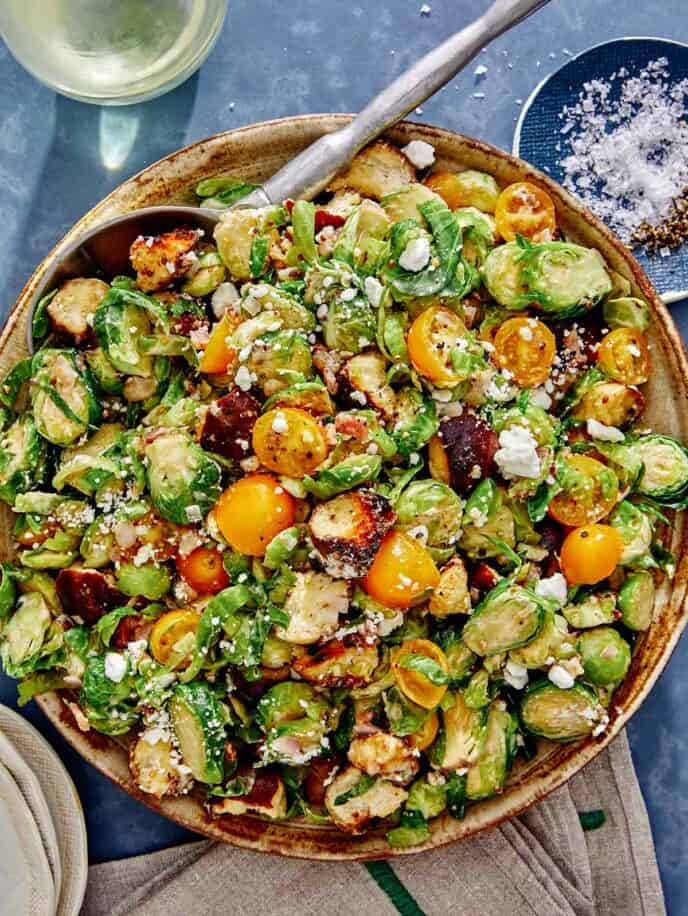
This gorgeous Roasted Brussels Sprouts Salad will steal the show at your family gathering this year! It’s a beautiful combination of roasted Brussels Sprouts, sweet potatoes, pecans, goat cheese, and a tangy-sweet maple Dijon dressing!
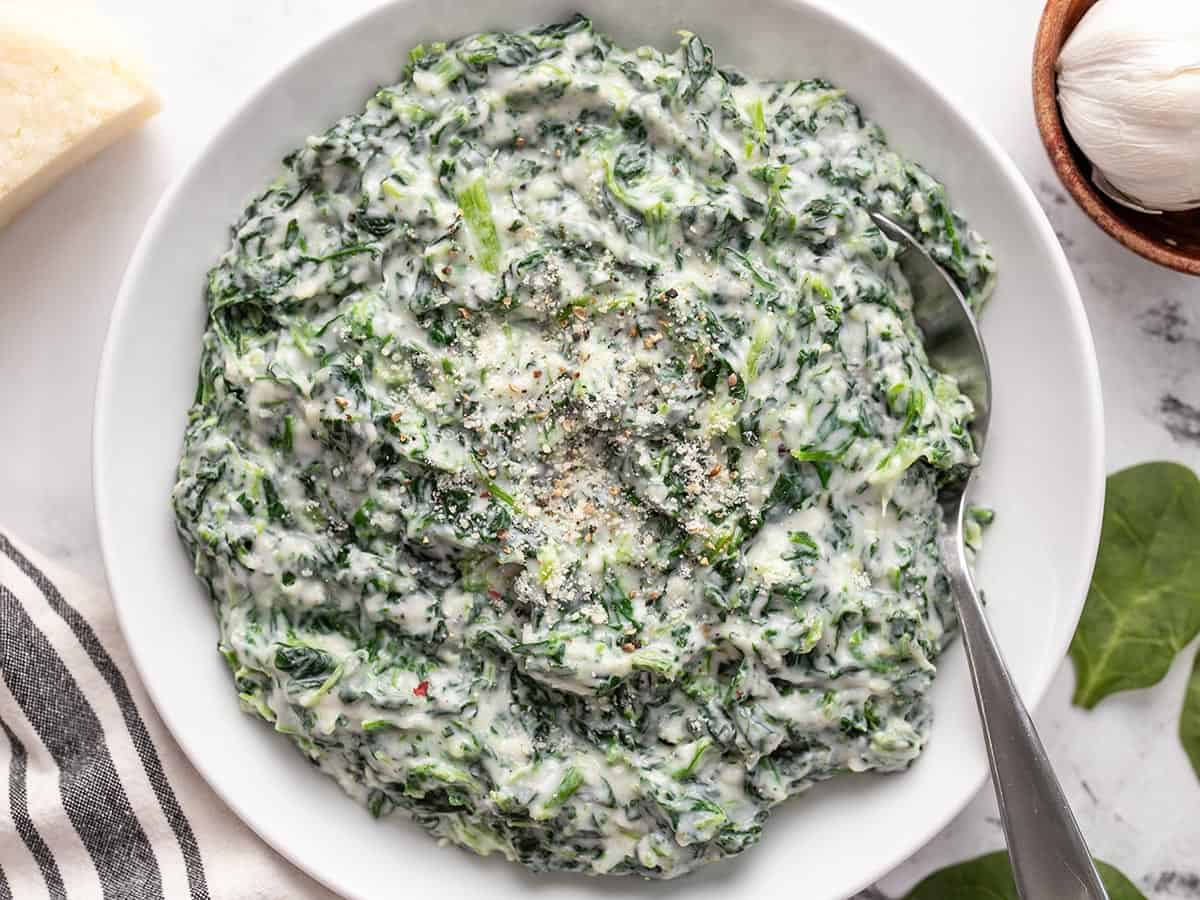
You can’t go wrong when you have an easy Creamed Spinach recipe in your back pocket. This version is simple, rich, and creamy without being overly heavy.
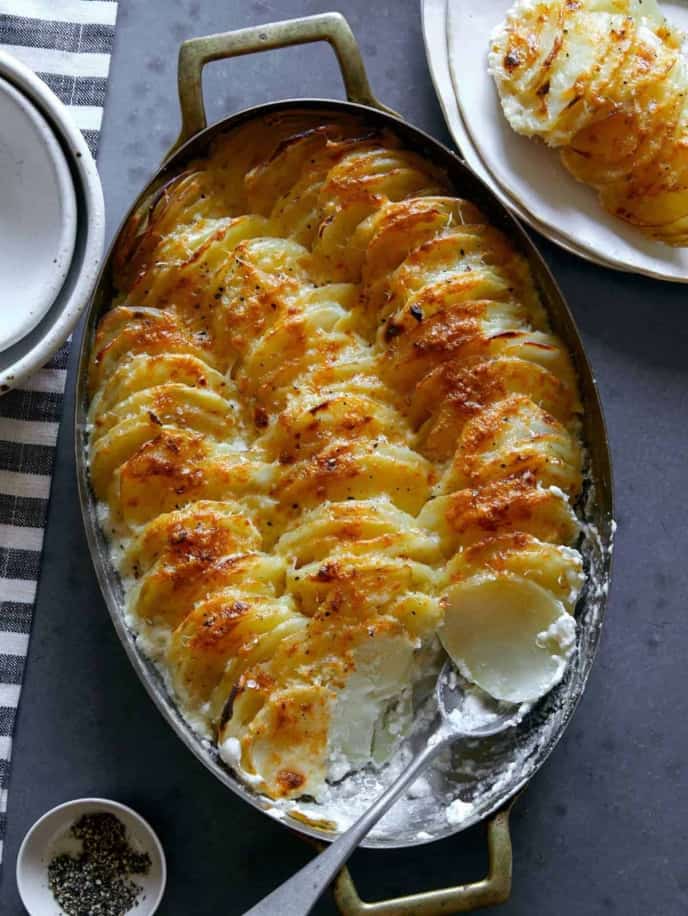
Potatoes Au Gratin – a truly classic comfort food dish made with thinly sliced potatoes in a rich and creamy sauce. Did I mention that I’m slightly addicted to this dish? It’s just SO good!
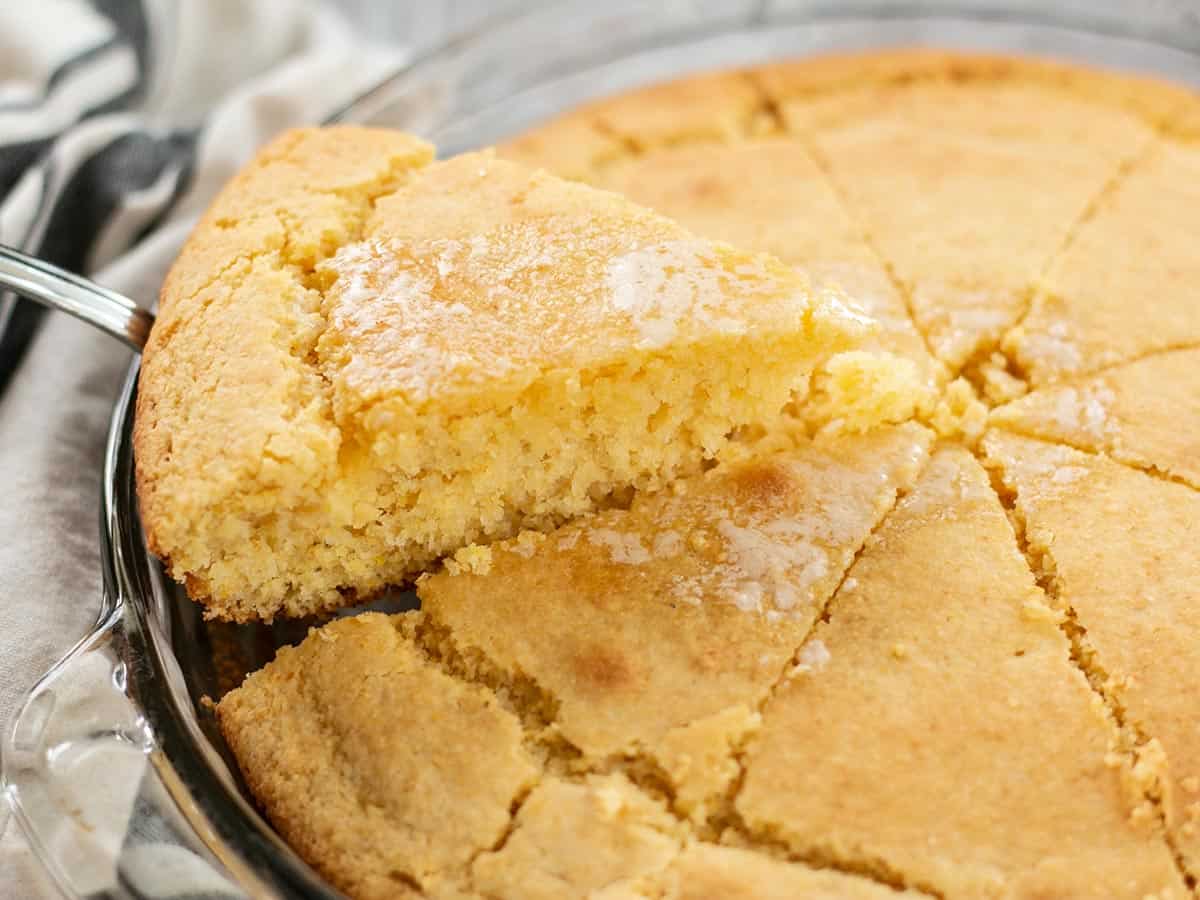
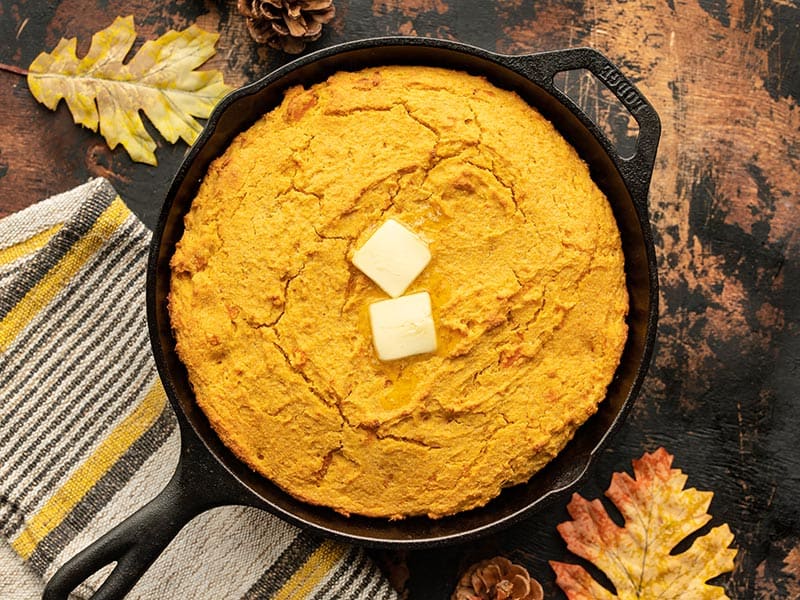
This Easy Homemade Cornbread is deliciously sweet, moist and it only uses a few pantry staple ingredients. It always makes the perfect side to go with collard greens or any type of slow cooked beans to help soak up all of that good flavor on your plate.
This easy and delicious potato and green bean skillet is the perfect weeknight meal made with simple ingredients like potatoes, green beans, onions, and bacon.
Take some of the stress away and make this simple and delicious Roasted Delicata Squash for Thanksgiving this year. A little bit of olive oil and a simple seasoning mix is all you need.
You’ll definitely impress your guests this year with these Twice Baked Potatoes. These deconstructed loaded baked potatoes are mixed perfectly with all your favorite toppings, then re-stuffed into crispy potato skins. Perfect for individual servings too!
These sweet and savory caramelized Balsamic Roasted Vegetables are versatile (use any vegetables) and make a simple yet stunning Thanksgiving side dish!
I’m pretty sure this Baked Mac and Cheese will be in high demand on Thanksgiving Day. It’s a staple potluck side dish and if you want more of that cheesy goodness with a crunchy flavorful topping, then baked mac and cheese is the way to go!
Get ready to take your cornbread skills to the next level with this rich and thick Sweet Potato Cornbread! It’s slightly sweet but also has a good amount of warm, aromatic spices to keep it from being too dessert-like.
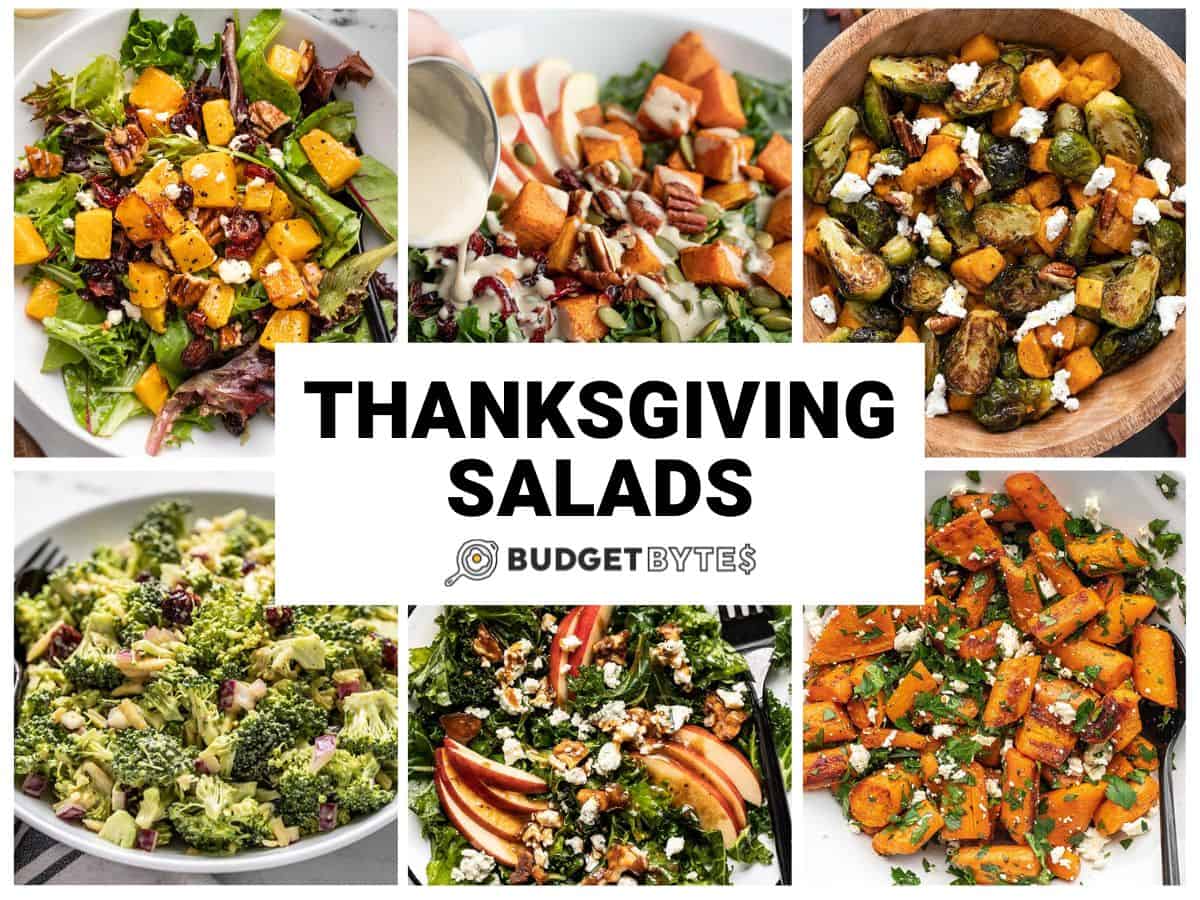
Well friends, the holiday season is upon us. And if you’re in the process of planning your Thanksgiving dinner menu, don’t forget to make some room for a fresh and colorful Thanksgiving Salad! Yes, I’m sure you’ll have lots of traditional sides like mashed potatoes, mac & cheese, and green bean casserole. But it never hurts to balance things out a bit with a simple, flavorful, salad for Thanksgiving. From easy broccoli salads, roasted vegetable salads, and delicious autumn salads with apples, we’ve got several Thanksgiving salads that we’re sure your guests will love!
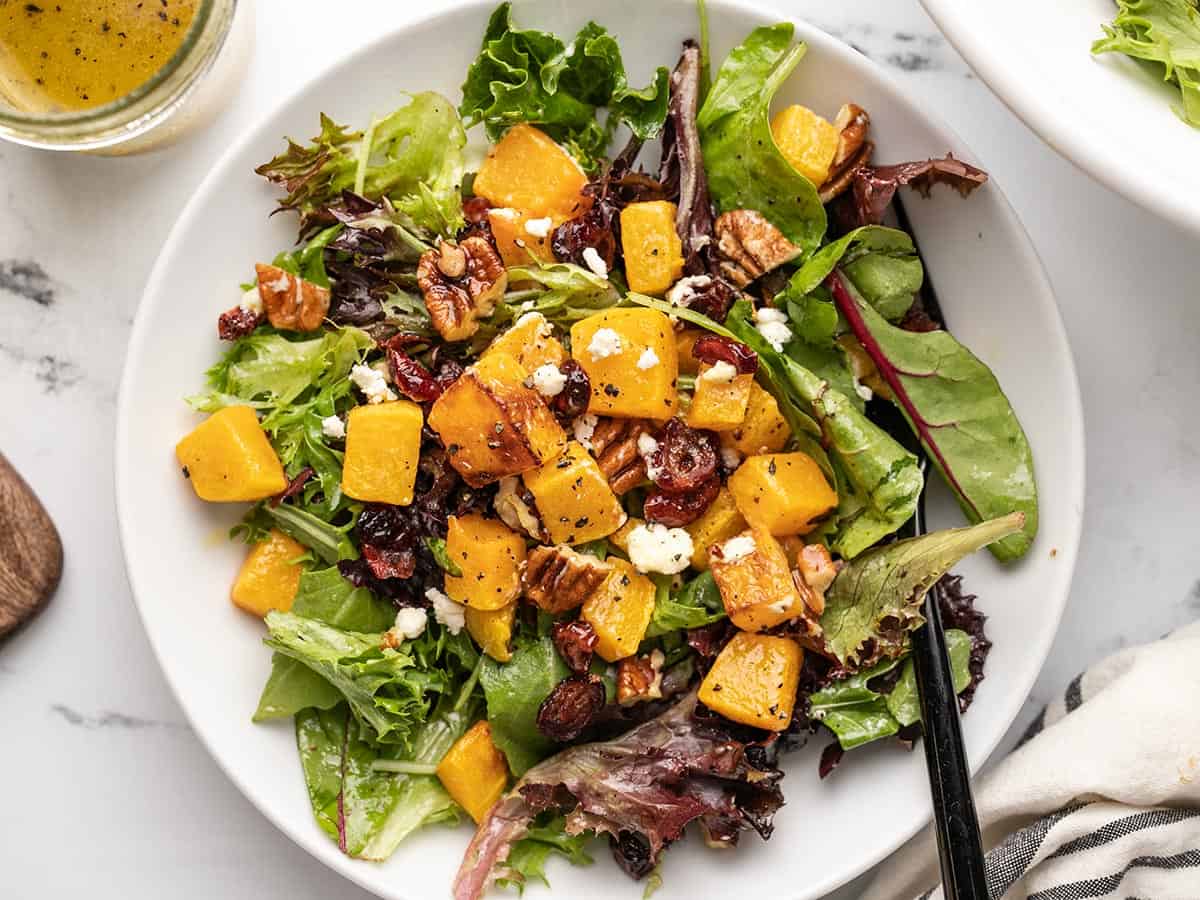
This delicious Butternut Squash Salad is the perfect salad to add to your Thanksgiving table! It features roasted butternut squash, a simple mix of toppings and a homemade maple Dijon vinaigrette dressing. It’s colorful, easy to make, and the perfect mix of sweet, savory, nutty, and creamy flavors!
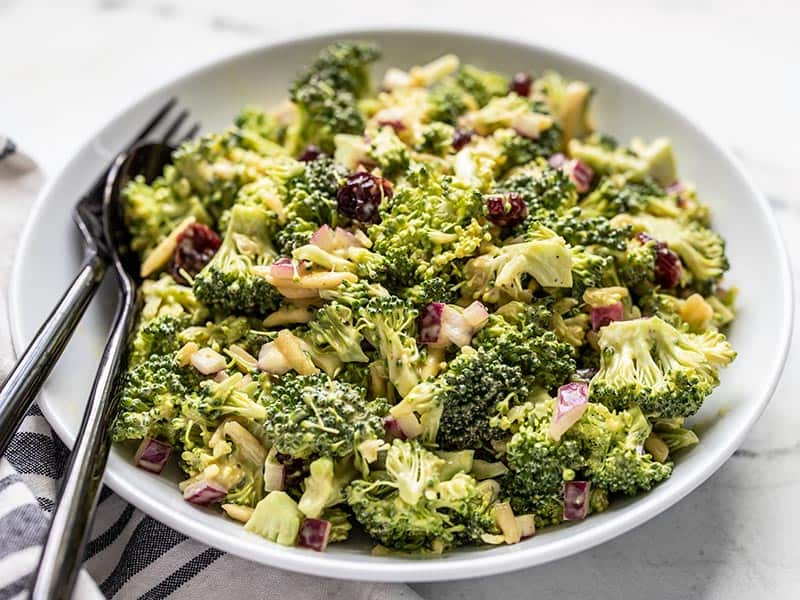
Broccoli Salads are always a great, fresh, side dish to add to Thanksgiving dinners. This Honey Mustard Broccoli Salad only takes minutes to make, is packed with flavor, and it holds up well in the refrigerator!
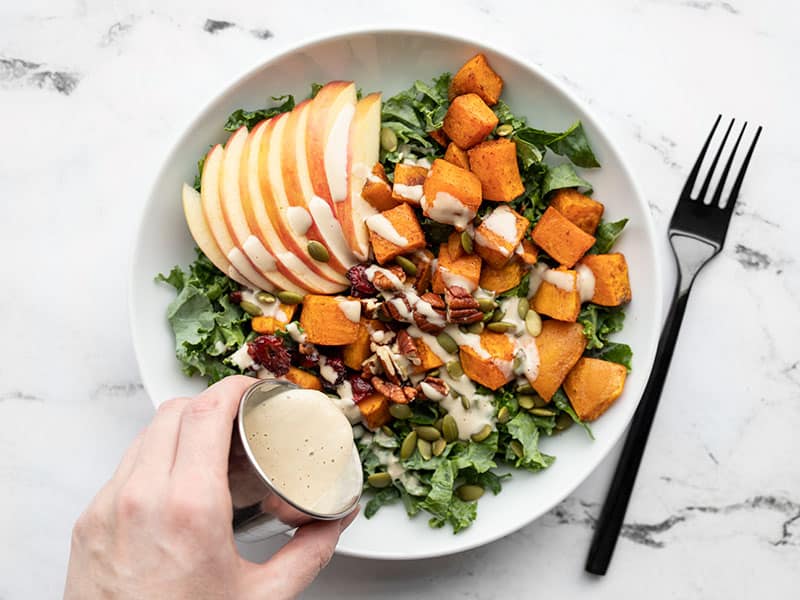
Take advantage of lots of fall flavors with this Autumn Kale and Sweet Potato Salad! It has incredible flavor and texture combinations including fresh apple and kale, roasted sweet potatoes, and a maple tahini dressing. So good!
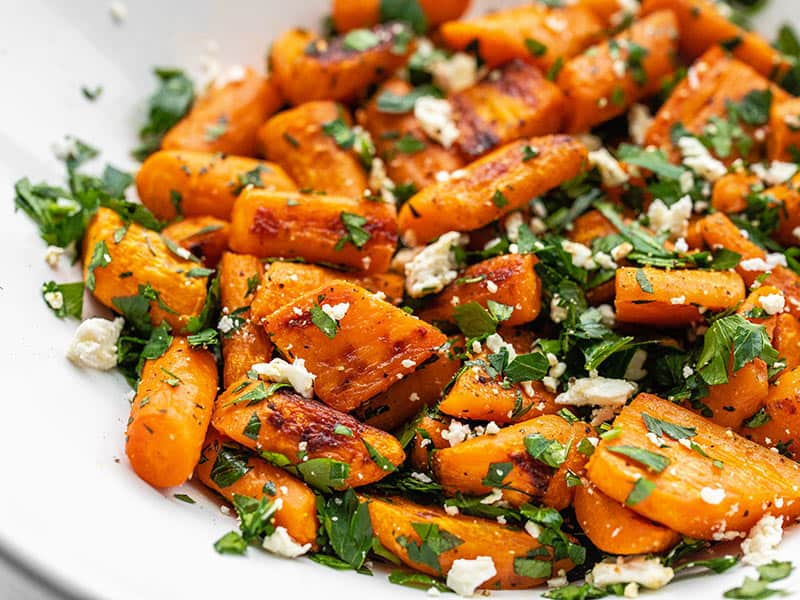
A simple an inexpensive side dish, this Roasted Carrot and Feta Salad combines sweet roasted carrots with salty feta and fresh parsley for a simple salad.
Turn those roasted carrots into a salad this Thanksgiving with this Roasted Carrot and Feta Salad. A really simple side dish that only requires six ingredients and the oven does most of the work!
This gorgeous Roasted Brussels Sprouts Salad will steal the show at your family gathering this year! It’s a beautiful combination of roasted Brussels Sprouts, sweet potatoes, pecans, goat cheese, and a tangy-sweet maple Dijon dressing!
Prepare to be blown away with this insanely delicious Autumn Kale and Apple Salad! It’s made with lots of kale, candied walnuts, and a simple balsamic vinaigrette dressing that everyone will love!
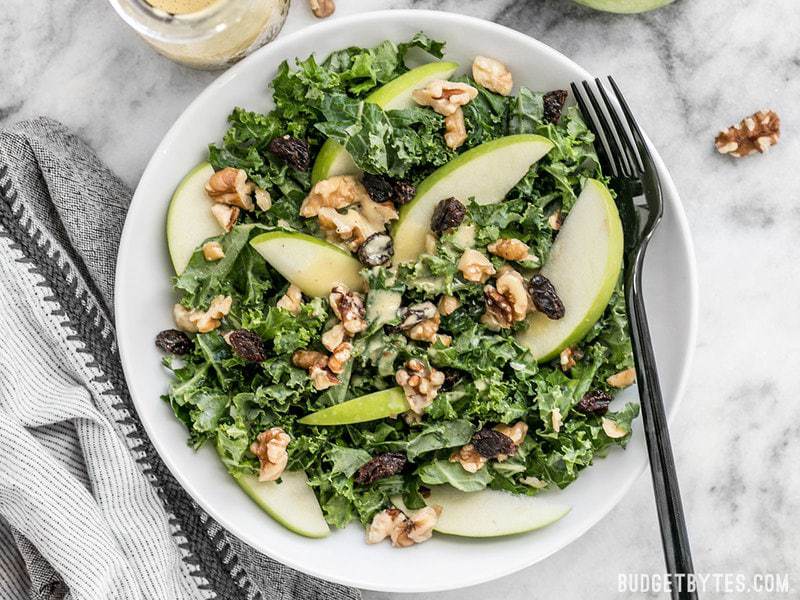
Adding to the list of flavorful apple salads is our crunchy, Apple Dijon Kale Salad. This crisp salad includes fresh apples, walnuts, raisins, and kale.
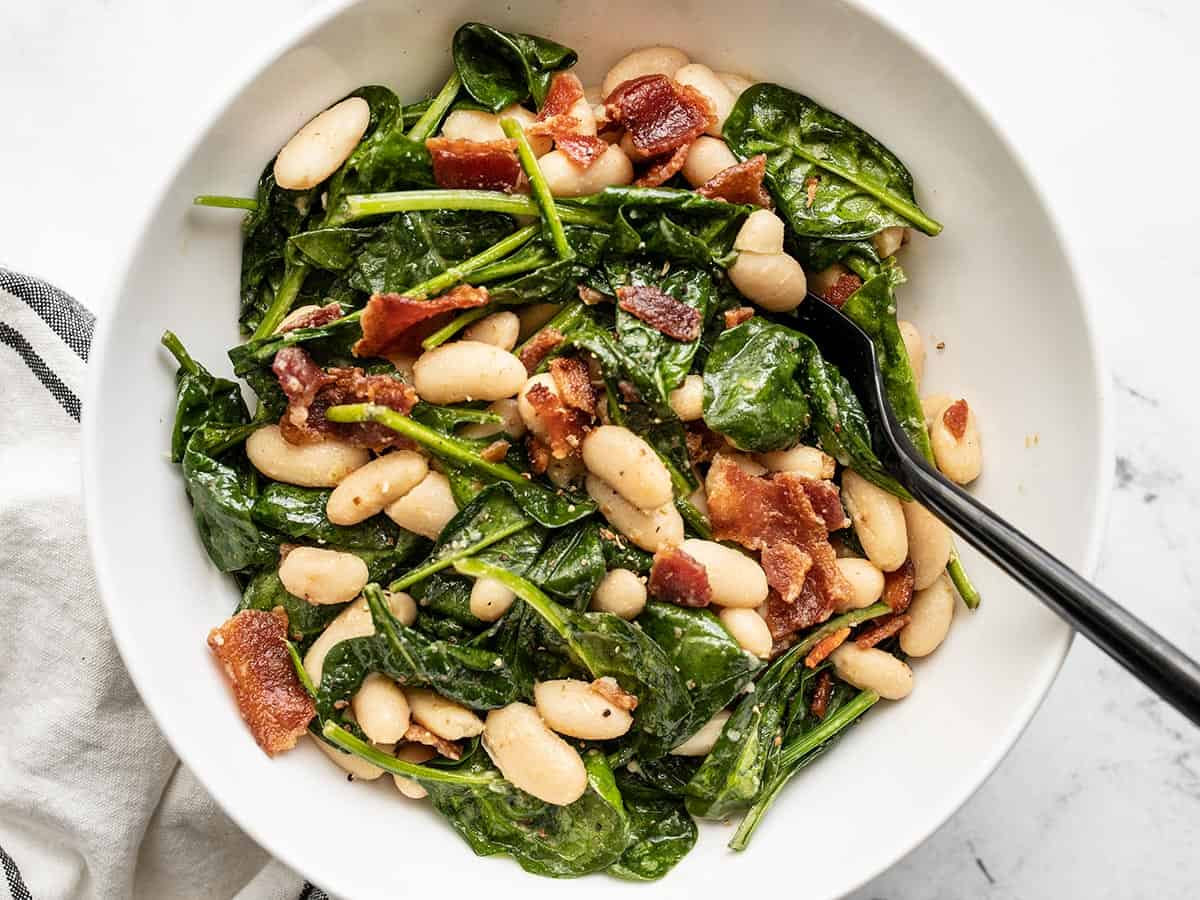
This quick 20-minute Wilted Spinach Salad is made with bacon, cannellini beans, and a warm vinaigrette that helps slightly wilt the spinach. It’s perfect as a side dish for your Thanksgiving meal.
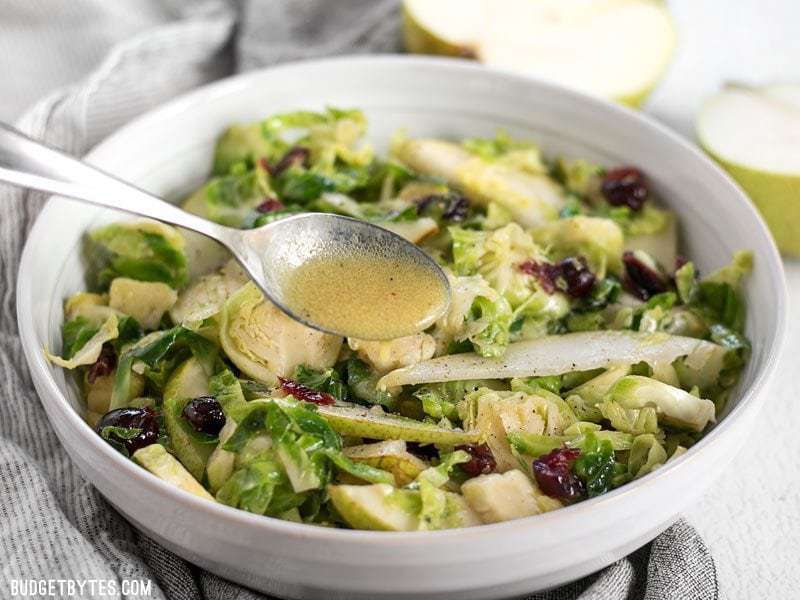
If you’re looking to save some time this holiday season, look no further. This Autumn-inspired Warm Brussels Sprouts and Pear Salad is simple, light, and only takes 15 minutes to make!
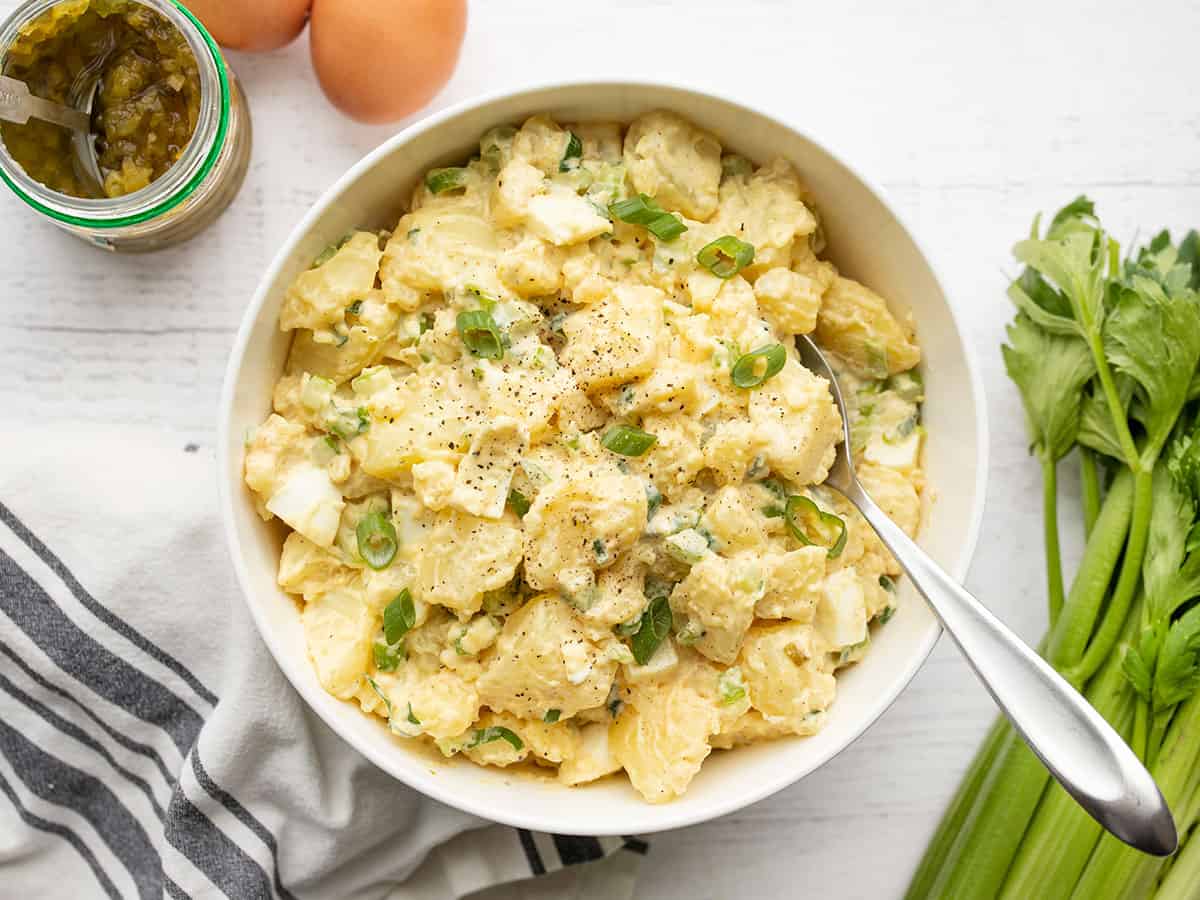
Classic Southern Style Potato Salad is another popular side salad during the holidays and at family gatherings. This potato salad recipe is creamy, tangy, and has just the right amount of crunch.
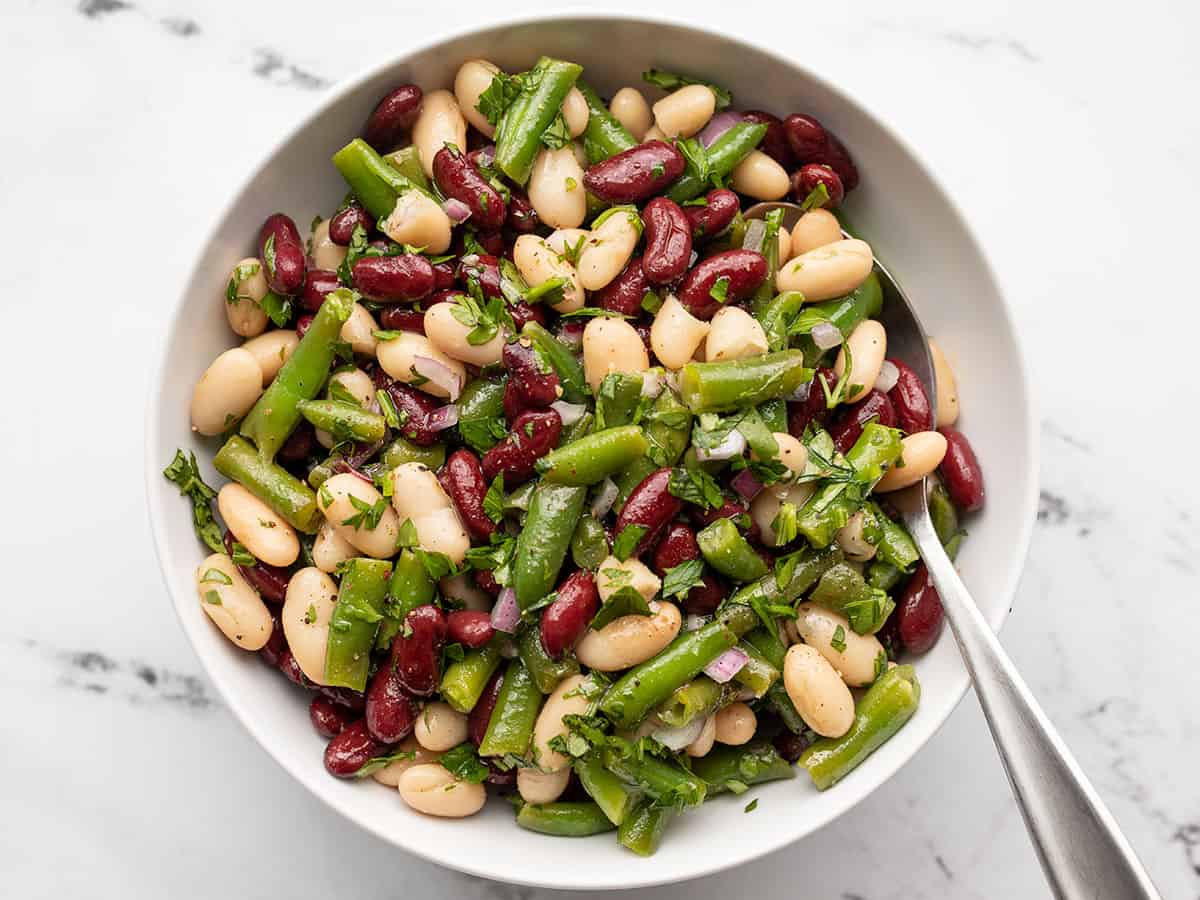
One of our favorite simple salad recipes is this Classic Three Bean Salad! It has minimal ingredients, a tangy-sweet dressing, and it’s the perfect side dish for any holiday meal.
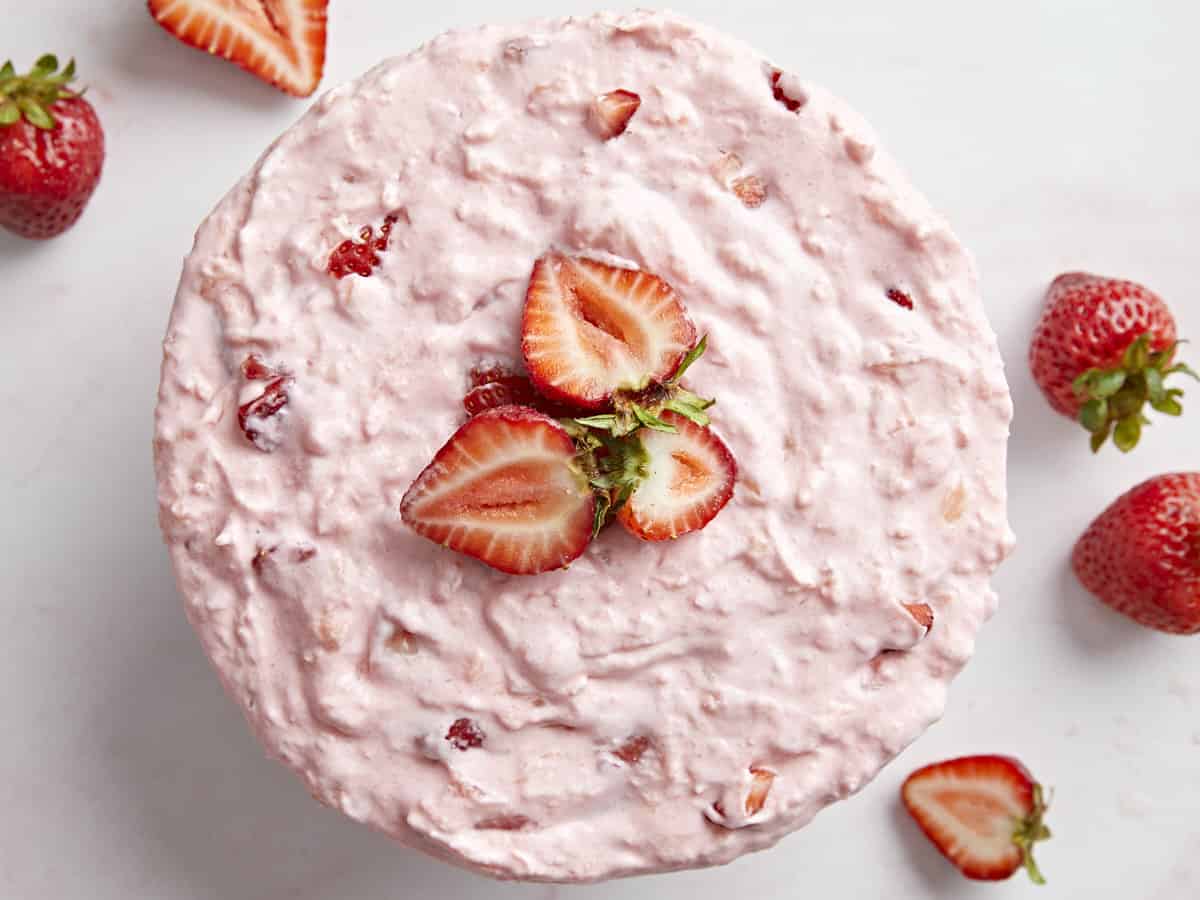
Trust me, after a big heavy meal your family will appreciate this light and airy Jello Salad. But don’t let the name fool you, this Jello Salad recipe is actually a classic dessert that’s popular during this time of year. It’s simple, sweet, and definitely a crowd favorite. ;)
Thanksgiving is right around the corner and we have our Best Thanksgiving Recipes for you! We have everything from appetizers, breads/biscuits, side dishes, mains (and not just turkeys!), and desserts. It’s the ultimate list of thanksgiving recipes! Thanksgiving Appetizers Everyone loves to prep their stomach by nibbling on a little something before the big meal, so we have a list of some of our favorite hot and cold appetizers that will definitely kickstart any appetite….
Thanksgiving is right around the corner and we have our Best Thanksgiving Recipes for you! We have everything from appetizers, breads/biscuits, side dishes, mains (and not just turkeys!), and desserts. It’s the ultimate list of thanksgiving recipes!
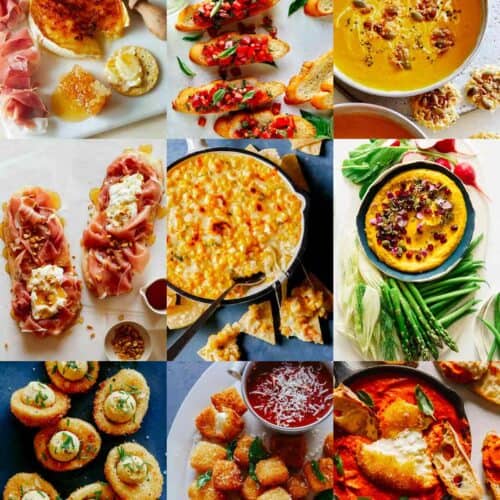
Thanksgiving Appetizers
Everyone loves to prep their stomach by nibbling on a little something before the big meal, so we have a list of some of our favorite hot and cold appetizers that will definitely kickstart any appetite.
Cold Appetizers
Cold appetizers are perfect for Thanksgiving. Why? Because cold means make ahead! We know oven space gets limited so these are all our trusted and most loved appetizer recipes.
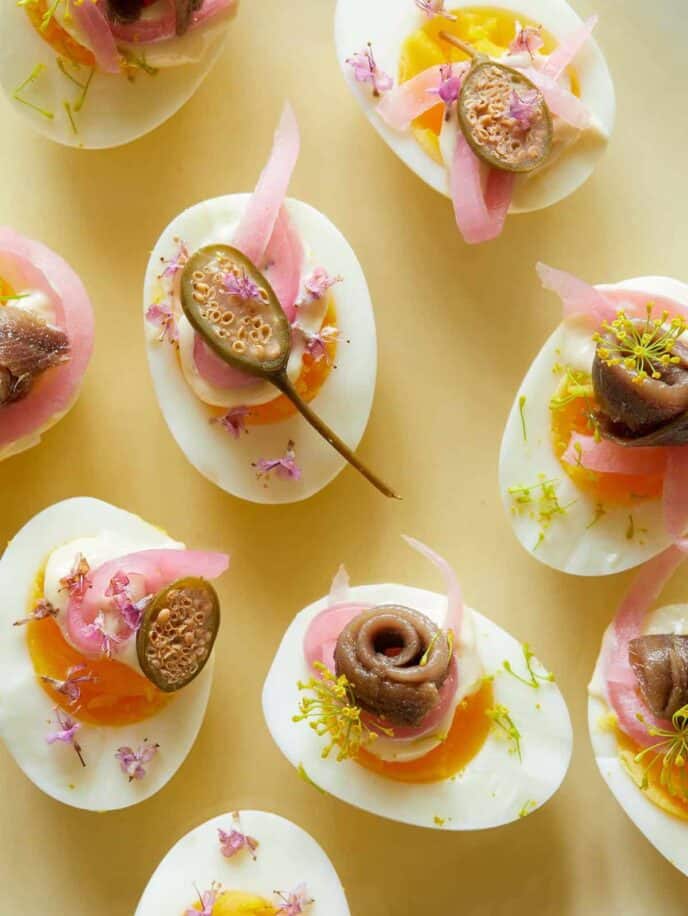
Our Undeviled Eggs are ALWAYS a hit. They’re a simplified way to serve the more traditional deviled eggs and can be topped with just about any yummy, topping of your choice!
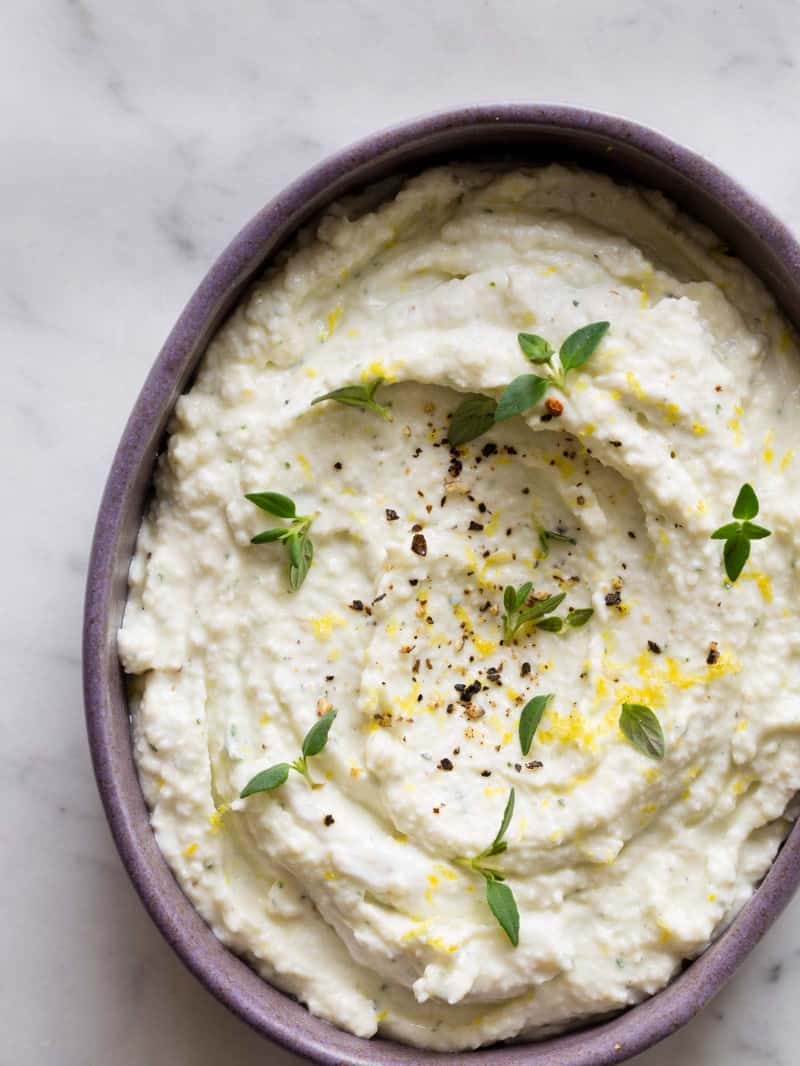
One of our favorite dips for a crowd is this Black Pepper and Lemon Asiago Dip! We love to serve it with a variety of crackers as well as a bunch of fresh crudité!
‘Tis the season for all things pumpkin so another dip option is our Roasted Pumpkin Hummus! It’s thick, creamy and always hits the spot! An added bonus is that this dish is vegan!
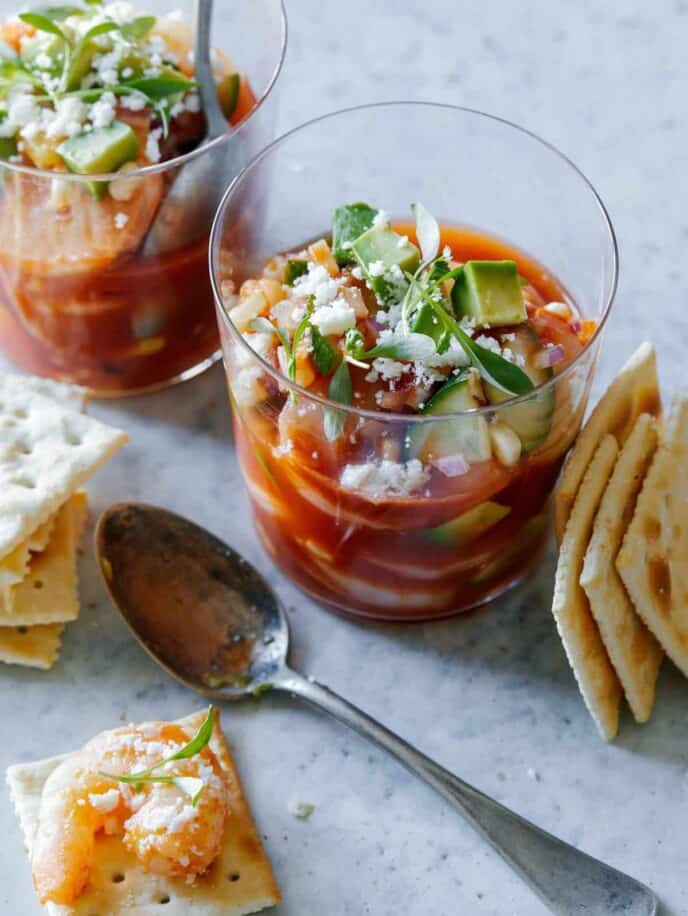
Our Mexican Shrimp Cocktail is delicious, bright, fresh, and light enough to enjoy without filling you up too much before the big meal.
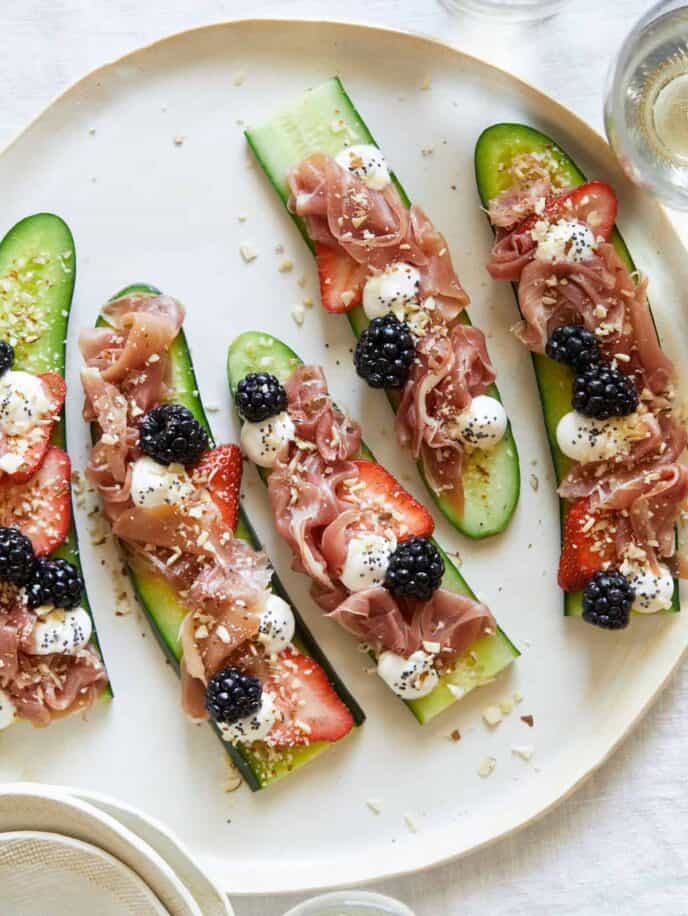
Our Prosciutto Topped Cucumber Crostini is so good! A lightly take on the traditional crostini, using sliced cucumbers instead of sliced pieces of toasted baguette.
Hot Appetizers
This collection of Thanksgiving appetizers is for those of you who are looking to impress. There are some seriously delicious recipes in this hot appetizer collection, and we know you will find some you just have to make!
Our Fried Burrata over Romesco Sauce is crazy delicious and always a crowd pleaser. Make the romesco sauce ahead of time and just heat it up before you’re ready to serve it.
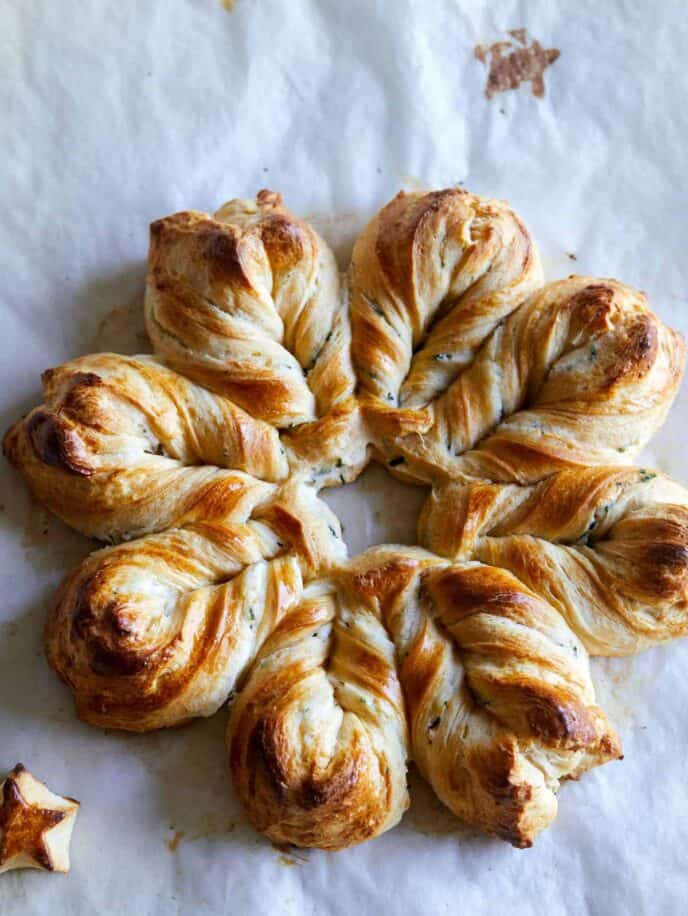
This Herb and Cheese Braided Star Bread is another great make ahead dish that looks super impressive, but is actually so easy to throw together and tastes delicious! You can make this whole thing ahead of time, freeze it and pop it in the oven right before your guests arrive! The perfect thanksgiving recipe to kickoff the night!
Our Honey Brûlée Brie is always a favorite! Who doesn’t love creamy, melty brie cheese? Why not take it a step further by slathering the top with honey and torching it to create a sweet, crackling top? You’re welcome.
Another unique take on deviled eggs, our Fried Deviled Eggs are delicious and totally addicting!
Our Crock Pot Beer Cheese Dip is a great make ahead appetizer! Serve it with chips, crackers, pretzels, broccoli florets, and more!
Breads and Biscuits
We love carbs and think warm bread and biscuits are a must on every thanksgiving table! Yes, ok, we know there is usually always stuffing which is also bread but come on – you can never have too much bread! We have rounded up our favorite Thanksgiving Bread and Biscuit recipes that are perfect for sopping up the last of that gravy on your plate.
Breads
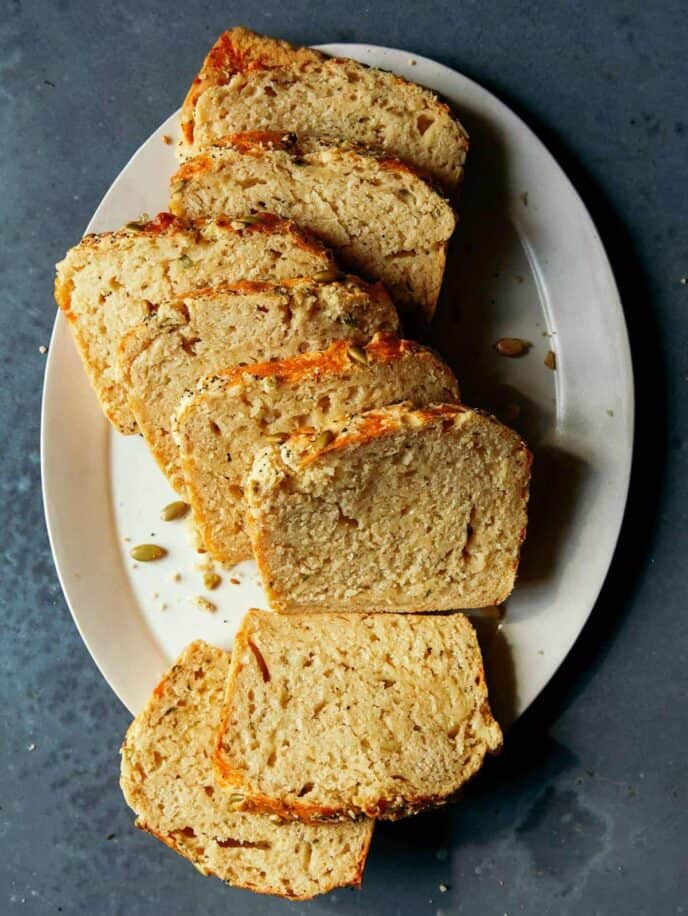
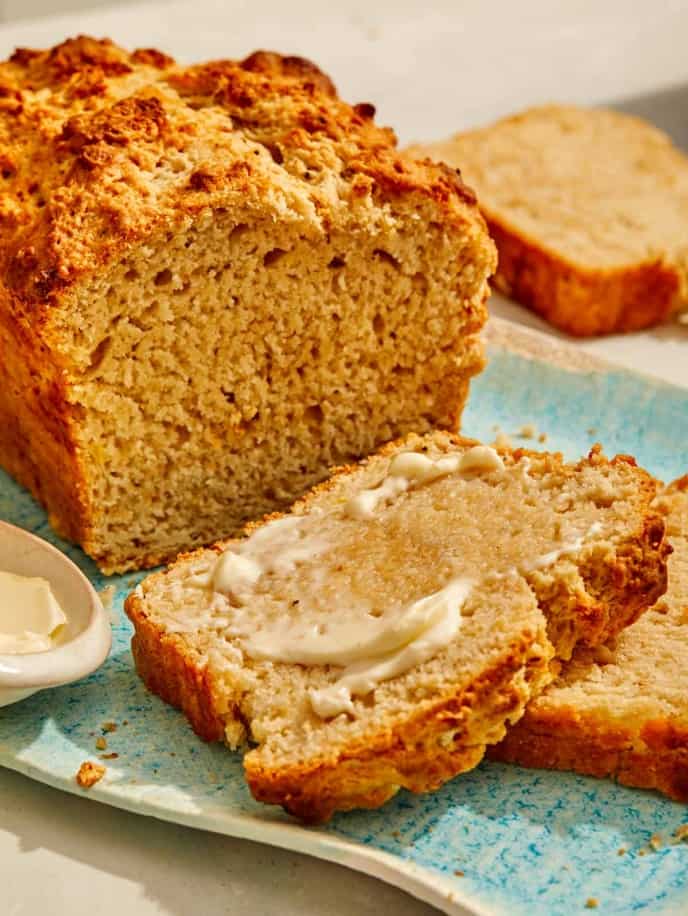
Cheesy Herb Beer Bread is our go to when we want warm bread without all the fuss of yeast. This no-yeast bread is savory, fluffy and delicious and takes no time at all to make!
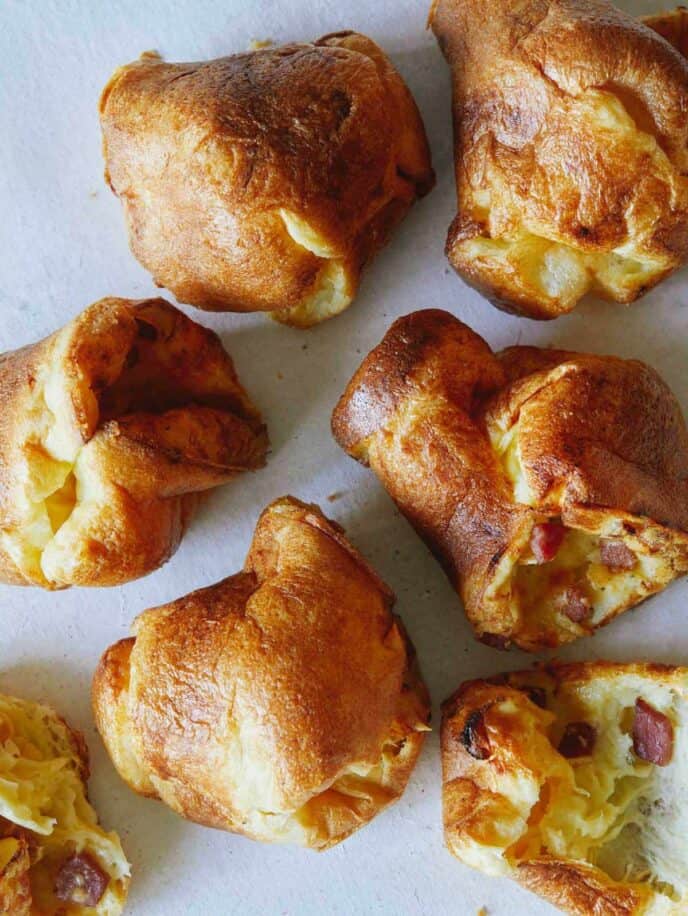
These Ham and Cheese Popovers are absolutely delicious, light and airy, and just a little something special for your table!
Our Cheesy Herb Pull Apart Bread is flaky and delicious. We love making a couple loaves to place around the table for guests to share.
Pumpkin Cornbread is something we love to make this time of year! It has a delicate pumpkin flavor that we love and should be paired with lots of soft butter. It’s a simple thanksgiving recipe that should definitely be added to your meal!
Another awesome no-yeast bread is our Black Pepper and Parmesan Beer Bread! We love this tasty combination of black pepper and Parmesan, it’s so good!
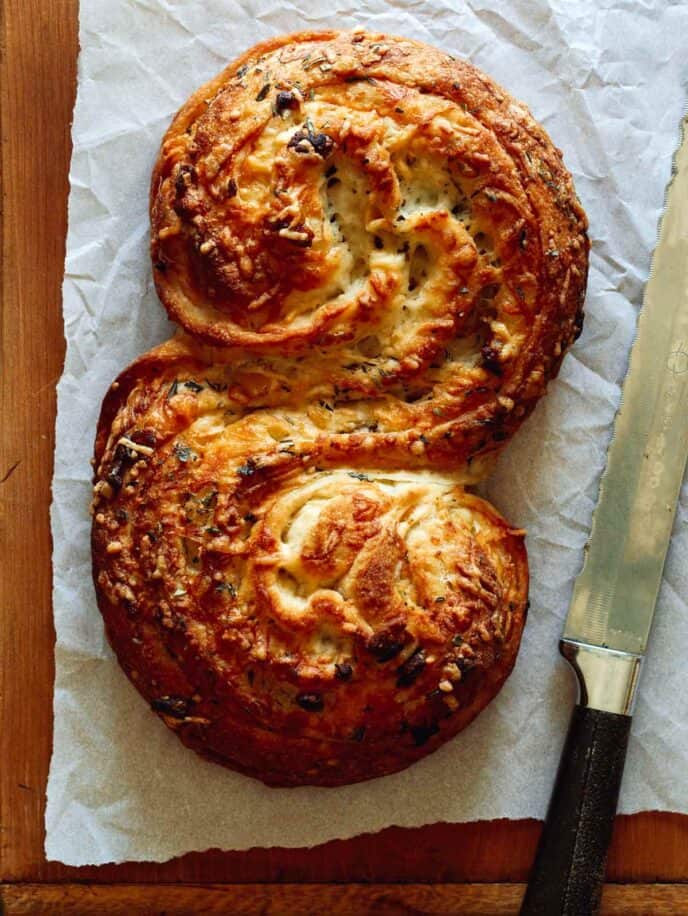
Cheesy Garlic and Herb Pane Bianco might look impressive, but it’s actually very easy to make! It’s also really versatile and can be flavored with so many different things like sliced olives, sun dried tomatoes and caramelized onions, just to name a few!
Biscuits
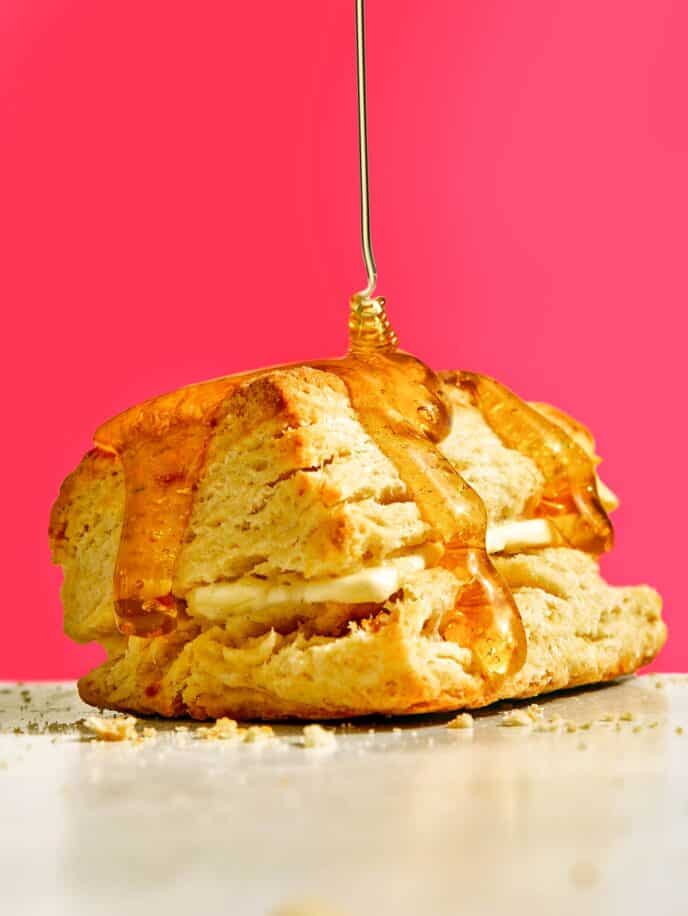
Our Buttermilk Biscuits are truly delicious. They’re flaky, buttery, and tender!
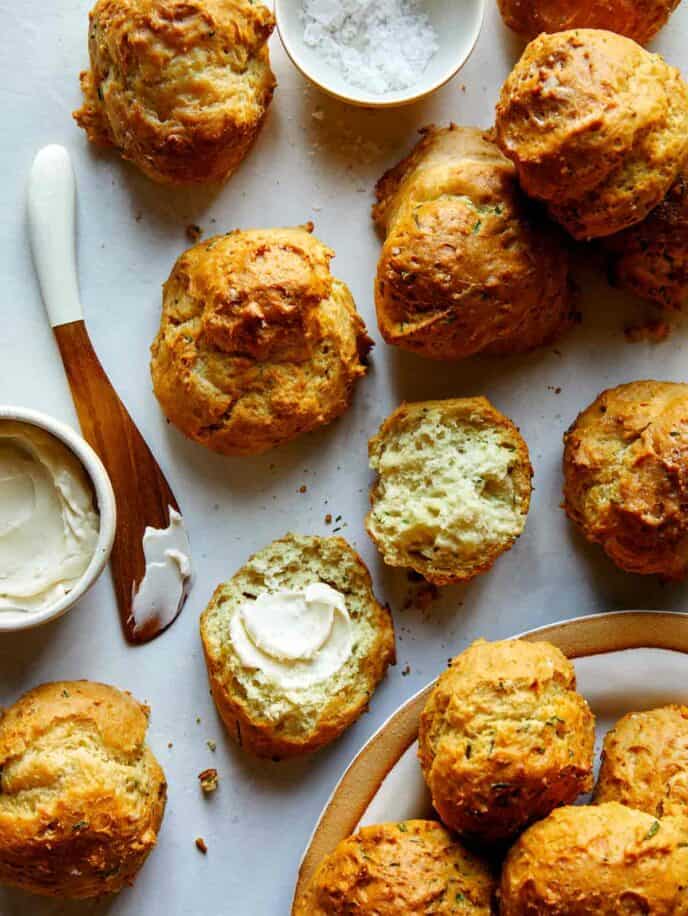
Our Sour Cream and Chive Drop Biscuits are for sure a favorite thanksgiving recipe. They’re so easy to make and are packed with so much delicious, buttery flavor!
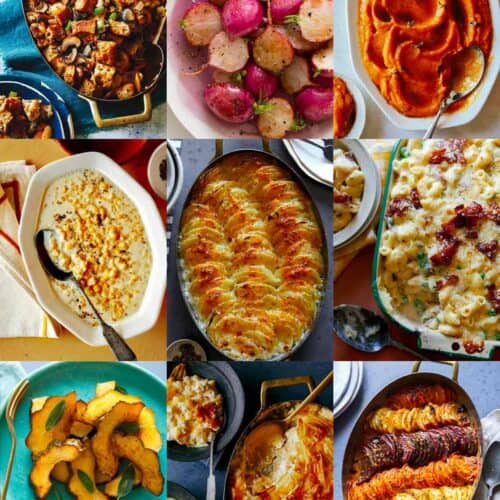
Thanksgiving side dishes are favorites for many people and we definitely don’t have a shortage of delicious side dishes to include in your thanksgiving meal! In fact, we think side dishes are maybe the best part of Thanksgiving. This collection of side dishes has everything you could want!
Thanksgiving Stuffing Recipes
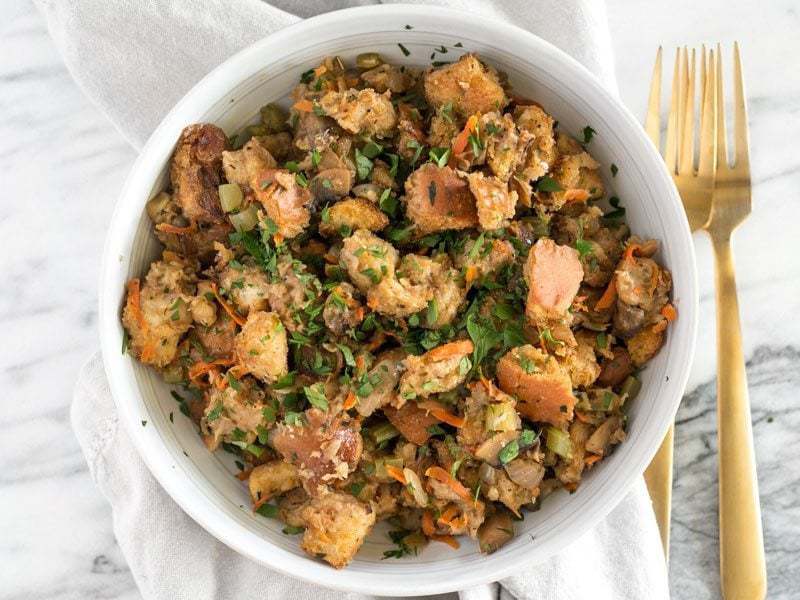
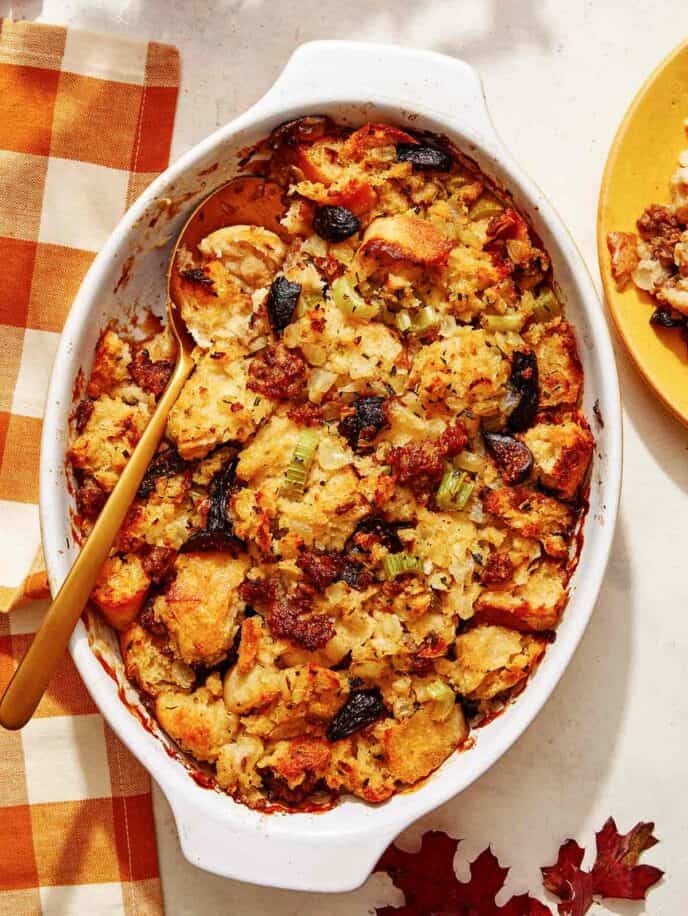
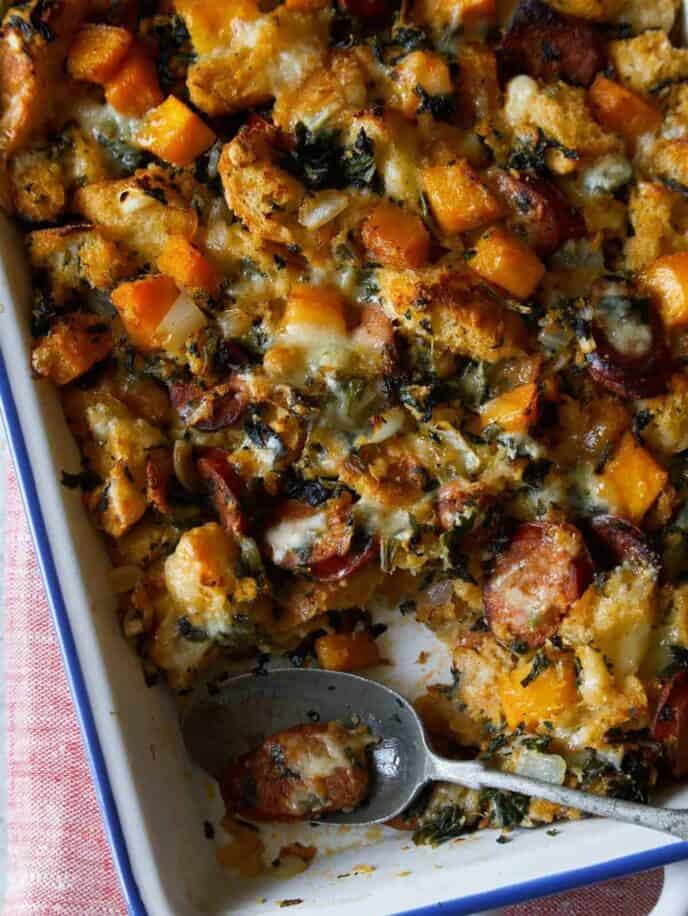
Stuffing is probably my favorite part of any thanksgiving meal. I love stuffing of all kinds, but one of my absolute favorites is this Fig, Herb and Sausage Stuffing. I promise you guys, this is SUCH a crowd pleaser. I can never make enough and it’s the first thing to go, ALWAYS!
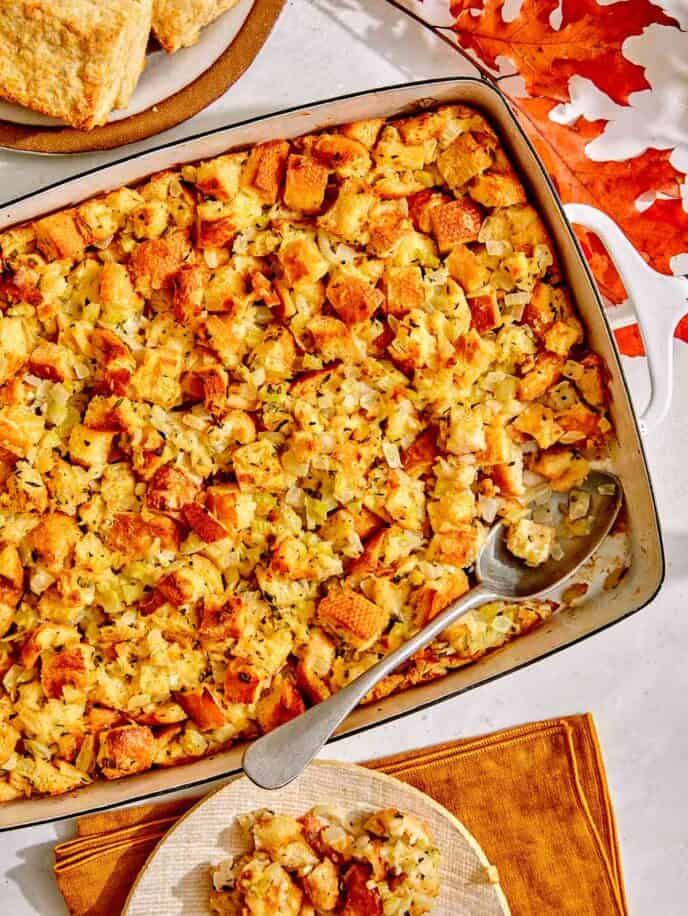
It’s always nice to have some delicious, but “no-frills” dishes on the table during thanksgiving and our Homemade Stuffing recipe is it! Perfectly moist and flavorful with a delicious toasted top!
Another stuffing very high on my list is this Apple and Fennel Stuffing. I love the combination of apple and fennel. The flavors balance each other out so nicely and just soak into aaalllll the bread. So good. Swapping the butter out for a vegan alternative and using vegetable stock will make this vegetarian dish, vegan friendly!
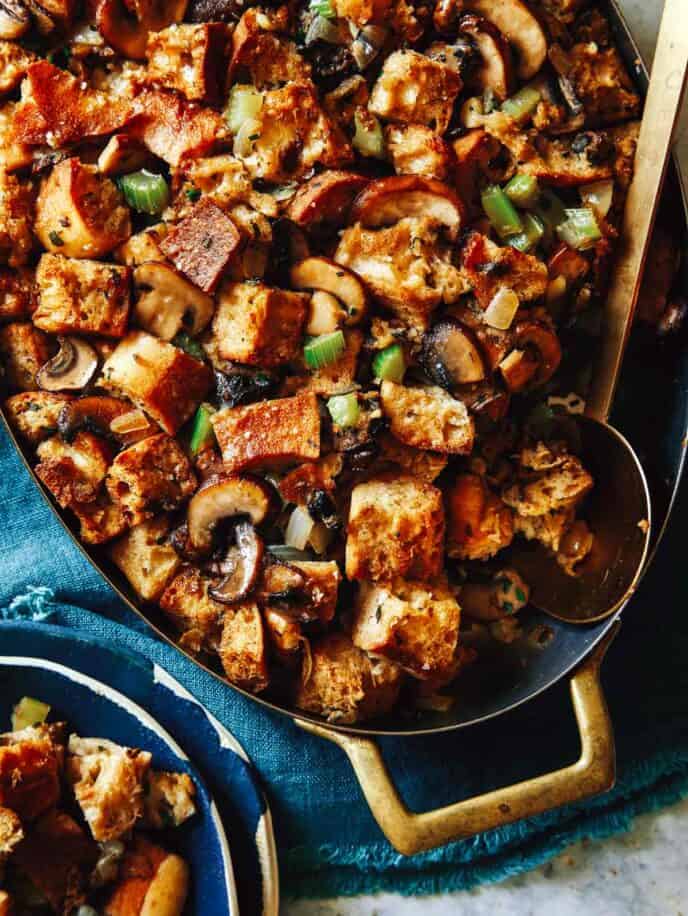
Our Mushroom and Sage Stuffing is another great vegetarian friendly thanksgiving recipe that can also easily be made vegan by swapping the butter out for a vegan alternative. We love the rich and savory mushroom flavor in this stuffing!
We’re starting with our Shaved Brussels Sprouts Salad (and yes, it’s so much more than just a salad! The crispy, salty bits of pancetta, toasty pieces of pretzel bread and crunchy shaved brussels sprouts get tossed together in the best mustard vinaigrette, for the tastiest side/salad/whatever you want to call it!
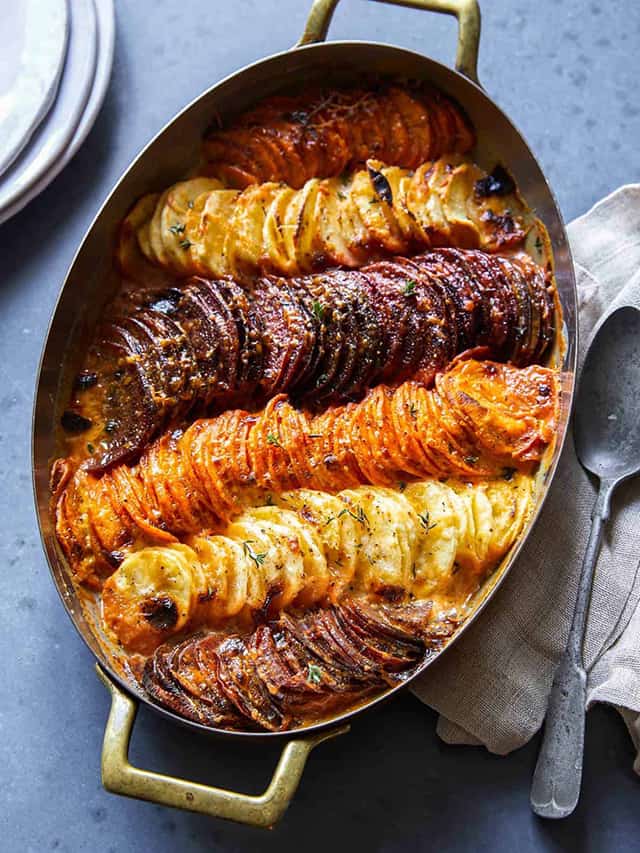
Our Cheesy Root Vegetable Gratin is not only a stunner, but tastes just as delicious as it looks! Filled with bubbling Parmesan and gruyere and super fragrant thyme, it’s one of our favorite side dishes ever!
This Butternut Squash with Brown Butter is a delicious side dish that by no means takes the place of mashed potatoes – but certainly will if you need a sub!
We have TONS of mac and cheese recipes on the blog, but this classic, Creamy Stovetop Mac and Cheese has always been and will probably be one of our favorites. This no fuss, creamy concoction is something we want to face plant into every time it’s in front of us. So creamy and satisfying!
Our Parsnip and Roasted Garlic Mash is the perfect alternative to mashed potatoes and a great vegetarian side dish. You can also swap out the butter and cream for vegan alternatives, resulting in an equally delicious thanksgiving side dish!
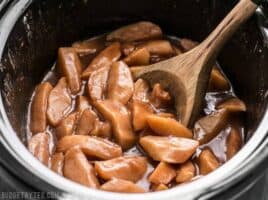
Maple Glazed Roasted Acorn Squash is always a great addition to any thanksgiving table, and so easy to throw together. We love that it’s a delicious and beautiful dish that takes minimal effort; perfect for when you have an entire feast to plan and cook!
If you’re looking for something extra decadent, but also easy to make our Cheesy Potato Casserole is for you! It’s creamy and delicious and the over the top potato chip crust might be one of our favorite things about this crazy good thanksgiving recipe!
It’s hard to beat ultra rich and creamy Mashed Potatoes and we promise our recipe won’t disappoint!
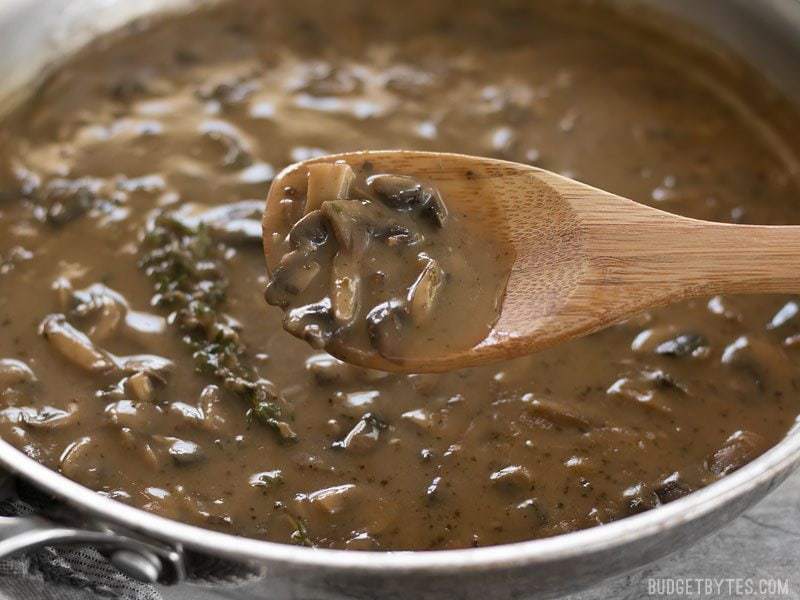
We think one of the stars of the thanksgiving dinner is the gravy (which we pour on everything!), so it needs to be great, right? Our Roasted Garlic Gravy is our absolute favorite gravy ever!
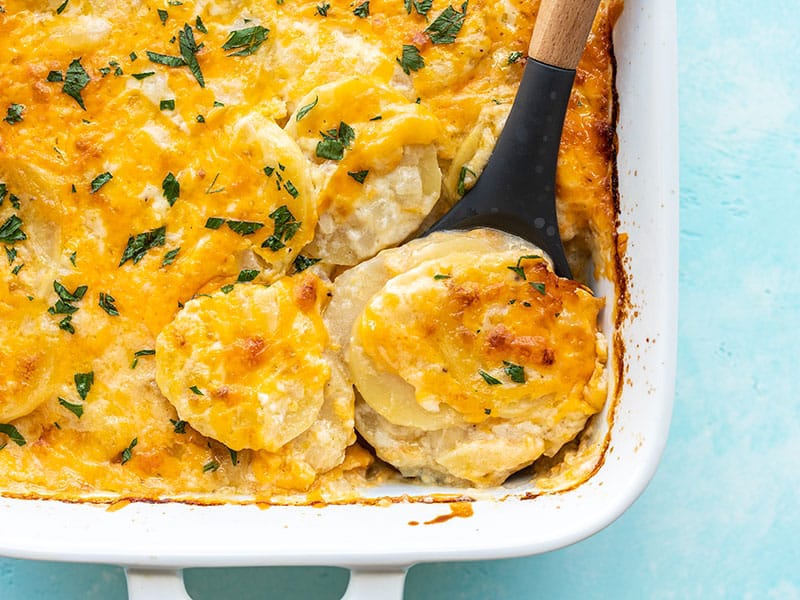
Want a more traditional take on gratin? Our Cheesy Potatoes Gratin is equally as delicious as our root vegetable version, but made with creamy russet potatoes!
We have nothing against canned cranberry sauce, in fact we love it! We do also love a nice homemade Cranberry Sauce and think our recipe is a little special with the addition of citrus zest, cinnamon and star anise!
Main Dishes
While turkey is the traditional main dish most people expect to enjoy we also have other alternatives if turkey isn’t your thing!
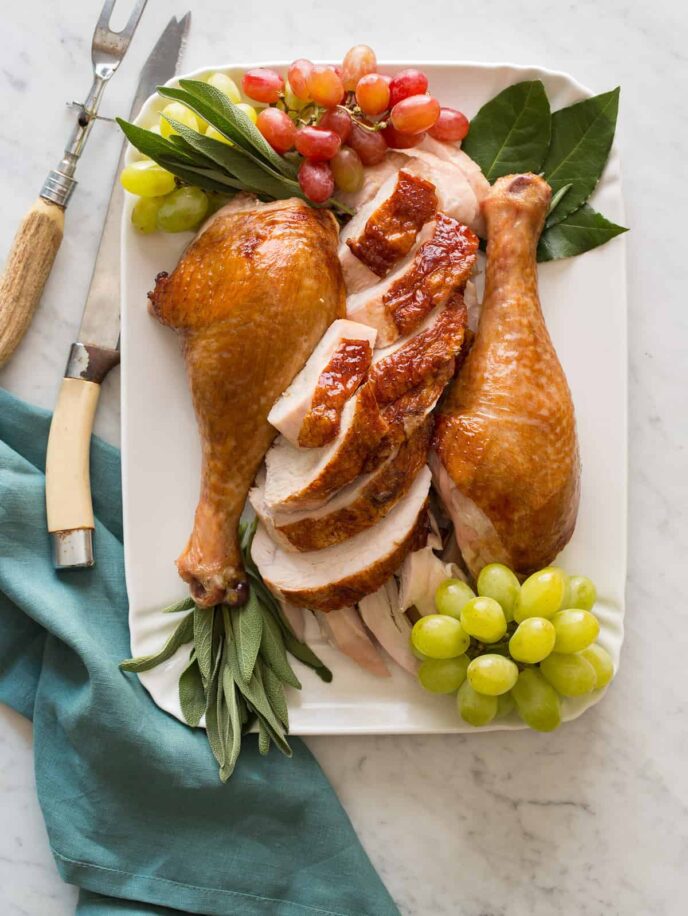
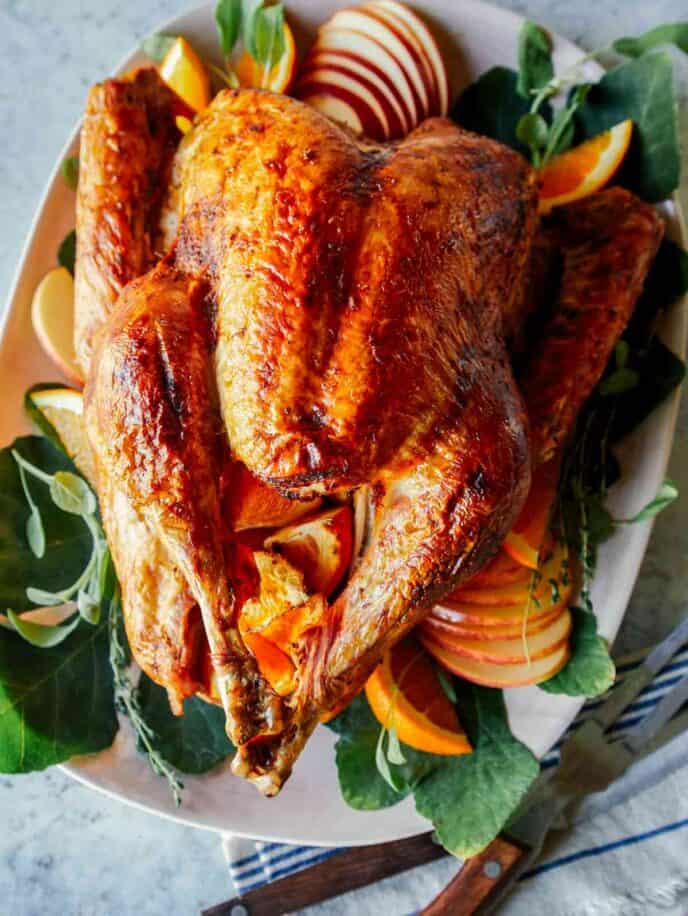
Citrus and Herb Roasted Turkey is my go-to if I’m going the classic route for thanksgiving. I love the flavor this brine imparts into the meat, and the cooking method insures you have a very juicy bird, with nice and crispy skin.
Our Citrus Dry Brined Turkey is another delicious take on roasting a whole thanksgiving turkey. It takes less fridge space, is a little more low maintenance to make and results in an equally flavorful and juicy turkey with crispy skin.
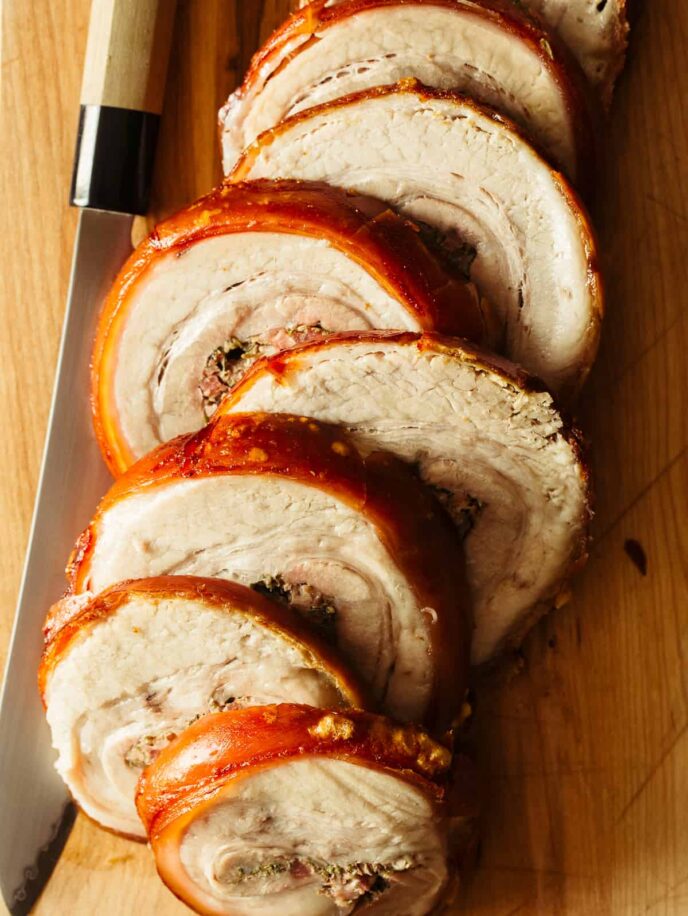
Not into turkey? Then this Pork Belly Porchetta might just be for you! Surprisingly low maintenance and very delicious, this is the perfect entrée alternative for any pork lover.
Our Standing Rib Roast recipe is a great beef alternative from the traditional turkey. We serve it with a simple and delicious savory au jus and a creamy horseradish sauce.
Maybe you just want something smaller to feed less people. Our Spatchcock Chicken recipe is just for you! The spatchcock method not only results in a deliciously juicy bird with crispy skin, but it also takes less time in the oven!
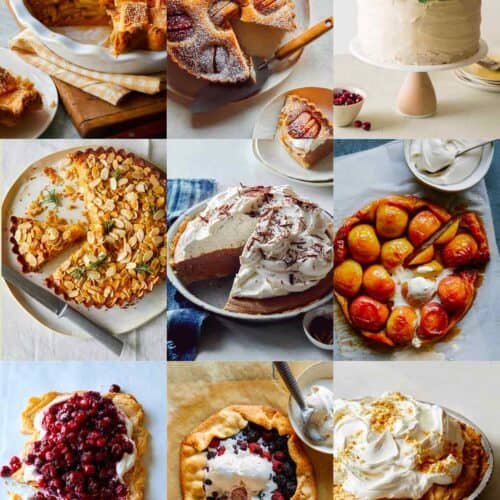
Even if everyone is ready to roll themselves home after thanksgiving dinner, people can and will always find some stomach space for dessert!
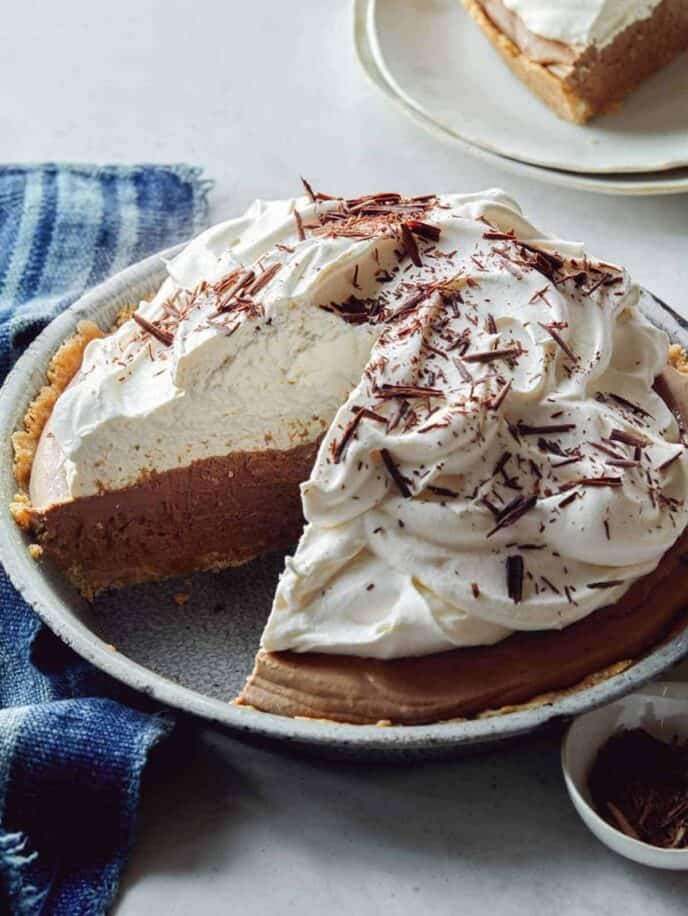
Pies are all the rage, especially pumpkin, apple, pecan, and sweet potato, but we’re changing things up a bit here with our French Silk Pie. I love this lighter than air chocolate pie with a buttery and delicious Nilla wafer crust!
This Sunken German Apple Cake is great pie alternative for thanksgiving dessert. Not only is it such a pretty dish, but so tasty, especially when served slightly warm.
Want something a little more traditional? Our Pumpkin Pie with a Chocolate Crust is our take on the traditional pumpkin pie. The chocolate wafer crust pairs surprisingly well with the sweet pumpkin filling. We promise you will love it!
Our Apple Cake with Chai Spiced Buttercream is the perfect cake to serve this holiday season. The bright flavor of chai cuts though some of the richness of the buttercream and compliments the apples in the cake quite well.
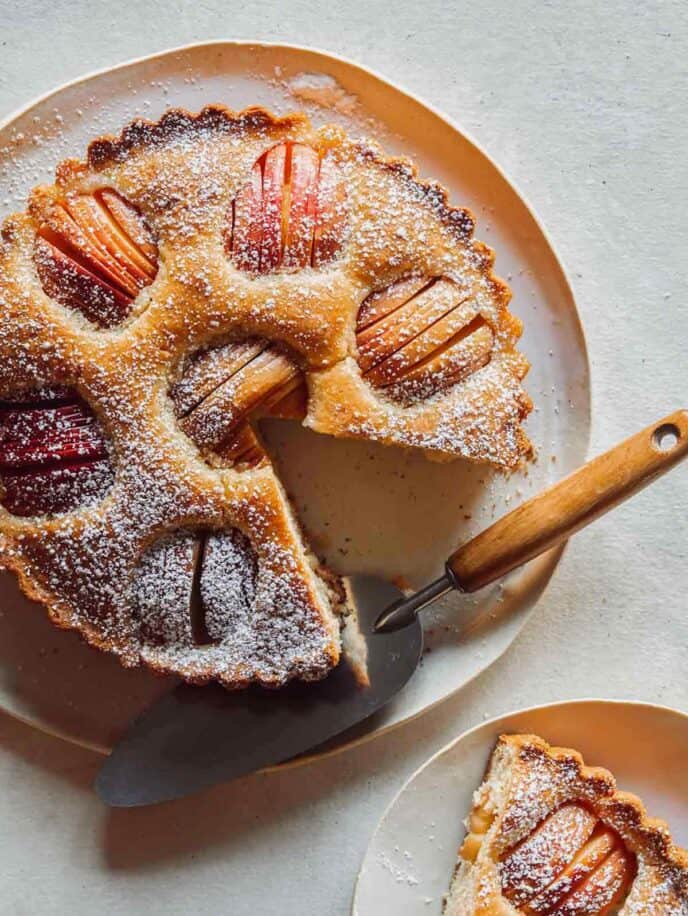
Our Caramelized Pear Tart is another low maintenance dessert that everyone will love! We love serving it warm with a scoop of vanilla ice cream or some soft whipped cream!
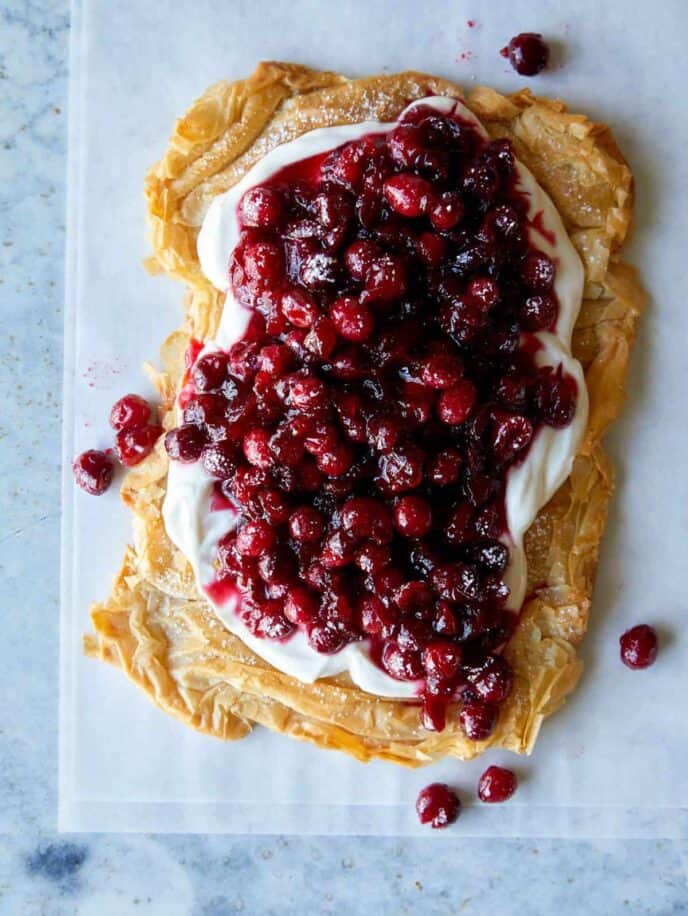
Our Cranberry Crostata is a super autumnal, minimal effort dessert that anyone can make! The cranberry topping and phyllo crust can both be made ahead of time and assembled right before you’re ready to serve it up!
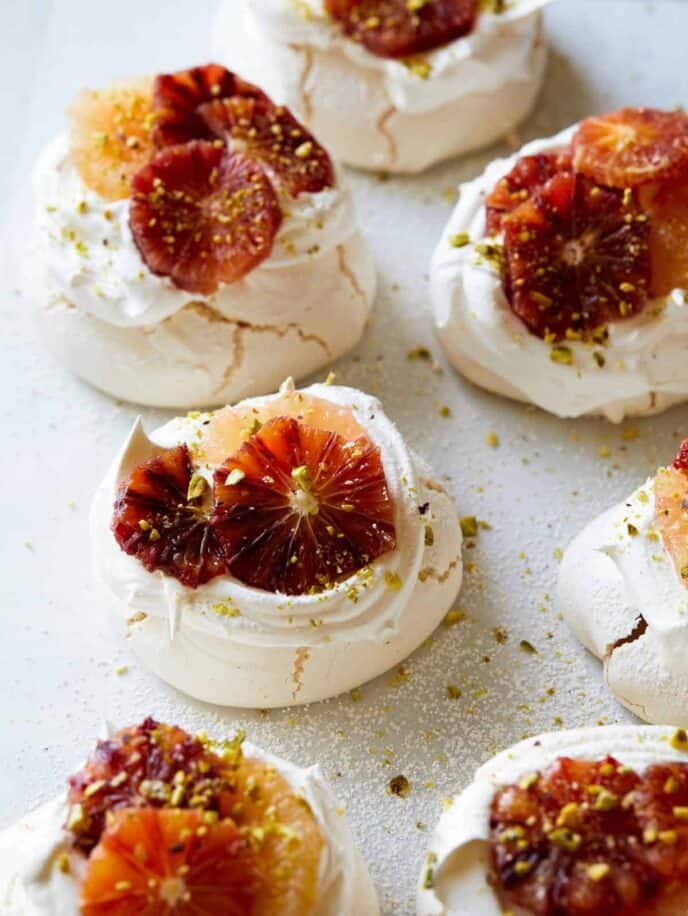
We love our Mini Citrus Pavlovas. Not only are they delicious, but we love that everyone is able to have their own sweet individual dessert.
More Delicious Thanksgiving Round Ups You Will Love
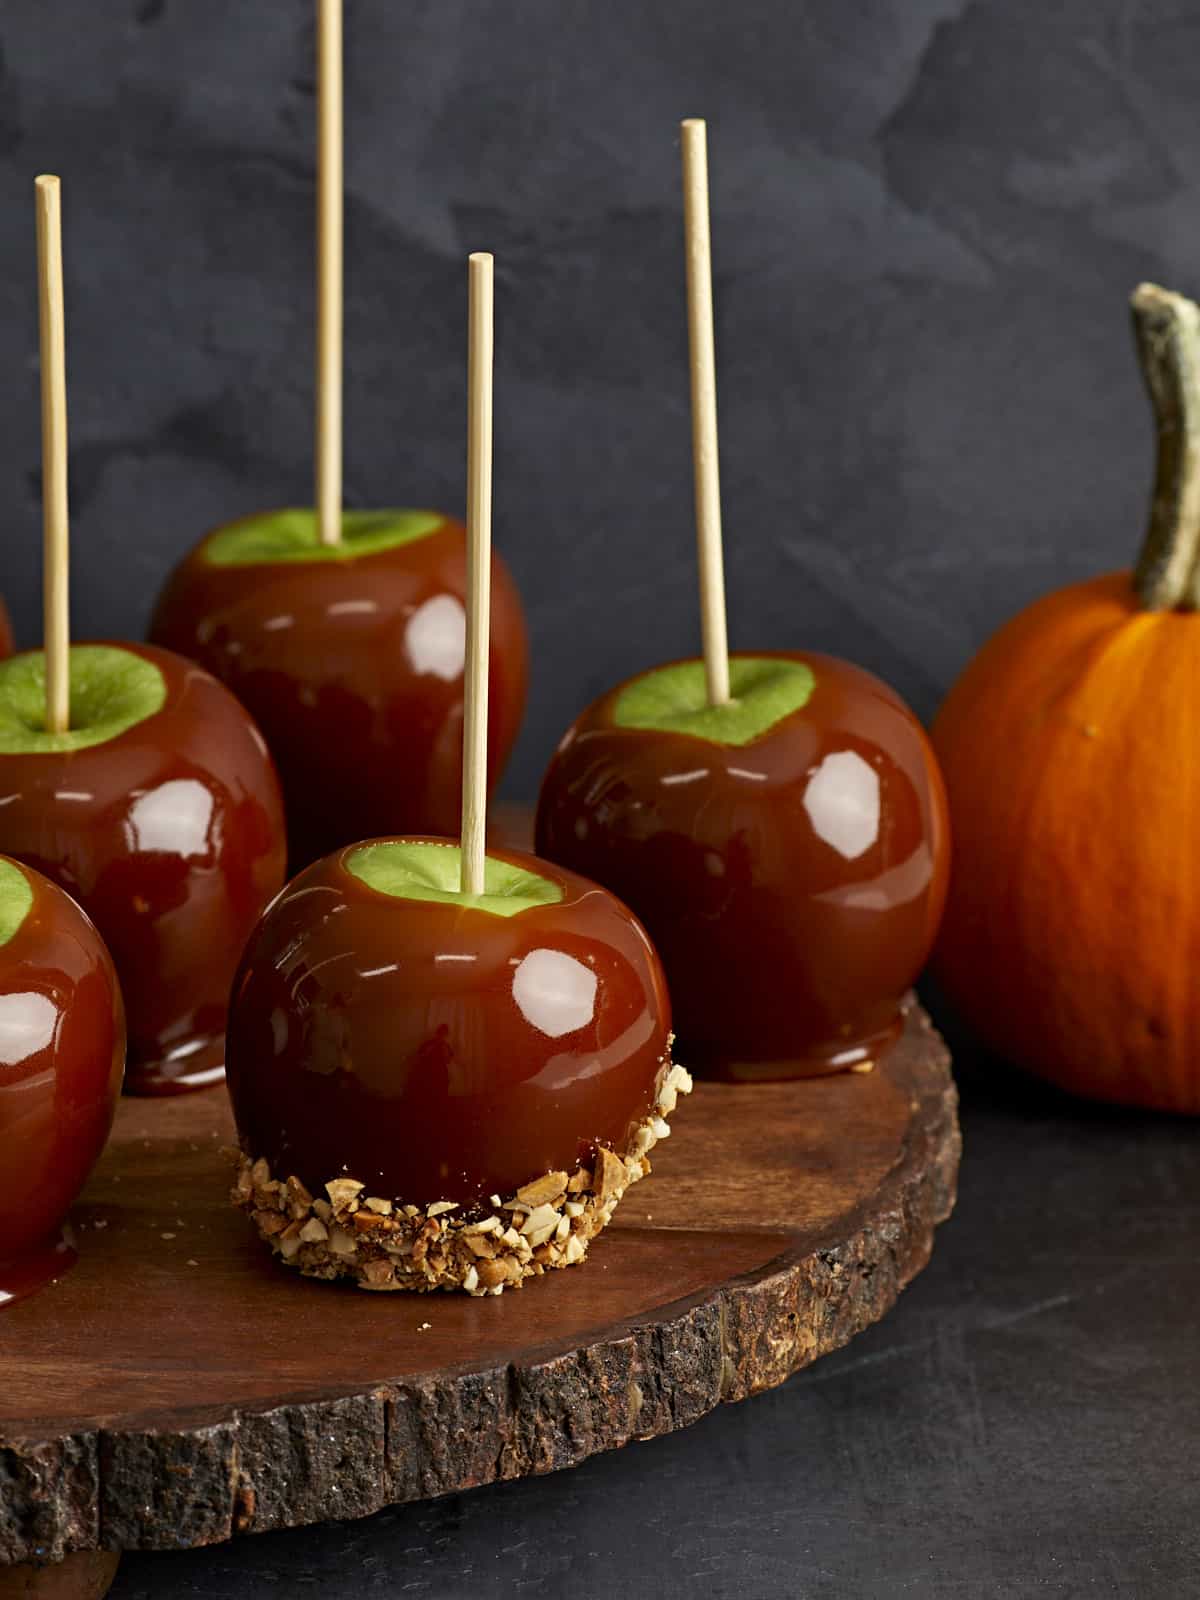
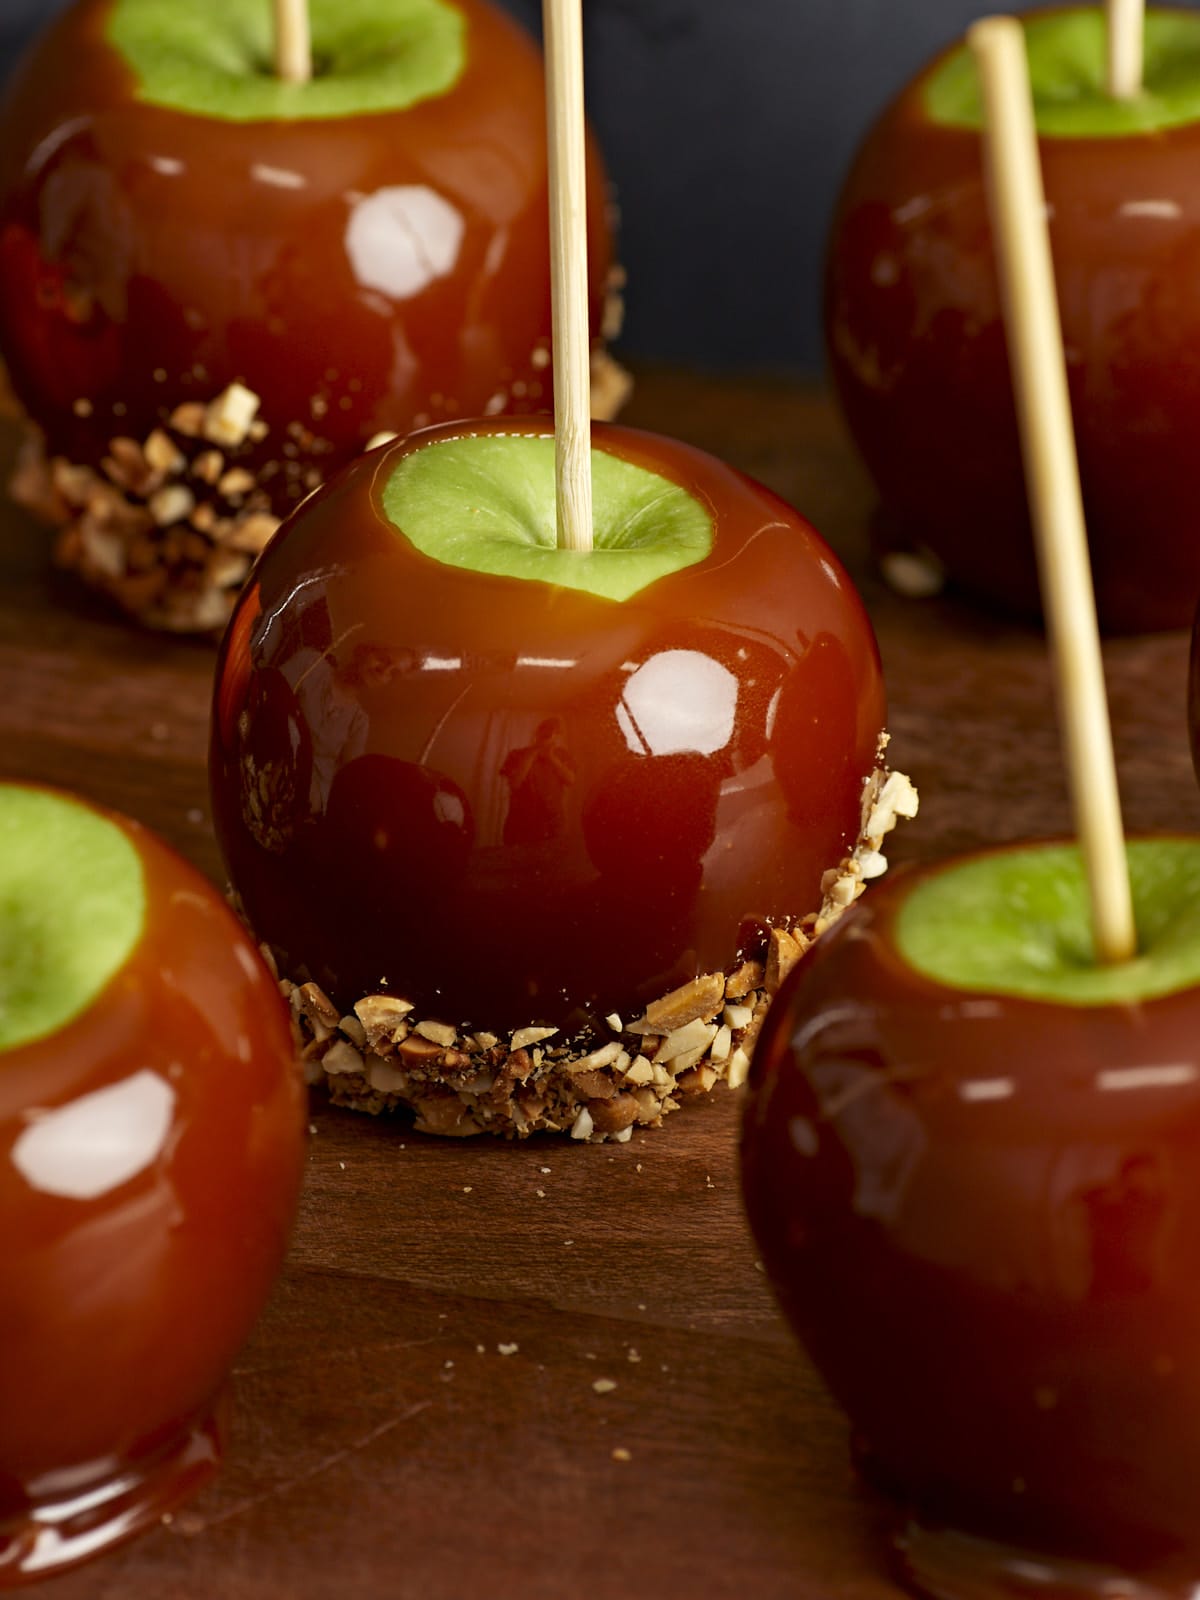
Is there anything more fall-like than caramel apples? The combination of fresh crisp fall apples with the creamy rich flavor of homemade caramel is absolute perfection. These caramel apples 100% from scratch, so there is a little bit of skill involved when cooking the sugar and creating the caramel, but candy-making aside, this caramel apple recipe is relatively fast and easy to make!
Homemade Caramel Apples
I was in the store the other day and saw some pre-made caramel apples out on display and I almost died when I saw the price tag of $6.99 for four small apples. And, of course, I immediately needed to prove to myself that I could make them better and cheaper.
A lot of caramel apple recipes use pre-made soft caramel candies, but those candies are also expensive, so that wouldn’t help my budget caramel apple quest. Instead, I made caramel from scratch using really simple and inexpensive ingredients, like sugar, butter, and cream. I will say that candy-making might be a bit tricky for beginners, but once you get the hang of it, it’s a breeze! I’ll show you the tricks to make sure you get that caramel thick enough to coat the apple, but soft enough to still be able to bite through.
Ingredients for Caramel Apples
Here’s what you’ll need to make your own homemade caramel apples from scratch:
White Sugar: White granulated sugar is cooked down until it begins to caramelize, giving that classic caramel color and flavor. It’s also what hardens the caramel so it can coat the apples.
Corn Syrup: Corn syrup helps stabilize the caramel sauce, preventing it from crystalizing and seizing up. This is especially helpful for those new to working with cooked sugar and the candy-making process.
Water: Dissolves the sugar, allowing it to caramelize a little more slowly and easily, which makes the recipe a little more forgiving than a dry sugar caramel.
Butter: Makes the caramel creamy and helps soften the caramel.
Heavy Cream: Also makes the caramel creamy and soft, and lightens the color.
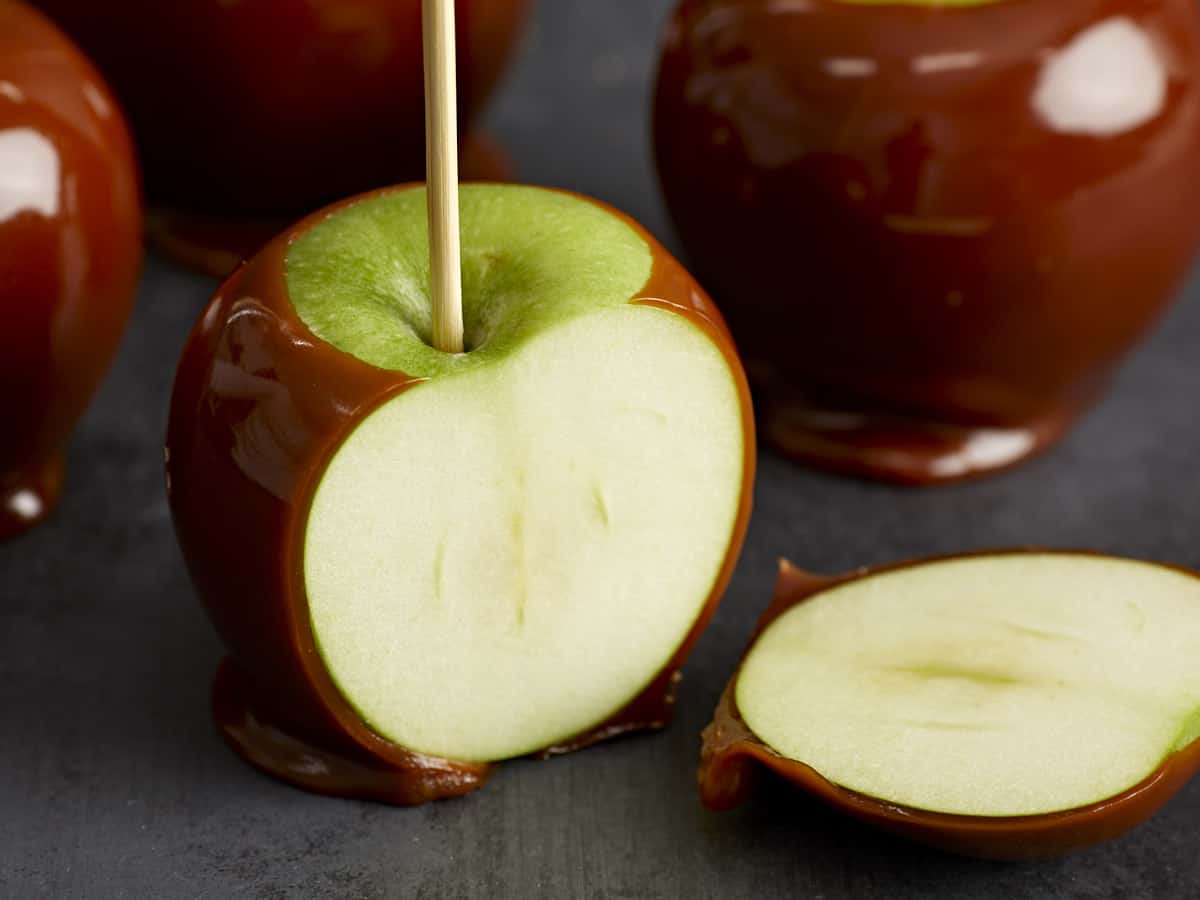
Apples: While you can use any type of apple you like, I love the contrast between a nice tart Granny Smith apple and the rich creamy caramel. Other great options include Fuji, Gala, and McIntosh apples.
Wooden or Bamboo Skewers: You’ll need some sort of handle for your caramel apples, so look for 6-inch wooden skewers or sticks. You can buy them online, or grocery stores usually have them around this time of year.
Extra Toppings
The fun part about caramel apples is that you can leave them plain or add all sorts of other toppings. Try rolling the freshly dipped caramel apples into crushed nuts (peanuts, walnuts, pecans), chocolate sprinkles, crushed pretzels, crushed graham crackers, or even other candies, like M&Ms. You can also melt some chocolate or white chocolate and drizzle that over top of the caramel after it sets.
How to Store Caramel Apples
Store the caramel apples in the refrigerator for up to two weeks. Keep them wrapped tightly in plastic or waxed paper to prevent them from drying out. Once cut open, you’ll want to eat your caramel apples within a few days. Remove the caramel apples from the refrigerator about 10 minutes before you plan to serve them so the caramel can soften slightly.
Tips for Making Caramel Apples
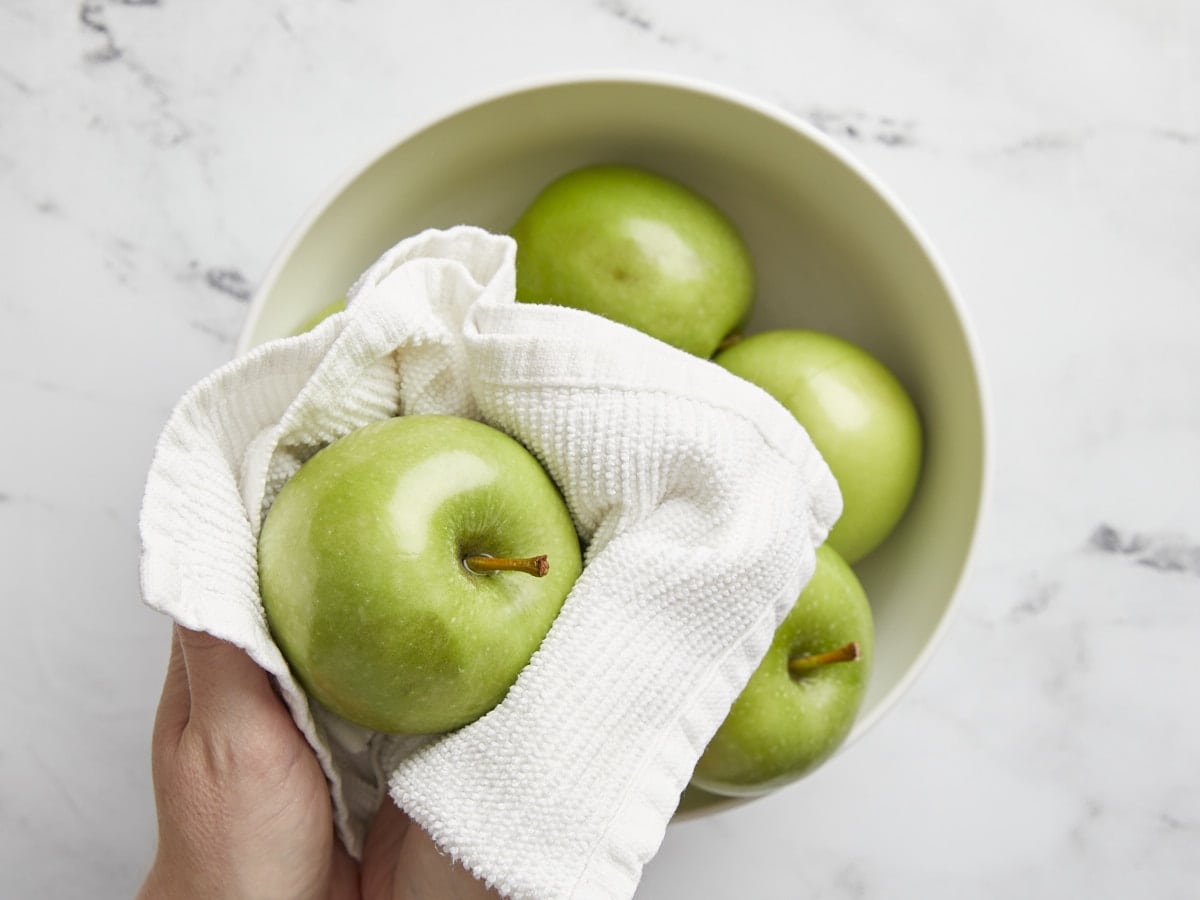
Wash and dry the apples well before beginning to remove any wax coating, which will make it difficult for the wax to adhere.
Make sure the apples are completely dry. Water will make the caramel slide off.
Keep the apples chilled until ready to dip. Cold apples will help the caramel set instead of sliding off the apple.
Have your dipping station, toppings, and apples ready to go before making the caramel. The caramel cooks and cools quickly, so once the caramel is ready, it’s go time!
Line a baking sheet with parchment (not waxed paper) to hold the dipped caramel apples. Waxed paper will melt under the heat of the hot caramel.
Halloween or autumn-themed cupcake liners make really cute cups to hold the caramel apples.
Use a candy thermometer or keep a glass full of ice and water handy to test the consistency of the caramel as it cooks. Drizzling a small amount of caramel into ice water will allow you to see the texture of the caramel once cooled.
Wash and dry the apples well to remove any wax coating. Remove the stems and insert a bamboo skewer in place of the stem. Place the skewered apples on a parchment-lined tray and refrigerate until ready to dip. Also prepare any additional toppings, if desired.
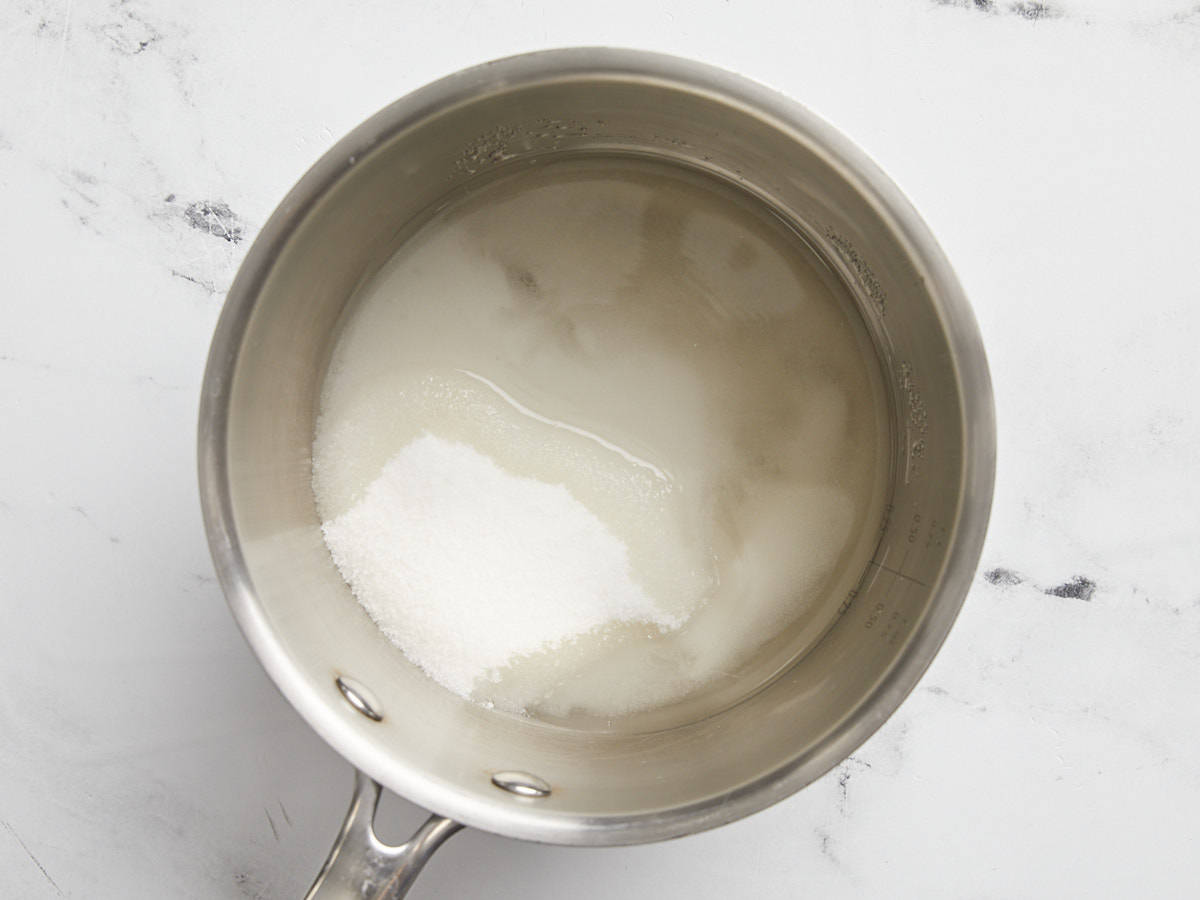
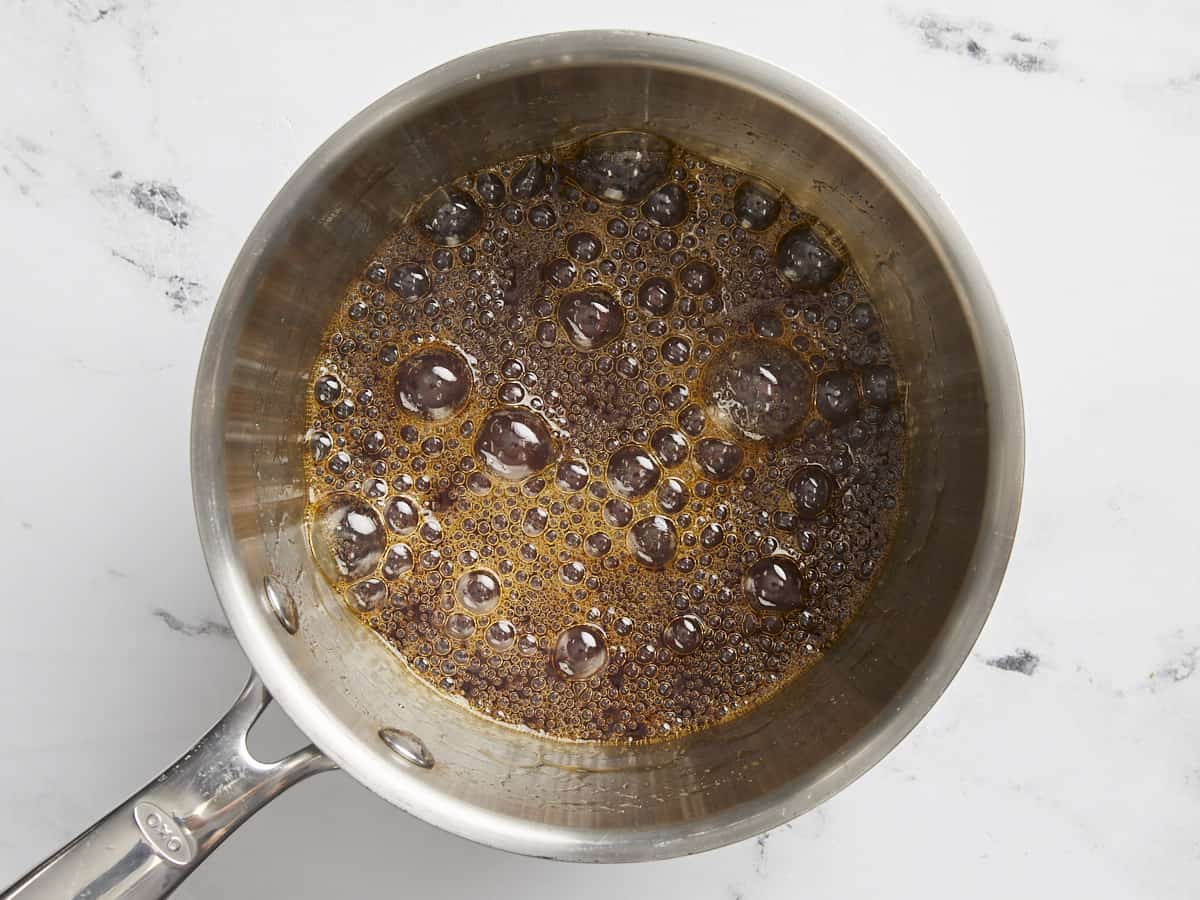
To make the caramel, add the sugar, corn syrup, and water to a medium sauce pot. Heat over medium-high, stirring often. Allow the mixture to come up to a boil. Continue to stir and boil the mixture until the color changes to a deep amber color.
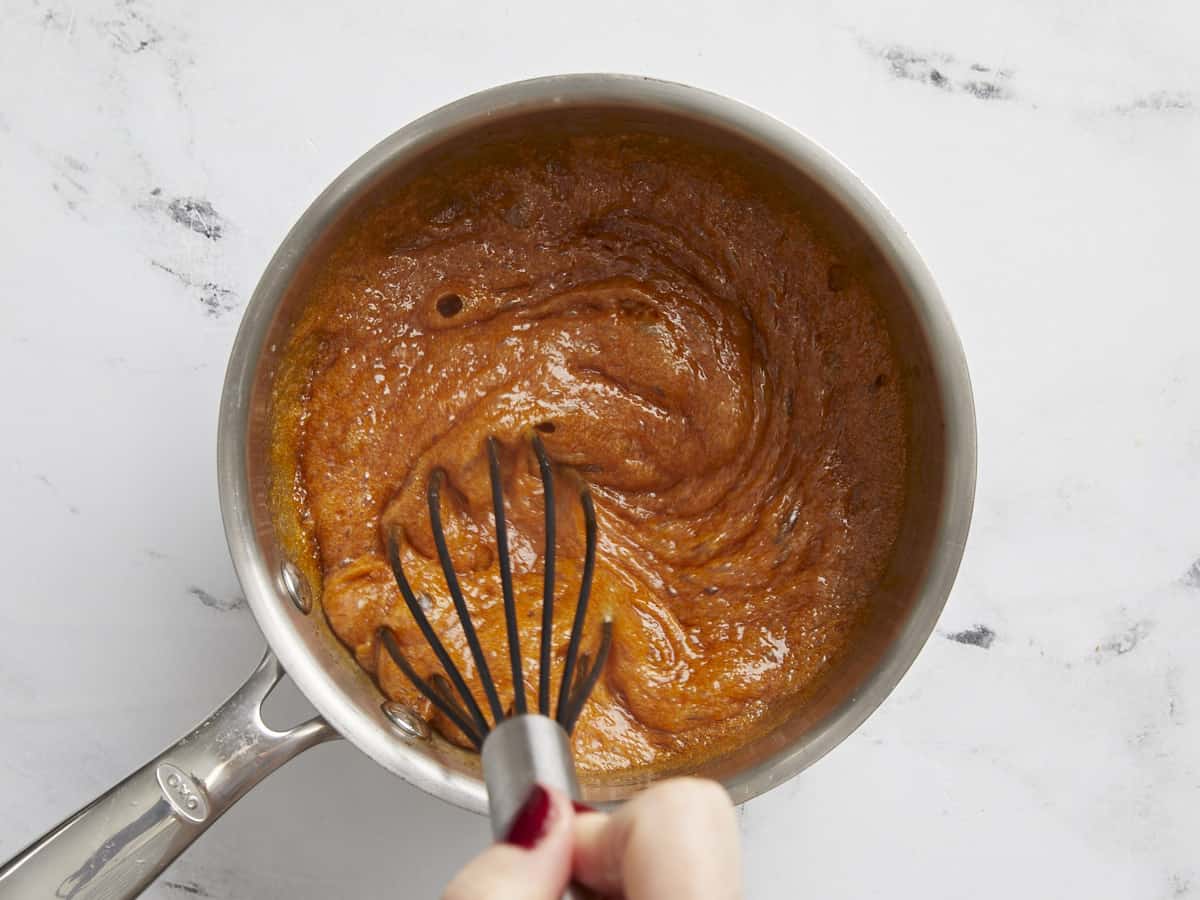
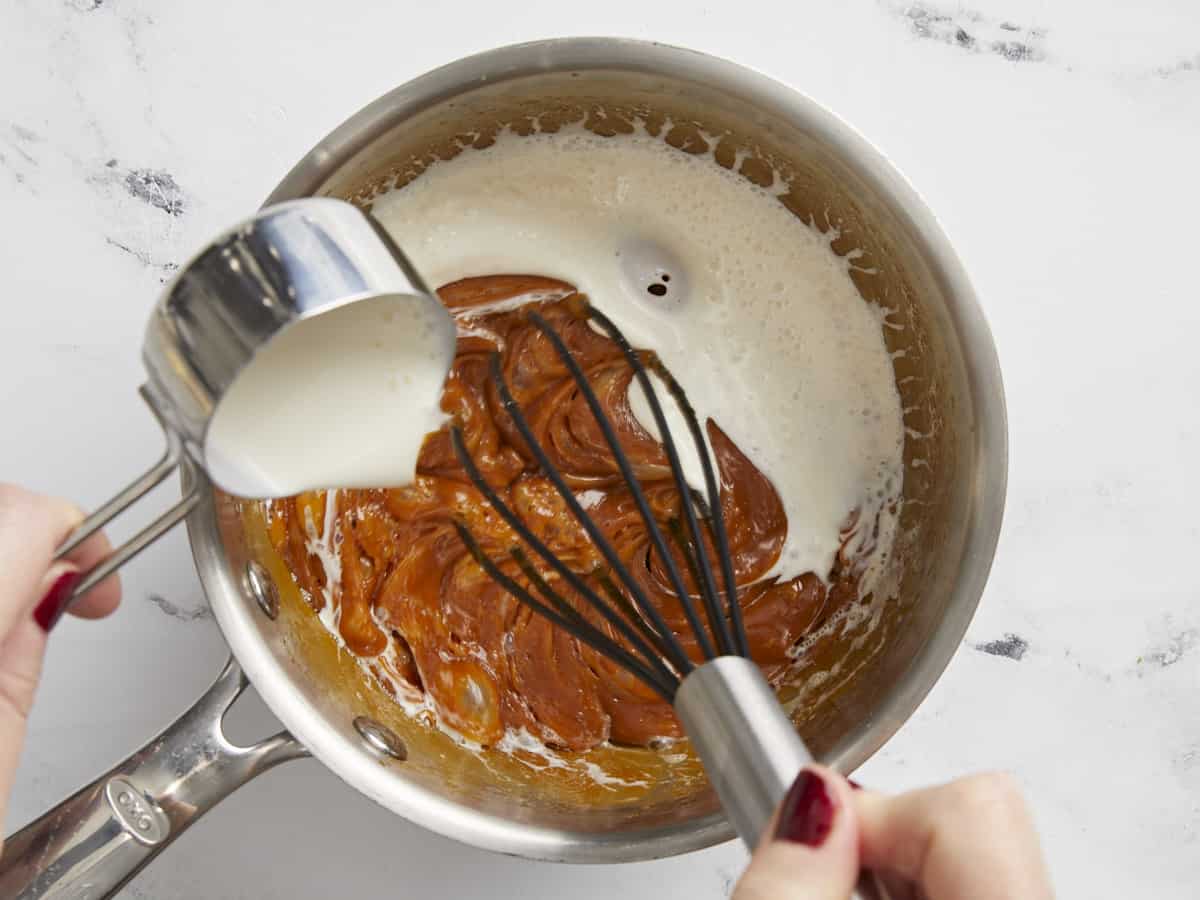
Remove the pot from the heat and stir in the butter, one tablespoon at a time, until melted into the sugar mixture. Once all of the butter is melted into the sugar, carefully add the heavy cream and stir to combine (it will bubble up and steam quite a bit when added, so be careful).
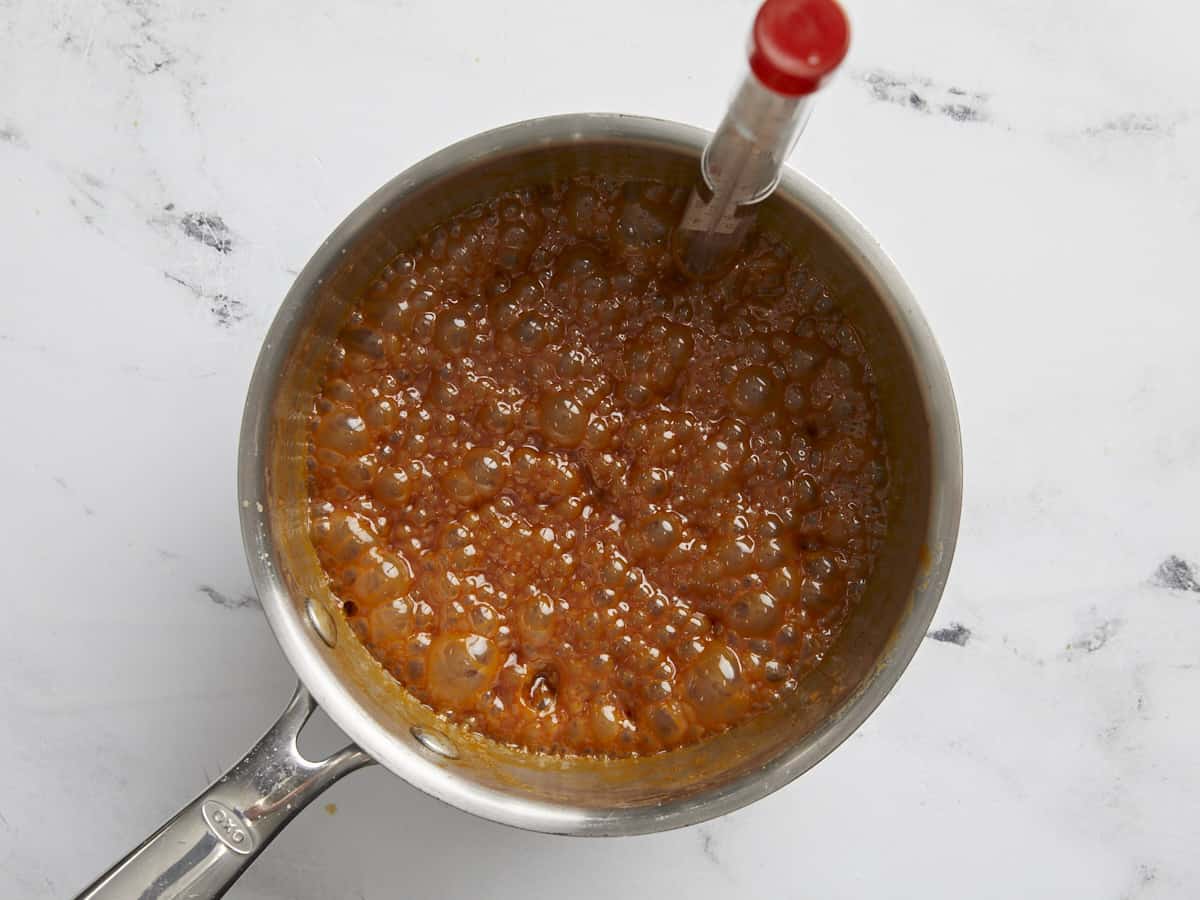
Return the pot to the stove and heat over medium. Allow the mixture to boil again, stirring often. If using a candy thermometer, allow the mixture to heat to 245ºF. Otherwise, prepare a glass of ice water to test the caramel. Cook the caramel until it reaches "firm ball" stage when drizzled into the ice water. In the firm ball stage, the chilled caramel will hold its shape, but you can still flatten it just slightly when pressed between your fingers. Be careful not to touch the hot caramel, only test the firmness after it has been dropped into the ice water.
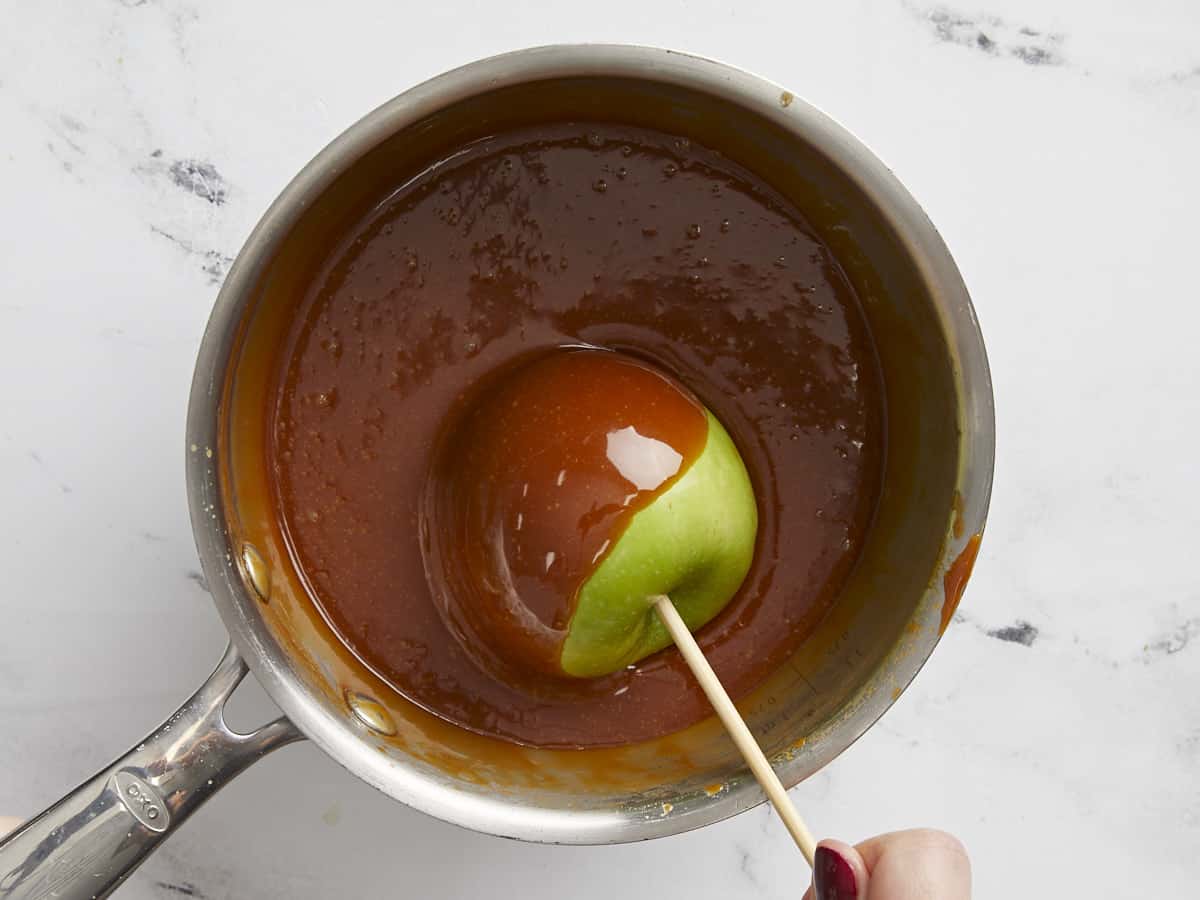
Once the caramel is the right temperature and texture, carefully dip the apples, one at a time, twirling the apple in the hot caramel to coat all sides, then transferring to rest on the parchment-lined baking sheet. The caramel will thicken as it cools, so make sure to work quickly. Or, if the caramel is too thin, pause for a minute or two to allow it to thicken.
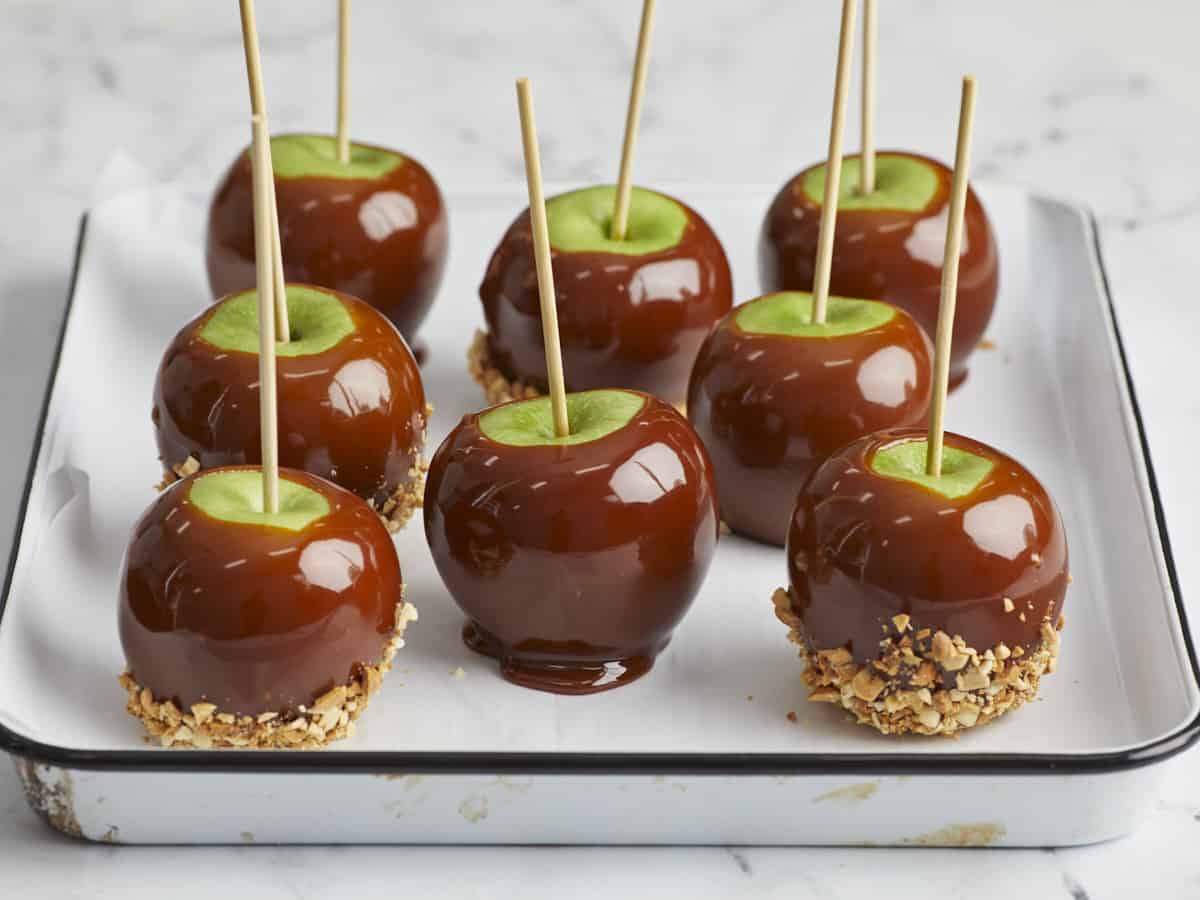
Dip the caramel apples in any additional toppings right after dipping in the caramel (before moving on to the next apple). Once dipped in the caramel and/or extra toppings, allow the apples to cool for about 10 minutes, or until the caramel is set. You can speed this up by placing them in the refrigerator if needed. Serve and enjoy!
Before beginning the caramel, wash and dry six apples (about ⅓ lb. each). Remove the stems and insert a wooden or bamboo skewer in their place. Place the apples on a parchment-lined baking sheet and refrigerate until you’re ready to dip them in the caramel. Prepare any additional toppings, like chopped nuts, if you plan to use them.
To make the caramel, combine 1 cup granulated sugar, ¼ cup light corn syrup, and ¼ cup water in a 2-quart sauce pot.
Cook and stir the sugar mixture over medium heat, allowing it to come to a boil. Continue to stir and boil the mixture until it turns a deep amber color, then remove it from the heat.
Whisk 8 Tbsp butter into the caramelized sugars, one tablespoon at a time.
Carefully whisk ¼ cup heavy cream into the caramel. The caramel will bubble up and steam quite a bit when the cream is added, so be careful.
Return the caramel to the stove and allow it to boil over medium heat, stirring often, until it reaches 245ºF. If you do not have a candy thermometer, you can use the ice water test (instructions next).
To use ice water to test the caramel, fill a glass with ice and water. Drizzle a little of the caramel into the ice water and once it is cooled, feel the texture with your fingers. The caramel should hold its shape when taken out of the ice water, but it should be pliable enough for you to squeeze between your fingers. Test the caramel often until it reaches this stage.
When the caramel has reached the right temperature and texture, remove it from the heat. Dip the prepared apples, one at a time, into the caramel, twirling them to coat on all sides. Work quickly to dip all of the apples as the caramel will continue to thicken as it cools.
Place each dipped apple back on the parchment-lined baking sheet. The cold metal will help stiffen the caramel. If you want to add other toppings, dip the caramel-coated apples in the extra toppings when the caramel is still warm, and before moving on to the next apple.
Allow the caramel apples to cool for 10 minutes, or until the caramel is set. Serve immediately, or wrap in plastic or waxed paper and refrigerate for up to two weeks. Enjoy!
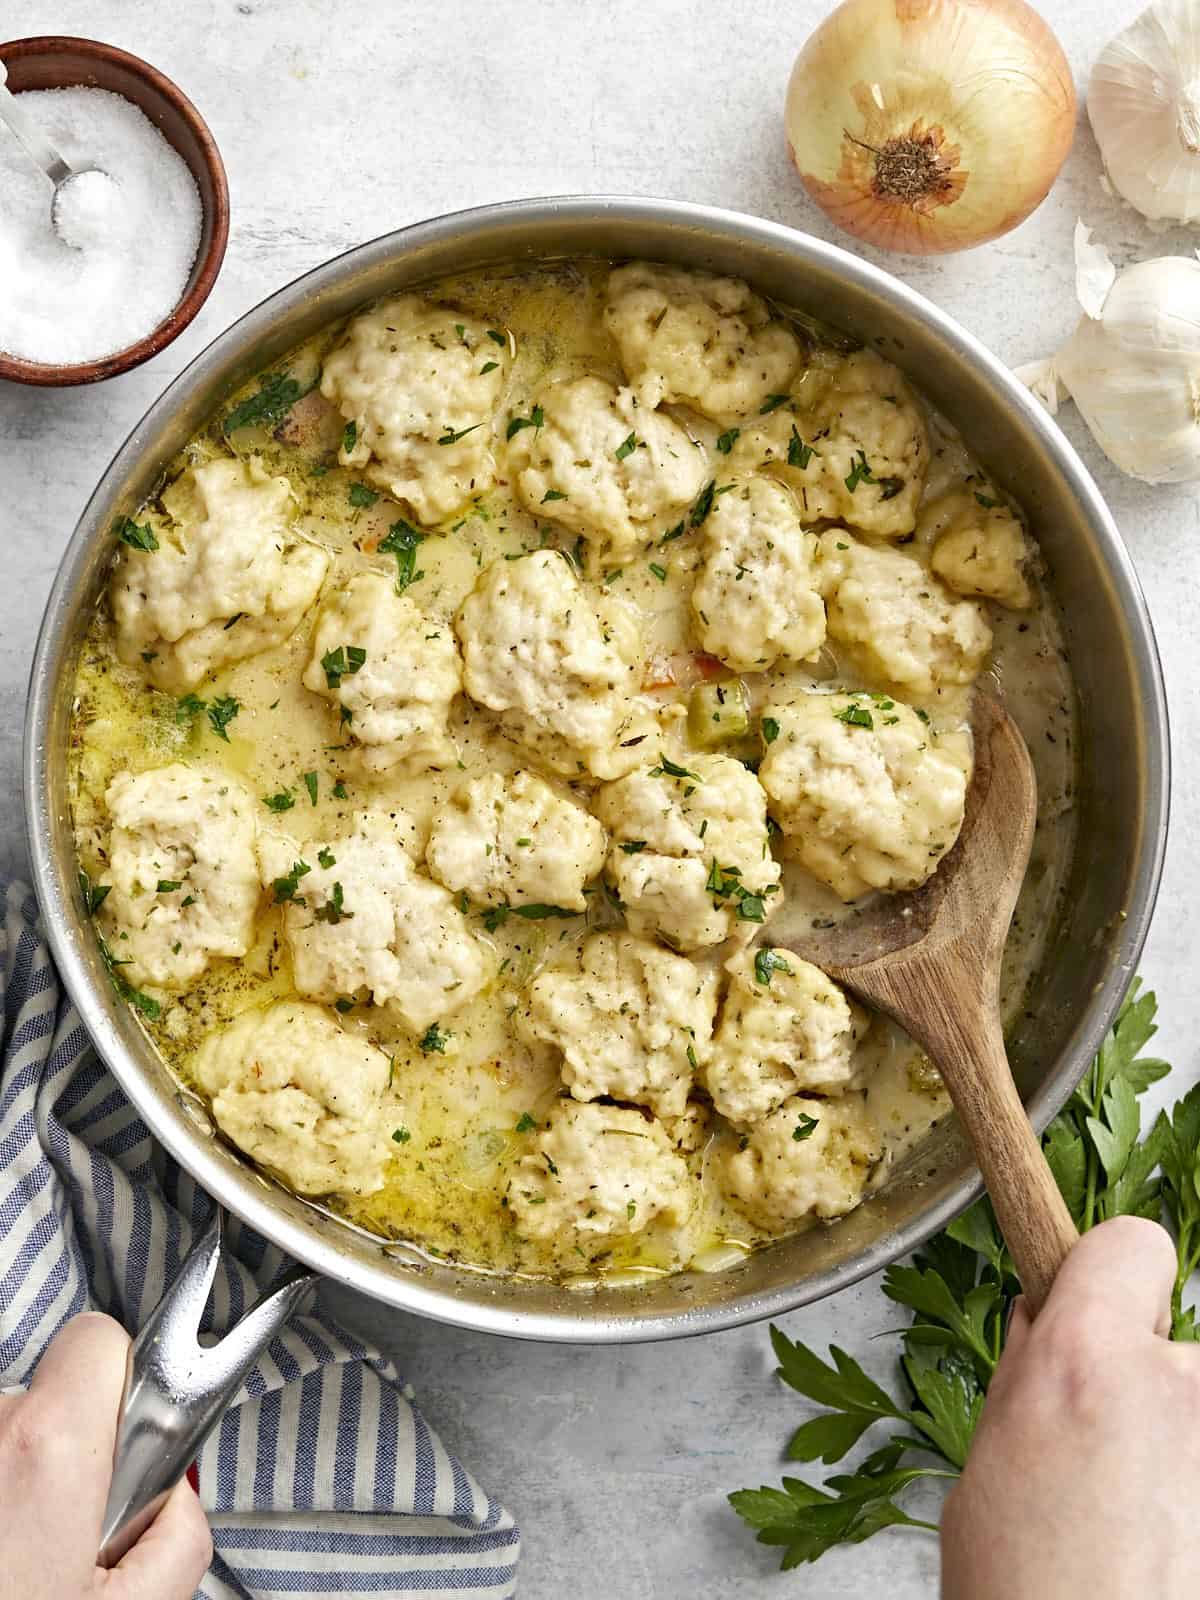
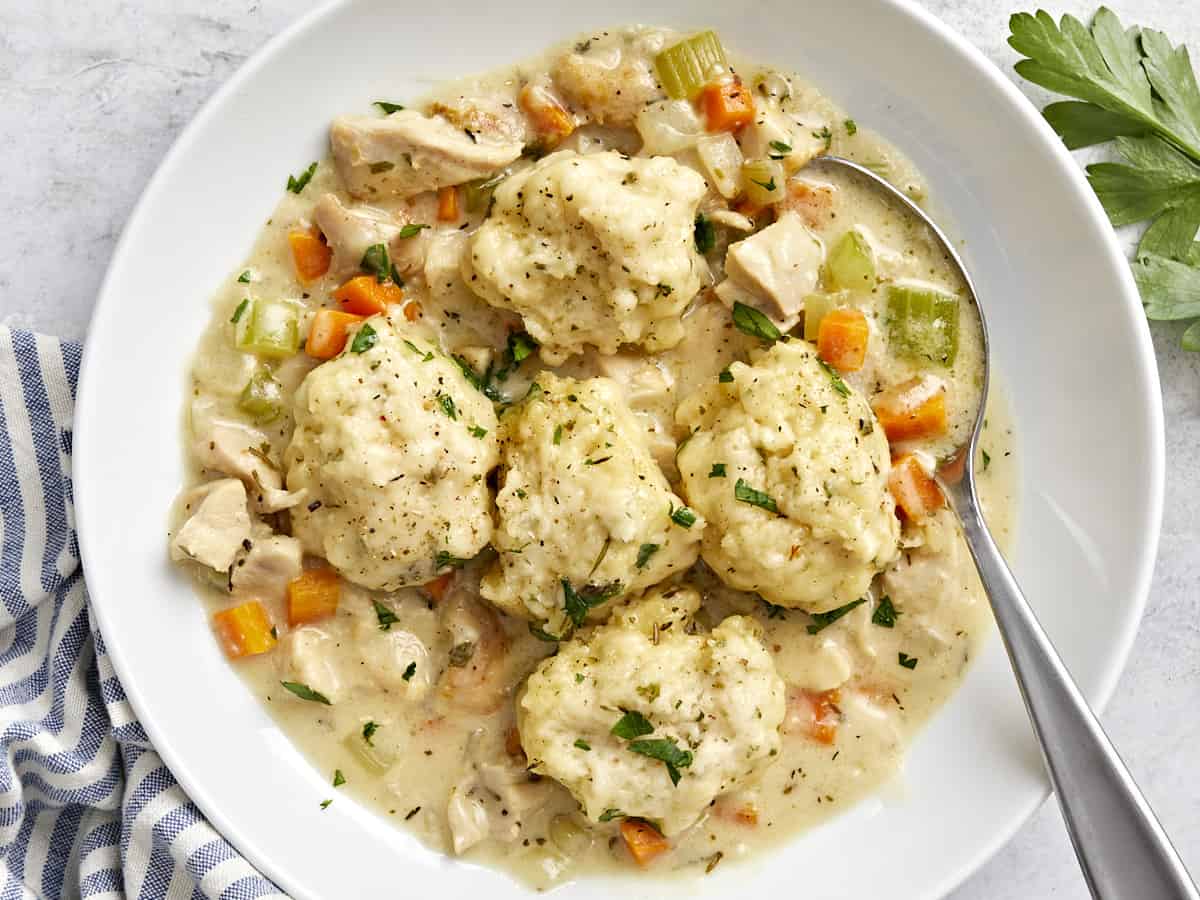
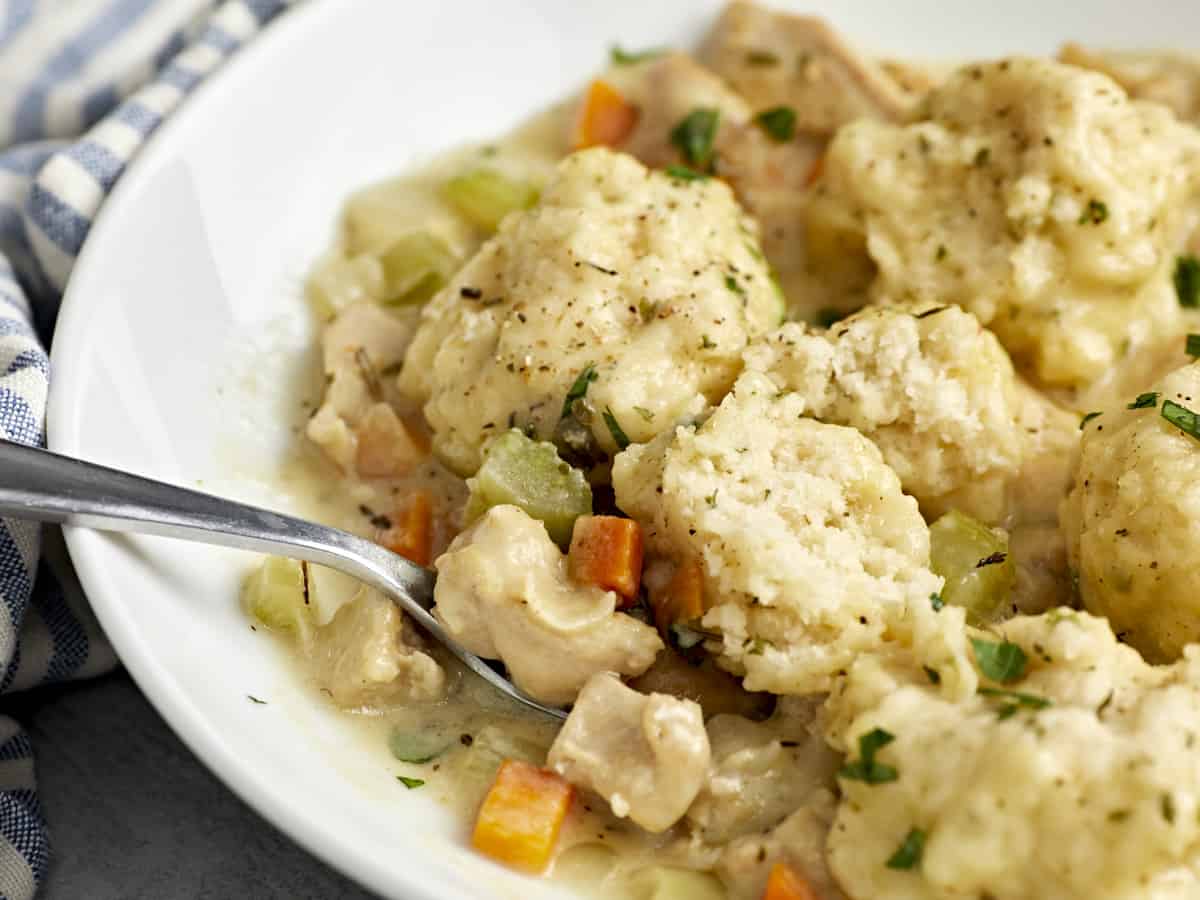
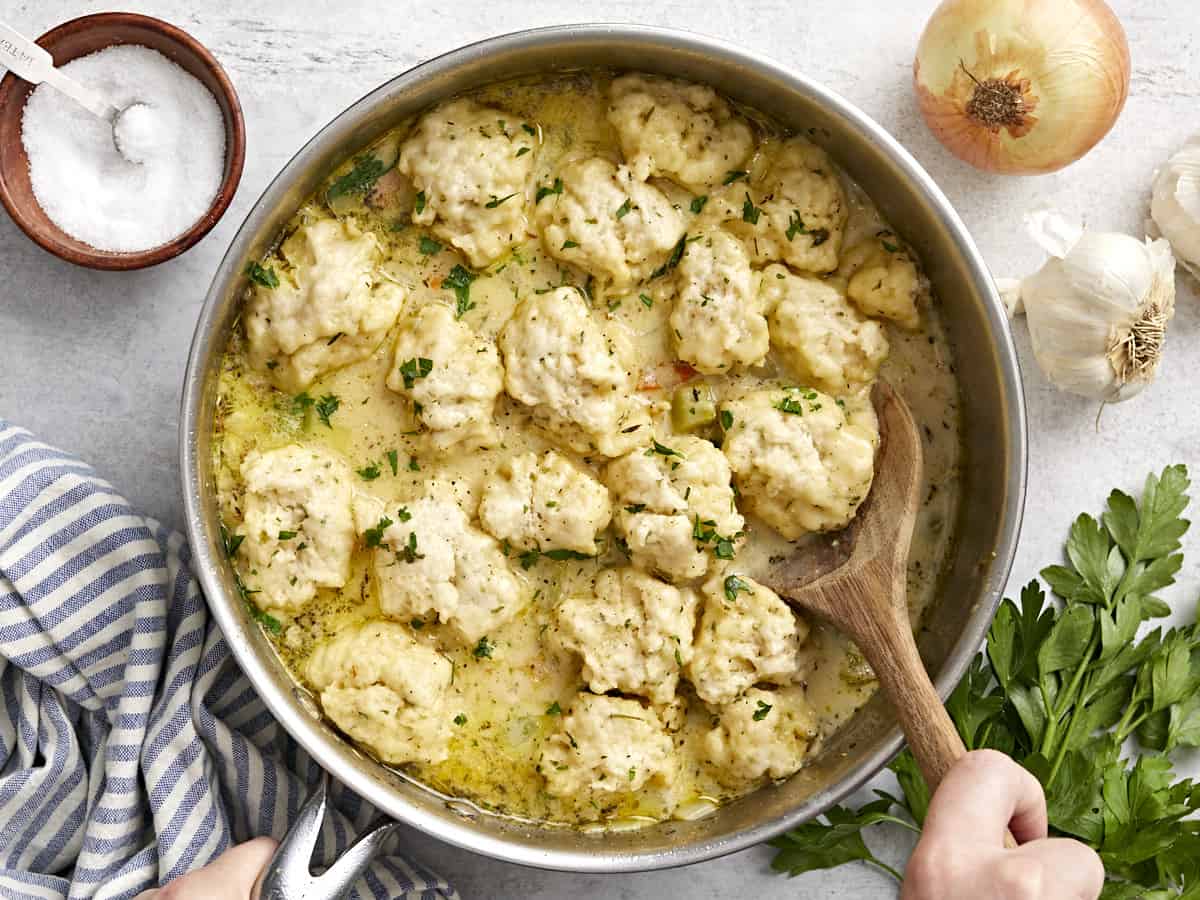
Tender chicken thighs simmered in a rich gravy and topped with fluffy dumplings makes these chicken and dumplings the perfect comfort food for cold nights.
I’m thoroughly obsessed with this chicken and dumplings recipe. This is some serious comfort food and I’m all about comfort food. 😅 We’re talking tender chicken thighs cooked in a rich gravy with a medley of colorful vegetables and then topped with tender, fluffy, and flavorful dumplings. This recipe is so cozy that eating a bowl of these chicken and dumplings feels like being wrapped up in a big warm hug. And the best part? They’re made 100% from scratch. 🙌 Ugh, brb, I need to go make another batch because my mouth is WATERING.
What Are Chicken and Dumplings?
Chicken and dumplings can mean different things depending on where you live, but they’re always super cozy, filling, and comforting. While they usually always have tender chicken smothered in a savory gravy as their base, the dumplings can either be a thick noodle, or a pillowy biscuit steamed on top of the gravy. I love both versions, but today we’re making the pillowy cloud dumplings!
Ingredients for Chicken and Dumplings
Here’s what you’ll need to make these delicious chicken and dumplings:
Chicken: I used boneless, skinless chicken thighs because they’re almost impossible to overcook and they always stay moist and tender, making this recipe foolproof. You can use chicken breast if you prefer, just be careful not to overcook the chicken.
Vegetables: A mix of onion, garlic, carrot, and celery provides the flavor base for the gravy, as well as adds a ton of color and texture to the dish.
Butter and Flour: A butter and flour roux is used to thicken the gravy and add a ton of rich flavor to the gravy.
Herbs: Parsley, thyme, rosemary, sage, and pepper create a classic chicken soup flavor profile that is extra warm and cozy.
Chicken Broth and Milk: The gravy is made with a combination of broth and milk for tons of flavor and a creamy finish.
Dumplings: The dumplings are made with a simple mix of flour, milk, melted butter, herbs, baking powder, salt, and sugar. They come together in minutes with very little mixing required!
How to Store the Leftovers
Leftover chicken and dumplings are SO delicious, so make sure to save some for lunch the next day! Simply divide the leftovers into single-serving containers and refrigerate. The gravy will get quite thick when refrigerated, but they’re still delicious! Chicken and dumplings will stay good in the refrigerator for about 3-4 days.
You can also freeze the chicken and dumplings. Once chilled in the refrigerator, transfer the chicken and dumplings to the freezer and store for 2-3 months. To reheat the frozen chicken and dumplings either thaw in the refrigerator overnight before microwaving until hot, or use the defrost function on the microwave.
Tips for Fluffy Dumplings
Make sure the dumpling batter is moist enough. It should be a soft, sticky, scoopable dough. If it’s too dry, the dumplings won’t be able to puff up as much.
Make sure the gravy is simmering before adding the dumplings. The dumplings need the steam action from the simmering gravy to cook and fluff up.
Keep the lid on the pot the entire time the dumplings are cooking (this holds in the steam and ensures they cook from all sides.
Don’t make the dumplings too big. They’ll double in size as they cook and larger dumplings will take much longer to cook.
Heat the olive oil in a deep skillet or Dutch oven over medium heat. Once hot, add the chicken thighs and brown on each side. The chicken does not need to be cooked through at this point, just make sure they get very brown on the outside. Transfer the partially cooked chicken to a clean bowl.
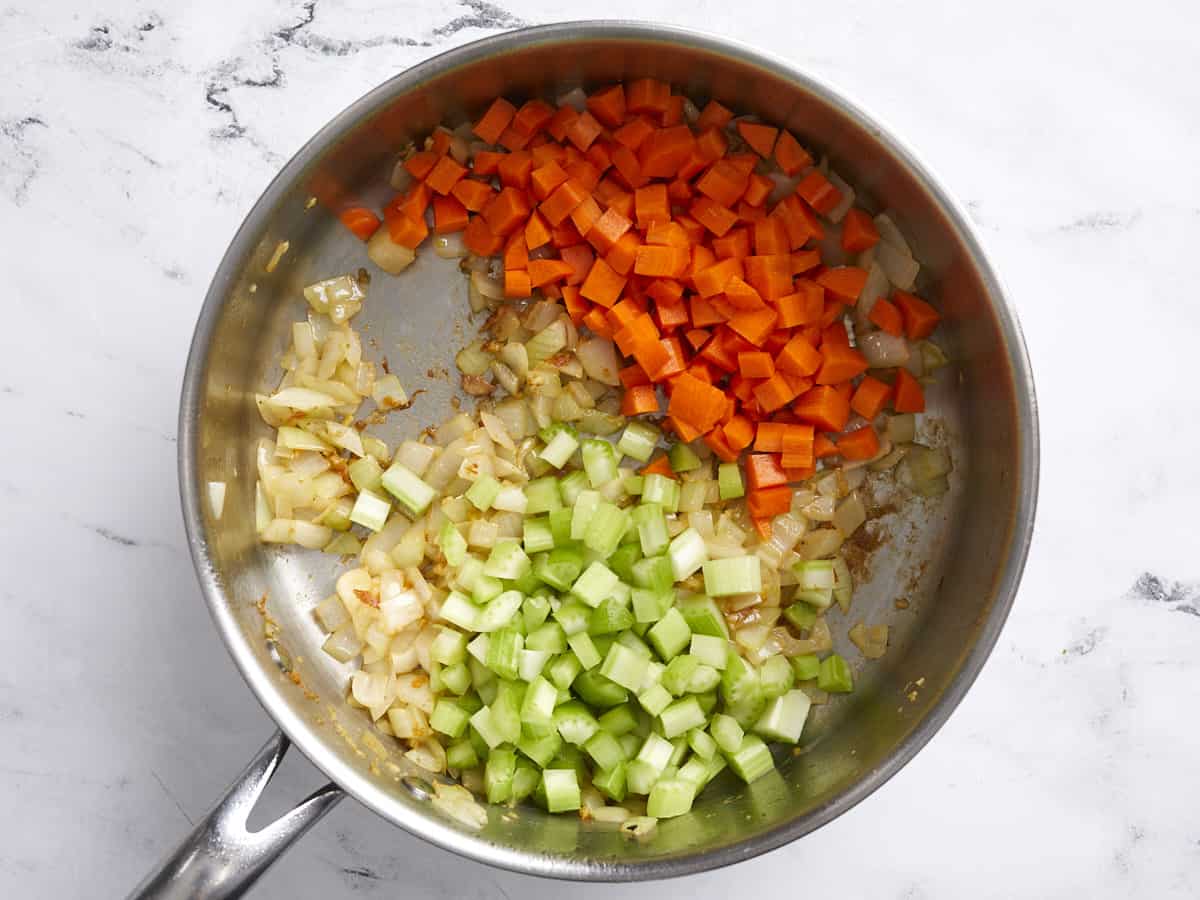
After removing the chicken from the skillet, add the diced onion and minced garlic and sauté over medium heat until the onions have softened. Stir to dissolve the browned bits off the bottom of the skillet as the onions cook.
Add the diced carrot and celery to the skillet with the onion and garlic and continue to sauté for about five minutes more.
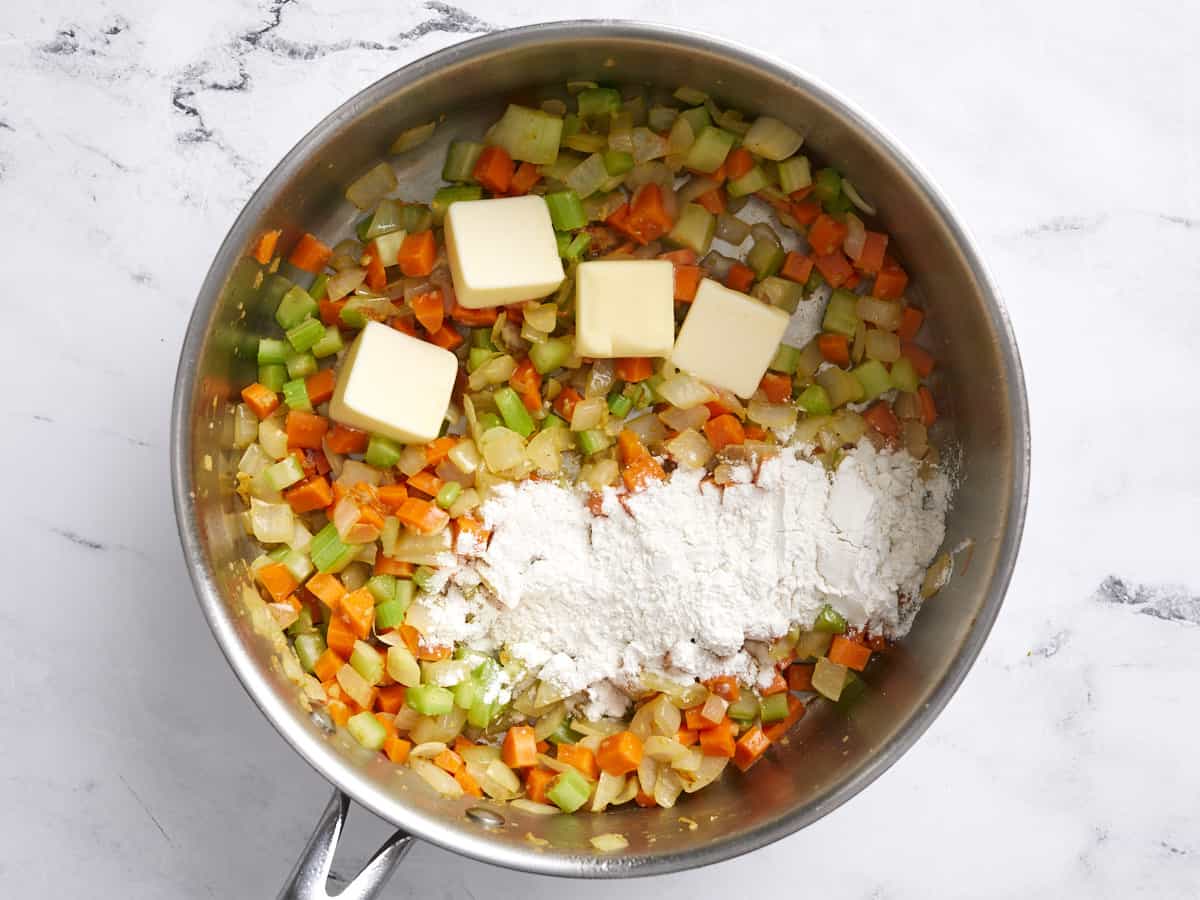
Add the butter and flour to the skillet and stir until the butter has melted and created a paste with the flour that coats the vegetables. Continue to cook and stir this mixture for about two minutes.
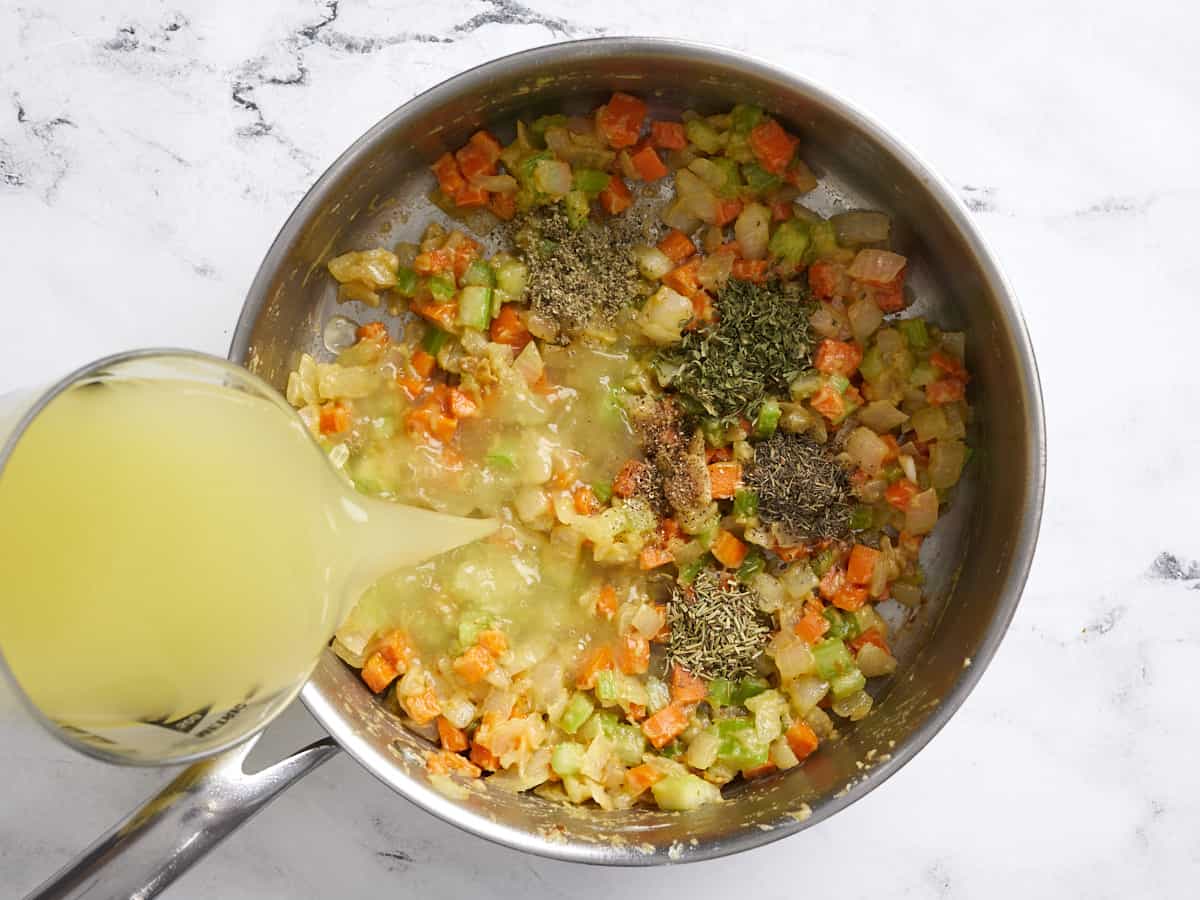
Add the parsley, thyme, rosemary, sage, salt, pepper, chicken broth, and milk to the skillet. Turn the heat up to medium-high and continue to stir and cook until the mixture comes up to a simmer and thickens into a gravy.
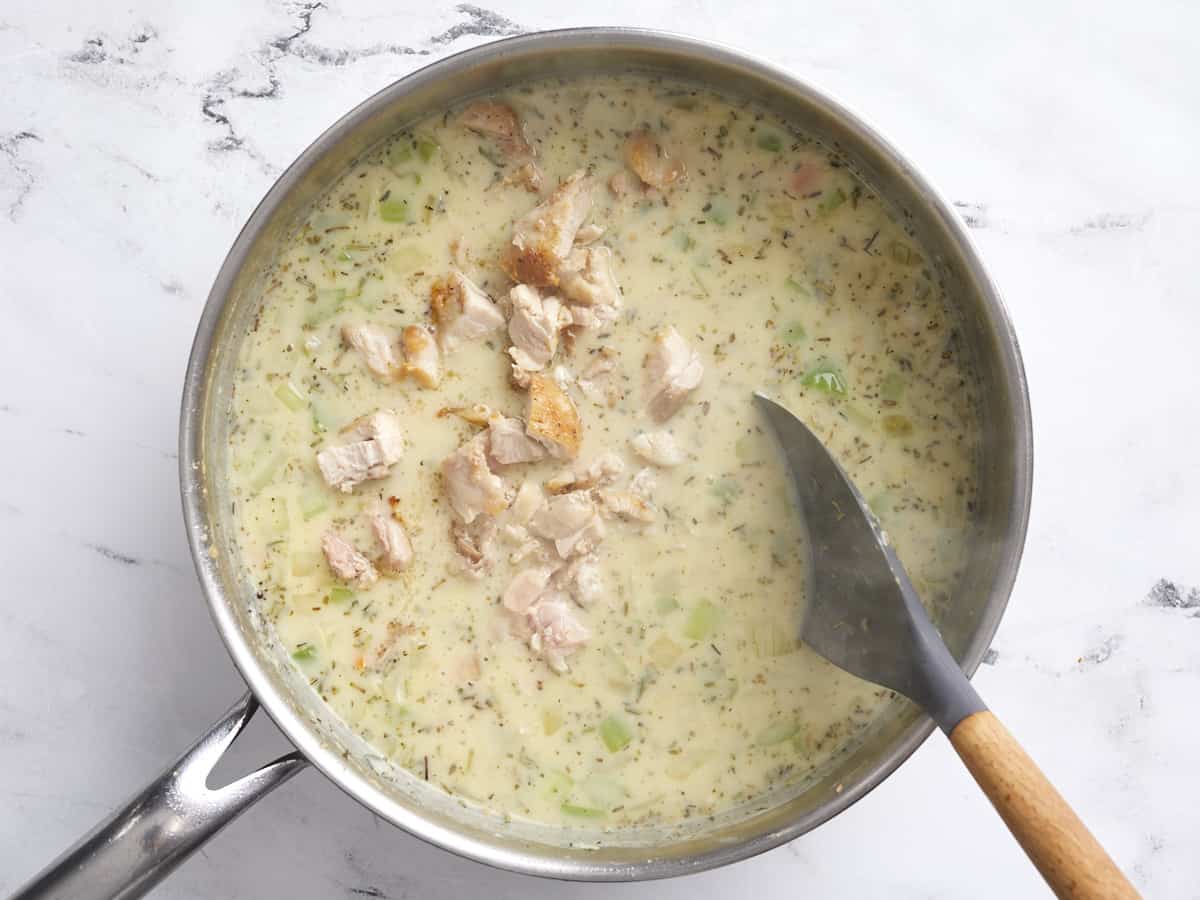
Dice the chicken and add it back to the skillet with the vegetables and gravy. Cover with a lid and let the chicken simmer in the gravy over medium heat while you prepare the dumplings.
Dumplings
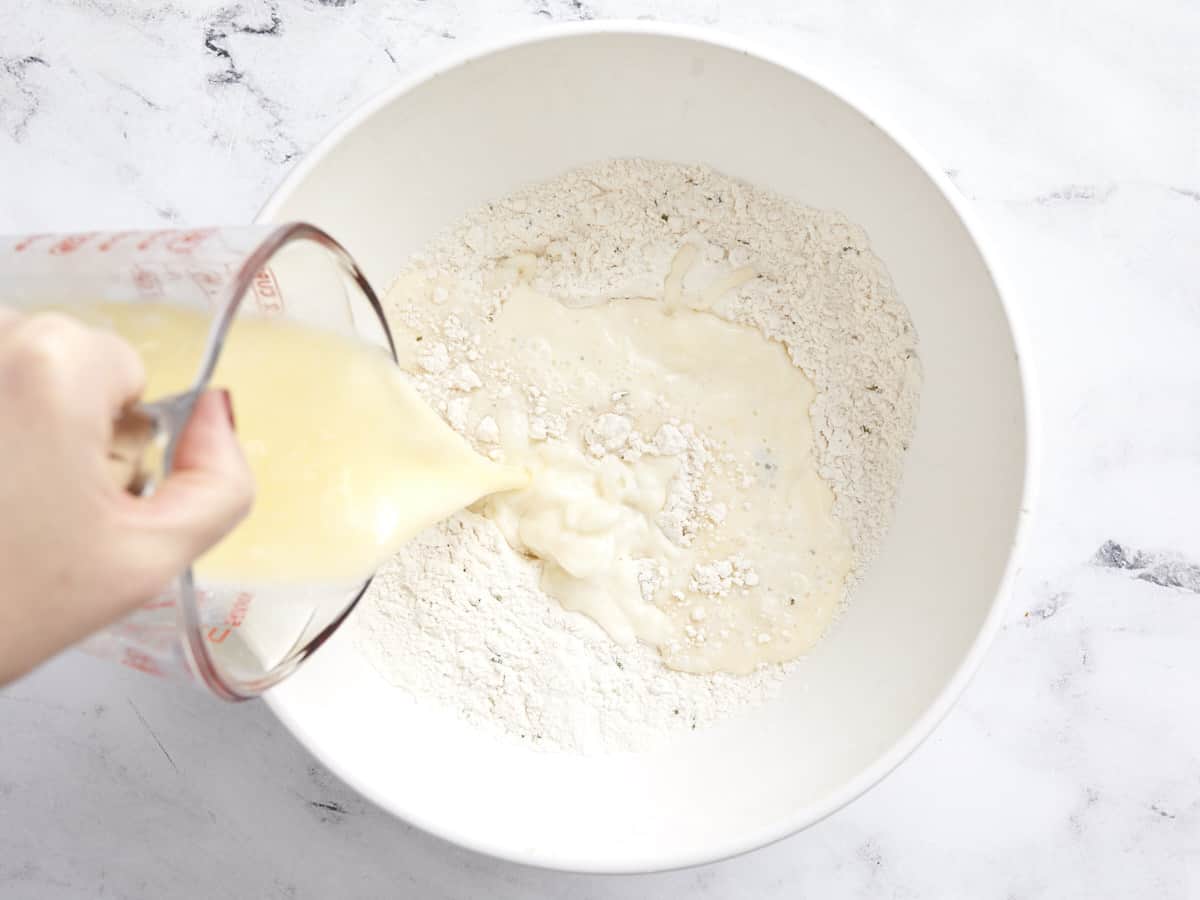
To prepare the dumplings, combine the flour, parsley, sugar, salt, baking powder, garlic powder, and pepper in a bowl.
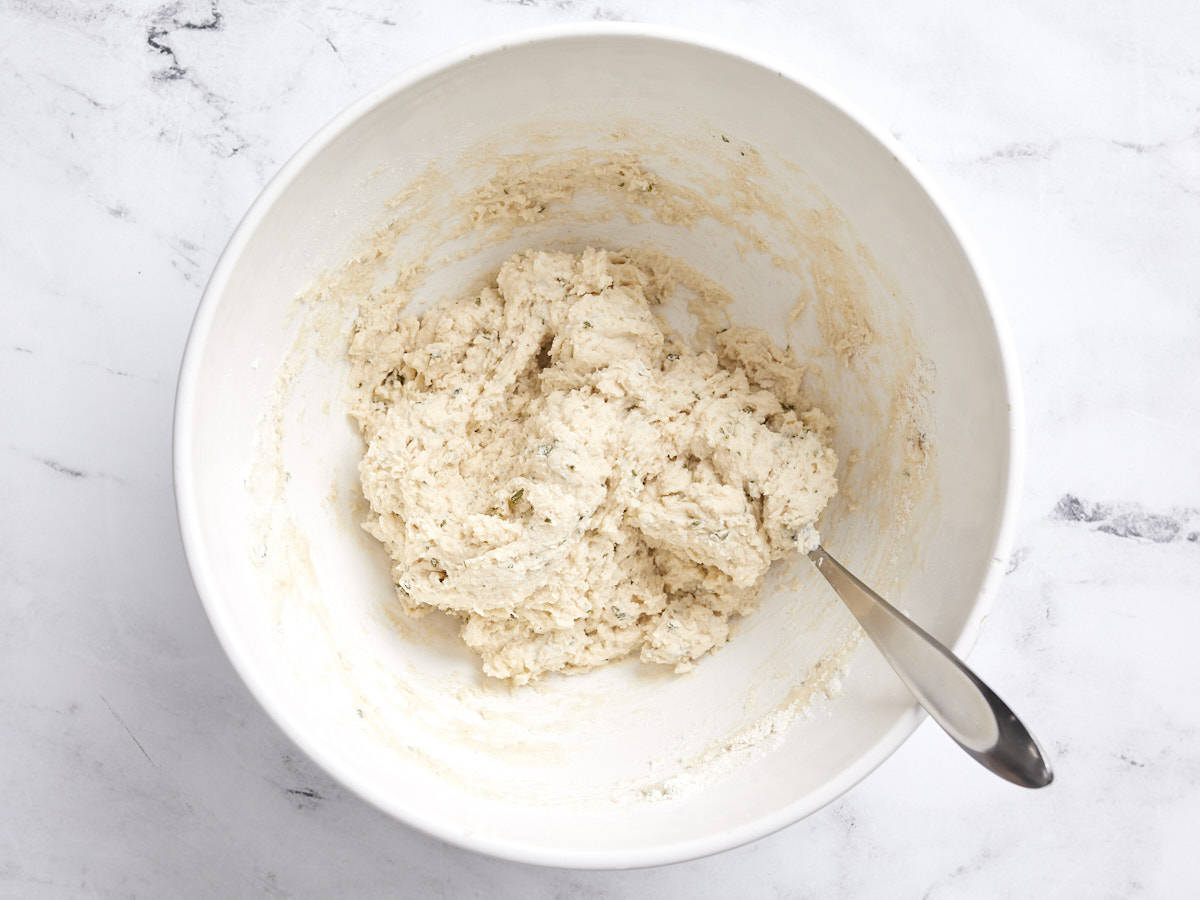
Pour the milk and melted butter into the flour mixture, then stir until a soft, scoopable batter is formed. Do not over stir.
Remove the lid from the chicken and gravy and drop the dumpling batter onto the surface of the gravy in 2 tablespoon dollops. You should get about 12 dumplings.
Make sure the gravy is still simmering, then place the lid back on the skillet and allow the dumplings to simmer for 15 minutes. Make sure they're simmering the entire time. After 15 minutes the dumplings should have doubled in size and will be fluffy and cooked in the center. Serve hot and enjoy!
Add 1 Tbsp olive oil to a large deep skillet and heat over medium. Once hot, add four boneless, skinless chicken breasts to the pan and allow them to brown very well on each side. The chicken doesn’t need to cook through at this point, just make sure it gets very brown. Remove the browned chicken to a clean cutting board and set aside.
Add two minced cloves of garlic and one diced yellow onion to the skillet and sauté over medium heat until the onions are softened. Add two diced carrots and two diced celery stalks and continue to sauté over medium for 2-3 minutes more.
Add four tablespoons of butter and ¼ cup of all-purpose flour to the skillet. Continue to stir and cook over medium heat. The butter will melt and combine with the flour to create a sort of paste that coats the vegetables. Continue to cook this mixture for about two minutes more.
Add 1 tsp dried parsley, ½ tsp dried thyme, ½ tsp dried rosemary, ½ tsp dried sage, ½ tsp salt, ¼ tsp pepper, 2 cups chicken broth, and 1 cup milk to the skillet. Whisk the ingredients together, making sure to dissolve any browned bits from the bottom of the skillet. Turn the heat up to medium-high and allow this mixture to come back up to a simmer, at which point it will thicken into a gravy.
Once the mixture has thickened to a gravy, dice the chicken thighs and stir them back into the skillet. Cover with a lid and allow the chicken to simmer in the gravy while you prepare the dumplings.
To make the dumplings, stir together 1 cup all-purpose flour, ½ tsp salt, 1.5 tsp baking powder, ⅛ tsp garlic powder, ⅛ tsp pepper, 1 tsp dried parsley, and ½ tsp sugar in a bowl. Melt 2 Tbsp butter and combine it with ½ cup milk. Pour the milk mixture into the flour mixture.
Stir the wet and dry ingredients together until it forms a soft, sticky dough. It should be soft enough that you can easily scoop it with a spoon.
Make sure the gravy is fully simmering, then drop the dumpling dough into the gravy in 2 Tbsp portions. The dumplings will expand quite a bit as they steam, so don’t worry that they don’t fully cover the surface.
Place the lid on the skillet and allow the dumplings to steam in the simmering gravy for 15 minutes without lifting the lid. Make sure the gravy is simmering the whole time. After 15 minutes they should be about double in size. Cut one open to make sure it’s fluffy all the way through.
Serve the chicken and dumplings hot and enjoy! (shown garnished with parsley for color)
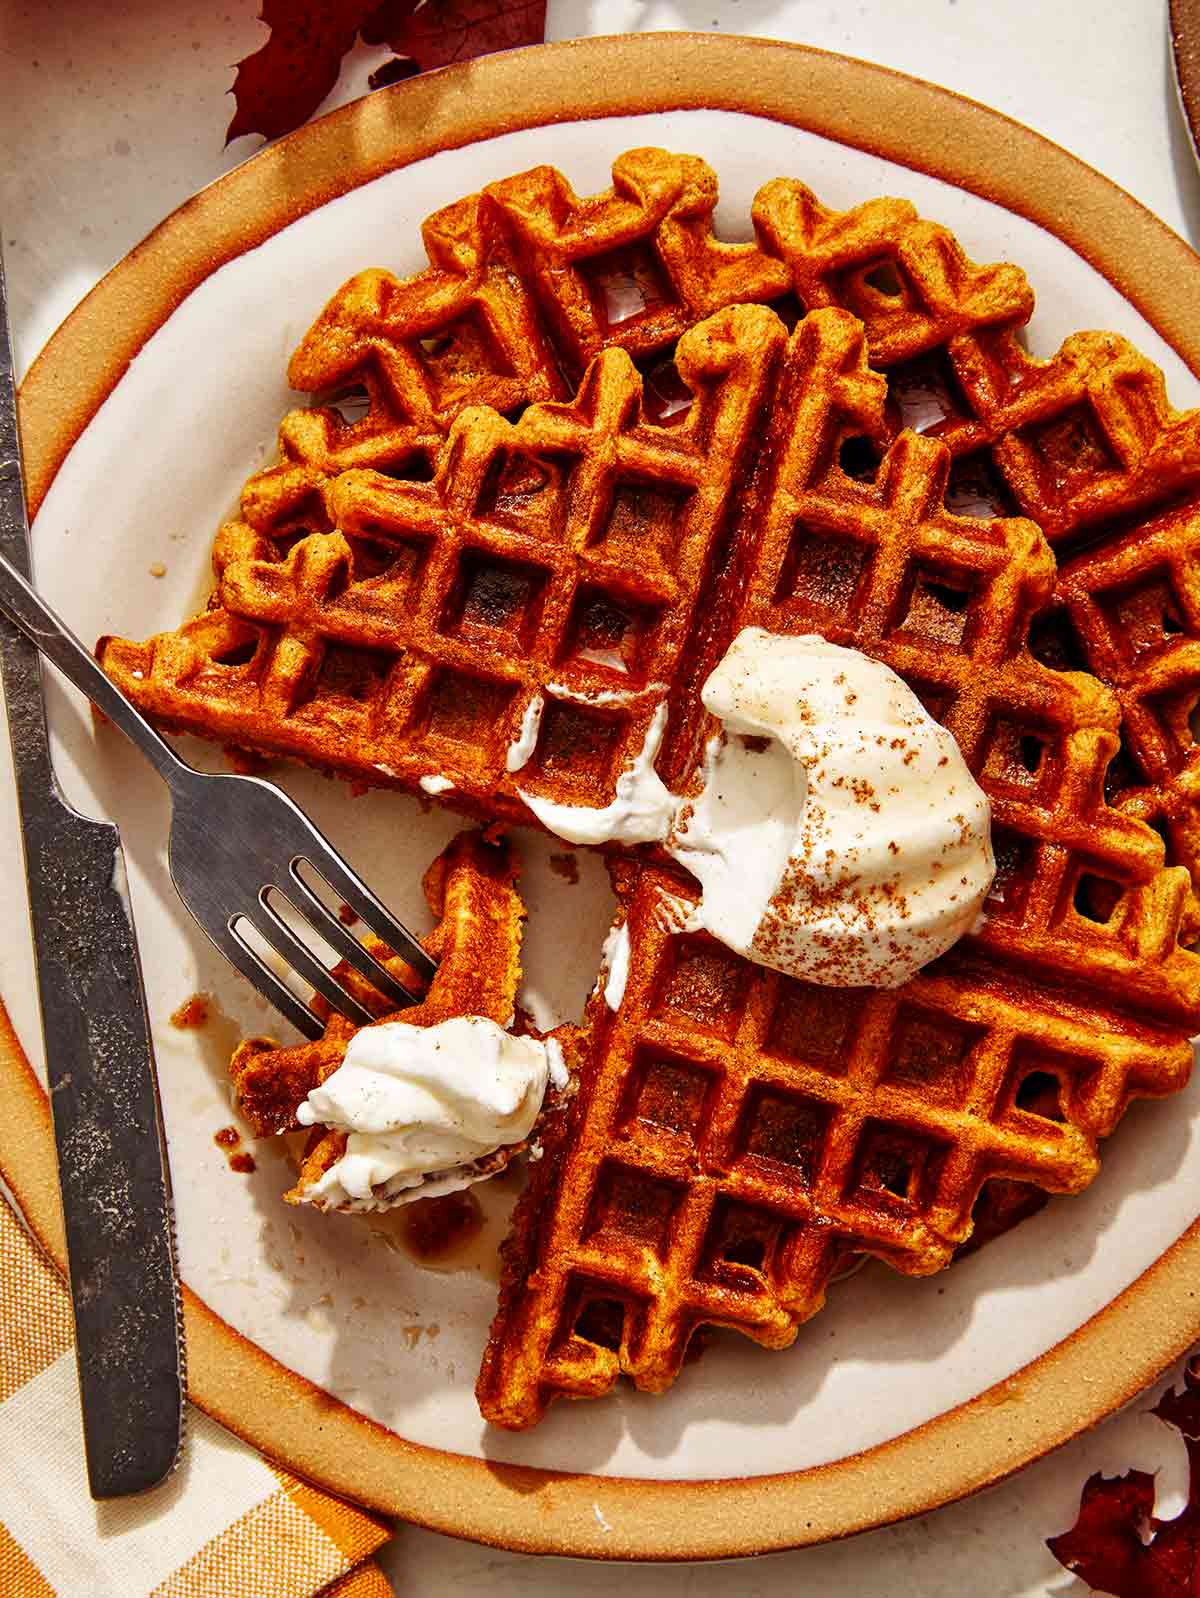
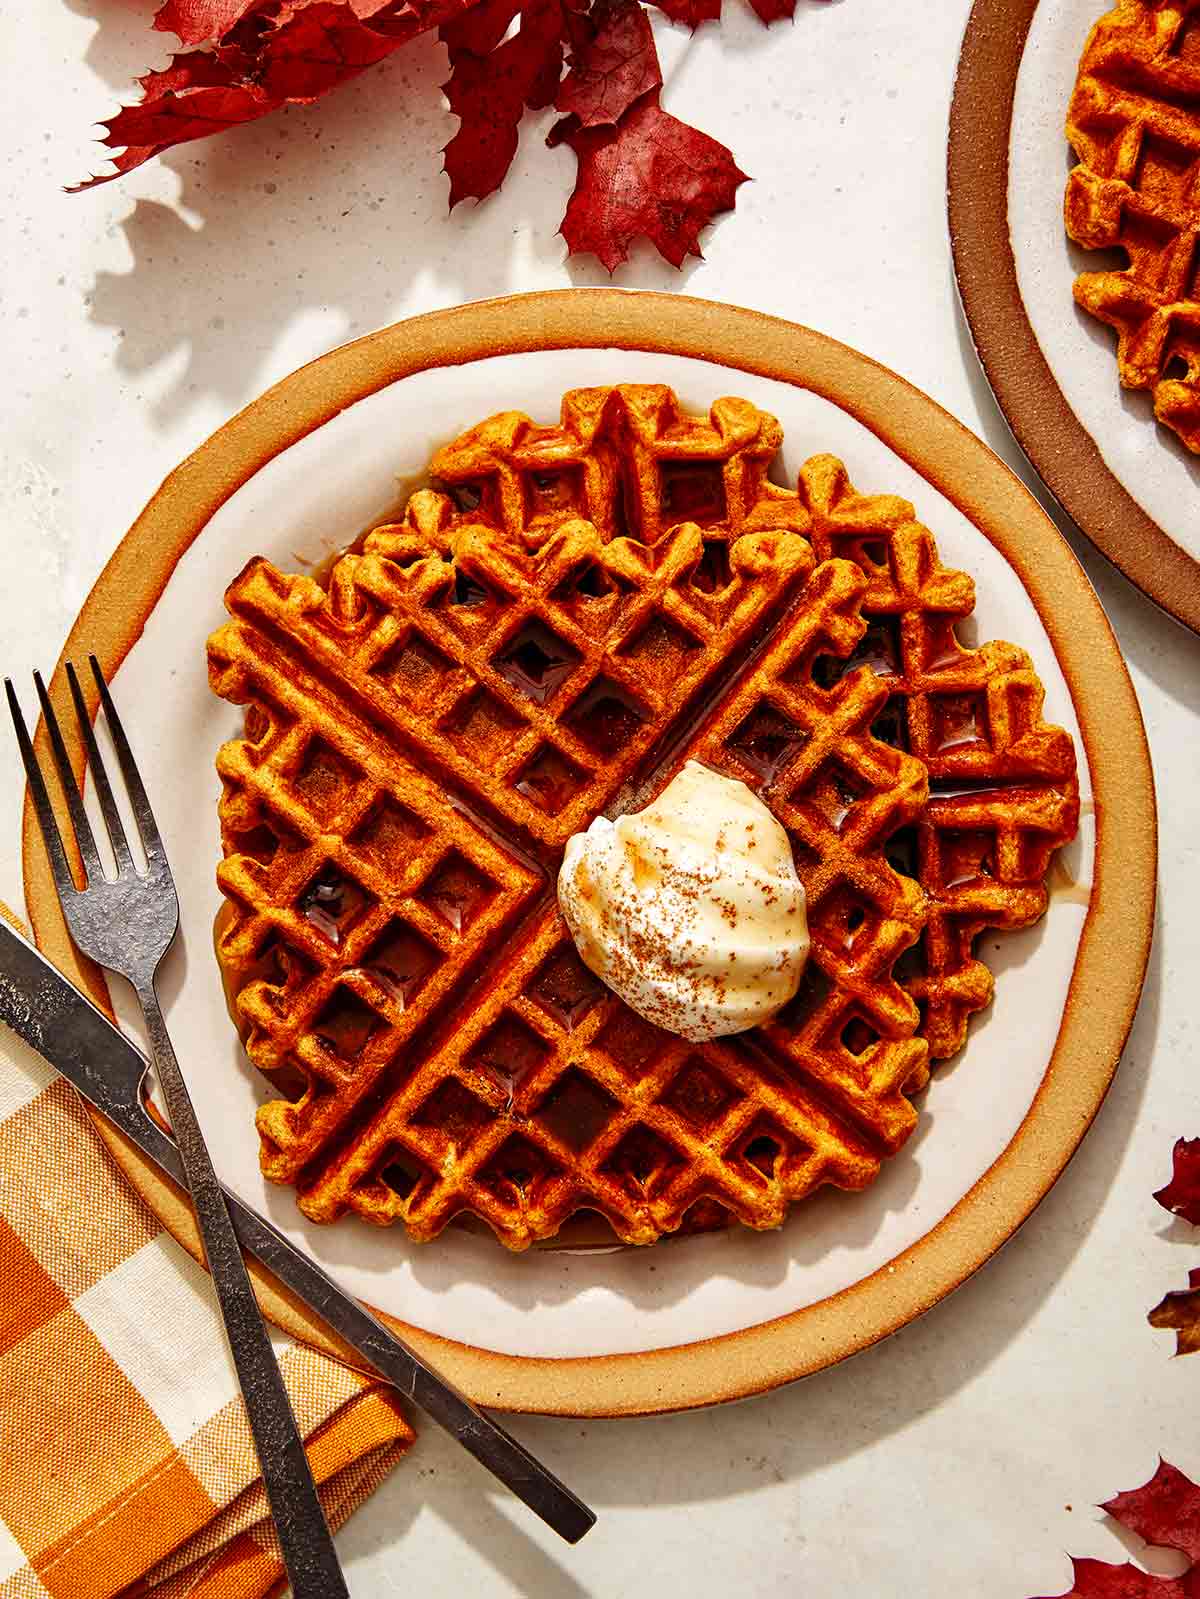
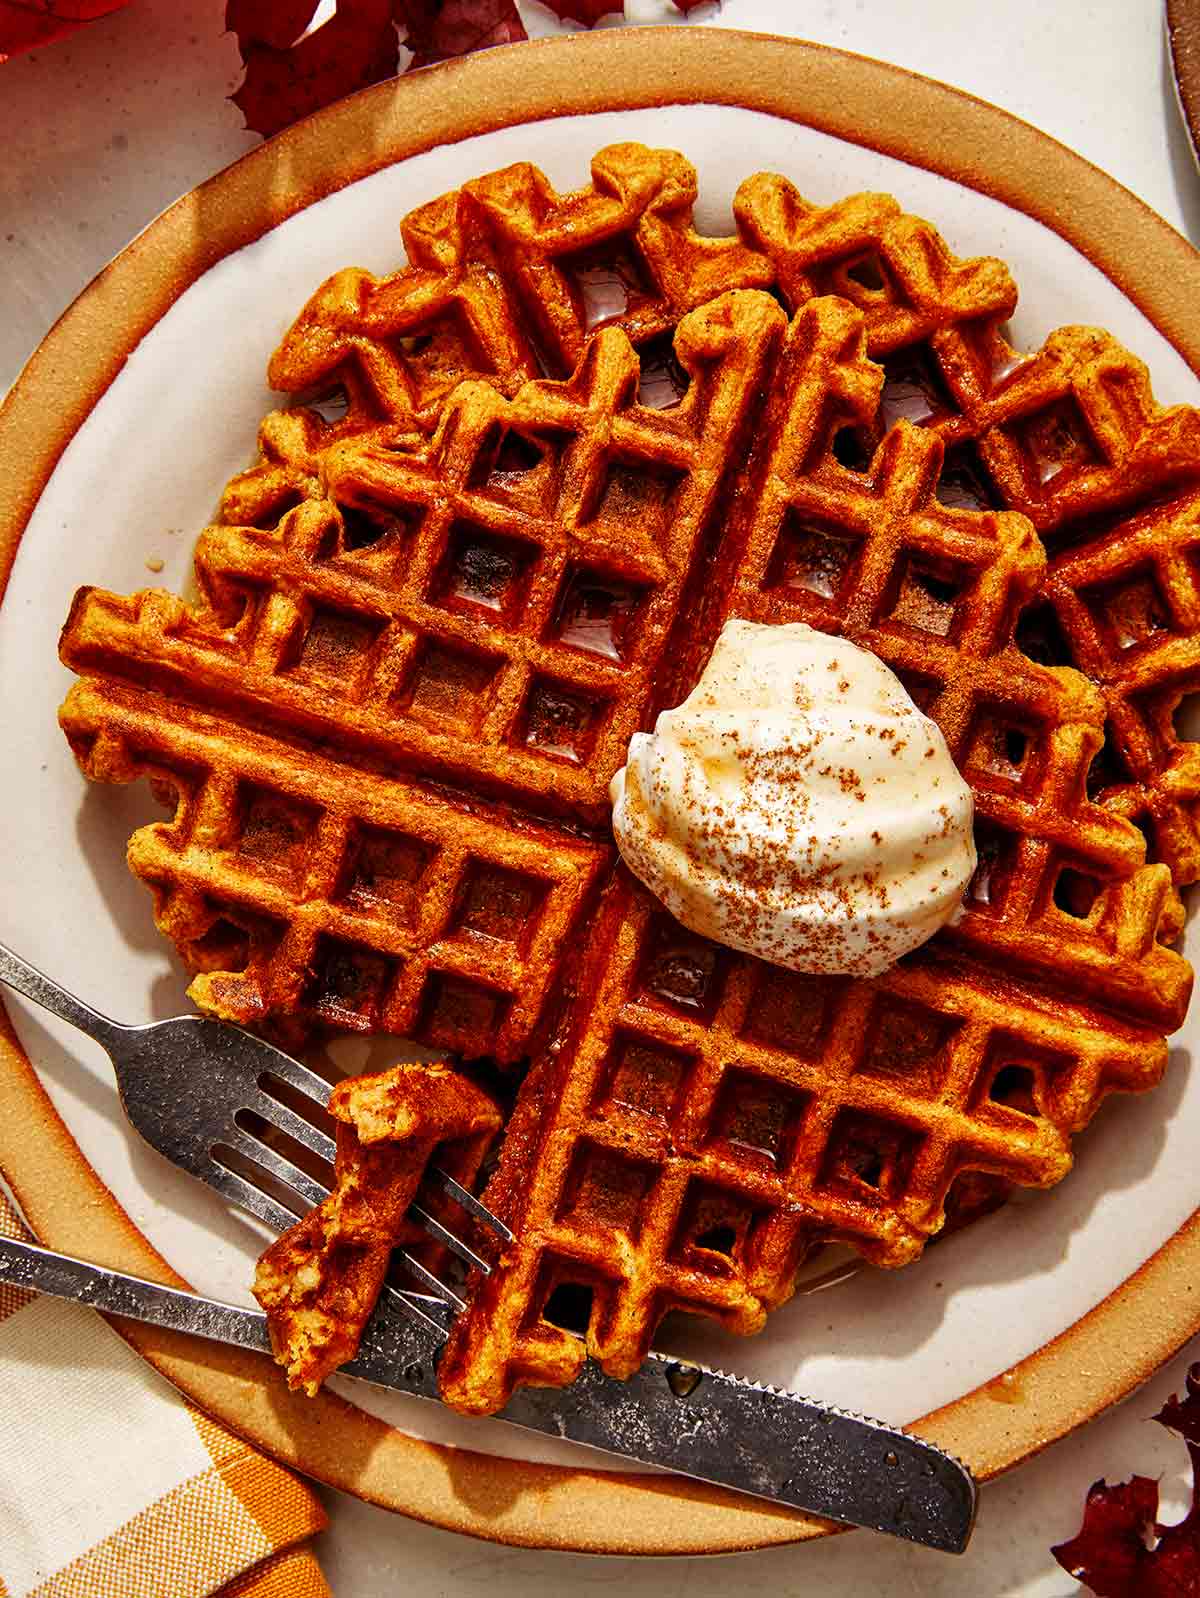
These pumpkin spice waffles are one of our new favorite breakfasts for fall! They’re crispy on the outside, hot and fluffy on the inside, and full of pumpkin flavor. Once we had the recipe perfected, they were quickly added to our list of favorite pumpkin recipes because as soon as the first leaf falls, we can’t get enough of the orange stuff! Get ready to rotate between pumpkin donuts, these pumpkin waffles, and cheesy pumpkin…
These pumpkin spice waffles are one of our new favorite breakfasts for fall! They’re crispy on the outside, hot and fluffy on the inside, and full of pumpkin flavor. Once we had the recipe perfected, they were quickly added to our list of favorite pumpkin recipes because as soon as the first leaf falls, we can’t get enough of the orange stuff! Get ready to rotate between pumpkin donuts, these pumpkin waffles, and cheesy pumpkin pancakes for a deliciously festive fall season!
You’ll love how easy these waffles are to make and how delicious they taste straight out of the iron. All you need is a little butter and syrup, but we won’t say no to a dollop of pumpkin butter slathered on top, either! We recommend making more than you need and freezing the extras for a quick weekday breakfast that just needs to be popped back into the toaster!
How to Make Pumpkin Waffles
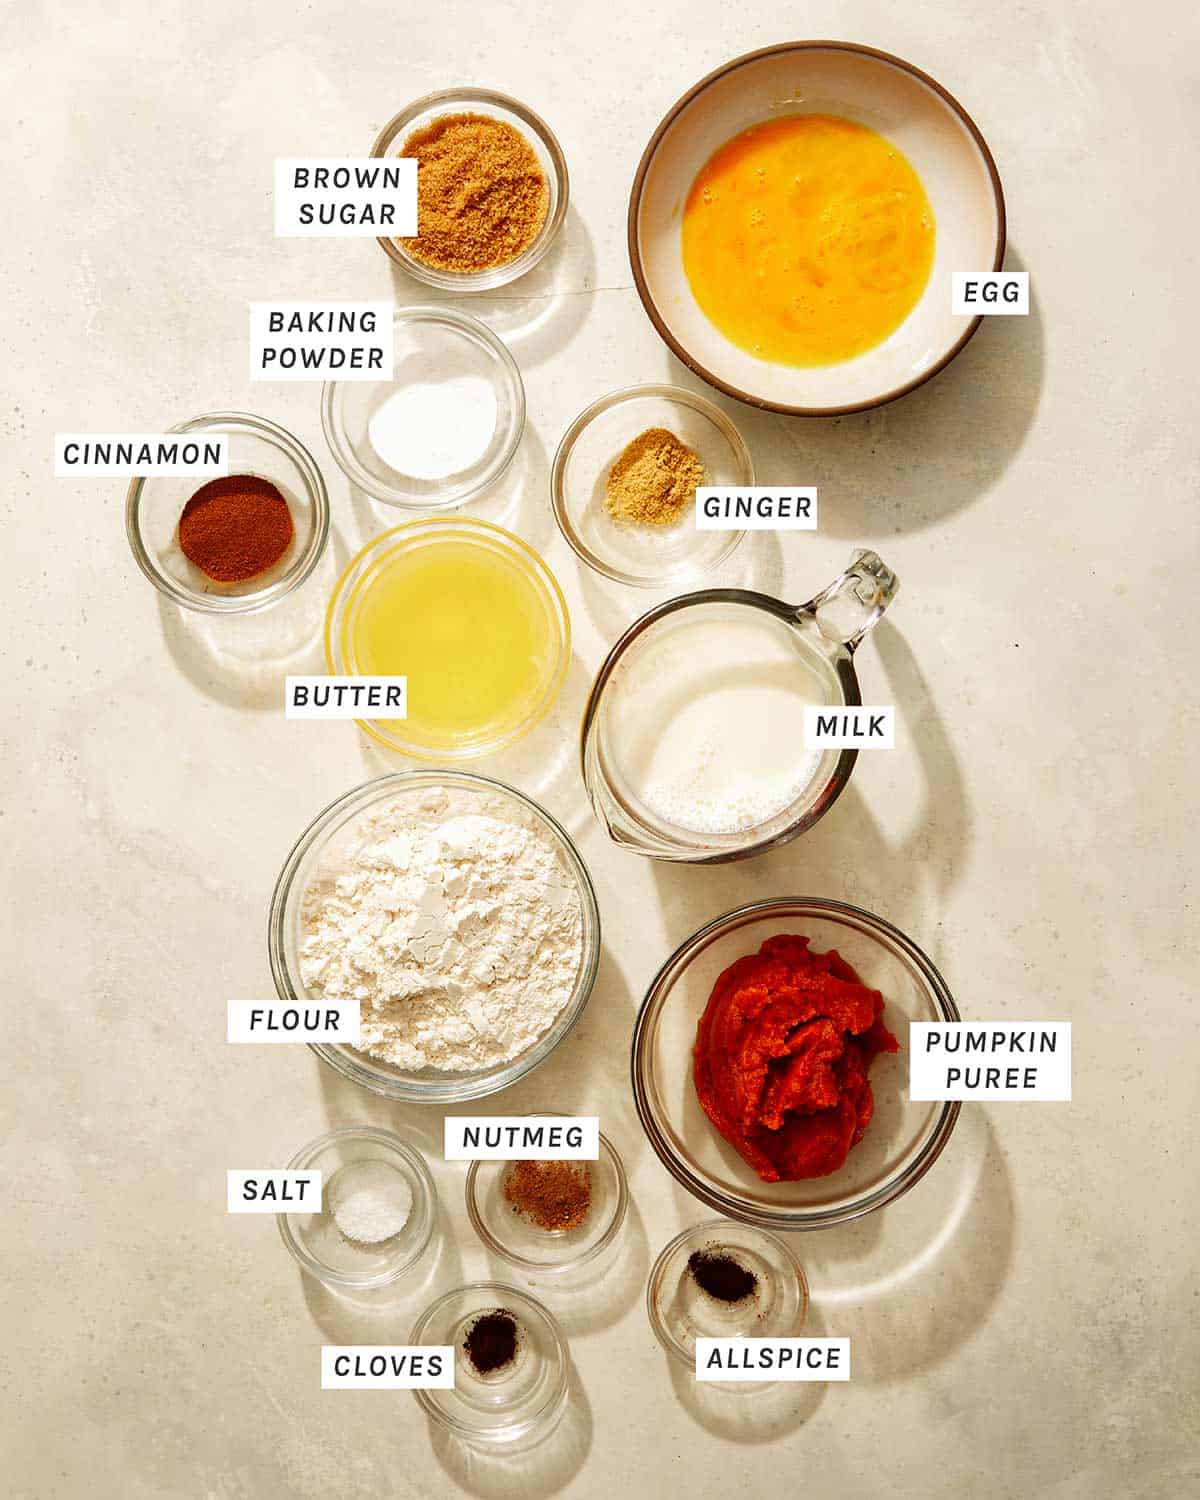
Ingredients
Process
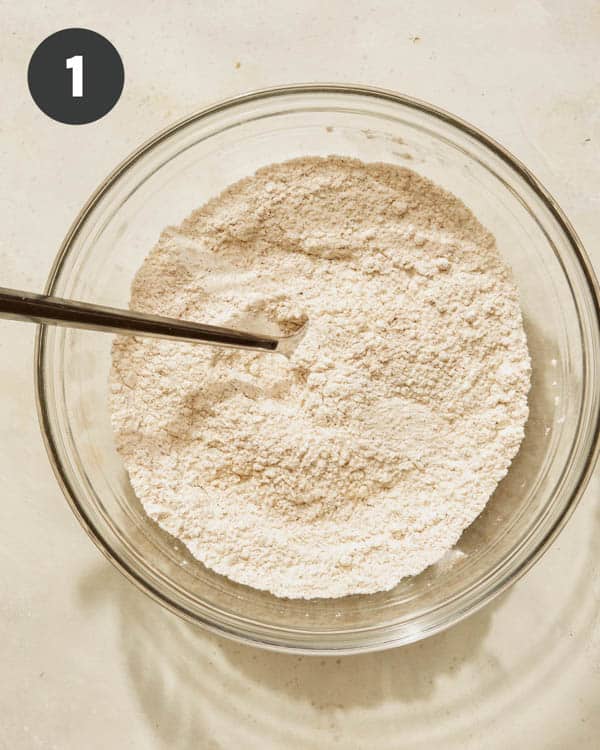
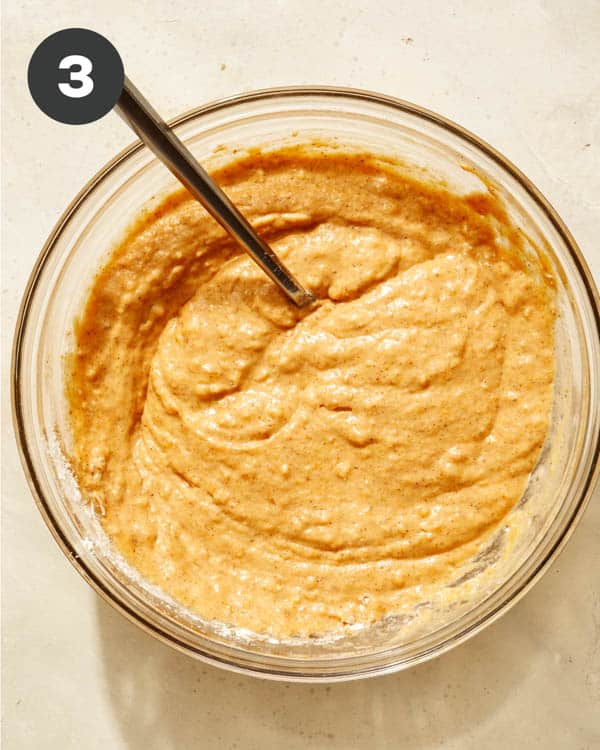
In a mixing bowl, whisk together flour, sugar, baking powder, spices, and salt.
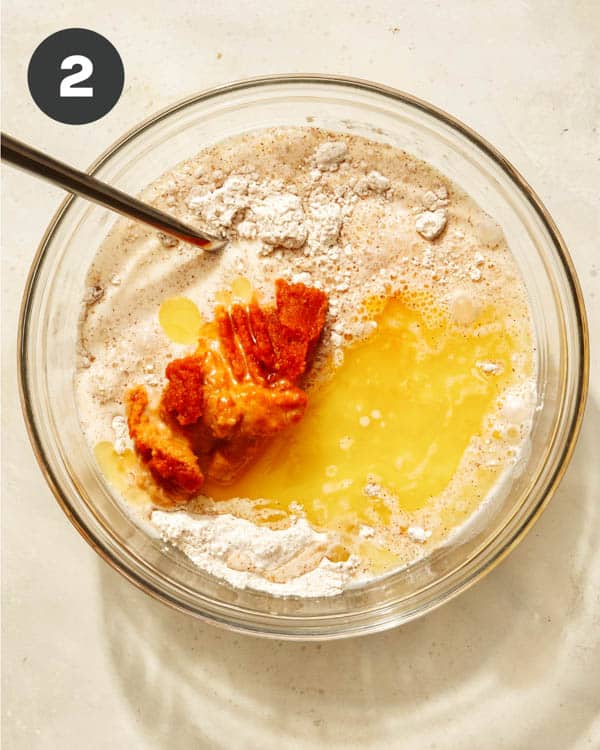
Add the remaining ingredients.
Stir together with a fork until a batter forms and the mixture is still lumpy, but no dry spots remain.
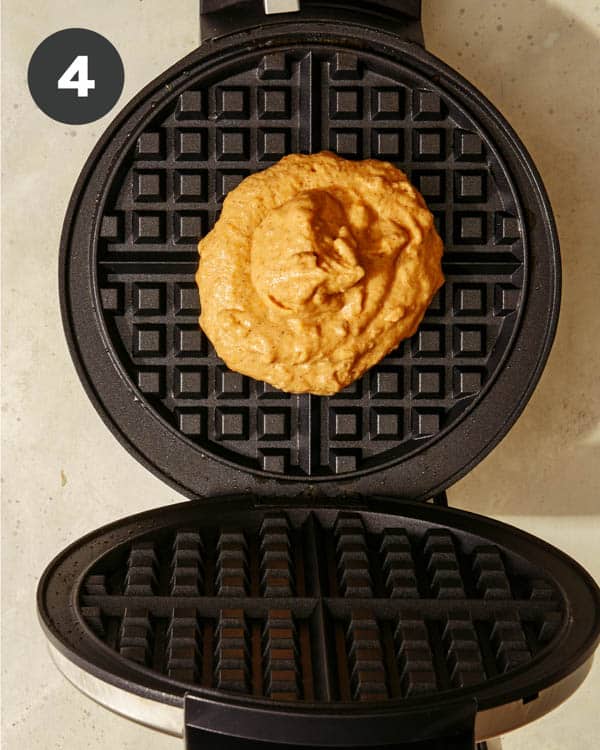
Set the waffle iron to the desired temperature. Once heated, lightly spray the top and bottom with nonstick cooking spray.
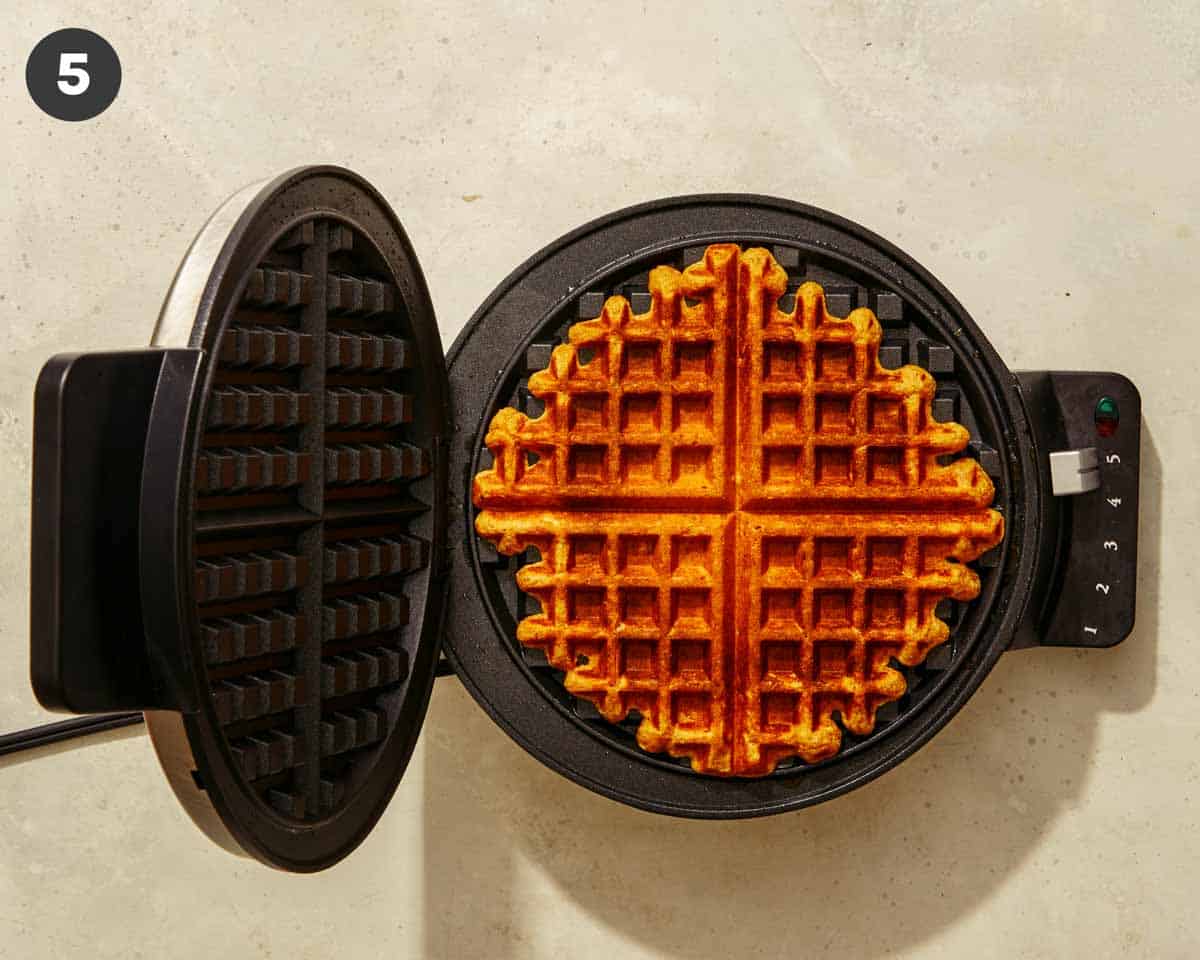
Pour ⅓ cup of the batter into the center of the waffle iron and press. Once desired doneness has been achieved, transfer the waffle to a baking sheet and repeat until all batter has been used, keeping the waffles in a single layer.
Storing Leftover Waffle Batter
If you’re not ready to use all of the batter and want to save it for another morning, you can! When storing waffle batter, keep in mind that the longer the batter sits, the more leavening power will be lost from the baking powder. We recommend storing any leftover waffle batter in the refrigerator in an air-tight container for up to two days.
For an easier pumpkin waffle breakfast, you can combine all of the dry ingredients for this recipe ahead of time and store it in an airtight container in the pantry until you’re ready to use it.
Storing and Reheating Leftover Waffles
Whether you’re making a double (or a triple!) batch of these waffles or end up having one or two left uneaten, they’re perfect for saving and eating another day.
You can store leftovers in the refrigerator for up to three days. Lay the waffles in a single layer on a pan or plate, cover, and refrigerate.
If you want to keep them for more than three days, store your leftovers in the freezer! Lay the waffles in a single layer on a sheet pan and freeze for 2-4 hours or until mostly frozen. Then, add the waffles to a freezer bag or an airtight freezer container and freeze for up to 3 months.
To reheat waffles, pop them in the toaster until warmed through. If reheating from frozen, you may need to warm it in the microwave for 20-30 seconds first so that the outside doesn’t get over-browned before the inside warms through.
Tips for Making the BEST Pumpkin Waffles
Avoid overmixing the batter, or the waffles will be dense and tough. Mix only until the dry spots are gone. The batter will still be a bit lumpy.
We love the mix of cinnamon, ginger, nutmeg, clove, and allspice to give these waffles a warm pumpkin spice flavor. If you’re short on time or don’t have all the spices needed, a second option would be to use a pre-mixed pumpkin pie spice mix.
If you plan on making extras to freeze and reheat later, slightly undercooked the ones you want to freeze, just so the outside isn’t too dark. This way, you can brown them and warm them in the toaster without burning the outside of the waffles.
What to Serve with Our Waffles
For a complete fall breakfast, serve these pumpkin spice waffles with:
In a mixing bowl whisk together flour, sugar, baking powder, spices, and salt.
Add the remaining ingredients.
Stir together with a fork until a batter forms, mixture is still lumpy, but no dry spots remain.
Set waffle iron to desired temperature. Once heated, lightly spray the top and bottom with nonstick cooking spray.
Pour ⅓ cup of the batter into the center of the waffle iron and press. Once desired doneness has been achieved, transfer waffle to a baking sheet and repeat until all batter has been used.
Notes
**Recipe Makes 6 Waffles – Each Waffle is 1 Serving**
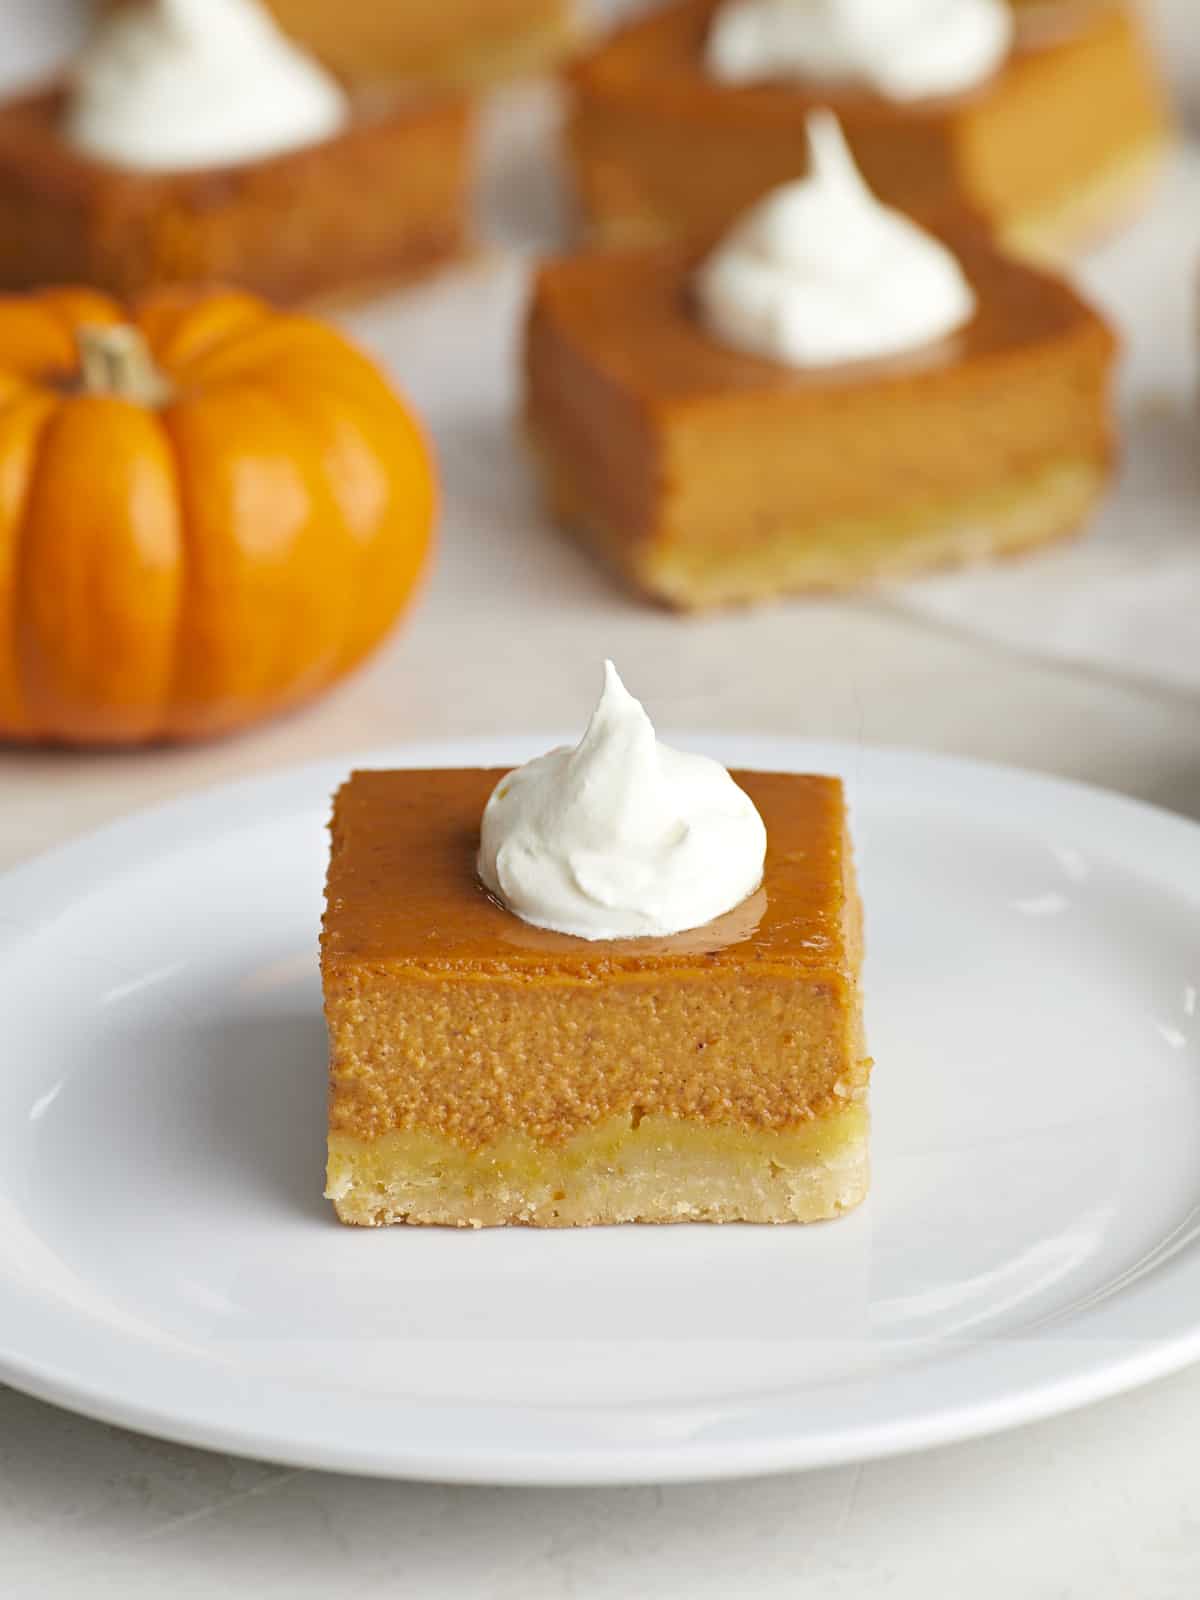
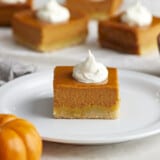
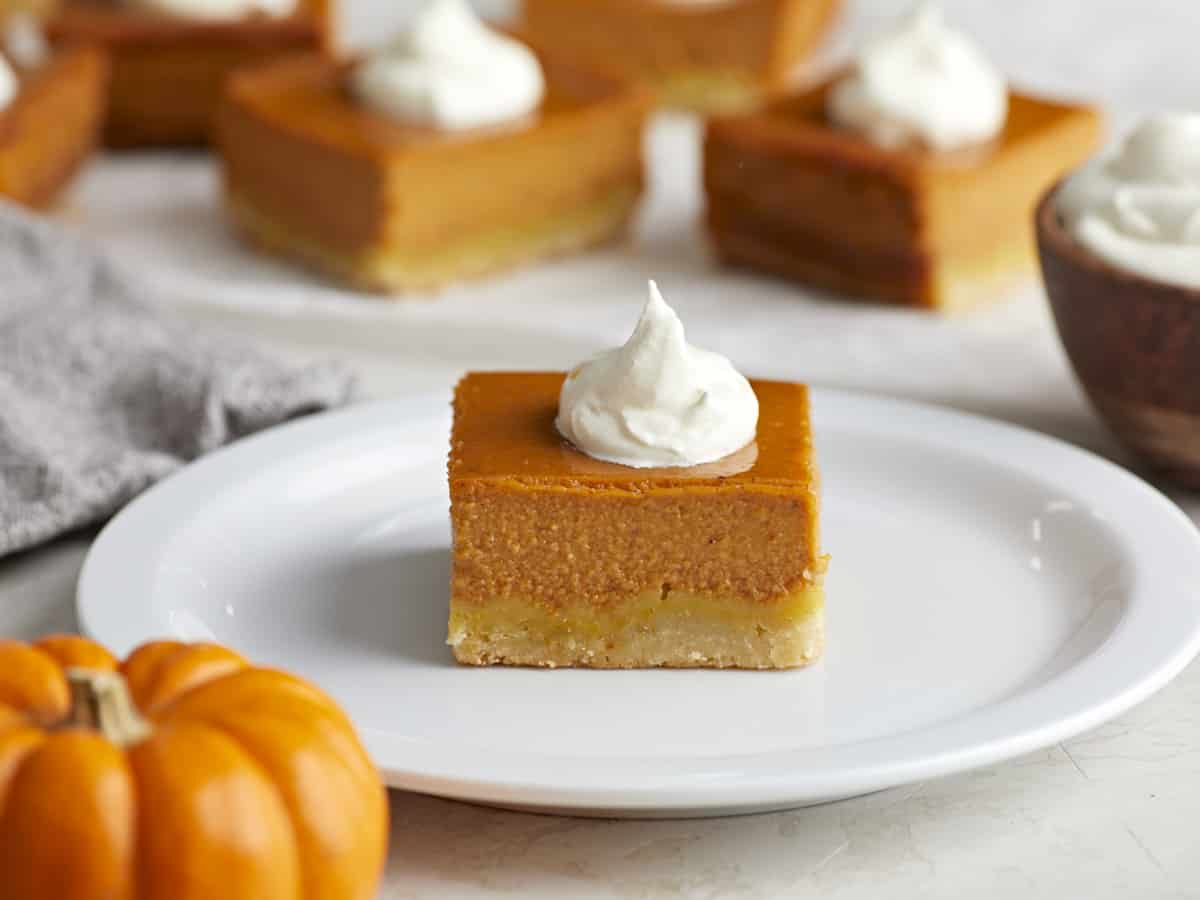
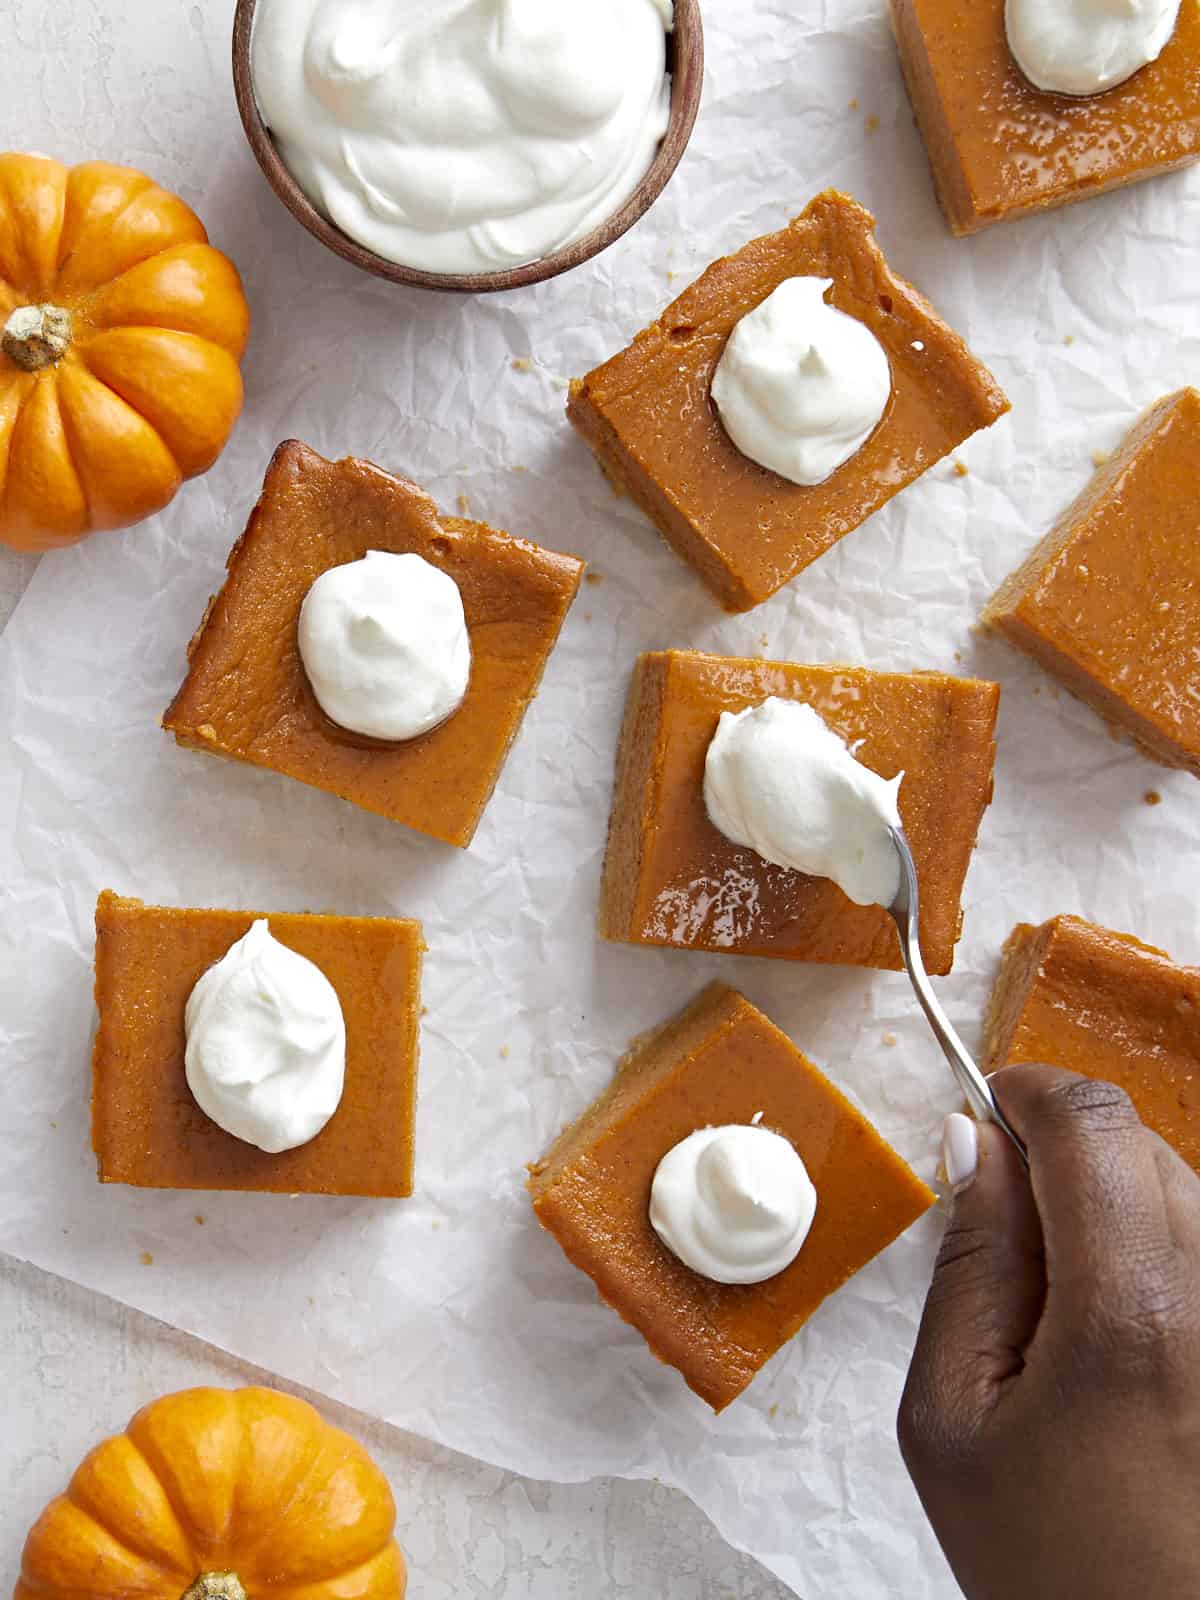
The classic, irresistible flavor and taste of pumpkin pie, but in a more convenient, easy to share form…umm, yes I’m sold! These easy Pumpkin Pie Bars are rich, creamy, full of warm spices, and made with a buttery shortbread crust. It’s the perfect dessert to enjoy during the fall season at family gatherings, holiday parties, or any time during the week. The best part is you can cut these bars as big or as little as you want, to make your dollar stretch, and to make them the perfect size for sharing, because trust me…they’re worth the hype!
What’s So Special About Pumpkin Pie Bars?
I’ll be honest, making a homemade pie crust for a traditional pumpkin pie can be a little intimidating. These pumpkin pie bars are made with a super easy, buttery, 4-ingredient shortbread crust. After testing this recipe, I fell in love with the light & airy texture of the crust combined with the smooth, custardy pie filling. One word…Heaven!
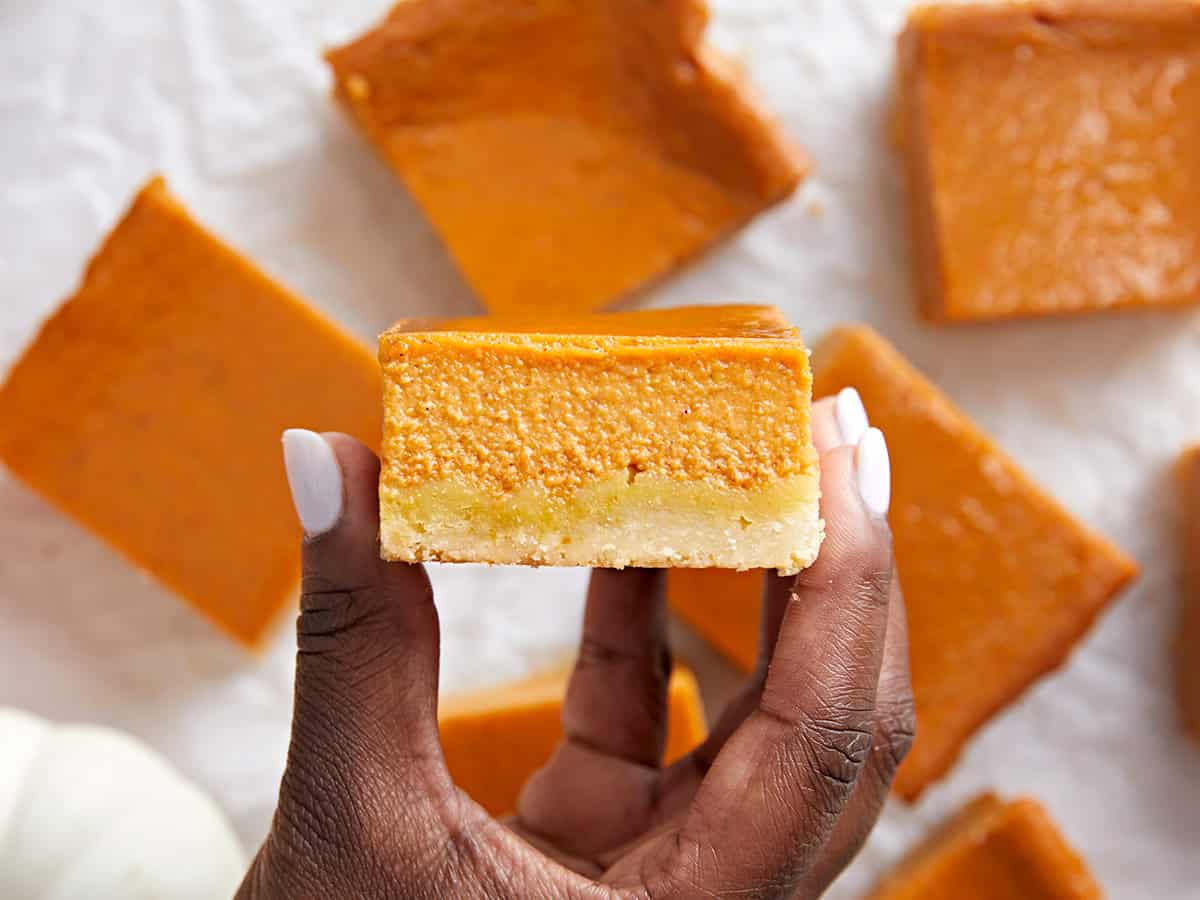
And with a traditional pie you typically get about 6-8 slices; not to mention the added pressure to cut the slices evenly 😳. But these pumpkin pie bars are unbelievably easy to cut into 9 squares or more and they’re very easy to serve. Basically, if you’re looking for a simple and stress-free dessert to make this season, it’s definitely going to be this one!
Ingredients For Pumpkin Pie Bars
Here are the ingredients you need to make this pumpkin pie bar recipe:
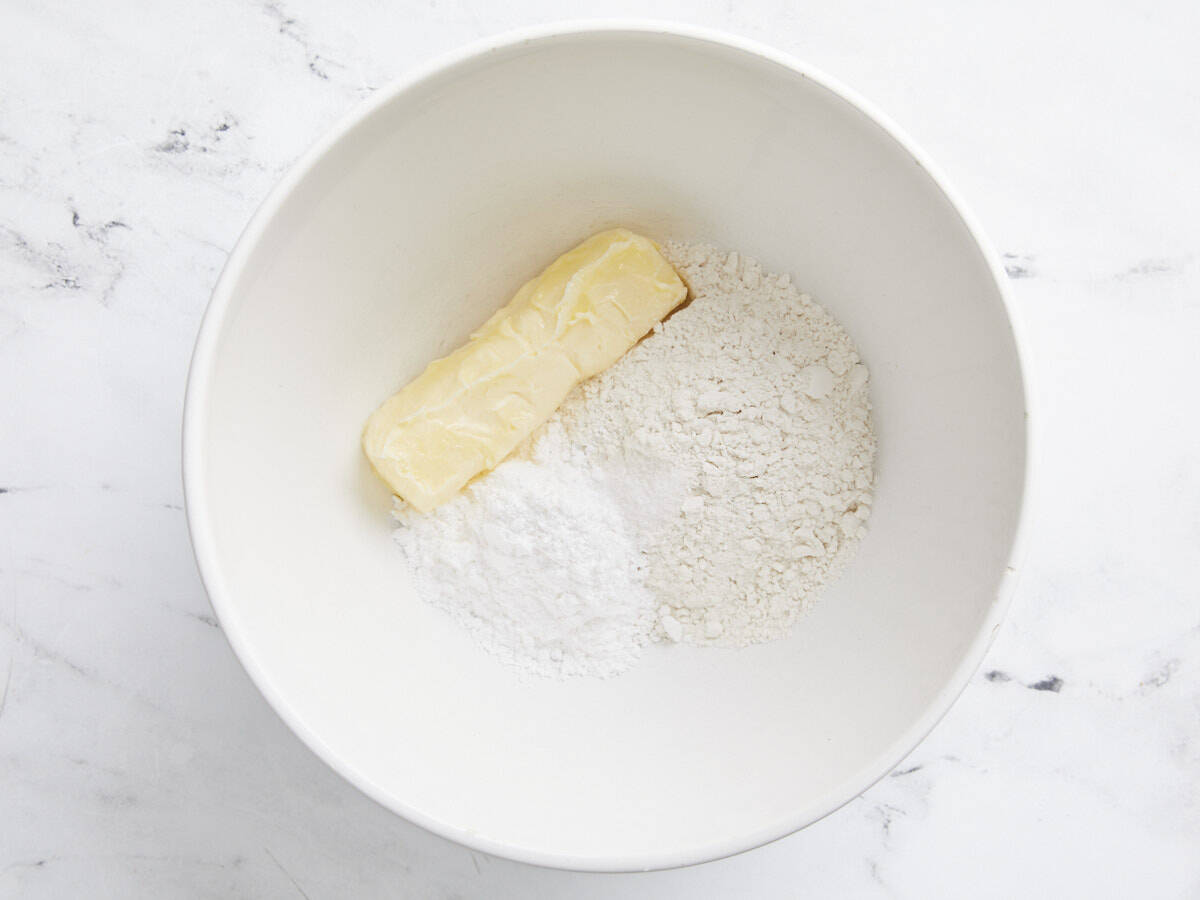
All-purpose flour, Butter & Powdered Sugar – These pumpkin pie bars are made with a quick and easy shortbread crust. It’s a simple combination of flour, butter, powdered sugar and salt. It has a crumbly, crisp texture with a buttery, semi-sweet flavor. It’s the perfect foundation for this luscious pumpkin pie filling!
Pumpkin Purée – Pumpkin purée is of course the star of the show! It gives these pie bars a beautiful color and rich flavor. And we tested these with both the Kroger store brand and the Libby’s brand. They were both equally delicious. So feel free to save some money in that area without sacrificing flavor!
Evaporated Milk – Evaporated milk gives this custard pie filling a rich and creamy texture.
Granulated Sugar – Granulated white sugar enhances the flavor of the pumpkin puree and provides extra sweetness to the pie filling.
Pumpkin Pie Spice – Pumpkin pie spice is a simple mix of warm spices like cinnamon, ginger, and nutmeg. It gives these pie bars amazing flavor! Feel free to use store-bought or make your own!
Eggs – Eggs help the custard pie filling set.
Tips For Making Pumpkin Pie Bars!
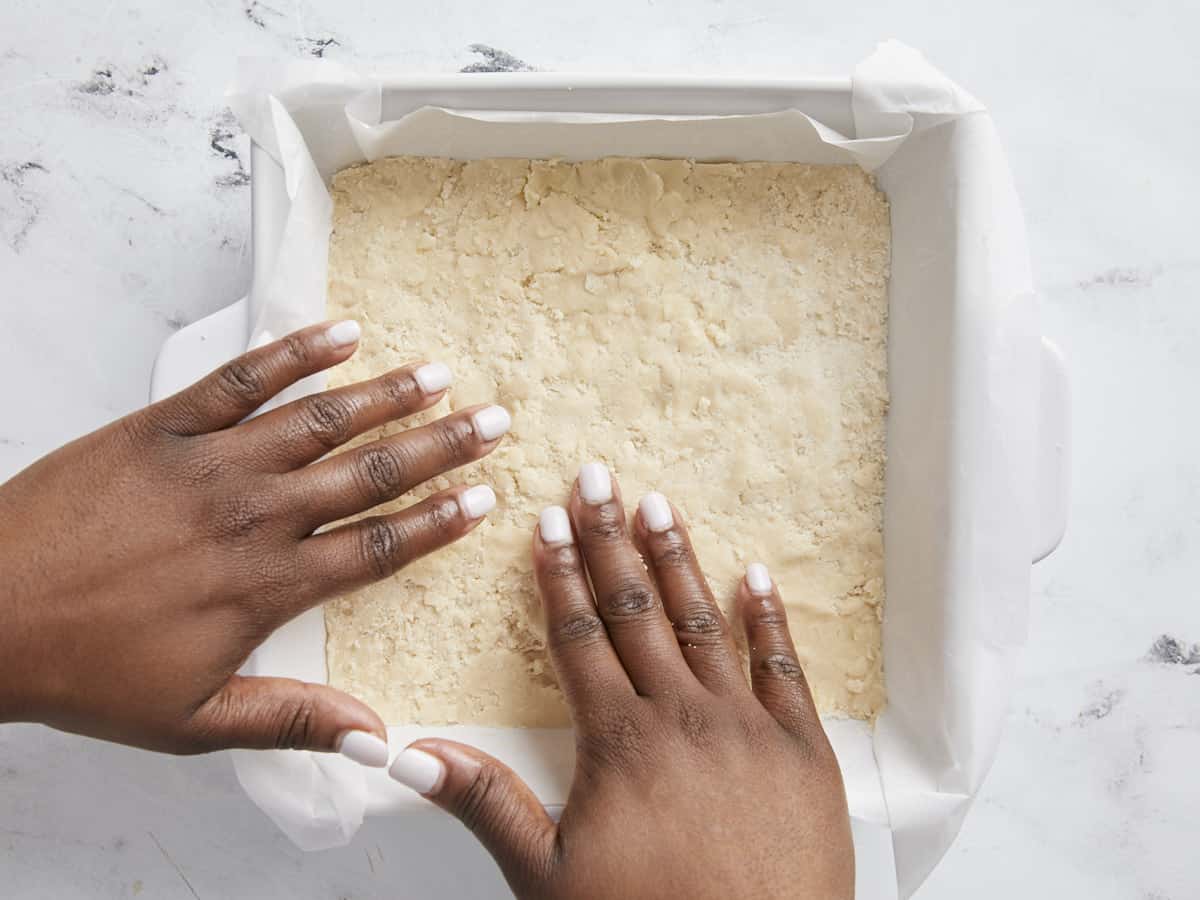
The shortbread crust mixture will look slightly crumbly at first, but will hold together nicely once pressed into the baking dish.
The best way to tell when your pumpkin pie bars are done is to give the dish a little shake at around 50-55 minutes. The center should be mostly set and jiggle just slightly. If the center still looks too wet, then it needs more time to bake.
When the bars are done baking, the top of the filling will be slightly puffed up. But don’t worry, it will settle back down as it cools.
Make sure you allow the bars to cool at room temperature before transferring to the refrigerator to chill completely for at least one hour or more.
And definitely allow the bars to chill and set completely before cutting.
Storing Leftovers
If you’re lucky enough to have any leftovers, you can store them covered in an airtight container in the fridge for up to 4 days. Just make sure they are completely cool before refrigerating.
These easy Pumpkin Pie Bars are rich, creamy, full of warm spices, and made with a buttery shortbread crust. The perfect stress-free dessert to make this holiday season!
Preheat the oven to 350°F. In a large bowl add the flour, powdered sugar, salt, and softened butter for the shortbread crust. Mix the ingredients together with a fork or spatula until they are well combined. The mixture should look slightly crumbly.
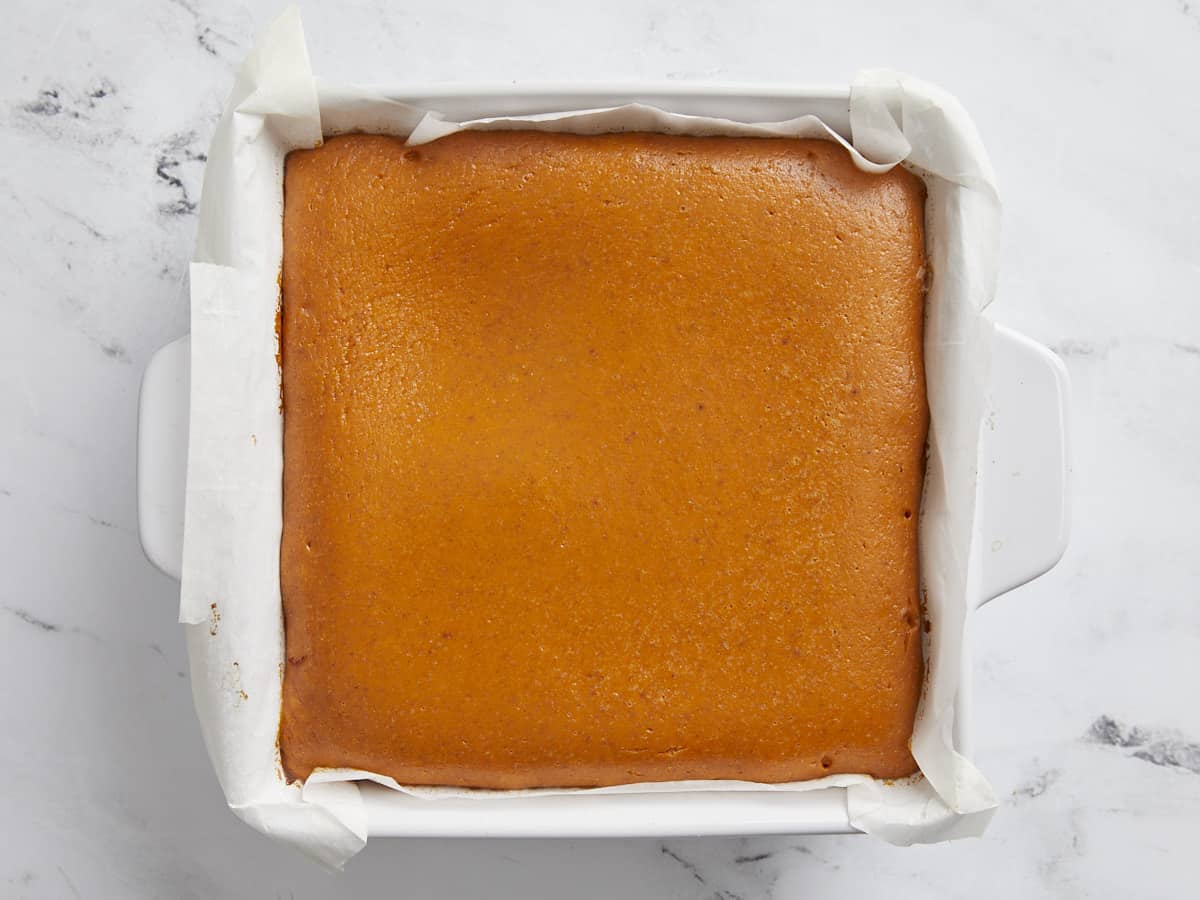
Line an 8×8-inch baking dish with parchment paper. Press the shortbread mixture into the bottom of the dish in an even layer.
Transfer the baking dish to the oven and bake the crust for 15 minutes or just until the crust is lightly golden.
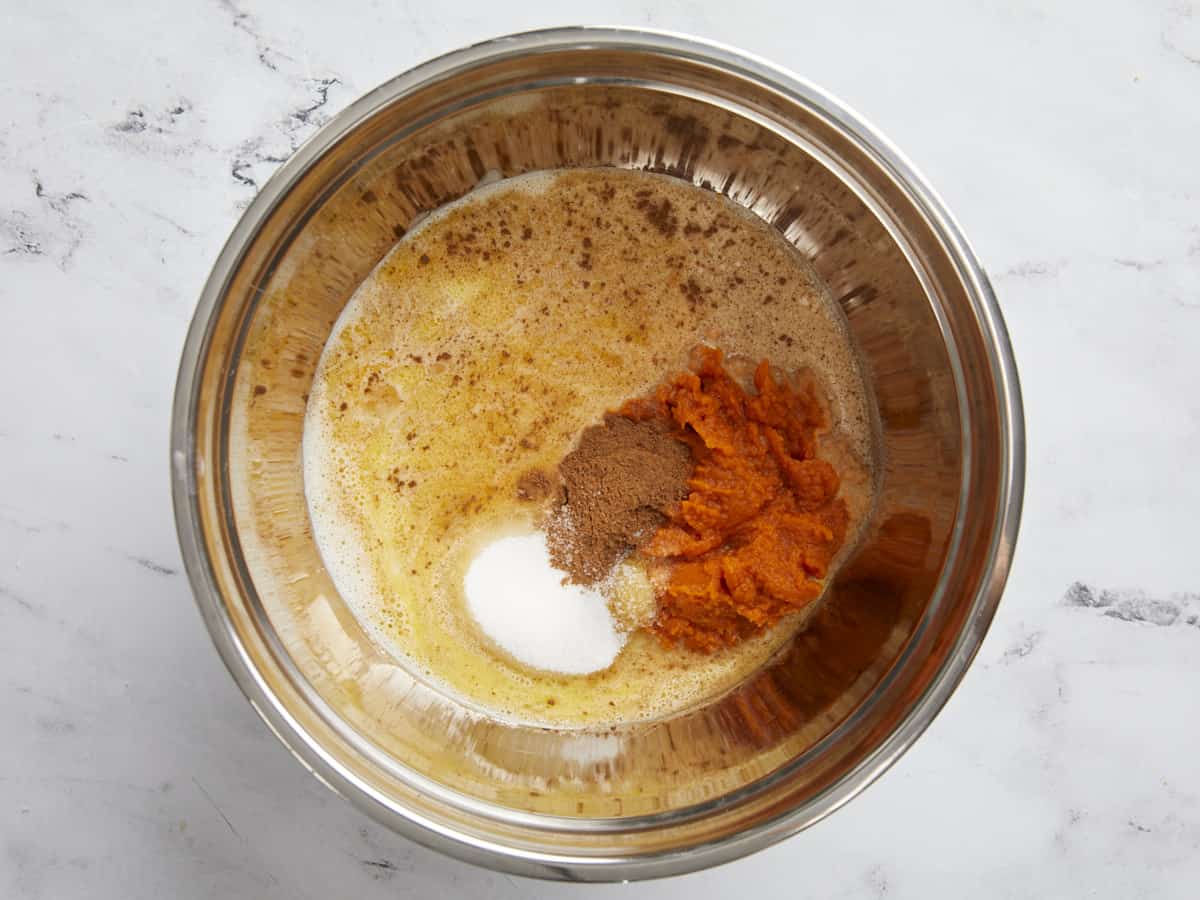
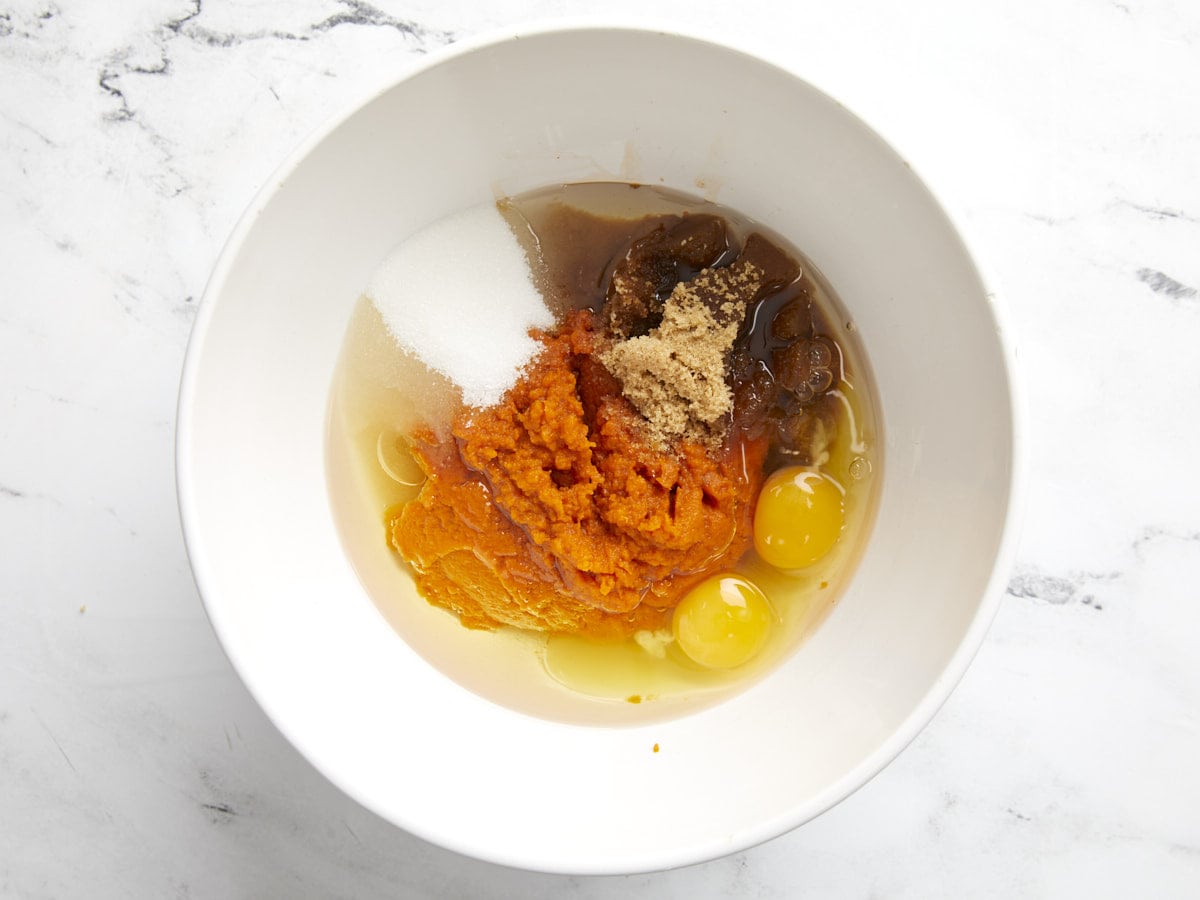
While the crust is baking, begin to make the filling. In another large bowl add the pumpkin purée, evaporated milk, sugar, pumpkin pie spice, salt, and beaten eggs.
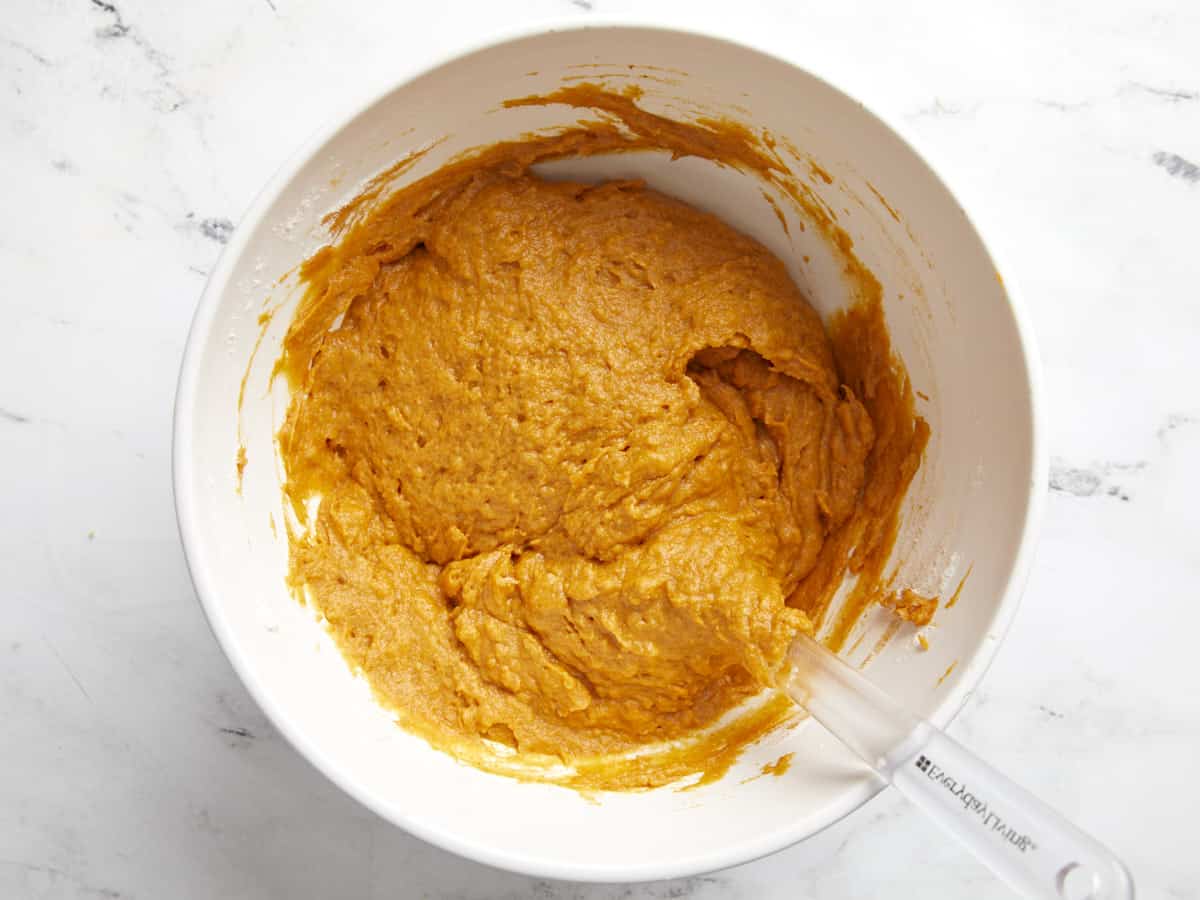
Blend with a hand mixer or whisk the pie filling ingredients together until smooth.
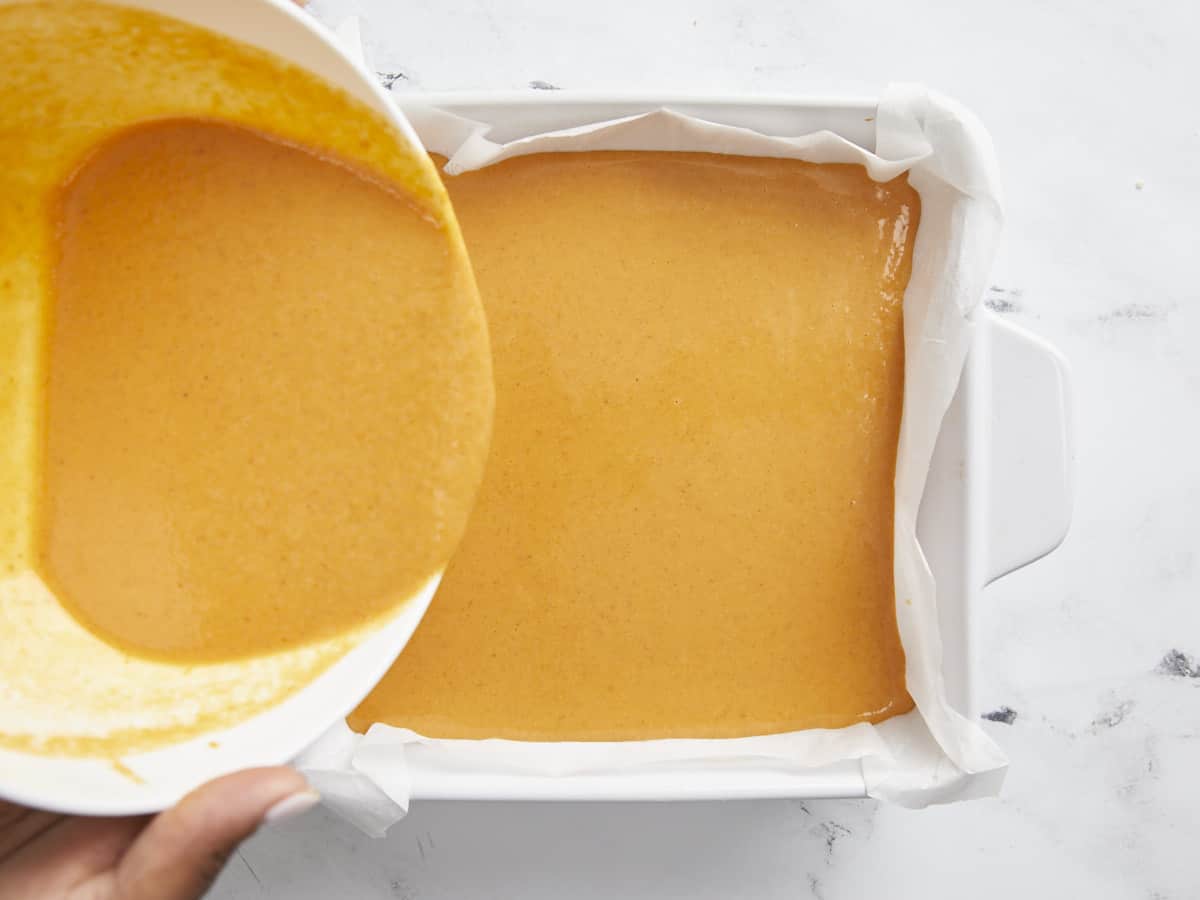
When the crust is finished baking, pour the pumpkin pie filling into the baking dish on top of the crust, then transfer it back to the oven and bake for 50-55 minutes, or until the filling is set and the center jiggles just slightly when you shake the baking dish.
Remove the baking dish from the oven and allow the pie bars to cool for about 30 minutes, then transfer the dish to the refrigerator to chill completely for at least 2 hours.
Once the pumpkin pie bars are completely chilled, remove them from the baking dish and slice into 9 bars. Top with some fresh whipped cream (optional) and enjoy!
How to Make Pumpkin Pie Bars – Step by Step Photos
Preheat the oven to 350°F. In a large bowl add 1 cup all-purpose flour, 1/3 cup powdered sugar, 1/4 tsp salt, and 1/2 cup (1 stick) of softened butter for the shortbread crust. Mix the ingredients together with a fork or spatula until they are well combined. The mixture should look slightly crumbly.
Line an 8×8-inch baking dish with parchment paper. Press the shortbread mixture into the bottom of the dish in an even layer. Transfer the baking dish to the oven and bake the crust for 15 minutes or just until the crust is lightly golden.
While the crust is baking, begin to make the pie filling. In another large bowl add 1-15oz. can of pumpkin purée, 1-12oz. can of evaporated milk, 3/4 cup granulated sugar, 1 1/2 tsp pumpkin pie spice, 1/2 tsp salt, and 2 large beaten eggs. Blend with a hand mixer or whisk the pie filling ingredients together until smooth.
When the crust is finished baking, pour the pumpkin pie filling into the baking dish on top of the crust, then transfer it back to the oven and bake for 50-55 minutes, or until the filling is set and the center jiggles just slightly when you shake the baking dish.
Remove the baking dish from the oven. The top of the pie filling will look slightly puffed when it comes out of the oven, but it will settle as it cools. Allow the pie bars to cool for about 30 minutes, then transfer the dish to the refrigerator to chill completely for at least 2 hours.
Once the pumpkin pie bars are completely chilled, remove them from the baking dish and slice them into 9 bars.
Top with some fresh whipped cream (optional) and enjoy!
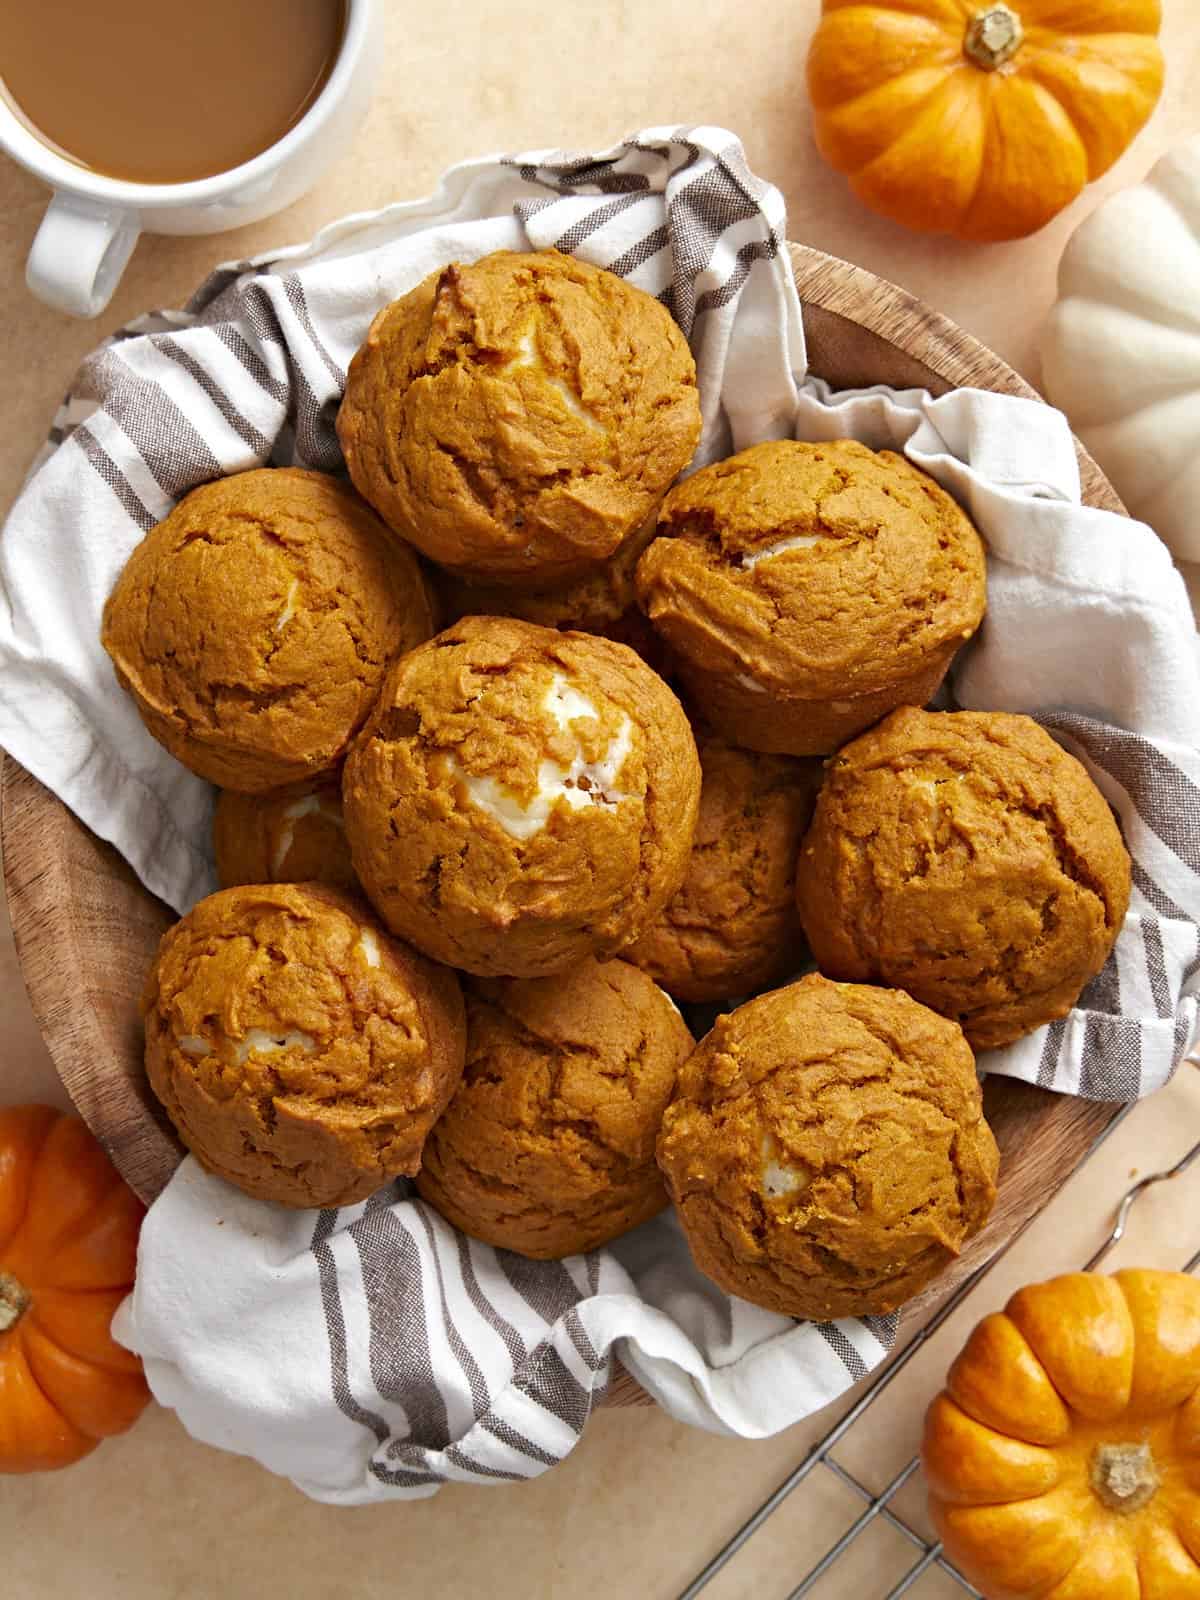
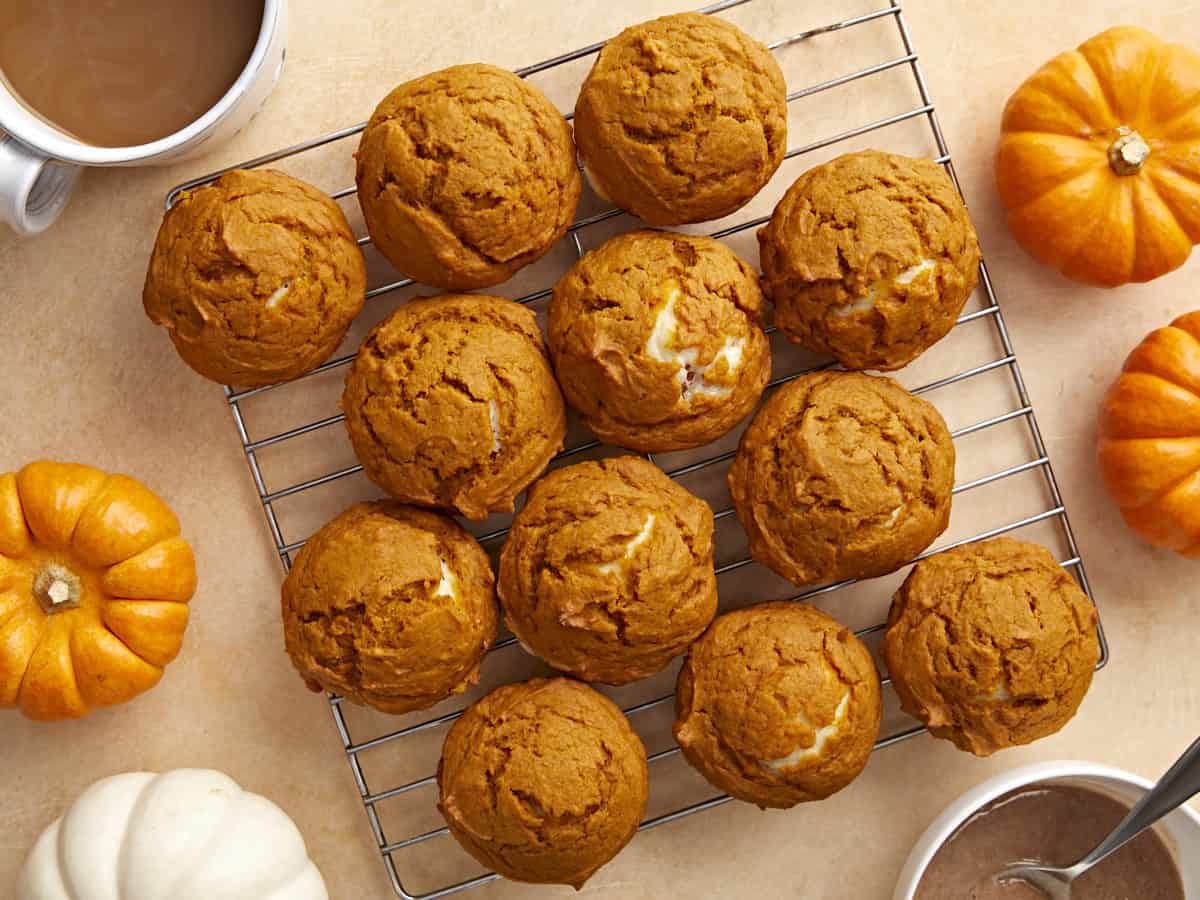
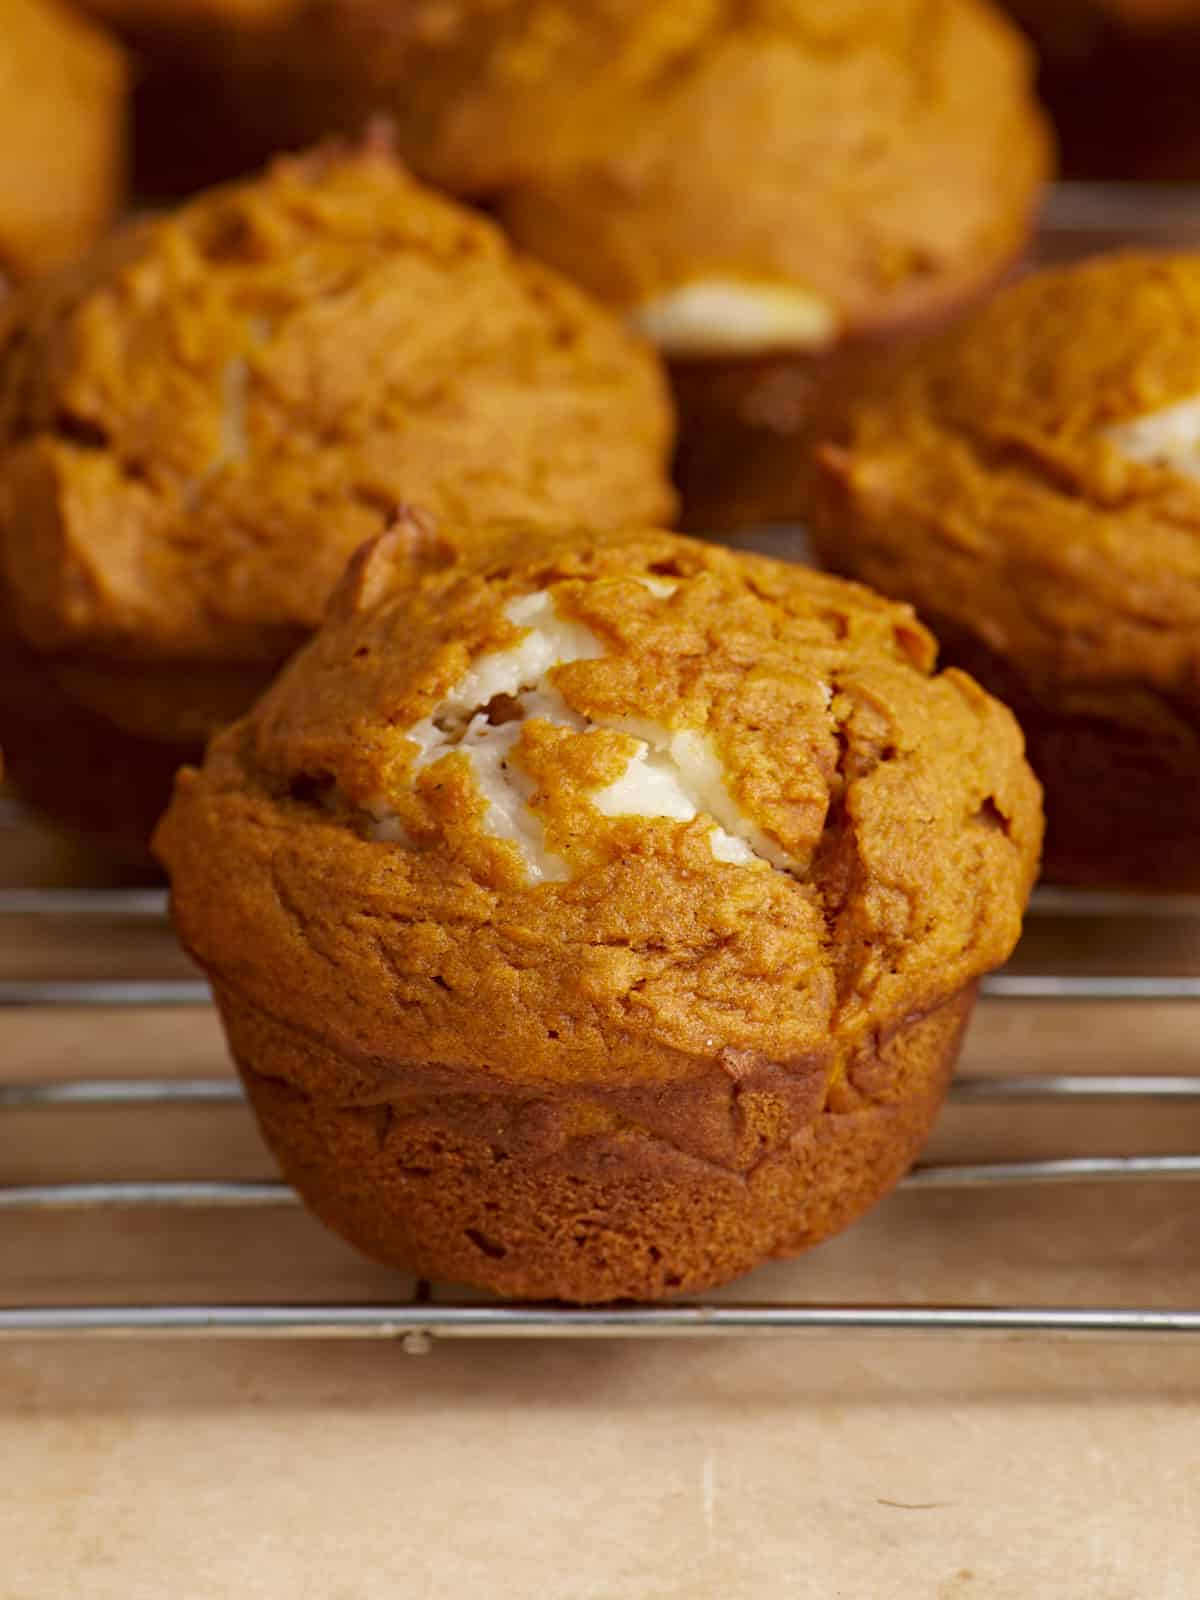
Want a more budget-friendly way to get your pumpkin spice fix than going to Starbucks for a PSL? Then you’ve got to make a batch of these Pumpkin Muffins. These muffins are moist, subtly sweet, full of warm spices, and have a hidden dollop of sweet cream cheese in the middle. They’re totally indulgent and you get a whole batch of twelve pumpkin muffins for about the price of one pumpkin spice latte. Plus, they’re freezer-friendly so you thaw one at a time to have with your morning coffee from now until the end of pumpkin season! 🙌
What Are Pumpkin Muffins Like?
Pumpkin purée is kind of magic because it can be added to both sweet and savory dishes, and it attracts moisture, which helps keep baked goods super soft, tender, and moist. The pumpkin flavor is slightly earthy with a subtle sweetness that, when paired with the warm pumpkin pie spice, is absolutely COZY. Bake up a batch of these pumpkin muffins on a weekend morning to make your house smell amazing and have the coziest of cozy fall experiences. 🥰
Ingredients for Pumpkin Muffins
Here’s what you’ll need to make this incredible pumpkin muffin recipe:
All-Purpose Flour: Flour gives the batter strength and body. It’s the vehicle for all that pumpkin-y goodness!
Baking Powder & Baking Soda: These muffins get a one-two punch of leavening to help them bake up light and airy, despite the density of the pumpkin purée.
Pumpkin Pie Spice and Vanilla: A simple mix of pumpkin pie spice and warm vanilla extract is all you need to flavor these delicious muffins.
White Sugar & Brown Sugar: A combination of white sugar and brown sugar gives the muffins sweetness with a slightly warm richness from the molasses in the brown sugar. The sugars also help keep the muffins moist.
Eggs: Eggs also help leaven baked goods when the water in the eggs turn to steam in the oven. When the egg solidifies as it bakes, it helps the muffins hold their puffed shape.
Pumpkin Purée: Pumpkin purée provides color, flavor, and moisture to the muffins. It’s the star of the show!
Cooking Oil: Oil helps the muffins stay moist and tender, and gives the muffin an extra rich flavor.
Cream Cheese & Sugar: A little dollop of sweetened cream cheese in the center of each muffin makes them extra special! But you can skip the cream cheese filling and make plain pumpkin muffins if you prefer.
How to Store Leftovers
This recipe makes a batch of 12 muffins, but that’s no reason to not make them for yourself if you live alone. Simply let the muffins cool completely to room temperature, then transfer to an air-tight food storage container. They’ll last about three days in the refrigerator, or you can freeze them for about three months. Thaw and reheat the frozen muffins with a quick 30 seconds in the microwave, or let them thaw at room temperature for about 15 minutes. Quick, easy, homemade muffins on demand!
Pumpkin Muffin Variations
You can take this basic pumpkin muffin batter and add so many different twists. Here are a couple of fun ideas for making this recipe your own:
Skip the cream cheese center and fold in chocolate chips
Top the muffins with a mixture of coarse sugar and cinnamon
Add chopped pecans to the batter or on top of each muffin
Make a quick cinnamon sugar glaze (powdered sugar + cinnamon + milk) to drizzle over the muffins (I did this during testing and while it didn’t look so pretty, it made them taste like cinnamon-coated donuts!)
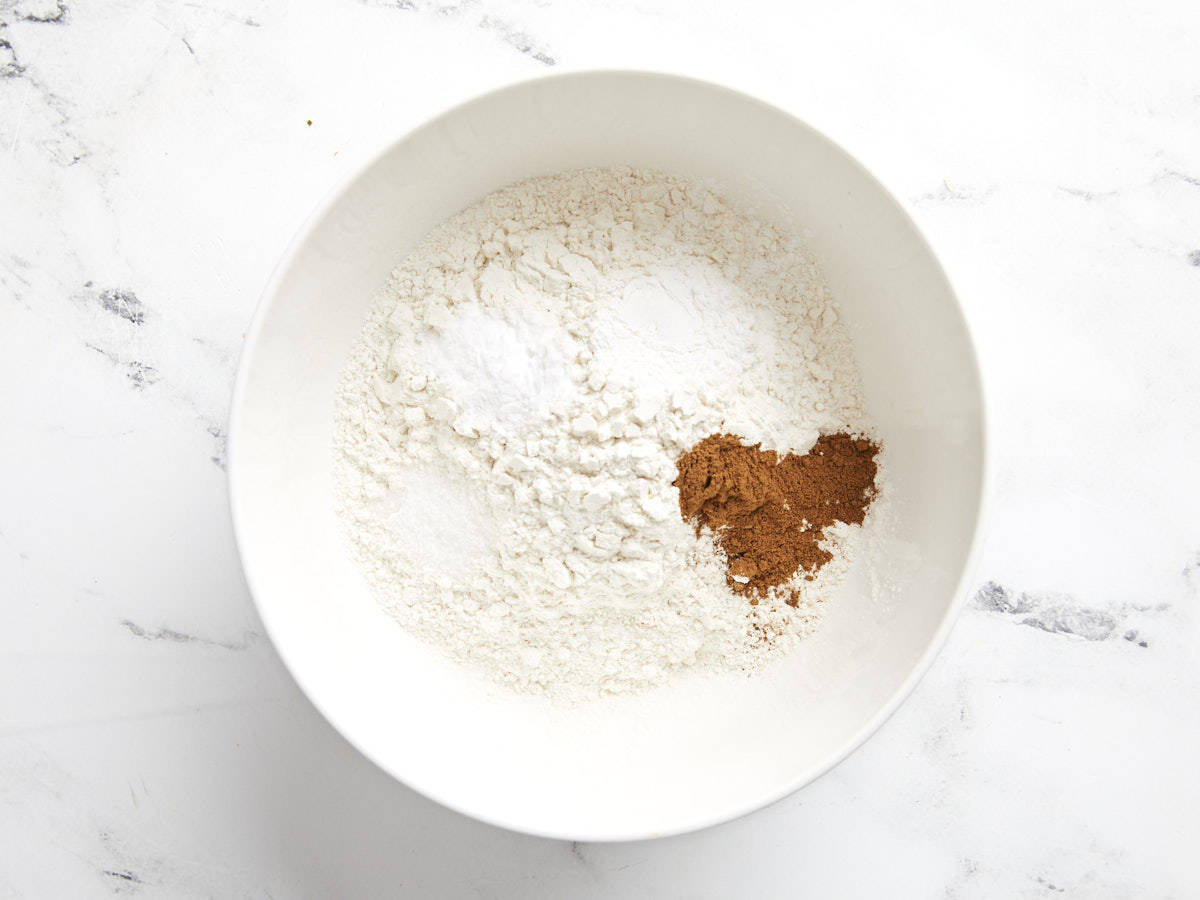
Preheat the oven to 350ºF. In a medium bowl, stir together the flour, baking powder, baking soda, salt, and pumpkin pie spice.
In a separate large bowl, whisk together the eggs, granulated sugar, brown sugar, pumpkin purée, oil, and vanilla extract.
Pour the bowl of dry ingredients into the bowl of wet ingredients and stir together just until combined. A few small lumps are okay, just try not to overmix.
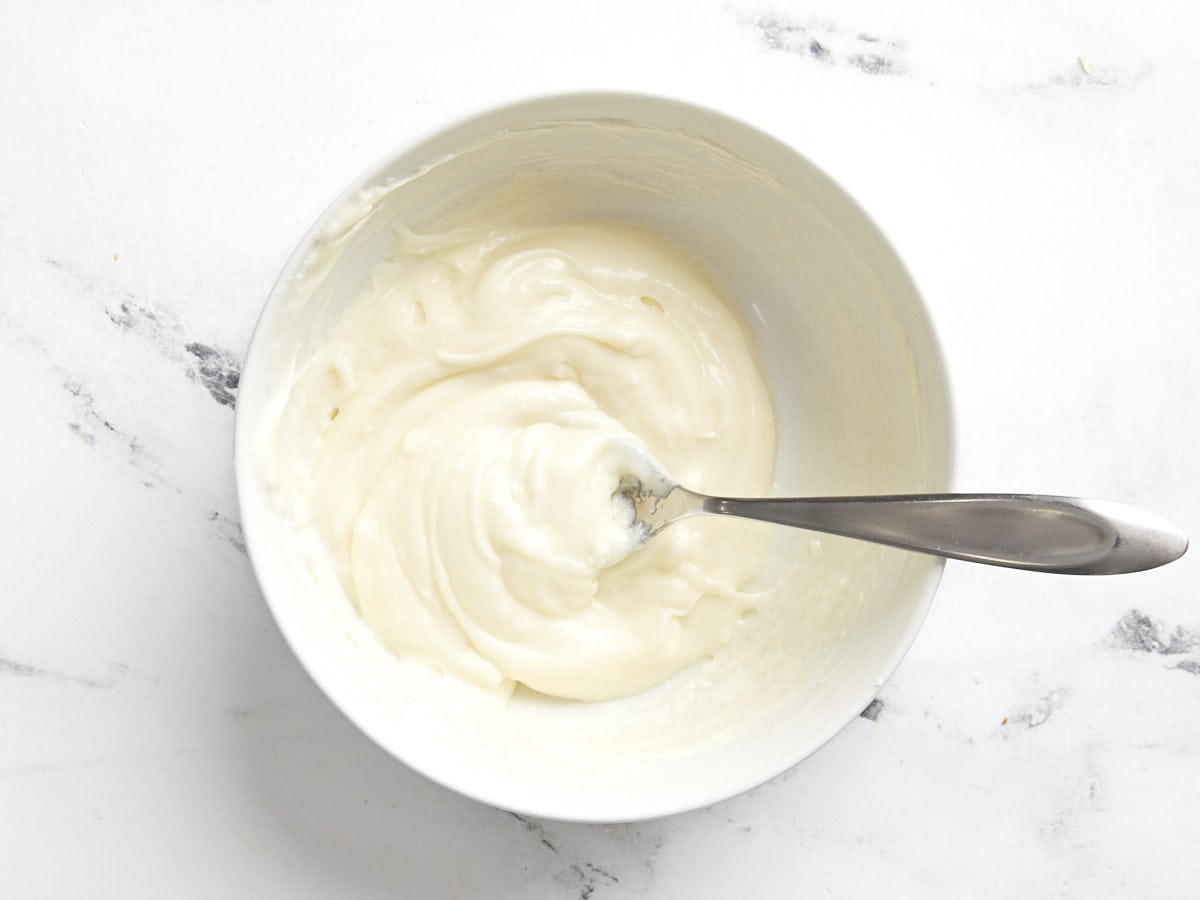
In a separate small bowl, stir together the cream cheese and sugar for the cream cheese filling.
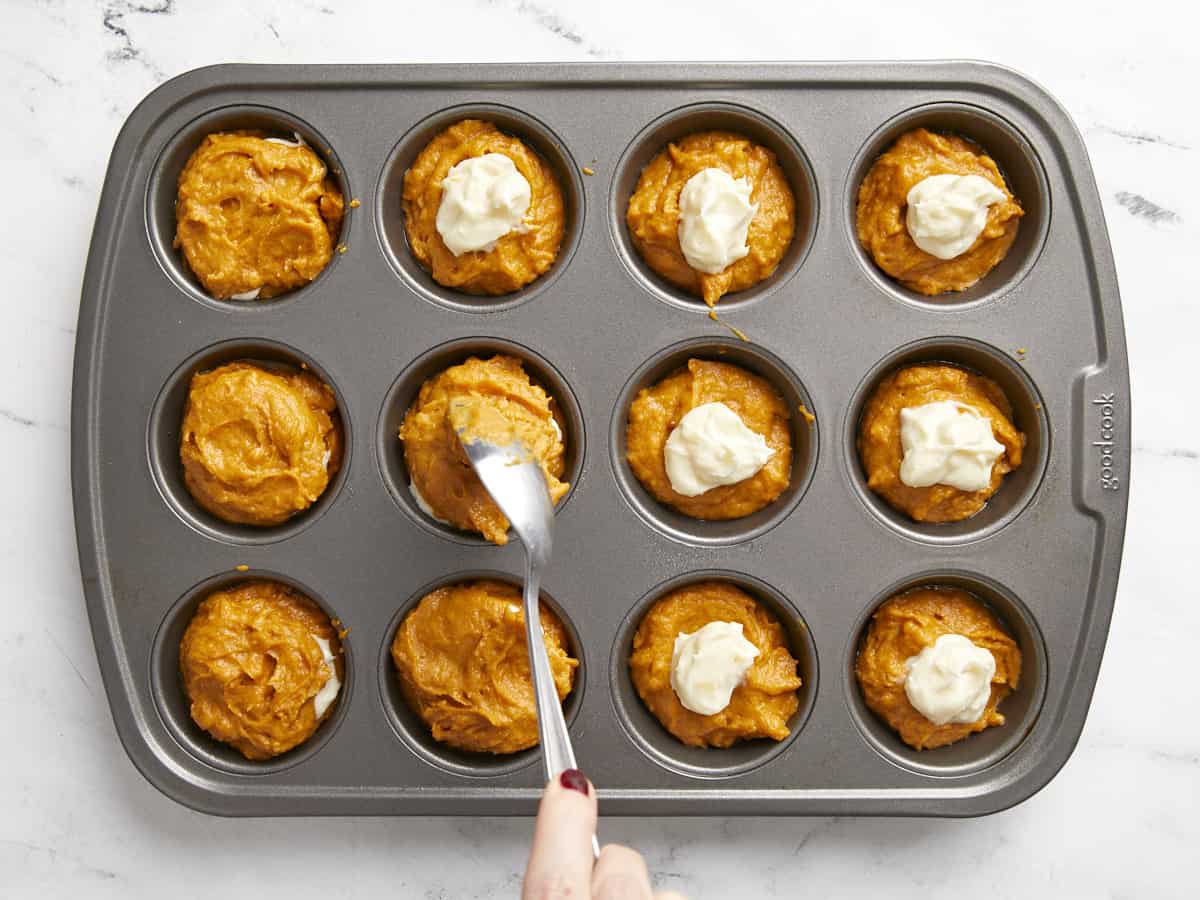
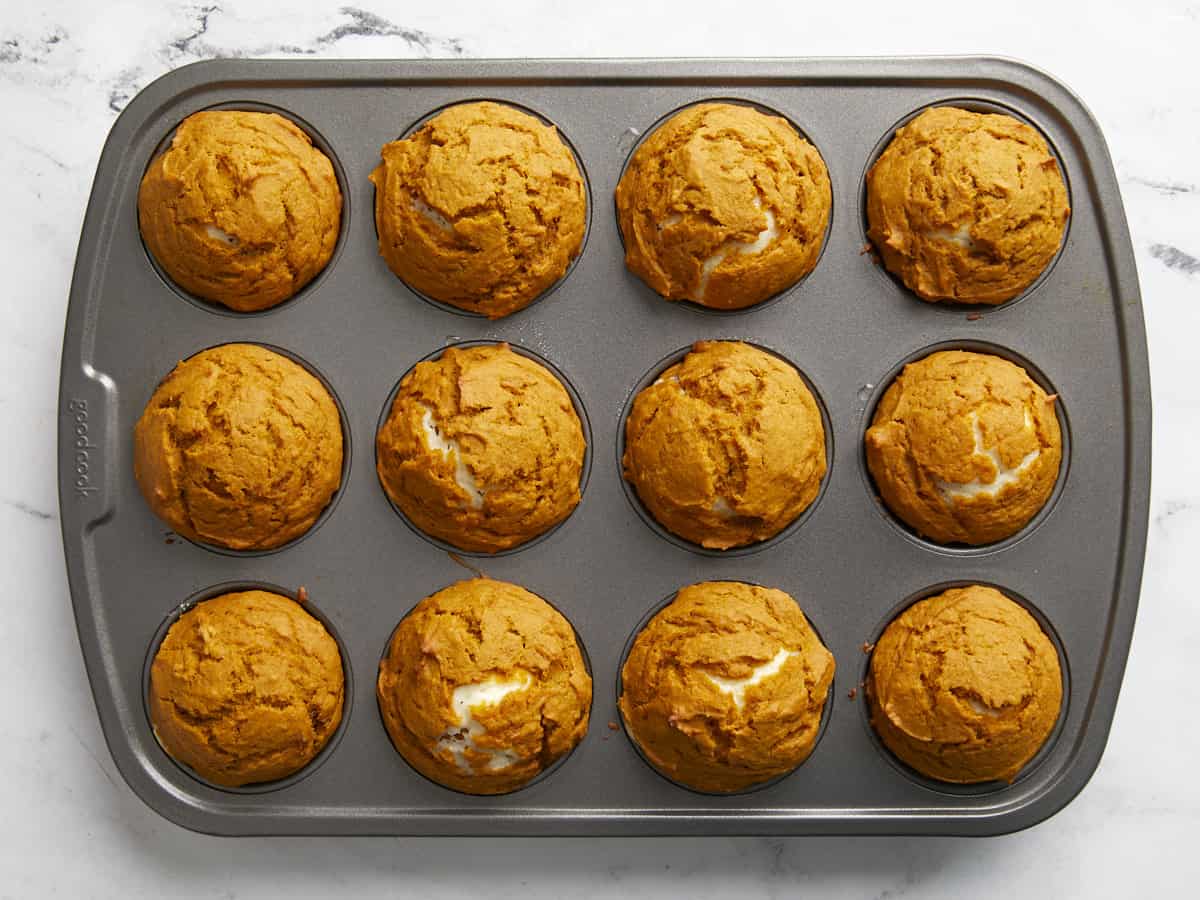
Grease a muffin tin or line with muffin liners. Fill each well in the muffin pan about ⅓ full. Add a small dollop of the cream cheese to each well, in the center of the muffin batter. Divide the remaining muffin batter between each well, covering the cream cheese. Each well in the muffin pan should be filled about ¾ full.
Bake the muffins for about 24 minutes, or until fully puffed in the center and slightly cracked on top.
Remove the muffins from the oven and let them cool for about 5 minutes before gently removing them from the muffin pan and allowing them to finish cooling on a wire rack.
Preheat the oven to 350ºF. In a medium bowl, stir together 2 cups all-purpose flour, 1 tsp baking powder, ½ tsp baking soda, ½ tsp salt, and 1 tsp pumpkin pie spice until evenly combined.
In a separate large bowl, stir together one 15oz. can of pumpkin purée, 2 large eggs, ½ cup white sugar, ½ cup brown sugar, ½ cup cooking oil, and 1 tsp vanilla extract until smooth.
Add the dry ingredients to the bowl of wet ingredients and stir them together just until combined. A few small lumps are okay, just be careful not to over-stir.
To make the cream cheese filling, stir together 4oz. room temperature cream cheese and 2 Tbsp white sugar.
Grease a muffin tin or line with paper liners. Fill each well in the tin about ⅓ full with pumpkin batter, then add a dollop of the sweetened cream cheese on top. Fill the rest of the way with the remaining pumpkin batter. Or, if choosing not to do the cream cheese filling, simply divide the pumpkin batter among the 12 wells of the muffin tin.
Bake the muffins in the preheated 350ºF oven for about 24 minutes, or until the muffins are fully puffed in the center and cracked slightly, and a little golden on the edges. Let them cool for about 5 minutes in the muffin pan before gently transferring them to a wire rack to finish cooling.
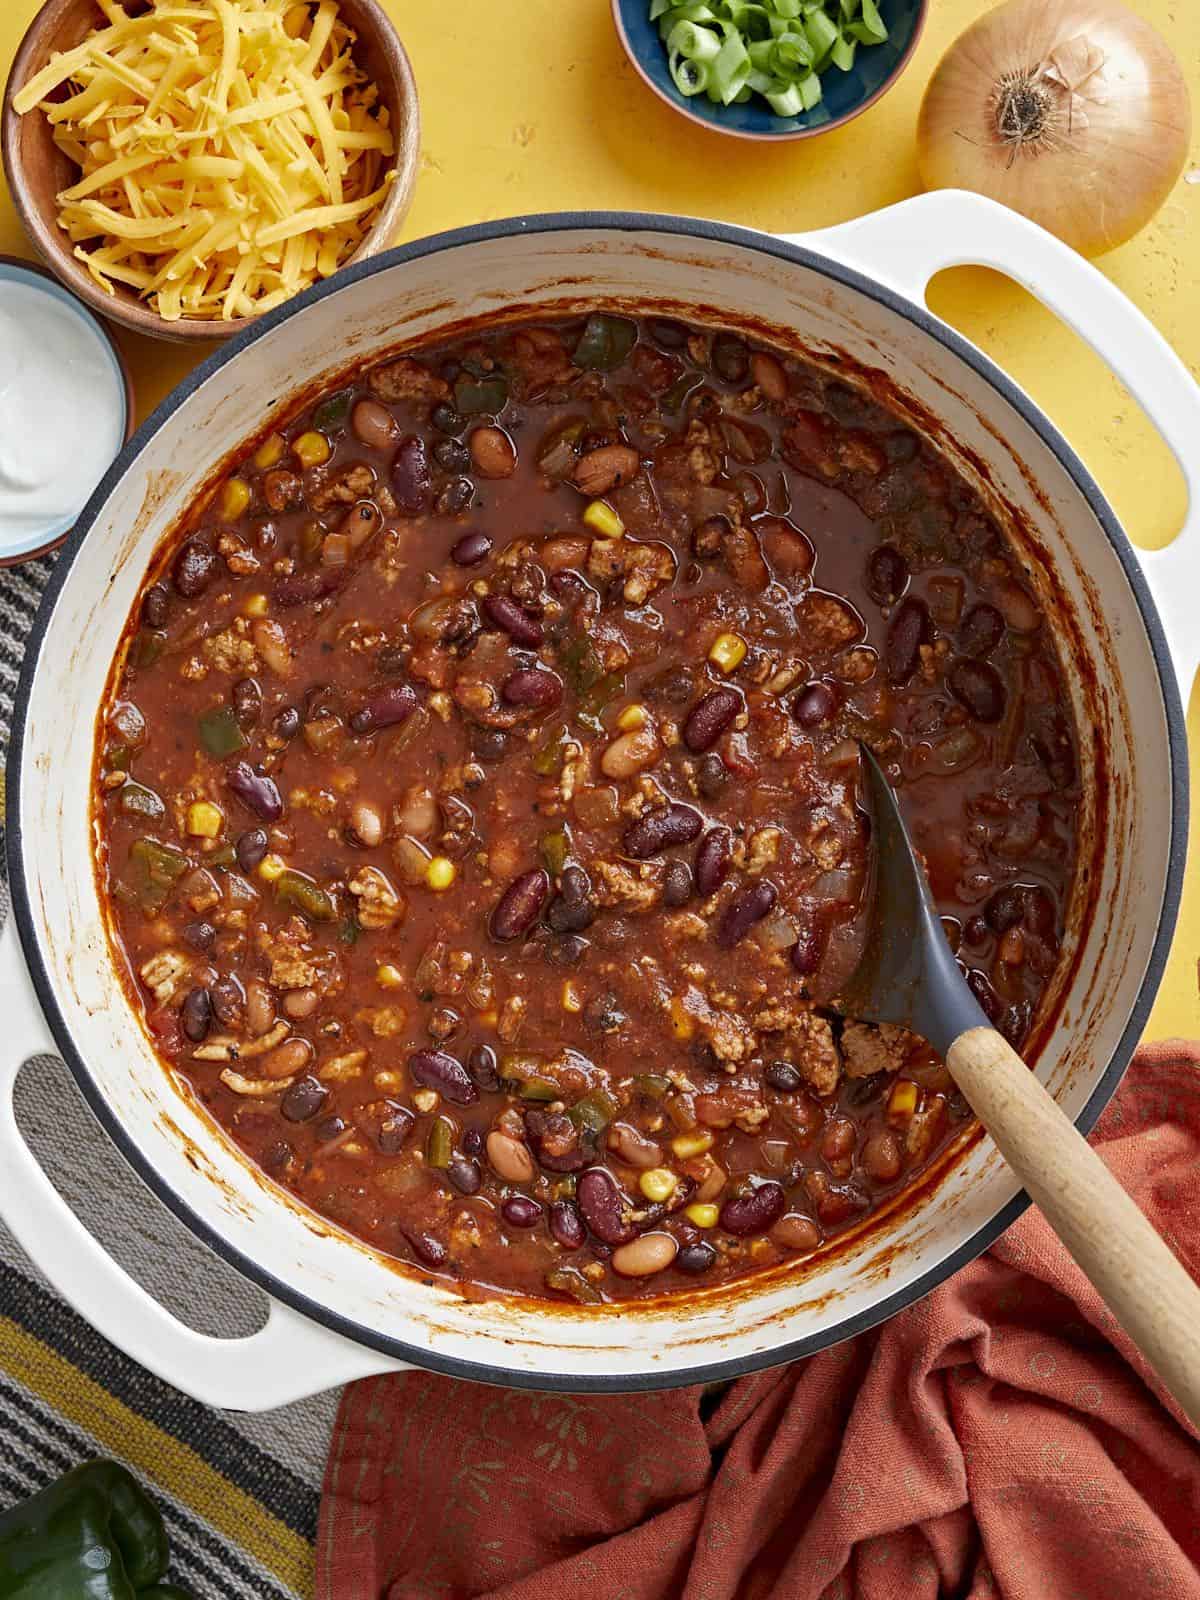
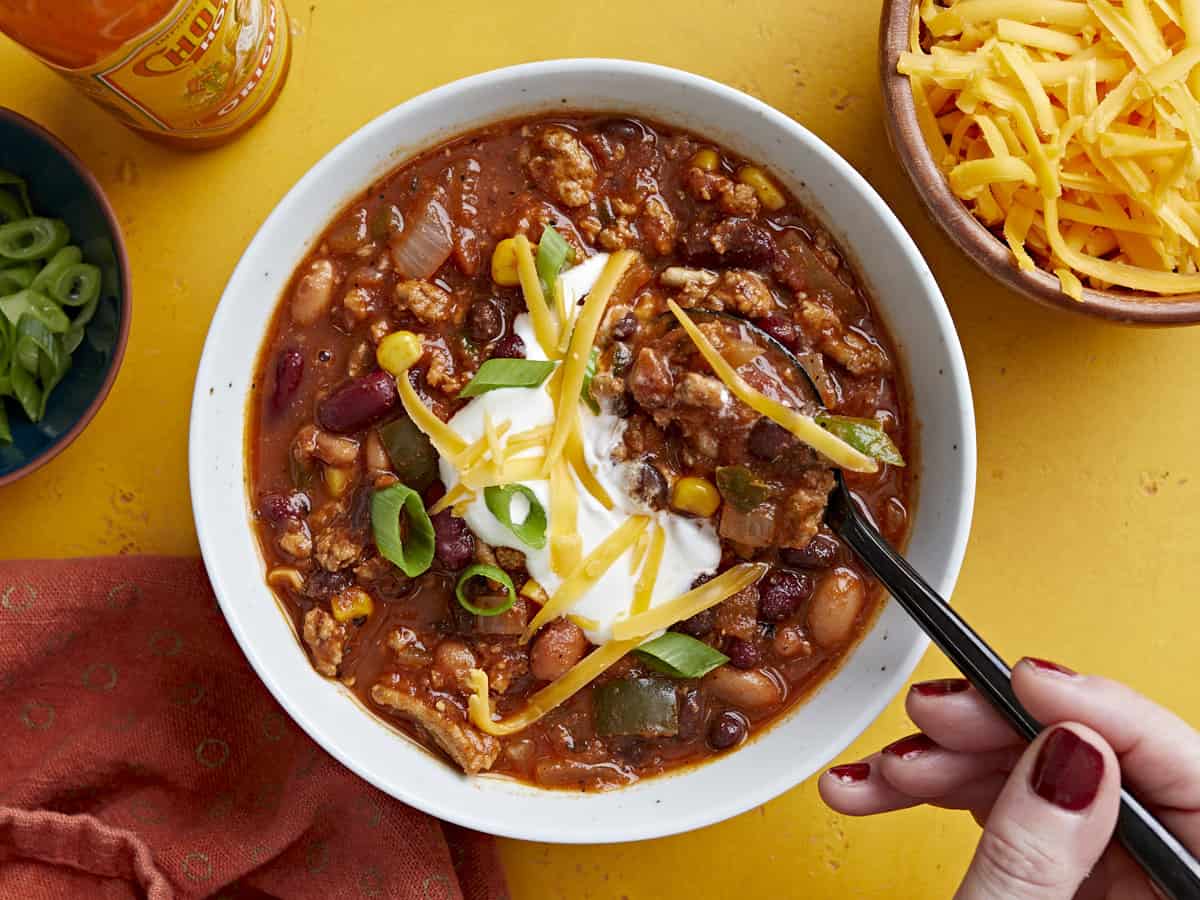
I make chili at least every other week during the fall and winter months, so naturally I’ve come up with quite a few variations of our classic chili recipe over the years. This Turkey Chili is a little bit lighter and is chock full of colorful vegetables. It’s the perfect chili recipe for the transition season when the leaves are just starting to fall but the air is still a little on the warm side. ;)
What’s in Turkey Chili?
Turkey chili starts with a similar base as a classic chili recipe: ground meat cooked in a rich and flavorful tomato-based sauce, and seasoned with tons of warm spices. Because ground turkey has a lighter flavor, we went with a lighter, zestier flavor profile and added a ton of colorful vegetables and beans.
Ingredients for Turkey Chili
Here’s what you’ll need to make turkey chili:
Ground Turkey: Opt for dark meat turkey or ground turkey with at least a little fat. Extra-lean ground turkey breast can get a little dry and tough when simmered in chili.
Onion and Garlic: Every good chili starts with onion and garlic to create a deeply savory flavor base! I went with four cloves of garlic for this recipe, but feel free to measure with your heart. ;)
Poblano Pepper & Corn: A diced poblano pepper and some frozen corn kernels add a lot of flavor and color to this chili, making it extra festive. Poblanos can be spicy, though, so if you need a mild heat, skip the pepper or substitute with a green bell pepper.
Beans: A combination of kidney beans, black beans, and pinto beans adds even more color, texture, and flavor to this chili. The beans are very flexible, so if you only want black beans or kidney beans, you can certainly substitute them to fit your needs.
Tomatoes: Diced tomatoes add texture to our chili while tomato paste helps thicken the sauce and adds a really rich tomatoey flavor.
Herbs & Spices: The secret to the sauce! We use our homemade chili seasoning, which is a mix of chili powder, cumin, oregano, garlic powder, onion powder, salt, and pepper, to season our turkey chili.
Make it Vegetarian
This turkey chili is super easy to make vegetarian. Simply swap the ground turkey with an extra can of beans (kidney, black beans, or even pinto beans), or your favorite meat substitute, like soy crumbles.
Slow Cooker Instructions
Chili is a great slow cooker recipe. To make this turkey chili in your slow cooker, first brown the ground turkey in a skillet, then add it to the slow cooker with all of the other ingredients (reduce the water to 1 cup). Cook the chili on high for 3 hours or low for 6 hours.
How to Store Leftovers
After cooking the turkey chili, divide it into single-serving containers and store in the refrigerator for 4-5 days. Once chilled in the refrigerator, you can transfer some to the freezer for longer storage (about 3 months).
To reheat the chili, either microwave on high, stirring occasionally, until heated through. Or add to a sauce pot and cook over medium-low, stirring often, until heated through.
What to Serve with Turkey Chili
Chili and cornbread were made for each other, so try pairing this turkey chili with our Jalapeño Cheddar Cornbread or Sweet Potato Cornbread. And don’t forget the toppings for your chili! Try adding a sprinkle of cheddar cheese, sliced green onions, or cilantro. Or maybe a dollop of sour cream, some corn chips, or pickled jalapeños.
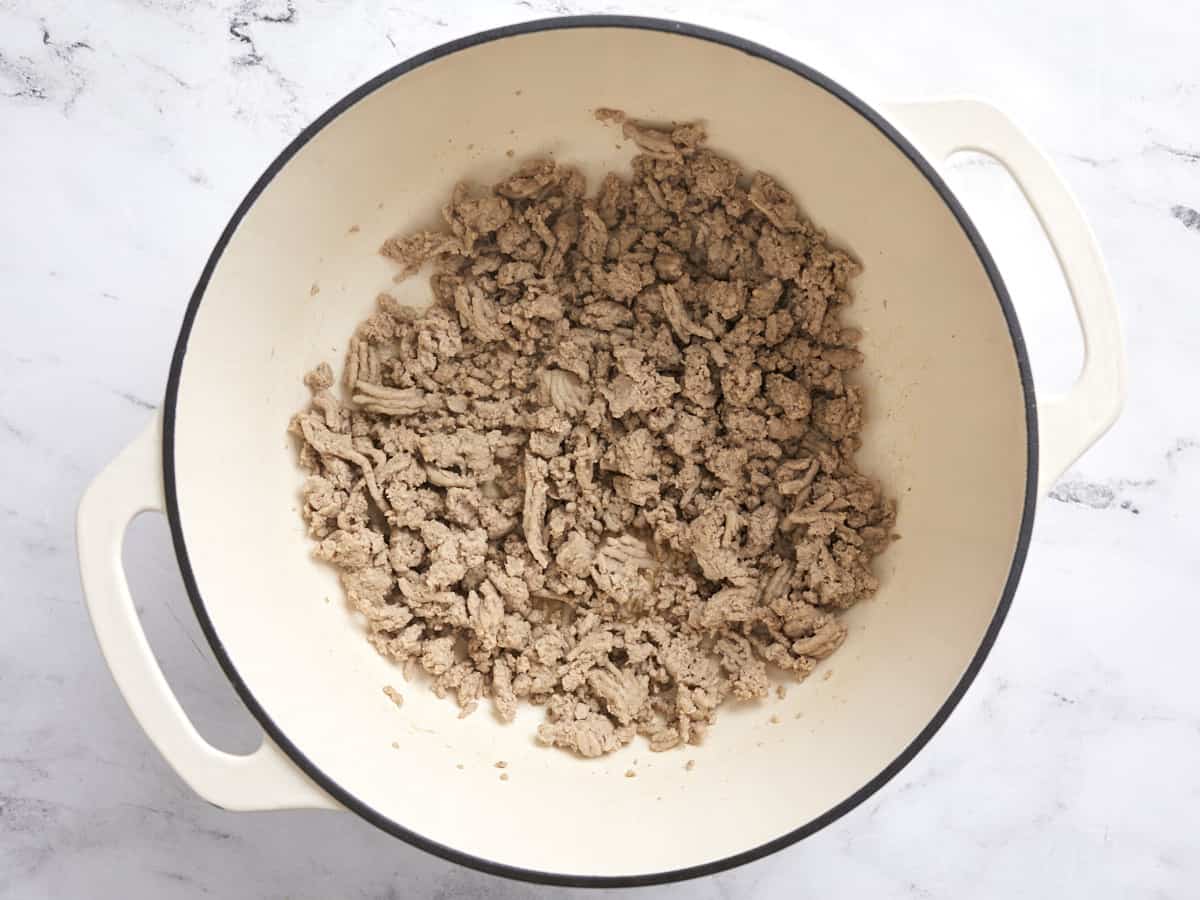
Add the olive oil and ground turkey to a large pot and cook over medium heat until the turkey is cooked through. Break the ground turkey up into pieces as it cooks.
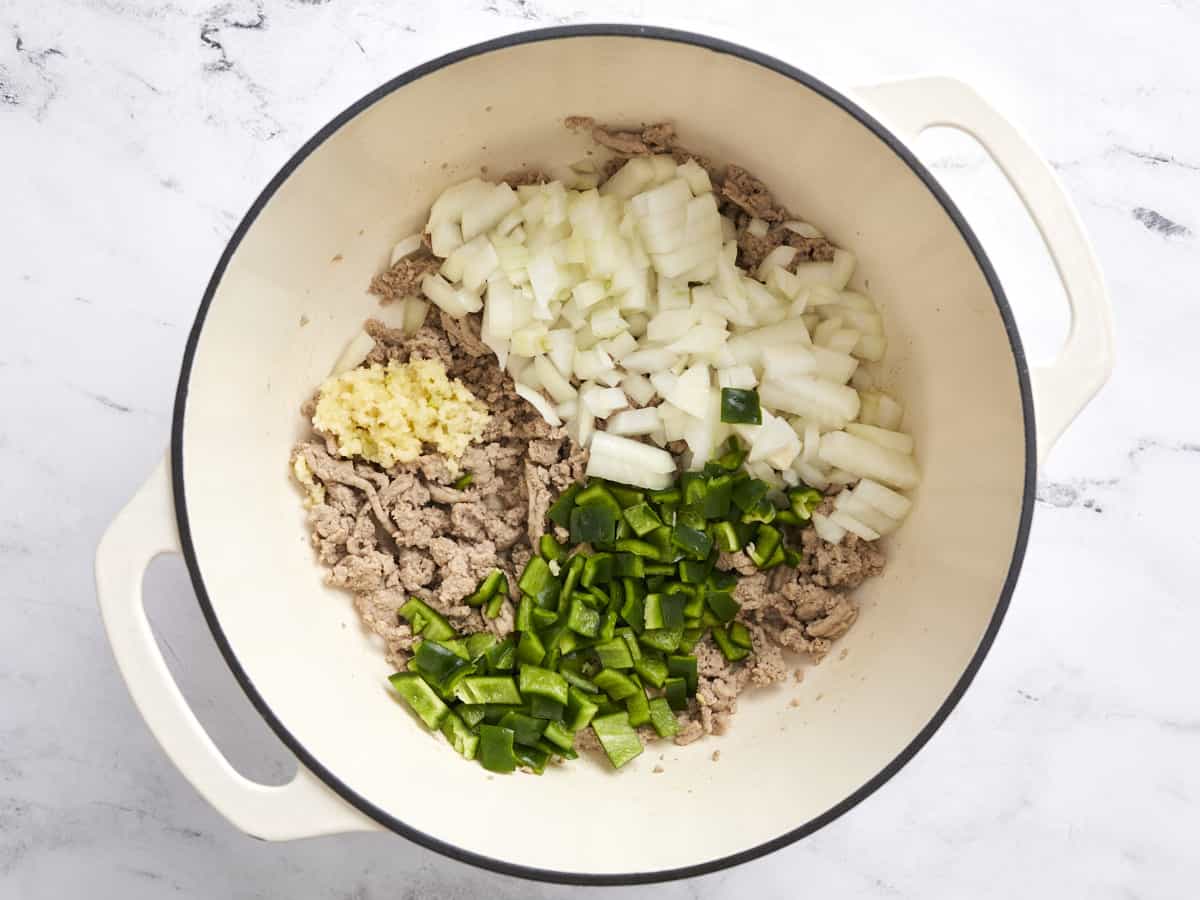
While the turkey is cooking, dice the onion and poblano pepper, and mince the garlic. Add the onion, poblano, and garlic to the pot and continue to sauté for a few minutes more, or until the onions are soft and translucent.
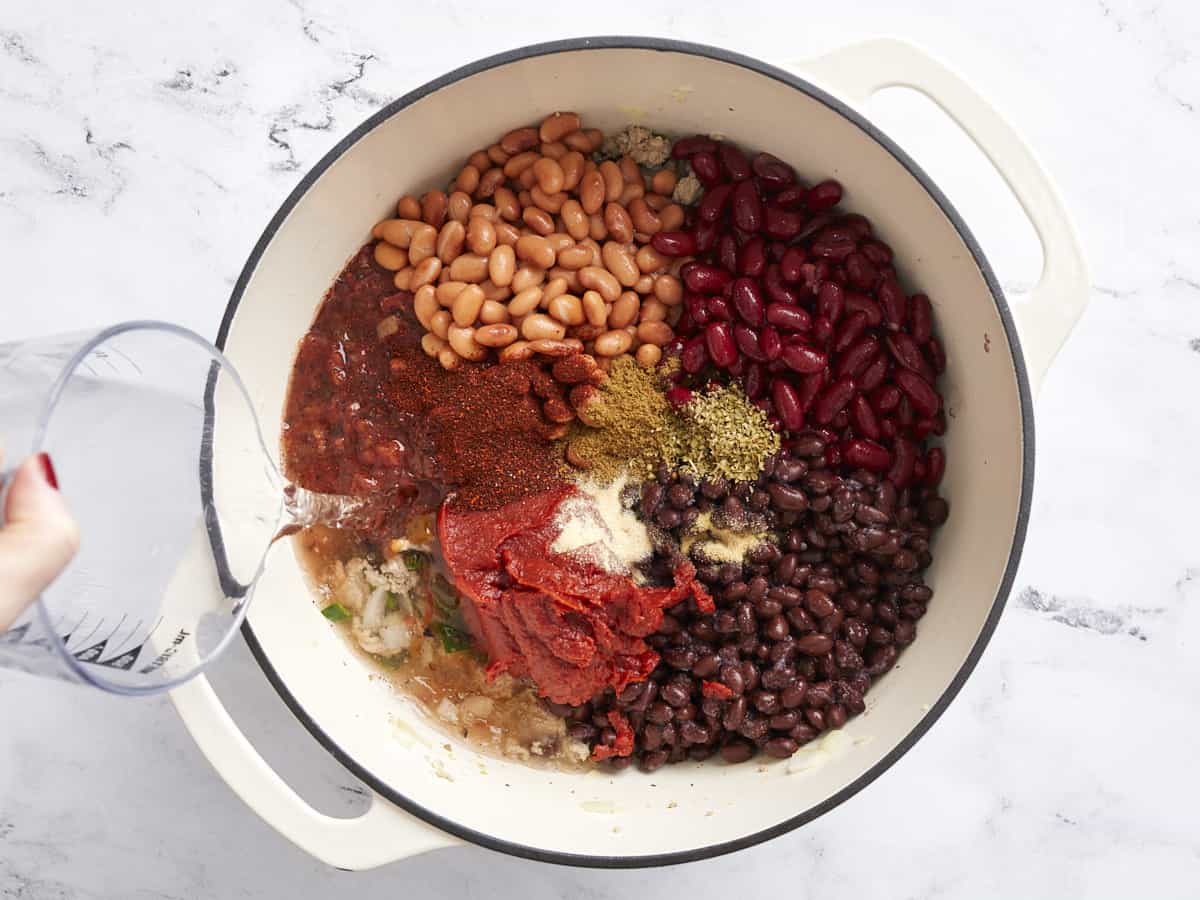
Add the canned beans (drained), frozen corn (no need to thaw), diced tomatoes (with juices), tomato paste, chili powder, cumin, oregano, onion powder, garlic powder, salt, pepper, and water. Stir to combine.
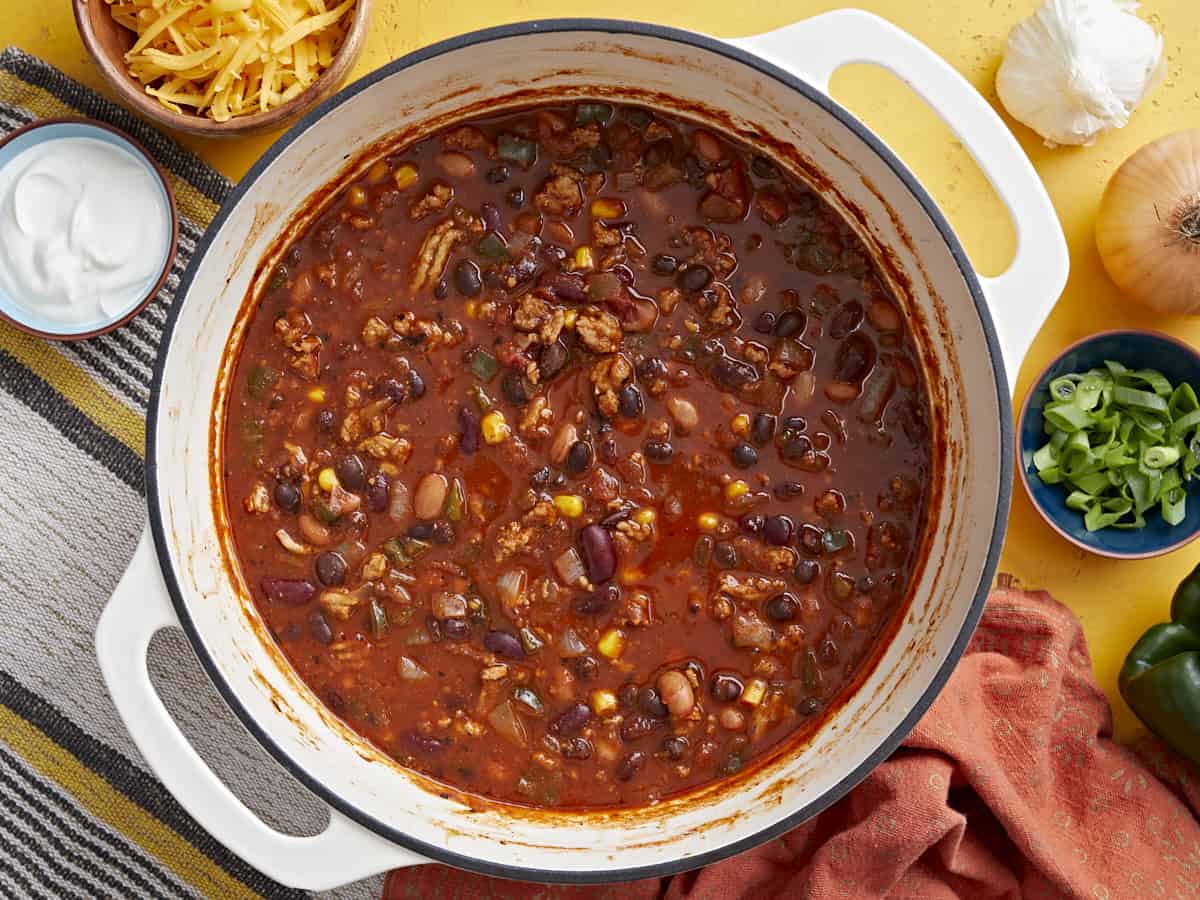
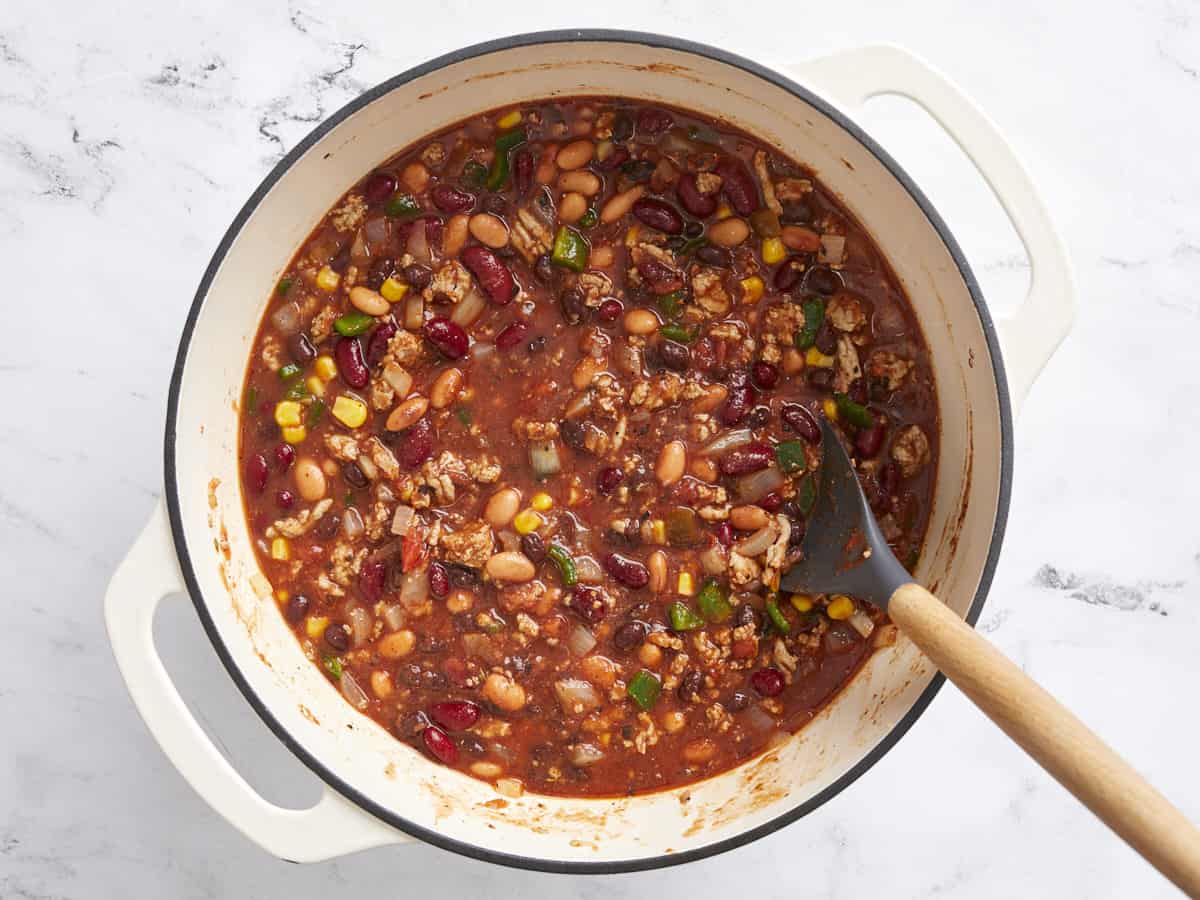
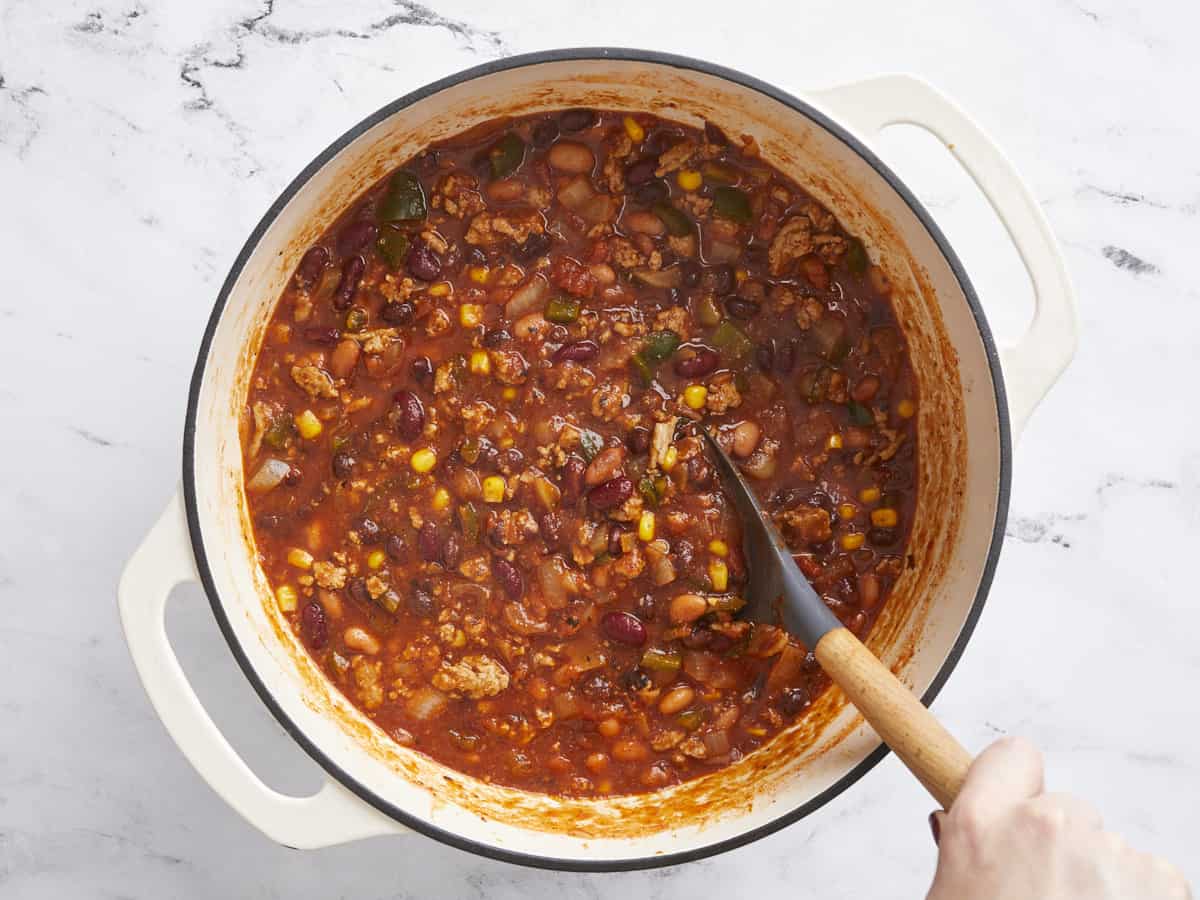
Place a lid on the pot and allow the chili to come up to a simmer. Once simmering, reduce the heat to medium-low and continue to simmer for 30 minutes (or longer, if preferred), stirring occasionally. After 30 minutes, taste and adjust the seasoning to your liking, then serve.
Add 2 Tbsp olive oil and one pound of ground turkey to a large pot. Cook over medium heat until the ground turkey is cooked through.
While the turkey is browning, mince four cloves of garlic, dice one yellow onion, and dice one poblano pepper. Add the garlic, onion, and pepper to the pot and continue to cook and stir over medium heat until the onions have softened.
Next, add one 15oz. can of kidney beans (drained), one 15oz. can of black beans (drained), one 15oz. can of pinto beans (drained), one 15oz. can of fire-roasted diced tomatoes (with juices), one 6oz. can of tomato paste, 1 cup frozen corn kernels, 1 Tbsp chili powder, 1 tsp cumin, ½ tsp dried oregano, ¼ tsp garlic powder, ½ tsp onion powder, ¾ tsp salt, ¼ tsp pepper, and 2 cups water to the pot.
Stir everything to combine, then place a lid on the pot and allow it to come up to a simmer.
Once simmering, reduce the heat to medium-low and let it simmer for 30 minutes. Give it a taste, adjust the seasoning to your liking, and serve!
And don’t forget to pile it high with your favorite chili toppings!