This loaded vegan tortilla soup is a sure hit for soup lovers. You will get four servings of this delightful Mexican-inspired soup with just an hour of prep and cooking time. Every spoonful will leave a lasting impression! If you are also…
This loaded vegan tortilla soup is a sure hit for soup lovers. You will get four servings of this delightful Mexican-inspired soup with just an hour of prep and cooking time. Every spoonful will leave a lasting impression! If you are also a soup enthusiast like me, you are in good company. I have several...
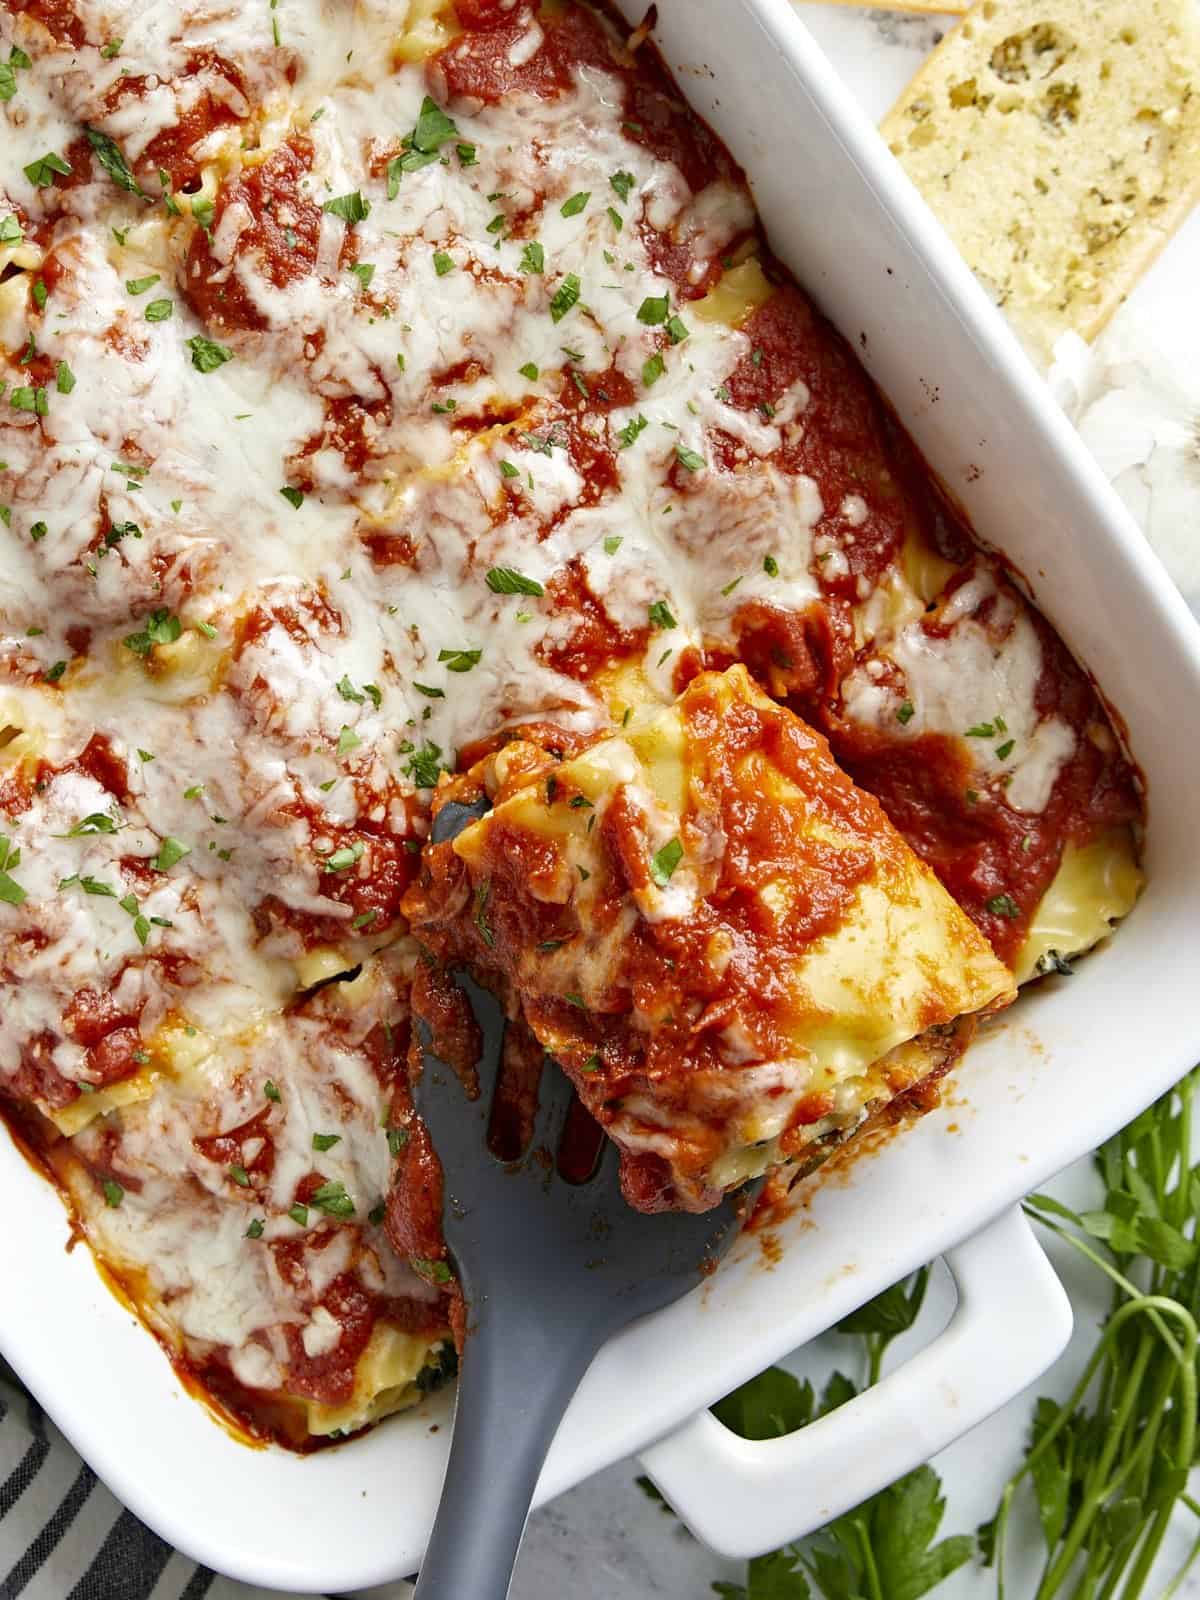
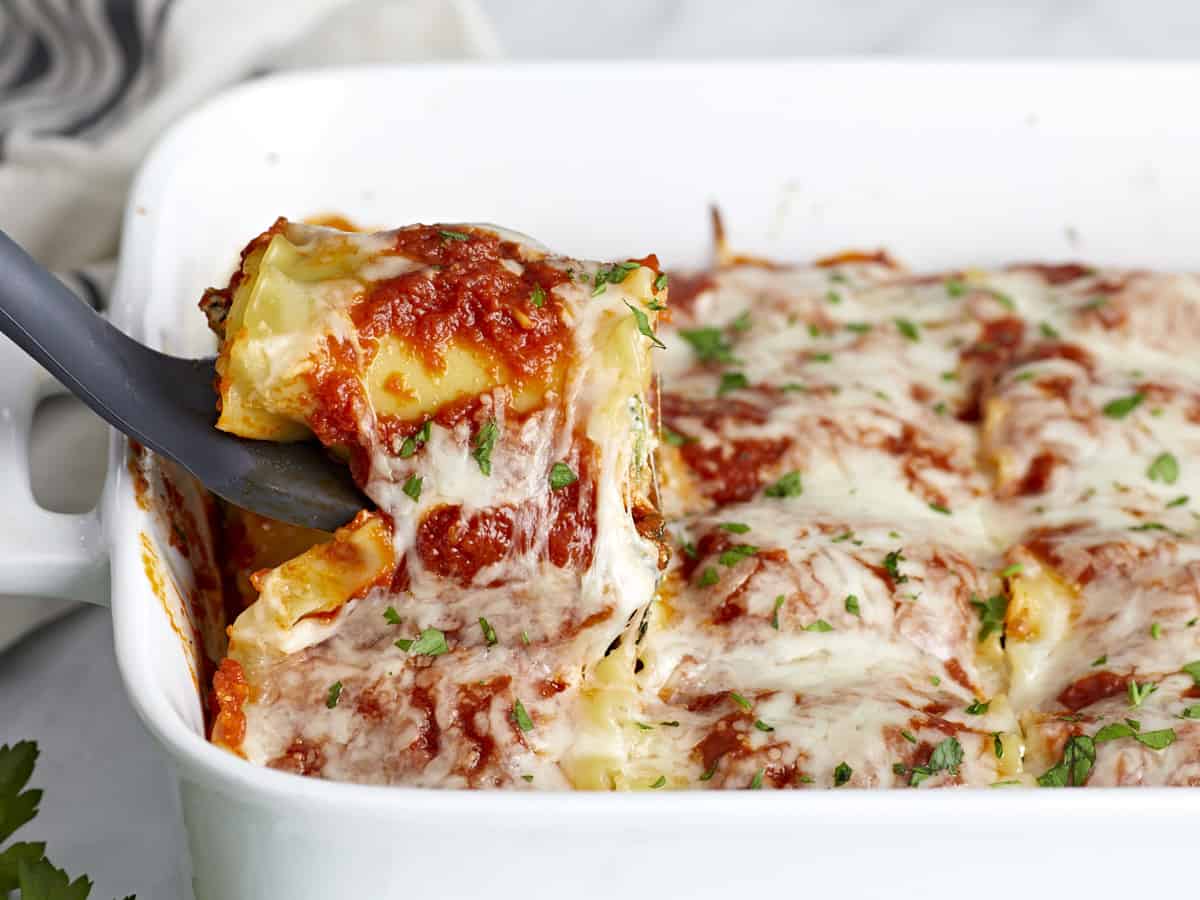
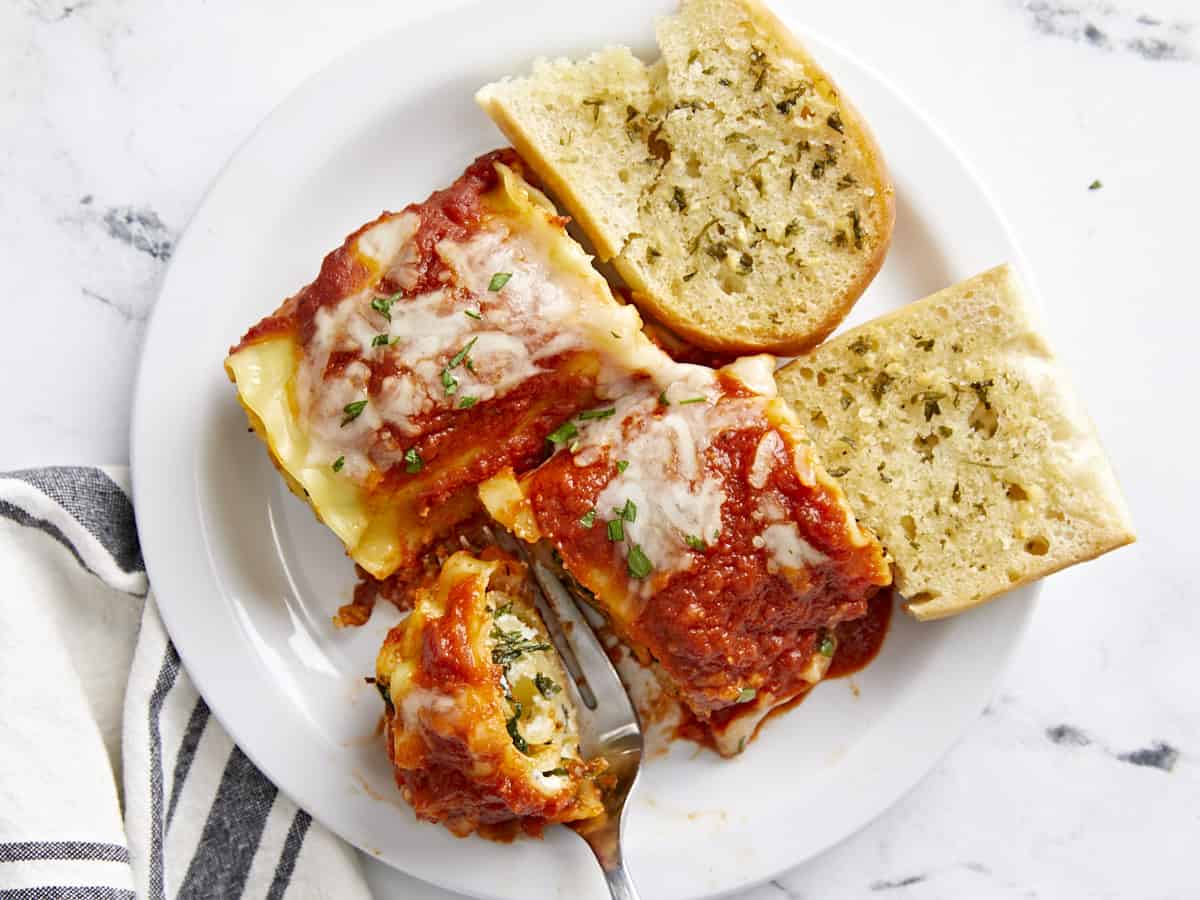
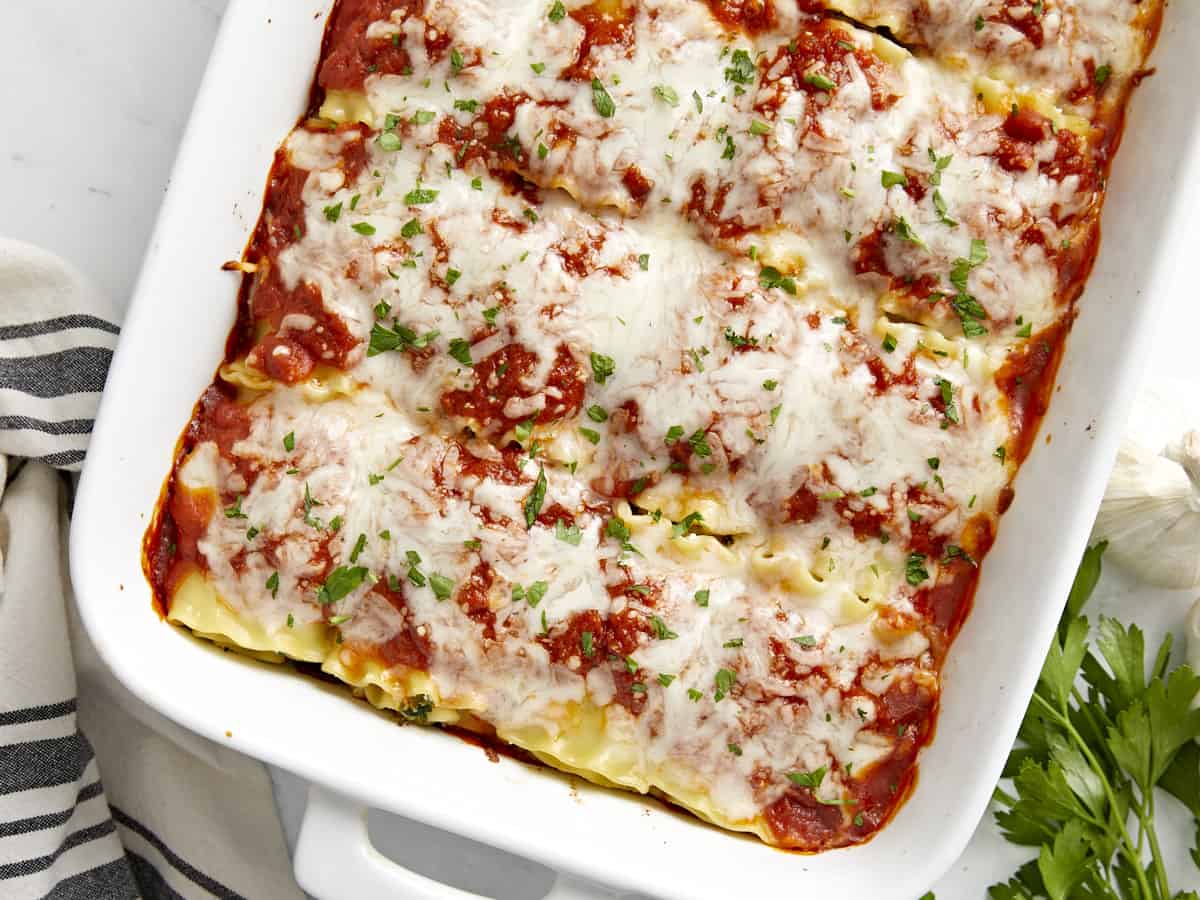
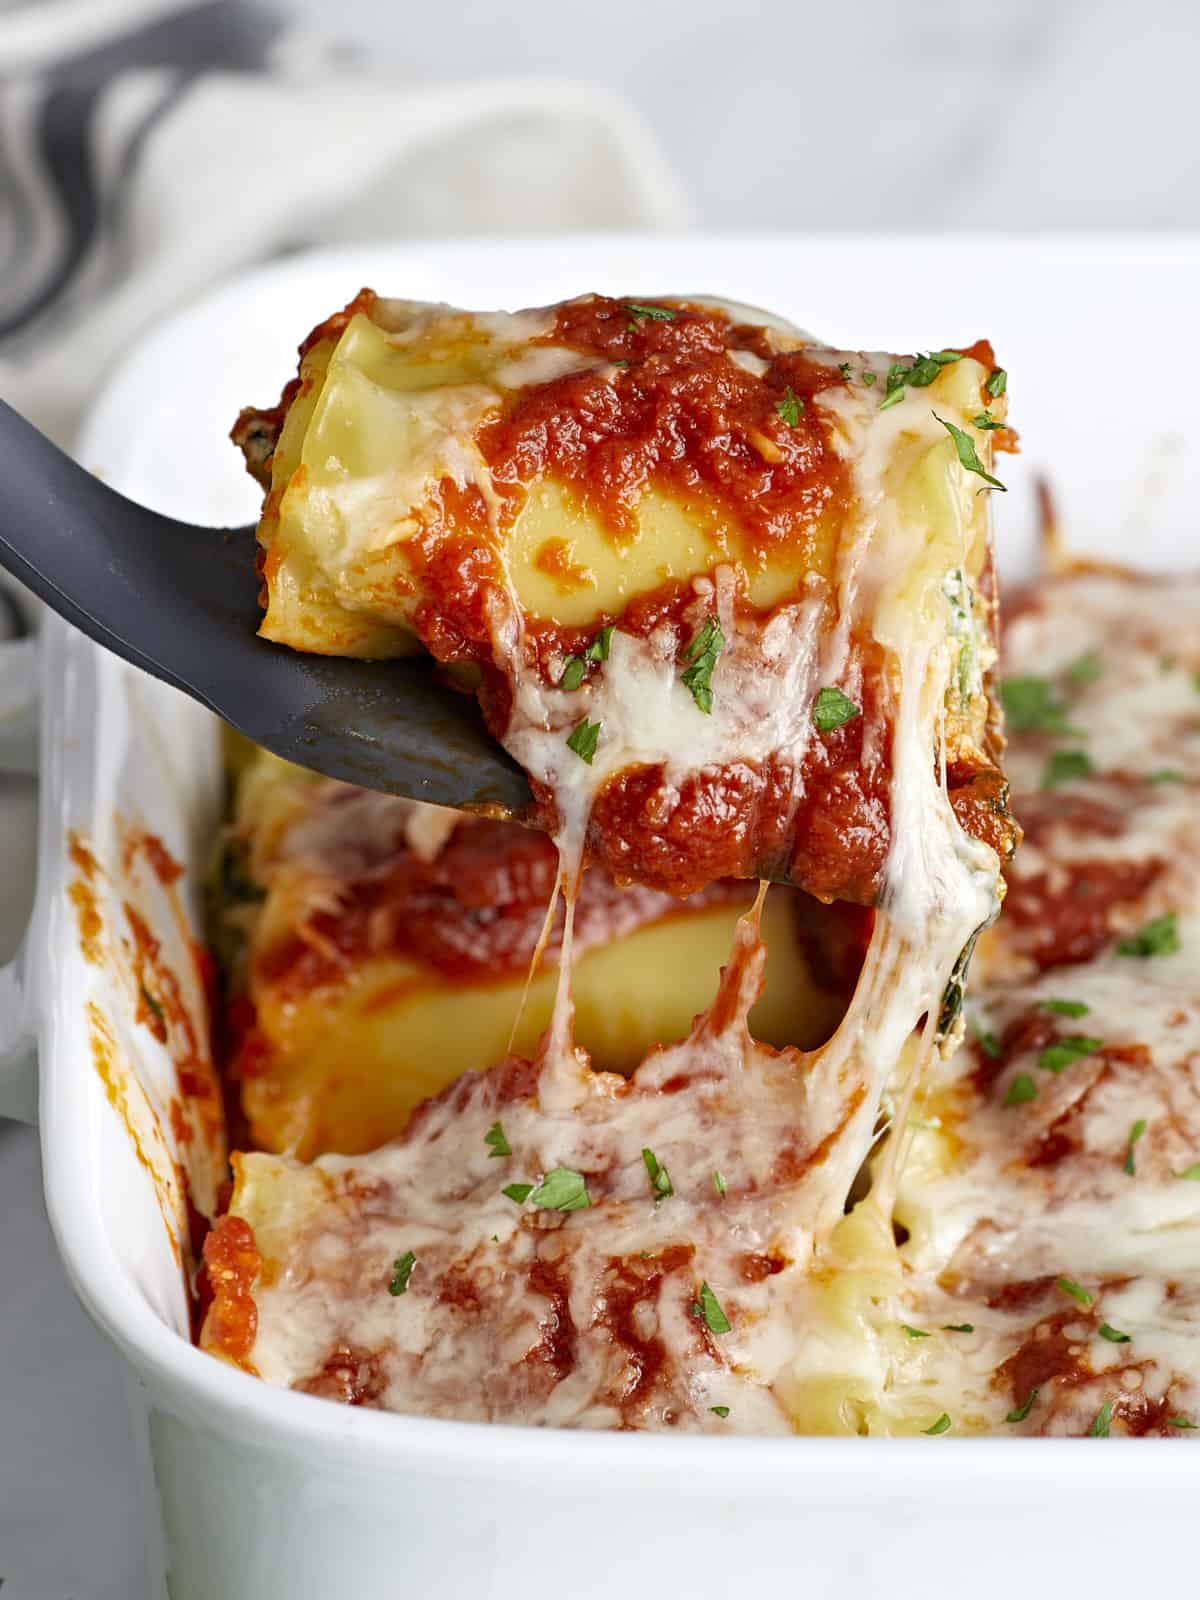
I love lasagna in all its forms, especially these cute little Lasagna Roll Ups that are perfectly portioned for meal prep. Stash a few portions of these in your freezer for a rainy day and you will THANK yourself later. Promise. Lasagna roll ups are flexible and you can fill them with whatever you like, sausage, beef, or even make them vegetarian as I have here with a light spinach-ricotta filling. No matter the flavor, they’re delicious and fun to eat!
What Are Lasagna Roll Ups?
Lasagna roll ups have all the same components of lasagna, but they are combined in different form. Instead of layering the ingredients into a casserole dish, the filling is spread onto each lasagna noodle and then rolled into a perfect little portion. Sauce is poured over the top and then they’re baked to perfection!
Ingredients for Lasagna Roll Ups
As with traditional lasagna, the filling for these lasagna roll ups is quite flexible. Here is what you’ll need to make the vegetarian spinach and ricotta-filled version below:
Lasagna Noodles: Each lasagna noodle makes one bundle. I like to get the flutter edge noodles instead of flat noodles because they make the prettiest roll ups.
Cheese: We use a mix of ricotta cheese, mozzarella cheese, and Parmesan cheese to create the most flavorful filling for the roll ups.
Egg: Egg helps bind the cheese filling and keeps the filling moist and rich. I have, on occasion, forgotten the egg and the lasagna roll ups still turned out quite delicious, just not as moist.
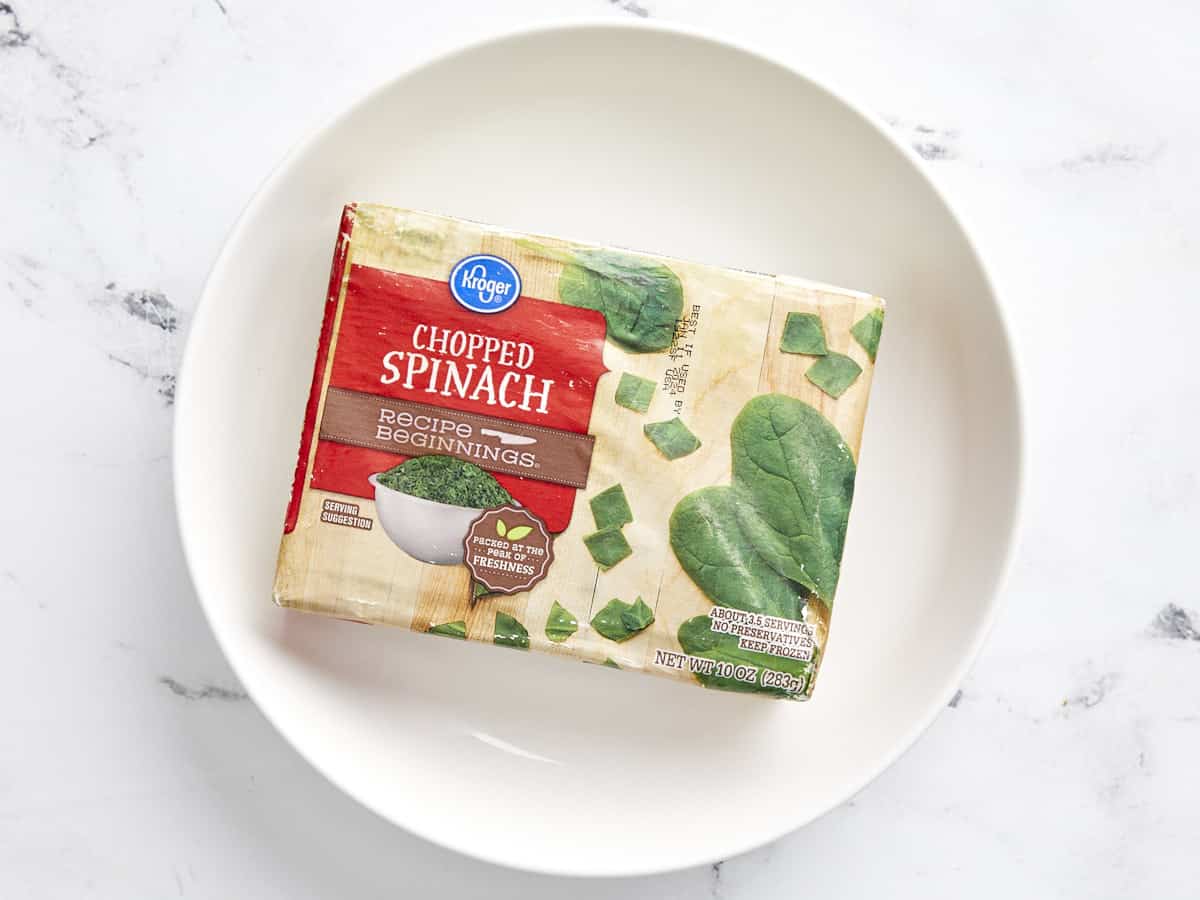
Frozen Spinach: I chose to make a vegetarian version of lasagna roll ups to save on money, using an inexpensive block of frozen cut spinach, but you can swap for Italian sausage or ground beef if you want a meat version. Sautéed mushrooms also work well.
Pasta Sauce: To make this recipe extra easy, I used a simple jar of pasta sauce to drench the lasagna roll ups. If you prefer to make your own, you can use our Slow Cooker Spaghetti Sauce, or our quick Weeknight Pasta Sauce and have meat in addition to the spinach.
What to Serve with Lasagna Roll Ups
Some homemade garlic bread and a nice side salad would be perfect to pair with this meal and will add some color and freshness to the plate. But the roll ups are pretty filling on their own, so you won’t need to add much to make it a meal!
Meal Prep It!
These lasagna roll ups will stay good in the refrigerator for about five days, so make sure to portion them out into air-tight containers after cooking for quick grab-and-reheat meals for the rest of the week. After the portions are chilled in the refrigerator you can transfer some to the freezer for longer storage (up to three months).
To reheat the frozen lasagna roll ups, either let them thaw in the refrigerator over night before reheating in the microwave, or go straight from the freezer to the microwave, making sure to use the defrost function first.
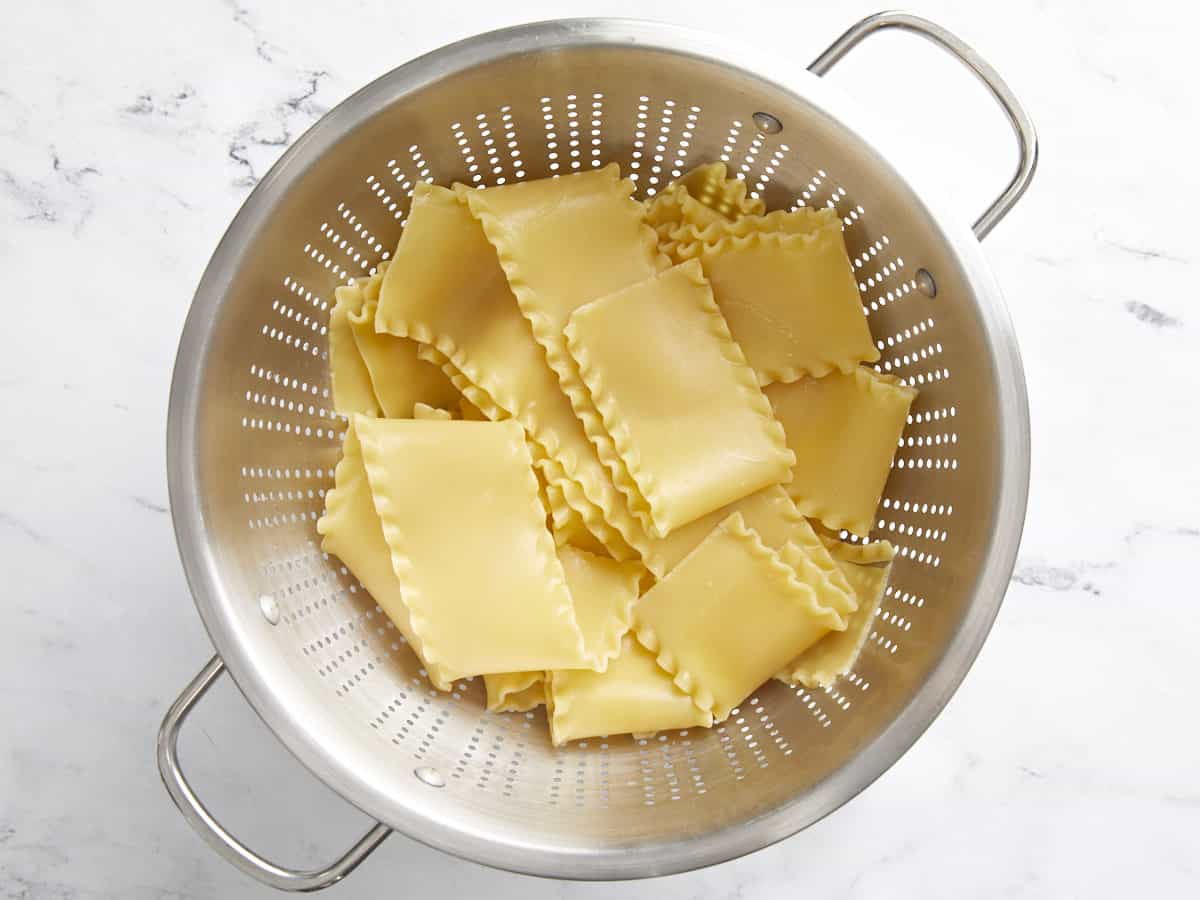
Preheat the oven to 400ºF. Bring a large pot of water to a boil over high heat. Once boiling, add 1 tsp salt to season the water, then add the lasagna noodles. Boil the noodles just until al dente (they become too delicate to roll if they are too soft). Drain the noodles in a colander.
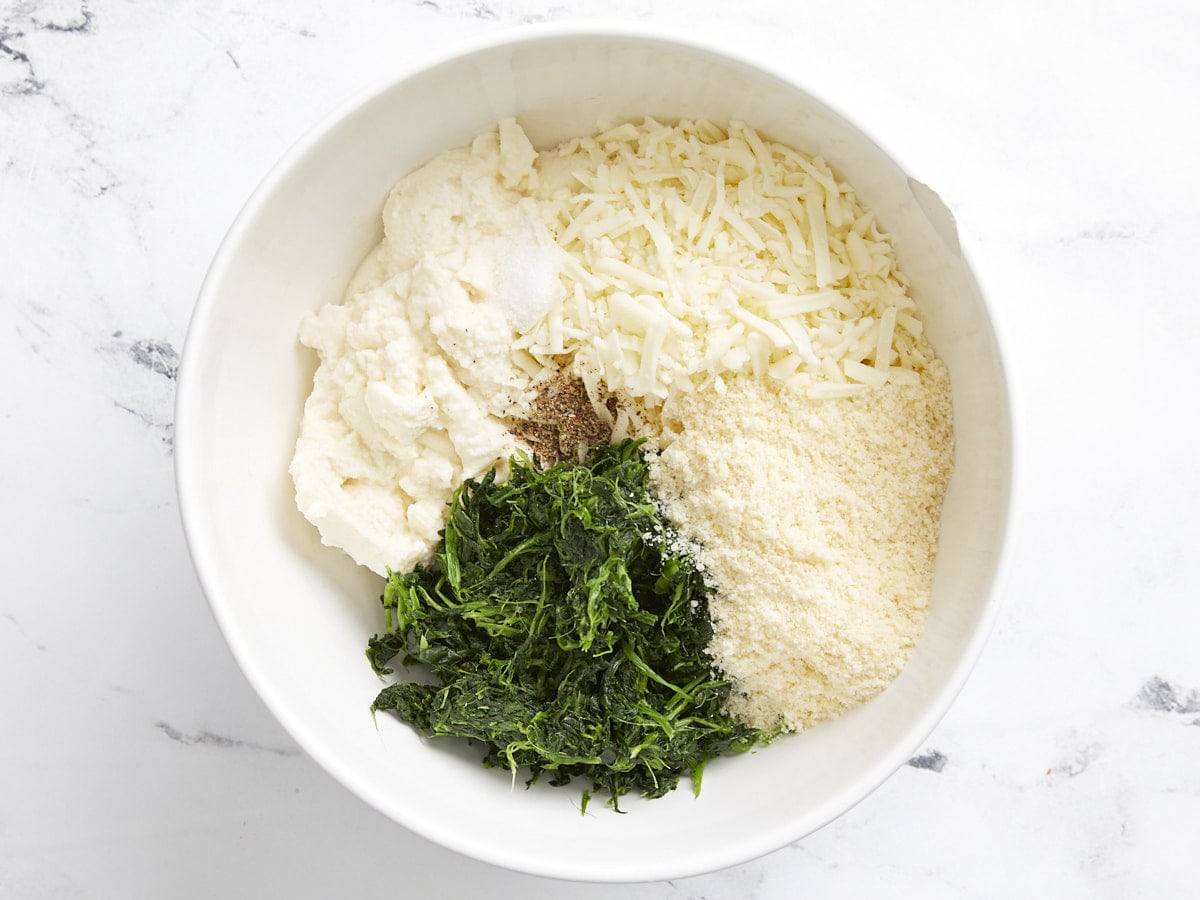
While the noodles are boiling, drain the thawed spinach, squeezing out as much of the excess water as possible. Add the spinach to a bowl with the ricotta, 1 cup of the mozzarella, Parmesan, egg, salt, and pepper. Stir until everything is evenly combined.
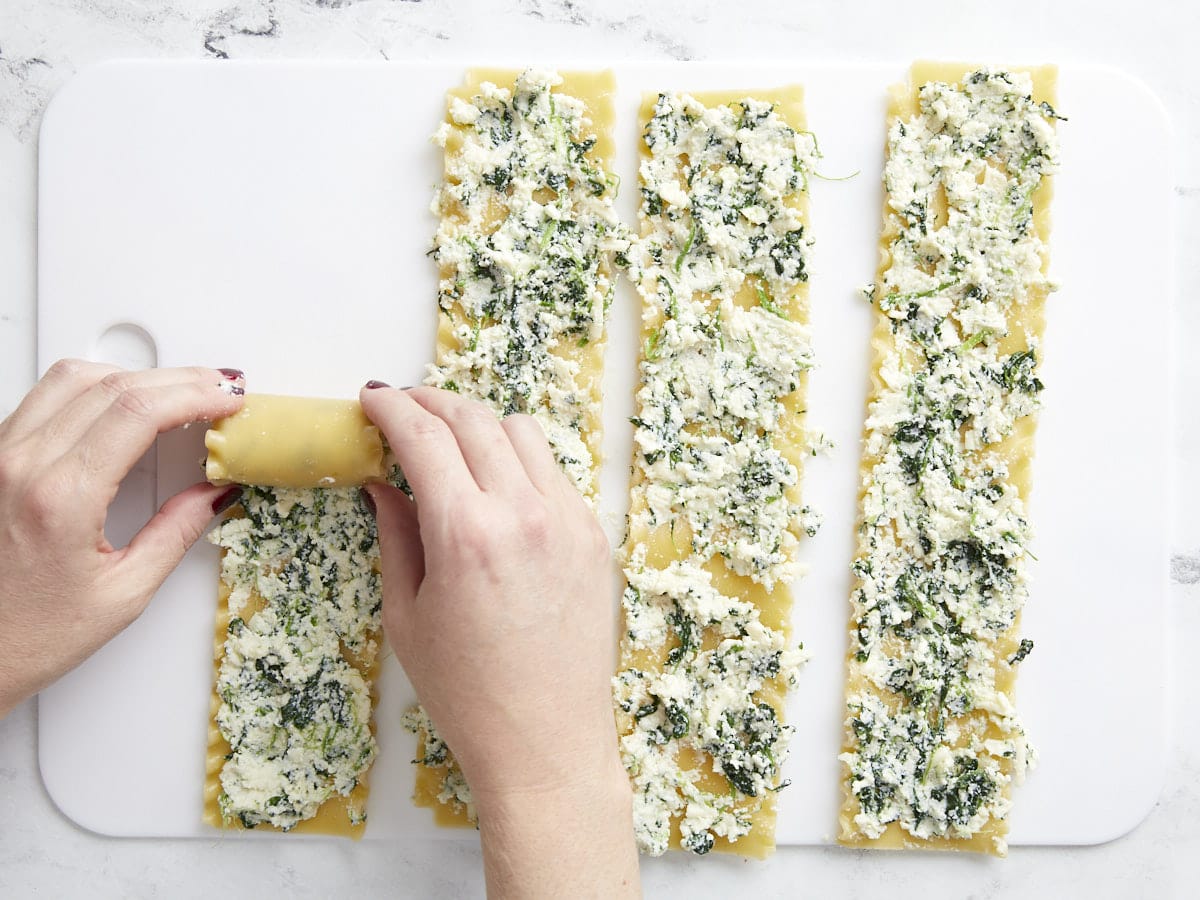
Once the lasagna noodles have cooled enough to touch with your hands, lay a few noodles out onto a clean surface. Spread about ¼ cup of the spinach and cheese filling onto each noodle, spreading it from edge to edge. It's okay if the filling is thin or doesn't create a solid layer. Roll the noodles up, then place in a large casserole dish. Repeat with the remaining noodles until you've used all of the filling. You should get about 16 roll ups and you may have a few noodles left over (those will be back up in case any tear).
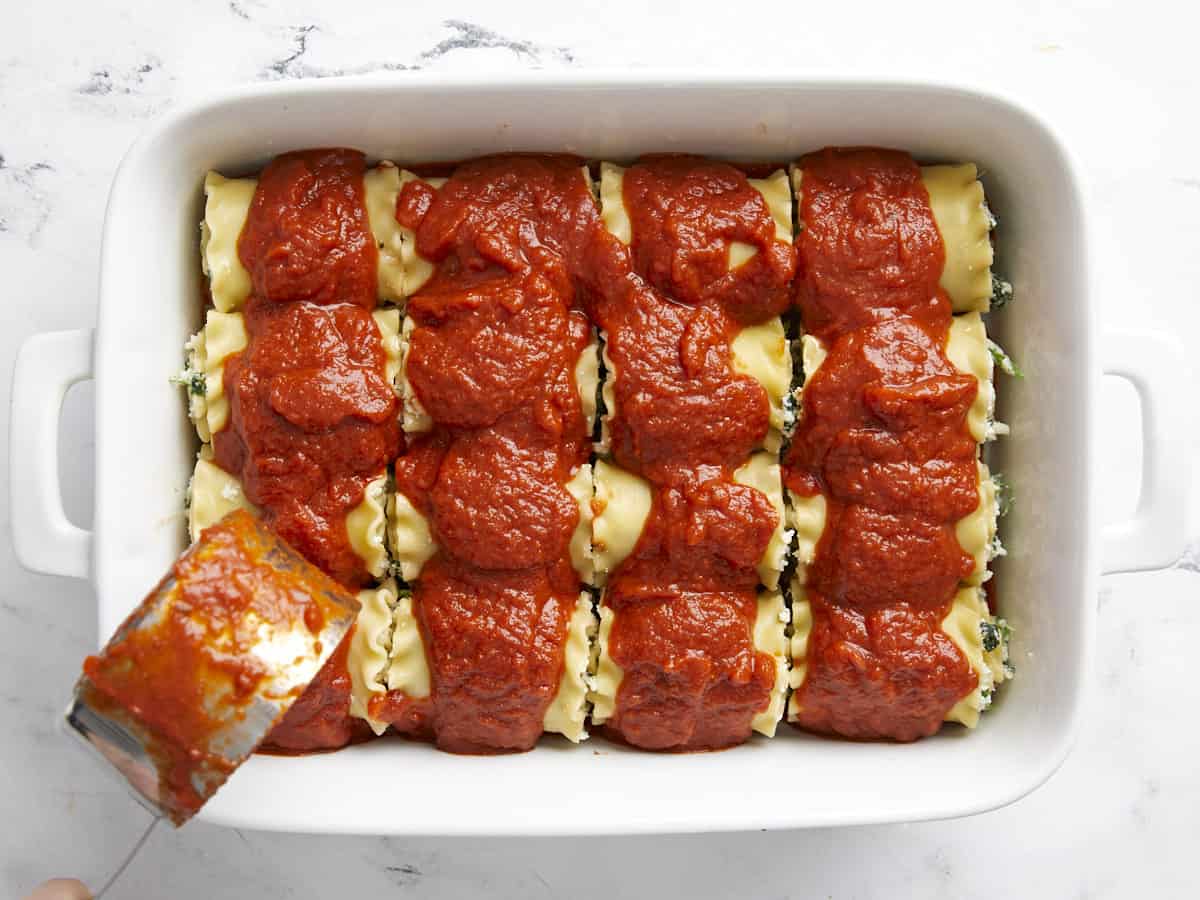
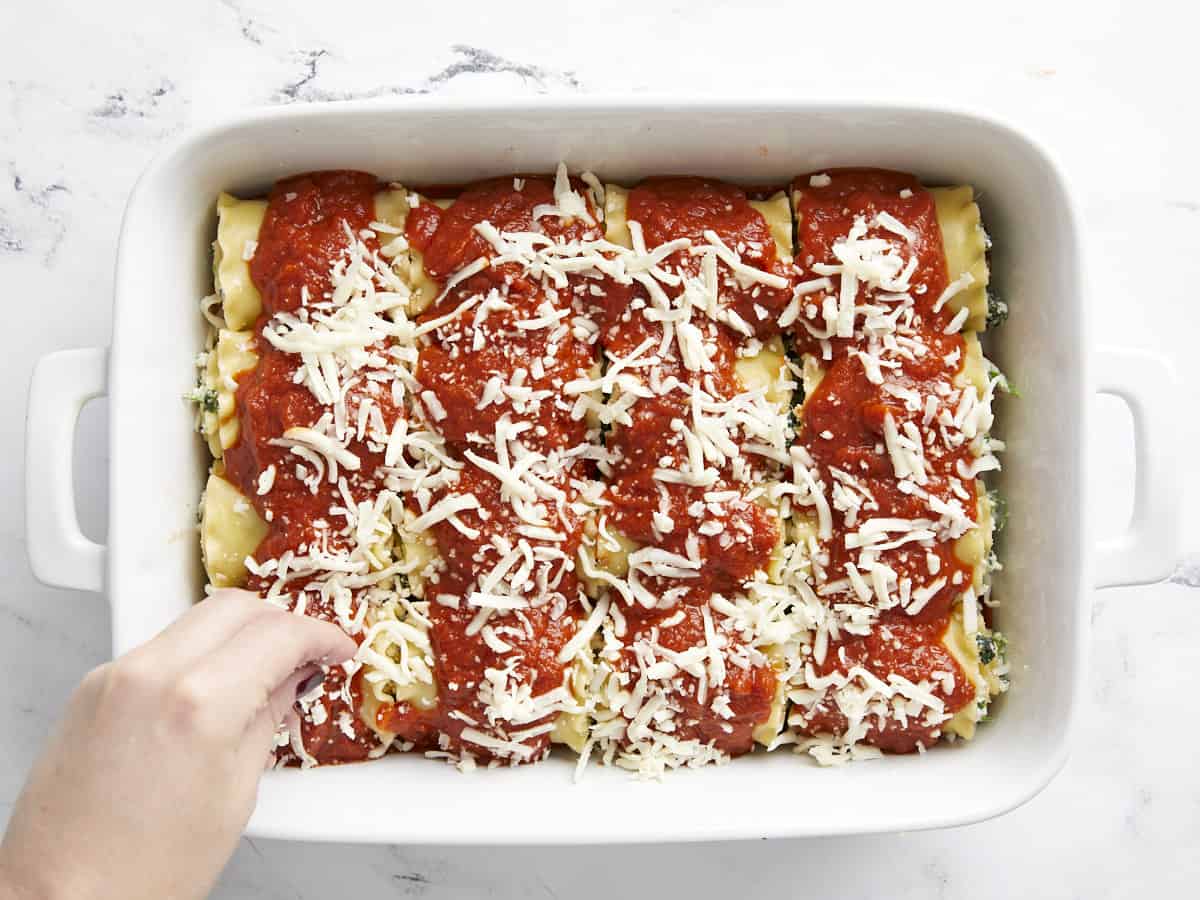
Once all of the noodles are filled, rolled, and placed in the casserole dish, pour the jar of pasta sauce over top. Top the lasagna roll ups with the remaining 1 cup of mozzarella cheese.
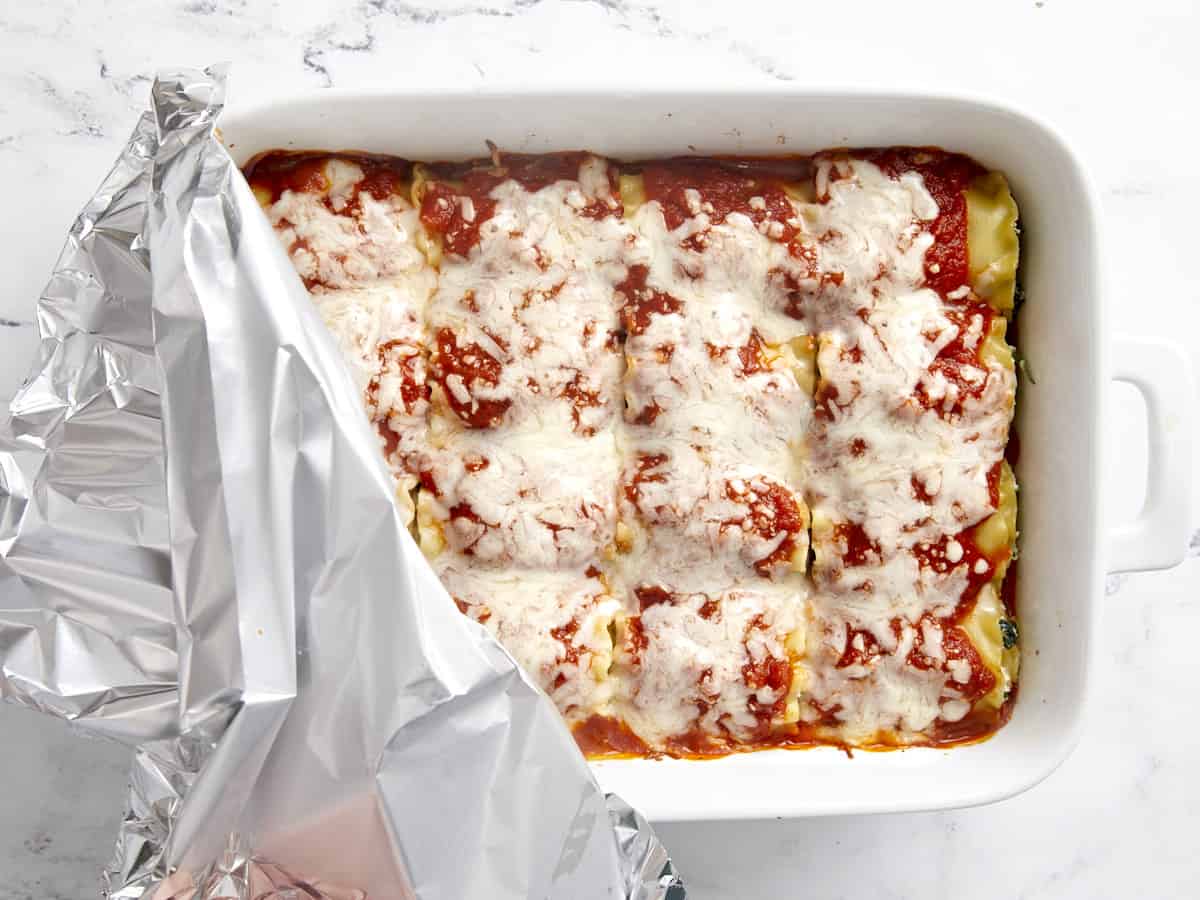
Cover the casserole dish with foil and bake the lasagna roll ups for 30 minutes in the preheated 400ºF oven. Serve hot and enjoy!
How to Make Lasagna Roll Ups – Step by Step Photos
Thaw one 10oz. package of frozen chopped spinach (either use the defrost function on a microwave or transfer it to the refrigerator the day before to thaw). Preheat the oven to 400ºF.
Once the spinach is fully thawed, squeeze out as much water as possible from the spinach. You should have about one cup tightly packed spinach after squeezing.
Add the spinach to a large bowl with one large egg, 15oz. ricotta cheese, 1 cup shredded mozzarella cheese, ¼ cup grated Parmesan cheese, ¼ tsp salt, and ¼ tsp pepper. Stir everything together until evenly combined.
Boil 12oz. lasagna noodles until al dente, then drain in a colander. Do not let the noodles overcook or they’ll be too delicate to work with. You’ll only need 12 noodles, but you’ll likely have a few more if you boil an entire 12oz. box. It’s always good to have a few back up in case they tear as you’re filling and rolling.
Lay a few of the lasagna noodles out onto a clean surface and spread a thin layer of the cheese filling onto each noodle from edge to edge. The filling does not need to be thick or in a solid layer because it adds up when the noodles are rolled. I used heaping ¼ cup of filling per noodle.
As you fill and roll the noodles, place them in a large casserole dish. Pour one 24oz. jar of marinara sauce over the lasagna roll ups.
Sprinkle the remaining 1 cup of mozzarella over the lasagna roll ups.
Cover the baking dish and bake the roll ups for about 30 minutes in the preheated 400ºF oven, or until the sauce and cheese are bubbling up around the edges.
Serve and enjoy! (Garnish with parsley for a little extra color, if desired.)
This sun dried tomato pasta is creamy, cozy, and a crowd-pleasing dinner idea! This recipe is simple to make with maximum wow-factor.
You know those recipes where people rave and only you know the secret that it’s actually easy to make? That’s the case with this Creamy Sun Dried Tomato Pasta! There’s major wow-factor but this pasta comes together in under 30 minutes. Earthy, fruity sundried tomatoes lend a meaty quality to this vegetarian pasta, which is bathed in a Parmesan cream sauce. We couldn’t stop raving about each bite!
Ingredients in sun dried tomato pasta
This sun dried tomato pasta comes together in about 30 minutes, with only one ingredient to chop. That’s right, all you need to do is mince garlic! Otherwise, it’s a matter of simmering up a simple sundried tomato cream sauce and boiling a pot of pasta. Here’s what you’ll need:
This sundried tomato pasta recipe works with any type of pasta noodle, but we like it best with short cut pasta. Short cut pasta makes it easy to get perfect distribution of sundried tomatoes, spinach, and bites of chewy pasta. However, you’re welcome to make it with long noodles too! Here are a few varieties we’d recommend:
The most important part of this sun dried tomato pasta recipe? Cook your pasta to al dente. Al dente means “to the bite” in Italian, and signifies to cook until it’s tender with a small white speck inside when you bite into a piece. There’s nothing worse than soft, rubbery pasta. Here are a few tips for the perfect al dente pasta:
Boil the pasta a few minutes less than indicated on the package instructions. Often package instructions make for overcooked pasta.
Start taste testing early. Start taste testing and stop cooking when the pasta is just tender but you can still see a small white speck inside.
Tips for making sun dried tomato pasta
Besides cooking your pasta to al dente, here are a few things to note about this sundried tomato pasta:
If the pasta finishes before the sauce, drain and stir with a drizzle of olive oil. This prevents the pasta from sticking to the pan.
You’ll add flour as a thickener after simmering the sauce. A standard cheese or cream sauce starts with a roux, a mixture of flour and butter that thickens cheese sauces. This sauce is a little different: it does contain flour as a thickener, but you’ll add it at the end of simmering.
For a gluten-free version, use cornstarch and GF pasta. There are lots of great brands of gluten-free pasta these days, made from gluten-free flour or legumes like chickpeas.
Protein adders
This sundried tomato pasta is a delicious vegetarian pasta that’s filling and satisfying! However, if you want to add protein it’s very easy to add the following:
Sundried tomato pasta tastes the best the day it is made. But unlike many pasta recipes, this one tastes great as leftovers! Store leftovers for up to 3 days refrigerated. You can reheat them in a skillet on the stove, adding a splash of milk to keep the sauce creamy. Or you can simply eat it cold (it’s still good!).
Start a large pot of generously salted water to a boil. Add the pasta and boil until al dente (check a few minutes before the package instructions indicate). When cooked, drain the pasta. If it finishes before the sauce, toss with a drizzle of olive oil to prevent sticking.
Meanwhile, heat a large saute pan or saucepan over medium low heat. Melt the butter, then add the garlic and thyme and cook for 30 seconds to 1 minute until the garlic is lightly browned and fragrant. Add the milk, heavy cream and Parmesan cheese and cook for 2 to 3 minutes until the cheese has melted and it thickens slightly. Add the sun dried tomatoes, spinach, and salt and cook 2 to 3 minutes more, until the spinach is wilted.
In a small bowl, mix the flour with 2 tablespoons water. Pour it into the pan with the sauce, then stir until it thickens. Cook 2 minutes more.
Add the drained pasta and stir to combine. Stir in a few grinds of fresh ground black pepper if desired. Serve immediately. Leftovers last refrigerated for up to 3 days.
Category:Main dish
Method:Stovetop
Cuisine:Vegetarian
Diet:Vegetarian
Keywords: Sun dried tomato pasta, sundried tomato pasta, creamy sun dried tomato pasta
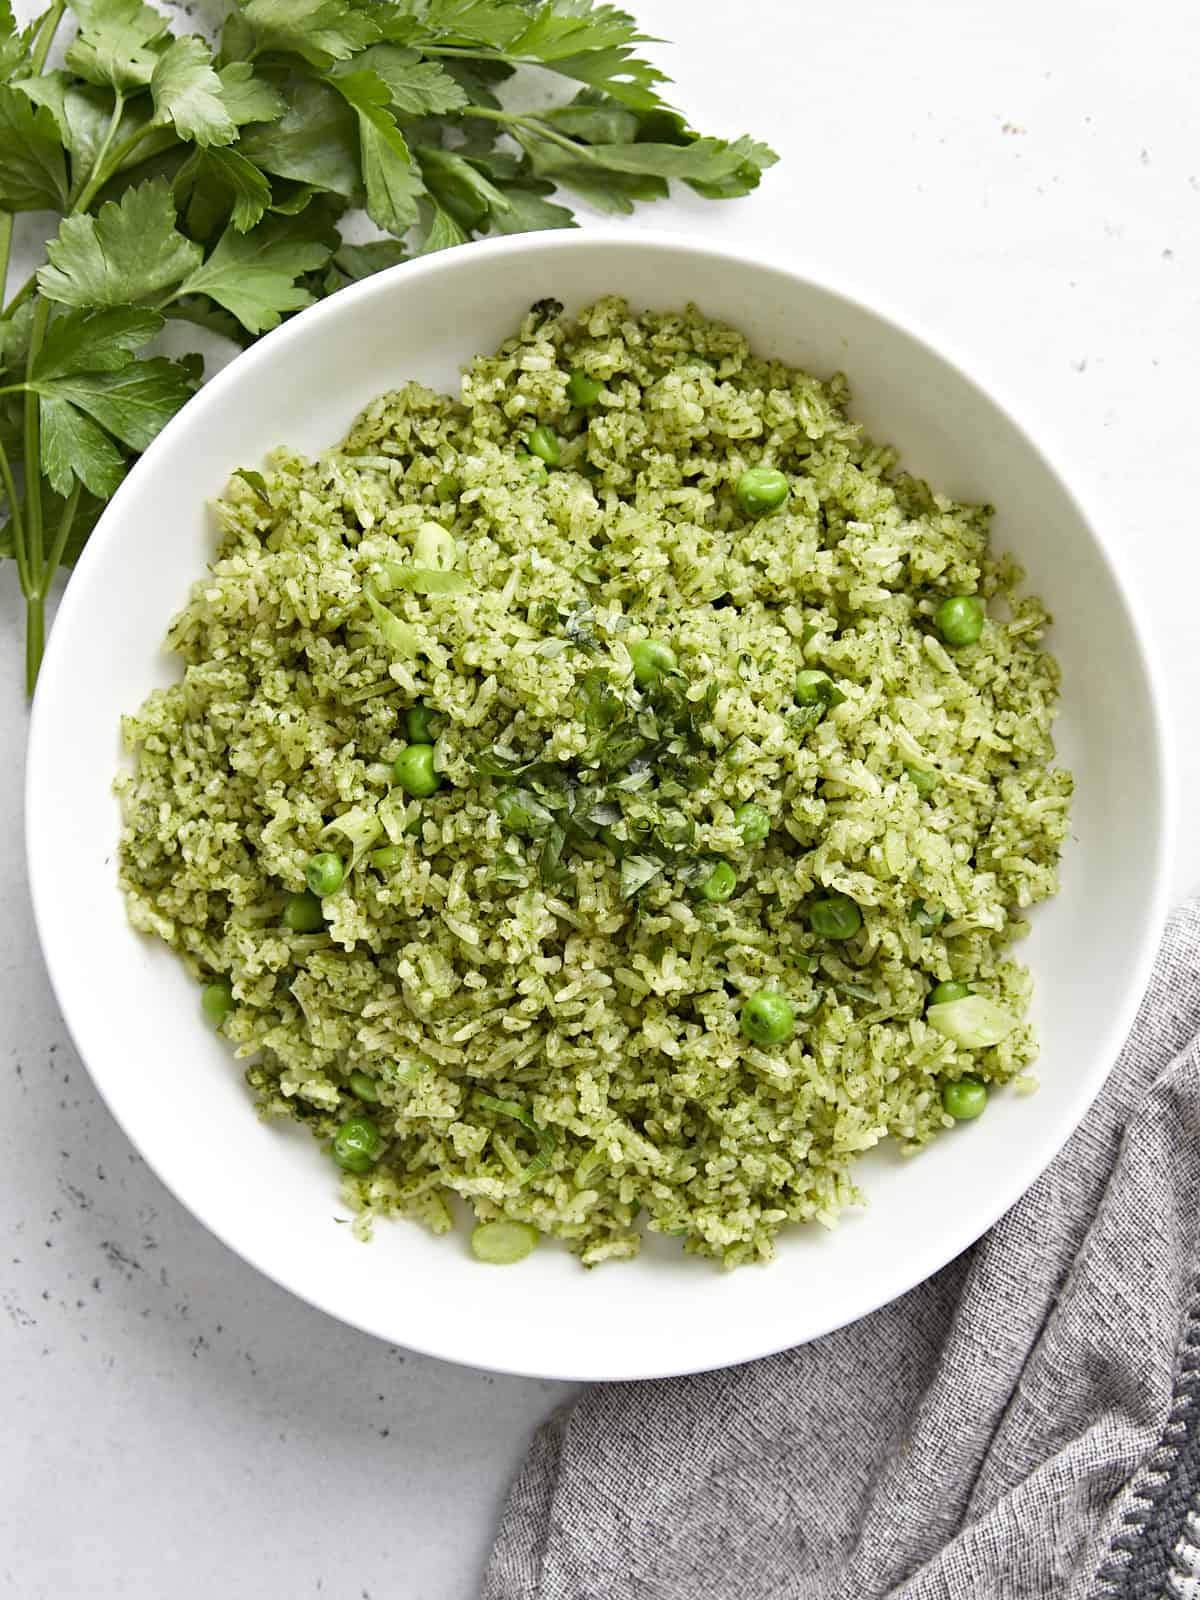
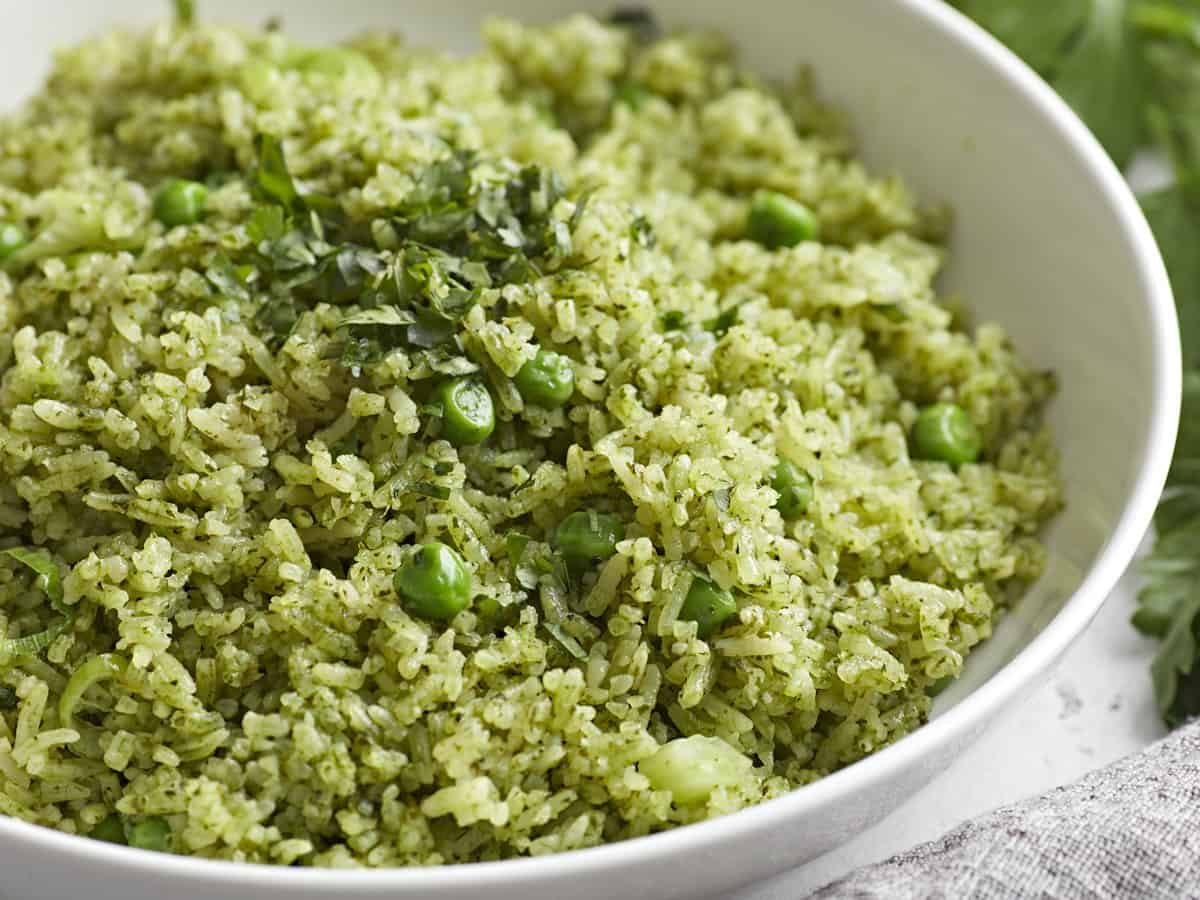
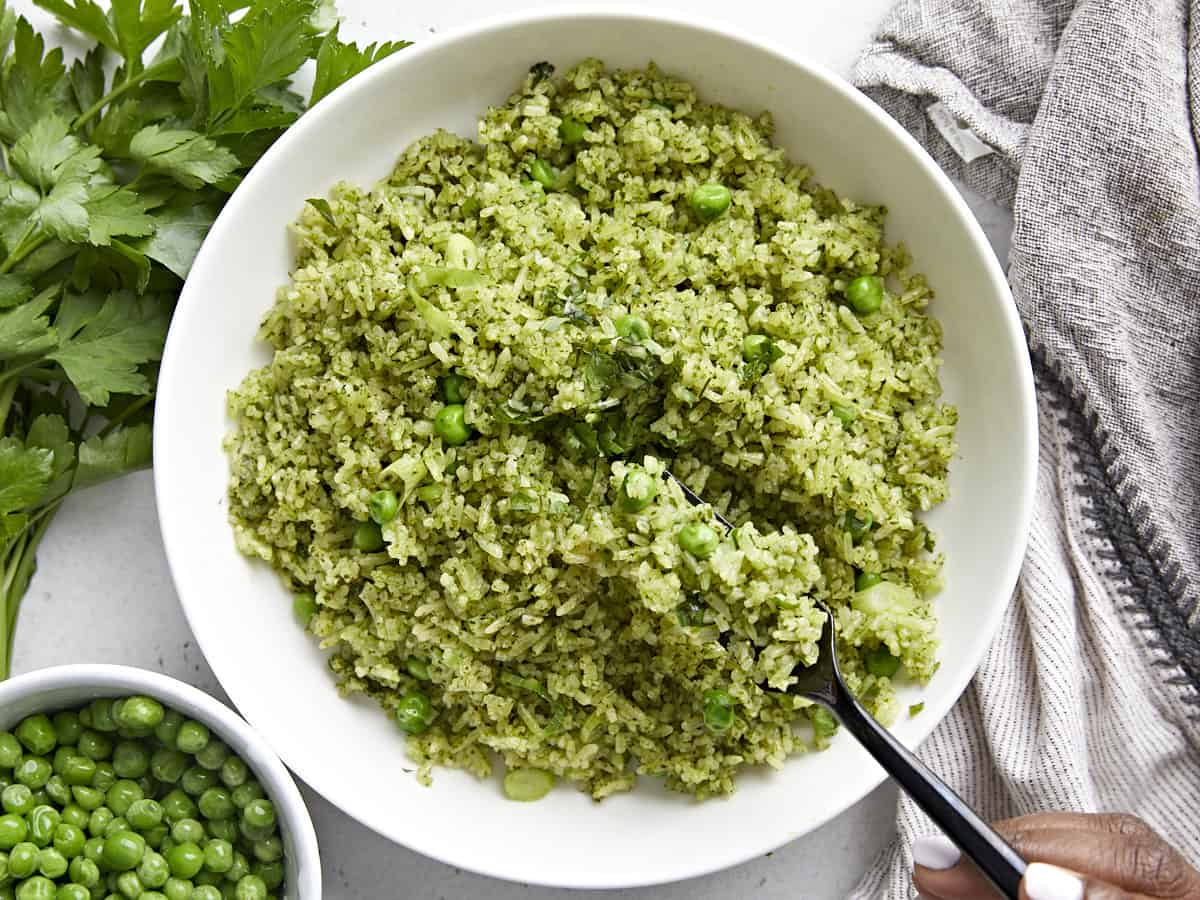
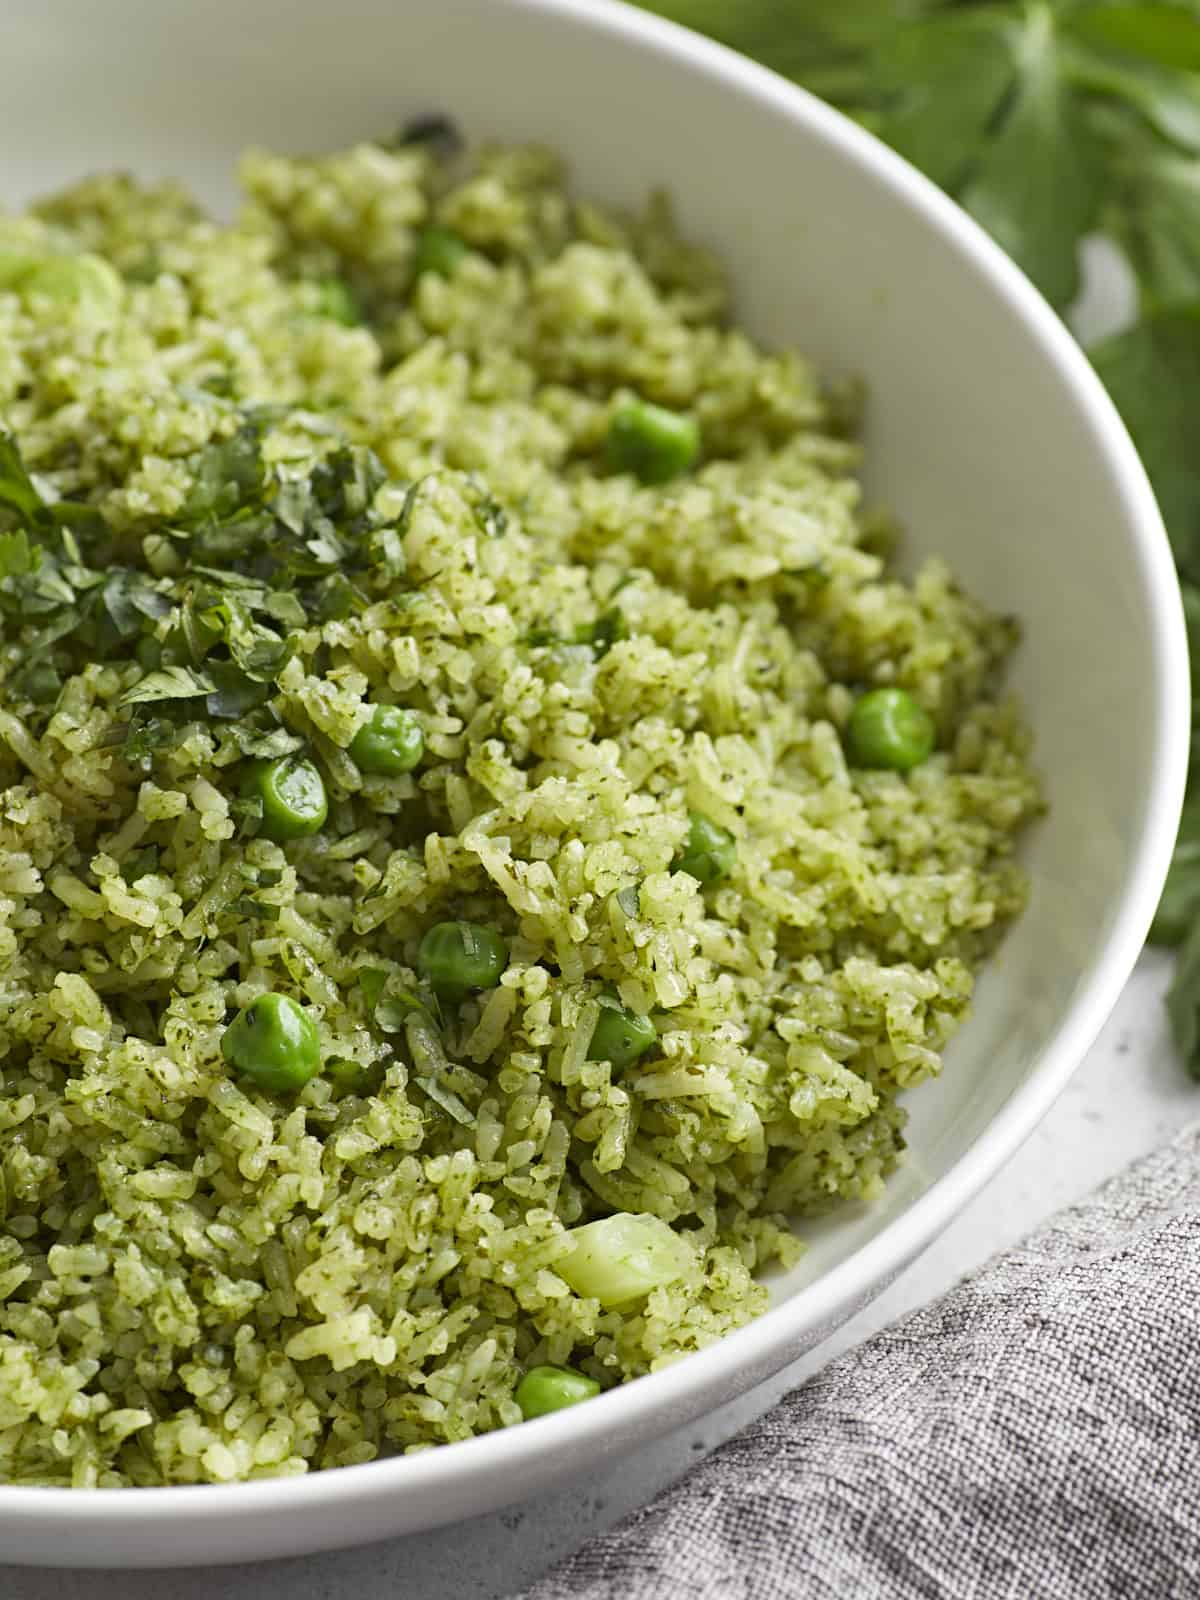
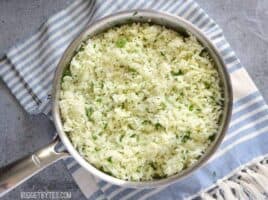
Rice is one of our favorite budget-friendly side dishes, so when we saw the recipe for Arroz Verde in Karla Salinari’s new book, Abuela’s Plant-Based Kitchen: Vegan Cuisine Inspired by Latin & Caribbean Family Recipes, we knew we had to give it a try! This simple Arroz Verde (Green Rice) recipe is bright, full of earthy flavor, and the perfect way to use up any herbs or leafy greens in your fridge! So if you’re looking for a new tasty way to enjoy this weeknight staple side dish, then definitely give this green rice recipe a try!
What is Arroz Verde?
Arroz Verde is a popular Mexican and Latin American green rice dish that’s known for its vibrant green color and herby flavors. It’s often made by cooking rice in a blended herb and leafy greens puree until it’s fluffy and infused with lots of earthy flavor.
INGREDIENTS FOR ARROZ VERDE
This green rice recipe includes lots of vegetables and packs a ton of flavor! Here’s what you need to make this simple rice dish:
Basmati Rice – Basmati rice, which is fragrant and fluffy, is the base for this recipe. We used jasmine rice, which is also fragrant because that is what we had on hand, but feel free to use any long-grain white rice that fits your budget.
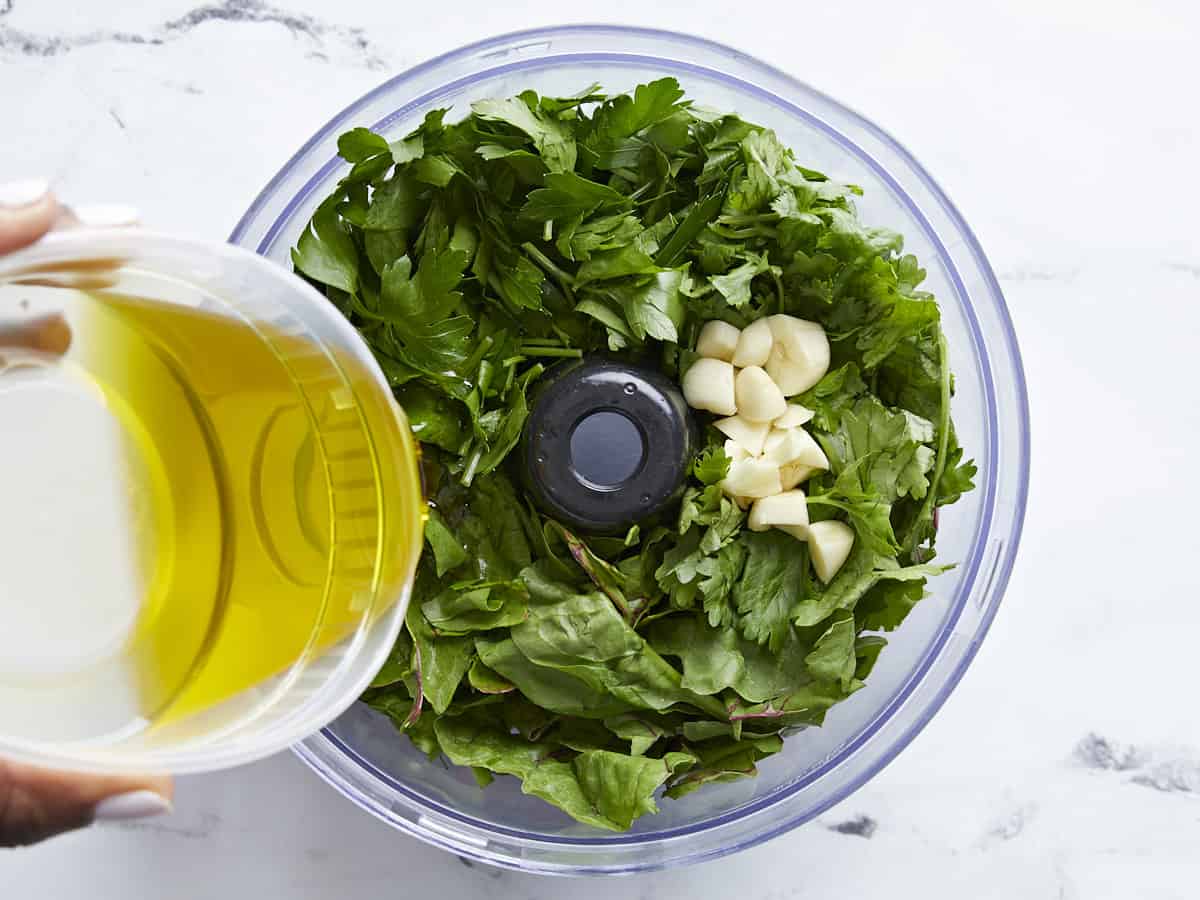
Green Leafy Vegetables – Lots of earthy green leafy vegetables and herbs are used in this arroz verde recipe including Swiss chard, spinach, parsley, and cilantro. It makes the rice bright and super flavorful! If you can’t find Swiss chard, simply substitute it with more spinach.
Olive oil and Garlic – Both of these are added with the leafy vegetables to create a green powerhouse blended mixture. The pureed mixture is then sautéed to release some of its fragrance before being cooked with the rice.
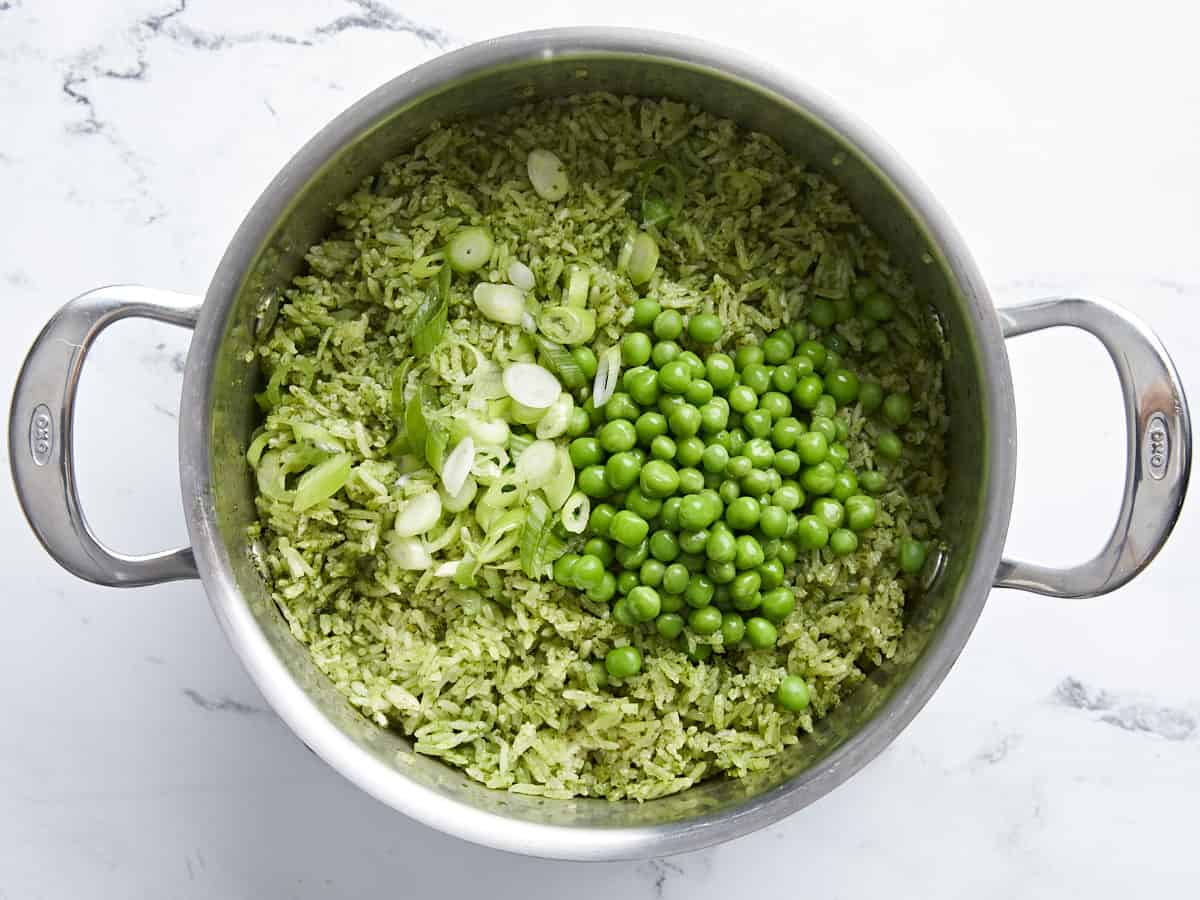
Green Peas and Scallions – Cooked green peas and sliced scallions give the dish more color, texture, and flavor, making this an anything-but-boring side dish.
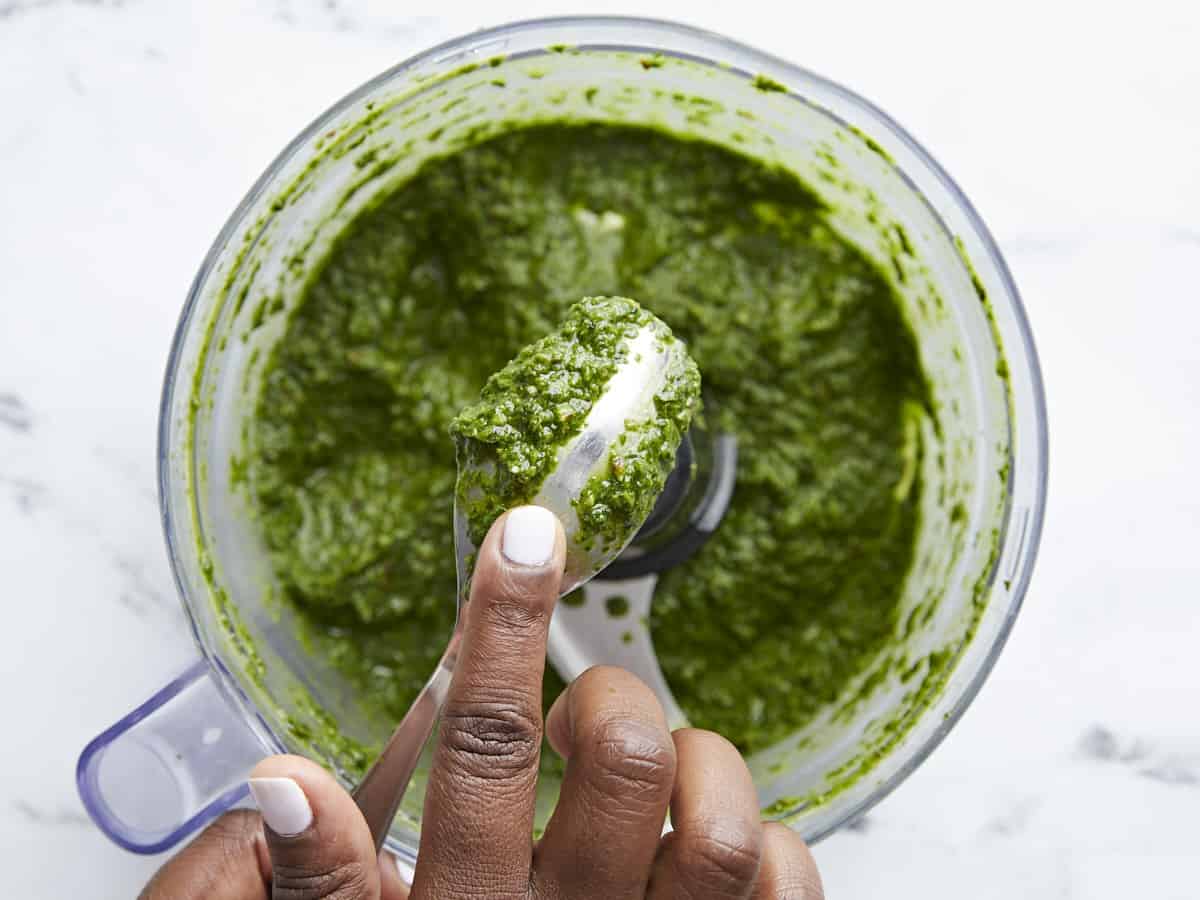
Add the Swiss chard, spinach, parsley, cilantro, olive oil, and roughly chopped garlic to a food processor. Process on high until mixture reaches a paste-like consistency.
Place a medium size pot over medium-high heat. Once hot, transfer the green vegetable mixture to the pot and sauté until fragrant, 2-3 minutes.
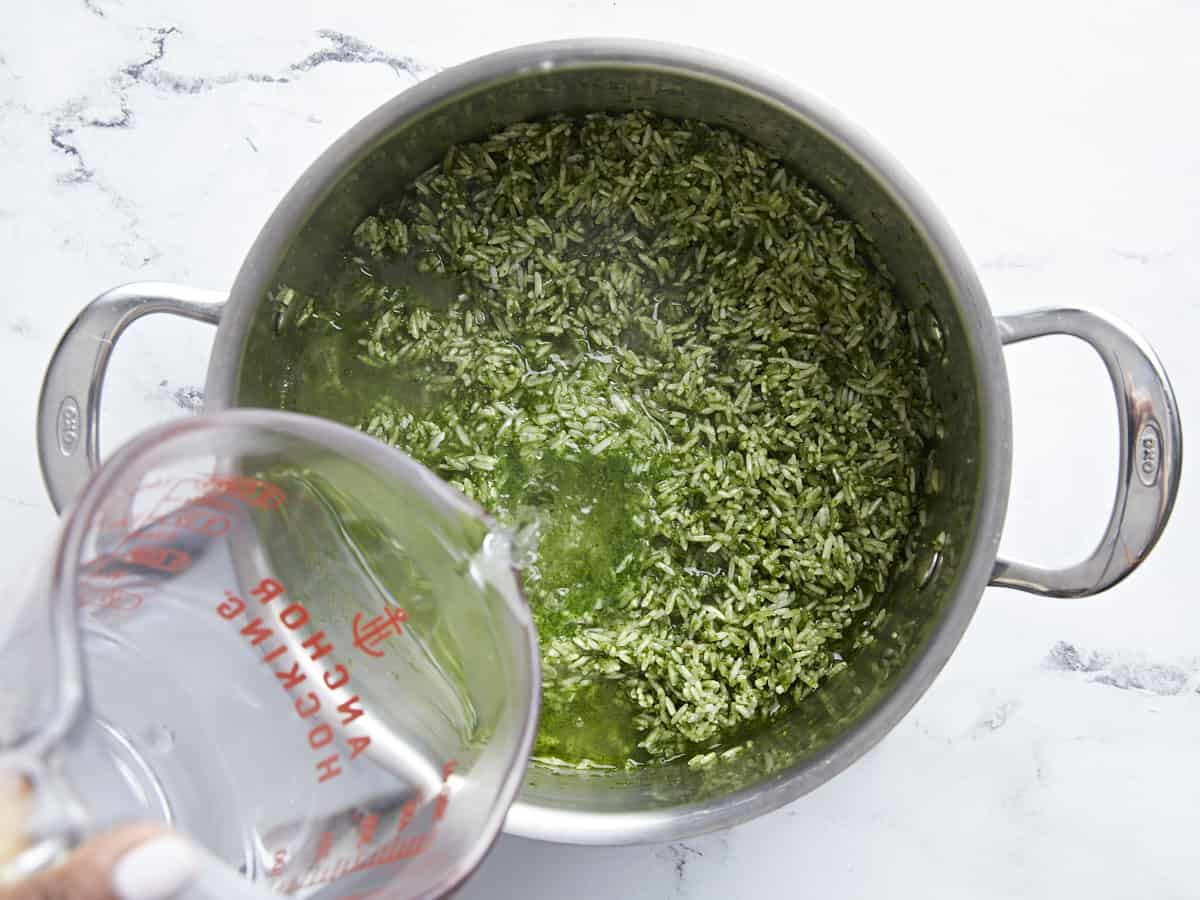
Add the rice to the pot and mix to combine coating the rice with the green mixture.
Add boiling water and salt to taste to the pot and let the mixture come to a boil. Once boiling, reduce the heat to a simmer and cover with a tight lid. Cook for 20 min or until the rice is tender.
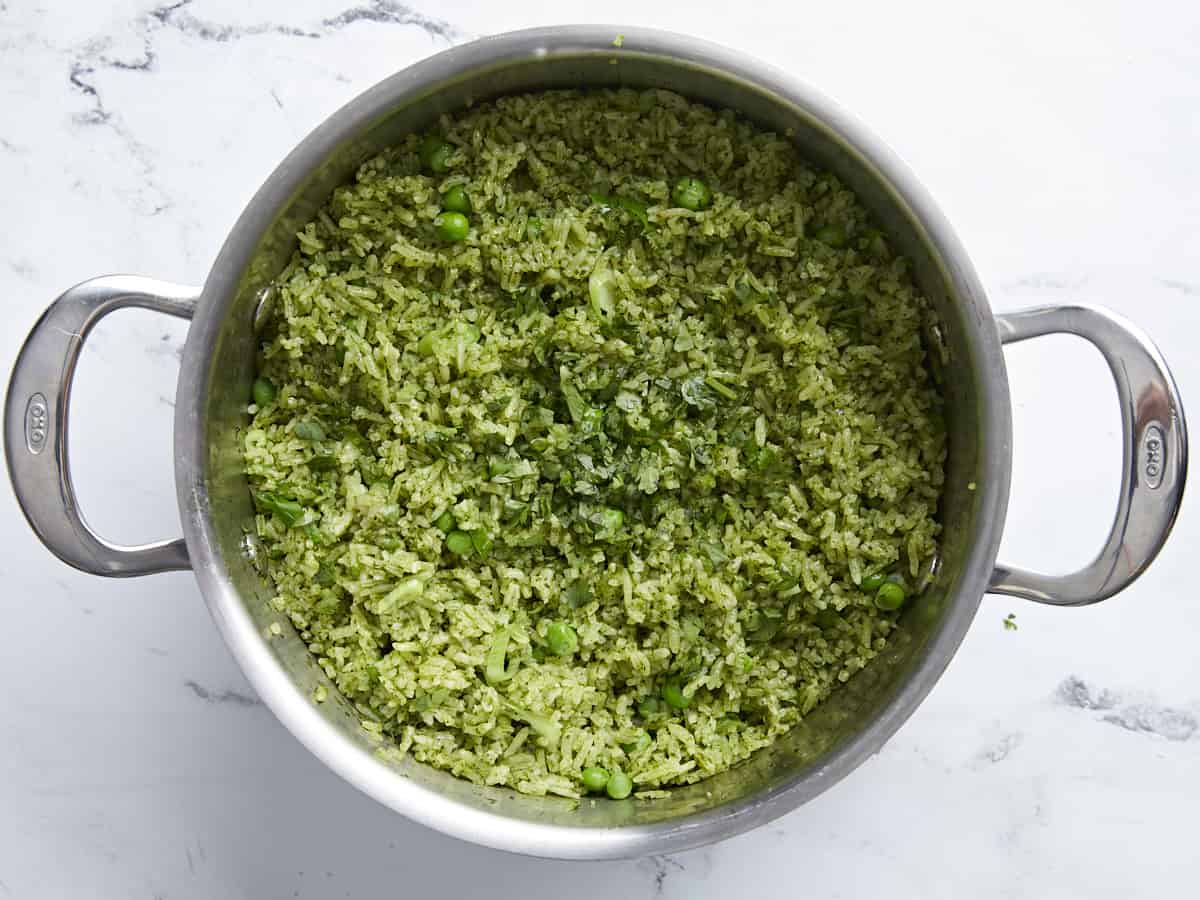
Once done remove the pot from the heat and using a fork fluff the rice. Add the cooked green peas and scallions and combine. Serve and enjoy!
Add 1 cup of chopped Swiss chard, 1 cup fresh spinach, 1 cup parsley, 1/2 cup cilantro, 1/2 cup olive oil, and 3 garlic cloves (roughly chopped) to a food processor.
Process on high until mixture reaches a paste-like consistency.
Place a medium size pot over medium-high heat. Once hot, transfer the green vegetable mixture to the pot and sauté until fragrant, 2-3 minutes.
Add 2 cups long-grain white rice (washed & rinsed) to the pot and mix to combine, coating the rice with the green mixture.
Add 2 cups of boiling water and salt to taste to the pot, then let the mixture come to a boil. Once boiling, reduce the heat to a simmer and cover with a tight lid. Cook for 20 min or until the rice is tender.
Once done remove the pot from the heat and using a fork fluff the rice. Add 1/2 cup cooked green peas and 1/4 cup sliced scallions and combine.
Serve and garnish with fresh chopped cilantro if desired. Simple and delicious! Enjoy!
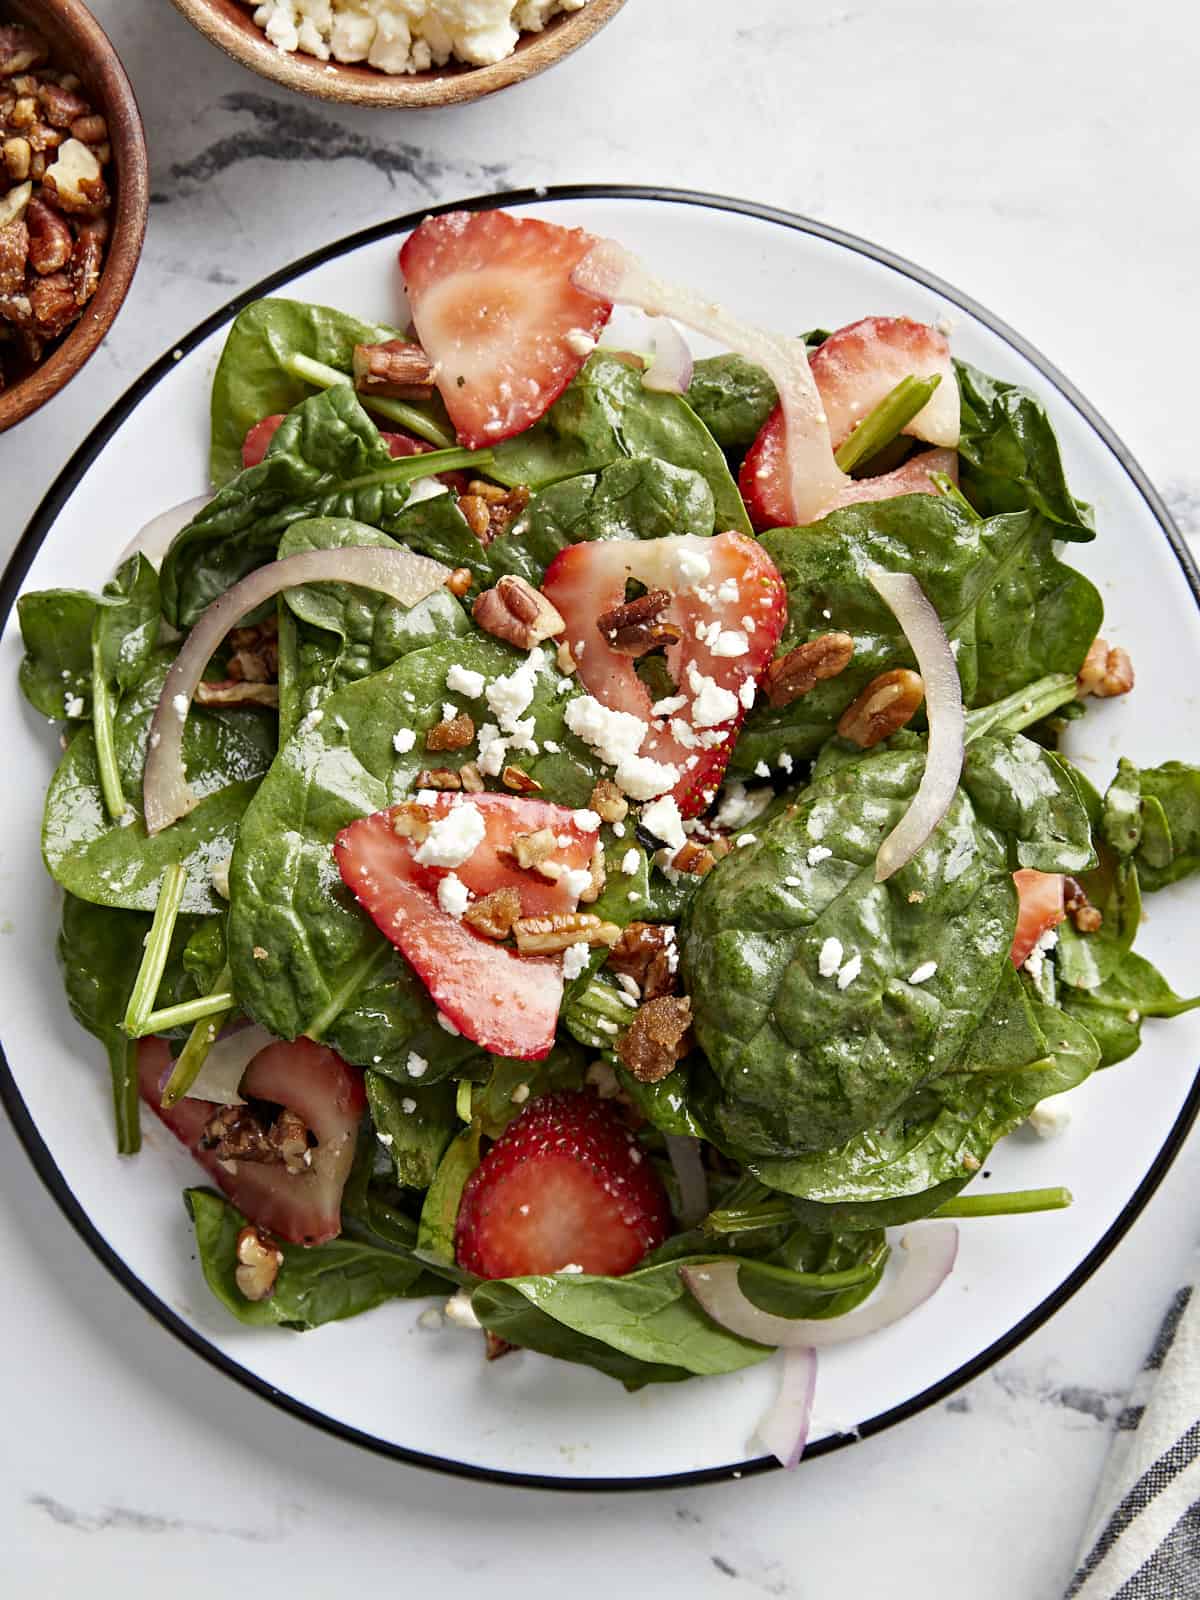
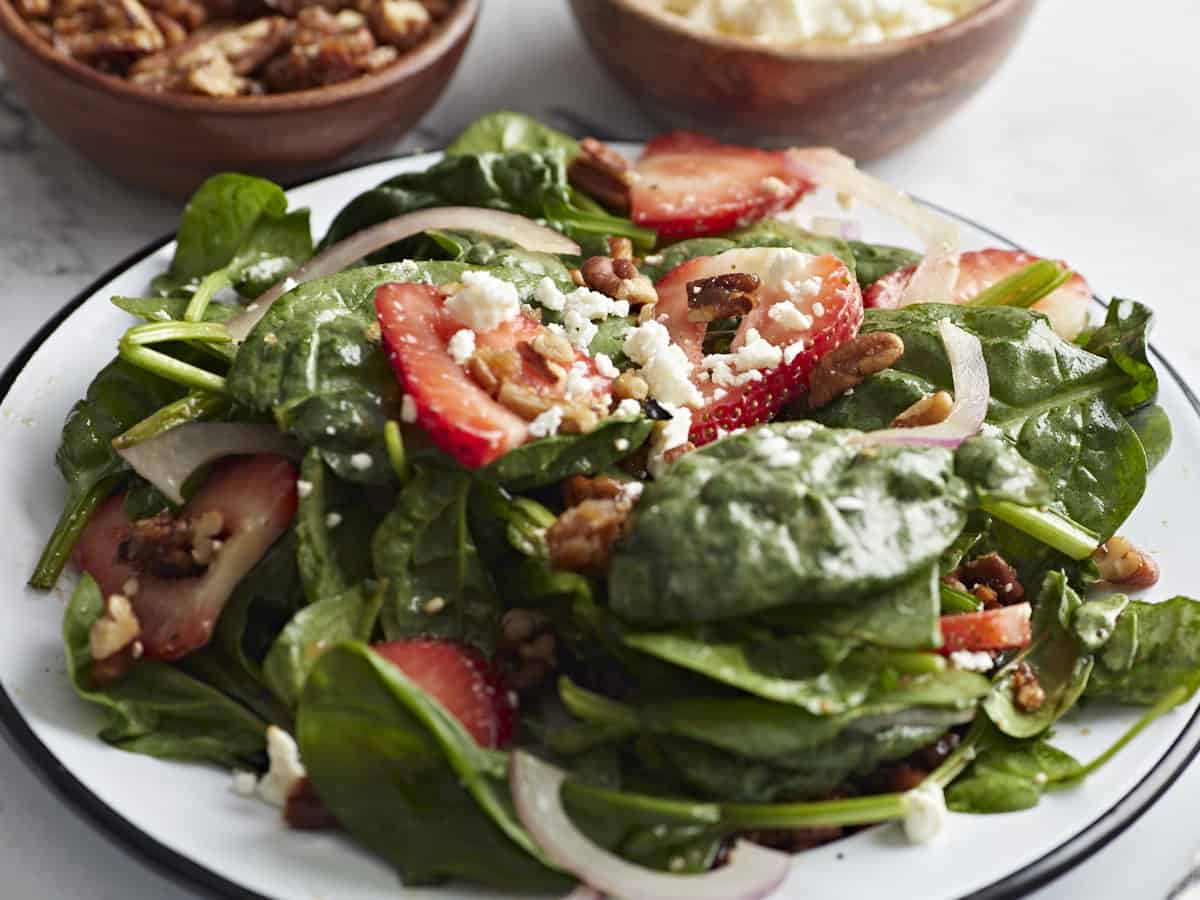
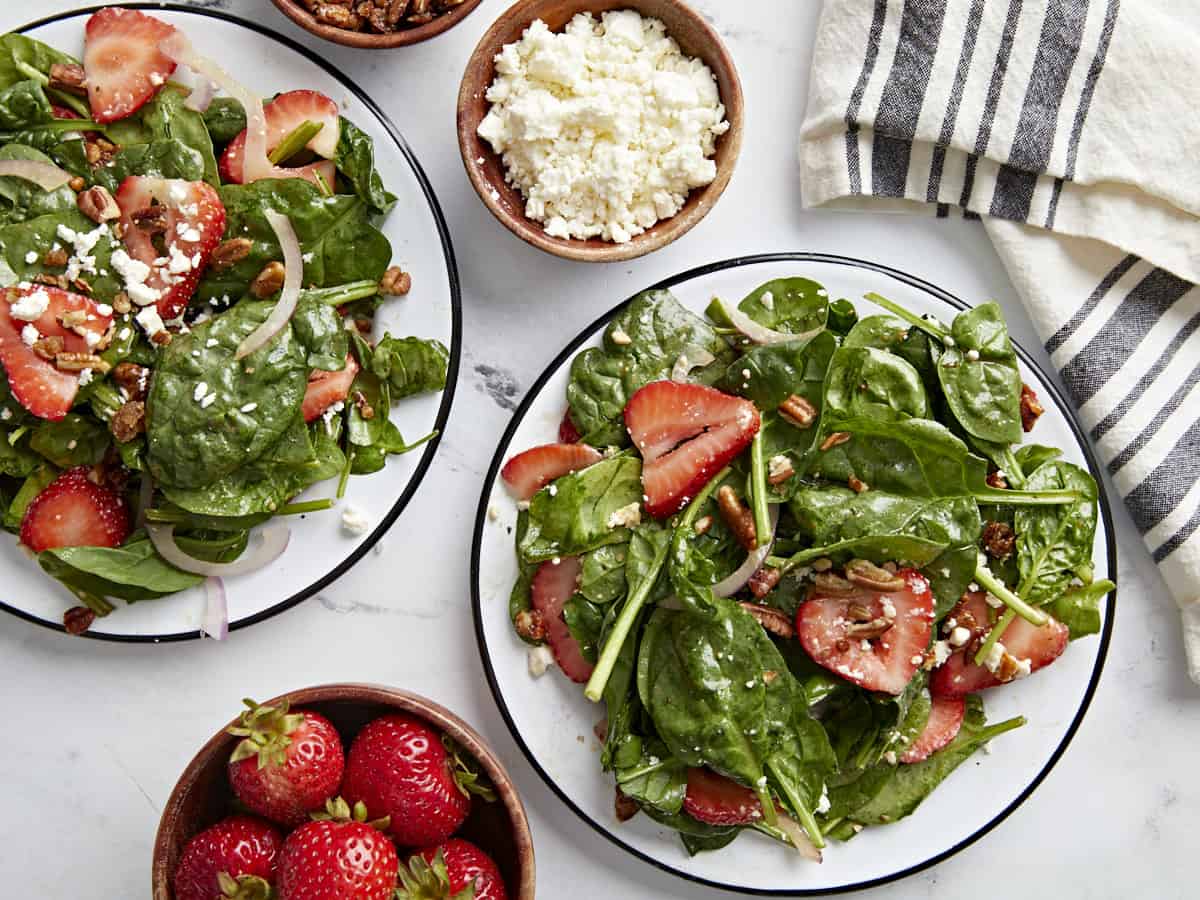
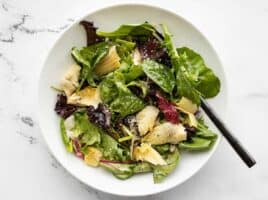
I’ve made several versions of Strawberry Spinach Salad over the years, but this by far is my favorite! It includes fresh strawberries, salty feta cheese, candied pecans, and an easy homemade balsamic vinaigrette. The textures and flavors are insanely delicious and compliment each other perfectly! It reminds you of a fancy salad that you’d get at a cafe, but you can make it at home for a fraction of the cost. This is one of those “summer” salads that I could literally eat all year long!
What’s in Strawberry Spinach Salad
Strawberry Spinach Salad includes lots of wonderful flavors and textures that compliment each other perfectly. Here’s what you’ll need:
Baby Spinach – a simple bed of spinach greens is the base foundation for this salad.
Strawberries – fresh, juicy, strawberries add a simple and wonderful sweetness.
Red onion – slightly sharp and a nice contrast to the sweetness of the strawberries and candied pecans.
Feta cheese – soft, creamy, salty feta cheese pairs well with the strawberries in this salad. If you’re not a fan of feta cheese, goat cheese or blue cheese would also work well.
Candied pecans – these candied pecans, in my humble opinion, are one of the best parts of the salad. It adds a crunchy, sweet texture, and you can swap the pecans out for toasted walnuts or toasted sliced almonds, which would also be totally delicious!
Balsamic vinaigrette – easy homemade balsamic vinaigrette dressing tops it all off.
Balsamic Vinaigrette Dressing
The dressing for this strawberry salad is probably my favorite part…ok it’s actually tied with the candied pecans! I started with Beth’s easy homemade balsamic vinaigrette and made one adjustment by replacing the mayonnaise with honey for a slightly sweeter taste. The results – absolutely amazing!
You can certainly use a store bought balsamic vinaigrette if you don’t have a well stocked pantry with all the necessary ingredients on hand, but I promise this homemade balsamic vinaigrette will taste wayyy better! I highly recommend you give it a try! ;)
Budget-Friendly Recipe Tips
If chopped nuts are a little too costly at your local store, toast up some day-old bread to use in place of the chopped pecans, similar to our Panzanella salad.
To bulk up the salad and make it stretch a little further, add your favorite pasta like penne or bow-tie pasta.
How To Store Strawberry Spinach Salad
Strawberry spinach salad stores well in the fridge for up to 3 days. In order to keep the spinach from wilting too much, it’s best to store the strawberries and the dressing separately and add them to the salad right before you’re ready to serve.
Serving Suggestions
This salad makes a great lunch meal by itself, Monti and I totally gobbled it up at the test studio, but you can also add some grilled chicken or sautéed shrimp on top for a more filling meal. This salad also pairs well with other leaner protein like baked cod and pan-seared chicken.
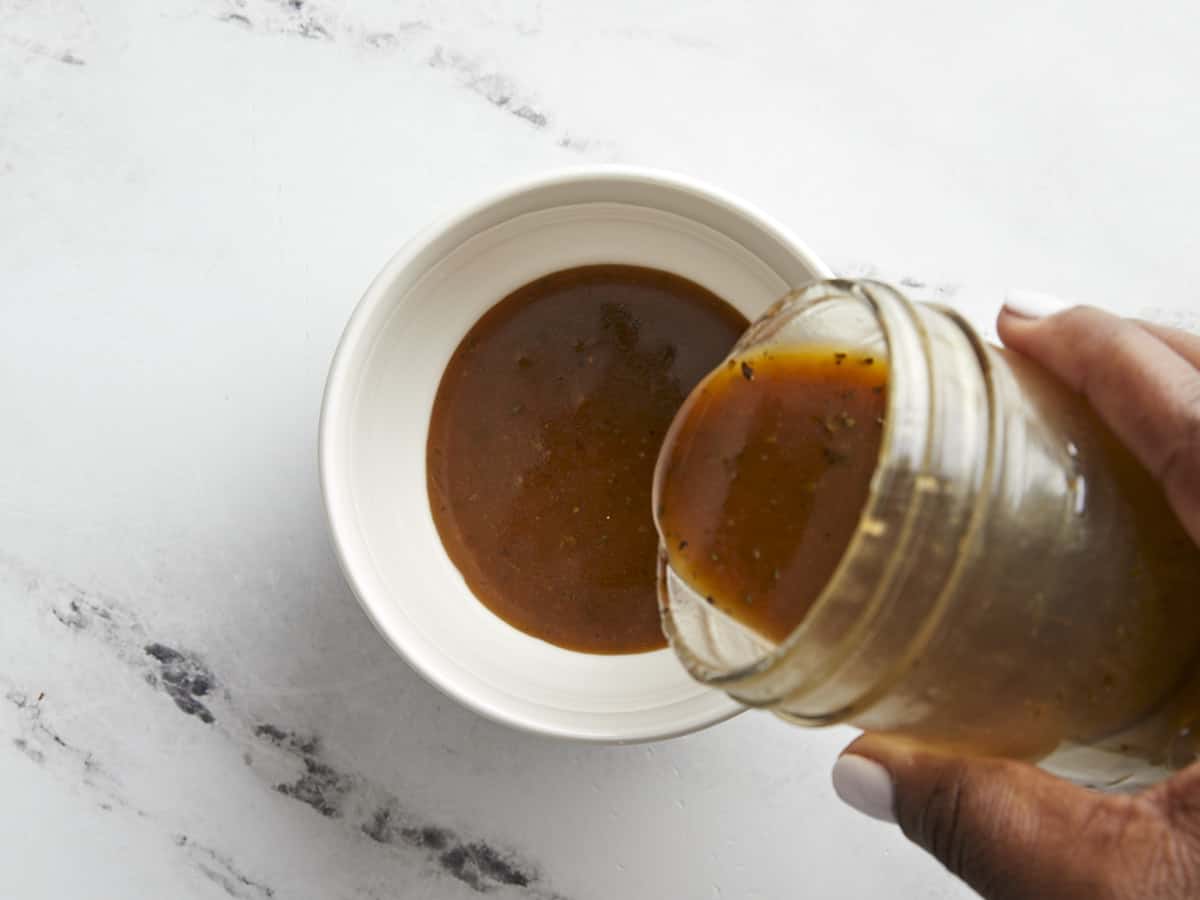
Start by making the homemade balsamic vinaigrette dressing. Add the olive oil, balsamic vinegar, honey, Dijon mustard, minced garlic clove, dried basil, salt, and freshly cracked black pepper to a jar, bowl, or blender. Close the jar and shake the ingredients together, whisk in a bowl, or blend until the dressing is evenly combined. Set the dressing aside.
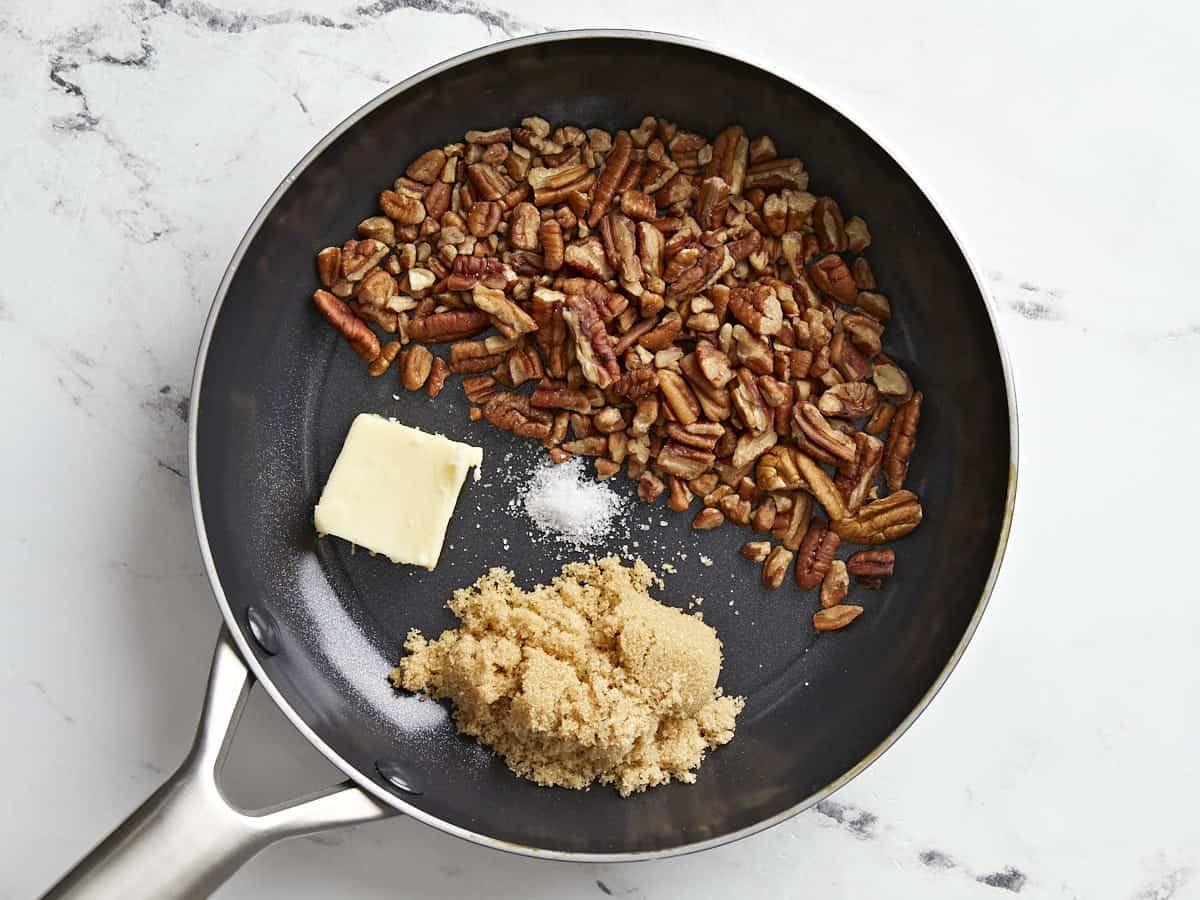
Next make the candied pecans. Add the butter, brown sugar and a pinch of salt to a small non-stick skillet. Heat over medium heat while stirring.
Once the butter and brown sugar begins to melt add the chopped pecans to the skillet and stir with the brown sugar mixture. Continue to cook over medium heat, stirring every 10-15 seconds until the brown sugar fully melts (looks glossy instead of grainy) and completely coats the pecans.
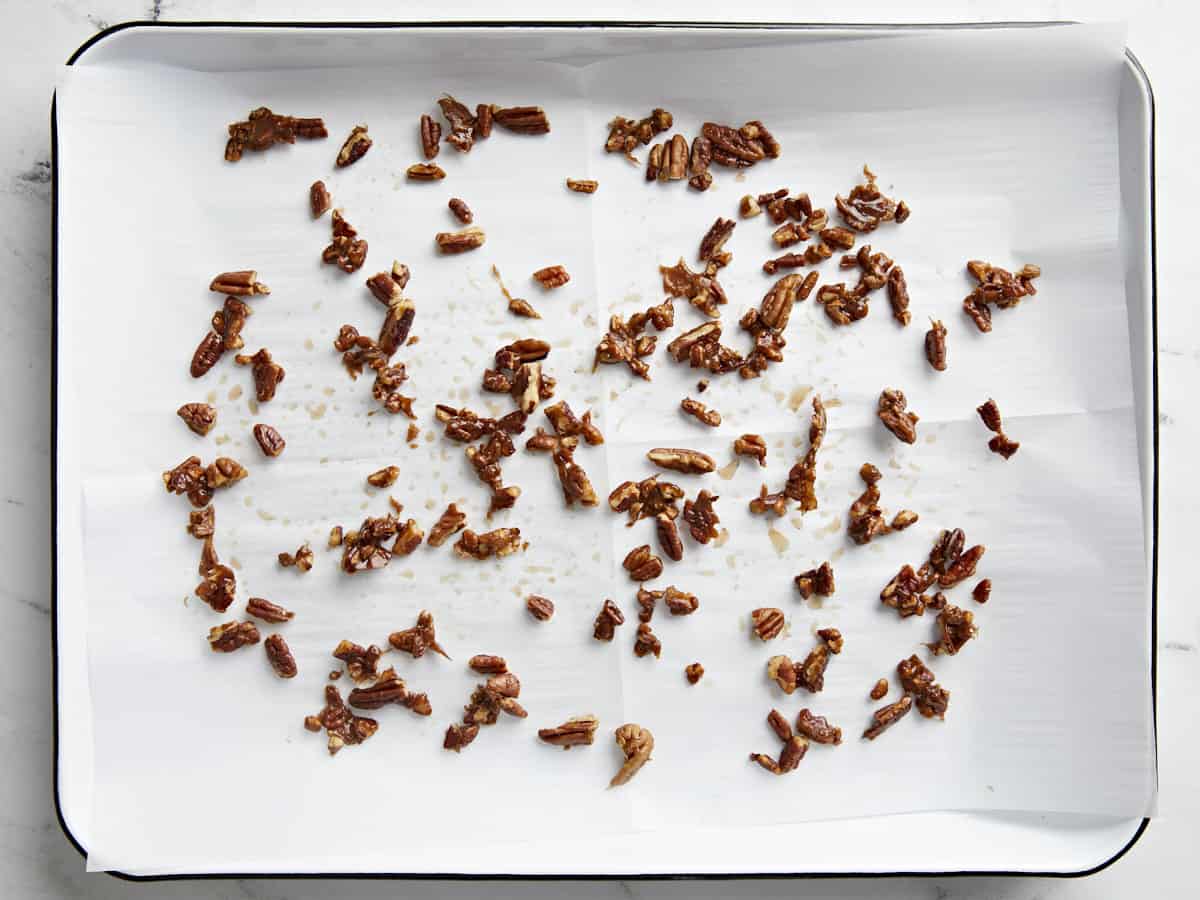
Remove the skillet from the heat immediately and transfer the candied pecans to a parchment lined baking sheet. Spread the pecans out evenly in a flat layer and allow them to cool for 10 minutes while the candied coating fully hardens.
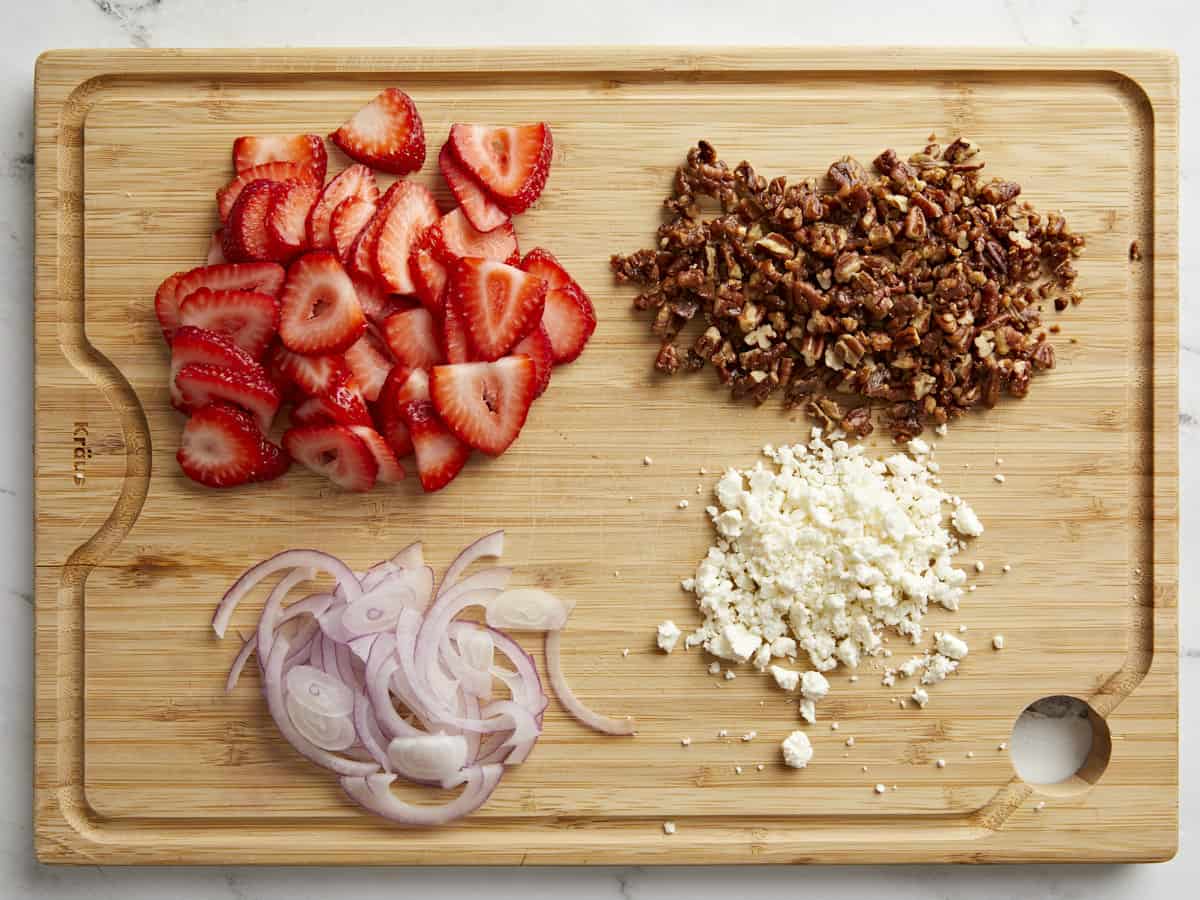
Now prep the strawberries, red onion and feta cheese. Remove the stems and slice the strawberries, thinly slice the red onion, and crumble the feta. Set these ingredients to the side.
Divide the spinach between four plates. Drizzle 2 Tbsp of balsamic vinaigrette on top of each bed of spinach.
Add sliced strawberries, red onions, a tablespoon or two of candied pecans, and a tablespoon of feta cheese to each salad. Feel free to drizzle a little more balsamic vinaigrette over the top of each and enjoy!
HOW TO MAKE STRAWBERRY SPINACH SALAD – STEP BY STEP PHOTOS
Start by making the homemade balsamic vinaigrette. Add 1/3 cup olive oil, 3 Tbsp balsamic vinegar, 2 Tbsp honey, 1/2 Tbsp Dijon mustard, 1 garlic clove minced, 1/2 tsp dried basic, 1/4 tsp salt, and 1/4 tsp freshly cracked black pepper to a jar, bowl, or blender. Add a top to the jar and shake, whisk in a bowl, or blend until all the ingredients are evenly combined. Set the vinaigrette dressing aside.
Next make the candied pecans. In a small non-stick skillet add 1/2 Tbsp butter, 2 Tbsp brown sugar, and a pinch of salt. Heat over medium heat while stirring just until the butter and brown sugar begins to melt. Add 1/2 cup of chopped pecan and stir to coat in the brown sugar mixture. Continue to cook for 2-4 minutes or until the brown sugar is fully melted (looks glossy, not grainy) and completely coating the pecans.
Remove the skillet from the heat immediately, to prevent the brown sugar from over cooking and burning. Transfer the candied pecans to a parchment lined baking sheet, spread out in a flat layer. Allow them to cool for 10 minutes and the sugar coating will fully harden.
Now prep the rest of the salad ingredients. Wash and slice 1/2 pound of strawberries, thinly slice 1/4 of a red onion, portion out 2 oz of crumbled feta cheese, and gather your cooled candied pecans.
Divide 8 oz of spinach between four salad plates (roughly 2 oz per plate) or you can add all of the spinach to a larger serving bowl. Add 2 Tbsp of the balsamic vinaigrette to each salad plate or drizzle 1/3 cup of the dressing over the bowl of spinach. Reserve the rest of the dressing to add right before serving.
Divide the toppings (sliced strawberries, sliced red onion, 1 tablespoon of crumbled feta, and 1-2 tablespoons of candied pecans) between the four salad plates or add the toppings to a larger salad serving bowl. Drizzle each salad with a little more of the balsamic dressing and enjoy!
Prepare for the most nostalgic recipe to hit the internet this summer: rainbow sherbet(!!). This DIY, no-churn, dairy-free version is fresh, perfectly sweet, and packed with allll the creamy, fruity flavor of the classic. Refreshing is an understatemen…
Prepare for the most nostalgic recipe to hit the internet this summer: rainbow sherbet(!!). This DIY, no-churn, dairy-free version is fresh, perfectly sweet, and packed with allll the creamy, fruity flavor of the classic. Refreshing is an understatement!
It features a naturally sweetened frozen fruit base with creamy coconut milk and tangy lime. We even snuck some spinach in there, but we promise you can’t taste it — just wholesome deliciousness here.
I love starting my day with a refreshing smoothie that is packed with good for you ingredients. A few of my favorites include my strawberry banana smoothie, peanut butter banana smoothie, and detox smoothie. I also LOVE this easy Blueberry Smoothie rec…
I love starting my day with a refreshing smoothie that is packed with good for you ingredients. A few of my favorites include my strawberry banana smoothie, peanut butter banana smoothie, and detox smoothie. I also LOVE this easy Blueberry Smoothie recipe. We always have blueberries in the freezer so we make this one often.…
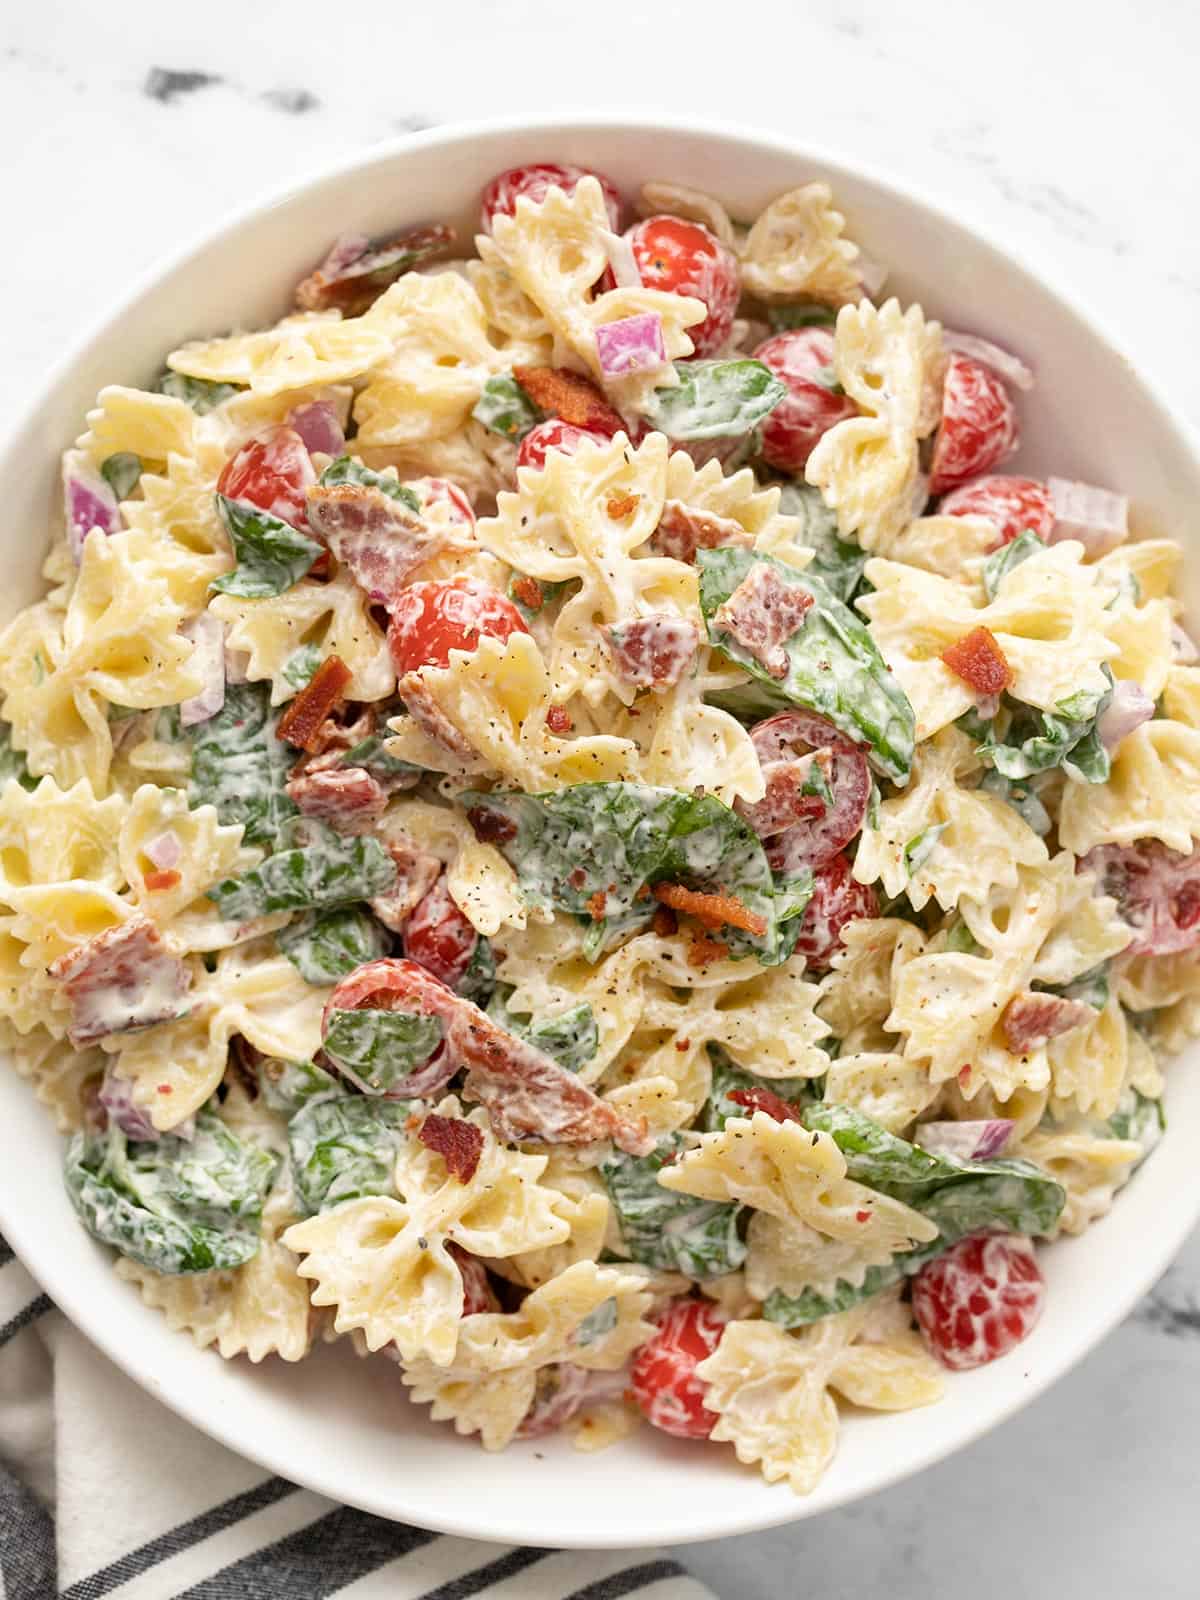
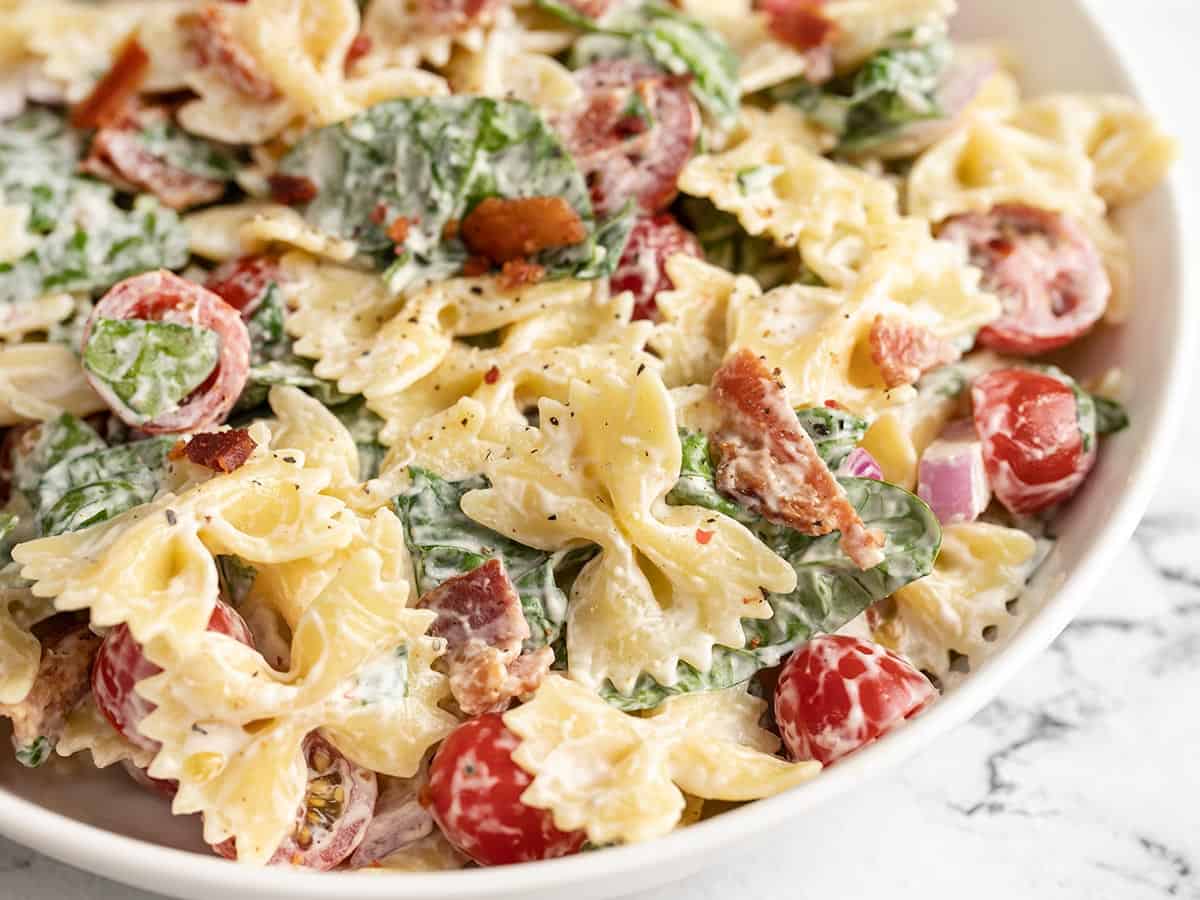
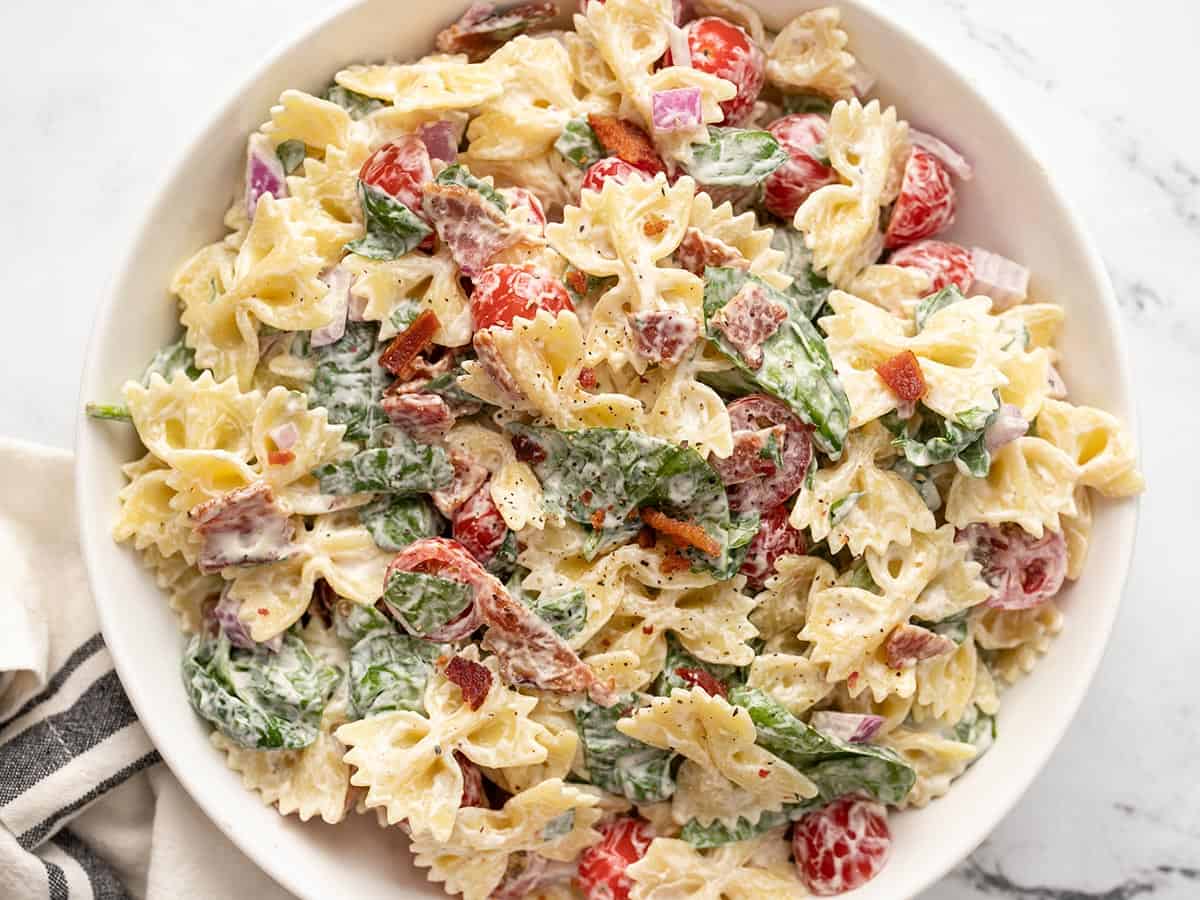
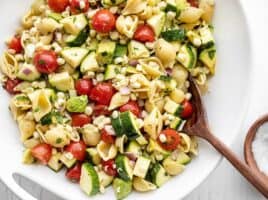
One of my favorite things about summer is a big ol’ juicy BLT sandwich. But until those gorgeous summer tomatoes come in, I’ll be enjoying that BLT flavor in salad form. This BLT Pasta Salad gives me all that creamy, tomatoey, balcony flavor I love but in a cold and refreshing pasta salad form. Plus, it’s great for all your summer BBQs, picnics, and potlucks. So if you haven’t tried this classic summer pasta salad, put it on your list!
What’s In BLT Pasta Salad?
Okay, just in case you’ve never experienced the beautiful simplicity of a BLT sandwich, let’s start there. “BLT” stands for “bacon lettuce tomato”. A BLT sandwich is just crispy bacon, fresh lettuce, and sliced tomatoes between two slices of bread, slathered with mayonnaise. It’s simple and perfect.
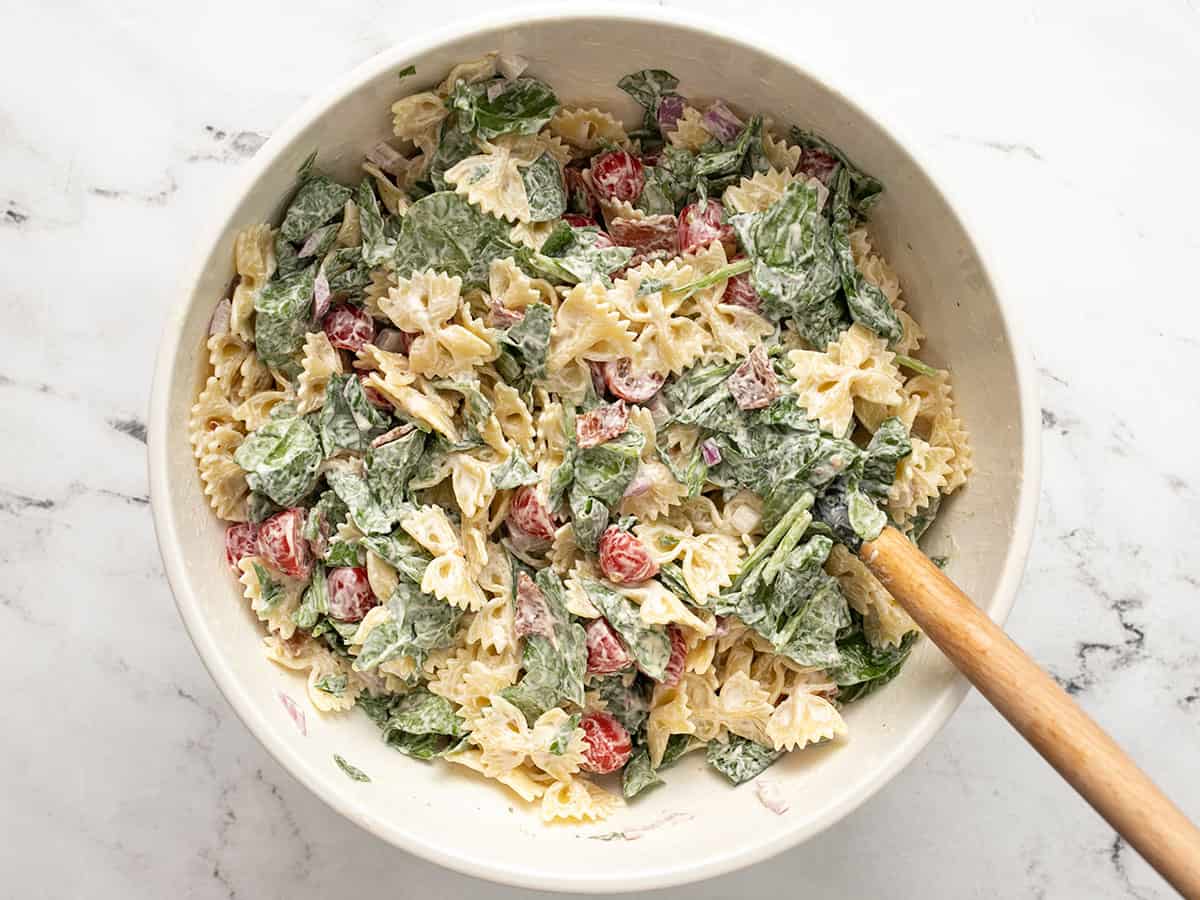
For BLT Pasta Salad we keep the core flavors the same, but we flesh it out just a bit. I think lettuce is a bit too delicate for pasta salad, so I used fresh spinach instead (I think it holds up better and has better color and texture for a pasta salad). To give the dressing a little more flavor than just plain mayo, we add a little ranch dressing, lemon juice for zing, and some salt and pepper. And then finally, I added a little diced red onion to round out the flavor and texture of the salad. It’s still super simple and totally delish!
What Kind of Pasta to Use
You can use any short pasta shape for this recipe, like rotini, small shells, macaroni, orecchiette, cavatappi, or farfalle (bowtie). I went for bowtie because I thought the shape was super cute in this salad!
How Long Does it Last?
This BLT Pasta Salad benefits from a little time in the fridge (you’ll want it to sit for 10-15 minutes for the best flavor), but it will eventually dry out, so you’ll want to make it the same day if you’re serving it to guests. I ate the leftovers for two days after I originally made the salad and while it was still amazing the next day, it did get a little dry by day two. So for best results, make this salad the same day you plan to serve it and try to eat up those leftovers within a day or so!
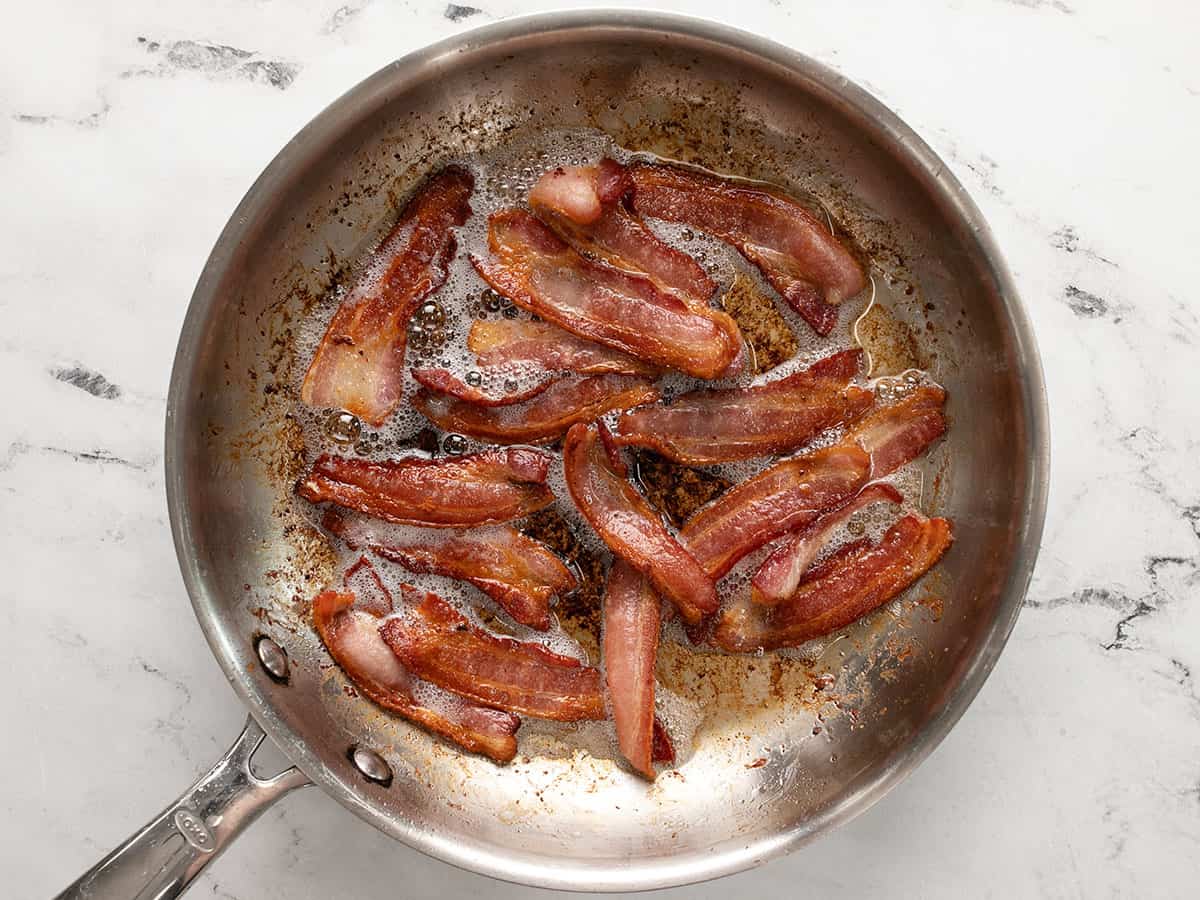
Cook the bacon in a large skillet over medium heat until brown and crispy. Transfer the cooked bacon to a paper towel-lined plate to drain and cool. Once cooled, chop or crumble the bacon into smaller pieces.
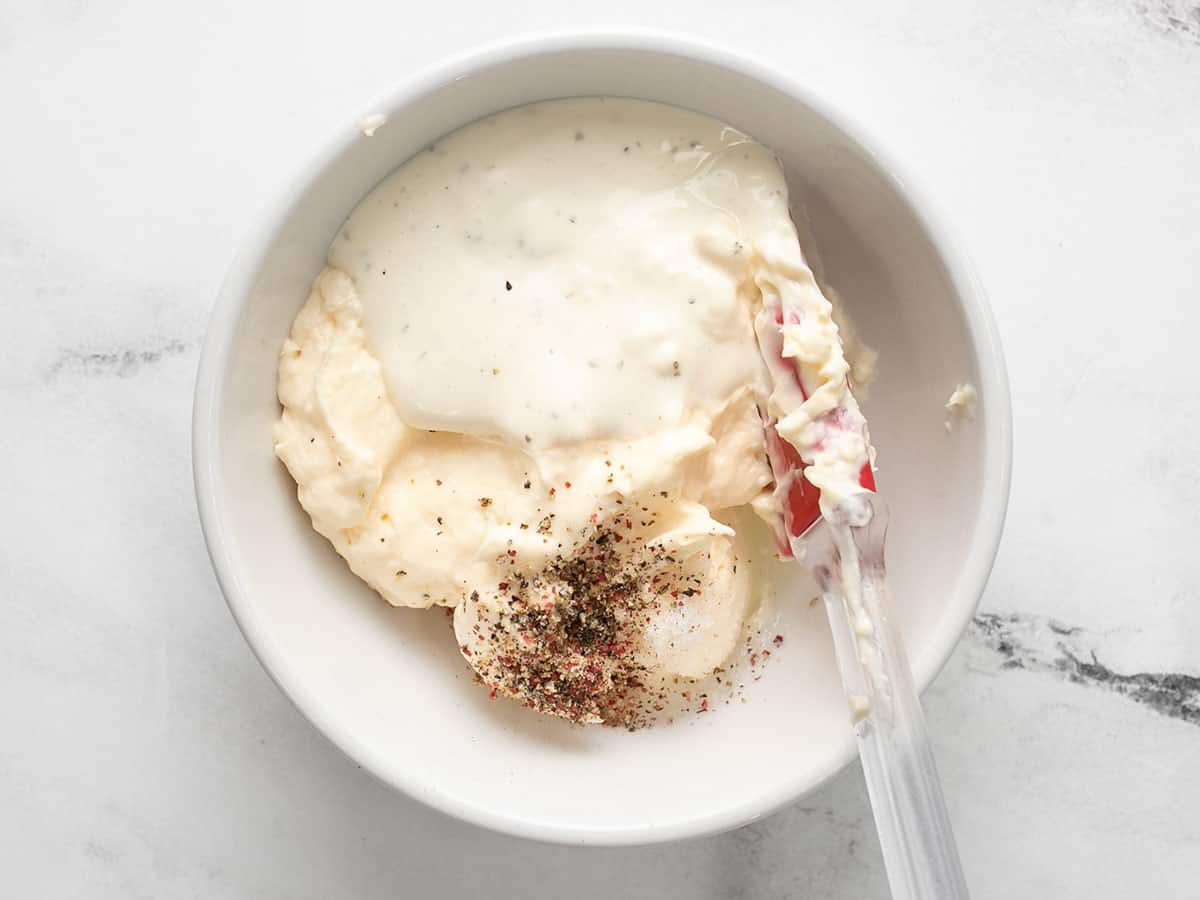
While the bacon is cooking, prepare the dressing. Stir together the mayonnaise, ranch dressing, lemon juice, salt, and pepper. Set the dressing aside.
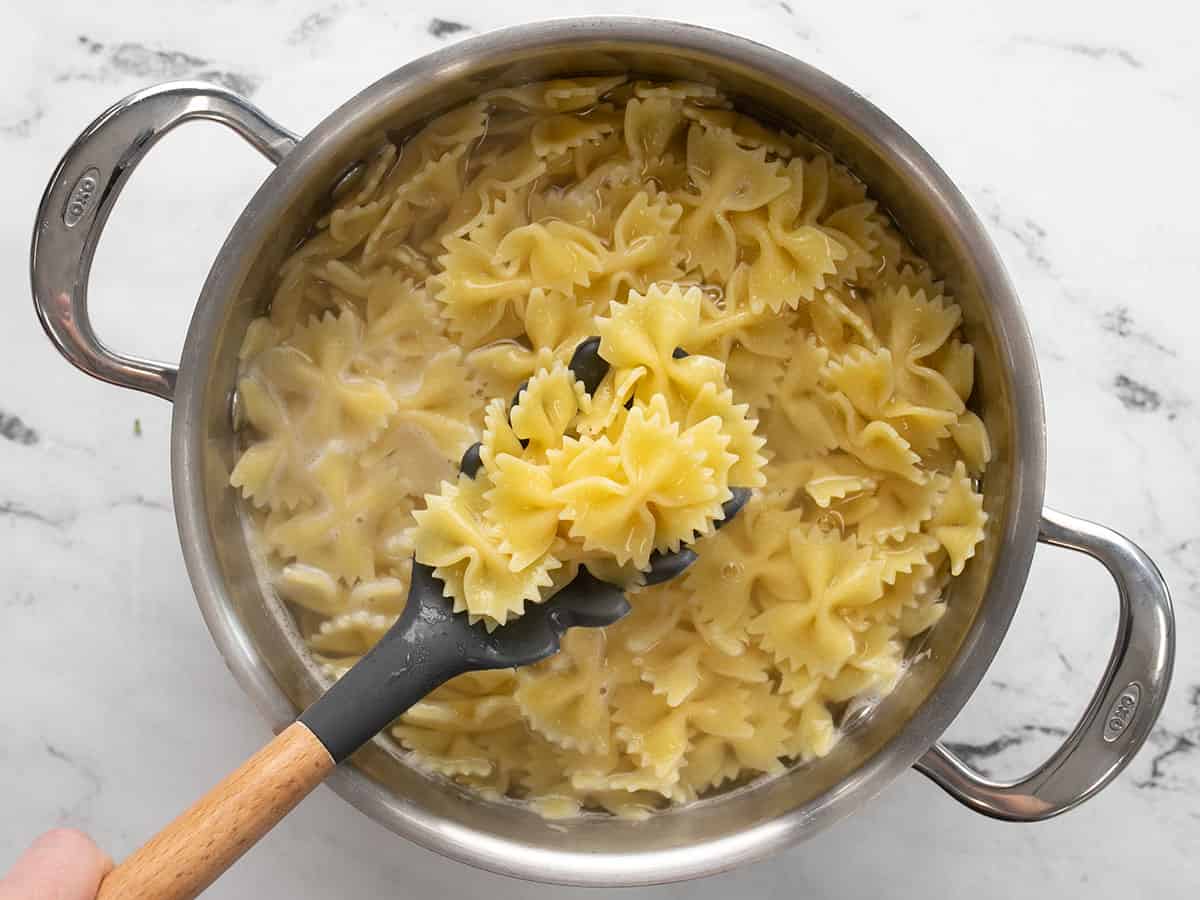
Bring a large pot of salted water to a boil for the pasta. Once boiling, add the pasta and cook until tender (7-8 minutes). Drain the pasta in a colander, rinse it briefly with cool water to cool it down, then let it drain very well.
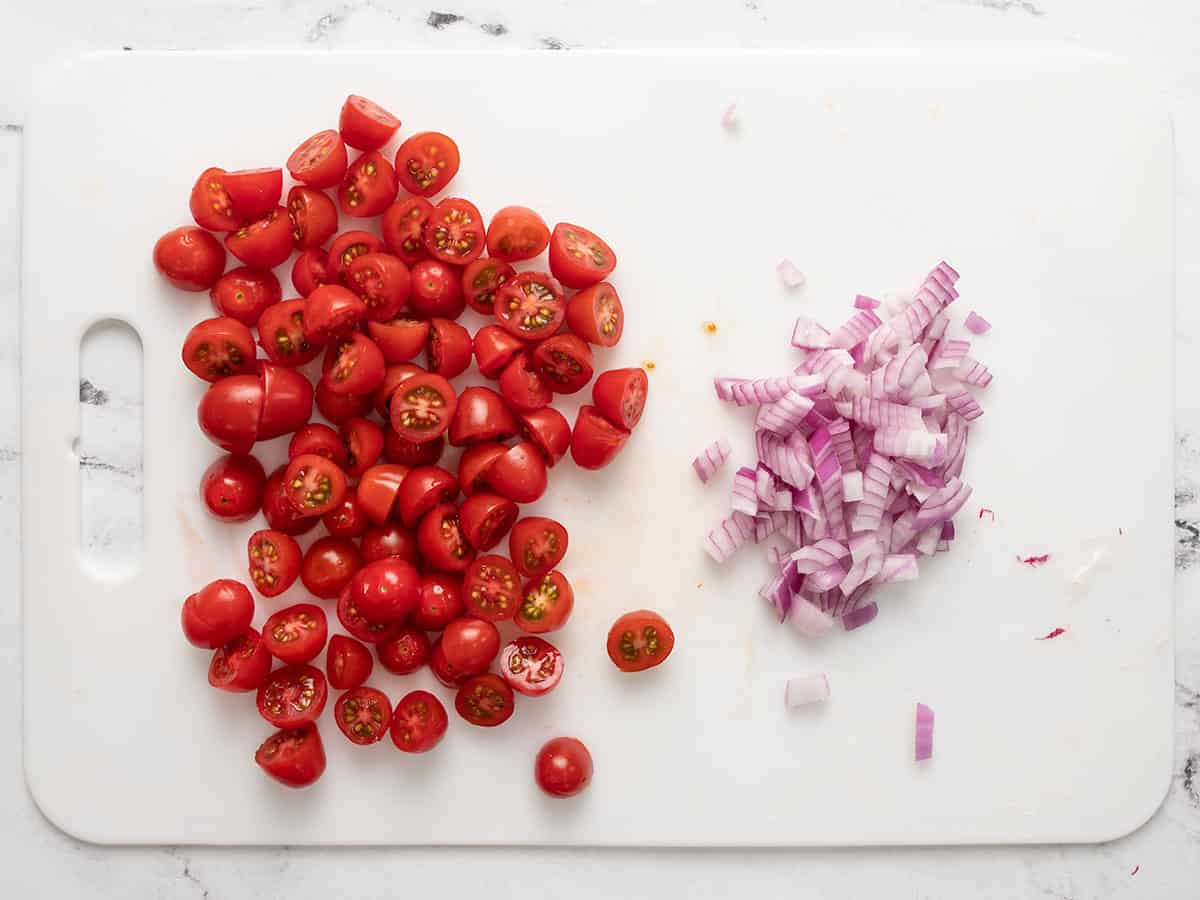
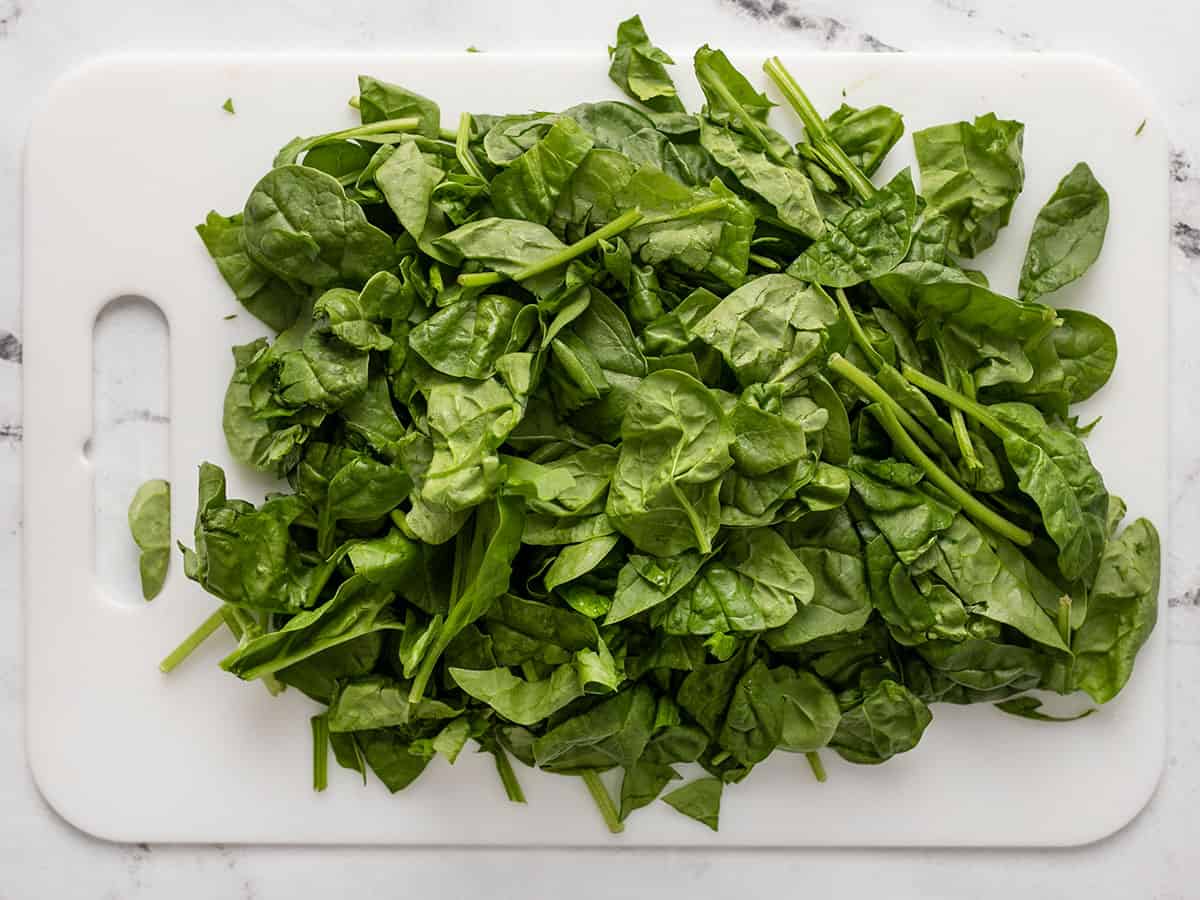
While the pasta is cooking and draining, prepare the vegetables. Slice the grape tomatoes in half, finely dice the red onion, and roughly chop the spinach.
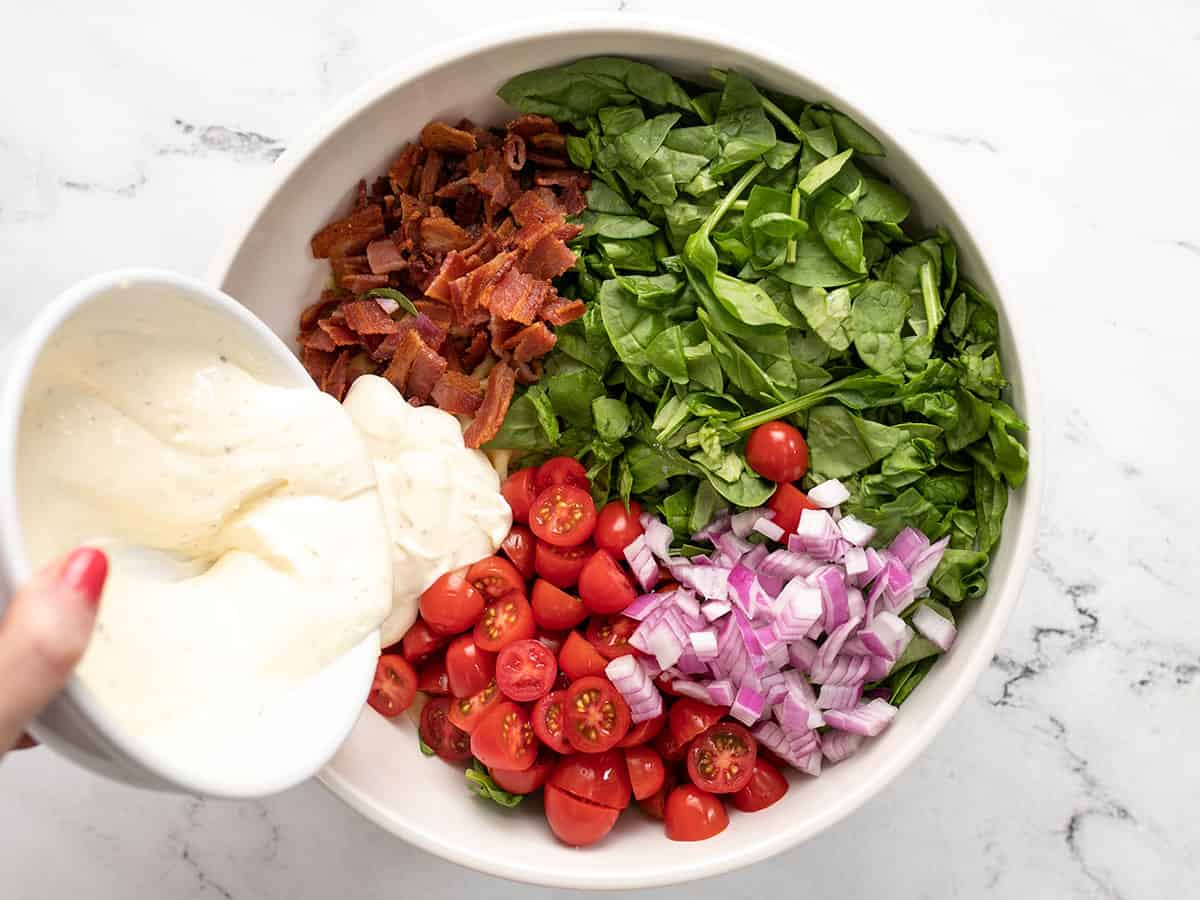
Once the pasta is cooled and drained, add it to a large bowl along with the spinach, tomatoes, onions, and dressing. Stir everything together until evenly combined and coated in dressing. Let the pasta sit for 10-15 minutes for the flavors to blend, then stir once more and serve.
Begin by cooking 8oz. of bacon in a skillet over medium heat until it is brown and crispy. Remove the bacon from the skillet and drain on a paper towel-lined plate. Once cooled, chop or crumble the bacon into smaller pieces.
While the bacon is cooking, make the salad dressing. Combine ¾ cup mayonnaise, ¼ cup ranch dressing, 2 Tbsp lemon juice, ½ tsp salt, and ¼ tsp freshly cracked pepper. Set the dressing aside.
Add a tablespoon of salt to a large pot of water and bring it to a boil over high heat. Once boiling, add 12oz. bowtie pasta and continue to boil until the pasta is tender (7-8 minutes). drain the pasta in a colander. Give it a quick rinse with cool water to cool it off, then let it drain very well.
While the pasta is cooking and draining, slice one pint of grape tomatoes in half and finely dice ¼ of a red onion (about ⅓ cup diced).
Roughly chop 2 packed cups of fresh spinach into bite-sized pieces.
Once the pasta is cooled and well drained, transfer it to a large bowl and add the spinach, tomatoes, onions, and dressing.
Stir until everything is evenly combined and coated in dressing. Let the salad sit for about 10 minutes for the flavors to blend a little more, then give it one more stir before serving.
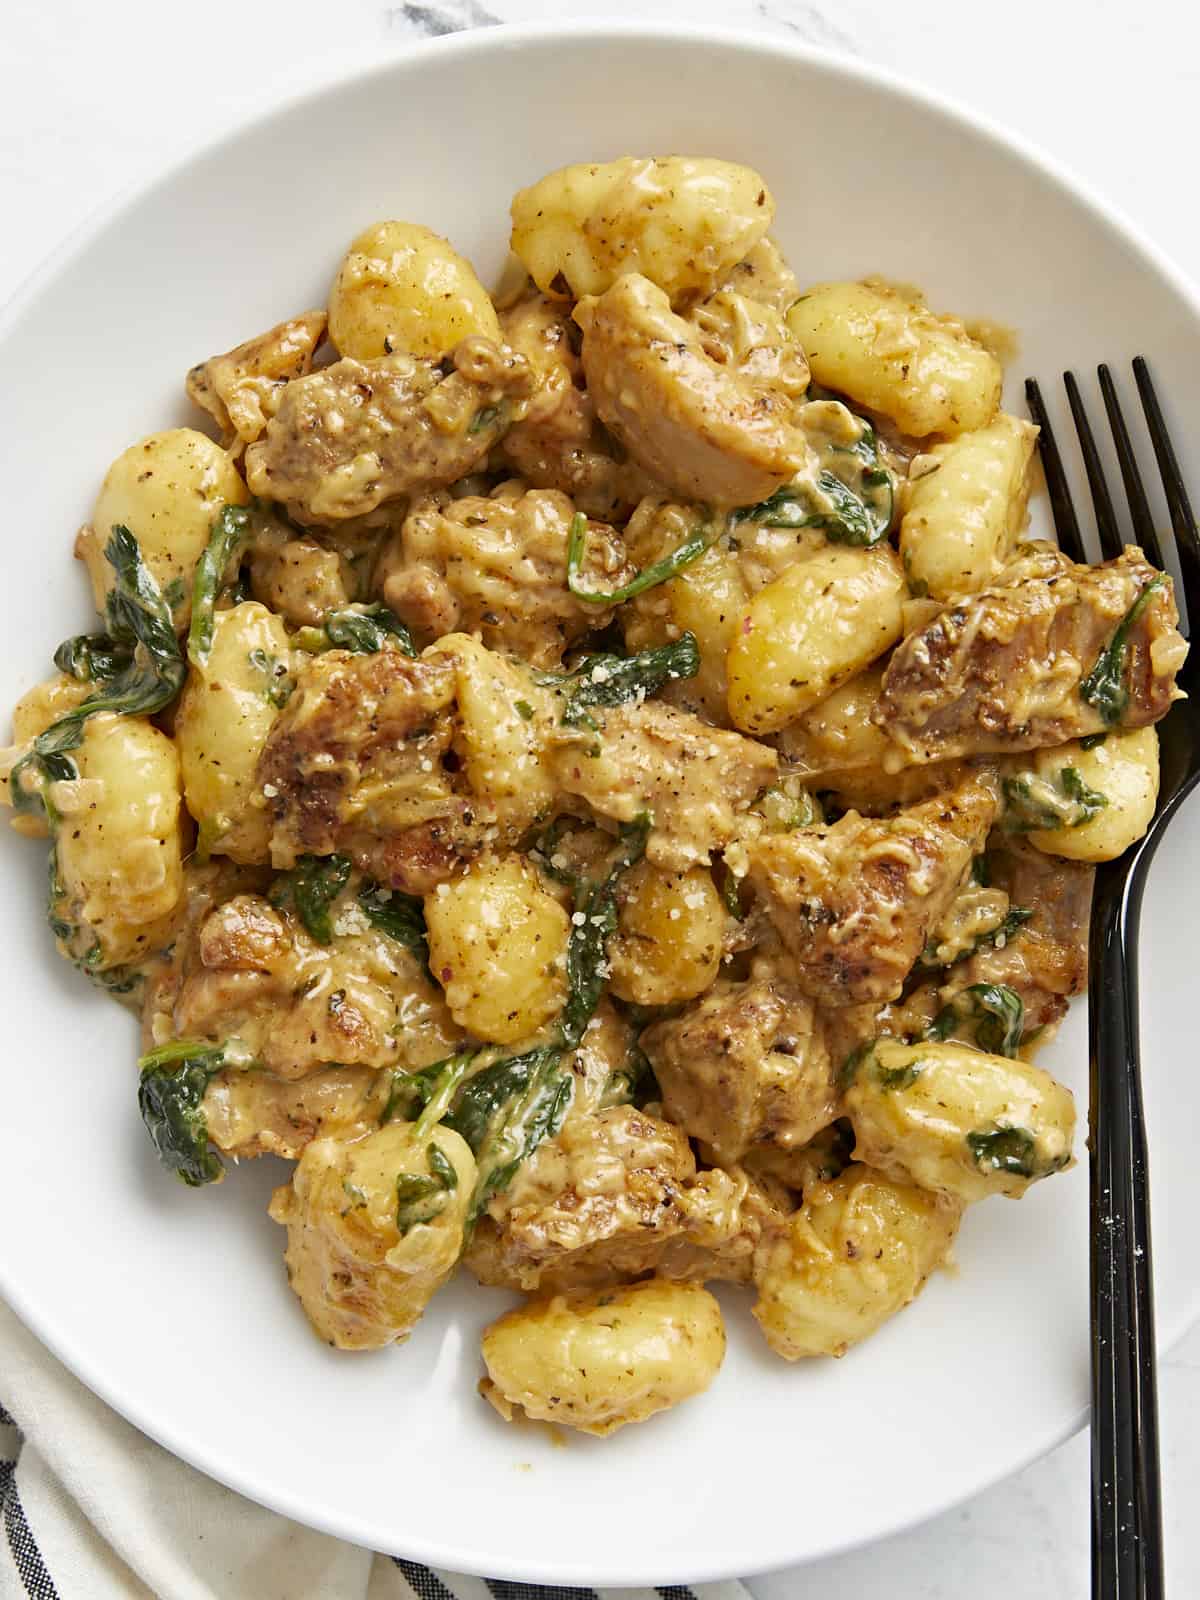
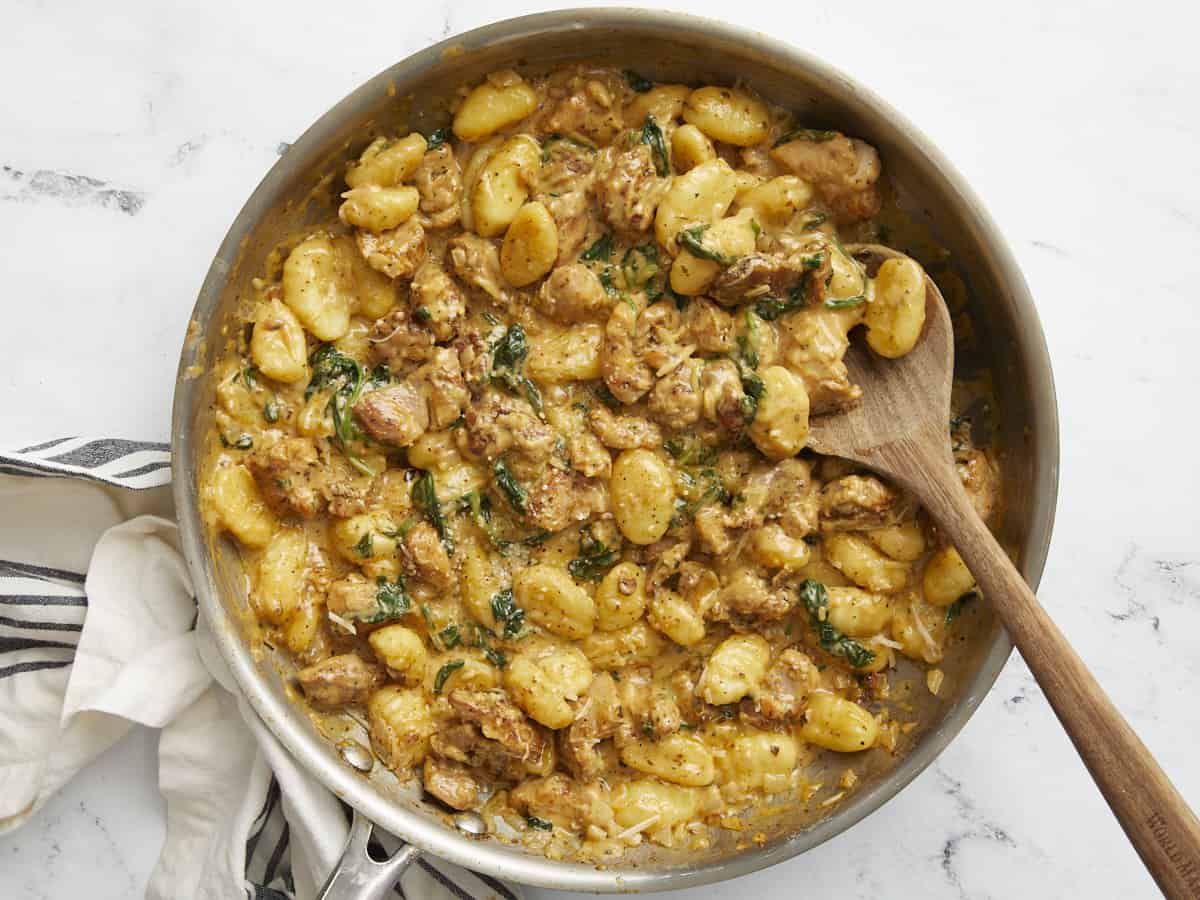
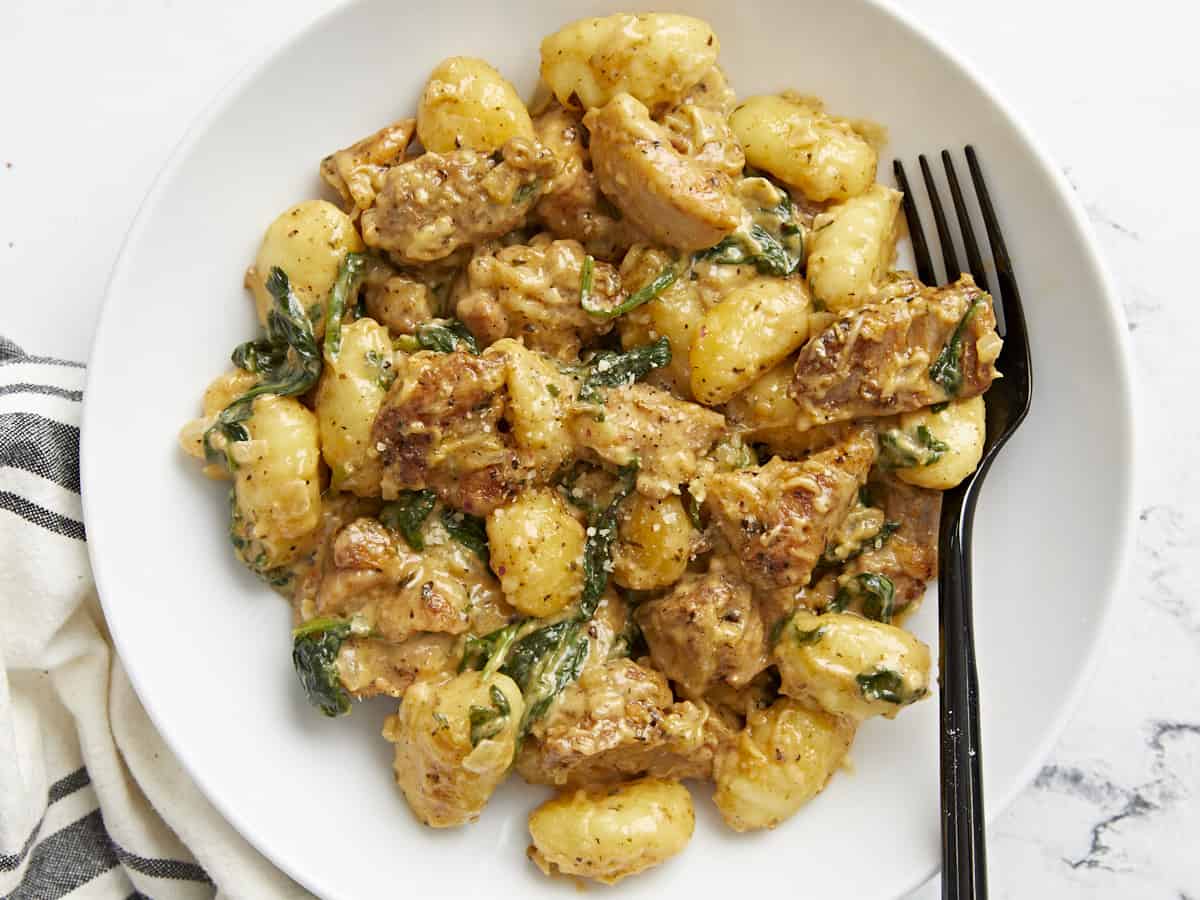
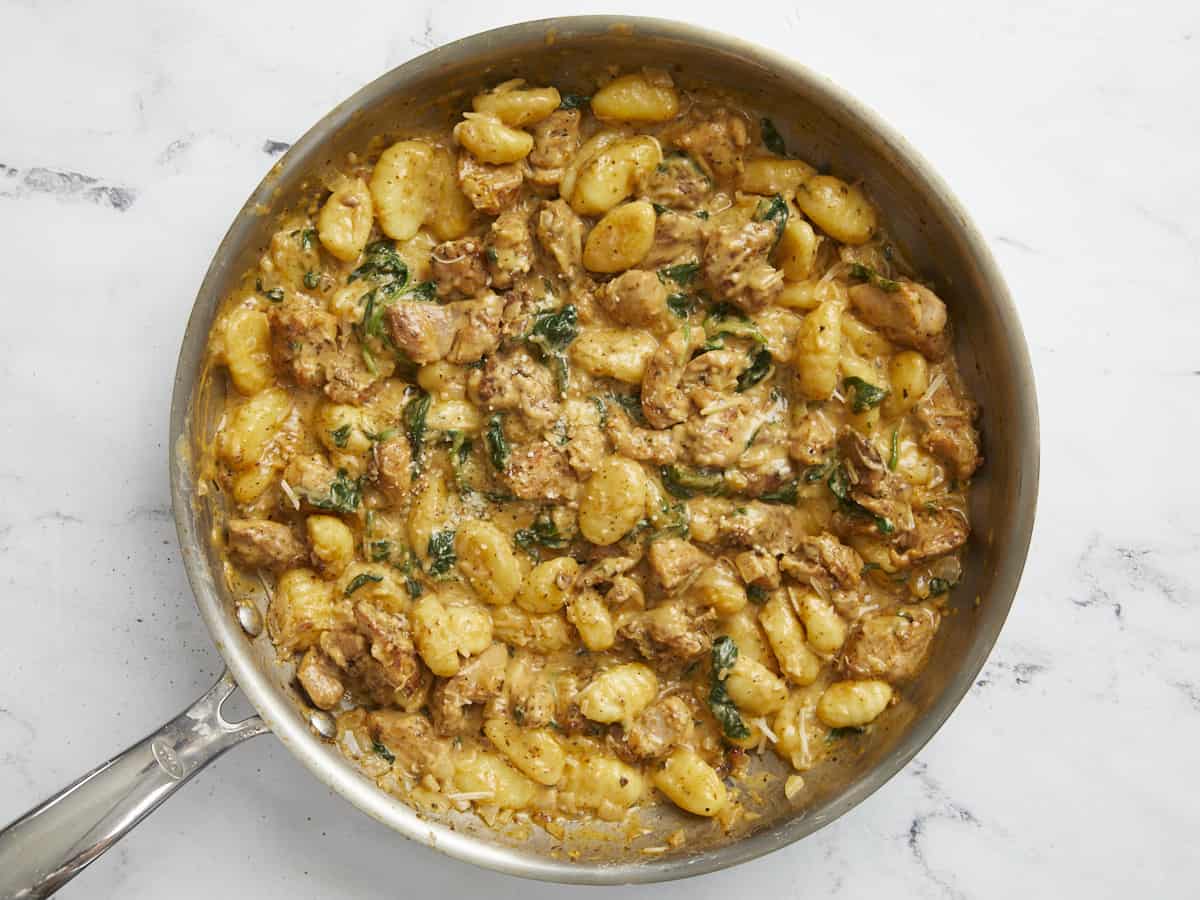
This velvety Creamy Chicken and Gnocchi recipe is one of my favorite one-pot meals because it’s easy, you can make it in under thirty minutes, it’s filling, and it’s big-time delicious. Like I’m-not-going-to-stop-eating-this-until-it’s-all-done delicious. Pillowy gnocchi drenched in a rich buttery cream sauce, with pops of juicy chicken and earthy spinach? Ummm, yeah. You’re going to love this one!
What Is Gnocchi?
Gnocchi are small two-inch dumplings made with mashed potatoes, flour, and eggs. They are served sauteed with butter, tomato, or cream-based sauce. In this dish, we pair gnocchi with diced chicken thighs in a buttery cream sauce. It’s basically an elevated meat and potatoes dish, with spinach thrown in because Beth says we need to cook more veggies.
What You’ll Need
You won’t need loads of time or pots and pans, that’s for sure. Everything in this dreamy, silky dish comes together in one skillet in under thirty minutes! Here’s what you’ll need to make Creamy Chicken And Gnocchi:
Gnocchi – you can find them frozen or fresh, but I prefer the dried ones as they are more economical, plus I have more room in my pantry than I do in my freezer. You’ll find them in the pasta section of your grocery store.
Chicken Thighs– You can also use chicken breast, but be careful not to overcook it, as you want juicy chicken, not dry, chicken-flavored cotton balls. In a pinch, sub the thighs with Italian sausage and skip the seasoning.
Heavy cream and Butter– this is a cream sauce, so it is dairy-heavy. You need the fat found in these ingredients to create the velvety sauce that brings everything together. You can substitute the heavy cream with full-fat coconut cream and the butter with vegan butter
Parmesan– does double duty, adding savory saltiness to the sauce while also thickening it. Asioago or feta make great substitutions. If you can’t do dairy, use a couple of tablespoons of nutritional yeast, but keep in mind that your sauce will be much looser.
Vegetable broth– is used to hydrate the dried gnocchi and helps create the base of our cream sauce. Substitute it with chicken broth or in a pinch, with a cup of water with a tablespoon of tomato sauce mixed in.
Onion and Garlic– these aromatics are fried in the chicken thigh fat and help flavor the gnocchi. You can substitute the onion with one tablespoon of onion powder and the garlic with 1/4 teaspoon of garlic powder.
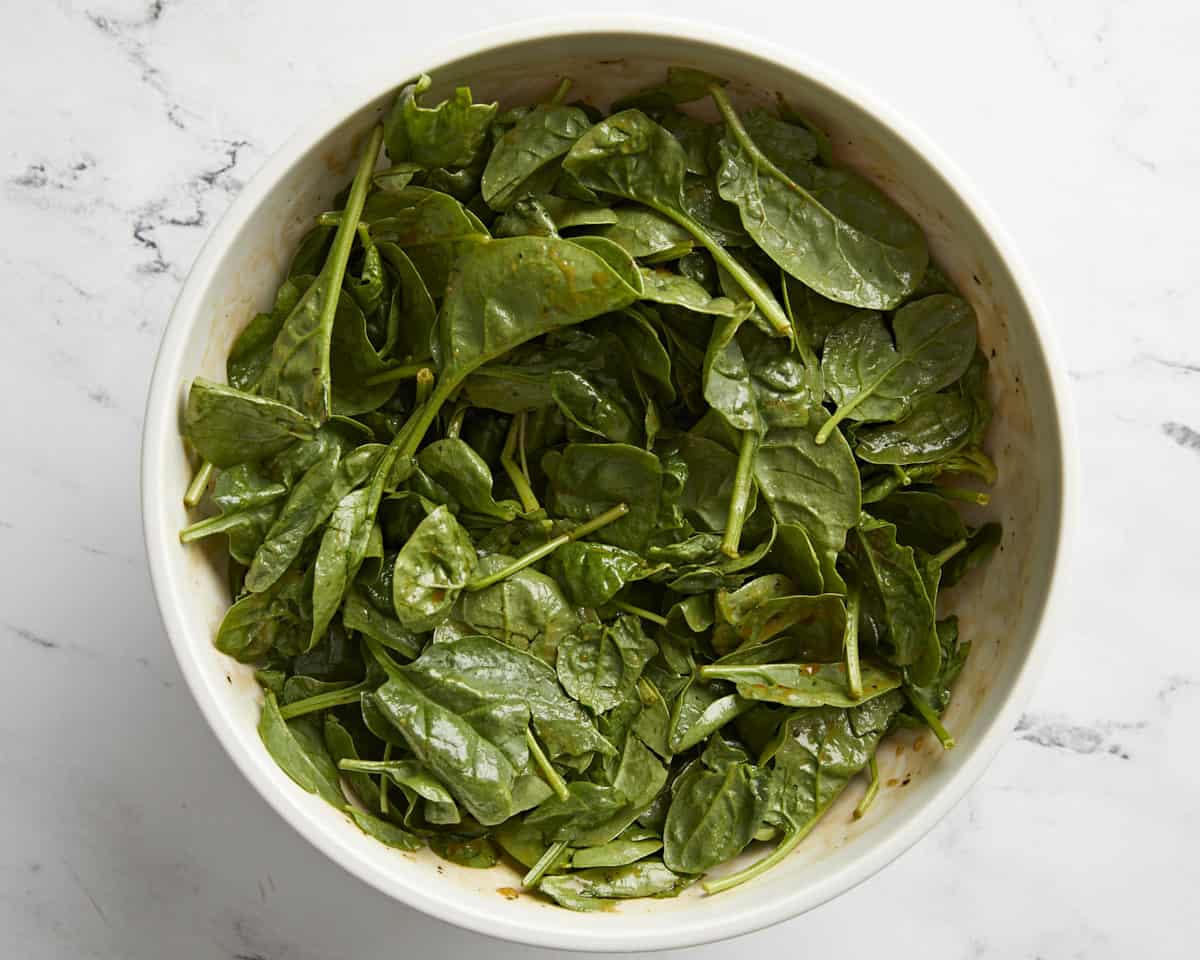
Spinach- brings earthiness and a beautiful color to the dish. You can substitute spinach with kale, though it will take a little longer to soften.
Italian seasoning – creates an easy flavor base. If you don’t have Italian seasoning, substitute it with one teaspoon of dried oregano, one teaspoon of dried thyme, and one teaspoon of dried rosemary.
Smoked paprika – using this spice is optional, but I use it to add a dank, smoky note that helps round out the sharpness of the Italian seasoning. It also lends a golden hue to the sauce.
What To Serve With Creamy Chicken and Gnocchi
This dish is heavy, so pair it with a Simple Side Salad or Panzanella. You can also lean into the heaviness and make Garlic Bread to sop up all the creamy sauce. (It is AMAZING with garlic bread. And garlic counts as a vegetable!)
Storing and Reheating
Because you make this dish with a cream-based sauce, I don’t recommend freezing it, as the cream gets grainy when it thaws. Keep leftovers in an airtight container in the refrigerator for up to 3 days. Reheat in a microwave until steaming.
This delicious dish is full of pillowy gnocchi drenched in a rich buttery cream sauce, with pops of juicy chicken and earthy spinach. Plus it's so easy, you can make it in under thirty minutes!
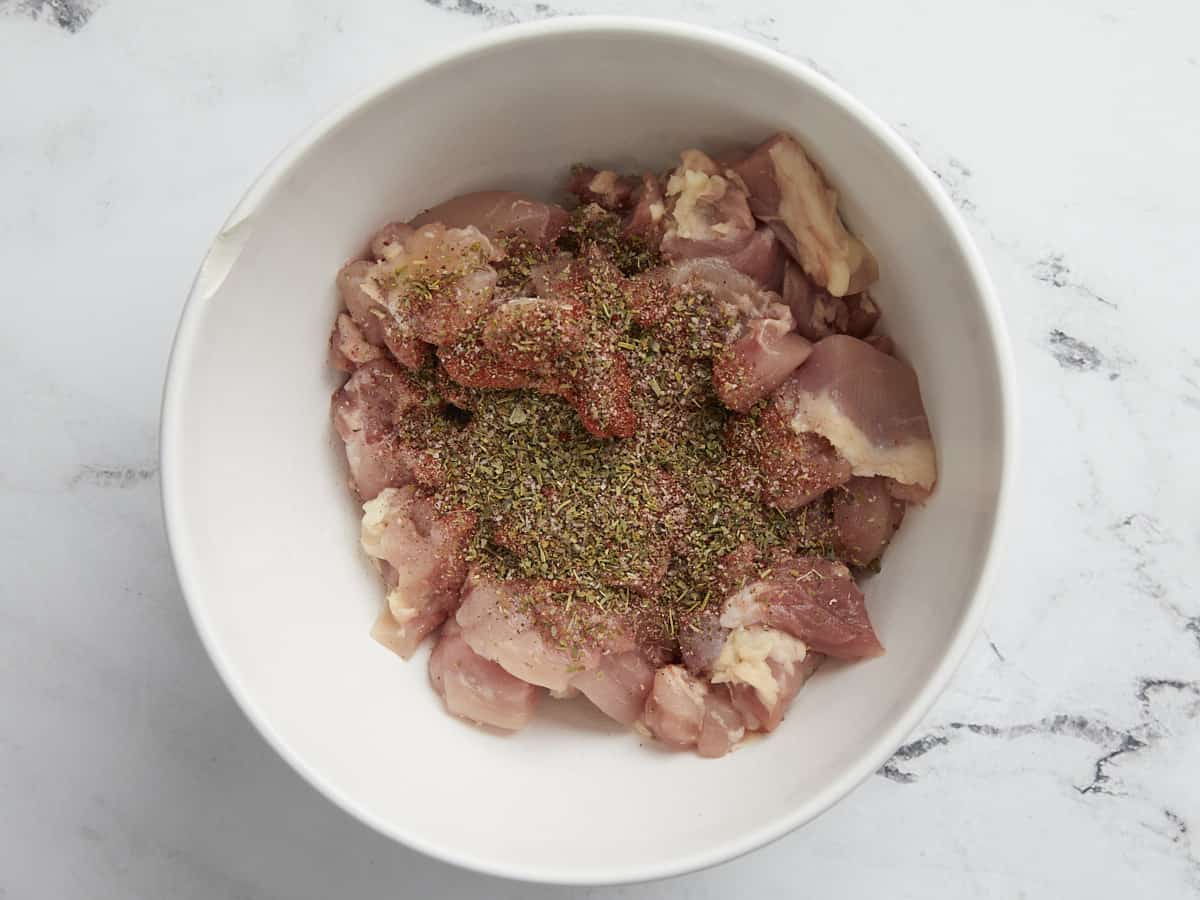
Dice the chicken thighs into 2-inch pieces. Add the chicken to a bowl and top it with Italian seasoning, smoked paprika, salt, and pepper. Mix until combined.
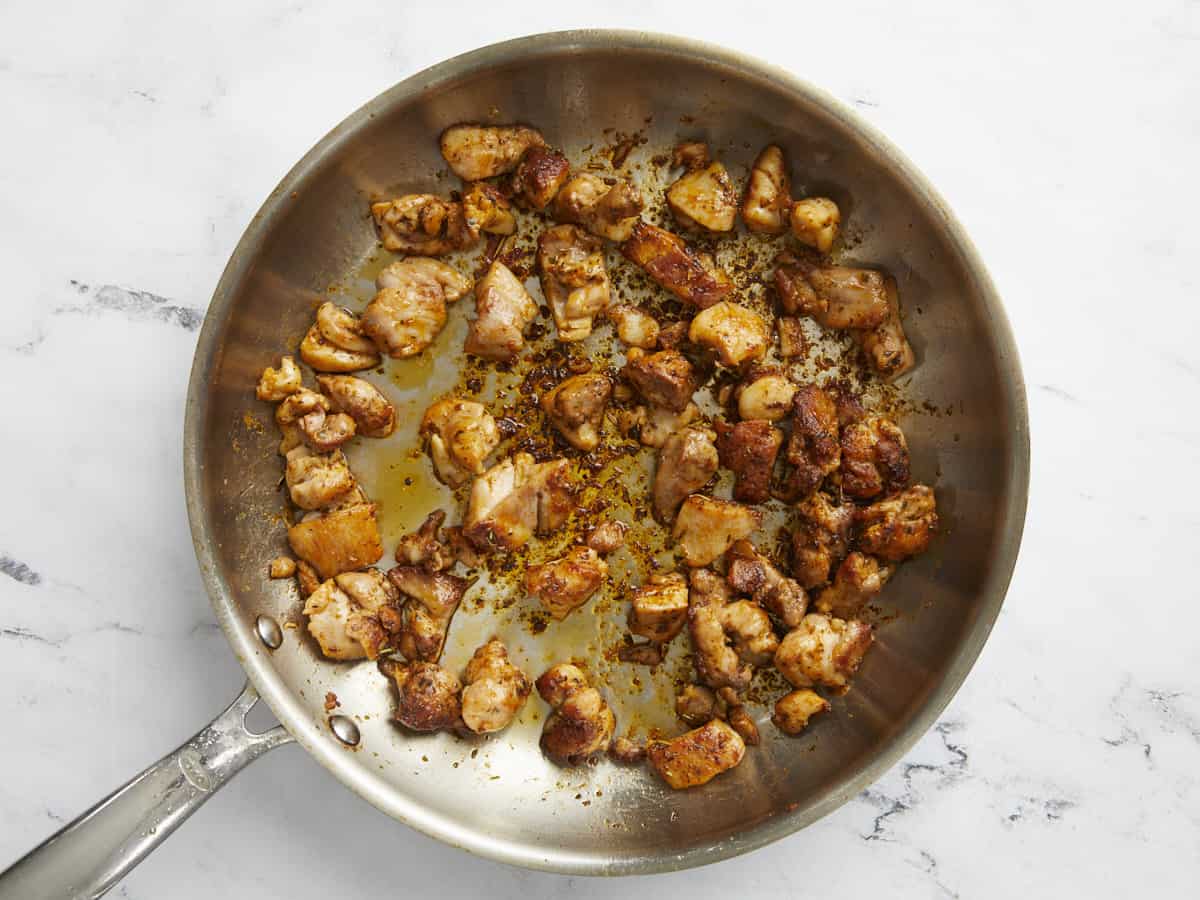
Place a large, deep skillet over medium heat and add the cooking oil. Once it's shimmering, add the chicken and cook undisturbed until well browned, about 3 minutes. Stir and brown on the other side, about 3 more minutes. Remove the chicken from the pan when it's cooked through and leave the fat in the pan.
Add the onion and garlic to the skillet. Saute until the onions have softened and the garlic is fragrant, about 2 minutes
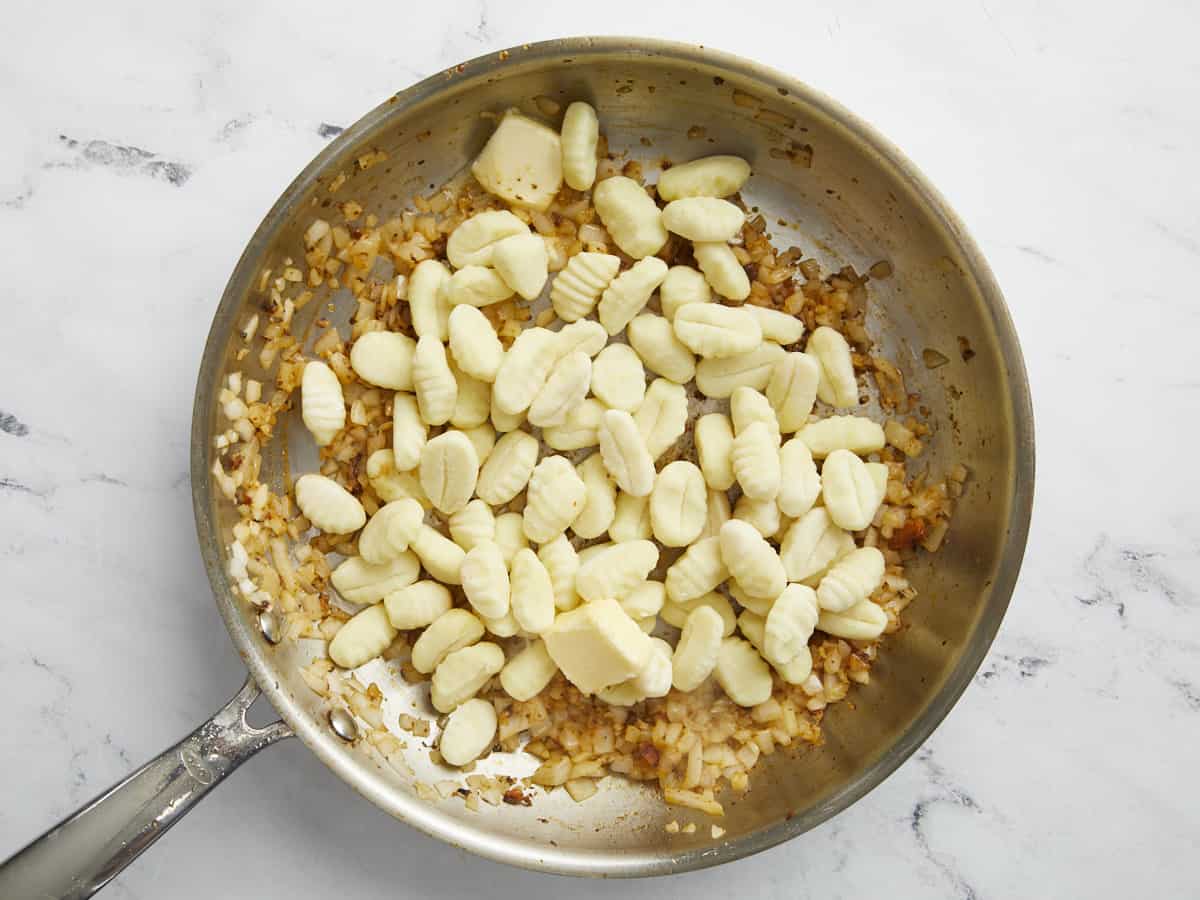
Add the gnocchi and butter to the skillet and brown for 2 minutes.
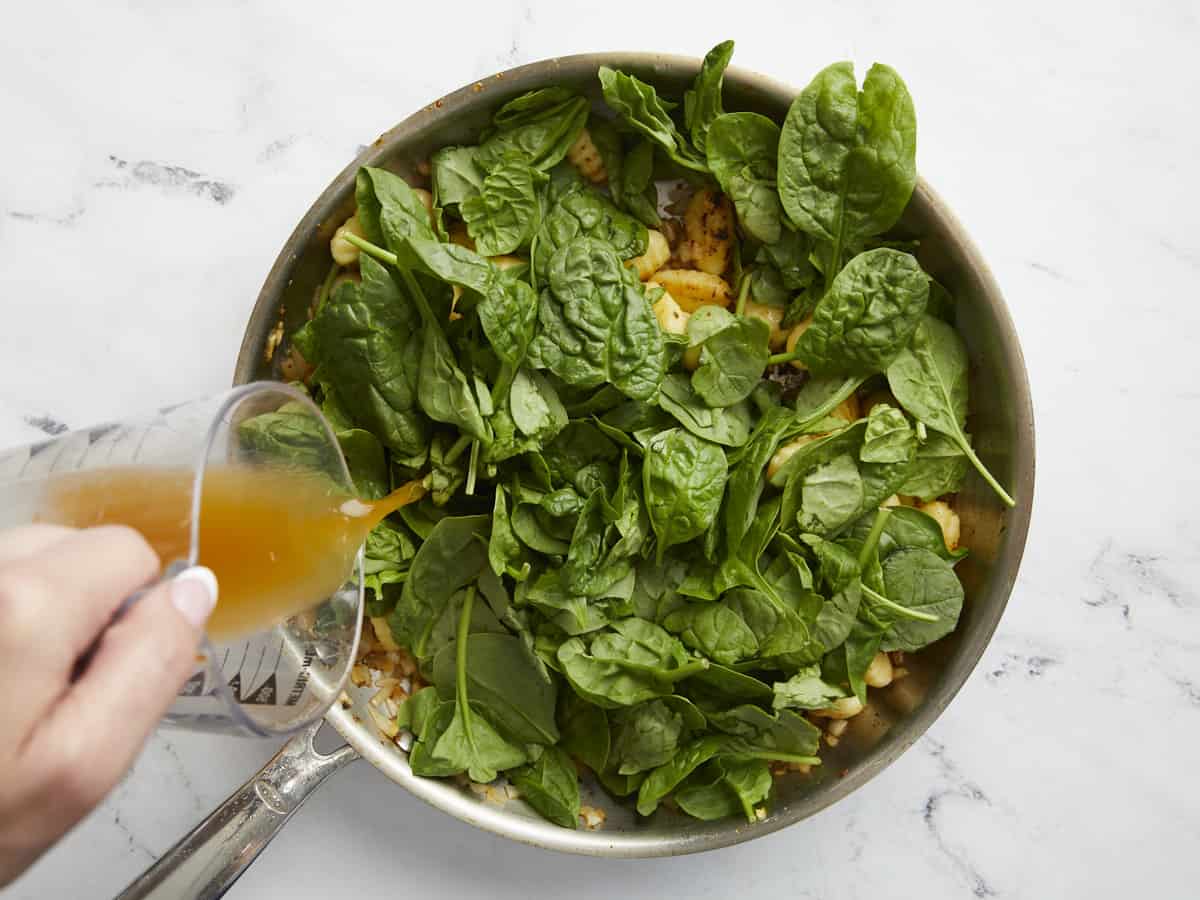
Add the spinach and the broth to the skillet. Cover the pan. Cook for 1 to 2 minutes until the spinach has wilted and the gnocchi has hydrated.
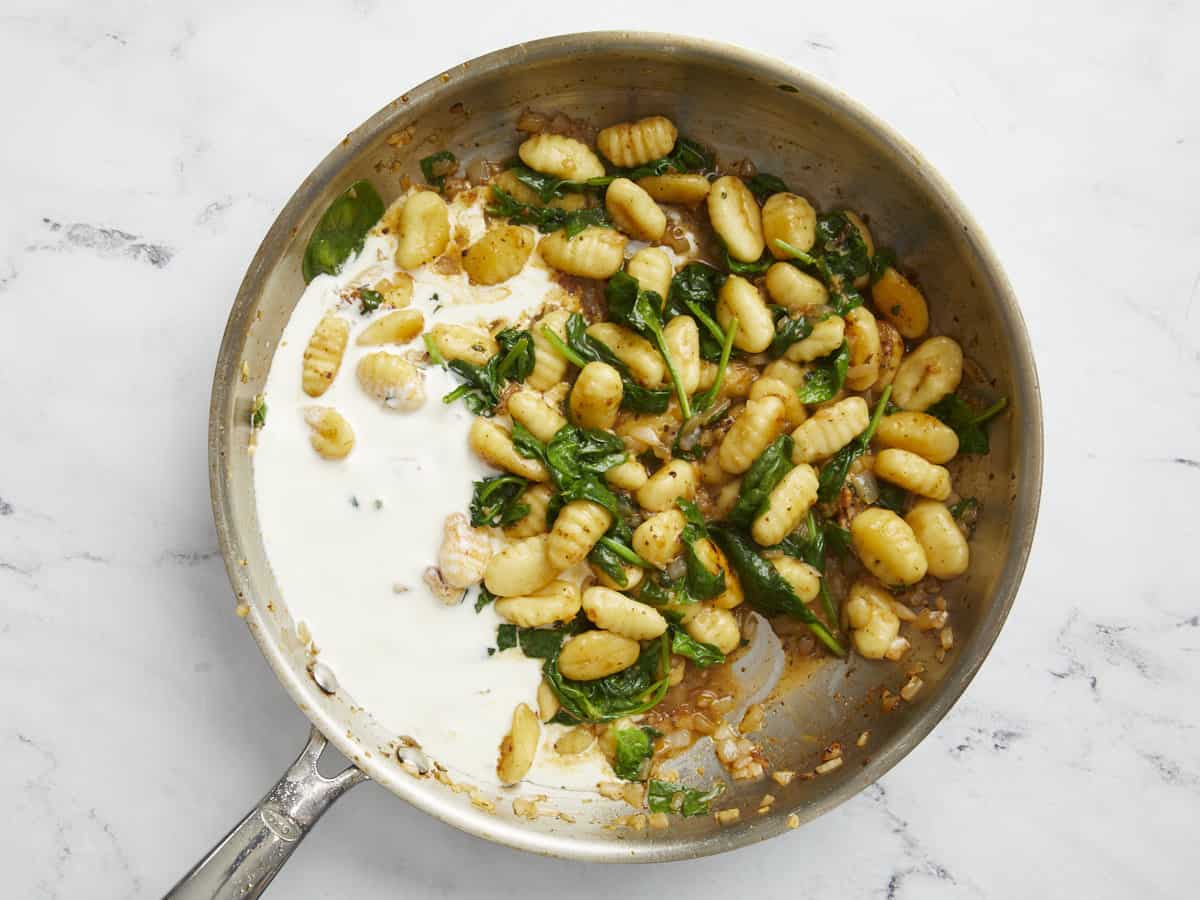
Add the heavy cream and salted butter to the skillet. Stir until the butter has melted and the cream is steaming hot but not boiling.
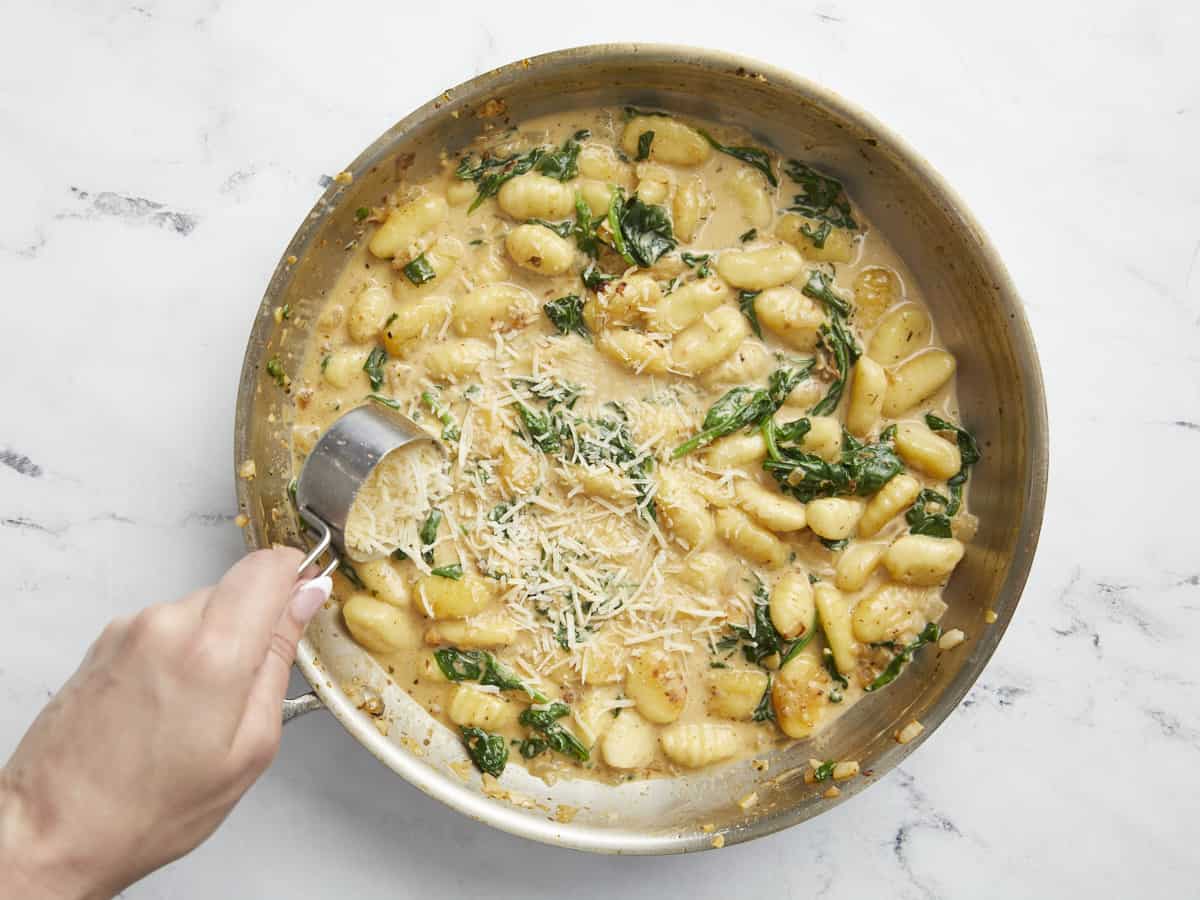
Take the skillet off the heat. Add the parmesan to the pan and stir until it melts, creating a velvety sauce.
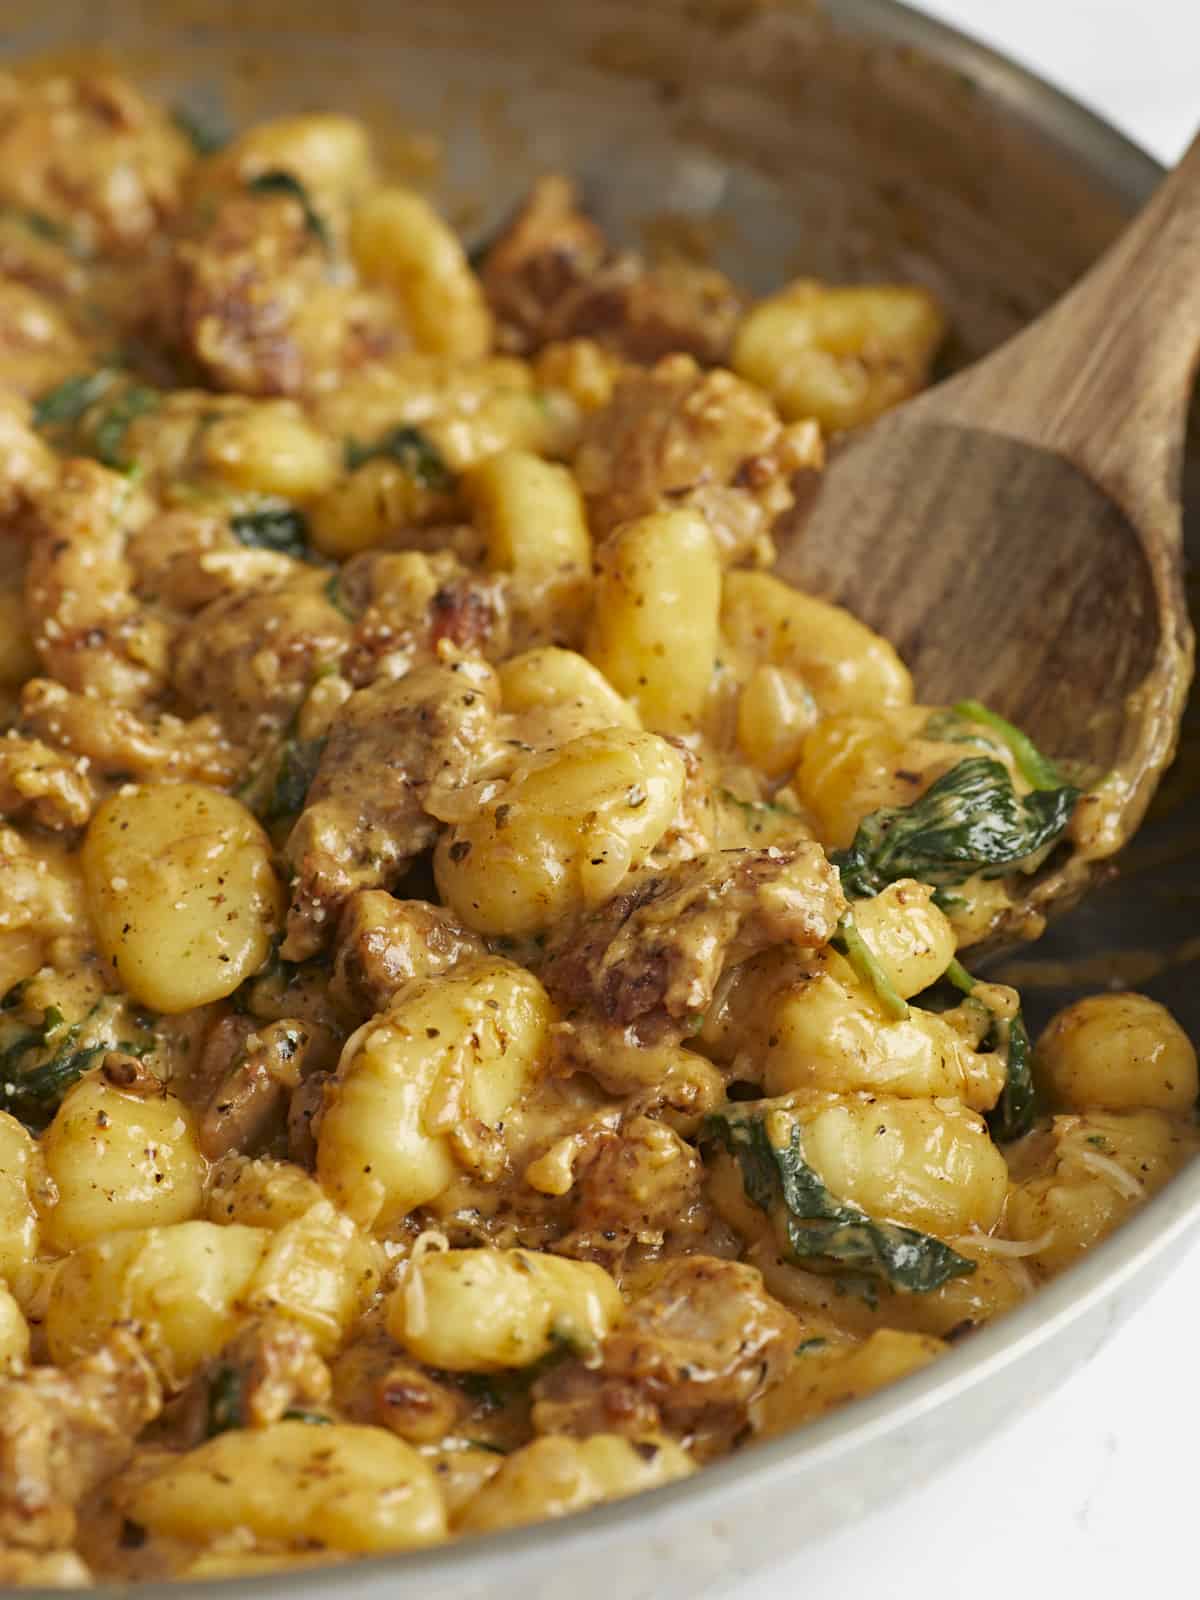
Finally, return the cooked diced chicken to the skillet. Mix gently into the gnocchi and cream sauce. If desired, garnish with parsley.
How to Make Creamy Chicken And Gnocchi – Step by Step Photos
Dice 1.25 pounds of chicken thighs (about 4 to 5 thighs) in 2-inch pieces. Add the chicken to a bowl and top it with 1 tablespoon of Italian seasoning, 1/2 teaspoon of smoked paprika, 1/2 teaspoon of salt, and 1/4 teaspoon of pepper. Mix until combined.
Set a large deep skillet over medium heat and add 2 tablespoons of cooking oil. When the oil is shimmering, add the chicken and cook undisturbed until well browned, about 3 minutes. Stir and brown on the other side, about 3 minutes more. Remove the chicken from the pan when it’s cooked through and has reached an internal temperature of 160°F. Leave the rendered fat in the pan.
Add 1 diced onion and 2 cloves of minced garlic to the skillet. Saute until the onions have softened and the garlic is fragrant, about 2 minutes.
Add 1 pound of dry potato gnocchi and 2 tablespoons of salted butter to the skillet. Brown the gnocchi for 2 minutes.
Add 2 cups of spinach and 1 cup of vegetable broth to the skillet. Cover the pan. Cook for 1 to 2 minutes until the spinach has wilted and the gnocchi has hydrated.
Add 1/2 cup of heavy cream and 2 tablespoons of salted butter to the skillet. Stir until the butter has melted and the cream is steaming hot, but not boiling. You’re about to add cheese to the sauce, and cheese curdles at high temperatures, so make sure it isn’t boiling.
Take the pan off the heat. Add 1/4 cup of parmesan to the pan and stir until it melts, creating a velvety sauce.
Finally, return the cooked diced chicken to the skillet. Mix gently into the gnocchi and cream sauce. If desired, garnish with parsley. Serve this dish piping hot, then sit back and enjoy what took you less than a half hour to make!
Curry that’s faster to make than it is to get it delivered? We’re in. We’ve done green, red, yellow, and Massaman curries, but we were missing another Thai classic: panang curry! Never had it? It’s like red curry’s richer, milder, peanutty cousin, and …
Curry that’s faster to make than it is to get it delivered? We’re in. We’ve done green, red, yellow, and Massaman curries, but we were missing another Thai classic: panang curry! Never had it? It’s like red curry’s richer, milder, peanutty cousin, and it’s SO good!
This is our inspired, veggie-packed version made with easier-to-find ingredients and your choice of chicken or tofu for protein. It’s SO rich and comforting, you won’t believe it only takes 30 minutes.


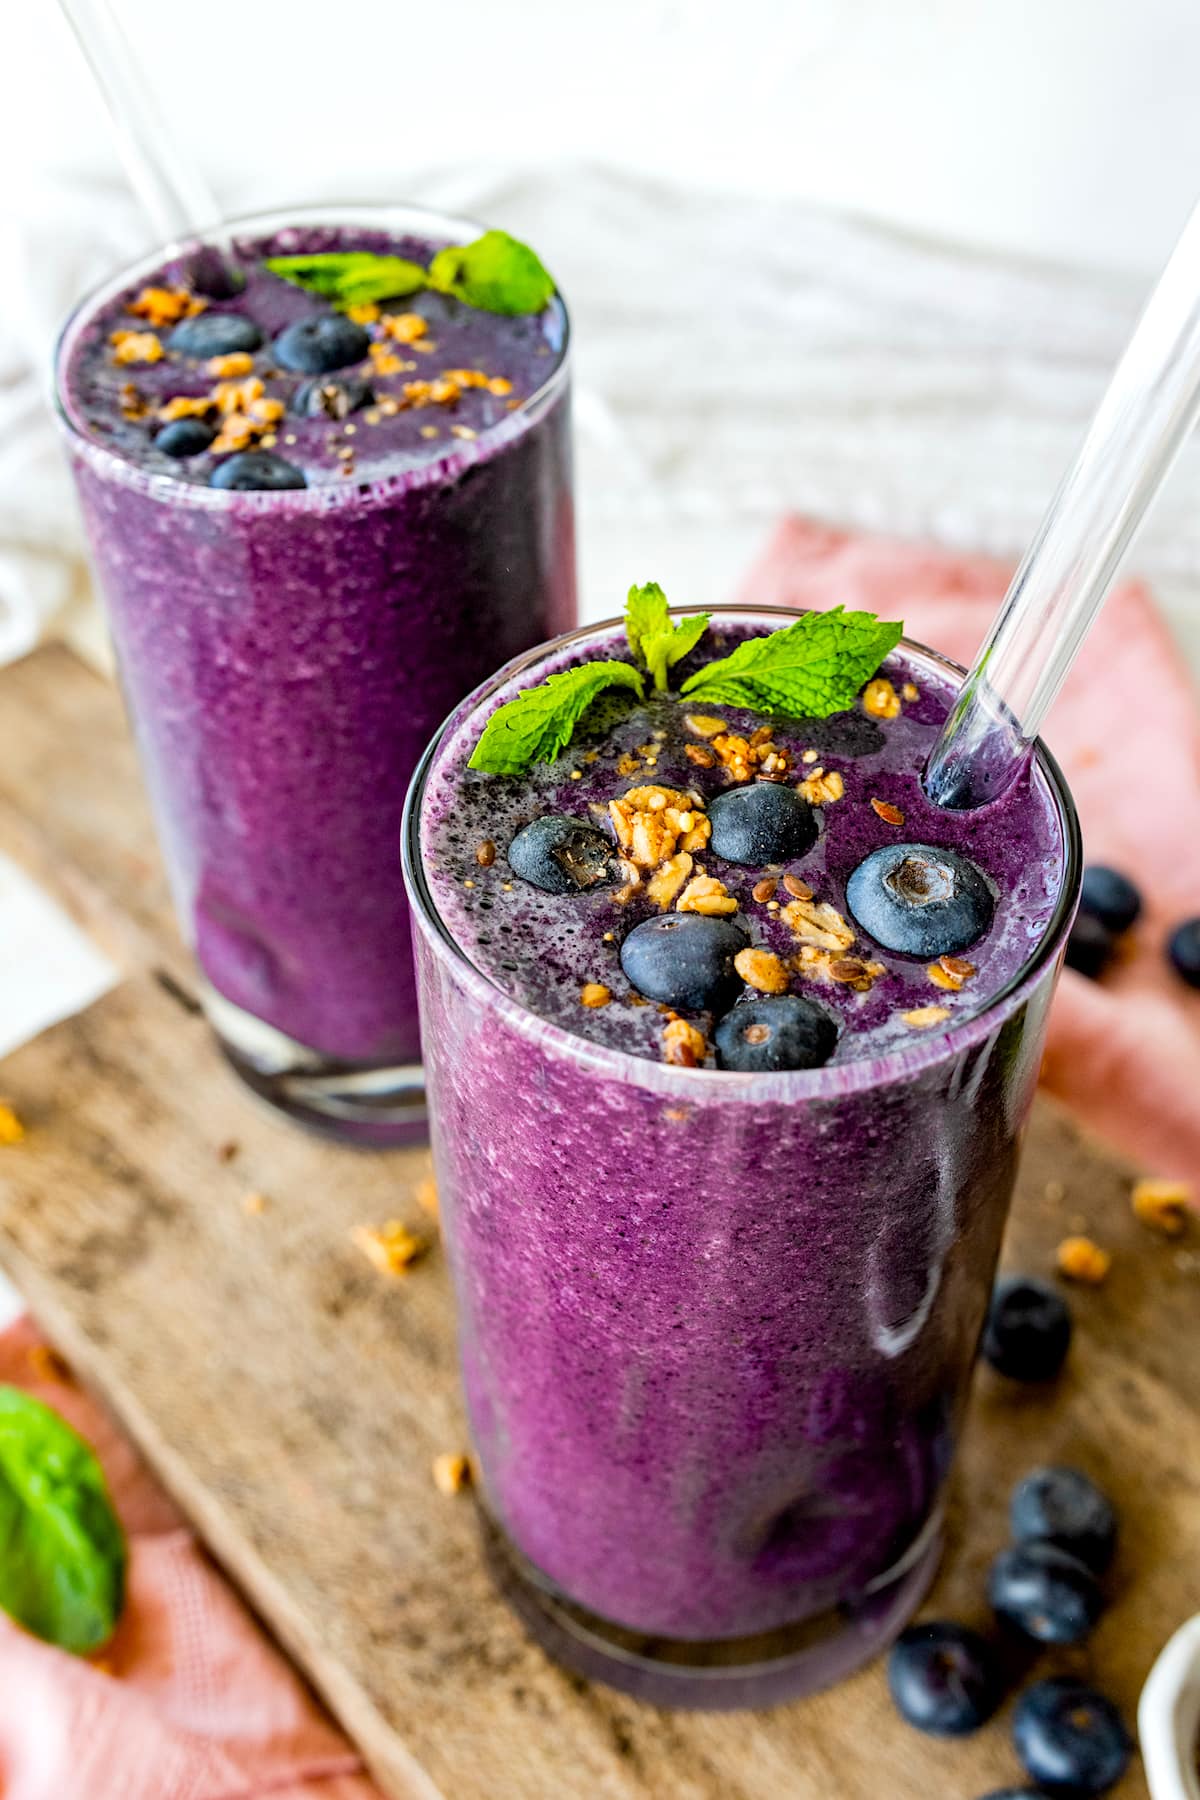 I love starting my day with a refreshing smoothie that is packed with good for you ingredients. A few of my favorites include my strawberry banana smoothie, peanut butter banana smoothie, and detox smoothie. I also LOVE this easy Blueberry Smoothie recipe. We always have blueberries in the freezer so we make this one often.…