I love making pumpkin recipes during the fall months. I usually go sweet instead of savory because I have so many favorites like pumpkin chocolate chip bread, pumpkin cookies, and pumpkin bundt cake. But I also love using pumpkin in savory dishes. This…
I love making pumpkin recipes during the fall months. I usually go sweet instead of savory because I have so many favorites like pumpkin chocolate chip bread, pumpkin cookies, and pumpkin bundt cake. But I also love using pumpkin in savory dishes. This Pumpkin Pasta recipe is a fall favorite and easy to make. The…
If our creamy vegan carrot soup and Thai-inspired butternut squash soup had a baby, this carrot ginger soup would be her! And she’s got both her parents’ best features. Creamy and luxurious, a little spicy and gingery, and not too complicated. Oh, and …
If our creamy vegan carrot soup and Thai-inspired butternut squash soup had a baby, this carrot ginger soup would be her! And she’s got both her parents’ best features. Creamy and luxurious, a little spicy and gingery, and not too complicated. Oh, and her sweet and spicy seedy topping? Highly recommended!
Just 1 pot and 8 simple ingredients required for this vibrant, warming chilly weather staple. Let us show you how it’s done!
Roasted tomato soup is the perfect transition recipe to usher us from summer into the fall season. This simple soup gives me just enough cozy vibes to get me excited for fall without being too heavy for these last few warm days of summer. Plus, it’s the perfect way to use up those last few juicy tomatoes of summer, whether you score them from your local farmer’s market or your backyard. Don’t let any of those gorgeous ‘maters go to waste!
What’s in Roasted Tomato Soup
I love this Roasted Tomato Soup because it’s incredibly simple, yet totally elegant. It’s the type of recipe that really makes you feel pampered even though it doesn’t take a lot of work. You’ll need these ingredients to make tomato soup:
Fresh tomatoes: The fresher the better when it comes to this homemade tomato soup! If you can score some home-grown or locally-grown tomatoes, that will give you the best flavor.
Onion: The natural sugars in the onion caramelize while roasting, giving this soup a natural sweetness to balance the acidity of the tomatoes, as well as a nice savory base note.
Garlic: Garlic gives the soup depth and I just can’t do tomato without it’s best friend, garlic. ;)
Olive oil: Olive oil helps the vegetables caramelize without drying out and it adds some body to the soup, so it doesn’t feel quite so thin on the palate.
Vegetable broth: Adds both volume and flavor to the soup. You can substitute chicken broth if preferred.
Basil: The seasoning is simple in this soup so that the natural flavors of the tomatoes really shine. Just a little basil does the trick!
Salt and pepper: It’s all about balance! Salt helps flavors pop and pepper adds just a little sparkle of flavor.
The Best Tomatoes for Tomato Soup
Tomatoes are the main ingredient in this easy soup, so picking the best tomatoes is key to making the soup really great. Here are some tips for choosing the best tomato for the job:
Fresh, vine-ripened tomatoes will give the best flavor and color to the soup. If you grow your own tomatoes or have a neighbor with a green thumb, take advantage! Or, try to source from a farmer’s market, when possible.
If tomatoes are not in season and you have to source from the grocery store, smaller varieties, like grape, cherry, plum, or Roma tomatoes will provide the best flavor. Roma tomatoes tend to be the most budget-friendly, but can sometimes be the least fresh, so make sure to check for freshness.
Avoid tomatoes that are large, pale, or grown in a hothouse. While these tomatoes may be great for slicing or dicing, they won’t provide much flavor to the soup.
What Else Can I Add?
The recipe below is elegantly simple, but you can jazz it up if you have some of the following ingredients on hand:
Fresh basil – blend into the soup when puréeing the vegetables, or top each bowl with fresh leaves
Parmesan – either use to top each bowl of soup or simmer a Parmesan rind in the soup
Cream – Swirl in a ½ cup to the pot for a deliciously creamy finish
Red bell pepper – roast with the tomato, onion, and garlic for a sweeter soup
Flavored olive oil – drizzle a little extra over each bowl just before serving for more depth of flavor
Pesto – add a shot of herbs, Parmesan, and flavorful oil all in one spoonful!
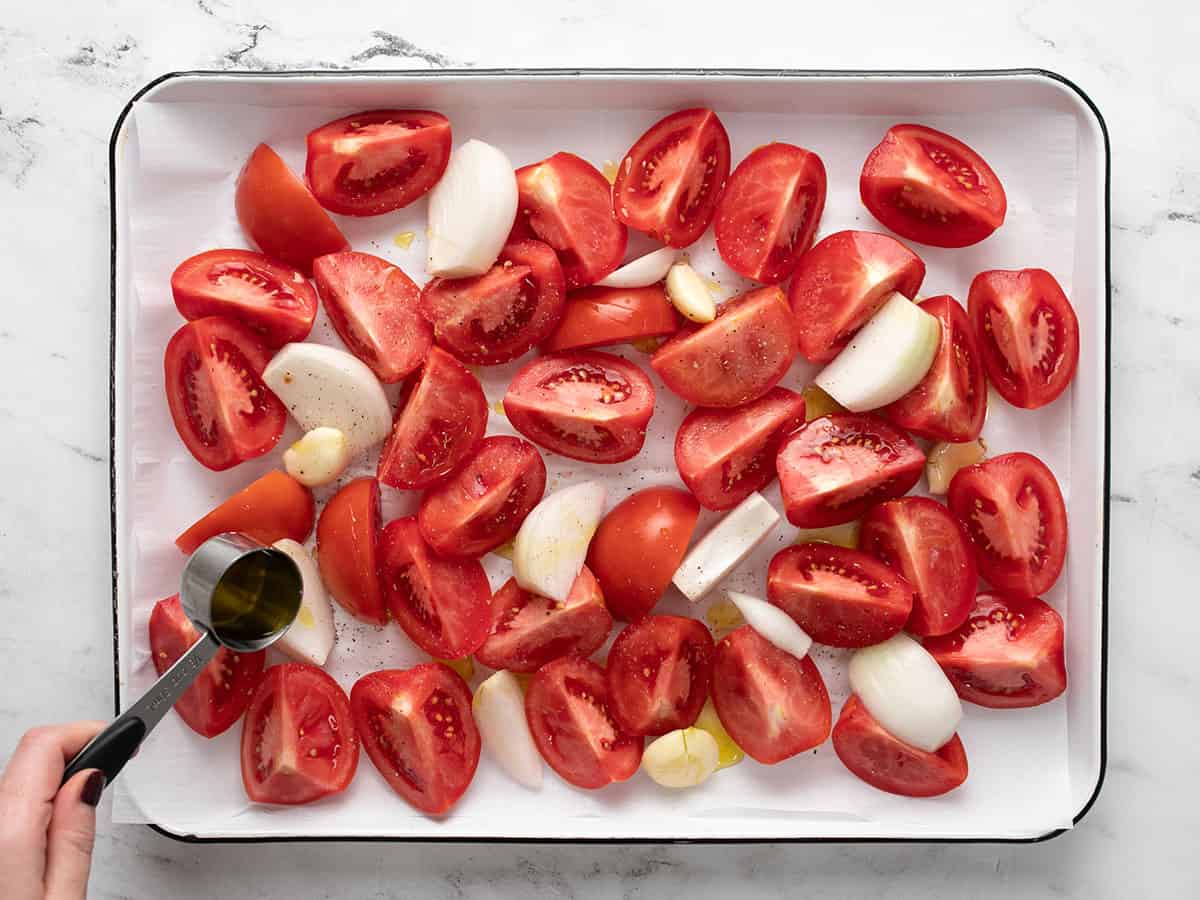
Preheat the oven to 400ºF. Cut the tomatoes into quarters or halves, depending on the size of the tomatoes. Slice the onion into 1-inch wide wedges. Peel the garlic.
Place the tomatoes, onions, and garlic on a large sheet pan. Sprinkle with ¼ tsp salt and ⅛ tsp pepper, then drizzle with the olive oil. Toss to coat everything in oil.
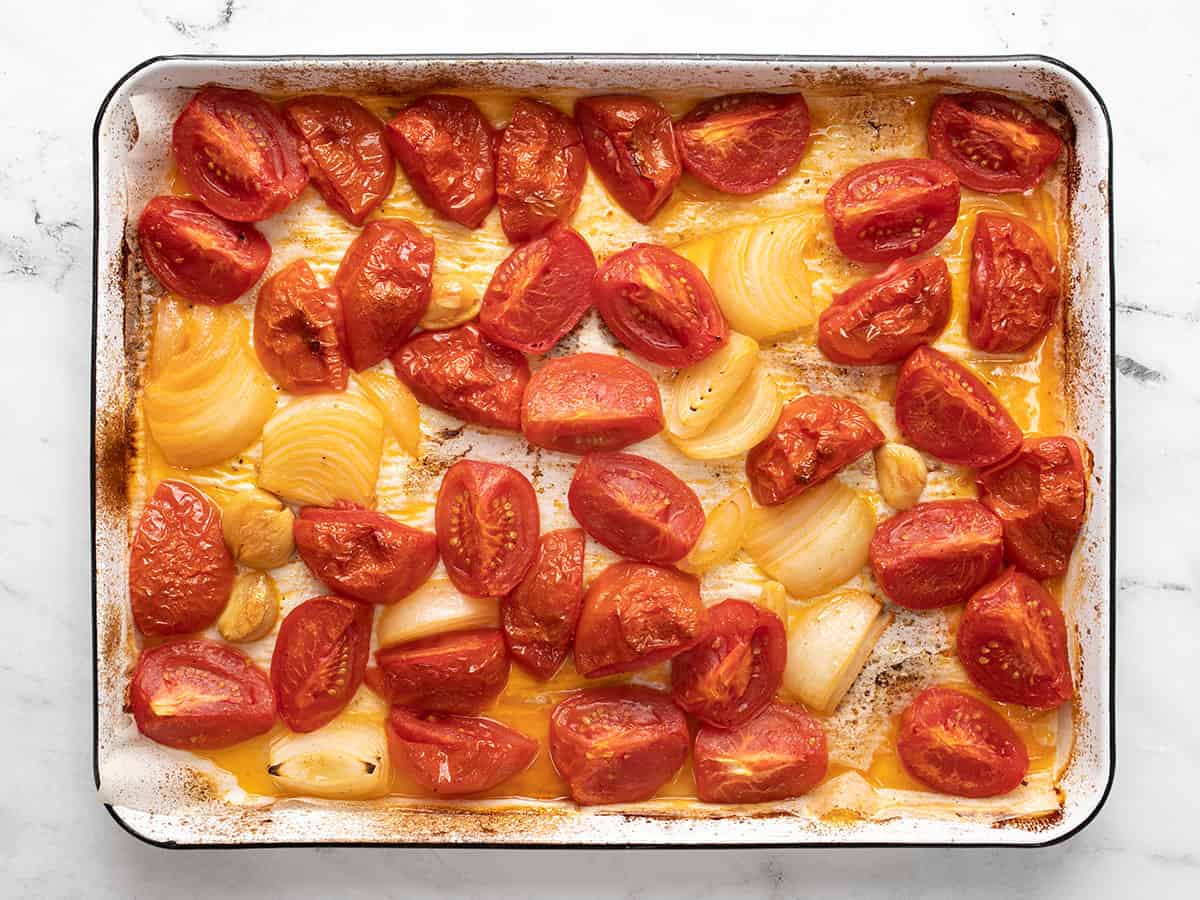
Roast the vegetables in the oven for 40-45 minutes or until they become slightly browned on the edges.
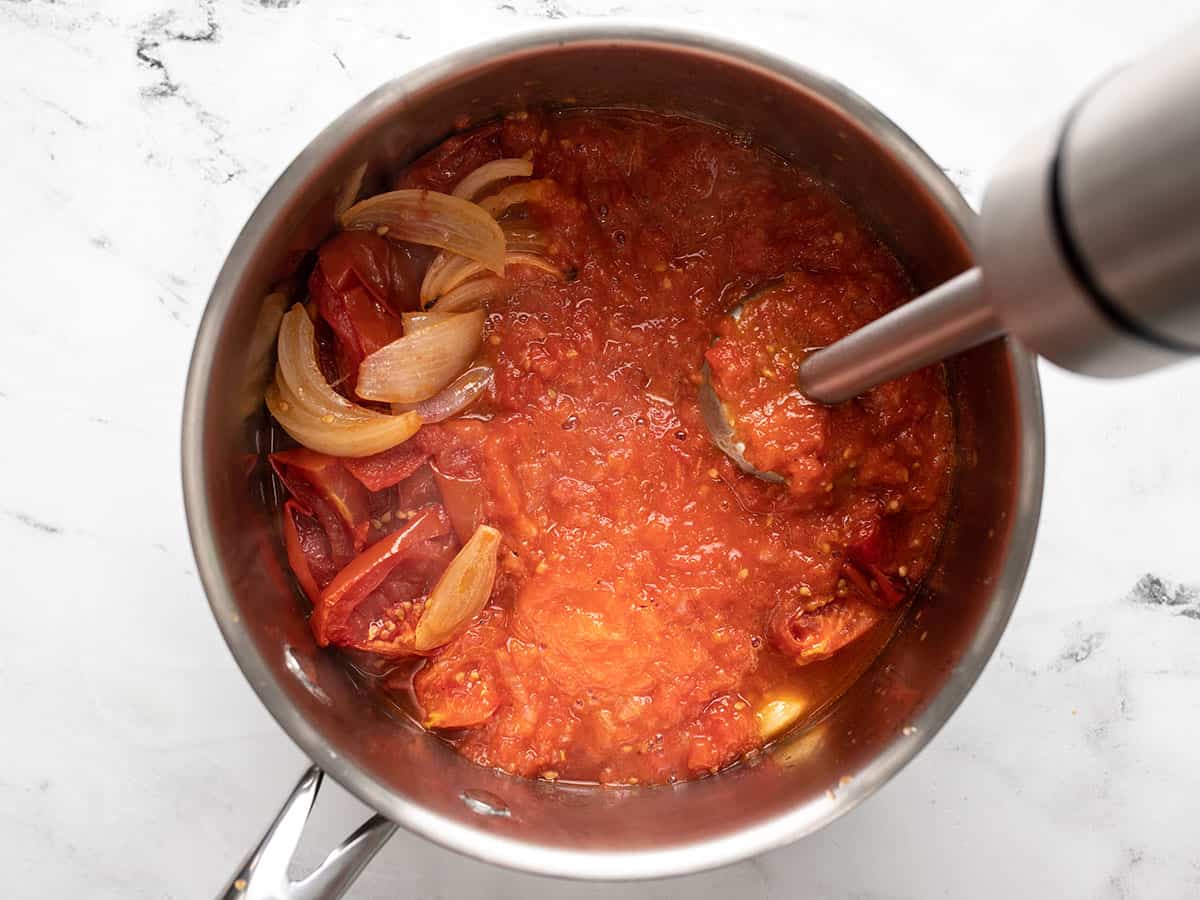
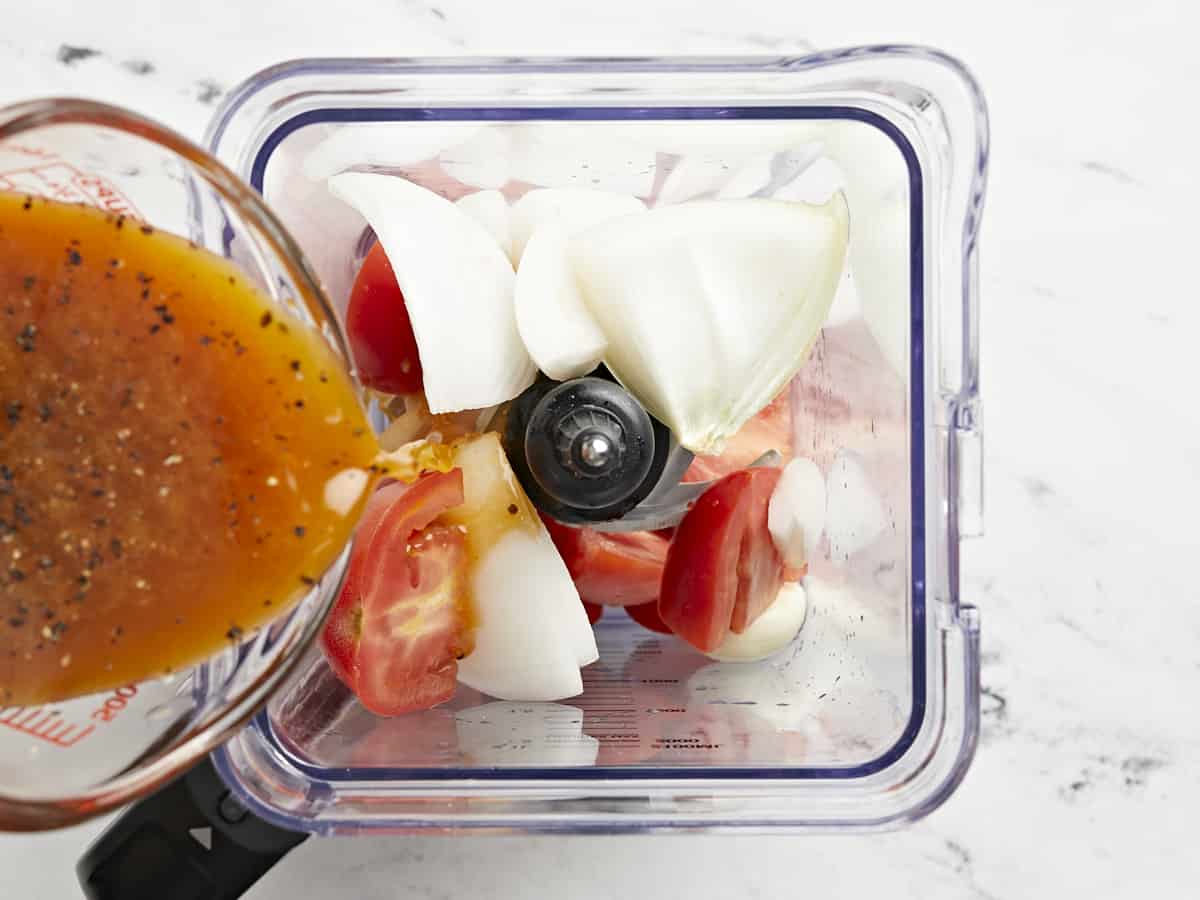
Transfer the vegetables and all of the juices to a soup pot and purée with an immersion blender. Or, transfer to a blender, add the vegetable broth, and purée.
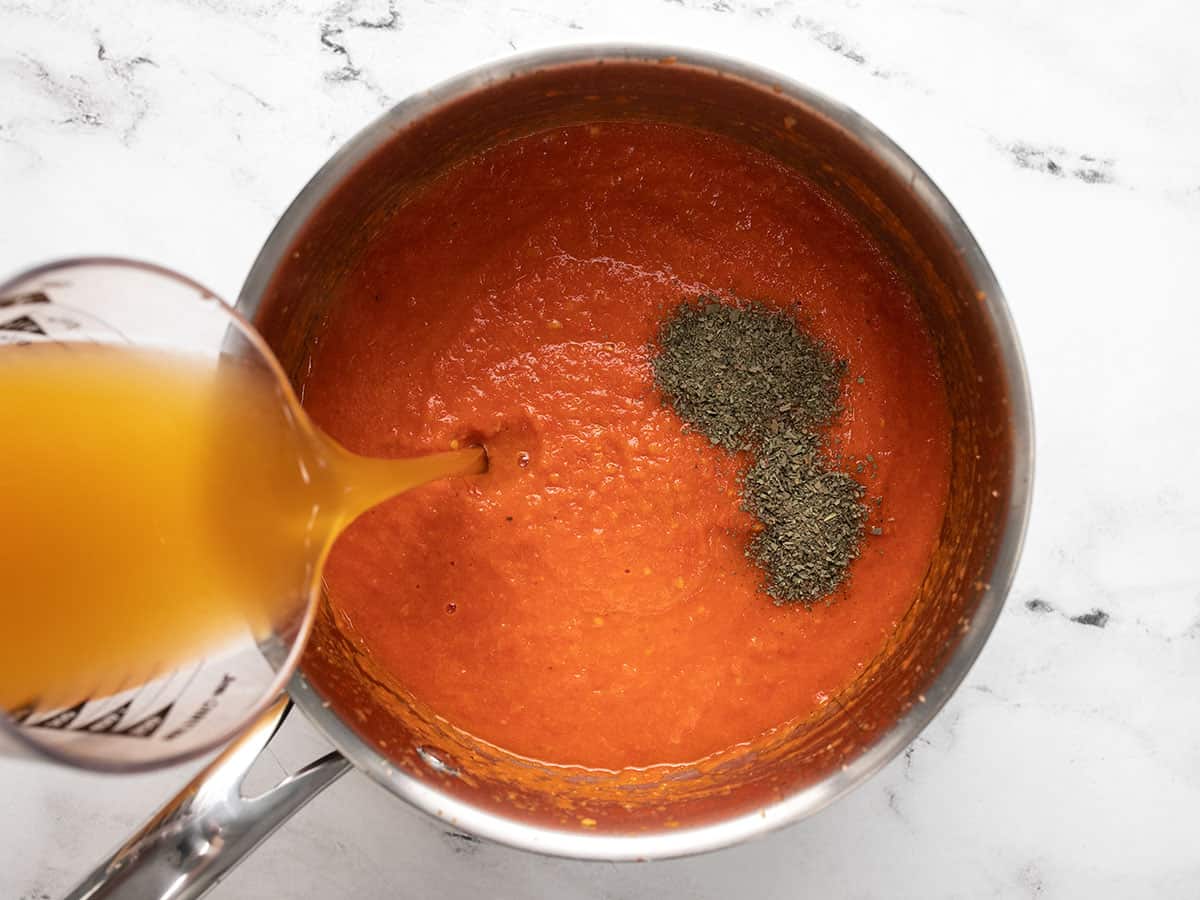
Add the basil and vegetable broth (if not already combined) to the soup pot and heat over medium. Allow the soup to come up to a simmer, then continue to simmer, stirring occasionally for 10 minutes.
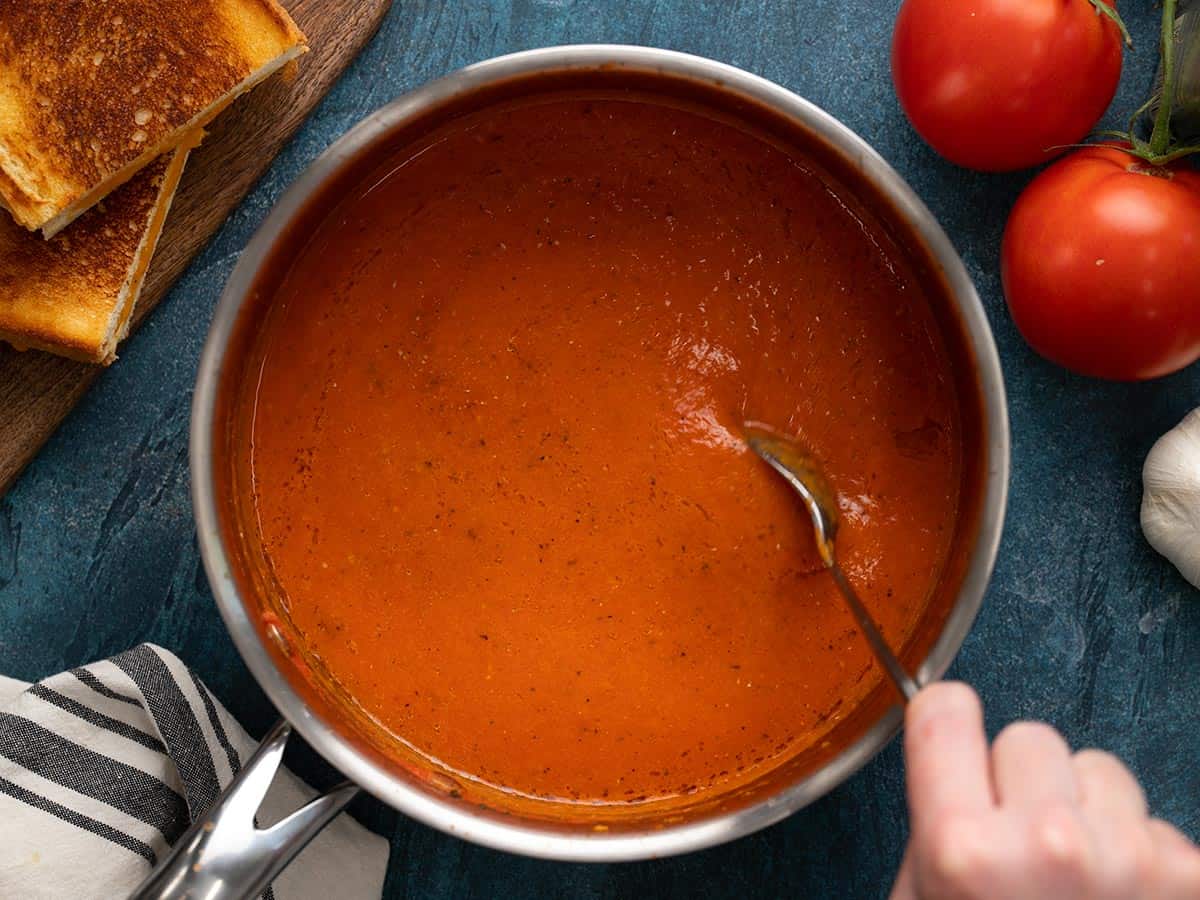
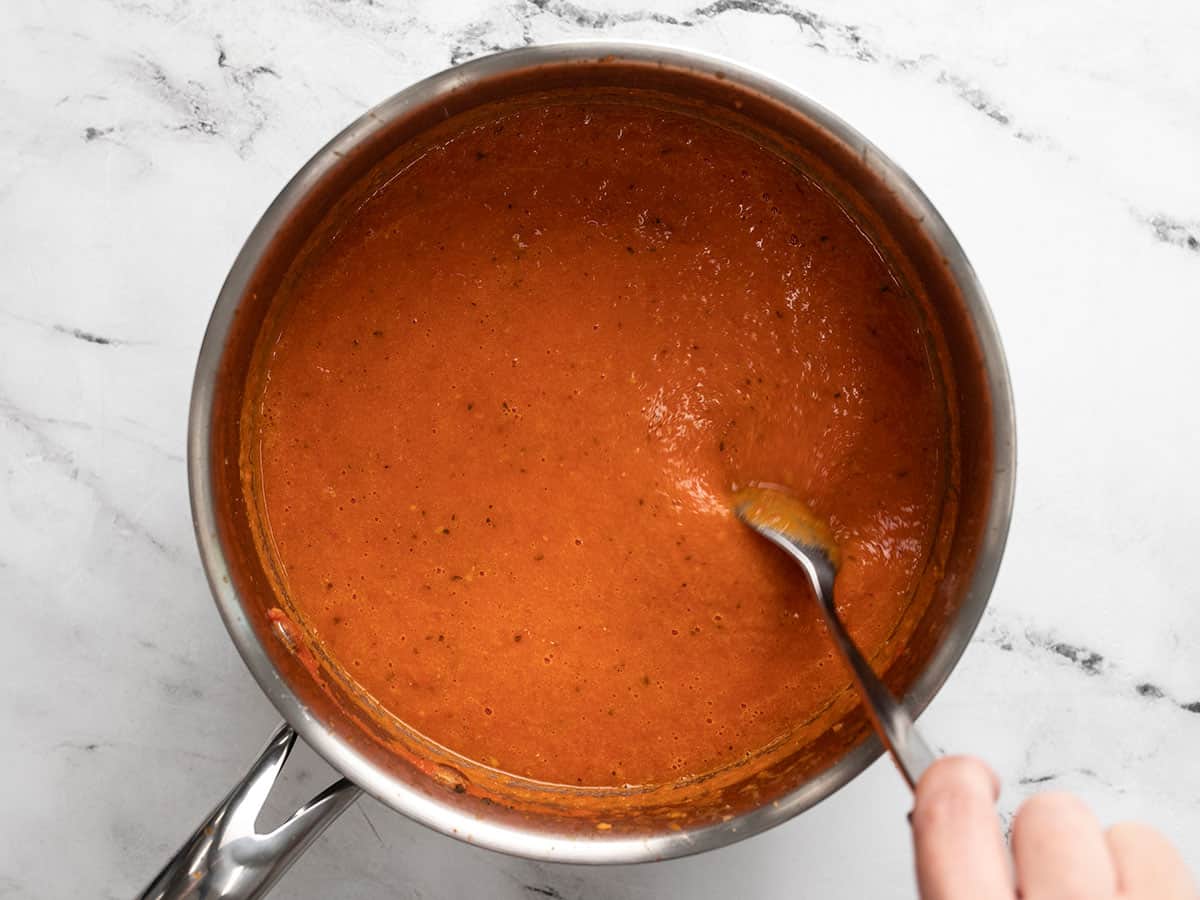
After simmering for 10 minutes, add salt to taste. The total amount of salt needed with depend on the salt content of the broth used, so start with ¼ tsp and add more until the flavors are vibrant. Serve hot with a grilled cheese or garlic bread for dipping!
How to Make Roasted Tomato Soup – Step by Step Photos
Preheat the oven to 400ºF. Cut 3 lbs. of fresh, ripe tomatoes into quarters (or, if using a small variety, cut in half). Slice one yellow onion into 1-inch wide wedges and peel four cloves of garlic. Add the tomatoes, onions, and garlic to a large sheet pan. Add ¼ tsp salt, ⅛ tsp pepper, and 2 Tbsp olive oil, then toss to coat.
Roast the tomatoes, onions, and garlic in the preheated 400ºF oven for 40-45 minutes, or until there is some browning on the edges of the tomatoes and onions.
Transfer the vegetables and all their juices to a soup pot and use an immersion blender to purée. Or, transfer them to a blender and the broth to cool them down, then purée.
Add ½ tsp dried basil and 2 cups of vegetable broth to the pot with the puréed vegetables. Place the pot over medium heat and allow it to come up to a simmer. Simmer the soup, stirring occasionally, for about 10 minutes.
After simmering for about 10 minutes, give the soup a taste and add salt to help the flavors pop. The amount of salt needed will depend greatly on the salt content of the broth used, so start with ¼ tsp and add more until the soup tastes vibrant.
Don’t forget to make an epic grilled cheese to go along with your fresh homemade tomato soup!
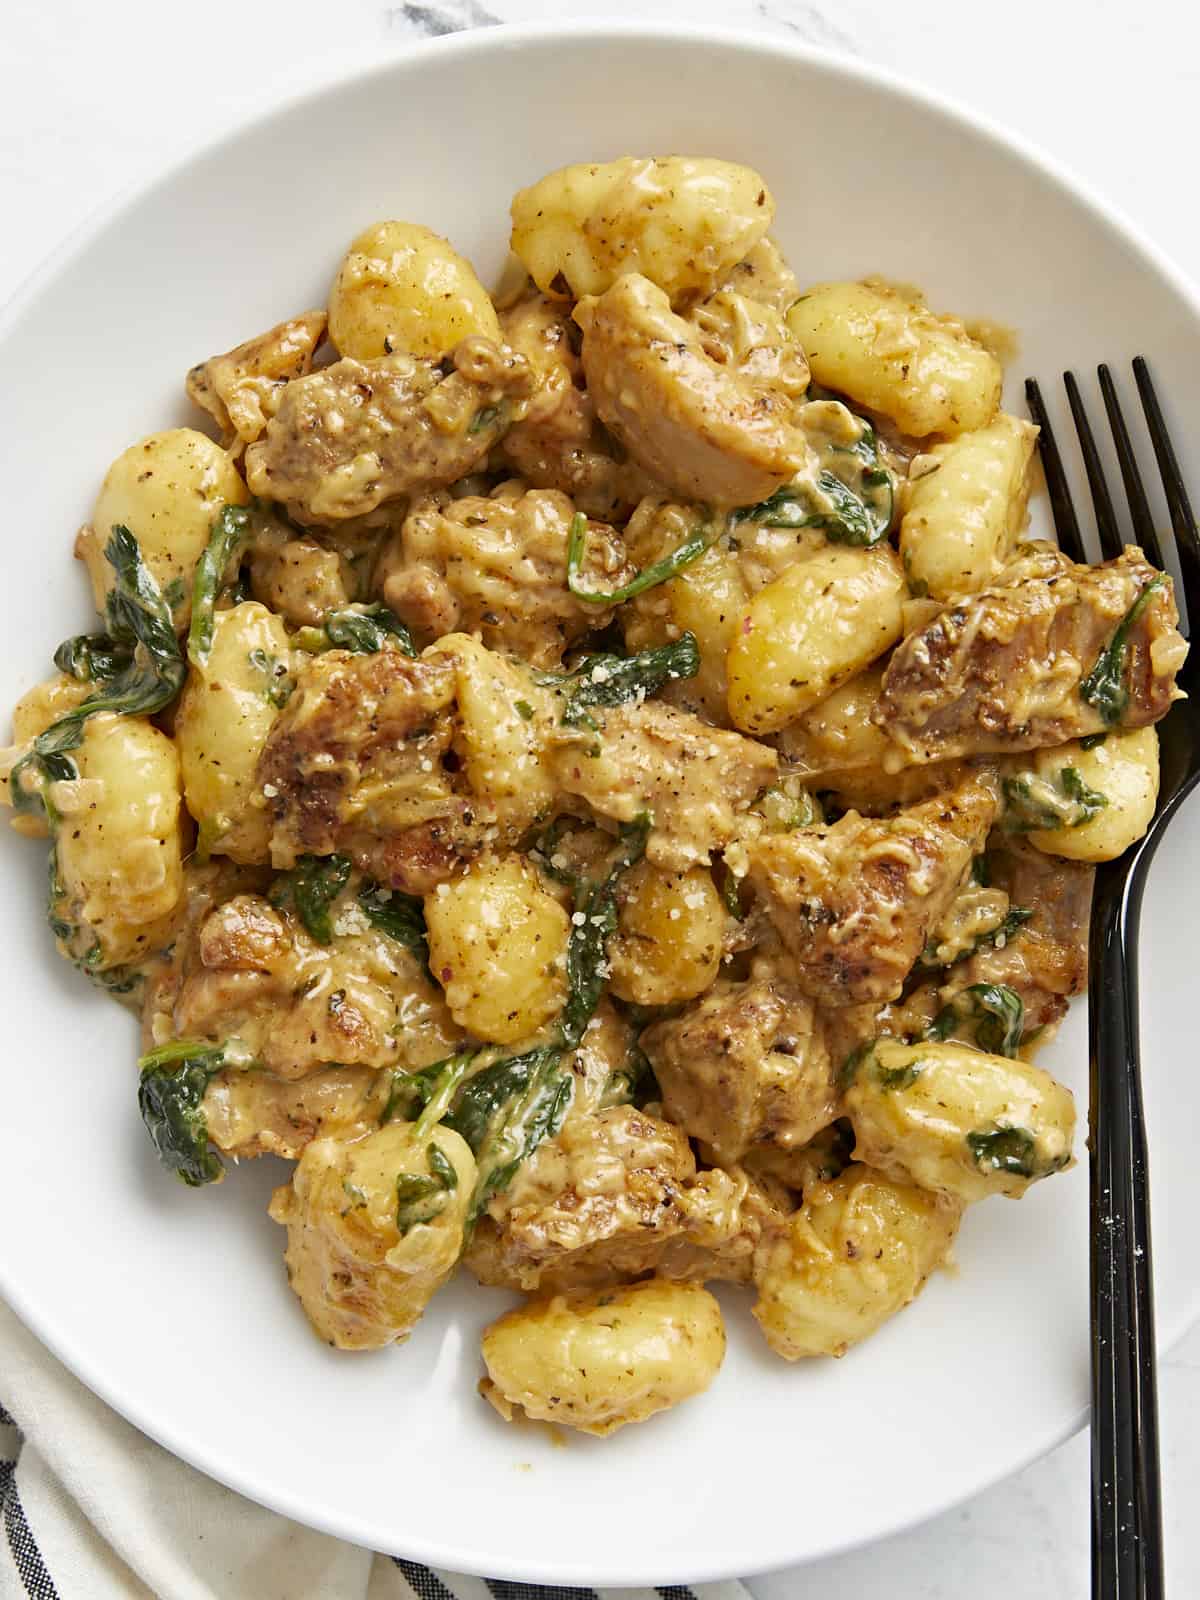
This velvety Creamy Chicken and Gnocchi recipe is one of my favorite one-pot meals because it’s easy, you can make it in under thirty minutes, it’s filling, and it’s big-time delicious. Like I’m-not-going-to-stop-eating-this-until-it’s-all-done delicious. Pillowy gnocchi drenched in a rich buttery cream sauce, with pops of juicy chicken and earthy spinach? Ummm, yeah. You’re going to love this one!
What Is Gnocchi?
Gnocchi are small two-inch dumplings made with mashed potatoes, flour, and eggs. They are served sauteed with butter, tomato, or cream-based sauce. In this dish, we pair gnocchi with diced chicken thighs in a buttery cream sauce. It’s basically an elevated meat and potatoes dish, with spinach thrown in because Beth says we need to cook more veggies.
What You’ll Need
You won’t need loads of time or pots and pans, that’s for sure. Everything in this dreamy, silky dish comes together in one skillet in under thirty minutes! Here’s what you’ll need to make Creamy Chicken And Gnocchi:
Gnocchi – you can find them frozen or fresh, but I prefer the dried ones as they are more economical, plus I have more room in my pantry than I do in my freezer. You’ll find them in the pasta section of your grocery store.
Chicken Thighs– You can also use chicken breast, but be careful not to overcook it, as you want juicy chicken, not dry, chicken-flavored cotton balls. In a pinch, sub the thighs with Italian sausage and skip the seasoning.
Heavy cream and Butter– this is a cream sauce, so it is dairy-heavy. You need the fat found in these ingredients to create the velvety sauce that brings everything together. You can substitute the heavy cream with full-fat coconut cream and the butter with vegan butter
Parmesan– does double duty, adding savory saltiness to the sauce while also thickening it. Asioago or feta make great substitutions. If you can’t do dairy, use a couple of tablespoons of nutritional yeast, but keep in mind that your sauce will be much looser.
Vegetable broth– is used to hydrate the dried gnocchi and helps create the base of our cream sauce. Substitute it with chicken broth or in a pinch, with a cup of water with a tablespoon of tomato sauce mixed in.
Onion and Garlic– these aromatics are fried in the chicken thigh fat and help flavor the gnocchi. You can substitute the onion with one tablespoon of onion powder and the garlic with 1/4 teaspoon of garlic powder.
Spinach- brings earthiness and a beautiful color to the dish. You can substitute spinach with kale, though it will take a little longer to soften.
Italian seasoning – creates an easy flavor base. If you don’t have Italian seasoning, substitute it with one teaspoon of dried oregano, one teaspoon of dried thyme, and one teaspoon of dried rosemary.
Smoked paprika – using this spice is optional, but I use it to add a dank, smoky note that helps round out the sharpness of the Italian seasoning. It also lends a golden hue to the sauce.
What To Serve With Creamy Chicken and Gnocchi
This dish is heavy, so pair it with a Simple Side Salad or Panzanella. You can also lean into the heaviness and make Garlic Bread to sop up all the creamy sauce. (It is AMAZING with garlic bread. And garlic counts as a vegetable!)
Storing and Reheating
Because you make this dish with a cream-based sauce, I don’t recommend freezing it, as the cream gets grainy when it thaws. Keep leftovers in an airtight container in the refrigerator for up to 3 days. Reheat in a microwave until steaming.
This delicious dish is full of pillowy gnocchi drenched in a rich buttery cream sauce, with pops of juicy chicken and earthy spinach. Plus it's so easy, you can make it in under thirty minutes!
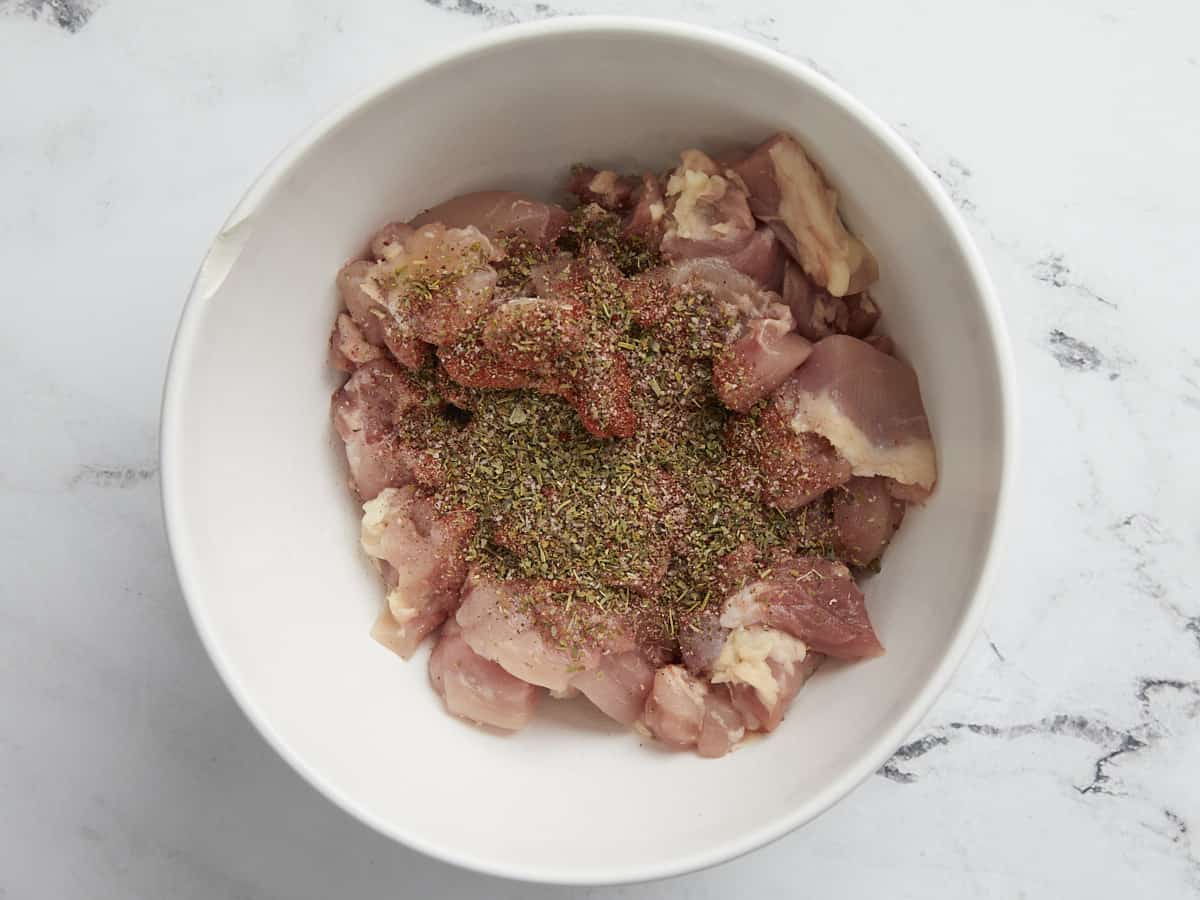
Dice the chicken thighs into 2-inch pieces. Add the chicken to a bowl and top it with Italian seasoning, smoked paprika, salt, and pepper. Mix until combined.
Place a large, deep skillet over medium heat and add the cooking oil. Once it's shimmering, add the chicken and cook undisturbed until well browned, about 3 minutes. Stir and brown on the other side, about 3 more minutes. Remove the chicken from the pan when it's cooked through and leave the fat in the pan.
Add the onion and garlic to the skillet. Saute until the onions have softened and the garlic is fragrant, about 2 minutes
Add the gnocchi and butter to the skillet and brown for 2 minutes.
Add the spinach and the broth to the skillet. Cover the pan. Cook for 1 to 2 minutes until the spinach has wilted and the gnocchi has hydrated.
Add the heavy cream and salted butter to the skillet. Stir until the butter has melted and the cream is steaming hot but not boiling.
Take the skillet off the heat. Add the parmesan to the pan and stir until it melts, creating a velvety sauce.
Finally, return the cooked diced chicken to the skillet. Mix gently into the gnocchi and cream sauce. If desired, garnish with parsley.
How to Make Creamy Chicken And Gnocchi – Step by Step Photos
Dice 1.25 pounds of chicken thighs (about 4 to 5 thighs) in 2-inch pieces. Add the chicken to a bowl and top it with 1 tablespoon of Italian seasoning, 1/2 teaspoon of smoked paprika, 1/2 teaspoon of salt, and 1/4 teaspoon of pepper. Mix until combined.
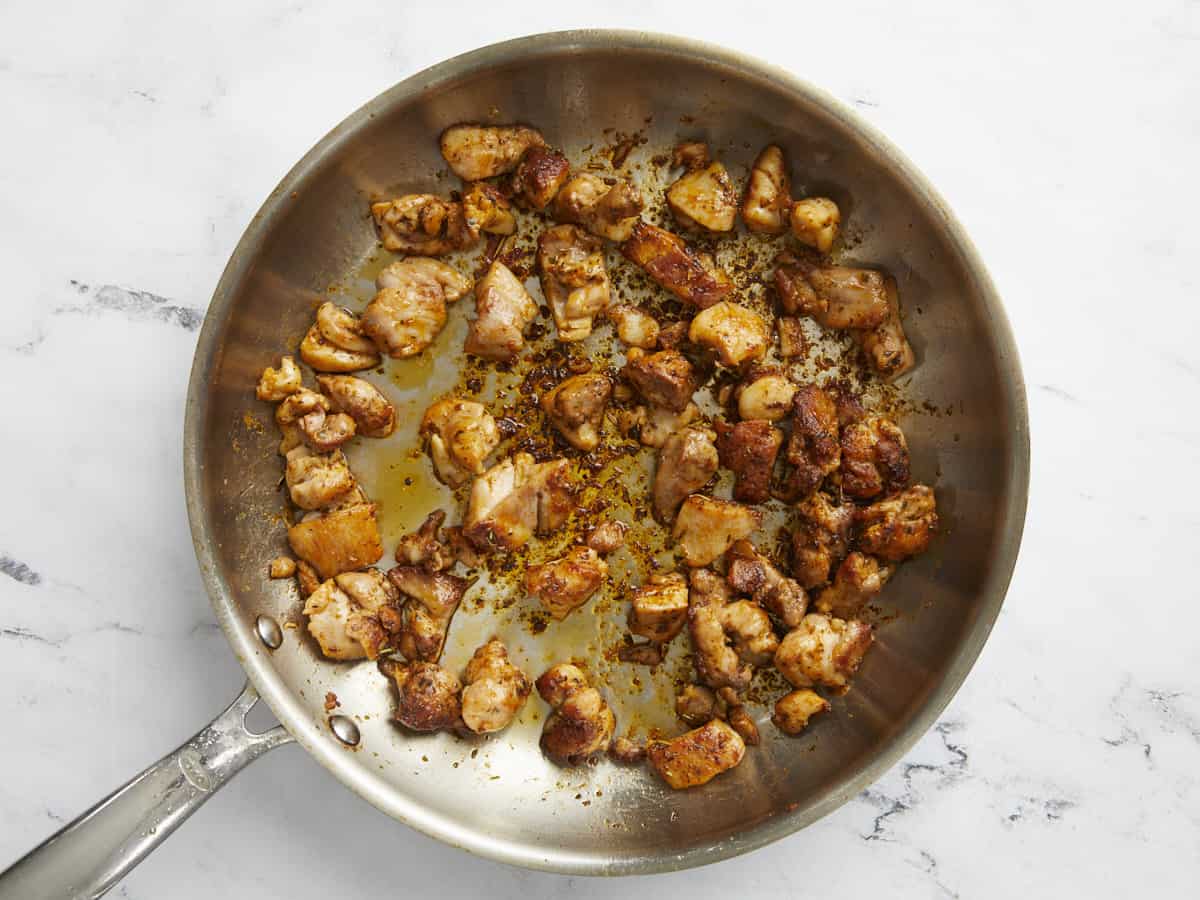
Set a large deep skillet over medium heat and add 2 tablespoons of cooking oil. When the oil is shimmering, add the chicken and cook undisturbed until well browned, about 3 minutes. Stir and brown on the other side, about 3 minutes more. Remove the chicken from the pan when it’s cooked through and has reached an internal temperature of 160°F. Leave the rendered fat in the pan.
Add 1 diced onion and 2 cloves of minced garlic to the skillet. Saute until the onions have softened and the garlic is fragrant, about 2 minutes.
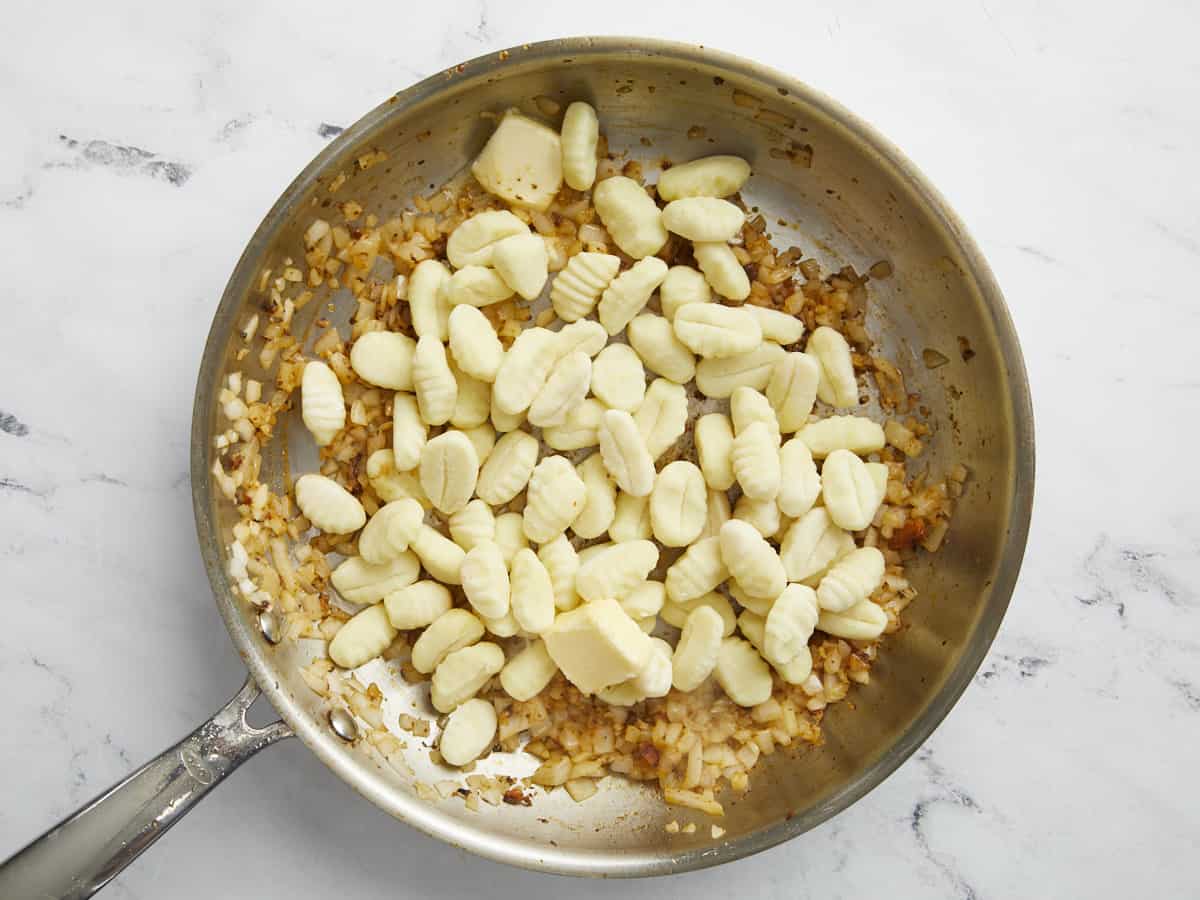
Add 1 pound of dry potato gnocchi and 2 tablespoons of salted butter to the skillet. Brown the gnocchi for 2 minutes.
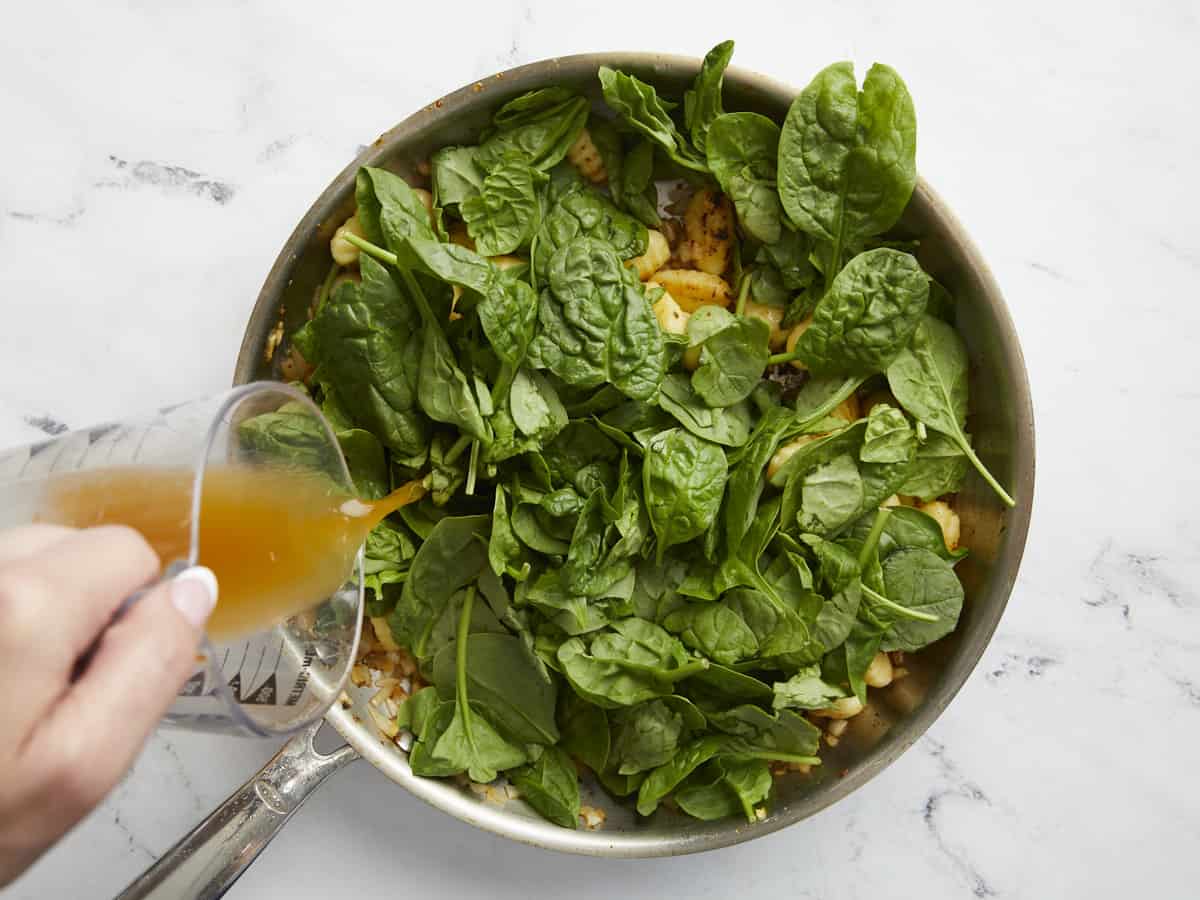
Add 2 cups of spinach and 1 cup of vegetable broth to the skillet. Cover the pan. Cook for 1 to 2 minutes until the spinach has wilted and the gnocchi has hydrated.
Add 1/2 cup of heavy cream and 2 tablespoons of salted butter to the skillet. Stir until the butter has melted and the cream is steaming hot, but not boiling. You’re about to add cheese to the sauce, and cheese curdles at high temperatures, so make sure it isn’t boiling.
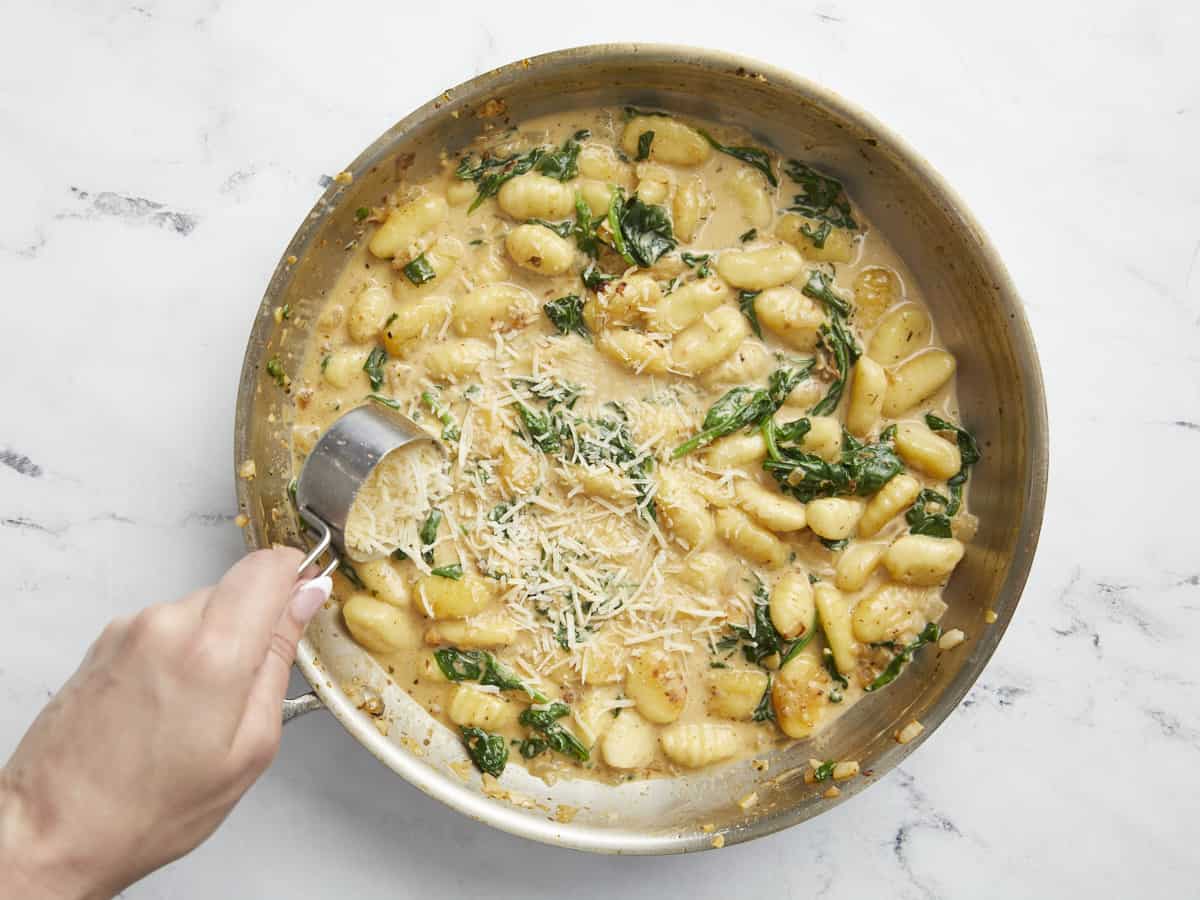
Take the pan off the heat. Add 1/4 cup of parmesan to the pan and stir until it melts, creating a velvety sauce.
Finally, return the cooked diced chicken to the skillet. Mix gently into the gnocchi and cream sauce. If desired, garnish with parsley. Serve this dish piping hot, then sit back and enjoy what took you less than a half hour to make!
I will literally (read: figuratively) eat anything that is Parmesan and black pepper flavor. There’s something about that combo that is so insanely satisfying to my palate. But I guess that’s why Cacio e Pepe is such a classic. And since I love turning a humble can of beans into something delicious, I decided to give a couple of cans of cannellini beans the Parmesan-pepper treatment. The end result is kind of like refried beans, but using a different bean and with a different flavor profile! Easy and delish!
What’s in Parmesan Beans?
This super simple side dish only has seven simple ingredients and only takes about twenty minutes to make! And since I usually have ALL of these ingredients on hand, Parmesan beans are going to be my new go-to side dish. Here are the ingredients you’ll need to make Parmesan Beans:
Cannellini Beans: I like Cannellini beans for this recipe because they have a soft and creamy texture, but also retain enough shape so that you’re not left with complete mush. Their flavor is also mild enough to not overpower the Parmesan.
Garlic: A little sautéed fresh garlic gives this recipe a nice deep base flavor. Plus, all good recipes start with sautéed garlic, ammiright?
Olive Oil: The oil is used to both sautée the garlic AND give the beans a little more body and richness. You need a little fat in there to smooth it all out.
Chicken Broth: Simmering the beans in a little bit of broth adds more flavor and helps create that saucy texture.
Parmesan & Pepper: The two main flavor players! I can never get enough of Parmesan and pepper together. I’ve listed amounts below, but really, just measure with your heart. ❤️
Can I Use a Different Bean?
Cannelini beans really are the best choice for this dish because of their flavor, texture, and size, but you could probably get away with Great Northern Beans or navy beans. Both of these varieties also have a mild and creamy flavor and texture, but they are smaller in size. Navy beans also tend to break down faster, which may result in a mushier texture.
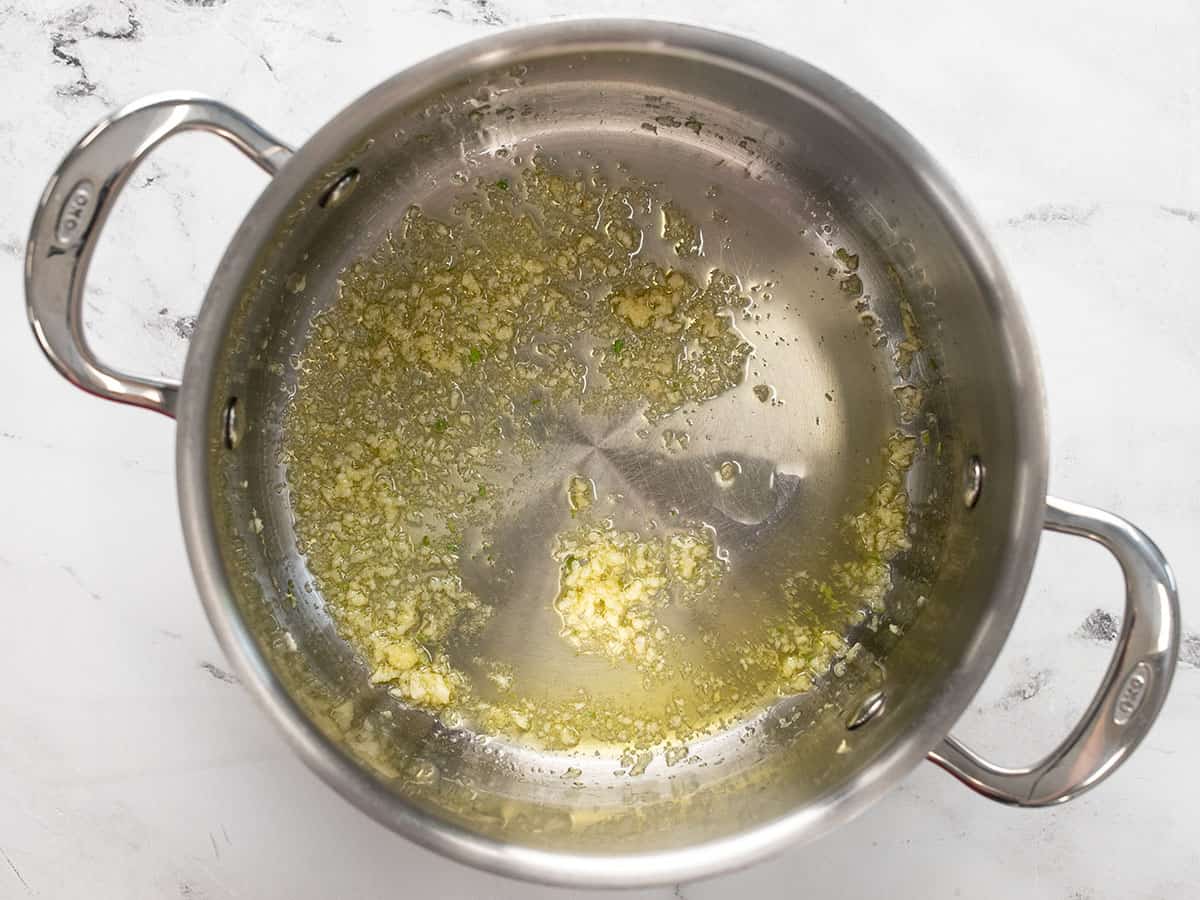
Mince the garlic and add it to a large skillet with the olive oil. Sauté the garlic over medium heat for about one minute.
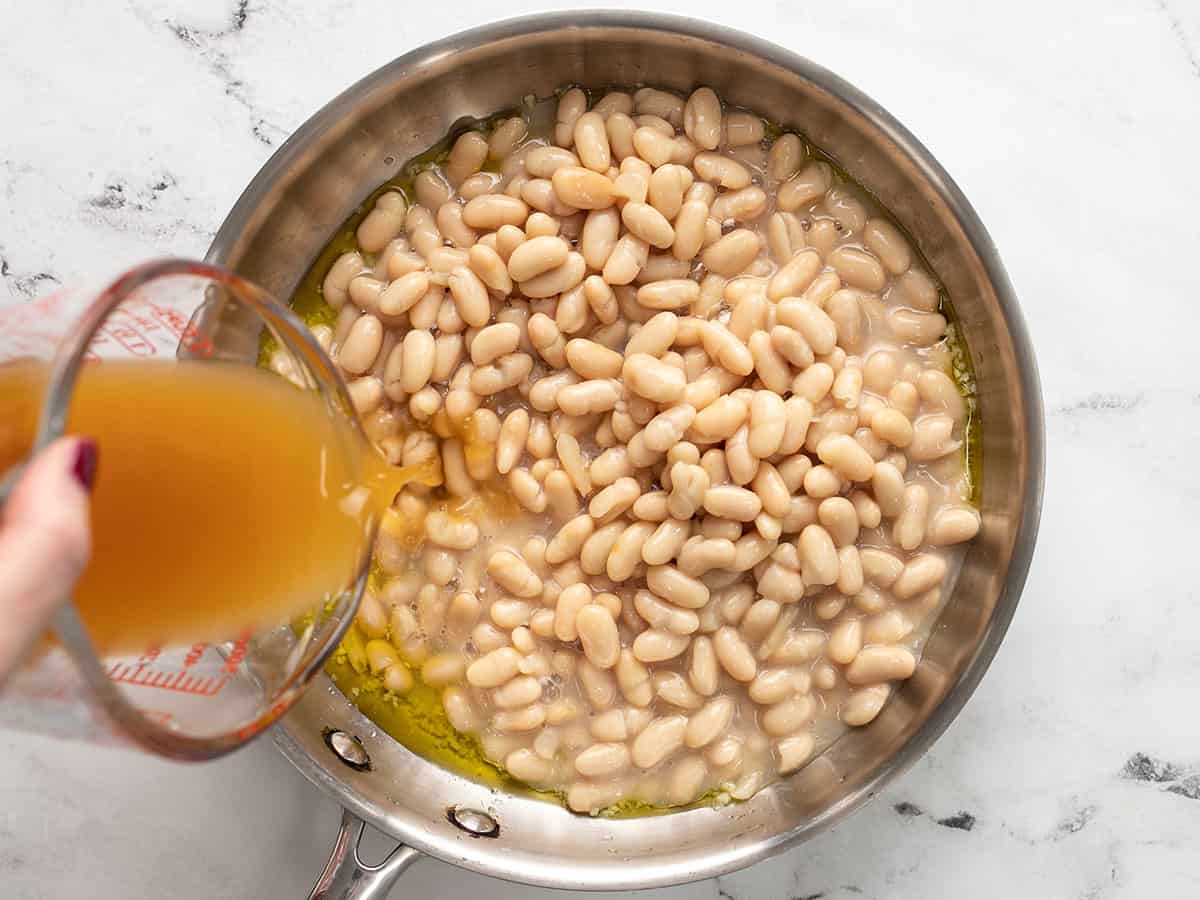
Drain, but do not rinse, the Cannellini beans. Add the beans and broth to the skillet with the garlic. Stir to combine.
Allow the beans to come up to a simmer. Simmer the beans, stirring occasionally, for about 10 minutes, or until they've thickened slightly. The spoon should leave a trail in the beans as you stir.
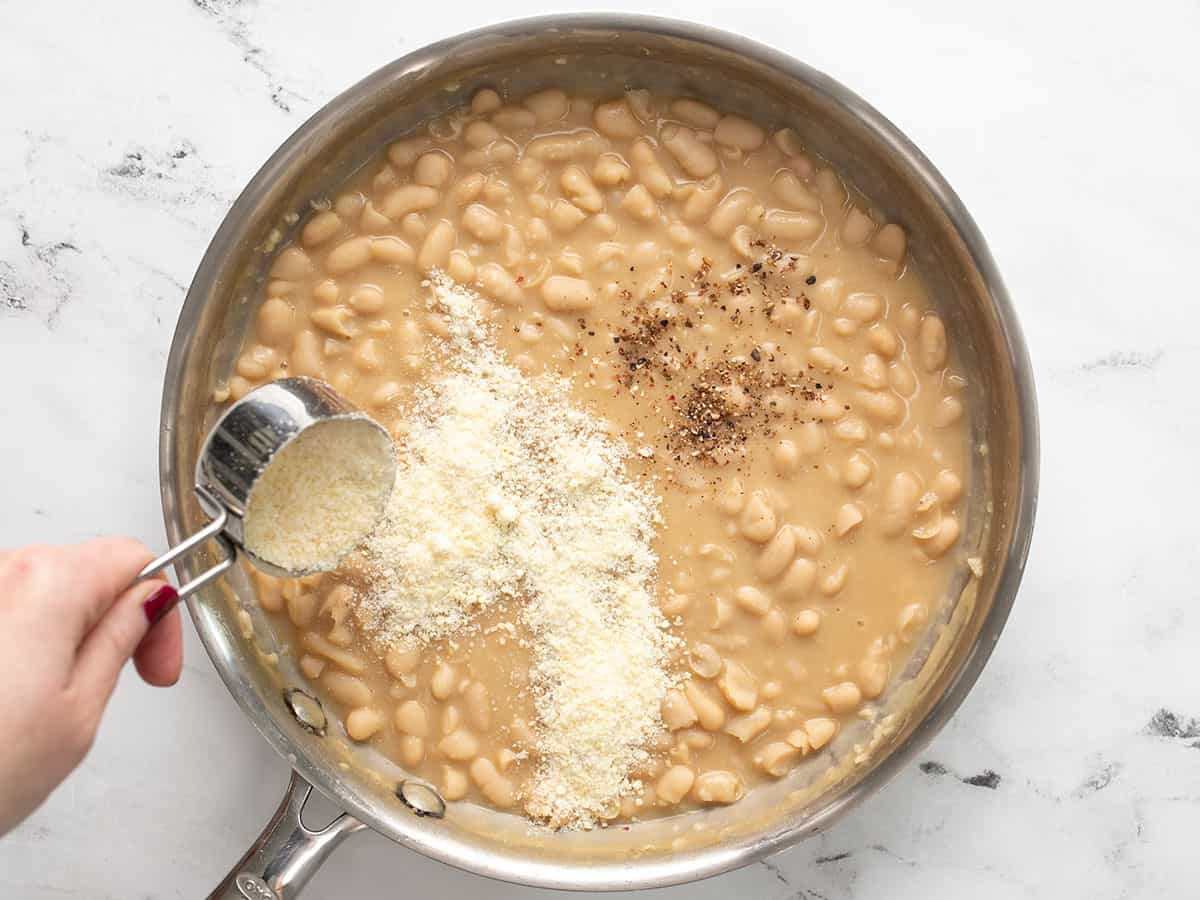
Add the Parmesan and pepper to the beans. Stir to combine. Taste the beans and adjust the Parmesan, pepper, or add salt if needed. Serve hot!
Mince two cloves of garlic and add them to a large skillet with two tablespoons of olive oil. Sauté the garlic over medium heat for about one minute.
Drain but don’t rinse two 15oz. cans of Cannellini beans. Add them to the skillet along with ½ cup vegetable or chicken broth. Stir to combine.
Allow the beans to come up to a simmer. Simmer the beans, stirring occasionally, for about 10 minutes, or until they become thick and saucy. There should be a trail left by the spoon when stirred.
Add ¼ tsp freshly cracked pepper and ⅓ cup Parmesan (grated or shredded) to the beans. Stir until the Parmesan has melted into the beans.
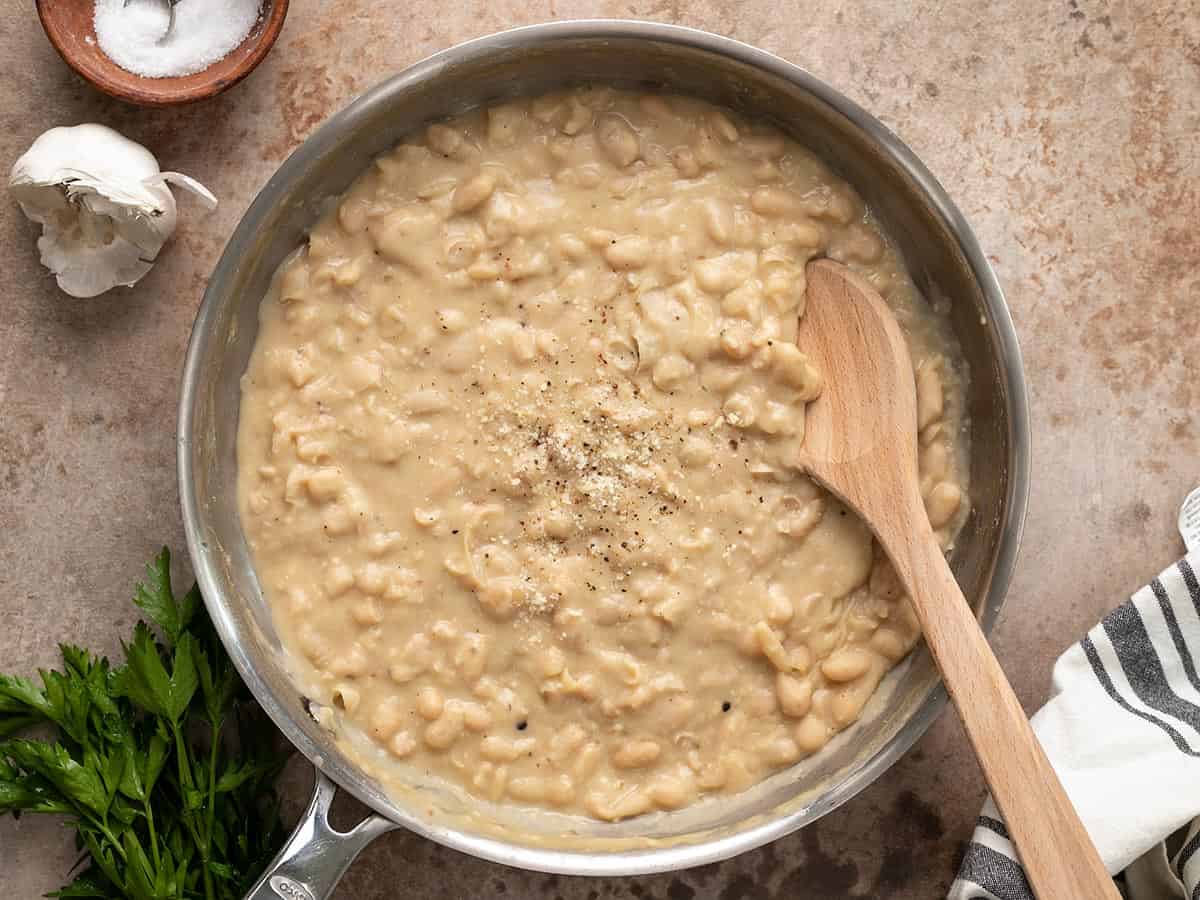
The Parmesan will help thicken the beans considerably. Give the beans a taste and adjust the Parmesan, pepper, or add salt if needed.
Serve the beans immediately, while still hot. The beans will thicken and solidify when cooled.
I’m a soup all-year-round type of gal and when that soup is made with just a few inexpensive ingredients and takes less than 30 minutes to make you know it’s going in my regular rotation. This super simple Pinto Bean Soup is a southwest version of our viral Rosemary Garlic White Bean Soup, and it’s every bit as easy and delicious. Plus, you can go wild with the toppings to make it more fun!
What’s in Pinto Bean Soup?
This incredibly simple soup only needs eight simple ingredients, most of which are pantry staples. Here’s what you’ll need to make pinto bean soup:
Garlic and Olive Oil: The soup starts by sautéing minced garlic in oil to create a deep savory base flavor.
Canned Pinto Beans: The bulk of the pinto bean soup is, surprise-surprise, pinto beans! We use a combination of whole beans and puréed beans to create both a creamy texture and something to sink your teeth into.
Spices: We used a simple mix of chili powder, cumin, oregano, and cayenne pepper to season this soup, but you could get creative and use your own seasoning blend if you prefer!
Vegetable broth: Vegetable broth adds volume, flavor, and salt to this soup. We use Better Than Bouillon to make our vegetable broth, which is very flavorful and contains a decent amount of salt. If you’re using a less flavorful broth your soup won’t be quite as scrumptious. If you’re using a low-sodium broth you may find that you need to add a little salt to your soup at the end to help make the flavors pop.
Is This Soup Spicy?
This soup can be made spicy OR mild. If the chili powder you use is spicy, your soup will be spicy. I used McCormmick’s chili powder, which is very mild, so I also added a pinch of cayenne pepper to the soup. It’s not enough cayenne to really make it hot, it just adds a little dimension. If you prefer a spicy soup you can use a spicy chili powder or add more cayenne.
What Else Can I add?
Soups like this are fun because they’re a blank slate for making your own creation. Here are some other fun ingredients that you could add to your soup:
Jalapeños (dice and sauté with garlic)
Canned diced green chiles (either leave diced or purée with the beans)
Fire roasted diced tomatoes (either leave diced or purée with the beans)
Much like chili, this soup is great with all sorts of fun toppings! So scan your fridge and pantry and add some more flavor, color, and texture to your bowl. Here are some topping ideas for this pinto bean soup:
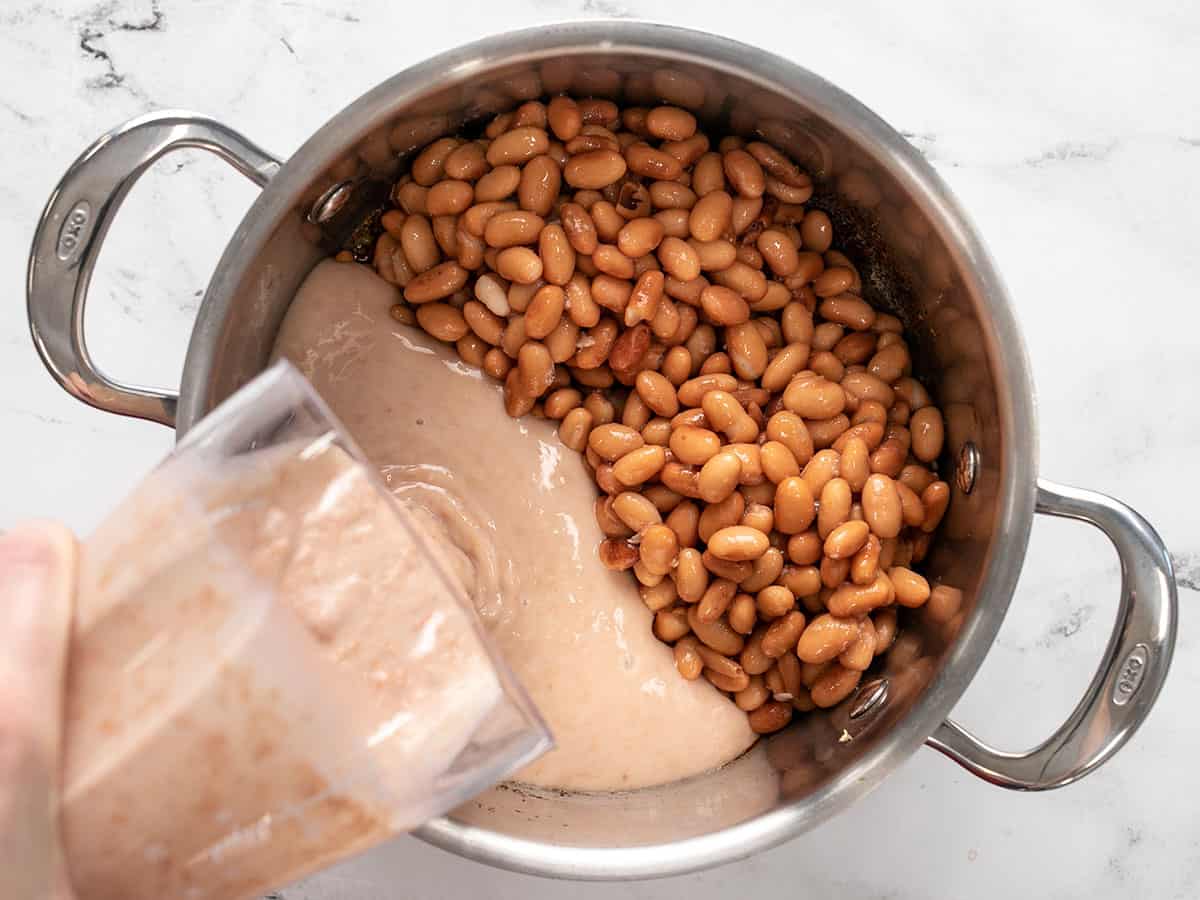
Pour 1 can of the pinto beans (with the liquid from the can) into a blender and purée until smooth. Set the puréed beans aside.
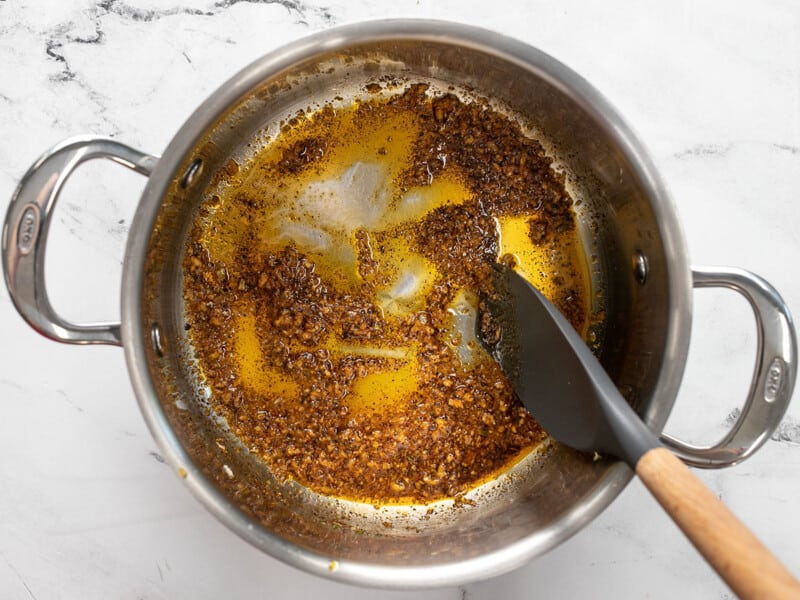
Mince the garlic and add it to a soup pot with the olive oil. Sauté over medium heat for about one minute.
Add the chili powder, cumin, oregano, and cayenne pepper to the pot and continue to sauté with the garlic for one minute more.
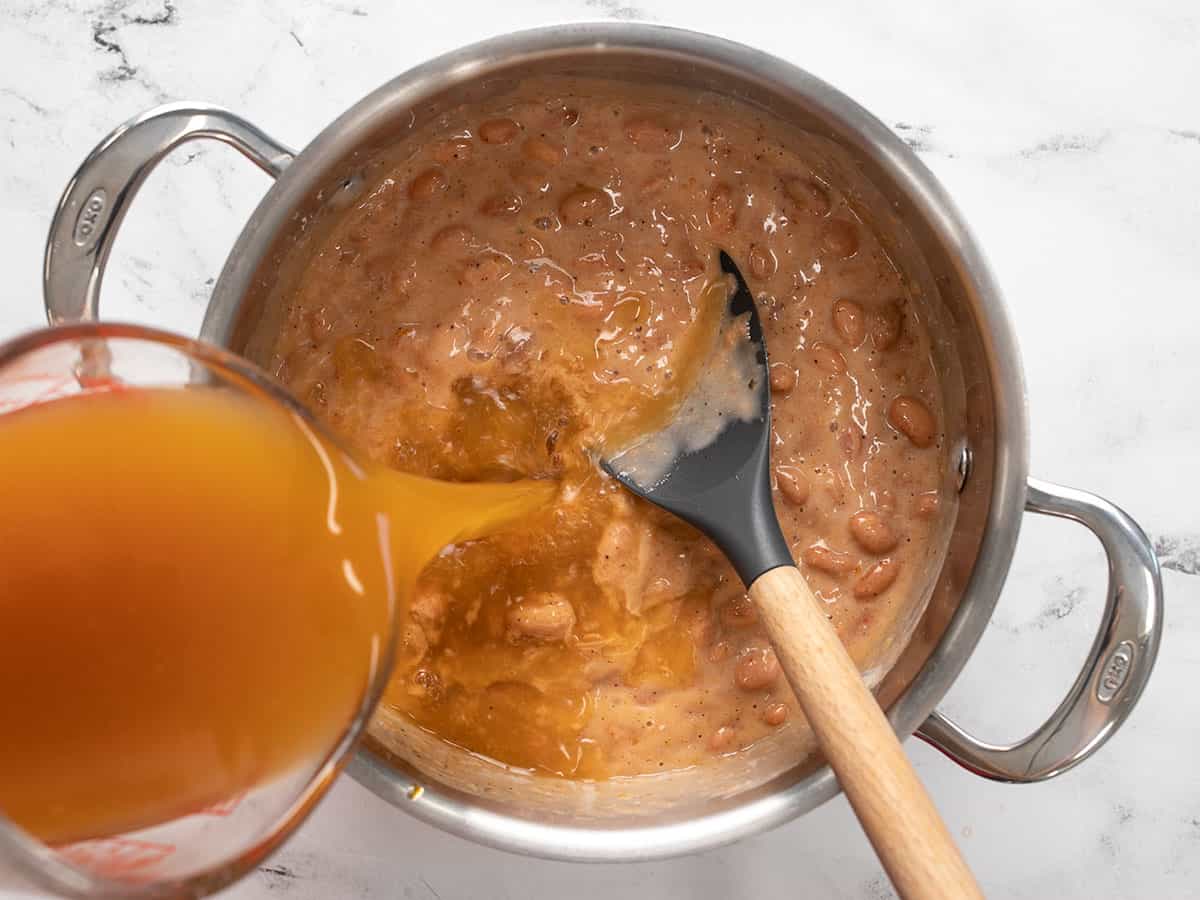
Drain the remaining 2 cans of pinto beans, then add them to the pot, along with the puréed beans and vegetable broth. Stir to combine.
Turn the heat up to medium-high and bring the soup up to a boil. Once boiling, reduce the heat slightly and let the soup simmer (without a lid) for 15 minutes. The soup will thicken slightly and the flavors will deepen as it simmers.
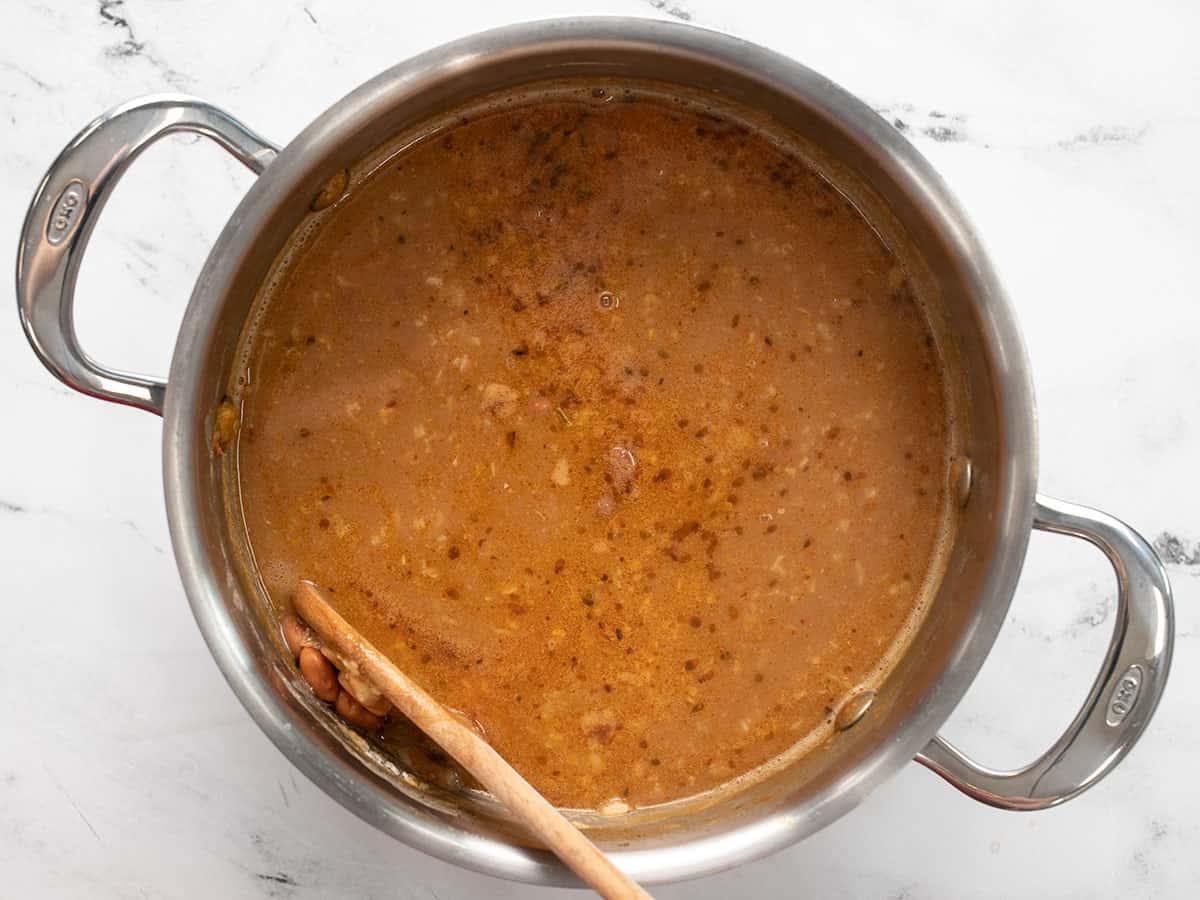
After simmering for 15 minutes, the beans should be extra soft. Use the back of a large cooking spoon to smash more of the beans and thicken the soup further.
Taste the soup and adjust the salt or seasonings to your liking. Serve hot with your favorite toppings!
*We use Better Than Bouillion to make our broth, which has a deep flavor and contains a decent amount of sodium. If you’re using a less flavorful broth, your soup will be less flavorful and you may want to increase the spices. If using a lower sodium broth, you may want to add some salt at the end to help the flavors pop.
Pour one 15oz. can of pinto beans (with the liquid from the can) into a blender and purée until smooth (you may still see some small pieces of skin, that’s okay).
Mince four cloves of garlic and add them to a soup pot with 2 Tbsp olive oil. Sauté the garlic over medium heat for about one minute or just until the garlic becomes really fragrant (don’t let it burn).
Add ½ tsp chili powder, ¼ tsp cumin, ¼ tsp oregano, and ⅛ tsp cayenne pepper to the pot. Sauté with the garlic for about one minute more.
Drain the remaining two 15oz. cans of pinto beans. Add the drained whole beans and the puréed beans to the soup pot.
Add two cups of vegetable broth to the pot and stir to combine. Turn the heat up to medium-high to bring the soup up to a boil. Once boiling, turn the heat down slightly and let the soup simmer for 15 minutes (no lid). The soup will thicken slightly as it simmers and the flavors will deepen.
After simmering for 15 minutes, the beans should be quite a bit softer. Use the back of a cooking spoon to smash a few more of the beans to thicken the soup even more. Give the soup a taste and adjust the salt or any other seasoning to your liking.
Serve the soup hot with your favorite toppings!
I particularly like sour cream because it makes the soup extra creamy and adds a light, bright flavor! What is your favorite topping?
Sopa De Letras, or alphabet soup, is a delicious and hearty tomato-based Mexican soup that’s packed with flavor. It’s perfect for a quick weeknight meal when you’re craving a big bowl of comfort food. It’s a breeze to put together (it’s finished in 20 minutes!), it’s vegan, and you can make a big batch and freeze it! Side note: You’ll be looking for words in every spoonful.
What is Sopa De Letras?
This Mexican soup is made with toasted alphabet pasta, a few vegetables, spices, and veggie broth. It’s an incredibly simple recipe that’s ready in a heartbeat, making it perfect for those days when you don’t even have time to think. I got this recipe from my friend Yvette Marquez-Sharpnack, who just published it in her new cookbook Muy Bueno: Fiestas. PSIf you love easy, approachable, super tasty Mexican food, you should check out the book. Her recipes are incredible!
Ingredients For Sopa De Letras
This soup is so easy that it only takes a few steps to make it! So, if you’re ready for a filling and simple recipe perfect for busy days, here’s what you need to make Sopa De Letras:
Alphabet pasta – you can find this tiny pasta shaped like letters in the Latin food aisle of most grocery stores. Substitute it with any small pasta, like ditalini, cous cous, star-shaped pasta (to make Sopa De Estrellitas) or vermicelli (to make Sopa de Fideo).
RomaTomatoes- Make up the base of the broth. Their tangy, savory deliciousness deepens the flavor. You can substitute with 1 pound of any fresh tomato or a 15-ounce can of crushed tomatoes.
Onions and Garlic – are aromatics that add complexity and an earthy sweetness. Sub the onion with 1/2 tablespoon of onion powder and the garlic with 1/8 teaspoon of garlic powder.
Vegetable broth – makes this soup vegan, but feel free to use chicken broth if that’s what you have on hand.
Toppings for Sopa De Letras
You can enjoy your soup as is or add a few tasty toppings to kick things up a notch!
Sour cream or yogurt adds richness and tang to the soup.
Shredded cheese adds a bit of creaminess and flavor.
Cilantro adds herbaceousness and a pop of color to the soup.
Lime wedges add acidity and brightness to the soup.
Hot sauce or chile flakes add a bit of heat and spice to the soup.
If you have leftovers, store them in an airtight container in the refrigerator for up to 3 days. Then reheat it on the stove or in a microwave. The pasta will soak up much of the broth, so you may want to add more veggie broth before reheating. If you’re going to make this to freeze it, I recommend making and freezing the broth. Then, when you’re reheating the broth, toast the pasta and add it in.
In a blender, combine the onion, tomatoes, garlic, pepper, and veggie broth and purée until smooth.
In a Dutch oven over medium heat, warm the oil. Add the alphabet pasta and heat, stirring, until lightly toasted, 1–2 minutes.
Add the puréed mixture, stir well, and cook, stirring, until the mixture thickens and darkens, about 5 minutes.
Add the water, stir well, and bring to a boil, stirring occasionally. Reduce the heat to low, cover, and cook until the pasta is cooked, about 10 minutes.
In a blender, combine the 1/2 white onion, 3 Roma tomatoes, 1 clove garlic, 1/2 teaspoon black pepper, and 2 cups of veggie broth. Purée until smooth.
In a Dutch oven over medium heat, warm the 2 tablespoons of olive oil. Add the 7 ounces of alphabet pasta and heat, stirring, until lightly toasted, 1–2 minutes.
Add the puréed mixture, stir well, and cook, stirring, until the mixture thickens and darkens, about 5 minutes.
Add the 2 cups of water, stir well, and bring to a boil, stirring occasionally. Reduce the heat to low, cover, and cook until the pasta is cooked, about 10 minutes.
Season with salt, ladle into bowls, and serve. Was that easy or what?! I hope you get a chance to enjoy it in peace without your kid freaking out about the poster board they need for a school project that’s due tomorrow but forgot to tell you about. #momlife
When you’re having one of those days when you think you don’t have time to cook anything, try this easy, buttery, and super tasty Creamy Chicken and Orzo Skillet! It’s hearty, rich, comforting, and a perfect dinner for when you want to do anything but spend time in the kitchen. Bonus: it cooks in one pan! Can you ask for anything more?
What is Orzo?
Orzo is a tiny football-shaped pasta that looks like rice but cooks much faster. Like rice, it soaks up all the water it’s cooked in, so you don’t have to worry about draining. That makes it an excellent choice for a speedy one-pan meal.
What You’ll Need
You are just a few spices and a handful of ingredients away from an incredible dinner! Here’s what you’ll need to make this Creamy Chicken And Orzo Skillet.
Seasoning Blend– We’re making our own with paprika, oregano, thyme, garlic powder, onion powder, and pepper. In a pinch, you can also use a heaping tablespoon of your favorite seasoning blend, though you should steer clear of anything super salty.
Boneless Chicken Thighs– These cook much faster than bone-in chicken thighs and their juices help flavor the orzo.
Yellow Onion– Adds depth and a subtle sweetness to the dish.
Garlic– Also adds depth and lends a slight nuttiness when cooked.
Orzo– This pasta cooks quickly and adds bulk. If you don’t have access to orzo, substitute it with a quick-cooking pasta like ditalini or pearl couscous. You can also use rice, but you’ll have to adjust the cooking time so it has enough time to cook.
Vegetable Broth– You need a liquid to cook the orzo and this broth does the trick without overpowering the dish. You can substitute it with water or chicken broth.
Cream– Creates a velvety, creamy sauce.
Butter– Helps pull the sauce together.
Parmesan– Adds depth and a touch of saltiness to the sauce. It also helps give it texture.
What Can You Serve With Creamy Chicken And Orzo?
This creamy Chicken and Orzo Skillet pairs well with a fresh side salad or roasted veggies. Some great options include:
The orzo will absorb much of the creamy sauce it’s cooked in, but the leftovers are still tasty. Store in the fridge for 3 to 4 days in an airtight container. However, do this within two hours of cooking the dish. Chicken left at room temperature any longer than that can contain enough harmful bacteria to give you food poisoning. You can also freeze leftovers for up to 2 months in an airtight container. Thaw in the fridge overnight and reheat on a stovetop or in the microwave until the chicken is steaming.
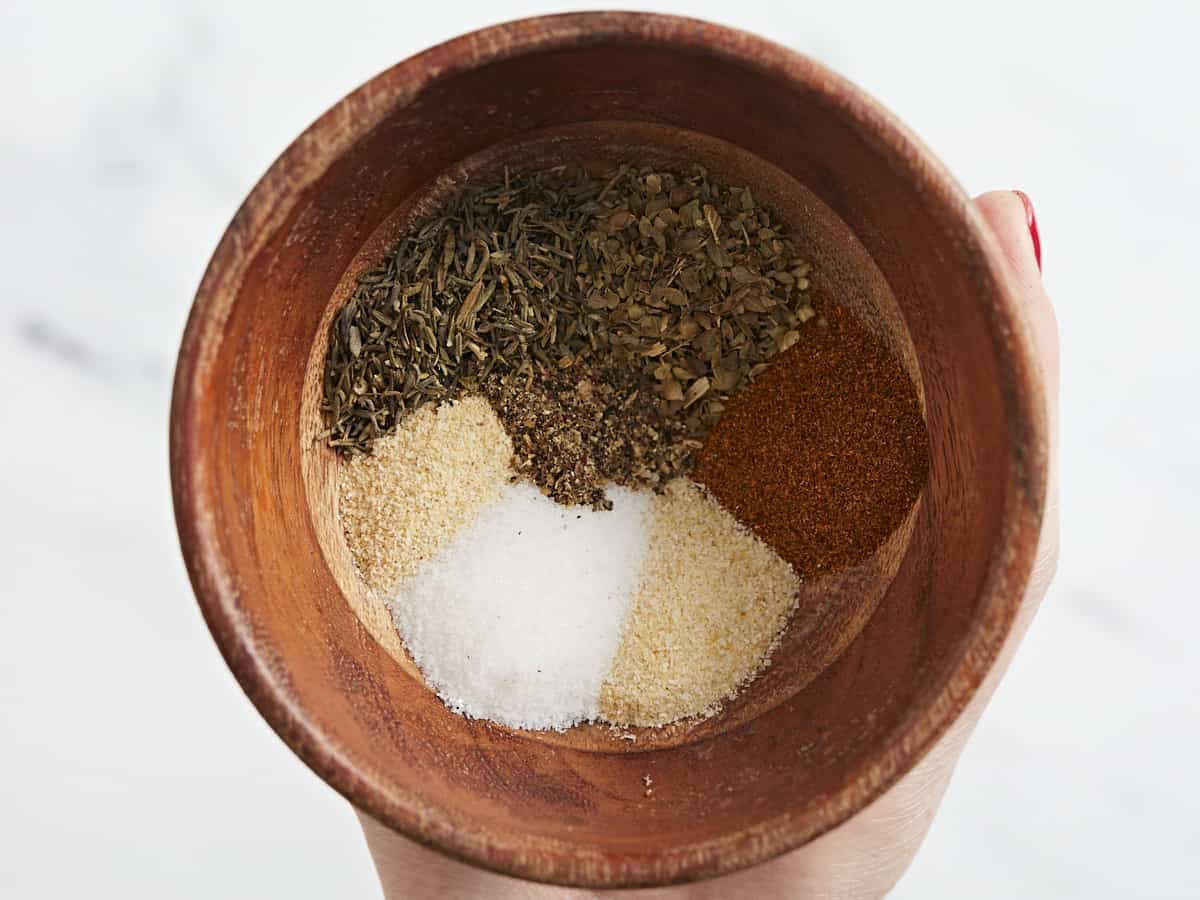
Add the paprika, dried oregano, dried thyme, garlic powder, onion powder, salt, and pepper to a small bowl. Mix until combined.
Blot the chicken thighs dry with a paper towel, then season both sides liberally with the seasoning blend.
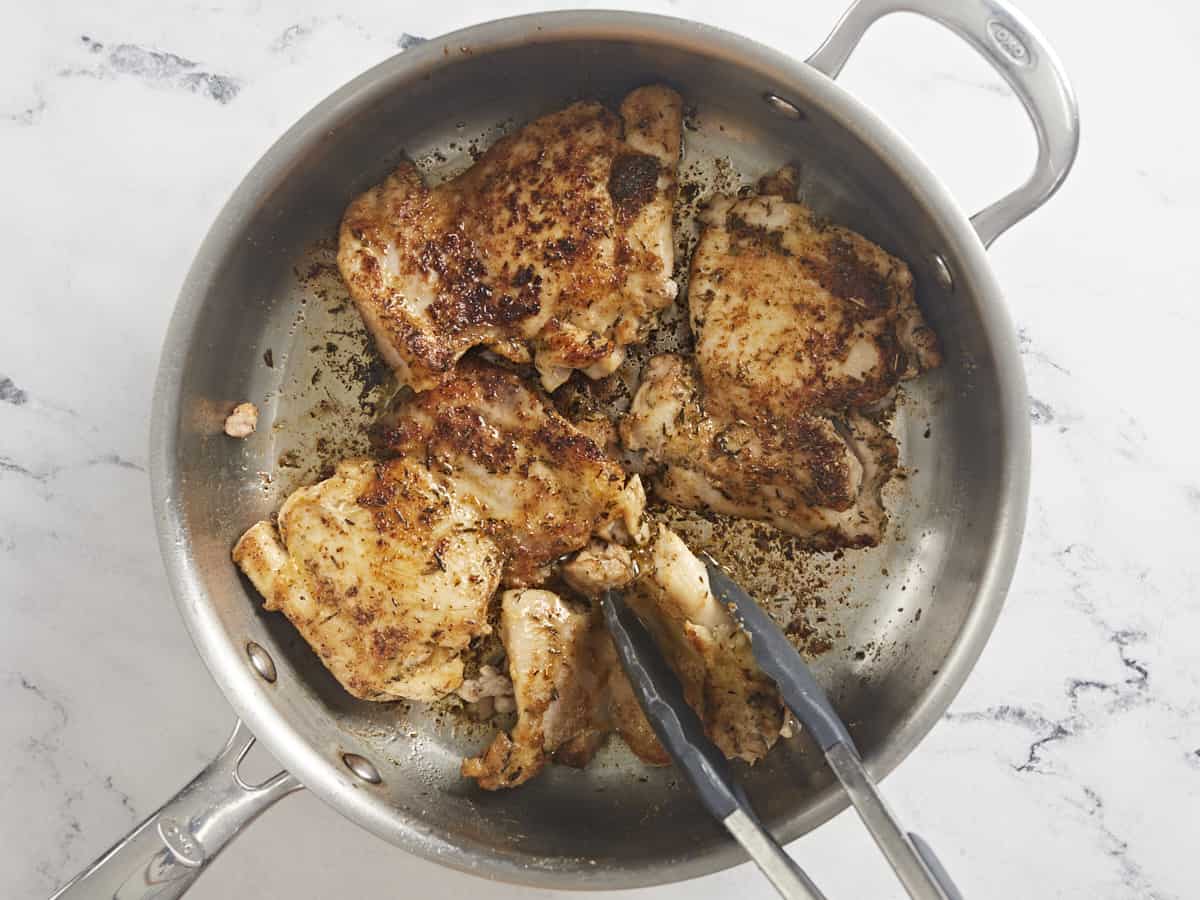
Heat a large deep skillet over medium and add the cooking oil. Add the seasoned chicken thighs and cook undisturbed until well browned, about 5 minutes. Flip and repeat on the other side. Remove the chicken from the pan.
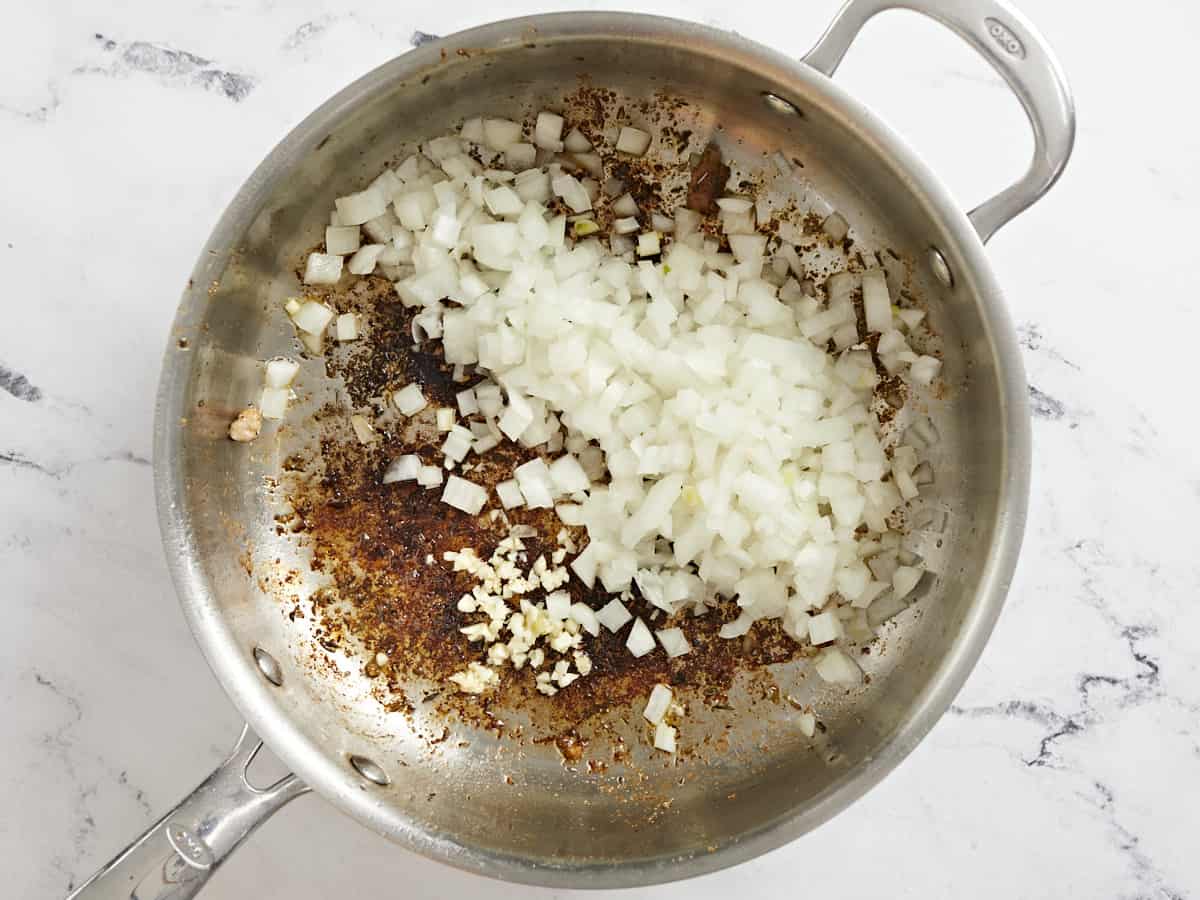
Turn the heat down to low, and add the onion and garlic. Saute until the onions are translucent, about 3 minutes.
Add the orzo and chicken broth to the skillet and stir well to help dissolve the crispy browned bits from the bottom of the pan. Return the chicken to the pan and nestle it down into the orzo.
Place a lid on the skillet, turn the heat up to medium-high, and let the broth come to a full boil. Then turn the heat down to low. Let the skillet simmer for about 15 minutes or until most of the broth is absorbed.
After about 15 minutes, the orzo should be tender and most of the broth absorbed, but there will still be a little sauce in the skillet. Remove the chicken from the skillet.
Add the cream and the butter to the skillet. Stir and heat over low until the butter melts and the cream is hot.
Add the Parmesan and stir to combine.
Finally, return the chicken to the skillet. If desired, garnish with parsley.
How to Make Creamy Chicken And Orzo Skillet – Step by Step Photos
Add 1 teaspoon paprika, 1 teaspoon dried oregano, 1 teaspoon dried thyme, 1/2 teaspoon garlic powder, 1/2 teaspoon onion powder, 1/2 teaspoon salt, and 1/4 teaspoon pepper to a small bowl. Mix until combined.
Blot the 1.25 pounds of chicken thighs dry with a paper towel, then season both sides liberally with the seasoning blend.
Heat a large deep skillet over medium. Once hot, add 2 tablespoons of cooking oil. Add the seasoned chicken thighs and cook undisturbed until well browned, about 5 minutes. Flip and repeat on the other side. Remove the chicken from the pan and place it on a clean plate. The chicken will finish cooking when simmered with the orzo.
Turn the heat down to low and add the diced onion and 2 cloves of minced garlic to the skillet. Saute until the onions are translucent, about 3 minutes.
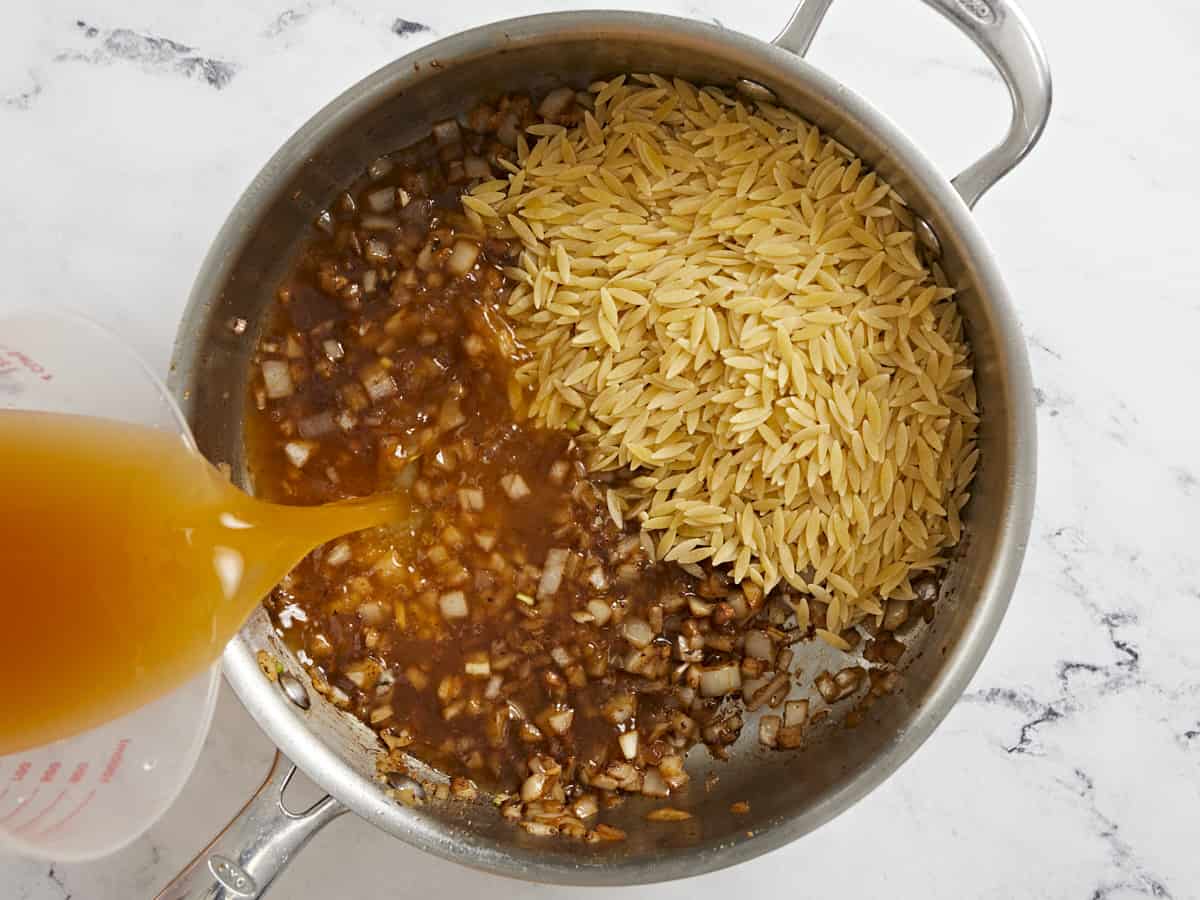
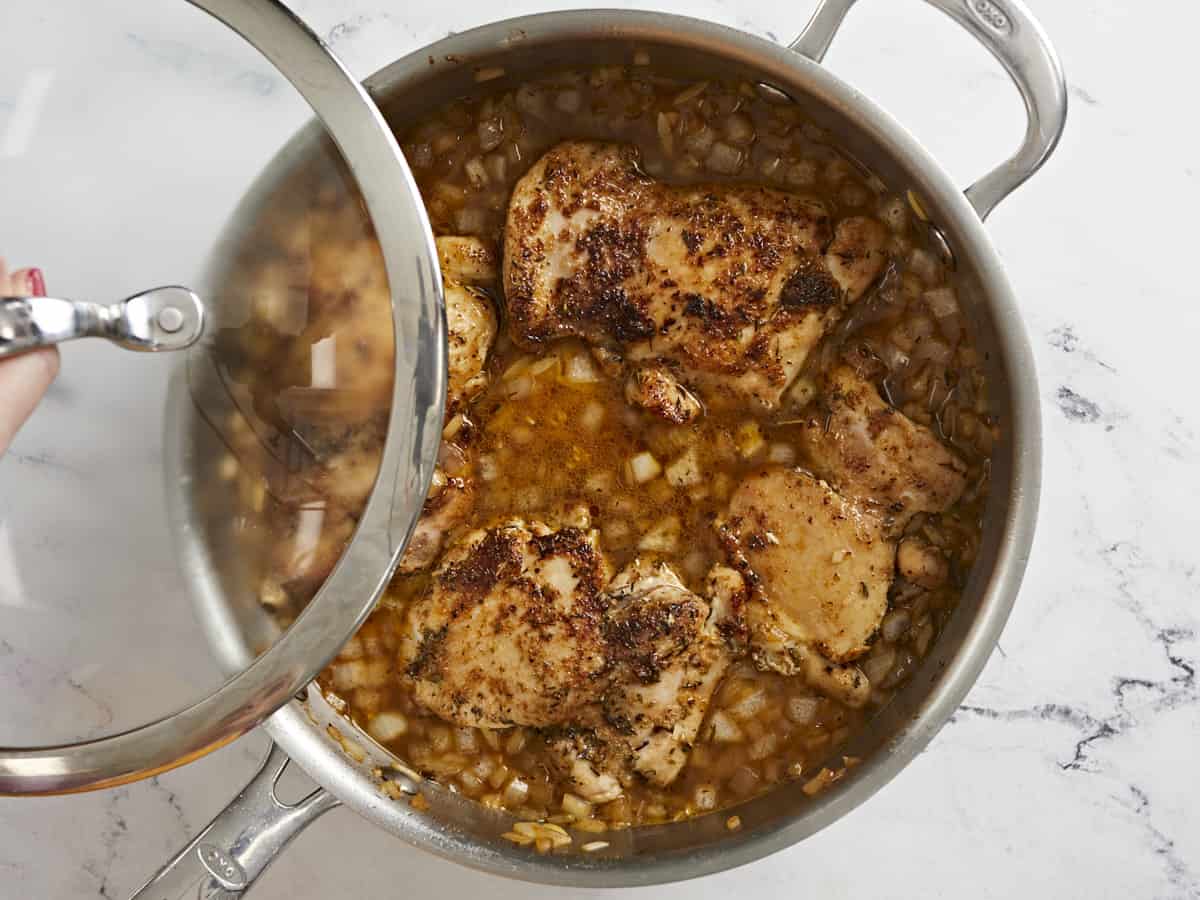
Add the 1/2 cup orzo and the 1 1/2 cups of chicken broth to the skillet and stir well to help dissolve the crispy browned bits from the bottom of the pan. Then return the chicken to the pan and nestle it down into the orzo.
Place a lid on the skillet, turn the heat up to medium-high, and let the broth come to a full boil. Then turn the heat down to low. Let the skillet simmer for about 15 minutes or until most of the broth is absorbed. If at any point it stops simmering, increase the heat slightly until it starts to simmer again.
After about 15 minutes, the orzo should be tender and most of the broth absorbed, but there will still be a little sauce in the skillet. Remove the chicken from the skillet.
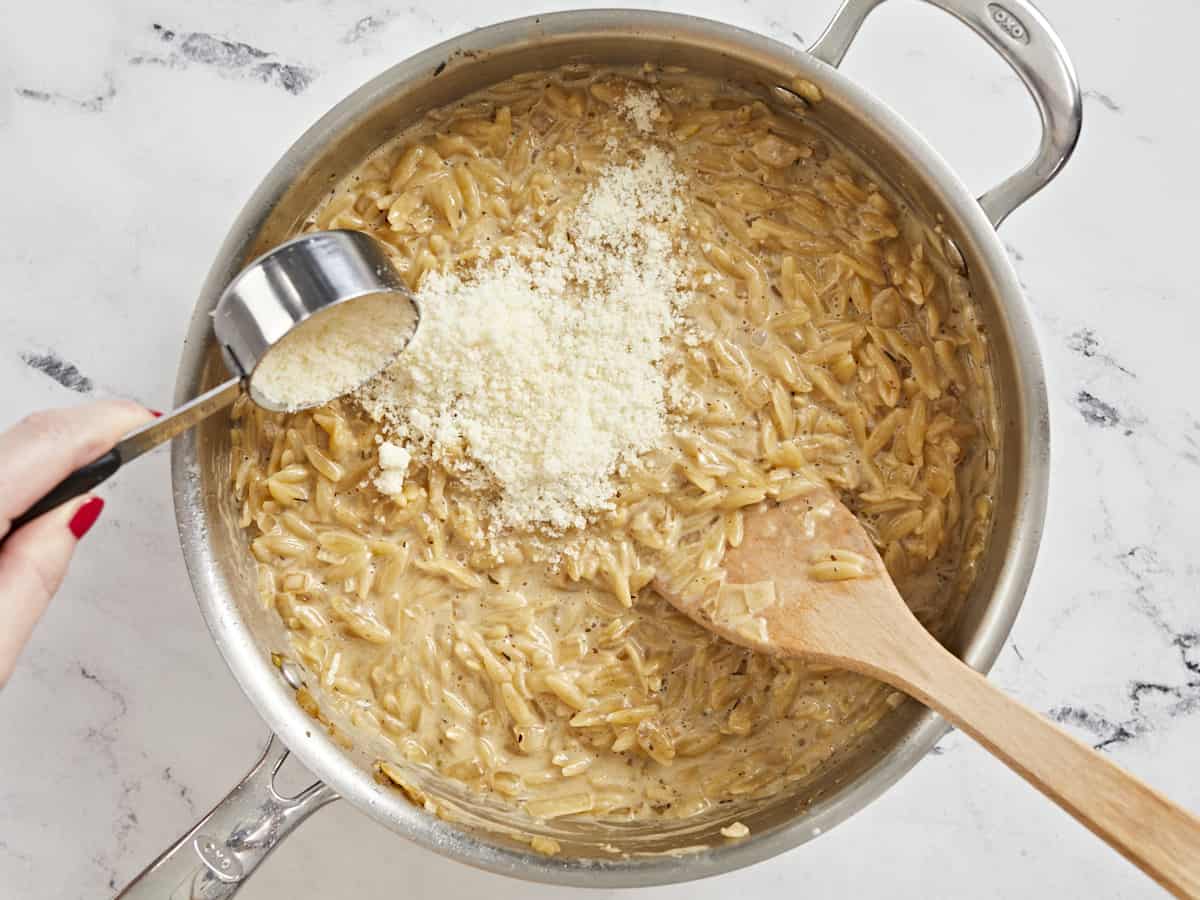
Then add the 1/2 cup of cream and the 2 tablespoons of butter to the skillet. Stir and heat over low until the butter melts and the cream is hot.
Next, add the 1/4 cup parmesan and stir to combine.
Finally, return the chicken to the skillet. If you’d like, garnish with chopped Italian parsley and serve. Pair with a side salad or roasted veggies for an incredibly filling meal! Wasn’t that easy?
Move over, butternut squash! Carrots are back and ready to be the new SOUPer star in this creamy vegan carrot soup. It’s rich thanks to coconut milk and subtly spicy from red pepper flakes, making it super warming and perfect for the transition from wi…
Move over, butternut squash! Carrots are back and ready to be the new SOUPer star in this creamy vegan carrot soup. It’s rich thanks to coconut milk and subtly spicy from red pepper flakes, making it super warming and perfect for the transition from winter to spring!
The best part? It’s made in 1 pot with just 10 ingredients you may have around right now. Let us show you how it’s done!
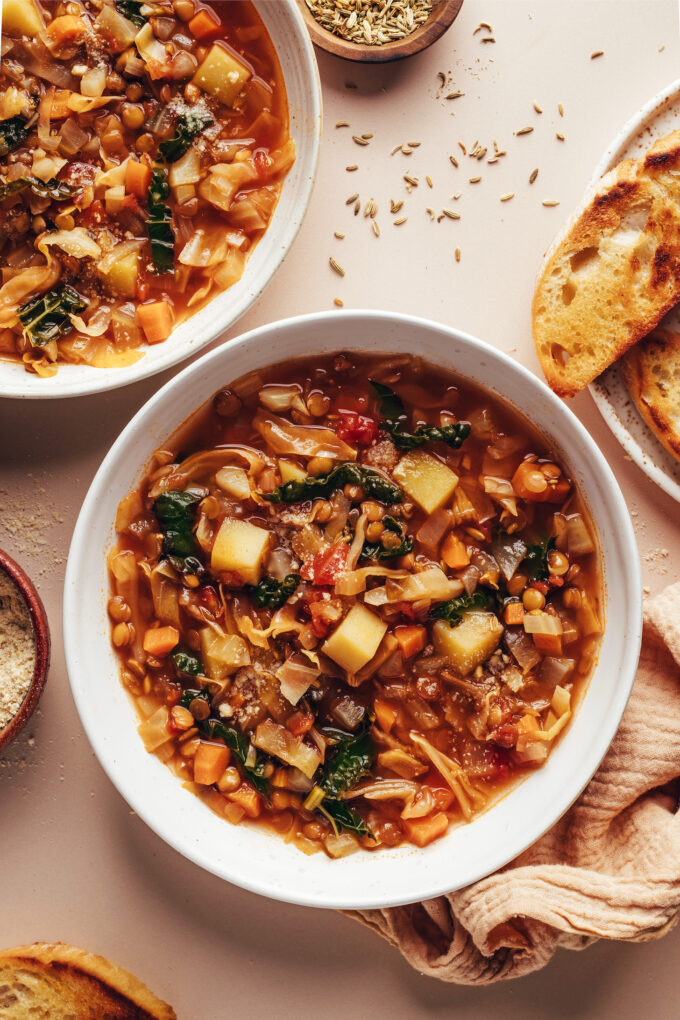
We know what you’re thinking: Cabbage soup isn’t sexy. But is it? Cabbage and fennel just met and they’re now inseparable. This soup is just the beginning of their love affair! Made with Italian seasonings, fresh fennel, and lentils, this soup is savor…
We know what you’re thinking: Cabbage soup isn’t sexy. But isit? Cabbage and fennel just met and they’re now inseparable. This soup is just the beginning of their love affair! Made with Italian seasonings, fresh fennel, and lentils, this soup is savory, nourishing, subtly spicy, and light yet satisfying!
Made in just 1 pot, it’s the perfect easy meal for a cozy weeknight in!
 I love making pumpkin recipes during the fall months. I usually go sweet instead of savory because I have so many favorites like pumpkin chocolate chip bread, pumpkin cookies, and pumpkin bundt cake. But I also love using pumpkin in savory dishes. This Pumpkin Pasta recipe is a fall favorite and easy to make. The…