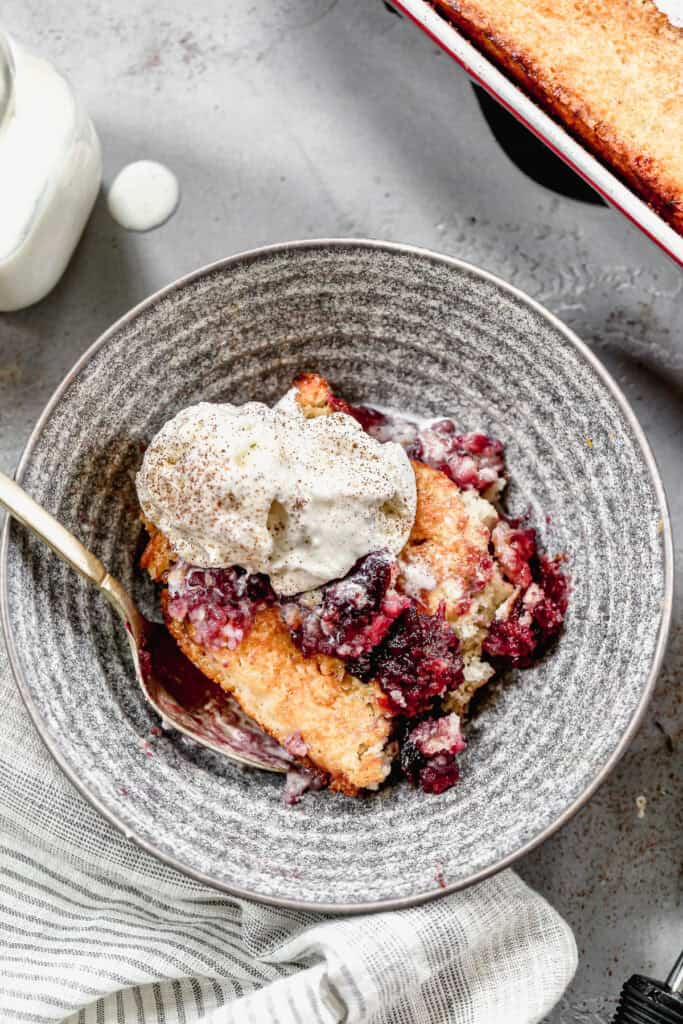
These healthy and delicious blackened Salmon Tacos include flavorful salmon wrapped in a corn tortilla, topped with cabbage, red onions, cilantro, and an easy cilantro lime sauce. If you love seafood recipes be sure to try our Crab Cakes, Grilled Fish Tacos, or Kung Pao Shrimp. How to make Salmon Tacos: Cook Salmon: Pat salmon…
These healthy and delicious blackened Salmon Tacos include flavorful salmon wrapped in a corn tortilla, topped with cabbage, red onions, cilantro, and an easy cilantro lime sauce.
I love meals, like these salmon tacos, that appear impressive ,but are one of the quickest meals out there. The salmon is broiled for less than 10-minutes, and the cilantro lime sauce is so easy. I strongly suggest taking an extra 10 minutes to make your own corn tortillas while the salmon is cooking; it truly makes such a big difference! If you want over-the-top goodness, whip up so quick pickled red onions for topping. Include those details and these are one of my favorite tacos of all time (along with my favorite chicken street tacos, of course).
How to make Salmon Tacos:
Cook Salmon: Pat salmon dry with a paper towel and place on a foil lined baking sheet. Rub oil all over top of salmon flesh. In a small bowl, combine spices and lime zest. Rub mixture onto flesh of salmon. Broil on upper middle rack for 8 to 10 minutes (140 degrees on a thermometer) or until salmon flakes with a fork. Remove from oven and tent with foil to rest.
Make Cilantro Lime Sauce: Add all ingredients to a food processor and blend cilantro lime sauce until smooth.
Assemble Tacos: Warm corn tortillas on a hot, dry skillet, flipping once. Break salmon into pieces then place a spoonful of salmon on a tortilla. Top with cabbage, pickled onions, sauce, and cilantro. Spritz with fresh lime juice and add hot sauce if desired.
Easy blackened Salmon Tacos will be your new weeknight favorite, with flaky and tender salmon, your favorite toppings, and an easy cilantro lime sauce.
Prep Salmon: Pat salmon dry with a paper towel, and place on a foil lined baking sheet. Rub oil all over top of salmon flesh. In a small bowl, combine spices and lime zest. Rub mixture onto flesh of salmon.
Broil on upper middle rack for 8 to 10 minutes (140 degrees on a thermometer) or until salmon flakes with a fork. (Or Bake at 400 for 15-20 minuntes). Remove from oven and tent with foil to rest.
Cilantro Lime Sauce: Add all ingredients to a food processor and blend until smooth.
Assemble Tacos: Warm corn tortillas on a hot, dry skillet, flipping once. Break salmon into pieces and place a spoonful of salmon on a tortilla. Top with cabbage, pickled onions, sauce, and cilantro. Spritz with fresh lime juice and add hot sauce if desired.
Notes
Serving size: 4oz salmon, 2 corn tortillas, 2 Tablespoons sauceAir Fryer Salmon Tacos: Heat air-fryer to 400 degrees F. Grease basket or use a liner. Cook salmon, skin-side down, for about 7-10 minutes.
Our 4-ingredient Oreo Milkshake recipe is thick, creamy, and everyone’s favorite dessert! Looking for more frozen treats? I’ve got you covered with Ice Cream Sandwiches, Frozen Hot Chocolate, Chocolate Milkshake, and Strawberry Cheesecake Ice Cream! How to make an Oreo Milkshake: Blend: Add ice cream, milk, chocolate sauce, and Oreos to a blender and blend…
Our 4-ingredient Oreo Milkshake recipe is thick, creamy, and everyone’s favorite dessert!
My husband is not a cook, but Oreo milkshakes have been his thing since before I knew him. You wouldn’t think a recipe is needed for them, but I love how he creates the perfect thickness and balance of chocolate vs Oreo, so I asked him to measure out the ingredients so I could share this recipe. And now my kids can make “Dad’s” drive-thru worthy Oreo Milkshakes with this recipe as their guide.
How to make an Oreo Milkshake:
Blend: Add ice cream, milk, chocolate sauce, and Oreos to a blender and blend until desired consistency. If you like your homemade Oreo milkshakes chunkier, blend all of the ingredients except the Oreos. Add the Oreos briefly at the end, or crush them by hand and stir them in. Top with whipped cream and enjoy!
Other Shake Variations:
Healthier Oreo Shake: Use slow churn vanilla ice cream, skim milk and only 6 Oreos.
Vegan Oreo Shake: Use vegan vanilla ice cream and almond milk. Omit whipping cream.
Caramel Oreo Milkshake: Add a few Tablespoons caramel sauce.
Banana Oreo Shake: Add a frozen banana.
Double Chocolate Oreo Shake: Swap vanilla ice cream for chocolate.
This easy S’mores Cookies recipe is thick and chewy with a graham cracker cookie base, chocolate and marshmallows. Want more tasty desserts? You have to try this Flourless Chocolate Cake, Scotcheroos, Chocolate Brownies, and Lemon Bars! How to make S’mores Cookies: Make Cookie Dough: Cream together butter and sugars for 2-3 minutes. Mix in egg…
This easy S’mores Cookies recipe is thick and chewy with a graham cracker cookie base, chocolate and marshmallows.
We make S’mores Cookies (and S’mores Bars) all year long, but they’re particularly fun during the summer months to bring the taste of camping to our kitchen without the smoke and mess. They have a soft graham cracker chocolate chip cookie base and are finished off with adding mini marshmallows and chunks of chocolate. They are absolutely delicious and such a winner at BBQ’s and potlucks.
How to make S’mores Cookies:
Make Cookie Dough: Cream together butter and sugars for 2-3 minutes. Mix in egg and vanilla. Add flour, graham cracker crumbs, baking soda, and salt and mix. Stir in chocolate chips.
Bake: Scoop cookie dough into 2-Tablespoon-size balls and place on baking sheet. Press down on each ball to flatten it slightly. Bake for 8 minutes then remove from the oven and softly press 2-3 small pieces of Hershey’s chocolate and 2-3 mini marshmallows on the top of each cookie. Return to oven for 3-5 minutes. Cool cookies on baking sheet for 5 minutes before moving to wire rack.
Make Ahead and Freezing Instructions:
To Make Ahead: Store S’mores cookie dough in the fridge for up to 3 days.
To Freeze: Freeze cookie dough balls, or baked s’mores cookies for up to 3 months in an airtight freezer-safe container. Freeze baked s’mores cookies after baking and cooling for up to 3 months. Just thaw on the counter or microwave for a few seconds until warm for a yummy treat.
Preheat oven to 375 degrees F. Line a baking sheet with parchment paper.
Cookie Dough: In large mixing bowl cream together the butter, granulated sugar and brown sugar for 2-3 minutes. Add egg, egg yolk and vanilla then mix. Add flour, graham cracker crumbs, baking soda and salt then mix until combined. Stir in chocolate chips.
Chill dough in the refrigerator for 15 minutes.
Scoop cookie dough into 2 Tablespoon size balls and place on prepared baking sheet, a few inches apart. Press down slightly on the cookie dough balls, to flatten a little.
Bake for 8 minutes. Remove from oven and gently press 2-3 small pieces of Hershey's chocolate and 2-3 mini marshmallows on the top of each cookie. Return to oven for 3-5 minutes.
Allow to cool on the baking sheet for 5 minutes before moving to a wire rack to cool completely.
Make Ahead Instructions: You can make and keep this s’mores dough in the fridge for up to 3 days.Freezing Instructions: Freeze cookie dough balls, or baked s’mores cookies for up to 3 months in an airtight freezer-safe container.
You can make the best Peach Jam recipe using fresh (or frozen) peaches and it will keep in the freezer for up to one year. If you’re hooked on homemade jam, try my Blackberry Jam, Chia Seed Jam, Orange Marmalade, Strawberry Jam, or Raspberry Jam! How to make Peach Jam: Peel Peaches and Prep Containers:…
You can make the best Peach Jam recipe using fresh (or frozen) peaches and it will keep in the freezer for up to one year.
I’m telling you, this is the EASIEST method for making jam; no special equipment, no processing in a steamer or water-bath. You just need peaches, sugar and pectin, and in a few short minutes you’ll have peach jam that will keep in the freezer for one year.
Peel Peaches and Prep Containers: Have clean glass or plastic containers and lids ready. Use my easy method of peeling peaches, and remove the pits.
Dice Peaches or pulse in food processor until diced. Measure exactly 3 cups of peaches into a large heat-proof bowl then add one cup of sugar. Stir well, then allow to rest for 5 minutes. Repeat with remaining sugar, stirring well and letting it rest in between. Stir in lemon juice then let rest for 10 minutes. Taste, and if the sugar is still grainy at all, place the bowl over a small saucepan of simmering water, stirring often, to help the sugar dissolve.
Add Pectin: Whisk water and pectin in a saucepan and bring to a boil, stirring constantly. Boil for 1 minute then remove from heat and whisk into peach mixture. Stir jam constantly for 3 minutes. The jam should start to slightly thicken–if it seems overly runny (or you had very juice peaches) you can repeat pectin process and add ½ or a full additional box of pectin, if needed.
Fill Jars and Enjoy: Pour jam into jars or plastic containers, leaving ½ inch headspace. Wipe rims of jars, cover with lids. Rest at room temperature for 24 hours before storing in the freezer.
Storing Instructions:
Freeze for up to one year, or refrigerate for up to 3-4 weeks.
Our favorite Peach Freezer Jam recipe uses fresh or frozen peaches and can be kept in the freezer for up to a year! It is so easy to make you will never go back to store-bought.
Gather containers: make sure they are clean and dry. Plastic or glass freezer-safe containers will work.
Prep Peaches: Peel and pit peaches (here's my method for how to easily peel peaches). Finely dice peaches and measure exactly 3 cups of diced peaches into a large bowl.
Dissolve Sugar: Add one cup of sugar to the bowl and stir well. Rest for 5 minutes. Repeat with remaining sugar, adding it a little at a time and resting in between, to help the sugar dissolve completely. Stir in lemon juice. Let mixture rest for 10 min. Taste the mixture and if it's still grainy from the sugar don't proceed until the sugar has dissolved! (If needed, you could place the heat-proof bowl or peaches over a saucepan of warm water on the stove. Gently stir the mixture and the heat will help the sugar to dissolve.)
Add Pectin: Whisk water and pectin in a saucepan and bring to a boil, stirring constantly. Boil for 1 minute then remove from heat and whisk into peach mixture. Stir jam constantly for 3 minutes. The jam will start to thicken, and will thicken more as it rests. If it seems overly runny (maybe you had very juice peaches) you can repeat pectin process and add ½ or a full additional box of pectin, if needed.
Fill containers, leaving ½ inch headspace. Wipe rim of jars clean and cover with lids. Let stand at room temperature for 24 hours before freezing. This allows the jam time to set up, but feel free to enjoy one of the jars right away.
Store jam in the refrigerator for up to 3 weeks or freeze for up to 1 year.
Video
Notes
Yield: Makes about 7 cupsServing Size for nutritional label: 2 TablespoonsFor Frozen Peaches: Allow peaches to thaw completely, then dice and use as instructed.Troubleshooting Runny Peach Jam: If your peaches are extra juicy and your jam hasn’t set up with one box of pectin, repeat step 4 and cook another package of pectin and add half or all of the mixture to thicken the jam more. Free Printable Peach Jam labels with these sheets make a great gift!More Jam Recipes: Strawberry, Raspberry, Blackberry, Chia Jam, Orange MarmaladeRecipe adapted from Surejell
Our Mexican-inspired Street Corn Pasta Salad is your new must-have at all BBQ’s and gatherings. It has fresh roasted corn tossed with pasta and a flavorful creamy lime sauce. We love to serve it with BBQ Chicken Drumsticks, Black Bean Burgers, Steak Kabobs, or Flank Steak. How to make Street Corn Pasta Salad: Cook pasta…
Our Mexican-inspired Street Corn Pasta Salad is your new must-have at all BBQ’s and gatherings. It has fresh roasted corn tossed with pasta and a flavorful creamy lime sauce.
What we’ve got here is the flavor I crave from my favorite elotes/esquites Mexican street corn, in pasta salad form, and I promise it will be the star of your next BBQ! It has SO much flavor, including a crema sauce with hints of chipotle. It’s just so good; main dish or side dish worthy, paired with any favorite Summer BBQ recipes.
How to make Street Corn Pasta Salad:
Cook pasta according to package instructions, in salted boiling water. Drain then rinse with cold water to cool it off.
Sauté Corn: Add butter to a large skillet over medium heat then add onion, corn and chipotle peppers and stir. Turn heat to high, cover with lid and sauté, stirring occasionally, until corn is charred and tender, about 4-5 minutes. Remove from heat then transfer to a plate to cool completely.
Sauce: Mix sauce ingredients in a bowl: mayo, sour cream, tajin, lime and milk.
Combine: Add pasta to a large mixing bowl then add cooled corn. Stir in sauce, and top with cotija cheese and cilantro.
Make Ahead Instructions:
To Make Ahead: Store cooked pasta and corn in a covered bowl in the fridge. Make sauce, but store separately. Mix sauce and pasta just before serving this elote pasta salad.
This Mexican-inspired Street Corn Pasta Salad is your new must-have at all BBQ's and gatherings. It has fresh roasted corn tossed with pasta and a flavorful creamy lime sauce.
Sauté corn: Add butter to a large skillet over medium heat. Add onion, corn and chipotle peppers and stir. Turn heat to high, cover with lid and sauté, stirring occasionally, until corn is charred and tender, about 4-5 minutes. Remove from heat and transfer to a plate to cool completely.
Cook pasta according to package instructions, in salted boiling water. Drain and rinse with cold water to cool it off.
Mix sauce ingredients in a bowl: mayo, sour cream, tajin, lime and milk.
Combine: Add pasta to a large mixing bowl. Add cooled corn and stir in sauce. Top with cotija cheese and cilantro and enjoy immediately.
Notes
Corn: you may substitute frozen corn (it just wont brown as much). I prefer Trader Joe’s frozen Roasted Corn.Tajin: Should be easy to find in the Mexican aisle at the store (or sometimes found near produce). Could substitute chili powder.Make Ahead Instructions: Store cooked pasta and corn in a covered bowl in the fridge. Make sauce, but store separately. Mix sauce and pasta just before serving.
Using a weekly meal plan is the best way to cook healthier for your family, save money, and time! This week’s menu includes our popular Baked Ziti, Black Bean Burger, Mini Meatloaf, BBQ Chicken Drumsticks and Crispy Southwest Wrap. Did you know you can SAVE your favorite recipes and ANY of my meal plans? Simply…
Using a weekly meal plan is the best way to cook healthier for your family, save money, and time! This week’s menu includes our popular Baked Ziti, Black Bean Burger, Mini Meatloaf, BBQ Chicken Drumsticks and Crispy Southwest Wrap.
Did you know you can SAVE your favorite recipes and ANY of my meal plans? Simply create an account (it’s free)!
To save this meal plan to your recipe collection, click here. You can even swap out recipes with your favorites.
We’ve been sharing 5-day weekly meal plans for many years now and we love the feedback we get from those of you who found our meal plans and who are using them regularly.
Each meal plan has 5 dinner recipes that will serve approximately 4 adults. We’ve tried to be thoughtful about including recipes that the whole family will love as well as varying the recipes to include a variety of different meals so that you’re not having chicken every night!
Why Meal Plan?
If you’re reading this, you probably already have your own ideas about why meal planning is a good idea for your family, but here’s what we think:
1. Prep Ahead Instructions:
Our meal plans come with prep-ahead instructions for every recipe. Even 5 minutes of cutting veggies or prepping a sauce ahead of time will make all the difference in your attitude about making dinner that night.
2. Budget Information:
Not only are these meal plans FREE but we’ve also included a rough estimate of budget info for each recipes to help you with your grocery planning. You can also swap out recipes and add more budget friendly recipes with just a few clicks. Learn more here.
3. Edit and Customize Meal Plans:
We know families each have unique needs, that’s why we’ve worked hard to make our meal plans fully customizable. You can swap out recipes, change serving sizes, and change the shopping list. Learn more here.
4. New Meal Plans Each Week:
There’s a new meal plan EVERY WEEK and we offer low carb, budget, and seasonal meal plans too.
5. Get Weekly Meal Plans Sent Straight To Your Inbox:
Sign up here to get our meal plans delivered right to your email every single week.
Follow Me
Click the link below to print out your shopping list, and you’re ready to go!
**NOTE: You’ll notice the shopping list includes categories like “pantry staples”, and “spices”. Hopefully, those are items you already have on hand, and you can cross them off of the list.
Our Dulce de Leche Cake recipe tastes as good as it looks and is easy to make from scratch. tPerfect for any caramel lover in your life. Our other favorite “birthday party” worthy cakes include German Chocolate Cake, Coconut Cake, Carrot Cake and Flourless Chocolate Cake. How to make Dulce de Leche Cake: Make Cake…
Our Dulce de Leche Cake recipe tastes as good as it looks and is easy to make from scratch. tPerfect for any caramel lover in your life.
We’ve crowned Dulce de Leche Cake our new birthday fav.
There’s not treat that reigns more supreme for me than cake, and I’m very excited to introduce you guys to this brand new Dulce de Leche Cake. I started testing this cake last year, when my oldest son requested a “caramel-like” cake for his birthday. Over the months it’s become everyones birthday request, and I’ve tweaked it until it has the perfect tender cake crumb and high quality dulce de leche buttercream.
Be careful not to over bake the cake layers, or they will be dry. And take care to whip the buttercream until light and fluffy.
How to make Dulce de Leche Cake:
Make Cake Batter: Cream together butter and sugar for about 3 minutes, until mixture is light and fluffy. Add vanilla and then eggs, mixing in one at a time, until combined. With the mixer on, add sour cream and slowly add ½ of the can of dulce de leche, mixing until batter becomes lighter in color.
In a separate bowl, combine the flour, baking powder, and salt. With the mixer on low speed, alternately add the dry mixture and the milk, starting and ending with the dry mixture.
Bake: Pour batter into prepared cake pans then bake for about 22-25 minutes, or until a toothpick inserted in the center of the cake comes out clean (or with a few moist crumbs). Do NOT over bake the cake, or it will be dry. Remove cake and cool in the pan for a few minutes before inverting onto a wire cooling rack to cool completely.
Make Frosting: In a stand mixer fitted with the paddle attachment, combine butter, powdered sugar and ½ can of dulce de leche. Mix for several minutes, tunil lightened in color, and very fluffy and smooth. Add a little milk, if needed, to thin the frosting.
Assemble: Place one cake round on serving platter or cardboard cake round and spread a thin layer of frosting on top. Add ½ of the second can of dulce de leche to a small bowl then microwave for a just a few seconds, to soften it a little. Spread it on top of the cake, leaving a 1 inch border. Place the second cake round on top.
Pipe a line of frosting into the crack between the two layers of cake. Frost cake completely with a very thin layer of frosting—the crumb coat. Stick in the fridge for 20 minutes, or freezer for 10 minutes. Remove and add another layer of frosting over the crumb coat.
Decorate Cake: Warm remaining ½ can of dulce de leche in a small bowl in the microwave for a just a few seconds to soften. Smooth dulce de leche over the top of the cake, leaving a 1-inch board. Pipe decorative frosting swirls around the outer top edge, if desired. (I use my reusable ateco piping bag and wilton 1M piping tip). Sprinkle a pinch of flake salt on top of the cake, if desired.
Make Ahead and Freezing Instructions:
To Make Ahead: The dulce de leche frosting can be stored in an airtight container in the fridge for up to a week. Bring to room temperature before remixing into soft and fluffy.
To Freeze: The cakes and frosting can be frozen. Allow the cakes to cool completely, then wrap in plastic wrap and store in a freezer bag for up to one month. Frost cakes when they are still frozen. Freeze frosting in an airtight container for up to three months.
Not only is our Dulce de Leche Cake recipe beautiful, it's a knock-out in flavor, with layers of moist dulce de leche cake and buttercream frosting and pure dulce de leche between layers, too.
Preheat oven to 350 degrees F. Line the bottom of two 8-inch cake pans with parchment paper rounds and spray with nonstick spray. Set aside.
Cake Batter: In a large mixing bowl with electric beaters, or bowl of a stand mixer fitted with the paddle attachment, combine the butter and the sugar. Cream together for about 3 minutes, until light and fluffy. Add vanilla and then eggs, mixing in one at a time, until combined.
With the mixer on, add sour cream, and slowly add ½ of the can of dulce de leche, mixing until batter becomes lighter in color.
In a separate bowl combine the flour, baking powder and salt. With the mixer on low speed, alternately add the dry mixture and the milk, starting and ending with the dry mixture.
Bake: Pour the batter into prepared cake pans and bake for about 23-25 minutes, or until a toothpick inserted in the center of the cake comes out clean (or with a few moist crumbs). Do NOT over bake or the cake will be dry. Allow to cool for a few minutes before inverting onto wire cooling racks to cool completely.
Dulce de Leche Buttercream Frosting: In a stand mixer fitted with the paddle attachment, combine the butter, powdered sugar and ½ can of dulce de leche and beat for several minutes, until very fluffy and smooth. Add a little milk, if needed, to thin the frosting.
Assemble: Place one cake round serving plate. Spread a thin layer of frosting over the top. Add ½ of the second can of dulce de leche to a small bowl and microwave for a just a few seconds, to soften it a little. Spread it on top of the cake, leaving a 1 inch border. Place the second cake round on top. Pipe a line of frosting into the crack between the two layers of cake. Frost cake completely with a very thin layer of frosting—the crumb coat. Refrigerate for 20 minutes, or freezer for 10 minutes. Remove and then add another layer of frosting over the crumb coat.
Warm the remaining ½ can of dulce de leche in a small bowl in the microwave for a just a few seconds to soften. Smooth dulce de leche over the top of the cake, leaving a 1-inch board. Pipe decorative frosting swirls around the outer top edge of the cake.
Sprinkle a pinch of flake salt on top of the cake, if desired.
Notes
Makes a 2 layer (8inch) cake.Dulce de Leche: The recipe uses two 14 oz cans of dulce de leche. I recommend the La Lechera brand. You will use half a can in the cake batter and half a can in the frosting. Half a can in between two cake layers when frosting, and remaining half can on top of the cake at the end. To make your own dulce de leche, use a can of sweet and condensed milk. Remove the wrappers. Place cans upside down in a large pot and add enough water to submerge them by about two inches. Bring to a boil, reduce heat to low, and cook for 1 hour. Flip can. Make sure water level is still above the lid, and simmer for another hour. Decorating: I have two favorite tips for piping swirls on a cake: Wilton 1M and Wilton 2D and this large 14” ateco piping bag. Make Ahead Instructions: The dulce de leche frosting can be stored in an airtight container in the fridge for up to a week. Bring to room temperature before using.Freezing Instructions: The cakes and frosting can be frozen. Allow the cakes to cool completely, then wrap in plastic wrap and store in a freezer bag for up to one month. Frost cakes when they are still frozen. Freeze frosting in an airtight container for up to three months.
Our Vinegar Coleslaw recipe is just as flavorful as the mayo version but less calories and fat. It’s healthy, fresh, and only takes a few minutes to make. Are you looking for the perfect BBQ Menu? You can’t go wrong with Steak Kabobs, Grilled Pizza, or the best Hamburger recipe! How to make Vinegar Coleslaw:…
Our Vinegar Coleslaw recipe is just as flavorful as the mayo version but less calories and fat. It’s healthy, fresh, and only takes a few minutes to make.
Vinegar Coleslaw is our Healthy BBQ Sidekick of Summer
I’m all about the fresh crunch and tangy flavor of this vinegar coleslaw recipe. It’s so versatile; enjoy it as a side dish, or load it on some fish tacos or pupusas. It has less calories and fat than a traditional creamy coleslaw recipe so you can feel better about eating it, too.
How to make Vinegar Coleslaw:
Prep Veggies: Add cabbage to an extra-large mixing bowl. Shred carrot then use paper towels to scoop up the carrots and squeeze out any excess moisture, over the sink. Add carrots and green onion to the bowl then toss to combine.
Make Dressing: Whisk ingredients together in a medium bowl then taste and adjust seasonings as needed. Pour dressing over veggies then toss well to coat evenly. Refrigerate no mayo coleslaw for several hours or overnight before serving, for best results.
Make Ahead Instructions:
To Make Ahead: Make this healthy coleslaw recipe 1-2 days in advance or let it sit in the fridge overnight for best results.
This Vinegar Coleslaw recipe is just as flavorful as the mayo version but less calories and fat. It's healthy, fresh, and only takes 10 minutes to make!
Prep Veggies: Add cabbage to an extra-large mixing bowl. Shred carrot then use paper towels to scoop up the carrots and squeeze out any excess moisture, over the sink. Add carrots and green onion to the bowl then toss to combine.
Dressing: Whisk ingredients together in a medium bowl. Taste and adjust seasonings as needed. Pour dressing over veggies and toss well to coat evenly. Refrigerate for several hours or overnight before serving, for best results.
Notes
*To sub Bag coleslaw mix—use two 14oz bags coleslaw mix in place of cabbage and carrot.
These healthy Fruit Pops are made with just three ingredients. They’re an easy and fun summer treat you can feel good about giving your kids. Looking for more frozen desserts? Try our Ice Cream Sandwiches, Chocolate Milkshake, or Orange Ice Cream! How to make Fruit Pops: Combine Ingredients: Add fruit to your popsicle mold (I…
These healthy Fruit Pops are made with just three ingredients. They’re an easy and fun summer treat you can feel good about giving your kids.
Not only are they delicious, but making fruit popsicles with your kids makes for a fun and easy summer activity, too. They’re healthier than store-bought popsicles, with nothing artificial; just fresh fruit and juice. I use these popsicles trays from Amazon.
How to make Fruit Pops:
Combine Ingredients: Add fruit to your popsicle mold (I use this one). Fill the mold with apple juice, leaving at least ⅛ in headspace and place the popsicle stick inside. Freeze fruit popsicles for at least 6 hours or overnight.
Assemble: Add fruit to your popsicle mold (I use this one), alternating different kinds of fruit until the molds are filled almost to the top. Gently fill the mold with apple juice, leaving at least ⅛ in headspace and place the popsicle stick inside.
Freeze for at least 6 hours or overnight.
Video
Notes
Fruit: any type of fresh or frozen fruit will work.Juice: Any type of fruit juice will work.
The BEST BBQ Chicken Drumsticks recipe is cooked in a simple homemade BBQ sauce and then grilled for that crispy skin we love. This is an easy and affordable recipe that’s always a crowd pleaser. Bring on all the grilling recipes like Steak Kabobs, Cedar Plank Salmon, Fish Tacos, and Hawaiian Bowls. How to make…
The BEST BBQ Chicken Drumsticks recipe is cooked in a simple homemade BBQ sauce and then grilled for that crispy skin we love. This is an easy and affordable recipe that’s always a crowd pleaser.
Our BBQ Chicken Drumsticks are Finger-Licking Good
This easy BBQ Chicken Drumsticks recipe is my Mom’s recipe that she made regularly for us growing up. It’s one of the oldest recipes I shared on my blog.
Why you’ll love this recipe: it’s super flavorful since the chicken is first cooked bbq sauce, it pairs with any side dish, and is one of the cheapest meals (a dozen chicken legs only costs about $8). We love serving chicken legs at a BBQ or summer potluck and they get gobbled up so fast.
How to make BBQ Chicken Drumsticks:
Make BBQ Sauce: Add tomato sauce, mustard, sugar, vinegar and soy sauce to a large pot over medium-high heat. Bring mixture to a gentle boil, then reduce to a simmer.
Add Drumsticks to the sauce, cover pot and cook for about 20-30 minutes, or just until cooked through.
Grill and Serve: Heat a gas grill over HIGH heat. Cook the drumsticks for a minute or so on each side, rotating them, allowing the sauce to caramelize and the skin to crisp and char.
The best BBQ Chicken Drumsticks are cooked in BBQ sauce and grilled for a caramelized, crispy skin. They're easy, affordable and always a crowd pleaser.
BBQ Sauce: tomato sauce, sugars, soy sauce, vinegar and mustard to a large pot over medium-high heat. Stir well to combine. Bring mixture to a gentle boil.
Add chicken drumsticks. Reduce heat to medium-low, cover, and simmer for about 20-30 minutes or until chicken is just cooked through. Remove chicken to a plate and ladle some of the sauce into a cup.
Grill: Clean grill and grease the grill grates well with oil. Heat to high heat. Once hot, add chicken drumsticks. (The chicken is cooked at this point, you're just wanting to char the skin). Lather some of the extra BBQ Sauce on the chicken as you grill it, and rotate the chicken drumsticks as each side becomes lightly charred. If your grill is hot enough, this should only take a few minutes!