Have you ever had traditional Red Beans and Rice? It’s a southern staple! I tried Popeye’s Red Beans and Rice for the first time a while back, but these beans are even better. They are so creamy and flavorful, with the perfect smoky Cajun spice! Originally posted August 31, 2018. I took the kids off…
Have you ever had traditional Red Beans and Rice? It’s a southern staple! I tried Popeye’s Red Beans and Rice for the first time a while back, but these beans are even better. They are so creamy and flavorful, with the perfect smoky Cajun spice! Originally posted August 31, 2018.
I took the kids off to school for their first day this morning! Valentine is at home with me still, and 2 seconds after we got home she managed to spill an entire cup of milk all over the kitchen. I walk in and start cleaning it up, and she keeps saying “S**t… s**t… s**t.” I’m dying laughing and trying to figure out where she learned that word (because no one in our house uses it) when I realize that she spilled milk on her SHIRT.
No use crying over spilled milk, right? She’s so cute I can’t even be mad at her. Also, a baby cussing (even if unintentional) is so funny that it makes a spilled milk situation a lot more bearable.
The BEST Red Beans and Rice Recipe (Better Than Popeye’s!)
I ate at Popeye’s for the first time just a few months ago, and now I’m totally obsessed with their red beans and rice. I told my brother Nathan about it and he just rolled his eyes at me. He lived in Richmond, Virginia for a few years in residency, so he had access to legit southern food. Popeye’s might not be a real Southerner’s top choice for where to get red beans and rice, but for this California girl who had never even heard of it? I was in love. Also, today’s recipe is even better than Popeye’s Red Beans and Rice, thanks to the meaty ham bone we are using. It makes the beans so smoky and delicious!
(But really though, shout out to Popeye’s. Again, I’m not Southern, but that place has delicious food. Nathan told me that once in Richmond they had a fried chicken contest with a bunch of local restaurants, and Popeye’s chicken won. BOOM.)
If you aren’t from the south (more specifically, New Orleans), you might not have heard of this delightful red beans and rice combination. Rice and beans is nothing new of course, but it’s the special Cajun twist on the beans that makes it unique. Traditionally it was made on Mondays, because that was laundry day, and you could set the pot of beans on the stove to cook all day while you were working. Red beans and rice was Louis Armstrong’s favorite food, and he used to sign letters “Red Beans and Ricely Yours,” how cute is that?
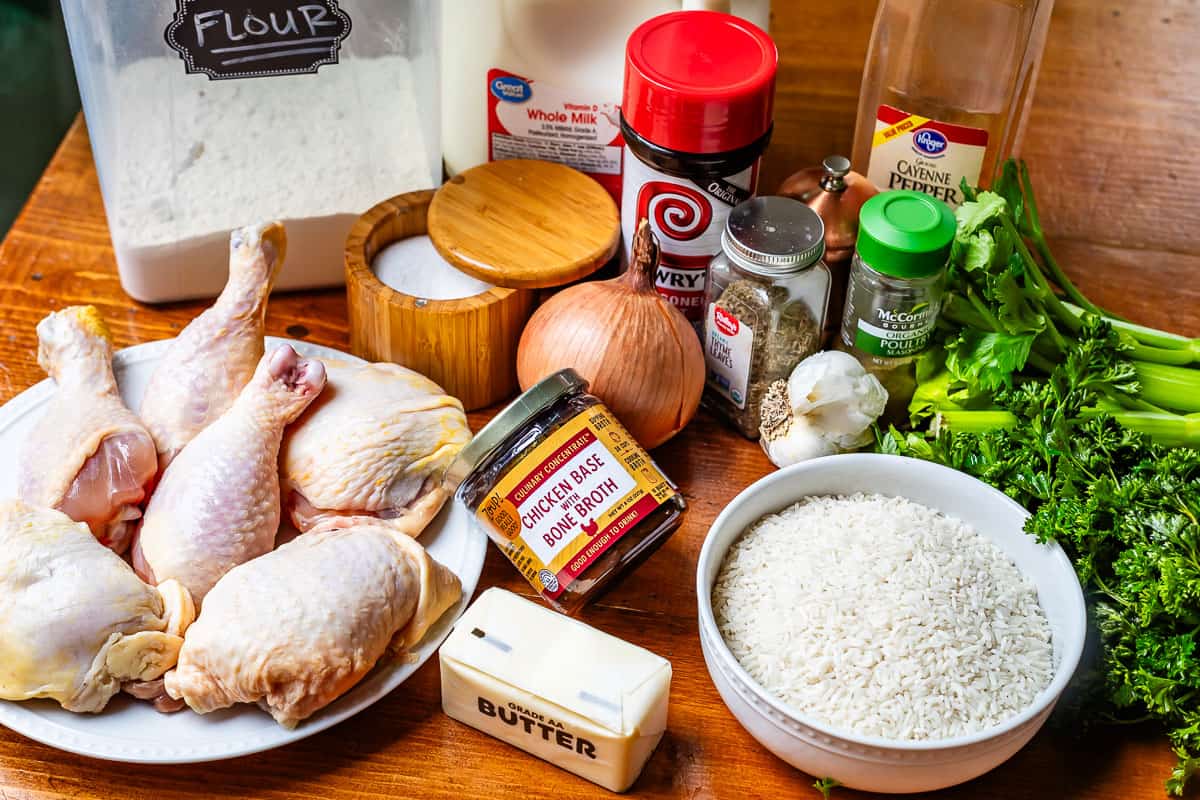
Homemade Red Beans and Rice Ingredients
Here’s what you’ll need. Quantities given in recipe below!
Dry red beans (you can substitute kidney beans)
Meaty ham bone or ham hock (another option is andouille sausage)
6-8 cups hot cooked rice
Large onion (yellow or red)
Green bell pepper
Celery
Cajun seasoning
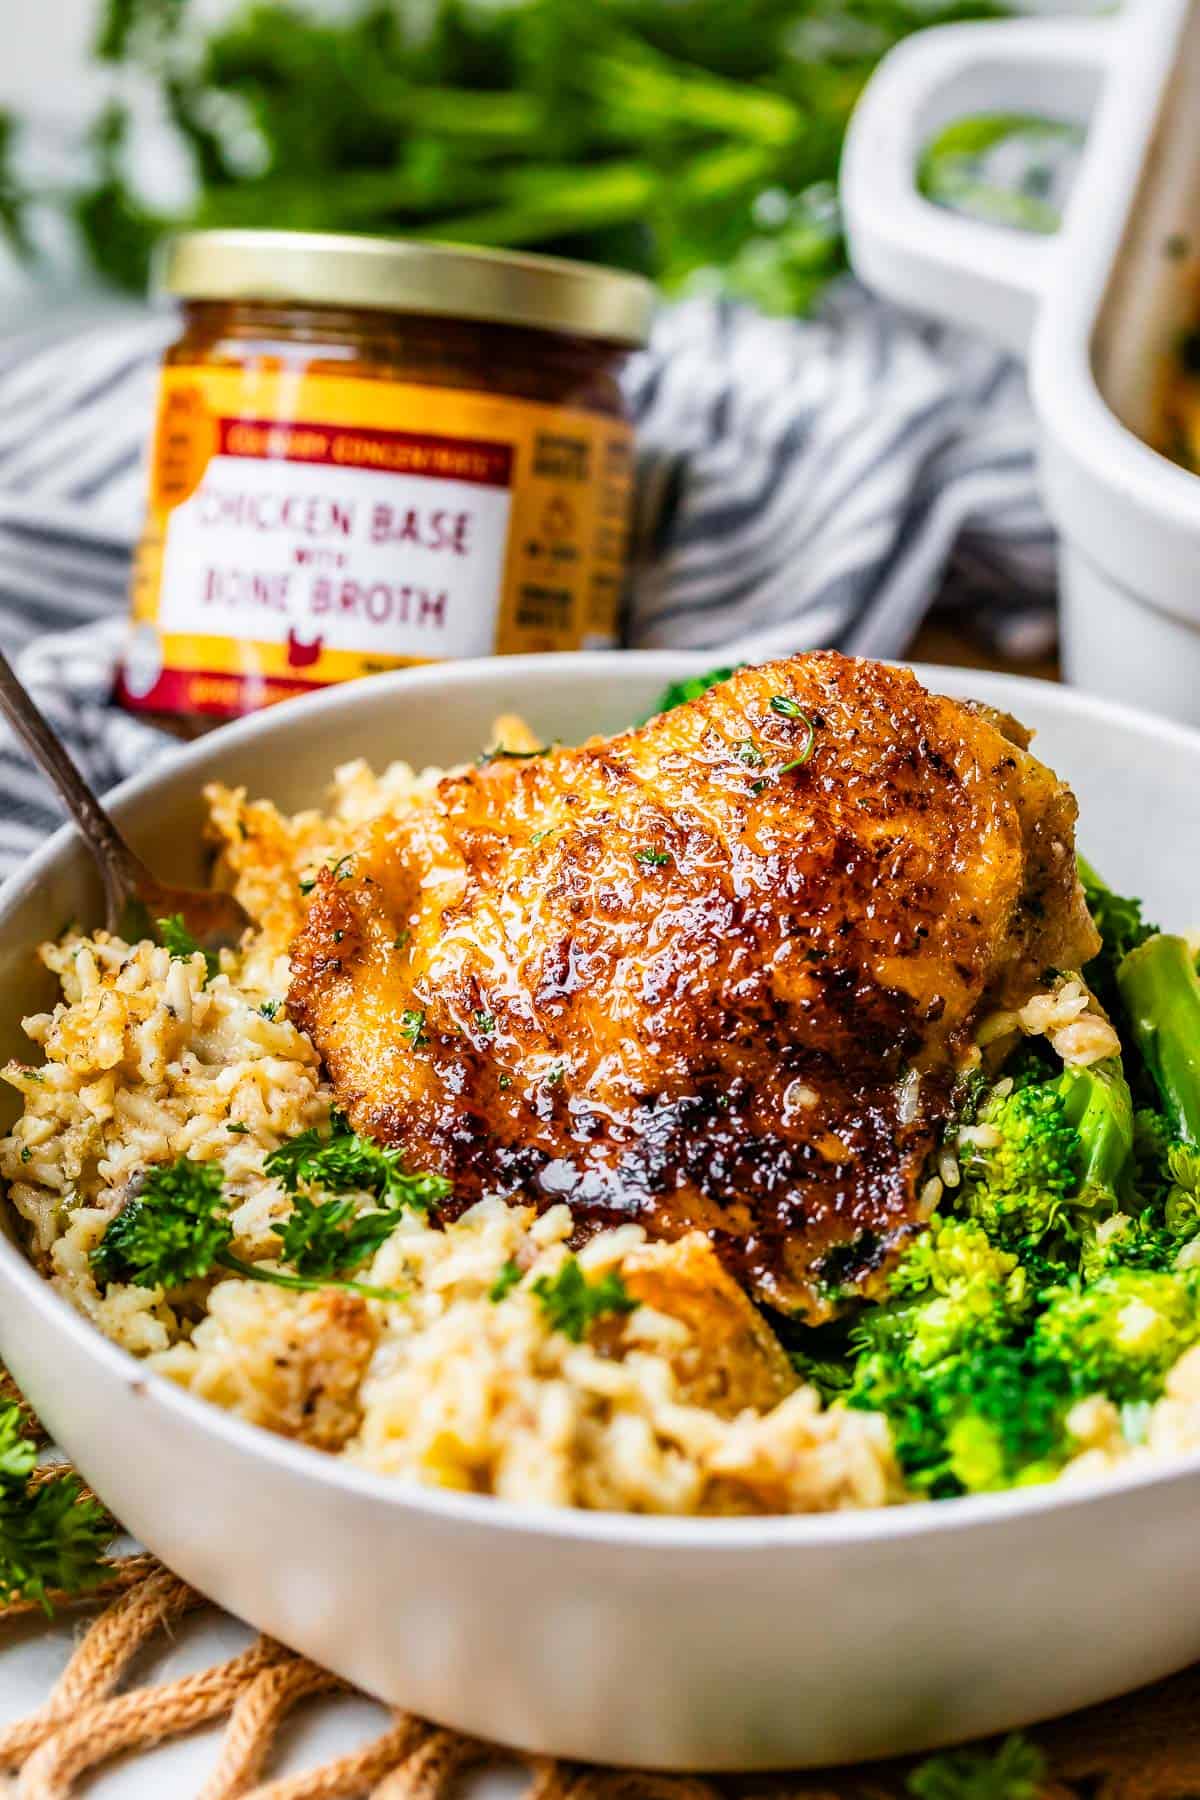
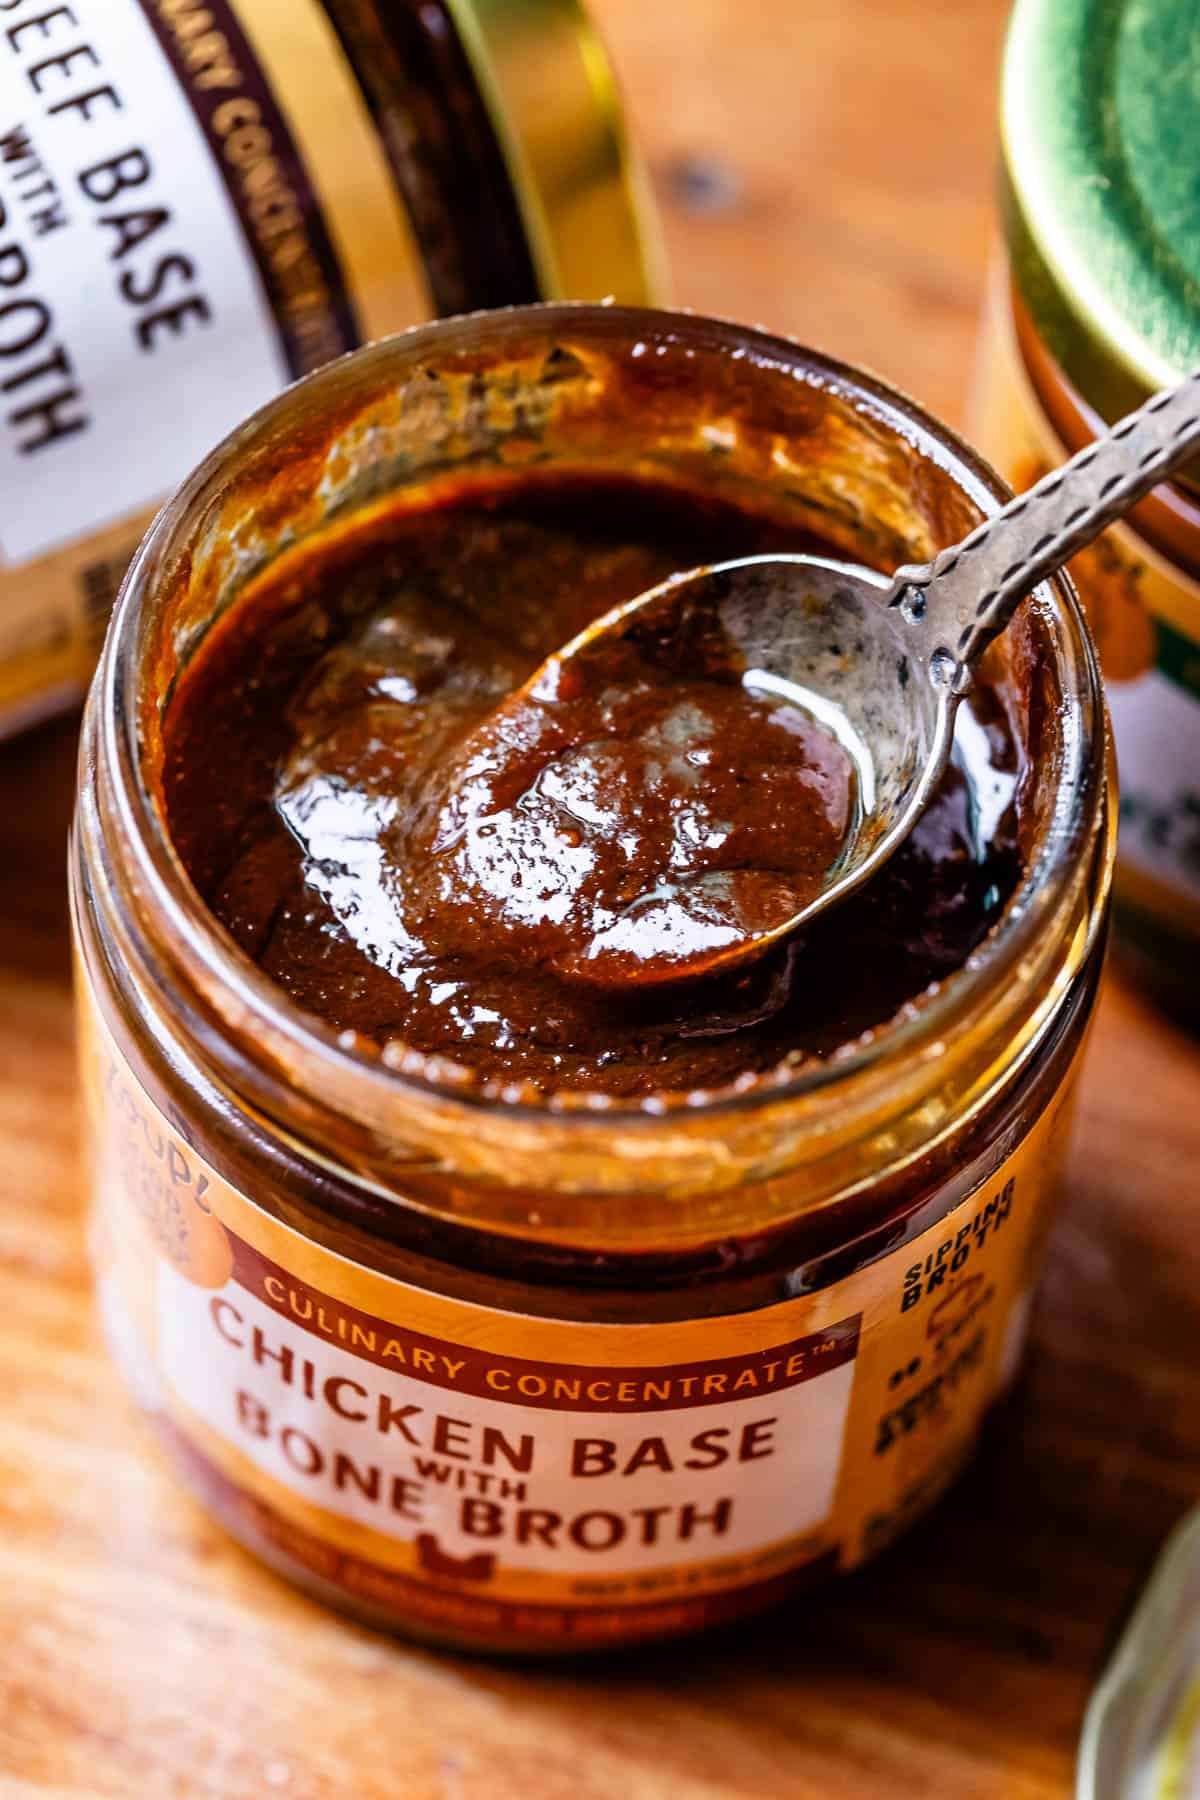
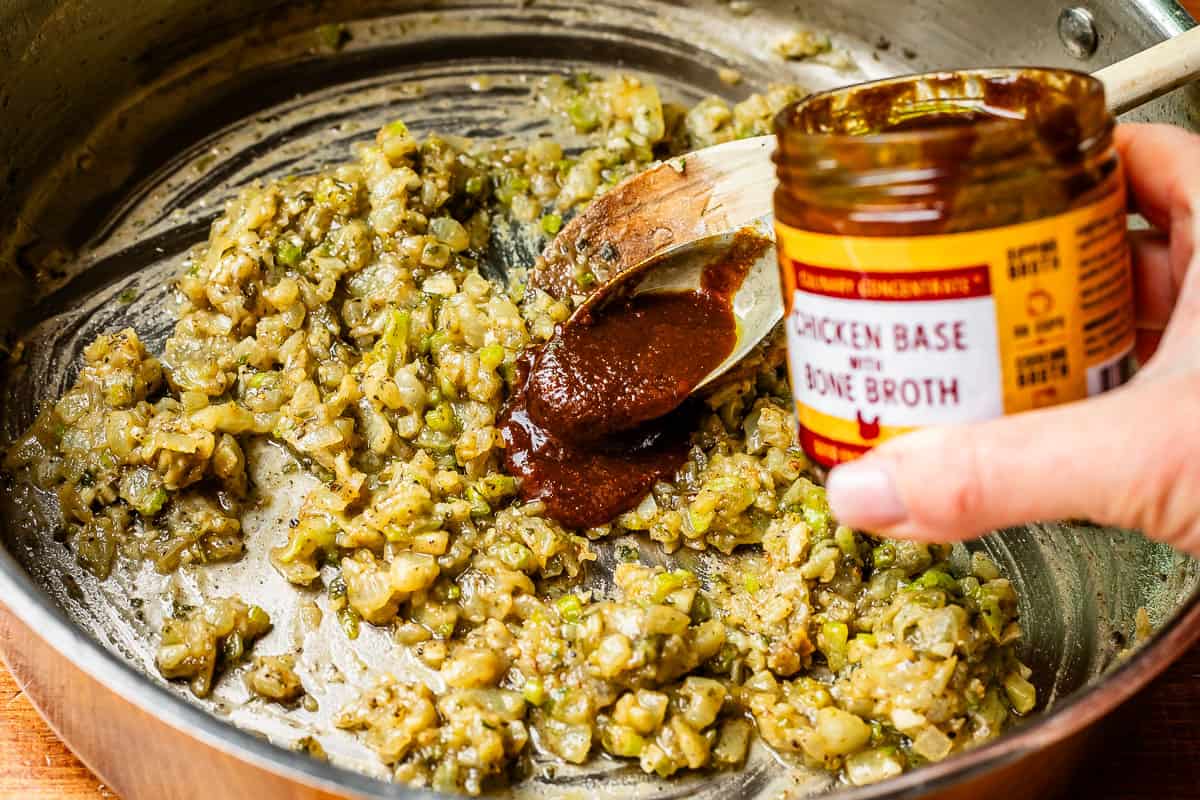
Better Than Bouillon Chicken Base (you can substitute another brand of bouillon cubes, but I highly recommend Better Than Bouillon)
Garlic
Kosher salt
Cayenne pepper
Thyme
Sage
Bay leaves
Dried parsley
Sugar
Olive oil
How to make Cajun Red Beans and Rice from scratch
I’m letting you in on a few secrets about cooking beans from scratch, so here’s a basic overview and what to watch out for. (All instructions are given in the recipe below.)
Chop the onions, celery, and bell peppers. Make sure to chop up some of those celery leaves to go in the beans. They have so much flavor!
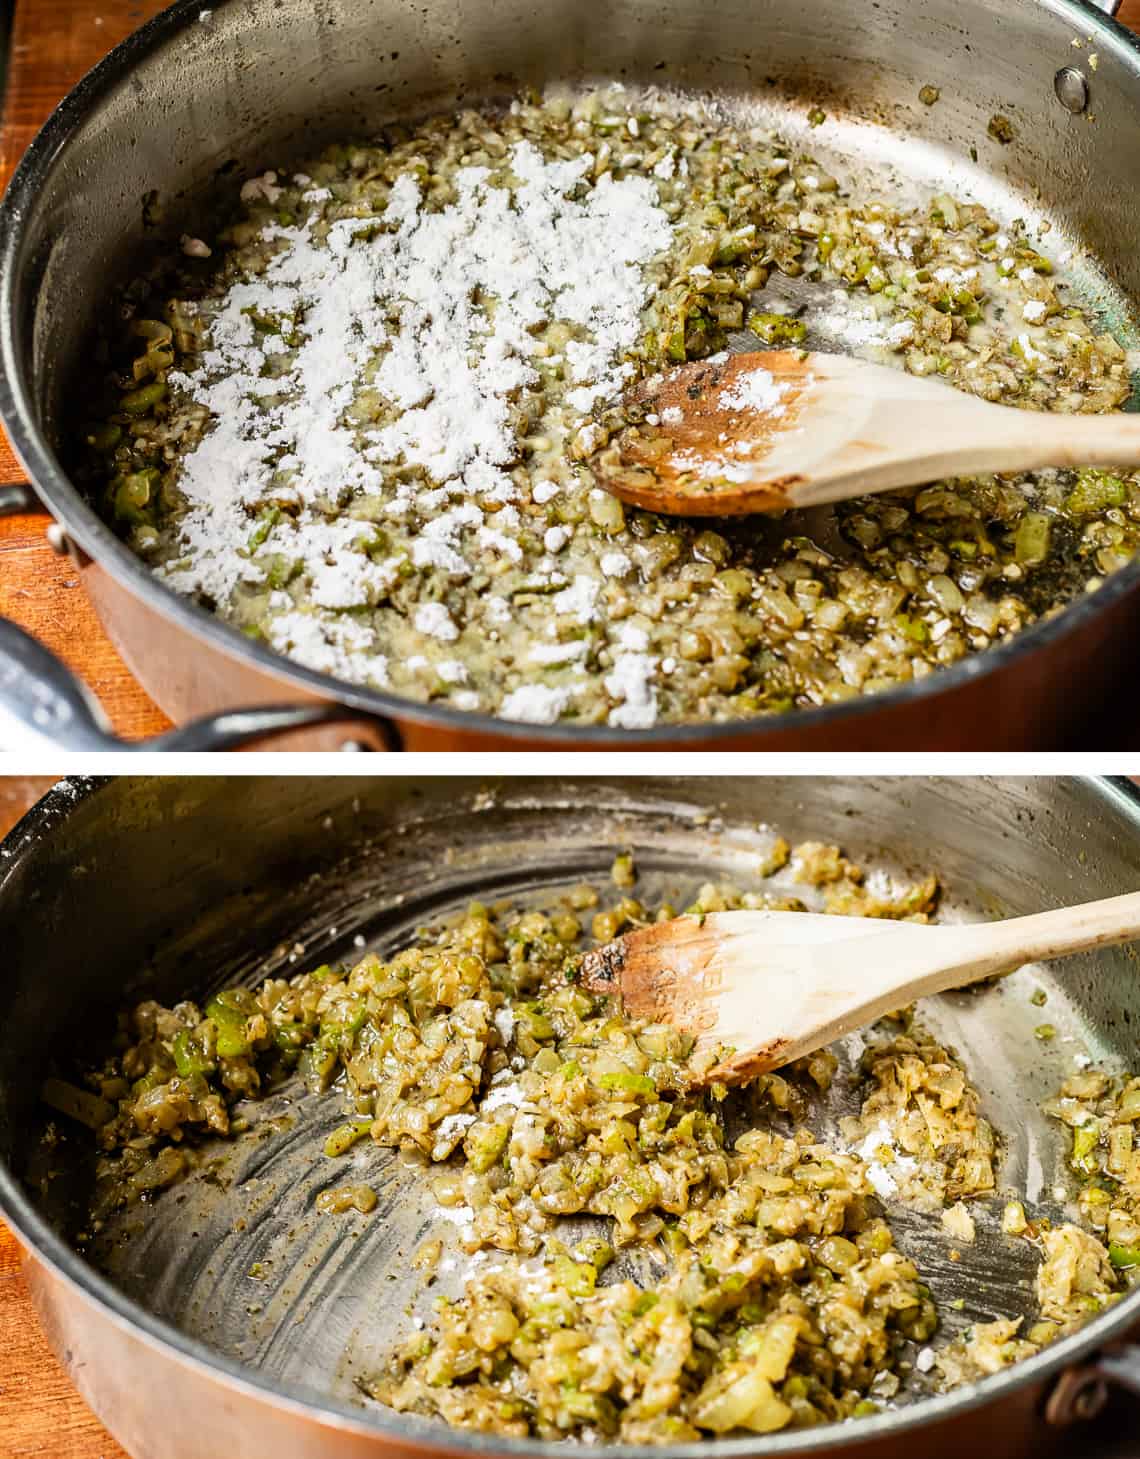
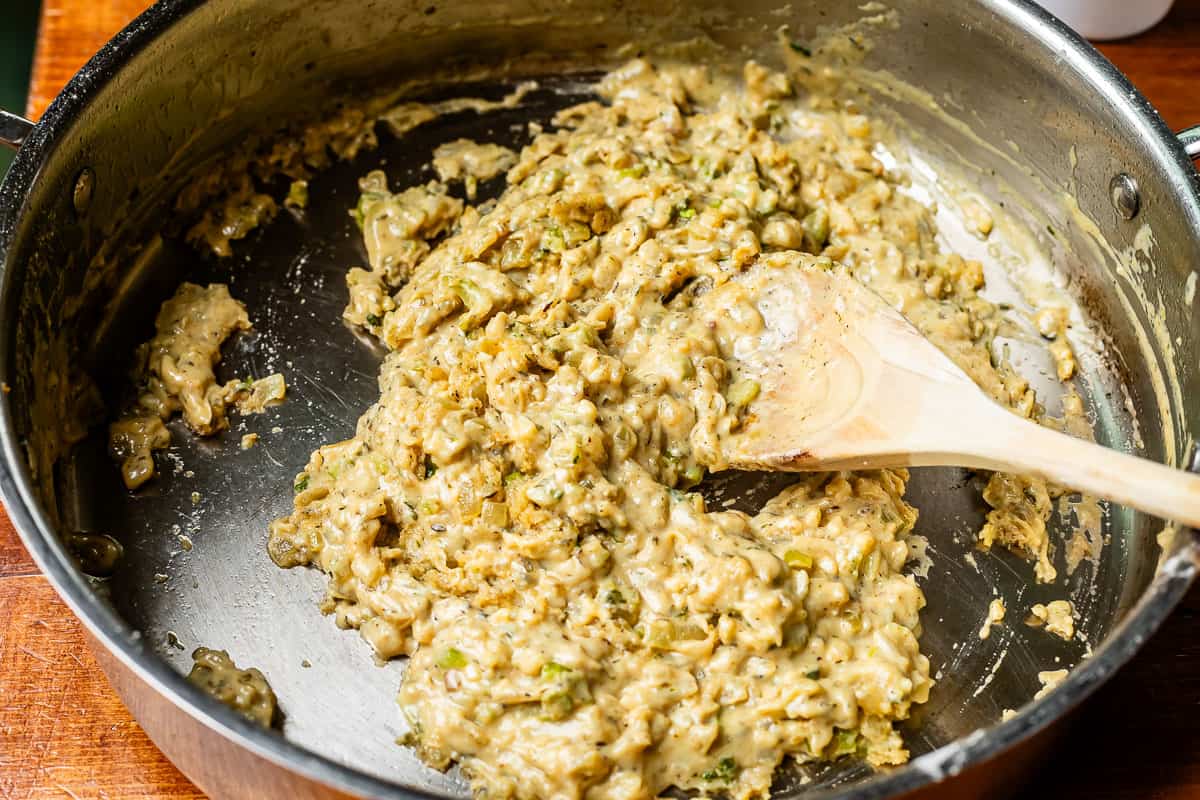
Cook the veggies up in some oil and then add garlic.
Reduce heat and add the spices.
Add in the dry, un-soaked beans. (Keep reading below for more on why you don’t have to pre-soak your beans.)
(Aren’t those red beans beautiful? If you can’t find them, kidney beans work great too!)
Add water and ham bone. Pro tip: save your ham bone whenever you make a ham. It gives the beans such an amazing smoky flavor. They will keep for a long time in the freezer. I’m pretty sure the one I used for this recipe was from last Thanksgiving, almost a year ago. If you don’t happen to have one, use a ham hock, those work great too and you can just buy them in the meat department. Also, lots of people have tried this recipe with andouille sausage with great success!
Cover with lid and simmer for 2 1/2 – 3 hours. Now it’s just a matter of waiting until your beans are tender, creamy, and have absorbed all that amazing Cajun flavor! Low and slow is really the best way to cook beans. It’s the perfect lazy-day-at-home meal.
What foods go with Red Beans and Rice?
Red beans and rice is considered a main dish all on its own. It really does fill you up and leave you satisfied! This is true especially if you use a ham bone that is nice and meaty.
But if you are craving a main dish that is not so beany, fried chicken is your best bet. It tastes amazing with these beans. I picked some up at the grocery store. I actually don’t have a recipe for fried chicken (have not mastered that technique yet! Anyone have a good recipe?) but these beans would taste great with this Simply Amazing Grilled Chicken Marinade.
You could also check out my post for How to Make Ultra Flaky Buttermilk Biscuits, because what’s better than buttery biscuits and beans?? It would also pair amazingly well with My Favorite Coleslaw. Put this all together and you will have an amazing Southern feast!
UPDATE! A reader named Patrick commented below and mentioned that Red Beans and Rice is served with French bread in New Orleans, not biscuits. So here’s my favorite recipe for One Hour French Bread! Thanks Patrick!
Cajun Red Beans and Rice Recipe FAQs
Are red beans and kidney beans the same thing?
No, they are not the same. Red beans are smaller, and (ironically) more pinkish than kidney beans, which are a deep crimson. You can use kidney beans in this recipe if that’s all you can find, but I highly recommend red beans if available. They have a nuttier, “beanier” flavor, and a more creamy texture than kidney beans.
Is Red Beans and Rice supposed to be soupy?
To some extent, yes! In my family we lovingly refer to this as “bean gravy” as described in this Tejano Pinto Beans recipe.
The bean gravy should be nice and thick.
Hopefully you can tell from the photos that red beans do NOT have the texture of refried beans. They are not completely mashed. Most of the beans should retain their shape and be swimming in a delectable pool of bean gravy, the better to soak into your rice.
What do red beans taste like?
Red beans have a rich flavor that make them perfect for being the star of a main dish. They taste nutty and mild, similar to a pinto bean. When you add red beans to a recipe, you are adding red bean flavor to the dish, rather than a bean that is mostly useful for absorbing the flavors around it (like a white bean).
What happens if you don’t soak beans before cooking?
Nothing at all. You do NOT need to soak the dry beans overnight. Seriously. I can’t tell you how many recipes call for this unnecessary step. Now, it is true for some people that you can reduce some of the, ahem, intestinal effects of beans by soaking for a few hours and discarding the water (every stomach is different). But it is absolutely not necessary and in my opinion a huge waste of time.
Prep your veggies: chop the onion, bell pepper, and 2 stalks celery. I like to chop the ends of the celery (so that some of the leaves get chopped also) instead of pulling off the stalks. Whichever way you choose will work!
Heat the oil in a large pot over medium high heat. Once it is hot and shimmering, add the chopped onion, bell pepper, and celery. Saute for 6-8 minutes, until the onions start to become translucent.
Mince 2 tablespoons garlic. In a small bowl, combine 1 and 1/2 teaspoons kosher salt, 1/2 teaspoon cayenne pepper, 1 teaspoon thyme, 3/4 teaspoon sage, 1 tablespoon parsley, 1 teaspoon Cajun seasoning, and 1 tablespoon sugar.
Add the garlic and spices to the pot and saute for 1-2 minutes, until fragrant.
Add about 7 cups of water and 1 pound of rinsed red beans. Add the ham bone or ham hock. Add 2 bay leaves.
Stir it all together over high heat until it comes to a boil. Turn the heat down to a low simmer, so that it is just barely bubbling.
Cover with a lid and keep it at a low simmer for 2 and 1/2 to 3 hours. About halfway through the cooktime, either remove the lid or tilt it so that the beans can vent.
After 2-3 hours, taste the beans. They should be tender and flavorful. If they are at all dry or chalky, keep cooking.
Add another half teaspoon or so of salt, or to taste. Add more Cajun seasoning to taste.
Remove the ham bone and bay leaves. Chop any meat left on the bone and return the meat to the beans. Discard the bone.
Serve with hot rice. See notes for a basic recipe!
Notes
*You can also use dry kidney beans if you can’t find red beans.Basic rice recipe: For this amount of beans, I like to use about 3 cups of DRY rice:
3 cups dry white rice
4 and 1/2 cups water
scant tablespoon kosher salt (2 and 1/4 teaspoon if using table salt)
2-3 teaspoons garlic ( I added the jarred kind)
Add 3 cups dry rice to a medium pot. (You’re supposed to rinse it and I never do…oops.) Add 4 and 1/2 cups water. Add the salt and garlic. Bring to a boil over high heat with the lid on. Once it boils, lower the heat to low. Do not remove the lid. Let cook for about 15 minutes. Remove lid and stir. Turn off the heat and put the lid back on and let steam in the pot for another 5-10 minutes.
I’ve been making this Chicken Tikka Masala recipe for years, but recently adapted it for the slow cooker. It is SO GOOD. I may never go back! Tikka Masala is the one dish that I never get tired of ordering at Indian restaurants and this version is super easy and tastes restaurant quality. Originally posted…
I’ve been making this Chicken Tikka Masala recipe for years, but recently adapted it for the slow cooker. It is SO GOOD. I may never go back! Tikka Masala is the one dish that I never get tired of ordering at Indian restaurants and this version is super easy and tastes restaurant quality. Originally posted January 25, 2017.
Do you guys have rules for how late you can text people? I mean of course it depends on who you’re texting. When I was growing up we didn’t make calls after 9pm. Is there texting etiquette these days? I’m always worried I’m going to wake someone up.
Eric and I are night owls and sometimes forget that people go to bed at normal times. One time my brother called me at midnight just to see if I really always stay up like I claim I do. I answered right away of course.
That same brother (who is also named Eric) went to college out of state in the same town that our uncle lives in. Our Uncle Ron had a habit of calling Eric waaaay too early in the morning. This was before cell phones, so when you call your nephew’s apartment at 6am on a Saturday, you definitely wake all the roommates up. Eric asked him not to call so early. So next time he called at 7am and still woke up the entire apartment.
Eric realized that if Uncle Ron was getting up so early, that meant he was getting to bed early. So he calls him up at 11:30pm the next night, wakes up Ron, and says all chipper, “Hey Ron! I was just calling to let you know that I’m planning on sleeping in tomorrow!”
I would worry that someone might call me super early to get me back for texting them too late at night, but it wouldn’t even work because I would sleep right through it.
Why make Slow Cooker Chicken Tikka Masala
I LOVE chicken tikka masala. The tender chicken, the creamy sauce, the delicious spices! I know I could totally branch out when we go out for Indian…but chicken tikka masala has my heart.
The thing about Chicken Tikka is that the chicken is supposed to be grilled, or broiled on high, or something that gives you that roasted-on-the-outside, tender-in-in-the-center flavor. But cooking chicken in liquid all day in a slow cooker isn’t going to give you that.
So I basically just removed the liquid; chicken, spices, and a little butter is all that goes in the crock pot until the end when you add the sauce. The result is golden brown chicken that has that roasted flavor. (I’m really loving this method and want to try it with some other recipes!).
Crockpot Chicken Tikka Masala Ingredients
Here’s a quick shopping list to help you gather your ingredients. See the recipe card below for the full ingredients and instructions!
Chicken breasts
Cumin
Cinnamon
Cayenne pepper
Butter
Tomato sauce
Heavy cream
Garlic
Jalapeno pepper
Paprika
Lemon juice
Fresh ginger
Plain Greek yogurt
Cilantro
Chicken Tikka Masala Slow Cooker substitutions
Next time I try this I’m replacing the cream with coconut milk, or perhaps coconut cream. It will make the final flavor a lot sweeter but would make this recipe dairy free, (if you used olive oil instead of butter) which is one reason people like the Slow Cooker Basil Chicken in Coconut Curry Sauce. They’re always tagging in #whole30, and and I’m over here like don’t look at me, I’m just here for the carbs.
How to make Chicken Tikka Masala (Crockpot Recipe)
This Chicken Tikka Masala is an old stove top recipe that I’ve been making for years. It’s a killer recipe. One time I made it for my friend Mir, who’s from Hyderabad, and he said it tasted authentic. He was probably just feeding my ego, but I don’t even care. This stuff is delicious.
I decided to see how it would work in the slow cooker and after a few trials I’m loving how it turned out. (I did the same with this stovetop Basil Chicken in Coconut Curry Sauce; here’s a link to the slow cooker version. It’s one of the top recipes on my site now. I actually decided to start working on a slow cooker Chicken Tikka recipe at the suggestion of one of the commenters on that post. Thanks for the idea Bethany!)
Here’s a quick overview of how to make this slow cooker chicken tikka masala. For complete instructions, scroll down to the recipe card below!
Chop the chicken into bite size chunks. Add the chicken to the slow cooker.
In a small bowl combine cumin, cinnamon, cayenne pepper, black pepper, and salt.
Sprinkle the spices over the chicken and use your hands to coat the chicken well. Sprinkle butter chunks over the chicken.
Put the lid on and cook on high for 2-3 hours, or on low for about 5 hours.
When the chicken is cooked, remove the lid and add the tomato sauce and cream (turn the crock pot up to high at this point if it’s not already.)
Add butter to a small frying pan. Add the garlic and jalapeno and sauté until fragrant.
In a small bowl combine ground cumin, paprika, and salt. Add the spices to the frying pan and continue sautéing for one minute.
Add lemon juice to the pan, stir it in and then remove from heat. Add this mixture to the crock pot. Add the minced ginger as well.
Replace the lid and let cook on high for another 20-30 minutes or until thickened and bubbly on the edges. Taste it and stir in some plain yogurt and the fresh cilantro.
This recipe is pretty darn spicy as written. Feel free to reduce the cayenne pepper; there are 2 teaspoons total, which is quite a lot. (I wouldn’t omit the jalapeno though, it adds great flavor. Most of the heat comes from the seeds anyway, and we’re not using those.)
How to serve Slow Cooker Tikka Masala
Chicken tikka masala is great with a side of jasmine rice, or you can fancy it up by adding other sides. Don’t overthink it, slow cooker meals are supposed to be easy! Here are some of my favorite Indian-inspired recipes.
Indian-Spiced Cauliflower Rice << no, it’s not rice. Yes, it is delicious, and the perfect veggie side when you’re low-carbing it.
How to store Slow Cooker Chicken Tikka Masala
Chicken tikka masala will keep in the fridge for about 5 days. If you don’t eat it all before then, you can freeze it. I like to put it into a labeled gallon (or quart) ziplock, then lay it flat so it’s easier to defrost. It will keep for 2-3 months and makes a great last minute meal, since all you have to do is defrost it and make some rice.
Crock Pot Chicken Tikka Masala FAQs
What is the difference between chicken tikka masala and butter masala?
Chicken tikka masala has its origins in Great Britain (surprise!). The sauce is tomato based, and is tangy and spicy. Some cream is added, but the focus is on the tomato. In butter masala (also known as butter chicken), the sauce includes tomato but is creamier and richer. Its origins are in India. Both dishes usually involve marinating the chicken in yogurt and spices (we’re skipping the marinade here since the chicken will be soaking up amazing flavor in the slow cooker all day long).
Is chicken tikka masala white or dark meat?
It depends on where you’re eating it. Chicken tikka masala is usually made with white meat–boneless, skinless chicken breasts. This is how you’ll often have it at Indian restaurants in the United States. You can absolutely substitute boneless, skinless chicken thigh meat, and yes, it will be absolutely delicious. Dark meat is often more tender and is less prone to dry out. You should use what you and your family usually prefer in this recipe.
Slow Cooker Chicken Tikka Masala from The Food Charlatan. I've been making this Chicken Tikka Masala recipe for years, but recently adapted it for the slow cooker. It is SO GOOD. I may never go back! Tikka Masala is the one dish that I never get tired of ordering at Indian restaurants and this version is super easy and tastes restaurant quality.
Chop the chicken into bite size chunks. Add the chicken to the slow cooker.
In a small bowl combine 2 teaspoons cumin, 1 teaspoon cinnamon, 1 teaspoon cayenne pepper, 1 teaspoon black pepper, and 1 teaspoon kosher salt.
Sprinkle the spices over the chicken and use your hands to coat the chicken well. Sprinkle 1 and 1/2 tablespoons butter chunks over the chicken.
Put the lid on and cook on high for 2-3 hours, or on low for about 5 hours.
When the chicken is cooked, remove the lid and add the tomato sauce and cream (turn the crock pot up to high at this point if it’s not already.)
Add 1/2 tablespoon butter to a small frying pan. Add the garlic and jalapeno and sauté for 1 minute, or until fragrant.
In a small bowl combine 2 teaspoons ground cumin, 2 teaspoons paprika, and 1 teaspoon kosher salt.
Add the spices to the frying pan and continue sautéing for one minute.
Add 1 tablespoon lemon juice to the pan, stir it in and then remove from heat. Add this mixture to the crock pot. Add the minced ginger as well.
Replace the lid and let cook on high for another 20-30 minutes or until thickened and bubbly on the edges.
Taste it and stir in some plain yogurt. The amount is up to you. This makes it a little more creamy and also tempers the heat. Sometimes I don’t add any, if I’m feeding kids I add more.
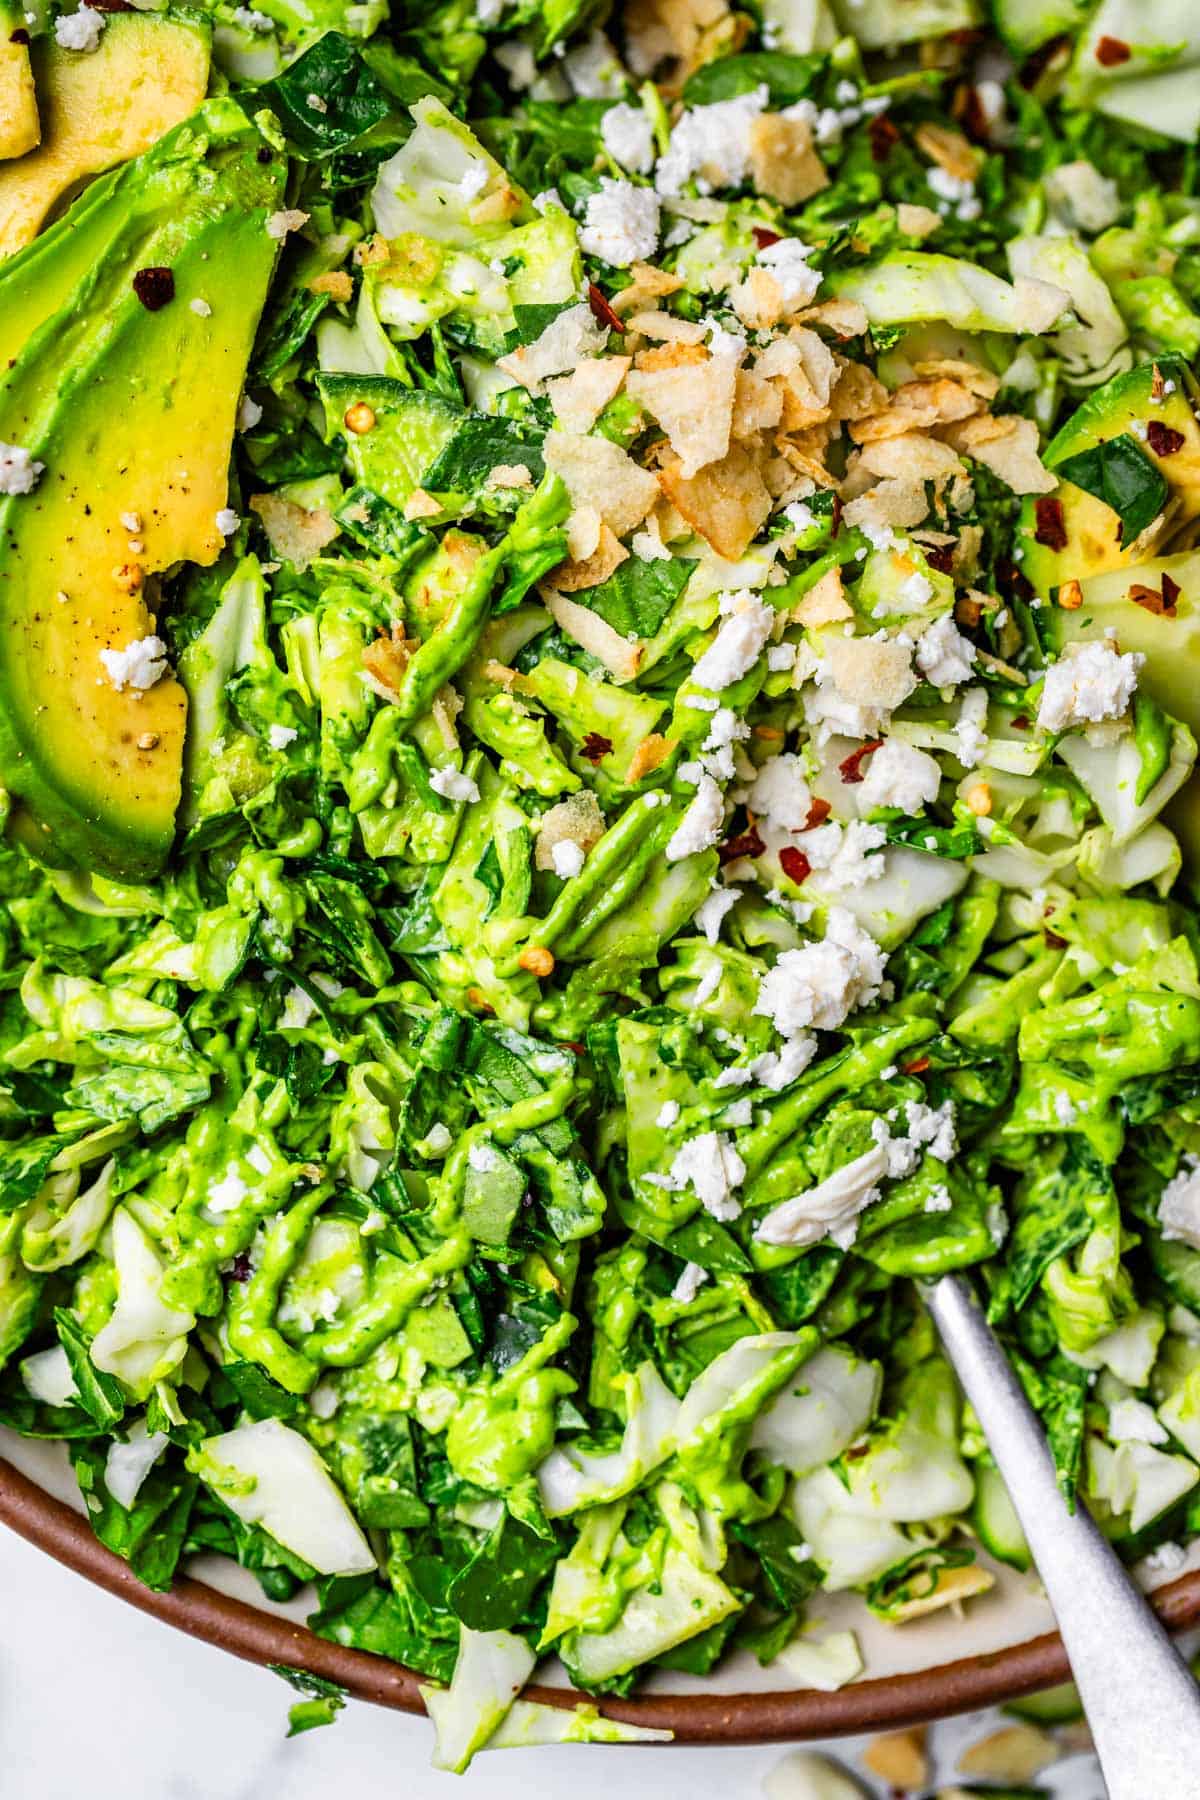
Listen, I have a rough history with salad in general. I’m a meat-and-potatoes-girl at heart. But this Green Goddess Salad makes my heart sing in a way I didn’t even know was possible! It’s packed with fresh herbs, crunchy greens, and an unbelievably creamy (and vividly green) dressing. It’s especially transcendent when you add crushed…
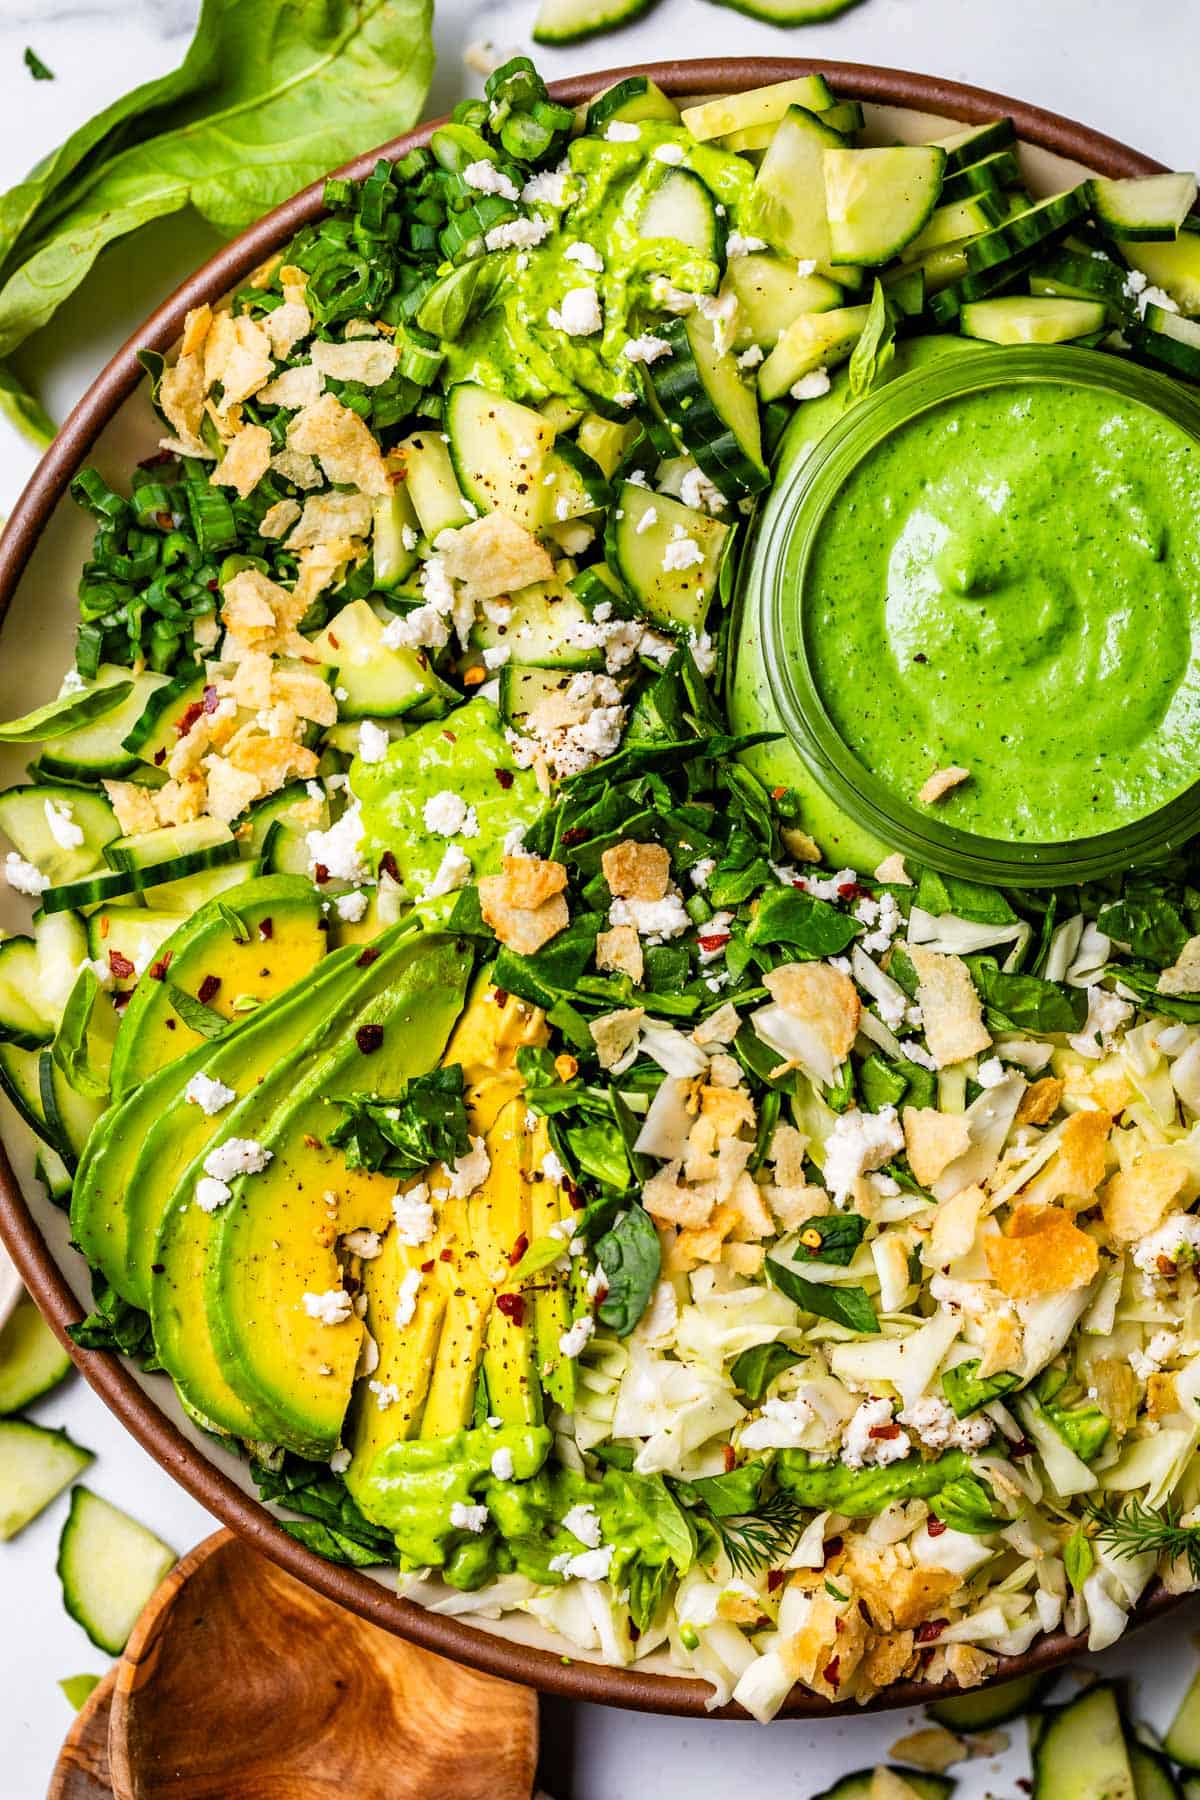
Listen, I have a rough history with salad in general. I’m a meat-and-potatoes-girl at heart. But this Green Goddess Salad makes my heart sing in a way I didn’t even know was possible! It’s packed with fresh herbs, crunchy greens, and an unbelievably creamy (and vividly green) dressing. It’s especially transcendent when you add crushed salt and vinegar chips on top (I mean, hello? I think I would like every salad better this way??)
Yesterday we were all frantically searching the house for Truman’s lost homework. It wasn’t just one assignment, it was an entire week’s worth, because we pulled the kids out to travel for the eclipse (more on that in a minute!)
We tore the house apart and couldn’t think where else to look. Then Charlotte said, “Wait, have you looked in Edison’s closet? He’s always hiding stuff in there.” Eric runs off to look, and Truman hollers, “Oh yeah, and check under the bed too, that’s where Edison has been hiding the Triscuits lately.”
Lately? Lately?? I’m sorry, what now?? I know Edison (who is 4) has a snacking problem, but I didn’t know the other kids were silently complicit. Darn them!!
We did end up finding the homework, by the way, thank goodness. We had told the elementary office that we were looking everywhere for it (it was late) and when I finally brought it into the office, the receptionist actually stood and gave me a hug. Probably because she could see I had devolved into a crazy eyed freak by that point. (No one tells you this is how motherhood ages you. It’s not the wrinkles; it’s the spiraling pupils.)
But no regrets! The eclipse experience was AMAZING! (Can you see the solar flare on the bottom right? My dad took this amazing photo!) We’ve been planning a family reunion around this eclipse for several years, since my sister lives in Dallas and in the path of totality. It was cloudy all morning, but cleared up just in time for all 27 of us to see it! It was truly once-in-a-lifetime-level cool.
If you are on my email list, you received my post with eclipse-worthy snacks last week. Because I can find a reason to snack at literally ANY event. (I guess this is where Edison gets it??) Sign up here to get recipe ideas in your inbox! (Thank you to reader Virginia, who emailed me requesting eclipse snack ideas!)
Okay folks, it’s Goddess time! (← who remembers this song? aahhh high school haha.) Have you seen the Green Goddess salad that’s viral on Tiktok? Yeah, me neither. I asked my friend if she lets her teens on Tiktok and she said, when it first came out, I signed up to see what it was all about. I had so much hot garbage funneled into my brain so fast, I couldn’t imagine letting my kids on it. Haha! No shade on all you Tiktokers out there. The good news is, we can have an incredible Green goddess salad even without a buxom influencer telling us to!
What is green goddess dressing?
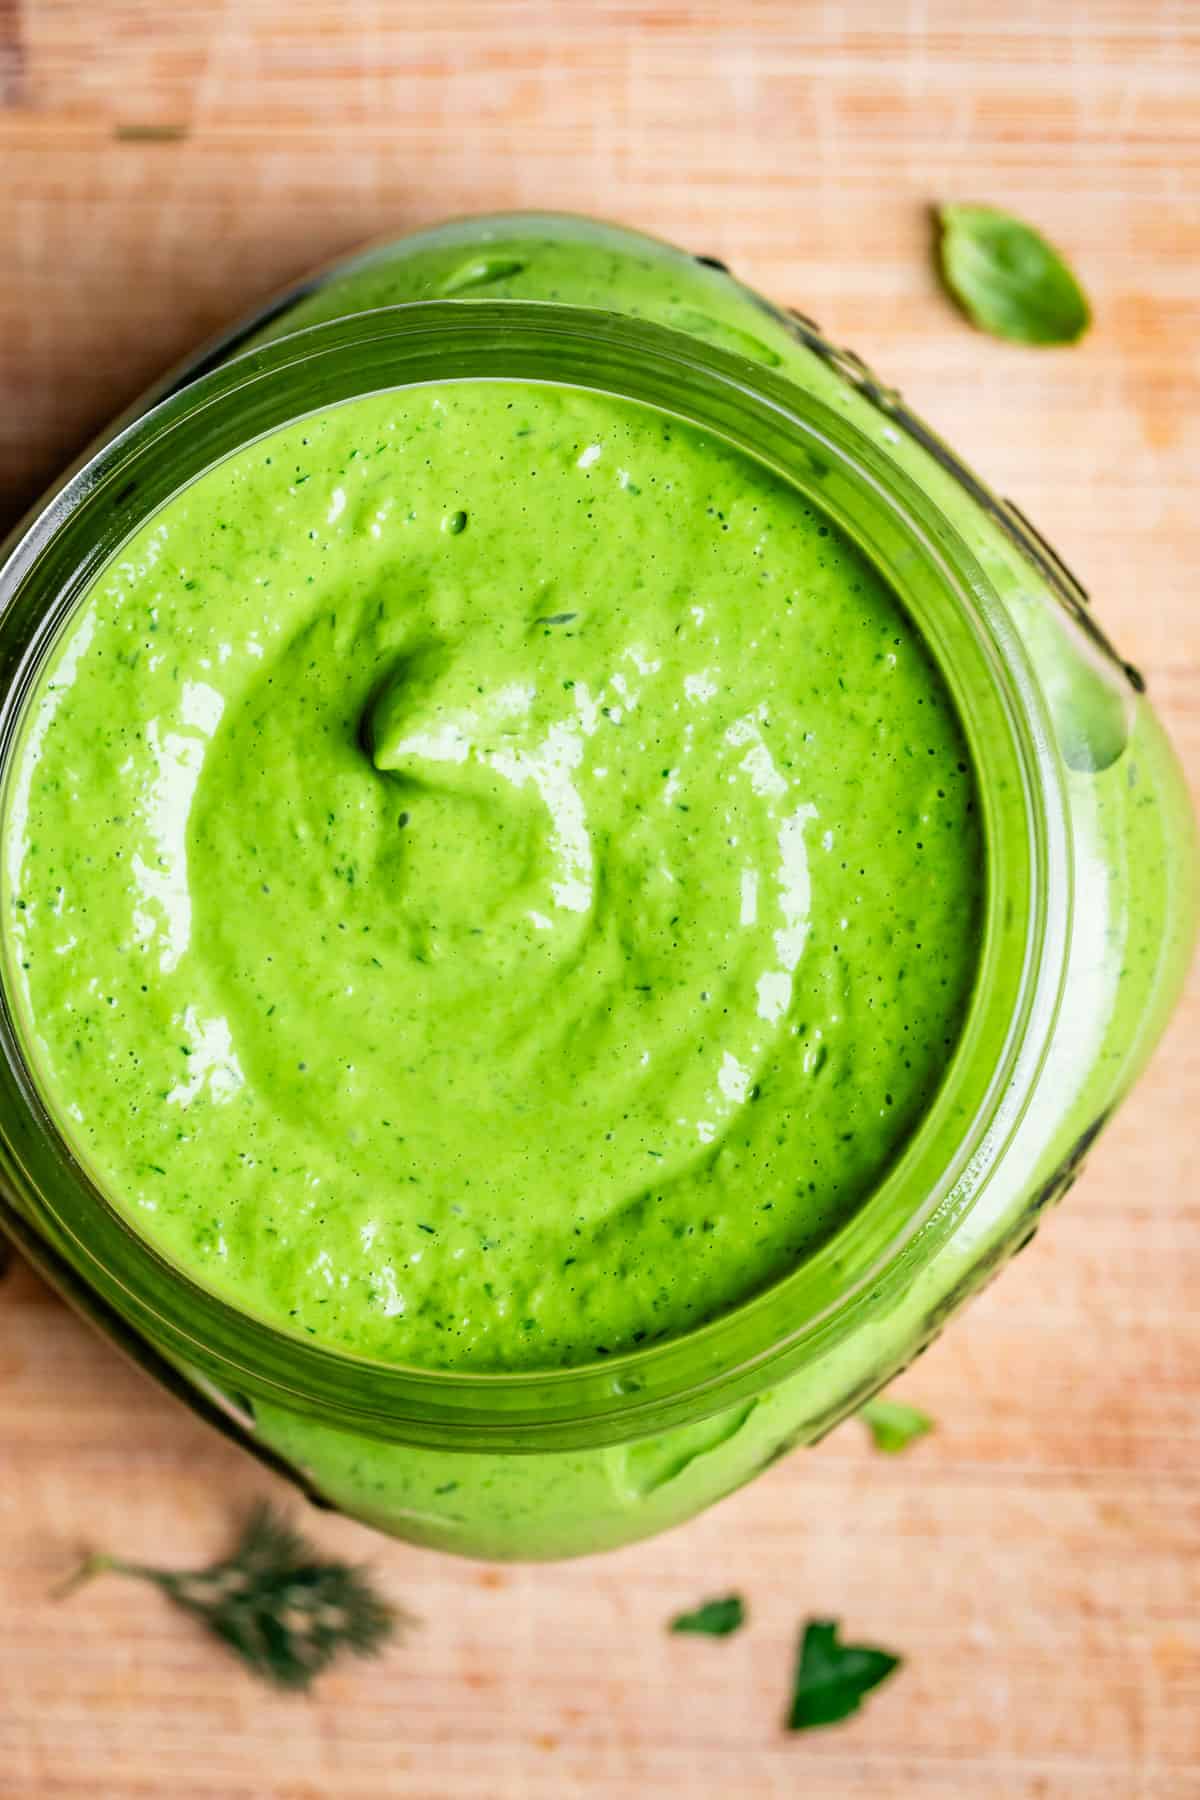
I mean, we know it’s green…but what is it? Green goddess is a creamy dressing made with mayo, fresh herbs, and lemon juice. You can really take it anywhere you want from those basic guidelines. There is a ton of variety in the recipes I found. I tried several ingredient combos, and I’m soooo happy with the one I landed on!! I could pour this stuff on anything.
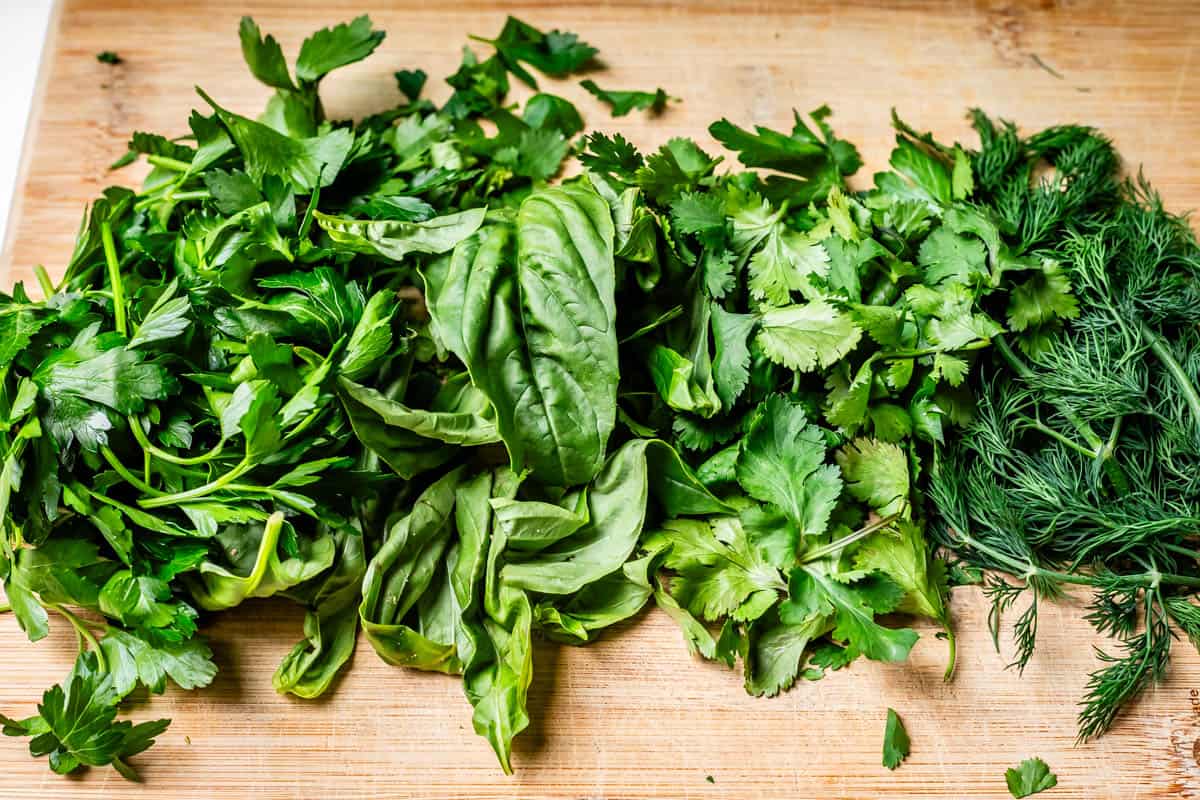
I’m a sucker for fresh herbs. This dressing has parsley, green onions, basil, dill, and cilantro. Pile it all in!! I promise it’s not overwhelming. Herbs bring all the flavor, but we also need plenty of fat in this dressing to make it nice and creamy since herbs are so watery. We’re drizzling this dressing over basically calorie-free greens, so I promise, it’s a good idea to have some fat in our dressing.
So we are adding mayo, greek yogurt, and half an avocado. Skip the avocado if you must, but I’m telling you, those lil green monsters are champs at bringing in the creamy fattiness. And hello, they are totally on the color theme! It was too perfect, I couldn’t pass it up.
Like I said, this dressing is really adaptable, so don’t stress about getting every single ingredient, especially if you don’t love one of them, like cilantro. Just leave it out. Swap the lemon for lime. Out of basil? Add in more parsley. Use soaked nuts like cashews or walnuts in place of yogurt for dairy free dressing. Just follow your little heart!
We are adding a teaspoon of fish sauce for some amazing umami flavor and saltiness. Do you have this ingredient in your fridge? You should. I put it in so many things, it’s not a fishy flavor when you use it sparingly (which I always do). Technically you can leave it out, but I do highly recommend it! Use it to make last week’s recipe, Korean Beef. Or this Pork Ramen. Or this Banh Mi Sandwich! Yum.
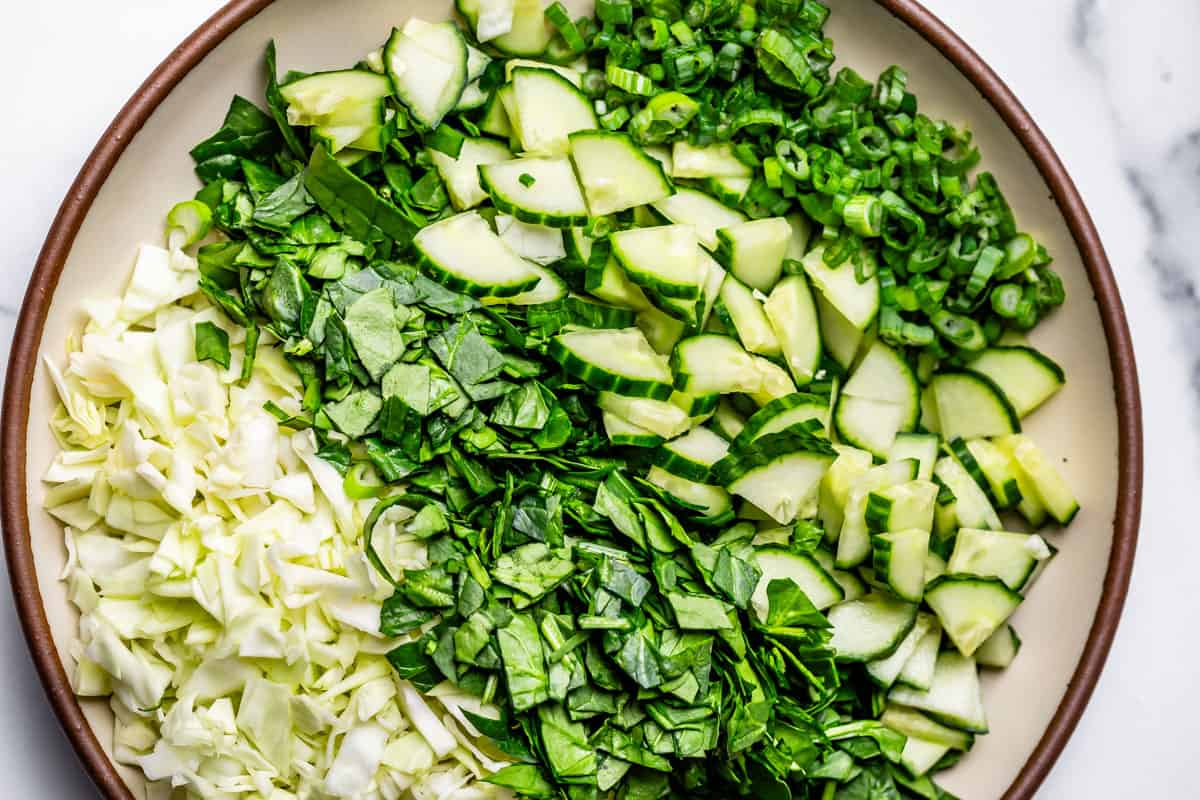
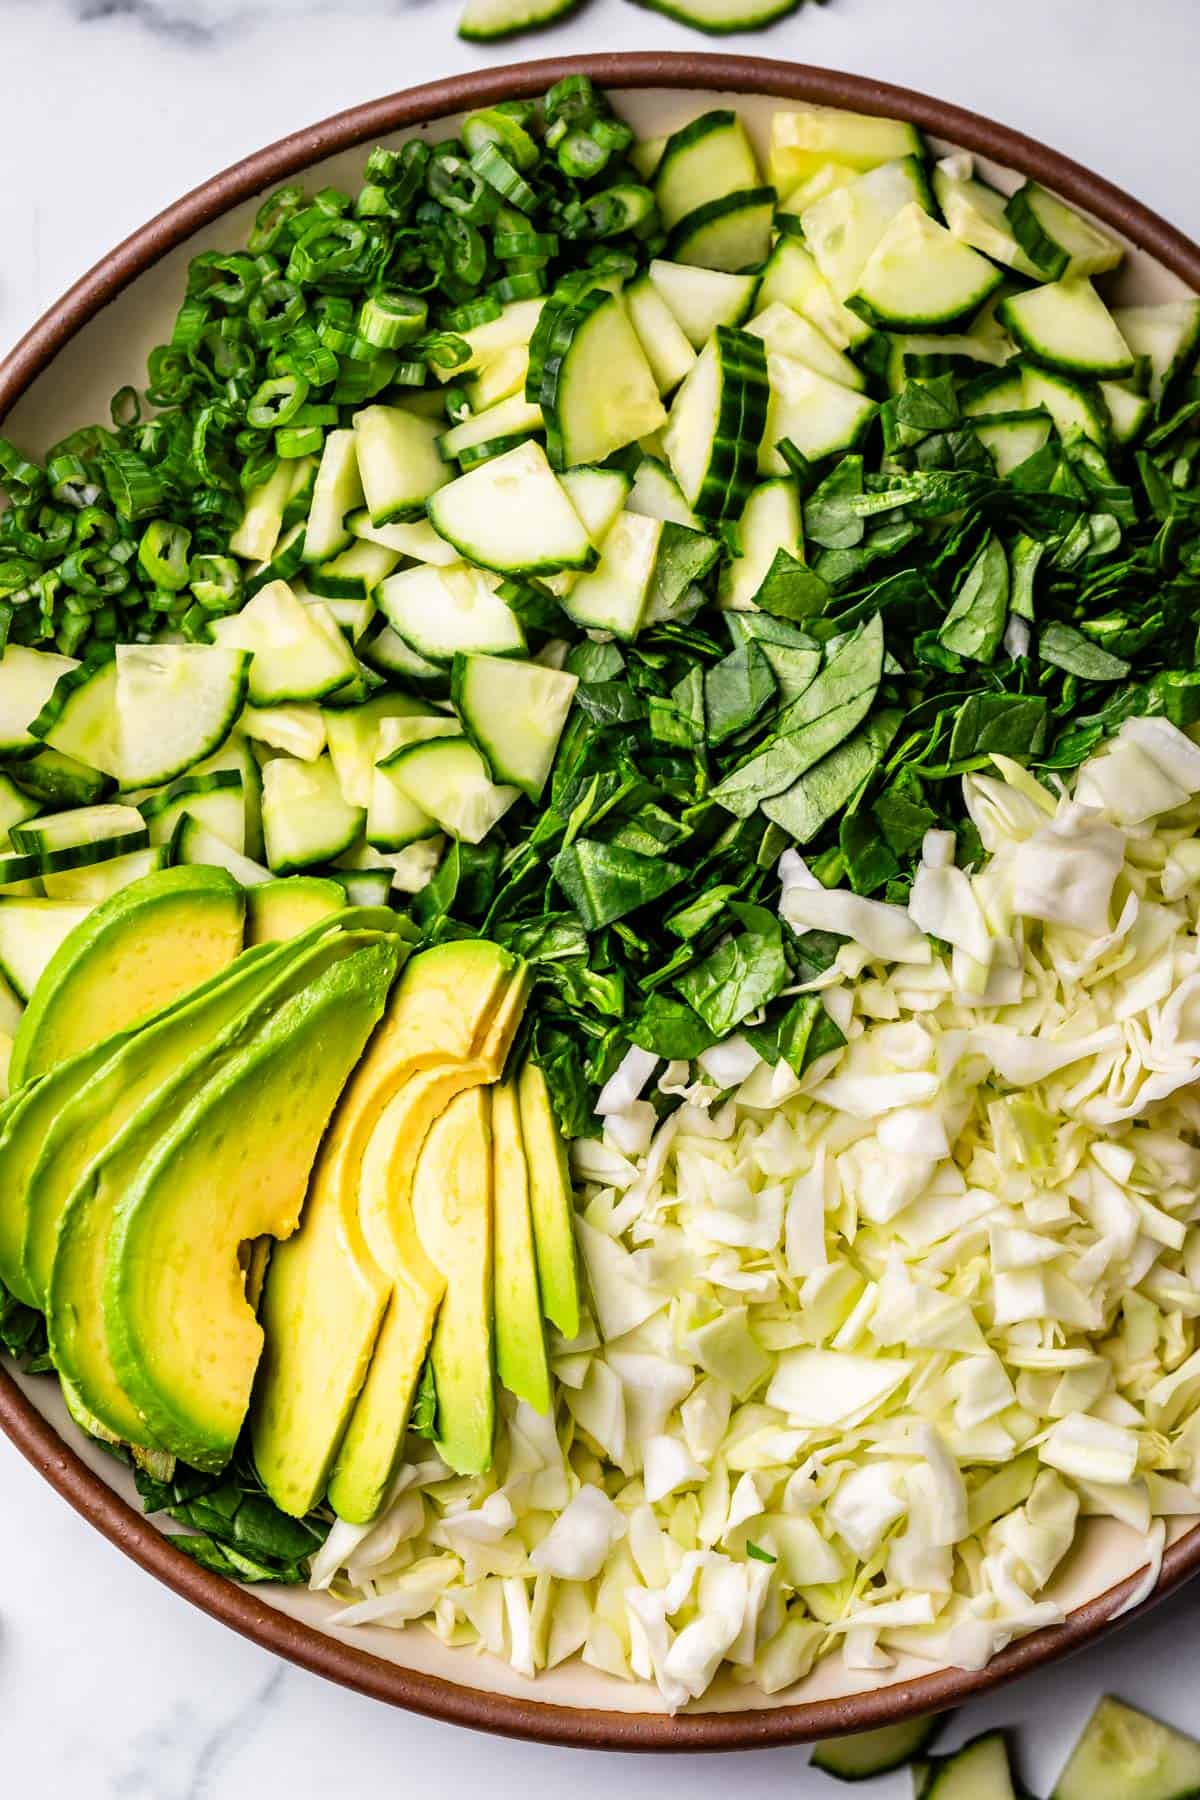
Once we’ve got our dressing ingredients all put together, sky is the limit on what you want to put it on. I love it with some simple cabbage (chopped up really small!) spinach, cucumbers, avocado and green onion. But that’s just one idea, you could put it on romaine lettuce butter lettuce, baby kale, arugula – really, any green veggies in any combination that you want. Some recipes call for broccoli or green bell pepper (nawwww…but you do you😂)
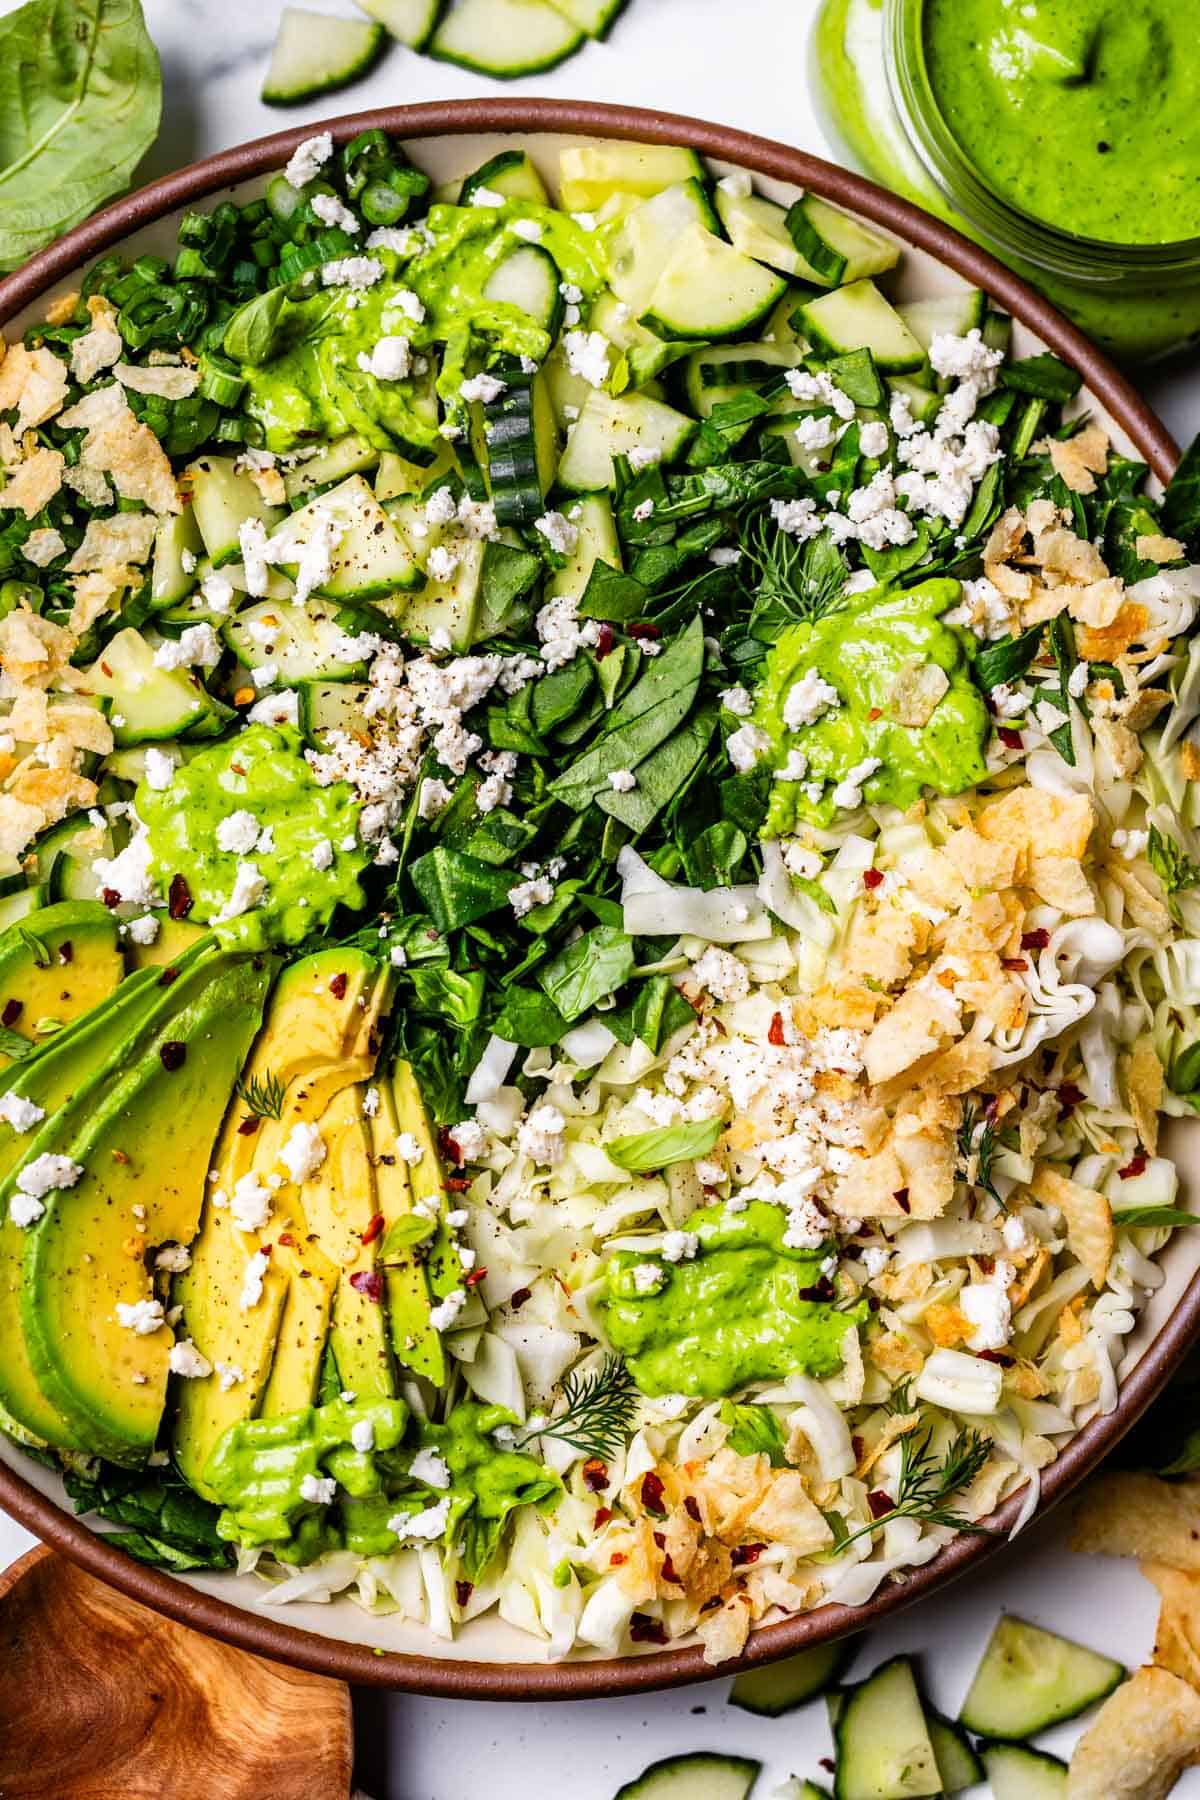
Although it really doesn’t matter what greens you choose once you find out about this next ingredient. It’s the kicker, the thing that transforms this salad from a bowl of vegetables into a sexy side dish: SALT AND VINEGAR CHIPSSSSSS!!! Y’all. I cannot get enough of this. Why am I not adding salt and vinegar chips to every salad of my life? #goals
TL;DR
Here’s the bullet list, all the reasons I love this green goddess salad more than life itself right now:
it’s got a dressing with creamy smooth ingredients and plenty of lemon and herbs for flavor
fish sauce for umami (a hack for not having to add anchovies, a traditional ingredient in many dressings)
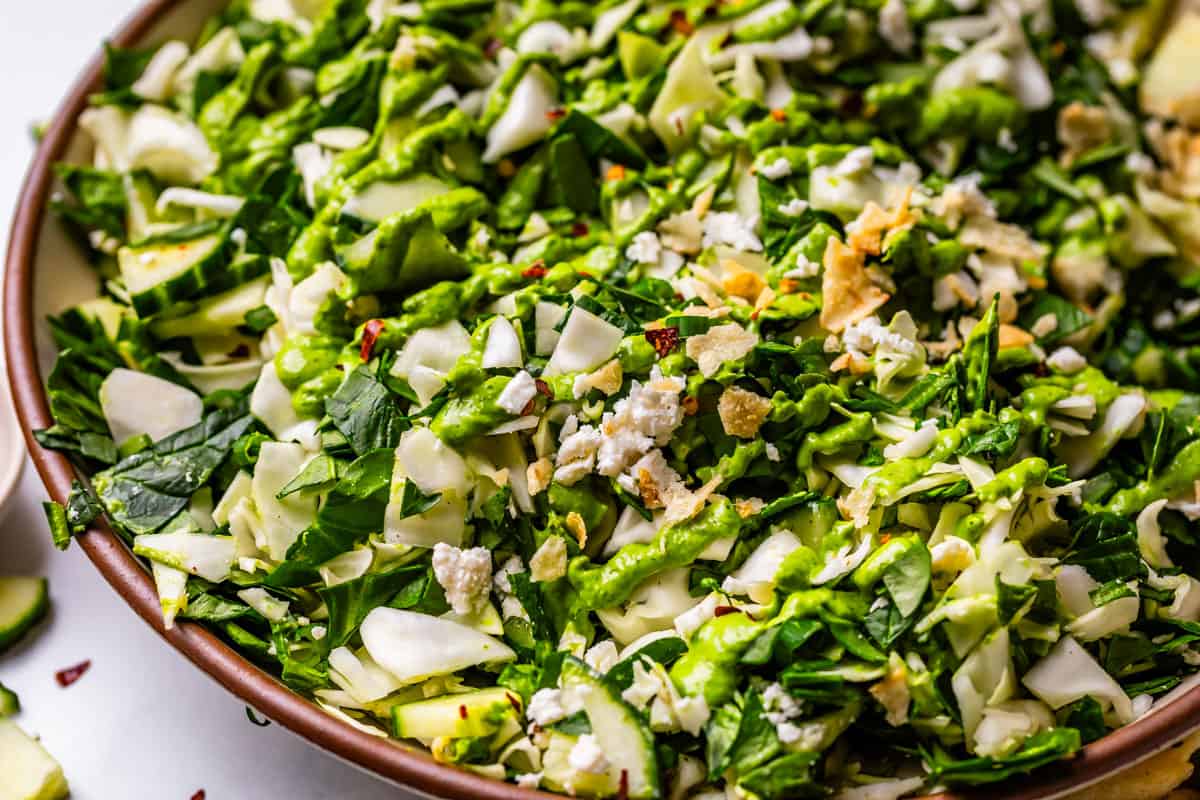
greens that are chopped itty bitty tiny, so you get all the goodness of the salad in each and every bite. this is huge for me.
feta cheese, what’s a salad without a lil cheese? It’s tangy and perfect.
and then, say it with me now….SALT AND VINEGARRRR yes please.
That’s it guys. I ate this salad every day for lunch for a week because I was so obsessed. If you want to make it dinner, throw in some rotisserie chicken breast or your protein of choice, salmon would be great! Now let’s make it!
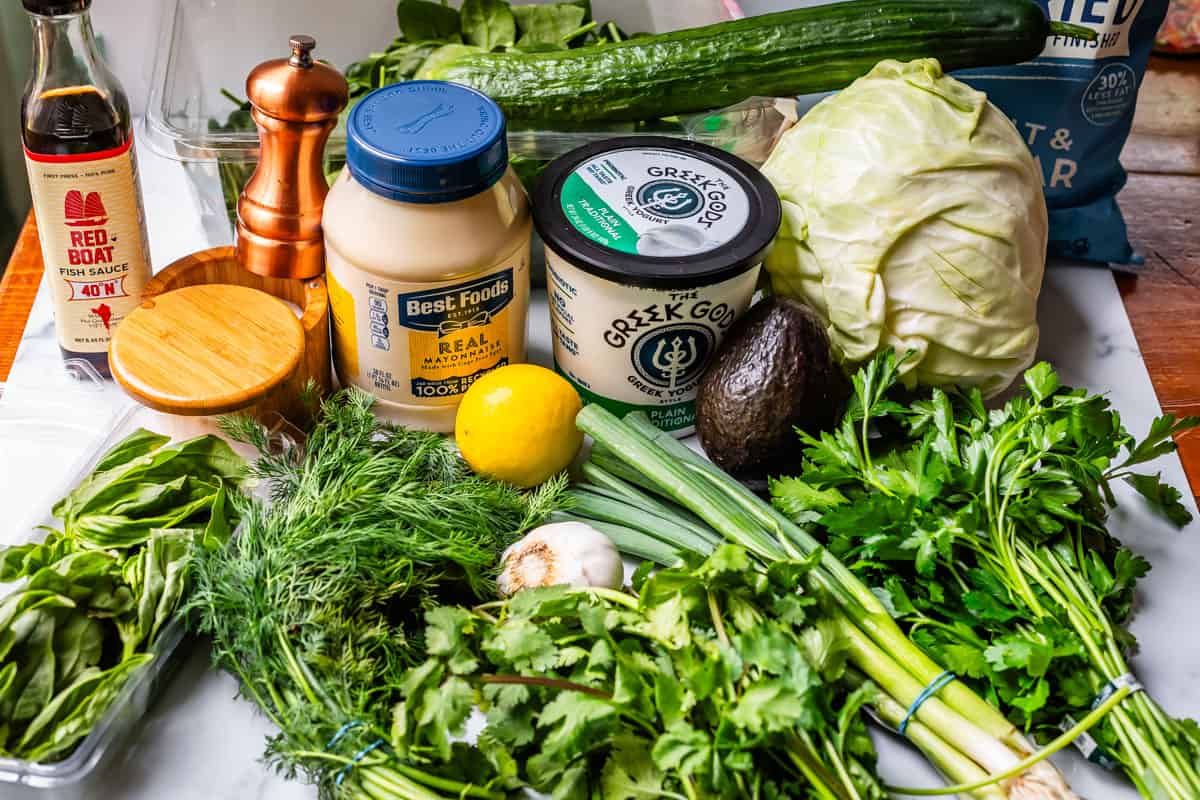
Green goddess salad recipe ingredients
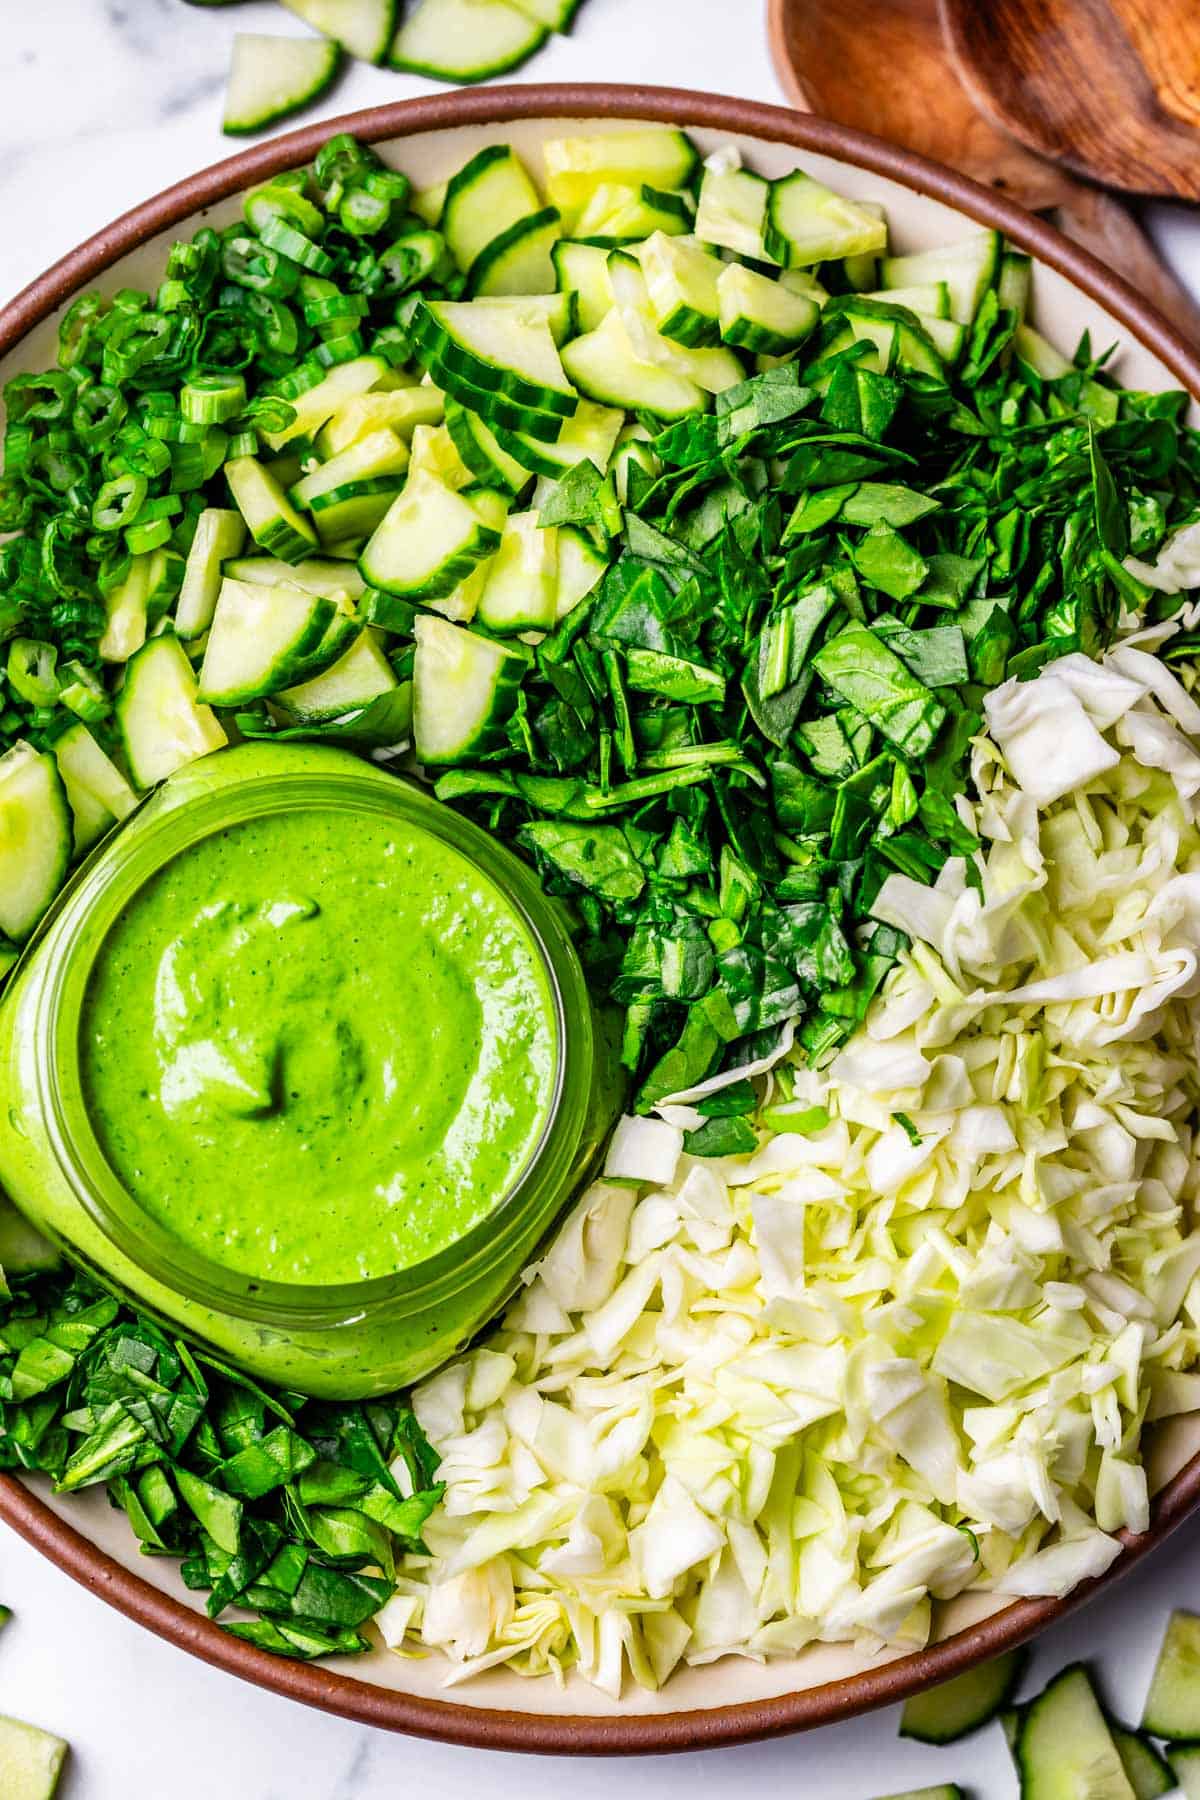
Here’s a quick list of what you need for the homemade dressing and the salad. Just look at this pile of GREEN. Don’t you feel like a champ already??
plain whole milk Greek yogurt
mayo (get the good stuff!)
fresh parsley
green onions
fresh basil
fresh dill
cilantro (skip it if you hate it)
lemons
cucumbers
garlic
green cabbage
baby spinach
fish sauce
avocado
feta cheese
salt and vinegar kettle chips (optional but I mean, not really?? so good!!)
How to make green goddess salad
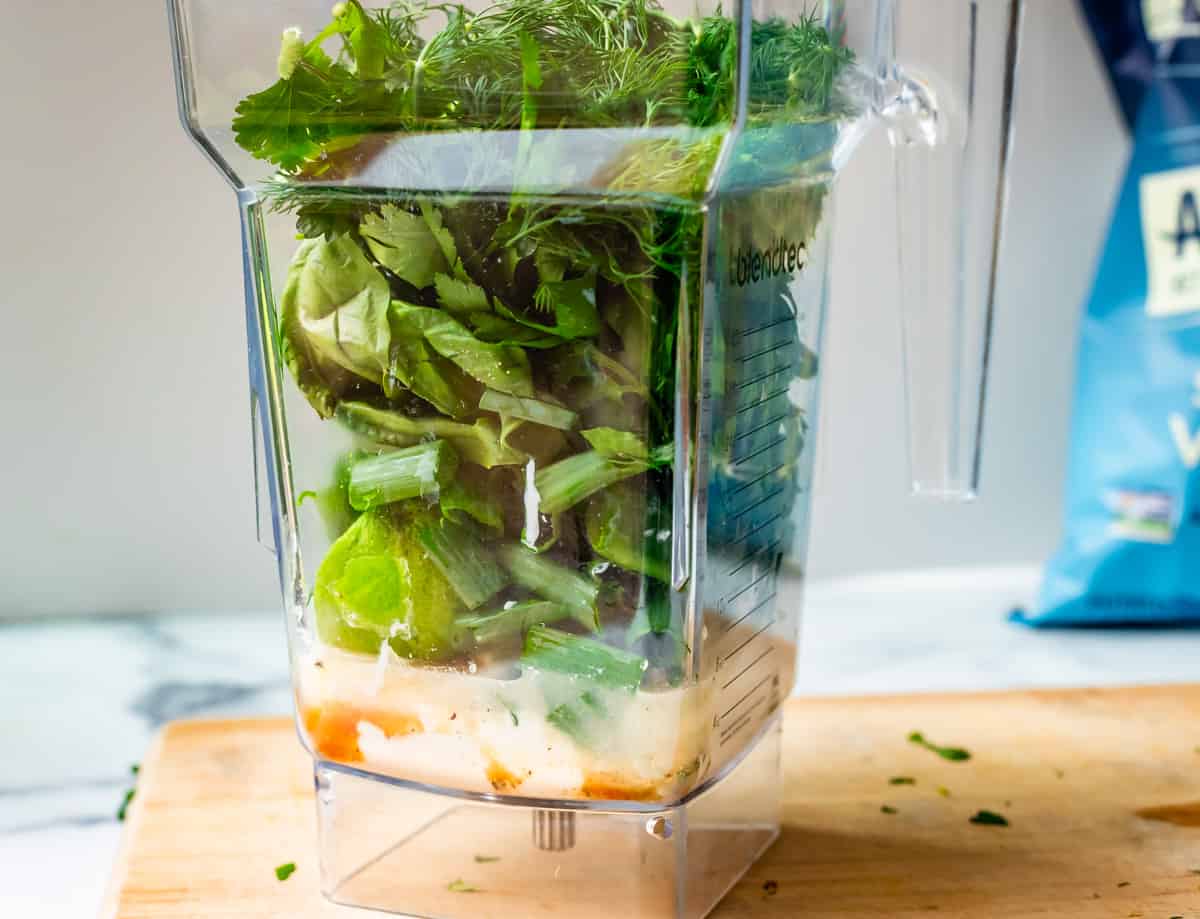
Bust out your blender, he’s the real MVP today.
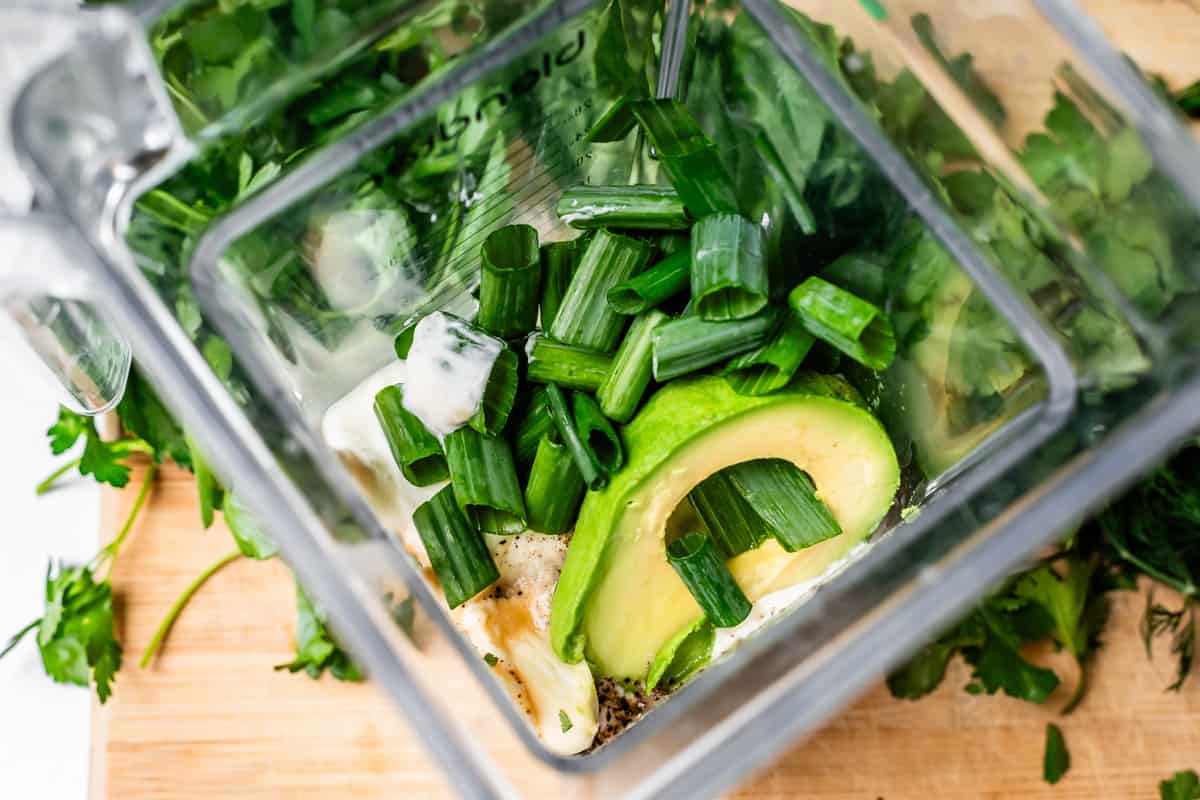
Start by adding all the liquid-y ingredients at the bottom, this will make it easier on the motor. Greek yogurt, mayo, lemon juice, fish sauce, etc.
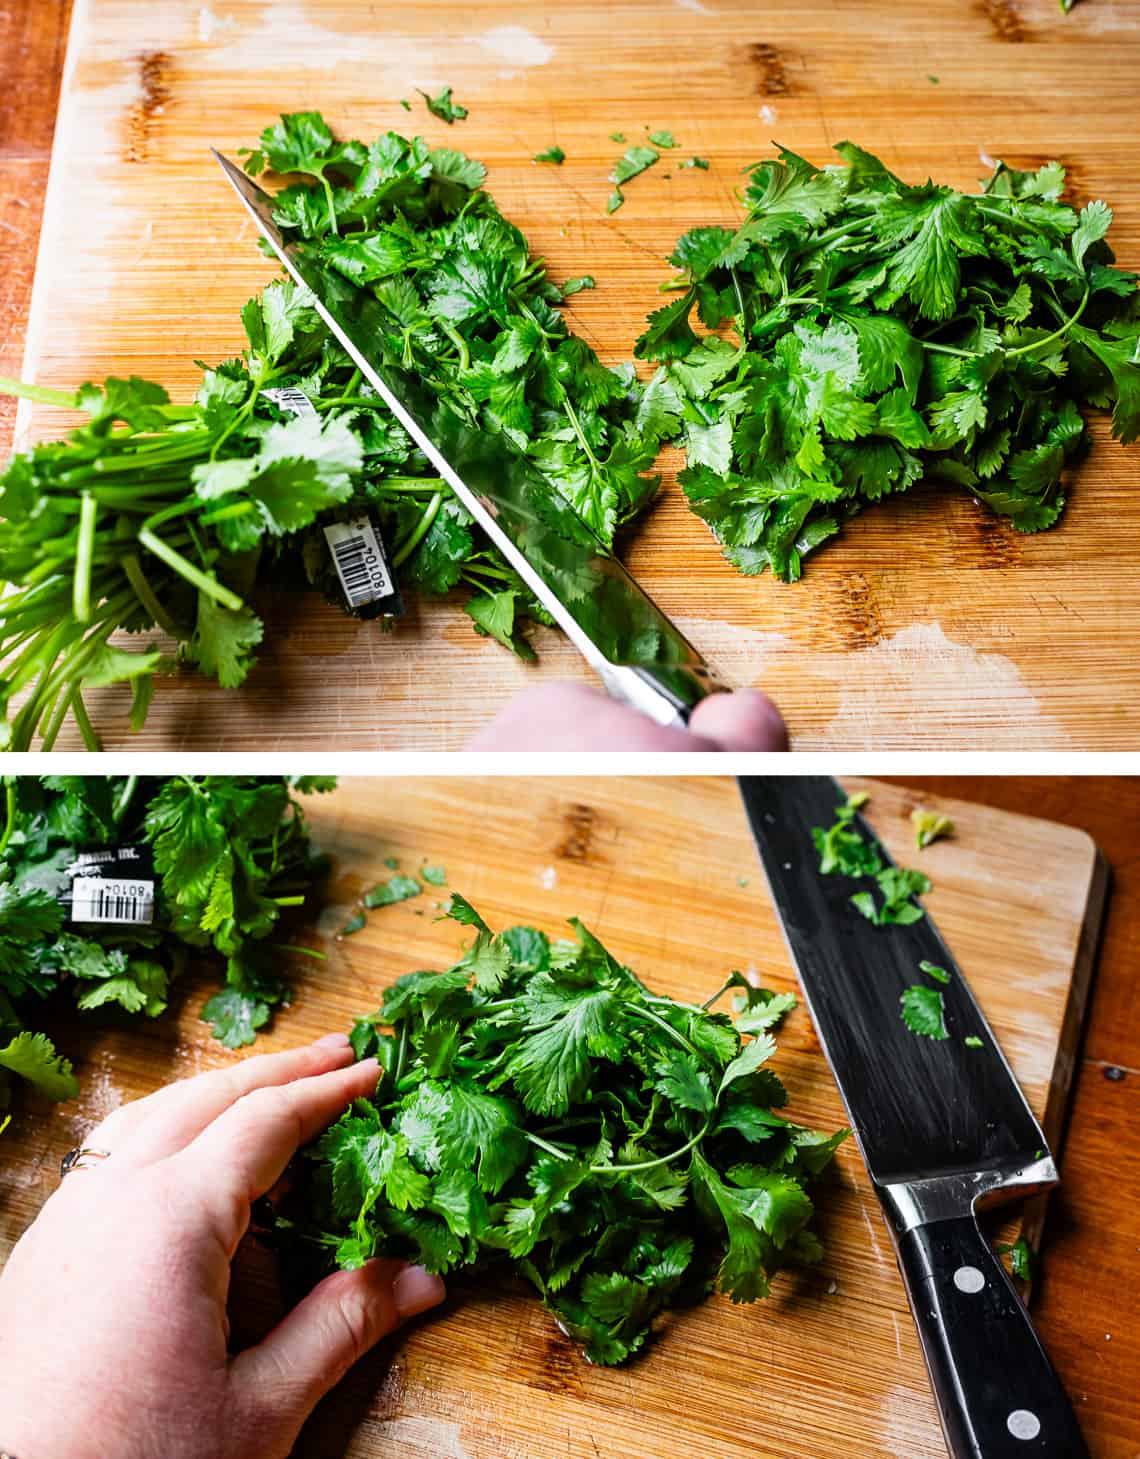
Then add all the herbs on top. You don’t need to chop them first! Just throw them in. Here’s how I slice cilantro away from the stems. Repeat for all the herbs.
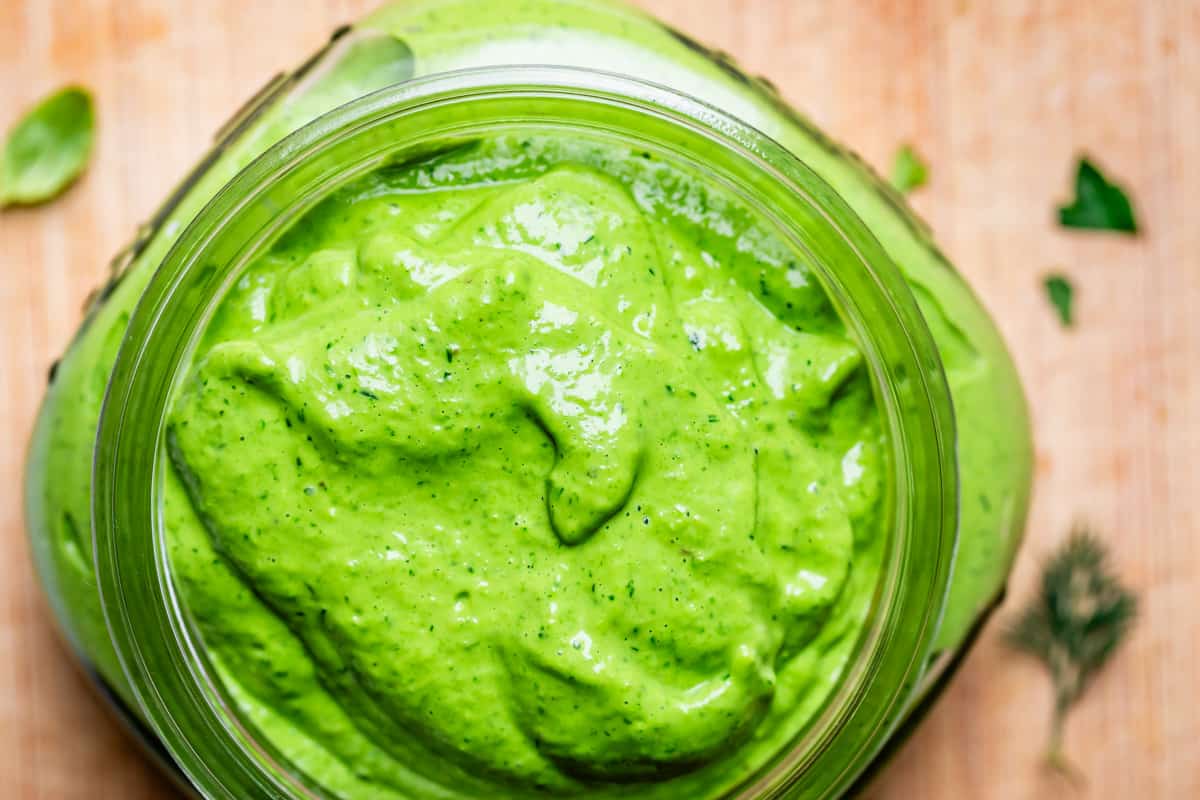
Blend away until you have this vibrant deliciousness in front of you.
Doesn’t it look like Hulk potion or something? Like, maybe if you drank this whole thing, suddenly you might be able to lift a car or something?? Green Goblin was onto something.
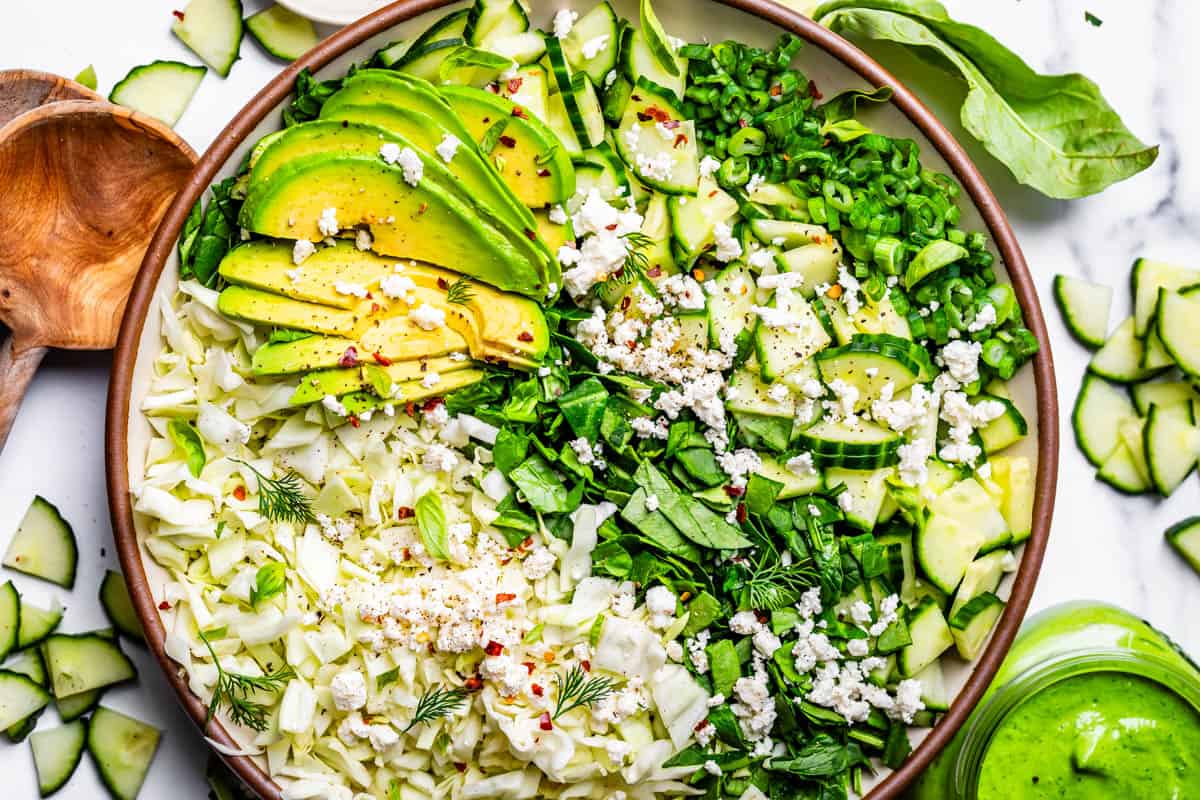
Set the dressing aside and get chopping. For today’s salad, we are using cabbage, spinach, cucumbers, avocado (the other half of the one you used in the dressing!) and green onions.
And when I say chopped, I mean chopped. Even the spinach. Small bites are what make this salad so amazing. All the flavors can fit compactly right on your fork when you do a decent job chopping. I swear, I would love salad in general so much more if they were all chopped to this level.
And that’s it my friends! Do NOT skip the salt and vinegar chips and the feta cheese!
How to store green goddess dressing
Green goddess salad dressing can be stored for up to a week in the fridge. Because we are using avocado it will start to discolor a little bit after day one, but it’s still tasty I promise. After a week, the fresh herbs aren’t going to keep very well. Use it or freeze it before then.
Can you freeze green goddess dressing?
Yes, you totally can! Make sure it’s labeled and in an airtight container or ziplock bag. Defrost it overnight in the fridge and then give it a quick whir in your blender or food processor to fully combine, just in case any separation occurred in the freezer.
Frequently asked questions about green goddess dressing
what does green goddess sauce taste like?
Fresh herbs, lemon, creamy yogurt, and a little garlic, yowz! It’s very fresh tasting, but also feels decadent because we’re using full-fat Greek yogurt and mayonnaise. PLUS an avocado for all the perfectly green fattiness that gorgeous veggie can offer. (veggie? fruit? Feels like a veggie, but I just checked, it’s a fruit. weird.)
Is green goddess dressing healthy?
Hey, I say anything that helps you to eat more vegetables is healthy! Who’s with me? This dressing is packed with fresh herbs and actually has some decent protein (for a dressing) from the greek yogurt. The creaminess comes from the yogurt, mayo, and avocado, so while it does have fat, I say it’s a healthier option than your average creamy dressing. As with all condiments, it’s all about how much you use!
why is it called green goddess salad?
In the 1920s, a California hotel chef dedicated a salad to an actor, who was in a play called The Green Goddess. The play and the salad were both extremely successful, but today most people only know the salad. (When I actually sit and think about the name of this salad, all I can picture is the Green Giant veggie brand dude, with the leafy Adam-and-Eve-outfit, and the Peter Pan shoes. You know that guy??)
Where to buy green goddess salad dressing?
You can find bottled commercial versions of green goddess dressing in just about any grocery store! I personally haven’t found one that can beat the flavor of fresh made dressing though. You should definitely give this recipe a try (it’s SO easy!!)
Listen, I have a rough history with salad in general. I'm a meat-and-potatoes-girl at heart. But this Green Goddess Salad makes my heart sing in a way I didn't even know was possible! It's packed with fresh herbs, crunchy greens, and an unbelievably creamy (and vividly green) dressing. It's especially transcendent when you add crushed salt and vinegar chips on top (I mean, hello? I think I would like every salad better this way??)
1/2teaspoonkosher saltuse less if using table salt
1/4teaspoonfreshly ground black pepper
1/2medium avocadosave the rest to garnish
1/4cupgreen onionsroughly chopped
1/2cupfresh parsleypacked
1/3cupfresh basil packed
1/4cupfresh dillpacked
1/4 cupfresh cilantropacked
For the salad:
1/2headgreen cabbagefinely chopped
6ouncesfresh baby spinachchopped small
1largeEnglish cucumbersliced and then quartered
1/4cupgreen onionschopped small
1 and 1/2mediumavocadossliced
Optional toppings
1/2cupfeta cheesecrumbled
1 and 1/2cupssalt and vinegar kettle chipscrunched
crushed red pepper
Instructions
In a blender or food processor, add 1/3 cup plain yogurt, 1/2 cup mayo, 1 and 1/2 tablespoons lemon juice, 1 teaspoon fish sauce, 1 clove of garlic, 1/2 teaspoon kosher salt, and 1/4 teaspoon freshly ground black pepper. Cut an avocado in half and scoop half of it into the blender. (Save the rest)
Add about 1/4 up green onions. (I use not-quite-all of the green parts from a bunch.) You only need to bother chopping them into 2-inch pieces.
Add 1/2 cup fresh parsley. Use a chef's knife to cut the leaves of the parsley away from the stems, dragging your knife along the length of the stem. See photo. You don't need to chop the parsley, just shove it into a 1/2 cup measurement, and when you have enough, toss it in the blender.
Do the same for about 1/3 cup basil. Cut the leaves away from the stems. Remove any very large stems but don't stress yourself out if a few get tossed in. Don't chop, just shove it into the measuring cup until it's full and then add it to the blender.
Repeat the process of cutting the dill leaves away from the stems, and packing into a 1/4 cup measuring cup. Add to the blender.
Repeat the process of cutting the cilantro leaves away from the stems, and packing into a 1/4 cup measuring cup. Add to the blender.
Blend the dressing ingredients together until smooth and creamy, scraping down the sides as necessary. Taste it and adjust seasonings as necessary; you might want to add more lemon juice or salt or pepper.
Finely chop the green cabbage. Annoyingly small. I promise, small bites make for the best salad! Add to a serving bowl.
Chop about 6 ounces of spinach into very small pieces, first one way, then turn and chop the other way. Add to the bowl.
Slice the cucumber in half lengthwise, then in half again. Chop the cucumber into slices. Add to the bowl.
Chop about 1/4 cup of green onions from the same bunch.
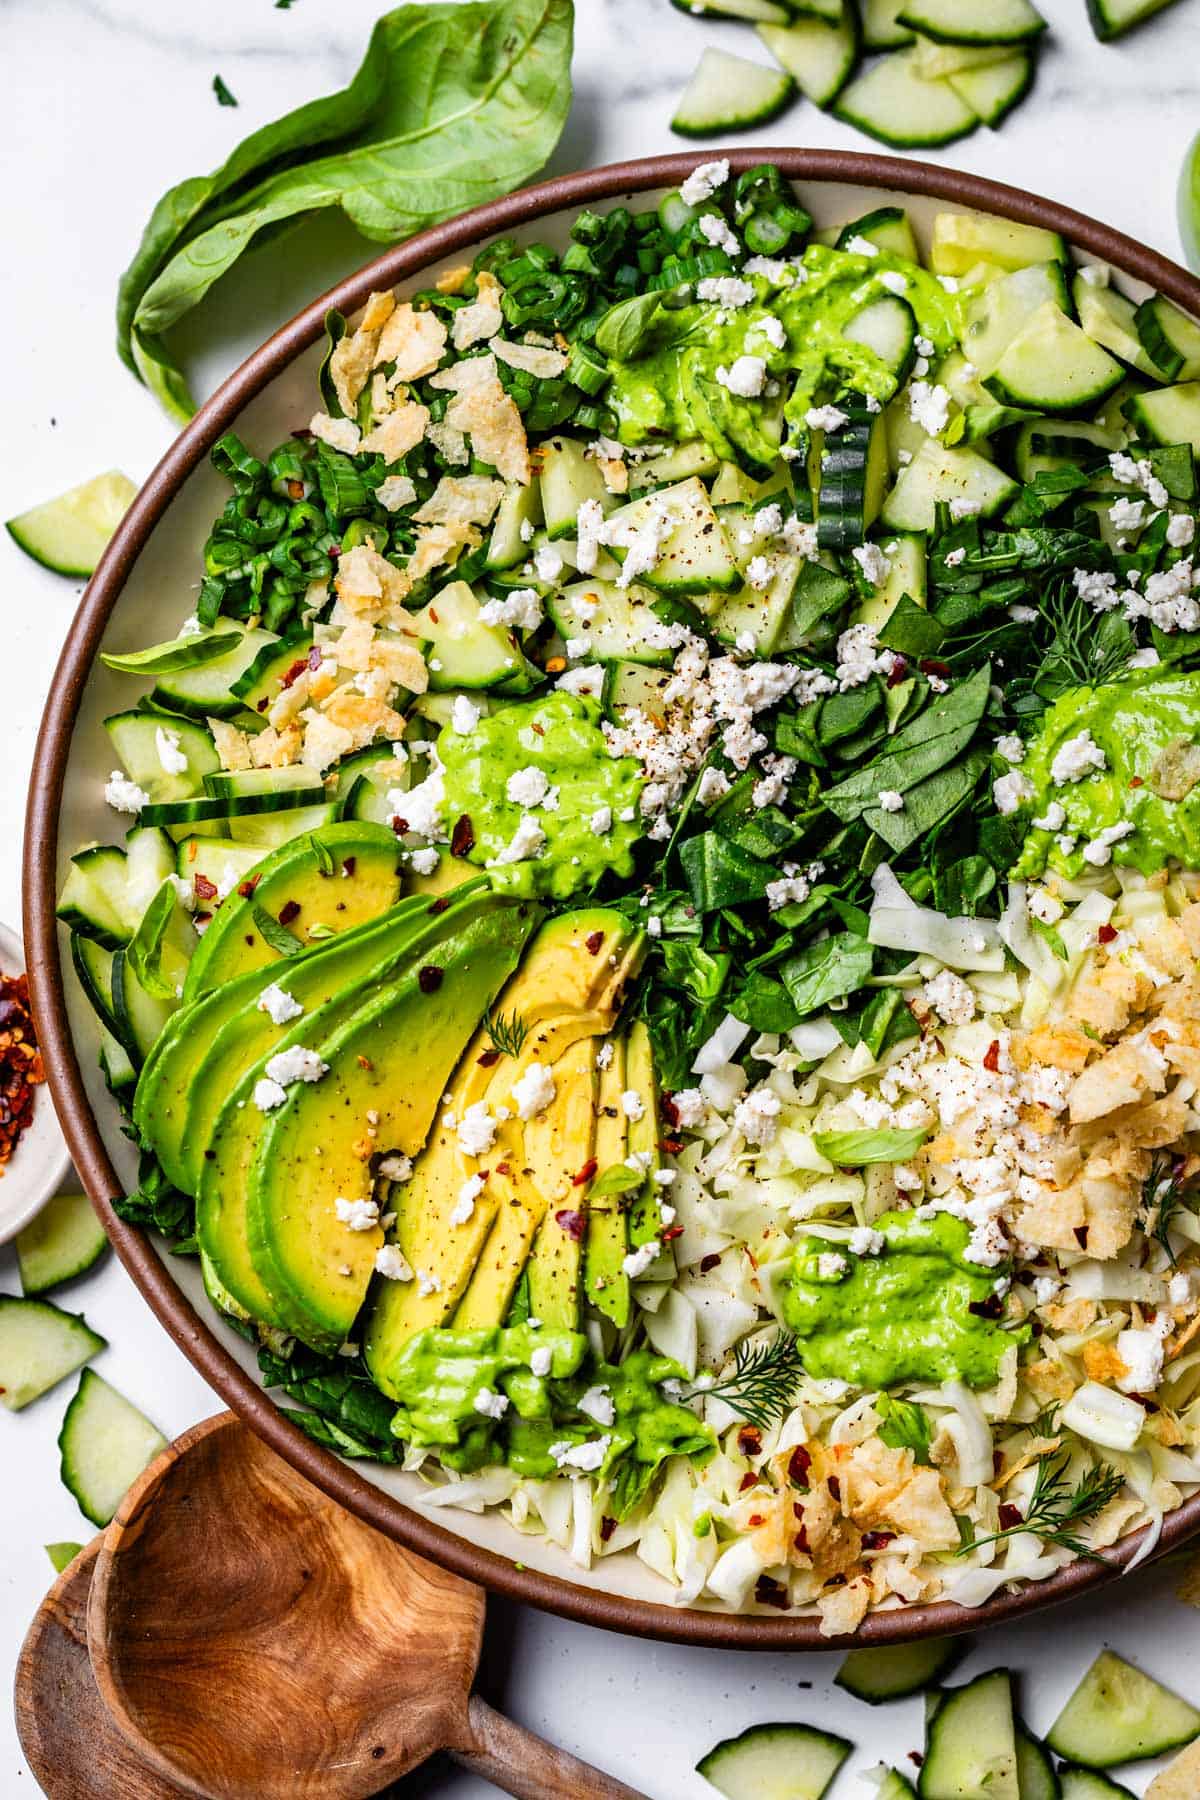
Family Style serving: Add dressing, as much as you like, and toss the salad. Top the tossed salad with the remaining avocado, sliced (plus another one if your crowd loves avocado). Top with 1/2 cup feta cheese, and 1 and 1/2 cups crushed salt and vinegar chips. Sprinkle with crushed red pepper. Pass the remaining dressing at the table.
Individual servings: Divide the chopped cabbage, spinach, cucumber, and green onions among 6 salad plates or bowls. Toss each serving with dressing, you don't have to use it all. Top with sliced avocado, feta cheese, salt and vinegar chips, and sprinkle with crushed red pepper. Pass the remaining dressing at the table.
This traditional Vietnamese Banh Mi Sandwich will blow your mind! A mini soft baguette, smeared with sriracha mayo, topped with thinly sliced marinated pork, pickled vegetables, and tons of cilantro. It’s heaven! Originally published July 19, 2018. This is the Best Banh Mi Sandwich Recipe This morning I went to Safeway at 6:45am. Never in my…
This traditional Vietnamese Banh Mi Sandwich will blow your mind! A mini soft baguette, smeared with sriracha mayo, topped with thinly sliced marinated pork, pickled vegetables, and tons of cilantro. It’s heaven! Originally published July 19, 2018.
This morning I went to Safeway at 6:45am. Never in my life have I set foot in a grocery store so early, but it was kind of nice! No crowds, and employees everywhere asking me if they could help me find anything. YES! please help me, where is the daikon because I’m making BANH MIIIII!!
(I forgot to mention that my pleasant early morning Safeway jaunt ended with me driving halfway home before realizing that I didn’t have my phone. I drove all the way back and found it in the cart right where I left it. Doh! Maybe it was a little TOO early in the morning.)
But back to the Banh Mi’s. Have you heard of them? Have you had one? The time is now! Just look at this!
What is a Banh Mi Sandwich?
A banh mi is a Vietnamese sandwich with an amazing combo of flavors and textures. Every banh mi starts with a delicious mini baguette: crispy crust on the outside, soft tenderness on the inside. You stuff it with meat (pork, chicken, ham, pâté, it varies!) and veggies (carrots, daikon radish, cucumbers). Mayo is a must. In my book cilantro is a must too, but I know some of you out there can’t stand it and that’s FINE. Seriously though, it won’t ruin your banh mi to leave it out.
Homemade Banh Mi Sandwich ingredients
Here’s a quick list of everything you’ll need to make a banh mi. Scroll down to the recipe card at the bottom of the post for more!
pork tenderloin
shallot
garlic
sugar
honey
fish sauce
sesame oil
Kosher salt
black pepper
carrots
daikon radish
white vinegar
mayonnaise
Sriracha
bolillo rolls, mini soft baguettes, or hero rolls
English cucumber
jalapeno pepper (optional)
cilantro
How to make a Banh Mi sandwich
Start with a soft (not crunchy!) mini french baguette. Hero/hoagie rolls will work but it’s even better if you can find Bolilo rolls. They are Mexican rolls used to make tortas, and I found them in the bakery section at Safeway. Whatever roll you use, make sure it’s not so crunchy that it will scrape the roof of your mouth, who wants that?
I asked the butcher behind the counter if she would slice the pork tenderloin for me. SOOO much easier than doing it at home. Grab a pork tenderloin from the shelf and ask the butcher to do the hard work for you! It will be hard to get it this thin at home. On the right are all the ingredients you need for the marinade. I just tossed it all in the blender because I’m lazy!
There should be a 2:1 ratio of veggies to meat on a traditional Banh Mi sandwich, but if you cheat and add more pork I won’t tell anyone. Besides the cilantro leaves and pickles, the thinly sliced and marinated pork is what MAKES this sandwich. It is so tender and flavorful.
The pickled daikon and carrots are KEY to a great banh mi sandwich. Daikon is a kind of radish commonly used in Vietnam and Asian cuisine generally, and if you can’t find any, just swap them out for radishes (radishes are stronger so maybe don’t use as much). The pickling process only takes about an hour. They last for months in the fridge, so if you have any leftover (I always make extra!) then you will have a ready to go sandwich topping in your fridge! Or burger topping! Or pulled pork topping! I’m telling you it’s so good!
Here’s what a daikon looks like. And how I chopped it to get matchsticks. Lay flat and slice again after this step, they will look like this:
Here are the carrots and daikon after 15 minutes of sitting in a bit of salt and sugar. It makes them flexible. They will still be crunchy, but will be able to bend without snapping.
Oh yeah baby. Pile those jalapeños on.
I made these Banh Mi’s several hours ago now and am learning just how much I rub my eyes. Because after slicing those jalapeños my eyes are burning! Gah! Be careful! Or buy latex gloves for the kitchen. Why do I not do this??
Banh Mi Recipe variations
Here are some ideas for adding new flavors and textures to your banh mi. Try them out and comment below the recipe to tell us how you liked them!
Add Maggi seasoning sauce. This is a classic flavor to add to Asian food. Just sprinkle a little on the mayo for more umami!
Put a fried egg in it. For a while there it seemed like people were putting fried eggs on everything! But a fried egg really is amazing in a banh mi.
Switch out your protein. If you don’t want to use pork, substitute thinly sliced chicken or pork belly. You could totally just use thinly sliced chicken breast from the deli in a pinch! Obviously if you go this route, just use it cold and skip the marinating and cooking.
Leave out (or replace) the cilantro. In my opinion, Banh Mi sandwiches are just an excuse to eat fistfuls of cilantro. Could there be anything better?? I know all the cilantro haters out there are gagging right now. But wait come baaack! You can replace the cilantro with another herb if you want! I think it would be good with basil (ooh! Thai basil if you can find it!) or even mint. Or maybe dill??
How to serve Banh Mi Sandwiches
For me a banh mi sandwich is a complete meal. You could totally serve any side you want of course, from fries to potato chips to fruit salad. It’s also great with a cold soda or juice, like orange or pineapple.
How to store a Homemade Banh Mi
It’s best to store the ingredients for a homemade banh mi separately. That way your bread won’t get soggy and your veggies will stay crisp. Everything except the bread should be stored in the fridge. I don’t recommend freezing anything. A banh mi is meant to be made fresh.
These traditional Vietnamese Banh Mi Sandwiches will blow your mind! A mini soft baguette, smeared with sriracha mayo, topped with thinly sliced marinated pork, pickled veggies, and tons of cilantro. It’s heaven!
Begin by slicing the pork tenderloin very thin. Or better yet, ask your butcher to do this for you! They can do it in about 2 minutes and it will save you tons of time. And they will get it much thinner than you can get it at home.
In a blender or food processor, add the shallot, garlic, sugar, honey, fish sauce, sesame oil, salt and pepper. Pulse until combined. It’s okay if there are chunks of onion or garlic. You can also just chop the shallot and garlic by hand and mix it all together in a bowl, I’m just lazy.
Add the marinade and thinly sliced pork to a medium bowl, cover, and refrigerate for at least an hour, or up to 24 hours.
Make the picked veggies: Chop the carrots and daikon into matchsticks. See photos. You want them to be about the length of a matchstick and the thickness of your average chop stick. It doesn’t have to be perfect! Don’t stress about it. Just chop them up thin-ish and your sandwich is going to taste amazing.
Add the chopped veggies to a large bowl and sprinkle with 1 and 1/2 tablespoons salt and 1 and 1/2 tablespoons sugar. Use your hands to massage the sugar and salt into the veggies. We’re doing this to get the carrots and daikon to release water, so that they will be flexible but still crunchy. After 15 minutes of sitting in the salt and sugar, you should be able to bend a carrot without it snapping (see photo).
Pour the veggies into a colander and rinse them under water until all the salt and sugar is washed off.
Rinse out the bowl and make the brine: combine 1/2 sugar and 1 cup warm water, and stir to dissolve. Add the vinegar and a few shakes of salt. Stir it all together.
Add the rinsed carrots and daikon to the vinegar mixture, make sure all the veggies are covered, and stick it in the fridge for 45 minutes. (They will keep for months in the fridge!)
When the pork has marinated, heat a large skillet over medium high heat. Add about a tablespoon of oil to the pan. Make sure it is shimmering.
Add the pork strips in batches. If you add it all at once, it will not brown. Make sure there is about an inch of space in between each piece of pork.
Sear the pork for about 1-2 minutes, then flip and sear for another minute or so. If you sliced the pork yourself, you will probably have to cook it longer because it will be thicker. Adjust the heat as necessary, you want to keep it as high as possible without the pan scorching.
Continue searing until all the pork is cooked. Add more oil as necessary. Set aside on a plate, or put it in the oven on a pan on the “keep warm” setting (170 degrees F).
In a small bowl, combine 1 cup mayonnaise and 1 tablespoon Sriracha (more or less Sriracha to taste).
To assemble: Slice a roll in half lengthwise. Spread both sides with Sriracha mayo.
Top one side with pork, sliced cucumber, sliced jalapeno, lots of pickled carrots and daikon, and fistfuls of cilantro (you can chop it if you want, I just tore it from the top of the bunch.)
Top with the other half of the roll and eat! Serve with more Sriracha mayo if you want.
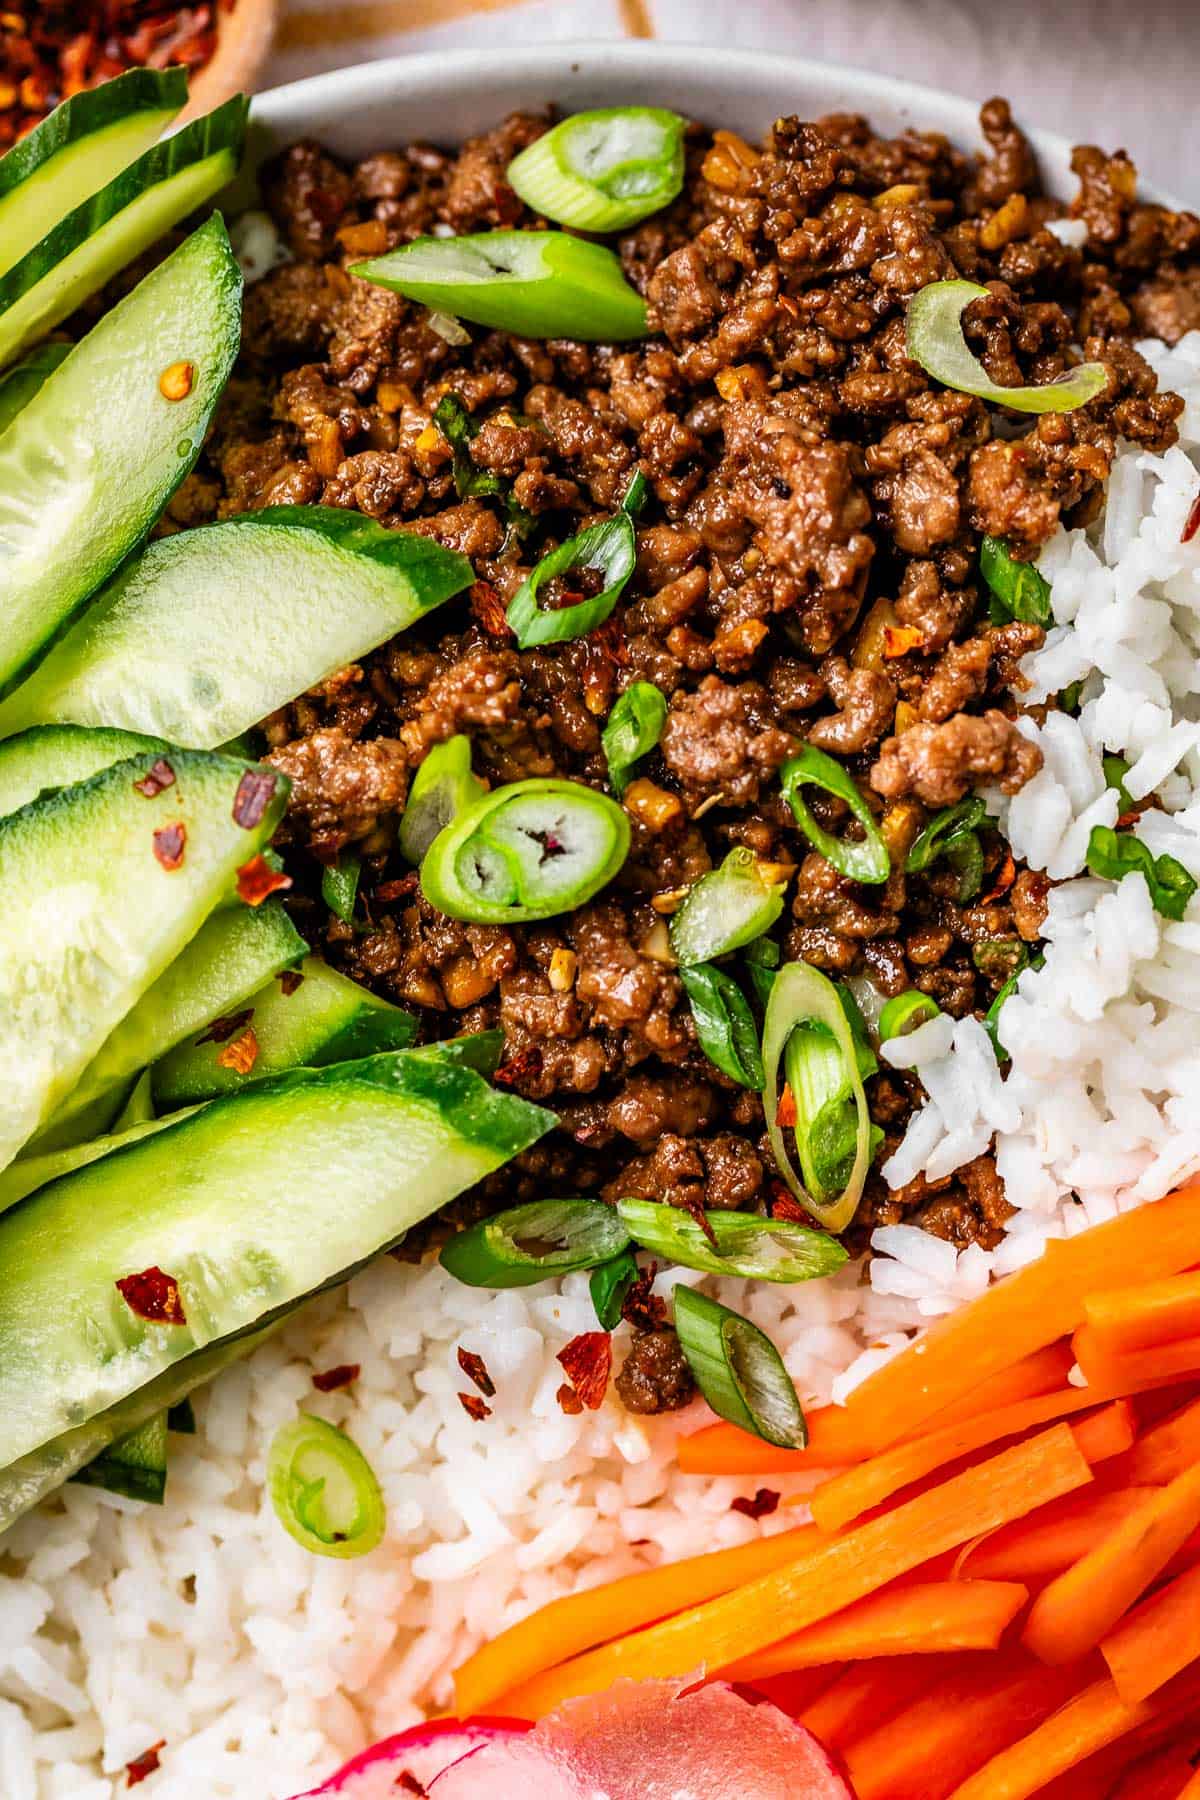
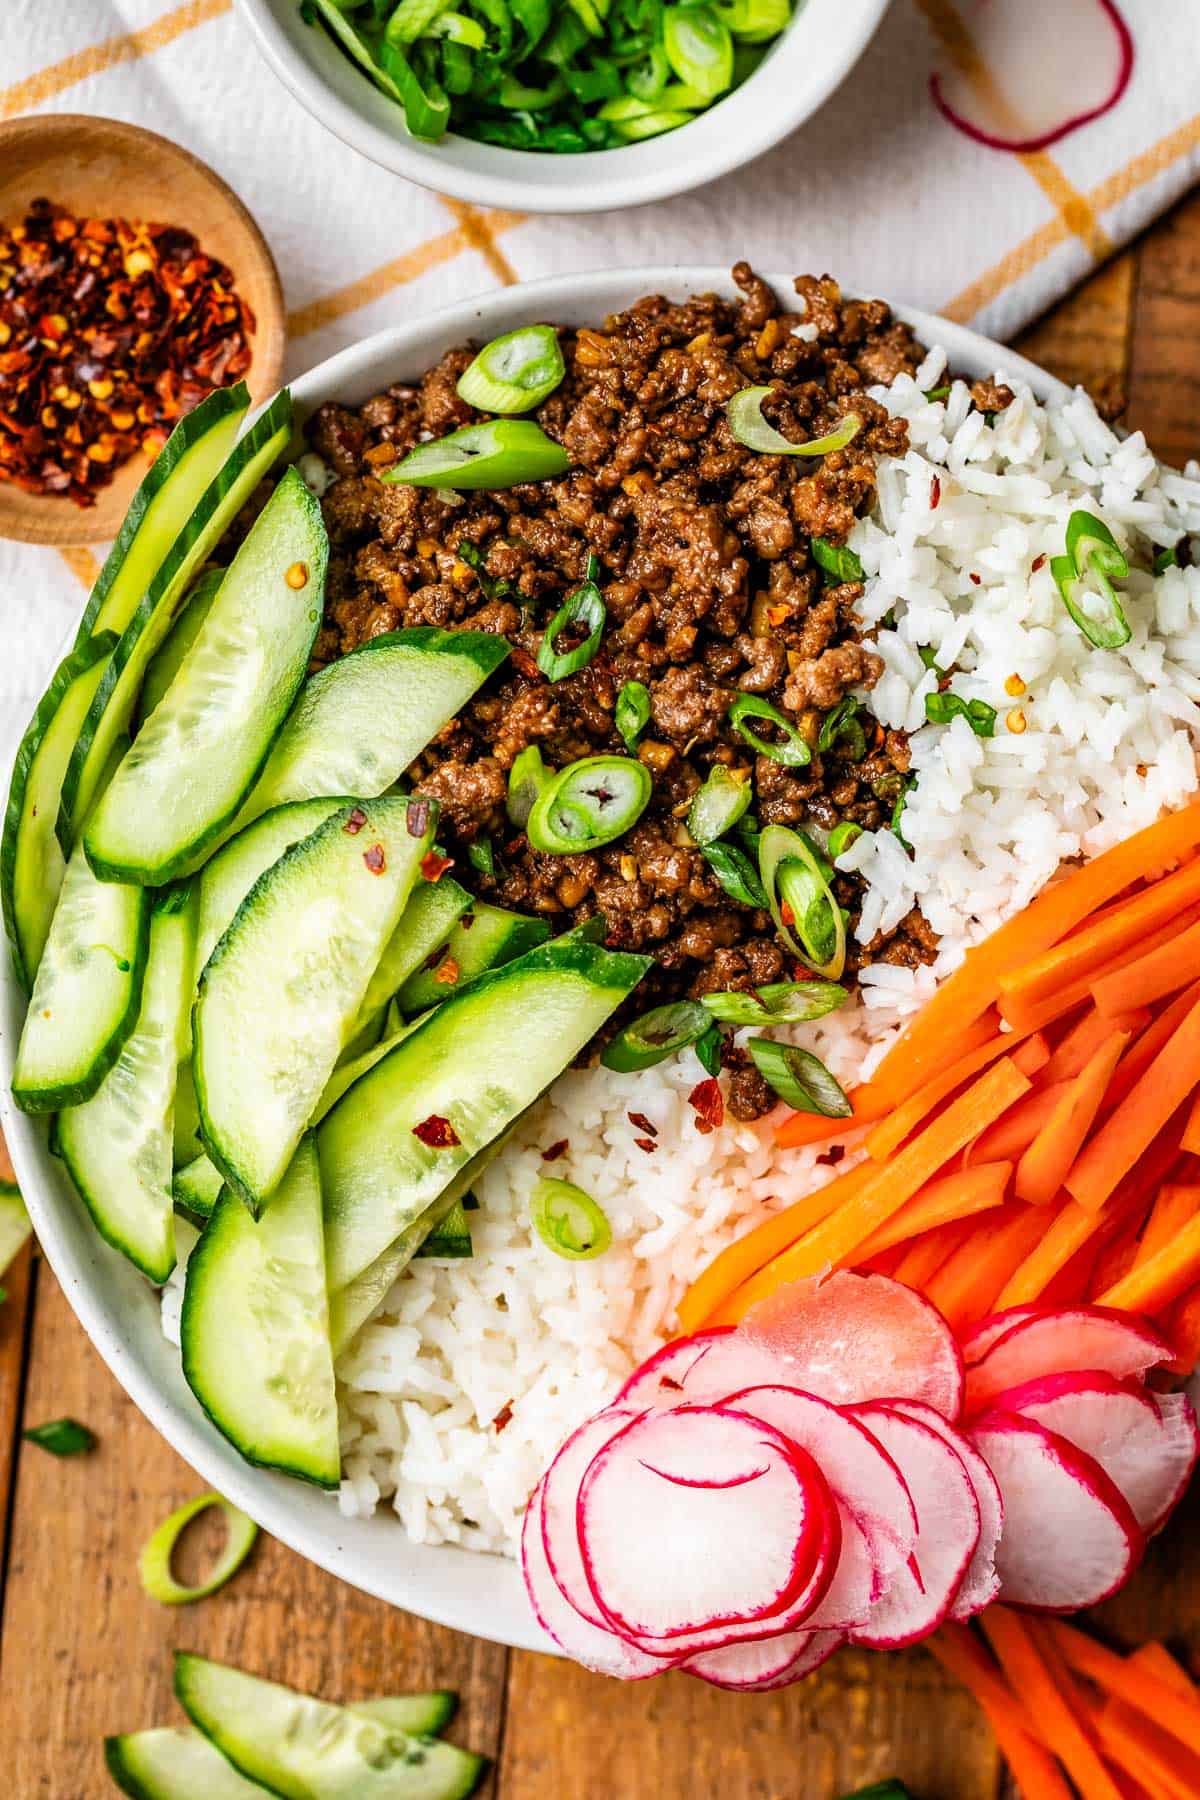
Guys, there’s easy, and then there’s this recipe. Korean beef is unbelievably good for how little effort it takes. A pound of ground beef and some Asian pantry ingredients turn into a magical dinner in just a few minutes. Dress it up as much or as little as you want. Rice is a go-to, but…
Guys, there’s easy, and then there’s this recipe. Korean beef is unbelievably good for how little effort it takes. A pound of ground beef and some Asian pantry ingredients turn into a magical dinner in just a few minutes. Dress it up as much or as little as you want. Rice is a go-to, but you could add any veggies you have in your fridge, like cucumbers, carrots, edamame, broccoli…the options are endless. My new favorite weeknight meal!
I looked up from my spot at the kitchen barstool the other day to see that my 4-year-old son Edison had something in his hair. I reached up to brush it away, and realized it WAS his hair. His completely shriveled, singed blond hair.
I sent this picture to my family: “Edison, when he smells a candle.” My family’s response:
“I think he’s drunk. Have you had him walk a straight line, or do finger-to-nose yet?”
“Poor kid. It’s rough being 4. 😂”
“At least the eyelashes were spared!!”
“I hope he makes it to adulthood.”
I sure hope he does too guys, it gets pretty dicey sometimes with this kid!! His face is all red, not from scorch marks (thank goodness), but because earlier that day at “play school,” he decided to paint his face instead of the paper. Of course.
I should probably stop lighting candles in my house altogether. So much for a lovely scented kitchen. I don’t think I’ve ever gone so deep on “stop drop and roll” demonstrations for such a young kid. He probably thought I was the crazy one after seeing me flail around all over the floor after he did something so innocuous as smelling a candle.
It’s shenanigans like this that mean I NEED some amazing 30-minute dinners like the one I’m sharing today. I can’t keep up with these kids as it is, forget an overly-involved dinner!
My sister Laura is the mastermind behind today’s Korean beef recipe. She is a pro at whipping up super quick and HEALTHY dinners. (anyone can pasta all day, but this girl knows where it’s at when it comes to nutritious meals.) Have you made Korean Beef before? There’s a reason it’s super popular.
Korean beef
I never thought much of Korean beef. I’d seen the pictures. Looks like some ground beef with spices over white rice. Big woof. But since making it, I’ve come around. Because the FLAVOR, oh my goodness. It’s amazing what these few simple ingredients can do for a pound of ground beef.
I’m usually the person who is telling you to buy 80/20 ground beef, because for things like Smash Burgers, you NEED all that fat to make your burger juicy. But for Korean beef, it’s best to use lean ground beef. I like 93/7 best. It’s a bit more expensive, but in this dish it means you don’t have to drain the grease, and helps to avoid that slick, greasy feel on the beef. PLUS it allows us to use toasted sesame oil in the pan before browning the meat (usually totally unnecessary with fattier beef) which gives the perfect flavor.
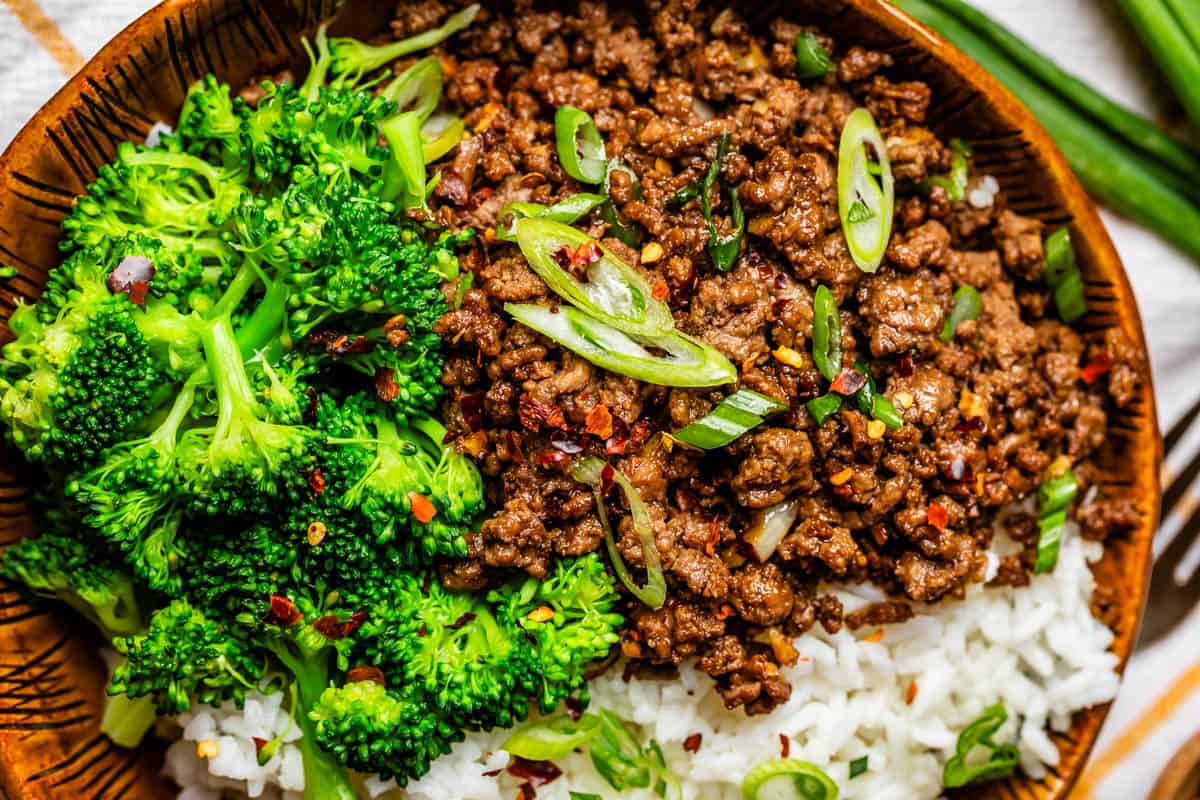
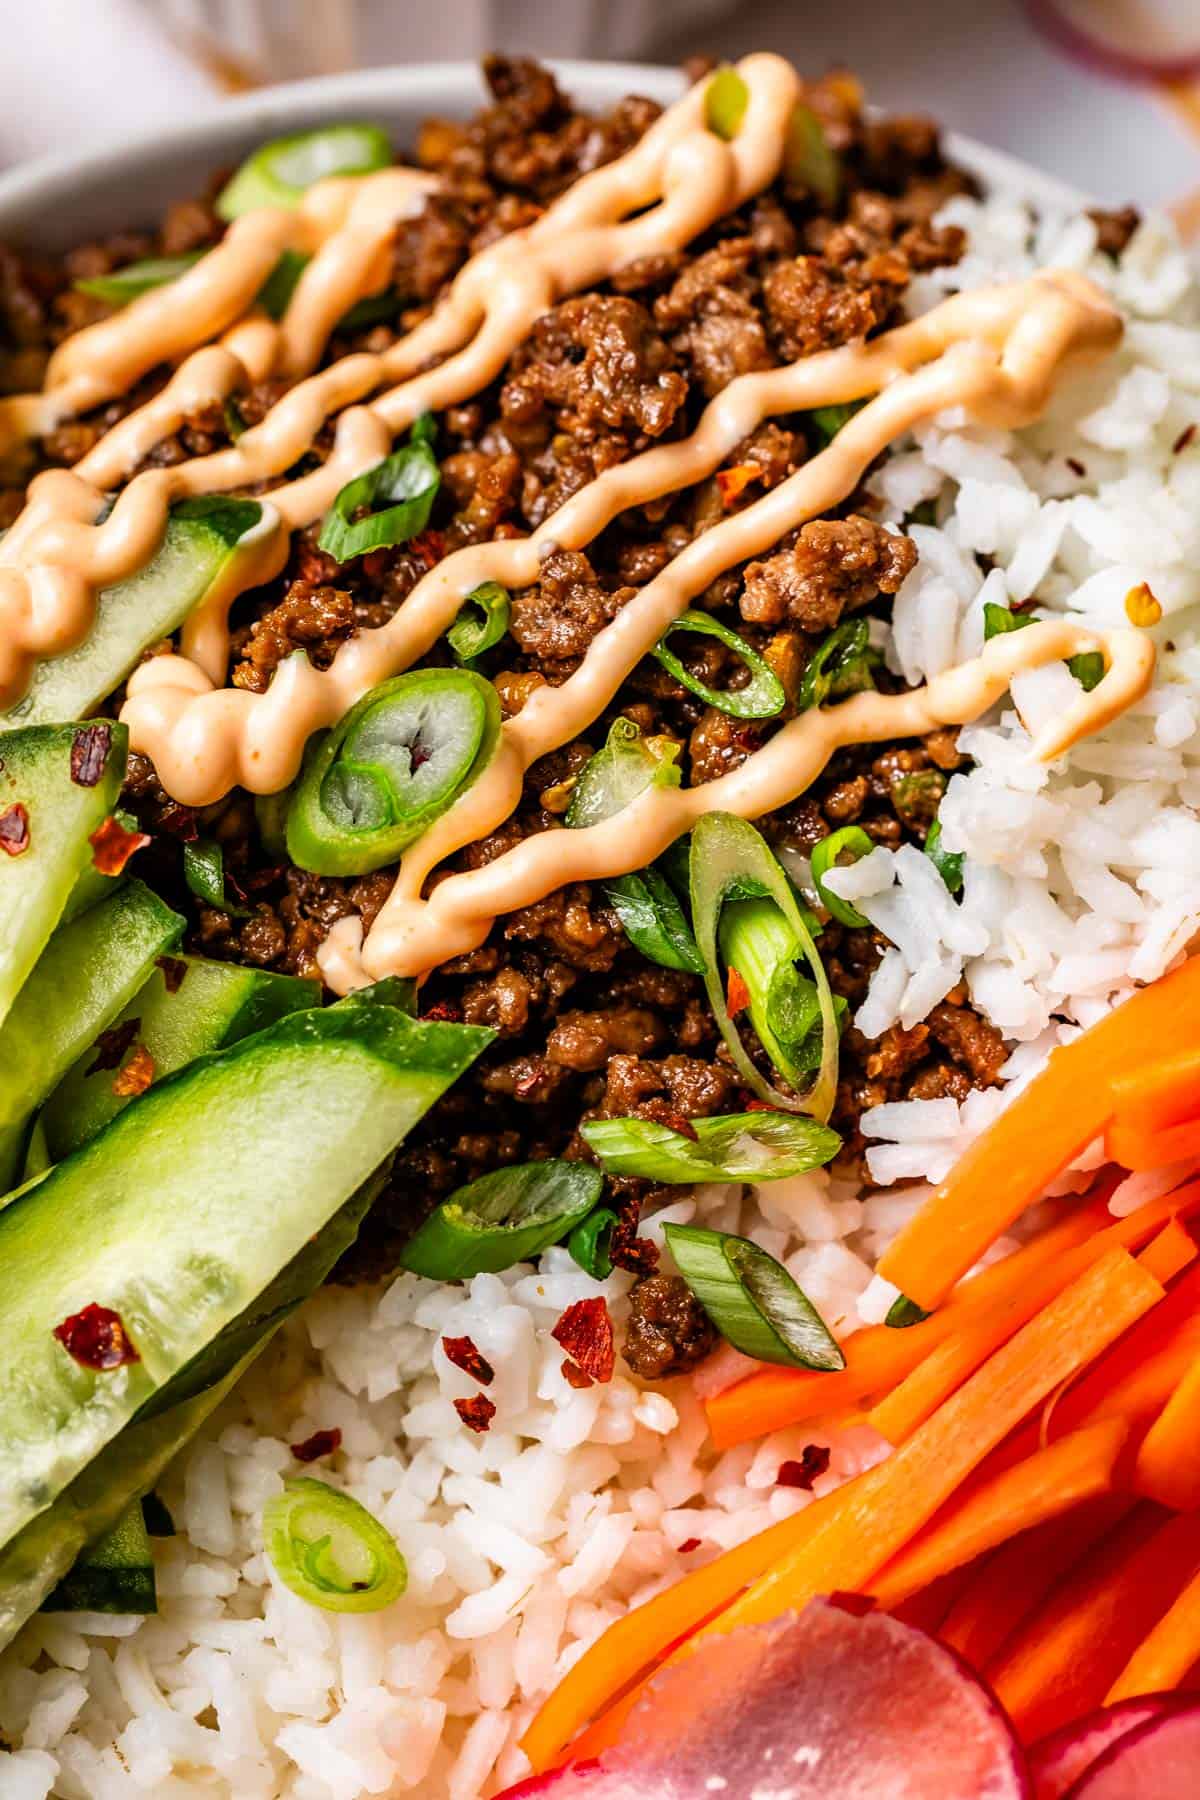
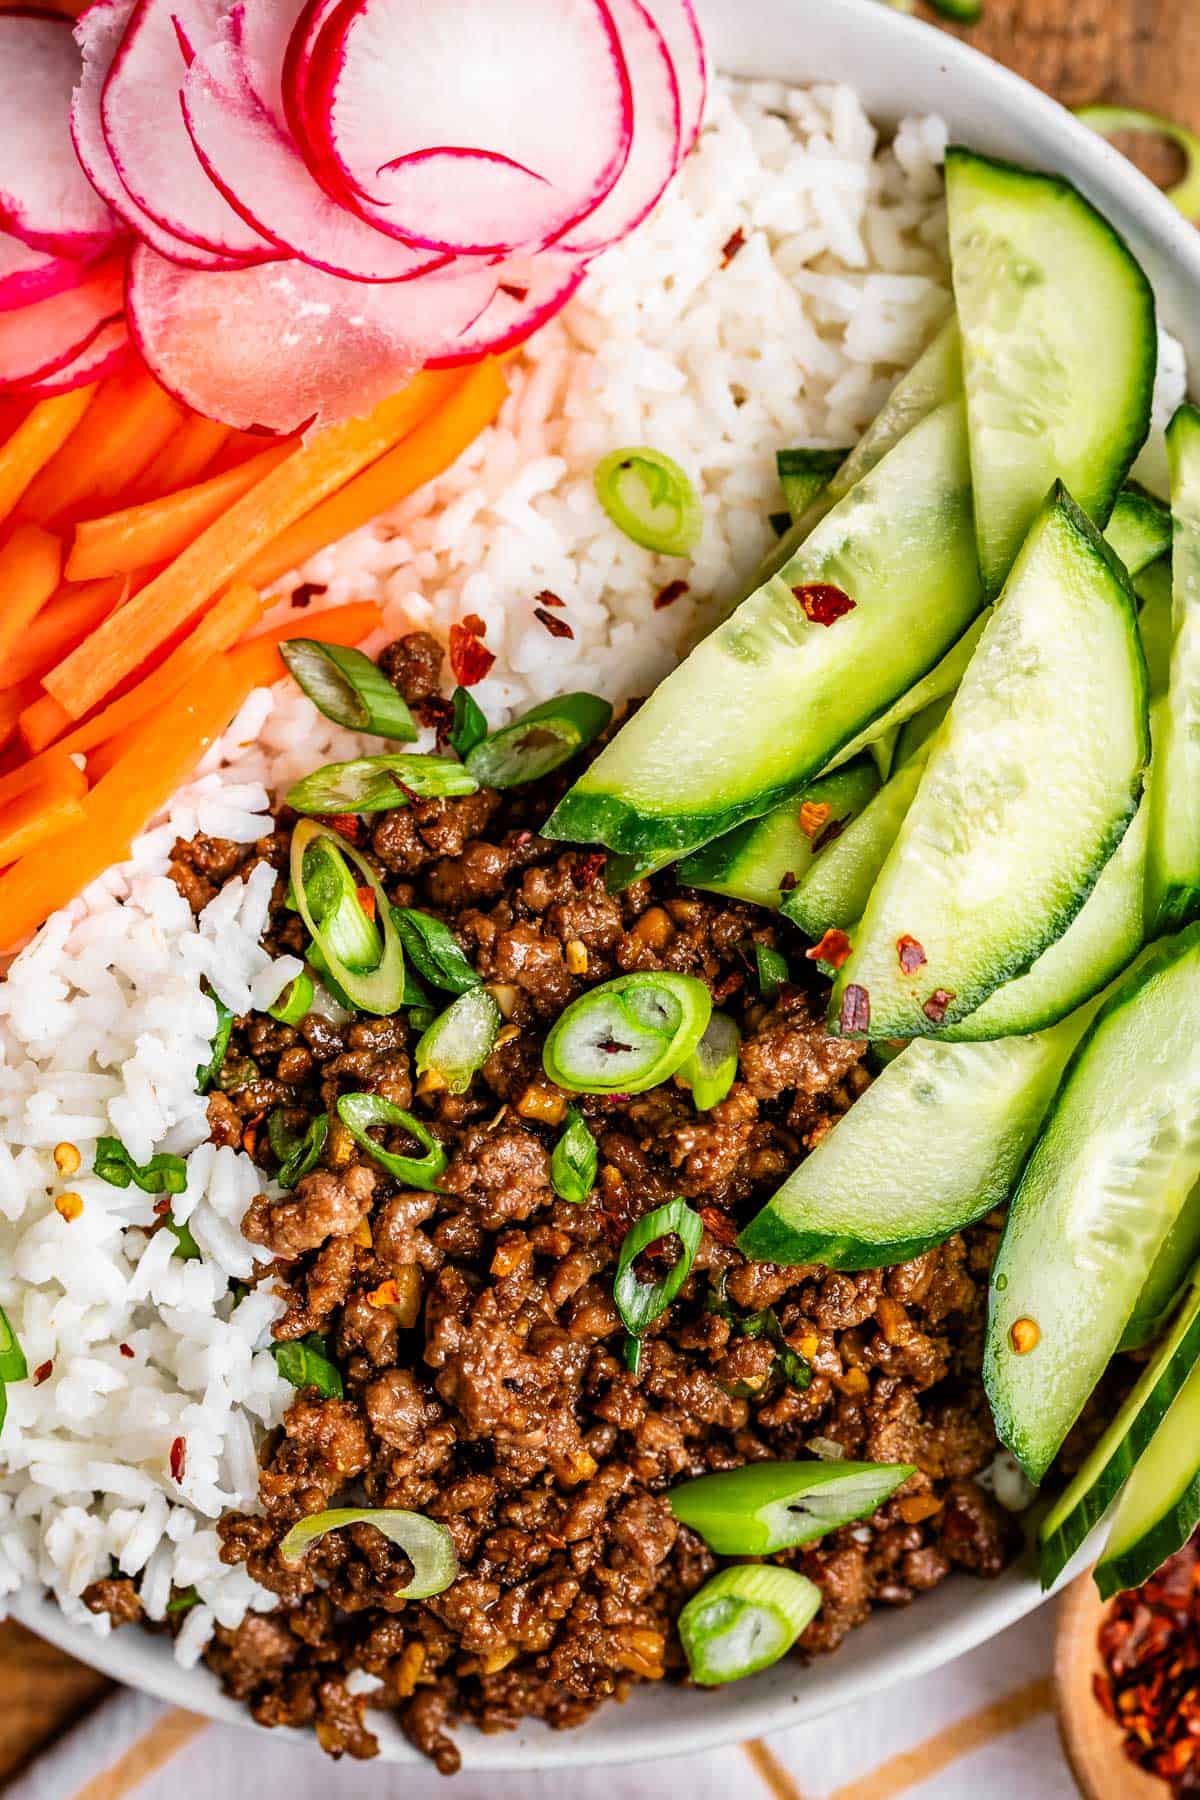
Then we’re going to add some simple but potent flavors like garlic, ginger, sesame oil, and soy sauce to truly transform the plain beef. A hint of dark brown sugar gets mixed in, LOTS of green onion and some sesame seeds sprinkled over the top, and voila, your Korean beef is DONE. It’s really that easy! Serve with your favorite rice and stir fry veggies, or put it together in a rice bowl like I’ve done for the photos today. Trust me when I say it will be a new favorite in your dinner rotation!
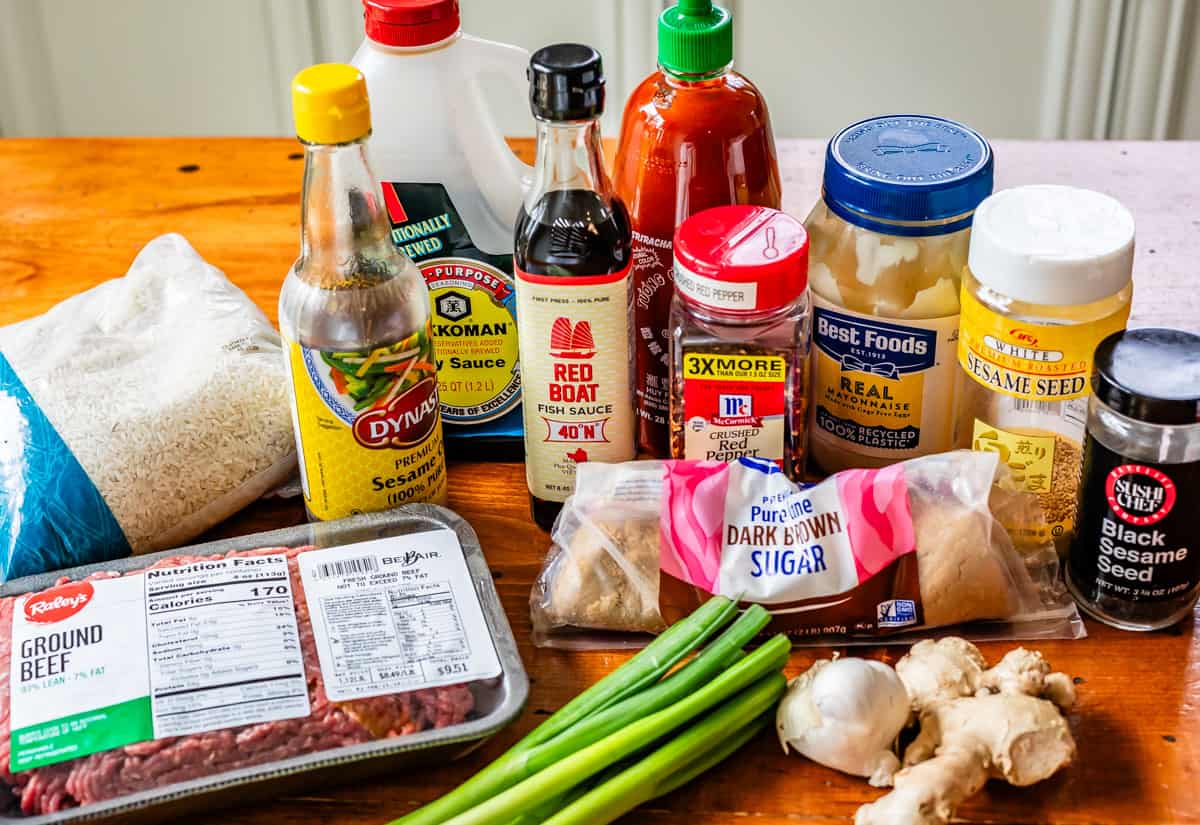
Korean beef ingredients
Check out what you’ll need for the recipe here, but be sure to look at the recipe card to get exact measurements and full instructions!
lean ground beef
sesame oil
garlic
ginger
red pepper
soy sauce
fish sauce (optional, but the UMAMIIII)
dark brown sugar
green onions
sesame seeds
rice, to serve with
More veggies to serve it with, see recipe
How to make Korean Beef
If you’re planning to serve this with rice, get the rice started first thing. Korean beef is done so fast that the rice will actually take longer to cook than the beef, so let it do it’s thing while you prep everything else.
When I make this for my family, I make white rice for the kids and Cauliflower Rice (or Asian Cauliflower Rice) for me and Eric, because we prefer to eat low-carb dinners most days. Sometimes I buy a head of cauliflower and make it homemade, and sometimes I buy the pre-riced frozen cauliflower. It’s so easy, just heat it up in a pan with some oil and salt.
Once you have your rice going, set a large skillet over medium high heat and add the toasted sesame seed oil. I love the taste of toasted oil, but normal sesame seed oil will work fine. Add the ground beef, and stir occasionally to break down the meat until it is all well browned. It’ll probably take about 5 or so minutes.
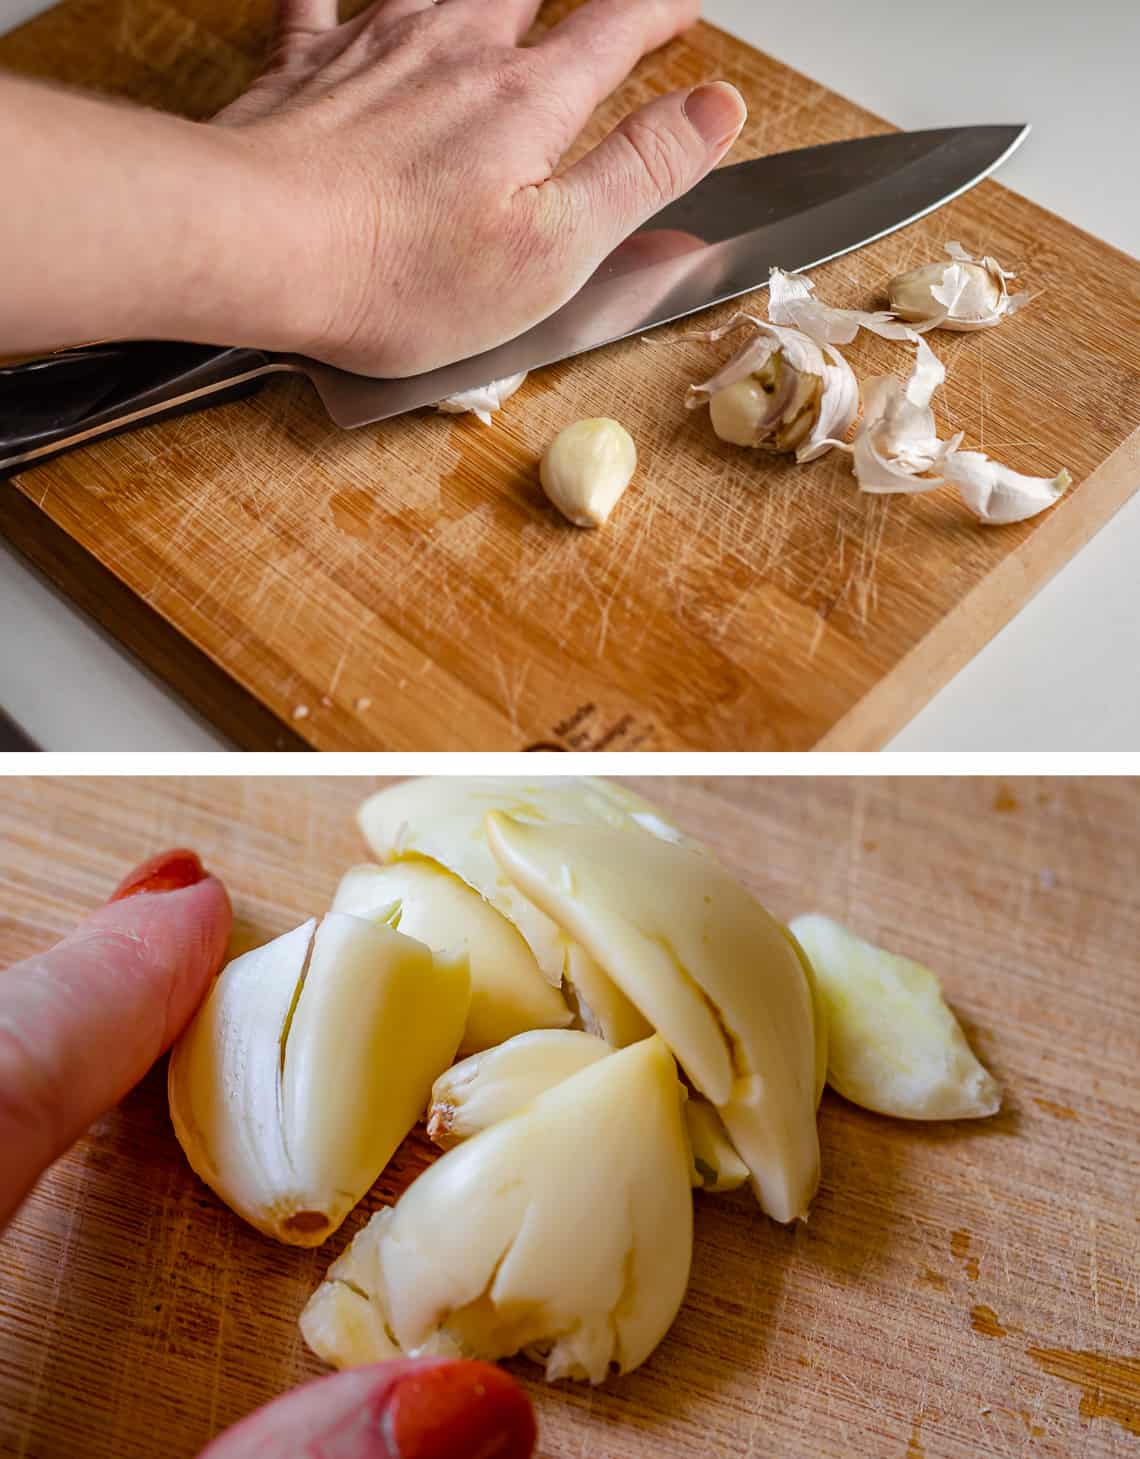
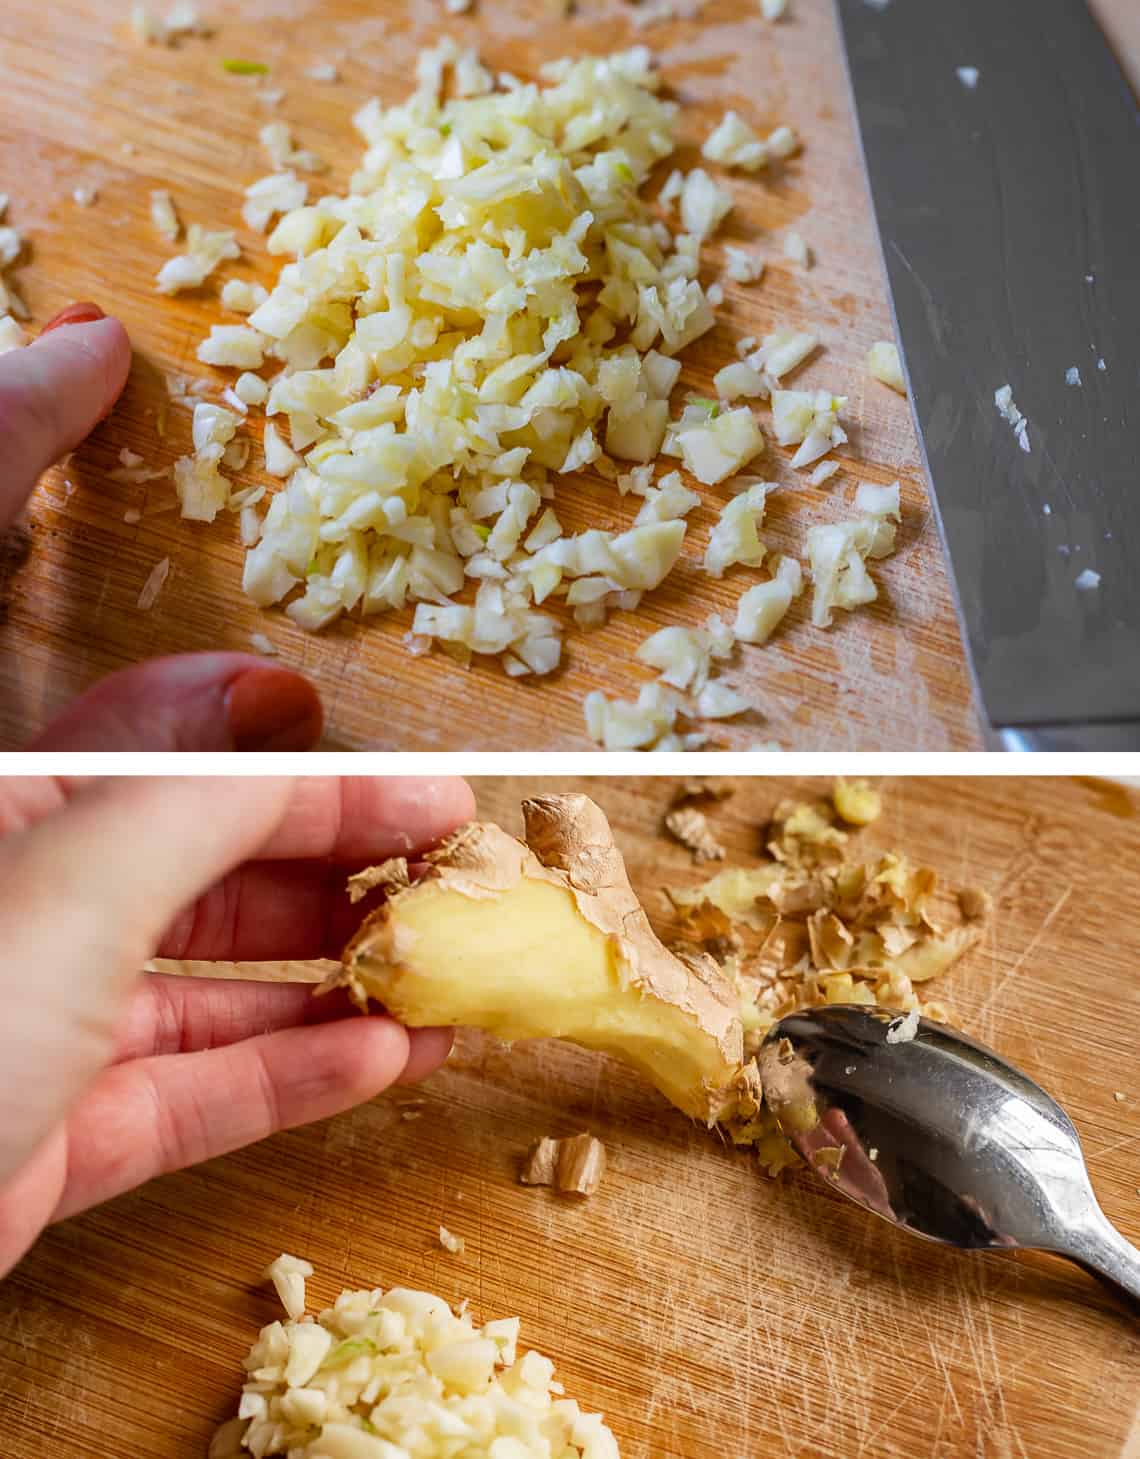
While the beef browns, prep your other ingredients. Smash and finely mince your garlic cloves.
Grate or mince your fresh ginger. I sometimes peel my ginger with a spoon, easy peasy (a vegetable peeler works great too.) My sister Laura doesn’t even peel ginger anymore 🤯 she just scrubs it real good and chops it up! THE FREEDOM, GUYS!!
If you’re really in a pinch, you can use bottled garlic and ginger, but the flavors won’t be as strong.
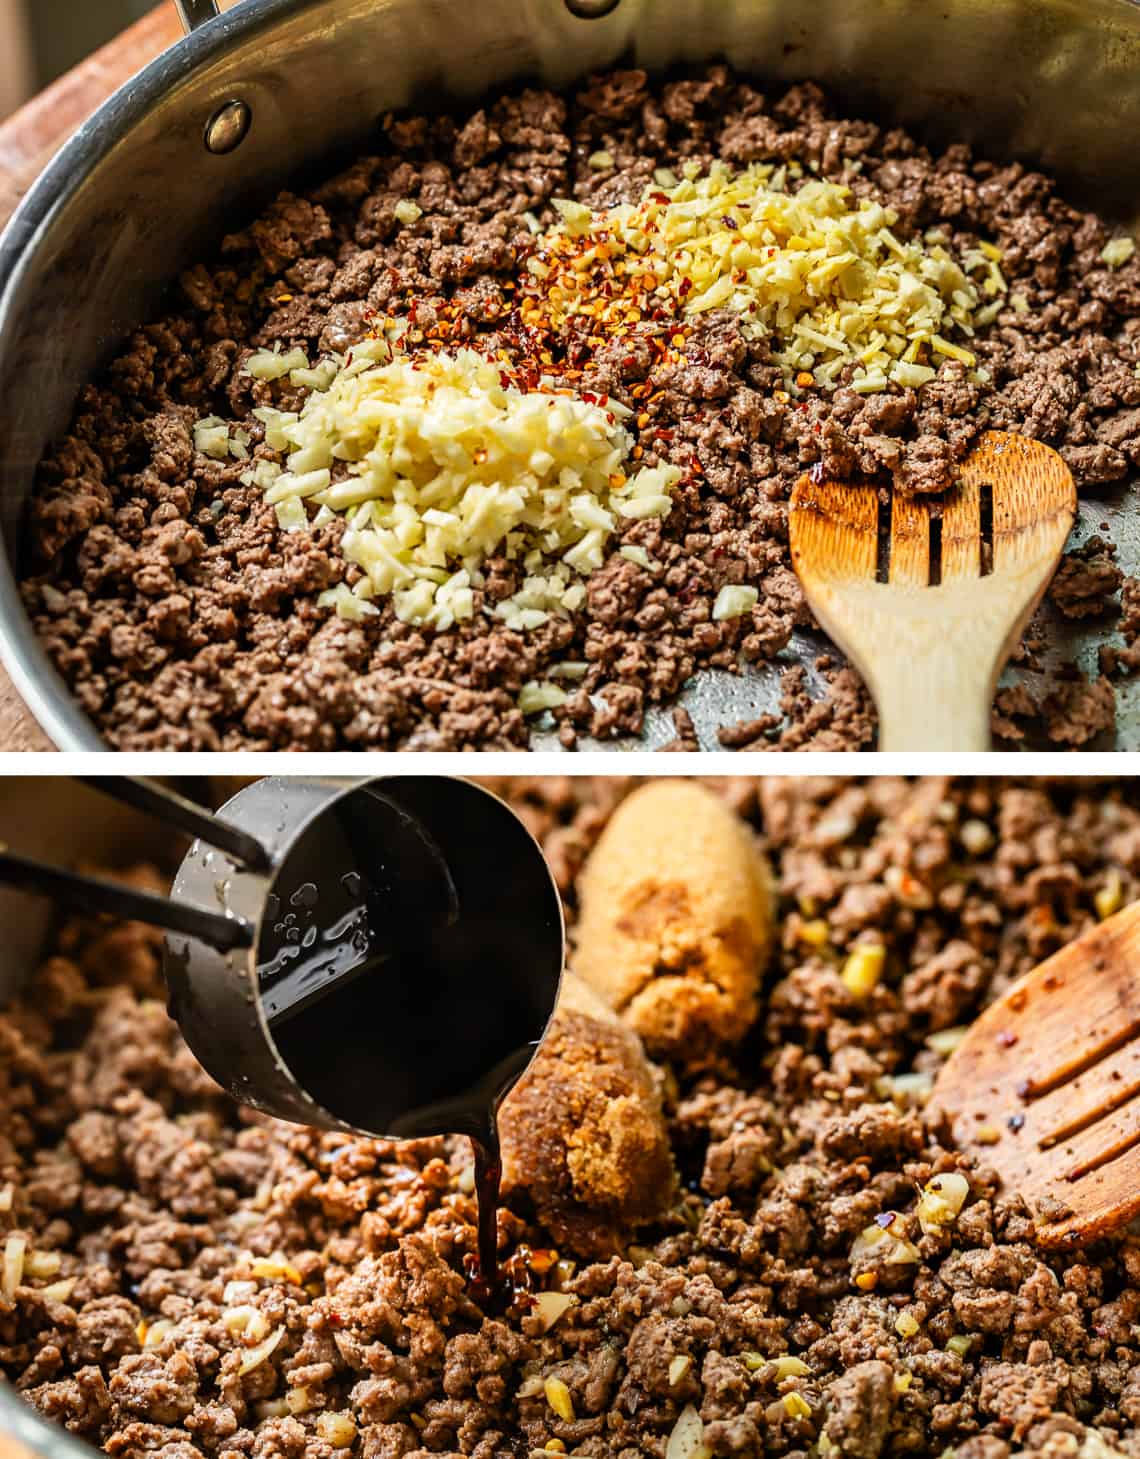
When the ground beef is thoroughly cooked, add in the garlic, ginger, and red pepper flakes. Mix it in with the meat and let it cook for 1-2 minutes until fragrant.
Add the soy sauce, brown sugar, and fish sauce to the mixture. The fish sauce is technically optional, but please, if you do ANY (even elementary level) Asian cooking, stick this on the door of your fridge. The Red Boat brand is best. It’s bottled umami. Add a teaspoon to literally any Asian style dish and it will amp up the flavors.
Stir up all those ingredients until well combined, and let it cook another 1-2 minutes. Turn off the burner. Y’all…THAT’S IT.
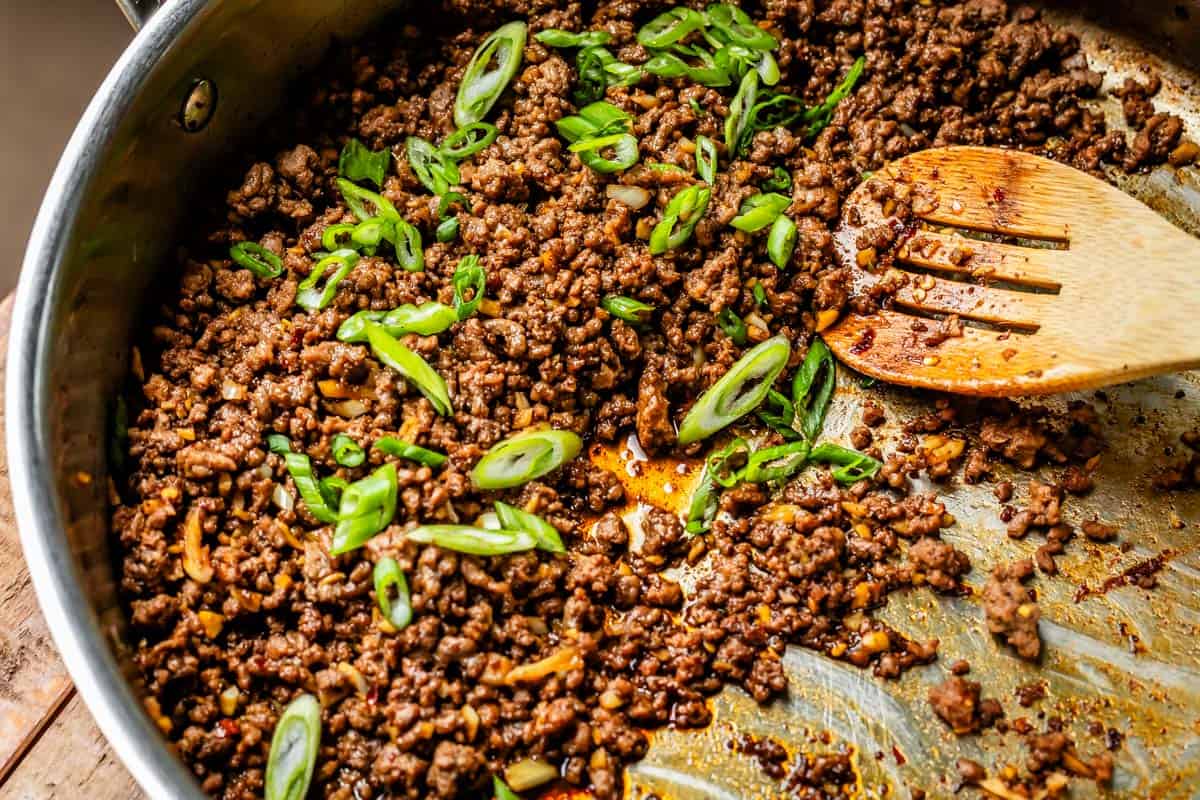
Okay except it’s really good with some green onions, so don’t forget those.
Here’s a little trick for ya. I like to use my kitchen shears to cut the green onions right into the pan, instead of chopping them. If you don’t have kitchen shears, chopping with a knife is of course just fine.
I hired a kitchen assistant recently, to help me out on shoot days (hi Katie!!) and she asked where my kitchen shears were, and I was like uuhhmmmmm…. basically any pair of scissors lying around my kitchen turn into “kitchen shears” when I need to cut food. Voila, it’s like magic, for low class people with very few sanitary boundaries.
Okay sorry, back to the recipe. I like to chop/cut about 3/4 of the bunch of green onions and mix that into the beef where they *very slightly* wilt. Once that’s stirred in, cut the remaining onions over the top. Or save to pass at the table so they are very fresh.
Don’t forget to garnish with sesame seeds! I love the nutty flavor it adds!
But of course, if you really love yourself, you’ll make some Sriracha mayo to dollop on top. And literally any veggie that’s lying around in your fridge. Sooo good!
What to serve with Korean beef bowls
When I really need this meal to be the quickest possible, I serve it with rice and a bag of stir-fry veggies from the fresh produce aisle. It’s usually a mix of cabbage, broccoli, carrots, and maybe some snow peas, snap peas, or brussels sprouts. If I have more time, I’ll cut up whatever is in my fridge and stir fry it, or make a separate veggie side. Here are some great rice and veggie options to choose from!
Thai Cucumber Salad >> these quick pickled cucumbers are light and refreshing, and the flavor would pair perfectly with this meal
Fresh Coleslaw (with Lemon and Herbs!) >> maybe a bit unconventional, but I love bright and herby salads with heavier meals so I think this coleslaw would totally work as a side
Transfer any leftover beef to a container with an air-tight lid and put it in the refrigerator. It will last there for about 5 days. Korean beef actually makes great meal prep! If you feel like doing yourself a favor, get a container you can microwave and add some leftover rice, beef, and veggies in the portion sizes that work for you, and store all together.
When it’s time to eat lunch just bust it out and you’re all ready to go! To heat up Korean beef that’s been in the refrigerator, use the microwave. Lean meat can get tough if it’s overcooked, so use 50% power for 1-2 minutes until it’s as warm as you’d like it to be.
Can you freeze Korean beef?
I love freezing Korean beef! It’s so easy and makes for a dinner that’s even easier than the night you made it, which is saying something. Sometimes I double or even triple the recipe to be sure to have enough to freeze for a “next time.” Add any beef you plan to freeze to a freezer ziplock bag, flattening it out to store and thaw easier. Seal, and let come to room temperature.
Once it’s cool enough, stick it in the freezer and it will stay good there for 4-6 months. When you decide to use it, pull the bag out of the freezer and put it in the refrigerator overnight or on the counter for a few hours. Warm up over low heat in a skillet on the stove. You may want to add 1-2 tablespoons of water to keep it from drying out.
Korean beef frequently asked questions
What is korean beef?
Korean beef is basically the easy, weeknight dinner knockoff version of Beef Bulgogi. Korean beef basically copies the flavor profile of Beef Bulgogi: sesame, soy, ginger, garlic, sugar but without the added sweetness of blended Asian pear. The original Bulgogi also uses a very thinly sliced cut of premium beef like ribeye or sirloin, and Korean beef keeps it simple (and cheap) by using ground beef.
What is korean beef called?
Well, to answer this question we need to differentiate between two things. First, there is the recipe called “Korean Beef,” which is what this recipe post is all about.
Then, there is a type of beef raised and butchered in Korea. “Korean Beef,” also called Hanwoo, is one of the rarest and most expensive meats in the world. Hanwoo, or Korean Beef, is so expensive because the meat comes from a small cattle that lives only in Korea. For the most part it is not sold in the U.S. and is very much a delicacy, even in Korea.
is korean beef healthy?
I think it’s a pretty darn balanced meal, personally! Lean ground beef offers lots of protein, you can add veggies galore for good nutrition, and you determine your carby (or non carby) side amount. While I think for most people this is already a healthy meal, there are plenty of things you can try to make it even leaner if you like. You can try swapping lean ground turkey for the beef, switching to cauliflower rice or serving the meat and veggies in lettuce wraps, or even using a brown sugar substitute to lower calories.
Easy ground beef recipes
The ever present “what am I gonna do with this ground beef?” question. Does anyone else have this problem? Here are some great options when you’re stuck in a (ground beef) rut!
Best Sliders Recipe >> these are the Cheeseburger Sliders that dreams are made of!
Smash Burger Recipe (Cast Iron Burgers) >> you never knew the best burger could be so easy. please don’t use today’s lean 93/7 ground beef for this recipe, I will feel so sad for you
Guys, there's easy, and then there's this recipe. Korean beef is unbelievably good for how little effort it takes. A pound of ground beef and some Asian pantry ingredients turn into a magical dinner in just a few minutes. Dress it up as much or as little as you want. Rice is a go-to, but you could add any veggies you have in your fridge, like cucumbers, carrots, edamame, broccoli…the options are endless. My new favorite weeknight meal!
Start your rice first. Add 1 and 1/2 cups long grain rice, 2 and 1/4 cups water, 1 teaspoon kosher salt, and 1 teaspoon garlic (you can use jarred garlic) to a medium saucepan and bring to a boil over high heat, with the lid on.
Once it reaches a boil (steam escapes from the lid) turn the heat down to low and set a timer for 10 minutes. When the timer goes off, turn off the heat but don't remove the lid. After another 10 minutes fluff with a fork. Leave the lid on until you are ready to eat.
Brown the meat. Place a 12-inch skillet over a burner and set the heat to medium high. Add 1 and 1/2 teaspoons of toasted sesame seed oil and swirl to coat. Once the pan is hot, add 1 pound of lean ground beef. Stir and break up the meat into small pieces. Keep cooking until all the meat is completely cooked, about 5-8 minutes. Turn the heat down to medium.(If you didn't use lean ground beef, take a minute now to drain the grease from the pan.)
Add seasonings. Smash the 5 cloves of garlic and mince finely, you should end up with about 1 tablespoon. Grate or mince the ginger until you get about 1 tablespoon.
Add the garlic and ginger to pan. Add 1/2 teaspoon red pepper flakes. If you like just a hint of spice, start with 1/2 teaspoon, if you like things very spicy start with 1 teaspoon. You can always add more flakes later if you like it hot.
Stir everything together and cook for 1-2 minutes over medium heat until the garlic and ginger are very fragrant.
Add sauce ingredients. Add in 1/4 cup of low sodium soy sauce, 1 teaspoon of fish sauce, and start with 2 tablespoons brown sugar. Stir it all in and let it cook for a minute or so.
Taste it and decide if you want it sweeter. I usually add 2 more tablespoons to make it a full 1/4 cup of brown sugar. Play around with it until you get the sweetness level you like. You can also add any salt or black pepper to taste at this point (but remember, even low sodium soy sauce is very salty so be careful.)
Add green onions. Once you have the taste where you like it, turn off the burner. Chop the bunch of green onions. Or, use scissors to snip them directly into the pan.
Add about three quarters of the bunch of onions. Mix well to let them wilt slightly with the warm beef. Sprinkle the rest over the top, or reserve for passing at the table.
Prep the veggie toppings, if using. Peel and chop 2 carrots into matchsticks.** Slice the cucumbers. Slice the radishes very thin. Follow the instructions on the bag of edamame for steaming in the microwave (it should say to microwave for about 2-3 minutes.) Don't forget the reserved green onions.
You can either add all the veggies to individual bowls and have guests build their own dinner, or plate each bowl of Korean beef with the veggies on top.
Sesame seeds. Don't forget the sesame seeds! I love the nutty flavor they add. Black or toasted white seeds are really good.
Make the sriracha mayo (optional) (but not really). In a small bowl, mix together 1/2 cup of mayonnaise and 1-3 teaspoons of sriracha sauce (or your favorite hot sauce) until combined. You can thin it with 1-2 teaspoons of milk if you want. Use a spoon to drip over the top of the beef and rice when plating. This mayo is not really traditional with Korean Beef, but I never pass up an opportunity to drizzle my food with sriracha mayo. Don't be a fool.
Notes
*I’ve successfully swapped out normal dark brown sugar for brown sugar Splenda to cut down on sugar content. Just add it in to taste! You can of course also use light brown sugar in place of dark. Keep in mind with either of these switches, the deeper molasses flavor won’t be as present.**If you are not into raw carrots, saute the matchsticks in a teaspoon of oil in a hot pan for about 7-9 minutes, until softened. Or, follow the instructions for pickling carrots on my Banh Mi sandwich recipe! That would be so good. Daikon would be another great veggie topper for this meal. UPDATE: I just tried this recipe with ground turkey instead of ground beef. You should have seen the looks on my kids faces when I told them we were having Korean Turkey for dinner 😂 It was really good! A great option for those who prefer/require lean meats.
The best crepes of your life…and I’ve been to France, guys. Homemade is best! This crepe recipe is truly my favorite! Crepes are kind of like a pancake in that they are flat and you put toppings on them, but really the comparison ends there. They are impossibly thin but not at all crispy. The…
The best crepes of your life…and I’ve been to France, guys. Homemade is best! This crepe recipe is truly my favorite! Crepes are kind of like a pancake in that they are flat and you put toppings on them, but really the comparison ends there. They are impossibly thin but not at all crispy. The are flexible and velvety. They are so buttery and golden, they will make you cry into your strawberries and cream. I’ll show you exactly how to make crepes, step by step! SO easy.
When I was 15 and my brother was 17, my parents went on a trip to Italy without us. It was summertime and we were busy with our lifeguarding jobs (and ok fine, we weren’t invited. Don’t worry I’m not bitter.)
Mom and Dad left us with a wad of cash that was our “Emergency Money.” No discussions were had about what exactly constituted an emergency. We were pretty good kids, though. They knew we weren’t going to be throwing any crazy parties.
But, I mean, we were teenagers. Not exactly above temptation. On the way home from the pool one afternoon, we saw him: the strawberry man. If you’ve ever been to California in the summer, you know what I’m talking about.
The strawberry sellers start popping up every spring (the first one just hit the streets in my neighborhood this week. I practically tripped in my rush to find some cash). The fun part is that you never know exactly what corner they will be on, or how long they will be there, so you have to act fast.
I can’t tell you the number of times my mom would be driving calmly down the road when BOOM she saw it, and suddenly the car has veered off the side of the road, ready to be loaded with an entire flat of the biggest, juiciest, reddest strawberries you ever laid eyes on. Strawberry haze hits lightning fast.
This exact thing happened to my brother Nathan and I. When we saw the strawberry man, our pupils were replaced with little tiny strawberries, and we rushed home to get the “Emergency Money” because by golly THIS WAS AN EMERGENCY. We bought $40 worth of strawberries (because apparently we needed an entire flat of 10 pounds of strawberries for each of us??)
We came home and made these crepes. Sooooo many crepes. With strawberries inside, strawberries on top, strawberries on the side, and some strawberry jam and soft cream cheese for good measure.
All these years later and I can still taste them. I’ve done my best to recreate what we had that day, but I don’t know if I will ever be able to match the vibe of a teenage summer day with a best friend and Emergency Money and no responsibilities, no schedule, and more strawberry crepes than anyone could possibly eat.
The absolute best crepes you will ever have
My mom has been making crepes her whole life and is a pro. I took her recipe and compared it with dozens of others, and paid special attention to Julia Child’s recipes (because you know, it’s Julia). Hers were a little fussy in my opinion (do we REALLY need to let the batter rest overnight? Read: NO.)
I’ve landed on my go-to crepe-for-all-occasions that is
easy and FAST to make
has incredible flavor (thank u butter 🥹)
is sturdy enough to NOT tear constantly (while still being incredibly delicate) and
can be adapted for both sweet AND savory fillings.
I know you think of dessert when you think of crepes but DO NOT underestimate the amazingness of a savory crepe. I grew up eating my mother’s Chicken Crepes, which are kind of like enchiladas, EXCEPT MADE WITH CREPES (you dump straight-up cream on top and add Pepper jack cheese, and you might die and go to heaven, literally, from all the artery clogging that’s going on, but by golly you will die happy.)
What is the secret of a good crepe?
Use butter in the batter. Many crepe recipes don’t call for butter, but it adds fat and flavor to the final crepe, making them unbelievably golden and the perfect texture.
Use a blender to get your crepe batter mixed really well, lightning fast.
Don’t cook in too big of a pan. An 8-inch pan is perfect.
Don’t overcook the crepes. They should be soft and pliable, not too brown, and certainly not so crisp that they hold a flat shape when you lift them up. They should be floppy and annoyingly difficult to flip, because they are so soft and tender.
These are the kind of crepes that are dangerous, because once you taste one that you have freshly cooked, eating it right out of the pan, you might never even get to the topping part. They are good just by themselves, the hotter and fresher the better.
Crepes are not hard to make, but there are some particular techniques you need to know to get the flipping part right. Crepes that are too thick (when you pour too much batter into the pan) are not the right texture. You want to pour them as thin as humanly possible, which can get a little dicey when you have to use a spatula to flip it 30 seconds later.
Rips and tears happen, especially when you’re first starting out. Crepe pouring, swirling, and flipping takes some practice. The trick is to just eat the first few that you mess up, right out of the pan, before anyone notices, then you can just present the perfect ones to your family or guests and they will never know. Follow me for more kitchen tips and tricks! 😂
Crêpes au Citron (Lemon Sugar Crepes)
When I was in college, I met a friend (hi Robert!) who had lived in France for 2 years serving a mission for our church. He was always talking about how amazing the crepes were, so we decided to make some together. He changed my crepe life forever that day by dumping straight up sugar directly on the crepe, squeezing a lemon over the top, and folding. It’s called Crêpes Citron Sucre and it has become my absolute FAVORITE. So bright and citrusy!
When I traveled to France over 10 years later, I remembered the Lemon Sugar Crepes and was determined to try them the first chance I got. The first evening in Paris, we were at the Eiffel tower and saw a food truck selling crepes. French street food! What could be better!
We rushed over and ordered lemon crepes. The guy poured the batter in the pan, used his fancy T-tool to spread out the batter, and moments later a fresh, real-French crepe was being laid on a plate. He sprinkled it with some sugar and then…reached over to a yellow squeeze bottle and squirted FAKE LEMON JUICE all over my precious crepe.
I mean, I’m not saying I didn’t have ANY decent crepes in France, but that experience taught me that man, sometimes if you want to get something done right, you gotta do it yourself. I promise, today’s recipe will match the best crepes you can find in France!
Do you need a special pan for crepes?
No ma’am! I like to use an 8-inch frying pan. And about that fancy T-tool I mentioned that the French guy used: you do not need one. I bought one in France because I think they are so cute (I display it in my kitchen) but this tool is meant to be used with a professional enormous crepe pan that is perfectly flat (no edge at all). They drag the top part of the T over the batter after it’s poured, to make sure it’s ultra thin. But it’s not really useful for a pan that has any kind of lip on the edge, which is what you and I are working with. Don’t fret, I promise you can get super thin crepes without the pan or the T-tool. You just need to practice. It’s all in the wrist. 😉
What is a crepe made of?
A crepe is made from very simple ingredients: flour, sugar, salt, milk, eggs, vanilla, and butter. The trick is getting the quantities of each just right. I tried it a bunch of different ways to get my recipe to buttery-velvety-perfection (so you don’t have to!)
Like I mentioned, the method for cooking crepes requires some solid technique to get a crepe that’s ultra thin and flexible, and not a crispy mess. I will show you everything in the how to section below!
Crepe recipe ingredients
I bet you have just about every ingredient you need to make these crepes right now! Such a simple recipe with mostly pantry ingredients. The full ingredient amounts and instructions are in the recipe card.
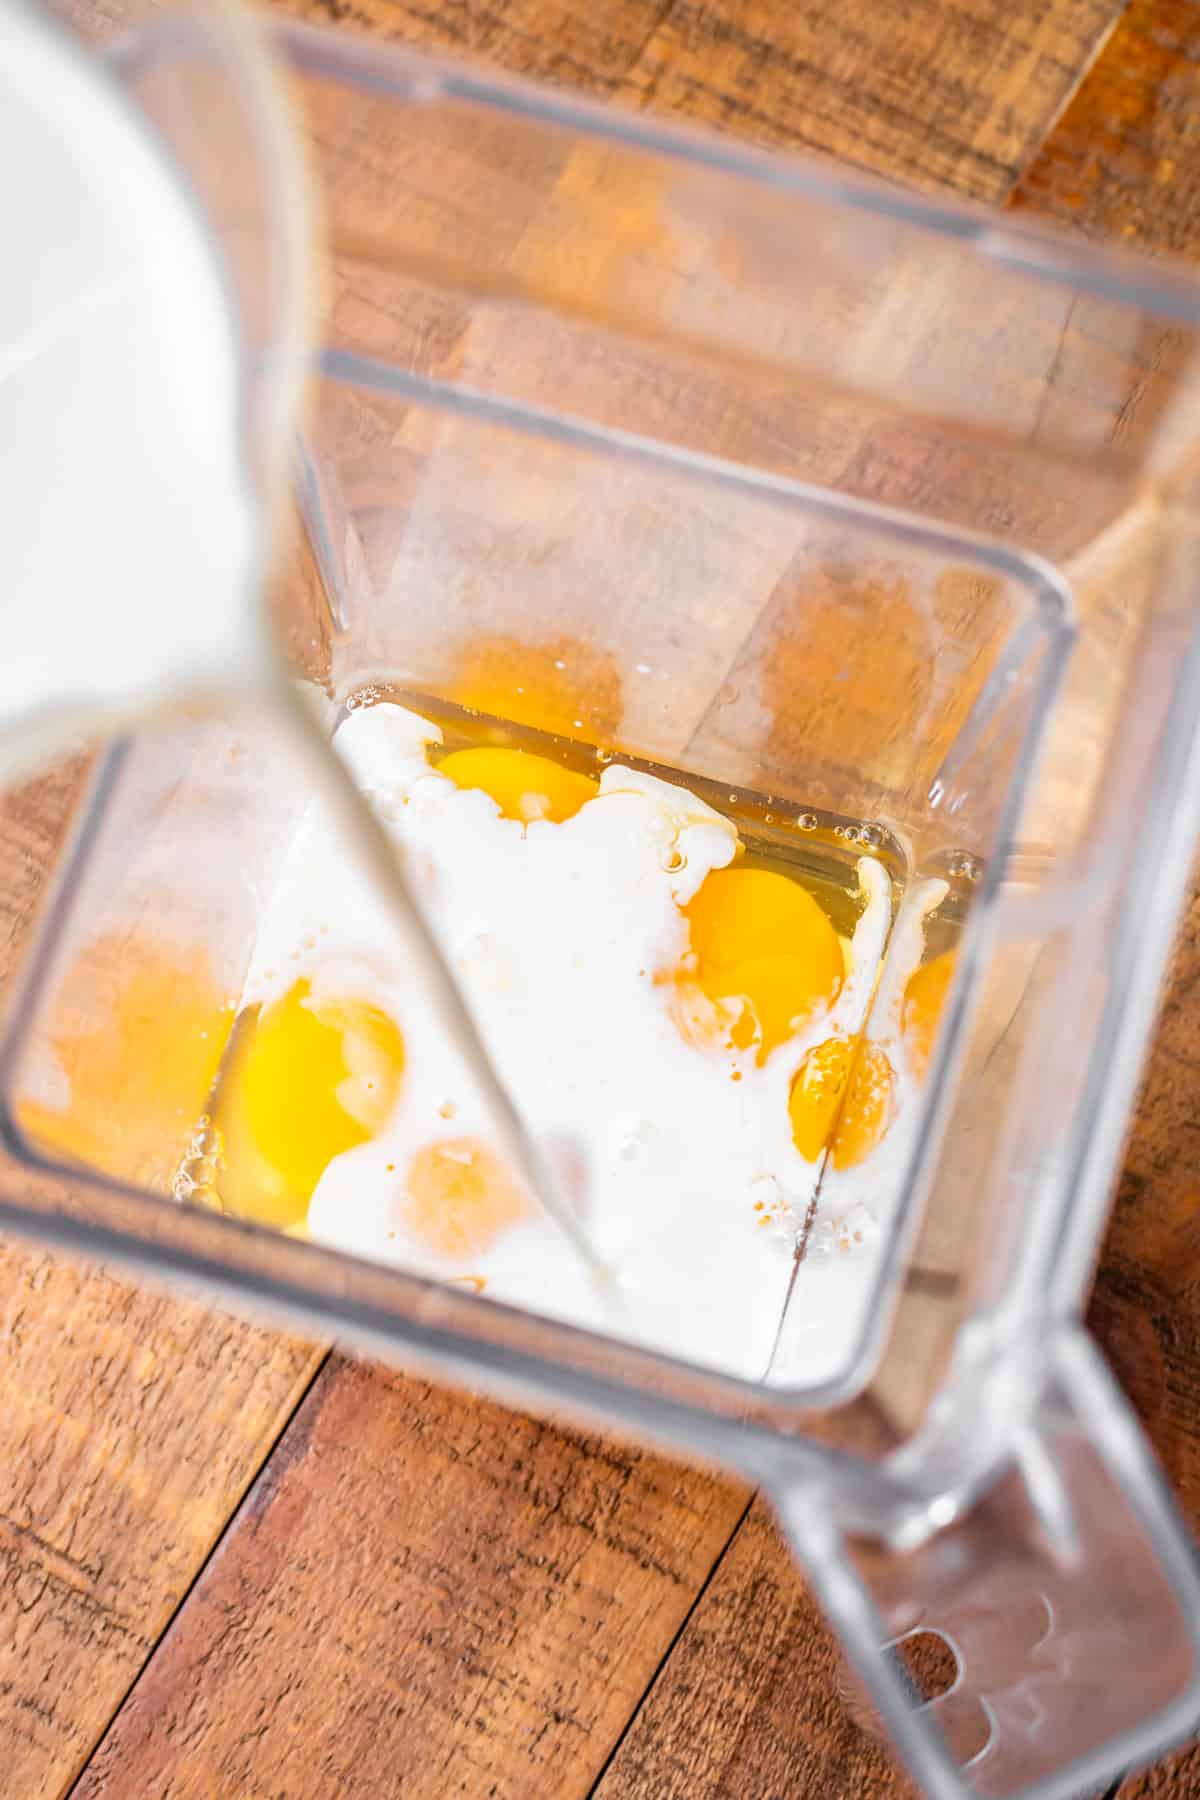
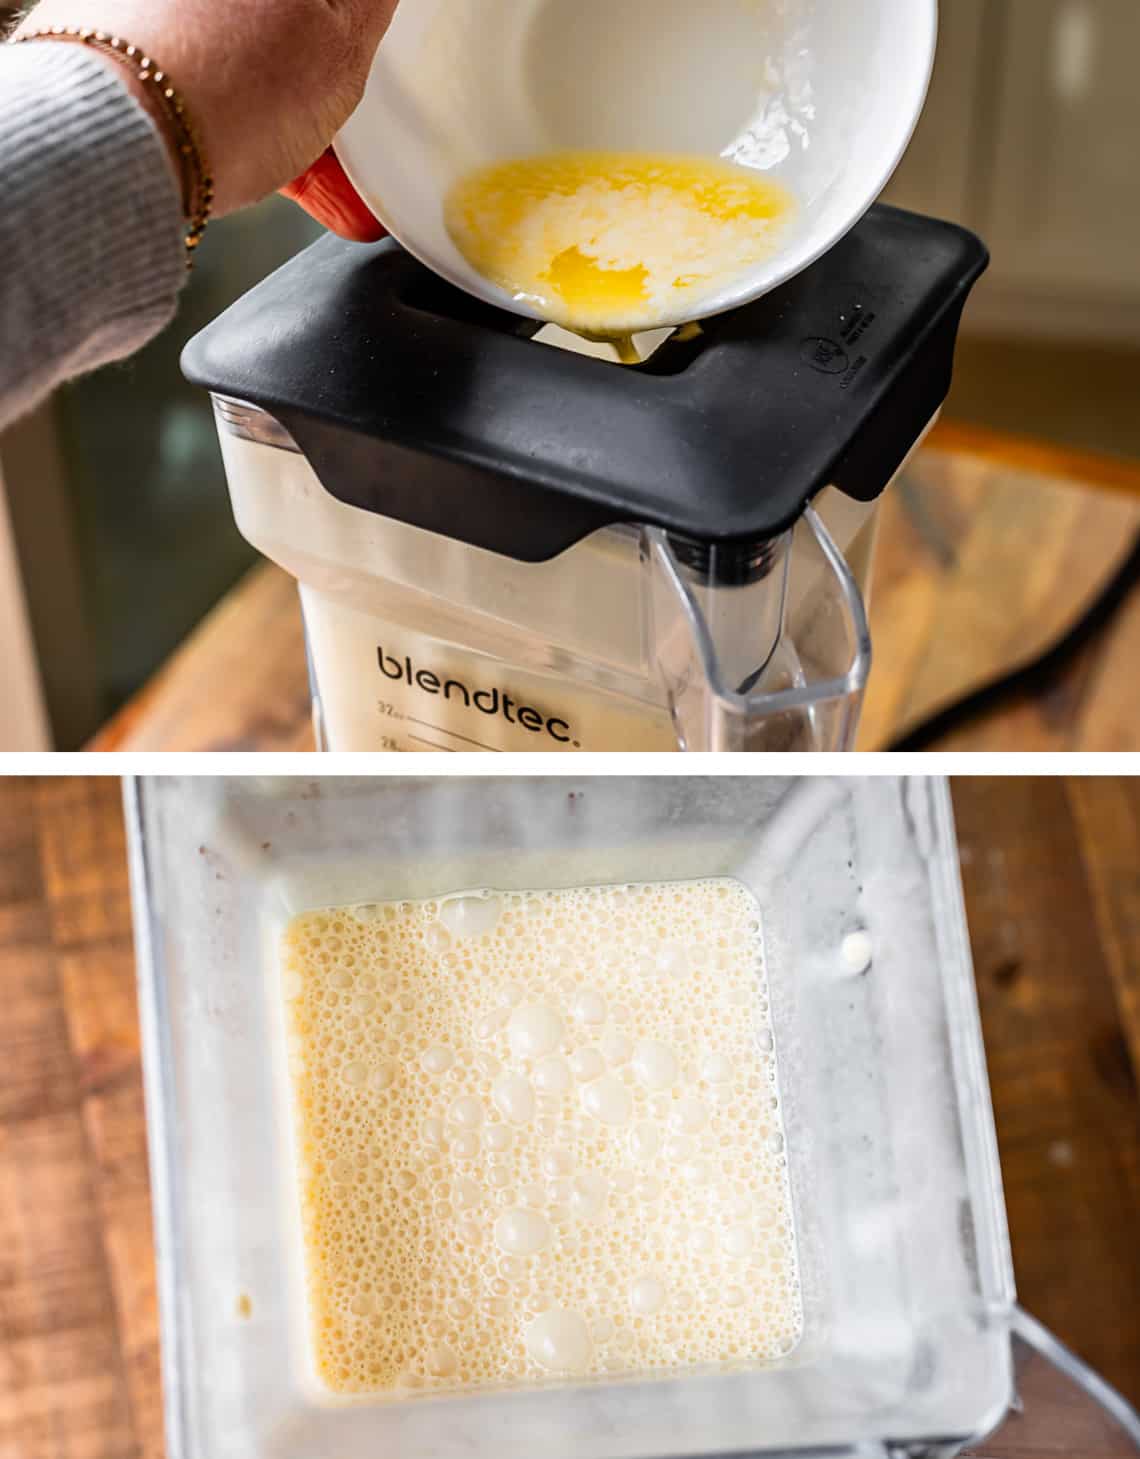
Add all the ingredients (except the butter) to a blender, starting with the milk and eggs. This makes it easier on your blender.
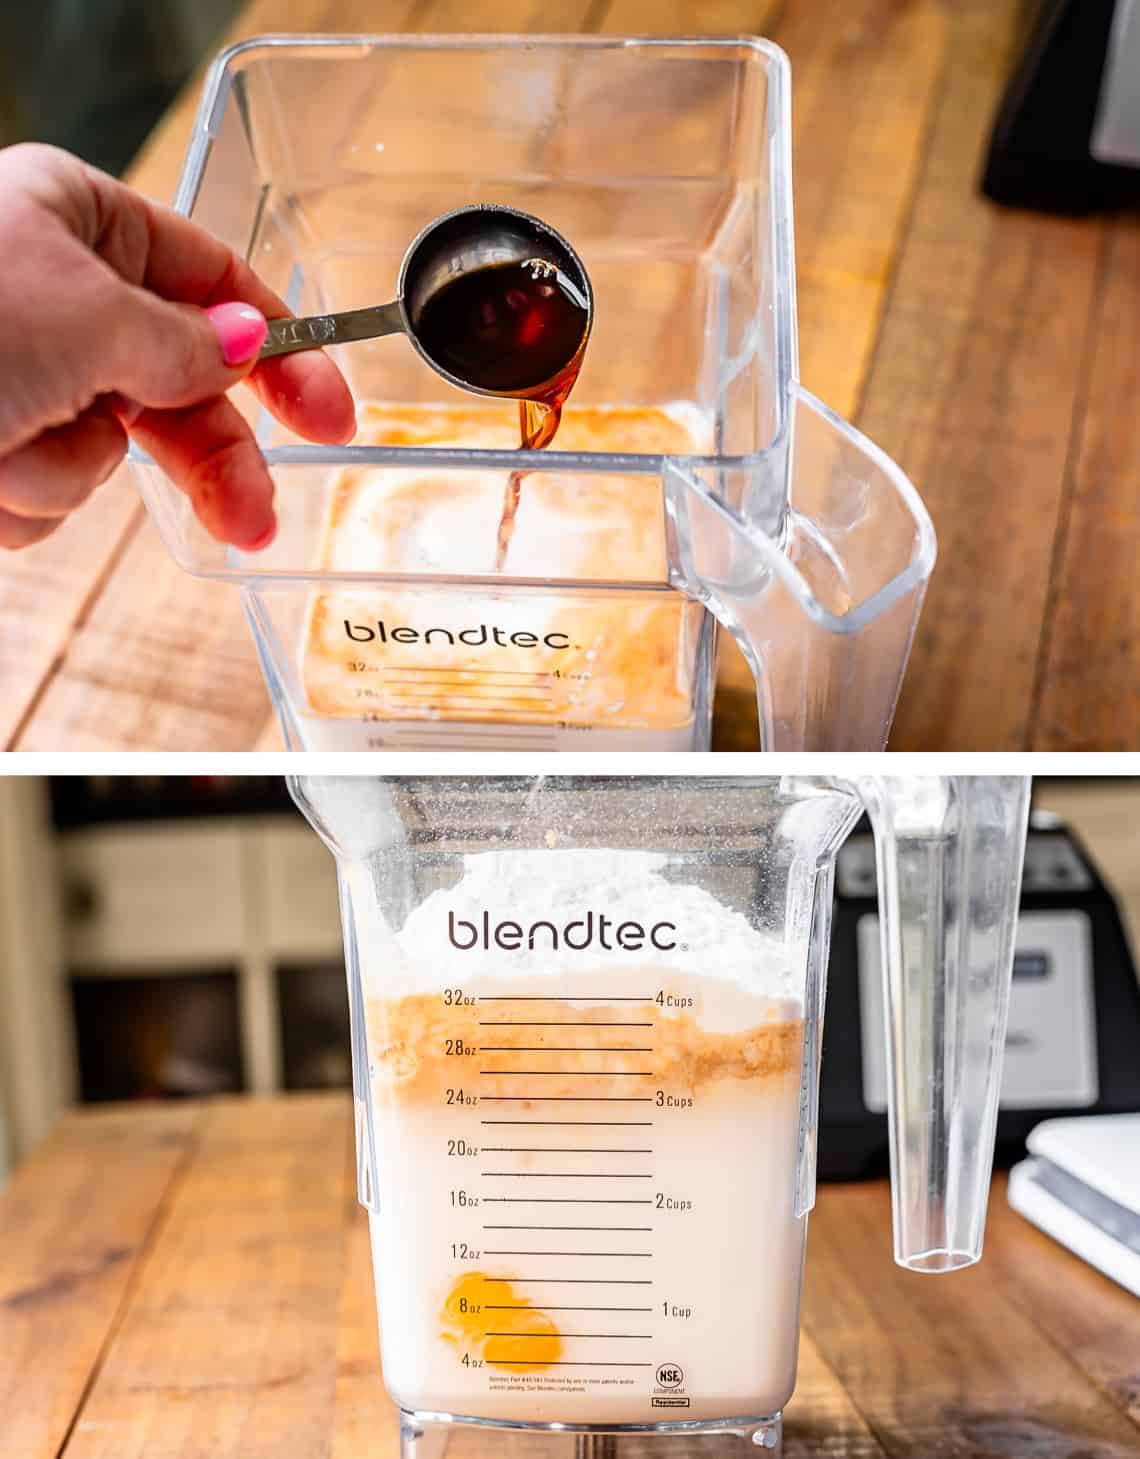
We are using an entire tablespoon of vanilla in these babies. Bring on the flavor!!
Dump the flour and salt on top, then blend away. Once it has come together, open the top spout and pour in your melted butter, with the blender on low.
And voila! That’s seriously it. It takes 5 minutes to whip this up. You can put a lid on this and keep it in the fridge for a few days if you like! Whisk (or blend again) before using, adding a little milk if it’s thick.
Now it’s time to cook. You can start cooking these right away, the batter does not need to rest.
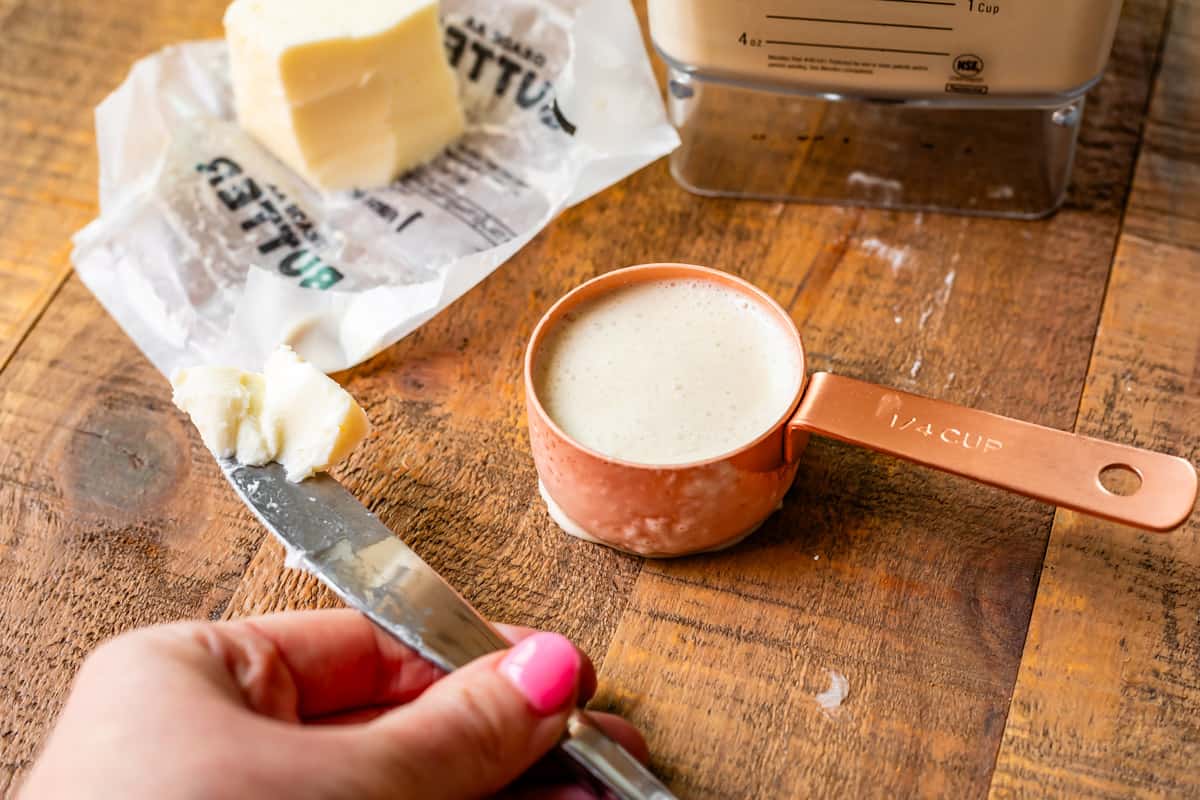
Set a stick of butter by the stove and heat up your 8 inch pan.
Dunk a 1/4 cup measuring cup right into the blender, you don’t need to fill it all the way. 1/4 cup is 4 tablespoons. So anywhere between 3-4 tablespoons of batter is what you want.
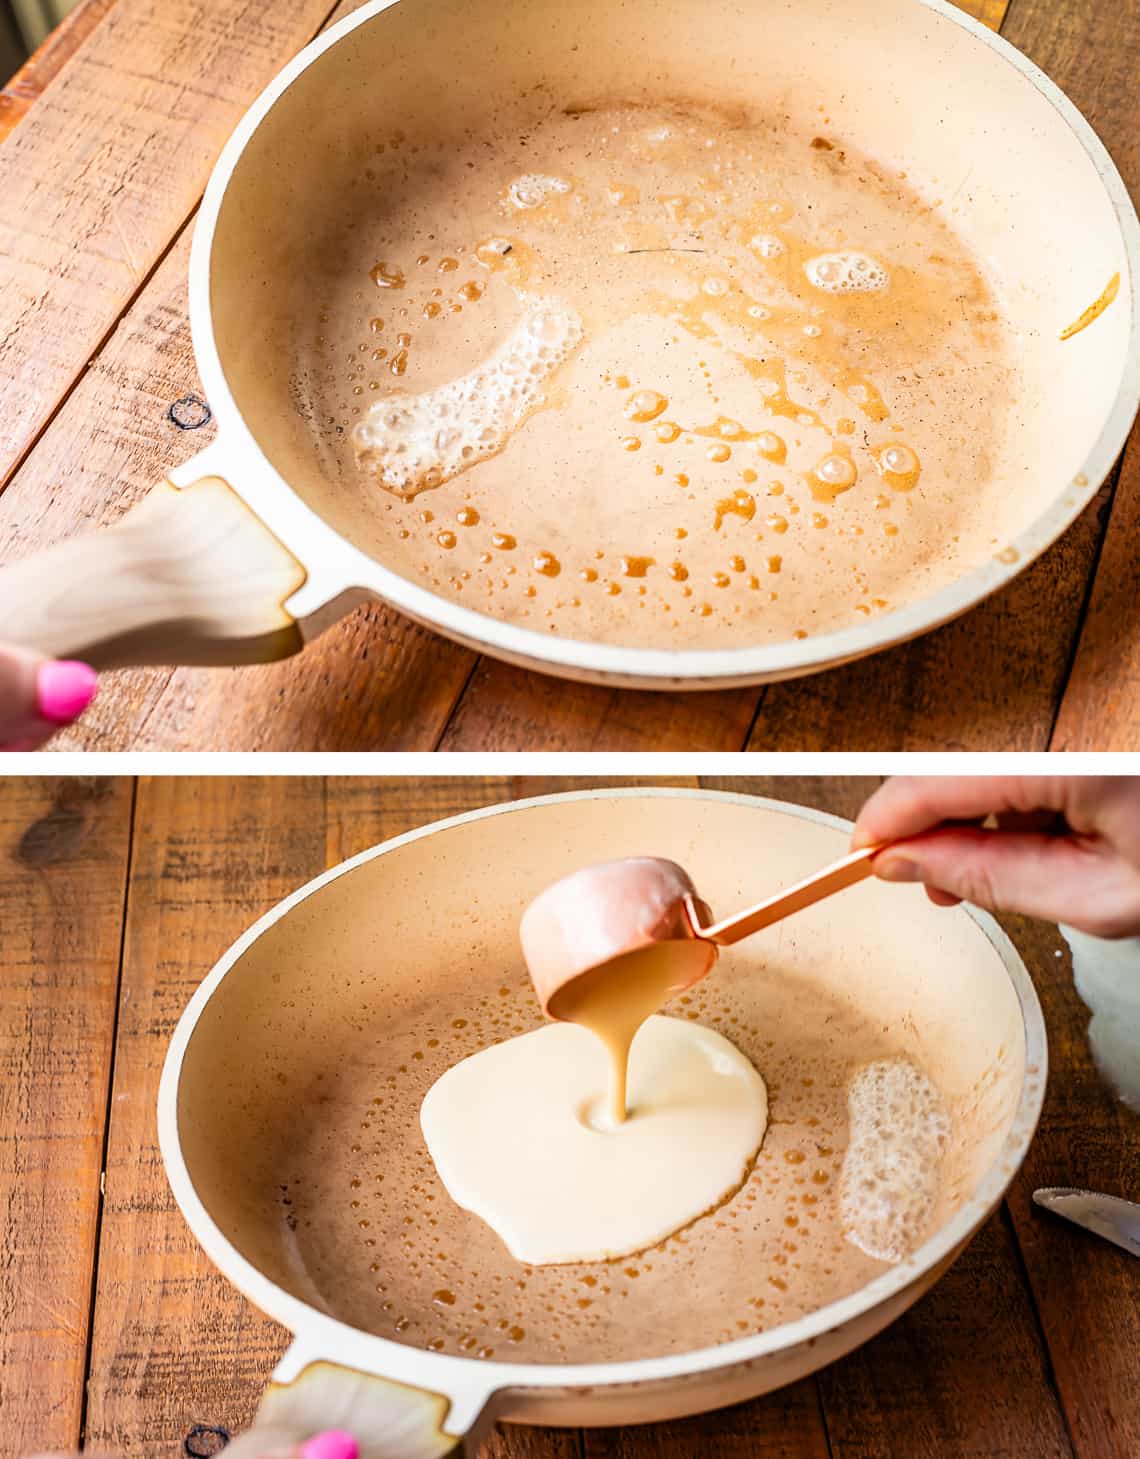
Add about 1-2 teaspoons butter to the pan and swirl it around to melt. My pan was hot enough that it browned the butter right away, this is fine. You can turn the heat down if you aren’t into browned butter (weirdo. I’m judging you.)
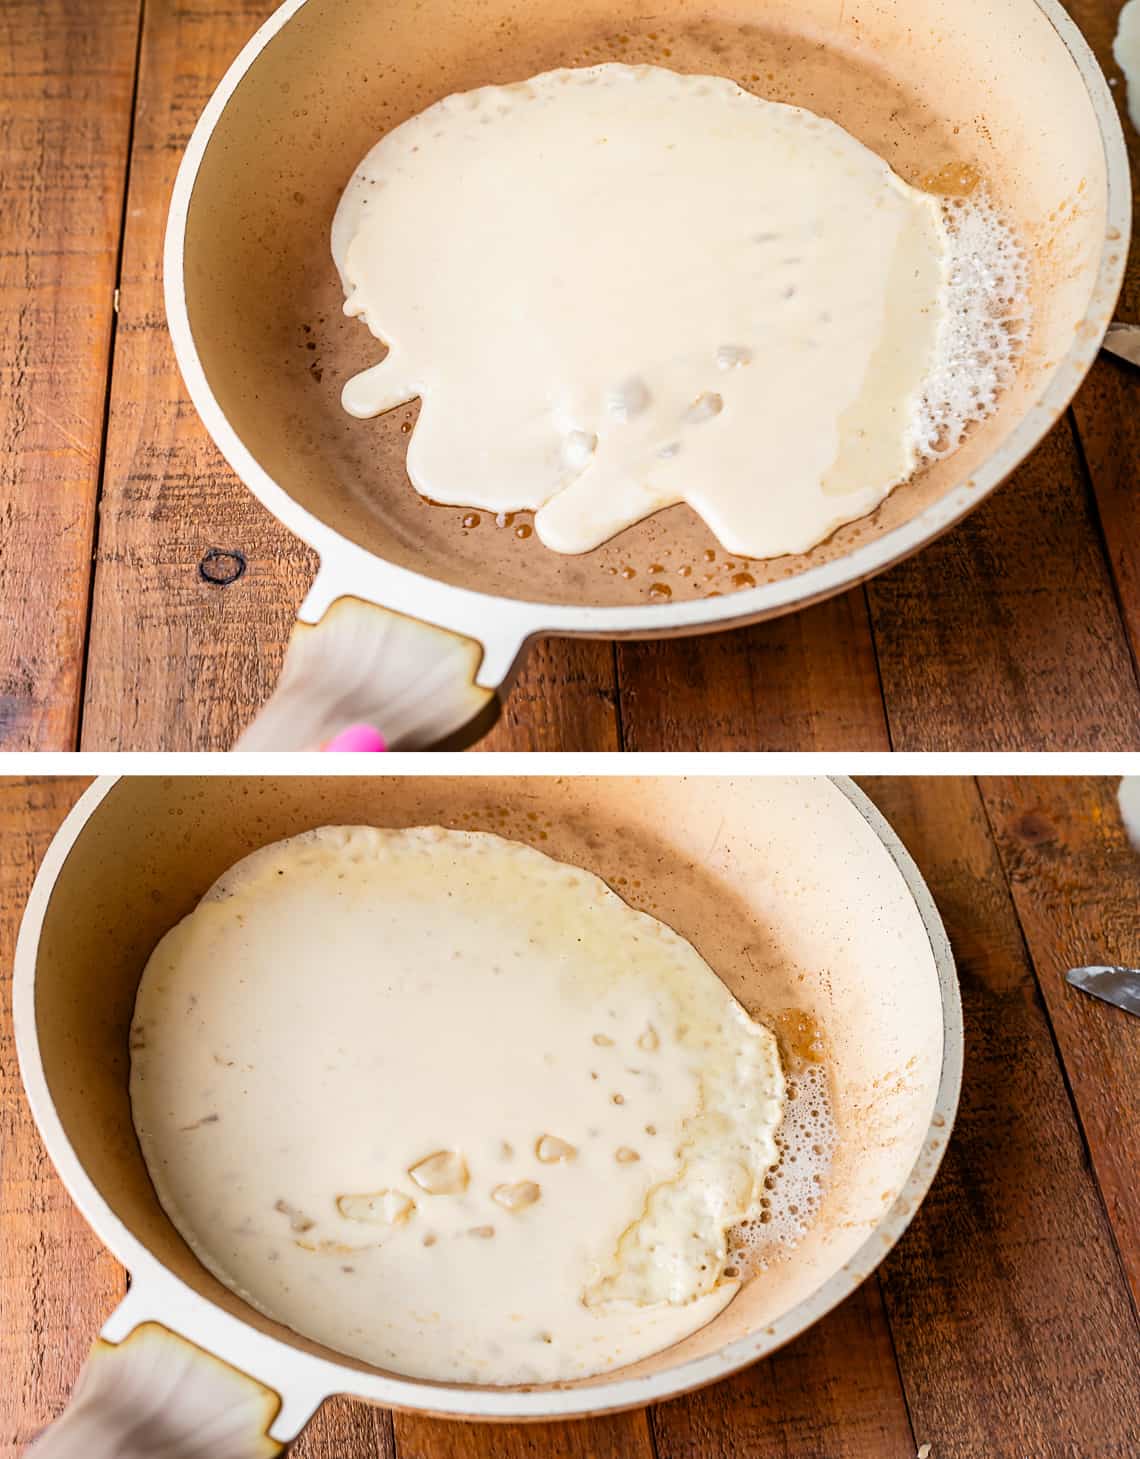
Then dump your batter in all at once. Immediately lift the pan with your other hand and start turning.
You want to keep the pan moving constantly to create a VERY thin layer of batter on the bottom of the pan, in as close to a large-circle shape as you can manage.
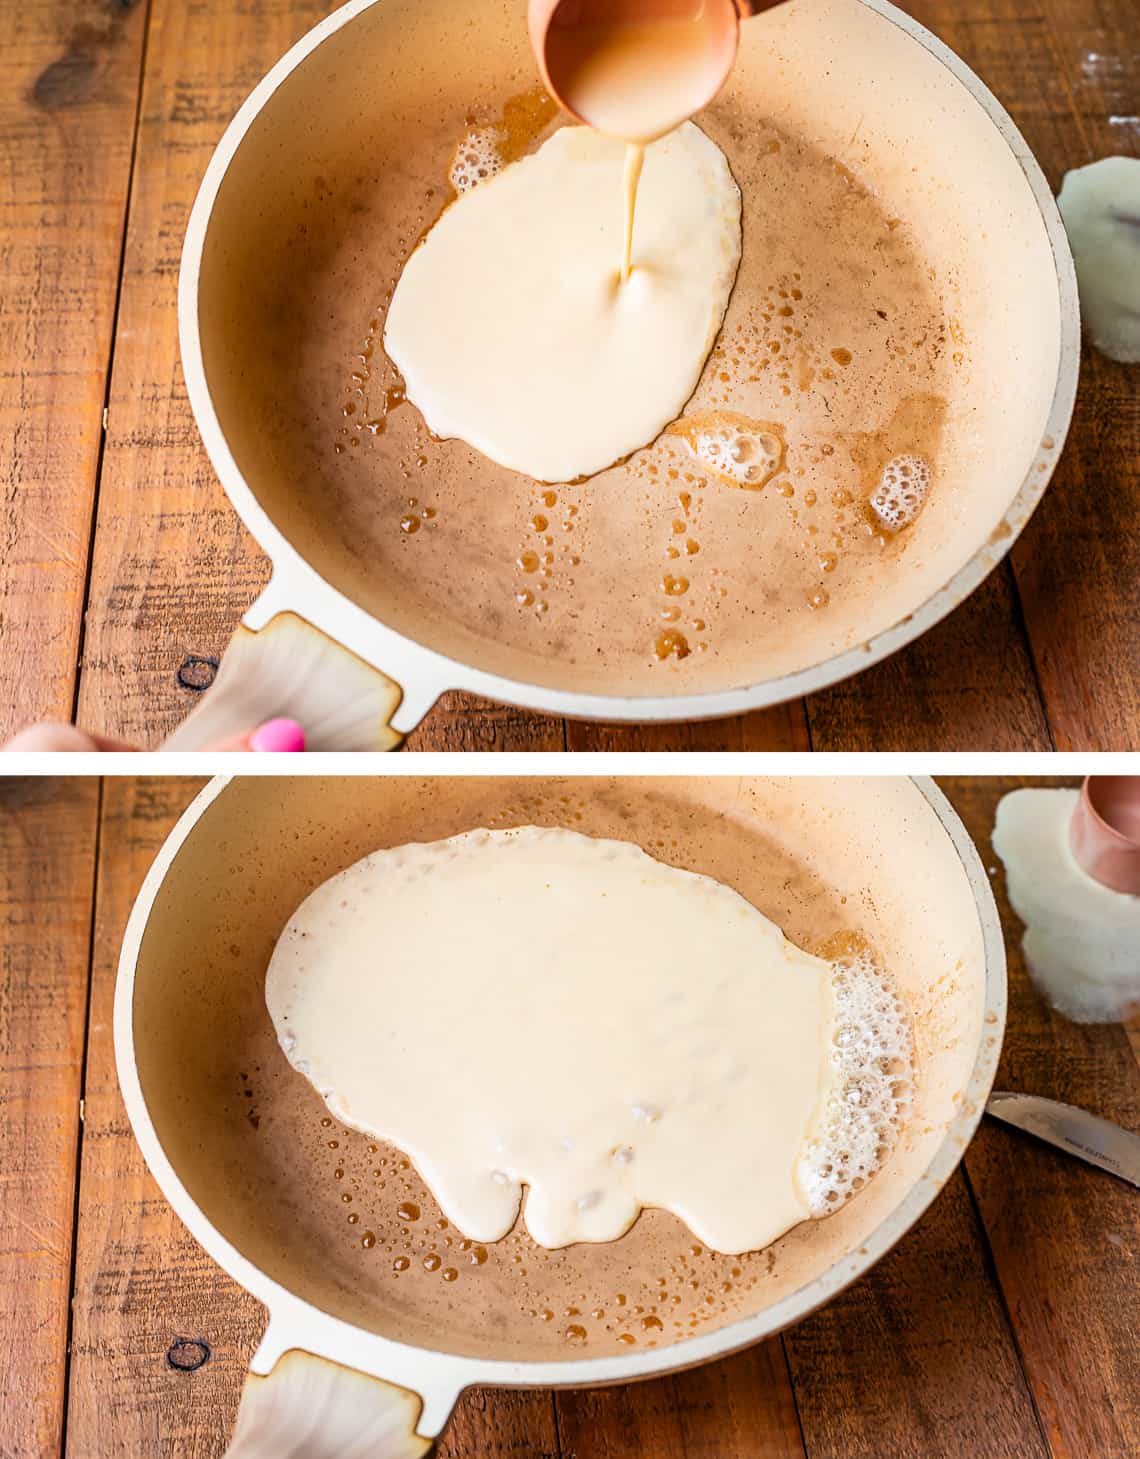
You might think it’s time to stop tilting now, but not for me. I despise thick crepes. Don’t stop tilting the pan until the batter no longer drips.
This might mean that you don’t end up with a perfect circle. That’s ok! Add in a couple drops of batter in the empty spots to fill it in. Or, scrape off the edges that are uneven if that’s easier.
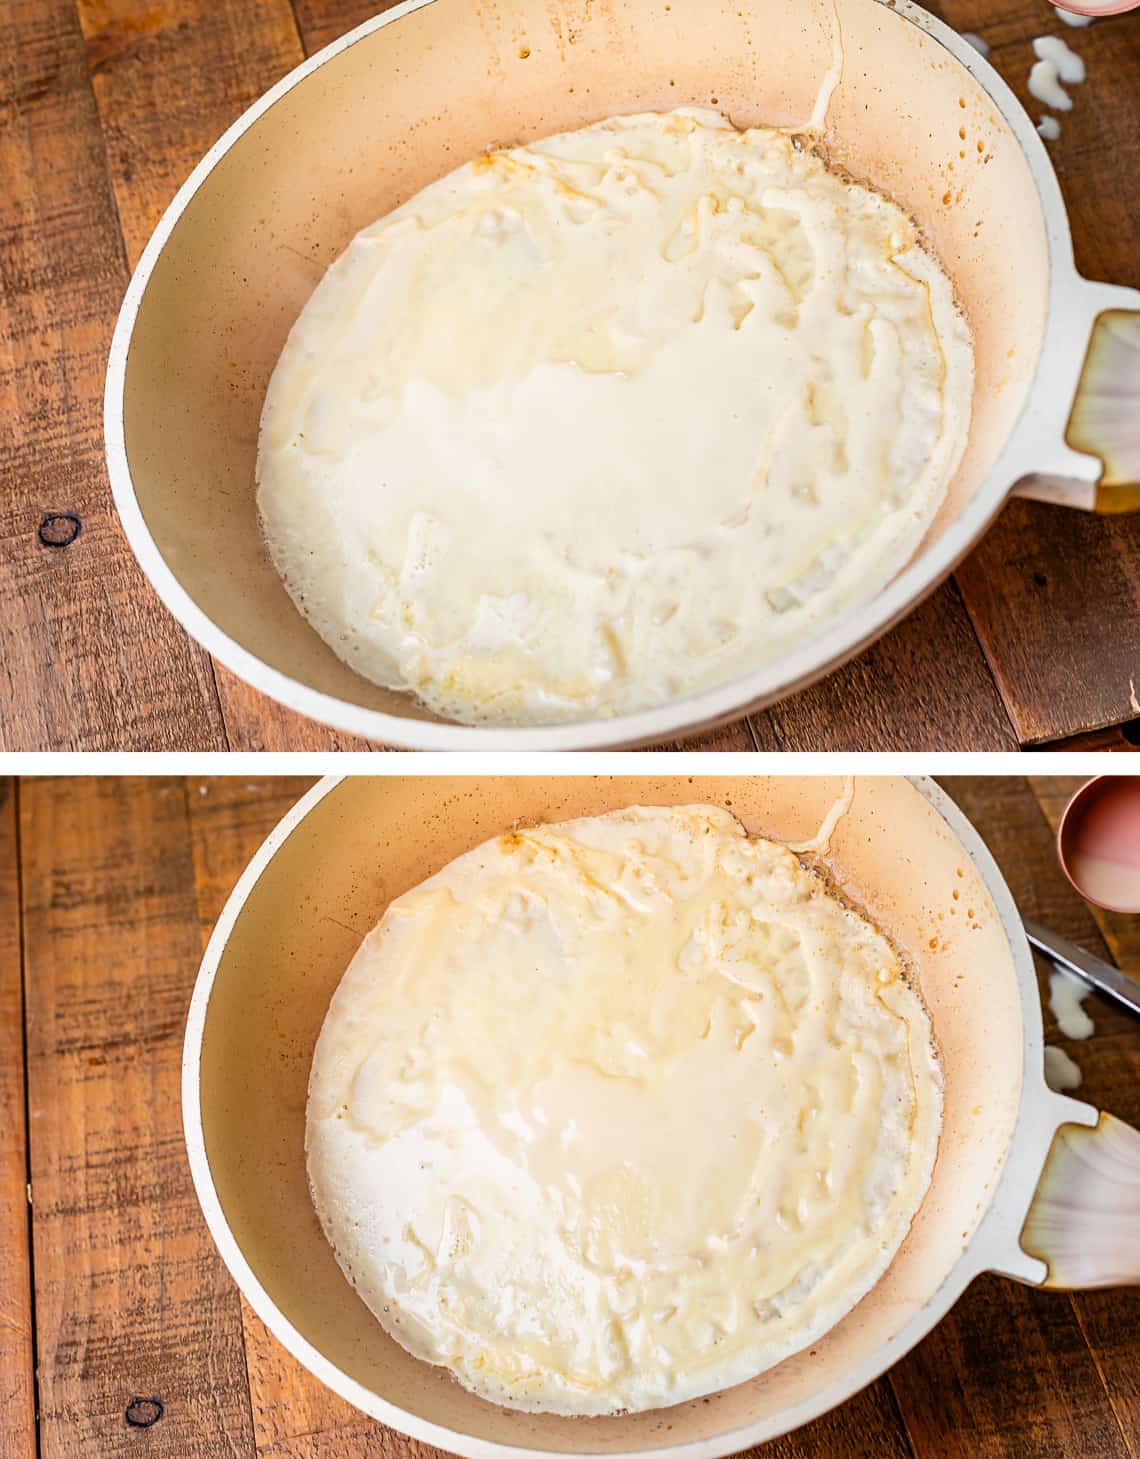
See? Now we’re cookin. A perfect circle. Even when I tilt the pan all the way up, the batter won’t drip around at this point. Wait just a moment longer…until the batter no longer looks shiny on top, like the photo below. As soon as it starts to look matte, or a little bit dried, it’s time to flip. Can you see the difference?
Then shove a spatula underneath as far as you can, and flip.
I can’t believe I don’t have a better photo of a flipped crepe in the pan. Look at this poor guy, he’s all mushed! That’s kind of the deal with crepes though, they are not always perfect, and that’s okay. They still taste amazing. If we had the fancy pan and crepe-T-tool, they would look better. But I promise, these taste great and the texture is perfect.
You would not believe how many times I made Eric help me take these process photos. We probably shot the swirling technique for about 10 crepes, with me taking a thousand photos each time. It’s kind of hard to capture this process in photos, even with a buddy! At least for me, ha, I’m no pro.
We don’t have enough light for photos by our stove, so we would heat the heck out the pan, walk all the way over into the other room by the window, and pour the batter in, doing the swirling over the wood board photo backdrop that you can see underneath. Don’t be like us. Stay right by your stove 😂
My one plea: do NOT over cook your crepes. You want them to just be barely browned, or not at all, depending on what you like. But if you have gotten to the point that the crepe has enough structure to stay flat as you flip them, then you have cooked too long. They should be floppy flexible.
You can see this one has spots that are a little too dark. It’s no biggie you guys. You better believe I still ate the heck out of that crepe. It’s just a little darker and crisper than is ideal.
Okay! Now it’s time to fill our crepes!! The best part!
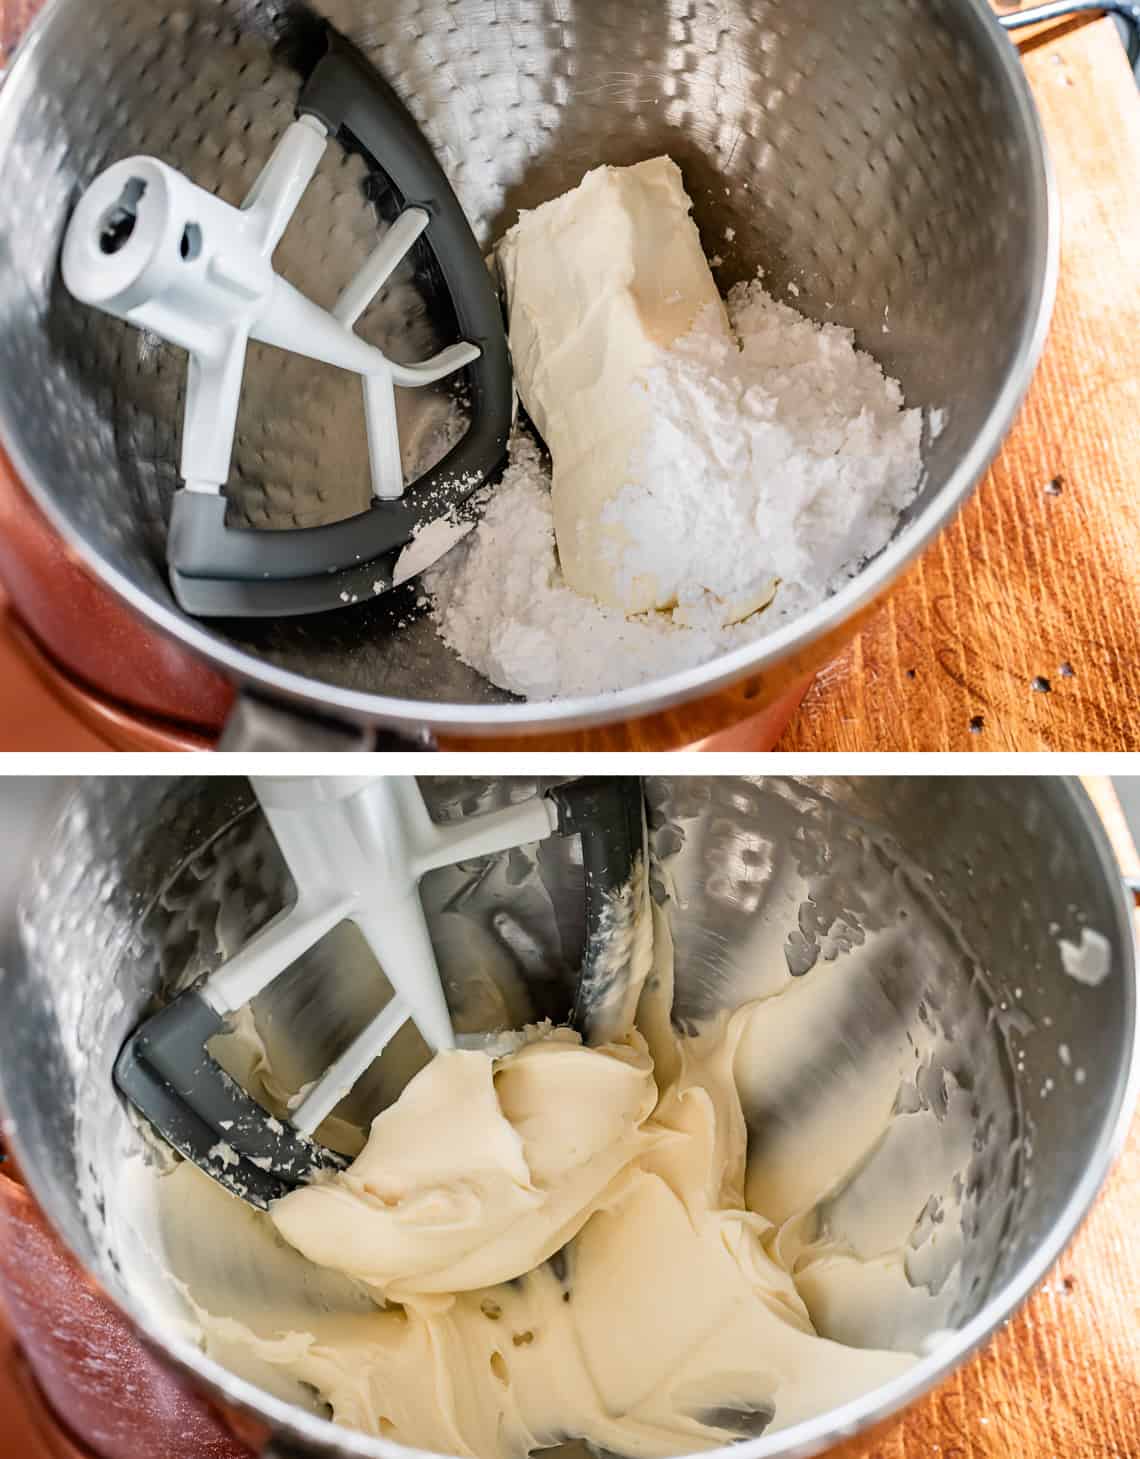
Add some soft cream cheese and powdered sugar to a mixing bowl and beat it up.
Add in some vanilla and a lil salt. Then spread some down the middle of your crepe…
And top with your strawberry filling. I have a simple recipe for macerated strawberries below, but if you want to take it even one step further, try my recipe for Fresh Strawberry Topping. It’s the same strawberry recipe I put on Strawberry Shortcakes, and it’s unbelievably juicy and fresh.
Or you could go with simple mixed berries and cream cheese. It’s really hard to go wrong at this point?? Just look around your kitchen, you will find something to fill your crepes with.
Often with leftovers the next morning, I spread crepes with peanut butter and sprinkle with sugar, for a little protein. My kids love it! ↓ here are some more ideas:
Filling ideas for crepes recipe
I’m pretty sure the options are limitless! Think of any kind of food you like, and put it in a deliciously thin buttery wrap and voila, a new kind of crepe is born. My family likes to have everything served buffet style and everyone gets to choose and mix whatever fillings they like to make various concoctions. Here’s a short list of the MANY possibilities:
Sweet crepe fillings
Homemade whipped cream
Cut up fresh fruit
Butter and cinnamon Sugar for a Snickerdoodle flavor
You can make your crepes (and all their fillings) the whole show, or you can round out the meal with some additional menu items. Between making the crepes themselves and the filling, having crepes for a meal can be a labor of love so if I have sides I keep them very simple. If I am making crepes with a sweet filling, I go for savory sides and of course do sweeter sides with savory crepes. Here are some ideas!
Crepes are actually quite simple to store! First, make sure they cool completely, otherwise the heat will turn into condensation and the crepes will get soggy. Some people like to separate each crepe in a stack with wax or parchment paper, but I find it unnecessary. Just stack them up on a plate and cover with plastic wrap.
If you plan to store them for a couple days, keep them in a gallon size ziplock bag, squeezing out as much air as possible before sealing. The seal on the bag helps keep the crepes moist. You can also store them in an airtight container, but I don’t have one big enough to keep them flat, which I prefer. They will stay good in the refrigerator for 2-3 days.
To reheat, put a nonstick skillet over medium heat. Once it’s hot, add each crepe individually and warm on each side for 30-60 seconds. Remove to a plate, add your fillings, and you’re good to go! If you are adding a savory filling, be sure to warm the filling up separately in the microwave before adding to the hot crepe.
Can you store crepe batter?
Crepe batter is great for making ahead of time. Store the batter in a sealed container in the fridge for 2-3 days. Stir well before cooking. If after making the first crepe, you feel the batter is too thick, add milk to the batter 1 tablespoon at a time.
Can you freeze crepes?
Crepes are a great candidate for freezing, so make a big stack and thank yourself in the future! To freeze, first make sure the crepes are completely cooled. You can add parchment paper between each one (or skip it, honestly they never stick for me), then add the whole stack to a gallon size ziplock freezer bag and squeeze all the air out before sealing.
To eat them after freezing, let the bag sit on the counter for an hour or two (or in the fridge overnight) until they are pliable enough to separate. Add one crepe at a time to a skillet over medium heat and warm for about 30 seconds to a minute until the crepe is totally heated through.
Frequently asked questions for crepes
What is a crepe?
A crepe is kind of like a large, flat pancake. The ingredients are very similar: milk, eggs, flour, vanilla, butter, etc. But in a crepe, more liquid is added and there is little or no leavening so it has no rise. This makes for an ultra thin, but ultra pliable and soft crepe.
What are the ingredients for crepes?
You’ll find that while there is some variation, most crepes follow the same recipe pattern. This recipe uses whole milk, large eggs, vanilla, flour, sugar, kosher salt, and butter.
Is crepe batter the same as pancake batter?
No sir! Pancakes and crepes are similar in that they are round, sweet breakfast items. But pancake batter is thicker and contains a leavening agent to make them rise so they’re nice and thick and fluffy. Crepe batter looks thin and runny in comparison; there is much more liquid added, and no leavening, making the cooked crepe extremely thin and delicate.
why are crepes healthier than pancakes?
Crepes by themselves end up being healthier than pancakes because they are just so much thinner, there’s literally less volume. That being said, I know I end up adding WAY more filling to my crepes than on top of my pancakes so in the end the calories may be a wash. If you’re looking to limit calories (something I personally have no interest in when making crepes 😂), you’ll really want to pay the most attention to what you use for a filling.
More amazing breakfast ideas
I’m pretty sure delicious breakfast foods are a love language. Forget sweet nothings, give me a sweet crepe or an incredible breakfast casserole! Here are some of my favorites.
The best crepes of your life…and I've been to France, guys. Homemade is best! This crepe recipe is truly my favorite! Crepes are kind of like a pancake in that they are flat and you put toppings on them, but really the comparison ends there. They are impossibly thin but not at all crispy. The are flexible and velvety. They are so buttery and golden, they will make you cry into your strawberries and cream. I'll show you exactly how to make crepes, step by step! SO easy.
fresh lemon juicewith powdered or granulated sugar
nutella
mixed berries
cinnamon sugar
whipped cream
Instructions
Prep the strawberries: Wash and hull the strawberries, then slice or quarter so they are whatever size you like. Add to a serving bowl. Top with 1/4 cup granulated sugar and 2 tablespoons strawberry jam. Stir together and set aside for about 20 minutes to let the strawberries macerate. (If you want to step it up a notch, make this Fresh Strawberry Topping, which calls for condensing the jam first.)
Make the cream cheese filling: This is optional but SO good. Add 8 ounces softened cream cheese to a large bowl or stand mixer. Beat for 1 minute until smooth and creamy, scraping the sides. Add 1/2 cup powdered sugar, 2 tablespoons whole milk, 1/2 teaspoon vanilla, and 1/8 teaspoon salt. Beat well until combined with no lumps, and transfer to a serving bowl.
Make the crepe batter: Add 2 cups whole milk and 4 eggs to a blender. (If you don't have a blender, add to a bowl and beat with a hand mixer.) Add 3 tablespoons sugar and 1 tablespoon vanilla. (See notes for savory crepes)
Add 1 and 1/2 cups flour and 3/4 teaspoon kosher salt. Spoon the flour into the measuring cups and level off!
Blend it together. Melt 1/4 cup butter in a small bowl. With the blender running on low, take the center spout off the blender and add the melted butter while the blender is running. Scrape the edges of the blender bowl and make sure all the flour is incorporated.
Set an 8-inch pan on the stove over medium heat. Let it heat for at least 60-90 seconds so it gets nice and hot. Set a stick of butter and the batter near the stove. When the pan is hot, add about 2 teaspoons butter to the hot pan. Swirl it around to coat the entire bottom and up the sides of the pan.
Use a 1/4 cup measuring cup to add batter to the pan. You want about 3-4 tablespoons batter for each crepe. (the 1/4 cup measuring cup doesn't need to be entirely full)
Add the batter to the center of the pan, dropping it in quickly. Use your other hand to lift the pan and swirl the batter out from the center. Work quickly. The batter sets fast, and you don't want a thick crepe. Continue moving the pan in circles until there is no more liquid batter that will drip around. Try to avoid creating holes in your crepe (this is easier said than done and takes some practice.) If you DO create some holes, quickly fill them in with a tiny bit more batter.
Cook the crepe for about 60 seconds. The top of the crepe should look dry and matte, not wet anymore. The bottom of the crepe should just barely be getting golden. Use a spatula, chopsticks, or an offset spatula to carefully lift the edge of the crepe, then insert it underneath as far as you can, and flip the crepe. This takes practice! Don't be discouraged if you need a few tries to get this right. Eat the evidence.
When you flip the crepe, it should be very flexible, not flat and hard. This of course makes it more difficult to flip, but a crepe that holds it's shape when lifted 1) either had too much batter poured into it, OR, 2) it was cooked too long. The edges should not be crispy, or if they are, just slightly.
Cook on the second side for 10-20 seconds, until the batter is cooked, but not so much that it has time to get crisp. A little browning is okay, but not too much.
Remove the crepe to a plate. You can either use a spatula to lift it, or you can lift the pan entirely and flip it over to let the crepe fall onto the plate. Stack the crepes one by one on top of each other on the plate.
Decide whether you need to turn the heat up or down. If your crepe has little baby bubbles that pop up right away all over your crepe before you need to flip, your pan is too hot; turn the heat down a little.
Continue cooking the crepes until the batter is gone. Sometimes I like to bust out a second frying pan so I can get two crepes cooked at once.
Eat hot, and eat them right away! See below for storage options!
Strawberry Cream Cheese Crepes: Add a few spoonfuls of cream cheese filling down the center of a crepe. Top with strawberries, and roll up like a burrito. Or, spread a thin layer of cream cheese all over the crepe, add strawberries, and fold into quarters. Top with whipped cream, if you want.
Strawberry Nutella Crepes: Add a few spoonfuls of nutella down the center of a crepe. Top with strawberries, and roll up like a burrito. Or, spread a thin layer of nutella all over the crepe, add strawberries, and fold into quarters. Top with whipped cream, if you want.
Lemon Sugar Crepes: Sprinkle 1-2 tablespoons granulated sugar all over the top of a crepe. Squeeze a fresh lemon over the top of the sugar. Fold or roll and serve, top with lemon zest if you want extra lemon love.
Mixed Berry Cream Cheese Crepes: Add a few spoonfuls of cream cheese filling down the center of a crepe. Top with raspberries, blueberries, and blackberries, and roll up like a burrito. Or, spread a thin layer of cream cheese all over the crepe, add berries, and fold into quarters. Top with whipped cream, if you want.
Cinnamon Sugar Crepes: Brush a crepe with melted butter. Sprinkle with cinnamon sugar (about 2-3 teaspoons cinnamon combined with 1/3 cup sugar.) Roll or fold. Top with whipped cream.
How to store: I always stack the crepes on a large plate as I am cooking them. If you are not serving them right away, cover the plate well with plastic wrap and keep in the fridge for up to 3 days. I don't bother separating the crepes with wax or parchment paper.
How to store batter: You can make this batter ahead of time. Store the batter in a sealed container in the fridge for 2-3 days. Stir well before cooking. If after making the first crepe, you feel the batter is too thick, add milk to the batter 1 tablespoon at a time.
Notes
*You can make these crepes with a lower fat milk, but they will tear and rip a lot more. You need the fat in the milk to help bind the crepes together. Savory Crepes:To make these crepes for a savory dish, like my mama’s Chicken Crepes, reduce the sugar and omit the vanilla. Here are the ingredients:
Did your grandma make you Chicken and Rice Casserole? It was my Grandma Georgia’s signature dish, pure comfort food. She called it “Chicken Continental.” She used Minute Rice and canned soup. I’ve updated the recipe to be completely from scratch, with a homemade sauce and white rice (which is more nutritious.) It’s still really easy,…
Did your grandma make you Chicken and Rice Casserole? It was my Grandma Georgia’s signature dish, pure comfort food. She called it “Chicken Continental.” She used Minute Rice and canned soup. I’ve updated the recipe to be completely from scratch, with a homemade sauce and white rice (which is more nutritious.) It’s still really easy, and a great old-fashioned recipe for when you feel like you need a warm hug from your dinner!
This post is sponsored by Zoup! Good, Really Good®, but all opinions are my own of course! Thanks for supporting the amazing brands that keep The Food Charlatan chugging along.
My Grandma Georgia was an amazing lady who grew up poor, helping her family on their farm from a young age. She remembers hearing the wind whistle between the wooden slats of their house growing up in the 1920s. Once when I was like 13, she saw me wearing overalls and she gave me a funny look. “Why are you wearing those? When I was a girl, that’s what I wore when I went outside to WORK.” My 2001 fashion statement was strange to her. (To be fair, if you saw pictures of me when I was 13, you would think I looked strange no matter what I wore. Puberty hit me HARD, y’all 😂)
Grandma would bring us roses cut from her garden every time she visited in the spring. She had porcelain figurines (dogs, cats, dancing ladies) all over her house that I adored. She made me a homemade dress every Christmas, and quilts too. She grew her own grapes and blackberries in the backyard and made the most amazing juice and pies.
One time when I was very young, grandma had to cancel dinner plans because she got a stomach bug. We decided to make her get well cards. I drew an extremely detailed picture of her bathroom, down to the bath toys she had for us, and the potpourri on the back of the toilet. I was very proud of my picture, and devastated when my sister told me we probably shouldn’t give it to her…because it also showed grandma on her knees violently throwing up in the toilet. (Still wish someone had saved that picture, ha!)
My grandma passed away when I was 20 years old, about a month after my wedding. We had just spent time together, and Eric and I were poor. (Not overalls-poor, not wind-in-the-slats-poor…but just starting out, and we felt poor). I lived out of state and decided not to attend the funeral, since I had been able to say my goodbyes at the wedding. I don’t have a lot of intense regrets in my life, but this is one of them. Funerals are much more about closure for the living, something I didn’t realize at the time.
I’ve come to terms with it, but there is still a hint of yearning, a little bittersweetness, whenever I think deeply about her, that I don’t think I will ever lose.
When I make her recipes, I feel a little connection to my past, a connection to HER, that I treasure so much. She was the most quintessential of grandmothers so of COURSE she was a phenomenal cook. My siblings and I often reminisce about the good ol days when she would serve up Chicken and Dumplings with a glass of fresh grape juice and Blackberry Torte for dessert (recipe coming this summer!)
Her signature dish was this “Chicken Continental,” or chicken and rice casserole. I can’t even describe the dreamy look in my dad’s eye when he talks about his mom making this dish. There is something about food from your childhood, right? His and mine both. It’s like a hug from your dinner…the next best thing to an actual hug from your Grandma.
Old-fashioned chicken and rice casserole
The recipe sounds so basic. Chicken and rice, what’s the big deal? Sounds kinda dry right. But I’m telling you, get ready for some MAGIC. When I finally nailed the recipe, I sent it to my best friend Sarah and she made it for her family. She texted me:
The depth of flavor is legit. The chicken gets cooked alongside the rice, and absorbs all the amazing flavor. We are using skin-on, bone-in chicken, and that’s not an apology. I told you, this recipe is old school. After breading and browning it, the skin magically stays super crispy throughout the bake, even with the moisture of the rice.
Using bone-in dark meat, like drumsticks and thighs, ensures that the chicken doesn’t get dry, even with the long bake time. Grandma Georgia’s original recipe calls for searing a whole fryer chicken, but I’m not mature enough for that. 😂 Using bone-in dark meat gives you the same result.
After searing the chicken, Grandma mixed together a couple cans of cream of mushroom soup with some Minute rice and tossed it all in the oven. Today we are making our own sauce instead of canned soup. I promise it’s not hard, and the flavor is so good.
We are also using regular white rice. Minute Rice is basically half cooked white rice, and it turns out pretty gummy. It also doesn’t have a lot of nutrients (we need that fiber!), and it’s not an ingredient I usually have in my pantry (but I always have rice). The total time for baking ends up being longer using white rice, but I think it’s worth it.
This recipe is NOT the same as a Chicken Broccoli Casserole. That recipe starts out similar, with some cream of chicken soup and chicken, but ends with a panko topping and lots of gooey cheddar cheese. Cheese is always a good idea right?
No no no. I LOVE me some cheese my friends, but it has no place in this dish. Cheese would overpower the deep chicken flavor we are going for in this recipe.
My absolute favorite part of this dish is the crispy bits of rice on the edges and bottom of the pan that Sarah mentioned. Almost every culture that uses rice as the staff of its diet has a name for the crispy, golden rice. Persians call it Tahdig. In the Dominican Republic they call it “concon.” In Indonesia it’s called “intip.”
You can see it in the photo above, the golden crisp rice on the top and left side that still has the shape of the pan it was scraped from. It’s SO good.
Zoup! Culinary Concentrate™
Today’s post is brought to you by Grandma Georgia, of course, but also by Zoup! Good, Really Good®. I’ve worked with Zoup! in the past using their chicken broth (Creamy Turkey Rice Soup) and beef broth (Beef Bourguignon). Let me tell you, this company knows what’s up when it comes to flavorful broths! That’s actually how they got started, they were the team behind an actual soup restaurant (Zoup! Eatery) before they started expanding into products. So they really know how to bring in that flavor!
This time they asked me to try out their new product, Zoup! Culinary Concentrate™. I was SO excited. I’ll tell you a secret, I almost never have regular broth on hand in my kitchen. I rely on broth bases that are concentrated, so that I can just add water to them to make broth when I need it. It’s not only my favorite way to have instant shelf-stable broth on hand at all times, but it’s also my secret ingredient in SO many recipes, even those that don’t call for broth. A spoonful-here or a stir-in there takes your ho-hum soup or stir fry up about 10 notches in 10 seconds.
There are not a lot of brands that offer this product and I’m SO glad that Zoup! has branched into this market! Just look at the gorgeous color of this base. You will not believe how amazing it smells. It’s so good, and you can even turn it into a sipping broth. It’s good enough to drink, just mix with hot water. There are no artificial flavors, no preservatives, no inexpensive fillers, and no added sugars.
I love Zoup! because they make their products in small batches, meaning the nuances of the recipe don’t get lost. So far, they are offering beef, chicken, and vegan broth bases. The depth from this concentrate seeps into the rice in today’s casserole and makes every single bite so, so flavorful. They are not cutting corners and it shows!
I found Zoup! Culinary Concentrate™ at my local grocery store, but you can also get it at Zoupbroth.com or on Amazon. In addition to these broth bases, Zoup! also offers traditional broths and bone broths, including chicken, beef, and veggie, plus super-premium, shelf-stable soups available in nine, flavor-forward recipes, like Chicken Potpie and Butternut Squash with Brown Butter and Sage.
If you buy these products on Amazon, I have a code for 20% off your first order! It’s 20Charlatan. The code is valid until April 12, 2024. Follow ZoupGoodReallyGoodBroth on Facebook, Instagram, Tiktok, and Pinterest!
Chicken and rice casserole recipe ingredients
Back to the recipe! Here’s everything you need to make Grandma Georgia’s rice and chicken casserole! You probably already have a lot of these spices in your cupboard. Take a look, and be sure to check out the recipe card for exact amounts and instructions.
This recipe is so easy! My grandma used an entire fryer chicken to make this recipe, that she would break down herself, but umm…I’m not grown up enough for that 😂 So instead we are cheating by using some thighs and drumsticks.
Dark meat all the way! (You could certainly make this with chicken breasts, but your chicken might get a little dry in the oven since it has to cook so long.) Coat your chicken in the flour mixture, and DON’T throw away the leftover flour!
Now it’s time to sear the heck out of your breaded chicken! Crank up the heat and brown the chicken in some oil. My grandma did this in butter (that’s what the recipe says!), but I have no idea how she didn’t burn the butter in the process. Vegetable oil has a higher smoke point, so it can handle a hot sear without smoking or scorching. To add in the flavor of the butter though, we are flipping the chicken and adding it to the pan for the sear on the second side. It does the job great! Gimme all that buttery flavor.
Now if you haven’t already, take a minute to chop up your veggies: onions, celery and garlic. I used fresh garlic this time, but I often cheat and just use the jarred stuff.
You want to chop your veggies on the small side. We are looking for flavor, but the onion and celery should kind of melt into the sauce and rice. My grandma actually grated her onion, and didn’t use a ton, just a few tablespoons. I wanted bigger onion flavor (and I’m way too lazy to grate…are you noticing a theme here?? 😂) It’s workin for me guys!
Okay now we are going to turn this into a white sauce. Mine is usually not white at all, because I tend to be an onion browner, not to mention a chicken-searer-gone-rogue. I love blackened edges too much, okay??
Your onions will start to stick together like this once you add the flour to the mixture.
Now it’s time to add in our Zoup Culinary Concentrate™! This stuff is liquid GOLD you guys. Give it a sniff, it will knock you out, it smells so good. Stir it into your onions and let the aroma transport you to your childhood.
Next we’re going to add in some milk and water to turn it into a creamy sauce. You have to stir constantly as you add the liquid, so the sauce doesn’t get clumpy.
Do you cook rice before putting it in a casserole?
We are not cooking the rice before it goes in the oven! Add the remaining water and rinsed rice straight to the casserole dish.
Add the white sauce to the casserole dish with the rice and water, then top with the seared chicken. Doesn’t it look so good already??
Don’t forget to tightly cover the dish with aluminum foil before putting it in the oven. This is really important! You must cover a pot of rice when you cook it on the stove, to lock in the steam, and the same thing applies here.
Then, cook in the oven for a good long while. Usually we wouldn’t bake chicken this long, but this is a special case. With all the moisture and steam, plus using only dark meat, the chicken comes out tender and flavorful, not dry at all.
The casserole does take a while to bake, so plan ahead. But from this point on you can just sit back and relax, the work is done!
Make some broccoli as a side dish, sprinkle on some parsley garnish, and bon appetit! I wish you could see my dad’s face when I make this for him. Grandma Georgia was his mom. There is NOTHING that brings you back like the smells and tastes of your mama’s kitchen!
What to serve with chicken rice casserole
There is usually a lot going on in a casserole, so I tend to prefer simpler sides. My favorite sides are usually some kind of salad or a cooked vegetable I know my kids will eat. Here are some great options!
Easy Roasted Broccoli Recipe >> definitely one of my family’s favorite veggie sides (and you can use frozen, huge win)
This is a really easy meal to store. Spoon the casserole into an airtight container and place it in the refrigerator. Easy peasy! It’ll last in the fridge for 4-5 days. If you wanted, you could use individual meal prep containers and add a portion of rice and a piece of chicken to each to make easy lunches throughout the week. To reheat, warm it covered in the microwave at 50% heat for 2-3 minutes until hot.
Can you freeze chicken and rice casserole?
Freezing leftover casserole is a great idea when you have a lot leftover or want to store individual portions for another time. It works great! Wait for the chicken and rice to cool, then add to freezer ziplock bags or freezer safe containers with airtight lids.
If you really want to get ahead in life, you can prepare this meal in disposable foil casserole trays and freeze directly in the tray after cooking. Put the cooled pan in the freezer for about 30 minutes to flash freeze. Take out, wrap well in plastic wrap, then wrap in aluminum foil. Label the top in sharpie so you don’t forget what it is! It will last in the freezer for 3-4 months. Thaw in the refrigerator overnight and place individual portions in the microwave, cover, and heat at 50% power for 2-3 minutes.
To reheat an entire frozen pan, first be sure to remove the plastic wrap. Put the foil back on and put the pan into a cold oven. Set the temperature to 350 degrees. The casserole should be ready in about 2 hours. You can remove the foil the last 10-15 minutes if you’d like to get it browned. You can also thaw the casserole in the fridge overnight and bake at 350 degrees for 45-60 minutes.
Rice and chicken casserole frequently asked questions
what are the four components to a casserole?
There are obviously huge variations among casseroles, and some may not have every single component. But generally, what you’ll find in casseroles are a starch, a protein, a vegetable, and a binding agent or sauce. For this chicken and rice casserole, we’re doing three of the four , leaving veggies out to ride solo on the plate next to the casserole.
how do you make chicken and rice casserole?
It’s a pretty simple concept! We’re going to lightly bread and sear some chicken pieces, then make a delicious white sauce to douse the chicken and rice in a casserole dish. For a step-by-step guide, you can look through the “How to” section above or check out the recipe card below!
Can you reheat chicken and rice casserole?
Absolutely! It can be warmed up in the microwave or in the oven. Over cooked chicken tends to get dried out, so if you use the microwave use 50% power and be sure to keep a cover over the food to keep moisture in and block splatter.
To reheat the entire casserole dish in the oven, add a couple tablespoons water to the bottom of the pan, if there are some servings missing. This will help keep it from scorching. Learned that trick from my mother-in-law! Then make sure it’s covered tightly in foil to keep moisture in, and put the dish into a cold oven. This is mostly to prevent a cold glass dish from breaking by going into a hot oven, so you can preheat if you’re not using glass. Then set a timer for 45 minutes. Check after the timer goes off, it may need another 15-30 minutes to get hot depending on your baking dish, and how much is in it. Because it makes so much, you can even split into two pans and bake that way. This works great for busy weeknights!
More comfort food meals you’ll love
I don’t know about you, but anything my Grandma made growing up counts as comfort food, so this casserole is on my list for sure! Check out these other recipes I love to make when I need a big hug from my dinner.
Did your grandma make you Chicken and Rice Casserole? It was one of my Grandma Georgia's signature dishes. She called it "Chicken Continental." It called for Minute Rice and canned soup. I've updated the recipe to be completely from scratch, with a homemade sauce and regular white rice (which is more nutritious.) It's still really easy, and a great old fashioned recipe for when you feel like you need a warm hug from your dinner!
1 and 3/4cupwhite long grain ricerinsed until the water runs clear
parsleychopped, to garnish
Instructions
Preheat your oven to 375 degrees F. Grease the edges of a large 9×13 inch casserole dish and set aside.
Chop the veggies: Finely dice 1 medium onion, in smaller pieces than you normally do. Dice 3/4 cup celery, don't be afraid to chop up some celery leaves too, they have great flavor. (I chop from the end of the full head of celery, I don't bother with individual stalks.) Smash and mince 1 tablespoon garlic (or, use the garlic from a jar if you are feeling lazy). Set aside.
Make the flour mixture: In a medium bowl, add 1/2 cup flour, 1 tablespoon dried parsley, 1 and 1/2 teaspoons kosher salt, 1 teaspoon seasoning salt, 1 teaspoon poultry seasoning, 3/4 teaspoon black pepper, 1/2 teaspoon dried thyme, and 1/4 teaspoon cayenne pepper. Stir together.
Trim any excess skin off of the edges of the chicken thighs, if there is a lot hanging off. Dredge each piece of chicken in the flour mixture, being sure to coat each piece top and bottom and all over. DO NOT discard the remaining seasoned flour!
Sear the chicken: Heat a high-sided 12-inch skillet over medium high heat. Add 2 tablespoons oil and swirl to coat. Add the chicken in a single layer; do not crowd the pan. Leave 1-2 inches of space in between pieces. Do it in two batches if your pan is small. Let the chicken sear over medium high heat for about 2 minutes, until well-browned. We are not cooking it all the way, just browning the edges.
Use tongs to flip each piece of chicken. Once the chicken is flipped, add 2 tablespoon butter and swirl around the edges of the chicken, lowering the heat a little if necessary to avoid burning the butter. After 1-2 minutes of searing the second side, when it is nice and browned, remove the chicken to the same plate from before.
Make the white sauce: Leave any drippings in the pan. Lower the heat to medium. Add 6 tablespoons butter. Add the diced onion and celery and saute for about 4 minutes until soft. Add 1 tablespoon minced garlic and cook for another 1 minute.
Measure the remaining seasoned flour mixture (that you have leftover from dredging the chicken). Add more flour as necessary to make sure it comes to about 1/2 cup. Slowly sprinkle the flour over the onions, stirring as you go.
Stirring constantly, gradually add 1 cup milk, whisking constantly to break up the flour. Do not add more liquid until the last bit has been incorporated.
Slowly pour 1 cup water into the onions, stirring constantly to make sure it combines with the sauce; you don't want lumps. Once it is incorporated, cook the mixture over medium heat for about 2 minutes, then turn off the heat.
Rinse 1 and 3/4 cup white rice in a strainer under running water. Rinse until the water runs clear, at least 30-60 seconds (this makes your rice less gummy.) Add the rice to the greased 9×13 inch casserole dish. Add 1 and 3/4 cup water to the rice in the dish.
Add the white sauce mixture to the rice and water in the pan, and stir.
Place the chicken on top of the rice mixture. It will sink down a bit, that's okay. Cover the pan tightly with aluminum foil, this is very important! Sometimes I even wrap the foil around the bottom of the dish just to make sure I have a good seal.
Bake at 375 for 45 minutes. Remove the foil and bake for another 30 minutes. At this point, turn the oven up to 400 degrees and bake for another 20-30 minutes. When the chicken is nice and brown, and the rice looks bubbly and thick on top, it's done. The edges of the pan should be very brown. The liquid will not look completely absorbed. To be 100% sure the rice is cooked, you can nab a spoonful from the center and taste it to see if it's nice and soft. If not, leave it in another 10 minutes. The chicken should be above 165 degrees. The top of the casserole will still look a little liquidy. The casserole will settle as it rests and continue absorbing some of the sauce, but it is meant to be a little saucy, it won't look as dry as rice you've cooked with water. The rice should be soft and the pan should be jiggly but not sloshy when you shake it.
Remove from the oven and let stand 10 minutes. Serve right away, sprinkled with chopped parsley as a garnish. I love this Easy Roasted Broccoli Recipe as a side dish with this meal!
Everyone needs their own easy BBQ sauce recipe! I love this one because it is super fast to throw together (10 minutes!) and it’s got the perfect level of vinegary-acidic kick to it. Black pepper and chili powder bring in a little heat, and molasses brings balance without making it overly sweet. Homemade barbecue sauce…
Everyone needs their own easy BBQ sauce recipe! I love this one because it is super fast to throw together (10 minutes!) and it’s got the perfect level of vinegary-acidic kick to it. Black pepper and chili powder bring in a little heat, and molasses brings balance without making it overly sweet. Homemade barbecue sauce is definitely worth it! Originally published September 2, 2022.
Every morning I have a 50/50 chance of either waking up relatively peacefully, from the alarm blaring loudly on the bedside table (night table? bed stand? Why can I never remember this word??) Or there’s the other option, which is being woken up by my 2-year-old, Edison. I would pick the loud alarm ANY DAY.
One morning last week I was in full REM mode: totally out, not a ray of sun yet, probably drooling. Suddenly in my subconscious I hear a baby-toddler voice whisper directlyin my ear, “Cann-aye have popsicle?”
My eyes fly open and land on the SCISSORS that are inches from my eyeball. How else would I open the Otter Pop he was holding in the other hand? It was 5:45am. (Who knows how high he climbed and what deathly moments ensued in his quest for the scissors. I’ve blocked the imaginings from my mind.)
Why do people even drink coffee? I don’t get it. All you need is a scissor-wielding 2-year-old, he will perk you up in no time.
No one prepares you for this. No one, when you are pregnant the first time, mentions, “Oh yeah, I get woken up via popsicle-scissor-face all the time. Get ready for that.”
I was talking to my sister about this a few weeks ago. She read a study that said moms with newborns have the same nighttime sleep quality as PTSD patients, because they know they could be called from sleep into wake-time action at literally any moment. There is no real peace.
You could be woken by a board book slammed into your jugular. Or via toddler full-body-roll. Or my favorite, a few weeks ago when he lovingly snuggled next to me in bed, and I looked over, bleary eyed, to register that he had something pink on his lips. Lipstick, from my daughter’s lip-gloss-making-kit. I looked down to find my bedsheets covered in pink dye, and little dots of pink on the carpet in a trail from the bathroom, because the dye had soaked into his footie pajamas.
Like I said. No. Peace.
Well, at least we can find peace in sauces. Peace in sauces?? What does that even mean? Well my friends, it means that the search is over for an easy, no-brainer, 10-minute BBQ sauce recipe for when you forgot to grab some at the store, or for when you want to add a little “umph” to that pulled pork you worked on all day long. Wouldn’t it be nice if you could have the perfect sauce for your meal in 10 minutes, every time? It’s the little things, guys.
This is the sauce with 100 name spellings! Eric’s grandma was named Barbara and called her own special sauce “Barb-ecue Sauce.” Get it? Get it?? However you spell it, this sauce is perfect for SO many recipes!
I made this barbecue sauce originally to go along with my favorite Pulled Pork Recipe (and also this Slow Cooker Pulled Pork). Long and slow cooked protein is going to be good no matter what, but slap this sauce on too? Irresistible.
Why you’ll love this Homemade BBQ Sauce Recipe
This homemade bbq sauce has a good balance, with no single flavor taking over. It’s peppery and sharp, but the molasses does its job of evening out the flavors perfectly. It is on the tangy side, I’m not a fan of overly-sweet sauces. (If you are, just add in a bit more molasses or brown sugar!)
Here are the ingredients you are going to need. It’s just pantry staples! For a complete list scroll down, the full recipe card is below!
ketchup
Worcestershire sauce
white vinegar
molasses
kosher salt and black pepper
paprika and smoked paprika
chili powder
liquid smoke, optional
How to make this BBQ Sauce Recipe
Let’s dig into the details! It could not be easier my friends. Today’s recipe is focused on keeping it simple and quick, but doesn’t sacrifice flavor.
We are starting out with some ketchup for instant flavor. I tested this recipe a few times with straight up tomato sauce and some extra sugar/vinegar, because that’s all ketchup is, right? Wrong. It was just not as flavorful.
There is something magical about ketchup. Don’t you turn your nose up at me. You will appreciate what you have if you just go to Australia. They still haven’t figured out how to do ketchup right, and every French fry I ate in that country was a disappointment. (Sorry Australia, I do love you. Even though you wrap your hot dogs in sandwich bread and top it with tomato sauce…you have lots of other redeeming qualities 😉)
Anyway. Get yourself some Heinz and then add in all the other stuff. It couldn’t be more easy.
Worcestershire sauce is the secret ingredient in so many recipes. It brings that umami flavor we all love, even if we don’t recognize it. I saw on a New Orleans blog recently (which is a super fun read, by the way!) the author referred to “Lea and Perrins” the way you would call it Coke instead of soda, or Kleenex instead of tissue, or the way I call it Lawry’s instead of seasoning salt. I love this brand so much that I think I’m going to adopt the Lea and Perrins moniker. They deserve it.
Molasses is the only sweetener I use in this recipe. I love it because of the complex, nutty flavor it adds, even more interesting than plain brown sugar. (Which is made from granulated sugar with some molasses mixed in, did you know that?) Don’t add too much, just a few tablespoons. This is not a sticky-sweet sauce. Bring the TANG.
Add in all the rest of the ingredients, including a dash of liquid smoke.
This ingredient is technically optional, but I love the depth that it adds to the sauce! I think it’s especially important to add in if you are not pairing it with grilled or smoked meat (like anything slow cooked would benefit from liquid smoke for sure). It’s not as good as the real thing (actually cooking with smoke), but I do love the aroma and big flavor it adds.
The other optional ingredient you can add to this recipe is water. If you have the time, add some water, bring the sauce to a simmer, and let bubble for 30-60 minutes. The water will cook off over that time, leaving you with a perfectly saucy sauce. I love this method because it gives the ingredients all a chance to get cozy together, enhancing flavor.
BUT…if you don’t have time for that (I get it! I get it!) just leave out the water, simmer for 5 minutes, and bam, you’re done. Perfect bbq sauce in 10 minutes.
Tips for making the Best BBQ Sauce Recipe
This BBQ sauce is incredibly easy. You literally just mix the ingredients together, simmer ‘em for 5 minutes, and you’re good to go! Here are the elements of this recipe that make the perfect topping for meats everywhere:
Add some liquid smoke. Technically this is optional, but it adds that hot-off-the-grill smoky note to your sauce and I can’t live without it.
Add water and time for even more flavor. If you have a little extra time, add water to the sauce, bring it to a simmer, and let it bubble for 30-60 minutes. The water will cook off until the sauce is the perfect consistency.
Make extra for later. This BBQ sauce freezes beautifully, so after you fall in love you’ll have some to pull out whenever you need it.
What to serve with BBQ Sauce
The question is, what CAN’T you serve BBQ sauce with?
This easy homemade BBQ sauce recipe is so easy to save if you have extra. Simply pour it into an airtight container, make sure it’s cooled to room temperature, and then place in the refrigerator. I like to use a mason jar or glass containers instead of plastic, as tomato-based sauces tend to stain. Once in the refrigerator, it will last for up to two weeks (or more). Lean in to the “more” here. Ask yourself, how long have I had my current open bottle of ketchup? That’s how long you can let this BBQ sauce hang out in the back of your fridge.
Can you freeze it?
Most definitely, and it’s about the easiest thing ever. Pour the BBQ sauce into a freezer ziplock bag, making sure it’s at room temperature, and place in the freezer. Store for 4-6 months. To reheat, you can let it thaw in the fridge overnight and heat the next day. If you’re in a time crunch, place the whole frozen chunk of sauce in a saucepan with a few tablespoons of water, cover with a lid, and turn the heat on low. Be sure to stir occasionally until it is heated through.
FAQs
What makes BBQ sauce taste like BBQ sauce?
What even is this stuff, right??
This classic BBQ flavor that we all adore is a combination of acidic tomato and vinegar combined with some sweetness, usually sugar or molasses, and a variety of spices that bring flavor and smokiness. You can use onion, smoked paprika, mustard, liquid smoke, sky is pretty much the limit here.
My recipe isn’t overly sweet and is spiced with lots of black pepper. Do not underestimate America’s second favorite seasoning! (It’s second, right? People never say, “Pepper and salt.”)
But I’m telling you, black pepper is legit, especially when it’s freshly cracked. I love how this bbq sauce recipe highlights it. Because black pepper is usually an afterthought, right? IT’S TIME TO SHINE BABY. Bust out that grinder.
Is BBQ sauce ketchup + brown sauce?
BBQ Sauce is not a combination of ketchup and brown sauce. For those who don’t know, brown sauce is a condiment common in the UK. It has a taste similar to Worcestershire sauce but is thicker. So, while I can see why people may think that, especially given the similar appearance of the two sauces, they are not related.
Is BBQ Sauce spicy?
There are a million different BBQ sauce brands and recipes out there. They run the gamut from mild as a baby lamb to “I think I need a new tongue.” This BBQ sauce has just a little heat from black pepper and chili powder. Nothing insane, just great flavor and a lil kick.
What are the basics of BBQ Sauce?
BBQ sauce is a tomato-based sauce with tangy vinegar, sweet molasses, and (if you know what’s good for you) a little bit of liquid smoke for that undeniable grill flavor. There are so many ways to make BBQ sauce but this one is classic. It’s the perfect condiment for just about any meat you can throw at it.
More BBQ to love!
What is summer without some epic grilling and BBQing sessions?! I’ve got you covered with all the BBQ meats you love:
Everyone needs their own easy BBQ sauce recipe! I love this one because it is super fast to throw together (10 minutes!) and it's got the perfect level of vinegary-acidic kick to it. Black pepper and chili powder bring in a little heat, and molasses brings balances without making it overly sweet. Homemade barbecue sauce is definitely worth it!
1 teaspoonblack pepperfreshly cracked, if possible
1/2teaspoonpaprika
1/2teaspoon smoked paprika
1teaspoon chili powder
1/4teaspoonliquid smokeoptional
1/4cupwateroptional, for simmering
Instructions
Add all the ingredients to a medium pot on the stove: 2 cups ketchup, 1/3 cup Worcestershire, 1/4 cup white vinegar, 3 tablespoons molasses, 1 and 1/2 teaspoons kosher salt (use less if all you have is table salt), 1 teaspoon black pepper (use a pepper grinder if you have one!), 1/2 teaspoon paprika, 1/2 teaspoon smoked paprika, 1 teaspoon chili powder, and 1/4 teaspoon liquid smoke.*
Add 1/4 cup water if you have a half hour to simmer. If you're short on time, leave the water out.
Bring the mixture to a boil over medium high heat. Simmer 5 minutes if you didn't add the water.
Simmer at a low bubble for about 25 minutes if you did add the water, or up to an hour. (add more water in increments if it starts to get too thick.) The longer you cook, the more time your ingredients will have to marry and meld together, enhancing flavor. (The extra water we added should all bubble off by the time it has simmered a half hour. We want nice and thick BBQ sauce. The water is added so that it doesn't get too thick as you simmer to achieve more flavor.)
Once you have simmered as long as you like, turn off the heat and let come to room temperature. The sauce will continue to thicken as it cools.
Store leftovers tightly sealed in the fridge for several weeks, as long as you would keep ketchup.
Notes
*Buy a decent brand of liquid smoke, I like Wright’s. The ingredients should be water and smoke, nothing else. This sauce freezes well, seal in a ziplock bag for 3-4 months! Let thaw in the fridge, or heat from frozen on low with a few tablespoons of water.
This Easy Cheeseburger Soup is a quick and easy weeknight meal! No drive thru needed for the satisfying cheeseburger flavors you’re craving. The pickles and bacon on top are the perfect garnish. Make this for game day, a chilly night, or anytime you want dinner done in 45 minutes. It’s easy to throw together, and…
This Easy Cheeseburger Soup is a quick and easy weeknight meal! No drive thru needed for the satisfying cheeseburger flavors you’re craving. The pickles and bacon on top are the perfect garnish. Make this for game day, a chilly night, or anytime you want dinner done in 45 minutes. It’s easy to throw together, and if you’re already at the store you can grab a package of sesame buns to butter and toast for homemade croutons.Originally published March 21, 2014.
The other day I saw something small on my kitchen floor and bent over to pick it up. I’m on a constant quest to keep the floor spotless, because Truman is still in the stage where he puts everything in his mouth.
But then I realized that it was a piece of lettuce. And I was THIS CLOSE to putting it back.
We’re bringing “tricking our kids into eating vegetables” to a whooooooole different level over here, guys.
Speaking of baby boys, my friend Claire over at Lemon Jelly Cake just had a sweet little boy a few weeks ago. Today I’m posting over there to give her a break so that she can get some freaking sleep snuggle with her baby. (The recipe is now available below.)
Claire asked me to make something that I would bring to a new mom in real life, and I instantly thought of soup, because it’s warm and comforting and fills you up when you need 5,000 calories per meal to keep up with nursing. Or was that just what I told myself way back when?
It really does taste like a bacon cheeseburger, pickles and all. And I don’t even like pickles. This soup is best served immediately because it has fresh iceberg lettuce in it. (Don’t be weirded out. Just trust me.)
Ingredients for the Best Cheeseburger Soup Recipe
Here’s a quick list of everything you need to make this soup. Scroll down to the recipe card at the bottom of the post for a full list!
Onion
Ground beef
Tomato paste
Worcestershire sauce
Yellow mustard
Beef broth (or use Better than Bouillon beef base, love that stuff)
Velveeta cheese
Iceberg lettuce
Grape or cherry tomatoes
Chopped pickles (relish would work too, for garnish)
Bacon (cooked, and crumbled, for garnish)
How to make Cheeseburger Soup with Velveeta
I love how easy this soup is. Here’s how you make it!
Cook the onion and ground beef over medium heat for about 10 minutes, or until meat is browned and onion is cooked through. Use a spoon to remove the grease.
Add the tomato paste, Worcestershire sauce, and mustard, and stir that together for about 2-3 minutes. Add the beef broth and Velveeta. Stir until the cheese has melted, about 5 minutes.
Add the grape tomatoes and lettuce, (it will look like WAY too much, but it will cook down, don’t worry) and simmer until the lettuce has just barely wilted, about 2 minutes.
Garnish with chopped pickles and cooked bacon.
Tips for making this Recipe for Cheeseburger Soup
Here are a couple tips for making this easy cheeseburger soup recipe turn out just right, every time.
Drain the grease. I already recommend using lean ground beef (like 90/10) for this soup, but you’ll still want to drain off extra grease.
Garnish right before eating. No one likes soggy lettuce! We’re letting it wilt for just a couple minutes. If you won’t finish off all the soup in one night, consider garnishing individual bowls with lettuce and tomato, rather than adding it all to the soup pot.
Cheeseburger Soup Recipe variations and substitutions
Just like a burger, you can have this soup your way. Here are a few ideas!
Make it vegetarian. Use a pound of your preferred ground beef substitute (like Impossible plant-based ground beef, or Beyond Beef, or Wegmans “Don’t Have a Cow” crumbles) instead of the regular ground beef. Omit the bacon, of course.
Sub your meat. Ground turkey works in this too!
Add mushrooms. Saute up some white button mushrooms or baby bellas and add them as a topping with the lettuce and tomatoes.
More cheese. If you’re a Swiss burger lover or you’ve got some pepper jack cheese on hand, add a slice or a sprinkling of grated cheese and let it melt on top of the hot soup. Cheddar cheese, Colby jack cheese, it’s all good. The creaminess!!
Fancy it up. See serving suggestions immediately below for how to gussy up this soup and send it off to the dinner table in style (or just serve it as an easy dinner just the way it is).
Give it a kick. Add a little hot sauce!
How to Serve the Best Ever Cheeseburger Soup
I serve this soup as a one-and-done kind of dinner, but here are a few ideas for giving your meal a little somethin somethin.
Brush some sesame seed buns with butter, cut them into 1.5 inch pieces, toast them in the oven, and serve your bun-croutons on top of the soup.
Throw some frozen french fries in the oven and serve them on top (or on the side).
Top each serving with half a toasted, buttered sesame seed bun, like a little hat for the soup (and of course, dip it in).
How to Store the Best Cheeseburger Soup
This cheeseburger soup can be stored in an airtight container in the refrigerator for 3-4 days, but I recommend leaving the lettuce out of whatever portion you’re not serving right away. That way you can add it last minute and get more crispy-crunchy goodness. You can also freeze it for 2-3 months. In this case, I’d recommend adding both the lettuce AND tomatoes after you defrost and reheat it on the stove.
In a large stock pot or dutch oven, add the onion and ground beef. Cook over medium heat for about 10 minutes, or until meat is browned and onion is cooked through. Use a spoon to remove the grease.
Add the tomato paste, Worcestershire sauce, and mustard, and stir that together for about 2-3 minutes.
Add the beef broth and velveeta. Stir until the cheese has melted, about 5 minutes.
Add the grape tomatoes and lettuce, (it will look like WAY too much, but it will cook down, don’t worry) and cook until the lettuce has just barely wilted, about 2 minutes.
Garnish with chopped pickles and cooked bacon.
Notes
Source: from Savoring Sarah, a blog that has been taken down.
 from The Food Charlatan. Have you ever had traditional Red Beans and Rice? It's a southern staple! I tried Popeye's Red Beans and Rice for the first time a while back, but these beans are even better. They are so creamy and flavorful, with the perfect smoky Cajun spice! #redbeansandrice #riceandbeans #beans #rice #ham #hambone #smokey #traditional #southern #cajun #neworleans #popeyes #recipe #easy #stovetop #authentic #withham #Louisiana #best #creamy")

 from The Food Charlatan. Have you ever had traditional Red Beans and Rice? It's a southern staple! I tried Popeye's Red Beans and Rice for the first time a while back, but these beans are even better. They are so creamy and flavorful, with the perfect smoky Cajun spice! #redbeansandrice #riceandbeans #beans #rice #ham #hambone #smokey #traditional #southern #cajun #neworleans #popeyes #recipe #easy #stovetop #authentic #withham #Louisiana #best #creamy")
 from The Food Charlatan. Have you ever had traditional Red Beans and Rice? It's a southern staple! I tried Popeye's Red Beans and Rice for the first time a while back, but these beans are even better. They are so creamy and flavorful, with the perfect smoky Cajun spice! #redbeansandrice #riceandbeans #beans #rice #ham #hambone #smokey #traditional #southern #cajun #neworleans #popeyes #recipe #easy #stovetop #authentic #withham #Louisiana #best #creamy")
 from The Food Charlatan. Have you ever had traditional Red Beans and Rice? It's a southern staple! I tried Popeye's Red Beans and Rice for the first time a while back, but these beans are even better. They are so creamy and flavorful, with the perfect smoky Cajun spice! #redbeansandrice #riceandbeans #beans #rice #ham #hambone #smokey #traditional #southern #cajun #neworleans #popeyes #recipe #easy #stovetop #authentic #withham #Louisiana #best #creamy")
 from The Food Charlatan. Have you ever had traditional Red Beans and Rice? It's a southern staple! I tried Popeye's Red Beans and Rice for the first time a while back, but these beans are even better. They are so creamy and flavorful, with the perfect smoky Cajun spice! #redbeansandrice #riceandbeans #beans #rice #ham #hambone #smokey #traditional #southern #cajun #neworleans #popeyes #recipe #easy #stovetop #authentic #withham #Louisiana #best #creamy")
 from The Food Charlatan. Have you ever had traditional Red Beans and Rice? It's a southern staple! I tried Popeye's Red Beans and Rice for the first time a while back, but these beans are even better. They are so creamy and flavorful, with the perfect smoky Cajun spice! #redbeansandrice #riceandbeans #beans #rice #ham #hambone #smokey #traditional #southern #cajun #neworleans #popeyes #recipe #easy #stovetop #authentic #withham #Louisiana #best #creamy")
 from The Food Charlatan. Have you ever had traditional Red Beans and Rice? It's a southern staple! I tried Popeye's Red Beans and Rice for the first time a while back, but these beans are even better. They are so creamy and flavorful, with the perfect smoky Cajun spice! #redbeansandrice #riceandbeans #beans #rice #ham #hambone #smokey #traditional #southern #cajun #neworleans #popeyes #recipe #easy #stovetop #authentic #withham #Louisiana #best #creamy")
 from The Food Charlatan. Have you ever had traditional Red Beans and Rice? It's a southern staple! I tried Popeye's Red Beans and Rice for the first time a while back, but these beans are even better. They are so creamy and flavorful, with the perfect smoky Cajun spice! #redbeansandrice #riceandbeans #beans #rice #ham #hambone #smokey #traditional #southern #cajun #neworleans #popeyes #recipe #easy #stovetop #authentic #withham #Louisiana #best #creamy")